

Page 1

Ch∏odziarko - zamra˝arka / Chladniãka s mrazákem / Refrigerator-Freezer
INSTRUKCJA OOBS¸UGI
NÁVOD NNA IINSTALACI AA PPOUÎITÍ
INSTALLATION AAND IINSTRUCTION MMANUAL
2222 053-74
ER 8230 B
PL
CZ
GB
Page 2
U˚YTKOWANIE
Panel ssterujàcy
minmax
ONSUPERALARM
B
A
A.
Lampka kontrolna temperatury
B.
Pokr´t∏o szybkiego zamra˝ania
C.
Lampka kontrolna szybkiego zamra˝ania
D.
Lampka kontrolna zasilania
CD
Czyszczenie wwn´trza
Przed rozpocz´ciem u˝ytkowania nowego
urzàdzenia nale˝y umyç starannie jego wn´trze i
wszystkie akcesoria letnià wodà z ∏agodnym
detergentem, w celu usuni´cia zapachu typowego
dla fabrycznie nowego wyrobu, a nast´pnie
dok∏adnie osuszyç mi´kkà szmatkà.
Nie nnale˝y uu˝ywaç ddetergentów ii ÊÊrodków
szorujàcych, mmogàcych uuszkodziç
powierzchni´ uurzàdzenia.
KORZYSTANIE ZZ ZZAMRA˚ARKI
Uruchomienie
W∏o˝yç wtyczk´ przewodu zasilajàcego do gniazdka
elektrycznego (zapalenie si´ lampki kontrolnej
wskazuje, ˝e zamra˝arka zosta∏a w∏àczona).
Celem uruchomienia urzàdzenia nale˝y przekr´ciç
termostat (E) w prawà stron´, ustawiajac go w
pozycji Êrodkowej (zapali si´ lampka awaryjna (D) ).
Prawid∏owe przechowywanie zamro˝onej ˝ywnoÊci
wymaga temperatury poni˝ej –18°C.
Nale˝y poczekaç a˝ lampka kontrolna zgaÊnie, co
nastàpi po osiàgni´ciu optymalnej temperatury.
Temperatur´ wewn´trznà mo˝na ustawiaç w
zale˝noÊci od temperatury otoczenia, lokalizacji
zamra˝arki, cz´stotliwoÊci otwierania drzwi itp.
W celu wy∏àczenia zamra˝arki termostat nale˝y
ustawiç w pozycji "<".
E
minmax
ON
FG
E.
Pokr´t∏o termostatu
F.
Lampka kontrolna zasilania
G.
Pokr´t∏o termostatu
Regulacja ttemperatury
Regulacja temperatury odbywa si´ automatycznie.
Przestawienie pokr´t∏a termostatu na ni˝szà wartoÊç
powoduje wzrost temperatury wewn´trznej.
Temperatura spada wraz z przestawieniem pokr´t∏a
na wy˝szà wartoÊç.
W∏aÊciwy wybór temperatury uzale˝niony jest od
nast´pujàcych czynników:
• temperatury otoczenia
• cz´stotliwoÊci otwierania drzwi
• iloÊci przechowywanej ˝ywnoÊci
• lokalizacji urzàdzenia.
Ustawienie ttemperatury ww ppozycji ppoÊredniej jjest
zalecane pprzy nnormalnym uu˝ywaniu ssprz´tu.
Szybkie zzamra˝anie
W∏àczenie szybkiego zamra˝ania wymaga
wciÊni´cia wy∏àcznika (B). Zapala si´ lampka
kontrolna (C).
Lampka kkontrolna ttemperatury ((A)
Lampka kontrolna temperatury zapala si´
automatycznie, gdy temperatura w zamra˝arce
wzrasta powy˝ej wartoÊci wymaganej dla
przechowywania produktów ˝ywnoÊciowych.
Jest rzecza normalnà, ˝e lampka pozostanie
zapalona przez pewien okres czasu po w∏àczeniu
zamra˝arki.
Pozostanie ona zapalona a˝ do momentu, w którym
temperatura osiàgnie wartoÊç wymaganà dla
przechowywania zamro˝onej ˝ywnoÊci.
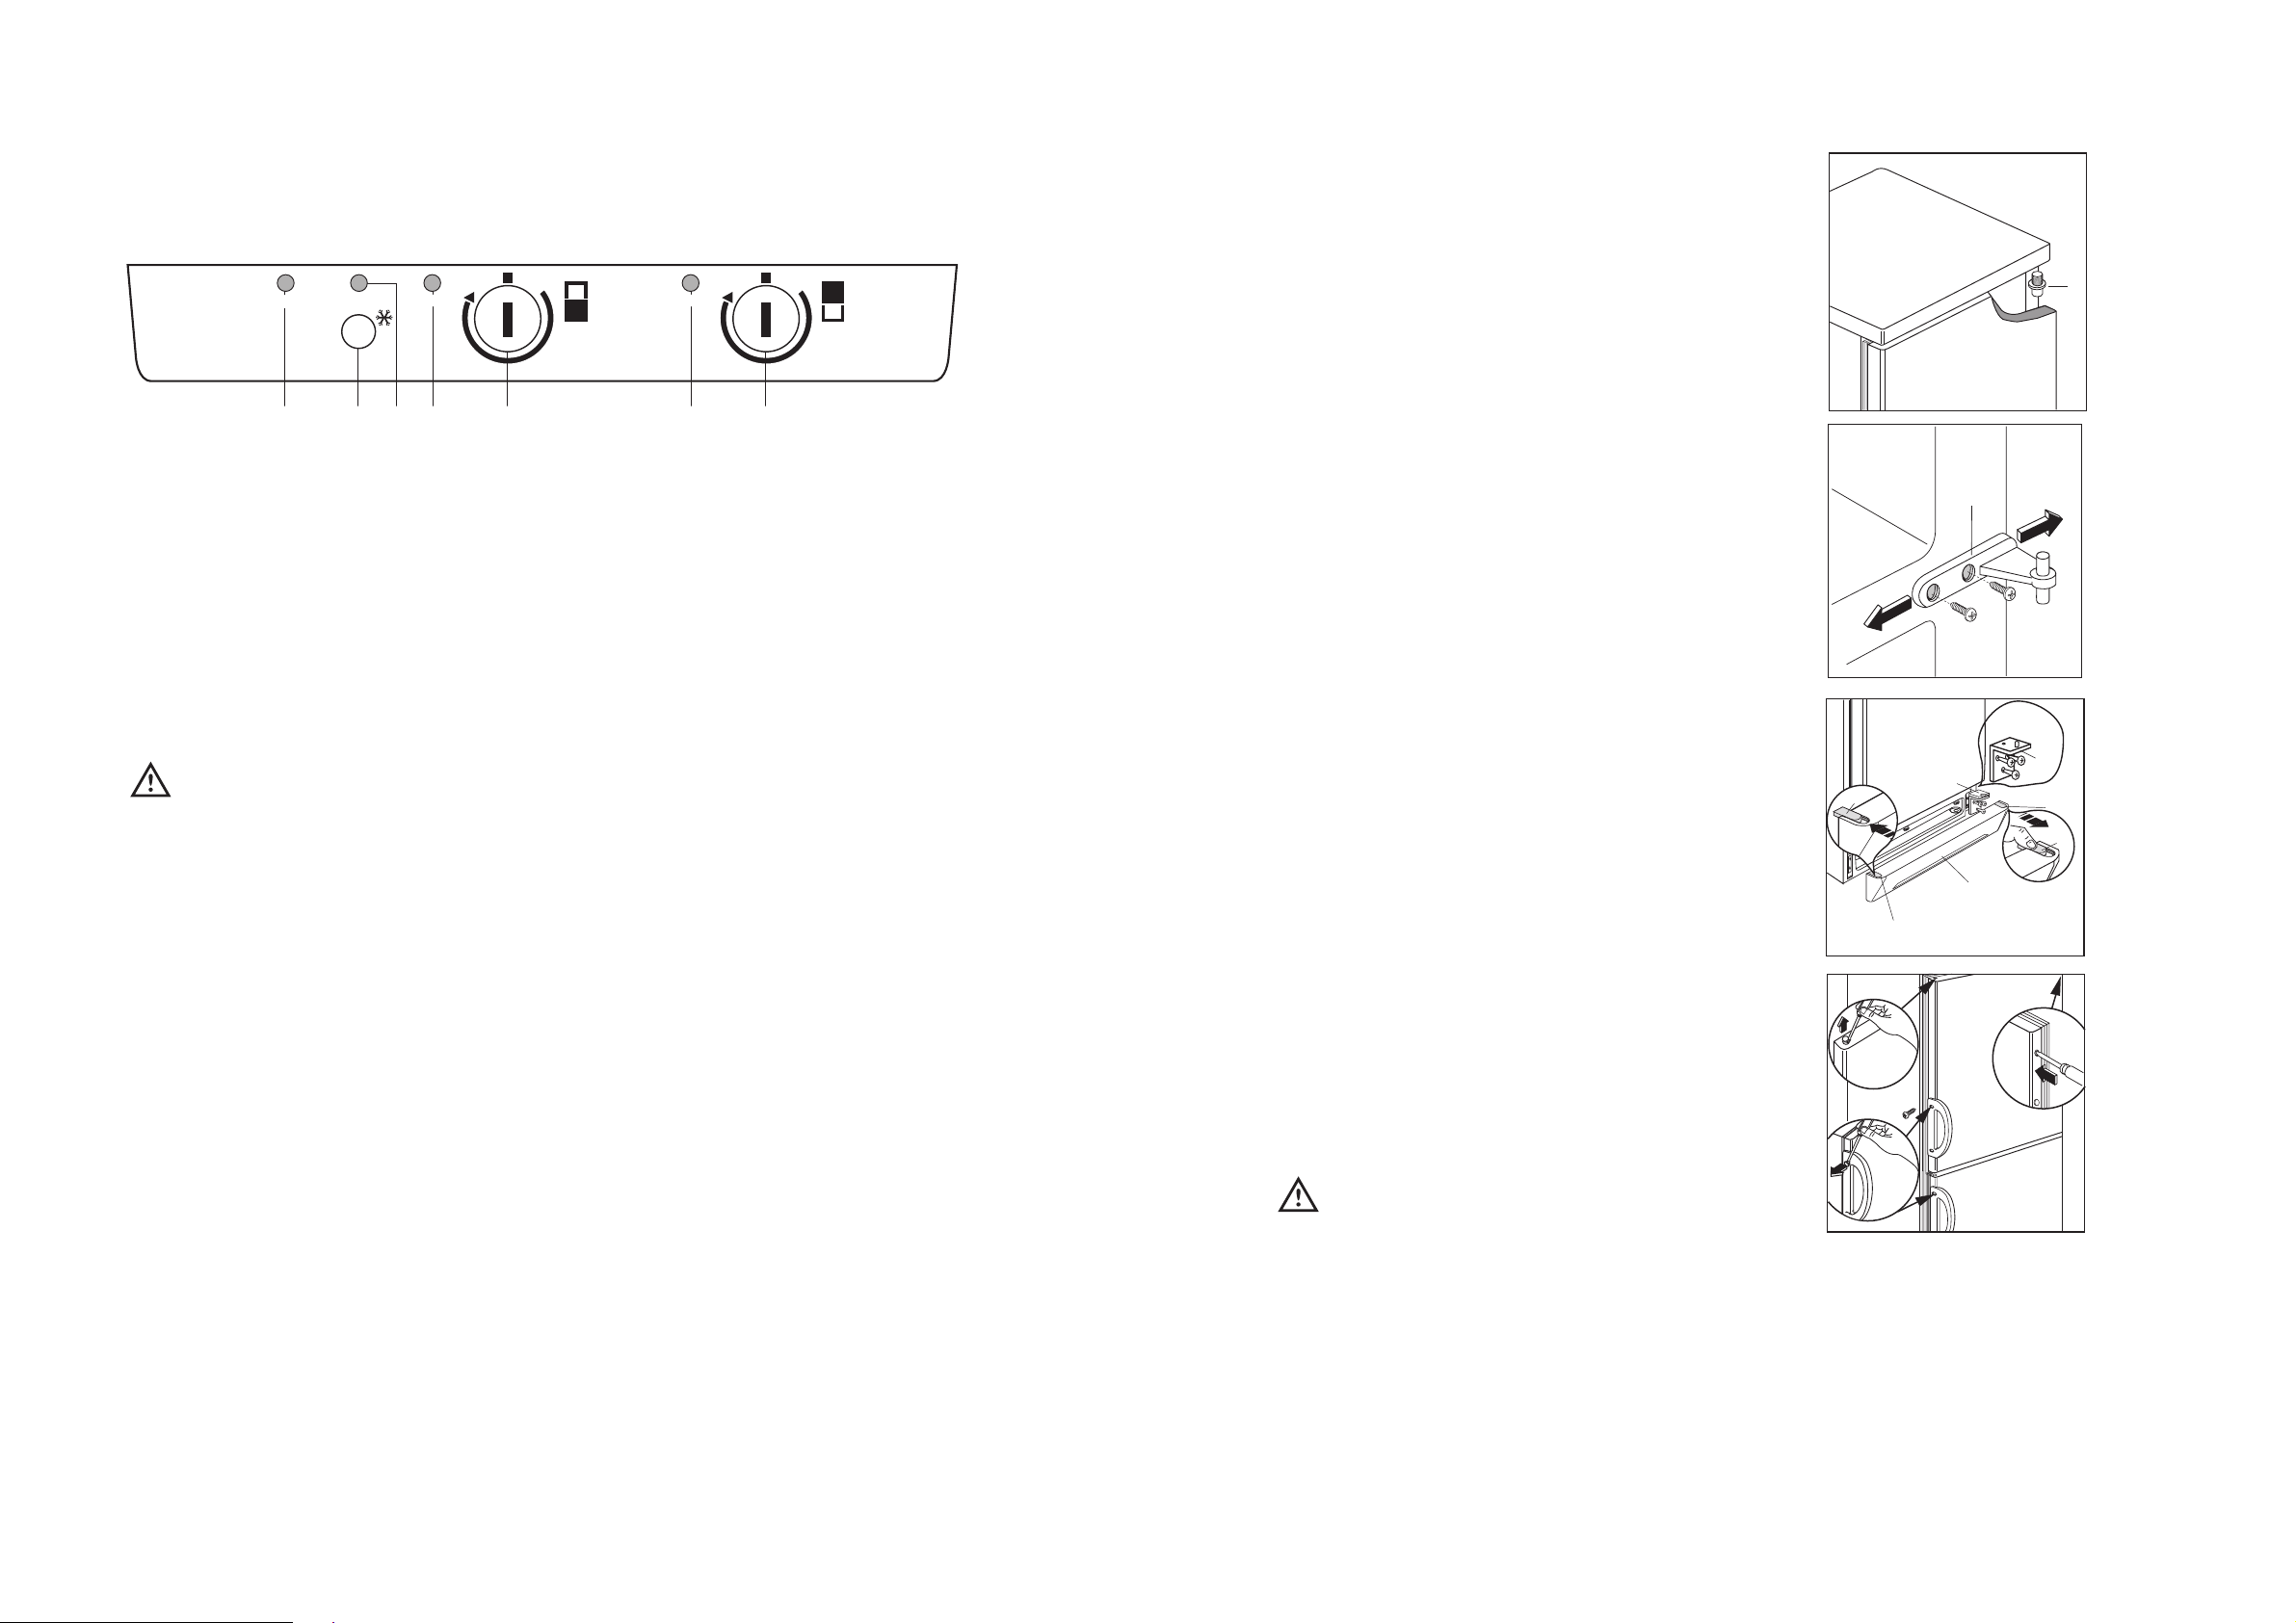
Changing the opening direction of
the doors
Before carrying out any operations, remove the plug
from the power socket.
To change the opening direction of the door,
proceed as follows:
1. pull off the ventilation grille (D) which is clipped
into place;
2. remove the bottom hinge (E) by unscrewing its
three fixing screws;
3. remove the lower door, sliding it out of the middle
hinge;
4. unscrew the middle hinge (H);
5. remove the upper door, releasing it from the
upper pin (G);
6. unscrew the upper pin (G) and refit it on the
opposite side;
7. remove the two plugs of the door (where
available), discovering the holes for the hinge
pins, assemble them on the opposite side and
refit the upper door;
8. reassemble the middle hinge on the opposite
side;
9. using a 10 mm spanner, unscrew the hinge pin
(E) and reassemble it on the opposite side of the
hinge;
10. reassemble the lower hinge (E) on the opposite
side, using the screws previously removed. Slide
the hole cover (F) out of the ventilation grille (D)
by pushing it in the direction of the arrow and
reassemble it on the opposite side;
11. reassemble the lower door;
12. refit the ventilation grille (D), clipping it into
place.
13.Unscrew the handles. Refit them on the opposite
side after having pierced the plugs with a punch.
Cover the holes left open with the plugs
contained in the documentation pack.
To line up the doors, it is possible to adjust the
middle hinge (H) horizontally by means of a tool,
after slackening the two screws (see figure).
Warning:
After having reversed the opening direction of
the doors check that all the screws are properly
tightened and that the magnetic seal adheres to
the cabinet. If the ambient temperature is cold (i.e.
in Winter), the gasket may not fit perfectly to the
cabinet. In that case, wait for the natural fitting of the
gasket or accelerate this process by heating up the
part involved with a normal hairdrier.
PR18
PR228
G
H
E
F
D
F
E
F
F
4
37
Page 3
Electrical connection
Zamra˝anie ÊÊwie˝ej ˝˝ywnoÊci
Before plugging in, ensure that the voltage and
frequency shown on the serial number plate
correspond to your domestic power supply. Voltage
can vary by ±6% of the rated voltage.
For operation with different voltages, a suitably sized
auto-transformer must be used.
The appliance must be earthed.
The power supply cable plug is provided with a
contact for this purpose.
If the domestic power supply socket is not earthed,
connect the appliance to a separate earth in
compliance with current regulations, consulting a
specialist technician.
The Manufacturer declines all responsibility if
the above safety precautions are not observed.
This appliance complies with the following
E.E.C. Directives:
- 87/308 EEC of 2/6/87 relative to radio interference
suppression.
- 73/23 EEC of 19.2.73 (Low Voltage Directive) and
subsequent modifications;
- 89/336 EEC of 3.5.89 (Electromagnetic
Compatibility Directive) and subsequent
modifications.
Komora oznaczona 4 gwiazdkami jest
przeznaczona do d∏ugoterminowego
przechowywania mro˝onek i do zamra˝ania Êwie˝ej
˝ywnoÊci. Nie nale˝y przekraczaç daty wa˝noÊci
podanej przez producenta na oryginalnym
opakowaniu.
Aby zamroziç Êwie˝à ˝ywnoÊç, nale˝y ustawiç
funkcj´ szybkiego mro˝enia 12 godzin przed
w∏o˝eniem ˝ywnoÊci.
˚ywnoÊç przeznaczonà do zamro˝enia nale˝y
umieÊciç w górnej cz´Êci komory zamra˝arki.
Przechowywanie mmro˝onek
Przed w∏o˝eniem ˝ywnoÊci do zamra˝arki w nowym
urzàdzeniu, po d∏u˝szej przerwie w jego pracy,
nale˝y uruchomiç urzàdzenie ustawiajàc pokr´t∏o na
najni˝szà temperatur´. Po up∏ywie przynajmniej 2
godz. wróciç do pozycji normalnej.
Aby zapewniç optymalne dzia∏ania urzàdzenia,
nale˝y:
- przechowujàc wi´ksze iloÊci mro˝onek usunàç
wszystkie szuflady i pojemniki i umieÊciç
produkty bezpoÊrednio na pó∏kach ch∏odzàcych.
- uwa˝aç, ˝eby nie przekroczyç maksymalnego
obcià˝enia wskazanego na bocznej tabliczce w
górnej cz´Êci urzàdzenia (jeÊli wyst´puje).
Wa˝ne
W rrazie pprzypadkowego rrozmro˝enia,
spowodowanego nnp. pprzerwà ww ddostawie eenergii
elektrycznej ttrwajàcà dd∏u˝ej nni˝ cczas ppodany ww
parametrach ttechnicznych ((poz.: zzdolnoÊç
utrzymywania ttemperatury), rrozmro˝ona ˝˝ywnoÊç
musi zzostaç sszybko sspo˝yta llub nnatychmiast
ugotowana ii ppo oostudzeniu pponownie zzamro˝ona.
Rozmra˝anie
Mro˝onki mo˝na rozmroziç w ch∏odziarce lub w
temperaturze pokojowej, w zale˝noÊci od czasu,
jakim dysponujemy.
Niewielkie porcje ˝ywnoÊci mo˝na gotowaç równie˝
bezpoÊrednio po wyj´ciu ich z zamra˝arki, tj. bez
uprzedniego rozmra˝ania. W tym wypadku czas
gotowania b´dzie d∏u˝szy.
Przygotowanie kkostek llodu
W sk∏ad wyposa˝enia zamra˝arki wchodzi pojemnik
na kostki lodu. Nale˝y wype∏niç go wodà i umieÊciç
w zamra˝arce.
Nie nnale˝y wwyjmowaç kkostek pprzy ppomocy
przedmiotów mmetalowych.
36
5
Page 4
KORZYSTANIE ZZ CCHLODZIARKI
TECHNICAL INFORMATION
Uruchomienie
W∏o˝yç wtyczk´ przewodu zasilajàcego do gniazdka
elektrycznego.
Temperatur´ wewnàtrz zamra˝arki mo˝na zmieniaç
pokr´t∏em termostatu (G).
W celu wy∏àczenia urzàdzenia, termostat nale˝y
ustawiç w pozycji «<».
Regulacja ttemperatury
Regulacja temperatury odbywa si´ automatycznie.
Przestawienie pokr´t∏a termostatu na ni˝szà wartoÊç
powoduje wzrost temperatury wewn´trznej.
Temperatura spada wraz z przestawieniem pokr´t∏a
na wy˝szà wartoÊç.
W∏aÊciwy wybór temperatury uzale˝niony jest od
nast´pujàcych czynników:
• temperatury otoczenia
• cz´stotliwoÊci otwierania drzwi
• iloÊci przechowywanej ˝ywnoÊci
• lokalizacji urzàdzenia.
Ustawienie ttemperatury ww ppozycji ppoÊredniej jjest
zalecane pprzy nnormalnym uu˝ywaniu ssprz´tu.
Wa˝ne:
JeÊli ttemperatura ootoczenia jjest wwysoka llub
urzàdzenie jjest mmaksymalnie wwype∏nione ii
ustawione nna nnajni˝szà ttemperatur´, uurzàdzenie
b´dzie ppracowaç bbez pprzerwy ppowodujàc
gromadzenie ssi´ llodu nna ttylnej ÊÊcianie. WW ttym
wypadku nnale˝y pprzestawiç ttermostat nna nni˝szà
wartoÊç, uumo˝liwiajàc ssamoczynne rrozmra˝anie ii
obni˝ajàc zzu˝ycie eenergii.
Przechowywanie pproduktów
˝ywnoÊciowych ww cch∏odziarce
Optymalne wykorzystanie urzàdzenia wymaga
przestrzegania nast´pujàcych zasad:
• Nie wolno przechowywaç w ch∏odziarce ciep∏ej
˝ywnoÊci i parujàcych p∏ynów
• ˚ywnoÊç powinna byç przykryta lub opakowana,
zw∏aszcza jeÊli wydziela silny zapach
• Nale˝y rozmieÊciç produkty w sposób
umo˝liwiajàcy swobodny przep∏yw powietrza
Modell
Gross Freezer Capacity lt.
Net Freezer Capacity lt.
Gross Fridge Capacity lt.
Net Fridge Capacity lt.
Dimensions (width*height*depth, cm)
Tension (V/Hz)
Energy Consumption (kWh/24h)
Energy Class
Freezing Capacity (kg/24h)
Temperature increase time h
Noise (dB/A)
Climatic Class
The technical infomation are situated in the rating plate on the internal left side of the appliance .
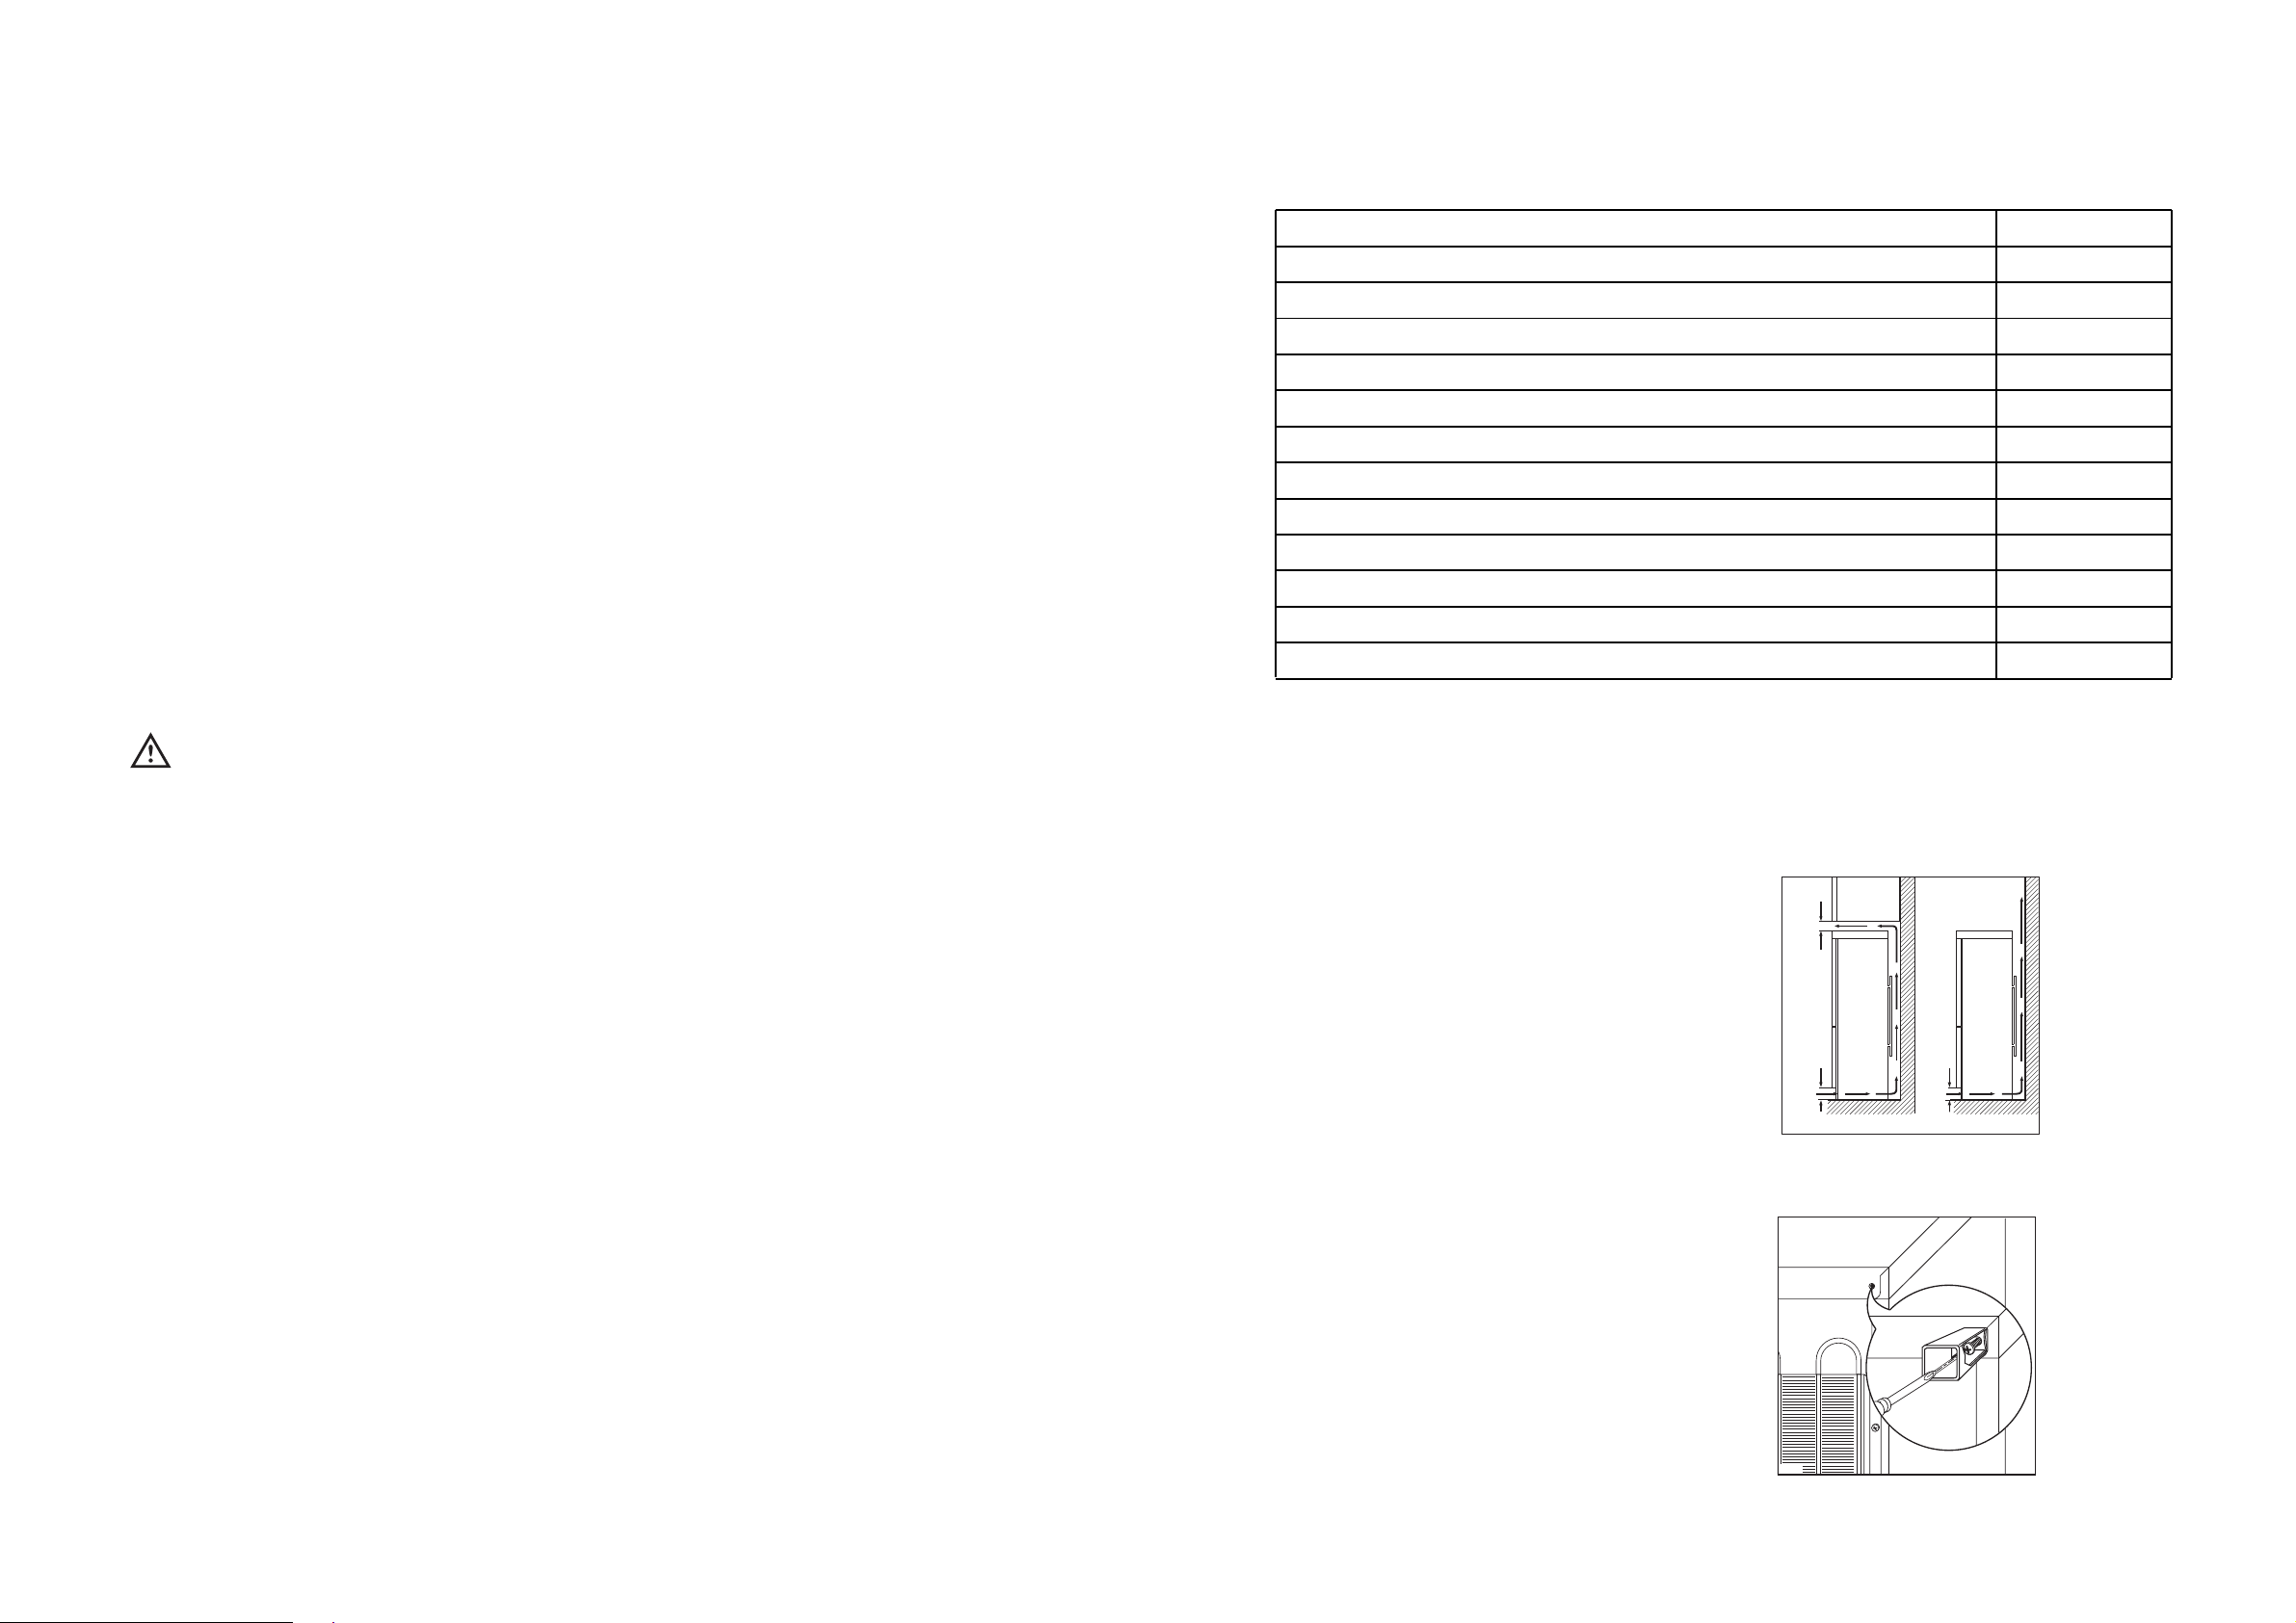
INSTALLATION
Location
The appliance should be installed well away from
sources of heat such as radiators, boilers, direct
sunlight etc.
For safety reasons, minimum ventilation must be as
shown in Fig.
Appliance positioned under overhanging kitchen wall
units (see Fig. A).
Appliance positioned without overhanging kitchen
wall units (see Fig. B).
Attention: keep ventilation openings clear of
obstruction.
Two adjustable feet at the cabinet base allow
accurate levelling of the appliance.
100 mm15 mm
B
A
15 mm
NP00
ER 8230 B
222
216
88
77
175x60x60
220-240/50
0,90
A
14
20
40
SN-ST
Rear spacers
In the bag with the documentation, there are two
spacers which must be fitted in the two top
corners.
Slacken the screws and insert the spacer under the
screw head, then re-tighten the screws.
D594
6
35
Page 5

Never use sharp metal tools to scrape off frost
from the evaporator as you could damage it.
However, when the ice becomes very thick on the
inner liner, complete defrosting should be carried out
as follows:
1. pull out the plug from the wall socket or turn the
thermostat knob to the «<» setting;
2. remove any stored food, wrap it in several layers
of newspaper and put it in a cool place;
3. leave the door open, and insert the plastic
scraper in the appropriate seating at the bottom
centre, placing a basin underneath to collect the
defrost water.
4. when defrosting is completed, dry the interior
thoroughly; keep the scraper for future use;
5. turn the thermostat knob back to the required
setting or replace the plug in the power socket.
6. After two or three hours, reload the previously
removed food into the compartment.
Important:
Never use sharp metal tools to scrape off frost
from the evaporator as you could damage it.
Do not use a maechanical device or any artificial
means to speed up the thawing process other
than those recommended by the manufacturer.
A temperature rise of the frozen food packs,
during defrosting, may shorten their safe
storage life.
D068
Regulacja ppó∏ek pprzenoÊnych
Ukszta∏towanie wewn´trznych Êcianek ch∏odziarki
umo˝liwia dowolne rozmieszczenie pó∏ek.
W celu lepszego wykorzystania miejsca, przednià
cz´Êç pó∏ki mo˝na po∏o˝yç na tylnej.
D338
Rozmieszczenie ppó∏ek nna ddrzwiach
Aby umo˝liwiç przechowywanie artyku∏ów
spo˝ywczych ró˝nej wielkoÊci, pó∏ki mo˝na
umieszczaç na ró˝nych wysokoÊciach.
KolejnoÊç post´powania: pociàgnàç pó∏k´ zgodnie z
kierunkiem strza∏ki a˝ do obluzowania, umieÊciç na
˝àdanej wysokoÊci.
PR249
CUSTOMER SERVICE AND SPARE PARTS
If the appliance is not functioning properly, check
that:
• the plug is firmly in the wall socket and the mains
power switch is on;
• there is an electricity supply (find out by plugging
in another appliance);
• the thermostat knob is in the correct position.
• If there are water drops on the bottom of the
cabinet, check that the defrost water drain
opening is not obstructed (see “Defrosting”
section).
34
• If your appliance is still not working properly after
making the above checks, contact the nearest
service centre.
To obtain fast service, it is essential that when you
apply for it you specify the model and serial number
of your appliance which can be found on the
guarantee certificate or on the rating plate located
inside the appliance, on the bottom left-hand side.
PR250
7
Page 6

ZALECENIA
Zalecenia ddotyczàce pprzechowywania
˝ywnoÊci ww cch∏odziarce
Podstawowe zalecenia:
Mi´so ((ka˝dego rrodzaju):
tworzywa i umieÊciç na szklanej pó∏ce nad
pojemnikiem na warzywa.
Ze wwzgl´dów bbezpieczeƒstwa pprzechowywaç ww tten
sposób nnajwy˝ej 11-2 ddni.
Produkty uugotowane, cciep∏e ppotrawy iitd.:
umieÊciç na dowolnych pó∏kach.
Owoce ii wwarzywa:
dole, w szufladzie na warzywa.
Mas∏o ii ssery:
specjalnych szczelnych pojemnikach lub w
opakowaniach aluminiowych bàdê foliowych, aby
utrudniç dost´p powietrza.
Butelki zz mmlekiem:
ustawione na specjalnej pó∏ce drzwiowej.
Banany, zziemniaki, ccebula ii cczosnek, jje˝eli ssà
nieopakowane, nnie mmogà bbyç pprzechowywane ww
ch∏odziarce.
powinny byç umieszczone w
Zalecenia ddotyczàce zzamra˝ania
Prawid∏owe zamra˝anie wymaga przestrzegania
kilku poni˝szych zasad:
• Maksymalna iloÊç artyku∏ów ˝ywnoÊciowych,
którà mo˝na zamroziç w ciàgu 24 godz., podana
jest na tabliczce znamionowej;
• Proces zamra˝ania trwa 24 godziny. W tym
czasie nie wolno dok∏adaç kolejnych produktów
do zamro˝enia.
• Podlegajàce zamro˝eniu produkty muszà byç
doskona∏ej jakoÊci, Êwie˝e i czyste;
• Przed zamro˝eniem nale˝y podzieliç ˝ywnoÊç na
ma∏e porcje, co przyspiesza proces zamra˝ania
oraz umo˝liwia rozmra˝anie produktów w
odpowiedniej iloÊci;
• Produkty spo˝ywcze nale˝y zawijaç w foli´
aluminiowà lub polietylenowà, dbajàc, by
opakowanie by∏o przylegajàce i szczelne;
• Âwie˝e produkty ˝ywnoÊciowe nie powinny
dotykaç zamro˝onych, aby nie powodowaç
zmian temperatury ˝ywnoÊci wczeÊniej
zamro˝onej;
• ˚ywnoÊç o niskiej zawartoÊci t∏uszczu
przechowuje si´ d∏u˝ej i lepiej ni˝ o wysokiej
zawartoÊci t∏uszczu; sól skraca okres
przechowywania produktów;
• Nie nale˝y spo˝ywaç lodów bezpoÊrednio po
wyj´ciu z zamra˝alnika, gdy˝ mo˝e to
spowodowaç odmro˝enia skóry;
• Zaleca si´ opatrzyç ka˝dy produkt datà
zamro˝enia. U∏atwi to kontrol´ okresu
przechowywania;
zawinàç w torebki z
przykryç i
dok∏adnie umyç i umieÊciç na
powinny byç zamkni´te i
•
Symbole na pojemnikach oznaczajà rodzaje
˝ywnoÊci do zamro˝enia.
Cyfry oznaczajà okres przechowywania ka˝dego
z produktów (w miesiàcach). Od jakoÊci
produktów ˝ywnoÊciowych i od rodzaju ich
wst´pnej obróbki przed zamro˝eniem zale˝y
wybór górnej lub dolnej wartoÊci.
• Do zzamra˝alnika nnie wwolno wwk∏adaç pp∏ynów
zawierajàcych ww´glany ((napoje ggazowane iitp.),
gdy˝ mmogà oone eeksplodowaç.
Zalecenia ddotyczàce
przechowywania mmro˝onek
Aby w optymalny sposób wykorzystaç mo˝liwoÊci
urzàdzenia, nale˝y:
• upewniç si´, ˝e mro˝onki by∏y odpowiednio
przechowywane w miejscu zakupu;
• zadbaç, by czas od momentu zakupu do chwili
w∏o˝enia do zamra˝arki by∏ jak najkrótszy.
• nie otwieraç zbyt cz´sto drzwiczek zamra˝alnika
i nie pozostawiaç ich otwartych d∏u˝ej ni˝ to
konieczne.
• Po rozmro˝eniu ˝ywnoÊç bardzo szybko si´
psuje i nie mo˝e ponownie zostaç zamro˝ona.
• Nie nale˝y przekraczaç daty wa˝noÊci podanej
przez producenta na opakowaniu ˝ywnoÊci..
MAINTENANCE
Unplug the appliance before carrying out
any maintenance operation.
Warning
This appliance contains hydrocarbons in its cooling
unit; maintenance and recharging must therefore
only be carried out by authorized technicians.
Periodic cleaning
Clean the inside with warm water and bicarbonate of
soda.
Rinse and dry thoroughly.
Clean the condenser (black grill) and the
compressor at the back of the appliance with a
brush or a vacuum cleaner. This operation will
improve the performance of the appliance and save
electricity consumption.
Interior light
The light bulb inside the refrigerator compartment
can be reached as follows:
- unscrew the light cover securing screw.
- unhook the moving part as shown in the figure.
If the light does not come on when the door
is open, check that it is screwed into place
properly. If it still does not light up, change the
bulb. The rating is shown on the light bulb cover.
Defrosting
Frost is automatically eliminated from the evaporator
of the refrigerator compartment every time the motor
compressor stops, during normal use. The defrost
water drains out through a trough into a special
container at the back of the appliance, over the
motor compressor, where it evaporates.
It is important to periodically clean the defrost
water drain hole in the middle of the refrigerator
compartment channel to prevent the water
overflowing and dripping onto the food inside.
Use the special cleaner provided, which you will
find already inserted into the drain hole.
The freezer compartment, however, will become
progressively covered with frost. This should be
removed with the special plastic scraper provided,
whenever the thickness of the frost exceeds 4 mm.
During this operation it is not necessary to switch off
the power supply or to remove the foodstuffs.
Periods of non-operation
When the appliance is not in use for long periods,
take the following precautions:
remove the plug from the wall socket;
remove all food;
defrost and clean the interior and all accessories;
leave the door ajar to allow air to circulate to prevent
unpleasant smells.
D613
D037
8
33
Page 7

HINTS
KONSERWACJA
Hints for refrigeration
Useful hints:
Meat (all types): wrap in polythene bags and place
on the glass shelf above the vegetable drawer.
For safety, store in this way only one or two days
at the most.
Cooked foods, cold dishes, etc..: these should be
covered and may be placed on any shelf.
Fruit and vegetables: these should be thoroughly
cleaned and placed in the special drawer(s)
provided.
Butter and cheese: these should be placed in
special airtight containers or wrapped in aluminium
foil or polythene bags to exclude as much air as
possible.
Milk bottles: these should have a cap and should
be stored in the bottle rack on the door.
Bananas, potatoes, onions and garlic, if not
packed, must not be kept in the refrigerator.
Hints for freezing
To help you make the most of the freezing process,
here are some important hints:
• the maximum quantity of food which can be
frozen in 24 hrs. is shown on the rating plate;
• the freezing process takes 24 hours. No further
food to be frozen should be added during this
period;
• only freeze top quality, fresh and thoroughly
cleaned, foodstuffs;
• prepare food in small portions to enable it to be
rapidly and completely frozen and to make it
possible subsequently to thaw only the quantity
required;
• wrap up the food in aluminium foil or polythene
and make sure that the packages are airtight;
• do not allow fresh, unfrozen food to touch food
which is already frozen, thus avoiding a rise in
temperature of the latter;
• lean foods store better and longer than fatty
ones; salt reduces the storage life of food;
• water ices, if consumed immediately after
removal from the freezer compartment, can
possibly cause the skin to be freeze burnt;
• it is advisable to show the freezing-in date on
each individual pack to enable you to keep tab of
the storage time;
• The symbols on the drawers show different types
of frozen goods.
The numbers indicate storage times in months
for the appropriate types of frozen goods.
Whether the upper or lower value of the indicated
storage time is valid depends on the quality of
the foods and pre-treating before freezing.
• do not put carbonated liquids (fizzy drinks,
etc.) in the freezer compartment as they may
burst.
Hints for storage of frozen food
To obtain the best performance from this appliance,
you should:
• make sure that the commercially frozen
foodstuffs were adequately stored by the retailer;
• be sure that frozen foodstuffs are transferred
from the foodstore to the freezer in the shortest
possible time;
• not open the door frequently or leave it open
longer than absolutely necessary.
• Once defrosted, food deteriorates rapidly and
cannot be refrozen.
• Do not exceed the storage period indicated by
the food manufacturer.
Nale˝y wwy∏àczyç uurzàdzenie zz ssieci pprzed
rozpocz´ciem jjakichkolwiek cczynnoÊci
konserwacyjnych.
Uwaga
Urzàdzenie to zawiera weglowodory w uk∏adzie
ch∏odniczym; konserwacja i uzupe∏nianie musi byç
przeprowadzane wy∏àcznie przez personel
autoryzowanych zak∏adów serwisowych.
Okresowe cczyszczenie
Komor´ ch∏odziarki nale˝y myç ciep∏à wodà z
dodatkiem oczyszczonej sody.
Starannie op∏ukaç i osuszyç.
Skraplacz (czarny ruszt) i spr´˝ark´ w tylnej cz´Êci
zamra˝arki odkurzyç przy pomocy szczotki lub
odkurzacza. Regularne usuwanie kurzu zapewnia
bezawaryjnà prac´ urzàdzenia i oszcz´dne zu˝ycie
energii elektrycznej.
Wymiana ˝˝arówki
Dost´p do ˝arówki oÊwietlajàcej komor´ ch∏odziarki
uzyskaç mo˝na w nast´pujàcy sposób:
- nale˝y odkr´ciç Êrub´ os∏ony ˝arówki.
- wyjàç jej cz´Êç ruchomà przez naciÊni´cie, zob.
rysunek.
Je˝eli ppo ootwarciu ddrzwi ˝˝arówka ssi´ nnie
zapala, nnale˝y ssprawdziç, cczy jjest oona ddobrze
wkr´cona. JJe˝eli nnie zzapala ssi´ ww ddalszym cciàgu,
nale˝y zzastàpiç jjà nnowà oo ttej ssamej mmocy. MMoc
maksymalna ppodana jjest nna oos∏onie ˝˝arówki.
Rozmra˝anie
Szron usuwany jest automatycznie z parownika
ch∏odziarki podczas ka˝dego cyklu wy∏àczania si´
spr´˝arki w trakcie pracy urzàdzenia. Powsta∏a w
wyniku tego woda sp∏ywa do specjalnego pojemnika
znajdujàcego si´ z ty∏u urzàdzenia nad spr´˝arkà, a
nast´pnie wyparowuje.
Nale˝y ppami´taç oo ookresowym cczyszczeniu ootworu
odp∏ywowego wwody, zznajdujàcego ssi´ ppoÊrodku
kana∏u oodp∏ywowego ww kkomorze cch∏odziarki.
Zapobiega ssi´ ww tten ssposób ggromadzeniu wwody,
która mmog∏aby ddostaç ssi´ ddo pprzechowywanej
˝ywnoÊci. UU˝yç nnale˝y sspecjalnej pprzetyczki,
znajdujàcej ssi´ ww ootworze oodp∏ywowym.
Przerwy ww uu˝ytkowaniu
Je˝eli urzàdzenie nie b´dzie u˝ytkowane przez
d∏u˝szy okres czasu, nale˝y:
wy∏àczyç urzàdzenie z sieci;
wyjàç wszystkie produkty;
rozmroziç, wyczyÊciç wn´trze i akcesoria;
pozostawiç otwarte drzwi, aby umo˝liwiç swobodny
przep∏yw powietrza i zapobiec powstawaniu
nieprzyjemnych zapachów.
D613
D037
32
9
Page 8

Komora zamra˝arki pokrywa si´ stopniowo
szronem. Dopóki warstwa szronu nie przekracza 4
mm. gruboÊci, nale˝y usuwaç jà specjalnà
plastikowà ∏opatkà, wchodzàcà w sk∏ad
wyposa˝enia urzàdzenia. Podczas wykonywania tej
czynnoÊci nie jest konieczne od∏àczenie urzàdzenia
od zasilania lub wyj´cie produktów.
Ca∏kowite rozmro˝enie zamra˝alnika, w razie gdy
lód w komorze osiàga znacznà gruboÊç, wymaga
nast´pujàcych czynnoÊci:
1. Wy∏àczyç urzàdzenie z sieci, ustawiç termostat w
pozycji «<»;
2. Wyjàç wszystkie przechowywane produkty,
owinàç w kilka gazet i umieÊciç w ch∏odnym
miejscu;
3. Pozostawiç otwarte drzwi, umieÊciç zbiornik na
wod´ na najwy˝szej pó∏ce komory ch∏odziarki,
usunàç zatyczk´ zgodnie z rysunkiem;
4. Po ca∏kowitym rozmro˝eniu dok∏adnie osuszyç
komor´; ponownie umocowaç zatyczk´;
5. Ustawiç termostat na ˝àdanej wartoÊci lub
ponownie pod∏àczyç urzàdzenie do sieci.
6. Po 2-3 godzinach w∏o˝yç wyj´te przedtem
produkty.
D068
Movable shelves
The walls of the refrigerator are equipped with a
series of runners so that the shelves can be
positioned as desired.
For better use of space, the front half-shelves can lie
over the rear ones.
D338
Positioning the door shelves
To permit storage of food packages of various sizes,
the door shelves can be placed at different heights.
To make these adjustments proceed as follows:
Gradually pull the shelf in the direction of the arrows
until it comes free, then reposition as required.
PR249
Wa˝ne
Nie uu˝ywaç ppod ˝˝adnym ppozorem oostrych
metalowych pprzedmiotów ddo zzeskrobywania sszronu
z pparownika. GGrozi tto jjego uuszkodzeniem.
Do rrozmra˝ania nnie uu˝ywaç iinnych uurzàdzeƒ
mechanicznych ii ssztucznych ÊÊrodków, nni˝ tte
zalecane pprzez pproducenta.
Wzrost ttemperatury zzamro˝onych pproduktów,
majàcy mmiejsce ppodczas ooperacji rrozmra˝ania,
mo˝e sskróciç iich bbezpieczny ookres
przechowywania.
SERWIS // NNAPRAWY II CCZ¢ÂCI ZZAMIENNE
W wypadku stwierdzenia nieprawid∏owej pracy
urzàdzenia nale˝y sprawdziç, czy:
• urzàdzenie jest w∏aÊciwie pod∏àczone do sieci
zasilajàcej
• obwód zasilania elektrycznego jest pod
napi´ciem (np. przez pod∏àczenie innego
urzàdzenia)
• pokr´t∏o termostatu znajduje si´ we w∏aÊciwej
pozycji
• Je˝eli na dnie komory ch∏odziarki wyst´pujà
Êlady wody, nale˝y sprawdziç, czy otwór
odp∏ywowy jest dro˝ny (zob. rozdz.
“Rozmra˝anie”).
• Je˝eli – po przeprowadzeniu powy˝szych
czynnoÊci sprawdzajàcych – urzàdzenie w
dalszym ciàgu nie pracuje prawid∏owo, nale˝y
zwróciç si´ do najbli˝szego autoryzowanego
punktu napraw.
˚eby przyspieszyç wykonanie us∏ugi, przy
zg∏oszeniu nale˝y koniecznie podaç model i numer
produktu urzàdzenia, znajdujàcy si´ w karcie
gwarancyjnej i na tabliczce znamionowej
umieszczonej w dolnej cz´Êci komory ch∏odziarki, po
lewej stronie.
PR250
10
31
Page 9

USING REFRIGERATOR
Operation
PARAMETRY TTECHNICZNE
Insert the plug into the wall socket.
The temperature inside the refrigerating
compartment is regulated with the thermostat knob
(G).
The operation is interrupted by turning the control
knob until its pointer coincides with symbol «<».
Temperature regulation
The temperature is automatically regulated and can
be increased to achieve a higher temperature
(warmer) by rotating the thermostat knob toward
lower settings or reduced (colder) rotating the knob
towards higher settings.
However, the exact setting should be chosen
keeping in mind that the temperature inside the
refrigerator depends on:
• room temperature;
• how often the door is opened;
• the quantity of food stored;
• location of appliance.
A medium setting is generally the most suitable.
Model ER 8230 B
PojemnoÊç brutto: zamra˝alnik (l)
PojemnoÊç netto: zamra˝alnik (l)
PojemnoÊç brutto: ch∏odziarka (l)
PojemnoÊç netto: ch∏odziarka (l)
Wymiary (*wys. *szer.*g∏´b., cm.)
Napi´cie (V/HZ)
Zu˝ycie efektywnoÊci energetycznej (kWh/24h)
Klasa energii
ZdolnoÊç zamra˝ania (kg/24h)
ZdolnoÊç utrzymywania temperatury (h)
Poziom ha∏asu (dB/A)
Klasa klimatyczna
Informacje techniczne znajdujà si´ na tabliczce znamionowej umieszczonej w dolnej cz´Êci ch∏odziarki, po
lewej stronie.
222
216
88
77
175x60x60
220-240/50
0,90
A
14
20
40
SN-ST
Important
If the ambient temperature is high or the
appliance is fully loaded, and the appliance is
set to the lowest temperatures, it may run
continuously causing frost to form on the rear
wall. In this case the dial must be set to a higher
temperature to allow automatic defrosting and
therefore reduced energy consumption.
Fresh food refrigeration
To obtain the best performance:
• do not store warm food or evaporating liquids in
the refrigerator;
• do cover or wrap the food, particularly if it has a
strong flavour.
• Position food so that air can circulate freely round
it.
INSTALACJA
Ustawienie
Urzàdzenie powinno zostaç ustawione z dala od
takich êróde∏ ciep∏a jak kaloryfery, grzejniki wody czy
bezpoÊrednie dzia∏anie promieni s∏onecznych.
Ze wzgl´dów bezpieczeƒstwa nale˝y zapewniç
minimalny swobodny przep∏yw powietrza, zgodnie z
rys.
Urzàdzenie stojàce pod kuchennà szafkà wiszàcà
(rys. A).
Urzàdzenie wolnostojàce (rys. B).
Uwaga: nnie wwolno zzas∏aniaç ootworów
wentylacyjnych.
Regulacja obu nó˝ek urzàdzenia umo˝liwia jego
dok∏adne wypoziomowanie.
Tylne eelementy ddystansowe
W oopakowaniu zzawierajàcym ddokumentacj´
urzàdzenia, zznajdà PPaƒstwo ddwa eelementy
dystansowe, pprzeznaczone ddo zzamontowania ww
dwóch ggórnych rrogach jjego ttylnej ÊÊciany.
W tym celu nale˝y odkr´ciç Êruby, wprowadziç pod
nie element dystansowy i ponownie Êruby te
dokr´ciç.
100 mm15 mm
B
A
15 mm
NP00
D594
30
11
Page 10

Pod∏àczenie ddo zzasilania
Przed pod∏àczeniem urzàdzenia nale˝y upewniç si´,
czy napi´cie i nat´˝enie podane na tabliczce
znamionowej sà zgodne z parametrami Paƒstwa
sieci zasilajàcej. Dopuszcza si´ +-6% odchylenia od
normy.
Przy innych wartoÊciach napi´cia nale˝y stosowaç
autotransformator o odpowiedniej mocy.
Urzàdzenie mmusi bbyç uuziemione.
Wtyczka przewodu zasilajàcego jest w tym celu
zaopatrzona w specjalny styk ochronny
(uziemienie).
Je˝eli w Paƒstwa instalacji elektrycznej brak
uziemienia, to urzàdzenie musi zostaç pod∏àczone
przez uprawnionego elektromontera do odzielnej
instalacji uziemiajàcej, zgodnie z obowiàzujàcymi
przepisami bezpieczeƒstwa
W wwypadku nnieprzestrzegania ppowy˝szych
przepisów bbezpieczeƒstwa, pproducent nnie pponosi
odpowiedzialnoÊci zza ppowsta∏e sszkody.
Urzàdzenie to spe∏nia wymagania
nast´pujàcych wytycznych EWG:
- 87/308 EEEC
- 773/23 EEEC
póêniejsze nowelizacje.
- 89/336 EEEC
elektromagnetyczna) i póêniejsze nowelizacje.
z 2.06.87 dot. zak∏óceƒ RTV.
19.02.73 (niskie napi´cia) i
03.05.89 (kompatybilnoÊç
Freezing fresh food
The 4-star compartment is suitable for
long term storage of commercially frozen food, and
for freezing fresh food. Do not exceed the storage
times shown by the manufacturer on the
commercially frozen food packets.
To freeze fresh food, let it run on fast freeze setting
for 12 hours before loading the food.
Place the food to be frozen on the upper
compartment.
Storage of frozen food
When first starting-up or after a period out of use,
before putting the products in the compartment let
the appliance run for at least two hours on the
coldest setting, then turn the thermostat knob to the
normal operating position.
To obtain the best performance from this appliance,
you should:
if large quantities of food are to be stored, remove
all drawers and baskets from appliance and place
food on cooling shelves.
if large quantities of food are to be stored, remove
all drawers and baskets from appliance and place
food on cooling shelves.
Pay careful attention not to exceed load limit stated on
the side of the upper section (where applicable).
Important
In the event of accidental defrosting, for example
due to a power failure, if the power has been off
for longer that the value shown in the technical
characteristics chart under “rising time”, the
defrosted food must be consumed quickly or
cooked immediately and then refrozen (after
cooling).
Thawing
Deep-frozen or frozen food, prior to being used, can
be thawed in the refrigerator compartment or at
room temperature, depending on the time available
for this operation.
Small pieces may even be cooked still frozen,
directly from the freezer: in this case, cooking will
take longer.
Ice-cube production
This appliance is equipped with one or more trays
for the production of ice-cubes. Fill these trays with
water, then put them in the freezer compartment.
Do not use metallic instruments to remove the
trays from the freezer.
12
29
Page 11

USE
Control panel
minmax
ONSUPERALARM
B
A
A. Temperature alarm light
B. Fast freezing knob
C. Quick- freezing indicator light
D. Function indicator light
CD
Cleaning the interior
Before using the appliance for the first time, wash
the interior and all internal accessories with lukewarm water and some neutral soap so as to remove
the typical smell of a brand-new product, then dry
thoroughly.
Do not use detergents or abrasive
powders, as these will damage the finish.
USE OF THE FREEZER
Operation
Insert the plug into the wall socket. The pilot light will
light up, indicating that the appliance is powered.
Turn the thermostat knob, clockwise, beyond the
«<» (STOP) position.
The appliance will start to operate.
To stop the appliance, turn the thermostat knob to
po-sition «<».
Temperature regulation
E
minmax
ON
FG
E. Thermostat knob
F. Function indicator light
G. Thermostat knob
Fast freezing
To start fast freezing push knob (B). The pilot light
(C) will goes on.
The temperature alarm light (A)
The temperature alarm light turns on automatically
whenever the temperature within the freezer rises
above a certain value which might endanger
satisfactory long-term conservation.
It is perfectly normal for the temperature alarm light
to remain lit up for a short time after the freezer is
initially turned on. It will remain lit up until the
optimum temperature for the conservation of frozen
food is attained.
Zmiana kkierunku ootwierania ddrzwi
Przed pprzystàpieniem ddo wwykonywania
jakichkolwiek cczynnoÊci nnale˝y wwyjàç wwtyczk´ zz
gniazdka zzasilajàcego.
Aby zmieniç kierunek otwierania drzwi, nale˝y
postàpiç nast´pujàco:
1. wyciàgnàç kratk´ wentylacyjnà (D);
2. wyjàç dolny zawias (E), odkr´cajàc trzy Êruby
s∏u˝àce do jego zamocowania;
3. wyjàç dolne drzwi, wyjmujàc je z zawiasu
Êrodkowego;
4. wyjàç zawias Êrodkowy (H);
5. wyjàç górne drzwi, wyjmujac je z trzpienia
górnego (G);
6. odkr´ciç górny trzpieƒ (G) i umieÊciç go po
przeciwnej stronie;
7. wyjàç dwie zaÊlepki z drzwi (jeÊli zosta∏y
przewidziane), w celu uzyskania otworów
s∏u˝àcych do za∏o˝enia zawiasu, po czym
umieÊciç je z przeciwnej strony, a nast´pnie
za∏o˝yç drzwi górne;
8. zamocowaç zawias Êrodkowy po przeciwnej
stronie;
9. kluczem 10 mm odkr´ciç trzpieƒ zawiasu (E) i
za∏o˝yç go po przeciwnej stronie tego samego
zawiasu;
10. zamocowaç dolny zawias (E) po przeciwnej
stronie przy pomocy poprzednio wyj´tych Êrub.
Wyjàç zaÊlepk´ (F) z kratki wentylacyjnej (D)
wciskajàc jà zgodnie z kierunkiem strza∏ki, a
nast´pnie za∏o˝yç po przeciwnej stronie.
11. za∏o˝yç dolne drzwi;
12. ponownie za∏o˝yç kratk´ wentylacyjnà (D)
poprzez wciÊni´cie.
13.Odkr´ciç uchwyt i zamocowaç go po przeciwnej
stronie, po uprzednim przewierceniu zaÊlepek.
Pozostawione otwory zakryã zaÊlepkami
znajdujacymi si´ w opakowaniu zawierajàcym
dokumentacj´.
Wzajemne ustawienie osiowe drzwi uzyskuje si´
poprzez poziomà regulacj´ zawiasu Êrodkowego (H)
przy pomocy w∏aÊciwego przyrzàdu, po uprzednim
poluzowaniu dwóch Êrub (por. rys.).
PR18
G
H
E
F
D
F
E
F
F
The temperature is automatically regulated and can
be increased to achieve a higher temperature
(warmer) by rotating the thermostat knob toward
lower settings or reduced (colder) rotating the knob
towards higher settings.
However, the exact setting should be chosen
keeping in mind that the temperature inside the
refrigerator depends on:
• room temperature;
• how often the door is opened;
• the quantity of food stored;
• location of appliance.
A medium setting is generally the most suitable.
28
Uwaga:
Po pprze∏o˝eniu ddrzwi nnale˝y ssprawdziç, cczy
wszystkie ÊÊruby ssà ddobrze ddokr´cone ii cczy
uszczelka mmagnetyczna ww∏aÊciwie pprzylega ddo
obudowy. JJe˝eli ttemperatura ootoczenia jjest nniska
(np. zzimà) ii uuszczelka pprzylega nniedok∏adnie, mmo˝na
poczekaç nna jjej ppowrót ddo nnaturalnego sstanu llub
przyspieszyç tten pproces, oogrzewajàc wwymagajàcy
tego oodcinek zzwyk∏à ssuszarkà ddo ww∏osów.
PR228
13
Page 12

DÒLEÎITÁ UUPOZORNùNÍ
Je vvelmi ddÛleÏité, aaby ttento nnávod nna ppouÏí sstále ddoprovázel sspotfiebiã aa sslouÏil jjako zzdroj iinformací oo jjeho
obsluze. II vv ppfiípadû pprodeje, ppfievodu sspotfiebiãe nna nnového vvlastníka, nnebo ii vv ppfiípadû sstûhování sse uujistûte, ÏÏe
návod bbyl ppfiiloÏen kke sspotfiebiãi, aaby sse nnov˘ vvlastník mmohl oobeznámit ss jjeho ffunkcemi aa ddÛleÏit˘mi
upozornûními.
U ttohoto ttypu sspotfiebiãe nnahradilo mmagnetické uuzavírání ddvefií ppÛvodní, kkteré uu sstar‰ích ttypÛ cchladniãek mmûlo
na ddvefiích zzápadku. PPfied vvyskládkováním vva‰í vvyfiazené cchladniãky sse ppostarejte, aaby zzápadka nna jjejím
zavírání bbyla nnepouÏitelná. ZZabráníte ttím, aaby sse zze sspotfiebiãe sstala ssmrtelná ppast ppro ddûti.
Následující uupozornûní jjsou uuvádûny vv zzájmu bbezpeãnosti. PPeãlivû ssi jje ppfieãtûte ppfied ssamotou iinstalací aa
pouÏitím sspotfiebiãe.
V‰eobecná bbezpeãnost
• Toto zafiízení by mûlo b˘t obsluhováno pouze
dospûl˘mi osobami. Dûtem by nemûlo b˘t
povoleno zacházet ãi hrát si s v˘robkem.
• Je nebezpeãné mûnit vlastnosti ãi zasahovat
jak˘mkoliv zpÛsobem do v˘robku.
• Vûnujte pozornost tomu, aby pfiístroj nestál na
síÈovém kabelu.
• Pfied ãi‰tûním a údrÏbou pfiístroje jej vÏdy
vypnûte a vytáhnûte síÈovou zástrãku.
• Tento elektrospotfiebiã je tûÏk˘. Pfii jeho
pfiemisÈování je tfieba postupovat opatrnû.
• Ledové kostky mohou zpÛsobit popáleniny, jsouli poÏívány ihned po vyjmutí z elektrospotfiebiãe.
• V ppfiípadû ppfiemisÈování eelektrospotfiebiãe jje
zapotfiebí ppostupovat oopatrnû, aaby nnedo‰lo kk
po‰kození cchladící jjednotky, kkteré bby mmohlo
zpÛsobit úúnik cchladící kkapaliny.
• Elektrospotfiebiã sse nnesmí nnacházet vv bblízkosti
radiátorÛ nnebo pplynov˘ch ssporákÛ.
• Zamezte ttomu, aaby bbyl eelektrospotfiebiã nna ddel‰í
dobu vvystaven ppfiímému ssluneãnímu zzáfiení.
• Na zzadní sstranû sspotfiebiãe mmusí bb˘t zzaji‰tûna
odpovídající vventilace aa mmusí bb˘t vvylouãeno
kaÏdé mmoÏné ppo‰kození nna cchladícím ookruhu.
• Pouze uu mmrazníãky ((kromû zzabudovan˘ch
modelÛ) jje iideálním uumístûním ssuterénní ssklep ããi
podsklep.
• NepouÏívejte jjiné eelektrospotfiebiãe ((jako
zmrzlinové ppfiístroje) uuvnitfi cchladících
elektrospotfiebiãÛ.
Servis/opravy
• Jakékoliv odborné elektroinstalaãní práce nutné k
instalaci tohoto zafiízení musí b˘t provedeny
kvalifikovan˘m odborníkem nebo kompetentní
osobou.
• Servis na zafiízení poskytuje autorizovaná
opravna a k jeho opravû se pouÏívají jen
originální náhradní díly.
• Za Ïádn˘ch okolností se nepokou‰ejte opravovat
zafiízení sami. Opravy provádûné neodbornou
osobou mohou zpÛsobit zranûní nebo závaÏné
selhání funkce zafiízení. Po poru‰e kontaktujte
místní autorizovanou opravnu a vÏdy trvejte na
originálních náhradních dílech.
• Tento elektrospotfiebiã obsahuje uhlovodíky
uvnitfi chladící jednotky: údrÏba a doplÀování
proto musí b˘t provádûna pouze povûfien˘mi
odborn˘mi pracovníky.
PouÏití
• Domácí ledniãky a mrazáky jsou konstruovány
pouze pro skladování poÏivatin.
• Nejlep‰í pracovní v˘sledky dosáhnete, bude-li se
venkovní teplota pohybovat mezi + 18°C a +
43°C (tfiída T); + 18°C a + 38°C (tfiída ST); +
16°C a + 32°C (tfiída N); + 10°C a + 32°C (tfiída
SN). Tfiída va‰eho spotfiebiãe je vyznaãena na
v˘konnostním ‰títku.
Upozornûní: jestliÏe se venkovní teplota pohybuje
mimo rámec rozpûtí vyznaãeného pro danou
tfiídu spotfiebiãe, je tfieba postupovat podle
následujících instrukcí: jestliÏe se teplota
prostfiedí sníÏí pod stanovenou hranici, nemÛÏe
b˘t zaruãena teplota v mrazniãce; z tohoto
dÛvodu doporuãujeme spotfiebovat uskladnûné
potraviny co nejdfiíve.
• RozmraÏené potraviny nesmí b˘t znovu
zmrazovány.
• Pfiesnû dodrÏujte doporuãení v˘robce t˘kající se
skladování, Seznamte se s pfiíslu‰n˘mi
instrukcemi.
• Vnitfiní obloÏení pfiístroje je tvofieno kanálky,
kter˘mi proudí mrazící smûs. Pfii jejich naru‰ení
dojde k nenávratnému po‰kození pfiístroje a
ztrátû uchovávan˘ch potravin.
NEPOUÎÍVEJTE OSTRÉ P¤EDMùTY K
ODSTRA≈OVÁNÍ NÁMRAZY A LEDU. K
odstraÀování námrazy je moÏno pouÏít
pfiiloÏenou ‰krabku. Za Ïádn˘ch okolností
nestrhávejte násilím pevn˘ led z obloÏení. Pfii
rozmrazování zafiízení musí led nejprve roztát.
Seznamte se s instrukcemi t˘kajícími se
rozmrazování.
• Neuchovávejte v mrazniãce sycené nápoje s
obsahem CO
2, neboÈ vyvíjejí tlak na nádobu,
• Do not place carbonated or fizzy drinks in the
freezer as it creates pressure on the container,
which may cause it to explode, resulting in
damage to the appliance. Do not use a
mechanical device or any artificial means to
speed up the thawing process other than those
recommended by the manufacturer. Never use
metal objects for cleaning your appliance as it
may get damaged.
Installation
• During normal operation, the condenser and
compressor at the back of the appliance heat up
considerably. For safety reasons, minimum
ventilation must be as shown in the relevant
Figure.
Attention: keep ventilation openings clear of
obstruction.
• Care must be taken to ensure that the appliance
does not stand on the electrical supply cable
Important: if the supply cord is damaged, it must
be replaced by a special cord or assembly
available from the manufacturer or its service
agent.
• There are working parts in this product which
heat up. Always ensure that there is adequate
ventilation as a failure to do this will result in
component failure and possible food loss. See
installation instructions.
• Parts which heat up should not be exposed.
Wherever possible the back of the product
should be against a wall.
• If the appliance has been transported
horizontally, it is possible that the oil contained in
the compressor flows in the refrigerant circuit. It
is advisable to wait at least two hours before
connecting the appliance to allow the oil to flow
back in the compressor.
Environment Protection
This appliance does not contain gasses which
could damage the ozone layer, in either its
refrigerant circuit or insulation materials. The
appliance shall not be discarded together with
the urban refuse and rubbish. Avoid damaging
the cooling unit, especially at the rear near the
heat exchanger. Information on your local
disposal sites may be obtained from municipal
authorities. The materials used on this appliance
marked by the symbol are recicable.
CONTENTS
Warnings . . . . . . . . . . . . . . . . . . . . . . . . . . . . . . . . . . . . . . . . . . . . . . . . . . . . . . . . . . . . . . . . . . . . . . . . 26
Use / Control panel - Cleaning the interior - USE OF THE FREEZER - Operation - . . . . . . . . . . . . . . . .
Temperature regulation - Fast freezing - The temperature alarm light (A) . . . . . . . . . . . . . . . . . . . . . . . . 28
Use / Freezing fresh food - Storage of frozen food - Thawing - Ice-cube production . . . . . . . . . . . . . . . 29
Use / USING REFRIGERATOR - Operation - Temperature regulation - Fresh food refrigeration . . . . . . 30
Use / Movable shelves -Positioning the door shelves . . . . . . . . . . . . . . . . . . . . . . . . . . . . . . . . . . . . . . . 31
Hints / Hints for refrigeration - Hints for freezing - Hints for storage of frozen food . . . . . . . . . . . . . . . . . 32
Maintenance / Periodic cleaning - Interior light - Defrosting - Periods of no operation . . . . . . . . . . . . . . 33
Customer service and spare parts . . . . . . . . . . . . . . . . . . . . . . . . . . . . . . . . . . . . . . . . . . . . . . . . . . . . 34
Technical information / Installation - Location - Rear spacers . . . . . . . . . . . . . . . . . . . . . . . . . . . . . . 35
Installation - Electrical connection . . . . . . . . . . . . . . . . . . . . . . . . . . . . . . . . . . . . . . . . . . . . . . . . . . . . . . 36
Installation -Changing the opening direction of the doors . . . . . . . . . . . . . . . . . . . . . . . . . . . . . . . . . . . . 37
14
27
Page 13

WARNINGS
It is most important that this instruction book should be retained with the appliance for future
reference. Should the appliance be sold or transferred to another owner, or should you move house
and leave the appliance, always ensure that the book is supplied with the appliance in order that the
new owner can be acquainted with the functioning of the appliance and the relevant warnings.
If this appliance featuring magnetic door seals is to replace an older appliance having a spring lock
(latch) on the door or lid, be sure to make that spring lock unusable before you discard the old
appliance. This will prevent it from becoming a death-trap for a child.
These warnings are provided in the interest of safety. You must read them carefully before installing or
using the appliance.
General Safety
• This appliance is designed to be operated by
adults. Children should not be allowed to tamper
with the controls or play with the product.
• It is dangerous to alter the specifications or
modify this product in any way.
• Before any cleaning or maintenance work is
carried out, be sure to switch off and unplug the
appliance.
• This appliance is heavy. Care should be taken
when moving it
• Ice lollies can cause frost burns if consumed
straight from the appliance.
• Take utmost care when handling your
appliance so as not to cause any damages to
the cooling unit with consequent possible
fluid leakages.
• The appliance must not be located close to
radiators or gas cookers.
• Avoid prolonged exposure of the appliance to
direct sunlight.
• There must be adequate ventilation round the
back of the appliance and any damage to the
refrigerant circuit must be avoided.
• For freezers only (except built-in models): an
ideal location is the cellar or basement.
• Do not use other electrical appliances (such
as ice cream makers).
Service/Repair
• Any electrical work required to install this
appliance should be carried out by a qualified
electrician or competent person
• This product should be serviced by an authorized
Service Centre, and only genuine spare parts
should be used.
• Under no circumstances should you attempt to
repair the appliance yourself. Repairs carried out
by inexperienced persons may cause injury or
more serious malfunctioning. Refer to your local
Service Centre, and always insist on genuine
spare parts.
• This appliance contains hydrocarbons in its
cooling unit; maintenance and recharging must
therefore only be carried out by authorized
technicians.
Use
• The domestic refrigerators and freezers are
designed to be used specifically for the storage
of edible foodstuffs only.
• Best performance is obtained with ambient
temperature between +18°C and +43°C (class
T); +18°C and +38°C (class ST); +16°C and
+32°C (class N); +10°C and +32°C (class SN).
The class of your appliance is shown on its rating
plate.
Warning: when the ambient temperature is not
included within the range indicated for the class
of this appliance, the following instructions must
be observed: when the ambient temperature
drops below the minimum level, the storage
temperature in the freezer compartment cannot
be guaranteed; therefore it is advisable to use
the food stored as soon as possible.
• Frozen food must not be re-frozen once it has
been thawed out.
• Manufacturers’ storage recommendations should
be strictly adhered to. Refer to relevant
instructions.
• The inner lining of the appliance consists of
channels through which the refrigerant passes. If
these should be punctured this would damage
the appliance beyond repair and cause food loss.
DO NOT USE SHARP INSTRUMENTS to scrape
off frost or ice. Frost may be removed by using
the scraper provided. Under no circumstances
should solid ice be forced off the liner. Solid ice
should be allowed to thaw when defrosting the
appliance. See defrost instructions.
která mÛÏe explodovat a zniãit zafiízení.
NepouÏívejte Ïádné mechanické nástroje ani jiné
pfiedmûty ãi pfiístroje k urychlení odmraÏení,
kromû nástrojÛ doporuãen˘ch v˘robcem.
NepouÏívejte zásadnû pfii ãi‰tûní va‰eho
elektrospotfiebiãe kovové pfiedmûty, neboÈ by
mohly zpÛsobit jeho po‰kození.
Instalace
• Bûhem normální ãinnosti elektrospotfiebiãe se
kondenzátor a kompresor umístûné na zadní
stûnû silnû zahfiívají.
Z bezpeãnostních dÛvodÛ proto minimální
ventilace musí b˘t zaji‰tûna podle pfiíslu‰ného
obrázku.
Upozornûní: vventilaãní ootvory jje zzapotfiebí
udrÏovat vvolnû pprÛchodné.
• Je-li zafiízení pfiepravováno ve vodorovné poloze,
mÛÏe se stát, Ïe olej obsaÏen˘ v kompresoru
vyteãe do mrazícího okruhu. Pfied nov˘m
zapojením zafiízení je nutno poãkat alespoÀ dvû
hodiny, neÏ olej pfieteãe zpût do kompresoru.
DÛleÏité:
pfiívodové ‰ÀÛry, je nuté ji nahradit speciální
‰ÀÛrou (nebo její ãástí), kterou si mÛÏete vyÏádat
u v˘robce, nebo u jeho servisní sluÏby.
v pfiípadû, Ïe dojde k po‰kození
• Zafiízení obsahuje souãásti, které se zahfiívají.
VÏdy zajistûte odpovídající ventilaci kolem
pfiístroje, neboÈ následkem jejího nedostatku
mÛÏe dojít k poru‰e pfiístroje a a ztrátû
uchovávan˘ch potravin. Seznamte se s
pfiíslu‰n˘mi instrukcemi.
• Zahfiívající se souãásti by nemûly b˘t zakryty. Jeli to moÏné, mûla b˘ b˘t zadní stûna zafiízení
otoãena ke stûnû.
• JestliÏe se elektrospotfiebiã pfiepravuje ve
vodorovné poloze, mÛÏe se stát, Ïe olej
obsaÏen˘ v kompresoru vyteãe do mrazícího
okruhu. Pfied uvedením elektrospotfiebiãe do
chodu je nutno poãkat alespoÀ dvû hodiny, neÏ
olej pfieteãe zpût do kompresoru.
Ochrana pprostfiedí
Tento ppfiístroj nneobsahuje vv ookruhu cchlazení aani vv
izolaci pplyny, kkteré jjsou ‰‰kodlivé ppro oozón.
Elektrospotfiebiã sse nnesmí oodhazovat sspolu ss
bûÏn˘m oodpadem. MMusí bb˘t zzaji‰tûno, ÏÏe nnedojde kk
po‰kození cchladícího ookruhu, hhlavnû vv jjeho zzadní
ãásti vv bblízkosti vv˘mûníku. PPotfiebné iinformace oo
sbûrn˘ch sstfiedisích pposkytne oodpovûdn˘ ppracovník
obecní zzprávy. MMateriály oopattfiené zznaãkou sse
dají rrecyklovat.
OBSAH
DÛleÏitá uupozornûní
Obsluha //
Rychlé zmrazování - Teplotní kontrolka (A) . . . . . . . . . . . . . . . . . . . . . . . . . . . . . . . . . . . . . . . . . . . . . . . 16
Obsluha //
Rozmrazování - Pfiíprava kostek ledu . . . . . . . . . . . . . . . . . . . . . . . . . . . . . . . . . . . . . . . . . . . . . . . . . . . . 17
Obsluha //
Chlazení ãerstv˘ch potravin . . . . . . . . . . . . . . . . . . . . . . . . . . . . . . . . . . . . . . . . . . . . . . . . . . . . . . . . . . . 18
Obsluha //
Rady //
ÚdrÏba //
SluÏba zzákazníkÛm aa nnáhradní ddíly
Technické vvlastnosti // IInstalace //
Instalace //
Instalace //
âi‰tûní vnitfiku pfiístroje - POUÎITæ MRAZNIâKY - Spu‰tûní -
Zmrazování ãerstv˘ch potravin - Uskladnûní zmrazen˘ch potravin - . . . . . . . . . . . . . . . . . . .
POUÎITæ CHLADNIâKY - Uvedení do provozu - Regulace teploty - . . . . . . . . . . . . . . . . . . . .
Nastavitelnû poliãky - Rozmístûní poliãek vestavûn˘ch do dvefií . . . . . . . . . . . . . . . . . . . . . . . . . . 19
Rady pro pouÏití chladniãky – Rady pro zmrazování – Rady pro uskladnûní zmraÏen˘ch potravin . . 20
Pravidelné ãi‰tûní – Vnitfiní osvûtlení – Odledování – Odstavení pfiístroje . . . . . . . . . . . . . . . . . 21
Zapojení do elektrické sítû . . . . . . . . . . . . . . . . . . . . . . . . . . . . . . . . . . . . . . . . . . . . . . . . . . . . 24
Obrácení otevírání dvífiek . . . . . . . . . . . . . . . . . . . . . . . . . . . . . . . . . . . . . . . . . . . . . . . . . . . . . 25
. . . . . . . . . . . . . . . . . . . . . . . . . . . . . . . . . . . . . . . . . . . . . . . . . . . . . . . . . . . . . . . . . 14
Regulace teploty - . . . . . . . . . .
. . . . . . . . . . . . . . . . . . . . . . . . . . . . . . . . . . . . . . . . . . . . . . . . . . . . . 22
Umístûní – Distanãní rozpûrky . . . . . . . . . . . . . . . . . . . . . . . . . . . . . . . 23
26
Printed on recycled paper
15
 Loading...