

Page 1

Kühl - Gefrierschrank / refrigerateur - congelateur
fridge freezer /frigorifero - congelatore
GEBRAUCHSANWEISUNGEN
MODE D’EMPLOI
LIBRETTO ISTRUZIONI
INSTRUCTION BOOK
2222 003-84
ER 7625 B
I
F
D
ELECTROLUX HOME PRODUCTS OPERATIONS EUROPE
Page 2

2
Gedruckt auf Umweltschutzpapier
WARNUNGEN UND WICHTIGE HINWEISE
Es ist sehr wichtig, da§ diese Bedienungsanleitung mit dem betreffenden GerŠt aufbewahrt wird. Sollte
dieses GerŠt verkauft bzw. einer anderen Person gegeben werden, so ist es nštig, die Anleitung beizufŸgen, damit der neue Besitzer Ÿber den Betrieb des GerŠtes bzw. die entsprechenden Warnungen.
Sollte dieses GerŠt mit Magnet-TŸrverschlu§ als Ersatz fŸr ein altes GerŠt dienen, das noch mit einem
Schnappschlo§ ausgerŸstet ist, so machen Sie bitte dieses Schlo§ unbrauchbar, bevor Sie das GerŠt
beiseite stellen oder zum MŸll geben. Sie verhindern damit, da§ spielende Kinder sich selbst einsperren
und damit in Lebensgefahr kommen.
Diese Warnungen wurden zu Ihrem bzw. dem Schutz anderer erarbeitet. Wir bitten Sie daher, diese
aufmerksam zu lesen, bevor das GerŠt in Betrieb genommen wird.
Sicherheit
¥ Dieses GerŠt wurde hergestellt, um von
Erwachsenen benutzt zu werden. Es ist unbedingt darauf zu achten, da§ Kinder es nicht
anfassen oder es als Spielzeug verwenden.
¥ Es ist gefŠhrlich, die Eigenschaften dieses
GerŠtes zu Šndern.
¥ Vor der inneren bzw. Šu§eren Reinigung des
GerŠtes sowie beim Auswechseln der
GlŸhlampe (bei damit ausgestatteten GerŠten)
das GerŠt spannungslos machen.
¥ Eis aus dem Gefrier- bzw. Frosterfach nicht
sofort essen, es kšnnte KŠlte-Brandwunden
verursachen.
¥ Dieses GerŠt ist schwer. Beim Versetzen bitte
darauf achten!
¥ Beachten Sie, dan wŠhrend der Bewegung
des GerŠtes der KŠltemittelkreislauf nicht
beschŠdigt wird.
¥ Das GerŠt darf nicht in unmittelbarer NŠhe
von Heizkšrpern oder Gasherden aufgestellt
werden.
¥ Ein Standort mit direkter Sonneneinstrahlung
sollte vermieden werden.
¥ Eine ausreichende Luftzirkulation an der
GerŠterŸckseite mu§ gewŠhrleistet sein.
Jegliche BeschŠdigung des KŸhlkreislaufes
ist zu vermeiden.
¥ NUR F†R GEFRIERSCHR€NKE
(EinbaugerŠte ausgenommen): ein optimaler
Aufstellungsort ist der Keller.
¥ Keine ElektrogerŠte (z.B. Eismaschinen) in
das GerŠt stellen.
Stšrungen - Kundendienst
¥ Sollte die Installation des GerŠtes eine
€nderung der elektrischen Hausinstallation verlangen, so darf diese nur von ElektroFachkrŠften durchgefŸhrt werden.
¥ Eventuelle Reparaturen dŸrfen nur von einem
Kundendienst oder sonstigen autorisierten
Stellen durchgefŸhrt werden.
¥ Es ist wichtig, da§ nur Original-Ersatzteile ver-
wendet werden.
¥ Dieses GerŠt enthŠlt im KŠltekreislauf
Kohlenwasserstoff. Aus diesem Grund darf die
Wartung und das Nachfiillen ausschlie§lich von
autorisiertem Fachpersonal durchgefŸhrt werden.
¥ Benutzen Sie nie MetallgegenstŠnde um das
GerŠt zu reinigen, da es beschŠdigt werden kšnnte.
¥ Tritt eine Stšrung oder ein Defekt ein, versuchen
Sie nicht, das GerŠt selbst zu reparieren.
ElektrogerŠte dŸrfen nur von Elektro-FachkrŠften
repariert werden, da durch unsachgemŠ§e
Reparaturen erhebliche FolgeschŠden entstehen
kšnnen. Wenden Sie sich bitte an die nŠchste
Kundendienststelle.
Aufstellung
¥ Sich vergewissern, da§ das GerŠt nach der
Installation nicht auf dem Netzkabel steht.
Wichtig:BeschŠdigte Versorgungskabel mŸssen
durch ein Spezialkabel bzw. einen Spezialsatz
ersetzt werden, die beim Hersteller oder den
Kundendienst erhŠltlich sind.
¥ WŠhrend das GerŠt in Betrieb ist, werden der
VerflŸssiger und der Kompressor, die sich auf
der RŸckseite des GerŠtes befinden, hei§. Es ist
darauf zuachten, dass die Luft um das GerŠt frei
zirkulieren kann, damit die WŠrme abgefŸhrt
werden kann. Eine ungenŸgende Luftzirkulation
kann einen unregelmŠssigen Betrieb bzw.
SchŠden am GerŠt verursachen. Achten Sie auf
die Installationsanweisungen.
¥ Teile, die hei§ werden (z.B.
KompressorgehŠuse, VerflŸssiger und zugehšrige Rohre), sollen nicht frei zugŠnglich sein.
Wo es auch immer mšglich ist, soll das GerŠt mit
der RŸckseite gegen eine Wand gestellt werden.
Page 3

3
Gebrauch
¥ Die HaushaltskŸhl- und GefriergerŠte sind nur
zur Einlagerung bzw. zum Einfrieren von
Nahrungsmitteln bestimmt.
¥ Die beste Leistung erzielt man bei
Raumtemperaturen von +18¡C bis +43¡C (Klasse
T); +18¡C bis +38¡C (Klasse ST); +16¡C bis
+32¡C (Klasse N); +10¡C bis +32¡C (Klasse SN);
die GerŠteklasse ist auf dem Typschild
angegeben.
Zu beachten: Wird dieses GerŠtes bei anderen
Umgebungstemperaturen betrieben als den in
der entsprechenden Klimaklasse angegebenen
Werten, sind folgende Hinweise zu beachten:
sinkt die Umgebungstemperatur unter den
angegebenen Mindestwert ab, kšnnte die
Lagertemperatur im Gefrierabteil nicht mehr
garantiert sein; es wird daher empfohlen, die
eingelagerten Lebensmittel so rasch als mšglich
zu verbrauchen.
¥ Einaufgetautes Produkt darf nicht wieder
eingefroren werden.
¥ FŸr das Aufbewahren bzw. das Einfrieren der
Lebensmittel sind die Anweisungen des
Herstellers zu befolgen.
¥ In allen KŸhl- und GefriergerŠten bedecken sich
im Laufe der Zeit alle kŠltefŸhrenden Teile mit
einer Reif bzw. Eissicht. Diese Schicht wird je
nach Modell automatisch oder mit der Hand
abgetaut.
¥ Die Reifsicht niemals mit MetallgegenstŠnden
abkratzen, das GerŠt kšnnte beschŠdigt werden.
Dazu nur den mitgelieferten Plastikschaber
verwenden.
¥ Zum Lšsen der festgefrorenen Eisschalen keine
scharfkantigen oder spitzn GegenstŠnde
benutzen.
¥ Es sollten keine kohlensŠurehaltigen GetrŠnke in
das Gefrier- bzw. Frosterfach eingestellt werden,
sie kšnnten platzen.
Umweltnormen
Dieses GerŠt enthŠlt im KŸhlkreislauf und in der
Isolierung kein ozonschŠdigendes Gas. Das
GerŠt darf nicht mit dem HausmŸll entsorgt
werden. Eine BeschŠdigung des
KŠltemittelkreislaufs, insbesondere des
WŠrmetauschers auf der RŸckseite des GerŠtes,
mu§ verhindert werden. Auskunft Ÿber
Abholtermine oder SammelplŠtze gibt die
šrtliche Gemeindeverwaltung an. Die in diesem
GerŠt verwendeten und mit dem Symbol
gekennzeichneten Materialien,sind
recyclingfŠhig.
2222 003-84
07/01
Page 4
4
INHALT
Warnungen und wichtige Hinweise 2
Hinweise zur Verpackungsentsorgung 4
Gebrauch 5
Bedienungsblende 5
Reinigung der Innenteile 5
Inbetriebnahme 5
Temperaturregelung 5
Klimaschalter 5
Einfrieren von frischen Lebensmitteln 6
Aufbewahrung der TiefkŸhlkost 6
EiswŸrfelbereitung 6
Auftauen 6
Hinweise zum richtigen KŸhlen 6
KŠlteakku 6
Hšhenverstellbare Abstellregale 7
Hšhenverstellung der TŸrablage 7
Tips 8
Tips fŸr das KŸhlen 8
Tips fŸr das Einfrieren 8
Tips fŸr TiefkŸhlkost 8
Wartung 9
RegelmŠ§ige Reinigung 9
Stillstandzeiten 9
Innenbeleuchtung 9
Abtauen 10
Stšrungen 10
Installation 11
Aufstellung 11
Hintere AbstandsstŸcke 11
Elektrischer Anschlu§ 11
TŸranschlagwechsel 12
HINWEISE ZUR VERPACKUNGSENTSORGUNG
Verpackungen und Packhilfsmittel unserer ElektroGro§gerŠte sind mit Ausnahme von Holzwerkstoffen
recyclingfŠhig und sollen grundsŠtzlich der
Wiederverwertung zugefŸhrt werden.
Wir empfehlen Ihnen:
¥ Papier-, Pappe- und Wellpappeverpackungen
sollten in die entsprechenden SammelbehŠlter
gegeben werden.
¥ Kunststoffverpackungsteile sollten ebenfalls in
die dafŸr vorgesehenen SammelbehŠlter
gegeben werden. Solange solche in Ihrem
Wohngebiet noch nicht vorhanden sind, kšnnen
Sie diese Materialien zum HausmŸll geben.
Als Packhilfsmittel sind bei uns nur recyclingfŠhige
Kunststoffe zugelassen, z.B.:
In den Beispielen steht
PE fŸr PolyŠthylen** 02 = ^ PE-HD; 04 = ^ PE-LD
PP fŸr Polypropylen
PS fŸr Polystyrol
BESTANDTEILE AUS PLASTIK
Zur einfacheren Entsorgung und/oder Recycling ist
ein Gro§teil der Materialien dieses GerŠtes
gekennzeichnet, um ihre Identifizierung zu
ermšglichen.
PS
SAN
ABS
02**
PE
05
PP
06
PS
Servicestellen
ZŸrich/MŠgenwil
5506 MŠgenwil
Industriestr. 10
9000 St. Gallen
Vonwilstrasse 15
4127 Birsfelden
Hauptstrasse 52
8604 Volketswil
Hšzliwiesentrasse 12
6032 Emmen
Buholzstrasse 1
7000 Chur
Ringstrasse 37
3063 Ittigen/Bern
Ey 5
Ersatzteilverkauf
5506 MŠgenwil
Industriestrasse 10
Tel. 0848 848 023
Kochberatung/Verkauf
8048 ZŸrich
Badenerstrasse 587
Tel. 01 405 81 11
Garantie
Wir gewŠhren auf allen Produkten,die in der
Schweiz gekauft und in Betrieb sind, eine
einjŠhrige Vollgarantie, gerechnet ab
Lieferdatum an den Endverbraucher.
Massgebend fŸr den Garantieanspruch ist die
Faktura oder ein entsprechend-der
Verkaufsbeleg.
Points de service
1028 PrŽverenges
Le TrŽsi 6
1950 Sion
Rue de la Piscine
Vente de pi•ces de
rechange
5506 MŠgenwil
Industriestrasse 10
Tel. 0848 848 023
Demonstration/Vente
8048 ZŸrich
Badenerstrasse 587
Tel. 01 405 81 11
Garantie
LÕutilisateur final de tout product achetŽ et
utilisŽ en Suisse, bŽnŽficie dÕune garantie
compl•te dÕune annŽe ˆ partir de la date
de livraison. La facture ou le justificat
dÕachat correspondant fait foi en la
mati•re.
Servizio dopo vendita
6916 Grancia
Zona Industriale E
Vendita pezzi di ricambio
5506 MŠgenwil
Industriestrasse 10
Tel. 0848 848 023
Consulente
(cucina)/Vendita
8048 ZŸrich
Badenerstrasse 587
Tel. 01 405 81 11
Garanzia
Per questo prodotto concediamo una
garanzia di 12 mesi a partire dalla data di
vendita. La garanzia Ž valida dietro
presentazione della fattura o dello
scontrino dÕacquisto.
Kundendienst
Page 5
Reinigung der Innenteile
Bevor Sie das GerŠt in Betrieb nehmen, beseitigen
Sie den typischen ÇNeugeruchÈ am besten durch
Auswaschen der Innenteile mit lauwarmem Wasser
und einem neutralen Reinigungsmittel SorgfŠltig
nachtrocknen.
Bitte keine Reinigungs- bzw. Scheuermittel
verwenden, die das GerŠt beschŠdigen
kšnnten.
Inbetriebnahme
Netzstecker in die Steckdose einstecken.
Den Thermostatknopf (D) Ÿber die Stellung Ç■È
drehen. Die Kontrollampe (C) leuchtet auf.
Den Stillstand erhŠlt man durch Drehen des
Schalters (D) auf Stellung Ç■È.
Temperaturregelung
Die Temperatur wird automatisch geregelt und kann
erhšht werden (wŠrmer) durch Drehen des Thermostatknopfes auf niedrigere Einstellungen oder
verringert (kŠlter) durch das Drehen auf hšhere
Zahlen.
Die richtige Einstellung erhŠlt man, unter
BerŸcksichtigung folgender, die Innentemperatur
beeinflussender Faktoren:
¥ Raumtemperatur,
¥ HŠufigkeit des TŸršffnens,
¥ Menge der eingelagerten Lebensmittel,
¥ Aufstellung des GerŠtes.
Die mittlere Einstellung ist meistens die
geeignetste.
GEBRAUCH
Wichtig
Hšchste KŠlteeinstellung bei hoher
Raumtemperatur und erheblicher
Lebensmittelmenge kann fortdauernden
KŸhlschrank-Betrieb verursachen, dabei kann
sich eine Reif- oder Eisschicht an der hinteren
Innenwand bilden. In diesem Falle den
Thermostatknopf auf wŠrmere Temperaturen
stellen, damit das automatische Abtauen, mit
folglich geringerem Stromverbrauch,
gewŠhrleistet werden kann.
Klimaschalter
Bei einer Raumtemperatur unter +16¡C muss der
Klimaschalter gedrŸckt werden. Die Kontrolleuchte
(A) leuchtet auf.
Bedienungsblende
minmax
AB C D
ON
A. Kontrollampe Heizung
B. Klimaschalter
C. Betreibskontrollampe
D. Thermostatknopf
5
44
Reversibilitˆ delle porte
Prima di ogni operazione staccare la spina dalla
presa di corrente.
Per lÕinversione operare come segue:
1. estrarre la griglia di aerazione (D) inserita a
scatto;
2. smontare la cerniera inferiore (E) svitando le
due viti che la fissano;
3. togliere la porta inferiore sfilandola dalla
cerniera intermedia;
4. smontare la cerniera intermedia (H);
5. togliere la porta superiore sfilandola dal perno
superiore (G);
6. svitare il perno superiore (G) e rimontarli sul lato
opposto;
7. togliere i due tappi delle porte (dove previsto),
liberando cos“ i fori per i perni cerniera, e
rimontarli sugli opposti lati; rimontare la porta
superiore;
8. rimontare la cerniera intermedia sul lato
opposto;
9. rimontare la porta inferiore;
10. rimontare la cerniera inferiore (E) sul lato
opposto utilizzando le viti tolte
precedentemente. Sfilare il copri-foro (F) dalla
griglia di aerazione (D) spingendolo nel senso
della freccia e rimontarlo sul lato opposto;
11. rimontare la griglia di aerazione (D) inserendola
a scatto.
12. smontare le maniglie e rimontarle sul lato
opposto. I fori non utilizzati sono mascherati da
tappi in plastica che si trovano nel sacchetto
accessori.
Per lÕallineamento delle porte si pu˜ operare sulla
cerniera intermedia (H):
la cerniera intermedia (H) si regola in orizzontale,
con lÕausilio di un attrezzo, dopo aver allentato le
due viti.
Attenzione
Ultimata la reversibilitˆ delle porte, controllare che la
guarnizione magnetica sia aderente al mobile. Se la
temperatura ambiente • fredda (ad es.in inverno),
pu˜ succedere che la guarnizione non aderisca
perfettamente al mobile. In tal caso attendere il
naturale rinvenimento della guarnizione stessa
oppure accelerare tale processo riscaldando la parte
interessata con un normale asciugacapelli.
G
H
E
F
D
F
F
F
PR228
Page 6

Hinweise zum richtigen KŸhlen
von Lebensmitteln und GetrŠnken
Um die besten Leistungen des KŸhlschrankes zu
erreichen, beachten Sie bitte folgendes:
¥ Keine warmen Speisen oder dampfenden
FlŸssigkeiten in den KŸhlschrank einstellen.
¥ Geruchverbreitende Lebensmittel mŸssen
abgedeckt oder eingewickelt werden.
¥ Die Lebensmittel mŸssen so eingelagert werden,
da§ die KŠlte um sie frei zirkulieren kann.
6
Einfrieren von frischen
Lebensmitteln
Das 4 Sterne-Gefrierfach eignet sich zur
langfristigen Einlagerung von TiefkiIhlkost sowie
zum Einfrieren frischer Kost.
FŸr das Einfrieren von Lebensmitteln ist es nicht
nštig, die Thermostateinstellung zu Šndern.
WŸnscht man aber ein rasches Einfrieren, so mu§
der Thermostatknopf auf die hšchste Stellung
gedreht werden.
Sollte jedoch bei dieser Einstellung die Temperatur
im KŸhlraum unter 0¡C sinken, so mu§ eine
niedrigere Reglerstellung gewŠhlt werden.
Die einzufrierenden Lebensmittel in das oberste
Fach des GerŠtes legen, weil dies die kŠlteste Stelle
ist.
Aufbewahrung der TiefkŸhlkost
Nach einem lŠngeren Stillstand oder bei der ersten
Inbetriebnahme des GerŠtes mu§ vor der
Einlagerung der TiefkŸhlkost die hšchste Stellung
des Thermostatknopfes gewŠhlt werden. Nach ca 2
Std. kann dieser auf eine mittlere Stellung
zurŸckgedreht werden.
Wichtig
Im Falle einer Stromunterbrechung wŠhrend der
Lagerung von TiefkŸhlkost bzw. von
eingefrorenen Lebensmitteln soll die TŸr des
Gefrierfaches nicht gešffnet werden. Die
TiefkŸhlkost verdirbt nicht, wenn es sich um
eine kurze Unterbrechung handelt (bis 6-8 Std.)
und das GerŠt voll ist. Wenn das nicht der Fall
ist, ist es nštig, die tiefgefrorenen Lebensmittel
innerhalb kurzer Zeit zu verbrauchen (eine
Temperaturerhšhung der TiefkŸhlkost verkŸrzt
die Aufbewahrungsdauer).
Auftauen
Die eingefrorenen oder tiefgekŸhlten Lebensmittel
sollten vor dem Gebrauch aufgetaut werden, indem
man sie am besten im KŸhlabteil oder je nach der
zur VerfŸgung stehenden Zeit bei Raumtemperatur
auftaut.
Kleine StŸcke kšnnen eingefroren gekocht werden.
SelbstverstŠndlich verlŠngert sich dabei die
Kochzeit.
EiswŸrfelbereitung
Das GerŠt hat eine oder mehrere EiswŸrfelschalen,
welche mit Wasser aufgefŸllt in das Gefrierfach
gestellt werden.
Bitte zur Entnahme der EiswŸrfelschalen keine
MetallgegenstŠnde benutzen!
K
Šlteakku
Im Gefrierschrank befinden sich zwei kŠlteakku, die
die Aufbewahrungszeit der eingefrorenen
Lebensmittel bei Stromausfall bzw. Stšrungsfall
verlŠngern.
Aus TransportsicherungsgrŸnden werden diese
Akkus werkseitig in der unteren Schublade
eingelegt.
FŸr ihren richtigen Gebrauch mŸssen sie in der
oberen Schublade, auf dem Gefriergut, eingelegt
werden.
43
INSTALLAZIONE
Posizionamento
Collocare lÕapparecchiatura lontana da fonti di calore,
quali: termosifoni, stufe da riscaldamento, esposizione
diretta ai raggi solari ecc.
Per motivi di sicurezza la ventilazione deve essere
come indicato in Fig.:
Posizionamento dellÕapparecchio sotto il pensile della
cucina posizionamento (vedi Fig. A). Posizionamento
dellÕapparecchio senza pensile della cucina (vedi Fig.
B).
Attenzione: mantenere le aperture per la ventilazione
libere da ogni ostruzione.
Uno o pi• piedini regolabili, posti alla base del mobile,
consentono un accurato livellamento.
Distanziali posteriori
Nel sacchetto della documentazione sono inseriti
due distanziali da applicare come indicato in figura.
Allentare le viti, inserire i distanziali sotto la testa
della vite e riavvitare.
Collegamento elettrico
Assicurarsi, prima di inserire la spina nella presa
di corrente, che la tensione e la frequenza
riportate sulla targhetta matricola corrispondano
a quelle dellÕimpianto domestico.
é ammessa una oscillazione di ±6% sulla tensione
nominale.
Per il funzionamento a tensioni diverse si dovrˆ
utilizzare un autotrasformatore di potenza adeguata.
EÕ indispensabile collegare lÕapparecchio ad una
efficiente presa di terra.
A tale scopo la spina del cavo di alimentazione Ž
dotata dellÕapposito contatto. Qualora la presa di
corrente dellÕimpianto domestico non sia collegata a
terra, allacciare lÕapparecchiatura ad un impianto di
terra a parte conformemente alle norme in vigore
consultando in proposito un tecnico specializzato.
La Casa Costruttrice declina ogni responsabilitˆ
qualora questa norma antinfortunistica non fosse
rispettata.
Questa apparecchiatura • conforme alle
seguenti Direttive Comunitarie
-87/308/CEE del 2/6/87 relativa alla
soppressione dei disturbi radio.
- 73/23/CEE del 19/02/73 (Bassa Tensione) e
successive modificazioni;
- 89/336/CEE del 03/05/89 (Compatibilitˆ
Elettromagnetica) e successive modificazioni.
NP002
100 mm10 mm
10 mm
A
B
PR153
Attenzione
LÕapparecchio deve poter essere scollegato dalla
rete; Ž quindi necessario che la spina rimanga
accessibile ad installazione avvenuta.
Page 7

7
D338
Hšhenverstellbare Abstellregale
Der Abstand zwischen den verschiedenen
Abstellregalen kann je nach Wunsch geŠndert
werden. Dazu die Regale herausnehmen und auf
das gewŸnschte Niveau einsetzen.
Zur besseren Raumnutzung kšnnen die vorderen
Halbteile der Ablagen auf die rŸckwŠrtigen
hinaufgelegt werden.
Hšhenverstellung der
InnentŸrablagen
Zur Einlagerung von Lebensmittel-Packungen
verschiedener Grš§e, sind die Abstellregale der
InnentŸr hšhenverstellbar.
Hierzu wie folgt vorgehen:
das Abstellregal stufenweise in Pfeilrichtung drŸcken
bis es frei wird; dann in der gewŸnschten Hšhe
wieder anbringen.
PR249
42
procedendo come segue:
¥ staccare la spina dalla presa di corrente o porre
la manopola del termostato (D) in posizione Ç■È;
¥ avvolgere gli alimenti in parecchi fogli di giornale
e riporli in un luogo molto fresco;
¥ lasciare la porta aperta e inserire nellÕapposita
sede la paletta raschiabrina come grondaia di
prolungamento: porre al di sotto una bacinella
per la raccolta dellÕacqua derivante dallo
sbrinamento;
¥ A sbrinamento avvenuto asciugare le pareti
accuratamente.
¥ conservare la paletta raschiabrina per utilizzi
successivi;
¥ posizionare la manopola termostato nella
posizione desiderata o reinserire la spina nella
presa;
¥ Dopo due o tre ore di funzionamento rimettere il
cibo nellÕapparecchiatura.
Attenzione:
Si raccomanda di non impiegare utensili
metallici per asportare la brina onde evitare
gravi danni allÕapparechio.
Non usare alcun dispositivo meccanico o altro
mezzo artificiale per accelerare il processo di
sbrinamento tranne quelli qui raccomandati.
Un innalzamento della temperatura dei surgelati
potrebbe ridurne il tempo di conservazione.
SE QUALCOSA NON VA
D068
Qualora lÕapparecchiatura presentasse qualche
disfunzione, • bene controllare:
¥ che la spina sia ben inserita nella presa di
corrente;
¥ che non manchi lÕenergia elettrica
¥ che la manopola del termostato si trovi in
posizione intermedia.
Inoltre:
¥ se lÕapparecchiatura • eccessivamente rumorosa
verificare che i fianchi non siano a contatto con
mobili o schienali che possono causare rumore o
vibrazioni;
¥ se vi sono tracce di acqua sul fondo dello
scomparto, verificare che il foro di deflusso
dellÕacqua derivante dallo sbrinamento non sia
ostruito.
Dopo le verifiche di cui sopra, se la disfunzione
dovesse permanere, • bene chiamare il Centro di
Assistenza Tecnica pi• vicino.
Page 8

8
Tips fŸr das Einfrieren
FŸr ein einwandfreies Einfrieren der Lebensmittel
geben wir folgende RatschlŠge:
¥ Das Gefriervermšgen des Gefrierabteils (in 24
Std.) kann auf dem Typenschild abgelesen
werden.
¥ Der Gefriervorgang dauert ca. 24 Stunden. In
dieser Zeit sollte keine zusŠtzliche Ware in das
Gefrierabteil eingelegt werden.
¥ Nur erstklassige, frische und gut gesŠuberte
Produkte einfrieren.
¥ Die Nahrungsmittel vor dem Einfrieren in kleine
Portionen einteilen, damit der Gefriervorgang
beschleunigt wird; dies ermšglicht das spŠtere
Auftauen von kleineren Portionen.
¥ Die Lebensmittel in Alu- oder PolyŠthylenfolien
luftdicht verpacken.
¥ Es soll vermieden werden, da§ die
einzufrierenden Lebensmittel mit den bereits
eingefrorenen in BerŸhrung kommen, um eine
WŠrmeŸbertragung an diese zu verhindern.
¥ Es ist zu beachten, da§ mageres Fleisch besser
und lŠnger haltbar ist. Fetthaltiges Fleisch hat
eine geringere Lagerzeit. Ferner reduziert Salz
die Haltbarkeitsdauer.
¥ Speiseeis, direkt aus dem Gefrierfach
genommen, kann KŠlte-Brandwunden
verursachen.
TIPS
Tips fŸr das KŸhlen
Nachstehend einige praktische RatschlŠge:
Fleisch (alle Sorten) in Plastikfolie einpacken und
auf die Glasplatte, die sich Ÿber der GemŸseschale
(Ÿber den GemŸseschalen) befindet, legen.
In dieser Lage kann das Fleisch lŠngstens 1-2
Tage aufbewahrt werden.
Gekochte Nahrungsmittel, kalte Platten, usw.
zugedeckt aufbewahren. Sie kšnnen auf jeden
beliebigen Rost gelegt werden.
Obst und GemŸse: nach vorherigem SŠubern und
Waschen in der GemŸseschale (in den
GemŸseschalen) aufbewahren.
Butter und KŠse: in speziellen BehŠltern aufbewahren oder in Alu- bzw. Plastikfolie einpacken, um
den Kontakt mit der Luft zu vermeiden.
Milch in Flaschen: gut verschlossen auf die Konsol
der InnentŸr stellen.
Wenn Bananen, Kartoffeln, Zwiebeln und
Knoblauch nicht verpackt sind, sollen sie nicht
in den KŸhlschrank gegeben werden.
¥ Es ist empfehlenswert, auf der Verpackung das
Einfrierdatum zu notieren, damit die
Aufbewahrungszeit eingehalten werden kann.
¥ Die Symbole auf den Schubladen zeigen
unterschiedliche Arten von TiefkŸhlgut.
Die Zahlen geben fŸr die jeweilige Art von
TiefkŸhlgut die Lagerzeit in Monaten an. Ob der
obere oder der untere Wert der angegebenen
Lagerzeiten gŸltig ist, hŠngt von der QualitŠt der
Lebensmittel und deren Vorbehandlung vor dem
Einfrieren ab.
¥ Es sollten keine kohlensŠurehaltigen
GetrŠnke in das Gefrierfach eingestellt
werden, da sie explodieren kšnnen.
Tips fŸr TiefkŸhlkost
Um optimale Leistungen des GerŠtes zu erhalten,
sich vergewissern,
¥ da§ die TiefkŸhlkost beim VerkŠufer gut
aufbewahrt wurde
¥ da§ der Transport vom VerkŠufer zum
Verbraucher in kurzer Zeit erfolgt.
¥ TŸr so wenig wie mšglich šffnen und nicht offen
lassen.
¥ Einmal aufgetaute Lebensmittel verderben
schnell und kšnnen kein ein zweites Mal
eingefroren werden.
¥ Das Haltbarkeitsdatum auf der
TiefkŸhlkostverpackung sollte nicht Ÿberschritten
werden.
41
MANUTENZIONE
Staccare la spina dalla presa di corrente prima di
eseguire qualsiasi operazione.
Attenzione:
Questa apparecchiatura contiene idrocarburi nel
circuito refrigerante; pertanato la manutenzione
e la ricarica devono essere effettuate
esclusivamente da personale autorizzato
dallÕazienda.
Pulizia periodica
Non usare mai oggetti metallici per pulire lÕapparecchiatura; essa potrebbe venir danneggiata.
Pulire lÕinterno con acqua tiepida e bicarbonato di
soda. Risciacquare e asciugare accuratamente.
Pulire il condensatore e il motocompressore con una
spazzola o un aspirapolvere. Questa operazione
migliorerˆ il funzionamento con conseguente
risparmio di energia.
Periodi di inattivitˆ
Durante i periodi in cui lÕapparecchiatura non • in
funzione osservare le seguenti precauzioni:
staccare la spina dalla presa di corrente;
togliere tutti gli alimenti;
sbrinare e pulire lÕinterno e tutti gli accessori;
lasciare le porte socchiuse per facilitare la
circolazione di aria allÕinterno in modo da evitare la
formazione di odori sgradevoli.
Lampada di illuminazione
La lampada di illuminazione dello scomparto
refrigerante Ž accessibile tramite le seguenti
operazioni.
¥ Svitare la vite di fissaggio della plafoniera.
¥ Sganciare la parte mobile esercitando una
pressione (vedi figura).
Qualora, a porta aperta, la lampada non si
accendesse, controllare che sia avvitata bene; se il
difetto rimane sostituire la lampada con una di pari
potenza ( la potenza massima Ž riportata sul
diffusore luce).
D731
Sbrinamento
SullÕevaporatore dello scomparto refrigerante la
brina viene eliminata automaticamente ad ogni
arresto del compressore. LÕacqua derivante dallo
sbrinamento, tramite un apposito convogliatore,
viene raccolta in una bacinella posta nella parte
posteriore sopra il compressore
dellÕapparecchiatura, da dove evapora.
Si raccomanda di pulire periodicamente il foro di
scarico dellÕacqua di sbrinamento, posto nella
parte centrale dellÕapposito convogliatore dello
scomparto frigorifero, utilizzando lÕapposito
ÇpulitoreÈ che si trova nel foro, per evitare che
lÕacqua di sbrinamento cada sui cibi.
Nello scomparto congelante la brina deve essere
eliminata ogniqualvolta si • formato uno spessore di
4 mm circa, utilizzando lÕapposita paletta
raschiabrina fornita con lÕapparecchiatura.Qualora si
formasse uno spesso strato di ghiaccio, sarˆ
necessario effettuare un completo sbrinamento,
D037
Page 9

9
WARTUNG
Vor jeder Reinigungsarbeit immer den
Netzstecker aus der Steckdose ziehen.
RegelmŠ§ige Reinigung
Benutzen Sie nie MetallgegenstŠnde um das GerŠt
zu reinigen, da es beschŠdigt werden kšnnte.
Den Innenraum mit lauwarmem Wasser und Natron
und die lackierten Teile mit einem Poliermittel
reinigen.
Gut nachwaschen und sorgfŠltig trocknen.
Den Kondensator und den Motorkompressor mit
einer BŸrste oder einem Staubsauger reinigen. Dies
begŸnstigt den guten Betrieb mit folglicher
Stromersparnis.
Stillstandszeiten
Bei lŠngerem Stillstand des GerŠtes, mŸssen Sie
folgenderma§en vorgehen:
den Stecker aus der Steckdose ziehen;
alle Lebensmittel herausnehmen;
GerŠt abtauen, Innenraum und Zubehšrteile
reinigen; die TŸren offen lassen, um im Innern eine
gute Luftzirkulation zu gewŠhrleisten und somit
Geruchsbildung zu vermeiden.
Innenbeleuchtung
Die Innenbeleuchtungslampe im KŸhlabteil ist durch
folgende Arbeitsschritte zugŠnglich:
¥ Lšsen Sie die Befestigungsschraube der
Lampenabdeckung.
¥ Heben Sie den beweglichen Teil ab, indem Sie
wie in der Abbildung gezeigt darauf drŸcken.
Sollte sich die Beleuchtung beim …ffnen der TŸre
nicht einschalten, ist zu ŸberprŸfen, ob die
GlŸhbirne fest eingeschraubt ist; wenn die Stšrung
dennoch bestehen bleibt, die defekte GlŸhbirne
durch eine neue Birne gleicher Leistung ersetzen.
Die maximale Leistung ist am Leuchtkšrper
angegeben.
D731
Achtung
Dieses GerŠt enthŠlt im KŠltekreislauf Kohlenwasserstoff. Aus diesem Grund darf die Wartung
und das NachfŸllen aussschlie§lich von
autorisiertem Fachpersonal durchgefŸhrt werden.
CONSIGLI
Consigli per la refrigerazione
Carne (di tutti i tipi): va avvolta in sacchetti di
plastica e posta sul vetro sopra il cassetto verdura.
In questa posizione si potrˆ conservare per uno
o due giorni al massimo.
Cibi cotti piatti freddi, ecc. devono essere ben
coperti e possono essere disposti su qualsiasi
griglia.
Frutta e verdura: saranno messe, previa pulitura,
nel/ nei cassetto/i previsto/i a tale scopo.
Burro e formaggio devono essere conservati negli
appositi contenitori o avvolti in fogli di plastica o
alluminio per evitare il contatto con lÕaria.
Latte in bottiglia: ben chiuse poste nel
portabottiglie.
Banane, patate, cipolla ed aglio, se non sono
confezionati, non vanno messi in frigorifero.
Consigli per la congelazione
Per ottenere i massimi vantaggi dal processo di
congelazione diamo alcuni consigli importanti:
¥ la quantitˆ massima di alimenti che possono
essere congelati in 24 h • riportata sulla
Çtarghetta matricolaÈ;
¥ il processo di congelamento dura 24 ore.In
questo lasso di tempo non si dovrebbe
aggiungere altro cibo da congelare;
¥ congelare solo alimenti di ottima qualitˆ, freschi e
ben puliti;
¥ dividere tutto in piccole parti, in modo da favorire
la rapiditˆ della congelazione e consentire lo
scongelamento solo della quantitˆ necessaria;
¥ avvolgere gli alimenti in fogli di alluminio o
politene.Gli stessi devono essere bene aderenti
ai cibi e ben chiusi;
¥ evitare di mettere i prodotti da congelare a
contatto di quelli giˆ congelati; ci˜ eviterˆ
lÕinnalzamento della temperatura di questi ultimi;
¥ tenere presente che gli alimenti magri si
conservano meglio e pi• a lungo di quelli grassi e
che il sale riduce il tempo di conservazione;
¥ non consumare immediatamente i ghiaccioli
prelevati dallo scomparto congelatore possono
provocare scottature da freddo;
¥ • consigliabile indicare sulla confezione la data di
inizio della congelazione al fine di poter
controllare il tempo di conservazione;
¥ i simboli sui cassetti indicano diversi tipi di
prodotti da congelare.
40
Consigli per la conservazione dei
surgelati
Per utilizzare nel modo migliore lo scomparto •
necessario:
¥ assicurarsi che i surgelati siano stati ben
conservati dal rivenditore;
¥ che il trasporto, dallÕacquisto alla sistemazione
nello scomparto, sia breve;
¥ non aprire troppo frequentemente la porta dello
scomparto e non lasciarla aperta pi• del
necessario.
¥ Una volta scongelati, gli alimenti si deteriorano in
breve tempo e non possono venir ricongelati.
¥ Non superare il periodo di conservazione indicato
sulle confezioni dal produttore dei cibi
Le cifre indicano il periodo di immagazzinaggio in
mesi per ciascun tipo di prodotto da congelare.
Se Ž valido il valore superiore oppure quello
inferiore del periodo di immagazzinaggio
indicato, dipende dalla qualitˆ dei prodotti
alimentari e dal proprio pretrattamento prima del
congelamento ;
¥ non mettere nello scomparto congelatore
bevande gassate: possono esplodere.
Page 10

10
ST…RUNGEN
Falls das GerŠt Stšrungen aufweisen sollte,
ŸberprŸfen Sie zuerst folgendes:
¥ Steckt der Netzstecker in der Steckdose?
¥ Befindet sich der Hauptschalter der elektrischen
Anlage in der richtigen Stellung?
¥ Ist die Stromzufuhr unterbrochen?
¥ Befindet sich der Thermostatknopf in richtiger
Stellung?
¥ WasserpfŸtze auf dem Boden des KŸhlfaches:
¥ Abtauwasserloch verstopft? (siehe Abschnitt
ÒAbtauenÓ)
Sollten Sie nach o.e. PrŸfungen zu keinem Resultat
kommen, so wenden Sie sich bitte an unseren
nŠchsten Kundendienst.
Um ein rasches Beheben des Schadens zu
ermšglichen, ist es beim Anruf an den
Kundendienst notwendig, die Modell- und
Seriennummer anzugeben, die Sie dem
Garantieschein oder dem Typenschild (Ð linke
Seite Ð unten) entnehmen kšnnen.
Abtauen
Die sich auf dem Verdampfer des KŸhlschrankes
bildende Reifschicht taut jedesmal in den Stillstandzeiten des Motorkompressors von selbst ab. Das
Tauwasser lŠuft durch eine Rinne in eine Plastikschale auf der RŸckseite des GerŠtes (Ÿber dem
Kompressor) und verdunstet dort.
Wir empfehlen, das in der Mitte der
Abtauwasserrinne des KŸhlraumes befindliche
Ablaufloch fŸr das Abtauwasser regelmŠ§ig zu
reinigen, um zu vermeiden, da§ das
Abtauwasser auf die eingelagerten Lebensmittel
tropft. Verwenden Sie den dafŸr vorgesehenen
Reiniger,der sich schon im Ablaufloch befindet.
Die sich im Gefrierfach bildende Reifschicht soll,
sobald diese eine StŠrke von 4 mm erreicht hat, mit
dem mitgelieferten Plastikschaber abgekratzt
werden. WŠhrend dieses Vorganges ist es nicht
nštig, das GerŠt auszuschalten und die
Nahrungsmittel herauszunehmen.
Wenn sich jedoch eine dicke Eisschicht bildet, mu§
man vollkommen abtauen. Um ein vollstŠndiges
Abtauen durchzufŸhren, geht man wie folgt vor:
1. Den Thermostatknopf auf Ç■È einstellen oder
den Stecker aus der Steckdose herausziehen.
2. Die eventuell im Frosterfach liegenden
Lebensmittel herausnehmen, sie in
Zeitungspapier einwickeln und sehr kŸhl
aufbewahren.
3. Die TŸr offen lassenund den Plastikschaber, der
als Rinne dient, am vorgesehenen Platz
einsetzen, soda§ das Abtauwasser in ein
geeignetes, darunter gestelltes GefŠ§ flie§en
kann.
4. Nach beendetem Abtauproze§ das Fach gut
trocknen. Plastikschaber fŸr spŠteren Gebrauch
aufbewahren.
5. Den Thermostatknopf wieder in die gewŸnschte
Stellung drehen bzw. den Stecker wieder
einstecken.
D037
D068
6. Nachdem das GerŠt fŸr 2-3 Std. in Betrieb
genommen wurde, kšnnen tiefgefrorene
Lebensmittel darin zurŸckgelegt
Achtung:
Benutzen Sie niemals MetallgegenstŠnde, um
die Reifschicht abzukratzen, damit eine
BeschŠdigungen des GerŠtes vermieden werden
kann.
Benutzen Sie kein mechanisches oder anderes
Mittel fŸr einen schnelleren Abtauproze§ mit
Ausnahme der vom Hersteller empfohlenen.
Ein Temperaturanstieg der TiefkŸhlkost wŠhrend
des Abtauens kšnnte die Aufbewahrungsdauer
verkŸrzen.
39
Ripiani mobili
Sulle pareti della cella sono ricavate delle guide che
consentono il posizionamento dei ripiani a diverse
altezze, secondo la necessitˆ.
Per un migliore utilizzo dello spazio, i semiripiani
anteriori possono sovrapporsi a quelli posteriori.
Posizionamento delle mensole
Per permettere lo stoccaggio dÕalimenti di diverse
dimensioni, si possono posizionare le mensole ad
altezze differenti. Operare come segue: Spingere la
mensola nel senso della freccia fino a quando non si
libera e posizionarla allÕaltezza desiderata.
D338
PR249
Page 11

11
INSTALLATION
Aufstellung
Das GerŠt sollte nicht in der NŠhe von
WŠrmequellen wie Heizkšrpern oder …fen
aufgestellt und vor direkter Sonneneinstrahlung
geschŸtzt werden. Aus GrŸnden der Sicherheit mu§
eine MindestbelŸftung gesichert sein, wie aus der
Abb. hervorgeht.
Anordnung des GerŠtes unter den OberschrŠnken
der KŸche (siehe Abb. A).
Anordnung des GerŠtes ohne OberschrŠnke der
KŸche (siehe Abb. B).
Achtung: Die Ventilations - …ffnungen mŸssen
immer saubergehalten werden.
Die Nivellierung erfolgt durch Drehen der am
Unterteil des GerŠtes angebrachten
Nivellierf٤chen.
Elektrischer Anschlu§
Bevor Sie den Stecker in die Steckdose einstecken,
ŸberprŸfen Sie bitte, da§ die auf dem Typenschild
des GerŠtes angegebene Spannung sowie
Frequenz mit dem Anschlu§wert des Hauses
Ÿbereinstimmen. Eine Abweichung von ±6% von der
Nominalspannung ist zulŠssig. FŸr die Anpassung
des GerŠtes an andere Spannungen mu§ ein
Spartransformator angemessener Leistung
vorgeschaltet werden.
Das GerŠt mu§ unbedingt vorschriftsmŠ§ig geerdet
werden. Zu diesem Zweck ist der Stecker des
Speisekabels mit dem dafŸr vorgesehenen Kontakt
versehen. Sollte die Netzleitung im Haus nicht mit
einer Erdleitung versehen sein, so mu§ das GerŠt
an eine getrennte Erdleitung vorschriftsmŠ§ig und
unter Hinzuziehung eines Fachmanns
angeschlossen werden.
Die Erzeugerfirma lehnt jede Verantwortung ab,
falls diese UnfallverhŸtungsvorschrift nicht
beachtet wird.
NP002
100 mm10 mm
10 mm
A
B
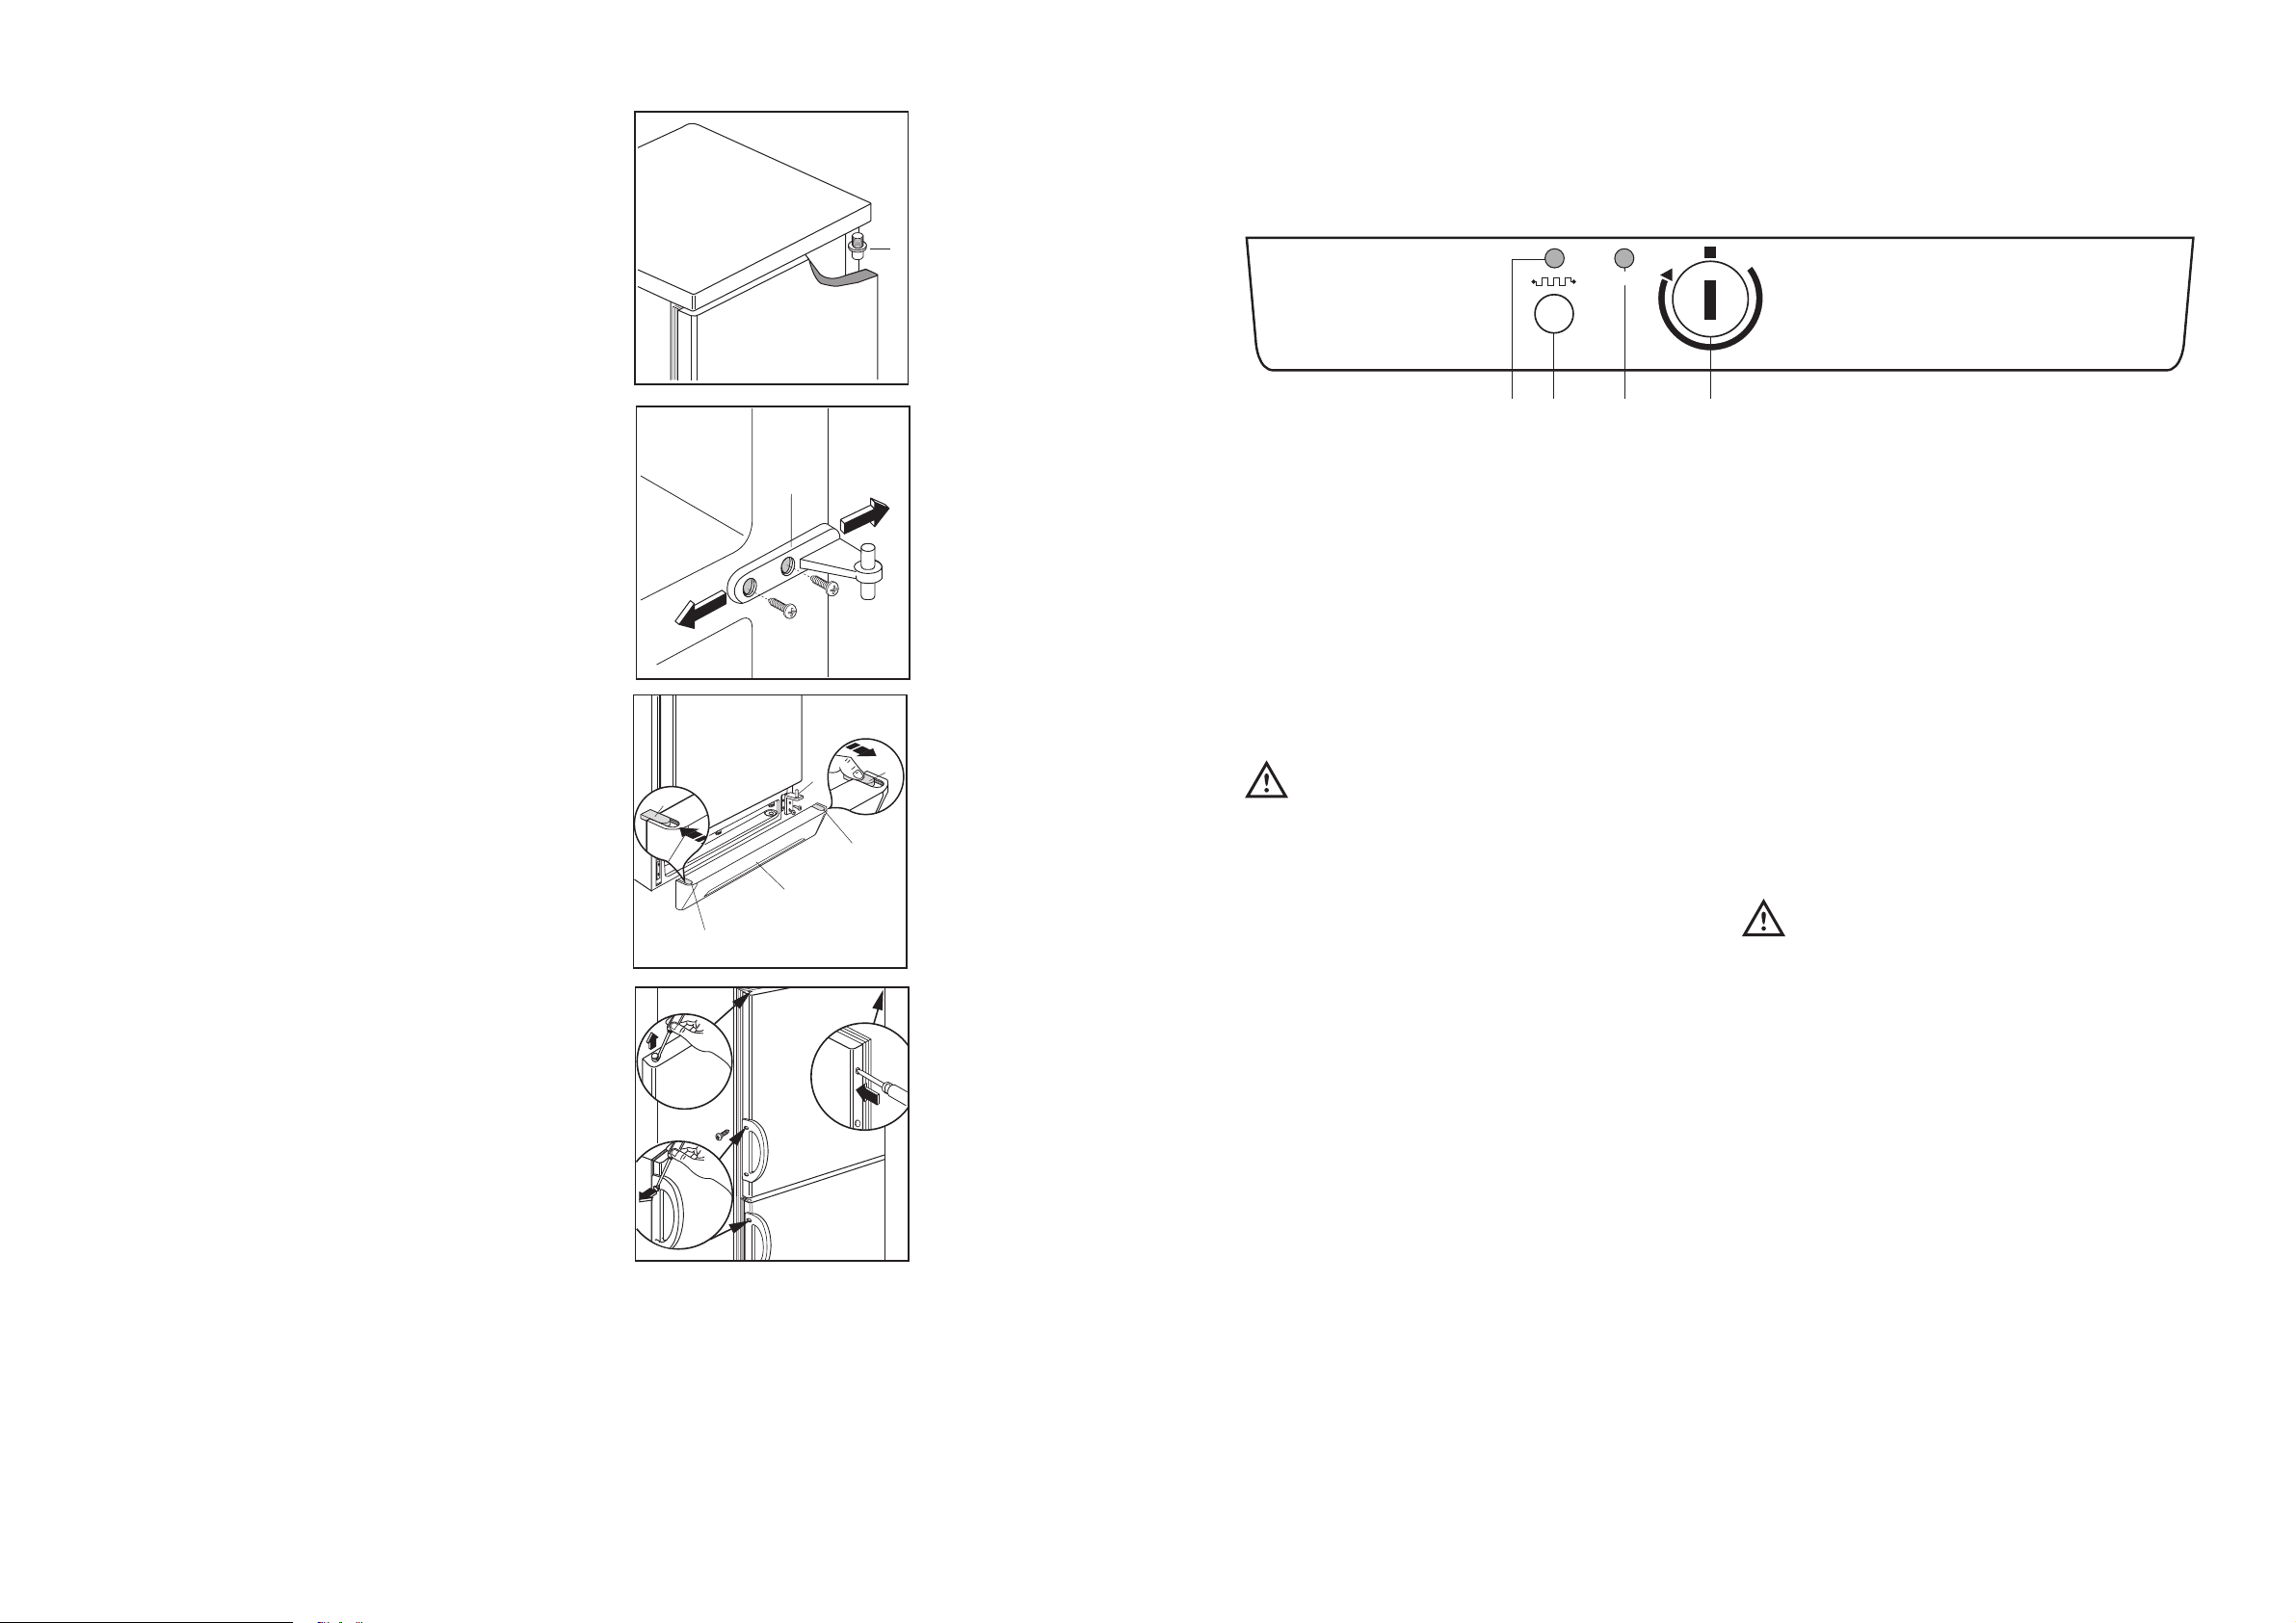
Hintere AbstandsstŸcke
Im Beipack sind 2 DistanzstŸcke enthalten, die an
der GerŠte-RŸckseite montiert werden mŸssen.
Lšsen Sie dazu etwas die Schrauben der
GehŠuseabdeckung. Schieben Sie das DistanzstŸck
unter den Schraubenkopf und ziehen Sie die
Schraube wieder fest.
PR153
Dieses GerŠt entspricht der folgende
EWG Richtlinie:
- 87/308 EWG vom 2.6.87 (DeutschlandAusfŸhrung) bzw. der …VE-Richtlinie Nr. F 61/84
(…sterreich-AusfŸhrung) bezŸglich
Funkentstšrung.
- 73/23 EWG vom 19/02/73 (Niederspannung) und
folgende €nderungen;
- 89/336 EWG vom 03/05/89 (Elektromagnetische
VertrŠglichkeit) und folgende €nderungen.
Achtung:
Es mu§ mšglich sein, das GerŠt vom Netz zu
trennen; nach der Installation mu§ sie Steckdose
daher zugŠnglich bleiben.
38
Congelazione dei cibi freschi
Lo scomparto • adatto alla congelazione
di cibi freschi e alla conservazione a lungo termine
di cibi congelati e surgelati.
Per la congelazione non • necessario variare la
posizione della manopola del termostato da quella di
normale funzionamento. Tuttavia, volendo ottenere
una congelazione pi• rapida, ruotare la manopola
del termostato verso la posizione di massimo
freddo; con la manopola in questÕultima posizione, la
temperatura nello scomparto refrigerante potrebbe
scendere al di sotto di 0¡C.
Se ci˜ si verificasse riportare la manopola del
termostato in corrispondenza di una posizione che
consenta una temperatura meno fredda.
Porre i cibi da congelare nello scomparto superiore
perchŽ Ž il punto pi• freddo.
Conservazione dei cibi surgelati
Al momento della messa in funzione o dopo un
periodo di inattivitˆ, introdurre gli alimenti
nellÕapparecchio dopo averlo fatto funzionare per
almeno due ore con la manopola del termostato
sulla posizione di massimo freddo, quindi ruotare la
manopola sulla posizione di funzionamento normale.
Importante
In caso di interruzione di corrente durante la
conservazione dei cibi congelati o surgelati, non
aprire assolutamente la porta dello scomparto
congelatore. I cibi non si deteriorano se
lÕinterruzione a breve (fino a 6-8 ore) e lo
scomparto congelatore • carico, diversamente •
consigiabile consumarli al pi• presto (un
innalzamento della temperatura dei surgelati
abbrevia il periodo di Conservazione).
Scongelazione
Gli alimenti surgelati o congelati, prima di essere
usati, possono essere scongelati nel frigorifero o a
temperatura ambiente, a seconda del tempo
disponibile per lÕoperazione. I pezzi piccoli possono
essere cucinati direttamente appena tolti dal
congelatore; in questo caso, per˜, il tempo di cottura
sarˆ pi• lungo.
Cubetti di ghiaccio
II frigorifero • equipaggiato con una o pi• vaschette
per la formazione dei cubetti di ghiaccio. Dette
vaschette vanno riempite di acqua potabile e riposte
nello scomparto congelatore. Si raccomanda di non
usare utensili metallici per staccare le vaschette.
Accumulatori termici
Nel congelatore si trovano due accumulatori termici
(masse eutettiche) che consentono di aumentare la
durata di conservazione degli alimenti in caso di
mancanza di energia elettrica o di guasto.
Per motivi di sicurezza, dovuta al trasporto, questi
accumulatori si trovano nel cassetto inferiore; per la
loro corretta utilizzazione bisogna collocarli nel
cassetto superiore, sopra gli alimenti.
Refrigerazione dei cibi e delle
bevande
Per utilizzare nel modo migliore lo scomparto
refrigerante • necessario:
non introdurre nella cella vivande calde o liquidi in
evaporazione;
coprire o avvolgere gli alimenti, specie se
contengono aromi;
disporre gli alimenti in modo che lÕaria possa
circolare liberamente attorno ad essi.
Page 12

12
TŸranschlagwechsel
Bevor Sie nachstehende ArbeitsvorgŠnge
durchfŸhren, Netzstecker unbedingt aus der
Steckdose ziehen!
Den Wechsel auf folgende Weise ausfŸhren:
1. EntlŸftungsgitter (D) abnehmen.
2. Unteres Scharnier (E) abschrauben.
3. Untere TŸr vom mittleren Scharnier (H) abheben
und Scharnier abschrauben.
4. Obere TŸr vom oberen Stift (G) abnehmen.
5. Nachdem Sie die Stšpsel entternt haben, die auf
der gegenŸberliegenden Seite wieder
einzusetzen sind, nehmen Sie den oberen Stift
ab und montieren Sie sie an der
gegenŸberliegenden Seite.
6. Obere TŸr wieder einsetzen. Mittleres Scharnier
an gegenŸberliegende Seite montieren.
7. Untere TŸr wieder einsetzen.
8. Unteres Scharnier (E) auf gegenŸberliegende
TŸrseite montieren und mittels der vorher
entnommenen Schrauben befestigen.
Abdeckung (F) vom EntlŸftungsgitter (D)
herausschieben und auf gegenŸberliegende
Seite montieren.
9. EntlŸftungsgitter wieder einsetzen.
10.Griff(e) abnehmen und auf der
gegenŸberliegenden Seite befestigen. Mit einem
Senkstift die Plastikstšpsel auf der
gegenŸberliegenden Seite der Griffe
durchlšchern. Mit den im Beipack enthaltenen
Plastikstšpsel, die freigebliebenen Lšcher
abdecken.
Zur Ausrichtung der TŸren kann man auf das
mittlere Scharnier wirken.
Das mittlere Scharnier ist nach dem Lšsen der
beiden Schrauben mit Hilfe einer Vorrichtung
horizontal regulierbar.
Achtung
Vergewissern Sie sich nach AusfŸhrung des
Anschlagwechsels der TŸren, da§ alle
Schrauben fest angezogen sind und ŸberprŸfen
Sie auch, ob die Magnetdichtung am Mšbel
perfekt anliegt. Bei einer niedrigen
Raumtemperatur (z.B. im Winter) kann es
vorkommen, dass die Dichtung nicht perfekt am
Schrank haftet. Die Wiederherstellung der
Dichtung erfolgt automatisch nach gewisser
Zeit. Wollen Sie aber diesen Prozess
beschleunige, so genšgt es die Dichtung mit
einem Fšn zu erwŠrmen.
G
H
E
F
D
F
F
F
PR228
37
USO
Pulizia delle parti interne
Prima dellÕuso e del collegamento elettrico pulire
tutte le parti interne con acqua tiepida e sapone
neutro allo scopo di togliere il caratteristico odore di
nuovo indi asciugare accuratamente.
Non usare detersivi n• polveri abrasive
che sono dannose alle finiture.
Pannello di controllo
minmax
AB C D
ON
Funzionamento
Inserire la spina nella presa di corrente.
Ruotare in senso orario la manopola del termostato
(D) oltre la posizione Ç■È (arresto).
LÕaccensione della lampada spia (C) indica che
lÕapparecchiatura • in funzione.
Lo spegnimento si ottiene ruotando la manopola del
termostato sulla posizione Ç■È.
A. Lampada spia della resistenza
B. Interruttore climatico
C. Lampada spia di funzionamento
D. Manopola termostato
Regolazione della temperatura
La temperatura • regolata automaticamente e pu˜
essere aumentata (meno freddo) ruotando la
manopola verso i numeri pi• bassi oppure diminuita
(pi• freddo) ruotandola verso i numeri pi• alti. La
posizione corretta, comunque, va individuata
tenendo conto che la temperatura interna dipende
da questi fattori:
¥ la temperatura ambiente;
¥ la frequenza di apertura delle porte;
¥ la quantitˆ di alimenti conservati;
¥ la collocazione dellÕapparecchio.
La posizione intermedia • la pi• indicata.
Importante
Sulle posizioni di massimo freddo, con temperatura ambiente elevata, ed una notevole quantitˆ
di alimenti, il funzionamento pu˜ essere
continuo, con formazione di brina o ghiaccio
sulla parete posteriore della cella. In tal caso •
necessario ruotare la manopola su una posizione di minor freddo, in modo da consentire lo
sbrinamento automatico e, di conseguenza, un
minor consumo di energia elettrica.
Interruttore climatico
Con una temperatura ambiente al di sotto dei +16¡C
deve essere azionato lÕinterruttore climatico (B).
La lampada di controllo (A) si accenderˆ.
Page 13

13
AVERTISSEMENTS ET CONSEILS IMPORTANTS
Il est tr•s important que cette notice dÕutilisation soit gardŽe avec lÕappareil pour toute future
consultation. Si cet appareil devait •tre vendu ou transfŽrŽ ˆ une autre personne, assurez-vous que la
notice dÕutilisation suive lÕappareil, de fa•on ˆ ce que le nouvel utilisateur puisse •tre informŽ du
fonctionnement de celui-ci et des avertissements relatifs.
Si cet appareil, muni de fermeture magnŽtique, doit •tre employŽ pour en remplacer un autre avec une
fermeture ˆ ressort, nous vous conseillons de rendre celle-ci inutilisable avant de mettre lÕancien
appareil de c™tŽ. Cela dans le but dÕŽviter que des enfants puissent sÕy renfermer et se mettre ainsi en
danger de mort. Ces avertissements sont donnŽs pour votre sžretŽ et pour celle dÕautrui. Nous vous
prions donc de bien vouloir les lire attentivement avant dÕinstaller et dÕutiliser lÕappareil.
SžretŽ
¥ Cet appareil a ŽtŽ con•u pour •tre utilisŽ par des
adultes. Veillez donc ˆ ce que les enfants nÕy
touchent pas ou quÕils ne lÕutilisent pas comme
un jouet.
¥ DŽbranchez toujours la prise de courant avant de
procŽder au nettoyage intŽrieur et extŽrieur de
lÕappareil et au remplacement de la lampe
dÕŽclairage (pour les appareils qui en sont
ŽquipŽs).
¥ Ne consommez pas certains produits tels que les
b‰tonnets glacŽs d•s leur sortie de lÕappareil; la
tempŽrature tr•s basse ˆ laquelle ils se trouvent
peut provoquer des bržlures.
¥ Cet appareil est lourd. Faites attention lors du
dŽplacement.
¥ Faites tr•s attention lorsque vous dŽplacez
lÕappareil afin de ne pas endommager des
parties du circuit de rŽfrigŽrant et ainsi
dÕŽviter le risque de fuites de liquide.
¥ LÕappareil ne doit pas •tre situŽ ˆ proximitŽ
de radiateurs ou cuisini•res ˆ gaz.
¥ Evitez une exposition prolongŽe de lÕappareil
aux rayons solaires.
¥ II doit y avoir une circulation dÕair suffisante ˆ
la partie arri•re de lÕappareil et il faut Žviter
tout endommagement du circuit rŽfrigŽrant.
¥ Seulement pour congŽlateurs (sauf mod•les
encastrŽs): un emplacement optimal est la
cave.
¥ Ne pas mettre dÕinstruments Žlectriques ˆ
lÕintŽrieur de lÕappareil (sorbeti•re, par
exemple).
Service/RŽparation
¥ Une Žventuelle modification ˆ lÕinstallation
Žlectrique de votre maison qui devait •tre nŽcessaire pour lÕinstallation de lÕappareil ne devra •tre
effectuŽe que par du personnel qualifiŽ.
¥ Il est dangereux de modifier ou dÕessayer de
modifier les caractŽristiques de cet appareil.
¥ Cet appareil contient des hydrocarbures dans
son circuit de rŽfrigŽrant; IÕentretien et la
recharge ne doivent done •tre effectuŽs que par
du personnel autorisŽ.
¥ En cas de panne, nÕessayez pas de rŽparer
lÕappareil vous-m•me. Les rŽparations effectuŽes
par du personnel non qualifiŽ peuvent provoquer
des dommages. Contactez le Service Apr•sVente le plus proche et nÕexigez que des pi•ces
dŽtachŽes originales.
Installation
¥ Assurez-vous, apr•s avoir installŽ lÕappareil, que
celuici ne repose pas sur le c‰ble dÕalimentation.
¥ LÕappareil se rŽchauffe sensibilment au niveau du
condenseur et du compresseur. Veillez ˆ ce que
lÕair circule librement tout autour de lÕappareil.
Une ventilation insuffisante entra“nerait un
mauvais fonctionnement et des dommages sur
lÕappareil. Suivez les instructions donnŽes pour
lÕinstallation.
¥ A cause du syst•me de transport, lÕhuile
contenue dans le compresseur pourrait sÕŽcouler
dans le circuit rŽfrigŽrant. Attendez 2 heures au
moins avant de brancher lÕappareil pour
permettre ˆ lÕhuile de refluer dans le
compresseur.
Utilisation
¥ Les rŽfrigŽrateurs et/ou congŽlateurs mŽnagers
sont destinŽs uniquement ˆ la conservation et/ou
congŽlation des aliments et des boissons.
¥ Pour le bon fonctionnement de votre appareil, la
tempŽrature ambiante du local doit •tre comprise
entre +18¡C et +43¡C (Classe T); +18¡C et
+38¡C (Classe ST); +16¡C et +32¡C (Classe N);
+10¡C et +32¡C (Classe SN); La classe
dÕappartenance est indiquŽe sur la plaque
signalŽtique.
ImprimŽ sur du papier recyclŽ
36
INDICE
Avvertenze e consigli importanti 34
Uso 37
Pulizia 37
Pannello di controllo 37
Funzionamento 37
Regolazione della temperatura 37
Interruttore climatico 37
Congelazione dei cibi freschi 38
Conservazione dei cibi surgelati 38
Accumulatori termici 38
Scongelazione 38
Cubetti di ghiaccio 38
Refrigerazione dei cibi e delle bevande 38
Ripiani mobili 39
Posizionamento delle mensole 39
Consigli 40
Consigli per la refrigerazione 40
Consigli per la congelazione 40
Consigli per la conservazione dei surgelati 40
Manutenzione 41
Pulizia periodica 41
Periodi di inattivitˆ 41
Lampada di illuminazione 41
Sbrinamento 41
Se qualcosa non va 42
Installazione 43
Posizionamento 43
Distanziali posteriori 43
Collegamento elettrico 43
Reversibilitˆ delle porte 44
Page 14

14
ATTENTION: En dehors des tempŽratures
ambiantes indiquŽes par la classe climatique
dÕappartenance de ce produit, il est obligatoire de
respecter les indications suivantes: lorsque la
tempŽrature ambiante descend sous la valeur
minimum, la tempŽrature de conservation du
compartiment congŽlateur peut ne pas •tre
garantie; il est donc conseillŽ de consommer les
produits que ce dernier contient au plus vite.
¥ Un produit dŽcongelŽ ne doit jamais •tre
recongelŽ.
¥ Suivez les indications du fabricant pour la
conservation et/ou congŽlation des aliments.
¥ Dans tous les appareils de rŽfrigŽration et
congŽlation il y a des surfaces qui se couvrent de
givre. Suivant le mod•le, ce givre peut •tre
ŽliminŽ automatiquement (dŽgivrage
automatique) ou bien manuellement.
¥ NÕessayez jamais dÕenlever le givre avec un objet
mŽtallique, vous risqueriez dÕendommager
irrŽparablement lÕŽvaporateur. NÕemployez pour
cela que la spatule en plastique livrŽe avec
lÕappareil.
¥ De m•me, ne dŽcollez jamais les bacs ˆ glace
avec un couteau ou tout autre objet tranchant.
¥ Ne placez ni bouteilles ni bo”tes de boissons
gazeuses dans le congŽlateur/compartiment ˆ
basse tempŽrature, elles pourraient exploser.
Protection de
lÕenvironnement
Cet appareil ne contient pas, dans son circuit de
rŽfrigŽrant et ses mati•res isolantes, de gaz
rŽfrigŽrant nocifs ˆ la couche dÕozone. LÕappareil
ne doit pas •tre mis au rebut avec les ordures
urbaines et la ferraille. Il faut Žviter dÕendommager le circuit de rŽfrigŽrant, surtout ˆ lÕarri•re
de lÕappareil, pr•s de lÕŽnchangeur thermique.
Vous pouvez vous renseigner sur les centres de
ramassage aupr•s de votre bureau municipal.
Les matŽriaux utilisŽs dans cet appareil
identifiŽs par le symbole sont recyclables.
35
¥
Non introdurre mai liquidi o alimenti caldi e non
riempire fino allÕorlo i recipienti muniti di
coperchio.
¥
Non usare alcun dispositivo meccanico o altro
mezzo artificiale per accelerare il processo di
sbrinamento tranne quelli qui raccomandati.
¥
Non usare mai oggetti metallici per pulire
lÕapparecchiatura; essa potrebbe venir
danneggiata.
Installazione
¥
Durante il normale funzionamento il
condensatore ed il compressore, che sono posti
sul retro dellÕapparecchiatura, si riscaldano
sensibilmente. Assicurarsi quindi che
lÕinstallazione venga eseguita come da istruzioni
riportate sul libretto. UnÕaerazione insufficiente
comporterˆ sicuramente un cattivo
funzionamento e dei danni allÕapparecchiatura.
¥
Se lÕapparecchiatura viene trasportata in
posizione orizzontale • possibile che lÕolio
contenuto nel compressore defluisca nel circuito
refrigerante. Lasciare lÕapparecchiatura in
posizione verticale almeno 2 ore prima di
metterla in funzione per dar modo allÕolio di
refluire nel compressore.
¥
LÕapparecchiatura non deve essere collocata
nelle vicinanze di termosifoni o cucine a gas.
¥
Evitate ogni esposizione prolungata
dellÕapparecchiatura ai raggi solari.
¥
La parte posteriore dellÕapparecchiatura deve
ricevere una sufficiente circolazione dÕaria e deve
essere evitato qualsiasi danno al circuito
refrigerante.
Protezione dellÕambiente
Questa apparecchiatura non contiene, nel
circuito refrigerante e nellÕisolamento, gas
refrigeranti nocivi per lÕozono. LÕapparecchiatura
non deve essere smaltita con rifiuti urbani e
rottami. Deve essere evitato il danneggiamento
del circuito refrigerante, soprattutto nella parte
posteriore vicino allo scambiatore. Informazioni
sui centri di raccolta vengono forniti dallÕautoritˆ
comunale. I materiali usati in questa
apparecchiatura contrassegnati dal simbolo
sono riciclabili.
Page 15

15
SOMMAIRE
Avertissements et conseils importants 13
Renseignements pour lÕŽlimination des
matŽriaux dÕemballage 15
Utilisation 16
Bandeau de commande 16
Nettoyage 16
Mise en service 16
RŽglage de la tempŽrature 16
Interrupteur de ÒclimatisationÓ 16
CongŽlation 17
Conservation des produits surgelŽs 17
DŽcongŽlation 17
Gla•ons 17
RŽfrigŽration 17
Accumulateurs thermique 17
Tablettes amovibles 18
Positionnement des balconnets de la contreporte 18
Conseils 19
Conseils pour la rŽfrigeration 19
Conseils pour la congŽlation 19
Conseils pour la surgŽlation 19
Entretien 20
Nettoyage 20
Arr•t prolongŽ 20
Changement de lÕampoule 20
DŽgivrage 20
Anomalie de fonctionnement 21
Installation 22
Emplacement 22
Entretoises postŽrieures 22
Branchement Žlectrique 22
RŽversibilitŽ des portes 23
RENSEIGNEMENTS POUR LÕƒLIMINATION
DES MATƒRIAUX DÕEMBALLAGE
Tous les matŽriaux et les accessoires utilisŽs pour
emballer nos grands ŽlectromŽnagers, sauf ceux qui
sont en bois recyclables et peuvent donc se
rŽcupŽrer.
Voici ce que nous vous conseillons:
¥ DŽposez les emballages en papier, en carton et
en carton ondulŽ aux endroits prŽvus pour le
ramassage de ce genre de matŽriau.
¥ Mettez les piŽces en plastique dans les
conteneurs prŽvus ˆ cet effet. Si ce genre de
conteneurs nÕexistent pas encore ˆ lÕendroit o•
vous habitez, vous pouvez Žliminer les matŽriaux
en question en les mettant dans les ordures
mŽnag•res.
Pour les emballages de mati•res plastiques
recyclables, par example:
Les exemples reportent les symboles suivants:
PE pour polyŽthyl•ne** 02 = ^ PE-HD; 04 = ^ PE-LD
PP pour le polypropyl•ne
PS pour le polystyr•ne
PIƒCES EN MATIƒRE PLASTIQUE
Pour faciliter lÕŽlimination et :ou le recyclage des
matŽriaux, la plupart des pi•ces de lÕappareil ont
une contremarque qui en facilite lÕindentification.
PS
SAN
ABS
02**
PE
05
PP
06
PS
34
AVVERTENZE E CONSIGLI IMPORTANTI
é molto importante che questo libretto istruzioni sia conservato assieme allÕapparecchiatura per
qualsiasi futura consultazione. Se lÕapparecchiatura dovesse essere venduta o trasferita ad unÕaltra
persona, assicurarsi che il libretto venga fornito assieme, in modo che il nuovo utente possa essere
messo al corrente del funzionamento della macchina e delle avvertenze relative.
Queste avvertenze sono state redatte per la Vostra sicurezza e per quella degli altri. Vi preghiamo,
dunque, di volerle leggere attentamente prima dÕinstallare e di utilizzare lÕapparecchiatura.
Sicurezza generale
¥
Qualora questa apparecchiatura, munita di
chiusura magnetica, venisse usata in
sostituzione di una con chiusura a scatto,
consigliamo di rendere questÕultima inservibile.
CioÕ eviterˆ che i bambini, giocando, vi
rimangano intrappolati, con grave pericolo per la
loro vita.
¥
Togliere la spina dalla presa di corrente prima di
procedere a qualsiasi operazione di pulizia e
manutenzione (come nel caso di sostituzione
della lampadina, sulle apparecchiature che ne
sono provviste).
¥
QuestÕapparecchiatura • stata progettata per
essere utilizzata da persone adulte. Fare
attenzione, quindi, che i bambini non si avvicinino
con lÕintento di giocarvi.
¥
Assicurarsi, dopo aver installato
lÕapparecchiatura, che essa non appoggi sul cavo
di alimentazione.
¥
é pericoloso modificare o tentare di modificare
le caratteristiche di questÕ apparecchiatura.
¥
Questa apparecchiatura contiene idrocarburi nel
circuito refrigerante; pertanto la manutenzione e
la ricarica deve essere effettuata esclusivamente
da personale autorizzato dallÕazienda.
¥
Prestare la massima cura nella
movimentazione per non dannegiare parti del
circuito refrigerante onde evitare possibili
fuoriuscite di fluido.
¥
LÕapparecchiatura non deve essere collocata
nelle vicinanze di termosifoni o cucine a gas.
¥
Evitate ogni esposizione prolungata
dellÕapparecchiatura ai raggi solari.
¥
La parte posteriore dellÕapparecchiatura deve
ricevere una sufficiente circolazione dÕaria e
deve essere evitato qualsiasi danno al
circuito refrigerante.
¥
Solo per i congelatori (esclusi incassati): una
collocazione ottimale • la cantina.
¥
Non introdurre apparecchi elettrici allÕinterno
dellÕapparecchiatura (ad es. gelatiera).
Assistenza / Riparazioni
¥
Ogni eventuale modifica che si rendesse
necessaria allÕimpianto elettrico domestico, per
poter installare lÕapparecchiatura, dovrˆ essere
eseguita solo da personale abilitato.
¥
Mai riparare lÕapparecchiatura da soli. Le
riparazioni effettuate da persone non competenti
possono provocare dei danni. Contattare il
Centro di Assistenza pi• vicino ed esigere solo
ricambi originali
.
Uso
¥
I frigoriferi e/o congelatori domestici sono
destinati unicamente alla conservazione e/o
congelazione degli alimenti.
¥
Le migliori prestazioni si hanno con temperature
dellÕambiente comprese tra +18¡C e +43¡C
(Classe T); + 18¡C e +38¡C (Classe ST); +16¡C
e +32¡C (Classe N); +10¡C e +32¡C (Classe SN);
la classe di appartenenza Ž riportata sulla targa
matricola ubicata nella cella a fianco del vano
verdura.
Attenzione: al di fuori delle temperature
ambiente indicate dalla classe climatica di
appartenenza di questo prodotto, si devono
osservare le seguenti indicazioni: quando la
temperatura ambiente scende al di sotto del
valore minimo pu˜ non essere garantita la
temperatura di conservazione nel vano
congelatore; pertanto si consiglia di consumare
al pi• presto gli alimenti in esso contenuti .
¥
In tutte le apparecchiature ci sono delle superfici
che si coprono di brina. A seconda del modello,
tale brina pu˜ essere eliminata automaticamente
(sbrinamento automatico) oppure manualmente.
Non tentare mai di togliere la brina con un
oggetto appuntito, si rischierebbe di danneggiare
irrimediabilmente lÕevaporatore. Utilizzare a tale
scopo lÕapposita paletta fornita con
IÕapparecchiatura.
¥
Non mettere mai nello scompartimento a bassa
temperatura (congelatore o conservatore) bibite
gassate: possono esplodere.
Stampato su carta riciclata
Page 16

16
Nettoyage
LÕappareil Žtant convenablement installŽ, nous vous
conseillons de le nettoyer soigneusement avec de
lÕeau ti•de savonneuse, pour enlever lÕodeur
caractŽristique de ÇneufÈ.
NÕutilisez pas de produits abrasifs, de
poudre ˆ rŽcurer ni dÕŽponge mŽtallique.
Mise en service
Enfoncez la fiche dans la prise de courant
Tournez le bouton du thermostat (D) vers la droite
au-delˆ de la position Ç■È.
Le voyant (C) sÕallume.
Pour arr•ter lÕappareil tournez le bouton du
thermostat (D) sur la position Ç
■
È.
RŽglage de la tempŽrature
La tempŽrature est rŽglŽe automatiquement et peut
•tre augmentŽe (moins froid) en tournant le bouton
vers les numŽros les plus bas ou bien diminuŽe
(plus froid) en le tournant vers les numŽros les plus
ŽlevŽs.
En tout cas, lÕexacte position doit •tre repŽrŽe en
considŽrant que la tempŽrature interne dŽpend des
facteurs suivants:
¥ tempŽrature ambiante;
¥ frŽquence dÕouverture des portes;
¥ quantitŽ dÕaliments conservŽs;
¥ emplacement de lÕappareil.
Une position moyenne est la plus indiquŽe.
UTILISATION
Important
Si le thermostat est rŽglŽ sur la position de froid
maximum, lorsque la tempŽrature ambiante est
ŽlevŽe et que l'appareil est plein, il est possible
que le compresseur fonctionne en rŽgime
continu. Dans ce cas, il y a un risque de
formation excessive de givre sur la paroi
postŽrieure ˆ lÕintŽrieur de lÕappareil. Pour Žviter
cet inconvŽnient, placez le thermostat sur une
position moins ŽlevŽe, de fa•on ˆ permettre un
dŽgivrage automatique et, par consŽquent, des
Žconomies de courant.
Interrupteur de ÒclimatisationÓ
Avec une tempŽrature ambiente infŽrieure ˆ +16¡C,
il faut appuyer sur lÕinterupteur de climatisation. Le
voyant (A) sÕallume.
Tableau de commande
minmax
AB C D
ON
A. Voyant de la rŽsistance
B. Interrupteur de ÒclimatisationÓ
C. Voyant de fonctionnement
D. Bouton du thermostat
33
Door reversibility
1. Unplug the appliance from the power supply
before carrying out the below-mentioned
operations.
2. Remove the ventilation grill (D).
3. Unscrew the bottom hinge (E).
4. Remove the freezer door by releasing it from the
middle hinge (H).
5. Unscrew the middle hinge.
6. Remove the fridge door by releasing it from the
top hinge pin (G).
7. Remove the pin then mount these on the
opposite side, after having removed the plugs
which must be refitted on the other side.
8. Refit the fridge door.
9. Replace the middle hinge to the left hand side.
10.Replace the freezer door.
11. Screw down the bottom hinge (E) on the opposite
side by using the screws previously removed.
12.Remove the plug (F) from the ventilation grill (D)
and replace it on the opposite side.
13.Re-assemble the ventilation grill (D).
14.Unscrew the handles. Refit them on the opposite
side after having pierced the plugs with a punch.
Cover the holes left open with the plugs
contained in the documentation pack.
The doors can be aligned by adjusting the middle
hinge.
The middle hinge can be adjusted horizontally, with
the help of a tool, after having slackened the two
screws.
Warning:
After having reversed the opening direction of
the doors check that all the screws are properly
tightened and that the magnetic seal adheres to
the cabinet. If the ambient temperature is cold (i.e.
in Winter), the gasket may not fit perfectly to the
cabinet. In that case, wait for the natural fitting of the
gasket or accelerate this process by heating up the
part involved with a normal hairdrier.
G
H
E
F
D
F
F
F
PR228
Page 17

17
CongŽlation
Le compartiment congŽlateur porte le sigle
normalisŽ 4 Žtoiles II vous permet de
congeler des denrŽes fra”ches et de conserver des
produits surgelŽs et congelŽs, dÕun mois a un an,
suivant la nature du produit.
Pour congeler les aliments frais il nÕest pas
nŽcessaire de rŽgler le thermostat sur une position
diffŽrente de celle employŽe en fonctionnement
normal.
Toutefois, si vous dŽsirez congeler plus rapidement
vous pouvez rŽgler le thermostat sur une position
plus froide tout en veillant ˆ ce que la tempŽrature
ne descende pas en dessous de 0¡C dans le
compartiment rŽfrigŽrateur.
Dans ce cas il faudra ramener le thermostat sur une
position moins froide.
Placez les aliments ˆ congeler dans le panier supŽrieur: cÕest la position la plus froide.
Conservation des produits
surgelŽs
A la premi•re mise en fonctionnement ou apr•s un
arr•t prolongŽ faites fonctionner lÕappareil pendant
deux heures au moins, avec le bouton du thermostat
sur la position de froid maximum. Ramenez ensuite
le thermostat sur une position moyenne.
Attention
En cas de coupure de courant abstenez-vous
dÕouvrir la porte. Si lÕinterruption est de courte
durŽe (jusquÕˆ 6-8 heures) et si le congŽlateur
est rempli, il nÕy a aucun risque dÕaltŽration pour
les aliments. En cas contraire vous devrez
consommer les aliments le plus rapidement
possible (une augmentation de la tempŽrature
peut rŽduireremarquablement la durŽe de
conservation des aliments).
DŽcongŽlation
Avant dÕ•tre utilisŽs, les aliments congelŽs ou
surgelŽs doivent •tre dŽcongelŽs dans le
rŽfrigŽrateur ou ˆ tempŽrature ambiante, selon le
temps dont on dispose pour cette opŽration.
SÕil sÕagit de produits minces ou divisŽs, placez-les
directement ˆ cuire: dans ce cas le temps de
cuisson sera plus long.
Gla•ons
L'appareil est ŽquipŽ d'un ou de plusieurs bacs ˆ
glace pour faire des gla•ons. Il faut remplir ces bacs
d'eau potable et les placer dans le congŽlateur.
NÕemployez pas dÕobjet mŽtallique pour dŽcoller
les bacs ˆ glace.
RŽfrigŽration
Pour obtenir le meilleur rendement du compartiment
rŽfrigŽrateur:
¥ nÕintroduisez pas dÕaliments encore chauds ou de
liquides en Žvaporation dans la cuve;
¥ couvrez les aliments, surtout sÕils sont
aromatiques;
¥ placez les denrŽes de fa•on ˆ ce que l'air puisse
circuler tout autour.
Accumulateur thermique
Dans le congelateur se trouvent deux
accumulateurs de froid qui permettent dÕaugmenteur
la durŽe de conservation des aliments stockŽs en
cas de coupure de courant ou dÕanomalie de
fonctionnement.
Pour des raisons de sŽcuritŽ liŽes au transport de
lÕappareil, ces accumulateurs sont mis, ˆ lÕusine,
dans le tiroir infŽrieur. Pour les utiliser correctement
il faut les palcer dans le tiroir supŽrieur, au-dessus
des aliments.
32
Electrical connection
Before plugging in, ensure that the voltage and
frequency shown on the serial number plate
correspond to your domestic power supply. Voltage
can vary by ±6% of the rated voltage.
For operation with different voltages, a suitably sized
auto-transformer must be used.
The appliance must be earthed.
The power supply cable plug is provided with a
contact for this purpose.
If the domestic power supply socket is not earthed,
connect the appliance to a separate earth in
compliance with current regulations, consulting a
specialist technician.
The Manufacturer declines all responsibility if
the above safety precautions are not observed.
This appliance complies with the following
E.E.C. Directives:
- 87/308 EEC of 2/6/87 relative to radio interference
suppression.
- 73/23 EEC of 19.2.73 (Low Voltage Directive) and
subsequent modifications;
- 89/336 EEC of 3.5.89 (Electromagnetic
Compatibility Directive) and subsequent
modifications.
INSTALLATION
Location
The appliance should be installed well away from
sources of heat such as radiators, boilers, direct
sunlight etc.
For safety reasons, minimum ventilation must be as
shown in Fig.
Appliance positioned under overhanging kitchen wall
units (see Fig. A).
Appliance positioned without overhanging kitchen
wall units (see Fig. B).
Attention: keep ventilation openings clear of
obstruction.
Two adjustable feet at the cabinet base allow
accurate levelling of the appliance.
Rear spacers
In the bag with the documentation, there are two
spacers which must be fitted in the two top
corners.
Slacken the screws and insert the spacer under the
screw head, then re-tighten the screws.
NP002
100 mm10 mm
10 mm
A
B
PR153
ATTENTION!
It must be possible to disconnect the appliance from
the mains power supply; the plug must therefore be
easily accessible after installation.
Page 18

18
Positionnement des balconnets de
la contre-porte
Il est possible de changer de place les balconnets.
A cet effet procŽdez comme suit:
DŽgagez les balconnets en agissant dans le sens
indiquŽ par les fl•ches. Remontez les balconnets ˆ
la hauteur dŽsirŽe.
Tablettes amovibles
Les glissi•res se trouvant sur les parois de la cuve
vous permettent de positionner les tablettes ˆ
diffŽrentes hauteurs, selon vos besoins.
Pour une meilleure utilisation de lÕespace vous
pouvez superposer les demi-tablettes antŽrieures
aux demi-tablettes postŽrieures.
D338
PR249
31
However, when the ice becomes very thick on the
inner liner, complete defrosting should be carried out
as follows:
1. pull out the plug from the wall socket or turn the
thermostat knob to the Ç■È setting;
2. remove any stored food, wrap it in several layers
of newspaper and put it in a cool place;
3. leave the door open, and insert the plastic
scraper in the appropriate seating at the bottom
centre, placing a basin underneath to collect the
defrost water.
4. when defrosting is completed, dry the interior
thoroughly; keep the scraper for future use;
5. turn the thermostat knob back to the required
setting or replace the plug in the power socket.
6. After two or three hours, reload the previously
removed food into the compartment.
Important:
Never use sharp metal tools to scrape off frost
from the evaporator as you could damage it.
Do not use a maechanical device or any artificial
means to speed up the thawing process other
than those recommended by the manufacturer.
A temperature rise of the frozen food packs,
during defrosting, may shorten their safe
storage life.
CUSTOMER SERVICE AND SPARE PARTS
If the appliance is not functioning properly, check
that:
¥ the plug is firmly in the wall socket and the mains
power switch is on;
¥ there is an electricity supply (find out by plugging
in another appliance);
¥ the thermostat knob is in the correct position.
¥ If there are water drops on the bottom of the
cabinet, check that the defrost water drain
opening is not obstructed (see ÒDefrostingÓ
section).
¥ If your appliance is still not working properly after
making the above checks, contact the nearest
service centre.
To obtain fast service, it is essential that when you
apply for it you specify the model and serial number
of your appliance which can be found on the
guarantee certificate or on the rating plate located
inside the appliance, on the bottom left-hand side.
D068
Page 19

19
Conseils pour la congŽlation
R•gles ˆ respecter pour la congŽlation:
¥ le pouvoir max. de congŽlation par 24 heures
figure sur la plaque signalŽtique;
¥ le processus de congŽlation prend 24 heures. Il
vaut mieux ne pas ajouter d'autres aliments ˆ
congeler pendant ce laps de temps;
¥ les produits destinŽs ˆ la congŽlation doivent •tre
frais, bien nettoyŽs et dÕexcellente qualitŽ;
¥ prŽparez de petites portions, de fa•on ˆ faciliter
la congŽlation et ˆ permettre de ne dŽcongeler
que la quantitŽ nŽcessaire;
¥ enveloppez les denrŽes dans du papier
d'aluminium ou de polyth•ne, en Žliminant les
bulles d'air et en fermant bien les paquets;
¥ Žvitez de placer des produits ˆ congeler en
contact avec des denrŽes dŽjˆ entreposŽes, pour
Žviter d'en Žlever la tempŽrature;
¥ les aliments maigres se conservent mieux et plus
longtemps que les gras; le sel rŽduit la durŽe de
conservation;
¥ ne consommez pas les b‰tonnets glacŽs toute
de suite apr•s les avoir sortis du congŽlateur. La
tempŽrature tr•s basse ˆ laquelle ils se trouvent
peut provoquer des bržlures:
¥ indiquez sur chaque paquet la date de
congŽlation, afin de pouvoir contr™ler le temps
dÕentreposage;
CONSEILS
Conseils pour la rŽfrigeration
O• placer les denrŽes?
Viandes (de toutes sortes): enveloppez-la dans des
sachets en plastique et placez-la sur la tablette en
verre au-dessus du(des) bac(s) ˆ lŽgumes.
La pŽriode de conservation est de 1 ˆ 2 jours au
maximum.
Aliments cuits, plats froids, etc.: placez-les, bien
couverts, sur une clayette.
Fruits et lŽgumes: bac(s) ˆ lŽgumes (une fois
nettoyŽs).
Beurre et fromage: enveloppez-les soigneusement
dans des feuilles dÕaluminium ou de polyŽthyl•ne et
mettez-les dans les casiers appropriŽs.
Lait en bouteille: ˆ placer dans lÕun des balconnets
de la contreporte.
Bananes, pommes de terre, oignon et ail ne
doivent pas •tre placŽs dans le rŽfrigŽrateur,
sÕils ne sont pas conditionnŽs.
Conseils pour la surgŽlation
Comment utiliser ce compartiment au mieux:
¥ vŽrifiez que les aliments aient bien ŽtŽ conservŽs
en magasin;
¥ assurez-vous que le transport, du moment de
l'achat jusqu'ˆ celui de la mise en place dans le
compartiment, dure le moins longtemps possible;
¥ Žvitez dÕouvrir trop souvent la porte et ne la
laissez ouverte que le temps nŽcessaire.
¥ Il convient de faire tr•s attention, car les aliments
dŽgelŽs, ne peuvent •tre recongelŽs.
¥ Ne dŽpassez jamais la date limite dÕutilisation
gŽnŽralement marquŽe sur les paquets.
¥ les symboles qui figurent sur les tiroirs correspondent
ˆ diffŽrents types de produits congelŽs.
Les chiffres indiquent la durŽe de conservation en
mois du type correspondant de produit. La durŽe de
conservation supŽrieure ou infŽrieure est valable en
fonction de la qualitŽ des aliments et du traitement
quÕils ont subi avant la congŽlation;
¥ ne placez ni bouteilles ni bo”tes de boissons
gazeuses dans le congŽlateur, car elles
pourraient Žclater.
30
Interior light
The light bulb inside the refrigerator compartment
can be reached as follows:
- unscrew the light cover securing screw.
- unhook the moving part as shown in the figure.
If the light does not come on when the door is open,
check that it is screwed into place properly. If it still
does not light up, change the bulb.
The rating is shown on the light bulb cover.
D731
Defrosting
Frost is automatically eliminated from the evaporator
of the refrigerator compartment every time the motor
compressor stops, during normal use. The defrost
water drains out through a trough into a special
container at the back of the appliance, over the
motor compressor, where it evaporates.
It is important to periodically clean the defrost
water drain hole in the middle of the refrigerator
compartment channel to prevent the water
overflowing and dripping onto the food inside.
Use the special cleaner provided, which you will
find already inserted into the drain hole.
The freezer compartment, however, will become
progressively covered with frost. This should be
removed with the special plastic scraper provided,
whenever the thickness of the frost exceeds 4 mm.
During this operation it is not necessary to switch off
the power supply or to remove the foodstuffs.
Never use sharp metal tools to scrape off frost
from the evaporator as you could damage it.
D037
MAINTENANCE
Unplug the appliance before carrying out
any maintenance operation.
Warning
This appliance contains hydrocarbons in its cooling
unit; maintenance and recharging must therefore
only be carried out by authorized technicians.
Periodic cleaning
Clean the inside with warm water and bicarbonate of
soda.
Rinse and dry thoroughly.
Clean the condenser (black grill) and the
compressor at the back of the appliance with a
brush or a vacuum cleaner. This operation will
improve the performance of the appliance and save
electricity consumption.
Periods of non-operation
When the appliance is not in use for long periods,
take the following precautions:
remove the plug from the wall socket;
remove all food;
defrost and clean the interior and all accessories;
leave the door ajar to allow air to circulate to prevent
unpleasant smells.
Page 20

DŽgivrage
Le dŽgivrage du compartiment rŽfrigŽrateur
sÕeffectue automatiquement, ˆ chaque arr•t du
compresseur. LÕeau de dŽgivrage est ŽvacuŽe dans
un bac situŽ ˆ lÕarri•re de lÕappareil o• elle
sÕŽvapore.
Nous recommandons de nettoyer
pŽriodiquement lÕorifice dÕŽcoulement de lÕeau
de dŽgivrage se trouvant dans la partie centrale
de la goutti•re du compartiment rŽfrigŽrateur
afin dÕŽviter que lÕeau, en dŽbordant, ne coule
sur les denrŽes stockŽes dans la cuve. Utilisez ˆ
cet effet le b‰tonnet se trouvant dans lÕorifice.
Dans le congŽlateur, par contre, il faut Žliminer le
givre ˆ chaque fois qu'il y a une couche Žpaisse qui
s'est formŽe (de 4 mm environ), en se servant de la
D037
20
ENTRETIEN
DŽbranchez lÕappareil avant toute
opŽration.
Attention
Cet appareil contient des hydrocarbures dans son
circuit de rŽfrigŽration; lÕentretien et la recharge ne
doivent donc •tre effectuŽs que par du personnel
autorisŽ.
Arr•t prolongŽ
Lorsque l'appareil doit rester ˆ l'arr•t pendant un
certain temps, prenez les prŽcautions suivantes:
dŽbranchez la prise de courant;
videz l'appareil;
dŽgivrez-le et nettoyez-le ˆ fond;
laissez les portes entrouvertes pour faire circuler de
l'air, de fa•on ˆ Žviter les mauvaises odeurs.
Changement de lÕampoule
LÕampoule dÕŽclairage dans le compartiment
rŽfrigŽrateur est accessible si on effectue les
opŽrations suivantes:
¥ dŽvissez la vis de fixation du plafonnier;
¥ dŽcrochez la partie mobile en exer•ant une
pression sur celle-ci comme indiquŽ dans la
figure.
Lorsque la porte est ouverte, si lÕampoule ne
sÕallume pas, il faut contr™ler quÕelle soit bien vissŽe;
si cela nÕŽlimine pas le probl•me, mettre une autre
ampoule qui ait la m•me puissance.
La puissance maximale est indiquŽe sur le diffuseur.
D731
Nettoyage intŽrieur
N'utilisez jamais des objets mŽtalliques pour
nettoyer l'appareil; vous risquez de l'endommager.
A l'occasion d'un dŽgivrage complet, lavez I'intŽrieur
avec de l'eau ti•de et du bicarbonate, rincez et
sŽchez soigneusement.
Nettoyage extŽrieur
Lavez la carrosserie avec de l'eau ti•de
savonneuse. Passez de temps en temps un produit
ˆ polir. DŽpoussiŽrez le condenseur situŽ ˆ l'arri•re
de l'appareil ˆ l'aide d'une brosse ou d'un aspirateur.
Une accumulation de poussi•re risquerait de
diminuer le rendement de l'appareil.
29
Hints for freezing
To help you make the most of the freezing process,
here are some important hints:
¥ the maximum quantity of food which can be
frozen in 24 hrs. is shown on the rating plate;
¥ the freezing process takes 24 hours. No further
food to be frozen should be added during this
period;
¥ only freeze top quality, fresh and thoroughly
cleaned, foodstuffs;
¥ prepare food in small portions to enable it to be
rapidly and completely frozen and to make it
possible subsequently to thaw only the quantity
required;
¥ wrap up the food in aluminium foil or polythene
and make sure that the packages are airtight;
¥ do not allow fresh, unfrozen food to touch food
which is already frozen, thus avoiding a rise in
temperature of the latter;
¥ lean foods store better and longer than fatty
ones; salt reduces the storage life of food;
¥ water ices, if consumed immediately after
removal from the freezer compartment, can
possibly cause the skin to be freeze burnt;
¥ it is advisable to show the freezing-in date on
each individual pack to enable you to keep tab of
the storage time;
HINTS
Hints for refrigeration
Useful hints:
Meat (all types): wrap in polythene bags and place
on the glass shelf above the vegetable drawer.
For safety, store in this way only one or two days
at the most.
Cooked foods, cold dishes, etc..: these should be
covered and may be placed on any shelf.
Fruit and vegetables: these should be thoroughly
cleaned and placed in the special drawer(s)
provided.
Butter and cheese: these should be placed in
special airtight containers or wrapped in aluminium
foil or polythene bags to exclude as much air as
possible.
Milk bottles: these should have a cap and should
be stored in the bottle rack on the door.
Bananas, potatoes, onions and garlic, if not
packed, must not be kept in the refrigerator.
Hints for storage of frozen food
To obtain the best performance from this appliance,
you should:
¥ make sure that the commercially frozen
foodstuffs were adequately stored by the retailer;
¥ be sure that frozen foodstuffs are transferred
from the foodstore to the freezer in the shortest
possible time;
¥ not open the door frequently or leave it open
longer than absolutely necessary.
¥ Once defrosted, food deteriorates rapidly and
cannot be refrozen.
¥ Do not exceed the storage period indicated by
the food manufacturer.
¥ the symbols on the drawers show different types of
frozen goods.
The numbers indicate storage times in months for
the appropriate types of frozen goods. Whether the
upper or lower value of the indicated storage time is
valid depends on the quality of the foods and pretreating before freezing;
¥ do not put carbonated liquids (fizzy drinks,
etc.) in the freezer compartment as they may
burst.
Page 21

21
ANOMALIE DE FONCTIONNEMENT
Si l'appareil marche mal, il faut contr™ler
¥ si la fiche est bien branchŽe ˆ la prise de courant
et si l'interrupteur est Žteint;
¥ s'il n'y a pas de panne de courant;
¥ si les commandes sont bien dans la bonne
position;
¥ s'il y a des traces d'eau au fond du compartiment
et si l'orifice d'Žcoulement de l'eau de dŽgivrage
est bouchŽ (voir chapitre ÒDŽgivrageÓ).
Une fois que tous ces contr™les ont ŽtŽ effectuŽs, si
l'anomalie de fonctionnement continue, adressezvous au Service Apr•s-Vente le plus proche.
Pour que l'intervention soit plus rapide, au
moment de l'appel, il vaut mieux indiquer le
code du mod•le et le numŽro d'immatriculation,
qui se trouvent sur le certificat de garantie ou
sur la plaque d'immatriculation placŽe ˆ
l'intŽrieur de l'appareil, ˆ gauche et en bas.
spatule en plastique qui est livrŽe avec l'appareil.
Pendant que l'on effectue cette opŽration, il n'est
pas nŽcessaire de couper le courant ou d'enlever
les denrŽes qui se trouvent dans le compartiment.
Pour effectuer un dŽgivrage complet procŽdez de la
mani•re suivante:
1. tournez le bouton du thermostat sur la position
Ç■È ou dŽbranchez lÕappareil;
2. enveloppez les denrŽes dans plusieurs feuilles
de papier journal et conservez-les dans un
endroit frais;
3. maintenez la porte ouverte,utilez la spatule
comme goutti•re et placez-la dans la partie
centrale, en bas, de lÕappareil, placez audessous une cuvette pour recevoir lÕeau de
dŽgivrage.
4. Žpongez et sŽchez soigneusement les parois et
le fond; conservez la spatule pour toute utilisation
future.
5. ramenez le bouton du thermostat sur la position
dŽsirŽe ou rebranchez lÕappareil.
6. Apr•s 2-3 heures de fonctionnement lÕappareil
est ˆ nouveau pr•t ˆ la con-servation des
produits surgelŽs.
Important:
Pour cette opŽration nÕutilisez jamais dÕobjet
mŽtallique qui risquerait de dŽtŽriorer lÕappareil.
NÕutilisez jamais de dispositifs mŽcaniques ou
autres moyens artificiels pour accŽlŽrer le
dŽgivrage, ˆ part ceux prŽconisŽs.
LÕŽlŽvation de tempŽrature des denrŽes
congelŽes peut diminuer leur durŽe de
conservation.
D068
28
Positioning the door shelves
To permit storage of food packages of various sizes,
the door shelves can be placed at different heights.
To make these adjustments proceed as follows:
Gradually pull the shelf in the direction of the arrows
until it comes free, then reposition as required.
D338
Movable shelves
The walls of the refrigerator are equipped with a
series of runners so that the shelves can be
positioned as desired.
For better use of space, the front half-shelves can lie
over the rear ones.
PR249
Page 22

22
Branchement Žlectrique
Contr™lez, avant de brancher lÕappareil, que le voltage
et la frŽquence indiquŽs sur la plaque signalŽtique
correspondent ˆ ceux de votre rŽseau.
TolŽrance admise: ±6%.
Pour lÕadaptation de lÕappareil ˆ des voltages
diffŽrents, lÕadjonction dÕun autotransformateur dÕune
puissance adŽquate est indispensable.
Il faut absolument brancher l'appareil ˆ une prise
de terre qui marche.
C'est pour cela que la prise du c‰ble d'alimentation est
munie d'un contact prŽvu expr•s. Si la prise de
courant du rŽseau domestique n'est pas branchŽe ˆ la
terre, branchez l'appareil ˆ une prise de terre ˆ part,
conformŽment aux normes en vigueur, en vous
adressant ˆ un technicien spŽcialisŽ.
Le fabricant dŽcline toute responsabilitŽ, si cette
norme de prŽvention des accidents n'est pas
respectŽe.
Cet appareil est conforme aux Directives
Communautaires suivantes:
- 87/308 CEE du 2.6.87 concernant la suppression
des interfŽrences radio-Žlectriques
- 73/23 CEE 19/02/73 (Basse Tension) et
modifications successives;
- 89/336 CEE 03/05/89 (CompatibilitŽ ElectromagnŽtique) et modifications successives.
INSTALLATION
Emplacement
Placez de prŽfŽrence votre appareil loin dÕune source
de chaleur (chauffage, cuisson ou rayons solaires trop
intenses).
Pour des raisons de sŽcuritŽ, la ventilation doit •tre
prŽvue comme indiquŽ dans la Fig.
Appreil positionnŽ sous armoires murales de cuisine
en surplomb (voir Fig. A).
Appreil positionnŽ sans armoires murales de cuisine
en surplomb (voir Fig. B).
Attention: veillez ˆ ne pas obstruer les ouvertures
de ventilation.
Mettez lÕappareil dÕaplomb en agissant sur les pieds
rŽglables.
Entretoises postŽrieures
Dans le sac avec la documentation, il y a deux
entretoises qui dolvent •tre montŽes dans les
deux coins supŽrieurs.
Desserrez les vis et introduisez les entretoises sous la
t•te de vis, puis resserrer.
NP002
100 mm10 mm
10 mm
A
B
PR153
Important: LÕappareil doit pouvoir •tre dŽbranchŽ
du secteur ; il est donc nŽcessaire que la fiche reste
accessible une fois que lÕinstallation est terminŽe.
27
Fresh food refrigeration
To obtain the best performance:
¥ do not store warm food or evaporating liquids in
the refrigerator;
¥ do cover or wrap the food, particularly if it has a
strong flavour.
¥ Position food so that air can circulate freely round
it.
Ice-cube production
This appliance is equipped with one or more trays
for the production of ice-cubes. Fill these trays with
water, then put them in the freezer compartment.
Do not use metallic instruments to remove the
trays from the freezer.
Thawing
Deep-frozen or frozen food, prior to being used, can
be thawed in the refrigerator compartment or at
room temperature, depending on the time available
for this operation.
Small pieces may even be cooked still frozen,
directly from the freezer: in this case, cooking will
take longer.
However, for a quicker freezing operation, turn the
thermostat knob to the coldest setting; but
remember that, in this condition, the refrigerating
compartment temperature might drop below 0¡C.
If this occurs reset thermostat knob to a warmer
setting.
Place the food to be frozen in the upper
compartment of the freezer as this is the coldest
part.
Important
Do not put carbonated liquids (fizzy drinks, etc.) in
the freezing compartment as they may burst.
Water ices, if consumed immediately after removal
from the freezing compartment, can possibly cause
the skin to be freeze burnt.
Remember that, once thawed, frozen food deteriorates rapidly.
Storage of frozen food
When first starting-up or after a period out of use,
before putting the products in the compartment let
the appliance run for at least two hours on the
coldest setting, then turn the thermostat knob to the
normal operating position.
Important
If there is a power failure when food is in the
freezer, do not open the door of the freezer
compartment. The frozen food will not be
affected if the power cut is of short duration (up
to 6-8 hours) and the freezer compartment is full,
otherwise, it is recommended that the food
should be used within a short time (a
temperature increase of the frozen food
shortens its safe storage period).
Cold accumulators
The freezer contains two cold accumulators which
increase storage times in the event of a power cut or
breakdown.
For security reasons, during the transport of the
appliance, the cold accumulators are located in the
lower drawer.
The correct location of the accumulators is inside
the upper drawer, on top of the stored food.
Page 23

23
RŽversibilitŽ des portes
Les portes de ce rŽfrigŽrateur congŽlateur sont
rŽversibles: leurs sens dÕouverture peuvent •tre
modifiŽs en fonction du souhait de lÕutilisateur.
Pour changer le sens dÕouverture des portes
1) DŽbranchez IÕappareil
2) Otez la grille dÕaŽration (D) qui est fixŽe par un
ressort.
3) DŽmontez la charni•re infŽrieure (E) en
dŽvissant les deux vis de fixation.
4) DŽgagez la porte infŽrieure de la charni•re du
milieu (H).
5) DŽvissez la charni•re du milieu.
6) DŽgagez la porte supŽrieure du pivot (G)
7) Enlevez le pivot et montez-le sur lÕautre c™tŽ de
lÕappareil. Enlevez les deux caches, de fa•on ˆ
dŽcouvrir les trous pour les pivots de la
charni•re, et remontez-les de lÕautre c™tŽ.
8) Remontez la porte supŽrieure. Fixez la charni•re
du milieu sur lÕautre c™tŽ.
9) Remontez la porte infŽrieure.
10)Vissez la charni•re infŽrieure (E) sur le c™tŽ
opposŽ en utilisant les vis enlevŽes
prŽcŽdemment.
11)DŽtachez le cache (F) de la grille de ventilation
(D) et remontez-le dans lÕouverture qui est restŽe
libre sur lÕautre c™tŽ.
12)DŽvissez les poignŽes Les remonter de lÕautre
c™tŽ apr•s avoir percŽ les bouchons avec un
poin•on. Couvrez les trous libres avec les
bouchons contenus dans le sachet de la
documentation.
13)Remontez la grille dÕaŽration (D) qui est fixŽe par
un ressort.
Pour aligner les portes vous pouvez agir sur la
charni•re du milieu.
La charni•re du milieu (H) se r•gle horizontalement,
ˆ lÕaide dÕun outil, apr•s avoir desserrŽ les deux vis.
La rŽversibilitŽ des portes une fois effectuŽe,
contr™lez que les joints magnŽtiques adh•rent ˆ la
carrosserie. Si la tempŽrature ˆ lÕintŽrieur de la
pi•ce est trop basse (en hiver, par exemple), il se
peut que les joints nÕadh•rent pas parfaitement.
Dans ce cas, si on ne veut pas attendre que les
joints reprennent leurs dimensions naturelles apr•s
un certain temps, on pourra accŽlŽrer ce processus
en chauffant la partie intŽressŽe ˆ lÕaide dÕun s•checheveux.
G
H
E
F
D
F
F
F
PR228
26
Cleaning the interior
Before using the appliance for the first time, wash
the interior and all internal accessories with lukewarm water and some neutral soap so as to remove
the typical smell of a brand-new product, then dry
thoroughly.
Do not use detergents or abrasive
powders, as these will damage the finish.
Operation
Insert the plug into the wall socket.
Turn the thermostat knob (D) to the right beyond the
Ç■È (the function indicator light (C) will light up .
To stop the appliance, turn the thermostat knob to
position Ç■È.
Temperature regulation
The temperature is automatically regulated and can
be increased to achieve a higher temperature
(warmer) by rotating the thermostat knob toward
lower settings or reduced (colder) rotating the knob
towards higher settings.
However, the exact setting should be chosen
keeping in mind that the temperature inside the
refrigerator depends on:
¥ room temperature;
¥ how often the door is opened;
¥ the quantity of food stored;
¥ location of appliance.
A medium setting is generally the most suitable.
USE
Important
If the ambient temperature is high or the
appliance is fully loaded, and the appliance is
set to the lowest temperatures, it may run
continuously causing frost to form on the rear
wall. In this case the dial must be set to a higher
temperature to allow automatic defrosting and
therefore reduced energy consumption.
Ambient switch
With a room temperature lower than +16¡C, the
ambient switch must be depressed. Pilot light (A) will
come on.
Freezing fresh food
The 4-star compartment is suitable for
long term storage of commercially frozen food, and
for freezing fresh food.
To freeze fresh foods it is not necessary to change
the setting of the thermostat knob with respect to the
normal running position.
Control panel
minmax
AB C D
ON
A. Resistance pilot light
B. Ambient switch
C. Operating light
D. Thermostat knob
Page 24

24
WARNINGS
It is most important that this instruction book should be retained with the appliance for future
reference. Should the appliance be sold or transferred to another owner, or should you move house
and leave the appliance, always ensure that the book is supplied with the appliance in order that the
new owner can be acquainted with the functioning of the appliance and the relevant warnings.
If this appliance featuring magnetic door seals is to replace an older appliance having a spring lock
(latch) on the door or lid, be sure to make that spring lock unusable before you discard the old
appliance. This will prevent it from becoming a death-trap for a child.
These warnings are provided in the interest of safety. You must read them carefully before installing or
using the appliance.
General Safety
¥ This appliance is designed to be operated by
adults. Children should not be allowed to tamper
with the controls or play with the product.
¥ It is dangerous to alter the specifications or
modify this product in any way.
¥ Before any cleaning or maintenance work is carried
out, be sure to switch off and unplug the appliance.
¥ This appliance is heavy. Care should be taken
when moving it
¥ Ice lollies can cause frost burns if consumed
straight from the appliance.
¥ Take utmost care when handling your
appliance so as not to cause any damages to
the cooling unit with consequent possible
fluid leakages.
¥ The appliance must not be located close to
radiators or gas cookers.
¥ Avoid prolonged exposure of the appliance to
direct sunlight.
¥ There must be adequate ventilation round the
back of the appliance and any damage to the
refrigerant circuit must be avoided.
¥ For freezers only (except built-in models): an
ideal location is the cellar or basement.
¥ Do not use other electrical appliances (such
as ice cream makers) inside of refrigerating
appliances.
Service/Repair
¥ Any electrical work required to install this
appliance should be carried out by a qualified
electrician or competent person
¥ This product should be serviced by an authorized
Service Centre, and only genuine spare parts
should be used.
¥ Under no circumstances should you attempt to
repair the appliance yourself. Repairs carried out
by inexperienced persons may cause injury or
more serious malfunctioning. Refer to your local
Service Centre, and always insist on genuine
spare parts.
¥ This appliance contains hydrocarbons in its
cooling unit; maintenance and recharging must
therefore only be carried out by authorized
technicians.
Use
¥ The domestic refrigerators and freezers are
designed to be used specifically for the storage
of edible foodstuffs only.
¥ Best performance is obtained with ambient
temperature between +18¡C and +43¡C (class
T); +18¡C and +38¡C (class ST); +16¡C and
+32¡C (class N); +10¡C and +32¡C (class SN).
The class of your appliance is shown on its rating
plate.
Warning: when the ambient temperature is not
included within the range indicated for the class
of this appliance, the following instructions must
be observed: when the ambient temperature
drops below the minimum level, the storage
temperature in the freezer compartment cannot
be guaranteed; therefore it is advisable to use
the food stored as soon as possible.
¥ Frozen food must not be re-frozen once it has
been thawed out.
¥ ManufacturersÕ storage recommendations should
be strictly adhered to. Refer to relevant
instructions.
¥ The inner lining of the appliance consists of
channels through which the refrigerant passes. If
these should be punctured this would damage the
appliance beyond repair and cause food loss. DO
NOT USE SHARP INSTRUMENTS to scrape off
frost or ice. Frost may be removed by using the
scraper provided. Under no circumstances should
solid ice be forced off the liner. Solid ice should be
allowed to thaw when defrosting the appliance.
¥ Do not place carbonated or fizzy drinks in the
freezer as it creates pressure on the container,
which may cause it to explode, resulting in
damage to the appliance. Do not use a
mechanical device or any artificial means to
Printed on recycled paper
25
CONTENTS
Warnings 24
Use 26
Control panel 26
Cleaning the interior 26
Operation 26
Temperature regulation 26
Ambient switch 26
Freezing fresh food 26
Storage of frozen food 27
Thawing 27
Ice-cube production 27
Fresh food refrigeration 27
Cold accumulators 27
Movable shelves 28
Positioning the door shelves 28
Hints 29
hints for refrigeration 29
Hints for freezing 29
Hints for storage of frozen food 29
Maintenance 30
Periodic cleaning 30
Periods of no operation 30
Interior light 30
Defrosting 30
Customer service and spare parts 31
Installation 32
Location 32
Rear spacers 32
Electrical connection 32
Changing the opening direction of the doors 33
speed up the thawing process other than those
recommended by the manufacturer. Never use
metal objects for cleaning your appliance as it
may get damaged.
Installation
¥ During normal operation, the condenser and
compressor at the back of the appliance heat up
considerably. For safety reasons, minimum
ventilation must be as shown in the instructions.
Attention: keep ventilation openings clear of
obstruction.
¥ Care must be taken to ensure that the appliance
does not stand on the electrical supply cable.
Important: if the supply cord is damaged, it must
be replaced by a special cord or assembly available from the manufacturer or its service agent.
¥ If the appliance is transported horizontally, it is
possible that the oil contained in the compressor
flows in the refrigerant circuit. It is advisable to
wait at least two hours before connecting the
appliance to allow the oil to flow back in the
compressor.
¥ There are working parts in this product which
heat up. Always ensure that there is adequate
ventilation as a failure to do this will result in
component failure and possible food loss. See
installation instructions.
¥ Parts which heat up should not be exposed.
Wherever possible the back of the product
should be against a wall.
Environment Protection
This appliance does not contain gasses which
could damage the ozone layer, in either its
refrigerant circuit or insulation materials. The
appliance shall not be discarded together with
the urban refuse and rubbish. Avoid damaging
the cooling unit, especially at the rear near the
heat exchanger. Information on your local
disposal sites may be obtained from municipal
authorities. The materials used on this appliance
marked by the symbol are recyclable.
 Loading...