

fridge - freezer
INSTRUCTION BOOK
2222 069-92
ER 7521 B
© Electrolux Household Appliances Limited 2001

IMPORTANT SAFETY INFORMATION
2
It is most important that this instruction book should be retained with the appliance for future reference. Should the appliance be sold or transferred to another owner, or should you move house and
leave the appliance, always ensure that the book is left with the appliance in order that the new owner
can get to know the functioning of the appliance and the relevant safety information.
This information has been provided in the interest of safety. You MUST read it carefully before
installing or using the appliance.
Installation
¥ This appliance is heavy. Care should be taken
when moving it.
¥ It is dangerous to alter the specifications or attempt
to modify this product in any way.
¥ Care must be taken to ensure that the appliance
does not stand on the electrical supply cable.
Important: if the supply cable is damaged, it must
be replaced by a special cable available from the
manufacturer or its service agent.
¥ Any electrical work required to install this appliance
should be carried out by a qualified electrician or
competent person.
¥ Parts which heat up should not be exposed.
Whenever possible, the back of the appliance
should be close to a wall but leaving the required
distance for ventilation as stated in the installation
instructions.
¥ The appliance should be left for 2 hours after instal-
lation before it is turned on, in order to allow the
refrigerant to settle.
Child Safety
¥ Do not allow children to tamper with the controls or
play with the product.
¥ Keep all packaging well away from children.
General Safety
¥ Take utmost care when handling your appliance
so as not to cause any damages to the cooling
unit with consequent possible fluid leakages.
¥ The appliance must not be located close to radi-
ators or boilers.
¥ Avoid prolonged exposure of the appliance to
direct sunlight.
¥ Do not use other electrical appliances (such as
ice cream makers) inside of refrigerating appliances, unless they are approved for this purpose by the manufacturer.
During Use
¥ This appliance is designed for domestic use only,
specifically for the storage of edible foodstuffs only.
¥ Frozen food must NOT be re-frozen once it has
thawed out.
¥ Do not place carbonated or fizzy drinks in the
freezer.
¥ Do not remove items from the freezer if your
hands are damp/wet, as this could cause skin
abrasions or frost/freezer burns.
¥ Ice lollies can cause Ôfrost/freezer burnsÕ if con-
sumed straight from the freezer.
¥ ManufacturersÕ storage recommendations should
be strictly adhered to. Refer to relevant instructions.
¥ The cooling plate or refrigerated freezer shelves
in this appliance contain channels through which
the refrigerant passes. If these are punctured this
will cause substantial damage to the appliance
and result in food loss. DO NOT USE SHARP
INSTRUMENTS to scrape off frost or ice. Under
NO circumstances should solid ice be forced off
the lining or shelves. Solid ice should be allowed
to thaw, when defrosting the appliance. See
Defrost Instructions.
Maintenance and Cleaning
¥ Switch off and unplug the appliance before carry-
ing out any cleaning or maintenance work.
Servicing
¥ This product should be serviced by an authorised
engineer and only genuine spare parts should be
used.
¥ Under no circumstances should you attempt to
repair the machine yourself. Repairs carried out
by inexperienced persons may cause injury or
serious malfunctioning. Refer to your local
Electrolux Service Force Centre and always
insist on genuine spare parts.
At the end of the
Appliance Life
¥ When disposing of your appliance, use an autho-
rised disposal site.
¥ Remove the plug and ensure that any locks or
catches are removed, to prevent young children
being trapped inside.
3
CONTENTS
2222 069-92
Instructions for the User
Important Safety Information
2
Description of the Appliance
4
Operation
5
Before use 5
Setting the temperature 5
The freezer compartment 5
Freezing fresh food 5
Frozen food storage 5
Thawing 6
Making ice cubes 6
Fresh food refrigeration 6
Normal operating sounds 6
Movable shelves 6
Hints and Tips
7
Maintenance and Cleaning
8
Internal cleaning 8
External cleaning 8
When the appliance is not in use 8
Changing the light bulb 8
Defrosting 8
Something Not Working
10
Service and Spare Parts
11
Customer Care
11
Guarantee Conditions
14
Instructions for the
Installer
Technical Specification
15
Installation
16
Positioning 16
Rear Spacers 16
Electrical Connection
17
Door Reversal
18
18
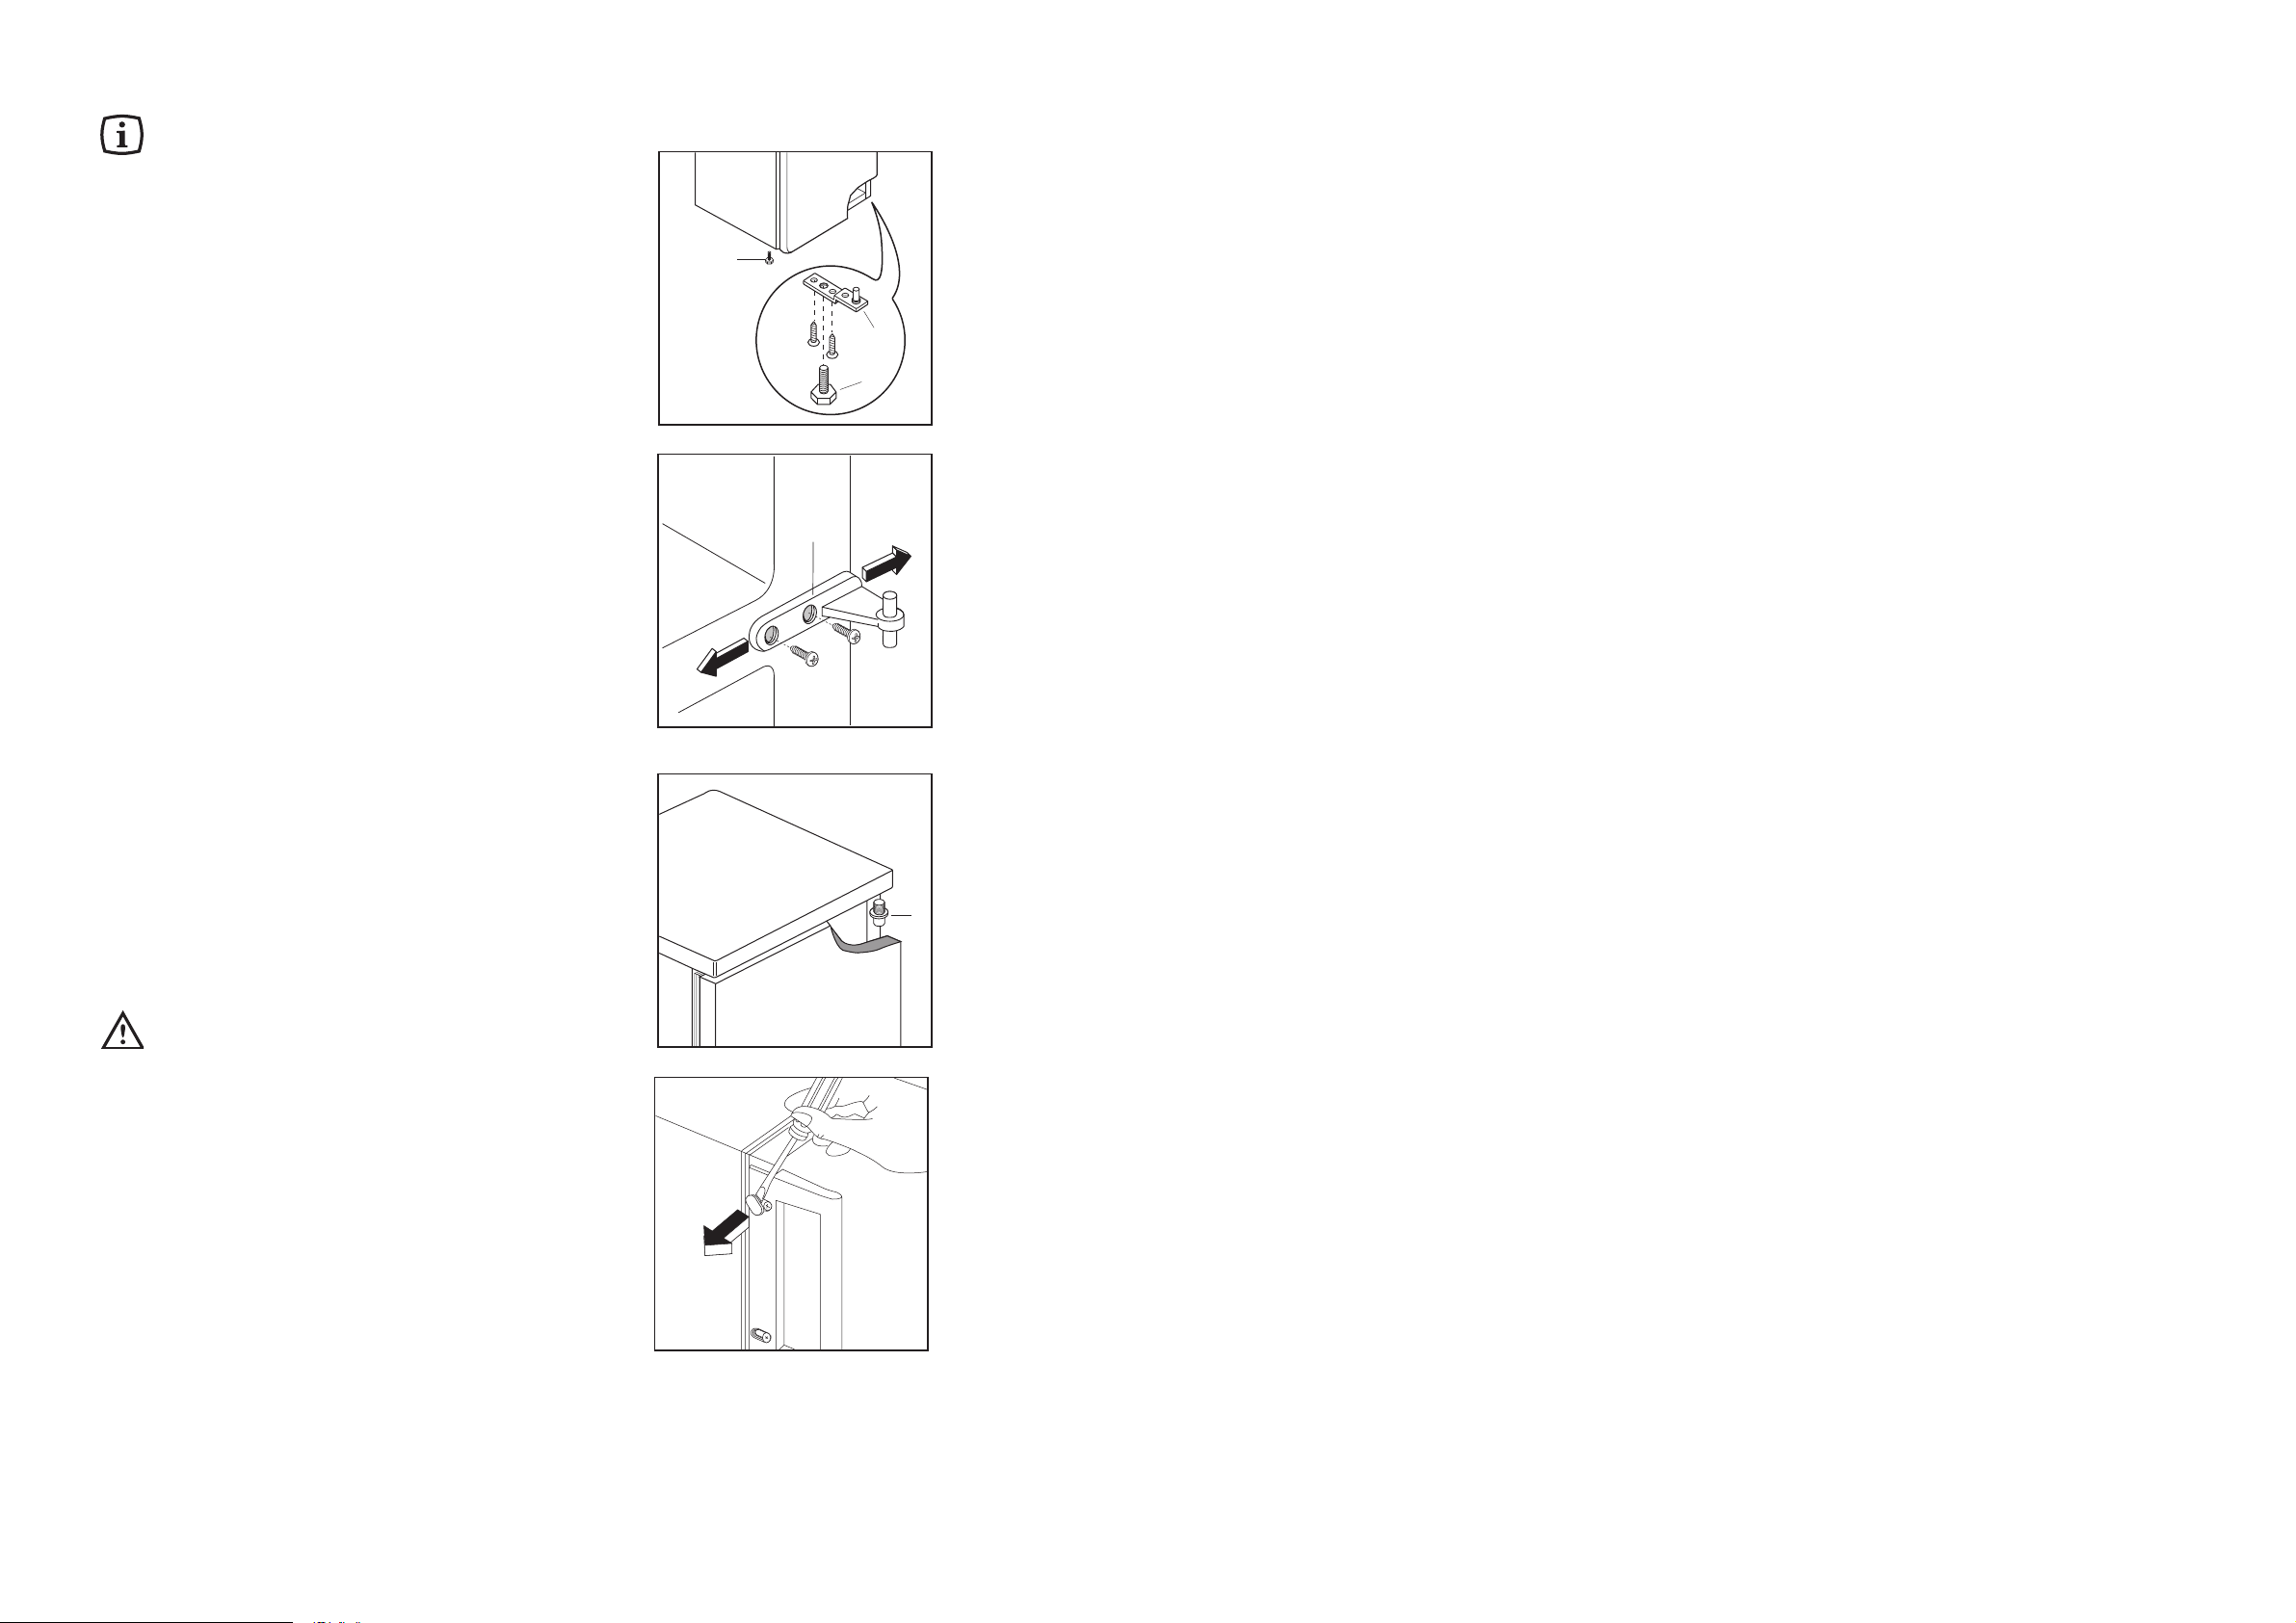
Door reversal
1. Disconnect from the electricity supply.
2. Remove all loose items, including food, store
food in a cool place.
3. Gently lay the fridge/freezer on its back with the
top held away from the floor by 5-8 cm (2-3
inches) of packing;
4. Remove the feet (2-3)
5. Remove bottom hinge (1).
6. Remove the freezer door by releasing it from the
middle hinge (H).
7. Unscrew the middle hinge.
8. Slide out the fridge door from pin (D), unscrew
the latter and then screw it down into the hinge
provided on the opposite side, after having
removed the small plugs (I) which should then be
fitted on the opposite side.
9. Refit the fridge door and replace the middle hinge
to the left hand side.
10.Replace the door and bottom hinge (1) on the
opposite side.
11.Refit the feet (2-3) on the opposite side.
12.Unscrew the handles. Refit them on the opposite
side.
13.The doors can be aligned by adjusting the
middle hinge.
14.The middle hinge can be adjusted horizontally
with a screwdriver, after having slackened the two
screws.
Retighten the screws after adjustment.
Attention
After completion of the door reversing operation,
check that the door gasket adheres to the cabinet. If
the ambient temperature is cold (i.e. in Winter), the
gasket may not fit perfectly to the cabinet. In that
case, wait for the natural fitting of the gasket or
accelerate this process by heating up the part
involved with a normal hairdryer on a cool setting.
D
D590
H
PR04
D715 PIED/M
1
2
3
 Loading...