

Page 1
COMPETENCE B 8139-4-m
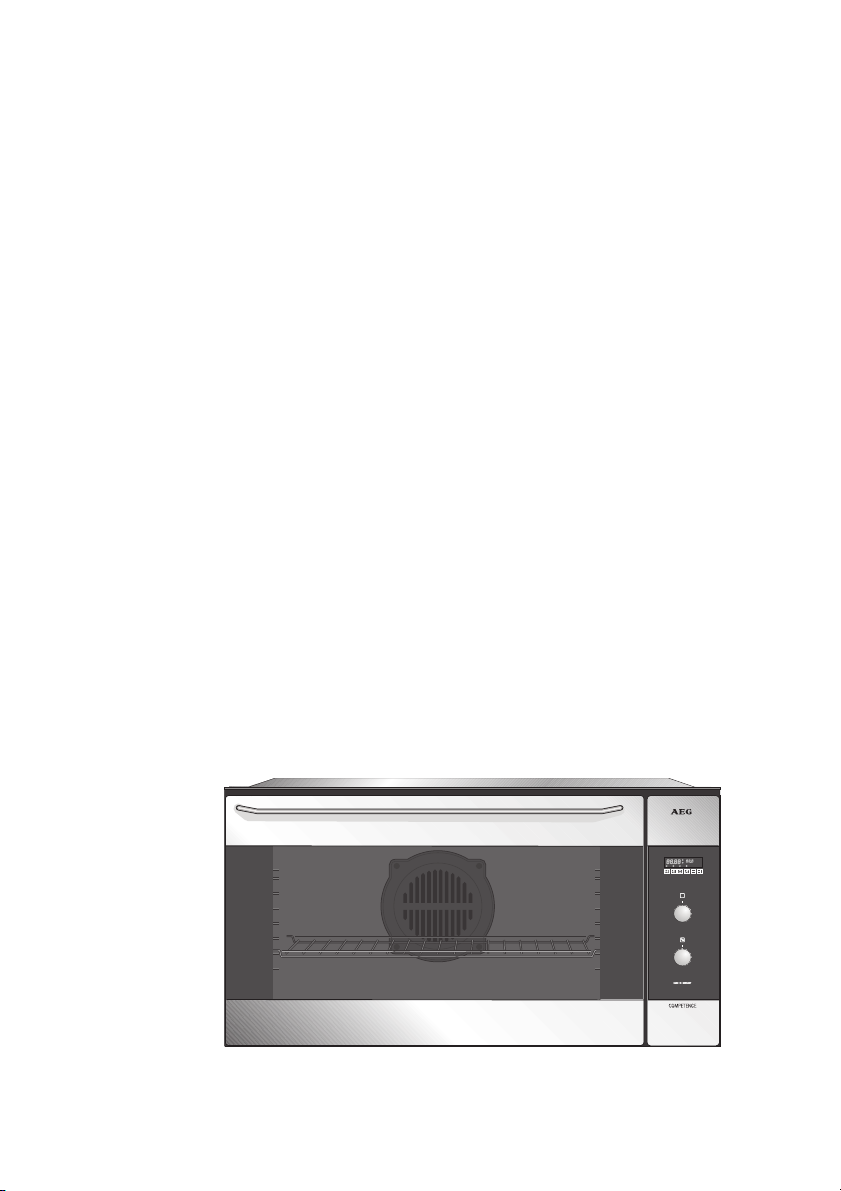
Built-in single oven
User Instructions
Page 2

Dear customer,
Before using your new appliance, please read these operating instructions through carefully.
They will enable you to make use of all the technical benefits of your
new appliance. The instructions contain important information on safe
use, installation and care.
Please keep the operating instructions for later reference. Pass them on
to any subsequent owner of the appliance.
The warning triangle and/or the specific words (Warning!, Caution!,
!
Important!) are used to highlight instructions that are important for
your safety or for the function of the appliance.
It is imperative that these instructions are observed.
☞ 1. This symbol guides you step by step when operating the appliance.
2. ...
3. ...
Next to this symbol you will find additional information and practical
i
tips on using the appliance.
Tips and information about the economical and ecological use of the
machine are marked with the clover.
In the event of a malfunction, these operating instructions contain
information on how to rectify faults yourself, see the "What to do, if…"
section.
2
Page 3

CONTENTS
CONTENTS
OPERATING INSTRUCTIONS . . . . . . . . . . . . . . . . . . . . . 5
Safety Instructions . . . . . . . . . . . . . . . . . . . . . . . . . . . . . . . . . . . 5
General Safety . . . . . . . . . . . . . . . . . . . . . . . . . . . . . . . . . . . . . . . . . . . . . . . . . . . . . 5
Disposal . . . . . . . . . . . . . . . . . . . . . . . . . . . . . . . . . . . . . . . . . . 7
The Key Features of Your Appliance . . . . . . . . . . . . . . . . . . . . . . 8
Description of the Appliance . . . . . . . . . . . . . . . . . . . . . . . . . . . . 9
Control Panel . . . . . . . . . . . . . . . . . . . . . . . . . . . . . . . . . . . . . . . . . . . . . . . . . . . . . . 9
Oven Features . . . . . . . . . . . . . . . . . . . . . . . . . . . . . . . . . . . . . . . . . . . . . . . . . . . . 10
Oven Accessories . . . . . . . . . . . . . . . . . . . . . . . . . . . . . . . . . . . . . . . . . . . . . . . . . . 10
Before first use . . . . . . . . . . . . . . . . . . . . . . . . . . . . . . . . . . . . . 13
Initial Cleaning . . . . . . . . . . . . . . . . . . . . . . . . . . . . . . . . . . . . . . . . . . . . . . . . . . .13
Setting the clock . . . . . . . . . . . . . . . . . . . . . . . . . . . . . . . . . . . . . . . . . . . . . . . . . . 13
Switching the Oven On and Off . . . . . . . . . . . . . . . . . . . . . . . . . . . . . . . . . . . . .14
Fast Warm Up . . . . . . . . . . . . . . . . . . . . . . . . . . . . . . . . . . . . . . . . . . . . . . . . . . . . 15
The electronic timer . . . . . . . . . . . . . . . . . . . . . . . . . . . . . . . . . . 16
Setting and changing the clock . . . . . . . . . . . . . . . . . . . . . . . . . . . . . . . . . . . . .17
Setting the minute minder . . . . . . . . . . . . . . . . . . . . . . . . . . . . . . . . . . . . . . . . .17
How to set the electronic timer . . . . . . . . . . . . . . . . . . . . . . . . . . . . . . . . . . . . .18
Changing the setting . . . . . . . . . . . . . . . . . . . . . . . . . . . . . . . . . . . . . . . . . . . . . .18
When the cooking time is finished . . . . . . . . . . . . . . . . . . . . . . . . . . . . . . . . . . .19
Setting the cooking time
Setting the finish time
Automatic switch-on and switch-off . . . . . . . . . . . . . . . . . . . . . . . . . . . . . . . . .21
Setting the Meat Probe, core temperature function . . . . . . . . . . . . . . . . . . . . 22
Meat Probe, function with delayed start . . . . . . . . . . . . . . . . . . . . . . . . . . . . . . 24
7 (switch-off function) . . . . . . . . . . . . . . . . . . . . .19
8 (switch-off function) . . . . . . . . . . . . . . . . . . . . . . . . 20
Usage, Tables and Tips . . . . . . . . . . . . . . . . . . . . . . . . . . . . . . . . 26
Baking . . . . . . . . . . . . . . . . . . . . . . . . . . . . . . . . . . . . . . . . . . . . . . . . . . . . . . . . . .26
Roasting . . . . . . . . . . . . . . . . . . . . . . . . . . . . . . . . . . . . . . . . . . . . . . . . . . . . . . . .35
Roasting with the Meat Probe . . . . . . . . . . . . . . . . . . . . . . . . . . . . . . . . . . . . . .41
Grilling . . . . . . . . . . . . . . . . . . . . . . . . . . . . . . . . . . . . . . . . . . . . . . . . . . . . . . . . .43
Defrosting . . . . . . . . . . . . . . . . . . . . . . . . . . . . . . . . . . . . . . . . . . . . . . . . . . . . . . .45
Preserving . . . . . . . . . . . . . . . . . . . . . . . . . . . . . . . . . . . . . . . . . . . . . . . . . . . . . . .46
3
Page 4

CONTENTS
Cleaning and Care . . . . . . . . . . . . . . . . . . . . . . . . . . . . . . . . . . . 47
The Exterior of the Appliance . . . . . . . . . . . . . . . . . . . . . . . . . . . . . . . . . . . . . . .47
Oven Interior . . . . . . . . . . . . . . . . . . . . . . . . . . . . . . . . . . . . . . . . . . . . . . . . . . . . . 47
Accessories . . . . . . . . . . . . . . . . . . . . . . . . . . . . . . . . . . . . . . . . . . . . . . . . . . . . . . .47
Side Rails . . . . . . . . . . . . . . . . . . . . . . . . . . . . . . . . . . . . . . . . . . . . . . . . . . . . . . . .48
Oven Light Bulb . . . . . . . . . . . . . . . . . . . . . . . . . . . . . . . . . . . . . . . . . . . . . . . . . .49
Combination Grill Element . . . . . . . . . . . . . . . . . . . . . . . . . . . . . . . . . . . . . . . . .50
Oven Door . . . . . . . . . . . . . . . . . . . . . . . . . . . . . . . . . . . . . . . . . . . . . . . . . . . . . . . 51
What to do, if … . . . . . . . . . . . . . . . . . . . . . . . . . . . . . . . . . . . . 52
SERVICE AND SPARE PARTS . . . . . . . . . . . . . . . . . . . 53
CUSTOMER SERVICE . . . . . . . . . . . . . . . . . . . . . . . . . 54
Warrenty Conditions . . . . . . . . . . . . . . . . . . . . . . . . 55
INSTALLATION INSTRUCTIONS . . . . . . . . . . . . . . . . . . 56
Technical Data . . . . . . . . . . . . . . . . . . . . . . . . . . . . . . . . . . . . . . . . . . . . . . . . . . . . 56
Regulations, Standards, Directives . . . . . . . . . . . . . . . . . . . . . . . . . . . . . . . . . . .56
Safety Instructions for the Installer . . . . . . . . . . . . . . . . . . . . . . . . . . . . . . . . . .57
Installation instructions . . . . . . . . . . . . . . . . . . . . . . . . . . . . . . . . . . . . . . . . . . . .57
Electrical Connection . . . . . . . . . . . . . . . . . . . . . . . . . . . . . . . . 58
INSTALLATION . . . . . . . . . . . . . . . . . . . . . . . . . . . . . . . . . . . . . 59
Drawing with Dimensions . . . . . . . . . . . . . . . . . . . . . . . . . . . . . . . . . . . . . . . . . . 59
Installation in a Kitchen Unit . . . . . . . . . . . . . . . . . . . . . . . . . . . . . . . . . . . . . . .59
INDEX . . . . . . . . . . . . . . . . . . . . . . . . . . . . . . . . . . . . 62
4
Page 5

OPERATING INSTRUCTIONS
OPERATING INSTRUCTIONS
Safety Instructions
!
This appliance is only to be installed by an approved installer.
Please observe this instruction, otherwise the warranty will not cover
any damage that may occur.
The safety features of AEG electrical appliances comply with accepted
technical standards and the German Appliance Safety Law. However, we
also consider it our obligation as a manufacturer to make you aware of
the following safety information.
General Safety
• When using other electrical appliances ensure the cable does not
come into contact with the hot surface of the oven.
• Do not store inflammable substances in the oven. They could ignite
when the oven is switched on.
• For safety reasons do not clean the appliance with a steam or high
pressure cleaner.
• Only use the original meat probe. The cable must not be trapped in
the oven door. When not in use, remove the meat probe from the
oven.
• Maintain a separation of at least 5 cm between the meat probe and
the grill or top heat.
• When roasting and grilling, the oven door will become hot.
Therefore, always keep small children away from the oven.
• Repairs to the appliance are only to be performed by qualified service
engineers. Improper repairs can give rise to significant hazards. If
your appliance needs repairing, please contact your local AEG Service
Force Centre.
• In the event of a malfunction, disconnect from the mains supply.
5
Page 6

OPERATING INSTRUCTIONS
Intended Use
• This oven is intended for domestic cooking only. It is not designed for
commercial or industrial purposes.
• Only use the appliance to prepare food.
• Do not use the oven to heat the room.
How To Avoid Damage to Your Appliance
• Do not line your oven with aluminium foil and do not place a fat tray,
baking sheet, dish, etc. on the oven floor, otherwise the oven enamel
will be damaged by the resulting build up of heat.
• Clean the appliance after each use. Spills are then easier to clean up
and do not become burnt onto the surface.
• Any drops of fruit juice that fall from the baking sheet will leave
spots that cannot be removed. Use the universal tray for very moist
cakes.
• Never pour water directly into the hot oven. The enamel may be
damaged.
• Do not sit on the open oven door.
• Do not store moist food in the oven.
• Only use the original meat probe. The separation between the grill or
top heat and the meat probe must be at least 5 cm.
• Do not leave the meat probe in the oven if it is not in use.
6
Page 7
OPERATING INSTRUCTIONS
Disposal
Disposing of the packaging materials
All materials used can be fully recycled.
Wood is used for the outer packaging.
The plastics are marked as follows:
• >PE< for polyethylene, e.g. as used for the outer wrapping and the
bags inside.
• >PS< for polystyrene foam, e.g. the packaging, which are all free of
CFCs.
Disposal of old appliances
All old appliances must be correctly disposed of for environmental reasons.
Warning! Please make old appliances unusable prior to disposal. Pull
!
out the mains plug, cut off the mains cable, and remove any door
catches.
Notes on Disposal
• The appliance must not be disposed of in the household rubbish.
• You can obtain information about collection dates or public tips from
your local refuse department or council.
7
Page 8

OPERATING INSTRUCTIONS
The Key Features of Your Appliance
• Control Knobs: The oven functions and temperature are each
selected using the control knobs. To release the control knob press
and release it so it pops out. Press the knob again to return it into the
control panel.
• Electronic Clock with Digital Display: time of day, interval, cooking
time, and core temperature are displayed.
• Automatic Switching On and Off: Using the electronic clock, the
oven can be automatically switched on with a time delay, and
switched off again at the end of the cooking time set.
•Large Oven Volume: The oven is suitable for cooking large amounts
of food due to its capacity of 92 litres (gross volume).
• Heat Protective Glazing: The oven door is triple glazed with a heat
reflective Thermax inner panel. The front of the appliance remains
cool when the oven is in operation.
• Energy Saving: It is fitted with multiple oven insulation, halogen
lighting on both sides, and a door switch that automatically turns off
the hot air fan and oven heating when the oven door is opened.
8
Page 9
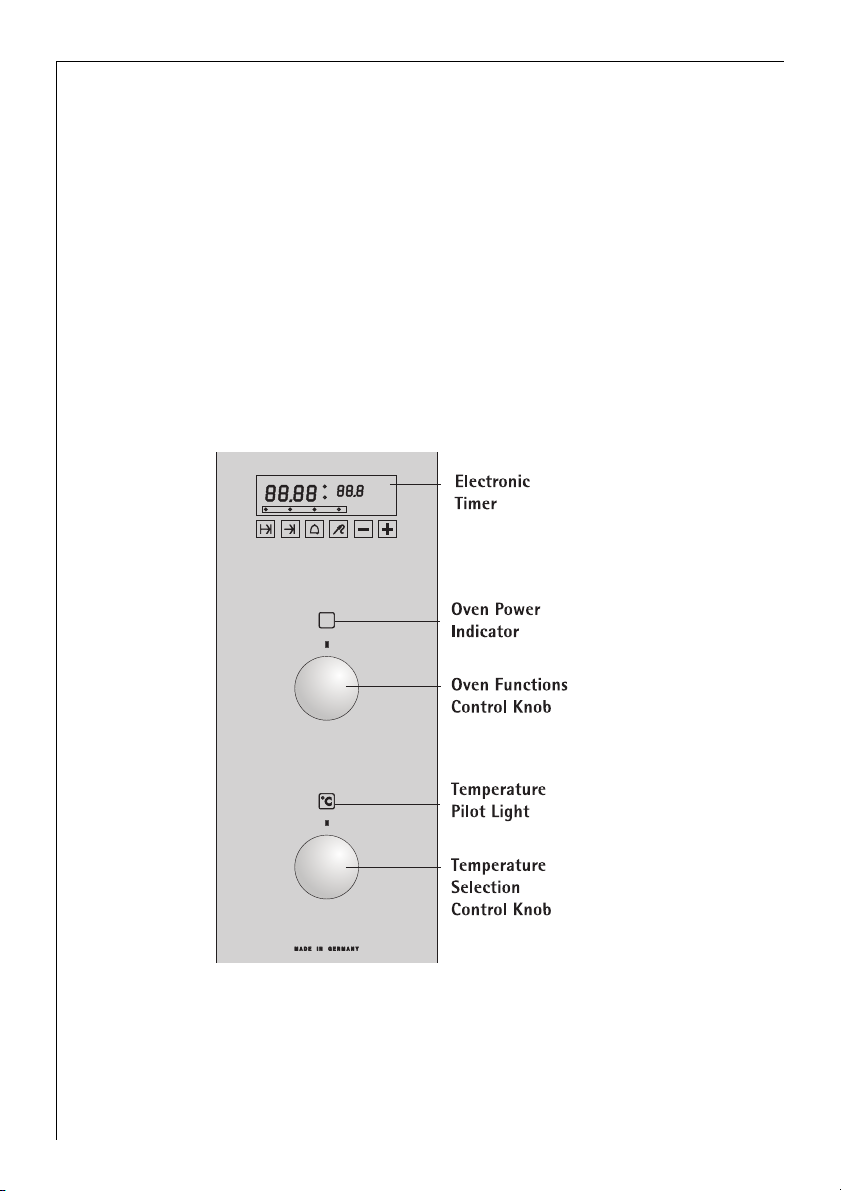
Description of the Appliance
Control Panel
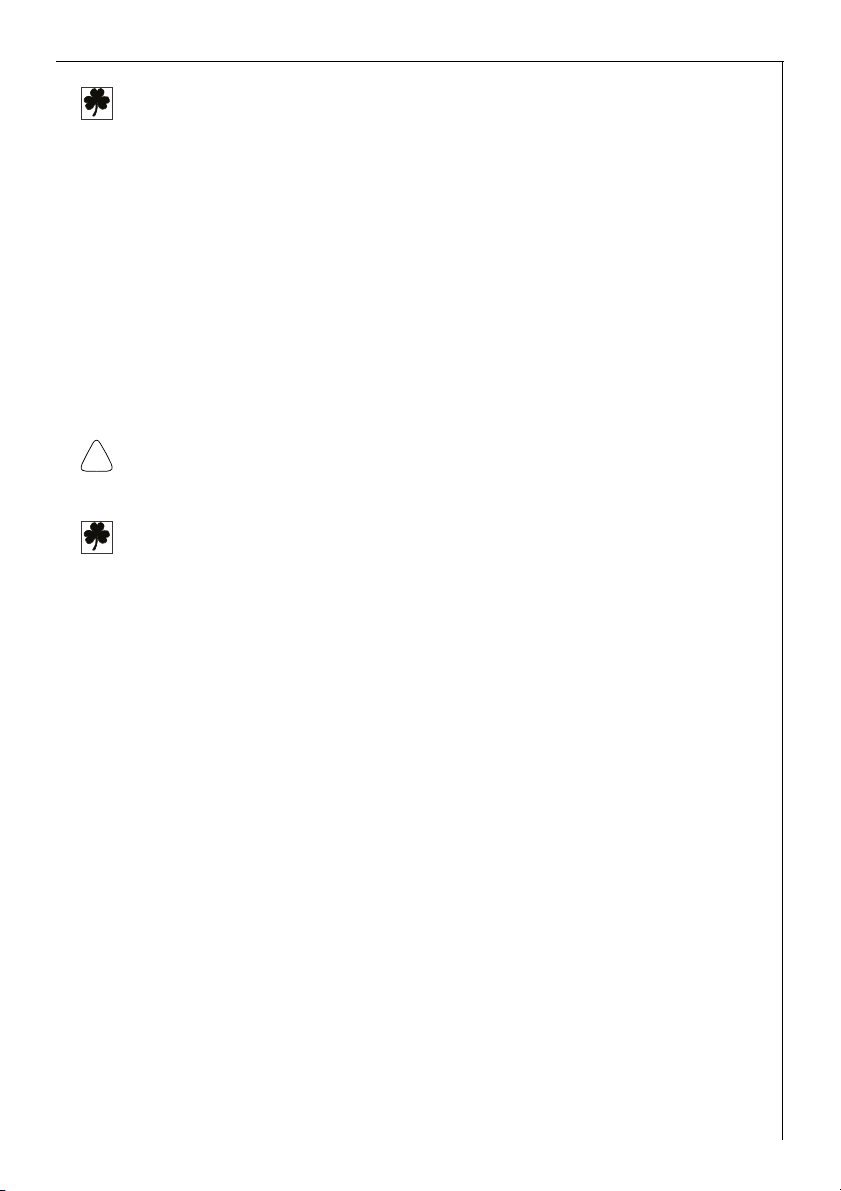
1 Electronic Timer
With indication of the time of day,
interval timer, meat probe display,
automatic switching on and off.
2 Oven Power Indicator
Illuminates when the oven function
is switched on.
3 Oven Function Control Knob
For selecting the required oven
functions.
4 Temperature Pilot Light
Illuminates as long as the oven is
warming up, and extinguishes when
the temperature set is reached.
OPERATING INSTRUCTIONS
Temperature Selection Control Knob
5
For selecting the required oven
temperature.
9
Page 10
OPERATING INSTRUCTIONS
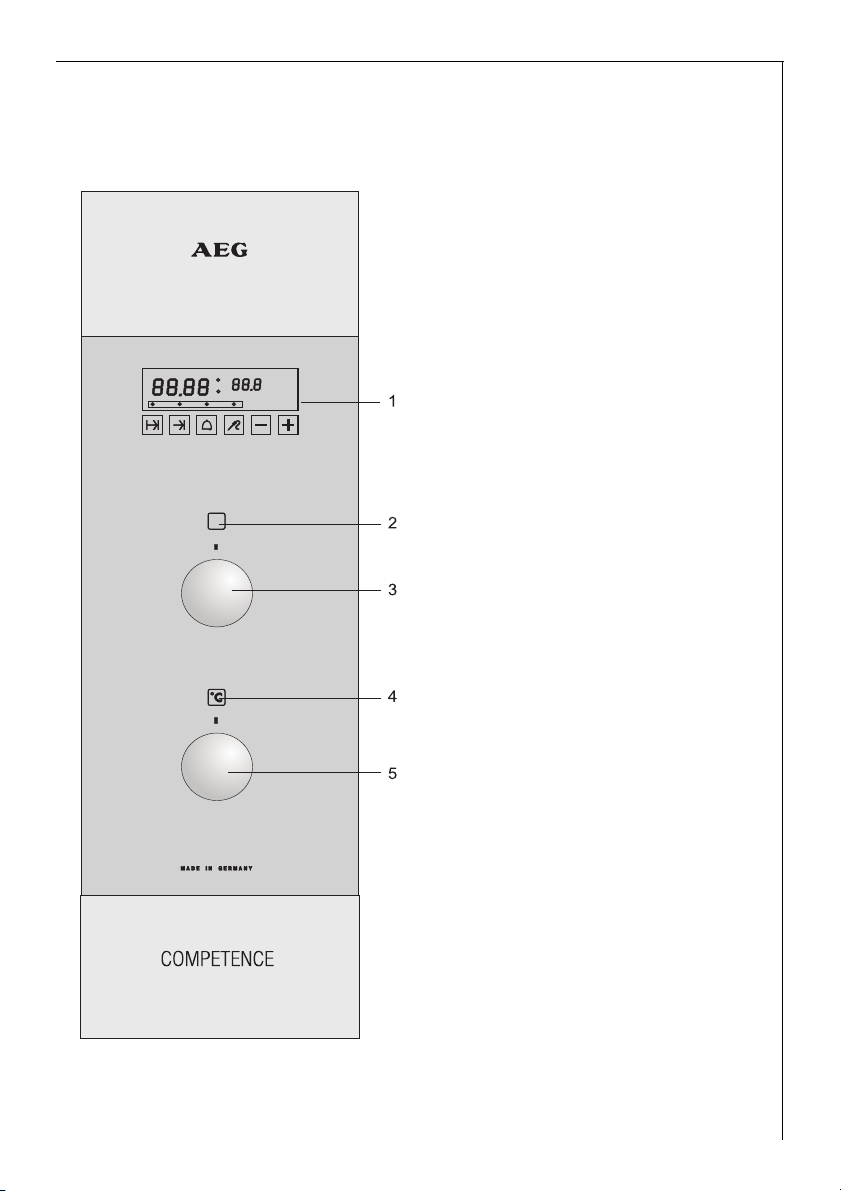
Oven Features
Shelf Positions
There are side rails on both
sides of the oven, with 7 shelf
positions for sliding in accessories.
Please note that the shelf positions are counted from bot-
tom to top.
The bottom shelf position is
position 1.
Oven Accessories
The following parts are supplied:
Baking sheet
For cakes and biscuits
10
Shelf
For ovenware, cake tins, items
for roasting and grilling
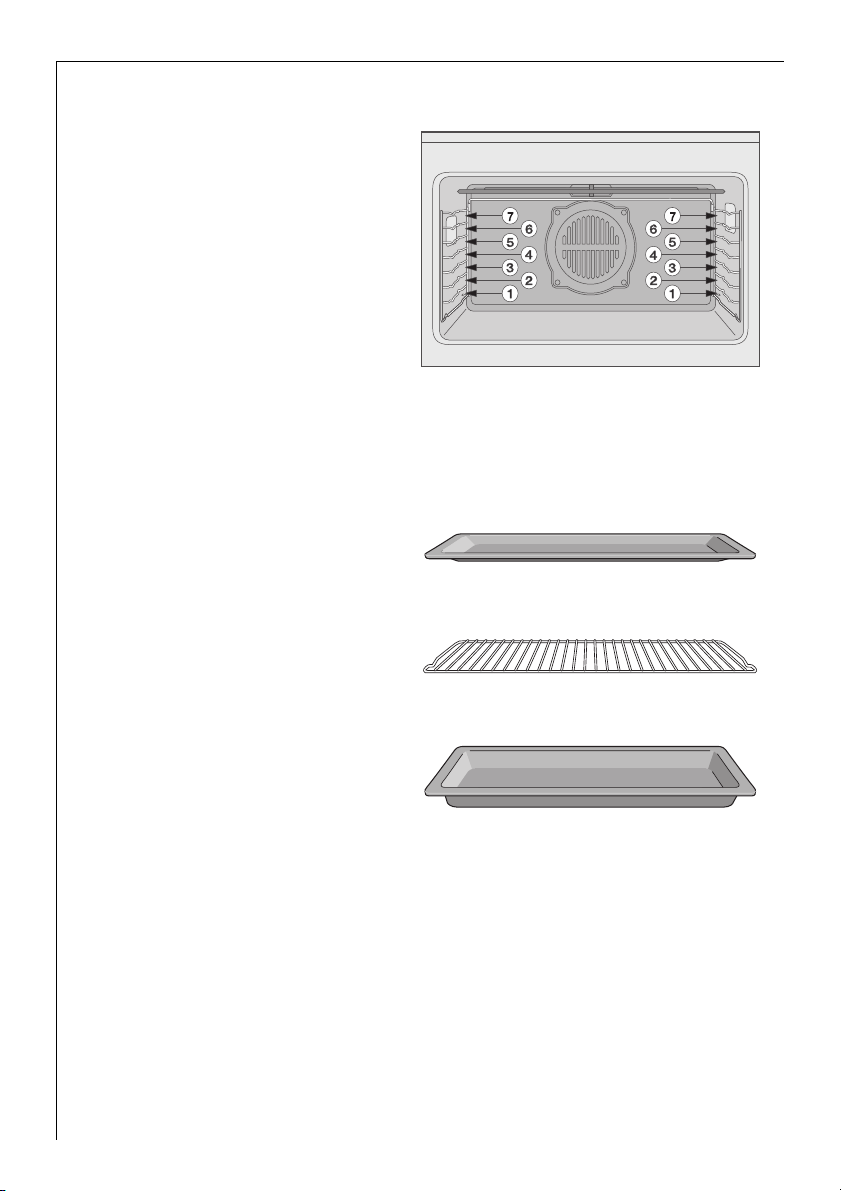
Universal Tray
For cakes with lots of juice,
roasts or as a baking sheet or
collecting container for fat
Pizza stone
Place the pizza stone with pizza on the shelf in shelf position 1.
You can find notes on use on page 29.
Meat Probe
For cooking roasts.
You can find notes on use on page 41.
Page 11

OPERATING INSTRUCTIONS
Oven Functions
The oven has various types of cooking functions that you can use:
Ventitherm (Fan cooking)
Ventitherm is particularly well suited to baking, roasting and slow
cooking on several shelves at once, and for defrosting.
Oven temperatures are generally 20 to 40 °C lower than for top/bottom
heat.
The heater on the rear wall of the oven and the fan ensure that the hot
air in the oven is circulated continuously. The food is heated from all
sides.
Defrost using the Ventitherm oven function without a temperature
i
setting, or defrost as per the table. This setting is suitable for the thawing or defrosting of e.g. flans, butter, ice cream, bread, vegetables or
other delicate foods.
Conventional oven
Conventional heat is suitable for baking and roasting on one shelf.
Heat is supplied evenly from above and below.
Bottom Heat
Bottom heat is suitable for preliminary baking of moist cakes.
Top Heat
Top heat is suitable for browning.
Grill
The grill function is particularly well suited to grilling or toasting small
quantities of flat foods.
The heat is provided by the grill heater element on the roof of the oven.
Large Area Grill
Grilling using the large area grill function is particularly well suited to
grilling or toasting large quantities of flat foods such as, e.g. steaks,
cutlets, fish or toast, and is also suitable for browning toast dishes and
gratins.
The heat is provided by the grill heater element on the roof of the oven.
11
Page 12

OPERATING INSTRUCTIONS
Rotitherm (Hot Air Grilling)
Rotitherm is particularly suited to grilling or roasting larger pieces of
meat or game on one shelf. This function is also suited to browning.
The grill heater element and fan are used simultaneously.
Pizza function
The pizza function is suitable for baking bread, pizza, moist cakes, and
for preserving.
This function is also suitable for fast warm up.
Using the fast warm up function you can very quickly pre-heat the
i
empty oven.
See Operating the Oven, Fast Warm Up page 15.
12
Page 13
OPERATING INSTRUCTIONS
Before first use
Initial Cleaning
Before you use the oven for the first time, you should clean it thoroughly. You can switch on the oven lighting to make cleaning easier.
☞ 1. Turn the oven function switch to oven lighting .
2. Remove all accessories and the side rails, and wash with warm water
and washing up liquid.
3. Also wipe out the oven with warm water and washing up liquid, and
dry.
4. Clean the front of the appliance with a damp cloth only.
Tip: In the case of stainless steel fronts, use commercially available
i
stainless steel cleaners that also form a protective film against finger
marks.
Important: Do not use any caustic or abrasive cleaners! The surface
!
could be damaged.
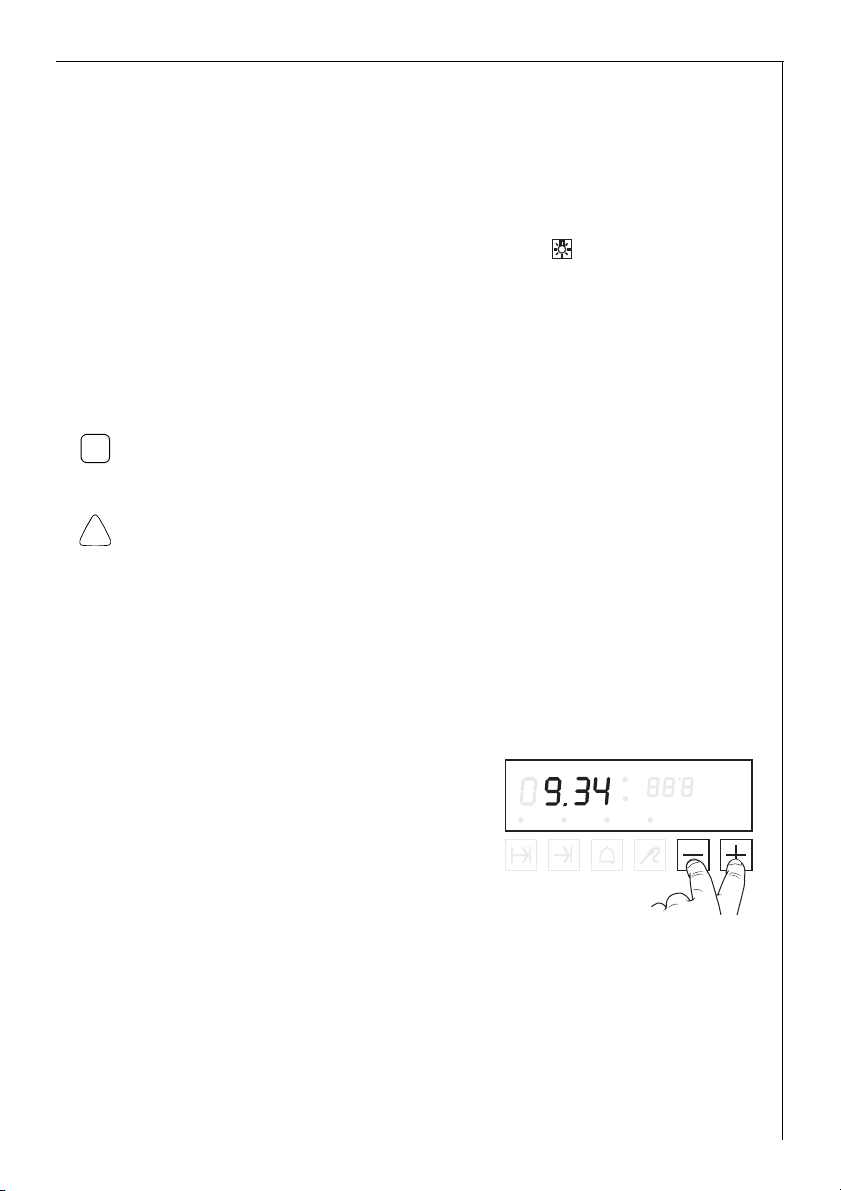
Setting the clock
Tip: The oven will not function until the clock is set.
The clock must be set before the oven is used and whenever power has
been disconnected to the appliance. If the clock needs to be set, you
will see ”0.00” flashing in the display.
☞
Use “+” and “-” to set the right time.
After around 3 seconds, the new time
will be accepted and the display will
stop blinking.
13
Page 14
OPERATING INSTRUCTIONS
Operating the Oven
Switching the Oven On and Off
1. To use, press the "Oven Functions" and "Temperature Selection" control
☞
knobs to release them.
The control knobs then protrude.
2. Using the "Oven Functions" control knob, set the required function.
3. Using the "Temperature Selection" control knob, set the required tem-
perature.
The temperature pilot light illuminates as long as the oven is warming
up. When the temperature set is reached, this pilot light goes out.
4. To switch off the oven, turn the “Oven Functions” control knob and the
“Temperature Selection” control knob to the off position.
5. Retract the control knobs by pressing them.
14
Page 15

OPERATING INSTRUCTIONS
Fast Warm Up
Using the pizza function , the empty oven can be pre-heated in a relatively short time.
Important! Only place the food to be roasted or cooked in the oven
!
when fast warm up is complete and the oven is set to the
required function.
☞ 1. Set the "Oven Functions" control knob to pizza function .
2. Set the "Temperature Selection" control knob to the required temperature. The temperature pilot light illuminates. Fast warm up starts.
3. As soon as the temperature pilot light goes out, set the
"Oven Functions" control knob to the required oven function.
4. You can now put the food to be cooked in the oven.
15
Page 16
OPERATING INSTRUCTIONS
The electronic timer
Tip: Page 22 details how to use the meat probe function.
As well as providing a minute minder, the electronic timer controls the
oven in several other ways. You can use it to set the cooking time, the
end time and the core temperature (using the meat probe). All timer
functions are available in any mode or temperature selection.
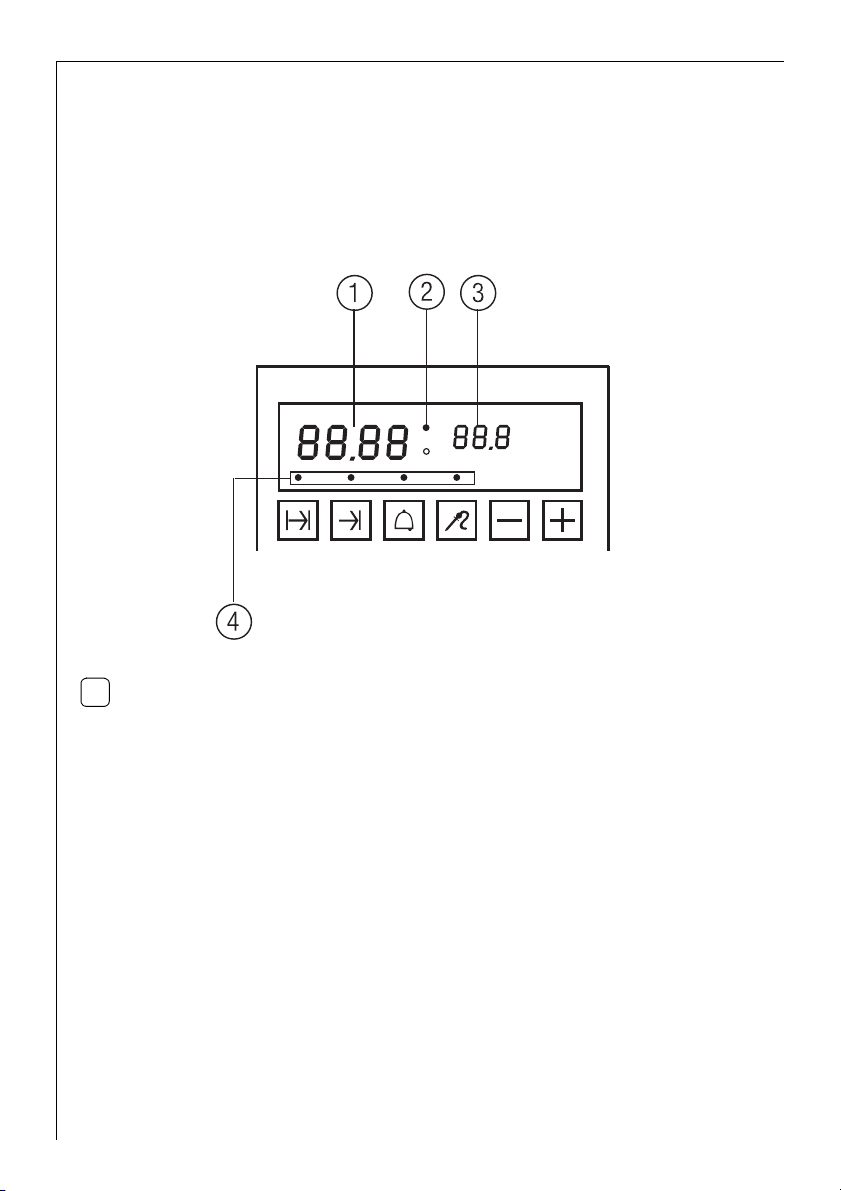
16
Display: 1 Time, alarm time (actual value in each case)
i
Selector
buttons: 7 Cooking time
Adjust: + or - For adjusting the settings.
Meat Probe, (value set)
2 Lamps, showing that the oven is switched on.
3 Meat Probe (actual value)
4 Indicator lamps (for each selector button/function)
8 Finish time (with meat probe: start time)
4 Alarm time
3 Meat Probe function
Page 17
OPERATING INSTRUCTIONS
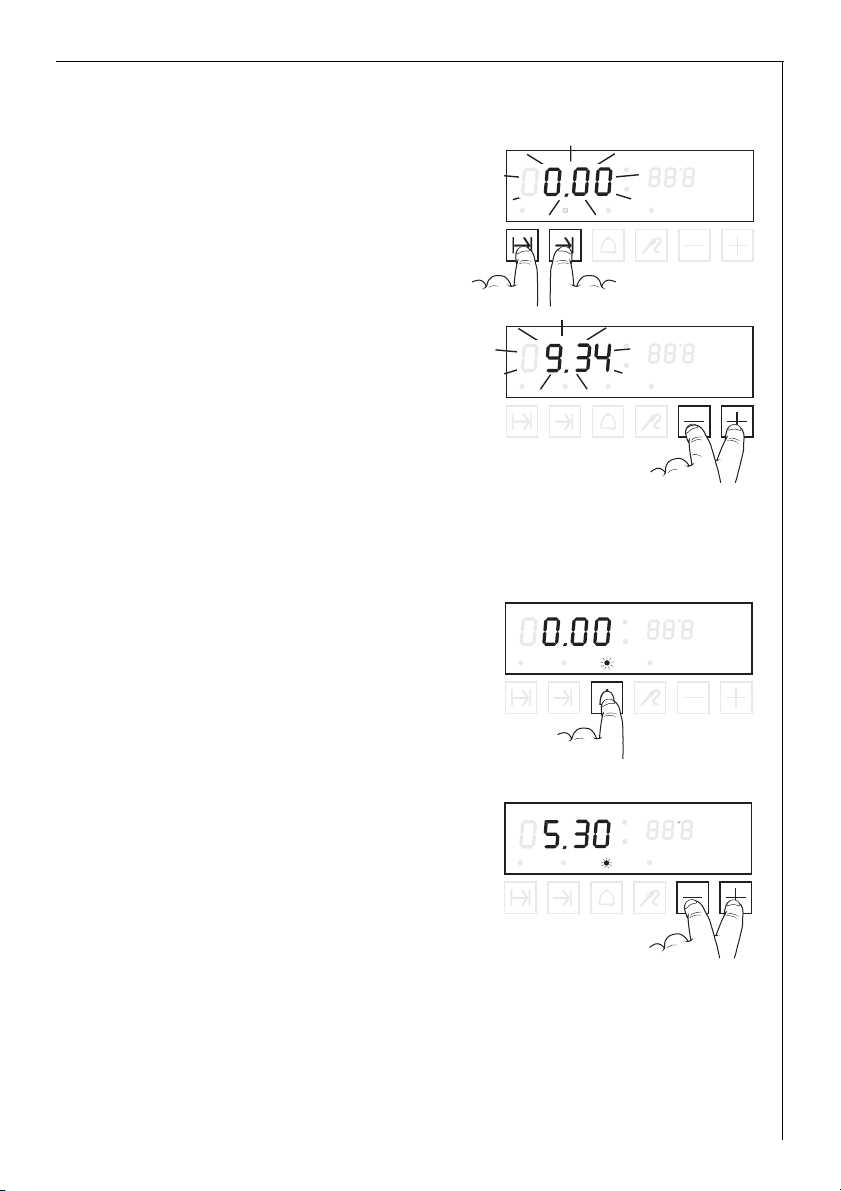
Setting and changing the clock
1. Simultaneously push “7” and “8”,
☞
until the time in the display flashes.
2. Adjust as required using “+” or “-”.
3. Wait for the display to stop flashing.
The time will then be accepted, and
the dot in the centre of the hour
and the minutes will flash every
second.
Setting the minute minder
You can use the minute minder on its own, without effecting the oven.
☞
1. Press “4 ”. The lamp will flash. The
display will read “0.00”.
2. Use “+” or “-” to set the timer in
minutes and seconds.
3. Start the timer with “4” or wait until
the lamp stops flashing. You will see
in the display the time remaining
until the buzzer sounds.
An acoustic signal is heard when the
set time has elapsed.
4. Press any button to stop the buzzer. The display will show the normal
clock again.
17
Page 18

OPERATING INSTRUCTIONS
How to set the electronic timer
Selecting the timer operation:
☞
Press the selector button for the operation you wish to use. The lamp
above the button you have pressed will start to flash and a number will
appear in the display.
Amending the operation:
☞
Adjust the value shown, using
Starting the operation:
• If you do not press another button for 3 seconds, the operation will
commence automatically and the lamp will stay on all the time.
• You can reduce the time by pressing a selector button:
• - the previously selected button confirms the input and starts the
operation.
• - another button confirms the input and selects the new operation
you have chosen.
Setting the oven functions (switching functions only):
☞
Use 3 to select the mode and 5 to select the temperature.
Tip: If you wish, you can set the temperature and mode before pro-
gramming the timer.
Changing the setting
If you wish to alter a setting you have made – even if the operation is
☞
running – push the appropriate button again and use “+”/“-” to change
the value in the display.
18
Page 19
OPERATING INSTRUCTIONS
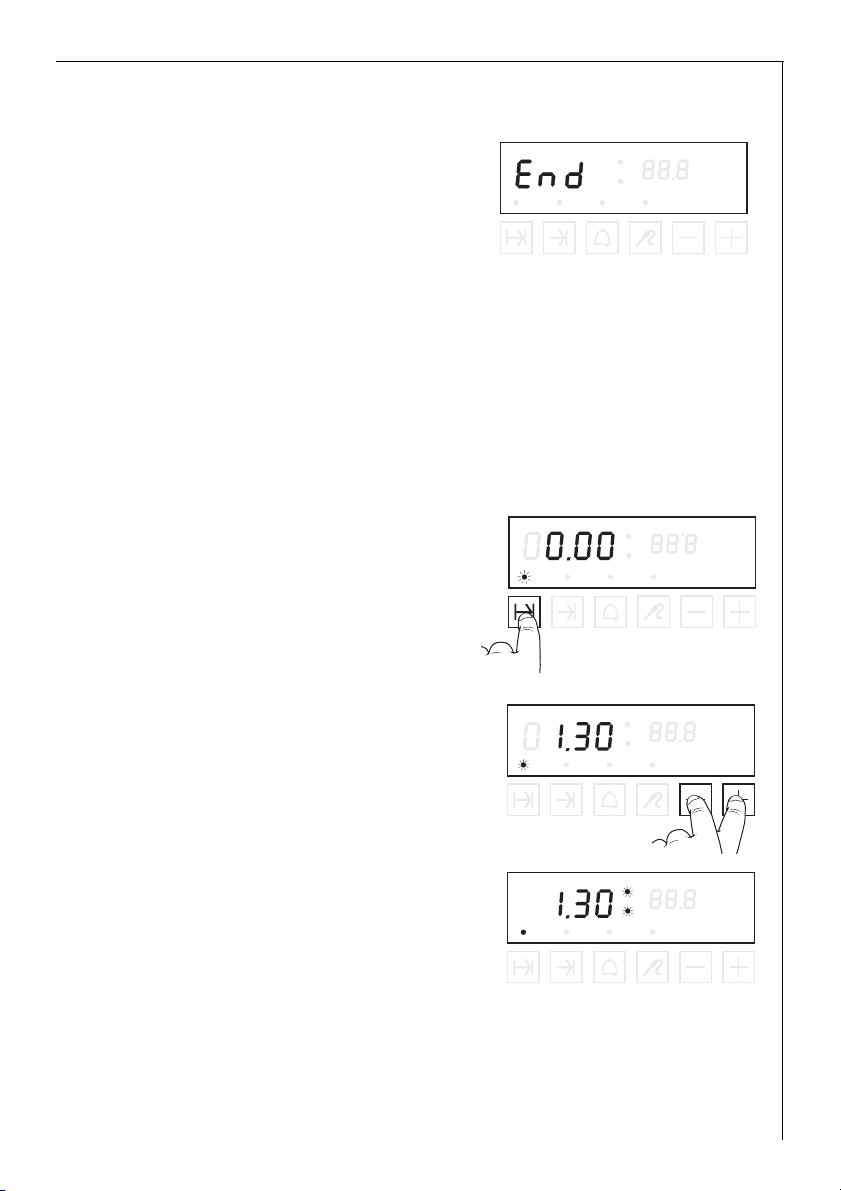
When the cooking time is finished
the oven will switch off and “End” will
appear in the display. A warning signal
will sound. Both of the lamps next to
the display will stop flashing.
☞
1. Press any selector button to stop the alarm buzzer.
The display will show the normal clock again. The oven starts again.
(not when the meat probe is inserted).
2. Turn the temperature selector and oven function control knobs to “0”.
Setting the cooking time 7 (switch-off function)
The oven switches itself off when the pre-set time has elapsed.
☞
1. Press “7”: the lamp will flash and
“0:00” will appear in the display.
2. Use “
3. Set the temperature and function.
+” or “-” to set the cooking time
in hours and minutes.
After approx. 3 seconds the timer will
start and the lamp will stay on continuously. The display will show the
time remaining. Both lamps will flash
alternately.
19
Page 20
OPERATING INSTRUCTIONS
Setting the finish time 8 (switch-off function)
Use this function if you want the oven to switch off automatically after
a certain time.
☞
1. Press “8”: the lamp will flash and the
display shows the normal clock.
2. Use “
3. Set the temperature and mode.
+”/“-” to set the desired switch-
off time.
After approx. 3 secs. the timer will start
and the lamp will stay on continuously.
The display will show the time remaining. Both lamps will flash alternately.
20
Page 21

OPERATING INSTRUCTIONS
Automatic switch-on and switch-off
If you wish use the oven’s time-delay feature, you may pre-select both
cooking time and finish time. The automatic start time itself cannot be
specified, but this is derived from both settings.
Tip: It is impossible to set a finish time before the start time: you will
hear a buzzer and the value in the display will not change. If you wish
to shorten the cooking time you have set, do this first before you reset
the finish time.
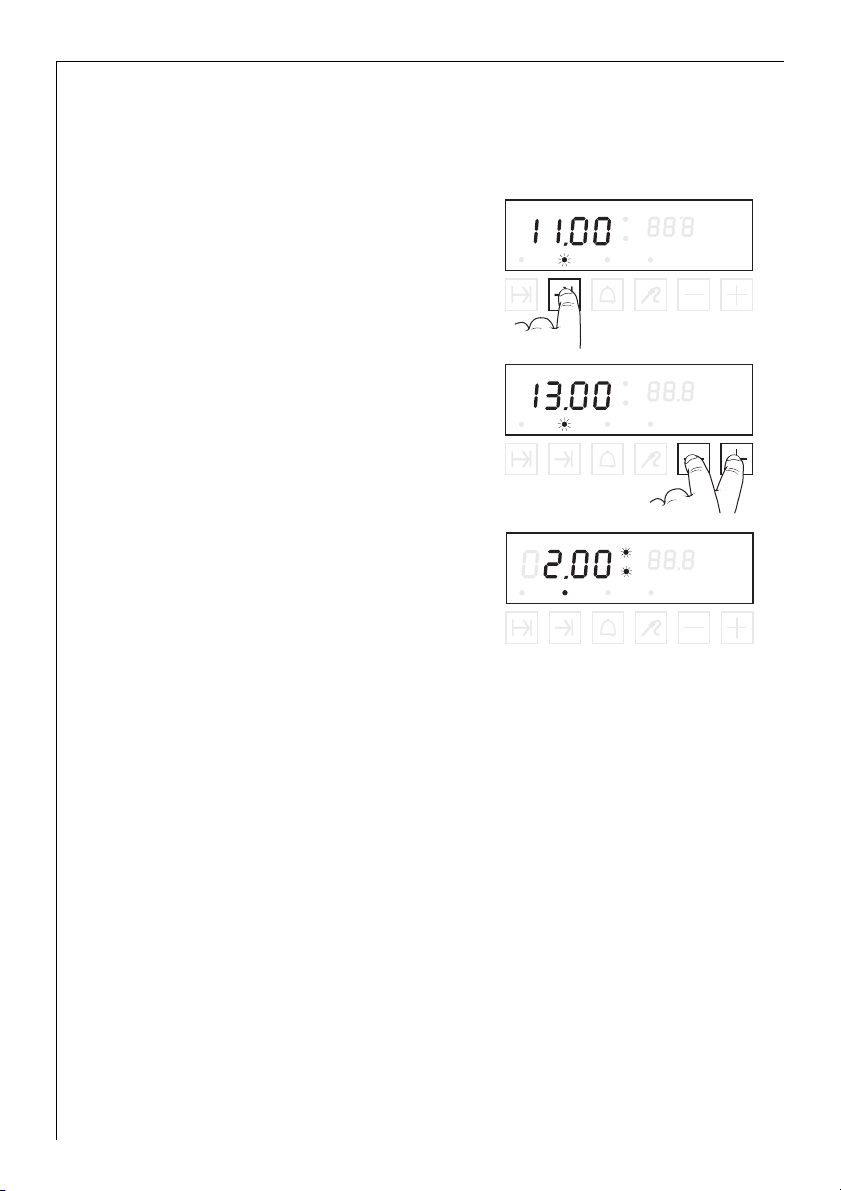
Example:
It is 8:00 and you wish to have your roast ready at 13:00. The roast
needs to be cooked for 90 minutes.
Change the cooking time “7” from 0:00 to 1:30. Then change the finish time “8” from 9:30 to 13:00.
Once the times have been accepted, “Auto” will appear in the display
and the oven will switch on at 11:30 and off at 13:00.
This is how to set the automatic switch-on and switch-off:
☞
1. Press “7”: the lamp will flash and
“0:00” will appear in the display.
2. Use “
3. Press “8” to confirm the input and
+” or ”-” to set the cooking time
in hours and minutes.
(For example: 90 minutes)
select the finish time. The display will
show a time (finish time if the oven is
to switch on immediately).
21
Page 22

OPERATING INSTRUCTIONS
4. Use “+” to set the finish time.
After approx. 3 secs. the lamps will stay
on continuously. The display will show
“Auto” until the oven switches on.
5. Set the temperature and mode.
The oven will automatically switch on
at the specified time and both lights
next to the display will flash alternately.
The time remaining until switch-off will
be shown in the display.
Setting the Meat Probe, core temperature function
Tip: This function will only work when the meat probe is inserted.
The display on the right shows you the current core temperature inside
the roast and “70 °C” will appear in the left display. Both of the lamps
next to the display will flashing.
☞
1. If you wish to change the preset temperature push 3 the lamp over 3
flashes.
2. Change the the recommended temperature of 70 °C with “
the desired temperature.
After approx. 3 second the timer will
start and the lamp above the selector
button will stay on continuously.
22
+” or “-” to set
Page 23

OPERATING INSTRUCTIONS
3. Set the temperature and function.
While roasting the display on the right
shows the current core temperature
inside the roast.
When the actual core temperature
reaches the value you have set, the
oven will switch itself off and “End” will
appear in the display. A warning signal
will sound. Both of the lamps next to
the display will stop flashing.
4. Press any button to stop the alarm
buzzer.
Both lights next to the display will flash
alternately - as long as the meat probe
is inserted.
5. Turn the temperature selector and the
function selector control knob to “0”.
6. Remove the meat probe from the socket. The display will show the time
of day again.
23
Page 24

OPERATING INSTRUCTIONS
Meat Probe, function with delayed start
This allows you to delay the start of cooking when using the meat
probe. As no fixed cooking time is set, it is not possible to set a finish
time.
Tip: This function will only work when the meat probe is inserted.
The right display shows you the current core temperature inside the
roast and “70 °C” will appear in the left display. Both lamps will flash
alternately.
☞
1. If you wish to change the preset temperature push 3” the lamp over 3”
flashes.
2. Change the recommended temperature
of 70 °C with “
desired temperature.
After approx. 3 second the timer will
start and the lamp will stay on continuously.
+” or “-” to set the
3. Press 8 to confirm the input and select
the start time. The display shows you
the current time of day.
4. Use “
24
+” or ”-” to set the start time.
After approx. 3 seconds the timer will
start and the lamps will stay on continuously. The display will show ”Auto”
Page 25

OPERATING INSTRUCTIONS
until the oven switches on. The display on the right shows you the current core temperature inside the roast.
5. Set the temperature and function.
The oven automatically switches on at
the at the beginning of the cooking
time. Both lamps will flash alternately.
When the actual core temperature
reaches the value you have set, the
oven will switch itself off and “End” will
appear in the display. A warning signal
will sound. Both lamps will stop flashing.
6. Press any button to stop the alarm
buzzer. Both lights next to the display
will flash alternately - as long as the
meat probe is inserted.
7. Turn the temperature selector and the
function selector control knob to “0”.
8. Remove the meat probe from the socket. The display will show the time
of day again.
25
Page 26

OPERATING INSTRUCTIONS
Usage, Tables and Tips
Baking
For baking use the Ventitherm , conventional oven or pizza
oven function.
Suitable Bakeware
• Tins made of dark metal and coated tins are suitable for conventional
heat .
• Light metal tins are also suitable for Ventitherm .
Shelf Positions
The shelf positions are counted from bottom to top.
• Baking with conventional heat should only be carried out on one
shelf level.
1 Baking sheet: for shelf positions see table
26
• Using Ventitherm you can bake on 2 baking sheets at once.
2 Baking sheets: Shelf positions 2 and 5
Page 27

OPERATING INSTRUCTIONS
Notes on Baking
General notes
• Please note that the shelf positions are counted from bottom to top
and that the bottom shelf position is position 1.
• Insert baking sheets with the bevelled edge to the front.
• Slide the baking sheet to the rear wall.
Always place cakes in tins in the middle of the shelf.
With Ventitherm and conventional heat you can also bake two or
three cakes simultaneously. In this case place the tins side by side on
the shelf. The baking time is then increased by 5 to 10 minutes.
Baking with Ventitherm
No pre-heating – baking on two shelves at once possible.
Shelf positions:
One sheet 3rd shelf position from the bottom
Two sheets 2nd and 5th shelf positions from the bottom
When baking several flat cakes (cakes in tins), the cooking time is
increased by approx. 5 to 10 minutes.
Take out the sheets individually when sufficiently browned.
i
Bake with Ventitherm at 160 °C if a temperature for fan oven is not
given in your recipe.
Important: in the case of cakes with a moist fruit topping, e.g. plum
cake, a large amount of moisture is generated. Baking should only be
performed on one level.
Baking with conventional heat
Pre-heat – Bake on one shelf.
Pre-heat using fast warm up function , once the oven temperature
has been reached, switch back to conventional heat .
Baking tins made of black metal and aluminium are particularly suitable.
Baking with pizza heat
Bake on one shelf.
• For moist cakes
• For pizzas: pre-heat with baking sheet or pizza stone
• For bread: pre-heat
27
Page 28

OPERATING INSTRUCTIONS
Notes on the Baking Tables
In the tables you will find information on temperatures, cooking times
and shelf positions for a selection of dishes.
• Ranges are often given for the temperatures and cooking times since
these are dependent on the mixture, quantity and baking tin used.
• When baking several cakes on baking sheets or in cake tins, the cook-
ing time can be 10-15 minutes longer.
• Moist cakes and pastries (e. g. pizza, fruit cakes, etc.) should only be
baked on one shelf.
• When using for the first time, we recommend setting the lower tem-
perature, and only if necessary, e. g. if increased browning is required
or the cooking time is too long, selecting a higher temperature.
• If you cannot find specific information for one of your own recipes,
use information on a similar recipe for guidance.
• Variations in the height of the item to be baked can lead to different
degrees of browning at the start of baking. In this case, please do
not change the temperature setting. Variations in the amount of
browning will even themselves out during baking.
Quantities for a 61-cm baking tin for the 90-cm oven.
Sponge cake mixture:
350 g fat, 270 g sugar, 1 vanilla sugar, 6 eggs,
670 g flour, 6 level teaspoons baking powder
Dough:
670 g flour, 50 g yeast, 1 teaspoon sugar, 250 ml milk,
100 g sugar, 2 eggs, 1 vanilla sugar, 100 g margarine
28
Page 29

OPERATING INSTRUCTIONS
Baking Pizza
with the pizza function at 250 °C.
Example:
Basic Pizza Recipe
375 g flour, 20 g yeast,
125 ml lukewarm water,
3 dessertspoon oil, salt
☞ 1. Make a dough out of the ingredients given.
2. Allow the dough to prove until it has doubled in volume
(approx. 30 minutes). Then knead the dough again for a few minutes
and leave to prove again for a further 15 minutes.
3. Place the dough on a baking sheet and add the topping, or split the
dough into to 2 or 3 pieces, roll out into circular bases, form an edge
and add the topping as required. The topping should be added quickly
so that the dough does not become moist.
4. Pre-heat the oven using the pizza function at 250 °C.
5. Place the sheet in shelf position 1, or leave the sheet in the oven during
pre-heating and slide the round pizzas onto the backing sheet.
6. Bake the pizza at 250 °C for 12 to 14 minutes.
Baking pizza on the pizza stone
1. Prepare the pizza dough as above and place on a flour-covered wooden
board.
2. Add the topping to the pizza quickly so that it does not become moist.
The completed pizza must not be left on the wooden board any
longer than necessary, otherwise it will not be possible to slide the
dough.
3. Place the pizza stone on the shelf and slide into the oven at shelf
position 1.
4. Pre-heat the oven and the pizza stone using pizza function at
250 °C.
5. Slide the pizza from the wooden board onto the pizza stone.
6. Bake the pizza using the pizza function at 250 °C for 12 to
14 minutes.
29
Page 30

OPERATING INSTRUCTIONS
Baking Tables
Baking with Ventitherm and conventional Heat
The information given in bold shows you the best oven function to use
in each case.
Type of Cake
or Pastry
Cakes in Cake Tins
Ring-Shaped Cakes 3 150 – 160 2 170 – 180 0:50 – 1:10
Madeira Cake/King
Cake
Sponge Cake 3 150 – 160 3 170 – 180 0:30 – 0:40
Shortcrust Pastry
Flan Base
Sponge Flan Base 3 160 – 170 3 180 – 200 0:20 – 0:25
Covered Apple Flan 3 150 – 170 2 170 – 180 0:45 – 1:00
Savoury Flan
(e. g. Quiche Lorraine)
Cheesecake 3 140 – 150 2 160 – 170 1:10 – 1:40
Cakes and Pastries on Baking Sheets
Ventitherm
Shelf
Pos.
from
Bottom
3 150 – 160 2 160 – 170 1:10 – 1:30
3 170 – 180 3 180 – 200 0:20 – 0:30
3 170 – 180 2 180 – 190 0:30 – 1:10
Temp.
in °C
Conventional Heat Time
Shelf
Pos.
from
Bottom
Temp.
in °C
For both
Functions
Hr. : Min.
30
Plaited Roll/Ring 3 160 – 170 3 170 – 180 0:30 – 0:50
Christmas Stollen
pre-heat
Rye Bread:
pre-heat
10 min. at 230 °C
Cream Puffs/Eclairs 3 160 – 180 3 190 – 200 0:20 – 0:30
Swiss Roll
pre-heat
3 160 – 170 3 170 – 180 0:45 – 1:10
2 170 – 180 0:45 – 1:05
3 170 – 180 3 180 – 200 0:12 – 0:20
Page 31

OPERATING INSTRUCTIONS
Type of Cake
or Pastry
Butter Cake/Sugar
Cake
Fruit Flans
(dough/sponge base)
Fruit Flan
(shortcrust pastry)
Flat Cakes with
Delicate Topping
(curd cheese, cream)
Unleavened Bread
pre-heat
Biscuits
Shortcrust Biscuits 3 150 – 160 3 170 – 190 0:15 – 0:30
Small Piped Biscuits 3 140 – 150 3 160 – 180 0:15 – 0:35
Ventitherm
Shelf
Pos.
from
Bottom
3 160 – 170 3 180 – 200 0:20 – 0:30
3 150 – 160 0:40 – 1:00
3 150 – 160 3 170 – 180 0:30 – 1:00
3 140 – 160 3 160 – 180 0:40 – 1:20
3 200 – 220 0:10 – 0:15
Temp.
in °C
Conventional Heat Time
Shelf
Pos.
from
Bottom
Temp.
in °C
For both
Functions
Hr. : Min.
Sponge Fingers 3 150 – 160 3 170 – 190 0:15 – 0:30
Meringues 3 80 – 100 3 100 – 120 2:00 – 2:30
Macaroons 3 100 – 120 3 120 – 140 0:40 – 1:10
Small Pastries made
with Yeast Dough
Small Pastries made
with Puff Pastry,
pre-heat
Rolls
pre-heat
3 150 – 160 3 170 – 190 0:20 – 0:40
3 170 – 180 3 190 – 210 0:20 – 0:35
3 180 – 200 0:20 – 0:40
31
Page 32

OPERATING INSTRUCTIONS
Baking with Pizza Function
Cakes and Pastries Pizza function
Shelf Pos.
from Bottom
Cakes in Cake Tins
Covered Apple Flan
Savoury Flan
(e. g. Quiche Lorraine)
Cheesecake
Cakes and Pastries on Baking Sheets
Rye Bread:
pre-heat:
10 min. at 230
Fruit Flan
(on yeast dough/
sponge base)
Fruit Flan
(on shortcrust pastry)
Flat Cakes with
Delicate Topping
(curd cheese, cream)
3 150 – 170 0:45 – 1:00
2 160 – 170 0:30 – 1:10
2 140 -150 1:10 – 1:40
3 160 – 170 0:50 – 1:05
3 150 – 160 0:40 – 1:00
3 150 – 160 0:40 – 1:10
3 140 – 160 0:40 – 1:20
Temp.
Time
Hr. : Min.
in °C
32
Pizza (with deep topping)
pre-heat
Pizza (thin)
pre-heat
Unleavened Bread
pre-heat
Rolls
pre-heat
1 250 0:12 – 0:14
1 250 0:08 – 0:10
2 200 – 220 0:10 – 0:15
2 160 – 180 0:20 – 0:40
Page 33

Tips on Baking
OPERATING INSTRUCTIONS
Tip
This is how to tell if your cake
is cooked through
The cake collapses
(is sticky, not properly cooked
through, water marks)
The cake is too light Next time use a dark cake tin or place the cake one
Cake with moist topping/
cake, is not cooked through,
is unevenly browned
Push a wooden skewer into the highest point of the
cake. When no more cake mixture sticks to the wood,
you can switch off the oven and utilise the residual
heat.
Check your recipe. Next time use less liquid. Observe
mixing times, particularly when using kitchen appliances.
shelf position lower.
Next time bake at a lower temperature and increase
the cooking time.
33
Page 34

OPERATING INSTRUCTIONS
Bakes and Gratins Table
The information given in bold shows you the best oven function to use
in each case.
Dish Ventitherm Rotitherm
Pasta Bake
Lasagne
Vegetable Gratin
Browned
Baguettes
Sweet Puddings
Fish Pies
Stuffed
Vegetables
Potato Bake
Shelf Pos.
from
Bottom
3 180 -190 2/3 150 – 160 0:40 – 0:60
3 160 – 180 2/3 150 – 160 0:30 – 0:45
3 180 – 200 3 150 – 160 0:15 – 0:30
3 200 – 220 3 150 – 160 0:15 – 0:30
3 160 – 180 0:40 – 0:60
3 180 – 190 3 150 – 160 0:40 – 1:10
3 160 – 180 3 150 – 160 0:40 – 1:10
3 160 – 180 3 150 – 160 0:50 – 1:20
Temp.
in °C
Shelf Pos.
from
Bottom
Frozen Ready Meals Table
Food to be Cooked Shelf Pos.
from
Bottom
Oven
Function
Temperature
in °C
Temp.
in °C
Time
Hr. : Min.
Time
Hr. : Min.
34
Frozen Pizza
pre-heat 250 °C
Chips (600 – 1000 g)
Baguettes
Fruit Flan
1 Pizza function
5 Rotitherm
3 Ventitherm In accordance
3 Ventitherm In accordance
250 0:06 – 0:09
180 – 200 0:16 – 0:25
with the
maker’s
instructions
with the
maker’s
instructions
In accordance
with the
maker’s
instructions
In accordance
with the
maker’s
instructions
Page 35

OPERATING INSTRUCTIONS
Roasting
For roasting, use the Ventitherm , conventional heat or Rotitherm
oven function.
Ovenware for Roasting
• Any heat-resistant dish is suitable for roasting.
• If the dish has plastic handles, ensure that the handles are heat-resis-
tant.
• Large roasts can be roasted directly on the fat tray or on the shelf
with the fat tray underneath (e. g. turkey, goose, 3-4 chickens,
3-4 knuckles).
• We recommend roasting all lean types of meat in a casserole with a
lid (e. g. veal, pork or beef pot roasts, frozen meat). This way the meat
will remain juicier.
• You can roast all types of meat that should have a crispy exterior in a
casserole without a lid (e. g. pork, meat loaf, lamb, mutton, duck,
1-2 knuckles, 1-2 chickens, small poultry, sirloin, fillet, game).
Tip: If you use dishes for roasting (particularly for small amounts), the
i
oven will not get so dirty!
Shelf Positions
• Please see the following table for the shelf positions to be used.
35
Page 36

OPERATING INSTRUCTIONS
Notes on the Roasting Tables
Information is given in the tables on suitable oven functions, temperature settings, cooking times and shelf positions for various types of
meat. The cooking times are only for guidance.
• We recommend roasting meat and fish in the oven from a weight
of 1kg.
• In general the conventional heat function
for very lean meat, fish and game. For all other types of meat we recommend the Rotitherm function , for large poultry e.g. turkey, the
Ventitherm function
• Turn the roast after approx. 2/3 of the cooking time, except when
using the Ventitherm function .
• The cooking time required is dependent on the type and quality of
the meat.
• The cooking time is dependent on the type of meat and its size. To
measure the height of the piece of meat, it should be lifted slightly as
it sinks under its own weight.
• In the case of meat with a layer of fat, it can be necessary to signifi-
cantly extend the cooking time, in some circumstances even double
it.
• If several small pieces of meat or a small piece of whole poultry are
placed in the oven, the cooking time increases by approx. 10 minutes
per piece (e.g. cooking time for 1 chicken approx. 55 minutes, cooking time for 3 chickens approx. 65 to 75 minutes).
• If cooking starts after a time delay, then only use the oven with the
Ventitherm function .
• Use the meat probe for roasting. You will always achieve good roast-
ing results with the thermometer. You can find information on correct use on page 41.
.
is particularly suitable
36
Page 37

OPERATING INSTRUCTIONS
Roasting Tables
Roasting with conventional Heat and Ventitherm
The information given in bold shows you the best oven function to use
in each case.
Type of Meat Quantity Conventional Heat Ventitherm Time
Beef
Pot Roast
Roast Beef
or Fillet
-red inside
- pink inside
- cooked through
Pork
Shoulder,
Neck,
Joint of Ham
Chop, Kassler
Meat Loaf
Knuckle of Pork
(pre-cooked)
Veal
Roast Veal
Knuckle of Veal
Weight Shelf
Pos.
from
Bottom
1- 1.5 kg 3 190 – 210 3 180 – 190 2:00 – 2:30
per cm
height
1 – 1.5 kg 4 190 – 210 4 160 – 170 1:40 – 2:00
1 – 1.5 kg 4 170 – 180 4 160 – 170 1:10 – 1:30
1 – 1.5 kg 4 190 – 210 4 160 – 170 1:40 – 2:00
1 – 1.5 kg 4 190 – 210 4 150 – 160 1:30 – 2:00
1 – 1.5 kg 4 190 – 210 4 160 – 170 2:00 – 2:30
Temp.
in °C
Shelf
Pos.
from
Bottom
3
3
3
Temp.
in °C
180 – 190
180 – 190
170 – 180
Hr. : Min.
per cm
height
0:05 – 0:06
0:06 – 0:08
0:08 – 0:10
Lamb
Leg of Lamb,
Roast Lamb
Saddle of Lamb
1 – 1.5 kg 4 190 – 210 4 150 – 160 1:20 – 2:00
1 – 1.5 kg 4 190 – 210 4 160 – 180 1:00 – 1:30
37
Page 38

OPERATING INSTRUCTIONS
Type of Meat Quantity Conventional Heat Ventitherm Time
Game
Saddle of
Venison
Leg of Venison
Poultry
Poultry Pieces
4 – 6 pieces
Chicken Halves
4 – 6 pieces
Chicken,
Duck
Goose
Turkey
Fish (steaming)
Weight Shelf
Pos.
from
Bottom
1.5 – 2 kg 4 180 – 200 4 150 – 160 1:20 – 1:30
1.5 – 2 kg 4 180 – 200 3 150 – 160 1:75 – 1:50
per 200 -
250 g
per 400 -
500 g
1 – 1.5 kg 3 200 – 220 3 180 – 190 0:45 – 1:20
1.5 – 2 kg 3 180 – 200 3 160 – 170 1:00 – 1:50
3.5 – 5 kg 2 180 – 190 3 160 – 170 2:30 – 3:00
2.5 -3.5kg
4 – 7 kg 22
4 220 – 250 3 180 – 190 0:40 – 0:50
4 200 – 220 3 180 – 190 0:40 – 0:50
Temp.
in °C
200 – 220
170 – 180 22
Shelf
Pos.
from
Bottom
Temp.
in °C
160 – 170
140 – 160
Hr. : Min.
1:30 – 2:00
2:30 – 3:40
38
Whole Fish
1 – 4 kg 3 180 – 200 3 160 – 170 0:45 – 2:00
Page 39

OPERATING INSTRUCTIONS
Roasting with Rotitherm
The information given in bold shows you the best oven function to use
in each case
Type of Meat Quantity Rotitherm
Beef
Roast Beef or Fillet
-red inside
- pink inside
- cooked through
Pork
Shoulder,
Neck,
Joint of Ham
Chop,
Meat Loaf
Knuckle of Pork
(pre-cooked)
Veal
Knuckle of Veal
Lamb
Leg of Lamb,
Roast Lamb
Saddle of Lamb
Weight Shelf Pos.
from
Bottom
per cm
height
1- 1.5 kg 2/3 150 – 170 1:40 – 2:00
1 – 1.5 kg 2/3 150 – 170 1:10 – 1:30
1 – 1.5 kg 2 140 – 160 1:40 – 2:00
1 – 1.5 kg 2 140 – 160 2:00 – 2:30
1 – 1.5 kg 2 140 – 160 1:20 – 2:00
1 – 1.5 kg 2 150 – 170 1:00 – 1:30
5
5
5
Temp.
180 – 190
180 – 190
170 – 180
Time
Hr. : Min.
in °C
per cm height
0:05 – 0:06
0:06 – 0:08
0:08 – 0:10
Game
Saddle of Venison
Leg of Venison
Poultry
Poultry Pieces
4 – 6 pieces
1.5 -2 kg 2 150 – 160 1:20 – 1:30
1.5 -2 kg 2 140 – 150 1:75 – 1:50
per 200 – 250 g
4 170 -190 0:40 – 0:50
39
Page 40

OPERATING INSTRUCTIONS
Type of Meat Quantity Rotitherm
Chicken Halves
4 – 6 pieces
Chicken,
Duck
Goose
Fish (steaming)
Whole Fish
Weight Shelf Pos.
from
Bottom
per 400 – 500 g
per 1 – 1.5 kg 4 160 – 170 0:45 – 1:20
per 1.5 – 2 kg 3 150 – 160 1: 00 – 1:50
per 3.5 – 5 kg 3 140 – 150 2:30 – 3:00
1 – 4 kg 2 150 – 160 0:45 – 2:00
3 160 – 180 0:40 – 0:50
Temp.
Time
Hr. : Min.
in °C
40
Page 41

OPERATING INSTRUCTIONS
Roasting with the Meat Probe
Notes on the Use of the Meat Probe
The meat probe measures the temperature inside the meat being
i
cooked. When the meat probe is used, the oven is automatically
switched off when the pre-defined core temperature is reached, inde-
pendent of the weight of the meat. The use of the meat probe is particularly recommended for the cooking of roasts of which the core
temperature must not exceed a specific figure, e. g. roast beef.
☞ 1. The tip of the meat probe is inserted into the centre of the meat from
the side. When inserting the thermometer, please note the following:
• Always insert the meat probe all the way up to the handle.
• The tip must be more or less in the centre of the meat.
• There should be no fat or bone near the tip.
• The meat probe should also not touch any bones in the case of poul-
try, as far as possible.
2. Insert the meat probe plug in the socket inside the oven. The meat
probe function is activated.
The Meat Probe symbol 3 illuminates in the timer display.
3. Close the oven door.
4. Using the "Oven Functions" switch, select an oven function.
Using the "Temperature Selection" switch, set the required temperature.
5. Set the required core temperature on the timer (see Electronic Timer,
Setting the Core Temperature page 22).
41
Page 42

OPERATING INSTRUCTIONS
Temperature Table for Meat Probe
Food to be Cooked Core Temperature
Beef
Temp. in °C
Roast Beef/Fillet of Beef - red
- pink
- cooked through
Roast Beef
Pork
Loin of Pork
Roast Pork/Ham
Neck, Knuckle
Chop, Saddle
Chop without Bone
Meat Loaf
Veal
Roast Veal
Loin of Veal with Kidneys
Knuckle of Veal
Game
Game, Meat
40 – 45
50 – 55
60 – 65
80 – 85
65 – 70
80 – 85
80 – 85
75 – 80
70
70 – 75
70 – 75
75 – 80
80 – 85
75 – 80
42
Game, Saddle
Game, Fillet - red
- pink
- cooked through
Lamb
Stuffed Roast
Poultry
Fish
60 – 70
40 – 45
50 – 55
60 – 65
80 – 85
70 – 75
85 – 90
70 – 80
Page 43

OPERATING INSTRUCTIONS
Grilling
• Use the grill oven function for grilling smaller quantities.
• For grilling larger quantities, select the large area grill oven func-
tion.
• Set the temperature selection switch in each case to .
Important! Always pre-heat the empty oven for 5 minutes using the
!
grill function!
Ovenware for Grilling
• Use the shelf and fat tray for grilling.
Shelf Positions
• Fat tray in the 1st shelf position from the bottom, roasting shelf in
the shelf position given in the table.
Notes on the Grilling Table
The grilling times are only for guidance and are dependent on the type
and quality of the meat or fish.
• Grilling is particularly suitable for flat pieces of meat and fish.
• Turn meat and pieces of fish as per the information given in the
table.
Warning! Always grill with the oven door shut.
!
43
Page 44

OPERATING INSTRUCTIONS
Grilling Table
Food for Grilling Shelf
Position
from
Bottom
Pork Chop/
6-7 10 – 13 8 – 10 10 – 15 10 – 12
Escalope of Pork
Fillet of Pork
Grilled Sausages
Shashlik
Rissoles
Beef Fillet Steaks
Slices of Liver
Veal Cutlet
Veal Steaks
Lamb Cutlet
Half Chicken
Fillet of Fish
Trout
Bread for Toasting
Toast with Topping
6 12 – 15 10 – 12 14 – 16 12 – 14
5/6 10 – 12 8 – 10 15 – 20 10 – 15
6-7 8 – 10 6 – 8 18 – 20 10 – 12
7 10 – 12 8 – 10 10 – 15 12 – 14
7 7 – 9 6 – 8 10 – 11 10 – 12
7 4 – 6 3 – 5 7 – 8 7 – 9
7 7 – 10 5 – 8 9 – 11 9 -12
7 8 – 10 6 – 8 10 – 12 10 – 12
7 10 – 12 8 – 10 12 – 14 12 – 14
5 12 – 15 10 – 14 16 – 20 15 – 18
7 8 – 10 6 – 8 10 – 12 10 – 14
5 7 – 10 6 – 8 11 – 15 10 – 14
7 3 – 5 3 – 5 6 – 7 6 – 7
6 8 – 10 12 – 14
Grill Large Area Grill
1st Side
in min.
2nd Side
in min.
1st Side
in min.
2nd Side
in min.
44
Page 45

OPERATING INSTRUCTIONS
Defrosting
For defrosting use the Ventitherm oven function at 30 to 40 °C.
Ovenware for Defrosting
• Place food on a plate and put the plate on the shelf.
• Only use grease-proof paper or foil for covering. Do not use plates or
bowls otherwise the defrosting time will increase considerably.
Shelf Positions
• For defrosting, position the shelf on the 3rd shelf position from the
bottom.
Notes on the Defrosting Table
The times quoted in the table are intended as a guide only, as the speed
of defrosting will depend on the kitchen temperature. For example, the
colder the room temperature, the longer the defrosting time.
Defrosting Table
Dish Defrosting
Time
in min
Chicken, 1000 g
Meat, 1000 g
Meat, 500 g
Trout, 150 g
Strawberries,
300 g
Butter, 250 g
Cream, 2 x 200 g
Flan, 1400 g
100 – 140 20 – 30
100 – 140 20 – 30
90 – 120 20 – 30
25 – 35 10 – 15
30 – 40 10 – 20
30 – 40 10 – 15
80 – 100 10 – 15
60 60
Further
Defrosting
Time
in min
Comments
Place the chicken on an upside
down saucer on a large plate.
Defrost uncovered and turn halfway through, or defrost covered
with foil.
Defrost uncovered and turn halfway through, or defrost covered
with foil.
Defrost uncovered and turn halfway through, or defrost covered
with foil.
Defrost uncovered.
Defrost uncovered.
Defrost uncovered.
Defrost uncovered
(Cream will also whip well if it is
still partially frozen.)
Defrost uncovered.
45
Page 46

OPERATING INSTRUCTIONS
Preserving
For preserving use the pizza oven function.
Preserving Jars
• Only use commercially available preserving jars (preserving jars with a
rubber ring and glass lid) for preserving.
• Jars with screw or bayonet tops are unsuitable, as are metal tins.
Shelf Positions
• Use the 2nd shelf position from the bottom for preserving.
Notes on Preserving
• Use the universal tray for preserving. There is room on this tray for up
to 8 preserving jars of 1 litre capacity.
• Pour two cups of water onto the universal tray to ensure that there is
sufficient humidity in the oven.
• Position the preserving jars on the universal tray such that they do
not touch each other.
• The preserving jars should all be filled with the same amount and
closed.
Preserving Times
☞ Select pizza oven function and set temperature to 160 °C.
Fruit and Pickled Gherkins
• As soon as bubbles start to form in the liquid in the first jar, normally
front right, switch off the oven. With 1 litre jars after 10 to
20 minutes.
Leave the jars to stand in the closed oven for a further 30 minutes –
in the case of delicate fruits, e. g. strawberries, approx. 15 minutes.
Vegetables and Meat
• As soon as air bubbles start to form in the liquid in the first jar, turn
the temperature down to 100 °C.
Leave the food to be preserved to continue to cook at 100 °C for
approx. 60–90 minutes.
• Then switch off the oven and leave the jars to stand in the closed
oven for a further 30 minutes.
46
Page 47

OPERATING INSTRUCTIONS
Cleaning and Care
The Exterior of the Appliance
Wipe the front of the appliance with a soft cloth and warm water with
☞
washing up liquid.
• Do not use scourers, caustic cleaners or abrasive items.
• You may use commercially available stainless steel cleaners. These
also provide a protective film against finger marks.
• Remove scale, fat, starch and egg-white marks from stainless steel
surfaces as soon as possible. Otherwise corrosion can occur under
these marks due the lack of air.
Oven Interior
Oven Lighting
You can switch on the oven light to make cleaning easier.
Cleaning
☞ 1. Wipe the oven clean after each use with water and washing up liquid
with a little vinegar added.
2. Then rub the oven dry with a cloth.
3. Remove stubborn marks with special oven cleaner.
Warning! For safety reasons do not clean the appliance with a steam
i
or higher pressure cleaner.
Important! When using oven spray, please ensure that you follow the
!
manufacturer’s instructions!
Accessories
After each use rinse all slide-in parts (shelf, fat tray, etc.) and dry well.
☞
To make the parts easier to clean, leave them to soak for a short period.
47
Page 48
OPERATING INSTRUCTIONS
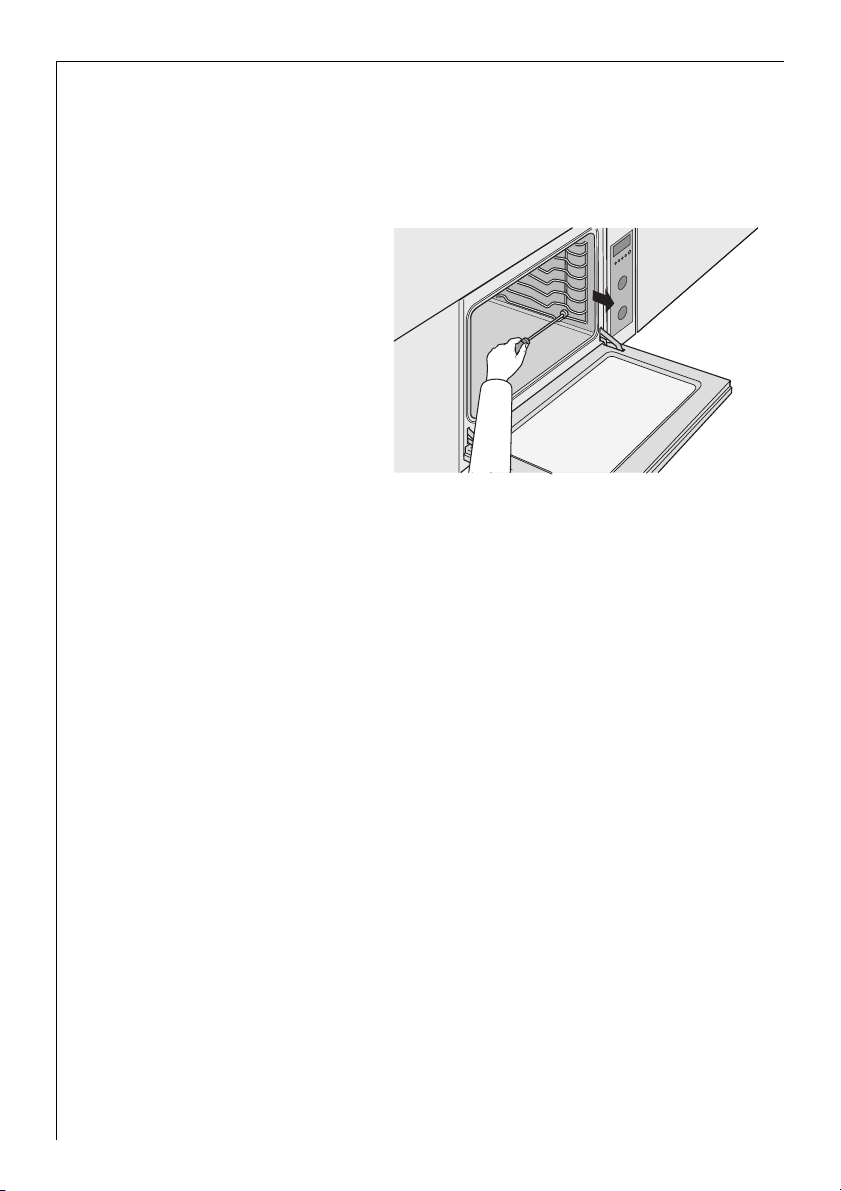
Side Rails
The side rails on the left and right hand sides of the oven can be
removed for cleaning the side walls.
Removing and Fitting the Side Rails
☞ 1. Using a screwdriver, undo
the side rail retaining
screws.
2. Remove rail to the front.
3. To refit, reinsert rail.
4. Fix both side rails in place
again using the screws.
48
Page 49

OPERATING INSTRUCTIONS
Oven Light Bulb
Warning! There is a risk of electric shock! Before changing the light
!
bulb in the oven:
• Switch off the oven!
• Isolate the oven from the power supply.
Replacing the Light Bulb in the Oven/Cleaning the Glass
.
☞ 1. Place a cloth on the floor of
the oven.
2. Carefully remove the glass
cover.
To do this, use a blunt tool
such as a flat bladed screwdriver, under the glass cover.
3. Replace oven halogen light
bulb (25 W, 12 V, heat-
resistant up to 300 °C).
4. Replace the glass cover.
5. Remove the cloth from the
oven.
49
Page 50

OPERATING INSTRUCTIONS
Combination Grill Element
To make the cleaning of the oven roof easier, the combination grill element (top heat and grill) can be folded down.
Warning! Only fold down the combination grill element when the
!
oven is switched off and the oven is cold.
Folding Down the Combination Grill Element
☞ 1. Undo the rotating fas-
tener on the combination grill element
(turn 90 degrees).
2. Fold the combination
grill element down.
Important! Do not use excessive force to lower the element! The ele-
!
ment can break off if excessive force is used.
Fitting the Combination Grill Element
3. Fold the combination
grill element back up
and lock in place
again using the rotating fastener.
50
Page 51

OPERATING INSTRUCTIONS
Oven Door
You can remove the oven door from your appliance for cleaning.
Removing the Oven Door
☞
1. Open the oven door completely.
2. Fold up the links on the
door hinges.
3. Take hold of the oven door
at the sides with both
hands and close slowly. At
around halfway the hinges
release from their locks.
The oven door can now be
removed.
To avoid scratches, lay the
door with the outer face downwards on a soft, flat surface, for example
a blanket.
Fitting the Oven Door
(as in the figure above but in the reverse order)
☞ 1. Take hold of the oven door at the sides with both hands and slide the
hinges from above into the corresponding openings on the oven.
2. Open the oven door slowly.
Ensure your fingers are kept well away from the hinges at all
times.
3. Fold the links down onto the door hinges.
4. Close the oven door.
51
Page 52

OPERATING INSTRUCTIONS
What to do, if …
… the oven does not heat up?
☞ Check whether
– the appliance is switched on,
– all the necessary settings have been made,
– a house fuse is defective.
If you do not find any of these malfunctions, call an approved electrician or contact your local Service Force Centre.
… the oven cannot be switched off?
☞ Switch the fuse off and call an approved electrician or contact your
local Service Force Centre.
… the oven door does not close?
Clean the door and seal with soap and water and a damp cloth.
… the oven lighting ceases to work?
☞ Replace the light bulb in the oven (see Cleaning and Care).
… the meat probe is defective?
☞ Do not continue to use a defective meat probe.
If this information does not provide you with the necessary assistance, please contact an electrician or customer service.
Warning! Repairs to the appliance are only to be performed by quali-
!
fied service engineers. Repairs performed improperly may cause injury
or serious malfunction. If your appliance needs repairing, please contact your local AEG Service Force Centre.
Important:
i
If you call out an engineer to a fault listed above, or to repair a fault
caused by incorrect use or installation, a charge will be made even if
the appliance is under guarantee.
52
Page 53

SERVICE AND SPARE PARTS
SERVICE AND SPARE PARTS
If you wish to purchase spare parts or require an engineer, contact your
local AEG Service Force Centre by telephoning:
08705 929 929
Your telephone call will be automatically routed to the Service Force
Centre covering yor post code area.
For the address of your local Service Force Centre and further information about Service Force, please visit the website at
www.serviceforce.co.uk
For Customer Services in the Republic of Ireland please contact us at
the address below:
AEG
Electrolux Group (Irl) Ltd
Long Mile Road
Dublin 12
Republic of Ireland
When you contact the Service Centre they will need the following
information:
1. Your name & address, including post code.
2. Your telephone number.
3. Clear and concise details of the fault.
4. The model and serial number of the
appliance (found on the rating plate).
5. The purchase date:
Please note that a valid purchase
receipt or guarantee documentation is
required for in-guarantee service calls.
53
Page 54

CUSTOMER SERVICE
CUSTOMER SERVICE
Customer Care
For general enquiries concerrning your AEG appliance or for further
information on AEG products please contact our Customer Care
Department by letter or telephone at the adress below or visit our website at
www.aeg.co.uk
Customer Care Department
AEG Domestic Appliances
55-77 High Street
Slough
Berkshire, SL1 1DZ
Tel. 08705 350350 (*)
(*) Calls may be recorded for training purposes
54
Page 55

Warrenty Conditions
Warrenty Conditions
Standard guarantee conditions
We, AEG, undertake that if within 12 months of the date of the purchase this AEG
appliance or any part thereof is proved to be defective by reason only of faulty workmanship or materials, we will, at our discretion repair or replace the same FREE OF
CHARGE for labour, materials or carriage on condition that:
• The appliance has been correctly installed and used only on the electricity or gas
supply stated on the rating plate.
• The appliance has been used for normal domestic purposes only, and in accordance
with the manufacturer’s operating and maintenance instructions.
• The appliance has not been serviced, maintained, repaired, taken apart or tampered
with by any person not authorised by us.
• All service work under this guarantee must be undertaken by a Service Force Centre.
Any appli-ance or defective part replaced shall become the Company’s property.
• This guarantee is in addition to your statutory and other legal rights.
• Home visits are made between 8.30am and 5.30pm Monday to Friday. Visits may be
available outside these hours in which case a premium will be charged.
Exclusions
This guarantee does not cover:
• Damage or calls resulting from transportation, improper use or neglect, the replace-
ment of any light bulbs or removable parts of glass or plastic.
• Costs incurred for calls to put right an appliance which is improperly installed or calls
to appli-ances outside the United Kingdom.
• Appliances found to be in use within a commercial environment, plus those which
are subject to rental agreements.
• Products of AEG manufacture which are not marketed by AEG.
European Guarantee
If you should move to another country within Europe then your guarantee moves with
you to your new home subject to the following qualifications:
• The guarantee starts from the date you first purchased your product.
• The guarantee is for the same period and to the same extent for labour and parts as
exists in the new country of use for this brand or range of products.
• This guarantee relates to you and cannot be transferred to another user.
• Your new home is within the European Community (EC) or European Free Trade Area.
• The product is installed and used in accordance with our instructions and is only used
domesti-cally, i.e. a normal household.
• The product is installed taking into account regulations in your new country.
Before you move please contact your nearest Customer Care centre, listed below, to
give them de-tails of your new home. They will then ensure that the local Service
Organisation is aware of your move and able to look after you and your appliances.
France Senlis +33 (0) 3 44 62 29 29
Germany Nürnberg +49 (0) 800 234 7378
Italy Pordenone +39 (0) 800 117511
Sweden Stockholm +46 (0) 8 672 5360
UK Slough +44 (0) 1753 219899
55
Page 56

INSTALLATION INSTRUCTIONS
INSTALLATION INSTRUCTIONS
Important! Any electrical installation work must be carried out by a
!
qualified electrician/competent person.
The oven must be installed according to the instructions supplied.
Technical Data
Oven Exterior Dimensions
Height x Width x Depth
Oven Interior Dimensions
Height x Width x Depth
Capacity
Nominal Power Consumption
Regulations, Standards, Directives
This appliance meets the following standards:
• EN 60 335-1 / VDE 0700 Part 1 and EN 60 335-2-6 / VDE 0700 Part 6
in respect of the safety of electrical appliances for household use and
similar purposes
• DIN 44546 / 44547 / 44548
in respect of the operating features of electric cookers for household
use
• EN 55014-1 / VDE 0875 Part 14-1
• EN 61000-3-2 / VDE 0838 Part 2
• in respect of basic electromagnetic compatibility (EMC) requirements.
48 x 89.2 x 53.5 cm
29.5 x 58.5 x 39.5 cm
68 l
3.6 kW
# This appliance conforms with the following EU Directives:
• 73/23/EWG dated 19.02.1973 (Low Voltage Directive)
• 89/336/EWG dated 03.05.1989 (EMC Directive including
Directive Amendment 92/31/EWG).
56
Page 57

INSTALLATION INSTRUCTIONS
Safety Instructions for the Installer
!
• Legal regulations and the local electricity board’s requirements for
making connections must be observed in full.
• When connecting, repairing and replacing the oven light bulb, isolate
the appliance from the electricity supply.
Installation instructions
• Full protection against electric shocks must be ensured by the
method of installation.
• The protective conductor must be long enough so that, if the strain
relief device fails, it is not subjected to tension until after the live
conductors of the connection cable.
• If you want to install the oven in the corner of an L-shaped kitchen
so that the left side of the oven is flush with the other kitchen line,
there must be a space of at least 15 cm between the left side of the
oven and the other line front.
• In accordance with heating testing standards, the appliance corresponds to Safety Class Y.
• The furniture into wich the oven is to be installed must be tempera-
ture resistant to 100°C. This applies in particular to veneer, edging,
plastic surfaces, adhesives and lacquers. The fronts of the surrounding
furniture must be temperture resistant to at least 70°C.
• The appliance is to be installed flush with the wall. The appliance
mains socket must therefore be located outside the installation area.
• It is imperative to install the appliance horizontally on an even surface. This surface must not bend.
• If the furniture unit is not attached to the wall, attach it using a conventional fixing angle.
57
Page 58

INSTALLATION INSTRUCTIONS
Electrical Connection
Warning! This appliance must be earthed!
!
Important! Electrical requirements (for UK and Republic of Ireland
!
only):
• Check that the voltage stamped on the rating plate corresponds with
your house electricity supply, which must be AC (alternating current).
• Electrical connection of the apppliance must be performed by a
trained electrician. The legally recognized regulations and the connection requirements of the electricity board seving your area must
be fully complied with.
Warning! Should the oven be supplied with a continental two-pin plug
!
fitted, then this plug must be cut off from the connection cable. Dispose of the plug safely; do not insert it in a 13 A socket elsewhere in
the house as this could cause a shock hazard.
Connection for UK and Republic of Ireland only: Permanent connection to an oven power point (fuse: 20 A!).
Connection Permanent connection to an oven power point.
Total rating at 230 V: 3.5 kW,
at 235 V: 3.6 kW
Electrical connection 230 - 240 V, 50 Hz
Fuse current 20 A
58
Other countries:
Connection is via the mains plug into a wall socket.
Total rating at 230 V: 3.5 kW,
at 235 V: 3.6 kW
Electrical connection 230 - 240 V, 50 Hz
Fuse current 16 A
Page 59

INSTALLATION
Drawing with Dimensions
INSTALLATION INSTRUCTIONS
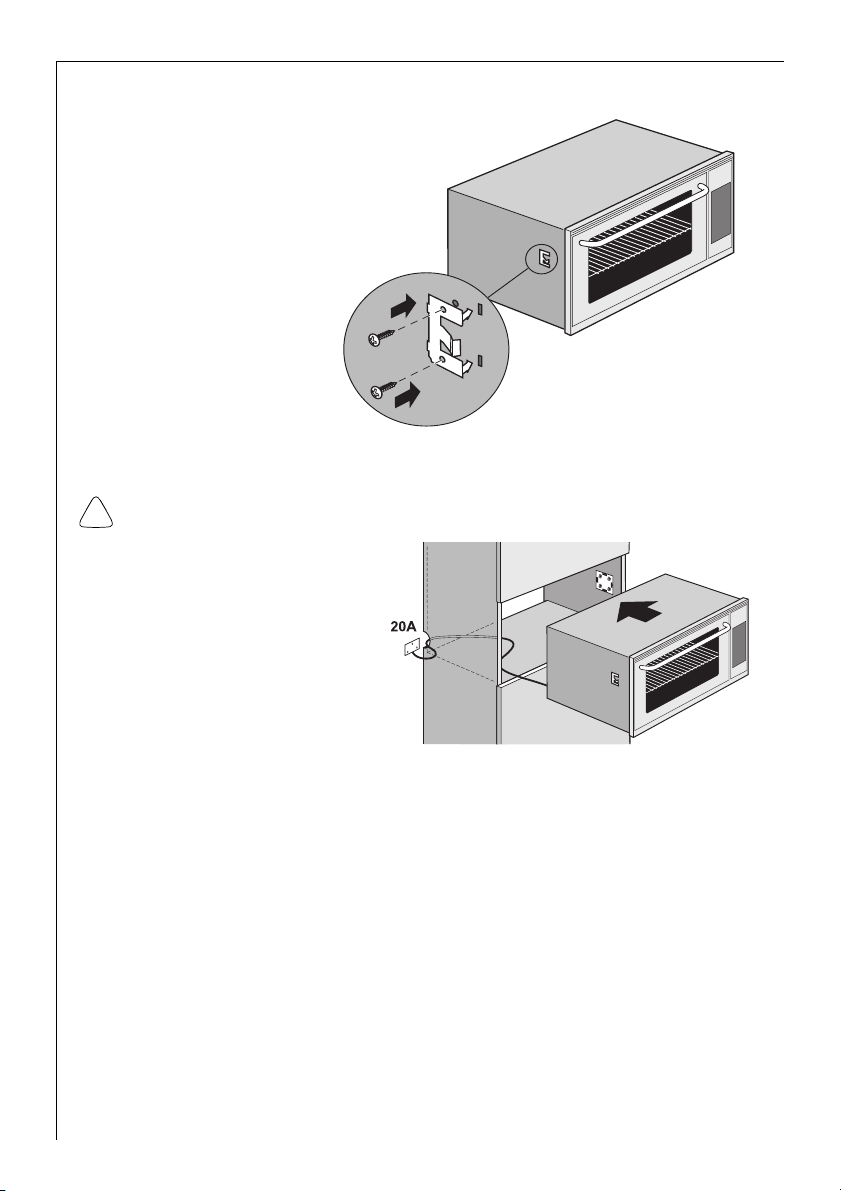
Installation in a Kitchen Unit
1. Fix retaining plates to both sides of the interior of the unit:
☞
• Fit the retaining plates
280 mm from the bottom
edge of the unit with the
embossing facing the unit and
mark the rear holes.
• Slide the retaining plate so
that the front holes are over
drilled holes.
• Fix the retaining plate to the
unit using the screws supplied.
59
Page 60
INSTALLATION INSTRUCTIONS
2. Fix the clips to both side walls on the appliance.
Fitting the oven
!
Warning! UK and Republic of Ireland: Connect to
an oven power point!
It is necessary that you
install a double pole
switch between the oven
and the electricity supply
(mains), with a minimum
gap of 3 mm between the
switch contacts and of a
type suitable for the
required load in compliance with the current rules.
The switch must not break the yellow and green earth cable at any
point.
60
Page 61
INSTALLATION INSTRUCTIONS
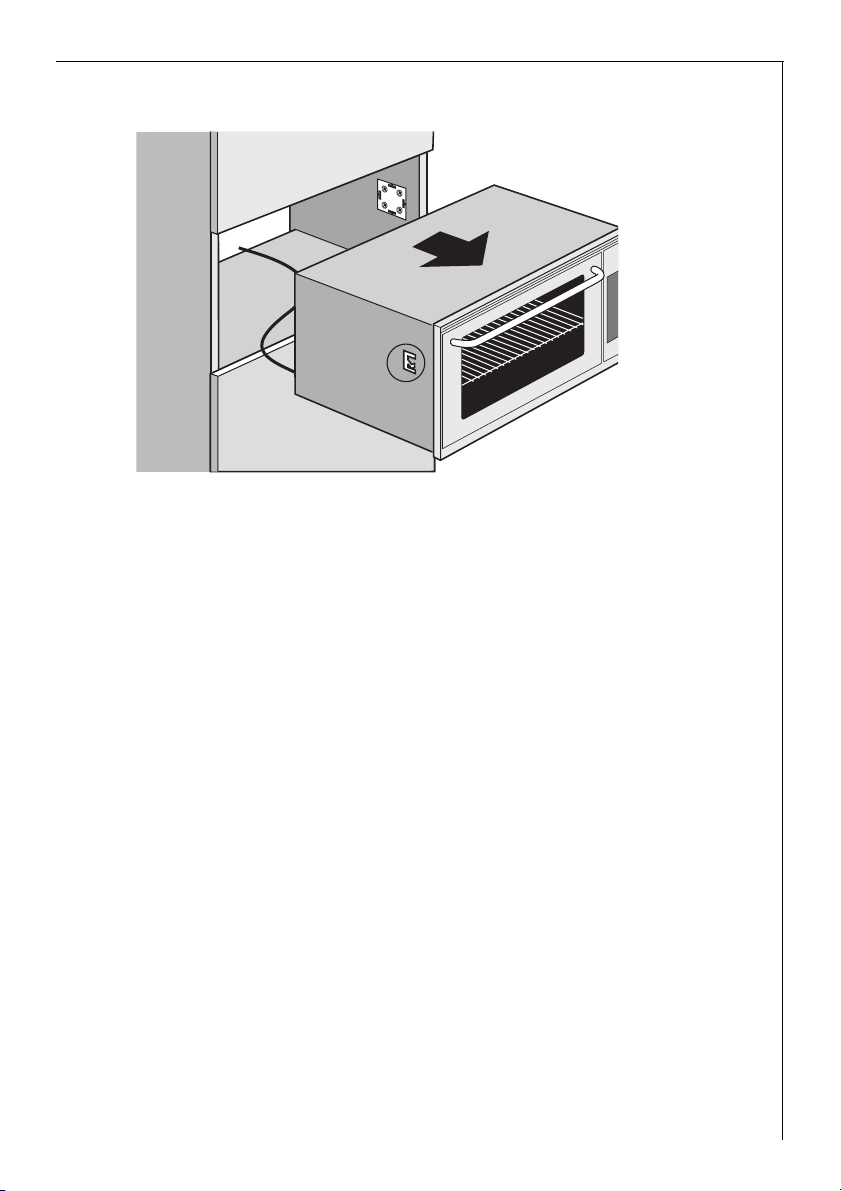
Removing the oven
☞ 1. Carefully pull the appliance out of the niche in the unit.
2. Disconnect the appliance from the mains supply.
61
Page 62

INDEX
INDEX
B
Baking
Baking Pizza . . . . . . . . . . . . . . .29
Baking sheet . . . . . . . . . . . . . . .10
Bottom Heat . . . . . . . . . . . . . . .11
C
Combination Grill Element
Control Panel . . . . . . . . . . . . . . . .9
Conventional oven . . . . . . . . . . .11
D
Defrosting
Disposal . . . . . . . . . . . . . . . . . . .7
E
Electrical Connection
F
Fast Warm Up
G
Grill
Grilling . . . . . . . . . . . . . . . . . . .43
Guarantee . . . . . . . . . . . . . . . . .55
L
Large Area Grill
M
Meat Probe
O
Oven
. . . . . . . . . . . . . . . . . . .27
Bakes and Gratins Table . . . . . .34
Frozen Ready Meals Table . . . . .34
Shelf Positions . . . . . . . . . . . .26
Table with Figures for
Guidance
Tips . . . . . . . . . . . . . . . . . . . .33
. . . . . . . . . . . . .30, 32
. . . . . .50
. . . . . . . . . . . . . . . . .45
. . . . . . . . .58
. . . . . . . . . . . . . .12
. . . . . . . . . . . . . . . . . . . . .11
Grilling Table . . . . . . . . . . . . .44
. . . . . . . . . . . . .11
. . . . . . . . . . . . . . . .10
. . . . . . . . . . . . . . . . . . . .10
Fast Warm Up . . . . . . . . . . . . .15
Initial Cleaning . . . . . . . . . . . .13
Installation . . . . . . . . . . . . . . 59
Switching On and Off . . . . . . . 14
Oven Dimensions . . . . . . . . . . . 56
Oven Function Control Knob . . . . . 9
Oven Light Bulb . . . . . . . . . . . . 49
P
Pizza function
Pizza stoneware . . . . . . . . . . . . 10
Preserving . . . . . . . . . . . . . . . . 46
R
Roasting
Ovenware for Roasting
Shelf Positions
Roasting Tables . . . . . . . . .37, 39
Temperature Table for Meat Probe .
. . . . . . . . . . . . . 12
. . . . . . . . . . 35
42
with the Meat Probe . . . . . . . . 41
Rotitherm . . . . . . . . . . . . . . . . 12
S
. . . . . . . . . . . . . . . . . .5, 57
Safety
Service and Spare Parts . . . . . . . 53
Shelf . . . . . . . . . . . . . . . . . . . 10
Shelf Position . . . . . . . . . . . . . . 10
Side Rails . . . . . . . . . . . . . . . . 48
Switching the Oven Off . . . . . . . 14
T
Temperature Selection Control Knob
Top Heat . . . . . . . . . . . . . . . . . 11
U
Universal Tray
V
Ventitherm
W
What to do, if …
. . . . . . . . . . . . . . 10
. . . . . . . . . . . . . . . 11
. . . . . . . . . . . . 52
9
62
Page 63

Notes
Notes
63
Page 64

G
COMPETENCE B 6139-m
AE
Der umschaltbare Einbau-Backofen
Benutzerinformation
AEG Hausgeräte GmbH
Postfach 1036
D-90327 Nürnberg
http://www.aeg.hausgeraete.de
@
Copyright by AEG
822947225
 Loading...