


I N F O
EOB 854
Built-in Oven Instruction and Installation Manual
GB
DEJ-K/RD-SD - 970505
319 2881-01

2
This manual will also be printed in the
ITALIAN language.
We like to send this manual, if needed to your address and ask you to
give us information by mail to
Electrolux-Juno
Küchentechnik GmbH
K/CS
Junostraße 1
D-35745 Herborn

Contents
Important hints on safety 4. ... . . . . . . . . . . . . . . . . . . . . . . . . . . . . . . . . . . . . . . . . . . . . . . . . . . . . . . . . . . . . . . . .
User instructions
Total view and control panel 5
Safety equipment 6
Prior to the first use 7
First cleaning 7
First heating-up 7
The oven switches 8
Function switch 8
Temperature selector 8
Control indicators 8
The oven cavity 9
Oven accessories 9
Oven runners 9
Application of the oven functions 10
Top- and bottom heat 10
Infra-red grilll 1 1
Large surface grill 1 1
Turbo grill 12
Remarks for baking and roasting 12
Oven lighting, bulb exchange 13
Electronic clock 14
Charts for roasting 18
Charts for baking, 19
Charts for grilling 21
Useful hints on practical problems 22
Useful hints on technical problems 22
Cleaning 23
Oven and accessories 23
Control panel and oven door 23
Heating elements on top 24
Stainless steel surface 24
Guarantee - Spare parts service - After sales addresses - -
Installation instructions
Installation instructions 25
Unpacking and disposal 25
Built-in in kitchen furniture 25
Built-in dimensions 25
Mains connection 26
Technical data, type plate 28
3

Important hints on safety
Priorto first useof the appliancedo makeyourself
familiar with the instruction manual. Pay special
attention to the hints on safety marked with a .
This will prevent from damages to persons as well
as to the appliance itself.
Do carefully keep the manual at a safe place and, if
need be, pass it on to your successor user.
The appliance is only to be used for its purpose in the
household. Thisapplianceisaccordingtointernational
security instructions and quality norms.
The safety measures existing as a matter of selfunderstanding would, however, not cover all of possible risks of accidents.
Electrical safety
The connection to the power supply must exclusively be carried out by expert electricians. Moreover, electrical safety has to be ensured by expert
installation in standard built-in cabinets.
Damaged appliances must not be used. Fuselage to
be cut off or unscrewed in case of trouble or failure.
For safety reasons repairing, in particular at live parts
ofthe appliance, hasto be carriedout by expertelectricians or trained service technicians only, as potential
danger will result for the user. If a fault occurs, please
contact our after--sales--service.
Theovenbottommust not be coveredwithalu-foil.The
heat will accumulate and may cause damage to the
material.
When taking out the hot items do absolutely make use
of pot or thermo-gloves.
The opened oven door must not be burdened too
heavily, do not sit or step on it.
When connecting additional electrical appliances to
sockets close to the oven make sure the connecting
wires do not come into contact with the hot appliance
and do not get jammed with the hot oven door.
Besides the accessories supplied with the unit do
exclusively make use of suitable and temperature-resistant baking tins and roasting dishes. Do please
follow the manufacturers’ instructions.
After use make sure that the appliance is switched off.
All of the rotary knobs have to be reset into the OFFposition.
Cleaning
No heating element must be switched on during the
cleaning procedure. Make sure that the oven has
cooled down in a way that one may get in touch with
interior parts without any danger.
Always keep the oven clean. When heating up fat
splashes and spots will cause inconvenient odours.
Children safety
Always keep small children away. Make sure that
playing children do not operate the appliance.
To protect against burns from hot heating elements of
the oven the oven door is provided with a catch lock,
that can normally be opened by adults, only.
Use and operation
Prior to first use the oven must be heated up once.
Take care for a sufficient space ventilation.
In case of careless handling there is danger of bur-
ning oneself at the heating elements in the oven.
The oven door must firmly close. Ensure clean sealing
surfaces at door and door frame.
Steam and high--pressure cleaning units are not suitable for cleaning because of the requirements of electrical safety.
4
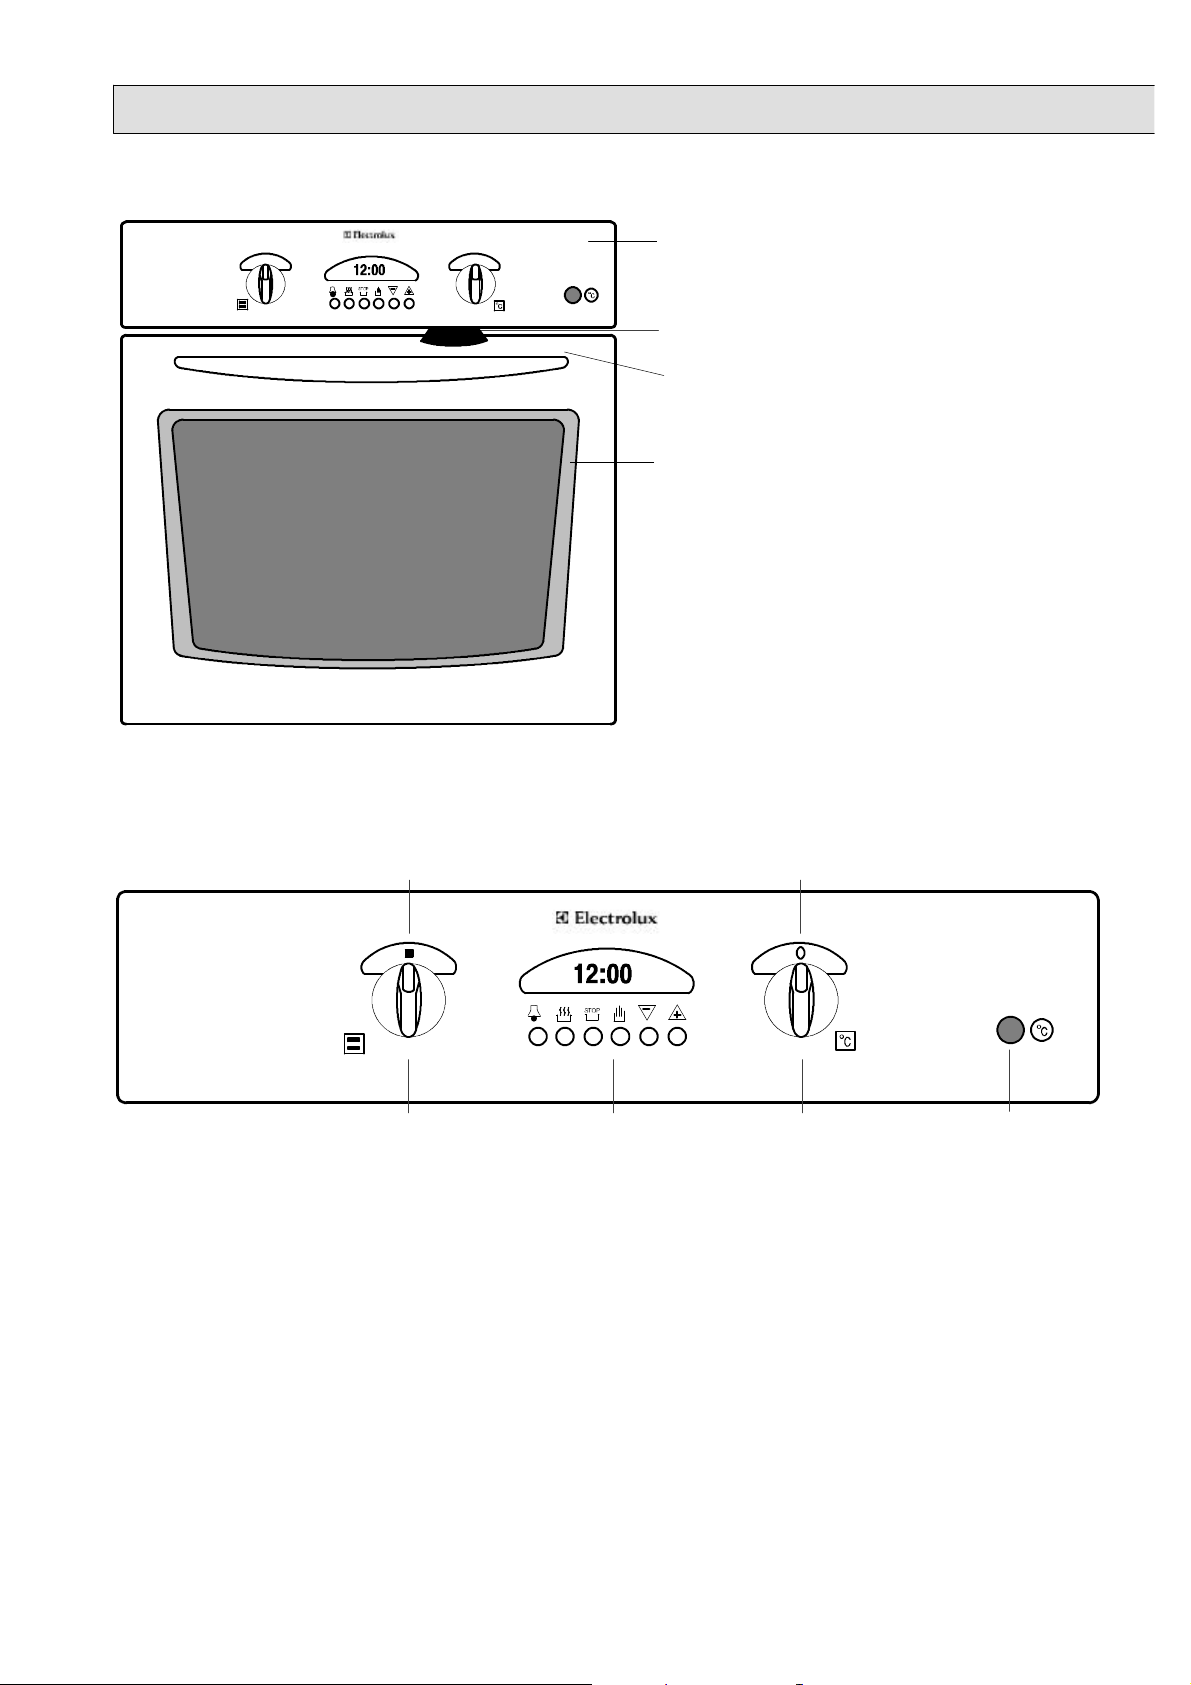
The built-in electric oven
Overall view
control panel with switches for function,
temperature and electronic clock
locking mechanism
oven-door handle
full glass oven door
with inspection window
Control panel
Oven function switch
Ê
Illuminated scale discs
Ë
Electronic clock
Ì
Oven temperature selector
Í
Temperature control lamp
Î
Ë Ë
Ê Ì
Í
Î
5
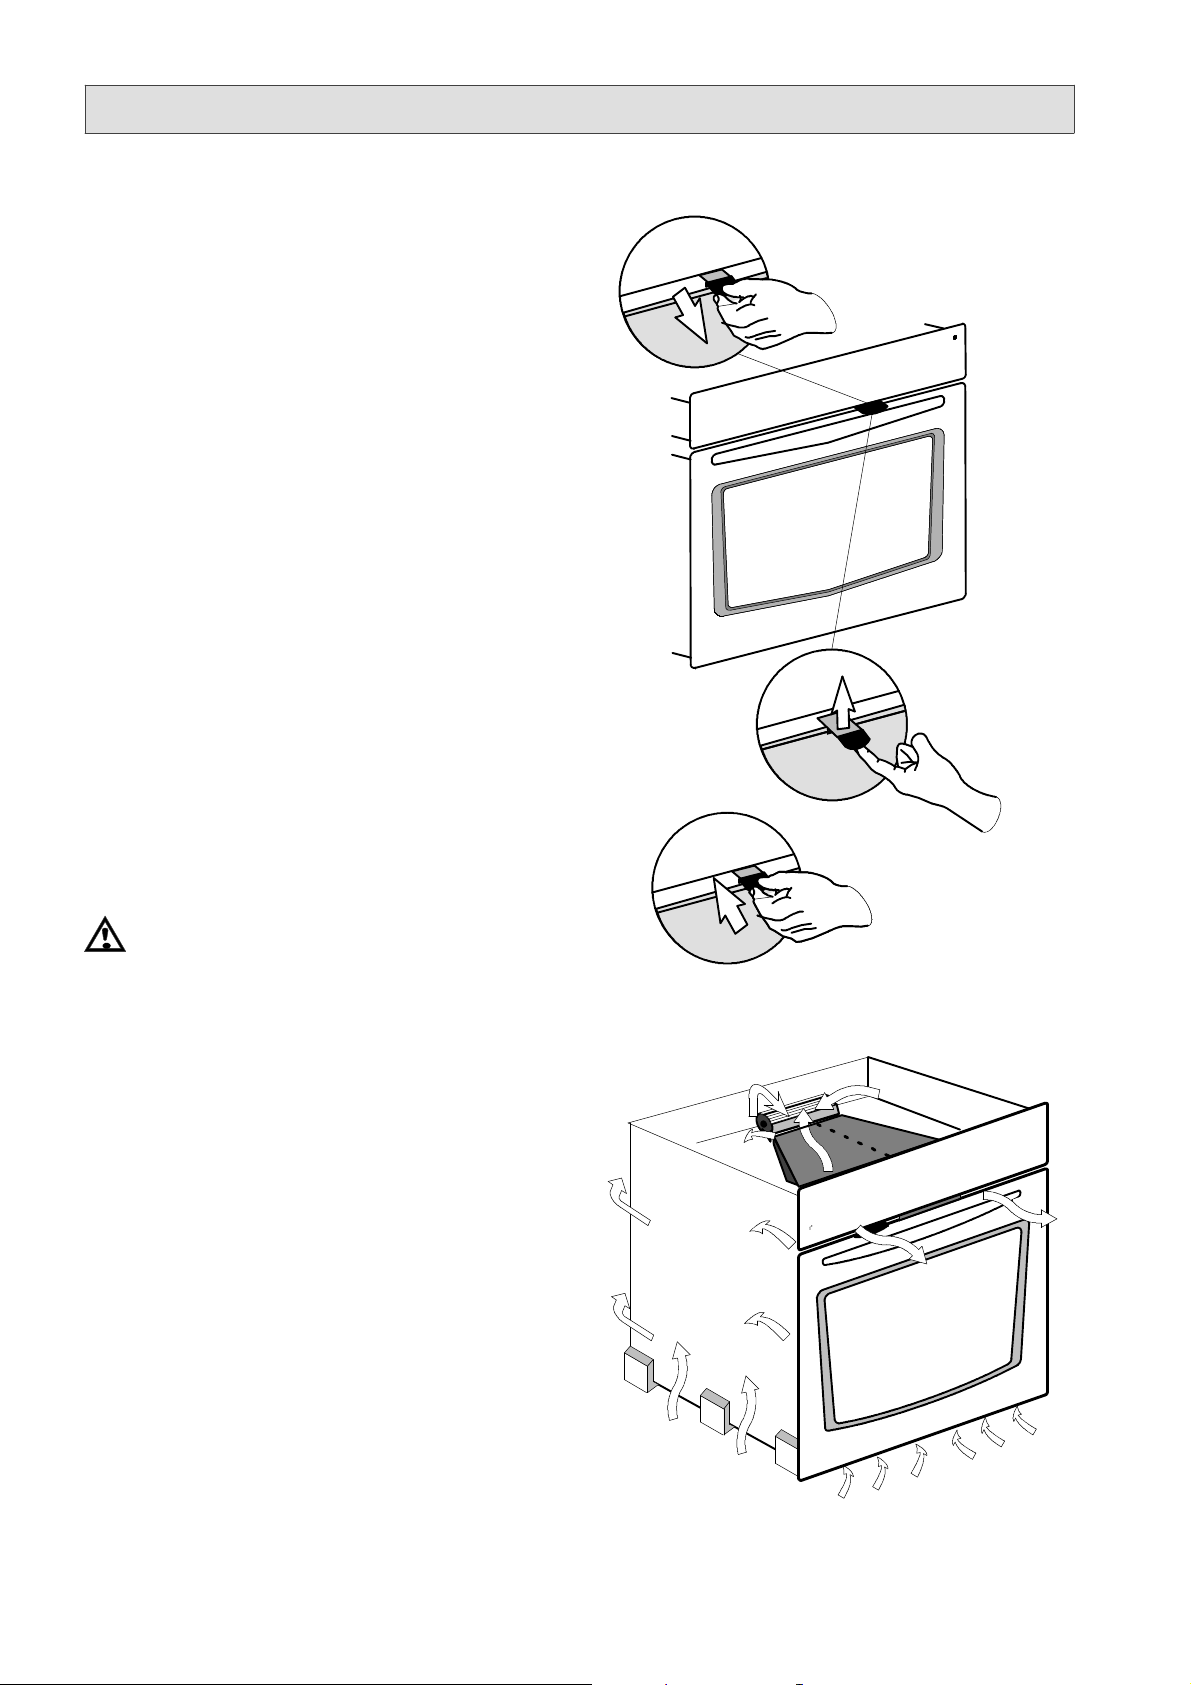
Safety equipment
Oven door locking /
Children safety mechanism
By means of an interlocking mechanism for the oven
you can prevent playing children from getting access
to it.
Activating of door lock
For interlocking of the oven door pull the interlocking
tongue out.
Opening and closing of the oven door with activated interlocking mechanism.
To open the door push the tongue upwards, the door
caneasily be opened. Make use of thermo-gloves or of
a pot cloth in case the appliance will be hot.
Whenclosingthedoortheinterlockingtongue will automatically catch in.
Deactivating of door lock
Push the tongue in. Now the oven may always be opened.
Activation (pull out) or deactivation (push in) of the
interlocking mechanism are always to be realized with
the door open.
In order to avoid any burns do only activate or
deactivate the oven door interlocking mechanism with the appliance in cold state.
Oven cooling fan
The appliance is fitted with a cooling fan that will automatically switch on in case of heat beeing developed
and, if need be, continue to run after switch-off of the
appliance.
6

Prior to the first use
Daytime setting
When the oven has been connected to the mains and
afterfailure of electricity, the timedisplay of theelectronic autotimer flashes 0.00 and AUTO. The present
daytimehas to be set. Without this, the oven cannot be
used. The time display covers the range from 0.01 to
24.00 hours.
. Pushbuttons and simultaneouslyand
hold it.
. Ata time set the present daytime by pushing
button forwards or button backwards.
STOP
To make corrections of time (summer--/winter--time,
etc.) simultaneously press the two adjusting buttons
and adjust the actual time with or .
First cleaning
In order to remove possible production remnants,
clean the appliance once prior to first use.
Remove any possibly existing labels and protective
foils from the front of the appliance.
Clean control panel and oven door with hot water and
a washing-up liquid and dry.
Remove the accessories from the oven and wash
them.
The clean-enammelled cavity has to be washedo with
warm water and a washing-up liquid. Then dry it.
The oven lighting may be switched on for this purpose
by setting the function switch to position .
STOP
D
First heating up
Prior to first use the oven must be heated up
once.Take care for a sufficientspaceventilation.
Setfunction switch totop / bottom heat and temperature selector knob to 250oC.
Holding this setting, operate the empty and closed
oven for 60 minutes.
250
7
8
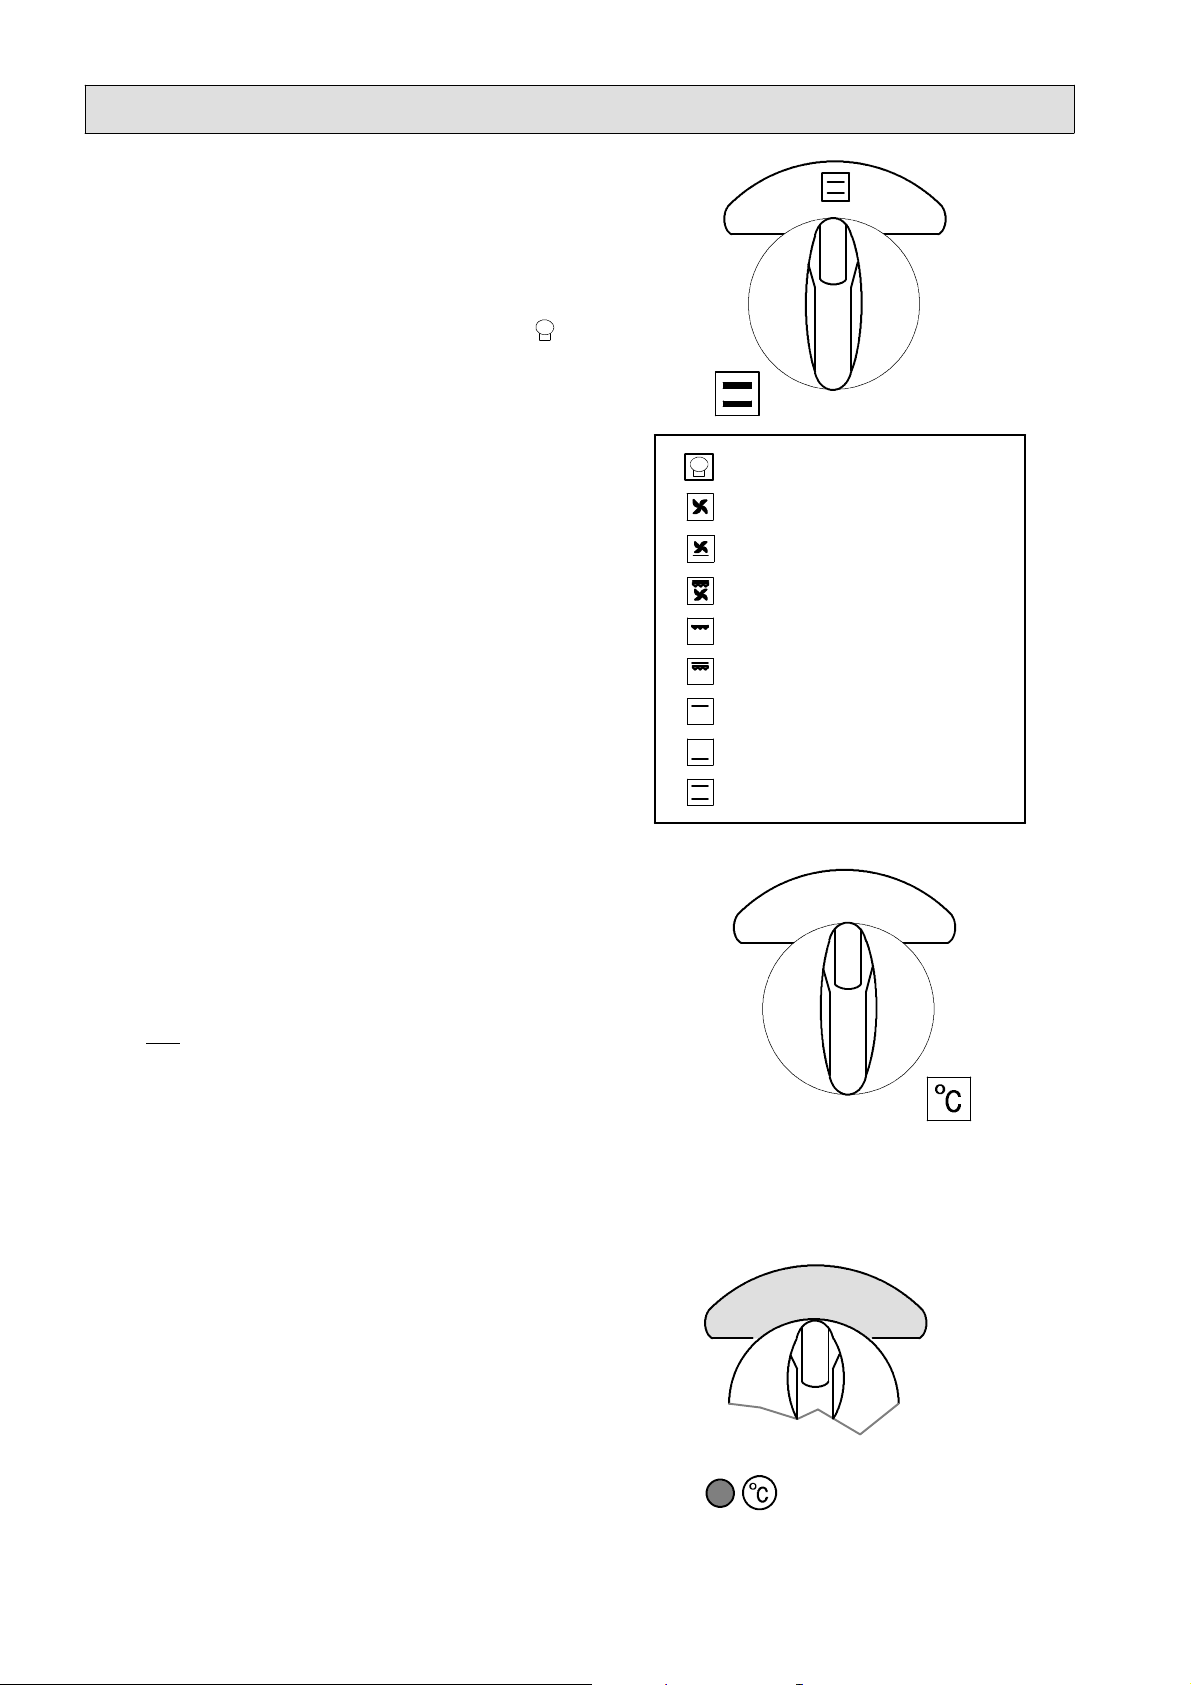
Oven switches
Oven function switch
The function switch can be turned to the left and to the
right to the desired position.
The oven illumination ist switched on with position
and at a time with all oven functions.
Oven illumination
Hot-air
Pizza function
Turbo grill
Infrared grill
Infrared large surface grill
Oven temperature selector
The temperature selector knob is switched on by turningto the right from50to275oC.Donotturn it beyond
the maximum setting. For switch--off turn left to 0--setting.
The oven will be heated up after setting of function
switch and temperature selector.
Indi cators
The function control
The scale discs light up, when the oven is switchedon.
The illumination goes out, when both switches are in
the OFF-position.
Top heat
Bottom heat
Top and bottom heat
275
The temperature control lamp
shines when the oven heating is on. It goes out, when
the set temperature has been reached, and lights up
again during reheating phase.
Temperature control lamp
9
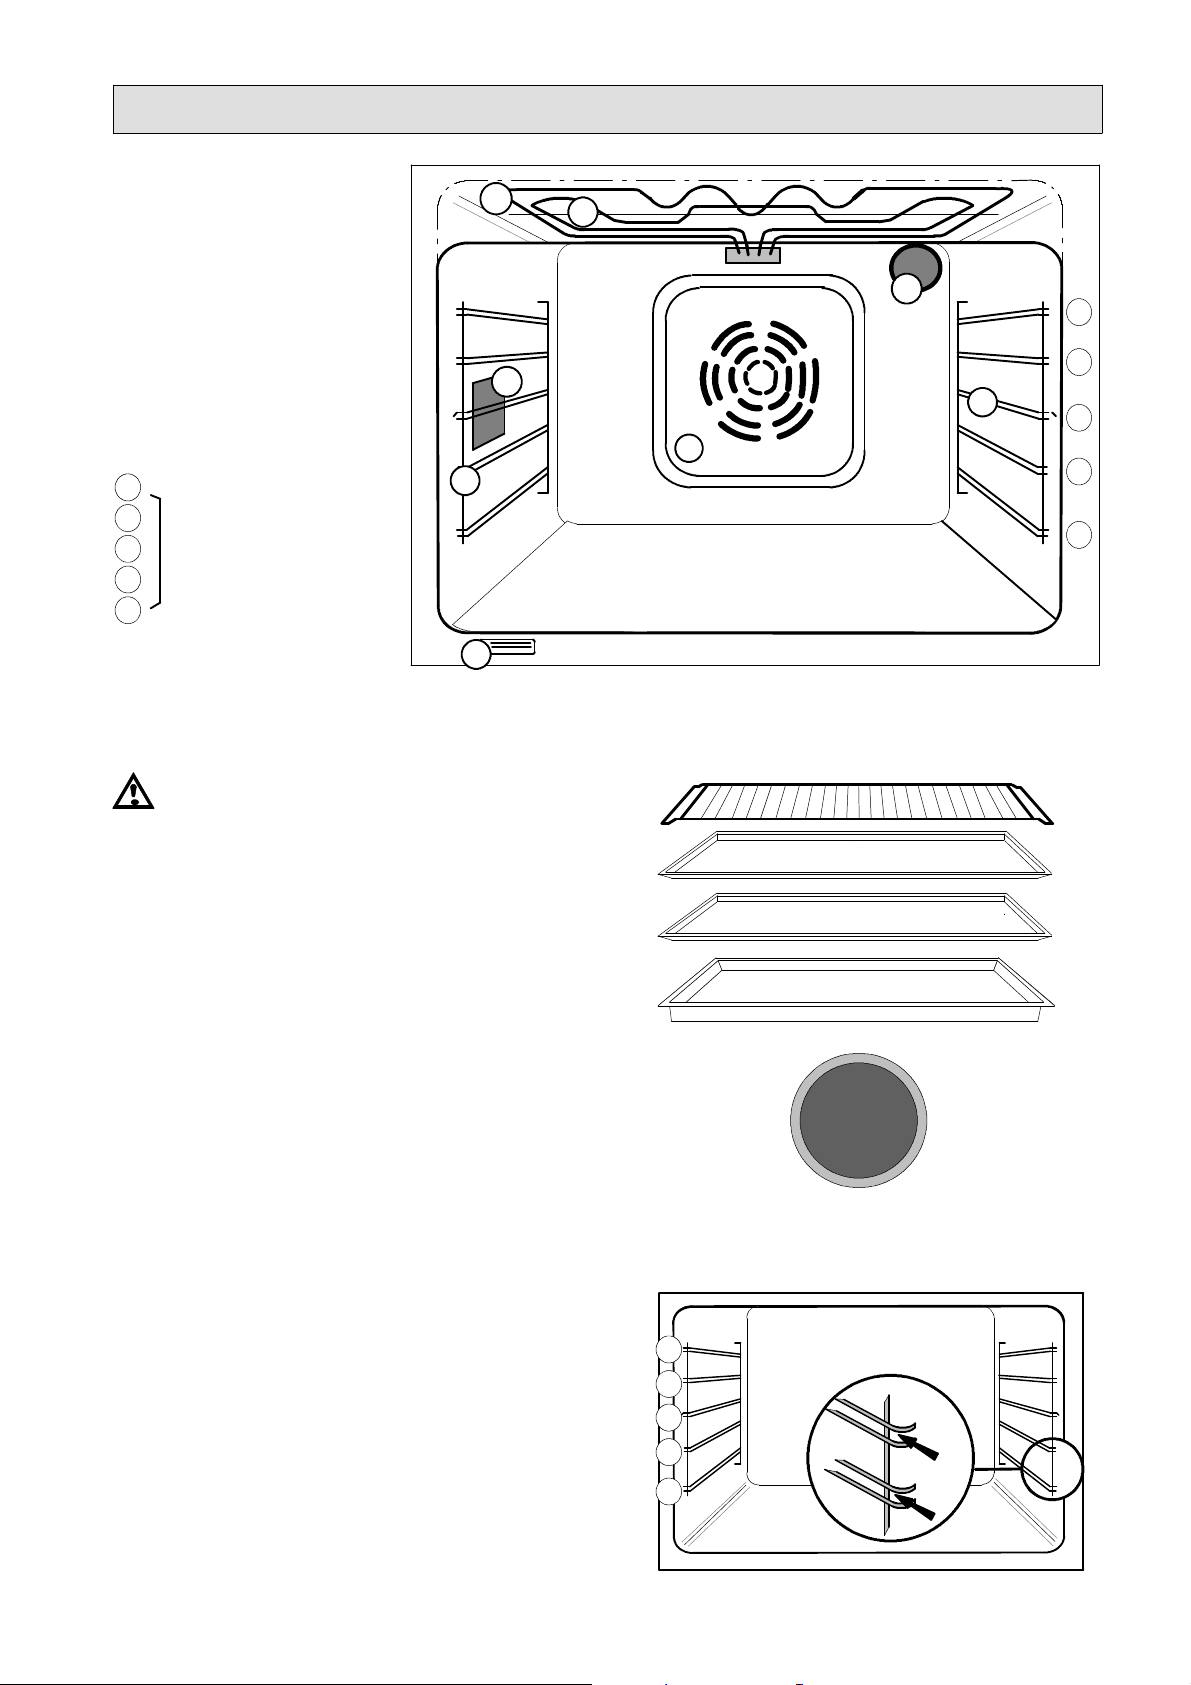
The oven cavity
Oven runners, removable
A
B
Separation panel, rear
element and fan behind
Infrared grill
C
Top heat element
D
Large surface grill
C+D
oven illumination
E
type plate
F
5
4
Runner level
3
2
1
D
E
A
C
E
5
4
A
B
3
2
1
F
Oven accessories
Besides the accessories supplied with the unit
do exclusively make use of suitable and temperature--resistant bakingtins and roastingdishes.
Do please follow the manufacturers’ instructions.
The oven has the following accessories:
1 drip pan
2 baking sheets
1 wire shelve
1 grease filter for rear element
Furtherbaking sheets andwire shelves can beordered
with our Central Spareparts Service.
Oven runners
The oven has 4 runners. In the charts and illustrations
of these instructions they are numbered from 1 = bot-
tom to 4= top. Pleaseinsert baking sheets,wire shelf
or grill pan between the double bars: this will hold
them in a secure position when inserting them and taking them out.
5
4
3
2
1

1
0
Application of the oven functions
Top- and bottom heat
Heating elementes installed under the oven bottom
and at the oven ceiling respectiveley give off radiant
heat to the food. Any temperature between50 and275
o
C can be set.
Baking and roasting using top and bottom heat is only
possible at one level.
Top heat
The radiant heat from the element at the oven ceiling
is used for follow-up baking, overbaking and gratinating. 180oC can be reached at maximum.
Bottom heat
The heating element under the oven bottom gives off
radiantheattotheitemstobecooked.Thefunctioncan
be set for follow-up baking and incrustation on the
sheet. 180oC can be reached at maximum.
Hot air
The oven is heated by circulating hot air. The fan at the
ovenback wall intensivelymovesthehot air in theoven
and thus ensures even cooking. Any temperature between 50 and 275 oC can be selected.
Depending on the food you can use up to 3 runner levels.

1
1
Grilling
During grill operation the oven always has to be
closed.When grilling, donot leave theappliance
unsupervised.
Set the function switch to the selected grilling function.
Which grilling function is to select depends on the
amount and the height of the grill food.
Thetemperature can be adapted to the particular food,
as the oven thermostat holds the temperature within
the set range also during grill operations.
For special advices of function selection, temperature
setting and runner level please see the grilling charts.
Infrared grill
For small amounts of flat meat as well as for chicken
halves,placed in the middle part of the wire shelf. Temperature from 210 to 275oC.
Large surface grill
Forflatitemstobegrilled,halfchickens,etc.onthefully
chargedwire shelf. Thisfunction combines theinfrared
grill with top heat.
Temperature from 210 to 275oC.
Bothsurface--grill functions are suitable for flatmeat
such as steaks, chops, sausages, fish, etc.
As the radiation heat can brown only the surface of the
grill food, same has to be turned over after some time.
The large--surface grill functions can, moreover
be used:
for the overbaking of toast,
for the overflaming of marzipane or icecream
for the crustation of soufflés.
The grill food has to be inserted on the wire shelf, depending on height, into runner 4 or 5. The distance toward the grill heating element can be varied by inserting the wire shelf with its convexity either turned
upward or downward.
Donotinsertflatgrillfoodtooclosebeneaththeheating
element. Drip pan has to be inserted in runner level 1
or 2.

1
2
Turbo grill
Remarksforbakingandroasting
Forhighroastssuchasporkloin,legorpoultryitisadvisable to select the function turbo grill with temperature
settings of about 150 to 190oC.
The infra--red grill operates along with the fan. In this
way,notonlythesurfaceofthegrillfoodisbrownedand
grilled, but the grill heat is led intensively to all sides of
the grill food.
Insert the drip pan into runner level 1 or 2 and the wire
shelf with the grilling food into the runner above.
Roasting with
hot-air and top-/bottom heat
The length of roasting time depends on the kind of
meat,weightandheightoftheroast.Basicallyyourekkon per cm height of meat:
beef, game 14 -- 17 minutes
pork, veal 14 -- 17 minutes
fillet, roastbeef 10 -- 12 minutes.
The higher the roast is, the lower the temperature
needs to be.
The doneness can be checked by pressing the meat
down with a spoon. If the roast does not give way, it is
done.
After switch--off leave the roast foranother 10 minutes
intheovensothatnojuicewillberunningout,whenyou
cut the roast.
Roastingon the wire sh elf
Placeroastonwireshelfwithits serving side turnedupward. Insert baking sheet into runner 1 and the wire
shelf directly above it onto the runner.
Roastingin the pan
Put lean meat, game or meat loaf directly into the drip
pan or in a vessel onto the wire shelf. Put short--roasts
on a sheet into the oven.
In case there is need for a roasting time of more than
an hour, put the ingredients for the gravy into the pan
only half an hour before the end of cooking time, have
them browned and fill in a little hot water.
1 baking sheet: runner 2 or 3
2 baking sheets: runners 1+3 or 2+4
3 baking sheets: runners 1, 3 and 5
1--2 high moulds side by side:
wire shelve in runner 1
flat mould: baking sheet in runner 2 or 3
2flat moulds: wire shelve and/or baking
sheets in runners 1 and 3 respectively.
Baking and roasting using top and bottom heat is only
possible at one level.
D flat cakes and biscuits on the baking sheet
-- in runner 1, 2 or 3
D high cakes, ring or square moulds
-- wire shelve in runner 2 or 3.
Bake-- and roastware
Use only the accessories supplied with the unit or dark
enamelled baking moulds. do exclusively make use of
suitable and temperature--resistant baking tins and
roasting dishes.
At baking or roasting with hot-air or pizza function you
can use dark andbright bakingmoulds, bakingpottery,
heat--resistant moulds and pots. Do exclusively make
use of suitable and temperature--resistant baking tins
and roasting dishes. Bright sheets and molds do, however,extend the baking and roasting times. Please observe manufacturer‘s instructions.
Using runner levels on baking and
roasting
Dependingon the foodwiththe hot-air function youcan
use up to 3 runner levels. We recommend:
Atfunction top-/bottom heatdonot use bright andgleaming sheets or moulds.
In the according runner level baking moulds and roasting dishes are put onto the wire shelf. Special hints
are given in the baking an roasting charts.

1
3
Temperature selection
Ovenlighting-bulbexchange
The hot air function is faster than ordinary functions in
supplyingthe food withheat. Therefore,set thetemperature by about 25oC lower than recommended in
reciepes for top and bottom heat.
Hint:The household appliance dealerisofferingbaking
/ roasting thermometers for the indication of the state
of cooking.
Grease filter
Grease filter to be hooked in with all roasting procedures with hotair and when turbogrilling; filter to be removed when baking as the baking time would otherwise
be extended.
Preheating
As the set temperature is reached within a very short
time, preheating of the oven before inserting the food
is not necessary for most of the baking and roasting
operations.
We recommend preheating with:
D meat dishes and short --roasts, such as fillet,
roastbeef, schnitzl or cutlet. The meat pores are
quicker closed and the item to be roasted
remains juicy.
For this purpose and before insertion of the items the
oven is heated up until the temperature signal lamp
goes out.
Baking with
hot air and top-/ bottom heat
Introduction for using the baking chart
The chart on baking operations contains in most cases
temperatureranges,e.g.160--175 oC.Selectthelower
temperatureforthemoment.Incaseoftoo high temperatures a cake overcrusts too fast, it will collapse or will
not rise properly, because only an insufficient amount
of water is extracted.
Ifthebakingoperationtakestoolongorifthecakedoes
not brown enough as expected, you may select a higher setting.
The even browning of the cake can be improved by reducing the baking temperature (by about 10oC). Then
prolonging of the baking time is necessary.
You might also have to change the baking time even if
you exactly followed the instructions given in the recipe, as the size of eggs, the binding quality of the flour
and the material of which the mould is made can vary.
D fancy biscuits that tend to spread easily,
D rolls, quiches, Swiss rolls.
Before opening the oven lamp the oven has to
be isolated from the mains. Fuselage to be swit-
ched off or removed.
You may replace defect light bulbs yourself.
Forthe replacement youneedbulbsthat are heat --resi-
stant up to 300oC, 25 W / 220-230 V -- E 14.
You can buy these bulbs in electronic specialist shops
or at the spare parts service.
Round oven lamp on the oven rear:
Unscrew the round protective cover glass, replace the
oven lamp and rescrew the protective cover glass.
Rectangular oven lamp in the left oven wall:
Hang out the left oven runner.With awide screwdriver
or a suitable knife unclip the protective glass carefully
from the support, replace the bulb and press the protective glass into place again.

1
4
Electronic clock
Electronic clock functions
D Daytime
The adjustment is described on page 7
D Short--term alarm
D Switch--off automatism
D Switch--on/off automatism
The clock is manipulated by 3 program buttons, two
setting buttons and the changeover button.
STOP
Start-up phase
After pushing of a programming button the next setting
maybemadewithin5seconds.Afterwardsthedaytime
appearson the display again. By pushing the programming buttons you can at any time check or correct the
settings made.
Luminous symbols in the display
Symbol AUTO and refer to set switch--on or switchon/offautomatismprograms.Afterexpirationoftime
goes out and AUTO flashes.
The bell symbol refers to short--term alarm swit-
ched--on.
Audible signal
program buttons setting buttons
changeover button
program button short--term alarm
program button duration of cooking
STOP
program button end of duration
of cooking
changeover to manual operation
setting buttons for all of the
time settings
Symbols in the display
A
U
comes on with automatic programs
T
set, flashes after expiration of time
O
comes on with short--term alarm settings
comes on with automatic sequences
The end of a duration of cooking or time setting is indicated by a signal tone resounding.
short-term alarm: double signal tone
end of cooking time: four-fold signal tone.
The signal tone is repeated for 3 minutes and can be
cut off in advance by pushing a program button.

1
5
Switch--off automatism
= terminates thecooking duration set by automatic switch--off of the oven
. Items to be cooked to be put into the oven.
. Set function and temperature switch
. Push program button
. and set the desired duration of cooking
by setting buttons and .
During the sequence of the duration of cooking symbols andA UTO are lighting up. Youmay check in the
display the remaining duration of cooking with button
and the switch--off time with button
Corrections: push button and the duration of cooking set can be varied with setting buttons and .
After expiration of the duration of cooking the oven is
automatically swithced off. The triple signal tone
resaounds, goes out and AUTO flashes.
. Press any setting button. The sound signal is
switched off, AUTO goes out.
STOP
STOP
Theovenisnowreadyagainformanualcookingoperation or for new automatic setting.
As long as symbol flashes any further oven settings will remain ineffictive. Then push button .
STOP
Switch--on /-offautomatism
= switches on the oven functions at a later time
and automatically ends them after required duration of cooking
. Items to be cooked to be put into the oven.
. Set function switch and temperature selector.
. Push program button
. and set the desired duration of cooking
by setting buttons and
STOP
STOP
. Then push program button
. and set the switch -off time (the expected
meal--ready--time) with bottoms and .

1
6
Theoven illumination andthe function are switchedoff,
symbolAUTOisonfromthestarttotheendoftheduration of cooking.
After actuation of button the duration of cooking set
and after actuation of button a switch--offtime adju-
sted can be checked in the display and if need varied
with setting buttons and .
After expiration of the duration of cooking the oven is
automatically swithced off. The signal resounds, symbol goes out and A UTO flashes.
. Press button , the flashing symbol
AUTO and the sound signal goes out.
Theovenisnowreadyagainformanualcookingoperation or for new automatic setting.
Aslong as A UTO flashes any further oven settings
will remain ineffictive. Then push button .
STOP
STOP
Short-term alarm
The short --term alarm has no switching function forthe
appliance. It may be used for any sequence of time in
a kitchen.
. Push button
the display shows 0.00 and Symbol
. adjust the time desired with setting
buttons and .
The setting range covers 24 hours. The bell symbol
lights up in the display.
After expiration the bell symbols goes out, the double
signal resounds at the same time.
. The sound signal is at once switched
off by pressing any setting button.
A correction of the short--term alarm setting can at any
time be made by pressing the program button again
togetherwith the actuationof the settingbuttons and
.
STOP
STOP

1
8
Roasting
Schnitzel/Chops,coate
d
Hot-air
Kind of roast Temperature
°C
Roasts
1 kg pork,
per cm of height, well done
smoked pork loin
per cm of height, well done
Mince meat 170 2 1 60
Beaf,
per cm of height, well done
Sirloin,
per cm of height
Roastbeef,
per cm of height
Roast veal,
per cm of height, well done
1 kg Turkey roll,
per cm of height
Roast lamb (abbr. 1,8 kg) 180 2 1 90
Chicken 160 2 1 55 -- 60
Duck (2 -- 2,5 kg) 160 2 1 90 -- 120
Goose (ca. 4,5 kg) 160 2 1 150 -- 180
Short roasts on baking sheet or drip pan in
Sausages T230 3
Schnitzel/Chops, coated
Meat balls T220 3
Liver T250 3
Fish on baking sheet or drip pan in 1 level
Trouts à 200 -- 250 g 200 3
4 Trout fillets (à 200 g) 180 3
Fish fillets, coated (ca. 1 kg) 200 3
Roasting times are approximated times. T = Preheating since the temperature indicator lamp goes out
160 2 1 14 -- 17
180 2 1 10 -- 12
160 2 1 18
200 2 1 6 - 8 rare
200 2 1 8 -- 10 rare
180 2 1 14 -- 17
160 2 1 11 -- 13
T230 4 + 2
T240 3
T240 4 + 2
T220 4 + 2
T250 4 + 2
wire shelve
level
1 abbr. 2 levels
drip pan
level
------
------
------
------
------
------
------
------
------
------
------
roasting time
minutes
8 - 10 medium
10 - 12 medium
12 -- 13
12 -- 13
13 -- 15
13 -- 15
15 -- 20
15 -- 20
6 - 7
6 - 7
20
22
30
Drying up
Hot-air
function
Temperature°Clevel from bottom / sheets
for 1 for 2 for 3
Apples 75 ------ ------ 5. 3. 1 6 h 10 min.
Mushrooms 50 ------ ------ 5. 3. 1 6 -- 8
approximated
time / = hours

1
9
Baking
Top-and
Kind of pastry tempera-
ture °C
Batter in tins or on sheet
High ring cake
Frankfurt ring, meddle high
Plain cake, loaf tin
Fruit cake, on sheet
Apple cake, round tin
Batter with fruit coating
Blitzkuchen
Honey cake, on sheet
160
150
150-160
160
160
160
160-170
150
Short pastry in tins
Plain tart base, tin
Tart with curd (750 g curd)
tin 26cm Æ
Tart with fruit, on the sheet
cake with curd, on the sheet
formed cake, on the sheet
160
-----170
------
170
Puff pastry
Hot-air
using levels
1 level 2 levels 3 levels
1
2
3
3
2
3
3
3
3
-----2
-----2
------
------
------
------
------
------
------
------
------
------
------
------
------
------
------
------
------
------
------
------
------
------
------
------
------
------
baking time
minutes
70--75
45-55
70-85
15-20
40-45
30-35
20-30
20-30
15-20
65--75 +10
min. after switch-off
45--60
45--55
45--55
bottom heat
tempera-
ture °C
175
170
160-170
T180
T175
T180
180-190
T170
------
170
180
175
180
using
level
2
1
3
3
2
3
3
3
------
1
1
2
2
Fench apple tart T170 3 ------ ------ 40-45 T190 2
Sponge mixture
Sponge cake (DIN)
Fruit flan
Omelette surprise
Swiss roll
T160
T160
T250
T180
3
3
2
3
------
4+2
------
------
------
------
------
------
35-40
25-35
3-4
15
T170
T180
------
T190
------
Yeast pastry
High ring cake
Medium high ring cake
Yeast pastry on sheets:
with butter /sugar coating
with crumble topping
with almonds (DIN)
with curd coating
Fruit loaf (500 g flour)
Yeast plaited loaf
Pizza
160
160
170-180
170-180
170
------
T150
170-180
T220
2
2
3
3
3
------
2
3
1
------
------
4+2
4+2
------
------
------
------
------
------
------
------
------
------
------
------
------
------
45 -- 55
30-35
25-30
40-50
15-20
45-50
65-70
25-35
20-30
170
180
180-190
180-190
200
180
T175
T200
T250
Small pastries
Meringues
Macaroons
Butter dough (DIN)
Short bread
Sponge mixture
T80--90
140
140-160
------
150
3
3
3
------
3
4+2
4+2
4+2
-----4+2
------
------
5,3,1
------
------
120 -- 180
21-22
15-35
25-30
15-20
80 -- 90
T170
160-170
180
T170
2
3
2
1
2
3
3
3
3
2
2
1
3
3
3
2
3
Approximated times may be changed - Recommended functions and temperatures are bold typed
T = Preheating of oven since temperature control lamp goes out.

2
0
Top-and
Kind of pastry tempera-
ture °C
Small pastry
Hot-air
using levels
1 level 2 levels 3 levels
baking time
minutes
bottom heat
tempera-
ture °C
using
level
Puff pastries
T180
------
4 + 2
------
20
T190
Rolls with curd/caraway or
poppy seed (aperitif pastries)
Yeast dough pastries
- with apples
Sponge pastries
- with fruit
T190
T170
160
T160
160
-----3
3
-----3
4 + 2
4 + 2
4 + 2
4 + 2
4 + 2
5.3.1
------
------
------
------
12-14
15-20
20-25
13
20-30
T210
T190
180
T180
180
Choux pastry
Cream puff 190 3 4 + 2 ------ 30 -- 40 T200 3
Strudel and quiches
Apfelstrudel
Swiss apple quiche
Quiche Lorraine
Cheese and onion tart
Tart with vegetables
160
------
------
------
------
2
------
------
------
------
------
------
------
------
------
------
------
------
------
------
55
35
35
40
30-40
230
230
230
210-220
Bread and rolls
Rolls with raisins
Breakfast rolls
Wholemeal bread
Ryemeal bread
White loaf in tin
Flat loaf
Brioche in tin 22 cm Ø
small Brioches on sheet
T190
T220--230
T190
T190
T175
------
T160
T160
3
3
2
3
2
-----2
------
4 + 2
4 + 2
------
------
------
------
------
4 + 2
------
------
------
------
------
------
------
------
15 -- 20
15-20
45-50
45-50
40-45
20-25
20-25
15-16
T210
T240
T210
T210
T190
T230
T190
------
------
3
3
3
3
3
3
2
1
1
1
3
3
2
3
1
2
1
Puddings and gratins
Pasta au gratin
Potatoes au gratin
Cauliflower with sauce Hollandaise
Toast ”Hawaii” T250 3 ------ ------ 5-8 ------ ------
Approximated times may be changed - Recommended functions and temperatures are bold typed
T = Preheating of oven since temperature control lamp goes out.
200
200
2
2
------
------
------
------
40-45
60-65
------
200
------
2
220 3 ------ ------ 20 ------ ------

--21-
-
Infraread and large surface grilling
5
5
4
4
5
5
Kind of grilling food
for all dishes the oven has to be
preheated for 3 minutes
4 -- 8 pork chops 275 1
2 -- 4 pork chops 275 1
pork medaillons 270 1
fillet steak 250 1
4 fillet steaks 250 1
2 half chickens 250 1
4 hals chickens 250 1 4 25 18
1 -- 4 chicken tights 250 1
4 -- 6 chicken tights 250 1 4 20 15
Grill sausages, up to 6 250 1
Grill sausages, up to 12 250 1 5 6 4
Frying sausages, up to 4 250 1
Function
Tempera-
ture °C
Drip pan
in level
Wire
shelve
4
4
4
Minutes
side 1 side 2
15 10
12 12
12 12
5 4
6 5
16 16
15 15
6 4
10 9
Frying sausages, up to 6 250 1 5 10 9
Toast without topping 250 1 5 1 -- 2 1 -- 2
for all dishes insert drip pan in level 1
Turbo-grilling
Kind of dishes
Chicken (900 -- 1000 g) 160 2 50 25
Pork rolled meat (2 kg) 160 2 90 -- 95 45
Pasta au gratin 180 2 30 -----Potatoes au gratin 200 3 20 -- 23 -----Gnocchi au gratin 180 3 20 -- 23 -----Cauliflower wirth sauce Hollandaise 200 3 15 ------
Temperature
°C
Wire shelve
drip pan in level 1
drip pan in level 1
Minutes
turn over
after ... minutes

Useful hints on practical problems
practical problem possible cause remedy
Items to be baked or roasted would
not really rise
Items to be baked or roasted would
not become brown
Wrong temperature setting Check the temperature set with the
Too low a temperature
indications of the chart
Increase the temperature setting,
look into the state of cooking, possibly shorten the time
Items to be baked or roasted would
not regularly brown
Items to be baked or roasted
become too dark
Items to be baked or roasted
become too dry
Wrong material of tins/moulds
Irregular height Reduce the temperature setting,
Too high a temperature Check the temperature set with the
Duration of baking too long
because of too low a temperature
With top and bottom heat make
use of dark oven tins only.
possibly extend the time
indications of the chart, reduce the
temperature setting, possibly
extend the time
Check the temperature set with the
indications of the chart, possibly
increase the temperature setting
and shorten the time
Useful hints on technical problems
technical problem possible cause remedy
The built-under oven would not
function
Oven lighting would not come on The bulb is defective Replace the bulb - see page 13
Trouble with the power supply Check the fuselage
Damaged appliances must not be used. In case of trouble or failure do please cut
off or unscrew the fuselage.
Do not do anything with the oven. Inappropriate work may lead to damages with persons and material.
Not being in a position to cure a trouble or failure with the help of the hints do please contact your after-sales-
service or your fitter.
22

2
3
Cleaningofoven,accessoriesandfascia
No heating element must be switched on during
thecleaning procedure. Make surethattheoven
has cooled down in a way that one may get in
touchwithinteriorparts withoutanydanger.Only
the function switch may be switched on for oven
lighting.
Steam and high--pressure cleaning units are not
suitable for cleaning because of the requirements of electrical safety.
Clean enamelled cavity
Carefully and regularly clean the appliance in lukewarm or cold state. Avoid repeated burning--on of soiling.
The oven inside is washed with a warm washing--up
liquid and a sponge or cloth. Soiling to be watered, if
need be. Afterwards wipe out with clear water and dry.
Never use caustic, scouring and scratching cleaners,
oven sprays, steel--wool. When nevertheless using
ovenspraydotakeintoconsiderationthatsomemeans
are damaging enamel surfaces.
Wire shelf and grill pan, baking sheets and
cake moulds
Oven accessories and shelving parts to be cleaned
withawarmwashing-upliquid.Theseitemsarenotsuitable for cleaning in a dishwasher.
D
Grease filter
Wash the stainless steel grease filter after every use
witha soft brushin a hotwashing-up liquid orquitesimply in a dishwasher. Have tenacious soiling soak and
react, for instance, in a hot scouring agent solution.
D

2
4
Removal an dInstallation of the runners
Foreasiercleaningyoumayremovetheentireshelving
parts from the oven inside.
For this purpose grip the oven runners in the middle,
draw off towards the oven center and remove from the
oven, lift slightly, if need be.
Hang in again: Insert the clevis hook and firmly press
down.
Fol ddown top heat element
For easier cleaning the heating elements under the
oven ceiling can be folded down at a slant.
Laybothyourthumbstotheleftand right on theoutside
oven frame, then grip with your fingers in the front
bends of the heating elements and draw them offtheir
fixture to the front. The heating elements can now be
lowered at a slant and you can clean the oven ceiling.
After cleaning move the elements up again, draw in
again with fingers and thumbs and catch into the fixture.
b
a
Appliances with stainless steel surface
During the cleaning procedure make sure that
the stainless steel surface finish (the fine horizontal lines) will not be processed against the
structure.
For the stainless steel front side we recommend
throughout and regular cleaning and care with suitable
stainless steel cleaners and preservative agents.
Please observe manufacturer‘s instructions. Scratching and scouring agents are not suitable.
Before wiping put the cleaner on a wet cloth and afterwards wash off with water and dry with a clean cloth.
Control panel and oven door
Do please pay attention to clean sealing surfaces at the door and in the door frame.
Thecontrolpanelandtheovendoorhavetobecleaned
with warm washing--up liquid or glass cleansing agent
andto be wiped dry.For cleaning the inside of the oven
door use only washing--up water.

2
5
Installationinstruction
s
The appliance must exclusively be connected to the mains by an expert electrician.
With the installation and in case of a service failure the appliance has to be isolated from the
mains. Fuselage to be switched off or removed.
The general rules for the operation of electric
appliances, the provisions by the competent
electricity supply board and the specifications of
these instructions for installation have to be
strictly adhered to.
Unpacking
Please do check whether the appliance was delivered
in perfect state. Appliances with obvious transport
damages must not be connected to the mains.
Disposal
All packaging parts are recyclable, wooden
strips are non--treated, foils and hard foam
parts marked. Packaging material and old
appliances to be disposed orderly.
Do please adhere to the national and regional
prescriptions (material separation, waste collection, residuary product yards).
Installation in kitchen furniture
Electricalsafety is tobe ensured byprofessional
installation.
Protection against accidental contact according
to the regulations set by VDE or other local
authorities must be ensured by correct installation of the appliances. The same refers to the
back of the appliance which, even in case of
built--in solutions away fromthewall,mustnotbe
freely accessible.
567
Einbauschrank
600 mm
560--568
560-600
522 / 540
547
579
20
Built--in cupboardshave to belocated and fastened in a way that they are stable.
Built --in dimensions
The opening in the cupboard must correspond to commercialdimensions. The hintsrequired aregiven inthe
following dimension sketch.
Built--in cupboards have to be located and fastened in
a way that they are stable.
594
592

2
6
With built--in furniture the plastic coating or the veneer
respectively and the glue used must be temperature-resistant up to 95°C.
Unsuitable plastic coating and non--heat --resistant
glues are the reason for possible deformation and loosening of the coating. When in doubt check with the
manufacturer of the built --in furniture.
With regard to the protection against overheating of
surrounding furniture surfaces this appliance correspondstotypeY. Thisapplianceorthe built --incupboard
for the appliance respectively may be located with the
rearwallandonesidewalltowhateverhighwalls or furniture respectively and with the other side to another
appliance or furniture of the same height as this
appliance.
Mains connection
Prior to connection it should be checked whether the
voltage stated on the type plate -- i.e. the nominal voltage of the appliance -- is identical with the prevailing
mains voltage. The type plate ist located on the lower
oven frame at the left side and is visible after opening
of the oven door.
Oven with cord and plug :
put the plug into a by an expert installed socket.
Connection to the mains terminal:
Themains connection mustbe carried outby an expert
electrician. The VDE--regulations and the valid prescriptions by the local power supply boards have to be
complied with.
According to existing mains voltage the appliances are
to be connected in correspondence with the following
diagram of connections.
The heating element voltage amounts to 230 V . The
appliance will also perfectly perform with the former
mains voltage of 220 V .
Themains connection mustbe carried outina way that
an all--pole isolating device is existing with a contact
opening of at least 3 mm, e.g. LS--automatism, earth-leakage circuit --breaker or fuse.
Awire of typeH05VV--Forof higher rating istobeused
as supply cable.
back of appliance
mains terminal
strain relief device
Mains terminal
The mains terminal is located at the back of the
appliance behind a covering slide.
Theprotective conductor istobeconnected to terminal
. The bridges of the terminal board are to be chan-
ged accordingly, if need be.
AC 230 V / AC 400 V
SL
Anschluß je nach Angabe
The cable connections have to be established as
prescribed and the terminal screws be firmly tigh tened. Afterwards the supply cable has to be secured
by strain relief device.
auf dem Typenschild des Gerätes

2
7
Aftercompletion of themains connection the built--in or
--under oven is located in the cupboard and aligned.
The screws and plastic sleeves supplied in a bag are
tobeinsertedatthe right and leftsideofthe oven frame
and the appliance is to be screwed down in the cupboard.
Prior to first use remove any possibly existing
labels and protective foils from the front of the
appliance.
After connection to the power supply all heating
elements are to be switched on shortly at maximum setting one after another, in order to check
the operability.

2
8
Electric built-in oven EOB 854
Technical data: :
Outer dimensions
Width 592/540 mm. . . . . . . . . . . . . . . . . . . . . .
Height 594/579 mm. . . . . . . . . . . . . . . . . . . . .
Depth 567/547 mm. . . . . . . . . . . . . . . . . . . . . .
Depth with open door 1010 mm. . . . . . . .
Oven cavity dimensions
Width 422 mm. . . . . . . . . . . . . . . . . . . . . .
Height 310 mm. . . . . . . . . . . . . . . . . . . . .
Depth 440 mm. . . . . . . . . . . . . . . . . . . . . .
Volume 57,5 l. . . . . . . . . . . . . . . . . . . .
Total weight net 34,5 kg. . . . . . . . . . . .
Connected load:
Top heat 1000 W. . . . . . . . . . . . . . . . . . .
Bottom heat 1000 W. . . . . . . . . . . . . . . .
Top and bottom heat 2000 W. . . . . . . .
Infra-red grill 1900 W. . . . . . . . . . . . . . . .
Large surface grill 2900 W. . . . . . . . . . .
Cavity illumination 2x25 W. . . . . . . . . . .
Voltage 230 V ~. . . . . . . . . . . . . . . . . . .
Total connected load max 3.000 W. . .
Type plates
Note down here the data from the type plate of your appliance. Same is to be seen after opening of the oven
door on the oven frame in the bottom at the left side
Make always reference to
this info:
-- when filing a service call
-- when ordering spare
parts or accessories
-- with technical queries
TYP
BEE1 002
Made in Germany
TYP
BEE1 002
Made in Germany
MODELL Prod.-Nr. Serien-Nr.
EOB 854 W
TOTAL max. 3,0 kW - AC 230 V 50 Hz
MODELL Prod.-Nr. Serien-Nr.
EON 854 X
TOTAL max. 3,0 kW - AC 230 V 50 Hz
948 900 273
230 VOLT
948 900 275
230 VOLT
TYP
BEE1 002
Made in Germany
MODELL Prod.-Nr. Serien-Nr.
EOB 854 K
TOTAL max. 3,0 kW - AC 230 V 50 Hz
948 900 274
230 VOLT
 Loading...