

Built-in Oven
Instruction and Installation Manual
319 4425--00
K/PM--D 99.03.05
EOB 821
GB

2
Dear Customer !
Carefullypleasereadtheseinstructionsforuse.Firstof
allpayspecialattentiontothechapter“Hintsonsafety”.
Keeptheseinstructionsforuseforlater onconsultation
and hand them over to a possible follow--up owner of
the appliance.
By means of this warning triangle and/or by the
signal words “precaution” and “attention!” hints
are stressed which are of importance for your
safety or for the functionability of the appliance.
Please do absolutely adhere to.
After this sign you will get further informationon
attendance and practical application of the
appliance.
By meansof this sign we havemarked tips and
hints for the economical and environment--protecting use of the appliance.
For possibly occurring trouble these instructions do
containhintsforself--actingremedy,seechapter“What
to do, if ...”
Should these hints not be sufficient there are at any
time two places to call at for helping you on: (After-sales--service or Hotline)
Here you will get an answer to any question in relation
with the equipment and application of your appliance.
Weare,ofcourse,readytoacceptwishes,suggestions
andcritics.Weareaimedatpermanentlyimprovingour
productsandservicesforthebenefitofourcustomers.
Our after-sales-service will be at your disposal at any
time with regard to technicalproblems (addressesand
phone numbers are given in chapter “after-sales-service agencies”).

Contents
User instructions
Hints on safety 4
Disposal 5
Description of the applianc 6
Total view 6
Control panel 6
Prior to the first use 7
First cleaning 7
Timer / Short term alarm 7
The oven switches 7
Function switch 7
Temperature selector 7
Control indicators 7
The oven cavity 8
Oven accessories 8
Oven runners 8
Application of the oven functions 10
Top- and bottom heat 10
Infra-red grilll 10
Large surface grill 10
Grilling with the turnspit 11
Remarks for baking and roasting 12
Oven lighting, bulb exchange 13
Charts for roasting 13
Charts for baking, 14
Charts for grilling 16
What to do in case of ... 17
technical problems 17
practical problems 17
Cleaning and care 18
Oven and accessories 18
Control panel and oven door 18
Appliance with stainless steel surface 18
Installat ion instructions
Installation instructions 19
Hints on safety 19
Built-in in kitchen furniture 19
Built-in dimensions 19
Mains connection 20
Fixing in kitchen furniture 21
Technical data, type plate 22
3

Hints on safety
The safety of this appliance corresponds to the
acknowledged rules of technique and to the law on
appliance safety. The safety measures existing as a
matterofself-understandingwould,however, notcover
all of possible risks of accidents.
Moreover, we feel compelled as the manufacturer to
make you familiar with the following hints on safety.
Electrical safety
Mounting and connection of the new appliance must
exclusivelybe carriedoutbyanapprovedelectricfitter.
Please observe this hint, as otherwisethe claim under
guarantee will be ruled out with occurring damages.
Built--in appliances must be installed in built--in
cupboards. The cupboards have to be located
and fastened in a way that they are stable.
Damagedappliancesmustnotbe used.Fuselage
tobecutofforunscrewedincaseoftroubleorfailure.
Repairwork at the appliance must exclusivelybe
carriedoutbyexperttechnicians.Improperrepair
workmayleadto considerabledanger. In needof
repair please contact our after--sales-- service or
your expert dealer.
Safety at cleaning
No heating element must be switched on during
the cleaning procedure.Make sure that the oven
has cooled down in a way that one may get in
touch with interior parts without any danger.
Alwayskeeptheovenclean.When heatingupfat
splashes and spots will cause inconvenient
odours.
The oven door must firmly close. Ensure clean
sealing surfaces at door and door frame.
The cleaning of the appliancewith a steam jet or
high--pressurecleaner is not allowedbecauseoff
the requirements of electrical safety.
How to avoid damages on the appliance
Safety for children
When roasting, baking or grilling the oven gets
hot. On principle, keep away small children, therefore.
Safety during use
This appliance must exclusively be used for the
boiling and frying of food as usual in household
applications.
Precaution with the connection of electric
appliances to sockets in the vicinity of the
appliance.Connectionleadsmust notgetintouch
with the hot oven door or cavity frame.
In case of careless handling there is danger of
burning oneself at the heating elements in the
oven.
Whentakingoutthehot itemsdoabsolutelymake
use of pot or t hermo-gloves.
Besidestheaccessoriessupplied with the unitdo
exclusively make use of suitable and temperature--resistantbakingtinsandroasting dishes.Do
please f ollow the manufacturers’ instructions.
Do not use the oven for the purpose of space
heating.
The oven bottom must not be covered with alufoil.Pots,pansandvesselsmustnotbeplacedon
the oven bottom. The heat will accumulate and
may cause damage to the material.
Makesurethat no acetic liquids,suchas vinegar,
lemon or deliming means get access to the
enamelled cavity, as this would result in mat
spots. Use the deep enamelled universal pan for
preparations like fruit cake etc.
Do’nt keep breador damp food in the oven cavity.
Theopened ovendoormust not be burdenedtoo
heavily, do not sit or step on it.
After use make sure that the appliance is
switched off.
4

Disposal
Disposal of packing material
All parts of the packing are re--usable, foils and
hard foam correspondingly marked.
PE = Polyethylen (cover, bags of accessories)
PS = Polystrol (cushion)
Packing m aterial and possibly old appliances
are to be disposed off orderly.
Please do observe the national and regional
regulations on appliances and packing material
aswellasthematerialmarking(materialseparation, waste collection, depots for valuable substances).
Hints on disposal
The appliance must not be disposedof with the
rubbish.
Information on collection dates and places are
available from the local towns cleaning dept. or
from the m unicipal administration. This symbol
refers to tips and hints on the economic and
environment protecting use of the appliance.
Warning!Pastuseoldappliancesdo pleaserender unserviceable prior to disposal. Cut off the
mains.
5
Description of the appliance
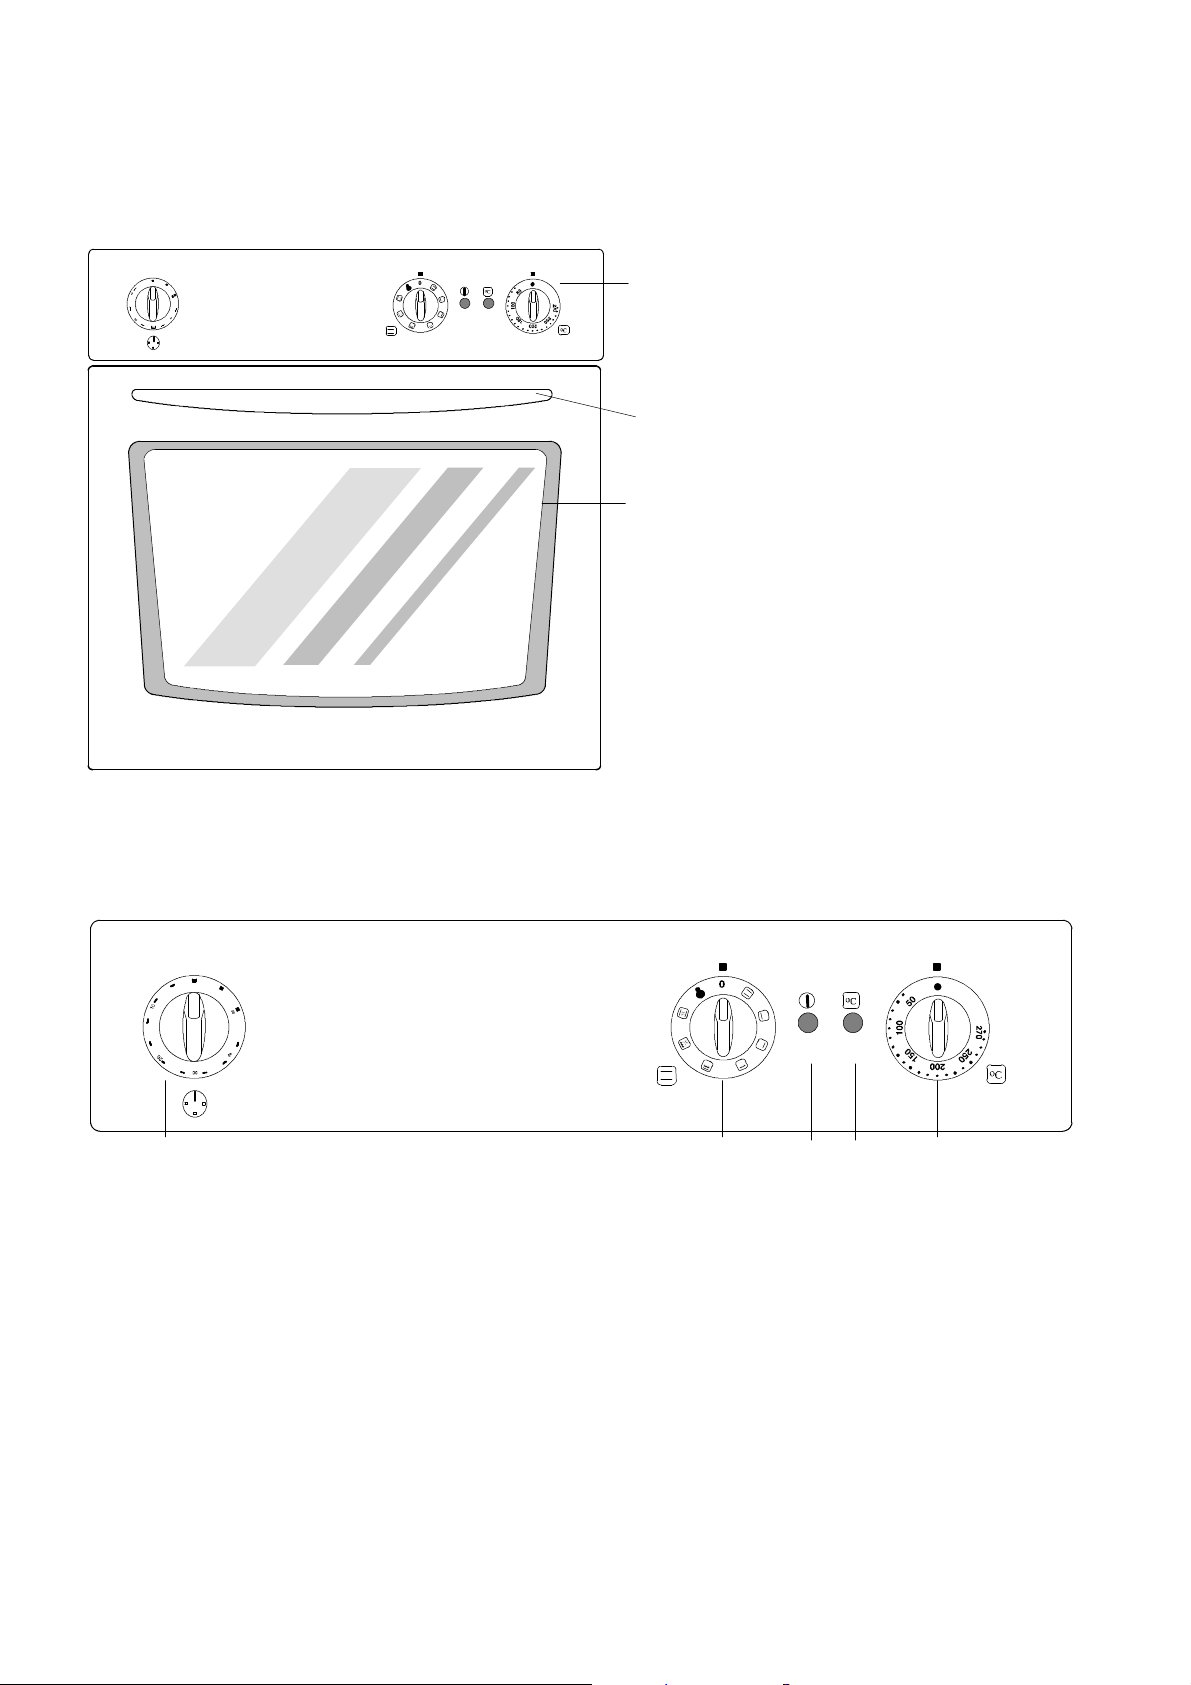
Total view
controlpanelwithswitchesforfunction,
temperature and timer
oven-door handle
full glass oven door
with inspection window
Control panel
À
Timer / short-term alarm
À
Oven function switch
Á
Function control lamp
Â
Temperature control lamp
Ã
Oven temperature selector
Ä
Á Â Ã
Ä
6
Prior to first use
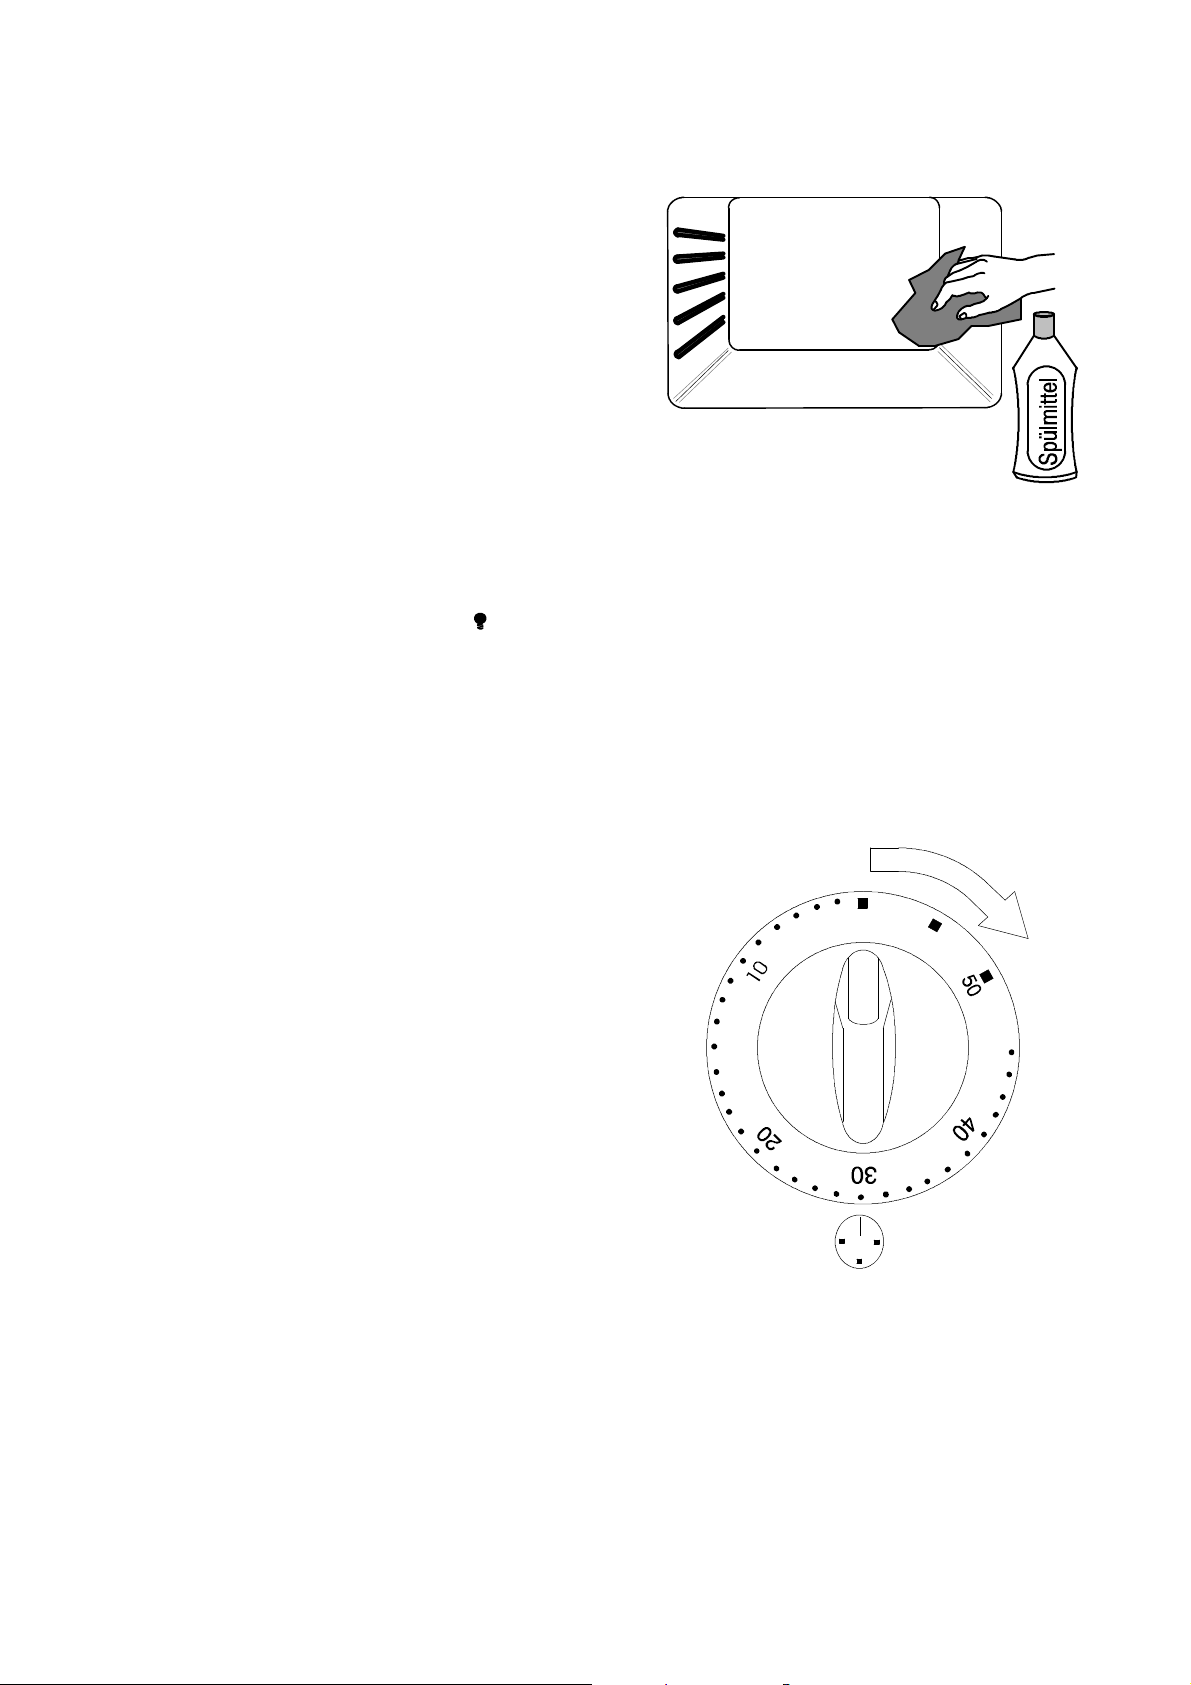
First cleaning
In order to remove possible production remnants,
clean the appliance once prior to first use.
Remove any possibly existing labels and protective
foils from the front of the appliance.
Clean control panel and oven door with hot water and
a washing-up liquid and dry.
Remove the accessories from the oven and wash
them.
The clean-enammelled cavity has to be washedo with
warm water and a washing-up liquid. Then dry it.
The oven lightingmay beswitched on for this purpose
by setting the function switch to position .
Timer / short--term alarm
Turn t he timer-knob to the right and set the desired
time.
After expiration a sound signal resounds.
A correctionof the short--term alarm setting can at any
time be made by turning the knob to the desired scale
markingor, if you want to switch off, to theOff-position.
Theshort--term alarm has noswitchingfunctionforthe
appliance. It may be used for any sequenceof time in
a kitchen.
7

8
The oven switches
Oven func tion switch
The function switch can be turned to the leftand to the
right to the desired position.
The oven illumination ist switched on with position
and at a time with all oven functions.
Positions of the function switch
Oven illumination
Top- and bottom heat
Top heat
Oven temperat u re selector
The temperature selector knob is switched on by turningtotherightfrom50to270oC.Donotturn itbeyond
the maximum setting. For switch--off turn left to 0--setting.
The oven will be heated up after setting of function
switch and temperature selector.
Indicators
The function control
The function control lamp lights up, when the oven or
a hotplate are switched on. The indicator lamp goes
out, when all switches are in the OFF-position.
The temperature control lamp
Bottom heat
Infrared grill
Large surface grill and
rotary spit
shines when the oven heating is on. It goes out, when
the set temperature has been reached, and lights up
again during reheating phase.
After use makesure, that the ovenis switched-off. All rotary knobshave to be set to the OFF-position.
9
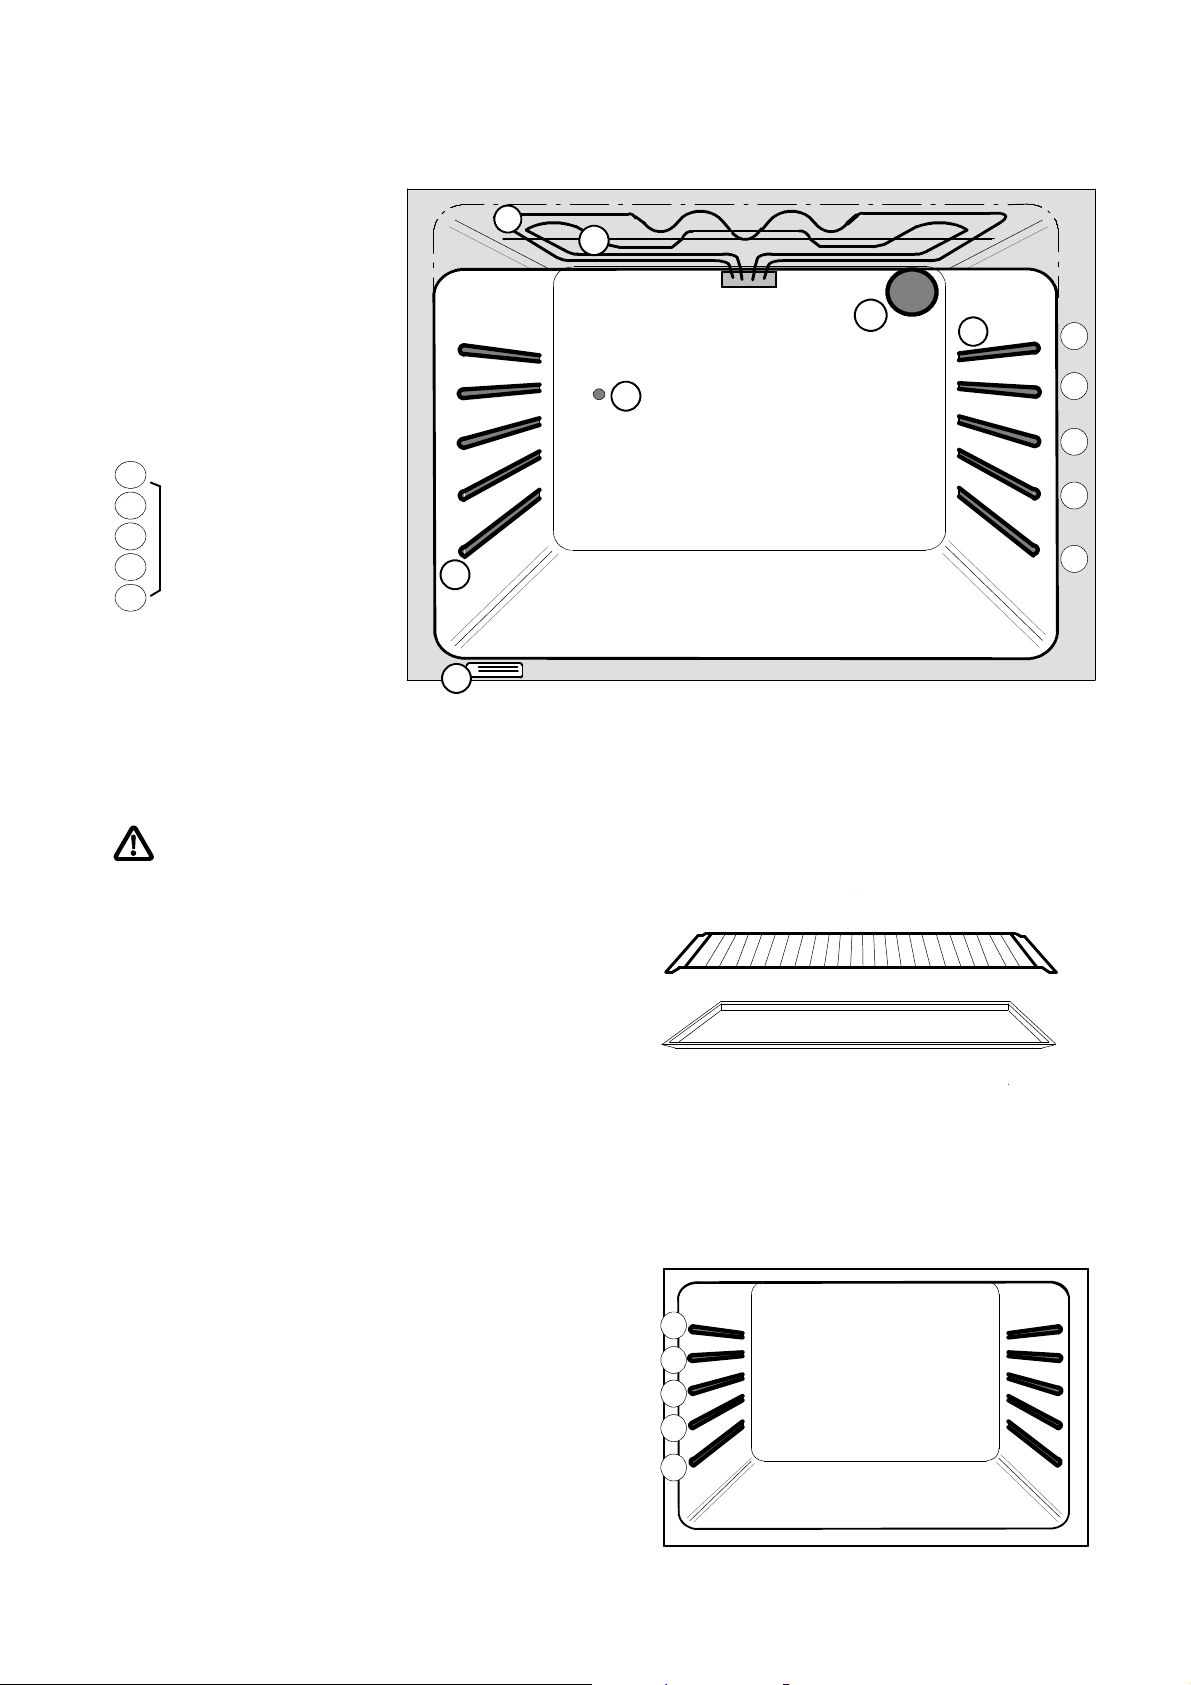
The oven cavity
Oven runners
A
B
Top heat element
C
Infrared grill
oven illumination
D
type plate
E
B
C
D
A
5
Plug-in socket
F
for turnspit
5
4
Runner level
3
2
1
A
E
Oven accessories
Besides the accessories supplied with the unit
do exclusively make use of suitable and temperature--resistantbakingtinsandroastingdishes.
Do please follow the manufacturers’ instructions.
F
4
3
2
1
The oven has the following accessories:
1 baking sheet
1 wire shelve
1 turnspit with frame
Furtherbakingsheetsandwireshelvescanbeordered
with our Central Spareparts Service.
Oven runners
The oven has 4 runners.In the charts andillustrations
of these instructionsthey are numbered f rom 1 = bot-
tom to 4 = top.
5
4
3
2
1

1
0
Application of the oven functions
Top - and bottom heat
Heating elementes installed under the oven bottom
and at the oven ceiling respectiveley give off radiant
heatto the food. Anytemperaturebetween50 and270
o
C can be set.
Baking and roasting using top and bottom heat is only
possible at one level.
Top heat
The radiant heat from the element at the oven ceiling
is used for follow-up baking, overbaking and gratinating. 180oC can be reached at maximum.
Bottom heat
The heating element under the oven bottom gives off
radiantheattotheitemstobecooked.Thefunctioncan
be set for follow-up baking and incrustation on the
sheet. 180oC can be reached at maximum.
Grilling
During grill operationthe oven alwayshas to be
closed.Whengrilling,donotleavetheappliance
unsupervised.
Set the functionswitchto the selectedgrillingfunction.
Which grilling function is to select depends on the
amount and the height of the grill food.
Thetemperaturecanbeadaptedtothe particularfood,
as t he oven thermostat holds the temperature within
the set range also during grill operations.
For special advices of function selection, temperature
setting and runner level please see the grilling charts.
Infrared grill
For small amounts of flat meat as well as for chicken
halves,placedin themiddlepartofthewireshelf.Temperature from 210 to 250oC.

1
1
Large surface grill and rotary spit
Forflatitemstobegrilled,half chickens,etc.onthefully
chargedwireshelf. This functioncombinestheinfrared
grill with top heat.
Temperature from 210 to 250oC.
The motor of the turnspitcomesonwith the large--surface grill at a time.
Bothsurface--grillfunc tionsare suitableforflatmeat
such as steaks, chops, sausages, fish, etc.
As the radiation heat can brown only thesurfaceof the
grillfood, same has to beturnedoverafter some time.
Donotinsertflatgrillfoodtooclosebeneaththeheating
element. Drip pan has to be inserted in runner level 1
or 2.
The large--surface grill functions can, moreover
be used:
for the overbaking of toast,
for the overflaming of marzipane or icecream
for the crustation of soufflés.
Supporting frame for turnspit
The grill food has to be inserted on the wire shelf, depending on height, into runner 4 or 5 and the baking
sheet into runner 1 or 2. The distance toward the grill
heating element can be varied by inserting the wire
shelf with its convexity either turned upward or downward.
Grilling with the turnspit
The electro-motor for the turnspit will be switched on
upon switching onlarge-surface grilling. Switch on the
ovenfunction only with the turnspit and theitems to be
grilled inserted together in the oven.
The supporting frame for the turnspit is to be inserted
intotherunnersin high level3betweenthedoublerods
and the universal pan in level 1.
Collar poultry or suitable dishes to be slipped onto the
turnspit and secured with two clips.
Turnspit with fixing clips
Driving socket
for the turnspit in
the oven rear wall:
turn spit to be
slipped on ..
3
Insert the turnspit with the items for grilling on into the
drivingsocket in theoven rear wall andplacethe roller
in the front camber of supporting frame.
Upon switching on the oven function the items for grilling will now be slowly turned under the grill element.
.. and roller to be
laid on the suppor -
ting frame.
To removetheitemsfor grillingfromtheovenmakeuse
of pot clothes or thermo-gloves.

1
2
Remarkls for baking and roasting
Roasting with top-/bottom heat
The length of roasting time depends on the kind of
meat,weightandheightoftheroast.Basicallyyourekkon per cm height of meat:
beef, game 14 -- 17 minutes
pork, veal 14 -- 17 minutes
fillet, roastbeef 10 -- 12 minutes.
The higher the roast is, the lower the temperature
needs to be.
The doneness can be checked by pressing the meat
downwith a spoon.If the roast does not give way,it is
done.
After switch--off leave the roast foranother10minutes
intheovensothatno juicewillbe runningout, whenyou
cut the roast.
Roasting on the wire shelf
Placeroastonwireshelfwithitsservingsideturnedupward. Insert baking sheet into runner 1 and the wire
shelf directly above it onto the runner.
Roasting in vessels or on baking sheet
Put lean meat, game or meat loaf directly onto the
baking sheet or in a vessel onto the wire shelf. Put
short--roasts on a sheet into the oven.
In case there is need for a roasting time of more than
an hour, put the ingredients for the gravy into the pan
only half an hour before the end of cooking time, have
them browned and fill in a little hot water.
Using runner levels on baking and roasting
Baking and roasting using top and bottom heat is only
possible at one level.
D flat cakes and biscuits on the baking sheet
-- in runner 1, 2 or 3
D high cakes, ring or square moulds
-- wire shelve in runner 2 or 3.
Bake-- and roastware
Useonly the accessories suppliedwith the unit ordark
enamelled baking moulds. do exclusively make use of
suitable and temperature--resistant baking tins and
roasting dishes.
Doexclusivelymakeuse of suitable andtemperature-resistantbakingtinsandroastingdishes.Brightsheets
andmoldsdo,however,extendthebakingandroasting
times. Please observe manufacturer‘s instructions.
Atfunctiontop-/bottomheatdonot usebrightandgleaming sheets or moulds.
In the according runner level baking moulds and roasting dishes are put onto the wire shelf. Special hints
are given in the baking an roasting charts.
Temperature selection
Hint:Thehouseholdappliancedealeris offeringbaking
orroastingthermometers for the indicationof the state
of cooking.
Preheating
As the set t emperature is reached within a very short
time, preheating of the oven before inserting the food
is not necessary for most of the baking and roasting
operations.
We recommend preheating with:
D meat dishes and short--roasts, such as fillet,
roastbeef,schnitzlorcutlet. The meat poresare
quicker closed and the item to be roasted
remains juicy.
D fancy biscuits that tend to spread easily,
D rolls, quiches, Swiss rolls.
For this purpose and before insertion of the items the
oven is heated up until the temperature signal lamp
goes out.
Baking with top-/ bottom heat
Introduction for using the baking chart
Thechart on bakingoperationscontainsinmostcases
temperatureranges,e.g.160--175oC.Selectthelower
temperatureforthemoment. Incaseoftoohightemperaturesacakeovercruststoofast, it willcollapseorwill
not rise properly, because only an insufficient amount
of water is extracted.
Ifthebakingoperationtakestoolongorifthecakedoes
not brown enough as expected, you may select a higher setting.
Theevenbrowningof the cakecanbeimproved by reducingthe baking temperature(by about 10oC). Then
prolonging of the baking time is necessary.
You might also have to change the bakingtime evenif
you exactly followed the instructions given in the recipe, as the size of eggs, the binding quality of the flour
and the materialof which the mould is madecan vary.

1
3
Oven lighting -- bulb exchange
Before opening the oven lamp the oven has to
beisolatedfrom the mains. Fuselagetobe swit-
ched off or removed.
You may replace defect light bulbs yourself.
Forthereplacementyouneedbulbsthat areheat--resi-
stant up to 300oC, 25 W / 220-230 V -- E 14.
You can buy these bulbs in electronic specialist shops
or at the spare parts service.
Round oven lamp on the oven rear:
Unscrewthe round protective coverglass, replacethe
oven lamp and rescrew the protective cover glass.

1
4
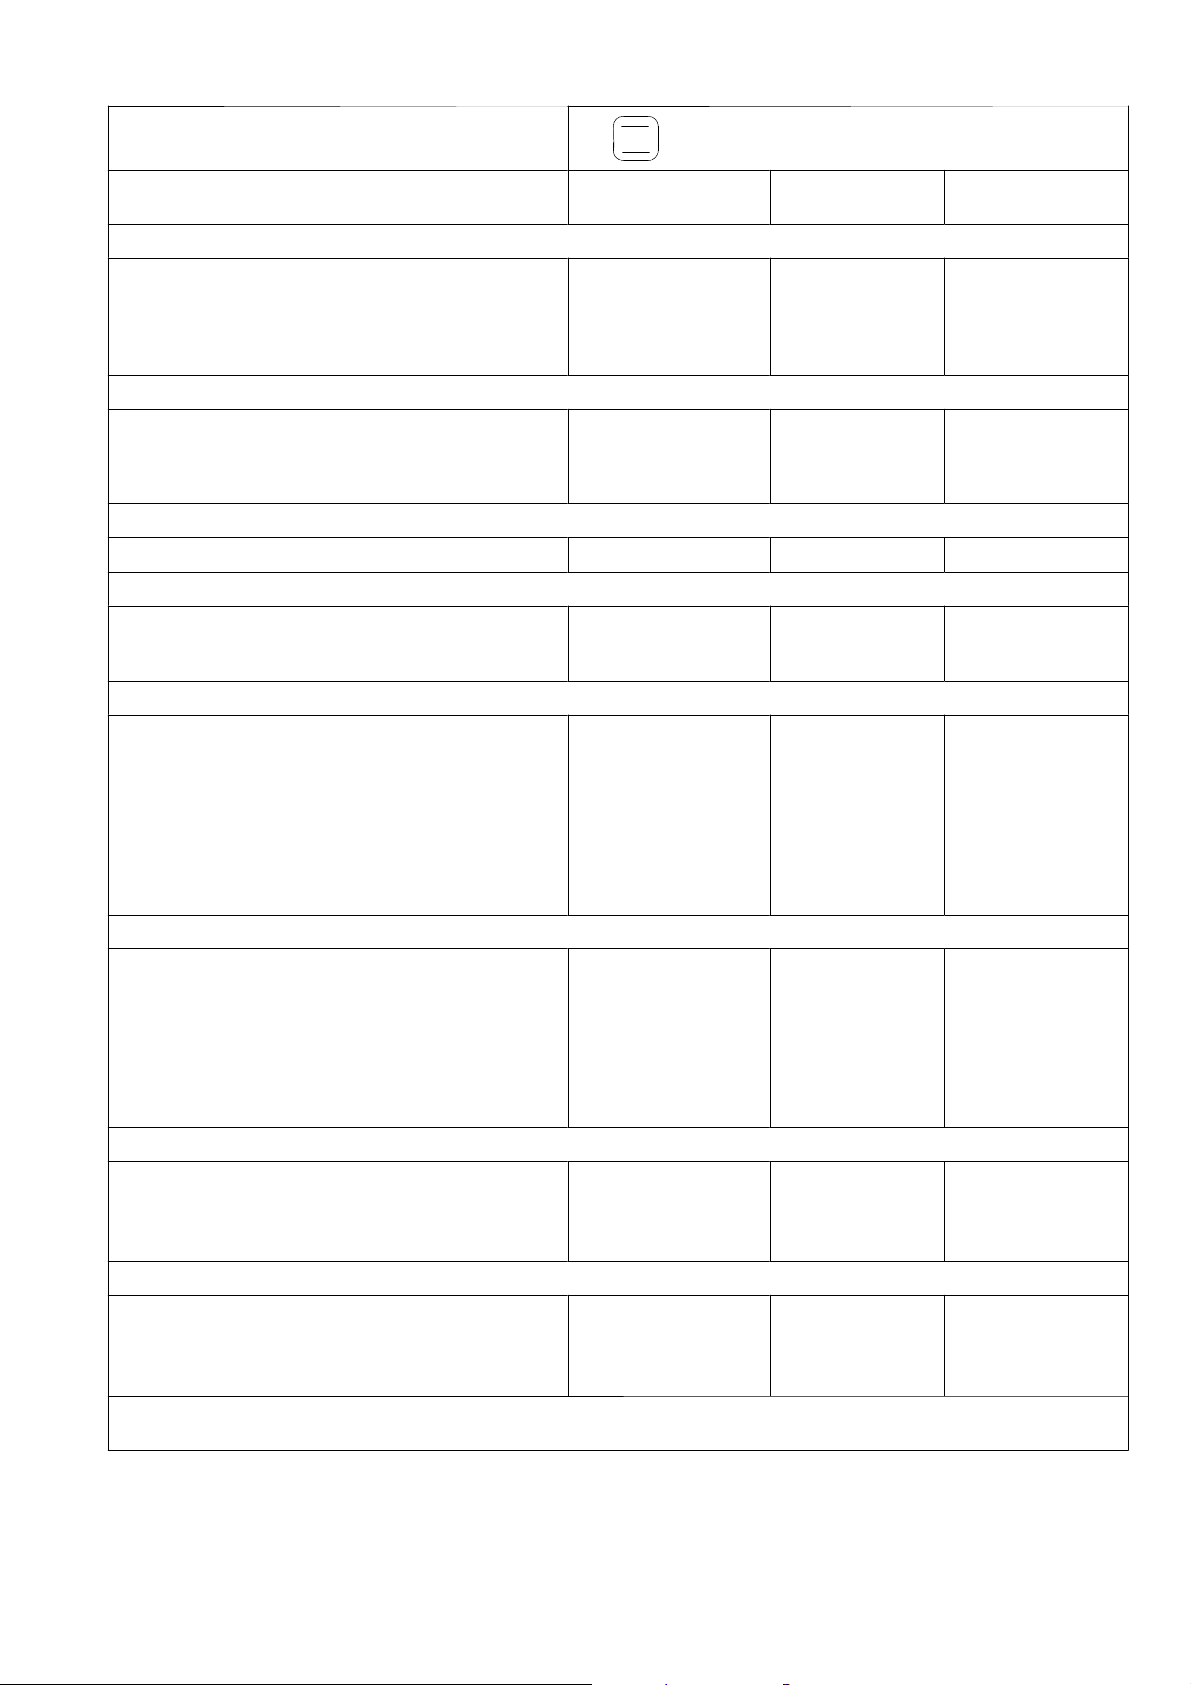
Roasting
Function: top-- and bottom heat
Temperature °C wire shelf
in level
Pork
1 kg roast pork,
per cm of height, well done
1 kg rolled pork,
per cm of height
smoked pork loin
per cm of height
mince meat 200 - 210 2 1 60
Beaf
roast beaf,
per cm of height
sirloin,
per cm of height
roastbeef,
per c, of height
Veal
roast veal
per cm of height, well done
Lamb
roast lamb (ca. 1,8 kg) 190 - 200 2 1 90
Poultry
chicken 180 - 190 2 1 55 - 65
duck (2 -- 2,5 kg) 180 - 190 2 1 90 - 120
goose (ca. 4,5 kg) 180 - 190 2 1 130 - 160
turkey (ca. 5 kg) 190 - 200 2 1 140 - 170
1 kg roast turkey ,
per cm of height
Short roasts
sausages T250 3 3 10 - 15
schnitzel, coated chops T250 3 3 13 - 15
meat balls T220 3 3 15 - 20
Fish
trouts à 200 -- 250 g T220 3 3 20 - 25
4 trout fillets (à 200 g) T200 3 3 20 - 25
fish fillets, coated (ca. 1 kg) T220 3 3 20 - 25
180 - 190 2 1 14 - 17
200 2 1 14 - 17
190 - 200 2 1 10 - 12
200 - 210 2 1 18 - 20
220 - 230 2 1 6 - 8 rare
220 - 230 2 1 8 - 10 rare
190 - 200 2 1 14 - 17
180 - 190 2 1 11 - 13
baking sheet
in level
roasting time
minutes
8--10 medium
10--12 medium
All times of roasting are approximated times and may be changed.
T = Preheating since the temperature indicator lamp goes out.
1
5
Baking
Top-- and bottom heat
Kind of pastry
Batter in tins or sheet
High ring cake
butter in tins or forms
fruit cake
apple cake, round tin
plain cake
Short pastry
tart with curd (750 g curd)
round tin, 26cm
apple cake in tin, apple in pastry
cake with curd, on the sheet
Puff pastry
French apple tart
Sponge mixture
sponge cake, (DIN)
fruit flan
Swiss roll
Yeast pastry
high ring cake
medium hight ring cake
yeast pastry with butter--sugar coating
yeast pastry with almonds
yeast pastry with crumle topping
yeast pastry with fruit an crumble topping (DIN)
yeast pastry with curd coating
fruit loaf (500 g flour
pizza
Small pastries
meringues
macroons
butter dough (DIN)
small pastry with nut coating
puff pastry
yeast pastry
Choux pastry
cream puff
Strudel an quiches
apfelstrudel
Swisse apple quiche
cheese and onion tart
tart with vegetables, Quiche Lorraine
Bread and rolls
brekatfast rolls
ryemeal bread
white loaf in tin
flat loaf, pitta
All times of roasting are approximated times and may be changed.
T = Preheating since the temperature indicator lamp goes out.
baking time
minutes
70-75
70-80
15-25
40-50
20-30
60-90 +10 Min. Nachwärme
45-60
45-55
40-50
35-45
25-30
10-15
45-60
30-35
25-30
25-35
40-50
45-50
65-70
10-20
150-180
20-30
15-45
25-35
15-20
15-20
35-40
55
30-40
30-40
30-40
15-20
45-60
40-50
15-25
temperature °C using level
170-180
160-170
T180-190
T170-180
180-190
160-170
180-190
170-180
T190-200 2
T170-180
T170-180
T190-200
160-170
170-180
T190-200
180-190
180-200
170-180
T170-180
T250-260
80-90
T160-170
160-170
170-180
T180-190
T180-190
T200-210
T220-230
T220-230
T220-230
T240-250
T210-220
T180-200
T230-250
2
3
3
2
3
1
1
2
2
3
2
1
2
3
3
3
3
2
2
3
3
3
2
3
3
3
2
1
1
3
3
1
2
1
6
wire
5
5
4
4
5
shelf
minutes
side 1 side 2
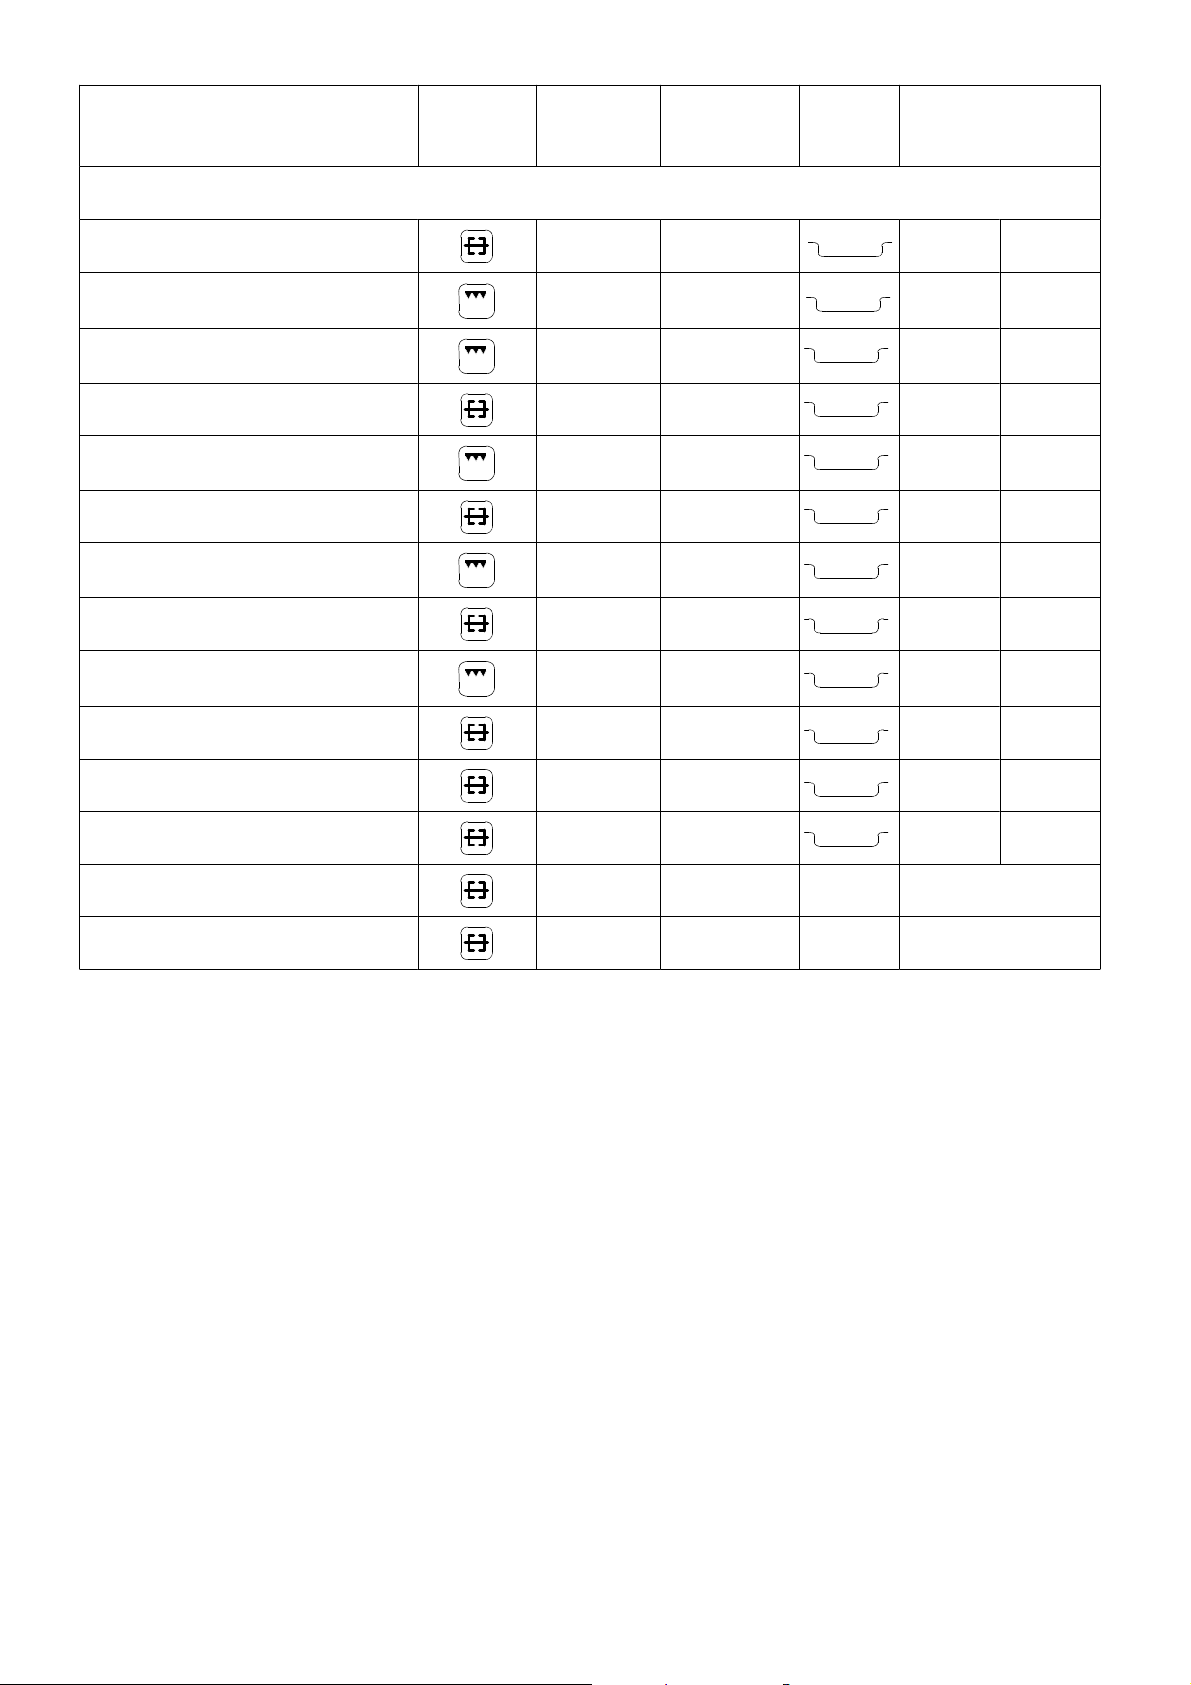
Surface grilling
function
tempera-
tureoC
baking sheet
in runner level
Kind of grilling food for all dishes the oven has to be preheated for 5 minutes
4 - 8 pork chops 250 1
2 - 4 pork chops 250 1
pork medaillons 250 1
4 fillet steaks 250 1
2 half chickens 250 1
4 half chickens 250 1
1 - 4 chicken tights 250 1
4 - 6 chicken tights 250 1
grill sausages, up to 6 250 1
grill sausages, up to 12 250 1
fish 250 1
5
5
4
4
5
5
15 10
12 12
5 4
6 5
15-20 15-20
15-20 15-20
20 10
20 15
5-10 5
5-10 5
10
toast without topping 250 1
chicken on turnspit 230-240 1
rolled meat on turnspit (1.500 g) 220-230 1
5
turnspit
turnspit
1-2 1-2
60-70
90-120
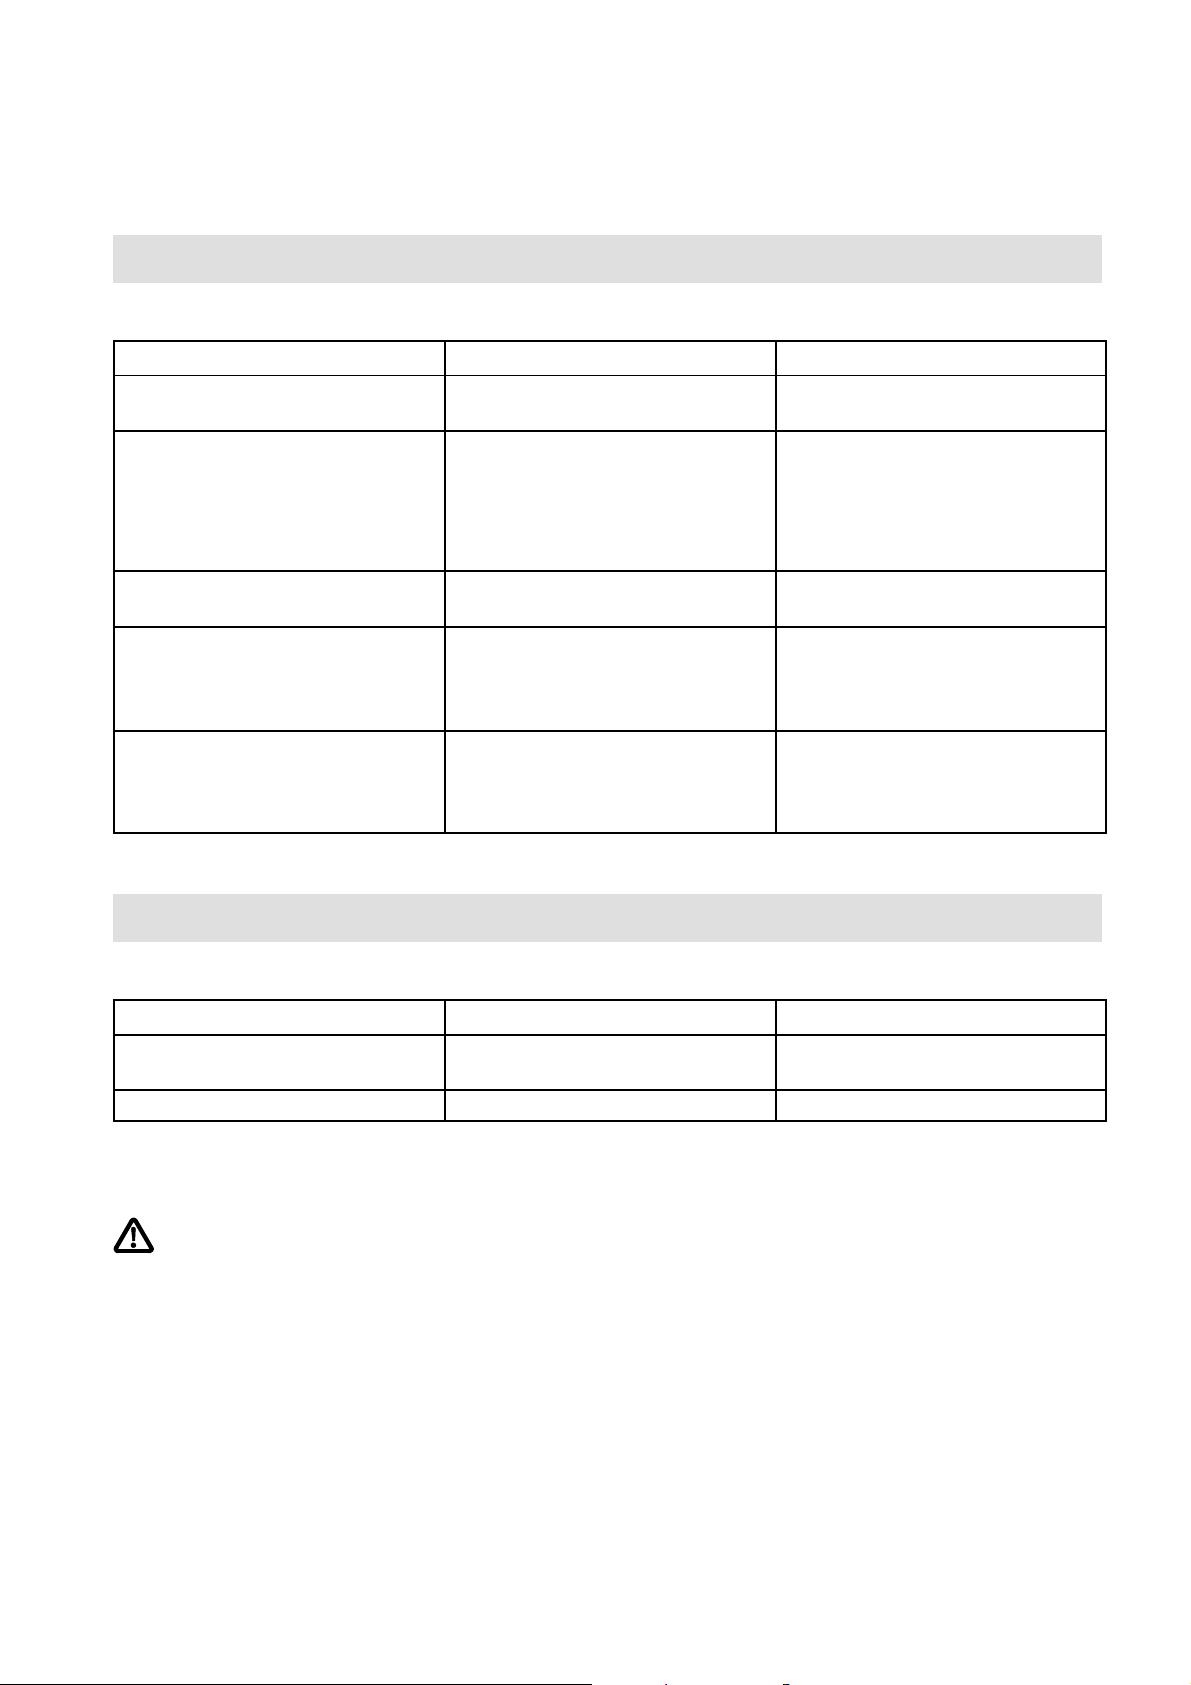
What to do in case of ....
... practical problems
practical problem possible cause remedy
Items to be baked or roasted would
not really rise
Items to be baked or roasted would
not become brown
Wrong temperature setting Check the temperature set with the
indications of the chart
Too low a temperature
Increase the temperature setting,
look into the state of cooking, possibly shorten the t ime
Items to be baked or roasted would
not regularly brown
Items to be baked or roasted
become too dark
Items to be baked or roasted
become too dry
Wrong material of tins/moulds
Irregular height Reduce the temperature setting,
Too high a temperature Check the temperature set with the
Duration of baking too long
because of too low a temperature
With top and bottom heat make
use of dark oven tins only.
possibly extend t he time
indications of the chart, reduce the
temperature setting, possibly
extend the time
Check the temperature set with the
indications of the chart, possibly
increase the temperature setting
and shorten the time
... technical problems
technical problem possible cause remedy
The built-under oven would not
function
Oven lighting would not come on The bulb is defective Replace the bulb - see page 13
Trouble with the power supply Check the fuselage
Damaged appliances must not be used. In case of trouble or failure do please cut
off or unscrew the fuselage.
Do not do anything with the oven. Inappropriate work may lead to damages with persons and mat erial.
Not being in a position to cure a trouble or failure with thehelp ofthe hints do pleasecontact yourafter-sales-
service or your fitter.
17
1
8
Cleaning and care
No heating element must be switched on during
thecleaningprocedure.Make surethattheoven
has cooled down in a way that one may get in
touchwithinteriorparts withoutanydanger.Only
thefunctionswitch may be switched on foroven
lighting.
Steam and high--pressurecleaningunitsarenot
suitable for cleaning because of the requirements of electrical safety.
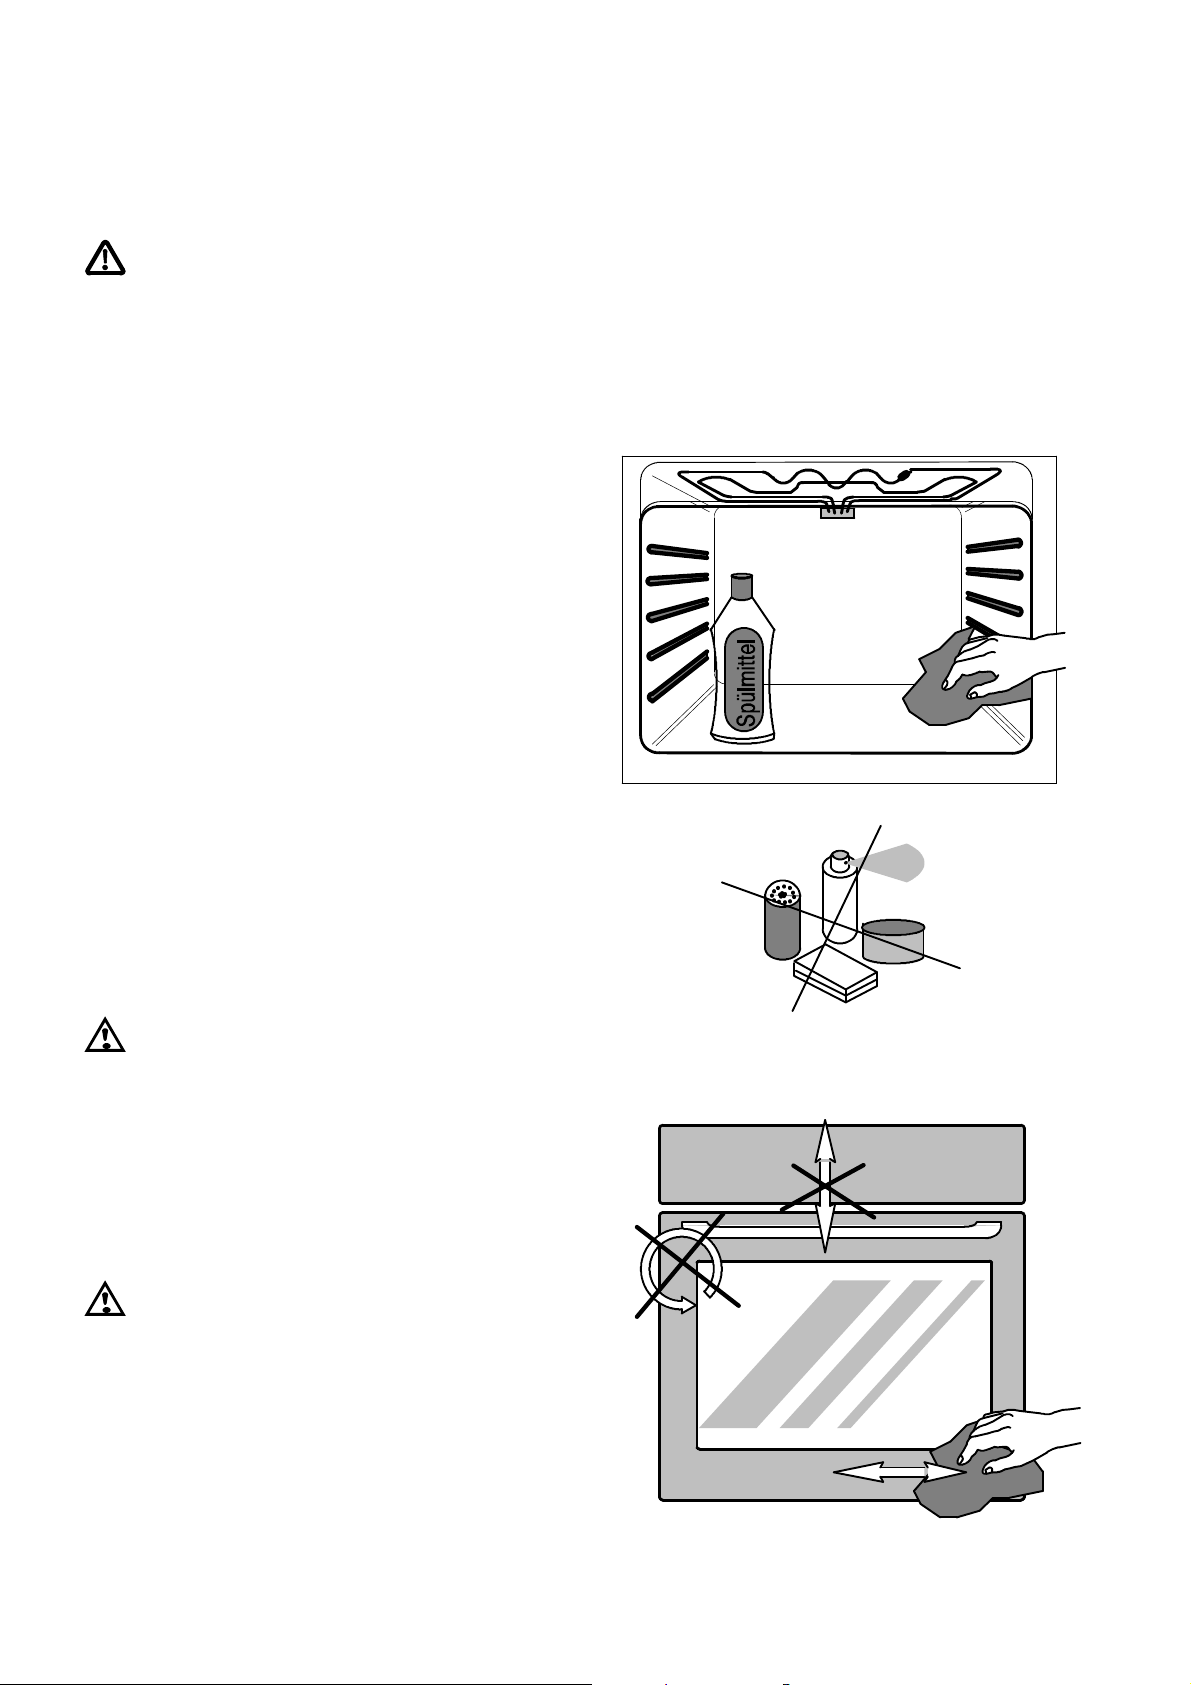
Clean enamelled cavity
Carefully and regularly clean the appliance in lukewarm or cold state. Avoid repeatedburning--on of soiling.
The oven inside is washed with a warm washing--up
liquid and a sponge or cloth. Afterwards wipe out with
clear water and dry.
Never use caustic, scouring and scratching cleaners,
ovensprays,steel--wool. Same willdestroythe catalytic cleaning aid resp. the clean enamelled bottom.
Wireshelfandgrill pan,bakingsheetsand
cake moulds
Oven accessories and shelving parts to be cleaned
withawarmwashing-upliquid.Theseitemsarenotsuitable for cleaning in a dishwasher.
Control panel and oven door
Do please pay attention to clean sealing surfaces at the door and in the door frame.
Thecontrolpanelandthe ovendoorhavetobecleaned
with warm washing--up liquid or glass cleansing agent
andtobewipeddry. For cleaningthe insideof theoven
door use only washing--up water.
Appliances with stainless steel surface
During the cleaning procedure make sure that
the stainless steel surface f inish (the fine horizontal lines) will not be processed against the
structure.
For the stainless steel front side we recommend
throughoutandregularcleaningandcarewithsuitable
stainless steel cleaners and preservative agents.
Please observe manufacturer‘s instructions.Scratching and scouring agents are not suitable.
Before wiping put the cleaner on a wet cloth and afterwards wash off with water and dry with a clean cloth.
1
9
Installation instructions
The appliance must exclusively be con-
nectedtothemainsby an expert electrician.
With the installation and incase of a service fai-
lure the appliance has to be isolated from the
mains.Fuselageto be switched-offorremoved.
The general rules for the operation of electric
appliances, the provisions by the competent
electricitysupplyboardandthespecificationsof
these instructions for installation have to be
strictly adhered to.
Prior to first use remove any possibly existing
labels and protective foils from the front of the
appliance.
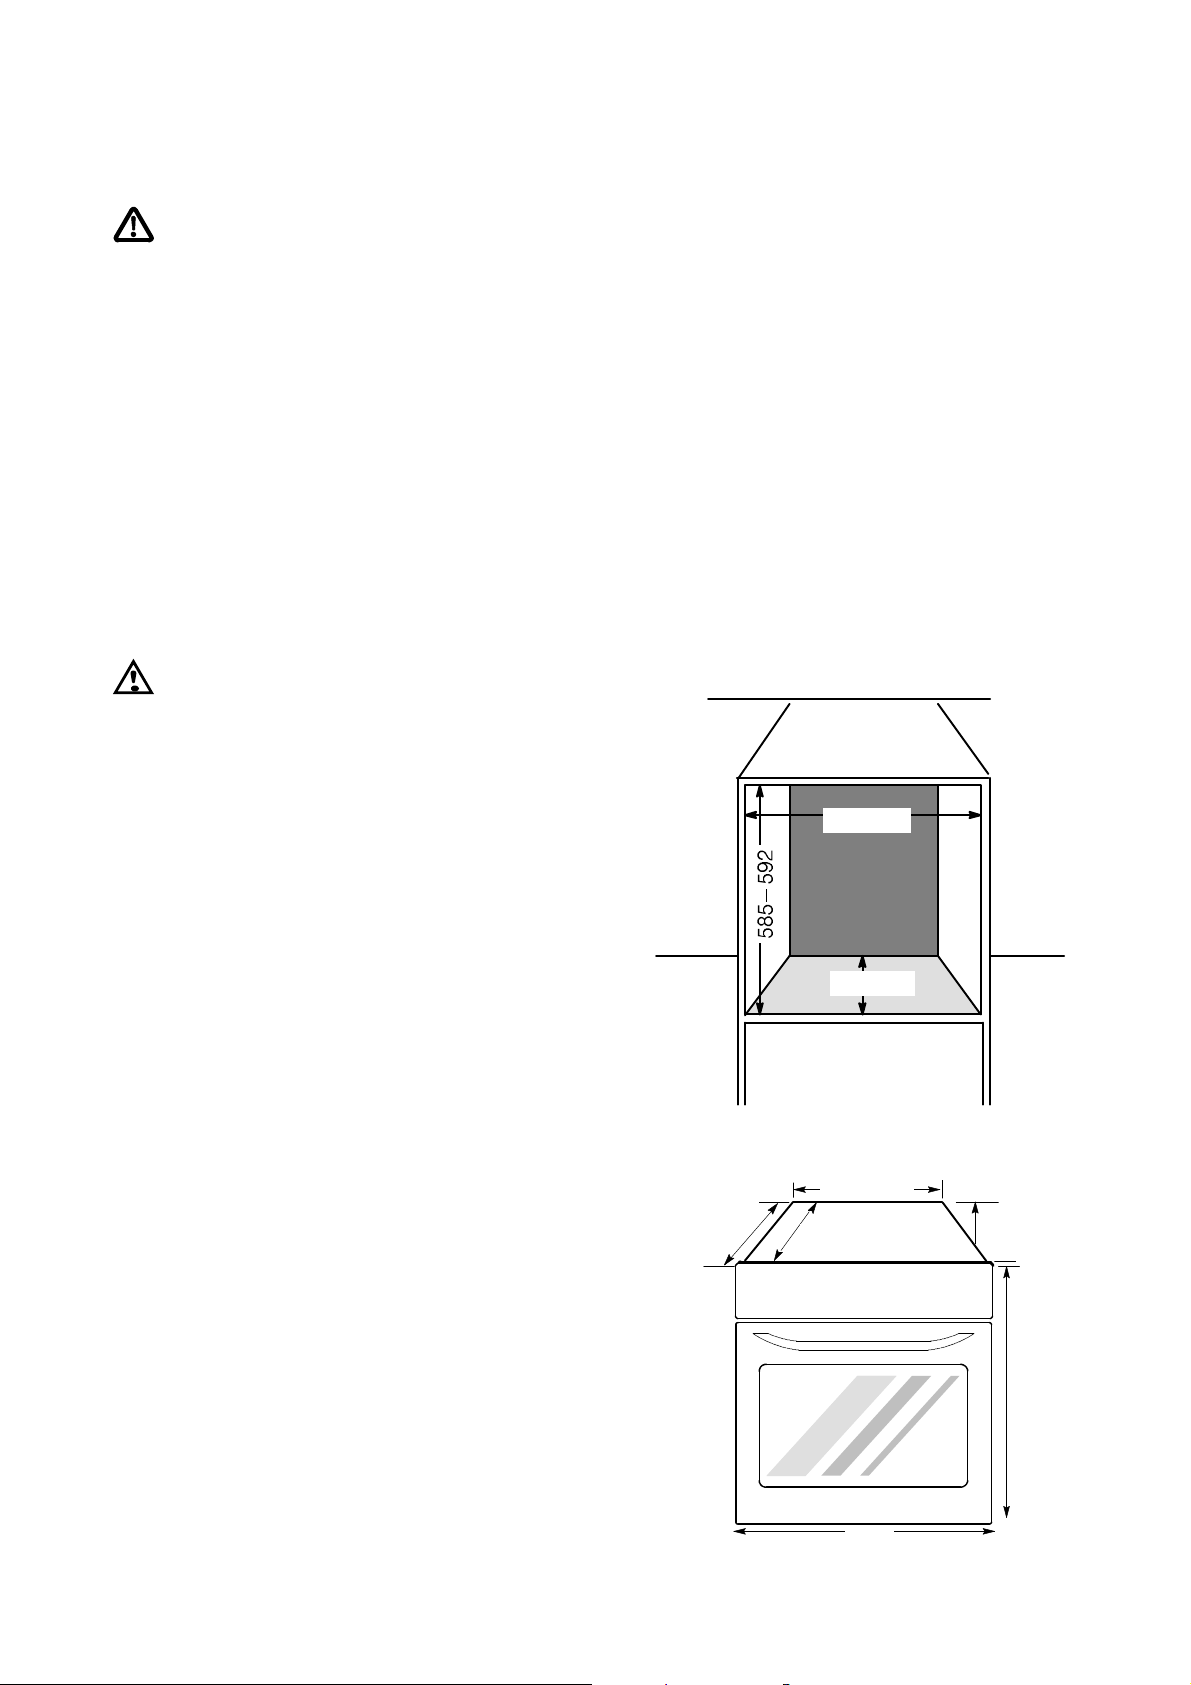
Built-- in in kitchen furniture
Electricalsafetyistobeensuredbyprofessional
installation.
Built-in cabinet
Protection against accidental contactaccording
to the regulations set by VDE or other local
authorities must be ensured by correct installa-
tion of the appliances.
600 mm
560--568
The same refers to the back of the appliance
which, even in case of built--in solutions away
from the wall, must not be freely accessible.
Built--in cupboardshavetobelocatedandfaste-
ned in a way that they are stable.
With built--in furniture the plastic coating or the veneer
respectively and the glue used must be temperature-resistant up to 95°C.
Unsuitable plastic coating and non--heat--resistant
gluesare the reasonfor possible deformation andloosening of the coating. When in doubt check with the
manufacturer of the built--in furniture.
With regard to the protection against overheating of
surrounding furniture surfaces this appliance correspondstotypeY.Thisapplianceorthe built--incupboard
for the appliance respectively may be located with the
rearwallandonesidewalltowhatever highwallsorfurniture respectively and with the other side to another
appliance or furniture of the same height as this
appliance.
567
560-600
522 / 540
547
579
20
594
Built-- in dimensions
Theopeninginthe cupboardmust correspond to commercialdimensions.Thehintsrequiredaregiven in the
following dimension sketch.
592
2
0
Mains connection
Prior to connection it should be checked whether the
voltage stated on the t ype plate -- i.e. the nominal voltage of the appliance -- is identical with the prevailing
mains voltage. The type plate ist located on the lower
oven frame at the left side and is visible after opening
of the oven door.
Oven with cord and plug :
put the plug into a by an expert installed socket.
Connection to the mains terminal:
Themainsconnectionmustbecarriedout by anexpert
electrician. The VDE--regulations and the valid prescriptionsby the localpower supply boards have tobe
complied with.
Accordingtoexistingmainsvoltagetheappliancesare
to be connected in correspondence with the following
diagram of connections.
The heating element voltage amountsto 230 Vµ. The
appliance will also perfectly perform with the former
mains voltage of 220 Vµ.
Themainsconnectionmustbecarriedout inawaythat
an all--pole isolating device is existing with a contact
openingof at least 3 mm, e.g. LS--automatism, earth-leakage circuit--breaker or fuse.
AwireoftypeH05VV--Forofhigherratingistobeused
as supply cable.
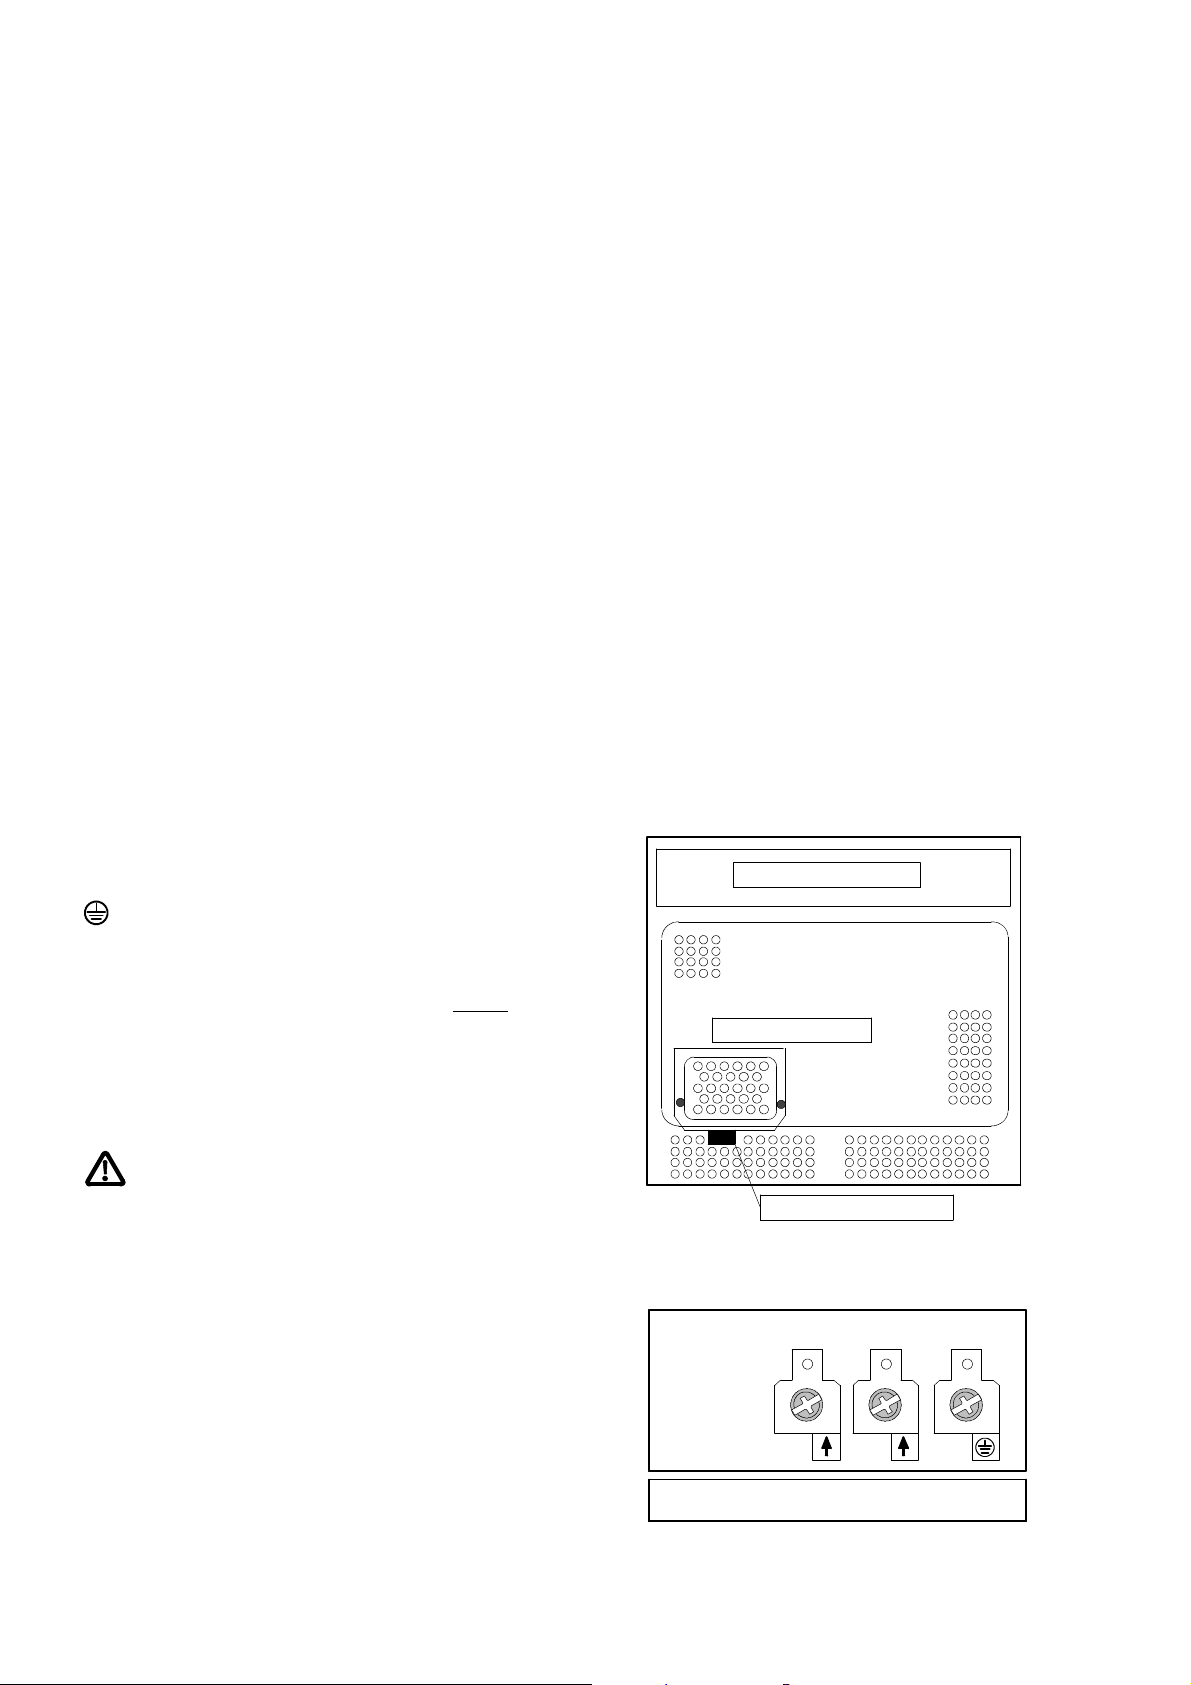
The mains terminal is located at the back of the
appliance behind a covering slide.
Theprotectiveconductoristobeconnectedtoterminal
. The bridges of the terminal board are to be chan-
ged accordingly, if need be.
The cable connections have to be established as
prescribed and the terminal screws be firmly tightened. Afterwards the supply cable has to be secured
by strain relief device.
Oven with cord and plug :
put the plug into a by an expert installed socket.
After connectionto the power supply all heating
elements are to be switched on shortly at maximumsetting one after another,in orderto check
the operability.
back of appliance
mains terminal
strain relief device
Mains terminal
AC 230
L
N
PE
2
1
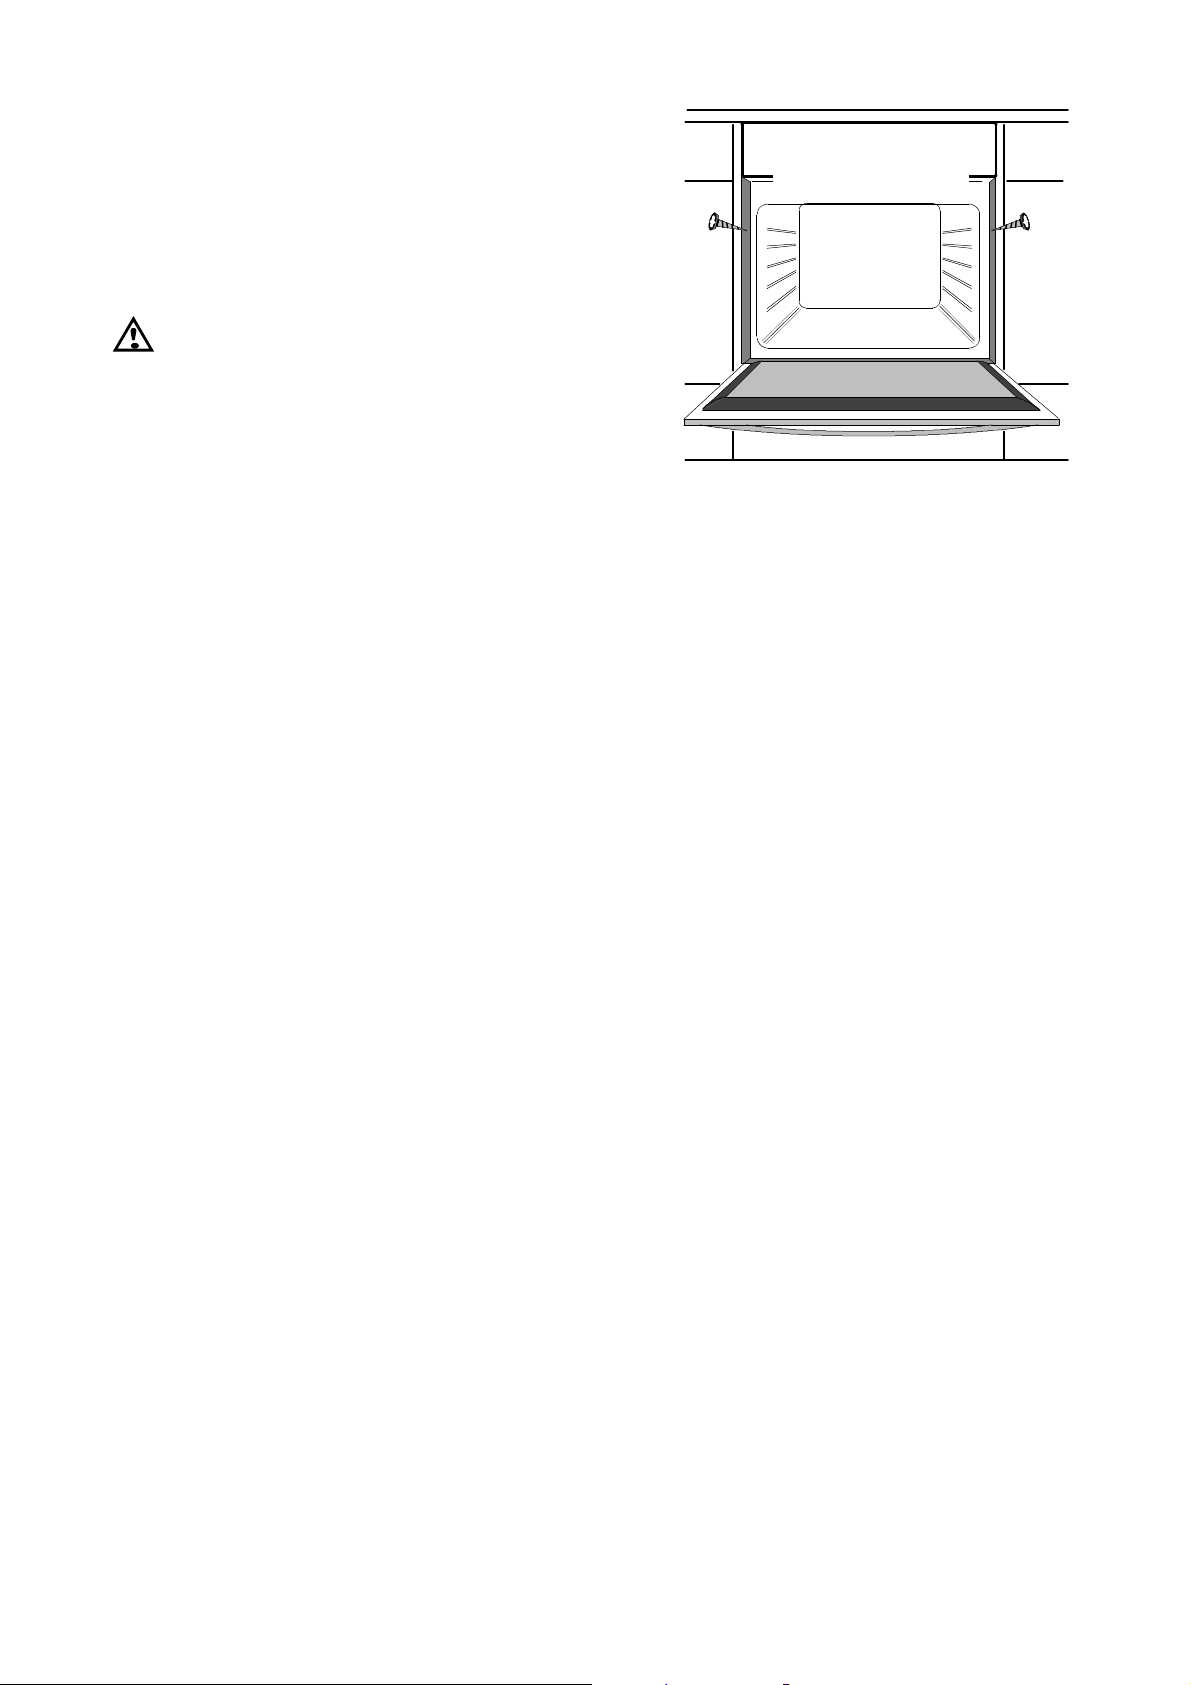
Fixing in the kitchen furniture
Aftercompletionofthemainsconnectionthebuilt--inor
--under oven is located in the cupboard and aligned.
Removetherubberplugfromthe plastic sleevesin the
oven frame and with the screws supplied in a bag the
appliance is to be screwed down in the cupboard. Finallyputthe rubber plugsbackintothe plasticsleeves.
Prior to first use remove any possibly existing
labels and protective foils from the front of the
appliance.
1. remove rubber plugs
2. inscrew the oven
3. put back rubber plugs
2
2
Technical data
EOB 821
Outer dimensions
Width 592/540 mm. . . . . . . . . . . . . . . . . . . . . .
Height 594/579 mm. . . . . . . . . . . . . . . . . . . . .
Depth 567/547 mm. . . . . . . . . . . . . . . . . . . . . .
Depth with open door 1010 mm. . . . . . . .
Oven cavity dimensions
Width 422 mm. . . . . . . . . . . . . . . . . . . . . .
Height 310 mm. . . . . . . . . . . . . . . . . . . . .
Depth 440 mm. . . . . . . . . . . . . . . . . . . . . .
Volume 57,5 l. . . . . . . . . . . . . . . . . . . .
Total weight net 25,5 kg. . . . . . . . . . . .
Connected load:
Top heat 1000 W. . . . . . . . . . . . . . . . . . .
Bottom heat 1000 W. . . . . . . . . . . . . . . .
Top and bottom heat 2000 W. . . . . . . .
Infra-red grill 1900 W. . . . . . . . . . . . . . . .
Large surface grill 2900 W. . . . . . . . . . .
Cavity illumination 25 W.. . . . . . . . . .
Voltage 230 V ~. . . .. . . .. . . .. . . . . . .
Total connected load max 3.000 W. . .
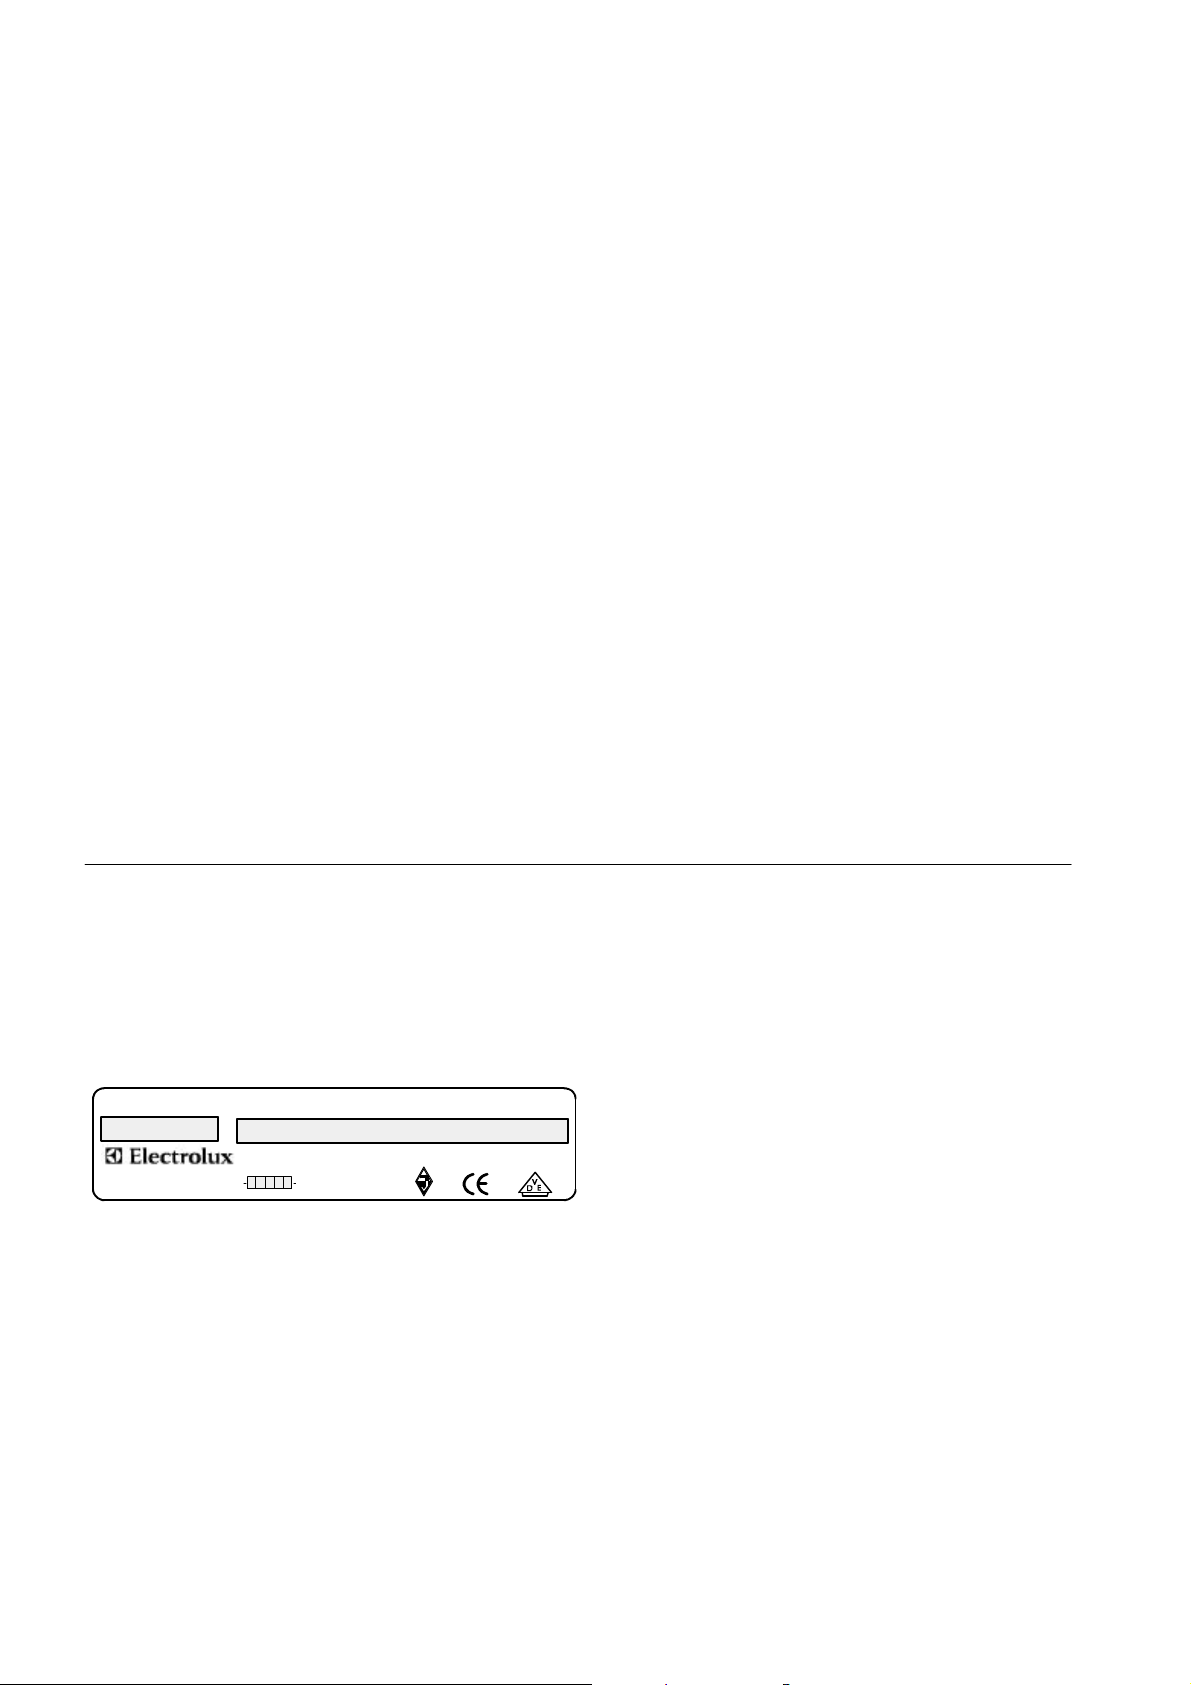
Type plates
Note down here the data from the type plate of your appliance. Same is to be seen after opening of the oven
door on the oven frame in the bottom at the left side
Make always reference to
this info:
-- when filing a servicecall
-- when ordering spare
parts or accessor ies
-- with technical queries
TYP
BEE0 002
Made in Germany
MODELL Prod.-Nr. Serien-Nr.
EOB 821 W
TOTALmax. 3,0 kW - AC 230 V 50 Hz
230 VOLT
948 900 328
µ

Electrolux-Juno Küchentechnik GmbH
D
D 35745 Herborn/Hess.
Telefon 02772/71-0 - Telefax 02772 / 71242
Electrolux AB
S
S 105 45 Stockholm
 Loading...