

Aeg-electrolux EOB63300X EU ENV06, EOB63300X EU R08 AF User Manual

user manual
Built-In Electric Oven
EOB63300

We were thinking of you
when we made this product

Welcome to the world of Electrolux
Thank you for choosing a first class
product from Electrolux, which hopefully
will provide you with lots of pleasure in
the future. The Electrolux ambition is to
offer a wide variety of quality products
that make your life more comfortable.
You will find some examples on the cover in this manual. Please take a few minutes to study this manual so that you
can take advantage of the benefits of
your new machine. We promise that it
will provide a superior User Experience
delivering Ease-of-Mind. Good luck!
electrolux 3

4 electrolux contents
T
1
Contents
Safety instructions 5
Description of the Appliance 7
Before Using for the first time 10
Using the Oven 12
Uses, Tables and Tips 27
Cleaning and Care 43
What to do if … 55
Installation Instructions 56
Disposal 59
Guarantee/Customer Service 60
Service 62
he following symbols are used in this user manual:
Important information concerning your personal safety and information on
how to avoid damaging the appliance.
3 General information and tips
2 Environmental information
Safety instructions
5
This appliance conforms with the
following EU Directives:
– 73/23/EEC dated 19.02.1973 Low
Voltage Directive
– 89/336/EEC dated 03.05.1989 EMC
Directive inclusive of Amending Directive 92/31/EEC
– 93/68/EEC dated 22.07.1993 CE
Marking Directive
Electrical safety
• This appliance must be only con-
nected by a registered electrician.
• In the event of a fault or damage to
the appliance: Take the fuses out or
switch off.
• Repairs to the appliance must only
be carried out by qualified service
engineers. Considerable danger
may result from improper repairs. If
repairs become necessary, please
contact our Customer Services or
your dealer.
Child Safety
• Never leave children unsupervised
when the appliance is in use.
Safety whilst Using
• This appliance is intended to be
used for cooking, roasting and baking food in the home.
• Take care when connecting electric
appliances to sockets nearby. Do
not allow connecting leads to come
into contact with or to catch beneath
the hot oven door.
safety instructions electrolux 5
• Warning: Risk of burns! The interi-
or of the oven becomes hot during
use.
• Using ingredients containing alcohol
in the oven may create an alcohol-air
mixture that is easily ignited. In this
case, open the door carefully. Do not
have embers, sparks or naked
flames in the vicinity when opening
the door.
Information on acrylamides
According to the latest scientific
knowledge, intensive browning of
food, especially in products containing starch, can constitute a
health risk due to acrylamides.
Therefore we recommend cooking
at the lowest possible temperatures
and not browning foods too much.
How to avoid damage to the
appliance
• Do not line the oven with aluminium
foil and do not place baking trays,
pots, etc. on the oven floor, as the
heat that builds up will damage the
oven enamel.
• Fruit juices dripping from the baking
tray will leave stains, which you will
not be able to remove. For very moist
cakes, use a deep tray.
• Do not put any strain on the oven
door when open.
• Never pour water directly into the
oven when it is hot. This could cause
damage to or discoloration of the
enamel.
• Rough handling, especially around
the edges of the front panel, can
cause the glass to break.

6 electrolux safety instructions
• Do not store any flammable materials inside the oven. These could ignite when the oven is switched on.
• Do not store any moist foods inside
the oven. This could damage the
oven enamel.
• After switching off the cooling fan, do
not keep uncovered dishes in the oven. Moisture may condense in the
oven interior or on the glass doors
and may get into the units.
Note on enamel coating
Changes in the colour of the oven’s
enamel coating as a result of use do not
affect the appliance’s suitability for normal and correct use. They therefore do
not constitute a defect in the sense of
the warranty law.
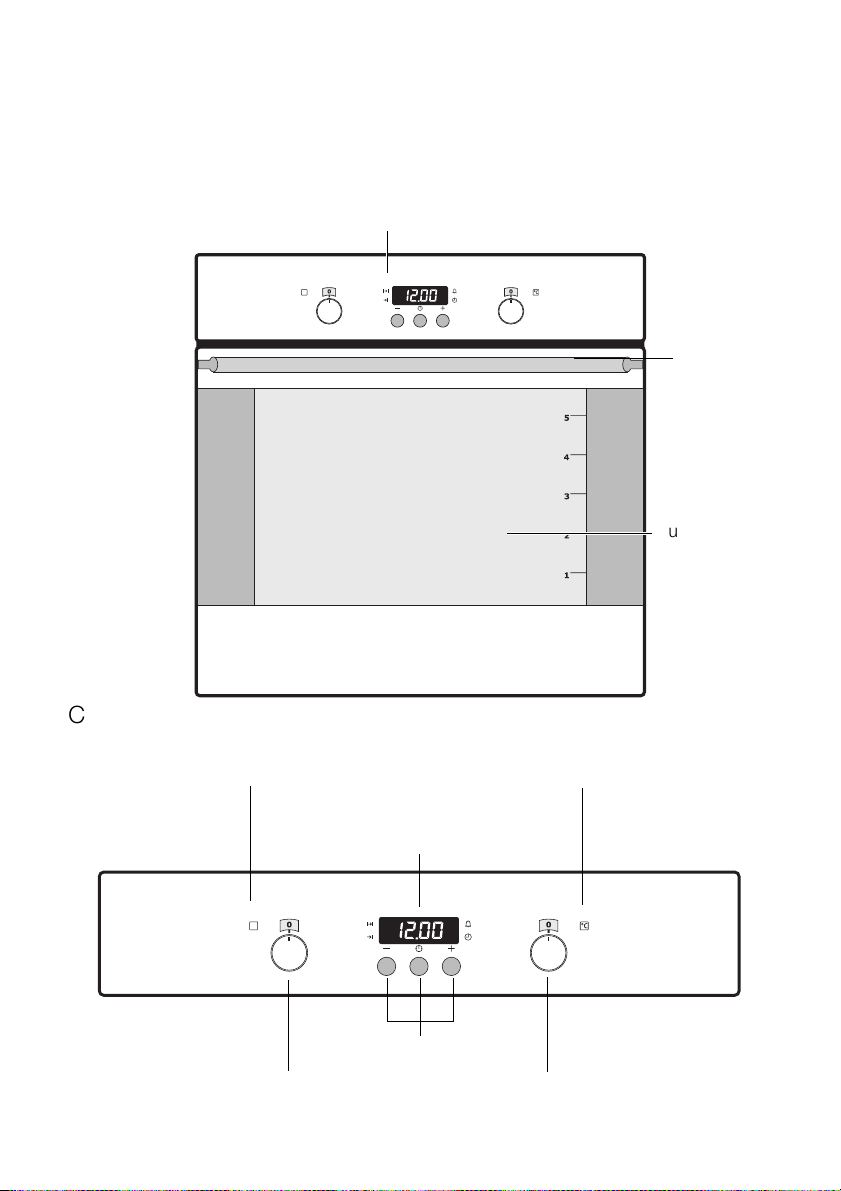
Description of the Appliance
General Overview
Control panel
description of the appliance electrolux 7
Door
handle
Full glass door
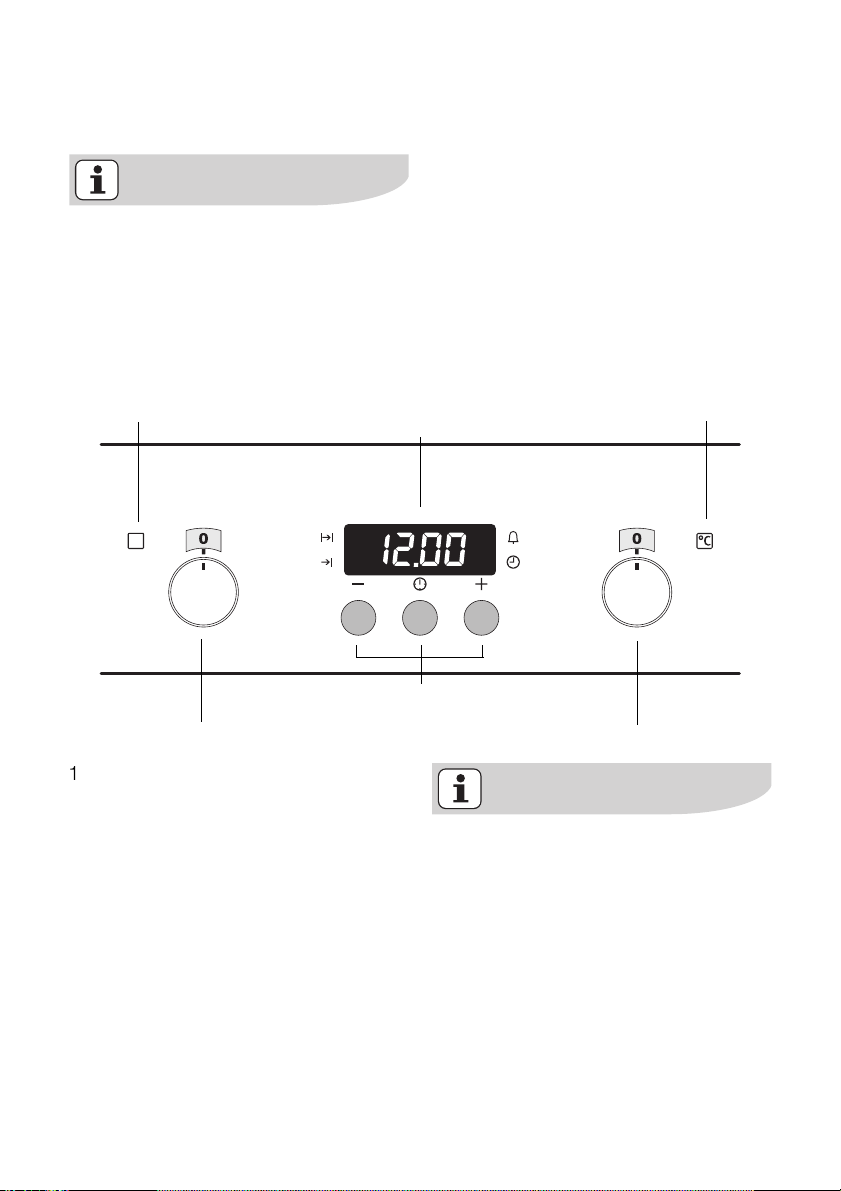
Control Panel
Oven Power Indicator Temperature Pilot Light
Time display
Clock function buttons
Oven Functions
Temperature selector
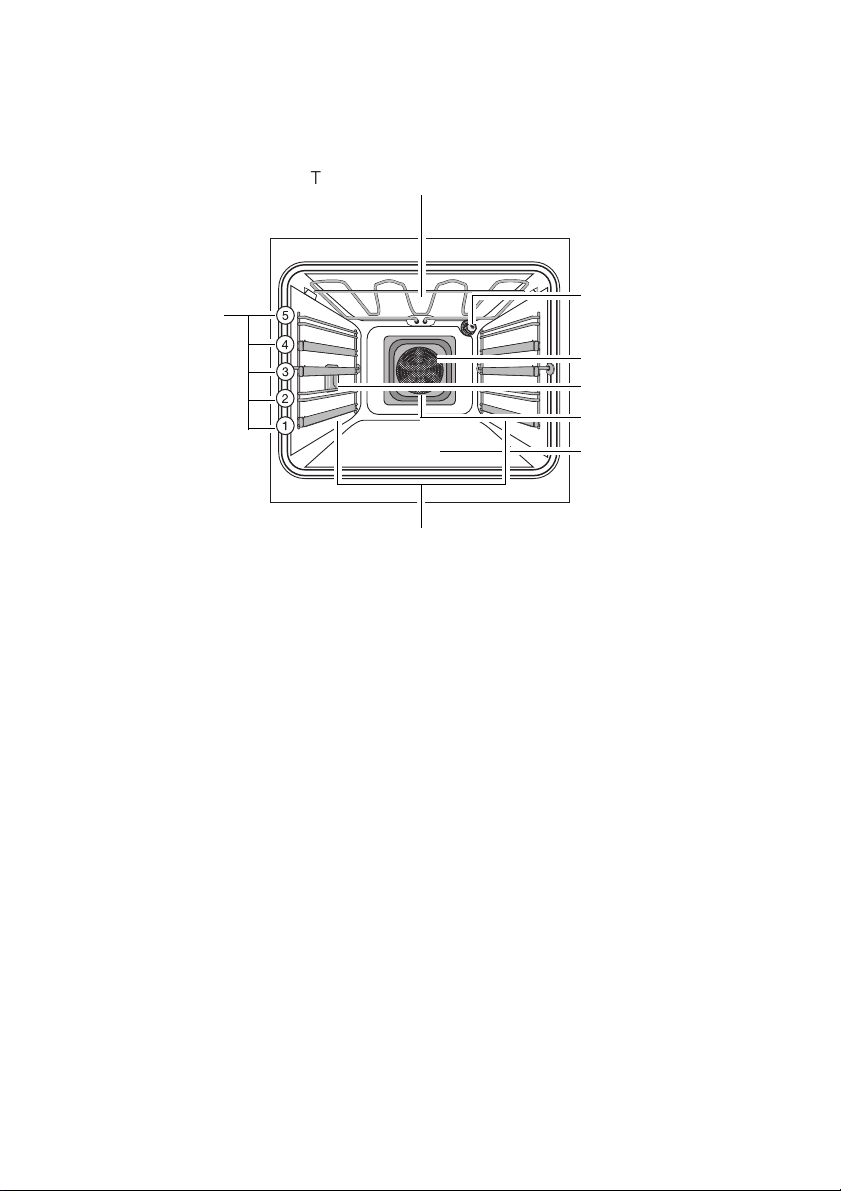
8 electrolux description of the appliance
Oven Features
Top heat and heating elements
Shelf positions
Oven shelf runners,
Oven lighting
Fat Filter
Oven lighting
Fan heating element
Fan
Bottom Heat
removable
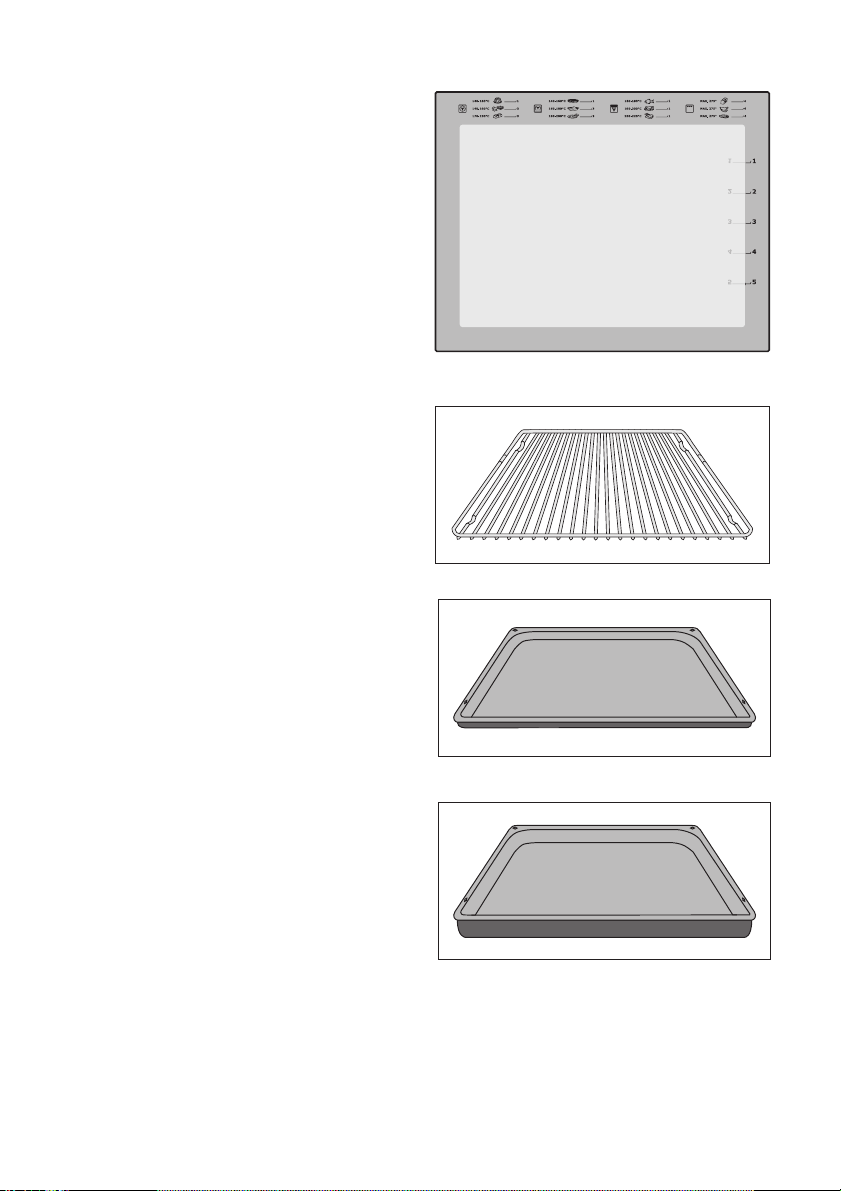
Inside of door
On the inside of the oven door you will
find the numbers of the different oven
shelves.
You will also find some brief information
about the oven's functions, recommended shelves and temperatures for
cooking the most popular dishes.
Oven accessories
Oven shelf
For cookware, cake tins, roasts and
grilled foods.
Baking tray
For cakes and biscuits.
description of the appliance electrolux 9
Roasting Pan
For baking and roasting or as a pan for
collecting fat.

10 electrolux before using for the first time
Before Using for the first time
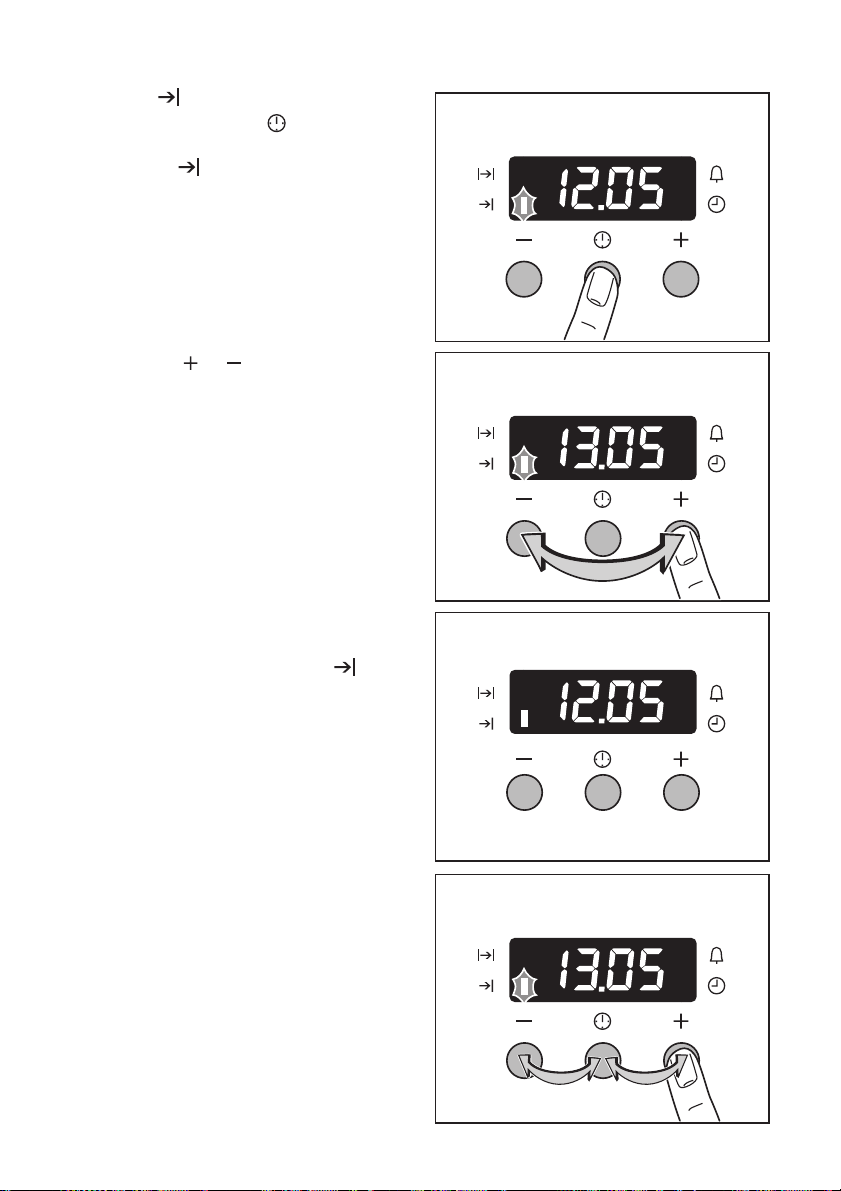
Setting and changing the time
The oven only operates when the
time has been set.
When the appliance has been connected to the electrical supply or
when there has been a power cut,
the function indicator Time flashes automatically.
1. To change a time that has already
been set, press the Selection button repeatedly until the function indicator Time flashes.
2. Using the or button, set the cur-
rent time.
After approx. 5 seconds, the flashing
stops and the clock displays the time
set.
The appliance is now ready to use.
The time can only be changed if no
automatic function (Cook time or
End time ) has been set.
Initial Cleaning
Before using the oven for the first time
you should clean it thoroughly.
Caution: Do not use any caustic,
abrasive cleaners! The surface
could be damaged.
To clean metal fronts use commercially available cleaning agents.
1. Turn the oven function switch to
oven lighting .
2. Remove all accessories and the shelf
support rails and wash them with
warm water and washing up liquid.
3. Then wash out the oven with warm
water and washing-up liquid, and
dry.
4. Wipe the front of the appliance with
a damp cloth.
before using for the first time electrolux 11
12 electrolux using the oven
Using the Oven
The oven is equipped with retractable
buttons for “Oven functions” and “Tem-
perature selection”. To use, press the
relevant button. The button then sticks
out.
Switching the Oven On and Off
Oven Power Indicator Temperature Pilot Light
Time display
Clock function buttons
Oven Functions
1. Turn the oven functions dial to the
desired function.
2. Turn the temperature selector to the
desired temperature.
The power indicator is lit as long as the
oven is in operation.
The temperature pilot light is lit as long
as the oven is heating up.
3. To turn the oven off, turn the oven
functions dial and the temperature
selector to the Off position.
Temperature selector
Cooling fan
The fan switches on automatically
in order to keep the appliance’s surfaces cool. When the oven is
switched off, the fan continues to
run to cool the appliance down, then
switches itself off automatically.
Oven Functions
The oven has the following functions:
using the oven electrolux 13
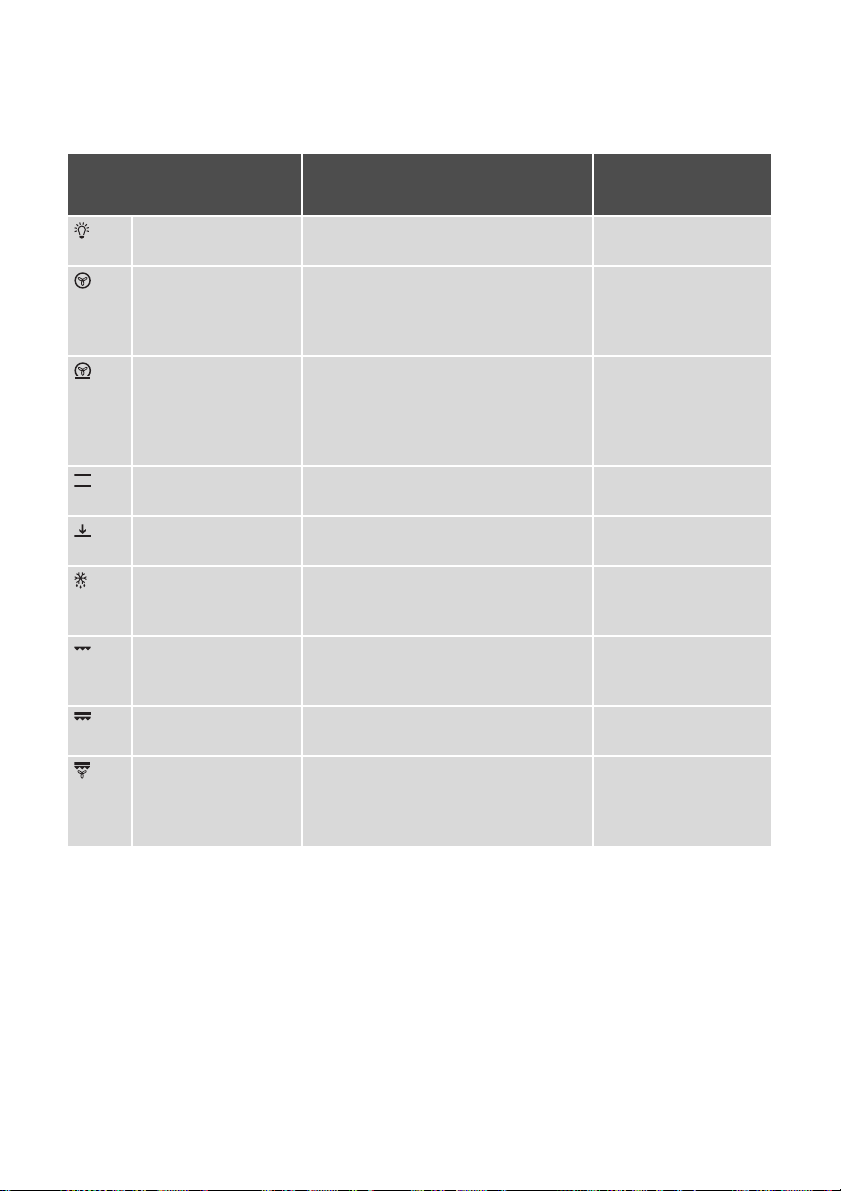
Oven function Application
Light
Using this function you can
Convection with
ring heating
element
Pizza setting
Conventional
Bottom heat
Defrost
Grill
Dual grill
Convection grilling
For
the oven interior, e.g. for cleaning.
For
baking
on
levels
at the same time.
Set the oven temperatures 20-40 °C
lower than when using Conventional.
For baking on one oven level dishes
that require
ing and a crispy base
Set the oven temperatures 20-40 °C
lower than when using Conventional.
For
baking
oven level
For
baking
crusty bases
For
defrosting
teaux, butter, bread, fruit or other
zen foods
For
grilling
middle of the grill
the
toasting
grilling
quantities
For
roasting
poultry on one level.
The function is also suitable for
nating
and
up to three oven
more intensive brown-
and
roasting
.
cakes with
.
.
flat foodstuffs placed in
.
flat foodstuffs in
and for
larger joints of meat or
browning
crispy or
e. g. flans and ga-
toasting
.
light up
.
on
one
and for
large
.
fro-
grati-
Heating element/
fan
---
Rear heating element,
fan
Bottom heat, rear wall
heating element, fan
Top heat, bottomheat
Bottom heat
Fan
Grill
Grill, top heat
Grill, top heat, fan
14 electrolux using the oven
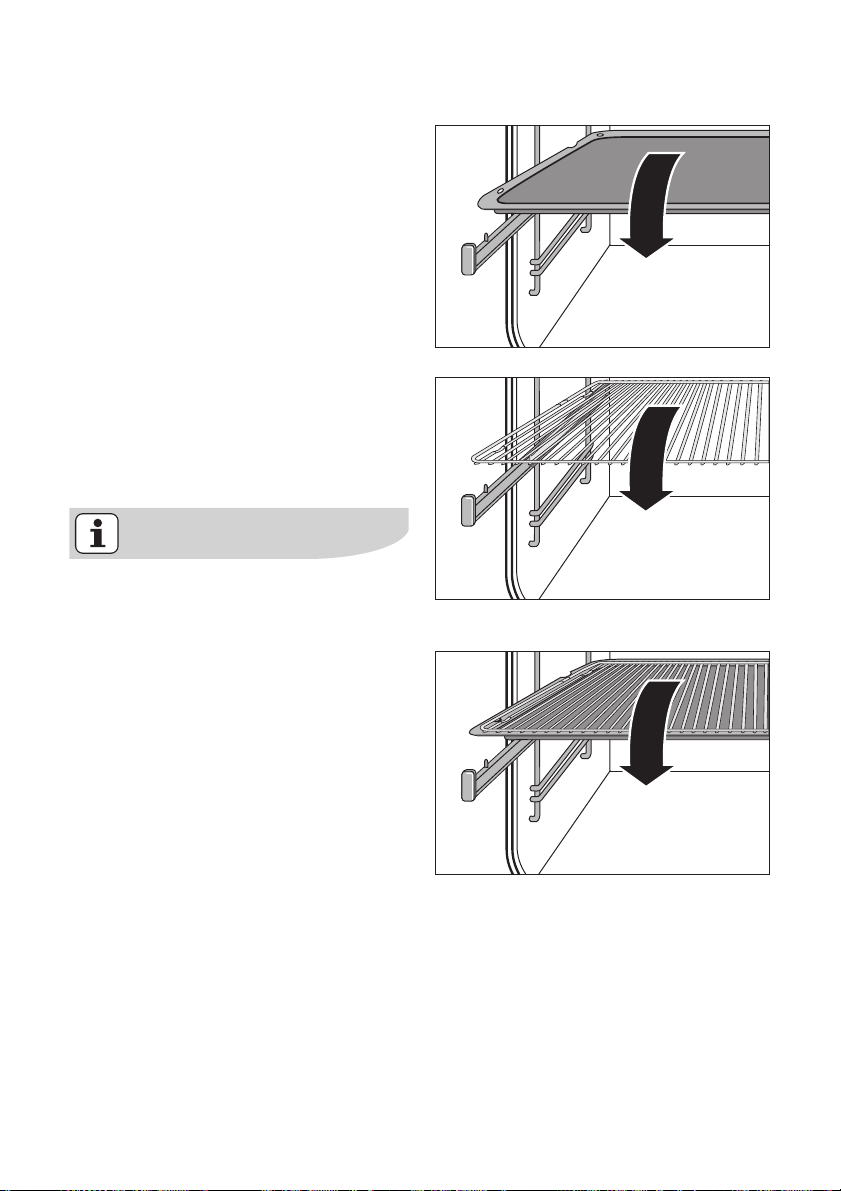
Inserting the Combination Shelf, Baking Tray and Roasting Pan
Inserting the baking tray or roasting
pan
Insert baking tray or or roasting pan on
the telescopic runners of the selected
oven level so that the two holes engage
on the front retaining pins on the telescopic runners.
Inserting the oven shelf:
Insert the oven shelf so that the feet
point downwards.
Insert the oven shelf on the telescopic
runners of the selected oven level.
The high rim around the oven shelf is an
additional device to prevent cookware
from slipping.
Inserting the oven shelf and roasting pan together:
Lay the oven shelf on the roasting pan.
Insert the oven shelf and the roasting
pan on the telescopic runners of the selected oven level so that the two holes of
the roasting pan engage on the front retaining pins on the telescopic runners.
To make it easier to insert the insertable component when runners are
extended to different extents, lay
the insertable component onto the
runners at the back, push it in as far
as the stop and then lower it onto
the retaining pins at the front.
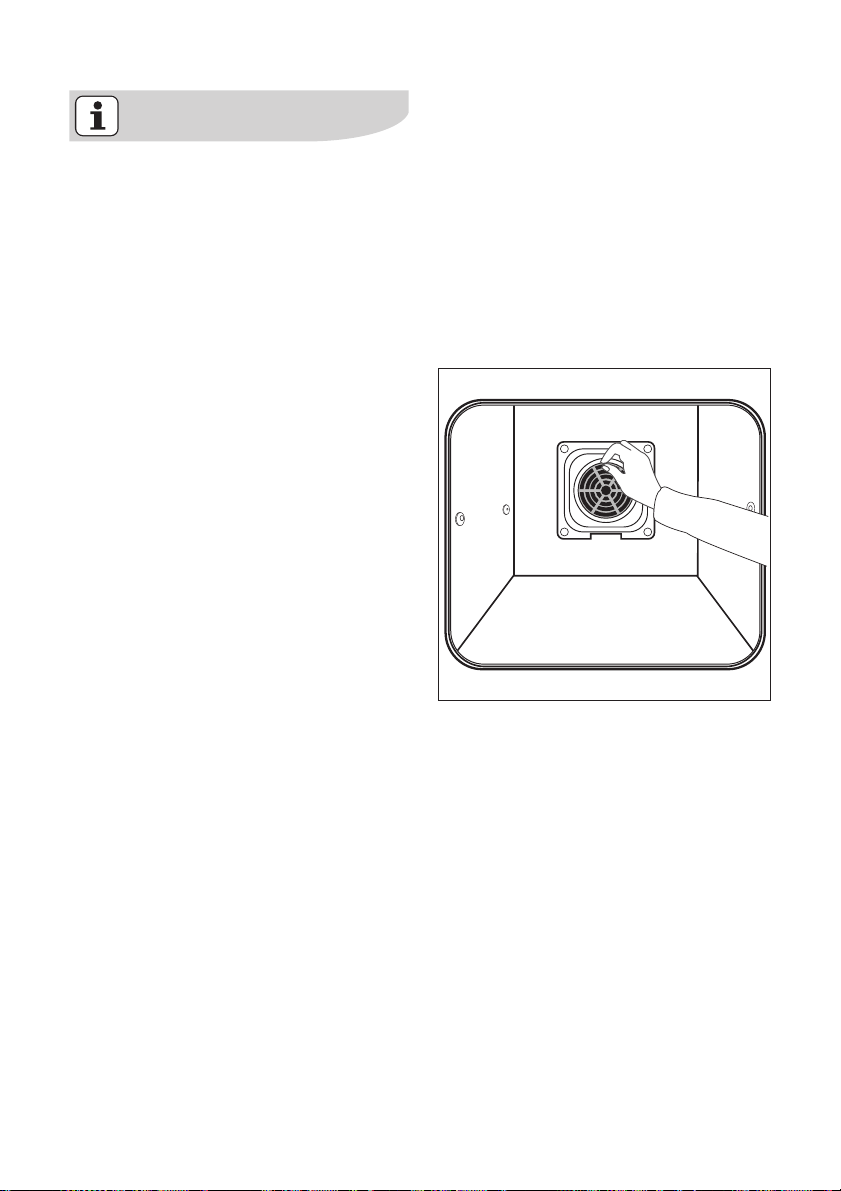
Inserting/Removing the Grease Filter
Only use the grease filter when
roasting to protect the rear heating ele-
ments from fat splashes.
Inserting the grease filter
Hold the grease filter by the grip and
insert the two mounts downwards into
the opening on the rear wall of the
oven (fan opening).
Taking out the grease filter
Hold the grease filter by the grip and
unhook it.
using the oven electrolux 15
16 electrolux using the oven
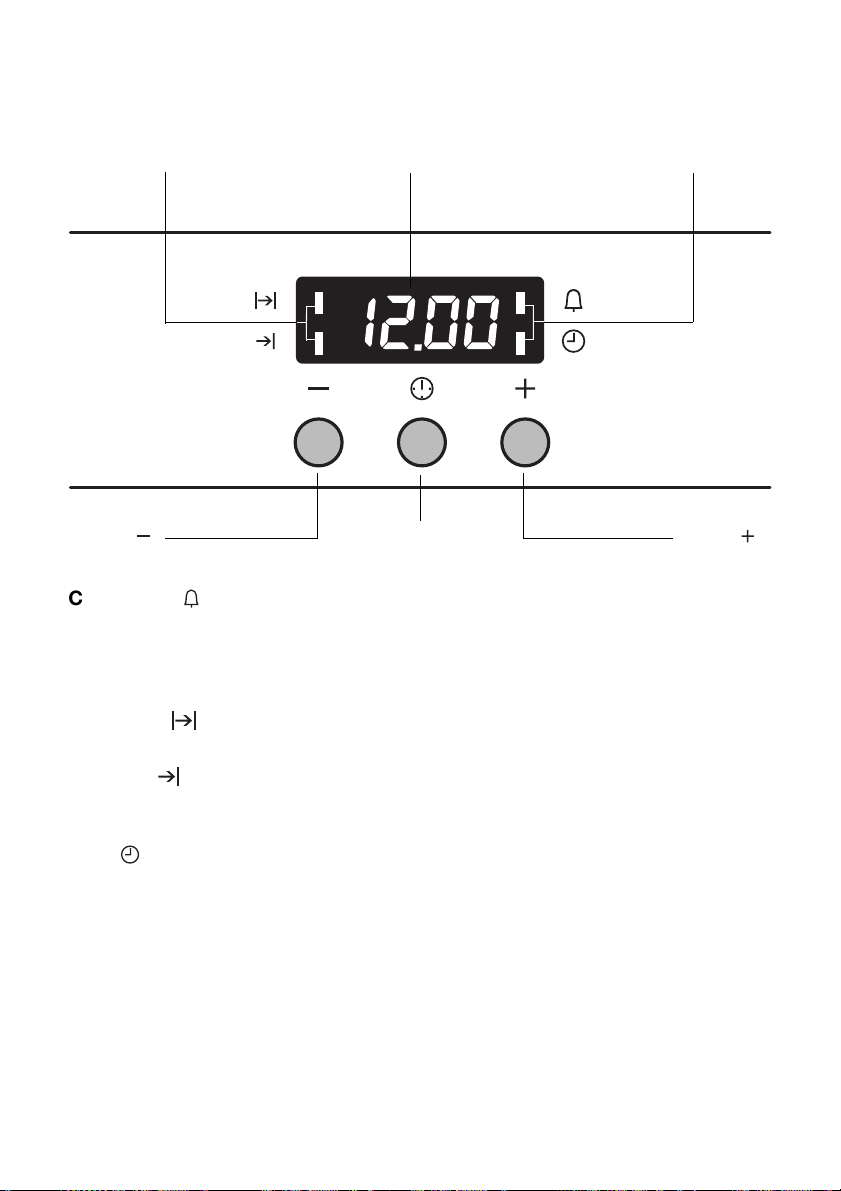
Clock Functions
Time display Function IndicatorsFunction Indicators
Button
Selector Button
Countdown
To set a countdown. A signal sounds after the time has elapsed.
This function does not affect the functioning of the oven.
Cook time
To set how long the oven is to be in use.
End time
To set when the oven is to switch off
again.
Time
To set, change or check the time
(See also section “Before Using for the
First Time”).
Button
How to use the clock functions
• After a function has been selected,
the corresponding function indicator
flashes for about 5 seconds. During
this period, the desired times can be
set using the or button.
• When the desired time has been set,
the function indicator continues to
flash for approx. 5 seconds. After
that the function indicator is then lit.
The set time begins to run.
• Press any of the buttons to stop the
audible signal.
• The desired oven function and temperature can be selected before or
after the clock functions Cook
time and End time are set.
• When the cooking process is completed, turn the oven function dial
and the temperature selector back
to the OFF position.
using the oven electrolux 17
Switching Off the Time Display
By switching off the time display you can
save energy.
Switching off the time display
Press and hold down any two buttons
until the display becomes dark.
Switching on the time display
Hold down any button until the time reappears in the display.
The display can only be switched off
if none of the clock functions Cook
time , End time or
Countdown is in use.
18 electrolux using the oven
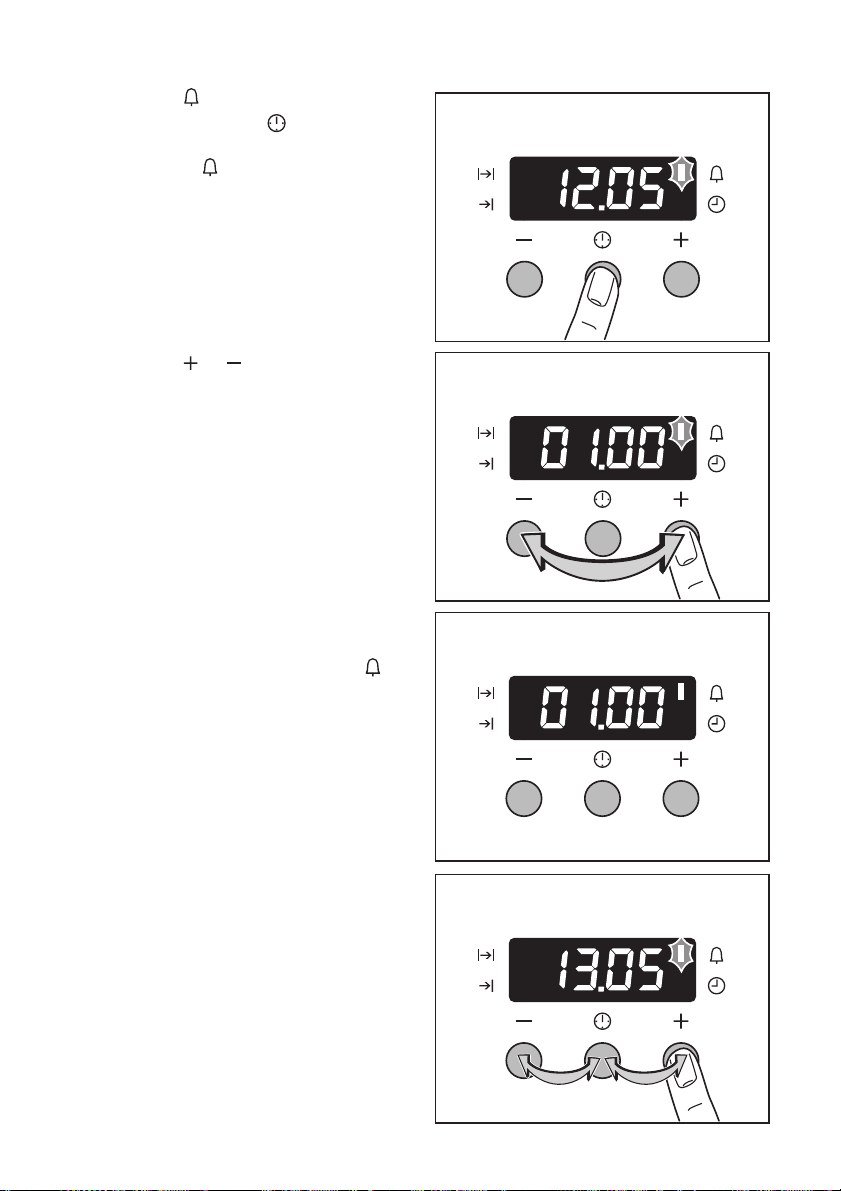
Countdown
1. Press the Selection button re-
peatedly until the function indicator
Countdown flashes.
2. Using the or button set the de-
sired Countdown (max. 2 hours
30 minutes).
After approx. 5 seconds the display
shows the time remaining.
The function indicator Countdown
lights up.
When the time has elapsed, the function
indicator flashes and an audible signal
sounds for 2 minutes.
The signal can be stopped by pressing
any button.

Cook time
1. Press the Selection button re-
peatedly until the function indicator
Cook time flashes.
2. Using the or button set the de-
sired cooking time.
After approx. 5 seconds the display returns to showing the current time. The
function indicator Cook time lights
up.
using the oven electrolux 19
When the time has elapsed, the function
indicator flashes, an audible signal
sounds for 2 minutes and the oven
switches itself off.
3. The signal and the programme can
be stopped by pressing any button.
20 electrolux using the oven
End time
1. Press the Selection button re-
peatedly until the function indicator
End time flashes.
2. Using the or button set the de-
sired switch-off time.
After approx. 5 seconds the display returns to showing the current time.
The function indicator End time lights
up.
When the time has elapsed, the function
indicator flashes, an audible signal
sounds for 2 minutes and the oven
switches itself off.
3. The signal and the programme can
be stopped by pressing any button.
 Loading...