


16
Index
Safety Instructions pág. 17
Installation pág. 18 - 19
Changing the opening
directions of the doors pág. 20
Regulation and Control pág. 21 - 22
How to use your
Fridge-Freezer pág. 23 - 24
Maintenance of your
Fridge-Freezer pág. 25
Something not working pág. 26 - 27
Normal noises when
functioning pág. 28
Guarantee, Service
and Spare Parts pág. 29
Tecnical Features pág. 30

17
tion of food.
m Frozen food must not be re-frozen once it
has been thawed out.
m Manufacturer’s storage recommendations
should be strictly complied with.
m Ice lollies can cause frost burns if consu-
med straight away from the freezer.
m Do not use electrical appliances inside the
fridge/freezer.
m Do not place carbonate or fizzy drinks in the
freezer as these may explode.
m Whenever you discard and old freezer
make sure to:
m Take off the doors in order to prevent
children being trapped inside.
Have the gas R600a from the cooling
system removed by an authorised person before making it into scrap metal.
m
Safety instructions
Warnings for your safety. Carefully read these instructions before installing and using the machine
m This appliance is designed to be operated by
adults only. Children should not be allowed to
tamper with the controls or play with the product.
m Make sure that the power plug is not squashed
or damaged by the back of the fridge/freezer.
Do not place heavy articles or the fridge/freezer itself on the power cord. Do not remove the
power cord by pulling on its lead, particularly
when the fridge/freezer is being pulled out of its
niche. If the power plug socket is loose, do not
insert the power plug. If the power cord is
damaged, it must be replaced by a certified
service agent or qualified service personnel.
Damage to the cord may cause a short-circuit,
fire and/or electric shock.
m This appliance is heavy. Care should be taken
when moving it.
m Repairs carried out by inexperienced persons
may cause injuries or serious malfunctioning.
Refer to the THECNICAL OFICIAL SERVICE.
m The appliance should be left for at least 4 hours
after installation before it is turned on in order
to allow the refrigerant to settle.
m This product must only be serviced by an aut-
horized Thecnical Oficial Service, and only
genuine SPARE PARTS should be used.
m Before cleaning or reparing the appliance,
make sure it is unplugged.
m It is dangerous to try and alter the specifica-
tions or modify this product in any way.
m These domestic appliances are designed to be
used specifically for the storage and conserva-
18
Installation
Fig. 1
Fig. 3
Fig. 2
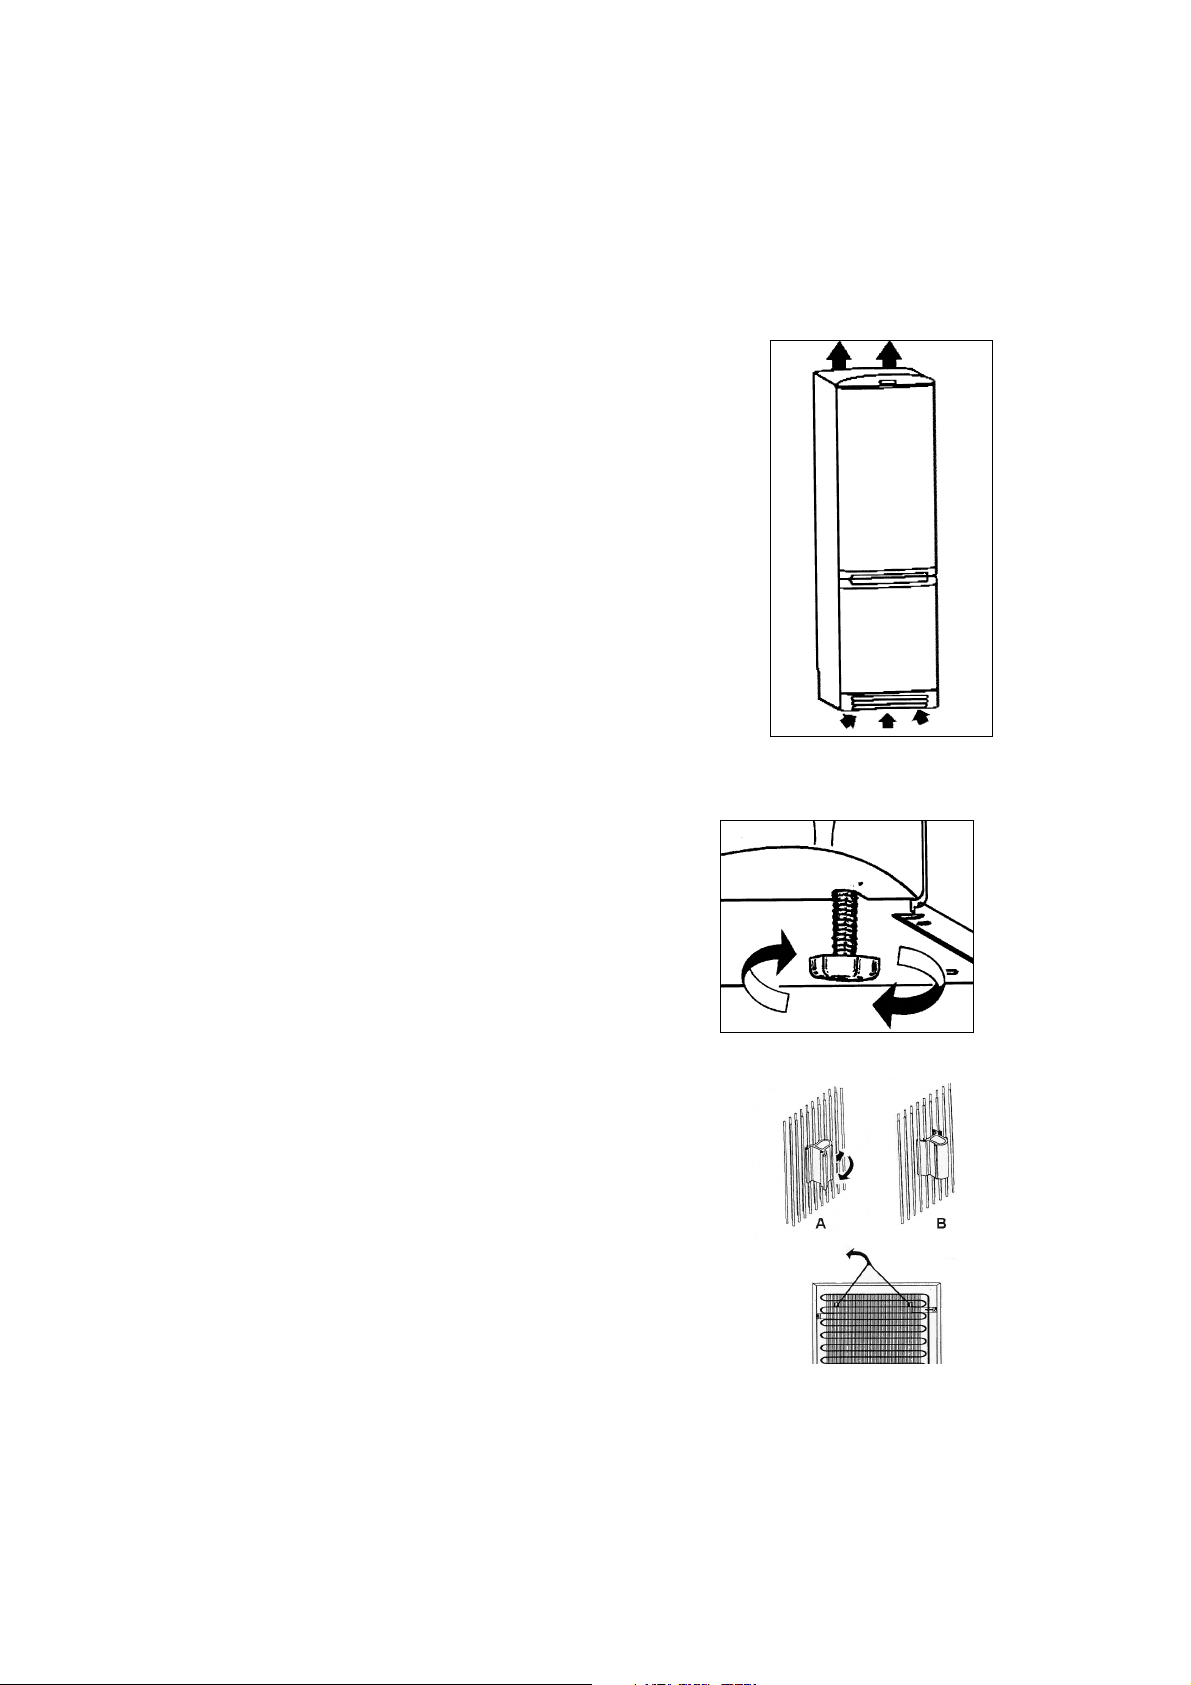
PPoossiittiioonniinngg
• Place the refrigerator away from direct sunlight
and heat sources.
• Take off at least 50 mm. free over the appliance.
• Never put something on the ventilator of the
appliance. (see fig. 1).
• Make sure the refrigerator is accurately levelled
turning the adjustable feet on the front, in order to
avoid vibrations and noises and to make sure that
the doors shut properly (see fig. 2).
• The appliance should not be located in places with
maximum temperatures more than 38ºC:
If the temperatures are higher the functioning and
the safety of the appliance could be affected.
• Assemble the spacers that you can find in the
documentation badge as shown in the figure 3.
CClleeaanniinngg tthhee iinntteerriioorr
• Do not use alcohol or any cleaning produts containing alcohol because they could damage the plastic parts of the appliance.
• Before using the appliance for the first time, wash
the interior with luke warm water and a neutral
soap. This will help to remove the typical smell of
a new fridge/freezer. Afterwards dry thoroughly.
• Do not use detergents or abrasive powders as
these will damage the finish.
• Remove security elements used for transportation.
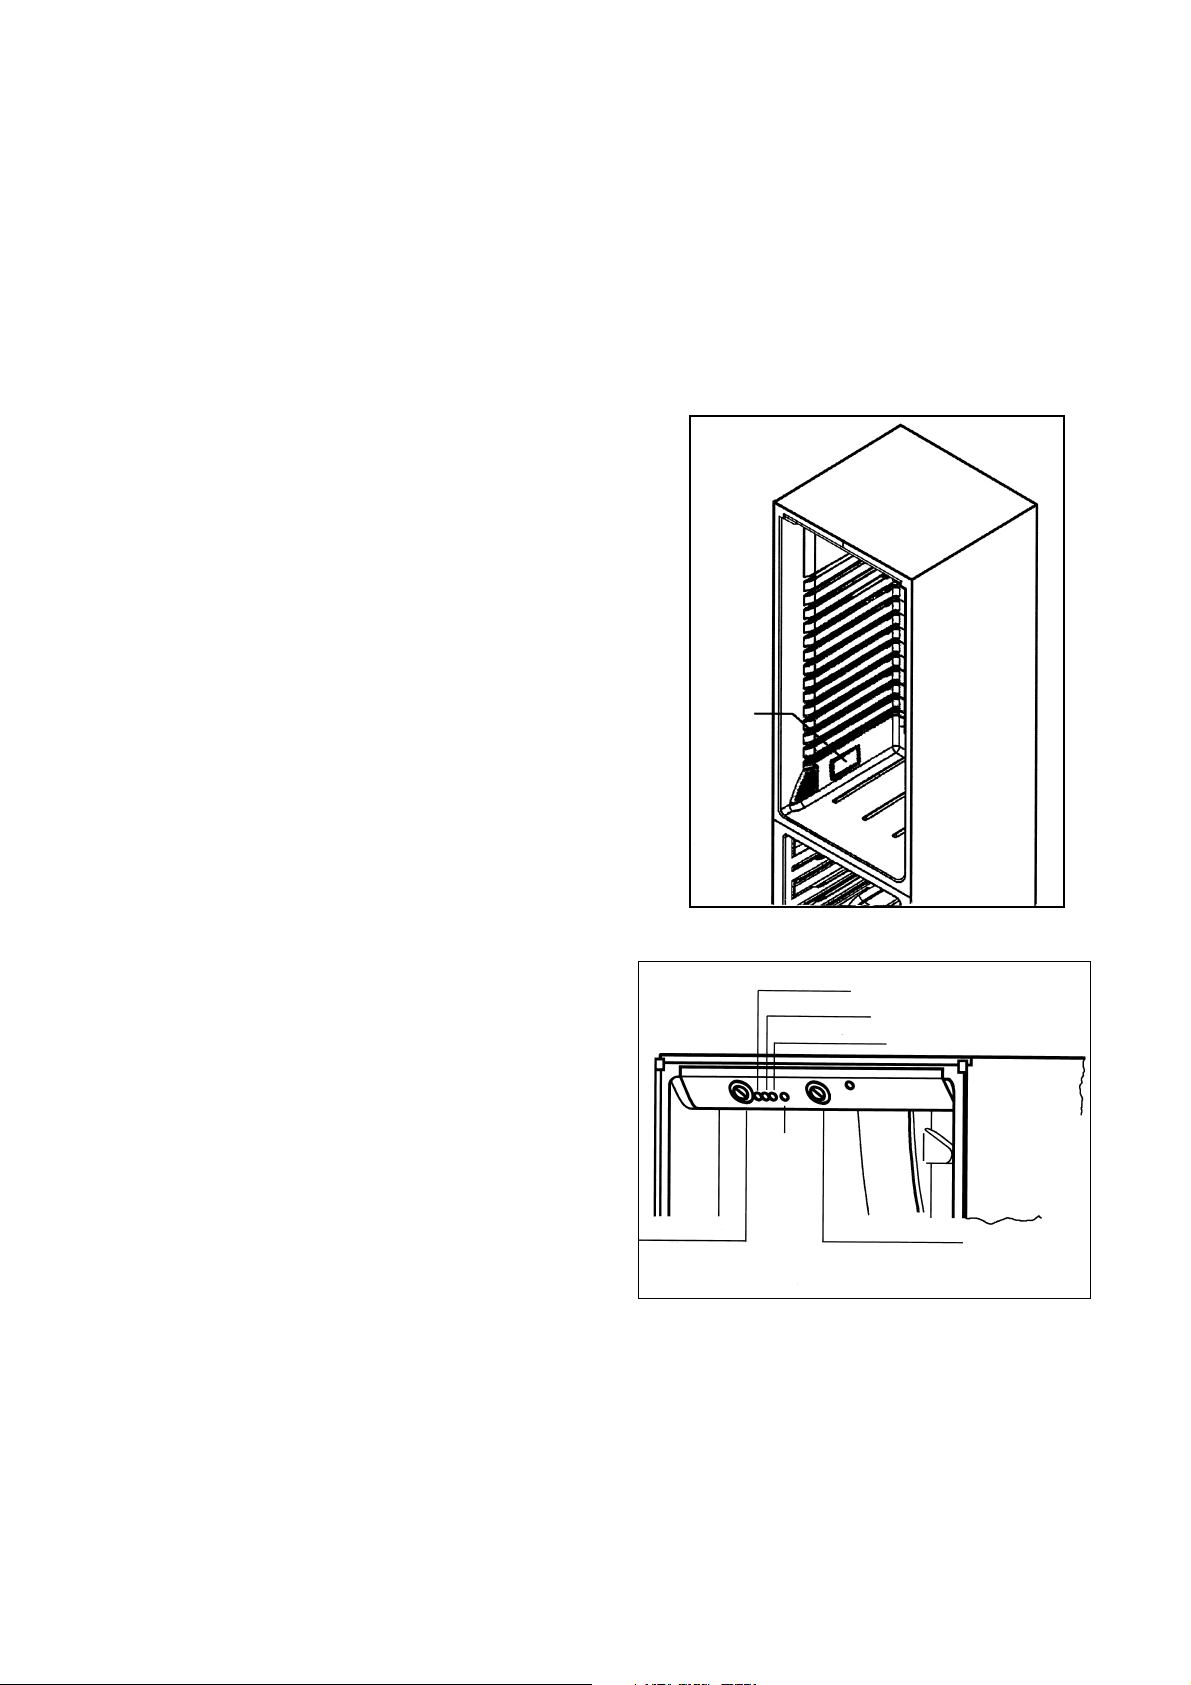
EElleeccttrriiccaall ccoonnnneeccttiioonn
mBefore plugging the appliance into a socket make
sure that the voltage and frequency shown on the
rating plate correspond to your home supply. (see
fig.4).
It is essential that the appliance should be properly
earthed.
mFor this purpose the supply cable plug incorpora-
tes a special earth contact. If the sockets of your
domestic wiring system are not earthed, have the
appliance connected to a separate earth wire in
accordance with existing safety regulations.
19
Installation
Fig. 4
Fig. 5
door alarm
temperature alarm
fast freeze
on/off
temperature
control fridge
temperature
control freezer
SSttaarrttiinngg -- uupp
• Plug the appliance into the wall socket.
• During 20 seconds a system check is carried
out automatically by the electronics and the
appliance will be switched on. The ON/OFF button will be illuminated in green, the interior lighting will go on, and the fridge will start to work.
If the temperature warning tone sounds it can
be cancelled by pressing the WARNING OFF
button.
Starting up if the appliance is switched off:
Hold the ON/OFF button pressed for three
seconds. The ON/OFF button will be illuminated in green, the interior lighting will go on, and
the fridge will start to work.
• The temperature alarm (a beeping noise) could
go on during the start up phase. If this happens
push the temperature alarm button. (See section on the temperature control for more
details).
rating
plate
20
Changing the opening direction
of the doors
Fig. 6
Fig. 7
If you wish to change the opening side of the doors
proceed as follows:
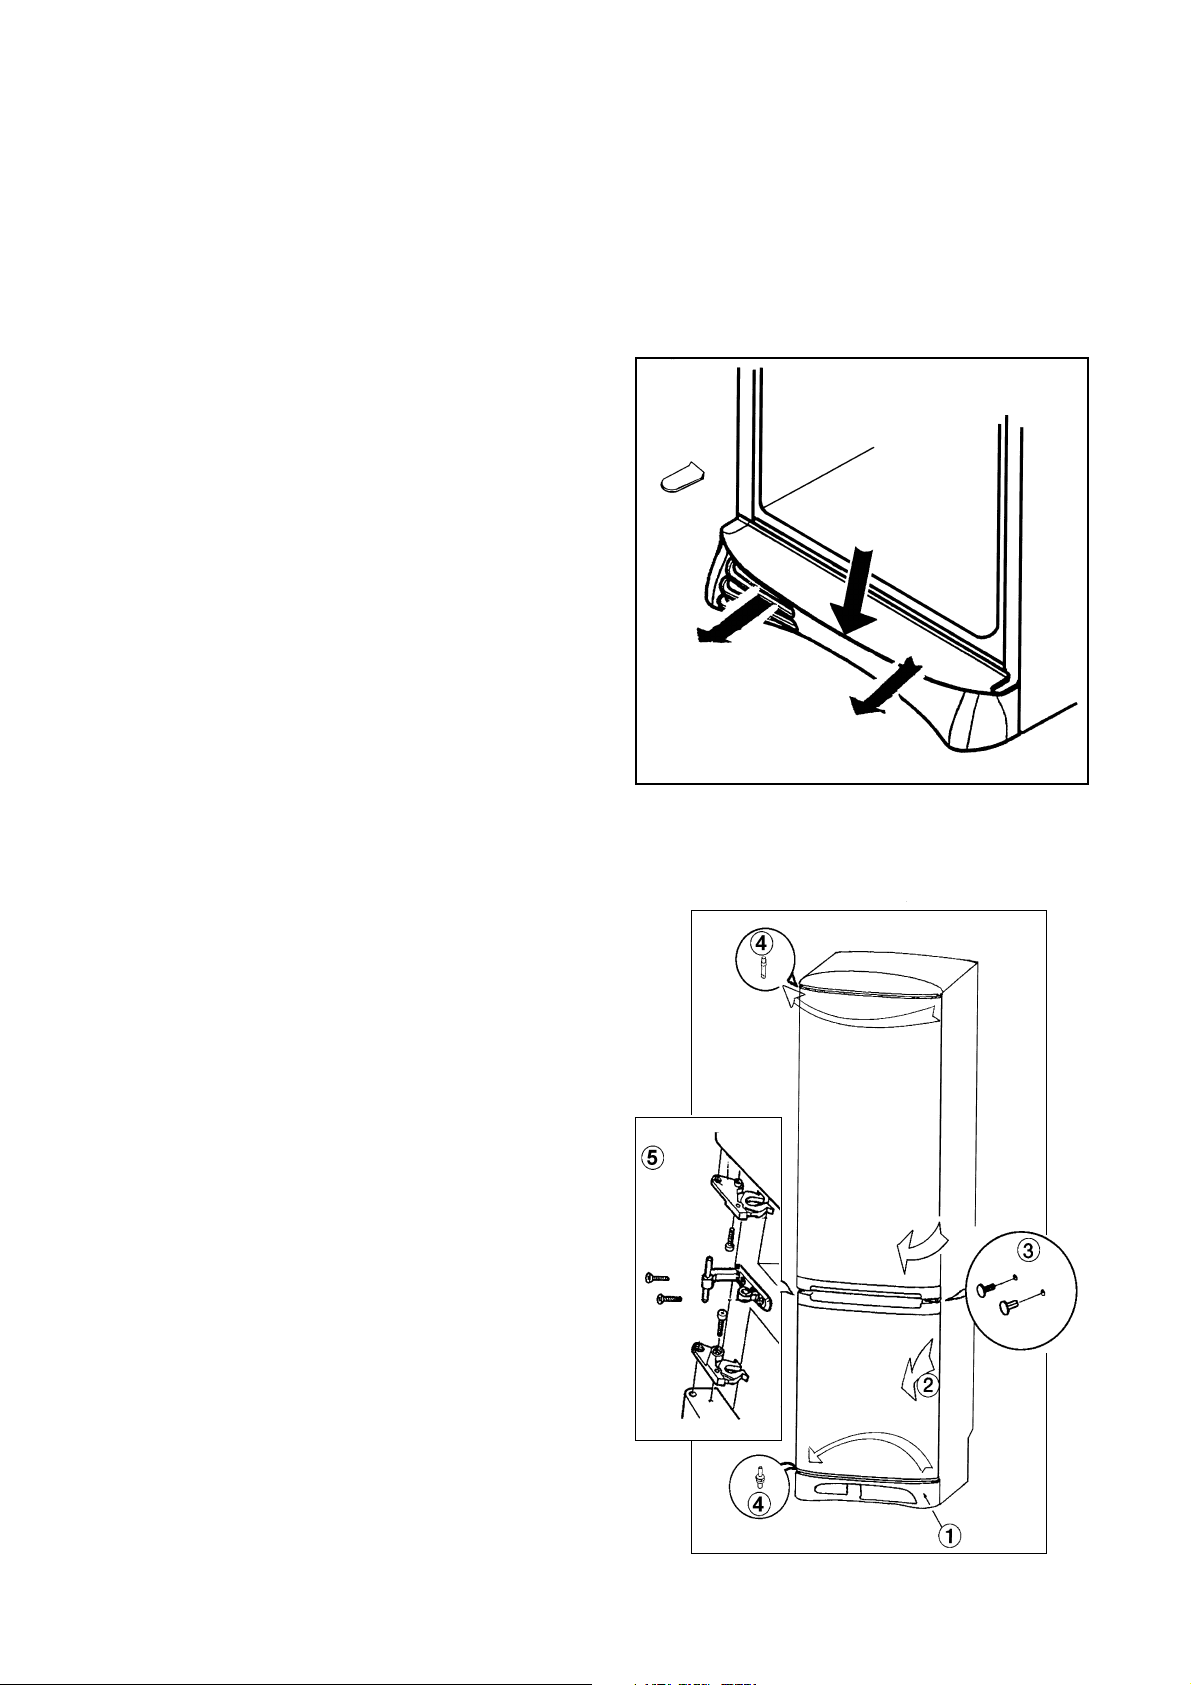
1... Open the freezer door. All the appliances have a
ventilation socle at the bottom. Remove it pushing strongly on the central and upper part. The
upper supports will be loosed takes the piece
out. Then, take the hinge cover off the opposite
side of the ventilation cover and place it as required. (see fig. 6).
2... Removing the central hinge:
– Open both doors.
– Remove the external pin and then close the
freezer door.
– Remove the other pin and close the fridge
door.
– Taking care the doors do not fall, pull them off
till bolts are loose.
– Put the doors carefully on the floor.
3... Change the bolts of the upper and lower hinges
to the opposite side. Change also the plastic
covers of the central partition.
4... Change the door self-closing system, putting the
freezer door’s on the fridge door and viceversa.
5... Fit the freezer door into the lower hinge bolt and
put the central hinge into the door.
6... Fit the fridge door into the upper hinge bolt.
Pulling both doors outwards, fit the central hinge
bolt too. Place the doors.
7... Open the fridge door and screw the central hinge
pin. Then, open the freezer door and screw the
other pin.
8... Assemble socle keep the door open, close it up
to the metallic part.
Fit the two lower flaps of the plastic piece into the
metallic one, press down wards the two upper
hooks (without stopping pressing the socle).
Push it to wards the metallic one till they fit perfectly.
Once finished make sure that all joints close perfectly well all around the door and check that the
internal light turns off when the fridge door closes. (see Fig. 7)
 Loading...