

Page 1

CF 500
Kaffee-Espresso-Vollautomat
Fully Automatic Espresso-Maker
Gebrauchsanweisung
Operating instructions
Page 2

1
D
C
B
A
S
R
Q
P
O
N
E
F
G
H
J
K
2
M
A
D
B
C
E
2
L
3
Page 3

4
5
6
78
10 11
13
14
9
12
15
3
Page 4
16/A
16/B
17
18
4
19
D
A
B
C
20
22
21
23
Page 5

g
Features (Figure 1)
g
A On/Off button
B Fresh water tank, lid
C Water filter (in water tank)
D Filler opening for preground coffee
with lid (coffee funnel)
E Cup rack
F Bean container with lid (in interior:
grinding texture adjustment)
G Selector dial for steam and hot
water (steam selector)
H Height-adjustable nozzle for frothed
milk spout, steam and hot water (also
see Figure 2)
J Drip grille
K Drip catcher
L Spent coffee drawer with spent coffee
container
M Height-adjustable outlet with spouts
N Rating plate (on the underside of the
appliance)
O Drip catcher float
P Programme selector (with P button)
Q Selector dial for adjusting amount of
water
R Coffee selector (with selection button)
S Display
Programme selector (Figure 1/P)
1 Coffee selection
2 Coffee temperature
3 Automatic switch off
4 Rinse
5 Cleaning
6 Decalcifying
7 Water hardness/water filter
8 Language
9 Counter/coffees
Frothed milk spout (Figure 2)
A Knob for regulating the froth
B Suction piece
C Milk discharge outlet
D Connector
E Flexible hose
Coffee selector (Figure 1/R)
1 cup regular
1 cup strong
1 cup X strong
2 cups regular
1 preground
2 preground
20
Page 6

g
Dear Customer,
Please read these operating instructions through carefully. Above all,
observe the safety instructions! Please
keep these operating instructions for
later reference, and pass them on to
any subsequent owners of the appliance.
Your fully coffee machine has functions that guarantee you
•easy operation, when preparing coffee
plus simple maintenance and care.
Information in the display will guide
you step by step through the procedure.
The excellent, individual taste is
achieved by
• the pre-brewing system: prior to the
actual brewing process, the ground
coffee is moistened to extract its full
aroma,
• the individually adjustable amount of
water per cup that can be varied
between a small espresso and a large
coffee with crema,
• the individually adjustable coffee temperature at which the coffee is brewed,
• the facility to choose between normal
or strong coffee,
• the grinding texture that can be
adjusted to suit the roasting of the
beans,
• and last but not least, through the
guaranteed crema, that small crown of
froth that makes an espresso incomparable for connoisseurs.
Incidentally: the time for which the
water is in contact with the ground
coffee is considerably shorter for
espressos than for conventional filter
coffee. As a result, less bitterness is
released from the coffee; it is this that
makes espresso coffee so much pleasanter!
Table of Contents
Safety Instructions
1. Before Using for the First Time
1.1. Setting up the Appliance
1.2. Cable Compartment (Figure 3)
1.3. Programme Selector (Figure 1/Q)
2. Prior to Making Coffee
2.1. Filling the Water Tank (Figure 5)
2.2. Filling the Bean Container
(Figure 6)
2.3. Adjusting the Grinding Texture
(Figure 7)
2.4. Switching on the Appliance
(Figure 8)
2.5. Setting the Language
2.6. Adjusting the Water Hardness
2.7. Inserting the Water Filter
(Figure 4)
2.8. “Rinsing” the Appliance
2.9. Adjusting the Safety Cut-Out
3. Making Coffee
3.1. Adjusting the Amount of Water
(Figure 10)
3.2. Selecting the Type of Coffee
One
3.2.1.
3.2.2.
3.2.3.
3.2.4.
3.2.5.One or Two Cups of Coffee from
Cup of
Beans (Figure 11)
One
Cup of
Beans
One
Cup of
from Beans
Two
Cups of
Beans
Preground Coffee
3.3. Setting Coffee Temperature
4. Frothing Milk (Figures 13-17)
5. Preparing Hot Water
6. Switching off the Appliance
7. Emptying the Water Tank, Drip
Catcher and Spent Coffee
Container (Figures 18-20)
8. Cleaning
8.1. Cleaning the Exterior
(Figures 18-22)
8.2. Internal Cleaning
Regular
Coffee from
Strong
Coffee from
Extra Strong
Regular
Coffee from
Coffee
21
Page 7

g
9. Decalcifying the Appliance
10. What to do if ...
11. Protecting the Environment
12. If a Service is Required
1 Safety Instructions
• The appliance may only be connected
to the mains if the voltage, type of
current, and frequency match the
information on the rating plate (see
underside of the appliance)!
• Never allow children to operate the
appliance unsupervised.
• Never allow the mains lead to come
into contact with hot parts of the
appliance.
• Never pull the plug from the socket by
means of the mains lead!
• Do not use the appliance if:
– the mains lead is damaged or
– the housing shows visible signs of
damage.
• The coffee outlet, swivelling nozzle,
and cup rack will become hot during
use due to the nature of their functions. Keep children away!
• Only fill the water tank with cold
water; do not use hot water, milk or
other liquids.
• Do not place frozen or caramelised
coffee beans in the bean container,
only use roasted coffee beans! Remove
any foreign bodies from the coffee
beans. Otherwise the guarantee will be
void.
• Only put preground coffee in the coffee funnel.
• Observe the cleaning and descaling
instructions.
• Prior to maintaining or cleaning,
switch off the appliance and unplug it
from the mains!
• Never immerse the appliance in water.
• Do not allow any liquid to enter the
housing via the ventilation holes on
the cup rack.
• Do not clean the parts of the appliance
in a dishwasher.
• Do not leave the appliance switched on
longer than necessary.
• Do not expose the appliance to the
weather.
Do not open or repair the appliance.
Repairs that are not carried out correctly may result in significant risk to
the user.
Repairs to electrical appliances may
only be carried out by qualified specialists.
Should repair become necessary,
including the replacement of the mains
lead, please contact the dealer from
whom you purchased the appliance, or
the AEG Service Line.
If the appliance is used for a purpose
other than that intended, or is incorrectly operated, no liability for any
resulting damage or claims under the
guarantee can be accepted - this is also
the case if the cleaning and decalcifying programmes are not performed
directly according to the information
in the display and in accordance with
the information given in these operating instructions.
This appliance complies with the fol-
;
lowing EU Directives:
• 73/23/EEC of 19.02.1973 “Low voltage
directive”, including Amending Directive 93/68/EEC
• 89/336/EEC dated 03.05.1989 “EMC
Directive”, including Amending Directive 92/31/EEC
22
Page 8

g
1. Before Using for the First Time
1.1. Setting up the Appliance
Choose a suitable, level, stable,
unheated, dry surface. Check that
there is adequate air circulation.
Important: If the appliance is placed in
a warm room after being brought in
from the cold, wait approx. 2 hours
before switching it on!
1.2. Cable Compartment
(Figure 3)
Your appliance has a cable compartment at the rear. If the mains lead is
too long, you can push the cable that is
not needed into the cable compartment.
1.3. Programme Selector
(Figure 1/P)
Positions 1-9 on the programme selector may be used to carry out or check
the various different functions.
Position 1: Coffee selection
Adjust the programme selector to this
position when you wish to prepare coffee.
Position 2: Coffee temperature
You can use this position to set the
coffee temperature between REGULAR
and HIGH.
Position 3: Automatic switch off
Use this position to set when you want
the appliance to switch off automatically. The appliance has 6 time steps.
Position 4: Rinse
If you require an additional rinse, it
can be carried out on Position 4 (see
Section 2.8).
Position 5: Cleaning
If “CLEAN UNIT” appears in the display,
the appliance must be cleaned using
a cleaning tablet. The cleaning programme runs automatically. Follow
the instructions in the display (see
Section 8.2).
Position 6: Decalcifying
If “UNIT DECALC.” appears in the display, the appliance must be decalcified
using a decalcifying agent. The decalcifying programme runs automatically.
Follow the instructions in the display
(see Section 9).
Position 7: Water hardness/water
filter
The hardness of the water used can be
set in this position (see Section 2.6).
Position 8: Language
In this position you can set the language in which you wish the information to appear in the display. You can
select the following languages: German, English, French, Italian, Spanish
or Dutch.
Position 9: Counter/coffees
Various functions can be requested in
this position.
Repeatedly pressing the P-button on
the programme selector displays
information about frequency of use
and the extent of calcification in the
following order:
– Number of coffees
– Number of times decalcified
– Number of times cleaned
– Number of hot water preparations
– Number of steam preparations
– Number of filter changes
– Degree of calcification:
0%, 25%, 50%, 75%, 100%
2. Prior to Making Coffee
2.1. Filling the Water Tank
(Figure 5)
If “FILL WATER TANK” appears in the
display, the water tank must be topped
up.
0 Open the lid (Figure 1/B) and remove
the water tank by the handle. Please
only use cold, clear water, and do not
fill beyond the MAX mark.
23
Page 9

g
0 Refit the water tank in the appliance
and press it down until it engages so
the valve on the base is opened.
For aromatic coffee, you should:
• change the water in the tank daily,
• not use mineral or distilled water and
• clean the water tank at least once a
week in normal washing up water (not
in a dishwasher). Then rinse with clean
water.
2.2. Filling the Bean Container
(Figure 6)
You can use both espresso and filter
coffee beans!
0 Open the lid of the bean container
(Figure 1/F) and fill the container with
roasted coffee beans (do not use frozen or caramelised beans). Ensure that
no foreign bodies enter the bean container.
0 Close the lid.
When using for the first time:
3
The first brewing procedure will be
interrupted by the display “FILL
BEANS”. The appliance is not ready
until after the second cup of coffee, as
the coffee channel must first be filled
with ground coffee. For this reason you
should trigger two brewing procedures
(see Section 3, Making Coffee).
2.3. Adjusting the Grinding
Texture (Figure 7)
To release the full aroma from the
beans, you can adjust the grinding texture to suit the roasting of the beans.
The grinding texture adjustment is on
the rear right of the appliance.
Important: The grinding texture is only
to be adjusted when the grinder is in
operation.
Starting from the factory medium
setting, turn the adjustment knob
clockwise for darker beans (coarser
grinding texture), anticlockwise for
lighter beans (finer grinding texture).
2.4. Switching On the Appliance
(Figure 8)
0 Switch the appliance on using the
On/Off button (Figure 1/A).
When using for the first time:
“HOT WATER CYCLE NECESSARY”
appears in the display to indicate that
the system needs to be filled.
0 Place an empty cup under the nozzle
(Figure 1/H).
0 Turn the steam selector (Figure 1/G)
anticlockwise until it reaches the
“Hot water” position. “SYSTEM
FILLING” appears in the display. After
a few seconds this procedure stops
and “SET STEAM/WATER DIAL TO ZERO”
appears in the display. Then “HEATING
UP” flashes in the display.
0 Place an empty cup under the coffee
outlet (Figure 1/M). When the appliance has reached the coffee temperature, the “RINSE MACHINE, PRESS
BUTTON” display appears.
0 Press the coffee selector button to
start brewing.
Brewing stops automatically. The type
of coffee that was selected last appears
in the display, e.g., “1 CUP REGULAR,
PRESS BUTTON”. The appliance is
ready to prepare another coffee (see
Section 3).
2.5. Setting the Language
0 Turn the programme selector (Fig. 1/P)
to Position 8. “SPRACHE DEUTSCH“
(language german) appears in the display.
0 Press the P-button on the programme
selector (Figure 1/P) until the required
language appears in the display.
0 Return the programme selector to
Position 1 to store the required language.
24
Page 10

g
2.6. Adjusting the Water
Hardness
Your appliance can be adjusted to the
hardness of the water used. The water
hardness must be adjusted correctly so
that the automatic calcification indicator can function correctly (see also
Section 9).
Note: The water hardness setting need
only be adjusted prior to using the
appliance for the first time, or if the
quality of the water used changes.
Use the Aquadur® test strips supplied
to determine the hardness of the local
water and follow the instructions given
on the test strip packaging. Or ask your
water board about the hardness of
your water!
The appliance has 4 hardness settings.
The factory setting is the middle set-
ting, 3 (corresponding to 16°-23°
degrees German hardness).
You can change this setting as follows:
0 Set the programme selector (Figure 1/P)
to Position 7. “HARDNESS LEVEL 3”
appears in the display.
0 Keep pressing the P-button on the pro-
gramme selector until the required
water hardness (1-4) or else “OFF” or
“FILTER” appears in the display.
If the water hardness is 2, “HARDNESS
LEVEL 2” appears in the display.
0 Return the programme selector to
Position 1 to store the displayed value.
The appliance is now ready for brewing
coffee.
If “LEVEL-” appears in the display, the
water hardness has not been set. The
decalcification warning will never
appear. This setting may only be used if
you have an independent water softening system.
If you are using a water filter, select
the “FILTER” setting. The appliance will
then automatically detect when the
filter needs to be changed.
Please also refer to Section 2.7 below,
Inserting the Water Filter.
2.7. Inserting the Water Filter
The appliance is fitted with a water filter. This water filter helps to remove
the majority of such elements as chlorine from tap water that might otherwise spoil the flavour. In addition, the
lime content in the water is greatly
reduced when the water filter is used.
This allows the full flavour of your coffee to develop.
If a water filter is used in the appliance, we recommend decalcifying the
appliance once or twice a year.
Inserting and Changing the Water
Filter (Figure 4)
0 Remove the water filter that comes
with the appliance from its plastic
packaging and rinse it thoroughly
under running water.
0 Raise the lid at the top of the water
tank (Figure 1/B).
0 Insert the water filter into the holder
at the bottom of the water tank and
turn it clockwise (Figure 4). Ensure that
the filter is fully and correctly in place!
The filter must be fully screwed in or
else its effectiveness will be reduced.
0 Fill the water tank with tap water and
insert (Figure 5).
0 Rinse the filter cartridge with at least
half a tank of water. To do this, proceed as described in Section 5, Prepar-
ing Hot Water.
The water might become slightly discoloured (not damaging to health).
The tap water is filtered as soon as it is
drawn in by the pump.
The device has automatic filter moni-
3
toring. When “REPLACE FILTER” appears
in the display, the filter in the water
tank must be replaced.
After the new filter has been fitted, set
the programme selector to Position 7,
Water hardness.
0 Press the P-button on the programme
selector for approximately 2 seconds.
The “REPLACE FILTER” display will be
cleared.
25
Page 11

g
If no new filter is fitted, the correct
water hardness must be set (see Section 2.6). Otherwise the appliance will
become calcified. This endangers your
rights to make a claim under the guarantee and the appliance could be damaged!
Please note that the filter cartridge
must be replaced either after brewing
approx. 500 cups of coffee or after
6 weeks (whichever is the sooner).
The cartridge cannot be cleaned and
must be replaced with a new one.
Important: Regardless of how often
the appliance has been used the water
filter must be changed without fail
after 2 months at the latest in order
to avoid a build-up of bacteria in the
filter.
You can purchase a new water filter
either from a specialist retailer
(E No. 900 084 951/4) or from the
Customer Care Department (ET No.
900 084 951/4).
2.8. “Rinsing” the Appliance
Rinsing removes any remaining water
from the system so that the next coffee is made with fresh water.
0 Place an empty cup under the spouts
(Figure 1/M).
0 Turn the programme selector
(Figure 1/R) to Position 4. “RINSE,
PRESS P BUTTON” appears in the
display.
Brewing stops automatically. “SET P
DIAL TO POS. 1” then appears in the
display.
0 Turn the programme selector to Posi-
tion 1. The type of coffee that was
selected last appears again in the display. The appliance is now ready for
brewing coffee.
2.9. Adjusting the Safety CutOut
If the appliance is not used for an
extended period of time, it switches
itself off for safety reasons and to save
energy.
You can choose between 5 time settings (automatic cut-out after 1 to
5 hours) or deactivate the safety cutout. The middle setting, 2 (switch off
after 2 hours), is set in the factory.
You can change this setting as follows:
0 Set the programme selector (Figure 1/P)
to Position 3. “AUTO SHUT-OFF AFTER
2 HOURS” appears in the display.
0 Keep pressing the P-button on the pro-
gramme selector until the time after
which you require the appliance to
switch off appears in the display.
0 Return the programme selector to
Position 1 to store the displayed value.
If “-HOURS” appears in the display, the
safety cut-out is not active. In this case
the appliance will
switched off using the On/Off button
(Figure 1/A).
stay on
until it is
3. Making Coffee
Although you are brewing espresso
coffee with your coffee machine, the
term coffee is used in the following for
clarity.
Note: The following process takes
place fully automatically once the
coffee selector button (Figure 1/R) has
been pressed: grinding, portioning,
pressing, pre-brewing, brewing, and
ejecting of the used ground coffee.
You can stop this process at any time
by pressing the coffee selector button
again.
Store your cups face downwards on
the cup rack (Figure 1/E). Steam
escapes through the openings in the
cup rack and warms the cups!
The outlet (Figure 1/M) can be
adjusted in height and can thus be
adjusted to suit different cup sizes. To
adjust the height, use the thumb and
index finger to grip the ribbing on the
side of the outlet and move it up or
down (Figure 9).
Important: Risk of burning!
26
Page 12

3.1. Adjusting the Amount of
Water (Figure 10)
The amount of water per cup can be
adjusted using the selector dial
(Figure 1/Q).
Depending on your taste, select a
“small” espresso (turn selector dial
anticlockwise) or a “large” coffee with
crema (turn selector dial clockwise).
Note: You can also change the amount
of water during brewing. As the coffee
is brewing, turn the selector dial slowly
anticlockwise from the maximum setting, until coffee ceases to run out at
the required quantity. If two cups of
coffee are drawn, the amount of water
is more or less doubled.
Note: As the appliance is heating up,
“HEATING UP” appears in the display
(Figure 1/S).
3.2. Selecting the Type of Coffee
0 Turn the programme selector to Posi-
tion 1. The type of coffee that was
selected last appears in the display.
0 Place an empty cup centrally under the
spouts.
One
Cup of
Regular
3.2.1.
from Beans (Figure 11)
0 Turn the coffee selector (Figure 1/R)
until “1 CUP REGULAR” appears in the
display, then press the coffee selection
button.
One
One
Cup of
Cup of
3.2.2.
from Beans
0 Turn the coffee selector (Figure 1/R)
until “1 CUP STRONG” appears in the
display, then press the coffee selection
button.
3.2.3.
Coffee from Beans
0 Turn the coffee selector (Figure 1/R)
until “1 CUP X STRONG” appears in the
display, then press the coffee selection
button.
Coffee
Strong
Coffee
Extra Strong
g
Two
3.2.4.
from Beans
0 Place a cup under each of the spouts.
Note: The correct position for the cups
is given by the two holes in the drip
grille (Figure 1/J) as these are directly
below the spouts.
0 Turn the coffee selector (Figure 1/R)
until “2 CUPS REGULAR” appears in the
display, then press the coffee selection
button.
3.2.5. One or Two Cups of Coffee
from
You can use this function, for example,
to brew decaffeinated coffee.
Important: Please do not use ground
coffee that is too fine, as this could
block the brewing unit.
0 Place one or two cups under the
spouts.
0 Open the lid (Figure 1/D) and place the
required amount of ground coffee for
one or two cups in the coffee funnel
(Figure 12).
Close the lid.
0 Turn the coffee selector (Figure 1/R)
until “1 PREGROUND” or “2 PREGROUND” appears in the display, then
press the coffee selection button.
Note: Add a maximum of 2 portions of
ground coffee. The coffee funnel is not
a container. Do not add anything other
than ground coffee! Do not insert
instant (soluble) coffee powder.
Cups of
Preground Coffee
3.3. Setting Coffee Temperature
0 Turn the programme selector to Posi-
tion 2. “TEMPERATURE REGULAR”
appears in the display.
0 Press the P-button on the programme
selector. “TEMPERATURE HIGH” appears
in the display.
0 Turn the programme selector to Posi-
tion 1 to store the displayed value.
Regular
(Figure 12)
Coffee
27
Page 13

g
4. Frothing Milk
(Figures 13 to 17)
Hot steam can be used both for frothing milk for cappuccino and for heating liquids.
For one cup of cappuccino, fill a large
3
cup up to ½ to 2/3 full with espresso
and then add the frothed milk.
Always use cool, fresh (low fat) milk to
achieve the best frothing results.
4.1. Frothing Milk
The type of coffee that was selected
last appears in the display.
0 Attach the frothed milk spout to the
steam nozzle (Figure 13).
0 Insert the knob for regulating the froth
(Figure 2/A) into the suction piece (Figure 2/B) and press firmly into place.
0 Insert the suction piece into the con-
nector (Figure 2/D), and connect the
milk discharge outlet (Figure 2/C) to
the connector.
0 Firmly push the complete frothed milk
spout onto the steam nozzle until the
red seal on the steam nozzle is no
longer visible. As you do so, carefully
push against the grip for adjusting the
height of the steam nozzle.
0 Pour cold milk into the container sup-
plied. If you are frothing milk from the
container supplied you do not need the
flexible hose. The milk container is
attached directly to the frothed milk
spout (Figure 14).
You can also suck up the milk directly
3
from the carton using the flexible hose
(Figure 2/E). However, the milk carton
must not exceed the height of the milk
frothing nozzle. The flexible hose must
be inserted down into the milk carton.
0 Attach the flexible hose to the frothing
nozzle and insert the other end of the
flexible hose into the cold milk (Figure
17).
0 Place an empty cup underneath the
frothing nozzle (Figure 23).
0 Turn the steam selector clockwise to
the “Steam” position (Figure 16/A).
The appliance heats up. “HEATING UP”
appears in the display. After a short
while the display “STEAM READY”
appears.
0 Press the coffee selection button.
“STEAM” appears in the display.
Important: Using the knob for regulat-
ing the froth (Figure 2/A) you can set
the amount of froth (more or less
added air) and the temperature of the
milk to your taste (Figure 15/A, B, C).
To do this turn the knob slowly to the
right or to the left until you achieve
the desired result.
Figure 15/A: maximum froth/
warm milk
Figure 15/B: valve closed/no froth
Figure 15/C: less froth/hot milk
0 You can stop the outlet of steam
– by turning the steam selector anti-
clockwise to return it to the O position or
– by pressing the coffee selection but-
ton. “SET STEAM/WATER DIAL TO
ZERO” appears in the display.
The type of coffee that was selected
last appears in the display.
After frothing please clean the frothed
milk spout particularly thoroughly (for
information refer to Section 8, Cleaning).
4.2. Heating Liquids
The appliance is ready when the last
previously selected coffee appears in
the display.
0 Attach the frothed milk spout to
the steam nozzle as described in Section 4.1, “Frothing Milk” (Figure 13).
Important: Whenever liquids are
heated the suction piece (Figure 2/B)
must always be fitted and the knob for
regulating the froth must always be
closed (Figure 15/B)! Otherwise hot
water could spray out of the side of
the connector (Figure 2/D). Risk of
burning!
28
Page 14

g
0 Turn the steam selector to the
“Steam” position. The appliance
heats up. “HEATING UP” appears in the
display. After a short while “STEAM
READY” appears in the display.
0 Immerse the nozzle about half way
down inside the container with the liquid to be heated so that the air can be
drawn in unhindered.
0 Press the coffee selection button.
“STEAM” appears in the display.
0 You can stop the outlet of steam
– by turning the steam selector anti-
clockwise to return it to the 0 position, or
– by pressing the coffee selection but-
ton. “SET STEAM/WATER DIAL TO
ZERO” appears in the display.
The coffee that was selected last
appears again in the display.
Please clean the frothed milk spout
particularly thoroughly after heating
(for information refer to Section 8,
Cleaning).
5. Preparing Hot Water
You can use the hot water function for
pre-warming cups and for preparing
instant beverages or tea. Important:
Risk of burning!
The appliance is ready when the last
previously selected coffee appears in
the display.
0 Attach the frothed milk spout to the
steam nozzle as described in Section
4.1, “Frothing Milk” (Figure 13).
Important: Whenever hot water is
drawn the suction piece (Figure2/B)
must always be fitted and the knob for
regulating the froth must always be
closed (Figure 15/B)! Otherwise hot
water could spray out of the side of
the connector (Figure 2/D). Risk of
burning!
0 Turn the steam selector (Figure 1/G)
anticlockwise until it reaches the
“Hot water” position (Figure 16/B).
0 You can stop the flow of hot water by
turning the steam selector clockwise
back to the O position. The type of coffee that was selected last appears in
the display.
6. Switching off the Appliance
0 Press the On/Off switch (Figure 1/A)
and switch the appliance off. The display (Figure 1/S) goes out.
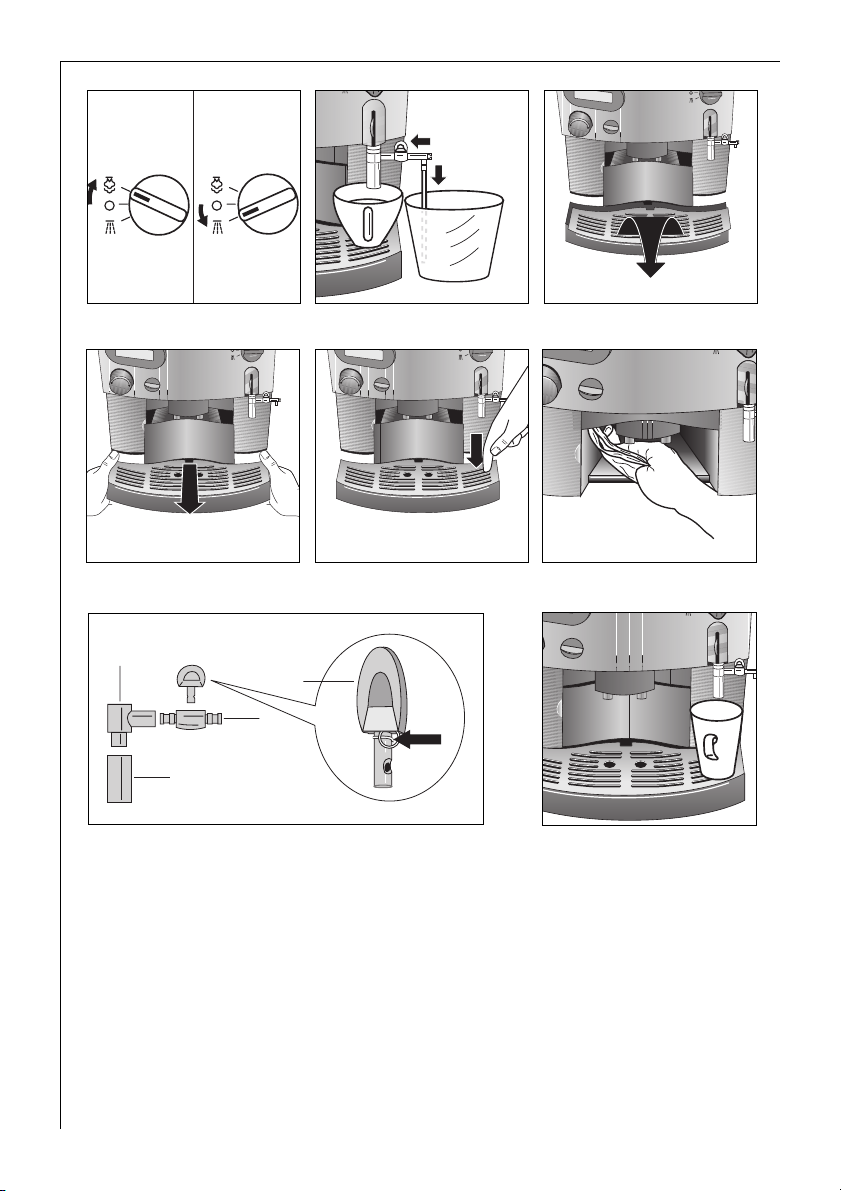
7. Emptying the Water Tank,
Drip Catcher and Spent Coffee
Container (Figures 18-20)
Note: You should perform the following tasks daily!
0 Remove the water tank (Figure 5) and
pour away the remaining water. Use
fresh water each day.
At the end of the day, however at the
latest when the red float (Figure 1/O)
at the rear of the drip grille becomes
visible, you should empty the drip
catcher and the spent coffee container.
Leave the appliance switched on when
performing these tasks.
0 Lift the drip catcher slightly and
remove it carefully from the appliance
to the front (Figure 18).
0 Remove the spent coffee container and
empty it (Figure 19).
0 Press on the markings on the left or
right side of the drip grille and remove
the drip grille (Figure 20). Pour away
the water left in the drip catcher.
0 Then clean the drip catcher, drip grille,
as well as the spent coffee drawer and
spent coffee container.
29
Page 15

g
8. Cleaning
8.1. Exterior Cleaning
(Figures 18 – 22)
Water tank: Clean at least once a
week in normal washing up water, not
in a dishwasher. Then rinse with clear
water.
Drip grille, drip catcher, and spent
coffee drawer: Clean after use in nor-
mal washing up water, not in a dishwasher (Figures 18-21).
Spent coffee container: May be
washed in a dishwasher after use!
Frothed milk spout:
Important: Immediately after use
clean all parts that have come into
contact with milk in normal washing
up water.
Check that you wash thoroughly not
only the individual parts of the
frothed milk spout (Figure 22/B,
C, D), but particularly the knob for
regulating the froth (Figure 22/A).
During the frothing procedure milk
residues can form in the crevice on the
knob (Figure 22/A “arrow”). As these
residues can have an adverse effect
on the frothing results we suggest
that the part indicated with an
“arrow” in the figure should be
cleaned particularly thoroughly.
Finally, rinse the parts with clear water
and dry them.
Do not clean these parts in a dishwasher as this will damage the seals.
Outlet and spouts: Clean with a damp
cloth as required.
Filler opening for ground coffee:
Clean with a damp cloth as required.
Then wipe dry.
Housing: Clean with a damp cloth as
required, also the inner parts of the
housing that only become accessible
when the drip catcher is removed
(Figure 21).
Bean container: Clean with a dry
cloth from time to time.
8.2. Internal Cleaning
Important: Only use original AEG
cleaning tablets! They are available
from the Customer Care Department
(ET No. 663 910 480) or from a specialist retailer (E No. 950 078 803).
Your appliance has a cleaning programme for cleaning interior parts
(duration approx. 15 min.). There is no
need to remove the brewing unit for
cleaning this appliance.
If “CLEAN UNIT” appears in the display
(Figure 1/S), you should run the cleaning programme as described below. The
appliance may also be cleaned sooner.
You can, however, also continue to use
your appliance and run the cleaning
programme later. However, in this way
you will endanger your rights to
make a claim under the guarantee,
as the unit (and thus also customer
service) will detect overdue cleaning!
Clean the appliance as follows:
0 Position the programme selector at Po-
sition 5 (Cleaning). “CLEANING, PRESS
P BUTTON” appears in the display.
0 Fill the water tank to the maximum
mark.
0 Press the P-button on the programme
selector. “EMPTY TRAY, PRESS P BUTTON” appears in the display. Empty the
drip catcher and place a large container under the coffee outlet.
0 Now press the P-button on the pro-
gramme selector. The cleaning
programme starts.
After a short while “DROP TABLET IN
COFFEE FUNNEL, PRESS P BUTTON”
appears in the display.
0 Now insert an original AEG cleaning
tablet in the coffee funnel (Figure 1/D).
0 Press the P-button on the programme
selector. “TABLET CLEANING
IN PROGRESS” appears in the display.
Water is now pumped through the system at short intervals to release, with
the aid of the cleaning tablet, residues
of coffee inside the machine.
30
Page 16

g
0 If the “EMPTY TRAY” display appears
during this procedure, empty the drip
catcher and spent coffee container and
refit them. “CLEANING, PRESS P BUTTON” then appears in the display.
0 Press the P-button on the programme
selector. The cleaning programme is
then continued. “TABLET CLEANING IN
PROGRESS” appears again in the display.
When “SET P DIAL TO POS. 1” appears
in the display the cleaning programme
has ended.
Turn the programme selector to Position 1. The type of coffee that was
selected last appears in the display.
If you want to check whether or how
often the appliance has been cleaned
to date:
0 Turn the programme selector (Figure
1/P) to Position 9.
0 Keep pressing the P-button on the pro-
gramme selector until “COUNTER/T
CLEANING …” appears in the display.
The figure that follows it indicates how
often the cleaning programme has
been run.
9. Decalcifying the Appliance
Your appliance has a decalcifying programme for decalcifying the appliance
(duration approx. 40 min.). If “UNIT
DECALC.” appears in the display, you
should run the decalcifying programme
as described below.
Alternatively, you can, however, continue to use your appliance and run
the decalcifying programme later.
However, you will endanger your
rights to make a claim under the
guarantee, as the appliance (and thus
also customer service) will detect overdue cleaning!
You can also run the decalcifying programme sooner, before the “DECALC.”
display appears.
Important: Do not under any circumstances use descalers based on formic
acid or vinegar or pure lemon juice, as
these can damage the appliance. Powdered descalers are not recommended.
Use only AEG descaling tablets.
If other descaling agents are used, AEG
accepts no liability for any damage.
You can obtain descaling tablets from
specialist retailers (E No. 900195 537/7)
or from the AEG Service Line.
0 Turn the programme selector (Figure
1/P) to Position 6 (decalcifying).
The “DECALC., PRESS P BUTTON” display appears.
0 Press the P-button on the programme
selector to start decalcifying. “EMPTY
TRAY, PRESS P BUTTON” appears in the
display. Then the display “FILL TANK
WITH WATER/DURGOL MIX” is illuminated.
0 Fill the water tank as far as the mark
(approx. 50 ml) with descaling solution.
0 Press the P-button on the programme
selector again. “PLACE LARGE CUP
UNDER FROTHER, PRESS P BUTTON”
appears in the display
0 Place an empty container under the
nozzle and empty it as required. The
liquid that runs out of the nozzle
should not be allowed to run into the
drip catcher as it will overflow.
0 Press the P-button on the programme
selector to start decalcifying. “DECALCIFYING IN PROGRESS” appears in the
display.
Descaler is now pumped through the
system at short intervals. The first half
of the descaling solution is pumped
over the steam tube, and the second
half directly to the collecting tray.
0 If the container is filled during the pro-
cedure it should be emptied.
If “EMPTY TRAY” appears in the display,
empty the drip catcher then refit it.
“DECALCIFYING IN PROGRESS” then
appears in the display.
0 If the display “FILL WATER TANK” ap-
pears during the procedure, rinse out
the water tank. Fill the water tank with
fresh water and refit it to the appliance.
31
Page 17

g
When the decalcifying procedure has
ended, “SET P DIAL TO POS. 1” appears
in the display. “RINSE MACHINE, PRESS
BUTTON” then appears in the display.
0 Press the coffee selection button to
trigger rinsing.
At the end of the rinse the type of cof-
fee that was selected last appears in
the display. The appliance is again
ready for brewing coffee.
If you want to check whether or how
often the appliance has been decalcified to date:
0 Turn the programme selector (Figure
1/P) to Position 9.
0 Keep pressing the P-button on the pro-
gramme selector until “COUNTER/
DECALCIFYING …” appears in the display. The figure that follows it indicates
how often the appliance has been
decalcified.
When using with a water filter
The water filter must be removed prior
to an annual or six-monthly decalcification.
0 Set the water hardness, e.g., Level 3, as
described in Section 2.6. Otherwise the
decalcifying programme will not start.
0
Fit a new water filter after decalcifying.
0 Set the programme selector (Figure
1/P) to Position 7 and select the "FILTER" setting.
If a water filter is not used:
Set the appropriate water hardness to
avoid damaging the appliance.
10. What to do if ...
• no coffee runs out of the spouts:
– Check that the water tank is cor-
rectly seated!
– Fill the water tank!
– Check the correct seating of the drip
catcher!
• coffee only drips out of the spouts:
– Set the grinding texture to a coarser
setting.
32
• there is too little froth produced when
frothing the milk:
– Always use cool, fresh (low fat) milk!
– Use a suitable container (e.g. jug)!
– Also cool the container if necessary!
– Clean the frothed milk spout!
• the temperature of the coffee is too
low:
– Pre-warm cups with steam or hot
water!
– Set a higher coffee temperature (see
Section 3.3). Caution: Sugar and
milk lower the temperature of the
coffee!
– Descale the appliance.
• the brewing process is interrupted
after grinding and “FILL BEANS”
appears in the display:
– Fill the bean container as the brew-
ing unit has detected that too few
beans have been ground; as a result
the brewing cycle has been interrupted.
• the spent coffee container is stuck in
the appliance:
– Pull out the drip catcher together
with the spent coffee drawer and
carefully remove the spent coffee
container from the appliance. Refit
the drip catcher with the spent coffee drawer, but without the spent
coffee container and wait until the
process is complete and the last type
of coffee selected appears in the display. Then insert the drip catcher
with the spent coffee container and
spent coffee drawer!
• “HOT WATER CYCLE NECESSARY”
appears in the display, although the
system is filled with water?
– Hold a container under the swivel-
ling nozzle. Turn the steam selector
(Figure 1/G) anti-clockwise until it
reaches the “Hot water” position
(Figure 17/B). Press the selection
button on the coffee selector immediately. Wait until the flow of water
stops. Turn the steam selector to the
0 position again (with the CF 400
please follow the instructions for
preparing hot water).
Page 18

g
If the message appears again, it is
possible that there is a blockage.
1. If the filter is blocked:
– Unplug the appliance from the
mains. Pull out the spent coffee
drawer. Put your hand into the appliance. You will feel a moveable flap
at the back at the top. Behind this
flap you will find the round filter.
Wipe the filter clean using a dry
cloth. Insert the spent coffee drawer
again and fill the system with water
as described above.
2. If there is a blockage inside:
– Remove the water tank and spent
coffee drawer and tip the appliance
onto its back. Jerk the height-adjustable outlet (Figure 9). Stand the
appliance up again, insert spent coffee drawer and water tank. Fill the
system with water as described
above.
• “SERVICE 1” appears in the display:
– The appliance, or else the ambient
temperature is too cold.
Unplug the appliance. Wait approx.
2 hours before switching on the
appliance again!
If this malfunction continues to be
displayed, please contact customer
service.
• “SERVICE 5” or “SERVICE 8” appears in
the display:
– Switch off the appliance, unplug
from the mains, plug into the mains
again, and switch on the appliance
again. If this malfunction is no
longer indicated, the appliance is
again ready for use.
If this malfunction continues to be
displayed, please contact customer
service!
• the grinder is making loud noises:
– Check the grinder for foreignbodies.
If necessary, have the appliance
checked by the Customer Care
Department.
• the appliance is to be transported:
– Keep the original packaging to pro-
vide protection during transport.
– Protect the appliance from knocks.
– If there is a risk of frost, drain the
heater system by drawing off steam
prior to transport:
–Place a container under the nozzle.
–Switch off the appliance and turn
the steam selector (Figure 1/G)
clockwise to the “Steam” position.
–Press the button on the coffee
selector (Figure 1/R) for a few seconds. “SYSTEM EMPTYING” appears
in the display. Steam exits from the
steam tube and the appliance
switches off automatically.
–Empty the bean container, water
tank and collecting tray.
11. D i s p o s a l
Packaging material
2
The packaging materials are environmentally friendly and can be recycled.
The plastic components are identified
by markings, e.g. >PE<, >PS<, etc.
Please dispose of the packaging materials in the appropriate container at
the community waste disposal facilities.
Old appliance
2
The symbol
its packaging indicates that this product may not be treated as household
waste. Instead it shall be handed over
to the applicable collection point for
the recycling of electrical and electronic equipment. By ensuring this product is disposed of correctly, you will
help prevent potential negative consequences for the environment and
human health, which could otherwise
be caused by inappropriate waste
handling of this product. For more
detailed information about recycling
of this product, please contact your
local city office, your household waste
disposal service or the shop where you
purchased the product.
W on the product or on
33
Page 19

g
12. If service is needed
If repairs should become necessary,
including replacement of the mains
cable, please telephone in the first
instance our AEG-Electrolux Service
Line.
For Germany: 01805-22 83 84*:
*from Deutsche Telekon’s fixed-line network 0.12/min.
For Austria:
For Repairs service: 0810-955 400*
For Product service: 0810-955 200*
*from TELEKOM AUSTRIA’s fixed-line network 0.10/min.
Original packaging including expanded
foam must be retained.
To avoid damage in transport, the
appliance must be packed securely.
The warranty period runs for 2 years
from the date of purchase. The warranty period is limited to 6 months, if the
appliance is used commercially. More
than 3,000 brewing cycles per year is
understood as commercial use.
Visit our Cafamosa website. Here you
will find information on the subject of
coffee plus further tips about using the
Cafamosa: www.aeg-hausgeraete.de/
cafamosa/
34
Page 20

35
Page 21

AEG Hausgeräte GmbH
Muggenhofer Straße 135
D-90429 Nürnberg
http://www.aeg-hausgeraete.de
© Copyright by AEG
822 949 213 – 02 - 0305
 Loading...