

Page 1

CP 3...
Kaffee-Espresso-Vollautomat
Fully Automatic Espresso-Maker
Volautomatische koffie- en espressomachine
Máquina automática para Café Expresso
Máquina de café Espresso- totalmente automática
Machine à café/expresso entièrement automatique
Gebrauchsanweisung
Operating instructions
Gebruiksaanwijzing
Instrucciones de uso
Instruções de serviço
Mode d’emploi
Page 2

d
Achtung: Zum Entkalken min. 400 ml
1
warmes Wasser in den Wassertank einfüllen!
g
Attention: Fill the water tank for
1
descaling with at least 400 ml of
warm water!
l
Attentie! Vul de watertank voor het
1
ontkalken met minstens 400 ml warm
water!
e
Atención: Para descalcificar la
1
máquina, llenar el depósito de agua
con por lo menos 400 ml de agua caliente.
p
Atenção: Para descalcificar, encha o
1
depósito de água com pelo menos
400 ml. de água quente.
s
Obs! För avkalkning fyll på minst
1
400 ml varmt vatten i vattentanken!
q
Huomio: Täytä vesisäiliöön vähintään
1
400 ml lämmintä vettä kalkinpoistoa
varten!
c
Upozornìní: Pøi odvápòování nalijte
1
do zásobníku na vodu min. 400 ml
teplé vody!
o
Uwaga: W celu odwapnienia nale¿y
1
nape³niæ pojemnik na wodê co najmniej 400 ml ciep³ej wody!
h
Figyelem! A vízkõmentesítéshez
1
legalább 400 ml meleg vizet kell tölteni a víztartályba!
r
Προσοχή: Για την αφαίρεση
f
Attention : Remplir le réservoir d'eau
1
pour détartrage avec au moins 400 ml
d'eau tiède !
1
αλάτων γεµίστε το δοχείο νερού µε
τουλάχιστον 400 ml χλιαρό νερό!
u
Внимание! Для удаления накипи
1
необходимо залить в емкость не
менее 400 ìë теплой воды!
Electrolux Hausgeräte Vertriebs GmbH 822 949 329
Page 3
A
B
K
C
D
E
F
G
H
I
J
L
M
N
2
O
P
1
Page 4
Q
U
R
S
V
T
2
a
b
g
h
c
d
e
f
i
j
k
3
3
Page 5
a
678
91011
b
45
12 13 14
4
Page 6
1.2.1.
15 16 17
18 19 20
2.
21 22 23
24 25 26
5
Page 7
27 28
30 31
29 32 33
6
Page 8
34 35 36
37 38 39
7
Page 9

8
Page 10

Dear customer
g
Please read these operating instructions through carefully. Please make
sure you read the safety instructions
on the first pages of these operating
instructions! Keep the operating
instructions for future reference. Pass
them on to any future owners.
Contents
g
1 Figure captions 34
1.1 Machine Parts (Fig 1) 34
1.2 Top View (Fig. 2) 34
1.3 Control Panel (Fig. 3) 34
2 Coffee and espresso 35
3 Safety Information 35
4 Overview of the menu points 37
5 Before using for the first time 37
5.1 Setting Up and Connecting the
Coffee Machine 37
5.2 Filling with Water 37
5.3 Switching on for the first time 38
5.4 Switching on the machine 38
5.5 Switching the coffee machine off 39
5.6 Setting the water hardness 39
6 Making Coffee with Beans 40
6.1 Filling the Coffee Bean Container 40
6.2 Select Cup Size 40
6.3 Selecting the coffee quantity 40
6.4 Setting the number of cups and
dispensing coffee 41
7 Making Ready-ground Coffee 41
7.1 Filling the ground coffee filler 42
7.2 Selecting cup size 42
7.3 Setting number of cups and
Dispensing coffee 42
8 Frothing Milk 42
9 Preparing Hot Water 43
10 Programming the cup measure
and the coffee quantity 44
10.1 Changing and saving the cup
measure and the coffee quantity 44
10.2 Changing and saving the coffee
quantity 45
11 Setting the Grinding Texture 45
12 Menu settings 45
12.1 Setting language 45
12.2 Setting the Coffee Temperature 46
12.3 Setting the Switch-off Time 46
12.4 Interrogate the number of dispensed
coffees and the cup measures 47
12.5 Resetting the machine to the
factory setting (Reset) 47
12.6 Reset display language 47
13 Cleaning and Care 48
13.1 Regular Cleaning 48
13.2 Cleaning the height adjustment 48
13.3 Emptying the Container 48
13.4 Cleaning the Grinder 48
13.5 Cleaning the Coffee-making Unit 49
13.6 Running the Cleaning Program 50
13.7 Running the Descaling Program 51
14 Ordering Accessories 53
15 What do I do, if ... 53
16 Technical Data 54
17 Disposal 55
18 If service is needed 55
33
Page 11
g
1 Figure captions
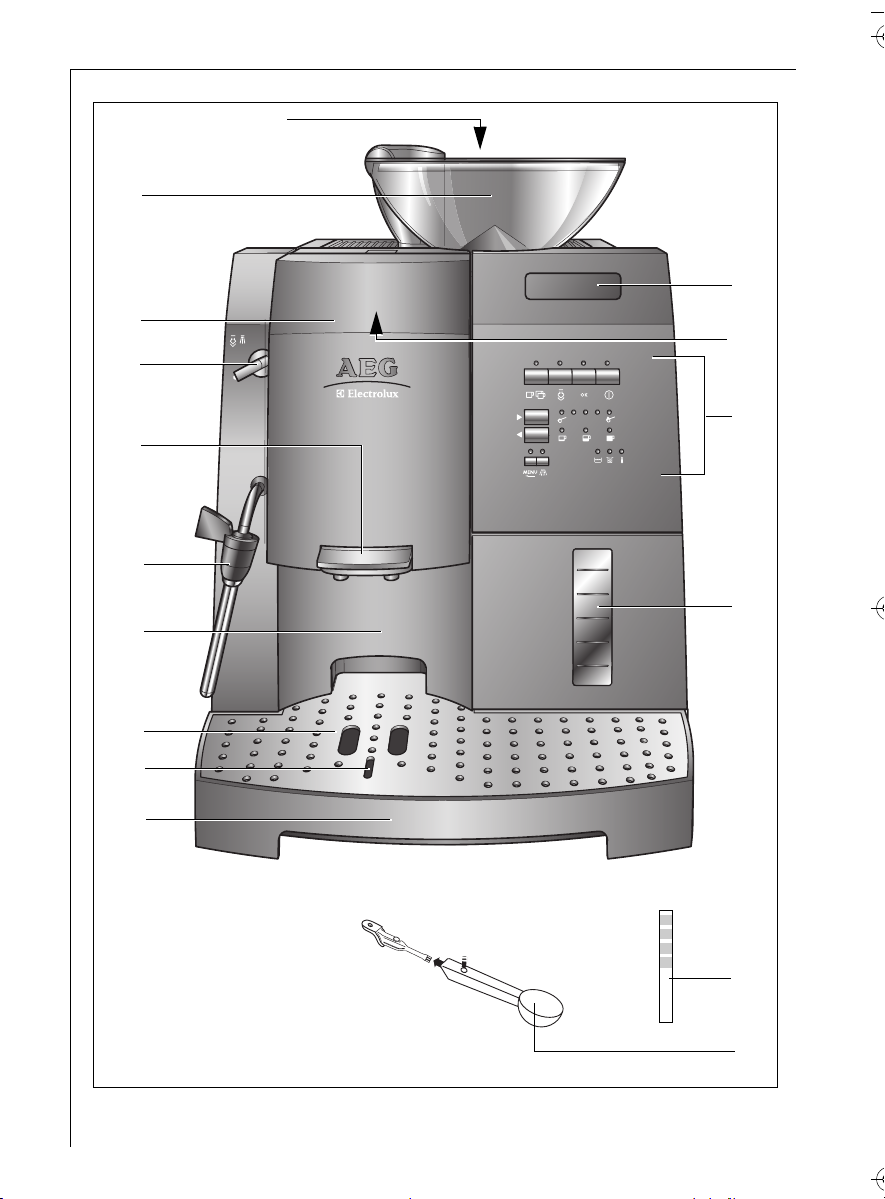
1.1 Machine Parts (Fig 1)
A Top view (see Fig. 2)
B Bean container with lid
C Service cover
D Selection dial for steam and hot water
E Height-adjustable dispenser with
outlets
F Swivel nozzle for steam and hotwater
with removable frothing aid
G Container (removable)
H Drip grille
I Drip tray float
J Drip tray
K Display
L Type plate (at top behind service cover)
M Control panel (see Fig. 3)
N Water tank with fill level indicator
(removable)
O Test strip for water hardness
P Measuring spoon with cleaning brush
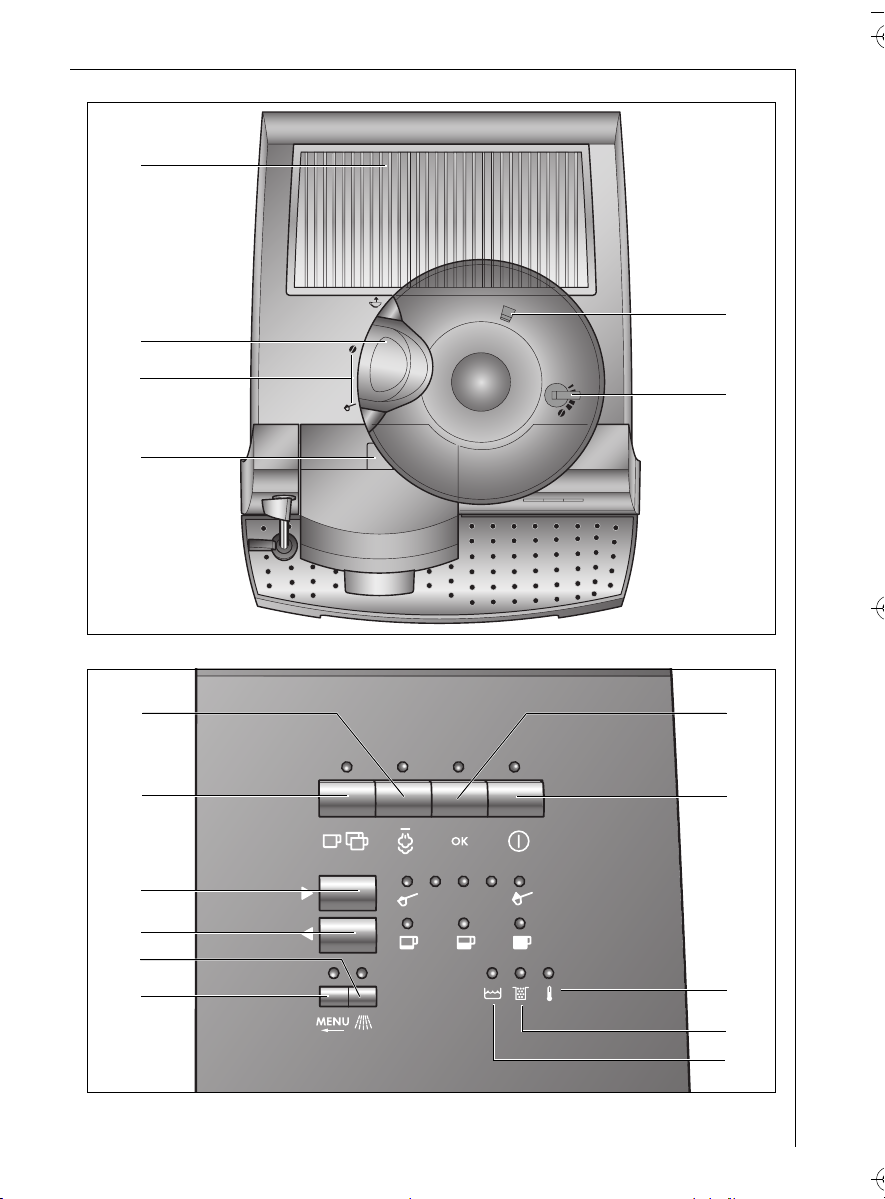
1.2 Top View (Fig. 2)
Q Cup rack
R Opening for ground coffee
with lid (ground coffee filler)
S Bean container position setting
T Service cover release button
U Release catch for removing grinding
ring
V Lever for setting grinding texture
1.3 Control Panel (Fig. 3)
a Key „Steam Pre-selector“
(with indicator)
b Key „1 or 2 cups of coffee“
(with indicator)
c Key „Coffee Quantity“ *
(with indicators)
* With menu selected (key f) this key
serves for „paging“ in the menu
d Key „Cup Measure“ **
(with indicators)
** With menu selected (key f) this key
serves for „paging“ in the menu
e Key „Rinse“ (with indicator)
f Key „Menu“ (with indicator)
g Key „OK“ (with indicator)
h „On/Off“ key (with indicator)
i „Coffee machine heating“ indicator
j „Waste container“ indicator
k „Fill water tank“ indicator
34
Page 12

g
2 Coffee and espresso
Your fully automated coffee machine
guarantees you
• Absolute ease of operation, both in
making coffee and in maintenance and
care.
The excellent, individual taste is
achieved by
• The pre-brewing system: before the
coffee is brewed, it is first moistened to
extract its full aroma
• The individually controllable amount of
water per cup, from a short espresso to
a „long“ milky coffee
• The individually controllable temperature, at which the coffee is made
• The choice between a normal or a
strong cup of coffee
• The grinding texture – adjustable to
the roast of the coffee beans, and
• Last, but not least, the guaranteed
crema, that small crown of froth that
makes espresso-coffee so unmatchable for connoisseurs
Did you know? The time the water is
in contact with the ground coffee is
considerably less for espresso coffee
than conventional filter coffee. As a
result, less bitterness is released from
the ground coffee– making espressocoffee that much milder!
3 Safety Information
This appliance corresponds to accepted
1
technological standards with regards
to safety and to the German Appliance
Safety Law. As the manufacturer, we
nevertheless wish to familiarise you
with the following safety information.
General safety
• The coffee machine must be connected
only to a mains power supply of which
the voltage, type of supply and frequency conform with the details
shown on the type plate (this can be
found on the upper part, behind the
service cover)!
• Never allow the mains lead to come
into contact with hot parts of the
appliance.
• Never use the mains lead to pull the
plug out of the mains socket!
• Do not use the coffee machine, if:
– the mains lead is damaged, or
– the case shows visible signs of
damage.
• Ensure that the coffee machine is
switched off before plugging into the
mains socket.
• This appliance is not intended for use
by persons (including children) with
reduced physical, sensory or mental
capabilities or lack of experience and
knowledge unless they have been given
initial supervision or instruction concerning use of the appliance by a person responsible for their safety.
Child safety
• Do not leave the coffee machine running unattended, and take special
care when children are about!
Safety in operation
• Caution! The coffee dispenser, swivel
nozzle and cup rack become hot in
operation. Keep childeren at a safe
distance!
• Caution! Danger of scalding when the
steam nozzle is activated! Hot water
or steam output can cause scalding.
35
Page 13

g
Activate the steam nozzle only when
you are holding a container under the
nozzle.
• Do not use steam to heat inflammable
liquids!
• Only use the coffee machine with
water in the system! Fill the water tank
with cold water. Do not use hot water,
milk or other liquids. Do not exceed the
maximum fill level of 1.5 litres.
• Do not put frozen or caramelised coffee beans in the bean container. Use
only roast coffee beans! Remove any
foreign bodies from the coffee beans.
Failure to do this invalidates the guarantee.
• Spoon only ground coffee into the
ground coffee filler.
• Do not leave the coffee machine
switched on unnecessarily.
• Do not expose the coffee machine to
the weather.
• When using an extension lead, use only
a commercially available cable with a
conductor cross-section of at least
2
1.5 mm
• To avoid injury, persons with motor
system disorders should never use the
machine without an accompanying
person.
• Operate the machine only when the
drip tray, container and the drip grille
are installed!
.
Safety in cleaning and care
• Follow the cleaning and descaling
instructions.
• Switch off the coffee machine and
unplug from the mains socket before
carrying out any maintenance or
cleaning!
• Do not immerse the coffee machine in
water.
• Only clean the steam nozzle when the
machine is switched off, cold and not
under pressure!
• Do not clean coffee machine parts in
the dishwasher.
• Never put water in the grinder. This
would damage the grinder.
Never open or repair the coffee
machine. Faulty repairs can result in
considerable hazard to the user.
Repairs to electrical appliances must be
carried out only by qualified service
engineers.
If a repair becomes necessary – including replacement of the mains lead,
please contact
• the dealer where you bought the
coffee machine, or
• the AEG Serviceline.
If the machine is misused or incorrectly operated the manufacturer
accepts no liability for damages and
the guarantee is invalidated – likewise if the cleaning and descaling
program is not carried out immediately after the display indication
«CARRY OUT CLEANING
PROCESS» respectively «CARRY
OUT DESCALING» and accord-
ing to the details in these operating
instructions.
36
Page 14

g
4 Overview of the menu
points
Below is an overview of the menu
points in which you can change and
save the machine parameters which are
preset at the factory and also start
programs and call up information. You
will find detailed information on this in
the further chapters of these operating
instructions.
•Menu «LANGUAGE»
Display language; Several languages
are available for selection.
Factory setting: «DEUTSCH» (German).
•Menu «TEMPERATURE»
Programmable coffee temperature
between 1 (moderately warm) to 5
(extra hot).
Factory setting: 3 (normal).
•Menu «SHUT OFF TIME»
Programmable switch-off time
between 1 to 5 hours.
Factory setting: 3h (3 hours).
•Menu «WATERHARDNESS»
Programmable hardness level between
1 (soft) and 4 (very hard).
Factory setting: 3 (hard).
•Menu «CLEAN»
Start the cleaning program.
•Menu «DESCALE»
Start the descaling program.
•Menu «RESET»
Reset the changed parameter settings
to the factory settings.
•Menu «INFO»
Retrieve the number of cups of coffee
dispensed and the cup measure for
each cup size.
5 Before using for the first
time
5.1 Setting Up and Connecting the
Coffee Machine
Place machine on a suitable horizontal,
stable, unheated and water-resistant
surface. Ensure there is good air circulation.
Important! If the coffee machine is
brought into a warm room from a cold
environment, wait about two hours
before switching on!
We advise you to place the coffee
machine on a suitable mat to prevent
damage being caused by spray and
splashes.
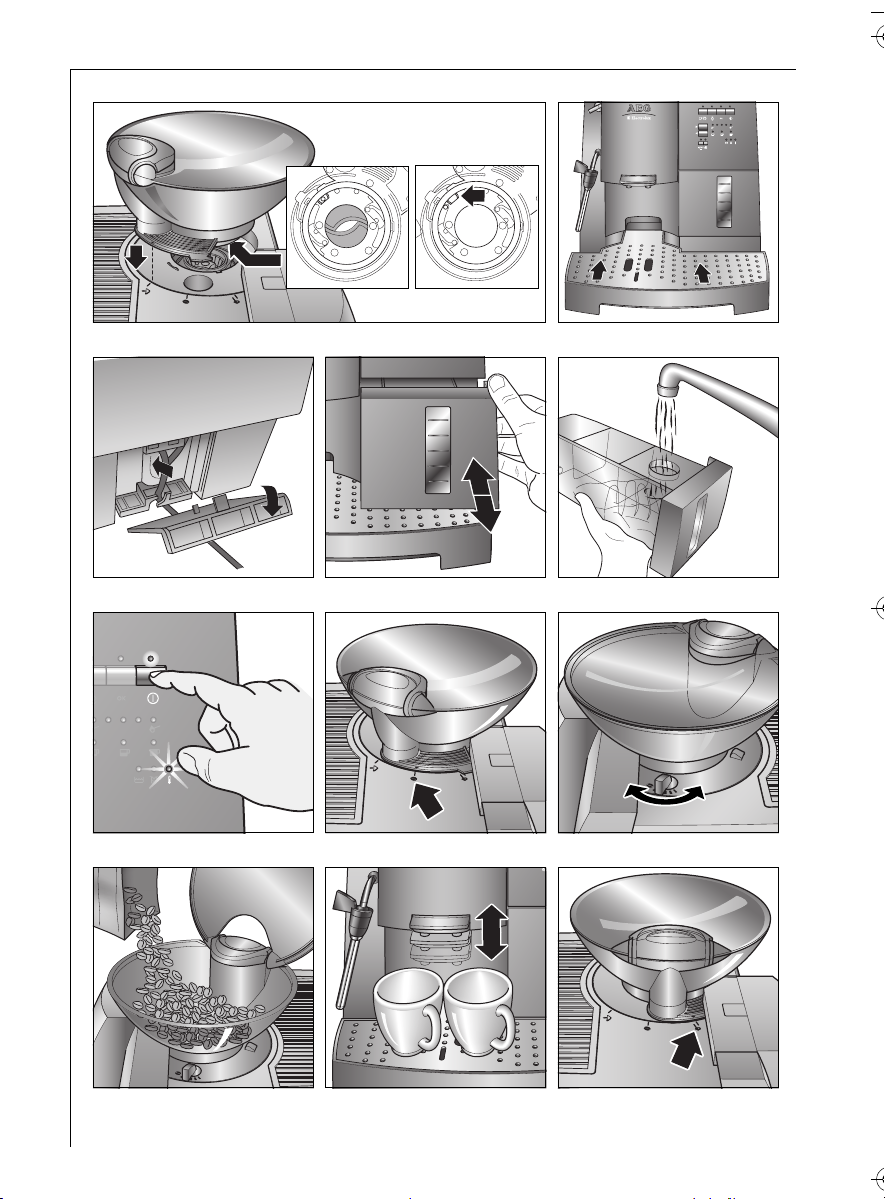
0 Hold the bean container with the
marking at the „Unlock container“
position and set it in place (Fig. 4).
The bottom opening of the bean container must be closed (Fig. 4,a), if it is
not closed (Fig. 4,b), insert the tip of a
ballpoint pen in the small oval hole
(arrow) of the black ring with the
marking „TOP“ and turn opening clockwise as far as the stop.
0 Now turn the bean container anti-
clockwise to the position „Coffee
beans“ (Fig. 10) or further on to
the position „Powder“ (Fig. 14).
0 Push the drip tray in, until it engages
on the right under the water tank
(Fig. 5).
0 Plug the coffee machine into an
earthed mains socket. Do not use a
socket that is not earthed!
0 If you do not need the full length of
the mains lead, open the cable compartment on the back of the coffee
machine, and stow away the unused
lead (Fig. 6).
5.2 Filling with Water
Each time before switching on the coffee machine, check that there is water
in the water tank and refill if necessary.
The coffee machine requires water for
the automatic rinsing processes each
time the machine is switched on or off.
37
Page 15

g
0 Remove the water tank from the cof-
fee machine (Fig. 7).
0 Fill the water tank with fresh cold
water (Fig. 8).
Pour only fresh cold water in the water
3
tank. Never put in other liquids, e.g.
mineral water or milk.
0 Replace the water tank (Fig. 7). Press
the tank firmly in, to ensure that the
water tank valve opens.
If for instance, water has to be refilled
3
during coffee dispensing, the „Fill
water tank“ indicator (Fig. 3, k)
flashes, the display indicates «REFILL
WATER». Coffee preparation is interrupted. Fill the water tank!
To always be sure of a rich coffee, with
3
a full aroma, you should:
• change the water in the water tank
daily,
• wash the water tank at least once per
week in normal washing-up water (not
in the dishwasher). Then rinse with
fresh water.
5.3 Switching on for the first time
When you place the machine in use for
the first time, the automatic switching
on process only continues if you have
selected the desired language.
0 Switch on the machine with the „On/
Off“ key (Fig. 3, h) (Fig. 9). The red
indicator light comes on
The machine is set at the factory to the
3
display language «DEUTSCH» (German).
To select a different language, proceed
3
with „Setting language“ page 45.
0 If you wish to select «DEUTSCH»,
press the „OK“ key (Fig. 3, g). German is
now programmed.
After programming the display returns
3
automatically in the main menu to the
menu point «LANGUAGE».
0 To start the switching on process, press
the „Menu“ key (Fig. 3, f) or wait
ca. 30 sec. For the machine to automatically start with the switching on
process.
The display briefly indicates «CAFFÈ
3
PERFETTO».
The machine now heats up (display
indication «UNIT HEATS») and sub-
sequently performs a rinsing cycle (display indication «UNIT RINSES»). On
completion of the rinsing cycle, the
machine is ready for use. The display
indication now appears according to
the basic setting.
5.4 Switching on the machine
Each time before switching on, make
sure there is water in the water tank
and replenish if necessary. The machine
requires water for the automatic rinsing cycles with each switching on and
switching off process.
0 Switch the machine on with the „On/
Off“ key (Fig. 3, h) (Fig. 9). The red
indicator light comes on, the display
indicates briefly «CAFFÈ PER-
FETTO».
Immediately after being switched on
3
the machine runs through a set-up
cycle. The noises occurring are perfectly normal.
During the heating-up phase (ca.
3
60 seconds) the „Coffee machine heating“ indicator (Fig. 3, i) flashes (display indication «UNIT HEATS»).
After the operating temperature has
3
been reached, the coffee machine carries out an automatic rinsing cycle.
(display indication «UNIT RINSES»).
The water flows into the drip tray. The
„Unit heats“ indicator (Fig. 3, i) lights
continuously.
The coffee machine is now ready to
use. The indication shown in the display depends on the last selected coffee mode.
38
Page 16

g
5.5 Switching the coffee machine
off
0 Switch the machine off with the „On/
Off“ key (Fig. 3, h) .
The machine carries out a rinsing cycle
(display indication «UNIT RINSES»)
and then requests you to empty the
container (display indication ca. 1 min.
alternately «UNIT SWITCHES
OFF» and «WASTE CONTAINER»).
The machine is switched off automatically after 60 seconds.
Emergency cut-out
You can place the machine out of
action immediately at any time.
0 Press the „On/Off“ key (Fig. 3, h) briefly
twice in succession . All functions
are immediately switched off and the
machine is placed out of action.
5.6 Setting the water hardness
After first placing the machine in use
or when using a different water quality
you should set the machine to the
water hardness level corresponding to
the local water hardness. You can use
the included test card to determine the
water hardness, or contact your local
water supply company.
Determining water hardness
0 Dip the test strip in cold water for
around 1 second. Shake off the excess
water, and gauge the hardness by
means of the pink bands.
No pink bands or one pink band:
Hardness 1, soft
up to 1.24 mmol/l, or
up to 7° German hardness, or
up to 12.6° French hardness
Two pink bands:
Hardness 2, medium hard
up to 2.5 mmol/l, or
up to 14° German hardness, or
up to 25.2° French hardness
Three pink bands:
Hardness 3, hard
up to 3.7 mmol/l, or
up to 21° German hardness, or
up to 37.8° French hardness
Four pink bands:
Hardness 4, very hard
over 3.7 mmol/l or
over 21° German hardness, or
over 37.8° French hardness
Setting and saving the water
hardness level
You can set 4 hardness levels. The coffee machine is factory-set to hardness
level 3.
0 With the machine switched on, press
the „Menu“ key (Fig. 3, f) . The
menu point «LANGUAGE» appears.
0 Press the paging keys or (Fig. 3, c
or d) until the menu point
«WATERHARDNESS» appears.
0 Confirm the menu point with the „OK“
key (Fig. 3, g). The display indicates the
current setting e.g. «HARDNESS
LEVEL 3»
0 Then press the paging keys or (Fig.
3, c oder d) until the determined hardness level is displayed.
0 Confirm the selection with the „OK“
key (Fig. 3, g).
After the programming the display
3
returns automatically into the main
menu to the meun point
«WATERHARDNESS».
0 To return to the coffee mode, then
press the „Menu“ key (Fig. 3, f) or
wait ca. 30 sec. For the machine to
automatically return to the coffee
mode.
You can execute other menu settings,
3
see „Menu settings“ page 45.
39
Page 17

g
6 Making Coffee with Beans
The following process for making coffee with beans runs completely auto-
matically: Grinding, portioning,
pressing, pre-brewing, brewing, ejection of the coffee grounds.
The facility to select the grinding texture and the coffee quantity allows
you to individually set up the coffee
machine to your own personal taste.
Ensure that you use only pure coffee
1
beans with no caramelised or aromatised additives. Do not use frozen
beans.
6.1 Filling the Coffee Bean
Container
0
Turn the bean container to the „Coffee
Beans“ position
anism sets to the required function
0 Set the grinding texture (Fig. 11).
Using the grinding texture adjustment
(Fig. 2, V) you can set the grinding texture of the grinder.
Note! Before putting beans into the
1
coffee machine for the first time, you
can set the grinding texture once with
the grinder stationary. Once the
grinder has been filled with beans, the
setting can be changed only while
grinding is proceeding. Otherwise the
coffee machine could be damaged.
The grinder is factory-set to a medium
3
grinding texture. Notes on changing
the grinder setting can be found in
„Setting the Grinding Texture" page 45.
0 Raise the lid of the coffee bean con-
tainer, and fill the container with fresh
coffee beans (Fig. 12). Then reclose the
lid.
Note! Make sure that no foreign bod-
1
ies, such as stones, enter the coffee
bean container. Damage caused by for-
eign bodies in the grinder is excluded
from the guarantee.
(
Fig. 10)
. The mech-
.
6.2 Select Cup Size
Depending on your taste, select a
„short“ espresso or a „long“ milky coffee.
0 For this press the „Cup Size“ key (Fig. 3,
d) until the desired cup symbol is selected or the desired cup size is
indicated on the display.
The cup sizes are indicated as follows:
«CUP SMALL»Espresso cup
«CUP MEDIUM»Coffee cup
«CUP LARGE»Coffee mug
The bottom line in the display shows
3
the coffee quantity. The procedure for
changing this is described in the following section.
The machine is set to standard quanti-
3
ties at the factory. Instructions for
changing the set coffee quantities are
to be found under „Programming the
cup measure and the coffee quantity"
on page 44.
6.3 Selecting the coffee quantity
0 Press the „Coffee Quantity“ key (Fig. 3,
c) until the desired coffee
quantity symbol lights or the desired
coffee quantity is selected on the display.
The coffee quantities are indicated as
follows:
«EXTRA MILD» extra mild
«MILD» mild
«NORMAL»normal
«STRONG»strong
«EXTRA-
STRONG»
extra strong
40
Page 18

g
The top line in the display indicates the
3
cup size. The instructions for selectig a
different cup size are contained in the
previous section.
To save having to select the coffee
3
quantity every time you switch on the
coffee machine, you can permanently
save the coffee quantity in relation to
the cup size. Instructions are to be
found under „Programming the cup
measure and the coffee quantity" on
page 44.
6.4 Setting the number of cups and
dispensing coffee
0 Place one or two cups under the coffee
dispenser. The dispenser can be slid up
or down to match the height of your
cup/mug to reduce heat loss and coffee splashes (Fig. 13).
If the height adjuster is stiff, proceed
3
as described under „Cleaning the
height adjustment“ page 48.
0 Press the key „1 or 2 cups of coffee“
(Fig. 3, b) once or twice in order
to select 1 or 2 cups. The display shows
«1CUP» or «2CUPS». If you have
selected «2CUPS», the key lights up.
0 Press the „OK“ key (Fig. 3, g).
The coffee is now made.
In the coffee-making process, the
3
ground coffee is first of all wetted with
a small quantity of water for prebrewing. Following a short pause, the
actual brewing process commences.
0 You can prematurely stop the coffee
being dispensed at any time by briefly
pressing the previously actuated „OK“
key (Fig. 3, g) once again. This is indicated in the display with «BREAK».
If you have not dispensed coffee for a
3
long period of time with the machine
switched on, you should rinse the system before dispensing again. Start the
rinsing with the „Rinse“ key (Fig. 3, e),
the display shows «UNIT RINSES».
With this additional rinsing phase the
brewing unit is brought back to the
initial coffee dispensing temperature.
7 Making Ready-ground
Coffee
This function allows you to brew preground coffee, e.g. decaffeinated cof-
fee.
Note that you must use only the supplied measuring spoon, and never put
more than 2 level measuring spoons of
ground coffee (max. 16 g) into the
ground coffee filler.
Note! Make sure that no ground coffee
1
has remained in the filler, and that no
foreign bodies enter the filler. The
ground coffee filler is not a storage
container. The ground coffee must be
fed directly into the coffee-making
unit.
If the brewing unit is overfilled, the
machine indicates a fault; the display
then shows «CLEAN BREWING
UNIT» and «SWITCHES OFF
UNIT» alternately. For instructions on
cleaning the brewing unit, see „Cleaning the Coffee-making Unit“ page 49.
Do not put any water-soluble or
1
freeze-dried instant powders or any
other drink powder into the ground
coffee filler. Coffee powder, which is
too fine, can lead to blockages.
41
Page 19

g
7.1 Filling the ground coffee filler
0 Turn the coffee bean container to the
„Ground Coffee“ position (Fig. 14).
The mechanism sets to the required
function.
When using ready ground coffee, the
3
„Coffee Quantity“ function is inactive.
So no coffee quantity signal lamps
light.
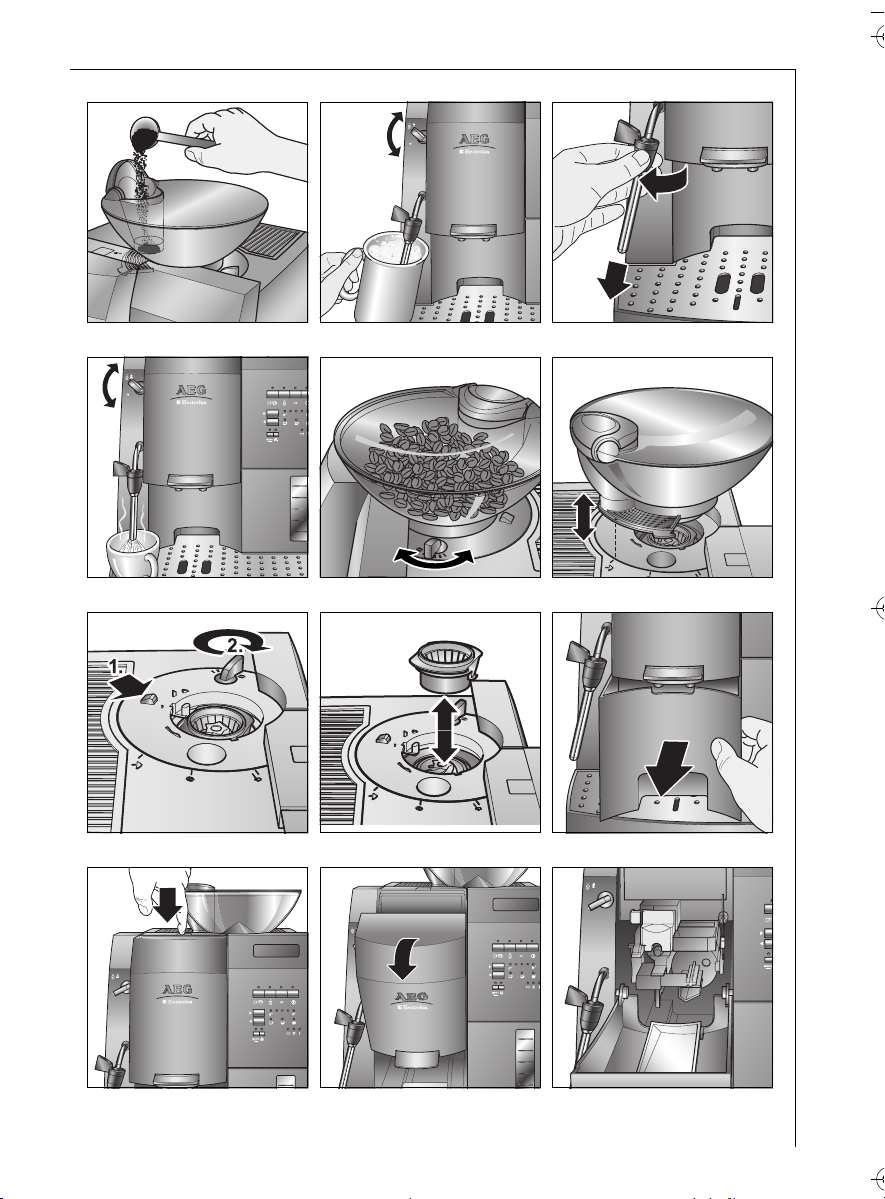
0 Open the lid of the ground coffee filler,
and spoon in the fresh ground coffee
(Fig. 15).
Do not add coffee during the brewing
process. Only put in ground coffee for
the next cup when the brewing process
has completely finished and the coffee
machine is ready.
0 Close the lid.
7.2 Selecting cup size
See „Select Cup Size" page 40.
7.3 Setting number of cups and
Dispensing coffee
See „Setting the number of cups and
dispensing coffee" page 41.
8 Frothing Milk
The steam can be used to froth milk
and to heat liquids. Since a higher
temperature is needed to produce
steam than to make coffee, the coffee
machine has an additional steam
mode.
To make a cappuccino, fill a large cup
3
1/2 to 2/3 full with espresso, and then
add the frothed milk.
Caution! Danger of scalding when the
1
steam nozzle is activated! Hot water or
steam output can cause scalding. Do
not activate the steam nozzle until it is
immersed in the milk.
0 To produce steam, press the „Steam
Pre-selector“ key (Fig. 3, a) . The
indicator illuminates; the „Unit heats“
indicator (Fig. 3, i) can also flash and
the display shows «UNIT HEATS».
When the heating process is finished,
the „Unit heats“ indicator (Fig. 3, i)
lights continuously the display shows
«STEAM READY – OPEN STEAM
NOZZLE». The machine is ready for
the milk frothing.
If the steam function is not used for
3
longer than 1 minute, the machine
switches back automatically to the
coffee mode.
0 Pour low-fat, cold milk into a mug
which must be small enough to fit
under the steam nozzle.
The milk should be cold. You should
3
also use a cold mug, preferably a stainless steel one which should not be
rinsed beforehand in hot water.
0 Swing out the steam nozzle and hold
the mug under the steam nozzle so
that the nozzzle opening is just
immersed in the milk.
42
Page 20

g
Attention! Impurities from dried milk
1
residues in the steam nozzle. Take care
not to immerse the steam nozzle in the
milk far enough to cover the air intake
opening at the top of the steam nozzle.
Otherwise milk can be sucked into the
nozzle and cause impurities in the
steam nozzle.
0 Turn the Selection dial for steam and
hot water (Fig. 1, D) to the position
(Fig. 16). The display shows the
steam process (indication «STEAM»).
The milk is frothed.
Hold the mug steady during the froth-
3
ing. The nozzle should not be allowed
to touch the bottom of the mug and
cut off the steam supply. Froth the milk
to at least twice its volume.
0 To end the frothing, turn the Selection
dial for steam and hot water (Fig. 1, D)
to the position and then remove the
vessel (Fig. 16). The display returns to
the steam readiness indication (indication «STEAM READY – OPEN
STEAM NOZZLE»).
Caution! Danger of scalding from hot
1
milk spray! Switch the steam off,
before removing the mug with the
frothed milk.
0 Exit the steam mode by pressing the
„Steam Pre-selector“ key (Fig. 3, a)
or wait ca. 60 sec., for the machine to
automatically return to the coffee
mode; the indication is extinguished.
Now the machine is once again ready
for making coffee; the last selected
coffee setting is shown in the display.
0 Each time you have frothed milk, let
off some hot water through the nozzle
for a short time by setting the Selection dial for steam and hot water (Fig.
1, D) to the position. This is necessary to prevent milk residues drying
inside the nozzle, and thereby blocking
it. Use a suitable container to catch the
water. During this process the display
shows «HOTWATER». Then return
the Selector dial to the position ; the
last selected coffee setting is shown in
the display.
0 Remove the frothing aid after each use
(Fig.17). For this, take hold of the
frothing aid by the black seal and disengage the bayonet connector by
turning it slightly anticlockwise. Rinse
off the milk residues under running
water. Wipe the steam nozzle with a
damp cloth.
Caution! Danger of burns from the
1
frothing aid! Hold the frothing aid only
by the black seal.
9 Preparing Hot Water
The hot water can be used to pre-heat
cups and for making hot drinks, e.g. tea
or instant soups.
Caution! Danger of scalding when the
1
hot water nozzle is activated! Hot
water or steam output can cause
scalding. Activate the hot water nozzle
only when a container is under the hot
water nozzle.
0 Place a container under the hot water
nozzle. Set the Selection dial for steam
and hot water (Fig. 1, D) to the
position (Fig. 18). Hot water is ready;
the display shows «HOTWATER».
0 After you have dispensed the hot water
turn the Selection dial for steam and
hot water (Fig. 1, D) back to the
position (Fig. 18) and remove the container.
43
Page 21

g
10 Programming the cup
measure and the coffee
quantity
The coffee machine is factory-set to
standard measures. These measures can
be individually changed to your own
taste and saved for each cup size.
10.1 Changing and saving the cup
measure and the coffee quantity
Here it is possible to change and save
the cup measure for each of the three
cup sizes and for coffee bean mode
also the coffee quantity. To program
the setting correctly, note the order:
– First select the cup size for which
you wish to make the settings.
– Next select the coffee quantity (only
for coffee bean mode) (i.e. how
strong you want the coffee to be).
– Then determine how full the cup is
to be filled.
0 First press the „Cup Size“ key (Fig. 3, d)
inated for which you want set the cup
measure. The display shows e.g.
«1CUPLARGE».
0 Only with coffee bean mode: Next
press the „Coffee Quantity“ key (Fig. 3,
c) until the desired coffee
quantity symbol illluminates. The display shows e.g. «STRONG».
The top line in the display indicates the
3
selected cup size. The bottom line in
the display indicates the selected coffee quantity.
0 Place a corresponding cup under the
coffee dispenser (e.g. coffee mug).
until the cup symbol is illuim-
0 Next press the „OK“ key (Fig. 3, g) and
keep it pressed until the desired cup
measure is reached.
During the filling the display indicates
3
«CUP LEVEL» ; the bar indicator in
the bottom line moves up. The max.
bar indication corresponds to the max.
possible cup measure of ca. 240 ml.
When you save the cup measure in
3
coffee bean mode, firstly the grinder
starts and grinds the coffee. Keep the
„OK“ key pressed (Fig. 3, g) until the
desired cup measure is reached.
0 Release the key once your desired cup
measure is reached. This cup measure is
now saved. The display briefly indicates
«PROGRAMMED».
0 Repeat the action if you would also
like to adjust the measures for the
other cup sizes.
The machine switches off automati-
3
cally on reaching the max. cup measure. The saved values are retained also
when the machine is switched off. If
you would like to change your cup size
or flavour, you can individually adjust
the cup measure at any time or return
them to the factory setting with a
reset. You will find which settings are
reset under „Resetting the machine to
the factory setting (Reset)“ page 47.
The saving of the cup measure is only
3
possible for 1 cup. For dispensing of 2
cups the saved values are doubled.
44
Page 22

g
10.2 Changing and saving the coffee
quantity
This is only possible with coffee bean
mode, not for use with ground coffee.
Should your taste change or you find
the coffee to strong or too mild, you
can change just the coffee quantity
without changing the cup measure.
0 First press the „Cup Size“ key (Fig. 3, d)
until the cup symbol illuminates, for which you would like to
adjust the coffee quantity. The display
shows e.g. «1 CUP LARGE».
The top line in the display shows the
3
selected cup size. The bottom line in
the display always shows the coffee
quantity you have saved previously for
this cup measure, e.g. «STRONG»
0 Next press the „Coffee quantity“ key
(Fig. 3, c) until the desired coffee quantity symbol is illuminated. The
display shows e.g. «MILD». The value is
now saved.
0 Repeat the process if you also want to
adjust the coffee quantities for the
other cup sizes.
Be sure the follow the order; first select
3
the cup size, then the coffee quantity.
The saved quantities remain stored
3
when the coffee machine is switched
off.
11 Setting the Grinding
Texture
Note! The grinder settings must be
1
changed only while coffee is being
ground. Making adjustments to the
stationary grinder can damage the coffee machine.
0 Dispense a coffee with beans. During
the grinding, set the grinding texture
with the grinding texture setting lever
(Fig. 2, V) and (Fig. 19).
The lever positions have the following
effects:
Fine grade for intensive taste
Medium grade for normal
taste
Coarse grade for mild coffee
Remove foreign bodies from the
grinder
Foreign bodies, such as small stones in
the grinder can damage the grinder.
The coffee machine includes a stone
detector. A foreign body in the coffee
causes a loud, even rattle. If you hear
this noise while coffee is being ground,
immediately switch off the coffee
machine and remove the foreign body,
as described in „Cleaning the Grinder“
page 48.
12 Menu settings
12.1 Setting language
You can select between several languages. The factory setting is
«DEUTSCH» (German). You can
change this setting as follows:
0 Press the „Menu“ key (Fig. 3, f) .
The manu point «LANGUAGE»
appears.
0 Confirm the menu point with the „OK“
key (Fig. 3, g). The set language appears
in the display (on placing in operation
for the first time, the factory setting
«GERMAN»).
0 Press the paging keys or (Fig. 3, c
or d) until the desired language
appears.
0 When the desired language is dis-
played, confirm it with the „OK“ key
(Fig. 3, g). This languaage is now programmed.
45
Page 23

g
After the programming, the display
3
returns in the main menu to the menu
point «LANGUAGE».
0 To return to the coffee mode, press the
„Menu“ key (Fig. 3, f) or wait ca.
30 sec. for the machine to return automatically to the coffee mode.
12.2 Setting the Coffee Temperature
There are five temperature levels to
choose from. The coffee temperature
levels are defined as follows:
•«TEMPERATURE 1» = „luke warm“
•«TEMPERATURE 2» = „warm“
•«TEMPERATURE 3» = „normal“
•«TEMPERATURE 4» = „hot“
•«TEMPERATURE 5» = „extra hot“
The factory setting is
«TEMPERATURE 3». You can
change this setting as follows:
0 Press the „Menu“ key (Fig. 3, f) .
The menu point «LANGUAGE»
appears.
0 Press the paging keys or (Fig. 3, c
or d) until the menu point
«TEMP ERAT URE » appears.
0 Confirm the menu point with the „OK“
key (Fig. 3, g). The display shows the
current setting, e.g. «TEMPERATURE
3».
0 Where necessary select a different
temperature, using the paging keys
or (Fig. 3, c or d).
0 When the required temperature is indi-
cated, confirm this with the „OK“ key
(Fig. 3, g). This temperature is now programmed.
After programming, the display returns
3
automatically in the main menu to the
menu point «TEM PER ATURE ».
0 To return to the coffee mode, press the
„Menu“ key (Fig. 3, f) or wait ca.
30 sec. for the machine to return automatically to the coffee mode.
12.3 Setting the Switch-off
Time
If the coffee machine is not used for a
set amount of time, it automatically
switches off for safety and economy
reasons.
You can choose between five switchoff times (automatic switch-off after
1 to 5 hours):
«
SHUT OFF TIME 1h
«
SHUT OFF TIME 2h
«
SHUT OFF TIME 3h
SHUT OFF TIME 4h
«
«
SHUT OFF TIME 5h
The factory setting is « SHUT OFF
TIME 3h». You can change this set-
ting as follows:
0 Press the „Menu“ key (Fig. 3, f) .
The menu point «LANGUAGE»
appears.
0 Press the paging keys or (Fig. 3, c
or d) until the manu point «SHUT
OFF TIME» appears.
0 Confirm the menu point with the „OK“
key (Fig. 3, g). The display indicates the
current setting, e.g. «SHUT OFF
TIME 3h».
0 Where necessary, select a different
switch-off time with the paging keys
or (Fig. 3, c or d).
0 When the required switch-off time is
indicated, confirm this with the „OK“
key (Fig. 3, g). This switch-off time is
now programmed.
After the programming, the display
3
returns automatically in the main
menu to menu point «SHUT OFF
TIME».
0 To return to the coffee mode, press the
„Menu“ key (Fig. 3, f) or wait ca.
30 sec. for the machine to return automatically to the coffee mode.
» = 1 hour
» = 2 hours
» = 3 hours
» = 4 hours
» = 5 hours
46
Page 24

g
12.4 Interrogate the number of
dispensed coffees and the cup
measures
The coffee machine has the facility to
display the total number of cups of
coffee made.
You can also display the cup measures
programmed for the three cup sizes.
Where 2 cups of coffee are dispensed
3
simultaneously, there are also counted
as 2 cups of coffee.
0 Press the „Menu“ key (Fig. 3, f) .
The menu point «LANGUAGE»
appears.
0 Press the paging keys or (Fig. 3, c
or d) until the menu point «INFO»
appears.
0 Confirm the menu point with the „OK“
key (Fig. 3, g). The display shows the
number of cups dispensed up to this
time, e.g. «QUANTITY 135» for 135
dispensed coffees.
0 Repeatedly press the paging keys or
(Fig. 3, c or d) to indicate the currently saved cup measures for each of
the three cup sizes. The display shows
the selected cup size, e.g. «MEDIUM»
and in the second line, the corresponding saved cup measure as a bar indication.
The max. bar indication corresponds to
3
the max. possible cup measure of ca.
240 ml.
0 To return to the coffee mode, press the
„Menu“ key (Fig. 3, f) or wait ca.
30 sec. for the machine to automatically return to the coffee mode.
12.5 Resetting the machine to the
factory setting (Reset)
This function is used to reset changes
you have made to the factory settings.
The following settings or saved values
are affected:
• Water hardness
• Cup measures/coffee quantities
• Coffee temperature
• Switch-off time
0 Press the „Menu“ key (Fig. 3, f) .
The menu point «LANGUAGE»
appears.
0 Press the paging keys or (Fig. 3, c
or d) until the menu point «RESET»
appears.
0 Confirm the menu point with the „OK“
key (Fig. 3, g). The display shows
«RESET».
0 Confirm the menu point with the „OK“
key (Fig. 3, g). The display shows
«RESET PROGRAMMED». The
machine is now reset to the factory
settings.
After programming, the machine
3
returns automatically to the menu
point «RESET».
0 To return to the coffee mode, press the
„Menu“ key (Fig. 3, f) or wait ca.
30 sec. for the machine to automatically return to the coffee mode.
12.6 Reset display language
With this function you can reset the
machine to its status on first placing in
operation.
The following settings are
•Water hardness
• Cup measures/Coffee quantities
• Coffee quantities
• Coffee temperatures
• Switch-off time
0 Press the „Menu“ key (Fig. 3, f)
and keep it pressed. Then press the
„On/Off“ key (Fig. 3, h) . The display
shows the menu point «LANGUAGE
RESET»
0
Confirm the menu point with the „OK“
key (Fig. 3, g). The machine switches off.
You have now carried out a „Language
3
Reset“ and the next time the machine
is placed in operation you must reselect the language; see „Switching on
for the first time“ page 38.
If you do not wish to carry out a „Lan-
3
guage Reset“, press the „On/Off“ key
(Fig. 3, h) at menu point
«LANGUAGE RESET» .
not
affected:
47
Page 25

g
13 Cleaning and Care
To ensure consistent coffee quality and
faultless operation, always keep your
coffee machine clean.
13.1 Regular Cleaning
Caution! Before cleaning, switch off
1
the coffee machine and allow it to cool
down. Do not use any abrasive, scouring or corrosive cleaning materials.
Wipe the inside and outside of the case
only with a damp cloth.
Note! Never put the coffee machine or
1
separate parts of the coffee machine in
the dishwasher.
Note! Never put water in the coffee
1
bean container, as this would damage
the grinder.
0 Remove the water tank daily (Fig. 7)
and empty any remaining water. Rinse
out the water tank with fresh water.
Use fresh water every day.
0 Empty the container daily, see „Empty-
ing the Container“ page 48.
0 Regularly drain the drip tray. This can
be done at any time, but must be done
when the red Drip tray float (Fig. 1, I)
appears through the opening in the
drip grille.
0 Regularly (at least once per week)
clean the Water tank (Fig. 1, N), Drip
tray (Fig. 1, J), Drip grille (Fig. 1, H) and
Container (Fig. 1, G) with warm water,
a mild washing up liquid and possibly a
brush.
0 From time to time, remove the coffee
bean container and clear away any residues.
0 Each time the machine is used for
frothing, remove the frothing aid and
clean off any milk remains. The air
intake opening under the seal must not
become blocked. This can be cleaned
out with a thin needle.
13.2 Cleaning the height adjustment
0 If the height adjustment of the coffee
dispenser becomes stiff, remove the
container, open the service cover and
remove it. Slide the height adjuster
right down, and off the bottom. To do
this, gently raise the inside catch. Use
warm water to clean any coffee residues from both parts. Reassemble the
two parts. To do this, gently pull up the
catch. Check the ease of movement of
the height adjuster. Refit the service
cover and push the container back in
place.
13.3 Emptying the Container
At regular intervals, after every 16 coffee brews, the „Waste container“ indicator (Fig. 3, j) signals that the
container has to be emptied and
cleaned. The display shows «WASTE
CONTAINER».
When the coffee machine is in daily
use, empty the container daily. As a
reminder the display shows «WASTE
CONTAINER» every time you switch
the machine off.
Always empty the container with the
3
coffee machine switched on, otherwise
the coffee machine does not register
that the container has been emptied.
13.4 Cleaning the Grinder
Use the supplied brush to remove
ground coffee residues.
Note! Never put water in the grinder.
1
This would damage the grinder.
0 Press the „On/Off“ key (Fig. 3, h) to
switch off the coffee machine. Unplug
from the mains socket.
0 Turn the bean container so that the
mark is at the „UnlockContainer“ position and remove the container
(Fig. 20).
0 Remove any remaining coffee beans
(you could use the vacuum cleaner
with the hose or crevice tool attachment for this).
48
Page 26

g
If a foreign body is impossible to
3
remove, take off the grinding ring.
0 To do this, proceed as follows (Fig. 21):
1. Push the Release catch for removing
grinding ring (Fig. 2, U) forward toward
the centre of the grinder.
2. Keep it in this position and turn the
Lever for setting grinding texture (Fig.
2, V) approximately one full turn
clockwise until it comes up against the
stop.
You can continue to turn the Lever for
3
setting grinding texture (Fig. 2, V) only
if the Release catch for removing
grinding ring (Fig. 2, U) is pressed.
0 Now release the grinding ring (Fig. 22)
and remove the foreign body or bodies.
Caution! Risk of injury from the spin-
1
ning grinder. Never switch the coffee
machine on, when you are working on
the grinder. This can lead to severe
injuries. Before starting work, ensure
that the machine is unplugged from
the mains socket.
When refitting the grinding ring,
3
ensure that both catches on the grinding ring holder engage in the corresponding slots (Fig. 22).
Failure to do this can lead to damage
to the grinder.
0 Turn the Lever for setting grinding tex-
ture (Fig. 2, V) approximately one full
turn anticlockwise until it comes up
against the stop.
0 Set the bean container in place at the
„UnlockContainer“ position and
turn it back to the „Coffee Beans“ position .
0 Add a small quantity of coffee beans,
and test the proper operation of the
grinder by making a cup of coffee. The
first time the grinder is used, or after
cleaning, less ground coffee will enter
the coffee-making unit, because the
channel first has to be filled. This can
influence the first cup of coffee.
13.5 Cleaning the Coffee-making Unit
We advise you to clean the coffeemaking unit regularly (depending on
how frequently it is used). It should be
cleaned before you start the cleaning
program. If your coffee machine is to
be left unused for some time (e.g. holidays), empty the container and the
water tank, and thoroughly clean the
coffee machine, including the coffeemaking unit.
Removing the coffee-making unit
0 Press the „On/Off“ key (Fig. 3, h) to
switch the coffee machine off. Unplug
from the mains socket.
0 Pull the container completely out of
the coffee machine (Fig. 23).
0 Press the Service cover release button
(Fig. 2, T) (Fig. 24).
The service cover opens at the front
(Fig. 25).
0 Remove the service cover.
The coffee-making unit is located
behind the service cover (Fig. 26). The
three red elements are used for latching and unlatching.
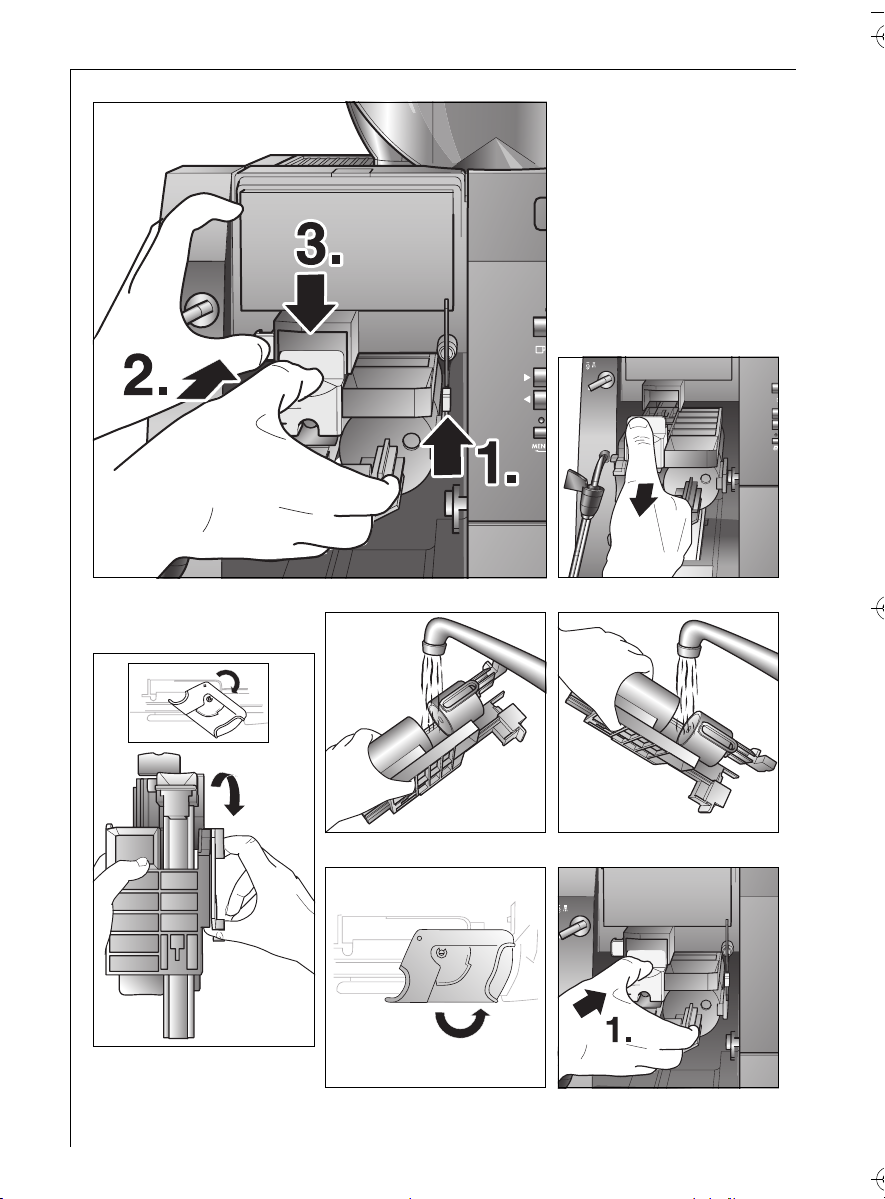
0 To remove the coffee-making unit,
operate the latches in the following
order (Fig. 27):
1. Push the latching lever up.
2. Press and hold the lock button.
3. Press and hold the latching button
down and pull out the coffee-making
unit (Fig. 28).
Cleaning the coffee-making unit
0 To clear coarse particles (contamina-
tion) from the coffee-making unit, pull
the red service lever down to the stop
and open the coffee-making unit
(Fig. 29).
The two strainers and now readily
accessible, and the ejector lever drops
down.
0 Rinse the coffee-making unit under
warm, running water. It is essential to
thoroughly rinse the stainless steel
strainers to remove all coffee residues
(Fig. 30 and 31).
49
Page 27

g
0 Dry the coffee-making unit off and
push the service lever back up to the
stop (Fig. 32).
The ejector lever flips in and the coffee-making unit closes.
Inserting the coffee-making unit
0 Follow these steps to re-insert the cof-
fee-making unit:
1. Push the coffee-making unit onto the
guide bar and then unit into the coffee
machine as far as it will go (Fig. 33).
2. Press the latching button down and
slide the coffee-making unit back for
around another 1 cm until the latching
button engages (Fig. 34).
3. Press the latching lever down to the
stop (Fig. 34).
0 Replace and close the service cover,
and re-insert the container.
The coffee machine can be switched on
3
only when the service cover is closed.
After the coffee machine has been
switched on, the coffee-making unit
runs through the set-up cycle, and this
is followed by the normal heating
process.
13.6 Running the Cleaning Program
The cleaning program permits the
intensive cleaning of otherwise inaccessible locations. Start the cleaning
program at the latest when you are
instructed by the display indication
«CARRY OUT CLEANING PRO-
CESS».
The cleaning process takes ca.
8 minutes and should not be interrupted.
Use only original AEG-cleaning tablets!
3
These can be obtained through the
AEG Serviceline (ET No. 663 910 480) or
your dealer (E No. 950 078 803).
0 Before starting the cleaning program,
clean the brewing unit (see „Cleaning
the Coffee-making Unit“ page 49).
0 Press the „Menu“ key (Fig. 3, f) .
The menu point «LANGUAGE»
appears.
0 Press the paging keys or (Fig. 3, c
or d) until the menu point «CLEAN»
appears.
0 Confirm the menu point with the „OK“
key (Fig. 3, g). The display shows
«START CLEANING».
0 Confirm with the „OK“ key (Fig. 3, g).
The display shows «PREPARE CLE-
ANING».
To prepare for cleaning, follow the
instructions in the display.
•«REFILL WATER – PRESS OK»
0 Remove the water tank, fill it with
water and replace. Then press the „OK“
key (Fig. 3, g).
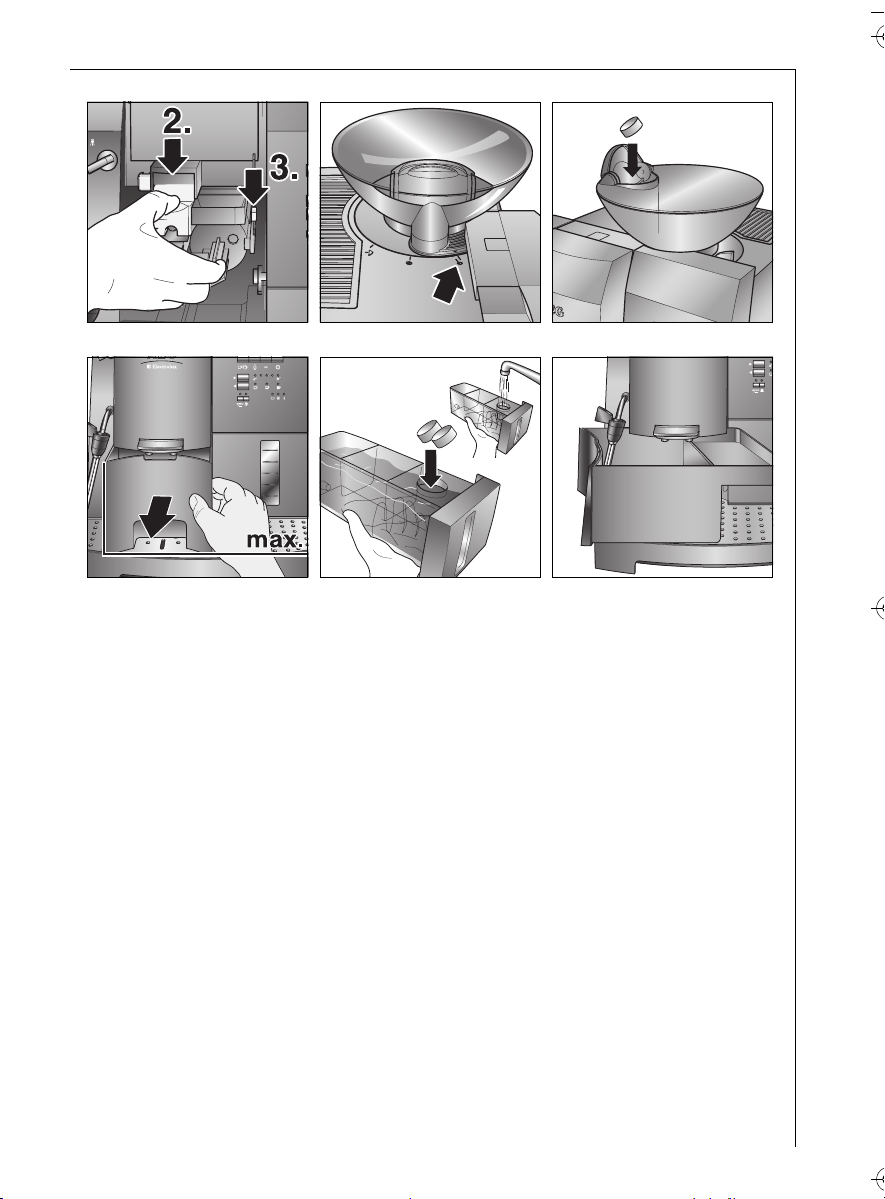
•«BEAN CONTAINER
IN POWDER MODE»
This message only appears when the
3
bean container is in powder mode.
0 Turn the bean container to the position
„Ground coffee“ (Fig. 35).
•«TABLETS IN POWDER HOLDER
– PRESS OK»
0 Place a cleaning tablet in the powder
holder (Fig. 36). Then press the „OK“
key (Fig. 3, g).
•«WAIT»
The brewing unit is positioned.
•«WASTE CONTAINER – PRESS
OK»
0 Remove and empty container. Then
press the „OK“ key (Fig. 3, g).
•«CONTAINER
UNDER OUTLET – PRESS OK»
0 Place the emptied container under the
outlet as shown in Fig. 37.
The container serves as a collecting
3
vessel for the cleaning fluid.
0 Press the „OK“ key (Fig. 3, g). The clean-
ing program starts.
50
Page 28

g
During the cleaning process the display
3
shows the following indications alternately:
•«CLEANING 1 <1-6>»:
The program carries out 6 cleaning
cycles. The pauses enable the cleaning
solution to take effect. The cleaning
cycles are counted off in the display.
•«IN PROCESS»
The bar indication in the bottom line
increases with the advance of the
pause duration.
In the event of a power failure or
3
interruption, the program must be
restarted!
The cleaning process takes ca.
8 minutes. Then the following is shown
in the display:
•«WAIT»
•«WASTE CONTAINER – PRESS
OK»
0 Empty and replace the container. Then
press the „OK“ key (Fig. 3, g).
•«REFILL WATER – PRESS OK»
0 Remove the water tank, refill water
and replace. Then press the „OK“ key
(Fig. 3, g).
•«CLEANING COMPLETED»
When this message appears, the cleaning program is ended.
0 Turn the bean container to the desired
position. The machine is now ready for
use and in the status of the last
selected coffee mode.
After running the cleaning program,
3
you are advised to throw away the first
cup of coffee from the machine.
13.7 Running the Descaling Program
The descaling program allows you to
simply and effectively descale your
coffee machine. The coffee machine
should be regularly descaled, every
4-6 months, at the latest when you are
instructed to do so by the displayindication «CARRY OUT DES-
CALING».
Important: Do not under any circum-
1
stances use descalers based on formic
acid or vinegar or pure lemon juice, as
these can damage the appliance. Powdered descalers are not recommended.
Use only AEG descaling tablets.
If other descaling agents are used, AEG
accepts no liability for any damage. You
can obtain descaling tablets from specialist retailers (E-No. 900195537/7) or
from the AEG Service Line.
The descaling process takes ca.
3
45 minutes and should not be interrupted. In the event of a power failure
or interruption, the program must be
restarted!.
0 Before starting the descaling program,
clean the coffee-making unit (refer to
„Cleaning the Coffee-making Unit“
page 49).
0 Press the „Menu“ key (Fig. 3, f) .
The menu point «LANGUAGE»
appears.
0 Press the paging keys or (Fig. 3, c
or d) until the menu point
«DECSALING» appears.
0 Confirm the menu point with the „OK“
key (Fig. 3, g). The display shows
«START DESCALING».
0 Confirm with the „OK“ key (Fig. 3, g).
The display shows «PREPARE DES-
CALING».
To prepare for descaling, follow the
instructions in the display.
•«REFILL WATER <min.800 ml>
- PRESS OK»
0 Fill the water tank with at least 800 ml
of warm water. Then press the „OK“ key
(Fig. 3, g).
•«DESCALER IN WATERTANK –
PRESS OK»
0 Place 2 descaling tablets in the water
tank (Fig. 38). Refit the water tank
after the tablets have dissolved; this
takes ca. 5-7 minutes. Then press the
„OK“ key (Fig. 3, g).
•«WAIT»
The brewing unit is positioned.
51
Page 29

g
•«WASTE CONTAINER – PRESS
OK»
0 Remove and empty the container. Then
press the „OK“ key (Fig. 3, g).
•«CONTAINER UNDER NOZZLE –
PRESS OK»
0 Place the emptied container under the
steam nozzle as shown in Fig. 39. Then
press the „OK“ key (Fig. 3, g). The container serves as a collecting vessel for
the descaling solution.
To avoid splashes, turn the steam noz-
3
zle to a position in which the descaling
solution can be expelled against the
wall of the container.
•«DESCALING – OPEN STEAM
NOZZLE»
0 Turn the Selection dial for steam and
hot water (Fig. 1, D) to the position
. The descaling program starts.
During the descaling process the dis-
3
play shows the following indications
alternately:
•«DESCALING 1 <1-14>»:
The program carries out 14 rinses. The
pauses allow the descaling solution to
take effect. The rinsing cycles are
counted off in the display.
•«IN PROCESS»
The bar indication in the bottom line
increases with the advance of the
pause duration.
The display shows the following at the
end of the last rinsing:
•«CLOSE STEAM NOZZLE»
0 Turn the Selection dial for steam and
hot water (Fig. 1, D) back to the position .
•«WASTE CONTAINER – PRESS
OK»
0 Empty the container. Then press the
„OK“ key (Fig. 3, g).
•«CONTAINER UNDER NOZZLE –
PRESS OK»
0 Place the emptied container under the
steam nozzle as shown in Fig. 39. The
press the „OK“ key (Fig. 3, g).
To avoid splashes, turn the steam noz-
3
zle to a position in which the descaling
solution can be expelled against the
wall of the container.
•«RINSE & FILL WATERTANK –
PRESS OK»
0
Remove the water tank, rinse it thoroughly, fill with fresh water and replace.
Then press the „OK“ key (Fig. 3, g).
The machine is now ready to be rinsed
with fresh water.
•«OPEN STEAM NOZZLE»
0 Turn the Selection dial for steam and
hot water (Fig. 1, D) to the position
. A rinsing with fresh water is
carried out.
•«UNIT RINSES»
•«CLOSE STEAM NOZZLE»
0 Turn the Selection dial for steam and
hot water (Fig. 1, D) back to the position .
•«WASTE CONTAINER – PRESS
OK»
0 Empty the container and replace it in
to the machine. Then press the „OK“
key (Fig. 3, g).
•«REFILL WATER – PRESS OK»
0 Remove water tank, fill with water and
replace. Then press the „OK“ key (Fig.
3, g).
•«WAIT – DESCALING COMPLE-
TED»
When this indication is shown, the descaling program is ended.
The machine is now ready for use and
is in the status of the last selected coffee mode.
After running the descaling program,
3
you are advised to throw away the first
cup of coffee from the machine.
52
Page 30

g
14 Ordering Accessories
To ensure years of satisfaction with
your coffee machine and prevent
faults arising, it is very important to
regularly clean and descale the coffee
machine. The original cleaning tablets
and descalant are obtainable direct
from us.
If you live in Germany, please call our
Order Hotline
Tel. 0 18 01-20 30 90.
15 What do I do, if ...
• ... coffee-making is interrupted and
«REFILL WATER» is displayed?
– The water tank is empty: Refill the
water tank and press the „OK“ key
(Fig. 3, g).
• ... coffee-making is interrupted and
the indications «CLEAN
BREWING UNIT» and
«SWITCH OFF UNIT» are shown
alternately?
– Brewing unit is overfilled: Carefully
clean the brewing unit; see
„Cleaning the Coffee-making Unit“
page 49.
– In powder mode spoon in a max. of 2
measuring spoons of ground coffee.
• ... the machine can no longer be
operated and «WASTE CONTAI-
NER» is indicated?
– Container is full: Empty container
and clean thoroughly; see „Emptying
the Container“ page 48.
• ... the machine can no longer be
operated and «CLEAN BREWING
UNIT» and «SWITCH OFF
UNIT» are shown alternately?
– Brewing unit is blocked or overfilled:
see „Cleaning the Coffee-making
Unit“ page 49; remove all coffee
residues from the brewing unit.
– Spoon in a little ground coffee.
– Set a small coffee quantity; see
„Changing and saving the coffee
quantity“ page 45.
– Check ejector.
– If you are unable to remedy the
fault, please contact the AEG
Serviceline.
•... «CARRY OUT CLEANING
PROCESS» is displayed?
– Number of coffees dispensed
necessitates cleaning: Run cleaning
program; see „Running the Cleaning
Program“ page 50.
•... «CARRY OUT DESCALING»
is displayed?
– Number of coffees dispensed
necessitates descaling: Carry out
descaling; see „Running the
Descaling Program“ page 51.
• ... the espresso/coffee is not hot
enough?
– Preheat the cups with hot water.
– Increase coffee temperature; see
„Setting the Coffee Temperature“
page 46.
– The coffee machine may need
descaling.
• ... the espresso/coffee is too weak?
– not enough ground coffee: spoon in
correct measure, max. 2 measuring
spoons.
– The coffee bean container is empty.
Add coffee beans.
– The coffee quantity is set too low.
Increase the coffee quantity, see
„Changing and saving the coffee
quantity“ page 45.
– The grinding texture is set too
coarse. Set the grinding texture to a
finer grade, see „Setting the
Grinding Texture“ page 45.
• ...the crema is too weak?
–Use fresh water.
– Use fresh beans or fresh coffee
powder.
– Clean the coffee-making unit, see
„Cleaning the Coffee-making Unit“
page 49.
53
Page 31

g
• ...milk is not frothy enough?
– The milk is too hot or too old or the
fat content is too high. Use suitable
milk.
– Blocked steam nozzle. Clean the
steam nozzle, see page 43.
– The air intake in the frothing aid is
blocked. Clean the frothing aid, see
page 43.
• ... the bean container will not locate
on the grinder?
– Coffee bean residue on or around
the grinder: Remove coffee bean
residue from the grinder, see
page 48.
– Coffee bean residue is jammed in the
bean container lock. Clear the bean
container lock of coffee bean
residue.
• ... the grinder makes very loud noises
when grinding?
– The grinder is blocked by a foreign
body. Remove the foreign bodyas
described in this manual, refer to
„Cleaning the Grinder“ page 48. If
necessary, have the coffee machine
checked by the Customer Service
Centre.
– You can continue to use your coffee
machine with ground coffee.
• ... the coffee-making unit will not
come out?
– The coffee-making unit is not in the
basic position.
–Leave the coffee machine switched
on, and set the bean container to
„Ground Coffee“.
–Switch off the coffee machine and
remove the coffee-making unit,
refer to „Cleaning the Coffeemaking Unit“ page 49.
• ... the coffee-making unit will not fit
back in?
– The coffee-making unit is not closed.
Turn the service lever to close the
coffee-making unit.
– The latching lever is not up. Push the
metal clip up, and insert the coffeemaking unit, see page 50.
• ... the coffee machine has to be
transported?
– Keep the original packaging as
transport protection.
– Secure the coffee machine against
jarring.
– Empty the coffee machine tank and
container and allow any remaining
moisture in the system to steam off.
This will protect your coffee machine
from being damaged by freezing in
cold weather.
To steam off the system, remove
water tank and then select the
steam function. When no more
steam is released, turn off the steam
tap and switch off the coffee
machine.
– Care should also be taken with the
location of the coffee machine –
especially in cold weather, when
damage can be caused by freezing.
16 Technical Data
Mains voltage: 220-240 V
Power consumption: 1290-1400 W
This coffee machine complies with the
;
following EU Directives:
• 73/23/EEEC of 19.2.1973 „Low
Voltage Directive“, including
Amendment Directive 93/68/EEC.
• 89/336/EEC of 3.5.1989 „EMI
Directive“, including Amendment
Directive 92/31/EEC.
54
Page 32

g
17 Disposal
Packaging material
2
The packaging materials are environmentally friendly and can be recycled.
The plastic components are identified
by markings, e.g. >PE<, >PS<, etc.
Please dispose of the packaging materials in the appropriate container at
the community waste disposal facilities.
Old appliance
2
The symbol
its packaging indicates that this product may not be treated as household
waste. Instead it shall be handed over
to the applicable collection point for
the recycling of electrical and electronic equipment. By ensuring this
product is disposed of correctly, you
will help prevent potential negative
consequences for the environment and
human health, which could otherwise
be caused by inappropriate waste handling of this product. For more detailed
information about recycling of this
product, please contact your local city
office, your household waste disposal
service or the shop where you purchased the product.
W on the product or on
18 If service is needed
If repairs should become necessary,
including replacement of the mains
cable, please telephone in the first
instance our AEG-Electrolux Service
Line.
For Germany: 01805-22 83 84*: *from
Deutsche Telekon’s fixed-line network 0.12/min.
For Austria:
For Repairs service: 0810-955 400 *
For Product service: 0810-955 200*
*from TELEKOM AUSTRIA’s fixed-line network 0.10/min.
Original packaging including expanded
foam must be retained.
To avoid damage in transport, the
appliance must be packed securely.
The warranty period runs for 2 years
from the date of purchase. The warranty period is limited to 6 months, if
the appliance is used commercially.
More than 3,000 brewing cycles per
year is understood as commercial use.
55
Page 33

g
56
Page 34

154
Page 35

155
Page 36

Electrolux Hausgeräte Vertriebs GmbH
Muggenhofer Str. 135
D-90429 Nürnberg
http://www.electrolux.de
© Copyright by Electrolux
822 949 320 – 01 - 0905
 Loading...