

Page 1

AT 30..
Automatic-Toaster
Automatic Toaster
Grille tous pains automatique
Automatische toaster
Tostapane automatico
Tostadora automática
Torradeira automática
Automatsk brödrost
Automaattinen leivänpaahdin
Automatický opékaè topinek
Automata kenyérpirító
Automatyczny toster
Бхфьмбфз фпуфйЭсб
Gebrauchsanweisung
Operating instructions
Mode d’emploi
Gebruiksaanwijzing
Istruzione per l'uso
Instrucciones de uso
Instruções de utilização
Bruksanvisning
Käyttöohje
Návod k použití
Instrukcja obs³ugi
Használati útmutató
ЕгчейсЯдйп пдзгйюн чсЮузт
Page 2
J
A
B
C
H
D
E
2
F
G
2
K
L
1
3
Page 3
4
5
6
7
3
Page 4

g
Dear Customer,
g
please read these operating instructions through carefully.
Above all please observe the safety
instructions on the first few pages of
these operating instructions! Please
keep these operating instructions for
later reference. Pass them on to any
subsequent owner of the appliance.
Using the warning triangle and/or the
1
key words (Danger!, Caution!, Important!), information that is important
for your safety or the correct functioning of the appliance is highlighted. It is
essential that this information is
observed.
0 This symbol guides you step by step
through the operation of the appliance.
Next to this symbol you will find addi-
3
tional information and practical tips on
using the appliance.
Tips and information about the eco-
2
nomical and environmentally friendly
use of the appliance are marked with
the clover.
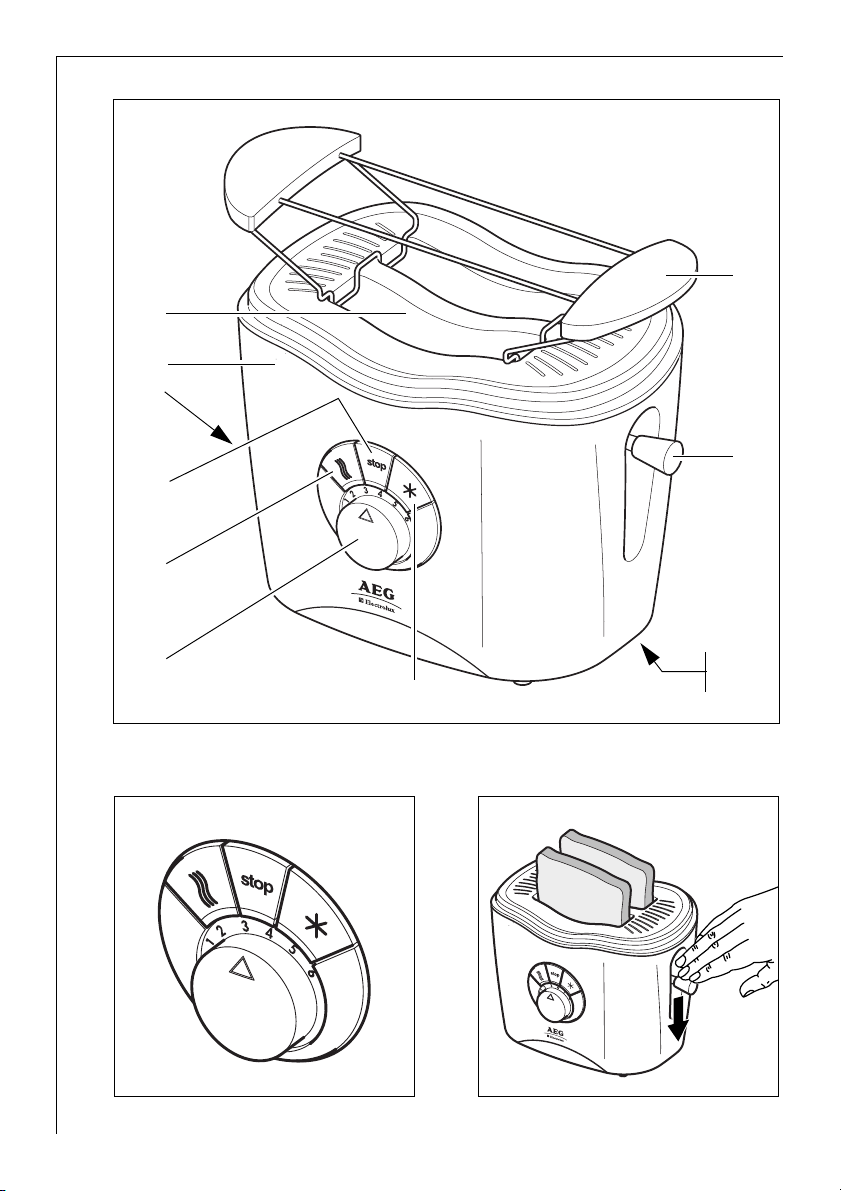
Appliance Description
(Figure 1)
A Toasting slot
B Thermally insulated outer housing
C Crumb drawer
D Stop button with indicator lamp
E Warm up button with indicator lamp
F Browning control
G Defrost button with indicator lamp
H Start lever and bread lift
J Roll rack for crisping up bread rolls
K Cord storage (on the underside of the
appliance)
L Rating plate (on the underside of the
appliance)
1 Safety Instructions
This appliance corresponds to accepted
technological standards with regards
to safety and to the German Appliance
Safety Law. Nevertheless, as a manufacturer we consider it our obligation
to make you aware of the following
safety information.
General Safety
• The operating voltage of the appliance
and the mains voltage as well as the
type of current must match (see the
rating plate on the underside of the
appliance).
• Only plug into a correctly installed
earthed mains socket.
• Never pull the plug from the socket by
means of the mains lead!
• Prior to cleaning or in the event of a
malfunction, unplug the appliance
first! Loosen jammed pieces of toast
with a blunt wooden implement (e.g.
the handle of a cooking spoon). Ensure
that you do not touch the heater elements during this process.
• Do not reach into the toasting slot
with your fingers or metal implements
– there is a risk of injury and damage
to the appliance.
• The outer housing of the toaster is
thermally insulated. However the metal
parts on the top of the appliance and
in the toasting slot will become hot –
there is a risk of burns!
• Do not use the appliance if the mains
cable is damaged or the housing is visibly damaged.
• The mains cable is of a special type and
is only to be replaced by the Customer
Care Department since special tools are
required for its replacement.
• Repairs to this appliance may only be
carried out by qualified service engineers. Considerable danger may result
from improper repairs. If repairs
become necessary, please contact the
Customer Care Department or your
authorised dealer.
8
Page 5

g
• If the appliance is used for purposes
other than those intended or used
incorrectly, no liability can be accepted
for any damage that may be caused.
• This appliance is not intended for use
by persons (including children) with
reduced physical, sensory or mental
capabilities or lack of experience and
knowledge unless they have been given
initial supervision or instruction concerning use of the appliance by a person responsible for their safety.
Child Safety
• Do not leave the toaster switched on
unsupervised.
• Keep children away from electrical
appliances.
You should take note of the following when using your toaster
• Do not place the appliance on hot surfaces.
• Do not use near naked flames.
• Do not operate the appliance on surfaces where heat may cause a problem.
Use an insulated heat pad if necessary.
• Bread can burn. Do not use the
toaster underneath or near inflammable objects (e.g. curtains). The
toaster must not be left unattended.
• Do not cover the toasting slot when
toasting.
• Do not use the appliance without
crumb drawer in place. The crumb drawer should be cleaned regulary. Do not
allow crumbs to build up in the crumb
drawer.
• Do not immerse the appliance in
water!
• Do not kink the mains lead or bring it
into contact with hot parts of the
appliance.
• To move the appliance when warm
after use, only pick it up by the thermally insulated outer housing.
• Unplug from the plug socket after use.
Do not store or cover the appliance
until it has fully cooled down.
• Do not wrap cord around cord storage
until the appliance has fully cooled
down.
Disposal
Packaging material
2
The packaging materials are environmentally friendly and can be recycled.
The plastic components are identified
by markings, e.g. >PE<, >PS<, etc.
Please dispose of the packaging materials in the appropriate container at
the community waste disposal facilities.
Old appliance
2
The symbol W on the product or on
its packaging indicates that this product may not be treated as household
waste. Instead it shall be handed over
to the applicable collection point for
the recycling of electrical and electronic equipment. By ensuring this product is disposed of correctly, you will
help prevent potential negative consequences for the environment and
human health, which could otherwise
be caused by inappropriate waste
handling of this product. For more
detailed information about recycling
of this product, please contact your
local city office, your household waste
disposal service or the shop where you
purchased the product.
9
Page 6

g
Operating Instructions
Prior to Using for the First Time
3
To avoid the build up of unpleasant
odours, the appliance should be placed
near an open window and operated a
few times at the maximum browning
setting without any bread.
Switching On (Figure 3)
0 Plug the mains plug into the mains
socket.
0 Insert bread for toasting.
0 Select the browning setting and press
down the start lever.
When the required degree of browning
3
has been reached, the toaster switches
off automatically; the slices of toast
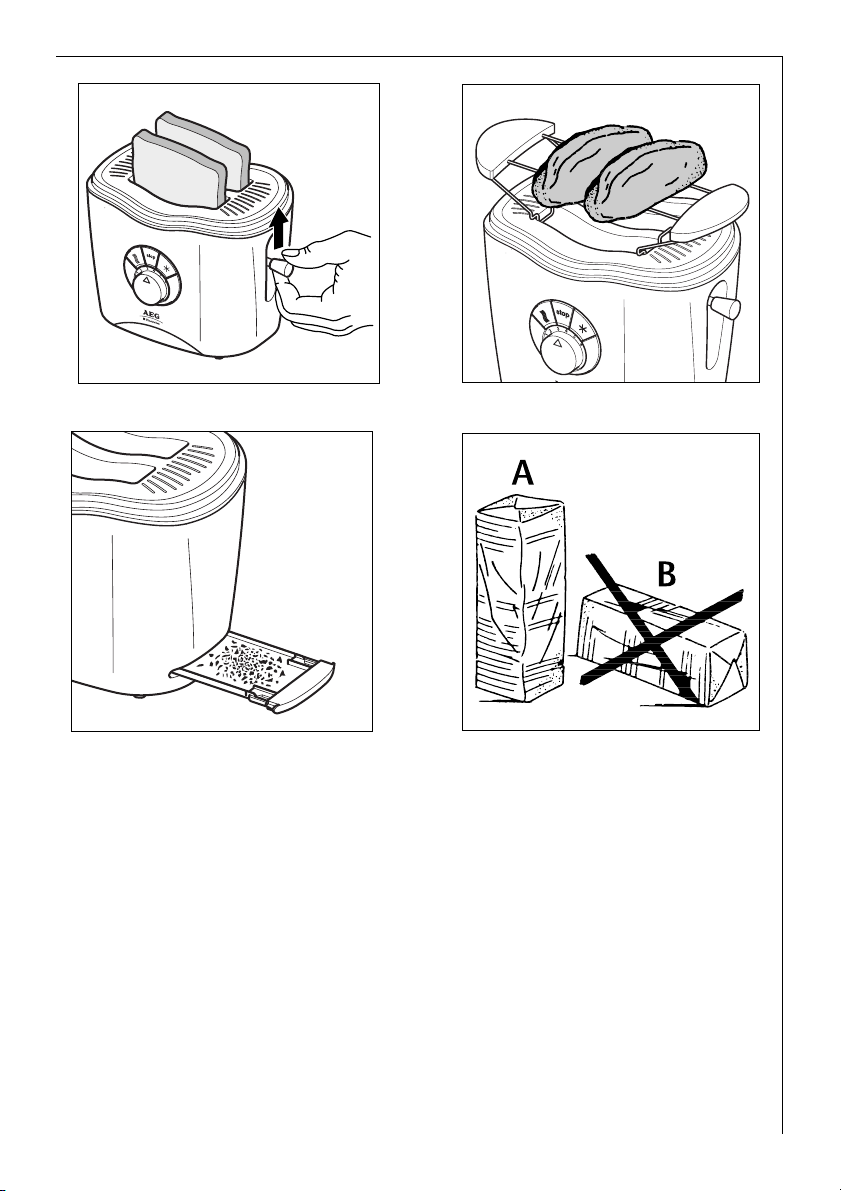
are lifted up ready for removal. By lifting the start lever (bread lift func-
tion) the toasted bread can be lifted
sufficiently such that it is easy to
remove (Figure 4).
Adjusting the Browning Setting
(Figure 2)
Using the rotary knob you can continuously adjust the browning setting
from 1-6 as required. Setting 1 for
lightest browning. Setting 6 for darkest
browning.
Use a setting between 1 and 3 when
you first start toasting. If the toast is
not browned to your liking, set the
adjuster lower or higher, higher for
example when toasting rye or dark
bread. When toasting only 1 slice and
also when toasting bread that is no
longer fresh, use a slightly lower
browning setting.
We would recommend to adjust a set-
3
ting that the toast is browned to a
„golden yellow“ or „light-brown“
colour. The electronic toasting time
regulator ensures that once a browning
setting has been chosen, the results are
always the same for the same type of
bread.
Stop Button
(Figure 2)
If you want to interrupt toasting, press
the stop button. The appliance
switches off.
Once chosen, the browning setting
remains unchanged.
Defrost Button
(Figure 2)
Also press the defrost button when
toasting frozen bread. This lengthens
the toasting time.
Warm Up Button
(Figure 2)
To warm up toasted bread also press
the warm up button to keep the toast
warm and crisp.
Roll Rack (Figure 5)
Due to the nature of the function of
1
the appliance, the roll rack will become
hot during toasting, therefore never
touch the metal parts.
0 First, make sure the toaster is switched
off.
Hold the roll rack by the hand grips
and put it onto the toasting slot.
0 Place rolls or other bread for crisping
on the rack, turn the browning control
to the required browning setting.
0 Switch on the toaster using the start
lever.
0 When the toaster has switched off,
turn the bread. Repeat the process.
Never place rolls or bread directly on
3
the toasting slot.
0 To remove the roll rack, first allow it to
cool down. Hold the roll rack by the
hand grips and remove it upwards.
10
Page 7

g
Cleaning and Care
(Figure 6)
0 Before cleaning, always unplug and
leave the toaster to cool down.
Crumbs dropping from the bread dur-
3
ing toasting collect in the crumb
drawer.
0 Pull out to the side and remove the
crumbs.
Do not use caustic or abrasive cleaners
3
to clean the appliance. Only clean the
housing with a dry or slightly moist
cloth.
Liquid must not be applied to the
3
toaster, the toaster must also never be
immersed in liquid.
Storage of Bread for Toasting
(Figure 7)
In order to always obtain evenly
3
browned toast, opened packets of
bread should be resealed and stored
with the end that has been started
downwards.
A = right
B = wrong
Technical Data
Mains voltage: 220 – 240 V/ 50/60 Hz
Power consumption: 720 – 860 W
This appliance complies with the fol-
;
lowing EC directives:
• 73/23/EWG dated 19.2.1973
– Low Voltage Directive
• 89/336/EWG dated 3.5.1989
(including Directive Amendment
92/31/EWG) – EMC Directive.
11
Page 8

AEG Hausgeräte GmbH
Muggenhofer Str. 135
D-90429 Nürnberg
http://www.aeg-hausgeraete.de
© Copyright by AEG
822 949 301 – 02 - 0805
 Loading...