

Page 1
822_949_233 KM400.book Seite 1 Freitag, 10. Februar 2006 6:14 18
KM 4.. Assistent
Stand-/Handmixer
Food processor/hand mixer
Mixer sur socle et à main
Batidora de pie / manual
Batedeira de pé / manual
Bords-/handmixer
Pöytä-/käsivatkain
Stolní / ruèní mixér
Mikser stoj¹cy / rêczny
Asztali / Kézi mixer
Gebrauchsanweisung
Operating instructions
Mode d’emploi
Instrucciones para el uso
Instruções de utilização
Bruksanvisning
Käyttöohje
Návod k použití
Instrukcja obs³ugi
Használati útmutató
Page 2
822_949_233 KM400.book Seite 2 Freitag, 10. Februar 2006 6:14 18
A
B
CD
E
O
F
L
G
M
N
K
H
J
P
1
32
2
Page 3
822_949_233 KM400.book Seite 3 Freitag, 10. Februar 2006 6:14 18
4
5
D
C
B
6
7
3
Page 4
822_949_233 KM400.book Seite 4 Freitag, 10. Februar 2006 6:14 18
d
Sehr geehrte Kundin,
d
sehr geehrter Kunde,
lesen Sie bitte diese Gebrauchsanweisung sorgfältig durch.
Beachten Sie vor allem die Sicherheitshinweise auf den ersten Seiten dieser
Gebrauchsanweisung! Bewahren Sie
bitte die Gebrauchsanweisung zum späteren Nachschlagen auf. Geben Sie diese
an eventuelle Nachbesitzer des Gerätes
weiter.
Mit dem Warndreieck und/oder durch
1
Signalwörter (Warnung!, Vorsicht!,
Achtung!) sind Hinweise hervorgeho-
ben, die für Ihre Sicherheit oder für die
Funktionsfähigkeit des Gerätes wichtig
sind. Bitte unbedingt beachten.
0Dieses Zeichen leitet Sie Schritt für
Schritt beim Bedienen des Gerätes.
Nach diesem Zeichen erhalten Sie
3
ergänzende Informationen zur Bedienung und praktischen Anwendung des
Gerätes.
Mit dem Kleeblatt sind Tipps und Hin-
2
weise zum wirtschaftlichen und
umweltschonenden Einsatz des Gerätes
gekennzeichnet.
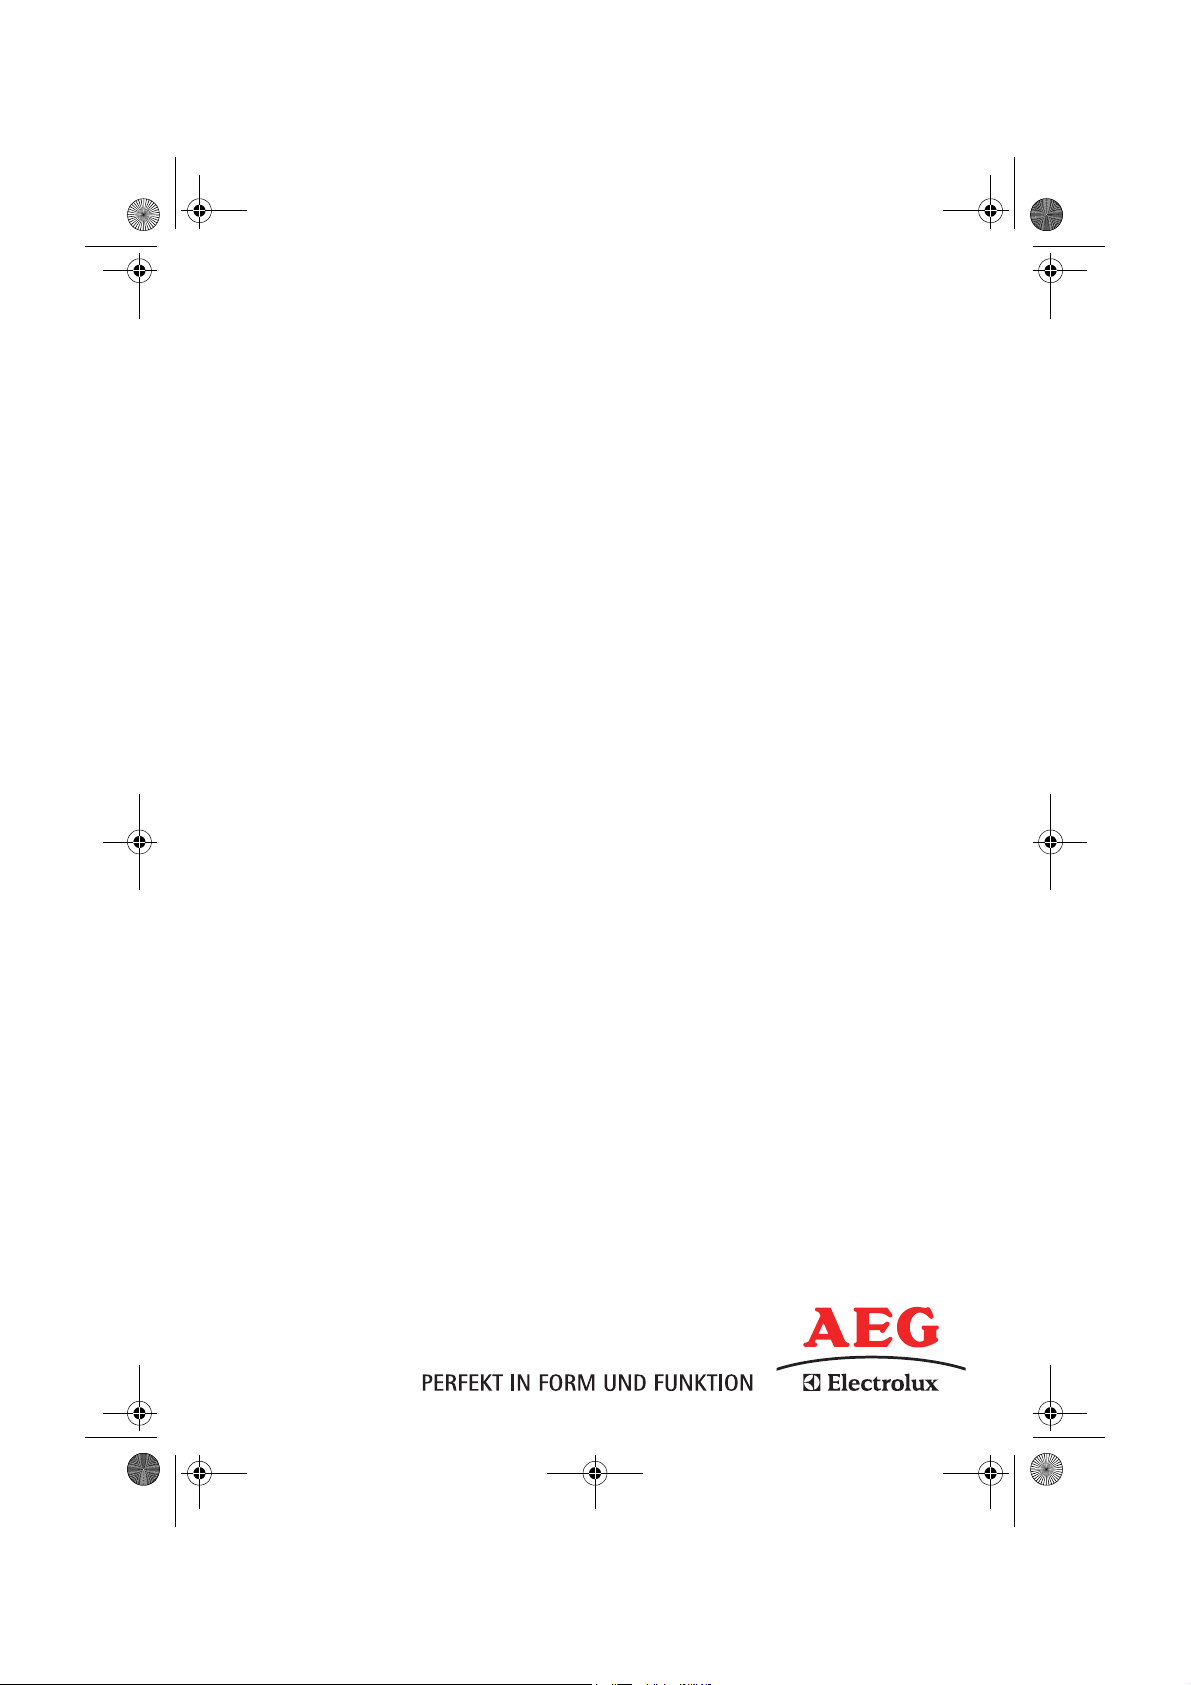
Gerätebeschreibung
(Bild 1)
A Auswurftaste
B Ein-/Ausschalter
C Schalter Geschwindigkeitsbereich
D Taste Pulse
E Mixer
F Schwenktaste
G Entriegelungstaste
H Wahlschalter Rührschüssel-
Geschwindigkeit
J Rührständer
K Kunststoff-Rührschüssel (nur KM 400)
L Schlagbesen
M Knethaken
N Teigschaber
O Edelstahl-Rührschüssel mit Deckel
(nur KM 450)
P Typschild (Unterseite Rührständer und
Unterseite Mixer)
1 Sicherheitshinweise
Die Sicherheit dieses Geräts entspricht
den anerkannten Regeln der Technik
und dem Gerätesicherheitsgesetz. Dennoch sehen wir uns als Hersteller veranlasst, Sie mit den nachfolgenden
Sicherheitshinweisen vertraut zu
machen.
Allgemeine Sicherheit
• Das Gerät darf nur an ein Stromnetz
angeschlossen werden, dessen Spannung und Frequenz mit der Angabe auf
dem Typschild übereinstimmt!
• Nehmen Sie das Gerät niemals in
Betrieb, wenn
– die Anschlußleitung beschädigt ist,
– das Gehäuse beschädigt ist.
• Den Netzstecker nie an der Anschlußleitung aus der Steckdose ziehen.
• Wenn die Anschlußleitung dieses Gerätes beschädigt wird, muss sie durch den
Hersteller oder seinen Kundendienst
oder eine ähnliche qualifizierte Person
ersetzt werden, um Gefährdungen zu
vermeiden.
4
Page 5

822_949_233 KM400.book Seite 5 Freitag, 10. Februar 2006 6:14 18
d
• Reparaturen an diesem Gerät dürfen
nur von Fachkräften durchgeführt
werden. Durch unsachgemäße Reparaturen können erhebliche Gefahren entstehen. Wenden Sie sich im
Reparaturfall an den Kundendienst
oder an Ihren autorisierten Fachhändler.
Sicherheit von Kindern
• Lassen Sie das Gerät nicht unbeaufsichtigt laufen und wahren Sie gegenüber Kindern eine besondere
Aufsichtspflicht!
Das sollten Sie beim Betrieb des
Gerätes beachten
• Werfen Sie die Werkzeuge nie bei laufendem Gerät aus.
• Greifen Sie nie bei laufendem Gerät
mit den Fingern in den Bereich der
Teighaken bzw. der Rührbesen. Es
besteht Verletzungsgefahr!
• Nehmen Sie das Gerät nie mit nassen
Händen in Betrieb.
• Plastikteile dürfen nicht auf oder in
unmittelbarer Nähe von Heizkörpern
getrocknet werden.
• Mit dem Gerät dürfen keine Farben
(Lacke, Polyester usw.) gerührt werden
– Explosionsgefahr!
• Vor allen Reinigungs- und Pflegearbeiten ist das Gerät auszuschalten und der
Netzstecker zu ziehen.
• Reinigen Sie das Gerät nie unter fließendem Wasser oder im Spülwasser.
• Der Hersteller haftet nicht für eventuelle Schäden, die durch nicht bestimmungsgemäßen Gebrauch oder falsche
Bedienung verursacht werden.
Aufstellung, Anschluss, Inbetriebnahme
• Die Arbeitswerkzeuge dürfen nur bei
vom Netz getrenntem Gerät eingesteckt bzw. vom Gerät gelöst werden.
• Der Handmixer kann die Lebensmittel
in jedem Gefäß verarbeiten. Verwenden
Sie am besten die mitgelieferte Rührschüssel.
• Das Gerät nur einschalten, wenn sich
die Arbeitswerkzeuge in dem Gefäß mit
den zu verarbeitenden Lebensmitteln
befinden. Warten Sie immer den Stillstand der Werkzeuge ab, bevor Sie das
Gefäß entfernen.
• Halten Sie keine harten Gegenstände
(Löffel, Messer, Quirle) in die laufenden
Werkzeuge und greifen Sie nicht mit
der Hand hinein. Es besteht Verlet-
zungsgefahr!
• Nach Beendigung der Arbeiten ist das
Gerät auszuschalten und der Netzstecker zu ziehen.
Entsorgung
2 Verpackungsmaterial
Die Verpackungsmaterialien sind
umweltverträglich und wiederverwertbar. Die Kunststoffteile sind gekennzeichnet, z. B. >PE<, >PS< etc.
Entsorgen Sie die Verpackungsmaterialien entsprechend ihrer Kennzeichnung
bei den kommunalen Entsorgungsstellen in den dafür vorgesehenen Sammelbehältern.
2 Altgerät
Das Symbol W auf dem Produkt
oder seiner Verpackung weist darauf
hin, dass dieses Produkt nicht als normaler Haushaltsabfall zu behandeln ist,
sondern an einem Sammelpunkt für
das Recycling von elektrischen und
elektronischen Geräten abgegeben
werden muss. Durch Ihren Beitrag zum
korrekten Entsorgen dieses Produkts
schützen Sie die Umwelt und die Gesundheit Ihrer Mitmenschen. Umwelt
und Gesundheit werden durch falsches
Entsorgen gefährdet. Weitere Informationen über das Recycling dieses Produkts erhalten Sie von Ihrem Rathaus,
Ihrer Müllabfuhr oder dem Geschäft, in
dem Sie das Produkt gekauft haben.
5
Page 6

822_949_233 KM400.book Seite 6 Freitag, 10. Februar 2006 6:14 18
d
Bedienung
Mit dem Stand-/Handmixer können Sie
Lebensmittel rühren, kneten und schlagen. Mixer und Rührschüssel werden
jeweils von einem eigenen Motor
angetrieben, Geschwindigkeit von
Mixer und Rührschüssel sind unabhängig voneinander einstellbar. Trotzdem
wird das Gerät mit nur einem Schalter
ein- und ausgeschaltet.
Sie können den Mixer auch mit wenigen Handgriffen vom Rührständer
abnehmen und als gewöhnlichen
Handmixer benutzen. Führen Sie dabei
das Gerät in ruhigen Kreisen durch das
Gefäß mit den Lebensmitteln.
3 Mit den Knethaken (Bild 1/M) können
Sie schwere Teige verarbeiten, wie
Hefe-, Mürbe-, Kartoffel- und schwere
Rührteige.
Mit den Schlagbesen (Bild 1/L) lassen
sich leichte Rührteige, Eischnee,
Schlagsahne, Mayonnaisen, Pürees
zubereiten und Soßen und Puddingpulver anrühren.
• Geräte vom Typ KM 400 sind mit einer
Kunststoff-Rührschüssel ausgestattet.
• Geräte vom Typ KM 450 sind mit einer
Edelstahl-Rührschüssel mit Deckel ausgestattet.
Inbetriebnahme
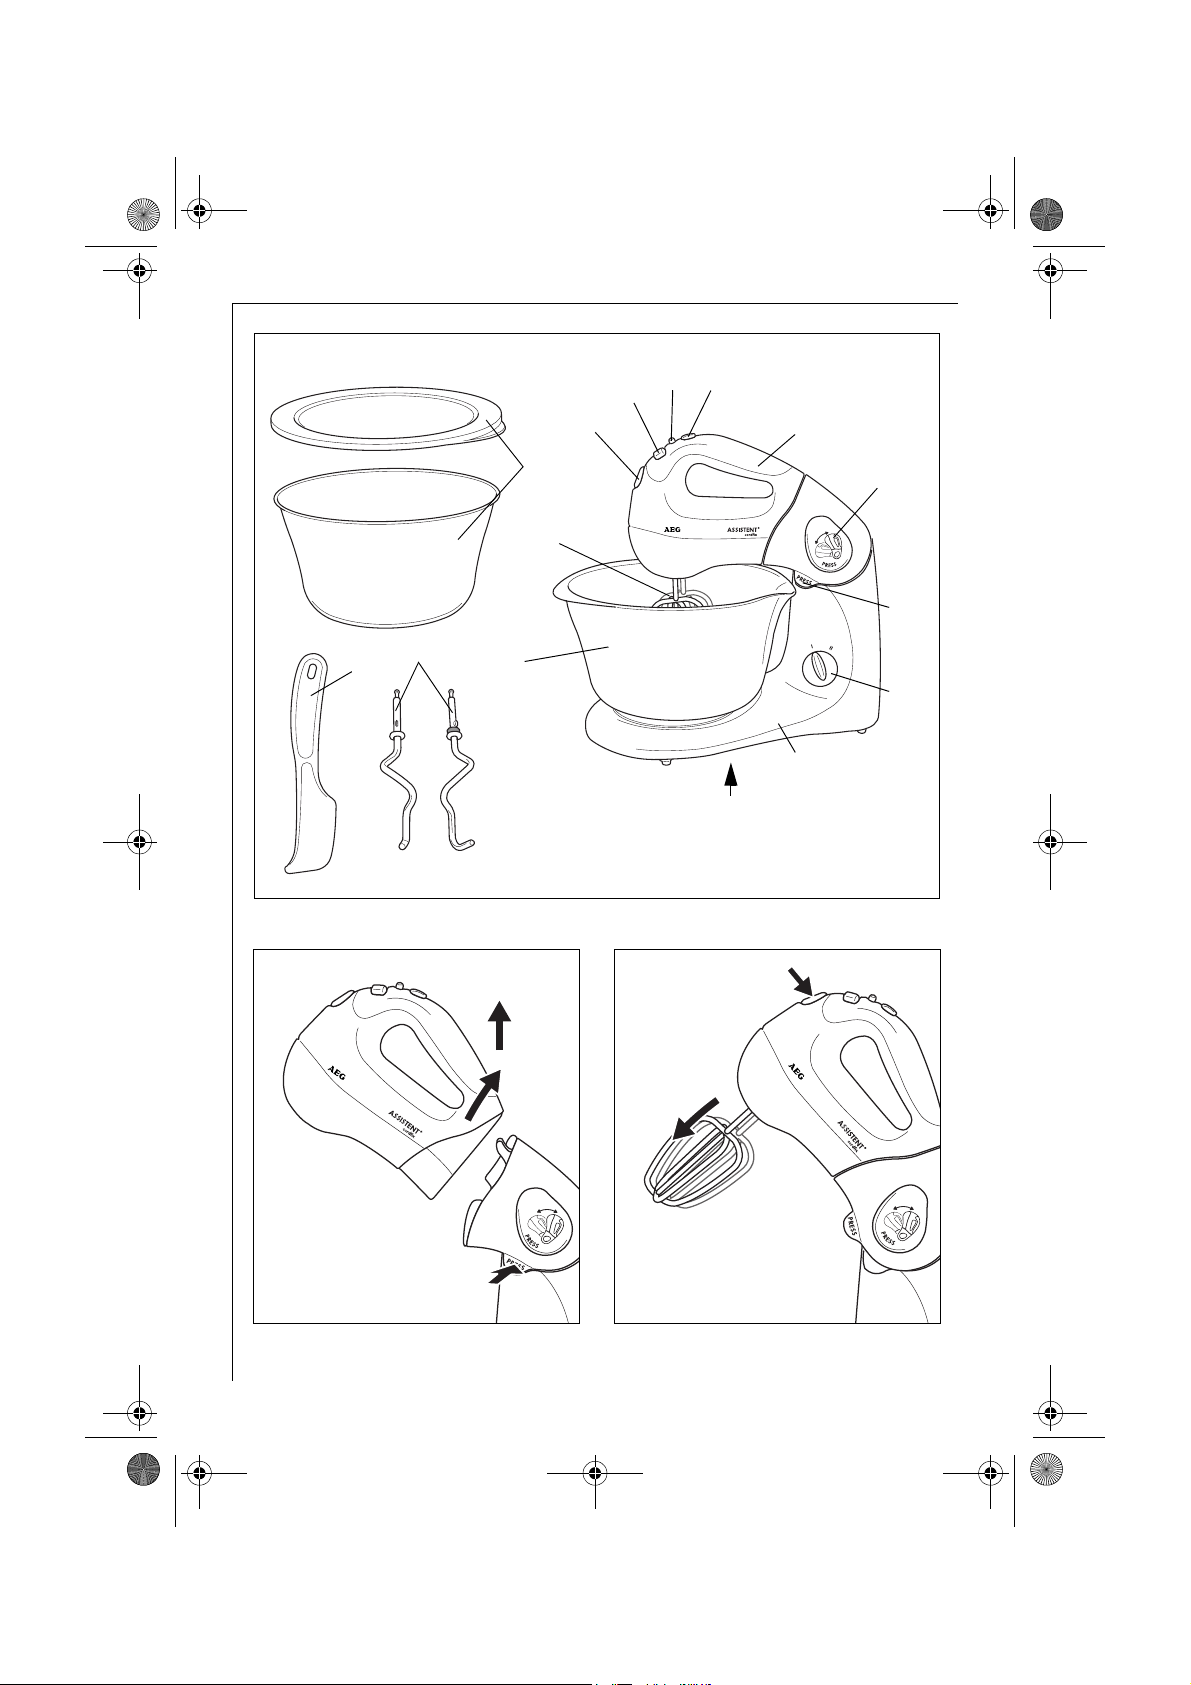
Mixer auf Rührständer aufsetzen/abnehmen (Bild 2)
Vor dem Aufsetzen oder Abnehmen des
1
Mixers Gerät ausschalten und Netzstecker ziehen!
0 Zum Aufsetzen den Mixer auf den
Rührständer aufsetzen (die beiden
Haken am Rührständer greifen in den
Mixer ein) und zum Verriegeln nach
unten drücken.
0 Zum Abnehmen die Entriegelungstaste
(Bild 1/G) drücken und den Mixer nach
oben abnehmen.
Werkzeug einstecken/entnehmen
(Bild 3)
Vor dem Auswerfen der Werkzeuge
1
Gerät ausschalten und Netzstecker ziehen!
0 Schlagbesen bzw. Knethaken in Werk-
zeugaufnahme an der Unterseite des
Mixers soweit einstecken, bis diese
spürbar einrasten.
Die beiden Knethaken haben unter-
1
schiedliche Steckformen. Sie müssen in
die entsprechende Werkzeugaufnahme gesteckt werden, da bei einer
Verwechslung der Teig nach oben
transportiert würde!
0 Ein Knethaken ist mit einem zusätzli-
chen kleinen Ring bei der Scheibe am
Schaft ausgestattet. Dieser Knethaken
kann nur in die passende Werkzeugaufnahme gesteckt werden.
Diese ist am Gerät durch das Symbol
gekennzeichnet.
0 Zum Entnehmen die Werkzeuge mit
einer Hand festhalten und Auswurftaste (Bild 1/A) drücken.
Mixer nach oben/nach unten
schwenken (Bild 4)
Vor dem nach oben Schwenken muss
1
der Mixer auf jeden Fall ausgeschaltet
werden!
0 Schwenktaste (Bild 1/F) drücken und
Mixer nach oben bzw. unten Schwenken, bis er einrastet.
Bei nach oben geschwenktem Mixer
3
können problemlos die Werkzeuge
gewechselt und die Rührschüssel abgenommen bzw. aufgesetzt werden.
6
Page 7
822_949_233 KM400.book Seite 7 Freitag, 10. Februar 2006 6:14 18
d
Rührschüssel aufsetzen/
abnehmen (Bild 5)
0 Rührschüssel auf die Führung im
Unterteil aufsetzen und durch eine
leichte Drehung im Uhrzeigersinn verriegeln.
0 Zum Abnehmen die Rührschüssel
gegen den Uhrzeigersinn entriegeln.
Das Unterteil dabei eventuell mit einer
3
Hand festhalten.
Durch die aussermittige Stellung des
Mixers können Zutaten mühelos auch
während dem Betrieb zugegeben werden.
Arbeiten mit dem Mixer
Ist der Mixer auf dem Rührständer auf-
1
gesetzt, wird mit dem Einschalten des
Mixers automatisch auch die Rührschüssel eingeschaltet.
Sie können das Gerät bis zu 10 Minu-
1
ten lang ohne Unterbrechung benutzen. Lassen Sie das Gerät nach einem
längeren, ununterbrochenen Betrieb
jeweils abkühlen (nach 10 Minuten
ohne Unterbrechung mindestens
20 Minuten).
Maximal verarbeitbare Mengen: Ver-
1
arbeiten Sie in der Rührschüssel maximal 1,5 kg feste bzw. 1,75 l flüssige
Lebensmittel.
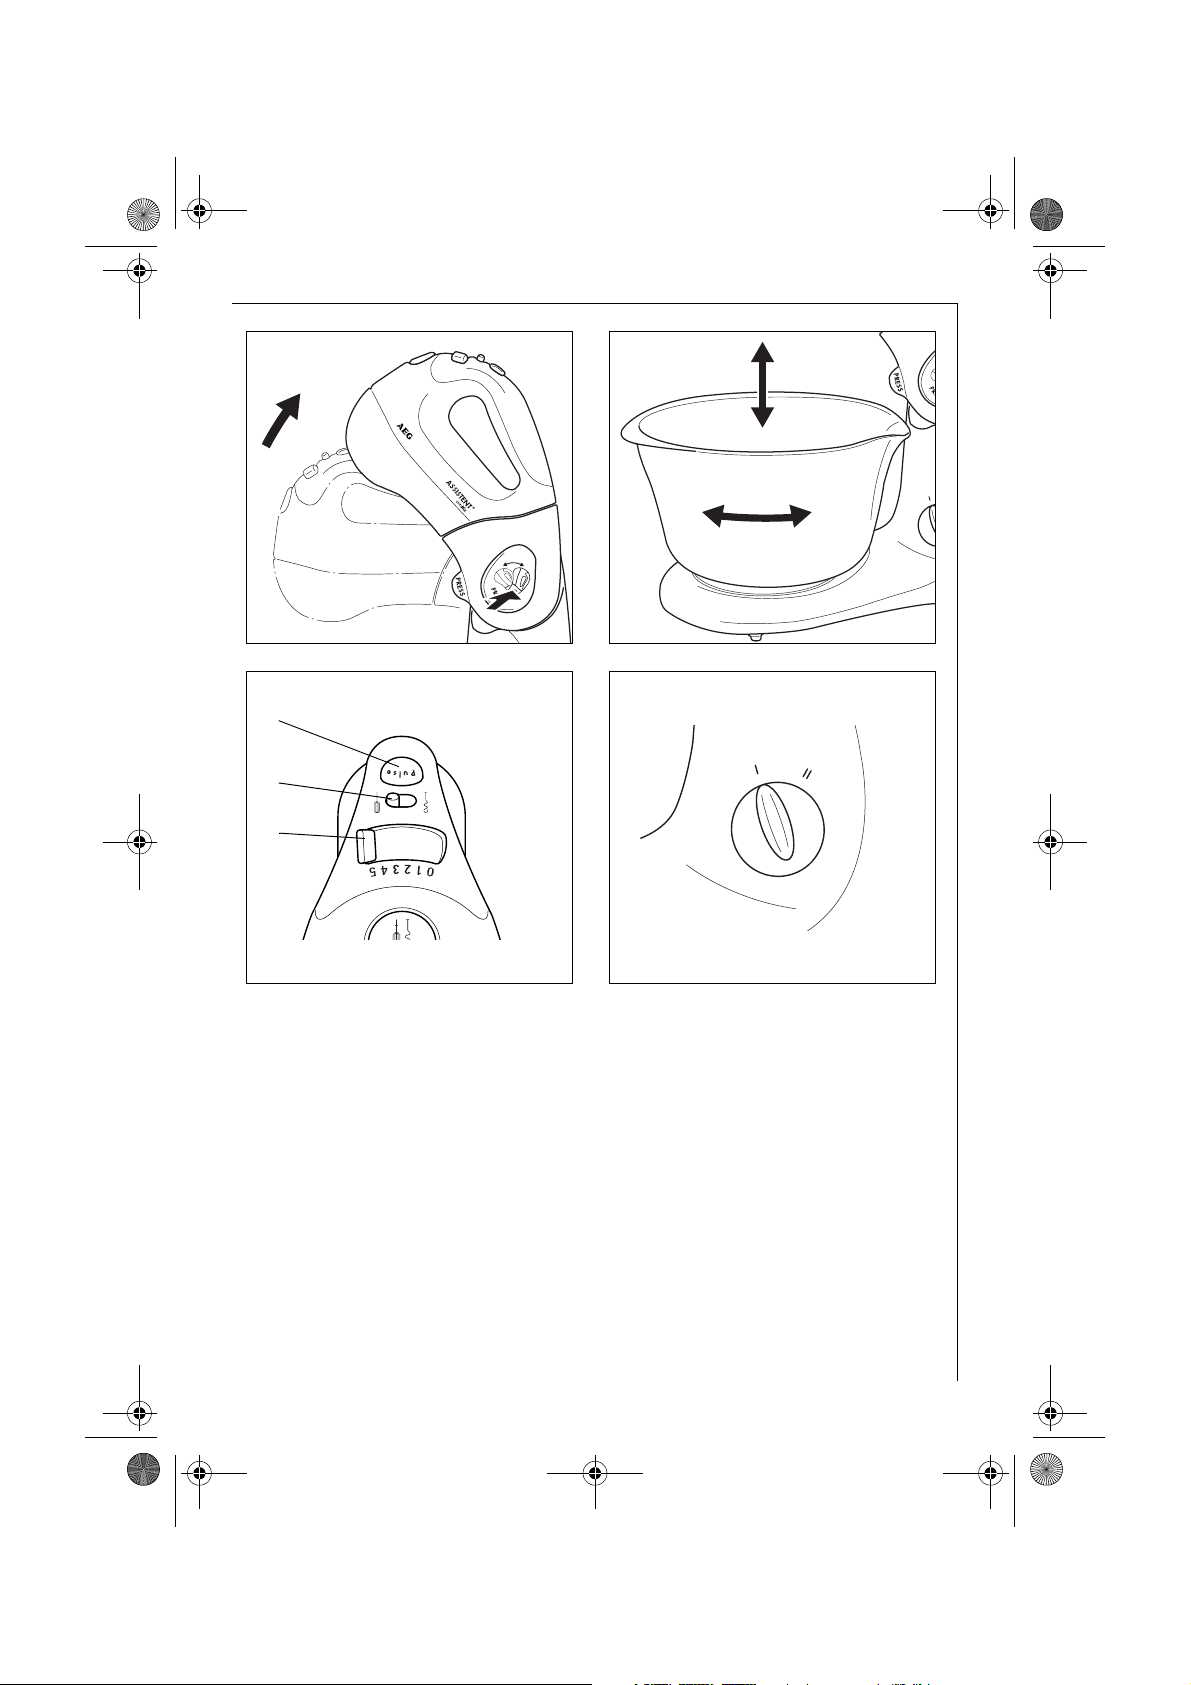
Gerät einschalten (Bild 6)
0 Mit dem Schalter Geschwindigkeitsbe-
reich (Bild 1+6/C) wählen Sie den
Geschwindigkeitsbereich vor:
niedrige Geschwindigkeiten, oder
hohe Geschwindigkeiten.
0 Mit dem Ein-/Ausschalter (Bild 1+6/B)
– schalten Sie das Gerät ein und aus,
– regeln Sie in 5 Stufen die Drehzahl
des Motors innerhalb der vorgewählten Geschwindigkeitsbereichs.
0 Solange Sie bei laufendem Gerät die
Taste Pulse (Bild 1+6/D) drücken, arbeitet der Mixer mit der höchsten
Geschwindigkeit.
Geschwindigkeit der Rührschüssel einstellen (Bild 7)
Die Geschwindigkeit der Rührschüssel
kann in zwei Stufen eingestellt werden.
0 Mit dem Wahlschalter Rührschüssel-
Geschwindigkeit (Bild 1/H) stellen Sie
die Geschwindigkeit der Rührschüssel
ein:
I = niedrige Geschwindigkeit
II = hohe Geschwindigkeit
Gerät ausschalten
0 Den Ein-/Ausschalter (Bild 1+6/B) in
Stellung „0“ schieben.
– Mixer und Rührschüssel werden aus-
geschaltet.
7
Page 8
822_949_233 KM400.book Seite 8 Freitag, 10. Februar 2006 6:14 18
d
Wahl der richtigen Einstellungen
Die folgenden Hinweise können Ihnen als Richtlinie dienen.
Geschwindigkeit Mixer
Schalter
Geschwindigkeitsbereich
(Bild 1+6/C)
• kneten, mischen:
• unterziehen: 3, 4
• rühren:
• schaumig schlagen: 4 oder 5
oder Taste (Bild 1+6/D)
Beginnen Sie alle Arbeiten mit einer niedrigen Geschwindigkeit. Sie vermeiden so das
3
Aufstäuben pulvriger Substanzen und das Verspritzen von Flüssigkeiten.
Ein-/Ausschalter
(Bild 1+6/B)
mit 1 oder 2 beginnen, dann
hochschalten auf 5
mit 2 oder 3 beginnen, dann
hochschalten
Geschwindigkeit Rührschüssel
Benutzen Sie Stufe „II“ für das Schlagen von Eiweiß, Sahne und leichten
Kuchenmischungen, Stufe „I“ für
schwere Teige und große Mengen.
Reinigung und Pflege
Rückstände von Karotten- und Rot-
3
krautsäften auf Plastikteilen entfernt
man vor dem Abspülen mit Speiseöl.
Mixer und Rührständer
Vor jedem Reinigen Netzstecker ziehen.
1
Beachten Sie, dass ins Innere des Gerätes auf keinen Fall Wasser dringen darf!
Gerät niemals unter fließendem Wasser
oder gar im Spülwasser reinigen.
0 Mixer und Rührständer mit feuchtem
Tuch reinigen.
Zubehör
Schlagbesen und Knethaken
0 Schlagbesen und Knethaken mit Bürste
oder Tuch unter fließendem Wasser
oder im Geschirrspüler reinigen!
Edelstahl-Rührschüssel
(nur KM 450)
0 Die Edelstahl-Rührschüssel (ohne
Deckel!) kann im Geschirrspüler gereinigt werden.
Der Deckel der Edelstahl-Rührschüssel
1
darf nicht im Geschirrspüler gereinigt
werden.
Kunststoff-Rührschüssel
(nur KM 400)
Reinigen Sie die Kunststoff-Rührschüssel im Spülwasser.
Soll die Kunststoff-Rührschüssel im
1
Geschirrspüler gereinigt werden, muss
sie im Oberkorb platziert werden.
8
Page 9
822_949_233 KM400.book Seite 9 Freitag, 10. Februar 2006 6:14 18
d
Aufbewahrung
Bewahren Sie Knethaken und Schlagbesen in der auf den Rührständer aufgesetzten Rührschüssel auf. So sind sie
vor Beschädigung geschützt.
Technische Daten
Netzspannung: 230 - 240 V
Leistungsaufnahme: 380 W
Maximale Betriebsdauer: 10 Minuten
Dieses Gerät entspricht den folgenden
;
EG-Richtlinien:
• 73/23/EWG vom 19.2.1973 „Niederspannungsrichtlinie“, einschließlich
Änderungsrichtlinie 93/68/EWG.
• 89/336/EWG vom 3.5.1989 „EMVRichtlinie“, einschließlich Änderungsrichtlinie 92/31/EWG.
Im Service-Fall
Bei einer evtl. erforderlichen Reparatur,
einschließlich Ersatz der Netzzuleitung,
wenden Sie sich bitte zunächst telefo-
nisch an unsere Serviceline AEGElectrolux.
Für Deutschland: 01805-30 60 80*:
*aus dem Festnetz der Deutschen Telekom Euro 0,12/Min.
Für Österreich:
Für Reparaturservice: 0810-955 400 *
Für Produktservice: 0810-955 200*
*aus dem Festnetz der TELEKOM AUSTRIA Euro 0,10/Min
9
Page 10

822_949_233 KM400.book Seite 10 Freitag, 10. Februar 2006 6:14 18
g
Dear customer,
g
Please read these operating instructions through carefully.
Above all please follow the safety
instructions on the first few pages of
these operating instructions! Please
keep the operating instructions for
future reference. If applicable pass these
instructions on to the next owner of the
appliance.
With the warning triangle and/or by
1
means of key words (Danger!, Caution!, Attention!), information is
emphasized which is important for
your safety or the correct functioning
of the appliance. It is essential that this
information is observed.
0 This symbol guides you step by step
through the operating procedure for
your appliance.
After this symbol you receive supple-
3
mentary information on the practical
application and use of the appliance.
Tips and information about the eco-
2
nomical and environmentally friendly
use of the appliance are marked with
the clover.
Description of the
appliance (Figure 1)
A Accessory release button
B ON/OFF switch
C Speed range selector switch
D Pulse button
E Mixer
F Raise/lower button
G Lock release
H Mixing bowl speed selector switch
J Processor stand
K Plastic mixing bowl (KM 400 only)
L Whisks
M Dough hooks
N Dough scraper
O Stainless steel mixing bowl with lid
(KM 450 only)
P Type plate (on bottom of processor
stand and bottom of mixer)
1 Safety instructions
This appliance corresponds to accepted
technological standards with regards
to safety and to the German Appliance
Safety Law. Nevertheless as a manufacturer we are committed to familiarise
you with the following safety instructions:
General safety
• The appliance may only be connected
to a power supply whose voltage and
frequency comply with the specifications on the rating plate!
• Never pick up the appliance if
– the lead is damaged,
– the housing is damaged.
• Never use the lead to pull the plug out
from the socket.
• In order to avoid danger, if the connection lead of this appliance is damaged,
it must be replaced by the manufacturer, its customer service department
or a similarly qualified person.
10
Page 11
822_949_233 KM400.book Seite 11 Freitag, 10. Februar 2006 6:14 18
g
• Repairs to this appliance may only be
carried out by qualified service engineers. Considerable danger may result
from improper repairs. If repairs
become necessary, please contact the
Customer Care Department or your
authorised dealer.
Safety of children
• Never leave the appliance unattended
when on and supervise particularly
carefully if young children are around!
When using your appliance
• Never release the accessories while the
processor/mixer is running.
• Ensure fingers are kept away from
moving whisks and dough hooks. This
could result in injury!
• Never use the mixer if you have wet
hands.
• Plastic parts may not be placed on or
directly near to heaters.
• Do not use this appliance to stir paints
(lacquers, polyesters etc.) This could
result in an explosion!
• The appliance should be switched off
and unplugged before any cleaning or
maintenance work is done on it.
• Never clean the appliance under running water or submerge it in washingup water.
• The manufacturer is not liable for any
damages which are caused by using the
appliance for any other purpose than
that intended or incorrect use.
Installation, connection and initial use
• The attachments are only to be
inserted into or removed from the
appliance when it is switched off.
• The hand mixer can be used to mix
food in any suitable bowl. You are
advised, however, to use the supplied
mixing bowls.
• Never switch on the appliance until the
working attachments are in the mixing
bowl with the ingredients to be processed. Always wait until the attachments stop before you remove the
bowl.
• Do not hold any hard objects (e.g. a
spoon, knife or whisk) against the
moving attachments and do not touch
them with your hand. This could
result in injury!
• When you have finished working with
the appliance, switch it off and unplug
it from the electricity supply.
Disposal
Packaging material
2
The packaging materials are environmentally friendly and can be recycled.
The plastic components are identified
by markings, e.g. >PE<, >PS<, etc.
Please dispose of the packaging materials in the appropriate container at
the community waste disposal facilities.
Old appliance
2
The symbol W on the product or on
its packaging indicates that this product may not be treated as household
waste. Instead it shall be handed over
to the applicable collection point for
the recycling of electrical and electronic equipment. By ensuring this product is disposed of correctly, you will
help prevent potential negative consequences for the environment and
human health, which could otherwise
be caused by inappropriate waste
handling of this product. For more
detailed information about recycling
of this product, please contact your
local city office, your household waste
disposal service or the shop where you
purchased the product.
11
Page 12

822_949_233 KM400.book Seite 12 Freitag, 10. Februar 2006 6:14 18
g
Operation
You can use the processor/hand mixer
to mix, knead and whisk food. The
mixer and mixing bowl are each driven
separately by their own motors, and
the speeds of the mixer and mixing
bowl can be individually adjusted.
However the mixer/processor has a single ON/OFF switch.
The mixer can be easily removed from
the processor stand in a moment and
used as a standard hand mixer. When
used in this way, move the hand mixer
in a smooth circular motion around the
inside of the bowl containing the
ingredients.
3 The dough hooks (Figure 1/M) are used
for heavy doughs, such as yeast dough,
short crust pastry, potato batters and
cake mixes.
The whisk (Figure 1/L) is suitable for
light cake mixes, egg white, cream,
mayonnaise, purées and for stirring
sauces and dessert powders.
• KM 400 models are supplied with a
plastic mixing bowl.
• KM 450 models are supplied with a
stainless steel mixing bowl with lid.
Preparing for use
Fitting the mixer to/removing
from the processor stand
(Figure 2)
Before fitting or removing the mixer,
1
switch off the processor/mixer and
remove the plug from the mains
socket!
0 To fit, push the mixer on to the proces-
sor stand (the two latches on the processor stand engage in the mixer) and
press down to lock.
0 To remove, press the lock release (Fig-
ure 1/G) and pull the mixer upwards.
Inserting/removing accessories
(Figure 3)
Before releasing the accessories, switch
1
off the mixer and remove the plug
from the mains socket!
0 Push the whisks or dough hooks into
the accessory slots on the underside of
the mixers, until they click into place.
The two dough hooks have different
1
plug shapes and must be pushed into
the correct slots. Insertion the wrong
way round would lead to the dough
being transported upwards!
0 One of the dough hooks has an
additional small ring near the collar
on the shaft. This dough hook will
only fit in the slot for which it
is intended. This is identified by a
symbol.
0 To remove the accessories, hold firmly
with one hand, while pressing the
accessory release button (Figure 1/A).
Raising/lowering the mixer
(Figure 4)
Ensure that the mixer is switched off
1
before raising/lowering!
0 Press the raise/lower button (Figure
1/F) and swing the mixer up or down,
until it clicks in place.
With the mixer raised, the accessories
3
can be easily changed and the mixing
bowl located on the processor stand or
removed.
Locating/removing the mixing
bowl (Figure 5)
0 Locate the mixing bowl on the guide
on the base and latch in place by
gently turning clockwise.
0 To remove the mixing bowl, turn anti-
clockwise to unlatch.
It may be necessary to hold the base to
3
prevent it rotating.
The off-centre position of the mixer
makes it easy to add ingredients while
the processor is in operation.
12
Page 13
822_949_233 KM400.book Seite 13 Freitag, 10. Februar 2006 6:14 18
g
Working with the mixer/
processor
When the mixer is attached to the
1
processor stand, the mixing bowl is
automatically switched on when the
mixer is switched on.
The appliance can be used for up to
1
10 minutes without stopping. It should
be allowed to cool each time following
prolonged, continuous operation (for
at least 20 minutes after using for
10 minutes without stopping).
Maximum processing quantities:
1
Processing in the mixing bowl must not
exceed 1.5 kg solid or 1.75 l liquid
foodstuffs.
Switching the mixer ON
(Figure 6)
0 Select the speed range with the speed
range selector switch (Figure 1+6/C):
low speeds, or
high speeds.
0 The ON/OFF switch (Figure 1+6/B) is
used to:
– switch the mixer ON and OFF,
– control the mixer speed (5 speed set-
tings) in the pre-selected speed
range.
0 As long as the Pulse button (Figure
1+6/D) is pressed and held when the
appliance is in operation, the mixer
operates at its maximum speed.
Selecting the mixing bowl speed
(Figure 7)
The mixing bowl has two speed settings.
0 The mixing bowl speed selector switch
(Figure 1/H) is used to select the mixing
bowl speed:
I = low speed
II = high speed
Switching the mixer OFF
0 Slide the ON/OFF switch (Figure 1+6/B)
to "0".
– The mixer and mixing bowl are
switched off.
Selecting the correct settings
The following notes can be used as a guide.
Mixer speed
Speed range selector switch
(Figure 1+6/C)
•Kneading, Mixing:
• Folding in: 3, 4
• Stirring:
• Whisking, Frothing: 4 or 5
or button (Figure 1+6/D)
Start all types of processing at a low speed. This will avoid powdery foods and liquids
3
spraying out.
ON/OFF switch
(Figure 1+6/B)
start with 1 or 2,
than speed up to 5
start with 2 or 3,
than speed up
13
Page 14

822_949_233 KM400.book Seite 14 Freitag, 10. Februar 2006 6:14 18
g
Mixing bowl speed
Use speed "II" for whisking egg white,
cream and light cake mixtures. Use
speed "I" for heavy dough and large
quantities.
Cleaning and care
Residues of carrot and red cabbage
3
juice can be removed from the plastic
parts with cooking oil before the appliance is cleaned.
Mixer and processor stand
Remove the plug from the mains
1
socket before cleaning.
Ensure that no water penetrates into
the inside of the appliance! Never
clean the appliance under running
water and never immerse in water.
0 Wipe the mixer and processor stand
with a damp cloth.
Accessories
Whisks and dough hooks
0 Clean the whisks and dough hooks
with a brush or a cloth under running
water or in the dishwasher!
Storage
Store the dough hooks and whisks in
the mixing bowl located on the processor base. This will protect them from
damage.
Technical data
Mains voltage: 230 - 240 V
Power consumption: 380 W
Maximum continuous operating time:
10 minutes
This appliance complies with the fol-
;
lowing EC directives:
• 73/23/EEC of 19/2/1973 "Low voltage directive", including the modification directive 93/68/EEC.
• 89/336/EEC of 3/5/1989 "EMC directive", including the modification
directive 92/31/EEC.
Stainless steel mixing bowl
(KM 450 only)
0 The stainless steel mixing bowl (not the
lid!) can be washed in the dishwasher.
The lid of the stainless steel mixing
1
bowl must not be washed in the dishwasher.
Plastic mixing bowl
(KM 400 only)
Wash the plastic mixing bowl in water
with washing-up liquid.
If you wish to wash the plastic mixing
1
bowl in the dishwasher, it must be
placed in the upper basket.
14
Page 15

822_949_233 KM400.book Seite 15 Freitag, 10. Februar 2006 6:14 18
f
Chère cliente,
f
Cher client,
Veuillez lire soigneusement le présent
mode d'emploi. Observez spécialement
les indications de sécurité figurant en
première page! Conservez ce mode
d'emploi pour toute référence ultérieure. Et transmettez-le à un éventuel
nouveau propriétaire.
Le triangle de secours et/ou les mots
1
d’avertissement (Avertissement!,
Prudence!, Attention!) mettent en
évidence des indications importantes
pour votre sécurité ou pour le bon
fonctionnement de l’appareil. A respecter absolument.
0 Ce repère vous guide pas à pas dans la
commande de l’appareil.
Ce symbole indique la présence d’infor-
3
mations complémentaires sur la commande et l’utilisation pratique de
l’appareil.
La feuille de trèfle signalise les conseils
2
et indications concernant un emploi
rentable et écologique de l’appareil.
Description de
l’appareil (Fig. 1)
A Touche d'éjection
B Interrupteur
C Commutateur de plage de vitesse
D Touche à impulsion
E Mixer
F Touche de pivotement
G Touche de déverrouillage
H Sélecteur de vitesse du récipient de
malaxage
J Socle de malaxage
K Récipient de malaxage en plastique
(seulement KM 400)
L Fouet
M Pétrisseurs
N Spatule à pâte
O Récipient de malaxage en acier inoxy-
dable avec couvercle (seulement KM 450)
P Plaquette signalétique (sous le socle de
malaxage et sous le mixer)
1 Consignes de sécurité
La sécurité de cet appareil est conforme aux règles reconnues de la technique et à la loi sur la sécurité du
matériel technique. Cependant, nous
nous voyons obligés en tant que fabricant à vous familiariser avec les remarques suivantes relatives à la sécurité.
Sécurité générale
• L'appareil ne doit être raccordé qu'à un
réseau électrique dont la tension et la
fréquence correspondent aux indications de la plaquette signalétique!
• Ne jamais mettre l'appareil en marche si
– le cordon d'alimentation est endom-
magé,
– le bâti est endommagé.
• Ne jamais retirer la fiche de la prise en
tirant sur le cordon d'alimentation.
• Si le cordon d'alimentation de cet
appareil est endommagé, il devra être
remplacé par le fabricant, son service
après-vente ou une personne qualifiée,
afin d'éviter tout risque.
15
Page 16
822_949_233 KM400.book Seite 16 Freitag, 10. Februar 2006 6:14 18
f
• Les travaux de réparations d’appareil
électriques ne peuvent être réalisés que
par des spécialistes agréés. D’importants dangers peuvent survenir par le
biais de réparations incorrectes. En cas
de réparation, adressez-vous au service-clientèle ou à votre commerçant
spécialisé agréé.
Sécurité des enfants
• Ne laissez jamais fonctionner l'appareil
sans surveillance et soyez particulièrement vigilant à l'égard des enfants!
Veuillez respecter les précautions
suivantes en utilisant l'appareil
• N'éjectez jamais les ustensiles quand
l'appareil est en marche.
• Ne mettez jamais les doigts au voisinage des pétrisseurs ou du fouet quand
l'appareil tourne. Il y a un risque de
blessure!
• Ne mettez jamais l'appareil en marche
avec les mains mouillées.
• Ne pas faire sécher les objets en plastique sur des radiateurs ou à proximité
immédiate.
• Ne pas mélanger des peintures avec
l'appareil (vernis, polyester, etc.) -
Risque d'explosion!
• Avant tous les travaux de nettoyage ou
d'entretien, il faut déclencher l'appareil
et retirer la fiche d'alimentation.
• Ne jamais nettoyer l'appareil à l'eau
courante ou dans l'eau de vaisselle.
• Le fabricant décline toute responsabilité en cas de dommages éventuels
résultant d'une utilisation non conforme ou d'une fausse manœuvre.
Installation, raccordement,
mise en service
• Les ustensiles ne doivent être mis en
place ou enlevés que lorsque l'appareil
est débranché du réseau.
• Le mixer à main permet de préparer des
aliments dans n'importe quel récipient.
Utilisez de préférence le récipient de
malaxage faisant partie de la fourniture.
• Ne mettez l'appareil en marche que
lorsque les ustensiles se trouvent dans
le récipient avec les aliments à travailler.
• N'introduisez pas d'objets dur (cuillères, couteaux, batteurs) dans le récipient quand les ustensiles sont en
marche et n'intervenez par avec la
main. Il y a un risque de blessure!
• Après le fin du travail, déclencher
l'appareil et retirer la fiche de la prise.
Protection de
l’environnement
Elimination du matériel d’emballage
2
Les matériaux d’emballage sont écologiques et recyclables. Les matières plastiques portent un signe distinctif, par
ex. >PE<, >PS<, etc. Eliminez les
matériaux d’emballage en fonction de
leur signe distinctif dans les containeurs prévus à cet effet sur le site de
collecte de votre commune.
Appareils usagés
2
Le symbole W sur le produit ou son
emballage indique que ce produit ne
peut être traité comme déchet ménager. Il doit plutôt être remis au point de
ramassage concerné, se chargeant du
recyclage du matériel électrique et
électronique. En vous assurant que ce
produit est éliminé correctement, vous
favorisez la prévention des conséquences négatives pour l’environnement et la santé humaine qui, sinon,
seraient le résultat d’un traitement
inapproprié des déchets de ce produit.
Pour obtenir plus de détails sur le
recyclage de ce produit, veuillez
prendre contact avec le bureau municipal de votre région, votre service d’élimination des déchets ménagers ou le
magasin où vous avez acheté le produit.
16
Page 17

822_949_233 KM400.book Seite 17 Freitag, 10. Februar 2006 6:14 18
f
Utilisation
Le mixer sur socle et à main permet de
brasser, pétrir et battre des aliments. Le
mixer et le récipient de malaxage sont
entraînés chacun par son propre
moteur, les vitesses du mixer et du
récipient de malaxage sont réglables
indépendamment l'une de l'autre.
Cependant, l'appareil ne s'enclenche et
se déclenche que par un seul interrupteur.
Vous pouvez aussi sortir le mixer en un
tournemain du socle de malaxage et
l'employer comme un mixer à main
usuel. Décrivez calmement des cercles
avec l'appareil dans le récipient contenant les aliments.
3 Avec les pétrisseurs (figure 1/M), vous
pouvez pétrir des pâtes lourdes, telles
que des pâtes levées, des pâtes brisées,
des pâtes à base de pommes de terre et
des pâtes molles lourdes.
Avec le fouet (figure 1/L), vous pouvez
pétrir des pâtes molles légères, battre
des blancs œufs en neige, fouetter de
la crème, préparer de la mayonnaise,
des purées, des sauces et des poudres à
pouding.
• Les appareils du type KM 400 sont
équipée d'un récipient de malaxage en
plastique.
• Les appareils du type KM 450 sont
équipée d'un récipient de malaxage en
acier inoxydable avec couvercle.
Mise en marche
Poser le mixer sur le socle de
malaxage ou l'enlever (figure 2)
Avant de poser ou d'enlever le mixer,
1
déclencher l'appareil et retirer la fiche
de la prise!
0 Pour poser le mixer, le placer sur le
socle de malaxage (les deux crochet du
socle de malaxage sont en prise dans le
mixer) et pour déverrouiller, presser
vers le bas.
0 Pour l'enlever, presser sur la touche de
déverrouillage (figure 1/G) et enlever le
mixer vers le haut.
Mettre en place ou enlever les
ustensiles (Figure 3)
Avant d'éjecter les ustensiles, déclen-
1
cher l'appareil et retirer la fiche de la
prise!
0 Introduire le fouet ou les pétrisseurs
dans le logement au bas du mixer
jusqu'à ce que l'on remarque qu'ils se
sont encliquetés.
Les deux pétrisseurs ont des fixations
1
différentes. Ils doivent être enfoncés
dans le logement correspondant, car en
cas d'inversion, la pâte serait transportée vers le haut!
0 Un des pétrisseurs est muni d'une
petite bague supplémentaire sur le disque de la tige. Ce pétrisseurs ne peut
être introduit que dans le logement
correspondant.
Il est marqué sur l'appareil par le
symbole .
0 Pour les enlever, tenir les ustensiles
dans une main et presser sur la touche
d'éjection (figure 1/A).
Pivoter le mixer vers le haut ou
le bas (figure 4)
Avant de pivoter vers le haut, le mixer
1
doit absolument être déclenché!
0 Presser sur la touche de pivotement
(figure 1/F) et pivoter le mixer vers le
haut ou le bas jusqu'à ce qu'il s'encliquète.
Quand le mixer est pivoté vers le haut,
3
vous pouvez changer les ustensiles ou
enlever ou poser le récipient de malaxage sans aucun problème.
Poser ou enlever le récipient de
malaxage (figure 5)
0 Poser le récipient de malaxage sur le
guidage de la partie inférieure et le
verrouiller par un léger mouvement de
rotation dans le sens des aiguilles d'une
montre.
17
Page 18

822_949_233 KM400.book Seite 18 Freitag, 10. Februar 2006 6:14 18
f
0 Pour enlever le récipient de malaxage,
le déverrouiller dans le sens contraire
à celui des aiguilles d'une montre.
Au besoin, tenir la partie inférieure
3
d'une main.
Grâce à la position excentrée du mixer,
on peut ajouter sans difficulté des
ingrédients aussi pendant le travail.
Travail avec le mixer
Si le mixer est posée sur le socle de
1
malaxage, le récipient de malaxage se
mettra en marche automatiquement à
l'enclenchement du mixer.
Vous pouvez utiliser l'appareil jusqu'à
1
10 minutes sans interruption. Après
une utilisation prolongée sans interruption, laissez refroidir l'appareil (au
moins 20 minutes au bout de
10 minutes sans interruption).
Quantité maximale pouvant être
1
travaillée: traiter dans le récipient de
malaxage au maximum 1,5 kg d'aliments solides, respectivement 1,75 l
d'aliments liquides.
Enclencher l'appareil (figure 6)
0 Avec le commutateur de plage de vit-
esse (figures 1+6/C), choisissez la plage
de vitesse:
basses vitesses, ou
0 Avec l'interrupteur (figures 1+6/B)
– vous enclenchez ou déclenchez
l'appareil,
– vous réglez en 5 niveaux la vitesse
de rotation du moteur à l'intérieur
de la plage de vitesses présélectionnée.
0 Tant que vous pressez sur la touche à
impulsion (figures 1+6/D) quand
l'appareil est en marche, le mixer travaille à la plus haute vitesse.
Régler la vitesse du récipient de
malaxage (figure 7)
La vitesse du récipient de malaxage
peut se régler sur deux niveaux.
0 Avec le sélecteur de vitesse du récipi-
ent de malaxage (figure 1/H), vous
réglez la vitesse du récipient de malaxage:
I = basse vitesse
II = haute vitesse
Arrêter l'appareil
0 Placer l'interrupteur (figures 1+6/B) en
position "0".
– Le mixer et le récipient de malaxage
s'arrêtent.
18
hautes vitesses.
Page 19

822_949_233 KM400.book Seite 19 Freitag, 10. Februar 2006 6:14 18
Choix des réglages corrects
Les indications suivantes vous servent de valeurs indicatives.
Vitesse du mixer
Commutateur de plage de
vitesse (figures 1+6/C)
• pétrir, mélanger:
•mélanger: 3, 4
f
Interrupteur
(figures 1+6/B)
commencer à 1 ou 2, puis
augmenter jusqu'à 5
•brasser:
• battre en mousse: 4 ou 5
ou touche (figures 1+6/D)
Commencez tous les travaux à basse vitesse. Vous évitez ainsi d'éjecter des substances
3
poudreuses et de projeter des liquides.
Vitesse du récipient de malaxage
Utilisez le niveau "II" pour battre des
blancs d'œufs en neige, pour la crème
et les pâtes à biscuits légères, le niveau
"I" pour les pâtes lourdes et les grandes
quantités.
Accessoires
Fouet et pétrisseurs
0 Nettoyer le fouet et les pétrisseurs avec
une brosse ou un chiffon à l'eau courante ou dans l'eau de vaisselle!
commencer à 2 ou 3, puis
augmenter
Récipient de malaxage en acier
Nettoyage et entretien
Eliminez les restes de jus de carotte et
3
de chou rouge des pièces en plastique
avant de rincer à l'huile alimentaire.
Mixer et socle de malaxage
Retirer la fiche avant chaque nettoy-
1
age.
Veillez à ce que de l'eau ne puisse en
aucun cas pénétrer dans l'appareil! Ne
jamais nettoyer l'appareil à l'eau courante ou dans l'eau de vaisselle.
0 Nettoyer le mixer et le socle de mala-
xage avec un chiffon humide.
inoxydable (seulement KM 450)
0 Le récipient de malaxage en acier ino-
xydable (sans couvercle!) peut être lavé
dans un lave-vaisselle.
Le couvercle du récipient de malaxage
1
en acier inoxydable ne doit pas être
lavé dans un lave-vaisselle.
Récipient de malaxage en plastique (seulement KM 400)
Lavez le récipient de malaxage dans
l'eau de vaisselle.
Si le récipient de malaxage en plas-
1
tique doit être lavé dans un lave-vaisselle, il faut le placer dans le panier
supérieur.
19
Page 20

822_949_233 KM400.book Seite 20 Freitag, 10. Februar 2006 6:14 18
f
Rangement
Rangez les pétrisseurs et le fouet dans
le récipient de malaxage posé sur le
socle de malaxage. Ils seront ainsi protégés contre les endommagements.
Caractéristiques
techniques
Tension du réseau: 230 - 240 V
Puissance consommée: 380 W
Durée maximale de fonctionnement:
10 minutes
Cet appareil est conforme aux directi-
;
ves suivantes de la C.E.:
• 73/23/CEE du 19.2.1973
– Directive basse tension
• 89/336/CEE du 3.5.1989
(y compris la directive de modification 92/31/CEE) – Directive CEM.
20
Page 21

822_949_233 KM400.book Seite 21 Freitag, 10. Februar 2006 6:14 18
e
Estimado/a cliente:
e
Lea detenida y completamente las instrucciones de uso. En especial, observe
las normas de seguridad incluidas en
las primeras páginas de estas instrucciones de uso. Conserve las instrucciones de uso para realiza consultas en el
futuro. Asimismo, proporcione estas instrucciones a otros posibles usuarios del
aparato.
El triángulo de alerta y/o las palabras
1
(¡Advertencia!, ¡Cuidado!, ¡Atención)
sirven para destacar indicaciones
importantes para su seguridad o para
el normal funcionamiento de la
máquina. Sígalas sin falta.
0 Este indicativo le conducirá paso a
paso por el manejo del electrodoméstico.
Después de este indicativo recibirá
3
usted información complementaria
sobre el manejo y la aplicación práctica
de la máquina.
La hoja de trébol se aplica para desta-
2
car consejos e indicaciones útiles para
trabajar con esta máquina de forma
ahorrativa y ecológica.
Descripción del aparato
(Figura 1)
A Botón de expulsión
B Interruptor de conexión / desconexión
C Selector de velocidad
D Tecla "Pulse"
E Batidora
F Tecla de basculación del brazo
G Tecla de desbloqueo
H Selector velocidad del recipiente
J Soporte
K Recipiente de plástico (sólo KM 400)
L Varilla batidora
M Amasador
N Rascador de masa
O Recipiente de acero inoxidable con
tapa (solo KM 450)
P Placa de características (parte inferior
soporte y parte inferior batidora)
1 Normas de seguridad
La seguridad de este aparato corresponde a las reglas reconocidas de la
técnica y a la Ley sobre la seguridad de
aparatos. No obstante, respete las normas de seguridad que proporcionamos
a continuación en calidad de fabricante.
Seguridad básica
• Antes de poner en funcionamiento el
aparato, asegúrese de que la tensión y
la frecuencia de la red eléctrica coinciden con los valores indicados en la
placa de características.
• No utilice jamás la batidora si
– el cable eléctrico está dañado, o
– la carcasa está dañada.
• Nunca desenchufe el aparato tirando
del cable.
• Si el cable de este aparato estuviese
dañado, deberá ser sustituido por el
fabricante, su Servicio Técnico o una
persona con cualificación semejante
con el fin de evitar riesgos.
21
Page 22

822_949_233 KM400.book Seite 22 Freitag, 10. Februar 2006 6:14 18
e
• Las reparaciones en este aparato deben
ser ejecutadas únicamente por técnicos
cualificados. En caso de reparaciones
inadecuadas se pueden producir considerables peligros. En caso de reparación, sírvase consultar al Servicio
postventa o a su distribuidor autorizado.
Protección de los niños
• Nunca deje la máquina funcionando
sin vigilancia y tenga especial cuidado
en presencia de niños.
Al trabajar con la batidora tenga
en cuenta lo siguiente:
• Nunca quite los accesorios mientras el
aparato esté funcionando.
• Nunca introduzca sus dedos en el área
de trabajo del amasador o de las varillas batidoras. ¡Existe riesgo de lesión!
• No ponga la máquina en marcha con
las manos mojadas.
• Las piezas de plástico no deben secarse
encima o muy cerca de radiadores o
calefactores.
• No utilice el aparato para mezclar pinturas (barniz, poliester, etc.) ¡Peligro de
explosión!
• Antes de cualquier trabajo de limpieza
o mantenimiento, apague la batidora y
desenchufe la clavija de la red eléctrica.
• Nunca limpie la máquina bajo el grifo
o sumergiéndola en agua.
• El fabricante no se hace responsable de
eventuales daños originados por una
utilización inapropiada o la manipulación incorrecta de la máquina.
Instalación, conexión, puesta en
servicio
• Los accesorios solo se podrán poner o
quitar si el aparato está desconectado
de la red eléctrica.
• La batidora manual puede procesar los
alimentos en cualquier tipo de recipiente. Sin embargo, recomendamos
que utilice el recipiente suministrado
con la máquina.
• Conectar el aparato sólo si los accesorios de trabajo están dentro del recipiente junto con los alimentos a
procesar. Para retirar el recipiente,
espere siempre a que se detengan por
completo los accesorios de trabajo.
• No introduzca ningún objeto duro
(cuchara, cuchillo, batidor) entre los
accesorios en marcha. No introduzca la
mano en esa zona. ¡Existe riesgo de
lesión!
• Tras finalizar los trabajos hay que desconectar el aparato y desenchufarlo de
la red.
Eliminación de
desechos
Material de embalaje
2
Los materiales de embalaje respetan el
medio ambiente y son reciclables. Los
elementos de materia plástica están
identificados; por ejemplo, >PE<, >PS<
etc. Elimine los materiales de embalaje,
según su identificación, en los contenedores de recogida disponibles en
los puntos de gestión de desechos
locales.
Aparato viejo
2
El símbolo
empaque indica que este producto no
se puede tratar como desperdicios normales del hogar. Este producto se debe
entregar al punto de recolección de
equipos eléctricos y electrónicos para
reciclaje. Al asegurarse de que este producto se deseche correctamente, usted
ayudará a evitar posibles consecuencias negativas para el ambiente y la
salud pública, lo cual podría ocurrir si
este producto no se manipula de forma
adecuada. Para obtener información
más detallada sobre el reciclaje de este
producto, póngase en contacto con la
administración de su ciudad, con su
servicio de desechos del hogar o con la
tienda donde compró el producto.
W en el producto o en su
22
Page 23

822_949_233 KM400.book Seite 23 Freitag, 10. Februar 2006 6:14 18
e
Instrucciones de manejo
Con la batidora fija / manual podrá Ud.
mezclar, batir y amasar alimentos. La
batidora y el recipiente mezclador son
accionados en cada caso por un motor
propio, su velocidad se puede regular por
tanto para la batidora y para el recipiente
mezclador independientemente una de
otra. Sin embargo, el aparato se conecta
y desconecta con un sólo interruptor.
También podrá, mediante un sencillo
mecanismo, quitar la batidora del
soporte, para utilizarla como una batidora normal de mano. Si utiliza el aparato en esta modalidad, hágalo
girándolo lentamente dentro del recipiente con los alimentos.
3 Con el amasador (Fig. 1/M) podrá tra-
bajar masas espesas como masa de
levadura, pastaflora, masas con patatas
y otras masas pesadas.
Con la varilla batidora (Fig. 1/L) se pueden preparar masas ligeras, punto de
nieve, nata batida, mayonesas y purés,
y se pueden mezclar salsas y flanes y
pudings en polvo.
• Los aparatos del tipo KM 400 están
equipados con un recipiente de mezclado de plástico.
• Los aparatos del tipo KM 450 están
equipados con un recipiente de mezclado de acero inoxidable con tapa.
Puesta en funcionamiento
Poner (o quitar, si se va a usar
como batidora de mano) la batidora del soporte (Fig. 2)
Antes de poner o quitar la batidora,
1
desconectar el aparato y desenchufarlo
de la red!
0 Para ponerla, colocarla sobre el soporte
(los dos ganchos del soporte se enganchan en la batidora) y empujar hacia
abajo para bloquearla en su posición.
0 Para quitarla, apretar la tecla de des-
bloqueo (Fig. 1/G) y retirar la batidora
hacia arriban.
Poner / quitar los accesorios
(Fig. 3)
Antes de quitar los accesorios, desco-
1
nectar el aparato y desenchufarlo de la
red!
0 Inserte la varilla batidora o el Amasa-
dor en el alojamiento para accesorios
situado en la parte inferior de la batidora, hasta que note claramente que se
quedan fijos.
Los dos elementos del amasador tienen
1
cada uno un enganche distinto. Deberá
introducir cada uno de ellos en su alojamiento correspondiente, porque de no
hacerlo así la masa saldrá hacia arriba!
0 Para ello, uno de los elementos del
amasador lleva un pequeño anillo adicional sobre el tope del enganche. Este
elemento sólo puede introducirse en el
alojamiento adecuado.
Este alojamiento está señalado en el
aparato con el símbolo .
0 Para quitar los accesorios, sujetarlos
con una mano y apretar la tecla de
desbloqueo (Fig. 1/A).
Bascular el brazo de la batidora
hacia arriba / abajo (Fig. 4)
Antes de bascular el brazo de la bati-
1
dora hacia arriba, desconectar el aparato y desenchufarlo de la red!
0 Apretar la tecla de basculación (Fig. 1/
F) y mover el brazo hacia arriba /
abajo, hasta que se bloquee.
Los accesorios se pueden cambiar fácil-
3
mente con la batidora en la posición
superior, y el recipiente de batido
puede igualmente colocarse o retirarse
de su sitio.
23
Page 24

822_949_233 KM400.book Seite 24 Freitag, 10. Februar 2006 6:14 18
e
Colocación y retirada del recipiente de mezclado (Fig. 5)
0 Colocar el recipiente sobre la guía en la
parte inferior y girar después suavemente en el sentido de las agujas del
reloj hasta el tope.
0 Para retirar el recipiente, girar en sen-
tido contrario a las agujas del reloj.
Para facilitar esta operación puede suje-
3
tar con una mano el soporte inferior.
Durante la utilización se pueden tam-
bién añadir ingredientes fácilmente
debido a la posición descentrada de la
batidora.
Utilización de la batidora
Si la batidora está colocada en el
1
soporte, al conectarla también se
conectará automáticamente el recipiente de mezclado.
Usted podrá utilizar el aparato hasta
1
10 minutos sin interrupción. Después
de un funcionamiento ininterrumpido
prolongado, deje que el aparato se
enfríe (tras 10 minutos de funcionamiento sin interrupción por lo menos
20 minutos)..
Cantidades máximas de trabajo:
1
podrá utilizar el aparato con un
máximo de 1,5 Kg de alimentos sólidos
o con 1,75 litros de líquidos en el recipiente de mezclado.
Encendido del aparato (Fig. 6)
0 Con el selector de velocidad (Fig. 1+6/
C) seleccione el rango de velocidad de
trabajo:
velocidades bajas, o bien
velocidades altas.
0 Con el interruptor de conexión / desco-
nexión (Fig.1+6/B)
– puede conectar y desconectar el
aparato, y
– también puede, para el rango de
velocidades seleccionado con el
mando anterior, regular las revoluciones del motor en 5 niveles distintos.
0 Si aprieta la tecla "Pulse" (Fig.1+6D)
durante el funcionamiento, el aparato
funcionará a la velocidad máxima
mientras mantenga esa tecla apretada.
Regulación de la velocidad del
recipiente de mezclado (Fig. 7)
La velocidad del recipiente de mezclado se puede regular a dos niveles.
0 Con el selector de velocidad del reci-
piente (Fig. 1/H) regulará la velocidad
del mismo:
I = velocidad baja
II = velocidad alta
Desconexión del aparato
0 Mover el interruptor de conexión / des-
conexión (Fig.1+6/B) a la posición "0".
– Se desconectarán la batidora y el
recipiente mezclador.
24
Page 25

822_949_233 KM400.book Seite 25 Freitag, 10. Februar 2006 6:14 18
Selección correcta de los ajustes
Los siguientes consejos le servirán como directrices.
Velocidad batidora
Selector rango velocidad
(Fig.1+6/C)
•Amasar, mezclar:
• Mezclar capas: 3, 4
e
Interruptor conexión /
desconexión (Fig 1+6/B)
Comenzar con 1 ó 2, después
pasar a 5
•Batir:
• Batir a espuma: 4 ó 5
o Tecla (Fig 1+6/D)
Comience todos los trabajos a velocidad baja. Así evitará que se levante polvo o que sal-
3
piquen los líquidos.
Velocidad del recipiente mezclador
Utilice el nivel "II" para batir clara de
huevo, nata y mezclas ligeras de repostería, y el nivel "I" para masas espesas y
cantidades grandes.
Limpieza y cuidados
Los restos de zumo de zanahoria y de
3
lombarda sobre las piezas de plástico se
deben quitar con aceite comestible
antes de fregarlas.
Batidora y soporte
Desenchufar de la red antes de cada
1
limpieza.
Tenga en cuenta que no debe entrar
agua al interior del aparato en ningún
caso! Nunca limpie el aparato bajo el
grifo ni lo sumerja en agua para fregarlo.
0 Limpie la batidora y el soporte con un
trapo húmedo.
Accesorios
Varilla batidora y amasador
0 La varilla batidora y el amasador se
limpian bajo el grifo con un cepillo de
fregar o en el lavavajillas.
Recipiente mezclador de acero
inoxidable (sólo KM 450)
0 El recipiente mezclador de acero inoxi-
dable (sin tapa!) se puede limpiar en el
lavavajillas.
La tapa del mezclador de acero inoxi-
1
dable no se puede meter en el lavavajillas.
Recipiente mezclador de plástico
(sólo KM 400)
Para limpiar el recipiente mezclador de
plástico, friéguelo normalmente.
Si quiere meter el recipiente mezclador
1
en el lavavajillas, deberá de colocarlo
sólo en la cesta de arriba del mismo.
Comenzar con 2 ó 3, después
aumentar velocidad
25
Page 26

822_949_233 KM400.book Seite 26 Freitag, 10. Februar 2006 6:14 18
e
Cómo guardar el
aparato
Guarde siempre el accesorio amasador
y la varilla batidora dentro del recipiente mezclador colocado en su sitio
sobre el soporte. De este modo evitará
que los accesorios se dañen.
Datos técnicos
Tensión de red: 230 - 240 V
Potencia: 380 W
Tiempo máximo de uso continuado:
10 minutos
Este aparato cumple las siguientes
;
Directivas CE:
• 73/23/CEE de 19.02.1973 “Directiva
baja tensión”, incluida la modificación
93/68/CEE
• 89/336/CEE de 03.05.1989 “Directiva
de compatibilidad electromagnética”,
incluida la modificación 92/31/ CEE
26
Page 27

822_949_233 KM400.book Seite 27 Freitag, 10. Februar 2006 6:14 18
p
Prezado cliente,
p
Leia este manual de instruções com
atenção. Tenha especial atenção às Instruções de segurança nas primeiras
páginas deste manual de instruções!
Guarde este manual de instruções para
posteriores consultas. Dê este manual a
um eventual novo proprietário do aparelho.
O que está marcado com um triângulo
1
de advertência e/ou palavras de aviso
(Aviso!, Cuidado!, Atenção!) são instruções importantes para a sua segurança ou para o bom funcionamento
do aparelho. Observá-las, portanto,
imprescindivelmente.
0
Este símbolo encaminha-o, passo a
passo, durante a utilização do aparelho.
A seguir a este símbolo receberá infor-
3
mações complementares para o
comando e sobre a utilização prática
do aparelho.
São ressaltadas com a folha de trevo as
2
instruções referentes a utilização económica do aparelho, além de instruções relativas à preservação do meio
ambiente.
Descrição do aparelho
(figura 1)
A Tecla de expulsão
B Interruptor para ligar / desligar
C Selector de velocidade
D Tecla "Pulse"
E Batedeira
F Tecla de balanceio do braço
G Tecla de desbloqueio
H Selector de velocidade do recipiente
J Suporte
K Recipiente de plástico (só KM 400)
L Batedor de claras
M Batedor para massa
N Raspador para massa
O Recipiente de aço inoxidável com
tampa (só KM 450)
P Placa de características (parte inferior
suporte e parte inferior batedeira)
1
Instruções de segurança
A segurança deste aparelho está de
acordo com as regras da técnica
conhecidas e com as normas de segurança de aparelhos. No entanto, no
papel de fabricante do aparelho, sentimo-nos na obrigação de passar-lhe as
instruções de segurança a seguir.
Segurança básica
• Antes de pôr o aparelho em funcionamento, certifique-se de que a tensão e
a frequência da rede eléctrica coincidem com os valores indicados na placa
de características.
• Nunca use a batedeira se
– fio eléctrico estiver danificado, ou
– chassis estiver danificado.
• Nunca desligue o aparelho puxando
pelo fio de ligação à rede.
• Se o fio deste aparelho estiver danificado, deve ser substituído pelo fabricante, o seu Serviço Técnico ou uma
pessoa com habilitações similares, a
fim de evitar riscos.
27
Page 28

822_949_233 KM400.book Seite 28 Freitag, 10. Februar 2006 6:14 18
p
• Qualquer reparação neste aparelho
deve ser efectuada unicamente por
técnicos especializados. Reparações
inadequadas podem causar ferimentos
graves. Em caso de reparação, dirija-se
ao serviço de assistência técnica ou ao
seu revendedor autorizado.
Protecção das crianças
• Nunca deixe a máquina a funcionar
sem vigilância e esteja especialmente
atento em presença de crianças.
Quando trabalhar com a batedeira, tenha em consideração
o seguinte:
• Nunca desmonte os acessórios
enquanto o aparelho estiver a funcionar.
• Nunca introduza os seus dedos na área
de trabalho dos batedores para massa
ou de claras. Existe risco de lesão!
• Não ponha a máquina em funcionamento com as mãos molhadas.
• As peças de plástico não devem ser
secas em cima ou muito perto de radiadores ou aquecedores.
• Não use o aparelho para misturar tintas
(verniz, poliéster, etc.) Perigo de explo-
são!
• Antes de qualquer trabalho de limpeza
ou manutenção, desligue a batedeira e
extraia a ficha da tomada eléctrica.
• Nunca limpe a máquina por baixo da
torneira ou submergindo-a em água.
• O fabricante não se responsabiliza por
eventuais danos originados por um uso
impróprio ou pelo manuseamento
incorrecto da máquina.
Instalação, ligação, colocação em
funcionamento
• Os acessórios só se podem montar ou
desmontar se o aparelho estiver desligado da rede eléctrica.
• A batedeira manual pode processar os
alimentos em qualquer tipo de recipiente. No entanto, recomendamos que
utilize o recipiente fornecido em conjunto com a máquina.
• Ligue o aparelho só se os acessórios de
trabalho estiverem dentro do recipiente, em conjunto com os alimentos
que deseja processar. Para retirar o
recipiente, espere sempre até os acessórios de trabalhos estarem completamente parados.
• Não introduza nenhum objecto duro
(colher, faca, batedores) entre os acessórios em funcionamento. Não meta a
mão nesta zona. Existe risco de lesão!
• Depois de acabar os trabalhos, é preciso desligar o aparelho e extrair o fio
eléctrico da tomada.
Eliminação
Material de embalagem
2
Os materiais utilizados na embalagem
deste aparelho são compatíveis com o
ambiente e recicláveis. As peças em
plástico estão identificadas, por exemplo, >PE<, >PS< etc. Elimine os materiais de embalagem de acordo com a sua
identificação, utilizando para o efeito
os contentores de recolha existentes
para essa finalidade nos locais de eliminação de resíduos da sua área de residência.
Aparelho usado
2
O símbolo W no produto ou na
embalagem indica que este produto
não pode ser tratado como lixo doméstico. Em vez disso, deve ser entregue
ao centro de recolha selectiva para a
reciclagem de equipamento eléctrico e
electrónico. Ao garantir uma eliminação adequada deste produto, irá ajudar a evitar eventuais consequências
negativas para o meio ambiente e para
a saúde pública, que, de outra forma,
poderiam ser provocadas por um tratamento incorrecto do produto. Para
obter informações mais pormenorizadas sobre a reciclagem deste produto,
contacte os serviços municipalizados
locais, o centro de recolha selectiva da
sua área de residência ou o estabelecimento onde adquiriu o produto.
28
Page 29

822_949_233 KM400.book Seite 29 Freitag, 10. Februar 2006 6:14 18
p
Instruções de uso
Com a batedeira fixa / manual, poderá
misturar, bater e amassar alimentos. A
batedeira e o recipiente misturador são
accionados em cada caso por um
motor próprio. Portanto, é possível
regular a velocidade da batedeira e do
recipiente misturador independentemente uma da outra. No entanto, o
aparelho liga-se e desliga-se com um
único interruptor.
Também poderá, com um simples
mecanismo, tirar a batedeira do
suporte, a fim de a utilizar como uma
batedeira de mão normal. Se utilizar o
aparelho nesta modalidade, faça-o
dando voltas lentamente pelo recipiente em que se encontram os alimentos.
3 Com os batedores para massa (Fig. 1/M)
poderá trabalhar massas espessas,
como massa de levedura, massa quebrada, massas de batata e outras massas pesadas.
Com os batedores de claras (Fig. 1/L)
pode preparar massas ligeiras, bater
claras em castelo, natas, fazer maioneses e purés, e também misturar molhos
e pudins flãs ou pudins em pó.
• Os aparelhos do tipo KM 400 estão
equipados com um recipiente misturador de plástico.
• Os aparelhos do tipo KM 450 estão
equipados com um recipiente misturador de aço inoxidável com tampa.
Colocação em funcionamento
Coloque ou tire a batedeira do
seu suporte (Fig. 2).
Antes de colocar ou tirar a batedeira,
1
desligue o aparelho e extraia o fio eléctrico da tomada!
0 Para pôr a máquina no suporte, colo-
que-a sobre este último (os dois ganchos do suporte prendem-se na
batedeira) e empurre para baixo, a fim
de a bloquear na sua posição.
0 Para a tirar do suporte, aperte a tecla
de desbloqueio (Fig. 1/G) e puxe a
batedeira para cima.
Montar / desmontar os acessórios (Fig. 3)
Antes de desmontar os acessórios, des-
1
ligue o aparelho e extraia o fio eléctrico da tomada!
0 Insira o batedor de claras ou o bate-
dor para massa no alojamento para
acessórios situado na parte de baixo da
batedeira, até notar claramente que
ficam engatados.
Cada um dos dois batedores para massa
1
dispõe de um acoplamento diferente.
Deve introduzir cada um no seu respectivo alojamento, porque em caso
contrário, a massa começaria a sair
pela parte superior!
Para isso, um dos batedores para massas dispõe de um pequeno anel adicional junto do batente do acoplamento.
Este batedor só pode ser introduzido
no alojamento adequado.
0 Este alojamento está assinalado
no aparelho com o símbolo .
0 Para desmontar os acessórios, agarre-
os com uma mão e aperte a tecla de
desbloqueio (Fig. 1/A).
Balanceie o braço da batedeira
para cima / para baixo (Fig. 4)
Antes de balancear o braço da bate-
1
deira para cima, desligue o aparelho e
extraia o fio eléctrico da tomada!
0 Aperte a tecla de balanceio (Fig. 1/F)
e desloque o braço para cima / para
baixo, até ficar bloqueado.
Os acessórios podem ser mudados
3
facilmente com a batedeira na posição
superior, e o recipiente misturador
também pode ser colocado ou tirado
do seu lugar.
29
Page 30

822_949_233 KM400.book Seite 30 Freitag, 10. Februar 2006 6:14 18
p
Colocar e tirar o recipiente
misturador (Fig. 5)
0 Coloque o recipiente sobre a guia na
parte inferior e gire-o depois com suavidade no sentido dos ponteiros do
relógio até engatar.
0
Para tirar o recipiente, gire-o em
contrário aos ponteiros do relógio.
Para facilitar esta operação, pode agar-
3
rar o suporte inferior com uma mão.
Durante a utilização, também é possí-
vel adicionar ingredientes facilmente
ao recipiente, devido à posição descentrada da batedeira.
Utilização da batedeira
Se a batedeira estiver colocada no
1
suporte, quando se liga, o recipiente
misturador também se liga automaticamente.
Poderá utilizar o aparelho durante um
1
período de até 10 minutos, sem interrupção. Depois de um período longo de
funcionamento, sem interrupções,
deverá deixar o aparelho arrefecer
(depois de 10 minutos sem interrupção
deixar, no mínimo, 20 minutos a arrefecer).
Quantidades máximas de trabalho:
1
poderá utilizar o aparelho com 1,5 Kg
de alimentos sólidos ou 1,75 litros de
líquidos no máximo no recipiente misturador.
sentido
Ligar o aparelho (Fig. 6)
0 Com o selector de velocidade
(Fig. 1+6/C) seleccione o nível de velocidade de trabalho:
velocidades baixas, ou bem
velocidades altas.
0 Com o interruptor para ligar / desligar
(Fig.1+6/B)
– pode ligar e desligar o aparelho, e
– também pode regular as rotações do
motor em 5 níveis diferentes, dentro
do nível de velocidade predefinido.
0 Se premir a tecla "Pulse" (Fig.1+6D)
durante o funcionamento, o aparelho
funcionará à velocidade máxima
enquanto essa tecla se mantiver premida.
Regulação da velocidade do recipiente misturador (Fig. 7)
A velocidade do recipiente misturador
pode ser regulada em dois níveis.
0 Com o selector de velocidade do recipi-
ente (Fig. 1/H), poderá regular a sua
velocidade:
I = velocidade baixa
II = velocidade alta
Desligar o aparelho
0 Coloque o interruptor para ligar / desli-
gar (Fig.1+6/B) na posição "0".
– A batedeira e o recipiente mistura-
dor desligam-se.
30
Page 31

822_949_233 KM400.book Seite 31 Freitag, 10. Februar 2006 6:14 18
Selecção correcta dos ajustes
Os seguintes conselhos podem servir de orientação.
Velocidade batedeira
Selector nível velocidade
(Fig.1+6/C)
• Amassar, misturar:
• Misturar ligeiramente: 3, 4
p
Interruptor para ligar /
desligar (Fig 1+6/B)
Começar com 1 ou 2, depois
passar para 5
•Bater:
• Bater até levantar: 4 ou 5
ou tecla (Fig. 1+6/D)
Comece todos os trabalhos à velocidade baixa. Deste modo, evitará que se levante pó ou
3
que os líquidos salpiquem.
Velocidade do recipiente misturador
Use o nível "II" para bater claras de ovo,
nata e massas leves, e o nível "I" para
massas espessas e grandes quantidades.
Limpeza e cuidados
Acessórios
Batedores de claras e para massa
0 Os batedores de claras e para massa
lavam-se à mão com uma escova ou na
máquina de lavar loiça.
Começar com 2 ou 3, depois
aumentar a velocidade
Recipiente misturador de aço
Os restos de sumo de cenoura e de
3
couve roxa nas peças de plástico
devem ser eliminados com óleo alimentar antes de proceder à sua limpeza com água e detergente.
Batedeira e suporte
Desligue da tomada eléctrica antes de
1
cada limpeza.
Tenha em conta que em caso algum,
deve entrar água no interior do aparelho! Nunca limpe o aparelho por baixo
da torneira, nem o submirja em água
para o lavar.
0 Limpe a batedeira e o suporte com um
pano húmido.
inoxidável (só KM 450)
0 O recipiente misturador de aço inoxi-
dável (sem tampa!) pode ser lavado na
máquina de lavar loiça.
A tampa do misturador de aço inoxidá-
1
vel não pode ser metida na máquina de
lavar loiça.
Recipiente misturador de
plástico (só KM 400)
Para limpar o recipiente misturador de
plástico, lave-o normalmente com
água e detergente.
Se quiser meter o recipiente misturador
1
na máquina de lavar loiça, deve
colocá-lo somente no cesto superior da
máquina.
31
Page 32

822_949_233 KM400.book Seite 32 Freitag, 10. Februar 2006 6:14 18
p
Como guardar o
aparelho
Guarde sempre os batedores para
massa e de claras dentro do recipiente
misturador colocado no seu lugar sobre
o suporte. Deste modo, evitará que os
acessórios sofram estragos.
Dados técnicos
Tensão de rede: 230 - 240 V
Potência: 380 W
Tempo máximo de uso contínuo:
10 minutos
Este aparelho está em conformidade
;
com as seguintes directivas da CE:
• 73/23/CEE de 19.2.1973 “Directiva de
baixa tensão”, inclusive directiva revisão 93/68/CEE.
• 89/336/CEE de 3.5.1989 “Directiva
CEM”, inclusive directiva de revisão
92/31/CEE.
32
Page 33

822_949_233 KM400.book Seite 33 Freitag, 10. Februar 2006 6:14 18
s
Bästa köpare,
s
läs noga igenom denna bruksanvisning.
Beakta särskilt säkerhetsföreskrifterna
på de första sidorna. Förvara bruksanvisningen för ett senare bruk på ett
säkert ställe och ge den vidare till möjliga senare ägare.
Med hjälp av varningstriangeln och/
1
eller signalorden (Varning! Se upp!
Obs!) framhävs punkter som är viktiga
för en säker och fungerande användning av apparaten. De ska absolut
beaktas.
0 Det här tecknet handleder dig steg för
steg när du använder mixern.
Det här tecknet står för komplette-
3
rande uppgifter som gäller den praktiska användningen av apparaten.
Med klöverbladet betecknas hänvis-
2
ningar och tips om en sparsam och
miljövänlig användning av apparaten.
Apparatbeskrivning
(bild 1)
A Utstötarknapp
B Strömställare Till/Från
C Hastighetsomkopplare
D Knapp Pulse
E Mixer
F Svängknapp
G Upplåsningsknapp
H Väljaromkopplare för bunkhastighet
J Omrörarstativ
K Plastbunke (endast KM 400)
L Visp
M Degkrokar
N Degskrapa
O Bunke i ädelstål med lock
(endast KM 450)
P Typskylt (undersida stativ och under-
sida mixer)
1 Säkerhetsföreskrifter
Säkerheten i denna apparat uppfyller
kraven i tekniska bestämmelser och
direktiv om säkerhet i elektrisk utrustning. Följande säkerhetsföreskrifter ska
ändå beaktas noga.
Allmänna säkerhetsanvisningar
• Apparaten får endast anslutas till ett
strömnät med en spänning och frekvens som överensstämmer med data på
typskylten!
• Starta inte apparaten om
– Nätsladden skadats,
– Mixerhuset skadats.
• Dra aldrig ut stickproppen ur vägguttaget genom att slita i nätsladden.
• För undvikande av olycksrisker får en
skadad nätsladd endast bytas ut av tillverkaren eller tillverkarens kundtjänst
eller annan kvalificerad person.
• Reparationer av denna apparat får
endast utföras av fackpersonal. Reparationer som utförs av ej utbildad personal kan innebära stora risker. Vänd
Dig vid behov av reparation till kundtjänst eller till en auktoriserad fackhandlare.
33
Page 34

822_949_233 KM400.book Seite 34 Freitag, 10. Februar 2006 6:14 18
s
Barnsäkerhet
• Lämna inte inkopplad mixer utan uppsikt och var speciellt försiktig om barn
finns i närheten!
Beakta följande vid användning
av apparaten
• Stöt inte ut arbetsredskapen när apparaten är påkopplad.
• För aldrig in handen eller fingrarna
mot degkrokarna eller vispen. Risk
finns för kroppsskada!
• Starta inte apparaten med våta händer.
• Plastdelarna får inte torkas på eller i
närheten av ett värmeelement.
• Apparaten får inte användas för att
röra färg (lack, polyester osv) - Explo-
sionsrisk!
• Innan underhålls- och rengöringsarbeten utförs skall apparaten frånkopplas
och stickproppen dras ur vägguttaget.
• Apparaten får inte rengöras under rinnande vatten eller i diskvatten.
• Tillverkaren ansvarar inte för skador
som uppstått till följd av icke avsedd
användning eller felhantering.
Uppställning, anslutning, start
• Arbetsredskapen får endast sättas i
eller tas ur när apparaten kopplats bort
från nätet.
• Med handmixern kan ingredienser i
alla slags kärl bearbetas. Använd helst
medlevererad bunke.
• Koppla på apparaten först sedan
arbetsredskapen placerats i bunken
med ingredienserna. Vänta till redskapen stannat innan du tar mixer ur bunken.
• För inte in hårda föremål (sked, kniv,
visp) eller handen mot roterande redskap. Risk finns för kroppsskada!
• Efter avslutat arbete skall apparaten
frånkopplas och stickproppen dras ur
vägguttaget.
Avfallshantering
Förpackningsmaterial
2
Förpackningsmaterialet är miljövänligt
och kan återanvändas. Plastdelarna är
märkta, till exempel >PE<, >PS<, etc.
Lämna förpackningsmaterialet vid de
kommunala återvinningsstationerna i
därför avsedda behållare.
Avfallshantering när produkten är
2
utsliten
Symbolen
emballaget anger att produkten inte
får hanteras som hushållsavfall. Den
skall i stället lämnas in på uppsamlingsplats för återvinning av el- och
elektronikkomponenter. Genom att
säkerställa att produkten hanteras på
rätt sätt bidrar du till att förebygga
eventuellt negativa miljö- och hälsoeffekter som kan uppstå om produkten
kasseras som vanligt avfall. För ytterligare upplysningar om återvinning bör
du kontakta lokala myndigheter eller
sophämtningstjänst eller affären där
du köpte varan.
W på produkten eller
34
Page 35

822_949_233 KM400.book Seite 35 Freitag, 10. Februar 2006 6:14 18
s
Användning
Med bords-/handmixern kan du röra,
knåda och vispa. Mixern och bunken
drivs av separata motorer och hastigheten för mixern och bunken kan därför ställas in oberoende av varandra.
Det oaktat till- och frånkopplas apparaten endast med en strömställare.
Med några få handgrepp mixern lyftas
bort från stativet för separat användning. För mixern långsamt runt i bunken med ingredienserna.
3 Med degkrokarna (bild 1/M) kan styva
degar bearbetas som t.ex. vete-, mör-,
potatis- och styva rördegar.
Med vispen (bild 1/L) kan lätta degar,
äggvita, vispgrädde, majonnäs, mos
tillredas samt såser och puddingpulver
röras.
• Apparatmodellen KM 400 har en plastbunke.
• Apparatmodellen KM 450 har en bunke
i ädelstål med lock.
Driftstart
Så här ställs mixern upp på eller
tas bort från stativet (bild 2)
Innan mixern ställs upp eller tas bort
1
skall apparaten frånkopplas och stickproppen dras ur vägguttaget!
0 Lägg upp mixern på stativet (de båda
hakarna på stativet griper in i mixern)
och tryck ned för låsning.
0 För borttagning tryck på upplåsnings-
knappen (bild 1/G) och lyft bort mixern
uppåt.
Insättning/uttagning av arbetsredskap (bild 3)
Innan arbetsredskapen stöts ut skall
1
apparaten frånkopplas och stickproppen dras ur vägguttaget!
0 Vispen resp degkrokarna skjuts in i
redskapsfästet på mixerns undre sida
tills de tydligt snäpper fast.
De båda degkrokarna har olika form på
1
skaften. De måste stickas in i rätt redskapsfäste, i annat transporteras degen
upp!
0 Den ena degkroken är försedd med en
liten ring vid skaftets skiva. Denna
degkrok passar endast i motsvarande
redskapsfäste.
Fästet är på apparaten märkt med
symbolen .
0 För uttagning grip tag i redskapet med
ena handen och tryck på utstötarknappen (bild 1/A).
Sväng mixern uppåt eller nedåt
(bild 4)
Frånkoppla alltid mixern innan den
1
svängs uppåt!
0 Tryck på svängknappen (bild 1/F) och
sväng mixern uppåt eller nedåt tills
den snäpper fast.
På uppsvängd mixer kan redskapen lätt
3
och bekvämt bytas ut och bunken tas
bort eller sättas upp.
Uppsättning/borttagning av
bunken (bild 5)
0 Lägg upp bunken på styrningen i stati-
vets undre del och lås med en lätt vridning medurs.
0 För borttagning lås upp genom att
vrida bunken moturs.
35
Page 36

822_949_233 KM400.book Seite 36 Freitag, 10. Februar 2006 6:14 18
s
Om så behövs, håll med ena hand fast
3
stativets undre del.
Eftersom mixern inte sitter i centrum
kan ingredienser bekvämt tillföras
under arbetets gång.
Användning av mixern
När mixern placerats på stativet och
1
inkopplats startar bunken automatiskt.
Du kan använda apparaten i upp till
1
10 minuter utan avbrott. Låt apparaten
svalna efter en längre tids användning
utan avbrott (låt svalna 20 minst
minuter efter 10 minuters användning
utan avbrott).
Maximimängder: Bearbeta i bunken
1
högst 1,5 kg fasta ingredienser eller
1,75 l i vätskeform.
Inkoppling av apparaten (bild 6)
0 Med hastighetsomkopplaren (bild 1+6/
C) kan du välja önskad hastighet:
låga hastigheter eller
höga hastigheter.
0 Med strömställaren (bild 1+6/B)
– kopplas apparaten till och från,
– regleras motorns varvtal i 5 steg
inom förvalt hastighetsintervall.
0 Så länge knappen Pulse (bild 1+6/D) på
inkopplad apparat hålls nedtryckt
arbetar mixern med högsta hastigheten.
Inställning av bunkens hastighet
(bild 7)
Bunkens hastighet kan ställas in i två
steg.
0 Med väljaromkopplaren för bunkhas-
tighet (bild 1/H) kan bunkens hastighet
ställas in:
I = låg hastighet
II = hög hastighet
Frånkoppling av apparaten
0 Skjut strömställaren (bild 1+6/B) till
läget "0".
– Mixern och bunken frånkopplas.
Val av rätt inställning
Anvisningarna nedan kan användas som riktlinjer.
Mixerns hastighet
Omkopplare hastighetsintervall (bild 1+6/C)
• knåda, blanda:
•röra ner: 3, 4
•röra:
• vispa till skum: 4 eller 5
eller knapp (bild 1+6/D)
Starta allt arbete med låg hastighet. Härvid undviks att mjöliga substanser virvlar upp
3
och att vätskor stänker.
Strömställare
(bild 1+6/B)
Starta med 1 eller 2, koppla
sedan upp till 5
Starta med 2 eller 3, koppla
sedan upp
36
Page 37

822_949_233 KM400.book Seite 37 Freitag, 10. Februar 2006 6:14 18
s
Bunkens hastighet
Använd steg "II" för vispning av äggvita, grädde och lätta kaksmetar, steg
"I" för styva degar och stora mängder.
Rengöring och skötsel
Avlägsna rester av morots- och röd-
3
kålssaft från plastdelar med matolja
innan de sköljs.
Mixer och bunke
Före rengöring skall stickproppen dras
1
ut vägguttaget
Se till att vatten inte tränger in i appa-
raten! Apparaten får inte rengöras
under rinnande vatten eller i diskvatten.
0 Rengör mixern och stativet med en
fuktig trasa.
Tillbehör
Visp och degkrokar
0 Rengör visp och degkrokar med borste
eller trasa under rinnande vatten eller i
diskmaskin!
Plastbunke (endast KM 400)
Rengör plastbunken i diskvatten.
Om plastbunken skall rengöras i disk-
1
maskin bör den placeras i övre korgen.
Förvaring
Förvara degkrokar och visp i på stativet
uppsatt bunke. Detta skyddar redskapen mot att skadas.
Tekniska data
Nätspänning: 230 - 240 V
Upptagen effekt: 380 W
Högsta brukstid: 10 minuter
Apparaten uppfyller följande
;
EG-direktiv:
• 73/23/EWG av den 19 februari 1973
"Lågspänningsdirektiv", med ändringsdirektiv 93/68/EWG.
• 89/336/EWG av den 3 maj 1989
"EMV-direktiv" med ändringsdirektiv
92/31/EWG.
Bunke i ädelstål (endast
KM 450)
0 Ädelstålsbunken kan (utan lock!) ren-
göras i diskmaskin.
Locket för ädelstålsbunken får inte
1
rengöras i diskmaskin.
37
Page 38

822_949_233 KM400.book Seite 38 Freitag, 10. Februar 2006 6:14 18
q
Arvoisa asiakas,
q
lue tämä käyttöohje huolellisesti läpi.
Ota ennen kaikkea huomioon tämän
käyttöohjeen ensimmäisillä sivuilla olevat turvallisuusohjeet! Säilytä käyttöohje myöhempää tarvetta varten.
Luovuta ohje mahdolliselle seuraavalle
omistajalle.
Huomioi varoituskolmio ja/tai varoitus-
1
sanat (Varoitus!, Varo!, Huomio!), joi-
den avulla tuodaan esille turvallisuutesi ja laitteen toimintakyvyn kannalta
tärkeitä ohjeita. Noudata niitä ehdottomasti!
0 Tämä merkki ohjaa sinua askel aske-
leelta laitteen käytössä.
Tämän merkin jälkeen saat laitteen
3
hallintaan ja käyttöön liittyviä lisätietoja.
Laitteen taloudelliseen ja ympäristöys-
2
tävälliseen käyttöön liittyvät vinkit ja
ohjeet on merkitty apilanlehdellä.
Laiteselostus (kuva 1)
A Irrotuspainike
B Käynnistyskytkin
C Nopeusalueen kytkin
D Sykäyspainike
E Sekoitin
F Kääntöpainike
G Vapautuspainike
H Sekoituskulhon nopeuden valintakyt-
kin
J Sekoitusteline
K Muovinen sekoituskulho (vain KM 400)
L Vispilät
M Taikinakoukut
N Taikinakaavin
O Jaloteräksinen sekoituskulho kansineen
(vain KM 450)
P Mallikilpi (sekoitustelineen ja sekoitti-
men pohjassa)
1 Turvallisuusohjeet
Tämä laite vastaa turvallisuudeltaan
yleisesti hyväksyttyjä tekniikka- ja laiteturvallisuusasetuksia. Meistä on silti
valmistajana aiheellista tutustuttaa
Sinut seuraaviin turvallisuusohjeisiin.
Yleiset turvallisuusohjeet
• Laite saadaan liittää ainoastaan sähkäverkkoon, jonka jännite ja taajuus vastaa mallikipeen merkittyjä tietoja!
• Älä koskaan ota laitetta käyttöön, jos
– verkkojohto on vahingoittunut,
– kotelo on vourioituinut.
• Älä koskaan irrota pistotulppaa pistorasiasta verkkojohdosta vetämällä.
• Jos laitteen verkkojohto on vahingoittunut, tulee vahingon välttämiseksi
verkkojohdon vaihto annettava valmistajan, valmistajan asiakaspalvelun tai
vastaavan ammattitaitoisen tehtäväksi.
• Tämän laitteen korjaukset tulee aina
jättää ammatti-ihmisen tehtäväksi. Epäasianmukaiset korjaustyöt saattavat
aiheuttaa vakavia vaaratilanteita.
Käänny huoltoasioissa aina valtuutetun
huoltoliikkeen puoleen.
38
Page 39

822_949_233 KM400.book Seite 39 Freitag, 10. Februar 2006 6:14 18
q
Lapsiturvallisuus
• Älä koskaan jätä laitetta käyntiin ilman
valvontaa ja kiinnitä erityistä huomiota
lasten turvallisuuteen!
Ota huomioon laitetta
käyttäessäsi
• Älä koskaan irrota tuökaluja koneen
käydessä.
• Älä koskaan tartu sormin taikinakoukkujen tai vispilöiden toiminta-alueeseen. Loukkaantumisvaara!
• Älä koskaan käytä laitetta märillä
käsillä.
• Muoviosia ei saa kuivattaa lämmityslaitteiden päällä tai välittömässä läheisyydessä.
• Laitetta ei saa käyttää maalien (lakan,
polyesterin jne.) sekoitukseen -
räjähdysvaara!
• Ennen huolto- ja puhdistustöitä on
laite sammutettava ja pistotulppa irrotettava pistorasiasta.
• Älä koskaan puhdista laitetta juoksevassa vedessä tai tiskivedessä.
• Valmistaja ei vastaa mahdollisista vaurioista, jotka ovat syntyneet asiattoman tai väärän käytön tuloksena.
Kokoaminen, liitäntä,
käyttöönotto
• Työvälineitä saadaan asentaa ja irrottaa vain laitteen ollessa irrotettuna
verkosta.
• Käsivatkaimella voidaan vatkata elintarvikkeita missä vain astiassa. Käytä
mieluiten toimitukseen kuuluvaa kulhoa.
• Käynnistä laite vain, työvälineiden
ollessa astiassa, jossa elintarvikkeet tullaan työstämään. Odota työvälineiden
pysähtymistä, ennen kuin poistat
astian.
• Älä pidä kovia esineitä (lusikoita, veitsiä, vispilöitä) lähellä pyöriviä työvälineitä äläkä laita kättäsi astiaan.
Loukkaantumisvaara!
• Työn päätyttyä on kone sammutettava
ja pistotulppa irrotettava pistorasiasta.
Jätehuolto
Pakkausmateriaalit
2
Pakkausmateriaalit ovat ekologisesti
kestäviä ja ne voidaan käyttää uudelleen. Muoviosat tunnistaa mm. merkinnöistä >PE<, >PS< jne. Toimita
käytetyt pakkausmateriaalit niille varattuihin keräyspisteisiin ja noudata
materiaalimerkinnöistä annettuja
ohjeita.
Käytöstä poistettujen laitteiden
2
hävittäminen
Symboli
teeseen tai sen pakkaukseen, osoittaa,
että tätä tuotetta ei saa käsitellä
talousjätteenä. Tuote on sen sijaan luovutettava sopivaan sähkö- ja elektroniikkalaitteiden kierrätyksestä
huolehtivaan keräyspisteeseen. Tämän
tuotteen asianmukaisen hävittämisen
varmistamisella autetaan estämään sen
mahdolliset ympäristöön ja terveyteen
kohdistuvat haittavaikutukset, joita voi
aiheutua muussa tapauksessa tämän
tuotteen epäasianmukaisesta jätekäsittelystä. Tarkempia tietoja tämän tuotteen kierrättämisestä saa paikallisesta
kunnantoimistosta, talousjätehuoltopalvelusta tai liikkeestä, josta tuote on
ostettu.
W, joka on merkitty tuot-
39
Page 40

822_949_233 KM400.book Seite 40 Freitag, 10. Februar 2006 6:14 18
q
Käyttö:
Pöytä-/käsivatkaimella voit sekoittaa,
alustaa ja vatkata elintarvikkeita.
Sekoitinta ja sekoituskulhoa käyttävät
omat moottorit, sekoittimen ja sekoituskulhon nopeutta voidaan säätää
toisistyaan riippumatta. Tästä huolimatta laite käynnistetään ja pysäytetään samalla kytkimellä.
Voit myös irrottaa sekoittimen sekoitustelineestä muutamalla otteella, ja
käyttää sitä tavallisena vatkaimena. Liikuta tällöin laitetta hiljaa ympyränmuotoisissa radoissa elintarviketta
sisältävässä astiassa.
3 Taikinakoukuilla (kuva 1/M) voit työs-
tää raskaita taikinoita, kuten , hiiva-,
muro-, peruna- ja raskaita sekoitettavia taikinoita.
Vispilöillä (kuva 1/L) voit sekoittaa
kevyitä sekoitettavia taikinoita, munavaahtoa, kermavaahtoa, majoneesia,
sosetta ja vanukasta.
• KM 400-malli on varustettu muovisella
sekoituskulholla.
• KM 450-malli on varustettu jaloteräksisellä kannellisella sekoituskulholla.
Käyttöönotto:
Sekoittimen asennus sekoitustelineeseen ja irrotus sekoitustelineestä (kuva 2)
Pysäytä kone ja irrota verkkopistoke
1
pistorasiasta ennen sekoittimen asennusta ja irrotusta!
0 Asenna sekoitin asettamalla se sekoi-
tustelineeseen (telineen kaksi hakasta
tarttuvat sekoittimeen) ja lukitse se
paikoilleen painamalla alaspäin.
0 Irrota painamalla vapautuspainiketta
(kuva 1/G) ja nostamalla sekoitin irti
ylöspäin.
Työkalun kiinnitys/irrotus
(kuva 3)
Pysäytä kone ja irrota verkkopistoke
1
pistorasiasta ennen työkalun irrotusta!
0 Työnnä vispilät tai taikinakoukut työ-
kalunpitimeen sekoittimen alapuolella
niin syvälle, että ne tuntuvasti lukkiutuvat.
Kahdella taikinakoukulla on erimuotoi-
1
set liitinosat. Ne tulee asentaa vastaaviin työkalunpitimiin, koska ne väärin
asennettuina nostaisivat taikinan ylös!
0 Toisessa taikinakoukussa on pieni lisä-
rengas varren levyn vieressä. Tämä
takinakoukku voidaan liittää vain oikeaan työkalunpitimeen.
Tämä on laitteessa merkitty .
0 Poista työkalut pitämällä kiinni niistä
toisella kädellä samalla, kun painat
vapautuspainiketta (kuva 1/A).
Käännä sekoitinta ylös/alas
(kuva 4)
Ennen ylöskääntämistä on sekoitin aina
1
pysäytettävä!
0 Paina kääntöpainiketta (kuva 1/F) ja
käännä sekoitinta ylös tai alas, kunnes
se lukkiutuu kyseiseen asentoon.
Sekoittimen ollessa ylös käännettynä
3
voidaan vaivatta vaihtaa työvälineitä
sekä poistaa tai asettaa sekoituskulho.
Sekoituskulhon asettaminen/
poistaminen (kuva 5)
0 Aseta sekoituskulho laitteen alaosan
ohjaimeen ja lukitse kiertämällä sitä
kevyesti myötäpäivään.
0 Vapauta ja poista sekoituskulho kiertä-
mällä sitä vastapäivään.
Pidä tarvittaessa kiinni alaostasta toi-
3
sella kädellä.
Sekoittimen toispuolisen sijoituksen
anasiosta voidaan vaivatta lisätä aineksia sekoituskulhoon myös käytön
aikana.
40
Page 41

822_949_233 KM400.book Seite 41 Freitag, 10. Februar 2006 6:14 18
q
Työskentely sekoittimen kanssa
Jos sekoitin on asennettu sekoitusteli-
1
neeseen käynnistyy myös sekoituskulho
automaattisesti sekoitinta käynnistettäessä.
Voit käyttää laitetta jopa 10 minuutin
1
ajan keskeytyksettä. Anna laitteen jäähtyä aina pidemmän, keskeytyksettömän
käytön jälkeen (10 minuutin käytön jälkeen vähintään 20 minuuttia)
Suurimmat sallitut työstettävät
1
määrät: Työstä sekoituskulhossa korkeintaan 1,5 kg kiinteitä tai 1,75 l
nestemäisiä elintarvikkeita.
Laitteen käynnistys (kuva 6)
0 Nopeusalueen valintakytkimellä (kuva
1+6/C) valitset halutun nopeusalueen:
alhaiset nopeudet, tai
suuret nopeudet.
Oikeiden asetusten valinta
Seuraavat ohjeet voivat toimia suuntaa antavina.
Sekoittimen nopeus
.
0 Käynnistyskytkimellä (kuva 1+6/B)
– voit käynnistää ja pysäyttää laitetta,
– säätää moottorin kierrosluvun vii-
dessä portaassa esivalitun nopeusalueen puitteissa.
0 Sekoitin toimii maksiminopeudella,
niin kauan kuin koneen käydessä pidät
sykäyspainiketta (kuva 1+6/D) painettuna.
Sekoituskulhon nopeuden säätö
(kuva 7)
Sekoituskulhon nopeutta voidaan säätää kahdessa portaassa.
0 Sekoituskulhon nopeuden valintakytki-
mellä (kuva 1/H) asetat sekoituskulhon
nopeuden:
I = alhainen nopeus
II = suuri nopeus
Laitteen pysäytys
0 Työnnä käynnistyskytkin (kuva 1+6/B)
asentoon "0".
– Sekoitin ja sekoituskulho pysähtyvät.
nopeusalueiden kytkin
(kuva 1+6/C)
• vaivaaminen, sekoittaminen:
• hämmentäminen: 3, 4
• sekoittaminen:
• vaahdoksi vatkaaminen: 4 tai 5
tai painike (kuva 1+6/D)
Aloita kaikki työt alhaisella nopeudella. Täten vältät jauhojen pöllähtämisen ja nesteiden
3
roiskimisen.
käynnistyskytkin
(kuva 1+6/B)
aloita asennosta 1 tai 2,
kytke sitten asentoon 5
aloita asennosta 2 tai 3,
kytke sitten suuremmalle
41
Page 42

822_949_233 KM400.book Seite 42 Freitag, 10. Februar 2006 6:14 18
q
Sekoituskulhon nopeus
Käytä nopeusporrasta "II" munanvalkuaisen ja kerman vatkaamiseen sekä
kevyeiden kakkutainoiden sekoittamiseen, porrasta "I" raskaille taikinoille ja
suurille määrille.
Puhdistus ja hoito
Muoviosiin jääneet porkkanan- ja
3
punajuurimehujäännökset poistetaan
ruokaöljyllä ennen huuhtelua.
Sekoitin ja sekoitusteline
Irrota aina pistotulppa pistorasiasta
1
ennen puhdistusta. Ota huomioon,
ettei laitteen sisään missään nimesä
saa päästä vettä! Älä koskaan puhdista
laitetta juoksevassa vedessä tai tiskivedessä.
0 Puhdista sekoitin ja sekoitusteline kos-
tealla liinalla.
Lisälaitteet
Vispilät ja taikinakoukut
0 Puhdista vispilät ja taikinakoukut har-
jalla tai liinalla juoksevassa vedessä tai
astianpesukoneessa!
Muovinen sekoituskulho
(vain KM 400)
Puhdista muovinen sekoituskulho tiskivedessä.
Jos tahdot puhdistaa muovisen sekoi-
1
tuskulhon astianpesukoneessa, se on
sijoitettava yläkoriin.
Säilytys
Säilytä taikinakoukut ja vispilät sekoitusteleineeseen asetetussa sekoituskulhossa. Täten suojaat niitä vaurioilta.
Tekniset tiedot
Verkkojännite: 230 - 240 V
Tehontarve: 380 W
Pisin sallittu käyttöaika: 10 minuuttia
Tämä laite on seuraavien EY-direktii-
;
vien mukainen:
• 73/23/ETY, 19.9.1973 "Pienjännitedirektiivi", mukaan luettuna muutosdirektiivi 93/68/ETY.
• 89/336/ETY, 3.5.1989 "Sähkömagneettista yhteensopivuutta koskeva direktiivi", mukaanluettuna muutosdirektiivi
92/31/ETY.
Jaloteräksinen sekoituskulho
(vain KM 450)
0 Jaloteräksinen sekoituskulho (ilman
kantta!) voidaan pestä astianpesukoneessa.
Jaloteräksisen sekoituskulhon kantta ei
1
saa pestä astianpesukoneessa.
42
Page 43

822_949_233 KM400.book Seite 43 Freitag, 10. Februar 2006 6:14 18
c
Vážená zákaznice,
c
vážený zákazníku,
pøeètìtì si laskavì peèlivì tento
návod k použití.
Dbejte pøedevším bezpeènostních
pokynù na prvních stránkách tohoto
návodu k použití! Návod k použití
laskavì uschovejte pro pozdìjší
vyhledání. Pøedejte jej dále
pøípadným novým vlastníkùm
pøístroje.
Prostøednictvím výstražného tro-
1
júhelníku a/nebo návìstí (Výstraha!,
Opatrnì!, Pozor!) jsou zdùraznìny
pokyny, které jsou dùležité pro Vaši
bezpeènost èi pro funkènost
pøístroje. Bezpodmíneènì si jich laskavì povšimnìte.
0 Tato znaèka Vás povede krok za kro-
kem pøi obsluze tohoto pøístroje.
Po této znaèce obdržíte doplòující
3
informace k obsluze a praktickému
použití pøístroje.
Trojlístek oznaèuje tipy a upozornìní
2
pro hospodárné a ekologicky vhodné
použití pøístroje.
Popis pøístroje
(obr. 1)
A Tlaèítko pro vyjímání nástrojù
B Vypínaè
C Spínaè rozsahu rychlosti
D Pulzní tlaèítko
E Mixér
F Tlaèítko pro pøevrácení
G Tlaèítko pro odblokování
H Voliè rychlosti míchací nádoby
J Podstavec
K Umìlohmotná míchací nádoba
(pouze u typu KM 400)
L Šlehací metly
M Hnìtací metly
N Stìrka tìsta
O Míchací nádoba z ušlechtilé oceli
s víkem (pouze u typu KM 450)
P Typový štítek (na dolní stranì
podstavce a na dolní stranì mixéru)
1 Bezpeènostní pokyny
Bezpeènost tohoto spotøebièe
odpovídá platným technickým
pøedpisùm a zákonu o bezpeènosti
spotøebièù. Jako výrobce máme však
nicménì zapotøebí Vás seznámit
s následujícími bezpeènostními
pokyny.
Všeobecné bezpeènostní
pokyny
• Pøístroj se smí pøipojit pouze k takové
elektrické síti, jejíž napìtí a kmitoèet
souhlasí s údaji na typovém štítku!
• Nikdy pøístroj neuvádìjte do provozu,
pokud je poškozená
– napájecí šòùra
–nebo pouzdro.
• Pøi vytahování zástrèky ze sít’ové
šòùry netahejte nikdy za napájecí
šòùru.
• Pokud je napájecí šòùra pøístroje
poškozená, musí ji výrobce,
pracovníci servisního støediska nebo
jiná kvalifikovaná osoba vymìnit, aby
se zabránilo možným škodám.
43
Page 44

822_949_233 KM400.book Seite 44 Freitag, 10. Februar 2006 6:14 18
c
• Opravy tohoto spotøebièe smí provádìt
pouze odbornì vyškolení pracovníci.
Nesprávnì provedené opravy mohou
zpùsobit znaèné škody. Potøebujete-li
opravu, obrat’te se na naši
zákaznickou službu nebo na svého
autorizovaného prodejce.
Zabezpeèení pøed dìtmi
• Nenechávejte pøístroj v provozu bez
dozoru a uchovávejte jej mimo dosah
dìtí!
Pøi používání pøístroje byste
mìli dodržovat následující
pokyny:
• Nevyjímejte z mixéru nikdy nástroje,
dokud je pøístroj v chodu.
• Dokud je pøístroj v provozu,
nevkládejte nikdy prsty do oblasti
hnìtacích a míchacích metel. Hrozí
nebezpeèí úrazu!
• S pøístrojem nikdy nemanipulujte
mokrýma rukama.
• Souèásti z umìlé hmoty nikdy
nesušte na topných tìlesech nebo
v jejich bezprostøední blízkosti.
• S pøístrojem nikdy nemíchejte barvy
(laky, polyester a podobnì) – hrozí
nebezpeèí výbuchu!
• Pøed zahájením jakýchkoli operací
èištìní nebo údržby prací pøístroj
vždy vypnìte a sít’ovou zástrèku
vytáhnìte ze zásuvky.
• Pøístroj nikdy neomývejte pod tekoucí
vodou ani jej vodou neoplachujte.
• Výrobce neruèí za pøípadné škody
zpùsobené nevhodným použitím
pøístroje nebo jeho chybnou
obsluhou.
Instalace, pøipojení a uvedení
do provozu
• Pracovní nástroje je dovoleno do
pøístroje zasouvat nebo je z nìj
vyjímat pouze v pøípadì, že je pøístroj
odpojen od sítì.
• Pomocí ruèního mixéru lze
zpracovávat potraviny v jakékoli
nádobì. Nejlépe se však hodí k
mixování v bìžných nádobách z
umìlé hmoty, pokud jsou dostateènì
hluboké, okrouhlé a mají neklouzavý
povrch. Pokud je to možné,
používejte nádobu dodanou
s mixérem.
• Pøístroj zapínejte pouze tehdy, jsou-li
v nádobì pracovní nástroje a
potraviny, které chcete zpracovat.
Pøed vyjmutím nádoby vždy vyèkejte,
dokud se pøístroj zcela nezastaví.
• Do oblasti, v níž se pohybují nástroje,
nevkládejte tvrdé pøedmìty (lžíce,
nože, vaøeèky) a nezasahujte do ní
rukama. Hrozí nebezpeèí úrazu!
• Po ukonèení práce pøístroj vypnìte a
sít’ovou zástrèku vytáhnìte ze
zásuvky.
Likvidace
Obalový materiál
2
Použité obalové materiály jsou ekologické a recyklovatelné. Umìlé hmoty
jsou oznaèeny následujícím
zpùsobem: >PE<, >PS<, atd. Obalový
materiál zlikvidujte v souladu s jeho
oznaèením ve speciálních sbìrných
dvorech ve své obci.
Starý spotøebiè
2
Symbol
balení udává, že tento výrobek nepatrí do domácího odpadu. Je nutné
odvézt ho do sberného místa pro
recyklaci elektrického a elektronického zarízení. Zajištením správné
likvidace tohoto výrobku pomužete
zabránit negativním dusledkum pro
životní prostredí a lidské zdraví, které
by jinak byly zpusobeny nevhodnou
likvidací tohoto výrobku. Podrobnejší
informace o recyklaci tohoto výrobku
zjistíte u príslušného místního úradu,
služby pro likvidaci domovního
odpadu nebo v obchode, kde jste
výrobek zakoupili.
W na výrobku nebo jeho
44
Page 45

822_949_233 KM400.book Seite 45 Freitag, 10. Februar 2006 6:14 18
c
Obsluha
Pomocí tohoto kuchyòského robotu/
ruèního mixéru mùžete potraviny
míchat, hníst a šlehat. Mixér a
míchací nádoba jsou pohánìny
vlastním motorem; rychlost mixéru i
rychlost nádoby lze nastavit
samostatnì. Pøesto je pøístroj
vybaven pouze jedním vypínaèem.
Nìkolika jednoduchými pohyby lze
mixér sejmout z podstavce a použít
ho jako bìžný ruèní mixér.
V takovém pøípadì pohybujte zvolna
mixérem v nádobì s potravinami
krouživými pohyby.
3 Hnìtací metly (obr. 1/M) slouží ke
zpracovávání tuhých druhù tìst, jako
je kynuté, køehké a bramborové tìsto
a tuhá míchaná tìsta.
Šlehací metly (obr. 1/L) se hodí
k pøípravì lehkých míchaných tìst,
ke šlehání bílku, šlehaèky, majonéz a
pyré a k rozmíchávání omáèek a
pudinkù v prášku.
• Pøístroje typu KM 400 jsou vybaveny
míchací nádobou z umìlé hmoty.
• Pøístroje typu KM 450 jsou vybaveny
míchací nádobou z ušlechtilé oceli s
víkem.
Uvedení do provozu
Nasazení mixéru na
podstavec/sejmutí mixéru
z podstavce (obr. 2).
Pøed nasazením nebo sejmutím
1
mixéru pøístroj vypnìte a vytáhnìte
sít’ovou zástrèku ze zásuvky.
0 Mixér nasaïte na podstavec (oba
háèky na podstavci zasuòte do
mixéru) a smìrem dolù na nìj
zatlaète.
0 Pøi sundávání mixéru z podstavce
zatlaète na tlaèítko pro doblokování
(obr. 1/G)
Zasunutí/vyjmutí nástroje
(obr 3)
Pøed vyjmutím nástrojù pøístroj
1
vypnìte a vytáhnìte sít’ovou
zástrèku.
0 Šlehací a hnìtací metly zasuòte do
úchytek na dolní stranì mixéru; pøi
správném postupu se ozve cvaknutí.
Obì hnìtací metly mají odlišnì tvaro-
1
vané konce. Každou hnìtací metlu je
nutno zasunout do pøíslušné úchytky;
pokud by došlo k zámìnì metel,
bude tìsto z nádoby vystøikovat.
0 Jedna hnìtací metla je vybavena
malým pøídavným kroužkem u
kotouèe na høídeli. Tuto hnìtací metlu
lze zasunout pouze do pøíslušné
úchytky.
Tato úchytka je na pøístroji oznaèena
znaèkou .
0 Chcete-li nástroje vyjmout, jednou
rukou je pøidržte a stisknìte tlaèítko
pro vyjmutí nástrojù (obr. 1/A).
Pøevrácení mixéru nahoru/
dolù (obr. 4)
Pøed obrácením mixéru nahoru je
1
mixér vždy nutno vypnout!
0 Stisknìte tlaèítko pro pøevrácení (obr.
1/F) a mixér pøevrat’te nahoru nebo
dolù; pøi správném postupu se ozve
cvaknutí
U mixéru pøevráceného nahoru lze
3
bez problémù vymìnit nástroje a
sejmout nebo nasadit míchací
nádobu.
Nasazení/sejmutí míchací
nádoby (obr. 5)
0 Míchací nádobu nasaïte na
pøíslušné místo na spodním dílu a
lehkým pootoèením ve smìru
hodinových ruèièek ji zajistìte.
0 Chcete-li míchací nádobu vyjmout,
pootoète jí proti smìru hodinových
ruèièek.
Spodní díl pøitom mùžete pøidržovat
3
rukou.
45
Page 46

822_949_233 KM400.book Seite 46 Freitag, 10. Februar 2006 6:14 18
c
Díky excentrické poloze mixéru
mùžete do nádoby snadno pøidávat
další pøísady i bìhem provozu.
Práce s mixérem
Pokud je mixér nasazen na
1
podstavec, zapne se souèasnì s
mixérem automaticky i míchací
nádoba.
Zaøízení mùžete používat až 10 minut
1
bez pøerušení. Po delším
nepøerušovaném provozu je vždy
nechejte vychladnout (po 10 minutách
bez pøerušení minimálnì 20 minut).
Maximální zpracovatelné
1
množství: V míchací nádobì
zpracovávejte maximálnì 1,5 kg
pevných nebo 1,75 l tekutých
potravin.
Zapnutí pøístroje (obr. 6)
0 Pomocí spínaèe rozsahu rychlosti
(obr. 1+6/C) nastavte rozsah
rychlosti:
nižší rychlosti, r
vyšší rychlosti.
0 Hlavní vypínaè (obr. 1+6/B) slouží
– zapínání a vypínání pøístroje,
– pìtistupòovému nastavení poètu
otáèek motoru (v rámci
pøedvoleného rozsahu rychlosti).
0 Pokud u spuštìného pøístroje
stisknete pulzní tlaèítko (obr. 1+6/D),
bude mixér pracovat nejvyšší
rychlostí.
Nastavení rychlosti míchací
nádoby (obr. 7)
Rychlost míchací nádoby lze nastavit
ve dvou stupních.
0 Rychlost míchací nádoby se
nastavuje pomocí pøíslušného volièe
(obr. 1/H):
I= nízká rychlost,
II = vysoká rychlost.
Vypnutí pøístroje
0 Nastavte hlavní vypínaè (obr. 1+6/B)
do polohy “0”.
–Mixér i míchací nádoba se
vypnou.
Volba správného nastavení
Pøi volbì nastavení vám mohou jako smìrnice posloužit následující pokyny.
Rychlost mixéru
Spínaè rozsahu rychlosti
(obr. 1+6/C)
• Hnìtení, mísení:
• dìlení: 3, 4
• Míchání:
• šlehání: na stupeò 4 nebo 5.
nebo tlaèítko (obr. 1+6/D)
Pøi jakémkoli druhu práce zaèínejte nižším stupnìm rychlosti. Tak zabráníte
3
rozprašování práškovitých substancí a vystøikování tekutin z nádoby.
Hlavní vypínac
(obr. 1+6/B)
Zaènìte stupnìm 1 nebo
2, poté zvyšte na stupeò 5
Zaènìte stupnìm 2 nebo
3, poté zvyšte
46
Page 47

822_949_233 KM400.book Seite 47 Freitag, 10. Februar 2006 6:14 18
c
Rychlost míchací nádoby
Ke šlehání vajeèného bílku, smetany
a lehkých kuchyòských smìsí
nastavte rychlost na stupeò „II“, pro
tuhá tìsta a velká množství
používejte stupeò „I“.
Èištìní a údržba
Zbytky mrkvové štávy a št’ávy z
3
èerveného zelí odstraòte pøed mytím
pomocí stolního oleje.
Mixér a podstavec
Pøed každým èištìním vytáhnìte ze
1
zásuvky sít’ovou zástrèku.
Dbejte na to, aby se voda v žádném
pøípadì nedostala dovnitø pøístroje!
Pøístroj nikdy neomývejte pod tekoucí
vodou ani jej vodou neoplachujte.
0 Mixér i podstavec èistìte vlhkým
hadøíkem.
Pøíslušenství
Šlehací a hnìtací metly
0 Šlehací a hnìtací metly oèistìte
kartáèem pod tekoucí vodou nebo je
umyjte v myèce na nádobí.
Uskladnìní
Hnìtací a šlehací metly ukládejte do
míchací nádoby, nasazené na
podstavec. Jedinì tak je uchráníte
pøed poškozením.
Technické údaje
Napìtí v síti: 230 - 240 V
Pøíkon: 380 W
Maximální doba provozu: 10 minut
Tento pøístroj odpovídá následujícím
;
smìrnicím ES:
• 73/23/EHS ze dne 19.2.1973 –
Nízkonapìt’ové smìrnice
• 89/336/EHS ze dne 3.5.1989
(vèetnì modifikaèní smìrnice
92/31/EHS) – Smìrnice EMV.
Míchací nádoba z ušlechtilé
oceli (pouze u typu KM 450)
0 Míchací nádobu z ušlechtilé oceli
(bez víka!) lze mýt v myèce na
nádobí.
Víko této nádoby však v myèce mýt
1
nelze.
Umìlohmotná míchací nádoba
(pouze u typu KM 400)
Umìlohmotnou míchací nádobu
umývejte s ostatním nádobím v
døezu.
Pokud budete umìlohmotnou
1
míchací nádobu umývat v myèce,
umístìte ji do horního koše.
47
Page 48

822_949_233 KM400.book Seite 48 Freitag, 10. Februar 2006 6:14 18
o
Szanowni klienci
o
Prosimy o staranne przeczytanie tej
instrukcji obs³ugi. Nale¿y szczególnie
zwróciæ uwagê na zasady
bezpieczeñstwa, które podano na
pierwszych stronach! Instrukcjê
obs³ugi nale¿y przechowywaæ w celu
korzystania z niej w póŸniejszym
terminie. Instrukcjê tê nale¿y
przekazaæ ewentualnemu nastêpnemu
u¿ytkownikowi tego sprzêtu.
Symbol trójk¹ta ostrzegawczego i/lub
1
s³owa ostrzegawcze (
Niebezpieczeñstwo!, Uwaga!
stosowane w celu podkreœlenia
zagro¿eñ osobistych lub podkreœlenia
informacji wa¿nych dla zachowania
u¿ytecznoœci sprzêtu. Prosimy o
bezwarunkowe ich przestrzeganie.
0 Ten symbol wskazuje kolejne
czynnoœci podczas obs³ugi sprzêtu.
Tym symbolem oznaczono informacje
3
uzupe³niaj¹ce, dotycz¹ce obs³ugi i
praktycznych zastosowañ sprzêtu.
Symbolem koniczynki oznaczono
2
rady i wskazówki dotycz¹ce
ekonomicznego i przyjaznego dla
naturalnego œrodowiska sposobu
u¿ywania sprzêtu.
Ostrze¿enie!
) s¹
Opis urz¹dzenia
(rysunek 1)
A Przycisk wyrzucaj¹cy
B W³¹cznik / wy³¹cznik
C Prze³¹cznik prêdkoœci
D Przycisk impulsowania
E Mikser
F Przycisk odchylania
G Przycisk odblokowuj¹cy
H Prze³¹cznik prêdkoœci miski
J Stojak
K Miska z tworzywa sztucznego
,
(tylko KM 400)
L Trzepaczka
M Koñcówka do wyrabiania ciasta
N Skrobak do ciasta
O Miska ze stali szlachetnej z pokrywk¹
(tylko KM 450)
P Tabliczka znamionowa (dolna czêœæ
stojaka i dolna czêœæ miksera)
1 Zasady
bezpieczeñstwa
Bezpieczeñstwo tego urz¹dzenia
odpowiada uznanym zasadom
techniki oraz ustawie o
bezpieczeñstwie urz¹dzeñ. Jako
producent sprzêtu szczególnie
zalecamy stosowanie siê do
poni¿szych zasad bezpieczeñstwa
Ogólne wskazówki dotycz¹ce
bezpieczeñstwa
• Urz¹dzenie mo¿na pod³¹czaæ tylko i
wy³¹cznie do sieci elektrycznej, której
napiêcie i czêstotliwoœci s¹ zgodne z
danymi na tabliczce znamionowej!
• Urz¹dzenia nie nale¿y uruchamiaæ,
jeœli
– Przewód przy³¹czeniowy jest
uszkodzony,
– Uszkodzona jest obudowa.
• Wtyczki nie nale¿y wyci¹gaæ z
gniazda sieciowego poci¹gaj¹c za
przewód.
• Jeœli uszkodzeniu uleg³ kabel
przy³¹czeniowy urz¹dzenia, nale¿y
zleciæ jego wymianê producentowi
48
Page 49

822_949_233 KM400.book Seite 49 Freitag, 10. Februar 2006 6:14 18
o
lub odpowiedniemu punktowi
serwisowemu, lub odpowiednio
wykwalifikowanemu personelowi, w
celu zapobiegniêcia
niebezpieczeñstwom.
• Urz¹dzenie mo¿e byæ naprawiane
wy³¹cznie przez specjalistów.
Niefachowe naprawy mog¹
prowadziæ do wyst¹pienia du¿ych
zagro¿eñ dla bezpieczeñstwa w
u¿ytkowaniu urz¹dzenia. W razie
koniecznoœci przeprowadzenia
naprawy nale¿y zwróciæ siê do
serwisu lub autoryzowanego
sprzedawcy.
Bezpieczeñstwo dzieci
• Nie pozostawiaæ w³¹czonego
urz¹dzenia bez nadzoru. Szczególn¹
ostro¿noœæ nale¿y zachowaæ w
przypadku obecnoœci dzieci!
Podczas eksploatacji
urz¹dzenia nale¿y zwróciæ
uwagê na nastêpuj¹ce
aspekty
• Nie wyjmowaæ koñcówek, jeœli
urz¹dzenie jest w³¹czone.
• Nie wk³adaæ palców w strefê pracy
koñcówki do wyrabiania ciasta lub
trzepaczki. Grozi doznaniem
obra¿eñ!
• Nie w³¹czaæ urz¹dzenia mokrymi
rêkami.
• Nie nale¿y suszyæ elementów
plastikowych na lub w bezpoœrednim
s¹siedztwie grzejników.
• Za pomoc¹ urz¹dzenia nie mo¿na
mieszaæ farb (lakierów, poliestrów
itd.) – Niebezpieczeñstwo
wybuchu!
• Przed wszystkimi czynnoœciami
konserwacyjnymi oraz czyszczeniem
nale¿y wy³¹czyæ urz¹dzenie i
wyci¹gn¹æ wtyczkê z gniazda
sieciowego.
• Urz¹dzenia nie nale¿y czyœciæ pod
bie¿¹c¹ wod¹ lub zanurzaæ w
wodzie.
• Producent nie ponosi
odpowiedzialnoœci za ewentualne
szkody zaistnia³e na skutek
u¿ytkowania niezgodnego z
przeznaczeniem lub niew³aœciwej
obs³ugi.
Ustawienie, pod³¹czenie,
uruchomienie
• Koñcówki mo¿na mocowaæ i
wyjmowaæ tylko i wy³¹cznie po
wyjêciu wtyczki urz¹dzenia z gniazda
sieciowego.
• Mikserem rêcznym mo¿na
przetwarzaæ ¿ywnoœæ w ka¿dym
naczyniu. Zalecamy jednak
zastosowanie miski znajduj¹cej siê w
komplecie.
• Urz¹dzenie nale¿y w³¹czaæ tylko po
umieszczeniu w naczyniu artyku³ów
spo¿ywczych przeznaczonych do
przetwarzania. Przed wyjêciem miksera z naczynia, nale¿y zawsze odczekaæ do momentu zatrzymania siê
koñcówek.
• Nie nale¿y zbli¿aæ twardych
przedmiotów (³y¿ka, nó¿, mieszad³o)
do strefy roboczej poruszaj¹cych siê
koñcówek, nie siêgaæ rêkoma. Grozi
doznaniem obra¿eñ!
• Po zakoñczeniu prac nale¿y wy³¹czyæ
urz¹dzenie i wyci¹gn¹æ wtyczkê z
gniazda sieciowego.
Recykling
Materia³ opakowania
2
Materia³y opakowania mog¹ bez
ograniczeñ zostaæ powtórnie przetworzone. Elementy z tworzyw sztucznych s¹ oznakowane, np. >PE<,
>PS<, itd. Usuwaæ materia³y opakowañ zgodnie z ich oznaczeniem w
komunalnych zak³adach utylizacyjnych, do przewidzianych w tym
celu pojemników zbiorczych.
Wyeksploatowane urz¹dzenie
2
Symbol
opakowaniu oznacza, ze tego produktu nie wolno traktowaæ tak, jak
innych odpadów domowych. Nalezy
na produkcie lub na
W
49
Page 50

822_949_233 KM400.book Seite 50 Freitag, 10. Februar 2006 6:14 18
o
oddaæ go do w³asciwego punktu
skupu surowców wtórnych
zajmuj¹cego siê z³omowanym sprzêtem
elektrycznym i elektronicznym.
W³asciwa utylizacja i z³omowanie
pomaga w eliminacji niekorzystnego
wp³ywu z³omowanych produktów na
srodowisko naturalne oraz zdrowie.
Aby uzyskaæ szczegó³owe dane
dotycz¹ce mozliwosci recyklingu
niniejszego urz¹dzenia, nalezy skontaktowaæ siê z lokalnym urzêdem
miasta, s³uzbami oczyszczania miasta lub sklepem, w którym produkt
zosta³ zakupiony.
Obs³uga
Za pomoc¹ miksera rêcznego /
stoj¹cego mo¿na mieszaæ, wyrabiaæ i
ubijaæ artyku³y spo¿ywcze. Zarówno
mikser jak i miska s¹ napêdzane
w³asnym silnikiem, prêdkoœæ miksera
i miski jest regulowana niezale¿nie.
Pomimo to urz¹dzenie mo¿na
w³¹czaæ i wy³¹czaæ jednym
przyciskiem.
Mikser kilkoma prostymi ruchami
mo¿na zdj¹æ ze stojaka i u¿ywaæ go
jak zwyczajny mikser rêczny. W tym
celu nale¿y prowadziæ urz¹dzenie
spokojnym ruchem okrê¿nym w
naczyniu z artyku³ami spo¿ywczymi.
3 Za pomoc¹ koñcówki do wyrabiania
ciasta (rysunek 1/M) mo¿na wyrabiaæ ciê¿kie ciasta, takie jak ciasto
dro¿d¿owe, ciasto kruche, ciasto
kartoflane i ciê¿kie ciasta p³ynne.
Za pomoc¹ trzepaczek (rysunek 1/L)
mo¿na mieszaæ lekkie ciasta p³ynne,
ubijaæ pianê, bit¹ œmietanê, majonezy, puree, oraz przygotowywaæ sosy
i puddingi z proszku.
• Urz¹dzenia typu KM 400
wyposa¿one s¹ w miskê z tworzywa
sztucznego.
• Urz¹dzenia typu KM 450
wyposa¿one s¹ w miskê ze stali
szlachetnej z pokrywk¹.
Uruchomianie urz¹dzenie
Zdejmowanie / mocowanie
mikser na stojaku (rysunek 2)
Przed zdjêciem lub zamocowaniem
1
miksera nale¿y wy³¹czyæ urz¹dzenie i
wyci¹gn¹æ wtyczkê z gniazda!
0 W celu zamocowania nasadziæ mik-
ser na stojak (dwa haczyki stojaka
powinny zazêbiaæ siê o mikser), w
celu zablokowania nale¿y wcisn¹æ je
w dó³.
0 Aby zdj¹æ mikser, nacisn¹æ na przy-
cisk odblokowuj¹cy (rysunek 1/G) i
wyci¹gn¹æ mikser do góry.
Wk³adanie/wyjmowanie
koñcówek (rysunek 3)
Przed wyjêciem koñcówki nale¿y
1
wy³¹czyæ urz¹dzenie i wyci¹gn¹æ
wtyczkê z gniazdka!
0 Trzepaczkê lub koñcówkê do
wyrabiania ciasta wsuwaæ w otwór
na dolnej stronie miksera w momentu
„zaskoczenia”.
Obie koñcówki do wyrabiania ciasta
1
maj¹ ró¿ny kszta³t. Nale¿y w³o¿yæ je
w odpowiedni otwór, poniewa¿
podczas pracy z odwrotnie
zamocowanymi koñcówkami ciasto
bêdzie przenoszone do góry!
0 Koñcówka do wyrabiania ciasta
wyposa¿ona jest dodatkowo w ma³y
pierœcieñ przy podk³adce na trzonku.
Tak¹ koñcówkê do wyrabiania ciasta
mo¿na umieœciæ tylko do odpowiedniego otworu. Jest on oznaczony
na urz¹dzeniu symbolem .
0 W celu wyjêcia przytrzymaæ
koñcówkê jedn¹ rêk¹, przyciskaj¹c
równoczeœnie przycisk wyrzucaj¹cy
(rysunek 1/A).
50
Page 51

822_949_233 KM400.book Seite 51 Freitag, 10. Februar 2006 6:14 18
o
Odchylanie miksera w górê /
w dó³ (rys. 4)
Przed odchyleniem w górê mikser
1
nale¿y koniecznie wy³¹czyæ!
0 Przycisn¹æ przycisk odchylania
(rysunek 1/F) i odchyliæ mikser w
górê lub w dó³ do momentu „zaskoczenia”.
Po odchyleniu miksera w górê
3
mo¿na ³atwo wymieniæ koñcówki
oraz w³o¿yæ / wyj¹æ miskê.
Wk³adanie / wyjmowanie miski
(rysunek 5)
0 Wsun¹æ miskê na prowadnice w dol-
nej czêœci i zablokowaæ obracaj¹c
lekko zgodnie z ruchem wska-
zówek zegara
0 W celu wyjêcia miski nale¿y j¹
odblokowaæ, obracaj¹c w kierunku
przeciwnym do ruchu wskazówek
zegara.
Przytrzymaæ przy tym ewentualnie
3
doln¹ czêœæ.
Dziêki niecentralnej pozycji miksera
mo¿na bez trudu dodawaæ sk³adniki,
równie¿ podczas pracy.
Praca z mikserem
Jeœli mikser jest zamocowany na
1
stojaku, po w³¹czeniu miksera
nastêpuje automatyczne w³¹czenie
siê miski.
Urz¹dzenie mo¿e pracowaæ bez
1
przerwy w czasie nie d³u¿szym ni¿
10 minut. Po d³u¿szym czasie pracy
bez przerwy urz¹dzenie nale¿y za
ka¿dym razem wy³¹czyæ w celu jego
och³odzenia. (oko³o 20 minut
przerwy po 10 minutach pracy
ci¹g³ej).
Maksymalnie przetwarzane iloœci:
1
w misce przetwarzaæ mo¿na maksymalnie 1,5 kg artyku³ów spo¿ywczych o sta³ej konsystencji lub 1,75 l
artyku³ów spo¿ywczych o p³ynnej
konsystencji.
W³¹czanie urz¹dzenia
(rysunek 6)
0 Wybraæ po¿¹dan¹ prêdkoœæ
prze³¹cznikiem prêdkoœci (rysunek
1+6/C):
niskie prêdkoœci, lub
wysokie prêdkoœci.
0 W³¹cznikiem / wy³¹cznikiem (rysunek
1+6/B)
– W³¹czanie i wy³¹czanie urz¹dzenia,
– 5- stopniowe ustawianie prêdkoœci
obrotowej silnika w obrêbie wybranego zakresu prêdkoœci.
0 Wciœniêcie przycisku impulsowania
przy pracuj¹cym urz¹dzeniu (rysunek
1+6/D) powoduje, ¿e mikser pracowaæ bêdzie z najwy¿sz¹ prêdkoœci¹.
Ustawianie prêdkoœci miski
(rysunek 7)
Prêdkoœæ obrotów miski ustawiæ
mo¿na dwustopniowo
0 Przy pomocy prze³¹cznika prêdkoœci
miski (rysunek 1/H) regulowana jest
prêdkoœæ miski:
I = niska prêdkoœæ
II = wysoka prêdkoœæ
Wy³¹czanie urz¹dzenia
0 W³¹cznik / wy³¹cznik (rysunek 1+6/
B) ustawiæ w pozycji „0”.
–Mikser oraz miska wy³¹czaj¹ siê.
51
Page 52

822_949_233 KM400.book Seite 52 Freitag, 10. Februar 2006 6:14 18
o
Wybór prawid³owych ustawieñ
Nastêpuj¹ce wskazówki mog¹ s³u¿yæ jako wytyczne.
Prêdkoœæ miksera
Prze³¹cznik prêdkoœci
(rysunek 1+6/C)
• Wyrabianie, ugniatanie:
• Delikatne mieszanie: 3, 4
W³¹cznik / wy³¹cznik
(rysunek 1+6/B)
Rozpocz¹æ od 1 lub 2
nastêpnie prze³¹czyæ na 5
• Mieszanie:
• Ubijanie piany: 4 lub 5
Lub przycisk (rysunek1+6/D)
Wszystkie prace nale¿y rozpocz¹æ na ni¿szej prêdkoœci. W ten sposób unikamy
3
rozpylenia substancji w proszku i rozbryzgania cieczy.
Prêdkoœæ miski
Do ubijania bia³ek, œmietany oraz
ciast w proszku nale¿y stosowaæ
prêdkoœæ „II“ , do ciê¿szych ciast i
wiêkszych iloœci - prêdkoœci „I“.
Czyszczenie i
pielêgnacja
Resztki soku z marchewki i
3
czerwonej kapusty z elementów
plastikowych nale¿y usun¹æ przed
zmywaniem przy pomocy oleju
jadalnego.
Mikser i stojak
Przed ka¿dym czyszczeniem nale¿y
1
wyci¹gn¹æ wtyczkê sieciow¹.
Nale¿y pamiêtaæ o tym, ¿e do
wnêtrza urz¹dzenia nie mo¿e
przedostaæ siê woda! Urz¹dzenia
nigdy nie myæ pod bie¿¹c¹ wod¹ i
nie zanurzaæ w wodzie.
0 Mikser i stojak czyœciæ wilgotn¹
œciereczk¹.
Akcesoria
Trzepaczki i koñcówki do
wyrabiania ciasta
0 Trzepaczki i koñcówki do wyrabiania
ciasta czyœciæ szczotk¹ lub
œciereczk¹ pod bie¿¹c¹ wod¹ lub w
zmywarce!
Miska ze stali szlachetnej
(tylko KM 450)
0 Miskê ze stali szlachetnej (bez pokry-
wki!) mo¿na myæ w zmywarce.
Pokrywka miski nie nadaje siê do
1
zmywania w zmywarce.
Miska z tworzywa sztucznego
(tylko KM 400)
Miskê z tworzywa sztucznego myæ w
wodzie z dodatkiem p³ynu.
W zmywarce do naczyñ miskê z
1
tworzywa sztucznego nale¿y
umieœciæ w górnym koszu.
Rozpocz¹æ od 2 lub 3
nastêpnie prze³¹czyæ na
wy¿szy stopieñ
52
Page 53

822_949_233 KM400.book Seite 53 Freitag, 10. Februar 2006 6:14 18
o
Przechowywanie
Koñcówki do wyrabiania ciast oraz
trzepaczki nale¿y przechowywaæ w
misce zamocowanej na stojaku.
Dziêki temu nie bêd¹ one nara¿one
na uszkodzenia.
Dane techniczne
Napiêcie sieciowe: 230 - 240 V
Pobór mocy: 380 W
Maksymalny czas pracy: 10 minut
Ten sprzêt odpowiada nastêpuj¹cym
;
wytycznym obowi¹zuj¹cym w Unii
Europejskiej:
• 73/23/EWG z dnia 19.2.1973
„Wytyczne dotycz¹ce niskich
napiêæ”, w³¹cznie ze zmianami
zawartymi w wytycznych 93/68/
EWG.
• 89/336/EWG z dnia 3.5.1989
„Wytyczne dotycz¹ce zgodnoœci
elektromagnetycznej”, w³¹cznie ze
zmianami zawartymi w wytycznych
92/31/EWG.
53
Page 54

822_949_233 KM400.book Seite 54 Freitag, 10. Februar 2006 6:14 18
h
Tisztelt Vásárló!
h
Kérjük, figyelmesen olvassa el ezt a
használati útmutatót. Mindenekelõtt
azt kérjük, hogy az útmutató elsõ
lapjain közölt biztonsági tudnivalókat
tartsa be. A használati útmutatót
gondosan õrizze meg, hogy késobb
is felhasználhassa. Ha a készüléket
eladja vagy elajándékozza, kérjük,
adja tovább az útmutatót is az új
tulajdonosnak.
A figyelmezteto háromszöggel és/
1
vagy figyelmeztetõ szavakkal
(Figyelmeztetés!, Vigyázat!,
Figyelem!) olyan tudnivalókat
emelünk ki, amelyek az Ön
biztonsága vagy a készülék
mûködõképessége szempontjából
fontosak. Kérjük feltétlenül vigye
figyelembe ezeket.
0 Ez a jel lépésrõl lépésre vezeti Önt a
készülék kezelése során.
Ez után a jel után kiegészítõ
3
tájékoztatást kap a készülék
kezelésérõl és gyakorlati
alkalmazásáról.
A lóhere a készülék gazdaságos és
2
környezetkímélõ alkalmazásához
adott tippeket és tájékoztatásokat
jelöl.
készülék leírása
(1. ábra)
A Keverõszár-kidobó gomb
B Ki-bekapcsoló gomb
C Sebességválasztó kapcsoló
D „Pulse” gomb
E Mixer
F Dõlésszög-állító gomb
G Kioldógomb
H Keverõtál forgássebesség-választó
kapcsoló
J Állvány
K Mûanyag keverõtál (csak a KM 400
típusnál)
L Habverõszár
M Keverõszár
N Tésztakenõ lapát
O Nemesacél keverõtál fedõvel
(csak a KM 450 típusnál)
P Típustábla (az állvány és a mixer alsó
részén)
1 Biztonsági tudnivalók
Ezen készülékek biztonsága megfelel
a technika jelenlegi állásának és a
készülékbiztonsági törvénynek.
Gyártóként mégis úgy érezzük, hogy
ismertetnünk kell Önökkel a
következõ biztonsági útmutatásokat.
Általános biztonsági elõírások
• A készüléket csak olyan elektromos
hálózatra szabad csatlakoztatni,
amelynek feszültsége és frekvenciája
a típustáblán feltüntetett értékekkel
megegyezik.
• A készüléket ne helyezzük üzembe, ha
– a csatlakozókábel sérült,
–a készülékház sérült.
• A csatlakozódugót soha ne a
kábelnél fogva húzzuk ki a fali
aljzatból.
• Ha a készülék csatlakozókábele
megsérült, azt a balesetek elkerülése
érdekében a gyártó, a vevõszolgálat
vagy egy megfelelõen szakképzett
személy cserélje ki.
54
Page 55

822_949_233 KM400.book Seite 55 Freitag, 10. Februar 2006 6:14 18
h
• A készüléken javításokat csak
szakember végezhet. A
szakszerûtlen javítások jelentõs
károkat okozhatnak. Amennyiben
javításra van szükség, forduljon a
vevõszolgálathoz vagy a hivatalos
márkakereskedõhöz.
Gyermekek biztonsága
• A készüléket ne mûködtessük
felügyelet nélkül, a gyermekekre
pedig fokozottan vigyázzunk!
A készülék használatakor a
következõkre kell figyelni:
• A habverõ- ill. keverõszárat ne oldjuk
ki mûködés közben!
• Mûködés közben ne nyúljunk kézzel
a keverõszárak közelébe.
Balesetveszély!
• A készüléket sose használjuk nedves
kézzel.
• A mûanyag alkatrészeket ne
szárítsuk a fûtõtesten vagy annak
közvetlen közelében.
• A készülékkel nem szabad festéket
(lakkot, poliésztert, stb.) keverni. –
Robbanásveszély!
• A készüléket tisztítás és ápolás elõtt
mindig ki kell kapcsolni, és a kábelt
ki kell húzni a fali aljzatból.
• A készüléket sose mosogassuk folyó
víz alatt vagy a mosogatóban.
• A gyártó nem felel azokért az
esetleges károkért, amelyeket nem
rendeltetésszerû használat vagy
szakszerûtlen kezelés okozott.
Összeállítás, csatlakoztatás,
üzembe helyezés
• A habverõ- ill. keverõszárakat csak
akkor szabad a készülékbe helyezni
ill. kivenni, ha a kábelt a fali aljzatból
kihúztuk.
• A kézi mixerrel bármilyen edényben
dolgozhatunk. Legmegfelelõbb a
készülékkel szállított keverõtál.
• A készüléket csak akkor kapcsoljuk
be, amikor a feldolgozandó élelmiszer, valamint a habverõ- ill.
keverõszárak már a keverõtálban
találhatók. Mindig várjuk meg, hogy a
keverõszárak teljesen megálljanak,
mielõtt a tálat elvennénk.
• Ne tartsunk kemény tárgyakat
(kanalat, kést, kézi habverõt) a
mûködõ keverõszárak közé, és kézzel se nyúljunk oda. Balesetveszé-
lyes!
• A készüléket munka után mindig
kapcsoljuk ki, és a kábelt húzzuk ki a
fali aljzatból.
Ártalmatlanítás
Csomagolóanyag
2
A csomagoláshoz felhasznált anyag
környezetkímélõ és újra felhasználható. A mûanyag részek külön meg
vannak jelölve, pl. >PE<, >PS< stb. A
csomagolóanyagot a rajta lévõ jelölésnek megfelelõen az ártalmatlanító helyeken az arra kijelölt
gyûjtõtartályba ártalmatlanítsa.
Elhasznált készülék
2
A terméken vagy a csomagoláson
található
a termék nem kezelhetö háztartási
hulladékként. Ehelyett a terméket el
kell szállítani az elektromos és elektronikai készülékek újrahasznosítására
szakosodott megfelelö begyüjtö
helyre. Azzal, hogy gondoskodik ezen
termék helyes hulladékba helyezéséröl, sergit megelözni azokat, a környrzetre és az emberi egészségre
gyakorolt potenciális kedvezötlen
következményeket, amelyeket ellenkezö esetben a termék nem megfelelö hulladékkezelése okozhatna. Ha
részletesebb tájékoztatásra van szüksége a termék újrahasznosítására
vonatkozóan, kérjük, lépjen kapcsolatba a helyi önkormányzattal, a
háztartási hulladékok kezelését végzö
szolgálattal vagy azzal a bolttal, ahol a
terméket vásárolta.
szimbólum azt jelzi, hogy
W
55
Page 56

822_949_233 KM400.book Seite 56 Freitag, 10. Februar 2006 6:14 18
h
A készülék kezelése
Az asztali ill. kézi mixerrel az
élelmiszerek keverhetõk,
dagaszthatók és felverhetõk. A mixert
és a keverõtálat külön-külön motor
mozgatja, a mixer és a keverõtál
sebessége egymástól függetlenül
állítható. A készülék ennek ellenére
egyetlen kapcsolóval ki- ill.
bekapcsolható.
A mixer néhány mozdulattal levehetõ
az állványról, és szokványos kézi
mixerként is használható. A
készüléket ilyenkor nyugodt
mozdulatokkal kell a tálban körbekörbe mozgatni.
3 A keverõszárral (1. ábra, M) sûrû
tésztákat – például kelt tésztát, omlós
tésztát, burgonyás és más sûrû
kevert tésztát – keverhetünk.
A habverõvel (1. ábra, L) könnyû
kevert tésztákat, tojáshabot, tejszínhabot, majonézt, pürét készíthetünk,
vagy mártást, pudingot keverhetünk.
• A KM 400 típusú készülék mûanyag
keverõtállal kerül forgalomba.
• A KM 450 típusú készüléket
nemesacél keverõtállal és tetõvel
gyártjuk.
Üzembe helyezés
A mixer felhelyezése és
levétele a keverõállványról
(2. ábra)
A mixer felhelyezése vagy levétele
1
elõtt kapcsoljuk ki a készüléket, és
húzzuk ki a kábelt a fali aljzatból.
0 Felhelyezéshez a mixert illesszük a
keverõállványra (az állványon található két kampó beakad a mixerbe)
és a rögzítéshez nyomjuk lefelé.
0 Levételhez nyomjuk meg a kioldógo-
mbot (1. ábra, G) és a mixert felfelé
húzva vegyük le.
Habverõ- ill. keverõszárak
behelyezése / kidobása
(3. ábra)
A habverõ- ill. keverõszárak kidobása
1
elõtt a készüléket kapcsoljuk ki, és a
kábelt húzzuk ki a fali aljzatból!
0 A habverõ- ill. keverõszárakat
behelyezéskor olyan mélyen nyomjuk
a mixer alsó részén található
nyílásba, amíg érezhetõen be nem
reteszelõdnek.
A két keverõszár nem egyforma,
1
más-más formájú nyílásba illik. Ügyeljünk arra, hogy a keverõszárakat a
megfelelõ formájú nyílásba helyezzük, mert felcserélés esetén a tésztát
felfelé nyomja!
0 Az egyik keverõszáron egy kis gyûrû
található is a száron lévõ korongon.
Ezt a keverõszárat csak a megfelelõ
nyílásba szabad illeszteni.
Ezt a készüléken a jelzés mutatja.
0 A keverõszár kivételéhez egyik
kezünkkel tartsuk a készüléket, a
másik kezünkkel nyomjuk meg a
kidobógombot (1. ábra, A).
A mixer dõlésszögének
állítása felfelé vagy lefelé
(4. ábra)
A felfelé történõ állításhoz a mixert
1
feltétlenül ki kell kapcsolni.
0 A dõlésszög-állító gombot (1. ábra,
F) nyomjuk meg és a mixert döntsük
meg fel- vagy lefelé, amíg be nem
reteszelõdik.
A felfelé döntött mixerben a
3
keverõszárakat minden további nélkül
ki lehet cserélni , a keverõtálat pedig le
lehet venni ill. fel lehet helyezni.
56
Page 57

822_949_233 KM400.book Seite 57 Freitag, 10. Februar 2006 6:14 18
h
A keverõtál felhelyezése /
levétele (5. ábra)
0 A keverõtálat az alsó részen található
megvezetésre helyezzük és könnyed
mozdulattal az óramutató járásával
megegyezõ irányban elforgatva rögzítjük.
0 A keverõtálat levételhez az óramu-
tató járásával ellentétes irányban
kell elfordítani.
Az alsó részt esetleg közben
3
ajánlatos tartani kell az egyik kézzel.
Mivel a mixer nem a tál közepén
mûködik, a hozzávalókat munka
közben is könnyen hozzáadhatjuk.
Hogyan dolgozzunk a mixerrel
Ha a mixer az állványon van, akkor a
1
bekapcsolással együtt a keverõtál is
automatikusan bekapcsolódik.
A készüléket 10 percig használhatjuk
1
folyamatosan. Hosszabb, folyamatos
mûködés után a készüléknek le kell
hûlnie (10 percig tartó folyamatos
mûködés után legalább 20 percig).
Maximálisan feldolgozható
1
mennyiségek: a keverõtálban
egyszerre legfeljebb 1,5 kg szilárd,
ill. 1,75 l folyékony élelmiszer
dolgozható fel.
A készülék bekapcsolása
(6. ábra)
0 Elõször válasszuk ki a sebességtar-
tományt a sebességválasztó kapcsolóval (1.+6. ábra, C):
alacsony sebességtartomány,
vagy
nagy sebességtartomány.
0 A ki-bekapcsoló gombbal (1.+6.
ábra, B)
– a gépet ki ill. bekapcsolhatjuk,
– a motor fordulatszámát 5 fokozat-
ban szabályozhatjuk a kiválasztott
sebességtartományon belül.
0 Amíg mûködés közben a Pulse gom-
bot (1.+6. ábra, D) nyomva tartjuk,
addig a mixer a maximális sebességfokozaton mûködik.
A keverõtál sebességének
beállítása (7. ábra)
A keverõtál forgássebessége két
fokozatban állítható.
0 A keverõtál sebességválasztó kapc-
solóval (1. ábra, H) a sebesség a
következõképpen állítható be:
I = alacsony sebesség
II = nagy sebesség
A készülék kikapcsolása
0 A ki-bekapcsoló gombot (1+6. ábra,
B) toljuk „0“ állásba.
–A mixer és a keverõtál kikapcsol.
57
Page 58

822_949_233 KM400.book Seite 58 Freitag, 10. Februar 2006 6:14 18
h
A helyes beállítás kiválasztása
A következõ útmutató szolgáljon irányelvként:
Mixer sebessége
Sebességválasztó kapcsoló
(1+6. ábra, C)
• dagasztás, keverés:
• könnyed összekeverés: 3, 4
• keverés:
• habverés: 4-es vagy 5-ös
vagy a gomb (1+6. ábra, D)
A munkát mindig alacsony sebességfokozaton kezdjük. Ezáltal elkerülhetjük, hogy a
3
por állagú hozzávalók miatt porfelhõ keletkezzen, vagy hogy a folyadék
kifröccsenjen.
Ki-bekapcsoló gomb
(1+6. ábra, B)
1-es vagy 2-es fokozaton
kezdjük, majd 5-ösre
kapcsolhatunk
2-es vagy 3-as fokozaton
kezdjük, aztán kapcsoljunk fel
A keverõtál forgási sebessége
Tojáshab, tejszínhab és könnyû
kevert tészták felveréséhez a „II“-es
fokozatot használjuk, sûrû tészták és
nagy mennyiségek keveréséhez
pedig az „I“-es fokozatot.
Tisztítás és ápolás
A sárgarépa és a vöröskáposzta
3
levének nyomát étolajjal történõ
lemosással távolíthatjuk el a
mûanyag alkatrészekrõl.
Mixer és keverõállvány
A tisztítás elõtt mindig húzzuk ki a
1
kábelt a fali aljzatból.
Ügyeljünk arra, hogy a készülék
belsejébe víz semmi esetre se
kerüljön! A készüléket sose tisztítsuk
folyó víz alatt vagy a mosogatóban.
0 A mixert és az állványt nedves
ruhával kell megtisztítani.
Tartozékok
Habverõ- és keverõszárak
0 A habverõ- és keverõszárakat folyó
víz alatt kefével vagy szivaccsal, vagy
mosogatógépben is mosogathatjuk!
Nemesacél keverõtál
(csak a KM 450 típusnál)
0 A nemesacél keverõtálat (a fedele
nélkül!) mosogatógépben mosogathatjuk.
A nemesacél keverõtál fedelét nem
1
szabad mosogatógépben mosogatni.
Mûanyag keverõtál
(csak a KM 400 típusnál)
A mûanyag keverõtálat szabad
mosogatni.
Amennyiben a mûanyag keverõtálat
1
mosogatógépben mosogatjuk, akkor
a felsõ kosárba helyezzük!
58
Page 59

822_949_233 KM400.book Seite 59 Freitag, 10. Februar 2006 6:14 18
h
Tárolás
A habverõ- és keverõszárakat az
állványra helyezett keverõtálban
tároljuk. Ezáltal elkerüljük azok
megsérülését.
Mûszaki adatok
Hálózati feszültség: 230 - 240 V
Teljesítmény: 380 W
A használat maximális idõtartama:
10 perc
Ez a készülék megfelel az EK alábbi
;
irányelveinek:
• 73/23/EWG, 1973.02.19., "A
kisfeszültségrõl szóló irányelv",
beleértve a 93/68/EWG számú
módosítást is.
• 89/336/EWG, 1989.05.03., "Az
elektromágneses kompatibilitásról
szóló irányelv", beleértve a 92/31/
EWG számú módosítást is.
59
Page 60

822_949_233 KM400.book Seite 60 Freitag, 10. Februar 2006 6:14 18
Electrolux Hausgeräte Vertriebs GmbH
Muggenhofer Str. 135
D-90429 Nürnberg
http://www.electrolux.de
© Copyright by Electrolux
822 949 233 – 03 - 0206
 Loading...