

Page 1

96901K-MN
Ceramic glass hob
Table de cuisson vitrocéramique
Glaskeramische kookplaat
Installation and Operating Instructions
Instructions de montage et mode d’emploi
Montage- en gebruiksaanwijzing
Page 2

Dear Customer,
Please read these user instructions carefully and keep them to refer to
later.
Please pass the user instructions on to any future owner of the appliance.
The following symbols are used in the text:
1 Safety instructions
Warning! Information that affects your personal safety.
Important! Information that prevents damage to the appliance.
3 Useful tips and hints
2 Environmental information
2
Page 3

Contents
Operating Instructions. . . . . . . . . . . . . . . . . . . . . . . . . . . . . . . . . . . . . 4
Safety instructions. . . . . . . . . . . . . . . . . . . . . . . . . . . . . . . . . . . . . . . . . . . . . . 4
Description of the Appliance. . . . . . . . . . . . . . . . . . . . . . . . . . . . . . . . . . . . . 6
Cooking surface layout . . . . . . . . . . . . . . . . . . . . . . . . . . . . . . . . . . . . . . . . . . . 6
Control panel layout . . . . . . . . . . . . . . . . . . . . . . . . . . . . . . . . . . . . . . . . . . . . . 6
Touch Control sensor fields . . . . . . . . . . . . . . . . . . . . . . . . . . . . . . . . . . . . . 7
Displays . . . . . . . . . . . . . . . . . . . . . . . . . . . . . . . . . . . . . . . . . . . . . . . . . . . . . 7
Residual heat indicator . . . . . . . . . . . . . . . . . . . . . . . . . . . . . . . . . . . . . . . . 8
Operating the appliance. . . . . . . . . . . . . . . . . . . . . . . . . . . . . . . . . . . . . . . . . 8
Switching the appliance on and off . . . . . . . . . . . . . . . . . . . . . . . . . . . . . . . . 8
Setting the heat setting . . . . . . . . . . . . . . . . . . . . . . . . . . . . . . . . . . . . . . . . . . 8
Switching the outside ring on and off . . . . . . . . . . . . . . . . . . . . . . . . . . . . . . 9
Switching the STOP+GO function on and off. . . . . . . . . . . . . . . . . . . . . . . . . 9
Locking/unlocking the control panel. . . . . . . . . . . . . . . . . . . . . . . . . . . . . . . . 10
Using the automatic warm-up function. . . . . . . . . . . . . . . . . . . . . . . . . . . . . 10
Using the child safety device . . . . . . . . . . . . . . . . . . . . . . . . . . . . . . . . . . . . . . 12
Using the timer . . . . . . . . . . . . . . . . . . . . . . . . . . . . . . . . . . . . . . . . . . . . . . . . . 13
Safety cut-out . . . . . . . . . . . . . . . . . . . . . . . . . . . . . . . . . . . . . . . . . . . . . . . . . . 16
Power-Management . . . . . . . . . . . . . . . . . . . . . . . . . . . . . . . . . . . . . . . . . . . . . 17
Tips on Cooking and Frying . . . . . . . . . . . . . . . . . . . . . . . . . . . . . . . . . . . . . . 18
Cookware . . . . . . . . . . . . . . . . . . . . . . . . . . . . . . . . . . . . . . . . . . . . . . . . . . . . . . 18
Energy saving . . . . . . . . . . . . . . . . . . . . . . . . . . . . . . . . . . . . . . . . . . . . . . . . . . . 18
Examples of cooking applications . . . . . . . . . . . . . . . . . . . . . . . . . . . . . . . . . . 19
Cleaning and Care . . . . . . . . . . . . . . . . . . . . . . . . . . . . . . . . . . . . . . . . . . . . . . 20
What to do if … . . . . . . . . . . . . . . . . . . . . . . . . . . . . . . . . . . . . . . . . . . . . . . . . 21
Disposal . . . . . . . . . . . . . . . . . . . . . . . . . . . . . . . . . . . . . . . . . . . . . . . . . . . . . . . 23
Installation Instructions . . . . . . . . . . . . . . . . . . . . . . . . . . . . . . . . . . . 24
Guarantee/Customer Service. . . . . . . . . . . . . . . . . . . . . . . . . . . . . . 26
Service . . . . . . . . . . . . . . . . . . . . . . . . . . . . . . . . . . . . . . . . . . . . . . . . . . . . . . 29
Assembly . . . . . . . . . . . . . . . . . . . . . . . . . . . . . . . . . . . . . . . . . . . . . . . . . . . . 92
3
Page 4

Operating Instructions
1 Safety instructions
Please comply with these instructions. If you do not, any damage re-
3
sulting is not covered by the warranty.
5 This appliance conforms with the following EU Directives:
– 73/23/EEC dated 19.02.1973 Low Voltage Directive
– 89/336/EEC dated 03.05.1989 EMC Directive inclusive of Amending
Directive 92/31/EEC
– 93/68/EEC dated 22.07.1993 CE Marking Directive
Correct use
• This appliance should be used only for normal domestic cooking and
frying of food.
• The appliance must not be used as a work surface or as a storage surface.
• Additions or modifications to the appliance are not permitted.
• Do not place or store flammable liquids, highly inflammable materials
or fusible objects (e.g. plastic film, plastic, aluminium) on or near the
appliance.
Children’s safety
• Small children must be kept away from the appliance.
• Only let bigger children work on the appliance under supervision.
• To avoid small children and pets unintentionally switching the appli-
ance on, we recommend activation of the child safety device.
General safety
• The appliance may only be installed and connected by trained, registered service engineers.
• Built-in appliances may only be used after they have built in to suitable built-in units and work surfaces that meet standards.
• In the event of faults with the appliance or damage to the glass ceramic (cracks, scratches or splits), the appliance must be switched off
and disconnected from the electrical supply, to prevent the possibility
of an electric shock.
• Repairs to the appliance must only be carried out by trained registered service engineers.
4
Page 5

Safety during use
• Overheated fats and oils can ignite quickly. When cooking with fat or
oil (e.g. chips) do not leave the appliance unattended.
• There is the risk of burns from the appliance if used carelessly.
• Remove stickers and film from the glass ceramic.
• Cables from electrical appliances must not touch the hot surface of
the appliance or hot cookware.
• Switch the cooking zones off after each use.
Safety when cleaning
• For cleaning, the appliance must be switched off and cooled down.
• For safety reasons, the cleaning of the appliance with steam jet or
high-pressure cleaning equipment is not permitted.
How to avoid damage to the appliance
• The glass ceramic can be damaged by objects falling onto it.
• The edge of the glass ceramic can be damaged by being knocked by
the cookware.
• Cookware made of cast iron, cast aluminium or with damaged bottoms can scratch the glass ceramic if pushed across the surface.
• Objects that melt and things that boil over can burn onto the glass
ceramic and should be removed straightaway.
• To avoid damaging cookware and glass ceramics, do not allow saucepans or frying pans to boil dry.
• Do not use the cooking zones with empty cookware or without cookware.
5
Page 6
Description of the Appliance
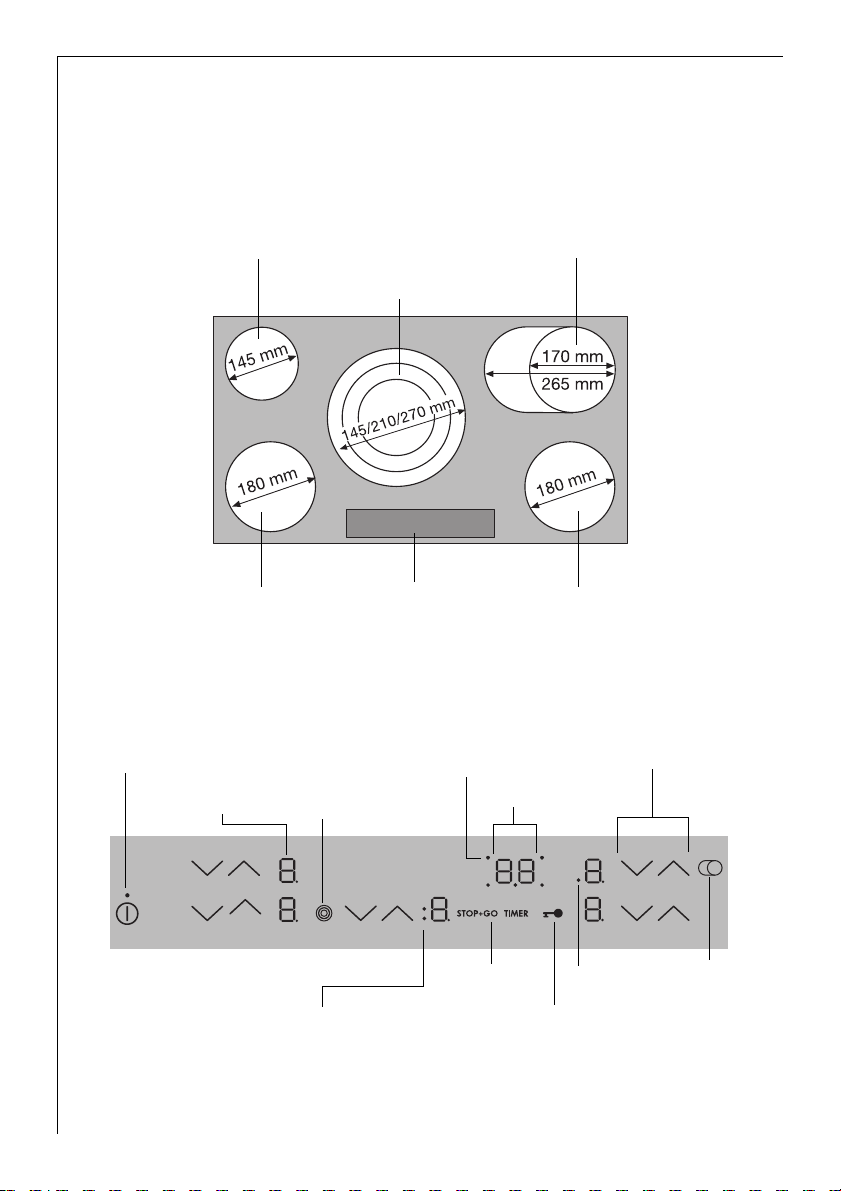
Cooking surface layout
Single cooking zone
1200W
Triple ring cooking zone
1050/1950/2700W
Multi-purpose zone
1400/2200W
Single cooking zone
1800W
Control panel layout
.................
On/Off
with power indicator
Display
Triple ring pilot light
6
Control panel Single cooking zone
Cooking zone indicators
Timer function
Outside/middle ring
On/Off
Timer display
STOP+GO
1800W
Heat setting selection
Double ring
pilot light
Lock
Outside
ring
On/Off
Page 7

Touch Control sensor fields
The appliance is operated using Touch Control sensor fields. Functions
are controlled by touching sensor fields and confirmed by displays and
acoustic signals.
Touch the sensor fields from above, without covering other sensor
fields.
Sensor field Function
On / Off To switch the appliance on and off
Increase settings Increasing heat setting/time
Decrease settings Decreasing heat setting/time
TIMER Timer Timer selection
Lock Locking/unlocking the control panel
Stop+Go To switch the Keep Warm setting on/
off
Triple ring switch To switch outer rings
on and off
Multi-purpose zone
switch
To switch the outside ring on and off
Displays
Display Description
¾ Cooking zone is switched off
u Keep warm setting Keep warm setting/STOP+GO func-
tion is set
¿ - Ç Heat settings Heat setting is set
2 - 6 Heating setting plus
decimal point
a Automatic warm up
function
e Fault Malfunction has occurred
h Residual heat Cooking zone is still hot
l Child safety device Lock/child safety device is engaged
_ Safety cut-out Safety cut-out has been activated
Intermediate heat setting is set
Automatic warm-up function is activated
7
Page 8

Residual heat indicator
1 Warning! Risk of burns from residual heat. After being switched off,
the cooking zones need some time to cool down. Look at the residual
heat indicator
h .
3 Residual heat can be used for melting and keeping food warm.
Operating the appliance
Switching the appliance on and off
Control panel Display Pilot light
Switch on Touch for 2 seconds ¾ / h lights up
Switch off Touch for 1 second h / none goes out
3 After switching on, within approx. 10 seconds a heat setting or a func-
tion must be set, otherwise the appliance automatically switches itself
off.
Setting the heat setting
Control panel Indicator
To increase Touch u to Ç
To decrease Touch Ç to ¾
To switch off Touch and at the same time ¾
3 The keep warm setting u lies between ¾ and ¿. It is used to keep
food warm.
8
Page 9
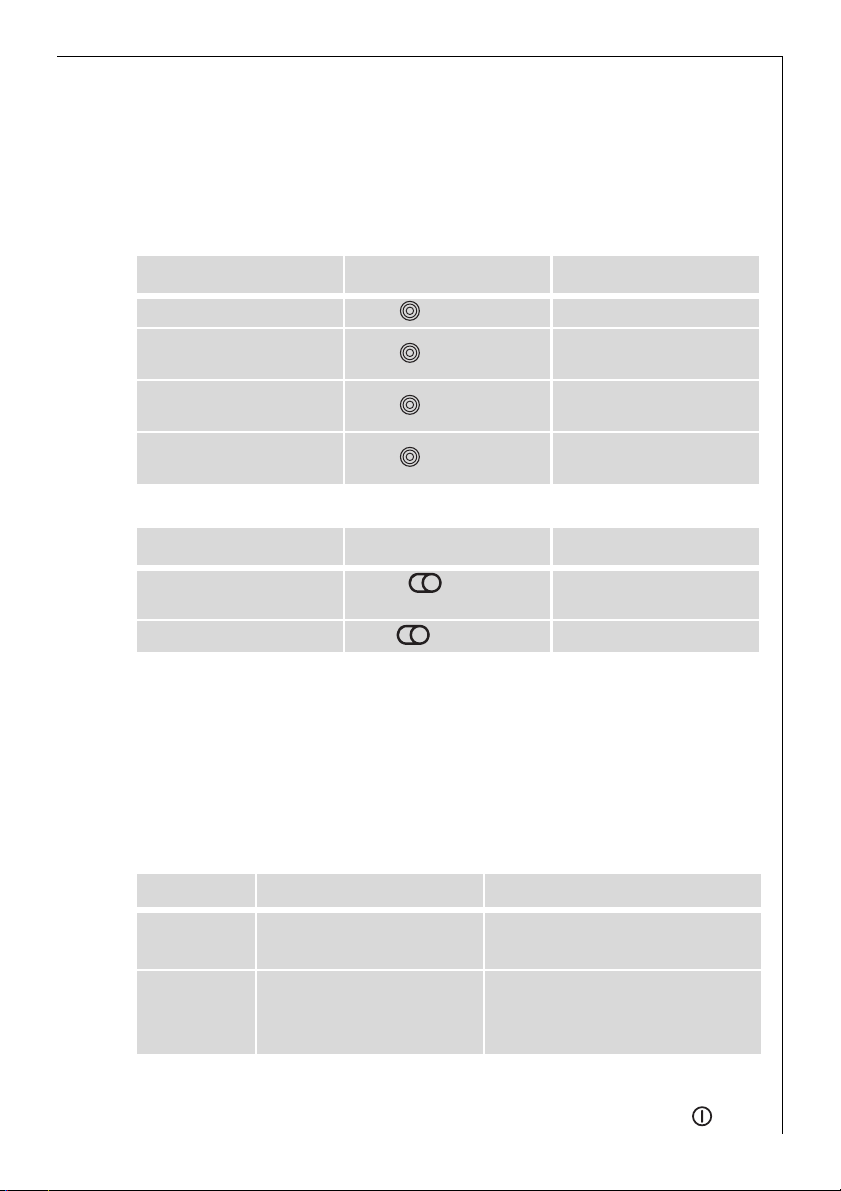
Switching the outside ring on and off
By switching the outside rings on or off, the effective heating surface
can be matched to the size of the cookware.
3 Before an outside ring can be switched on, the inside ring must be
switched on.
Triple cooking zone Sensor panel Power indicator
To switch on middle ring Touch for 1-2 seconds. One power indicator is lit.
To switch on outside ring Touch for 1-2 seconds.
To switch off outside ring Touch for 1-2 seconds.
To switch off middle ring Touch for 1-2 seconds.
Roasting zone Sensor panel Power indicator
Two power indicators are
lit.
Second power indicator
goes out.
First power indicator goes
out.
To switch on outside ring
To switch off outside ring Touch for 1-2 seconds goes out
Touch for 1-2 sec-
onds
is lit
Switching the STOP+GO function on and off
The STOP+GO function simultaneously switches all cooking zones that
are switched on to the keep warm setting and then back to the heat
setting that was previously set. This function can be used to briefly interrupt and then continue the cooking process e.g. to take a telephone
call.
Control panel Display
To switch onTouch STOP+GO u
To switch
off
Touch STOP+GO heat setting that was previ-
ously set (not automatic
warm up function)
3 Timer functions are not stopped by STOP+GO.
3 STOP+GO locks the whole control panel except the sensor field .
9
Page 10
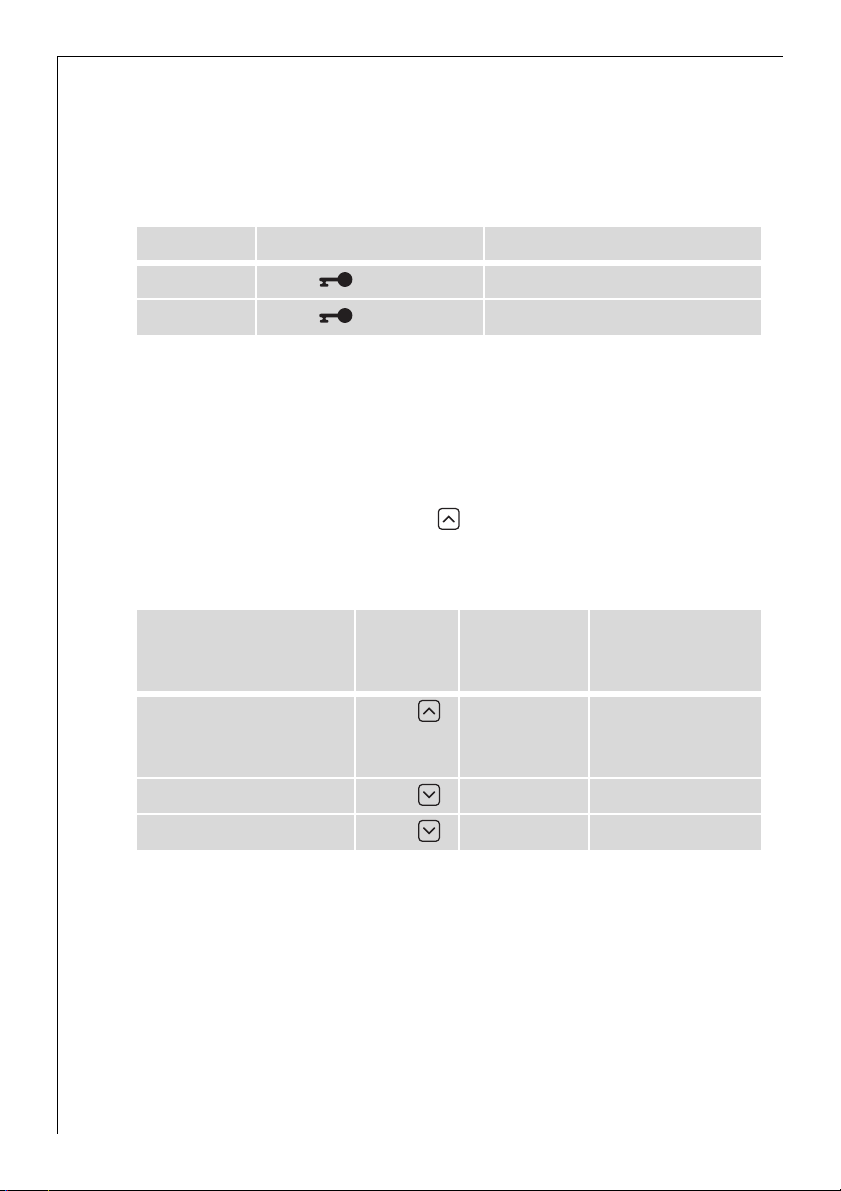
Locking/unlocking the control panel
The control panel, with the exception of the “On/Off” sensor field, can
be locked at any time in order to prevent the settings being changed
e.g. by wiping over the panel with a cloth.
Control panel Display
Switch on Touch l (for 5 seconds)
Switch off Touch previously set heat setting
3 When you switch the appliance off, the locking function is automati-
cally switched off.
Using the automatic warm-up function
All cooking zones are equpped with an automatic warm up function
When setting a heat setting using , when starting from
ing zone switches to full power for a certain amount of time and then
automatically switches back to the heat setting set.
¾, the cook-
Switch on
(only when starting at
Control
panel
Touch ¿ to Æ a (after 5 sec-
possible
heat settings
Display
onds)
¾)
Switch off Touch Æ to ¿ / u Æ to u
Not used Touch Ç to u Ç to u
3 If during the automatic warm up a a higher heat setting is selected,
e.g. from
Á to Ã, the automatic warm up is adjusted.
3 If there is still residual heat on the cooking zone (display h), the auto-
matic warm up is not performed.
10
Page 11

The length of time that the automatic warm up function operates depends on the heat setting selected.
Heat
setting
v 0:30
1 1:00
2 1:40 2. 2:40
3 4:50 3. 5:30
4 6:30 4. 8:10
5 10:10 5. 12:20
6 2:00 6. 2:30
7 3:30
8 4:30
9 ---
Length of the
automatic warm up
[min:sec]
Intermediate heat
setting
Length of the
automatic warm up
[min:sec]
11
Page 12

Using the child safety device
The child safety device prevents unintentional use of the appliance.
Setting the child safety device
Step Control panel Display/Signal
1. Switch on the appliance
¾
(Do not set a heat setting)
2. Touch until the signal sounds Acoustic signal
3. Touch l
Appliance switches off. The child safety device is engaged.
Releasing the child safety device
Step Control panel Display/Signal
1. Switch on the appliance l
2. Touch until the signal sounds Acoustic signal
3. Touch
Appliance switches off. The child safety device is released.
Overriding the child safety device
The child safety device can be released in this way for a single cooking
session; it remains activated afterwards.
12
Step Control panel Display/Signal
1. Switch on the appliance l
2. Touch and at the same time ¾ / acoustic signal
Until the appliance is next switched off, it can used as normal.
Page 13

Using the timer
All cooking zones can use each use one of the two timer functions at
the same time.
Function Condition Outcome after the
time has elapsed
Automatic cut-out a heat setting is set acoustic signal
00 flashes
Cooking zone
switches off
Countdown timer cooking zones not in use acoustic signal
00 flashes
3 If a cooking zone is switched off, the timer function set is also switched
off.
3 If a heat setting is set on this cooking zone in addition to a countdown
timer, the cooking zone is switched off after the time set has elapsed.
Selecting a cooking zone
Step Control panel Indicator
1. Touch TIMER 1x Pilot light for the first
cooking zone flashes
2. Touch TIMER 1x Pilot light for the sec-
ond cooking zone flashes
3. Touch TIMER 1x Pilot light for the third
cooking zone flashes
4. Touch TIMER 1x Pilot light for the
fourth cooking zone
flashes
5. Touch TIMER 1x Pilot light for the fifth
cooking zone flashes
13
Page 14

3 The heat setting indicator of the selected cooking zone goes out, until
the timer time is set.
3 If the power indicator is flashing more slowly, the heat setting indicator
appears again and the heat setting can be re-set or modified.
3 If other timer functions are set, after a few seconds the shortest re-
maining time of all the timer functions is displayed and the corresponding pilot light flashes.
Setting the time
Step Control panel field Display
1. TIMER Select cook-
ing zone
2. Touch or for
the cooking zone selected
After a few seconds the pilot light flashes more slowly.
The time is set.
The time counts down.
Switching off the timer function
Step Control panel field Display
1. TIMER Select cook-
ing zone
2. Touch for the
cooking zone selected
The pilot light goes out.
The timer function for the selected cooking zone is switched off.
Pilot light of the cooking zone selected flashes
00 to 99 minutes
Pilot light of the cooking zone selected flashes faster
The time remaining is displayed
The time remaining counts down to
00.
14
Page 15

Changing the time
Step Control panel field Display
1. TIMER Select cook-
ing zone
Pilot light of the cooking zone selected flashes faster
The time remaining is displayed
2. Touch or for
01 to 99 minutes
the cooking zone selected
After a few seconds the pilot light flashes more slowly.
The time is set.
The time counts down.
Displaying the time remaining for a cooking zone
Step Control panel field Display
1. TIMER Select cooking
zone
Pilot light of the cooking zone select-
ed flashes faster
The time remaining is displayed
After a few seconds the pilot light flashes more slowly.
Switching off the acoustic signal
Step Control panel field Acoustic signal
1. Touch TIMER Acoustic signal to acknowledge.
Acoustic signal stops.
15
Page 16

Safety cut-out
Cooking surface
• If after switching on the cooking surface, a heat setting is not set for
a cooking zone within approx. 10 seconds, the cooking surface automatically switches itself off.
• If one or more sensor fields are covered for longer than approx. 10
seconds, e.g. by a pan placed upon it, a signal sounds and the cooking
surface switches off automatically.
• If all cooking zones are switched off, the cooking surface automatically switches itself off after approx. 10 seconds.
Control panel
• When the appliance is switched off, if one or more of the sensor
fields on the control panel are covered for more that 10 seconds, an
acoustic signal sounds. The acoustic signal switches itself off automatically when the sensor fields are no longer covered.
Cooking zones
• If one of the cooking zones is not switched off after a certain time, or
if the heat setting is not modified, the relevant cooking zone switches
off automatically.
Heat setting Switches off after
16
V, 1 - 2
3 - 4
5
6 - 9
6 hours
5 hours
4 hours
1.5 hours
Page 17

Power-Management
The three cooking zones front left,
front right and back right together
have a maximum possible power
available to them.
If it looks like the maximum power
of all three cooking zones is going
to be exceeded, for example by
turning on an additional cooking
zone or by turning up a heat setting, the Power Management automatically reduces the power of another cooking zone. The power of the
cooking zone that has been switched on for the longest time is reduced. For two minutes the indicator for this cooking zone changes between the previously set heat setting and the maximum possible heat
setting at this time. After two minutes the actual heat setting is displayed.
The following table shows the distribution of the maximum possible
heat settings when all three cooking zones are on at the same time.
1st cooking zone 2nd cooking zone
1 - 6 8 9
7 7 9
8 8 8
17
Page 18

Tips on Cooking and Frying
Information on acrylamides
3
According to the latest scientific knowledge, intensive browning of
food, especially in products containing starch, can constitute a health
risk due to acrylamides. Therefore we recommend cooking at the lowest
possible temperatures and not browning foods too much.
Cookware
• You can recognise good cookware from the bottoms of the pans. The
bottom should be as thick and flat as possible.
• Cookware made of enamelled steel or with aluminium or copper bottoms can leave discolorations on the glass ceramic surface which are
difficult or impossible to remove.
Energy saving
2 Always place cookware on the cook-
ing zone before it is switched on.
2 If possible, always place lids on the
pans.
2 Switch cooking zones off before the
end of the cooking time, to take advantage of residual heat.
2 Bottom of pans and cooking zones
should be the same size.
18
Page 19

Examples of cooking applications
The information given in the following table is for guidance only.
Heat
Cooking-
setting
process
0 Off position
Keeping
V
1-2
2-3
3-4
4-5 Boiling
6-7
7-8
9
food
warm
Melting
Solidi-
fying
Simmer-
ing on
low heat
Steaming
Braising
Gentle
Frying
Heavy
Frying
Boiling
Searing
Deep
frying
suitable for
Keeping cooked foods
warm
Hollandaise sauce,
melting butter, chocolate,
gelatine
Fluffy omelettes, baked
eggs
Simmering rice and milk-
based dishes
Heating up ready-cooked
meals
Steaming vegetables, fish
braising meat
Steaming potatoes 20-60 mins.
Cooking larger quantities
of food, stews and soups
Frying escalopes, veal
cordon bleu, cutlets, ris-
soles, sausages, liver, roux,
eggs, pancakes, dough-
nuts
Hash browns, loin steaks,
steaks, Flädle (pancakes
for garnishing soup)
Boiling large quantities of water, cooking pasta, searing meat
(goulash, pot roast), deep frying chips
Cooking
time
as required Cover
5-25 mins. Stir occasionally
10-40 mins. Cook with lid on
25-50 mins.
20-45 mins.
60-150
mins.
Steady
frying
5-15 mins.
per pan
Tips/Hints
Add at least twice as
much liquid as rice, stir
milk dishes part way
through cooking
With vegetables add
only a little liquid (a
few tablespoons)
Use only a little liquid,
e. g.: max.
for 750 g potatoes
Up to 3 l liquid plus in-
Turn halfway through
Turn halfway through
¼ l water
gredients
cooking
cooking
19
Page 20

Cleaning and Care
Take care! Risk of burns from residual heat.
1
1 Warning! Sharp objects and abrasive cleaning materials will damage
the appliance. Clean with water and washing up liquid.
1 Warning! Residues from cleaning agents will damage the appliance.
Remove residues with water and washing up liquid.
Cleaning the appliance after each use
1.Wipe the appliance with a damp cloth and a little washing up liquid.
2.Rub the appliance dry using a clean cloth.
Removing deposits
1.Place a scraper on the glass ceramic surface at an angle.
2.Remove residues by sliding the blade over the surface.
3.Wipe the appliance with a damp cloth and a little washing up liquid.
4.Rub the appliance dry using a clean cloth.
Remove
Type of dirt
sugar, food containing sugar yes --plastics, tin foil yes --limescale and water rings --- yes
fat splashes --- yes
shiny metallic discolorations --- yes
*Scrapers and cleaners for glass ceramic and stainless steel can be purchased in specialist shops
imme-
diately
when the appliance has
cooled down
using
a scraper*
cleaner for glass ce-
ramic or stainless
steel*
3 Remove stubborn residues with a cleaner for glass ceramic or stainless
steel.
3 Scratches or dark stains on the glass ceramic that cannot be removed
do not however affect the functioning of the appliance.
20
Page 21

What to do if …
Problem Possible cause Remedy
The cooking zones will not
switch on or are not functioning
Acoustic signal sounds
when appliance is switched
off
The residual heat indicator
is not displaying anything
The automatic warm up
function is not switching
itself on
Acoustic signal sounds and
appliance switches itself on
and then off again; after 5
seconds another acoustic
signal sounds
Display changes between
two heat settings
More than 10 seconds have
passed since the appliance
was switched on
The child safety device is
switched on
Several sensor fields were
touched at the same time
Safety cut-out has been
triggered
STOP+GO is activated u Switching off STOP+GO
The control panel is wholly
or partly covered by objects.
The cooking zone was only
on for a short time and is
therefore not hot
There is still residual heat
on the cooking zone h
The highest heat setting is
set Ç
The heat setting was set
using the sensor field
The On/Off sensor field has
been covered up, e.g. by a
cloth
Power Management is reducing the power of this
cooking zone
l
Switch the appliance on
again.
Deactivate the child safety
device (See the section
“Child safety device”)
Only touch one sensor field
Remove any objects (pan,
cloths, etc.) that are lying
on the control panel.
Switch the appliance on
again
Remove objects.
If the cooking zone is supposed to be hot, call the
Customer Service Department.
Let the cooking zone cool
down
The highest heat setting
has the same power as the
automatic warm up function
1. Switching off the cook-
ing zone
2.Set the cooking zone us-
ing the sensor field
Do not place any objects
on the control panel
See section “Power Management“ in the Operating
the Appliance chapter
21
Page 22

Problem Possible cause Remedy
_ is lit Overheating protection for
e and number are dis-
played
the cooking zone has been
triggered
Electronics fault Disconnect the appliance
Switch off the cooking
zone. Switch the cooking
zone on again
from the electrical supply
for a few minutes (Take the
fuse out of the house’s wiring system)
If after switching on again,
e is displayed again, call
the customer service department
e and minus are displayed Light rays that are too
strong on the control panel, for example bright sunlight
Briefly shade the control
panel, for example with
the hand Acoustic signal
sounds, appliance switches
itself off Switch appliance
on (again)
If you are unable to remedy the problem by following the above
suggestions, please contact your dealer or the Customer Care Department.
1 Warning! Repairs to the appliance are only to be carried out by quali-
fied service engineers. Considerable danger to the user may result from
improper repairs.
3 If the appliance has been wrongly operated, the visit from the customer
service technician or dealer may not take place free of charge, even
during the warranty period.
22
Page 23

Disposal
Packaging material
2
The packaging materials are environmentally friendly and can be recycled. The plastic components are identified by markings, e.g. >PE<,
>PS<, etc. Please dispose of the packaging materials in the appropriate
container at the community waste disposal facilities.
2 Old appliance
The symbol
product may not be treated as household waste. Instead it shall be
handed over to the applicable collection point for the recycling of electrical and electronic equipment. By ensuring this product is disposed of
correctly, you will help prevent potential negative consequences for the
environment and human health, which could otherwise be caused by
inappropriate waste handling of this product. For more detailed information about recycling of this product, please contact your local city
office, your household waste disposal service or the shop where you
purchased the product.
W on the product or on its packaging indicates that this
23
Page 24

Installation Instructions
Safety instructions
The laws, ordinances, directives and standards in force in the country of
use are to be followed (safety regulations, proper recycling in accordance with the regulations, etc.)
Installation may only be carried out by a qualified electrician.
The minimum distances to other appliances and units are to be observed.
A protective floor must be installed under the appliance.
The cut surfaces of the worktop are to be protected against moisture
using a suitable sealant.
The sealant seals the appliance to the work top with no gap.
Do not use silicon sealant between the appliance and the work top.
Avoid installing the appliance next to doors and under windows. Otherwise hot cookware may be knocked off the rings when doors and windows are opened.
1 WARNING!
Risk of injury from electrical current.
• The electrical mains terminal is live.
• Make electrical mains terminal free of voltage.
• Observe connection schematic.
• Observe electrical safety rules.
• Ensure anti-shock protection through correct installation by a quali-
fied electrician.
• The appliance must be connected to the electrical supply by a qualified electrician.
1 IMPORTANT!
Risk of injury from electrical current.
Loose and inappropriate plug and socket connections can make the terminal overheat.
• Have the clamping joints correctedly installed by a qualified electrician.
• Use strain relief clamp on cable.
• In the event of single-phase or two-phase connection, the appropri-
ate mains cable of type H05BB-F Tmax 90° (or higher) must be used.
• If this appliance’s mains cable is damaged, it must be replaced by a
special cable (type H05BB-F Tmax 90°; or higher). The latter is available from the Customer Care Department.
24
Page 25

A device must be provided in the electrical installation which allows the
appliance to be disconnected from the mains at all poles with a contact
opening width of at least 3 mm.
Suitable isolation devices include line protecting cut-outs, fuses (screw
type fuses are to be removed from the holder), earth leakage trips and
contactors.
25
Page 26

Guarantee/Customer Service
Weitere Kundendienststellen im Ausland
In diesen Ländern gelten die Garantiebedingungen der örtlichen Partner. Diese können dort eingesehen werden.
Further after-sales service agencies overseas
In these countries our AEG-Electrolux agents’ own guarantee conditions are applicable. Please obtain further details direct.
Autres agences étrangères assurant le service après-vente
Dans ces pays, les conditions de garantie des concessionnaires de la région sont valables. Vous pouvez les consulter sur place.
Otros puntos de Postventa en el extranjero
En estos países rigen las condiciones de nuestros representantes locales.
las cuales pueden ser consultadas allí mismo.
Ulteriori uffici del servizio tecnico assistenza clienti all’estero
In questi paesi sono valide le condizioni di garanzia dei partner locali.
Queste condizioni possono essere esaminante sul luogo.
Serviços de assistência técnica no estrangeiro
Nestes países são válidas as condições de garantia dos concessionários
locais, podendo aí ser consultadas.
További vevöszolgálati irodák külföldön
Ezekben az országokban a mi AEG-Electrolux vevöszolgálatainknál
saját jótállási feltételek alkalmazhatók. A további adatokat kérjük
közvetlenül szerezzék be.
26
Servisne službe
Na garancijskem listu boste našli seznam pooblašèenih servisnih
služb AEG-Electrolux.
Page 27

U.A.E. Abu Dhabi
Universal Trading Company
P.O. Box 43 99
Tel.: 6335331
Service Center 6733974
Egypt
Middle East Commercial
Center
4 Salah El Dein St. - 2nd floor
Heliopolis, Kairo
Egypt
Tel.: 2024181719
Australia
The Andi-Co Group
1 Stamford Road
Oakleigh VIC 3166
Tel.: (03) 9569 1255
Fax: (03) 9569 1450
www.andico.com.au
Bahrain/Arabian Gulf
A.A. Zayani & Sons
P.O. Box 9 32
Bahrain
Tel. : 17 3111 2 4
Bulgaria
Electrolux Bulgaria E.O.O.D.
91 Levski Blvd.
1000 Sofia
Tel.: 2 806676
Fax. 2 980 5276
Cyprus
Hadjikyrlakos & Sons Ltd.
Prodromou 121
P.O. Box 21587
Nicosia 1511
Service Telephones:
Nicosia 02 481226
Limassol 05 562182
Larnaca 04 633929
Paphos 06 932 699
Estonia
Electrolux Estonia Ltd.
Mustamäe tee 24
EE0006 Tallinn
Tel.: (372) 6 650 090
Fax: (372) 6 650 092
Hong Kong
Dah Chong Hong Ltd.
20 Kai Cheung Road
Kowloon Bay
Kowloon - Hong Kong
Tel.: 0085222621620
Fax: 0085227550333
Jordan
Jordan Household
Supply Co. Ltd.
P.O. Box 3/68
Amman/Tel.: 69 70 50
Canada
EURO-LINE Appliances
2150 Winston PARK Drive 20
Oakville, Ontario L6H 5V1
Tel.: 905 829 3980
Fax: 905 829 3985
Korea (South)
Core Incorp.
3/F Chewoo Bldg.
200 Nonhyun-Dong
Kangnam-Ku 135-010
Seoul
Telefon 82 2 549 89 61
Croatia
Electrolux D.O.O.
Suplova 7
10000 Zagreb
Tel.: 1 61 19512
Fax: 1 61 19513
Kuwait/Arabian Gulf
Ali Al-Ghanim Est.
P.O. Box 21540 - Safat
Tel.: 4822190
Fax: 4820116
Lebanon
Adib & Assaferi
P.O. Box 539
Tripoli
Latvia
Electrolux Latvija Ltd.
Kr.Barona iela 130/2
Riga, LV-1012
Tel.: 371 7313626
Fax: 371 7845954
Lithuania
Electrolux Lithuania
Verkui 29
2600 Vilnus
Tel.: 372 272 3326
Fax: 372 272 3366
Malta
ITC
International Trading Company
White House Building
Mountbatte Street
Blata L-Bajda/Tel.: 220644
Mauritius
Happy World Centre Ltd.
P.O. 7 54
1 Chausee Street
Port Louis
Tel.: 25355
Namibia
AEG NAMIBIA (PTY)
LIMITED-Jeppe Street
Northern Industrial Area
Windhoek
Tel.: (061) 21-6082/4
Fax: (061) 217838
New Zealand
Monaco Corporation Ltd.
10 Rothwell Avenue
Albany - Auckland
4399 Auckland 1
New Zealand
Tel.: 00 64-92 59 11 11
Fax: 00 64-92 59 11 12
Syria
WATTAR CO.
P.O. Box 36109
Mazzeh - Damascus
Direct Phone: 00963116132649
Fax: 00963116119537
Iran
ARIAN International Development Co.
AEG Showroom
Shariati, Balatar as Safar
Teheran / Iran
Phone No. Showroom:
021 / 285 513 / 4
Phone No. Service:
021 / 312 27 67 / 8
Poland
Electrolux Poland Sp. zo.o.
ul. Domaniewska 41
02-034 Warszawa
tel.: 022 874 33 33
fax: 022 874 33 00
Russia
Electrolux Russia Ltd.
16 Olympiysky prospekt
129090 Moscow
Tel.: (095) 937 7837
Fax: (095) 926 5513
27
Page 28

Israel
Evis Ltd.
Tadiran-Ampa Service
10 Gibonay Israel Street
New Industrial Zone
Netanya, 42504
Israel
Japan
Electrolux Japan Ltd.
Domestic Appliances
Department
Maruzen Showa Warehouse
Building
Tookai 4-5-12, Ota-ku
143-006 Tokyo
Tel.: 0120-13-7117
Fax: 03-3790-5257
Thailand
Olympia Thai Tower, 444
Rachadapiser Road
Samsennok- Huaykwang
10320 Bangkok
Thailand
Tel.: 006625136111
Malaysia
Arzbergh Engineering
No. 49A/B, Jalan Petaling
Utama 7
4600 Petaling Jaya
Tel.: 3 795 1084
Fax: 3 795 1082
Singapore
Group Pte Ltd.
833 Bukit Timah Road
Unit no. 01-11 Royalville
279887 Singapore
Tel.: 0065 64638484
Fax: 0065 64638488
Slovakia Rep.
Electrolux Slovakia S.R.O.
Seberiniho 1
821 03 Bratislava
Tel.: 02 4333 4322, 4355
Fax: 02 4333 6976
Saudi Arabia
Awad Badi Nahas Est
Shara Siteen
Jeddah 21463
Phone: 6646583
Alia Trading Co
Mecca Road
Riyadh 11491
Phone 4645977
Slovenia
Electrolux Slovenia D.O.O.
Traska Ul. 132
1000 Ljubljana
Tel.: 61 1234 137
Fax: 61 1234 238
South Africa
AEG (Pty) Ltd.
55, 12th Road
P.O. Box 1 02 64
Kew/Johannesburg 2000
Tel.: 8069111
Fax: 006625136334
Hungary
Electrolux Lehel KFT
Erzsébet Királyné útja 87.
1142 Budapest
Tel.: 00361/467-3200
Czech Rep.
ELECTROLUX DOMÁCå
SPOTØEBIÈE CZ
DIVIZE ELECTROLUX S.R.O.
Customer Centre
Hanusova ul.
140 21 Praha 4
Tel.: 2 6112 6112
Telefax: 2 6112 3504
28
Page 29

Service
In the event of technical faults, please first check whether you can
remedy the problem yourself with the help of the operating instructions (section “What to do if…”).
If you were not able to remedy the problem yourself, please contact the
Customer Care Department or one of our service partners.
In order to be able to assist you
quickly, we require the following
information:
– Model description
– Product number (PNC)
– Serial number (S No.)
(for numbers see rating plate)
– Type of fault
– Any error messages displayed by
the appliance
– three digit letter-number combination for glass ceramic
So that you have the necessary reference numbers from your appliance
at hand, we recommend that you write them in here:
Model description: .....................................
PNC: .....................................
S No: .....................................
29
Page 30

Assembly / Montage
92
Page 31

93
Page 32

Rating Plate / Plaque signalétique / Typeplaatje
96901K-MN
55HCDAAAO
AEG-ELECTROLUX
230 V 50 Hz
949 592 324
7,9 kW
94
Page 33

95
Page 34

From the Electrolux Group. The world´s No.1 choice.
The Electrolux Group is the world´s largest producer of powered appliances for kitchen, cleaning and outdoor
use. More than 55 million Electrolux Group products (such as refrigerators, cookers, washing machines,
vacuum cleaners, chain saws and lawn mowers) are sold each year to a value of approx. USD 14 billion in more
than 150 countries around the world.
AEG Hausgeräte GmbH
Postfach 1036
D-90327 Nürnberg
http://www.aeg-electrolux.de
© Copyright by AEG
822 925 917-A-291105-01
Subject to change without notice
Sous réserve de modifications
Wijzigingen voorbehouden
 Loading...