

Page 1

6500 K
Ceramic Glass Hob
User Instructions
Page 2

Dear customer,
Please read these operating instructions through carefully.
Above all, please observe the “Safety“ section on the first few pages.
Please retain these operating instructions for future reference. Pass
them on to any subsequent owners of the appliance.
The warning triangle and/or specific words (Warning!, Caution!,
1
Important!) are used to highlight information that is important for
your safety or the function of the appliance. It is imperative that this
information is observed.
0 1. This symbol guides you step by step through the operation of the appli-
ance.
2. ...
3. ...
Next to this symbol you will find additional information and practical
3
tips on using the appliance.
Tips and information about the economical and ecological use of the
2
machine are marked with the clover.
In the event of a malfunction, these operating instructions contain
information on how to rectify faults yourself, see the “What to do, if...“
section.
If you require further assistance please contact your local AEG Service
Force Centre, see the section “Service and Spare Parts“
Printed on paper manufactured with environmentally sound processes.
He who thinks ecologically, acts accordingly ...
2
Page 3

Contents
CONTENTS
Operating Instructions . . . . . . . . . . . . . . . . . . . . . . . . . . . . . . . . . . . . 5
Safety . . . . . . . . . . . . . . . . . . . . . . . . . . . . . . . . . . . . . . . . . . . . . . . . . . . . . . . . 5
Disposal . . . . . . . . . . . . . . . . . . . . . . . . . . . . . . . . . . . . . . . . . . . . . . . . . . . . . . 7
The Key Features of Your Appliance . . . . . . . . . . . . . . . . . . . . . . . . . . . . . 8
Appliance Description 6500 K . . . . . . . . . . . . . . . . . . . . . . . . . . . . . . . . . . . 9
Control panel 6500 K . . . . . . . . . . . . . . . . . . . . . . . . . . . . . . . . . . . . . . . . . . . 10
Mains “On/Off“ button . . . . . . . . . . . . . . . . . . . . . . . . . . . . . . . . . . . . . . . 10
Cooking zone selection . . . . . . . . . . . . . . . . . . . . . . . . . . . . . . . . . . . . . . . 10
“Heat Setting/Residual Heat“ display . . . . . . . . . . . . . . . . . . . . . . . . . . . . 10
Heat setting selection + and - . . . . . . . . . . . . . . . . . . . . . . . . . . . . . . . . . 11
“Lock“ button and indicator . . . . . . . . . . . . . . . . . . . . . . . . . . . . . . . . . . 11
Cooking zone safety switch . . . . . . . . . . . . . . . . . . . . . . . . . . . . . . . . . . . . . 12
Resetting the safety switch . . . . . . . . . . . . . . . . . . . . . . . . . . . . . . . . . . . . . . 12
Before Using for the First Time . . . . . . . . . . . . . . . . . . . . . . . . . . . . . . . . . 13
Cleaning for the first time . . . . . . . . . . . . . . . . . . . . . . . . . . . . . . . . . . . . . . . 13
Operation of the Cooking Surface . . . . . . . . . . . . . . . . . . . . . . . . . . . . . . . 13
TOUCH CONTROL sensor buttons . . . . . . . . . . . . . . . . . . . . . . . . . . . . . . . 13
Switching on the appliance . . . . . . . . . . . . . . . . . . . . . . . . . . . . . . . . . . . 13
Switching off the appliance . . . . . . . . . . . . . . . . . . . . . . . . . . . . . . . . . . . 13
Cooking with the automatic warm up function . . . . . . . . . . . . . . . . . . . 14
Cooking without the automatic warm up function . . . . . . . . . . . . . . . . 15
Locking/unlocking the control panel . . . . . . . . . . . . . . . . . . . . . . . . . . . . 16
Tables and Tips . . . . . . . . . . . . . . . . . . . . . . . . . . . . . . . . . . . . . . . . . . . . . . . . 17
Pans . . . . . . . . . . . . . . . . . . . . . . . . . . . . . . . . . . . . . . . . . . . . . . . . . . . . . . . . . . 17
Energy saving tips . . . . . . . . . . . . . . . . . . . . . . . . . . . . . . . . . . . . . . . . . . . . . . 17
Tips for cooking with and without the automatic warm up function . . . . 18
Cleaning and Care . . . . . . . . . . . . . . . . . . . . . . . . . . . . . . . . . . . . . . . . . . . . . 20
Ceramic glass cooking surface . . . . . . . . . . . . . . . . . . . . . . . . . . . . . . . . . . . . 20
Stubborn Soilage . . . . . . . . . . . . . . . . . . . . . . . . . . . . . . . . . . . . . . . . . . . . . . . 21
3
Page 4

Contents
What to do if ... . . . . . . . . . . . . . . . . . . . . . . . . . . . . . . . . . . . . . . . . . . . . . . . 23
Service and Spare Parts . . . . . . . . . . . . . . . . . . . . . . . . . . . . . . . . . . . 26
Customer Care . . . . . . . . . . . . . . . . . . . . . . . . . . . . . . . . . . . . . . . . . . . . . . . . . 26
Guarantee Conditions . . . . . . . . . . . . . . . . . . . . . . . . . . . . . . . . . . . . . 27
Installation Instructions . . . . . . . . . . . . . . . . . . . . . . . . . . . . . . . . . . . 28
Technical Data . . . . . . . . . . . . . . . . . . . . . . . . . . . . . . . . . . . . . . . . . . . . . . . . 28
Regulations, Standards, Directives . . . . . . . . . . . . . . . . . . . . . . . . . . . . . . . 29
Installing and Connecting Up . . . . . . . . . . . . . . . . . . . . . . . . . . . . . . . . . . . 30
Installing . . . . . . . . . . . . . . . . . . . . . . . . . . . . . . . . . . . . . . . . . . . . . . . . . . . . . . 30
Electrical connection . . . . . . . . . . . . . . . . . . . . . . . . . . . . . . . . . . . . . . . . . . . . 33
4
Page 5

OPERATING INSTRUCTIONS
1 Safety
The safety aspects of this appliance comply with the accepted technical
standards and the German Appliance Safety Law. However, we also
consider it our obligation as a manufacturer to make you aware of the
following safety information.
Electrical Safety
• The new appliance may only be installed and connected up by qualified personnel, according to the manufacturers instructions and to
the relevant country standards.
Please observe this instruction, otherwise the warranty will not cover
any damage that may occur.
• Repairs to the appliance should only be carried out by approved service engineers. Improper repairs can cause injury or significant malfunction. If your appliance needs repairing, please contact your local
AEG Service Force Centre.
• If your appliance malfunctions, or fractures, cracks or splits appear:
– switch off all cooking zones,
– Disconnect the hob from the electricity supply.
Safety
Child Safety
The cooking zones will become hot when the hob is in use. Therefore,
always keep small children away.
The hob is designed to be operated by adults. Do not allow children to
play near or with the hob
Safety During Use
• This appliance is intended for domestic cooking only. It is not
designed for commercial or industrial purposes
• Do not use the hob to heat the room.
• Take care when plugging electrical appliances into mains sockets near
the hob. Connecting leads must not come into contact with the hot
surface.
• Overheated fats and oils catch fire quickly. You should supervise
cooking when preparing foods in fat or oil (e.g. chips).
• Switch the cooking zones off after use.
5
Page 6

Safety
Safety When Cleaning
• For safety reasons do not clean the appliance with a steam jet or high
pressure cleaner.
• Clean the hob in accordance with the maintenance and cleaning
instructions in this manual.
How to Avoid Damage to Your Appliance
• Do not use the hob as a work surface or for storage.
• Do not use the cooking zones with empty pans, or without pans.
• Ceramic glass is insensitive to temperature shock and very robust,
however it is not unbreakable. Hard and sharp objects, in particular,
can damage the cooking surface if they fall on it.
• Do not use cast iron pans or pans with damaged bases that are rough
or burred. Scratching may occur when the pans are slid.
• Do not place any pans on the hob frame. Scratching may occur or the
paint damaged.
• Ensure that liquids containing acids, e.g. vinegar, lemon or scale
remover do not come into contact with the hob frame, otherwise
matt spots will appear.
• If sugar or a dish containing sugar comes into contact with a hot
cooking zone and then melts, remove the soiling immediately whilst
still hot using a scraper. If it cools, damage to the surface may occur
on removal.
• Keep all items and materials that can melt away from the ceramic
glass surface, e.g. plastics, aluminium foil, or oven foils. If something
of this nature should melt onto the ceramic glass surface, it must also
be removed immediately using the scraper.
• If you wish to use special types of pan (e.g. a pressure cooker, simmering pan, wok, etc.), please observe the manufacturer's instructions.
• Avoid boiling pans dry. The bases could be irreparably damaged in the
process and the glass ceramic cooking surface also damaged.
6
Page 7

2 Disposal
Disposing of packaging material
All materials used can be recycled.
The plastics are marked as follows:
• >PE< for polyethylene, e.g. as used for the outer wrapping and the
bags inside.
• >PS< for polystyrene foam, e.g. as used for the packing pieces, completely free of CFCs.
The cardboard is made from 80% recycled paper.
Disposal of old appliances
Please dispose of any old appliance with due regard to safety and the
environment.
Warning! Before disposing of old appliances make them inoperable.
1
Unplug from the mains, cut off the mains cable.
Information on disposal
2
• The appliance must not be disposed of in the household rubbish.
• You can obtain information about collection dates or public tips from
your local refuse department or council.
Disposal
7
Page 8

The Key Features of Your Appliance
The Key Features of Your Appliance
• Ceramic Glass Cooking Surface: the appliance has a VITRAMIC®
cooking surface made of ceramic glass and 4 fast heating cooking
zones. The particularly powerful radiant heater elements significantly
shorten the amount of time taken for the zones to heat up.
• Sensor Buttons: your appliance is operated using
TOUCH CONTROL sensor buttons.
• Cleaning: the advantage of glass ceramic cooking surfaces and the
sensor buttons is their ease of cleaning. A damp cloth is often sufficient for cleaning. (see:
• Mains Button: the appliance has a separate mains button. The
Off“ button enables the electricity supply to the appliance to be completely switched off at the touch of a button.
• Displays: digital displays and indicators provide information on the
heat setting chosen, the functions that are activated, and any heat
remaining in the cooking zone.
• Lock Button: the appliance is also equipped with a lock button. The
control panel can be completely locked using this button. In this way
inadvertent change to the settings can be prevented.
• Automatic Function: your appliance is equipped with an electroni-
cally controlled automatic warm up function on all four cooking
zones. The built-in function switches automatically from the maximum heat setting to the lower heat setting selected for further cooking.
• Safety Switch: a safety switch automatically switches off all the
cooking zones when no changes have been made to the settings for a
certain period of time.
• Keep Warm Setting: ! is the heat setting at which food can be kept
warm.
• Residual Heat Indicator: h illuminates in the display, if the cooking
zone is sufficiently hot to cause burns.
“Cleaning and care“)
“On/
8
Page 9

Appliance Description 6500 K
Appliance Description 6500 K
Cooking zone dimensions:
rear left: 145 mm
rear right: 180 mm
front left: 210 mm
front right: 145 mm
Co
tor
ca
i
d
In
on with
i
ect
l
ne Se
o
Z
ng
i
k
o
Heat Se
n
ti
t
ection “+“ and
l
g Se
-“
“
“On/Off“
a
d Lock
n
9
Page 10
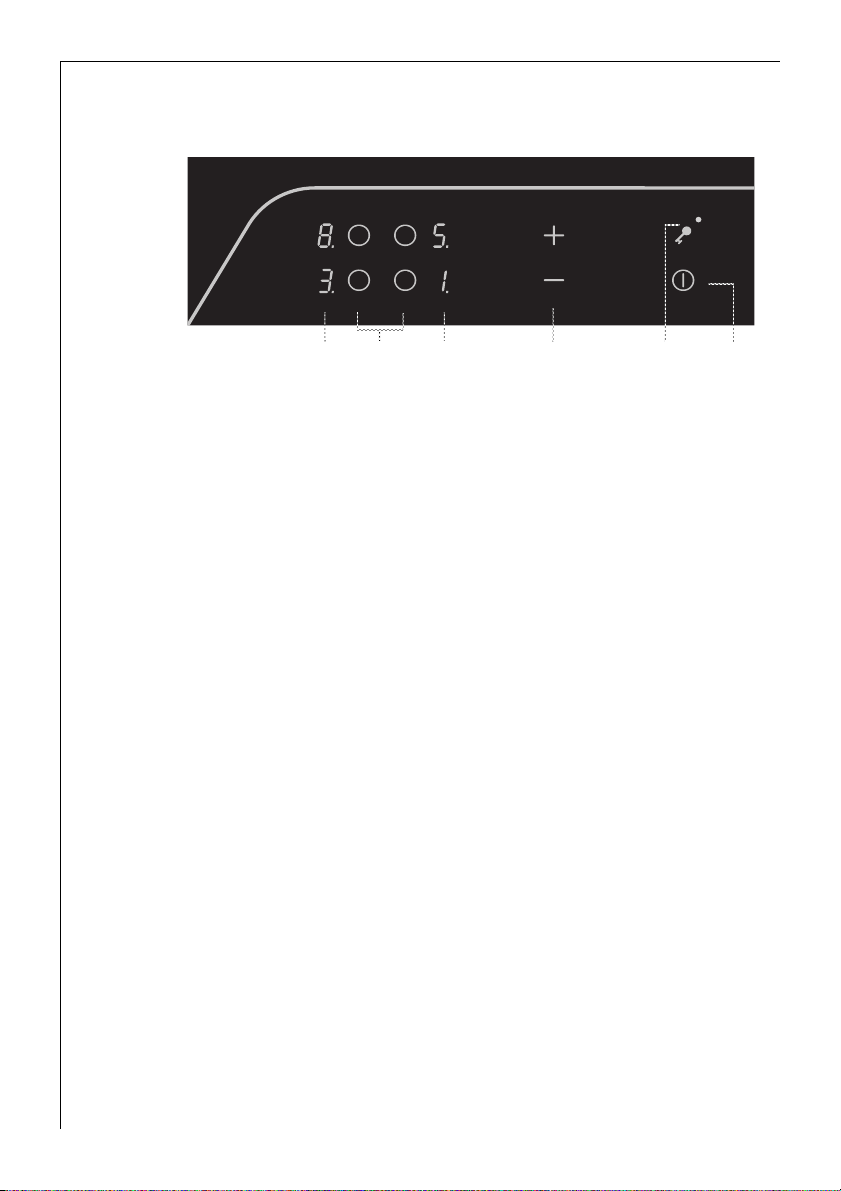
Appliance Description 6500 K
Control panel 6500 K
Setting/Residual
t
Hea
C
ooki
n
Zon
He
o
cti
e
el
S
e
ng
ti
t
e
S
at
eat
H
ng
l
sidua
/Re
t Setting Selection
a
He
He
at
d “-“
n
“ a
+
“
Lock
tor
ca
i
nd
I
h
it
w
“O
ns
Mai
n
/Off“
But
on
t
Mains “On/Off“ button n
For switching on the appliance. The appliance is:
–switched on when the button is touched for approx. one second,
–switched off when the button is touched again for one second.
When the appliance is switched on, at least one of the “Heat Setting/
Residual Heat“ displays is illuminated.
Cooking zone selection
Buttons for choosing the cooking zone on which the setting is to be
changed. The decimal point is illuminated in the display field of the
cooking zone just selected.
“Heat Setting/Residual Heat“ display
The four display fields that are assigned to the four cooking zones display:
–j, after switching on and when automatically switched off by the
safety function,
–! to ), depending on the heat setting chosen,
–a when the warm up function is active,
–h in the case of residual heat,
–f in the case of a fault.
10
Page 11

Appliance Description 6500 K
Heat setting selection + and -
For setting or adjusting the heat setting (! to )) on the selected
cooking zone.
–The heat setting is increased using the + button and the automatic
warm up function activated.
–The heat setting is lowered using the - button.
“Lock“ button and indicator o
To lock the control panel against inadvertent changes to the settings,
touch the button for approx. two seconds. The lock is lifted by touching
the button again for two seconds.
The lock can also be used as a child safety measure.
The indicator illuminates when the control panel is locked.
11
Page 12

Cooking zone safety switch
1 Cooking zone safety switch
If, after a set period of time, one of the rings is not switched off or the
heat setting not changed, the cooking zone switches off automatically.
j, or h appears in the displays of all the rings that are switched on.
The rings are switched off at:
• Heat setting 1 - 2 after 6 hours
• Heat setting 3 - 4 after 5 hours
• Heat setting 5 after 4 hours
• Heat setting 6 - 9 after 1.5 hours
Resetting the safety switch
0 To release the safety switch on all cooking zones switched on, switch
the appliance off and on again at the main button The cooking zones
are then ready for use again.
h appears in the ring display when there is still heat remaining.
3
12
Page 13

Before Using for the First Time
Before Using for the First Time
Cleaning for the first time
Wipe the ceramic glass cooking surface with a damp cloth to remove
any traces left from manufacturing.
Important: Do not use any caustic, abrasive cleaners! The surface could
1
be damaged.
Operation of the Cooking Surface
TOUCH CONTROL sensor buttons
To operate the TOUCH CONTROL sensor buttons, place your finger flat
on the desired button until the corresponding indicator illuminates, or
extinguishes, or the desired function is performed.
For quicker adjustment leave your finger on the button until the
desired value is reached.
All entries are confirmed by an acoustic signal.
Switching on the appliance
0 Switch on the appliance using the main “On/Off“ button.
The “Heat Setting/Residual Heat“ display fields indicate j.
After the main “On/Off“ button has been operated to switch on your
3
appliance, one of the cooking zones must be selected using the cooking
zone selection buttons within approx. 10 seconds. Otherwise the appliance switches off again for safety reasons.
Switching off the appliance
0 Operate the main “On/Off“ button to completely
switch off the appliance.
After the individual cooking zones or the entire cooking surface have
3
been switched off, the presence of residual heat is indicated by h (as
in “Hot“) in the “Heat Setting/Residual Heat“ display fields of the
respective cooking zones.
If all cooking zones are switched off, the appliance switches off automatically after a period of time.
13
Page 14

Operation of the Cooking Surface
Cooking with the automatic warm up function
ng
Cooki
Heat Setting/Residual Heat
Zon
He
n
o
cti
e
el
S
e
ng
ti
t
e
S
at
He
l
sidua
/Re
eat setting selectio
H
at
“+“ and “-“
n
Lock
tor
ca
i
nd
I
h
it
w
Main
t
But
All four rings on the cooking surface have nine heat settings and are
equipped with an automatic warm up function.
–!, lowest heat setting
–), highest heat setting
–a, automatic warm up function.
When you select the heat setting that you require for cooking, using
the + button, once the pan is hot, the cooking zone operates for a certain period of time at full power (a = automatic warm up function)
and then switches back to the heat setting selected for further cooking.
The duration of the automatic warm up period is dependent on the setting chosen for further cooking once the pan is hot!
0 1.Select the desired cooking zone using the cooking zone buttons.
The decimal point in the associated display field illuminates.
2. Press the + button, until the required heat setting ! to ( is reached.
The cooking setting chosen is then displayed. After 5 seconds, a
appears again in display instead of the cooking setting.
The cooking setting is displayed again at the end of the automatic
warm up time.
on “On/Off“
14
Page 15

Operation of the Cooking Surface
If you select a higher setting when the automatic function is in opera-
3
tion, e.g. from § to %, the previous warm up time is taken into
account. If you select a lower setting, then the automatic warm up
function is brought to an immediate end. If you start cooking again on
a cooking zone that is still warm, the automatic warm up function uses
the residual heat. This saves time and energy.
Switching off a cooking zone
0 1.Select the desired cooking zone using the cooking zone buttons.
2. Press the + and - buttons simultaneously to switch off.
Cooking without the automatic warm up function
If you want to use the cooking zone without the automatic warm up
function, then select the desired heat setting with the - button.
Select a high setting for warming up. As soon as steam starts to form or
the oil is hot, turn back to the heat setting necessary for further cooking.
0 1.Switch on the appliance and select the desired cooking zone using the
cooking zone selection buttons.
The decimal point in the associated display field illuminates.
2. Press the - button to set the required heat setting ! to ).
The “Heat Setting/Residual Heat“ display field for the corresponding
cooking zone indicates the current setting.
3. You can adjust the heat setting at any time using the + and - but-
tons, as long as the cooking zone is selected.
Switching off a cooking zone
0 1.Select the desired cooking zone using the cooking zone buttons.
2. Press the + and - buttons simultaneously to switch off.
If you want to switch on again a cooking zone on which there is food
3
that is already hot, you should always choose the required heat setting
using the - button. In this way you will avoid the food being overcooked by the automatic warm up function.
15
Page 16

Operation of the Cooking Surface
Locking/unlocking the control panel
At any time during the cooking process, the control panel can be
locked, with the exception of the “On/Off“ button. By this means accidental changes to the settings can be prevented. This function is also
useful as a child safety measure.
0 1.Touch the o button until the indicator illuminates.
2. To unlock, touch the lock button again until the indicator extinguishes.
Child safety! If, the lock button is active when the cooking surface is
completely switched off by touching the main button, when the cooking surface is switched on again, the lock button is active. This means
that the lock button must be operated first, before the rings can be
switched on again.
16
Page 17

Tables and Tips
Pans
The better the pan, the better the results.
• You can recognise good quality pans by the base of the pan.
• The base should be as thick and flat as possible. Rough bases (e.g. on
cast iron pans) will scratch the cooking surface when slid.
• Use high sided pans for dishes with a lot of liquid, so that nothing
boils over.
• Ensure that the pan is in the centre of the cooking zone and covers
the heated/marked area.
Important! Avoid pans boiling dry. The base could be damaged and
1
then scratch the cooking surface when slid. Saucepans and frying pans
with sharp edges and burrs will also scratch.
Energy saving tips
You will save valuable energy if you observe the following tips:
2
• Whenever possible, use the automatic warm up function on your
cooking zones (see
• Observe the special tips on saucepans and frying pans. The pan base
and cooking zone should be the same size.
• Dirty cooking zones and pan bases damage the glass ceramic cooking
surface and increase electricity consumption.
• Switch the cooking zone off before cooking is finished to use the
residual heat.
• Cooking times are reduced by up to 50% when a pressure cooker is
used. Not only do you save energy, but more vitamins and minerals
are retained.
“Cooking and Frying Table“).
Tables and Tips
17
Page 18

Tables and Tips
You will waste energy if the....
Pan is too small Pan lid is not fit-
ted properly
Pan base is
uneven
Pan is too large
(glass ceramic)
Tips for cooking with and without the automatic warm
up function
The automatic warm up function is suitable for:
• dishes that start off cold, are heated up at a high setting and do not
need to be continually watched when cooking,
• dishes that are put in a hot frying pan.
The automatic warm up function is not suitable for:
• goulash and similar braised dishes that need continual turning until
browned correctly, liquid adding and then braising until cooked,
• dumplings, pasta dishes with large amounts of liquid,
• cooking with pressure cookers,
• very large quantities of soup/stew with more than 2 litres of liquid.
General notes:
• When cooking without the automatic warm up function, we recom-
3
mend the use of a high heat setting to warm up the food (using the
- button) and then leaving the dish to finish cooking at an appropriate lower heat setting.
• You can use the ! heat setting for keeping food warm.
• Take note of the results when you initially use the appliance. You can
then decide which heat setting is the best for "your dishes" in the
"quantities you are accustomed to preparing" with "your pans". You
will then rapidly come to value the merits of the automatic function
and will feel at ease with you new cooking surface.
18
Page 19

Tables and Tips
Typical Heat Settings
The figures given in the following tables are for guidance only. Exactly
which heat setting needs to be used depends on the quality of the pans
and the type and quantity of the food.
Table: Cooking and Frying
Automatic
Switch
Setting
Warm Up
*
Time
(Min.)
Cooking
Process
Examples of Usage
Warming Up
9
8 4.5
7 3.5
6 2.5 Gentle Frying
5 8.5
4 6.5
3 4.8
2 3.0
1 1.0
*) When cooking without the automatic warm up function, the warm up time can
be selected as required.
Browning
Frying
Fast Frying
Boiling Boiling potatoes, vegetables
Steaming
Softening
Keeping warm
Melting
Warm up large amounts of liquid,
boil pasta,
brown meat,
(brown goulash, pot-roast)
Steaks, pieces of loin,
potato fritters,
fried sausages,
pancakes
Schnitzel/cutlets,
liver, fish,
rissoles, fried eggs
Steam and sauté small quantities of
vegetables,
cooking rice and
milk based dishes
Keep food warm,
melt butter,
dissolve gelatine,
melt chocolate
19
Page 20

Cleaning and Care
Cleaning and Care
Ceramic glass cooking surface
It is important to clean the cooking surface after each use.
Important! Never use aggressive cleaners such as, for example, coarse
1
scouring cleaners or pan cleaners that scratch.
0 1.Always clean the cooking surface after each use. Use a damp cloth and
a little washing up liquid.
Then rub the cooking surface dry with a clean cloth. No residues of
cleaner must be left on the surface.
2. Clean the entire cooking surface thoroughly once a week. For cleaning
use “Stahl-Fix“or “Vitroclen“.
3. Then rinse the entire cooking surface with plain water and rub it dry
with a clean cloth.
Ensure that no remnants of cleaner are left on the surface! Otherwise
the cooking surface will be damaged!
Only use the recommended cleaners.
20
Page 21

Stubborn Soilage
Residues from food that has boiled over
First soften these using a wet cloth and
then remove residues using a glass
scraper.
Caution! Take care when using a glass
1
scraper.
Then clean the cooking surface with the
recommended cleaners.
Sugar
Warning! Remove burnt on sugar or
1
melted plastic immediately - when still
warm (not hot) - using a glass scraper,
otherwise damage may be caused to the
hob.
Then clean the cooking surface normally.
Damage from sugar or food containing
sugar can be avoided by polishing the
cooking surface with “Vitroclen“.
Cleaning and Care
21
Page 22

Cleaning and Care
Spots
Scale, shiny pearl like spots, metallic iridescent coloured spots, and food remnants from pans that have formed
during cooking are best removed when
the cooking zones are still warm.
Use the cleaners and polishes recommended. If necessary, clean more than
once.
Acids
Important! Do not put vinegar, lemons
1
or scale removers on the recess frame,
they will make the surface matt.
Grains of sand that have fallen on the
cooking surface can cause scratching
when pans are slid. Therefore make sure
that no grains of sand are left on the
cooking surface.
22
Abraded decor
Important! If aggressive cleaners or
1
pans with abrasive bases are used, then
the decor will take on an abraded
appearance and dark spots will appear
over time.
You can obtain suitable cleaners and polishes as well as glass scrapers
3
from AEG Service Force Centre.
Page 23

What to do if ...
A fault may have been caused by a minor operating error, which you
can correct yourself with the help of the following instructions. Do not
attempt any further repairs if the following instructions do not help in
the specific case.
Warning! Repairs to the appliance should only be carried out by
1
approved service engineers. Improper repairs can cause injury or
malfunction. If your appliance needs repairing, please contact your
local AEG Service Force Centre.
What to do if ...
.... the cooking zones do not work?
0 Check whether
–the mains fuse (fuse box) is intact. If the fuse blows several times,
please call an approved electrician.
–that the appliance is correctly connected and is switched on,
–indicators on the control panel illuminate,
–the corresponding cooking zone is switched on,
–the cooking zones are set to the desired heat setting for cooking
(see section: “Cooking“).
–the cooking zones have been switched off by the safety switch
(see section: “Safety Functions“).
What to do if ...
.... the cooking zones cannot be switched on?
0 Check whether
–the control panel is locked (see section: “Locking/Unlocking
the Control Panel“).
–more than 10 seconds have elapsed between operating the On/Off
button and switching on the desired cooking zone, (see section:
“Switching on the Appliance“).
–the touch switches are partially covered by a damp cloth or liquid.
23
Page 24

What to do if ...
.... the cooking zones do not heat up, even though the displays
are working?
0 Check whether
– demonstration mode has been activated accidentally.
To deactivate this mode, ensure that the appliance is switched off and
that the control panel is not locked.
Then proceed as follows:
1. Switch on main button.
2. Within 10 seconds, press the following buttons simultaneously for a
maximum of one second:
– lock button o
– cooking zone selection button, front left
– cooking zone selection switch, rear left.
When the buttons are released, a peep tone sounds as confirmation.
3. Press the j button, a peep tone sounds as confirmation.
Your cooking surface is now ready for use again.
.... the display suddenly changes to j or h for residual heat?
0 Check whether
–the On/Off button has been operated accidentally.
–the touch switches are partially covered by a damp cloth, liquid or
similar.
–there has been a power cut.
–the safety switch has been activated.
.... after switching off the cooking zones, neither j nor h for
residual heat appears in the display?
0 Check whether
–the cooking zone was only used for a short period and is therefore
not hot enough.
If the cooking zone is hot, call AEG customer service.
.... a cooking zone cannot be switched off?
0 Check whether
–the touch switches are partially covered by a damp cloth or liquid.
–the lock is activated.
.... a cooking zone cannot be switched on?
0 Check whether
–the lock is activated.
24
Page 25

.... f is shown in the display?
0 Check whether
–a pan that is too small is on the cooking zone.
–the cooking zone has been overheated.
If a cooking zone button is pressed and the pan on the cooking zone is
too small, f (Fault) appears in the display. This symbol is also displayed
in the case of overheating, faults in the electronics or for safety reasons.
Improtant! If you call an engineer to resolve a problem listed in these
notes, or to rectify an error caused by incorrect use or installation, a
charge will be made even during the guarantee period.
What to do if ...
25
Page 26

What to do if ...
SERVICE & SPARE PARTS
If you wish to purchase spare parts or require an engineer, contact your
local AEG Service Force Centre by telephoning:
08705 929 929
Your telephone call will be automatically routed to the Service Centre
covering your post code area.
When you contact the Service Centre they will need the following
information:
1. Your name & address, including post code.
2. Your telephone number
3. Clear and concise details of the fault.
4. The model, serial and
production number. This
information can be found on
the rating plate. The rating
plate is on the inner edge of
the door on the right.
5. Date of purchase. Please note
that it will be necessary to
provide proof of purchase for
any in guarantee service call.
26
In-guarantee customers should ensure that the chapter headed „Reme-
dying Faults“ has been read, as the engineer will make a charge if the
fault is not a mechanical or electrical breakdown.
Customer Care
For general enquiries concerning your AEG appliance or for further
information on AEG products please contact our Customer Care
Department by letter or telephone as follows:
Customer Care Department
AEG Domestic Appliances
55-77 High Street, Slough
Berkshire, SL1 1DZ
Tel. 08705 350350 (*)
(*) Call may be recorded for training purposes
Page 27

What to do if ...
GUARANTEE CONDITIONS
Guarantee Conditions
AEG offer the following guarantee to the first purchaser of this appliance.
1. The guarantee is valid for 12 months commencing when the appliance is handed over
to the first retail purchaser, which must be verified by purchase invoice or similar documentation.
The guarantee does not cover commercial use.
2. The guarantee covers all parts or components which fail due to faulty workmanship or
faulty materials. The guarantee does not cover appliances where defects or poor performance are due to misuse, accidental damage, neglect, faulty
installation,unauthorised modification or attempted repair, commercial use or failure
to observe requirements and recommendations set out in the instruction book.
This guarantee does not cover such parts as light bulbs, removable glassware or plastic.
3. Should guarantee repairs be necessary the purchaser must inform the nearest customer
service office (manufacturer´s service or authorised agent). AEG reserves the right to
stipulate the place of the repair (i. e. the customer´s home, place of installation or AEG
workshop).
4. The guarantee or free replacement includes both labour and materials.
5. Repairs carried out under guarantee do not extend the guarantee period for the appli-
ance. Parts removed during guarantee repairs become the property of AEG.
6. The purchaser´s statutory rights are not affected by this guarantee.
European Guarantee
If you should move to another country within Europe then your guarantee moves with
you to your new home subject to the following qualifications:
– The guarantee starts from the date you first purchased your product.
– The guarantee is for the same period and to the same extent for labour and parts as
exist in the new country of use for this brand or range of products.
– This guarantee relates to you and connot be transferred to another user.
– Your new home is within the European Community (EC) or European Free Trade Area.
– The product is installed and used in accordance with our instructions and is only used
domestically, i. e. a normal household.
– The product is installed taking into account regulations in your new country.
Before you move please contact your nearest Customer Care Centre, listed below, to
give them details of your new home. They will then ensure that the local Service Organisation is aware of your move and able to look after you and your appliances.
France Senlis +33 (0) 44 62 29 29
Germany Nürnberg +49 (0) 911 323 2600
Italy Pordenone +39 (0) 1678 47053
Sweden Stockholm +46 (0) 8 738 7910
UK Slough +44 (0) 1753 219899
27
Page 28

Technical Data
INSTALLATION INSTRUCTIONS
Important! This appliance must be installed by qualified personnel,
1
according to the manufacturer’s instructions and to the relevant British
Standards.
Please observe this instruction, otherwise the warranty will not cover
any damage that may occur.
Technical Data
Appliance Dimensions
Width 570 mm
Depth 500 mm
Height 55 mm
Cut-Out Dimensions
Width 560 mm
Depth 490 mm
Corner radius R3
28
Power Consumption
Front left cooking zone 2300 W
Rear left cooking zone 1200 W
Rear right cooking zone 1800 W
Front right cooking zone 1200 W
Heater Element Voltage 230 V ...240 V
Total Electrical Load Max. 6.5 kW
Fuse Rating 30 Amp
Page 29

Regulations, Standards, Directives
Regulations, Standards, Directives
This appliance meets the following standards:
• EN 60 335-1 and EN 60 335-2-6
in respect of the safety of electrical appliances for household use and
similar purposes and
• DIN 44546 / 44547 / 44548
in respect of properties of electrical cookers for the household.
• EN 55014-2 / VDE 0875 part 14-2
• EN 55014 / VDE 0875 part 14/12.93
• EN 61000-3-2 / VDE 0838 part 2
• EN 61000-3-3 / VDE 0838 part 3
in respect of basic electromagnetic compatibility (EMC) requirements.
This appliance complies with the following EC directives:
;
• 73/23/EWG dated 19.02.1973 (Low Voltage Directive)
• 89/336/EWG dated 03.05.1989 (EMC Directive, including Amendment
Directive 92/31/EWG).
29
Page 30

Installing and Connecting Up
Installing and Connecting Up
Installing
Important: The new appliance may only be installed and connected up
1
by an approved installer.
Please observe this instruction, otherwise the guarantee will not cover
any damage that may occur.
The veneer or plastic coverings on kitchen units around the appliance
must be bonded with heat resistant adhesive (100 °C). If plastic coverings or the adhesive are not sufficiently temperature resistant, then the
covering may distort or come loose.
In respect of fire protection, the appliance corresponds to type Y
(EN 60335-2-6). Only this type of appliance may built into positions
with a high cupboard or wall on one side.
30
The cooking surface must have a heat protective base permanently
fixed in position. The distance from the base to the underside of the
cooking surface must be at least 50 mm. The edges of the cut out must
be coated with a water-proof material. The cooking surface must be
built-in such that the TOUCH CONTROL control panel is at the front
(see Fig.).
Page 31

Installing and Connecting Up
• For protection against moisture, all cut faces are to be sealed with
suitable sealing material.
• On tiled work surfaces, the joints in the area where the hob sits must
be completely filled with grout.
• On natural, artificial stone, or ceramic tops, the snap action springs
must be bonded in place.
• Ensure that the seal is correctly seated in the frame and that it is
seated against the work surface without leaving any gaps. Additional
silicon sealant must not be applied, this will make removal more difficult in the event of the need for service.
• To remove the hob, it must be pressed out from below.
31
Page 32

Installing and Connecting Up
min.
25 mm
min.
5 mm
32
Page 33

Installing and Connecting Up
Electrical connection
Assembly and connection of the new appliance may only be performed
by an approved installer.
Please observe this instruction, otherwise the guarantee will not cover
any damage that may occur.
Attention! Only the cable fitted to the cooking surface recess may be
1
used for connecting up the appliance. Replacement cables can only be
obtained from AEG Service Force Centre. Part No. 374 349 000
A device is to be included in the electrical installation that makes it
possible to isolate the appliance from the mains supply with a minimum contact separation of 3 mm. Suitable isolation devices include,
e.g. cut-outs, fuses (screw type fuses are to be removed from the
holder), earth leakage trips and contactors.
Important! Make the electrical connection in accordance with the wir-
1
ing diagram.
33
Page 34

34
Page 35

35
Page 36

Hier Typschild aufkleben!
(nur für Werk)
AEG Hausgeräte GmbH
Postfach 1036
D-90327 Nuremberg
http://www.aeg.hausgeraete.de
© Copyright by AEG
ANC 822 947 294 -04- 0500
 Loading...