

Page 1

2222681-36
INSTRUCTION BOOKLET
REFRIGERATOR
ZU 9155
Page 2

Instructions for the User
Important Safety Instructions 3
Description of the Appliance 4
Operation 5
Before use 5
Setting the temperature 5
Fresh food refrigeration 5
The door shelves 5
Normal Operating Sounds 5
Health and Safety Guidelines 6
Defrosting 7
Maintenance and Cleaning 7
Internal cleaning 7
External cleaning 7
Periodic cleaning 7
Changing the light bulb 8
When the appliance is not in use 8
Something Not Working? 8
Service and Spare Parts 9
Customer Care Department 9
Zanussi Service Force 10
Guarantee Conditions 12
Instructions for the Installer
Technical Specifications 13
Installation 13
Positioning 13
The Electrical Connection 14
Building-in instructions 15
Grid preparation 15
Right door opening 15
Left door opening 15
Door reversal 15
Building the appliance in under a worktop 16
Fitting the plinth 18
CONTENTS
2
Page 3
3
General Safety
■ This appliance contains hydrocarbons in its
cooling unit; maintenance and recharging
must therefore only be carried out by authorised technicians.
■ Take utmost care when handling your appli-
ance so as not to cause any damages to the
cooling unit with consequent possible fluid
leakages.
■ The appliance must not be located close to
radiators or boilers.
■ Avoid prolonged exposure of the appliance to
direct sunlight.
■ Do not use other electrical appliances (such as
ice cream makers) inside of refrigerating appliances.
During Use
■ This appliance is designed for domestic use only,
specifically for the storage of edible foodstuffs. It is
not intended for commercial or industrial use.
■ Containers with flammable gases or liquids can
leak at low temperatures. Do not store any containers with flammable materials, such as spray
cans, fire extinguisher refill cartridges etc. in the
refrigerator.
Maintenance and Cleaning
■ Before cleaning, always switch off the appliance
and disconnect from the electrical supply.
■ When unplugging always pull the plug from the
mains socket, do not pull on the cable.
Servicing
■ This product should be serviced by an authorised
engineer and only genuine spare parts should be
used.
■ Under no circumstances should you attempt to
repair the appliance yourself. Repairs carried out
by inexperienced persons may cause injury or
serious malfunctioning. Contact your local Service
Force Centre.
At the end of the Appliance Life
■ When disposing of your appliance use an autho-
rised disposal site.
■ Remove the plug and ensure that any locks or
catches are removed, to prevent young children
being trapped inside.
IMPORTANT SAFETY INSTRUCTIONS
Prior to Installation
■ Check the appliance for transport damage. Under
no circumstance should a damaged appliance be
installed. In the event of damage please contact
your retailer.
Installation
■ This appliance is heavy. Care should be taken
when moving it.
■ It is dangerous to alter the specifications or
attempt to modify this product in any way.
■ Ensure that the appliance does not stand on the
electrical supply cable.
Important: if the supply cable is damaged, it
must be replaced by authorized service or qualified personnel using a special cable of the same
type.
■ Any electrical work required to install this appli-
ance should be carried out by a qualified electrician or competent person.
■ Parts which heat up should not be exposed.
Whenever possible, the back of the appliance
should be close to a wall, but leaving the required
distance for ventilation, as stated in the installation instructions.
■ The appliance should be left for 2 hours after
installation before it is turned on, in order to allow
the refrigerant to settle.
Refrigerant
■ The refrigerant isobutane (R600a) is contained
within the refrigerant circuit of the appliance, a
natural gas with a high level of environmental
compatibility, which is nevertheless flammable.
■ During transportation and installation of the appli-
ance, be certain that none of the components of
the refrigerant circuit become damaged.
■ If the refrigerant circuit should become damaged:
- avoid open flames and sources of ignition.
- thoroughly ventilate the room in which the
appliance is situated.
Child Safety
■ Do not allow children to tamper with the controls
or play with the product.
■ There is a risk of suffocation! Keep packaging
material away from children!
These warnings are provided in the interests of your safety. Ensure that you understand them all
before installing or using this appliance. Your safety is of paramount importance. If you are unsure
about any of the meanings of these warnings contact the Customer Care Department.
Page 4
DESCRIPTION OF THE APPLIANCE
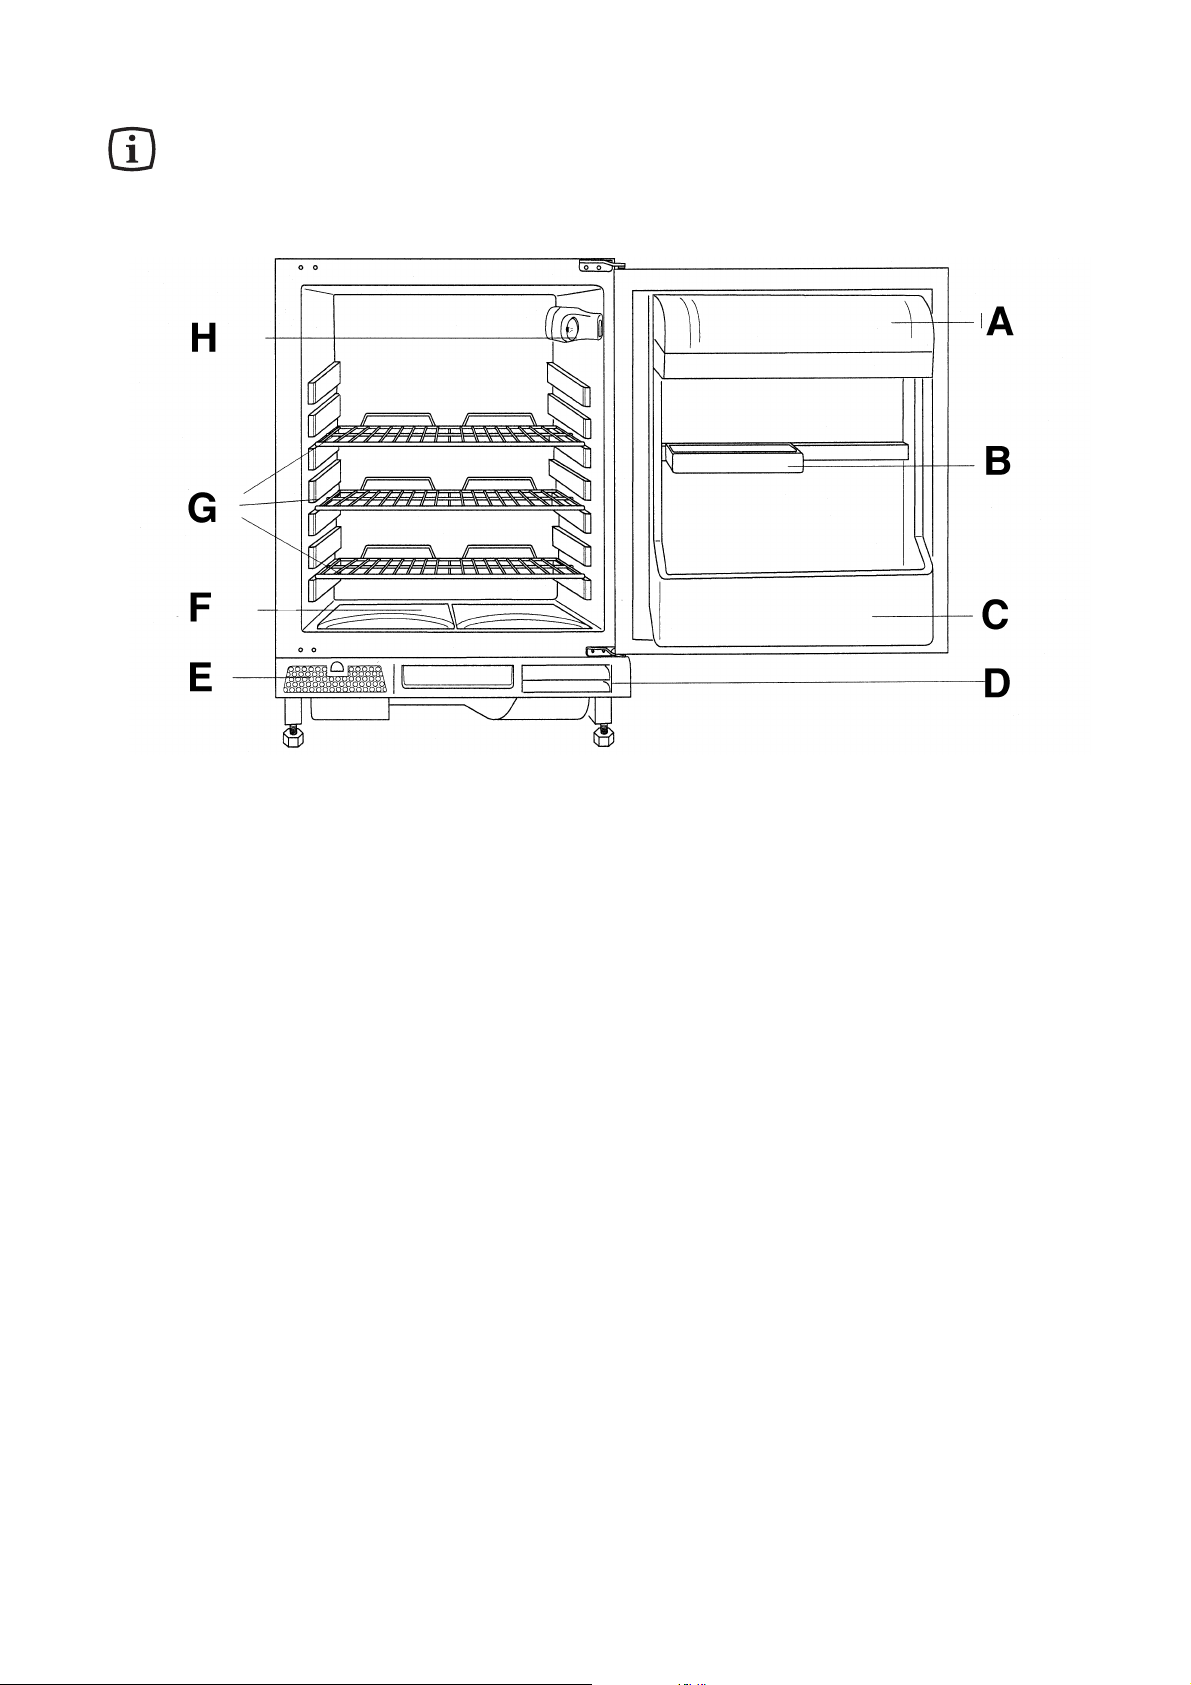
A - Dairy compartment
B - Movable shelf
C - Bottle storage shelf
D - Airduct exit
E - Air inlet filter
F - Salad bins
G - Storage shelves with cool check temperature
guide
H - Thermostat control
4
Page 5
5
OPERATION
Before use
Remove all securing tapes. Wash inside the appliance with lukewarm water and bicarbonate of soda
(5 ml to 0.5 litre of water). Do not use soap or detergent as the smell may linger. Dry thoroughly.
Setting the temperature
The temperature inside the refrigerator is regulated
by a thermostat with 6 temperature positions and
one «OFF» (O) position.
Position 1 = minimum coldness
Position 6 = maximum coldness
Turn the thermostat dial to the required position.
An intermediate position is usually the most suitable,
although the temperature will be affected by:
l
Room temperature
l
How often the door is opened
l
How much food is stored
l
Position of the appliance
In determining the correct temperature control setting
all these factors have to be considered and some
experimentation may be necessary.
When altering the temperature setting, allow 24
hours for the temperature to stablise before making
further changes.
Important
During prolonged periods of abnormally
hot weather, if the thermostat is set on too
high a number, the cooling system may
operate continuously and the fridge cooling plate may not defrost. Turning the knob
to a lower number will cause the automatic
defrosting to resume.
Fresh food refrigeration
To obtain the best performance, do not store warm
food or evaporating liquids in the refrigerator; do
cover or wrap the food, particularly if it has a strong
flavour.
Do not cover the shelves with any protective material, such as paper, cardboard or plastic, which may
obstruct the air circulation through them.
To help you use your refrigerator correctly, here are
some more useful hints:
Raw meat (beef, pork, lamb & chicken or poultry): wrap in polythene bags and place on top of the
salad drawer.
Meat can only be stored safely in this way for
one or two days at the most.
Fruit & vegetables: these should be thoroughly
cleaned and placed in the bottom salad bin.
Butter & cheese: these should be placed in special
airtight containers or wrapped in aluminium foil or
polythene bags to exclude as much air as possible.
Milk bottles: these should have a cap and should
be stored in the bottle rack on the door.
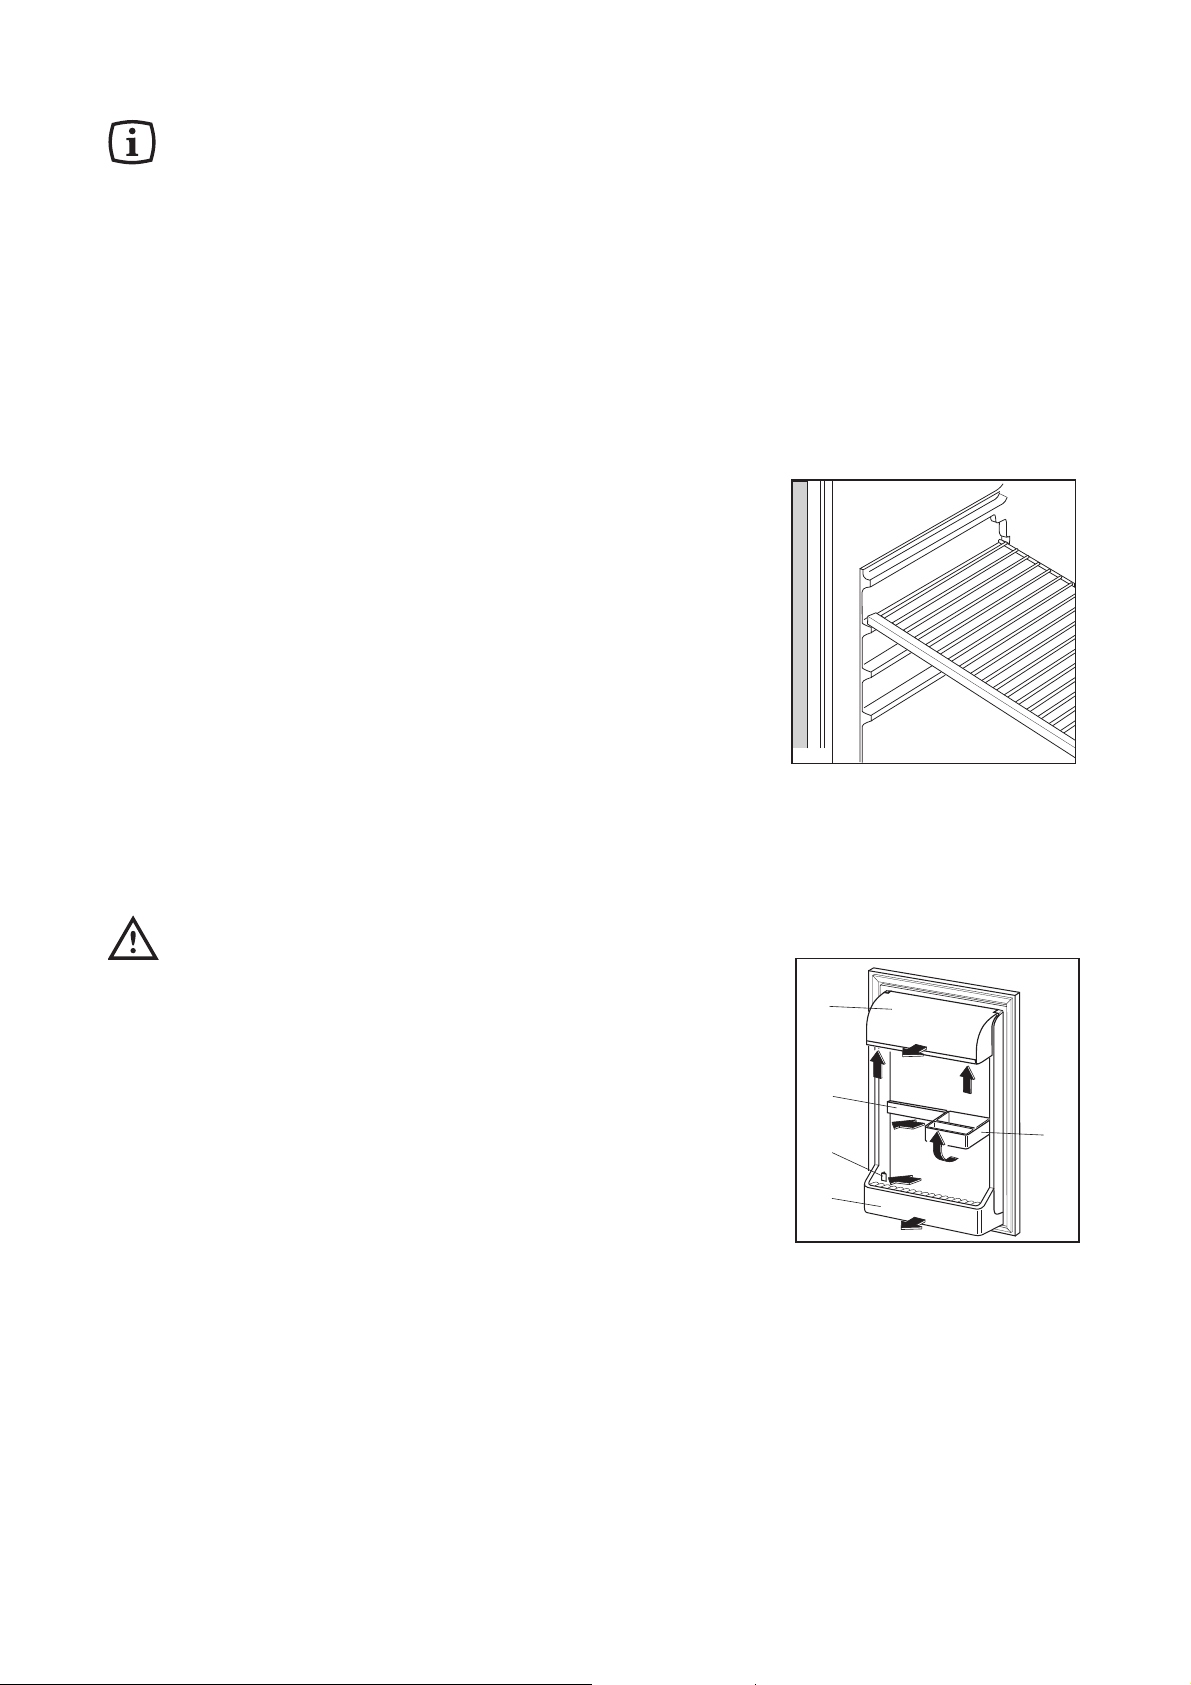
The walls of the refrigerator are equipped with runners so that shelves can be positioned as desired.
The door shelves
Depending on the use of the bottle shelf (3) the short
shelf (2) can be adjusted in the direction of the arrow
(a).
For more thorough cleaning, shelves can be
removed, then refitted in their position. To make
these adjustements proceed as follows:
top shelf (1): gradually pull in the direction of the
arrows until it comes free;
middle shelf (2): turn it in the direction of the arrows
until it comes free from the metallic crosspiece (4);
bottle shelf (3): push on the buttons (b) until it
comes free, then pull it in the direction of the arrow.
D040
1
4
b
3
S.I.010
a
2
Page 6
6
HEALTH AND SAFETY GUIDELINES
Because of consumer demand, preservatives have been removed from many pre-prepared foods.
This together with the changes in shopping habits to a once-a-week shop, mean that safe handling and
storage of food is even more important than ever.
The following tips should help you to ensure that
the food in your home is in as perfect condition
as possible.
■
Keep the time between buying chilled food and
placing it in your fridge as short as possible. Tests
showed that the temperature of 1 litre of orange
juice rose to 22°C in an hour between the supermarket and home. It then took 11 hours to get
down to 7°C in the refrigerator.
■
Keep the refrigerator door closed as much as
possible.
■
Do not push food together too much, try to allow
air to circulate around each item.
■
Cool cooked food as quickly as possible but do
NOT place in the refrigerator until cool. (Leave
food in a cool place in order that it can then be
placed in the refrigerator as soon as possible).
■
Do NOT mix raw and cooked meat, they must be
in separate containers. Take care not to let the
meat juices drip onto other food. If the meat does
drip, remove everything and clean thoroughly.
■
Do not store food uncovered.
■
Remove suspect food from your refrigerator and
clean the interior (see “Maintenance and
Cleaning”).
■
Never allow spillages to dry and harden.
■
Store eggs in the egg rack provided in the refrigerator door. Discard any broken or chipped eggs.
■
Regularly check the refrigerator door seal to
ensure that it is clean and free from debris.
■
Always wash your hands with soapy water and
dry them with a clean towel before handling food.
■
Keep work surfaces clean and avoid cross contamination by not using the same work surface or
knife, without washing them thoroughly in
between.
Normal Operating Sounds
You may hear faint gurgling or bubbling sounds when
the refrigerant is pumped through the coils below, to
the cooling evaporator.
When the compressor is on, the refrigerant is being
pumped round, and you will hear a whirring sound or
pulsating noise from the compressor. A thermostat
controls the compressor, and you will hear a faint
‘click’ when the thermostat cuts in and out.
Page 7
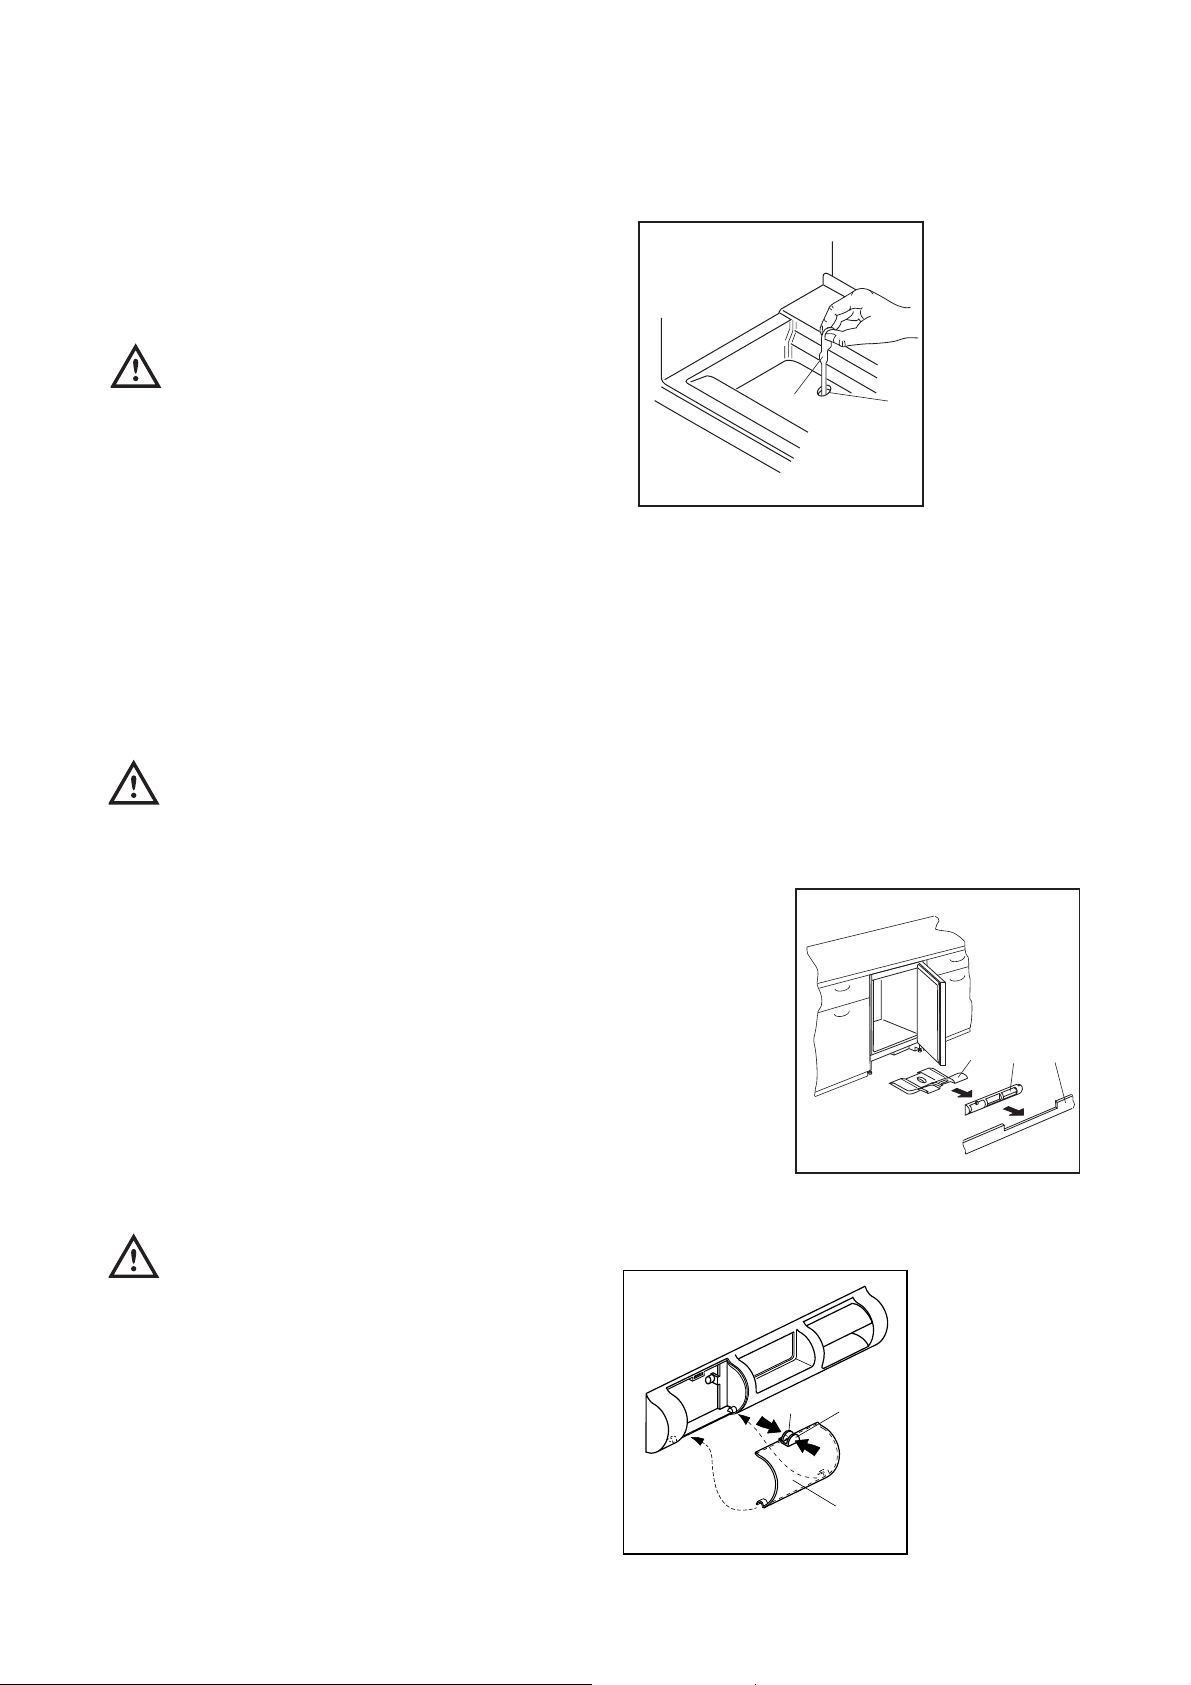
DEFROSTING
The refrigerator automatically defrosts every time the
compressor stops. The water is discharged, via the
pipe, into a tray located at the back of the appliance
above the compressor, where it evaporates.
Important
To avoid defrost water overflowing and drip-
ping onto the food in the fridge, periodically
clean the water discharge hole (F) situated
under the vegetable drawers. Use the special cleaner provided (P) which you will find
already inserted into the discharge hole
7
Before any maintenance or cleaning work is carried
out, DISCONNECT the appliance from the ELECTRICITY supply.
Warning
This appliance contains hydrocarbons in its
cooling unit maintenance and recharging must
therefore only be carried out by authorised
technicians.
Internal cleaning
Clean the inside and accessories with warm water
and bicarbonate of soda (5ml to 0.5 litre of water).
Rinse and dry thoroughly.
NEVER USE DETERGENTS, ABRASIVE POWDERS, HIGHLY PERFUMED CLEANING PRODUCTS OR WAX POLISHES, TO CLEAN THE INTERIOR AS THESE WILL DAMAGE THE SURFACE
AND LEAVE A STRONG SMELL.
Clean the drain hole of the water trough at regular
intervals and make sure that the drain hole is never
obstructed, so that the defrost water may flow freely.
Important
Do not use abrasive products.
Periodic cleaning
The appliance is equipped with an air inlet filter (1)
and an air outlet duct (2) on the ventilation grid.
Keep clean to guarantee good ventilation and good
working order of the appliance.
The filter can be removed and washed with water, as
follows:
1. Pinch flaps (a) and (b) with fingers
2. Pull the filter down.
3. Pull the filter out.
To replace the filter reverse the process.
MAINTENANCE AND CLEANING
An accumulation of dust will affect the performance
of the appliance and cause excessive electricity consumption.
The structure of the appliance permits to clean the
rear zone close to the wall, using a vacuum cleaner.
1. Remove the plinth (1), then the ventilation grid (2);
2. Carefully pull the air deflector out (3), checking
that there is no water left from the defrosting.
S.I.011
P
F
21
3
S.I.013
2
b
a
1
S.I.012
Page 8
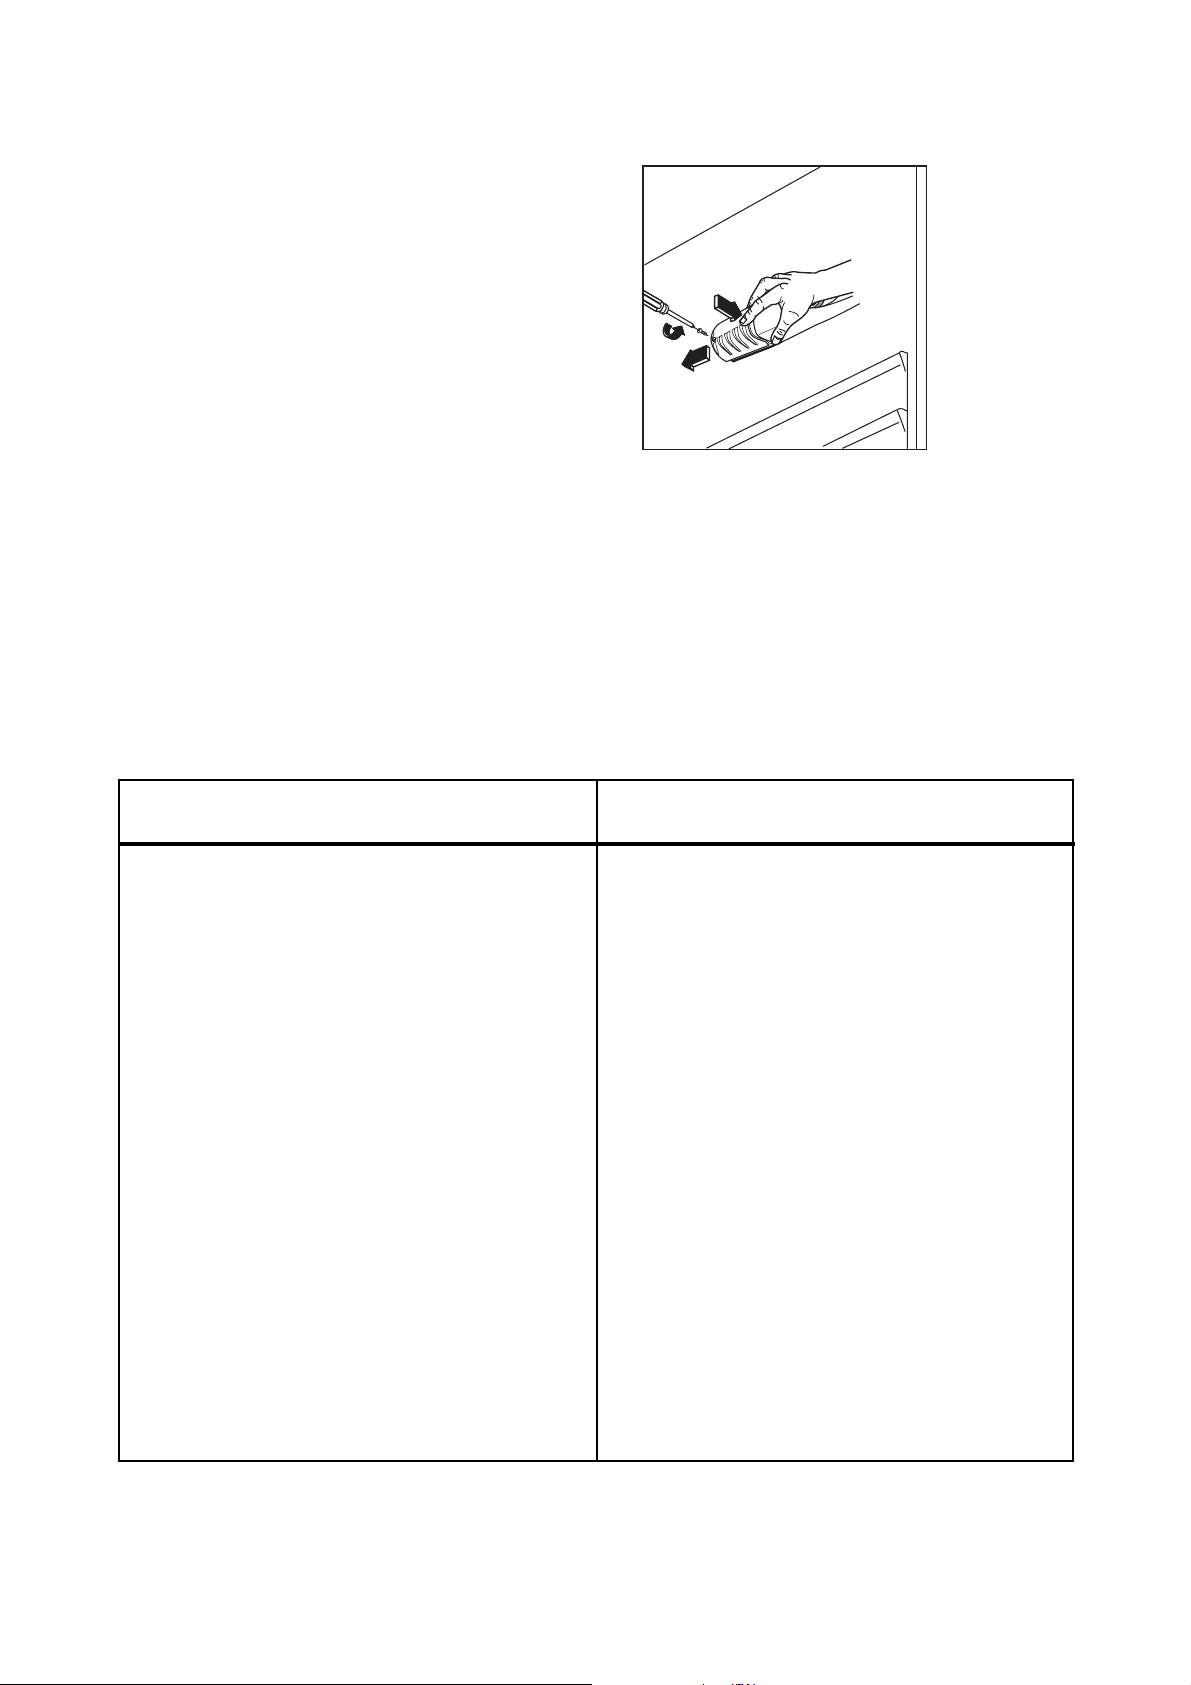
Changing the light bulb
Should the interior light fail to work, first switch off the
appliance and disconnect from the electricity supply,
then replace the bulb as follows:
1. Unscrew the light cover and then pull it outward by
pressing as shown in the figure. Unscrew the bulb
and replace it with a new 15 watt bulb (available
from your nearest Zanussi Service Force centre).
2. Replace the light cover by sliding it into its original
position and replacing the screw.
When the appliance is not in use
When the appliance is not in use for long periods, disconnect from the electricity supply, empty all foods
and clean the appliance, leaving the door ajar to prevent unpleasant smells.
8
SOMETHING NOT WORKING?
Before contacting your local Service Force Centre check the following points.
IMPORTANT: If you call out an engineer to a fault listed below, or to repair a fault caused by incorrect use or
installation, a charge will be made even if the appliance is under guarantee.
Symptom Solution
No power to appliance
The light does not come on
The temperature in the fridge or freezer section is too
high
The compressor runs continuosly
Excessive frost and ice has built up
Noise
Water under the salad bin
- Check there is power at the socket.
- Check there is not a power cut by checking the
household lights.
- Check the fuse has not blown.
- Ensure that the bulb is correctly fitted.
- Replace the bulb if it has blown.
- Check the door light switch is not jammed.
- Check the ambient temperature is within the appliances
operating limits of 10˚C to 32˚C.
Relocate the appliance if necessary.
- Check the thermostat control knob is turned to the
correct setting relative to ambient conditions.
- Adjust the thermostat to give correct temperature
control. See page 5.
- Check that the door is closed.
- Large quantities of food have recently been placed in
the cabinet and/or door is frequently opened.
- Check that air ventilation is not obstructed.
- Ensure the door is not left open.
- Check that nothing is preventing the door from closing.
- Is the door gasket intact and clean?
- Refer to normal operating sounds.
- Check the drain hole is not blocked. (see Maintenance
and Cleaning).
If after the above checks, there is still a fault, call your local Service Force Centre. In-guarantee customers
should ensure that the above checks have been made as the engineer will make a charge if the fault is not a
mechanical or electrical breakdown.
Please note that proof of purchase is required for any in-guarantee service calls.
D411
Page 9
9
SERVICE AND SPARE PARTS
In the event of your appliance requiring service, or if
you wish to purchase spare parts, please contact your
local Zanussi Service Force Centre by telephoning:-
08705 929929
Your telephone call will be automatically routed to the
Service Force Centre covering your post code area.
The addresses are listed on the following pages.
Before calling out an engineer, please ensure you
have read the details under the heading ‘Something
Not Working’.
When you contact the Service Centre you will need
to give the following details.
1. Your name, address and post code
2. Your telephone number
3. Clear and concise details of the fault
4. The model serial no. of the appliance (found on
the rating plate)
5. The purchase date
CUSTOMER CARE DEPARTMENT
For general enquiries concerning your Zanussi appliance or for further information on Zanussi products, you
are invited to contact our Customer Care Department by letter or telephone or visit our website at
www.zanussi.co.uk
Customer Care Department
Zanussi
55-77 High Street
Slough
Berkshire
SL1 1DZ
Tel: 08705 727727 (*)
(*) calls to this number may be recorded for training purposes.
Page 10
101112
Page 11
Page 12

Standard guarantee conditions
We, Zanussi, undertake that if within 24 months of the date of purchase this Zanussi appliance or any part thereof is proved to be defective by reason only of faulty workmanship or materials, we will, at our option repair or
replace the same FREE OF CHARGE for labour, materials or carriage on condition that:
■ The appliance has been correctly installed and used only on the electricity supply stated on the rating plate.
■ The appliance has been used for normal domestic purposes only, and in accordance with the manufactuer's
instructions.
■ The appliance has not been serviced, maintained repaired, taken apart or tampered with by any person not
authorized by us.
■ All service work under this guarantee must be undertaken by a Zanussi Service Force Centre.
■ Any appliance or defective part replaced shall become the Company's property.
■ This guarantee is in addition to your statutory and other legal rights.
Home visits are made between 8.30am and 5.30pm Monday to Friday. Visits may be available outside these
hours in which case a premium will be charged.
Exclusions
This guarantee does not cover:
■ Damage or calls resulting from transportation, improper use or neglect, thc replacement of any light bulbs or
removable parts of glass or plastic.
■ Costs incurred for calls to put right an appliance which is improperly installed or calls to appliances outside
the United Kingdom.
■ Appliances found to be in use within a commercial environment, plus those which are subject to rental
agreements.
■ Products of Zanussi manufacture which are not marketed by Zanussi.
European Guarantee
If you should move to another country within Europe then your guarantee moves with you to your new home
subject to the following qualifications:
■ The guarantee starts from the date you first purchased your product.
■ The guarantee is for the same period and to the same extent for labour and parts as exists in the new
country of use for this brand or range of products.
■ This guarantee relates to you and cannot be transferred to another user.
■ Your new home is within European Community (EC) or European Free Trade Area.
■ The product is installed and used in accordance with our instructions and is only used domestically, i.e. a
normal household.
■ The product is installed taking in account regulations in your new country.
Before you move please contact your nearest Customer Care centre, listed below, to give them details of your
new home. They will then ensure that the local Service Organisation is aware of your move and able to look
after you and your appliance.
France Senlis +33 (0) 44 62 29 99
Germany Nurenberg +49 (0) 911 323 2600
Italy Pordenone +39 (0) 1678 47053
Sweden Stockholm +46 (0) 8 738 79 50
UK Slough +44 (0) 1753 219897
GUARANTEE CONDITIONS
Page 13

TECHNICAL SPECIFICATIONS
Positioning
This appliance should only be installed at a location
where the ambient temperature corresponds to the
climate classification indicated on the rating plate,
which is located on the inside left of the appliance.
The following table shows which ambient temperature
is correct for each climate classification.
SN +10°C to +32°C
N +16°C to +32°C
The appliance should be located in a dry atmosphere,
out of direct sunlight and away from continuous heat
and extreme temperature, e.g. not next to a boiler or
radiator, or in a very cold room e.g. an outhouse. If
these temperatures are exceeded i.e. warmer or colder, then the appliance may not operate correctly.
For building-in and door reversal instructions please
refer to the relevant instructions on the following
pages.
INSTALLATION
13
DIMENSIONS Height 81,5 cm
Width 56 cm
Depth 53,8 cm
POWER SUPPLY VOLTAGE AND FREQUENCY 220-240 V / 50 Hz
TOT ALPOWER ABSORBED 100 W
AVERAGE DAILY UNITS ELECTRICITY (*) 0,65 kWh
GROSS CAPACITY 138 l
NET CAPACITY 135 l
(*)This figure is based on standard test results in accordance with European Standard EN153. Actual con-
sumption will depend on how the appliance is used and where it is located.
Page 14
14
ELECTRICAL CONNECTION
WARNING:
THIS APPLIANCE MUST BE EARTHED.
The manufacturer declines any liability
should this safety measure not be
observed.
If the plug that is fitted to your appliance is not suitable for your socket outlet, it must be cut off and the
appropriate plug fitted.
Remove the fuse from the cut off plug.
The cut off plug should then be disposed of to prevent the hazard of shocks in case it should be
plugged into a 13amp socket in another part of your
home.
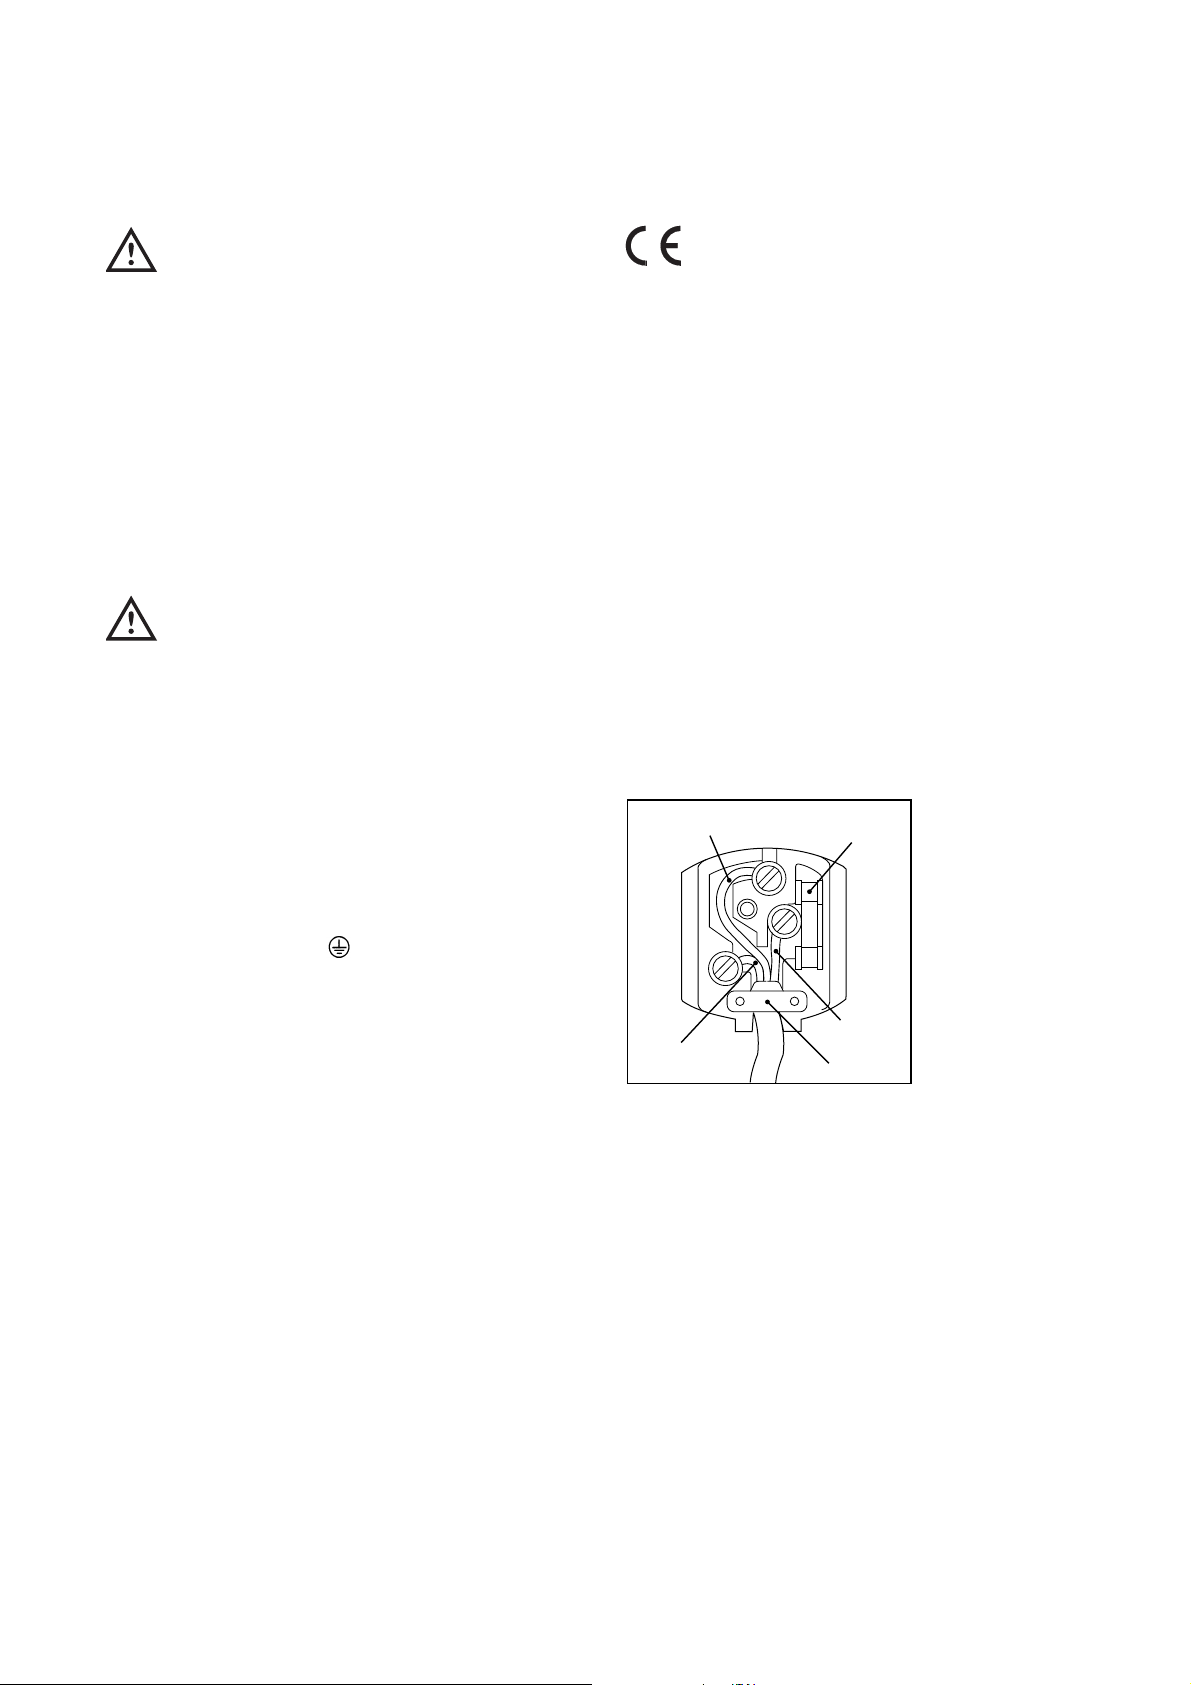
Important
The wires in the mains lead are coloured in
accordance with the following code:
Green and Yellow - Earth
Blue - Neutral
Brown - Live
If you fit your own plug, the colours of the wires in
the mains lead of your appliance, may not correspond with the markings identifying the terminals in
your plug, proceed as follows:
Connect the Green and the Yellow (earth) wire to the
terminal in the plug which is marked with the letter
«E» or the earth symbol , or coloured green and
yellow.
Connect the blue (neutral) wire to the terminal in the
plug which is marked with the letter «N» or coloured
black.
Connect the brown (live) wire to the terminal in the
plug which is marked with the letter «L» or coloured
red.
The plug moulded onto the lead incorporates a fuse.
For replacement, use a 13amp BS1362 fuse. Only
ASTA or BSI approved fuses should be used.
The plug must not be used if the fuse cover/carrier is
lost. The cover/carrier is indicated by the coloured
insert at the base of the plug.
A replacement cover/carrier must be obtained from
your local Zanussi Service Force Centre.
This appliance complies with the E.E.C. Directive
No. 87/308 of 2.6.87 relative to radio interference
suppression.
This appliance complies with the following
E.E.C. Directive:
- 73/23 EEC of 19.2.73 (Low Voltage Directive)
and subsequent amendments.
- 89/336 EEC of 3.5.89 (Electromagnetic
- Compatibility Directive) and subsequent amend-
ments.
Please ensure that when the appliance is
installed it is easily accessible for the engineer
in the event of breakdown.
GREEN & YELLOW
13 AMP. FUSE
13 AMP
D207
BROWN
BLUE
CORD CLAMP
Page 15
BUILDING-IN INSTRUCTIONS
Before carrying out any work, remove the plug from
the power socket.
Grid preparation
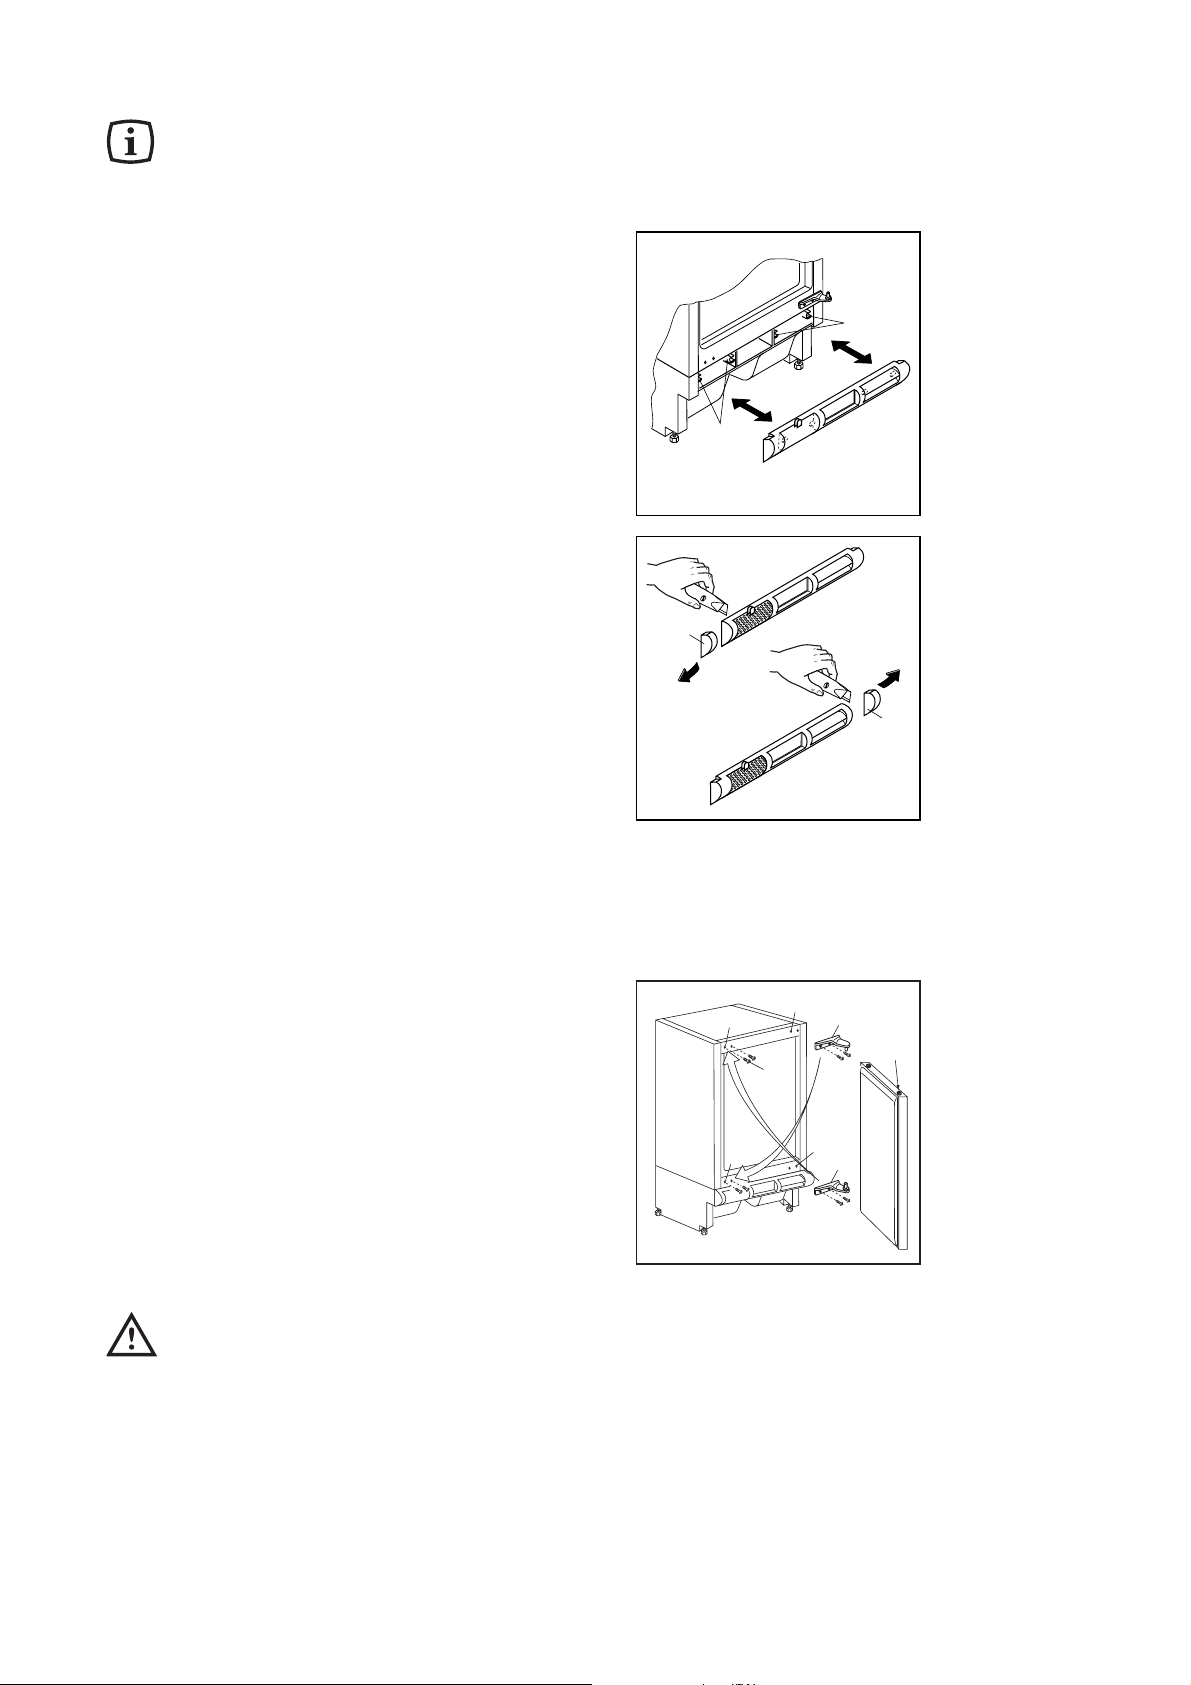
Remove the grid from the appliance pulling it towards
you with hands.
Right door opening:
Remove the left side (A) of the grid cutting it from the
rear (see figure, a).
Left door opening:
Remove the right side (B) of the grid cutting it from
the rear (see figure, b).
To reposition the grid on the appliance proceed as follows:
Apply the grid to the base of the appliance by pushing
the clasps (a) until they click.
N.B. The grid is to be assembled after having fixed
the appliance in the niche with the brackets.
Door reversal
The appliance must be unplugged before starting
work. To reverse the opening direction of the door,
proceed as follows:
1. remove the top hinge (1) taking care not to let the
door fall;
2. remove the bottom door hinge (5).
3. take out the plugs (3) from the holes (F) and rein-
sert them in the holes (F1) on the opposite side;
4. refit the upper hinge (1) on the opposite side, on
the bottom (position A);
5. refit the door on the pin of the hinge (1) in position
A;
6. insert the pin of the unscrewed bottom hinge (2) in
the upper hole (G) of the door, therefore fix the
hinge on the top in position B.
Important
After completion of the door reversal operation,
verify that the door gasket is sealing onto the
cabinet.
If the ambient temperature is cold (i.e. in
Winter), the gasket may not fit perfectly to the
cabinet. In that case, wait for the natural fitting
of the gasket or accelerate this process by
heating up the part involved with a normal
hairdryer on a low setting.
15
S.I.001
S.I.002
a
a
A
a
B
b
S.I.003
1
F
B
F
A
F
1
G
3
1
F
2
Page 16
16
Building the appliance in under a
worktop
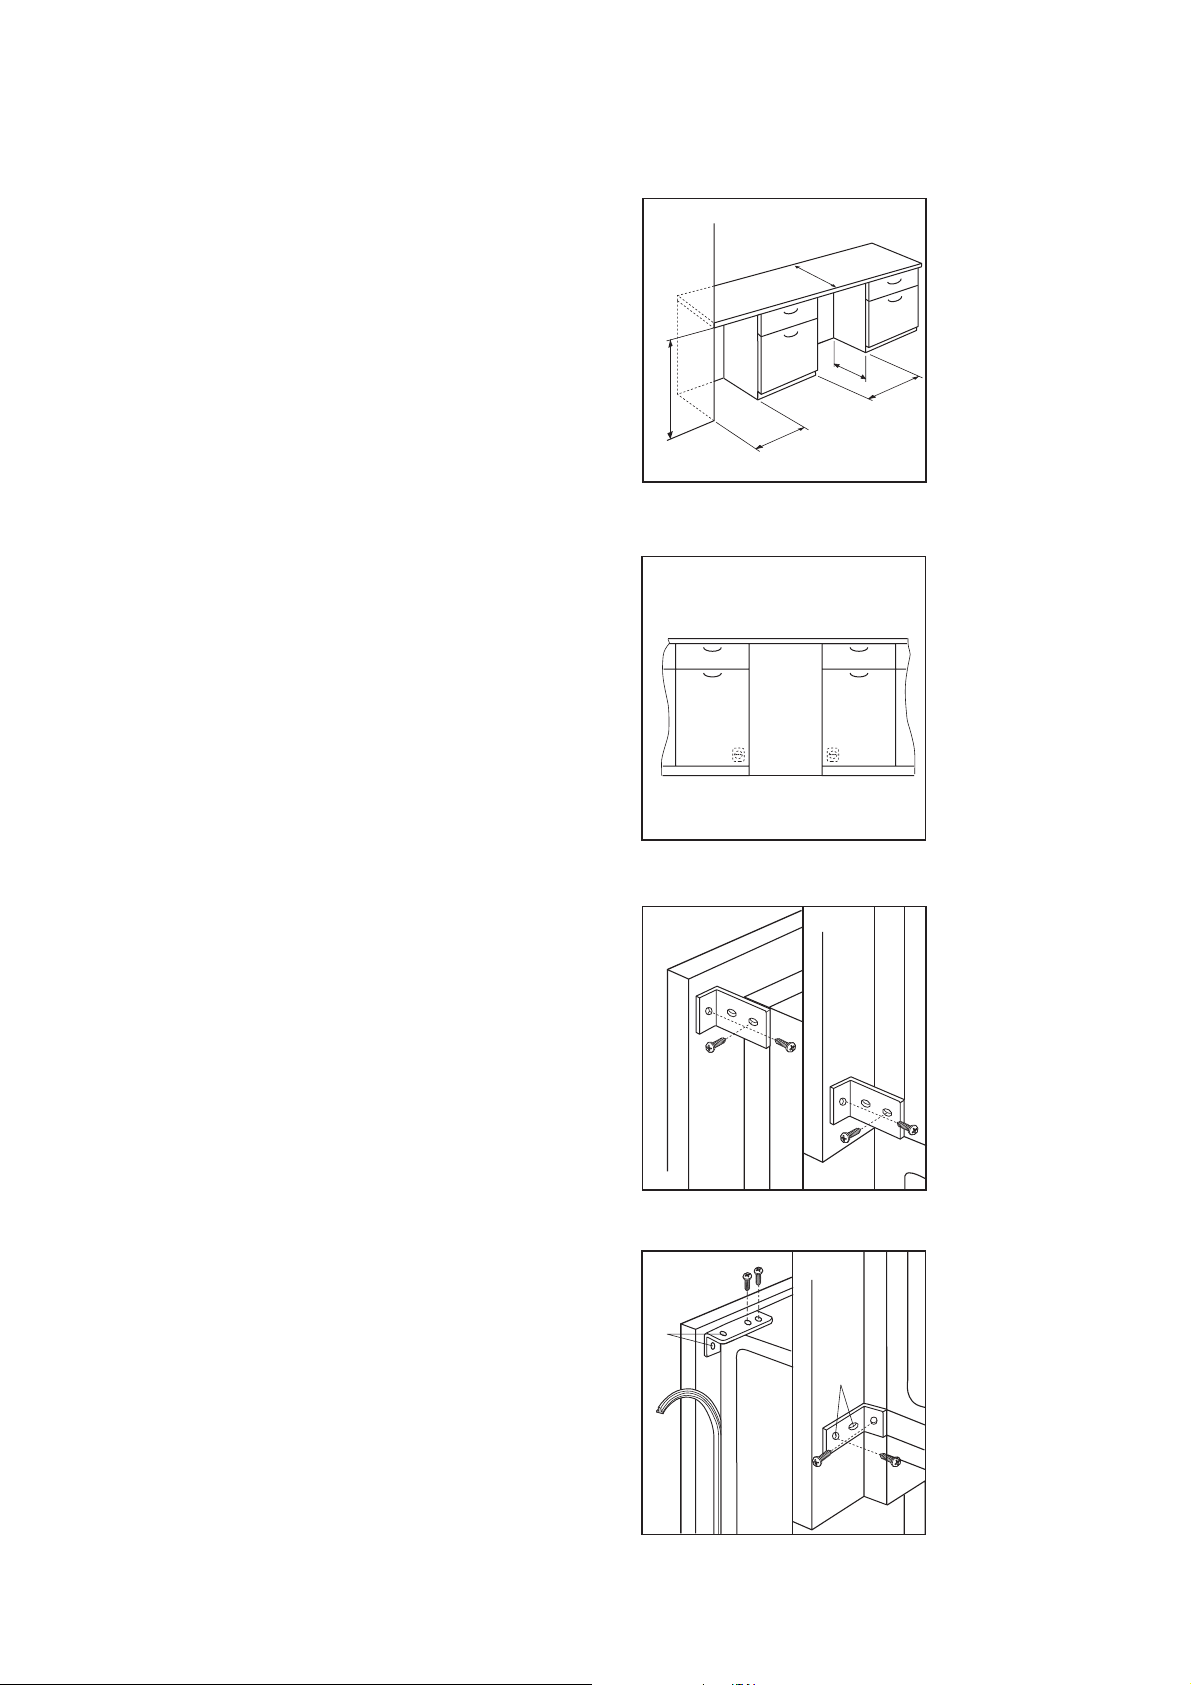
The dimensions of the recessed installation area must
correspond with those indicated in the figure. The
appliance could be inserted between two units (a) or
as an end unit (b).
The plug socket necessary for connection of the appliance to the electricity supply should be positioned, so
that the plug is not placed in the recess.
Fasten the side panel to the rear of the appliance with
the fixing brackets.
Fasten the appliance to the worktop or the sides,
applying the sealing strip between the refrigerator and
adjacent cabinet using the fixing brackets (E).
S.I.004
820 ÷ 870
600
b
600
550
600
a
S.I.005
SUPER.
D326
SUPER.
E
INFER.
INFER.
E
D319
Page 17
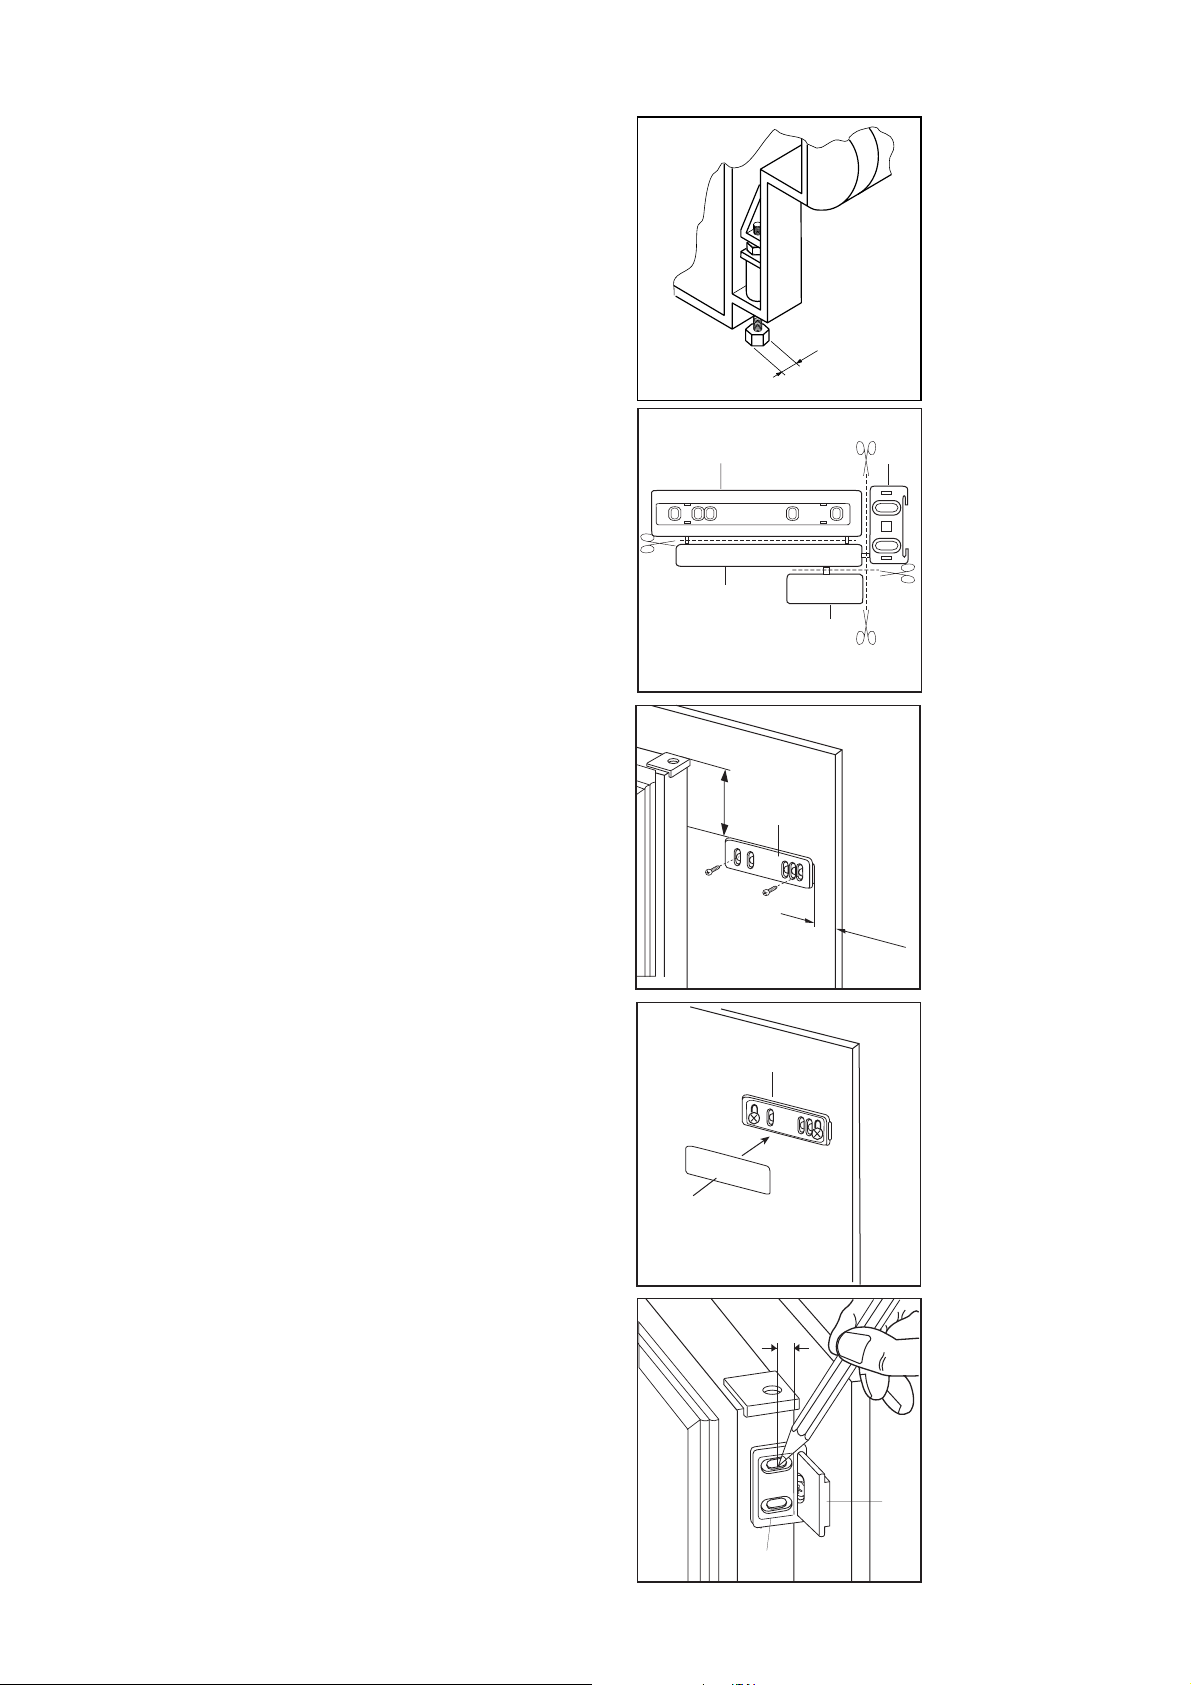
17
The appliance is equipped with adjustable support
feet. To adapt the appliance to the height of the installation area (max 870 mm), screw in, or screw out the
feet situated to the four bottom corners.
Separate parts A, B, C, D as shown in the figure.
Place guide (A) on the inside part of the furniture
door, up and down as shown in the figure and mark
the position of external holes. After having drilled
holes, fix the guide with the screws supplied.
Fix cover (C) on guide (A) until it clips into place.
Open the appliance door and the furniture door at
90°. Insert the small square (B) into guide (A). Put
together the appliance door and the furniture door and
mark the holes as indicated in the figure.
Remove the squares and drill holes with Ø 2 mm at 8
mm from the outer edge of the door. Place the small
square on the guide again and fix it with the screws
supplied.
30
S.I.006
PR266
PR166
A
C
50mm
B
D
A
20mm
PR33/2
PR167
A
C
8mm
A
B
Page 18
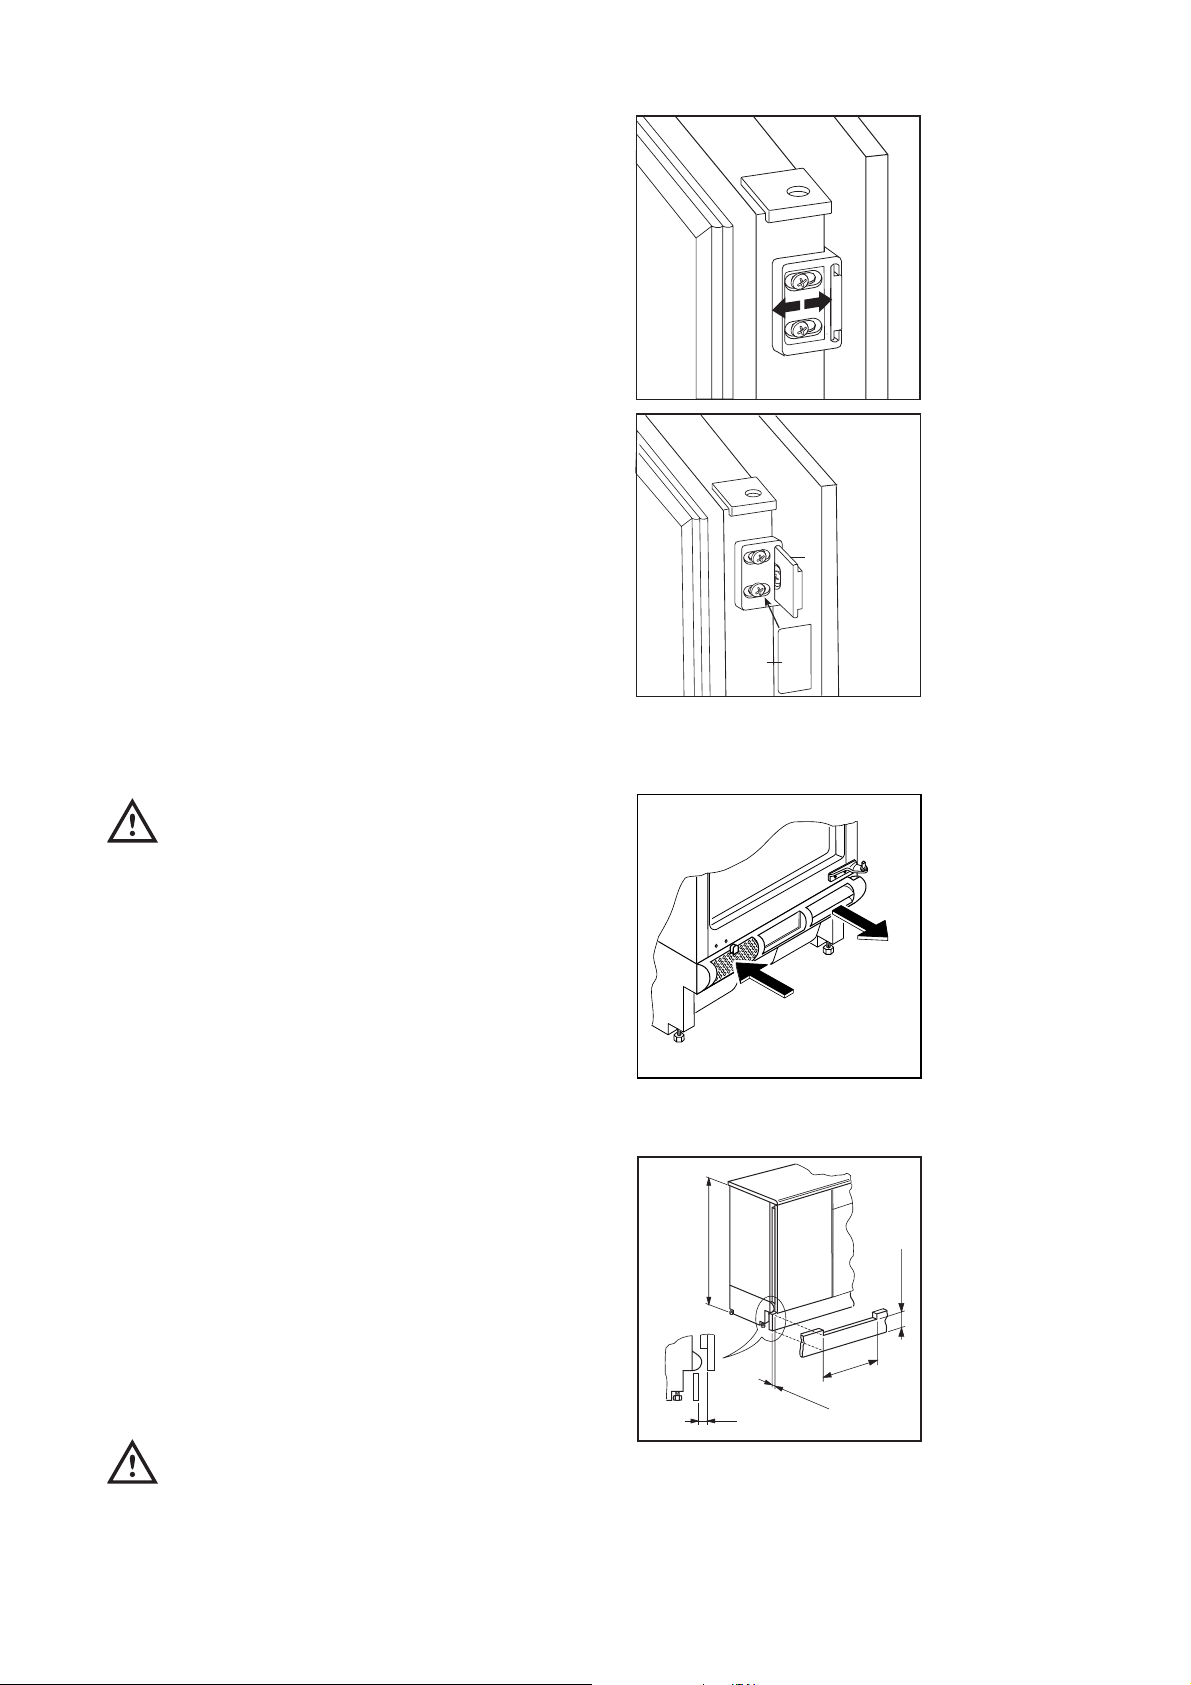
18
Should the lining up of the furniture door be necessary, use the clearance of slots.
At the end of operations, it is necessary to check if
the door of the furniture closes properly.
Fix cover (D) on guide (B) until it clips into place.
Fitting the plinth
Important
For the efficient operation of the appliance, it is
important that the original ventilation grid is
used.
■ For an opening height dimension A=820 mm and a
plinth height dimension a=100 mm, the plinth may
be fitted without adjustments. The same applies to
an opening height dimension B=870 mm and a
plinth height dimension b=150 mm.
■ For plinth heights greater than a=100 mm, b=150
mm, a cut should be made in the plinth, 580 mm
wide, in the centre of the appliance position, leaving a remaining height of a=100 mm, b=150 mm.
■ Attach plinth to the kitchen units.
Important
The plinth must be positioned at a minimun distance of 25 mm from the door.
PR168
B
D
PR167/1
S.I.007
S.I.008
A = 820
B = 870
25
25 ÷ 80
580
a = 100
b = 150
Page 19
© Electrolux Household Appliances Limited 2000
 Loading...