

Page 1
Page 2

Page 3
1 2 3 4
®
s-bag
5 6 7 8 910
11 12 13
cordmatic™
14
15 16 17**
18 19
ergoshock™
20
21
22
Page 4
Page 5

Page 6

23 24 25 26
27 28
30 31
29
3332
34 35
36 37 38
39 40
Page 7

English 4-5
Thank you for having chosen an Electrolux
Ergospace vacuum cleaner. These Operating
Instructions cover all Ergospace models. This
means that with your specific model, some
accessories/features may not be included. In
order to ensure the best results, always use
original Electrolux accessories. They have been
designed especially for your vacuum cleaner.
Tiêng Viêt 6-7
Cam ơn quy vi đa chon may hut bui
Electrolux Ergospace. Cac hương dân
thao tac nay bao ham cho moi kiêu may
Ergospace. Điêu nay nghia la kiêu may
cua ban co thê không đươc kem theo môt
sô phu kiên/tinh năng nao đo. Đê bao
đam đat kêt qua tôt nhât, luôn dung cac
phu kiên chinh hiêu Electrolux. Cac phu
kiên nay đươc thiêt kê đăc biêt danh cho
may hut bui cua ban.
ไทย 8-9
ขอขอบคุณที่เลือกใช้เครื่องดูดฝุ่นรุ่น
Ergospace ของอีเลคโทรลักซ์คู่มือการใ
ช้งานเล่มนี้จะนำมาใช้กับเครื่องดูดฝุ่นรุ่น
Ergospace ทุกรุ่น ที่วางจำหน่ายในหลา
ยประเทศ ซึ่งอาจทำให้เครื่องดูดฝุ่นในรุ่น
ที่คุณถืออยู่นี้ ไม่มีอุปกรณ์ประกอบ/คุณล
ักษณะบางประการเช่นที่อธิบายไว้ในคู่มือ
และเพื่อใช้เครื่องดูดฝุ่นได้อย่างมีประส
ิทธิภาพสูงสุด ควรใช้ร่วมกับอุปกรณ์ปร
ะกอบของแท้ของอีเลคโทรลักซ์เท่านั้น
อุปกรณ์ประกอบเหล่านี้ได้รับการออกแบบ
มาเป็นพิเศษเพื่อนำมาใช้ร่วมกับเครื่องดูด
ฝุ่นในรุ่นของคุณ
Bahasa melayu 10-11
Terima kasih kerana memilih pembersih
vakum Electrolux Ergospace. Arahan
Penggunaan ini merangkumi semua model
Ergospace. Ini bermakna yang sesetengah
aksesori/ciri mungkin tidak termasuk dalam
model anda. Untuk memastikan hasil terbaik,
sentiasalah guna aksesori Electrolux yang
asli yang telah direka khas untuk pembersih
vakum anda.
한국 12-13
Electrolux Ergospace 진공 청소기
를 구입해 주셔서 대단히 감사합니다
. 본 사용 설명서는 모든 Ergospace
모델에 적용됩니다. 따라서, 구입하
신 모델에는 사용설명서상의 일부 부
속품/기능이 제외되어 있을 수 있습
니다. 제품을 최상의 상태로 사용하
기 위하여 항상 Electrolux의 순정 부
품만을 사용하십시오. 순정 정품은
여러분의 진공 청소기에 맞도록 특별
제작된 것입니다.
繁體中文 14-15
感謝您選擇使用 Electrolux
Ergospace 吸塵器。這些「操作說
明」涵蓋所有的 Ergospace 型號。
這表示,您如果使用特別的型號,則
某些配件可能不包含在內。為了確保
最佳的使用效果,請一律使用原廠的
Electrolux 配件。這些配件是專門針
對您的吸塵器而設計。
3
Page 8

English
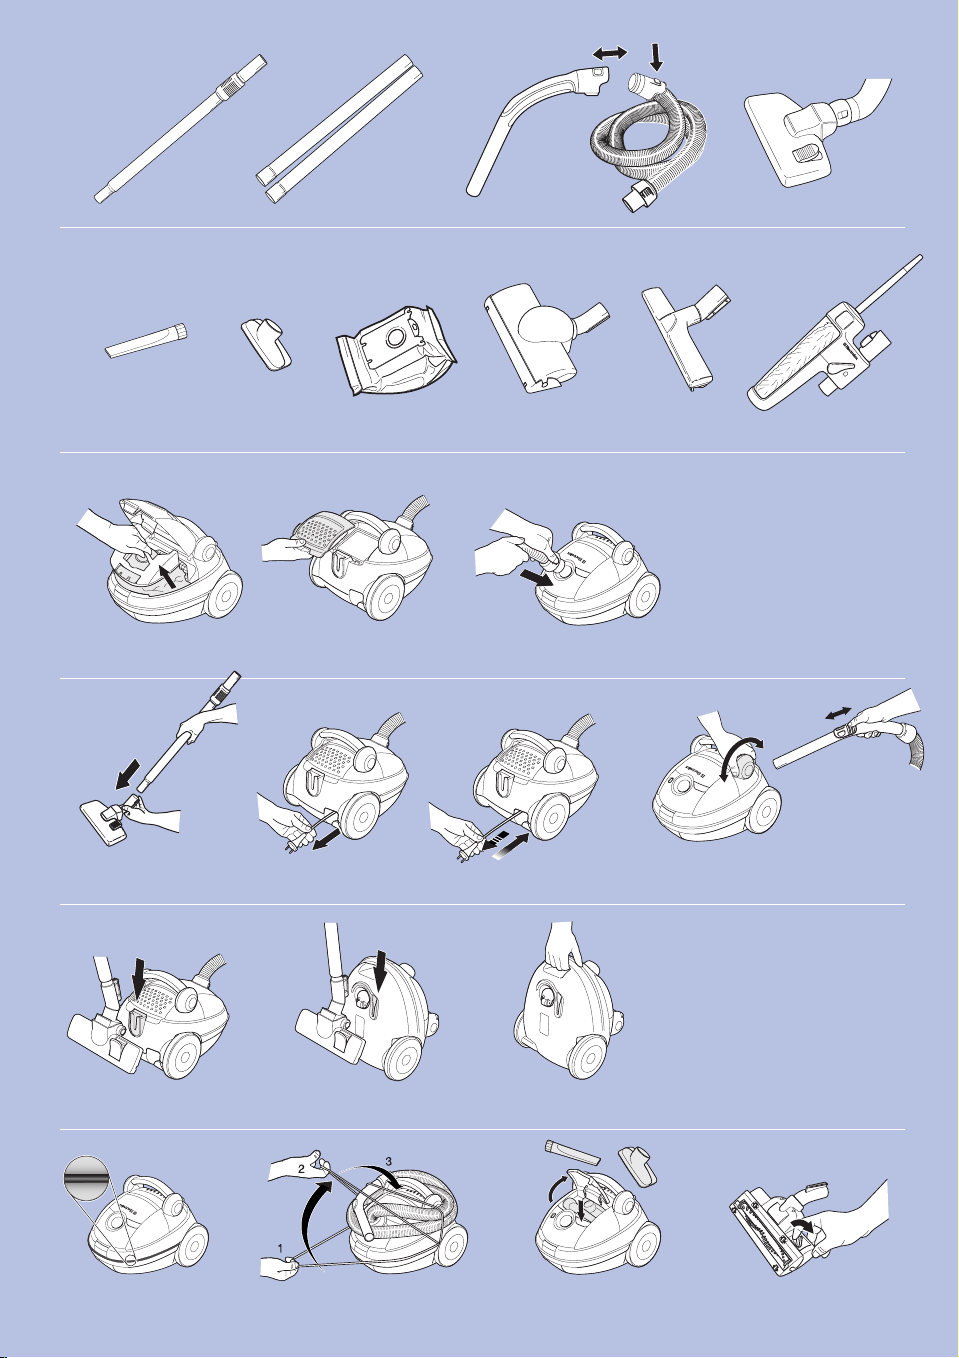
Accessories
1*/** Telescopic tube
2* Extension tubes
3** Hose handle + hose
4** Carpet/hard floor nozzle
5** Crevice nozzle
6 Upholstery nozzle
7 Dust bag, s-bag®
8* Turbo nozzle
9*/** Parquet nozzle
10* Easy clean kit
Safety precautions
Ergospace should only be used by
adults and only for normal vacuuming
in a domestic environment. The vacuum
cleaner features double insulation and
does not need to be earthed.
Never vacuum:
• In wet areas.
• Close to flammable gases etc.
• Without a dust bag s-bag® to avoid
damaging the cleaner. A safety device
is fitted, which prevents the cover
closing without a s-bag®. Do not
attempt to force the cover shut.
• When housing shows visible signs of
damage
Never vacuum:
• Sharp objects.
• Fluids (this can cause serious damage
to the machine).
• Hot or cold cinders, lit cigarette butts,
etc.
• Fine dust, for example from plaster,
concrete, flour, hot or cold ashes.
The above may cause serious damage to
the motor – damage which is not covered
by the warranty.
Electrical cable precautions:
• A damaged cable should only be
replaced by an authorised Electrolux
service centre.
• Damage to the machine’s cable is not
covered by the warranty.
• Never pull or lift the vacuum cleaner
by the cable.
• Disconnect the plug from the mains
before cleaning or maintenance of the
vacuum cleaner.
• Regularly check that the cable is not
damaged. Never use the vacuum
cleaner if the cable is damaged.
All servicing and repairs must be carried out
by an authorised Electrolux service centre. Be
sure to keep the vacuum cleaner in a dry place.
Before starting
11 Open the front cover on the machine
and check that the dust bag, s-bag®,
and the motor-/microfilter** are in
place. (See also Replacement of
filter(s))
12* Open the back lid* on the machine
and check that the exhaust filter* is in
place.
13 Insert the hose until the catches
click to engage (press the catches to
release the hose).
3* Insert the hose into the hose handle
until the catches click to engage
(press the catches to release the
hose).
14 Attach the extension tubes* or tel-
escopic tube* to the hose handle
and nozzle by pushing and twisting
together. (Twist and pull apart to dismantle.)
15 Extend the electric cable and connect
it to the mains. The vacuum cleaner
is fitted with a cable winder. Once the
electric cable has been extended, it
stays in that position.
16 To rewind the cable, give it a slight
sharp pull and then release. The
cable will then automatically rewind.
17** Adjust suction power by using the
suction control on the hose handle
17** Models with ON/OFF control: Twist
the control once to the left to start
the vacuum cleaner. Twist the control
once more to the left to turn it off.
17** Models with Power Regulation: Twist
the power control to the right to start
the vacuum cleaner and increase
the suction power. Twist the power
control to the left to decrease suction
power, and further to the left to turn it
off.
18 Practical parking positions (and at
the same time a backsaving feature)
when you pause during cleaning or
when you carry and store the vacuum
cleaner.
19 You can also carry the vacuum clean-
er using the handle on top or on the
lower front edge of the machine.
20* Keep the hose in place while storing
the vacuum cleaner by extending the
elastic bumper cord and placing it
across the hose.
Getting the best results
21 Accessories on board
Upholstery nozzle and crevice nozzle to
be found under foldable cover.
Use the nozzles as follows:
Carpets: Use the carpet/hard floor nozzle
with the lever* in position (32). Reduce
suction power for small carpets.
Hard floors: Use the carpet/hard floor
nozzle with the lever* in position (33).
Wooden floors: Use the parquet nozzle*
(9).
Upholstered furniture: Use the upholstery
nozzle (6). Curtains, lightweight fabrics,
etc.: Use the upholstery nozzle (6).
Reduce suction power if necessary.
Frames, bookshelves, etc.: Use the Easy
clean kit* (10).
Crevices, corners, etc.: Use the crevice
nozzle (5).
Using the turbo nozzle*
22 Adjust the suction power by opening
or closing the air vent.
Note: Do not use the turbo nozzle on skin
rugs, rugs with long fringes or a pile depth
exceeding 15 mm. To avoid damaging the
carpet, do not keep the nozzle stationary
whilst the brush is rotating. Do not pass the
nozzle across electric cables, and be sure to
switch off the vacuum cleaner immediately
after use.
Replacing the dust bag,
®
s-bag
23 The dust bag, s-bag® must be
replaced latest when the indicator
window is completely red. Read with
the nozzle lifted up.
24 Open the front cover and lift out the
insert holding the s-bag®.
25 Pull the cardboard to remove the
s-bag® from the insert. This automatically seals the s-bag® and prevents
dust leaking out.
26 Insert a new s-bag® by pushing the
cardboard right into the end of the
groove in the insert.
27 Put the insert back into the bag com-
partment, and close the cover.
Note. Replace the s-bag® even if it is not full
(it could be obstructed). Also replace after vacuuming carpet-cleaning powder. Be sure to use
only an original Electrolux dust bags, s-bag®
Classic, s-bag® Clinic, s-bag® long performance or s-bag® Anti-odour.
Replacement of the filter(s)
Should be done with every 5th replacement
of the dust bag, s-bag® Never use the vacuum
cleaner without filter(s).
A Model without exhaust filter has to
be equipped with a combinationfilter (micro-filter + motor-filter, Ref.
No. EF 74).
*Certain models only. **Execution depending on model. *** HEPA H12 washable filter can be bought as an option
4
Page 9

24 Open the front cover and lift out the
insert holding the s-bag®.
28 Pull the filter(s) holder upwards
until coming away from the groove.
Carefully pull the old, dirty filter(s) out
of the filter holder and replace with a
new filter(s).
29 Reattach the filter holder containing
the new filter(s).
27 Replace the insert holding the s-bag®
and then close the cover.
B Model with exhaust filter Follow steps
24, 28 and replace old motor-filter
with a new one. Then follow steps 29,
27.
Replacement of the exhaust filter*
There are three types*** of exhaust filter:
• Microfilter* (Ref. No. EF 17)
• Hepa H12* non washable (Ref. No. EF
H12)
• Hepa H12*/*** washable (Ref. No. EF
H12W)
The filters must always be replaced with
new ones and cannot be washed (if not
mentioned).
30 Place your thumbs on the back edge
of the lid and then open the lid by
pulling the handle backwards and
upwards with your index/middle finger.
31 Lift out the filter. Insert a new filter
and replace the lid as shown.
Cleaning the hose and nozzle
The vacuum cleaner stops automatically
if the nozzle, tube, hose or filters and
s-bag® becomes blocked. In such cases,
disconnect from mains and allow to cool
for 20-30 minutes. Clear blockage and/or
replace filters and s-bag® and restart.
Tubes and hoses
34 Use a cleaning strip or similar to clear
the tubes and hose.
3* Hose handle could be dismantled
from hose if cleaning is needed.
35 It may also be possible to remove the
obstruction in the hose by squeezing it. However, be careful in case
the obstruction is caused by glass or
needles caught inside the hose.
Note: The warranty does not cover any damage to the hose caused by cleaning it.
Cleaning the floor nozzle
39 To avoid deterioration of suction
power, frequently clean the carpet/
hard floor nozzle. The easiest way to
clean it is by using the hose handle.
36* Press each wheel-hub and draw away
the wheels. Use the crevice nozzle to
clean the wheel axles. Remove dust-
balls, hair or other objects that may
be entangled. Replace the wheel by
pressing them onto the axles.
37* Larger objects can be accessed by
removing the connection hose from
the nozzle (press the small catches
located on each side and simultaneously draw the connection tube outwards in an upright position).
38* Remove the object(s) and replace the
connection hose.
Cleaning the turbo nozzle*
40 Disconnect the nozzle from the
vacuum cleaner tube and remove
entangled threads, etc. by snipping
them away with scissors. Use the
hose handle to clean the nozzle.
Troubleshooting
The vacuum cleaner does not start
• Check that the cable is connected to
the mains.
• Check that the plug and cable are not
damaged.
• Check for a blown fuse.
The vacuum cleaner stops
• Check whether the dust bag, s-bag®
is full. If so, replace it with a new one.
• Is the nozzle, tube or hose blocked?
• Are the filters blocked?
Water has entered the vacuum cleaner
It will be necessary to replace the motor
at an authorised Electrolux service centre. Damage to the motor caused by the
penetration of water is not covered by the
warranty.
Consumer information
Electrolux decline all responsibility for all
damages arising from any improper use
of the appliance or in cases of tampering
with the appliance.
This product is designed with the environment in mind. All plastic parts are marked
for recycling purposes. For details see our
web site: www.electrolux.com
If you have any comments on the cleaner
or the Instructions for Use booklet please
e-mail us at: floorcare@electrolux.com
If you can´t find dustbags or accessories to your
Electrolux vacuum cleaner, please visit our website at
www.electrolux.com.
5
Page 10

Page 11

Classic Anti-odour Long Performance Clinic
Forget bag numbers, s-bag®
is all you need to remember!
®
s-bag
is the new standard dustbag
especially created by Electrolux to fit
all current Electrolux cylinder cleaners
and virtually all future ones.
s-bag® is now your password, a simple
name that's so easy to remember you'll
get the right bag every time for your
new Electrolux vacuum cleaner.
This unique dustbag offers you a greater
level of Hygiene, thanks to its clever
closing system, high filtration and
resistance level.
Beware: use of non original dustbag may
adversely affect your vacuum cleaner.
Choose only original s-bag® each time!
www.electrolux.com
2190884-01
 Loading...