

Page 1

Page 2
Page 3
1 2 3 4
®
s-bag
5 6 7 8 910
11 12 13
cordmatic™
14
ergoshock™
15 16 17**
18 19
20
2221
Page 4

Thank you for having chosen an
Electrolux Ergospace vacuum cleaner.
These Operating Instructions cover all
Ergospace models. This means that with
your specific model, some accessories/
features may not be included. In order
to ensure the best results, always use
original Electrolux accessories. They have
been designed especially for your vacuum
cleaner.
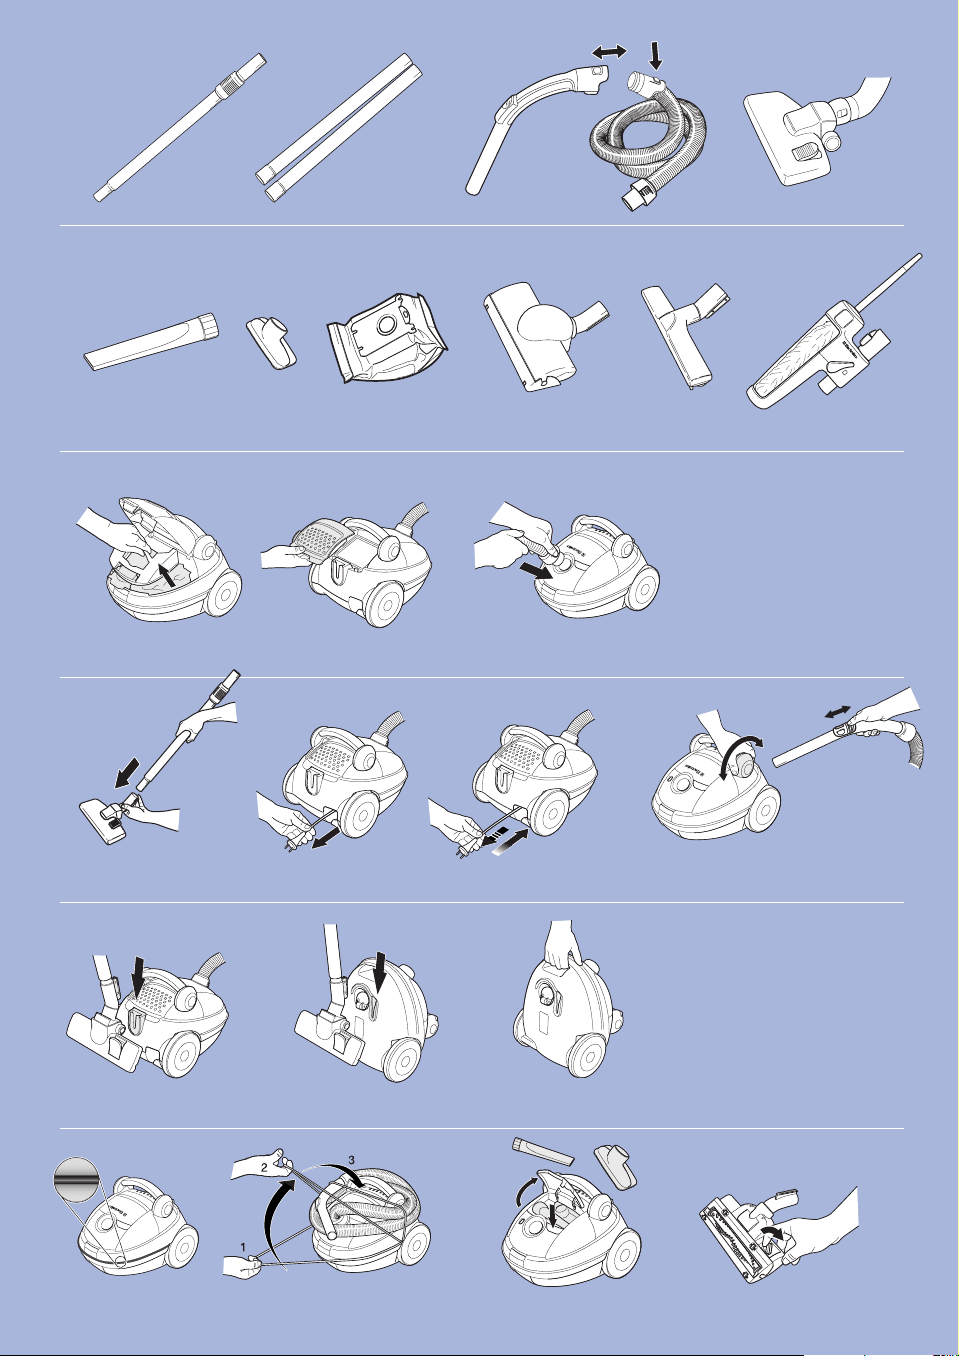
Accessories
1*/**
Telescopic tube
2*
Extension tubes
3**
Hose handle + hose
4**
Carpet/hard floor nozzle
5**
Crevice nozzle
6
Upholstery nozzle
7
Dust bag, s-bag
®
8*
Turbo nozzle
9*/**
Parquet nozzle
10*
Easy clean kit
Safety precautions
Ergospace should only be used by
adults and only for normal vacuuming
in a domestic environment. The vacuum
cleaner features double insulation and
does not need to be earthed.
Never vacuum:
• In wet areas.
• Close to flammable gases etc.
• Without a dust bag s-bag
®
to avoid
damaging the cleaner. A safety
device is fitted, which prevents the
cover closing without a s-bag
®
. Do
not attempt to force the cover shut.
• When housing shows visible signs of
damage
Never vacuum:
• Sharp objects.
• Fluids (this can cause serious dam-
age to the machine).
• Hot or cold cinders, lit cigarette
butts, etc.
• Fine dust, for example from plaster,
concrete, flour, hot or cold ashes.
The above may cause serious damage to
the motor – damage which is not covered
by the warranty.
Electrical cable precautions:
• A damaged cable should only be
replaced by an authorised Electrolux
service centre.
• Damage to the machine’s cable is not
covered by the warranty.
• Never pull or lift the vacuum cleaner
by the cable.
• Disconnect the plug from the mains
before cleaning or maintenance of
the vacuum cleaner.
• Regularly check that the cable is not
damaged. Never use the vacuum
cleaner if the cable is damaged.
All servicing and repairs must be carried
out by an authorised Electrolux service
centre. Be sure to keep the vacuum
cleaner in a dr y place.
Before starting
11
Open the front cover on the machine
and check that the dust bag, s-bag
®
,
and the motor-/microfilter** are in
place. (See also Replacement of
filter(s))
12*
Open the back lid* on the machine
and check that the exhaust filter* is
in place.
13
Insert the hose until the catches
click to engage (press the catches to
release the hose).
3*
Insert the hose into the hose handle
until the catches click to engage
(press the catches to release the
hose).
14
Attach the extension tubes* or tel-
escopic tube* to the hose handle
and nozzle by pushing and twisting
together. (Twist and pull apart to dis-
mantle.)
15
Extend the electric cable and con-
nect it to the mains. The vacuum
cleaner is fitted with a cable winder.
Once the electric cable has been
extended, it stays in that position.
16
To rewind the cable, give it a slight
sharp pull and then release. The
cable will then automatically rewind.
17**
Adjust suction power by using the
suction control on the hose handle
17**
Models with ON/OFF control: Twist
the control once to the left to start
the vacuum cleaner. Twist the control
once more to the left to turn it off.
17**
Models with Power Regulation: Twist
the power control to the right to start
the vacuum cleaner and increase the
suction power. Twist the power con-
trol to the left to decrease suction
power, and further to the left to turn
it off.
18
Practical parking positions (and at
the same time a backsaving feature)
when you pause during cleaning
or when you carry and store the
vacuum cleaner.
19
You can also carry the vacuum
cleaner using the handle on top
or on the lower front edge of the
machine.
20*
Keep the hose in place while storing
the vacuum cleaner by extending the
elastic bumper cord and placing it
across the hose.
Getting the best results
21 Accessories on board
Upholstery nozzle and crevice nozzle to
be found under foldable cover.
Use the nozzles as follows:
Carpets:
Use the carpet/hard floor nozzle
with the lever* in position (32). Reduce
suction power for small carpets.
Hard floors:
Use the carpet/hard floor
nozzle with the lever* in position (33).
Wooden floors:
Use the parquet nozzle*
(9).
Upholstered furniture:
Use the upholstery
nozzle (6). Curtains, lightweight fabrics,
etc.: Use the upholstery nozzle (6).
Reduce suction power if necessary.
Frames, bookshelves, etc.:
Use the Easy
clean kit* (10).
Crevices, corners, etc.:
Use the crevice
nozzle (5).
Using the turbo nozzle*
22
Adjust the suction power by opening
or closing the air vent.
Note: Do not use the turbo nozzle on
skin rugs, rugs with long fringes or a pile
depth exceeding 15 mm. To avoid damag-
ing the carpet, do not keep the nozzle
stationary whilst the brush is rotating.
Do not pass the nozzle across electric
cables, and be sure to switch off the
vacuum cleaner immediately after use.
Replacing the dust bag,
s-bag
®
23
The dust bag, s-bag
®
must be
replaced latest when the indicator
window is completely red. Read with
the nozzle lifted up.
24
Open the front cover and lift out the
insert holding the s-bag
®
.
25
Pull the cardboard to remove the
s-bag
®
from the insert. This automat-
ically seals the s-bag
®
and prevents
dust leaking out.
26
Insert a new s-bag
®
by pushing the
cardboard right into the end of the
groove in the insert.
27
Put the insert back into the bag com-
partment, and close the cover.
Note. Replace the s-bag
even if it is not
full (it could be obstructed). Also replace
after vacuuming carpet-cleaning powder.
Be sure to use only an original Electrolux
dust bags, s-bag
Classic, s-bag
Clinic,
s-bag
long performance or s-bag
Anti-
odour.
English
Page 5

3
Replacement of the filter(s)
Should be done with every 5th replace-
ment of the dust bag, s-bag
Never use
the vacuum cleaner without filter(s).
A
Model without exhaust filter has to
(micro-filter + motor-filter,
24
Open the front cover and lift out the
®
28
Pull the filter(s) holder upwards
Carefully pull the old, dirty filter(s) out
of the filter holder and replace with a
29
Reattach the filter holder containing
the new filter(s).
27
Replace the insert holding the s-bag
®
and then close the cover.
B
Model with exhaust filter Follow steps
24, 28 and replace old motor-filter
with a new one. Then follow steps
29, 27.
Replacement of the exhaust filter*
There are three types*** of exhaust filter:
(Ref. No. EF H12)
The filters must always be replaced with
30
Place your thumbs on the back edge
of the lid and then open the lid by
finger.
31
Lift out the filter. Insert a new filter
and replace the lid as shown.
Cleaning the hose and nozzle
The vacuum cleaner stops automatically
s-bag
®
becomes blocked. In such cases,
disconnect from mains and allow to cool
for 20-30 minutes. Clear blockage and/or
®
and restart.
Tubes and hoses
34
Use a cleaning strip or similar to
clear the tubes and hose.
3*
Hose handle could be dismantled
from hose if cleaning is needed.
35
It may also be possible to remove the
obstruction in the hose by squeezing
obstruction is caused by glass or
Note: The warranty does not cover any
damage to the hose caused by clean-
ing it.
Cleaning the floor nozzle
39
To avoid deterioration of suction
clean it is by using the hose handle.
36*
Press each wheel-hub and draw
away the wheels. Use the crevice
objects that may be entangled.
onto the axles.
37*
Larger objects can be accessed by
the nozzle (press the small catches
ously draw the connection tube out-
wards in an upright position).
38*
Remove the object(s) and replace the
connection hose.
Cleaning the turbo nozzle*
40
Disconnect the nozzle from the
vacuum cleaner tube and remove
entangled threads, etc. by snipping
them away with scissors. Use the
Troubleshooting
The vacuum cleaner does not start
the mains.
The vacuum cleaner stops
®
Water has entered the vacuum cleaner
at an authorised Electrolux service centre.
the warranty.
Page 6

真空吸尘器。 这些操
作说明书涵盖了所有 Ergospace
型号。 这意味着对于特定型号,可
得最佳的使用效果,请始终使用原装
配件
1*/**
伸缩管
2*
延长管
3**
软管把手和软管
4**
地毯/地板两用吸嘴
5**
缝隙吸嘴
6
多用毛刷
7
s-bag
®
集尘袋
8*
涡轮吸嘴
9*/**
木地板吸嘴
10*
掸灰吸
安全注意事项
环境的日常清洁。 本真空吸尘器具有双重
绝缘功能,无需接地。
切勿在以下情况使用真空吸尘器:
潮湿的地方。
可燃性气体附近。
未配备 s-bag
®
集尘袋(可能会损坏吸
®
的情况下
当外壳出现明显的破损痕迹时
切勿使用真空吸尘器吸入以下物品:
尖锐的物品。
液体(这样会严重损坏机器)。
高温或低温的灰烬、燃着的烟蒂等。
细尘,例如石膏、混凝土、面粉、高温
或低温的灰烬中的粉尘。
这种损坏不在保修之列。
电源线注意事项:
破损的电源线只能通过授权的
吸尘器电源线的破损不在保修范围
切勿用电源线拉扯或抬高真空吸尘器。
清洁或维护真空吸尘器之前,请先拔
定期检查电源线是否破损。 如果电源
线受损,切勿使用该真空吸尘器。
所有服务或修理必须由Electrolux
授权的 服务中心提供。 确保将真空
开始使用前
11
打开机器的前盖,检查 s-bag
®
集
否安装到位。 (另请参阅“更换滤
12*
打开机器的后盖*,检查排气滤网*是
否安装到位。
13
插入软管,直到压扣咔哒一声接合入
位(按下压扣可松脱软管)。
3*
将软管插入软管把手,直至压扣咔哒
14
用推、转的方式将延长管*或伸缩
来。)
15
拉出电源线,将其插入电源插座。 真
16
要卷回电源线,请轻轻地快速拉动电
线,然后松开。 随后电源线将会自动
17**
通过使用软管柄上的吸力控制钮调节
17**
旋动一次控制钮可关闭真空吸尘器。
17**
源控制钮可启动真空吸尘器以及增强
18
使用中的暂停或搬动和存放真空吸尘
器时实用的停放位置(同时在背部也
有存放位置)。
19
也可抓住机器顶部的手柄或下方前缘
20*
通过展开弹性支座缆线,将其横穿软
在其适当的位置上。
获得最佳的使用效果
21 随附配件
在可折叠盖下可以找到多用毛刷和缝隙
请按以下说明使用吸嘴:
地毯:
使用地毯/地板两用吸嘴,将控制
杆置于适当的位置 (32)。 对于小地毯,
硬质地板:
使用地毯/地板两用吸嘴时,
将控制杆置于适当的位置 (33)。
木质地板:
使用木地板吸嘴* (9)。
家具的装饰面:
使用多用毛刷(6)。 窗
根据需要减弱吸力。
框架、书柜等:
使用掸灰吸* (10)。
缝隙、角落等:
使用缝隙吸嘴 (5)。
使用涡轮吸嘴*
22
通过打开或关闭通气孔来调节吸力。
在毛刷旋转时将吸嘴保持不动。 请
更换 s-bag® 集尘袋
23
当尘满显示窗口完全显示为红色时,
®
集尘袋。 需将
24
打开前盖,取出放置 s-bag
®
的嵌
25
拉出纸板,从嵌圈中取出 s-bag
®
®
会自动封闭以防止灰尘
泄漏。
26
将纸盘推入嵌圈凹槽的末端以插入新
®
27
将嵌圈放回袋舱,然后关闭盖子。
®
未满的情况
塞)。 吸入地毯灰尘后也请更换集
®
Classic、s-bag
®
Clinic、s-bag
®
long performance
®
Anti-odour。
更换滤网
每更换 5 次 s-bag
®
集尘袋后应更
换滤网。切勿在未安装滤网的情况下
使用真空吸尘器。
A
未安装排气滤网的型号须配备组合滤网
24
打开前盖,取出放置 s-bag
®
的嵌圈。
28
向上拉动滤网支架,直至其与凹槽脱
29
重新装上带新滤网的滤网支架。
27
更换放置 s-bag
®
的嵌圈,然后关闭
盖子。
B
配备排气滤网的型号应按照步骤 24、
28 进行操作,并更换旧的马达滤网。
更换排气滤网*
排气滤网共用 3 种类型***:
Microfilter*(参考号 EF 17)
Hepa H12*,不可清洗(参考号:
Hepa H12*/***,可清洗(参考号:
30
将拇指放在盖子的后边缘上,然后用食
指和中指向后上方拉动手柄以打开盖
31
取出滤网。 如图所示,插入新滤网并
重新装上盖子。
清洁软管和吸嘴
如果吸嘴、管子、软管、滤网或 s-bag
®
在这种情况下,请从电源插座上拔下插
塞物和/或更换滤网和 s-bag
®
启动机器。
管子和软管
34
使用清洁条棒之类的物品清洁管子和软
* 仅限于特定型号。 ** 具体依型号而定。 *** HEPA H12 可清洗过滤器可作为可选件购买。
简体中文
Page 7

5
3*
如果需要清洁软管把手,可从软管上拆
35
也可通过挤压软管清除阻塞物。 但
针等物体引起,请格外小心。
清洁地板吸嘴
39
为避免吸力减弱,应经常清洁地毯/硬
质地板吸嘴。 最简单的清洁方法是使
用软管把手进行清洁。
36*
按压每个轮轴,然后拉出轮子。 使用
毛发或其它易绞缠在一起的物品。
将轮子按入轮轴,重新装上轮子。
37*
从吸嘴上取下连接软管(按住软管两
侧的小压扣,同时朝右上方向外拉出
连接管),可以将较大的物品取出。
38*
取出物品,然后重新装上连接软管。
清洁涡轮吸嘴*
40
从真空吸尘器的管子上取下吸嘴,然
故障排除
真空吸尘器不能启动
请检查电源线是否连接到电源插座。
请检查插头和电源线是否破损。
请检查保险丝是否已熔断。
真空吸尘器停止工作
检查 s-bag
®
集尘袋是否已满。 如果
吸嘴、管子或软管是否堵塞?
滤网是否堵塞?
真空吸尘器中进水
Page 8

23 24 25 26
27 28 29
30 31
3332
36 37 38
39 40
34 35
Page 9

Page 10

Classic Anti-odour Long Performance Clinic
Forget bag numbers, s-bag®
is all you need to remember!
®
s-bag
is the new standard dustbag
especially created by Electrolux to fit
all current Electrolux cylinder cleaners
and virtually all future ones.
s-bag® is now your password, a simple
name that's so easy to remember you'll
get the right bag every time for your
new Electrolux vacuum cleaner.
This unique dustbag offers you a greater
level of Hygiene, thanks to its clever
closing system, high filtration and
resistance level.
Beware: use of non original dustbag may
adversely affect your vacuum cleaner.
Choose only original s-bag® each time!
www.electrolux.com
219 08 84-00 04/09
makes life a little easier
 Loading...