

8228629-05
1
2
3
45 6
7
8
9
10
12
11
13
14
18
17
15
16
15
a
b c
d
f hg
i
j
k
e
a
b c
d
f hg
i
j
k
e
English ...................................... 2
繁體中文 ................................ 4
简体中文 ................................ 6
Bahasa Malaysia ...................... 8
한국 ........................................ 10
ไทย ......................................... 12
2
English
Please keep both cover flaps open and cross reference pictures
with text where necessary.
Before you start, please refer to the electrical safety supply
instructions on page 14 (U.K. and Ireland only).
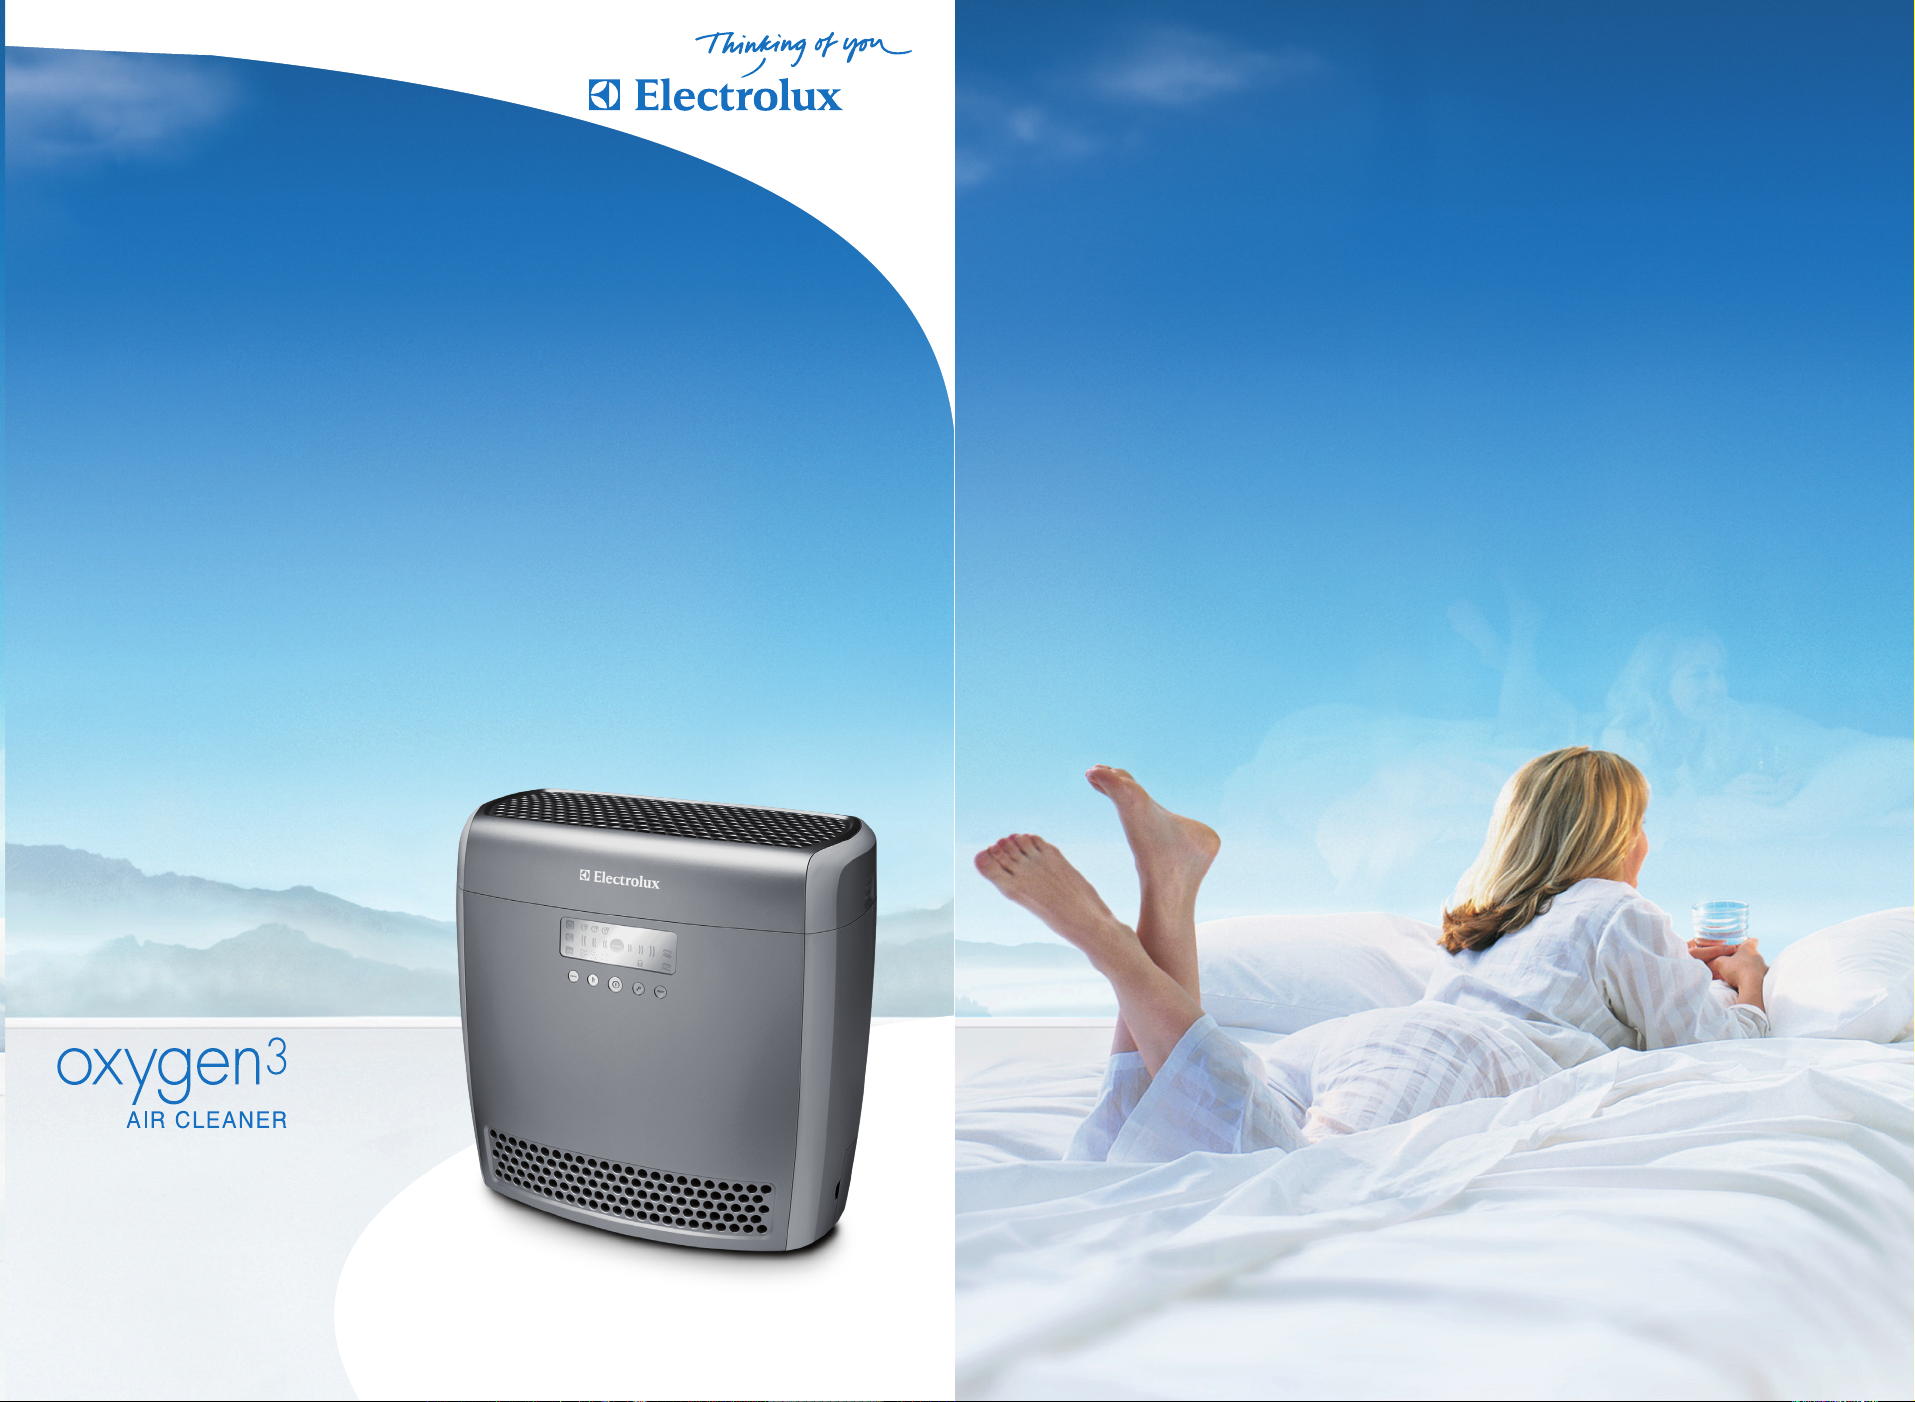
Clean air for healthier homes
Now that you have an Electrolux Oxy3silence Air Cleaner, you
will be breathing cleaner air. Obviously, you should locate this in
a room where you spend most time e.g. living room or bedroom.
Wherever there are people, plants or pets, there are airborne
particles that can affect your wellbeing, especially if you suffer
from allergies. For instance, did you know that the air inside a
room could be more polluted than the air in a large city? Scientific studies have shown the following levels of particles per litre
of air:
COUNTRYSIDE 1 million
CITY 100 million
IN THE HOME 100 million
HIGHWAY 1 billion
TOBACCO SMOKE 100 billion
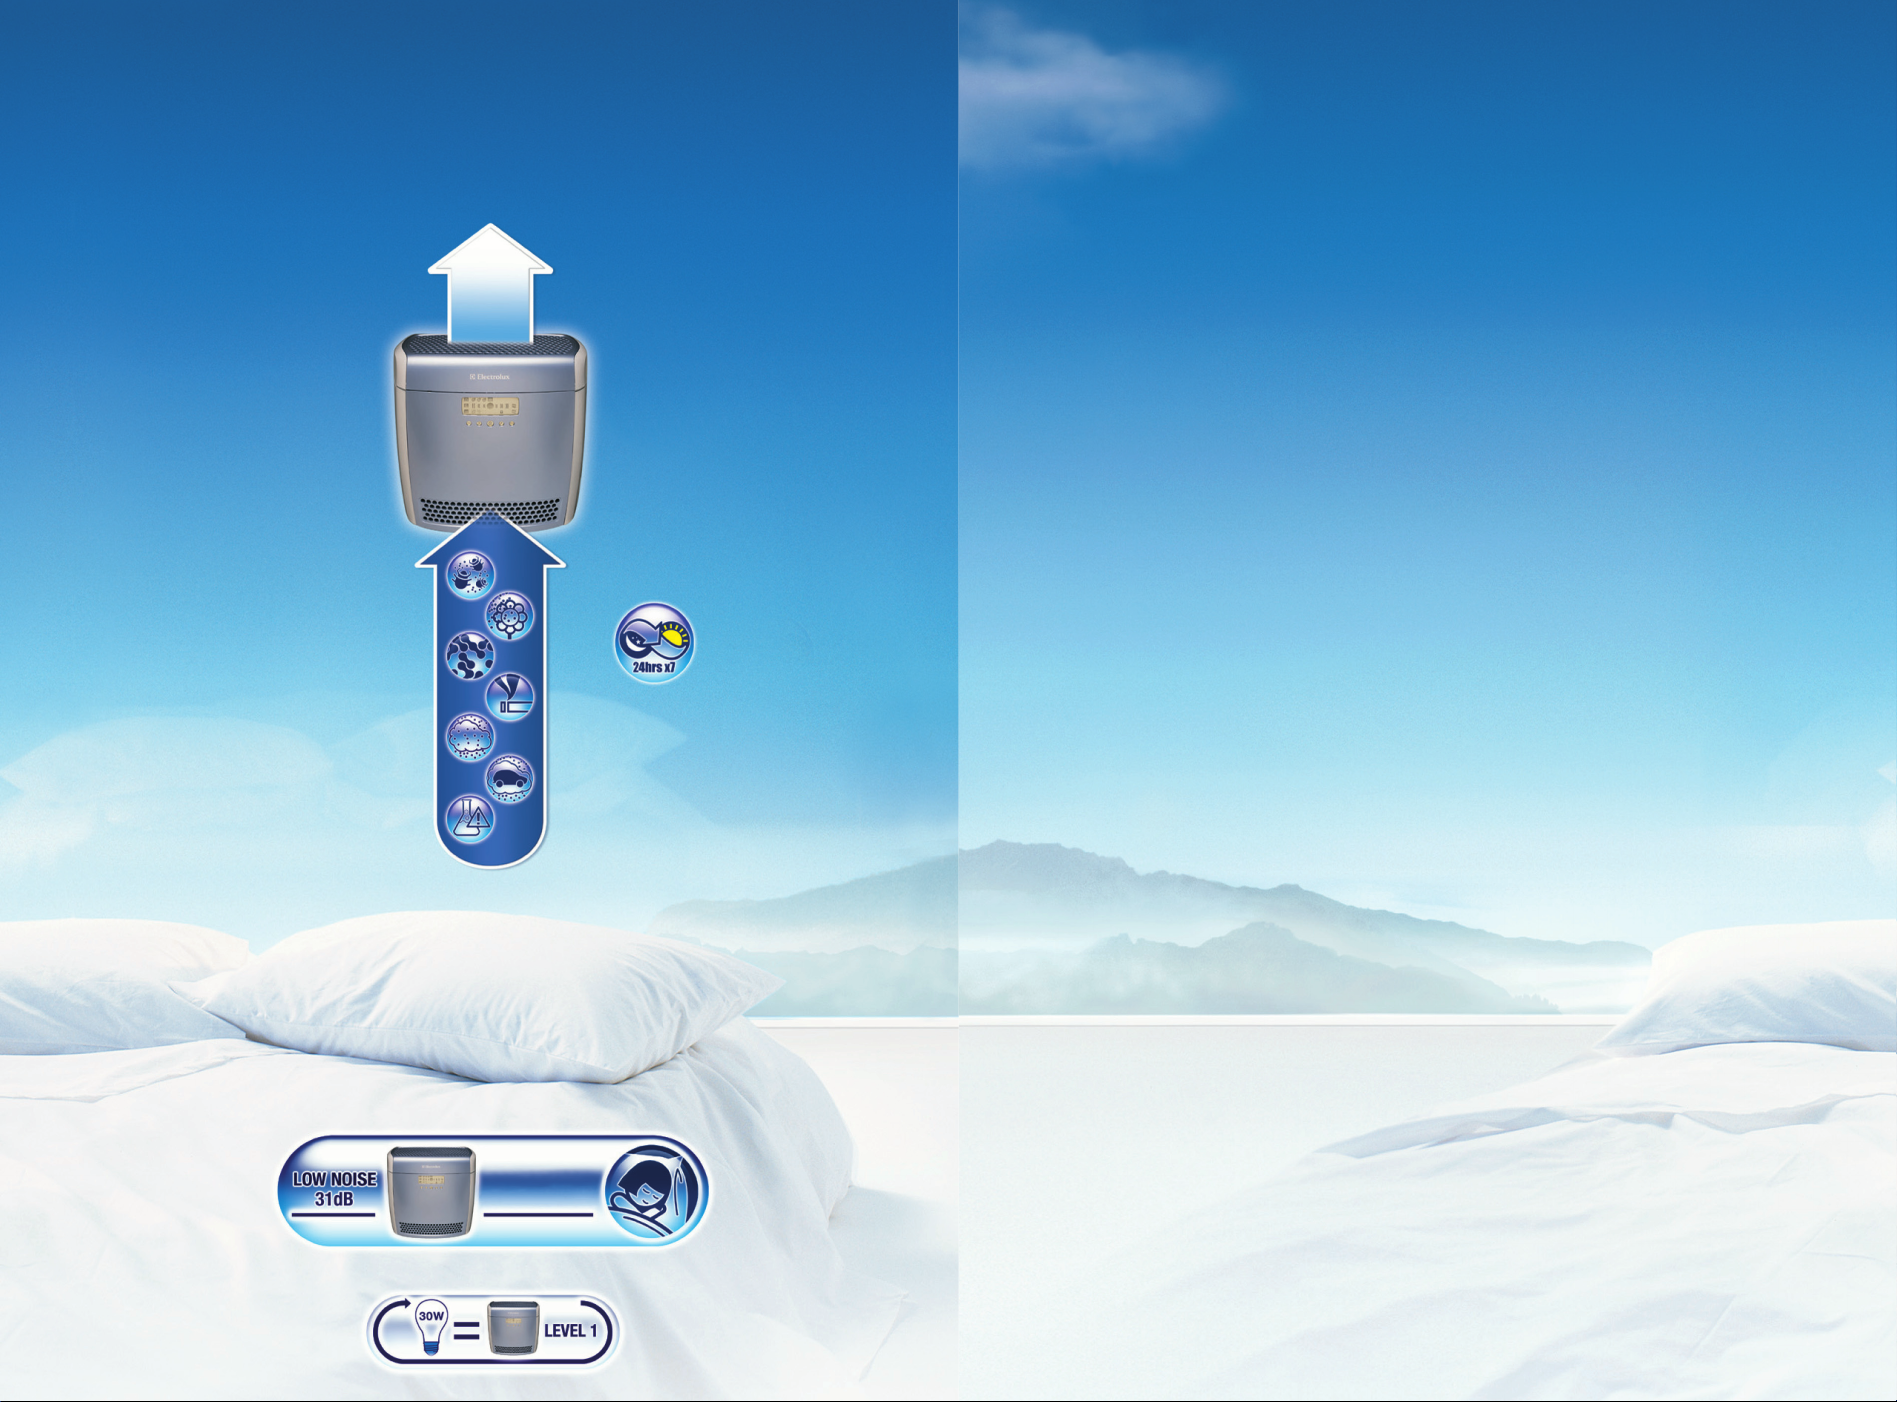
Usually, you cannot see or smell particles in indoor air. But they
are there, and they can affect your health. If used in rooms of the
recommended size, your air cleaner reduces particle content by
at least 80% continuously. It reduces airborne particles in
a room, such as dust, pollen, spores, particles from animal fur
and industrial pollutants which improves the air quality. It will
also reduce the amount of bacteria and viruses.
Filtration in several stages
To guarantee the highest quality of air, the air cleaner has a
unique multi-stage electrostatic filtration system.
Stage 1 Two pre-filters remove large particles such as strands
of hair.
Stage 2 An electrostatic main filter reduces smaller airborne
particles. (See above)
Stage 3 Using a carbon filter* will also reduce gases and
odours in the indoor air. A carbon filter will reduce the air flow
somewhat. Remove the protective plastic, put the carbon filter
in place inside the air cleaner above the main filter and replace
the cover. The carbon filter is available as an accessory (refer
ence no. EF103) and can be used in all models.
-
For your safety
The Air cleaner is an electrical appliance and should be treated
accordingly. Follow these safety instructions and retain this
booklet for reference.
• The cleaner is only to be used by adults. Young children or
infirm persons should be supervised to ensure that they do not
play with the appliance.
• Do not use in humid places such as bathrooms. If liquid enters
the air cleaner, turn it off and have it inspected by an autho rised service station.
• Do not use outdoors.
• Do not use near flammable gases.
• Do not locate under a smoke alarm.
• Do not use if the lead or plug are damaged. To prevent
hazards, a damaged lead or plug must always be replaced
at an authorised Electrolux service station.
• Do not put objects on top of or inside the unit.
• Do not block the grills.
• Always disconnect from the power supply before removing the
filters for cleaning.
• Do not wash the main filter in water or dishwasher.
• Always change a damaged main filter.
Like other electrical appliances, the air cleaner may generate a
small amount of ozone. You might detect a faint smell (similar to
chlorine) especially when the unit is new. However, the amount
generated is extremely small and well below the limits stipulated
by the authorities. To reduce the amount of ozone you can fit
your Air cleaner with a carbon filter.
For best results
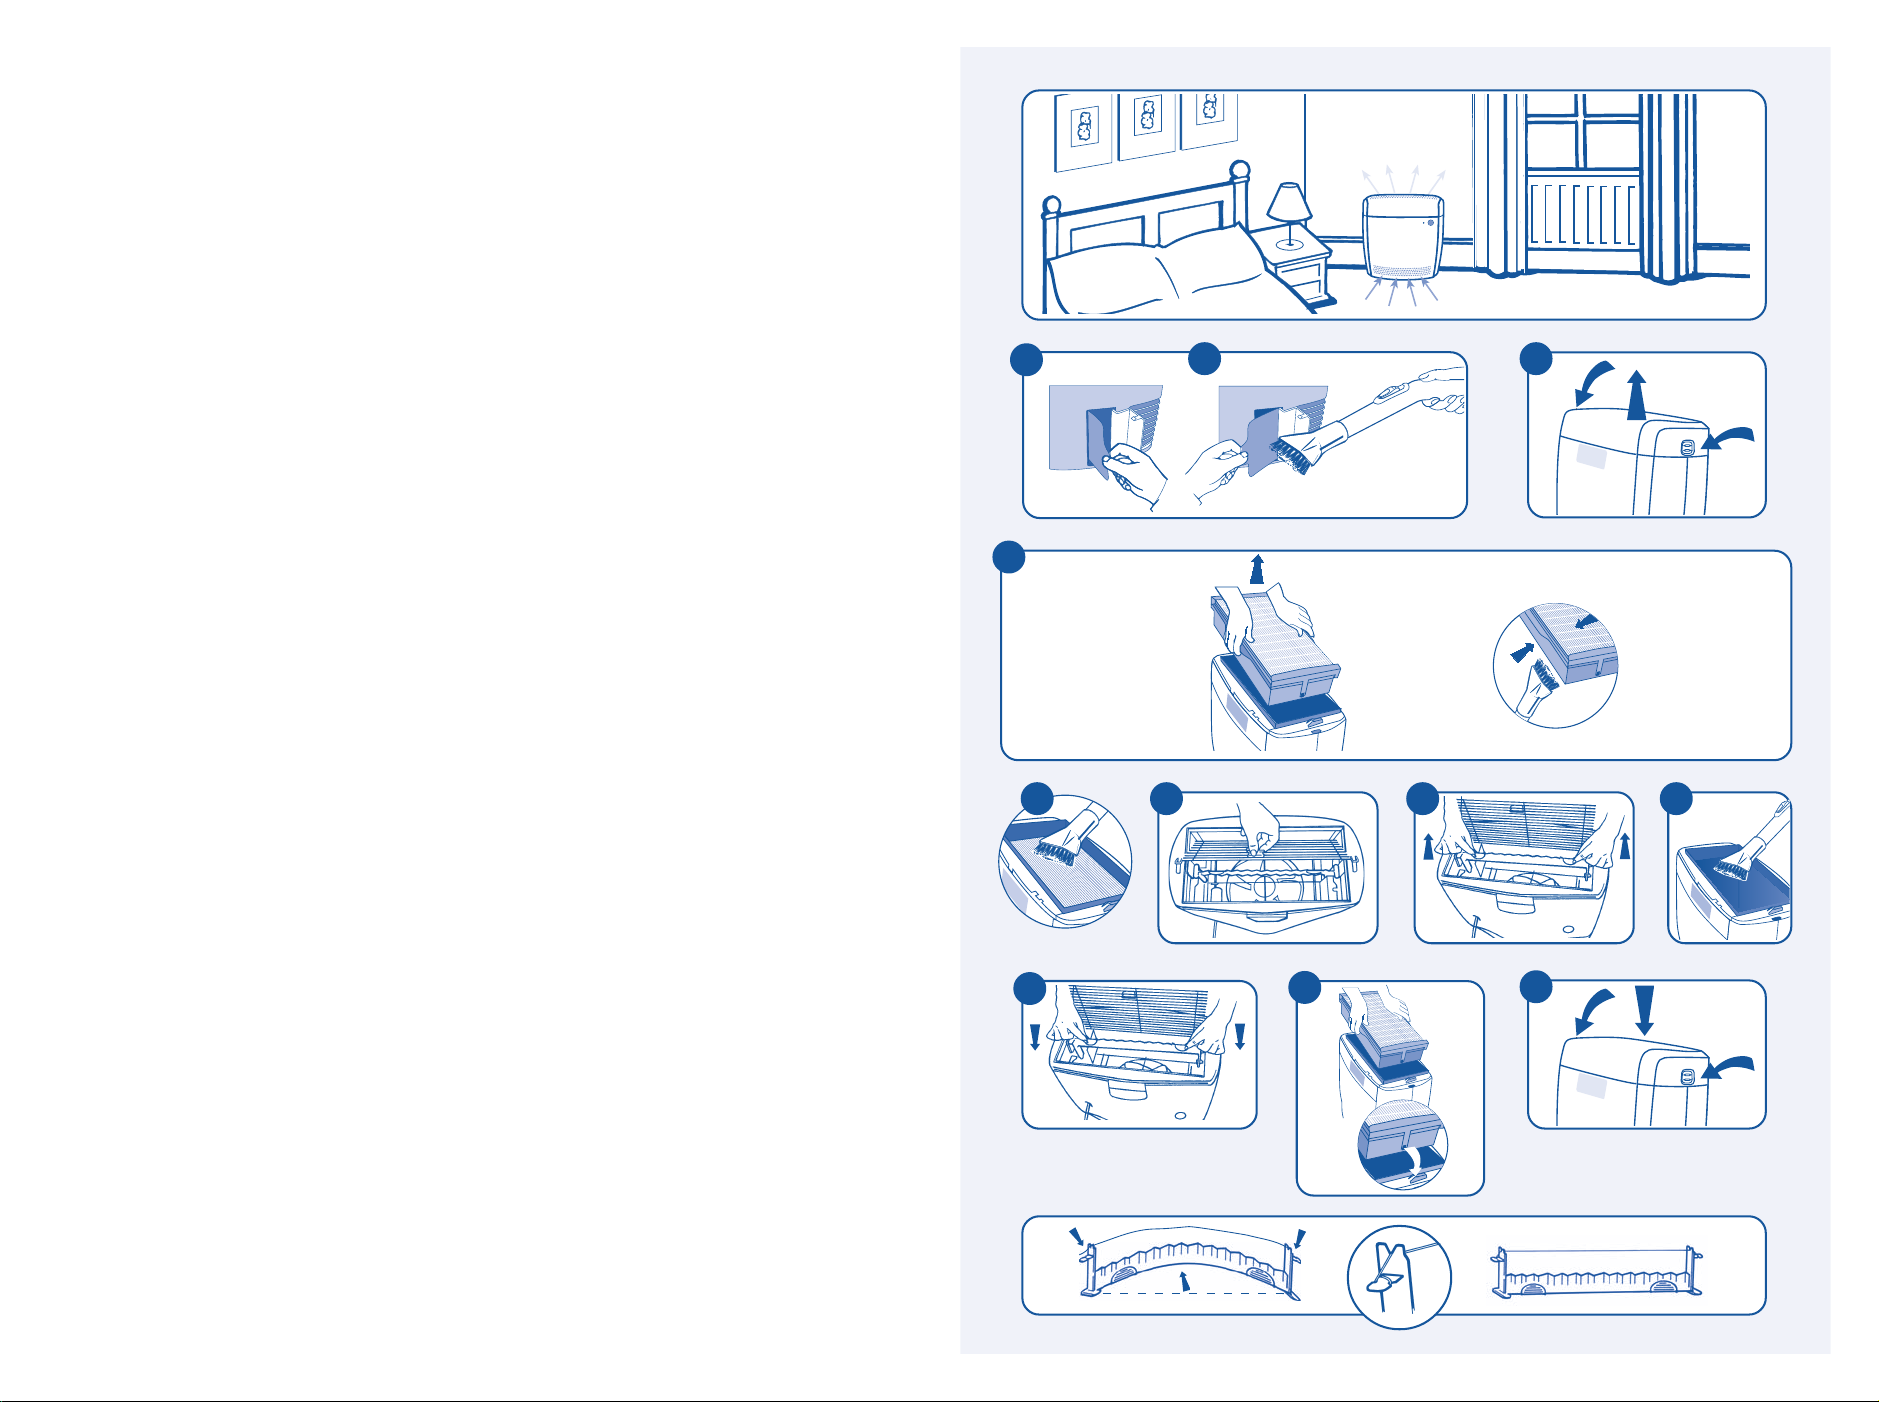
Place the air cleaner on the floor next to a wall. The Air cleaner
sucks in air at floor level and blows it out at the top. If there is
a wall mounted heater, place the air cleaner along the same
wall so that the rising warm air coincides with the air flow of the
cleaner. When using two or more units in one room, place them
along the same wall, as far apart as possible.
Technical Specifications
220-240V/50-60HZ 100-110V/50-60Hz
Clean air delivery rate*)
(CADR +/-10% m3/h)
Position 1 130 110
Position 2 240 230
Position 3 380 380
Room size capacity (m2)
Position 1 27 23
Position 2 50 48
Position 3 79 79
Noise level (dBA)
(ISO 3741)
Position 1 31 28
Position 2 44 43
Position 3 63 63
Power consumption (W)
Position 1 30 30
Position 2 35 35
Position 3 70 60
*) = CADR measured without carbon filter.
Meets the safety requirements and ozone emission limits of
the IEC 60335-1 and 60335-2-65 directives. CE-certified.
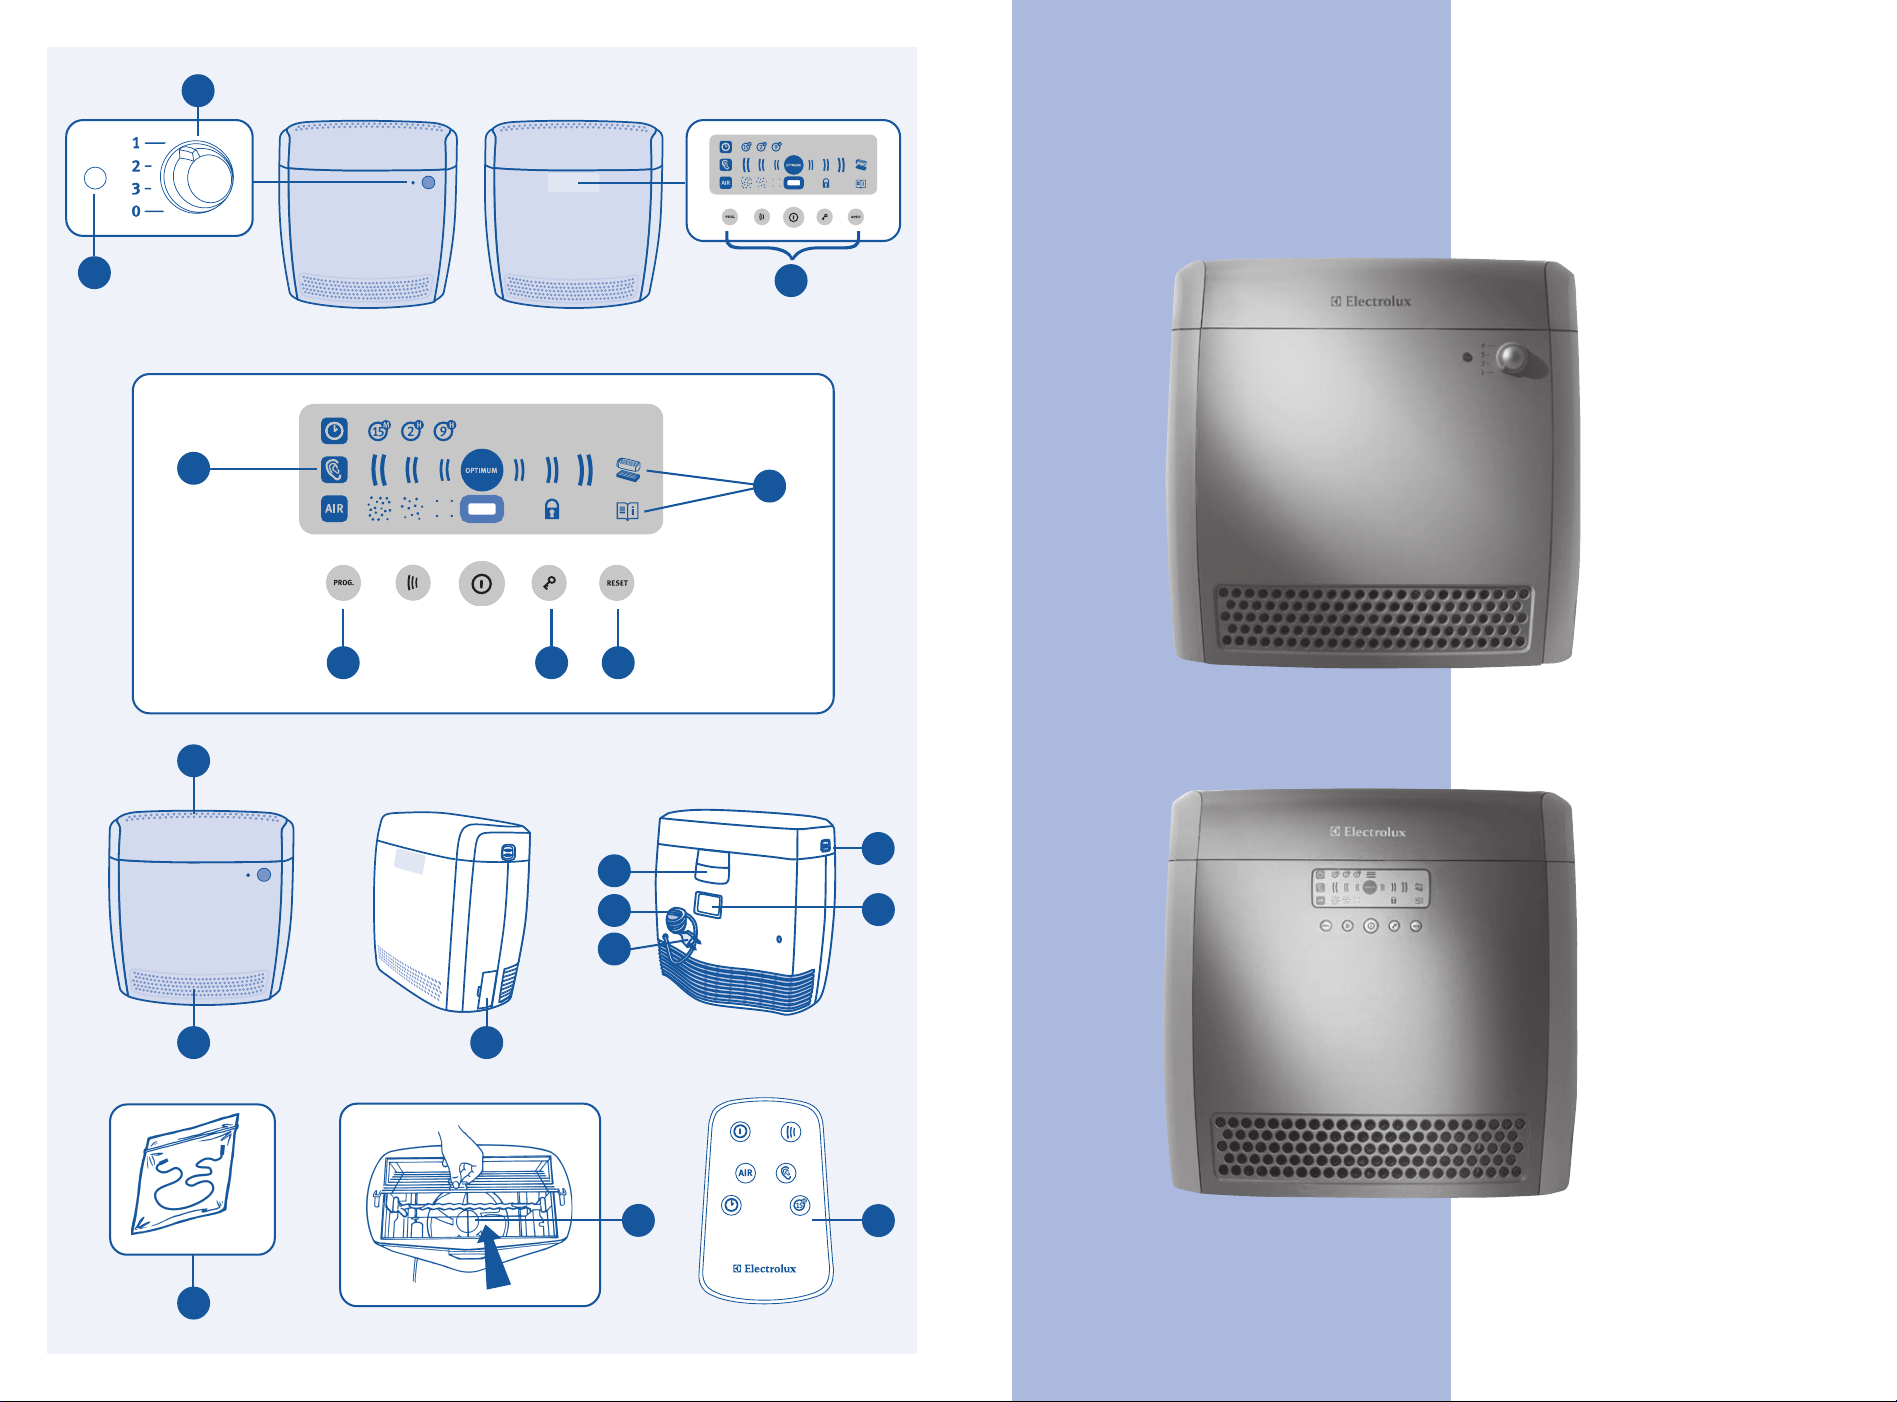
Operating Instructions
1. Regulators* 10. Carrying handle
2. Buttons* 11. Power cord
3. Sound Sensor* 12. Compartment for unused cord
4. Reset button* 13. Top cover release button
5. Programme button* 14. Rating plate
6. Childproof lock button* 15. Indicator lamp*
7. Air inlet grills 16. Reserve wire/corona wire
8. Air outlet grills 17. Ionization chamber
9. Pre-filter door 18. Remote control*
*Only on certain models
Usage
All models are intended for continuous use at fan speed setting
1 or any one of the automatic programmes*. The fan speed
setting can be changed to 2 or 3 if necessary.
The best results are achieved by leaving the air cleaner on
around the clock. (It uses less power than most light bulbs.)
Buttons
Controls the active programme. Press the button to
switch between
manual mode.
Changes fan speed setting manually. Press the
button to switch between the different fan speeds.
Turns the air cleaner on and off.
and

3
English
Activates/deactivates the button lock. Press the
button for longer than two seconds to activate the
button lock. The indicator lamp will flash first and then
remain on while the lock is activated. The same pro cedure applies for deactivating the button lock.
Resets the air cleaner after cleaning the filter or after a
fault in the air cleaner. Press the button for longer
than two seconds. The indicator lamp will flash first
and then go out once the cleaner has been reset.
Functions (only models with automatic programmes and
functions)
A This program adjusts the fan speed according to
the degree of pollutants in the room.
B This program adjusts the fan speed according to
the noise level in the room. The air cleaner will
operate at the highest possible fan speed without
increasing the noise level in the room.
C This function can be used, for example, when
coming home after a day’s work to quickly clean the
room from pollutants. This programme has three
different modes.
The air cleaner automatically operates at setting 3.
After 15 minutes, it will automatically drop to setting 1.
The air cleaner will be turned off after two hours. The
fan speed setting is selected manually. The setting
can be changed during the preset operating duration.
The air cleaner will be turned off after nine hours.
Fan speed setting as above (2h).
D Indicates the degree of pollutants in the room. Adjust to
suitable fan speed setting or use auto program
E Indicates current fan speed setting.
F This symbol shows that the machine is operating
optimally and is supplying clean air. The symbol will
be extinguished and the respective fault indicator
lamp ( ) will come on when it’s time to clean/-
change the filters or an air cleaner fault has occurred.
G Indicates that the filters should be cleaned
according to the cleaning schedule below.
H Indicates a fault in the air cleaner. Refer to the
instructions under “Air cleaning problems”.
I With the button lock activated you can press all
the buttons without anything happening, which can
be used around children.
High degree of pollutants.
Medium degree of pollutants.
Low degree of pollutants.
.
Cleaning and maintenance
Always disconnect the power supply prior to cleaning the unit.
Pre-filter
(a) Open the access door (9). (b) Take out the filters one at a time
and vacuum them. Use the brush accessory to avoid damaging
the filters. After cleaning filters insert and close the door. The
pre-filters do not need to be replaced. Follow this procedure
every two months or more often for sensitive people, e.g. when
vacuuming your home.
Main filter
(c) Press the button (13) and lift off the cover. (
vacuum the main filter with the brush or crevice nozzle. Do not
wash the main filter in water.
Continue cleaning the air cleaner as follows (stage 3)
(e) Vacuum the grille at the top of the space. (f) Lift the grille
using the handle. (g) Remove the wire holder carefully with both
hands keeping it level and upright. (h) Vacuum the inside of
the cleaner, including the lower grille, with the brush or crevice
nozzle. If necessary, use a damp cloth with mild detergent.
(i) Carefully refit the wire holder using both hands and close the
d) Take out and
grille. (If the wire is broken please refer to the troubleshoo-ting
section.) (j) Replace the main filter. Make sure the guides
are properly set in the grooves when you put the filter back.
(k) Replace the cover.
Resetting the air cleaner (stage 4)*
Press the reset button (4) after cleaning or replacement. The
warning lamp goes out to indicate that the air cleaner has been
reset. The air cleaner is reset automatically on models that do
not have a warning lamp.
Filter cleaning intervals
Depending on the level of ambient contamination, we recommend that you follow the above procedure every two months or
when the indicator on the display lights up. The main filter may
need cleaning more frequently if dust is visible on the upper filter
surface.
Replace the main filter once a year or more frequently if neces
sary to ensure the function of the air cleaner.
When using the carbon filter, replace every three to six months
or sooner if you are no longer able to detect a reduction in gases
and smells. Reference No EF103.
-
Troubleshooting air cleaner problems when fault
indicator on display comes on or the blue indicator
lamp changes colour to red (depending on model)
• A break in the corona wire (stage 1) is shown in figure
(g) and is used as a reference in the paragraph “Continue
cleaning the air cleaner as follows”.
Change the wire as instructed below. Press the reset button
(4). If the fault indicator comes on again after a short period,
proceed with the next stage.
Changing corona wire - Remove the broken wire. Carefully
replace the new wire as follows: Secure one end of the wire into
the groove. Bend the wire holder slightly and attach the other
end.
• Additional cleaning(stage 2)
Clean the filter and the ionization chamber inside the air cleaner
according to the maintenance instructions. Get in touch with
your service station if the fault indicator comes on again after a
short period.
Troubleshooting
• If the fan does not operate, (ie. if you cannot sense a weak air
current), check that the power cable is undamaged and that it is
connected to the power supply. Check that the cover and filters
are correctly set. If the fan still does not start, take your air cleaner to an authorised Electrolux service station for inspection.
• If a continuous crackling sound can be heard from the main
filter, lift up the filter and turn it 180°. If this does not remedy the
problem, take the unit for service. (A soft hissing coming from
the filter is normal, especially when new.)
• If the indicator lamp (15) does not light up though the fan
is operating, take the unit for service. (This applies only to air
cleaners without automatic functions.)
Refer also to further information from Electrolux at the end of
this brochure.

4
繁體中文
請將封面翻頁保持開啟,以便需要時與圖片交叉參
考。
開始使用前,請先閱讀第14頁的電力安全供應說明 (限英國
與愛用蘭地區)。
空氣更乾淨 ,家人更健康
現在您有 Electrolux Oxy³ 靜音空氣清淨機,就可以呼吸到更
潔淨的空氣。您應該將空氣清淨機放置在自己停留最久的空
間內,例如客廳或臥室。
只要是有人、植物或寵物的地方,空氣中都會有微粒子,可
能影響您的健康,尤其是當您患有過敏症時。您可知道,室
內的空氣可能比大都市裡的空氣更髒?科學研究顯示出下列
環境中每一公升空氣裡的微粒子量:
鄉間 1 百萬
都市 1 億
家中 1 億
高速公路 10 億
香菸的煙霧 1000 億
一般而言,室內空氣中看不見也聞不到微粒子。但微粒子卻
是存在的,而且會影響您的健康。如果根據建議在合適的房
間大小內使用空氣清淨機,可持續將微粒子量減少至少百分
之80。Electrolux Oxy³ 靜音空氣清淨機可以去除室內空氣中的
微粒子,例如灰塵、花粉塵、砲子、寵物毛的微粒子與工業
污染源,進而改善空氣品質,也可以減少細菌與病毒量。
多層過濾機制
為確保享有最高空氣品質,空氣清淨機中設計有獨特的多階
段靜電過濾系統。
階段 1 兩個預濾濾心移除較大的粒子,如髮絲。
階段 2 主靜電濾心可過濾空氣中較小的微粒子。(見上方)
階段 3 使用碳濾心* 也可以減少室內空氣中的臭氣和異味。
碳濾心會造成空氣的流動略微減緩。將保護的塑膠膜取下,將
碳濾心放入空氣清淨機裡主濾心的上方,然後將蓋子蓋上。碳
濾心為空氣清淨機附件 (參考號 EF101),可用於所有型號。
安全注意事項
本空氣清淨機是一種電器設備,請按以下說明使用。請遵守
本安全說明並將本手冊收好以供日後參考。
• 本機器應由成人操作。孩童及老人使用時應有人從旁協助
與監督,以免操作不當。
• 請勿於潮濕的環境中使用,如浴室。如液體意外進入機器
中,請將機器關閉並送授權服務站檢查。
• 請勿於戶外使用。
• 請勿靠近易燃氣體使用。
• 請勿放置於煙霧感測器下方使用。
• 電源導線或插頭損壞時請勿使用。為避免發生危險,捐壞
的電源導綜或插頭一律必須在授權的 Electrolux 維修站
更換。
• 請勿將任何物體放置在機器上或機器內。
• 請勿擋住護柵。
• 取出濾心進行清潔之前,請一律將電源線從插座拔除。
• 主濾心不可在水中或洗碗機中清洗。
• 損壞的主濾心不可繼續使用,一定要更換。
本空氣清淨機與其他電器設備相同,可能會產生小量臭氧。
尤其當使用新機時,您可能會察覺到令人不適的氣味 (類似
氯)。不過,此氣體量非常低,且遠遠低於有關當局設定的安
全限制。如果想減少臭氧,可以在空氣清淨機中裝碳濾心。
最佳效果
請將空氣清淨機靠牆放置在地上。空氣清淨機將地面的空氣
吸進,從機器上方排出。如果牆上裝置有暖氣,請將空氣清淨
機放置在同一面牆,如此暖氣的氣流可與清淨機氣流配合。
如在一個房間內使用二或多台空氣清淨機,請放置在同一面
牆,但盡量拉遠空氣清淨機之間的距離。
技術規格
220-240V/50-60HZ 100-110V/50-60Hz
清淨空氣輸送速率*)
(CADR +/-10% 立方公尺/小時)
設定 1 130 110
設定 2 240 230
設定 3 380 380
可清淨之房間大小 (m
設定 1 27 23
設定 2 50 48
設定 3 79 79
2
)
噪音程度 (dBA)
(ISO 3741)
設定 1 31 28
設定 2 44 43
設定 3 63 63
耗電量 (瓦)
設定 1 30 30
設定 2 35 35
設定 3 70 60
*) = CADR measured without carbon filter.
符合IEC 60335-1 和 60335-2-65 指令之安全規定與臭氧排
放限制。CE 認證。
操作說明
1. 調節器* 10. 把手
2. 按鈕* 11. 電源線
3. 聲音感應器* 12. 電線收藏室
4. 重設鈕* 13. 上蓋開啟鈕
5. 預設設定鈕* 14. 測定板
6. 兒童安全鎖鈕* 15. 指示燈*
7. 進氣口護柵 16. 收藏電線/電暈線
8. 出氣口護柵 17. 電離
9. 預濾濾心門 18. 遙控裝置*
*限特定型號
用法
所有型號的設計均可在風扇轉速 1 或任何自動預設設定速度
之下連續運轉。如有需要,風扇轉速可加快為 2 或 3。
二十四小時連續運轉可達到最佳清淨效果。(所需電力比使用
大部分電燈泡低。)

5
繁體中文
按鈕
控制使用中的預設設定。按下按鈕在
與手動模式中切換。
以手動更改風扇轉速設定。按下按鈕切換不同風扇轉
開關空氣清淨機。
啟動/且又消安全鎖鈕。持續按下按鈕兩秒鐘以上,可
啟動安全銷。指示燈會先閃爍,然後在安全鎖啟動的
時間內保持亮起。取消安全鎖鈕時步驟相同。
在清洗濾心或故障發生後重設空氣清淨機。持續按下
按鈕兩秒鐘以上。指示燈會先閃爍,然後在空氣清淨
機重設後熄滅。
速。
功能 (限有自動預設設定及功能的型號)
A 此預設設定可根據室內空氣污染程度調整風扇轉速。
B 此預設設定可根據室內噪音程度調整風扇轉速。空
氣清淨機可在不增加室內噪音的條件下以最高風速運
行。
C 此功能可快速清淨室內的空氣污染,例如下班回家後
馬上使用。此預設設定有三種模式。
空氣清淨機自動以設定 3 運行 15 分鐘,然後切換至
設定 1 運行。
空氣清淨機運行兩小時之後自動關閉。風扇轉速以手
動設定。設定可以在預設運作時間內變更。
空氣清淨機運行九小時之後自動關閉。風扇轉速如上
(2小時) 。
D 顯示室內空氣污染程度。調整至合適的風扇轉速,或
使用自動預設設定 。
E 顯示目前風扇轉速設定。
F 此符號亮起顯示機器正以最佳狀態運行,並提供潔
G 顯示濾心應依下方時間表清洗。
H 顯示空氣清淨機發生故障。顯示空氣清淨機發生故
I 當有孩童在室內時,可按下安全鎖鈕。安全鎖啟動
高污染。
中污染。
低污染。
淨空氣。濾心需要清洗/-更換或空氣清淨併發生故障
時,此符號將熄滅且故障燈將依故障情形亮起。
障。請參閱 <空氣清淨疑難排解>中的說明。
後,任何按鈕均不會發生作用。
清潔與維護
清潔機器之前,請一律將電源線從插座拔除。
預濾濾心
(a) 開啟濾心門 (9)。(b) 一次取出一個濾心並用吸塵器清
潔。使用附件的刷子以免損壞濾心。使用附刷子之吸嘴以免損
壞濾心。清潔濾心後,將濾心置回並關閉濾心門。預濾濾心不
需更換。每兩個月如此清潔一次,過敏型使用者可更頻繁清
潔。可於家庭吸塵時一併清潔。
主濾心
(c) 按下蓋扣 (13) 然後將蓋子掀起。(d) 先取出主濾心並用
吸塵器清潔。請勿於水中清洗主濾心。
繼續如下所示清潔空氣清淨機(第3階段)
(e) 以吸塵器清潔上方護柵。(f) 使用把手將護柵拉起。(g)
用雙手小心地將電線盒取出,保持水平與垂直。(h) 以吸塵
器清潔空氣清淨機內部,包括下方護柵,也可使用刷子或細
管嘴清潔。如有需要,使用沾有溫和清潔劑的濕布清潔。(i)
用雙手小心地將電線盒重新放回,然後關閉護柵。(如果電線
破損,請參閱障礙排除一節。)(j) 更換主濾心。將濾心放回
時,詰確定滑軌卡進溝槽中。(k) 更換蓋子。
重設空氣清淨機 (第4階段)*
在清潔或更換後按下重設按鈕 (4) 。暖機燈熄滅時表示空氣
清淨機己重設。沒有暖機燈的型號,空氣清淨機將自動重設。
濾心更換間隔時間
建議您根據室內環境的污染程度,每兩個月遵循上述程序清
潔濾心或請於指示燈亮起時清潔。如果在上面濾心的表面看
見灰塵,表示主濾心可能需更常清潔。
請每年更換一次主濾心或視需要更常更換,以確保空氣清淨
機的功能。
使用碳濾心時,每三到六個月更換一次,或者在您感覺無法
減少臭氣或異味時即更換。參考號 EF103。
故障指示燈亮起或藍色指示燈變為紅色時 (視型號而
定) 的疑難排解
• 電暈線破裂 (第1階段) 如圖 (g) 所示,請參照 <繼續如
下所示清潔空氣清淨機> 一節中使用此例為參考。
根據下方指示更換電線。按下重設按鈕 (4)。如果故障指
示燈仍然在短時間後再次亮起,請進行到下一階段。
更換電暈線 - 移除破損的電線。小心更換新電線,如下:
將電線的一端穩置於溝槽中。將電線盒略微彎曲,然後將
另一端裝上。
• 其他清潔 (第2階段)
依照機器保養指示,清潔空氣清淨機內部的濾心及電離
室。如果故障指示燈仍然在短時間後再次亮起,請與維修
站聯絡。
障礙排除
• 如果風扇不運轉 (即,當您感覺不到微弱的氣流時),請檢
查並確定電線沒有捐壞並己插到電源插座。確定蓋子與濾
心均正確裝好。如果風扇還是不運轉,請將空氣清淨機送
至 Electrolux 維修站檢查。
• 如果聽到爆裂聲持續從主濾心傳出,請將濾心拿起旋轉
180�。如果問題仍無法解決,請將空氣清淨機送修。(濾
心發出嘶嘶聲為正常反應,尤其當使用新濾心時。)
• 如果指示燈 (15) 在風扇運轉期間沒有亮起, 請將空氣清
淨機送修。(僅於空空氣清淨機不能自動運作時使用此方
法。)
請另參閱本手冊最後方的其他 Electrolux 資訊。

6
简体中文
请使两个端盖都处于开启状态需要的话还可以参阅附
文图片。
开始使用前,请参阅第 14 页的电力安全供应说明(仅限英
国和爱尔兰)。
洁净的空气带给您健康的家庭
现在您拥有了一台 Electrolux Oxy³ 静音空气清洁器,您将会
呼吸到更加清洁的空气。显然您该把它放在您经常活动的房
间里,诸如起居室或者卧室等等。
只要是在有植物、人群或宠物的地方,空气中就会悬浮着微
粒,影响着您的健康。尤其当您患有过敏症时。您可知道,
室内的空气可能会比大城市里的空气污染更严重?科研结果
揭示了以下地方的每立升空气中所含微粒的数量:
农村 一百万个
城市 一亿个
家庭 一亿个
高速公路 十亿个
香烟的烟雾 一千亿个
通常情况下,您看不到或闻不到室内空气中的这些微粒。但
是它们的确悬浮在空气中,影响着您的健康。如果您在大小
合适的房间里使用这个空气清洁器,它可以将空气中的微粒
减少 80%,并能保持在这个水平上。此清洁器可减少室内空
气中的微粒,例如灰尘、花粉、霉孢、动物皮毛上的脱落物
和工业污染颗粒物,从而改善空气质量。它还可以减少细菌
和病毒的数量。
数级过滤机制
为了保证最高的空气质量,本空气清洁器还包含一个独特的
多级静电过滤系统。
第一级 两个预过滤器将除去空气中较大的微粒如头发等。
第二级 主静电过滤器可过滤空气中较小的微粒。〔参阅上文〕
第三级 使用碳过滤器*也可以减少室内空气中的废气,并去除
异味。碳过滤器将略微减小空气流量。请移开保护塑料盖,
将碳过滤器放在空气清洁器内主过滤器的上方,放置到位后
放回盖板。此碳过滤器可作为附件提供〔参考号为 EF101〕,
并可用于所有型号中。
安全事项
该空气清洁器为电器产品,请按以下说明使用。请遵守本安
全说明,并保存本手册以备日后参考。
• 清洁器只供成人操作。幼童及体弱人士使用时应有人从旁
协助与监督,以免使用不当。
• 请勿在诸如浴室等潮湿的环境中使用。如果有液体进入该
清洁器,请将清洁器关闭并送授权服务站检查。
• 请勿在户外使用。
• 请勿在靠近易燃气体的地方使用。
• 请勿放置于烟雾警报器下方使用。
• 导线或插头损坏时勿用。为了避免发生危险,破损的导线
或插头一律必须在经授权的 Electrolux 维修站更换。
• 请勿将物件放在清洁器的顶部或内部。
• 请勿堵塞格栅。
• 在取出过滤器清洁前,切记将电源断开。
• 请勿用水或在洗碗机中清洗主过滤器。
• 随时更换破损的主过滤器。
像其它电器产品一样,该空气清洁器能产生少量的臭氧。尤
其在使用新的清洁器时,您可能会闻到一种微弱的气味(与
氯气相仿)。但是它所产生的臭氧量极少,远远低于有关部
门规定的限度。如果想减少臭氧量,您可以给清洁器装上一
个碳滤芯。
最佳效果
把清洁器放在靠近墙壁的地板上。它从地板表面吸入空气,
并将过滤后的洁净空气从其顶部吹入房间。如果墙壁上安装
有加热器的话,就将清洁器顺着同一墙壁放置,这样上升的
热空气可以与从清洁器里吹出来的气流融合在一起。如果您
在房间里使用两个或以上清洁器,请将它们顺着同一墙壁放
置,并尽可能离得远一点。
技术指标
220-240V/50-60HZ 100-110V/50-60Hz
清洁空气传送速率*)
(CADR +/-10% m³/h)
档位 1 130 110
档位 2 240 230
档位 3 380 380
房间容量 (m²)
档位 1 27 23
档位 2 50 48
档位 3 79 79
噪音水平 (dBA)
(ISO 3741)
档位 1 31 28
档位 2 44 43
档位 3 63 63
功率消耗 (W)
档位 1 30 30
档位 2 35 35
档位 3 70 60
*) = CADR measured without carbon filter.
符合 IEC 60335-1 和 60335-2-65 标准所规定的安全要求
以及臭氧排放限度。CE-认证。
操作說明
1. 调节器* 10. 把手
2. 按钮* 11. 电源导线
3. 聲音感應器* 12. 备用线存放格
4. 复位按钮* 13. 顶盖开启按钮
5. 程序按钮* 14. 额定值指示盘
6. 儿童保护锁按钮* 15. 指示灯*
7. 空气入口格栅 16. 备用线/冠状线
8. 空气出口格栅 17. 电离室
9. 预过滤器端盖 18. 遥控器*
*仅适用于某些型号
使用方法
所有型号都可在 1 档风扇速度下或任一个自动程序*状态下
连续使用。必要时可以将风扇速度改为 2 档或 3 档。
如果想达到最佳效果,就长时间连续运转该清洁器。(它的
耗电量比大多数的灯泡都要低。)

7
简体中文
按钮
控制当前使用的程序。按下该按钮可在
手动改变风扇速度设置。按下该按钮可切换为不同的
风扇速度。
开启和关闭空气清洁器。
启用/禁用按钮锁。按下该按钮两秒以上可启用按钮
锁。当按钮锁启用时,指示灯首先会闪烁,然后持续
发亮。禁用按钮锁时也同样如此。
在清洗过滤器后或空气清洁器发生故障后,可将空气
清洁器复位。按下该按钮两秒钟以上。一旦清洁器复
位后,指示灯首先会闪烁,然后熄灭。
和手动模式之间切换。
功能(仅适用于带有自动程序和功能的型号)
A 此程序可根据室内污染程度来调节风扇速度。
B 此程序可根据室内噪声等级来调节风扇速度。空气清
洁器可以在最高的风扇速度下运行而不会增加室内噪
声等级。
C 例如,当您经过一天工作后回到家中时,可使用此功
能快速清除室内的污染物。此程序有三种不同的模式。
空气清洁器自动工作在第 3 档。15 分钟后,会自动
下降到第 1 档。
两小时后空气清洁器将会关机。风扇速度设置是手动
选择的。在预先设定的工作周期内,此设置可以被更
改。
九小时后空气清洁器将会关机。风扇速度设置同上
(2h)。
D 指示室内污染程度。调节风扇速度或使用自动程序
E 指示当前风扇速度设置。
F 此符号说明清洁器运行在最佳状态,并且正在提供清
G 指出应按下面的清洁时间表对过滤器进行清洁。
H 指示空气清洁器发生故障。请参阅“空气清洁故
I 在启用了按钮锁之后,按下任何按钮都不会执行操
。
高度污染。
中度污染。
轻度污染。
洁的空气。当需要清洗/更换过滤器或空气清洁器发生
故障时,该符号将会熄灭,且相应的故障指示灯
( )将会亮起。
障”中的说明。
作,可以在周围有儿童时使用此功能。
清洗及保养
清洗该清洗器前,必须将电源断开。
第一级过滤器
(a) 打开入口端盖 (9)。(b) 逐一取出过滤器,然后用真空吸
尘器清洁它们。使用带有刷子的附件以避免损坏过滤器。清洗
完过滤器后,将其插入并合上端盖。预过滤器并不需要更换。
注意每两个月就应按照该程序将过滤器清洗对于敏感的人士,
则需要清洗的更勤一些,比如,在您用真空吸尘器清扫房间的
时候,就可以对其进行清洗。
第二级过滤器
(c) 压按按钮 (13),并掀开端盖。(d) 首先取出主过滤器并
用毛刷吸嘴或细管嘴进行清洁。不要用水清洗主过滤器。
按如下步骤继续清洁空气清洁器(阶段 3)
(e) 用真空吸尘器清洁上部的格栅。(f) 用把手将格栅拉起。
(g) 用双手小心地拆下电线支架,保持支架的平放及直立。
(h) 用真空吸尘器清洁空气清洁器的内部,包括下部格栅,
也可使用毛刷吸嘴或细管嘴。如有需要,用沾有温和清洁剂
的湿布进行清洗。(i) 用双手小心地将电线支架放回,并关
上格栅。(如果电线已经损坏,请参阅故障排除部分。)(j)
放回主过滤器。确保在放回过滤器时,所有零件均被适当地
放回沟槽之内。(k) 放回端盖。
复位空气清洁器(阶段 4)*
在清洗或放回零件后,按重置按钮 (4)。警告指示灯熄灭,
指示空气清洁器已经复位。对于不带警告指示灯的型号,空
气清洁器会自动复位。
过滤器清洗周期
以周围环境的污染程度而定,我们建议您每两个月或看到显
示器亮起指示灯时,按照以上程序对清洁器进行清洗。如果
看到过滤器的上层表面有灰尘的话,那么主过滤器可能需要
清洗的更勤一些。
每年更换主过滤器,必要时可以更频繁地更换,以确保空气
清洁器正常工作。
使用碳滤心时,每三到六个月更换一次,或者在您感觉到无
法减少臭气或异味时即更换。参考号 EF103。
当显示器上的故障指示灯亮起或蓝色指示灯变为红色
(取决于型号)时须排除空气清洁器的故障
• 在图 (g) 中显示了冠状导线(阶段 1)中有一处破裂,并
且在“按如下步骤继续清洁空气清洁器”一节中被用作参
考。
按下面的说明更换导线。按复位按钮 (4)。如果短时间后
故障指示灯再次亮起,则继续下一阶段。
更换冠状导线 - 拆下损坏的电线。按以下程序,小心地换
上新的电线:把电线的一端系在沟槽之内。把电线支架轻
微弯曲,然后接上电线的另一端。
• 额外清洁(阶段 2)
按照维护说明清洁过滤器和空气清洁器内的电离室。如果
短时间故障指示灯再次亮起,请与维修站联系。
故障排除
• 如果风扇不转,(即当您感觉不到微弱的气流时),请检
查并确定导线没有损坏并已插到电源插座。还应检查端盖
和过滤器是否正确安装。如果风扇仍不启动,请将空气清
洁器送到经授权的 Electrolux 维修站进行检查。
• 如果可以听到来自主过滤器的连续的噼啪声,请拿起过滤
器并旋转 180°。如果问题仍得不到解决,应将空气清洁
器送修。(过滤器发出的微弱嘶嘶声是正常的,新机器尤
其如是。)
• 如果风扇运转时指示灯 (15) 没有亮起,应将空气清洁器
送修。(仅使用于不带自动功能的空气清洁器。)
另外请参考本手册最后由 Electrolux 提供的更多信息。

8
Bahasa Melayu
Sila pastikan kedua-dua kepak terbuka dan silang rujuk gambar
dengan teks bila perlu.
Sebelum anda mulakan, sila rujuk kepada arahan bekalan keselamatan elektrik pada halaman 14 (U.K. dan Ireland sahaja).
Udara lebih bersih untuk rumah yang lebih sihat
Kini anda mempunyai Pembersih Udara Electrolux Oxy³silence,
anda akan menyedut udara yang lebih bersih. Sebaiknya, alat ini
diletakkan di tempat anda paling banyak menghabiskan masa,
misalnya di ruang tamu atau bilik tidur.
Di mana sahaja ada orang, tanaman atau haiwan peliharaan,
pasti ada partikel bawaan udara yang boleh menjejas kesejahteraan anda, terutama jika anda mengalami alergi. Misalnya,
tahukah anda bahawa udara dalam sebuah bilik boleh menjadi
lebih tercemar daripada udara di dalam sebuah bandar yang
besar? Kajian sains menunjukkan kandungan partikel setiap liter
udara seperti berikut:
PERSEKITARAN DESA 1 juta
BANDAR 100 juta
DALAM RUMAH ANDA 100 juta
LEBUH RAYA 1 bilion
ASAP TEMBAKAU 100 bilion
Biasanya, anda tidak boleh lihat atau bau partikel dalam udara
di dalam bangunan. Tetapi partikel yang ada dalam bangunan
dan boleh menjejaskan kesihatan anda. Jika digunakan di dalam
bilik-bilik yang saiznya seperti yang disarankan, mesin pembersih
udara anda mengurangkan kandungan habuk dengan sekurangkurangnya 80% berterusan. Ia mengurangkan habuk bawaan
udara, seperti debu, debunga, spora, habuk daripada bulu bina
tang dan bahan cemar perindustrian yang meningkatkan kualiti
udara. Ia juga mengurangkan jumlah bakteria dan virus.
Penapisan beberapa peringkat
Untuk menjamin kualiti udara paling tinggi, pembersih udara
mempunyai sistem penapisan elektrostatik berbilang peringkat unik.
Peringkat 1 Dua penapis awal membuang partikel besar
seperti rambut.
Peringkat 2 Sebuah penapis utama elektrostatik mengurangkan habuk bawaan udara lebih kecil. (Lihat di atas)
Peringkat 3 Menggunakan penapis karbon* akan mengurangkan gas dan bau udara dalaman. Penapis karbon akan
mengurangkan sedikit aliran udara. Keluarkan plastik pelindung,
letakkan penapis karbon di tempatnya dalam penapis udara di
atas penapis utama dan letak balik penutup. Penapis karbon
boleh didapati sebagai aksesori (No. Rujukan EF103) dan boleh
digunakan dalam semua model.
Untuk keselamatan anda
Mesin pembersih udara ialah sebuah alat elektrik dan semestilah
dijaga seperti sebuah alat elektrik. Ikut arahan keselamatan ini
dan simpan risalah ini untuk rujukan.
• Mesin ini hanya harus digunakan oleh orang dewasa sahaja.
Kanak-kanak kecil atau orang yang uzur hendaklah diawasi
untuk memastikan bahawa mereka tidak bermain dengan
perkakas itu.
• Jangan guna di tempat yang lembap seperti bilik mandi. Jika
cecair termasuk ke dalam pembersih udara, matikannya dan
bawanya ke wakil servis yang disahkan untuk diperiksa.
• Jangan guna di luar rumah.
• Jangan gunakannya berdekatan dengan gas yang mudah
terbakar.
• Jangan letakkan di bawah pengesan asap.
• Jangan guna jika wayar atau plagnya rosak. Untuk mengelak
kan bahaya, wayar atau plag yang rosak mesti sentiasa
diganti di wakil servis Electrolux yang disahkan.
• Jangan letakkan apa-apa barang di atas atau di dalam unit.
• Jangan sekat jeriji.
• Sentiasa cabut plag dari bekalan kuasa sebelum mengeluar
kan penapis untuk dibersihkan.
• Jangan basuh penapis utama di dalam air atau mesin basuh
pinggan mangkuk.
• Sentiasa tukar penapis utama yang rosak.
Seperti perkakas elektrik lain, pembersih udara ini boleh menghasilkan sedikit ozon. Anda mungkin mengesan sedikit bau
(seperti bau klorin) terutama sekali ketika unit ini masih baru.
Walau bagaimanapun, jumlah yang dijana adalah amat kecil dan
di bawah had yang ditetapkan oleh pihak yang berkuasa. Untuk
mengurangkan jumlah ozon anda boleh memasang penapis
karbon pada Pembersih udara anda.
Untuk hasil terbaik
Tempatkan mesin pembersih di atas lantai berhampiran dengan
dinding. Pembersih udara menyedut udara di paras lantai dan
mengeluarkan udara dari atas. Jika terdapat alat pemanas
yang dipasang di dinding, letak pembersih udara ini sepanjang
dinding yang sama supaya udara panas yang naik keluar sama
dengan udara dari mesin pembersih udara ini. Apabila dua atau
lebih unit digunakan di dalam sebuah bilik, letakkan di sepanjang dinding yang sama, jaraknya sejauh mungkin.
Spesifikasi Teknikal
220-240V/50-60HZ 100-110V/50-60Hz
Kadar penyampaian udara bersih*)
(CADR +/-10% m³/h)
Kedudukan 1 130 110
Kedudukan 2 240 230
Kedudukan 3 380 380
Muatan saiz bilik (m2)
-
Kedudukan 1 27 23
Kedudukan 2 50 48
Kedudukan 3 79 79
Paras bunyi (dBA)
(ISO 3741)
Kedudukan 1 31 28
Kedudukan 2 44 43
Kedudukan 3 63 63
Penggunaan kuasa (W)
Kedudukan 1 30 30
Kedudukan 2 35 35
Kedudukan 3 70 60
*) = CADR diukur tanpa penapis karbon.
Menepati keperluan keselamatan dan had pengeluaran ozon
yang ditetapkan oleh arahan IEC 60335-1 dan 60335-2-65.
Arahan untuk Mengguna
1. Pengatur* 10. Pemegang untuk membawa
2. Butang* 11. Kord kuasa elektrik
3. Pengesan Bunyi* 12. Ruang untuk kord yang tidak digunakan
4. Set semula butang* 13. Butang untuk melepaskan tudung atas
5. Butang program* 14. Pelapik kadar
6. Butang kunci untuk 15. Lampu penanda*
keselamatan kanak-kanak* 16. Dawai rizab/dawai korona
7. Jeriji salur masuk udara 17. Kebuk pengionan
8. Jeriji salur keluar udara 18. Kebuk pengionan
9. Pintu sebelum menapis
*Hanya pada model-model tertentu
Penggunaan
Semua model adalah dimaksudkan untuk penggunaan
berterusan pada seting kelajuan kipas 1 atau salah daripada
program automatik*. Seting kelajuan kipas boleh ditukar kepada
2 atau 3 jika perlu.
Hasil terbaik boleh didapati dengan cara meninggalkan mesin
pembersih udara ini sepanjang masa. (Ia menggunakan kurang
kuasa elektrik daripada kebanyakan lampu.)
-
9
Bahasa Melayu
Butang
Mengawal program yang aktif. Tekan butang untuk bertukar
Mengubah seting kelajuan kipas secara manual. Tekan
Menghidupkan dan mematikan pembersih udara.
Mengaktifkan/menyahaktifkan kunci butang. Tekan butan
Mengeset semula pembersih udara selepas membasuh penapis
antara dan mod manual.
butang untuk bertukar antara kelajuan kipas yang berlainan.
lebih daripada dua saat untuk mengaktifkan kunci butang.
Lampu penunjuk akan menyala dulu dan kemudian terus
menyala apabila kunci diaktifkan. Prosedur yang sama
digunakan untuk menyahaktifkan kunci butang.
atau selepas kerosakan dalam penapis udara. Tekan butang
selama lebih daripada dua saat. Lampu petunjuk akan menyala
dulu dan kemudian padam sebaik sahaja pembersih disetkan
semula.
Fungsi (hanya model dengan program dan fungsi automatik)
A Program ini melaraskan kelajuan kipas selaras dengan tahap
B Program ini melaraskan kelajuan kipas selaras dengan tahap
C Fungsi ini boleh digunakan, misalnya, apabila balik rumah
Pembersih udara beroperasi secara automatik pada seting
Pembersih udara akan dimatikan selepas sembilan jam.
Pembersih udara akan dimatikan selepas sembilan jam.
D Menunjukkan tahap bahan cemar di dalam bilik. Melaraskan
Tahap bahan cemar sederhana.
E Menunjukkan seting kelajuan kipas semasa.
F Simbol ini menunjukkan bahawa mesin beroperasi secara
G Menunjukkan bahawa penapis hendaklah dibersihkan
H Menunjukkan kerosakan dalam pembersih udara. Rujuk
I Dengan kunci butang diaktifkan anda boleh menekan semua
bahan cemar di dalam bilik.
bunyi di dalam bilik. Pembersih udara akan beroperasi pada
kelajuan kipas paling tinggi yang mungkin tanpa meningkatkan
tahap bunyi di dalam bilik.
selepas kerja seharian untuk membersihkan bilik dari bahan
cemar dengan cepat. Program ini mempunyai tiga mod
berlaina
3. Selepas 15 minit, ia akan secara automatik turun kepada
seting 1
Seting kelajuan kipas dipilih secara manual. Seting boleh
diubah semasa tempoh pengoperasian yang dipratetapkan.
Seting kelajuan kipas seperti di atas (2h).
seting kelajuan kipas yang sesuai atau menggunakan
program auto
Tahap bahan cemar tinggi.
Tahap bahan cemar rendah.
optimum dan membekalkan udara bersih. Simbol ini akan
dipadamkan dan lampu petunjuk rosak masing-masing
( ) akan menyala apabila tiba masanya untuk
membasuh penapis atau terjadi kerosakan pembersih udara.
menurut jadual pembersihan di bawah.
kepada arahan di bawah “Masalah pembersihan udara”.
butang tanpa apa-apa berlaku, yang boleh digunakan oleh
kanak-kanak.
.
Penapis awal
Sentiasa tanggalkan plag bekalan kuasa sebelum membersihkan unit.
Penapis awal
(a) Buka pintu masuk (9). (b) Keluarkan penapis satu demi satu
dan vakumkannya. Gunakan aksesori berus untuk mengelakkan merosakkan penapis. Selepas membersihkan penapis,
masukkannya dan tutup pintu. Alat penapis awal tidak perlu
digantikan. Ikut prosedur ini setiap 2 bulan atau lebih kerap
lagi bagi orang yang sensitif misalnya, semasa memvakum
rumah anda.
Penapis utama
(c) Tekan butang (13) dan angkat tudungnya. (d) Keluarkan dan
vakum penapis utama dulu dengan muncung berus atau celah.
Jangan basuh penapis utama di dalam air.
Teruskan membersihkan pembersih udara seperti berikut
(peringkat 3)
(e) Vakum gril di atas ruang. (f) Angkat jeriji dengan menggu
nakan pemegangnya. (g) Tanggalkan pemegang wayar secara
-
hati-hati dengan menggunakan kedua belah tangan sambil
memastikan wayar itu rata dan tegak. (h) Vakum di dalam pem
bersih, termasuk gril bawah dengan muncung berus atau celah.
Jika perlu, gunakan kain lembap dengan detergen yang lembut.
(i) Gantikan pemegang wayar secara berhati-hati dengan menggunakan kedua belah tangan, kemudian tutup jeriji. (Jika wayar
terpatah, sila rujuk kepada bahagian Menyelesaikan Masalah.) (j)
Menggantikan penapis utama. Pastikan panduannya betul-betul
berada dalam alurnya apabila anda meletakkan kembali pena
-
pisnya. (k) Pasang semua tudungnya.
Mengeset semula pembersih udara (peringkat 4)*
Tekan butang set semula (4) selepas membersihkan atau
menggantikannya. Lampu amaran padam untuk menunjukkan
bahawa pembersih udara telah diset semula. Pembersih udara
diset semula secara automatik bagi model-model yang tidak
mempunyai lampu amaran.
Jarak masa membersihkan penapis
Bergantung pada tahap pencemaran persekitaran, kami
sarankan supaya mengikuti prosedur di atas setiap dua bulan
sekali atau apabila lampu penunjuk menyala di paparan. Penapis utama mungkin perlu dibersihkan lebih kerap lagi jika habuk
kelihatan di permukaan atas penapis.
Tukar penapis utama dalam tempoh sekali atau lebih kerap
dalam setahun jika perlu untuk memastikan berfungsinya pembersih udara tersebut
Apabila menggunakan penapis karbon, gantikan setiap tiga atau
enam bulan atau kurang jika anda tidak lagi dapat mengesan
berkurangnya kandungan gas dan bau. Nombor Rujukan EF103.
Menyelesai masalah pembersih udara apabila
lampu penunjuk rosak menyala atau lampu
penunjuk berwarna biru bertukar warna kepada
warna merah (bergantung pada model).
• Wayar korona yang terputus (peringkat 1) dipaparkan dalam
rajah (g) dan digunakan sebagai rujukan dalam perenggan
“Teruskan membersihkan pembersih udara seperti berikut”.
Tukar dawai sebagaimana diarahkan di bawah. Tekan butang
set semula (4). Jika petunjuk kerosakan menyala lagi selepas
tempoh yang singkat, teruskan ke peringkat seterusnya.
Menukar dawai korona - Keluarkan wayar yang patah. Letakkan
dawai baru dengan berhati-hati seperti berikut: Pasang hujung
dawai yang satu lagi ke dalam alurnya. Bengkokkan sedikit
pemegang dawai dan pasangkan hujung yang satu lagi.
• Pembersihan tambahan (peringkat 2)
Bersihkan penapis dan kebuk pengionan di dalam pembersih
udara selaras dengan arahan penyelenggaraan. Hubungi stesen
perkhidmatan anda jika penunjuk kerosakan menyala sekali lagi
selepas tempoh yang singkat.
Menyelesaikan masalah
• Jika kipas tidak berjalan (misalnya, jika anda tak dapat rasa aliran udara yang kuat), periksa sama ada kabel kuasa tidak rosak
dan ianya disambungkan ke bekalan kuasa. Periksa tudung dan
penapis dipasang dengan betul. Jika kipas tidak hidup, bawa
pembersih udara anda ke pusat perkhidmatan Electrolux yang
disahkan untuk diperiksa.
• Jika bunyi menggeresek boleh didengar dari penapis udara
utama, angkat penapis dan pusingkannya 180°. Jika ini tidak
juga menyelesaikan masalah, ambil unit untuk diservis. (Bunyi
desir lembut daripada penapis adalah biasa, terutamanya
apabila ia baru.)
• Jika lampu penunjuk (15) tidak menyala melalui lampu walaupun kipas beroperasi, bawanya untuk diservis. (Ini digunakan
hanya untuk pembersih udara tanpa fungsi automatik.)
Rujuk juga kepada maklumat selanjutnya dari Electrolux di akhir
brosur ini.

10
한글
커버 덮개를 여신 후 필요한 부분의 상호 참조 그림을 책에
서 펼쳐 놓습니다
시작하기 전에14페이지의 전기 안전 지침을 참조하십시오
(영국 및 아일랜드만 해당).
건강한 가정을 위한 공기 청정기
Electrolux Oxy³ 무소음 공기 청정기를 선택해 주셔서 감사
드리며, 본 공기 청정기는 주변의 공기를 더 깨끗하고 맑게
바꿔드릴 것입니다. 물론 이 청정기 배치 장소는 거실이나
침실과 같이 시간을 많이 보내는 곳이 바람직합니다.
사람이나 식물, 또는 애완동물이 있는 곳은 어디나 공중에
미립자가 있어서 건강에 영향을 끼칠 수 있습니다. 특히 알
레르기로 고생하는 분이 계시다면 더욱 그렇습니다. 예를
들어, 집안의 공기도 대도시의 공기보다 더 오염될 수 있
다는 사실을 알고 계십니까? 과학연구 자료에 따르면 공기
1리터당 미립자 수는 다음과 같습니다.
지방 1백만
도시 1억
집안 1억
고속도로 1조
담배연기 100조
보통 실내에서는 미립자를 눈으로 보거나 코로 냄새 맡을 수 없
지만 안 보이게 떠 있으면서 건강에 영향을 끼칠 수 있습니다. 선
택하신 청정기가 저희들이 권장해 드리는 방 규격과 일치 할 경
우 지속적으로 감소되는 미립자 양은 최소한 80%입니다. 공기
청정기는 실내 공기 중에 떠다니는 미립자인 먼지, 꽃가루, 포자,
동물의 털이나 산업 오염 물질 등을 감소시킵니다. 또한 박테리
아와 바이러스도 감소시킵니다.
여러 단계 별 여과 작용
가장 좋은 공기를 유지하기 위해 본 공기 청정기는 고유한 다단
계 정전기식 여과 장치를 갖추고 있습니다.
단계 1 두 개의 1차 필터는 머리카락 같은 큰 미립자를 제거합
니다.
단계 2 정전기식 메인 필터는 실내 공기에 떠다니는 더 작은 미
립자들을 감소시킵니다. (위 참조)
단계 3 카본 필터*를 사용하면 실내에 떠다니는 가스와 냄새 또
한 감소하게 됩니다. 카본 필터를 사용하면 공기 흐름이 다소 느
려집니다. 보호 플라스틱을 열고, 공기 청정기의 메인 필터 위에
카본 필터를 끼우고 덮개를 닫습니다. 카본 필터는 액세서리(참
조번호: EF103)이며 모든 모델에 적용할 수 있습니다.
안전사항
공기 청정기는 전기 기구이므로 조심하게 다뤄야 합니다. 다음
안전 수칙을 명심하고 이 안내서를 잘 보관하면서 참고하시기 바
랍니다.
• 이 청정기 사용자는 성인으로 국한됩니다. 어린이나 허약한 사
람은 이 기구를 만지작거리는 일이 없도록 감독해야 합니다.
• 목욕탕과 같이 습기가 많은 곳에서는 사용하지 마십시오. 청정
기에 액체가 들어 가면 바로 스위치를 끄십시오. 그런 다음에
정식 서비스 센터 직원의 점검을 받으십시오.
• 실외에서는 사용하지 마십시오.
• 인화성 가스 가까이에서는 사용하지 마십시오.
• 청정기 바로 위에 화재 경보기가 있으면 안됩니다.
• 전기 줄이나 플러그에 손상이 가 있으면 사용하지 마십시오.
재해를 방지하기 위해 줄 또는 플러그에 손상이 있을 경우 필
히 공인 일렉트로룩스 서비스 센터에서 교체해 받으십시오.
• 본 기구 위나 속에 물건을 두지 마십시오.
• 그릴을 덮어 씌우지 마십시오.
• 필터를 꺼내어 청소하려면 먼저 전원을 끄십시오.
• 메인 필터를 물에 담가서 또는 식기세척기에 세척하지 마십시
오.
• 손상된 메인 필터는 필히 교체하십시오.
여느 전기 제품과 마찬가지로 이 청정기에서도 소량의 오존이 발
생됩니다. 특별히 새것일 경우에는 (클로린과 같은) 희미한 냄새
가 납니다. 하지만 여기서 발생하는 양은 아주 미소하고 당국에
서 정한 수준을 훨씬 밑돕니다. 청정기에 카본 필터를 장착하면
오존 양이 줄어 듭니다.
최선의 효과를 위한 안내
청정기를 벽에서 가까운 바닥에 놓으십시오. 이렇게 되면 바닥의
먼지를 빨아 들여 위로 내뿜습니다. 만약 한 쪽 벽에 히터가 설치
되어 있다면 바로 그 벽 쪽에 놓으십시오. 그러면 위로 오르는 따
뜻한 공기와 청정기의 공기 흐름이 일치하게 됩니다. 방 하나에
2 대 이상을 사용하실 경우에는 벽을 따라 최대한의 간격을 두고
배치하십시오.
기술사양
220-240V/50-60HZ 100-110V/50-60Hz
깨끗한 공기 공급율*)
(CADR +/-10% m³/h)
위치 1 130 110
위치 2 240 230
위치 3 380 380
방 크기(m²)
위치 1 27 23
위치 2 50 48
위치 3 79 79
소음수준(dBA)
(ISO 3741)
위치 1 31 28
위치 2 44 43
위치 3 63 63
소비 전력(W)
위치 1 30 30
위치 2 35 35
위치 3 70 60
*) 표시는 카본 필터 없이 측정한 CADR입니다.
안전 규정과 오존 배기 한도는 IEC 60335-1과 60335-2-
65 지침을 충족하며 CE 인증을 받고 있음.60335-2-65.
운용사항
1. 규제* 10. 운반 손잡이
2. 단추* 11. 전원 줄
3. 사운드 센서* 12. 나머지 줄 보관소
4. 재설정 단추* 13. 맨 위 뚜껑 여는 단추
5. 프로그램 단추* 14. 전압 표시 판
6. 어린이 보호 잠금 단추* 15. 표시 등*
7. 공기 흡입 그릴 16. 여분의 줄/코로나 줄
8. 공기 배출 그릴 17. 이온화 챔버
9. 1차 필터 도어 18. 리모컨*
*특정 모델에 한함
사용법
모든 모델은 팬 속도 설정 1 또는 자동 프로그램*에서 연속 사용
하도록 설계되었습니다. 필요 시 팬 속도 설정을 2 또는 3으로 변
경할 수 있습니다.
공기 청정기는 하루 24시간 켜 놓는 것이 제일 좋습니다. (전력
소모는 대부분의 집안 전구보다 적습니다)

11
한글
단추
활성 프로그램을 제어합니다. 이 단추를 눌러
합니다
팬 속도 설정을 수동으로 변경합니다. 이 단추를 눌
공기 청정기를 켜고 끕니다.
단추 잠금을 활성화/비활성화 합니다. 단추를 2초 이
필터 세척 후 또는 공기 청정기 고장 이후 공기 청정
기능(자동 프로그램 및 기능을 가진 모델에 한함)
A 이 프로그램은 실내의 오염 수준에 따라 팬 속도를
B 이 프로그램은 실내의 소음 수준에 따라 팬 속도를
C 이 기능은 예를 들어, 외출 후 집에 들어와 신속히 실
공기 청정기가 자동으로 설정 3으로 작동됩니다.
공기 청정기가 2시간 작동 후 꺼집니다. 팬 속도 설
공기 청정기가 9시간 작동 후 꺼집니다. 팬 속도 설
D 실내의 오염 정도를 표시합니다. 알맞은 팬 속도 설
E 현재 팬 속도 설정을 나타냅니다.
F 이 심볼은 청정기가 최적으로 작동되어 깨끗한 공기
G 아래 청소 주기에 따라 필터를 청소해야 함을 나타냅
H 공기 청정기에 고장이 있음을 나타냅니다. “공기 청
I 단추 잠금을 활성화하면 어떤 단추를 눌러도 아무 일
청정기 청소와 유지보수
언제고 전원을 차단한 다음에 본 기구를 청소하십시오.
1단계 필터
(a) 접속 문을 엽니다(9). (b) 필터를 하나씩 꺼내면서 진공 청
소기로 털어냅니다. 필터에 손상을 주지 않도록 솔 액세서리를
러 팬 속도를 변경합니다.
상 눌러 단추 잠금을 활성화합니다. 표시등이 번쩍인
후 켜진 상태를 유지하며 잠금이 활성화됩니다. 같은
절차를 반복해 단추 잠금을 비활성화할 수 있습니다.
기를 재설정합니다. 단추를 2초 이상 누릅니다. 청정
기가 재설정되면 표시등이 번쩍인 후 완전히 꺼집니
다.
조정합니다.
조정합니다. 실내 소음을 증가시키지 않고 가능한 가
장 높은 속도로 팬 속도를 높입니다.
내의 오염을 제거하고자 할 경우 사용할 수 있습니
다. 이 프로그램은 세 가지 모드가 있습니다.
15분 후 자동으로 설정 1로 떨어집니다.
정이 수동으로 선택됩니다. 설정이 사전 설정 작동
중 변경될 수 있습니다.
정은 위(2h)와 같음.
정으로 조절하거나 자동 프로그램 을 사용합니
다.
오염도 높음.
오염도 중간임.
오염도 낮음.
를 내보내고 있음을 나타냅니다. 필터 세척/교환이
필요한 시기가 되거나 공기 청정기에 고장이 일어나
면 이 심볼이 꺼지고 해당 고장 표시등 ( )
이 켜집니다.
니다.
정 문제”의 지시를 참조하십시오.
도 일어나지 않습니다. 이것은 어린이를 보호하기 위
한 기능입니다.
와 수동 모드 사이를 전환
사용하십시오. 필터를 다 닦았으면 다시 넣은 다음에 문을 닫습
니다. 1차 필터는 교환할 필요가 없습니다. 이러한 절차는 2달에
한 번이면 충분하지만 보다 더 민감한 사람의 경우에는 가령 집
안 전체를 진공 청소할 때 마다 본 기구를 청소하십시오.
메인 필터
(c) 캐치(13)를 누르고 덮개를 들어 떼어냅니다. (d) 메인 필터를
꺼내 솔이나 뾰족한 취구로 진공 청소합니다. 물에 메인 필터를
담가 세척하지 마십시오.
다음과 같이 공기 청정기 청소 계속(단계 3)
(e) 그릴의 윗부분을 진공 청소기로 청소합니다. (f) 그릴은 손잡
이로 들어 올리십시오. (g) 줄 받침대를 두 손으로 조심스레 평평
한 상태에서 위로 향한 채 들어올려야 합니다. (h) 청정기 내부를
솔이나 뾰족한 취구로 닦아내십시오. 필요하면 축축한 천에 가벼
운 세척제를 써서 닦으십시오. (i) 줄 받침대를 두 손으로 조심스
럽게 다시 끼우고 그릴을 닫습니다. (줄이 끊어져 있으면 문제해
결 항목을 참고하십시오.) (j) 메인 필터를 다시 끼우십시오. 필터
를 다시 넣을 때 필터의 안내면이 홈에 제대로 따라 들어가도록
하십시오. (k) 뚜껑을 다시 덮으십시오.
공기 청정기 재설정(단계 4)*
청소 또는 교체 후 재설정 단추(4)를 누르십시오. 경고등이 꺼져
공기 청정기가 재설정되었음을 알립니다. 경고등이 없는 모델은
공기 청정기가 자동으로 재설정됩니다.
필터 청소 간격
실내 공기의 오염 정도에 따라 다르지만 두 달에 한 번씩 또는 디
스플레이의 표시기가 켜질 때 위 절차를 밟으십시오. 메인 필터
의 경우 위 쪽 표면에 먼지가 보이면 청소를 더 자주 해야 합니
다.
메인 필터를 1년에 한번 또는 더 자주 교환하여 공기 청정기의
제 성능을 유지하십시오.
카본 필터를 사용할 경우에는 3~6달에 한 번씩, 또는 가스와 냄
새가 줄어들지 않으면 더 자주 갈아 끼우셔야 합니다. 참조 번
호 : EF103.
고장 표시등이 켜질 때 공기 청정기의 문제 해결
그림 (g)에 코로나 줄(단계 1)이 끊어진 것이 보입니다. “다음과
같이 공기 청정기 청소 계속” 단락에 참조로 사용되었습니다.
아래 지시한 대로 줄을 교환합니다. 재설정 단추를 누르십시오
(4). 잠시 후 고장 표시기가 다시 들어올 경우 다음 단계로 진행
합니다.
줄 바꾸기 - 끊어진 줄을 제거하십시오. 다음 절차에 따라 조심
스럽게 새 것으로 바꾸십시오. 줄의 한 쪽 끝을 홈에 고정시킵니
다. 줄 받침을 약간 굽히면서 다른 한 쪽 끝을 부착합니다.
• 추가 청소(단계 2)
유지보수 지시에 따라 공기 청정기 내의 필터와 이온화 챔버를
청소합니다. 잠시 후 고장 표시기가 다시 들어올 경우 서비스 센
터에 문의하십시오.
문제 해결
• 팬이 돌지 않으면 (가령 공기가 약하게 도는 걸 느끼지 못하겠
거든), 전원 줄에 손상이 가지 않았나, 제대로 꽂혀 있나를 확인
합니다. 뚜껑과 필터가 제대로 들어 가 있는지 살펴 보십시오.
팬이 여전히 작동하지 않으면 공기 청정기를 공인 일렉트로룩스
서비스 센터에 가져가 검사를 요청하십시오.
• 메인 필터에서 딱딱거리는 소리가 계속되면 필터를 들어올려
180° 뒤집으십시오. 여전히 소리가 나면 청정기를 서비스 센터에
가져 가십시오. (필터에서 특히, 새 필터에서 바람소리가 나는 것
은 정상입니다.)
• 팬이 작동하지만 표시등(15)이 켜지지 않으면 서비스 센터에
가져가십시오. (자동 기능 없는 공기 청정기에만 적용됩니다.)
보다 자세한 일렉트로룩스 정보는 본 소책자의 맨 뒷부분을 참
조하십시오.

12
ไทย
โปรดเปิดแผ่นปกหน้าไว้ รวมทั้งรูปภาพอ้างอิงกับข้อความเมื่อจำเป็น
ก่อนเริ่มต้น โปรดอ้างถึงคำแนะนำด้านความปลอดภัยของระบบไฟฟ้
าในหน้า 14 (อังกฤษและไอร์แลนด์เท่านั้น)
อากาศบริสุทธิ์สำหรับบ้านที่สุขสบายกว่า
ด้วยเครื่องฟอกอากาศที่ทำงานได้เงียบสนิทรุ่น Electrolux Oxy³
อากาศที่ท่านหายใจจะสดชื่นขึ้น ท่านควรตั้งเครื่องนี้ไว้ในห้องที่ใช้เว
ลาอยู่ในนั้นมากที่สุด เช่น ห้องนั่งเล่น หรือห้องนอน
ที่ไหนก็ตามที่มีคน พืช หรือสัตว์เลี้ยง ที่นั่นก็จะมีอนุภาคที่ลอยอยู่ใน
อากาศ ซึ่งสามารถมีผลต่อความผาสุกของท่านได้ โดยเฉพาะอย่างยิ่
งถ้าท่านเป็นโรคภูมิแพ้ ตัวอย่างเช่น ท่านทราบหรือไม่ว่า อากาศภา
ยในห้องสกปรกได้มากกว่าอากาศในเมืองใหญ่? จากการศึกษาทาง
ด้านวิทยาศาสตร์ได้แสดงระดับของอนุภาคต่อลิตรในอากาศ ดังนี้:
ในชนบท 1 ล้าน
ในเมืองใหญ่ 100 ล้าน
ในบ้าน 100 ล้าน
ทางหลวง 1 พันล้าน
ควันบุหรี่ 100 พันล้าน
ปกติแล้ว ท่านไม่สามารถมองเห็นหรือดมกลิ่นอนุภาคเล็กๆ
ที่ลอยอยู่ในอากาศ ในบ้าน หรืออาคารต่างๆ ได้ แต่อนุภาคเหล่านี้อ
ยู่ที่นั่นและสามารถมีผลต่อสุขภาพของท่านด้วย หากใช้เครื่องนี้ในห้
องขนาดที่แนะนำไว้ เครื่องฟอกอากาศของท่านจะลดปริมาณอนุภาค
ลงอย่างน้อย 80% อย่างต่อเนื่อง เครื่องฟอกอากาศจะทำหน้าที่ลดอ
ณูจากอากาศภายในห้อง เช่น ฝุ่น ละอองเกสร สปอร์ อณูจากขนสัตว์
และมลภาวะจากอุตสาหกรรม ซึ่งจะช่วยปรับปรุงคุณภาพของอากาศให้ดี
ยิ่งขึ้น เครื่องฟอกอากาศยังช่วยลดจำนวนแบคทีเรียและไวรัส
การกรองหลายขั้นตอน
เครื่องฟอกอากาศจะมีระบบกรองอากาศด้วยไฟฟ้าสถิตแบบหลายขั้นเพื่อ
รับประกันถึงคุณภาพอากาศที่ดีที่สุด
ขั้นตอนที่ 1 แผ่นกรองสองแผ่นที่ติดตั้งไว้แล้วจะช่วยกำจัดอนุภาคขนา
ดใหญ่ เช่น เส้นผม
ขั้นตอนที่ 2 แผ่นกรองหลักที่ใช้หลักการของไฟฟ้าสถิตจะช่วยลดอณูขน
าดเล็กที่ลอยมากับอากาศ (ดูข้างต้น)
ขั้นตอนที่ 3 การใช้แผ่นกรองคาร์บอน* ยังจะช่วยลดแก๊สและกลิ่น
ที่อยู่ภายในห้อง แผ่นกรองคาร์บอนจะลดการหมุนเวียนของอากาศ
แกะแผ่นพลาสติกป้องกันออก ใส่แผ่นกรองคาร์บอนลงในเครื่องฟอกอาก
าศเหนือแผ่นกรองหลัก และประกอบฝาครอบ แผ่นกรองคาร์บอนมีจำหน่
ายเป็นอุปกรณ์เสริม (หมายเลขอ้างอิง EF103) และสามารถใช้แผ่นกรอง
นี้กับเครื่องฟอกอากาศทุกรุ่น
เพื่อความปลอดภัยของท่าน
เครื่องฟอกอากาศเป็นเครื่องไฟฟ้า และควรได้รับการดูแลรักษาเป็นอย่า
งดี ปฏิบัติตามคำแนะนำเพื่อความปลอดภัยนี้ และรักษาหนังสือเล่มเล็กนี้
ไว้เพื่ออ้างอิง
• เครื่องนี้สำหรับใช้โดยผู้ใหญ่เท่านั้น ควรควบคุมดูแลไม่ให้เด็กเล็กหรือ
บุคคลทุพพลภาพเล่นกับเครื่อง
• ห้ามใช้เครื่องในสถานที่ชื้น เช่น ห้องน้ำ หากน้ำเข้าตัวเครื่อง ปิดเครื่อง
และนำเครื่องไปตรวจสอบยังสถานบริการที่ได้รับอนุญาตให้บริการ
• ห้ามใช้กลางแจ้ง (หรือนอกอาคาร)
• ห้ามใช้ใกล้ก๊าซติดไฟ
• ห้ามใช้หรือตั้งไว้ใต้สัญญาณเตือนควัน
• ห้ามใช้หากสายไฟหรือปลั๊กไฟเสีย ควรให้ศูนย์บริการรับอนุญาตของ
Electrolux เป็นผู้เปลี่ยนสายไฟหรือปลั๊กไฟที่ชำรุดเสียหาย เพื่อป้องกั
นอันตรายที่อาจเกิดขึ้น
• ห้ามวางสิ่งของใดๆ บนเครื่องหรือในตัวเครื่อง
• ห้ามบังตะแกรง
• ถอดปลั๊กออกจากแหล่งจ่ายไฟก่อนที่จะถอดแผ่นกรองนำมาทำความ
สะอาดเสมอ
• ห้ามล้างแผ่นกรองหลักในน้ำหรือเครื่องล้างจาน
• หมั่นเปลี่ยนแผ่นกรองหลักที่ชำรุดอยู่เสมอ
เหมือนกับเครื่องไฟฟ้าทั่วๆ ไป เครื่องฟอกอากาศอาจทำให้เกิดปริมาณ
โอโซนเล็กน้อย ท่านอาจได้กลิ่นจางๆ (คล้ายกับคลอรีน) โดยเฉพาะอ
ย่างยิ่งกับเครื่องใหม่ หรือเมื่อแผ่นกรองได้รับการทำความสะอาดใหม่ๆ
อย่างไรก็ตาม ปริมาณที่เกิดขึ้นนั้นมีน้อยมาก และต่ำกว่าปริมาณที่ทางรา
ชการกำหนดไว้ ท่านสามารถลดปริมาณโอโซนโดยใส่แผ่นกรองคาร์บอ
นในเครื่องฟอกอากาศของท่าน
เพื่อผลลัพธ์ที่ดีที่สุด
ตั้งเครื่องฟอกอากาศไว้บนพื้นติดกับผนัง เครื่องจะดูดอากาศที่ระดับพื้นแ
ละเป่าขึ้นไปยังระดับบน หากมีเครื่องทำความร้อนติดผนัง ตั้งเครื่องฟอกอ
ากาศไว้ข้างๆ เพื่อที่ว่าอากาศอุ่นจะได้รวมตัวกับอากาศที่ไหลจากตัวเครื่
อง หากใช้สองเครื่องหรือมากกว่าในหนึ่งห้องตั้งเครื่องไว้ที่ผนังด้านเดีย
วกัน แต่ให้ห่างกันมากที่สุด
รายละเอียดทางด้านเทคนิค
220-240V/50-60HZ 100-110V/50-60Hz
อัตราการส่งอากาศบริสุทธิ์ *)
ลูกบาศก์เมตร/ชม.
ตำแหน่งที่ 1 130 110
ตำแหน่งที่ 2 240 230
ตำแหน่งที่ 3 380 380
ขนาดห้อง (m²)
ตำแหน่งที่ 1 27 23
ตำแหน่งที่ 2 50 48
ตำแหน่งที่ 3 79 79
ระดับเสียง (เดซิเบล)
(องค์การระหว่างประเทศว่าด้วยมาตรฐาน (ISO) 3741)
ตำแหน่งที่ 1 31 28
ตำแหน่งที่ 2 44 43
ตำแหน่งที่ 3 63 63
การใช้กำลังไฟฟ้า (วัตต์)
ตำแหน่งที่ 1 30 30
ตำแหน่งที่ 2 35 35
ตำแหน่งที่ 3 70 60
*) = CADR measured without carbon filter
ได้มาตรฐานความปลอดภัยตามที่กำหนดไว้ และตามข้อจำกัดกา
รปล่อยโอโซนของIEC 60335-1 และตามกฏของ 60335-2-65
ได้รับการรับรองจากสภากรรมาธิการของยุโรป
คำแนะนำเกี่ยวกับการปฏิบัติการ
1. ตัวควบคุม* 10. ที่จับสำหรับหิ้ว
2. ปุ่ม* 11. สายไฟ
3. เครื่องส่งสัญญาณไวต่อเสียง* 12. ช่องเก็บสายไฟ
4. ปุ่มตั้งต้นใหม่สำหรับการเปลี่ยนแผ่นกรอง* 13. ปุ่มเปิดฝาครอบ
5. ปุ่มตั้งโปรแกรม* 14. แผ่นแสดงการใช้ไฟฟ้
6. ปุ่มล็อคป้องกันเด็ก* 15. ไฟแสดงความผิดพลาด*
7. ตะแกรงดึงอากาศเข้า 16. ลวดสำรอง/ลวดโคโรน่า
8. ตะแกรงปล่อยอากาศออก 17. ช่องไอออน
9. ช่องเปิดขึ้นหน้าแผ่นกรอง 18. รีโมทคอนโทรล*
*เฉพาะบางรุ่นเท่านั้น
การใช้
เครื่องฟอกอากาศทุกรุ่นได้รับการผลิตขึ้นเพื่อการใช้งานอย่างต่อเนื่
องโดยตั้งความเร็วของพัดลมไว้ที่ระดับ 1 หรือตั้งเป็นโปรแกรมอัตโ
นมัติโปรแกรมใดก็ได้* ส่วนความเร็วของพัดลมสามารถปรับเป็น 2
หรือ 3 ได้หากจำเป็น
ผลลัพธ์ที่ดีที่สุดทำได้โดยตั้งเครื่องฟอกอากาศทิ้งไว้ให้สุดรอบเข็มน
าฬิกา (ตลอดเวลา) (ใช้พลังงานน้อยกว่าหลอดไฟส่วนใหญ่)

13
ไทย
ปุ่ม
ควบคุมโปรแกรมที่นำมาใช้ในขณะนั้น กดปุ่มเพื่อสลับระหว่
เปลี่ยนความเร็วของพัดลมด้วยตนเอง กดปุ่มเพื่อสลับระหว่
เปิดหรือปิดเครื่องฟอกอากาศ
ปิด/ปิดตัวล็อคปุ่ม กดปุ่มค้างไว้นานกว่า 2 วินาทีเพื่อใช้ตัว
รีเซ็ตเครื่องฟอกอากาศหลังจากทำความสะอาดแผ่น
างโหมด และโหมดที่ตั้งเอง
างความเร็วของพัดลมที่ตั้งไว้ในระดับต่าง
ล็อคปุ่ม ไฟแสดงจะกะพริบก่อนแล้วจึงติดสว่างในขณะที่ยัง
ใช้ตัวล็อค ใช้ขั้นตอนเดียวกันนี้เพื่อปิดใช้ตัวล็อคปุ่ม
กรอง หรือหลังจากเครื่องฟอกอากาศทำงานผิดปกติ
กดปุ่มค้างไว้เกิน 2 วินาที ไฟแสดงจะกะพริบก่อนแล้วจึงดับ
ลงเมื่อรีเซ็ตเครื่องฟอกอากาศเสร็จแล้ว
ฟังก์ชันต่างๆ (เฉพาะรุ่นที่มีโปรแกรมและฟังก์ชันอัตโนมัติ)
A โปรแกรมนี้จะปรับความเร็วของพัดลมตามระดับความสกปร
B โปรแกรมนี้จะปรับความเร็วของพัดลมตามระดับเสียงภายใน
C ใช้ฟังก์ชันนี้ ตัวอย่างเช่น เมื่อกลับมาถึงบ้านหลั
ครื่องฟอกอากาศจะทำงานที่ระดับ 3 โดยอัตโนมัติ
เครื่องฟอกอากาศจะปิดการทำงานหลังผ่านไป 2 ชั่วโมง
เครื่องฟอกอากาศจะปิดการทำงานหลังผ่านไป 9 ชั่วโมง
D แสดงระดับมลภาวะภายในห้อง ปรับให้เหมาะสมกับความเร็
มลภาวะอยู่ในระดับสูง
มลภาวะอยู่ในระดับปานกลาง
E แสดงความเร็วพัดลมที่ตั้งไว้ในปัจจุบัน
F สัญลักษณ์นี้แสดงว่า เครื่องฟอกอากาศกำลังทำงาน
G แสดงว่า ควรทำความสะอาดแผ่นกรองตามกำหนดการทำค
H แสดงว่าเครื่องฟอกอากาศเกิดผิดพลาด โปรดดูที่ส่วนของค
I เมื่อใช้ปุ่มล็อค ท่านสามารถกดทุกปุ่มได้โดยไม่มีอะไรเกิดขึ้
กภายในห้อง
ห้อง เครื่องฟอกอากาศจะทำงานโดยใช้ความเร็วพัดลมสูง
สุดเท่าที่จะทำได้โดยไม่ทำให้เสียงภายในห้องดังขึ้นกว่าที่
เป็นอยู่
งเลิกงานเพื่อทำให้ห้องปลอดกลิ่นต่างๆ โดยเร็ว
โปรแกรมนี้มีโหมดการทำงาน 3 โหมด
และหลังผ่านไป 15 นาที
เครื่องฟอกอากาศจะกลับมาทำงานที่ระดับ 1
ส่วนความเร็วของพัดลมนั้นสามารถเลือกได้เอง
และสามารถเปลี่ยนความเร็วของพัดลมได้ในช่วงที่เครื่องฟ
อกอากาศทำงาน ตามที่ตั้งไว้ล่วงหน้า
ส่วนการตั้งความเร็วพัดลมทำได้เหมือนกับข้างต้น (2h)
วของพัดลมหรือใช้โปรแกรมอัตโนมัติ .
มลภาวะอยู่ในระดับต่ำ
เพื่อให้เกิดประสิทธิภาพสูงสุด และกำลังผลิตอากาศบริสุทธิ์
สัญลักษณ์นี้จะดับลงและไฟเตือนเครื่องฟอกอากาศทำงาน
ผิดปกติ (
เปลี่ยนแผ่นกรองหรือเกิดข้อผิดพลาดขึ้นที่เครื่องฟอกอากาศ
วามสะอาดด้านล่าง
ำแนะนำใต้หัวข้อ “ปัญหาในการทำงานความสะอาด”
น ใช้ฟังก์ชันนี้เมื่ออยู่ใกล้ๆ กับเด็ก
) จะติดสว่างเมื่อถึงเวลาทำความสะอาด/
การทำความสะอาดและบำรุงรักษา
ถอดปลั๊กออกจากแหล่งจ่ายไฟฟ้าก่อนที่จะทำความสะอาดเครื่อง
เสมอ
แผ่นกรอง
(a) เปิดช่องเข้า (9) (b) แกะแผ่นกรองออกทีละแผ่นก่อนดูด
แผ่นกรองให้สะอาด ใช้แปรงที่เป็นอุปกรณ์เสริม เพื่อไม่ให้แผ่
นกรองชำรุดเสียหาย เมื่อทำความสะอาดแผ่นกรองเสร็จแล้ว
ใส่เข้าช่องและปิดช่อง ไม่จำเป็นต้องเปลี่ยนชิ้นที่ติดอยู่หน้าเครื่อง
กรอง ปฏิบัติตามขั้นตอนนี้ทุกๆ 2 เดือน หรือบ่อยครั้งกว่านั้นสำหรับ
ผู้ที่มีอาการแพ้มาก เช่น เมื่อดูดฝุ่นที่บ้าน
แผ่นกรองหลัก
(c) กดปุ่ม (13) และยกฝาครอบขึ้น (d)
นำแผ่นกรองหลักออกมาก่อน และดูดให้สะอาดด้วยแปรงหรือหัวดูด
สำหรับซอกมุม ห้ามใช้น้ำล้างทำความสะอาดแผ่นกรองหลัก
ทำความสะอาดเครื่องฟอกอากาศต่อไปตามวิธีการต่อไปนี้
(ขั้นตอนที่ 3)
(e) ดูดทำความสะอาดตะแกรงบริเวณด้านบนของตัวเครื่อง (f)
ยกตะแกรงขึ้นโดยใช้ที่จับ (g) ถอดที่ยึดสายไฟของแผ่นกรองหลัก
ออกอย่างระมัดระวัง โดยใช้มือทั้งสองข้างถอดออกให้ตรงและขน
านกับพื้นตลอดเวลา (h) ทำความสะอาดภายในเครื่องฟอกอากาศ
รวมถึงตะแกรงด้านล่างด้วยแปรงหรือหัวดูดสำหรับซอกมุม หากจำเ
ป็นให้ใช้ผ้าชุบน้ำหมาดๆ ผสมผงซักฟอกอ่อนๆ เช็ดทำความสะอาด
(i) ใช้มือทั้งสองข้างค่อยๆ ประกอบตัวยึดลวดกลับเข้าไปและปิดตะ
แกรงครอบ (ถ้าสายไฟขาด ให้ดูหัวข้อการแก้ปัญหา) (j) ใส่แผ่น
กรองหลักเข้าที่เดิม ต้องแน่ใจว่า ใส่เข้าช่องนำร่องอย่างถูกต้อง
เมื่อใส่แผ่นกรองกลับเข้าตัวเครื่อง (k) ใส่ฝากลับเข้าที่เดิม
การรีเซ็ตเครื่องฟอกอากาศ (ขั้นตอนที่ 4)*
กดปุ่มตั้งใหม่ (4) หลังจากทำความสะอาดหรือเปลี่ยนแผ่นกรองเสร็
จแล้ว ไฟเตือนจะดับเพื่อแสดงว่า มีการรีเซ็ตเครื่องฟอกอากาศแล้ว
เครื่องฟอกอากาศสำหรับรุ่นที่ไม่มีไฟเตือนจะรีเซ็ตเองโดยอัตโนมัติ
ช่องว่างระหว่างการเปลี่ยนแผ่นกรอง
ขึ้นอยู่กับระดับของสิ่งเจือปนที่อยู่ล้อมรอบ เราขอแนะนำว่าท่านควร
ปฏิบัติตามขั้นตอนข้างต้นทุกๆ 2 เดือน หรือเมื่อมีสัญญาณไฟเตือน
แผ่นกรองหลักอาจต้องการทำความสะอาดบ่อยครั้ง หากสามารถมอ
งเห็นฝุ่นที่ติดอยู่บนแผ่นกรองด้านบนได้
เปลี่ยนแผ่นกรองหลักปีละหนึ่งครั้งหรือบ่อยกว่านั้นหากจำเป็นเพื่อใ
ห้เครื่องฟอกอากาศทำงานได้อย่างเป็นปกติ
เมื่อใช้แผ่นกรองคาร์บอน ให้เปลี่ยนใหม่ทุกๆ สามถึงหกเดือ
นหรือบ่อยกว่านี้หากท่านรู้สึกว่าก๊าซหรือกลิ่นต่างๆ ไม่ลดลง
หมายเลขอ้างอิง EF103
การแก้ปัญหาของเครื่องฟอกอากาศเมื่อไฟเตือนเครื่องฟอกอากาศท
ำงานผิดปกติบนจอแสดงข้อมูลสว่างขึ้น หรือเมื่อไฟเตือนความผิดป
กติสีฟ้าเปลี่ยนเป็นสีแดง (ขึ้นอยู่กับรุ่น)
• ลวดโคโรน่าที่ปริแตก (ขั้นตอนที่ 1) แสดงไว้ในภาพ (g)
และถูกอ้างอิงถึงในย่อหน้า “ทำความสะอาดเครื่องฟอกอากาศต่อไป
ตามวิธีการต่อไปนี้”
เปลี่ยนลวดเช่นที่อธิบายไว้ด้านล่าง กดปุ่มตั้งใหม่ (4) หากไฟเตือนเ
ครื่องฟอกอากาศทำงานผิดปกติสว่างขึ้นมาอีกหลังจากผ่านไปช่วงสั้
นๆ ให้ทำตามขั้นตอนถัดไป
การเปลี่ยนลวดโคโรน่า - ถอดสายไฟที่ขาดออก และใส่สายไฟใ
หม่อย่างระมัดระวัง ดังนี้: ใส่ปลายสายไฟข้างหนึ่งเข้ายึดไว้ในร่อง
งดที่ยึดสายไฟเล็กน้อย แล้วใส่ปลายสายไฟอีกข้างหนึ่ง
• การทำความสะอาดเพิ่มเติม (ขั้นตอนที่ 2)
ทำความสะอาดแผ่นกรองและช่องไอออนภายในเครื่องฟอกอากาศ
ตามคำแนะนำในการบำรุงรักษา โปรดติดต่อศูนย์บริการหากไฟเตือ
นความผิดปกติของเครื่องฟอกอากาศติดขึ้นมาอีกครั้งเพียงไม่กี่นา
ทีถัดมา
การแก้ปัญหา
• หากพัดลมไม่ทำงาน (เช่น เมื่อท่านไม่รู้สึกว่ามีอากาศเบาๆ
หมุนเวียนอยู่) ตรวจสอบว่า สายไฟชำรุดหรือไม่ และได้เสียบปลั๊กเข้
ากับแหล่งจ่ายไฟหรือไม่ ตรวจสอบว่า ฝาและแผ่นกรองอยู่ในตำแห
น่งที่ถูกต้องหรือไม่ หากพัดลมยังไม่หมุน ควรส่งเครื่องฟอกอากาศใ
ห้ศูนย์บริการรับอนุญาตของ Electrolux เป็นผู้ตรวจสอบ
• หากยังได้ยินเสียงแคร็กๆ จากแผ่นกรองหลัก
ให้ยกแผ่นกรองขึ้นและหมุน 180° โปรดติดต่อศูนย์บริการหากไฟ
เตือนความผิดปกติของเครื่องฟอกอากาศติดขึ้นมาอีกครั้งเพียงไม่
กี่นาทีถัดมา (เสียงเบาๆ ที่ออกมาจากแผ่นกรองถือเป็นเรื่องปกติ
โดยเฉพาะเมื่อเป็นแผ่นกรองแผ่นใหม่)
• หากไฟเตือน (15) ไม่ติดขึ้นแม้พัดลมทำงานปกติ ให้ส่งเครื่องฟอ
กอากาศไปที่ศูนย์บริการ (ใช้ได้เฉพาะกับเครื่องฟอกอากาศที่มีฟังกั
ชันอัตโนมัติเท่านั้น)
ขอรับข้อมูลเพิ่มเติมจาก Electrolux ตามที่อยู่ด้านล่างแผ่นพับนี้

English
ANY PROBLEMS?
08706 055 055
CUSTOMER HELPLINE
DON’T TAKE
Something missing?
Don’t understand the instructions?
We are only a telephone call away.
Need more help?
IT BACK TO THE SHOP
Electrical supply (UK and Ireland only)
Before you start … check the voltage
Before connecting the air cleaner to an electrical supply ensure that the
voltage marked on the data plate (on the reverse side of the air cleaner) is
correct for your electrical supply. If it is not, do not use the air cleaner but
refer back to your dealer.
Connecting to your electricity supply
Permanently connected to the air cleaner is a mains supply (2-core) cable
fitted with a non-rewirable plug incorporating a 13A fuse. In the event of
the fuse requiring replacement the fuse cover should be removed using a
small screwdriver. The old fuse MUST be replaced by a 13A ASTA approved
BS1362 fuse and the fuse cover must be replaced before the plug is used
again. In the event of loss of the fuse cover, replacements can be obtained
from your Electrolux dealer or Electricity Board and must be of the same
colour as indicated by the coloured insert on the base of the plug.
If difficulty is experienced in obtaining a replacement, contact your nearest
Electrolux Service Centre. (Please see the separate Electrolux Service
Organisation leaflet).
In no circumstances must the plug be used without a correct fuse
cover fitted.
If the plug that is fitted to your appliance is not suitable for your socket
outlet, it must be cut off and the appropriate plug fitted. Remove the fuse
from the cut off plug. The cut off plug should then be disposed of to prevent
the hazard of shocks in case it should be plugged into a 13 amp socket in
another part of your home.
The wires in the mains cable of this appliance are coloured in accordance with the following code:
Blue: Neutral.
Brown: Live.
As the colours of the wires in the mains cable of this appliance may not
correspond with the coloured markings identifying the terminals in your
plug, proceed as follows:
The wire which is coloured blue must be connected to the terminal which is
marked with the letter N or coloured black.
The wire which is coloured brown must be connected to the terminal which
is marked with the letter L or coloured red.
If using a three-pin plug, do not make any connection to the terminal
marked with the letter E or by the earth symbol or coloured green or
green-and-yellow. This cleaner is double insulated and no earth connection
is necessary.
It is in your interest to ensure that the plug is correctly attached to the
mains cable. In case of doubt, have it done by a qualified electrician, as
Electrolux cannot regard the repair of faults on the plug connection as a
service that can be given free of charge under the terms of the guarantee.
As a general guide to fitting any plug:
• Ensure the lengths of wire inside the plug are prepared correctly.
• Connections should be firmly made after all conductor strands are
entered into the terminal posts.
• When preparing the cable ends take care not to damage the outer
sheath, or the insulation surrounding the inner conductors.
• Tighten all screws.
• Replace the top cover of the plug and secure.
14

English: Electrolux decline all responsibility for all damages
arising from any improper use of the appliance or in cases of
tampering with the appliance.
Electrolux reserve the right to alter product appearance and/or
specifications without notice. Not all models featured are avail
able in all countries.
Electrolux air cleaner features and accessories are protected
worldwide by Patents or Registered Designs.
This product is designed with the environment in mind. All plastic
parts are marked for recycling purposes.
For details see our website: www.electrolux.com
-
Bahasa Malaysia: Electrolux tidak bertanggung jawab ke atas semua
kerosakan yang disebabkan oleh penggunaan perkakas secara tidak betul atau
di mana perkakas ini telah diusik.
Electrolux berhak mengubah bentukrupa dan/atau spesifikasi-spesifikasi
produk tanpa notis. Tidak semua model yang dipaparkan terdapat di semua
negara.
Ciri-ciri dan aksesori-aksesori mesin pembersih udara Electrolux dilindungi
seluruh dunia oleh Paten atau Rekabentuk-Rekabentuk Berdaftar.
Produk ini direkabentuk sambil mempertimbangkan alam sekitar. Semua
bahagian plastik ditanda untuk tujuan kitaran semula.
Untuk butir-butir selanjutnya lihat website kami; www.Electrolux.com
15

 Loading...