

Page 1

7
Page 2
Z 7311F Z 7312 Z 7314
•
•
•
•
•
•
•
•
•
•
•
•
•
•
•
•
•
•
•
Page 3

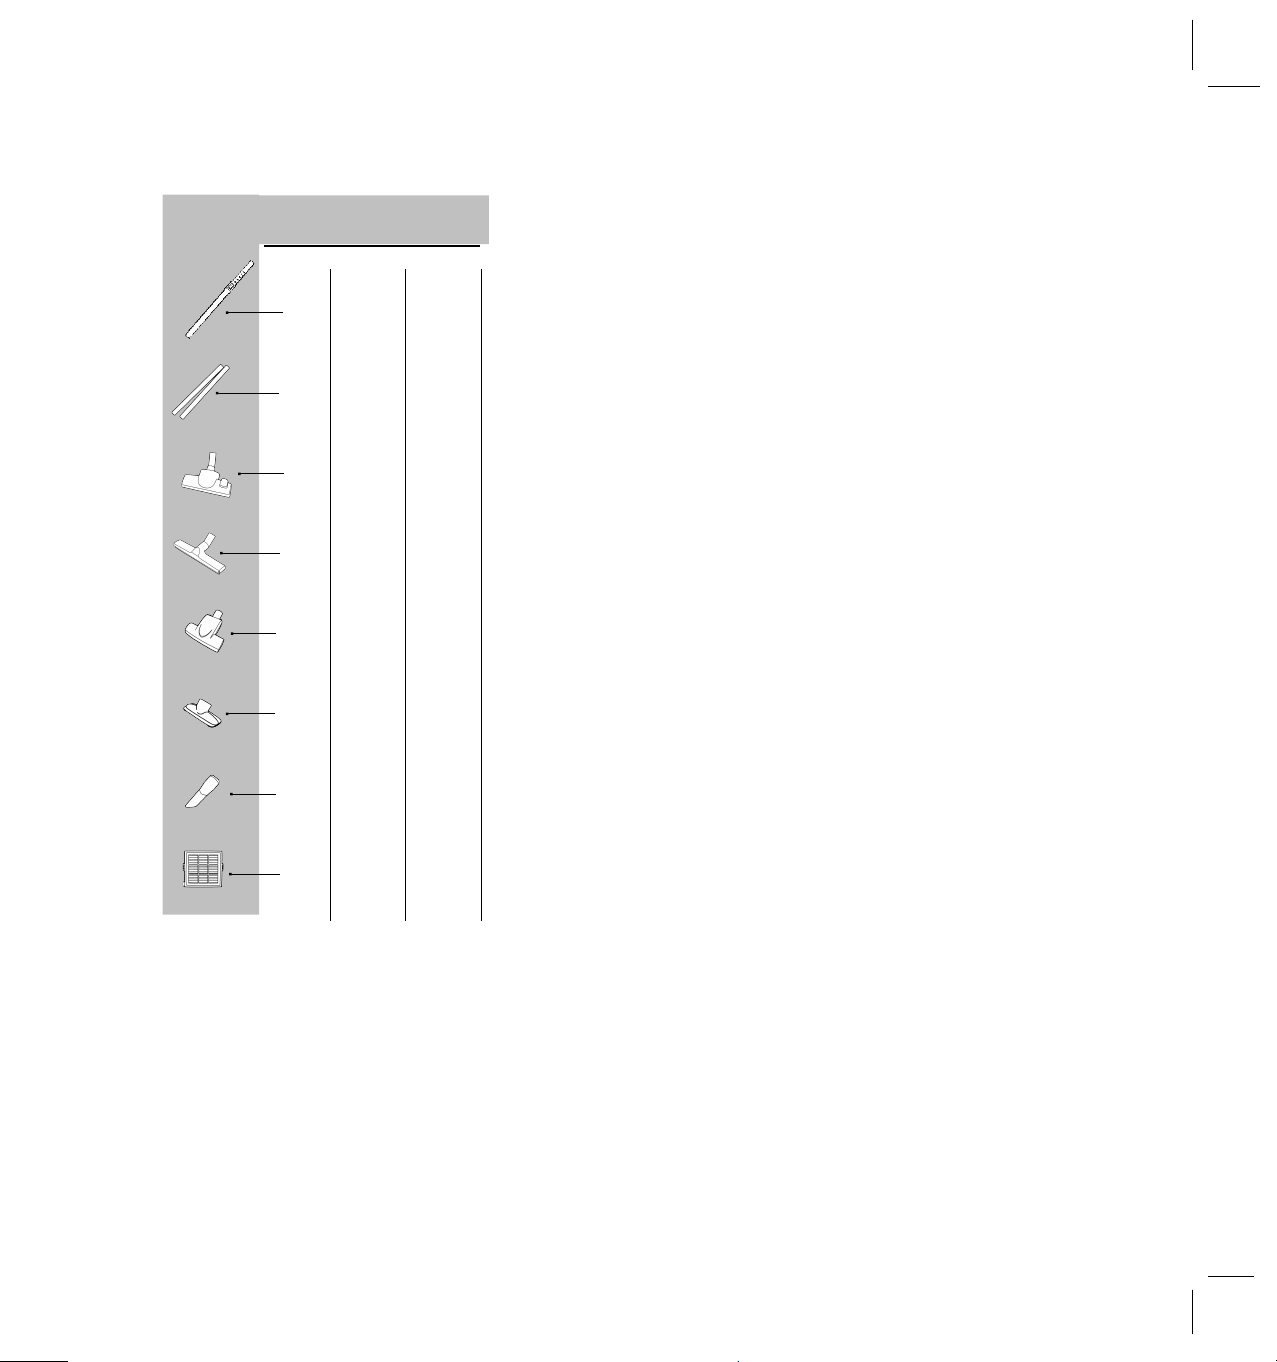
DESCRIPTION OF PARTS
1. Suction inle t
2. Ele ctronic pe rform ance indicator
3. On/off s w itch
4. Cable re w ind button
5. Variable pow e r control
6. W h e e l
7. Dus t containe r
8. Carrying h andle
9 . Dus t containe r ope n button
10 . H os e
11. Te le s copic tube
12. Dual purpos e floor noz z le
13. Cre vice noz z le
14. Uph ols te ry noz z le
15. Turbo noz z le
16. H ard floor noz z le
17. H EPA filte r
18. Nos e cone
19 . Ve rtical park ing
20 . H oriz ontal park ing
IM PORTANT SAFEGUARDS
• Re ad th is ins truction book le t care fully.
• Be fore us ing th e appliance , ch e ck th at th e m ains pow e r voltage
corre s ponds to th e voltage s h ow n on th e rating plate .
• Do not s w itch th e appliance on if it appe ars to be faulty in any w ay or it
h as a dam age d cord or plu g.
• Do not try to re pair th e appliance by yours e lf.
• Alw ays re m ove th e plug from th e pow e r s ock e t w h e n th e appliance is
not in us e and be fore carrying out any cle aning or m ainte nance
ope rations .
• Ne ve r le ave th e appliance unatte nde d w h e n it is s w itch e d on. Ke e p th e
appliance out of re ach of ch ildre n.
• Th is appliance is for dom e s tic us e only. Us e as de s cribe d in th is
ins truction book le t.
• Do not pull th e appliance by th e cord. Do not unplug by pulling on th e
cord.
• Do not us e appliance on w e t s urface s or to vacuum liq uids , m ud, ash
and burning cigare tte butts. Do not vacuum up any h igh ly flam m able or
e xplos ive s u bs tance s or gas e s .
• Do not unplug th e vacuum cle ane r w ith w e t h ands .
• Do not ope rate th e vacuum cle ane r too clos e to h e ate rs and radiators ,
s tove s e tc.
• Be fore you s tart us ing th e vacuum cle ane r, ple ase re m ove large or
s h arp obje cts from th e floor to pre ve nt dam age to th e dus t containe r
and h os e .
1
Page 4

6
Page 5

ELECTRICAL SUPPLY INSTRUCTIO NS
Be fore you s tart
… ch e ck th e voltage
Be fore conne cting th e
cle ane r to an e le ctrical
s u pply e ns ure th at voltage
m ark e d on th e data plate
(on th e unde rs ide of
cle ane r) is corre ct for your
e le ctrical s u pply. If is not,
do not us e th e cle ane r but
re fe r back to your de ale r.
Conne cting to your e le ctrical s upply
Pe rm ane ntly conne cte d to th e cle ane r is a m ains s upply (2- core )
cable fitte d w ith a non-re w irable plug incorporating a 13A fus e . In th e
e ve nt of th e fus e re q uiring re place m e nt th e fus e cove r s h ould be
re m ove d us ing a s m all s cre w drive r. Th e old fu s e M UST be re place d
by a 13A ASTA approve d BS1362 fus e and th e fus e cove r m us t be
re place d be fore th e plus is us e d again. In th e e ve nt of los s of th e
fus e cove r, re place m e nts can be obtaine d from your Ele ctrolux
de ale r or Ele ctricity Board and m us t be of th e s am e colour as
indicate d by th e coloure d ins e rt on th e bas e plug.
If difficulty is e xpe rie nce d in obtaining a re place m e nt, contact your
ne are s t Ele ctrolux Se rvice Ce ntre . (Ple as e s e e th e s e parate
Ele ctrolux Se rvice Organis ation le afle t).
As th e colours of th e w ire s in th e m ains cable of th is appliance m ay
not corre s pond w ith th e coloure d m ark ings ide ntifying th e te rm inals
in your plug, proce e d as follow s :
Th e w ire w h ich is coloure d blue m us t be conne cte d to th e te rm inal
w h ich m ark e d w ith th e le tte r N or coloure d black . Th e w ire w h ich is
coloure d brow n m us t be conne cte d to th e te rm inal w h ich is m ark e d
th e le tte r L or coloure d re d.
If us ing a th re e -pin plug, do not m ak e any conne ction to th e te rm inal
m ark e d w ith th e le tte r E or by th e e arth s ym bol or coloure d gre e n or
gre e n-and- ye llow . [Th is cle ane r is double ins ulate d and no e arth conne ction is ne ce s sary.]
It is in your inte re s t to e ns u re th at th e plug is corre ctly attach e d to
th e m ains cable . In cas e of doubt, h ave it done by a q ualifie d
e le ctrician, as Ele ctrolu x cannot re gard th e re pair of faults on th e plug
conne ction as a s e rvice th at can be give n fre e of ch arge u nde r th e
te rm s of guarante e .
As a ge ne ral guide to fitting any plug
• Ensure th e le ngth s of w ire ins ide th e plug are pre pare d corre ctly.
• Conne ction s h ould be firm ly m ade afte r all conductor s tands are
e nte re d into th e te rm inal pos ts .
• W h e n pre paring th e cable e nds tak e care not to dam age th e
oute r s e al, or insulation s urrounding th e inne r conductors .
• Tigh te n all s cre w s .
• Re place th e top cove r of th e plug and s e cure .
In no circum s tance s m us t th e plug be us e d w ith out
a corre ct fus e cove r fitte d.
If th e plug th at is fitte d to your appliance is not s uitable for your
s ock e t ou tle t, it m u s t be cut off and th e appropriate plug fitte d.
Re m ove th e fus e from th e cut off plug. Th e cut off plug s h ould th e n
be dis pos e d of to pre ve nt h az ard of s h ock s in cas e it s h ould be
plugge d into a 13 Am p s ock e t in anoth e r part of your h om e .
Th e w ire s in th e m ains cable of th is appliance are
coloure d in accordance w ith th e follow ing code :
Blue : Ne utral.
Brow n: Live .
T40 0 5B 0 2 0 1 0 1
5
Page 6

A B
INSTRUCTIONS FOR USE
Be fore placing into ope ration m ak e ce rtain th at th e filte rs are in th e
prope r pos ition.
A Unw ind a s ufficie nt le ngth of cable and ins e rt th e plug into th e pow e r
s ock e t. A YELLOW m ark on th e pow e r cable s h ow s th e ide al cable
le ngth . Do not e xte nd th e cable be yond th e RED m ark .
B Pre s s th e ON/OFF button to s w itch th e appliance on. O n initial s tart up
full pow e r is re ach e d afte r approxim ate ly 1- 2 s e conds .
C To re w ind th e pow e r cable , pre s s th e re w ind button w ith foot, and guide
th e cable w ith h and to e ns ure th at it doe s not w h ip caus ing dam age .
D By m oving th e variable pow e r control, th e s uction pow e r can be
adjus te d.
E Suction can als o be re gulate d on th e h os e h andle by ope ning / clos ing
th e ape rture .
C
21
23
D
M AINTENANCE
REM OVING TH E CONTENTS OF TH E DUS T CONTAINER
• Ne ve r ope rate th e cle ane r w ith out th e dus t containe r ins talle d.
• Th e cle ane r is e q uippe d w ith an e le ctronic pe rform ance indicator.
• Th e dus t containe r m us t be e m ptie d if th e pe rform ance indicator
ch ange s to re d w h e n th e cle ane r is ope rating at m axim um le ve l and th e
noz z le is rais e d from th e floor.
21 R e m ove th e dus t containe r by pus h ing th e ope n button on th e h andle .
24 R e m ove th e filte r from its place .
E
22 R e m ove th e conte nts of th e dus t containe r by pus h ing th e orange -
coloure d ope ning button.
24 Put th e filte r back into its place .
23 Clos e th e dus t containe r lid u ntil it click s .
21 Put th e dus t containe r back into th e cle ane r.
Ple as e note : It is norm al for th e re d ligh t of th e indicator to flick e r on and
off during us e .
If th e dus t containe r is e m ptie d and th e indicator is s till active , it m e ans
th at th e cartridge filte r is clogge d. In th is cas e , follow th e instructions of
ch apte r 'Re placing or cle aning th e cartridge filte r'.
22
REPLACING TH E FILTERS
• Filte rs s h ould be re place d at le as t tw ice a ye ar or w h e n th e y be com e
vis ibly s oile d.
• Alw ays ope rate th e cle ane r w ith filte rs ins talle d to avoid re duce d s uction.
• Dis conne ct from e le ctrical outle t be fore ch anging th e filte rs .
24
2
Page 7

25 26
REPLACING OR CLEANING TH E CARTRID GE FILTER
21 R e m ove th e dus t containe r by us ing th e ope n button on th e h andle .
24 R e m ove th e filte r from its place .
25 R e m ove th e prote ctor m e s h from th e cartridge filte r.
26 Sh ak e th e dirt from th e filte r and th e m e s h into a bin, if ne ce ss ary th e
filte r and m e s h can be rins e d, w ith cold w ate r, u nde r a tap.
27 Air dry th e m for approxim ate ly 24 h ou rs , to e ns ure it is com ple te ly dry
be fore re - us ing. Avoid dire ct s unligh t and e xtre m e drying circum s tance s.
If you w is h to us e your appliance w h ile th e cartridge filte r is drying, you
m ay us e th e e xtra cartridge filte r ins e rte d in th e pack aging box.
25 Ins e rt th e prote ctor m e s h into its place by pus h ing it onto th e cartridge
filte r.
24 Put th e filte r back into its place .
21 Ins e rt th e dus t containe r back into th e cle ane r by pre s s ing it dow n until
it click s .
Cartridge filte r re fe re nce num be r: EF140
27 28
29 30
31
32
CLEANING TH E M O TOR FILTER
If ne ce s s ary, th e m otor filte r als o can be w ash e d or re place d at le as t
tw ice a ye ar or if clogge d.
21 R e m ove th e dus t containe r by us ing th e ope n button on th e h andle .
28 R e m ove th e filte r from its place .
29 Rins e it unde r tap w ate r and dry it com ple te ly.
28 Put th e filte r back into its place .
21 Ins e rt th e dus t containe r back into th e cle ane r by pre s s ing it dow n until
it click s .
M otorfilte r re fe re nce num be r: Contact Ele ctrolux Floorcare H e lpline on
0 8445 6 146 14
CH ANGING TH E EXH AUS T FILTER
30 Ope n th e filte r grill.
31 R e m ove th e e xh aus t filte r w ith grill.
32 Tak e th e filte r out of th e grill and ins e rt a ne w one .
31 Ins e rt th e filte r w ith grill into th e cle ane r.
30 Clos e th e filte r grill.
Exh aus t filte r re fe re nce num be r: Contact Ele ctrolu x Floorcare H e lpline on
0 8445 6 146 14
OPERATING TH E H O SE IN/O UT OF TH E SUCTIO N INLET
33 To conne ct th e h os e into th e s uction inle t pus h it until it click s .
To dis conne ct th e h os e from th e s uction inle t pus h th e button at th e
e nd of th e h os e .
33
3
Page 8

PROTECTING TH E ENVIRO NM ENT
• Atte m pt to re cycle pack aging m ate rial and old appliance s .
• Th e cardboard pack aging can be place d in th e w aste pape r colle ction.
• De pos it th e plas tic bag m ade of polye th yle ne (PE) at th e PE colle ction
point for re cycling.
• De pos it th e polys tyre ne foam at th e PS colle ction point for re cycling.
Re cycling th e Appliance at th e e nd of its life .
• Th e plas tic com pone nts all carry a m ate rial ide ntification m ark ing s o
th at, lik e th e oth e r m ate rials , th e y can re cycle d at th e e nd of th e life of
th e appliance .
Ple as e inq uire w ith your local auth ority.
Block e d air flow and dirty filte rs
• Th e cle ane r stops autom atically if a block age occurs in th e
noz z le /tube /h os e or if th e filte rs are block e d w ith dirt.
• Dis conne ct from m ains and allow th e cle ane r to cool for 20 - 30 m inute s .
Re m ove block age and/or cle an filte rs .
• Re s tart th e cle ane r.
Th is appliance conform s w ith th e follow ing EC Dire ctive s :
• Low Voltage Dire ctive 20 0 6/9 5/EC
• EMC Dire ctive 89 /336 /EEC w ith am e ndm e nts 9 2/31/EEC and 9 3/6 8/EEC
Th e s ym bol on th e product or on its pack aging indicate s th at th is
product m ay not be tre ate d as h ous e h old w as te . Ins te ad it s h all be
h ande d ove r to th e applicable colle ction point for th e re cycling of
e le ctrical and e le ctronic e q uipm e nt. By e ns uring th is product is
dis pos e d of corre ctly, you w ill h e lp pre ve nt pote ntial ne gative
cons e q ue nce s for th e e nvironm e nt and h um an h e alth , w h ich could
oth e rw is e be caus e d by inappropriate w as te h andling of th is product.
For m ore de taile d inform ation about re cycling of th is product, ple as e
contact your local city office , your h ous e h old w as te dis pos al s e rvice or
th e s h op w h e re you purch as e d th e product.
4
 Loading...