

Page 1

Thank you for choosing an Electrolux Power Max vacuum
cleaner. These operating instructions cover all Power Max
models. This means that with your specific model, some
accessories may not be included.
Accessories and safety precautions 3
Before starting 4
Getting the best results 4
Replacing the paper dustbag 5
Replacing the reusable textile dustbag 5
Cleaning the motor filter 6
Replacing the exhaust filter 6
Cleaning the hose and nozzle 7
Troubleshooting and customer information 8
Electrical supply instructions 9
Warning instructions 10
Guarantee 11
ACCESSORIES AND SAFETY PRECAUTIONS
Accessories
1 Paper dustbag
2 Reusable textile dustbag
3 Telescopic extension tube (Z4590)
4 Metal extension tubes (Z4520T)
5 Hose
6 Hose handle with suction control
7 Dual purpose floor nozzle
2
3
8 Upholstery nozzle (on board)
9 Crevice nozzle (on board)
10 Dusting brush (on board)
1
4
11 Turbo nozzle (Z4590)
Safety precautions
The Power Max should only be used by adults for normal
vacuuming in a domestic environment. The vacuum cleaner
features double insulation and does not need to be earthed.
Never vacuum:
• In wet areas
5
6
• Close to flammable gas, etc.
• Without a dustbag (this may damage the cleaner). A safety device is fitted which prevents the cover closing without
a dustbag in place. Do not attempt to force the cover shut.
7
10. on board
8. on board
11
9. on board
Never vacuum:
• Sharp objects
• Fluids (this can cause serious damage to the machine)
• Hot or cold cinders, lit cigarette butts, etc.
• Fine dust from plaster, concrete, flour or ash, for example.
The above can cause serious damage to the motor - damage which is not covered by the warranty.
Electrical cable precautions:
• A damaged cable must be replaced by an authorised
Electrolux service engineer. Damage to the cleaner cable
will not be covered by the warranty.
• Never pull or lift the vacuum cleaner by the cable.
• Disconnect the plug from the mains before cleaning or
maintenance of the vacuum cleaner.
• Regularly check that the cable is not damaged. Never use
the vacuum cleaner if the cable is damaged.
All service and repairs must be carried out by an authorised
Electrolux service engineer. Always keep the vacuum cleaner
in a dry place.
2
3
Page 2

BEFORE STARTING
REPLACING THE DUSTBAG
1 Open the dustbag cover.
2 Check that the dustbag is in place.
Replace the dustbag as soon as the indicator becomes fully
illuminated. Refer to indicator with cleaner on but no accessories attached. If illuminated, attach hose, etc., and com-
3 Insert the hose until the catch clicks to engage (press
the catch to engage hose).
4 Attach the extension tube (Z4520T) or the telescopic
tube (Z4590) to the hose handle and the floor nozzle.
1
2
3
5 Pull out the cable and plug it in. Press the foot pedal to
1
2
3
rewind the cable (take hold of the plug to prevent it
striking you).
6 Press the On/Off button with control your foot to start
the vacuum cleaner.
7 Adjust the suction power using the linear potentiometer
button on the vacuum cleaner or the suction control on
mance cleaning. Indicator may illuminate whilst cleaning please ignore.
1 Remove the hose and open the dustbag cover.
2 Pull the cardboard holder to remove the dustbag.
3 Insert a new dustbag by pushing the cardboard holder
straight down in its tracks.
4 Adjust the bottom corners of the dustbag into the dust-
bag compartment.
5 Adjust the upper part of the dustbag into the dustbag
compartment.
1 Close the dustbag compartment and continue cleaning.
the hose handle.
Note: Replace the dustbag even if it is not full (it may be
4
5
6
GETTING THE BEST RESULTS
4
5
Hard floors: Use the dual purpose floor nozzle with the left
blocked). Also replace after using carpet cleaning powder.
Use only Electrolux original dustbags.
Dustbag reference number: E53n.
pedal in position (8).
Carpets: Use the dual purpose floor nozzle with the left
pedal in position (9).
Reduce suction power for rugs and fabrics.
Upholstered furniture: Use the upholstery nozzle.
7
Skirting boards, crevices, corners, etc.: Use the crevice
nozzle.
Lamps, pictures and bookshleves: Use the dusting
6
7
8
brush.
Short-pile carpets, for stubborn fluff and pet hairs: Use
the turbo nozzle.
REPLACING THE TEXTILE DUSTBAG
6 Remove the hose and open the dustbag cover.
7 Pull the cardboard holder to remove the textile dustbag.
8,9 Slide the plastic clip away from the bag to open and
empty.
8 Replace the plastic clip ensuring that both sides of the
bag are parallel.
11 Replace the bag into the holder.
Note: The bag may be washed in luke warm water Allow
to dry it for 24 hours. It should not be washed in washing machine (10).
6 Close the cover by pressing down until it clicks.
89
9
10
4
11
5
Page 3

Cleaning the motor filter
CLEANING
THE HOSE AND NOZZLE
(The motor filter should be cleaned approximately every three
months, or when required for more frequent use).
The vacuum cleaner stops automatically if the nozzle, tube
or hose becomes blocked, or the filter and dustbag are
blocked. Disconnect from the mains and allow the vacuum
1 Pull dustbag upward and remove the motor protection
filter.
2 Rinse the filter under tap water and allow 24 hours to
dry.
3 Put the filter back into the cleaner and close the cover.
cleaner to cool down for approximately 20-30 minutes.
Clear whatever is causing the blockage and/or replace
dirty filters or the full dustbag. Then restart the vacuum
cleaner.
Check the blockage in the hose by dropping a small coin
through it.
1
2
3
Filter reference number: EF 1.
1
Tubes and hose
1 Use a cleaning strip or similiar to clear the tubes and
Replacing the micro exhaust filter
(The exhaust filter should be replaced approximately every 4
months).
hose.
2 It is sometimes possible to clear the hose by "massag-
ing" it. However, be careful in case the obstruction has
been caused by glass or needles caught inside the
4 Open the filter grill to remove the exhaust filter.
5 Remove the filter unit.
6 Take the filter out of the grill and insert a new one.
hose.
Note: The warranty does not cover any damage to hoses
caused by cleaning them.
5 Put the filter set back into the cleaner.
4
5
6
2
6 Close the filter cover.
Cleaning the floor nozzle
3 To avoid reduction in suction power, frequently clean
the dual purpose floor nozzle. The easiest way to clean
Note: Do not use cleaning agents and avoid touching the deli-
it is by using the hose handle.
cate filter surface.
3
6
7
Page 4
TROUBLESHOOTING AND CUSTOMER INFORMATION
ELECTRI CAL S UPPLY INSTRUCTIONS
Troubleshooting
The vacuum cleaner does not start
1 Check that the cable is connected to the mains.
2 Check that the plug and the cable are not damaged.
3 Check for a blown fuse.
The vacuum cleaner stops
1 Check whether the dustbag is full. If so, replace it with
a new one.
2 Is the nozzle, tube or hose blocked?
3 Are the filters blocked?
Water has entered the vacuum cleaner
It will be necessary to replace the motor by an authorised
Electrolux service engineer.
Damage to the motor caused by the penetration of water is
not covered by the warranty.
Customer Information
Electrolux decline all responsibility for all damages arising
from any improper use of the appliance or in cases of tampering with the appliance. This product is designed with
the environment in mind. All plastic parts are marked for
recycling purposes. For futher details see our website:
www.electrolux.com
For repairs or accessories, contact the Electrolux Group
Floorcare Helpline on 08706 055 055.
If you have any comments on the cleaner or the Instructions
for Use booklet please contact us on 08706 055 055.
The symbol on the product or on its packaging indicates that this product may not be treated as household
waste. Instead it shall be handed over to the applicable collection point for the recycling of electrical and electronic
equipment. By ensuring this product is disposed of correctly,
you will help prevent potential negative consequences for the
environment and human health, which could otherwise be
caused by inappropriate waste handling of this product. For
more detailed information about recycling of this product,
please contact your local city office, your household waste
disposal service or the shop where you purchased the product.
Before you start …check
the voltage
Before connecting the
cleaner to an electrical supply ensure that voltage
marked on the data plate
(on the underside of cleaner) is correct for your electrical supply. If is not, do
not use the cleaner but
refer back to your dealer.
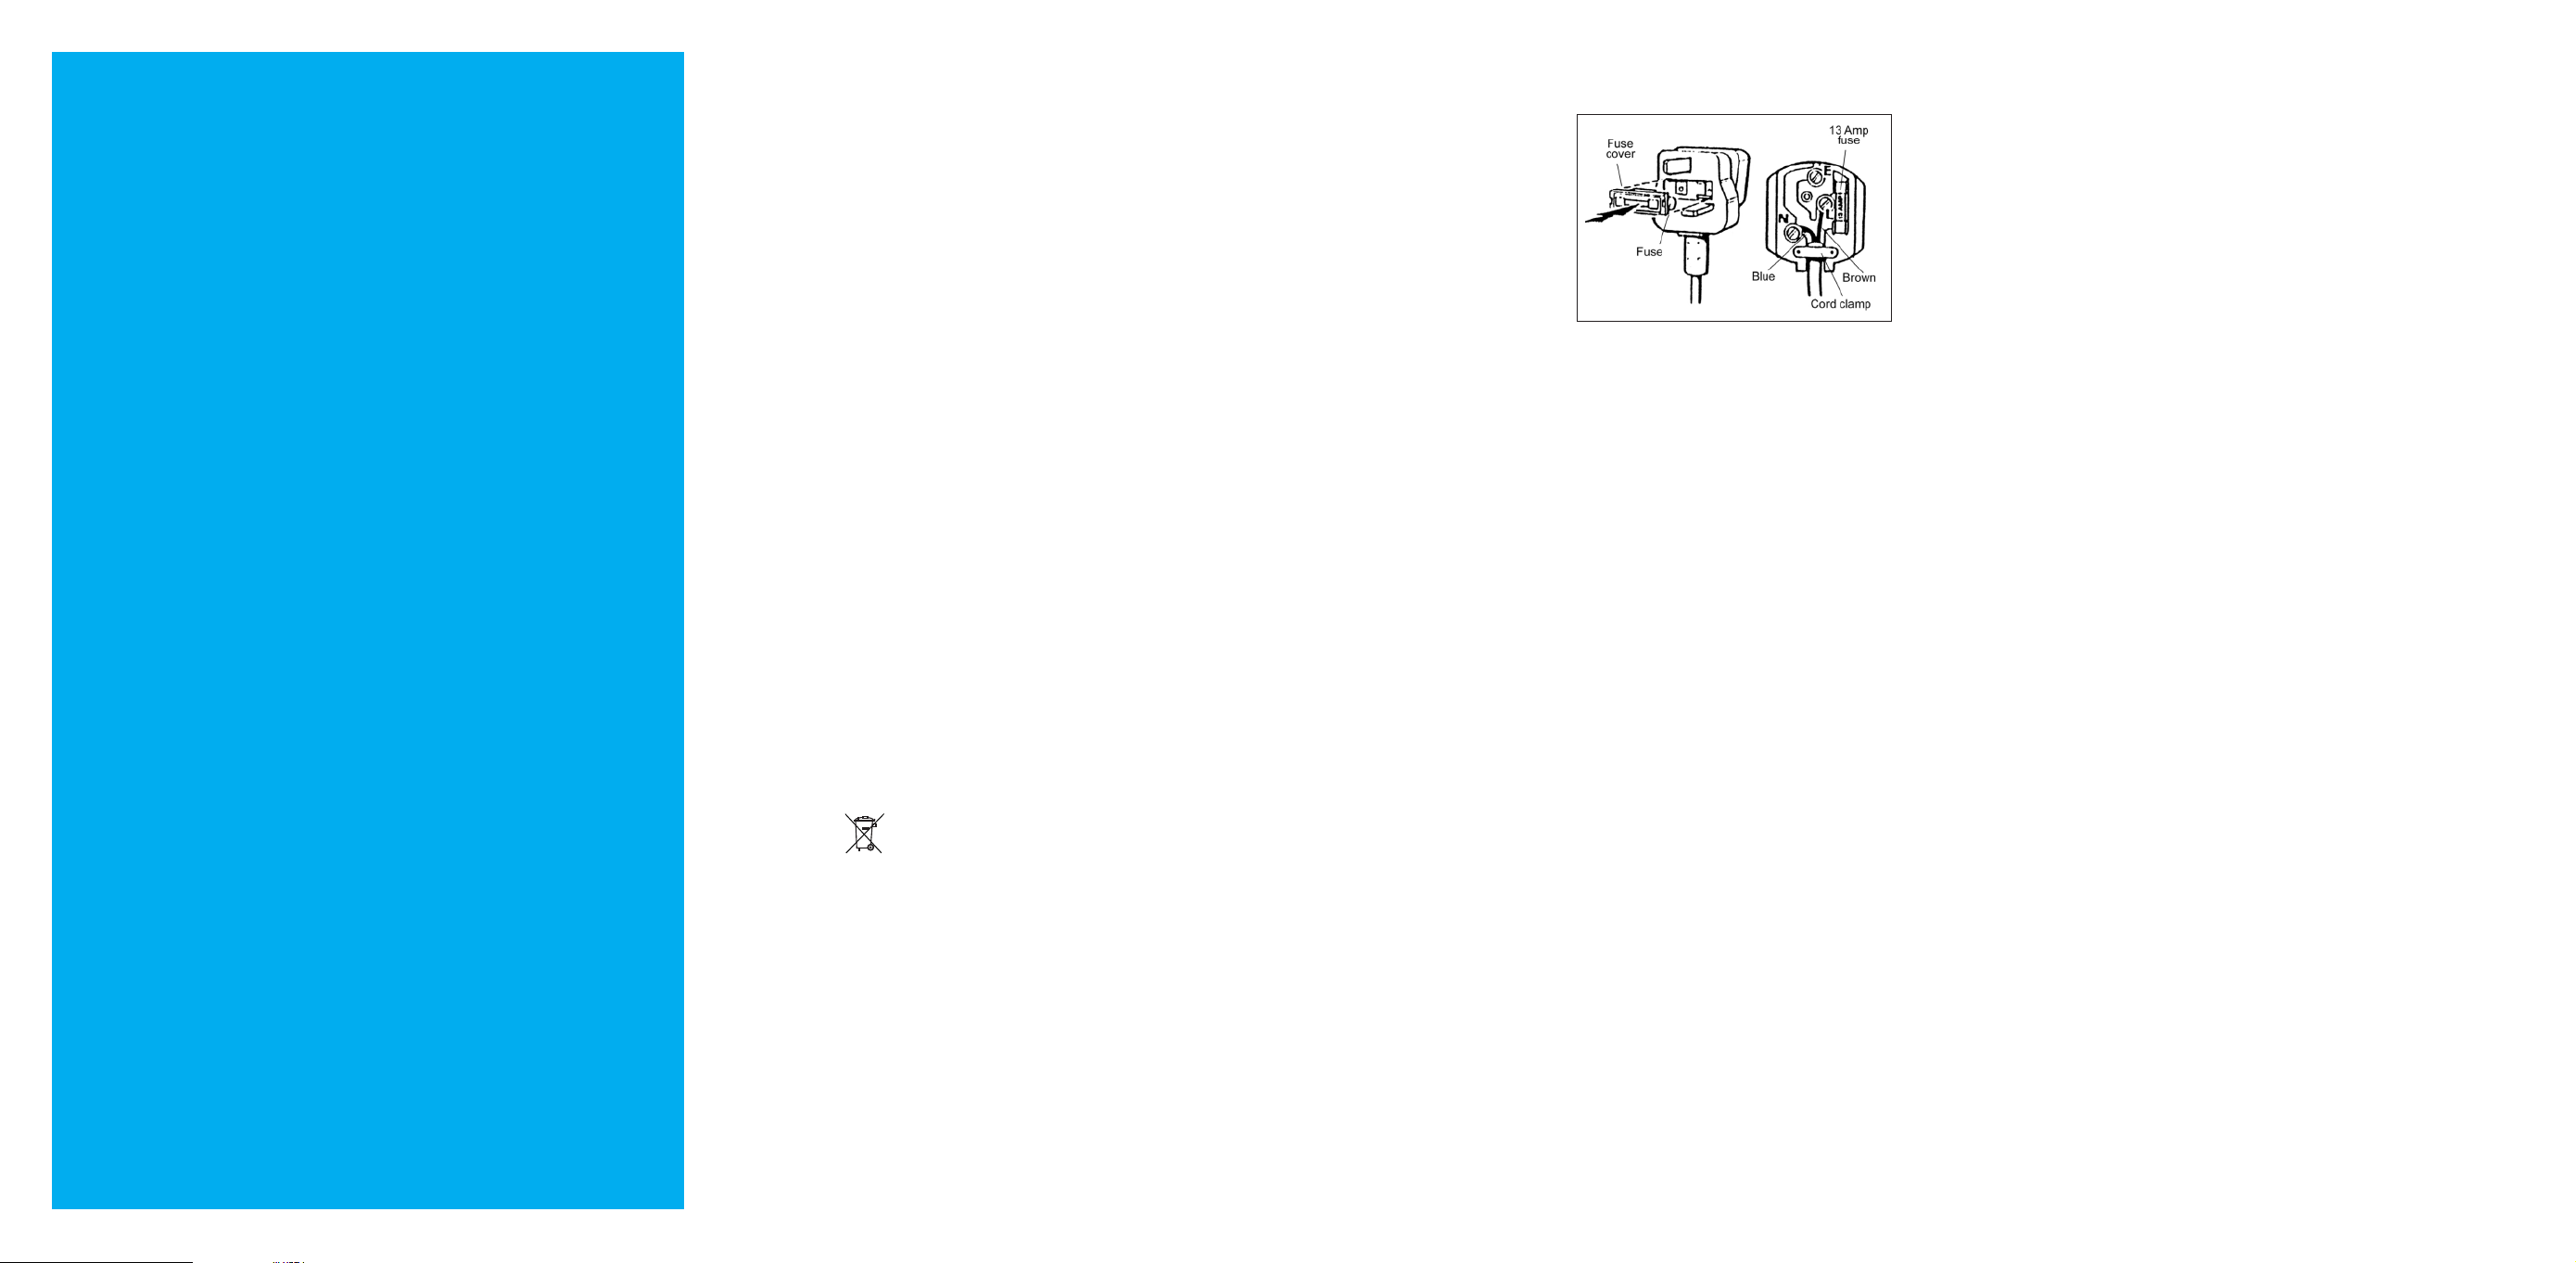
Connecting to your electrical supply
Permanently connected to the cleaner is a mains supply (2-core)
cable fitted with a non-rewirable plug incorporating a 13A fuse. In
the event of the fuse requiring replacement the fuse cover should
be removed using a small screwdriver. The old fuse MUST be
replaced by a 13A ASTA approved BS1362 fuse and the fuse cover
mustbe replaced before the plus is used again. In the event ofloss
of the fuse cover, replacements can be obtained from your
Electrolux dealer or Electricity Board and must be of the same
colour as indicated by the coloured insert on the base plug.
If difficulty is experienced in obtaining a replacement, contact your
nearest Electrolux Service Centre. (Please see the separate
Electrolux Service Organisation leaflet).
In no circumstances must be plug be used without a correct
fuse cover fitted
If the plug that is fitted to your appliance is not suitable for your
socket outlet, it must be cut off and the appropriate plug fitted.
Remove the fuse from the cut off plug. The cutoff plug should then
be disposed of to prevent hazard of shocks in case it should be
plugged into a 13 Amp socket in another part of your home.
The wires in the mains cable of this appliance are coloured in
accordance with the following code:
Blue: Neutral.
Brown: Live.
As the colours of the wires in the mains cable of this appliance may
not correspond with the coloured markings identifying the terminals in your plug, proceed as follows:
The wire which is coloured blue must be connected to the terminal
which marked with the letter N or coloured black. The wire which is
coloured brown must be connected to the terminal which is marked
the letter L or coloured red.
If using a three-pin plug, do not make any connection to the terminal marked with the letter E or by the earth symbol or coloured
green or green-and-yellow. [This cleaner is double insulated and no
earth-connection is necessary.]
It is in your interest to ensure that the plug is correctly attached to
the mains cable. In case of doubt, have it done by a qualified electrician, as Electrolux cannot regard the repair of faults on the plug
connection as a service that can be given free of charge under the
terms of guarantee.
As a general guide to fitting any plug
• Ensure the lengths of wire inside the plug are prepared correctly.
• Connection should be firmly made after all conductor stands are
entered into the terminal posts.
• When preparing the cable ends take care not to damage the outer
seal, or insulation surrounding the inner conductors.
• Tighten all screws.
• Replace the top cover of the plug and secure.
8
9
Page 5
When using an electrical appliance, basic precautions should always be followed,
including the following:
GUARANTEE
This guarantee is in addition to your statutory and other legal rights.
READ ALL THE INSTRUCTIONS BEFORE USING THIS VACUUM CLEANER.
WARNING
To reduce the risk of fire, electric shock, or injury:
• Do not use out doors or on wet surfaces.
• Do not leave vacuum cleaner when plugged in.
• Do not allow to be used as a toy. Close attention is necessary when used near
children. Do not allow children to operate this appliance.
• Use only as described in this manual. Use only manufacturer's recommended attachments.
• Do not use with damaged cord or plug. If vacuum cleaner is not working as it should, has
been dropped, damaged, left outdoors, or dropped into water, return it to a service centre
before using.
• Do not pull or carry by cord, use cord as a handle, close door on cord. Keep cord away
from heated surfaces.
• Do not use extension cords or outlets with inadequate current carrying capacity.
• Turn off all controls before unplugging.
• Do not unplug by pulling on cord. To unplug, grasp the plug not the cord.
• Do not handle plug or vacuum cleaner with wet hands.
• Do not put any object into openings. Do not use with any opening block, keep free of
dust, lint, hair and anything that may reduce air flow.
• Do not use to pick up anything that is burning or smoking, such as cigarettes, matches or
hot ashes.
• Do not use without dust bag in place.
• Use extra care when cleaning on stairs.
• Do not use to pick up flammable or combustible liquids such as gasoline, or use in areas
where they may be present.
• Store your cleaner indoors in a cool, dry area.
• Keep your work area well lighted.
• Unplug electrical appliances before vacuuming them.
Electrolux products are carefully designed, manufactured, tested and inspected and in consequence,
we undertake to replace or repair any part found to be defective in material or workmanship, within
one year of delivery to the original purchaser, free of charge. You may be required to take the product
to your nearest service provider if the product requries attention during the first year.
There are certain conditions which may invalidate this guarantee:
a. It is dependent upon the appliance being correctly installed and used in accordance with the
Company's instructions under normal domestic conditions within the United Kingdom or the
Republic of Ireland.
b. Service at all times must be carried out by an Electrolux Service Representative or authorised agent.
c. The guarantee may be invalidated by unauthorised repair or modification of the appliance.
d. You may be charged by the Electrolux Group if you call for an engineer to resolve a problem that
we believe is covered in the instruction booklet.
The Company does not accept liability for defects arising from neglect, misuse or accident. This guarantee excludes such normal wearing parts as filters, brushes and dust bags as the life of these
depends upon the amount and nature of use.
Proof of the date of purchase will be required before service under guarantee is provided.
For futher assistance call the
Electrolux Group Floorcare Helpline on 08706 055 055.
Important:
For future reference we suggest you record the following details here, and keep the receipt with this
booklet as proof or purchase.
Purchased from:__________________________________________________
Date purchased ____________Model No _____________________________
SAVE THESE INSTRUCTIONS
10
The Electrolux Group, 101 Oakley Road, LUTON, BEDFORDSHIRE, LU4 9QQ
Features of the
Registered Designs.
This appliance conforms with the requirements of the amended E.E.C. directive No. 89/336/EEC relating to electromagnetic
compatibility (EMC) CE.
The Electrolux Group may introduce modifications to their product from time to time, and consequently the details given in
this booklet are subject to alteretion without notice.
Electrolux vacuum cleaner and accessories with it are protected in Great Britain and abroad by Patents of
4506 02 01 04
11
 Loading...