

Page 1
EN User Manual 2
Tumble Dryer
FR Notice d'utilisation 22
Sèche-linge
RU Инструкция по эксплуатации 43
Сушильный барабан
LAVATHERM 61275AC
Page 2
www.aeg.com2
CONTENTS
1. SAFETY INFORMATION...........................................................................................3
2. SAFETY INSTRUCTIONS.......................................................................................... 5
3. PRODUCT DESCRIPTION........................................................................................ 7
4. ACCESSORIES...........................................................................................................8
5. CONTROL PANEL.....................................................................................................9
6. PROGRAMME TABLE...............................................................................................9
7. OPTIONS................................................................................................................. 12
8. BEFORE FIRST USE.................................................................................................12
9. DAILY USE................................................................................................................12
10. HINTS AND TIPS...................................................................................................14
11. CARE AND CLEANING........................................................................................ 15
12. TROUBLESHOOTING...........................................................................................18
13. TECHNICAL DATA............................................................................................... 19
14. INSTALLATION..................................................................................................... 20
FOR PERFECT RESULTS
Thank you for choosing this AEG product. We have created it to give you
impeccable performance for many years, with innovative technologies that help
make life simpler features you might not find on ordinary appliances. Please
spend a few minutes reading to get the very best from it.
Visit our website for:
Get usage advice, brochures, trouble shooter, service information:
www.aeg.com/webselfservice
Register your product for better service:
www.registeraeg.com
Buy Accessories, Consumables and Original spare parts for your appliance:
www.aeg.com/shop
CUSTOMER CARE AND SERVICE
Always use original spare parts.
When contacting our Authorised Service Centre, ensure that you have the
following data available: Model, PNC, Serial Number.
The information can be found on the rating plate.
Warning / Caution-Safety information
General information and tips
Environmental information
Subject to change without notice.
Page 3

1. SAFETY INFORMATION
Before the installation and use of the appliance,
carefully read the supplied instructions. The
manufacturer is not responsible if an incorrect
installation and use causes injuries and damages. Always
keep the instructions with the appliance for future
reference.
1.1 Children and vulnerable people safety
WARNING!
Risk of suffocation, injury or permanent
disability.
• This appliance can be used by children aged from 8
years and above and persons with reduced physical,
sensory or mental capabilities or lack of experience
and knowledge if they have been given supervision or
instruction concerning use of the appliance in a safe
way and understand the hazards involved.
• Do not let children play with the appliance.
• Children of less than 3 years should be kept away
unless continuously supervised.
• Keep all packaging away from children.
• Keep all detergents away from children.
• Keep children and pets away from the appliance door
when it is open.
• If the appliance has a child safety device, we
recommend you activate it.
• Cleaning and user maintenance shall not be made by
children without supervision.
ENGLISH
3
General Safety
1.2
• Do not change the specification of this appliance.
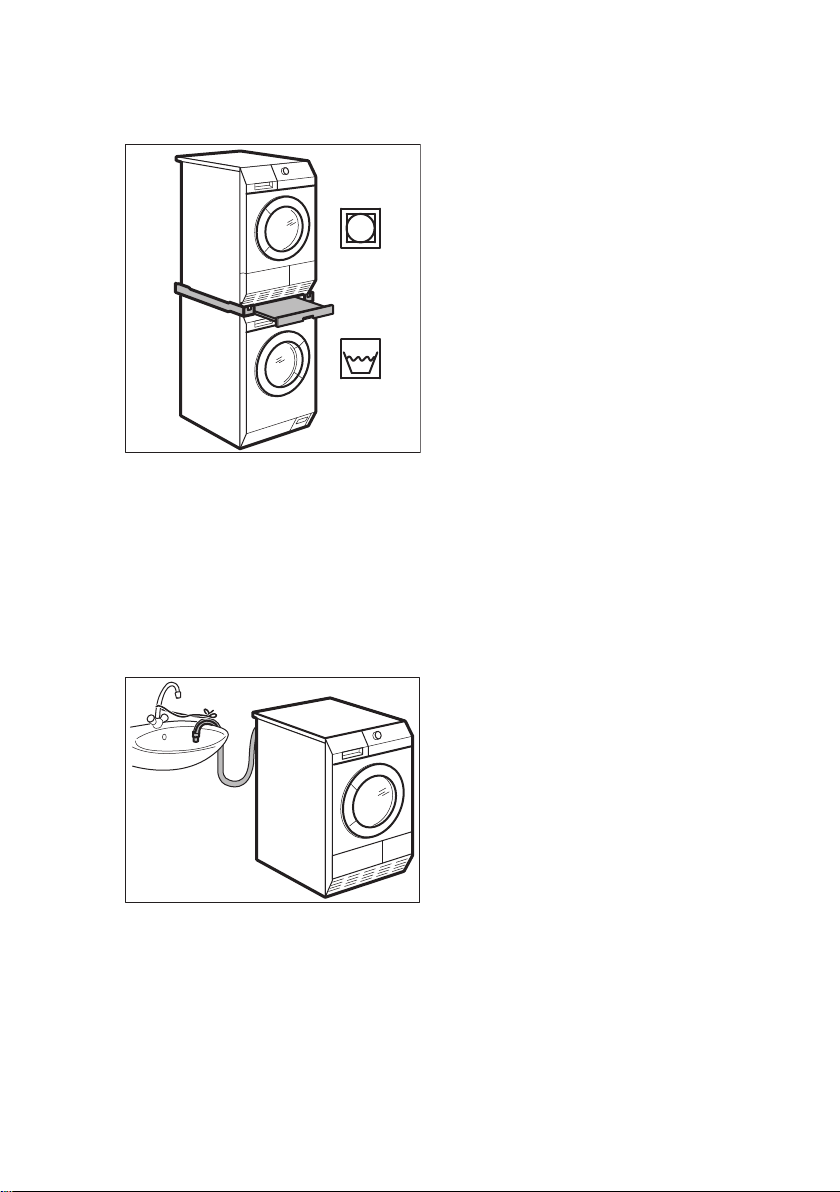
• If the tumble dryer is put on top of a washing
machine, use the stacking kit. The stacking kit,
available from your authorized vendor, can be used
only with the appliance specified in the instructions,
Page 4

www.aeg.com4
supplied with the accessory. Read it carefully before
installation (Refer to the Installation leaflet).
• The appliance can be installed as freestanding or
below the kitchen counter with correct space (Refer to
the Installation leaflet).
• Do not install the appliance behind a lockable door, a
sliding door or a door with a hinge on the opposite
side, where the appliance door can not be fully
opened.
• The ventilation openings in the base (if applicable)
must not be obstructed by a carpet.
• Connect the mains plug to the mains socket only at
the end of the installation. Make sure that there is
access to the mains plug after the installation.
• Ensure you have good ventilation in the installation
room to avoid the back flow of gases into the room
from appliances burning other fuels, including open
fires.
• Exhaust air must not be discharged into a flue which is
used for exhausting fumes from appliances burning
gas or other fuels. (if applicable)
• If the supply cord is damaged, it must be replaced by
the manufacturer, its Authorised Service Centre or
similarly qualified persons in order to avoid a hazard.
• Obey the maximum load volume of 7kg (refer to the
“Programme chart” chapter).
• Do not use the appliance if industrial chemicals have
been used for cleaning.
• Wipe away lint that has accumulated around the
appliance.
• Do not run the appliance without a filter. Clean the lint
filter before or after each use.
• Do not dry unwashed items in the tumble dryer.
• Items that have been soiled with substances such as
cooking oil, acetone, alcohol, petrol, kerosene, spot
removers, turpentine, waxes and wax removers should
be washed in hot water with an extra amount of
detergent before being dried in the tumble dryer.
Page 5

• Items such as foam rubber (latex foam), shower caps,
waterproof textiles, rubber backed articles and clothes
or pillows fitted with foam rubber pads should not be
dried in the tumble dryer.
• Fabric softeners, or similar products, should be used
as specified by the fabric softener instructions.
• Remove all objects from pockets such as lighters and
matches.
• Never stop a tumble dryer before the end of the
drying cycle unless all items are quickly removed and
spread out so that the heat is dissipated.
• The final part of a tumble dryer cycle occurs without
heat (cool down cycle) to ensure that the items are left
at a temperature that ensures that the items will not
be damaged.
• Before maintenance, deactivate the appliance and
disconnect the mains plug from the mains socket.
2. SAFETY INSTRUCTIONS
ENGLISH
5
2.1 Installation
• Remove all the packaging.
• Do not install or use a damaged
appliance.
• Obey the installation instruction
supplied with the appliance.
• Always be careful when you move the
appliance because it is heavy. Always
wear safety gloves.
• Do not install or use the appliance
where the temperature is less than
5°C or higher than 35°C.
• Make sure that the floor where you
install the appliance is flat, stable,
heat resistant and clean.
• Make sure that there is air circulation
between the appliance and the floor.
• Always move the appliance vertically.
• The rear surface of the appliance
must be put against the wall.
• When the appliance is put in its
permanent position, check if it is fully
level with the aid of a spirit level. If it
is not, adjust the feet until it is.
2.2 Electrical connection
WARNING!
Risk of fire and electrical
shock.
• The appliance must be earthed.
• Make sure that the electrical
information on the rating plate agrees
with the power supply. If not, contact
an electrician.
• Always use a correctly installed
shockproof socket.
• Do not use multi-plug adapters and
extension cables.
• Do not pull the mains cable to
disconnect the appliance. Always pull
the mains plug.
• Do not touch the mains cable or the
mains plug with wet hands.
• Only for UK and Ireland. The
appliance has a 13 A mains plug. If it
is necessary to change the fuse in the
mains plug, use a 13 A ASTA (BS
1362) fuse.
• This appliance complies with the
E.E.C. Directives.
Page 6
www.aeg.com6
2.3 Use
WARNING!
Risk of injury, electrical
shock, fire, burns or damage
to the appliance.
• Use this appliance in a household
only.
• Do not dry the damaged items which
contain padding or fillings.
• Only dry fabrics which are applicable
to dry in the tumble dryer. Follow the
instructions on the fabric label.
• If you have washed your laundry with
a stain remover start an extra rinse
cycle before you start the dryer.
• Do not drink or prepare food with the
condensed water/distilled water. It
can cause health problems to people
and pets.
• Do not sit or stand on the open door.
• Do not dry dripping wet clothes in the
tumble dryer.
2.4 Care and cleaning
WARNING!
Risk of injury or damage to
the appliance.
• Do not use water spray and steam to
clean the appliance.
• Clean the appliance with a moist soft
cloth. Only use neutral detergents. Do
not use abrasive products, abrasive
cleaning pads, solvents or metal
objects.
2.5 Disposal
WARNING!
Risk of injury or suffocation.
• Disconnect the appliance from the
mains supply.
• Cut off the mains cable and discard it.
• Remove the door catch to prevent
children and pets to get closed in the
appliance.
Page 7
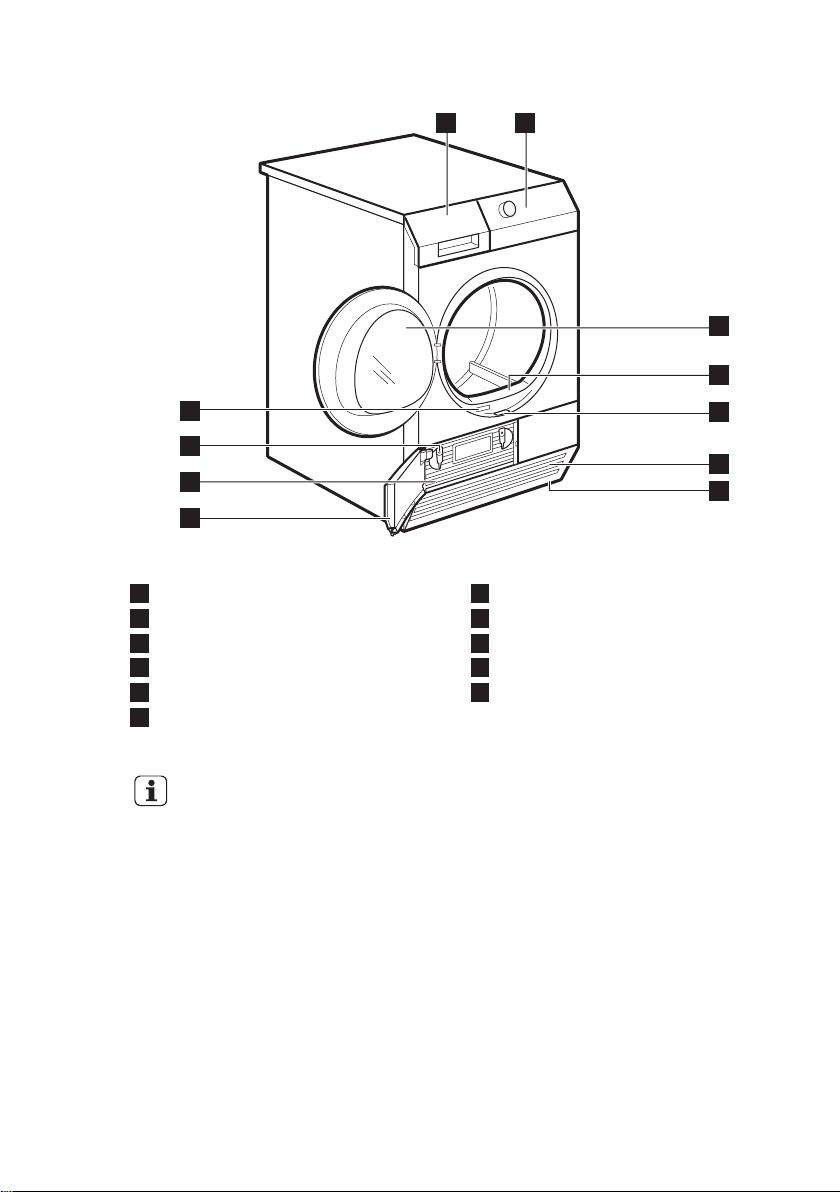
3. PRODUCT DESCRIPTION
21
4
3
8
9
10
11
5
6
7
ENGLISH
7
Water container
1
Control panel
2
Appliance door
3
Filter
4
Button for condenser door
5
Airflow slots
6
The load door can be
Adjustable feet
7
Condenser door
8
Condenser cover
9
Locks for condenser cover
10
Rating plate
11
installed by the user in the
opposite side. It can help to
easily put and remove the
laundry or if there is a limit
to install the appliance (see
separate leaflet).
Page 8
www.aeg.com8
4. ACCESSORIES
4.1 Stacking kit
Accessory name: SKP11, STA8, STA9
Available from your authorized vendor.
Stacking kit can be used only with the
washing machines specified in the
leaflet. See the leaflet attached.
Read carefully the instructions supplied
with the accessory.
4.2 Draining kit
Accessory name: DK11.
It is available from your authorized
vendor (can be attached to some types
of the tumble dryers)
The accessory for through draining of the
condensed water into a basin, siphon,
gully, etc. After the installation, the water
container is drained automatically. The
water container must stay in the
appliance.
The installed hose must be on the height
from minimum of 50 cm to maximum of 1
m from floor level. The hose cannot be in
loop. Decrease the length of the hose if
necessary.
Read carefully the instructions supplied
with the accessory.
Page 9
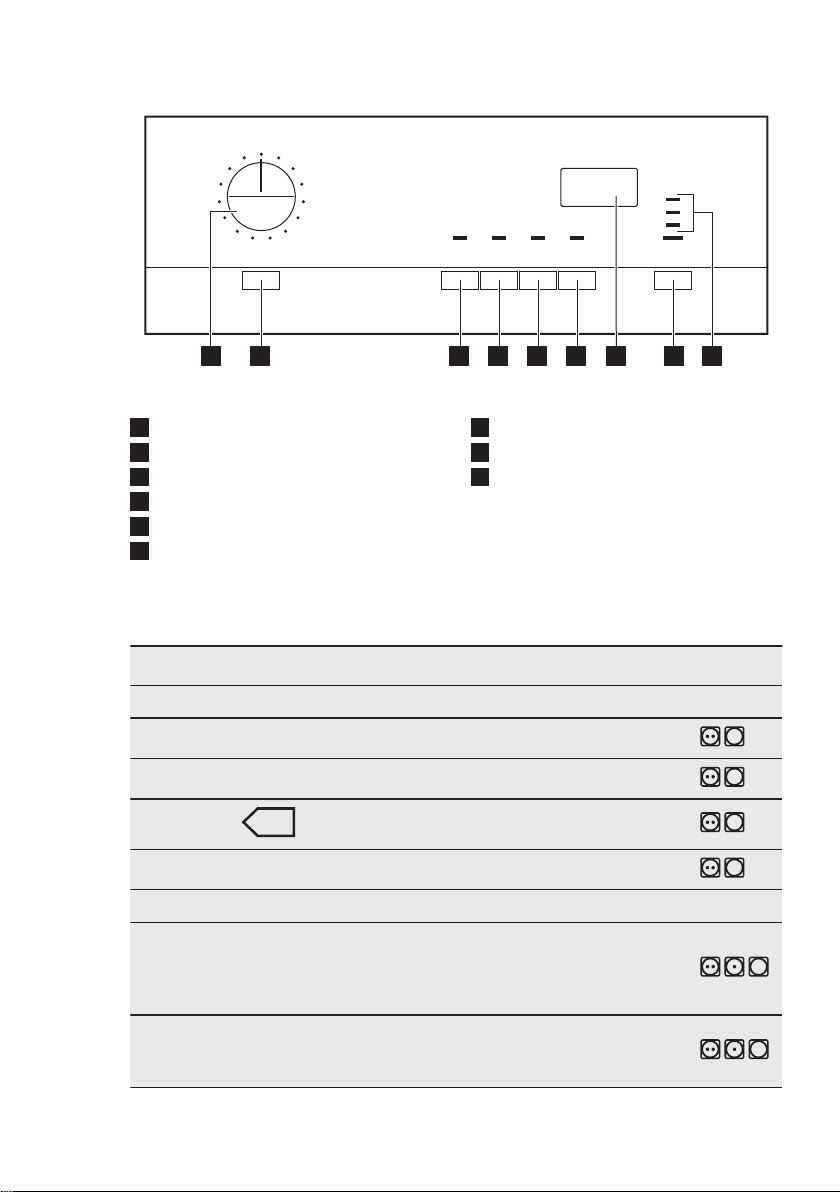
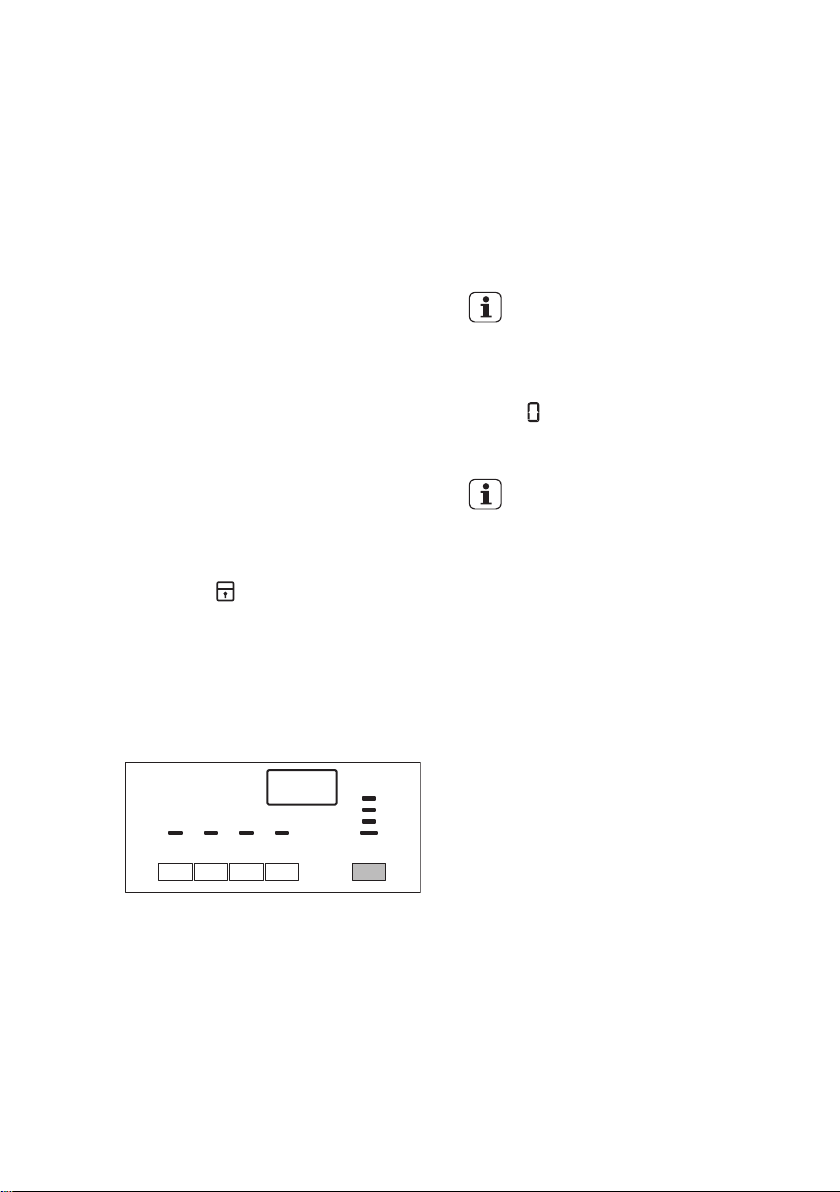
5. CONTROL PANEL
1 2 3 4 5 6 7 8 9
ENGLISH
9
Programme dial
1
On/Off button
2
Delicate button
3
Buzzer button
4
Anti-crease button
5
Delay Start button
6
6. PROGRAMME TABLE
Programmes
Extra Dry 7 kg Drying level: extra dry.
Strong Dry 7 kg Drying level: strong dry.
Cupboard Dry
Iron Dry
Jeans 7 kg
Pillows 3 kg
2)
Load
2)3)
Display
7
Start/Pause button
8
Indicators:
9
Tank - drain the water container
Filter - clean filter
Condenser - clean condenser
1)
Cottons
7 kg Drying level: cupboard dry.
7 kg Drying level: applicable for iron.
Leisure clothing such as jeans,
sweat-shirts of different material
thicknesses (e.g. at the neck, cuffs
and seams).
To dry single or double duvet and
pillows (with feather, down or synthetic fillings).
Properties / Fabric mark
/
/
/
/
/
/
Page 10

www.aeg.com10
Programmes
Delicates 3 kg Delicate fabrics.
Load
1)
Properties / Fabric mark
/
Synthetics
Extra Dry 3 kg Drying level: extra dry.
Cupboard Dry
2)
3 kg Drying level: cupboard dry.
Iron Dry 3 kg Drying level: applicable for iron.
/
/
/
Easy care fabrics for which a minimum of ironing
is necessary. The drying results can be different
from one type of fabric to the other. Shake the
items before you put them in the appliance.
When the programme is completed, Immediate-
Easy Iron
1 kg (or 5
shirts)
ly remove the items and put them on a hanger.
/
Microfiber 2 kg
Time 60’ 3 kg
Time 30’ 1 kg
1)
The maximum weight refers to dry items.
2)
For test institutes only: Standard programmes for tests are specified in the EN 61121 document.
Clean the filter after each cycle
3)
The
to dry normal wet cotton laundry and it is the most efficient programme in terms of energy consumption
for drying wet cotton laundry.
Cottons Cupboard Dry programme is the “Standard cotton programme” and it is suitable
Sportswear, thin and light fabrics, microfiber,
polyester, which are not ironed.
Time programme to dry individual
items of laundry.
Time programme to dry individual
items of laundry.
/
/
6.1 Programmes and options selection
Options
Programmes
1)
Cottons; Extra Dry
Cottons; Strong Dry
Cottons; Cupboard Dry
Cottons; Iron Dry
Delicate Anti-crease
Page 11
Options
ENGLISH
11
Programmes
1)
Jeans
Pillows
Delicates
Synthetics; Extra Dry
Synthetics; Cupboard Dry
Synthetics; Iron Dry
Easy Iron
Microfiber
Time 60’
Time 30’
1)
Together with the programme you can set 1 or more options.
2)
Activated by default.
6.2 Consumption Data
Delicate Anti-crease
2)
2)
2)
Energy
Programme Spun at / residual humidity Drying time
consump-
tion
Cottons 7 kg
Cupboard Dry 1400 rpm / 50% 109 min. 3,76 kWh
1000 rpm / 60% 124 min. 4,29 kWh
Iron Dry 1400 rpm / 50% 88 min. 3,03 kWh
1000 rpm / 60% 100 min. 3,45 kWh
Synthetics 3 kg
Cupboard Dry 1200 rpm / 40% 43 min. 1,26 kWh
800 rpm / 50% 49 min. 1,43 kWh
Page 12
www.aeg.com12
7. OPTIONS
7.1 Delicate
To dry more lightly the sensitive and
temperature sensitive textiles (e.g.
acrylic, viscose). With this option
programme operates with decreased
heat. For fabrics with the symbol on
the fabric label.
7.2 Buzzer
When the buzzer option is activated you
can hear the buzzer at the:
• cycle end
• anti-crease phase start and end
• cycle interruption
The buzzer option is by default always
on. You can use this function to activate
or deactivate the sound.
You can activate the Buzzer
option with all programmes.
7.3 Anti-crease
Extends up to 90 minutes the anti-crease
phase (30 minutes) at the end of the
8. BEFORE FIRST USE
Before you use the appliance for the first
time do these operations:
• Clean the tumble dryer drum with a
moist cloth.
drying cycle. After drying phase drum
rotates time to time what prevents the
laundry from creases. Laundry can be
removed during the anti-crease phase.
7.4 Delay Start
Lets to delay the start of a
drying programme from
minimum of 30 minutes to
maximum of 20 hours.
1. Set the drying programme and
options.
2. Push the Delay Start button again
and again.
the necessary time of the delay come
into the view on the display (e.g.
if the programme has to start after 12
hours.)
3. To activate the Delay Start option,
push the Start/Pause button. The
time to start decreases on the
display.
• Start a short programme (e.g. 30
minutes) with moist laundry.
9. DAILY USE
9.1 Preparing the laundry
• Close the zippers.
• Close the fasteners of the duvet
covers.
• Do not keep ties or ribbons loose
(e.g. apron ribbons). Tie them before
you start a programme.
• Remove all items from the pockets.
• If an item has the internal layer made
of cotton, turn it inside out. Make sure
that the cotton layer is always external
• We recommend that you set the
correct programme applicable for the
type of fabrics that are in the
appliance.
• Do not put fabrics with strong colours
together with fabrics with light
colours. Strong colours can bleed.
• Use an applicable programme for
cotton jersey and knitwear to prevent
the items to shrink.
• Make sure that the laundry weight is
not more than the maximum weight
that is in the programme table.
• Dry only the laundry that is applicable
for tumble dryer. Refer to the fabric
label on the items.
• Do not dry large and small items
together. Small items can be trapped
inside the large and remain not dried.
Page 13

Fabric label Description
Laundry that is applicable for tumble drying.
Laundry that is applicable for tumble drying and resists higher drying
temperature.
Laundry that is applicable for tumble drying but only with low drying
temperature.
Laundry that is not applicable for tumble drying.
ENGLISH
13
9.2 Loading the laundry
CAUTION!
Do not lock the laundry in
between the appliance door
and rubber seal.
1. Pull the appliance door.
2. Load loosely the laundry.
3. Close the appliance door.
9.3 Turning on the appliance
To turn on the appliance:
Push the On/Off button.
If the appliance is on, some indications
come in to the view on the display.
9.4 Auto stand-by function
To decrease the energy consumption,
the automatic stand-by function
deactivates the appliance:
• if the Start/Pause button was not
pushed in the time of 5 minutes.
• after 5 minutes from the programme
end.
Push the On/Off button to activate the
appliance.
If the appliance is on, some indications
come in to the view on the display.
9.5 Setting a programme
Use the programme dial to set the
programme.
The possible time to complete the
programme comes into the view on the
display.
The drying time you see is
related to the load of 5 kg
for cotton and jeans
programmes. For the other
programmes the drying time
is related to the
recommended loads. The
drying time of the cotton
and jeans programmes with
the load more than 5 kg is
longer.
9.6 Options
Together with the programme you can
set 1 or more special options.
To activate or deactivate the option push
the applicable button .
Page 14
www.aeg.com14
When the option is activated the LED
above the button or symbol on the
display comes into the view.
9.7 Child lock option
The child lock can be set to prevent the
children to play with the appliance. The
child lock option locks all push buttons
and the programme dial (this option
does not lock On/Off button).
You can activate the child lock option:
• before you push the Start/Pause
button - the appliance cannot start
• after you push the Start/Pause button
- programmes and option selection is
off.
Child lock option activation:
1. Turn on the dryer.
2. Wait approximately 8 seconds.
3. Select 1 of the available
programmes.
4. Push at the same time and hold
down the Anti-crease and Delay
Start buttons .
The symbol comes into the view on
the display.
5. To deactivate the child lock, push
again the above buttons until the
symbol goes out of the view.
9.8 Starting a programme
To start the programme:
The appliance starts and the LED above
the button does not flash but is stable.
9.9 Programme change
To change a programme:
1. Turn the programme dial to Stop
position.
2. Set a new programme.
9.10 Programme end
Clean the filter and drain the
water container after each
drying cycle. (See chapter
CARE AND CLEANING.)
If the drying cycle is completed, the
symbol flashes on the display. If the
Buzzer option is on, the acoustic signal
sounds intermittently for 1 minute.
If you do not turn off the
appliance, the crease guard
phase starts. Laundry can be
removed during this phase.
To remove the laundry:
1. Push the On/Off button for 2
seconds to turn off the appliance.
2. Open the appliance door.
3. Remove the laundry.
4. Close the appliance door.
Push the Start/Pause button.
HINTS AND TIPS
10.
10.1 Ecological hints
• Spin good the laundry before drying.
• Use the load volumes which are
specified in the programme chart.
• Clean the filter after each drying
cycle.
• Do not use fabric softener to wash
and then dry. In the tumble dryer
laundry becomes soft automatically.
• Use the condensate as distilled water,
e.g. for steam ironing. If it is necessary
clean the condensate before (e.g.
with a coffee filter) to remove possible
small pieces of fluff.
Page 15
ENGLISH
15
• Always keep the airflow slots on the
bottom of the appliance clear.
• Make sure that is good airflow in the
appliance installation position.
10.2 Adjustment of the
remaining laundry moisture
degree
To change the default degree of the
remaining moisture of the laundry:
1. Turn on the appliance.
2. Wait approximately 8 seconds.
3. Select 1 of available programmes.
4. Push at the same time and hold
down the Delicate and Anti-crease
buttons.
One of the symbols goes into the view
on the display:
- the maximum dry laundry
- the more dry laundry
- the standard dry laundry
5. Push the Start/Pause button again
and again until you set necessary
degree.
6. To memorise the setting, push at the
same time the Delicate and Anti-
crease buttons for approximately 2
seconds.
10.3 Deactivating the Tank indicator
The water container indicator is by
default on. It starts to light at the end of
the drying cycle or during the cycle if the
water reservoir is full. If the draining kit is
installed the water container is drained
automatically and indicator can be
permanently off.
To deactivate the indicator:
1. Turn on the appliance.
2. Wait approximately 8 seconds.
3. Select 1 of available programmes.
4. Push at the same time and hold
down the Delicate and Delay Start
buttons.
One of 2 configurations is possible:
• the Tank indicator: is on and the
symbol goes into the
view - the water container
indicator is permanently on
• the Tank indicator: is off and the
symbol
view - the water container
indicator is permanently off
goes into the
11. CARE AND CLEANING
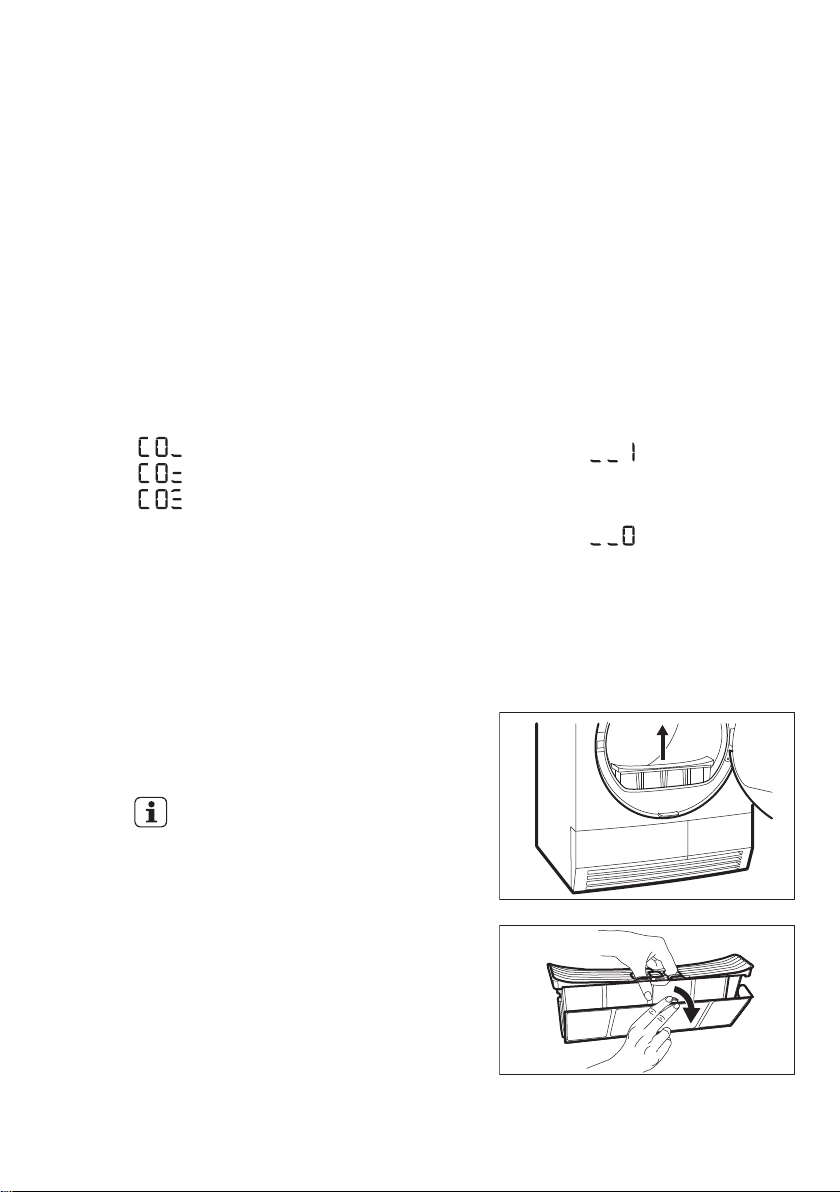
11.1 Cleaning the filter
At the end of each cycle the indicator
Filter is on and you must clean the filter.
The filter collects the fluff.
The fluff occurs while the
clothes are dried in the
tumble dryer.
To clean the filter:
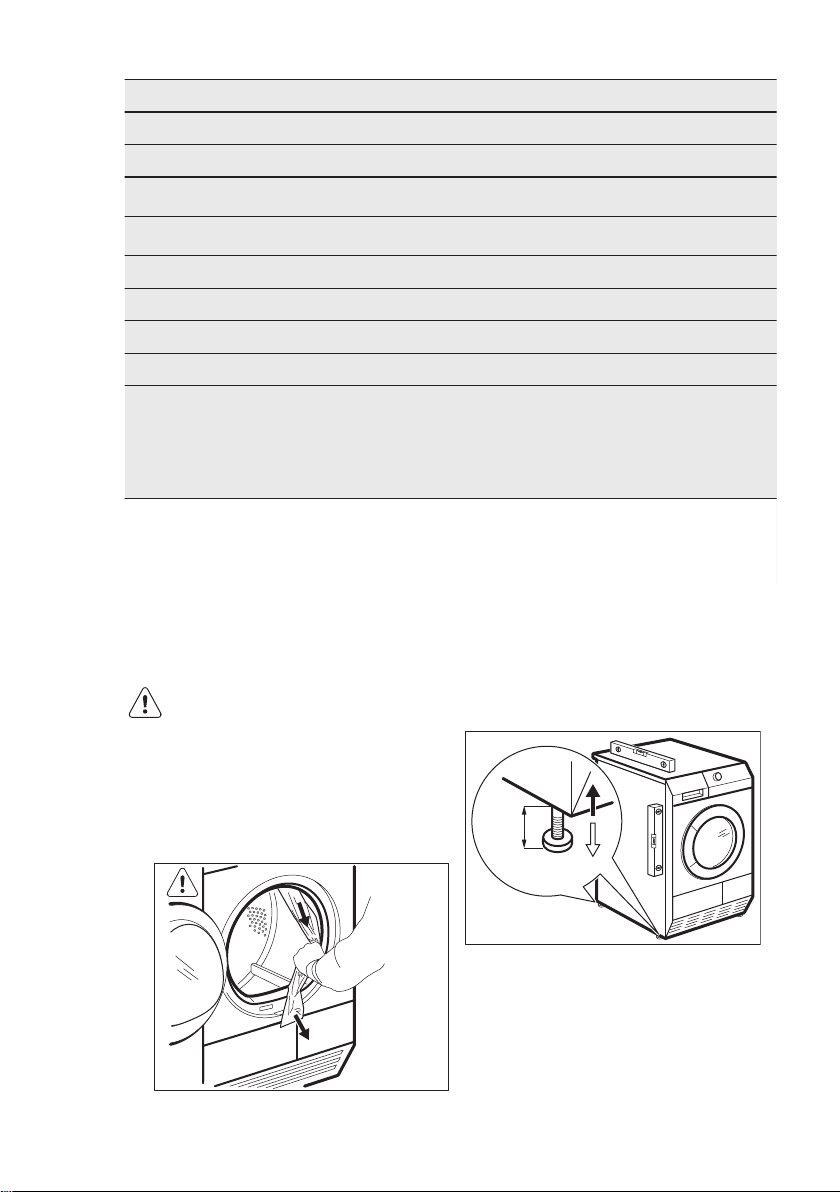
1. Open the door. Pull the filter.
2. Open the filter.
3. Use a moist hand to clean the filter.
Page 16
www.aeg.com16
4. If necessary clean the filter with the
brush under warm tap water and/or a
vacuum cleaner. Close the filter.
5. If necessary remove fluff from the
filter socket and gasket. You can use
a vacuum cleaner. Put the filter inside
the filter socket.
The indicator Tank is on and you must
empty the water container.
To empty the water container:
1. Pull the water container and keep it
in horizontal position.
2. Move the plastic connection out and
drain the water into a basin or
equivalent receptacle.
3. Move plastic connection in and install
water container.
4. To continue the programme press
the Start/Pause button.
11.3 Cleaning the condenser
If the indicator Condenser flashes, the
condenser and its compartment must be
cleaned.
To clean the condenser and its
compartment:
1. Open the door.
2. Move the release button on the
bottom of the door to open the
condenser door.
11.2 Emptying the water container
Empty the condensed water container
after each drying cycle.
If the condensed water container is full,
the programme breaks off automatically.
3. Turn 2 blockages to unlock the
condenser cover.
Page 17
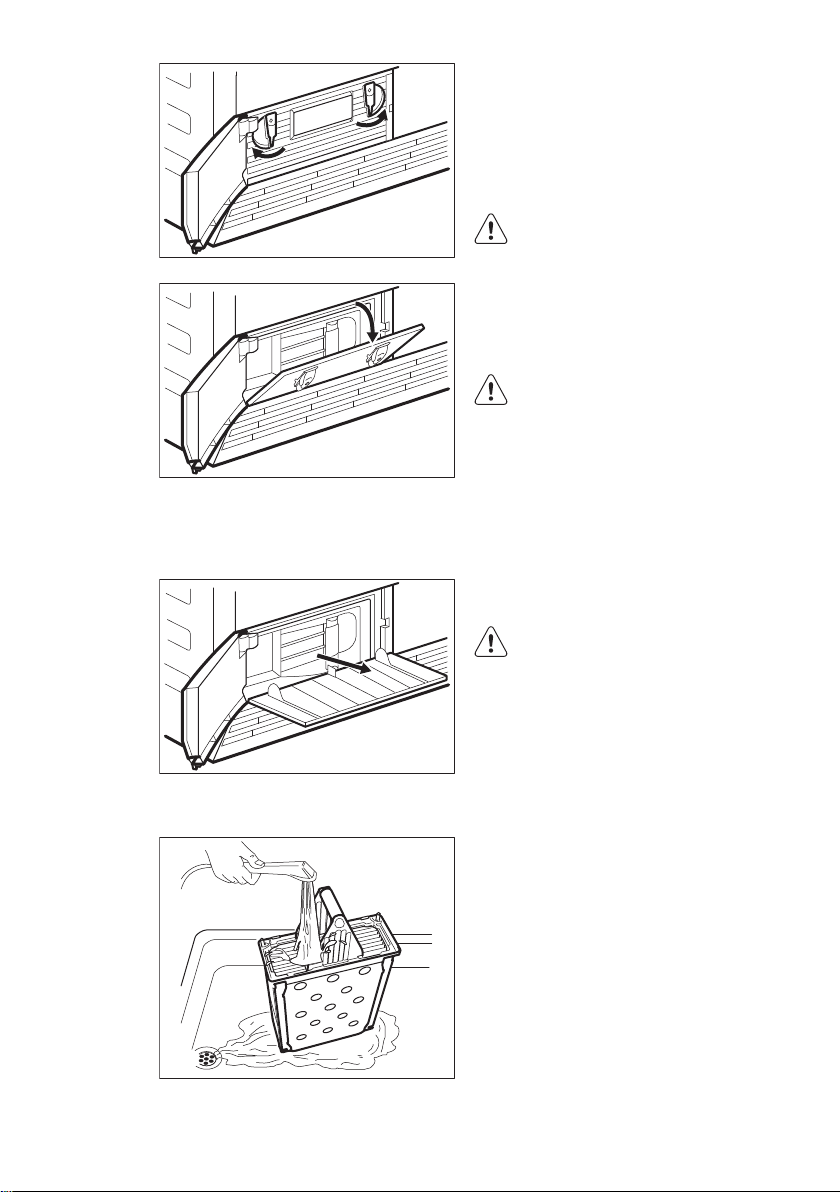
4. Lower the condenser cover.
ENGLISH
7. Put the condenser back inside the
bottom compartment.
8. Close the condenser cover.
9. Lock 2 blockages until they snap.
10. Close the condenser door.
11.4 Cleaning the drum
WARNING!
Disconnect the appliance
before you clean it.
Use a standard neutral soap detergent to
clean the inner surface of the drum and
drum ribs. Dry the cleaned surfaces with
a soft cloth.
CAUTION!
Do not use abrasive
materials or steel wool to
clean the drum.
17
5. Catch the handle and pull the
condenser out from the bottom
compartment. Move condenser
horizontally to do not spill remaining
water.
6. Clean the condenser in vertical
position over a basin or paddling.
Rinse through with a hand shower.
11.5 Cleaning the control panel and housing
Use a standard neutral soap detergent to
clean the control panel and housing.
Use a moist cloth to clean. Dry the
cleaned surfaces with a soft cloth.
CAUTION!
Do not use furniture
cleaning agents or cleaning
agents which can cause
corrosion to clean the
appliance.
11.6 Cleaning the airflow slots
Use a vacuum cleaner to remove the fluff
from the airflow slots.
Page 18

www.aeg.com18
12. TROUBLESHOOTING
Problem
1)
The tumble dryer does not operate.
Unsatisfactory
drying result.
The loading
door does not
closed
Err
(Error) on
the display.
Possible cause Remedy
The tumble dryer is not connected
to mains supply.
Connect in at mains socket. Check
fuse in fuse box (domestic installation).
The loading door is opened. Close the loading door.
The On/Off button was not push-
Push the On/Off button.
ed.
The Start/Pause button was not
Push the Start/Pause button.
pushed.
The appliance is in the standby
Push the On/Off button.
mode.
Incorrect programme selection. Do the selection of the applicable
2)
3)
4)
The filter is clogged.
The Dry Plus option was in minimum level.
4)
programme.
Clean the filter.
Change the Dry Plus option to the
moderate or maximum level.
Too high volume of the load. Obey the maximum load volume.
The airflow grill is clogged. Clean the airflow grill in the bot-
tom of the appliance.
Dirt on the humidity sensor in the
drum.
Incorrect remaining laundry moisture degree.
The condenser is clogged.
The filter not locked in the position.
The laundry is locked between the
Clean the front surface of the
drum.
Adjust remaining laundry moisture
5)
degree.
Clean the condenser.
3)
Put the filter in the correct position.
Put the load correctly in the drum.
door and the seal.
You try to change the programme
or the option after the start of the
Turn the tumble dryer off and on.
Make the new selection.
cycle.
The option you try to activate is
not applicable with the selected
Turn the tumble dryer off and on.
Make the new selection.
programme.
Page 19

ENGLISH
19
Problem
1)
Abnormally
elapsing time on
the display.
Programme inactive.
The time to end is calculated on
the basis of the volume and dampness of the laundry.
The water container is full. Drain the water container, push
Possible cause Remedy
The automatic procedure — this is
not the appliance malfunction.
the Start/Pause button.
3)
Too small laundry volume. Do the selection of time pro-
gramme. The time value must be
related to the load. To dry 1 item
Drying cycle too
short.
or small quantities of the laundry
we recommend to use short times.
The laundry is too dry. Do the selection of time pro-
gramme or higher drying level
(e.g. Extra Dry)
The filter is clogged. Clean the filter.
Drying cycle too
6)
long
1)
If there is an error message on the display (e.g. E51): Turn the tumble dryer off and on. Make a selec-
tion of the new programme. Push the Start/Pause button. Does not operate? - contact the service centre
and give the error code.
2)
Follow the programme description — see PROGRAMME TABLE
3)
See chapter CARE AND CLEANING
4)
Only dryers with the Dry Plus option
5)
See HINTS AND TIPS chapter
6)
Note: After maximum 5 hours the drying cycle ends automatically.
Too high volume of the load. Obey the maximum load volume.
The laundry not spun sufficiently. Spin correctly the laundry.
Very high room temperature - this
is not the appliance malfunction.
If possible, lower the room temperature.
13. TECHNICAL DATA
Height x Width x Depth 850 x 600 x 540 mm (maximal 570 mm)
Max. depth with the appliance door open 1030 mm
Max. width with the appliance door open 950 mm
Adjustable height 850 mm (+ 15 mm - feet regulation)
Drum volume 104 l
Maximum load volume 7 kg
Voltage 230 V
Frequency 50 Hz
Page 20
15mm
www.aeg.com20
Necessary fuse 16 A
Total power 2800 W
Energy efficiency class B
Energy consumption
Annual energy consumption
Left—on mode power absorption 0,41 W
Off mode power absorption 0,41 W
Type of use Household
Permitted ambient temperature + 5°C to + 35°C
Level of protection against ingress of solid
particles and moisture ensured by the protective cover, except where the low voltage
equipment has no protection against moisture
1)
With reference to EN 61121. 7kg of cotton centrifuged at 1000 rpm.
2)
Energy consumption per year in kWh, based on 160 drying cycles of the standard cotton programme
at full and partial load, and the consumption of the low-power modes. Actual energy consumption per
cycle will depend on how the appliance is used (REGULATION (EU) No 392/2012).
1)
2)
4,29 kWh
504 kWh
IPX4
14. INSTALLATION
14.1 Unpacking
CAUTION!
Before use all parts of the
transport packaging must be
removed.
To remove the polystyrene blockages:
1. Open the door.
2. Pull plastic hose with the polystyrene
blockages out from the drum.
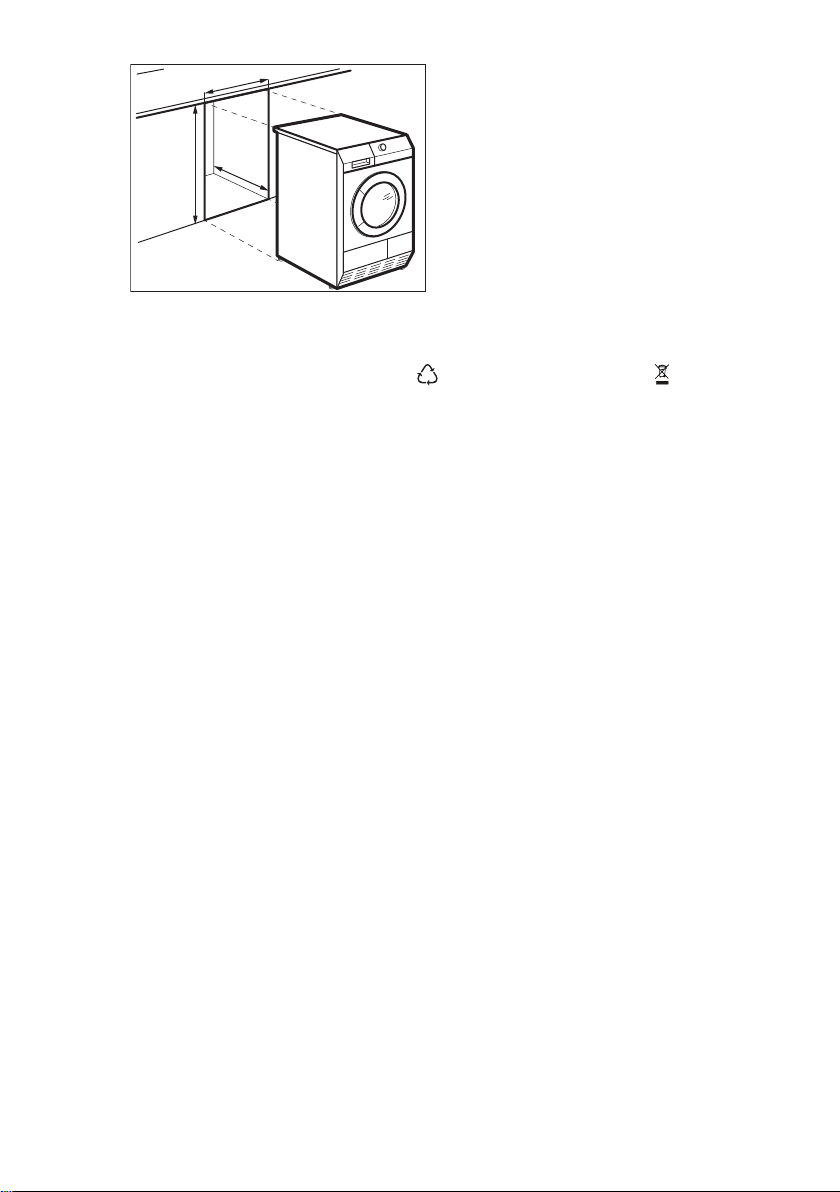
14.2 Feet regulation
It is possible to adjust the height of the
tumble dryer. To do that adjust the feet.
14.3 Installation under a counter
The appliance can be installed as
freestanding or below the kitchen
counter with correct space (see picture).
Page 21
> 850 mm
600 mm
540 mm
15. ENVIRONMENT CONCERNS
ENGLISH
21
Recycle the materials with the symbol .
Put the packaging in applicable
containers to recycle it. Help protect the
environment and human health and to
recycle waste of electrical and electronic
appliances. Do not dispose appliances
marked with the symbol with the
household waste. Return the product to
your local recycling facility or contact
your municipal office.
Page 22

www.aeg.com22
TABLE DES MATIÈRES
1. CONSIGNES DE SÉCURITÉ................................................................................... 23
2. INSTRUCTIONS DE SÉCURITÉ.............................................................................. 25
3. DESCRIPTION DE L'APPAREIL.............................................................................. 27
4. ACCESSOIRES.........................................................................................................28
5. PANNEAU DE COMMANDE................................................................................. 29
6. TABLEAU DES PROGRAMMES............................................................................. 29
7. OPTIONS................................................................................................................. 32
8. AVANT LA PREMIÈRE UTILISATION.....................................................................33
9. UTILISATION QUOTIDIENNE................................................................................33
10. CONSEILS..............................................................................................................35
11. ENTRETIEN ET NETTOYAGE..............................................................................36
12. DÉPANNAGE........................................................................................................ 39
13. CARACTÉRISTIQUES TECHNIQUES.................................................................. 40
14. INSTALLATION..................................................................................................... 41
POUR DES RÉSULTATS PARFAITS
Merci d'avoir choisi ce produit AEG. Nous l'avons conçu pour qu'il vous offre des
performances irréprochables pour longtemps, en intégrant des technologies
innovantes qui vous simplifient la vie grâce à des caractéristiques que vous ne
trouverez pas forcément sur des appareils ordinaires. Veuillez prendre quelques
instants pour lire cette notice afin d'utiliser au mieux votre appareil.
Visitez notre site Internet pour :
Obtenir des conseils d'utilisation, des brochures, de l'aide, des informations :
www.aeg.com/webselfservice
Enregistrer votre produit pour obtenir un meilleur service :
www.registeraeg.com
Acheter des accessoires, consommables et pièces de rechange d'origine pour
votre appareil :
www.aeg.com/shop
SERVICE APRÈS-VENTE
N'utilisez que des pièces de rechange d'origine.
Avant de contacter le service, assurez-vous de disposer des informations
suivantes : Modèle, PNC, numéro de série.
Vous trouverez ces informations sur la plaque signalétique.
Avertissement/Attention : consignes de sécurité.
Informations générales et conseils.
Informations en matière de protection de l'environnement.
Sous réserve de modifications.
Page 23

1. CONSIGNES DE SÉCURITÉ
Avant d'installer et d'utiliser cet appareil, lisez
soigneusement les instructions fournies. Le fabricant ne
peut être tenu pour responsable des dommages et
blessures liés à une mauvaise installation ou utilisation.
Conservez toujours cette notice avec votre appareil
pour vous y référer ultérieurement.
1.1 Sécurité des enfants et des personnes vulnérables
AVERTISSEMENT!
Risque d'asphyxie, de blessure ou d'invalidité
permanente.
• Cet appareil peut être utilisé par des enfants âgés
d'au moins 8 ans et par des personnes ayant des
capacités physiques, sensorielles ou mentales réduites
ou dénuées d’expérience ou de connaissance, s’ils (si
elles) sont correctement surveillé(e)s ou si des
instructions relatives à l’utilisation de l'appareil en
toute sécurité leur ont été données et si les risques
encourus ont été appréhendées.
• Les enfants ne doivent pas jouer avec l’appareil.
• Veuillez à maintenir hors de portée de la machine les
enfants de moins de 3 ans à moins qu'ils soient
constamment surveillés.
• Ne laissez pas les emballages à la portée des enfants.
• Ne laissez pas les détergents à la portée des enfants.
• Tenez les enfants et les animaux éloignés de la porte
de l'appareil lorsque celle-ci est ouverte.
• Si l'appareil est équipé d'un dispositif de sécurité
enfants, nous vous recommandons de l'activer.
• Le nettoyage et l’entretien par l'usager ne doivent pas
être effectués par des enfants sans surveillance.
FRANÇAIS
23
Consignes générales de sécurité
1.2
• Ne modifiez pas les caractéristiques de cet appareil.
Page 24

www.aeg.com24
• Si le sèche-linge est placé au-dessus d'un lave-linge,
utilisez le kit de superposition. Le kit de superposition,
disponible auprès d'un revendeur agréé, ne peut être
utilisé qu'avec l'appareil indiqué dans les instructions
(fournies avec l'accessoire). Lisez attentivement les
instructions avant de procéder à l'installation
(reportez-vous au livret d'installation).
• L'appareil peut être installé de façon autonome ou
sous un plan de travail de cuisine si un espace correct
est disponible (reportez-vous au livret d'installation).
• L'appareil ne doit pas être installé derrière une porte
à serrure, une porte coulissante ni une porte battante
dotée d'une charnière du côté opposé à l'appareil qui
pourrait empêcher l'ouverture complète du hublot.
• Les éventuelles ouvertures de ventilation ne doivent
pas être obstruées par un tapis.
• Ne connectez la fiche d'alimentation secteur à la prise
de courant secteur qu'à la fin de l'installation. Assurezvous que la fiche d'alimentation est accessible une
fois l'appareil installé.
• Aérez suffisamment la pièce pour éviter le reflux de
gaz provenant d'appareils utilisant d'autres
combustibles, y compris les flammes nues.
• L'air rejeté ne doit pas être évacué dans une
évacuation utilisée pour les fumées rejetées provenant
des appareils brûlant du gaz ou d'autres
combustibles. (si présent)
• Si le câble d'alimentation est endommagé, il doit être
remplacé par le fabricant, son service après-vente ou
des personnes de qualification similaire afin d'éviter
un danger.
• Respectez la charge maximale de 7 kg (reportez-vous
au chapitre « Tableau des programmes »).
• Ne séchez pas d'articles sur lesquels ont été utilisés
des produits de nettoyage chimiques industriels.
• Retirez les peluches accumulées dans l'appareil.
• N'utilisez pas l'appareil sans filtre. Nettoyez le filtre à
peluches avant ou après chaque utilisation.
Page 25

FRANÇAIS
• N'introduisez dans le sèche-linge que du linge propre.
• Il convient que les articles qui ont été salis avec des
substances telles que l'huile de cuisson, l'acétone,
l'alcool, l'essence, le kérosène, les détachants, la
térébenthine, la cire et les substances pour retirer la
cire soient lavés dans de l'eau chaude avec une
quantité supplémentaire de détergent avant d'être
séchés dans le sèche-linge à tambour.
• Les pièces avec mousse de caoutchouc (mousse de
latex), bonnets de bain, textiles imperméables, articles
doublés en caoutchouc ou vêtements et taies
d'oreiller rembourrés de mousse de caoutchouc ne
doivent pas être séchés dans un sèche-linge.
• Les assouplissants ou autres produits similaires
doivent être utilisés conformément aux instructions de
leur fabricant.
• Retirez des poches tous les objets tels que briquets et
allumettes.
• N'arrêtez jamais le sèche-linge avant la fin du cycle de
séchage à moins de sortir immédiatement tout le
linge et de le déplier pour mieux dissiper la chaleur.
• La phase finale d'un cycle de sèche-linge à tambour
se produit sans chaleur (cycle de refroidissement) afin
de s'assurer que les articles sont soumis à une
température garantissant qu'ils ne seront pas
endommagés.
• Avant toute opération d'entretien, éteignez l'appareil
et débranchez la fiche de la prise secteur.
25
2.
INSTRUCTIONS DE SÉCURITÉ
2.1 Instructions d’installation
• Retirez l'intégralité de l'emballage
• N'installez pas et ne branchez pas un
appareil endommagé.
• Suivez scrupuleusement les
instructions d'installation fournies
avec l'appareil.
• Soyez toujours vigilants lorsque vous
déplacez l'appareil car il est lourd.
Portez toujours des gants de sécurité.
• N'installez pas l'appareil ou ne
l'utilisez pas dans un endroit où la
température ambiante est inférieure à
5°C ou supérieure à 35°C.
• Assurez-vous que le sol sur lequel
vous installez l'appareil est plat,
stable, résistant à la chaleur et propre.
• Assurez-vous que de l'air circule entre
l'appareil et le sol.
• Déplacez toujours l'appareil à la
verticale.
Page 26

www.aeg.com26
• La surface arrière de l'appareil doit
être positionnée contre le mur.
• Une fois l'appareil installé à son
emplacement permanent, vérifiez
qu'il est bien de niveau à l'aide d'un
niveau à bulle. S'il n'est pas de
niveau, réglez les pieds jusqu'à ce
qu'il le soit.
2.2 Branchement électrique
AVERTISSEMENT!
Risque d'incendie ou
d'électrocution.
• L'appareil doit être relié à la terre.
• Vérifiez que les données électriques
figurant sur la plaque signalétique
correspondent à celles de votre
réseau. Si ce n'est pas le cas,
contactez un électricien.
• Utilisez toujours une prise de courant
de sécurité correctement installée.
• N'utilisez pas d'adaptateurs
multiprises ni de rallonges.
• Ne tirez jamais sur le câble
d'alimentation électrique pour
débrancher l'appareil. Tirez toujours
sur la fiche.
• Ne touchez jamais le câble
d'alimentation ni la fiche avec des
mains mouillées.
• Pour le Royaume-Uni et l'Irlande
uniquement. L'appareil est livré avec
une fiche secteur de 13 ampères. Si
vous devez changer le fusible de la
fiche secteur, utilisez un fusible 13 A
approuvé ASTA (BS 1362).
• Cet appareil est conforme aux
directives CEE.
2.3 Utilisation
AVERTISSEMENT!
Risque de blessure, de choc
électrique, d'incendie, de
brûlures ou de dommage
matériel à l'appareil.
• Utilisez cet appareil uniquement dans
un environnement domestique.
• Ne séchez pas d'articles
endommagés contenant un
rembourrage ou un garnissage.
• Séchez uniquement les textiles
adaptés au séchage dans un sèchelinge. Suivez les instructions figurant
sur l'étiquette des textiles.
• Si vous avez lavé votre linge avec un
produit détachant, lancez un cycle de
rinçage supplémentaire avant de
démarrer le sèche-linge.
• N'utilisez pas l'eau de
condensation/eau distillée pour
préparer des boissons ni pour
cuisiner. Elle peut entraîner des
problèmes de santé chez les
personnes et les animaux
domestiques.
• Ne montez pas sur le hublot ouvert
de votre appareil ; ne vous asseyez
pas dessus.
• N'introduisez pas de linge non essoré
dans le sèche-linge.
2.4 Entretien et nettoyage
AVERTISSEMENT!
Risque de blessure
corporelle ou de dommages
matériels.
• Ne pulvérisez pas d'eau ni de vapeur
pour nettoyer l'appareil.
• Nettoyez l'appareil avec un chiffon
doux humide. Utilisez uniquement
des produits de lavage neutres.
N'utilisez pas de produits abrasifs, de
tampons à récurer, de solvants ni
d'objets métalliques.
2.5 Mise au rebut
AVERTISSEMENT!
Risque de blessure ou
d'asphyxie.
• Débranchez l'appareil de
l'alimentation électrique.
• Coupez le câble d'alimentation et
mettez-le au rebut.
• Retirez le dispositif de verrouillage de
la porte pour empêcher les enfants et
les animaux de s'enfermer dans
l'appareil.
Page 27

3. DESCRIPTION DE L'APPAREIL
21
4
3
8
9
10
11
5
6
7
FRANÇAIS
27
Bac d'eau de condensation
1
Panneau de commande
2
Hublot de l'appareil
3
Séparateur
4
Bouton du volet du condenseur
5
Fentes de circulation d'air
6
L'utilisateur peut installer le
Pied réglable
7
Volet du condenseur
8
Couvercle du condenseur
9
Verrous du couvercle du condenseur
10
Plaque de calibrage
11
hublot de sorte qu'il s'ouvre
dans l'autre sens. Cela est
utile si l'espace autour de
l'appareil est restreint et
rend le chargement et le
retrait du linge difficile (voir
brochure fournie
séparément).
Page 28

www.aeg.com28
4. ACCESSOIRES
4.1 Kit de superposition
Nom de l'accessoire : SKP11, STA8, STA9
Disponible auprès de votre magasin
vendeur agréé.
Le kit de superposition ne peut être
utilisé qu'avec les lave-linge indiqués
dans le livret. Reportez-vous au livret
joint.
Lisez attentivement la notice fournie avec
l'accessoire.
4.2 Kit d'évacuation
Nom de l'accessoire : DK11.
Il est disponible chez votre magasin
vendeur agréé (peut se fixer à certains
types de sèche-linge)
L'accessoire est destiné à la vidange
directe de l'eau de condensation dans
une cuvette, un siphon, une rigole, etc.
Après l'installation, le bac d'eau de
condensation est vidangé
automatiquement. Le bac d'eau de
condensation doit demeurer dans
l'appareil.
Le tuyau doit être installé à une hauteur
comprise entre 50 cm au minimum et
1 m au maximum du niveau du sol. Ce
tuyau ne doit pas faire de boucle. Si
nécessaire, réduisez la longueur du
tuyau.
Lisez attentivement la notice fournie avec
l'accessoire.
Page 29

5. PANNEAU DE COMMANDE
1 2 3 4 5 6 7 8 9
FRANÇAIS
29
Sélecteur de programme
1
Touche Marche/Arrêt (On/Off)
2
Touche Délicat (Delicate)
3
Touche Alarme (Buzzer)
4
Touche Anti-froissage (Anti-crease)
5
Touche Départ Différé (Delay Start)
6
Affichage
7
6. TABLEAU DES PROGRAMMES
Programmes
Très Sec (Extra Dry) 7 kg Degré de séchage : très sec.
Sec (Strong Dry) 7 kg Degré de séchage : très sec plus.
Prêt à Ranger (Cupboard
Dry)
Prêt à Repasser (Iron Dry)
Jeans (Jeans) 7 kg
2)3)
2)
1)
Charge
7 kg Degré de séchage : prêt à ranger.
7 kg
Propriétés / Étiquette d'entretien des textiles
Coton (Cottons)
Degré de séchage : prêt à repasser.
Vêtements décontractés tels que
les jeans, les sweats, avec différentes épaisseurs de tissu (par ex. au
niveau du poignet, du col ou des
coutures).
Touche Départ/Pause (Start/Pause)
8
Voyants :
9
Réservoir (Tank) - vidanger le bac à
eau
Filtre (Filter) - nettoyer le filtre
Condenseur (Condenser) - nettoyer
le condenseur
/
/
/
/
/
Page 30

www.aeg.com30
Programmes
Charge
1)
Propriétés / Étiquette d'entretien des textiles
Séchage de couettes simples ou
Oreillers (Pillows) 3 kg
doubles et d'oreillers (garnissage
/
en plumes, duvet ou synthétique).
Délicats (Delicates) 3 kg Textiles délicats.
/
Synthétiques (Synthetics)
Très Sec (Extra Dry) 3 kg Degré de séchage : très sec.
Prêt à Ranger (Cupboard
2)
Dry)
Prêt à Repasser (Iron Dry) 3 kg
3 kg Degré de séchage : prêt à ranger.
Degré de séchage : prêt à repasser.
/
/
/
Vêtements faciles à entretenir nécessitant un minimum de repassage. Les résultats de séchage
peuvent varier en fonction du type de textile.
Dépliez-les le plus possible avant de les placer
dans l'appareil. Une fois le programme terminé,
sortez immédiatement les articles et accrochez-
Repassage Facile (Easy
Iron)
1 kg (ou
5 chemi-
ses)
les sur un cintre.
/
Tenues de sport, textiles fins et légers, à micro-
Microfibres (Microfiber) 2 kg
fibres, en polyester, ne nécessitant pas de repassage.
Minuterie 60' (Time 60') 3 kg
Minuterie 30' (Time 30') 1 kg
1)
Poids maximal des articles secs.
2)
Uniquement pour les instituts de test : Les programmes de test standard sont indiqués dans le do-
cument EN 61121. Nettoyez le filtre après chaque cycle.
3)
Le programme
le coton et est adapté pour sécher du linge en coton normal et humide. Il s'agit du programme le plus
efficace en termes de consommation électrique pour sécher le linge en coton humide.
Coton (Cottons) Prêt à Ranger (Cupboard Dry) est le programme standard pour
Réglez une durée pour le séchage
d'articles séparés.
Réglez une durée pour le séchage
d'articles séparés.
/
/
Page 31

6.1 Sélection des programmes et des options
Options
Programmes
1)
Coton (Cottons); Très Sec (Extra Dry)
Coton (Cottons); Sec (Strong Dry)
Coton (Cottons); Prêt à Ranger (Cupboard Dry)
Coton (Cottons); Prêt à Repasser (Iron
Dry)
Jeans (Jeans)
Délicat (Delicate)
FRANÇAIS
Anti-froissage (Anti-
crease)
31
Oreillers (Pillows)
Délicats (Delicates)
2)
2)
Synthétiques (Synthetics); Très Sec (Extra
Dry)
Synthétiques (Synthetics); Prêt à Ranger
(Cupboard Dry)
Synthétiques (Synthetics); Prêt à Repasser
(Iron Dry)
Repassage Facile (Easy Iron)
2)
Microfibres (Microfiber)
Minuterie 60' (Time 60')
Minuterie 30' (Time 30')
1)
Conjointement au programme, vous pouvez sélectionner 1 ou plusieurs options.
2)
Activé par défaut.
6.2 Données de consommation
Programme
Vitesse d'essorage / humidité rési-
duelle
Coton (Cottons) 7 kg
Temps de sé-
chage
Consom-
mation
énergéti-
que
Page 32

www.aeg.com32
Programme
Prêt à Ranger (Cupboard Dry)
1000 tours/min / 60% 124 min. 4,29 kWh
Prêt à Repasser (Iron
Dry)
1000 tours/min / 60% 100 min. 3,45 kWh
Prêt à Ranger (Cupboard Dry)
800 tours/min / 50% 49 min. 1,43 kWh
7. OPTIONS
Consom-
Vitesse d'essorage / humidité rési-
duelle
1400 tours/min / 50% 109 min. 3,76 kWh
1400 tours/min / 50% 88 min. 3,03 kWh
Synthétiques (Synthetics) 3 kg
1200 tours/min / 40% 43 min. 1,26 kWh
Temps de sé-
chage
mation
énergéti-
que
7.1 Délicat (Delicate)
Pour sécher en douceur les textiles
délicats et sensibles à la chaleur (par
exemple acrylique, viscose). Le
programme fonctionne avec moins de
chaleur avec cette option. Pour les
textiles dont l'étiquette porte le symbole
.
7.2 Alarme (Buzzer)
Lorsque l'option Alarme est activée,
l'alarme rententit :
• à la fin du cycle
• au démarrage et à la fin de la phase
d'anti-froissage
• lors de l'interruption du cycle
Par défaut, l'option Alarme est activée.
Vous pouvez utiliser cette fonction pour
activer ou désactiver l'alarme sonore.
Vous pouvez activer l'option
Alarme (Buzzer) avec tous les
programmes.
7.3 Anti-froissage (Anti-crease)
Prolonge la phase anti-froissage
(30 minutes) à la fin du cycle de séchage
à 90 minutes. Après la phase de séchage,
le tambour tourne quelques fois pour
empêcher le linge de se froisser. Le linge
peut être retiré durant la phase antifroissage.
7.4 Départ Différé (Delay Start)
Permet de retarder le départ
du programme de séchage,
d'un minimum de 30 min à
un maximum de 20 heures.
1. Sélectionnez le programme et les
options de séchage.
2. Appuyez à plusieurs reprises sur la
touche Départ Différé (Delay Start).
le délai nécessaire s'affiche à l'écran (par
ex. si le programme doit
démarrer après 12 heures.)
3. Pour activer l'option Départ Différé
(Delay Start), appuyez sur la touche
Départ/Pause (Start/Pause). Le délai
restant avant le départ diminue sur
l'écran.
Page 33

8. AVANT LA PREMIÈRE UTILISATION
FRANÇAIS
33
Avant d'utiliser l'appareil pour la
première fois, effectuez les opérations
suivantes :
• Nettoyez le tambour du sèche-linge
avec un chiffon humide.
9. UTILISATION QUOTIDIENNE
9.1 Préparation du linge
• Fermez les fermetures à glissière.
• Fermez les boutons des housses de
couette.
• Ne laissez pas de cordons ni de
rubans dénoués (par exemple des
cordons de tablier). Nouez-les avant
de démarrer le programme.
• Videz les poches.
• Si un article dispose d'une doublure
en coton, retournez-le. Assurez-vous
que la doublure en coton est toujours
tournée vers l'extérieur.
• Nous vous recommandons de
toujours régler le programme le
mieux adapté au type de textiles se
trouvant dans l'appareil.
• Ne mélangez pas les articles de
couleurs foncées avec des articles de
• Démarrez un programme court (par
exemple 30 minutes) avec du linge
humide.
couleurs claires. Les couleurs foncées
pourraient déteindre.
• Utilisez un programme adapté pour
les lainages et la bonneterie pour
éviter qu'ils ne rétrécissent.
• Assurez-vous que la charge de linge
ne dépasse pas le poids maximal
indiqué dans le tableau des
programmes.
• Séchez uniquement du linge adapté
au sèche-linge. Reportez-vous aux
étiquettes des vêtements.
• Ne séchez pas les grands articles et
les petits articles ensemble. Les petits
articles peuvent se coincer dans les
grands et ne pas sécher
correctement.
Étiquette d'entretien du textile
Description
Linge adapté au sèche-linge.
Linge adapté au sèche-linge et résistant aux températures de séchage
élevées.
Linge adapté au sèche-linge mais uniquement à basse température.
Linge non adapté au sèche-linge.
9.2 Chargement du linge
ATTENTION!
Ne coincez pas de linge
entre la porte de l'appareil
et le joint en caoutchouc.
1. Tirez le hublot de l'appareil
2. Introduisez le linge, sans le
comprimer.
3. Fermez le hublot de l'appareil.
9.3 Mettez l'appareil en
marche.
Pour mettre l'appareil en marche.
Appuyez sur la touche Marche/Arrêt (On/
Off).
Page 34

www.aeg.com34
Si l'appareil est en fonctionnement,
certaines indications sont affichées sur
l'écran.
9.4 Fonction Veille automatique
Pour réduire la consommation d'énergie,
la fonction Veille automatique éteint
l'appareil :
• si la touche Départ/Pause (Start/
Pause) n'a pas été actionnée dans un
délai de 5 minutes. .
• 5 minutes après la fin du programme.
Appuyez sur la touche Marche/Arrêt (On/
Off) pour mettre l'appareil en marche.
Si l'appareil est en fonctionnement,
certaines indications sont affichées à
l'écran.
9.5 Réglage d'un programme
Utilisez le sélecteur pour sélectionner le
programme.
Le temps restant du programme apparaît
sur l'écran.
Le temps de séchage que
vous voyez s'afficher
s'applique à une charge de 5
kg pour les programmes
coton et jeans. Pour les
autres programmes, le
temps de séchage est en
fonction des charges
recommandées. Pour les
programmes coton et jeans
avec une charge de plus de
5 kg, le temps de séchage
est plus long.
9.6 Options
Conjointement au programme, vous
pouvez régler 1 ou plusieurs options
spéciales.
Pour activer ou désactiver l'option,
appuyez sur la touche .
Lorsque l'option est activée, la LED audessus de la touche ou du symbole
s'affiche à l'écran.
9.7 Option Sécurité des enfants
La sécurité enfants peut être activée
pour empêcher les enfants de jouer avec
l'appareil. La sécurité enfants verrouille
toutes les touches et le sélecteur de
programme (cette option ne verrouille
pas la toucheMarche/Arrêt (On/Off)).
Vous pouvez activer l'option Sécurité
enfants :
• avant d'appuyer sur la touche
Départ/Pause (Start/Pause), ce qui
empêche l'appareil de démarrer
• après avoir appuyé sur la touche
Départ/Pause (Start/Pause), la
sélection des programmes et des
options est désactivée.
Activation de l'option Sécurité enfants :
1. Allumez le sèche-linge.
2. Attendez environ 8 secondes.
3. Sélectionnez 1 des programmes
disponibles.
4. Appuyez en même temps et
maintenez enfoncées les touches
Anti-froissage (Anti-crease) et
Départ Différé (Delay Start).
Le symbole s'affiche.
5. Pour désactiver la Sécurité enfants,
appuyez à nouveau sur les touches
ci-dessus jusqu'à ce que le symbole
disparaisse.
Page 35

FRANÇAIS
35
9.8 Départ d'un programme
Pour lancer le programme :
Appuyez sur la touche Départ/Pause
(Start/Pause).
L'appareil démarre et le voyant audessus de la touche reste fixe.
9.9 Changement de programme
Pour changer de programme :
1. Tournez le sélecteur de programme
sur la position Stop.
2. Sélectionnez un nouveau
programme.
9.10 Fin du programme
Nettoyez le filtre et vidangez
le bac d'eau de
condensation après chaque
cycle de séchage. (Reportezvous au chapitre ENTRETIEN
ET NETTOYAGE.)
Une fois le cycle de séchage terminé, le
symbole clignote sur l'écran. Si
l'option Alarme (Buzzer) est activée, le
signal sonore retentit de façon
intermittente pendant 1 minute.
Si vous n'éteignez pas
l'appareil, la phase antifroissage commence. Le
linge peut être retiré au
cours de cette phase.
Pour sortir le linge :
1. Appuyez sur la touche Marche/Arrêt
(On/Off) pendant 2 secondes pour
éteindre l'appareil.
2. Ouvrez le couvercle de l'appareil.
3. Sortez le linge.
4. Fermez le hublot de l'appareil.
10. CONSEILS
10.1 Conseils écologiques
• Essorez suffisamment le linge avant
de le sécher.
• Respectez les charges indiquées dans
le tableau consacré aux programmes.
• Nettoyez le filtre après chaque cycle
de séchage.
• N'utilisez pas d'assouplissant pour le
lavage et le séchage. Le sèche-linge
adoucit automatiquement le linge.
• Utilisez l'eau de condensation comme
de l'eau distillée, par ex. dans un fer à
repasser à vapeur. Nettoyez l'eau de
condensation si nécessaire (par ex.
avec un filtre à café) pour enlever les
petites peluches qui peuvent s'y
trouver.
• Maintenez toujours dégagées les
fentes de circulation d'air au fond de
l'appareil.
• Veillez à maintenir une bonne
circulation d'air autour de l'appareil.
10.2 Réglage du degré
d'humidité résiduelle dans le
linge
Pour modifier le degré d'humidité
résiduelle dans le linge par défaut :
1. Mettez l'appareil en marche.
2. Attendez environ 8 secondes.
3. Sélectionnez 1 des programmes
disponibles.
4. Appuyez en même temps et
maintenez enfoncées les touches
Page 36

www.aeg.com36
Délicat (Delicate) et Anti-froissage
(Anti-crease).
L'un des symboles s'affiche à l'écran :
- linge séché au maximum
- linge plus sec
- linge sec standard
5. Appuyez sur la touche Départ/Pause
(Start/Pause) à plusieurs reprises
jusqu'à ce que vous ayez réglé le
degré nécessaire.
6. Pour mémoriser le réglage, appuyez
en même temps sur les touches
Délicat (Delicate) et Anti-froissage
(Anti-crease) pendant environ 2
secondes.
10.3 Désactivation du voyant
Réservoir (Tank)
Par défaut, le voyant du bac d'eau est
allumé. Il commence à s'allumer à la fin
du cycle de séchage ou en cours de
cycle si le bac d'eau est plein. Si le kit de
11. ENTRETIEN ET NETTOYAGE
11.1 Nettoyage du filtre
À la fin de chaque cycle, le voyant Filtre
(Filter) s'allume et vous devez nettoyer le
filtre.
Le filtre recueille les
peluches. Des peluches
apparaissent lors du
séchage des textiles dans le
sèche-linge.
vidange est installé, le bac d'eau se
vidange automatiquement et le voyant
est toujours éteint.
Pour éteindre le voyant :
1. Allumez l'appareil.
2. Attendez environ 8 secondes.
3. Sélectionnez l'un des programmes
disponibles.
4. Appuyez simultanément sur les
touches Délicat (Delicate) et Départ
Différé (Delay Start) et maintenezles enfoncées.
L'une des deux configurations est
possible :
• le voyant Réservoir (Tank) : est
allumé et le symbole
s'affiche ; le voyant du bac d'eau
de condensation est allumé en
permanence
• le voyant Réservoir (Tank) : est
éteint et le symbole
s'affiche ; le voyant du bac d'eau
de condensation est éteint en
permanence
3. Nettoyez le filtre après vous être
humecté la main.
Pour nettoyer le filtre :
1. Ouvrez le hublot. Retirez le filtre.
2. Ouvrez le filtre.
4. Au besoin, nettoyez le filtre avec la
brosse sous l'eau tiède et/ou avec un
aspirateur. Refermez le filtre.
Page 37

5. Au besoin, retirez les peluches le
logement et le joint du filtre. Vous
pouvez utiliser un aspirateur. Insérez
le filtre dans son logement.
FRANÇAIS
2. Sortez le raccord en plastique et
vidangez le bac d'eau de
condensation dans un évier ou un
réceptacle équivalent.
3. Remettez le raccord en plastique en
place et réinstallez le bac d'eau de
condensation.
4. Pour faire repartir le programme,
appuyez sur la touche Départ/Pause
(Start/Pause).
37
11.2 Vidange du bac d'eau de condensation
Videz le bac d'eau de condensation
après chaque cycle de séchage.
Si le bac d'eau de condensation est
plein, le programme s'interrompt
automatiquement. Le voyant Réservoir
(Tank) est allumé et vous devez vidanger
le bac d'eau de condensation.
Pour vidanger le bac d'eau de
condensation :
1. Tirez sur le bac d'eau de
condensation et maintenez-le en
position horizontale.
11.3 Nettoyage du condenseur
Si le voyant Condenseur (Condenser)
clignote, le condenseur et son
compartiment doivent être nettoyés.
Pour nettoyer le condenseur et son
compartiment :
1. Ouvrez le hublot.
2. Déplacez le curseur de verrouillage
situé en bas du hublot et ouvrez la
porte du condenseur.
3. Tournez les 2 loquets pour
déverrouiller le couvercle du
condenseur.
Page 38

www.aeg.com38
4. Abaissez le couvercle du condenseur.
5. Saisissez la poignée et sortez le
condenseur du compartiment
inférieur. Placez le condenseur en
position horizontale pour éviter de
renverser l'eau restante.
6. Nettoyez le condenseur en position
verticale au-dessus d'une cuvette ou
d'un bac. Rincez-le avec une
douchette à main.
7. Replacez le condenseur à l'intérieur
du compartiment inférieur.
8. Fermez le couvercle du condenseur.
9. Verrouillez les 2 loquets jusqu'à ce
qu'ils produisent un clic.
10. Fermez la porte du condenseur.
11.4 Nettoyage du tambour
AVERTISSEMENT!
Débranchez l'appareil avant
de le nettoyer.
Utilisez un détergent savonneux neutre
standard pour nettoyer la surface interne
du tambour et les nervures de ce dernier.
Séchez les surfaces nettoyées avec un
chiffon doux.
ATTENTION!
N'utilisez pas de matières
abrasives ou de laine d'acier
pour nettoyer le tambour.
11.5 Nettoyage du bandeau
de commande et de
l'enveloppe
Utilisez un détergent savonneux neutre
standard pour nettoyer le bandeau de
commande et le boîtier.
Nettoyez-les à l'aide d'un chiffon
humide. Séchez les surfaces nettoyées
avec un chiffon doux.
ATTENTION!
Ne nettoyez pas l'appareil à
l'aide de produits de
nettoyage pour meubles ou
autres pouvant entraîner une
corrosion.
11.6 Nettoyage des fentes de
circulation d'air
Utilisez un aspirateur pour retirer les
peluches des fentes de circulation d'air.
Page 39

12. DÉPANNAGE
FRANÇAIS
39
Anomalie
1)
Le sèche-linge
ne fonctionne
pas.
Résultats de séchage insatisfaisants.
Le hublot de
l'appareil ne ferme pas.
Err
(Erreur) sur
l'écran.
Cause probable Solution
Le sèche-linge n'est pas branché
électriquement.
Branchez l'appareil sur le secteur.
Vérifiez le fusible dans la boîte à
fusibles (installation domestique).
Le hublot est ouvert. Fermez le hublot.
La touche Marche/Arrêt (On/Off)
n'a pas été activée.
La touche Départ/Pause (Start/
Pause) n'a pas été activée.
Appuyez sur la touche Marche/
Arrêt (On/Off).
Appuyez sur la touche Départ/
Pause (Start/Pause).
L'appareil est en mode veille. Appuyez sur la touche Marche/
Arrêt (On/Off).
Sélection d'un programme inapproprié.
Le filtre est obstrué.
L'option Séchage + (Dry Plus) est
au niveau minimum.
4)
Sélectionnez un programme adap-
2)
té.
Nettoyez le filtre.
3)
Modifiez l'option Séchage + (Dry
Plus) et passez au niveau modéré
ou maximum.
4)
Charge excessive. Respectez la charge maximale.
La grille d'aération est obstruée. Nettoyez la grille d'aération qui se
trouve en bas de l'appareil.
Le capteur d'humidité du tambour
est sale.
Degré d'humidité résiduelle dans
le linge incorrect.
Le condenseur est obstrué.
Le filtre n'est pas verrouillé en position.
Le linge est coincé entre le hublot
et le joint.
Vous essayez de modifier le programme ou l'option alors que le
Nettoyez la surface avant du tambour.
Réglez le degré d'humidité résiduelle dans le linge.
Nettoyez le condenseur.
5)
3)
Mettez le filtre dans la bonne position.
Placez la charge correctement
dans le tambour.
Éteignez puis rallumez le sèche-linge. Faites une nouvelle sélection.
cycle a commencé.
L'option que vous essayez d'activer ne s'applique pas au program-
Éteignez puis rallumez le sèche-linge. Faites une nouvelle sélection.
me que vous avez sélectionné.
Page 40

www.aeg.com40
Anomalie
1)
Durée affichée à
l'écran anormalement longue.
Programme
inactif.
La durée du cycle est calculée sur
la base du volume et de l'humidité
du linge.
Le bac d'eau de condensation est
plein.
Cause probable Solution
La procédure automatique ; il ne
s'agit pas d'une anomalie de l'appareil.
Vidangez le bac d'eau de condensation, puis appuyez sur la touche
Départ/Pause (Start/Pause).
3)
Il n'y a pas assez de linge. Sélectionnez la durée du program-
me. La durée doit être proportionnelle à la charge. Pour sécher un
seul article ou de petites quantités
Cycle de séchage trop court.
de linge, nous vous recommandons d'utiliser des durées courtes.
Le linge est trop sec. Sélectionnez la durée du program-
me ou un niveau de séchage plus
élevé (par exemple Très Sec (Extra
Dry))
Le filtre est obstrué. Nettoyez le filtre.
Charge excessive. Respectez la charge maximale.
Cycle de séchage trop long
Le linge n'est pas bien essoré. Essorez correctement le linge.
6)
La température de la pièce est très
élevée ; il ne s'agit pas d'une ano-
Si possible, réduisez la température de la pièce.
malie de l'appareil.
1)
Si un message d'erreur s'affiche sur l'écran (par exemple E51) : Éteignez puis rallumez le sèche-linge.
Sélectionnez le nouveau programme. Appuyez sur la touche Départ/Pause. Cela ne fonctionne pas ? contactez votre service après-vente et indiquez le code d'erreur.
2)
Suivez le descriptif du programme ; reportez-vous au TABLEAU PROGRAMMES
3)
Reportez-vous au chapitre ENTRETIEN ET NETTOYAGE
4)
Uniquement les sèche-linges avec l'option Séchage + (Dry Plus)
5)
Reportez-vous au chapitre CONSEILS ET ASTUCES
6)
Remarque : Au bout de 5 heures au maximum, le cycle de séchage s'arrête automatiquement.
13. CARACTÉRISTIQUES TECHNIQUES
Hauteur x Largeur x Profondeur 850 x 600 x 540 mm (maximum 570 mm)
Profondeur max. avec hublot ouvert 1030 mm
Largeur max. avec hublot ouvert 950 mm
Hauteur réglable 850 mm (+ 15 mm - réglage des pieds)
Capacité du tambour 104 l
Page 41

FRANÇAIS
Charge maximale 7 kg
Tension 230 V
Fréquence 50 Hz
Fusible nécessaire 16 A
Puissance totale 2800 W
Classe d'efficacité énergétique B
Consommation énergétique
Consommation énergétique annuelle
Puissance absorbée en mode « Veille » 0,41 W
Puissance absorbée en mode éteint 0,41 W
Type d'utilisation Domestique
Température ambiante autorisée + 5 °C à + 35 °C
Niveau de protection contre l'infiltration de
particules solides et d'humidité assuré par
le couvercle de protection, excepté là où
l'équipement basse tension ne dispose
d'aucune protection contre l'humidité
1)
Conformément à la norme EN 61121. 7 kg de coton, essoré à 1 000 tr/min.
2)
Consommation énergétique annuelle en kWh basée sur 160 cycles de séchage du programme standard pour le coton, avec une charge complète ou partielle, et la consommation des modes basse consommation. La consommation énergétique réelle par cycle dépendra de l'utilisation de l'appareil (NORME (EU) No 392/2012).
1)
4,29 kWh
504 kWh
2)
IPX4
41
14. INSTALLATION
14.1 Déballage
ATTENTION!
Avant de mettre l'appareil
en service, il est impératif
d'enlever tous les éléments
de protection de transport.
Pour retirer les cales en polystyrène :
1. Ouvrez le hublot.
2. Sortez le tuyau en plastique et les
cales en polystyrène du tambour.
14.2 Réglage des pieds
Il est possible de régler la hauteur du
sèche-linge. Pour ce faire, réglez les
pieds.
Page 42

15mm
> 850 mm
600 mm
540 mm
www.aeg.com42
cuisine si un espace correct est
disponible (voir schéma).
14.3 Installation sous un plan de travail
L'appareil peut être installé de façon
autonome ou sous un plan de travail de
15. EN MATIÈRE DE PROTECTION DE
L'ENVIRONNEMENT
Recyclez les matériaux portant le
symbole . Déposez les emballages
dans les conteneurs prévus à cet effet.
Contribuez à la protection de
l'environnement et à votre sécurité,
recyclez vos produits électriques et
électroniques. Ne jetez pas les appareils
portant le symbole avec les ordures
ménagères. Emmenez un tel produit
dans votre centre local de recyclage ou
contactez vos services municipaux.
Page 43

СОДЕРЖАНИЕ
1. СВЕДЕНИЯ ПО ТЕХНИКЕ БЕЗОПАСНОСТИ...............................................44
2. УКАЗАНИЯ ПО БЕЗОПАСНОСТИ................................................................. 47
3. ОПИСАНИЕ ИЗДЕЛИЯ...................................................................................49
4. ПРИНАДЛЕЖНОСТИ......................................................................................50
5. ПАНЕЛЬ УПРАВЛЕНИЯ................................................................................. 51
6. ТАБЛИЦА ПРОГРАММ................................................................................... 51
7. РЕЖИМЫ.........................................................................................................54
8. ПЕРЕД ПЕРВЫМ ИСПОЛЬЗОВАНИЕМ........................................................55
9. ЕЖЕДНЕВНОЕ ИСПОЛЬЗОВАНИЕ.............................................................. 55
10. ПОЛЕЗНЫЕ СОВЕТЫ...................................................................................57
11. УХОД И ОЧИСТКА........................................................................................ 58
12. ПОИСК И УСТРАНЕНИЕ НЕИСПРАВНОСТЕЙ..........................................61
13. ТЕХНИЧЕСКИЕ ДАННЫЕ............................................................................ 63
14. УСТАНОВКА.................................................................................................. 64
ДЛЯ ИДЕАЛЬНЫХ РЕЗУЛЬТАТОВ
Благодарим Вас за выбор данного изделия AEG. Оно будет безупречно
служить Вам долгие годы – ведь мы создали его, призвав на помощь
инновационные технологии, которые помогают облегчить жизнь и реализуют
функции, которых не найдешь в обычных приборах. Потратьте несколько
минут на чтение, чтобы получить от своей покупки максимум пользы.
На нашем веб-сайте Вы сможете:
Найти рекомендации по использованию изделий, руководства по
эксплуатации, мастер устранения неисправностей, информацию о
техническом обслуживании:
www.aeg.com/webselfservice
Зарегистрировать свое изделие для улучшения обслуживания:
www.registeraeg.com
РУССКИЙ
43
Приобрести дополнительные принадлежности, расходные материалы и
фирменные запасные части для своего прибора:
www.aeg.com/shop
ПОДДЕРЖКА ПОТРЕБИТЕЛЕЙ И СЕРВИСНОЕ
ОБСЛУЖИВАНИЕ
Мы рекомендуем использовать оригинальные запчасти.
При обращении в сервис-центр следует иметь под рукой следующую
информацию: модель, код изделия (PNC), серийный номер.
Данная информация находится на табличке с техническими данными.
Внимание / Важные сведения по технике безопасности.
Общая информация и рекомендации
Информация по охране окружающей среды
Право на изменения сохраняется.
Page 44

www.aeg.com44
1. СВЕДЕНИЯ ПО ТЕХНИКЕ БЕЗОПАСНОСТИ
Перед установкой и эксплуатацией прибора
внимательно ознакомьтесь с приложенным
руководством. Производитель не несет
ответственности за травмы и повреждения,
полученные/вызванные неправильной установкой и
эксплуатацией. Позаботьтесь о том, чтобы данное
руководство было у Вас под рукой на протяжении
всего срока службы прибора.
1.1 Безопасность детей и лиц с ограниченными возможностями
ВНИМАНИЕ!
Существует риск удушья, получения травм
или стойких нарушений нетрудоспособности.
• Данный прибор может эксплуатироваться детьми
старше 8 лет и лицами с ограниченными
физическими, сенсорными или умственными
способностями и с недостаточным опытом или
знаниями только при условии нахождения под
присмотром лица, отвечающего за их
безопасность, или после получения
соответствующих инструкций, позволяющих им
безопасно эксплуатировать электроприбор и
дающих им представление об опасности,
сопряженной с его эксплуатацией.
• Не позволяйте детям играть с прибором.
• Детям младше 3 лет запрещается находиться
рядом с прибором, если взрослые не
обеспечивают за ними постоянный надзор.
• Храните все упаковочные материалы вне
досягаемости детей.
• Храните все средства для стирки вне
досягаемости детей.
• Не подпускайте детей и домашних животных к
прибору, когда его дверца открыта.
Page 45

РУССКИЙ 45
• Если прибор оснащен устройством защиты от
детей, рекомендуем Вам включить это устройство.
• Очистка и доступное пользователю техническое
обслуживание не должно производиться детьми
без присмотра.
1.2 Общие правила техники безопасности
• Не изменяйте параметры данного прибора.
• Если сушильный барабан устанавливается поверх
стиральной машины, используйте монтажный
комплект. Комплект для вертикальной сборки,
который можно приобрести в авторизованных
магазинах, может использоваться только с
приборами, которые перечислены в поставляемых
вместе с принадлежностью инструкциях.
Внимательно изучите их перед установкой (см.
Вкладыш с инструкцией по установке).
• Прибор может быть установлен как отдельно, так и
под столешницу, если под ней достаточно места
(см. вкладыш с инструкцией по установке).
• Не устанавливайте прибор за дверью, запираемой
на замок, за раздвижной дверью или за дверью с
петлями, расположенными на противоположной
стороне по отношению к петлям на дверце
прибора.
• Вентиляционные отверстия в днище (если они
предусмотрены конструкцией) не должны
перекрываться ковровым покрытием.
• Вставляйте вилку сетевого кабеля в розетку только
во конце установки прибора. Убедитесь, что после
установки имеется доступ к вилке.
• Обеспечьте надлежащую вентиляцию для того,
чтобы избежать обратного притока газов в
помещение, создаваемого устройствами, в
которых происходит сгорание других видов
топлива (включая камины).
• Запрещается отводить выпускаемый прибором
воздух в вытяжную систему, используемую для
Page 46

www.aeg.com46
приборов, в которых происходит сжигание газа или
иных видов топлива. (если это применимо)
• В случае повреждения шнура питания во
избежание несчастного случая он должен быть
заменен изготовителем, авторизованным
сервисным центром или специалистом с
равнозначной квалификацией.
• Соблюдайте максимально допустимую загрузку в 7
кг (см. Главу «Таблица программ»).
• Не используйте прибор для вещей, подвергшиеся
чистке с помощью промышленных химикатов.
• Убирайте ворс, скопившийся вокруг прибора.
• Не используйте прибор без фильтра. После
каждым использованием или перед ним очищайте
фильтр для ворса.
• Не сушите в сушильном барабане нестиранные
вещи.
• Перед тем как сушить в сушильном барабане
вещи, загрязненные такими веществами, как
кулинарный жир, ацетон, спирт, бензин, керосин,
пятновыводители, скипидар, воск и средства для
удаления воска, их следует выстирать в горячей
воде с увеличенным количеством стирального
порошка.
• Нельзя сушить в сушильном барабане изделия из
вспененной резины (латексная губка), шапочки для
душа, водостойкие текстильные изделия, изделия
на резиновой основе, а также одежду и подушки со
вставками из вспененной резины.
• Смягчители для ткани и другие подобные средства
следует использовать в соответствии с указаниями
их изготовителей.
• Выньте из карманов все предметы, например,
зажигалки и спички.
• Никогда не останавливайте сушильные барабан до
завершения цикла сушки за исключением случая,
когда белье быстро вынимается и расстилается
для обеспечения рассеивания тепла.
Page 47

• Заключительный этап цикла сушки в сушильном
барабане выполняется без нагрева (этап
охлаждения) для того, чтобы конечная
температура белья позволила обеспечить его
сохранность.
• Перед выполнением операций по чистке и уходу
выключите прибор и извлеките вилку сетевого
шнура из розетки.
2. УКАЗАНИЯ ПО БЕЗОПАСНОСТИ
РУССКИЙ 47
2.1 Установка
• Удалите всю упаковку.
• Не устанавливайте и не
подключайте прибор, если он имеет
повреждения.
• Следуйте приложенным к прибору
инструкциям по его установке.
• Прибор имеет большой вес: не
забывайте о мерах
предосторожности при его
перемещении. Обязательно
используйте защитные перчатки.
• Не устанавливайте и не
эксплуатируйте прибор в
помещениях с температурой ниже
5°C или выше 35°C.
• Убедитесь, что пол на месте
установки прибора ровный,
прочный, чистый и не боится
нагрева.
• Убедитесь, что между днищем
прибора и полом имеется
достаточная вентиляция.
• Перемещайте прибор только в
вертикальном положении.
• Задняя сторона прибора должна
располагаться у стены.
• После установки прибора в
рабочее положение при помощи
спиртового уровня убедитесь в том,
что прибор стоит абсолютно ровно.
При необходимости выровняйте
его, изменяя высоту ножек.
2.2 Подключение к электросети
ВНИМАНИЕ!
Существует риск пожара и
поражения электрическим
током.
• Прибор должен быть заземлен.
• Убедитесь, что параметры
электропитания, указанные на
табличке с техническими данными,
соответствуют параметрам
электросети. В противном случае
вызовите электрика.
• Включайте прибор только в
установленную надлежащим
образом электророзетку с
защитным контактом.
• Не пользуйтесь тройниками и
удлинителями.
• Для отключения прибора от
электросети не тяните за кабель
электропитания. Всегда беритесь
за саму вилку.
• Не беритесь за кабель
электропитания или за его вилку
мокрыми руками.
• Только для Великобритании и
Ирландии. Прибор оснащен вилкой,
рассчитанной на ток 13 А. При
замене предохранителя в вилке
электропитания следует
использовать предохранитель 13 А
ASTA (BS 1362).
• Данный прибор соответствует
директивам E.E.C.
Page 48

www.aeg.com48
2.3 Эксплуатация
ВНИМАНИЕ!
Существует риск травмы,
поражения электрическим
током, пожара, получения
ожогов или повреждения
прибора.
• Используйте прибор только в
жилых помещениях.
• Не сушите поврежденные изделия
с набивкой или наполнителями.
• Сушите только ткани, для которых
допускается сушка в сушильном
барабане. Следуйте указаниям на
ярлыке.
• Если при стирке белья
использовался пятновыводитель,
то перед тем, как помещать белье в
сушильный барабан, следует
выполнить дополнительный цикл
полоскания.
• Не пейте конденсат/
дистиллированную воду и не
готовьте на них пищу. Это может
причинить вред здоровью людей и
домашних животных.
• Не садитесь и не вставайте на
открытую дверцу.
• Не сушите в сушильном барабане
неотжатые вещи.
2.4 Уход и очистка
ВНИМАНИЕ!
Это может привести к
повреждению прибора или
травмам.
• Не используйте для очистки
прибора подаваемую под
давлением воду или пар.
• Протирайте прибор мягкой влажной
тряпкой. Используйте только
нейтральные моющие средства. Не
используйте абразивные средства,
царапающие губки, растворители
или металлические предметы.
2.5 Утилизация
ВНИМАНИЕ!
Существует опасность
травмы или удушья.
• Отключите прибор от электросети.
• Отрежьте и утилизируйте кабель
электропитания.
• Удалите защелку дверцы, чтобы
предотвратить риск ее запирания
при попадании внутрь прибора
детей и домашних животных.
Page 49

3. ОПИСАНИЕ ИЗДЕЛИЯ
21
4
3
8
9
10
11
5
6
7
РУССКИЙ 49
Емкость для конденсата
1
Панель управления
2
Дверца прибора
3
Фильтр
4
Кнопка дверцы конденсатора
5
Вентиляционные щели
6
Пользователь может
Регулируемые ножки
7
Дверца конденсатора
8
Крышка конденсатора
9
Фиксаторы крышки конденсатора
10
Табличка с техническими данными
11
перевесить дверцу, чтобы
изменить сторону ее
открывания. Это поможет
облегчить загрузку и
выгрузку белья или
установку самого прибора
(см. отдельную брошюру).
Page 50

www.aeg.com50
4. ПРИНАДЛЕЖНОСТИ
4.1 Комплект для установки на стиральную машину
Наименование принадлежности:
SKP11, STA8, STA9
Имеется в продаже в ближайшем
авторизованном магазине.
Комплект для вертикальной сборки
может использоваться только со
стиральными машинами,
перечисленными в буклете. См.
приложенный буклет.
Внимательно прочитайте инструкцию,
прилагаемую к данной
дополнительной принадлежности.
Наименование принадлежности: DK11.
Имеется в продаже в ближайшем
авторизованном магазине (возможна
установка на сушильные барабаны
нескольких типов)
Принадлежность для проточного
слива конденсата в таз, сифон,
канализацию и т.д. После установки
слив конденсата из контейнера для
воды производится автоматически.
Контейнер для конденсата должен
оставаться в приборе.
Установленный шланг должен
находиться на высоте не менее 50 см
и не более 1 м от уровня пола. Шланг
не должен образовывать петлю. При
необходимости укоротите шланг.
Внимательно прочитайте инструкцию,
прилагаемую к данной
дополнительной принадлежности.
4.2 Комплект для слива конденсата
Page 51

5. ПАНЕЛЬ УПРАВЛЕНИЯ
1 2 3 4 5 6 7 8 9
РУССКИЙ 51
Селектор программ
1
Кнопка Вкл/Выкл (On/Off)
2
Кнопка Щадящая сушка (Delicate)
3
Кнопка Звуковой сигнал (Buzzer)
4
Кнопка Антисминание (Anti-crease)
5
Кнопка Задержка старта (Delay
6
Start)
Дисплей
7
Кнопка Старт/Пауза (Start/Pause)
8
6. ТАБЛИЦА ПРОГРАММ
Программы
Очень сухое (Extra Dry) 7 кг Степень сушки: очень сухое.
Cухое (Strong Dry) 7 кг Степень сушки: сухое.
В шкаф (Cupboard Dry)
2)3)
Под утюг (Iron Dry)
2)
Загрузка
7 кг Степень сушки: в шкаф.
7 кг
Индикаторы:
9
Слейте конденсат (Tank) – слейте
воду из контейнера для сбора
конденсата
Почистите фильтры (Filter) –
произведите очистку фильтра
Почистите конденсер
(Condenser) – произведите
очистку конденсатора
1)
Хлопок (Cottons)
Свойства / Символы на ярлыке
Степень сушки: пригодна для
глажки.
/
/
/
/
Page 52

www.aeg.com52
Программы
Загрузка
1)
Свойства / Символы на ярлыке
Повседневная одежда, напри‐
Джинсы (Jeans) 7 кг
мер, джинсы, свитера из тканей
различной толщины (например,
/
на воротнике, манжетах и швах).
Сушка односпальных или двус‐
Подушки (Pillows) 3 кг
пальных одеял и подушек (с пер‐
овым, пуховым или синтетиче‐
/
ским наполнением).
Деликатные ткани
(Delicates)
3 кг Изделия из тонких тканей.
/
Синтетика (Synthetics)
Очень сухое (Extra Dry) 3 кг Степень сушки: очень сухое.
2)
В шкаф (Cupboard Dry)
Под утюг (Iron Dry) 3 кг
3 кг Степень сушки: в шкаф.
Степень сушки: пригодна для
глажки.
/
/
/
Простой уход за бельем, которому требуется
минимум глажки. Результаты сушки могут
различаться в зависимости от типа и вида
Легкая глажка (Easy
Iron)
1 кг (или 5
рубашек)
ткани. Перед загрузкой встряхните каждое за‐
гружаемое изделие. По завершении програм‐
мы быстро сразу же извлеките вещи из бара‐
бана и повесьте их на вешалку.
/
Спортивная одежда, одежда из тонких и лег‐
Микрофибра (Microfiber) 2 кг
ких тканей, микрофибры и полиэстра, кото‐
рые не подлежат глажке.
Программа с заданным време‐
Время 60 мин (Time 60') 3 кг
нем для сушки отдельных ве‐
/
щей.
Программа с заданным време‐
Время 30 мин (Time 30') 1 кг
нем для сушки отдельных ве‐
/
щей.
1)
Максимальный вес приведен для сухих вещей.
2)
Только для тестирующих организаций: стандартные программы для тестирования приведе‐
ны в документации EN 61121. Очищайте фильтр после каждого цикла
3)
Программа Хлопок (Cottons) В шкаф (Cupboard Dry) является стандартной программой
для хлопка и является наиболее энергоэффективной программой для сушки влажного белья из
хлопка нормальной степени загрязненности.
Page 53

6.1 Выбор программ и режимов
Режимы
Программы
1)
Хлопок (Cottons); Очень сухое (Extra
Dry)
Хлопок (Cottons); Cухое (Strong Dry)
Хлопок (Cottons); В шкаф (Cupboard
Dry)
Хлопок (Cottons); Под утюг (Iron Dry)
Джинсы (Jeans)
Щадящая сушка
(Delicate)
РУССКИЙ 53
Антисминание
(Anti-crease)
Подушки (Pillows)
Деликатные ткани (Delicates)
2)
2)
Синтетика (Synthetics); Очень сухое
(Extra Dry)
Синтетика (Synthetics); В шкаф
(Cupboard Dry)
Синтетика (Synthetics); Под утюг (Iron
Dry)
Легкая глажка (Easy Iron)
2)
Микрофибра (Microfiber)
Время 60 мин (Time 60')
Время 30 мин (Time 30')
1)
Одновременно с программой можно выбрать один или более режимов.
2)
Включено по умолчанию.
6.2 Данные по потреблению энергии
Программа
Отжим при / остаточная влаж‐
ность
Хлопок (Cottons) 7 кг
Время сушки
Энергопо‐
требле‐
ние
Page 54

www.aeg.com54
Программа
В шкаф (Cupboard
Dry)
1000 об/мин / 60% 124 мин 4,29 кВт·ч
Под утюг (Iron Dry) 1400 об/мин / 50% 88 мин 3,03 кВт·ч
1000 об/мин / 60% 100 мин 3,45 кВт·ч
В шкаф (Cupboard
Dry)
800 об/мин / 50% 49 мин 1,43 кВт·ч
7. РЕЖИМЫ
7.1 Щадящая сушка (Delicate)
Сушка более легких, деликатных
тканей, боящихся высоких температур
(например, акрила, вискозы). При
использовании данного режима
программа работает при пониженной
температуре. Для изделий со значком
на ярлыке.
7.2 Звуковой сигнал (Buzzer)
При работе этой функции звуковые
сигналы выдаются в следующих
случаях:
• завершение цикла
• начало и окончание фазы
антисминания.
• прерывание цикла.
По умолчанию звуковая сигнализация
включена. При помощи данной
функции можно включать и отключать
звуковую сигнализацию.
Режим Звуковой сигнал
(Buzzer) можно задавать
для любой программы.
Отжим при / остаточная влаж‐
ность
1400 об/мин / 50% 109 мин 3,76 кВт·ч
Синтетика (Synthetics) 3 кг
1200 об/мин / 40% 43 мин 1,26 кВт·ч
Время сушки
Энергопо‐
требле‐
ние
7.3 Антисминание (Anticrease)
Увеличение стандартного времени
фазы «антисминание» (30 минут) по
окончании цикла сушки до 90 минут.
По окончании фазы сушки барабан
время от времени вращается, не
допуская образования на белье
складок. При выполнении фазы
«Антисминание» белье можно вынуть
из сушильного барабана.
7.4 Задержка старта (Delay Start)
Задержка запуска
программы сушки от 30
минут (минимум) до 20
часов (максимум).
1. Выберите программу сушки и
режимы.
2. Многократным нажатием на кнопку
Задержка старта (Delay Start)
добейтесь:
появления на дисплее требуемой
величины отсрочки пуска (например,
для пуска программы через 12
часов).
3. Для включения режима Задержка
старта (Delay Start) нажмите на
кнопку Старт/Пауза (Start/Pause).
Page 55

На дисплее начнется обратный
отсчет времени, остающегося до
старта.
8. ПЕРЕД ПЕРВЫМ ИСПОЛЬЗОВАНИЕМ
РУССКИЙ 55
)Перед первым использованием
прибора необходимо произвести
данные операции:
• Протрите сушильный барабан
влажной тряпкой.
• Запустите короткую программу
(напр. 30 минут) с влажным бельем.
9. ЕЖЕДНЕВНОЕ ИСПОЛЬЗОВАНИЕ
9.1 Подготовка белья
• Закройте молнии.
• Застегните пуговицы или иные
крепления пододеяльников.
• Не позволяйте завязкам или
лентам (например, тесемкам
фартука) свободно развиваться.
Завяжите их до запуска программы.
• Извлеките все содержимое
карманов.
• Если у предмета одежды имеется
внутренний слой из ваты,
выверните его наизнанку. Ватный
слой всегда должен находиться
снаружи
• Рекомендуем выбирать программу,
подходящую к типу ткани, белье из
которой загружено в прибор.
• Не загружайте ткани насыщенных
цветов вместе со светлыми
тканями. Ткани насыщенных цветов
могут полинять.
• Для изделий из трикотажа и хлопка
используйте соответствующую
программу, чтобы избежать усадки
одежды.
• Убедитесь, что вес белья не
превышает максимально
допустимого веса, указанного в
Таблице программ.
• Сушите только изделия, для
которых допускается сушка в
сушильном барабане.
Руководствуйтесь информацией на
ярлыках изделий.
• Не сушите вместе большие и
маленькие вещи. Маленькие вещи
могут запутаться в больших и не
высохнуть.
Ярлык изделия Описание
Изделия, для которых допускается сушка в сушильном барабане.
Изделия, для которых допускается сушка в сушильном барабане
и сушка при более высоких температурах.
Изделия, для которых допускается сушка в сушильном барабане
при условии низкой температуры сушки.
Изделия, сушка которых в сушильном барабане не допускается.
Page 56

www.aeg.com56
9.2 Загрузка белья
ОСТОРОЖНО!
Позаботьтесь о том, чтобы
белье не было зажато
между дверцей и
резиновым уплотнением.
1. Потяните дверцу прибора.
2. Загрузите белье, не стараясь
набить его как можно плотнее.
3. Закройте дверцу прибора.
9.3 Включение прибора
Для включения прибора:
Нажмите на кнопку Вкл/Выкл (On/Off).
Если прибор включен, на дисплее
высвечивается ряд индикаторов.
9.4 Функция автоматического перехода в режим ожидания
Для снижения энергопотребления
прибор автоматически переходит в
режим ожидания в следующих
случаях:
• если кнопка Старт/Пауза (Start/
Pause) не была нажата в течение
пяти минут;
• через пять минут после
завершения программы.
Для включения прибора нажмите на
кнопку Вкл/Выкл (On/Off).
Если прибор включен, на дисплее
высвечивается ряд индикаторов.
9.5 Выбор программы
Для выбора программы
воспользуйтесь селектором программ.
На дисплее отобразится информация
об ориентировочной
продолжительности выбранной
программы.
Время сушки, которое Вы
видите на дисплее,
рассчитывается исходя из
загрузки 5 кг изделий из
хлопка и джинсовой ткани.
Информация о других
программах
рассчитывается исходя из
рекомендованных для них
объемов загрузки. На
сушку загрузки изделий из
хлопка и джинсовой ткани,
превышающей 5 кг
изделий, потребуется
больше времени.
9.6 Режимы
Одновременно с программой можно
выбрать один или более особых
режимов.
Для включения или выключения
режима нажмите на соответствующую
кнопку .
При включении режима над кнопкой
загорается светодиод или на дисплее
отображается символ данного
режима.
9.7 Режим «Защита от детей»
Чтобы дети не играли с прибором,
можно установить защиту от детей.
Режим «Защита от детей» выполняет
блокировку всех кнопок и селектора
программ (кнопка Вкл/Выкл (On/Off)
не блокируется).
Режим «Защита от детей» можно
включить:
• до нажатия на кнопку Старт/Пауза
(Start/Pause) – прибор будет
невозможно запустить;
• после нажатия на кнопку Старт/
Пауза (Start/Pause) – выбор и
запуск программ и режимов будет
недоступен.
Page 57

РУССКИЙ 57
Установка режима «Защита от детей»:
1. Включите сушильный барабан.
2. Подождите приблизительно 8
секунд.
3. Выберите одну из доступных
программ.
4. Одновременно нажмите и
удерживайте кнопки
Антисминание (Anti-crease) и
Задержка старта (Delay Start).
На дисплее появится значок
5. Для выключения функции «Защита
от детей» снова нажмите
указанные выше кнопки, чтобы
данный значок пропал с дисплея.
.
9.8 Запуск программы
Для запуска программы:
Нажмите на кнопку Старт/Пауза
(Start/Pause).
Прибор приступит к работе, а
светодиод над кнопкой перестанет
мигать и загорится постоянным
светом.
1. Поверните селектор программ в
положение Stop.
2. Задайте новую программу.
9.10 Окончание программы
Производите очистку
фильтра и опорожняйте
контейнер для конденсата
после каждого цикла
сушки. (См. Главу «УХОД
И ОЧИСТКА»).
По окончании цикла сушки на дисплее
начинает мигать значок . Если
включен режим Звуковой сигнал
(Buzzer), в течение одной минуты
будет выдаваться прерывистый
звуковой сигнал.
Если Вы не выключите
прибор, запустится этап
антисминания. Во время
выполнения данного этапа
белье можно вынуть из
прибора.
Выемка белья:
1. Нажмите на кнопку Вкл/Выкл (On/
Off) на две секунды для
выключения прибора.
2. Откройте дверцу прибора.
3. Выньте белье.
4. Закройте дверцу прибора.
9.9 Смена программы
Для смены программы:
10. ПОЛЕЗНЫЕ СОВЕТЫ
10.1 Рекомендации по экологичному использованию
• Хорошо отжимайте белье перед
сушкой.
• Придерживайтесь норм загрузки,
указанных в Таблице программ.
• Очищайте фильтр после каждого
цикла сушки.
• Не используйте в ходе стирки
смягчитель для ткани, если белью
предстоит сушка. Высушенное в
сушильном барабане белье
автоматически становится мягким.
• Конденсат можно использовать в
качестве дистиллированной воды,
например при паровой глажке. При
необходимости вначале
отфильтруйте конденсат
(например, с помощью кофейного
фильтра) для удаления из него
частичек ворса.
• Всегда следите за тем, чтобы
вентиляционные щели в цоколе
прибора не были перекрыты.
Page 58

www.aeg.com58
• Обеспечьте хорошую вентиляцию в
месте установки прибора.
10.2 Настройка уровня
остаточной влажности
белья
Для изменения уровня остаточной
влажности белья:
1. Включите прибор.
2. Подождите приблизительно 8
секунд.
3. Выберите одну из доступных
программ.
4. Одновременно нажмите и
удерживайте кнопки Щадящая
сушка (Delicate) и Антисминание
(Anti-crease).
На дисплее высветится один из
символов:
– максимально сухое белье
– более сухое белье
– стандартный уровень
сухости белья
5. Нажимайте на кнопку Старт/Пауза
(Start/Pause) до тех пор, пока не
установится требуемый уровень.
6. Для записи значения в память
одновременно нажмите на кнопки
Щадящая сушка (Delicate) и
Антисминание (Anti-crease)
приблизительно на 2 секунды.
заполнения резервуара для воды она
всегда включается по окончании цикла
сушки или в ходе цикла. В случае
установки комплекта для слива
конденсата слив резервуара для воды
производится автоматически, а
индикация всегда отключена.
Отключение индикации:
1. Включите прибор.
2. Подождите приблизительно 8
секунд.
3. Выберите одну из доступных
программ.
4. Одновременно нажмите и
удерживайте кнопки Щадящая
сушка (Delicate) и Задержка
старта (Delay Start).
Доступна одна из двух конфигураций:
• индикатор Слейте конденсат
(Tank) и высвечивается символ
– индикация контейнера
для сбора конденсата
постоянно включена
• индикатор Слейте конденсат
(Tank) не горит и
высвечивается символ
– индикация контейнера для
сбора конденсата постоянно
выключена
10.3 Отключение индикатора Слейте конденсат (Tank)
По умолчанию индикация резервуара
для воды всегда включена. В случае
11. УХОД И ОЧИСТКА
11.1 Очистка фильтра
В конца каждого цикла загорается
индикатор Почистите фильтры
(Filter) ; это означает, что необходимо
произвести очистку фильтра.
Фильтр собирает ворс.
Ворс образуется при сушке
одежды в сушильном
барабане.
Очистка фильтра:
1. Откройте дверцу. Потяните
фильтр.
Page 59

2. Откройте фильтр.
3. Очистите фильтр влажной рукой.
4. При необходимости почистите
фильтр щеткой в теплой воде или
очистите его при помощи
пылесоса. Закройте фильтр.
РУССКИЙ 59
11.2 Слив воды из контейнера для сбора конденсата
Опорожняйте контейнер для сбора
конденсата после каждого цикла
сушки.
Если контейнер для сбора конденсата
полон, программа автоматически
прерывает работу. Загорается
индикатор Слейте конденсат (Tank) ;
это означает, что необходимо
опорожнить контейнер для сбора
конденсата.
Для слива воды:
1. Выньте контейнер для сбора
конденсата, сохраняя его в
горизонтальном положении.
5. При необходимости удалите ворс
из гнезда для фильтра и с
уплотнителя. Для этого можно
использовать пылесос. Установите
фильтр в гнездо для фильтра.
2. Вытяните пластиковый
соединитель и слейте содержимое
контейнера для сбора конденсата
в таз или подходящую емкость.
Page 60

www.aeg.com60
3. Вставьте пластиковый
соединитель и установите
контейнер для сбора конденсата
на место.
4. Чтобы продолжить выполнение
программы, нажмите на кнопку
Старт/Пауза (Start/Pause).
11.3 Очистка конденсатора
Мигающий индикатор Почистите
конденсер (Condenser) указывает на
необходимость очистки конденсатора
и его отделения.
Очистка конденсатора и его
отделения:
1. Откройте дверцу.
2. Нажмите на фиксирующую кнопку,
расположенную внизу дверцы, и
откройте дверцу конденсатора.
5.
Нащупайте ручку и вытяните
конденсатор из цокольного
отделения. При перемещении
держите конденсатор
горизонтально, чтобы не пролить
остающуюся в нем воду.
6. Очистите конденсатор, перевернув
его в вертикальное положение над
раковиной или тазом. Промойте
его при помощи душевой насадки.
3. Для отпирания крышки
конденсатора поверните две
блокирующих рычага.
4. Опустите крышку конденсатора.
7. Установите конденсатор обратно в
цокольное отделение.
8. Закройте крышку конденсатора.
9. Закройте два блокирующих рычага
до их фиксации.
10. Закройте дверцу конденсатора.
Page 61

РУССКИЙ 61
11.4 Чистка барабана
ВНИМАНИЕ!
Перед очисткой отключите
прибор от электросети.
Для мытья внутренней поверхности
барабана и его ребер используйте
нейтральное моющее средство.
Протрите вымытые поверхности
мягкой тряпкой.
ОСТОРОЖНО!
Не используйте для чистки
барабана абразивные
материалы или
металлические губки.
Для очистки используйте влажную
тряпку. Протрите вымытые
поверхности мягкой тряпкой.
ОСТОРОЖНО!
Не используйте для мытья
прибора средства для
мытья мебели и чистящие
вещества, которые могут
вызвать коррозию.
11.6 Очистка вентиляционных щелей
Для удаления ворса из
вентиляционных щелей
воспользуйтесь пылесосом.
11.5 Очистка панели управления и корпуса
Для мытья панели управления и
корпуса используйте нейтральное
моющее средство.
12. ПОИСК И УСТРАНЕНИЕ НЕИСПРАВНОСТЕЙ
Неисправ‐
1)
ность
Сушильный ба‐
рабан не рабо‐
тает.
Возможная причина Решение
Сушильный барабан не подклю‐
чен к электросети.
Открыта загрузочная дверца. Закройте загрузочную дверцу.
Не была нажата кнопка Вкл/Выкл
(On/Off).
Не была нажата кнопка Старт/
Пауза (Start/Pause).
Прибор находится в режиме
ожидания.
Вставьте вилку в розетку. Про‐
верьте предохранитель на до‐
машнем распределительном щи‐
те.
Нажмите на кнопку Вкл/Выкл
(On/Off).
Нажмите на кнопку Старт/Пауза
(Start/Pause).
Нажмите на кнопку Вкл/Выкл
(On/Off).
Page 62

www.aeg.com62
Неисправ‐
1)
ность
Результаты су‐
шки неудовле‐
творительны.
Не закрывается
загрузочная
дверца.
Err
(Ошибка)
на дисплее.
Неверный от‐
счет времени,
отображающе‐
гося на дис‐
плее.
Программа не
выполняется.
Возможная причина Решение
Неверно выбрана программа. Выберите подходящую програм‐
2)
му.
Засорен фильтр.
Режим Доп. степень сушки (Dry
Plus) был установлен на мини‐
мальный уровень.
4)
Превышена максимальная за‐
грузка.
Засорена вентиляционная ре‐
шетка.
Загрязнение на датчике влажно‐
сти внутри барабана.
Неверное значение остаточной
влажности белья.
Засорен конденсатор.
Прочистите фильтр.
Измените уровень режима Доп.
степень сушки (Dry Plus) на
средний или максимальный.
Превышать максимальную за‐
грузку запрещено.
Очистите вентиляционную ре‐
шетку на цоколе прибора.
Очистите переднюю поверх‐
ность барабана.
Отрегулируйте значение оста‐
точной влажности белья.
Очистите конденсатор.
3)
4)
5)
3)
Фильтр не зафиксирован. Установите фильтр как следует.
Между дверцей и уплотнителем
зажато белье.
Была произведена попытка из‐
менить программу или режим
после запуска цикла.
Режим, который Вы пытаетесь
включить, не подходит к выбран‐
ной программе.
Время до окончания цикла рас‐
считывается исходя из объема и
влажности белья.
Контейнер для сбора конденсата
полон.
Как следует уложите белье в ба‐
рабан.
Выключите и снова включите су‐
шильный барабан. Снова задай‐
те параметры.
Выключите и снова включите су‐
шильный барабан. Снова задай‐
те параметры.
Время вычисляется автоматиче‐
ски – это не является неисправ‐
ностью прибора.
Слейте воду из контейнера для
сбора конденсата и нажмите на
кнопку Старт/Пауза (Start/
3)
Pause).
Page 63

РУССКИЙ 63
Неисправ‐
1)
ность
Возможная причина Решение
Объем загрузки слишком мал. Выберите программу с задан‐
ным временем сушки. Выбран‐
ное время должно соответство‐
вать конкретной загрузке. Для
сушки одного изделия или не‐
Слишком ко‐
роткий цикл су‐
шки.
большого количества белья ре‐
комендуется выбирать короткое
время сушки.
Белье слишком сухое. Выберите программу с задан‐
ным временем сушки или более
высокую степень сушки (напр.,
Очень сухое (Extra Dry))
Засорен фильтр. Прочистите фильтр.
Превышена максимальная за‐
Слишком длин‐
ный цикл су‐
6)
шки
грузка.
Белье недостаточно хорошо от‐
жато.
Слишком высокая температура
окружающей среды – это не явл‐
яется неисправностью прибора.
1)
В случае, если на дисплее высвечивается сообщение об ошибке (напр., E51), Выключите и сно‐
ва включите сушильный барабан. Выберите новую программу. Нажмите на кнопку Пуск/Пауза.
Прибор не работает? - обратитесь в сервисный центр и сообщите код ошибки.
2)
Руководствуйтесь описанием программы — см. «ТАБЛИЦА ПРОГРАММ»
3)
См. Главу «УХОД И ОЧИСТКА».
4)
Только для сушильных машин с режимом Доп. степень сушки (Dry Plus)
5)
См. Главу «УКАЗАНИЯ И РЕКОМЕНДАЦИИ»
6)
Примечание. По истечении максимального времени сушки (5 часов) цикл сушки автоматически
завершается.
Превышать максимальную за‐
грузку запрещено.
Как следует отожмите белье.
Если есть такая возможность,
уменьшите температуру воздуха
в помещении.
13. ТЕХНИЧЕСКИЕ ДАННЫЕ
Высота x Ширина x Глубина 850 x 600 x 540 мм (максимум 570 мм)
Макс. глубина с открытой дверцей прибо‐ра1030 мм
Макс. ширина с открытой дверцей прибо‐ра950 мм
Регулируемая высота 850 мм (+ 15 мм – регулировка высоты
Объем барабана 104 л
ножек)
Page 64

www.aeg.com64
Максимальная загрузка 7 кг
Напряжение 230 В
Частота 50 Гц
Необходимый предохранитель 16 A
Полная мощность 2800 Вт
Класс энергопотребления B
Энергопотребление
Годичное энергопотребление
При оставлении во включенном состоя‐
нии
Энергопотребление в состоянии «выклю‐
чено»
Тип использования Бытовой
Допустимая температура окружающей
среды
Защита от проникновения твердых ча‐
стиц и влаги обеспечивается защитной
крышкой. Исключения: низковольтное
оборудование не имеет защиты от влаги.
1)
В соответствии со стандартом EN 61121. 7 кг изделий из хлопка на скорости отжима 1000 об/
мин.
2)
Годовое энергопотребление в кВт·ч из расчета 160 циклов сушки с использованием стандарт‐
ной программы для хлопка при полной и частичной загрузке и потреблении, рассчитанном для
энергосберегающих режимов. Фактическое энергопотребление при конкретном цикле будет зави‐
сеть от того, как используется прибор (ПОЛОЖЕНИЕ ЕС №392/2012).
1)
2)
4,29 кВт·ч
504 кВт·ч
0,41 Вт
0,41 Вт
от +5°C до +35°C
IPX4
14. УСТАНОВКА
14.1 Распаковка
ОСТОРОЖНО!
Перед включением
прибора следует удалить
все элементы его
защитной упаковки.
Извлечение вставок из полистирола:
1. Откройте дверцу.
2. Выньте из барабана пластиковый
шланг и вставки из полистирола.
Page 65

15mm
> 850 mm
600 mm
540 mm
РУССКИЙ 65
14.2 Регулировка ножек
Высота сушильного барабана
под ней достаточно места (см.
рисунок).
регулируется. Для этого
воспользуйтесь регулировочными
ножками.
14.3 Установка под столешницу
Прибор может быть установлен как
отдельно, так и под столешницу, если
15. ОХРАНА ОКРУЖАЮЩЕЙ СРЕДЫ
Материалы с символом следует
сдавать на переработку. Положите
упаковку в соответствующие
контейнеры для сбора вторичного
сырья. Принимая участие в
переработке старого электробытового
оборудования, Вы помогаете
защитить окружающую среду и
здоровье человека. Не выбрасывайте
вместе с бытовыми отходами бытовую
технику, помеченную символом .
Доставьте изделие на местное
предприятие по переработке
вторичного сырья или обратитесь в
свое муниципальное управление.
*
Page 66

www.aeg.com66
Page 67

РУССКИЙ 67
Page 68

www.aeg.com/shop
136940740-A-312015
 Loading...