

Page 1
Bedienungsanleitung/Garantie
Gebruiksaanwijzing • Mode d’emploi
Instrucciones de servicio • Manual de instruções
Istruzioni per l’uso • Instruction Manual
Instrukcja obsługi/Gwarancja • Használati utasítás
Інструкція з експлуатації • Руководство по эксплуатации
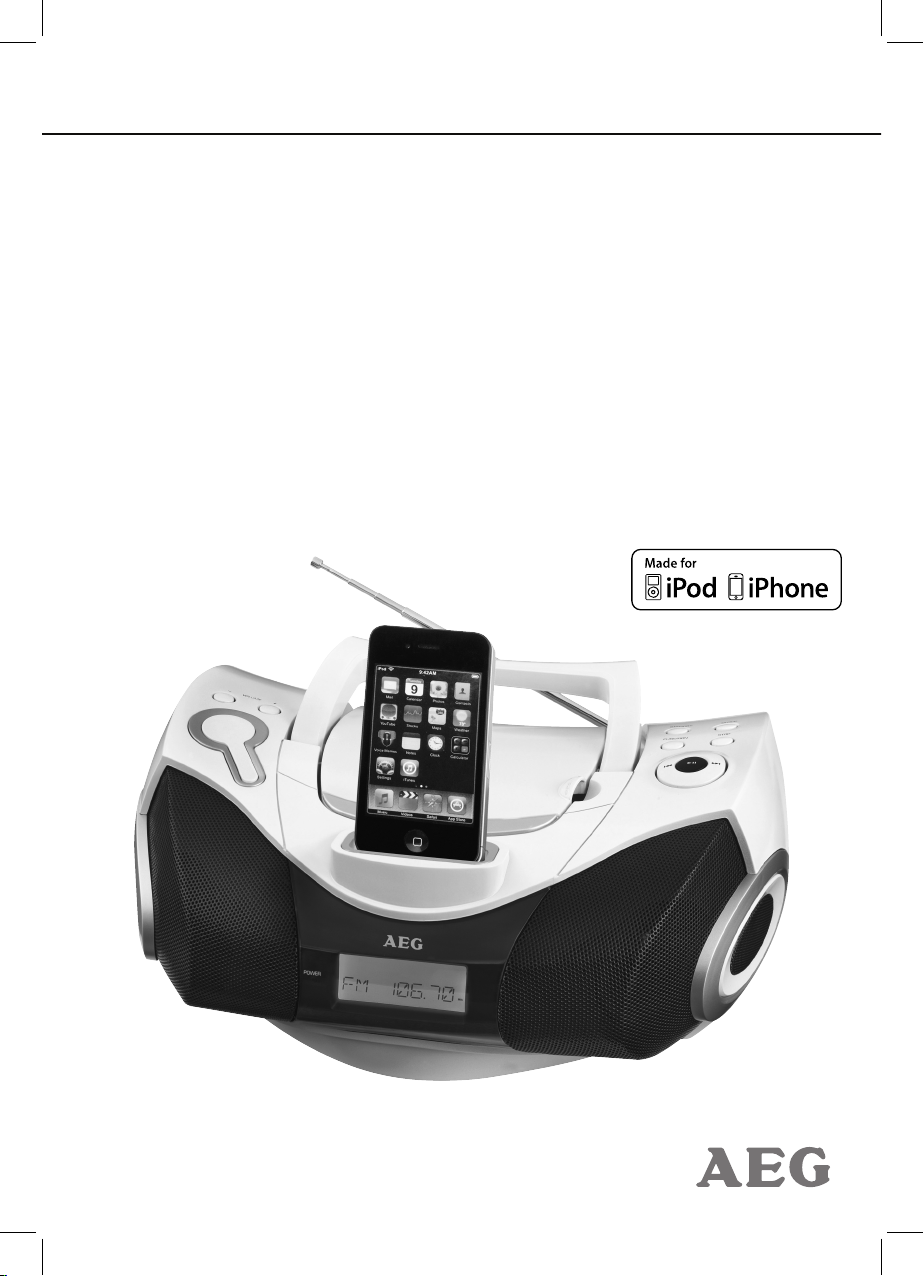
Stereo Boombox mit iPhone docking
Stereo-boombox met iPhone docking • Chaine stéréo avec station d’accueil iPhone
Reproductor estéreo con conexión para iPhone • Boombox estéreo com estação de iPhone
Stereo Boombox con docking iPhone • Stereo Boombox with iPhone Docking
Boombox stereo z dokowaniem iPhone • Sztereo boombox iPhone dokkolóval
Стереопрогравач із док-станцією для iPhone
•
Стерео Boombox с док-станцией для iPhone
PERFECT IN FORM AND FUNCTION
SR 4337 iP
iPhone und iPod sind Schutzmarken der Apple Inc., registriert in den USA und anderen Ländern.
iPhone and iPod are trademarks of Apple Inc., registered in the USA and other countries.
Page 2

2
3
DEUTSCH
Inhalt
Übersicht der Bedienelemente ...........................................Seite 3
Bedienungsanleitung .............................................................Seite 4
Technische Daten .....................................................................Seite 10
Garantie .......................................................................................Seite 10
Entsorgung/Bedeutung des Symbols „Mülltonne“ ....Seite
11
NEDERLANDS
Inhoud
Locatie van bedieningselementen ..................................... blz 3
Gebruiksaanwijzing .................................................................blz 12
Technische specicaties ......................................................... blz 18
Verwijdering/Betekenis van het symbool
‘vuilnisemmer’ ............................................................................ blz 18
FRANÇAIS
Table des matières
Situation des commandes .................................................page 3
Manuel ...................................................................................... page 19
Caractéristiques techniques ............................................. page 25
Elimination/Signication du symbole
“Elimination”...........................................................................page 25
ESPAÑOL
Contenidos
Ubicación de los controles .............................................página 3
Manual del usuario ...........................................................página 26
Especicaciones técnicas ................................................página 32
Eliminación/Signicado del símbolo del
"cubo de basura" ................................................................página 32
PORTUGUÊS
Índice
Localização dos controlos ..............................................página 3
Manual do utilizador........................................................página 33
Especicações técnicas ....................................................página 39
Deposição/Signicado do símbolo
“contentor do lixo”............................................................página 39
ITALIANO
Contenuto
Posizione dei comandi .....................................................pagina 3
Manuale dell'utente .........................................................pagina 40
Speciche tecniche ...........................................................pagina 46
Smaltimento/Signicato del simbolo
"Eliminazione" .....................................................................pagina 46
ENGLISH
Contents
Location of Controls ............................................................page 3
User manual ............................................................................page 47
Technical Specications .....................................................page 53
Disposal/Meaning of the “Dustbin” Symbol ..............page 53
JĘZYK POLSKI
Spis treści
Lokalizacja kontrolek ....................................................strona 3
Instrukcja użytkowania ...............................................strona 54
Techniczne specykacje ..............................................strona 60
Warunki gwarancji ........................................................strona 60
Usuwanie/Znaczenie symbolu
„Pojemnik na śmieci“ ....................................................strona 61
MAGYARUL
Tartalom
A kezelőszervek elhelyezkedése ..................................oldal 3
Használati útmutató .......................................................oldal 62
Műszaki adatok .................................................................oldal 68
Hulladékkezelés/A „kuka” piktogram jelentése .... oldal 68
УКРАЇНСЬКА
Зміст
Розташування органів керування ................................... стор. 3
Посібник користувача ...................................................... стор. 69
Технічні характеристики .................................................. стор. 75
РУССКИЙ
Содержание
Расположение элементов ................................................. стр. 3
Руководство пользователя ................................................ стр. 76
Технические характеристики ............................................ стр. 82
Inhalt
Page 3
3
Übersicht der Bedienelemente
Locatie van bedieningselementen
Situation des commandes
Ubicación de los controles
Localização dos controlos
Posizione dei comandi
Location of Controls
Lokalizacja kontrolek
A Kezelőszervek Elhelyezkedése
Розташування органів керування
Расположение элементов
Page 4
4
Deutsch
Allgemeine Sicherheitshinweise
Lesen Sie vor Inbetriebnahme dieses Gerätes die Bedienungsanleitung sehr sorgfältig durch und bewahren Sie
diese inkl. Garantieschein, Kassenbon und nach Möglichkeit den Karton mit Innenverpackung gut auf. Falls Sie das
Gerät an Dritte weitergeben, geben Sie auch die Bedienungsanleitung mit.
• Um das Risiko von Feuer oder einem elektrischen
Schlag zu vermeiden, sollten Sie das Gerät nicht Regen
oder Feuchtigkeit aussetzen. Das Gerät nicht in unmittelbarer Nähe von Wasser betreiben (z.B. Badezimmer,
Schwimmbecken, feuchte Keller).
• Benutzen Sie das Gerät ausschließlich für den privaten
und den dafür vorgesehenen Zweck. Dieses Gerät ist
nicht für den gewerblichen Gebrauch bestimmt.
• Das Gerät ausschließlich an eine vorschriftsmäßig
installierte Steckdose anschließen. Achten Sie darauf,
dass die angegebene Spannung mit der Spannung der
Steckdose übereinstimmt.
• Bei Verwendung von externen Netzteilen auf die
richtige Polarität und Spannung achten, Batterien stets
richtig herum einlegen.
• Das Gerät so aufstellen, dass vorhandene Lüftungsönungen nicht verdeckt werden.
• Niemals das Gehäuse des Gerätes önen. Durch unsachgemäße Reparaturen können erhebliche Gefahren
für den Benutzer entstehen. Bei Beschädigung des
Gerätes, insbesondere des Netzkabels, das Gerät nicht
mehr in Betrieb nehmen, sondern von einem Fachmann reparieren lassen. Netzkabel regelmäßig auf
Beschädigungen prüfen.
• Ein defektes Netzkabel darf nur vom Hersteller, unserem Kundendienst oder einer ähnlich qualizierten
Person durch ein gleichwertiges Kabel ersetzt werden,
um Gefährdungen zu vermeiden.
• Benutzen Sie das Gerät längere Zeit nicht, ziehen Sie
den Netzstecker aus der Steckdose, bzw. entnehmen
Sie die Batterien.
Diese Symbole können sich ggf. auf dem Gerät benden
und sollen Sie auf folgendes hinweisen:
Das Blitz-Symbol soll den Benutzer auf
Teile im Inneren des Gerätes hinweisen, die
gefährlich hohe Spannungen führen.
Das Symbol mit Ausrufezeichen soll den
Benutzer auf wichtige Bedienungs- oder
Wartungs-Hinweise in den Begleitpapieren
hinweisen.
Geräte mit diesem Symbol arbeiten mit
einem „Klasse 1-Laser“ zur Abtastung der CD.
Die eingebauten Sicherheitsschalter sollen
verhindern, dass der Benutzer gefährlichem,
für das menschliche Auge nicht sichtbarem
Laserlicht ausgesetzt wird, wenn das CD-Fach
geönet ist.
Diese Sicherheitsschalter sollten auf keinen Fall überbrückt oder manipuliert werden, sonst besteht die Gefahr,
dass Sie sich dem Laser-Licht aussetzen.
Kinder und gebrechliche Personen
• Zur Sicherheit Ihrer Kinder lassen Sie keine Verpackungsteile (Plastikbeutel, Karton, Styropor etc.)
erreichbar liegen.
WARNUNG!
Lassen Sie kleine Kinder nicht mit Folie spielen. Es
besteht Erstickungsgefahr!
• Dieses Gerät ist nicht dafür bestimmt, durch Personen
(einschließlich Kinder) mit eingeschränkten physischen, sensorischen oder geistigen Fähigkeiten oder
mangels Erfahrung und/oder mangels Wissen benutzt
zu werden, es sei denn, sie werden durch eine für ihre
Sicherheit zuständige Person beaufsichtigt oder erhielten von ihr Anweisungen, wie das Gerät zu benutzen
ist.
• Kinder sollten beaufsichtigt werden, um sicherzustellen, dass sie nicht mit dem Gerät spielen.
Symbole in dieser Bedienungsanleitung
Wichtige Hinweise für Ihre Sicherheit sind besonders
gekennzeichnet. Beachten Sie diese Hinweise unbedingt,
um Unfälle und Schäden am Gerät zu vermeiden:
WARNUNG:
Warnt vor Gefahren für Ihre Gesundheit und zeigt
mögliche Verletzungsrisiken auf.
ACHTUNG:
Weist auf mögliche Gefährdungen für das Gerät oder
andere Gegenstände hin.
HINWEIS:
Hebt Tipps und Informationen für Sie hervor.
Spezielle Sicherheitshinweise
Dieses Gerät arbeitet
mit einem Laser der Klasse 1.
Übersicht der Bedienelemente
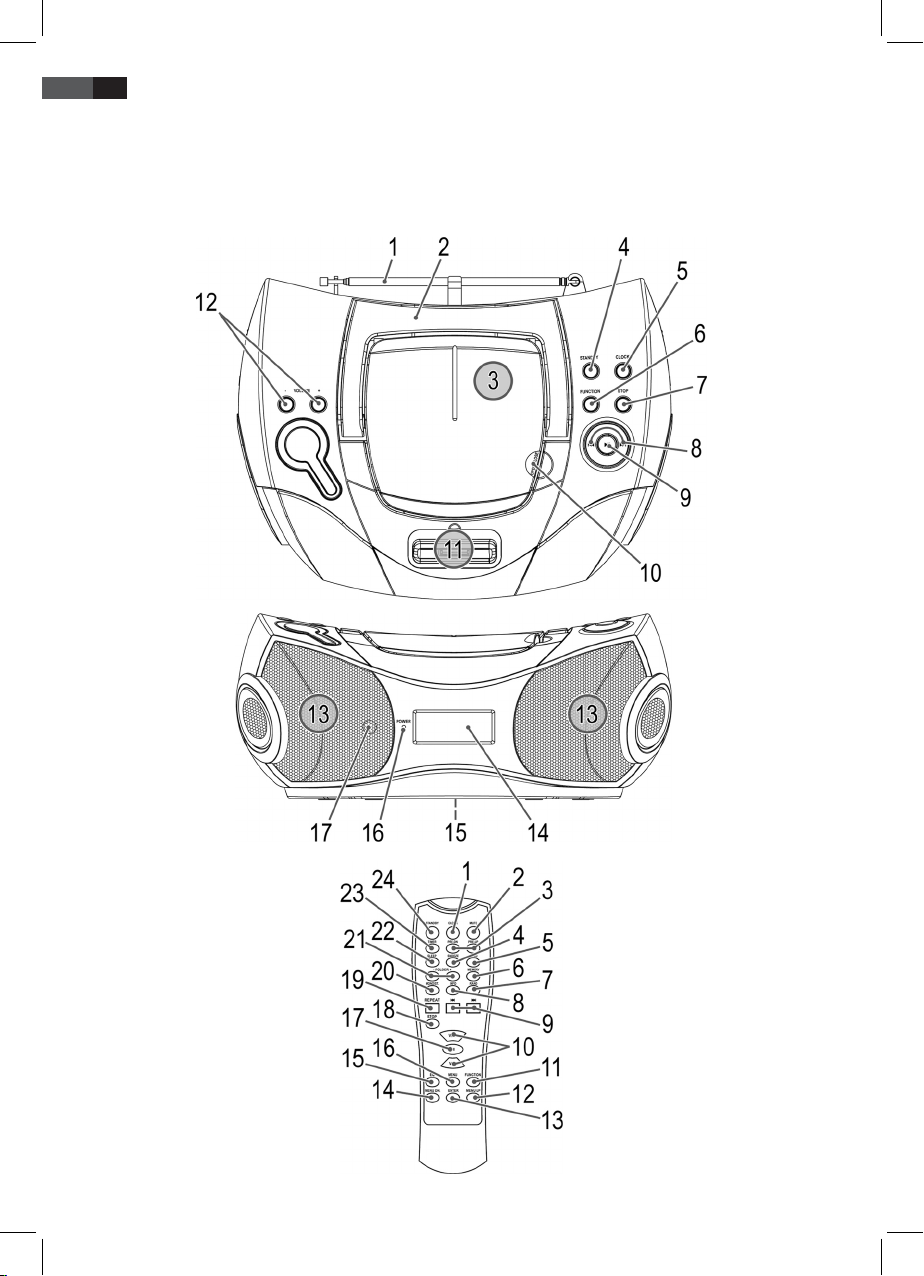
1 Teleskopantenne
2 Gri
3 CD-Fach
4 STANDBY Taste (Standby/Betrieb)
5 CLOCK Taste (Uhrzeit)
6 FUNCTION Funktionswahltaste
7 STOP Taste
8
/ Tasten (Suchlauf vorwärts/rückwärts)
9
Taste (Wiedergabe/Pause)
Page 5
5
Deutsch
10 Lasche zum Önen des CD Fachs (OPEN/CLOSE)
11 Docking Anschluss
12 VOLUME +/- (Lautstärke) Tasten
13 Lautsprecher
14 LCD-Display
15 Batteriefach
16 Kontrollleuchte POWER
17 IR Sensor für die Fernbedienung
Rückseite (ohne Abbildung)
AUX IN Anschluss
AC~ Netzanschluss
Fernbedienung
1 CLOCK Taste (Uhrzeit)
2 MUTE (Stumm) Taste
3 PRE-DN/PRE-UP Tasten (Radiospeicherplatz)
4 SNOOZE Taste
5 INTRO Taste
6 MEMORY Taste (Speicher)
7 RAND Taste (Zufallswiedergabe)
8 INFO Taste
9
Taste (Suchlauf vorwärts)
Taste (Suchlauf rückwärts)
10 VOLUME +/- (Lautstärke) Tasten
11 FUNCTION Funktionswahltaste
12 MENU UP Taste (iPod/iPhone Menünavigation)
13 ENTER Taste (Bestätigen)
14 MENU DN Taste (iPod/iPhone Menünavigation)
15 EQ Taste
16 MENU Taste
17
(Wiedergabe/Pause) Taste
18 STOP Taste
19 REPEAT Taste (Wiederholen)
20 MONO/ST Taste
21 FOLDER +/- Tasten (aufwärts/abwärts Album)
22 SLEEP Taste
23 TIMER Taste
24 STANDBY Taste
Inbetriebnahme des Gerätes/Einführung
• Lesen Sie vor der Inbetriebnahme die Bedienungsanlei-
tung sorgfältig durch!
• Wählen Sie einen geeigneten Standort für das Gerät.
Geeignet wäre eine trockene, ebene, rutschfeste Fläche,
auf der Sie das Gerät gut bedienen können.
• Achten Sie darauf, dass das Gerät ausreichend belüftet
wird!
• Entfernen Sie, falls vorhanden, die Schutzfolie vom
Display.
Stromversorgung
• Verbinden Sie das beiliegende Netzkabel (siehe ggf.
Batteriefach (15)) mit einer vorschriftsmäßig installierten Schutzkontaktsteckdose 230 V / 50 Hz und des
Netzanschlusses AC ~ an der Rückseite des Gerätes.
• Achten Sie darauf, dass die Netzspannung mit den
Angaben auf dem Typenschild übereinstimmt.
• Die Speicherung der Uhrzeit geht verloren, sobald die
Stromzufuhr unterbrochen wurde.
Batteriebetrieb (Batterien nicht im Lieferumfang enthalten)
• Önen Sie den Batteriefachdeckel (15) auf der Unterseite.
• Legen Sie 8 Batterien des Typs UM 2/R14 1,5V ein.
Achten Sie auf die richtige Polarität (siehe Batteriefachboden)!
• Schließen Sie das Batteriefach.
Wird das Gerät längere Zeit nicht benutzt, entnehmen Sie
die Batterien, um ein „Auslaufen“ zu vermeiden.
HINWEIS:
• Haben Sie ein Netzkabel angeschlossen, werden die
Batterien automatisch abgeschaltet.
• Im Batteriebetrieb wird der Akku eines aufgesteckter
iPod/iPhone nicht geladen.
ACHTUNG:
• Ungleiche Batterietypen oder neue und gebrauchte
Batterien dürfen nicht zusammen verwendet werden.
• Batterien gehören nicht in den Hausmüll. Geben Sie
verbrauchte Batterien bei zuständigen Sammelstellen
oder beim Händler ab.
WARNUNG:
Setzen Sie Batterien keiner hohen Wärme oder dem
direkten Sonnenlicht aus. Werfen Sie Batterien niemals
ins Feuer. Es besteht Explosionsgefahr!
Batterien der Fernbedienung (Batterien nicht im Lieferumfang enthalten)
• Önen Sie den Batteriefachdeckel auf der Rückseite
der Fernbedienung.
• Legen Sie 2 Batterien des Typs R03 „AAA“ 1,5V ein.
Achten Sie auf die richtige Polarität (siehe Batteriefachboden)!
• Wird die Fernbedienung längere Zeit nicht benutzt,
entnehmen Sie die Batterien, um ein „Auslaufen“ von
Batteriesäure zu vermeiden.
ACHTUNG:
• Ungleiche Batterietypen oder neue und gebrauchte
Batterien dürfen nicht zusammen verwendet werden.
• Batterien gehören nicht in den Hausmüll. Bitte
geben Sie verbrauchte Batterien bei zuständigen
Sammelstellen oder beim Händler ab.
WARNUNG:
Setzen Sie Batterien keiner hohen Wärme oder dem
direkten Sonnenlicht aus. Werfen Sie Batterien niemals
ins Feuer. Es besteht Explosionsgefahr!
Page 6

6
Deutsch
Einstellen der Uhrzeit (im Standby-Modus)
1. Halten Sie die CLOCK Taste (5/1) kurz gedrückt. Im
Display erscheint die Anzeige „24 HOUR“.
2. Wählen Sie mit den
/ Tasten (8/9) zwischen der
24 Stunden und 12 Stunden Anzeige. Drücken Sie die
CLOCK Taste zum Bestätigen.
HINWEIS: Bei der 12 Stunden Anzeige erscheint
AM = Vormittags, PM = Nachmittags.
3. Drücken Sie die
/ Tasten um die Stunden einzu-
stellen. Drücken Sie die CLOCK Taste zum Bestätigen.
4. Um die Minuten einzustellen, drücken Sie die /
Tasten.
5. Drücken Sie erneut auf die CLOCK Taste um die Uhrzeit abzuspeichern.
Transportsicherung CD Fach
• Önen Sie das CD Fach (3), indem Sie den Deckel an
der Lasche (10) nach oben ziehen.
• Entfernen Sie vor der Inbetriebnahme, wenn vorhan-
den, die Transportsicherung aus dem CD-Player.
• Schließen Sie das CD-Fach wieder.
iPod/iPhone Kompatibilität
Aufgrund der vielen verschiedenen iPod- und iPhone
Modelle und Generationen, die zurzeit auf dem Markt
erhältlich sind, kann eine volle Kompatibilität nicht
gewährleistet werden. Vergewissern Sie sich vor Anschluss
Ihres iPod/iPhone davon, dass dieser eine kompatible
Schnittstelle besitzt.
Des Weiteren kann eine volle Kompatibilität der Fernbedienfunktionen nicht garantiert werden. Bedienen Sie
daher ggf. Ihren iPod/iPhone wie gewohnt, während dieses
in der Docking Station steckt.
HINWEIS:
In Abhängigkeit vom Softwarestand Ihres iPhone kann
im Einzelfall die folgende Fehlermeldung im Display
erscheinen:
„Dieses Zubehör wurde nicht für die Verwendung mit
dem iPhone entwickelt. Es ist möglich, dass Störgeräusche auftreten und die Signalstärke reduziert wird.“
Drücken Sie in diesem Fall „OK“.
Allgemeine Bedienung
HINWEIS:
Einige Tasten nden Sie sowohl am Gerät als auch auf
der Fernbedienung.
Gleichlautende Tasten bewirken die gleiche Funktion.
STANDBY (4/24)
Schalten Sie das Gerät mit der STANDBY Taste in den
Standby-Betrieb. Die Kontrollleuchte POWER (16) leuchtet. Drücken Sie diese Taste erneut, schaltet sich das Gerät
wieder ein.
Lautstärke (12/10)
Zum Einstellen der individuellen Lautstärke. Im Display
erscheint „VOL“ und eine Zier. Dies entspricht der eingestellten Lautstärke bis „VOL MAX“ bzw. „VOL MIN“.
Infrarot-Fernbedienung
Zur kabellosen Bedienung aus einer Entfernung von bis zu
5 Metern. Lässt diese Reichweite nach, müssen die Batterien ausgetauscht werden. Achten Sie bei der Bedienung
auf freie Sicht zwischen Fernbedienung und dem Sensor
(17) am Gerät.
AUX IN Buchse (Geräterückseite)
Zum Anschluss von analogen Wiedergabegeräte. Über
diese Buchse können Sie auch den Ton anderer Wiedergabegeräte wie MP3-Player, CD-Player usw. über die
Lautsprecher hören.
1. Schließen Sie das externe Gerät, mit einem 3,5 mm
Stereo-Klinkenstecker, an die AUX IN Buchse an.
2. Wählen Sie nun mit der FUNCTION Taste (6/11) den
Modus AUX aus.
3. Über die Lautsprecher hören Sie die Tonwiedergabe
aus dem externen Gerät, mit den VOLUME +/- Tasten
(12/10) können Sie die Lautstärke verändern. Die CD
Tasten sind nicht funktionsfähig.
4. Die weitere Vorgehensweise entnehmen Sie bitte der
Bedienungsanleitung der externen Tonquelle.
HINWEIS:
Stellen Sie die Lautstärke des externen Gerätes auf eine
hörgerechte Lautstärke.
Radio hören
1. Drücken Sie die FUNCTION Taste (6/11) so oft, bis im
Display „TUNER“ erscheint.
2. Stimmen Sie mit den / Tasten (8/9) den gewünschten Sender ab.
3. Die FM.ST-Kontrollleuchte ((ST)) (im Display) leuchtet
nur, wenn der ausgewählte Sender in Stereo-Qualität
empfangen wird. Ist der Empfang zu schwach und
rauscht der empfangene Sender, ackert diese. Bei
FM-Sendern können Sie mit der MONO/ST Taste (20
an der FB) zwischen MONO und STEREO Empfang umschalten. Bei schlechtem Empfang empfehlen wir auf
MONO zu schalten.
Page 7
7
Deutsch
Sender abspeichern/anwählen
4. Haben Sie den gewünschten Sender gefunden, drücken Sie die MEMORY Taste (6 an der FB). Im Display
leuchtet MEMORY und die Programmplatznummer
blinkt.
5. Zum Wählen des Programmplatzes, drücken Sie die
PRE-UP/DN Tasten (3 an der FB).
6. Zum Abspeichern, drücken Sie die MEMORY Taste.
Zum Anwählen eines gespeicherten Senders, drücken Sie
die PRE-UP oder PRE-DN Taste.
Musik vom iPod/iPhone wiedergeben
(iPod/iPhone nicht im Lieferumfang enthalten)
1. Drücken Sie die FUNCTION Taste (6/11) so oft, bis im
Display „NO IPOD“ erscheint.
2. Sofern mit Ihrem iPod mitgeliefert, stecken Sie den
Adapter auf den Dock Anschluss. Nur mit aufgestecktem Adapter kann einen korrekter Sitz des iPod
gewährleisten werden.
3. Stecken Sie einen iPod/iPhone auf den Dock Anschluss.
ACHTUNG:
Achten Sie darauf, dass Sie Ihren iPod/iPhone gerade
auf den Anschluss stecken. Verbiegen oder kippen Sie
den iPod/iPhone nicht während dieser auf dem iPod/
iPhone Anschluss steckt. Dies könnte zur Beschädigung des Steckplatzes oder des iPod/iPhone führen.
4. In Abhängigkeit vom iPod/iPhone Modell entriegeln
Sie zuerst die Tastensperre und starten die Musikwiedergabe ggf. mit der
Taste (9/17).
5. Für die weitere Bedienung beachten Sie bitte die
Bedienungsanleitung Ihres iPod/iPhone.
ACHTUNG:
Stoppen Sie die Wiedergabe, bevor Sie den iPod/iPhone
vom Anschluss abstecken, da der iPod/iPhone sonst
Schaden nehmen könnte.
HINWEIS:
• Verändern Sie ggf. die Toneinstellungen in Ihrem
iPod/iPhone, um einen optimalen Klang zu erzeugen.
• Geht bei der Musikwiedergabe eines aufgesteckten
iPhone ein Anruf ein, stoppt das Gerät mit der Wiedergabe und der Klingelton ist hörbar. Nehmen Sie
das iPhone vom Gerät, um das Gespräch zu führen.
iPod/iPhone Ladefunktion
Haben Sie einen iPod/iPhone auf dem Dock Anschluss
aufgesteckt, so wird der Akku des iPod/iPhone geladen.
Hierfür muss das Gerät ans Stromnetz angeschlossen sein.
HINWEIS:
• Sofern mit Ihrem iPod mitgeliefert, verwenden Sie
den Steckplatzadapter, um den korrekten Sitz des
iPod zu gewährleisten.
• Nicht alle iPod/iPhone Generationen unterstützen die
Ladefunktion.
• Die Dauer des Ladevorgangs ist abhängig vom verwendeten iPod/iPhone und dessen Betriebszustand.
• Von einer Auadung im Batteriebetrieb raten wir ab,
da sich die Batterien hierbei schneller entladen.
CDs/MP3 abspielen
So geben Sie eine CD wieder
1. Drücken Sie die FUNCTION Taste (6/11) so oft, bis im
Display „CD“ erscheint.
2. Önen Sie das CD Fach (3), indem Sie den Deckel an
der Lasche (10) nach oben ziehen.
3. Legen Sie eine Audio CD mit dem Aufdruck nach oben
so auf den Zentrierkegel, dass die CD mechanisch einrastet. Schließen Sie dann den CD Fachdeckel wieder.
4. Bei einer AUDIO CD:
Auf dem Display erscheint kurz „READING“. Anschließend „TOTAL“, die Anzahl der Titel und die Gesamtlaufzeit. Die CD wird vom ersten Titel an abgespielt.
Das aktuelle Lied, die abgelaufene Spielzeit und das
Symbol
werden im Display angezeigt.
Bei einer CD im MP3 Format:
Auf dem Display erscheint kurz „READING“. Anschließend „TOTAL“, „MP3“, die Anzahl der Titel und Ordner
(FOLDER). Die CD wird vom ersten Titel, und dem
ersten Ordner, an abgespielt. Das aktuelle Lied (TRACK),
die abgelaufene Spielzeit, „MP3“ und das Symbol
werden im Display angezeigt. Mit den FOLDER + oder
FOLDER - Tasten (21 an der FB) können Sie die einzelnen Ordner anwählen.
5. Um eine CD zu entnehmen, betätigen Sie die STOP
Taste (7/18), önen das CD-Fach und heben die CD
vorsichtig ab.
Halten Sie den CD-Deckel stets geschlossen.
HINWEIS:
• Bei CDs im MP3 Format, mit Ordner, erscheint beim
Wechsel in einen anderen Ordner 01 für das erste
Lied des neuen Ordners.
• Wenn eine Disk falsch herum eingelegt wird, bzw.
keine Disk eingelegt ist, leuchtet die Meldung
„READING“, und „NO DISC“ (keine Disk) erscheint auf
dem Display.
• Die Wiedergabe anwenderseitig erstellter CD kann
durch die Vielzahl der verfügbaren Software und CDMedien nicht garantiert werden.
Page 8

8
Deutsch
Beschreibung der Bedientasten
(9/17)
Sie können die Wiedergabe kurz unterbrechen und wieder
starten. Im Display blinkt die abgelaufene Spielzeit und
das Symbol „
“ wird angezeigt. Nochmaliges Drücken der
Taste setzt die Wiedergabe an derselben Stelle fort.
/ (8/9)
Bei laufender Audio-CD, einer CD im MP3 Format oder im
IPOD Modus:
Mit
können Sie zum nächsten bzw. übernächsten Titel
springen usw. Halten Sie die Taste gedrückt, setzt ein
Musiksuchlauf ein (der Ton wird stumm geschaltet).
Die
Taste können Sie wie folgt bedienen:
1 x drücken = Beginnt das aktuelle Lied wieder von
vorne.
2 x drücken = Springt zum vorherigen Titel.
3 x drücken = Spielt ein Lied davor usw. Halten Sie die
Taste gedrückt, setzt ein Musiksuchlauf
ein (der Ton wird stumm geschaltet).
Im Radiobetrieb:
Zum Abstimmen des gewünschten Radiosenders.
STOP (7/18)
Die CD bzw. das Musikstück wird angehalten.
ENTER (13 an der FB)
Im IPOD Modus:
Drücken Sie diese Taste, um eine Funktion zu aktivieren
bzw. um das nächste Menü anzeigen zu lassen.
MENU (16 an der FB)
Im IPOD Modus:
Drücken Sie diese Taste, um das iPod/iPhone Menü aufzurufen bzw. in das vorherige Menü zurückzukehren.
HINWEIS: Bei iPod/iPhone Musikwiedergabe
Verändern Sie ggf. auch die EQ Einstellung in Ihrem
iPod/iPhone, um einen optimalen Klang zu erzeugen.
MONO/ST (20 an der FB)
Im FM-Radiobetrieb:
Zum Umschalten zwischen STEREO und MONO.
INFO (8 an der FB)
Bei einer CD im MP3 Format:
Bei gespeicherter ID-3 Tag Information erscheint diese im
Display als Laufband. Drücken Sie die Taste erneut, um die
Funktion zu deaktivieren.
INTRO (5 an der FB)
Jeder Titel der CD wird jeweils 10 Sekunden lang angespielt. Drücken Sie die Taste erneut, um die Funktion
auszuschalten.
REPEAT (19 an der FB)
1x drücken: (REPEAT 1 leuchtet) Das aktuelle Lied wird
ständig wiederholt.
2x drücken: (REPEAT ALL leuchtet) Die komplette CD
wird ständig wiederholt.
3x drücken: Alle Funktionen sind aufgehoben. Der
normale Abspielbetrieb wird fortgesetzt.
Nur für CDs im MP3-Format:
1x drücken: Das aktuelle Lied wird ständig wiederholt
(im Display erscheint REPEAT 1).
2x drücken: Die komplette CD wird ständig wiederholt
(im Display erscheint REPEAT ALL).
3x drücken: Der angewählte Ordner der MP3 CD wird
ständig wiederholt (im Display erscheint
REPEAT ALBUM). Mit den FOLDER +/Tasten (21 an der FB) können Sie die
einzelnen Ordner anwählen.
4x drücken: Die Funktion wird deaktiviert und die CD
wird im normalen Modus abgespielt.
RAND (6 an der FB)
Im Display erscheint die Anzeige „RANDOM“ und die
erste Titelnummer, welche als erste gespielt wird. Alle
Titel werden nacheinander in einer zufälligen Reihenfolge
wiedergegeben.
FOLDER +/- (21 an der FB)
Bei einer CD im MP3 Format:
Drücken Sie diese Tasten, während der Wiedergabe, um
einen Ordner nach oben bzw. nach unten zu wechseln.
Die Anzeige, z.B. FOLDER 02, wird kurz angezeigt. Anschließend beginnt selbsttätig die Wiedergabe der MP3
CD. Wird die Taste im Stopp-Modus gedrückt, erscheint
ebenfalls kurz die Anzeige im Display. Starten Sie danach
die Wiedergabe mit der
Taste.
HINWEIS:
Das Musik App muss hierfür bereits gestartet sein.
MENU UP/MENU DN. (12/14 an der FB)
Im IPOD Modus:
Drücken Sie diese Tasten, um sich im iPod/iPhone Menü
hoch-/bzw. runter zu bewegen.
MUTE (2 an der FB)
Dient zum schnellen Abstellen der Lautstärke. Die Anzeige
„MUTE“ blinkt im Display. Zum Beheben dieser Funktion,
drücken Sie erneut die MUTE Taste.
EQ (15 an der FB)
(Voreingestellte Equalizer-Funktion). Es stehen verschiedene Sound Modi zur Verfügung (CLASSIC, ROCK, POP, JAZZ,
FLAT).
Page 9
9
Deutsch
PRE-UP/PRE-DN (3 an der FB)
Im Radiobetrieb:
Zum Anwählen der gespeicherten Radiosender.
SLEEP (8 an der FB)
Hier wird bei eingeschaltetem Gerät in 10-MinutenSchritten von 90 bis 10 Minuten der Zeitraum eingestellt,
nachdem sich das Gerät in die Betriebsbereitschaft (Standby) schaltet. Die Taste so oft drücken, bis die gewünschte
Dauer im Display angezeigt wird. Bei aktivierter Funktion
erscheint das Symbol „SLEEP“ im Display. Das Gerät schaltet nach der eingegebenen Zeit automatisch ab.
Um die noch verbleibende Zeit abzurufen, drücken Sie
die SLEEP Taste. Diese Zeit kann auch nachträglich noch
verkürzt oder wieder abgeschaltet werden.
TIMER (23 an der FB)
Sie können das Gerät so einstellen, das es sich zu einer
bestimmten Uhrzeit ein und wieder ausschaltet.
1. Schalten Sie das Gerät mit der STANDBY Taste in den
Standby-Betrieb (Die Kontrollleuchte POWER (16)
leuchtet).
2. Drücken Sie die TIMER Taste, bis die Anzeige „ON
TIME“ im Display erscheint.
• Sie können nun nacheinander mit den
/ Tasten
(8/9) die Einstellungen für die Einschaltstunden,
Einschaltminuten, Ausschaltstunden, Ausschaltminuten, den Einschaltmodus und die Einschaltlautstärke vornehmen.
• Bestätigen Sie Ihre Eingabe jeweils mit der TIMER
Taste. Die aktuell einzustellende Anzeige blinkt im
Display.
HINWEIS:
Wird innerhalb von ca. 10 Sekunden keine Taste
betätigt, schaltet das Gerät in den Standby-Betrieb
zurück ohne die Eingaben zu speichern.
3. Nachdem Sie die Einschaltlautstärke ausgewählt haben, drücken Sie abschließend erneut die TIMER Taste.
Das Gerät schaltet wieder in den Standby-Betrieb.
Nach Erreichen der eingestellten Uhrzeit schaltet sich das
Gerät im gewählten Modus ein. Die Lautstärke steigt langsam auf die ausgewählte Lautstärke an.
Zum Deaktivieren des Timers drücken Sie die TIMER Taste.
Die Anzeige „TIMER“ im Display erlischt.
SNOOZE (4 an der FB)
Wurde das Gerät mittels Timer eingeschaltet, kann die
Funktion mit der SNOOZE Taste für ca. 9 Minuten verzögert werden. Nach Ablauf der 9 Min. schaltet sich das
Gerät wieder ein.
CLOCK (5/1)
Dient zur Einstellung der Uhrzeit.
Drücken Sie diese Taste, wird auf dem Display kurz die
Uhrzeit angezeigt.
MEMORY (6 an der FB)
Dient zur Senderspeicherung und zur Einstellung der
programmierten Wiedergabe.
Programmierte Wiedergabe
Lässt die Programmierung einer beliebigen Titelfolge zu
(nur im CD Modus).
1. Drücken Sie die STOP Taste (8/14).
2. Drücken Sie die MEMORY Taste (6 an der FB). Im
Display erscheint „00 P01“ („Titel“ P „Speicherplatz“)
und die Anzeige MEMORY. Wählen Sie mit den
/
Tasten (7/14) den gewünschten Titel aus und drücken
Sie erneut die MEMORY Taste. Die Anzeige im Display
wechselt auf Speicherplatz P02.
Bei CD‘s im MP3 Format:
Die Ordner Anzeige „F00“, neben der Anzeige P01,
blinkt im Display. Wählen Sie mit den FOLDER +/Tasten (21 an der FB) zuerst den gewünschten Ordner
aus. Drücken Sie zur Bestätigung die MEMORY Taste.
T00 erscheint im Display.
3. Wählen Sie mit den
/ Tasten den nächsten Titel
aus und drücken Sie erneut die MEMORY Taste. Wiederholen Sie den Vorgang, bis Sie alle Titel ausgewählt
haben.
HINWEIS:
Wurde die Speicherkapazität der zu programmierenden Titel erreicht, erscheint die Anzeige „PROGFULL“
im Display.
4. Drücken Sie die
Taste (9/17). Die Wiedergabe
wird gestartet. Im Display wird die erste gewählte
Titelnummer angezeigt. Mit dieser Taste können Sie
das Programm ebenso kurz unterbrechen.
5. Drücken Sie einmal die STOP Taste, wird die
Wiedergabe gestoppt, das Programm bleibt jedoch
erhalten.
6. Zur erneuten Wiedergabe des Programms drücken Sie
die Taste.
7. Zum Löschen des Programms drücken Sie bitte 2x die
STOP Taste. Die Anzeige MEMORY erlischt.
Das Gerät stoppt automatisch, nachdem alle programmierten Titel wiedergegeben wurden. Die programmierte
Reihenfolge bleibt im Speicher enthalten bis Sie in den
anderen Modus wechseln, oder die CD aus dem CD Fach
entnommen wird bzw. das Gerät ausgeschaltet wird.
Page 10
10
Deutsch
Sie haben die Möglichkeit die programmierten Titel mit
der REPEAT-Funktion zu kombinieren. Nachdem Sie
programmiert und das Gerät gestartet haben, drücken
Sie bitte die REPEAT Taste (13 an der FB) bis zu 3 x und
die Funktionen können, wie unter Abschnitt „REPEAT“
beschrieben, angewendet werden.
Wiedergabe von Musik im MP3 Format
Sie haben die Möglichkeit mit diesem Gerät Musikstücke
im MP3 Format wiederzugeben. Das Gerät unterstützt
außerdem die gängigen CD Typen: CD, CD-RW, CD-R.
Sie können mit Ihrem Gerät MP3 CDs abspielen. Auf diesen CDs können bis zu 200 Titel verdichtet abgespeichert
werden. Ihr Gerät erkennt eine MP3 CD automatisch (im
Display erscheint die Gesamtzahl der Titel und Ordner).
Zum Abspielen dieser CDs gehen Sie bitte vor, wie unter
CDs/MP3 abspielen beschrieben. Die Programmierung
von Titeln können Sie, wie bereits unter „Programmierte
Wiedergabe“ beschrieben, durchführen.
Bitte beachten Sie:
Es gibt eine Vielzahl von Brenn- und Komprimierungsverfahren, sowie Qualitätsunterschiede bei CDs und gebrannten CDs.
Des Weiteren hält die Musikindustrie keine festen Standards ein (Kopierschutz).
Aus diesen Gründen kann es in seltenen Fällen zu Problemen bei der Wiedergabe von CDs und MP3 CDs kommen.
Dies ist keine Fehlfunktion des Gerätes.
Reinigung und Pege
• Ziehen Sie vor der Reinigung den Netzstecker.
• Äußere Flecken können Sie mit einem leicht feuchten
Tuch, ohne Zusatzmittel, abwischen.
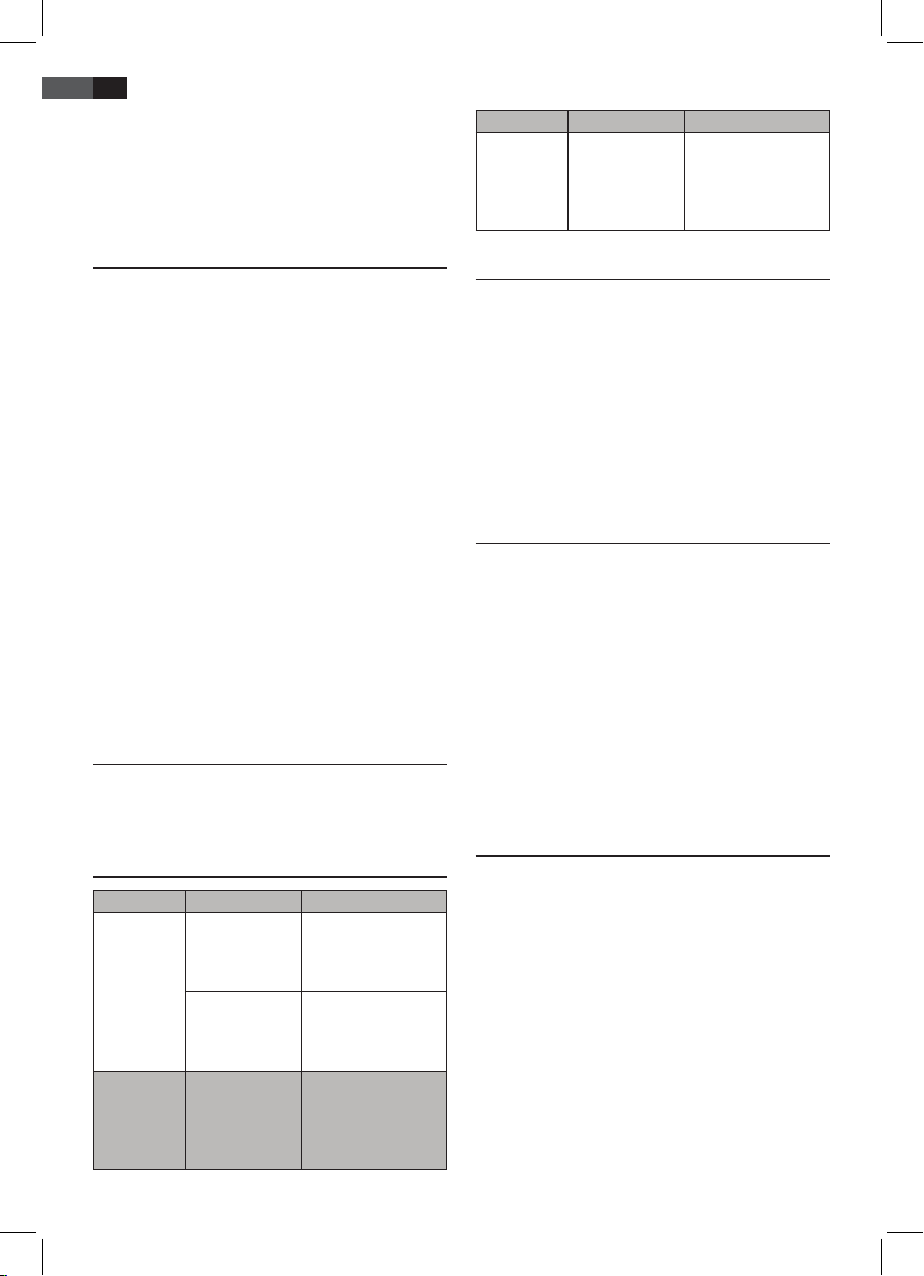
Störungsbehebung
Symptome Ursache Lösung
CD kann nicht
wiedergegeben werden.
CD ist nicht oder
nicht korrekt
eingelegt.
Stellen Sie sicher, dass
die Disc mit der Beschriftung nach oben
gerichtet eingelegt ist.
Batterien zu
schwach.
Legen Sie neue Batterien ein, oder betreiben Sie das Gerät mit
dem Netzkabel.
CD springt
während der
Wiedergabe.
Kontrollieren
Sie die Disc auf
Fingerabdrücke,
Schmutz oder
Kratzer.
Säubern Sie diese mit
einem weichen Tuch
von der Mitte heraus.
Symptome Ursache Lösung
Gerät lässt
sich nicht
bedienen.
Gerät blockiert
„hängt fest“.
Ziehen Sie für ca.
5 Sek. den Netzstecker.
Schalten Sie das Gerät
anschließend wieder
ein.
Technische Daten
Modell: ..................................................................................SR 4337 iP
Spannungsversorgung:...................................220-240 V~ 50 Hz
Batteriebetrieb: .......................................... 8x 1,5V Typ UM2/R14
Ausgangsleistung: .........................................................80 W PMPO
Leistungsaufnahme: ...................................................................15 W
Schutzklasse: .........................................................................................II
Nettogewicht: ...........................................................................2,00 kg
Radioteil:
Frequenzbereiche: ..........................UKW/FM 87,5 ~ 108,0 MHz
Technische Änderungen vorbehalten!
Konformitätserklärung
Hiermit erklärt die Firma ETV – Elektro-Technische Vertriebsgesellschaft mbH, dass sich das Gerät SR 4337 iP in
Übereinstimmung mit den grundlegenden Anforderungen, der europäischen Richtlinie für elektromagnetische
Verträglichkeit (2004/108/EG) und der Niederspannungsrichtlinie (2006/95/EG) bendet.
„Made for iPod“ und „Made for iPhone“ bedeutet, dass
ein elektronisches Zubehör konzipiert wurde, um eine
Verbindung speziell mit einem iPod oder iPhone herzustellen und wurde von dem Entwickler zertiziert, um den
Leistungsstandard der Apple Inc. zu erfüllen. Apple Inc. ist
nicht verantwortlich für den Betrieb dieses Gerätes oder
die Einhaltung der Sicherheitsvorschriften und Normen.
Garantie
Garantiebedingungen
1. Gegenüber Verbrauchern gewähren wir bei privater
Nutzung des Geräts eine Garantie von 24 Monaten ab
Kaufdatum.
Ist das Gerät zur gewerblichen Nutzung geeignet,
gewähren wir beim Kauf durch Unternehmer für das
Gerät eine Garantie von 12 Monaten.
Die Garantiezeit für Verbraucher reduziert sich auf 12
Monate, sofern sie ein zur gewerblichen Nutzung geeignetes Gerät – auch teilweise – gewerblich nutzen.
2. Voraussetzung für unsere Garantieleistungen sind
der Kauf des Geräts in Deutschland bei einem unserer
Vertragshändler sowie die Übersendung einer Kopie
des Kaufbelegs und dieses Garantiescheins an uns.
Page 11
11
Deutsch
Bendet sich das Gerät zum Zeitpunkt des Garantiefalls im Ausland, muss es auf Kosten des Käufers uns
zur Erbringung der Garantieleistungen zur Verfügung
gestellt werden.
3. Mängel müssen innerhalb von 14 Tagen nach Erkennbarkeit uns gegenüber schriftlich angezeigt werden.
Besteht der Garantieanspruch zu Recht, entscheiden
wir, auf welche Art der Schaden/Mangel behoben
werden soll, ob durch Reparatur oder durch Austausch
eines gleichwertigen Geräts.
4. Garantieleistungen werden nicht für Mängel erbracht,
die auf der Nichtbeachtung der Gebrauchsanweisung,
unsachgemäßer Behandlung oder normaler Abnutzung des Geräts beruhen. Garantieansprüche sind
ferner ausgeschlossen für leicht zerbrechliche Teile,
wie zum Beispiel Glas oder Kunststo. Schließlich
sind Garantieansprüche ausgeschlossen, wenn nicht
von uns autorisierte Stellen Arbeiten an dem Gerät
vornehmen.
5. Durch Garantieleistungen wird die Garantiezeit nicht
verlängert. Es besteht auch kein Anspruch auf neue
Garantieleistungen. Diese Garantieerklärung ist eine
freiwillige Leistung von uns als Hersteller des Geräts.
Die gesetzlichen Gewährleistungsrechte (Nacherfüllung, Rücktritt, Schadensersatz und Minderung)
werden durch diese Garantie nicht berührt.
Stand 03 2008
Garantieabwicklung
Sollte Ihr Gerät innerhalb der Garantiezeit einen Mangel
aufweisen, bitten wir Sie, uns Ihren Garantieanspruch mitzuteilen.
Die schnellste und komfortabelste Möglichkeit ist die
Anmeldung über unser SLI (Service Logistik International)
Internet-Serviceportal.
www.sli24.de
Sie können sich dort direkt anmelden und erhalten alle Informationen zur weiteren Vorgehensweise Ihrer Reklamation.
Über einen persönlichen Zugangscode, der Ihnen direkt
nach Ihrer Anmeldung per E-Mail übermittelt wird,
können Sie den Bearbeitungsablauf Ihrer Reklamation auf
unserem Serviceportal online verfolgen.
Alternativ können Sie uns den Servicefall per E-Mail
hotline@etv.de
oder per Fax
0 21 52 – 20 06 15 97
mitteilen.
Bitte teilen Sie uns Ihren Namen, Vornamen, Straße,
Hausnummer, PLZ und Wohnort, Telefon-Nummer,
soweit vorhanden, Fax-Nummer und E-Mail-Adresse mit.
Im Weiteren benötigen wir die Typenbezeichnung des
reklamierten Gerätes, eine kurze Fehlerbeschreibung, das
Kaufdatum und den Händler, bei dem Sie das Neugerät
erworben haben.
Nach Prüfung Ihres Garantieanspruches erhalten Sie
von uns einen fertig ausgefüllten Versandaufkleber. Sie
brauchen diesen Aufkleber nur noch auf die Verpackung
Ihres gut verpackten Gerätes zu kleben und das Paket bei
der nächsten Annahmestelle der Deutschen Post / DHL
abzugeben. Der Versand erfolgt für Sie kostenlos an unser
Servicecenter bzw. Servicepartner.
Bitte fügen Sie dem Paket eine Kopie Ihres Kaufbeleges
(Kassenbon, Rechnung, Lieferschein) sowie eine kurze
Fehlerbeschreibung bei.
Ohne den Garantienachweis (Kaufbeleg) kann Ihre
Reklamation nicht kostenfrei bearbeitet werden.
Bitte nehmen Sie in keinem Fall eine unfreie Einsendung
Ihres Gerätes vor. Bei unfreien Lieferungen entfällt Ihr
Anspruch auf Garantieleistungen.
0 21 52 – 2006 666
ETV
Elektro-Technische Vertriebsgesellschaft mbH
Industriering Ost 40
D-47906 Kempen
Entsorgung/Bedeutung des Symbols
„Mülltonne“
Schonen Sie unsere Umwelt, Elektrogeräte gehören nicht
in den Hausmüll.
Nutzen Sie die für die Entsorgung von Elektrogeräten
vorgesehenen Sammelstellen und geben dort Ihre Elektrogeräte ab die Sie nicht mehr benutzen werden.
Sie helfen damit die potenziellen Auswirkungen, durch
falsche Entsorgung, auf die Umwelt und die menschliche
Gesundheit zu vermeiden.
Sie leisten damit Ihren Beitrag zur Wiederverwertung, zum
Recycling und zu anderen Formen der Verwertung von
Elektro- und Elektronik-Altgeräten.
Informationen, wo die Geräte zu entsorgen sind, erhalten
Sie über Ihre Kommunen oder die Gemeindeverwaltungen.
Page 12
12
NEDERLANDS
Algemene veiligheidsrichtlijnen
Lees deze gebruiksaanwijzing zorgvuldig door voordat u
dit apparaat in gebruik neemt, en bewaar hem samen met
het Garantiecerticaat, het aankoopbewijs en, indien mogelijk, de originele verpakking inclusief het materiaal in de
doos. Als u het apparaat doorgeeft aan een derde persoon,
geef de gebruiksaanwijzing dan ook door.
• Stel het apparaat niet bloot aan regen of vocht, om
het risico op elektrische schokken te vermijden. Gebruik het apparaat niet in de buurt van water (bijv. in
badkamers, zwembaden en vochtige kelders).
• Dit apparaat is alleen bedoeld voor privégebruik, en
mag alleen gebruikt worden voor het beoogde doel.
Dit apparaat is niet bedoeld voor commercieel gebruik.
• Sluit het apparaat alleen aan op een standaard stop-
contact. Zorg dat de spanning die is aangegeven op
het apparaat overeenkomt met de spanning van het
stopcontact.
• Controleer bij het gebruik van externe adapters dat de
spanning en polariteit correct zijn. Plaats batterijen op
de juiste wijze.
• Dek bij de installatie van het apparaat geen van de
ventilatieopeningen af.
• Open de behuizing van het apparaat nooit. Ondeskun-
dige reparaties kunnen de gebruiker blootstellen aan
ernstige risico’s. Als het apparaat of het netsnoer zijn
beschadigd, gebruik dan het apparaat niet en zorg dat
het door een deskundige wordt gerepareerd. Controleer het netsnoer regelmatig op beschadigingen.
• Om risico’s te vermijden, dient een beschadigd net-
snoer vervangen te worden door een gelijkwaardige
kabel van de fabrikant, onze klantenservice of een
andere specialist.
• Als u het apparaat gedurende langere tijd niet
gebruikt, haal dan de stekker uit het stopcontact en
verwijder de batterijen.
Deze symbolen kunnen op het apparaat aangetroen
worden en zijn bedoeld als waarschuwingen:
De bliksemschicht dient ervoor om de
gebruiker te wijzen op de aanwezigheid van
gevaarlijke spanning in het apparaat.
Het uitroepteken dient ervoor om de gebruiker te wijzen op belangrijke aanwijzingen
over de bediening of het onderhoud die
horen bij dit apparaat.
Producten die voorzien zijn van dit symbool
zijn voorzien van een “Klasse 1 Laser” voor het
lezen van de CD. De ingebouwde veiligheidschakelaars dienen ervoor om te voorkomen
dat de gebruiker wordt blootgesteld aan de
gevaarlijke laserstraal, die niet zichtbaar is
voor het ook, wanneer het CD-compartiment
wordt geopend.
Deze veiligheidschakelaars dienen niet overbrugd of
gemodiceerd te worden, omdat anders het risico bestaat
van blootstelling aan de laserstraal.
Kinderen en gehandicapten
• Houd voor de veiligheid van uw kinderen het verpakkingsmateriaal (plastic zakken, karton, piepschuim
enz.) buiten hun bereik.
WAARSCHUWING!
Laat kleine kinderen niet met verpakkingsmateriaal
spelen i.v.m. verstikkingsgevaar!
• Dit apparaat is niet bedoeld voor gebruik door personen (inclusief kinderen) met verminderde lichamelijke,
zintuiglijke of mentale capaciteiten, of gebrek aan
ervaring en/of kennis tenzij zij onder toezicht staan of
instructies hebben gekregen betreende het gebruik
van het apparaat door een persoon verantwoordelijk
voor hun veiligheid.
• Houd kinderen onder toezicht om er voor te zorgen
dat zij niet met het apparaat gaan spelen.
Symbolen in deze gebruiksaanwijzing
Belangrijke opmerkingen voor uw veiligheid worden
speciaal aangeduid. Volg deze opmerkingen altijd op, om
ongelukken en schade aan het apparaat te voorkomen.
WAARSCHUWING:
Warnt vor Gefahren für Ihre Gesundheit und zeigt
mögliche Verletzungsrisiken auf.
LET OP:
Duidt op potentiaal gevaar voor het apparaat of voor
andere voorwerpen.
OPMERKING:
Duidt op tips en informatie voor u.
Speciale veiligheidsinstructies
Dit apparaat is uitgerust
met een Klasse 1 laser.
Overzicht van de bedieningsorganen
1 Telescopische antenne
2 Handgreep
3 CD-compartiment
4 STANDBY Toets (slaapstand/aan)
5 CLOCK toets (klok)
6 FUNCTION (functieschakelaar)
7 STOP toets
8 / Toetsen (snel vooruit/achteruit zoeken)
9 Toets (afspelen/pauze)
10 Klem voor het openen van het CD-vak (OPEN/CLOSE)
Page 13
13
NEDERLANDS
11 Dockingpoort
12 VOLUME +/- (volume) toetsen
13 Luidspreker
14 LCD-scherm
15 Batterijvak
16 POWER indicatorverlichting
17 IR sensor voor de afstandsbediening
Achteraanzicht (niet getoond)
AUX IN aansluiting
AC~ Aansluiting netsnoer
Afstandsbediening
1 CLOCK toets (klok)
2 MUTE (demp) toets
3 PRE-DN/PRE-UP toetsen (radiostation geheugen)
4 SNOOZE knop
5 INTRO knop
6 MEMORY toets (geheugen)
7 RAND toets (willekeurig afspelen)
8 INFO knop
9
Toets (snel vooruit)
Toets (snel achteruit)
10 VOLUME +/- (volume) toets
11 FUNCTION (functieschakelaar)
12 MENU UP toets (iPod/iPhone nagivatiemenu)
13 ENTER toets (bevestiging)
14 MENU DN toets (iPod/iPhone nagivatiemenu)
15 EQ toets
16 MENU knop
17 (afspelen/pauze) toets
18 STOP toets
19 REPEAT toets (herhaal)
20 MONO/ST toets
21 FOLDER +/- toetsen (omhoog/omlaag, album)
22 SLEEP toets
23 TIMER toets
24 STANDBY toets
Installatie/Inleiding
• Lees deze gebruiksaanwijzing aandachtig door voordat
u het apparaat in gebruik neemt!
• Selecteer een geschikte locatie voor het apparaat.
De ondergrond waarop u het apparaat plaatst dient
droog, vlak en niet glad te zijn, voor een gemakkelijke
bediening.
• Zorg dat het apparaat voldoende geventileerd wordt!
• Verwijder indien nodig het beschermende plastic van
het scherm.
Stroomverzorging
• Sluit het bijgeleverde netsnoer (zie indien nodig bat-
terijvak (15)) om een correct geïnstalleerd stopcontact
230 V/50 Hz en op de stroomaansluiting AC ~ op de
achterkant van het apparaat.
• Zorg dat de spanning in overeenstemming is met die
op het indicatieplaatje.
• De bespaarde tijd zal verloren gaan zodra de stroom
wordt uitgeschakeld.
Werking van de batterij (Batterijen niet inbegrepen)
• Open aan de onderkant het deksel van het
batterijvak (15).
• Plaats 8 batterijen van het type UM 2/R14 1,5 V. Let
op de correcte polariteit (zie de onderkant van het
batterijvak)!
• Sluit het batterijvak.
Als het apparaat voor lange tijd niet wordt gebruikt,
verwijder de batterijen om enige “lekkage” te voorkomen.
OPMERKING:
• Zodra een hoofdkabel is aangesloten, worden de
batterijen automatisch uitgeschakeld.
• Tijdens de werking van de batterijen, zal de oplaadbare batterij van een aangesloten iPod/iPhone niet
worden opgeladen.
LET OP:
• Gebruik geen verschillende soorten batterijen of
nieuwe en gebruikte batterijen door elkaar.
• Doe geen gebruikte batterijen in het huisvuil. Lever
ze in bij een erkend verzamelpunt of geef ze terug
aan uw leverancier.
WAARSCHUWING:
Stel de batterijen niet bloot aan hitte of direct zonlicht.
Gooi batterijen nooit in open vuur. Explosiegevaar!
Batterijen van de afstandsbediening (Batterijen worden
niet meegeleverd)
• Open de afdekking van het batterijvak aan de achterzijde van de afstandsbediening.
• Plaats 2 batterijen R03 “AAA” 1,5 V. Let op de juiste
polariteit (zie de bodem van het batterijvak)!
• Als u de afstandsbediening gedurende langere tijd niet
gebruikt, verwijder dan de batterijen om “lekkage” van
batterijzuur te voorkomen.
LET OP:
• Gebruik geen verschillende soorten batterijen of
nieuwe en gebruikte batterijen door elkaar.
• Doe geen gebruikte batterijen in het huisvuil. Lever
ze in bij een erkend verzamelpunt of geef ze terug
aan uw leverancier.
WAARSCHUWING:
Stel de batterijen niet bloot aan hitte of direct zonlicht.
Gooi batterijen nooit in open vuur. Explosiegevaar!
Page 14

14
NEDERLANDS
Instellen van de klok (in slaapstand)
1. Houd de CLOCK toets voor een korte tijd ingedrukt
(5/1). Het scherm geeft aan “24 HOUR”.
2. Gebruik de
/ toetsen (8/9) om te kiezen tussen
24 en 12-uursweergave. Bevestig met CLOCK.
OPMERKING: De 12-uursweergave resulteert in
de volgende aanduiding op het scherm
AM = ochtend, PM = middag.
3. Gebruik de
/ toetsen om de uren in te stellen.
Bevestig met CLOCK.
4. Gebruik de
/ toetsen om de minuten in te stellen.
5. Druk nogmaals CLOCK om de tijdinstellingen op te slaan.
Transportbeveiliging van het CD-compartiment
• Open het CD-vak (3) door het deksel met de klem (10)
omhoog te trekken.
• Verwijder indien aanwezig de transportbeveiliging van
de CD speler voordat u deze in gebruik neemt.
• Sluit het CD-vak.
iPod/iPhone compatibiliteit
Volledige compatibiliteit kann niet worden gegarandeerd
vanwege de grote verscheidenheid aan iPod en iPhone
modellen en generaties op de markt vandaag. Controleer
dat uw iPod/iPhone met dit apparaat gebruikt kan worden
voordat u de iPod/iPhone aansluit.
Er kan ook niet gegarandeerd worden dat alle functies op
afstand bediend kunnen worden. Bedien uw iPod/iPhone op
de gebruikelijke wijze, terwijl het in het dockingstation zit.
OPMERKING:
De volgende storingsmelding kan worden weergegeven,
afhankelijk van de softwareversie van uw iPhone:
“Dit accessoire was niet ontwikkeld voor iPhone gebruik. Er kan eventueel ruis optreden en de signaalsterkte
kan gereduceerd zijn.”
Druk in dit geval op “OK”.
Algemene bediening
OPMERKING:
U zult sommige toetsen zowel op het apparaat als op de
afstandsbediening aantreen.
Toetsen met de zelfde naam bedienen de zelfde functies.
STANDBY (4/24)
Druk de STANDBY toets om het apparaat in de slaapstand
te schakelen. De POWER-indicatorverlichting (16) gaat
branden. Druk deze toets nogmaals om het apparaat in te
schakelen.
Volume (12/10)
Instellen van het gewenste volume. Het scherm geeft “VOL”
en een nummer weer. Dit nummer komt overeen met een
waarde tussen “VOL MAX” en “VOL MIN”.
Infrarood afstandsbediening
Voor draadloze bediening tot een afstand van 5 meter. Als
dit bereik kleiner wordt, vervang dan de batterijen. Zorg
dat er zich tijdens het gebruik geen obstakels bevinden
tussen de afstandsbediening en de sensor (17) op het apparaat.
AUX IN aansluiting (Achterkant van het apparaat)
Voor het aansluiten van analoge afspeelapparatuur. Als u
hier apparatuur op aansluit, kunt u ook via de luidsprekers
luisteren naar andere apparaten, zoals MP3 of CD-spelers.
1. Sluit het externe apparaat aan op de AUX IN aansluiting met een 3,5 mm plug.
2. Gebruik nu de FUNCTION toets (6/11) om de AUX
stand te kiezen.
3. U kunt via de luidsprekers luisteren naar het geluid
van het externe apparaat; gebruik de VOLUME +/toetsen (12/10) om het volume aan te passen. De CD
toetsen werken niet.
4. Zie voor verdere functies het de gebruiksaanwijzing
van het externe audiotoestel.
OPMERKING:
Stel het volume van het externe apparaat in op een
acceptabel niveau.
Radio luisteren
1. Druk herhaaldelijk de FUNCTION toets (6/11) totdat
het scherm “TUNER” toont.
2. Gebruik de
/ toetsen (8/9) om op het gewenste
station af te stemmen.
3. De indicatielamp FM.ST ((ST)) (op het scherm) licht op
wanneer het station in stereo wordt ontvangen. Als
de ontvangst te slecht is en er storing in de ontvangst
zit, zal de indicatielamp knipperen. Voor FM stations
kunt u MONO/ST toets (20 op de afstandsbediening)
gebruiken om te wisselen tussen MONO en STEREO
ontvangst. In het geval van slechte ontvangst bevelen
we aan om de MONO stand te kiezen.
Opslaan/Stations selecteren
4. Als u het gewenste station gevonden hebt, druk dan
de MEMORY toets (6 op de afstandsbediening). MEMORY licht op in het scherm en de geheugenpositie
knippert.
5. Gebruik de PRE-UP/DN toets (3 op de afstandsbediening) voor het kiezen van de geheugenstand.
6. Druk MEMORY om de instellingen op te slaan.
Page 15
15
NEDERLANDS
Druk de PRE-UP of PRE-DN toets om een geprogrammeerd station te selecteren.
Muziekweergave via de iPod/iPhone
(iPod/iPhone niet bijgeleverd)
1. Druk herhaaldelijk op de FUNCTION toets (6/11), totdat
“NO IPOD” op het display verschijnt.
2. Als een adapter met uw iPod is meegeleverd, verbind
deze dan met de docking aansluiting. Pas als de adapter aangesloten is, kunt u controleren of de iPod goed
in de iPod-aansluiting past.
3. Plaats uw iPod/iPhone in het dock.
LET OP:
Zorg ervoor dat uw iPod/iPhone rechtop in de aansluiting gezet wordt. Zet de iPod/iPhone niet scheef in
de aansluiting. Dit kan het dock en/of de iPod/iPhone
beschadigen.
4. Afhankelijk van het iPod/iPhone model moet eerst de
toetsenvergrendeling uitgeschakeld worden, en moet
de weergave gestart worden met behulp van de
toets (9/17).
5. Raadpleeg de gebruiksaanwijzing van uw iPod/iPhone
voor meer informatie over de bediening.
LET OP:
Stop het afspelen voordat u de iPod/iPhone aansluit,
anders kan de iPod/iPhone beschadigd raken.
OPMERKING:
• Indien nodig kunt u de audio-instellingen wijzigen
van uw iPod/iPhone om optimaal geluid te realiseren.
• Indien er een inkomende oproep wordt ontvangen
terwijl u muziek afspeelt met de iPhone in het dock,
zal het afspelen stoppen zodat u de ringtoon kunt
horen. Haal de iPhone uit het apparaat om gesprekken te accepteren.
iPod/iPhone opladen
Uw iPod/iPhone batterij wordt opgeladen zodra de iPod/
iPhone is aangesloten. Om de batterij op te kunnen laden
moet het apparaat aangesloten zijn op de elektriciteit.
OPMERKING:
• Als een adapter is meegeleverd met uw Pod, gebruik
deze dan om ervoor te zorgen dat de iPod past op de
aansluiting.
• Niet alle iPod/iPhone-generaties ondersteunen de
oplaadstand.
• De duur van het oplaadproces hangt af van het
iPod/iPhone model en van de staat van de batterij.
• We raden u niet aan gedurende het bedrijf de batterij op te laden, omdat de batterijen hierdoor sneller
leeg raken.
Afspelen CD’s/MP3
Het afspelen van een CD
1. Druk herhaaldelijk de FUNCTION toets (6/11) totdat
het scherm “CD” weergeeft.
2. Open het CD-vak (3) door het deksel met een klem (10)
omhoog te trekken.
3. Plaats de audio-CD op de conische as met de label
naar boven, zodat deze mechanisch vastklikt. Sluit de
CD-lade weer dicht.
4. AUDIO CD:
“READING” verschijnt kort op het display, dan “TOTAL”,
het aantal titels en de totale afspeeltijd. Het afspelen
begint vanaf het eerste nummer op de CD. De huidige
track, de verstreken afspeeltijd en het
symbool
worden getoond.
CD in MP3 formaat:
“READING” verschijnt kort op het display, dan “TOTAL”,
“MP3”, het aantal titels en de en mappen (FOLDER).
Het afspelen start vanaf het eerste nummer en vanaf
de eerste map. De huidige track (TRACK), de verstreken
afspeeltijd, “MP3” en het
symbool worden getoond.
Gebruik de FOLDER + of FOLDER - toetsen
(21 op de afstandsbediening) om de verschillende
mappen te selecteren.
5. Om de CD te verwijderen drukt u op de STOP toets
(7/18), open het CD-vak en haal voorzichtig de CD
eruit.
Houd de CD door altijd gesloten.
OPMERKING:
• Bij het afspelen van een CD in MP3 formaat die
mappen bevat, toont het scherm 01 voor het eerste
nummer van de nieuwe map wanneer een andere
map wordt geselecteerd.
• Als een disc niet juist of geheel niet is geplaatst, zal
“READING” oplichten en het scherm geeft “NO DISC”
(geen disc) weer.
• Het afspelen van CD’s die gecreëerd zijn door de
gebruiker kan niet gegarandeerd worden vanwege de
verscheidenheid in software en CD schrijfapparatuur.
Beschrijving van de werking van de knoppen
(9/17)
U kunt het afspelen tijdelijk onderbreken en hervatten. De
verstreken afspeeltijd knipeprt en het symbool “
” wordt
getoond. Door nogmaals op de toets te drukken wordt het
afspelen vanaf het zelfde punt hervat.
/ (8/9)
Gedurende het afspelen van een audio-CD, of een CD in
MP3 formaat, of in de IPOD modus.
U kunt met de
toets naar volgende nummers springen.
Houd de toets ingedrukt om versneld voorwaarts te gaan
in het huidige nummer (het geluid wordt gedempt).
Page 16

16
NEDERLANDS
U kunt de toets als volgt gebruiken:
1 x drukken = Ga terug naar het begin van het huidige
2 x drukken = Ga terug naar het vorige nummer.
3 x drukken = Ga terug naar het nummer daarvoor enz.
In de radiostand:
Afstemmen van het gewenste radiostation.
STOP (7/18)
De CD of de track stopt.
ENTER (13 op de afstandsbediening)
In IPOD mode:
Druk op de toets om de functie te activeren of om het
volgende menu te tonen.
MENU (16 op de afstandsbediening)
In IPOD modus:
Druk op de toets om het iPod/iPhone menu te openen of
om naar het vorige menu terug te keren.
OPMERKING:
Voor deze functie, de geluidsapplicatie moet reeds
gestart zijn.
MENU UP/MENU DN. (12/14 op de afstandsbediening)
Im IPOD Modus:
Druk op de toets om door het iPod/iPhone menu omhoog
of omlaag te bladeren.
MUTE (2 op de afstandsbediening)
Om het geluid snel uit te schakelen. Op het scherm zal
“MUTE” knipperen. Druk nogmaals op MUTE om deze
functie uit te schakelen.
EQ (15 op de afstandsbediening)
(Voorinstelling voor de toonregeling). Er zijn diverse standen voor de toonregeling beschikbaar (CLASSIC, ROCK,
POP, JAZZ, FLAT).
OPMERKING: Gedurende het afspelen van iPod/iPhone
Indien nodig kunt u de EQ instellingen van uw iPod/
iPhone wijzigen om optimaal geluid te realiseren.
MONO/ST (20 op de afstandsbediening)
In de FM radiostand:
Voor het schakelen tussen STEREO en MONO.
INFO (8 op de afstandsbediening)
Tijdens het afspelen van een CD in MP3 formaat:
nummer.
Houd de toets ingedrukt om versneld achterwaarts te gaan in het huidige nummer
(geluid wordt gedempt).
Opgeslagen ID-3 labelinformatie wordt als banier op het
scherm weergegeven. Druk nogmaals op de toets om de
functie uit te schakelen.
INTRO (5 op de afstandsbediening)
Elke titel van de CD zal 10 seconden worden afgespeeld.
Druk nogmaals op de toets om de functie uit te schakelen.
REPEAT (19 op de afstandsbediening)
1x drukken: (REPEAT 1 licht op) Het huidige nummer
2x drukken: (REPEAT ALL licht op) De CD wordt vol-
3x drukken: Alle functies worden geannuleerd. Nor-
Alleen voor CD’s in MP3 formaat:
1x drukken: Het huidige nummer wordt doorlopend
2x drukken: De hele CD zal voortdurend worden
3x drukken:
4x drukken: De functie wordt uitgeschakeld en de CD
RAND (6 op de afstandsbediening)
Het scherm toont “RANDOM” en het nummer dat als eerste wordt afgespeeld wordt weergegeven. Alle nummers
worden in willekeurige volgorde afgespeeld.
FOLDER +/- (21 op de afstandsbediening)
CD in MP3 formaat:
Druk deze toetsen tijdens het afspelen om naar de vorige
of volgende map te springen. Het scherm geeft kort een
bericht weer, bijv. FOLDER 02. Daarna start het systeem
automatisch met het afspelen of the MP3 CD. Wanneer
de toetsen worden gedrukt in de stop stand, wordt het
bericht ook kort weergegeven op het scherm. Druk dan
om het afspelen te starten.
PRE-UP/PRE-DN (3 op de afstandsbediening)
In de radiostand:
Selecteer een geprogrammeerd radiostation.
SLEEP (8 op de afstandsbediening)
Wanneer het apparaat is ingeschakeld, kunt u de tijd
instellen waarna het apparaat naar de slaapstand zal
schakelen. De tijd kan ingesteld worden tussen 90 en
wordt volledig herhaald.
ledige herhaald.
maal afspelen wordt hervat.
herhaald (Het scherm toont REPEAT 1).
herhaald (REPEAT ALL wordt getoond).
De geselecteerde map van de MP3 CD
wordt doorlopend herhaald (het scherm
toont REPEAT ALBUM). Gebruik de FOLDER
+/- toetsen (21 op de afstandsbediening)
om de verschillende mappen te selecteren.
wordt in de normale stand afgespeeld.
Page 17
17
NEDERLANDS
10 minuten in stappen van 10 minuten. Druk deze toets
herhaaldelijk totdat het scherm de gewenste tijd weergeeft. Wanneer de functie wordt geactiveerd toont het
scherm het symbool “SLEEP”. Het apparaat schakelt automatisch af als de ingestelde tijd is verstreken.
Druk de SLEEP toets om de resterende tijd weer te geven.
U kunt naderhand nog steeds de tijd reduceren of de
functie uitschakelen.
TIMER (23 op de afstandsbediening)
U kunt het apparaat programmeren zodat het na een
vooraf ingestelde tijd uit en weer aan gaat.
1. Gebruik de STANDBY toets om naar de slaapstand te
schakelen. De POWER indicatorverlichting (16) brandt.
2. Druk de TIMER toets totdat het scherm “ON TIME”
weergeeft.
• Nu kunt u de
/ toetsen (8/9) gebruiken om
de uren en minuten in te stellen voor het in- en
uitschakelen, en voor het aanzetten van de modus
en volume.
• Bevestig altijd uw invoer met TIMER knop. De
instelling dat momenteel moet worden aangepast
knippert op het display.
OPMERKING:
Als binnen 10 seconden geen toets wordt geactiveerd, keert het apparaat terug naar de stand-by
modus zonder de invoer op te slaan.
3. Na het selecteren van het inschakelvolume, druk
nogmaals op de TIMER knop. Het apparaat schakelt in.
Na het bereiken van de ingestelde tijd, wordt het apparaat ingeschakeld in de geselecteerde modus. Het volume
neemt langzaam toe tot het geselecteerde volume.
Druk TIMER om de schakelklok uit te schakelen. “TIMER”
zal verdwijnen van het scherm.
SNOOZE (4 op de afstandsbediening)
Als het apparaat via de timer wordt ingeschakeld, kan
deze functie worden uitgesteld voor ongeveer 9 minuten
met de SNOOZE knop. Na 9 minuten wordt het apparaat
opnieuw ingeschakeld.
CLOCK (5/1)
Om de klok in te stellen.
Wanneer u op deze toets drukt, zal de tijd kortstondig
getoond worden.
MEMORY (6 op de afstandsbediening)
Om de stations op te slaan en het programmeerbaar
afspelen in te stellen.
Programmeren van het afspelen
Programmeren van het afspelen in een gewenste volgorde.
1. Druk de STOP toets (8/14).
2. Druk de MEMORY toets (6 op de afstandsbediening).
Het scherm toont “00 P01” (“Nummer” P “geheugenpositie”) en MEMORY. Gebruik de
/ toetsen
(7/14) om het gewenste nummer te selecteren en druk
nogmaals de MEMORY toets. De aanduiding op het
scherm wijzigt in geheugenpositie P02.
Voor CD’s in MP3 formaat:
Map “F00” naast P01, knippert op het display. Selec-
teer eerst de gewenste map met de toetsen FOLDER
+/- (21 op de afstandsbediening). Voor bevestiging
druk op de MEMORY knop. T00 wordt getoond.
3. Gebruik de
/ toetsen om het volgende nummer te
selecteren en druk nogmaals op MEMORY. Herhaal de
stappen totdat u alle nummers hebt geselecteerd.
OPMERKING:
Zodra de geheugencapaciteit van de programmeerbare titel is bereikt, zal “PROGFULL” getoond worden.
4. Druk de
toets (9/17). Het afspelen begint. Het
scherm toont het volgnummer van het eerste geselecteerde nummer. Gebruik deze toets ook voor het
tijdelijk onderbreken van het afspelen.
5. Druk eenmaal de STOP toets om het afspelen te stoppen. De positie wordt onthouden.
6. Voor herhaaldelijk afspelen van de programma’s, druk
op de knop.
7. Druk tweemaal op de STOP toets om het geheugen
te wissen. MEMORY zal niet langer meer getoond
worden.
Het apparaat stopt automatisch nadat alle geprogrammeerde nummers zijn afgespeeld. De geprogrammeerde
volgorde wordt in het geheugen vastgehouden totdat u
naar een andere stand schakelt, de CD uit het compartiment haalt of het apparaat uitschakelt.
Het is mogelijk om het geprogrammeerd afspelen te
combineren met de REPEAT functie. Druk na het programmeren en het starten van het afspelen de REPEAT toets
(13 op de afstandsbediening) tot drie keer in. De functies
kunnen toegepast worden zoals beschreven onder
“REPEAT”.
Page 18
18
NEDERLANDS
Het afspelen van muziekbestanden in MP3
formaat
Met dit apparaat kunnen muziekbestanden in MP3 formaat afgespeeld worden. Het apparaat ondersteunt verder
de volgende soorten CD’s: CD, CD-RW, en CD-R.
Uw apparaat kan MP3 CD’s afspelen. Dit zijn gecomprimeerde CD’s die tot 200 nummers kunnen bevatten. Het
apparaat herkent automatisch MP3 discs (het scherm
toont het totale aantal nummers en mappen). Zie hoofdstuk “Afspelen van CD/MP3” voor het afspelen van zulke
CD’s. U kunt nummers programmeren, zoals beschreven
onder “Programmeren van het afspelen”.
Opmerking:
Er zijn vele methoden voor het comprimeren en branden
van CD’s. Er zijn ook grote verschillen in kwaliteit van CD’s
en gebrande CD’s.
Verder past de muziekbranche geen vast standaards toe
(kopieerbeveiliging).
Daarom kunnen zich soms problemen voordoen bij het
afspelen van CD’s en MP3 discs. Dat is geen storing van
dit apparaat.
Reiniging en onderhoud
• Haal de stekker uit het stopcontact voor het reinigen.
• U kunt vlekken op de buitenzijde afvegen met een
vochtige doek zonder toevoegingen.
Verhelpen van storingen
Symptomen Oorzaak Oplossing
CD kan niet
worden weergegeven.
CD is niet of niet
correct geplaatst.
Controleer of de disc
met het opschrift naar
boven is geplaatst.
Batterijen te
zwak.
Plaats nieuwe batterijen of gebruik
het apparaat met de
netkabel.
CD springt
tijdens de
weergave.
Controleer de
CD op vingerafdrukken, vuil of
krassen.
Reinig de CD vanuit
het midden met een
zachte doek.
Het apparaat
werkt niet.
Het apparaat is
geblokkeerd en
“hangt”.
Haal de stekker ca. 5
seconden uit het stopcontact. Schakel het
apparaat vervolgens
weer in.
Technische specicaties
Model: ...................................................................................SR 4337 iP
Voeding:................................................................220-240 V~ 50 Hz
Batterijwerking: ......................................8 x 1,5 V type UM2/R14
Uitgangsvermogen: ......................................................80 W PMPO
Opgenomen vermogen: ............................................................15 W
Beschermingsklasse: ........................................................................... II
Netto gewicht: ..........................................................................2,00 kg
Radio:
Frequentiebereiken: .........................VHF/FM 87,5 ~ 108,0 MHz
Onderhevig aan verandering zonder voorafgaande kennisgeving!
Dit apparaat voldoet aan alle huidige CE-richtlijnen, zoals
de richtlijn elektromagnetische compatibiliteit en de
laagspanningsrichtlijn, en is gefabriceerd volgens de meest
recente veiligheidsvoorschriften.
“Made for iPod” en “Made for iPhone” betekent dat een
apparaat speciek is ontworpen voor een verbinding met
een iPod of iPhone en dat de ontwerper is gecerticeerd
om aan de Apple standaarden te voldoen. Apple is niet
verantwoordelijk voor de functionering van dit apparaat,
of in hoeverre deze voldoet aan de veiligheids- en regulatiestandaarden.
Verwijdering/Betekenis van het
vuilnisbak-symbool
Houd rekening met het milieu, gooi elektrische apparaten
niet weg bij het huishoudafval.
Breng overbodige of defecte elektrische apparaten naar
gemeentelijke inzamelpunten.
Help potentiële milieu- en gezondheidsgevaren door
onverantwoordelijk wegwerpen te voorkomen.
Draag bij aan hergebruik en ander opnieuw gebruik van
oude elektrische en elektronische apparaten.
Uw gemeente kan u informatie geven over inzamelingspunten.
Page 19
19
FRANÇAIS
Enfants et personnes invalides
• Pour la sécurité de vos enfants, garder hors de leur
portée tous les emballages (sachets en plastique, pièces
de cloisonnement, polystyrène etc.).
AVERTISSEMENT !
Ne pas laisser de jeunes enfants jouer avec les emballages danger d’étouement !
• Cet appareil n‘est pas destiné à être utilisé par des personnes (y compris des enfants) aux capacités physiques,
sensorielles ou mentales réduites ou ne disposant pas
de l‘expérience et/ou des connaissances nécessaires à
moins qu‘elles ne soient supervisées ou reçoivent d‘une
personne responsable de leur sécurité des instructions
concernant l‘utilisation de l‘appareil.
• Surveillez les enfants et assurez-vous qu‘ils ne jouent
pas avec l‘appareil.
Symboles utilisés dans ce manuel
Les notes importantes de sécurité sont marquées de façon
distincte. Y faire attention an d’éviter les accidents et
dommages sur l’appareil :
AVERTISSEMENT :
Avertit contre les dangers pour la santé et indique les
risques potentiels de blessure.
ATTENTION :
Indique de potentiels dangers pour l’appareil ou d’autres
objets.
NOTE :
Souligne les conseils et informations donnés à l’utilisateur.
Directives spéciales de sécurité
Cet appareil fonctionne avec un
laser de Classe 1.
Liste des diérents éléments de commande
1 Antenne téléscopique
2 Poignée
3 Compartiment CD
4 Touche STANDBY (Veille/Marche)
5 Touche CLOCK (Horloge)
6 Touche FUNCTION (Interrupteur Fonction)
7 Touche STOP
8 Touches
/ (recherche en avant/en arrière)
9 Touche (lecture/pause)
10 Clip d’ouverture du compartiment CD (OPEN/CLOSE)
11 Station d’accueil
12 Touche VOLUME +/- (volume)
13 Haut-parleurs
Indications générales de sécurité
Avant d’utiliser cet appareil, lire attentivement ce manuel
et le conserver avec le Certicat de Garantie, la facture
et, si possible, l’emballage d’origine, y compris l’emballage
interne. Si cet appareil est donné à une tierce personne,
transmettre le manuel avec.
• Pour éviter tout risque d‘incendie ou d‘électrocution,
n‘exposez pas cet appareil à la pluie ou à l‘humidité.
Ne le faites pas fonctionner à proximité de l‘eau (par
ex. dans une salle de bain, une piscine ou un sous-sol
humide).
• Cet appareil est conçu uniquement pour l’utilisation
privée et dans la limite de ce pour quoi il a été conçu.
Cet appareil n’est pas destiné à l’utilisation commerciale.
• Ne branchez l‘appareil que sur une prise de courant
murale standard. Assurez-vous que la tension indiquée
sur l‘appareil soit conforme à celle délivrée par la prise.
• Si vous utilisez des adaptateurs externes, veuillez
respecter la polarité et la tension. Insérez les batteries
correctement.
• Lorsque vous installez l‘appareil, prenez soin de ne pas
obstruer les orices de ventilation.
• N‘ouvrez jamais l‘appareil. Des réparations inadaptées
peuvent créer des risques importants pour l‘utilisateur.
Si l‘appareil ou son cordon d‘alimentation sont endommagées, cesser de les utiliser et faites-les réparer par
un expert. Vériez régulièrement le bon état du cordon
d‘alimentation.
• Pour éviter les risques, un cordon endommagé doit
être remplacé par un cordon similaire fourni par le
constructeur, notre service clientèle ou tout autre
spécialiste.
• Si vous n‘utilisez pas l‘appareil durant une période prolongée, veuillez le débrancher et en retirer les batteries.
Ces symboles peuvent se trouver sur l‘appareil à titre
d‘avertissements :
Le symbole en forme d'éclaire est destiné à
prévenir l'utilisateur de la présence d'une
tension dangereuse à l'intérieur de l'appareil.
Le point d'exclamation est destiné à prévenir
l'utilisateur de la présence d'instructions d'utilisation importantes accompagnant l'appareil.
Les équipements avec ce symbole utilisent
un "Rayon laser de Classe 1" pour lire le CD.
Les interrupteurs de sécurité intégrées sont
destinés à éviter que l'utilisateur ne puisse
être exposé à au faisceau laser dangereux,
bien qu'invisible à l'œil nu, lorsqu'ils ouvrent
le compartiment CD.
Ces interrupteurs de sécurité ne doivent pas être contournés ou modiés sous peine de créer un risque d‘exposition
au faisceau laser.
Page 20
20
FRANÇAIS
14 Ecran LCD
15 Compartiment à piles
16 Voyant lumineux POWER
17 Capteur IR pour la télécommande
Vue Arrière (non illustré)
Connexion AUX IN
Alimentation secteur AC~
Télécommande
1 Touche CLOCK (Horloge)
2 Touche MUTE (silence)
3 Touches PRE-DN/PRE-UP (mémoire de radio station)
4 Touche SNOOZE
5 Touche INTRO
6 Touche MEMORY (mémoire)
7 Touche RAND (lecture aléatoire)
8 Touche INFO
9 Touche
(Recherche vers l‘avant)
Touche (recherche vers l‘arrière)
10 Touche VOLUME +/- (volume)
11 FUNCTION (Interrupteur Fonction)
12 Touche MENU UP (menu de navigation iPod/iPhone)
13 Touche ENTER (conrmation)
14 Touche MENU DN button (iPod/iPhone menu naviga-
tion)
15 Touche EQ
16 Touche MENU
17 Touche (lecture/pause)
18 Touche STOP
19 Touche REPEAT (Répétition)
20 Touche MONO/ST
21 Touches FOLDER +/- (Haut/Bas, position mémoire
Album)
22 Touche SLEEP
23 Touche TIMER
24 Touche STANDBY
Installation/Introduction
• Lisez l‘ensemble du manuel avec d‘utiliser l‘appareil !
• Sélectionnez un endroit adéquat pour l’appareil. Les
endroits adaptés sont secs et disposent de surfaces
anti-dérapantes sur lesquelles vous pouvez utiliser
l‘appareil sans dicultés.
• Assurez-vous que l‘appareil dispose d‘une ventilation
adaptée !
• Retirez si nécessaire le lm de protection qui recouvre
l‘écran.
Alimentation
• Branchez le câble d’alimentation secteur inclus (si né-
cessaire, voir le compartiment à piles (15)) à une prise
électrique de 230 V / 50 Hz correctement installée et le
branchement électrique AC ~ à l’appareil de l‘appareil.
• Assurez-vous que la tension corresponde à celle indiquée sur la plaque indicatrice.
• L’heure enregistrée sera perdue dès que l’alimentation
est interrompue.
Fonctionnement à piles (Piles non incluses)
• Ouvrez le couvercle du compartiment à piles (15) au
bas de l’appareil.
• Insérez les 8 piles de type UM 2/R14 1,5 V. Veillez à
respecter la polarité (voir le bas du compartiment à
piles) !
• Refermez le compartiment à piles.
Si l’appareil doit resté inutilisé pendant de longues periods,
retirez les piles pour éviter les “fuites“.
NOTE :
• Si un cable secteur est connecté, les piles sont
automatiquement désactivées.
• Lors du fonctionnement par piles, la batterie rechargeable de l’iPod/iPhone ne sera pas rechargée.
ATTENTION :
• Ne mélangez pas diérents types de batteries, ou
bien des batteries neuves avec des batteries usagées.
• Ne jetez pas les batteries usagées avec les déchets
ménagers. Veuillez les remettre à un point de collecte
agrée ou bien les rap-porter au revendeur.
AVERTISSEMENT :
N‘exposez pas les batteries à la chaleur ou aux rayons
directs du soleil. Ne jetez jamais les batteries au feu.
Risque d‘explosion !
Batteries de la télécommande (Batteries non fournies)
• Ouvrez le couvercle du compartiment des batteries,
situé au dos de la télécommande.
• Insérez 2 batteries R03 “AAA“ de 1,5 V. Veuillez respecter la polarité (voir au fond du compartiment des
batteries) !
• Si vous n‘utilisez pas la télécommande durant une
période prolongée, veuillez retirer les batteries an
d‘éviter les “fuites“ d‘acide des batteries.
ATTENTION :
• Ne mélangez pas diérents types de batteries, ou
bien des batteries neuves avec des batteries usagées.
• Ne jetez pas les batteries usagées avec les déchets
ménagers. Veuillez les remettre à un point de collecte
agrée ou bien les rapporter au revendeur.
AVERTISSEMENT :
N‘exposez pas les batteries à la chaleur ou aux rayons
directs du soleil. Ne jetez jamais les batteries au feu.
Risque d‘explosion !
Page 21
21
FRANÇAIS
Réglage de l‘horloge (en mode de veille)
1. Maintenez brièvement le bouton CLOCK (5/1). L‘écran
va acher “24 HOUR”.
2. Servez-vous des touches
/ (8/9) pour sélectionner
l‘achage de l‘heure sur 12 ou sur 24 h. Conrmez à
l‘aide de CLOCK.
NOTE : L‘achage sur 12h implique l‘achage
des indications suivantes :
AM = matin, PM = après-midi.
3. Utilisez les touches
/ pour régler les heu-res.
Conrmez avec CLOCK.
4. Utilisez les touches / pour régler les minutes.
5. Appuyez à nouveau sur CLOCK pour sauvegarder le
réglage de l‘heure.
Dispositif de sécurisation du compartiment CD pour le
transport
• Ouvrez le compartiment à CD (3) en tirant le couvercle
vers le haut à l’aide du clip (10).
• Retirez, s‘il est présent, le dispositif de sécuri-sation
pour le transport du lecteur de CD avant de commencer à vous en servir.
• Refermez le compartiment à CD.
Compatibilité iPod / iPhone
En raison de la variété importante de modèles et de générations d’iPod et d’iPhone sur le marché, la compatibilité
absolue ne peut pas être garantie. Avant de connecter un
iPod / iPhone, vérier qu’il a une interface compatible.
Une entière compatibilité des fonctions de télécommande
ne peut pas non plus être garantie. Utilisez normalement
votre iPod / iPhone, quand il est dans sa station d’accueil.
NOTE :
Selon la version du logiciel de votre iPhone le message
d’erreur suivant peut s’acher :
“Cet accessoire n’a pas été conçu pour une utilisation
avec iPhone. Il est possible qu’un bruit soit audible et
que la force du signal soit réduite.”
Dans ce cas, appuyez sur “OK”.
Fonctionnement général
NOTE :
Certaines touches se trouvent à la fois sur l‘appareil et
sur la télécommande.
Les touches ayant le même nom ont la même fonction.
STANDBY (4/24)
Appuyez sur la touche STANDBY pour mettre l‘appareil en
mode de veille. Le témoin lumineux POWER (16) s’allume.
Appuyez à nouveau sur cette touche pour mettre l‘appareil en marche.
Volume (12/10)
Ajustez le volume au niveau de votre choix. L‘écran va afcher “VOL“ ainsi qu‘un chire correspondant à la valeur
réglée pour “VOL MAX“ ou “VOL MIN“.
Télécommande à infrarouges
Fonctionnement sans l jusqu‘à une distance de 5m. Si
cette portée diminue, veuillez remplacer les batteries.
Lorsque vous utilisez la télécommande, assurez-vous qu‘il
n‘y ait pas d‘obstacles entre la télécommande et le capteur
(17) situé sur l‘appareil.
Prise AUX IN (Arrière de l’appareil)
Connexion aux appareils de lecture analogiques. Lorsque
vous les connectez sur cette prise, vous pouvez également
écouter la radio ou d‘autres appareils comme des lecteurs
MP3 ou CD, etc. par les enceintes.
1. Veuillez connecter l‘appareil externe sur la prise AUX
IN à l‘aide de la che 3,5mm.
2. Utilisez ensuite la touche FUNCTION (6/11) pour sélectionner le mode AUX.
3. Vous écouterez le son de l‘appareil externe par les
enceintes; utilisez les touches VOLUME +/- (12/10)
pour régler le volume. Les touches du CD ne sont plus
actives.
4. Pour les autres fonctions, veuillez consulter le manuel
de l‘utilisateur de l‘appareil audio externe.
NOTE :
Réglez le volume de l‘appareil audio externe sur un
niveau audible.
Ecouter la radio
1. Appuyez plusieurs fois sur la touche FUNCTION (6/11)
jusqu‘à ce que l‘écran indique “TUNER“.
2. Utilisez les touches / (8/9) pour sélectionner la
station de votre choix.
3. Le voyant de contrôle FM.ST ((ST)) (sur l‘achage) va
s‘allumer lorsque la station choisie est captée avec une
qualité stéréo. Si la réception est trop faible et que la
station subit des interférences, le voyant de contrôle
va se mettre à clignoter. Vous pouvez utiliser la touche
MONO/ST pour les stations FM (20 sur la télécommande) pour permuter entre les modes de réception
MONO et STEREO. En cas de mauvaise réception, nous
vous recommandons d‘avoir recours au mode MONO.
Enregistrement/Sélection de Stations
4. Lorsque vous avez trouvé la station de votre choix, appuyez sur la touche MEMORY (6 sur la télécommande).
MEMORY va s‘allumer sur l‘écran et la position de la
mémoire va se mettre à clignoter.
5. Pour choisir la position de la mémoire, veuillez appuyer
sur la touche PRE-UP/DN (3 sur la télécommande).
Page 22

22
FRANÇAIS
6. Appuyez sur MEMORY pour sauveg-arder les réglages.
Pour sélectionner une station enregistrée, veuillez appuyer
sur les touches PRE-UP ou PRE-DN.
Lecture de chiers musicaux à partir de
l’iPod / iPhone
(iPod / iPhone non fourni)
1. Appuyez sur le bouton FUNCTION (6/11) plusieurs fois
jusqu’à ce que “NO IPOD“ apparaisse sur l’écran.
2. En cas d’adaptateur fourni avec votre iPod, placezle sur le connecteur d’accueil. Le bon branchement
de l’iPod dans le port iPod ne peut être vérié que si
l’adaptateur est branché.
3. Insérez votre iPod ou iPhone dans la station d’accueil.
ATTENTION :
Vérier que l’iPod / iPhone est branché droit dans
le port. Ne pas renverser ni incliner l’iPod / iPhone
lorsqu’il est branché dans le port. Cela pourrait
endommager la station ou l’iPod / iPhone.
4. Selon le modèle d’iPod / iPhone, relâcher d’abord
le verrouillage des touches et démarrer la lecture si
nécessaire avec la touche
(9/17).
5. Suivre les indications du manuel de votre iPod /
iPhone pour l’utilisation des commandes.
ATTENTION :
Arrêtez la lecture après avoir connecté l’iPod/iPhone,
faute de quoi, l’iPod/iPhone pourrait être endommagé.
NOTE :
• Si nécessaire, vous pouvez changer les paramètres audio
de votre iPod/iPhone an d’obtenir le meilleur son.
• Si vous recevez un appel alors que l’iPhone posé sur
la station est en train de lire de la musique, alors la
lecture s’arrêtera et vous entendrez la sonnerie. Retirez l’iPhone de l’appareil an de répondre à l’appel.
Chargement de l’iPod / iPhone
La batterie de votre iPod / iPhone se charge dès que l’iPod
/ iPhone est branché à une station d’accueil. Pour cela,
l’appareil doit être branché à l’alimentation.
NOTE :
• Si l’adaptateur de logement est fourni avec votre iPod,
utilisez-le pour garantir que votre iPod est bien adapté.
• Les diérentes versions d’iPod / iPhone ne supportent
pas toutes le mode charge.
• La durée de chargement dépend de l’iPod / iPhone
utilisé et des ses conditions de fonctionnement.
• Il n’est pas recommandé de recharger lors du
fonctionnement à piles, dans la mesure où les piles
s’useront plus vite.
Lire des CD/MP3
Comment lire un CD
1. Appuyez plusieurs fois sur la touche FUNCTION (6/11)
jusqu‘à ce que l‘écran ache “CD“.
2. Ouvrez le compartiment à CD (3) en tirant le couvercle
vers le haut à l’aide du clip (10).
3. Placez le CD audio sur l’axe conique, la face imprimée
étant dirigée vers le haut, de manière à ce qu’il s’enclenche en place. Refermez ensuite le compartiment à
CD.
4. CD AUDIO :
“READING” apparait brièvement sur l’écran, puis
“TOTAL”, le nombre de pistes et la durée de lecture
totale. La lecture débute à partir de la première piste
du CD. La piste actuelle, le temps de lecture écoulé et
le symbole
s’achent.
CD au format MP3 :
“READING” apparait brièvement sur l’écran, puis “TOTAL”, “MP3” ainsi que le nombre de pistes et de chiers
(FOLDER). La lecture débute à partir de la première piste et du premier répertoire. La piste (TRACK), le temps
de lecture écoulé, “MP3” et le symbole
s’achent.
Servez-vous des touches FOLDER + ou FOLDER - (21
sur la télécommande) pour sélectionner un répertoire
précis.
5. Pour retirer un CD appuyez sur le bouton STOP (7/18),
ouvrez le compartiment à CD et retirez délicatement
le CD.
Conservez toujours la porte du compartiment à CD refermée.
NOTE :
• Lorsque vous lisez des CD au format MP3 contenant
des répertoires, l'écran va acher 01 pour la
première piste du nouveau répertoire lorsque vous
accédez à un autre répertoire.
• Si un disque n'est pas correctement inséré ou absent,
l'indication "READING" va apparaître, et l'écran va
indiquer "NO DISC" (pas de disque).
• La lecture de CD crées par l'utilisateur ne peut être
garantie compte tenu de la diversité des logiciels et
des équipements média CD disponibles.
Description des boutons de commande
(9/17)
Vous pouvez interrompre la lecture de façon temporaire,
puis la reprendre. Le temps de lecture écoulé clignote et
le symbole “
“ s’ache. En appuyant à nouveau sur la
touche, vous reprendrez la lecture à partir de la même
position.
/ (8/9)
Pendant la lecture d’un CD audio, d’un CD au format MP3
ou en mode IPOD.
Page 23

23
FRANÇAIS
La touche vous permet de passer à la piste suivante ou
bien à celle d’après, etc. Maintenez cette touche enfoncée pour parcourir rapidement les morceaux (le son sera
coupé).
Vous pouvez utiliser la touche
Appuyez 1 fois = Reprend la lecture de la piste en cours,
depuis son commencement.
Appuyez 2 fois = Passe à la piste précédente.
Appuyez 3 fois = Lis la piste d’avant, etc. Maintenez cette
touche enfoncée pour parcourir rapide-
ment les chiers musicaux (le son sera
coupé).
En mode radio :
Réglez la station radio de votre choix.
STOP (7/18)
Le CD ou la piste s’arrête.
ENTER (13 sur la télécommande)
En mode IPOD :
ppuyez sur ce bouton pour active une fonction ou pour
acher le menu suivant.
MENU (16 sur la télécommande)
En mode IPOD :
Appuyez sur ce bouton pour ouvrir le menu iPod/iPhone
ou pour retourner au menu précédent.
NOTE :
Pour cette fonction, l’application musicale doit déjà être
en marche.
MENU UP/MENU DN. (12/14 sur la télécommande)
En mode IPOD :
Appuyez sur ce bouton pour parcourir le menu de l’iPod/
iPhone vers le haut ou vers le bas.
MUTE (2 sur la télécommande)
Coupe rapidement le son. L’indication “MUTE“ va clignoter
à l’écran. Pour annuler cette fonction, appuyez à nouveau
sur MUTE.
EQ (15 sur la télécommande)
(Fonction égaliseur préréglé). Il existe diérents modes
audio disponibles (CLASSIC, ROCK, POP, JAZZ, FLAT).
NOTE : Pendant la lecture d’iPod/iPhone
Si nécessaire, vous pouvez modier les réglages EQ de
votre iPod/iPhone an d’obtenir le meilleur son.
MONO/ST (20 sur la télécommande)
En mode radio FM :
Permute entre STEREO et MONO.
de la façon suivante :
INFO (8 sur la télécommande)
Lors de la lecture de CD au format MP3 :
Les informations tag ID-3 stockées seront achées à
l’écran sous forme de bannière. Appuyez à nouveau sur ce
bouton pour désactiver la fonction.
INTRO (5 sur la télécommande)
Chaque piste du CD sera lue pendant 10 secondes. Appuyez
à nouveau sur ce bouton pour désactiver la fonction.
REPEAT (19 sur la télécommande)
Appuyez 1 fois : (REPEAT 1 s’allume) L’intégralité de la piste
Appuyez 2 fois : (REPEAT ALL s’allume) L’ensemble du CD
Appuyez 3 fois : Toutes les fonctions seront annulées. La
Uniquement pour les CD au format MP3 :
Appuyez 1 fois : La piste en cours sera lue en boucle de façon
Appuyez 2 fois : Le CD entier sera répété en continu (RE-
Appuyez 3 fois : Le répertoire sélectionner du CD MP3 sera
Appuyez 4 fois : La fonction sera désactivée et le CD sera
RAND (6 sur la télécommande)
L’écran va acher “RANDOM” et le numéro de la piste qui
sera lue en premier. Toutes les pistes seront ensuite lues
dans un ordre aléatoire.
FOLDER +/- (21 sur la télécommande)
CD en mode MP3 :
ppuyez sur ces touches au cours de la lecture pour passer
au répertoire supérieur ou inférieur. L’écran ache brièvement un message, ex : FOLDER 02. Le système commence
alors automa-tiquement à lire le CD de MP3. Lorsque vous
ap-puyez sur les touches en mode arrêt, le message va
également s’acher brièvement à l’écran. Appuyez alors
sur
PRE-UP/PRE-DN (3 sur la télécommande)
En mode radio :
Sélectionner une station radio mémorisée.
SLEEP (8 sur la télécommande)
Lorsque l’appareil est en marche, vous pouvez régler le
temps au bout duquel il passera automatiquement en
mode de veille; réglez le temps par intervalles de 10 minutes, entre 10 et 90 minutes. Appuyez plusieurs fois sur
en cours sera répétée.
sera lu en boucle.
lecture normale va reprendre.
continue (l’écran va acher REPEAT 1).
PEAT ALL s’ache)
lu en boucle (l’écran va acher REPEAT
ALBUM). Utilisez les touches FOLDER +/(21 sur la télécom-mande) pour sélectionner un répertoire donné.
joué en mode normal.
pour commencer la lecture.
Page 24
24
FRANÇAIS
la touche jusqu’à ce que l’écran indique le temps désiré.
Lorsque la fonction est ac-tivée, l’écran va acher le symbole “SLEEP”. L’appareil va automatiquement s’éteindre au
temps indiqué.
Pour acher le temps restant, veuillez appuyer sur la
touche SLEEP. Vous pouvez toujours réduire l’intervalle de
temps ou désactiver la fonction.
TIMER (23 sur la télécommande)
Vous pouvez programmer l’appareil pour qu’il s’éteigne et
se rallume à un moment prédéterminé.
1. SUtilisez la touche STANDBY pour passer en mode de
veille. Le témoin lumineux POWER (16) s’allume).
2. Appuyez sur la touche TIMER jusqu’à ce que l’écran
ache “ON TIME“.
• Vous pouvez à présent utiliser les boutons
/
(8/9) pour régler les heures et les minutes d’arrêt
ou de mise en marche, le mode de mise en marche
et le mode de mise en marche du volume.
• Conrmez toujours votre entrée à l’aide du bouton
TIMER. Le réglage étant couramment ajusté s’ache sur l’écran.
NOTE :
Si aucun bouton n’est activé dans les 10 secondes
qui suivent, l’appareil retourne en mode de veille
sans que l’entrée soit enregistrée.
3. Après avoir sélectionné le volume de mise en marche,
appuyez à nouveau sur le bouton TIMER. L’appareil va
passer en mode de veille.
Une fois que l’heure voulue est atteinte, l’appareil se met
en marche au mode sélectionné. Le volume augmente
graduellement jusqu’au volume sélectionné.
Appuyez sur TIMER pour désactiver la fonction de minuterie. Le symbole “TIMER” va disparaître de l’écran.
SNOOZE (4 sur la télécommande)
Si l’appareil s’est mis en route sur la commande du minuteur, cette fonction peut être retardée pendant environ
9 minutes à l’aide du bouton SNOOZE. Après 9 minutes,
l’appareil se met à nouveau en marche.
CLOCK (5/1)
Pour régler l’horloge.
Lorsque vous appuyez sur ce bouton, l’heure s’ache
brièvement.
MEMORY (6 sur la télécommande)
Pour enregistrer les stations et pour régler la lecture programmée.
Lecture programmée
Lecture programmée suivant la séquence de votre choix.
(uniquement en mode CD).
1. Appuyez sur la touché STOP (8/14).
2. Appuyez sur la touche MEMORY (6 sur la télécommande). L’écran va indiquer “00 P01” (“piste” P “position en mémoire”) et MEMORY. Utilisez les touches
/ (7/14) pour sélec-tionner la piste de votre choix,
puis appuyez à nouveau sur MEMORY. L’écran va
acher la position de mémoire P02.
Pour les CD au format MP3 :
Le chier “F00” à côté de P01, clignote sur l’achage.
Sélectionnez d’abord le chier que vous souhaitez à
l’aide des boutons FOLDER +/- (21 sur la télécommande). Pour conrmer, appuyez sur le bouton MEMORY.
T00 apparait sur l’écran.
3. Utilisez les touches
/ pour sélectionner la piste
suivante et appuyez à nouveau sur MEMORY. Répétez
ces étapes jusqu’à ce que vous ayez sélectionné toutes
les pistes.
NOTE :
Si la capacité de mémoire de la piste programmable
est atteinte, “PROGFULL“ s’achera sur l’écran.
4. Appuyez sur la touche
(9/17). La lecture débute.
L’écran va acher le numéro de la première piste
sélectionnée. Utilisez également cette touche pour
interrompre la lecture de façon temporaire.
5. Appuyez une fois sur la touche STOP pour arrêter la
lecture. La mémoire sera conservée.
6. Pour répéter la lecture des programmes, appuyez sur
le bouton
.
7. Pour eacer la mémoire, veuillez appuyer deux fois
sur STOP. MEMORY ne sera plus aché.
L’appareil va s’arrêter automatiquement une fois que
toutes les pistes enregistrées ont été lues. La séquence
programmée sera conservée en mémoire jusqu’à ce que
vous basculiez sur un autre mode, retiriez le CD du compartiment ou éteignez l’appareil.
Il est possible de combiner la lecture programmée avec la
fonction REPEAT. Une fois la programmation eectuée et
la lecture débutée, appuyez jusqu’à 3 fois sur la touche
REPEAT (13 sur la télécommande); Les fonctions peuvent
s’appliquer comme décrites dans “REPEAT”.
Lecture de chiers musicaux au format MP3
Cet appareil permet la lecture de chiers musicaux au
format MP3. L’appareil supporte également les types de
CD communs : CD, CD-RW et CD-R.Vous appareil peut lire
les CD MP3. Il s’agit de CD au format compressé pouvant
Page 25
25
FRANÇAIS
Caractéristiques techniques
Modèle : ................................................................................SR 4337 iP
Tension d’alimentation :.................................220-240 V~ 50 Hz
Fonctionnement à piles : ........................ 8x 1,5V Typ UM2/R14
Puissance de sortie : .....................................................80 W PMPO
Consommation électrique : .....................................................15 W
Classe de protection : .........................................................................II
Poids net : ...................................................................................2,00 kg
Radio :
Gamme de fréquences : .................VHF/FM 87,5 ~ 108,0 MHz
Sujet à changement sans avertissement préal-able !
Cet appareil est conforme à toutes les directives CE en
vigueur, telles que les directives sur la compatibilité
électromagnétique et les faibles tensions et a été fabriqué
selon les derniers règlements de sécurité.
“Made for iPod” et “Made for iPhone“ signient qu’un
accessoire électronique a été tout particulièrement conçu
pour être branché à un iPod ou iPhone et a été certié par
le développeur pour répondre aux normes de performances Apple. Apple n’est pas responsable du fonctionnement
de cet appareil ni de sa conformité aux normes de sécurité
et des régulateurs.
Elimination/Signication du symbole
“Elimination”
Prendre soin de l’environnement, ne pas jeter des appareils
électriques avec les ordures ménagères.
Porter les appareils électriques obsolètes ou défectueux
dans les centres de récupération municipaux.
Aider à éviter les impacts potentiels sur l’environnement
et la santé en luttant contre les déchets sauvages.
Vous contribuerez ainsi au recyclage et autres formes de
réutilisation des appareils électriques usagés.
Votre municipalité vous fournira les informations nécessaires sur les centres de collecte.
contenir jusqu’à 200 pistes. Votre appareil peut automatiquement reconnaître les disques MP3 (l’écran va indiquer le
nombre total de pistes et de réper-toires). Veuillez consulter le chapitre “Lires des CD/MP3” pour la lecture de tels
CD. Vous pouvez programmer la lecture des pistes comme
cela est décrit dans le paragraphe “Lecture programmée”.
Veuillez noter :
Il existe de nombreuses méthodes de gravure et de
compressions ainsi que diérentes qualités de CD et de CD
gravés.
De plus, l’industrie musicale n’applique pas les standards
xés (protection contre les copies).
Il se peut donc qu’en de rares occasions, des problèmes
surviennent lors de la lecture de disques CD et MP3. Il ne
s’agit pas d’un disfonctionnement de l’appareil.
Nettoyage et entretien
• Débranchez la prise d’alimentation sur secteur avant
de procéder au nettoyage.
• Vous pouvez nettoyer les salissures externes à l’aide
d’un chion légèrement humidié, sans aucun additif.
En cas de problèmes
Symptômes Cause Solution
CD ne peut
pas être lu.
CD n’est pas dans
l’appareil ou mal
positionné.
Vériez que la face
imprimée du disque
se trouve vers le haut.
Piles trop faibles. Changez les piles de
l’appareil ou branchez
le câble d’alimentation de l’appareil.
CD saute
pendant la
lecture.
Vériez l’état du
disque (empreintes
de doigts, salissures
ou rayures).
Nettoyez le disque à
l’aide d’un torchon
doux, du centre vers
le bord.
L’appareil ne
fonctionne
pas
L’appareil est bloqué et “ne répond
pas”.
Débranchez la che
électrique pendant
environ 5 secondes.
Puis, remettez l’appareil en marche.
Page 26
26
ESPAÑOL
Normas generales de seguridad
Antes de usar este dispositivo, lea cuidadosamente este
manual del usuario y consérvelo junto con el certicado
de garantía, el recibo de compra y, si es posible, el embalaje original, incluyendo el embalaje interno. Si entrega
el dispositivo a terceros, incluya también el manual del
usuario.
• Para evitar riesgos de incendio o electrocución, no
exponga el aparato a la lluvia o la humedad. No lo use
cerca del agua (como en baños, piscinas ni sótanos
húmedos).
• Esta unidad está destinada exclusivamente a su uso
privado y la aplicación especíca para la que ha sido
diseñada. Esta unidad no ha sido diseñada para nes
comerciales.
• Conéctelo exclusivamente a una toma de corriente
estándar. Asegúrese de que el voltaje indicado en el
dispositivo coincida con la tensión de la toma.
• Si usa adaptadores externos, observe la polaridad y
voltaje correctos. Introduzca correctamente las baterías.
• Cuando instale el dispositivo, no tape ninguna de las
aperturas de ventilación.
• No abra nunca el chasis del dispositivo. Las repara-
ciones inadecuadas pueden provocar riesgos notables
para el usuario. Si el dispositivo o cable de corriente
está dañado, no use el dispositivo y hágalo reparar por
un experto. Compruebe regularmente si hay daños en
el cable de alimentación.
• Para evitar riesgos, el cable de alimentación daña-
do debe sustituitse por un cable equivalente por el
fabricante, nuestro servicio de atención al cliente o
cualquier otro especialista.
• Si no usa el dispositivo durante un periodo de tiempo
prolongado, desenchúfelo y saque las baterías.Estos
símbolos pu
Estos símbolos pueden encontrarse en el dispositivo y
están pensados como advertencias:
El símbolo del rayo pretende avisar al usuario
de la presencia de tensión peligrosa dentro
del dispositivo.
El símbolo de exclamación pretende alertar
al usuario de la presencia de instrucciones
importantes de uso y mantenimiento que
acompañan a este dispositivo.
Los productos con este símbolo funcionan
con un “Láser de Clase 1” para explorar el CD.
Los conmutadores de seguridad integrados
están pensados para evitar que el usuario se
vea expuesto al peligroso rayo láser invisible
al ojo cuando abra el compartimiento del CD.
Estos interruptores de seguridad no deben anularse ni
alterarse, o se producirá riesgo de exposición al rayo láser.
Niños y personas discapacitadas
• Para la seguridad de sus hijos, mantenga las piezas de
embalaje (bolsas de plástico, cartones, porexpan, etc.)
fuera de su alcance.
AVISO!
No deje que los niños pequeños jueguen con los
plásticos. debido al riesgo de asxia!
• Este dispositivo no está pensado para ser usado por
personas (incluyendo niños) con capacidades físicas, sensoriales o mentales reducidas, o con falta de
experiencia y/o conocimientos, a menos que tengan
supervisión o sean instruidas sobre el uso del dispositivo por una persona responsable por su seguridad.
• Vigile a los niños para garantizar que no jueguen con
el dispositivo.
Símbolos en este manual del usuario
Las notas importantes para su seguridad se indicant claramente. Preste mucha atención a las mismas para evitar
accidentes y daños al dispositivo.
AVISO:
Advierte de riesgos para su salud, e indica riesgo
potencial de heridas.
ATENCIÓN:
Indica peligros potenciales para el dispositivo u otros
objetos.
NOTA:
Indica recomendaciones e información para usted.
Normas especiales de seguridad
Este dispositivo funcionacon un
láser de Clase 1.
Indicación de los elementos de manejo
1 Antena telescópica
2 Asa
3 Compartimiento de CD
4 Botón STANDBY (espera/encendido)
5 Botón CLOCK (reloj)
6 FUNCTION (interruptor de función)
7 Botón STOP
8
/ Botones (buscar adelante/atrás)
9
button (reproducir/pausa)
10 Clip para abrir el compartimiento de CD (OPEN/CLOSE)
11 Puerto de conexión
12 Botones VOLUME +/- (volumen)
13 Altavoz
14 Pantalla LCD
Page 27

27
ESPAÑOL
15 Compartimiento de baterías
16 Testigo POWER
17 Sensor IR para el mando a distancia
Vista trasera (no mostrado)
Conexión AUX IN
Conexión a la red AC~
Mando a distancia
1 Botón CLOCK (reloj)
2 Botón MUTE (silencio)
3 Botones PRE-DN/PRE-UP (memoria de emisoras de radio)
4 Botón SNOOZE
5 Botón INTRO
6 Botón MEMORY (memoria
7 Botón RAND (reproducción aleatoria)
8 Botón INFO
9 Botón
(buscar adelante)
Botón (buscar atrás)
10 Botón VOLUME +/- (volumen)
11 FUNCTION (interruptor de función)
12 Botón MENU UP (navegación de menú iPod/iPhone)
13 Botón ENTER (conrmación)
14 Botón MENU DN (navegación de menú iPod/iPhone)
15 Botón EQ
16 Botón MENU
17 Botón (reproducir/pausa)
18 Botón STOP
19 Botón REPEAT (repetir)
20 Botón MONO/ST
21 Botones FOLDER +/- (arriba/abajo, álbum)
22 Botón SLEEP
23 Botón TIMER
24 Botón STANDBY
Instalación/presentación
• Lea por completo el manual antes de usar el dispositivo.
• Seleccione una ubicación adecuada para el dispositi-
vo. Las ubicaciones adecuadas son supercies secas,
uniformes y antideslizantes sobre las que pueda usar
con facilidad el dispositivo.
• Asegúrese de que exista una ventilación adecuada para
el dispositivo.
• Retire, si es necesario, la hoja protectora de la pantalla.
Alimentación
• Conecte el cable de alimentación incluido (ver compar-
timiento de baterías (15) si es necesario) a una toma
de corriente correctamente instalada de 230 V/50 Hz y
la conexión de alimentación AC~ de la parte posterior
del dispositivo.
• Asegúrese de que el voltaje coincida con la placa
identicadora.
• La hora guardada se perderá cuando se desconecte la
alimentación.
Funcionamiento con baterías (baterías no incluidas)
• Abra la tapa del compartimiento de baterías (15) de la
parte inferior.
• Introduzca 8 baterías tipo UM 2/R14 de 1,5 V. Observe
la polaridad correcta (ver parte inferior del compartimiento de baterías)
• Cierre el compartimiento de baterías.
Si el dispositivo no se usa durante periodos prolongados,
retire las baterías para evitar “fugas”.
NOTA:
• Si se conecta un cable de alimentación las baterías se
desactivan automáticamente.
• Durante el funcionamiento con baterías, la batería
recargable del iPod/iPhone no se cargará.
ATENCIÓN:
• No mezcle distintos tipos de batería ni baterías
nuevas y usadas.
• No deseche las baterías con los residuos domésticos.
Entréguelas en un punto de recogida autorizado o
devuélvalas a su vendedor.
AVISO:
No exponga las baterías al calor ni a la luz del sol
directa. No tire nunca las baterías al fuego. ¡Riesgo de
explosión!
Baterías del mando a distancia (baterías no incluidas)
• Abra la tapa del compartimiento de baterías en el lado
posterior del mando a distancia.
• Introduzca 2 baterías R03 “AAA” de 1,5 V. Observe la
polaridad correcta (ver la parte inferior del compartimiento de baterías)!
• Si no usa el mando a distancia durante un periodo
prolongado de tiempo, saque las baterías para evitar
“fugas” de ácido de las baterías.
ATENCIÓN:
• No mezcle distintos tipos de batería ni baterías
nuevas y usadas.
• No deseche las baterías con los residuos domésticos.
Entréguelas en un punto de recogida autorizado o
devuélvalas a su vendedor.
AVISO:
No exponga las baterías al calor ni a la luz del sol
directa. No tire nunca las baterías al fuego. ¡Riesgo de
explosión!
Congurar el reloj (durante el modo espera)
1. Mantenga pulsado brevemente el botón CLOCK (5/1).
La pantalla mostrará “24 HOUR”.
2. Use los botones
/ (8/9) para selec-cionar entre la
conguración de indicación de 24 horas y 12 horas.
Conrme con CLOCK.
Page 28

28
ESPAÑOL
NOTA: La conguración de 12 horas producirá la
indicación siguiente
AM = mañana, PM = tarde.
3. Use los botones
/ para establecer las horas. Conr-
me con CLOCK.
4. Use los botones
/ para establecer los minutos.
5. Pulse CLOCK de nuevo para guar-dar la conguración
de hora.
Dispositivo de asegurado del compartimiento de CD
para el transporte
• Abra el compartimiento del CD (3) tirando de la tapa
con el clip (10) hacia arriba.
• Saque, si está presente, el dispositivo de asegurado
para transporte del reproductor de CD antes de iniciar
el uso.
• Cierre de nuevo el compartimiento del CD.
Compatibilidad con el iPod/iPhone
Debido a la gran variedad de modelos y generaciones de
iPod y iPhone disponibles en el mercado, no se puede garantizar plena compatibilidad. Antes de conectar su iPod/
iPhone, compruebe que la interfaz es compatible.
Asimismo, tampoco podemos garantizar la compatibilidad
de todas las funciones del control remoto. Use el iPod/
iPhone con normalidad mientras se encuentra colocado
en la base de carga.
NOTA:
En función de la versión del software de su iPhone, podría aparecer en pantalla el siguiente mensaje de error:
“Este accesorio no ha sido diseñado para su uso con
iPhone. Es posible que se registre ruido y que la intensidad de la señal sea reducida.
”En este caso, pulse “OK”.
Funcionamiento general
NOTA:
Algunos botones se encuentran en el dispositivo y en el
mando a distancia.
Los botones con el mismo nombre producen las mismas
funciones.
STANDBY (4/24)
Pulse el botón STANDBY para poner el dis-positivo en
modo espera. El testigo POWER (16) se encenderá. Pulse
este botón de nuevo para encender el dispositivo.
Volumen (12/10)
Ajústelo al nivel deseado de volumen. La pantalla mostrará
“VOL” y un número. Equivaldrá al volumen establecido
entre “VOL MAX” o “VOL MIN”.
Mando a distancia por infrarrojos
Funcionamiento inalámbrido desde una distancia de hasta
5 metros. Si el alcance se reduce, cambie las baterías.
Asegúrese de que no haya obstáculos entre el mando a
distancia y el sensor (17) del dispositivo durante el funcionamiento.
Toma AUX IN (Parte posterior del dispositivo)
Conexión de dispositivos de reproducción analógicos.
Cuando conecte con esta toma también puede escuchar
el sonido de otros dispositivos, como reproductores MP3 o
CD, etc. por los altavoces.
1. Conecte el dispositivo externo por la toma de 3,5mm
a la toma AUX IN.
2. Use el botón FUNCTION (6/11) para selec-cionar el
modo AUX.
3. Con los altavoces puede escuchar el sonido del dispositivo externo; use los botones VOLUME +/- (12/10)
para ajustar el volu-men. Los botones de CD están
desactivados.
4. Para otras funciones, consulte el manual del usuario
del dispositivo de audio externo
NOTA:
Ponga el volumen del dispositivo externo a un nivel de
audición adecuado.
Escuchar la radio
1. Pulse repetidamente el botón FUNCTION (6/11) hasta
que la pantalla muestre “TUNER”.
2. Use los botones / (8/9) para sintonizar la emisora
deseada.
3. El testigo de control FM.ST ((ST)) (en la pantalla) se encenderá cuando la emisora seleccionada se reciba con
calidad estéreo. Si la recepción es demasiado baja y la
emisora tiene estática, el testigo de control parpadeará. Para las emisoras FM puede usar el botón MONO/ST
(20 en el mando) para cambiar entre MONO recepción
y STEREO. En caso de mala recepción, recomendamos
cambiar a modo MONO.
Guardar/seleccionar emisoras
4. Cuando haya encontrado la emisora deseada, pulse el
botón MEMORY (6 en el mando). Se encenderá MEMORY
en la pantalla y la posición de memoria parpadeará.
5. Para elegir la posición de memoria, pulse el botón
PRE-UP/DN (3 en el mando).
6. Pulse MEMORY para guardar la conguración.
Para elegir una emisora guardada, pulse el botón PRE-UP
o PRE-DN.
Page 29

29
ESPAÑOL
Reproducción música del iPod/iPhone
(iPod/iPhone no incluido)
1. Pulse el botón FUNCION (6/11) repetidamente hasta
que aparezca “NO IPOD” en la pantalla.
2. Si se proporciona un adaptador con el iPod, póngalo
sobre el conector de la base de carga. Solamente
podrá comprobar que el iPod se ajusta correctamente
al puerto si el adaptador está conectado.
3. Coloque el iPod/iPhone en la base de carga.
ATENCIÓN:
Compruebe que el iPod/iPhone está conectado al
puerto en la posición correcta. No tuerza ni incline
el iPod/iPhone mientras esté conectado al puerto.
Podría provocar daños en la base de carga o en el
iPod/iPhone.
4. En función del modelo de iPod/iPhone, es posible que
sea necesario desbloquear los botones y comenzar la
reproducción con el botón
(9/17).
5. Siga el manual de su iPod/iPhone para saber el uso de
los controles.
ATENCIÓN:
Detenga la reproducción antes de conectar el iPod/iPhone, o podría dañarlo.
NOTA:
• Si es necesario puede cambiar la conguración audio
del iPod/iPhone para obtener un sonido óptimo.
• Si recibe una llamada durante la reproducción de
música con el iPhone en la base de carga, la reproducción de detendrá y podrá oír el tono de llamada.
Saquen el iPhone del dispositivo para aceptar la
llamada.
Carga de iPod/iPhonen
La batería de su iPod/iPhone se carga en cuanto se conecta el iPod/iPhone. Para ello, la unidad debe estar conectada al suministro eléctrico.
NOTA:
• Si se ha suministrado un adaptador de ranura con
su iPod, utilícelo para estar seguro de que el iPod se
acopla correctamente.
• No todas las generaciones de iPod/iPhone soportan
el modo de carga.
• La duración del proceso de carga dependerá del iPod/
iPhone utilizado y sus características de funcionamiento.
• No recomendamos cargar durante el funcionamiento
con baterías; hacerlo gastará las baterías más rápidamente.
Reproducir CD/MP3
Cómo reproducir un CD
1. Pulse repetidamente el botón FUNCTION (6/11) hasta
que la pantalla muestre “CD”.
2. Abra el compartimiento del CD (3) tirando de la tapa
con el clip (10) hacia arriba.
3. Introduzca el CD audio en el eje cónico con la etiqueta
hacia arriba de forma que encaje mecánicamente en
su lugar. Cierre de nuevo el compartimiento del CD.
4. CD AUDIO:
Aparecerá brevemente “READING” en pantalla, y a
continuación “TOTAL”, el número de pistas y el tiempo
total de reproducción. La reproducción comenzará en
el primer título del CD. Se mostrará la canción actual, el
tiempo de reproducción transcurrido y el símbolo
.
CD en formato MP3:
Aparecerá brevemente “READING“ en pantalla, y a
continuación “TOTAL”, “MP3“, el número de pistas y
de carpetas (FOLDER). La reproducción comenzará por
la primera pista y la primera carpeta. Se mostrará la
canción actual (TRACK), el tiempo de reproducción
transcurrido, “MP3” y el símbolo
Use los botones
FOLDER + o FOLDER - (21 en el mando) para elegir las
carpetas indepen-dientes.
5. Para sacar el CD, pulse el botón STOP (7/18), abra el
compartimiento de CD y retírelo cuidadosamente.
Mantenga siempre cerrada la tapa del CD.
NOTA:
• Cuando reproduzca un CD en formato MP3 que
contenga carpetas, la pantalla mostrará 01 para la
primera pista de la nueva carpeta cuando pase a otra
carpeta.
• Si no se ha introducido un disco o no se ha introducido correctamente, se encenderá “READING” y la
pantalla mostrará “NO DISC (Sin disco)”.
• La reproducción de CD creados por el usuario no
puede garantizarse por la diversidad de software y
equios de medios de CD.
Descripción de los botones de uso
(9/17)
Puede detener temporalmente la reproducción y comenzar de nuevo. Parpadeará el tiempo de reproducción
transcurrido y se mostrará “
“ Pulsando el botón de nuevo
continuará la reproducción desde la misma posición.
/ (8/9)
Durante la reproducción de un CD audio, un CD en formato MP3, o en modo iPOD.
Con el botón
puede saltar a la pista siguiente o posterior, etc. Presione y mantenga este botón para buscar
música rápidamente (el sonido se silenciará).
Page 30

30
ESPAÑOL
Puede usar el botón del modo siguiente:
Pulsar x 1 = Inicia de nuevo la pista actual desde el
Pulsar x 2 = Salta a la pista anterior.
Pulsar x 3 = Reproduce la pista anterior, etc,
En modo radio:
Sintoniza la emisora de radio deseada.
STOP (7/18)
Se detiene el CD o la canción.
ENTER (13 en el mando)
En modo IPOD:
Pulse este botón para activar una función o mostrar el
siguiente menú.
MENU (16 en el mando)
En modo IPOD:
Pulse este botón para abrir el menú del iPod/iPhone o
volver al menú anterior.
NOTA:
Para esta función, la aplicación de música debe estar
iniciada.
MENU UP/MENU DN. (12/14 en el mando)
En modo IPOD:
Pulse este botón para ascender o descender en el menú
del iPod/iPhone.
MUTE (2 en el mando)
Apaga rápidamente el sonido. “MUTE” par-padeará en
pantalla. Para cancelar esta función, pulse MUTE de nuevo.
EQ (15 en el mando)
(función de ecualizador preestablecida). Tiene distintos
modos de sonido disponibles (CLASSIC, ROCK, POP, JAZZ,
FLAT).
NOTA: Durante la reproducción de iPod/iPhone.
Si es necesario puede cambiar la conguración EQ del
iPod/iPhone para obtener un sonido óptimo.
MONO/ST (20 en el mando)
En modo radio FM:
Cambia entre STEREO y MONO.
INFO (8 en el mando)
Durante la reproducción de CD en formato MP3:
La información de la etiqueta ID-3 se mostrará como una
banda en pantalla. Pulse este botón de nuevo para desactivar la función.
principio.
Presione y mantenga el botón para buscar
música rápidamente (el sonido se silenciará).
INTRO (5 en el mando)
Se reproducirá cada pista del CD durante 10 segundos.
Pulse este botón de nuevo para desactivar la función.
REPEAT (19 en el mando)
Pulsar x 1: (REPEAT 1 se enciende) La pista actual se
repetirá por completo.
Pulsar x 2: (se enciende REPEAT ALL) se repetirá todo el
CD por completo.
Pulsar x 3: Se cancelarán todas las funciones. Se conti-
nuará con la reproducción normal.
Sólo para CD en formato MP3:
Pulsar x 1: La pista actual se repetirá continua-mente
(La pantalla mostrará REPEAT 1).
Pulsar x 2: Se repetirá todo el CD continuamente
(muestra REPEAT ALL).
Pulsar x 3: La carpeta actual del CD MP3 se repetirá
continuamente (La pan-talla mostrará REPEAT ALBUM). Use los botones FOLDER +/-
(21 en el mando) para elegir las carpetas
independientemente.
Pulsar x 4: Se desactivará la función y el CD se repro-
ducirá de la forma normal.
RAND (6 en el mando)
La pantalla mostrará “RANDOM“ y el número de pista que
se reproducirá en primer lugar. Se reproducirán todas las
pistas en orden aleatorio.
FOLDER +/- (21 en el mando)
CD en formato MP3:
Pulse estos botones durante la reproducción para pasar a
una carpeta arriba o abajo. La pantalla mostrará brevemente un mensaje, por ejemplo FOLDER 02. El sistema
comenzará automáticamente la reproducción del CD MP3.
Cuando pulse los botones en modo detención, el mensaje
se mostrará brevemente en la pantalla. Pulse el botón
para iniciar la reproducción.
PRE-UP/PRE-DN (3 en el mando)
En modo radio:
Selecciona una emisora de radio guardada.
SLEEP (8 en el mando)
Cuando el dispositivo esté encendido, puede establecer el
tiempo pasado el cual el dispositivo pasará a modo espera;
establezca el tiempo en intervalos de 10 minutos, de 90 a
10 minutos. Pulse repetidamente este botón hasta que la
pantalla muestre el tiempo deseado. Cuando la función
esté activada, la panjtalla mostrará el símbolo “SLEEP“. El
dispositivo se apagará automáticamente pasado el tiempo
preestablecido.
Page 31

31
ESPAÑOL
Para mostrar el tiempo restante, pulse el botón SLEEP. Aún
puede reducir el tiempo o desactivar la función a continuación.
TIMER (23 en el mando)
Puede programar el dispositivo para que se apague y
encienda de nuevo pasado un tiempo preestablecido.
1. Pulse el botón STANDBY para poner el dis-positivo en
modo espera El testigo POWER (16) se encenderá.
2. Pulse el botón TIMER hasta que la pantalla muestre
“ON TIME“.
• Ahora puede usar los botones
/ para establecer
las horas y minutos de encendido o apagado, el
modo de encendido y el volumen de encendido.
• Conrme la entrada con el botón TIMER. La
conguración que se debe ajustar parpadeará en
pantalla.
NOTA:
Si no pulsa ningún botón durante 10 segundos, el
dispositivo volverá a modo espera sin guardar la
introducción.
3. Después de seleccionar el volumen de encendido,
pulse el botón TIMER de nuevo. El dispositivo pasará a
modo espera.
Cuando llegue a la hora establecida, el dispositivo se encenderá en el modo seleccionado. El volumen aumentará
lentamente hasta el volumen seleccionado.
Pulse TIMER para desactivar la función de tem-porizador.
“TIMER“ desaparecerá de la pantalla.
SNOOZE (4 en el mando)
Si se ha encendido el dispositivo con el temporizador, esta
función retrasa unos 9 minutos mediante el botón SNOOZE. Pasados 9 minutos el dispositivo se activará de nuevo.
CLOCK (5/1)
Conguración del reloj.
Cuando pulse este botón se mostrará brevemente la hora.
MEMORY (6 en el mando)
Guarda las emisoras y establece la reproducción programada.
Reproducción programada
Reproducción programada en la secuencia deseada. (sólo
en modo CD).
1. Pulse el botón STOP (8/14).
2. Pulse el botón MEMORY (6 en el mando). La pantalla
mostrará “00 P01” (“pista” P “posición de memoria”)
y MEMORY. Use los botones
/ ara elegir la pista
deseada y pulse el botón MEMORY (7/14) de nuevo. La
pantalla cambiará a la posición de memoria P02.
Con CD en formato MP3:
La carpeta “F00” parpadeará en pantalla al lado de
P01. Seleccione primero la carpeta deseada con los
botones FOLDER +/- (21 en el mando). Para conrmar,
pulse el botón MEMORY. Se mostrará T00.
3. Use los botones
/ para elegir la pista siguiente y
pulse el botón MEMORY de nuevo. Repita los pasos
hasta haber selec-cionado todas las pistas.
NOTA:
Si se alcanza la capacidad de memoria de programación, se mostrará “PROGFULL“.
4. Pulse el botón
(9/17). Comenzará la reproducción. La pantalla mostrará el primer número de pista
seleccionado. Use también este botón para detener
temporalmente la reproducción.
5. Pulse el botón STOP una vez para detener la reproducción. Se conservará la memoria.
6. Para reproducir repetidamente el programa pulse el
botón .
7. Para borrar la memoria, pulse el botón STOP dos veces.
Dejará de mostrarse MEMORY.
El dispositivo se detendrá automáticamente cuando se hayan reproducido todas las pistas guardadas. La secuencia
de programa se conservará en memoria hasta que cambie
a otro modo, saque el CD del compartimiento o apague el
dispositivo.
Puede combinarse la reproducción programada con la
función REPEAT. Después de programar e iniciar la reproducción, pulse el botón REPEAT (13 en el mando) hasta
tres veces; las funciones pueden usarse como se describe
en “REPEAT”.
Reproducción de archivos de música en
formato MP3
Este dispositivo permite la reproducción de archivos de
música en formato MP3 El dispositivo, además soporta los
tipos de CD habituales: CD, CD-RW, y CD-R.
El dispositivo puede reproducir CD MP3. Son CD comprimidos que pueden guardar hasta 200 pistas. El dispositivo reconoce automáticamente discos MP3 (la pantalla
mostrará el número total de pistas y carpetas). Consulte el
capítulo “Reproducir CD/MP3” para reproducir estos CD.
Puede programar pistas como se ha descrito en “Reproducción programada”.
Observe:
Existen muchos métodos de grabación y compresión, así
como diferencias de calidad de los CD y los CD grabados.
Además, la industria musical no aplica es-tándares jos
(protección de copia).
Page 32

32
ESPAÑOL
Por este motivo pueden, en algunos casos, producirse
problemas cuando reproduzca discos CD y MP3. No es una
avería del dispositivo.
Limpieza y mantenimiento
• Desconecte el enchufe de corriente antes de limpiar.
• Puede limpiar las manchas externas usando un trapo
ligeramente húmedo sin aditivos.
Reparación de fallos
Síntomas Causa Solución
No se puede
reproducir CD.
CD no está
colocado o no
está colocado
correctamente.
Asegúrese que el disco
esté introducido con la
etiqueta hacia arriba.
Pilas muy débiles. Coloque nuevas pilas o
utilice el aparato con
un cable de red.
CD salta
durante lareproducción.
Controle el disco
si tiene huellas
dactilares, suciedad o arañazos.
Limpie estos con un
paño suave desde el
centro.
La unidad no
funciona
La unidad está
bloqueada y “se
cuelga”
Desconecte el enchufe
durante aproximadamente 5 segundos.
Vuelva a encender la
unidad.
Especicaciones técnicas
Modelo: .................................................................................SR 4337 iP
Tensión de alimentación:...............................220-240 V~ 50 Hz
Funcionamiento con baterías: ..........8 x 1,5 V tipo UM2/R14
Potencia de salida: ........................................................80 W PMPO
Consumo: ........................................................................................15 W
Clase de protección: ........................................................................... II
Peso neto: ...................................................................................2,00 kg
Radio:
Rangos de frecuencia: ....................VHF/FM 87,5 ~ 108,0 MHz
Sujeto a cambios sin previo aviso.
Este dispositivo cumple con todas las directrices CE
actuales, como la directriz de compatibilidad electromagnética y de bajo voltaje, y está fabricada según las últimas
normas de seguridad.
“Made for iPod” y “Made for iPhone” indican que un accesorio electrónico está diseñado para conectarse especícamente con iPod o iPhone y ha sido certicado por el
desarrollador en el cumplimiento de los estándares de
rendimiento de Apple. Apple no se hace responsable del
funcionamiento de este dispositivo ni del cumplimiento
de las exigencias de seguridad y regulación.
Eliminación/Signicado del símbolo del “cubo
de basura”
Cuide del medio ambiente, no deseche aparatos eléctricos
con los residuos domésticos.
Deseche los aparatos eléctricos obsoletos o defectuosos en
los puntos de recolección municipales.
Ayude a evitar potenciales impactos medioambientales y
en la salud por una eliminación de residuos inadecuada.
Contribuye al reciclaje y otros modos de uso de aparatos
eléctricos y electrónicos viejos.
Su municipalidad le proporcionará información sobre los
puntos de recolección.
Page 33

33
PORTUGUÊS
Directrizes gerais de segurança
Antes de utilizar este aparelho, leia atentamente este
manual do utilizador e guarde-o juntamente com o
Certicado de Garantia, o talão de compra e, tanto
quanto possível, a embalagem original com os elementos
interiores. Se puser o aparelho à disposição de terceiros,
entregue-lhes também o manual do utilizador.
• Para evitar o risco de incêndio ou choque eléctrico,
não exponha o aparelho a chuva ou humidade. Não o
coloque em funcionamento perto de água (por ex. em
casas de banho, piscinas ou caves húmidas).
• A unidade está denida unicamente para utilização em
privado e para os seus ns previstos. Esta unidade não
está denida para utilização comercial.
• Ligue só a uma tomada de parede normal. Certique-
se de que a tensão indicada no aparelho está em
conformidade com a tensão da tomada.
• Se utilizar adaptadores externos, observe a polaridade
e a tensão correctas. Insira pilhas adequadas.
• Quando instalar o aparelho, não cubra nenhuma aber-
tura de ventilação.
• Nunca abra a caixa do aparelho. As reparações
incorrectas podem causar acidentes signicativos ao
utilizador. No caso de o aparelho ou cabo de alimentação estiverem danicados, não o coloque em funcionamento e faça-o reparar por um técnico. Verique
danos regularmente no cabo de alimentação.
• Para evitar acidentes, deve ser substituído um cabo de
alimentação por um cabo equivalente pelo fabricante,
pelos nossos serviços de assistência ao cliente ou por
qualquer outro técnico.
• Se não estiver a utilizar o aparelho durante um longo
período de tempo, desligue-o e retire as pilhas.
Estes símbolos podem ser encontrados no aparelho e
servem como avisos:
O símbolo do relâmpago serve para avisar o
utilizador da presença de tensão perigosa no
interior do aparelho.
O símbolo do ponto de exclamação serve para
avisar o utilizador da presença de instruções
do funcionamento e da manutenção que
acompanham este aparelho.
Os produtos com este símbolo funcionam
com um “Laser de Classe 1” para procurar
o CD. Os botões de segurança integrados
servem de aviso ao utilizador para não se
expor ao feixe do laser perigoso que não é
visível a olho quando o compartimento do CD
é aberto.
Estes botões de segurança não devem ser ignorados ou
alterados, caso contrário corre o risco de car exposto ao
feixe do laser.
Crianças e pessoas débeis
• Para a segurança dos seus lhos, não deixe partes da
embalagem (sacos plásticos, papelão, esferovite, etc.)
ao alcance dos mesmos.
AVISO!
Não deixe crianças pequenas brincarem com folhas
de plástico. Perigo de asxia!
• Este dispositivo não se destina a ser usado por pessoas
(incluindo crianças) com redução capacidades físicas,
sensoriais ou mentais ou com falta de experiência e /
ou conhecimentos a menos que tenham recebido supervisão ou instruções respeitantes ao uso do dispositivo por uma pessoa responsável pela sua segurança.
• Supervisione as crianças para assegurar que elas não
tocam o aparelho.
Símbolos neste manual do utilizador
Indicações importantes para a sua segurança estão marcadas de forma especial. Preste incondicionalmente atenção
a estas indicações, para evitar acidentes e estragos no
aparelho.
AVISO:
Chama a atenção para perigos existentes para a sua
saúde e para possíveis riscos de ferimento.
ATENÇÃO:
Chama a atenção para possíveis perigos existentes para
o aparelho ou para outros objectos.
INDICAÇÃO:
Realça sugestões e informações para si.
Instruções de segurança especícas
Este aparelho funciona com um
laser de Classe 1.
Localização dos controlos
1 Antena telescópica
2 Pega
3 Compartimento do CD
4 Botão STANDBY (espera/ligar)
5 Botão CLOCK (relógio)
6 Botão de funções FUNCTION
7 Botão STOP
8 Botões
/ (avançar/retroceder procura)
9 Botão (reproduzir/pausar)
10 Mola para abrir o compartimento do CD (OPEN/CLOSE)
11 Porta da estação
12 Botões VOLUME +/- (volume)
13 Altifalante
Page 34

34
PORTUGUÊS
14 Visor LCD
15 Compartimento da pilha
16 Luz indicadora POWER
17 Sensor infravermelho do controlo remoto
Vista traseira (não apresentado)
Ligação AUX IN
AC~ Conector de rede
Controlo remoto
1 Botão CLOCK (relógio)
2 Botão MUTE (sem som)
3 Botões PRE-DN/PRE-UP (memorização das estações de
rádio)
4 Botão SNOOZE
5 Botão INTRO
6 Botão MEMORY (memorização)
7 Botão RAND (misturar reprodução)
8 Botão INFO
9 Botão
(avançar procura)
Botão (retroceder procura)
10 Botão VOLUME +/- (volume)
11 Botão de funções FUNCTION
12 Botão MENU UP (menu de navegação do iPod/iPhone)
13 Botão ENTER (conrmação)
14 Botão MENU DN (menu de navegação do iPod/iPhone)
15 Botão EQ
16 Botão MENU
17 Botão (reproduzir/pausar)
18 Botão STOP
19 Botão REPEAT (repetir)
20 Botão MONO/ST
21 Botões FOLDER +/- (para cima/para baixo, posição da
memória álbum)
22 Botão SLEEP
23 Botão TIMER
24 Botão STANDBY
Instalação/introdução
• Leia o manual completamente antes de colocar em
funcionamento o aparelho!
• Seleccione um local adequado para colocar o apare-
lho. O local adequado deve ser seco, estável e ter uma
superfície antideslizante no qual pode colocar em
funcionamento o aparelho facilmente.
• Certique-se de que o aparelho tem uma ventilação
correcta!
• Retire, se necessário, a película de protecção do visor.
Alimentação eléctrica
• Ligue o cabo de alimentação fornecido (ver comparti-
mento da pilha (15), se necessário) a uma tomada de
alimentação correctamente instalada de
230 V / 50 Hz e o cabo de ligação AC ~ na parte de
trás do aparelho.
• Certique-se de que a tensão está em conformidade
com a tensão indicada na placa de classicação.
• O tempo guardado será perdido assim que a alimentação é desligada.
Funcionamento das pilhas (pilhas não incluídas)
• Abra o compartimento da pilha (15) na base do aparelho.
• Insira as 8 pilhas tipo UM 2/R14 de 1,5 V. Preste
atenção à polaridade correcta (ver compartimento da
pilha)!
• Volte a fechar o compartimento da pilha.
Se o aparelho não estiver a ser utilizado por um longo
período de tempo, retire as pilhas para evitar qualquer
“fuga”.
INDICAÇÃO:
• Se é ligado um cabo de alimentação, as pilhas automaticamente não funcionam.
• Durante o funcionamento com as pilhas, a bateria
recarregável de um iPod/iPhone ligado não será
carregada.
ATENÇÃO:
• Não misture diferentes tipos de pilhas ou pilhas
novas com pilhas usadas.
• Não elimine as pilhas juntamente com o seu lixo
doméstico. Deposite-as em pontos de recolha autorizados ou devolva-as ao seu revendedor.
AVISO:
Não exponha as pilhas ao calor ou à luz directa solar.
Nunca deite pilhas para o fogo. Perigo de explosão!
Pilhas do controlo remoto (pilhas não incluídas)
• Abra a tampa do compartimento das pilhas na parte
traseira do controlo remoto.
• Insira 2 pilhas R03 “AAA” de 1,5 Volts. Observe a polaridade correcta (veja o interior do compartimento das
pilhas)!
• Se não utilizar o controlo remoto durante um longo
período de tempo, retire as pilhas para evitar a “fuga”
de ácido das pilhas.
ATENÇÃO:
• Não misture diferentes tipos de pilhas ou pilhas
novas com pilhas usadas.
• Não elimine as pilhas juntamente com o seu lixo
doméstico. Deposite-as em pontos de recolha autorizados ou devolva-as ao seu revendedor.
AVISO:
Não exponha as pilhas ao calor ou à luz directa solar.
Nunca deite pilhas para o fogo. Perigo de explosão!
Page 35

35
PORTUGUÊS
Denir o relógio (durante o modo espera)
1. Mantenha pressionado brevemente o botão CLOCK
(5/1). O visor mostrará “24 HOUR”.
2. Utilize os botões
/ (8/9) para escolher entre as
denições de apresentação 24 horas e 12 horas.
Conrme com o botão CLOCK.
INDICAÇÃO: A denição 12 horas resultará no
seguinte visor
AM = antes do meio-dia e PM = depois do meio-dia.
3. Utilize os botões
/ para denir as horas. Conrme
com o botão CLOCK.
4. Utilize os botões / para denir os minutos.
5. Pressione de novo o botão CLOCK para guardar as
denições da hora.
Dispositivo de segurança para transporte do compartimento do CD
• Abra o compartimento do CD (3) puxando a tampa
com a mola (10) para cima.
• Retire, se estiver presente, o dispositivo de segurança
para transporte do leitor do CD antes de iniciar o
funcionamento.
• Feche de novo o compartimento do CD.
Compatibilidade iPod/iPhone
Dados os vários e diferentes modelos do iPod e iPhone
e as gerações no mercado, não podemos garantir uma
compatibilidade total. Antes de ligar o seu iPod/iPhone,
assegure-se de que tem uma ligação compatível.
A compatibilidade total das funções do controlo remoto
também não pode ser garantida. Utilize o seu iPod/iPhone
normalmente, enquanto estiver ligado à estação de ligação.
INDICAÇÃO:
Dependendo da versão de software do seu iPhone, pode
ser apresentada a seguinte mensagem de erro:
“Este acessório não foi concebido para uso com iPhone.
É possível que ocorra ruído e que a força do sinal seja
reduzida.”
Nesta caso, pressione “OK”.
Funcionamento geral
INDICAÇÃO:
Encontrará alguns botões no aparelho e controlo remoto.
Os botões com o mesmo nome têm as mesmas funções.
STANDBY (4/24)
Pressione o botão STANDBY para passar o aparelho para
o modo espera. A luz indicadora POWER (16) acende. Pressione de novo este botão para ligar o aparelho.
Volume (12/10)
Ajuste o nível de volume que deseja. O visor apresentará
“VOL” e um número. Isto equivale ao volume denido de
“VOL MAX” ou “VOL MIN”.
Controlo remoto com sensor infravermelho
O controlo remoto funciona a uma distância de até 5
metros. Se o seu alcance for diminuindo, substitua as
pilhas. Certique-se de que não existe nenhum obstáculo
entre o controlo remoto e o sensor infravermelho (17) no
aparelho durante o funcionamento.
Tomada de AUX IN (Parte de trás do aparelho)
Ligue os aparelhos de reprodução analógicos. Quando os
ligar a esta tomada, também pode ouvir o som de outros
aparelhos, como leitores de MP3 ou de CD etc., através dos
altifalantes.
1. Ligue o aparelho externo através de uma cha de
entrada de 3,5 mm à tomada AUX IN.
2. Agora utilize o botão FUNCTION (6/11) para seleccionar o modo AUX.
3. Através dos altifalantes ouvirá o som do aparelho
externo. Utilize os botões VOLUME +/- (12/10) para
denir o volume. Os botões do CD estão desactivados.
4. Para outras funções consulte o manual do utilizador
do aparelho de som externo.
INDICAÇÃO:
Dena o volume do aparelho externo para um nível de
audição correcto.
Ouvir o rádio
1. Pressione repetidamente o botão FUNCTION (6/11) até
o visor mostrar “TUNER”.
2. Utilize os botões / (8/9) para sintonizar a estação
que deseja.
3. A luz do botão FM.ST ((ST)) (no visor) acenderá quando
a estação seleccionada é recebida com qualidade estéreo. Se a recepção for muito fraca e a estação car
imóvel, a luz do botão piscará. Para estações FM pode
utilizar o botão MONO/ST (20 no controlo remoto)
para passar para a recepção MONO ou STEREO. No
caso de recepção fraca, recomendamos que passe para
o modo MONO.
Guardar/seleccionar estações
4. Quando tiver encontrado a estação que deseja,
pressione o botão MEMORY (6 no controlo remoto).
MEMORY aparecerá no visor e a posição da memória
piscará.
5. Para escolher a posição da memória, pressione o botão
PRE-UP/DN (3 no controlo remoto).
6. Pressione o botão MEMORY para guardar as denições.
Page 36

36
PORTUGUÊS
Para seleccionar uma estação guardada, pressione os
botões PRE-UP ou PRE-DN.
Reprodução de música a partir do iPod/iPhone
(iPod/iPhone não fornecido)
1. Pressione o botão FUNCTION (6/11) repetidamente, até
“NO IPOD” aparecer no visor.
2. Se foi fornecido um adaptador com o seu iPod,
coloque-o no conector da estação. Só pode ter a
certeza de que o iPod encaixa correctamente na porta
do iPod se o adaptador estiver ligado.
3. Insira o seu iPod/iPhone na base.
ATENÇÃO:
Certique-se que o iPod/iPhone está ligado na vertical na ligação. Não dobre ou inclina o iPod/iPhone
enquanto está ligado na ligação. Isto pode danicar
a ligação ou o iPod/iPhone.
4. Dependendo do modelo do iPod/iPhone, primeiro solte
o fecho do botão e inicie a reprodução da música se
necessário através do botão
(9/17).
5. Para vericar as utilizações adicionais dos controlos,
consulte o manual do iPod/iPhone.
ATENÇÃO:
Pare a reprodução antes de ligar o iPod/iPhone, caso
contrário o iPod/iPhone poderá danicar-se.
INDICAÇÃO:
• Se necessário, pode alterar as denições de áudio do
seu iPod/iPhone de modo a obter um óptimo som.
• Se receber uma chamada quando reproduz música
com o iPhone na base, então a reprodução pára e
consegue ouvir o tom de toque. Retire o iPhone do
aparelho de modo a aceitar a chamada.
Carregamento do iPod/iPhone
A bateria do seu iPod/iPhone é carregada assim que coloca
o iPod/iPhone na base. Para tal, o aparelho tem de estar
ligado à corrente eléctrica.
INDICAÇÃO:
• Se o adaptador foi fornecido com ranhura juntamente com o seu iPod, utilize-o de maneira a que o
iPod encaixe correctamente na ranhura.
• Nem todas as gerações de iPod/iPhone suportam o
modo de carregamento.
• A duração do processo de carregamento depende do
iPod/iPhone que é utilizado e das suas condições de
funcionamento.
• Não recomendamos carregar a bateria durante o
funcionamento do aparelho, uma vez que ao fazer
isso, as pilhas cam gastas mais rápido.
Reproduzir CDs/MP3
Como reproduzir um CD
1. Pressione repetidamente o botão FUNCTION (6/11) até
o visor mostrar “CD”.
2. Abra o compartimento do CD (3) pressionando a
tampa com a mola (10) para cima.
3. Insira o CD de áudio CD no eixo cónico com a etiqueta
do CD voltada para cima, de modo a que encaixe no
lugar mecanicamente. Depois feche de novo com a
tampa o compartimento do CD.
4. CD de ÁUDIO:
“READING” aparece brevemente no visor e depois
“TOTAL”, o número de títulos e o tempo total da reprodução. A reprodução inicia a partir do primeiro título
incluído no CD. A música actual, o tempo da reprodução decorrido e o símbolo
são apresentados.
CD em formato MP3:
“READING” aparece brevemente no visor e depois
“TOTAL”, “MP3”, o número de títulos e pastas (FOLDER).
A reprodução é iniciada a partir da primeira faixa e
da primeira pasta. A música actual (TRACK), o tempo
da reprodução decorrido, “MP3” e o símbolo
são
apresentados. Utilize os botões FOLDER + ou FOLDER -
(21 no controlo remoto) para seleccionar as pastas
individuais.
5. Para retirar um CD, pressione o botão STOP (7/18), abra
o compartimento do CD e retire cuidadosamente o CD.
Mantenha sempre a porta do CD fechada.
INDICAÇÃO:
• Quando reproduz um CD no formato MP3 que contém pastas, o visor mostrará 01 para a primeira faixa
da nova pasta ao passar para outra pasta.
• Se um disco não for correcta ou totalmente inserido,
“READING” aparecerá e o visor mostrará “NO DISC”
(sem disco).
• A reprodução de CDs criados pelo utilizador não
pode ser garantida dada a variedade de software e
equipamento média de CD disponível.
Descrição dos botões de funcionamento
(9/17)
Pode parar temporariamente a reprodução e iniciá-la de
novo. O tempo de reprodução decorrido pisca e o símbolo
“
” é apresentado. Ao pressionar de novo o botão a repro-
dução continuará a partir da mesma posição.
/ (8/9)
Durante a reprodução de um CD de áudio, de um CD no
formto MP3, ou no modo de IPOD.
Com o botão
pode avançar só de uma faixa para outra
e assim sucessivamente. Pressione e mantenha pressionado este botão para rapidamente procurar música (o som
estará desactivado).
Page 37

37
PORTUGUÊS
O botão pode funcionar da maneira seguinte:
Pressionar 1 vez = Reproduz de novo a faixa actual
desde o início.
Pressionar 2 vezes = Volta à faixa anterior.
Pressionar 3 vezes = Reproduz a faixa antes disso, etc.
Pressione e mantenha pressionado
este botão para rapidamente procurar
música (o som estará desactivado).
Durante o modo rádio:
Sintonize a estação de rádio que deseja.
STOP (7/18)
O CD ou a música pára.
ENTER (13 no controlo remoto)
No modo de IPOD.
Pressione este botão para activar uma função ou apresentar o menu seguinte.
MENU (16 no controlo remoto)
No modo de IPOD.
Pressione este botão para abrir o menu iPod/iPhone ou
voltar para o menu anterior.
INDICAÇÃO:
Para esta função, a aplicação musical deve ter já sido
iniciada.
MENU UP/MENU DN. (12/14 no controlo remoto)
No modo de IPOD.
Pressione este botão para procurar no menu iPod/iPhone
no sentido ascendente ou descendente.
MUTE (2 no controlo remoto)
Desliga rapidamente o som. “MUTE” piscará no visor. Para
cancelar esta função, pressione de novo MUTE.
EQ (15 no controlo remoto)
(Predenir a função do equalizador). Existem diferentes
modos de som disponíveis (CLASSIC, ROCK, POP, JAZZ,
FLAT).
INDICAÇÃO: Durante a reprodução do iPod/iPhone
Se necessário, pode alterar as denições do EQ s do seu
iPod/iPhone de modo a obter um óptimo som.
MONO/ST (20 no controlo remoto)
Durante o modo rádio FM:
Passa de STEREO para MONO e vice-versa.
INFO (8 no controlo remoto)
Durante a reprodução do CD no formato MP3:
As informações da tag ID3 guardadas serão mostradas
como uma faixa no visor. Pressione este botão de novo
para desactivar a função.
INTRO (5 no controlo remoto)
Cada título do CD será reproduzido durante 10 segundos.
Pressione este botão de novo para desactivar a função.
REPEAT (19 no controlo remoto)
Pressionar 1 vez: (Aparece REPEAT 1) A faixa actual
Pressionar 2 vezes: (Aparece REPEAT ALL) Todo o CD será
Pressionar 3 vezes: Todas as funções serão canceladas. A
Só para CDs no formato MP3:
Pressionar 1 vez: A faixa actual será repetida continu-
Pressionar 2 vezes: Todo o CD será repetido continua-
Pressionar 3 vezes: A pasta seleccionada do CD no
Pressionar 4 vezes: A função será desactivada e o CD
RAND (6 no controlo remoto)
O visor mostrará “RANDOM”e o número da faixa que
será reproduzida em primeiro lugar. Todas as faixas serão
reproduzidas consecutivamente por ordem aleatória.
FOLDER +/- (21 no controlo remoto)
CD no formato MP3:
Pressione estes botões durante a reprodução para avançar
ou retroceder uma pasta. O visor mostra brevemente uma
mensagem, por ex. FOLDER 02. A seguir, o sistema inicia
automaticamente a reprodução do CD no formato MP3.
Quando pressiona os botões durante o modo de paragem,
uma mensagem também será mostrada brevemente no visor.
A seguir, pressione o botão
PRE-UP/PRE-DN (3 no controlo remoto)
Durante o modo rádio:
Seleccionar a estação de rádio guardada.
SLEEP (8 no controlo remoto)
Quando o aparelho é ligado, pode denir a hora após a
qual o aparelho passará para o modo espera; dena a hora
para intervalos de 10 minutos entre 90 a 10 minutos. Pressione repetidamente este botão até o visor mostrar a hora
que deseja. Quando a função é activada, o visor mostrará
o símbolo “SLEEP”. O aparelho desligará automaticamente
após a hora predenida.
Para apresentar a hora restante, pressione o botão SLEEP.
Pode ainda diminuir a hora ou desactivar a função depois.
será totalmente repetida.
totalmente repetido.
reprodução normal continuará.
amente. (O visor mostrará REPEAT 1).
mente (REPEAT ALL é apresentado).
formato MP3 será repetida continuamente (o visor mostrará REPEAT
ALBUM). Utilize os botões FOLDER
+/- (21 no controlo remoto) para
seleccionar as pastas individuais.
será reproduzido no modo normal.
para iniciar a reprodução.
Page 38

38
PORTUGUÊS
TIMER (23 no controlo remoto)
Pode programar o aparelho para ligar e desligar após uma
determinada hora predenida.
1. Utilize o botão STANDBY para passar para o modo
espera. A luz indicadora POWER (16) acende.
2. Pressione o botão TIMER até o visor mostrar “ON
TIME“.
• Agora pode utilizar os botões
/ (8/9) para
denir as horas e os minutos para ligar ou desligar
o modo e o volume.
• Conrme sempre que introduz as denições com o
botão TIMER. A denição que actualmente precisa
de ser denida pisca no visor.
INDICAÇÃO:
Se nenhum botão é activado dentro dos 10 segundos seguintes, o aparelho passa para o modo espera
sem que sejam guardadas as denições introduzidas.
3. Depois de seleccionar o volume, pressione o botão TIMER de novo. O aparelho passará para o modo espera.
Depois de alcançar o tempo denido, o aparelho é ligado
no modo seleccionado. O volume aumenta ligeiramente
com a selecção que deniu.
Pressione o botão TIMER para desactivar a função do temporizador. O ícone “TIMER” desaparecerá do visor.
SNOOZE (4 no controlo remoto)
Se o aprelho foi ligado através do temporizador, esta
função pode ser atrasada para cerca de 9 minutos com o
botão SNOOZE. Passados 9 minutos, o aparelho ligar-se-á
de novo.
CLOCK (5/1)
Denir o relógio.
Quando pressiona este botão, o tempo será apresentado
brevemente.
MEMORY (6 no controlo remoto)
Para guardar as estações e denir a reprodução programada.
Reprodução do programa
Reproduz o programa na sequência que deseja. (só no
modo CD).
1. Pressione o botão STOP (8/14).
2. Pressione o botão MEMORY (6 no controlo remoto).
O visor mostrará “00 P01” (“faixa” P “posição da memória”) e MEMORY. Utilize os botões
/ (7/14) para
seleccionar a faixa que deseja e pressione de novo
o botão MEMORY. O visor passará para a posição de
memória P02.
Para CDs no formato MP3:
A pasta “F00” junto de P01 pisca no visor. Em primeiro
lugar, seleccione a pasta que deseja com os botões
FOLDER +/- (21 no controlo remoto). Para conrmar,
pressione o botão MEMORY. T00 é apresentado.
3. Utilize os botões / para seleccionar a faixa seguinte e pressione de novo o botão MEMORY. Repita os
passos até ter seleccionado todas as faixas.
INDICAÇÃO:
Se a capacidade de memória do título programável é
alcançada, “PROGFULL“ será apresentado.
4. Pressione o botão
(9/17). A reprodução é iniciada.
O visor mostrará o primeiro número da faixa seleccionada. Utilize também este botão para temporariamente parar a reprodução.
5. Pressione o botão STOP para parar a reprodução. Será
mantida na memória.
6. Para a reprodução repetida de programas, pressione o
botão .
7. Para eliminar o que está na memória, pressione o
botão STOP duas vezes. MEMORY não será mais
apresentado.
O aparelho parará automaticamente depois de todas as
faixas guardadas terem sido reproduzidas. A sequência do
programa será mantida na memória até que passe para
outro modo. Retire o CD do compartimento ou desligue o
aparelho.
É possível combinar a reprodução do programa com a
função REPEAT. Após programar e iniciar a reprodução,
pressione o botão REPEAT (13 no controlo remoto) até três
vezes. As funções podem ser aplicadas como descrito em
“REPEAT”.
Reproduzir cheiros de música no
formato MP3
Este aparelho permite-lhe reproduzir cheiros de música
no formato MP3. O aparelho suporta, além disso, tipos de
CDs comuns: CD, CD-RW e CD-R.
O seu aparelho pode reproduzir CDs no formato MP3.
Estes CDs são CDs comprimidos capazes de guardar até 200
faixas. O seu aparelho reconhece automaticamente discos
MP3 (o visor mostrará o número total de faixas e pastas).
Consulte o capítulo “Reproduzir CD/MP3” para reproduzir
estes CDs. Pode programar faixas como já descrito em
“Programar reprodução”.
Nota:
Existem muitos métodos de gravação e compressão, assim
como diferenças na qualidade dos CDs e dos CDs regraváveis.
Page 39

39
PORTUGUÊS
Além disso, a indústria discográca não aplica padrões
xos (protecção contra cópia).
Por este motivo, é possível, em casos raros, ocorrerem
problemas quando reproduz CDs e discos no formato MP3.
Isso não signica um mau funcionamento deste aparelho.
Limpeza e manutenção
• Desligue a cha eléctrica antes de limpar.
• Pode retirar manchas, utilizando um pano ligeiramente humedecido sem quaisquer aditivos.
Solução de problemas
Sintomas Causa Solução
CD não poder
ser reproduzido.
CD não foi
inserido ou não
está colocado
correctamente.
Certique-se de que o
disco foi inserido com
a etiqueta para cima.
Baterias demasiado fracas.
Coloque baterias
novas, ou utilize o
aparelho com o cabo
de ligação à corrente.
CD salta
durante a
reprodução.
Verique se o disco tem dedadas,
sujidade ou riscos.
Limpe-o com um pano
macio a partir do
meio.
O aparelho
não funciona.
O aparelho está
bloqueado e
“balança”.
Desligue o cabo de
alimentação durante
cerca de 5 segundos.
Volte a ligar o aparelho.
Especicações técnicas
Modelo: .................................................................................SR 4337 iP
Voltagem da corrente: ....................................220-240 V~ 50 Hz
Funcionamento das pilhas: ...................8x 1,5V Tipo UM2/R14
Alimentação de saída: .................................................80 W PMPO
Consumo da alimentação: .......................................................15 W
Classe de protecção: ........................................................................... II
Peso líquido: ...............................................................................2,00 kg
Rádio:
Gamas de frequência: ...................UKW/FM 87,5 ~ 108,0 MHz
Reserva-se o direito de alterações!
Este aparelho está em conformidade com todas as actuais
directivas da CEE, tais como inocuidade electromagnética
e directiva sobre baixa tensão, e fabricado de acordo com
as mais novas prescrições de segurança técnica.
“Made for iPod” e “Made for iPhone“ signica que um
acessório electrónico foi construído para ser ligado
especicamente ao iPod ou iPhone e que foi certicado
pelo engenheiro do produto, de modo a cumprir com os
padrões de desempenho da Apple. A Apple não assume a
responsabilidade pelo funcionamento deste aparelho ou
pela sua conformidade com os padrões de regulação da
segurança.
Deposição/Signicado do símbolo
“contentor do lixo”
Poupe o nosso ambiente, não deite aparelhos eléctricos
para o lixo doméstico.
Elimine os aparelhos eléctricos usados ou avariados através dos pontos de recolha municipais.
Ajude a evitar potenciais impactos no ambiente e na
saúde através da eliminação incorrecta de resíduos.
Desta forma, poderá contribuir para a reciclagem e outras
formas de utilização de aparelhos eléctricos e electrónicos
usados.
A sua autarquia oferece informações sobre os pontos de
recolha.
Page 40

40
ITALIANO
Bambini e persone disabili
• Per ragioni di sicurezza tenere qualsiasi parte dell‘imballaggio (sacchetti di plastica, cartilagine, spugne ecc.)
fuori dalla portata dei bambini.
AVVISO!
Non lasciare che i bambini giochino con le pellicole
in quanto c'è pericolo di soocamento!
• L’apparecchio non deve essere utilizzato da individui
(compresi bambini) con ridotte abilità siche, sensoriali
oppure mentali o con esperienza/conoscenza insufciente dell’apparecchio, se non dietro supervisione
oppure istruzioni sull’uso dell’apparecchio da parte del
personale responsabile della loro sicurezza.
• Controllare che i bambini non giochino con l’apparecchio.
Simboli nel manuale dell‘utente
Note importanti per la sicurezza sono segnate in modo
chiaro. Fare attenzione ad evitare incidenti o danneggiare
il dispositivo :
AVVISO:
Avvertimenti di pericoli alla salute e indica rischi
potenziali di lesioni.
ATTENZIONE:
Indica pericoli potenziali per il dispositivo e altri oggetti.
NOTA:
Sottolinea consigli e informazioni.
Linee guide speciali di sicurezza
Il presente apparecchio utilizza
un laser di classe 1.
Posizione dei comandi
1 Antenna telescopica
2 Impugnatura
3 Vano CD
4 Tasto STANDBY (standby/alimentazione)
5 Tasto CLOCK (orologio)
6 FUNCTION (commutatore di funzione)
7 Tasto STOP
8 Tasti / (ricerca in avanti/all’indietro)
9 Tasto
(riproduzione/pausa)
10 Clip per aperture del vano CD (OPEN/CLOSE)
11 Porta docking
12 Tasti VOLUME +/- (volume)
13 Altoparlante
14 Display LCD
15 Vano batteria
16 Spia luminosa POWER
17 Sensore IR per il telecomando
Linee guida generali sulla sicurezza
Prima di usare questo dispositivo, leggere attentamente
il manuale dell‘utente e conservarlo con il Certicato di
Garanzia, lo scontrino e, se possibile, la confezione originale. Se il dispositivo viene consegnato a terzi, consegnare
anche il manuale dell‘utente.
• Per evitare il pericolo di incendi o scosse elettriche, non
esporre l’apparecchio a pioggia o umidità. Non far funzionare l’apparecchio vicino all’acqua (per es. in stanze
da bagno, piscine o ambienti umidi).
• L‘unità è progettata esclusivamente per uso privato e
per lo scopo previsto. Questa unità non è idonea ad
utilizzo commerciale.
• Eettuare il collegamento soltanto a una presa standard. Controllare che la tensione indicata sull’apparecchio corrisponda alla tensione della presa.
• Se si usano adattatori esterni, rispettare polarità e
tensione. Inserire le batterie correttamente.
• Quando si installa l’apparecchio, non ostruire le aperture di ventilazione.
• Non aprire mai il guscio dell’apparecchio. Riparazioni
improprie possono provocare pericoli per l’utente.
Se l’apparecchio o i cavi principali sono danneggiati,
non mettere in funzione l’apparecchio e farlo riparare
da un esperto. Controllare periodicamente che i cavi
principali non siano danneggiati.
• Per evitare pericoli, far sostituire I cavi principali
danneggiati con un altro equivalente dal produttore,
dall’assistenza clienti o da un altro specialista.
• E l’apparecchio non viene utilizzato per un periodo
prolungato, slare la spina ed estrarre le batterie.
I presenti simboli sono riportati sull’apparecchio e devono
essere considerati come avvertenze:
La spia intermittente ha lo scopo di avvertire
l’utente della presenza di tensione pericolosa
nell’apparecchio.
Il punto esclamativo ha lo scopo di avvertire
l’utente della presenza di importanti istruzioni
di funzionamento e manutenzione fornite
con l’apparecchio.
I prodotti con questo simbolo funzionano con
“laser di classe 1” per la scansione del CD. I
commutatori di sicurezza integrati hanno lo
scopo di impedire che l’utente venga esposto
al pericoloso fascio di luce laser invisibile a
occhio nudo che fuoriesce dall’apparecchio
quando si apre il vano CD.
I commutatori di sicurezza non devono essere bypassati o
manomessi; in caso contrario sussiste il rischio di esposizione al raggio laser.
Page 41

41
ITALIANO
Vista posteriore (non nell’immagine)
Collegamento AUX IN
AC~ Alimentazione principale
Telecomando
1 Tasto CLOCK (orologio)
2 Tasto MUTE (silenziamento)
3 Tasti PRE-DN/PRE-UP (memoria stazioni radio)
4 Tasto SNOOZE
5 Tasto INTRO
6 Tasto MEMORY (memoria)
7 Tasto RAND (riproduzione casuale)
8 Tasto INFO
9 Tasto
(ricerca in avanti)
Tasto (ricerca all’indietro)
10 Tasti VOLUME +/- (volume)
11 FUNCTION (commutatore di funzione)
12 Tasto MENU UP (navigazione menu iPod/iPhone)
13 Tasto ENTER (conferma)
14 Tasto MENU DN (navigazione menu iPod/iPhone)
15 Tasto EQ
16 Tasto MENU
17 Tasto (riproduzione/pausa)
18 Tasto STOP
19 Tasto REPEAT (ripetizione)
20 Tasto MONO/ST
21 Tasti FOLDER +/- (su/giù, album)
22 Tasto SLEEP
23 Tasto TIMER
24 Tasto STANDBY
Installazione/Introduzione
• Leggere attentamente il manuale prima di mettere in
funzione l’apparecchio!
• Selezionare una posizione idonea per il dispositivo. I
luoghi adatti sono asciutti e non scivolosi, non ché
facilmente accessibili per consentire di azionare l’apparecchio facilmente.
• Assicurare una ventilazione adeguata!
• All’occorrenza, rimuovere la pellicola protettiva dal
display.
Alimentazione
• Collegare un cavo di alimentazione (vedi vano batteria
(15), se necessario) ad una presa 230 V / 50 Hz correttamente installata e la connessione di alimentazione
AC ~ sul retro del dispositivo.
• Controllare che la tensione corrisponda alla tensione
nominale riportata sull’etichetta.
• Il tempo memorizzato andrà perso non appena l’ali-
mentazione viene disconnessa.
Funzionamento a batteria (Batterie non in dotazione)
• Aprire il coperchio del vano batteria (15) presente sul
retro.
• Inserire 8 batterie tipo UM 2/R14 1,5 V. Rispettare la
corretta polarità (vedi fondo del vano batteria)!
• Chiudere il vano batteria.
Se il dispositivo non è usato per lunghi periodi, rimuovere
le batterie, per prevenire qualsiasi “perdita”.
NOTA:
• Se è connesso un cavo di alimentazione, le batterie
sono automaticamente disattivate.
• Durante il funzionamento a batterie, la batteria
ricaricabile di un iPod/iPhone connesso non sarà
caricata.
ATTENZIONE:
• Non mescolare batterie di tipo diverso o batterie
nuove e usate.
• Non gettare le batterie coi riuti domestici. Consegnarle a un centro autorizzato o restituirle al rivenditore.
AVVISO:
Non esporre le batterie a calore oppure alla luce diretta
del sole. Non gettare le batterie nel fuoco. Pericolo di
esplosione!
Batterie del telecomando (Batterie non incluse)
• Aprire il coperchio del vano batterie sul lato posteriore
del telecomando.
• Inserire 2 x R03 “AAA” batterie da 1,5 V. Rispettare la
polarità (vedere il fondo del vano batterie)!
• Se il telecomando non viene utilizzato per periodi
prolungati, rimuovere le batterie per evitare perdite di
acido per batterie.
ATTENZIONE:
• Non mescolare batterie di tipo diverso o batterie
nuove e usate.
• Non gettare le batterie coi riuti domestici. Consegnarle a un centro autorizzato o restituirle al rivenditore.
AVVISO:
Non esporre le batterie a calore oppure alla luce diretta
del sole. Non gettare le batterie nel fuoco. Pericolo di
esplosione!
Impostazione dell’orologio (durante il modo standby)
1. Tenere premuto il tasto CLOCK (5/1) per breve tempo.
Il display mostra “24 HOUR”.
2. Usate I tasti
/ (8/9) per selezionare l’impostazione
“24 ore” oppure “12 ore”. Confermare con CLOCK.
NOTA: In caso di selezione dell’impostazione
“12 ore”, il display visualizza quando segue
AM = mattina, PM = pomeriggio.
3. Usare I tasti
/ per impostare le ore. Confermare
con CLOCK.
Page 42

42
ITALIANO
4. Usare I tasti / per impostare i minuti.
5. Premere nuovamente CLOCK per salvare le impostazioni dell’orario.
Dispositivo di sicurezza del vano CD
• Aprire il vano CD (3) tirando il coperchio con il clip (10)
verso l’alto.
• Se presente, rimuovere il dispositivo di sicurezza del CD
prima di mettere in funzione l’apparecchio.
• Chiudere nuovamente il vano CD.
Caricamento dell‘iPod/iPhone
A causa della varietà di modelli e generazioni di iPod
e iPhone sul mercato, non è possibile garantire una
compatibilità completa. Prima di collegare l‘iPod/iPhone,
assicurarsi che disponga dell‘interfaccia compatibile.
Non è possibile garantire nemmeno la completa compatibilità con le funzioni remote. Far funzionare l’iPod/iPhone
normalmente mentre è collocato nella stazione docking.
NOTA:
A seconda della versione del software del vostro iPhone
potrà essere visualizzato il seguente messaggio di errore:
“Questo accessorio non è stato sviluppato per l’uso su
iPhone. È possibile che vi sia del rumore e che la potenza del segnale sia ridotta.”
In questo caso premere “OK”.
Funzionamento generale
NOTA:
Alcuni tasti sono presenti sia sull’apparecchio che sul
telecomando.
I tasti con lo stesso nome hanno la stessa funzione.
STANDBY (4/24)
Premere il tasto STANDBY per portare l’apparecchio nel
modo. La spia luminosa POWER (16) si accende. Premere
nuovamente il tasto per accendere l’apparecchio.
Volume (12/10)
Impostare il livello di volume preferito. Il display mostra
“VOL” e un numero. Il volume può essere impostato tra I
valori “VOL MAX” e “VOL MIN”.
Telecomando a infrarossi
Funzionamento senza li da una distanza max di 5 m.
Se l’intervallo è minore, sostituire le batterie. Controllare
che non vi siano ostacoli tra telecomando e sensore (17)
dell’apparecchio durante il funzionamento.
Spinotti AUX IN (Retro del dispositivo)
Collegare I dispositive di riproduzione analogica. Quando
si eettua il collegamento a questo spinotto, è possible
anche ascoltare altri dispositive, come lettori MP3 o CD
ecc. attraverso gli altoparlanti.
1. Collegare il dispositivo esterno per mezzo dello presa
da 3,5 mm allo spinotto AUX IN.
2. Utilizzare il tasto FUNCTION (6/11) per selezionare il
modo AUX.
3. Per mezzo degli altoparlanti è possible ascoltare l’audio
dei dispositivi esterni; utilizzare I tasti VOLUME +/(12/10) per regolare il volume. I tasti CD non sono
attivi.
4. Per ulteriori funzioni, fare riferimento al manuale
utente del dispositivo audio esterno.
NOTA:
Impostare il volume dl dispositivo esterno a un livello
corretto.
Ascolto radio
1. Premere ripetutamente il tasto FUNCTION (6/11)
nché il display non mostra “TUNER”.
2. Utilizzare I tasti
/ (8/9) per selezionare la stazione
desiderata.
3. La spia FM.ST ((ST)) (sul display) si accende quando la
stazione selezionata viene ricevuta con qualità stereo.
Se la ricezione é di cattiva qualità e la stazione è
statica, la spia lampeggia. Per le stazione FM è possible
utilizzare il tasto MONO/ST (20 sul telecomando) per
selezionare la ricezione MONO e STEREO. In caso di
ricezione di cattiva qualità, si consiglia di selezionare il
modo MONO.
Salvataggio/selezione di stazioni
4. Una volta trovata la stazione desiderata, premere
il tasto MEMORY (6 sul telecomando). MEMORY si
accende sul display e la posizione della memoria
lampeggia.
5. Per selezionare la posizione della memoria, premere il
tasti PRE-UP/DN (3 sul telecomando).
6. Premere MEMORY per salvare le impostazioni.
Per selezionare una stazione memorizzata, premere il tasti
PRE-UP o PRE-DN.
Riproduzione musicale dall‘iPod/iPhone
(iPod/iPhone non in dotazione)
1. Premere il tasto FUNCTION (6/11) in modo ripetuto,
nché non compare “NO IPOD” sul display.
2. Se un adattatore è stato fornito con l‘iPod, inserirlo
nel connettore dock. È anche possibile assicurare che
l‘iPod entri correttamente nella porta iPod se l‘adattatore è collegato.
Page 43

43
ITALIANO
3. Inserire l’iPod/iPhone nel dock.
ATTENZIONE:
Assicurarsi che l‘iPod/iPhone sia collegato nella porta
in modo diritto. Non piegare o inclinare l‘iPod/iPhone
mentre è connesso nella porta. In caso contrario, il
dock o l’iPod/iPhone possono subire danni.
4. In base al modello dell‘iPod/iPhone, rilasciare il blocco
tasti e iniziare la riproduzione di musica se necessario
con il tasto
(9/17).
5. Seguire manualmente l‘iPod/iPhone per un ulteriore
utilizzo dei tasti del dispositivo.
ATTENZIONE:
Interrompere la riproduzione prima di collegare l’iPod/
iPhone, in caso contrario l’iPod/iPhone potrebbe danneggiarsi.
NOTA:
• Se necessario, è possibile cambiare le impostazioni audio dell’iPod/iPhone per raggiungere l’audio
migliore.
• In caso di chiamata in arrivo con riproduzione di musica di fondo con l’iPhone in dock, la riproduzione si
interrompe e si sente il suono di chiamata. Rimuovere l’iPhone dal dispositivo per accettare la chiamata.
Caricamento dell‘iPod iPod/iPhone
La batteria dell‘iPod/iPhone viene caricata non appena
l‘iPod/iPhone viene collegato. Per eettuare ciò, l‘unità
deve essere connessa all‘alimentazione.
NOTA:
• Se l‘adattatore dello slot è stato fornito con l‘iPod,
usarlo per assicurarsi che l‘iPod sia posizionato correttamente.
• Non tutte le generazioni di iPod/iPhone supportano
la modalità di ricarica.
• La durata del processo di ricarica dipende dall‘iPod/
iPhone che è utilizzato e dalla condizione di funzionamento.
• Non si consiglia di caricare durante il funzionamento
a batteria, questo determina il rapido scaricamento
delle batterie.
Riproduzione CD/MP3
Come riprodurre un CD
1. Premere ripetutamente il tasto FUNCTION (6/11)
nché il display non mostra “CD”.
2. Aprire il vano CD (3) tirando il coperchio con il clip (10)
verso l’alto.
3. Inserire il CD audio sul mandrino conico con l’etichetta
rivolta verso l’alto, in modo che sia in posizione corretta. Poi chiudere nuovamente il coperchio del vano CD.
4. CD AUDIO:
“READING” compare sul display, poi “TOTAL”, il numero
di trace e il tempo totale di riproduzione. La riproduzione ha inizio dal primo brano del CD. La canzone
corrente, il tempo di riproduzione trascorso e il simbolo vengono visualizzati.
CD in formato MP3:
“READING” compare sul display, poi “TOTAL”, “MP3”, il
numero delle trace e le cartelle (FOLDER). La riproduzione ha inizio dal primo brano e dalla prima cartella.
La canzone corrente (TRACK), il tempo di riproduzione
trascorso, “MP3” e il simbolo l
sono visualizzati.
Utilizzare I tasti FOLDER + o FOLDER - (21 sul telecomando) per selezionare le single cartelle.
5. Per rimuovere un CD premere il tasto STOP (7/18),
aprire il vano CD e rimuovere il CD.
Tenere sempre chiuso lo sportello del CD.
NOTA:
• Quando si riproducono CD in formato MP3 contenenti
cartelle, il display mostra 01 per il primo brano della
nuova cartella quando si passa a un’altra cartella.
• Se il disco non è inserito completamente oppure non
è inserito correttamente, compare il testo “READING”
e il display mostra “NO DISC” (nessun disco).
• Non è possible garantire la riproduzione di CDs create
dall’utente per la varietà dei software disponibile e le
varie attrezzature media CD.
Descrizione dei tasti di funzionamento
(9/17)
È possible interrompere momentaneamente la riproduzione e riprenderla in seguito. Il tempo di riproduzione
trascorso lampeggia e il simbolo “
” viene visualizzato.
Premere nuovamente il tasto per riprendere la riproduzione dal punto in cui era stata interrotta.
/ (8/9)
Durante la riproduzione di un CD audio, di un CD in
formato MP3 o nella modalità IPOD.
Con il tasto
è possibile saltare al brano successivo o a
quello ancora successivo ecc. Tenere premuto il tasto per
eettuare la ricerca rapida della musica (il suono viene
silenziato).
È possible azionare il tasto
come segue:
Premere 1 x = Riproduce nuovamente il brano attuale
dall’inizio.
Premere 2 x = Salta al brano precedente.
Premere 3 x = Riproduce il brano precedente ecc. Tenere
premuto questo tasto per eettuare la
ricerca rapida della musica (il suono viene
silenziato).
Page 44

44
ITALIANO
Durante il modo radio:
Sintonizzare la stazione radio desiderata.
STOP (7/18)
Il CD o la canzone si ferma.
ENTER (13 sul telecomando)
In modalità IPOD:
Premere questo tasto per attivare una funzione o per
visualizzare il menu successivo.
MENU (16 sul telecomando)
In modalità IPOD:
Premere questo tasto per aprire il menu iPod/iPhone o per
ritornare al menu precedente.
NOTA:
Per questa funzione, l’applicazione musicale deve essere
già aperta.
MENU UP/MENU DN. (12/14 sul telecomando)
In modalità IPOD:
Premere questo tasto per sfogliare il menu iPod/iPhone
verso l’alto o verso il basso.
MUTE (2 sul telecomando)
Silenzia rapidamente il suono. “MUTE” lampeggia sul
display. Per cancellare questa funzione, premere nuovamente MUTE.
EQ (15 sul telecomando)
(Preimpostare la funzione equalizzazione). Sono disponibili
diversi modi di suono (CLASSIC, ROCK, POP, JAZZ, FLAT).
NOTA: Durante la riproduzione iPod/iPhone
Se necessario, è possibile cambiare le impostazioni EQ
dell’iPod/iPhone per avere l’audio perfetto.
MONO/ST (20 sul telecomando)
Durante il modo radio FM:
Eettua la commutazione tra STEREO e MONO.
INFO (8 sul telecomando)
Durante la riproduzione del CD in formato MP3:
Le informazioni ID-3 tag memorizzate vengono mostrate
come banner sul display. Premere nuovamente questo
tasto per disattivare questa funzione.
INTRO (5 sul telecomando)
Ogni brano del CD sarà riprodotto per 10 secondi. Premere
nuovamente questo tasto per disattivare questa funzione.
REPEAT (19 sul telecomando)
Premere 1x: (REPEAT 1 si accende) Viene ripetuto com-
Premere 2x: (REPEAT ALL si accende) Viene ripetuto
Premere 3x: Tutte le funzioni vengono cancellate. La
Soltanto per I CD in formato MP3:
Premere 1x: Viene ripetuto continuamente il brano
Premere 2x: L’intero CD sarà ripetuto di continuo
Premere 3x: Viene ripetuta continuamente la cartel-
Premere 4x: La funzione viene disattivata e il CD viene
RAND (6 sul telecomando)
Il display mostra “RANDOM” e il numero del brano da
riprodurre per primo. Tutti I brani vengono riprodotti
continuamente in ordine casuale.
FOLDER +/- (21 sul telecomando)
CD in formato MP3:
Premere questi tasti durante la riproduzione per passare
alla cartella superiore oppure inferiore. Il display mostra
brevemente un messaggio, per es. FOLDER 02. Il sistema
inizia quindi la riproduzione del Cd in formato MP3.
Quando si premono i tasti durante il modo di arresto, il
messaggio viene anche in questo caso mostrato brevemente sul display. Premere quindi
riproduzione.
PRE-UP/PRE-DN (3 sul telecomando)
Durante il modo radio:
Selezionare una stazione radio memorizzata.
SLEEP (8 sul telecomando)
Quando viene acceso l’apparecchio, è possible impostare
l’ora in cui l’apparecchio di porterà nel modo standby; impostare l’orario a intervalli di 10 minuti da 90 a 10 minuti.
Premere ripetutamente questo tasto nché il display non
mostra l’orario desiderato. Quando la funzione è attivata,
il display mostra il simbolo “SLEEP”. L’apparecchio si spegne
automaticamente dopo il tempo preimpostato.
Per mostrare il tempo rimanente, premere il tasto SLEEP.
È ancora possible ridurre il tempo oppure disattivare la
funzione.
pletamente il brano attuale.
completamente l’intero CD.
riproduzione normale continua.
attuale (Il display mostra REPEAT 1).
(REPEAT ALL è visualizzato)
la selezionata del CD in MP3 (il display
mostra REPEAT ALBUM). Utilizzare i tasti
FOLDER +/- (21 sul telecomando) per selezionare le single cartello.
riprodotto nel modo normale.
per avviare la
Page 45

45
ITALIANO
TIMER (23 sul telecomando)
È possible programmare l’apparecchio in modo che si spenga e si riaccenda dopo un periodo di tempo preimpostato.
1. Utilizzare il tasto STANDBY per passare al modo standby. La spia luminosa POWER (16) si accende.
2. Premere il tasto TIMER nché il display non mostra “ON
TIME“.
• Ora è possibile usare i tasti
/ (8/9) per impostare le ore e i minuti per l’accensione o lo spegnimento, la modalità di accensione e il volume di
accensione.
• Confermare sempre l’immissione con il tasto
TIMER. L’impostazione che deve essere regolata al
momento lampeggia sul display.
NOTA:
Se nessun tasto è attivato entro i successivi
10 secondi, il dispositivo ritorna nella modalità
di standby senza salvare l’immissione.
3. Dopo aver selezionato il volume di accensione, premere nuovamente il tasto TIMER. L’apparecchio di porta
nel modo standby.
Al raggiungimento dell’orario impostato, il dispositivo si
accende nella modalità selezionata. Il volume aumenta
lentamente al volume selezionato.
Premere TIMER per disattivare la funzione Timer. Il display
smette di mostrare “TIMER”.
SNOOZE (4 sul telecomando)
Se il dispositivo viene alimentato tramite il timer,questa
funzione può essere ritardata per circa 9 minuti con il
tasto SNOOZE. Dopo 9 minuti, il dispositivo si accenderà
nuovamente.
CLOCK (5/1)
Come impostare l’orologio.
Quando si preme questo tasto, l’orario sarà visualizzato
per breve tempo.
MEMORY (6 sul telecomando)
Come salvare le stazioni e per impostare la riproduzione
programmata.
Riproduzione programma
Riproduzione programma nella sequenza desiderata. (solo
in modalità CD).
1. Premere il tasto STOP (8/14).
2. Premere il tasto MEMORY (6 sul telecomando). Il display mostra “00 P01“ (“brano“ P “posizione memoria“)
e MEMORY. Utilizzare I tasti
/ (7/14) per selezionare
il brano desiderato e premere nuovamente il tasto
MEMORY. Il display cambia a posizione memoria P02.
Per CD in formato MP3:
Cartella “F00” accanto a P01, lampeggia sul display.
Selezionare prima la cartella desiderata con i tasti
FOLDER +/- (21 sul telecomando). Per conferma premere il tasto MEMORY. T00 viene visualizzato.
3. Utilizzare I tasti / per selezionare il brano successivo e premere nuovamente MEMORY. Ripetere questi
punti nché non sono stati selezionati tutti I brani.
NOTA:
Se la capacità di memoria della traccia programmabile viene raggiunta, “PROGFULL“ sarà visualizzato.
4. Premere il tasto
(9/17). La riproduzione ha inizio. Il
display mostra il numero del primo brano selezionato.
Utilizzare questo tasto per interrompere momentaneamente la riproduzione.
5. Premere una volta il tasto STOP per interrompere la
riproduzione. La memoria viene mantenuta.
6. Per la riproduzione ripetuta dei programmi, premere il
tasto .
7. Per cancellare la memoria, premere due volte il tasto
STOP. MEMORY non sarà più visualizzato.
L’apparecchio si spegne automaticamente dopo aver riprodotto tutti i brani memorizzati. La sequenza programma
viene mantenuta in memoria nché non si eettua la
commutazione a un altro modo; rimuovere il CD dal vano
o spegnere l’apparecchio.
È possibile combinare la riproduzione programma con la
funzione REPEAT. Dopo la programmazione e l’avvio della
riproduzione, premere il tasto REPEAT (13 sul telecomando) no a 3 volte; le funzioni possono essere applicata
come descritto nella sezione “REPEAT”.
Riproduzione di le musicali in formato MP3
Questo apparecchio consente di riprodurre le musicali in
formato MP3. L’apparecchio supporta inoltre I tipi di CD
più comuni: CD, CD-RW, e CD-R.
L’apparecchio può riprodurre CD in formato MP3. Si tratta
di CD compressi che possono memorizzare no a 200
brani. L’apparecchio riconosce automaticamente dischi
MP3 (il display mostra il numero totale di brani e cartelle).
Fare riferimento al capitolo “Riproduzione di CD/MP3” per
la riproduzione di questo tipo di CD. È possibile programmare brani come descritto in precedenza nella sezione
“Riproduzione programma”.
Nota:
Vi sono metodi di masterizzazione e compressione diversi,
come diverse qualità di CD e CD masterizzati.
Inoltre, il settore musicale non utilizza standard pressati
(protezione copia).
Page 46

46
ITALIANO
Per questo motivo è possible, in rari casi, che insorgano
errori durante la lettura di CD e MP3. Non si tratta di
un’anomalia dell’apparecchio.
Pulizia e manutenzione
• Scollegare l’alimentazione prima di pulire l’apparecchio
• Rimuovere le macchie esterne con un panno leggermente umido, senza detergente.
Rimozione guasti
Sintomi Causa Soluzione
Non si riesce
a riprodurre il
CD.
Il CD non è inserito o lo è, ma non
correttamente.
Accertarsi che il disco
sia inserito con la
dicitura rivolta verso
l’alto.
Le batterie sono
troppo deboli.
Inserire nuove batterie,
oppure usare l’ apparecchio collegandolo
alla rete.
Il CD salta
durante la
riproduzione.
Controllare che
sul disco non ci
siano impronte
di dita, sporco o
gra.
Pulirlo con un panno
morbido partendo dal
centro.
L'unità non
funziona.
L'unità è bloccata
e “resta sospesa”.
Scollegare l'alimentazione principale per
circa 5 secondi. Quindi
accendere nuovamente l'unità.
Speciche tecniche
Modello: ...............................................................................SR 4337 iP
Tensione di alimentazione: ...........................220-240 V~ 50 Hz
Funzionamento con batteria: .............8x 1,5 V Tipo UM2/R14
Uscita di potenza: ..........................................................80 W PMPO
Consumo di potenza: .................................................................15 W
Classe di protezione: ...........................................................................II
Peso netto: ..................................................................................2,00 kg
Radio:
Gamme di frequenza: .....................VHF/FM 87,5 ~ 108,0 MHz
Con riserva di apportare moche tecniche!
Questo dispositivo risponde a tutte le direttive della CE,
come la direttiva sulla compatibilità elettromagnetica e
quella sul basso voltaggio ed è prodotto secondo le più
recenti norme di sicurezza.
“Made for iPod” e “Made for iPhone“ signica che un accessorio elettronico è stato progettato per essere connesso
all‘iPod o iPhone ed è stato certicato dallo sviluppatore
al ne di rispettare gli standard di prestazione Apple.
Apple non è responsabile del funzionamento di questo
dispositivo o del suo rispetto degli standard di sicurezza e
regolamentativi.
Smaltimento/Signicato del simbolo “Eliminazione“
Rispettare l‘ambiente, non smaltire dispositivi elettrici nei
riuti domestici.
Lo smaltimento di dispositivi obsoleti o difettosi deve
avvenire tramite consegna presso punti di raccolta locali.
Aiutate ad evitare pericoli potenziali per l‘ambiente e la
nostra salute tramite uno smaltimento non corretto.
Voi contribuite al riciclaggio e altro forme di utilizzo di
dispositivi elettrici e elettronici.
Vostro comune è in grado di fornirvi informazioni sui
punti di raccolta.
Page 47

47
ENGLISH
General Safety Guidelines
Before using this device, carefully read this user manual
and keep it together with the Warranty Certicate, cashier
receipt and if possible, the original package inclusive its
interior packing. If you hand on the device to any third
person, include the user manual as well.
• To avoid the risk of re or electric shock, do not expose
the device to rain or humidity. Do not operate near
water (e.g. in bathrooms, swimming pools and wet
basements).
• The unit is designed solely for private use and its
intended purpose. This unit is not designed for commercial use.
• Only connect to a standard wall outlet. Make sure the
voltage indicated on the device is in conformity with
the voltage of the outlet.
• If using external adapters, please observe correct
polarity and voltage. Insert batteries properly.
• When installing the device, do not cover any of the
ventilation openings.
• Never open the enclosure of the device. Improper re-
pairs may cause signicant hazards to the user. In case
the device or the mains cable are damaged, do not
operate the device and have it repaired by an expert.
Regularly check the mains cable for damage.
• In order to avoid hazards, a damaged mains cable must
be replaced with an equivalent cable by the manufacturer, our customer service or any other specialist.
• If you do not use the device for a longer period of
time, please unplug the device and remove the batteries.
These symbols may be found on the device and are
intended as warnings:
The lightning ash is intended to alert the
user to the presence of dangerous voltage
within the device.
The exclamation mark is intended to alert the
user to the presence of important operating
and maintenance instruction accompanying
this device.
Products with this symbol operate with a
“Class 1 Laser” for scanning the CD. The builtin safety switches are intended to prevent the
user from being exposed to the dangerous
laser beam not visible to the eye when opening the CD compartment.
These safety switches must not be bypassed or altered;
otherwise there is a risk of being exposed to the laser
beam.
Children and disabled persons
• For the safety of your children, keep any packing parts
(plastic bags, cartilage, Styrofoam etc.) out of their reach.
WARNING!
Don’t let small children play with foils for danger of
suocation!
• This device is not intended for use by persons (including children) with reduced physical, sensory or mental
capabilities, or lack of experience and/or knowledge
unless they have been given supervision or instructions
concerning the use of the device by a person responsible for their safety.
• Supervise children to ensure they do not play with the
device.
Symbols in this user manual
Important notes for your safety are marked distinctively.
Pay absolute attention to them to avoid accidents and
damage to the device.
WARNING:
Warns of dangers for your health and indicates potential risks of injury.
CAUTION:
Indicates potential dangers for the device or other objects.
NOTE:
Highlights tips and information for you.
Special safety guidelines
This device operates with a
Class 1 laser.
Overview of the components
1 Telescopic antenna
2 Handle
3 CD compartment
4 STANDBY button (standby/power)
5 CLOCK button (clock)
6 FUNCTION (function switch)
7 STOP button
8 / buttons (search forward/backwards)
9 button (play/pause)
10 Clip for opening the CD compartment (OPEN/CLOSE)
11 Docking port
12 VOLUME +/- (volume) buttons
13 Speaker
14 LCD dsplay
15 Battery compartment
16 POWER indicator light
17 IR sensor for the remote control
Page 48

48
ENGLISH
Rear view (not shown)
AUX IN connection
AC~ mains supply
Remote control
1 CLOCK button
2 MUTE button
3 PRE-DN/PRE-UP buttons (radio station memory)
4 SNOOZE button
5 INTRO button
6 MEMORY button
7 RAND button (random playback)
8 INFO button
9
button (search forward)
button (search backwards)
10 VOLUME +/- buttons
11 FUNCTION (function switch)
12 MENU UP button (iPod/iPhone menu navigation)
13 ENTER button (conrmation)
14 MENU DN button (iPod/iPhone menu navigation)
15 EQ button
16 MENU button
17 (play/pause) button
18 STOP button
19 REPEAT button
20 MONO/ST button
21 FOLDER +/- buttons (up/down, album)
22 SLEEP button
23 TIMER button
24 STANDBY button
Installation/Introduction
• Read the manual thoroughly before operating the
device!
• Select a suitable location for the device. Suitable loca-
tions are dry, even and anti-slip surfaces on which you
may operate the device easily.
• Make sure there is proper ventilation for the device!
• Remove, if necessary, the protection sheet from the
display.
Power supply
• Connect the supplied mains cable (see battery com-
partment (15), if necessary) to a correctly installed
power outlet 230 V / 50 Hz and the power connection
AC ~ on the back of the device.
• Make sure the voltage is in conformity with the rating
plate.
• The saved time will be lost as soon as the power is
disconnected.
Battery Operation (Batteries not supplied)
• Open the cover of the battery compartment (15) on
the bottom.
• Insert the 8 batteries type UM 2/R14 1.5 V. Observe the
correct polarity (see bottom of battery compartment)!
• Close the battery compartment.
Should the device not be used for a long periods, remove
the batteries, to prevent any “leakage”.
NOTE:
• If a mains cable is connected, the batteries are
automatically switched o.
• During battery operation, the rechargeable battery
of a connected iPod/iPhone will not be charged.
CAUTION:
• Dierent battery types or new and used batteries
must not be used together.
• Do not dispose of batteries with your household
trash. Please hand over at authorized collection
points or return to your dealer.
WARNING:
Do not expose batteries to heat or direct sunlight. Never
throw batteries into re. Danger of explosion!
Batteries of remote control (Batteries not included)
• Open the cover of the battery compartment on the
rear side of the remote control.
• Insert 2 x R03 “AAA” 1.5 V batteries. Please observe
correct polarity (see bottom of battery compartment)!
• If you do not use the remote control for a longer
period of time, please remove the batteries in order to
avoid “leakage” of battery acid.
CAUTION:
• Dierent battery types or new and used batteries
must not be used together.
• Do not dispose of batteries with your household
trash. Please hand over at authorized collection
points or return to your dealer.
WARNING:
Do not expose batteries to heat or direct sunlight. Never
throw batteries into re. Danger of explosion!
Setting the clock (during standby mode)
1. Briey hold down the CLOCK button (5/1). The display
will show “24 HOUR”.
2. Use the
/ buttons (8/9) to select between 24-hour
and 12-hour display setting. Conrm with CLOCK.
NOTE: The 12-hour setting will result in the
following display
AM = morning, PM = afternoon.
3. Use
/ buttons to set the hours. Conrm with CLOCK.
4. Use
/ buttons to set the minutes.
5. Press CLOCK again in order to save the time settings.
Page 49
49
ENGLISH
Transport securing device of CD compartment
• Open the CD compartment (3) by pulling the cover
with the clip (10) upwards.
• Remove, if present, the transport securing device from
the CD player before starting operation.
• Close the CD compartment again.
iPod/iPhone Compatibility
Due to the large variety of iPod and iPhone models and
generations on the market, full compatibility cannot be
guaranteed. Before connecting your iPod/iPhone, ensure
that it has a compatible interface.
Full compatibility of the remote functions also cannot be
guaranteed. Operate your iPod/iPhone as normal, while it
sits in the docking station.
NOTE:
Depending on the software version of your iPhone the
following error message may be displayed:
“This accessory was not developed for iPhone use. It
is possible that noise occurs and signal strength is
reduced.“
In this case press “OK”.
General operation
NOTE:
Some buttons you will nd on both the device and the
remote control.
Buttons with the same name result in the same functions.
STANDBY (4/24)
Press STANDBY button to switch the device into standby
mode The POWER indicator light (16) lights up. Press this
button again to turn on the device.
Volume (12/10)
Adjust to your preferred volume level. The display will
show “VOL” and a number. This will equal to the set volume of “VOL MAX” or “VOL MIN”.
Infrared remote control
Wireless operation from a distance of up to 5 meters. If
this range gets less, please change the batteries. Make sure
there are no obstacles between the remote control and
the sensor (17) on the device during operation.
AUX IN jack (Back of Device)
Connect analogue playback devices. When connecting to
this jack you may also listen to the audio of other devices,
such as MP3 or CD players etc., via the speakers.
1. Please connect the external device via 3.5 mm plug
jack to the AUX IN jack.
2. Now use FUNCTION button (6/11) to select AUX mode.
3. Via the speakers you will listen to the audio of the
external device; use VOLUME +/- buttons (12/10) to
adjust the volume. The CD buttons are not active.
4. For further functions please refer to the user manual
of the external audio device.
NOTE:
Set the volume of the external device to a proper audible level.
Listening to the radio
1. Repeatedly press FUNCTION button (6/11) until the
display shows “TUNER”.
2. Use the
/ buttons (8/9) to tune in the desired sta-
tion.
3. The FM.ST control lamp ((ST)) (in the display) will
light up when the selected station is received with
stereo quality. If reception is too poor and the station
experiences static, the control lamp will icker. For
FM stations you may use MONO/ST button (20 on
the remote) to switch between MONO and STEREO
reception. In case of poor reception we recommend
switching to MONO mode.
Saving/Selecting Stations
4. When you have found the desired station, press the
MEMORY button (6 on remote). MEMORY will light up
in the display and the memory position will ash.
5. For choosing the memory position, please press PREUP/DN button (3 on the remote).
6. Press MEMORY to save the settings.
To select a stored station, please press PRE-UP or PRE-DN
button
Music Playback from iPod/iPhone
(iPod/iPhone not supplied)
1. Press the FUNCTION button (6/11) repeatedly, until “NO
IPOD” appears in the display.
2. If an adapter has been supplied with your iPod, put it
onto the dock connector. You can only ensure that the
iPod ts correctly into the iPod port if the adapter is
plugged in.
3. Insert your iPod/iPhone into the dock.
CAUTION:
Make sure that your iPod/iPhone is plugged upright
into the port. Do not bend or tilt the iPod/iPhone
whilst it is plugged into the port. This may cause
damage to the dock or the iPod/iPhone.
4. Depending on the iPod/iPhone Model, rstly release
the button lock and start playing music if necessary
with the
button (9/17).
Page 50

50
ENGLISH
5. Follow your iPod/iPhone manual for further use of the
controls.
CAUTION:
Stop playback before connecting the iPod/iPhone,
otherwise the iPod/iPhone could become damaged.
NOTE:
• If necessary, you can change the audio settings of
your iPod/iPhone in order to achieve optimum sound.
• If you have an incoming call when playing back
music with the iPhone docked, then playback stops
and you can hear the ring tone. Take the iPhone out
of the device in order to accept the call.
iPod/iPhone Charging
Your iPod/iPhone battery is charged as soon as the iPod/
iPhone is docked. To do this, the unit must be connected
to the mains.
NOTE:
• If the slot adapter has been supplied with your iPod,
use it to ensure that your iPod its correctly.
• Not all iPod/iPhone generations support the charge
mode.
• The duration of the charging process depends on the
iPod/iPhone which is used and its operating condition.
• We do not recommend charging during battery
operation, since doing so will run down the batteries
quicker.
Playing CDs/MP3
This is how to play a CD
1. Repeatedly press FUNCTION button (6/11) until the
display shows “CD”.
2. Open the CD compartment (3) by pulling the cover
with the clip (10) upwards.
3. Insert the audio CD onto the conical spindle with the
label facing upwards, so that it snaps into place mechanically. Then close the CD compartment cover again.
4. AUDIO CD:
“READING” briey appears on the display, then “TOTAL”,
the number of titles and total playback time. The playback starts from the rst title on the CD. The current
song, the elapsed playback time and the
symbol are
displayed.
CD in MP3 format:
“READING” briey appears on the display, then “TOTAL”,
“MP3”, the number of titles and folders (FOLDER). The
playback starts from the rst track and from the rst
folder. The current song (TRACK), the elapsed playback
time, “MP3” and the
symbol are displayed. Use the
FOLDER + or FOLDER - buttons (21 on the remote) to
select the individual folders.
5. To remove a CD press the STOP button (7/18), open
the CD compartment and carefully take out the CD.
Always keep the CD door closed.
NOTE:
• When playing CD in MP3 format containing folders,
the display will show 01 for the rst track of the new
folder when switching to another folder.
• If a disc is not properly or not at all inserted,
“READING” will light up and the display will show “NO
DISC”.
• Playback of CDs created by the user cannot be
guaranteed due to the variety of available software
and CD media equipments.
Description of the Operating Buttons
(9/17)
You may temporarily stop playback and start again. The
elapsed playback time ashes and the symbol “
” is displayed. Pressing the button again will continue playback
from the same position.
/ (8/9)
During playback of an audio CD, of a CD in MP3 format,
or in the IPOD mode.
With the
button you may skip to the next or next but
one track, etc. Press and hold this button to quickly search
music (sound will be muted).
You may operate the
button as followed:
Press 1 x = Starts current track again from the begin-
ning.
Press 2 x = Skips back to previous track.
Press 3 x = Plays track prior to that, etc. Press and
hold this button to quickly search music
(sound will be muted).
During radio mode:
Tune the desired radio station.
STOP (7/18)
The CD or the songstops.
ENTER (13 on remote)
In IPOD mode:
Press this button to activate a function or to display the
next menu.
MENU (16 on remote)
In IPOD mode:
Press this button to open the iPod/iPhone menu or to
return to the previous menu.
NOTE:
For this function, the music app must have been already
started.
Page 51

51
ENGLISH
MENU UP/MENU DN. (12/14 on remote)
In IPOD mode:
Press this button to browse the iPod/iPhone menu upwards or downwards.
MUTE (2 on the remote)
Quickly turn o the sound. “MUTE” will ash in the display. To cancel this function, press MUTE again.
FOLDER +/- (21 on the remote)
CD in MP3 format:
Press these buttons during playback to switch one folder
up or down. The display shortly shows a message, e.g.
FOLDER 02. Then the system automatically starts playback of the MP3 CD. When pressing the buttons during
stop mode, the message will also shortly be shown in the
display. Then press
to start playback.
EQ (15 on the remote)
(Preset equalizer function). There are dierent sound
modes available (CLASSIC, ROCK, POP, JAZZ, FLAT).
NOTE: During iPod/iPhone playback
If necessary, you can change the EQ settings of your
iPod/iPhone in order to achieve optimum sound.
MONO/ST (20 on the remote)
During FM radio mode:
Switch between STEREO and MONO.
INFO (8 on the remote)
During playback of CD in MP3 format:
Stored ID-3 tag information will be shown as banner in
the display. Press this button again to disable the function.
INTRO (5 on remote)
Each title of the CD will be played for 10 seconds. Press
this button again to disable the function.
REPEAT (19 on the remote)
Press 1x: (REPEAT 1 lights up) The current track will
be repeated entirely.
Press 2x: (REPEAT ALL lights up) The complete CD
will be repeated entirely.
Press 3x: All functions will be canceled. Normal
playback will be continued.
Only for CDs in MP3 format:
Press 1x: The current track will be repeated con-
tinuously (The display will show REPEAT 1).
Press 2x: The entire CD will be repeated continu-
ously (REPEAT ALL is displayed)
Press 3x: The selected folder of the MP3 CD will be
repeated continuously (the display will
show REPEAT ALBUM). Use FOLDER +/buttons (21 on the remote) to select the
individual folders.
Press 4x: The function will be deactivated and the
CD will be played in normal mode.
RAND (6 on remote)
The display will show “RANDOM” and the number of the
track that will be played rst. All tracks will be played
consecutively in random order.
PRE-UP/PRE-DN (3 on remote)
During radio mode:
Select a stored radio station.
SLEEP (8 on the remote)
When the device is switched on, you can set the time after
which the device will turn into standby mode; set the time
in 10 minutes intervals from 90 to 10 minutes. Repeatedly
press this button until the display shows the desired time.
When the function is activated, the display will show the
symbol “SLEEP”. The device will turn o automatically
after the preset time.
To display the remaining time, please press SLEEP button.
You may still reduce the time or deactivate the function
afterwards.
TIMER (23 on the remote)
You may program the device for it to turn o and on
again after a certain preset time.
1. Use STANDBY button to switch into standby mode.
The POWER indicator light (16) lights).
2. Press TIMER button until the display shows “ON TIME“.
• Now you can use the
hours and minutes for switching on or o, the
power on mode and the power on volume.
• Always conrm your input with the TIMER button.
The setting that currently needs to be adjusted
ashes on the display.
NOTE:
If no button is activated within the following
10 seconds, the device switches back into standby
mode without saving the input.
3. After selecting the power on volume, press the TIMER
button again. The device will switch into standby
mode.
After reaching the set time, the device is switched on in
the selected mode. The volume slowly increases to the
selected volume.
Press TIMER to deactivate the timer function. “TIMER” will
disappear from the display.
/ buttons (8/9) to set the
Page 52

52
ENGLISH
SNOOZE (4 on remote)
If the device was powered on via the timer, this function
can be delayed for about 9 minutes with the SNOOZE
button. After 9 minutes, the device will be switched on
again.
CLOCK (5/1)
To set the clock.
When you press this button, the time will be displayed
briey.
MEMORY (6 on remote)
To save the stations and to set the programmed playback.
Program Playback
Program playback in desired sequence. (only in CD mode).
1. Press STOP button (8/14).
2. Press MEMORY button (6 on the remote). The display
will show “00 P01“ (“track“ P “memory position“) and
MEMORY. Use the
/ buttons (7/14) to select the
desired track and press MEMORY buttons agian. The
display will change to memory position P02.
For CDs in MP3 format:
Folder “F00” next to P01 , ashes on the display. First,
select the desired folder with the buttons FOLDER +/(21 on remote). For conrmation, press the MEMORY
button. T00 is displayed.
3. Use the
/ buttons to select the next track and
press MEMORY/CLOCK again. Repeat the steps until
you have selected all tracks.
NOTE:
If the memory capacity of the programmable title is
reached, “PROGFULL“ will be displayed.
4. Press the
button (9/17). Playback starts. The display will show the rst selected track number. Also use
this button to temporarily stop playback.
5. Press STOP button once to stop playback. The memory
will be kept.
6. For repeated playback of the programmes, press the
button.
7. To delete memory, please press STOP button twice.
MEMORY will no longer be displayed.
The device will stop automatically after all stored tracks
have been played. The program sequence will be kept in
the memory until you switch to another mode, remove
the CD from the compartment or switch o the device.
It is possible to combine program playback with the REPEAT function. After programming and starting playback,
please press REPEAT button (13 on the remote) up to three
times; the functions can be applied as described under
“REPEAT”.
Playback of music les in MP3 format
This device allows the playback of music les in MP3
format. The device furthermore supports the common CD
types: CD, CD-RW, and CD-R.
Your device can play MP3 CDs. These are compressed CDs
that can store up to 200 tracks. Your device automatically
recognizes MP3 discs (the display will show total number
of tracks and folders). Please refer to chapter “Playing CD/
MP3” for playback of such CDs. You may program tracks
as already described under “Program playback”.
Please note:
There are many burning and compressing methods, as well
as dierences in quality of CDs and burnt CDs.
Furthermore, the music industry does not apply xed
standards (copy protection).
For that reason there might, in rare cases, occur problems
when playing CDs and MP3 discs. That is not a malfunction of this device.
Cleaning and maintenance
• Disconnect the mains plug before cleaning.
• You may wipe o external stains, using a slightly
damp cloth without any additives.
Troubleshooting
Symptoms Course Solution
CD can not be
played back.
CD is not inserted
or inserted incorrectly.
Ensure that the disc is
inserted with the label
facing upwards.
Batteries too
weak.
Insert new batteries
or operate the device
with the mains lead.
CD jumps
during
playback.
Check the disc for
ingerprints, dirt or
scratches.
Check the disc for
ingerprints, dirt or
scratches.
The unit does
not work.
The unit is blocked
and “hangs”.
Disconnect the mains
plug for approximately
5 seconds. Then switch
the unit back on.
Page 53

53
ENGLISH
Technical Specications
Model: ...................................................................................SR 4337 iP
Voltage supply: ..................................................220-240 V~ 50 Hz
Battery operation: .................................8 x 1.5 V Type UM2/R14
Output power: ................................................................80 W PMPO
Power consumption: ..................................................................15 W
Protection class: ................................................................................... II
Net weight: ................................................................................2,00 kg
Radio:
Frequency ranges: ............................VHF/FM 87.5 ~ 108.0 MHz
Specications are subject to change!
This device complies with all current CE directives, such as
electromagnetic compatibility and low voltage directive
and is manufactured according to the latest safety regulations.
“Made for iPod” and “Made for iPhone“ mean that
an electronic accessory has been designed to connect
speciically to iPod or iPhone and has been certiied by the
developer to meet Apple performance standards. Apple
is not responsible for the operation of this device or its
compliance with safety and regulators standards.
Disposal/Meaning of the “Wheelie Bin”
Symbol
Take care of our environment, do not dispose of electrical
applicances via the household waste.
Dispose of obsolete or defective electrical appliances via
municipal collection points.
Please help to avoid potential environmental and health
impacts through improper waste disposal.
You contribute to recycling and other forms of utilization
of old electric and electronic appliances.
Your municipality provides you with information about
collecting points.
Page 54

54
JĘZYK POLSKI
Generalne wskazówki dotyczące
bezpieczeństwa
Przed użyciem urządzenia, należy dokładnie przeczytać
podręcznik użytkowania i zachować go wraz z gwarancją,
paragonem oraz w razie możliwości wraz z oryginalnym
opakowaniem zawierającym wewnętrzne elementy.
W razie przekazania urządzenia osobom trzecim, należy
dołączyć podręcznik użytkowania.
• Aby uniknąć zagrożenia pożarem lub porażenia prądem
elektrycznym, nie wystawiać urządzenia na działanie
deszczu lub wilgoci. Nie używać urządzenia w pobliżu
wody (np. w łazience, na basenie, w wilgotnej piwnicy).
• Z urządzenia należy korzystać wyłącznie do celów
prywatnych i zgodnie z przeznaczeniem. Urządzenie to
nie jest przeznaczone do użytku komercyjnego.
• Podłączać tylko do standardowego gniazdka ściennego.
Upewnić się, czy napięcie wskazane na urządzeniu jest
zgodne z napięciem w gniazdku.
• W przypadku stosowania przedłużacza, zwrócić uwagę
na poprawną biegunowość i napięcie. Poprawnie
włożyć baterie.
• Podczas instalowania urządzenia nie przykrywać otworów wentylacyjnych.
• Nie otwierać obudowy urządzenia. Dokonywanie
nieodpowiednich napraw może skutkować poważnym
zagrożeniem dla użytkownika. Jeśli urządzenie lub
kabel zasilający są uszkodzone, nie należy używać
urządzenia – oddać je do naprawy przez profesjonalistę. Regularnie sprawdzać, czy kabel zasilający nie jest
uszkodzony.
• Aby uniknąć zagrożenia, uszkodzony kabel zasilający
należy wymienić. Powinien to zrobić producent, punkt
serwisowy lub inny specjalista.
• Jeśli urządzenie nie będzie przez dłuższy czas używane,
należy wyjąć wtyczkę z gniazdka i baterie.
Poniższe symbole, umieszczone na urządzeniu, służą jako
ostrzeżenie:
Symbol błyskawicy oznacza ostrzeżenie
o obecności w urządzeniu niebezpiecznego
napięcia.
Symbol wykrzyknika oznacza ostrzeżenie
o ważnej wskazówce dotyczącej obsługi lub
konserwacji urządzenia.
Produkty oznaczone tym symbolem należą do grupy „Laser Klasy 1" skanujący CD.
Wbudowane wyłączniki bezpieczeństwa służą
ochronie użytkownika przed wystawieniem
na niebezpieczny promień lasera niewidoczny
podczas otwierania komory CD.
Wyłączników bezpieczeństwa nie wolno obchodzić i zmieniać; w przeciwnym razie występuje ryzyko wystawienia
na promień lasera.
Dzieci i osoby niepełnosprawne
• Ze względu na bezpieczeństwo dzieci, trzymać części
opakowania (torby plastikowe, kartony, styropian, itp.)
poza ich zasięgiem.
OSTRZEŻENIE!
Małe dzieci nie mogą bawić się folią ze względu na
niebezpieczeństwo uduszenia!
• Urządzenia nie powinny używać osoby (także dzieci),
które mają ograniczone możliwości zyczne, sensoryczne lub umysłowe, którym brakuje doświadczenia i/
lub wiedzy, chyba, że znajdują się pod nadzorem osoby
odpowiedzialnej za ich bezpieczeństwo albo osoba ta
przedstawiła im instrukcje dotyczące używania urządzenia.
• Należy dopilnować, aby dzieci nie bawiły się urządzeniem.
Symbole użyte w instrukcji użytkowania
Ważne wskazówki dotyczące bezpieczeństwa są wyraźne
zaznaczone. Należy wziąć je pod szczególną uwagę, aby
uniknąć wypadków i uszkodzeń urządzenia.
OSTRZEŻENIE:
Niebezpieczeństwo dla zdrowia oraz potencjalne ryzyko
obrażeń ciała.
UWAGA:
Oznacza potencjalne zagrożenie urządzenia lub innych
obiektów.
WSKAZÓWKA:
Podświetlone wskazówki oraz informacje.
Specjalne wytyczne dotyczące bezpieczeństwa
To urządzenie działaz
laserem Klasy 1.
Przegląd elementów obsługi
1 Antena teleskopowa
2 Uchwyt
3 Komora CD
4 Przycisk STANDBY (tryb gotowości/zasilanie)
5 Przycisk CLOCK (zegar)
6 Przycisk FUNCTION (przełącznik funkcyjny)
7 Przycisk STOP
8 Przyciski / (wyszukiwanie w przód/ w tył)
9 Przycisk (odtwarzanie/pauza)
10 Zatrzask otwierania przedziału CD (OPEN/CLOSE)
11 Port dokowania
12 Przyciski VOLUME +/- (głośność)
13 Głośnik
Page 55

55
JĘZYK POLSKI
14 Wyświetlacz LCD
15 Komora baterii
16 Wskaźnik świetlny zasilania POWER
17 Czujnik IR (podczerwieni) do pilota
Widok z tyłu (niepokazane)
Złącze AUX IN
Zasilanie sieciowe AC~
Pilot
1 Przycisk CLOCK (zegar)
2 Przycisk MUTE (wyciszenie)
3 Przyciski PRE-DN/PRE-UP (pamięć stacji radiowych)
4 Przycisk SNOOZE
5 Przycisk INTRO
6 Przycisk MEMORY (pamięć)
7 Przycisk RAND (odtwarzanie losowe)
8 Przycisk INFO
9 Przycisk
(wyszukiwanie w przód)
Przycisk (wyszukiwanie wstecz)
10 Przyciski VOLUME +/- (głośność)
11 FUNCTION (przełącznik funkcyjny)
12 Przycisk MENU UP (nawigacja menu iPod/iPhone)
13 Przycisk ENTER (potwierdzenie)
14 Przycisk MENU DN (nawigacja menu iPod/iPhone)
15 Przycisk EQ
16 Przycisk MENU
17 Przycisk (odtwarzanie/pauza)
18 Przycisk STOP
19 Przycisk REPEAT (powtórz)
20 Przycisk MONO/ST
21 Przyciski FOLDER +/- (w górę/w dół, album)
22 Przycisk SLEEP
23 Przycisk TIMER
24 Przycisk STANDBY
Instalacja/Wprowadzenie
• Przed użyciem urządzenia należy uważnie przeczytać
podręcznik użytkownika!
• Wybrać odpowiednią lokalizację dla urządzenia.
Odpowiednie miejsce to sucha, równa i antypoślizgowa
powierzchnia, na której w łatwy sposób można obsługiwać urządzenie.
• Zapewnić prawidłową wentylację urządzenia!
• W razie konieczności zdjąć folię ochronną z wyświetlacza.
Zasilanie
• Podłączyć dołączony kabel sieciowy (patrz komora
baterii (15), w razie konieczności) do prawidłowo zainstalowanego gniazda zasilania 230 V / 50 Hz oraz złącza
AC ~ w tylnej części urządzenia.
• Upewnić się, czy napięcie jest zgodne z wartością
podaną na tabliczce znamionowej.
• Zapisany czas zostanie utracony dopiero wtedy, gdy
zasilanie jest odłączone.
Zasilanie bateryjne (brak baterii w zestawie)
• Otworzyć pokrywkę komory baterii (15) w dolnej części
urządzenia.
• Włożyć 8 baterii typu UM 2/R14 1,5 V. Sprawdzić
prawidłowe położenie biegunów (patrz dolna część
komory baterii)!
• Zamknąć komorę baterii.
Jeśli urządzenie nie jest używane przez długie okresy,
wyjąć baterie, aby uniknąć „przecieku“.
WSKAZÓWKA:
• Jeśli kabel sieciowy jest podłączony, baterie wyłączają
się automatycznie.
• Podczas pracy baterii, akumulator podłączonego
urządzenia iPod/iPhone nie będzie ładowany.
UWAGA:
• Nie stosować jednocześnie różnych rodzajów baterii,
a także baterii nowych i używanych.
• Nie wyrzucać zużytych baterii do śmieci z gospodarstwa domowego. Zużyte baterie należy zanieść do
punktu zbiórki lub zwrócić sprzedawcy.
OSTRZEŻENIE:
Nie wystawiać baterii na działanie gorąca lub bezpośredniego promieniowania słonecznego. Nie wolno wrzucać
baterii do ognia. Grozi wybuchem!
Baterie pilota (brak w zestawie)
• Otworzyć klapkę komory baterii znajdującej się
w tylnej części pilota.
• Włożyć 2 baterie R03 „AAA” 1,5 V. Zwrócić uwagę na
poprawną biegunowość (wskazówki znajdują się
w komorze baterii)!
• Jeśli pilot nie będzie używany przez dłuższy czas,
należy wyjąć baterie, aby uniknąć „wycieku” kwasu
akumulatorowego.
UWAGA:
• Nie stosować jednocześnie różnych rodzajów baterii,
a także baterii nowych i używanych.
• Nie wyrzucać zużytych baterii do śmieci
z gospodarstwa domowego. Zużyte baterie należy
zanieść do punktu zbiórki lub zwrócić sprzedawcy.
OSTRZEŻENIE:
Nie wystawiać baterii na działanie gorąca lub bezpośredniego promieniowania słonecznego. Nie wolno wrzucać
baterii do ognia. Grozi wybuchem!
Ustawienia zegara (w trybie gotowości)
1. Przytrzymać na krótko przycisk CLOCK (5/1). Na
wyświetlaczu pojawi się „24 HOUR”.
2. Za pomocą przycisków
/ (9/6/17), wybrać
ustawienia wyświetlania zegara 24-godzin-nego lub
12-godzinnego. Potwierdzić przy-ciskiem CLOCK.
Page 56

56
JĘZYK POLSKI
WSKAZÓWKA: Ustawienie zegara 12-godzinnego
spowoduje wyświetlenie następujących symboli
AM = rano, PM = po południu.
3. Przyciskami
/ ustawić godzinę. Potwierdzić przyci-
skiem CLOCK.
4. Przyciskami
/ ustawić minuty.
5. Ponownie wcisnąć przycisk CLOCK, aby zapisać ustawienia czasu.
Zabezpieczenie transportowe komory CD
• Otworzyć kieszeń CD (3), zdejmując pokrywę za pomo-
cą zatrzasku (10) ku górze.
• Wyjąć, o ile jest, zabezpieczenie transportowe z odtwa-
rzacza CD przed użyciem.
• Zamknąć ponownie kieszeń CD.
Zgodność odtwarzacza iPod/iPhone
Ze względu na dużą liczbę dostępnych na rynku różnych
modeli oraz generacji urządzeń iPod i iPhone nie można
zagwarantować pełnej zgodności z niniejszym produktem.
Przed podłączeniem odtwarzacza iPod/iPhone należy
sprawdzić, czy jego interfejs jest zgodny.
Nie można także zagwarantować pełnej zgodności funkcji
zdalnych. Po umieszczeniu urządzenia iPod/iPhone w stacji
dokującej należy je obsługiwać w zwykły sposób.
WSKAZÓWKA:
W zależności od wersji oprogramowania telefonu iPhone
może zostać wyświetlony następujący komunikat
o błędzie:
„To urządzenie nie zostało zaprojektowane do użytku
z telefonem iPhone. Możliwe jest występowanie zakłóceń i zmniejszenie natężenia sygnału.”
W takim przypadku należy nacisnąć przycisk „OK”.
Obsługa - ogólnie
WSKAZÓWKA:
Niektóre przyciski znajdują się zarówno na urządzeniu,
jak i na pilocie.
Przyciski, które nazywają się tak samo, mają takie same
funkcje.
STANDBY (4/24)
Wcisnąć przycisk STANDBY, aby przełączyć urządzenie
w tryb gotowości. Wskaźnik świetlny POWER (16) zapala się.
Ponownie wcisnąć ten przycisk, aby włączyć urządzenie.
Głośność (12/10)
Ustawić preferowany poziom głośności. Na wyświetlaczu
pojawi się „VOL” oraz liczba. Trwa ustawianie głośności
w zakresie od „VOL MAX” do „VOL MIN”.
Pilot na podczerwień
Bezprzewodowa obsługa z odległości do 5 metrów. Jeśli
dystans ten się zmniejszy, należy wymienić baterie. Upewnić się, że w czasie działania urządzenia, pomiędzy pilotem
i czujnikiem (17) w urządzeniu nie ma żadnych przeszkód.
Gniazdo wtykowe AUX IN (tylna część urządzenia)
Podłączyć analogowe urządzenie odtwarzające. Po podłączeniu do tego gniazda, można także słuchać muzyki
z innych urządzeń, takich jak odtwarzacze MP3 lub CD
itp., na głośnikach.
1. Włożyć wtyczkę 3,5 mm urządzenia zewnętrznego do
gniazda wtykowego AUX IN.
2. Za pomocą przycisku FUNCTION (6/11) wybrać tryb
AUX.
3. Dźwięk z urządzenia zewnętrznego jest słyszalny przez
głośniki; głośność wyregulować przyciskami VOLUME
+/- (12/10). Przyciski CD są nieaktywne.
4. Informacji na temat innych funkcji należy szukać
w podręczniku użytkownika zewnętrznego urządzenia
audio.
WSKAZÓWKA:
Głośność urządzenia zewnętrznego ustawić do odpowiedniego poziomu słyszalności.
Słuchanie radia
1. Kilkakrotnie wcisnąć przycisk FUNCTION (6/11), aż na
wyświetlaczu pojawi się „TUNER”.
2. Za pomocą przycisków / (8/9) ustawić żądaną
stację.
3. Lampka kontrolna FM.ST ((ST)) (na wyświetlaczu) zapali się, gdy wybrana stacja osiągnie odbiór w jakości
stereo. Jeśli odbiór jest zbyt słaby, a stacja ma zakłócenia, lampka kontrolna będzie migać. W przypadku
stacji FM, można - za pomocą przycisku MONO/ST (20
na pilocie) – przełączać się między odbiorem MONO
i STEREO. W przypadku słabego odbioru, zalecamy
przełączenie się w tryb MONO.
Stacje zapisywania/wyboru
4. Po znalezieniu żądanej stacji, wcisnąć przycisk MEMORY (6 na pilocie). Na wyświetlaczu zapali się MEMORY,
a pozycja pamięci zacznie mrugać.
5. Aby wybrać pozycję pamięci, wcisnąć przycisk
PRE-UP/DN (3 na pilocie).
6. Wcisnąć MEMORY, aby zapisać ustawienia.
Aby wybrać zapisaną stację, wcisnąć przycisk PRE-UP lub
PRE-DN.
Page 57

57
JĘZYK POLSKI
Odtwarzanie muzyki z urządzenia iPod/iPhone
(Urządzenie iPod/iPhone nie jest dostarczane)
1. Nacisnąć kilkakrotnie przycisk FUNCTION (6/11) aż na
ekranie pojawi się tekst „NO IPOD”.
2. Jeśli do urządzenia iPod dołączony jest adapter, wstawić go złącza doku. Dopiero po włożeniu adaptera
można sprawdzić, czy odtwarzacz iPod jest prawidłowo umieszczony w porcie iPod.
3. Włóż urządzenie iPod lub telefon iPhone do doku.
UWAGA:
Należy się upewnić, że urządzenie iPod/iPhone
zostało włożone do portu w pozycji pionowej. Po
podłączeniu urządzenia iPod/iPhone do portu nie
należy go wyginać ani nachylać. Może to prowadzić
do uszkodzenia doku lub urządzenia iPod/iPhone.
4. W zależności od modelu odtwarzacza iPod/iPhone
należy najpierw zwolnić blokadę przycisków i w razie
potrzeby rozpocząć odtwarzanie muzyki za pomocą
przycisku
(9/17).
5. Skorzystać z instrukcji iPod/iPhone w celu dalszego
korzystania z kontrolek.
UWAGA:
Zatrzymać odtwarzanie przed podłączeniem iPod/iPhone, w przeciwnym razie urządzenie iPod/iPhone może
ulec uszkodzeniu.
WSKAZÓWKA:
• W razie konieczności można zmienić ustawienia audio
dla iPod/iPhone, aby osiągnąć optymalny dźwięk.
• Jeśli podczas odtwarzania muzyki z włożonego do
doku telefonu iPhone nawiązane zostanie połączenie
przychodzące, odtwarzanie zostanie zatrzymane,
dzięki czemu będzie można usłyszeń dźwięk dzwonka.Wyjąć iPhone z urządzenia w celu akceptacji połączenia.
Ładowanie iPod/iPhone
Bateria urządzenia iPod/iPhone jest ładowana tak długo,
jak urządzenie iPod/iPhone jest włożone do doku. W celu
zapewnienia ładowania niniejsze urządzenia musi być
podłączone do zasilania.
WSKAZÓWKA:
• Jeśli urządzenie iPod posiada slot adaptera, należy go
użyć, aby sprawdzić, czy iPod pasuje prawidłowo.
• Nie wszystkie generacje urządzeń iPod/iPhone obsługują tryb ładowania.
• Czas trwania procesu ładowania zależy od stanu
działania używanego urządzenia iPod/iPhone.
• Nie zalecamy ładowania w czasie zasilania bateriami, ponieważ może to doprowadzić do szybszego
wyczerpania baterii.
Odtwarzanie CD/MP3
Jak odtwarzać CD:
1. Kilkakrotnie wcisnąć przycisk FUNCTION (6/11), aż na
wyświetlaczu pojawi się „CD”.
2. Otworzyć kieszeń CD (3), zdejmując pokrywę za pomocą zatrzasku (10) ku górze.
3. Włożyć płytę audio CD na stożkowy wałek, etykietą
skierowaną ku górze, tak by mechanicznie zatrzasnęła
się na miejscu. Następnie ponownie zamknąć pokrywkę kieszeni CD.
4. AUDIO CD:
Tekst „READING” na krótko pojawia się na ekranie,
następnie „TOTAL”, liczba tytułów I całkowity czas
odtwarzania. Odtwarzanie rozpocznie się od pierwszego utworu na płycie CD. Wyświetla się bieżący utwór,
czas, jaki minął oraz symbol
.
CD w formacie MP3:
Tekst „READING” na krótko pojawia się na ekranie, następnie „TOTAL”, „MP3”, liczba tytułów oraz folderów
(FOLDER). Odtwarzanie rozpocznie się od pierwszego
utworu i pierwszego folderu. Wyświetla się bieżący
utwór (TRACK), czas odtwarzania, jaki minął, „MP3”
oraz symbol
Za pomocą przycisków FOLDER + lub
FOLDER - (21 na pilocie), wybrać pojedynczy folder.
5. Aby wyjąć CD, należy nacisnąć przycisk STOP (7/18),
otworzyć kieszeń CD i ostrożnie wyjąć płytę CD.
Drzwiczki komory CD powinny zawsze być zamknięte.
WSKAZÓWKA:
• Podczas odtwarzania płyty CD w formacie MP3,
zawierającej foldery, wyświetlacz pokazuje 01 dla
pierwszego utworu z nowego folderu, po przełączeniu do innego folderu.
• Jeśli płyta jest włożona nieprawidłowo lub w ogóle
nie włożona, zapali się „READING”, a wyświetlacz
pokaże „NO DISC” (brak płyty).
• Z powodu różnorodności dostępnego oprogramowania i wyposażenia mediów CD, odtwarzanie płyty CD
nagranej przez użytkownika nie jest zagwarantowane.
Opis przycisków operacyjnych
(9/17)
Chwilowo przerywa odtwarzanie i wznawia je. Miga czas,
jaki minął i wyświetla się symbol „
“ Ponowne wciśnięcie
przycisku wznawia odtwarzanie od tego samego miejsca.
/ (8/9)
Podczas odtwarzania audio CD, CD w formacie MP3 lub
w trybie IPOD:
Przycisk
können przeskakuje do następnego utworu,
potem kolejnego itd. Wcisnąć i przytrzymać ten przycisk,
aby szybko wyszukać utwór (dźwięk będzie wyciszony).
Page 58

58
JĘZYK POLSKI
Przycisk działa w następujący sposób:
Wcisnąć 1 x = Ponownie zaczyna odtwarzanie bieżące-
Wcisnąć 2 x = Przeskakuje do poprzedniego utworu.
Wcisnąć 3 x = Odtwarza wcześniejszy utwór itd. Wcisnąć
W trybie radiowym:
Dostraja stację radiową.
STOP (7/18)
CD lub piosenka zatrzymują się.
ENTER (13 na pilocie)
W trybie IPOD:
Nacisnąć ten przycisk, aby uruchomić funkcję lub wyświetlić następne menu.
MENU (16 na pilocie)
W trybie IPOD:
Nacisnąć ten przycisk, aby otworzyć menu iPod/iPhone lub
powrócić do poprzedniego menu.
WSKAZÓWKA:
W przypadku tej funkcji ap. muzyczna musi być już
włączona.
go utworu od początku.
i przytrzymać ten przycisk, aby szybko
wyszukać utwór (dźwięk będzie wyciszony).
INTRO (5 na pilocie)
Każdy tytuł na CD będzie odtworzony przez 10 sekund.
Nacisnąć przycisk ponownie, aby wyłączyć tę funkcję.
REPEAT (19 na pilocie)
Wcisnąć 1x: (zaświeci się REPEAT 1) ieżący utwór
zostanie w całości powtórzony.
Wcisnąć 2x: (zaświeci się REPEAT ALL) Cała zawartość
płyty CD zostanie w całości powtórzona.
Wcisnąć 3x: Wszystkie funkcje zostaną skasowane.
Kontynuowane będzie normalne odtwarzanie.
Dotyczy wyłącznie płyt CD w formacie MP3:
Wcisnąć 1x: Bieżący utwór będzie powtarzany w
sposób ciągły (Na wyświetlaczu pojawi się
REPEAT 1).
Wcisnąć 2x: Cała płyta CD będzie ciągle powtarzana
(wyświetla się REPEAT ALL).
Wcisnąć 3x: Wybrany folder płyty CD MP3 będzie
powtarzany w sposób ciągły (na wyświetlaczu pojawi się REPEAT ALBUM). Za
pomocą przycisków FOLDER +/- (21 na
pilocie) wybrać pojedync-zy folder.
Wcisnąć 4x: Funkcja zostanie wyłączona, a płyta CD
będzie odtwarzana w normalnym trybie.
MENU UP/MENU DN. (12/14 na pilocie)
W trybie IPOD:
Nacisnąć ten przycisk, aby przejrzeć menu iPod/iPhone do
góry i na dół.
MUTE (2 na pilocie)
W szybki sposób wyłącza dźwięk. Na wyświetlaczu mruga
„MUTE”. Aby wyłączyć wyciszenie, wcisnąć ponownie
MUTE.
EQ (15 na pilocie)
(Funkcja korektora dźwięku). Dostępne są różne tryby
odtwarzania dźwięku (CLASSIC, ROCK, POP, JAZZ, FLAT).
WSKAZÓWKA: Podczas odtwarzania iPod/iPhone
W razie konieczności można zmienić ustawienia EQ dla
iPod/iPhone, aby osiągnąć optymalny dźwięk.
MONO/ST (20 na pilocie)
W trybie radiowym FM:
Przełącza pomiędzy STEREO i MONO.
INFO (8 na pilocie)
Podczas odtwarzania płyt CD w formacie MP3:
Zapisana etykieta ID-3 pojawi się na wyświetlaczu jako
nagłówek. Nacisnąć przycisk ponownie, aby wyłączyć tę
funkcję.
RAND (6 na pilocie)
Na wyświetlaczu pojawi się „RANDOM” oraz numer utworu, który zostanie odtworzony jako pierwszy. Odtworzone
zostaną wszystkie utwory w losowej kolejności.
FOLDER +/- (21 na pilocie)
CD w formacie MP3:
Wciśnięcie tych przycisków podczas odtwarzania powoduje przeskoczenie o jeden folder w górę lub w dół.
Wyświetlacz przez krótki czas pokazuje komunikat, np.
FOLDER 02. Następnie system automatycznie rozpoczyna
odtwarzanie płyty CD MP3. Po wciśnięciu tych przycisków
podczas trybu zatrzymania, komunikat również pojawi się
na chwilę na wyświetlaczu. Następnie wcisnąć przycisk
aby rozpocząć odtwarzanie.
PRE-UP/PRE-DN (3 na pilocie)
W trybie radiowym:
Wybiera zapisaną stację radiową.
SLEEP (8 na pilocie)
Gdy urządzenie jest włączone, można ustawić czas, po upływie którego przełączy się w tryb gotowości; można ustawić
od 10 do 90 minut, w przedziałach 10-minutowych. Wciskać kilkakrotnie ten przycisk, do momentu aż na wyświetlaczu pojawi się żądany czas. Gdy funkcja jest aktywna, na
wyświetlaczu widać symbol „SLEEP”. Urządzenie wyłączy się
automatycznie po upłynięciu ustawionego czasu.
Page 59

59
JĘZYK POLSKI
Aby wyświetlić pozostały czas, wcisnąć przycisk SLEEP. Można wtedy zmniejszyć liczbę minut lub wyłączyć tę funkcję.
TIMER (23 na pilocie)
Urządzenie można zaprogramować, aby wyłączyło się
i włączyło ponownie po upływie ustawionego czasu.
1. Przycisk STANDBY przełącza urządzenie w tryb gotowości. (Wskaźnik świetlny POWER (16) zapala się).
2. Wciskać przycisk TIMER do momentu, aż na wyświetlaczu pojawi się „ON TIME“.
• Teraz można użyć przycisków
/ (8/9) aby ustawić godziny i minuty włączania oraz wyłączania,
regulacje trybu oraz głośności.
• Zawsze potwierdzać zmiany za pomocą przycisku
TIMER. Na ekranie miga zawsze ustawienie, które
w danej chwili należy wyregulować.
WSKAZÓWKA:
Jeśli żaden przycisk nie aktywuje się w przeciągu
kolejnych 10 sekund, urządzenie przełącza się do
trybu awaryjnego bez zapisywania zmian.
3. Po wyborze regulacji głośności, nacisnąć ponownie
przycisk TIMER. Urządzenie przełączy się w tryb gotowości.
Po osiągnięciu ustawianego czasu, urządzenie włącza się
w wybranym trybie. Głośność powoli rośnie do wybranego
poziomu.
Wcisnąć TIMER, aby wyłączyć funkcję timera. „TIMER”
zniknie z wyświetlacza.
SNOOZE (4 na pilocie)
Jeśli urządzenie było włączone za pomocą timera, tę funkcję można opóźnić o około 9 minut za pomocą przycisku
DRZEMKI. Po 9 minutach urządzenie włączy się ponownie.
CLOCK (5/1)
Ustawianie zegara.
Kiedy naciskamy ten przycisk, czas na krótko zostanie
wyświetlony.
MEMORY (6 na pilocie)
Aby zapisać stację i ustawić zaprogramowane odtwarzanie.
Odtwarzanie Zaprogramowane
Programowanie odtwarzania w pożądanej kolejności (tylko
w trybie CD).
1. Wcisnąć przycisk STOP (8/14).
2. Wcisnąć przycisk MEMORY (6 na pilocie). Na wyświetlaczu pojawi się „00 P01” („utwór” P „pozycja
w pamięci”) oraz MEMORY. Za pomocą przycisków
/ (7/14) wybrać żądany utwór i wcisnąć ponownie
przycisk MEMORY. Na wyświetlaczu pojawi się nowa
pozycja w pamięci P02.
Dla CD w formacie MP3:
Folder „F00” jak również P01 migają na ekranie.
Najpierw wybrać dany folder za pomocą przycisków
FOLDER +/- (21 na pilocie). Celem potwierdzenia, nacisnąć przycisk MEMORY. Wyświetla się T00.
3. Za pomocą przycisków / wybrać następny utwór
i wcisnąć ponownie przycisk MEMORY. Powtarzać
powyższe kroki dla kole-jnych utworów.
WSKAZÓWKA:
Jeśli miejsce w pamięci dla zaprogramowanych
tytułów jest już pełne, wyświetla się tekst „PROGFULL“.
4. Wcisnąć przycisk
(9/17). Rozpocznie się odtwarzanie. Na wyświetlaczu pojawi się nu-mer pierwszego
wybranego utworu. Również ten przycisk służy do
chwilowego zatrzymania odtwarzania.
5. Aby zatrzymać odtwarzanie, wcisnąć raz przycisk
STOP. Pamięć zostanie zachowana.
6. Aby powtórzyć odtwarzanie programów, należy nacisnąć przycisk .
7. Aby usunąć pamięć, nacisnąć dwukrotnie przycisk
STOP. MEMORY Nie będzie już dłużej wyświetlane.
Urządzenie zatrzyma się automatycznie po odtworzeniu wszystkich zapisanych utworów. Zaprogramowana
kolejność będzie przechowywana w pamięci, do momentu
przełączenia w inny tryb, wyjęcia płyty CD z komory lub
wyłączenia urządzenia.
Odtwarzanie programowane można łączyć z funkcją
REPEAT. Po zaprogramowaniu i rozpoczęciu odtwarzania,
wcisnąć przycisk REPEAT (13 na pilocie) do trzech razy;
funkcji można użyć tak, jak opisano w części dotyczącej
„REPEAT”.
Odtwarzanie plików muzycznych
w formacie MP3
Urządzenie umożliwia odtwarzanie plików muzycznych
w formacie MP3. Poza tym odtwarza powszechne rodzaje
płyt CD: CD, CD-RW, i CD-R.
Może również odtwarzać płyty CD MP3. Są to skompresowane płyty CD, na których można zapisać do 200 utworów. Urządzenie automatycznie rozpoznaje płyty MP3
(na wyświetlaczu pojawi się całkowita liczba utworów i
folderów).
Więcej o odtwarzaniu takich płyt CD w rozdziale „Odtwarzanie CD/MP3”. Odtwarzanie utworów można zaprogramować tak, jak opisano w części „Odtwarzanie Zaprogramowane”
Uwaga:
Istnieje wiele metod wypalania i kompresji, a także wiele
różnic w jakości płyt CD i wypalonych płyt CD.
Page 60
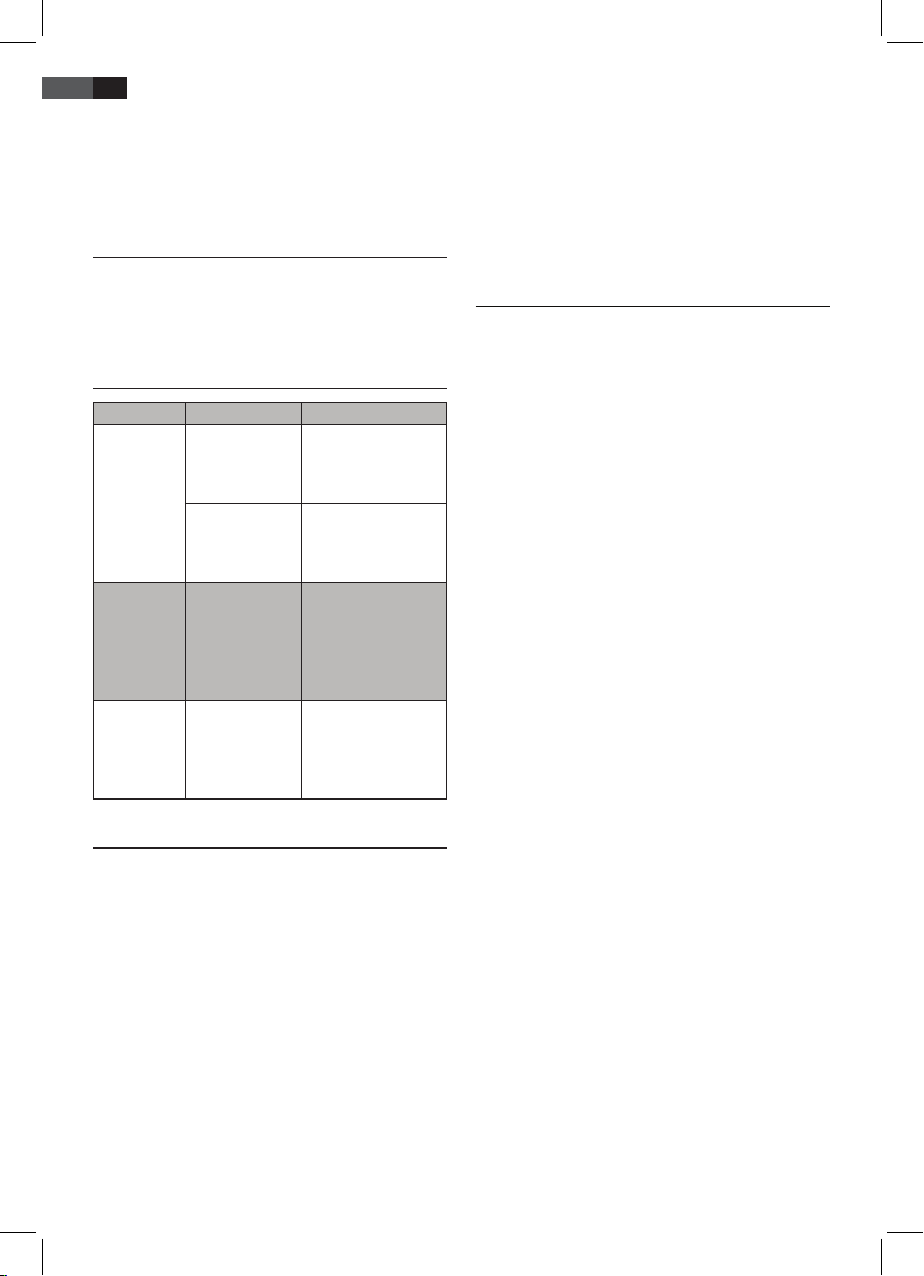
60
JĘZYK POLSKI
Poza tym przemysł muzyczny nie stosuje ustalonych standardów (ochrona przed kopiowaniem).
Dlatego w rzadkich przypadkach mogą wystąpić problemy
z odtwarzaniem płyt CD i MP3. Nie oznacza to wadliwego
działania urządzenia.
Czyszczenie i konserwacja
• Przed przystąpieniem do czyszczenia należy wyjąć
wtyczkę z gniazdka.
• Zabrudzenia zewnętrzne można zetrzeć lekko wilgotną szmatką bez żadnych dodatków.
Usuwanie zakłóceń
Zakłócenie Przyczyna Rozwiązanie
CD nie daje
się odtworzyć.
CD nie jest włożona w ogóle lub
włożona niewłaściwie.
Proszę się upewnić,
że dysk włożony jest
napisami do góry.
Baterie za słabe. Proszę włożyć nowe
baterie albo zasilać
urządzenie przy pomocy kabla do sieci.
CD przeskakuje podczas
odtwarzania.
Proszę sprawdzić
dysk pod względem pozostawionych odcisków
palców, zabrudzeń
lub porysowania.
Proszę oczyścić go
miękką ściereczką,
zaczynając od środka.
Urządzenie
nie działa.
Urządzenie jest
zablokowane i
„zawieszone”.
Wyjąć wtyczkę z
gniazda na około
5 sekund. Następnie
włączyć z powrotem
urządzenie.
Technische Daten
Model: ...................................................................................SR 4337 iP
Zasilanie: ..............................................................220-240 V~ 50 Hz
Zasilanie bateryjne: .................................8 x 1,5 V Typ UM2/R14
Moc wyjściowa: ..............................................................80 W PMPO
Pobór mocy: ...................................................................................15 W
Klasa ochrony:.......................................................................................II
Waga netto: ...............................................................................2,00 kg
Radio:
Zakres częstotliwości:......................VHF/FM 87,5 ~ 108,0 MHz
Możliwość dokonywania zmian bez powiadom-ienia!
Urządzenie jest zgodne z aktualnymi dyrektywami CE,
dotyczącymi zgodności elektromagnetycznej czy niskiego napięcia i produkowane jest zgodnie z najnowszymi
przepisami bezpieczeństwa.
Oznaczenie „Made for iPod” i „Made for iPhone” oznacza, że urządzenie elektroniczne zostało zaprojektowane
specjalnie do podłączenia odtwarzacza iPod lub telefonu
iPhone, a także że producent zatwierdził jego zgodność
ze standardami wydajności rmy Apple. Firma Apple nie
ponosi odpowiedzialności za działanie tego urządzenia ani
za jego zgodność ze standardami regulacyjnymi i dotyczącymi bezpieczeństwa.
WARUNKI GWARANCJI
Przyznajemy 24 miesiące gwarancji na produkt licząc od
daty zakupu.
W tym okresie będziemy bezpłatnie usuwać w terminie
14 dni od daty dostarczenia wadliwego sprzętu z kartą
gwarancyjną do miejsca zakupu wszystkie uszkodzenia
powstałe w tym urządzeniu na skutek wady materiałów
lub wadliwego wykonania, naprawiając oraz wymieniając
wadliwe części lub Gęśli uznamy za stosowne) wymieniając cale urządzenie na nowe.
Sprzęt do naprawy powinien być dostarczony w komplecie
wraz z dowodem zakupu oraz z ważną kartą gwarancyjną do sprzedawcy w miarę możliwości w oryginalnym
opakowaniu lub innym odpowiednim dla zabezpieczenia
przed uszkodzeniem. W razie braku kompletnego opakowania fabrycznego, ryzyko uszkodzenia sprzętu podczas
transportu do i z miejsca zakupu ponosi reklamujący.
Naprawa gwarancyjna nie dotyczy czynności przewidzianych w instrukcji obsługi, do wykonania których zobowiązany jest użytkownik we własnym zakresie i na własny
koszt.
Gwarancja nie obejmuje:
• mechanicznych, termicznych, chemicznych uszkodzeń
sprzętu i wywołanych nimi wad,
• uszkodzeń powstałych w wyniku działania sił zewnętrznych takich jak wyładowania atmosferyczne,
zmiana napięcia zasilania i innych zdarzeń losowych,
• nieprawidłowego ustawienia wartości napięcia
elektrycznego, zasilanie z nieodpowiedniego gniazda
zasilania,
• sznurów połączeniowych, sieciowych, żarówek, baterii,
akumulatorów,
• uszkodzeń wyrobu powstałych w wyniku niewłaściwego lub niezgodnego z instrukcją jego użytkowania,
przechowywania, konserwacji, samowolnego zrywania
plomb oraz wszelkich przeróbek i zmian konstrukcyjnych dokonanych przez użytkownika lub osoby
niepowołane,
• roszczeń z tytułu parametrów technicznych wyrobu,
o ile są one zgodne z podanymi przez producenta,
• prawidłowego zużycia i uszkodzeń, które mają nieistotny wpływ na wartość lub działanie tego urządzenia.
Page 61

61
JĘZYK POLSKI
Karta gwarancyjna bez pieczątki sklepu, daty sprzedaży,
nie wypełniona, źle wypełniona, ze śladami poprawek,
nieczytelna wskutek zniszczenia, bez możliwości ustalenia
miejsca sprzedaży oraz dołączonego dowodu zakupu jest
nieważna.
Korzystanie z usług gwarancyjnych nie jest możliwe po
upływie daty ważności gwarancji. Gwarancja na części lub
całe urządzenie, które są wymieniane kończy się, wraz
z końcem gwarancji na to urządzenie.
Wszystkie inne roszczenia, wliczając w to odszkodowania
są wykluczone chyba, że prawo przewiduje inaczej. Roszczenia wykraczające poza tą umowę nie są uwzględniane
przez tą gwarancję.
Gwarancja na sprzedany towar konsumpcyjny nie wyłącza,
nie ogranicza ani nie zawiesza uprawnień kupującego
wynikających z niezgodności towaru z umową.
Gwarancja oraz zawarte w niej warunki obowiązują na
terenie Rzeczpospolitej Polskiej.
Usuwanie/Znaczenie symbolu
„Pojemnik na śmieci“
Należy zadbać o środowisko i nie wyrzucać urządzeń elektrycznych razem z odpadami gospodarstwa domowego.
Stare lub uszkodzone urządzenia elektryczne należy
odstawić do miejskich punktów zbiórki.
Prosimy unikać potencjalnych zagrożeń dla zdrowia
i środowiska poprzez nieprawidłowe metody utylizacji
odpadów.
Przyczyniasz się do recyklingu i innych form utylizacji
zużytych urządzeń elektrycznych i elektronicznych.
Informacje na temat punktów zbiórki znajdują się na
terenie danego miasta.
Page 62

62
MAGYARUL
Általános Biztonsági Rendszabályok
A készülék használata előtt gyelmesen olvassa el a
használati útmutatót és őrizze meg a garancialevéllel, a
számlával és – amennyiben lehetséges – az eredeti csomagolással, valamint a belső csomagolóanyaggal együtt.
Amennyiben a készüléket harmadik személynek adja
tovább, akkor a használati útmutatót is mellékelje.
• A tűz- és áramütés elkerülése érdekében ne tegye ki a
készüléket eső és nedvesség hatásának. Ne használja a
készüléket víz közelében (pl. fürdőszoba, úszómedence,
nedves pince).
• A készülék kizárólag személyes használatra való, és csak
a rendeltetésének megfelelően használható. A készülék
kereskedelmi célú használatra nem alkalmas.
• A készüléket csak a szabványos fali aljzatba csatlakoztassa. Ellenőrizze, hogy az elektromos hálózat feszültsége megegyezik-e a készüléken jelzett feszültséggel.
• Külső adapter használata esetén ellenőrizze a polaritást és a feszültséget. Ügyeljen az elemek megfelelő
behelyezésére.
• A készülék üzembe helyezésekor ne takarja el annak
szellőzőnyílásait.
• Soha ne nyissa fel a készülék burkolatát. A nem
megfelelően végzett javítások veszélyt jelentenek a felhasználóra. Ha a készülék vagy annak hálózati kábele
megsérült, akkor ne használja a készüléket, hanem
javíttassa meg szakemberrel. Rendszeresen ellenőrizze
a kábel épségét.
• A veszélyek elkerülése érdekében a sérült hálózati
kábelt feltétlenül cseréltesse ki egy azzal egyenértékű
kábelre a gyártóval, ügyfélszolgálatunkkal vagy más
szakemberrel.
• Ha a készüléket hosszabb ideig nem használja, akkor
húzza ki a hálózatból, és vegye ki belőle az elemeket.
A készüléken található alábbi gyelmeztető szimbólumok
jelentése a következő:
A villám-jel a készülékben levő veszélyes
feszültség jelenlétére gyelmezteti a felhasználót.
A felkiáltójel a készülékre vonatkozó fontos
használati vagy karbantartási előírásra gyelmezteti a felhasználót.
Az ezzel a jellel ellátott készülékek a CD
olvasását „Class 1” besorolású lézerrel végzik.
A beépített biztonsági kapcsolók megakadályozzák, hogy a felhasználó a szemmel nem
látható, veszélyes lézersugárnak legyen kitéve
a CD-tartó kinyitásakor.
Ezeket a kapcsolókat nem szabad kikerülni, illetve módosítani, ellenkező esetben fennáll a lézersugárnak való
kitettség veszélye.
Gyermekek És Fogyatékkal Élő Személyek
• A gyermekek biztonsága érdekében a csomagolóanyagokat (műanyag zacskó, karton, styrofoam stb.) ne
hagyja általuk elérhető helyen.
FIGYELMEZTETÉS!
Vigyázzon, hogy a kisgyermekek ne játsszanak a
fóliával, mert ez fulladásveszélyt jelenthet!
• A készüléket nem használhatják csökkent zikai, érzékszervi vagy értelmi képességű személyek (a gyerekeket
is beleértve), vagy akiknek nincs meg a tapasztalatuk
és tudásuk ehhez; kivéve, ha a biztonságukért felelős
személy a használatra megtanítja, vagy a használat
közben felügyeli őket.
• Figyeljen a gyerekekre, hogy ne játsszanak a készülékkel.
A Használati Útmutatóban Található Jelzések
Az Ön biztonságára vonatkozó fontos tudnivalókat külön
kiemeltük. Kérjük, mindenképpen ügyeljen ezekre annak
érdekében, hogy elkerülje a baleseteket és a készülék károsodását:
FIGYELMEZTETÉS:
Egészségét károsító veszélyforrásokra gyelmeztet, és
jelzi a lehetséges sérülésveszélyeket.
VIGYÁZAT:
A készülékre vagy más tárgyakra veszélyt jelentő dolgokat jelez.
MEGJEGYZÉS:
Javaslatokat, információt közöl.
Speciális biztonsági előírások
Ez a készülék „Class 1” besorolású
lézerrel működik.
A kezelőszervek elhelyezkedése
1 Teleszkópantenna
2 Fogantyú
3 CD-tartó
4 STANDBY (készenlét/ki-bekapcsolás) gomb
5 CLOCK (óra) gomb
6 FUNCTION (funkcióváltó) gomb
7 STOP gomb
8 / gombok (keresés előre/hátra)
9 gomb (lejátszás/pillanat-állj
10 Fül a CD-tartó kinyitásához (OPEN/CLOSE)
11 Dokkolóport
12 VOLUME +/- (hangerő) gombok
13 Hangszóró
14 LCD-kijelző
Page 63

63
MAGYARUL
15 Elem-tartó
16 POWER jelzőlámpa
17 A távirányító infravörös érzékelője
Hátulnézet (nem látható)
AUX IN aljzat
AC~ Hálózati csatlakozó
Távirányító
1 CLOCK (óra) gomb
2 MUTE (némítás) gomb
3 PRE-DN/PRE-UP gombok (rádióállomás memória)
4 SNOOZE gomb
5 INTRO gomb
6 MEMORY gomb (memória)
7 RAND gomb (véletlen lejátszás)
8 INFO gomb
9
(keresés előre) gomb
(keresés hátra) gomb
10 VOLUME +/- (hangerő) gomb
11 FUNCTION (funkcióváltó) gomb
12 MENU UP gomb (iPod/iPhone menünavigáció)
13 ENTER gomb (megerősítés)
14 MENU DN gomb (iPod/iPhone menünavigáció)
15 EQ gomb
16 MENU gomb
17 (lejátszás/pillanat-állj) gomb
18 STOP gomb
19 REPEAT gomb (ismétlés)
20 MONO/ST gomb
21 FOLDER +/- gombok (fel/le, album)
22 SLEEP gomb
23 TIMER gomb
24 STANDBY gomb
Üzembe helyezés/Bevezetés
• A készülék használatának megkezdése előtt olvassa el
gyelmesen a használati útmutatót!
• Válasszon egy megfelelő helyet a készülék számára. A
megfelelő hely száraz, vízszintes és csúszásmentes, ahol
könnyen kezelheti a berendezést.
• Gondoskodjon a készülék megfelelő szellőzéséről!
• Ha szükséges, távolítsa el a kijelzőről a védőfóliát.
Áramellátás
• Csatlakoztassa a mellékelt tápkábelt (lásd az elemtartót
(15), ha szükséges) egy megfelelően felszerelt 230 V/
50 Hz hálózati aljzatba és készülék hátoldalán található
AC ~ csatlakozóba.
• Ellenőrizze, hogy a feszültség megegyezik-e a készülé-
ken feltüntetettel.
• A mentett idő a hálózatról való lecsatlakoztatáskor elvész.
Működés elemrőlb (elemek nincsenek mellékelve)
• Nyissa fel az elemtartó fedelét (15) a készülék alján.
• Helyezzen be 8 darab UM 2/R14 1,5 V elemet. Figyeljen
a helyes polaritásra (lásd az elemtartón)!
• Zárja be az elemtartót.
Ha a készüléket hosszabb ideig nem használja, a „szivárgást” megelőzendő vegye ki az elemeket.
MEGJEGYZÉS:
• Ha a tápkábel csatlakoztatva van, az elemekről biztosított tápellátás automatikusan lekapcsol.
• Az elemről való működés alatt a csatlakoztatott iPod/
iPhone akkumulátora nem fog töltődni.
VIGYÁZAT:
• Ne használjon különböző típusú, illetve vegyesen régi
és új elemeket.
• Ne dobja az elemeket a háztartási szemétbe. Az
elemeket juttassa el a megfelelő gyűjtőhelyre vagy
vigye vissza a forgalmazónak.
FIGYELMEZTETÉS:
Ne tegye ki az elemeket közvetlen hőhatásnak és napsugárzásnak. Soha ne dobja tűzbe az elemeket. Robbanás-
veszély!
A távirányító elemei (nem tartozék)
• Nyissa ki a távirányító hátoldalán található elemtartó
fedelét.
• Helyezzen be 2 db 1,5 voltos R03 „AAA” elemet. Ügyeljen a helyes polaritásra (ld. az elemtartó alját)!
• Ha a távirányítót hosszabb ideig nem használja, akkor
az elemek „kifolyásának” megelőzése érdekében vegye
ki belőle az elemeket.
VIGYÁZAT:
• Ne használjon különböző típusú, illetve vegyesen régi
és új elemeket.
• Ne dobja az elemeket a háztartási szemétbe. Az
elemeket juttassa el a megfelelő gyűjtőhelyre vagy
vigye vissza a forgalmazónak.
FIGYELMEZTETÉS:
Ne tegye ki az elemeket közvetlen hőhatásnak és napsugárzásnak. Soha ne dobja tűzbe az elemeket Robbanás-
veszély!
Az óra beállítása (készenléti üzemmódban)
1. Röviden nyomja le a CLOCK gombot (5/1). A kijelzőn
megjelenik a „24 HOUR” felirat.
2. A
/ gombokkal (8/9) válassza ki a 24-órás és a
12-órás beállítás egyikét. A választást erősítse meg a
CLOCK gombbal.
MEGJEGYZÉS: A 12-órás beállítás a következő
kijelzéseket eredményezi:
AM = délelőtt, PM = délután
Page 64
64
MAGYARUL
3. A / gombokkal állítsa be az órát. A választást
erősítse meg a CLOCK gombbal.
4. A / gombokkal állítsa be a percet.
5. Nyomja meg ismét a CLOCK gombot az időbeállítás
elmentéséhez.
A CD-tartó szállítás közbeni védelme
• Nyissa ki a CD-tartót (3) a fedélnek a fülnél (10) törté-
nő felhúzásával.
• Ha még benne van a tartóban, akkor távolítsa el a
CD-tartó szállítás közbeni védelmét biztosító eszközt,
mielőtt megkezdené a készülék használatát.
• Zárja vissza a CD-tartót újra.
iPod/iPhone kompatibilitás
A kereskedelemben kapható rengeteg különböző iPod és
iPhone modell miatt a teljes kompatibilitás nem garantálható. Az iPod/iPhone készüléke csatlakoztatása előtt
ellenőrizze, hogy a készülék rendelkezik kompatibilis
csatlakozóval.
A távirányítási funkciók teljes kompatibilitása szintén nem
garantálható. Normál módon használja az iPod/iPhone
készüléket, amíg a dokkoló állomásban van.
MEGJEGYZÉS:
Az iPhone készüléken futó szoftver verziójának függvényében a következő hibaüzenet jelenhet meg: „Ezt a
kiegészítőt nem az iPhone készülékkel való hasz-nálatra
fejlesztették ki. Előfordulhat a zajszint megnö-vekedése
és a térerő csökkenése:
„Ebben az esetben nyomja meg az „OK” gombot.
Általános használat
MEGJEGYZÉS:
Egyes gombok mind a készüléken, mind a távirányítón
megtalálhatók.
Az azonos nevű gombok funkciója is azonos.
STANDBY (4/24)
Nyomja meg a STANDBY gombot a készülék készenléti
üzemmódba kapcsolásához. A POWER jelzőlámpa (16)
kigyullad. Nyomja meg ismét ezt a gombot a készülék
bekapcsolásához.
Hangerő (12/10)
Állítsa be a kívánt hangerőszintet. A kijelzőn megjelenik a „VOL” felirat, valamint egy szám. Ez megegyezik a
beállított „VOL MAX” és a „VOL MIN” tartományba eső
hangerővel.
Infravörös távirányító
A vezeték nélküli kapcsolat hatósugara legfeljebb 5 méter.
Ha ez a távolság csökkenne, akkor ki kell cserélni az
elemeket. Győződjön meg arról, hogy a készülék használatakor ne legyen semmilyen akadály a távirányító és a
készüléken található érzékelő (17) között.
AUX IN aljzat (a készülék hátoldalán)
Ide csatlakoztathatja az analóg lejátszókat. Ehhez az aljzathoz csatlakoztatva más eszközöket, pl. MP3- vagy CDlejátszókat is hallgathat a hangszórókon keresztül.
1. Dugja be a külső eszközt egy 3,5 mm-es jack csatlakozóval az AUX IN aljzatba.
2. Ezután válassza ki a FUNCTION gombbal (6/11) az AUX
módot.
3. Ekkor a hangszórókon keresztül a külső eszközt hallgathatja; a hangerőt a VOLUME +/- gombokkal (12/10)
állíthatja be. A CD gombok ilyenkor nem használhatók.
4. A további funkciókkal kapcsolatban olvassa el a külső
eszköz használati útmutatóját.
MEGJEGYZÉS:
Állítsa a külső eszköz hangerejét megfelelően hallható
szintre.
Rádióhallgatás
1. Nyomja meg néhányszor a FUNCTION gombot (6/11),
hogy a kijelzőn megjelenjen a „TUNER” felirat.
2. A / gombokkal (8/9) hangoljon a kívánt állomásra.
3. Ha a kiválasztott állomás sztereóban fogható, akkor az
FM.ST ellenőrzőlámpa ((ST)) (a kijelzőn) világítani kezd.
Gyenge vétel, illetve légköri zavarok esetén az ellenőrző lámpa időnként kialszik. FM-állomásoknál a MONO/
ST gombbal (20 a távirányítón) válthat a MONO és a
STEREO vétel között. Gyenge vétel esetén javasoljuk,
hogy váltson át MONO módba.
Állomások mentése/kiválasztása
4. Miután megtalálta a kívánt állomást, nyomja meg a
MEMORY gombot (6 a távirányítón). A kijelzőn megjelenik a MEMORY felirat, a memóriahely pedig villogni
kezd.
5. A memóriahely kiválasztásához nyomja meg a PREUP/DN gombot (3 a távirányítón).
6. Nyomja meg a MEMORY gombot a beállítások elmentéséhez.
Egy tárolt állomás kiválasztásához nyomja meg a PRE-UP
vagy a PRE-DN gombot.
Zene lejátszása iPod/iPhone készülékről
(az iPod/iPhone nem tartozék)
1. Nyomja meg a FUNCTION gombot (6/11) többször
egymás után, amíg a kijelzőn meg nem jelenik a „NO
IPOD” felirat.
Page 65

65
MAGYARUL
2. Ha az iPod készülékéhez adaptert is kapott, csatlakoztassa azt a dokk csatlakozójához. Csak akkor ellenőrizheti, hogy az iPod megfelelően illeszkedik az iPod
portba, ha az adapter be van dugva.
3. Helyezze be az iPod vagy iPhone készülékét a dokkolóba.
VIGYÁZAT:
Ügyeljen arra, hogy az ipod/iphone készüléket állítva
dugja be a portba. ne feszítse és ne döntse meg
az ipod/iphone-t miközben a portba van dugva.
ez károsíthatja a dokkolót és/vagy az ipod/iphone
készüléket.
4. Az iPod/iPhone modelltől függően először oldja fel
a billentyűzetzárat, és szükség esetén a
gombbal
(9/17) indítsa el a zenelejátszást.
5. A kezelőszervek használatáról tájékozódjon az iPod/
iPhone kézikönyvéből.
VIGYÁZAT:
Állítsa le a lejátszást az iPod/iPhone csatlakoztatása
előtt, máskülönben az iPod/iPhone megsérülhet.
MEGJEGYZÉS:
• Szükség esetén módosíthatja az iPod/iPhone hangbeállításait az optimális hang eléréséhez.
• Ha bejövő hívása van a dokkolt iPhone készüléken
zenelejátszás közben, a lejátszás leáll és hallhatja a
csengőhangot. A hívás fogadásához vegye az iPhone-t a készülékből.
Az iPod/iPhone Töltése
Az iPod/iPhone akkumulátorának töltése megkezdődik,
amint az iPod/iPhone készüléket a dokkolóba helyezi. Ehhez a készüléknek a hálózatba csatlakoztatva kell lennie.
MEGJEGYZÉS:
• Ha az iPod készülékhez csatlakozó adapter volt mellékelve, ellenőrizze, hogy az iPod helyesen csatlakozik.
• Nem mindegyik iPod/iPhone generáció támogatja a
töltés üzemmódot.
• A töltési folyamat időtartama a használt iPod/iPhone
készüléktől és annak működési állapotától függ.
• Nem javasoljuk az elemről való működés soráni töltést, mert ekkor az elemek gyorsabban lemerülnek.
CD/MP3 lejátszás
CD lejátszása
1. Nyomja meg néhányszor a FUNCTION gombot (6/11),
hogy a kijelzőn megjelenjen a „CD” felirat.
2. Nyissa ki a CD-tartót (3) a fedélnek a fülnél (10) történő felhúzásával.
3. Helyezze az audio CD-t a kúpos orsóra a címkével felfelé, hogy mechanikusan rögzüljön a helyére. Ezután
zárja be a CD-tartó fedelét újra.
4. AUDIO CD:
A „READING” rövid időre megjelenik a kijelzőn, majd a
„TOTAL” felirat, a címek száma és a teljes lejátszási idő.
A lejátszás a CD-lemez első címétől indul. Az aktuális
dal, az eltelt lejátszási idő és a szimbólum jelenik
meg a kijelzőn.
CD MP3 formátumban:
A „READING” rövid időre megjelenik a kijelzőn, majd a
„TOTAL”, „MP3” felirat, a címek és a mappák (FOLDER)
száma. A lejátszás az első mappa első műsorszámával
kezdődik. Az aktuális dal (TRACK), az eltelt lejátszási
idő, az „MP3” felirat és a
szimbólum jelenik meg a
kijelzőn. Az egyes mappák között a + és a FOLDER gombokkal (21 a távirányítón) válthat.
5. A CD-lemez eltávolításához nyomja meg a STOP gombot (7/18), nyissa ki a CD-tartót és óvatosan vegye ki a
CD-lemezt.
A CD-tartó fedelét mindig tartsa csukott állapotban.
MEGJEGYZÉS:
• MP3-formátumú fájlokat tartalmazó CD lejátszásakor új mappára történő váltás esetén a kijelző 01-et
mutat, az új mappa első dalát jelezve.
• Ha nincs lemez a lejátszóban vagy rosszul van behelyezve, akkor a „READING”, majd a „NO DISC” (nincs
lemez) felirat jelenik meg a kijelzőn.
• A felhasználó által készített CD-k lejátszása nem
garantálható a rendelkezésre álló szoftverek és CDkészülékek sokfélesége miatt.
A kezelőszervek leírása
(9/17)
Ideiglenesen leállíthatja a lejátszást és újraindíthatja. Az
eltelt lejátszási idő villog és a „
” szimbólum látható a
kijelzőn. A gomb újra megnyomása ugyanattól az állástól
folytatja a lejátszást.
/ (8/9)
Audio CD, MP3 formátumú CD vagy IPOD módban történő lejátszáskor.
A
gombbal a következő, majd az azután következő stb.
dalra ugorhat. Nyomja meg a gombot és tartsa lenyomva, így gyorsan kereshet a dalok között (a hang közben
elnémul).
A
gombot a következőképpen használhatja:
Nyomja meg 1 x = az aktuális dal lejátszása az elejétől.
Nyomja meg 2 x = visszaugrás az előző dalra.
Nyomja meg 3 x = visszaugrás az azt megelőző dalra stb.
Nyomja meg a gombot és tartsa lenyomva, így gyorsan kereshet a dalok
között (a hang közben elnémul).
Rádió üzemmódban:
Hangolás a kívánt rádióállomásra.
Page 66

66
MAGYARUL
STOP (7/18)
A CD vagy dal leállítása.
ENTER (13 a távirányítón)
IPOD módban:
Nyomja meg ezt a gombot egy funkció aktiválásához vagy
a következő menü megjelenítéséhez.
MENU (16 a távirányítón)
IPOD módban:
Nyomja meg ezt a gombot az iPod/iPhone menü megnyitásához vagy az előző menüre való visszatéréshez.
MEGJEGYZÉS:
Ehhez a funkcióhoz a zene alkalmazásnak már futnia kell.
MENU UP/MENU DN. (12/14 a távirányítón)
IPOD módban:
Nyomja meg ezt a gombot az iPod/iPhone menü fel vagy
le történő böngészéséhez.
MUTE (2 a távirányítón)
A hang gyors elnémítása. A kijelzőn villogni kezd a „MUTE”
felirat. A funkció kikapcsolásához nyomja meg ismét a
MUTE gombot.
EQ (15 a távirányítón)
(Gyári hangszín-beállítások). Különböző hangmodulok
közül lehet választani (CLASSIC, ROCK, POP, JAZZ és FLAT).
MEGJEGYZÉS: iPod/iPhone készülékről történő leját-
szás során
Szükség esetén módosíthatja az iPod/iPhone EQ beállításait az optimális hang eléréséhez.
MONO/ST (20 a távirányítón)
FM-rádió üzemmódban:
Váltás a STEREO és a MONO üzemmód között.
INFO (8 a távirányítón)
MP3 formátumú CD lejátszásakor:
A kijelzőn futó szövegként megjelenik a tárolt ID-3 információ. Nyomja meg újra a gombot a funkció kikapcsolásához.
INTRO (5. a távirányítón)
A CD-lemezen található összes cím le lesz játszva 10 másodpercig. Nyomja meg újra a gombot a funkció kikapcsolásához.
REPEAT (19 a távirányítón)
Nyomja meg 1x: (REPEAT 1 jelzés világítani kezd) Az
aktuális dal teljes ismétlése.
Nyomja meg 2x: (REPEAT ALL jelzés világítani kezd) A
teljes CD ismétlése.
Nyomja meg 3x: Az összes funkció törlése, visszatérés a
normál lejátszáshoz
Csak MP3 formátumú CD lejátszásakor:
Nyomja meg 1x: Az aktuális dal folyamatos ismétlése (a
kijelzőn megjelenik az REPEAT 1 ábra).
Nyomja meg 2x: A teljes CD folyamatosan ismételve lesz
(a REPEAT ALL felirat látható).
Nyomja meg 3x: Az MP3 CD kiválasztott mappájának
folyamatos ismétlése (a kijelzőn megjelenik az REPEAT ALBUM jelzés). Az
egyes mappákat a FOLDER +/- gombbal
(21 a távirányítón) választhatja ki.
Nyomja meg 4x: Az összes funkció törlése, visszatérés a
CD normál lejátszásához.
RAND (6 a távirányítón)
A kijelzőn megjelenik az „RANDOM” ábra és az először
lejátszandó dal száma. Ezután az összes szám lejátszása
következik véletlenszerű sorrendben.
FOLDER +/- (21 a távirányítón)
MP3 formátumú CD:
A gombok lejátszás közbeni megnyomásával válthat felfelé,
illetve lefelé a mappák között. A kijelzőn rövid időre megjelenik egy üzenet, pl. FOLDER 02. Ezután automatikusan
elkezdődik az MP3 CD lejátszása. A kijelzőn akkor is megjelenik az üzenet, ha a gombokat álló helyzetben nyomja
meg. Ekkor a
Tgombbal indíthatja el a lejátszást.
PRE-UP/PRE-DN (3 a távirányítón)
Rádió üzemmódban:
Tárolt rádióállomás kiválasztása.
SLEEP (8 a távirányítón)
Bekapcsolt állapotában beállíthatja, hogy a készülék mennyi
idő elteltével kapcsoljon át készenléti üzemmódba. Ez az
idő - tízperces intervallumonként - 90 és 10 perc közöttire
állítható be. Nyomja meg néhányszor a gombot, hogy a
kijelzőn megjelenjen a kívánt időtartam. A funkció aktiválásakor a kijelzőn megjelenik az „SLEEP” ábra. A beállított idő
elteltével a készülék automatikusan kikapcsol.
A maradék idő kijelzéséhez nyomja meg a SLEEP gombot.
Ezt követően még mindig csökkentheti ezt az időt, vagy
kikapcsolhatja a funkciót.
TIMER (23 a távirányítón)
A készüléket beprogramozhatja arra, hogy a kikapcsolást
követően egy adott idő elteltével ismét kapcsoljon be.
1. A STANDBY gombbal kapcsolja a készüléket készenléti
üzemmódba. A POWER jelzőlámpa (16) kigyullad.
2. Nyomja meg néhányszor a TIMER gombot, hogy a
kijelzőn megjelenjen a „ON TIME“ opció.
Page 67

67
MAGYARUL
• Most használhatja a / gombokat (8/9) a be
vagy kikapcoslás óráinak és perceinek, a bekapcsolási üzemmódnak és bekapcsolási hangerőnek a
beállításához.
• Mindig erősítse meg a bevitelt a TIMER gombbal. A
pillanatnyilag beállítandó beállítás villog a kijelzőn.
MEGJEGYZÉS:
Ha nem nyom meg egy gombot sem a következő
10 másodpercben, a készülék visszavált készenléti
üzemmódba a bevitt beállítások elmentése nélkül.
3. A bekapcsolási hangerő beállítása után nyomja meg
újra a TIMER gombot. A készülék készenléti üzemmódba vált.
A beállított idő elérésekor a készülék a kiválasztott üzemmódba kapcsol be. A hangerő lassan növekszik a kiválasztott hangerőszintre.
Az időzítési funkciót a TIMER gomb megnyomásával
kapcsolhatja ki. A kijelzőről eltűnik az „TIMER” ábra.
SNOOZE (4 a távirányítón)
Ha a készülék időzítővel volt bekapcsolva, ez a funkció
9 percet késleltethető a SNOOZE gomb segítségével. A 9
perc eltelte után a készülék újra be fog kapcsolni.
CLOCK (5/1)
Az óra beállításához.
A gomb megnyomásakor az idő rövid időre megjelenik a
kijelzőn.
MEMORY (6 a távirányítón)
Az állomások mentéséhez és a programozott lejátszás
beállításához.
Programozott lejátszás
Lejátszás a kívánt sorrendben. (csak CD módban).
1. Nyomja meg a STOP gombot (8/14).
2. Nyomja meg a MEMORY gombot (6 a távirányítón). A
kijelzőn megjelenik a „00 P01” („dal száma” P „memóriahely”) és a MEMORY felirat. A
/ ombokkal
(7/14) válassza ki a kívánt dal számát, majd nyomja
meg ismét a MEMORY gombot. A kijelző átvált a P02
memóriahelyre.
MP3 formátumú CD-lemezekhez:
A „F00” mappa a P01 mellett villog a kijelzőn. Először
a FOLDER +/- (21 a távirányítón) gombok segítségével
válassza ki a kívánt mappát. A megerősítéshez nyomja
meg a MEMORY gombot. A kijelzőn megjelenik a T00
felirat.
3. A
/ gombokkal válassza ki a következő dalt, majd
nyomja meg ismét a MEMORY gombot. Ismételje meg a
fenti lépéseket az összes kívánt dal beprogramozásáig.
MEGJEGYZÉS:
A programozható címek memóriakapacitása végének
elérésekor a „PROGFULL“ fog megjelenni.
4. Nyomja meg a
gombot (9/17). Elkezdődik a
lejátszás. A kijelzőn megjelenik az első kiválasztott dal
száma. Ezt a gombot használhatja a lejátszás ideiglenes megállítására is.
5. A lejátszás megállításához nyomja meg egyszer a STOP
gombot. Az memória (elmentett program) megmarad.
6. A programok ismételt lejátszásához nyomja meg a
gombot.
7. A memória törléséhez nyomja meg kétszer a STOP
gombot. A MEMORY nem lesz tovább látható.
Az összes beprogramozott dal lejátszása után a készülék
automatikusan megáll. A beprogramozott sorrend mindaddig a memóriában marad, amíg a készüléket át nem
kapcsolja egy másik üzemmódba, el nem távolítja a CD-t a
tartóból, illetve ki nem kapcsolja a készüléket.
A programozott lejátszás a REPEAT funkcióval is kombinálható. A programozás megtörténte és a lejátszás elkezdése
után nyomja meg 1-3x a REPEAT gombot (13 a távirányítón). A lehetséges opciókról a „REPEAT” gombnál olvashat.
MP3-formátumú zenei fájlok lejátszása
A készülék alkalmas az MP3-formátumú zenei fájlok
lejátszására, továbbá támogatja a következő elterjedt CDtípusokat: CD, CD-RW és CD-R.
A készülékkel MP3 CD-k is lejátszhatók. Ezek tömörített formátumban akár 200 dalt is tartalmazhatnak. A
készülék automatikusan felismeri az MP3-lemezeket (a
kijelzőn megjelenik a dalok és a mappák száma). Az ilyen
CD-k lejátszásával kapcsolatban kérjük, olvassa el a „CD/
MP3 lejátszás” c. részben foglaltakat. A dalok lejátszási
sorrendje programozható a „Programozott lejátszás” c.
részben foglaltak szerint.
Megjegyzés:
Számos CD-írási és tömörítési módszer létezik, és az írott
CD-k között minőségbeli különbségek is vannak.
Emellett nem egységesek a zenei szakma által alkalmazott
szabványok sem (másolásvédelem).
Ezért egyes ritka esetekben probléma léphet fel a CD és
MP3 lemezek lejátszásakor. Ez nem a készülék hibája.
Tisztítás és karbantartás
• Tisztítás előtt húzza ki a készüléket az elektromos
hálózatból.
• A szennyeződéseket enyhén nedves ruhával (adalékanyagok nélkül) törölje le.
Page 68

68
MAGYARUL
Zavarelhárításg
Tünet Ok Megoldás
A CD-t nem
lehet lejátszani.
Nincs betéve,
vagy hibásan van
betéve a CD.
Győződjék meg róla,
hogy a diszk úgy van-e
behelyezve, hogy a
rajta lévő felirat felfelé
néz.
Túl gyengék az
elemek
Helyezzen be új
elemeket vagy hálózati
vezeték-kel üzemeltesse a készüléket.
A CD lejátszás
közben ugrik.
Ellenőrizze, hogy
nincseneke a diszken ujjlenyomatok, szennyeződés
vagy karcolás!
Tisztítsa meg a diszket
puha ruhával úgy,
hogy a ruhát a diszk
középétől a széle felé
húzza.
Az egység
nem működik
A készülék leblokkolt és „lefagyott”.
Körülbelül 5 másodpercre húzza ki a
tápkábelt. Ezután kapcsolja be a készüléket.
Műszaki adatok
Típus: ......................................................................................SR 4337 iP
Hálózati feszültség: ..........................................220-240 V~ 50 Hz
Elemról való működés: .....................8 x 1,5V UM2/R14 Típusú
Kimeneti teljesítmény: .................................................80 W PMPO
Áramfogyasztás: ...........................................................................15 W
Érintésvédelmi osztály: ......................................................................II
Tiszta súly:...................................................................................2,00 kg
Rádió:
Frekvenciatartomány: .....................VHF/FM 87,5 ~ 108,0 MHz
Előzetes értesítés nélkül módosulhat.
A készülék megfelel minden érvényes CE irányelvnek,
beleértve az elektromágneses megfelelőségről, és a kisfeszültségű berendezésekről szóló irányelveket, és a legújabb
biztonsági szabályozások gyelembe vételével készült.
A „Made for iPod” és a „Made for iPhone“ azt jelenti,
hogy egy elektronikus kiegészítő úgy lett kialakítva, hogy
speciálisan iPod vagy iPhone készülékhez csatlakoztatható
legyen, és a fejlesztő tanúsítja, hogy megfelel az Apple
teljesítményre vonatkozó szabványainak. Az Apple nem
vállal felelősséget a készülék működéséért, sem azért, az
megfelel a biztonsági és egyéb szabványoknak.
Hulladékkezelés/A „kuka” piktogram
jelentése
Óvja a környezetet, ne a háztartási hulladékkal semmisítse
meg az elektromos készülékeket.
A fölösleges vagy hibás elektromos készülékeket a helyi
gyűjtőpontokban adja le.
Segítsen elkerülni a helytelen hulladékkezelésből eredő
környezeti és egészségügyi hatásokat.
Hozzájárulhat a régi elektromos és elektronikus készülékek
újrahasznosításához vagy más módon való hasznosításához.
A gyűjtőpontokról a helyi hatóságok adhatnak felvilágosítást.
Page 69

69
УКРАЇНСЬКА
Загальні вказівки щодо техніки безпеки
Перш ніж використовувати пристрій, уважно прочитайте
цей посібник користувача і зберігайте його, а також гарантію, чек і, якщо можливо, оригінальну упаковку разом із
внутрішнім пакуванням. Якщо ви передасте пристрій третій
особі, додайте також цей посібник користувача.
• Щобзапобігтипожежічиураженнюелектричнимструмом, не залишайте пристрій під дощем чи у вологому
місці. Не вмикайте пристрій поблизу води (наприклад, у
ванній кімнаті, басейні чи сирому підвалі).
• Пристрійпризначеновиключнодляпобутовоговикористання. Користуйтеся пристроєм лише за призначенням.
Він не призначений для викорис-тання з комерційною
метою.
• Підключайтепристрійвиключнодостандартноїнастінної
розетки. Перевірте, чи напруга, зазначена на пристрої,
відповідає напрузі розетки.
• Якщовикористовуєтьсязовнішнійадаптер,дотримуйтесь правильної полярності та напруги. Правильно
вставте батареї.
• Підчасвстановленняпристроюнезакривайтежодного
з вентиляційних отворів.
• Ніколинерозбирайтекорпуспристрою.Невідповідний ремонт пристрою може нести значний ризик для
користувача. Якщо пошкоджено пристрій або кабель
живлення, не використовуйте його і віднесіть його для
ремонту до спеціаліста. Регулярно перевіряйте кабель
живлення на наявність пошкоджень.
• Щобуникнутинебезпеки,слідзамінитипошкоджений
кабель живлення на такий самий кабель; заміну має
виконувати виробник, служба підтримки споживачів чи
інший спеціаліст.
• Якщопристрійневикористовуєтьсяпротягомтривалого
терміну, від’єднайте його від живлення і вийміть батареї.
На пристрої можуть бути розміщені подані далі символи, які
попереджають про таке.
Блискавка має на меті попередити користувача про небезпечну напругу в пристрої.
Позначка “знак оклику” має на меті попередити
користувача про важливі вказівки, пов’язані
з роботою та доглядом за пристроєм, що додаються до цього пристрою.
Вироби з цим символом працюють з “лазером
класу 1” для читання інформації з компактдиска. Вбудовані перемикачі безпеки призначені захистити користувача від дії небезпечного
лазерного променя, невидимого для ока, під
час відкривання відсіку для компакт-дисків.
Ці перемикачі безпеки не слід розбирати або змінювати;
інакше існує ризик ураження лазерним променем.
Діти і особи з особливим потребами
• Задлябезпекивашихдітейзберігайтепакувальнийматеріал (пластикові пакети, скоби, пінопласт тощо) у місцях,
недоступних для дітей.
ПОПЕРЕДЖЕННЯ!
Не дозволяйте малим дітям бавитися фольгою, існує
небезпека задушення!
• Цейпристрійнепризначенийдлявикористанняособами
(включаючи дітей) з обмеженими фізичними чи розумовими здібностями, або з браком досвіду та/або знань,
якщо за ними не ведеться нагляд чи їм не були надані
відповідні вказівки стосовно використання пристрою
особою, яка несе відповідальність за їхню безпеку.
• Стежте,щобдітинебавилисьпристроєм.
Символи у цьому посібнику
Задлявашоїбезпекиподаночіткізастереження.Радимо
звернути на них увагу, щоб уникнути нещасних випадків і
пошкодження пристрою.
ПОПЕРЕДЖЕННЯ.
Попереджає про небезпеку здоров’ю і вказує на можливий ризик травмування.
УВАГА.
Вказує на можливу небезпеку для пристрою чи інших
предметів.
ПРИМІТКА.
Вказує на підказку чи інформацію для користувача.
Вказівки з техніки безпеки
Цей пристрій працює з лазером
класу 1.
Розташування органів керування.
1 Телескопічна антена
2 Ручка
3 Відсік для компакт-дисків
4 Кнопка STANDBY (режим очікування/живлення)
5 Кнопка CLOCK (годинник)
6 FUNCTION (перемикання функцій)
7 Кнопка STOP
8 Кнопки / (пропускання вперед/назад)
9 Кнопка (пауза/відтворення)
10 Затискачнавідсікудлякомпакт-дисків(OPEN/CLOSE)
11 Роз’єм для док-станції
12 КнопкиVOLUME+/-(гучність)
13 Гучномовець
14 РК екран
Page 70

70
УКРАЇНСЬКА
15 Відсік для батарей
16 ндикаторживленняPOWER
17 Інфрачервоний сенсор для пульта дистанційного керу-
вання
Задня панель (не показано)
Роз’єм AUX IN
AC~ Живлення від мережі
Пульт дистанційного керування
1 Кнопка CLOCK (годинник)
2 КнопкаMUTE(вимкненнязвуку)
3 КнопкиPRE-DN/PRE-UP(збереженнярадіостанцій)
4 КнопкаSNOOZE
5 КнопкаINTRO
6 КнопкаMEMORY(пам‘ять)
7 КнопкаRAND(довільневідтворення)
8 Кнопка INFO
9 Кнопка
(пропускання вперед)
Кнопка (пропускання назад)
10 КнопкаVOLUME+/-(гучність)
11 FUNCTION (перемикання функцій)
12 КнопкаMENUUP(навігаціяменюiPod/iPhone)
13 КнопкаENTER(підтвердження)
14 КнопкаMENUDN(навігаціяменюiPod/iPhone)
15 КнопкаEQ
16 КнопкаMENU
17 Кнопка (пауза/відтворення)
18 Кнопка STOP
19 КнопкаREPEAT(повторюване)
20 Кнопка MONO/ST
21 КнопкаFOLDER+/-(вгору/вниз,положенняпам’ятів
режимі альбом)
22 КнопкаSLEEP
23 КнопкаTIMER
24 Кнопка STANDBY
Встановлення/вступ
• Уважнопрочитайтепосібникпередвикористаннямпристрою!
• Виберітьмісцерозташуванняпристрою.Пристрійслід
встановлювати у сухому легкодоступному місці, на
рівній і не ковзкій поверхні.
• Перевірте,чипристрійвстановленотумісцізналежною
вентиляцією!
• Якщопотрібно,знімітьзахиснупластинузекрана.
Живлення
• Підключітькабельживлення,якийдодається,(якщопотрібно, дивіться відсік для бетарей (15), якщо потрібно)
до належним вином встановленої розетки 230 В / 50 Гц і
роз’єму змінного струму на тильній стороні пристрою.
• Перевірте,чинапругаврозетцівідповідаєнапрузі,зазначеній на табличці з паспортними даними.
• Післявід’єднанняживленнязбережененалаштування
часу буде втрачено.
Робота від батарей (батареї не додаються)
• Відкрийтекришкувідсікудлябатарей(15)внизу.
• Вставте8батарейтипуUM2/R141,5В.Дотримуйтесь
правильної полярності (дивіться нижню частину відсіку
для батарей)!
• Закрийтевідсікдлябатарей.
Якщо пристрій не використовується протягом тривалого
часу, вийміть батареї, щоб вони не “потекли“.
ПРИМІТКА.
•
Якщо під’єднано кабель живлення, живлення від
батарей вимикається автоматично.
•
Під час роботи виробу від батарей акумуляторна батареяпідключеногопристроюiPod/iPhoneнезаряджатиметься.
УВАГА.
•
Не використовуйте одночасно батареї різних типів або
нові та старі батареї.
•
Не утилізуйте батареї разом із побутовим сміттям. Віддайте їх у спеціальний пункт приймання або поверніть
продавцю.
ПОПЕРЕДЖЕННЯ.
Не залишайте батареї у спекотному місці або під прямим
сонячним промінням. Ніколи не кидайте батареї у вогонь.
Існує небезпека вибуху!
Батареї пульта дистанційного керування
(батареї не додаються)
• Відкрийтекришкувідсікудлябатарейназаднійпанелі
пульта дистанційного керування.
• Вставте2батареїR03“AAA”1,5В.Дотримуйтесь
правильної полярності (див. нижню частину відсіку для
батарей)!
• Якщопультдистанційногокеруванняневикористовується протягом тривалого періоду часу, вийміть батареї,
щоб уникнути “витікання” кислоти батареї.
УВАГА.
•
Не використовуйте одночасно батареї різних типів або
нові та старі батареї.
•
Не утилізуйте батареї разом із побутовим сміттям. Віддайте їх у спеціальний пункт приймання або поверніть
продавцю.
ПОПЕРЕДЖЕННЯ.
Не залишайте батареї у спекотному місці або під прямим
сонячним промінням. Ніколи не кидайте батареї у вогонь.
Існує небезпека вибуху!
Page 71

71
УКРАЇНСЬКА
Налаштування годинника (в режимі очікування)
1. Коротко натисніть кнопку CLOCK (5/1). На екрані
з’явитьсяіндикація“24HOUR”.
2. Задопомогоюкнопок
/ (8/9) виберіть 24-годинний
або 12-годинний режим відображення. Підтвердьте вибір за допомогою кнопки CLOCK.
ПРИМІТКА. Якщо встановлено 12-годинний режим,
буде відображатись таке:
АМ = до полудня, РМ = після полудня.
3. Задопомогоюкнопок
/ встановіть години. Підтвердьте вибір за допомогою кнопки CLOCK.
4. Задопомогоюкнопок / встановіть хвилини.
5. ЗновунатиснітькнопкуCLOCK,щобзберегтиналашту-
вання часу.
Засіб захисту відсіку для компакт-дисків під час транспортування
• Відкрийтевідсікдлякомпакт-дисків(3),потягнувши
кришку із затискачем (10) догори.
• Виймітьзасібзахиступідчастранспортування,якщовін
є, із програвача компакт-дисків перед тим, як почати
його використовувати.
• Зновузакрийтевідсікдлякомпакт-дисків.
Сумісність із iPod/iPhone
Узв’язкузвеликимрізноманіттямпоколіньімоделей
iPodіiPhone,доступнихумагазинах,повнасумісністьне
гарантується.Першніжпід’єднуватиiPod/iPhone,перевірте
сумісність його інтерфейсу.
Також не може гарантуватись повна сумісність функцій
пультадистанційногокерування.Якщопотрібно,щобiPod/
iPhone працював нормально, підключіть його до док-станції.
ПРИМІТКА.
В залежності від версії програмного забезпечення,
встановленого на iPhone, можуть відображатися наступні
повідомлення про помилки.
“Цей аксесуар непридатний для використання з iPhone.
Використання може привести до появи шумів і послаблення сигналу.”
В цьому випадку натисніть кнопку “OK”.
Загальна інформація про роботу пристрою
ПРИМІТКА.
Деякікнопкиможназнайтиякнапристрої,такінапульті
дистанційного керування.
Кнопки з однаковими назвами виконують ті самі функції.
STANDBY (4/24)
Натисніть кнопку STANDBY, щоб перемкнути пристрій у
режимочікування.ЗасвітитьсяіндикаторPOWER(16).Щоб
увімкнути пристрій, натисніть цю кнопку знову.
Гучність (12/10)
Можна налаштувати потрібний рівень гучності. На екрані
відображатиметься індикація “VOL” і номер. Це означає,
що гучність встановлено у діапазоні від “VOL MAX” до “VOL
MIN”.
Інфрачервоний пульт дистанційного керування
Працює за допомогою бездротового зв’язку на відстані до
5 метрів. Якщо ця відстань починає зменшуватись, замініть
батареї. Слідкуйте, щоб під час використання між пультом
дистанційного керування і сенсором (17) на пристрої не
було перешкод.
Роз’єм AUX IN (тильна сторона пристрою)
Під’єднайтеаналоговийпристрійвідтворення.Задопомогою цього роз’єму можна прослуховувати звук з інших
пристроїв, наприклад MP3-програвачів або програвачів
компакт-дисків тощо через гучномовці.
1. Під’єднайте зовнішній пристрій через роз’єм 3,5 мм до
роз’єму AUX IN.
2. ЗадопомогоюкнопкиFUNCTION(6/11)виберітьрежим
AUX.
3. Через гучномовці можна прослуховувати звук із зовнішніх пристроїв; налаштуйте гучність за допомогою кнопок
VOLUME+/-(12/10).Кнопкипрогравачакомпакт-дисків
вимкнені.
4. Детальнішепроіншіфункціїдив.упосібникукористувача зовнішнього аудіопристрою.
ПРИМІТКА.
Налаштуйте гучність зовнішнього пристрою на належний
рівень.
Прослуховування радіо
1. Кілька разів натискай кнопку FUNCTION (6/11), допоки
наекраніневідобразитьсяіндикація“TUNER”.
2. Налаштуйте потрібну станцію за допомогою кнопок
/ (8/9).
3. Індикатор FM.ST ((ST)) (на екрані) засвітиться, якщо вибрана станція приймається в стереорежимі. Якщо сигнал занадто слабкий і станція приймається з перешко-
дами,індикаторбудеблимати.ДлястанційFMможна
використати кнопки MONO/ST (20 на пульті дистанційного керування), щоб перемикати між режимами MONO
іSTEREO.Увипадкуслабкогоприйманнясигналуми
рекомендуємо перемкнутись у режим MONO.
Збереження/вибір радіостанцій
4. Коли потрібну станцію буде знайдено, натисніть кнопку
MEMORY(6напультідистанційногокерування).На
екраніз’явитьсяпозначкаMEMORYібудеблиматипо-
ложення пам’яті.
5. Щобвибратиположенняпам’яті,натиснітькнопку
PRE-UP/DN(3напультідистанційногокерування).
Page 72

72
УКРАЇНСЬКА
6. Щобзберегтиналаштування,натиснітькнопку
MEMORY.
Щобвибратизбереженустанцію,натиснітькнопкуPRE-UP
абоPRE-DN.
Відтворення музики з iPod/iPhone
(iPod/iPhoneневходитьвкомплектпоставки)
1. Натискайте кнопку FUNCTION (6/11), допоки на дисплеї
не з’явиться індикація “NO IPOD”.
2. ЯкщодоiPodдодаєтьсяадаптер,встановітьйогона
панельізроз’ємами.iPodможнавстановитиналежним
чиномуроз’ємдляiPodтількитоді,колипід’єднано
адаптер.
3. Під’єднайтеiPod/iPhoneдодоку.
УВАГА.
Перевірте,щобiPod/iPhoneбуловстановленовертикальновроз’єм.Ненагинайтетанена-хиляйтеiPod/
iPhone, допоки він підключений до роз’єму. Це може
пошкодитидокабо/таiPod/iPhone.
4. ЗалежновідмоделіiPod/iPhoneспершузнімітьблоку-
вання кнопок і розпочніть відтворення му-зики, якщо
потрібно, натиснувши кнопку
(9/17).
5. Про використання елементів управління читайте у по-
сібникукористувачаiPod/iPhone.
УВАГА.
Зупинітьвідтворення,першніжпідключатиiPod/iPhone,
інакшеможнапошкодитиiPod/iPhone.
ПРИМІТКА.
•
Якщонеобхідно,можназмінитипараметризвукуiPod/
iPhone для отримання оптимального звучання.
•
Якщо iPhone під’єднано до доку і під час відтворення
музики поступає вхідний дзвінок, відтворення зупиня-
ється,ілунаєвиклик.Щобприйнятивиклик,зніміть
iPhone із пристрою.
Заряджання iPod/iPhone
БатареяiPod/iPhoneпочнезаряджатисьпісляпід’єднання
iPod/iPhoneдороз’єму.Дляцьогопристрійслідпід’єднати
до розетки.
ПРИМІТКА.
•
ЯкщодоiPodдоданоадаптердлягнізда,використайтейого,щобпід’єднатиiPodналежнимчином.
•
НевсіпоколінняiPod/iPhoneпідтримуютьре-жимзаряджання.
•
Тривалість заряджання залежить від того, який вико-
ристовуєтьсяiPod/iPhone,іумовйогови-користання.
•
Не рекомендовано заряджати пристрій під час роботи
від батарей; інакше строк служби батарей зменшиться.
Відтворення з компакт-диска/MP3
Про відтворення з компакт-дисків
1. Кілька разів натискайте кнопку FUNCTION (6/11), допоки на екрані не відобразиться індикація “CD”.
2. Відкрийте відсік для компакт-дисків (3), потягнувши
кришку із затискачем (10) догори.
3. Належним чином вставте аудіокомпак-диск у пристрій
читаннядисківстороноюзналіпкоюдогори.Закрийте
відсік для компакт-дисків.
4. АУДІО КОМПАКТ-ДИСК.
На короткий час на дисплеї з’явиться індикація
“READING”,тоді“TOTAL”,кількістьдоріжокізагальний
час відтворення. Відтворення розпочнеться з першого
заголовканакомпакт-диску.З’являтьсявідомостіпро
поточну мелодію, час відтворення, що минув, і символ
.
Компакт-диск у MP3-форматі
На короткий час на дисплеї з’явиться індикація
“READING”,тоді“TOTAL”,“MP3”,кількістьдоріжокіпапок(FOLDER).Відтвореннярозпочнетьсязпершоїдоріжкиізпершоїпапки.З’являтьсявідомостіпропоточну
мелодію(TRACK),часвідтворення,щоминув,“MP3”і
символ
Вибрати папку можна за допомогою кнопок
FOLDER+абоFOLDER-(21напультідистанційного
керування).
5. Щобвийнятикомпот-диск,натиснітькнопкуSTOP(7/18),
відкрийте відсік для компакт-дисків і обережно вийміть
компакт-диск.
Завждитримайтедверцятавідсікудлякомпакт-дисківзакритими.
ПРИМІТКА.
•
Увипадкувідтвореннязкомпакт-дискавMP3-
форматі, що має декілька папок, на екрані відображатиметься позначка “01” для першої доріжки нової
папки під час переходу до іншої папки.
•
Якщо диск не встановлений належним чином або
не встановлено взагалі, засвітиться повідомлення
“READING”інаекранібудевідображатисяіндикація
“NO DISC” (диск відсутній).
•
Відтворення з компакт-диска, створеного користувачем, не гарантовано у зв’язку з наявністю різноманітного доступного програмного забезпечення і обладнання для компакт-дисків.
Опис кнопок управління
(9/17)
Дозволяєнадеякийчаспризупинитивідтворенняірозпочати його знову. Час відтворення, що минув, миготить і
відображається символ “
”.
Повторне натиснення кнопки дозволить продовжити відтворення з того самого місця.
Page 73

73
УКРАЇНСЬКА
/ (8/9)
Під час відтворення з аудіокомпакт-диска, компакт-диска у
форматі MP3 чи у режимі IPOD.
Задопомогоюкнопки можна пропустити до наступної або
пропустити наступну доріжку тощо. Натисніть і утримуйте цю
кнопку для швидкого пошуку музики (звук буде вимкнено).
Задопомогоюкнопки
1 натиснення = розпочинає відтворення поточної доріжки
2 натиснення = пропускає до попередньої доріжки.
3 натиснення = відтворюється доріжка перед цією тощо.
можна виконати таке
з початку.
Натисніть і утримуйте цю кнопку для швидкого пошуку музики (звук буде вимкнено).
Режим радіо
Налаштування потрібної радіостанції.
STOP (7/18)
Компакт-диск чи мелодія зупиняється.
ENTER (13 на пульті дистанційного керування)
УрежиміIPOD:
увімкнення функції або відображення наступного меню.
MENU (16 на пульті дистанційного керування)
MONO/ST(20 на пульті дистанційного керування)
Режим FM-радіо
ДозволяєперемикатиміжрежимамиSTEREOіMONO.
INFO (8 на пульті дистанційного керування)
Відтворення з компакт-диска у MP3-форматі
ЗбереженаінформаціяID-3-тегубудевідображатисьяк
банер на екрані. Натисніть кнопку ще раз, щоб вимкнути цю
функцію.
INTRO (5 на пульті дистанційного керування)
Кожну доріжку на компакт-диску буде відтворено впродовж 10 секунд. Натисніть кнопку ще раз, щоб вимкнути цю
функцію.
REPEAT (19 на пульті дистанційного керування)
1натиснення: (засвітитьсяREPEAT1)поточнудоріжку
2натиснення: (засвітитьсяREPEATALL)будеповторно
3 натиснення: усі функції буде скасовано. Буде продо-
Тільки для компакт-дисків у MP3-форматі
1 натиснення: безперервно буде повторюватись поточна
УрежиміIPOD:
натиснітьцюкнопку,щобвідкритименюiPod/iPhoneабо
повернутись до попереднього меню.
ПРИМІТКА.
Дляцієїфункціїслідпопередньовстановитивідповідне
програмне забезпечення.
MENU UP/MENU DN. (12/14 на пульті дистанційного керування)
2 натиснення: буде виконано безперервне відтворення
3 натиснення: безперервно буде повторюватись вибрана
УрежиміIPOD:
натискайтецюкнопку,щобпереглянутипунктименюiPod/
iPhone вгору або вниз.
MUTE (2 на пульті дистанційного керування)
Швидке вимкнення звуку. На екрані буде блимати індикація
“MUTE”.Щобскасуватицюфункцію,зновунатиснітькнопку
MUTE.
EQ (15 на пульті дистанційного керування)
(Попереднєналаштуванняфункціїеквалайзера).Доступні
різнірежимизвуку(CLASSIC,ROCK,POP,JAZZ,FLAT).
ПРИМІТКА. Під час відтворення з iPod/iPhone
Якщонеобхідно,можназмінитипараметриEQiPod/
iPhone для отримання оптимального звучання.
4 натиснення: функцію буде вимкнено і вміст компакт-диска
RAND (6 на пульті дистанційного керування)
наекранівідобразитьсяпозначка“RANDOM”іномердоріжки, яка буде відтворюватись першою. Всі доріжки будуть
відтворюватись у довільній послідовності.
FOLDER +/- (21 на пульті дистанційного керування)
Компакт-диск у MP3-форматі
Натиснення цих кнопок під час відтворення дозволяє
перейти на одну папку вгору або вниз. На екрані на деякий
часз’явитьсяповідомлення,наприкладFOLDER02.Тоді
система автоматично розпочне відтворення з компактдиска MP3. Повідомлення також з’явиться на короткий час
на екрані, якщо натиснути кнопки в режимі зупинки. Тоді
натисніть кнопку , щоб розпочати відтворення.
буде відтворено повторно повністю.
відтворено весь вміст компакт-диска.
вжено звичайне відтворення.
доріжка (на екрані буде відображатися
позначкаREPEAT1).
всього вмісту диска (відображається
індикаціяREPEATALL).
папка на компакт-диску MP3 (на екрані
будевідображатисьіндикаціяREPEAT
ALBUM). Вибрати певну папку можна
задопомогоюкнопокFOLDER+/-(21на
пульті дистанційного керування).
буде відтворюватись у звичайному режимі.
Page 74

74
УКРАЇНСЬКА
PRE-UP/PRE-DN (3 на пульті дистанційного керування)
Режим радіо
Можна вибрати збережену радіостанцію.
SLEEP (8 на пульті дистанційного керування)
Якщо пристрій увімкнено, можна встановити час, після збігу
якого пристрій перейде в режим очікування; встановіть
час із 10-ти хвилинним інтервалом у діапазоні від 90 до 10
хвилин. Повторно натискайте цю кнопку, допоки на екрані
не відобразиться потрібний час. Якщо функцію увімкнено,
наекранібудевідображатисьзначок“SLEEP”.Пристрій
вимкнеться автоматично після збігу встановленого часу.
Длявідображеннячасу,щозалишився,натиснітькнопку
SLEEP.Післяцьогоможназменшитизначеннячасуабо
вимкнути функцію.
TIMER (23 на пульті дистанційного керування)
Дозволяєзапрограмуватипристрійтак,щовінвимкнетьсяі
увімкнеться знову після збігу наперед встановленого часу.
1. ЗадопомогоюкнопкиSTANDBYперейдітьурежим
очікування.ЗасвітитьсяіндикаторPOWER(16).
2. НатискайтекнопкуTIMER,допокинаекраніневідобразитьсяіндикація“ONTIME”.
• Теперкнопки
/ (8/9) можна використовувати
для встановлення годин і хвилин для вимкнення чи
увімкнення пристрою, для режиму увімкнення і налаштування гучності увімкнення.
• ЗавждипідтверджуйтевведеніданікнопкоюTIMER.
Пункт, який слід налаштувати, миготить на екрані.
ПРИМІТКА.
Якщо впродовж 10 секунд не увімкнути жодної кнопки, пристрій перейде в режим очікування, не зберігши
введені дані.
3. Вибравши гучність увімкнення, ще раз натисніть кнопку
TIMER.Пристрійперейдеврежимочікування.
Коли настане встановлений час, пристрій увімкнеться у вибраному режимі. Гучність повільно збільшиться до встановленого рівня.
Щобвимкнутифункціютаймера,натиснітькнопку“TIMER”
зникне з екрана.
SNOOZE (4 на пульті дистанційного керування)
Якщо пристрій увімкнено таймером, цю функцію можна від-
кластина9хвилинзадопомогоюкнопкиSNOOZE.Через9
хвилин пристрій увімкнеться знову.
CLOCK (5/1)
Встановлення годинника.
Після натиснення на цю кнопку на екрані на мить
з’являтиметься час.
MEMORY (6 на пульті дистанційного керування)
Збереженнярадіостанційіналаштуванняпрограмноговідтворення.
Запрограмоване відтворення
Запрограмуйтевідтворенняупотрібнійпослідовності.(Лише
в режимі відтворення з компакт-диска).
1. Натисніть кнопку STOP (8/14).
2. НатиснітькнопкуMEMORY(6напультідистанційного
керування). На екрані буде відображатись повідомлен-
ня“00P01”(“доріжка”P“положенняпам’яті”)іMEMORY.
Задопомогоюкнопок
/ (7/14) виберіть потрібну
доріжкуізновунатиснітькнопкуMEMORY.Положення
пам’яті на екрані зміниться на P02.
Для компакт-дисків у форматі MP3:
Папка “F00” поруч із P01 миготить. Спершу виберіть
потрібнупапкузадопомогоюкнопокFOLDER+/-(21на
пультідистанційногокерування).ДляпідтвердженнянатиснітькнопкуMEMORY.З’явитьсяіндикаціяT00.
3. Задопомогоюкнопок
/ виберіть наступну доріжку
ізновунатиснітькнопкуMEMORY.Повторітьдіїцих
кроків, допоки не буде вибрано всі доріжки.
ПРИМІТКА.
Якщо досягнуто максимально допустимого
об’єму програмованих даних, з’явиться
індикація“PROGFULL”.
4. Натисніть кнопку (9/17). Розпочнеться відтворення.
На екрані відобразиться номер першої вибраної доріжки. Цю кнопку також можна використати для тимчасової
зупинки відтворення.
5. Щобзупинитивідтворення,одинразнатиснітькнопку
STOP.Запрограмованийвмістбудезбережено.
6. Дляповторюваноговідтворенняпрограмнатисніть
кнопку .
7. Длявидаленнязапрограмованоговмісту,двічінатиснітькнопкуSTOP.ІндикаціяMEMORYневідображати-
меться.
Після того, як всі збережені доріжки буде відтворено, пристрій зупиниться автоматично. Послідовність програмування буде зберігатись у пам’яті до переходу в інший режим,
виймання компакт-диска з відсіку або вимкнення пристрою.
Можна поєднувати відтворення запрограмованого вмісту з
функцієюREPEAT.Післятогояквідбулосьпрограмування
ібулорозпочатовідтворення,натиснітькнопкуREPEAT(13
на пульті дистанційного керування) до трьох разів; функції
будутьзастосовуватисьякописановрозділі“REPEAT”.
Page 75

75
УКРАЇНСЬКА
Відтворення музичних файлів у форматі MP3
На цьому пристрої можна відтворювати музичні файли
MP3-формату. Крім того, пристрій підтримує звичайні типи
компакт-дисків:CD,CD-RWіCD-R.
Пристрій може відтворювати з компакт-дисків MP3формату. Це “стиснений” компакт-диск, на якому можна
зберегти до 200 доріжок. Пристрій розпізнає диск у форматі
MP3 автоматично (на екрані відобразиться загальна кіль-
кістьдоріжокіпапок).Щодовідтвореннязтакихкомпакт-
дисків див. розділ “Відтворення з компакт-диска/MP3”.
Доріжкиможназапрограмувати,якописановрозділі
“Запрограмованевідтворення”.
Пам’ятайте.
Існує багато методів запису і стиснення, а також різниця в
якості компакт-дисків та їх форматуванні.
Крім того, музична індустрія не використовує фіксовані
стандарти (захист від копіювання).
Узв’язкузцим,інколи,дужерідко,можутьвиникатипроблеми під час відтворення з компакт-дисків і MP3-дисків.
Це не є несправністю цього пристрою.
Чищення та обслуговування
• Передтимякчиститипристрій,від’єднайтештекер
живлення.
• Пляминазовнішнійповерхніможнавитертизадопомогою вологої ганчірки без будь-яких речовин для
чищення.
Усунення недоліків
Симптоми Підстави Рішення
Компакт диск
CD не програється.
Компакт диск CD
не поставлено або
поставлено не належним чином на
своє місце.
Перевірте, чи
поставлено диск
на місце так, що
етикетка находиться
зверху.
Батареї не мають
належної напруги.
Покладіть нові батарейки або включіть
прилад в мережу
через кабель.
Компакт диск
CD стрибає
під час програвання.
Перевірте, чи
має компакт диск
відбитки пальців,
забруднення або
подряпини.
Очистіть диск м'якою
тканиною, розпочинаючи зсередини.
Пристрій не
працює.
Пристрій заблокований або “завис”.
Від’єднайте штекер
живлення приблизно
на 5 секунд. Тоді
знову увімкніть виріб.
Технічні характеристики
Модель: ..................................................................... SR4337iP
Напруга: ...........................................................220-240 В, 50 Гц
Живлення від бататреек: ....................... 8x1,5ВтипUM2/R14
Вихідна потужність: ............................................................ 80 Вт
(максимальна потужність вихідного сигналу)
Споживання живлення: .....................................................15 Вт
Клас захисту: ..............................................................................II
Вага нетто: ........................................................................ 2,00 кг
Радіо:
Частотний діапазон: ......................... VHF/FM 87,5 ~ 108,0 МГц
Технічні характеристики можуть бути змінені!
Цей пристрій сертифіковано відповідно до діючих норм РЄ,
наприклад норм електромагнітної сумісності і низької напруги, і сконструйовано відповідно до останніх характеристик із
техніки безпеки.
Позначки“MadeforiPod”і“MadeforiPhone“означають,що
електронне обладнання було виготовлено для підключення
самедоiPodабоiPhoneіїхсертифіковановиробником
щодо відповідності стандартам роботи компанії Apple. Apple
не несе відповідальності за роботу пристрою чи його відповідність стандартам і нормам безпеки.
Page 76

76
РУССКИЙ
Общие правила техники безопасности
Перед пользованием прибором внимательно ознакомьтесь
с данным руководством. Сохраните его, а также гарантийный талон, кассовый чек и по возможности оригинальную
упаковку, включая ее внутренние элементы. В случае передачи прибора третьим лицам к нему должно прилагаться
данное руководство.
• Чтобыизбежатьопасностипожараилипоражения
электрическим током не подвергайте устройство
воздействию дождя или влажности. Не используйте
устройство возле воды (например, в ванных комнатах,
плавательных бассейнах или во влажных подвальных
помещениях).
• Изделиепредназначенотолькодлядомашнегоиспользования; оно не предназначено для ком-мерческих
целей.
• Подключайтеустройствотолькокстандартнойнастенной розетке. Проверьте, чтобы напряжение, указанное
на устройстве, соответствовало напряжению розетки.
• Прииспользованиивнешнихадаптеров,пожалуйста,
учитывайте правильную полярность и напряжение.
Правильно вставляйте аккумуляторные батареи.
• Приустановкеустройстваненакрывайтеникакиевентиляционные отверстия.
• Никогданеоткрывайтекорпусустройства.Неправильный ремонт может привести к серьезным травмам для
пользователя. В случае, если устройство или сетевой
кабель повреждены, не используйте устройство и
отремонтируйте его с помощью квалифицированного
специалиста. Регулярно проверяйте сетевой кабель на
отсутствие повреждений.
• Чтобыизбежатьрисков,необходимо,чтобыповрежденный сетевой кабель заменил производитель, наш
сервисный центр или иной специалист.
• Есливынеиспользуетеустройствовтечениедлительного периода времени, пожалуйста, отключите устройство
от сети питания и выньте аккумуляторные батареи.
Данныесимволымогутбытьуказанынаустройствеипредназначаются для предупреждений:
Вспышка молнии предназначена для того,
чтобы предостеречь пользователя о наличии
опасного напряжении в устройстве.
Восклицательный знак предназначен для того,
чтобы предостеречь пользователя о наличии
важной инструкции по эксплуатации и техническому обслуживанию, которая прилагается к
устройству.
Товарысэтимсимволомработаютс“Лазером
класса 1” для сканирования CD. Встроенные
предохранительные выключатели предназначены для того, чтобы не допустить, чтобы пользователь подвергался опасному воздействию
невидимого лазерного луча при открывании
отсека CD.
Данныепредохранительныевыключателинельзяблокировать или изменять; в противном случае существует опасность воздействия лазерного луча.
Дети и люди с ограниченными возможностями
• Изсоображенийдетскойбезопасностихранитевсе
элементы упаковки (пластиковые пакеты, картонные
и изоляционные материалы и т.п.) в недоступных для
детей местах.
ПРЕДУПРЕЖДЕНИЕ!
Не позволяйте маленьким детям играть с пленкой.
Опасность удушья!
• Данноеустройствонедолжноиспользоватьсялицами
(включая детей) с ослабленными физическими, сенсорными или умственными способностями, или недостатком опыта и/или знаний, за исключением случаев, когда
за ними наблюдает ответственный за их безопасность
персонал или они получили инструкции по использованию устройства.
• Следитезадетьми,чтобыубедиться,чтоонинеиспользуют прибор в качестве игрушки.
Символы в данном руководстве пользователя
Важные указания, касающиеся вашей безопасности, отмечены особо. Во избежание несчастных случаев и повреждения устройства обращайте на них особое внимание.
ПРЕДУПРЕЖДЕНИЕ:
Предупреждение об опасности для здоровья, указывает
на возможность повреждений.
ВНИМАНИЕ:
Потенциальная опасность для устройства или других
предметов.
ПРИМЕЧАНИЯ:
Советы и информация для вас
.
Особые инструкции по безопасности
Данноеустройствоработает
с лазером Класса 1.
Расположение элементов
1 Телескопическая антенна
2 Ручка
3 Отсек CD
4 Кнопка STANDBY (режим ожидания/питание)
5 Кнопка CLOCK (часы)
6 FUNCTION (переключатель функций)
7 Кнопка STOP
8 Кнопки / (перемотка вперед/назад)
Page 77

77
РУССКИЙ
9 Кнопка (воспроизведение/пауза)
10 Ушкодляоткрытияотсекакомпакт-диска(OPEN/
CLOSE)
11 Докпорт
12 КнопкиVOLUME+/-(громкость)
13 Громкоговоритель
14 ЖК дисплей
15 Батарейный отсек
16 ИндикаторPOWER
17 ИК датчик для дистанционного управления
Вид сзади (не показан)
Соединение AUX IN
AC~ Электропитание от сети
Дистанционное управление
1 Кнопка CLOCK (часы)
2 КнопкаMUTE(отключениезвука)
3 КнопкиPRE-DN/PRE-UP(памятьдлярадиостанций)
4 КнопкаSNOOZE
5 КнопкаINTRO
6 КнопкаMEMORY(память)
7 КнопкаRAND(воспроизведениевслучайномпорядке)
8 Кнопка INFO
9 Кнопка
(перемотка вперед)
Кнопка (перемотка назад)
10 КнопкаVOLUME+/-(громкость)
11 FUNCTION (переключатель функций)
12 КнопкаMENUUP(менюнавигацииiPod/iPhone)
13 КнопкаENTER(подтверждение)
14 КнопкаMENUDN(менюнавигацииiPod/iPhone)
15 КнопкаEQ
16 КнопкаMENU
17 Кнопка (воспроизведение/пауза)
18 Кнопка STOP
19 КнопкаREPEAT(повтор)
20 Кнопка MONO/ST
21 КнопкиFOLDER+/-(вверх/вниз,положениевпамяти
альбом)
22 КнопкаSLEEP
23 КнопкаTIMER
24 Кнопка STANDBY
Установка/Введение
• Прочтитеинструкциюполностьюпередиспользованием
устройства!
• Выберитедляустройстваподходящееместо.Подходя-
щее место – это сухая ровная и нескользкая поверхность, на которой вы без проблем сможете использовать устройство.
• Проверьте,чтобыпроисходилаправильнаявентиляция
устройства!
• Принеобходимостиснимитезащитнуюпленкусдис-
плея.
Электропитание
• Вставьтештепсельшнураэлектропитания,имеющегося
в комплекте, (если нужно, см. в батарейном отсеке
(15)) в исправную розетку 230 В / 50 Гц, а другой конец
шнура – в гнездо AC ~ на задней панели устройства.
• Проверьте,чтобынапряжениесоответствовалопаспортной табличке.
• Приотключенииэлектропитаниясохраненныенастройки
времени сразу же сбрасываются.
Работа от батареек (батарейки в комплект не входят)
• Откройтекрышкубатарейногоотсека(15)внижней
части устройства.
• Вставьте8батареектипаUM2/R14,1,5В.Привставке
батареек соблюдайте правильную полярность (см. отметки на дне батарейного отсека)!
• Закройтебатарейныйотсек.
Еслиустройствонеиспользуетсядлительноевремя,извле-
ките из него батарейки, так как они могут начать протекать.
ПРИМЕЧАНИЯ:
•
При подключении шнура электропитания, питание от
батареек автоматически отключается.
•
При питании от батареек/аккумуляторов, перезаря-
жаемыеаккумуляторыподключенногоiPod/iPhoneне
заряжаются.
ВНИМАНИЕ:
•
Не смешивайте различные типы батареек или старые
и новые батарейки.
•
Не выбрасывайте использованные батарейки в бытовой мусор. Пожалуйста, сдавайте их в авторизированный пункт приема или верните вашему дилеру.
ПРЕДУПРЕЖДЕНИЕ:
Не подвергайте батарейки воздействию тепла или прямых
солнечных лучей. Никогда не бросайте батарейки в огонь.
Опасность взрыва!
Батарейки пульта дистанционного управления (не вхо-
дят в комплект поставки)
• Откройтекрышкуотсекадлябатареексзадипультадистанционного управления
• Вставьте2батарейкиR03“AAA”1,5В.Пожалуйста,
соблюдайте правильную полярность (указанную внизу
отсека для батареек)!
• Есливынепользуйтесьпультомдистанционногоуправления на протяжении длительного времени, пожалуйста,
выньте батарейки, чтобы не протек электролит батареек.
ВНИМАНИЕ:
•
Не смешивайте различные типы батареек или старые
и новые батарейки.
•
Не выбрасывайте использованные батарейки в бытовой мусор. Пожалуйста, сдавайте их в авторизированный пункт приема или верните вашему дилеру.
Page 78

78
РУССКИЙ
ПРЕДУПРЕЖДЕНИЕ:
Не подвергайте батарейки воздействию тепла или прямых
солнечных лучей. Никогда не бросайте батарейки в огонь.
Опасность взрыва!
Настройка часов (в режиме ожидания)
1. Нажмите кнопку CLOCK (5/1). На дисплее появится “24
HOUR”.
2. Используйтекнопки
/ (8/9) для переключения
между режимами времени 24-часа и 12-часов. Подтвердите с помощью CLOCK.
ПРИМЕЧАНИЯ: При 12-часовом режиме время
будет показано следующим образом:
AM = утро, PM = после полудня.
3. Используйтекнопки
/ для установки часа. Подтвердите с помощью CLOCK.
4. Используйтекнопки / для установки минут.
5. Нажмите CLOCK снова для сохранения параметров
установки времени.
Защитное устройство для транспортировки вашего отсека для CD
• Откройтеотсекдлякомпакт-дисков(3),взявшисьза
ушко (10) и потянув крышку вверх.
• ВыньтезащитноеустройстводлятранспортировкиизCD
проигрывателя, если такое есть, перед тем, как начать
использование устройства.
• Сновазакройтеотсекдлякомпакт-дисковe.
Совместимость с iPod/iPhone
Из-забольшогоразнообразиямоделейипоколе-нийiPod
и iPhone на рынке полное соответствие не гарантируется.
ПередподключениемiPod/iPhoneубедитесьвналичиисовместимого интерфейса.
ПолнаясовместимостьспультомДУтакженегарантируется.УправляйтевашимiPod/iPhoneобычнымобразомпосле
вставки его в стыковочный порт.
ПРИМЕЧАНИЯ:
ПолнаясовместимостьспультомДУтакженегарантируется.УправляйтевашимiPod/iPhoneобычнымобразом
после вставки его в стыковоч-ный порт.
“Эта принадлежность не предназначена для этого iPhone.
Возможны появление шумов и снижение уровня сигнала.”
В этом случае нажмите кнопку “OK”.
Общие указания по эксплуатации
ПРИМЕЧАНИЯ:
Некоторые кнопки находятся как на самом устройстве,
так и на пульте дистанционного управления.
Кнопки с одинаковым названием имеют одинаковые
функции.
STANDBY (4/24)
Нажмите кнопку STANDBY для переключения устройства
врежиможидания.ЗагоритсяиндикаторпитанияPOWER
(16). Нажмите эту кнопку снова для включения устройства.
Громкость (12/10)
Отрегулируйте громкость до желаемого уровня. На дисплее
будет показано “VOL” и цифра. Она соответствует установленной громкости в диапазоне от “VOL MAX” до “VOL MIN”.
Инфракрасное дистанционное управление
Беспроводнаяработасрасстояниядо5метров.Еслиэто
расстояние сокращается, пожалуйста, замените батарейки.
Проверьте, чтобы не было препятствий между пультом дистанционного управления и датчиком (17) на устройстве во
время эксплуатации устройства.
Гнездо AUX IN (Задняя панель устройства)
Подключите аналоговые устройства для воспроизведения.
При подключении к этому гнезду вы также можете слушать
аудио файлы с других устройств, таких как MP3 или CDплееры и пр., через колонки.
1. Пожалуйста, подключите внешнее устройство через 3,5
мм гнездовой разъем к гнезду AUX IN.
2. Теперь используйте кнопку FUNCTION (6/11) для выбора режима AUX.
3. Через колонки вы будет слушать аудио файлы внешне-
гоустройства;используйтекнопкиVOLUME+/-(12/10)
для регулировки громкости. Кнопки CD не активны.
4. Дляполученияинформацииодругихфункцияхпожалуйста, обратитесь к руководству пользователя внешнего
аудио устройства.
ПРИМЕЧАНИЯ
:
Установитегромкостьвнешнегоустройствадожелаемого уровня.
Работа радио
1. Несколько раз нажмите кнопку FUNCTION (6/11) до тех
пор,поканадисплеенепоявится“TUNER”.
2. Используйтекнопки / (8/9) для настройки нужной
станции.
3. Контрольная лампочка FM.ST((ST)) (на дисплее) загорится, когда выбранная станция будет приниматься со
стереокачеством.Есликачествоприемаоченьнизкое
и на станцию влияют помехи, контрольная лампочка
будетмигать.ДляFMстанцийвытакжеможетеиспользовать кнопку MONO/ST (20 на пульте дистанционного управления) для переключения между MONO
иSTEREOприемами.Вслучаеслабогоприемамы
рекомендуем переключиться на режим MONO.
Page 79

79
РУССКИЙ
Сохранение/выбор радиостанций
4. После того, как вы нашли нужную станцию, нажмите
кнопкуMEMORY(6напультедистанционногоуправления).НадисплеезагоритсяMEMORYиположениев
памяти будет мигать.
5. ДлявыбораположениявпамятинажмитекнопкуPRE-
UP/DN (3 на пульте дистанционного управления).
6. НажмитеMEMORYдлясохраненияпараметров.
Длявыборастанции,внесеннойвпамять,нажмитекнопку
PRE-UPилиPRE-DN.
Воспроизведение музыки с iPod/iPhone
(iPod/iPhoneвкомплектневходит)
1. Нажимайте кнопку FUNCTION (6/11), пока на дисплее
не высветится “NO IPOD”.
2. ЕсливкомплектесiPodимеетсяадаптер,подсоединитеегокстыковочномупорту.Еслииспользуетсяпереходник,правильновключитеiPodвстыковочныйпорт.
3. ВставьтевашiPod/iPhoneвстыковочныйпорт.
ВНИМАНИЕ:
Проверьте,правильноливставленвашiPod/iPhoneв
стыковочный порт. Не перекашивайте или не накло-
няйтеiPod/iPhoneпривставкевстыковочныйпорт.
Можноповредитьстыковоч-ныйпортилиiPod/iPhone.
4. ВзависимостиотмоделиiPod/iPhoneпринеоб-
ходимости сначала отпустите фиксатор кнопки и запустите воспроизведение музыки кнопкой
(9/17).
5. ДляуправленияiPod/iPhoneвоспользуйтесьегоруководством.
ВНИМАНИЕ:
Остановите воспроизведение перед тем, как отключать
iPod/iPhone,иначеiPod/iPhoneможетбытьповрежден.
ПРИМЕЧАНИЯ:
•
При необходимости можно изменить аудио настройки
iPod/iPhone,чтобыдобитьсяоптимальногозвучания.
•
В случае получения входящего вызова в процессе
воспроизведения музыки с iPhone воспроизведение
остановится, и вы услышите сигнал вызова. Отсоедините iPhone от устройства, чтобы принять входящий
вызов.
Зарядка iPod/iPhone
АккумуляторiPod/iPhoneприподключенииегокстыковочнойстанциизаряжается.Дляэтогоустройстводолжнобыть
включено в сетевую розетку.
ПРИМЕЧАНИЯ:
•
ЕсливкомплектесiPodимеетсяадаптер,используйте
его,чтобыобеспечитькорректноеподключениеiPod.
•
НевсепоколенияiPod/iPhoneподдерживаютрежим
зарядки.
•
ДлительностьпроцессазарядкизависитотконкретногоiPod/iPhoneиегорабочегосостояния.
•
Еслиустройствоработаетотаккумуляторов,топодзаряжать их в это время не рекомендуется, так как они
будут быстрее разряжаться.
Воспроизведение CD/MP3
Как воспроизводить CD
1. Несколько раз нажмите кнопку FUNCTION (6/11) до тех
пор, пока на дисплее не появится “CD”.
2. Откройте отсек для компакт-дисков (3), взявшись за
ушко (10) и потянув крышку вверх.
3. Поставьте аудио CD на конический шпиндель этикеткой
вверх, так чтобы он защелкнулся на своем месте. После этого закройте отсек для компакт-дисков.
4. АУДИО CD:
Надисплеекратковременновысветится“READING”,
потом слово “TOTAL”, количество заголовков и общее
время воспроизведения. Воспроизведение начнется с
первой дорожки на CD. На дисплее высветятся текущая
песня, время, прошедшее с начала воспроизведения, и
символ
.
CD в формате MP3:
Надисплеекратковременновысветится“READING”,
потом слово “TOTAL”, “MP3”, количество заголовков
икаталогов(FOLDER).Начнетсявоспроизведениес
первой дорожки и с первой папки. Высветятся текущая
песня(TRACK),время,прошедшеесначалавоспроизведения, “MP3” и символ
.Используйтекнопки
FOLDER+илиFOLDER-(21напультедистанционного
управления) для выбора определенных папок.
5. Чтобы извлечь из устройства компакт диск, нажмите
кнопку STOP (7/18), откройте отсек для компакт-дисков
и осторожно возьмите диск.
Всегда держите заслонку CD закрытой.
ПРИМЕЧАНИЯ:
•
При воспроизведении CD в формате MP3, содержащем папки, дисплей будет показывать 01 для первой
дорожки новой папки при переключении на другую
папку.
•
Еслидисквставленнеправильноилиневставлен
вообще,загорится“READING”инадисплеебудетпо-
казано “NO DISC” (нет диска).
•
Воспроизведение CD, созданных пользователем,
не может гарантироваться в связи с разнообразием
доступного на рынке программного обеспечения и
медиа оборудования для CD.
Page 80

80
РУССКИЙ
Описание кнопок
(9/17)
Вы можете временно остановить воспроизведение и начать
его снова. На дисплее будет мигать время, прошедшее
с начала воспроизведения, и высветится символ “
повторном нажатии кнопки воспроизведение продолжится
с того же места.
/ (8/9)
”. При
Во время воспроизведения аудио CD, диска в формате
MP3, или в режиме IPOD.
С помощью кнопки вы можете перейти на следующую
или через одну дорожку и т.д. Нажмите и удерживайте эту
кнопку для быстрого поиска музыки (звук будет отключен).
Вы можете управлять кнопкой
Нажмите 1 раз = Начинается воспроизведение теку-
щей дорожи с начала.
Нажмите 2 раза = Переход на предыдущую дорожку.
Нажмите 3 раза = Воспроизведение дорожки, находя-
щейся перед предыдущей и т.д. На-
жмите и удерживайте эту кнопку для
быстрого поиска музыки (звук будет
отключен).
следующим образом:
В время режима радио:
Настройте любимую радиостанцию.
STOP (7/18)
Остановка диска или песни.
ENTER (13 на пульте дистанционного управления)
В режиме IPOD:
Нажмите эту кнопку, чтобы активировать функцию или высветить на дисплее следующее меню.
MENU (16 на пульте дистанционного управления)
В режиме IPOD:
Нажмитеэтукнопку,чтобыоткрытьменюiPod/iPhone,или
вернуться в предыдущее меню.
ПРИМЕЧАНИЯ:
Длявыполненияэтойфункциимузыкальноеприложение
должно быть уже запущено.
MENU UP/MENU DN. (12/14 на пульте дистанционного
управления)
В режиме IPOD:
Нажимайте эти кнопки, чтобы переходить по пунктам меню
iPod/iPhoneвверхиливниз.
MUTE (2 на пульте дистанционного управления)
Быстровыключаетзвук.“MUTE”будетмигатьнадисплее.
ДляотменыэтойфункцииснованажмитеMUTE.
EQ (15 на пульте дистанционного управления)
(Нажмитенафункциюэквалайзера).Доступныразличные
режимызвука(CLASSIC,ROCK,POP,JAZZ,FLAT).
ПРИМЕЧАНИЯ: во время воспроизведения с iPod/
iPhone
При необходимости можно изменить настройки эква-
лайзера(EQ)iPod/iPhone,чтобыдобитьсяоптимального
звучания.
MONO/ST (20 на пульте дистанционного управления)
Во время режима радио FM:
ПереключениемеждуSTEREOиMONO.
INFO (8 на пульте дистанционного управления)
Во время воспроизведения CD в формате MP3:
Сохраненная информация ID3-тегов будет показана в виде
баннера на дисплее. Нажмите кнопку еще раз, чтобы отключить эту функцию.
INTRO (5 на пульте дистанционного управления)
Каждый заголовок компакт-диска будет воспроизводиться
в течение 10 секунд. Нажмите кнопку еще раз, чтобы отключить эту функцию.
REPEAT (19 на пульте дистанционного управления)
Нажмите1раз: (загоритсяREPEAT1)воспроизве-
Нажмите2раза: (загоритсяREPEATALL)Воспроизве-
Нажмите 3 раза: Все функции будут отключены. Вернет-
дение текущей дорожки повторится
полностью.
дение всего CD повторится полностью.
ся стандартный режим воспроизведения.
Только для CD в формате MP3:
Нажмите 1 раз: Воспроизведение текущей дорожки
Нажмите 2 раза: Весь диск будет все время повторять-
Нажмите 3 раза: Воспроизведение выбранной папки
Нажмите 4 раза: Функция будет отключена и воспроиз-
будет повторяться последовательно
(на дисплее будет показан значок
REPEAT1).
ся (на дисплее будет высвечиваться
REPEATALL)
MP3 CD будет повторяться последовательно (на дисплее будет показано
REPEATALBUM).Используйтекнопки
FOLDER+/-(21напультедистанцион-
ного правления) для выбора отдельных папок.
ведение CD вернется в нормальный
режим.
Page 81

81
РУССКИЙ
RAND (6 на пульте дистанционного управления)
Надисплеепоявится“RANDOM”иномердорожки,которая
будет воспроизведена первой. Все дорожки будут воспроизведены друг за другом в свободном порядке.
FOLDER +/- (21 на пульте дистанционного управления)
CD в формате MP3:
Нажмите эти кнопки в режиме воспроизведения для того,
чтобы переместить одну папку вверх или вниз. На дисплее
краткопоявитсясообщение,например,FOLDER02.Затем
система автоматически начнет воспроизведение MP3 CD.
При нажатии кнопок в режиме остановки на дисплее также
краткопоявитсясообщение.Затемнажмите для того,
чтобы начать воспроизведение.
PRE-UP/PRE-DN (3 на пульте дистанционного управления)
Во время режима радио:
Выберите внесенную в память радиостанцию.
SLEEP (8 на пульте дистанционного управления)
Когда устройство включено, вы можете установить время,
после которого устройство перейдет в режим ожидания;
установите время с
10-минутным интервалом от 90 до 10 минут.
Несколько раз нажмите эту кнопку до тех пор, пока на
дисплее не появится нужное время. Когда эта функция
активирована,надисплеепоявитсясимвол“SLEEP”.
Устройствовыключитсяавтоматическипослетого,какна-
ступит заданное время.
Дляотображенияоставшегосявремени,пожалуйста,нажмитекнопкуSLEEP.Вытакжеможетеуменьшитьвремя
или отключить функцию после этого.
TIMER (23 на пульте дистанционного управления)
Вы можете запрограммировать устройство для отключения
и последующего включения после определенного заданного времени.
1. ИспользуйтекнопкуSTANDBYдляпереходаврежим
ожидания.ЗагоритьсяиндикаторпитанияPOWER(16).
2. НажмитекнопкуTIMERдотехпор,поканадисплеене
появится“ONTIME”.
• Теперьможноиспользоватькнопки
/ (8/9), чтобы час и минуту включения или выключения, режим
и громкость при включении.
• Всегдаподтверждайтесвойвыборспомощью
кнопкиTIMER.Настройка,котораявданныймомент
регулируется, будет мигать на дисплее.
ПРИМЕЧАНИЯ:
Есливтечениеследующих10секунднебудетактивирована ни одна из функций, устройство переключается обратно в дежурный режим без сохранения
введенных настроек.
3. После установки уровня громкости при включении,
нажмитеещеразкнопкуTIMER.Устройствопереключится в режим ожидания.
При наступлении установленного времени устройство
включится автоматически в выбранном режиме. Громкость
постепенно повысится до выбранного уровня.
НажмитеTIMERдляотключенияфункциитаймера.Сдисплеяисчезнетзначок“TIMER”.
SNOOZE (4 на пульте дистанционного управления)
Еслиустройствовключилосьавтоматическиспомощью
таймера, эта функция может быть задержана на 9 минут с
помощьюкнопкиSNOOZE.Через9минутустройствоснова
автоматически включится.
CLOCK (5/1)
Чтобы установить время.
Еслинажатьнаэтукнопку,надисплеекратковременно
высветится текущее время.
MEMORY (6 на пульте дистанционного управления)
Длясохранениявпамятивыбранныхрадиостанцийиустановки запрограммированного воспроизведения.
Программа воспроизведения
Программа воспроизведения - это желаемая последовательность. (только в режиме CD).
1. Нажмите кнопку STOP (8/14).
2. НажмитекнопкуMEMORY(6напультедистанционного
управления). На дисплее появится “00 P01” (“дорожка”
P“местовпамяти”)иMEMORY.Используйтекнопки
/ (7/14) для выбора нужной дорожки и нажмите снова
кнопкуMEMORY.Надисплееизменитсяместовпамяти
на P02.
Для компакт-дисков в формате MP3:
На дисплее начнет мигать каталог “F00” и P01. Сначала,
спомощьюкнопкиFOLDER+/-
(21 на пульте дистанционного управления) нужно вы-
братьжелаемыйкатало.Дляподтверждениянажмите
кнопкуMEMORY.НадисплеевысветитсяT00.
3. Используйтекнопки
/ для выбора следующей до-
рожкиинажмитесновакнопкуMEMORY.Повторите
шаги до тех пор, пока не выберите все дорожки.
ПРИМЕЧАНИЯ:
При достижении предела емкости памяти, на дисплее
высветится“PROGFULL”.
4. Нажмите кнопку
(9/17). Начнется воспроизведение.
На дисплее будет показан номер первой выбранной
дорожки. Также используйте эту кнопку для временной
остановки воспроизведения.
5. Нажмите кнопку STOP один раз, чтобы остановить воспроизведение. Память будет сохранена.
Page 82

82
РУССКИЙ
6. Дляповторноговоспроизведениязапрограммированной последовательности, нажмите кнопку .
7. ДляудаленияспискаизпамятинажмитекнопкуSTOP
дважды.СловоMEMORYнадисплеепогаснет.
Устройствоостановитсяавтоматическипослетого,как
закончится воспроизведение всех внесенных в память дорожек. Последовательность программы будет сохранена в
памяти до тех пор, пока вы не перейдете в другой режим,
не извлечете CD из отсека или не выключите устройство.
Существует возможность совмещать программу воспро-
изведениясфункциейREPEAT.Послепрограммирования
и начала воспроизведения, пожалуйста, нажмите кнопку
REPEAT(13напультедистанционногоуправления)дотрех
раз; функции могут применяться согласно описанному в
разделе“REPEAT”.
Воспроизведение музыкальных файлов в
формате MP3
Устройствопозволяетвоспроизводитьмузыкальныефайлы
вформатеMP3.Устройствотакжеподдерживаетобычные
типыCD:CD,CD-RWиCD-R.
Ваше устройство может воспроизводить MP3 CD. Это
сжатые CD, которые могут содержать до 200 дорожек.
Ваше устройство автоматически распознает MP3 диски
(на дисплее появится общее количество дорожек и папок).
Пожалуйста, обратитесь к главе “Воспроизведение CD/
MP3” для воспроизведения таких CD. Вы можете программировать дорожки согласно описанному выше в разделе
“Программа воспроизведения”.
Пожалуйста, примите во внимание:
Существует много методов записи и сжатия, а также разного качества CD и записанных CD.
Боле того, музыкальная индустрия не использует постоянные стандарты (защита от копирования).
По этой причине в редких случаях могут возникать проблемы с воспроизведением CD и MP3 дисков. Это не является
неисправностью устройства.
Очистка и техобслуживание
• Отключитесетевойшнурпередочисткой.
• Выможетевытеретьвнешниепятна,используянемно-
го влажную тканевую салфетку без каких-либо моющих
средств.
Устранение неисправностей
Симптомы Причина Решение
Компакт-диск
не воспроизводится.
Дискневставлен,
или вставлен неправильно.
Убедитесь,чтодиск
вставлен этикеткой
вверх.
Батарейки разряжены
Вставьте новые батарейки или включите
устройство от сети
электропитания.
Компакт-диск
«проскальзывает» во
время воспроизведения.
Убедитесь,чтона
поверхности диска
нет отпечатков
пальцев, грязи или
царапин.
Убедитесь,чтонаповерхности диска нет
отпечатков пальцев,
грязи или царапин.
Устройствоне
работает
Устройствозаблокировалось и
“зависло”.
Отсоедините устройство от сети электропитания примерно на
5 секунд, после чего
включите его снова.
Технические характеристики
Модель: ..................................................................... SR4337iP
Электропитание: .............................................220-240 В~ 50 Гц
Питание от батареек ...........................8x1,5В,типаUM2/R14
Выходная мощность: .........................................................80 Вт
пиковая максимальная выходная мощность
Энергопотребление: ..........................................................15 Вт
Класс защиты: ............................................................................II
Вес нетто: ......................................................................... 2,00 кг
Радио:
Частотный диапазон: ........................ VHF/FM 87,5 ~ 108,0 МГц
Изменениямогутвноситьсябезпредварительногоуведомления!
ДанноеустройствосоответствуетвсемтекущимдирективамCE,такимкакэлектромагнитнаясовместимость
и низкое напряжение; оно произведено в соответствии с
новейшими правилами техники безопасности.
Надписи“MadeforiPod”и“MadeforiPhone“означают,что
эта электронная принадлежность спроектирована специ-
альнодляподключенияiPodилиiPhoneисертифицирована
разработчиком в соответствии с производственными стандартами Apple. Apple не несет ответственности за работу
этого устройства или его соответствие стандартам безопасности и законодательным актам.
Page 83

Page 84

Page 85

Page 86

SR 4337 iP
Stand 03/11
Elektro-technische Vertriebsges. mbH
Industriering Ost 40 • 47906 Kempen
Telefon 0 21 52/20 06-666
Hotline@etv.de
GARANTIE-KARTE
Garantiebewijs • Carte de garantie
Certicato di garanzia • Tarjeta de garantia
Cartão de garantia • Guarantee card
Garantikort • Karta gwarancyjna • Garancia lap
Гарантійний талон • Гарантийная карточка
24 Monate Garantie gemäß Garantie-Erklärung • 24 maanden
garantie overeenkomstig schrif telijke garantie • 24 mois de
garantie conformément à la déclaration de garantie • 24 meses de
garantie según la declaratión de garantía • 24 meses de garantia,
conforme a declaração de garantia • 24 mesi di garanzia a seconda
della spiegazione della garanzia • 24 months guarantee according
to guarantee declaration • 24 miesiące gwarancji na podstawie
karty gwarancyjnej • A garanciát lásd a használati utasításban
24 міс яці гарантії згідно з гарантійним листом • Гарантийные
обязател ьства – смотри руководство поль зователя
Kaufdatum , Händlerst empel, Unter schrift • Koopdatum, Stempel van de levera ncier, Handteke ning • Date d‘achat , cachet du revendeu r, signature • Fecha de com pra, Sello del vended or, Firma
Data de co mpra, Carimbo do vendedor, Ass inatura • Data dell ‘aquisto, timbr o del commerciant e,
rma • P urchase date , Dealer st amp, Signature • Kjøpsdato , stempel fr a forhandler, u nderskrift
Data kupna, Pieczątk a sklep u, Podpi s • A vásárlá si dátum , a v ásárlási hely b élyegzője , aláirá s
Датакупівлі,печ аткатапідписторгівця• Датапокупки,пе чатьторговца,подпись
Elektro-technische
Vertriebsgesellschaft mbH
Industriering Ost 40
47906 Kempen
SR 4337 iP
PERFECT IN FORM AND FUNCTION
 Loading...