

AEG SK91800-4I User Manual [pt]

SANTO K 9 18 00-4 i
Integrierbares Kühlgerät
Integrating Fridge
Réfrigérateur intégrable
Refrigeradores embutíveis
Kjøleskap for innbygging
Gebrauchs- und Einbauanweisung
Operating and Installation Instructions
Notice d’utilisation
Instruções de utilização e de montagem
Bruksanvisning
AEG Hausgeräte GmbH
Postfach 1036
D-90327 Nürnberg
http://www.aeg.hausgeraete.de
Änderungen vorbehalten
© Copyright by AEG Subject to change without notice
2223 363-32 11/05 Sous réserve de modifications
Sujeito a alterações sem aviso prévio
Med forbehold om endringer
21
Remove transport safeguard
The appliance and the interior fittings are protected for transport.
• Pull off the adhesive tape on the left and right side of the door.
• Remove all adhesive tape and packing pieces from the interior of the
appliance.
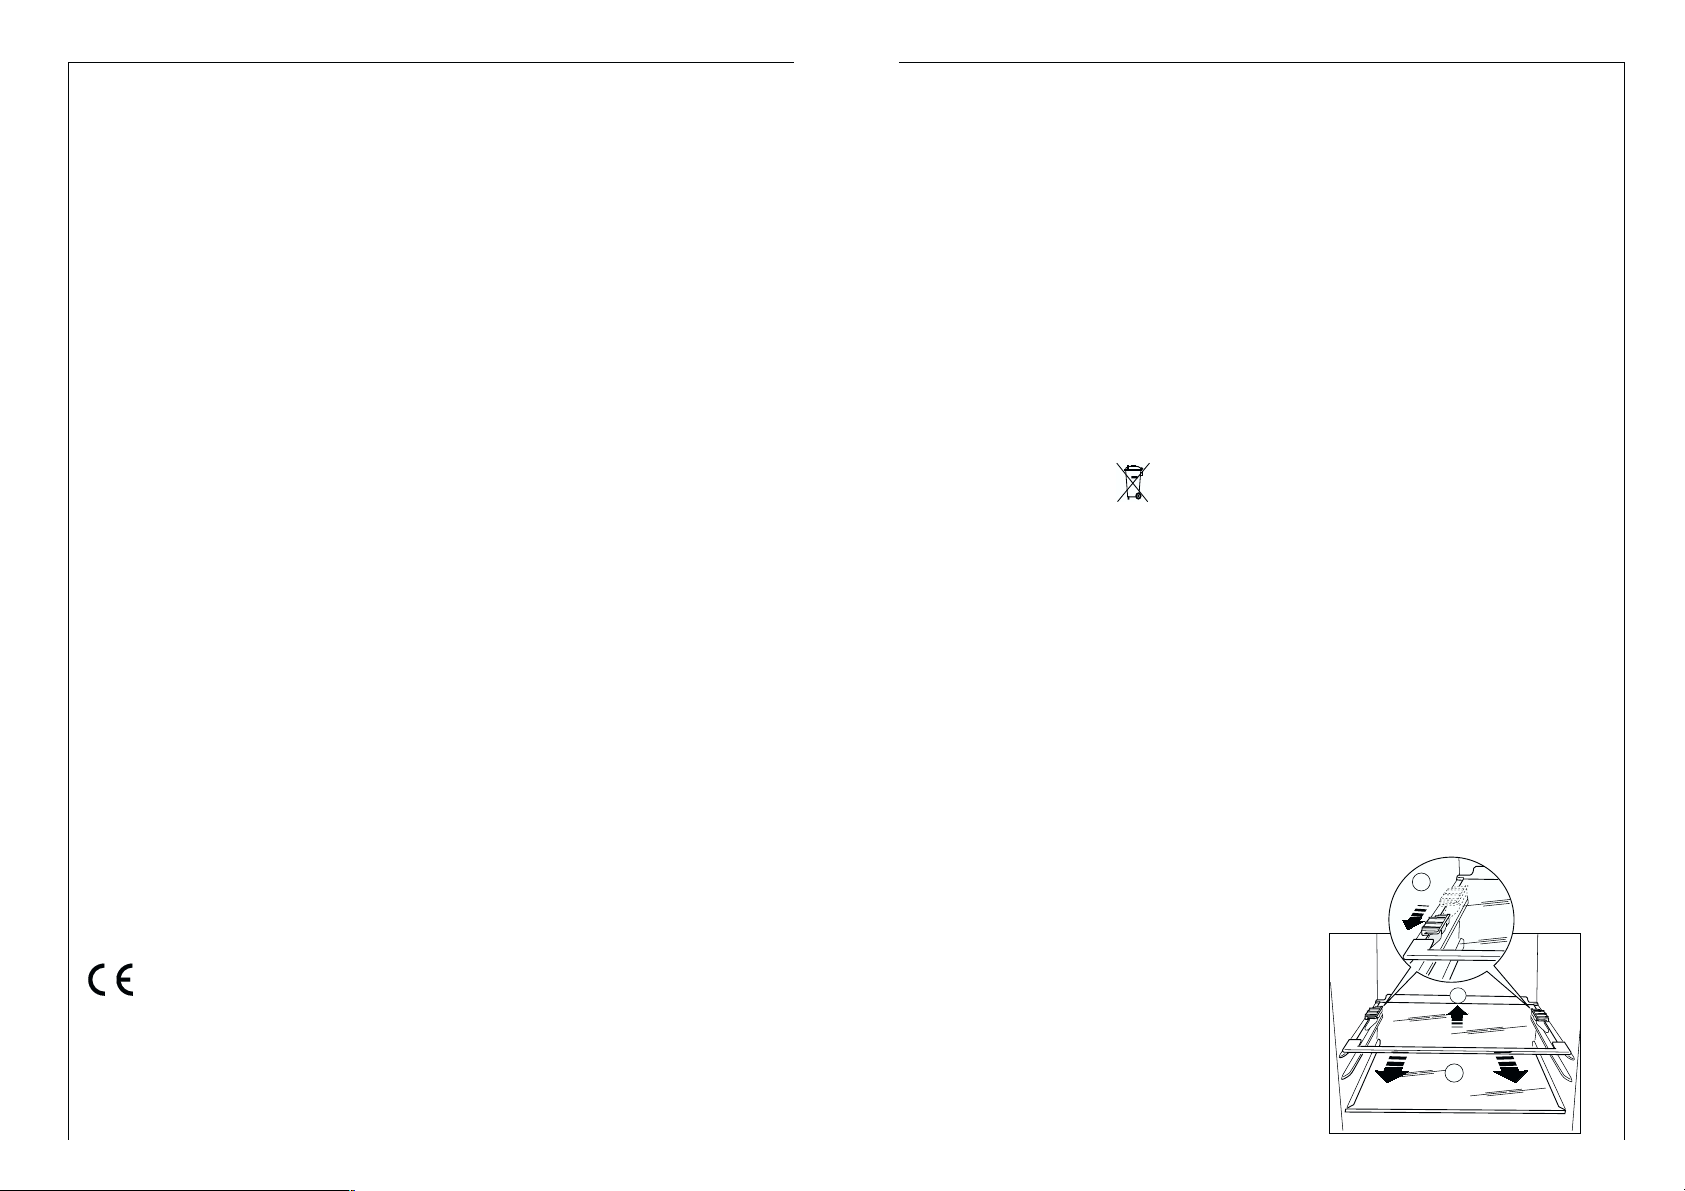
Shelf holders
Your appliance is equipped with shelf
retainers that make it possible to
secure the shelves during transportation.
To remove them proceed as follows:
Move the shelf retainers in the
direction of the arrow, raise the
shelf from the rear and push it
forward until it is freed and
remove the retainers.
Disposal of old Appliances
For environmental reasons, refrigeration appliances must be disposed of
properly. This applies to your old appliance, and - at the end of its service
life - for your new appliance as well.
Warning! Before disposing of old appliances make them inoperable. Remove plug from mains, sever the power cable, remove or destroy any snap or
latch closures. This eliminates the danger that playing children lock themselves into the appliance (danger of suffocation!) or place themselves into
other life-endangering situations.
Disposal:
• The appliance may not be disposed of with domestic waste or bulky refuse.
• The refrigerant circuit, especially the heat exchanger at the back of the
appliance, may not be damaged.
• Het symbool op het product of op de verpakking wijst erop dat dit
product niet als huishoudafval mag worden behandeld, maar moet worden afgegeven bij een verzamelpunt waar elektrische en elektronische
apparatuur wordt gerecycled. Als u ervoor zorgt dat dit product op de juiste manier wordt verwijderd, voorkomt u mogelijk negatieve gevolgen
voor mens en milieu die zich zouden kunnen voordoen in geval van
verkeerde afvalverwerking. Voor gedetailleerdere informatie over het
recyclen van dit product, kunt u contact opnemen met de gemeente, de
gemeentereiniging of de winkel waar u het product hebt gekocht.
A
C
B
68
Serviço de assistência técnica
Se, em caso de avaria, não conseguir solucionar o problema com o auxílio
destas instruções de utilização, é favor dirigirse à casa especializada mais
próxima ou ao nosso serviço de assistência técnica. Encontrará os endereços
e números de telefone no folheto em anexo "Condições de garantia/Postos
de assistência técnica".
Uma listagem precisa das peças sobressalentes necessárias, poderá evitar
perdas de tempo e custos desnecessários. Por isso, é favor indicar os seguintes dados do seu aparelho:
• Designação do modelo
• Número do produto (PNC)
• Número de fabrico (S-No.)
Estas indicações encontramse na placa de características, no interior do aparelho. Para que possa ter estes dados sempre à mão, recomendamos que os
registe aqui.
Se a indicação da temperatura assinalar uma falha (F1, F2, etc.), é favor participar ao serviço de assistência técnica a falha indicada.
Nota: uma deslocação injustificada do serviço de assistência técnica está
sujeita a pagamento, mesmo durante o prazo de garantia.
Prescrições, normas, directivas
Este aparelho frigorífico foi concebido para uso doméstico e fabricado em
conformidade com as normas vigentes para este tipo de aparelhos. Durante a sua produção tomaram-se as providências necessárias, especialmente as
que são prescritas pela lei sobre a segurança de aparelhos (GSG), pelas prescrições para a prevenção de acidentes relativas a instalações frigoríficas
(VBG 20) e pelos regulamentos da Associação dos Electrotécnicos Alemães
(VDE).
O circuito de refrigeração foi testado quanto ao seu estancamento.
Este aparelho corresponde às seguintes directivas da CE:
– 73/23/CEE de 19.2.1973 - Directiva referente à baixa tensão
– 89/336/CEE de 3.5.1989
(inclusivé directiva de rectificação 92/31/CEE) - Directiva referente à com-
patibilidade electromagnética
22
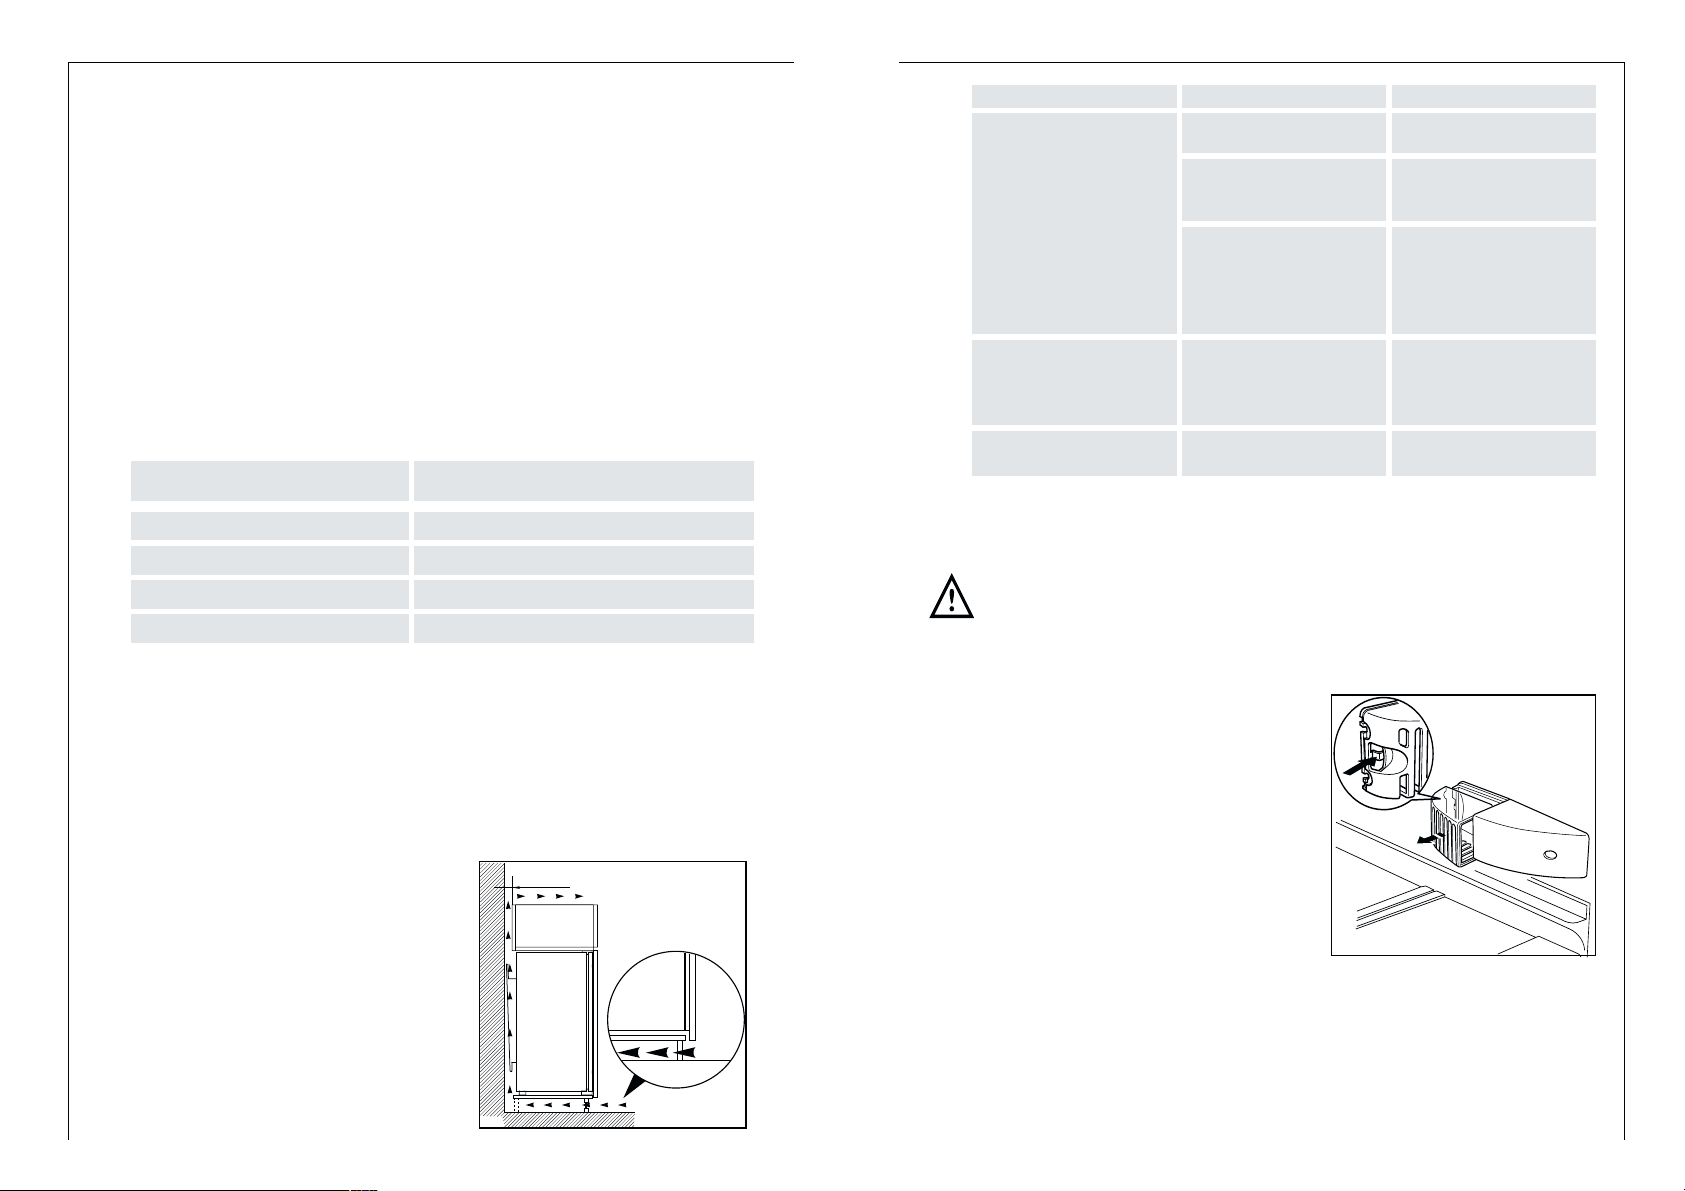
Your appliance needs air
For safety reasons, minimum
ventilationmust be as shown Fig.
Attention: keep ventilation openings clear of obstruction;
Climate classification
for an ambient temperature of
SN +10 bis +32 °C
N +16 bis +32 °C
ST +18 bis +38 °C
T +18 bis +43 °C
If installation next to a source of heat is unavoidable, the following minimum clearances must be maintained at the sides of the appliance:
– for electric cookers 3 cm;
– for oil and coal fired ranges 30 cm.
If these clearances cannot be maintained a heat insulating pad is required
between the cooker and the refrigeration appliance.
Installation
Installation Location
The appliance should be set up in a well ventilated, dry room.
Energy use is affected by the ambient temperature. The appliance should
therefore
– not be exposed to direct sunlight;
– not be installed next to radiators, cookers or other sources of heat;
– only be installed at a location whose ambient temperature corresponds to
the climate classification, for which the appliance is designed.
The climate classification can be found on the serial plate, which is located
at the left on the inside of the appliance.
The following table shows which ambient temperature is correct for each
climate classification: each climate classification:
67
O compressor funciona automaticamente apòs um certo
tempo
Veja o capìtlo “Limpeza e cuidados
Isto é normal, não se trata de
um defeito
Apòs a modificação do ajuste
de temperatura, o compressor
não funciona imediatamente,
Agua no chão do refrigerador
ou nas pratleiras
O orifìcio de descarga para a
àgua do degel est entupido
Ruídos estranhos.
O aparelho está em tacto com
a parede ou com outros
objectos.
O aparelho não está direito
Um elemento, p. ex. um tubo,
na parte de trás do aparelho,
toca num outro elemento do
aparelho ou na parede.
Curvar, eventualmente, o elemento em causa cuida- dosamente
Afastar o aparelho um pouco
da parede.
Reajustar os pés reguláveis
frontais
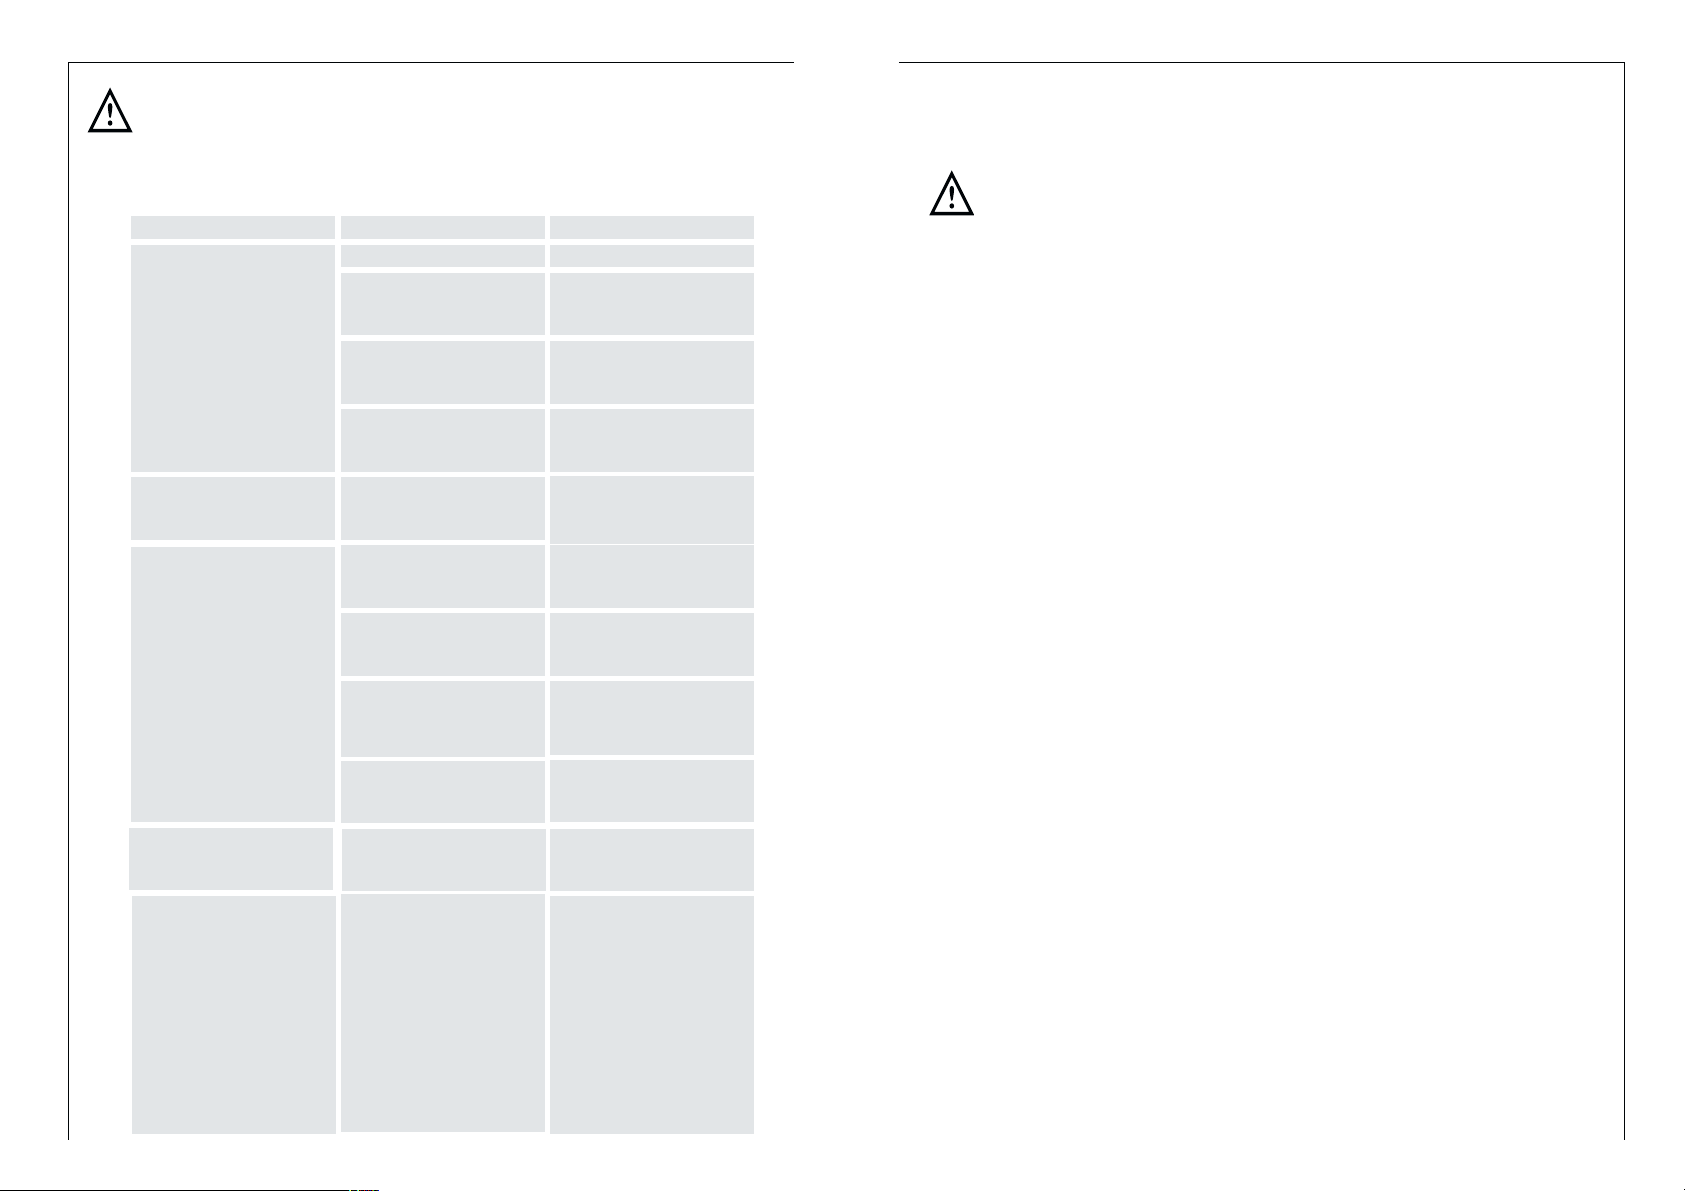
Avaria Causa possível Solução
Substituição da lâmpada
Aviso! Perigo de choque eléctrico! Antes de proceder à substituição da lâmpada, desligar o aparelho e retirar a ficha de ligaçã o à rede da tomada ou
desconectar o fusível.
Dados da lâmpada: lâmpada halógena, 220-240 V, máx. 25 W, porta-lâmpadas: E 14
1. Para desligar o aparelho.
2. Retirar a ficha de ligaçã o à rede da
tomada.
3. Para a eventual substituição da
lâmpada apertar o engate traseiro e
simultaneamente desenfiar a tampa no sentido das setas.
4. Substituir a lâmpada fundida.
5. Instalar novamente a cobertura da
lâmpada.
50 mm
min.
200 cm
2
min.
2
200 cm
D567
23
Prior to Initial Start–Up
• Please clean the appliance interior and all accessories prior to initial start-
up (see section: “Cleaning and Care”).
Electrical connection
Before initial start-up, refer to the appliance rating plate to ascertain if supply voltage and current values correspond with those of the mains at the
installation location.
e.g.: AC 220 ... 240 V 50 Hz or
220 ... 240 V~ 50 Hz
(i.e. 220 to 240 volts alternating current, 50 Hertz)
The rating plate is inside the appliance on the left.
A correctly installed, earthed socket is required for the electrical supply. The
supply must have a fuse rating of at least 10 Amps.
If the socket is not accessible once the appliance is built in, the electrical
installation must include suitable means of isolating the appliance from the
mains (e.g. fuse, cut-out, current trip or similar with a minimum contact
separation of 3 mm).
Attention: The mains connection cable may only be replaced by a skilled
electrician. Please contact your dealer or our customer service department
for repairs.
Housing dimensions
Height 1780mm
Depth 550 mm
Width 560 mm
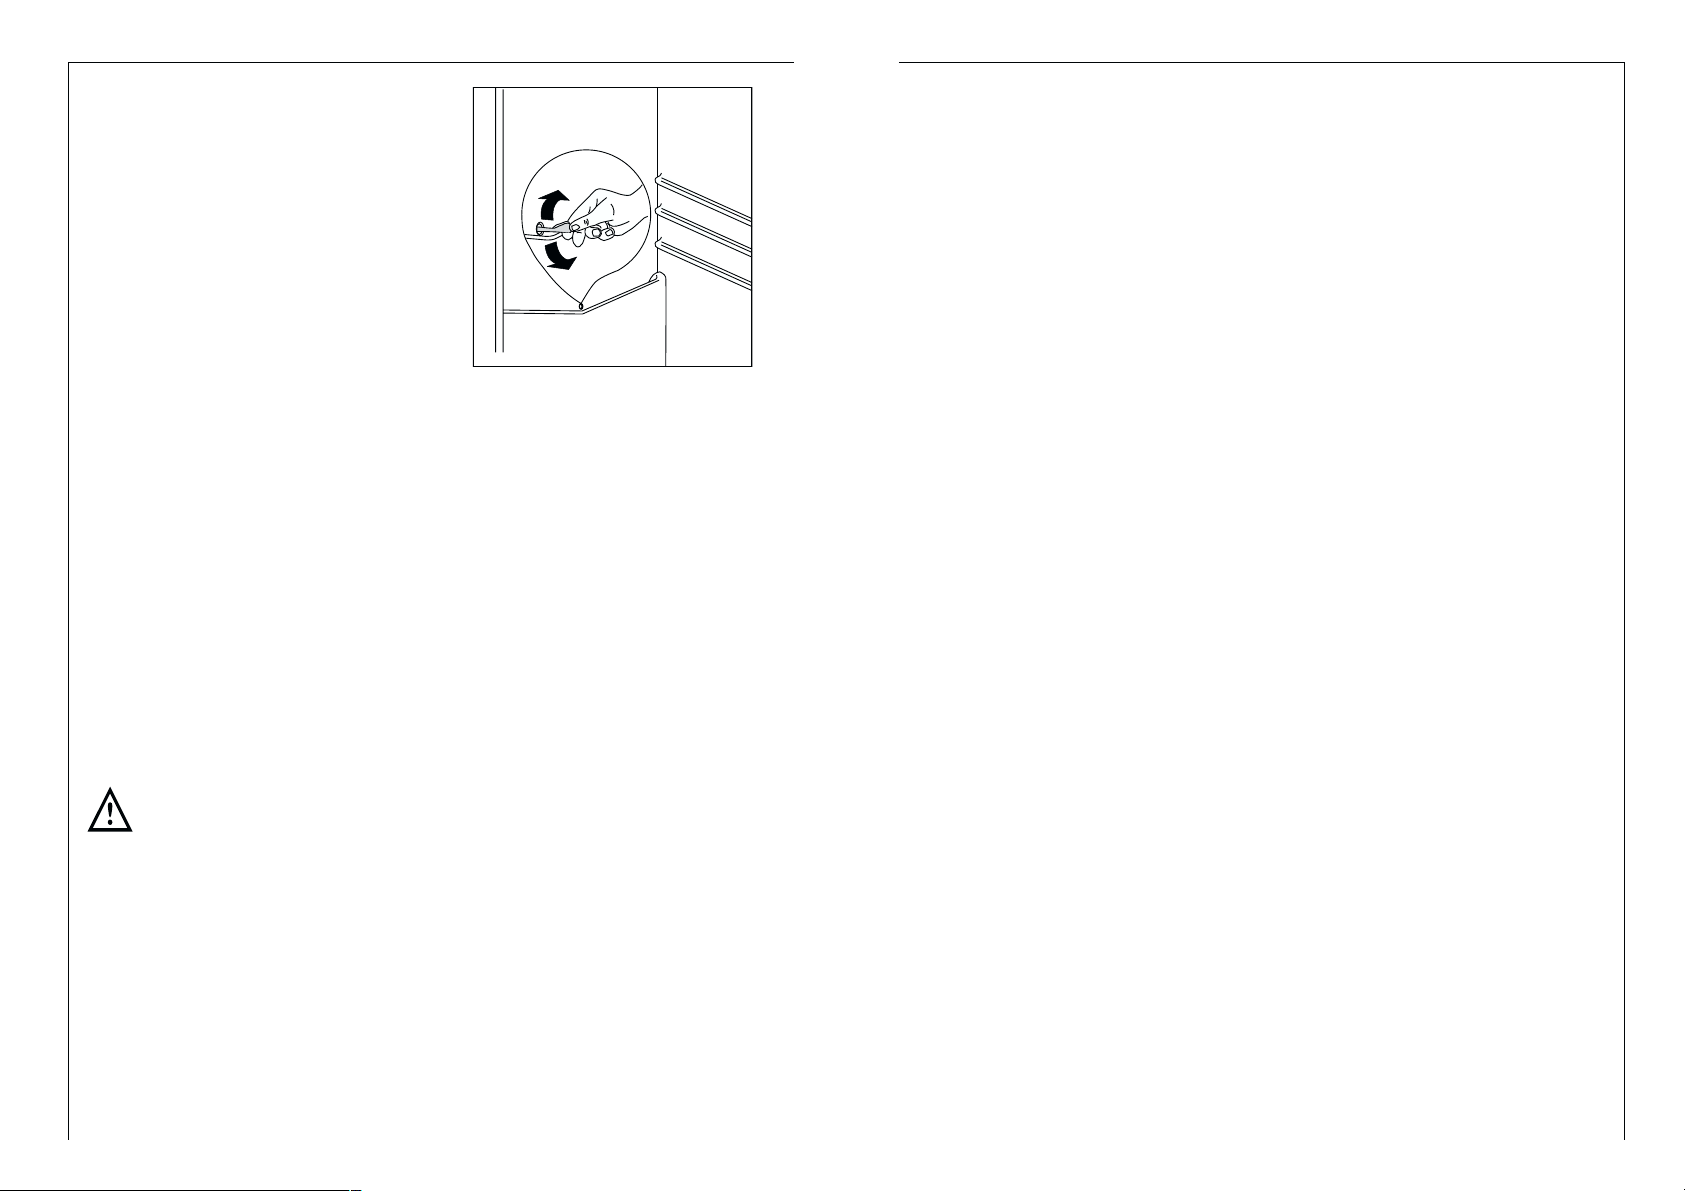
Rehingeing the door
The appliance’s door has been locked in position for transport by means of
pins on both sides.According to the door opening direction, remove relevant
pins at the top and at the bottom.
Warning! When changing the side at which the door opens, the
appliance may not be connected to the mains. Remove plug from the
mains beforehand.
66
Os géneros alimentìcios estão
quente demais
A iluminação interior não
funciona.
O aparelho está instalado ao
lado de uma fonte de calor.
A temperatura não está regulada correctamente.
É favor consultaro capítulo
"Regulação da
temperatura"
A lâmpada está estragada.
É favor consultar o ponto
"Substituição da lâmpada"
neste capítulo.
Ajustar temporariamente o
reguldor de temperatura em
uma temperatura mais baixa
A porta ficou aberta durante
um período de tempo prolongado.
É favor consultar o capítulo
"Local de
instalação"
Nas últimas 24 horas foram
armazenadas grandes quantidades de alimentos quentes.
Deixar a porta aberta só
durante o tempo estritamente
necessário.
A vedaç ã o da porta não
veda bem (event. depois de
mudar o lado de abertura da
porta).
Aquecer, cuidadosamente,
com um secador de cabelo os
pontos da vedação da porta
que não vedam bem (não a
uma temperatura superior a
aprox. 50 °C). Esticar, simultaneamente, a vedaç ã o da
porta aquecida para a pôr em
forma, de maneira a ficar correctamente assente.
Aparelo gela demais
A temperatura ajustada é
munito baixa
Ajustar temporariamente o
regulador de temperatura em
uma temperatura maist
a
Avaria Causa possível Solução
O aparelho não funciona
O aparelho não está ligado. Ligar o aparelho.
A ficha de ligação à rede não
está encaixada ou está mal
encaixada.
Encaixar a ficha de ligação à
rede na tomada.
O fusível disparou ou está
avariado.
Controlar o fusível, substida
tuílo em caso de necessidade.
A tomada está estragada.
As avarias na rede eléctrica
são reparadas pelo seu electricista.
mações não dêem solução ao seu problema concreto.
Aviso! O aparelho frigorífico só pode ser reparado por pessoal especializado.
Reparações impróprias podem dar origem a perigos graves para o utilizador.
Sendo necessário efectuar reparações, dirija-se à casa especializada mais
próxima ou ao nosso serviço de assistência técnica.
Forte formação de geada no
aparelho, eventualmente
também na vedaç ã o da porta.

24
Operating and indicator panel
AB C D E GF
°C
°C
ON/OFF
A. Mains pilot indicator (green)
B Fridge button ON/OFF
C Temperature setting button (for warmer temperatures)
D Temperature display
E Temperature setting button (for colder temperatures)
F COOLMATIC function "on" indicator (yellow)
G COOLTMATIC button
Temperature setting buttons
The temperature is adjusted using the „C“ (+) and „E“ (-) buttons. These buttons are connected to the temperature display.
• The temperature display is switched over from the display of the ACTUAL
temperature (Temperature display is illuminated) to the display of the DESIRED temperature (Temperature display flashes) by pressing one of the two
buttons, „C“ (+) or „E“ (-).
• Each time one of the two buttons is pressed again the DESIRED temperature is adjusted by 1 °C. The DESIRED temperature must be reached within 24
hours.
If neither button is pressed, the temperature display automatically switches
back after a short period (approx. 5 sec.) to the display of the ACTUAL temperature.
DESIRED temperature means:
The temperature that has been selected for inside the fridge. The DESIRED
temperature is indicated by flashing numbers.
ACTUAL temperature means:
The temperature display indicates the current temperature inside the fridge.
The ACTUAL temperature is indicated with illuminated numbers.
65
– Ácido butírico;
– Detergentes com ácido acético.
Não deixar que estas substâncias entrem em contacto com as peçasdo apa-
relho.
• Não utilizar detergentes abrasivos.
1. Limpar o congelador antes de descongelálo (ver capítulo "Desconge lar").
2. Desligar o aparelho e retirar a ficha da tomada ou desconectar o fusível.
3. Limpar o aparelho e o seu equipamento interior com um pano e água morna. Juntar, eventualmente, um pouco de detergente da louça.
4. Em seguida, limpar novamente com água limpa.
5. Controlar o orifício de escoamento da água de descongelaçã o na parede
posterior do frigorífico. Se o orifício de escoamento da água estiver entupido, desentupilo com o auxílio de um arame.
Grandes camadas de pó no liquefactor reduzem a capacidade frigorífica e
aumentam o consumo de energia. Por isso, limpar uma vez por ano o liquefactor, na parte de trás do aparelho, com uma escova macia ou com o aspirador.
6. Depois de estar tudo seco, ligar novamente o aparelho.
Conselhos práticos para poupar energia
• Não instalar o aparelho nas proximidades de fogões, aquecimentos ou de
outras fontes de calor. Com uma temperatura ambiente elevada o compressor trabalha mais frequentemente e por períodos de tempo mais prolongados.
• Assegurar uma ventilaçã o e evacuaçã o de ar suficientes na base e na
parte de trás do aparelho. Nunca tapar os orifícios de ventilação.
• Não colocar alimentos quentes no aparelho. Esperar que os alimentos
arrefeçam.
• Deixar a porta aberta apenas o tempo estritamente necessário.
• Não regular uma temperatura mais fria do que o necessário.
• Colocar os produtos congelados na parte frigorífica para os descon-gelar.
O frio dos produtos congelados é, assim, aproveitado para refrescar a parte frigorífica.
• Manter o liquefactor, situado na parte de trás do aparelho, sempre limpo.
O que fazer, se ...
Soluções para a eliminaçã o de falhas
Caso surja uma avaria, tratase provavelmente de uma pequena falha que
poderá ser reparada por si com o auxílio das indicações seguintes. Não execute outros trabalhos de reparação por sua conta, caso as seguintes infor-
25
Temperature display
The temperature display can indicate several pieces of information.
• During normal operation, the temperature currently present in the fridge
(ACTUAL temperature) is displayed.
• When the temperature is being adjusted a flashing display indicates the
fridge temperature currently set (DESIRED temperature).
Starting Up - Setting the Temperature
1. Plug the mains plug into the mains socket.
2. If the display is OFF press ON/OFF button. The green mains pilot indicator
illuminates. The appliances start.
3. Press either the „C“ (+) or „E“ (-) button. The temperature display switches
over and the DESIRED temperature currently set flashes on the temperature display.
4. Set the required temperature by pressing the „C“ (+) or „E“ (-) buttons (see
section "Temperature setting buttons"). The temperature display will immediately show the changed setting. Each time the button is pressed the temperature is adjusted by 1 °C.
From a food safety point of view +5 °C should be considered sufficiently
cold for storing food in the fridge.
5. Once the required temperature has been set, after a short period (approx. 5
sec.) the temperature display will change and again indicate the current
ACTUAL temperature inside the fridge. The display will change from flashing
to continuous illumination.
Information! When the setting is changed, the compressor does not start
immediately if automatic defrosting is currently taking place. As the storage temperature within the fridge is reached quickly you can store food
immediately after switching on.
COOLMATIC
The COOLMATIC function is suited for quick cooling of large quantities of
goods in the refrigerator.
1. The COOLMATIC function is switched on by pressing the COOLMATIC button. The yellow light illuminates.
The COOLMATIC function now provides for intensive cooling. The COOLMATIC function is ended automatically after a period of 6 hours.
2. The COOLMATIC function can be ended manually at any time by pressing
the COOLMATIC button again. The yellow light goes out.
64
Descongelar
O frigorífico
Uma vez que a maior incidência de
humidade tem lugar quando se abre
a porta, a frequência das fases de
descongelação é determinada pelo
número de vezes que se abre a porta
e pelo tempo que se mantém a porta aberta.
A água de condensaç ã o é recolhida na calha de escoamento, situada na
parede posterior do frigorífico, é conduzida através do orifício de escoamento para o recipiente de recolha do compressor e é aqui evaporada.
Descrição do aparelho
Se pretender pôr o aparelho fora de serviço por um período de tempo
mais prolongado:
1. Desligar o aparelho.
2. Retirar a ficha de ligação à rede da tomada ou desconectar o fusível.
3. Descongelar o congelador e limpálo a fundo (ver capítulo "Limpeza e conservação").
4. Deixar, por fim, a porta aberta para evitar maus cheiros.
Limpeza e conservação
Por uma questão de higiene, o interior do aparelho e o seu equipamento
interior deveriam ser limpos regularmente.
Aviso!
• Durante a limpeza, o aparelho não pode estar ligado à rede. Perigo de cho-
que eléctrico! Antes de iniciar os trabalhos de limpeza, desligar o aparelho
e retirar a ficha da tomada ou desligar o fusível.
• Nunca limpar o aparelho com aparelhos de limpeza a vapor. Poderia pene-
trar humidade nos componentes eléctricos: perigo de choque eléctrico! O
vapor quente poderia danificar as peças de plástico.
• O aparelho tem de estar seco quando voltar a colocá-lo em funciona-
mento.
Atenção!
•Ó leos etéreos e solventes orgânicos podem corroer as peças de plástico, p. ex.
– Sumo da casca de limão ou de laranja;
D037
 Loading...