

AEG SK71840-4I User Manual

SANTO K 7 18 40-4i
Integrated Fridge Freezer
Operating and Installation Instructions

2
Dear customer,
Before placing your new refrigerator/freezer into operation please read these operating instructions carefully. They contain important information for
safe use, for installation and for care of the appliance.
Please keep these operating instructions for future reference. Pass them on
to possible new owners of the appliance.
These operating instructions are for use with several technically comparable
models with varying accessories. Please observe the notes which apply to
your model.
Notes which are important for your safety or for the proper functioning of
the appliance are stressed with a warning triangle and/or with signal words
(Warning!, Important!, Attention!). Please observe the following instructions
carefully.
Additional information regarding operation and practical applications of
the appliance appear after this symbol.
Tips and notes concerning economical and environmentally sound use of
the appliance are marked with the flower.
In the event of a malfunction, these operating instructions contain information on how to rectify faults yourself, see the “Something Not Working”
section.
For futher assistance contact your local AEG Service Force Centre, see the
chapter “Service and Spare Parts”.
Printed on paper manufactured with environmentally sound processes.
who thinks ecologically acts accordingly ...
23
Regulations, Standards, Guidelines
This appliance was designed for household use and was manufactured in
accordance with the appropriate standards. The necessary measures in
accordance with appliance safety legislation regulations (GSG), accident
prevention regulations for refrigeration appliances (VBG 20) and the regu-
lations of the German Society of Electrical Engineers (VDE) were observed in
the manufacture of this appliance.
The refrigerant circuit has been checked for leaks.
This appliance is in accordance with the following EU guidelines:
– 73/23/EWG dated 19 February 1973 - low voltage guidelines.
– 89/336/EWG dated 3 May 1989
(including guideline change notice 92/31/EWG) - EMV guideline
PR167/1
Hd
Hb
Fix cover (Hd) on guide (Hb) until it
clips into place.
PR168
Hb
Place the small square on the guide
again and fix it with the screws sup-
plied.
Should adjustment of the furniture
door be necessary, use the clearance
slots.
At the end of installation/adjusting, it
is necessary to check if the door of
the furniture closes properly.

3
Contents
Safety . . . . . . . . . . . . . . . . . . . . . . . . . . . . . . . . . . . . . . . . . . . . . . . . . . . . . .4
Disposal . . . . . . . . . . . . . . . . . . . . . . . . . . . . . . . . . . . . . . . . . . . . . . . . . . . .5
Appliance Packaging Information . . . . . . . . . . . . . . . . . . . . . . . . . . . . . .5
Disposal of old Appliances . . . . . . . . . . . . . . . . . . . . . . . . . . . . . . . . . . . . .6
Remove transport packaging . . . . . . . . . . . . . . . . . . . . . . . . . . . . . . . . .6
Shelf holders . . . . . . . . . . . . . . . . . . . . . . . . . . . . . . . . . . . . . . . . . . . . . . . .6
Starting up and temperature regulation . . . . . . . . . . . . . . . . . . . . . . . .7
Interior Accessories . . . . . . . . . . . . . . . . . . . . . . . . . . . . . . . . . . . . . . . . .8
Storage shelves . . . . . . . . . . . . . . . . . . . . . . . . . . . . . . . . . . . . . . . . . . . . . .8
Variable Inner Door . . . . . . . . . . . . . . . . . . . . . . . . . . . . . . . . . . . . . . . . . . .8
Fresh food refrigeration . . . . . . . . . . . . . . . . . . . . . . . . . . . . . . . . . . . . . .8
Freezing and storing frozen food . . . . . . . . . . . . . . . . . . . . . . . . . . . . . .9
Preparation of Ice Cubes . . . . . . . . . . . . . . . . . . . . . . . . . . . . . . . . . . . .10
Defrosting . . . . . . . . . . . . . . . . . . . . . . . . . . . . . . . . . . . . . . . . . . . . . . . . .10
Switching off the appliance . . . . . . . . . . . . . . . . . . . . . . . . . . . . . . . . .11
Cleaning and Care . . . . . . . . . . . . . . . . . . . . . . . . . . . . . . . . . . . . . . . . . .11
Energy Saving Tips . . . . . . . . . . . . . . . . . . . . . . . . . . . . . . . . . . . . . . . . .12
Something Not Working . . . . . . . . . . . . . . . . . . . . . . . . . . . . . . . . . . . . .13
Changing the light bulb . . . . . . . . . . . . . . . . . . . . . . . . . . . . . . . . . . . . . .14
Service and Spare Parts . . . . . . . . . . . . . . . . . . . . . . . . . . . . . . . . . . . . . .15
Guarantee Conditions . . . . . . . . . . . . . . . . . . . . . . . . . . . . . . . . . . . . . . .16
Installation . . . . . . . . . . . . . . . . . . . . . . . . . . . . . . . . . . . . . . . . . . . . . . . .17
Electrical Connection . . . . . . . . . . . . . . . . . . . . . . . . . . . . . . . . . . . . . . . .17
Positioning . . . . . . . . . . . . . . . . . . . . . . . . . . . . . . . . . . . . . . . . . . . . . . . . .18
Your appliance needs air . . . . . . . . . . . . . . . . . . . . . . . . . . . . . . . . . . . . .18
Housing dimensions . . . . . . . . . . . . . . . . . . . . . . . . . . . . . . . . . . . . . . . . .18
Reversing the door . . . . . . . . . . . . . . . . . . . . . . . . . . . . . . . . . . . . . . . . . .18
Inner door reversal . . . . . . . . . . . . . . . . . . . . . . . . . . . . . . . . . . . . . . . . . .19
Housing dimensions . . . . . . . . . . . . . . . . . . . . . . . . . . . . . . . . . . . . . . . . .19
Instructions for building-in . . . . . . . . . . . . . . . . . . . . . . . . . . . . . . . . . . .19
Regulations, Standards, Guidelines . . . . . . . . . . . . . . . . . . . . . . . . . . . .23
4
Safety
Please read this instruction book before using the appliance and retain for
future reference. These warnings are provided in the interests of your safety, ensure you understand them fully before using the appliance.
Intended use
• The appliance is intended for use in the home. It is suitable for the cooling, freezing and storing of frozen food, as well as for making ice. If the
appliance is used for purposes other than those intended or used incorrectly, no liability can be accepted by the manufacturer for any damage
that may be caused.
• Alterations or changes to the appliance are not permitted for reasons of
safety.
Prior to initial start–up
• Check the appliance for transport damage. Under no circumstance should
a damaged appliance be plugged in! In the event of damage, please contact your retailer.
Refrigerant
The refrigerant isobutane (R600a) is contained within the refrigerant circuit
of the appliance, a natural gas with a high level of environmental compatibility, which is nevertheless flammable.
• During transportation and installation of the appliance, be certain that
none of the components of the refrigerant circuit become damaged.
• If the refrigerant circuit should become damaged:
– avoid open flames and sources of ignition;
– thoroughly ventilate the room in which the appliance is situated.
Safety of children
• Keep packaging material away from children.
• Please make old appliances unusable prior to disposal. Pull out the mains
plug, cut off the mains cable and remove any locks or catches, to prevent
young children being trapped inside.
• Do not allow children to tamper with the controls or play with the product.
21
B
E
C
D
Apply covers (C-D) into the relevant
holes.
Snap ventilation grille (B) and hinge
cover (E) into position.
Separate parts Ha,Hb, Hc, Hd as
shown in the figure
PR266
Ha
Hb
Hc
Hd
Place guide (Ha) on the inside part of
the furniture door, in the upper and
lower positions as shown in the fig-
ure and mark the position of external
holes. Having drilled the holes, fix the
guide with the screws supplied.
2
1
m
m
21
m
m
ca. 50 mm
90°
90°
ca. 50 mm

5
Daily Operation
• Containers with flammable gases or liquids can leak at low temperatures.
There is a risk of an explosion! Do not store any containers with flammable materials such as, spray cans, fire extinguisher refill cartridges etc in
the refrigerator/freezer.
• Bottles and cans must not be placed in the freezer compartment. They can
burst when the contents freeze, high carbonate content drinks can even
explode! Never store lemonade, juices, beer, wine, sparkling wine etc. in
the freezer compartment.
• Ice cream or ice cubes can cause “frost/freezer” burns if consumed straight from the freezer.
• Do not touch frozen food with wet hands. Your hands could stick to the
food.
• Do not operate any electrical appliances in the refrigerator/freezer (e.g.
electric ice cream makers, mixers etc.).
• Before cleaning the appliance, always switch off the appliance and
disconnect from the electricity supply.
• When unplugging always pull the plug from the mains socket, do not pull
on the cable.
Service
• Under no circumstances should you attempt to repair the appliance yourself. Repairs carried out by inexperienced persons may cause injury or
serious malfunctioning. Contact your local AEG Service Force Centre.
Disposal
Appliance Packaging Information
All materials are environmentally sound.
The plastics can be recycled and are identified as follows:
>PE< for polyethylene, e.g. the outer covering and the bags in the interior.
>PS< for polystyrene foam, e.g. the pads, which are all free of chlorofluo-
rocarbon.
The carton parts are made from recycled paper and should be disposed of
at a waste-paper recycling collection location.
6
Remove transport packaging
The appliance and the interior fittings are protected for transport.
• Remove all adhesive tape and packing pieces from the interior of the
appliance.
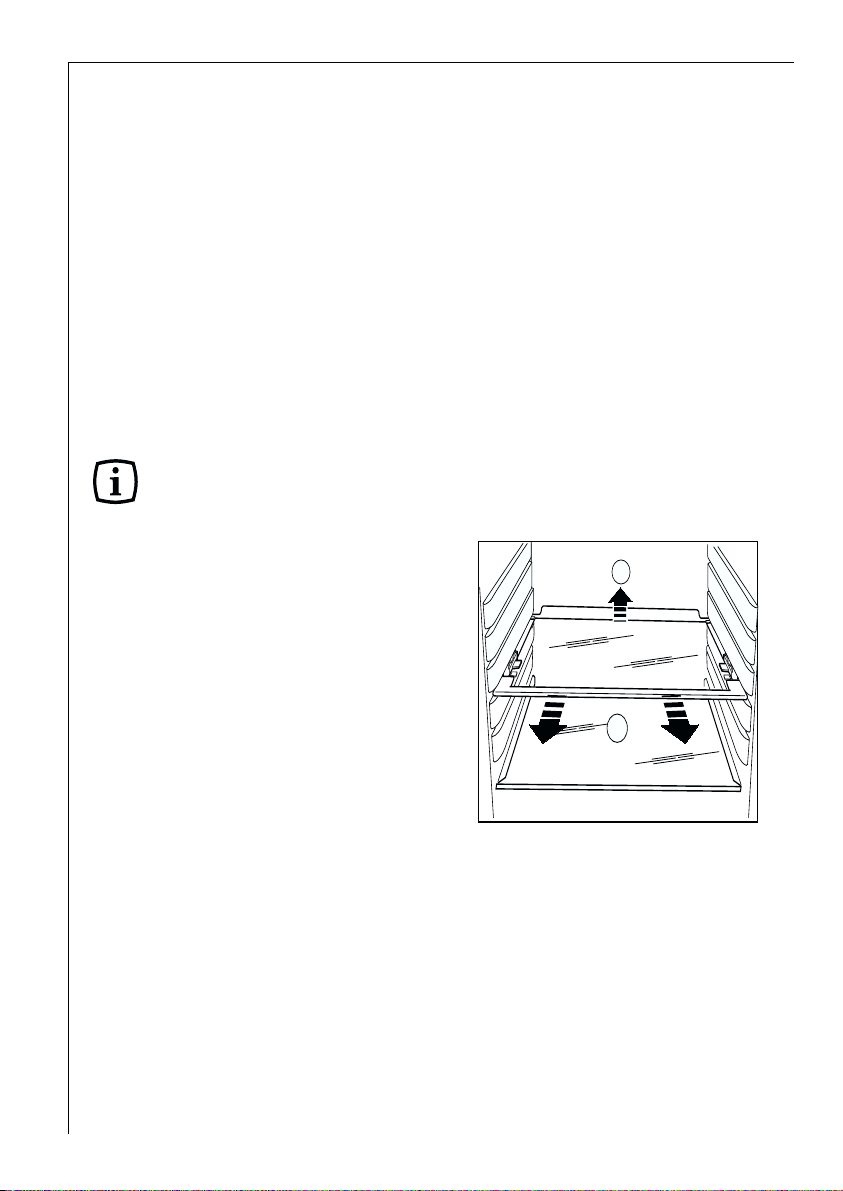
Shelf holders
Your appliance is equipped with shelf
retainers that make it possible to
secure the shelves during transportation.
To remove them proceed as follows:
Raise the shelf from the back, push it
in the direction of the arrow until it
is freed and remove the retainers.
.
Disposal of old Appliances
For environmental reasons, refrigeration appliances must be disposed of
properly. This applies to your old appliance, and - at the end of its service
life - to your new appliance as well.
Warning! Before disposing of old appliances make them inoperable.
Remove plug from mains, sever the power cable, remove or destroy any
snap or latch closures, to prevent small children being trapped inside.
• Use an authorised disposal site.
Contact your Local Council or Environmental Health Office to see if there
are facilities in your area to recycle the appliance.
B
A
19
Inner door reversal
1. Using a screwdriver release bracket
(1) by pressing on the internal spring
and withdraw it from its seat
together with the door; remove plug
(2) and fit it in the hole left open on
the opposite side; turn the door
through 180°, remove the bracket (1)
and refit it on the opposite side.
2. Refit the door and insert the top pin
and bottom bracket (1), pushing it
into place.
To ensure correct storage of food, the door is fitted with a simple spring
device which holds it in the open position until it is properly closed.
PR14
1
2
180°
D765
Instructions for building-in
Apply joint the sealing strip as shown
in figure.

7
Starting up and temperature regulation
Wash the inside of the appliance with lukewarm water with a little bicarbonate of soda added (5ml to 0,5 litre of water). Do not use soap or detergent as the smell may linger. Dry the appliance thoroughly.
• When the refrigerator compartment door is opened, the internal lighting
is switched on. The temperature control knob is located on the right hand
side of the refrigerator compartment.
Setting “0”: Off.
Setting “1”: Hightest temperature, (warmest setting).
Setting “6” (end-stop) : Lowest temperature, (coldest setting).
The exact setting should be chosen keeping in mind that the temperature
inside the refrigerator depends on:
-the quantity of food stored
-how often the door is opened
The temperatures in the refrigerator compartment and freezer compart-
ment cannot be independently regulated.
If you want to freeze fresh food rapidly, select setting “6”, ensuring that the
temperature in the refrigerator compartment does not drop below 0°C. You
should reset the temperature control knob to setting “3” or “4”, if this does
occur.
As soon as the fresh food placed in the freezer has frozen, return the temperature control knob to “3” or “4”.
Important!
High ambient temperatures (e.g. on hot summer days) and a cold setting on
the temperature regulator (position"5" to "6") can cause the compressor to
run continuously.
If this happens, turn the temperature control knob back to a warmer setting (position "3" to "4"). At this setting the compressor will be switched on
and off as usual and automatic defrosting recommenced.
8
Interior Accessories
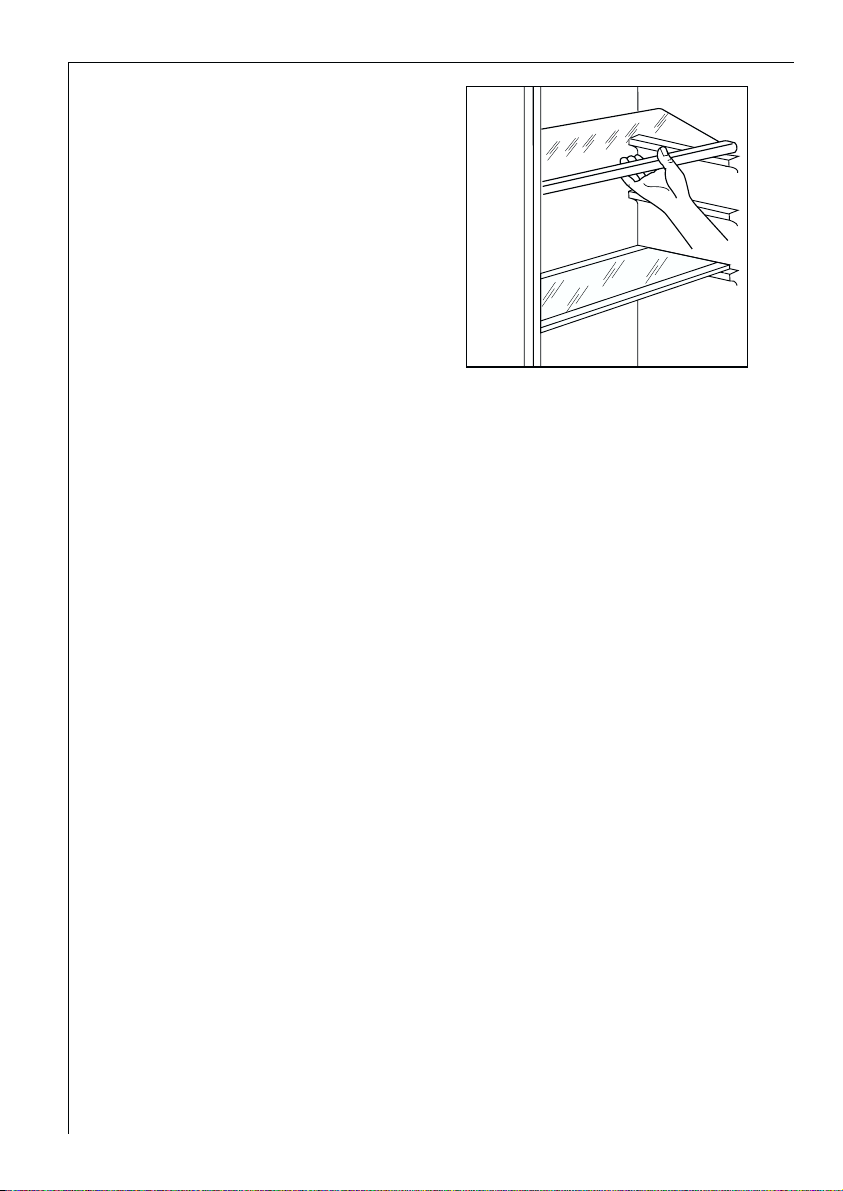
Storage Shelves
The glass shelf above the fruit and
vegetable compartment should
always remain in position, to ensure
fruit and vegetables stay fresh longer.
The remaining storage shelves can be
adjusted to various heights:
Pull the storage shelf forward until it
can be tipped up or down and removed.
To insert at a different height use the same procedure in reverse.
Adjustment for tall goods:
Remove the front half of the two-part vario glass storage shelf and insert it
at a different level. Space is thus gained for storage of tall goods on the
underlying storage shelf.
Variable Inner Door
The door compartments can be pulled up and removed, and inserted at
other positions as needed.
Fresh food refrigeration
To obtain the best performance:
• do not store warm food or evaporating liquid in the refrigerator
• do cover or wrap the food, particularly if it has a strong flavour.
• Position food so that air can circuiate freely round it.
Useful hints:
Meat (all types): wrap in polythene bags and place on the glass shelf above
the vegetable drawer(s)
For safety, store in this way only one or two days at the most.
Cooked foods, cold dishes, etc: these should be covered and may be placed
on any shelf.
Fruit and vegetables: these should be thoroughly cleaned and placed in the
special drawer(s) provided.
17
Installation
Electrical Connection
Any electrical work required to install this appliance should be carried
out by a qualified electrician or competent person.
WARNING – THIS APPLIANCE MUST BE EARTHED
The manufacturer declines any liability should these safety measures not
be observed.
Before switching on, make sure the electricity supply voltage is the same as
that indicated on the appliance rating plate. The rating plate is inside, on the
left.
The appliance is supplied with a 13 amp plug fitted. In the event of having
to change the fuse in the plug supplied, a 13 amp ASTA approved (BS 1362)
fuse must be used.
Important!
The wires in the mains lead are
coloured in accordance with the fol-
lowing code:
Green and Yellow Earth
Blue Neutral
Brown Live
As the colours of the wires in the
mains lead of this appliance may not
correspond with the coloured mark-
ings identifying the terminals in your
plug, proceed as follows:
1. The wire coloured green and yellow must be connected to the terminal
marked with the letter “E” or by the earth symbol or coloured green and yel-
low.
2. The wire coloured blue must be connected to the terminal marked “N” or
coloured black.
3. The wire coloured brown must be connected to the terminal marked “L” or
coloured red.
4. Upon completion there must be no cut, or stray strands of wire present and
the cord clamp must be secure over the outer sheath.
Warning! A cut-off plug inserted into a 13 amp socket is a serious safety
(shock) hazard. Ensure that the cut-off plug is disposed of safely.
D207
GREEN & YELLOW
13 AMP. FUSE
BROWN
CORD CLAMP
BLUE
13 AMP
D338
 Loading...