

DE POCKET SPANNUNGSWANDLER BEDIENUNGS- UND SICHERHEITSHINWEISE 5
GB POCKET VOLTAGE CONVERTER OPERATION AND SAFETY NOTES 15
FR CONVERTISSEUR DE TENSION DE POCHE INSTRUCTIONS D‘UTILISATION ET CONSIGNES DE SÉCURITÉ 23
IT TRASFORMATORE DI TENSIONE TASCABILE INDICAZIONI PER L’USO E PER LA SICUREZZA 33
CZ KAPESNÍ MĚNIČ NAPĚTÍ POKYNY PRO OBSLUHU A BEZPEČNOSTNÍ POKYNY 43
SK VRECKOVÝ TRANSFORMÁTOR NAPÄTIA POKYNY PRE OBSLUHU A BEZPEČNOSTNÉ POKYNY 51
97110
POCKET
SPANNUNGS
WANDLER
Klappen Sie vor dem Lesen die Seite mit den Abbildungen aus und machen Sie sich
anschließend mit allen Funktionen des Gerätes vertraut.
Before reading, unfold the page containing the illustrations and familiarise yourself
with all functions of the device.
Avant de lire le mode d‘emploi, ouvrez la page contenant les illustrations et familiarisez-vous ensuite avec toutes les fonctions de l‘appareil.
Prima di leggere aprire la pagina con le immagini e prendere confidenza con le
diverse funzioni dell’apparecchio.
Před čtením si otevřete stranu s obrázky a potom se seznamte se všemi funkcemi
přístroje.
SystemPartnerAutoteile GmbH & Co. KG
Benzstr. 1 I 76185 Karlsruhe
SystemPartnerAutoteile GmbH & CO.
Industrie Str. 31 I CH-8112 Otelfingen
SPA Systems s.r.o. Pod Visnovkou 1661/37
140 00 Praha 4 - Krc - CZ
www.aeg-automotive.com
AEG is a registered trademark used under license from AB Electrolux (publ)
Stand der Informationen: 05 / 2011 • Ident.-No.: 97110112010
Si 150
Pred čítaním si odklopte stranu s obrázkami a potom sa oboznámte so všetkými
funkciami prístroja.
D Bedienungs- und Sicherheitshinweise Seite 5
GB Operation and Safety Notes Page 15
FR Instructions d‘utilisation et consignes de sécurité Page 23
IT Indicazioni per l’uso e per la sicurezza Pagina 33
CZ Pokyny pro obsluhu a bezpečnostní pokyny Strana 43
SK Pokyny pre obsluhu a bezpečnostné pokyny Strana 51
9 8
1 2
Si 150
Pocket Spannungswandler
Power Inverter
230V
12V
A
9
8
47 56
3
10
B

Inhaltsverzeichnis
Einleitung
Bestimmungsgemäßer Gebrauch ................................................................................................................Seite 6
Lieferumfang .....................................................................................................................................................Seite 6
Teilebeschreibung ............................................................................................................................................ Seite 7
Technische Daten ............................................................................................................................................. Seite 7
Technische Merkmale .....................................................................................................................................Seite 7
Sicherheit
Allgemeine Sicherheitshinweise ..................................................................................................................Seite 9
Vor der Inbetriebnahme ....................................................................................................................... Seite 10
Bedienung
Externe Geräte anschließen ..........................................................................................................................Seite 11
Spannungswandler ein-/ausschalten, Modus wechseln ...................................................................... Seite 11
Sicherungen am Sicherungshalter auswechseln ....................................................................................Seite 12
Fehlersuche ......................................................................................................................................................Seite 12
Wartung und Pflege ................................................................................................................................Seite 13
Service ..................................................................................................................................................................Seite 13
Garantie ..............................................................................................................................................................Seite 13
Entsorgung .......................................................................................................................................................Seite 13
5 D
Einleitung
In dieser Bedienungsanleitung / am Gerät werden folgende Piktogramme verwendet:
Bedienungsanleitung lesen! Innengebrauch
Warn- und Sicherheitshinweise
beachten!
Lebens- und Unfallgefahr für
Kleinkinder und Kinder!
Pocket Spannungswandler Si 150
Einleitung
Machen Sie sich vor der ersten Inbe-
triebnahme mit allen Funktionen des
Gerätes vertraut und informieren Sie
sich über den richtigen Umgang mit dem Gerät.
Lesen Sie hierzu die nachfolgende Bedienungsanleitung sorgfältig. Bewahren Sie diese Anleitung
gut auf. Händigen Sie alle Unterlagen bei Weitergabe des Gerätes an Dritte ebenfalls aus.
Bestimmungsgemäßer Gebrauch
Der Spannungswandler ist für die Umwandlung
von Gleichstrom mit einer Spannung von 12 V in
Wechselstrom mit einer Spannung von 230 V und
einer Frequenz von 50 Hz und/oder von 5-V
Gleichspannung und einer Stromstärke von 500 mA
vorgesehen. Überprüfen Sie das Gerät immer auf
kontinuierliche maximale Ausgangsleistung
(siehe auch Kapitel „Fehlersuche“). Der Spannungswandler ist ausschließlich für den privaten
Gebrauch in trockenen Räumen zugelassen. Jede
andere Verwendung oder Veränderung des Gerätes gilt als nicht bestimmungsgemäß und birgt
erhebliche Gefahren. Für Schäden, die aus
bestimmungswidriger Verwendung entstanden
sind, übernimmt der Hersteller keine Haftung.
Schutzklasse II
Entsorgen Sie Verpackung und
Gerät umweltgerecht!
Dieses Gerät kann für die folgenden Arten von
externen Elektrogeräten verwendet werden:
- Anschluss an eine 12 V-Stromquelle mit
mindestens 15 A
- Gewöhnliche Elektrogeräte wie Laptop,
Tischrechner, Fernseher, MP3-Player, PDA
oder Batterieladegerät für Handys, Computer
- Gesamtleistung max. 150 W
Nicht erlaubt ist die Verwendung des Gerätes
unter folgenden Umständen und mit folgenden
Arten von externen Elektrogeräten:
- Anschluss an eine Stromquelle mit einer
Spannung von 6, 24 oder 230 V
- Externe Geräte, die Hitze erzeugen wie beispielsweise Haartrockner, elektrische Decken,
Kaffeemaschinen, Mikrowellenherde, Toaster
- Gesamtleistung > 150 W
Lieferumfang
Kontrollieren Sie unmittelbar nach dem Auspacken den Lieferumfang. Prüfen Sie das Gerät
sowie alle Teile auf Beschädigungen. Nehmen Sie
ein defektes Gerät oder Teile nicht in Betrieb.
1 Pocket Spannungswandler Si 150
1 iPod-Ladekabel (nicht geeignet
für iPod Shuffle)
1 Bedienungsanleitung
6 D
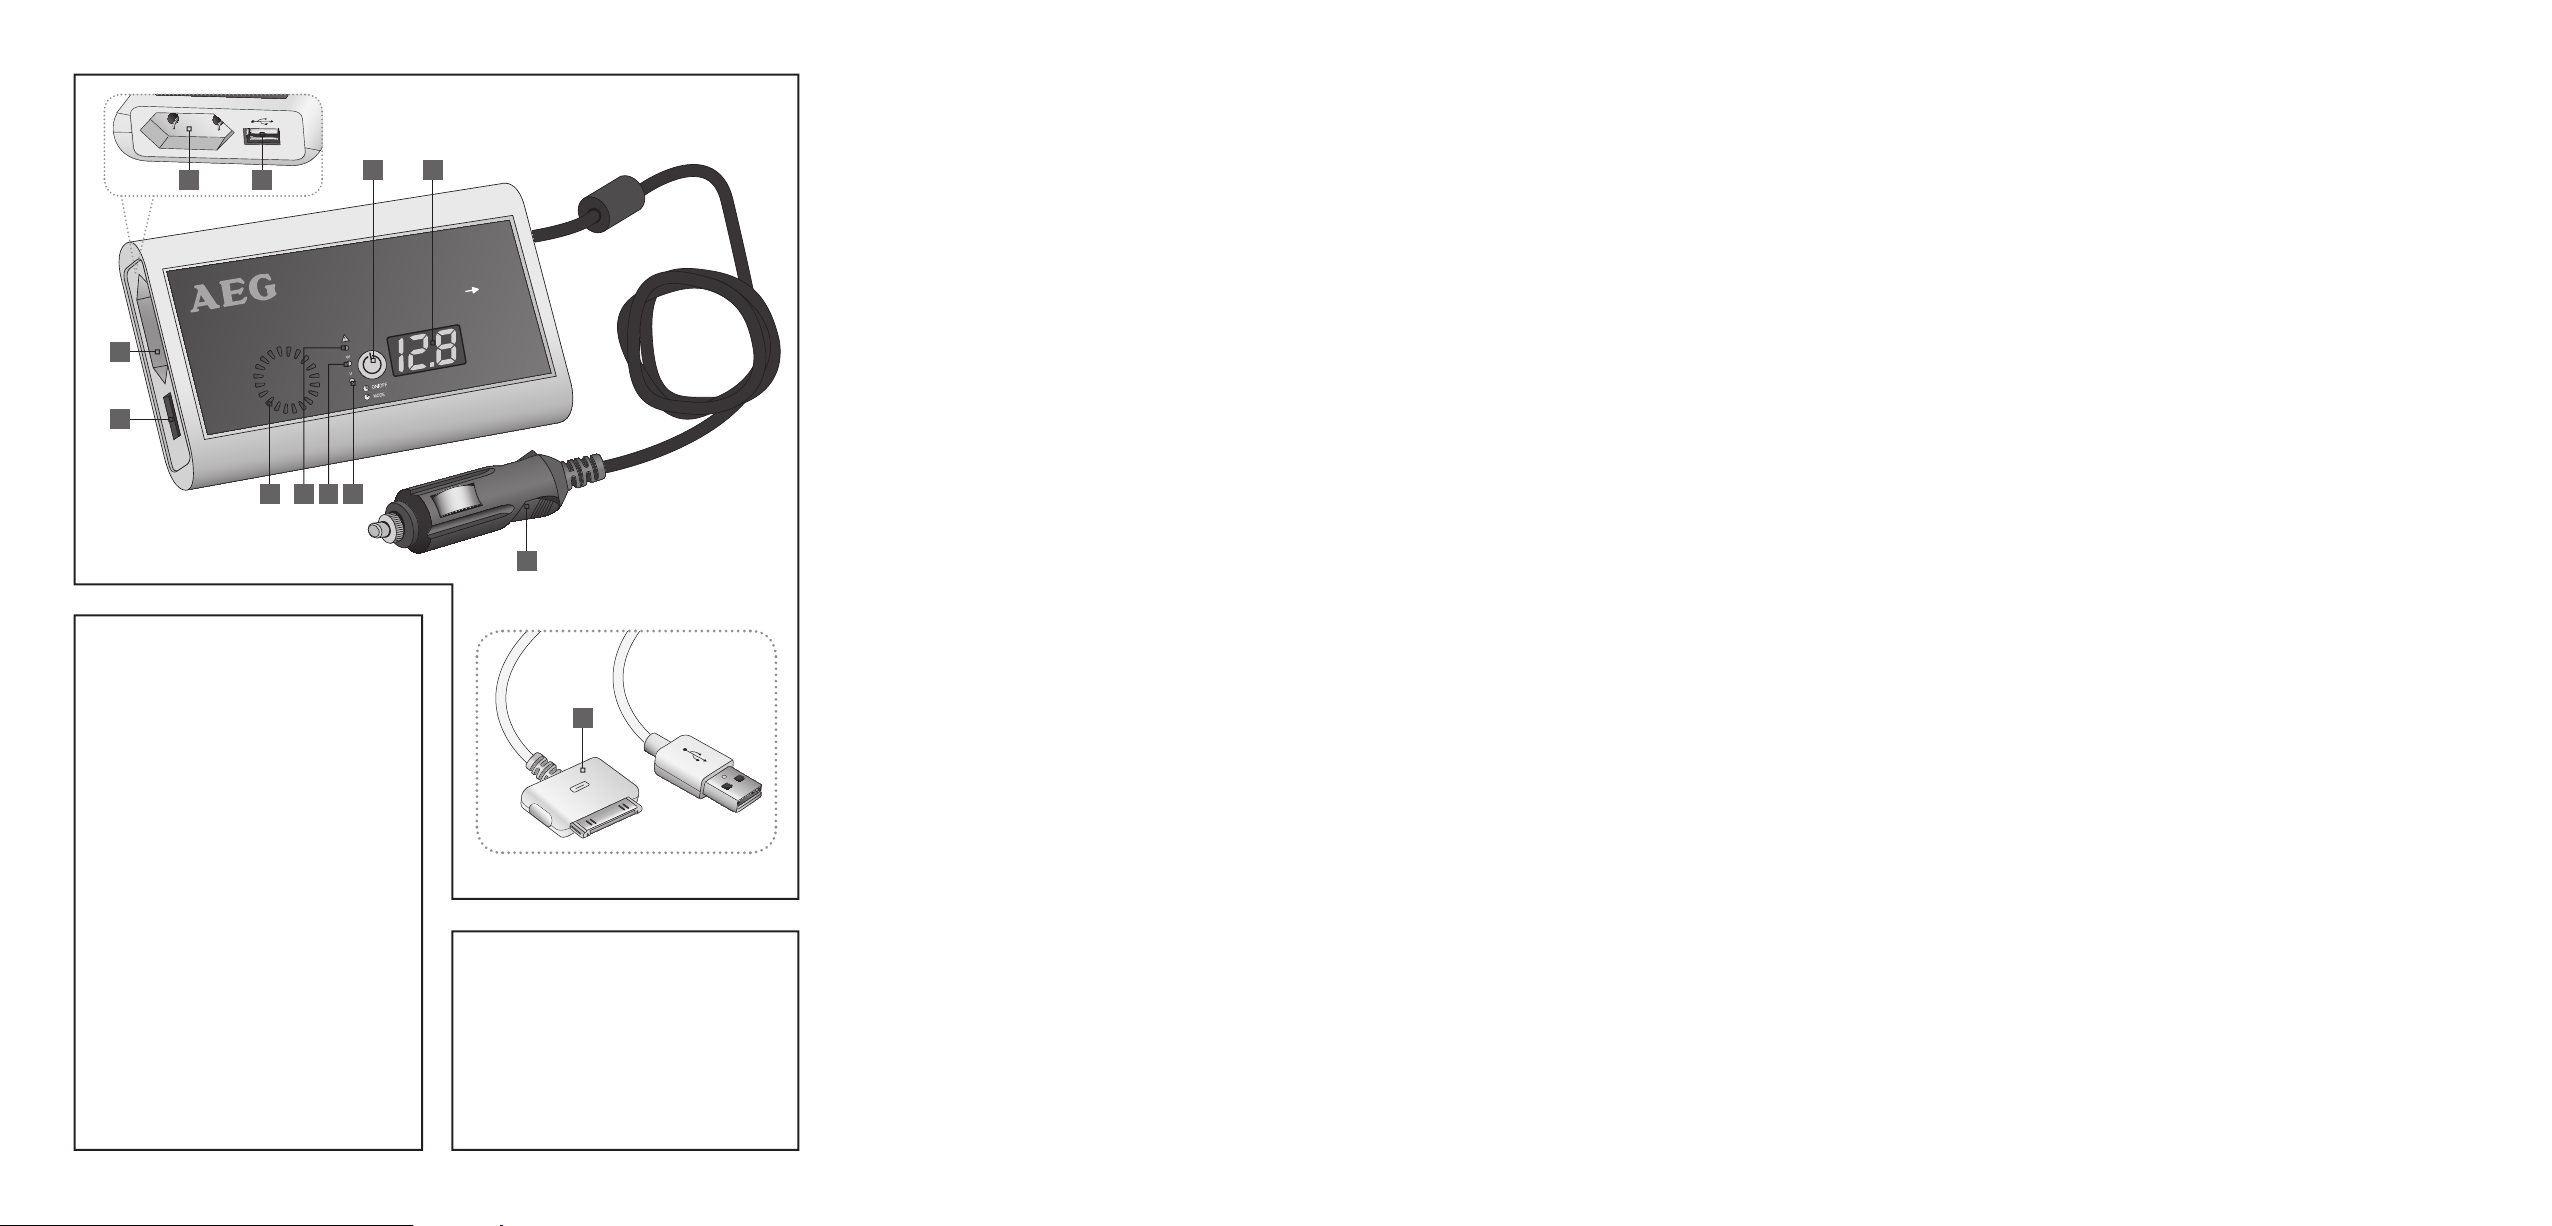
Teilebeschreibung
1
Taste EIN/AUS/MODE
2
LED-Anzeige
3
Netzkabel mit 12 V-Stecker
4
LED-Anzeige „Volt“ (V)
5
LED-Anzeige „Watt“ (W)
6
LED-Anzeige „Fehler“
7
Lüftungsschlitze
8
USB-Ausgang 5 V
9
Ausgang 230 V AC 50 Hz, 150 W
10
iPod-Ladekabel
Technische Daten
Nenneingangsspannung: 10,5 - 15,5 V /
15 A
Ausgangsleistung: 150 W
Spitzenausgangsleistung: 300 Watt (für
0,1 Sek.)
Ausgangsspannung: 230 V ~
Wirkungsgrad: > 80 %
Ausgangsfrequenz: 50 Hz
USB-Ausgang: 5,0 V
/ 0,5 A
Einleitung
Schutzklasse: II /
Sicherung: 15 A
Umgebungstemperatur: 0 °C - 35 °C
Unterspannungsschutz: 10 V +/– 0,5 V
Überspannungsschutz : 15,5 V
+/– 0,5 V
Überlastungsschutz: 180 V, +/– 0,5 V
Überhitzungsschutz: > 65 °C
Abmessungen: 147 x 88 x 27 mm
(L x B x H)
Gewicht: 280 g
Technische Merkmale
Der Spannungswandler weist einige technische
Merkmale auf, um sich selbst und/oder die
angeschlossenen Geräte zu schützen.
Warnungs- und Schutzanzeigen
Die Fehler sind generell wie folgt erkennbar:
- Rote LED-Anzeige
6
- Piep- oder Summton
- Wartungscode (A) oder Schutzcode (P) in der
LED-Anzeige
2
Code Rote LED-Anzeige Bedeutung Warnungstyp
A - 1
Leuchtet
Überlastungswarnung
PieptonA - 2 Überhitzungswarnung
A - 3 Unterspannungswarnung
P - 1
P - 2 Überhitzungsschutz
Leuchtet
Überlastungsschutz
Kurzschlussschutz
Summton
P - 3 Unterspannungsschutz
P - 4 Überspannungsschutz
Überspannungsschutz:
Falls die Eingangsspannung über 15,5 V (+/– 0,5 V)
liegt, ertönt ein Summton, die rote LED-Anzeige
leuchtet, und in der LED-Anzeige
2
wird P-4
angezeigt.
Der Spannungswandler stoppt die Leistungsinvertierung, und das externe Gerät wird ausgeschaltet. Wenn die Spannung unter 14,5 V
(+/– 0,5 V) fällt, nimmt der Spannungswandler
6
den normalen Betrieb wieder auf.
Unterspannungsschutz (Batterieanzeigefunktion, Schutz der Fahrzeugbatterie):
Falls die Eingangsspannung unter 11 V (+/– 0,5 V)
liegt, ertönt ein Piepton, die rote LED-Anzeige
6
7 D

Einleitung
leuchtet, und in der LED-Anzeige 2 wird A-3
angezeigt.
Falls die Eingangsspannung unter 10,5 V (+/– 0,5 V)
liegt, ertönt ein Summton, die rote LED-Anzeige
leuchtet und in der LED-Anzeige
2
wird P-3
6
angezeigt.
Der Spannungswandler stoppt die Leistungsinvertierung, und das externe Gerät wird ausgeschaltet.
Wenn die Spannung über 12 V (+/– 0,5 V) ansteigt,
nimmt der Spannungswandler den normalen
Betrieb wieder auf.
Kurzschlussschutz:
Falls das angeschlossene Gerät einen Kurzschluss
verursacht, ertönt ein Summton, die rote LED-An-
6
zeige
leuchtet und die LED-Anzeige zeigt P-1.
Überhitzungsschutz:
Falls die Temperatur im Inneren des Gerätes über
60 °C liegt, ertönt ein Piepen, die rote LED-An-
6
zeige
leuchtet, und in der LED-Anzeige 2
wird A-2 angezeigt.
Falls die Temperatur im Inneren des Gerätes über
68 °C liegt, ertönt ein Summton, die rote LEDAnzeige
6
leuchtet, und in der LED-Anzeige 2
wird OFF angezeigt. Der Spannungswandler
stoppt die Leistungsinvertierung, und das externe Gerät wird ausgeschaltet.
Sinkt die Temperatur unter 50 °C, drücken Sie
ca. 3 Sekunden die Taste EIN/AUS/MODE
1
, um
den Spannungswandler neu zu starten.
Überlastungsschutz:
Falls die Last über 160 W (+/– 10 W) liegt, ertönt
ein Piepton, die rote LED-Anzeige
und in der LED-Anzeige
2
6
leuchtet,
wird A-1 angezeigt.
Falls die Last über 180 W (+/– 10 W) liegt, ertönt
ein Summton, die rote LED-Anzeige
und in der LED-Anzeige
2
wird P-1 an.
6
leuchtet,
Der Spannungswandler stoppt die Leistungsinvertierung und das externe Gerät wird ausgeschaltet.
Technologie
Die Umwandlung des Gleichstroms mit einer
Spannung von 12 V in Wechselstrom mit einer
Spannung von 230 V erfolgt in zwei Stufen.
Stufe 1:
Das Gerät erhöht den eingehenden Gleichstrom
auf eine Spannung von 300 V.
Stufe 2:
Diese Spannung wird dann in Wechselstrom mit
einer Spannung von 230 V und einer Frequenz
von 50 Hz umgewandelt.
Für diesen Prozess wird eine Art Transistor verwendet, der aus hochintegrierten Chips namens
MOSFET (Metalloxid-Halbleiter-Feldeffekttransistor) besteht.
Ausgangsspannung, Wellenform
Die Ausgangsspannung in diesem Gerät wird als
eine modifizierte Sinuswelle reproduziert. Diese
hat eine gestufte Form, die fast genau dieselben
Charakteristiken aufweist, wie eine reine Sinuswelle. Diese modifizierte Sinuswelle wird von
den meisten modernen externen Geräten mit
einer Spannung von 230 V anerkannt. Dazu
gehören Stromversorgungseinrichtungen in
elektronischen Komponenten, Transformatoren
und/oder kleine Motoren. Die von diesem Spannungswandler erzeugte modifizierte Sinuswelle
verwendet eine Effektivspannung von 230 V. Die
meisten digitalen und analogen Voltmeter können die Effektivspannung nicht lesen und zeigen
einen Wert an, der um 20 bis 30 Volt unter dem
tatsächlichen Wert der Ausgangsspannung liegt.
Um ein genaues Messergebnis zu erzielen, verwenden Sie ein Messgerät, das für die Messung
der Effektivspannung geeignet ist.
WARNUNG!
Einige externe Geräte, besonders Radios und/
oder andere Audio- und aufladbare Geräte
können den Spannungswandler und/oder das
angeschlossene Gerät beschädigen.
Überprüfen Sie, ob das an den Spannungswandler angeschlossene externe Gerät “brummt”, sich
stark erwärmt oder sich während der ersten paar
Minuten übermäßig erhitzt. Trennen Sie in
8 D

Einleitung / Sicherheit
diesem Fall die externen Geräte und alle Kabel
sofort ab.
Dies bedeutet, dass die Geräte nicht kompatibel
sind und nicht miteinander verwendet werden
können. Sollte Ihnen etwas unklar sein, wenden
Sie sich an Fachhändler Ihres externen Geräts.
Dieses Problem tritt bei modernen und/oder
hochwertigen Geräten nicht auf, da diese in der
Lage sind, modifizierte Sinuswellen zu erfassen
und zu verarbeiten.
Softstarttechnologie
Der Spannungswandler ist mit Softstarttechnologie ausgestattet, die dazu beiträgt, dass die
Spannungsumwandlung in Stufen erfolgt. Auf
diese Weise können Geräte verwendet werden,
die einen höheren Anlassstrom benötigen. Durch
die Erhöhung der Ausgangsspannung in Stufen
wird eine Beschädigung des Spannungswandlers,
der 12-V-Eingangsbuchse und der angeschlossenen Geräte verhindert.
Sicherheit
Allgemeine
Sicherheitshinweise
WARNUNG!
weise und Anweisungen. Versäumnisse bei der
Einhaltung der Sicherheitshinweise und Anweisungen können elektrischen Schlag, Brand und/
oder schwere Verletzungen verursachen.
Bewahren Sie alle Sicherheitshinweise und
Anweisungen für die Zukunft auf.
LEBENS- UND UNFALLGEFAHR
unbeaufsichtigt mit dem Verpackungsmate-
rial. Es besteht Erstickungsgefahr.
Dieses Gerät ist nicht dafür bestimmt, durch
Personen (einschließlich Kinder) mit eingeschränkten physischen, sensorischen oder
geistigen Fähigkeiten oder mangels Erfahrung und/oder mangels Wissen benutzt zu
Lesen Sie alle Sicherheitshin-
FÜR KLEINKINDER UND KINDER! Lassen Sie Kinder niemals
werden, es sei denn, sie werden durch eine
für ihre Sicherheit zuständige Person beaufsichtigt oder erhielten von ihr Anweisungen,
wie das Gerät zu benutzen ist. Kinder sollten
beaufsichtigt werden, um sicherzustellen,
dass sie nicht mit dem Gerät spielen.
Halten Sie Gerät von Kindern fern. Kinder
sind nicht in der Lage, die möglichen Risiken
bei der Handhabung von Elektrogeräten zu
verstehen und zu erkennen.
Halten Sie das Gerät immer von Regen und
Feuchte fern. In Elektrogeräte eingedrungenes Wasser bedeutet Lebensgefahr durch
Stromschlag.
Achten Sie darauf, dass alle Stecker und
Netzkabel von Feuchtigkeit frei sind. Schalten Sie das Gerät nie mit feuchten oder
nassen Händen ein.
Verwenden Sie das Gerät nur, wenn Netzka-
bel und Gehäuse von Beschädigungen frei
sind.
Achten Sie immer darauf, dass die Stromka-
bel gesichert sind.
Verwenden Sie ein Netzkabel nicht, um das
Gerät zu tragen oder daran zu ziehen. Beschädigte Netzkabel bedeuten Lebensgefahr
durch Stromschlag.
Ziehen Sie immer am Stecker, nie am Netz-
kabel, um das Gerät von der Spannungsquelle
zu trennen.
Falls Kabel durch Wände mit scharfen
Kanten, beispielsweise Metallwände, verlegt
werden, verwenden Sie leere Rohre oder
Rohrleitungen, um eine Beschädigung der
Kabel zu vermeiden.
Verlegen Sie die Hauptkabel von 230 V nie
zusammen mit den Gleichstromkabeln von
12 V DC in einem Rohr (einer Rohrleitung).
Verlegen Sie die Netzkabel so, dass man
nicht darüber stolpern und die Kabel
beschädigen kann.
Verlegen Sie die Kabel nicht in der Nähe von
leitfähigen Materialien. Falten Sie die Kabel
nicht und schützen Sie sie gegen Beschädigungen.
Beschädigte Kabel müssen unverzüglich
ersetzt werden.
9 D

Vermeiden Sie Kurzschlüsse und Brücken mit
Fremdkörpern zwischen den Ein- und Ausgängen des Spannungswandlers. Verwenden
Sie nur Schutzkontaktstifte oder Gabelanschlussstecker, um Geräte an die Ausgangsbuchsen anzuschließen. Selbst wenn die
eingebaute Sicherung ausgelöst wird, bleiben einige Teile des Geräts unter Last.
Achten Sie darauf, dass das Gerät immer an
einem sicheren Ort verwendet wird.
Wählen Sie den Aufstellort des Gerätes sorg-
fältig aus.
Die Instandhaltungsarbeiten müssen von
einem qualifizierten Elektriker durchgeführt
werden.
Nehmen Sie das Gerät nicht in Betrieb, wenn
es beschädigt ist.
Setzen Sie das Gerät
- keinen extremen Temperaturen,
- keinen starken Vibrationen,
- keinen starken mechanischen Beanspruchungen,
- keiner direkten Sonneneinstrahlung,
- keiner Feuchtigkeit aus.
Andernfalls droht eine Beschädigung des
Gerätes.
Beachten Sie, dass Beschädigungen durch
unsachgemäße Handhabung, Nichtbeachtung der Bedienungsanleitung oder Eingriff
durch nicht autorisierte Personen von der
Garantie ausgeschlossen sind.
Nehmen Sie das Gerät keinesfalls auseinander.
Durch unsachgemäße Reparaturen können
erhebliche Gefahren für den Benutzer entstehen.
Lassen Sie Reparaturen nur von Fachkräften
durchführen.
Vor der Inbetriebnahme
nungswandler mit derartigen Fahrzeugen nicht
verwenden.
Stecken Sie den 12 V-Stecker
3
des Spannungswandlers in die 12 V-Stromquelle mit einer
Stromstärke von mindestens 15 A. Trennen Sie
den 12 V-Stecker
3
immer von der Stromquelle,
wenn Sie den Spannungswandler nicht verwenden.
Nach dem Anschließen die EIN/AUS/MODE
1
Taste
für ca. 3 Sek. gedrückt halten nun
leuchtet die LED-Anzeige auf:
Grüne LED-Anzeige
4 5
= Gerät ist betriebsbereit
Rote LED-Anzeige
den 12 V-Stecker
6
= Fehler! Überprüfen Sie
3
bzw. sehen Sie im Kapitel
„Fehlersuche“ nach.
WARNUNG!
Trennen Sie den Spannungswandler immer von
der 12 V-Buchse des Fahrzeugs ab, bevor Sie den
Anlasser einschalten.
Schließen Sie während der Fahrt nie Geräte an
den Spannungswandler an und bedienen Sie
auch eventuell angeschlossene Geräte nicht.
Vergewissern Sie sich, dass keine Geräte an den
Spannungswandler angeschlossen sind, wenn
Sie diesen an die 12 V-Spannungsquelle, z. B. die
Zigarettenanzünder- oder 12 V-Buchse in einem
Auto, anschließen.
Hinweis: Falls die Stromversorgung unterbrochen wird, während sich der Spannungswandler
in Betrieb befindet, müssen Sie ihn erneut starten.
Sie können dies tun, indem Sie den Spannungswandler zuerst abtrennen und dann erneut
anschließen. Nach dem Anschließen die EIN/
AUS/MODE Taste
1
für ca. 3 Sek. gedrückt halten, die LED-Anzeige leuchtet auf und der
Selbsttest wird, wie oben beschreiben, durchgeführt.
Bevor Sie den Spannungswandler anschließen,
müssen Sie die Anschlüsse an der Batterie des
Fahrzeugs überprüfen.
Falls der Plus-Pol (+) der Fahrzeugbatterie mit
dem Chassis verbunden ist, dürfen Sie den Span-
10 D

Bedienung / Fehlersuche
Bedienung
Externe Geräte anschließen
Führen Sie den Stecker des externen Geräts
in den Ausgang 230 V
wandler ein und/oder schließen Sie das externe USB-Gerät am USB-Ausgang
Schalten Sie den Spannungswandler ein,
indem Sie die Taste EIN/AUS/MODE
ca. 3 Sekunden gedrückt halten. Nach erfolgreich durchgeführtem Selbsttest, zeigt
die grüne LED
des Spannungswandlers an. Sollte die rote
LED-Anzeige
6
das Kapitel „Fehlersuche“.
Schalten Sie nun die mit dem Spannungs-
wandler verbundenen (externen) Geräte ein.
Hinweis: Beträgt die Leistungsentnahme 35 W
oder mehr, schaltet sich der eingebaute Lüfter
sofort ein um eine Überhitzung des Spannungswandlers zu vermeiden. Bei geringerer Leistungsentnahme (< 35 W), ist das Einschalten des Lüfters temperaturabhängig. Sie können beide
Ausgänge
8
und 9 gleichzeitig verwenden.
Die Gesamtnennleistung für beide externe Geräte, darf 150 W nicht übersteigen.
Die Nennleistung eines externen Geräts wird auf
dem Typenschild angezeigt, das sich an einer
bestimmten Stelle auf diesem externen Gerät
befindet. Externe Geräte, wie Elektromotoren,
Bohrer, Elektrosägen, Kühlschränke und Musikanlagen, weisen normalerweise beim Start eine
größere Nennleistung auf, als die auf dem Typenschild angegebene. Falls die Nennleistung
nur in Ampere angegeben ist, multiplizieren Sie
den Wert in Ampere mit einem Faktor von 230,
um die Leistung in Watt zu erhalten.
Zum Beispiel: 0,4 A x 230 = 92 Watt
Ausgang 230 V
9
Verwenden Sie nur externe Geräte, die entweder
mit Schutzkontaktstiften oder europäischen
Gabelanschlusssteckern ausgestattet sind.
9
am Spannungs-
8
an.
1
für
5
die Betriebsbereitschaft
aufleuchten, lesen Sie bitte
USB-Ausgang
8
Verbinden Sie das externe USB-Gerät mit dem
USB-Ausgang
8
und schalten Sie es dann ein.
Der USB-Ausgang dieses Spannungswandlers
liefert einen Gleichstrom von 5 V für externe
USB-Geräte (z. B. Lampen, Ventilatoren, Radios).
Der USB-Ausgang ist immer ausgeschaltet, wenn
der Spannungswandler an die 12 V-Eingangsbuchse angeschlossen ist.
WARNUNG!
Der USB-Ausgang am Spannungswandler ist
nicht für die Datenübertragung vorgesehen.
Schließen Sie keine Memory Sticks, MP3-Player
oder ähnliche externe Datenspeichergeräte an.
Schließen Sie keine Datenübertragungskabel an
den USB-Ausgang an!
Spannungswandler ein-/
ausschalten, Modus wechseln
Halten Sie die EIN/AUS/MODE Taste 1 für 3
Sekunden gedrückt, um den Spannungswandler einzuschalten. Der Spannungswandler führt nun automatisch einen
Selbsttest durch. Hierbei werden alle LEDs,
die Lüfterfunktion sowie der Warnsummer
für einen kurzen Zeitraum von ca. 2 Sekun-
den aktiviert.
Nach dem Selbsttest ist der Spannungs wandler betriebsbereit und die grüne LED-
Anzeige
in der LED Anzeige
nommene Ausgangsleistung in Watt. Sofern
kein Verbraucher an der 230 Volt Ausgangs buchse
Anzeige
Zum Ausschalten des Spannungswandlers
betätigen Sie erneut die EIN/AUS/MODE Ta-
ste
ler schaltet sich aus und alle Anzeigen erlö-
schen.
Drücken Sie während dem Betrieb des Span-
nungswandlers die Taste EIN/AUS/MODE
5
leuchtet. Gleichzeitig erscheint
2
die momentane ent-
9
angeschlossen ist, zeigt die LED-
2
0 – Watt an.
1
für 3 Sekunden. Der Spannungswand-
1
11 D

nur kurz (1 Sekunde), so wechselt die LED
Anzeige
2
zwischen dem Anzeigemodus
Watt und Volt.
Sicherungen am Sicherungshalter
auswechseln:
Trennen Sie den Spannungswandler vom
Versorgungsnetz, indem Sie den 12-Volt Ste-
3
cker
aus der 12 Volt Bordnetzsteckdose
ziehen. Trennen Sie auch eventuell angeschlossene Verbraucher von der 230 Volt
ab.
9
und der USB Ausgangs-
8
und 9.
Ausgangsbuchse
buchse
8
Lösen Sie die Halteschraube am Sicherungs-
halter, in dem Sie diese gegen den Uhrzeigersinn mithilfe eines Kreuzschlitzschraubendrehers herausdrehen. Heben Sie nun die
Abdeckkappe durch leichten Zug nach oben
vom Sicherungshalter ab.
Entfernen Sie die defekte Sicherung und er-
setzen Sie sie gegen eine neue Sicherung mit
gleicher Amperezahl. (max. 20 Ampere Sicherung). Achtung: die Sicherung sitzt fest
im Sicherungshalter, sodass es empfehlenswert ist, diese mithilfe eines geeigneten Auszugswerkzeuges zu entnehmen.
Schließen Sie nun den Deckel des Siche-
rungshalters und ziehen die Kreuzschlitzschraube des Deckels fest an.
Verbinden Sie nun den Spannungswandler
ohne angeschlossene Verbraucher wieder mit
der Bordspannungssteckdose und schalten
diesen wie beschrieben ein.
Fehlersuche
Trennen Sie in einem der aufgelisteten Fälle
den Spannungswandler von der 12 V-Stromquelle und trennen Sie die externen Geräte
von den Ausgängen
= Fehler = Mögliche Ursache
= Abhilfe
Keine LED-Anzeige leuchtet.
Der 12 V-Stecker 3 ist nicht korrekt in die
Buchse der Stromquelle eingesteckt.
Überprüfen Sie alle Anschlüsse.
Keine Eingangsspannung; der 12 V-Anschluss
führt keine Spannung.
Schalten Sie den Anlasser ein.
Fehlerhafte Sicherung
Ersetzen Sie die Sicherung.
LED-Anzeige 6 leuchtet rot.
Die Temperatur liegt über 65 °C.
Schalten Sie den Spannungswandler sofort
aus. Überprüfen Sie, ob der Spannungswandler
ausreichend gekühlt wird und die Lüftungsschlitze
7
frei sind.
Lassen Sie das Gerät auskühlen und sorgen
Sie für ausreichend Belüftung.
Warten Sie 10 Minuten lang, bevor Sie den
Spannungswandler erneut einschalten.
Die Eingangsspannung ist zu hoch; Über-
spannungsschutz.
Schalten Sie den Spannungswandler sofort
aus. Überprüfen Sie die Eingangsspannung.
Die Eingangsspannung ist zu niedrig; Unter-
spannungsschutz.
Schalten Sie den Spannungswandler sofort
aus.
Überprüfen Sie den Anschluss, und laden Sie
die Batterie.
Falls die Spannung über 12 V liegt, starten
Sie den Spannungswandler erneut.
Falscher Anschluss der Pole; Kurzschluss-
schutz.
Schalten Sie den Spannungswandler sofort
aus.
Überprüfen Sie alle Anschlüsse, Kabel und
Geräte.
Führen Sie, falls erforderlich, die nötigen
Einstellungen durch.
Die Nennleistung liegt über 150 W; Strom-
überlastungsschutz.
Verwenden Sie Geräte, deren Nennleistung
150 W nicht übersteigt.
12 D
Service / Garantie / Entsorgung
Kurzschluss im Gerät.
Überprüfen Sie die angeschlossenen Geräte.
Verwenden Sie betroffene Geräte nicht weiter.
= Fehler
= Abhilfe
Bei TV-Betrieb und/oder Tonanlagen und/
oder -geräten:
Schneebild, wackeliges Bild, summen,
klopfen oder schwirren.
Stellen Sie den Spannungswandler so weit
wie möglich vom Fernseher auf.
Überprüfen Sie den Antennenanschluss und
ihre Einstellung. Entfernen Sie das Antennenkabel weiter vom Spannungswandler. Verwenden Sie ein abgeschirmtes Antennenkabel.
Die modifizierte Sinuswelle des Spannungswandlers kann durch das angeschlossene
externe Gerät nicht ausreichend gefiltert
werden. Trennen Sie alle Kabel sofort ab.
Die einzige verfügbare Lösung ist die Verwendung eines moderneren externen Geräts
bzw. eines Geräts mit einer höheren Leistung
mit ausreichend Filterkapazität.
Wartung und Pflege
Das Gerät ist wartungsfrei.
WARNUNG!
immer vom Netzstrom, bevor Sie Arbeiten zur
Pflege etc. durchführen.
Trennen Sie elektrische Geräte
ren. Damit wird die Sicherheit des Gerätes
sichergestellt und bleibt erhalten.
WARNUNG!
des Steckers oder der Anschlussleitung
immer von qualifiziertem Fachpersonal
ausführen. Damit wird die Sicherheit des
Gerätes sichergestellt und bleibt erhalten.
Garantie
Die allgemeinen Garantiebedingungen beziehen
sich auf Produktions- und Materialdefekte.
Falls das Gerät fehlerhaft ist, bringen Sie es
zu Ihrem Fachhändler bzw. der betreffenden
Verkaufsstelle zurück. Um die Garantie- und
Reparaturarbeiten am Gerät zu beschleunigen,
brauchen Sie Folgendes:
- Eine Kopie des Kassenzettels (Lieferschein,
Kassenbon) mit dem Erwerbsdatum.
- Grund für die Beschwerde oder Beschreibung des Fehlers.
Entsorgung
Die Verpackung besteht aus umweltfreundlichen
Materialien, die Sie über die örtlichen Recyclingstellen entsorgen können.
Werfen Sie Elektrogeräte
Lassen Sie den Austausch
nicht in den Hausmüll!
Schalten Sie das Gerät aus.
Ziehen Sie den 12 V-Stecker 3 aus dem
12-Anschluss Ihres Fahrzeugs.
Reinigen Sie das Gerät mit einem trockenen
Tuch. Verwenden Sie keinesfalls Lösungsmittel oder andere aggressive Reiniger.
Service
WARNUNG!
von qualifiziertem Fachpersonal reparie-
Lassen Sie das Gerät nur
Gemäß Europäischer Richtlinie 2002 / 96 / EC
über Elektro- und Elektronik-Altgeräte und Umsetzung in nationales Recht müssen verbrauchte
Elektrogeräte getrennt gesammelt und einer
umweltgerechten Wiederverwertung zugeführt
werden.
Über Entsorgungsmöglichkeiten für ausgediente
Elektrogeräte informieren Sie sich bitte bei Ihrer
Gemeinde- oder Stadtverwaltung.
13 D

Abbildungen können geringfügig vom Produkt
abweichen. Änderungen, die dem technischen
Fortschritt dienen, vorbehalten. Dekoration nicht
enthalten.
14

Table of Contents
Introduction
Intended use ......................................................................................................................................................Page 16
Scope of delivery ............................................................................................................................................. Page 16
Part description ................................................................................................................................................ Page 16
Technical Data...................................................................................................................................................Page 17
Technical characteristics ................................................................................................................................ Page 17
Security
General safety guidelines .............................................................................................................................. Page 18
Before start-up ............................................................................................................................................ Page 19
Operation
Attach external devices .................................................................................................................................Page 20
Switch on / o the voltage converter, change mode ............................................................................ Page 21
Replacing fuses in the fuse holder .............................................................................................................Page 21
Error tracing ...................................................................................................................................................Page 21
Maintenance and care ...........................................................................................................................Page 22
Service ..................................................................................................................................................................Page 22
Warranty ............................................................................................................................................................Page 22
Disposal ............................................................................................................................................................... Page 22
15 GB
Introduction
In this operating manual / this device the following pictogram’s are used:
Internal use only
Read operating manual!
Observe warning- and safety
guidelines!
Danger to life and danger of
accident for children!
Pocket Voltage converter Si 150
Introduction
Make yourself familiar with all functions
before first start-up of the equipment
and gain inform you about correct
handling the device. Read for this the following
operating manual carefully. Store this manual
carefully. Pass on all documents also when passing
on the device to third parties.
Intended use
The voltage converter is meant for the conversion
of DC current with a voltage of 12 V into AC with
a voltage of 230 V and a frequency of 50 Hz and /
or 5 V DC and amperage of 500 mA. Always check
for a continuous maximum output capacity
(see also chapter “Error tracing”. It is exclusively
certified for the private use. All other use or change
to the device is considered as not intended and
bears substantial dangers. The manufacturer does
not take over any liability for damages arising
from unintended use.
This device can be used for the following kind of
external electrical appliances:
- Connection to a 12 V powers supply with at
least15 A
- Common electrical appliances such as laptop,
table calculator, TV, MP3-player, PDA or battery
charger for mobile phones, computer.
- Total capacity max. 150 W
Protection Class II
Dispose the packaging environmentally friendly!
Not permitted is the use of the device under the
following circumstances and with the following
type of external electrical appliances:
- Connection to a power supply with a voltage
of 6, 24 or 230 V
- External appliances that produce heat, such
as hairdryer, electrical blankets, coffee
percolator, microwaves, toaster
- Total capacity > 150 W
Scope of delivery
After unpacking immediately check the scope of
delivery. Examine the device and all parts for
damages. Do not take a defective device or part
into operation.
1 Pocket Voltage converter Si 150
1 iPod-charging cable (not suitable for iPod
Shuffle)
1 Operating manual
Part description
1
Button ON / OFF / MODE
2
LED-Display
3
Power cable with 12 V-Plug
4
LED-Display „Volt“ (V)
5
LED-Display „Watt“ (W)
6
LED-Display „Error“
7
Cooler grid
8
USB-Output 5 V
9
Output 230 V AC 50 Hz, 150 W
10
iPod-charging cable
16 GB
Introduction
Technical Data
Nominal input voltage: 10,5 - 15,5 V / 15 A
Output capacity: 150 W
Peak output capacity: 300 Watt (for 0,1 Sec.)
Technical characteristics
The voltage converter has some technical
characteristics, in order to be protected and /
or the connected appliances.
Output voltage: 230 V ~
Efficiency: > 80 %
Output frequency: 50 Hz
USB-Output: 5,0 V
Protection class: II /
Fuse: 15 A
Ambient temperature: 0 °C - 35 °C
/ 0,5 A
Warning- and Protection display
In general errors are recognisable as follows:
- Red LED-display
6
- Peep- or butting tone
- Maintenance code (A) or protection code (P)
in the LED-display
2
Undervoltage protection: 10 V + / – 0,5 V
Overvoltage protection: 15,5 V
+ / – 0,5 V
Overload protection: 180 W, + / – 0,5 W
Overheating protection: > 65 °C
Dimensions: 147 x 88 x 27 mm
(L x W x H)
Weight: 280 g
Code Red LED-Display Meaning Type of Warning
A - 1
Lights up
Overload warning
Peep toneA - 2 Overheating warning
A - 3 Undervoltage warning
P - 1
P - 2 Overheating protection
Lights up
Overload protection
Short circuit protection
Buzzing tone
P - 3 Undervoltage protection
P - 4 Overvoltage protection
Overvoltage protection:
If the input voltage is above 15,5 V (+ / – 0,5 V), a
buzzing tone sounds, the red LED-Display
shines, and P-4 is displayed on the LED-display
6
2
The voltage converter stops converting and the
external device will be switched off. If the voltage
drops below 14,5 V (+ / – 0,5 V), the voltage
converter starts the normal operation again.
Undervoltage protection (Battery display function,
Protection of the vehicle battery):
If the input voltage is under 11 V (+ / – 0,5 V), a
beep tone sounds, the red LED-display
up and A-3 is indicated on the LED-Display
If the input voltage is under 10,5 V (+ / – 0,5 V), a
buzzing tone sounds, the red LED-display
.
up and P-3 is displayed on the LED-display
The voltage converter stops converting and the
external device will be switched off.
If the voltage climbs above 12 V (+ / – 0,5 V), the
voltage converter starts the normal operation
again.
Short circuit protection:
If the connected device causes a short circuit, a
6
lights
6
2
.
lights
2
.
17 GB

Introduction
buzzing tone sounds. The red LED-display 6
lights up and P-1is indicated on the LED-display.
Overheating protection:
If the temperature inside the device is over 60 °C,
a beep sounds, the red LED-display
A-2 is indicated in the LED-display
6
shines, and
2
.
If the temperature inside the device is over 68 °C,
a buzzing tone sounds, the red LED-display
shines, and OFF is indicated in the LED display
6
2
The voltage converter stops the converting, and
the external device is switched off.
If the temperature sinks below 50 °C, press the
button ON / OFF / MODE
1
for approx. 3 seconds
to re-start the voltage converter again
Overload protection:
If the load is above 160 W (+ / – 10 W), a beep tone
sounds, the red LED-display
6
lights up and A-1
is indicated in the LED-display.
If the load is above 180 W (+ / – 10 W), a buzzing
2
.
6
and P-1 is
tone sounds, the red LED-display
indicated in the LED-display
The voltage converter stops converting and the
external device is switched off.
Technology
The transformation of the direct current with a
voltage of 12 V into alternating current with a
voltage of 230 V follows place in two stages.
Stage 1:
The device increases the incoming direct current
to a voltage of 300 V.
Stage 2:
This voltage is then converted into alternating
current with a voltage of 230 V and a frequency
of 50 Hz per second.
For this process a kind of transistor is used, which
consists of a highly integrated chip named
MOSFET (metal oxide semiconductor field-effect
transistor).
which shows nearly exactly the same characteristics
like a pure sine wave. This modified sine wave is
recognized by most modern external devices
with a voltage of 230 V. Power supply systems in
electronic components belong to it, transformers
and / or small motors. The modified sine wave
produced by this voltage converter uses an
effective voltage of 230 V. Most digital and similar
voltmeters cannot read the effective voltage and
show a value, which is around 20 to 30 V below
.
the actual value of the output voltage. In order
to obtain an exact measurement result, please
use a measuring instrument suitable for the
measurement of the effective voltage.
WARNING!
Some external devices, particularly radios and / or
other audio and rechargeable devices can damage
the voltage converter and / or the attached
devices.
Examine whether the external equipment attached
to the voltage converter “hums”, warms up
strongly or heats up excessively during the first
few minutes. In this case separate the external
devices and all cables immediately.
This means in fact that the devices are not
compatible and cannot be used together. Should
something be unclear you, refer to the specialist
dealers of your external device.
This problem does not arise with modern and / or
high-quality devices, since these are able to
recognise and process modified sine waves.
Soft starting technology
The voltage converter is equipped with soft
starting technology, which contributes to the
fact that the voltage inversion takes place in
stages. In this way devices can be used, which
need a higher starter current. By increase of
the output voltage in stages, a damage of the
voltage inverter, the 12-V-input socket and the
attached devices is prevented.
Output voltage, wave shape
The output voltage in this device is reproduced
as a modified sine wave. This has a gradated form,
18 GB
Security
General safety guidelines
Introduction / Security
WARNING!
instructions. Omissions regarding the compliance
to safety guidelines and instructions can cause
electrical shock, fire and / or serious injuries.
Keep all safety guidelines and instructions for
future reference.
DANGER OF ACCIDENT AND LIFE
with the packing material. There is danger of
suffocation.
This device is not intended for use by persons
(including children) with reduced physical,
sensory or mental abilities or lack of experience and / or lack of knowledge unless they
are supervised by a person responsible for
their security or received instructions from
this person, how the equipment is to be used.
Children should be supervised, in order to
guarantee that they do not play with the
device.
Keep the device away from children. Children
are not able to understand and recognise the
possible risks during the handling of electrical
devices.
Keep the device away from rain and dampness.
Water penetrated into electrical appliances
means mortal danger by electrical shock.
Pay attentions that all plugs and power
cables are free of dampness. Never switch
on the device with damp or wet hands.
Only use the device when power cable and
housing a free of damage.
Pay attention that the power cables are
secured.
Do not use a power cable to carry the device
or pull it. Damaged power cable means mortal
danger by electrical shock.
Always pull the plug; never pull the power
cable to separate the device from the voltage
source.
If cables a routed through walls with sharp
edges, for example metal walls, use empty
pipes or piping to avoid damaging the cable.
Never route the main cables with 230 V
together with direct current cables of 12 V DC
Read all safety guidelines and
FOR INFANTS AND CHILDREN!
Never leave children unsupervised
in the same pipe Rohr (one piping).
Route the power cable in such a way that no
one trips and no one can damage the cables.
Do not route the cables next to conductive
materials. Do not fold the cables and protect
them against damages.
Damaged cables must be exchanged imme-
diately.
Avoid short circuits and bridges with foreign
objects between in- and outputs of the voltage
inverter. Use only bonding pins or fork wall
pins to connect devices to the output sockets.
Even if the build in fuse is released, some
parts remain under load.
Pay attention that the device is always used
in a safe place.
Choose the set-up place for the device with
care.
The maintenance work must be accomplished
by a qualified electrician.
Do not operate the device if it is damaged.
Do not expose the device to
- extreme temperatures,
- strong vibrations,
- strong mechanical load
- direct sunlight,
- dampness.
Otherwise damage to the device is likely.
Note that damages caused by improper
handling, ignorance to the operating manual
or interference by unauthorised persons are
excluded from the warranty.
Never dismantle the device. Inappropriate
repairs can cause considerable dangers for
the user.
Only let specialists do repairs.
Before start-up
Before you start up the voltage inverter, the
connections on the battery of the vehicle must
be checked.
If the plus-pole (+) of the vehicle battery is
connected to the chassis, you are not allowed to
use the voltage converter with such vehicles.
19 GB

Place the 12 V-plug 3 of the voltage converter
into the 12 V-power source with a current min
15 A. Separate the 12 V-plug
3
always from the
power source, if you are not using the voltage
inverter.
indicate that the converter is ready for use.
Please read the chapter „error tracing “if the
red LED-display lights up.
Now switch on the (external) devices con-
nected with the voltage inverter.
After connection press the ON / OFF / MODE
button
1
for approx. 3 sec, now the
LED-display lights up:
Green LED-display
operate. Red LED-display
12 V-plug
3
4 5
= Device is ready to
6
= Error! Examine the
respectively see chapter „Error trac-
ing“.
WARNING!
Always separate the voltage converter from the
12 V-socket of the vehicle, before you switch on
the starter.
Never attach devices to the voltage converter
while driving and do not operate possibly attached
devices. Make sure that no devices are attached
to the voltage converter if attached to the
12 V power source, e.g. the cigarette lighter or
12 V-socket in a car.
Note: If the power supply is interrupted while
the voltage converter is in operation, you must
start it again. You can do this, by separating the
voltage converter again first and attaching it
again. After connecting the converter press and
hold the ON/OFF/MODE key
1
for approx. 3
seconds. The LED display will light and the selftest will start as described above.
Operation
Attach external devices
Note: If the power drawn is 35W or more, the
built-in fan will automatically switch on to prevent the converter from overheating. With lower
power draws (< 35W) the fan will switch on
based on the temperature. Both outputs
9
can be used at the same time. The total nom-
8
and
inal capacity for both external devices, may not
exceed 150 W.
The nominal capacity of external device is shown
on the identification plate, which is in a certain
place on this external device. External devices like
electric motors, drills, electrical saws, refrigerators
and music systems, normally require a larger
nominal capacity when starting than indicated on
the identification plate. If the nominal capacity
is indicated in ampere only, multiply the value in
ampere by a factor of 230, in order to receive
the capacity in Watts.
For example: 0.4 A x 230 = 92 Watts
Exit 230 V
9
Use only external devices, which are either
equipped with bonding contact pins or European
fork wall plugs.
USB exit
8
Connect the external USB-device with the USB
8
output
and switch it on. The USB exit of this
voltage converter supplies a direct current of 5 V for
external USB devices (e.g. Lamps, fans, radios). The
USB output is always switched off, if the voltage
converter is connected to the 12 V-input socket.
Place the plug of the external device into the
output 230 V
9
on the voltage converter
and / or connect the external USB device to
at the USB output
8
.
Now power on the voltage converter by
pressing and holding ON/OFF/MODE
1
for
approx. 3 seconds. Once the self-test has
completed successfully the green LED
20 GB
5
will
WARNING!
The USB output on the voltage converter is not
intended for the data communication. Do not
attach a memory stick, MP3-Player or similar
external data memory devices. Do not connect
data communication cables to the USB exit!

Operation / Error tracing
Switch on / off the voltage
converter, change mode
Press and hold the ON/OFF/MODE key 1 for
3 seconds to power on the voltage converter. The converter will now automatically perform a self-test. During this process all LEDs,
the fan and the alarm buzzer will activate
briefly for approx. 2 seconds.
Once the self-test has been completed the
converter is ready for use and the green LED
5
will light up. The LED display 2 will also
show the output being drawn, in watts. Pro vided no loads are connected to the 230 Volt
output socket
show 0 – watts.
Press and hold the ON/OFF/MODE key 1 for
3 seconds again to power off the voltage
converter. The converter will power off and
the displays will turn off.
When pressing the ON/OFF/MODE key 1
briefly (1 second) with the converter on the
LED display
and volts.
9
the LED display 2 will
2
will switch between watts
Replacing fuses in the fuse holder:
Disconnect the voltage converter from the
power supply by unplugging the 12V plug
3
from the 12V on-board outlet. If neces-
sary, also unplug any connected loads from
the 230V output socket
output
Loosen the retaining screw on the fuse hold-
er using a cross slot screwdriver, turning it
counter clockwise. Now carefully open the
cover on the fuse holder, pulling the cover
up.
Remove the defective fuse and replace it
with a new fuse with the same ampere rat ing. (max. 20A fuse). Be sure the fuse is se curely seated in the fuse holder, use of a
fuse puller is recommended.
Now close the cover of the fuse holder and
tighten the cross head screw on the cover.
Now reconnect the converter to the on-
8
.
9
and the USB
board outlet without any loads connected
and power on as described.
Error tracing
Separate the voltage converter from the
12 V- power supply and the external devices
from the outputs
cases listed.
= Error
= Possible cause
= Remedy
No LED-display lights up.
The 12 V-plug 3 is not placed correctly in
the socket.
Examine all connections.
No input voltage; the 12 V-connection has
no voltage.
Switch on the starter.
Faulty fuse
Replace the fuse.
LED-display 6 lights up red.
The temperature is above 65 °C.
Switch of the voltage converter immediately.
Examine if the voltage converter is sufficiently
cooled and the cooling grids
Let the device cool down and provide sufficient
ventilation.
Wait for 10 minutes before you switch on
the voltage converter again.
The input voltage is too high; Overvoltage
protection.
Switch of the voltage converter immediately.
Examine the input voltage.
The input voltage is too low; Under-voltage
protection.
Switch of the voltage converter immediately.
Examine the connection and charge the
battery.
If the voltage is above 12 V, restart the voltage
inverter.
Wrong connection of the poles; Short circuit
protection.
Switch of the voltage converter immediately.
Examine all connections, cables and devices.
8
und 9 in one of the
7
are free.
21 GB

If necessary, carry out the required adjustments.
The nominal capacity is above 150 W;
Current-overload protection.
Use devices where the nominal capacity does
not exceed 150 W.
Short circuit in the device.
Examine the connected devices. Do not use
the concerned devices.
WARNING!
to qualified technical personnel to repair.
Thus the safety of the device is guaranteed and
maintained.
WARNING!
plug or the connecting cable always to qualified technical personnel. Thus the security of
the equipment is guaranteed and maintained.
Leave the repair of the device
Leave the exchange of the
= Error
= Remedy
In TV-operation and / or sound systems
and / or devices:
Snow picture, wobbly picture, hum, knock
or buzzing.
Place the voltage converter as far as possible
from the TV.
Examine the antenna connection und setting.
Move the antenna cable further from the
voltage inverter. Use a shielded antenna
cable. The modified sin wave of the voltage
converter could be filtered not sufficiently
by the connected external device. Separate
all cables immediately.
The only available solution is the use of a
modern external device respectively a device
with a higher capacity and sufficient filtering
capacity.
Maintenance and care
The device is maintenance-free.
WARNING!
devices from the power supply, before you carry
out service etc.
Switch off the device.
Pull the 12 V-plug 3 from the 12-connection
of your vehicle.
Clean the device with a dry cloth. Do not use
solvents or other aggressive agents.
Service
Always separate electrical
Warranty
The general guarantee conditions refer to
production and material defects. If the device is
faulty, bring it to your specialist dealer respectively back to the sales office. In order to accelerate the warranty and repair work on the device, you need the following:
- A copy of the receipt (delivery note, bill)
with the acquisition date.
- Reason for the complaint or description of
the error.
Disposal
The packing consists of pollution free materials,
which can dispose of you over the local recycling
stations.
Do not throw electrical appliances
into the domestic waste!
In accordance with European guideline
2002 / 96 / EC for electrical and old electronic
devices and conversion to national law, used
electrical appliances must be collected separately and brought to a environmental fair recycling.
For disposal possibilities for retired electrical
appliances please inform yourself at your
community or city administration.
Illustrations may vary slightly from the product
itself. We reserve the right to administer changes due to technical progress. Decoration not
included.
22 GB

Table des matières
Introduction
Utilisation selon les prescriptions ...............................................................................................................Page 24
Volume de livraison .........................................................................................................................................Page 24
Description des pièces .................................................................................................................................... Page 25
Fiche technique ................................................................................................................................................ Page 25
Données techniques ........................................................................................................................................ Page 25
Sécurité
Instructions générales de sécurité ..............................................................................................................Page 27
Avant de la mise en marche .............................................................................................................Page 28
Utilisation
Connecter les appareils externes ................................................................................................................Page 29
Commutez / décommutez le convertisseur de tensions, changer de mode. ..................................Page 29
Remplacer le fusible dans la prise femelle de 12 V ...............................................................................Page 29
Recherche d’erreurs ..................................................................................................................................Page 29
Entretien et soins ....................................................................................................................................... Page 30
Service ..................................................................................................................................................................Page 31
Garantie ..............................................................................................................................................................Page 31
Élimination .......................................................................................................................................................Page 31
23 FR

Introduction
Dans ce manuel d’utilisation / dans l’appareil on utilise les pictogrammes suivants :
Lire le manuel d’utilisation ! Utilisation à l’intérieur
Respectez les instructions d’alerte
et de sécurité !
Danger de mort de d’accident pour
les tous petits et les enfants !
Convertisseur de tension
de poche Si 150
Introduction
Familiarisez-vous avec toutes les fonc-
tions de l‘appareil avant la première
mise en marche et renseignez-vous
sur la manipulation correcte de l‘appareil. Lisez
pour cela soigneusement le guide d‘utilisation
suivant. Gardez ce manuel dans un lieu sûr.
Remettez tous les documents lors du transfert
de l‘appareil à un nouveau propriétaire.
Utilisation selon les prescriptions
Le convertisseur de tension est prévu pour
convertir le courant continu d’une tension de
12 V en courant alternatif d’une tension de 230 V
et une fréquence de 50 Hz et / ou une tension de
5 V de tension à courant continu et un courant
de 500 mA. Examinez l’appareil toujours avec
une puissance continue de sortie maximale (voir
aussi chapitre «Recherche des erreurs»). Il est
homologué uniquement pour l‘utilisation dans le
domaine privé. Toute utilisation ou modification
de l‘appareil doit être considérée comme non
conforme et entraînerait de graves dangers. Pour
les dommages qui ont surgi en raison d‘une
utilisation non conforme, le fabricant n‘assumera
aucune responsabilité.
Classe de protection II
Éliminez l’emballage et l’appareil
de manière respectueuse de
l’environnement !
Cet appareil peut être utilisé pour les types
d’appareils électriques externes suivants :
- Connexion à une source d’alimentation de 12 V,
avec au moins 15 A d’intensité de courant
- Appareils électriques habituels comme des
ordinateurs portables, ordinateurs de bureau,
téléviseurs, lecteurs MP3, PDA ou chargeur de
batterie pour téléphones mobiles, ordinateurs
- Puissance totale max. 150 W
Il n’est pas autorisé d’utiliser le dispositif dans
les circonstances suivantes et avec les types de
dispositifs électroniques externes suivants :
- Connexion à une source d’alimentation avec
une tension de 6, 24 ou 230 V
- Appareils externes qui produisent de la
chaleur tels que sèche-cheveux, couvertures
électriques, cafetières, fours à micro-ondes,
grille-pain
- Puissance totale de 150 W
Volume de livraison
Contrôlez immédiatement après le déballage le
volume de livraison. Vérifiez si l’appareil et ses
composants présentent des dommages. Ne réalisez
pas la mise en marche d‘un appareil défectueux
ou avec des parties défectueuses.
1 convertisseur de tension Pocket Si 150
1 câble de rechargement pour iPod (pas adapté
pour les iPod Shuffle)
1 manuel d’utilisation
24 FR

Introduction
Description des pièces
1
Touches ON / OFF / MODE
2
Affichage à LED
3
Câble d’alimentation avec prise de 12 V
4
Témoin à LED «Volt» (V)
5
Témoin à LED «Watt» (W)
6
Témoin à LED «Error»
7
Fentes d’aération
8
Sortie USB de 5 V
9
Sortie de 230 V AC 50 Hz, 150 W
10
Câble de chargement pour iPod
Fiche technique
Tension d’entrée nominale : 10,5 à 15,5 V /
15 A
Puissance de sortie : 150 W
Puissance de sortie de crête : 300 W (pendant
0,1 sec)
Tension de sortie : 230 V ~
Rendement énergétique: > 80 %
Fréquence de sortie : 50 Hz
Sortie USB : 5,0 V
Classe de protection : II /
Fusible : 15 A
/ 0,5 A
Température ambiante : 0 °C - 35 °C
Protections contre
la sous-tension : 10 V + / - 0,5 V
Protection contre
les surtensions : 15,5 V
+ / - 0,5 V
Protection contre
les surcharges : 180 W, + / - 0,5 W
Protection thermique
contre la surchauffe : > 65 °C
Dimensions : 147 x 88 x 27 mm
(Long. x Larg. x Hauteur)
Poids : 280 g
Données techniques
Le convertisseur de tension possède quelques
caractéristiques techniques afin de se protéger
soi-même et / ou les appareils connectés.
Témoins d’avertissement et de protection
Les erreurs seront détectables comme suit :
- Témoin LED rouge
- Bip sonore et bourdonnement
- Code d’entretien (A) ou code de protection
(P) dans le témoin LED
6
2
Code Affichage LED rouge Signification Type d‘avertissement
A - 1
Brille
Avertissement de surcharge
Bip sonoreA - 2 Avertissement de surchauffe
A - 3 Avertissement de sous-tension
P - 1
P - 2 Protection contre la surchauffe
Brille
Protection contre la surcharge
Protection contre le court-circuit
Bourdonnement
P - 3 Protection contre la sous-tension
P - 4 Protection contre la surtension
Protection contre la surtension :
Si la tension d‘entrée est située au-dessus des 15,5 V
(+ / -0,5 V), on écoutera un bourdonnement, le
témoin rouge LED
2
LED
on affichera P-4.
6
brillera, et dans le témoin
Le convertisseur de tension arrête l‘inversion de
puissance et l‘appareil externe est décommuté.
Si la tension tombe sous les 14,5 V (+ / – 0,5 V),
le convertisseur de tension entreprendra le
fonctionnement normal.
25 FR

Introduction
Protection contre la sous-tension (fonction
d’affichage de niveau de batterie, protection
de la batterie du véhicule) :
En cas que la tension d’entrée soit située sous les
11 V (+ / – 0,5 V), on écoutera un bip sonore, le
témoin LED rouge
2
LED
s’affichera A-3.
6
brillera et dans le témoin
Dans le cas que la tension d’entrée sois située
sous les 10,5 V (+ / – 0,5 V), on écoutera un bourdonnement, le témoin LED rouge
dans le témoin LED
2
s’affichera P-3.
6
brillera et
Le convertisseur de tension arrête l’inversion de
puissance et l’appareil externe est décommuté.
Si la tension monte au-dessus des 12 V (+ / – 0,5 V),
le convertisseur de tension reprendra le fonctionnement normal.
Protection contre le court-circuit :
Si l’appareil raccordé provoque un court-circuit,
on écoutera un bourdonnement, le témoin LED
6
rouge
brillera et dans le témoin LED s’affi-
chera P-1.
Protection thermique contre la surchauffe :
Dans le cas que la température à l’intérieur de
l’appareil soit située au-dessus des 60 °C, on
écoutera un bip sonore, le témoin LED rouge
brillera et dans le témoin LED
2
s’affichera A-2.
6
Dans le cas que la température à l’intérieur de
l’appareil soit située au-dessus des 68 °C, on
écoutera un bourdonnement, le témoin LED
6
rouge
brillera et dans le témoin LED 2
s’affichera OFF. Le convertisseur de tension arrête
l’inversion de puissance et l’appareil externe est
décommuté.
Si la température chute au-dessous des 50 °C,
appuyez pendant environ 3 secondes sur la
touche ON / OFF / MODE
1
afin de démarrer le
convertisseur de tension à nouveau.
Protection contre les surcharges :
Dans le cas que la charge se situe au-dessus des
160 W (+ / – 10 W), on écoutera un bip sonore, le
témoin LED rouge
2
LED
s’affichera A-1.
6
brillera et dans le témoin
Dans le cas que la charge se situe au-dessus des
180 W (+ / – 10 W), on écoutera un bourdonnement,
le témoin LED rouge
moin LED
2
s’affichera P-1.
6
brillera et dans le té-
Le convertisseur de tension arrête l’inversion de
puissance et l’appareil externe est décommuté.
Technologie
La conversion du courant continu avec une
tension de 12 V en courant alternatif avec une
tension de 230 V a lieu en deux étapes.
Étape 1
L’appareil augmente le courant continu entrant
à une tension de 300 V.
Étape 2
Cette tension est convertie en courant alternatif
avec une tension de 230 V et une fréquence
de 50 Hz.
Pour ce processus une espèce de transistor qui
est composé de puces hautement intégrées
appelées MOSFET (transistor à effet de champ
avec des semi-conducteurs en oxyde métallique).
Tension de sortie, forme ondulé
La tension de sortie dans cet appareil est reproduite
en forme d’onde sinusoïdale modifiée. Celle-ci a
une forme échelonnée qui présente presque les
mêmes caractéristiques qu’une onde sinusoïdale.
Cette onde sinusoïdale modifiée est détectée par
presque tous les appareils externes modernes
avec une tension de 230 V. Il faut inclure ici les
dispositifs d’alimentation électriques dans des
composants électroniques, transformateurs et / ou
des petits moteurs. L’onde sinusoïdale modifiée
générée par ce convertisseur de tension utilise
une tension effective de 230 V. La plupart des
voltmètres digitaux et analogues ne peuvent pas
lire la tension efficace et affichent une valeur
qui est située 20-30 V au-dessous de la valeur
de tension de sortie de fait. Afin d’atteindre un
résultat de mesure exacte, utilisez un appareil de
mesure qui soit adapté à la mesure de la tension
efficace (tension moyenne quadratique).
26 FR

Introduction / Sécurité
AVERTISSEMENT
Quelques appareils externes, spécialement les
radios et / ou d’autres appareils audio et rechargeables peuvent endommager le convertisseur
de tension et / ou l’appareil connecté,
Vérifiez si l’appareil externe connecté au convertisseur de tension «ronfle», se réchauffe considérablement ou pendant les premières deux minutes est excessivement chaud. Dans ce cas,
coupez le courant en tirant des connecteurs de
câble et déconnectant tous les appareils externes.
Cela signifie que les appareils ne sont pas compatibles et qu’ils ne peuvent pas être utilisés entre
eux. Si vous deviez avoir des doutes, contactez le
distributeur spécialisé de votre appareil externe.
Ce problème n’apparaît pas dans des appareils
modernes et / ou de haute qualité, car ceux-ci
sont en mesure de détecter des ondes sinusoïdales
modifiées et de les traiter.
Technologie de démarrage en douceur
Les convertisseurs de tension sont équipés avec
une technologie de démarrage en douceur qui
contribue à ce que la conversion de tension ait
lieu par étapes. De cette manière on peut utiliser
des appareils qui ont besoin d’une intensité de
courant de démarrage supérieure. Grâce à l’augmentation de la tension de sortie en étapes on
évite un endommagement du convertisseur de
tension, des prises femelles de 12 V et des appareils
raccordés.
Sécurité
Instructions générales
de sécurité
AVERTISSEMENT
de sécurité et instructions. Les manquements
dans le respect des indications de sécurité et
instructions peuvent provoquer un choc électrique,
des brulures et/ou des blessures graves.
Conservez toutes les indications de sécurité et
instructions pour une utilisation future.
Lisez toutes les indications
DANGER DE MORT DE D’ACCI-
DENT POUR LES TOUS PETITS
ET LES ENFANTS ! Ne laissez
jamais les enfants sans surveillance avec le
matériel d’emballage. Il y a danger d’asphyxie.
Cet appareil n’est pas destiné à être utilisé
par des personnes (incluant des enfants)
avec des capacités physiques, sensorielles ou
psychiques limitées ou avec un manque
d’expérience et/ou un manque de savoir-faire,
à moins qu’elles soient surveillées par une
personne responsable de leur sécurité ou
qu’elles reçoivent des instructions sur comment utiliser cet appareil. Les enfants devront
être surveillés, afin de vérifier qu’ils ne
jouent pas avec l’appareil.
Laissez l’appareil hors de la portée des enfants.
Les enfants ne comprennent ou ne reconnaissent pas les dangers potentiels associés
à l’utilisation d’appareils électriques.
Tenir l’appareil à l’écart de la pluie et de l’hu-
midité. L’eau entrante dans l’appareil comporte un danger de mort par choc électrique.
Veillez à ce que les connecteurs et le câble
soient libres d’humidité. Ne commutez jamais
l’appareil avec des mains humides ou mouillées.
Utilisez l’appareil uniquement si le câble
de réseau et la carcasse sont exempts de
dommages.
Faites attention à ce que le câble électrique
soit sécurisé.
N’utilisez pas le câble pour porter l’appareil
ou pour tirer de lui. Les câbles endommagés
comportent un danger de mort par choc
électrique.
Tirez toujours du connecteur, jamais du
câble, afin de couper l’appareil de la source
d’alimentation électrique.
Dans le cas que le câble soit posé sur des murs
avec des angles vifs, par exemple des murs
métalliques, utilisez des tuyaux vides ou des
conduites, afin d’éviter des endommagements
des câbles.
Ne posez jamais le câble principal de 230 V
avec des câbles de courant continu de 12 V DC
dans un tube (une conduite).
27 FR

Ne disposez pas le câble de connexion de
manière à ce que vous puissiez trébucher et
que la gaine du câble soit endommagée.
N’utilisez pas le câble dans les proximités de
matériaux conducteurs. Ne pliez pas le câble
et protégez-le contre les dommages.
Les câbles endommagés devront être remplacés
immédiatement.
Évitez des court-circuits et des pontages
avec des corps étrangers entre les entrées et
sorties du convertisseur de tension. Utilisez
uniquement des broches de contact de protection ou des colliers de protection du câble
pour connecter les appareils dans les prises
femelles. Même quand le fusible monté est
déclenché, certaines parties de l’appareil
continuent d’être soumises à des charges.
Assurez-vous que l’appareil soit gardé toujours
dans un endroit sûr.
Sélectionnez le lieu d’emplacement de
l’appareil soigneusement.
Tous les travaux d’entretien doivent être
effectués par un électricien qualifié.
Ne mettez pas l’appareil en marche s’il est
endommagé.
Ne soumettez pas l’appareil à
- des températures extrêmes,
- des vibrations trop fortes,
- des efforts mécaniques forts,
- au rayonnement direct du soleil,
- à l’humidité.
En cas contraire vous pourriez l’endommager.
Tenez en compte que les dommages produits
par une utilisation incorrecte, le non respect
du manuel d’utilisation ou l’intervention par
des personnes non autorisées, seront exclus
de la garantie.
Ne démontez en aucun cas l’appareil. Des
réparations inappropriées peuvent déclencher
des dangers importants pour l’utilisateur.
Faites réparer l’appareil par des professionnels
spécialisés.
Avant de la mise en marche
Avant de raccorder le convertisseur de tension,
vous devez vérifier les connexions dans la batterie
du véhicule. Dans le cas que le pôle positif (+) de
la batterie du véhicule soit en contact avec le
châssis, vous ne devrez pas utiliser le convertisseur de tension avec de tels véhicules.
Branchez le connecteur de 12 V
seur de tension à la source d’alimentation de 12 V
avec une intensité de courant d’au moins 15 A.
Débranchez toujours le connecteur de 12 V
de la source électrique si vous n’utilisez plus le
convertisseur de tension.
Après la connexion appuyez sur la touche
ON / OFF / MODE
1
pendant environ
3 secondes. Puis le témoin LED brillera :
Témoin LED vert
4 5
= l’appareil est prêt à
fonctionner
Témoin LED rouge
connecteur de 12 V
6
= Erreur ! Vérifiez le
3
ou bien consultez dans
le chapitre « Recherche de l’erreur ».
AVERTISSEMENT
Débranchez toujours le convertisseur de tension
de la prise femelle de 12 V du véhicule avant de
commuter le démarrage.
Ne connectez jamais des appareils pendant les
déplacements du véhicule au convertisseur de
tension et n’utilisez pas les éventuels appareils
branchés. Vérifiez qu’aucun appareil ne soit
connecté au convertisseur de tension quand
vous le connectez à une source électrique de
12 V, p. ex. à des allume-cigares ou à des prises
femelles de 12 V dans une voiture.
Note : Dans le cas que l’alimentation électrique
soit coupée pendant que le convertisseur de tension
est en fonctionnement, vous devrez redémarrer à
nouveau. Vous pouvez faire cela en déconnectant
d’abord le convertisseur de tension et en le connectant à nouveau. Après avoir connecté le bouton ON
/ OFF / MODE (1) pendant environ 3 secondes, le
voyant à LED brillera et l’autodiagnostic sera réalisé
comme décrit ci-dessus.
3
du convertis-
3
28 FR

Utilisation
Connecter les appareils externes
Introduisez le connecteur de l’appareil ex-
terne dans la sortie de 230 V
convertisseur de tension et / ou connectez le
dispositif USB à la sortie USB
Commutez le convertisseur de tension en
appuyant sur la touche ON/OFF/MODE
pendant environ 3 secondes. Après avoir
complété avec succès l’autodiagnostic, le
voyant à LED de couleur vert
capacité opérationnelle du convertisseur de
tension. Si c’est le témoin LED rouge
brille, lisez s.v.p. le chapitre «recherche d’er
reurs».
Commutez donc les appareils (externes) reliés
avec le convertisseur de tension.
Note : Si la consommation énergétique est de
35 W ou plus, le ventilateur intégré commute
immédiatement afin d’éviter la surchauffe du
convertisseur de tension. Avec une utilisation à
faible puissance (<35 W), la commutation du
ventilateur dépendra de la température. Vous
pouvez utiliser les deux sorties
même temps. La puissance nominale totale pour
les deux appareils externes ne doit pas dépasser
les 150 W. La puissance nominale d’un appareil
externe est affichée sur la plaque signalétique
qui se trouve dans un endroit précis de cet appareil externe. Les appareils externes, comme les
moteurs électriques, les perceuses, les scies électriques, les frigidaires et les équipes hi-fi, possèdent normalement une puissance nominale plus
importante à celle indiquée sur la plaque signalétique. Dans le cas que la puissance nominale
soit indiquée uniquement en ampères, multipliez
la valeur en ampères avec un facteur de 230
pour obtenir la puissance en watt.
Par exemple : 0,4 A x 230 = 92 Watt
Sortie 230 V
9
Utilisez uniquement des appareils externes qui disposent de broches de contact de protection ou des
prises avec colliers de protection pour câbles européens.
9
dans le
8
.
5
affichera la
8
et 9 au
6
1
qui
Utilisation / Recherche d’erreurs
Sortie USB
Utilisez le dispositif USB externe avec la sortie
USB
convertisseur de tension fournit un courant
continu de 5 V pour des dispositifs USB externes
(p. ex. des lampes, ventilateurs, radios).
La sortie USB est toujours décommutée si le
convertisseur de tension est raccordé à la prise
femelle de 12 V.
AVERTISSEMENT
La sortie USB dans le convertisseur de tension
n’est pas prévue pour le transfert de données.
Ne branchez pas des Memory Sticks, des lecteurs
MP3 ou des mémoires externes similaires. Ne
connectez pas des câbles de transfert de données
à la sortie USB !
Commutez / décommutez
le convertisseur de tensions,
changer de mode
Appuyez sur la touche ON/OFF/MODE 1
pendant 3 secondes afin de commuter le
convertisseur de tension. Le convertisseur de
tension effectuera automatiquement un au todiagnostic. Tous les LEDs brilleront, la
fonction du ventilateur et le vibreur d’alerte
seront activés pendant une courte période
d’environ 2 secondes.
Après l’autodiagnostic, le convertisseur de
tension est opérationnel et le voyant vert
s’allume. Sur l’affichage à LED
la puissance détectée actuelle en watts. Tant
qu’aucun consommateur est connecté à la
prise de sortie de 230 volts
LEDs
Pour désactiver le convertisseur de tension,
appuyez à nouveau sur le bouton de ON /
OFF / MODE
convertisseur de tension décommutera auto matiquement et effacera toutes les données
affichées.
Appuyez pendant le fonctionnement du
convertisseur de tension sur le bouton ON /
8
8
et commutez-le. La sortie USB de ce
2
apparaîtra
9
, l’affichage à
2
affichera 0 watts.
1
pendant 3 secondes. Le
5
29 FR

OFFE / MODE 1 brièvement (1 seconde) et
l’affichage à LED
2
passera du mode d’affi-
chage de watts à affichage de volts.
Remplacer les fusibles dans le
porte-fusible :
Débranchez le convertisseur de tension de
l’alimentation électrique en tirant le connecteur de 12 V
3
de la prise d’alimentation
femelle de 12 V du véhicule. Débranchez les
consommateurs éventuellement connectés à
la prise femelle de sortie de 230 V
prise de sortie USB
8
.
9
et à la
Desserrez la vis de fixation dans le porte-fu-
sible en la dévissant dans le sens antihoraire
avec un tournevis cruciforme. Enlevez le
couvercle en le soulevant légèrement du
porte-fusible.
Retirez le fusible défectueux et remplacez-le
contre un nouveau fusible du même ampé rage. (max. fusible de 20 A). Attention : Le
fusible est coincé dans le porte-fusible, il est
donc conseillé de l’extraire à l’aide d’un outil
d’extraction approprié.
Fermez le couvercle du porte-fusible et res-
serrez fermement la vis cruciforme du cou vercle.
Rebranchez le convertisseur de tension, sans
qu’il ait des consommateurs connectés, avec
la prise femelle de courant de bord et com mutez-la comme décrit ci-dessus.
Recherche d’erreurs
Débranchez dans un des cas listés le conver-
tisseur de tension de la source électrique de
12 V et séparez l’appareil externe des sorties
8
et 9.
= Erreur
= Cause possible
= Aide
Aucun témoin LED ne brille.
Le connecteur de 12 V 3 n’est pas correcte-
ment connecté à la prise femelle de la source
électrique.
Vérifiez toutes les connexions.
Aucune tension d’entrée; par la connexion
de 12 V ne passe aucun courant.
Décommutez le démarreur.
Fusibles défaillants
Remplacez le fusible.
Le témoin LED 6 brille en couleur rouge.
La température dépasse les 65 °C.
Décommutez le convertisseur de tension
immédiatement. Vérifiez si le convertisseur
de tension est suffisamment refroidi et si les
fentes de refroidissement
7
sont libres.
Laissez refroidir l’appareil et assurez une
ventilation suffisante.
Attendez pendant 10 minutes, avant de
commuter le convertisseur de tension à
nouveau.
La tension d’entrée est trop haute: Protection
contre la surtension.
Décommutez le convertisseur de tension
immédiatement. Vérifiez la tension d’entrée.
La tension d’entrée est trop faible; Protection
contre la sous-tension.
Décommutez le convertisseur de tension
immédiatement.
Vérifiez la connexion et chargez la batterie.
Dans le cas que la tension dépasse les 12 V,
redémarrez le convertisseur de tension à
nouveau.
Mauvais raccordement des pôles; Protection
contre le court-circuit.
Décommutez le convertisseur de tension
immédiatement.
Vérifiez toutes les connexions, câbles et
appareils.
Procédez, si besoin, aux réglages nécessaires.
La puissance nominale est au-dessus des 150 W;
Protection contre le courant et la surcharge.
Utilisez des appareils dont la puissance
nominale ne dépasse pas les 150 W.
Court-circuit dans l’appareil.
Vérifiez les appareils connectés. N’utilisez
plus les appareils concernés.
30 FR

Service / Garantie / Élimination
= Erreur
= Aide
Dans le fonctionnement de TV et / ou des
chaînes de musique et / ou des appareils :
Images brouillés, images vacillantes,
bourdonnement s, des secousses ou des
grincements
Placez le plus loin possible du téléviseur le
convertisseur de tension.
Vérifiez la connexion de l’antenne et son
réglage. Placez le câble de l’antenne encore
plus loin du convertisseur de tension. Utilisez
un câble d’antenne avec un blindage
antiparasite. L’onde sinusoïdale modifiée du
convertisseur de tension ne peut pas être
suffisamment filtrée à travers l’appareil externe.
Débranchez immédiatement tous les câbles.
La seule solution disponible est l’utilisation
d’un appareil externe plus moderne ou d’un
appareil avec une puissance plus élevée avec
une capacité de filtrage suffisante.
Entretien et soins
L’appareil ne nécessite aucun entretien.
AVERTISSEMENT
électriques toujours du courant électrique avant
de réaliser les travaux d’entretien, etc.
Décommutez l’appareil.
Tirez du connecteur de 12 V 3 de la prise à
12 pins de votre véhicule.
Nettoyez l’appareil avec un chiffon sec.
N’utilisez en aucun cas des solvants ou
autres produits nettoyants agressifs.
Service
AVERTISSEMENT
reil uniquement par du personnel qualifié.
De cette manière vous assurez et conservez la
sécurité de l’appareil.
Débranchez les appareils
Faites réparer l’appa-
AVERTISSEMENT
connecteur ou le câble de connexion toujours
par du personnel qualifié spécialisé. De cette
manière vous assurez et conservez la sécurité de
l’appareil.
Garantie
Les conditions générales de garantie font référence
à des défauts de fabrication et des matériaux.
Si l’appareil est défaillant, portez-le à votre distributeur spécialisé ou bien au poste de vente
correspondant. Afin d’accélérer les travaux de
garantie et de réparation dans l’appareil, vous
aurez besoin des éléments suivants :
- Une copie de la pièce de vente (bon de
livraison, facture de caisse) avec la date
d’achat.
- Motifs pour la réclamation ou descriptions
de la défaillance.
Élimination
L’emballage est composé de matériaux respectueux de l’environnement que vous pourrez
éliminer dans les points de recyclages locaux
qu’y sont prévus.
Ne jetez pas les appareils électriques
dans votre poubelle domestique !
Selon la directive européenne 2002 / 96 / EC
concernant les vieux appareils électriques et
électroniques et son application dans le droit
national, vous devez collecter les appareils séparément et les éliminer de manière respectueuse
de l’environnement utilisant les postes de recyclage spéciaux.
Vous pouvez vous renseigner sur les possibilités
d’élimination pour les appareils électriques aussi
dans votre commune ou administration locale.
Faites remplacer le
31 FR

Les images peuvent différer légèrement du produit.
On se réserve des changements dans l’intérêt du
progrès technique. Décoration pas incluse.
32

Indice
Introduzione
Utilizzo secondo la destinazione d’uso ................................................................................................Pagina 34
Contenuto ......................................................................................................................................................Pagina 34
Descrizione dei pezzi ...................................................................................................................................Pagina 35
Dati tecnici .....................................................................................................................................................Pagina 35
Caratteristiche tecniche .............................................................................................................................Pagina 35
Sicurezza
Indicazioni di sicurezza generali ............................................................................................................Pagina 37
Prima dell‘attivazione .........................................................................................................................Pagina 38
Funzionamento
Collegamento di apparecchi esterni ......................................................................................................Pagina 38
Accendere / spegnere il trasformatore di tensione, cambiare il modulo ........................................Pagina 39
Cambiare i fusibili sul supporto ..............................................................................................................Pagina 39
Ricerca errori .............................................................................................................................................Pagina 40
Manutenzione e cura ..........................................................................................................................Pagina 41
Assistenza ......................................................................................................................................................Pagina 41
Garanzia ..........................................................................................................................................................Pagina 41
Smaltimento ...............................................................................................................................................Pagina 41
33 IT

Introduzione
In queste istruzioni per l‘uso / sull’apparecchio vengono utilizzati i seguenti pittogrammi
Leggere le istruzioni per l‘uso Utilizzo interno
Osservare le avvertenze e le indicazioni
di sicurezza
Pericolo di morte e di incidenti
per i bambini
Trasformatore di tensione
tascabile Si 150
Introduzione
Familiarizzate con tutte le funzioni
dell’apparecchio prima del primo
utilizzo ed informatevi sulla gestione
dell’apparecchio. Leggete attentamente le seguenti
istruzioni per l’uso. Conservate bene queste
istruzioni. Recapitate tutto il kit nel caso della
cessione dell’attrezzo a terzi.
Utilizzo secondo la
destinazione d’uso
Il trasformatore di tensione tascabile è destinato
alla trasformazione di corrente continua con
una tensione di 12 V in corrente alternata con
una tensione di 230 V ed una frequenza di 50 Hz
e/o di tensione continua di 5V ed una intensità
di corrente di 500 mA. Verificate il dispositivo
sempre su una potenza d’uscita massimale continua (si veda anche il capitolo “ricerca errore”).
E’ omologato esclusivamente per l’uso privato.
Ogni altro utilizzo o modifica dell’apparecchio
non è conforme alla destinazione d’uso e presenta
pericoli rilevanti. Per quanto riguarda danneggiamenti che derivino da un utilizzo diverso dalla
sua destinazione, il produttore non si assume
responsabilità.
Classe di protezione II
Smaltite la confezione e l’apparecchio in modo ecocompatibile
Questo dispositivo può essere utilizzato per i
seguenti tipi di apparecchi elettronici esterni:
- Collegamento ad una fonte di corrente da
12 V con minimo 15 A
- Apparecchi elettrici di uso comune come
computer portatile, calcolatrice, televisore,
lettore MP3, PDA o caricabatterie per telefoni
cellulari, computer
- Potenza totale max. 150 W
Non è consentito l’utilizzo del dispositivo nelle
seguenti condizioni e con i seguenti tipi di apparecchi elettrici esterni:
- Collegamento ad una fonte di corrente con
una tensione di 6, 24 o 230 V
- Apparecchi esterni che generano calore,
come per esempio asciugacapelli, coperte
elettriche, macchine per il caffè, forni a
microonde, tostapane
- Potenza totale > 150 W
Contenuto
Controllate il contenuto subito dopo aver aperto
la confezione. Provate l’apparecchio e tutti i
pezzi per verificare danni. Non mettete in
funzionare apparecchi o pezzi difettosi.
1 trasformatore di tensione tascabile Si 150
1 cavo di ricarica per iPod (non adatto per
iPod Shuffle)
1 manuale utente
34 IT

Introduzione
Descrizione dei pezzi
1
Tasto ON/OFF/MODE
2
Indicatore LED
3
Cavo di rete con spina da 12 V
4
Indicatore LED “Volt“ (V)
5
Indicatore LED “Watt“ (W)
6
Indicatore LED “errore“
7
Fessure di aerazione
8
Uscita USB 5 V
9
Uscita 230 V AC 50 Hz, 150 W
10
Cavo di ricarica per iPod
Dati tecnici
Tensione nominale d‘entrata: 10,5 - 15,5 V /
15 A
Potenza d‘uscita: 150 W
Potenza massima in uscita: 300 Watt
(per 0,1 sec.)
Potenza d‘uscita: 230 V ~
Grado di efficienza: > 80 %
Frequenza d‘uscita: 50 Hz
Uscita USB: 5,0 V
/ 0,5 A
Classe di protezione: II /
Protezione: 15 A
Temperatura dell‘ambiente: 0 °C - 35 °C
Protezione contro
le sottotensioni: 10 V +/– 0,5 V
Protezione contro
le sovratensioni :
15,5 V +/– 0,5 V
Protezione da sovraccarico: 180 V, +/– 0,5 V
Protezione
antisurriscaldamento: > 65 °C
Dimensioni: 147 x 88 x 27 mm
(L x L x A)
Peso: 280 g
Caratteristiche tecniche
Il trasformatore di tensione presenta alcune caratteristiche tecniche per proteggere se stesso
e/o i dispositivi ad esso collegati.
Indicatori di avvertenza e protezione
Gli errori sono generalmente riconoscibili come
segue:
- Indicatore LED rosso
6
- Bip o ronzio
- Codice di avvertenza (A) o codice di
protezione (P) nell’indicatore LED
2
Codice Indicatore LED rosso Significato Tipo di avviso
A - 1
Si accende
Avvertenza di sovraccarico
BipA - 2 Avvertenza di surriscaldamento
A - 3 Avvertenza di sottotensioni
P - 1
P - 2 Protezione antisurriscaldamento
Si accende
Protezione contro le sovratensioni
Protezione corto circuito
Ronzio
P - 3 Protezione sottotensioni
P - 4 Protezione sovratensioni
Protezione contro le sovratensioni:
Se la tensione in entrata è maggiore di 15,5 V
(+/– 0,5 V) si sente un ronzio, si accende l’indicatore LED rosso
6
e sulla spia LED 2 viene
indicato P-4.
Il trasformatore di tensione interrompe l’inversione e l’apparecchio esterno si spegne. Quando
la tensione cade al di sotto dei 14,5 V (+/– 0,5 V),
il trasformatore di tensione riprende il funzionamento normale.
35 IT

Introduzione
Protezione contro la sottotensione (funzione
monitor batteria, protezione della batteria
per auto):
Se la tensione d’entrata è al di sotto dei 11V (+/–
0,5 V) si sente un bip, l’indicatore LED rosso
accende e nella spia LED
2
viene indicato A-3.
6
si
Se la tensione d’entrata è al di sotto dei 10,5 V
(+/– 0,5 V) si sente un ronzio, l’indicatore LED
6
rosso
si accende e nella spia LED 2 viene
indicato P-3.
Il trasformatore di tensione interrompe l’inversione e l’apparecchio esterno si spegne.
Quando la tensione sale al di sopra dei 12 V
(+/– 0,5 V), il trasformatore di tensione riprende
il funzionamento normale.
Protezione dal corto circuito:
Se l’apparecchio collegato provoca un corto circuito si sente un ronzio, l’indicatore LED rosso
6
si accende e la spia LED indica P-1.
Protezione contro il surriscaldamento:
Se la temperatura all’interno del dispositivo è al
di sopra dei 60 °C si sente un bip, l’indicatore
LED rosso si accende
6
e nella spia LED 2
viene indicato A-2.
Se la temperatura all’interno del dispositivo è al
di sopra dei 68 °C si sente un ronzio, l’indicatore
LED rosso
6
si accende e nella spia LED 2 viene
indicato OFF. Il trasformatore di tensione interrompe l’inversione e l’apparecchio esterno si spegne.
Quando la temperatura si abbassa al di sotto dei
50 °C, premete per ca. 3 secondi il tasto ON/OFF/
1
MODE
e iniziate nuovamente ad invertire la
tensione.
Protezione contro il sovraccarico:
Se la carica è superiore a 160 W (+/– 10 W) si
sente un bip, l’indicatore LED rosso
e nella spia LED
2
viene indicato A-1.
6
si accende
Se la carica è superiore a 180 W (+/– 10 W) si
sente un ronzio, l’indicatore LED rosso
accende e nella spia LED
2
viene indicato P-1.
6
si
Il trasformatore di tensione interrompe l’inversione e l’apparecchio esterno si spegne.
Tecnologia
L’inversione della corrente continua con una
tensione di 12 V in corrente alternata di 230 V
avviene in 2 fasi.
Fase 1:
Il dispositivo aumenta la corrente continua in
entrata ad una tensione di 300 V.
Fase 2:
Questa tensione viene poi convertita in corrente
alternata con una tensione di 230 V ed una
frequenza di 50 Hz.
Per questo processo viene utilizzato una specie
di transistor che è composto da circuiti ad alta
integrazione chiamati MOSFET (Metal-OxideSemiconductor Field-Effect Transistor, transistor
ad effetto di campo con semiconduttore di
ossido metallico).
Tensione d‘uscita, forma ad onda
La tensione d’uscita in questo dispositivo viene
riprodotta come un’onda sinusoidale modificata.
Essa ha una forma ripida, che presenta quasi
esattamente le stesse caratteristiche dell’onda
sinusoidale pura. Questa onda sinusoidale modificata viene riconosciuta dalla maggior parte dei
moderni apparecchi con una tensione di 230 V.
Ad essi appartengono gli alimentatori che si
trovano nelle componenti elettroniche, trasformatori e/o piccoli motori. L’onda sinusoidale
modificata, generata da questo invertitore d’alimentazione utilizza una tensione effettiva di
230 V. La maggior parte dei voltmetri digitali ed
analogici non riesce a rilevare la tensione effettiva, producendo per questo un’indicazione da
20 a 30 Volt inferiore al valore reale della tensione d’uscita. Per ottenere dunque un risultato
di misurazione preciso, è necessario utilizzare un
apparecchio adatto per la misurazione della
tensione effettiva.
AVVISO!
Alcuni dispositivi esterni, soprattutto radio e/o
altri apparecchi audio e ricaricabili, possono
danneggiare l’invertitore di tensione e/o l’apparecchio ad esso collegato.
36 IT

Introduzione / Sicurezza
Verificate se l’apparecchio esterno collegato al
trasformatore di tensione emette dei “ronzii“, si
riscalda molto o emette troppo calore durante i
primi minuti di funzionamento. In questo caso
scollegate immediatamente l’apparecchio esterno e tutti i cavi.
Questo significa che gli apparecchi non sono
compatibili e non possono essere utilizzati l’uno
con l’altro. Se qualcosa non fosse chiara, rivolgetevi al rivenditore specializzato del Vostro apparecchio esterno.
Questo problema non si presenta con gli apparecchi moderni e/o di alta qualità, poiché essi sono
in grado di rilevare onde sinusoidali modificate
ed elaborarle.
Tecnologia di avvio morbido ”soft start“
Il trasformatore di tensione è provvisto di una
tecnologia soft start che permette di invertire la
tensione per fasi. In questo modo possono essere
utilizzati apparecchi che necessitano di un’elevata
corrente di spunto. Aumentando per fasi la tensione di uscita si evita il danneggiamento del
trasformatore di tensione, della boccola d’ingresso
da 12 V e dell’apparecchio ad esso collegato.
Sicurezza
Indicazioni di
sicurezza generali
AVVISO!
curezza e le istruzioni. Omissioni nell’osservanza
delle indicazioni di sicurezza e delle istruzioni
possono provocare scosse elettriche, ustioni e/o
forti lesioni.
Conservate per il futuro tutte le indicazioni di
sicurezza e le istruzioni.
PERICOLO DI VITA E DI INCI-
stoditi con il materiale contenuto nella confe-
zione. Ciò comporta pericolo di soffocamento.
Questo dispositivo non è destinato ad essere
Leggete tutte le indicazioni di si-
DENTI PER I BAMBINI PICCOLI!
Non lasciate mai i bambini incu-
utilizzato da persone (compresi i bambini)
con capacità fisiche, psichiche, sensoriali e
intellettuali limitate, oppure senza esperienza
e/o senza conoscenze adeguate, a meno che
essi non siano sotto il controllo di una persona
competente oppure ricevano da essa indicazioni su come utilizzare il dispositivo. I bambini dovrebbero essere sorvegliati per essere
sicuri che non giochino con il dispositivo.
Tenete il dispositivo fuori dalla portata dei
bambini. Essi non sono in grado di comprendere né riconoscere i rischi possibili nel
maneggiare gli apparecchi elettrici.
Tenete il dispositivo lontano da pioggia ed
umidità. L’acqua introdotta negli apparecchi
elettronici costituisce un pericolo di morte
per folgorazione.
Assicuratevi che tutte le prese e i cavi di rete
siano privi di umidità. Non accendete mai il
dispositivo con mani umide o bagnate.
Utilizzate il dispositivo solo se il cavo di rete
e la cassa sono privi di lesioni.
Assicuratevi sempre che il cavo di corrente
sia sicuro.
Non utilizzate un cavo di rete per trasportare
o tirate il dispositivo. I cavi di rete danneggiati costituiscono un pericolo di morte per
folgorazione.
Tirate sempre dalla presa, non dal cavo di
rete, per scollegare il dispositivo dalla fonte
di tensione.
Se il cavo venisse instradato attraverso muri
con spigoli vivi, per esempio muri di metallo,
utilizzate dei tubi cavi o tubature per evitare
il danneggiamento del cavo.
Non fate passare mai il cavo principale da
230 V insieme ai cavi di corrente continua da
12 V DC nello stesso tubo (una tubatura).
Posizionate il cavo di rete in modo tale che
non si possa inciampare su di esso e danneggiarlo.
Non posizionate il cavo vicino a materiali
conduttivi. Non piegate il cavo e proteggetelo da eventuali lesioni.
I cavi danneggiati devono essere sostituiti
immediatamente.
Evitate corti circuiti e ponti elettrici spine di
37 IT

contatto protette o con corpi estranei tra le
entrate e le uscite del trasformatore di tensione
Utilizzate solo spine di contatto protette o
connettori a spada per il collegamento di
apparecchi elettrici alle prese di uscita. Anche se il fusibile incorporato dovesse saltare,
alcune parti del dispositivo rimangono sotto
carica.
Verificate che il dispositivo venga sempre
utilizzato in un luogo sicuro.
Scegliete accuratamente il luogo in cui
collocare il dispositivo.
I lavori di manutenzione devono essere
eseguiti da un elettricista qualificato.
Non mettete in funzione il dispositivo se
risulta danneggiato.
Non esponete il dispositivo
- a temperature estreme,
- a forti vibrazioni,
- a sforzi meccanici elevati,
- ad esposizione solare diretta,
- all‘umidità.
In caso contrario, si rischia un danneggiamento del dispositivo.
Notate che i danneggiamenti a causa di un
utilizzo non conforme, inosservanza delle
istruzioni per l’uso o intromissione da parte
di persone non autorizzate, sono al di fuori
della garanzia.
Non separate mai il dispositivo. Attraverso le
riparazioni non conformi possono incorrere
pericoli rilevanti per l’utilizzatore.
Fate eseguire le riparazioni solo da specialisti.
sempre la spina da 12 V
quando non utilizzate il trasformatore.
.
3
dalla fonte di corrente
Dopo il collegamento mantenete premuto il
tasto ON/OFF/MODE
1
per ca. 3 sec. e si
accende l‘indicatore LED su:
Indicatore LED verde
4 5
= il dispositivo è
pronto per l‘utilizzo.
Indicatore LED rosso
presa da 12 V
6
= Errore! Verificate la
3
e controllate il capitolo “ricerca
errore“.
AVVISO!
Separate sempre il trasformatore dalla presa da
12 V prima di accendere il motore del veicolo.
Non connettete mai apparecchi al trasformatore
di tensione o far funzionare gli apparecchi connessi mentre si sta guidando. Assicuratevi che non
sia collegato alcun apparecchio al trasformatore
di tensione quando lo si connette alla presa di
tensione d’ingresso a 12 V del veicolo, ad esempio la presa dell’accendisigari di un’automobile.
Indicazione: Se l’alimentazione elettrica viene
ad essere interrotta mentre sta funzionando il
trasformatore di tensione, lo si dovrà riavviare.
Per far questo, sconnettete e riconnettete il cavo
d’alimentazione. Dopo il collegamento tenete
premuto il tasto ON/OFF/MODE
1
per ca. 3 secondi, si accende l’indicatore LED e viene eseguito l’autotest come descritto sopra.
Funzionamento
Prima dell‘attivazione
Prima di azionare il trasformatore di tensione
dovete verificare i collegamenti alla batteria
dell’auto.
Nel caso in cui il polo positivo (+) della batteria
fosse collegato alla massa del telaio, non dovete
utilizzare il trasformatore con automobili di
questo tipo.
Inserite la spina da 12 V
3
del trasformatore
nella fonte di corrente che deve fornire un’intensità di corrente di almeno 15 A. Separate
38 IT
Collegamento di apparecchi esterni
Introducete la spina dell’apparecchio esterno
nell’uscita da 230 V
9
del trasformatore di
tensione e/o collegate l’apparecchio esterno
USB all’uscita USB.
Accendete il trasformatore di tensione tenendo
premuto il tasto ON/OFF/MODE
1
per ca. 3
secondi. Dopo un autotest con risultato positi vo, il LED verde
5
indica che il trasformatore
di tensione è pronto per l‘uso. Se si dovesse
accendere l’indicatore LED rosso, leggete il
capitolo “ricerca degli errori“.

Funzionamento / Ricerca errori
Accendete ora gli apparecchi (esterni) colle-
gati con il trasformatore di tensione.
Indicazione: Se l’assorbimento è uguale o maggiore di 35 W, si accende immediatamente la ventilazione incorporata, per evitare un surriscaldamento
del trasformatore di tensione. In caso di assorbimento limitato (< 35 W),l’accensione della ventilazione dipende dalla temperatura. Potete utilizzare
8
contemporaneamente entrambe le uscite
e
9
. La potenza nominale totale per entrambi gli
apparecchi esterni non deve superare i 150 W. La
potenza nominale di un apparecchio esterno viene indicata dalla targhetta tecnica apposta sullo
specifico apparecchio esterno. Gli apparecchi
esterni come motori elettrici, perforatrici, seghe
elettriche, frigoriferi e sistemi audio normalmente presentano all’inizio una potenza nominare maggiore rispetto a
quella indicata sulla targhetta tecnica12
Per esempio: 0,4 A x 230 = 92 Watt
Uscita da 230 V
9
Impiegare soltanto apparecchi esterni che dispongano di spine a contatti protetti, o di connettori
europei ad innesto.
Accendere / spegnere il trasformatore
di tensione, cambiare il modulo
Tenete premuto il tasto ON/OFF/MODE 1
per 3 secondi, per accendere il trasformatore
di tensione. Il trasformatore esegue ora un
autotest automatico. Durante questa opera zione vengono attivati tutti i LED, la ventila zione e l‘allarme sonoro per ca. 2 secondi.
Dopo l‘autotest il trasformatore di tensione
è pronto per l‘uso e si accende l‘indicatore
LED verde
nell‘indicatore LED
uscita presa momentaneamente in Watt.
Finché non è collegato alcun utilizzatore alla
presa d‘uscita da 230 Volt
LED indica 0 – Watt.
Per spegnere il trasformatore di tensione,
toccate nuovamente il tasto ON/OFF/MODE
1
per 3 secondi. Il trasformatore di tensione
si spegne e spariscono tutte le indicazioni.
Durante il funzionamento del trasformatore
di tensione, premete brevemente il tasto ON/
OFF/MODE
re LED
tra Watt e Volt.
5
. Nello stesso momento
2
appare la potenza in
9
, l‘indicatore
1
per 1 secondo, così l’indicato-
2
cambia la modalità d’indicazione
Uscita USB
8
Connettete l’apparecchio esterno USB alla porta
8
USB
ed attivatelo. L’uscita USB di questo trasformatore di tensione fornisce un’energia di 5 V
per dispositivi esterni USB (ad esempio, lampade,
ventilatori, radio). L’uscita USB è alimentata in
permanenza quando l’invertitore d’alimentazione
è connesso ad una fonte di tensione d’ingresso
di 12 V.
AVVISO!
L’uscita USB di questo trasformatore di tensione
non è concepita per il trasferimento di dati. Non
connettere memorie flash, lettori MP3 o simili
elementi di memoria esterni. Non connettete
alcun cavo di trasferimento dati alla porta USB!
Cambiare i fusibili sul supporto:
Rimuovete il trasformatore di tensione dalla
rete di alimentazione, tirando la spina da 12 V
3
dalla presa della rete di bordo da 12 V. Rimuovete eventualmente anche gli utilizzatori
collegati dalla presa d‘uscita da 230V
la presa d‘uscita USB
8
.
e dal-
9
Staccate la vite di fissaggio sul supporto del
fusibile, svitandola in senso antiorario con un
cacciavite a croce. Sollevare il coperchio di
protezione tirando leggermente verso l‘alto dal
supporto del fusibile.
Rimuovete il fusibile difettoso e sostituitelo
con uno nuovo con lo stesso valore in Ampere.
(fusibile da max. 20 A). Fate attenzione che il
fusibile sia inserito bene nel supporto, in modo
che sia necessario usare un dispositivo di estra zione adeguato per rimuoverlo.
39 IT

Chiudete ora il coperchio del supporto del fusi-
bile e avvitate bene la vite a croce del
coperchio.
Riallacciate ora il trasformatore di tensione
senza utilizzatori collegati alla presa di tensio ne di bordo ed accendetela nel modo descritto.
Ricerca errori
Se dovesse verificarsi uno dei seguenti casi,
separate il trasformatore di tensione dalla
fonte di corrente da 12 V e separate gli apparecchi esterni dalle uscite
8
e 9.
= Errore
= Possibile causa
= Rimedio
Non si accende alcun LED.
La spina da 12 V 3 non è inserita corretta-
mente nella presa.
Verificate tutti i collegamenti.
Nessuna tensione in entrata; il collegamento
da 12 V non trasporta tensione.
Avviate il motore.
Sicurezza difettosa.
Sostituite la sicurezza.
Indicatore LED 6 rosso si accende.
La temperatura è maggiore di 65 °C.
Spegnete immediatamente il trasformatore.
Verificate che esso si sia raffreddato suffi-
cientemente e che le fessure di aerazione
siano libere.
Fate raffreddare il dispositivo e aerate suffi-
cientemente.
Aspettate 10 minuti prima di accendere
nuovamente il trasformatore.
La tensione in entrata è troppo alta; prote-
zione contro la sovratensione.
Spegnete immediatamente il trasformatore.
Verificate la tensione in entrata.
La tensione in entrata è troppo bassa; prote-
zione contro la sottotensione.
Spegnete il trasformatore immediatamente.
Verificate il collegamento e caricate la batteria.
Se la tensione è al di sopra dei 12 V, accen-
dete nuovamente il trasformatore.
Falso collegamento del polo; corto circuito.
Spegnete il trasformatore immediatamente.
Verificate tutti i collegamenti, cavi e appa-
recchi.
Effettuare le necessarie impostazioni, ove
richiesto.
La tensione nominale è superiore ai 150 W;
protezione da sovraccarico.
Utilizzate apparecchi che non superino la
tensione nominale di 150 W.
Corto circuito nel dispositivo.
Verificate gli apparecchi collegati. Non
utilizzate più gli apparecchi interessati.
= Errore
= Rimedio
Nel funzionamento di TV e/o impianti audio
e/o apparecchi:
Immagine neve, immagine traballante,
ronzio, battiti o rullio.
Disponete il trasformatore il più lontano
possibile da televisori.
Verificate il collegamento dell’antenna e le
sue impostazioni. Allontanate il cavo dell’antenna dal trasformatore. Utilizzate un cavo
dell’antenna schermato. L’onda sinusoidale
modificata del trasformatore non può essere
filtrata sufficientemente attraverso l’apparec-
7
chio esterno collegato. Separate immediatamente tutti i cavi.
L’unica soluzione disponibile è l’utilizzo di un
apparecchio esterno moderno o un apparecchio con elevate prestazioni e capacità
filtranti sufficienti.
40 IT

Smaltimento
Manutenzione e cura
Il dispositivo non necessita di manutenzione.
AVVISO!
sempre dalla corrente elettrica prima di intraprendere lavori di cura ecc.
Spegnete il dispositivo.
Estraete la spina da 12 V 3 dal collegamento
da 12 del vostro veicolo.
Pulite il dispositivo con un panno asciutto.
Non utilizzate mai detersivi o altri detergenti
aggressivi.
Assistenza
AVVISO!
da personale qualificato, in modo da man-
tenere integra la sicurezza del dispositivo.
AVVISO!
cavo di collegamento solo da personale
qualificato, in modo da mantenere integra
la sicurezza del dispositivo.
Separate gli apparecchi elettrici
Fate riparare il dispositivo solo
Fate sostituire la spina o il
Smaltimento
la confezione è composta da materiali a basso
impatto ambientale, riciclabili negli appositi siti
di raccolta.
Non buttate i dispositivi elettrici
nei rifiuti domestici!
Secondo la direttiva europea 2002 / 96 / EC sui
vecchi apparecchi elettrici ed elettronici e la
recezione nel diritto nazionale, gli apparecchi
elettrici usati devono essere raccolti separatamente per provvedere al riciclaggio in modo
ecologico.
Per informazioni sullo smaltimento degli
apparecchi elettrici usati, consultate l’amministrazione cittadina.
Garanzia
Le condizioni di garanzia si riferiscono ai difetti
legati alla produzione e ai materiali. In caso di
apparecchio difettato, riportatelo al rivenditore
specializzato, o al punto vendita dove è stato
acquistato. Per usufruire della garanzia e delle
riparazioni sono necessari:
- Una copia dello scontrino (ricevuta di consegna o ricevuta d’acquisto) con la data di
consegna.
- Motivo del reclamo o descrizione del guasto.
41 IT

Le illustrazioni possono leggermente differire
dal prodotto. Ci si riserva il diritto a modifiche
che siano funzionali al miglioramento tecnico.
Decorazione non compresa.
42

Seznam obsahu
Úvod
Používání k určenému účelu ....................................................................................................................Strana 44
Obsah dodávky .............................................................................................................................................Strana 44
Popis elementů na přístroji .......................................................................................................................Strana 44
Technické údaje ............................................................................................................................................Strana 45
Technické vlastnosti ....................................................................................................................................Strana 45
Bezpečnost
Všeobecná bezpečnostní upozornění ....................................................................................................Strana 46
Před uvedením do provozu .............................................................................................................Strana 47
Obsluha
Připojení externích přístrojů ....................................................................................................................Strana 48
Vypnutí a zapnutí měniče napětí, změna režimu ..............................................................................Strana 48
Výměna pojistky na bezpečnostním spínači ........................................................................................Strana 49
Hledání chyb ...............................................................................................................................................Strana 49
Údržba a ošetřování .............................................................................................................................Strana 50
Servis .................................................................................................................................................................Strana 50
Záruka ..............................................................................................................................................................Strana 50
Odstranění do odpadu ........................................................................................................................Strana 50
43 CZ

Úvod
V tomto návodu k obsluze a na přístroji budou použité následující piktogramy:
Přečíst návod k obsluze! Použití uvnitř prostorů
Dbát na varovná a bezpečnostní
upozornění!
Nebezpečí zranění a ohrožení
života dětí!
Kapesní měnič napětí Si 150
Úvod
Před uvedením do provozu se seznamte
s funkcemi přístroje a informujte se o
správném zacházení. K tomu si přečtěte
důkladně následující návod k obsluze. Tento
návod si dobře uschovejte. Předávejte tyto podklady spolu s přístrojem.
Používání k určenému účelu
Měnič napětí je určený na přeměnu stejnosměrného proudu s napětím 12 V na střídavý proud o
napětí 230 V s frekvencí 50 Hz a/nebo stejnosměrné napětí 5 V a proud 500 mA. Přezkoušejte
vždy přístroj na jeho kontinuální výstupní výkon
(viz. kapitola „Hledání chyb“). Je připuštěný jen k
privátnímu použití. Každé jiné použití nebo pozměnění přístroje platí jako používání k jinému,
než určenému účelu a přináší sebou značná
nebezpečí. Výrobce neručí za škody vzniklé
použitím k jinému než k určenému účelu.
Přístroj je možné použít pro následující druhy
externích elektrických přístrojů:
- připojení na zdroj proudu s napětím 12 V a
nejméně 15 A
- běžné elektrické spotřebičů jako notebooku,
stolní kalkulačky, přehrávače MP3, PDA nebo
nabíječku mobilních telefonů, PC, atd.
- celkovém příkonu maximálně 150 W
Ochranná třída II
Přístroj a obalový materiál
odstraňujte do odpadu ekologicky!
Použití přístroje není dovolené pro následující
druhy elektrických spotřebičů a následující
okolnosti:
- připojení na zdroj elektrického proudu s
napětím 6, 24 nebo 230 V
- externí spotřebiče produkující žár nebo teplo,
jako jsou například vysoušeče vlasů, elektrické
zahřívací deky, kávovary, mikrovlnné trouby,
opékače topinek, toustovače, atd.
- s celkovým příkonem > 150 W
Obsah dodávky
Zkontrolujte ihned po vybalení obsah dodávky.
Zkontrolujte, jestli není přístroj poškozený. Neuvádějte vadný přístroj nebo jeho díly do provozu.
1 Kapesní měnič napětí Si 150
1 Kabel pro nabíjení iPod (není vhodný pro iPod
Shue)
1 Návod k obsluze
Popis elementů na přístroji
1
Tlačítko ON/OFF/MODE
2
LED displej
3
Připojovací kabel se zástrčkou na 12 V
4
LED kontrolka „Volt“ (V)
5
LED kontrolka „Watt“ (W)
6
LED kontrolka „Chyba“
7
Větrací otvory
8
USB výstup 5 V
9
Výstup 230 V AC 50 Hz, 150 W
10
Nabíjecí kabel pro iPod
44 CZ

Úvod
Technické údaje
Ochrana proti přehřátí: > 65 °C
Rozměry: 147 x 88 x 27 mm
Jmenovité vstupní napětí: 10,5 - 15,5 V /
15 A
Váha: 280 g
(D x Š x V)
Výstupní výkon: 150 W
Špičkový výstupní výkon: 300 Watt (po
dobu 0,1 vteřin)
Technické vlastnosti
Výstupní napětí: 230 V ~
Účinnost: > 80 %
Výstupní frekvence: 50 Hz
USB výstup: 5,0 V
/ 0,5 A
Třída ochrany: II /
Pojistka: 15 A
Teplota okolního prostředí: 0 °C - 35 °C
Ochrana proti podpětí: 10 V +/– 0,5 V
Ochrana proti přepětí: 15,5 V
+/– 0,5 V
Měnič napětí má určitá technická provedení pro
vlastní ochranu a ochranu připojených spotřebičů.
Varovná a ochranná signalizace
Chyby jsou následujícími způsoby signalizované:
- Červená LED kontrolka
6
- Pípání nebo oznamovací tón
- Kód pro technickou údržbu (A) nebo ochranný
kód (P) na displeji s LED
2
Ochrana proti přetížení: 180 V, +/– 0,5 V
Kód Červená LED kontrolka Popis Typ varování
A - 1
svítí
Varování před přetížením
Pípající tónA - 2 Varování před přehřátím
A - 3 Varování před podpětím
P - 1
P - 2 Ochrana proti přehřátí
svítí
Ochrana proti přetížení
Ochrana proti zkratem
Oznamovací tón
P - 3 Ochrana proti podpětí
P - 4 Ochrana proti předpětí
Ochrana proti přepětí:
Jestliže přesáhne vstupní napětí 15,5 V (+/– 0,5 V),
zazní oznamovací tón, svítí červená LED kontrol-
6
ka
a na LED displeji 2 se objeví P-4.
Měnič napětí přeruší přeměnu a externí přístroj
se vypne. Po poklesu napětí pod 14,5 V (+/– 0,5 V)
se vrátí měnič napětí do normálního provozu.
Ochrana proti podpětí (Ukazatele funkce
baterie, ochrana baterie ve vozidle):
Jestliže klesne vstupní napětí pod 11V (+/– 0,5 V),
zazní pískavý tón, svítí červená LED kontrolka
a na LED displeji
2
se objeví A-3.
6
Jestliže je vstupní napětí nižší než 10,5 V (+/– 0,5 V)
zazní oznamovací tón, svítí červená LED kontrol-
6
ka
a na LED displeji 2 svítí P-3.
Měnič napětí přeruší přeměnu a externí přístroj
se vypne.
Po dosažení napětí přes 12 V (+/– 0,5 V) se vrátí
měnič napětí do normálního provozu.
Ochrana proti zkratu:
Jestliže způsobí připojený spotřebič zkrat zazní
oznamovací tón, svítí červená LED kontrolka
a na LED displeji svítí P-1.
Ochrana proti přehřátí:
Jestliže překročí teplota uvnitř přístroje 60 °C,
zazní pípnutí, červená LED kontrolka
6
svítí a
6
45 CZ

Úvod / Bezpečnost
na LED displeji 2 svítí A-2.
Jestliže překročí teplota uvnitř přístroje 68 °C
zazní oznamovací tón, červená LED kontrolka
svítí a na LED displej
2
svítí OFF. Měnič napětí
6
přeruší přeměnu a externí přístroj se vypne.
Po poklesu teploty pod 50 °C stiskněte na 3 vteřiny tlačítko ON/OFF/MODE
1
pro nový start.
Ochrana proti přetížení:
Jestliže překročí zatížení 160 W (+/– 10 W), zazní
pípající tón, červená LED kontrolka
LED displeji
2
svítí A-1.
6
svítí a na
Jestliže překročí zatížení 180 W (+/– 10 W), zazní
oznamovací tón, červená LED kontrolka
a na LED displeji
2
svítí P-1.
6
svítí
Měnič napětí přeruší přeměnu a externí přístroj
se vypne.
Technologie
Přeměna stejnosměrného proudu s napětím 12 V
na střídavý proud s napětím 230 V probíhá ve
dvou stupních.
Stupeň 1:
Přístroj zvyšuje napětí vstupujícího stejnosměrného proudu na 300 V.
Stupeň 2:
Toto napětí potom přístroj mění na střídavý
proud s napětím 230 V a frekvencí 50 Hz.
Pro tento proces se používá druh tranzistoru
skládající se z čipu s velkou integrací pod názvem MOSFET (Metalloxid-Halbleiter-Feldeekttransistor).
analogových měřičů napětí nemůže efektivní
napětí číst a ukazuje hodnotu, která leží o 20 až
30 V pod skutečnou hodnotou výstupního napětí.
Pro dosažení přesného výsledku měření použijte
měřící přístroj vhodný pro měření efektivního
napětí.
VAROVÁNÍ
Některé externí přístroje, obzvláště rádia anebo
jiné audio přístroje resp. nabíjecí přístroje mohou
poškodit měnič napětí i připojené přístroje.
Kontrolujte, jestli na měnič připojené externí
přístroje “nebručí”, se nezahřívají nebo se během
pár minut nepřiměřeně nezahřívají. V těchto
případech odpojte všechny externí přístroje a
odstraňte všechny kabely.
Toto znamená, že nejsou tyto přístroje kompatibilní a nemohou se společně používat. Jestliže
Vám není něco jasné obraťte se na odborného
prodejce Vašeho externího přístroje.
Tento problém se nevyskytuje u moderních a
jakostních přístrojů, protože jsou schopné zaznamenat a zpracovat právě zmíněné, modifikované
sinusové křivky.
Technologie měkkého, pozvolného startu
Měnič napětí je vybavený technologií přispívající
k průběhu přeměny napětí po stupních. Tím mohou být použité přístroje, které potřebují vyšší
startovací proud. Stupňovité zvyšování výstupního napětí zabraňuje poškození měniče napětí,
vstupní zásuvky na 12 V a připojených přístrojů.
Výstupní napětí, tvar křivky
Výstupní napětí je v přístroji reprodukované jako
modifikovaná sinusová křivka. Tato má stupňovitý
tvar prokazující skoro přesně stejnou charakteristiku
jako čistá sinusová křivka. Tato modifikovaná
sinusová křivka je pro většinu moderních, externích přístrojů s napětím 230 V rozeznatelná. K
těmto patří napájecí zařízení proudem v elektronických komponentech, transformátorech anebo
malých motorech. Modifikovaná sinusová křivka
produkovaná tímto měničem napětí používá
efektivní napětí 230 V. Většina digitálních a
46 CZ
Bezpečnost
Všeobecná bezpečnostní
upozornění
VAROVÁNÍ
upozornění a pokyny. Nedbání na bezpečnostních
upozornění a pokyny může vést k zásahu elektrickým proudem, požáru nebo k těžkým zraněním.
Uschovejte si všechna bezpečnostní upozornění
a pokyny pro budoucí použití.
Přečtěte si všechna bezpečnostní

Bezpečnost / Před uvedením do provozu
NEBEZPEČÍ ZRANĚNÍ A OHRO-
ŽENÍ ŽIVOTA MALÝCH DĚTÍ!
Nenechávejte děti nikdy bez do-
hledu s obalovým materiálem. Hrozí nebez-
pečí udušení.
Přístroj nemají obsluhovat osoby (včetně
dětí) s omezenými fyzickými, senzorickými
nebo duševními schopnostmi nebo bez zkušeností, ledaže jsou poučené o používání
přístroje v zájmu vlastní bezpečnosti a pod
dozorem příslušné osoby. Děti mají zůstat
pod dohledem, aby si nehráli s přístrojem.
Uchovávejte přístroj mimo dosah dětí. Děti
nejsou schopné rozpoznat a rozumět možným rizikům při zacházení s přístrojem.
Chraňte přístroj před deštěm a vlhkostí. Voda
vniklá do přístroje znamená ohrožení života
zásahem elektrického proudu.
Dbejte na to, aby nebyly zástrčka a přívodní
kabel vlhké. Nepřipojujte přístroj nikdy vlhkýma nebo mokrýma rukama.
Používejte přístroj jen s přívodním kabelem a
tělesem v bezvadném stavu.
Dbejte vždy na zajištění a pojištění kabelu.
Nepoužívejte kabel na nošení nebo tahání
přístroje. Poškozený kabel znamená ohrožení
života zásahem elektrického proudu.
Při rozpojování netahejte za kabel, vytahujte
zástrčku.
Jestliže musíte protáhnout kabel stěnami s
ostrými hranami, například kovovými stěnami,
používejte na vedení trubky.
Neprotahujte a nepokládejte nikdy hlavní
kabel s 230 V spolu s kabely stejnosměrného
proudu 12 V DC v jedné trubce.
Neumisťujte síťový kabel tak, aby jste mohli
o něj zakopnout a poškodit ho.
Nepokládejte kabely nikdy v blízkosti vodi-
vých materiálů. Kabel neskládejte, nerolujte
a chraňte ho před poškozením.
Poškozené kabely se musí ihned vyměnit.
Zabraňte zkratům a přemostění s cizími
předměty mezi vstupem a výstupem z měniče
napětí. Používejte pro připojení přístrojů na
výstupní zdířky jen spojení s uzemňovacími
kolíky nebo vidlicovou zástrčkou. Některé
díly přístroje zůstávají pod proudem i po
zapůsobení pojistky.
Dbejte na používání přístroje jen na bezpeč-
ném místě.
Místo pro přístroj volte pečlivě.
Opravy přístroje musí provádět kvalifikovaný
elektrikář.
Poškozený přístroj neuvádějte do provozu.
Nevystavujte přístroj:
- extrémním teplotám,
- silným vibracím,
- velkému mechanickému zatížení,
- přímému slunečnímu záření,
- nebo vlhkosti.
V opačném případě hrozí poškození přístroje.
Vezměte na vědomí, že se záruka nevztahuje
na škody způsobené neodborným zacházením, nedbáním na pokyny uvedené v návodu
k obsluze nebo zásahem osoby, která není
autorizovaná pro opravy.
Přístroj v žádném případě nerozebírejte. Ne-
odborně provedené opravy mohou ohrozit
uživatele.
Opravy nechte provádět odborníkem.
Před uvedením do provozu
Před připojení měniče proudu musíte zkontrolovat kontakty baterie Vašeho vozidla.
Měnič napětí se nesmí používat ve vozidle, které
má připojený kladný pól (+) baterie na karosérii.
Připojte zástrčku 12 V
3
měniče napětí ke zdroji
proudu s napětím 12 V a proudem nejméně 15 A.
Jestliže nepoužíváte měnič napětí, vytáhněte
vždy zástrčku 12 V
3
z přívodu proudu.
Po připojení stiskněte tlačítko ON/OFF/MODE
1
a přidržte ho po dobu cca 3 vteřin až se
rozsvítí LED kontrolka:
Zelená LED kontrolka
4 5
= přístroj je připravený k provozu
Červená LED kontrolka
zástrčku 12 V
3
6
= chyba! Zkontrolujte
resp. čtěte dále v kapitole
„Hledání chyb“.
47 CZ

VAROVÁNÍ
Před nastartováním vozidla vždy odpojujte
měnič napětí od jeho zásuvky na 12 V.
Během jízdy nikdy nepřipojujte přístroje na měnič
napětí a ani neobsluhujte eventuálně připojené
přístroje. Jestliže chcete připojit měnič napětí na
zdroj napětí 12 V, např. na cigaretový zapalovač
nebo zásuvku 12 V v autě, přezkoušejte nejdříve,
jestli nejsou na něj připojené jiné přístroje.
Upozornění: Jestliže dojde k přerušení přívodu
proudu za provozu měniče napětí musí se měnič
znovu aktivovat. Toto můžete provést odpojením
a novým připojením měniče napětí. Po připojení
přidržte tlačítko EIN/AUS/MODE
1
stlačené po
dobu cca 3 vteřin, LED svítí a měnič provede jak
už bylo výše popsáno vlastní test.
Obsluha
Připojení externích přístrojů
Zastrčte zástrčku externího přístroje do vý-
stupu 230 V
přístroj s USB rozhraním na výstup USB
9
měniče napětí nebo připojte
8
.
Zapněte měnič napětí stlačením a přidrže-
ním tlačítka EIN/AUS/MODE
1
po dobu 3
vteřin. Po úspěšně provedeném vlastním testu signalizuje nakonec zelená LED kontrolka
5
provozní pohotovost měniče napětí. Jestliže se rozsvítí červená LED kontrolka, hledejte příčinu v kapitole „Hledání chyb“.
Nyní zapněte externí přístroje spojené s
měničem napětí.
Upozornění: Jestliže dosáhne odebíraný výkon
hodnotu 35 W nebo vyšší, zapíná se ventilátor,
aby nedošlo k přehřátí měniče napětí. Při nižším
odběru (< 35 W) je zapínání ventilátoru řízené v
závislosti na teplotě. Použít můžete oba výstupy
8
a 9. Celkový příkon obou externích přístrojů
nesmí přesáhnout 150 W.
Jmenovitý výkon externího přístroje je uvedený
na jeho typovém štítku. Externí přístroje jako
elektromotory, vrtačky, elektrické pily a audio
přístroje potřebují při zapnutí vyšší jmenovitý
výkon než je uvedený na typové štítku. Jestliže je
jmenovité napětí uvedené v ampérech, můžete
zjistit výkon ve wattech znásobením této hodnoty faktorem 230.
Příklad: 0,4 A x 230 = 92 W
Výstup 230 V
9
Používejte jen externí přístroje vybavené uzemňovacími kolíky nebo evropskou, vidlicovou
zástrčku.
Výstup USB
8
Spojte přístroj s USB s výstupem USB 8 a
zapněte ho. USB výstup měniče napětí dodává
stejnosměrný proud o napětí 5 V pro externí
přístroje s USB (např. svítilny, ventilátory, rádia).
Výstup USB je vždy vypnutý, jestliže je měnič
napětí připojený na vstupní zásuvku 12 V.
VAROVÁNÍ
Výstup USB na měniči napětí není určený pro
přenos dat. Nepřipojujte zde žádné externí paměti,
přehrávače MP3 nebo podobné externí paměti
dat. Nepřipojujte na tento výstup USB ani žádné
kabely pro přenos dat!
Vypnutí a zapnutí měniče napětí,
změna režimu
Pro vypnutí měniče napětí přidržte tlačítko
EIN/AUS/MODE
napětí provede automaticky vlastní test.
Během te stu jsou po dobu 2 vteřin akti vovány všechny LED, funkce ventilátoru a
varovný signál.
Po tomto testu je měnič napětí znovu
připravený k provozu, svítí zelená LED
Zároveň ukáže LED
výstupní výkon ve wattech. Jestliže není
připojený na výstupu žádný spotřebič pro
230 V
9
Pro vypnutí měniče napětí stlačte znovu na
3 vteřiny tlačítko EIN/AUS/ MODE
napětí se vypne a veškerá signalizace zhasne.
Jestliže stlačíte během provozu měniče na
pětí krátce (na 1 vteřinu) tlačítko EIN/AUS/
MODE
1
jednotkami watt (W) a volt (V).
1
na 3 vteřiny. Měnič
5
2
momentálně měřený
ukazuje LED 2 0 W.
1
. Měnič
, mění se LED znázornění 2 mezi
.
48 CZ

Hledání chyb / Údržba a ošetřování / Servis
Výměna pojistky na bezpečnostním
spínači:
Odpojte měnič napětí od přívodu elektrické ho proudu vytažením zástrčky z palubní zá suvky na 12 V. Odpojte eventuálně i
připojené spotřebiče od výstupní zdířky 230
V
křížovým šroubovákem, otáčením proti
směru otáčení hodinových ručiček.
Vytáhněte kryt směrem nahoru.
jnou ampérovou hodnotou (maximálně 20
A). Pozor, pojistka drží poměrně pevně v
držáku, proto doporučujeme použít k jejímu
vytažení vhodný nástroj.
utáhněte pevně křížový šroub.
připojených spotřebičů, znovu na palubní
zásuvku a zapněte ho podle uvedeného po pisu.
a přípojky USB 8.
9
Povolte připevňovací šroub držáku pojistky
Nahraďte vadnou pojistku pojistkou se ste-
Nyní uzavřete znovu držák krytem a
Nakonec připojte měnič napětí, bez
Hledání chyb
Při výskytu jednoho z níže uvedených stavů
odpojte měnič napětí od zdroje proudu 12 V
a odpojte i připojené externí přístroje z
výstupů
= Chyba
= Možná příčina
= Odpomoc
Nesvítí žádná LED kontrolka
Zástrčka 12 V 3 není správně zastrčená v
zásuvce zdroje proudu.
Zkontrolujte všechny přípoje.
Žádné vstupní napětí; připojení 12 V nemá
napětí.
Zapněte startér.
Vadná pojistka.
Vyměňte pojistku.
LED kontrolka svítí červeně.
Teplota přesáhla 65 °C.
8
a 9.
Vypněte ihned měnič napětí. Zkontrolujte,
jestli je měnič napětí dostatečně chlazený a
jestli jsou průchozí a nezakryté větrací otvory.
Nechte přístroj vychladnout a zajistěte
dostatečné chlazení.
Vyčkejte 10 minut, než znovu zapnete měnič
napětí.
Vstupní napětí je příliš vysoké; ochrana proti
přepětí.
Vypněte ihned měnič napětí. Zkontrolujte
vstupní napětí.
Vstupní napětí je příliš nízké; Ochrana proti
podpětí.
Vypněte ihned měnič napětí.
Zkontrolujte připojení a nabijte baterii.
V případě, že je napětí vyšší než 12 V zapněte
znovu měnič napětí.
Nesprávné připojené pólů; ochrana proti
zkratu.
Vypněte ihned měnič napětí.
Zkontrolujte všechna připojení, kabel a pří-
stroje.
V případě potřeby proveďte všechna potřebná
nastavení.
Jmenovitý příkon je vyšší než 150 W; prou-
dová ochrana proti přetížení.
Použijte přístroje jejichž jmenovitý příkon
nepřesahuje 150 W.
Zkrat v přístroji.
Zkontrolujte všechny připojené přístroje.
Nepoužívejte dále dotyčné přístroje.
= Chyba
= Odpomoc
Za provozu TV, audio souprav nebo přístrojů:
Sněžení na obrazovce, roztřesený obraz,
bzučení, klepání nebo cvrčení.
Postavte měnič napětí pokud možno nejdále
od televize.
Zkontrolujte připojení antény, její nastavení
a umístěte anténní kabel dále od měniče
napětí. Použijte kabel antény s odstíněním.
Modifikovaná sinusová křivka není dostatečně filtrovaná připojeným externím přístrojem.
Ihned rozpojte všechny kabely.
Jediným řešením je použití modernějšího
49 CZ

Záruka / Odstranění do odpadu
externího přístroje resp. přístroje s vyšším
výkonem, s dostatečnou kapacitou pro filtrování.
Údržba a ošetřování
Přístroj nepotřebuje žádnou údržbu.
VAROVÁNÍ
všechny elektrické přístroje od přívodu elektrického proudu.
Vypněte přístroj.
Vytáhněte zástrčku 12 V 3 ze zásuvky s 12 V
Vašeho vozidla.
Čistěte přístroj suchým hadrem. V žádném
případě nepoužívejte rozpouštědla nebo jiné
agresivní čistící prostředky.
Servis
VAROVÁNÍ
jen kvalifikovanými pracovníky. Tím zůstane
zajištěná bezpečnost přístroje.
Před čistěním odpojte nejdříve
Nechávejte přístroj opravovat
Odstranění do odpadu
Balení je vyrobené z ekologických materiálů,
které můžete odstranit do odpadu u místních
sběren recyklovatelných materiálů..
Neodhazujte elektrické přístroje do
domácího odpadu!
Podle evropské směrnice 2002/96/EC, týkající se
starých elektrických a elektronických přístrojů a
realizace národního práva, se musí nepotřebné
elektrické přístroje sbírat odděleně a odevzdávat
k ekologickému, opětovnému zhodnocení.
Informujte se o možnostech odstranění elektrických přístrojů do odpadu u Vaší obce nebo
správy města.
VAROVÁNÍ
přívodního kabel nechávejte provádět jen
kvalifikovaným odborníkem. Tím zůstane
zajištěná bezpečnost přístroje.
Záruka
Všeobecné podmínky záruky se vztahují jen na
vady materiálu nebo chyby při výrobě.
Závadný přístroj odevzdejte u Vašeho odborného
prodejce. V zájmu urychlení záručních a opravářských prací potřebujeme následující doklady:
- Kopii pokladní poukázky (dodací list,
účtenku) s datem zakoupení.
- Důvod reklamace nebo popis závady.
50 CZ
Výměnu zástrčka nebo
Zobrazení se mohou nepatrne lišit od vzhledu
výrobku. Zmeny v popisu provedené z duvodu
technického vývoje výrobku jsou vyhrazeny.
Dekorace není v obsahu.

Obsah
Úvod
Použitie podľa predpisov ...........................................................................................................................Strana 52
Obsah ...............................................................................................................................................................Strana 52
Popis častí .......................................................................................................................................................Strana 52
Technické údaje ............................................................................................................................................Strana 53
Technické špecifiká ......................................................................................................................................Strana 53
Bezpečnosť
Všeobecné bezpečnostné predpisy .........................................................................................................Strana 55
Pred uvedením prístroja do prevádzky .................................................................................Strana 55
Obsluha
Pripojenie externých prístrojov ...............................................................................................................Strana 56
Zapnutie / vypnutie transformátora, zmena režimu ..........................................................................Strana 57
Výmena poistiek na držiaku poistiek .....................................................................................................Strana 57
Vyhľadávanie chýb .................................................................................................................................Strana 57
Údržba a ošetrovanie ..........................................................................................................................Strana 58
Servis .................................................................................................................................................................Strana 58
Záruka ..............................................................................................................................................................Strana 58
Likvidácia .......................................................................................................................................................Strana 58
51 SK

Úvod
Vtomto návode na obsluhu / na prístroji sú použité nasledovné piktogramy:
Prečítajte si návod na obsluhu! Vnútorné použitie
Rešpektujte výstražné abezpečnostné
pokyny!
Nebezpečenstvo ohrozenia života
azranenia malých detí adetí!
Vreckový transformátor napätia Si 150
Úvod
Pred prvým uvedením prístroja do
činnosti sa oboznámte so všetkými
funkciami prístroja azabezpečte si
informácie ohľadom správneho používania prístroja. Dôsledne si prečítajte nasledujúci návod
na obsluhu. Tento návod si odložte. Ak prístroj
odovzdáte tretej osobe, taktiež jej priložte všetky
podklady.
Použitie podľa predpisov
Transformátor napätia je určený na transformáciu
jednosmerného prúdu s napätím 12 Vna striedavý
prúd s napätím 230 Va frekvenciou 50 Hz a/
alebo5 V jednosmerným napätím aintenzitou
prúdu 500 mA. Vždy skontrolujte kontinuálny
maximálny výkon na výstupe prístroja (pozri tiež
kapitolu „Vyhľadávanie chýb“). Prístroj je určený
výlučne na súkromné použitie. Ak sa prístroj
použije na akýkoľvek iný účel, alebo sa na ňom
vykonajú zmeny, takéto použitie sa nepovažuje
za štandardné askrýva vsebe značné riziká.
Výrobca neručí za škody vzniknuté vdôsledku
nesprávneho používania prístroja.
Tento prístroj je možné použiť pre nasledovné
druhy externých elektrických spotrebičov:
- pripojenie na 12 V zdroj prúdu smin. 15 A
- bežné elektrické prístroje ako je malý pre-
nosný počítač, stolová kalkulačka, televízor,
Kategória ochrany II
Obal aprístroj zlikvidujte
ekologickým spôsobom!
MP3 prehrávač, osobný digitálny asistent
alebo nabíjačka batérií do mobilných telefónov, počítačov
- celkový výkon max. 150 W
Prístroj sa nesmie použiť za nižšie uvedených
okolností asnasledovnými druhmi externých
elektrospotrebičov:
- pripojenie na zdroj prúdu snapätím 6,
24 alebo 230 V
- externé prístroje, ktoré vytvárajú teplo napr.
sušiče vlasov, elektrické prikrývky, kávovary,
mikrovlnné rúry, hriankovače
- celkový výkon > 150 W
Obsah
Po vybalení prístroja ihneď skontrolujte obsah
balenia. Prístroj avšetky ostatné diely skontrolujte, či nie sú poškodené. Poškodený prístroj
alebo iné diely nepoužite.
1 vreckový transformátor napätia Si 150
1 nabíjací kábel iPod (nevhodný pre iPod shue)
1 návod na obsluhu
Popis častí
1
Tlačidlo ZAP/VYP/MODE
2
LED displej
3
Sieťový kábel s 12 V konektorom
4
Kontrolka LED „Volt“ (V)
5
Kontrolka LED „Watt“ (W)
6
Kontrolka LED „Chyba“
52 SK

7
Vetracie otvory
8
USB výstup 5 V
9
Výstup 230 Vstriedavý prúd 50 Hz, 150 W
10
Nabíjací kábel iPod
Ochrana proti preťaženiu: 180 V, +/– 0,5 V
Ochrana proti prehriatiu: > 65 °C
Rozmery: 147 x 88 x 27 mm
(D x Š x V)
Hmotnosť: 280 g
Technické údaje
Technické špecifiká
Menovité vstupné napätie: 10,5 - 15,5 V /
15 A
Výkon na výstupe: 150 W
Max. výkon na výstupe: 300 W (za 0,1 s)
Transformátor je technicky vybavený tak, aby
bola zabezpečená jeho ochrana aochrana pripo-
jených prístrojov.
Napätie na výstupe: 230 V ~
Účinnosť: > 80 %
Výstupná frekvencia: 50 Hz
USB výstup: 5,0 V
/ 0,5 A
Kategória ochrany: II /
Poistka: 15 A
Teplota okolia: 0 °C - 35 °C
Podpäťová ochrana: 10 V +/– 0,5 V
Prepäťová ochrana: 15,5 V
+/– 0,5 V
Zobrazenie výstražných aochranných
upozornení
Prehľad hlásení chýb:
- červená LED kontrolka
6
- pípanie alebo bzučanie
- výstražný kód (A) alebo ochranný kód (P) na
LED displeji
2
Kód Červená LED kontrolka Význam Druh výstrahy
A - 1
Svieti
Výstraha pred preťažením
PípanieA - 2 Výstraha pred prehriatím
A - 3 Výstraha pred podpätím
P - 1
P - 2 Ochrana pred prehriatím
Svieti
Ochrana pred preťažením
Ochrana pred skratom
Bzučanie
P - 3 Ochrana pred podpätím
P - 4 Ochrana pred prepätím
Úvod
Prepäťová ochrana:
Ak je vstupné napätie vyššie ako 15,5 V (+/– 0,5 V),
zaznie bzučivý tón, rozsvieti sa červená LED
kontrolka
6
ana LED displeji 2 sa zobrazí P-4.
Transformátor zastaví inverziu výkonu aexterný
prístroj sa vypne. Keď napätie klesne pod 14,5 V
(+/– 0,5 V), transformátor začne opäť normálne
fungovať.
Podpäťová ochrana (indikačná funkcia
batérie, ochrana autobatérie):
Ak je vstupné napätie nižšie ako 11 V (+/– 0,5 V),
zaznie pípavý tón, rozsvieti sa červená LED kon-
6
trolka
ana LED displeji 2 sa zobrazí A-3.
Ak je vstupné napätie nižšie ako 10,5 V (+/– 0,5 V),
zaznie bzučivý tón, rozsvieti sa červená LED
kontrolka
6
ana LED displeji 2 sa zobrazí P-3.
Transformátor zastaví inverziu výkonu aexterný
prístroj sa vypne.
53 SK

Úvod
Keď napätie presiahne 12 V (+/– 0,5 V), transformátor začne opäť normálne fungovať.
Ochrana proti skratu:
Ak pripojený prístroj spôsobí skrat, zaznie bzučivý tón, rozsvieti sa červená LED kontrolka
6
ana LED displeji sa zobrazí P-1.
Ochrana proti prehriatiu:
Ak teplota vo vnútri prístroja presiahne 60 °C,
zaznie pípavý tón, rozsvieti sa červená LED kon-
6
trolka
ana LED displeji 2 sa zobrazí A-2.
Ak teplota vo vnútri prístroja presiahne 68 °C,
zaznie bzučivý tón, rozsvieti sa červená LED kon-
6
trolka
ana LED displeji 2 sa zobrazí OFF.
Transformátor zastaví inverziu výkonu aexterný
prístroj sa vypne.
Ak teplota klesne pod 50 °C, na cca 3 sekundy
stlačte tlačidlo ZAP/VYP/MODE
1
, transformá-
tor tak znova zapnete.
Ochrana proti preťaženiu:
Ak zaťaženie presiahne hranicu 160 W (+/– 10 W),
zaznie pípavý tón, rozsvieti sa červená LED kon-
6
trolka
ana LED displeji 2 sa zobrazí A-1.
Ak zaťaženie presiahne hranicu 180 W (+/– 10 W),
zaznie bzučivý tón, rozsvieti sa červená LED kon-
6
trolka
ana LED displeji 2 sa zobrazí P-1.
Transformátor zastaví inverziu výkonu aexterný
prístroj sa vypne.
Technológia
Transformácia jednosmerného prúdu s napätím
12 Vna striedavý prúd s napätím 230 V prebieha
vdvoch stupňoch.
Stupeň:
Prístroj zvýši prichádzajúci jednosmerný prúd na
napätie 300 V.
Stupeň:
Napätie sa potom zmení na striedavý prúd s
napätím 230 Va frekvenciou 50 Hz.
Na tento proces sa používa druh tranzistora,
ktorý pozostáva zvysokointegrovaných čipov
nazývaných MOSFET (tranzistor riadený poľom
oxidu kovu polovodiča).
Napätie na výstupe, priebeh vlny
Napätie na výstupe tohto prístroja sa reprodukuje
ako modifikovaná sínusová vlna. Táto má stupňovitý tvar, ktorý má takmer identické charakteristiky ako pravá sínusová vlna. Túto modifikovanú
sínusovú vlnu akceptujú takmer všetky moderné
externé prístroje snapätím 230 V. Knim patria
napájacie zariadenia selektronickými prvkami,
transformátormi a/alebo malé motory. Modifikovaná sínusová vlna vytvorená týmto transformátorom využíva efektívne napätie 230 V. Prevažná
väčšina digitálnych aanalógových voltmetrov
nemôže efektívne napätie snímať atieto voltmetre
ukazujú hodnotu, ktorá je o20 až 30 voltov nižšia ako je skutočná hodnota napätia na výstupe.
Na zistenie presného výsledku merania použite
merací prístroj vhodný na meranie efektívneho
napätia.
VAROVANIE!
Niektoré externé prístroje hlavne rádia a/alebo
iné audioprístroje anabíjateľné prístroje môžu
poškodiť transformátor a/alebo pripojený prístroj.
Skontrolujte, či externý prístroj pripojený
ktransformátoru “bzučí”, výrazne sa zohrieva,
alebo sa nadmerne zohrieva počas prvých minút.
Vtakomto prípade ihneď odpojte externé
prístroje avšetky káble.
To znamená, že prístroje nie sú vzájomne kompatibilné, apreto nemôžu byť spolu použité.
Vprípade nejasností sa obráťte na odborného
predajcu Vášho externého prístroja.
Tento problém nevzniká pri použití moderných
a/alebo vysokokvalitných prístrojov, pretože tieto
sú schopné modifikované sínusové vlny zachytiť
aspracovať.
Technológia mäkkých štartov
Transformátor je vybavený technológiou mäkkých štartov, ktorá prispieva kstupňovitej transformácii napätia. Takto môžu byť použité prístroje, ktoré potrebujú vyšší rozbehový prúd.
Vďaka zvýšeniu stupňovitého napätia na výstupe
sa zabráni poškodeniu transformátora, 12 Vzásuvky apripojených prístrojov.
54 SK

Bezpečnosť / Pred uvedením prístroja do prevádzky
Bezpečnosť
Všeobecné bezpečnostné
predpisy
VAROVANIE! Prečítajte si bezpečnostné
pokyny a poučenie. Nerešpektovaním bezpečnostných pokynov apoučení sa vystavujete nebezpečenstvu zasiahnutia elektrickým prúdom,
vzniku požiaru a / alebo ťažkým zraneniam.
Všetky bezpečnostné pokyny apoučenia si odložte.
NEBEZPEČENSTVO OHROZENIA
ŽIVOTA AZRANENIA MALÝCH
DETÍ A DETÍ! Deti nenechajte
nikdy bez dozoru vblízkosti obalového
materiálu. Hrozí nebezpečenstvo ohrozenia
života udusením.
Tento prístroj nesmú používať osoby (vrátane
detí) sobmedzenými fyzickými, senzorickými
alebo duševnými schopnosťami, alebo osoby
snedostatkom skúseností a / alebo vedomostí,
iba ak by mali zabezpečený osobný dozor
aboli poučení oobsluhe prístroja. Deti by
mali mať zabezpečený dozor, aby sa sprístrojom nehrali.
Prístroj odkladajte mimo dosahu detí. Deti
nie sú schopné zhodnotiť eventuálne riziká
pri manipulácii selektrospotrebičmi.
Prístroj nevystavujte dažďu a vlhkosti. Voda
velektrických spotrebičoch predstavuje
ohrozenie života zásahom elektrického prúdu.
Všetky zásuvky akáble musia byť vždy suché.
Prístroj nikdy nezapínajte vlhkými alebo
mokrými rukami.
Poškodený prístroj a poškodenýsieťový kábel
nepoužite.
Dbajte na to, aby boli káble istené.
Prístroj neprenášajte tak, že ho budete držať
za kábel, za kábel ho ani nevyťahuje zo zásuvky. Poškodené káble sú životu nebezpečné.
Pri vyťahovaní kábla zo siete uchopte vždy
zásuvku, nie kábel.
Ak káble prechádzajú stenami sostrými
hranami, napríklad kovovými stenami, káble
prevlečte rúrkami alebo potrubím, aby sa
nepoškodili.
Hlavné káble snapätím 230 Vneklaďte nikdy
spolu skáblami na vedenie jednosmerného
prúdu snapätím 12 Vdo jednej rúrky (jedného potrubia).
Káble uložte tak, aby nikomu nezavadzali,
aaby ich nikto nemohol poškodiť.
Káble neklaďte do blízkosti vodivých mate-
riálov. Káble neskladajte achráňte ich pred
poškodením.
Poškodené káble okamžite nahraďte novými.
Dajte pozor na skrat, premostenie cudzími
telesami medzi vstupmi avýstupmi transformátora. Používajte len zásuvky suzemnením
alebo vidlicové konektory. Niektoré časti
prístroja sú pod napätím aj potom, ako sa
zaktivuje zabudovaná poistka.
Prístroj používajte vždy len na bezpečnom
mieste.
Miesto používania prístroja zvoľte zodpovedne.
Údržbu prístroja musí vykonať kvalifikovaný
elektrikár.
Ak je prístroj poškodený, nepoužívajte ho.
Prístroj nevystavujte
- extrémnym teplotám,
- silným vibráciam,
- neprimeranému mechanickému zaťaženiu,
- priamemu slnečnému žiareniu,
- vlhkosti.
Prístroj by sa mohol poškodiť.
Nezabudnite, že na poškodenia spôsobené
vdôsledku neodbornej manipulácie, vdôsledku nerešpektovania pokynov uvedených
vnávode na obsluhu, alebo v dôsledku zásahu neautorizovanou osobou sa záruka nevzťahuje.
Prístroj vžiadnom prípade nerozoberajte.
Neodborne vykonané opravy môžu pre užívateľa predstavovať značné nebezpečenstvá.
Opravy zverte do rúk odborníkom.
Pred uvedením prístroja
do prevádzky
Skôr než transformátor pripojíte na autobatériu,
skontrolujte prípojky autobatérie.
55 SK

Ak je plusový pól (+) autobatérie spojený skostrou automobilu, transformátor na takýchto
vozidlách nesmiete použiť.
12 V konektor
3
transformátora vsuňte do 12 V
zdroja prúdu sintenzitou prúdu min. 15 A. Keď
transformátor nepoužívate, 12 V konektor
3
vždy odpojte od zdroja prúdu.
Po pripojení stlačte tlačidlo ZAP/VYP/MODE
1
apodržte ho stlačené cca 3 sekundy, teraz sa
rozsvieti LED kontrolka:
Zelená LED kontrolka
4 5
= prístroj je pripravený na použitie
Červená LED kontrolka
12 V konektor
6
= chyba! Prekontrolujte
3
, príp. sa pozrite do kapitoly
návodu „Vyhľadávanie chýb“.
VAROVANIE!
Transformátor vždy odpojte z 12 V zásuvky
vautomobile skôr, než spustíte štartér.
Počas jazdy nepripájajte na transformátor nikdy
prístroje aeventuálne zapojené prístroje neobsluhujte. Keď transformátor pripájate do 12 V
zdroja napätia, napr. do zapaľovača cigariet alebo
12 V zásuvky vo vozidle, uistite sa, či nie sú
ktransformátoru pripojené žiadne prístroje.
Poznámka: Ak sa počas prevádzky transformátora preruší prívod prúdu, musíte ho znova zapnúť. Toto môžete urobiť tak, že transformátor
najskôr vytiahnete zo zdroja apotom ho znova
zapojíte.
Po pripojení napäťového transformátora stlačte
tlačidlo ZAP/VYP/MODE
1
a podržte ho stlačené cca 3 sekundy. Potom sa rozsvieti kontrolka a
zrealizuje sa test prístroja podľa vyššie uvedených pokynov.
Obsluha
Pripojenie externých prístrojov
Konektor externého prístroja vsuňte do výstu-
pu 230 V
výstupu
9
transformátora a/alebo do USB
8
pripojte externý USB prístroj.
Zapnite napäťový transformátor, prístroj zap-
nete stlačením tlačidla ZAP/VYP/MODE
ktoré podržíte cca 3 sekundy stlačené. Po
úspešne vykonanom teste prístroja indikuje
zelená kontrolka
5
prevádzkyschopnosť
napäťového transformátora. Ak sa rozsvieti
červená LED kontrolka
6
, prečítajte si kapi
tolu „Vyhľadávanie chýb“.
Teraz zapnite (externé) prístroje spojené s
transformátorom.
Poznámka: Ak odber výkonu činí 35 W alebo
viac, zabudovaný ventilátor sa okamžite zaktivuje, aby sa napäťový transformátor neprehrial. Pri
nižšom odbere výkonu (< 35 W) sa ventilátor zaktivuje v závislosti od teploty. Súčasne môžete
použiť obidva výstupy
8
a 9. Celkový výkon
pre obidva externé prístroje nesmie prekročiť
150 W.
Menovitý výkon externého prístroja je uvedený
na typovom štítku, ktorý sa nachádza na určenom
mieste externého prístroja. Externé prístroje ako
sú elektromotory, vŕtačky, elektrické píly, chladničky ahudobné zariadenia vykazujú pri štarte
obyčajne vyšší menovitý výkon, ako je udaný na
typovom štítku. Ak je menovitý výkon udaný len
v A, hodnotu vAvynásobte faktorom 230 adostanete výkon vo W.
Príklad: 0,4 A x 230 = 92 W
Výstup 230 V
9
Používajte len tie externé prístroje, ktoré sú vybavené buď konektormi sochranným kontaktom, alebo európskymi vidlicovými prípojnými
konektormi
USB výstup
8
Spojte externý USB prístroj sUSB výstupom 8
apotom ho zapnite. USB výstup tohto transformátora dodáva jednosmerný prúd snapätím
5 Vexterným USB prístrojom (napr. lampy, ventilátory, rádia).
Keď je transformátor pripojený do 12 V vstupnej
zásuvky, USB výstup je vždy vypnutý.
VAROVANIE!
USB výstup transformátora nie je určený na
prenos dát. Do výstupu preto nepripájajte žiadne
1
,
56 SK

Obsluha / Vyhľadávanie chýb
pamäťové kolíky, MP3 prehrávače alebo podobné
externé prístroje na uloženie dát. Do USB výstupu nezapájajte žiadne káble na prenos dát!
Zapnutie / vypnutie transformátora,
zmena režimu
Stlačte tlačidlo ZAP/VYP/MODE 1 a podržte
ho stlačené 3 sekundy, napäťový transformátor takto zapnete. Napäťový transformátor sa teraz automaticky otestuje. Pri
tomto samočinnom teste sa približne na 2
sekundy zaktivujú všetky LED diódy, ventilátor a výstražný bzučiak.
Po vykonaní tohto samočinného testu je
napäťový transformátor pripravený na
použitie a zelená kontrolka
displeji
2
sa súčasne zobrazí momentálne
odobratý výstupný výkon udaný vo wattoch.
Pokiaľ nie je v 230 V výstupnej zásuvke
pripojený žiadny spotrebič, na LED displeji
2
je zobrazený údaj 0 – W.
Pre vypnutie napäťového transformátora
opäť stlačte tlačidlo ZAP/VYP/ MODE
podržte ho stlačené 3 sekundy. Napäťový
transformátor sa vypne a všetky údaje sa
vymažú.
Ak počas prevádzky napäťového trans-
formátora stlačíte tlačidlo ZAP/VYP/MODE
1
len krátko (1 sekundu), na LED displeji 2
sa zmení režim medzi W a V.
Výmena poistiek na držiaku poistiek:
Napäťový transformátor odpojte zo siete vyti ahnutím 12 V konektora
zástrčky. Z 230 V výstupnej zástrčky
výstupnej USB zástrčky
tuálne pripojený spotrebič.
Na držiaku poistky povoľte fixačnú skrutku,
skrutku vyskrutkujte krížovým skrutkovačom
proti smeru pohybu hodinových ručičiek.
Z držiaka poistky teraz jemným ťahom nahor
nadvihnite kryt.
Odstráňte poškodenú poistku a nahraďte ju
5
svieti. Na LED
1
3
z 12 V palubnej
9
a z
8
odpojte tiež even-
9
a
novou s identickým počtom ampérov (max.
20 A poistka). Dajte pozor, poistka je v držiaku
pevne upnutá, takže sa odporúča, vybrať ju
pomocou vhodného nástroja.
Teraz uzatvorte kryt držiaka poistky a pevne
dotiahnite krížovú skrutku.
Napäťový transformátor teraz zapojte bez
pripojeného spotrebiča do palubnej zástrčky a
zapnite ho podľa uvedených pokynov.
Vyhľadávanie chýb
Transformátor vjednom zvypísaných prípa-
dov odpojte od 12 V zdroja prúdu aexterné
prístroje odpojte od výstupov
8
a 9.
= Chyba
= Možná príčina
= Odstránenie chyby
Nesvieti žiadna LED kontrolka.
12 V konektor 3 nie je korektne vsunutý do
zásuvky zdroja prúdu.
Skontrolujte všetky pripojenia.
Na vstupe nie je napätie; 12 V prípojka
nevedie napätie.
Zapnite štartér.
Chybná poistka.
Poistku vymeňte.
LED kontrolka 6 svieti červeným svetlom.
Teplota presiahla hranicu 65 °C.
Transformátor okamžite vypnite. Skontrolujte,
či je chladenie transformátora dostatočné,
ači sú voľné vetracie otvory
7
.
Prístroj nechajte vychladnúť azabezpečte
dostatočné vetranie.
Transformátor znova zapnite až po 10 minú-
tach.
Vstupné napätie je príliš vysoké; prepäťová
ochrana.
Transformátor okamžite vypnite. Skontroluj-
te vstupné napätie.
Vstupné napätie je príliš nízke; podpäťová
ochrana.
Transformátor okamžite vypnite.
Skontrolujte pripojenie anabite batériu.
57 SK

Vyhľadávanie chýb / Údržba a ošetrovanie / Servis / Záruka / Likvidácia
Ak je napätie vyššie ako12 V, transformátor
zapnite znova.
Nesprávne pripojenie pólov; ochrana proti
skratu.
Transformátor okamžite vypnite.
Skontrolujte všetky pripojenia, káble a prí-
stroje.
Vprípade potreby vykonajte potrebné nasta-
venia.
Menovitý výkon presahuje150 W; ochrana
proti preťaženiu prúdom.
Používajte prístroje, ktorých menovitý výkon
nepresiahne 150 W.
Skrat v prístroji.
Skontrolujte pripojené prístroje. Zasiahnuté
prístroje už nepoužívajte.
= Chyba
= Odstránenie chyby
Pri zapnutom televízore a/alebo hudobných
zariadeniach a/alebo prístrojoch:
Zrnitý obraz, roztrasený obraz, bzučanie,
klopanie alebo chvenie.
Transformátor položte od televízora čo najďalej.
Skontrolujte pripojenie antény ajej nastavenie.
Kábel antény dajte ďalej od transformátora.
Použite odrušený kábel antény. Modifikovaná
sínusová vlna transformátora sa kvôli pripojenému externému prístroju nemôže dostatočne filtrovať. Okamžite vytiahnite kábel.
Jediné možné riešenie je použiť modernejší
externý prístroj, príp. prístroj svyšším výkonom sdostatočnou kapacitou filtra.
Vášho vozidla.
Prístroj vyčistite suchou handričkou. Vžiad-
nom prípade nepoužívajte rozpúšťadlá alebo
iné agresívne čistiace prostriedky.
Servis
VAROVANIE! Opravu prístroja zverte len
kvalifikovanému odborníkovi. Tak bude garan-
tovaná stála bezpečnosť prístroja.
VAROVANIE! Konektor akábel smie vy-
meniť len kvalifikovaný odborník. Tak bude
garantovaná stála bezpečnosť prístroja.
Záruka
Všeobecné záručné podmienky sa vzťahujú na
výrobné amateriálové chyby.
Ak je prístroj chybný, vráťte ho vpríslušnej
predajni. Na rýchle vybavenie záručných plnení
aopráv budete potrebovať nasledovné doklady:
- Kópiu pokladničného lístka (dodací list,
pokladničný lístok) sdátumom kúpy.
- Dôvod reklamácie alebo popis chyby.
Likvidácia
Obal je zložený zekologických materiálov, tento
môžete zlikvidovať prostredníctvom miestnych
recyklačných zberní.
Elektrospotrebiče nelikvidujte
spolu sdomácim odpadom!
Údržba a ošetrovanie
Prístroj si nevyžaduje údržbu.
VAROVANIE! Elektrické prístroje musia byť
počas ich ošetrovania odpojené zo siete.
Prístroj vypnite.
12 V konektor 3 vytiahnite z12 V prípojky
58 SK
Na základe Európskej smernice 2002 / 96 / EC
oelektrických aelektronických použitých spotrebičoch arealizácii do národného práva musia
byť elektrospotrebiče zhromažďované separátne
adodávané do zariadení na ekologickú recykláciu.
Omožnostiach likvidácie použitých elektrospotrebičov sa informujte na správe Vašej obce alebo
mesta.

Obrázky nemusia celkom korešpondovat s originálnym produktom. Zmeny súvisiace s technickým rozvojom vyhradené. Dekorácia nie je
súcastou dodávky.
59 SK
 Loading...