

Page 1

LAVATHERM 57760 electronic
Condenser Dryer
Operating Instructions
Page 2

Dear customer,
Pri
Please read these operating instructions through carefully.
Please make sure you read the safety instructions on the first pages of
these operating instructions! Keep the operating instructions for future
reference. Pass them on to any future owners.
With the warning triangle and/or by means of key words (Danger!,
1
Caution!, Attention!), information is emphasized which is important
for your safety or the correct functioning of the appliance. It is
essential that this information is observed.
0 This symbol guides you step by step when operating the appliance.
Next to this symbol you receive additional information and practical
3
tips on using the appliance.
Tips and information about the economical and environmentally
2
friendly use of the machine are marked with the clover.
• These operating instructions contain information about how to
independently solve any problems which may arise. See "Something not
working".
nted on environmentally friendly paper ...
Whoever thinks ecologically also acts ecologically.
2
Page 3

Content
Important Safety Information . . . . . . . . . . . . . . . . . . . . . . . . . . . . . . . . . . . 5
General Information . . . . . . . . . . . . . . . . . . . . . . . . . . . . . . . . . . . . . . . . . . . 7
Disposal . . . . . . . . . . . . . . . . . . . . . . . . . . . . . . . . . . . . . . . . . . . . . . . . . . . . . . 8
Packaging . . . . . . . . . . . . . . . . . . . . . . . . . . . . . . . . . . . . . . . . . . . . . . . . . . . . . 8
Environmental protection tips . . . . . . . . . . . . . . . . . . . . . . . . . . . . . . . . . . 9
The key features of your appliance . . . . . . . . . . . . . . . . . . . . . . . . . . . . . . 11
Description of the appliance . . . . . . . . . . . . . . . . . . . . . . . . . . . . . . . . . . . . 12
Front view . . . . . . . . . . . . . . . . . . . . . . . . . . . . . . . . . . . . . . . . . . . . . . . . . . . . . 12
The program selector . . . . . . . . . . . . . . . . . . . . . . . . . . . . . . . . . . . . . . . . . . . . 14
Before using the appliance for the first time . . . . . . . . . . . . . . . . . . . . . 14
Brief instructions . . . . . . . . . . . . . . . . . . . . . . . . . . . . . . . . . . . . . . . . . . . . . . 15
Drying . . . . . . . . . . . . . . . . . . . . . . . . . . . . . . . . . . . . . . . . . . . . . . . . . . . . . . . . 16
Prepare the laundry . . . . . . . . . . . . . . . . . . . . . . . . . . . . . . . . . . . . . . . . . . . . . 16
Open the door . . . . . . . . . . . . . . . . . . . . . . . . . . . . . . . . . . . . . . . . . . . . . . . . . 16
Load the laundry . . . . . . . . . . . . . . . . . . . . . . . . . . . . . . . . . . . . . . . . . . . . . . . 16
Closing the door . . . . . . . . . . . . . . . . . . . . . . . . . . . . . . . . . . . . . . . . . . . . . . . 16
Select the drying program . . . . . . . . . . . . . . . . . . . . . . . . . . . . . . . . . . . . . . . 16
Start time pre-selection . . . . . . . . . . . . . . . . . . . . . . . . . . . . . . . . . . . . . . . . . 17
Start the drying program . . . . . . . . . . . . . . . . . . . . . . . . . . . . . . . . . . . . . . . . 18
Removing laundry or loading laundry when necessary . . . . . . . . . . . . . . . . 18
End of the drying process . . . . . . . . . . . . . . . . . . . . . . . . . . . . . . . . . . . . . . . . 18
Removing the laundry . . . . . . . . . . . . . . . . . . . . . . . . . . . . . . . . . . . . . . . . . . . 18
Empty the water reservoir . . . . . . . . . . . . . . . . . . . . . . . . . . . . . . . . . . . . . . . 19
Cleaning the door seal . . . . . . . . . . . . . . . . . . . . . . . . . . . . . . . . . . . . . . . . . . 19
Clean the fluff filter . . . . . . . . . . . . . . . . . . . . . . . . . . . . . . . . . . . . . . . . . . . . 20
Cleaning the condenser . . . . . . . . . . . . . . . . . . . . . . . . . . . . . . . . . . . . . . . . . 21
Switch-off the dryer . . . . . . . . . . . . . . . . . . . . . . . . . . . . . . . . . . . . . . . . . . . . 21
Program tables . . . . . . . . . . . . . . . . . . . . . . . . . . . . . . . . . . . . . . . . . . . . . . . . 22
A small glossary of textile information . . . . . . . . . . . . . . . . . . . . . . . . . . . 24
Care symbols . . . . . . . . . . . . . . . . . . . . . . . . . . . . . . . . . . . . . . . . . . . . . . . . . . 24
3
Page 4

Content
Cleaning and maintenance . . . . . . . . . . . . . . . . . . . . . . . . . . . . . . . . . . . . . 25
Cleaning the condenser . . . . . . . . . . . . . . . . . . . . . . . . . . . . . . . . . . . . . . . . . 25
Cleaning the filter area . . . . . . . . . . . . . . . . . . . . . . . . . . . . . . . . . . . . . . . . . . 25
Cleaning the drum . . . . . . . . . . . . . . . . . . . . . . . . . . . . . . . . . . . . . . . . . . . . . . 26
Cleaning the panel and operating parts . . . . . . . . . . . . . . . . . . . . . . . . . . . . 26
Cleaning the door seal . . . . . . . . . . . . . . . . . . . . . . . . . . . . . . . . . . . . . . . . . . 26
Something not working? . . . . . . . . . . . . . . . . . . . . . . . . . . . . . . . . . . . . . . . 27
Replace the interior light . . . . . . . . . . . . . . . . . . . . . . . . . . . . . . . . . . . . . . . . 30
Door Reversal Instructions . . . . . . . . . . . . . . . . . . . . . . . . . . . . . . . . . . . . . . 31
Programming possibilities . . . . . . . . . . . . . . . . . . . . . . . . . . . . . . . . . . . . . . 33
Technical data . . . . . . . . . . . . . . . . . . . . . . . . . . . . . . . . . . . . . . . . . . . . . . . . 35
Installation and electrical connection . . . . . . . . . . . . . . . . . . . . . . . . . . . . 35
Information for the electrician . . . . . . . . . . . . . . . . . . . . . . . . . . . . . . . . . . 35
Special accessories . . . . . . . . . . . . . . . . . . . . . . . . . . . . . . . . . . . . . . . . . . . . . 36
Drainage kit . . . . . . . . . . . . . . . . . . . . . . . . . . . . . . . . . . . . . . . . . . . . . . . . . . . 36
Stacking kit . . . . . . . . . . . . . . . . . . . . . . . . . . . . . . . . . . . . . . . . . . . . . . . . . . . 36
Content . . . . . . . . . . . . . . . . . . . . . . . . . . . . . . . . . . . . . . . . . . . . . . . . . . . . . . 38
Service . . . . . . . . . . . . . . . . . . . . . . . . . . . . . . . . . . . . . . . . . . . . . . . . . . . . . . . 39
4
Page 5

Important Safety Information
1 Important Safety Information
The safety of AEG electrical appliances complies with the established
technical principles and statutory equipment safety regulations. Nevertheless, as manufacturer we have to draw your attention to the following safety instructions.
General safety
• Repairs of the dryer may be carried out only by trained personnel.
Incompetently carried out repairs can entail considerable hazards for
the user. Please get in touch with our customer service or with an
authorised AEG dealer when repair is necessary.
• Before commencing operation please make sure that the nominal
voltage and type of supply specified on the type plate of the
appliance correspond to the actual nominal voltage and supply type
at the place of utilisation. The fuse rating is also specified on the
rating plate.
• Never operate the dryer when the mains cable is damaged or when
the operator control mask, work plate or base shrouding are damaged
such that there is direct access to the interior of the appliance.
• Switch-off the dryer before carrying out any cleaning, care and
maintenance tasks! You are quite safe if you disconnect the mains
plug from the power outlet or – if the electrical connection is
permanent – if you switch-off the circuit breaker in the fusebox or
screw the fuse cartridge right out of its holder.
• If the appliance will be out of operation for an extended period of
time, unplug it from the mains.
• Never pull on the cable to disconnect the mains plug from the power
outlet. Always grasp and pull-out the plug.
• Don’t lean on the opened door; this could make the appliance fall over.
• Don’t use a water jet to spray-down the appliance. Danger of electric
shock!
• The covering hood for the filament lamp bulb for drum illumination
must be screwed-on.
• When closing the door, please check that the washing is not caught
in it.
• If you interrupt the drying process to take out laundry, bear in mind
that the laundry and the drum could be hot.
• Adaptors and extension cables must not be used. There is risk of fire
because of overheating!
5
Page 6

Important Safety Information
Safety of children
• Children are often not aware of the dangers involved when handling
electrical equipment. Therefore provide the necessary supervision of
children when operating the appliance and do not let children play
with the dryer – there is a danger that children could become trapped
inside the appliance.
• Packaging parts (e.g. films, styropore) can be dangerous for children.
Danger of suffocation! Keep packaging parts out of reach of children.
• Make sure that children or small animals do not climb into the drum
of the dryer. For this purpose keep the door of the dryer closed when
the appliance is not in use.
Utilisation in accordance with the intended purpose
• Conversions or modifications of the dryer are forbidden for safety
reasons.
• Use the dryer only to dry ordinary household laundry! The manufac-
turer accepts no liability for any damage resulting from incorrect
operation or utilisation for an unintended purpose.
• Dry only laundry which has been washed in water. In particular,
textiles which have been treated with inflammable cleaning agents
and solvents (petrol-ether, alcohol, stain remover and similar
materials) must not be dried in the dryer. Danger of fire! Explosion
hazard!
• Laundry items containing sponge rubber or rubber-like materials
must not be dried in the dryer. Danger of fire!
• Washing that is in poor condition (heavily worn) and items with loose
fillings (cushions) that could break open must not be dried or
refreshed. There is a risk of fire!
• Washing with rigid components (foot mats) will cover the air slots;
the slots will also be covered if the drum is overfilled. Observe the
maximum load of 6 kg. There is a risk of overheating which could
cause a fire!
• Only dry washing that does not contain any explosive objects (fire
lighters, spray cans). There is a risk of fire or an explosion!
• Clean the fluff filter after each drying procedure.
• Clean the condenser regularly.
• In the case of washer / dryer tower combinations, do not place any
objects on the dryer during use as they could drop down.
6
Page 7

General Information
Installation and connection
• Check the dryer for Transportation damage. Never connect-up a
damaged appliance! Contact your supplier if the appliance is
damaged.
• If the tumble dryer has to be carried, first remove the plinth!
• Do not set-up the dryer in frost-endangered rooms!
• Set-up the dryer horizontal!
• If the dryer is placed adjacent to a gas, coal or electric cooking stove,
interpose a thermally insulating non-combustible plate between the
dryer and the stove (dimensions: 85x57,5 cm).
• Do not place the dryer on high-pile carpet floors!
This would hinder air circulation at the ventilation slots!
• The electric power plug connector of the appliance must remain
accessible even after installation.
• Check that the tumble dryer is not standing on the mains cable.
• The technical conditions of the electric power supply company for
making fixed connections of electrical appliances to the mains
require that such connections may only be made by an authorised
electrician.
3 General Information
• Starched washing leaves traces of starch on the drum and therefore
should not be placed in the tumble dryer.
• If you exceed the maximum load stipulated in the program table your
washing is more likely to get creased! For very delicate fabrics you
should only fill in 1.5kg washing at the most.
• For your information: 70 per cent of fabric wear is caused by being
worn, 20 per cent by washing and only 10 per cent by being dried in
a tumble dryer. As the fabric is worn down, fluff gathers in the fluff
filter. When using a tumble dryer, only approx. 0.03g fluff per
kilogramme washing is produced.
7
Page 8

Disposal
2 Disposal
Packaging
Dispose of the packaging material!
Dispose of the packaging material of your tumble dryer correctly. All
the packaging materials used are harmless to the environment and can
be recycled.
• Plastic parts are marked with standard international abbreviations:
– >PE< for polyethylene, e.g. sheet wrapping material
– >PS< for polystyrene, e.g. padding material (always CFC-free)
– >POM< for polyoxymethylene, e.g. plastic clips
Cardboard packaging is manufactured from recycled paper and should
be deposited in the waste paper collection for recycling.
Disposal of the old appliance!
When you eventually stop using your tumble dryer please bring it to
the nearest recycling centre or to your dealer who will take it back for a
small fee.
Warning! When disposing of the tumble dryer, pull out the plug, cut
1
off the flex, dispose of the plug and remaining flex and destroy the
door lock. This hinders children from locking themselves in and endangering their lives.
The materials can be recycled in accordance with their markings. Standard tools (crosshead screwdriver, hammer) are sufficient to dismantle
the old appliance.
8
Page 9

Environmental protection tips
2 Environmental protection tips
• Your laundry will become light and soft in the tumble dryer even without a fabric softening agent.
• Loosen your laundry before loading it into the dryer. This helps to prevent lengthy running times and creasing. Ensure your laundry is well
spun.
• Remove as much water as possible from the washing before drying!
This is based on the principle: the better you spin the washing before
drying the more economical the dryer is.
In the following table we give an overview of specific electric consumption data depending on the spinning speed. This information is
valid for 6 kg laundry dried with the program COTTONS CUPBOARD
DRY (KATOEN KAST-DROOG):
Spinning/wringing out: Drying cycle:
Revolutions per
minute
800 4,2 70 11 5 4,2
1000 3,5 59 100 3,5
1200 3,2 53 92 3,2
1400 3,0 50 88 3,0
1600 2,6 44 79 2,6
1800 2,5 42 77 2,5
Residual dampness
in litres in %
Time required in
minutes
Energy requirement
in kWh
• Never obstruct the ventilation slits at the base of the dryer!
• Ensure that the room is well ventilated!
• Observe the maximum load instructions. Whenever possible, dry full
loads.
9
Page 10

Environmental protection tips
• Select the appropriate drying program for the type and quantity of
laundry. The dryer will then operate as economically as possible. Some
typical consumption values:
Power
consumption
in kWh
Drying program
COTTONS CUPBOARD DRY
(KATOEN KAST-DROOG)
COTTONS HAND IRON
(KATOEN STRIJK-DROOGb)
DELICATES CUPBOARD DRY
(MENGWEEFSELS KAST-DROOG)
1) spun at 800 revolutions per minute
2) spun at 1000 revolutions per minute
1
1
2
Fill weight
in kg
6 11 5 4,2
6 85 3,3
3 48 1,6
Duration in
Minutes
If the amount of laundry is not enough for a particular degree of drying (e.g. HAND IRON; STRIJK-DROOG
b
), you should dry it in stages for
best economy: Fill the dryer and select the program HAND IRON
b
(STRIJK-DROOG
); after the end of this program take out your laundry for ironing. Finally dry the remaining laundry with the program
CUPBOARD DRY (KAST-DROOG).
• Only use the SPECIAL CARE (LAGE TEMP.) button for loads up to 3 kg.
• Clean the fluff filter after every drying program!
• Empty the water reservoir after every drying process!
You can use the collected condensed water as distilled water in the
household, but first pour it through a paper filter bag.
10
Caution! The condensed water is not suitable for drinking or for use
1
with foodstuffs.
• Clean the condenser regularly!
The dryer will operate more economical ly if you clean the condenser
regularly.
Page 11

The key features of your appliance
The key features of your appliance
• Program or time setting via the program selector
• AUDIBLE SIGNAL (ZOEMER) can be selected in addition; an
intermittent audible signal is sounded after the end of the program.
• SPECIAL CARE (LAGE TEMP.) button for gentle drying of sensitive
fabrics
• DELAY TIMER (STARTTIJDKEUZE): Program start delayed by 1 to
19 hours
(e.g. for operation at times when electricity is cheaper)
• Multi-display for displaying
–probable program duration and time remaining until program end,
–Time preselection (start time postponement or time remaining until
program start,
–Error code.
• Indication of degree of drying
• Program run display
• Programming facility for permanent adaptation of the program
sequence to your requirements.
11
Page 12

Description of the appliance
Description of the appliance
Front view
Control panel
Interior Light
Rating plate
Vent
Feet
(all height-adjustable)
Water reservoir
with handle flap
Condenser Unit
behind Removal Plinth
Fluff filter
Reversible door
12
Page 13
Description of the appliance
Control panel
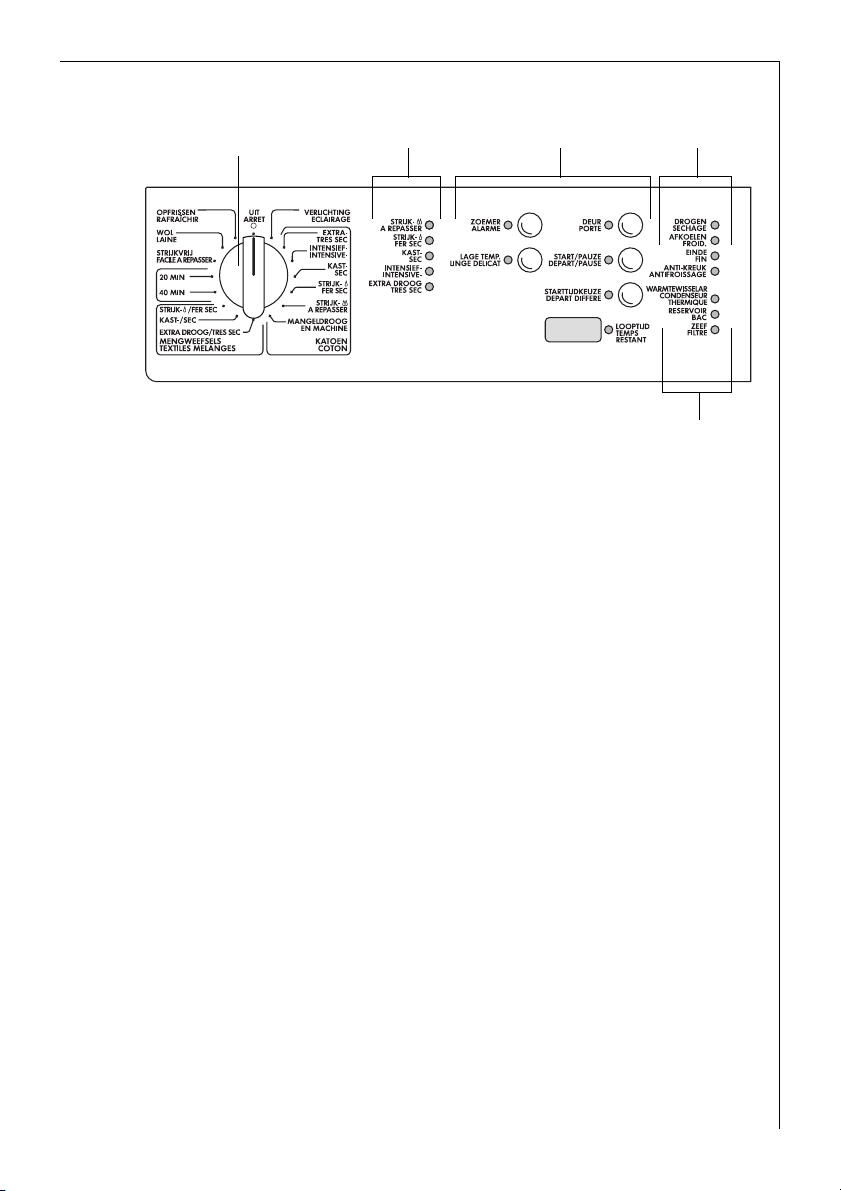
A
B
A Program selector: for setting the drying program
B Drying degree indicator: Shows the achieved extent of drying; this
enables you to take-out individual pieces of laundry at the right time
during the drying process.
C Buttons and display block
– AUDIBLE SIGNAL (ZOEMER) button: When switched-on, an audible
signal is sounded at the end of the drying program; then take-out the
laundry
– SPECIAL CARE (LAGE TEMP.) button: For sensitive fabrics
– START/PAUSE (START/PAUZE) button: To start or interrupt a pro-
gramme.
– DELAY TIMER (STARTTIJDKEUZE) button: For pre-setting the start time in
the range from 1 to 19 hours; indication in the PROG. TIME display field
– Multi-display/ Display PROG. TIME (LOOPTIJD): Indicates the probable
program duration or the time remaining of the currently set drying
program;
with postponed start time (DELAY TIMER (LOOPTIJD) button) indica-
tion of the number of hours left until the drying program starts; an
error code is displayed in the case of a disturbance (C and a number).
D Program run display: The currently running phase of the drying process
is indicated.
E Instructions for the user:
– Indication CONDENSER (WARMTEWISSELAR): Clean the condenser!
– EMPTY WATER (RESERVOIR) display: Empty the water reservoir!
– CLEAN FILTER (ZEEF) display: Clean the fluff filter!
Note: The indicators are extinguished only after the programme is switched off.
C
D
E
13
Page 14
Before using the appliance for the first time
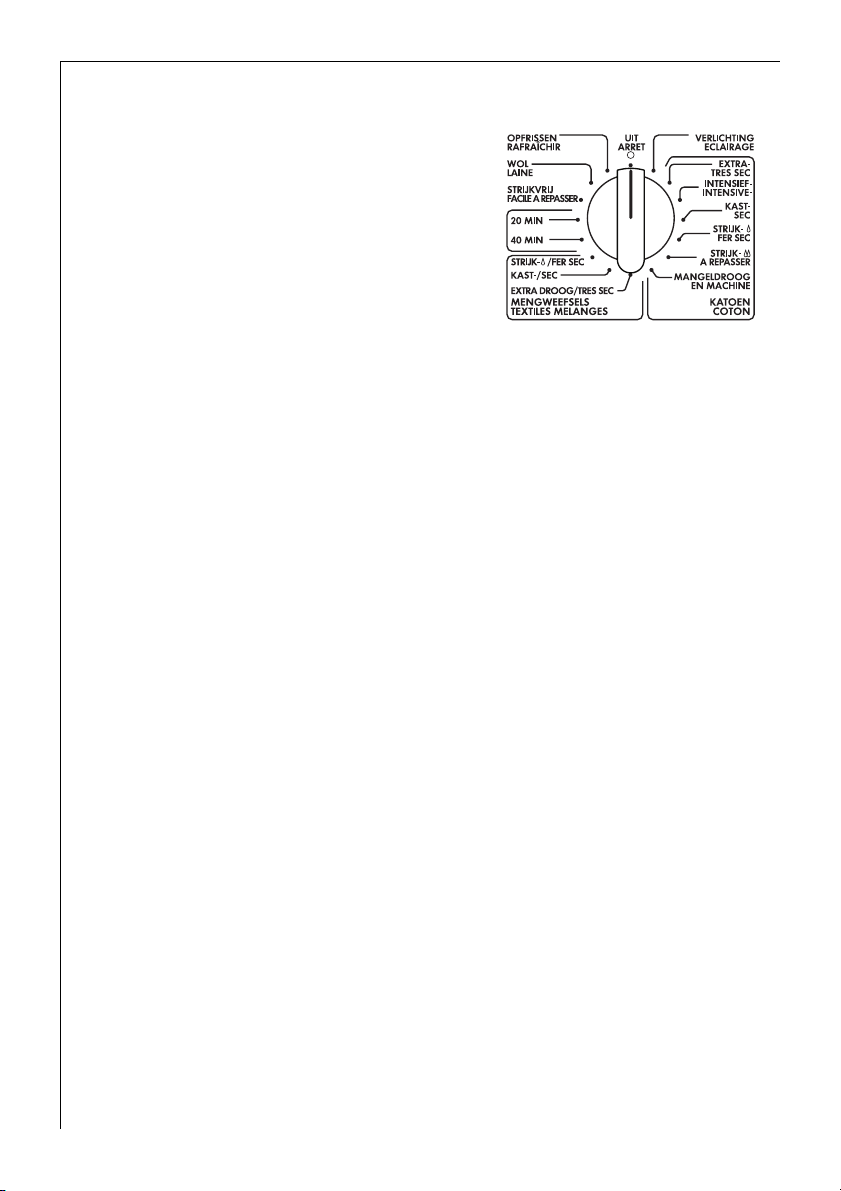
The program selector
• OFF (UIT):
The tumble dryer is switched off.
• LIGHT (VERLICHTING):
The drum light switches on when the
door is opened.
• Program group COTTON (KATOEN):
Programs for drying cotton and linen
fabrics;
maximum load 6 kg.
• Program group DELICATES
(MENGWEEFSELS):
Programs for drying mixed fabrics and
synthetics;
maximum load 3 kg.
•Time programs:
For additional drying or for drying
loads of less than 1 kg.
• Program EASY IRON (STRIJKVRIJ):
Special drying program with anticrease mechanism for easy-care
fabrics;
maximum load 1kg.
•Program WOOL (WOL):
To freshen up woollen fabrics after
they have been line dried;
maximum load 1 kg.
• REFRESHING (OPFRISSEN) programme
For optimum results when refreshing items of clothing and gently
cleaning textiles with the aid of commercially available dry-cleaning
products
(please follow the manufacturer’s instructions for use);
Programme duration: 35 minutes;
maximum load 1 kg.
Before using the appliance for the first time
0 Wipe out the drum using a damp cloth or else insert damp cloths and
carry out a short drying procedure (20 mins.).
14
Page 15

Brief instructions
Brief instructions
• Ensure the laundry is well spun before tumble drying.
• Prepare the laundry.
• Open the door and insert washing.
• Shut the door.
Attention! Do not catch washing in the door.
• Select the drying program
– on the program selector.
– If required press the buttons AUDIBLE SIGNAL (ZOEMER), SPECIAL
CARE (LAGE TEMPERATUUR).
• Pre-select the start time?
• Start the program by pressing the START/PAUSE (START/PAUZE)-button.
While the program is running you can open the door to take-out laun-
dry or add more laundry.
At the end of the program
(END (EINDE) and CREASE GUARD (ANTI-KREUK) display is illuminated,
acoustic signal is sounded, if set, the anti-crease phase begins):
• Remove the laundry.
• Empty the water reservoir.
• Clean the fluff filter.
If the indicator CONDENSER (WARMTEWISSELAR) is highlighted:
• It is essential to clean the condenser!
• Switch-off the dryer by turning the programme selector to the OFF
(UIT) position.
15
Page 16
Drying
Drying
Prepare the laundry
• To prevent tangled bundles of laundry: Close zip fasteners; button-up
bed linen and pillow cases; tie-together loose tapes, e.g. aprons.
• Empty all pockets.
• Remove all metal objects (paper clips, pins, etc.).
• Turn clothing consisting of double-layer fabric inside out (such as
cotton-lined anoraks with the cotton layer facing outwards). The fabrics will dry better.
• Loosen the laundry.
Open the door
To open the door:
• Press firmly against the door (Press position )
or
• while the dryer is switched-on: Press the DOOR (DEUR) button.
Load the laundry
• Load the prepared laundry into the dryer.
Closing the door
Closing the door:
• apply pressure to the door until it clicks audibly into place.
Caution! Ensure the laundry does not get caught in the door when the
1
door is closed! This could damage the laundry!
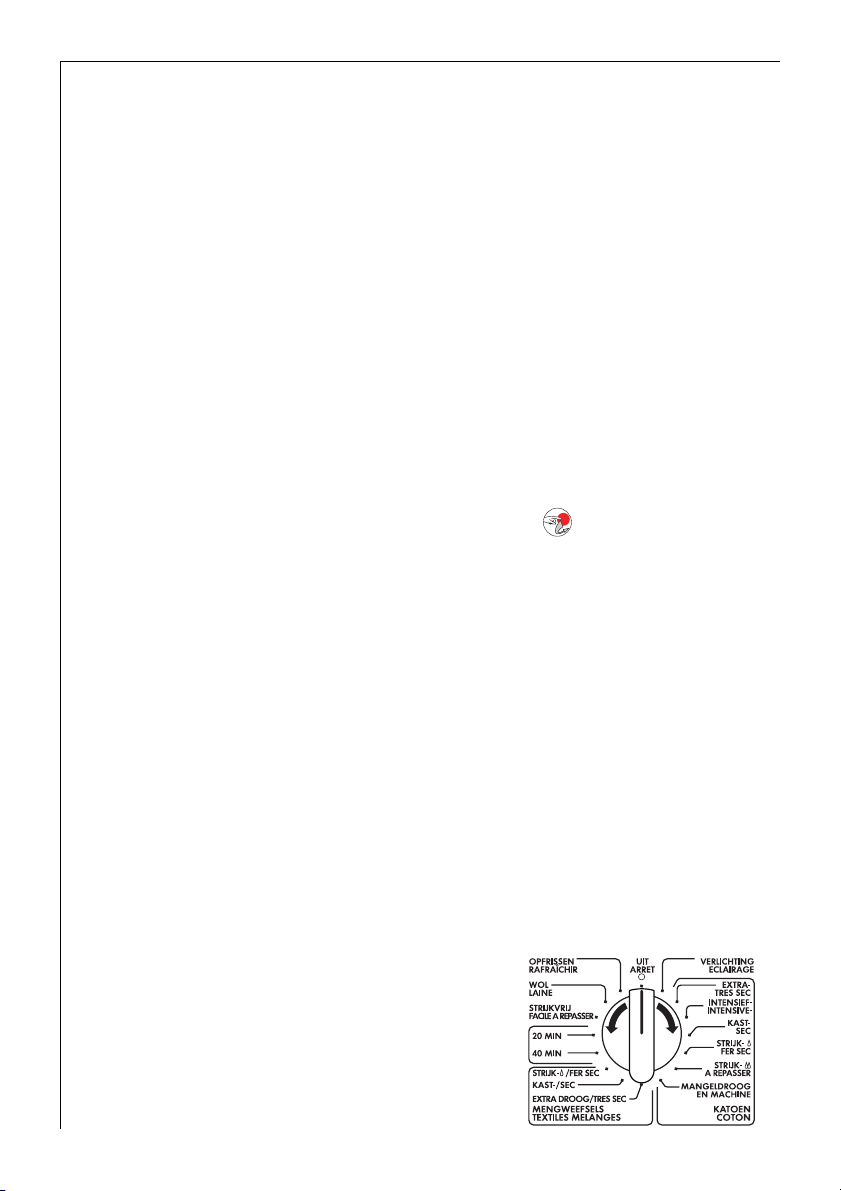
Select the drying program
0 Select the suitable drying program
using the program selector (see "Program tables").
16
Page 17
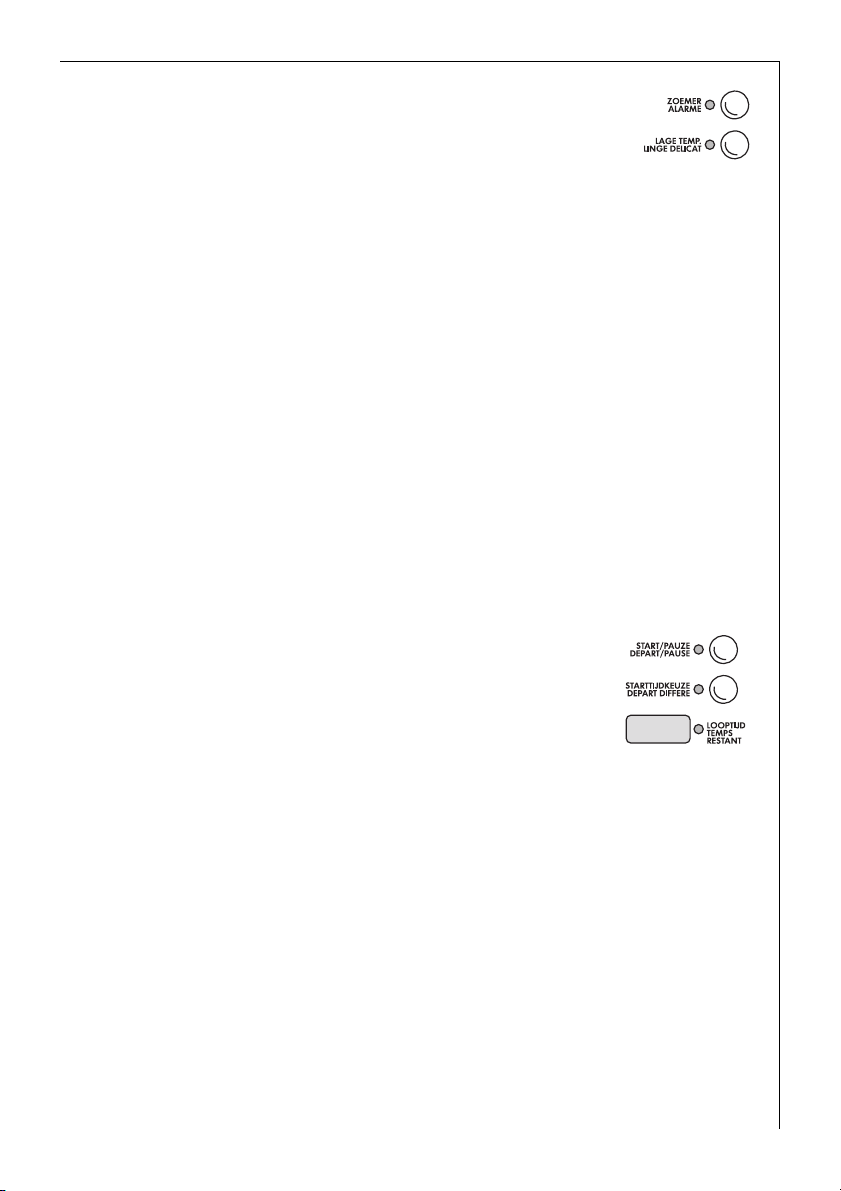
0 If required, select the button AUDIBLE SIG-
NAL (ZOEMER), SPECIAL CARE (LAGE
TEMPERATUUR).
• AUDIBLE SIGNAL (ZOEMER) button
During the crease-protection phase (immediately after the drying
process), an acoustic signal is sounded at certain intervals (see "End of
drying process").
• SPECIAL CARE (LAGE TEMPERATUUR) button
This program operates with reduced heat. Press the SPECIAL CARE
(LAGE TEMPERATUUR) button for fabrics bearing the care symbol S.
Gentle drying is advisable for heat-sensitive fabrics (such as acrylic and
viscose).
Start time pre-selection
With the start time pre-selection you can program the start delay of
the drying program in the range from 1 to 19 hours.
0 Setting the program.
Drying
0 Hold the DELAY TIMER (STARTTIJDKEUZE) button
depressed
until the desired number of hours of delay
of the program start appears in the display
field for PROG. TIME (LOOPTIJD).
0 Press the START/ PAUSE (START/PAUZE) button.
After elapse of the set number of hours the dryer
automatically starts the set drying program. The
PROG. TIME (LOOPTIJD) display field shows the
number of hours after which the drying program
will start.
You can correct the pre-selected start delay time
at any time.
17
Page 18

Drying
Start the drying program
0 Press the button START/ PAUSE (START/PAUZE).
The drying programme begins. You can check the
progress of the drying procedure in the programme
progress display.
Removing laundry or loading laundry when necessary
You can interrupt the drying process at any time to remove some of the
laundry or to add more laundry.
0 Open the door.
Caution! The laundry and the drum may be hot.
1
0 Remove or add more laundry.
0 Close the door.
0 Press the START/ PAUSE (START/PAUZE) button
to resume the drying process.
End of the drying process
The cooling phase starts shortly before the end of the drying process:
The heater is switched-off during this phase. After the cooling phase
the END (EINDE) and CREASE GUARD (ANTI-KREUK) display is illuminated. You can now remove the washing from the tumble dryer.
The crease guard phase follows automatically after the drying process.
For 30 minutes the drum rotates intermittently. This keeps your laundry
loose and crease-free.
If you have pressed the AUDIBLE SIGNAL (ZOEMER) button, an acoustic
signal is sounded intermittently during this phase.
You should remove the washing at the latest towards the end of the
anti-crease phase to avoid creasing.
Removing the laundry
0 Open the door and remove the laundry.
18
Page 19
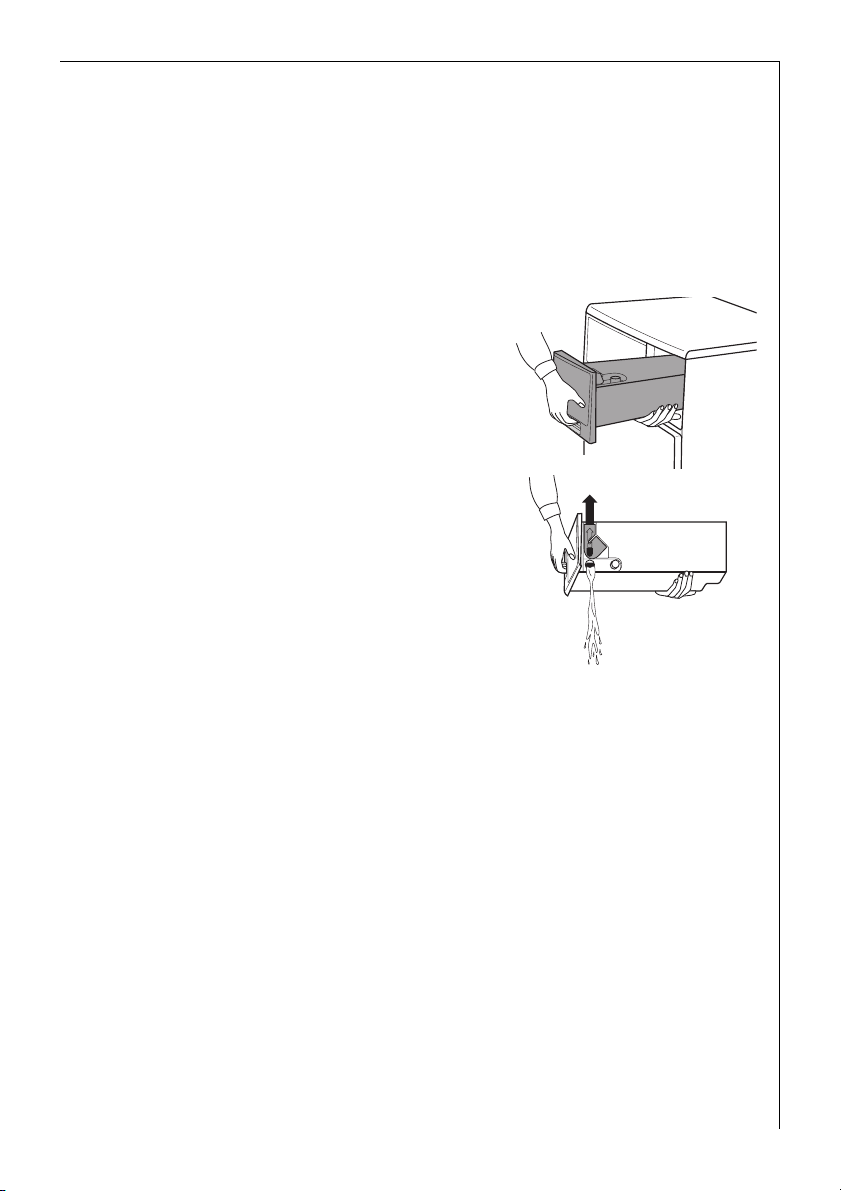
Empty the water reservoir
Caution! The condensed water is not suitable for drinking or for use
1
with foodstuffs.
The water reservoir should be emptied completely after every drying
programme. This avoids interruption of a programme when the water
reservoir is full.
0 Grasp the handle flap of the water reser-
voir and pull-out completely.
0 Push the cover of the water reservoir to
the side and pour-out the condensed
water.
0 Re-insert the water reservoir into the con-
trol panel.
Drying
If the drying cycle has not yet ended:
0 Press the START/ PAUSE (START/PAUZE)
button to resume the drying process.
The water reservoir has a capacity of approx. 4.0 litres. This is sufficient
3
for a laundry load of 6 kg which has been machine spun at
800 revolutions per minute.
Cleaning the door seal
0 Rub the door seal with a damp cloth.
19
Page 20
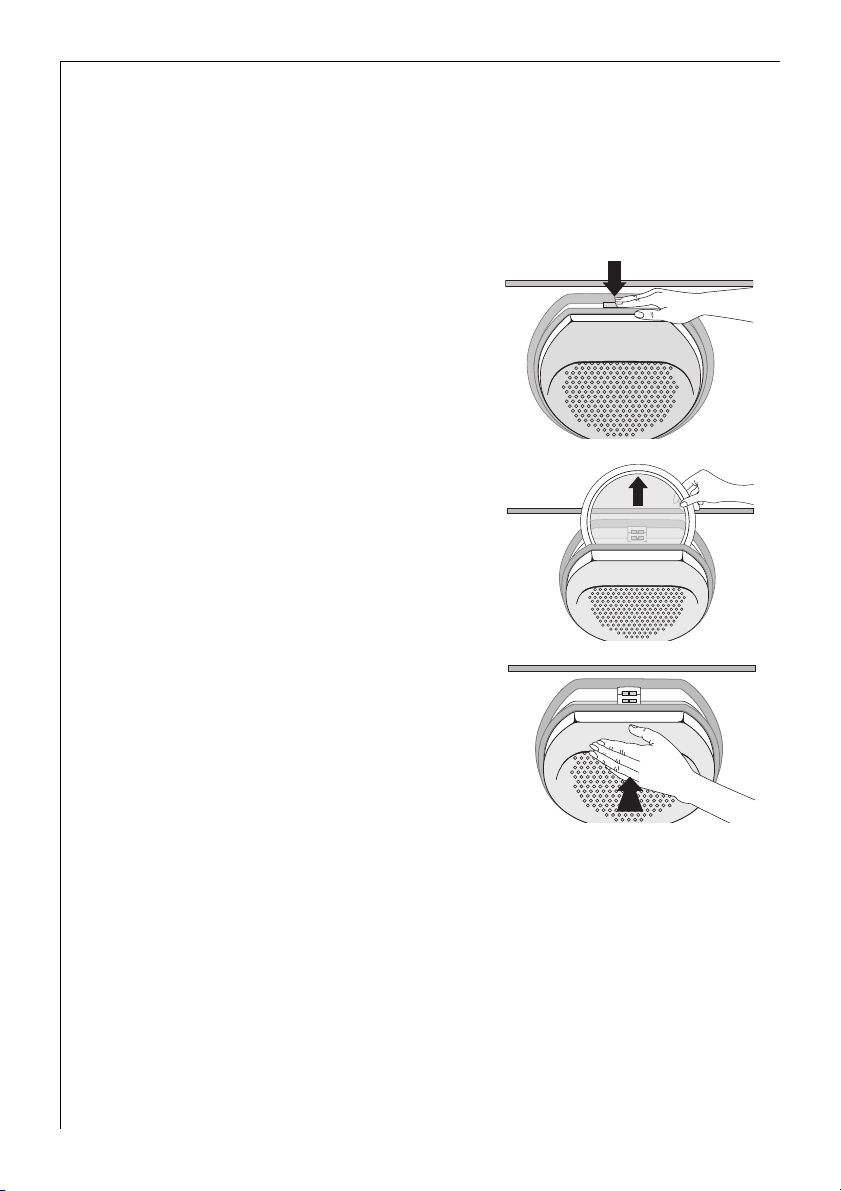
Drying
Clean the fluff filter
To ensure efficient operation of the tumble dryer, clean the fluff filter
after each drying program.
Also check whether there are any remnants or fluff from the washing
in the drum; remove immediately.
0 Press the catch of the filter lid down-
wards.
The filter lid will open.
0 Take-out the fluff filter.
0 Remove fluff out of the fluff filter, with
a moistened hand.
0 Re-insert the fluff filter.
0 Press against the filter lid until it catches
into the locking device.
The filter lid cannot catch shut without
3
the fluff filter in place and the door cannot be closed.
Warning! The dryer must not be operated with a damaged or blocked
1
fluff filter.
20
Page 21
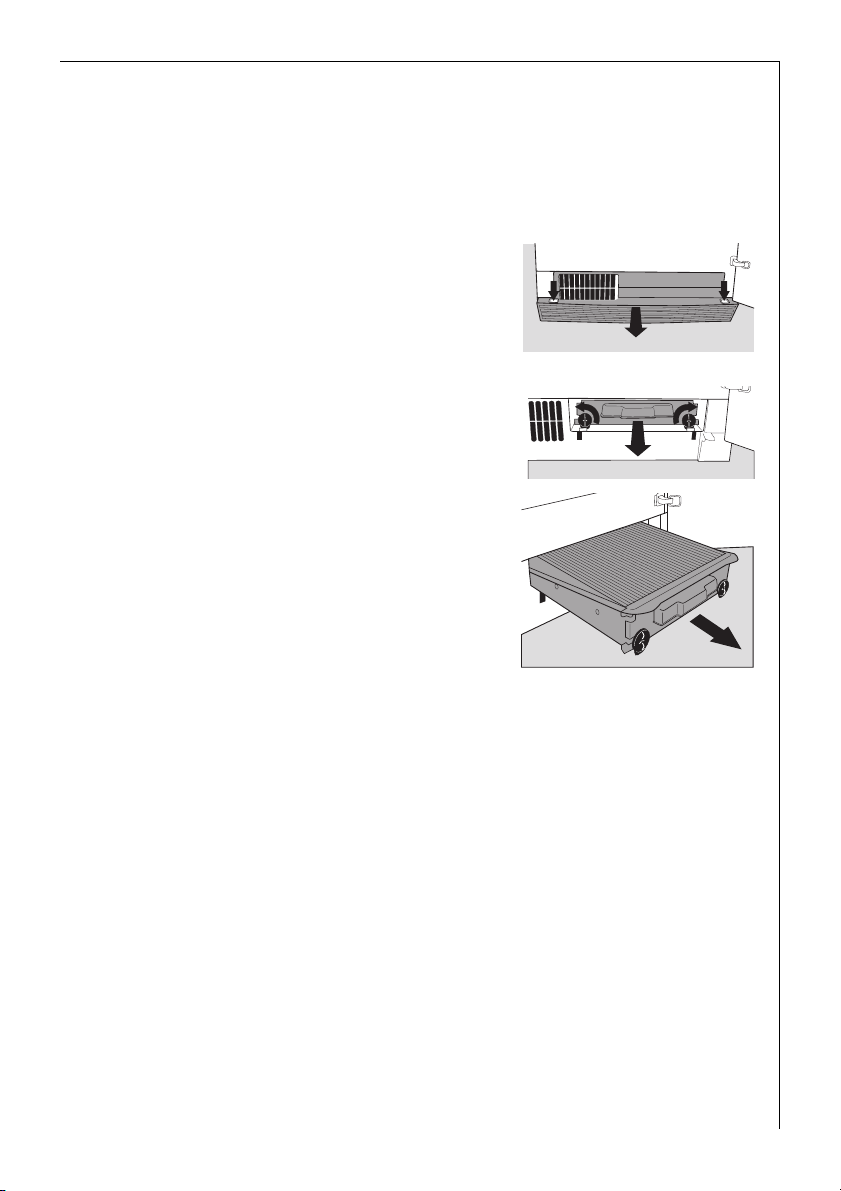
Cleaning the condenser
Important! When the CONDENSER (WARMTEWISSELAR) display lights,
1
it is essential to clean the condenser. Otherwise your dryer might suffer
damage. In addition energy consumption will be increased if the condenser unit is covered with fluff.
0 Open the door.
0 Press on the two tabs to unlatch and
take off the removable plinth.
0 Turn the two securing disks through a
quarter turn each outwards.
0 Pull the condenser out of the base by the
handle.
0 Clean the condenser, best with a hand-
held brush or by rinsing with a handheld shower head. The water removal
slits on the rear of the condenser must
be free too.
Drying
Important! Do not use any sharply pointed objects to clean the con-
1
denser. They could make it leak.
0 Reinsert and push in and turn each one of the two securing disks
through a quarter turn inwards. The words "top – oben – en haut" must
be at the top.
0 Re-mount the plinth.
Important! The dryer must not be operated without condenser.
1
Switch-off the dryer
0 Turn the program selector to the OFF (UIT) position.
21
Page 22
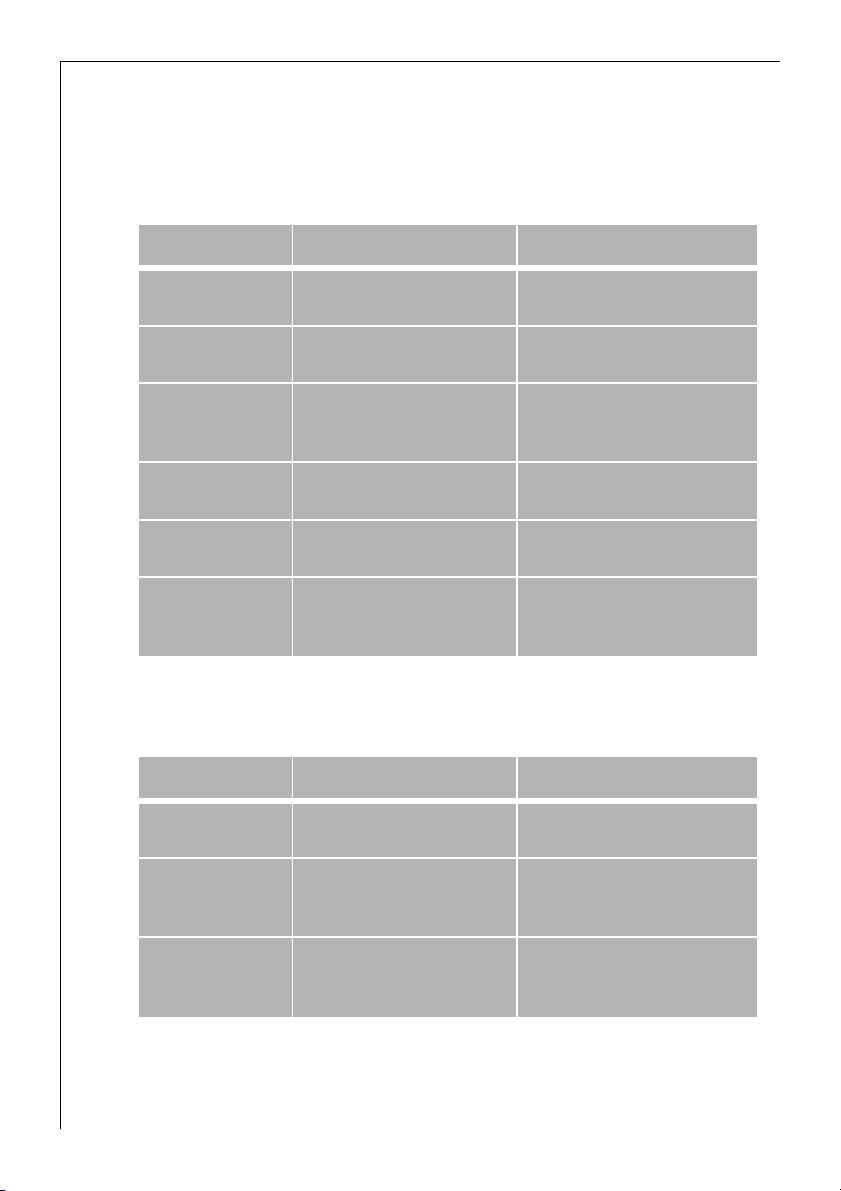
Program tables
Program tables
Program group COTTONS (KATOEN)
care symbols R, Q; maximum load 6 kg
Program Laundry Type Examples for
EXTRA DRY
(EXTRA DROOG)
VERY DRY
(INTENSIEFDROOG)
CUPBOARD DRY
(KASTDROOG)
DAMP
(STRIJKDROOG c)
HAND IRON
(STRIJKDROOG b)
MACHINE IRON
(MANGELDROOG)
Heavy weight or mult-layered
fabrics
thick textiles that are to be
thoroughly dried.
Fabrics of medium weight,
articles not made up of multlayers
Lightweight materials
requiring ironing
Normal cotton and linen
articles
Cotton and linen articles, to
be ironed by rotary ironer or
starched laundry
Towelling material, bath robes
Towelling, terry towels
Towel laundry, hand towels
Cotton shirt and underwear
Sheets and pillowcases,
tablecloths
Cotton sheets and pillowcases,
tablecloths
Program group DELICATES (MENGWEEFSELS)
1
care symbols R, S
Program Laundry Type Examples for
EXTRA DRY
(EXTRA DROOG)
, Q; maximum load 3kg
Heavy weight or mult-layered
fabrics
Sweatshirts, bed linen and table
linen
22
CUPBOARD DRY
(KASTDROOG)
DAMP
(STRIJKDROOG c)
1) Press the SPECIAL CARE (LAGE TEMPERATUUR) button!
Lightweight materials which
doe not require ironing
Lightweight synthetics and
cotton/polyester mixtures
requiring ironing
Easycare fabric shirts, table
linen, baby clothes, socks and
underwear
Bed and table linen, easycare
fabric shirts and blouses
Page 23

Program tables
TIME programs
1
care symbols R, S
You can select 20 and 40 minutes program duration for additional drying of
individual pieces of laundry or to dry small quantities.
1) Press the SPECIAL CARE (LAGE TEMPERATUUR) button!
, Q; loads less than 1kg
Program EASY IRON (STRIJKVRIJ)
1
care symbols R, S
For drying fabrics such as shirts and blouses; minimal ironing required.
Result depends on type and finish of fabric.
Recommendation: spin fabrics in the washing machine at a speed of about 1200
revolutions and then transfer immediately to the dryer. Remove fabrics immediately
after drying and hang on a hanger.
1) Press the SPECIAL CARE (LAGE TEMPERATUUR) button!
, Q; maximum load 1kg (approx. 5-6 shirts)
Program WOOL (WOL)
maximum load 1kg
To freshen up the wool fibres of woollen garments after they have been line dried,
worn or stored for longer periods they can be treated briefly using warm air. The wool
emerges beautifully soft.
Recommendation: remove fabrics immediately after drying.
REFRESHING (OPFRISSEN) programme
maximum load 1kg
For optimum results when refreshing items of clothing and gently cleaning textiles
with the aid of commercially available dry-cleaning products (please follow the manufacturer‘s instructions for use);
Programme duration: 35 minutes.
23
Page 24

A small glossary of textile information
A small glossary of textile information
Care symbols
Ensure articles to be dried are suitable for tumble drying. If they are
one of the following symbols should be present on the care label:
This fabric can be tumble dried. The fabric manufacturer does not stip-
Q
ulate if the piece of laundry should be dried on a normal or gentle program.
Normal drying
R
Drying with special care (press the SPECIAL CARE (LAGE TEMPERATUUR)
S
button!)
Do not tumble dry
T
If you do not find any of these care symbols:
Dry whites and coloureds as well as mixed fabrics at normal temperature. Press the SPECIAL CARE (LAGE TEMPERATUUR) button if you are
drying delicate fabrics.
24
•Wool
Do not dry any woollen items in the dryer.
As a follow-up treatment for woollen fabrics in quantities up to 1 kg
select the WOOL programme.
• Fabrics sensitive to temperatures
Dry fabrics sensitive to temperatures (such as acrylic or viscose) and
textiles with the care label S with the SPECIAL CARE (LAGE
TEMPERATUUR) button selected.
• Cotton jersey and hosiery have a tendency to shrink! Do not dry these
fabrics excessively.
• New coloured textiles
To avoid the possibility of dye transference do not dry new coloured
textiles together with light-coloured laundry.
Page 25
Cleaning and maintenance
Cleaning and maintenance
Cleaning the condenser
Important! When the CONDENSER (WARMTEWISSELAR) display lights,
1
it is essential to clean the condenser. Otherwise your dryer might suffer
damage. In addition energy consumption will be increased if the condenser unit is covered with fluff.
For information on cleaning the condenser see section "Cleaning and
maintenance, cleaning the condenser".
Cleaning the filter area
Important! A small amount of fluff may reach the area around the fil-
1
ter in spite of the fluff filter. Therefore you should clean the entire filter
area from time to time, or at least every three months.
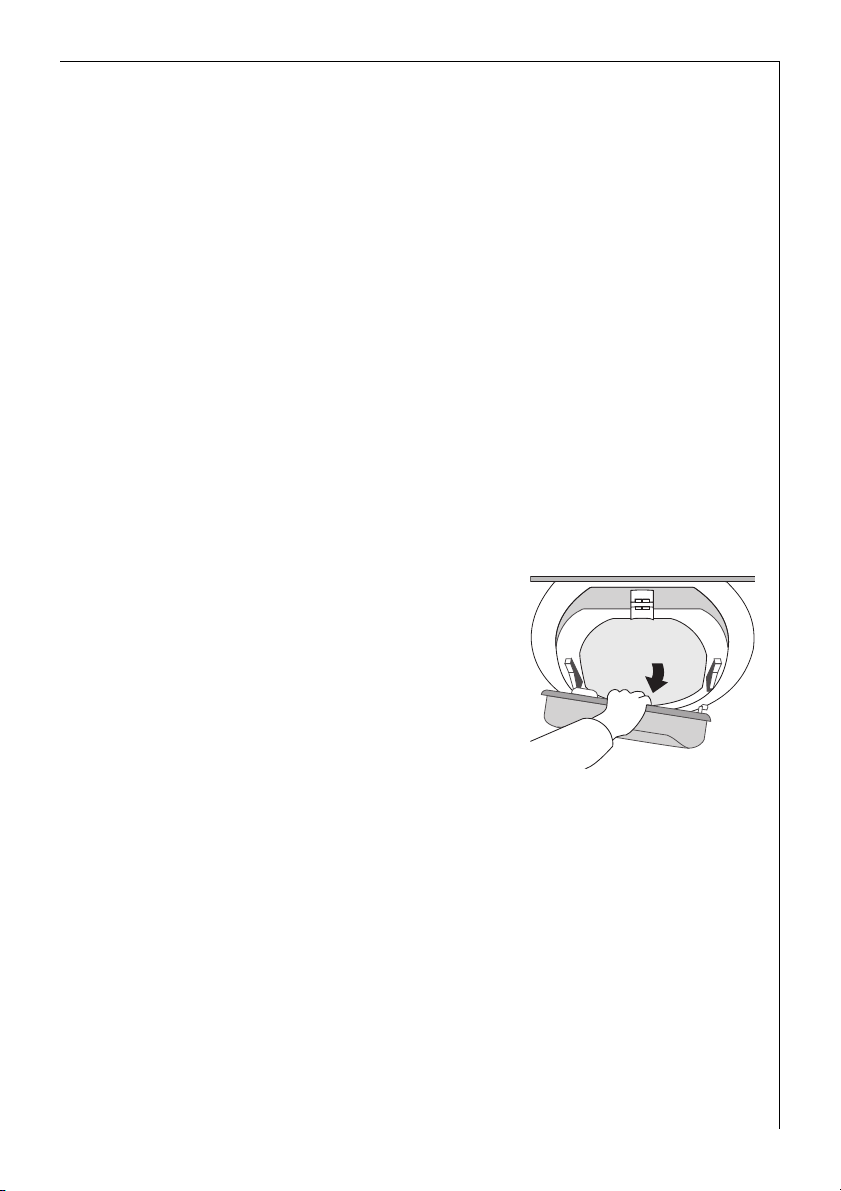
0 Remove the fluff filter.
0 Hold the filter lid by the top and pull it
forwards until it is released from both
holders.
0 Remove the fluff from the entire filter area
– preferably with a vacuum cleaner.
0 Press both pins of the filter lid into the
holders on the door until they click in.
0 Reinsert the fluff filter.
0 Press against the filter lid until it clicks
into the lock.
25
Page 26

Cleaning and maintenance
Cleaning the drum
Warning! Do not clean the stainless steel drum with abrasive deter-
1
gents or steel wool!
Fabric softeners or lime in the water can cause a scarcely visible deposit
to form on the drum. The dryer is then no longer reliably able to
recognise how dry the washing is. When the washing is removed from
the dryer it will be damper than you expect.
0 Wipe the inside of the drum and the drum fins with white vinegar to
avoid a build up of residues/deposits effecting the sensors. This is particularly important if you regulary use fabric conditioning sheets or dry
starched items in the dryer.
Cleaning the panel and operating parts
Warning! Do not use household furniture polish or aggressive deter-
1
gents.
0 Wipe over the panel and operating parts with a damp cloth.
Only use warm water.
Cleaning the door seal
0 Rub the door seal with a damp cloth immediately after the drying pro-
cedure.
26
Page 27
Something not working?
Something not working?
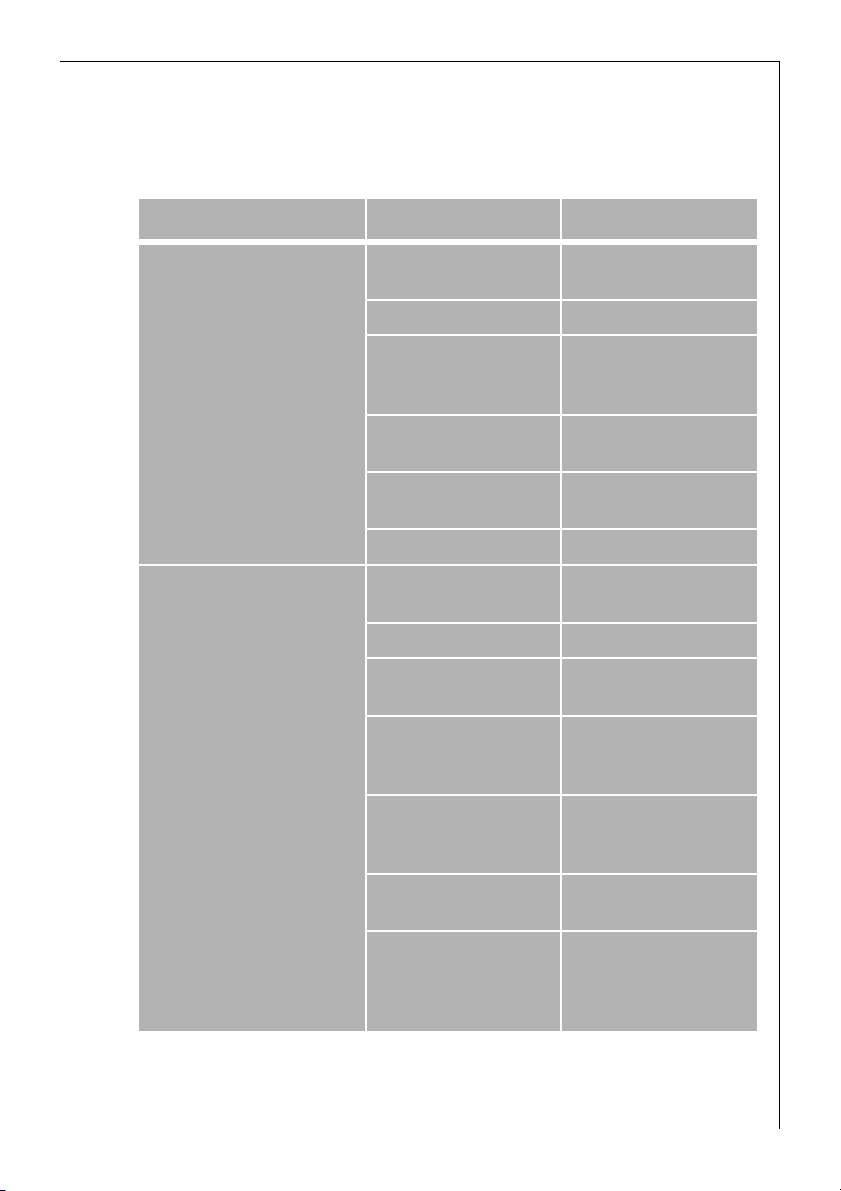
If the tumble dryer is not working correctly please carry out the following checks before calling an engineer.
Symptom Possible cause Solution
The tumble dryer will not start
The results are unsatisfactory
The appliance is not
plugged in
The fuse has blown Check the fuse
The START/PAUSE (START/
PAUZE) button has not
been pressed
No program has been
selected
The door is not properly
closed
The water reservoir is full Empty the water reservoir
The wrong program has
been selected
Fluff filter blocked Clean the fluff filter
Condenser covered with
fluff
The tumble dryer has
been overloaded
Laundry not sufficiently
spun prior to tumble
drying
Plug in the appliance
Press the START/PAUSE
(START/PAUZE) button
Select the required
program
Close the door
Select a different
program
Clean the condenser
Observe the maximum
loads stated for each
program
Ensure the wash load is
well spun before tumble
drying
The vent in the base of
the appliance is covered
A residue may have
formed on the drum
interior, blocking the
sensors
Ensure the vent is clear
Clean the inside of the
drum with white vinegar
27
Page 28

Something not working?
Symptom Possible cause Solution
The drying result is unsatisfactory; the washing is still
damp.
The drying process takes
unusually long
The door cannot be closed
The door cannot be opened
with the DOOR (DEUR) button
The drum illumination does
not work
The conductivity of the
water in your locality differs from the standard
setting of the appliance.
The condenser unit is
covered with fluff
Fluff filter is clogged Clean the fluff filter
Fluff filter has not been
inserted correctly and/or
the filter lid not closed
Electric mains plug not
connected
Program selector set to
OFF (UIT)
The program selector is in
the OFF (UIT) position
The bulb needs replacing Replace bulb
Reprogram the standard
setting, eg. H0 instead of
H1, for dryer washing (see
chapter “Programming
Possibilities“.
Clean the condenser unit
Replace the fluff filter
and ensure the filter lid is
closed
Connect the mains plug
Set a program. The fill-in
door can be opened at
any time by pressing
firmly against the door
(pressing location
Turn the program selector
dial to LIGHT
(VERLICHTING)
)
28
Display EMPTY WATER
(RESERVOIR) is lit
EMPTY WATER (RESERVOIR)
indicator illuminated, even
though the container has
already been emptied
The remaining running time
display changes rapidly.
Condensate container full
Foreign bodies, e. g. animal hairs, can block the
inlet nozzle as well as the
valve on the end of the
container
The remaining running
time is adjusted
automatically depending
on the type of items
being washed, the
washing time and the
degree of dampness.
Empty the condensate
container
With the container pulled
out, switch on the
appliance momentarily.
The blockage can be
removed from the container shaft or the hair cleaned out of the valve
Automatic process. There
is no unit fault.
Page 29

Something not working?
Symptom Possible cause Solution
The dryer terminates the
drying process automatically:
END (EINDE) is displayed
shortly after program start;
no display of the extent of
drying
The drying process takes
unusually long. 4.5 hours
after the beginning of the
drying process:
- END (EINDE) display is illuminated
- acoustic signal sounds
- discontinuation of the
drying process
-
program run display is flash-
ing
- error code C6 is displayed
Too dry or too little
laundry filled-in for the
selected program
SPECIAL CARE (LAGE
TEMPERATUUR) button
pressed and too much
laundry filled-in
Too much laundry
filled-in
Laundry too damp
Select time program or
higher drying stage (e.g.
EXTRA DRY (EXTRADROOG) instead of
VERY DRY (INTENSIEFDROOG))
Check the program
selection: SPECIAL CARE
(LAGE TEMPERATUUR)
button appropriate only
for laundry amounts up
to 3.0 kg
Reduce the amount of
laundry filled-in
Pre-dry the laundry more
thoroughly
If you do not find the required information in this manual to remedy a
disturbance, please call the customer service.
29
Page 30

Something not working?
Replace the interior light
0 A replacement bulb can be purchased through your local AEG Service
Force Centre (Part No: 647072580).
Warning! Never use standard light bulbs in your Lavatherm.
1
0 Isolate the appliance from the mains supply.
0 Screw-off the bulb cover. (The bulb is located at the top behind the
door; see Front view).
0 Replace the defective bulb.
0 Screw-on the bulb cover.
Warning! For safety reasons the bulb cover must be screwed-on. The
1
dryer must not be operated, without the cover in place.
30
Page 31
Door Reversal Instructions
Door Reversal Instructions
The door opening direction can be changed if required.
Warning! Before reversing the door, isolate the appliance from the
1
mains supply.
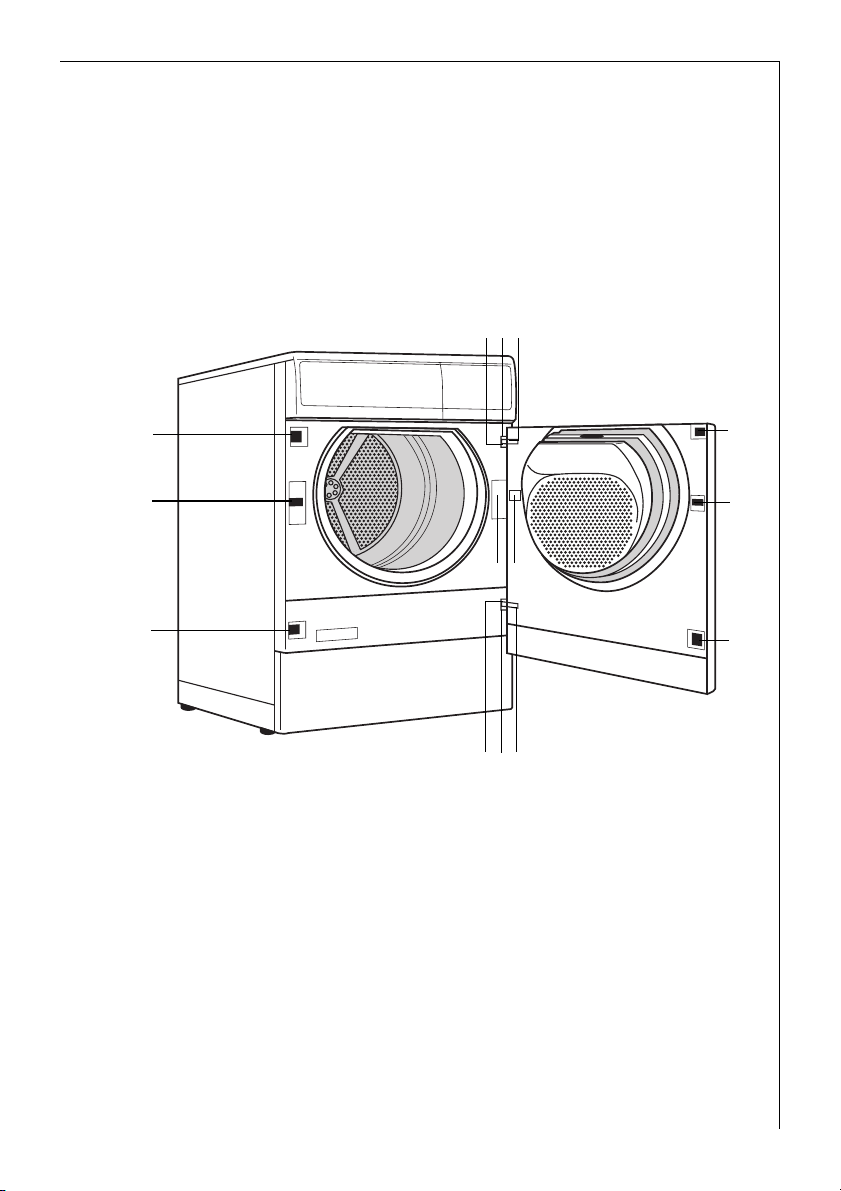
Proceed as follows to reverse the door opening direction:
A
C
B
F
H
J
G
F
A
C
B
E
D
E
0 Un-screw the screws A on the front panel of the appliance.
0 Take-off the door by displacing it horizontally.
0 Un-screw the screws B on the inside of the door and take-off the
hinges C.
0 Unscrew and take-off the locking block D.
0 Release the coverplates E, F and G with a thin screwdriver by pressing
on the latching device, displace them to the side. Take them out and
insert them again on the opposite side.
0 Screw-on the hinges C and the locking block D on the opposite side of
the door.
0 Screw-off the door catch H and remove it and pull-off the plug.
31
Page 32

Door Reversal Instructions
0 Take-out the latched catch covering J and pull-off the plug.
0 Connect the door catch H and the catch covering J on the respective
opposite side to the plug, insert into the break-out and screw-down or
latch into position.
0 Push the door with the hinges into the breakouts provided for them in
the front panel of the appliance and firmly attach it with the screws.
0 After changing-over the door, check that the DOOR (DEUR) button
functions correctly.
Warning! The appliance is safe again for operation only when all plas-
1
tic parts have been mounted.
32
Page 33

Programming possibilities
Programming possibilities
The electronic control system of your laundry dryer provides you with
the possibility to adapt some functions of the dryer permanently to
your requirements.
Purpose Execution
"Laundry protection": If
you want to "lock" the
selected drying program
(the selected program
setting cannot be
changed during the
drying process at the
program selector or with
the SPECIAL CARE (LAGE
TEMP.) button:
When "Washing
Protection" is enabled,
the drying programme
always runs at reduced
heater power (SPECIAL
CARE (LAGE TEMP.)
Function).
If you always want to be
reminded by an audible
signal at the end of the
program:
When a drying program is set at the program selector and
the START/PAUSE (START/PAUZE) button has been pressed:
- Hold the SPECIAL CARE (LAGE TEMP.) button depressed
for five seconds.
The program execution display flashes for five seconds and
the laundry protection is then switched-on.
If an attempt is nevertheless made to change the program
setting, the program execution display flashes; after
pressing the SPECIAL CARE (LAGE TEMP.) button, it flashes
for five seconds; on turning the program selector it flashes
until the program selector is returned to the initial setting.
To cancel the laundry protection:
- Hold the SPECIAL CARE (LAGE TEMP.) button depressed
for five seconds.
The program run indicator flashes for five seconds, then it
is lit steady for five seconds; laundry protection is
cancelled.
1) Ensure that the program selector is not in the setting
LIGHT (VERLICHTING) or OFF (UIT).
2) Hold the AUDIBLE SIGNAL (ZOEMER) button depressed
for at least five seconds.
The AUDIBLE SIGNAL (ZOEMER) display lights; a short
audible signal is sounded.
The selected setting is therewith fixed-programmed.
If you want to cancel this setting:
3) Proceed as described under item 1) and 2).
The display AUDIBLE SIGNAL (ZOEMER) disappears.
If you remove
condensate via an
external condensate
drain-off and wish to
permanently suppress
the EMPTY WATER
(RESERVOIR) indication:
1) Set the programme selector to LIGHT (VERLICHTING).
2) Hold the AUDIBLE SIGNAL (ZOEMER) button depressed
for five seconds.
The PROG. TIME (LOOPTIJD) display shows U for normal
function and & for external condensate drain-off.
3) Briefly press the AUDIBLE SIGNAL (ZOEMER) button to
choose between U and & .
4) Turn the program selector.
The selected setting is therewith fixed-programmed.
33
Page 34

Programming possibilities
Purpose Execution
Adjusting the drying
result:
If at the end of the programme you always
want the washing to be
somewhat dryer or
somewhat damper than
with the standard setting and you want to
adjust the tumble
dryer’s recognition of
the degree of dryness
accordingly:
1) Turn the programme selector to the LIGHT (VERLICHTING) position.
2) Hold down the DELAY TIMER (STARTTIJDKEUZE) button
for five seconds.
The current setting appears in the PROGRAMME TIME
(LOOPTIJD)
H1 is the standard setting, with
H0 the washing will be dryer, with
H2 the washing will stay damper.
3) Keep pressing the DELAY TIMER (STARTTIJDKEUZE) button until the value you require appears in the display.
4) Turn the programme selector.
The selected setting is then saved.
display:
34
Page 35

Technical data
Height x Width x Depth 85x60x60cm
Depth with the door open 117 cm
Height adjustable from 1.0/–0.4 cm
Empty weight approx. 46 kg
Load (depending on the program) max. 6kg
(Different loads in some countries
are due to different measuring methods)
Power consumption in acc. with IEC 1121 s.e. 4.2 kWh
(6 kg Cotton, spun at 800 revolutions per minute,
program COTTON CUPBOARD DRY - KATOEN KASTDROOG)
Area of use Household
Permissible ambient temperature +5°C up to +35° C
This appliance complies with the following EC directives:
;
– 73/23 /EEC of 19/2/1973 ’Low voltage directive’
– 89/336 /EEC of 3/5/1989 ’EMC directive’ including the
Modification directive 92/31/EEC
Technical data
Installation and electrical connection
Please refer to the type plate for specifications about the power supply.
The nominal voltage stated on the type plate and type of current must
be identical with the nominal voltage and type of current at the point
of installation. Also refer to the type plate for the fuse required.
Information for the electrician
When connecting the appliance without a plug, care must be taken
that this is done correctly. Please follow the relevant information in the
section on installing and connecting the appliance.
For appliances with variable voltage settings, the switch-over diagram
can be found on the cover of the connection box at the back of the
appliance.
35
Page 36

Special accessories
Special accessories
You can obtain the following special accessories from your retailer.
Drainage kit
With this kit (E-No. 916 019 000) you can lead the condensate directly
into a drain (sink, siphon, drain grating) with a maximum feed height of
1m above the floor on which the dryer is standing (3m Length).
Emptying he condensate container is then no longer necessary.
You can then suppress the EMPTY WATER (RESERVOIR) indicator at the
end of each program with the aid of the appliance programming
features (see " Programming possibilities" section). However, the
condensate container must be inserted correctly in the operator control
mask.
Stacking kit
With these kits you can combine your laundry dryer with any LAVAMAT
automatic washing machine to a washing and drying column. The
appliances are stacked in space-economising manner in this arrangement, the washing machine at the bottom and the laundry dryer at the
top.
The following two kits are available:
36
– without plate E-No. 916 018900
– with extendible deposit plate E-No. 916 018901
Page 37

37
Page 38

Content
A
Acrylate . . . . . . . . . . . . . . . . . . . . . . . . . . . . 17
Acrylic
. . . . . . . . . . . . . . . . . . . . . . . . . . . . . 24
Anorak
. . . . . . . . . . . . . . . . . . . . . . . . . . . . . 16
AUDIBLE SIGNAL
. . . . . . . . . . . . . . . . . .17, 18
C
Children, safety . . . . . . . . . . . . . . . . . . . . . . . 6
Closing the door
Condenser
Connection
Control panel
Cool-down phase
COTTON
. . . . . . . . . . . . . . . . . . . . . . . . . . . . 14
Crease protection phase
Creasing
Customer service
. . . . . . . . . . . . . . . . . . . . . 20
. . . . . . . . . . . . . . . . . . . . . . .21, 25
. . . . . . . . . . . . . . . . . . . . . . . . . . 7
. . . . . . . . . . . . . . . . . . . . . . . . 13
. . . . . . . . . . . . . . . . . . . . 18
. . . . . . . . . . . . . . . 18
. . . . . . . . . . . . . . . . . . . . . . . . . . . . . 7
. . . . . . . . . . . . . . . . . . . . . 39
D
Delicate fabric . . . . . . . . . . . . . . . . . . . . . . . . 7
Disposal
. . . . . . . . . . . . . . . . . . . . . . . . . . . . . 8
Door Reversal
. . . . . . . . . . . . . . . . . . . . . . . 31
E
EASY IRON . . . . . . . . . . . . . . . . . . . . . . .14, 23
Easy-care fabrics
Environmental protection
. . . . . . . . . . . . . . . . . . . . . 24
. . . . . . . . . . . . . . 9
F
Fabric softeners . . . . . . . . . . . . . . . . . . . . . . 26
Fabric wear when drying
Fluff filter
Fluff quantity
Full load, specified
Furniture polish
. . . . . . . . . . . . . . . . . . . . . . . . . . 20
. . . . . . . . . . . . . . . . . . . . . . . . 7
. . . . . . . . . . . . . . . . . . . . . . 26
. . . . . . . . . . . . . . . 7
. . . . . . . . . . . . . . . . . . . . 7
G
Glossary . . . . . . . . . . . . . . . . . . . . . . . . . . . . 24
I
Interior light . . . . . . . . . . . . . . . . . . . . . . . . 30
Ironing
. . . . . . . . . . . . . . . . . . . . . . . . . . . . . 10
L
Lime . . . . . . . . . . . . . . . . . . . . . . . . . . . . . . . .26
O
Opening the door . . . . . . . . . . . . . . . . . . . . .16
P
Packaging . . . . . . . . . . . . . . . . . . . . . . . . . . . . 8
R
REFRESHING . . . . . . . . . . . . . . . . . . . . . 14, 23
Repair
. . . . . . . . . . . . . . . . . . . . . . . . . . . . . . .5
S
Safety Information . . . . . . . . . . . . . . . . . . . .5
Solvent(s)
SPECIAL CARE
Sponge rubber
Stacking kit
Starched washing
START
. . . . . . . . . . . . . . . . . . . . . . . . . . . .6
. . . . . . . . . . . . . . . . . . . . 10, 17
. . . . . . . . . . . . . . . . . . . . . . . . 6
. . . . . . . . . . . . . . . . . . . . . . . . . .36
. . . . . . . . . . . . . . . . . . . . . .7
. . . . . . . . . . . . . . . . . . . . . . . . . . . . . . .18
T
Transportation damage . . . . . . . . . . . . . . . . .7
Two-layer fabric
. . . . . . . . . . . . . . . . . . . . . .16
V
Viscose . . . . . . . . . . . . . . . . . . . . . . . . . . . . . .24
W
Water reservoir . . . . . . . . . . . . . . . . . . . . . . .19
WOOL
. . . . . . . . . . . . . . . . . . . . . . . . . . 14, 23
Wool
. . . . . . . . . . . . . . . . . . . . . . . . . . . . . . .24
38
Page 39
Service
In the chapter "Something not working" some disturbances have been
summarised, which you can solve yourself. If you do not find any
helpful information there, please contact your local customer service
centre. It is nearby and if necessary can reach you quickly.
(Addresses and phone numbers can be found in the Warranty
Conditions/Service Departments)
Be well prepared before you phone. This facilitates the diagnosis and
the decision as to whether a customer service visit is necessary. With
our checklist you can gather important information before making
your call:
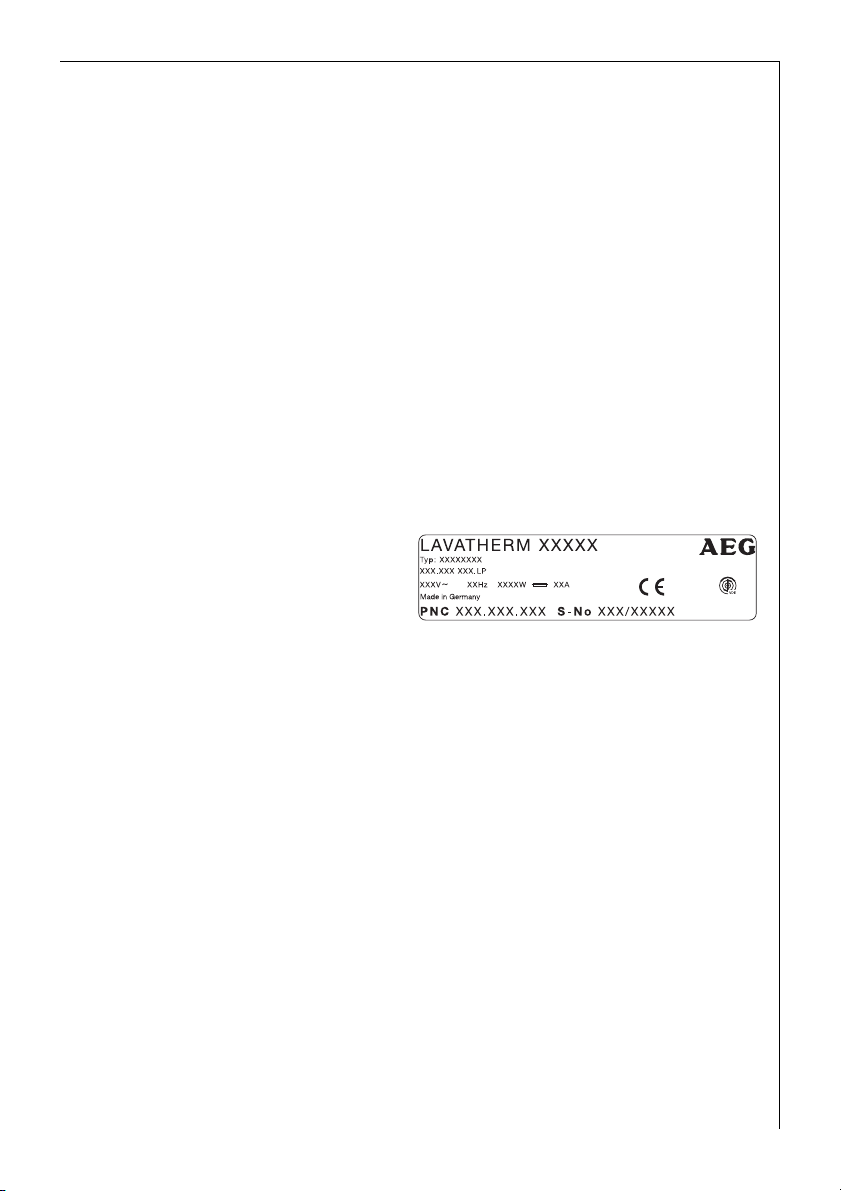
Make a note of the PNC number and the S number. They are both on
the rating plate behind your tumble dryer’s door.
PNC ................................
S-No ................................
If possible establish:
• How is the disturbance evident?
• Under what circumstances does the disturbance occur?
• Does the multi-display issue an error message? (( and a number)?
When do you incur costs even during the warranty period?
– if you could have solved the disturbance yourself with the help of the
Troubleshooting table (see section "Something not working"),
– if the customer service engineer has to make several journeys because
he did not receive all the necessary important information before his
visit and now e.g. has to fetch spares. You can avoid these extra trips
by preparing your telephone call properly in the way described above.
39
Page 40

From the Electrolux Group. The world´s No.1 choice.
The Electrolux Group is the world´s largest producer of powered appliances for kitchen, cleaning and outdoor
use. More than 55 million Electrolux Group products (such as refrigerators, cookers, washing machines,
vacuum cleaners, chain saws and lawn mowers) are sold each year to a value of approx. USD 14 billion in more
than 150 countries around the world.
AEG Hausgeräte GmbH
Postfach 1036
D-90327 Nürnberg
http://www.aeg.hausgeraete.de
© Copyright by AEG
822 944 320–00- 0503/PRO
Subject to change without notice
 Loading...