

Page 1

Operating Iriotructions
¿/\v &£xsfi IOCS iCiJ
Fully automatic
washing machines
LAVAMAT BELLA 1003/803
AEG
Page 2

The LAVAMAT BB-yV 1003
LAVAMAT 1003 U
and LAVAMAT BELLA 803
E-605 191 902
Your new LAVAMAT Is a modern fully
automatic washing machine.
With a little care and attention, It will give
you many years of faithful service.
This machine offers you the advantage of
compiling the wash programmes exactly
as you like.
It also Incorporates special ’’power
economy” programmes for lightly .«?niied
laundry and economy programm lOr
small load sizes.
In addition, the BELLA 1003 models Incor
porate an extra gentle programr for
woollens.
To enable you to obtain the max im
benefit from your LAVAMAT wa.,..«ng
machine, please read this booklet tho
roughly. This will assist you In becoming
familiar with the controls of the machine
and their functions, thereby ensuring
carefree, happy wash days.
Please remember to remove the transit
bars (see page 5 under installation).
Spinning speed: more
(LAVAMAT BELLA 803:
more than 800 rpm.)
Contents:
than 1000 rpm.
Page
Installation 4
Electrical connection 4
Water supply 4
Water drainage 5
Preparing the laundry 5
Load sizes 6
Washing powder dispenser 6
Controls 8
Wash programmes 9-11
Operation 12
Maintenance 12
What can be the cause when... 13
Page 3
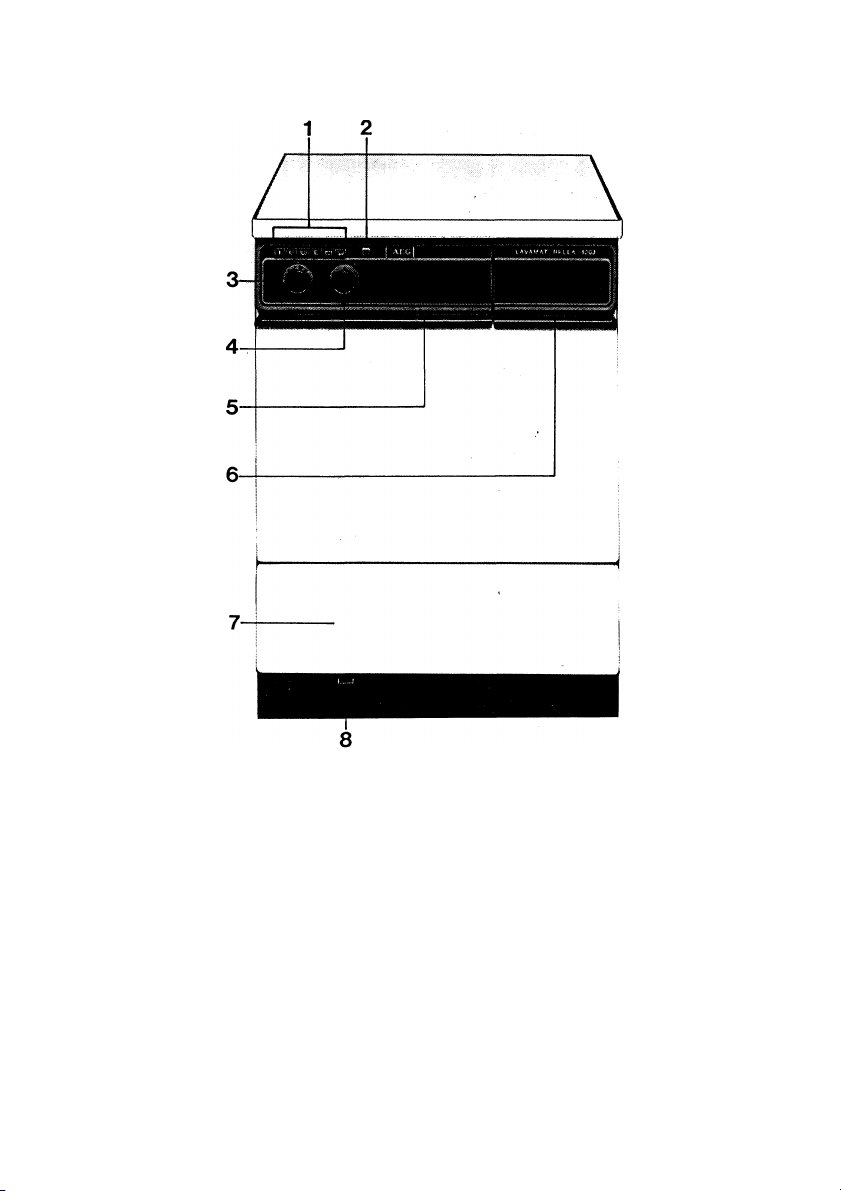
1 = Selector buttons plus ON/OFF-buttons
2 = Pilot lamp
3 = Programme switch
4 = Temperature control
5 = Finger grip for opening
the drop type front door
6 = Finger grip for detergent
dispenser tray
7 = Lower front panel (pull this lower
panel down and the drain fiiter
becomes accessibie).
8 = Fiiter outiet
Page 4
Installation
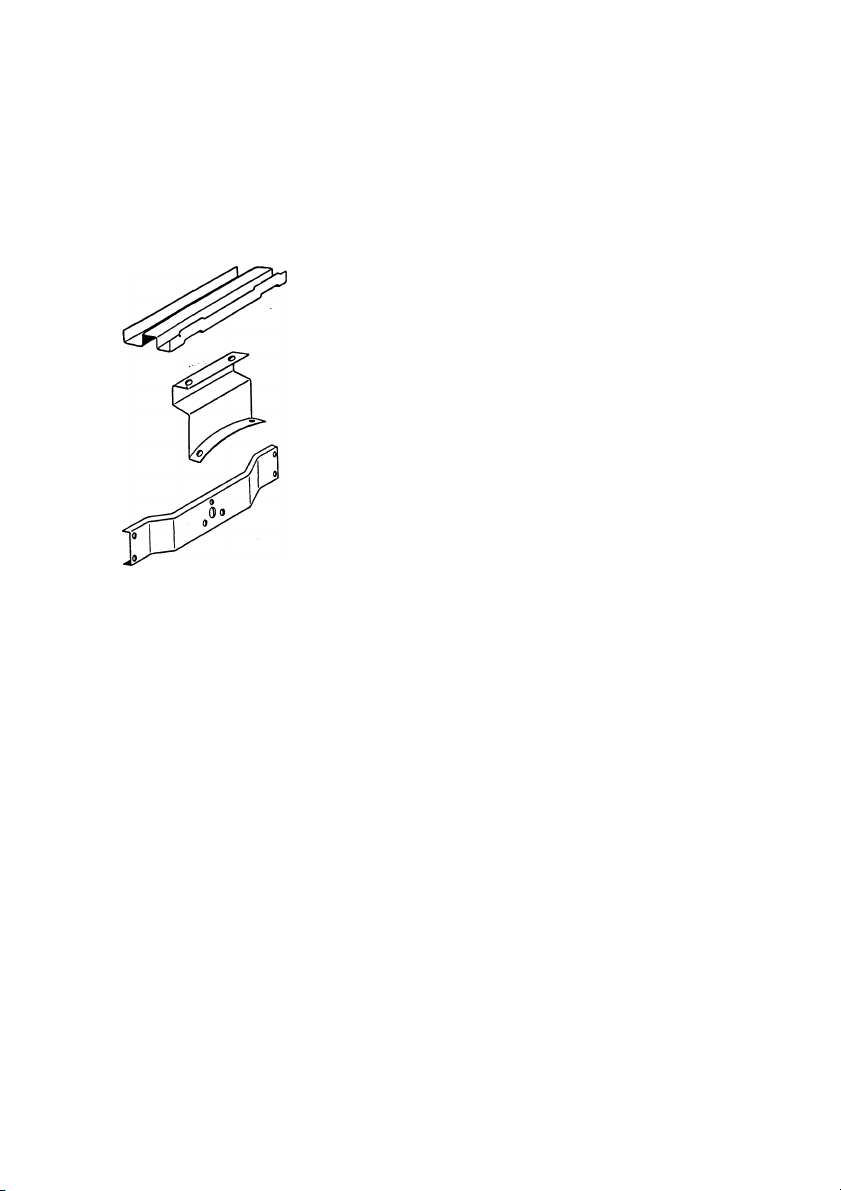
ATTENTION: Having unpacked the
machine, you must first remove the
transit bars. Detailed instructions for this
operation shouid be contained on the
machine in the form of a separate instruc
tion leafiet. Unscrew the worktop and rear
plate and remove 3 parts, 2 bars and
1 bracket (see illustration).
Please keep these transit bars, in case
you have to move the appliance for any
distance, e.g. moving house.
You can now position the machine into
place, as required.
Dimensions: Height 85 cm
(without worktop 82 cm)
Width 59.5 cm
Depth 60 cm
Weight: 100 kg approx.
Your machine features a three-point
support system so that no adjustment of
the feet shouid be necessary. However,
should levelling become necessary — e.g.
when incorporating the machine into a
fitted kitchen system, then adjustable
feet are available as an optional extra.
Part Number E 605 899 821.
Fuse protection fp^ 03 kW = 16 A,
for 2.08 kW = 10 >-..^JK version please fit
a 13 amp fuse or 15 amp plug).
WARNING: This appliance must be
earthed.
This appliance complies with the require
ments laid out in the EEC Directive
76/889.
Important
The wires in the mains lead are coloured
in accordance with the following code:
1. green and yeilow = earth
2. biue = neutral
3. brown = live
Fit the mains lead with a 3 pin 13 or 15
amp plug.
As the coiours of the wires in the ,ns
lead of the appliance may not correp'^ind
with the coloured marking identifyii ne
terminais in your plug, please proceed as
follows:
1. The wire which is coioured green and
yellow must be connected to the earth ter
minal in your plug, which is marked with
the ietter ’E’ or by the earth symboi or
coloured green yellow, or green and
yellow.
2. The wire which is coioured brown must
be connected to the live terminai which is
marked with the letter ’L’ or coloured red.
3. The wire which is coloured blue must
be connected to the neutral terminal
which is marked with the letter ’N’ or
coloured black.
When \yjring the plug ensure tt. all
strands of .wire are securely retained in
each terminal. Do not forget to tightp" the
mains lead clamp on the plug. If y^ in
stallation is fitted with 2 pin socket out
lets, or if you are in doubt, please c ult
a qualified electrician.
Electrical connection
Voltage: 220 V AC only (UK versions 240 V)
Connected load 3.03 kW which may be
changed over to 2.08 kW
A
Water supply
Your washing machine is fitted with a
high quality pressure hose Va inch bore
with a y* inch BSP screw connector for
connection to a water tap with male
Page 5
thread. The necessajrv washers are en
closed. (Please do : use any other
washers as they may prove to be of an
unsatisfactory quality). Hand tightening
of the nut is sufficient ~ be very careful
when using tools.
Please do not connect the machine to a
hot water supply, as this has an adverse
effect on the washing performance of the
machine.
Notes for plumber
Minimum water pressure: about 1 bar
excess pressure (= 1 atu, = 1 kp/cm^,
“ ^>'cm2 = 15 p.s.i.)
Mv lum permissible water pressure
about 10 bar. Where the supply pressure
exceeds 10 bar, it is necessary to fit a
pr jre relief valve type AD 723 (Part
Nuijioer E 612 896 723).
Sf ’d you require a longer water supply
hoovi than that provided, please use only a
continuous high-pressure hose (at least
60 bar) of suitable length. Do not extend
the existing hose.
On no account must you use cheap gar
den hose or similar hose. Please ensure
that suitable clamps are used for at
taching the hose to the connector fitting.
Please ensure that you comply with any
drinking water regulations of your local
water board.
At the completion of each wash pro
gramme, please close the tap.
Should you wish to soak laundry for a
lop^'^^r period, we recommend that you
cl the tap after the temperature has
been reached (at the end of the drum
movement).
S! !d you discover some residual water
in vour machine, after unpacking, please
df worry. It does not mean that the
ma^nine has been used before, it is due
to the very thorough quality control that
the machine undergoes in our factory.
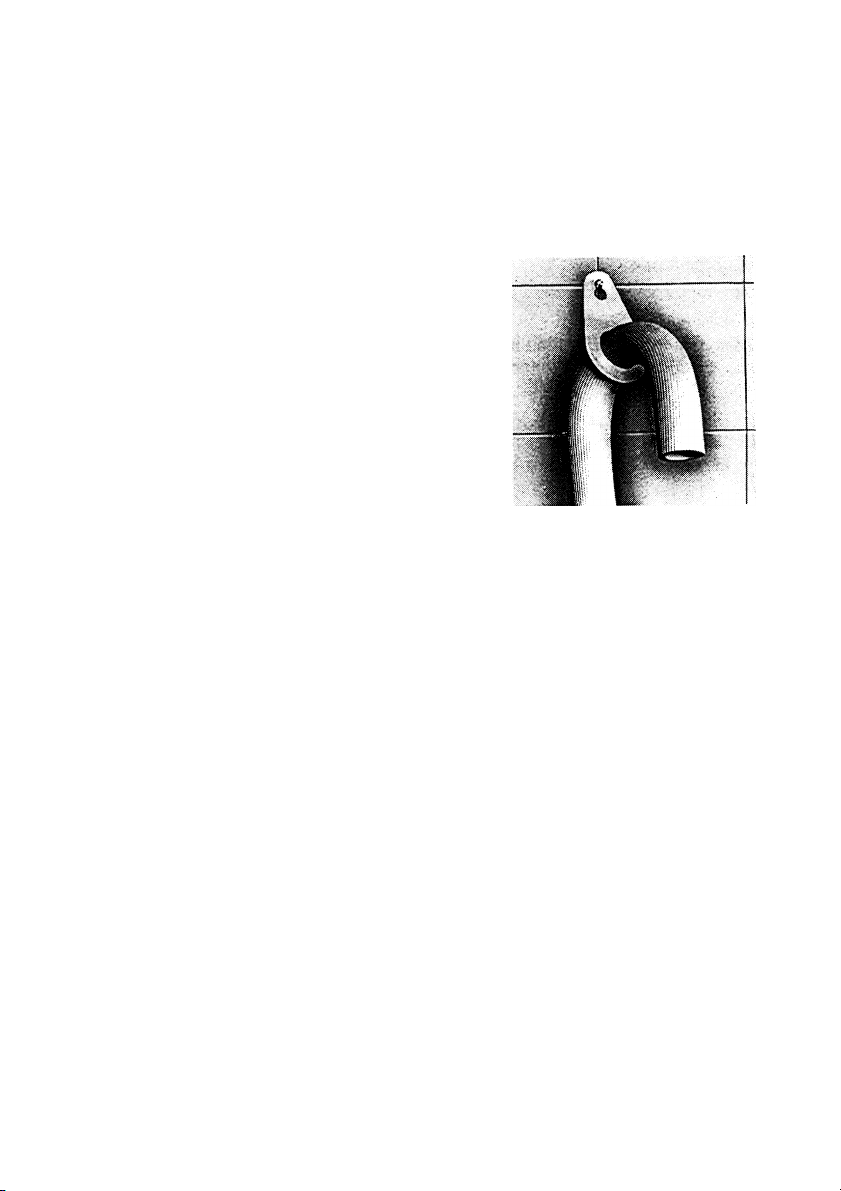
aeiivers me waier lo a neau ui i.» n
through the drain hose fitted at the back
of the machine.
The drain hose (i/D 19 mm max.) is bent at
the end for hooking over a sink edge or si
milar receptacle. Please secure this bent
end in such a way that it cannot siip off
(especialiy where the sink or basin edge
is very wide).
If permanent connection to a siphon is re
quired, you can shohen the drain hose as
necessary (in this case the hose must be
ventilated. The necessary ventilating
valve or breather Is available from the
AEG Service Department).
When installing the machine In a room
with floor drainage (i. e. a gulley in a
laundry room), you can place the hose
directly onto the floor after cutting off the
bent part, which should be cut at an
angle. The hose has been routed inside
the machine in such a way that no water
can drain off unintentionally when the
hose is placed on the floor.
If necessary (e.g. in the case of a power
failure) the water can be drained from the
machine by carefully opening the
drainage filter. The laundry cah then be
removed from the drum as normal.
Preparing the laundry
Water drainage
To drain the machine of all soap and rinse
water, the machine is fitted with a pump,
which Is controlled by the programme. It
Preparation of your laundry prior to com
mencing washing, can be of immense be
nefit to you. Take a little time and sort
your laundry according to colour and type
of fabric. Please check the manufacturers
5
Page 6

washing label inside each garment.
Next check the pockets of each garment
for foreign bodies e. g. pins, needles,
paper clips, paper etc., close all zips.
Loosely tie long apron strings or pyjama
cords.
Please note: White fabrics should never
be washed vi/ith coloured items. If you do,
the white items will gradually become
grey in colour.
New items being washed for the first time
should always be washed separately.
This is because they tend to lose some of
their colour duringlheir first wash.
Wool: Woollen articles should only be
washed in your LAVAMAT if they are
labelled ’’Machine Washable”.
Curtains: Curtains of synthetic fibres are
very delicate and can easily be damaged
when taken down, or put back up. In most
cases the damage shows only after
washing (pulled threads etc.). We cannot
accept any responsibility for curtains so
damaged. If your curtains are particularly
delicate, then we recommend that they be
hand washed.
Washing pow^r dispenser
The washing powder dispenser operates
automatically. You can add the washing
powder for prewash and main wash, as
well as the fabric conditioner at the start
of the programme, namely
compartment A (centre) for the prewash,
compartment B (front) for the main wash,
compartment C (rear) for after-care.
Please use only liquids in compartment C
(e. g. fabric conditioner) and do not add
more than up to the level of the red mark
in compartment C.
Red mark = load limit
Load sizes
Washing
Normally soiled whites or coloureds —
Maximum 5 kg (11 lbs) dry laundry weight.
The drum has been correctly loaded when
you can still turn your hand freely bet
ween drum wall and the laundry.
Heavily soiled whites or coloureds (cot
tons and linens) — up to 4 kg (9 lbs) dry
laundry weight. (Items like work clothes,
overalls etc). The reason for the reduced
load is that heavily soiled garments need
the additional space for good wash re
sults.
Easy care fabrics, synthetics and wool
lens — up to 1.5 kg {Vi lbs) dry laundry
weight. This is the equivalent to 6-8shirts.
In this case the reason for the reduced
load is that these types of fabric float in
the water to minimise creasing.
If you want to use a fabric conditioner in
powder form, such as starch, then this
should be dissolved in accordance with
the manufacturer’s instructions and
poured directly into the drum. Alternative
ly, pull out the dispenser and po he
starch slowly into compartment B.
Piease ensure that the dispens'^*^^ is
pushed home fuiiy after ioading i ith
washing powder etc. As otherwise' no
water can come into the machine.
Wash powders
There are many different types of washing
powders on the market today. Please do
not use ordinary powders like Ariel,
Radiant, Daz etc., in your new AEG
LAVAMAT. The reason for this is very
simpie, these powders produce so much
Page 7

lather that the clothes are prevented from
tumbling freely durr the washing cycle,
therefore they do wt get a thorough
wash.
Do use the right powder. To get the best
results, we recommend the use of PERSIL
AUTOMATIC. Like'all modern automatic
machines the LAVAMAT works at peak
efficiency with a low lather product.
PERSIL AUTOMATIC'S balanced lather is
specially designed to complement the
cleaning action of the machine. Do use
enough powder. Follow the manufactu
rer’s recommended dosage. Please bear
in id that the correct amount of powder
de,. .ids on a number of factors — the
hardness of the water, the size of the load
an'“ *he amount of soiling of the laundry.
Pi' 'se note: On ’Economy’ programmes
fc nail loads (using button Vz). These do
not require the full amount of powder. Use
about 30 to 40 % less than for a normal
programme with a full wash load.
Overfoaming can be caused by several
things:
1. wrong type of powder
2. too much washing powder in conjunc
tion with soft water
3. when washing very small loads.
To correct overfoaming (1) use a powder
specially formulated for front loading
automatics, (2) and (3) reduce the amount
of '«ashing powder used.
Page 8

Controls
Selector buttons Control lamp
2) Temperature cojpl<pl
With the temper^.dre control is in posi
tion ’0’ you can actually wash cold
(woollens for example). Between 30°C
and 95°C the temperature is infinitely
variable.
Please note the washing instructions
on the labels Inside your garments.
3) Selector buttons
Programme switch Temperature control
1) Programme switch
The programme switch has 8 settings
for the basic programmes:
1 wash programme with prewash
2 wash programme without prewash
3 fabric softening — starching —
spinning
4 pumping — spinning
5 woollens
6 short spin (automatic SL action)
7 soaking — extra prewash
8 pumping
With the exception of woollens, you
can wash ail fabrics with or without
prewash, depending on their degree of
soiling. Wooilens are washed on a
main wash only.
The programme selector should al
ways be operated rn clockwise direc
tion.
Button
Button Q] Switch off
When depressing button you
cancel the function of ail other
buttons.
Button VIll
Economy button for small loads
This economy button means that you
need not to work with the same water,
power and washing powder consump
tion as for full loads. Instead, you can
make savings all round.
Effect: reduced water level during
washing and rinsing. Depending on the
actual programme, you save up to 45 %
of water, up to 45% power and up to
20% time. The amount of washing
powder is also reduced.
Application: for small loads — about
half a drum full (up to 2Vz kg of whites
and coloureds, up to 0.8 kg of
care fabrics and synthetics).
Used with programmes 1, 2, 3.
Please note, that optimal economy . id
that the most favourable consump n
of water, electricity and wash pov jr
can only be achieved when the full
capacity of the drum is used.
Button [e] Energy saving
By selecting this button in conjunction
with programme 1 or 2 the water tem
perature is limited to 60°C and the
length of the wash is extended to that
Switch on
Page 9

of a 95°C wash pi:agrarpme. This
means you can expc the same re
sults as the 95 ®G wash programme,
providing the laundry is only slightly
soiled. Furtherhnore, you save electrici
ty and the wear and tear on your
laundry Is reduced.
Used with programmes 1, 2, 3.
Button \l/2/-t-[E]
Naturally, It Is also possible to com
bine these two buttons when washing
small loads of lightly soiled laundry.
You save even more electricity, water
a'''' ash powder.
You cannot combine the energy saving
button [i] with buttons tzJ ^nd
Bu**">n tZi
water level (rinse water stop)
Effect: The laundry is washed at a
high water level, but with normal
drum movement. The laundry is left
floating in the last rinse water (rinse
water stop).
Application: for synthetics or synthe-
tic/cotton mixtures which require a
high water level, e.g. all outer garments
such as blouses, shirts, skirts, dres
ses, trousers etc. bearing the HLCC
symbols:
Used with programmes 1, 2 and 3.
Bv ^ LJ
Reu^^ed drum movement
Effect: Depression of this button re-
su in a reduced drum movement
(reouced mechanics) coupled with a
nc il water level. In addition, the
lauiiory if left in the last rinse water
(rinse water stop).
Application: for baby clothes, cotton
mixtures or synthetics e. g. sheets,
underwear etc. which do not require a
high water level bearing HLCC sym
Buttons: tH/ -f \ /
High water level combined with re
duced drum movement. For particular
ly delicate fabrics which require a high
water level and a gentle wash action.
Please note:
in the case of programmes where the
last rinsing water or the soak water is
left in the machine (buttons XZJ ,
\u . a + W , as well as
programmes 5 and 7) It Is necessary to
first pump off the water before the door
Is opened. This can be done in diffe
rent. ways, depending on the type of
fabric involved. (See programme chart
’’Additional Programmes”).
Wash programmes
The basic programmes of your LAVAMAT
can be adapted for practically all kinds of
fabric by using the selector buttons and
temperature controls. You can vary the
programmes to suit your particular re
quirements.
Your LAVAMAT is an advanced piece of
technology. We have taken care of the
future — this means any future develop
ments by the textile Industry can be
catered for.
On page 10 and 11 is a table showing the
major programmes. Please study this
table and find out the many possibilities
open to you before putting your washing
machine into operation.
The water symbols used in the table are
explained as follows: —
normal water level
^ high water level
\60*c] \50*c/
Used with programmes 1, 2, 3, 7.
Page 10

Main programmes
Load size
T> )f laundry
Cottons and linens 30® C to
with prewash 95 °C
Cottons and linens 30° C to
without prewash 95°C
fi] Whites 95 °C
'— with prewash
[e] Whites 95 ®C
without prewash
Easy-care fabrics 30°Cto
with prewash tzz/ 95 °C
Easy-care fabrics 30 ° C to
without prewash tzd 95°C
Easy-care fabrics ^ 30®Cto
with prewash tui 60 ® C
Easy-care fabrics 30® to
without prewash tZi/ 60 ® C
Woollens tZi ooldto
30®C
5 kg max. cotton, linen
e.g. bed linen, table linen,
underwear, shirts, towels,
tea cloths, aprons etc.
5 kg max.
\9fc]
5 kg max. cotton, linen etc.
lightly soiled
5 kg max.
1.5 kg max.
1.5 kg max.
@ ^ ®
special finish cotton, cotton mixtures,
synthetics which do not
require a high water level
1.5 kg max.
1,5 kg max.
\60*c7 \^*c/ \40^
nylon, polyester, cotton mixtures,
cotton with special finishes; all
outer garments which require a
high water level
1,5 kg max.
3 4 6
\60*c/ \^/
1.0 kg max.
fabrics of machine-washable wool
or wool mixtures
Additional Programmes
Soft rinsing, starching, spinning 5 kg max. cotton, linen
Soft rinsing, starching tZi/ 1.5 kg max. easy-care fabrics, synthetics
Soaking — (extra) prewash 4.0 kg max.
Pumping, spinning
Pumping, Variomatic spinning
5 kg max.
1,5 kg max.
cotton, linen, very heavily soiled
cotton, linen
easy-care fabrics, synthetics,
delicate cotton fabrics
Pumping — short spinning
1.0 kg max.
woollens, wool mixtures
automatic SL action
Pumping
easy-care fabrics which must
not be spun
10
tzJ = RINSE WATER STOP! First pump off the water before the door Is opened.
Page 11

Programme setting <
Programm« Button Temp,
switch control
\vater Wash
' level powder
dispenser
Programme cycle
1 30°Cto
95 °C
2 30°Cto
95°C
1 [|] 95°C
2 [|] 95°C
1 LJ 30-Cto
95-C
2 LJ 30°Cto
95°C
1 30”Cto
60-c
2 tZ/ 30»Cto
60°C
5 cold to
3o:*c
^ ABC
Q B c
Q ABC
Q Bc
Q A BC
Q BC
^ ABC
^ B c
^ B c
Prewash — main wash at normal water level
cooling — 5 rinses — spinning
Main wash at normal water level — cooling —
5 rinses — spinning
Prewash — main wash at normal water level
60°C — cooling — 5 rinses — spinning
Main wash at normal water level 60°C — cooling
— 5 rinses — spinning
Prewash — main wash with reduced drum move
ment, normal water level — cooling — 4 rinses —
the laundry is left In the last rinse water
Main wash with reduced drum movement,
normal water level — cooling — 4 rinses —
the laundry is left in the last rinse water
Prewash — main wash at high water level —
cooling — 4 rinses — the laundry is left floating
in the last rinse water
Main wash at high water level — cooling —
4 rinses — the laundry is left floating in the last
rinse water
Main wash at high water level and particularly
gentle drum movement — 3 rinses — the laundry
is left floating in the last rinse water
3
4
4 a
6
8
7 upto40°C
9 *
'
# <=
• 0
Rinsing and spinning
Rinsing — the laundry Is left floating in the last
rinse water
Prewash at high water level — the laundry is left
floating in the soap water
Spinning
Gentle spinning — (repeated short spins followed
by loosening action)
Pumping — short spin
Pumping
Page 12

Operating procedure
Washing
ana me programrne seleoior temams in
the relevant cut-< oosition (one of the
breaks in the cycle indicator band).
Plug the machine In or switch on (If permanently connected).
Hook the drain hose over sink edge.
Uniess piumbed in, connect the suppiy
hose to the tap.
Open the tap.
Open the door.
Load with dry iaundry.
Ciose inner and outer doors.
Please ensure that both doors àr« closed
properly as otherwise the programme
cannot start. The outer door must engage.
Puli out the drawer type washing powder
dispenser.
Add washing powder.
Push the dispenser back in.
Select the required temperature.
Rotating the programme selector in
clockwise direction, set it to the required
position.
Press buttons as necessary ( tH/ ,
, \W2y or E).
Press button
The control light goes out.
Return the temperature control to ”0”.
If the programme ends with the laundry in
the last rinse water, remember to pump
off the water before opening the door.
Open the door (on programmes with
spinning cycle this is not possible until
approx. 1 minute after completion of the
programme — safety feature.)
Remove the iaundry.
if you have nothing else to wash, retóse
the tap, pull the plug out of the so. or
switch off.
Press button [T]
The programme starts.
The left control lamp lights up.
The programme selector begins to rotate.
It stops during heating-up until the re
quired temperature is reached.
Opening of the outer door during opera
tion will immediately interrupt the pro
gramme.
It Is not possible to open the door during
spinning (safety feature).
Please remember that the glass of the
door gets hot during washing (do not
touch). The door features a safety lock
and cannot be opened during a pro
gramme cycle.
On completion of the programme
the machine switches off automatically
12
Maintenance
When you have done all your wa ig,
close the tap and pull the plug out or the
socket or switch off the main switch.
Leave the door open for a short while to
allow the machine to dry out. Remove any
washing powder left in the dispenser. To
do this, hold the dispenser with both
hands, lift and pull out completely, giving
it a short sharp pull.
Page 13

Should your machine show grey deposits
of lime, please do not try to remove them
by unsuitable means, but contact your
AEG Service Department instead.
If there is a danger of frost, empty the
machine beforehand of all water by ope
ning the drain filter. Unscrew the supply
hose and let this drain as well.
What can be the cause when ...
Non-functioning of your automatic
washing machine is mostly due to the
following which you can rectify yourself.
What is important is that you regulariy
ciean the drain filter.
To do this, place a flat dish on the floor
below the filter outlet bottom left. Next
fold down the lower front panel (where the
machine has been built in, you should use
the plastic hook provided for the purpose)
and give the filter cover about a half a turn
in r ‘’-clockwise direction. The water can
no. .rain off. Unscrew the filter com
pletely and clean It. When refitting the fil
ter -^lease ensure that it is Inserted correi in its guides and securely tightenpd.
Oc^ .oionally you should also clean the
filter in the water inlet hose.
What may look like rust stains on drum or
tub is due to ferrous foreign bodies intro
duced with the laundry or the water.
Remove such stains with a stainless steel
cleaning agent. Do not use chlorous or
ferrous scouring powders. Never use
acids, chloride or bleach in the machine.
The programme does not start.
Has the machine been plugged in or
switched on?
Are the fuses in order?
Have the doors of the machin.^ been
closed properly? '
Is button in depressed?^
Too little or no water in coming in.
Has the tap been O/pened?
Has the washing /powder dispenser been
fully pushed home?
Is the filter In thè water supply line
blocked?
It should be cleaned from time to time.
Is'the supply hose kinked?
Is the water pressure too low?
The water is immediately running off
again through the drain hose.
Please note that the discharge end of the
drain hose must not be Immersed In the
pumped-off water (siphon action).
13
Page 14

The programme switch stops during the
programme cycie.
Your fully automatic machine has been
fitted with the Thermo-Chron control
system. This means that the control knob
stops during prewash and main wash
until the required temperature is reached.
The washing powder foams excessiveiy.
Too much washing powder or the wrong
powder has been used. Omit the prewash
from your next programme or reduce the
amount of washing powder used. Use a
low lather powder.
The programme (white or coioureds) has
been compieted without spinning.
The thermal protection device of the
motor has tripped. Possible causes:
blocked drain filter, kinked drain hose.
The spinning cycle will automatically co
me on again after a certain period has
elapsed (up to an hour).
The door cannot be opened immediately
on completion of the programme cycle.
Please wait until the release time of the
door locking mechanism has elapsed
(about 1 minute).
Should you be unable to locate the cause
of a problem in s^ i of the above check
list, then please coTitact your AEG Service
Department. To assist our service staff,
please quote the E-number of your ma
chine which you find on the inside front
cover of this booklet or on the rating plate
of your machine.
If you call a service engineer in connec
tion with one of the aforementioned pro
blems, please note that the cost involved
will have to be passed on even during the
warranty period.
A more comprehensive guaran' is
offered by our AEG Service Club. ■ or a
modest annual premium you can sign a
service agreement with our Tec’ cal
Service to cover your machine.
14
Page 15

Page 16

Subject to change without notice
H 245 256 240 - 07801./31 —
AEG
 Loading...