

Page 1
LAVAMAT 16810
TURBO ELECTRONIC
Der umweltschonende Waschtrockner
The environmentally friendly washer-dryer
Benutzerinformation
Instruction booklet
AUS ERFAHRUNG GUT
132994110d.qxd 11-04-2002 16:03 Pagina 1 (Nero/Process Black pellicola)
Page 2
Sehr geehrte Kundin, sehr geehrter Kunde,
lesen Sie bitte diese Gebrauchsanweisung sorgfältig durch.
Beachten Sie vor allem die Sicherheitshinweise auf den ersten Seiten
dieser Gebrauchsanweisung! Bewahren Sie bitte die Gebrauchsanweisung zum späteren Nachschlagen auf. Geben Sie sie an eventuelle
Nachbesitzer des Geräts weiter.
Mit dem Warndreieck und/oder durch Signalwörter (Warnung!, Vorsicht!,
Achtung!) sind Hinweise hervorgehoben, die für Ihre Sicherheit oder für
die Funktionsfähigkeit des Geräts wichtig sind.
Bitte unbedingt beachten.
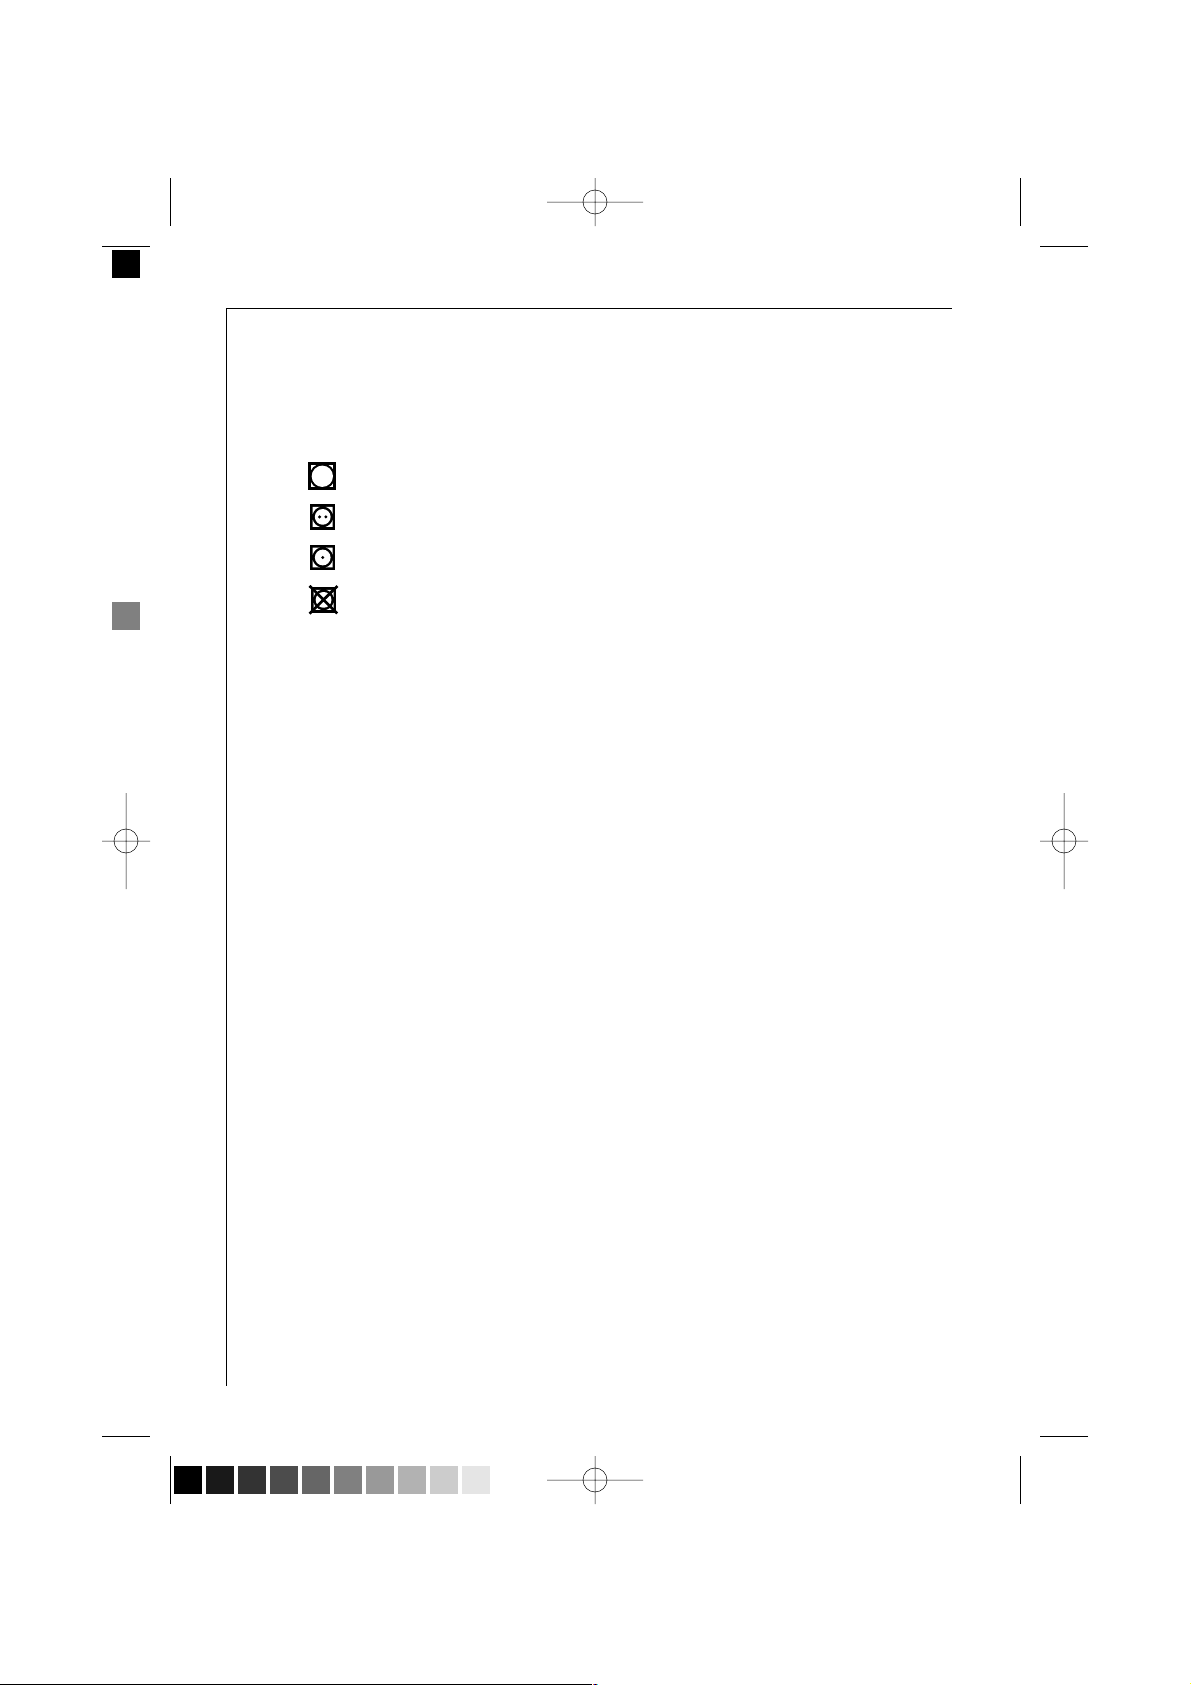
Dieses Zeichen leitet Sie Schritt für Schritt beim Bedienen des Geräts.
Nach diesem Zeichen erhalten Sie ergänzende Informationen zur Bedienung und praktischen Anwendung des Geräts.
Mit dem Kleeblatt sind Tipps und Hinweise zum wirtschaftlichen und
umweltschonenden Einsatz des Geräts gekennzeichnet.
Für eventuell auftretende Störungen enthält die Gebrauchsanweisung
Hinweise zur selbständigen Behebung, siehe Abschnitt “Was tun,
wenn...”
Sollten diese Hinweise nicht ausreichen, wenden Sie sich bitte an unseren Werkskundendienst in Ihrer Nähe.
Gedruckt auf umweltschonend hergestelltem Papier.
Wer ökologisch denkt, handelt auch so…
2
132994110d.qxd 11-04-2002 16:03 Pagina 2 (Nero/Process Black pellicola)
Page 3

INHALT
Gebrauchsanweisung. . . . . . . . . . . . . . . . . . . . . . . . . . . . . . . . . . . . . . 6
Sicherheitshinweise. . . . . . . . . . . . . . . . . . . . . . . . . . . . . . . . . . . . . . . . . . . . 6
Entsorgung . . . . . . . . . . . . . . . . . . . . . . . . . . . . . . . . . . . . . . . . . . . . . . . . . . 8
Umwelttipps
. . . . . . . . . . . . . . . . . . . . . . . . . . . . . . . . . . . . . . . . . . . . . . . . . 9
Die wichtigsten Merkmale Ihres Geräts . . . . . . . . . . . . . . . . . . . . . . . . . . 10
Gerätebeschreibung . . . . . . . . . . . . . . . . . . . . . . . . . . . . . . . . . . . . . . . . . . . 11
Bedienblende . . . . . . . . . . . . . . . . . . . . . . . . . . . . . . . . . . . . . . . . . . . . . . . . . 12
Programmwähler. . . . . . . . . . . . . . . . . . . . . . . . . . . . . . . . . . . . . . . . . . . . 12
Taste "START/PAUSE". . . . . . . . . . . . . . . . . . . . . . . . . . . . . . . . . . . . . . . . . 14
Taste "ZElT-VORWAHL" . . . . . . . . . . . . . . . . . . . . . . . . . . . . . . . . . . . . . . . 14
Taste "TROCKENPROGRAMME". . . . . . . . . . . . . . . . . . . . . . . . . . . . . . . . . 15
Taste TROCKENZElT . . . . . . . . . . . . . . . . . . . . . . . . . . . . . . . . . . . . . . . . . . 15
Wahltasten . . . . . . . . . . . . . . . . . . . . . . . . . . . . . . . . . . . . . . . . . . . . . . . . 15
FLECKEN . . . . . . . . . . . . . . . . . . . . . . . . . . . . . . . . . . . . . . . . . . . . . . . . . . 15
ZEIT SPAREN . . . . . . . . . . . . . . . . . . . . . . . . . . . . . . . . . . . . . . . . . . . . . . . 15
EINWEICHEN . . . . . . . . . . . . . . . . . . . . . . . . . . . . . . . . . . . . . . . . . . . . . . . 16
VORWÄSCHE . . . . . . . . . . . . . . . . . . . . . . . . . . . . . . . . . . . . . . . . . . . . . . . 16
SCHLEUDERN/SPÜLSTOPP. . . . . . . . . . . . . . . . . . . . . . . . . . . . . . . . . . . . . 16
Multidisplay . . . . . . . . . . . . . . . . . . . . . . . . . . . . . . . . . . . . . . . . . . . . . . . 17
Programmablauf-Anzeige. . . . . . . . . . . . . . . . . . . . . . . . . . . . . . . . . . . . . 18
Waschprogramm löschen . . . . . . . . . . . . . . . . . . . . . . . . . . . . . . . . . . . . . 18
Änderung eines laufenden Programms . . . . . . . . . . . . . . . . . . . . . . . . . . 18
Türöffnung während eines laufenden Programms . . . . . . . . . . . . . . . . . 18
Schublade für Wasch- und Pflegemittel. . . . . . . . . . . . . . . . . . . . . . . . . . . . 19
Vor dem ersten Waschen . . . . . . . . . . . . . . . . . . . . . . . . . . . . . . . . . . . . . . 19
Waschgang vorbereiten. . . . . . . . . . . . . . . . . . . . . . . . . . . . . . . . . . . . . . . . 20
Wäsche sortieren und vorbereiten. . . . . . . . . . . . . . . . . . . . . . . . . . . . . . . . . 20
Wäschearten und Pflegekennzeichen . . . . . . . . . . . . . . . . . . . . . . . . . . . . . . 21
Wasch- und Pflegemittel. . . . . . . . . . . . . . . . . . . . . . . . . . . . . . . . . . . . . . . . 22
Welches Wasch- und Pflegemittel? . . . . . . . . . . . . . . . . . . . . . . . . . . . . . 22
Wieviel Wasch- und Pflegemittel?. . . . . . . . . . . . . . . . . . . . . . . . . . . . . . 22
Wasserenthärter einsetzen . . . . . . . . . . . . . . . . . . . . . . . . . . . . . . . . . . . . 22
Angaben der Wasserhärte. . . . . . . . . . . . . . . . . . . . . . . . . . . . . . . . . . . . . 22
3
132994110d.qxd 11-04-2002 16:03 Pagina 3 (Nero/Process Black pellicola)
Page 4

Trockengang vorbereiten. . . . . . . . . . . . . . . . . . . . . . . . . . . . . . . . . . . . . . . 23
Füllmengen. . . . . . . . . . . . . . . . . . . . . . . . . . . . . . . . . . . . . . . . . . . . . . . . . . . 23
Nicht zum Trocknen geeignet . . . . . . . . . . . . . . . . . . . . . . . . . . . . . . . . . . . . 23
Pflegesymbole . . . . . . . . . . . . . . . . . . . . . . . . . . . . . . . . . . . . . . . . . . . . . . . . 24
Trockendauer . . . . . . . . . . . . . . . . . . . . . . . . . . . . . . . . . . . . . . . . . . . . . . . . . 24
Änderung der Trockenzeit . . . . . . . . . . . . . . . . . . . . . . . . . . . . . . . . . . . . . . . 24
Flusen . . . . . . . . . . . . . . . . . . . . . . . . . . . . . . . . . . . . . . . . . . . . . . . . . . . . . . . 24
Nachtrocknen. . . . . . . . . . . . . . . . . . . . . . . . . . . . . . . . . . . . . . . . . . . . . . . . . 25
Trockengang durchführen . . . . . . . . . . . . . . . . . . . . . . . . . . . . . . . . . . . . . . 25
Nur Trocknen . . . . . . . . . . . . . . . . . . . . . . . . . . . . . . . . . . . . . . . . . . . . . . . . . 25
Waschgang durchführen . . . . . . . . . . . . . . . . . . . . . . . . . . . . . . . . . . . . . . . 26
Füllmengen. . . . . . . . . . . . . . . . . . . . . . . . . . . . . . . . . . . . . . . . . . . . . . . . . . . 26
Wäsche einlegen . . . . . . . . . . . . . . . . . . . . . . . . . . . . . . . . . . . . . . . . . . . . . . 26
Wasch- und Pflegemittel zugeben . . . . . . . . . . . . . . . . . . . . . . . . . . . . . . . . 26
Waschprogramm einstellen . . . . . . . . . . . . . . . . . . . . . . . . . . . . . . . . . . . . . . 26
Zusatzfunktion(en) wählen . . . . . . . . . . . . . . . . . . . . . . . . . . . . . . . . . . . . . . 27
Schleuderdrehzahl ändern/Spülstopp wählen. . . . . . . . . . . . . . . . . . . . . . . . 27
Zusätzlicher Spülgang . . . . . . . . . . . . . . . . . . . . . . . . . . . . . . . . . . . . . . . . . . 27
Zeitvorwahl einstellen . . . . . . . . . . . . . . . . . . . . . . . . . . . . . . . . . . . . . . . . . . 28
Waschprogramm starten . . . . . . . . . . . . . . . . . . . . . . . . . . . . . . . . . . . . . . . . 28
Programmende. . . . . . . . . . . . . . . . . . . . . . . . . . . . . . . . . . . . . . . . . . . . . . . . 29
Waschen und Trocknen durchgehend (NON-STOPP-Betrieb) . . . . . . . . 30
Programmtabellen . . . . . . . . . . . . . . . . . . . . . . . . . . . . . . . . . . . . . . . . . 31-32
Waschen . . . . . . . . . . . . . . . . . . . . . . . . . . . . . . . . . . . . . . . . . . . . . . . . . . . . . 31
Sonderprogramme . . . . . . . . . . . . . . . . . . . . . . . . . . . . . . . . . . . . . . . . . . . . . 32
Trocknen. . . . . . . . . . . . . . . . . . . . . . . . . . . . . . . . . . . . . . . . . . . . . . . . . . . . . 33
Verbrauchswerte für das zeiteingestellte Trockenprogramm . . . . . . . . . 34
Pflege und Wartung. . . . . . . . . . . . . . . . . . . . . . . . . . . . . . . . . . . . . . . . . . . 35
Im Alltagsbetrieb . . . . . . . . . . . . . . . . . . . . . . . . . . . . . . . . . . . . . . . . . . . . . . 35
Bedienteile reinigen . . . . . . . . . . . . . . . . . . . . . . . . . . . . . . . . . . . . . . . . . . . . 35
Bedienblende. . . . . . . . . . . . . . . . . . . . . . . . . . . . . . . . . . . . . . . . . . . . . . . 35
Waschmittelschublade . . . . . . . . . . . . . . . . . . . . . . . . . . . . . . . . . . . . . . . 35
Einfülltür. . . . . . . . . . . . . . . . . . . . . . . . . . . . . . . . . . . . . . . . . . . . . . . . . . 36
Wassereinlaufsieb . . . . . . . . . . . . . . . . . . . . . . . . . . . . . . . . . . . . . . . . . . . 36
Flusensieb . . . . . . . . . . . . . . . . . . . . . . . . . . . . . . . . . . . . . . . . . . . . . . . . . 36
Notentleerung. . . . . . . . . . . . . . . . . . . . . . . . . . . . . . . . . . . . . . . . . . . . . . 37
Frost. . . . . . . . . . . . . . . . . . . . . . . . . . . . . . . . . . . . . . . . . . . . . . . . . . . . . . 37
4
Inhalt
132994110d.qxd 11-04-2002 16:03 Pagina 4 (Nero/Process Black pellicola)
Page 5

Was tun, wenn…. . . . . . . . . . . . . . . . . . . . . . . . . . . . . . . . . . . . . . . . . . . . . . 38
Störungsbehebung . . . . . . . . . . . . . . . . . . . . . . . . . . . . . . . . . . . . . . . . . . 38-41
Wenn das Waschergebnis nicht befriedigend ist . . . . . . . . . . . . . . . . . . . . . 42
Technische Daten . . . . . . . . . . . . . . . . . . . . . . . . . . . . . . . . . . . . . . . . . . . . . 43
Service . . . . . . . . . . . . . . . . . . . . . . . . . . . . . . . . . . . . . . . . . . . . . . . . . . . . 44
Aufstell- und Anschlussanweisung. . . . . . . . . . . . . . . . . . . . . . . 45
Sicherheitshinweise für die Installation . . . . . . . . . . . . . . . . . . . . . . . . . . . . 45
Abmessungen des Gerätes. . . . . . . . . . . . . . . . . . . . . . . . . . . . . . . . . . . . . . 46
Vorderansicht und Seitenansicht. . . . . . . . . . . . . . . . . . . . . . . . . . . . . . . . . . 46
Rückansicht . . . . . . . . . . . . . . . . . . . . . . . . . . . . . . . . . . . . . . . . . . . . . . . . . . 46
Installation . . . . . . . . . . . . . . . . . . . . . . . . . . . . . . . . . . . . . . . . . . . . . . . . . . 47
Entfernen der Transportsicherung. . . . . . . . . . . . . . . . . . . . . . . . . . . . . . . . . 47
Aufstellort vorbereiten. . . . . . . . . . . . . . . . . . . . . . . . . . . . . . . . . . . . . . . . . . 48
Nivellierung . . . . . . . . . . . . . . . . . . . . . . . . . . . . . . . . . . . . . . . . . . . . . . . . . . 48
Kaltwasseranschluss . . . . . . . . . . . . . . . . . . . . . . . . . . . . . . . . . . . . . . . . . . . . 49
Wasserablauf . . . . . . . . . . . . . . . . . . . . . . . . . . . . . . . . . . . . . . . . . . . . . . . . . 50
Elektrischer Anschluss . . . . . . . . . . . . . . . . . . . . . . . . . . . . . . . . . . . . . . . . . . 51
5
Inhalt
132994110d.qxd 11-04-2002 16:03 Pagina 5 (Nero/Process Black pellicola)
Page 6
GEBRAUCHSANWEISUNG
Sicherheitshinweise
Die Sicherheit von AEG-Elektrogeräten entspricht den anerkannten
Regeln der Technik und dem Gerätesicherungsgesetz. Dennoch sehen
wir uns als Hersteller veranlasst, Sie mit den nachfolgenden Sicherheitshinweisen vertraut zu machen.
Allgemeine Sicherheit
• Reparaturen am Gerät dürfen nur von Fachkräften durchgeführt werden. Durch unsachgemäße Reparaturen können erhebliche Gefahren
entstehen. Wenden Sie sich im Reparaturfall an unseren Kundendienst oder an Ihren Fachhändler.
• Nehmen Sie das Gerät niemals in Betrieb, wenn das Netzkabel beschädigt ist oder Bedienblende oder Arbeitsplatte so beschädigt sind, dass
das Geräteinnere offen zugänglich ist.
• Schalten Sie vor Reinigung, Pflege und Wartungsarbeiten das Gerät
aus. Dazu Netzstecker aus der Steckdose ziehen oder - bei Festanschluss - LS-Schalter im Sicherungskasten ausschalten oder Schraubsicherung ganz herausdrehen.
• Netzstecker nie am Kabel aus der Steckdose ziehen, sondern am
Stecker.
• Spritzen Sie das Gerät nicht mit einem Wasserstrahl ab.
Stromschlaggefahr!
• Bei Waschprogrammen mit hohen Temperaturen und bei Trocknungsprogrammen wird das Glas in der Einfülltür heiß. Nicht berühren!
• Lassen Sie die Waschlauge vor einer Notentleerung des Geräts, einer
Reinigung der Laugenpumpe oder einer Notöffnung der Einfülltür
abkühlen.
• Kleintiere können Stromleitungen und Wasserschläuche anfressen.
Stromschlaggefahr und Gefahr von Wasserschäden!
Aufstellung, Anschluss, Inbetriebnahme
• Beachten Sie die Aufstell- und Anschlussanweisung weiter hinten in
dieser Gebrauchsanweisung.
• Führen Sie einen ersten Waschgang ohne Wäsche durch (KOCHWÄSCHE mit halber Waschmittelmenge), um fertigungsbedingte Rückstände an Trommel und Laugenbehälter zu entfernen.
• Bei Geräteanlieferungen in Wintermonaten mit Minustemperaturen:
Gerät vor Inbetriebnahme für 24 Stunden bei Raumtemperatur lagern.
6
132994110d.qxd 11-04-2002 16:03 Pagina 6 (Nero/Process Black pellicola)
Page 7

Sicherheit von Kindern
• Kinder können Gefahren, die im Umgang mit Elektrogeräten liegen, oft
nicht erkennen. Sorgen Sie deshalb für die notwendige Aufsicht
während des Betriebs und lassen Sie Kinder nicht mit dem Gerät spielen - es besteht die Gefahr, dass Kinder sich einschließen.
• Verpackungsteile (z.B. Folien, Styropor) können für Kinder gefährlich
sein. Erstickungsgefahr! Verpackungsteile von Kindern fernhalten.
• Stellen Sie sicher, dass Kinder oder Kleintiere nicht in die Trommel des
Geräts klettern.
• Bei der Entsorgung des Geräts: Ziehen Sie den Netzstecker, schneiden
Sie die elektrische Zuleitung ab und beseitigen Sie den Stecker mit der
Restleitung. Zerstören Sie das Türschloss: so können spielende Kinder
sich nicht einsperren und nicht in Lebensgefahr geraten.
Bestimmungsgemäße Verwendung
• Das Gerät ist nur zum Waschen und Trocknen haushaltsüblicher
Wäsche im Haushalt bestimmt. Wird das Gerät zweckentfremdet eingesetzt oder falsch bedient, kann vom Hersteller keine Haftung für
eventuelle Schäden übernommen werden.
• Umbauten oder Veränderungen am Gerät sind aus Sicherheitsgründen
nicht zulässig.
• Verwenden Sie nur Waschmittel, die für Waschautomaten geeignet
sind. Beachten Sie die Hinweise der Waschmittelhersteller.
• Die Wäsche darf keine entflammbaren Lösungsmittel enthalten. Beachten
Sie dies vor allem auch beim Waschen vorgereinigter Wäsche.
• Benutzen Sie Ihre Maschine nicht für eine chemische Reinigung.
• Färbe-/Entfärbemittel dürfen nur benutzt werden, wenn der Hersteller
dieser Produkte dies ausdrücklich erlaubt. Für eventuelle Schäden können wir nicht haften.
• Verwenden Sie nur Wasser aus der Wasserleitung. Verwenden Sie
Regen- oder Brauchwasser nur dann, wenn es die Anforderungen nach
DIN 1986 und DIN 1988 erfüllt.
7
Sicherheitshinweise
132994110d.qxd 11-04-2002 16:03 Pagina 7 (Nero/Process Black pellicola)
Page 8
Entsorgung
Verpackungsmaterial entsorgen!
Entsorgen Sie das Verpackungsmaterial Ihres Geräts sachgerecht. Alle
Verpackungsmaterialien sind umweltverträglich und können gefahrlos
deponiert werden oder in der Müllverbrennungsanlage verbrannt werden.
Die Kunststoffe können auch wiederverwendet werden und sind gekennzeichnet:
>PE<=für Polyethylen
>PS<=für Polystyrol
>PP<=für Polypropylen
Die Kartonteile sollten der Altpapiersammlung beigegeben werden.
Altgerät entsorgen!
Wenn Sie Ihr Gerät eines Tages endgültig außer Betrieb nehmen, bringen
Sie es bitte zum nächsten Recyclingcenter oder zu Ihrem Fachhändler.
8
132994110d.qxd 11-04-2002 16:03 Pagina 8 (Nero/Process Black pellicola)
Page 9
Umwelttipps
• Bei durchschnittlich verschmutzter Wäsche kommen Sie ohne Vorwaschgang aus. So sparen Sie Waschmittel, Wasser und Zeit (und schonen die Umwelt!)
• Besonders sparsam arbeitet das Gerät dann, wenn Sie die angegebenen
Füllmengen für Waschen und Trocknen ausnutzen.
• Dosieren Sie bei kleinen Mengen nur die Hälfte bis zwei Drittel der
empfohlenen Waschmittelmenge.
• Durch geeignete Vorbehandlung können Flecken und begrenzte
Anschmutzungen entfernt werden. Dann können Sie bei niedrigerer
Temperatur waschen.
• Waschen Sie leicht bis normal verschmutzte Kochwäsche mit dem
Energiesparprogramm.
• Ihr Gerät arbeitet besonders wirtschaftlich, wenn die Wäsche vor dem
Trocknen gründlich entwässert wird.
• Oft kann auf Weichspüler verzichtet werden. Versuchen Sie es einmal!
Wenn Sie in der Maschine trocknen, wird Ihre Wäsche auch ohne
Weichspüler weich und flauschig.
• Bei mittlerer bis hoher Wasserhärte (ab Härtebereich II, siehe “Waschund Pflegemittel”) sollten Sie Wasserenthärter einsetzen.
Das Waschmittel kann dann immer für den Härtebereich I (= weich)
dosiert werden.
9
132994110d.qxd 11-04-2002 16:03 Pagina 9 (Nero/Process Black pellicola)
Page 10
Die wichtigsten Merkmale Ihres Geräts
• Programm- und Temperatureinstellung über den Programmwähler.
• Fleckenprogramm zur wirksamen Behandlung verfleckter Wäsche.
• Energiesparprogramm für leicht bis normal verschmutzte Kochwäsche.
• Maximale Schleuderdrehzahl 1600 Umdrehungen pro Minute, Dreh-
zahl für das Endschleudern je nach Waschprogramm automatisch
angepasst:
- KOCHWÄSCHE/BUNTWÄSCHE 1600 Umdrehungen pro Minute
- PFLEGELEICHT 900 Umdrehungen pro Minute
- FEINWÄSCHE 700 Umdrehungen pro Minute
- WOLLE 900 Umdrehungen pro Minute
• Drehzahl für das Endschleudern änderbar auf 1200, 900, 700 bzw. 400
Umdrehungen pro Minute.
• Spülstopp zuwählbar: die Wäsche bleibt im letzten Spülwasser liegen,
sie wird nicht geschleudert.
• Die Möglichkeit, andere Optionen zu wählen, ermöglicht ein “persönliches” Waschen durchzuführen.
• Zeitvorwahl: Programmstart um 1 bis max. 19 Stunden aufschiebbar.
(z.B. auf Zeiten mit günstigerem Stromtarif.)
• Das spezielle Wollprogramm behandelt Ihre Wollsachen sehr schonend, dank seinem neu entwickelten Waschrhythmus.
• Mit den Trocknungsprogrammen erhalten Sie bei jedem Wetter eine
flauschig weiche Wäsche.
• Programmablauf-Anzeige
• 3-Kammer-Schublade für Wasch- und Pflegemittel: zeitlich versetzte
Einspülung von Waschmittel und Fleckensalz ermöglicht umweltbewusstes Waschen und verbessert die Wirksamkeit der Waschmittel.
• Unwucht-Kontroll-System: Standsicherheit und ruhiger Lauf.
10
132994110d.qxd 11-04-2002 16:03 Pagina 10 (Nero/Process Black pellicola)
Page 11
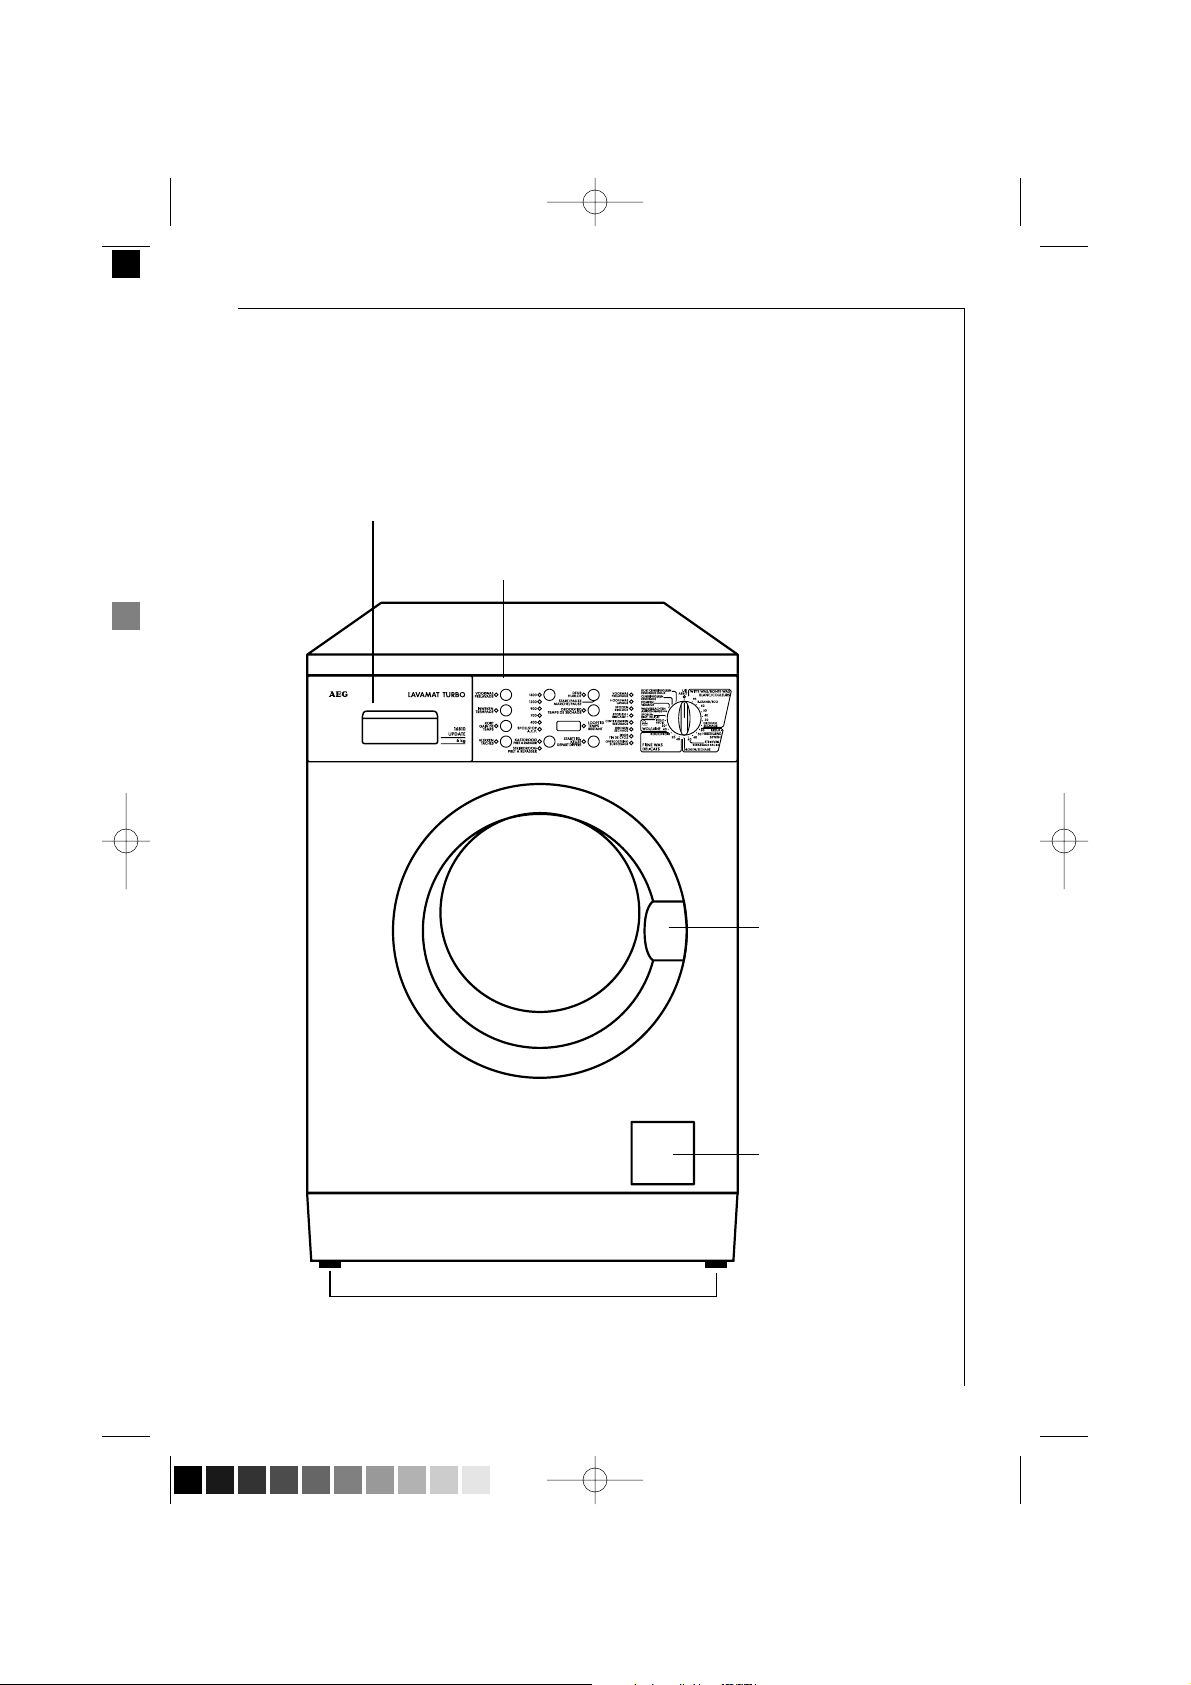
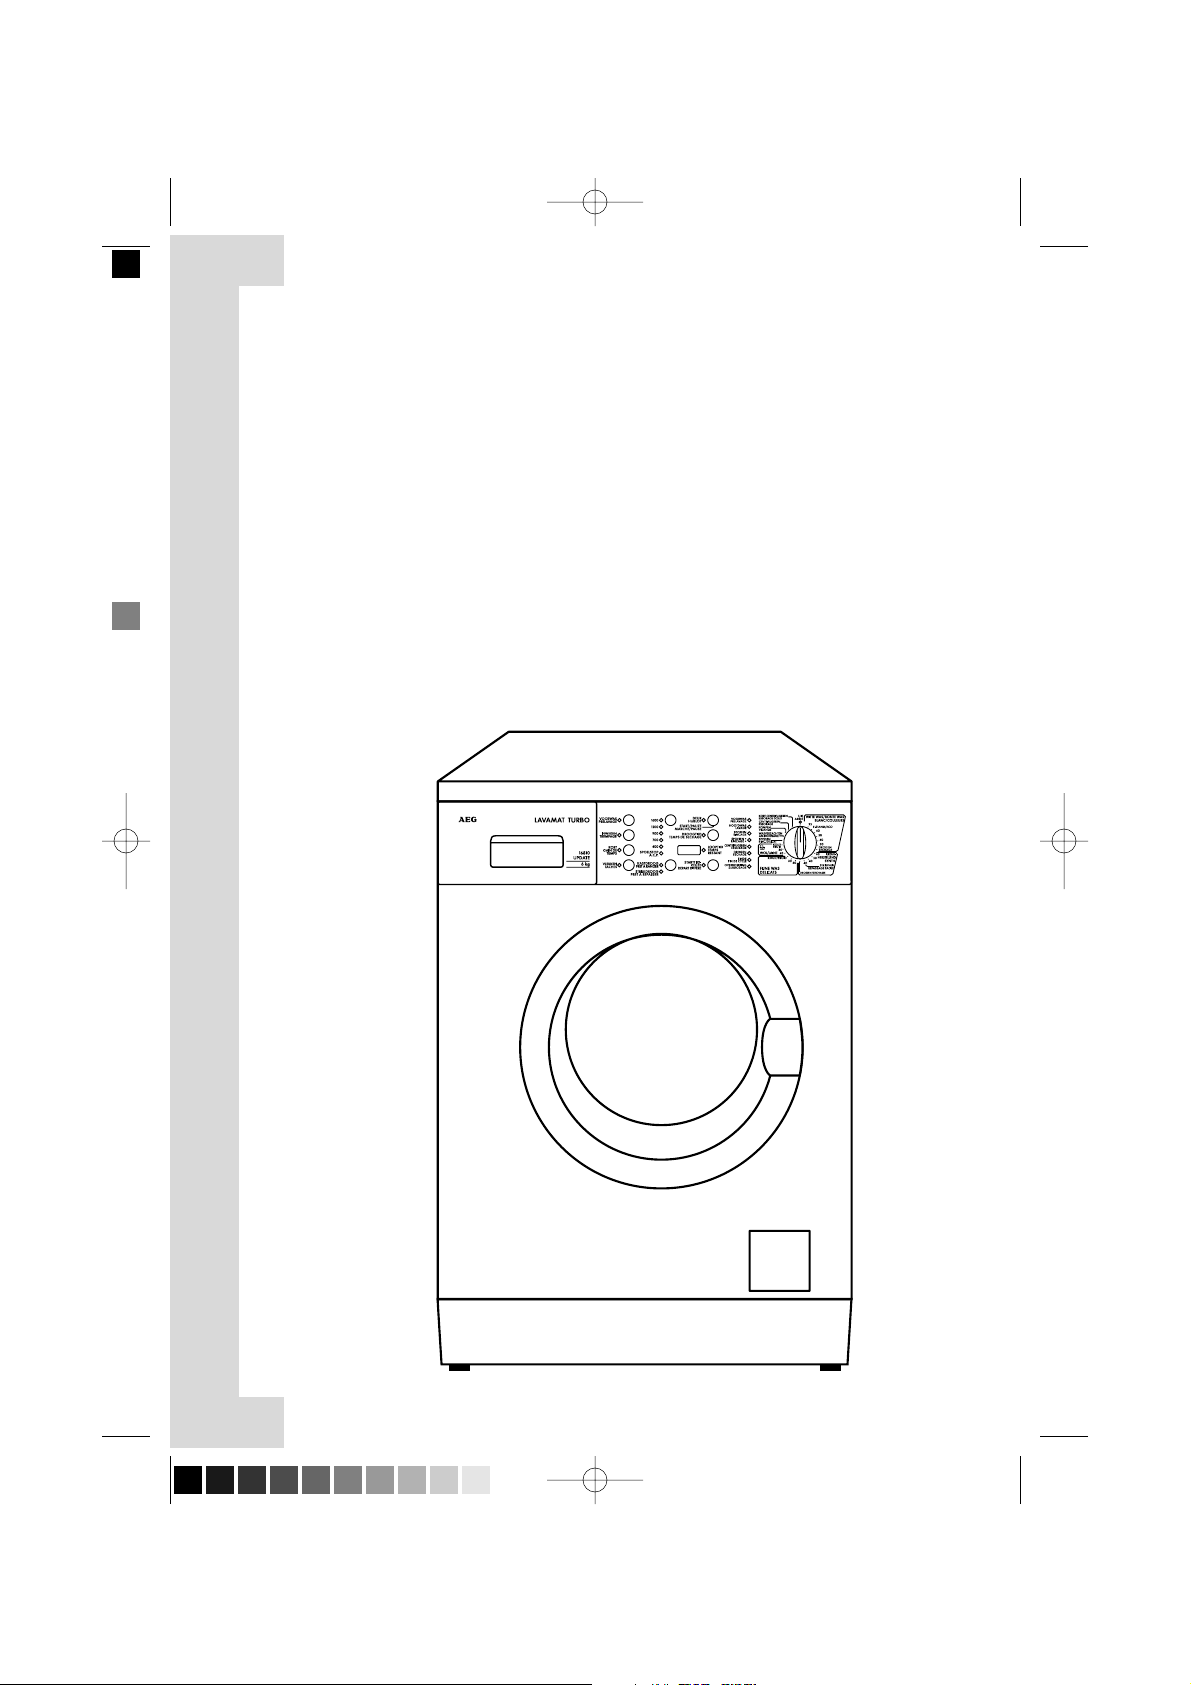
Gerätebeschreibung
Vorderansicht
11
Lade voor was- en nabehandelingsmiddel
Bedieningspaneel
Deur
Pluizenfiltre
in hoogte verstelbare voeten
Waschmittelschublade
Bedienblende
Einfülltür
Flusensieb
höhenverstellbare Füße
132994110d.qxd 11-04-2002 16:03 Pagina 11 (Nero/Process Black pellicola)
Page 12

12
Bedienblende
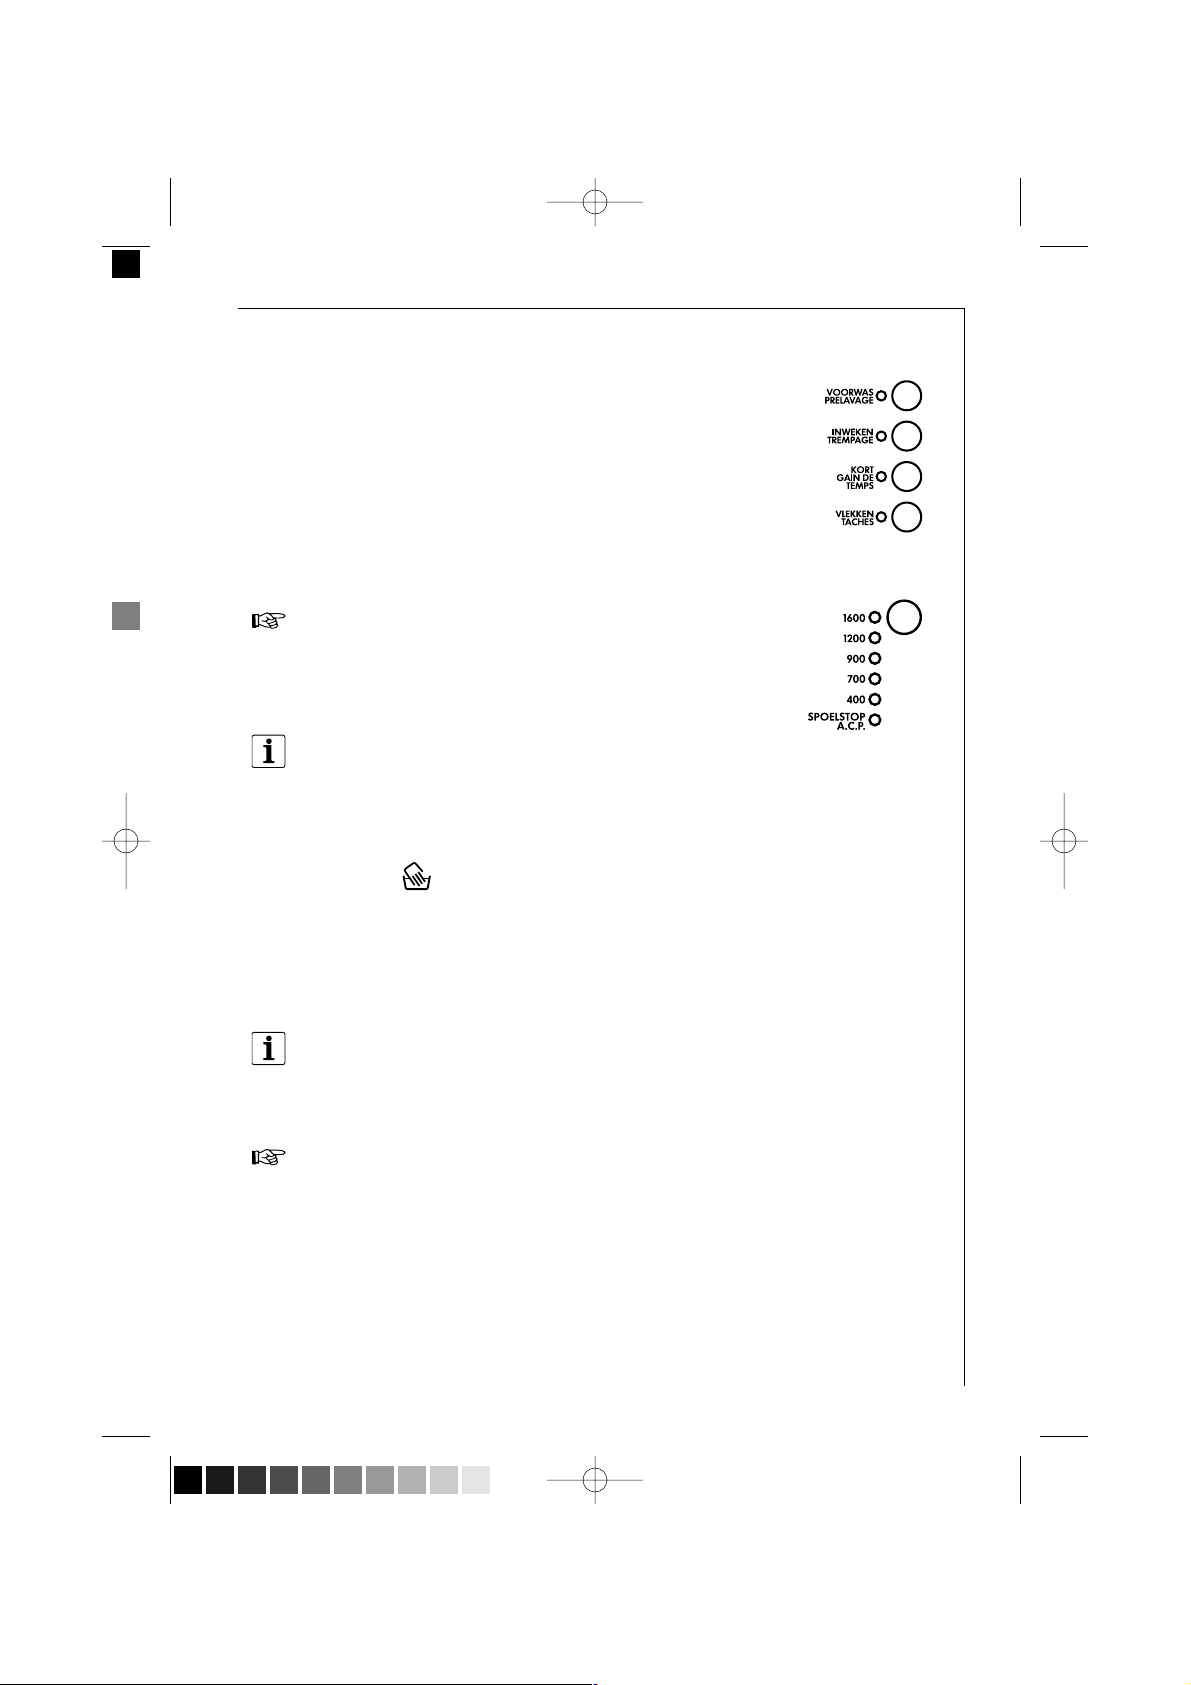
A = Wahltasten
B = Taste SCHLEUDERN
C = Taste TROCKENPROGRAMME
D = Multidisplay
E = Taste START/PAUSE
F = Taste ZEIT-VORWAHL
G = Taste TROCKENZEIT
H = Programmablauf-Anzeige
J = Programmwähler
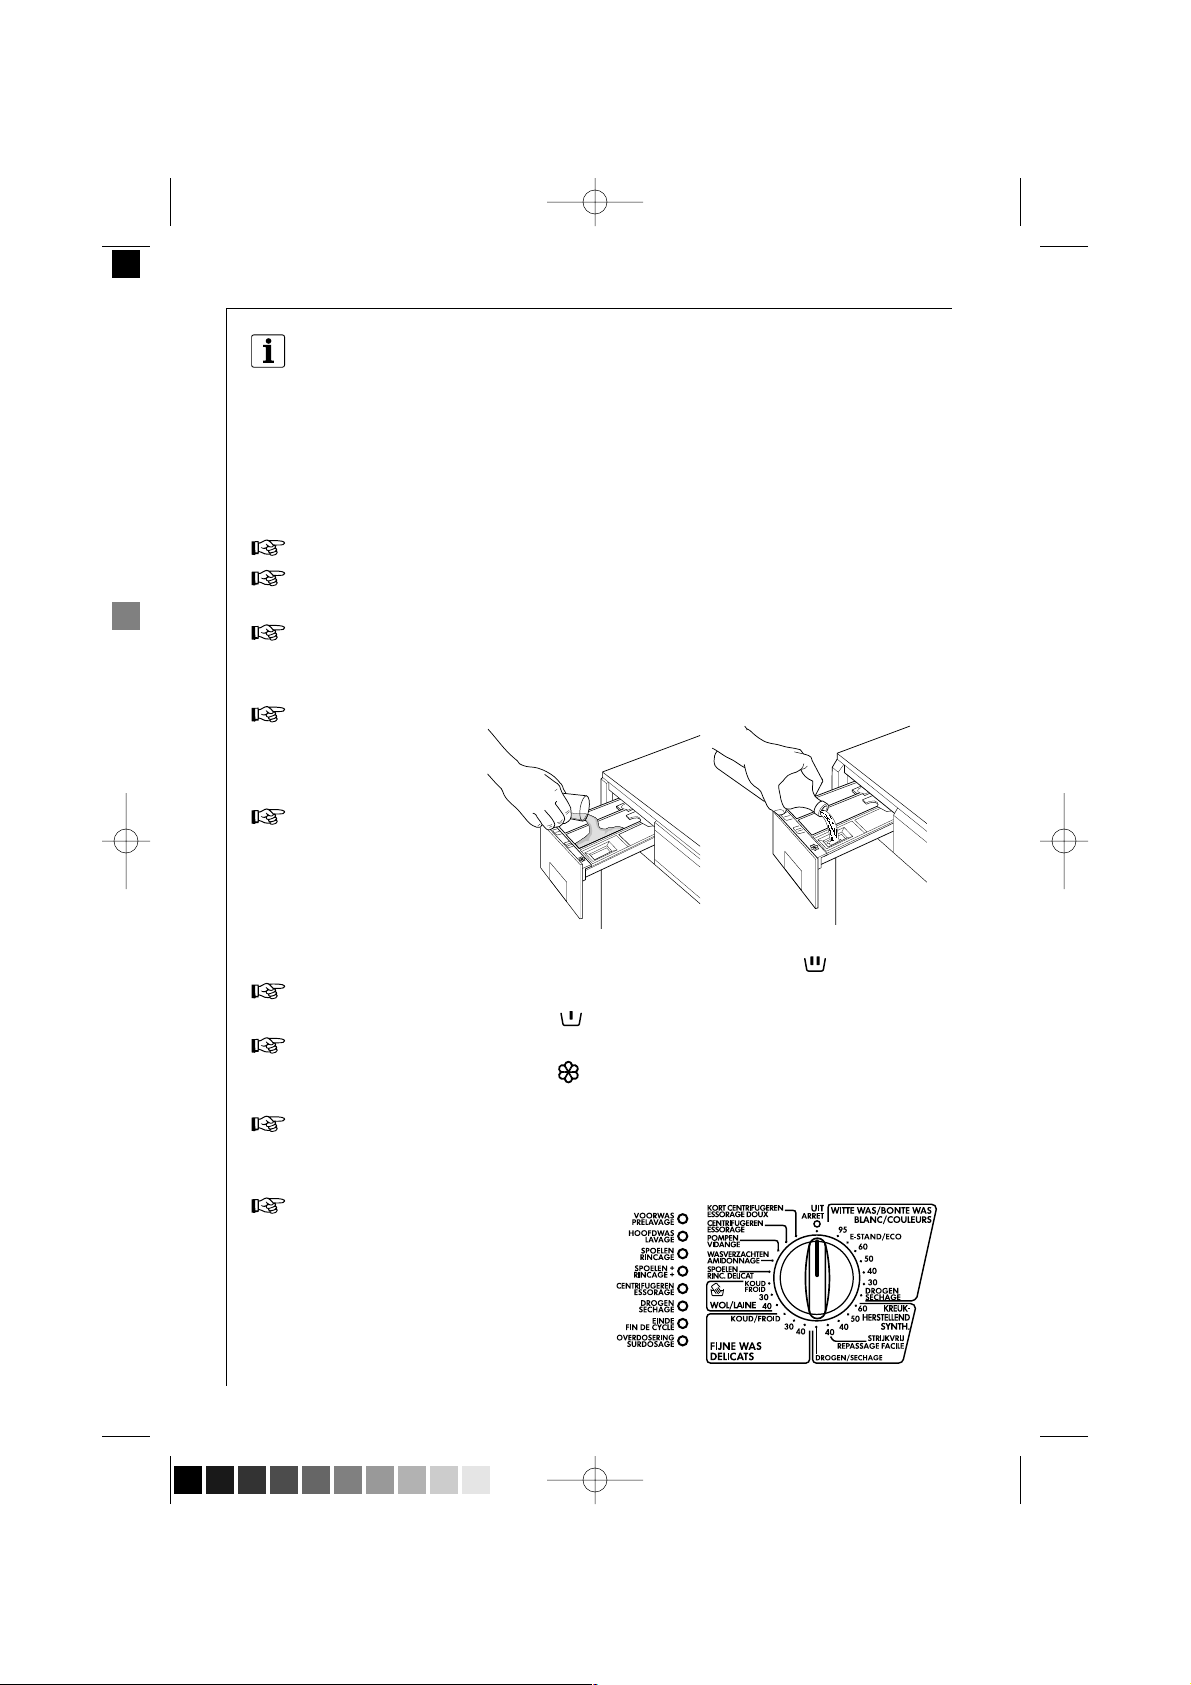
Programmwähler
Der Programmwähler bestimmt die
Art des Waschgangs (z.B. Wasserstand, Trommelbewegung, Anzahl
der Spülgänge) entsprechend der zu
behandelnden Wäscheart, sowie die
Laugentemperatur. Er erlaubt auch
die Wahl von zwei Trocknungsprogrammen. Die verschiedenen Einstellpositionen haben folgende Wirkung:
KOCHWÄSCHE/BUNTWÄSCHE (Witte was/Bonte was)
Hauptwaschgang für Koch-/Buntwäsche (Waschen bei 30-95°C Spülen/Weichspülen - Schleudern).
Gerätebeschreibung
132994110d.qxd 11-04-2002 16:03 Pagina 12 (Nero/Process Black pellicola)
Page 13
13
Position ENERGIESPAREN: Energiesparendes Programm bei ca. 67°C für
leicht bis normal verschmutzte Kochwäsche, verlängerte Waschzeit
(nicht mit ZEIT SPAREN kombinierbar).
TROCKNEN (Drogen) (Koch-/Buntwäsche)
Trocknungsprogramm mit voller Heizleistung für Koch-/Buntwäsche.
PFLEGELEICHT (Kreukherstellend)
Hauptwaschgang für pflegeleichte Textilien (Waschen bei 40-60°C Spülen, Weichspülen - Schleudern).
LEICHTBÜGELN im Programm PFLEGELEICHT (Strijkvrij)
Die Wäsche wird besonders schonend gewaschen und geschleudert.
Dadurch wird die Knitterbildung gemindert und der Bügelaufwand
reduziert.
TROCKNEN (Drogen) (Pflegeleicht)
Trocknungsprogramm mit halber Heizleistung für pflegeleichte Wäsche.
FEINWÄSCHE (Fijne was)
Hauptwaschgang für Feinwäsche (Waschen, kalt-40°C - Spülen/ Weichspülen - Schleudern).
WOLLE/ (Handwäsche) (Wol)
Hauptwaschgang für maschinenwaschbare Wolle sowie für handwaschbare Wolltextilien und Seide mit dem Pflegekennzeichen
(Handwäsche).
Waschen, kalt-40°C - Spülen/Weichspülen - Schleudern, stark verminderte Trommelbewegung.
FEINSPÜLEN (Spoelen)
Separates schonendes Spülen, z.B. zum Spülen von handgewaschenen
Textilien (3 Spülgänge und Schonschleudern).
STÄRKEN (Wasverzachten)
Separates Stärken, separates Weichspülen, separates Imprägnieren (ein
Spülgang läuft ab, flüssiges Pflegemittel aus Einspülfach wird eingespült), Schleudern.
PUMPEN (Pompen)
Abpumpen des Wassers nach einem Spülstopp (ohne nachträgliches
Schleudern).
SCHLEUDERN (Centrifugeren)
Separates Schleudern von handgewaschener Koch-/Buntwäsche.
SCHONSCHLEUDERN (Kort centrifugeren)
Schonendes Schleudern, bzw. separates schonendes Schleudern von
handgewaschenen, empfindlichen Textilien (pflegeleichte Wäsche,
Feinwäsche, Wolle).
E
Gerätebeschreibung
132994110d.qxd 11-04-2002 16:03 Pagina 13 (Nero/Process Black pellicola)
Page 14

O/AUS (UIT)
Annullierung des eingestellten Programms, Ausschalten der Maschine.
Taste "START/PAUSE" (Start/Pauze)
Diese Taste hat drei Funktionen:
a) Start
Durch Drücken der Taste wird das eingestellte Programm gestartet.
Wurde eine Startzeitvorwahl eingestellt, so wird diese gestartet.
b) Pause
Um ein laufendes Programm zu unterbrechen, die START/PAUSE-Taste
drücken: die Anzeige im Multidisplay blinkt.
Durch einen erneuten Tastendruck kann das Programm wieder fortgesetzt werden.
c) Abpumpen des Wassers
Durch Drücken der Taste wird:
• bei Programmen mit Spülstopp (Spoelstop) das Wasser abgepumpt
und ein Endschleudergang durchgeführt.
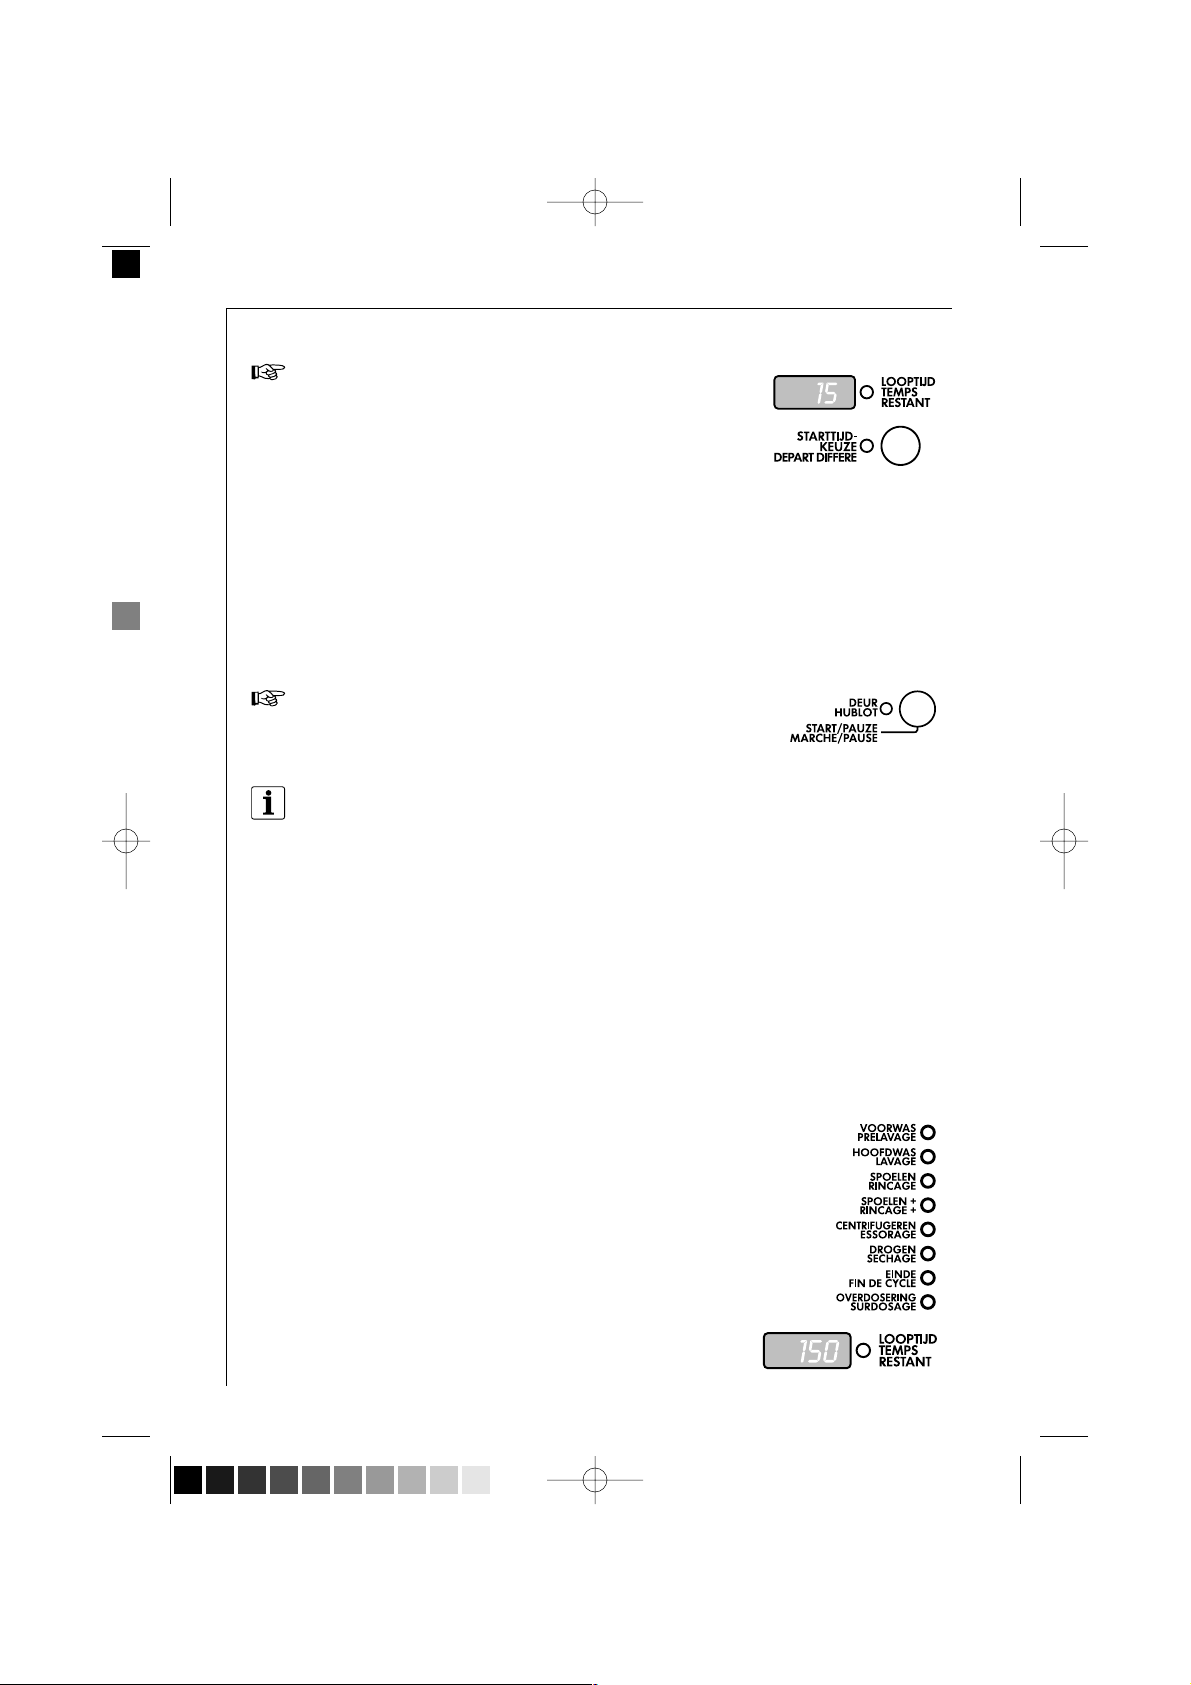
Taste "ZElT-VORWAHL" (Starttijdkeuze)
Mittels dieser Taste kann der Programmbeginn von 1 bis max. 19 Stunden verschoben werden. So können Sie zum Beispiel das Waschen Ihrer
Wäsche in die Nachtstunden verlegen, um Nachtstromtarife auszunutzen.
Diese Taste muss vor dem Einschalten der START/PAUSE-Taste
gedrückt werden.
Im Display erscheint die gewählte Zeit für 3 Sekunden, dann wird die
Dauer des gewählten Programms wieder angegeben.
Nach Einschaltung der START/PAUSE-Taste beginnt die Maschine im
Stundentakt die Restzeit zurückzuzählen.
Um die gewählte Startverzögerung zu ändern oder zu annullieren, die
START/PAUSE-Taste drücken, dann die ZElT-VORWAHL-Taste, bis im
Multidisplay die gewünschte Zeit erscheint bzw. bei gewünschter
Annullierung der Startzeitvorwahl, bis die Schrift 0 h angezeigt wird.
Nun die START/PAUSE-Taste nochmals drücken.
Bei Annullierung der Verzögerungszeit wird im Display wieder die Dauer
des vorher gewählten Waschprogramms angezeigt.
14
Gerätebeschreibung
132994110d.qxd 11-04-2002 16:03 Pagina 14 (Nero/Process Black pellicola)
Page 15

15
Gerätebeschreibung
Taste "TROCKENPROGRAMME" (elektronische Trocknung)
(Kastdroog/Strijkdroog)
Durch Drücken dieser Taste wählen Sie den gewünschten Trockengrad für
Koch-/Büntwäsche und pflegeleichte Textilien:
- schranktrocken (Kastdroog)
- bügeltrocken (nicht wählbar für pflegeleichte Gewebe) (strijkdroog)
Beim Starten des Trocknungsprogramms reguliert die Maschine die
Trockenzeit automatisch: die Wäsche wird solange getrocknet bis sie den
gewünschten Trockengrad erreicht hat.
Taste "TROCKENZEIT" (Droogtijd)
Mit dieser Taste kann ein zeitlich begrenztes Trocknen gewählt werden.
Bei jedem Tastendruck erhöht sich die Zeit um 5 Minuten.
Drücken Sie die Taste so oft, bis die gewünschte Trockenzeit im Multidisplay angezeigt wird. Für Koch-/Buntwäsche kann die Trockenzeit von 10
Minuten bis zu 130 Minuten eingestellt werden.
Für pflegeleichte Gewebe kann die Trockenzeit von 10 Minuten bis zu
100 Minuten eingestellt werden.
Wahltasten
Je nach Programm sind verschiedene Funktionen miteinander kombinierbar.
Diese sind nach der Programmeinstellung und vor dem Einschalten der
START/PAUSE-Taste zu wählen.
Durch Drücken der Tasten leuchten die zugeordneten Leds auf. Beim
nochmaligen Drücken erlöschen die Leds.
FLECKEN (Vlekken)
Zum Behandeln stark verschmutzter Wäsche oder verfleckter Wäsche
mit Fleckensalz (verlängerter Hauptwaschgang mit zeitoptimierter
Fleckensalzeinspülung, nicht wählbar bei Einstellung WOLLE, zusammen
mit ZEIT SPAREN, EINWEICHEN und VORWÄSCHE und bei Temperaturen
unter 40°C).
ZEIT SPAREN (Kort)
Verkürzter Hauptwaschgang für leicht verschmutzte Wäsche, nicht
wählbar bei Einstellung WOLLE, ENERGIESPAREN und zusammen mit
FLECKEN.
132994110d.qxd 11-04-2002 16:03 Pagina 15 (Nero/Process Black pellicola)
Page 16

EINWEICHEN (Inweken)
Ca. 30 Minuten bei 30°C. Mit Taste ZEITVORWAHL verlängerbar bis max.
10 Stunden. Danach folgt automatisch der Hauptwaschgang. Nicht
wählbar bei Einstellung Wolle und zusammen mit VORWÄSCHE und
FLECKEN.
Das Einweichen endet mit einem kurzen Schleudergang bei den Programmen Koch-/Buntwäsche und Pflegeleicht und nur mit Abpumpen
bei Feinwäsche.
VORWÄSCHE (Voorwas)
Vorwaschen bei max 30°C vor dem automatisch folgenden Hauptwaschgang (nicht wählbar bei Einstellung WOLLE und zusammen mit EINWEICHEN und FLECKEN).
Die Vorwäsche endet mit einem kurzen Schleudergang bei den Programmen Koch-/Buntwäsche und Pflegeleicht und nur mit Abpumpen bei
Feinwäsche.
Wichtig: Bei gleichzeitigem Drücken der Tasten VORWÄSCHE und ZEIT
SPAREN führt die Maschine einen zusätzlichen Spülgang durch (s.S. 27).
Bei gleichzeitigem Drücken der Tasten VORWÄSCHE und FLECKEN wird das
akustische Signal am Ende des Programmes abgeschaltet.
SCHLEUDERN
Durch Drücken dieser Taste kann die vorgegebene maximale Schleuderdrehzahl für das eingestellte Programm reduziert oder SPÜLSTOPP eingestellt werden.
Die maximalen Schleuderdrehzahlen sind der jeweiligen Wäscheart
angepasst.
So stehen folgende Drehzahlen zur Verfügung:
• Koch-/Buntwäsche 400/700/900/1200/max. 1600 U/min.
• Pflegeleicht/Wolle 400/700/max. 900 U/min.
• Feinwäsche 400 max. 700 U/min.
SPÜLSTOPP (Spoelstop)
Die Wäsche bleibt im letzten Spülwasser liegen.
Die Led ENDE leuchtet auf der Programmablauf-Anzeige am Ende des
Programms, die Tür bleibt verriegelt, das Wasser muss abgepumpt werden.
16
Gerätebeschreibung
132994110d.qxd 11-04-2002 16:03 Pagina 16 (Nero/Process Black pellicola)
Page 17

Dazu gibt es drei Möglichkeiten:
• START/PAUSE-Taste drücken; die Maschine führt nach dem Abpumpen
den für die jeweilige Wäscheart vorgesehenen Schleudergang durch
• Schleuderdrehzahl wählen und START/PAUSE-Taste drücken;
• das Programm PUMPEN wählen, um das Wasser abzupumpen, ohne zu
schleudern.
Achtung! Vor der Einstellung des Programms PUMPEN soll der Programmwähler auf O gedreht werden.
Wird das Wasser nicht abgepumpt, so pumpt die Maschine nach 18
Stunden automatisch ab.
Die Funktion SPÜLSTOPP ist nicht wählbar beim NON-STOPP-Betrieb
Waschen und Trocknen.
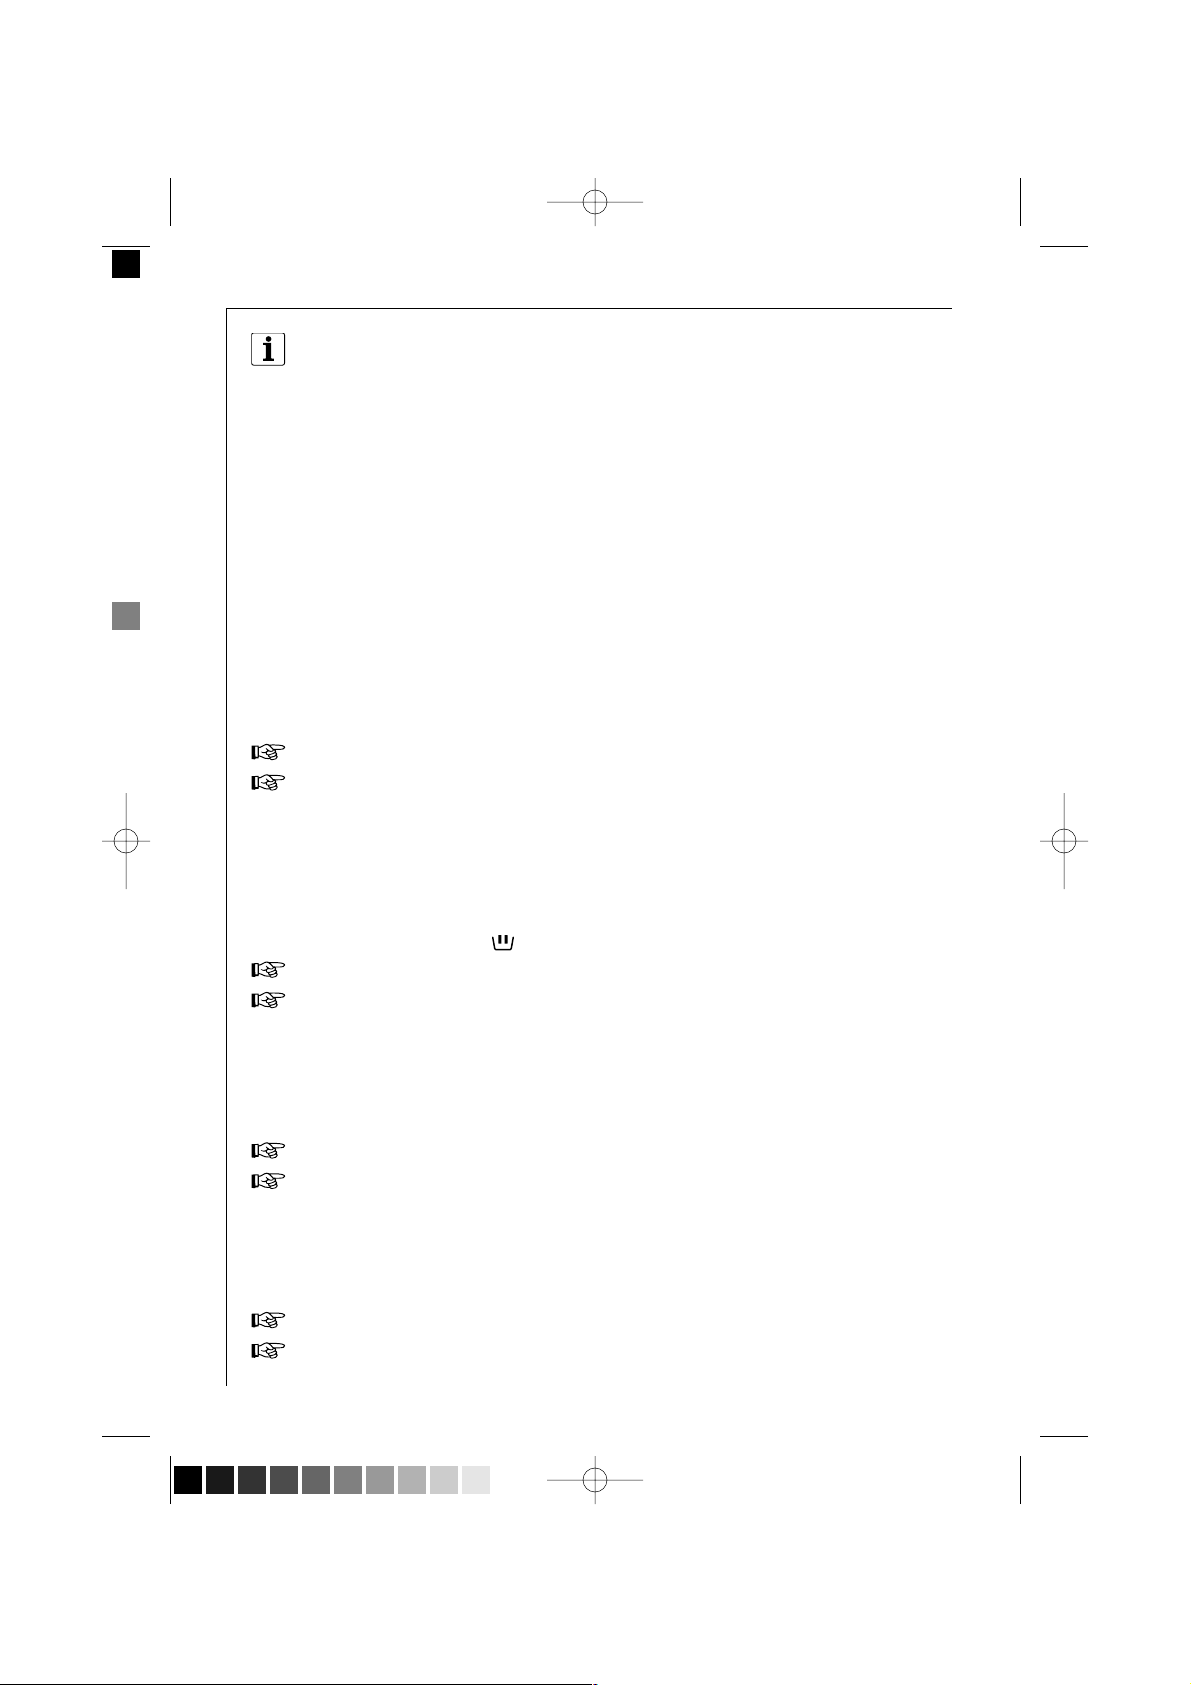
Multidisplay
In diesem Display werden folgende Informationen angezeigt:
• Dauer des gewählten Programms (in Minuten), die automatisch
nach dem max. Füllgewicht für die jeweilige Wäscheart berechnet
wird.
• Eingestellte Trockenzeit (maximal 130 Minuten für Koch-/Buntwäsche, maximal 100 Minuten für pflegeleichte Gewebe).
Nach dem Start des Programms wird die aktuelle Restzeit bis zum Programmende in Minuten angezeigt.
• eine aufleuchtende Null am Ende des Programms.
• Startzeitvorwahl, die mit der entsprechenden Taste angewählt wurde.
Die für den verzögerten Start vorausgewählte Zeit (max. 19 Stunden) wird
im Stundentakt zurückgezählt.
• Fehlercode. Treten Störungen am Gerät auf, so werden diese über
einen speziellen Fehlercode im Display angezeigt. Dies stellt eine wertvolle Hilfe für den Benutzer und den Kundendienst dar, z. B."E10”
(s.Seite 38).
.
17
Gerätebeschreibung
132994110d.qxd 11-04-2002 16:03 Pagina 17 (Nero/Process Black pellicola)
Page 18
Programmablauf-Anzeige
Diese zeigt vor Programmstart die gewählten Programmschritte an. Während des Waschprogramms
leuchtet die Anzeige des aktuellen Programmschrittes.
Leuchtet ÜBERDOSIERT (OVERDOSERING) auf, bedeutet
dies, dass im abgelaufenen Waschprogramm zuviel
Waschmittel verwendet wurde und/oder das Flusensieb
verstopft ist.
Waschprogramm löschen
Soll ein bereits laufendes Programm gelöscht werden, so drehen Sie den
Programmwählerknopf auf O.
Achtung! Nach einem Programm mit SPÜLSTOPP-Funktion unbedingt
Programmwähler auf “O” stellen und dann das Programm PUMPEN
wählen.
Änderung eines laufenden Programms
Um eine Funktion zu ändern, zuerst die Maschine durch Drücken der
START/PAUSE-Taste auf PAUSE stellen.
Alle Funktionen können, bevor das Programm sie durchführt, geändert
werden. Nach Einschaltung der gewünschten Funktion(en) START/PAU-
SE-Taste nochmals drücken.
Um ein Programm zu ändern, zuerst den Programmwähler auf “O” dre-
hen und dann auf ein anderes Programm stellen.
Das Wasser bleibt in der Trommel und nach erneutem Drücken der
START/PAUSE-Taste läuft das Programm weiter.
Türöffnung während eines laufenden Programms
Soll die Tür geöffnet werden, so muss zuerst die Maschine auf Pause
gestellt werden. Dazu START/PAUSE-Taste drücken.
Unter diesen Bedingungen
- die Maschine befindet sich in der Heiz- bzw. Trocknungsphase
- der Wasserstand ist hoch
- die Waschtrommel ist in Bewegung
kann die Tür nicht geöffnet werden.
Die Tür-Led auf der Bedienblende ist in diesem Falle erloschen.
Die Tür-Led zeigt bei eingeschaltetem Gerät an, ob die Tür geöffnet
werden kann:
- grün: Tür kann geöffnet werden
- aus: Tür kann momentan nicht geöffnet werden
- rot (blinkend): Tür ist offen
18
Gerätebeschreibung
132994110d.qxd 11-04-2002 16:03 Pagina 18 (Nero/Process Black pellicola)
Page 19
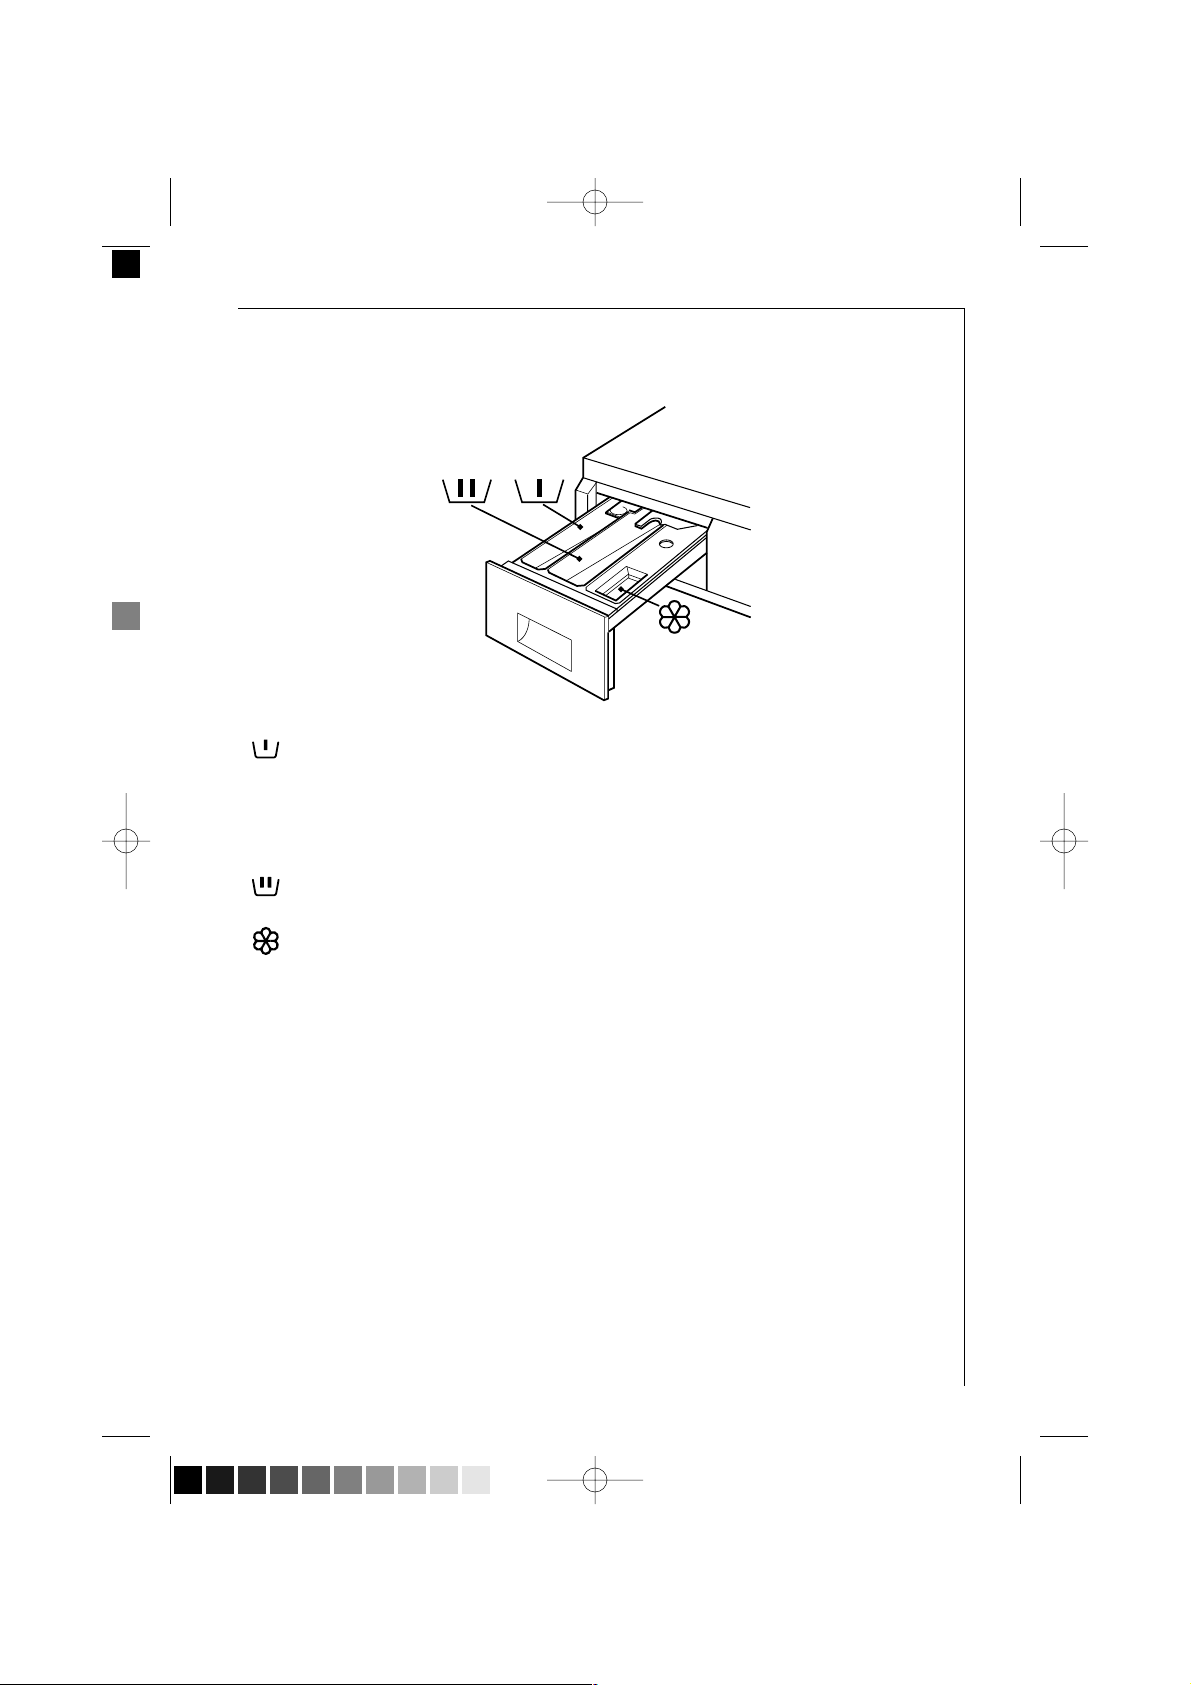
Schublade für Wasch- und Pflegemittel
Einspülfach für Vorwaschmittel/Einweichmittel oder Fleckensalz.
Das Vorwaschmittel/Einweichmittel wird ganz zu Beginn des Waschpro-
gramms eingespült.
Das Fleckensalz wird beim Programm FLECKEN (VLEKKEN) zeitoptimiert
während des Hauptwaschgangs eingespült.
Einspülfach für pulverförmiges oder flüssiges Hauptwaschmittel.
Wird zu Beginn des Hauptwaschgangs eingespült.
Einspülfach für flüssige Pflegemittel (Weichspüler, Formspüler, Stärke).
Werden im letzten Spülgang eingespült.
Achtung! Fach höchstens bis zur Marke MAX füllen.
Vor dem ersten Waschen
Führen Sie einen Waschgang ohne Wäsche durch (KOCHWÄSCHE 95°)
mit halber Waschmittelmenge.
Dadurch werden fertigungsbedingte Rückstände an Trommel und Lau-
genbehälter entfernt.
19
Gerätebeschreibung
132994110d.qxd 11-04-2002 16:03 Pagina 19 (Nero/Process Black pellicola)
Page 20

Waschgang vorbereiten
Wäsche sortieren und vorbereiten
• Wäsche gemäß Pflegekennzeichen und Art sortieren (siehe “Wäschearten
und Pflegekennzeichen").
• Taschen leeren.
• Metallteile (Büroklammern, Sicherheitsnadeln usw.) entfernen.
• Zur Verhinderung von Wäscheschäden und Wäscheknäueln: Reißverschlüsse schließen, Bett- und Kissenbezüge zuknöpfen, lose Bänder,
etwa von Schürzen, zusammenbinden.
• Kleidung aus doppelschichtigem Gewebe wenden (Schlafsack, Anorak
usw.).
• Bei gewirkten farbigen Textilien sowie Wolle und Textilien mit aufgesetztem Schmuck: Innenseite nach außen wenden.
• Kleine und empfindliche Stücke (Babysöckchen, Strumpfhosen usw.)
und Wäsche mit Metalleinlagen (z.B. BHs) in einem Wäschenetz,
einem Kissenbezug mit Reißverschluss oder in größeren Socken
waschen.
• Gardinen besonders vorsichtig behandeln. Metallröllchen oder gratige Kunststoffröllchen entfernen oder diese in ein Netz oder einen
Beutel einbinden.
Für Schäden können wir keine Haftung übernehmen.
• Farbige und weiße Wäsche gehören nicht gemeinsam in einen Waschgang. Weiße Wäsche vergraut sonst.
• Neue farbige Wäsche hat oft einen Farbüberschuss. Waschen Sie solche Stücke das erste Mal besser separat.
• Kleine und große Wäschestücke mischen! Damit verbessert sich die
Waschwirkung und die Wäsche wird beim Schleudern günstiger verteilt.
• Wäsche vor dem Einfüllen in die Maschine auflockern.
• Wäsche auseinandergefaltet in die Trommel einfüllen.
20
132994110d.qxd 11-04-2002 16:03 Pagina 20 (Nero/Process Black pellicola)
Page 21
Wäschearten und Pflegekennzeichen
Die Pflegekennzeichen helfen bei der Wahl des richtigen Waschprogramms. Die Wäsche sollte nach Art und Pflegekennzeichen sortiert werden.
Die Temperaturangaben in den Pflegekennzeichen sind jeweils Maximalangaben.
Kochwäsche
Textilien aus Baumwolle und Leinen mit diesem Pflegekennzeichen sind
unempfindlich gegenüber mechanischer Beanspruchung und hohen
Temperaturen. Für diese Wäscheart eignet sich das Programm KOCH/BUNTWÄSCHE.
Buntwäsche
Textilien aus Baumwolle und Leinen mit diesen Pflegekennzeichen sind
unempfindlich gegenüber mechanischer Beanspruchung.
Für diese Wäscheart eignet sich das Programm KOCH-/BUNTWÄSCHE.
Pflegeleichte Wäsche
Textilien wie ausgerüstete Baumwolle, Baumwollmischgewebe und Synthetiks mit diesen Pflegekennzeichen verlangen nach einer mechanisch
milderen Behandlung. Für diese Wäscheart eignet sich das Programm
PFLEGELEICHT.
Feinwäsche
Textilien wie Schichtfasern, Mikrofasern, Synthetiks, Gardinen mit diesem Pflegekennzeichen brauchen eine besonders schonende Behandlung.
Für diese Wäscheart eignet sich das Programm FEINWÄSCHE.
Wolle und besonders empfindliche Wäsche
Textilien wie Wolle, Wollgemische oder Seide mit diesen Pflegekennzeichen sind besonders empfindlich gegenüber mechanischer Beanspruchung. Für Textilien dieser Art eignet sich das Programm WOLLE/
(Handwäsche).
Der Wollwaschgang dieser Waschmaschine wurde gemäß den WoolmarkStandards geprüft und für das Waschen von waschmaschinenfesten
Wollsiegel-Produkten empfohlen, vorausgesetzt, dass die Waschanleitung auf dem Einnäh-Etikett sowie die Anleitung des Herstellers dieses
Wäschetrockners eingehalten wird. M9605.
Textilien mit Pflegekennzeichen (Nicht waschen!) dürfen nicht im
Waschautomaten gewaschen werden!
30
40
40
605040
30
40
50
60
95
21
Waschgang vorbereiten
132994110d.qxd 11-04-2002 16:03 Pagina 21 (Nero/Process Black pellicola)
Page 22
22
Wasch- und Pflegemittel
Welches Wasch- und Pflegemittel?
Nur Wasch- und Pflegemittel verwenden, die für den Einsatz in Waschautomaten geeignet sind. Grundsätzlich die Angaben der Hersteller
beachten.
Wieviel Wasch- und Pflegemittel?
Die Menge der einzusetzenden Mittel ist abhängig
• von der Füllmenge:
Wenn der Waschmittelhersteller keine Dosierangabe für Minderbeladungen macht, bei halber Beladung ein Drittel weniger, bei Kleinstbeladungen nur die Hälfte der Waschmittelmenge zugeben, die für
eine volle Beladung empfohlen wird.
• vom Verschmutzungsgrad der Wäsche:
Bei nur leicht verschmutzter Wäsche weniger dosieren. Angaben des
Waschmittelherstellers und Füllmenge beachten.
• vom Härtebereich des Leitungswassers:
Je härter das Wasser, desto höher die Dosierung! Auf der Waschmittelpackung finden Sie Dosierangaben nach Härtegraden.
Flüssigwaschmittel
Flüssigwaschmittel mit von der Waschmittelindustrie angebotenen
Dosierhilfen zugeben, oder in das Fach für Hauptwaschmittel der
Schublade unmittelbar vor Beginn des Programms füllen. Hinweise auf
Waschmittelpackung beachten.
Wasserenthärter einsetzen
Bei mittlerer bis hoher Wasserhärte (ab Härtebereich II) sollte Enthärter
eingesetzt werden. Herstellerangaben beachten! Waschmittel dann
immer für den Härtebereich I (= weich) dosieren. Auskunft über die örtliche Wasserhärte erteilt das zuständige Wasserwerk.
Angaben der Wasserhärte
Härtebereich
Wasserhärte in mmol/l
(Millimol pro Liter)
bis 1,3
Wasserhärte in °dH
(Grad deutscher Härte)
0-7I - weich
1,3-2,57-14II - mittelhart
2,5-3,814-21III - hart
über 3,8über 21IV - sehr hart
132994110d.qxd 11-04-2002 16:03 Pagina 22 (Nero/Process Black pellicola)
Page 23

Trockengang vorbereiten
Der Waschtrockner arbeitet nach dem Kondensationsverfahren. Deshalb
muss auch beim Trocknen der Wasserhahn geöffnet sein und der
Ablaufschlauch in ein Wasch- oder anderes Auffangbecken führen.
Füllmengen
Hinweis:
Größere Wäschebeladungen müssen vor dem Trocknen unbedingt aufgeteilt werden, sonst erhalten Sie ein unbefriedigendes Trockenergebnis.
Nicht zum Trocknen geeignet
• Besonders empfindliche Gewebe, z.B. Gardinen aus synthetischen
Fasern, Wollsachen, Seide, Textilien mit Metalleinlagen, Nylonstrümpfe, großvolumige Textilien, z.B. Anoraks, Tagesdecken, Steppdecken,
Schlafsäcke und Federbetten dürfen nicht getrocknet werden.
• Wäschestücke, die Schaumgummi oder gummiähnliches Material enthalten, dürfen ebenfalls aufgrund der Brandgefahr nicht getrocknet
werden.
• Textilien, die Rückstände von Haarspray, Nagellackentferner, Haarfestiger oder ähnlichen Mitteln enthalten, dürfen wegen der Gefahr einer
Gasbildung nicht getrocknet werden.
Achtung:
Mit feuergefährlichen Reinigungs- und Lösungsmitteln (Waschbenzin,
Alkohol, Fleckentferner etc.) behandelte Wäschestücke dürfen nie in
diesem Waschtrockner getrocknet werden. Es besteht Brandgefahr.
Also nur in Wasser gewaschene Textilien trocknen!
23
Wäscheart
Max. Füllmengen
(Trockengewicht)
3kgKoch- u. Buntwäsche (Witte was/Bonte was)
2 kgPflegeleicht (Kreukherstellend)
132994110d.qxd 11-04-2002 16:03 Pagina 23 (Nero/Process Black pellicola)
Page 24
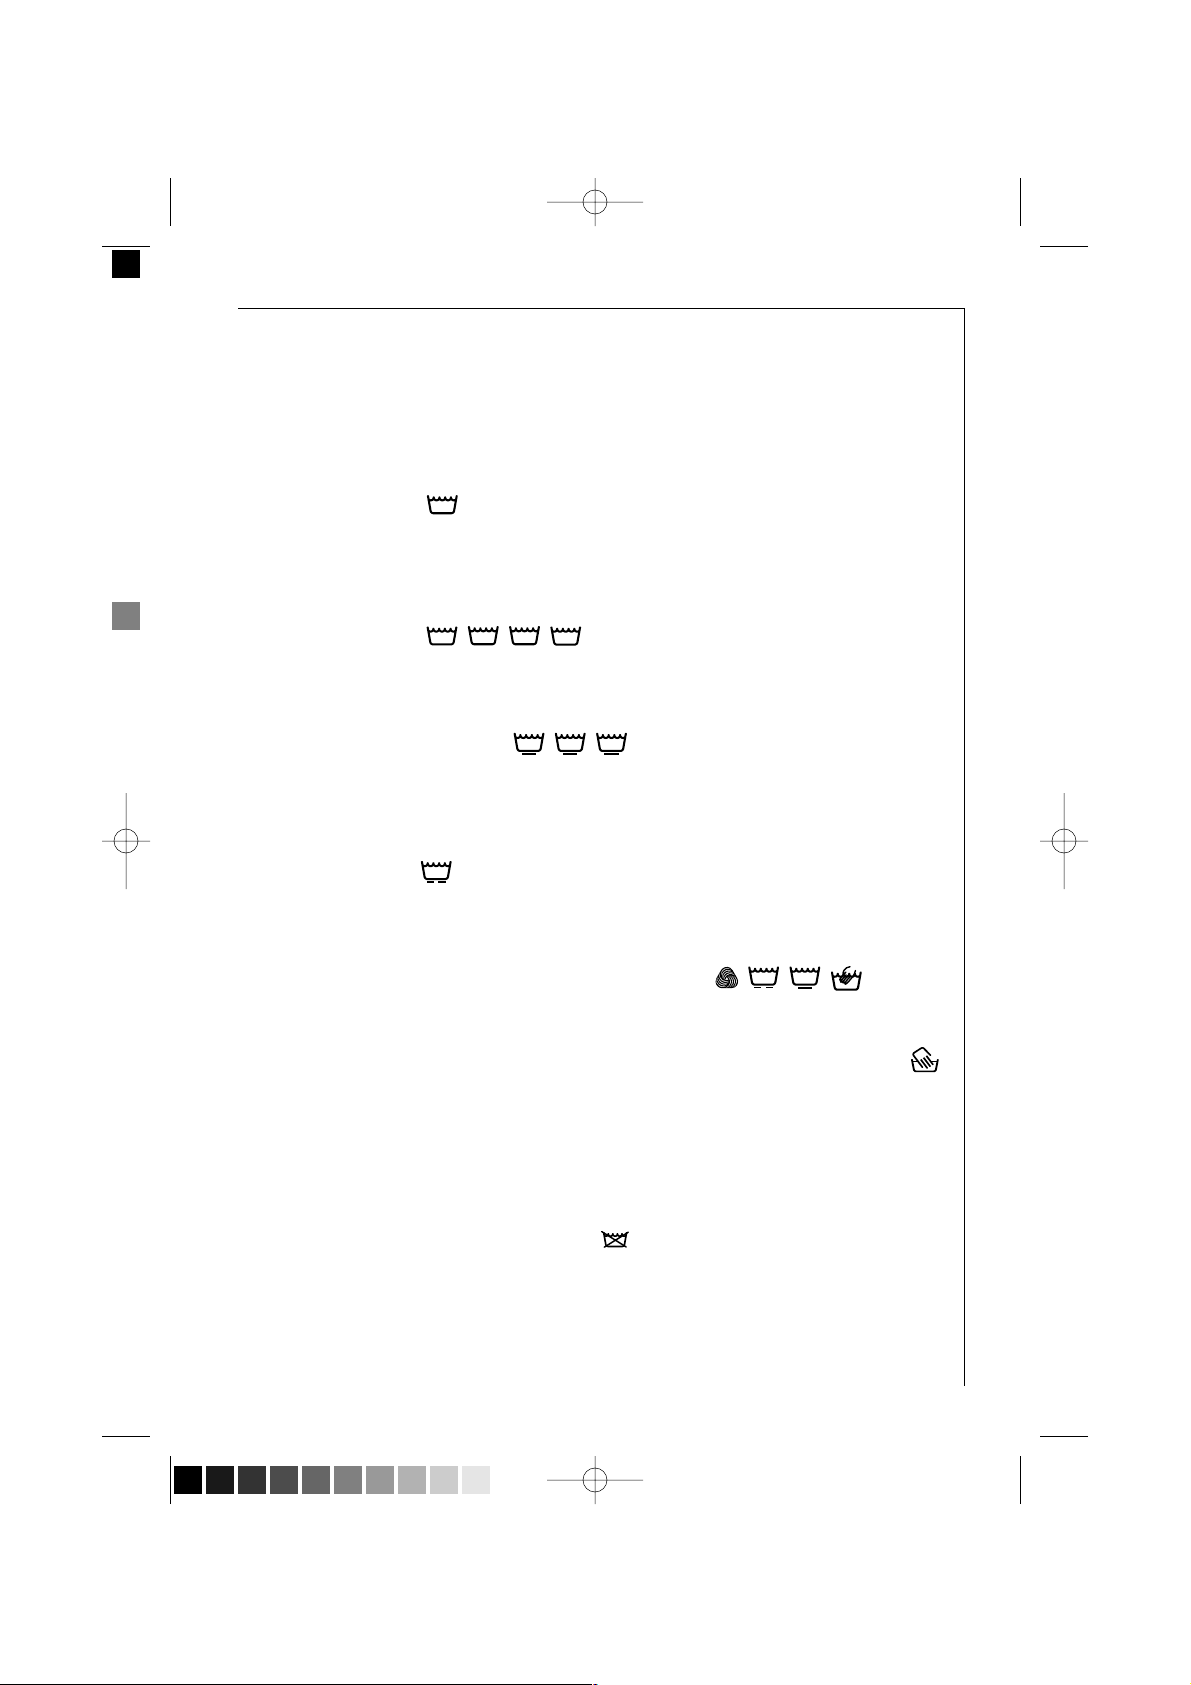
Pflegesymbole
Prüfen Sie sorgfältig, ob die Textilien zum Trocknen im Waschtrockner
geeignet sind. Einen Hinweis hierauf finden Sie auf dem Pflegekennzeichen-Etikett.
Folgende Symbole sind für das Trocknen von Bedeutung:
Grundsätzlich ist das Trocknen möglich
Normales Trocknen
Schonendes Trocknen
Trocknen nicht zulässig
Trockendauer
Die Trockenzeit kann von sehr unterschiedlicher Dauer sein, sie hängt ab
von:
• Der Endschleuderdrehzahl
•
Dem gewünschten Trockengrad (schranktrocken oder bügeltrocken)
• Der Art der Wäsche
• Der Füllmenge
Die normalen Trockenzeiten für die zeiteingestellte Trocknung können der
Tabelle auf Seite 33 entnommen werden. Die Erfahrung wird Ihnen zeigen,
welche Trockendauer für die verschiedenen Textilarten Ihnen am angenehmsten ist.
Änderung der Trockenzeit bzw. des Trockengrades
Wünschen Sie die eingestellte Trockenzeit oder den Trockengrad während
des Trockengangs ändern, so stellen Sie die Maschine auf PAUSE durch
Drücken der START/PAUSE-Taste.
Nach Einstellung der Trockenzeit oder des Trockengrades die Taste
nochmals drücken, um das Programm fortzusetzen.
Flusen
Nach dem Trocknen stark flusender Wäsche, z.B. neuen Frottierwaren,
empfehlen wir, das Waschprogramm “Feinspülen” (Spoelen) durchzuführen, um sicherzustellen, dass die eventuell im Laugenbehälter angesammelten Flusen ausgespült werden, und sich bei einem darauffolgenden Waschprogramm nicht auf der Wäsche ablagern.
Auch das Flusensieb sollte nach jedem Trockenprogramm geprüft und
gegebenenfalls gereinigt werden.
24
Trockengang vorbereiten
132994110d.qxd 11-04-2002 16:03 Pagina 24 (Nero/Process Black pellicola)
Page 25
Nachtrocknen
Erscheint Ihnen die Wäsche bei Programmende zu feucht, kann durch
Einstellung einer kurzen Trockenzeit nachgetrocknet werden.
Trockenprogramm neu einstellen.
Vorsicht! Um Knitterbildung und Einlaufen zu vermeiden, nicht
übertrocknen.
Trockengang durchführen
Nur Trocknen
Beladung:
- Koch-/Buntwäsche max. 3 kg
- Pflegeleicht max. 2 kg
Während der Trocknung muss der Wasserhahn geöffnet bzw. der Ablaufschlauch richtig positioniert sein.
Trockenprogramm je nach Gewebeart wählen.
Bei zeiteingestellter Trocknung, Trockenzeit-Taste so oft drücken, bis die
gewünschte Trockenzeit im Multidisplay angezeigt wird.
Bei elektronischer Trocknung, den gewünschten Trockengrad durch die
entsprechende Taste wählen.
Gerät starten durch Drücken der START/PAUSE-Taste.
Am Ende des Programms Programmwähler auf “O” drehen.
Wäsche entnehmen.
25
Trockengang vorbereiten
132994110d.qxd 11-04-2002 16:03 Pagina 25 (Nero/Process Black pellicola)
Page 26
Waschgang durchführen
Füllmengen: Koch-/Buntwäsche max. 6,0 kg
Pflegeleicht u. Feinwäsche 3,0 kg
Wolle 2,0 kg
Wäsche einlegen
Einfülltür öffnen.
Die Wäschestücke entfalten und locker in die Waschtrommel einfüllen.
Möglichst große und kleine Wäschestücke gemischt waschen.
Einfülltür fest schließen.
Wasch- und Pflegemittel zugeben
Ziehen Sie die
Schublade aus der
Bedienblende, bis
zum Aschlag.
Geben Sie die
notwendige
Waschmittelmenge (beachten Sie
bitte die Dosierhinweise der
Waschmittelhersteller) in das Fach für die Hauptwäsche .
Wird die Vorwäsche- Einweich- oder Fleckenfunktion gewählt, so geben
Sie auch das Pulver im Fach ein.
Eventuelle flüssige Zusatzmittel zum Weichspülen oder Stärken der
Wäsche können in das Fach gefüllt werden.
Das Niveau MAX nicht überschreiten.
Waschmittelschublade wieder in die Bedienblende schieben.
Waschprogramm einstellen
Drehen Sie den Programmwähler
auf die gewünschte Stellung.
Die leuchtenden Leds des Programmablaufs zeigen die Programmabschnitte des gewählten
Programms an.
26
132994110d.qxd 11-04-2002 16:03 Pagina 26 (Nero/Process Black pellicola)
Page 27
27
Im Multidisplay wird die voraussichtliche Dauer des eingestellten Programms in Minuten angezeigt.
Zusatzfunktion(en) wählen
Je nach Verschmutzungsgrad und Gewebeart. Die entsprechende Led leuchtet.
Schleuderdrehzahl ändern/Spülstopp wählen
Eventuell Schleuderdrehzahl für das Endschleudern
wählen: Taste so oft drücken, bis die gewünschte
Schleuderdrehzahl leuchtet.
Bei der Anzeige SPÜLSTOPP (Spoelstop) bleibt die
Wäsche im letzten Spülwasser liegen.
Wenn Sie die Schleuderdrehzahl nicht ändern, wird das
Endschleudern je nach Waschprogramm automatisch angepasst:
- KOCHWÄSCHE/BUNTWÄSCHE 1600 U/Min
- PFLEGELEICHT 900 U/Min
- FEINWÄSCHE 700 U/Min
- WOLLE / (Handwäsche) 900 U/Min
Zusätzlicher Spülgang
Der Waschautomat ist auf äußerst sparsamen Wasserverbrauch eingestellt.
Für Menschen, die an einer Allergie leiden, kann es jedoch hilfreich sein, mit
mehr Wasser zu spülen (zusätzlicher Spülgang).
Wenn diese Funktion eingestellt ist, erfolgt ein zusätzlicher Spülgang
bei den Programmen KOCH-/BUNTWÄSCHE, FEINWÄSCHE und PFLEGELEICHT.
Zusätzlichen Spülgang einstellen:
Tasten ZEIT SPAREN (Kort) und VORWÄSCHE (Voorwas) mindestens
3 Sekunden lang gleichzeitig gedrückt halten. SPOELEN + auf der Programmablaufanzeige leuchtet auf.
Diese Funktion bleibt ständig gespeichert.
Zusätzlichen Spülgang annullieren :
Tasten ZEIT SPAREN und VORWÄSCHE so lange drücken, bis SPOELEN
+
auf der Programmablauf-Anzeige erlischt.
Waschgang durchführen
132994110d.qxd 11-04-2002 16:03 Pagina 27 (Nero/Process Black pellicola)
Page 28
Zeitvorwahl einstellen
Bevor das Programm gestartet wird und falls Sie
den Start verschieben möchten, die Taste “ZEITVORWAHL” (Starttijdkeuze) drücken, bis die
gewünschte Verzögerungszeit eingestellt ist; im
Multidisplay wird die gewählte Verzögerung für 3
Sekunden angezeigt. Dann erscheint im Display die Dauer des gewählten
Programms.
Bei gedrückter Taste EINWEICHEN (INWEKEN) bestimmt die Zeitvorwahl die
Einweichzeit. (Ohne Zeitvorwahl beträgt die Einweichzeit ca. 30 Minuten).
Nach Einschaltung der START/PAUSE-Taste erscheint wieder im Display die
Zeitvorwahl und die Maschine beginnt die Restzeit zurückzuzählen.
Waschprogramm starten
1. Kontrollieren Sie, ob der Wasserhahn geöffnet ist.
2. Waschprogramm starten: Taste START/PAUSE drücken.
Das Waschprogramm wird gestartet, bzw. startet
nach Ablauf der eingestellten Zeitvorwahl.
Blinkt die Tür-Led beim Drücken der Taste START/PAUSE rot, so ist die
Einfülltür nicht richtig geschlossen. Einfülltür fest zudrücken und Taste
START/PAUSE nochmals drücken.
bei eingestellter Zeitvorwahl:
Die eingestellte Zeitvorwahl läuft ab, im Multidisplay wird die verbleibende
Zeit bis zum Programmstart (jeweils in vollen Stunden) angezeigt. Während
dieser Zeit können Sie Wäsche nachlegen oder die Zeitvorwahl ändern bzw.
abbrechen.
• Wäsche nachlegen: Taste START/PAUSE drücken, die Einfülltür lässt sich
öffnen. Danach Tür schließen und wieder Taste START/PAUSE drücken.
• Zeitvorwahl ändern bzw. abbrechen: Taste START/PAUSE drücken, dann
Taste ZEITVORWAHL so oft drücken, bis die gewünschte Zeit angezeigt wird;
bei Anzeige
0 h startet das Waschprogramm ohne Aufschub.
Taste START/PAUSE erneut drücken.
Programmablauf-Anzeige
Vor dem Start werden die gewählten Programmschritte
durch die Programmablauf-Anzeige angezeigt. Während
des Waschprogramms wird der aktuelle Programmschritt
angezeigt.
Multidisplay
Die zu erwartende Restlaufzeit (in Minuten) wird
bis zum Programmende im Multidisplay angezeigt.
28
Waschgang durchführen
132994110d.qxd 11-04-2002 16:03 Pagina 28 (Nero/Process Black pellicola)
Page 29
Programmende
Die Maschine bleibt automatisch stehen, im Multidisplay erscheint eine
aufleuchtende Null und ein akustisches Signal ertönt.
Die Led ENDE auf der Programmablaufanzeige leuchtet.
Leuchtet ÜBERDOSIERT (OVERDOSERING) auf der ProgrammablaufAnzeige, so wurde im abgelaufenen Waschprogramm zuviel Waschmittel
verwendet.
Beim nächsten Waschen Dosierungsangaben des Waschmittel-Herstellers
sowie Beladung beachten!
Diese Led könnte auch bei verstopftem Flusensieb aufleuchten!
Wurde die Option SPÜLSTOPP gewählt, so muss das Wasser abgepumpt
werden:
- Entweder Taste START/PAUSE drücken (die Wäsche wird entsprechend
dem abgelaufenen Programm geschleudert; mit der entsprechenden
Taste kann die Schleuderdrehzahl geändert werden), oder
- Schleuderdrehzahl wählen und START/PAUSE-Taste drücken oder
- Programmwähler auf “O” und dann auf PUMPEN drehen, und Taste
START/PAUSE drücken (das Wasser wird ohne Schleudern abgepumpt).
Drehen Sie den Programmwähler auf “O”.
Nehmen Sie die Wäsche heraus.
Kontrollieren Sie die Trommel auf vollständige Entleerung, sonst könnten
Textilien beim nächsten Waschen Schaden nehmen (z.B. einlaufen) oder
auf andere Wäsche abfärben.
Wenn nicht mehr gewaschen wird, schließen Sie den Wasserhahn und
ziehen Sie vorsorglich den Stecker aus der Steckdose.
Lassen Sie die Einfülltür spaltbreit geöffnet, damit die Feuchtigkeit aus
der Trommel verdunsten kann.
29
Waschgang durchführen
132994110d.qxd 11-04-2002 16:03 Pagina 29 (Nero/Process Black pellicola)
Page 30
30
Waschen und Trocknen durchgehend
(NON-STOPP-Betrieb)
Die Trockenzeit oder der Trockengrad muss bereits bei Einstellung des
Waschprogramms gewählt werden.
Die eingestellte Trockenzeit oder der Trockengrad können während des
Waschgangs geändert werden. Dazu die Maschine auf PAUSE stellen und
nach neuer Wahl die START/PAUSE-Taste nochmals drücken, um das Programm fortzusetzen.
Der NON-STOPP-Betrieb ist nur in den Programmen Koch-/Buntwäsche
und Pflegeleicht möglich.
Beladung:
- Koch-/Buntwäsche max. 3 kg
- Pflegeleicht max. 2 kg
Wäsche einlegen.
Wasch-/Pflegemittel zugeben.
Bei Verwendung von Flüssigwaschmitteln:
Flüssigwaschmittel mit von der Waschmittelindustrie angebotenen
Dosierbehältern nicht zugeben. Das Plastikmaterial, aus dem diese bestehen, übersteht die beim Trocknen auftretenden Temperaturen nicht.
Geben Sie das flussige Waschmittel unmittelbar vor Beginn des Pro-
gramms in das Fach .
Waschprogramm wählen.
Evtl. Zusatzfunktion wählen.
Wenn möglich, Schleuderdrehzahl nicht reduzieren, um somit Energie
und Trockenzeit zu sparen.
Beim NON-STOPP-Betrieb ist es nicht möglich eine Schleuderdrehzahl
niedriger als 900 U/min für Koch-/Buntwäsche bzw. 700 U/min für pflegeleichte Gewebe (bei zeiteingestellter Trocknung) zu wählen.
Trockenzeit oder Trockengrad wählen.
Gerät starten (START/PAUSE-Taste drücken).
Die Wäsche wird nun durchgehend automatisch gewaschen und
getrocknet.
Wenn die angezeigte Zeit abgelaufen ist, ist das Wasch-/Trockenpro-
gramm beendet.
Programmwähler auf “O” drehen.
Wäsche entnehmen.
Waschgang durchführen
132994110d.qxd 11-04-2002 16:03 Pagina 30 (Nero/Process Black pellicola)
Page 31

Programmtabellen
Waschen
Das Programm “Buntwäsche 60°” ist das Bezugsprogramm für die Angaben auf
dem Energie-Etikett, gemäß Richtlinie 92/75/EWG.
* Bei den angeführten Verbrauchswerten handelt es sich um ca. Werte, die von
Wäschemenge, Wäscheart, Wassereinlauftemperatur und Umgebungstemperatur
abhängig sind. Diese beziehen sich auf die höchste Waschtemperatur, die für das
betreffende Programm vorgesehen ist.
31
Programm
Koch-
wäsche
Temp.
95°-60°
Wäscheart
Kochwäsche, z.B.
normal verschmutzte Berufswäsche,
Bett-,Tisch- und
Unterwäsche,
Handtücher
Zusatzfunktion
über Tasten
FLECKEN
VORWÄSCHE
EINWEICHEN
ZEIT SPAREN
SPÜLEN+
SCHLEUDERN
SPÜLSTOPP
Wäsche-
menge
max.
6 kg
E
Energie-
sparen
60°
Spar-Kochwäsche, z.B.
kurzzeitig benutzte
Bettwäsche, leicht verschmutzte Tisch- u.
Gebrauchswäsche, usw.
FLECKEN
VORWÄSCHE
EINWEICHEN
SPÜLEN+
SCHLEUDERN
SPÜLSTOPP
6 kg
Bunt-
wäsche
60°-50°
40°-30°
Bunte Normalwäsche aus Leinen
oder Baumwolle,
Hemden, Leibwäsche, Frottée
FLECKEN
VORWÄSCHE
EINWEICHEN
ZEIT SPAREN
SPÜLEN+
SCHLEUDERN
SPÜLSTOPP
6 kg
Pflege-
leicht
60°-50°
40°
Synthetiks,
Leibwäsche,
Buntwäsche,
bügelfreie Hemden,
Blusen
FLECKEN
VORWÄSCHE
EINWEICHEN
ZEIT SPAREN
SPÜLEN+
SCHLEUDERN
SPÜLSTOPP
3 kg
Fein-
wäsche
40°-30°
KALT
Für alle zarten
Gewebe, z.B.
Gardinen
FLECKEN
VORWÄSCHE
EINWEICHEN
ZEIT SPAREN
SPÜLEN+
SCHLEUDERN
SPÜLSTOPP
3 kg
Wolle
40°-30
KALT
Wolle und besonders empfindliche
Wäsche
SCHLEUDERN
SPÜLSTOPP
2 kg
Strom
kWh
1,6
1,14
1,0
0,55
0,4
Wasser
Liter
52
52
55
60
63
Zeit
Min.
153
137
96
67
58
Verbrauchswerte*
2,0 55 161
132994110d.qxd 11-04-2002 16:03 Pagina 31 (Nero/Process Black pellicola)
Page 32

Programmtabellen
Sonderprogramme
* Bei den angeführten Verbrauchswerten handelt es sich um ca. Werte, die von
Wäschemenge, Wäscheart, Wassereinlauftemperatur und Umgebungstemperatur
abhängig sind.
32
Programm
Programm-
beschreibung
Programmabwicklung
Zusatzfunktion
über Tasten
Wäsche-
menge
max.
Feinspülen
Handgewaschene Textilien
können mit
diesem Programm gespült
werden.
3 Spülgänge mit
Pflegemittel
Schonschleudern
(700 U/min max.)
SCHLEUDERN
SPÜLSTOPP
SPÜLEN+
6 kg
Stärken
Für frischgewaschene Textilien, die zusätzlich gestärkt
werden sollen.
1 Spülgang mit
Pflegemittel
Normalschleudern
SCHLEUDERN
SPÜLSTOPP
6 kg
Pumpen
Zum Abpumpen des letzten Spülwassers bei den
Programmen
mit Spülstopp.
Wasserablauf /
Schleudern
Separates
Schleudern
für Koch/Buntwäsche
Normalschleudern
SCHLEUDERN
6 kg
Schonschleudern
Separates
Schleudern
für Pflegeleicht, Feinwäsche u. Wolle.
Schonschleudern
(700 U/min max.)
SCHLEUDERN
3 kg
Strom
kWh
0,025
-
-
-
-
Wasser
Liter
52
20
-
-
-
Zeit
Min.
23
22
3
12
4
O/AUS
Annullierung des eingestellten Programms bzw.
Ausschalten der
Maschine
- - -
Verbrauchswerte*
132994110d.qxd 11-04-2002 16:03 Pagina 32 (Nero/Process Black pellicola)
Page 33

Programmtabellen
Zeiteingestellte Trocknung
(*) Das Programm “Schranktrocken” ist das Bezugsprogramm für die
Angaben auf dem Energie-Etikett, gemäß Richtlinie 92/75 EWG.
Füllmenge 3 kg.
33
Trockengrad Wäscheart Wäschemenge
Schleuder-
drehzahl
Zeitdauer
in Minuten
1600 70-80
1600 35-45
900 70-80
900 35-45
1600 50-60
1600 30-40
Schranktrocken (*)
Bügeltrocken
Baumwollwäsche
gleichmäßiger
Dicke, die durchgetrocknet werden soll, z.B.
Frottierwäsche,
Biberbettwäsche,
Trikotwäsche
3 kg
1,5 kg
Pflegeleichte
Gewebe, die keine
Nachbehandlung
(z.B. Bügeln)
benötigen, z.B.
Oberhemden,
Tischwäsche,
Babykleidung,
Socken, Miederwäsche
2 kg
1 kg
Baumwollwäsche,
die noch gebügelt werden soll,
z.B. Bettwäsche,
Tischwäsche
3 kg
1,5 kg
132994110d.qxd 11-04-2002 16:03 Pagina 33 (Nero/Process Black pellicola)
Page 34

34
Verbrauchswerte für das zeiteingestellte Trockenprogramm
Die Werte in der folgenden Tabelle wurden unter Normbedingungen
ermittelt.
Für den Betrieb im Haushalt geben sie eine hilfreiche Orientierung.
Wäscheart/
Trockengrad
Schleuder-
drehzah
l
Wäsche-
menge
Wasser
Liter
Strom
kWh
Zeitdauer
Min.
Koch-/Buntwäsche
Schranktrocken
1600 3 kg 19 1,85 70-80
1600 3 kg 15 1,4 50-60Bügeltrocken
Pflegeleichte
Gewebe
Schranktrocken
900 2 kg 20 1,2 70-80
132994110d.qxd 11-04-2002 16:03 Pagina 34 (Nero/Process Black pellicola)
Page 35

Pflege und Wartung
Im Alltagsbetrieb
Nach Programmende die Waschmittelschublade ein kleines Stück herausziehen, damit sie austrocknen kann.
Einfülltür nach dem Waschen und Trocknen nur anlehnen, damit die
Maschine innen belüftet wird und austrocknen kann.
Wird die Maschine längere Zeit nicht benutzt:
Wasserhahn schließen und Maschine vom Stromnetz trennen.
Bedienteile reinigen
Bedienblende
Achtung! Keine Möbelpflegemittel oder aggressive Reinigungsmittel
zur Reinigung von Blenden- und Bedienteilen benutzen.
Bedienblende mit einem feuchten Tuch abwischen. Dabei nur warmes
Wasser verwenden.
Waschmittelschublade
Von Zeit zu Zeit
sollte die Waschmittelschublade
gereinigt werden.
Waschmittelschublade nach
Drücken der Arretierungs-Taste
herausziehen.
Der obere Teil des
Pflegemittelfaches kann herausgenommen werden.
Waschmittelschublade unter fließendem Wasser reinigen.
Auch im Sitz der Waschmittelschublade
sollten Sie alle Ablagerungen von Waschmitteln beseitigen.
35
132994110d.qxd 11-04-2002 16:03 Pagina 35 (Nero/Process Black pellicola)
Page 36

36
Pflege und Wartung
Einfülltür
Regelmäßig prüfen, ob Ablagerungen oder
Fremdkörper in der Gummimanschette hinter der Einfülltür vorhanden sind und gegebenenfalls entfernen.
Wassereinlaufsieb
Gelegentlich sollte das Sieb am Wasserhahn gereinigt werden.
Wasserhahn schließen.
Wasserzulaufschlauch vom Wasserhahn abschrauben.
Sieb im Innern des Schlauchs mit einer Zahnbürste unter fließendem
Wasser reinigen.
Wasserschlauch am Wasserhahn wieder festschrauben.
Flusensieb
Bitte reinigen Sie von Zeit zu Zeit das zum Auffangen von Fremdkörpern, Flusen usw. dienende Flusensieb. Ein sauberes Sieb sorgt für einwandfreie
Waschresultate.
Folgende Handgriffe sind erforderlich:
Flusensiebklappe
durch Drücken
öffnen.
Schüssel etc. für
Restwasser unterstellen.
Flusensiebknebel nach links entgegen dem Uhrzeigersinn drehen, bis
das Flusensieb
entnommen
werden kann.
Flusensieb herausziehen, reinigen,
einsetzen und
wieder fest verschrauben.
132994110d.qxd 11-04-2002 16:03 Pagina 36 (Nero/Process Black pellicola)
Page 37

37
Pflege und Wartung
Notentleerung
Wenn Sie aus zwingenden Gründen das Gerät entleeren müssen, gehen
Sie bitte wie folgt vor:
Netzstecker aus der Steckdose ziehen.
Wasserhahn schließen.
Abkühlung der evtl. aufgeheizten Lauge abwarten.
Gefäß, Schüssel, o.ä. für das Restwasser unterstellen.
Dann Flusensieb lösen.
Frost
Sollte Ihr Gerät Temperaturen von weniger als 0°C ausgesetzt sein, so
müssen Sie einige Vorsichtsmaßnahmen ergreifen.
• Den Wasserhahn schließen und den Wasserzulaufschlauch abschrauben.
• Das Ende des Zulauf- u. Ablaufschlauchs in ein Gefäß auf dem Boden
legen.
• Das Programm “Pumpen" wählen und die Maschine bis zum Ende laufen lassen.
• Den Programmwähler auf “O” stellen.
• Die Maschine ausschalten.
• Den Zulaufschlauch am Gerät wieder fest verschrauben und den
Ablaufschlauch wieder einhängen.
So wird verhindert, dass Wasser im Innern des Waschautomaten
bleibt, das beim Gefrieren Schaden anrichten könnte.
Vor Inbetriebnahme der Maschine darauf achten, dass die Raumtemperatur höher als 0°C ist.
132994110d.qxd 11-04-2002 16:03 Pagina 37 (Nero/Process Black pellicola)
Page 38

Was tun, wenn…
Das im Vergleich zu früheren Waschmaschinen etwas
andere, pfeifende Laufgeräusch beim Schleudern ist
durch das moderne Antriebssystem bedingt.
Ist kein Wasser in der Trommel zu sehen, so
liegt dies am neuartigen Waschsystem der
Maschine.
Moderne Waschmaschinen verbrauchen
weniger Wasser als alte, das Wasch- und
Spülergebnis bleibt trotzdem einwandfrei.
Störungsbehebung
Versuchen Sie im Störungsfalle mit Hilfe der hier aufgeführten Hinweise das Problem selbst zu beheben. Wenn Sie bei einer der hier aufgeführten Störungen oder zur Behebung eines Bedienfehlers den Kundendienst in Anspruch nehmen, erfolgt der Besuch des KundendienstTechnikers auch während der Garantiezeit nicht kostenlos.
Verschiedene Fehler werden im Multidisplay bzw. auf der Programmablauf-Anzeige angezeigt:
- E10: Es läuft kein Wasser ein (SPOELEN+ leuchtet auf).
- E20: Das Wasser wird nicht abgepumpt (SPOELEN leuchtet auf).
- E40: Die Einfülltür ist nicht geschlossen (HOOFDWAS leuchtet auf).
Nach Behebung des Fehlers Taste START/PAUSE drücken. Wird der
Fehlercode erneut angezeigt, verständigen Sie den Kundendienst.
Die Maschine arbeitet nicht.
38
Störung Mögliche Ursache Abhilfe
Netzstecker ist nicht eingesteckt.
Sicherung der Hausinstallation ist nicht in Ordnung.
Einfülltür ist nicht richtig
geschlossen. (E40)
Zeit-Vorwahl-Funktion
gewählt.
Taste START/PAUSE nicht
gedrückt.
Netzstecker einstecken.
Sicherung ersetzen.
Einfülltür schließen; Verschluss
muss hörbar einrasten.
Kontrollieren Sie die Verzögerungszeit auf dem Display.
Taste START/PAUSE drücken.
Was tun, wenn…
132994110d.qxd 11-04-2002 16:03 Pagina 38 (Nero/Process Black pellicola)
Page 39

39
Was tun, wenn…
Störung Mögliche Ursache Abhilfe
Es läuft kein Wasser
Wasserhahn ist geschlossen. Wasserhahn öffnen.
(E10)
Zulaufschlauch ist Kontrollieren Sie den
geknickt. (E10) ganzen Schlauch und
beseitigen Sie die
Knickstelle.
Sieb in der Verschraubung Schlauch vom Wasserhahn
des Zulaufschlauchs ist abschrauben, Sieb
verstopft. (E10) unter fließendem Wasser
reinigen.
Einfülltür ist nicht richtig Einfülltür schließen.
geschlossen. (E40)
Die Maschine pumpt das
Wasser nicht ab bzw.
schleudert nicht.
Der Ablaufschlauch Kontrollieren Sie den ganzen
ist geknickt. (E20) Schlauch und beseitigen
Sie die Knickstelle.
Das Flusensieb oder der Flusensieb reinigen oder
Ablaufschlauch sind Ablaufschlauch kontrollieren.
verstopft. (E20)
Spülstopp-Funktion gewählt. Wasser abpumpen lassen
durch Drücken der Start/
Pause-Taste oder Wählen
des Programms PUMPEN.
Wäsche in der Trommel Wäsche besser verteilen.
nicht gleichmäßig verteilt.
Die Maschine nimmt das
Wasser an, aber dieses
fließt wieder aus dem
Ablaufschlauch ab.
Das Ende des Ablauf- Die Auslaufhöhe muss
schlauchs liegt nicht hoch mindestens 60 cm betragen.
genug vom Boden. Siehe die Anschlussanwei-
sungen.
Wasser läuft unter dem
Waschautomaten hervor.
Verschraubung am Zulaufschlauch festschrauben.
Zulaufschlauch ist undicht.
Ablaufschlauch ist undicht. Ablaufschlauch überprüfen
und gegebenenfalls erneuern.
Flusensieb nicht richtig Flusensieb richtig schließen.
verschlossen.
Waschmittelschublade ist Schublade reinigen.
verstopft.
Zuviel oder stark Waschmittel genau nach
schäumendes Waschmittel Herstellerangaben dosieren
gefüllt. und Spezialwaschmittel für
Trommelwaschmaschinen
verwenden.
132994110d.qxd 11-04-2002 16:03 Pagina 39 (Nero/Process Black pellicola)
Page 40

40
Die Einfülltür lässt sich bei
eingeschaltetem Gerät
nicht öffnen.
Die Waschtrommel ist Die Einfülltür ist aus
in Bewegung. Sicherheitsgründen
verriegelt.
Der Wasserstand im Gerät Wasser abpumpen lassen,
befindet sich über bevor die Tür geöffnet
den unteren Teil der Tür. wird.
Die Maschine befindet Warten, bis die betreffende
sich in der Heiz- oder Phase beendet ist.
Trocknungsphase
Die Maschine vibriert
während des Betriebs oder
steht unruhig.
Transportsicherung Lesen Sie bitte den
nicht vollständig entfernt. entsprechenden Abschnitt
in dieser Gebrauchsanweisung.
Die höhenverstellbaren Füße laut Aufstell- und
Schraubfüße sind nicht Anschlussanweisung
korrekt eingestellt. justieren.
Es ist nur sehr wenig Funktion ist dadurch
Wäsche in der Trommel nicht beeinträchtigt.
(z.B. nur ein Bademantel).
Störung Mögliche Ursache Abhilfe
Das Schleudern beginnt
verzögert bzw. die Wäsche
wird am Programmende
nicht geschleudert.
Das Unwucht-Kontroll- Die Wäsche wird durch
system der Maschine hat Drehrichtungswechsel der
aufgrund ungünstiger Trommel aufgelockert, neu
Wäscheverteilung verteilt und wieder angeangesprochen. schleudert. Dies kann
mehrmals der Fall sein, bis
die Unwucht beseitigt ist
und das Schleudern
endgültig ablaufen kann,
eventuell mit verminderter
Schleuderdrehzahl, wenn
die Wäscheverteilung noch
nicht optimal ist. Die
Auflockerungsphase dauert
ca. 10 Minuten. Sollte
nach dieser Zeit die
Wäsche nicht aufgelockert
sein, führt die Maschine
das Schleuderprogramm
nicht aus.
Was tun, wenn…
132994110d.qxd 11-04-2002 16:03 Pagina 40 (Nero/Process Black pellicola)
Page 41

41
Was tun, wenn…
Die Maschine trocknet
nicht oder die Wäsche ist
zu feucht.
Wasserhahn ist geschlossen. Wasserhahn öffnen.
(E10)
Flusensieb verstopft. Flusensieb reinigen.
Trocknungszeit oder Trocknungszeit wählen.
Trockengrad nicht einge- oder Trockengrad einstellen.
stellt.
Passende Trocknungszeit Trocknungszeit gemäß
nicht gewählt. gewünschtem
Trocknungsgrad und Art der
Wäsche wählen.
Maschine übermäßig Füllmenge reduzieren.
gefüllt.
Störung Mögliche Ursache Abhilfe
In der Waschmittelschublade bilden sich Waschmittelrückstände.
Wasserhahn ist nicht voll- Wasserhahn vollständig aufständig aufgedreht. drehen.
Sieb in der Verschraubung Sieb reinigen.
des Zulaufschlauchs
verstopft.
Spülwasser ist trüb.
Ursache ist vermutlich ein Kein negativer Einfluss auf
Waschmittel mit hohem das Spülergebnis, evtl.
Silikatgehalt Flüssigwaschmittel
verwenden.
132994110d.qxd 11-04-2002 16:03 Pagina 41 (Nero/Process Black pellicola)
Page 42

Wenn das Waschergebnis nicht befriedigend ist
Wenn die Wäsche vergraut ist und sich in der Trommel Kalk
ablagert
• Das Waschmittel wurde zu gering dosiert.
• Es wurde nicht das richtige Waschmittel eingesetzt.
• Spezielle Verschmutzungen wurden nicht vorbehandelt.
• Programm/Temperatur wurde nicht richtig eingestellt.
• Beim Einsatz von Baukasten-Waschmitteln wurden die einzelnen Komponenten nicht im richtigen Verhältnis eingesetzt.
Wenn sich auf der Wäsche noch graue Flecken finden
• Mit Salben, Fetten oder Ölen verschmutzte Wäsche wurde mit zu wenig
Waschmittel gewaschen.
• Es wurde mit zu niedriger Temperatur gewaschen.
• Häufige Ursache ist, dass Weichspüler - besonders solcher in Konzentratform - auf die Wäsche gelangt ist. Solche Flecken möglichst rasch
auswaschen und den betreffenden Weichspüler vorsichtig einsetzen.
Wenn nach dem letzten Spülen noch Schaum sichtbar ist
• Moderne Waschmittel können auch im letzten Spülgang noch Schaum
verursachen. Die Wäsche ist dennoch ausreichend gespült.
Wenn sich weiße Rückstände auf der Wäsche finden
• Es handelt sich um unlösliche Inhaltsstoffe moderner Waschmittel.
Sie sind nicht Folge einer unzureichenden Spülwirkung.
Wäsche schütteln oder ausbürsten. Vielleicht sollten Sie die Wäsche in
Zukunft vor dem Waschen wenden. Waschmittelauswahl überprüfen,
eventuell Flüssigwaschmittel einsetzen.
42
Was tun, wenn…
132994110d.qxd 11-04-2002 16:03 Pagina 42 (Nero/Process Black pellicola)
Page 43

Technische Daten
Höhe x Breite x Tiefe 84x60x60
Tiefe bei geöffneter Tür 101.5 cm
Höhenverstellbarkeit ca. ±13 mm
Leergewicht ca. 84 kg
Füllmenge (programmabhängig) max. 6 kg
Einsatzbereich Haushalt
Trommeldrehzahl Waschen max.55 min
-1
Trommeldrehzahl Schleudern 1600/1200/900/700/400
Wasserdruck 50-800 kPa
Dieses Gerät entspricht den folgenden EG-Richtlinien:
- 73/23/EWG vom 19.2.1973 “Niederspannungsrichtlinie”, einschließ-
lich Änderungsrichtlinie 93/68/EWG
- 89/336/EWG vom 3.5.1989 “EMV-Richtlinie”, einschließlich Ände-
rungsrichtlinie 92/31/EWG
43
132994110d.qxd 11-04-2002 16:03 Pagina 43 (Nero/Process Black pellicola)
Page 44

SERVICE
Im Kapitel “Was tun, wenn…" sind einige Störungen zusammengestellt,
die Sie selbst beheben können. Sehen Sie im Störungsfall zunächst dort
nach. Wenn Sie dort keine Hinweise finden, wenden Sie sich bitte an
unseren Kundendienst.
Adresse unseres Kundendiensts:
ELECTROLUX HOME PRODUCTS BELGIUM
Bergensesteenweg, 719 - B-1502 LEMBEEK
Tel. 02.3630444
Bereiten Sie das Gespräch in jedem Fall gut vor. Sie erleichtern so die
Diagnose und die Entscheidung, ob ein Kundendienstbesuch nötig ist.
Mit unserer Checkliste können Sie wichtige Informationen vor dem
Telefonat zusammenstellen.
Notieren Sie die PNC-Nummer und die Serie-Nummer. Beide finden Sie
auf dem Typschild an der Tür-Innenseite Ihres Waschautomaten:
Prod. No. . . . . . . . . . . . . . . . . . . . .
Ser. No. . . . . . . . . . . . . . . . . . . . . . .
Halten Sie weiterhin möglichst genau fest:
• Wie äußert sich die Störung?
• Unter welchen Umständen tritt die Störung auf?
• Bringt das Multidisplay eine Fehlermeldung?
(E und eine Zahl)?
44
132994110d.qxd 11-04-2002 16:03 Pagina 44 (Nero/Process Black pellicola)
Page 45

45
Wann entstehen Ihnen auch während der Garantiezeit Kosten?
- wenn Sie die Störung mit Hilfe der Störungstabelle (siehe Abschnitt
“Was tun, wenn…") selbst beseitigen können hätten,
- wenn mehrere Anfahrten des Kundendienst-Technikers erforderlich
sind, weil er vor seinem Besuch nicht alle wichtigen Informationen
erhalten hat und jetzt z.B. Ersatzteile holen muss. Diese Mehrfahrten können Sie vermeiden, wenn Sie Ihren Telefonanruf in der oben
beschriebenen Weise gut vorbereiten.
AUFSTELL- UND ANSCHLUSSANWEISUNG
Sicherheitshinweise für die Installation
• Überprüfen Sie die Maschine auf Transportschäden. Ein beschädigtes
Gerät dürfen Sie auf keinen Fall anschließen. Wenden Sie sich im
Schadensfall an Ihren Lieferanten.
• Stellen Sie sicher, dass alle Teile der Transportsicherung entfernt sind,
siehe “Transportsicherung entfernen”. Andernfalls kann es beim
Schleudern zu Schäden am Gerät oder an benachbarten Möbeln kommen.
• Stecker immer in vorschriftsmäßig installierte Schutzkontakt-Steckdose stecken. Keine Verlängerungskabel, Mehrfachsteckdosen oder
Adapter verwenden.
• Bei Festanschluss muss das Gerät durch Trennvorrichtungen in der
elektrischen Installation (Sicherungen, LS-Schalter, Fl-Schutzschalter
oder dergleichen) mit mindestens 3 mm Kontaktöffnungsweite allpolig vom Netz getrennt werden können. Der Festanschluss darf nur
durch einen autorisierten Fachmann erfolgen.
• Vergewissern Sie sich vor Inbetriebnahme, dass die auf dem Typschild
des Geräts angegebene Nennspannung und Stromart mit Netzspannung und Stromart am Aufstellort übereinstimmen. Die erforderliche
elektrische Absicherung ist ebenfalls dem Typschild zu entnehmen.
• Die Netzzuleitung darf nur vom Kundendienst oder einem autorisierten Fachmann ausgetauscht werden.
132994110d.qxd 11-04-2002 16:03 Pagina 45 (Nero/Process Black pellicola)
Page 46

Abmessungen des Geräts
Vorderansicht und Seitenansicht
Rückansicht
46
1015
Kaltwasser
132994110d.qxd 11-04-2002 16:03 Pagina 46 (Nero/Process Black pellicola)
335
40
165
50
Netzkabel
Wasserablaufschlauch
45
85
Page 47

Installation
Entfernen der Transportsicherung
Vor der Installation müssen Sie die Transportsicherungen entfernen.
Gehen Sie wie folgt vor:
Schrauben Sie mit einem Schlüssel die
rechte Schraube an der Rückwand des
Waschautomaten heraus.
Legen Sie das Gerät auf die Rückwand und passen Sie dabei auf,
dass die Schläuche nicht gequetscht werden.
Legen Sie zu diesem Zweck zwischen Maschine und Fußboden einen
von den Verpackungswinkeln.
Entfernen Sie den
Polystyrolblock
vom Waschmaschinenboden.
Lösen Sie die
zwei Plastikhüllen
und ziehen Sie
sorgfältig die
rechte (1) mit
dem Polystyrolpolster heraus, danach die linke (2), indem Sie sie zur Mitte führen.
Stellen Sie die Maschine wieder gerade
auf und schrauben Sie die übrigen zwei
Schrauben an der Rückwand aus.
47
2
1
132994110d.qxd 11-04-2002 16:03 Pagina 47 (Nero/Process Black pellicola)
Page 48

Ziehen Sie die drei Plastikzapfen heraus.
Verschließen Sie diese drei Schraubenlöcher
mit den Plastikstöpseln, die der Bedienungsanleitung beigepackt sind.
Hinweis:
Wir empfehlen, die Transportsicherungsteile
aufzubewahren, um sie bei Umzug wieder verwenden zu können. Gerät niemals ohne
Transportsicherung transportieren. Ferner müssen bei Umzug dieselben
Vorsichtsmaßnahmen ergreift werden, die im Paragraph “Frost” (s.S. 37)
angegeben sind.
Aufstellort vorbereiten
• Die Aufstellfläche muss sauber und trocken sein, frei von
Bohnerwachsresten und anderen schmierenden Belägen, damit das
Gerät nicht wegrutscht. Keine Schmierstoffe als Gleithilfe verwenden.
• Die Aufstellung auf hochflorigen Teppichböden oder Bodenbelägen
mit Weichschaumrücken ist nicht zu empfehlen, da dadurch die Standsicherheit des Geräts nicht gewährleistet ist.
• Bei Standplätzen mit kleinformatigen Fliesen handelsübliche Gummimatte unterlegen.
• Kleinflächige Unebenheiten des Bodens niemals durch Unterlegen von
Holz, Pappe, oder ähnlichem ausgleichen, sondern grundsätzlich durch
Einstellen der Schraubfüße.
• Wenn aus Platzgründen die Aufstellung des Geräts direkt neben einem
Gas- oder Kohleherd nicht vermeidbar ist: Zwischen Herd und Waschautomat eine wärmeisolierende Platte (85x57 cm) einfügen, die auf der
Seite gegen den Herd mit einer Aluminiumfolie versehen sein muss.
• Das darf nicht in einem frostgefährdeten Raum aufgestellt werden.
Frostschäden!
• Zulauf- und Ablaufschlauch dürfen
nicht geknickt oder gequetscht werden.
Nivellierung
Das Gerät muss mit allen vier Füßen fest
auf dem Boden stehen. Kleine Unebenheiten lassen sich durch Heraus- oder
Hineindrehen der vier Gerätefüße ausgleichen.
48
Installation
132994110d.qxd 11-04-2002 16:03 Pagina 48 (Nero/Process Black pellicola)
Page 49

Kaltwasseranschluss
Mitgeliefert wird ein Druckschlauch von 1,5 m Länge.
Zum Kaltwasseranschluss ist ein Wasserhahn mit Schlauchverschraubung
3/4” erforderlich.
Der Wasserdruck (Fließdruck) muss 50 bis 800 kPa betragen.
Die Maschine kann ohne zusätzlichen Rückflussverhinderer an jede
Wasserleitung angeschlossen werden.
Das Gerät entspricht den nationalen Vorschriften (z.B. Deutschland - DVGW).
Den Zulaufschlauch, der sich an der Rückseite
des Geräts befindet, am Wasserhahn fest anschrauben, die erforderliche Gummidichtung
ist bereits in der Verschraubung des Zulaufschlauches vorhanden.
Wasserstop
Das Wasserstop-System schützt zusätzlich
vor Wasserschäden. Durch natürliche Alterung kann der Wasserzulaufschlauch schadhaft werden; in diesem Fall blockiert das System die Wasserzufuhr zum
Gerät.
Die Störung wird durch die Erscheinung einer roten Markierung im
Fensterchen ”A” angezeigt. Der Kundendienst muss verständigt
und der Zulaufschlauch ersetzt werden.
Prüfen Sie bei geöffnetem Wasserhahn (unter vollem Leitungsdruck) die
Anschlussstelle am Gerät und am Wasserhahn auf Dichtheit.
Wird ein längerer Zulaufschlauch benötigt, ist ausschließlich ein von
unserem Kundendienst angebotener, VDE-zugelassener kompletter
Schlauchsatz mit montierten Schlauchverschraubungen zu verwenden.
Eventuelle besondere Vorschriften des
örtlichen Wasserwerks sind genauestens
zu beachten!
Das Schlauchende an der Maschinenrückwand kann in allen Richtungen gedreht werden. Positionieren Sie den Schlauch richtig,
indem Sie die Schlauchverschraubung etwas
lockern. Dann drehen Sie sie wieder fest zu,
um Wasseraustritt zu vermeiden.
49
Installation
A
132994110d.qxd 11-04-2002 16:03 Pagina 49 (Nero/Process Black pellicola)
Page 50

Wasserablauf
Der Ablaufschlauch kann wie folgt positioniert werden:
Über den Waschbeckenrand mit Hilfe des
beiliegenden Krümmers.
Wichtig ist, dass der Schlauch durch das
schnelle Ausfließen des Wassers nicht vom
Rande abspringt. Befestigen Sie ihn mit
einer Schnur am Wasserhahn oder an einem
Haken in der Wand.
In eine Ablaufrohrabzweigung des Waschbeckens.
Die Rohrabzweigung
muss oberhalb des
Siphons (Geruchverschlusses) sitzen,
sodass sich die Krümmung mindestens
60 cm über dem
Boden befindet.
In ein Ablaufrohr.
Empfohlen wird ein 65 cm hohes Standrohr; keinesfalls niedriger als
60 cm oder höher als 90 cm.
Das Ablaufschlauchende muss immer belüftet sein, d.h. der Rohrinnendurchmesser muss größer sein als der Schlauchaußendurchmesser.
Der Ablaufschlauch darf höchstens bis zu einer Gesamtlänge von 4 m
verlängert werden. Dabei muss der Durchmesser des Verlängerungsschlauches gleich groß wie der Innendurchmesser des Originalschlauches sein. Verwenden Sie bitte ein dazu geeignetes Verbindungsstück.
Der Verlängerungsschlauch soll am Boden liegen und nur beim Ablauf
emporsteigen.
50
Installation
132994110d.qxd 11-04-2002 16:03 Pagina 50 (Nero/Process Black pellicola)
Page 51

51
Elektrischer Anschluss
Der Anschluss darf nur über eine vorschriftsmäßig installierte Schutzkontakt-Steckdose an 220-230 V (50 Hz) erfolgen.
Der Anschlusswert beträgt ca. 2,2 kW.
Erforderliche Absicherung: 10 A - LS-L-Schalter.
Das Gerät entspricht den VDE-Vorschriften.
Besondere Vorschriften der örtlichen Elektrizitätswerke sind genaue-
stens zu beachten.
Bei Festanschluss ist in der elektrischen Installation eine Einrichtung
vorzusehen, die es ermöglicht, das Gerät mit einer Kontaktöffnungs-
weite von mindestens 3 mm allpolig vom Netz zu trennen. Als geeignete Trennvorrichtungen gelten z. B. LS-Schalter, Sicherungen (Schraubsicherungen sind aus der Fassung herauszunehmen), FI-Schutzschalter
und Schütze. Der Festanschluss darf nur duch einen autorisierten Fachmann erfolgen.
Das Netzkabel muss nach Aufstellung des Geräts leicht zugänglich
sein.
Installation
132994110d.qxd 11-04-2002 16:03 Pagina 51 (Nero/Process Black pellicola)
Page 52

Dear customer,
Please read these operating instructions carefully and pay particular
attention to the safety notes indicated in the first pages. We recommend that you keep this instruction booklet for future reference and
pass it on to any future owners.
The warning triangle and/or the key words (Warning!, Caution!) emphasize information that is particularly important for your safety or correct
functioning of the appliance.
This symbol guides you, step by step, in the operation of the appliance.
The information marked with this symbol provides additional instructions and practical tips on the use of the appliance.
Tips and information about economical and ecological use of the
machine are marked with the clover symbol.
Should any problems arise, this booklet provides instructions on how to
solve them by yourself; see section “Something not working?”.
If this information is not sufficient, please contact our nearest SERVICE
CENTRE.
Printed on recycled paper.
People who think ecologically, act accordingly…
52
132994110gb.qxd 11-04-2002 16:06 Pagina 52
Page 53

Contents
Safety instructions . . . . . . . . . . . . . . . . . . . . . . . . . . . . . . . . . . . . . . . . 56-57
Disposal . . . . . . . . . . . . . . . . . . . . . . . . . . . . . . . . . . . . . . . . . . . . . . . . . . . . 58
Tips for environmental protection
. . . . . . . . . . . . . . . . . . . . . . . . . . . . . . 58
Main features of your washer-dryer . . . . . . . . . . . . . . . . . . . . . . . . . . . . 59
Description of the appliance. . . . . . . . . . . . . . . . . . . . . . . . . . . . . . . . . . . . 60
Control panel . . . . . . . . . . . . . . . . . . . . . . . . . . . . . . . . . . . . . . . . . . . . . . . . . 61
Programme selector dial. . . . . . . . . . . . . . . . . . . . . . . . . . . . . . . . . . . . . . 61
START/PAUSE button . . . . . . . . . . . . . . . . . . . . . . . . . . . . . . . . . . . . . . . . 62
DELAY START button . . . . . . . . . . . . . . . . . . . . . . . . . . . . . . . . . . . . . . . . 62
ELECTRONIC DRYING button. . . . . . . . . . . . . . . . . . . . . . . . . . . . . . . . . . . 63
DRYING TIME button . . . . . . . . . . . . . . . . . . . . . . . . . . . . . . . . . . . . . . . . 63
Programme Option buttons . . . . . . . . . . . . . . . . . . . . . . . . . . . . . . . . . . . 63
STAIN . . . . . . . . . . . . . . . . . . . . . . . . . . . . . . . . . . . . . . . . . . . . . . . . . . . . 63
QUICK . . . . . . . . . . . . . . . . . . . . . . . . . . . . . . . . . . . . . . . . . . . . . . . . . . . . 63
SOAK . . . . . . . . . . . . . . . . . . . . . . . . . . . . . . . . . . . . . . . . . . . . . . . . . . . . 63
PREWASH . . . . . . . . . . . . . . . . . . . . . . . . . . . . . . . . . . . . . . . . . . . . . . . . . 64
SPIN SPEED . . . . . . . . . . . . . . . . . . . . . . . . . . . . . . . . . . . . . . . . . . . . . . . 64
RINSE HOLD . . . . . . . . . . . . . . . . . . . . . . . . . . . . . . . . . . . . . . . . . . . . . . . 64
Display. . . . . . . . . . . . . . . . . . . . . . . . . . . . . . . . . . . . . . . . . . . . . . . . . . . . 65
Programme progress display. . . . . . . . . . . . . . . . . . . . . . . . . . . . . . . . . . . 65
Cancelling a programme. . . . . . . . . . . . . . . . . . . . . . . . . . . . . . . . . . . . . . 66
Altering a programme which is running . . . . . . . . . . . . . . . . . . . . . . . . . 66
Opening the door after the programme has started. . . . . . . . . . . . . . . . 66
Detergent dispenser drawer. . . . . . . . . . . . . . . . . . . . . . . . . . . . . . . . . . . . . . 67
Before the first wash. . . . . . . . . . . . . . . . . . . . . . . . . . . . . . . . . . . . . . . . . . 67
Preparing the wash cycle . . . . . . . . . . . . . . . . . . . . . . . . . . . . . . . . . . . . . . 68
Sorting out and preparing the laundry. . . . . . . . . . . . . . . . . . . . . . . . . . . . . 68
Weight of laundry . . . . . . . . . . . . . . . . . . . . . . . . . . . . . . . . . . . . . . . . . . . . . 69
Types of fabric and care labels . . . . . . . . . . . . . . . . . . . . . . . . . . . . . . . . . . . 69
Detergents and additives . . . . . . . . . . . . . . . . . . . . . . . . . . . . . . . . . . . . . . . . 71
Which detergent and additive? . . . . . . . . . . . . . . . . . . . . . . . . . . . . . . . . 71
How much detergent? . . . . . . . . . . . . . . . . . . . . . . . . . . . . . . . . . . . . . . . 71
Liquid detergent . . . . . . . . . . . . . . . . . . . . . . . . . . . . . . . . . . . . . . . . . . . . 71
Adding a water softener (descaling product) . . . . . . . . . . . . . . . . . . . . . . . . 71
Information on water hardness . . . . . . . . . . . . . . . . . . . . . . . . . . . . . . . . . . . 71
53
132994110gb.qxd 11-04-2002 16:06 Pagina 53
Page 54

Preparing the drying cycle . . . . . . . . . . . . . . . . . . . . . . . . . . . . . . . . . . . . . 72
Load . . . . . . . . . . . . . . . . . . . . . . . . . . . . . . . . . . . . . . . . . . . . . . . . . . . . . . . . 72
Garments not suitable for drying . . . . . . . . . . . . . . . . . . . . . . . . . . . . . . . . . 72
Drying symbols on garment labels . . . . . . . . . . . . . . . . . . . . . . . . . . . . . . . . 73
Duration of the drying cycle . . . . . . . . . . . . . . . . . . . . . . . . . . . . . . . . . . . . . 73
Modification of the drying time or degree of drying. . . . . . . . . . . . . . . . . . 73
Fibre residue. . . . . . . . . . . . . . . . . . . . . . . . . . . . . . . . . . . . . . . . . . . . . . . . . . 73
Additional drying . . . . . . . . . . . . . . . . . . . . . . . . . . . . . . . . . . . . . . . . . . . . . . 74
How to dry . . . . . . . . . . . . . . . . . . . . . . . . . . . . . . . . . . . . . . . . . . . . . . . . . . 74
Drying only. . . . . . . . . . . . . . . . . . . . . . . . . . . . . . . . . . . . . . . . . . . . . . . . . . . 74
How to wash
. . . . . . . . . . . . . . . . . . . . . . . . . . . . . . . . . . . . . . . . . . . . . . . . . 75
Load the laundry . . . . . . . . . . . . . . . . . . . . . . . . . . . . . . . . . . . . . . . . . . . . . . 75
Add detergent and additive. . . . . . . . . . . . . . . . . . . . . . . . . . . . . . . . . . . . . . 75
Selection of the desired wash programme . . . . . . . . . . . . . . . . . . . . . . . . . . 76
Selection of the desired options . . . . . . . . . . . . . . . . . . . . . . . . . . . . . . . . . . 76
Selection of the SPIN SPEED or RINSE HOLD option . . . . . . . . . . . . . . . . . . 76
Selection of the EXTRA RINSE . . . . . . . . . . . . . . . . . . . . . . . . . . . . . . . . . . . 77
Selection of the DELAY START option . . . . . . . . . . . . . . . . . . . . . . . . . . . . . . 77
Starting the programme . . . . . . . . . . . . . . . . . . . . . . . . . . . . . . . . . . . . . . . . 78
At the end of the programme . . . . . . . . . . . . . . . . . . . . . . . . . . . . . . . . . . . . 78
Automatic washing and drying (NON-STOP programme). . . . . . . . . . . . 79
Programme charts: wash and special programmes . . . . . . . . . . . . . . 80-81
Programme chart: timed drying. . . . . . . . . . . . . . . . . . . . . . . . . . . . . . . . . 82
Consumption data for timed drying . . . . . . . . . . . . . . . . . . . . . . . . . . . . . 82
Cleaning and maintenance . . . . . . . . . . . . . . . . . . . . . . . . . . . . . . . . . . . . . 83
After each wash . . . . . . . . . . . . . . . . . . . . . . . . . . . . . . . . . . . . . . . . . . . . . . . 83
Periodical cleaning. . . . . . . . . . . . . . . . . . . . . . . . . . . . . . . . . . . . . . . . . . . . . 83
Exterior . . . . . . . . . . . . . . . . . . . . . . . . . . . . . . . . . . . . . . . . . . . . . . . . . . . 83
Detergent dispenser drawer . . . . . . . . . . . . . . . . . . . . . . . . . . . . . . . . . . . 83
Door seal . . . . . . . . . . . . . . . . . . . . . . . . . . . . . . . . . . . . . . . . . . . . . . . . . . 84
Drain filter. . . . . . . . . . . . . . . . . . . . . . . . . . . . . . . . . . . . . . . . . . . . . . . . . 84
Water inlet filter. . . . . . . . . . . . . . . . . . . . . . . . . . . . . . . . . . . . . . . . . . . . 84
Emergency emptying out. . . . . . . . . . . . . . . . . . . . . . . . . . . . . . . . . . . . . . . . 85
Frost precautions . . . . . . . . . . . . . . . . . . . . . . . . . . . . . . . . . . . . . . . . . . . . . . 85
Something not working?. . . . . . . . . . . . . . . . . . . . . . . . . . . . . . . . . . . . . . . 86
Troubleshooting . . . . . . . . . . . . . . . . . . . . . . . . . . . . . . . . . . . . . . . . . . . . 86-89
Unsatisfactory washing results . . . . . . . . . . . . . . . . . . . . . . . . . . . . . . . . . . . 90
54
Contents
132994110gb.qxd 11-04-2002 16:06 Pagina 54
Page 55

Technical data. . . . . . . . . . . . . . . . . . . . . . . . . . . . . . . . . . . . . . . . . . . . . . . . 91
Service . . . . . . . . . . . . . . . . . . . . . . . . . . . . . . . . . . . . . . . . . . . . . . . . . . . . . 92
Instructions for installation and electrical connection. . . . . . . . . . . . . . 93
Safety instructions for the installer . . . . . . . . . . . . . . . . . . . . . . . . . . . . . . . 93
Dimensions of the appliance. . . . . . . . . . . . . . . . . . . . . . . . . . . . . . . . . . . . 94
Front view and side view . . . . . . . . . . . . . . . . . . . . . . . . . . . . . . . . . . . . . . . . 94
Rear view . . . . . . . . . . . . . . . . . . . . . . . . . . . . . . . . . . . . . . . . . . . . . . . . . . . . 94
Installation . . . . . . . . . . . . . . . . . . . . . . . . . . . . . . . . . . . . . . . . . . . . . . . . . . 95
Unpacking . . . . . . . . . . . . . . . . . . . . . . . . . . . . . . . . . . . . . . . . . . . . . . . . . . . 95
Positioning . . . . . . . . . . . . . . . . . . . . . . . . . . . . . . . . . . . . . . . . . . . . . . . . . . . 96
Levelling . . . . . . . . . . . . . . . . . . . . . . . . . . . . . . . . . . . . . . . . . . . . . . . . . . . . . 96
Water inlet . . . . . . . . . . . . . . . . . . . . . . . . . . . . . . . . . . . . . . . . . . . . . . . . . . 96
Water drainage. . . . . . . . . . . . . . . . . . . . . . . . . . . . . . . . . . . . . . . . . . . . . . . . 97
Electrical connection . . . . . . . . . . . . . . . . . . . . . . . . . . . . . . . . . . . . . . . . . . . 98
Permanent connection. . . . . . . . . . . . . . . . . . . . . . . . . . . . . . . . . . . . . . . . . . 98
55
Contents
132994110gb.qxd 11-04-2002 16:06 Pagina 55
Page 56

Safety instructions
The safety of AEG appliances complies with the industry standards and
with legal requirements on the safety of appliances. However, as manufacturers, we feel it is our duty to provide the following safety notes.
General safety
• Repairs to the machine must be carried out only by qualified personnel. Repairs carried out by inexperienced persons could cause serious
danger. Contact your local AEG Service Force Centre.
• Never start the machine if the electrical supply cable is damaged or
the control panel or worktop are so damaged that inner components
can be reached.
• Unplug the appliance before carrying out any cleaning or maintenance operations.
• Never pull the power supply cable to remove the plug from the socket; always take hold of the plug itself.
• Never spray the machine with a jet of water. Danger of electric shock!
• During high temperature wash programmes and during the drying
cycle the door glass may get hot. Do not touch it!
• Let the water cool down before carrying out emergency emptying or
before opening the door in an emergency.
• Small animals can gnaw electric wires and water hoses causing electrocution hazard and damage due to water leaks.
Positioning, connection, starting up
• Follow the instructions for positioning and connection.
• Carry out a first wash without laundry (COTTONS 60, with half the
amount of detergent) in order to remove any manufacturing residue
from the tub and the drum.
• Should the machine be purchased in winter, when temperatures can
be below 0°, leave the appliance for 24 hours at ambient temperature
before starting it.
56
132994110gb.qxd 11-04-2002 16:06 Pagina 56
Page 57

Child safety
• Children are often not aware of how dangerous electrical appliances
can be. When the machine is working, children should be carefully
supervised and not be allowed to play with the appliance - there is a
risk that they could become trapped inside.
• The packaging components (e.g. plastic film, polystyrene) can be dangerous to children - danger of suffocation! Keep them out of children’s reach.
• Keep all detergents in a safe place out of children’s reach.
• Make sure that children or pets do not climb into the drum.
• When the appliance is to be scrapped, cut off the electrical supply
cable and destroy the plug with the remaining cable. Disable the door
catch in order to prevent children from becoming trapped inside
while playing.
Proper use
• This appliance is designed for domestic use only. If the machine is
used for any other purposes or is not used correctly, the manufacturer accepts no responsibility for any damage that might occur.
• For safety reasons, the appliance must not be modified.
• Use only detergents suitable for washing machines and follow the
manufacturer’s instructions.
• Garments which have been in contact with flammable solvents
should not be machine washed.
• Do not use your machine for dry cleaning.
• Dyes and bleaching agents may only be used if specifically permitted
by the manufacturer of these products. We cannot be held responsible for any damage.
• Always unplug the appliance and turn off the water tap after use.
57
Safety instructions
132994110gb.qxd 11-04-2002 16:06 Pagina 57
Page 58

Disposal
Packaging materials
The materials marked with the symbol are recyclable.
>PE<=polyethylene
>PS<=polystyrene
>PP<=polypropylene
This means that they can be recycled by disposing of them properly in
appropriate collection containers.
Machine
Use authorised disposal sites for your old appliance. Help to keep your
country tidy!
Tips for environmental protection
To save water, energy and to help protect the environment, we recommend
that you follow these tips:
• Normally soiled laundry may be washed without prewashing in order
to save detergent, water and time (the environment is protected too!).
• Use the energy saving programme when washing normally soiled garments.
• The machine works more economically if it is fully loaded (for both
washing and drying cycles).
• When small loads are washed, use only half to two thirds of the recommended amount of detergent.
• The machine will consume less energy if the laundry is adequately
spun before being dried.
• With adequate pre-treatment, stains and limited soiling can be
removed; the laundry can then be washed at a lower temperature.
• If the water has a medium or high degree of hardness (starting from
hardness degree II, see “Detergents and additives”) water softeners
must be added.
The amount of detergent can then be adjusted to hardness degree I (= soft).
58
132994110gb.qxd 11-04-2002 16:06 Pagina 58
Page 59

Main features of your washer-dryer
• Programme and temperature setting using the programme selector.
• Stain programme for effectively treating stained washing.
• Energy saving programme for normally soiled cotton items.
• Speed for the final spin can be reduced to 1200, 900, 700 or 400
rpm.
• RINSE HOLD: the laundry is left immersed in the final rinse water to
prevent creasing.
• Delay timer: programme start can be delayed by 1 to 19 hours (e.g.
to times with a more economical power rate).
• Programme progress display showing the programme steps selected
and the programme phase which is running.
• Because of its gentle washing action, the special wool cycle washes
your garments with extreme care.
• The drying programmes will enable you to have dry and soft laun-
dry in a short time.
• 3-compartment drawer for detergent and fabric softener.
• Unbalance detection device: to prevent vibration during spinning.
59
132994110gb.qxd 11-04-2002 16:06 Pagina 59
Page 60

Description of the appliance
Front view
60
Lade voor was- en nabehandelingsmiddel
Bedieningspaneel
Deur
Pluizenfiltre
in hoogte verstelbare voeten
Detergent drawer
Control panel
Door
Drain filter
Adjustable feet
132994110gb.qxd 11-04-2002 16:06 Pagina 60
Page 61

61
Control panel
A = Option buttons
B = Spin speed button
C = Electronic drying button
D = Display
E = START/PAUSE button
F = Delay start button
G = Drying time button
H = Programme progress display
J = Programme selector dial
Programme selector dial
The programme selector determines the
type of washing cycle (e.g. water level,
drum movement, number of rinses), the
washing temperature and enables the
required drying programme to be selected
according to the type of laundry.
The selector dial is divided into 5 sections:
• Cottons (Witte was, bonte was)
• Synthetics (Kreukherstellend)
• Delicates (Fijne was)
• Wool (Wol) (hand washing)
• Special programmes
• Reset programme O
The selector dial can be turned either clockwise or anticlockwise.
Description of the appliance
132994110gb.qxd 11-04-2002 16:06 Pagina 61
Page 62

62
Description of the appliance
Position E corresponds to the ENERGY SAVING programme at approx.
67°C for normally soiled laundry, extended washing time (cannot be
combined with QUICK).
Position “Strijkvrij” at 40°C = Easy to iron.
In this position the laundry is gently washed and spun to avoid any
creasing. In this way ironing is easier.
Position “KOUD” = cold wash
Position “DROGEN” = drying
START/PAUSE button
This button has three functions:
a) Start
After having selected the required programme, press this button to start
the machine. If you have selected the DELAY START option, the machine
starts its hourly countdown.
b) Pause
To interrupt a programme which is running, press the START/PAUSE
button: the information on the display starts to flash.
To restart the programme from the point at which it was interrupted,
press the START/PAUSE button again.
c) Empty out water
At the end of a programme which ends with water in the drum (SPOEL-
STOP option), press the START/PAUSE button to empty out the water:
the machine will empty and spin.
DELAY START button (Starttijdkeuze)
The wash programme can be delayed from 1 hour up to a maximum of
19 hours.
The button must be pressed after selecting the programme and
before pressing the START/PAUSE button.
The figures indicating the delay appear for about 3 seconds in the display. The duration of the selected wash programme is then displayed.
After depressing the START/PAUSE button, the machine starts its hourly
countdown.
To alter or cancel the preset delay, press the START/PAUSE button, then
press the DELAY START button until the required time is displayed or, if
you wish to cancel the delay, until the symbol 0 h is displayed.
Then press the START/PAUSE button again.
When the delay is cancelled, the display shows the duration of the wash
programme previously selected.
132994110gb.qxd 11-04-2002 16:06 Pagina 62
Page 63

63
ELECTRONIC DRYING button (Kastdroog/Strijkdroog)
By means of this button you can choose the required degree of drying
for cottons and synthetics:
- Store dry (Kastdroog)
- Iron dry (not for synthetics) (Strijkdroog)
The drying time is automatically adjusted by the machine: the laundry
will be dried to the selected degree of dryness.
DRYING TIME button (droogtijd)
If you wish to carry out a timed programme instead of an electronic programme push the button until the drying time you want appears in the
display according to the fabrics (cotton or synthetics) you have to dry.
For COTTON you can select a drying time from 10 minutes to 130 minutes.
For SYNTHETICS you can select a time from 10 minutes to 100 minutes.
Programme Option buttons
Depending on the programme, different functions can be combined.
These must be selected after choosing the desired programme and
before depressing the START/PAUSE button.
When these buttons are pressed, the corresponding pilot lights come on.
When they are pressed again, the pilot lights go out.
STAIN (VLEKKEN)
To treat heavily soiled or stained laundry with stain remover (extended main
wash with time optimised stain action phase, not selectable for wool or programmes with temperatures lower than 40°C).
This function cannot be used with QUICK, SOAK and PREWASH.
QUICK (KORT)
By pressing this button the washing time is reduced. For use when
washing lightly soiled laundry.
This option is not available with the wool and economy programme and
cannot be used with STAIN.
SOAK (INWEKEN)
The machine performs a soak of about 30 minutes at 30°C. By pressing
the DELAY START button the soak time can be prolonged up to 10 hours
max. After this time the wash cycle will automatically start.
This function cannot be used with WOOL, PREWASH or STAIN programme.
Description of the appliance
132994110gb.qxd 11-04-2002 16:06 Pagina 63
Page 64

The soak programme ends with a short spin in programmes for Cotton and
Synthetics, and with emptying of the water without spinning for Delicates.
PREWASH (VOORWAS)
The machine performs a prewash cycle at 30°C max. The prewash cycle
ends with a short spin in programmes for Cotton and Synthetics, and
with emptying of the water without spinning for Delicates.
This option is not available with the wool programme and cannot be
used with SOAK and STAINS.
For use when washing heavily soiled laundry.
Important: By depressing at the same time buttons VOORWAS and
KORT the machine will perform an extra rinse (see page 77).
By depressing at the same time VOORWAS and VLEKKEN the acoustic
signal at the end of programme is suppressed.
SPIN SPEED
Press this button to reduce the maximum speed of the final speed proposed
by the machine for the selected programme or to select option “SPOELSTOP”
(RINSE HOLD).
The maximum spin speed for cotton is 1600 rpm, for synthetics and
wool 900 rpm and for delicates 700 rpm.
RINSE HOLD (SPOELSTOP)
By selecting this option, the last rinse water is not emptied out, to
prevent the fabrics from creasing. When the programme has finished,
the pilot light EINDE (END) on the programme progress display illuminates to indicate that the water must be emptied out. The door is locked.
To empty out water:
• press the START/PAUSE button: after emptying, the machine performs
the spin cycle required for the type of wash selected;
• select the spin speed and then press START/PAUSE;
• select the DRAIN programme “Pompen” to empty out the water without spinning.
Warning! The programme selector dial must be turned first to RESET O
and then to the DRAIN programme.
If the water is not emptied out, the machine automatically empties
itself after 18 hours.
The RINSE HOLD option cannot be selected for the automatic WASHING &
DRYING programme.
64
Description of the appliance
132994110gb.qxd 11-04-2002 16:06 Pagina 64
Page 65

Display
The display shows the following information:
• Duration of the selected programme (in minutes), calculated auto-
matically on the basis of the maximum recommended load for each type
of fabric.
• Selected drying time (max. 130 minutes for cotton, 100 minutes for
synthetics).
After the programme has started, the time remaining is updated every
minute.
• When the programme has finished, a steadily lit zero is displayed.
• Delayed start, (19 hours max.) programmed using the special button.
The countdown is updated every hour.
• Alarm code indicating a fault in the machine operation (see page 86).
Programme progress display
By selecting the wash programme, the pilot lights corresponding to the various phases making up the programme come on.
After the machine has started, only the running
phase pilot light stays on. When the programme has
finished, the END pilot light comes on.
When the programme has finished, if the OVERDOSAGE (OVERDOSERING)
light comes on, it indicates that too much detergent has been used or
that the drain filter is blocked.
65
Description of the appliance
132994110gb.qxd 11-04-2002 16:06 Pagina 65
Page 66

Cancelling a programme
To cancel a programme which is running, turn the programme selector
dial to the RESET O position.
Warning! After a programme which ends with water in the drum
(SPOELSTOP option), turn the selector dial first to O and then to the
DRAIN programme “Pompen”.
Altering a programme which is running
To alter a programme, first set the machine to PAUSE by pressing the
START/PAUSE button.
Any function can be modified before the machine starts it. After selecting the new option press the START/PAUSE button again to re-start the
selected programme.
To modify the selected programme turn the programme selector dial to
O and then choose a new programme.
The water is not emptied out and after pressing the START/PAUSE button again the machine restarts with the newly selected programme.
Opening the door after the programme has started
To open the door set the machine to PAUSE by pressing the START/PAUSE
button.
The door can be opened if:
• the machine is not already heating or drying;
• the water level is not above the bottom edge of the door;
• the drum is not turning.
The light “DEUR” on the control panel indicates if the door can be
opened:
• green light: the door can be opened;
• unlit light: the door cannot be opened;
• flashing red light: the door is open.
66
Description of the appliance
132994110gb.qxd 11-04-2002 16:06 Pagina 66
Page 67

Detergent dispenser drawer
Compartment for prewash or soak detergent and stain remover. The prewash
or soak detergent is added at the beginning of the wash programme. The
stain remover is added during the STAIN-Action phase in the main wash.
Compartment for powder or liquid detergent used for main wash.
It is emptied at the beginning of the wash cycle.
Compartment for liquid additives (fabric softener, starch).
It is emptied at the last rinse.
The quantity of additives must not exceed the “MAX” mark in the
drawer.
Before the first wash
Before your first wash, we recommend that you run a cotton cycle at
60°C, without any laundry in the machine, to remove any manufac-
turing residue from the drum and tub.
Pour 1/2 a measure of detergent into the dispenser drawer and start the
machine.
67
Description of the appliance
132994110gb.qxd 11-04-2002 16:06 Pagina 67
Page 68

Preparing the wash cycle
Sorting out and preparing the laundry
• Sort out the laundry according to type of fabrics and care labels (see
“Types of fabric and care labels”).
• Empty pockets.
• Remove any metal parts (safety pins, clips, etc.).
• To prevent the laundry from getting damaged and forming bundles,
it is advisable to close zips, button up pillowcases and quilt covers and
tie up loose straps such as those of aprons.
• Turn double faced items inside out (sleeping bags, anoraks, etc.)
• Turn coloured knitted fabrics, woollens and fabrics with trim inside
out.
• Wash small and delicate items (baby socks, tights) inside a laundry net
or in a pillow case closed with a zip, or in larger socks.
• Treat curtains with special care. Remove all metal or plastic hooks or
put them in a net or a bag. We take no responsibility for any damage.
• Whites and coloureds must be washed separately: white items can
loose their whiteness.
• New coloured fabrics often have excess dyes; it is advisable to wash
them separately for the first time.
• Wash small and large items together; this improves the washing result
and the laundry is better distributed during spinning.
• Shake out garments before putting them into the machine.
• Insert each garment separately.
68
132994110gb.qxd 11-04-2002 16:06 Pagina 68
Page 69

Weight of laundry
Types of fabric and care labels
The labels on garments help you to select the most suitable wash programme. The laundry should be sorted out according to the type of fabric and the instructions indicated on care labels.
Temperatures indicated on labels are always maximum temperatures.
Cotton
Linen and cottons marked with this symbol can be washed at high temperatures.
Cotton
Linen and cottons marked with this symbol are colourfast and can be
washed at 60°C.
Cotton
Garments marked with these symbols have delicate colours, therefore
the washing temperature must not exceed these values.
Synthetics
Mixed and synthetic fabrics marked with these symbols require a gentle
wash programme and they must therefore be washed using the specific
programme.
60
40
30
406095
69
Sort of laundry
Preparing the wash cycle
Approximate
dry weights
1200 gBathrobes
300-600 gWork shirts
700 gQuilt covers
500 gSheets
100 gBlouses
200 gHand towels
100 gTea towels
200 gShirts
200 gPillowcases
200-250 gNight-gowns/Pyjamas
200-300 gTablecloths
250 gUnderwear
132994110gb.qxd 11-04-2002 16:06 Pagina 69
Page 70

Delicates
Microfibres, synthetics or curtains marked with these symbols require a
very gentle treatment.
The DELICATES programme is suitable for this type of fabric.
Woollens and particularly delicate items
Fabrics such as wool, wool mix or silk marked with this symbol are particularly sensitive to machine washing.
The WOOL programme is suitable for this type of fabric.
The wool wash cycle of this machine has been approved by Woolmark
for the washing of machine washable Woolmark products provided that
the garments are washed according to the instructions on the garment
label and those issued by the manufacturer of this washer-dryer.
M9605.
If the label has the symbol (do not wash), the garments must not
be machine washed!
304030
40
70
Preparing the wash cycle
132994110gb.qxd 11-04-2002 16:06 Pagina 70
Page 71

71
Detergents and additives
Which detergent and additive?
Use only detergents and additives for washing machines. Follow the
manufacturer’s instructions.
How much detergent?
The quantity depends on:
• the load:
if the manufacturer does not provide any indications on the amount of
detergent for small loads, use about one third less than the suggested
amount for half loads and half the amount for very small loads;
• the degree of soil:
use a small amount of detergent for lightly soiled garments. Judge
the amount according to the detergent manufacturer’s instructions
and size of the load;
• the water hardness:
the harder the water, the more detergent required. Instructions
according to water hardness are given on the detergent pack.
Liquid detergent
Liquid detergent can be poured directly into the main wash compartment
of the dispenser drawer immediately before starting the programme, or
a special dispenser can be used that is placed directly in the drum. Measure the detergent according to the manufacturer’s instructions.
Adding a water softener (descaling product)
A water softener must be added when water has a medium-high degree
of hardness (from degree of hardness II). Follow the manufacturer’s
instructions. The quantity of detergent can then always be adjusted to
degree of hardness I (= soft). Information on water hardness can be
obtained from your local water supply authority.
Information on water hardness
Preparing the wash cycle
Degree of hardness French degrees °TH
0-15
German degrees °dH
0-7I=Soft
16-257-14II=Medium
26-3714-21III=Hard
more than 37more than 21IV=Very hard
132994110gb.qxd 11-04-2002 16:06 Pagina 71
Page 72

Preparing the drying cycle
As a dryer, the machine works on the condensation principle.
Therefore, the water tap must be open and the drain hose must
drain water into a sink or into the drain pipe, even during the drying cycle.
Load
Warning:
Loads of washed laundry exceeding these values must be divided
before being dried, otherwise poor results will be obtained.
Garments not suitable for drying
• Particularly delicate items such as synthetic curtains, woollen and silk,
garments with metal inserts, nylon stockings, bulky garments such as
anoraks, bedcovers, quilts, sleeping bags and duvets must not be
machine dried.
• Garments padded with foam-rubber or materials similar to foamrubber must not be machine dried; they represent a fire hazard.
• Also, fabrics containing residues of setting lotions or hair sprays, nail
solvents or similar solutions must not be machine dried in order to
avoid the formation of harmful vapours.
72
Sort of laundry
max. load
(dry weight)
3 kgLinen and cottons
2 kgSynthetics
132994110gb.qxd 11-04-2002 16:06 Pagina 72
Page 73

Drying symbols on garment labels
Always look at the garment label to check whether garments can be
machine dried.
The following symbols refer to drying:
Machine drying is usually possible
Normal drying (normal temperature)
Gentle drying (reduced temperature)
Do not machine dry
Duration of the drying cycle
The drying time can vary according to
• the final spin speed;
• the required degree of drying (store dry or iron dry);
• the type of laundry;
• the size of load.
The usual drying times for the timed programmes are indicated in the
programme chart. As you become more familiar with the appliance, you
will discover the drying times that best suit your needs according to the
various type of fabric. It is a good idea to make a note of these times.
Modification of the drying time or degree of drying
If you wish to modify the drying time or the degree of drying when a drying programme is running, first depress START/PAUSE button to set the
machine to PAUSE. After modifying the time or degree, depress
START/PAUSE again to continue the programme.
Fibre residue
After drying fluffy fabrics, such as new towels, it is advisable to perform
the RINSE programme “SPOELEN” to be sure that any residue that may
remain in the tub is completely removed and does not stick to garments
dried afterwards.
After each drying cycle the filter should be checked and cleaned.
73
Preparing the drying cycle
132994110gb.qxd 11-04-2002 16:06 Pagina 73
Page 74

Additional drying
Should the laundry still be too wet at the end of the programme, set
another short drying time.
Warning! To prevent the formation of creases or shrinking of fabrics, avoid excessive drying.
How to dry
Drying only
Max. load
- cottons 3 kg
- synthetics 2 kg
During the drying programme the water tap must be open and the
drain hose must be correctly positioned.
Turn the programme selector dial to DROGEN (DRYING) for cottons or
synthetics.
If you wish to carry out the timed drying press button “DROOGTIJD”
until the time you want appears in the display.
If you wish to carry out the electronic drying depress the relevant button
until the light corresponding to the degree of dryness required (store dry kastdroog or iron dry - strijkdroog) illuminates.
Press the START/PAUSE button to start the programme.
At the end of the cycle turn the programme selector dial to O and
remove the laundry.
74
Preparing the drying cycle
132994110gb.qxd 11-04-2002 16:06 Pagina 74
Page 75

75
How to wash
Max. load
- cottons 6 kg
- synthetics and delicates 3 kg
- wool 2 kg
Load the laundry
Open the door.
Place the laundry in the drum, one item at a time. Distribute laundry as
evenly as possible. Close the door.
Add detergent and additive
Pull the drawer
out till it stops.
Pour the main
wash detergent
into compartment .
If you wish to
perform a prewash, a SOAK or
a STAIN-Action programme, pour detergent or stain remover into compartment .
Important!
Do not use normal detergent for the STAIN-Action programme,
always use a STAIN remover.
Pour the fabric softener into compartment without exceeding the
“MAX” mark.
Close the drawer gently, pushing it fully in.
132994110gb.qxd 11-04-2002 16:06 Pagina 75
Page 76

76
How to wash
Selection of the desired wash programme
Turn the programme selector
dial to the desired position:
the lights corresponding to
the different phases making
up the selected programme
light on.
The display shows the duration of the programme.
Selection of the desired options
depending on the degree of soil of the
laundry. The corresponding light comes on.
Selection of the spin speed or RINSE HOLD option (Spoelstop)
It is possible to select a lower spin speed by means
of the relevant button; the light corresponding to
the selected speed comes on.
Selecting option SPOELSTOP (RINSE HOLD) the laundry is left immersed in the final rinse water.
If the spin speed is not reduced , the final spin speed will be as follows:
- cottons 1600 r.p.m.
- synthetics 900 r.p.m.
- delicates 700 r.p.m.
- wool (hand washing) 900 r.p.m.
132994110gb.qxd 11-04-2002 16:06 Pagina 76
Page 77

EXTRA RINSE
This appliance is designed for saving water. However, for people with
a very delicate skin (allergic to detergents) it may be necessary to
rinse the laundry using an extra quantity of water (extra rinse).
The extra rinse is available only with the cotton, synthetics or delicate
programme.
Selection of the EXTRA RINSE option
Press simultaneously buttons VOORWAS and KORT for about 3
seconds: the light SPOELEN+ comes on in the programme progress
display.
This function stays permanently on. To remove it press the same buttons again until the light SPOELEN+ comes off.
Selection of the DELAY START option
To delay starting of a programme, press the
DELAY START button (STARTTIJDKEUZE) before
starting the machine. The figures corresponding to the selected delay will be displayed for
about 3 seconds, after which the duration of
the selected programme will appear on the display.
If the SOAK button (INWEKEN) has been pressed the selected delay
will correspond to the soak time. If no delay time is selected the soak
programme will last about 30 minutes.
When the START/PAUSE button is pressed, the selected delay will
appear again on the display and the machine starts its countdown.
77
How to wash
132994110gb.qxd 11-04-2002 16:06 Pagina 77
Page 78

Starting the programme
1. Check that the water tap is open.
2. Press START/PAUSE to start the programme.
If the Delay Start option has been selected the
programme will start at the end of the countdown.
If the door light is red and flashing at the start of the programme it
indicates that the door is open. Close the door and press the
START/PAUSE button again.
If the delay start option has been selected, the machine starts its
countdown, in hours, which will appear on the display. During this
period it is possible to load other laundry, to modify or cancel the
delay time.
• Load other laundry: press the START/PAUSE button. Open the door.
Load the laundry. Close the door and press the START/PAUSE button
again.
• Modify or cancel the delay time: press the START/PAUSE button.
Press the DELAY START button until the time required appears on
the display, or 0h, if you wish to cancel it. Press the START/ PAUSE
button again.
Programme progress display
By selecting the wash programme, the pilot lights corresponding to
the various phases making up the programme come on. After the
machine has started, only the running phase pilot light stays on.
Display
The time to the end of the programme decreases minute
by minute and appears on the display.
At the end of the programme
The machine stops automatically. A zero appears on the display. An
acoustic signal is clearly audible. The END light comes on in the programme progress display.
If the light OVERDOSERING (OVERDOSAGE) comes on it indicates that
too much detergent has been used. At the next wash carefully follow
the detergent manufacturer’s instructions. Measure out detergent
according to amount, type, degree of soil of fabrics and water hardness.
78
How to wash
132994110gb.qxd 11-04-2002 16:06 Pagina 78
Page 79

This light could come on also when the drain filter is blocked.
If the RINSE HOLD option (SPOELSTOP) has been selected, the water
must be emptied out before opening the door either
- by pressing the START/PAUSE button (the laundry will be spun at the
speed corresponding to the selected type of fabrics. The spin speed
can be reduced by means of the SPIN SPEED button)
- or by selecting the spin speed and then pressing START/PAUSE-button
- or by turning the selector dial to O and then to DRAIN “POMPEN”
and pressing the START/PAUSE button again. In this case the water
will be emptied, but the laundry is not spun.
Turn the selector dial to O.
Remove the laundry from the drum.
Check that the drum is empty so as to avoid any forgotten items
being damaged in a subsequent wash (e.g. shrinking) or their colour
running into a load of whites.
Close the water tap.
Leave the door open to prevent the formation of mildew and unpleas-
ant smells.
Automatic washing and drying
(NON-STOP programme)
Warning! For NON-STOP programmes, it is also essential not to exceed
the maximum load sizes of 3 kg for cotton and 2 kg for synthetics.
Do not use dosing device/ball when carrying out a NON-STOP programme. The plastic material with which it is made cannot withstand
the high temperature in the drum during drying.
Load the laundry.
Add detergent and additive.
Select the wash programme.
Select eventually the required options by means of the relevant buttons.
If possible, do not select a spin speed lower than that proposed by the
appliance to avoid a too long drying time so saving energy.
By automatic washing and drying it is not possible to select a spin speed
lower than 900 r.p.m. for cottons and 700 r.p.m. for synthetics with timed
drying.
Select the drying time or degree of drying.
Start the programme by depressing the START/PAUSE button.
At the end of the programme, turn the selector dial to O.
Remove the laundry.
79
How to wash
132994110gb.qxd 11-04-2002 16:06 Pagina 79
Page 80

80
Programme chart
Wash programmes
In compliance with EC directive 92/75, the consumption figures indicated on the
energy label refer to the 60°C wash programme for cotton.
* The consumption data shown on this chart is to be considered purely indicative, as it may vary depending on the quantity and type of laundry, on the inlet
water temperature and on the ambient temperature. It refers to the highest temperature for each wash programme.
Wash
programme
White
Cottons
(Witte was)
Temp.
95°-60°
Fabrics
Cotton and linen,
for example normally soiled work
garments, sheets,
household linen,
underwear, towels.
Additional
functions
STAIN
SOAK
QUICK
PREWASH
EXTRA RINSE
RINSE HOLD
SPIN SPEED
Max.
load
6 kg
E
Whites
ECONOMY
60°
Cotton and linen, for
example normally to
lightly soiled sheets
and household linen.
STAIN
SOAK
PREWASH
EXTRA RINSE
RINSE HOLD
SPIN SPEED
6 kg
Coloured
cottons
(Bonte
was)
60°-50°
40°-30°
Coloured cotton or
linen fabric, shirts,
underwear, towels.
STAIN
SOAK
QUICK
PREWASH
EXTRA RINSE
RINSE HOLD
SPIN SPEED
6 kg
Synthetics
(Kreuk-
herstellend)
60°-50°
40°
Synthetic fabrics,
underwear,
coloured garments,
non-shrink shirts,
blouses.
STAIN
SOAK
QUICK
PREWASH
EXTRA RINSE
RINSE HOLD
SPIN SPEED
3 kg
Delicates
(Fijne was)
40°-30°
COLD
Delicate fabrics, for
example curtains.
STAIN
SOAK
QUICK
PREWASH
EXTRA RINSE
RINSE HOLD
SPIN SPEED
3 kg
Wool
(Wol)
40°-30
COLD
Wool, wool mixtures, silk.
RINSE HOLD
SPIN SPEED
2 kg
Energy
kWh
2.0
1.6
1.14
1.0
0.55
0.4
Water
lt.
55
52
52
55
60
63
Duration
min.
161
153
137
96
67
58
Consumption*
132994110gb.qxd 11-04-2002 16:06 Pagina 80
Page 81

Programme chart
Special programmes
* The consumption data shown on this chart is to be considered purely
indicative, as it may vary depending on the quantity and type of laundry,
on the inlet water temperature and on the ambient temperature.
81
Programme
Descrip-
tion
Programme phases
Additional
functions
Max.
load
Gentle
rinses
(Spoelen)
This programme can
be used for
rinsing hand
washed garments.
3 rinses with liquid
additive.
Short spin.
(700 rpm max)
EXTRA RINSE
RINSE HOLD
SPIN SPEED
6 kg
Softeners
(Was-
verzachten)
Hand washed
garments to
be starched
or softened.
1 rinse with liquid
additive.
Long spin.
RINSE HOLD
SPIN SPEED
6 kg
Drain
(Pompen)
For emptying
out the last
rinse water in
programmes
with the Rinse
Hold option
The water is emptied
out.
/
Spin
(Centrif.)
Separate spin
for cottons.
Long spin.
SPIN SPEED
6 kg
Short spin
(Kort centrif.)
Separate spin
for synthetics
and delicate
fabrics.
Short spin.
(700 rpm max)
SPIN SPEED
3 kg
Energy
kWh
0.025
/
/
Water
lt.
52
20
/
/
/
Duration
min.
23
22
3
12
4
O
Reset/Off
For cancelling the
programme which
is running or to
switch the machine
off.
/ / /
Consumption*
132994110gb.qxd 11-04-2002 16:06 Pagina 81
Page 82

Programme chart
Timed Drying
(*) The STORE DRY drying programme for cotton is the reference programme
for the Energy Label data, in compliance with standard EEC 92/75.
Consumption data for timed drying
The values shown in the chart have been obtained in laboratory tests.
They may vary when the appliance is used at home, but they can be
used as indicative values.
82
Degree of drying Type of fabric Max. load Spin speed
Drying time
mins
Store dry (*)
Suitable for items to
put away without
ironing
Iron dry
Suitable for ironing
Cotton and
linen (towels,
T-shirts,
bathrobes)
3 kg 1600 70-80
1.5 kg 1600 35-45
Synthetics and
mixed fabrics
(jumpers,
blouses,
underwear,
household
linen)
2 kg 900 70-80
1 kg 900 35-45
Cotton and
linen (sheets,
tablecloths,
shirts, etc.)
3 kg 1600 50-60
1.5 kg 1600 30-40
Degree of drying Spin speed
Max
load
Water
litres
Energy
kWh
Duration
minutes
Cotton
Store dry
1600 3 kg 19 1.85 70-80
Cotton
Iron dry
1600 3 kg 15 1.4 50-60
Synthetics
Store dry
900 2 kg 20 1.2 70-80
132994110gb.qxd 11-04-2002 16:06 Pagina 82
Page 83

83
Cleaning and maintenance
After each wash
At the end of the wash programme, pull the dispenser drawer out a little to let it dry.
Leave the door ajar to allow air to circulate.
If the machine is not used for a prolonged period:
Close the water tap and unplug the appliance.
Periodical cleaning
Exterior
Clean the outside of the cabinet with soap and water only. Rinse with
clean water and dry.
Important: do not use methylated spirits, solvents or similar products
to clean the cabinet.
Detergent dispenser drawer
After a while,
detergents and
fabric softeners
leave deposits in
the drawer.
Clean the drawer,
from time to
time, by rinsing it
under a running
tap. To remove the drawer from the machine, press the button in the
rear left-hand corner.
To facilitate cleaning, the top part of the additive compartment can be
removed.
Detergent can also accumulate inside the
drawer recess: clean it with an old toothbrush.
Refit the drawer after cleaning.
132994110gb.qxd 11-04-2002 16:06 Pagina 83
Page 84

Door seal
Check from time to time the door seal and
eliminate eventual possible objects that
could be trapped in the fold.
Drain filter
The drain filter collects threads and small objects inadvertently left in
the laundry. Check regularly that the filter is clean.
Open the filter
door.
Place a container under the filter and unscrew
it; some water
will come out of
the filter.
Pull out the filter.
Clean the filter
under a running
tap, then refit it,
screwing it fully
in.
Water inlet filter
If you notice that the machine is taking longer to fill, check that the
filter in the water inlet hose is not blocked.
Turn off the water tap.
Unscrew the hose from the tap.
Clean the filter in the hose with a stiff brush.
Screw the hose back onto the tap.
84
Cleaning and maintenance
132994110gb.qxd 11-04-2002 16:06 Pagina 84
Page 85

Emergency emptying out
If the water is not discharged (pump is blocked, filter or drain pipe are
clogged), proceed as follows to empty out the machine:
• pull out the plug from the power socket;
• close the water tap;
• if necessary, wait until the water has cooled;
• place a bowl on the floor;
• put the drain hose end into the bowl and let the water out.
Should it not be possible to have access to the drain hose because, for
example the appliance is built in the kitchen furniture, slightly loosen
the drain filter after placing a bowl on the floor to let the water come
out slowly.
At the end screw the filter again.
Frost precautions
If the machine is installed in a place where the temperature could drop
below 0°C, proceed as follows:
• Close the water tap and unscrew the water inlet hose from the tap.
• Place the end of the drain hose and the inlet hose in a bowl placed
on the floor.
• Select the “DRAIN” programme “POMPEN” and run it until the
machine stops.
• Turn the programme selector dial to O (RESET).
• Remove the plug from the power socket.
• Screw the water inlet hose back on and put the drain hose back in its
place.
By doing this, any water remaining in the machine is removed, avoiding
ice forming and consequently damage to the appliance.
When you use the machine again, make sure that the ambient temperature is above 0°C.
85
Cleaning and maintenance
132994110gb.qxd 11-04-2002 16:06 Pagina 85
Page 86

86
Something not working?
If during the spin cycle the machine makes an unusual
whistling noise, different from the noise made by traditional washing machines, this is due to a new type of
motor.
If water is not visible in the drum, this is due to
the modern technology of new washing
machines that use less water than traditional
machines.
Troubleshooting
If a problem arises, you can try to solve it yourself following the
instructions below.
If you call out an engineer when one of the following problems arises,
or to repair a fault due to incorrect use, the call-out will be charged
even if requested within the guarantee period.
During machine operation the following alarm codes may be displayed:
- E10: problem with the water supply (phase light SPOELEN+ is on)
- E20: problem with water draining (phase light SPOELEN is on)
- E40: door open (phase light HOOFDWAS is on)
Once the problem has been eliminated, press the START/PAUSE button
to restart the programme. If after all checks, the problem persists, contact your local Service Centre.
Problem
The machine does not work
Possible cause
The main electrical fuse Replace the fuse.
has blown.
The door is not properly Close the door; the click
closed (E40). of the lock should be heard.
The plug is not connected. Insert the plug.
The START button has not Press the button.
been pressed.
The DELAY START Check the selected delay on
option has been selected. the display.
Solution
132994110gb.qxd 11-04-2002 16:06 Pagina 86
Page 87

87
Something not working?
Problem
The machine does not
empty and/or does not spin
Possible cause
The drain hose is Check the whole length of
squashed or kinked (E20). the hose and remove the
kink.
The drain filter or the Clean the filter or check
drain hose are clogged (E20). the hose.
The RINSE HOLD option Empty out the water by
(stop with water in drum) pressing the START button
has been selected. or selecting the DRAIN
programme.
The laundry is not evenly Redistribute the laundry
distributed inside the drum. manually in the drum.
There is water on the floor
Too much detergent has Measure detergent
been used. according to the
manufacturer’s instructions.
An unsuitable detergent Use a suitable washing
has been used that machine detergent.
creates too much foam.
One of the connectors on Check that the hose is
the water inlet hose is firmly screwed on at both
leaking. ends.
The drain filter has not Fully screw the filter into
been properly screwed on place.
after cleaning.
Solution
The machine does not fill
The water tap is closed (E10). Open the water tap.
The water inlet hose is Check the whole length of the
squashed or kinked (E10). hose and remove the kink.
The small filter of the water Clean the filter.
inlet hose is clogged (E10).
The door is not properly Close the door.
closed (E40).
The machine fills then
empties immediately
The end of the drain hose Place the hose at the right
is too low. height (see Installation
section).
132994110gb.qxd 11-04-2002 16:06 Pagina 87
Page 88

88
Something not working?
Problem
The door will not open
Possible cause
The programme is still Wait until the end of the
running and the drum programme before opening
is turning. the door.
The water level is above the Before opening the door,
bottom edge of the door. the water must be emptied
out.
The machine is heating the Wait until the end of the
water or drying the heating or drying phase.
clothes.
Solution
The machine vibrates or is
noisy
The transit bolts have Check that the machine
not been removed. has been unpacked as
described in the Installation
section.
The feet have not been Carefully level the machine.
adjusted.
There is little laundry in Correct operation of the
the drum. machine is not affected.
132994110gb.qxd 11-04-2002 16:06 Pagina 88
Page 89

89
Something not working?
Spinning starts late or the
machine does not spin
The unbalance detection If the laundry is not evenly
device that prevents distributed inside the drum
excessive vibration during at the beginning of the
spinning has cut in. spin cycle, the machine
detects this and tries to
redistribute it more evenly
by means of a few drum
rotations.
Only when the laundry is
more evenly distributed
will the spin cycle be
performed, at a lower speed,
if the laundry is not evenly
distributed.
If, after about 10 minutes,
the laundry is still tangled,
the machine will not spin.
Therefore, if the laundry is
still wet at the end of the
cycle, it is advisable to
redistribute it manually
inside the drum and to
select the spin programme.
Problem Possible cause Solution
The machine will not dry or
the laundry is not dry
enough
The water tap is not open Open the water tap.
(E10).
The drain filter is clogged. Clean the filter.
The drying time or degree of Select the required function.
dryness has not been selected.
An appropriate drying time Select the appropriate
has not been chosen. drying time suitable for the
required degree of drying,
according to the type of
fabric (cottons or synthetics).
There is too much laundry Reduce the load.
inside the appliance.
132994110gb.qxd 11-04-2002 16:06 Pagina 89
Page 90

Unsatisfactory washing results
If the laundry looks grey and lime scale is found in the drum
• Too little detergent has been used.
• An unsuitable detergent has been used.
• Stubborn stains have not been treated prior to washing.
• The programme/temperature has not been correctly selected.
If grey stains remain on the laundry
• Laundry stained with ointments, grease or oil has been washed with
an insufficient amount of detergent.
• The temperature selected for the wash programme was too low.
• Fabric softener - especially the concentrated type - has come into
direct contact with the laundry. Wash these stains immediately and
pour fabric softener carefully.
Foam is still visible even after the last rinse
• Modern detergents often produce foam, even in the last rinse. However the laundry has been completely rinsed.
White residue is left on the laundry
• This is due to insoluble components in modern detergents and is
therefore not the result of insufficient rinsing. Shake or brush the
laundry. In future, it may be better to turn garments inside out before
washing them. Check the choice of detergent; try using liquid detergents.
90
Something not working?
132994110gb.qxd 11-04-2002 16:06 Pagina 90
Page 91

Technical data
Height x Width x Depth 84x60x60 cm
Depth with door opened 101.5 cm
Height adjustment ± 13 mm approx.
Net weight 84 kg approx.
Load (depending on programme) 6 kg max.
Use domestic
Drum speed during washing max. 55 rpm
Drum speed during spinning 1600/1200/900/700/400 rpm
Water pressure 50-800 kPa
This appliance complies with the following EC directives:
- 73/23/EEC of 19.2.1973 “Low voltage directive”, including directive
93 / 68 / EEC
- 89/336/EEC of 3.5.1989 “Electromagnetic Compatibility Directive”.
91
132994110gb.qxd 11-04-2002 16:06 Pagina 91
Page 92

Service
In the section “Something not working?” some problems that can be
solved by yourself are listed. Read this section in the event of problems.
If you are not able to find a solution, contact the Service centre.
Address for our consumer services department:
ELECTROLUX HOME PRODUCTS BELGIUM
Bergensesteenweg, 719 1502 LEMBEEK Tel. 02.3630444.
In all cases, explain your problem carefully, in order to facilitate troubleshooting: the engineer will be able to decide whether a service call
is necessary.
Take note of the serial number (Ser.No.) and the product number (Prod.
No.) indicated on the rating plate.
Ser. No. . . . . . . . . . . . . . . . . . . . . . .
Prod. No. . . . . . . . . . . . . . . . . . . . . .
Furthermore, try to specify, as precisely as possible:
- The symptoms of the fault
- When the fault occurs
- The alarm code displayed
When can a service visit be charged during the guarantee period?
- when it should have been possible to solve the problem by yourself,
with the help of the troubleshooting chart (see section “Something
not working?”)
- when the engineer has to come out several times because he has
not been given all the relevant information he needs and so, for
example, has to fetch spare parts. Repeated trips can be avoided if
you prepare your call to the Service centre as described above.
92
132994110gb.qxd 11-04-2002 16:06 Pagina 92
Page 93

Instructions for installation and electrical connection
Safety instructions for the installer
• This appliance is heavy, care should be taken when moving it.
• When unpacking the appliance, check that it is not damaged. If in
doubt, do not use it and contact the retailer.
• All internal packing must be removed before using the appliance.
Serious damage may be caused to the machine or adjacent furniture
if the protective transit devices are not completely removed. Refer to
the relevant paragraph.
• Any electrical work required to install this appliance must be carried
out by a qualified electrician.
• Any plumbing work required to install this appliance must be carried
out by a qualified plumber.
• After having installed the machine, check that it is not standing on
its electrical supply cable.
• If the appliance is placed on a carpeted floor, ensure that air can circulate freely between the adjustable feet and the floor.
• The installation should comply with local water authority and building regulations requirements.
• Should the appliance power supply cable need to be replaced, this
should be carried out by our Service Centre.
93
132994110gb.qxd 11-04-2002 16:06 Pagina 93
Page 94

Dimensions of the appliance
Front view and side view
Rear view
94
1015
335
165
50
40
45
85
Power cable
Drain
Cold water
132994110gb.qxd 11-04-2002 16:06 Pagina 94
Page 95

Installation
Unpacking
All transit bolts and packing must be removed before using the appliance.
Using a spanner, unscrew and remove the rear
right-hand bolt and lay the machine on its
back, taking care not to squash the hoses. This
can be avoided by placing one of the corner
packing pieces between the machine and the
floor.
Remove the polystyrene block from
the bottom of the
machine and
release the two
plastic bags.
Carefully remove the
right-hand bag (1)
then the left-hand
bag (2) by pulling them towards the centre of the machine.
Set the machine upright and remove the two remaining bolts from
the back.
Pull out the three
plastic spacers from
the holes into which
the bolts were fitted.
Plug the open holes
with the plugs which
you will find in the
plastic bag containing
the instruction booklet.
You are advised to keep all transit devices so that they can be refitted if the
machine ever has to be transported again.
95
132994110gb.qxd 11-04-2002 16:06 Pagina 95
2
1
Page 96

96
Installation
Positioning
Install the machine on a flat hard floor.
Make sure that air circulation around the machine is not impeded by
carpets, rugs etc.
• Before placing it on small tiles, apply a rubber coating.
• Never try to correct any unevenness in the floor by putting pieces of
wood, cardboard or similar materials under the machine.
• If it is impossible to avoid positioning the machine next to a gas
cooker or coal-burning stove, an insulating panel (85x57 cm) covered
with aluminium foil on the side facing the cooker or stove, must be
inserted between the two appliances;
• The machine must not be installed in rooms where the temperature
can drop below 0.
• The water inlet hose and the drain hose must not be kinked.
• Please ensure that when the appliance is installed, it is easily accessi-
ble for the engineer in the event of a breakdown.
Levelling
Carefully level by screwing the adjustable
feet in or out. Never place cardboard,
wood or similar materials under the
machine to compensate for any unevenness in the floor.
Water inlet
Connect the water
inlet hose to a separate tap with a 3/4"
thread.
The other end of the
inlet hose which
connects to the
machine can be
turned in any direction. Simply loosen the fitting, rotate the hose and retighten the fitting,
making sure there are no water leaks.
The inlet hose must not be lengthened. If it is too short and you do not
wish to move the tap, you will have to purchase a new, longer hose spe-
132994110gb.qxd 11-04-2002 16:06 Pagina 96
A
Page 97

cially designed for this type of use.
The inlet hose is provided with a water stop device, which protects
against damage caused by water leaks in the hose which could develop
due to natural ageing of the hose. This fault is shown by a red sector in
the window “A”. Should this occur, turn the water tap off and refer to
your Service Centre to replace the hose.
Water drainage
The end of the drain hose can be positioned
in three ways:
Hooked over the edge of a sink using the
plastic hose guide supplied with the
machine. In this case, make sure the end can-
not come unhooked when the machine is
emptying.
This could be done by tying it to the tap with
a piece of string or attaching it to the wall.
In a sink drain pipe branch. This branch must be above the trap so that
the bend is at least 60 cm above the ground.
Directly into a
drain pipe at a
height of not less
than 60 cm and
not more than
90 cm.
The end of the
drain hose must always be ventilated, i.e. the inside diameter of the
drain pipe must be larger than the outside diameter of the drain hose.
The drain hose must not be kinked. Run it along the floor; only the part
near the drainage point must be raised.
97
Installation
132994110gb.qxd 11-04-2002 16:06 Pagina 97
Page 98

98
Electrical connection
This machine is designed to operate on a 220-230 V, single-phase,
50 Hz supply.
Check that your domestic electrical installation can take the maximum
load required (2.2 kW), also taking into account any other appliances in
use.
Connect the machine to an earthed socket.
The manufacturer does not accept any responsibility for damage or
injury through failure to comply with the above safety precaution.
Permanent connection
In the case of a permanent connection it is necessary that you install a
double pole switch between the appliance and the electricity supply
(mains), with a minimum gap of 3 mm between the switch contacts and
of a type suitable for the required load in compliance with the current
electrical regulations.
The switch must not break the yellow and green earth cable at any
point.
This operation must be performed by a qualified electrician.
Important: The power supply cable must be easily accessible after
installing the machine.
Installation
132994110gb.qxd 11-04-2002 16:06 Pagina 98
Page 99

132994110gb.qxd 11-04-2002 16:06 Pagina 99
Page 100

AEG Hausgeräte GmbH
Postfach 1036
D-90327 Nürnberg
http://www.aeg.hausgeraete.de
© Copyright by AEG
technische Änderungen vorbehalten
132994110-01-0402 Subject to change without notice
132994110gb.qxd 11-04-2002 16:06 Pagina 100
 Loading...