

Page 1
ÖKO-LAVAMAT 74620 update
The environmentally friendly washing machine
Instruction book
Page 2

Dear customer,
f
Please read these user instructions carefully.
Above all, observe the "Safety" section in the first pages. Keep these
user instructions in a safe place for future reference. Please pass them
along to future owners of the appliance.
Important information concerning your safety and proper functioning
1
of the appliance is highlighted with the warning triangle or the signal
words (Warning!, Caution!, Attention!). Please observe carefully.
0 1. This symbol guides you step by step when operating the appliance.
2. ...
Next to this symbol you receive additional information and practical
3
tips on using the appliance.
Tips and information about the economical and environmentally
2
friendly use of the machine are marked with the clover.
These user instructions include tips for the correction of possible mal-
functions by the user. See the section "What to do when...".
Our customer service department is at your disposal should technical
problems occur. See also the "Service" section.
Printed on paper manu
He who thinks ecologically acts accordingly ...
2
actured with environmentally sound processes.
Page 3

Contents
CONTENTS
Operating instructions . . . . . . . . . . . . . . . . . . . . . . . . . . . . . . . . . . . . 6
Safety . . . . . . . . . . . . . . . . . . . . . . . . . . . . . . . . . . . . . . . . . . . . . . . . . . . . . . . . 6
Disposal . . . . . . . . . . . . . . . . . . . . . . . . . . . . . . . . . . . . . . . . . . . . . . . . . . . . . . 8
Environmental protection tips . . . . . . . . . . . . . . . . . . . . . . . . . . . . . . . . . . 9
Description of the Appliance . . . . . . . . . . . . . . . . . . . . . . . . . . . . . . . . . . . . 10
Front View . . . . . . . . . . . . . . . . . . . . . . . . . . . . . . . . . . . . . . . . . . . . . . . . . . . . 10
Drawer for detergent and conditioner . . . . . . . . . . . . . . . . . . . . . . . . . . . . . 10
Control Panel . . . . . . . . . . . . . . . . . . . . . . . . . . . . . . . . . . . . . . . . . . . . . . . . . 11
Program Selector . . . . . . . . . . . . . . . . . . . . . . . . . . . . . . . . . . . . . . . . . . . . 11
Additional Program Buttons . . . . . . . . . . . . . . . . . . . . . . . . . . . . . . . . . . . 12
Consumption Data and Time Required . . . . . . . . . . . . . . . . . . . . . . . . . . . 13
What does "update" mean? . . . . . . . . . . . . . . . . . . . . . . . . . . . . . . . . . . . . . 13
Before washing the first time . . . . . . . . . . . . . . . . . . . . . . . . . . . . . . . . . . . 14
Prepare washing cycle . . . . . . . . . . . . . . . . . . . . . . . . . . . . . . . . . . . . . . . . . . 14
Sort washing and prepare . . . . . . . . . . . . . . . . . . . . . . . . . . . . . . . . . . . . . . . . 14
Washing types and care symbols . . . . . . . . . . . . . . . . . . . . . . . . . . . . . . . . . . 15
Detergent and conditioner . . . . . . . . . . . . . . . . . . . . . . . . . . . . . . . . . . . . . . . 16
Which detergent and conditioner? . . . . . . . . . . . . . . . . . . . . . . . . . . . . . 16
How much detergent and conditioner? . . . . . . . . . . . . . . . . . . . . . . . . . 16
Using Water Softener . . . . . . . . . . . . . . . . . . . . . . . . . . . . . . . . . . . . . . . . . . . 16
Performing A Washing Cycle . . . . . . . . . . . . . . . . . . . . . . . . . . . . . . . . . . . . 17
Brief Instructions . . . . . . . . . . . . . . . . . . . . . . . . . . . . . . . . . . . . . . . . . . . . . . . 17
Setting the Washing Program . . . . . . . . . . . . . . . . . . . . . . . . . . . . . . . . . . . . 18
Changing Spin Speed/Selecting Rinse Hold . . . . . . . . . . . . . . . . . . . . . . . . . 18
Setting the Delay Timer . . . . . . . . . . . . . . . . . . . . . . . . . . . . . . . . . . . . . . . . . 19
Opening and Closing the Door . . . . . . . . . . . . . . . . . . . . . . . . . . . . . . . . . . . . 19
Loading the Washing . . . . . . . . . . . . . . . . . . . . . . . . . . . . . . . . . . . . . . . . . . . . 19
Add detergent/conditioner . . . . . . . . . . . . . . . . . . . . . . . . . . . . . . . . . . . . . . 20
Starting the Washing Program . . . . . . . . . . . . . . . . . . . . . . . . . . . . . . . . . . . 21
Washing Program Sequence . . . . . . . . . . . . . . . . . . . . . . . . . . . . . . . . . . . . . . 22
Washing Cycle Complete/Removing the Washing . . . . . . . . . . . . . . . . . . . . 23
3
Page 4

Contents
Program Tables . . . . . . . . . . . . . . . . . . . . . . . . . . . . . . . . . . . . . . . . . . . . . . . . 24
Washing . . . . . . . . . . . . . . . . . . . . . . . . . . . . . . . . . . . . . . . . . . . . . . . . . . . . . . 24
Separate Gentle Rinsing/Starching/Conditioning . . . . . . . . . . . . . . . . . . . 25
Separate Rinsing . . . . . . . . . . . . . . . . . . . . . . . . . . . . . . . . . . . . . . . . . . . . . . . 25
Separate Spinning . . . . . . . . . . . . . . . . . . . . . . . . . . . . . . . . . . . . . . . . . . . . . . 25
Cleaning and Caring . . . . . . . . . . . . . . . . . . . . . . . . . . . . . . . . . . . . . . . . . . . 26
Control panel . . . . . . . . . . . . . . . . . . . . . . . . . . . . . . . . . . . . . . . . . . . . . . . . . . 26
Detergent drawer . . . . . . . . . . . . . . . . . . . . . . . . . . . . . . . . . . . . . . . . . . . . . . . 26
Washing drum . . . . . . . . . . . . . . . . . . . . . . . . . . . . . . . . . . . . . . . . . . . . . . . . . 27
Fill-in door . . . . . . . . . . . . . . . . . . . . . . . . . . . . . . . . . . . . . . . . . . . . . . . . . . . . 27
What to do when… . . . . . . . . . . . . . . . . . . . . . . . . . . . . . . . . . . . . . . . . . . . . 28
Trouble Shooting . . . . . . . . . . . . . . . . . . . . . . . . . . . . . . . . . . . . . . . . . . . . . . . 28
If the washing results are not satisfactory . . . . . . . . . . . . . . . . . . . . . . . . . . 31
Perform emergency drain . . . . . . . . . . . . . . . . . . . . . . . . . . . . . . . . . . . . . . . . 32
Clean the circulating pump . . . . . . . . . . . . . . . . . . . . . . . . . . . . . . . . . . . . . . 33
Emergency release for fill-in door . . . . . . . . . . . . . . . . . . . . . . . . . . . . . . . . . 34
Additional Rinse and/or Water Cooling . . . . . . . . . . . . . . . . . . . . . . . . . . . . . 35
Installation and Connection Instructions . . . . . . . . . . . . . . . . 38
Installation Safety Precautions . . . . . . . . . . . . . . . . . . . . . . . . . . . . . . . . . . 38
Dimensions of the appliance . . . . . . . . . . . . . . . . . . . . . . . . . . . . . . . . . . . . 39
Front and Side Views . . . . . . . . . . . . . . . . . . . . . . . . . . . . . . . . . . . . . . . . . . . 39
Rear View . . . . . . . . . . . . . . . . . . . . . . . . . . . . . . . . . . . . . . . . . . . . . . . . . . . . . 39
Installation of the appliance . . . . . . . . . . . . . . . . . . . . . . . . . . . . . . . . . . . . 40
Transporting the appliance . . . . . . . . . . . . . . . . . . . . . . . . . . . . . . . . . . . . . . . 40
Remove transportation protection . . . . . . . . . . . . . . . . . . . . . . . . . . . . . . . . 40
Prepare the installation place . . . . . . . . . . . . . . . . . . . . . . . . . . . . . . . . . . . . 41
Installation on a concrete base . . . . . . . . . . . . . . . . . . . . . . . . . . . . . . . . . 42
Installation on vibrating floors . . . . . . . . . . . . . . . . . . . . . . . . . . . . . . . . . 42
Levelling on uneven floors . . . . . . . . . . . . . . . . . . . . . . . . . . . . . . . . . . . . . . . 42
4
Page 5

Contents
Power supply . . . . . . . . . . . . . . . . . . . . . . . . . . . . . . . . . . . . . . . . . . . . . . . . . . 43
Water connection . . . . . . . . . . . . . . . . . . . . . . . . . . . . . . . . . . . . . . . . . . . . . 44
Permissible water pressure . . . . . . . . . . . . . . . . . . . . . . . . . . . . . . . . . . . . . . . 44
Water feed . . . . . . . . . . . . . . . . . . . . . . . . . . . . . . . . . . . . . . . . . . . . . . . . . . . . 45
Water drain-off . . . . . . . . . . . . . . . . . . . . . . . . . . . . . . . . . . . . . . . . . . . . . . . . 46
Delivery heights above 1m . . . . . . . . . . . . . . . . . . . . . . . . . . . . . . . . . . . . . . . 46
Technical data . . . . . . . . . . . . . . . . . . . . . . . . . . . . . . . . . . . . . . . . . . . . . . . . 47
Service Departments . . . . . . . . . . . . . . . . . . . . . . . . . . . . . . . . . . . . . . 48
Guarantee Conditions . . . . . . . . . . . . . . . . . . . . . . . . . . . . . . . . . . . . . 49
Index . . . . . . . . . . . . . . . . . . . . . . . . . . . . . . . . . . . . . . . . . . . . . . . . . . . . . . . . 50
Service . . . . . . . . . . . . . . . . . . . . . . . . . . . . . . . . . . . . . . . . . . . . . . . . . . . . . . 51
5
Page 6

OPERATING INSTRUCTIONS
1 Safety
The safety standards of AEG electric appliances are in keeping with the
recognised rules of technology and the law governing the safety of
appliances. Nevertheless as a manufacturer we are committed to familiarise you with the following safety instructions:
Prior to initial start-up
• Observe the "Installation and Connection Instructions" below in
these user instructions.
• If the appliance is delivered during the winter and temperatures are
below freezing, allow the appliance to stand at room temperatur e for
24 hours before operation
Intended use
• The washing machine is intended exclusively for the washing of nor-
mal household washing in the home. If the appliance is used for purposes other than those intended, or if it is improperly operated, the
manufacturer can assume no liability for damages which may occur.
• Additions or modifications to the washing machine are strictly for-
bidden due to safety reasons.
• Use only those detergents which are suitable for the washing
machine. Observe instructions provided by the detergent manufacturer.
• Laundry to be washed may not contain any flammable solvents. This
must also be taken into consideration when washing pre-washed
laundry.
• Do not use the washing machine for dry-cleaning.
• Dyes and bleaches may only be used in the washing machine if such
use has been expressly endorsed by the manufacturer of these products. We can assume no liability for damages which may occur.
• Use tap water only. Rain water and industrial water may only be used
if they fulfil requirements in accordance with DIN1986 and DIN1988.
• Damage due to frost is not covered by the guarantee! If the washing
machine is located in a room in which below freezing temperatures
might occur, emergency draining must be carried out if danger of
freezing occurs (see "Emergency Draining"). Furthermore, the inlet
hose must be disconnected from the tap and laid on the floor.
6
Page 7

Operating instructions
Safety of children
• Packaging materials (e.g. sheet and Styrofoam) can be dangerous for
children. Danger of asphyxiation! Keep packaging materials at a safe
distance from children.
• Children are often unable to recognise the dangers involved with
electrical appliances. Provide for proper supervision during operation,
and do not allow children to play with the washing machine – the
danger exists that a child might lock itself into the appliance.
• Make certain that children or small animals do not climb into the
drum of the washing machine.
• If the washing machine needs to be disposed of, remove the mains
plug, destroy the door lock, cut off the electrical cable and dispose of
the plug and remaining cable separately. In this way children are prevented from locking themselves in and are not exposed life threatening danger.
General safety
• Repairs to the washing machine may only be carried out by trained
personnel. Improper repairs can lead to extreme danger. If repairs are
required, contact our customer service department or your authorised dealer.
• Never place the washing machine into operation if the power cable is
damaged or the control panel, the countertop or the base are damaged to such an extent that the inside of the machine is accessible.
• Switch off the washing machine before cleaning, maintenance and
servicing. In addition, pull out the mains plug or – in the case of permanent connection – pull the circuit breaker, or completely remove
screw type fuses.
• Never remove the mains plug by pulling on the cable. Always grip the
plug.
• Octopus plugs, couplings and extension cables may not be used. Dan-
ger of overheating!
• Do not clean the washing machine with a jet stream of water . Danger
of electrical shock!
• When high temperature washing programs are selected, the glass in
the fill-in door becomes hot. Do not touch!
• Allow the wash-water to cool before emergency draining of the
appliance, cleaning of the circulation pump or emergency opening of
the door.
7
Page 8

Operating instructions
• Small animals may gnaw at electrical power cables and water hoses.
Danger of electrical shock and water damage! Keep small animals
away from the washing machine.
2 Disposal
Dispose of the packaging!
Dispose of washing machine packaging materials properly. All packaging materials are environmentally sound and can be safely disposed of,
or burned in a refuse incineration plant.
The plastic parts can be reused:
• The external plastic cover and the bags inside are made of polyethyl-
ene (marking >PE<).
• The padding is made of CFC free expanded polystyrene
(marking >PS<).
Corrugated components are made from recycled paper and should be
disposed of at a paper recycling station.
Dispose of your old appliance!
If, at some point in time, the service life of the appliance has expired,
please take it to your nearest recycling centre, or to your appliance
dealer, who will accept the old appliance for a minimal fee.
8
Page 9

Operating instructions
2 Environmental protection tips
• No pre-wash is required for normally soiled washing. This saves you
detergent, water and time (and is good for the environment!).
• If the indicated load capacities are taken full advantage of, the wash-
ing machine is especially efficient.
• For small loads, use only one half to one third of the recommended
detergent quantity.
• Stains and soiling confined to given areas can be removed by means
of appropriate pre-treatment. You can then wash at lower temperatures.
• Wash lightly to medium soiled cottons with the energy saving pro-
gram.
• Softeners are often not required. Try it! If you use a dryer, your wash-
ing will be soft and fluffy, even without softeners.
• A water softener should be used for water within a hardness range of
mid to high (as of hardness level II, see "Detergents and Conditioners"). Detergent can then always be dosed for water hardness level I
(= soft).
9
Page 10
Operating instructions
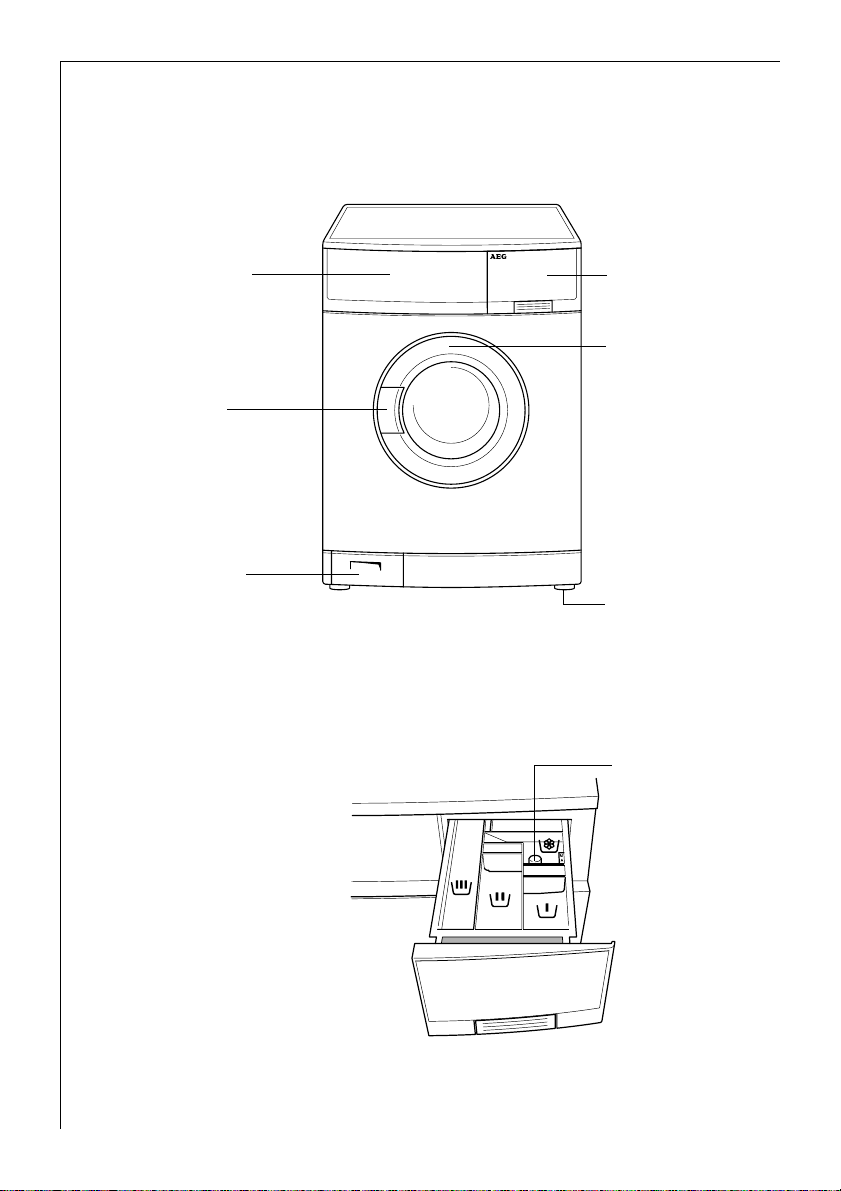
Description of the Appliance
Front View
Control Panel
Door with
handle
Flap in front of
the circulation pump
Drawer for
detergent and
softener
Rating plate
(behind door)
Threaded feet
(height adjustable);
back right:
automatically
adjusting foot
Drawer for detergent and conditioner
k Pre-wash detergent/
detergent for
soaking or water softener
l Main wash detergent
(powder) and water
softener if required
m In-wash stain treat-
ment
w Liquid conditioner
(softener, finisher,
starch)
10
Suction cap
(must be securely
in place)
Page 11
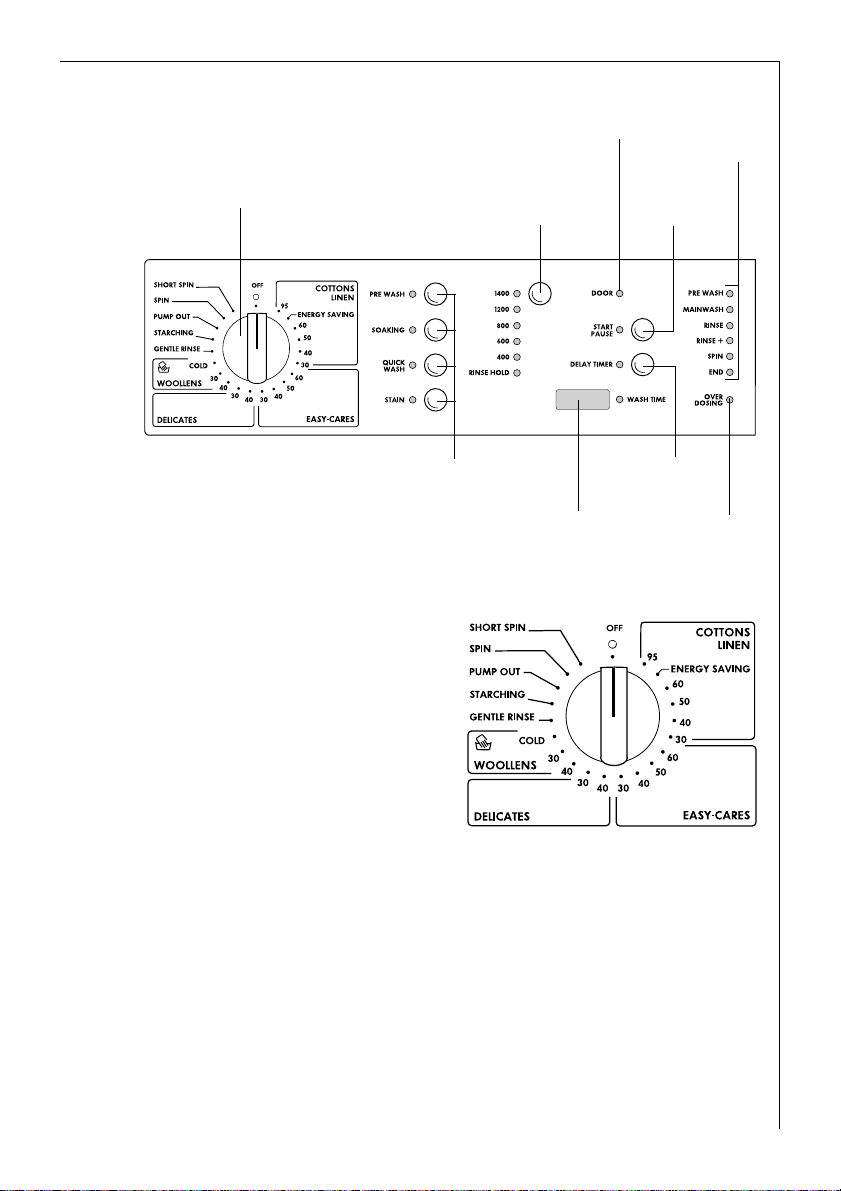
Control Panel
Operating instructions
DOOR Indicator
Program
Progress Display
Program Selector
Additional Program Buttons
Program Selector
The program selector defines the
nature of the washing cycle (e.g.
water level, drum movement,
number of rinses, spin speed) to suit
the type of washing, as well as the
wash temperature.
Spin Speed/RINSE HOLD
Button
Multi-Display
START/PAUSE
Button
DELAY TIMER
button
OVERDOSING
Indicator
OFF
Switches the washing machine off,
the machine is switched on at all
other positions.
COTTONS/LINEN
Main washing cycle for cottons/linen at 30 °C to 95°C.
ENERGY SAVING position: Energy saving program at approx. 67 °C for
2
lightly to normally soiled cottons, extended washing time (cannot be
combined with QUICK WASH and STAIN).
EASY-CARES
Main washing cycle for easy-care fabrics at 30 °C to 60 °C.
11
Page 12
Operating instructions
DELICATES
Main washing cycle for delicates at 30 °C or 40 °C.
WOOLLENS / P (Hand Washing)
Main washing cycle (cold to 40 °C) for machine washable woollens as
well as for hand washable woollen fabrics and silk with the ï (hand
washing) care symbol.
GENTLE RINSE
Separate gentle rinse, e.g. for rinsing hand washed fabrics (2 rinses and
a short spin).
STARCHING
Separate starching, separate softening, separate conditioning of wet
washing (1 rinse, liquid conditioner is washed in from the w compartment, and a spin).
PUMP OUT
Pump out the water at the end of a rinse hold (without spinning).
SPIN
Pump out the water at the end of a rinse hold and spin, or separate
spinning of hand washed cottons/linen.
SHORT SPIN
Pump out the water at the end of a rinse hold and short spin, or separate short spinning of delicate fabrics (easy-cares, delicates, woollens).
12
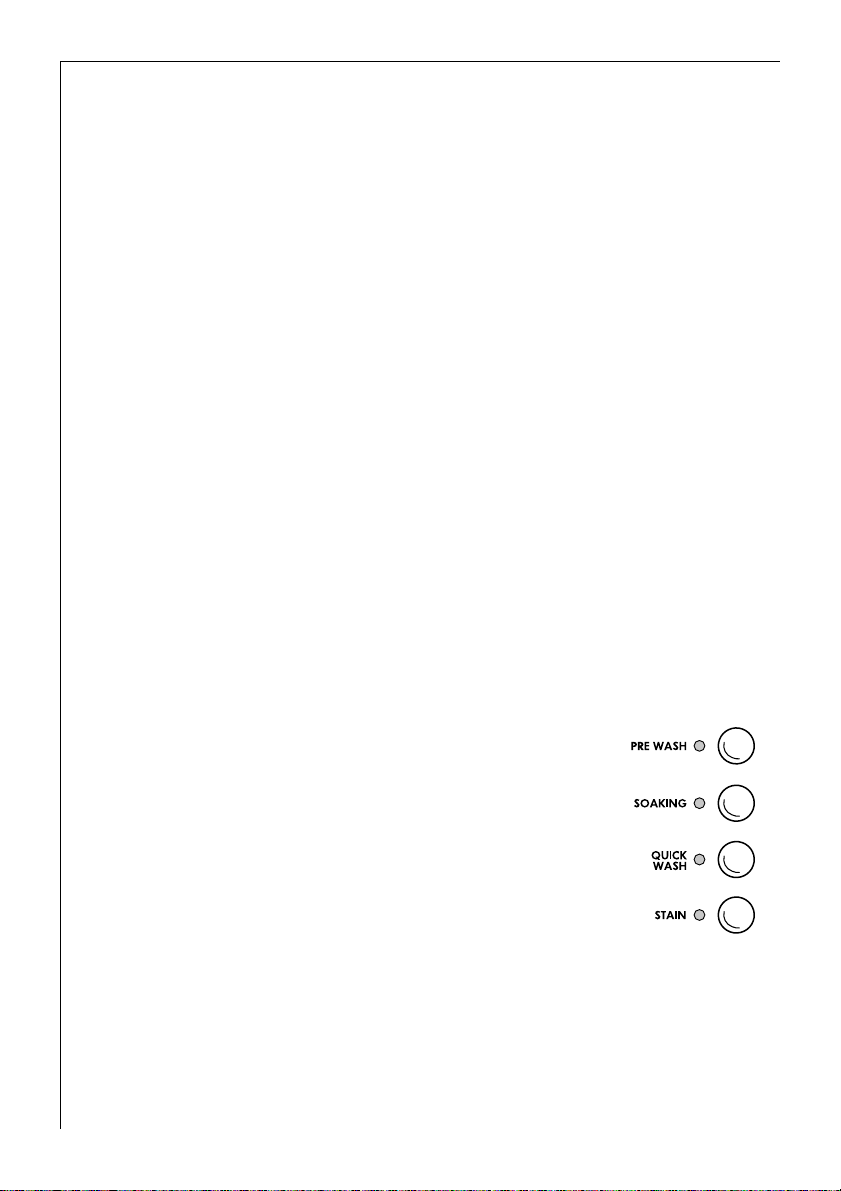
Additional Program Buttons
The additional program buttons are used to adapt
the washing program to suit the degree of soiling of
the washing. Additional programs are not required
for normally soiled washing.
The different functions can be combined together
depending on the program.
PRE WASH
Cold pre wash prior to the subsequent main washing cycle that follows automatically.
SOAKING
Approx. 1 hour at 40 °C. Can be lengthened to a maximum of 19 hours
using the DELAY TIMER button. The main washing progr am then follows
automatically.
QUICK WASH
Shortened main washing cycle for lightly soiled washing.
Page 13

Operating instructions
STAIN
For treating heavily soiled or stained washing. (In-wash stain treatment
is washed in from the m compartment at the optimal point in the
program cycle.)
When the WOOLLENS/P (hand washing) setting is chosen, the addi-
3
tional programs cannot be selected (any buttons pressed do not have
any effect).
Consumption Data and Time Required
The values given in the following table for selected programs were calculated under standard conditions. They provide a useful guide for
operation in the home.
Program Selector/Temperature Load in kg
COTTONS/LINEN 95 5 42 1.70 130
COTTONS/LINEN 60
COTTONS/LINEN 40 5 42 0.60 109
EASY-CARES 40 2.5 54 0.50 82
DELICATES 30 2.5 48 0.35 65
WOOLLENS / P (Hand Washing) 30 2 53 0.28 37
1)Note: program setting for testing in accordance with EN 60 456
1)
5 42 0.94 119
Water
in Litres
Energy
in kWh
What does "update" mean?
New fabrics or new detergents could, in the future, require a new
washing technique (e. g. an additional rinse, more water to wash in the
detergent, ...).
Your washing machine is prepar ed for this eventuality. The controller is
fully electronic. The software in which the controller is defined can be
re-programmed.
If a new state of the art is achieved in washing technology, you can
bring your washing machine up to the latest standard with an update.
For more information concerning updates, please contact customer
service. Customer service can also inform you of the costs involved in
an update..
Time in
Minutes
13
Page 14

Operating instructions
Before washing the first time
0 1. Pull the detergent drawer a short distance out of the control panel.
2. Pour about 1 litre of water through the detergent drawer and into the
washing machine. This is required in order to seal the wash-water container so that the ECO valve can function properly.
3. Run a washing cycle without any washing (COTTONS 95, with detergent
quantity cut in half).
This serves to remove residues resulting from production of the
appliance from the drum and the wash-water container.
Prepare washing cycle
Sort washing and prepare
• Sort washing according to care symbol and type (see "Washing types
and care symbols").
• Empty all pockets.
• Remove metal objects (paper clips, safety pins etc.).
• In order to prevent bunching up of washing and damage to washing,
close zippers, button up duvets and pillow cases, and tie up loose
ends from, for example, aprons.
• Turn articles with double layered textiles inside out (sleeping bags,
anoraks etc.).
• Coloured, knitted fabrics, as well as wool and textiles with appliqués
should be turned inside out.
• Place small and delicate articles (baby booties, stockings, bras etc.)
into a washing net, a pillow case with zipper, or in large socks before
washing.
• Treat net curtains particularly carefully. Remove metal curtain rail
rollers or burred plastic rollers, or wrap these in a net or bag.
We cannot accept any liability for damage.
• Do not wash coloured and white washing together. White washing
will otherwise turn grey.
• New, coloured washing often contains excessive dye. Wash these
items separately the first time.
14
Page 15

Operating instructions
• Mix small and large articles of washing! This improves washing effi-
ciency, and the washing is more favourably distributed during the
spin cycle.
• Fluff washing before placing into the washing machine.
• Do not place folded washing into the drum.
• Observe tips for proper care such as "wash separately" and "wash sep-
arately several times"!.
Washing types and care symbols
Care symbols assist in the selection of the correct washing program.
Washing should be sorted according to type and care symbol. The temperatures indicated in the care symbols are maximum temperatures.
Cottons ç
Textiles made from cotton and linen which bear this care symbol are
insensitive to mechanical stress and high temperatures.
The COTTONS/LINEN program is appropriate for this type of washing.
Linen èë
Textiles made from cotton and linen which bear these care symbols are
insensitive to mechanical stress.
The COTTONS/LINEN program is appropriate for this type of washing.
Easy-care washing êíî
Fabrics such as treated cottons, cotton mixtures and synthetics with
this care symbol need to be handled carefully in machines.
The EASY-CARES program is suitable for this type of washing.
Delicates ì
Fabrics such as those with layered fibres, micr o-fibr es, as well as synthetics and net c u r t ai n s w i t h t h is car e symbol require particularly careful
handling. The DELICATES program is suitable for this type of washing.
Wool and particularly delicate washing 9 ìï
Textiles such as wool, wool mixtures and silk which bear these care
symbols are especially sensitive to mechanical stress.
The WOOLLENS/P (Hand washables) program is appropriate for this
type of washing.
Important! Fabrics with this care symbol ñ (Do Not Wash!) must not
be washed in the washing machine!
15
Page 16

Operating instructions
Detergent and conditioner
Which detergent and conditioner?
Use only detergents and conditioners which are suitable for use in
washing machines. Always observe the manufacturer’s instructions.
How much detergent and conditioner?
The required quantity depends upon:
• the amount of washing
If the detergent manufacturer does not include dosing instructions for
2
reduced loads, use one third less for half loads and only half of the full
load detergent quantity for very small loads.
• extent of soiling of the washing
• hardness of tap water
Observe instructions for use and dosing provided by the detergent and
conditioner manufacturer.
Using Water Softener
In the case of medium to very hard water (from har dness band II) water
softener should be used. Observe the manufacturer’s instructions! Then
always use detergent dosing for hardness band I (= soft). Information
on the hardness of the water in your area is provided by your local
water board.
16
Due to the fact that the water softener is added before the main wash
2
detergent (pre-softening of the water), only eighty percent of the
quantity of water softener indicated on the package is required.
Information on Water Hardness
Hardness Band
I – soft 0 – 7 to 1.3
II – medium-hard 7 – 14 1.3 – 2.5
III – hard 14 – 21 2.5 – 3.8
IV – very hard greater than 21 greater than 3.8
Water hardness in °dH
(German hardness scale)
Water hardness in mmol/l
(millimol per litre)
Page 17

Operating instructions
Performing A Washing Cycle
Brief Instructions
A washing cycle is performed in the following steps:
0 1. Set the correct washing program:
– select the program and the temperature with the program selector
– select additional program(s) if required
2. If required, change the spin speed/select RINSE HOLD.
3. Set the DELAY TIMER if necessary.
4. Open the door, load the washing.
5. Close the door.
6. Add detergent/conditioner.
7. Start the washing program.
At the end of the washing program:
Important! If the washing cycle ends with a rinse hold, perform either
PUMP OUT, SPIN or SHORT SPIN before opening the door.
8. Open the door, remove the washing.
9. Switch off the washing machine: set the program selector to OFF.
17
Page 18

Operating instructions
Setting the Washing Program
See "Program Tables" for a suitable program, correct temperature and
3
possible additional programs to suit the type of washing.
0 Set the program selector to the
desired program and the desired
temperature.
The expected duration of the program selected is displayed on the
multi-display in minutes.
0 If required select additional program(s):
The indicators for the additional programs selected
illuminate.
– To change the selection press another button.
– To cancel a selection, press the button again.
Changing Spin Speed/Selecting Rinse Hold
0 If necessary change the spin speed for the final spin/
select rinse hold:
press the spin speed /RINSE HOLD button repeatedly
until the indicator of the required spin speed or
RINSE HOLD illuminates.
With RINSE HOLD the washing stays in the final rinse
water, it is not spun.
If you do not change the spin speed, the final spin will be automatically
3
adjusted to suit the washing program:
– COTTONS/LINEN 1400 revolutions per minute
– EASY-CARES 1200 revolutions per minute
– DELICATES 1200 revolutions per minute
– WOOLLENS/P (Hand Washing) 1200 revolutions per minute
The speed for the intermediate spin is dependent on the program
selected and cannot be changed.
18
Page 19

Operating instructions
Setting the Delay Timer
0 If necessary set the delay timer:
press the DELAY TIMER button repeatedly
until the desired time delay is displayed in
the multi-display, for example 12h for a
12 hour delay start of the program.
If 19h is displayed and you press the button again, the duration of the
3
washing program set appears (displayed in minutes, e.g. 119). In this
condition the start delay timer is not set.
If the SOAKING option is selected the delay timer determines the
soaking time. (Without delay timer the soaking time is approx. 1 hour.)
Opening and Closing the Door
0 Opening: pull the handle on the door.
0 Closing: press the door firmly
When the appliance is switched on, the DOOR
indicator shows whether the door can be opened:
– green light = The door can be opened
– light off = The door cannot be opened at the moment
– red light = The door is open
Loading the Washing
See "Program Tables" for maximum loads.
3
information about the correct preparation of the washing see
"Washing Types and Care Symbols".
0 1. Sort and prepare washing according to type.
2. Open the door: pull the handle on the door.
3. Put the washing in the machine.
Important! Do not trap any washing when closing the door! The fabrics
and the machine could be damaged!
4. Close the door firmly.
19
Page 20

Operating instructions
Add detergent/conditioner
For instructions concerning detergents and conditioners see
3
"Detergents and Conditioners".
0 1. Open drawer: press in the flap on the
drawer so as to be able to grasp the handle
(1), pull out the drawer (2).
2. Add detergent/conditioner.
k
l
m
w
Pre wash detergent/detergent for soaking
(for additional programs PRE WASH/
SOAKING), or water softener.
Powder detergent
(if you use a water softener and need compartment k for the pre-wash/softener,
add the water softener to the detergent in
compartment l.)
Stain remover
(only with additional program STAIN)
Liquid conditioner (softener, finisher, starch)
Attention! Fill the compartment at the most up to the MAX mark.
Thick liquid detergents are eventually diluted up to the MAX mark,
powdered starch is dissolved.
3. Push in the drawer all the way.
When using liquid detergents:
Add liquid detergent with dosing containers provided by the detergent
manufacturer. Observe instructions on detergent package.
20
Page 21

Operating instructions
Starting the Washing Program
0 1. Check whether the water tap is open.
2. Start the washing program: press the START/PAUSE
button.
The washing program is started, or starts at the end of
the time delay set.
If the DOOR indicator flashes red when the START/PAUSE button is
3
pressed, the door is not properly closed. Close the door firmly and press
the START/PAUSE button again.
If the delay timer has been set:
The start time delay set on the delay timer counts down; the time
remaining until the program starts is displayed on the multi-display (in
whole hours remaining). During th is time you can add washing, change
or stop the delay timer.
• Adding washing: press the START/PAUSE button, the door can be
opened. Then close the door and press the START/PAUSE) button
again.
• Changing or stopping delay timer: press the DELAY TIMER button
repeatedly until the desired time is displayed; when the program
duration is displayed (display in minutes, e.g.119), the washing program starts without delay.
21
Page 22

Operating instructions
Washing Program Sequence
Program Progress Display
Prior to the start, the program steps chosen
are displayed on the program pr ogress display .
During the washing program, the current pr ogram step is displayed.
Multi-Display
The expected time remaining (in minutes) to
the end of the program is displayed on the
multi-display.
Counting down of the remaining time may be stopped or corrected by
3
the washing machine controller as a result of automatic adjustments to
the program (amount of washing, washing type, imbalance detection,
special rinse cycle, etc.).
Changing the Spin Speed
The spin speed can be changed or RINSE HOLD set during the washing
program. Other settings cannot be altered.
Stopping the Program
0 To stop the washing program early, turn the program selector to OFF.
22
The washing program can be interrupted at any time using the START/
3
PAUSE button and then continued by pressing the button again. It is
not possible to change the washing program during a pause.
Page 23

Operating instructions
Washing Cycle Complete/Removing the Washing
Once the washing program has come to an end, END illuminates on the
program progress display.
If RINSE HOLD was selected, the indicator beside the START/PAUSE button flashes.
0 1. After a RINSE HOLD, the water must first be pumped out:
– Press either the START/PAUSE button (the washing will be spun in
accordance with the program which has just been completed; the
spin speed can also be changed during spinning using the spin speed/
RINSE HOLD button),
or
– turn the program selector to (PUMP OUT), and press the START/
PAUSE button (the water is pumped out without spinning),
or
– turn the program selector to SPIN or SHORT SPIN, and press the
START/PAUSE button (the washing will be spun or short spun).
At the end of this program step, the END indicator will illuminate.
2. Open the door.
As soon as the DOOR indicator is green, the door can be opened.
3. Turn the program selector to OFF.
4. Remove the washing.
5. Close the water tap.
6. Pull the detergent drawer out a little after washing so that it can dry
out. Leave the door ajar so that air can circulate in the washing
machine.
If the OVERDOSING indicator illuminates, then too much detergent was
3
used in the washing program just completed, and as a result an additional rinse performed. Next time you use the machine, observe the
detergent manufacturer’s dosing instructions for the load to be
washed!
Important! If the washing machine is not to be used for a long period:
close the tap and isolate the washing machine from the mains.
23
Page 24

Operating instructions
Progr am Tables
Washing
Not all possible settings are given in the following, but only those that
are useful and meaningful in everyday use.
Type of Washing,
Care Symbol
Cottons
ç
Energy Saving Program
Cottons ç
Linen
èë
Easy-Cares
êíî
Delicates
ì
Max. Load
(Weight Dry)
5kg
5kg
5kg
2.5kg
2.5kg
(or 15-20m
Net Curtains)
Program Selector
1)
2
Temperature
COTTONS/LINEN
95
COTTONS/LINEN
ENERGY SAVING
COTTONS/LINEN
30 to 60
EASY-CARES
30 to 60
DELICATES
30, 40
Possible
Additional
Programs
PRE WASH
SOAKING
QUICK WASH
STAIN
PRE WASH
SOAKING
PRE WASH
SOAKING
QUICK WASH
STAIN
PRE WASH
SOAKING
QUICK WASH
STAIN
PRE WASH
SOAKING
QUICK WASH
STAIN
24
Woollens/Hand Washing
9 ìï
1)A 10-litre bucket contains about 2.5 kg of dry washing (cotton).
2kg
P
WOOLLENS
COLD to 40
Page 25

Operating instructions
Separate Gentle Rinsing/Starching/Conditioning
Type of Washing
Cottons/Linen 5kg
Delicates 2.5kg
Separate Rinsing
Type of Washing
Cottons/Linen 5kg
Easy-Cares 2.5kg
Delicates 2.5kg
Woollens/Hand Washing 2kg
Separate Spinning
Type of Washing
Cottons/Linen 5kg SPIN
Easy-Cares 2.5kg
Woollens/Hand Washing 2kg
Max. Load
(Weight Dry)
Max. Load
(Weight Dry)
Max. Load
(Weight Dry)
Program Selector
STARCHING Easy-Cares 2.5kg
Program Selector
GENTLE RINSE
Program Selector
SHORT SPIN Delicates 2.5kg
25
Page 26

Operating instructions
Cleaning and Caring
Control panel
Attention! Do not use furniture care products or aggressive cleansers
for cleaning control panels and control elements.
0 Wipe control panels with a moist cloth. Use warm water.
Detergent drawer
The detergent drawer should be cleaned from time to time.
0 1. Pull the detergent drawer out as far as it will go.
2. Remove the detergent drawer by pulling sharply.
3. Remove siphon cap.
4. Clean the siphon cap under running
water.
5. Clean compartments with warm water
from the rear. For best results use a
bottle brush.
6. Push the siphon cap all the way on so
that it is securely seated.
7. Clean the entire compartment area of
the washing machine with a brush.
8. Set the detergent drawer into the guide tracks and push in.
26
Page 27

Operating instructions
Washing drum
The washing drum is made of rust-free stainless steel. Rusty objects in
the washing drum may lead to rust deposits on the drum.
Attention! Do not clean the stainless steel drum with acid containing
decalcifying age nts, abr asives containing chlorine or iron, or steel wool.
Appropriate cleansers are available from our customer service department.
0 Remove rust deposits at the drum with a stainless steel cleanser.
Fill-in door
0 Check on a regular basis to see if deposits or foreign objects are pr esent
in or at the rubber sleeve behind the door, and remove.
27
Page 28

Operating instructions
What to do when…
The somewhat different, in comparison to older wash-
3
ing machines, whistling noise during spinning is due to
the modern drive system.
A rattling sound on startup – in particular when using
for the first time – is caused by the circulation pump
and is due to the design.
Trouble Shooting
In the event of a malfunction, try to eliminate the problem yourself
with the help of the instructions listed here. If you request customer
service assistance for one of the malfunctions listed here, or for an
operator error, a charge will be billed for the customer service technician’s visit, even during the guarantee period.
• If error code (1, (2 or (d appears at the multi-display, you may
be able to eliminate the error yourself (see the following table of
malfunctions).
After the error has been eliminated, press the START/PAUSE button. If
the error code is again displayed, contact customer service.
• Please contact customer service for all other error displays and
inform them of the error code.
28
Malfunction Possib le Cause Remedy
Mains plug is not plugged in. Insert mains plug.
House fuse in defective. Replace fuse.
Washing machine does
not work.
The machine does not
take in water.
Error code
played.
Error code (d appears
(1 is dis-
Door is not closed properly.
START/PAUSE button not
pressed for long enough.
Tap is closed. Open tap.
Sieve in the threaded fitting
on the water inlet hose is
blocked.
Door is probably not closed
properly.
Close door; lock must engage
audibly.
Press START/PAUSE button
until the program starts.
Unscrew the hose from the
tap, remove the sieve and
clean under running water
Close the door again. Press
the door firmly in the area of
the lock.
Page 29

Operating instructions
Malfunction Possib le Cause Remedy
Washing machine
vibrates during operation or is unstable.
Excessive foaming during the main wash
Water runs out from
under the washing
machine.
Softener is not washed
in, the À compart-
ment for conditioner is
full with water.
Washing is creased.
The height adjustable
threaded feet are not correctly adjusted.
There is only very little washing in the drum (e.g. only a
toweling dressing gown).
Water could not be completely pumped out prior to
spinning because
the drain hose is kinked
or
the circulation pump is
clogged.
Probably too much detergen t
was used.
Threaded fitting on the
water inlet hose is leaking.
Drain hose is leaking.
Circulation pump cover is
not closed properly.
Washing is trapped in the
door.
Suction cap in the compartment for conditioner is not
correctly positioned or is
blocked.
Too much washing was
placed in the appliance.
Adjust the feet as per the
installation and connection
instructions.
Function is not impaired.
Check the drain hose and if
necessary remove any kink or
clean the circulation pump
and remove any foreign bodies from the pump housing.
Dose detergent exactly in
accordance with the manufacturer’s instructions.
Screw the inlet hose tight.
Check drain hose and if necessary replace.
Close cover properly.
Stop the program, re move
washing from the door, start
a new program.
Clean detergent drawer,
place suction cap firmly in
position.
Put less washing in the appliance.
29
Page 30

Operating instructions
Malfunction Possib le Cause Remedy
Washing is not spun
properly, water is still
visible in the drum.
Error code
played.
Door cannot be opened
when the machine is
switched off.
Remnants of detergent
are building up in the
detergent drawer.
Rinse water is cloudy.
When an additional
program button is
pressed, the corresponding indicator
does not illuminate.
(2 is dis-
Drain hose is kinked. Remove kink.
Maximum pumping height
(drain height 1m above the
floor on which the machine
is standing) exceeded.
Circulation pump is blocked.
In the case of siphon connection: siphon is blocked.
The door is locked for safety
reasons (DOOR indicator is
off).
Tap is not fully open. Open tap fully.
The sieve in the threaded fit-
ting on the water inlet hose
at the tap is blocked.
Sieve on threaded fitting for
the water inlet hose on the
machine is blocked.
The cause is probably a
detergent with a high silicate
content.
The additional program
selected cannot be combined
with the program set.
Please contact customer
service who have a retrofit
kit for pumping to heights of
greater than 1m.
Switch off the machine and
unplug from the mains, clean
the circulation pump.
Clean siphon.
Wait until the DOOR indicator is green.
Clean sieve.
Clean sieve.
No negative impact on the
rinsing results, possibly use
liquid detergent.
Make another choice.
30
Page 31

Operating instructions
If the washing results are not satisfactory
If the washing is grey and there are calcium deposits in the drum
• Too little detergent was used.
• The wrong detergent was used.
• Special soiling was not pre-treated.
• Program or temperature not set correctly.
• When using component detergents, the individual components were
not used in the correct proportions.
If there are still gray stains on the washing
• Washing soiled with ointments, grease or oils was washed with too
little detergent.
• Too lower temperature was used for washing.
• A common cause is that softener – particularly that in concentrated
form – has got onto the washing. Wash out any such spots as quickly
as possible and use that particular softener carefully.
If at the end of the last rinse foam is still visible
• Modern detergents can cause foam also in the last rinse. The washing
is however sufficiently rinsed.
If there are white remnants on the washing
• This is an insoluble material contained in modern detergents.
This is not the result of unsatisfactory rinsing.
Shake or brush the washing. Perhaps you should turn the washing
inside out before washing in future. Reconsider choice of detergent,
possibly use liquid detergent.
31
Page 32

Operating instructions
Perform emergency drain
• If the washing machine no longer pumps out the water then an
emergency drain must be performed.
• If the washing machine is located in a room in which below freezing
temperatures might occur, emergency draining must be carried out if
danger of freezing occurs.
Furthermore, the inlet hose must be disconnected from the tap and
laid on the floor.
Warning! Switch the washing machine off and pull the mains plug
1
prior to emergency draining.
Attention! The water which runs out of the emergency draining hose
can be hot. There is a danger of scolding! Before an emergency drain
first allow the water to cool down!
0 1. Have a flat container on hand to catch the water running out.
2. Open the flap on the left of the pedestal
cover downwards and remove.
3. Remove the emergency drain hose from
the bracket.
4. Pull the emergency drain hose out a little.
5. Place the container under the hose.
6. Undo and remove the plug in the end of
the emergency drain hose by turning it in
an anti-clockwise direction.
The wash-water runs out. Depending
upon the amount of water, it may be
necessary to empty the container several
times. Temporarily close the emergency
drain hose with the plug to this end.
32
Page 33

Operating instructions
When the water is completely drained:
7. Press the end stop firmly back into the emergency drain hose.
8. Push the emergency drain hose back in a little and allow it to snap into
the mounting.
9. Put on the flap and close.
The ECO valve does not function when the machine has been fully
3
emptied. Therefore add approx. 1liter of water before the next wash
(pour in through the detergent drawer).
Clean the circulating pump
Warning! Switch off the washing machine and pull the mains plug
1
before cleaning the circulation pump!
0 1. First perform emergency draining (see above: "Perform Emergency
Drain").
2. Lay a cloth on the floor in front of the circulation pump cover. Some
water may run out.
3. Unscrew the circulation pump cover in an
anti-clockwise direction and remove.
4. Remove foreign body from the pump
housing.
5. Check whether it is possible to turn the
pump impeller. (Jerky pump movement is
normal.) If it is not possible to turn the
impeller, contact customer service.
6. Replace cover (insert stud on the cover
into the guide slot) and tighten in a
clockwise direction.
7. Close emergency drain hose, push in and
fix in place.
8. Close the flap.
33
Page 34

Operating instructions
Emergency release for fill-in door
If the fill-in door can no longer be opened (e.g. due to a defective door
release or power failure during the washing program), it can be opened
with the help of the emergency release.
0 1. If water can be seen at the window in the fill-in door, perform emer-
gency draining first (see "Perform emergency drain").
2. Turn the knob in an anti-clockwise direction
with the aid of a coin or with a screwdriver.
3. Open the door by pulling on the door
handle.
Rotating knob
34
Page 35

Operating instructions
Additional Rinse and/or Water Cooling
The washing machine is set up for extremely low water consumption.
• For people who suffer from an allergy to detergents, it can be useful
to rinse with more water (additional rinse).
• It can be necessary to cool down the water prior to pumping out in
order to avoid thermal damage to plastic waste pipes (water cooling).
The program duration and water consumption are increased by water
3
cooling and/or the additional rinse.
Additional Rinse (RINSE +)
If this function is enabled, an additional rinse in performed for the pro-
3
grams COTTONS/LINEN, DELICATES and EASY-CARES.
As supplied from the factory, the additional rinse function is not enabled.
Enabling the additional rinse function:
0 1. Turn the program selector to SHORT SPIN.
2. Press the SOAKING button for at least 5 seconds.
After the button has been kept pressed for 5 seconds, RINSE
on the program progress indicator for 5 seconds.
3. Release the SOAKING button while RINSE
The additional rinse function is enabled once the flashing has ceased. It
continues to be enabled until specifically disabled.
When the additional rinse function is enabled, the RINSE
the program progress display illuminates prior to program start and
during the additional rinse.
4. If you wish to check whether the additional rinse function is enabled:
– Turn the program selector to SHORT SPIN.
– Press the SOAKING button briefly.
If RINSE
function is enabled.
+ flashes on the program progress display, the additional rinse
+ is flashing.
+ flashes
+ indicator on
35
Page 36

Operating instructions
Disabling the additional rinse function:
0 1. Turn the program selector to SHORT SPIN.
2. Press the SOAKING button for at least 5 seconds.
As soon as the button is pressed RINSE
progress display. After 5 seconds RINSE
nates continuously for a further 5 seconds.
3. Release the SOAKING button whilst RINSE
nated.
Once RINSE
tion is disabled.
+ has ceased to be illuminated, the additional rinse func-
+ flashes on the program
+ ceases to flash and illumi-
+ is continuously illumi-
Water Cooling
The water is cooled prior to pumping out at the end of the main wash-
3
ing cycle (by adding cold water). (This setting is only effective for
COTTONS/LINEN at a temperature of over 40 °C.)
As supplied from the factory , the water cooling function is not enabled.
Enabling the water cooling function:
0 1. Turn the program selector to SHORT SPIN.
2. Press the PRE WASH button for at least 5 seconds.
After the button has been kept pressed for 5 seconds, MAINWASH
flashes on the program progress indicator for 5 seconds.
3. Release the PRE WASH button while MAINWASH is flashing.
Once the indicator has stopped flashing, the water cooling function is
enabled. It continues to be enables until specifically disabled.
4. If you wish to check whether the water cooling function is enabled:
– Turn the program selector to SHORT SPIN.
– Press the PRE WASH button briefly.
If the MAINWASH indicator on the program progress display flashes,
the water cooling function is enabled.
36
Page 37

Operating instructions
Disabling the water cooling function:
0 1. Turn the program selector to SHORT SPIN.
2. Press the PRE WASH button for at least 5 seconds.
As soon as the button is pressed, MAINWASH flashes on the program
progress display. After 5 seconds MAINWASH ceases to flash and illuminates continuously for 5 seconds.
3. Release the PRE WASH button while MAINWASH is continuously illuminated.
Once MAINWASH has ceased to be illuminated, the water cooling function is disabled.
Additional Rinse and Water Cooling
The additional rinse and water cooling functions can be combined.
Enable as under “Additional Rinse” and “Water Cooling”.
37
Page 38

Installation and Connection Instructions
INSTALLATION AND CONNECTION
INSTRUCTIONS
Installation Safety Precautions
• Do not tip the washing machine over the front or the left side (seen
from the front). Electrical components could become wet!
• Check the washing machine for transport damages. You should never
connect a damaged appliance. In the event of a damage consult your
dealer.
• Make certain that all shipping braces have been removed and that
the splash guard is attached to the appliance, see "Shipping Brace
Removal". Otherwise damage may occur to the machine or close by
furniture during the spin cycle.
• The plug may only be inserted into a properly installed earthing con-
tact safety socket. Extension cables, octopus plugs or adapters may
not be used.
• For permanent connection a current interruption device must be pro-
vided for in the electrical circuit (fuse, circuit breaker, ground fault
circuit interrupter or the like) with a contact opening of at least
3 mm which allows for disconnection of the appliance at all poles.
Permanent connection may only be carried out by an authorised
electrician.
• Before starting your appliance please ensure that the nominal volt-
age and type of current specified on the rating plate are the same as
those used at the place of installation. Please also refer to the rating
plate for the type of fuse to be used.
• Prior to carrying out modifications on the appliance (on the worktop
or front door) pull out the mains plug.
• The mains feed-line may only be replaced by the customer service or
by an authorised electrician.
38
Page 39

Installation and Connection Instructions
Dimensions of the appliance
Front and Side Views
Rear View
39
Page 40

Installation and Connection Instructions
Installation of the appliance
Washing machines with arched covers are not suited for installation
3
beneath countertops.
Transporting the appliance
• Do not lay the washing machine on the front or on the left side (seen
from the front); otherwise the electrical components could become
wet!
• Never transport the appliance without transportation protection.
Remove the protection only at the place of installation! Transportation without protection can lead to damages to the appliance.
• Neither lift the appliance by an open door nor by the base.
• The appliance weighs approx. 85kg.
• By transportation with a trolley: Place the trolley only sidewise.
Remove transportation protection
Attention! Be absolutely certain that all shipping braces have been
removed before installing the appliance.
Store all shipping braces in a safe place in case they are required for
future transport (moving).
40
Page 41

Installation and Connection Instructions
Special spanner H and cover caps E (2 off) and G (1 off) are supplied
3
with the appliance.
0 1. Remove flexible tubing holder A.
2. Remove the two screws B with special spanner H.
3. Remove the four screws C.
4. Detach transportation rail D.
5. Close the two large openings with the cover caps E.
Attention! Press cover caps forcefully in, so that they snap into the
rear wall (protecting the interior of the appliance against sprayed
water).
6. Drive in the screws C into the four small holes again.
7. Remove the screw and compression spring F with special spanner H,
cover the hole with caps G.
Attention! Press cover caps forcefully in, so that they snap into the
rear wall (protecting the interior of the appliance against sprayed
water).
Prepare the installation place
• The installation surface must be clean and dry, free of floor wax and
other smearing substances, so that the appliance does not slip off. Do
not use any lubricant as sliding aid.
• Installation on a high-veil carpet or floor tiles with soft sponge backs
is not recommended because the standing safety of the appliance is
then no longer ensured.
• By installation surfaces with small-format tiles, lay a conventional
rubber mat underneath.
• Small unevenness of the floor surface should never be levelled out by
laying pieces of wood, carton or similar elements, but rather basically
compensated by adjusting the screw feet.
• When it is unavoidable to install the appliance besides a gas or a
coal-fuelled cooker, due to spatial reasons: insert a piece of heatinsulating board (85 x 57 cm) between the cooker and the washing
machine; the board side facing the cooker must be provided with an
aluminium foil.
• The washing machine may not be installed in a frost-endangered
room. Frost-caused damages!
• Flexible feed and drain tubings may not be crinkled or squeezed.
41
Page 42

Installation and Connection Instructions
Installation on a concrete base
When installing on a concrete base,
for safety reasons it is imperative
that steel plates are installed, the
washing machine is then installed in
these plates. The steel plates are
available from customer service
under ET-No. 645 425 058.
Installation on vibrating floors
In the case of floors that vibrate, especially wooden floors with floorboards that flex, a water-proof wooden panel of at least 15 mm thickness must be firmly screwed to at least 2 floor beams. If possible, install
the appliance in a corner of the room: the wooden floor is more firmly
supported in the corners and thus has less tendency to resonant vibration..
Levelling on uneven floors
Automatically adjusting foot: The back right foot of your washing
3
machine is designed like a telescopic strut with a spring. It ensures that
your appliance remains stable even at high spin speeds.
If, nevertheless, the washing machine is unstable during spinning,
please proceed as follows:
0 1. Set the three adjustable feet to an initial height of 10 mm. To adjust
the feet, use the special spanner supplied with the appliance for the
removal of transport braces.
If the automatically adjusting foot does not reach the floor:
2. Manually adjust the automatically adjusting foot (back right) by the
necessary amount.
3. If necessary, check positioning with a spirit level.
Important! Never compensate for small areas of unevenness in the
floor through the use of wooden wedges, cardboard or the like. Levelling should only ever be performed by adjusting the feet.
42
Page 43

Installation and Connection Instructions
Power supply
Details on the mains voltage,
type of current and the necessary fuse protection are to be
found on the rating plate. The
rating plate is above and
behind the door.
For permanent electrical connection within the electrical
circuit, provisions must be made which allow for electrical disconnection of the appliance from the mains with a contact opening of at least
3 mm at all poles. Suitable devices include circuit breakers, fuses
(threaded fuses must be entirely removed from the socket), ground
fault circuit interrupters and contactors. Permanent connection may
only be carried out by an authorised electrician.
;
This appliance conforms to the following EC directives
– "Low-Voltage Directive" 73/23/EWG dated 19 February 1973
and Directive amendment 93/68/EWG
– "EMC Directive" 89/336/EWG dated 3 May 1989
and Directive amendment 93/68/EWG
43
Page 44

Installation and Connection Instructions
Water connection
The washing machine is provided with safety devices which prevent
3
reverse pollution of drinking water and conform to the State regulations issued by water supply authorities (e.g. in Germany: DVGW Directives). Further protective measures in the installation are hence
unnecessary.
Attention! Appliances for cold water connection may not be connected to warm water!
Permissible water pressure
Water pressure must be equal to a least 1 bar (= 10N/cm2 = 0.1 MPa),
and no more than 10 bar (= 100N/cm
• By more than 10 bar: connect a pressure reduction valve upstream.
• By less than 1 bar: Unscrew the flexible inlet tubing on the magnetic
inlet valve on one side of the appliance and remove the flow meter
(thereby remove the sieve by means of a pair of pointed pliers and
then remove the rubber washer behind it). Remount the sieve.
2
= 1 MPa).
44
Page 45

Installation and Connection Instructions
Water feed
A flexible pressure tubing of 1.3m length is supplied.
If a longer feed tubing is needed, a complete VDE-approved tubing set
with mounted screw connections, supplied by our customer service,
should be used exclusively.
– For washing machines without Aqua-Control, tubing sets are
available in lengths of 2.2m, 3.5m and 5m.
– For washing machines with Aqua-Control, tubing sets are available
in lengths of 2.0m, 2.9m and 3.9m.
Attention! Under no circumstances may tubing be pieced together for
the purpose of lengthening!
Sealing rings are either inserted in plastic nuts of the tubing screw con-
3
nection or contained in an accompanying packet. Do not use other
seals.
0 1. Connect the angled hose connector to the
machine.
Attention! Plastic nut at the tube coupling
may only be hand tightened.
2. Connect the straight hose connector to a water tap
with an R 3/4 (inch) thread.
Attention! Only tighten the plastic nuts on the
hose connectors by hand.
3. By opening the water tap slowly prior to the initial
operation, check whether the connection is tight.
45
Page 46

Installation and Connection Instructions
Water drain-off
The drain-off tubing can be connected either to a siphon or be hanged
in a washing or sink basin or in a bathtub.
For extension (max. 3 m floor length and up to 80 cm high) only original tubing may be used. The customer service supplies drain-off tubing
of 2.7 and 4m lengths.
Water drain-off inside a siphon
The spout at the end of the tubing fits all common siphon types.
0 Make the connection spout/siphon secure with a tubing clip.
Water drain-off inside a basin
For hanging in a wash basin, sink or bath,
the drain hose must be prevented from
moving using the detachable elbow supplied.
The tube could otherwise be pushed out of
the basin by the reactive force imparted by
draining water.
Small sink basins are not suitable!
0 Fasten the elbow on the water tap or on
the wall by means of the hole.
Delivery heights above 1m
Every washing machine is provided with a suds pump for draining the
washing/rinsing suds, which can deliver liquids via the drain-off tubing
up to a height of 1m, measured from the standing level of the machine.
For delivery heights above 1m please establish contact with the AEG
customer service.
46
Page 47

Installation and Connection Instructions
Technical data
Height x Width x Depth 85x60x60cm
Depth with open door 95cm
Height adjustment approx. +10/-5mm
Weight when empty approx. 85kg
Load (depending on the program) max. 5kg
Area of use Household
Wash cycle drum speed max. 53min
Spin cycle drum speed see type plate
Water pressure 1-10bar
(=10–100N/cm
2
= 0.1 – 1.0MPa)
-1
r.p.m.
47
Page 48

Service Departments
SERVICE DEPARTMENTS
South Africa
AEG Domestic Appliances
Head Office
55, 12th Road, Kew
P.O. Box 3657
JOHANNESBURG 2000
Tel.: elfa(011) 806-9111
Telefax: (011) 887-0849
DURBAN
84 & 73 Victoria Park
123 Old North Coast Road
Glen Anil
P.O. Box 1061
DURBAN 4999
Tel.: elef(031) 569-1470
Telefax: (93 1) 569 -1498
CAPE TOWN
43 Neptune Street
Paarden Eiland
P.O Box 184
PAARDEN EILAND 7420
Tel.: elef(021) 511-0486
Telefax: (021) 510-5073
PORT ELISABETH
43 Pickering Street
Newton Park
P.O. Box 1231
PORT ELISABETH 6001
Tel.: elef(041) 353-600
Telefax: (04 1) 354 -015
48
Page 49

Guarantee Conditions
GUARANTEE CONDITIONS
Guarantee Conditions
1. AEG guarantees the equipment against defective material or faulty manufacture,
provided it is used for domestic purposes only, for a period twelve (12) months from
the date of purchase by the original purchaser. If used for commercial purposes, the
warrantly period will be limited to six (6) months.
2. Where the appliance is used or installed more than Fifty (50) kilometres from the
nearest AEG Service Agent shall be for the account of the purchaser.
3. The risk in regard to appliances to be repaired shall at al l times remain with the pur-
chaser.
4. This guarantee is given on condition that only genuine AEG parts and accessories are
at all times used in the appliance.
5. AEG shall not be responsible for damage of any kind resulting from electricity fluctuations, faults in the building wiring, faulty installations, improper use of controls or
failure to use the appliance in accordance with the operating instructions and/or general misure and/or abuse.
6. Any attempt by an unauthorised person to repair or tamper with the equipment shall
render this guarantee null and void.
7. This guarantee does not apply to li gh t bulbs, loose glass, glass oven doors and enamelled surfaces or to dust bags, filters and other parts subject to wear and tear.
8. AEG shall not be responsible in terms of this guar antee for the r epl acement o r r epair
of any part of the equipment which may have been damaged in transit.
9. Repairs carried out under guarantee do not extend the guarantee period for the
appliance. Parts removed during guarantee repairs become the property of AEG.
10. This guarantee shall be available only to an original purchaser of AEG domesic
appliances from an authorised AEG Dealer of Distributor in and where the appliance
has been retained for use in the Republic of South Africa, Namibia, Botswana, Swaziland, Lesotho and Zimbabwe.
11. Failure to produce documentary proof of the date or original acquisition by the
original purchaser will result in normal charges being levied for the work carried out
and the parts supplied.
12. The liability of AEG under this guarantee is limited to the r eplac ement and/or r epair
of the defective parts within the guarantee period and does not extend to be installation or removal of the appliance. Furthermore, AEG does not accept responsibility or
liability to compensate for any consequential loss or damage of any kind caused by or
due to the failure of operation or malfunction of any equipment to which this guarantee applies.
AEG Domestic Appliances. A division of Electrolux S.A. (Pty) Ltd.
55 Twelfth Road, Kew, Johannesburg 2000
49
Page 50

Index
INDEX
A
Additional Rinse . . . . . . . . . . . . . . . . . . . . . 35
Automatically Adjusting Foot . . . . . . .10
, 42
C
Calcium . . . . . . . . . . . . . . . . . . . . . . . . . . . . 31
Conditioner . . . . . . . . . . . . . . 10
liquid . . . . . . . . . . . . . . . . . . . . . . . . . . . . 10
Cotton mixtures . . . . . . . . . . . . . . . . . . . . . 15
Cottons . . . . . . . . . . . . . . . . . . 11
Customer service . . . . . . . . . . 27
, 16, 17, 20
, 15, 24, 25
, 28, 48, 51
D
Danger of freezing . . . . . . . . . . . . . . . . .6, 32
Delay Timer . . . . . . . . . . . . . . . . . .11
Delicates . . . . . . . . . . . . . . . . . 12
Detergent . . . . . . . . . . . . . . . . 10
liquid . . . . . . . . . . . . . . . . . . . . . . . . . . . . 20
Detergent for Soaking . . . . . . . . . . . . .10
, 19, 21
, 15, 24, 25
, 16, 17, 20
, 20
E
Easy-Cares . . . . . . . . . . . . . . . 11, 15, 24, 25
ECO Valve . . . . . . . . . . . . . . . . . . . . . . . . 14
Emergency release . . . . . . . . . . . . . . . . . . . 34
Energy saving . . . . . . . . . . . . . . . . . . . .11
, 33
, 24
G
Gentle Rinsing . . . . . . . . . . . . . . . . . . . . . . . 25
Guarantee . . . . . . . . . . . . . . . . . . . . 6
, 28, 49
H
Hand Washing . . . . . . . . . . . . . . . . 12, 24, 25
L
Linen . . . . . . . . . . . . . . . . . . . . 11, 15, 24, 25
Liquid detergent . . . . . . . . . . . . . . . . . . . . . 20
M
Multi-Display . . . . . . 11, 19, 21, 22, 28, 51
N
Net Curtains . . . . . . . . . . . . . . . . . .14, 15, 24
O
Open Door . . . . . . . . . . . . . . . 19, 23, 30, 34
Overdosing . . . . . . . . . . . . . . . . . . . . . . .11
, 23
P
Pre Wash . . . . . . . . . . . . . . . . 12, 18, 20, 24
Pre-wash detergent . . . . . . . . . . . . . . . . . . 20
Program Progress Display . . . . . . . . . . . . . . 22
Q
Quick Wash . . . . . . . . . . . . . . . . . . . . . . 12, 24
R
Rating Plate . . . . . . . . . . . . . . . . . 10, 43, 51
Rinse + . . . . . . . . . . . . . . . . . . . . . . . . . . . . .35
Rinse Hold . . . . . . . . . . . . . . . . . . . 11
, 18, 23
S
Silk . . . . . . . . . . . . . . . . . . . . . . . . . . . . . 12, 15
Soaking . . . . . . . . . . . . . . . . . . . . . 12
Softener . . . . . . . . . . . . . . . . . . . . . .9
Spin . . . . . . . . . . . . . .11
Stain . . . . . . . . . . . . . . . . . 9
Stain remover . . . . . . . . . . . . . . . . . . . . . . . .20
Stains . . . . . . . . . . . . . . . . . . . . . . . . . . . . . . .20
Starching . . . . . . . . . . . . . . . . . . . . . . . . . . . .25
Stopping the Program . . . . . . . . . . . . . . . . .22
, 12, 17, 18, 22, 25
, 10, 13, 24, 31
, 18, 19
, 10, 20
U
Update . . . . . . . . . . . . . . . . . . . . . . . . . . . . . .13
W
Washing
coloured . . . . . . . . . . . . . . . . . . . . . . . . . .14
delicate . . . . . . . . . . . . . . . . . . . 12
easy-care . . . . . . . . . . . . . . . . . . 11
gentle rinse . . . . . . . . . . . . . . . . . . . . 12
lightly soiled . . . . . . . . . . . . . . . . . . . . 9
normally soiled . . . . . . . . . . . . . . . . . . . . . .9
soaking . . . . . . . . . . . . . . . . . . . . . . . 20
starching . . . . . . . . . . . . . . . . . . 10
Water
circulation pump . . . . . . . . . . . . . . . 10
emergency drain . . . . . . . . . . . . . . . . . . .32
hardness . . . . . . . . . . . . . . . . . . . . . . . 9
pump out . . . . . . . . . . . . . . . . . . . . . 12
softener . . . . . . . . . . . . . . . . . 9
water cooling . . . . . . . . . . . . . . . . . . 35
Woollens . . . . . . . . . . . . . . . . .12
hand washable . . . . . . . . . . . . . . . . . 12
, 14, 15
, 15, 24
, 25
, 12
, 24
, 12, 20
, 33
, 16
, 23
, 10, 16, 20
, 36
, 15, 24, 25
, 24
50
Page 51

SERVICE
If a malfunction should occur at the appliance, refer first to the section
"What to do when ..." in these user instructions. If you do not find any
applicable instructions there, contact your customer service centre.
(Addresses and telephone number can be found in the "Service Departments" section.)
Be well prepared before you phone. This facilitates the diagnosis and
the decision as to whether a customer service visit is necessary. With
our checklist you can gather important information before making
your call:
Make a note of the PNC number and
the S-number.
Both of these number can be found
on the rating plate on the inside of
the door of your washing machine.
......................................................
PNC
......................................................
S-No.
In addition to this please establish if possible:
• How is the malfunction noticeable ?
• Under what circumstances does the malfunction occur?
• Do an error message (( and an number) appear in the multi-display?
Service
You will be charged even during the warranty period
– if you could have corrected the malfunction yourself with the help of
the malfunctions table (see "What to do when ..." section),
– if the customer service technician is required to make several trips
because he had not received all relevant information before his visit,
and must return, for example, to pick up replacement parts. This
additional driving can be avoided if your telephone call is well prepared, as described above.
51
Page 52

AEG Hausgeräte GmbH
Postfach 1036
D-90327 Nürnberg
http://www.aeg.hausgeraete.de
© Copyright by AEG
822 942 031 - 01 - 1299
 Loading...