

Page 1
DE LUFT- UND ENERGIESTATION BETRIEBSANLEITUNG 2
GB AIR AND POWER STATION OPERATING INSTRUCTIONS 15
FR STATION DE GONFLAGE ET D´ÉNERGIE NOTICE D´UTILISATION 28
IT KIT DI ALIMENTAZIONE E ARIA ISTRUZIONI PER L´USO 41
CZ ENERGETICKÁ STANICE S KOMPRESOREM NÁVOD K PROVOZU 54
SK PNEUMATICKÁ A ENERGETICKÁ STANICA NÁVOD NA POUŽÍVANIE 67
97180
LUFT- UND
ENERGIESTATION
LA 10
Page 2

2
INHALTSVERZEICHNIS
1.0 EINLEITUNG
1.1 Was bedeuten die Symbole?
1.2 Funktionsweise des Gerätes
1.3 Bestimmungsgemäßer Gebrauch
1.4 Ausstattungsmerkmale des Gerätes
2.0 SICHERHEITSHINWEISE
2.1 Allgemeine Sicherheitshinweise
2.2 Sicherheitshinweise zur Anwendung des Gerätes
2.3 Sicherheitshinweise zum Geräteakku
2.4 Verhalten bei einem Notfall
3.0 PRODUKTBESCHREIBUNG
3.1 Lieferumfang
3.2 Produktübersicht
4.0 BEDIENUNG / ZUBEHÖR
4.1 Gerät ein- / ausschalten
4.2 Bedienung der Beleuchtung
4.3 Bedienung des Kompressors
4.4 Laden des Geräteakkus
4.5 Verwendung der 12 V Kfz-Steckdose
4.6 Sicherungen wechseln
4.7 Fehlersuche
3
3
3
4
4
5
7
7
7
8
9
9
9
11
11
11
12
5.0 WARTUNG UND PFLEGE
5.1 Reinigung, Wartung und Aufbewahrung
6.0 TECHNISCHE DATEN
7.0 ENTSORGUNG
8.0 GARANTIE UND SERVICE
13
13
14
14
Page 3
DE 3
1.0 EINLEITUNG
Sehr geehrte Kundin,
sehr geehrter Kunde,
wir gratulieren Ihnen zu Ihrer neuen „Luft- und Energiestation LA 10" und danken für Ihr Vertrauen.
Um optimale Funktion, Leistungsbereitschaft und
Sicherheit Ihres Gerätes zu gewährleisten, bitten
wir Sie, vor der ersten Inbetriebnahme die Betriebsanleitung zu lesen. Somit ist sichergestellt,
dass Sie lange Freude an diesem Gerät haben
werden.
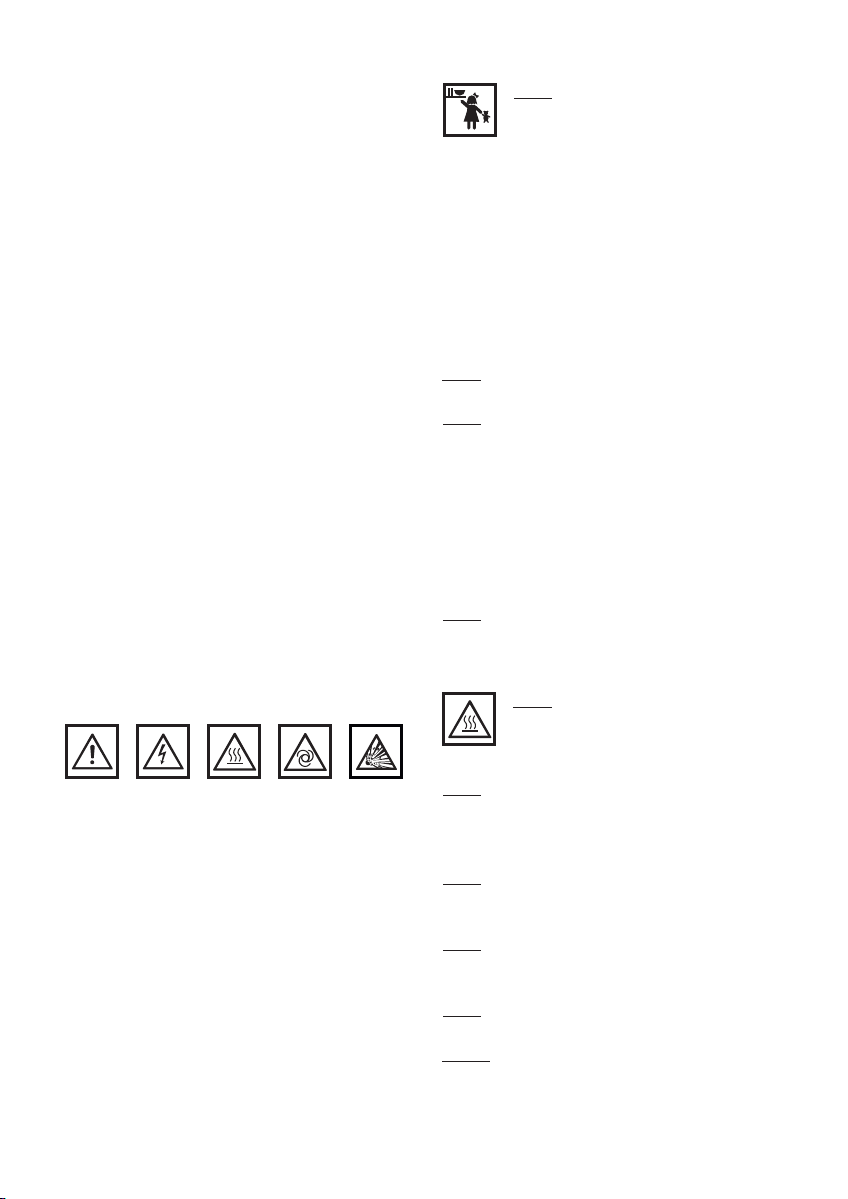
1.1 Was bedeuten die Symbole?
Betriebsanleitung lesen!
Warnung - Gefahr! Sicherheits- und
Warnhinweise beachten!
Warnung vor gefährlicher elektrischer Spannung! Lebensgefahr!
Weitere Erklärungen zu Symbolen, Einheiten und
Abkürzungen finden Sie auf den Seiten 13 und
14.
1.2 Funktionsweise des Gerätes
Die Luft- und Energiestation LA 10 ist ein mobiles
Gerät mit einem leistungsstarken Kompressor und
einem integrierten 12 V Akku. Mit dem komfortablen Aufpumpsystem können Sie Auto- und
Fahrradreifen, Bälle und andere aufblasbare
Artikel aufpumpen. Hierfür stehen 3 verschiedene
Ventiladapter im Ablagefach des Gerätes zur
Verfügung. Am Manometereinstellring des Gerätes lässt sich zur Orientierung der gewünschte
Luftdruckwert bis zu 10 bar einstellen. Der integrierte 12 V Akku des Gerätes kann über die
KFZ-Steckerbuchse als 12 V Stromquelle genutzt
werden. Die Aufladung des Akkus erfolgt über ein
230 V Ladenetzteil. Die Batteriekapazität und der
Ladezustand des Akkus werden durch 3 LEDLeuchten auf der Gehäuseeinheit für die Bedienelemente angezeigt. Durch 4 LED-Leuchten und
das beleuchtete Zifferblatt des Manometers ist
eine Anwendung auch bei Dämmerung und in der
Nacht möglich.
Warnung vor optischer Strahlung!
Warnung vor explosionsgefährlichen
Stoffen und Gegenständen!
Warnung vor automatischem Anlauf!
Warnung vor heißer Oberfläche!
Gehörschutz und
Schutzbrille tragen!
Entsorgen Sie Gerät, Batterien
und Verpackung umweltfreundlich!
1.3 Bestimmungsgemäßer Gebrauch
Die Luft- und Energiestation LA 10 ist ausschließlich für den privaten Gebrauch bestimmt. Das
Gerät ist zum Aufpumpen von PKW-, Motorradund Fahrradreifen sowie aufblasbaren Sport-,
Spiel- und Freizeitartikeln geeignet. Die Energieabgabe des internen Geräteakkus ist ausschließlich über die 12 V KFZ-Steckerbuchse erlaubt.
Jede andere Verwendung oder Änderung der Luftund Energiestation ist nicht bestimmungsgemäß.
Für den Betrieb der Luft- und Energiestation ist der
integrierte 12 V Akku oder der 12 V Kfz-Stecker
des Gerätes vorgesehen. Der Kompressor ist nicht
für Dauerbetrieb ausgelegt. Ein Betrieb mit 24 V /
DC ist nicht möglich!
Achtung: Gefahr von Sach- und Personenschäden!
Page 4
4
1.4 Ausstattungsmerkmale der Gerätes
Leistungsstarker Kompressor zum komfortablen
▪
Aufpumpen von Auto- und Fahrradreifen,
Bällen etc.
▪ Luftdruckvorwahl zur Orientierung am
Manometerring einstellbar
▪ Durch integrierten Akku für den mobilen Einsatz
geeignet
▪ Portable 12 V Stromquelle (Kfz-Steckerbuchse)
▪ Praktische LED-Lampe zur Anwendung bei
Dämmerung und in der Nacht
▪ Mit Ladezustandsanzeige
▪ Zubehör: 230 V / 12 V Ladenetzteil sowie
3 Ventiladapter zum Aufpumpen von Bällen,
Fahrradreifen und Freizeitartikeln
▪ Praktische Aufbewahrungsmöglichkeit für
Kabel, Stecker und Zubehör
2.0 SICHERHEITS HINWEISE
2.1 Allgemeine Sicherheitshinweise
Warnung!
Lesen Sie alle Anweisungen! Das Nichtbefolgen
der Sicherheitshinweise kann zu Schäden an
Eigentum, Personen oder zum Todesfall führen!
Bewahren Sie diese Anleitung zum Nachschlagen
auf. Bewahren Sie diese Betriebsanleitung für
spätere Fragen auf und händigen Sie diese bei
Weitergabe des Gerätes an Dritte ebenfalls aus.
Machen Sie die Anleitung auch für Dritte zugänglich. Die Betriebsanleitung ist Bestandteil des
Gerätes.
Halten Sie das Gerät von
2.1.1
Kindern und Jugendlichen bis zum 16.
Lebensjahr fern! Kinder und Jugendliche unter 16 Jahren verstehen oder erkennen
nicht die möglichen Gefahren im Umgang mit
elektrischen Geräten. Lassen Sie das Gerät nicht
in Kinderhände gelangen und bewahren Sie es
für Kinder unzugänglich auf. Die Kleinteile könnten von Kindern verschluckt werden und Kinder
könnten daran ersticken. Kinder und Jugendliche
könnten sich bei der Verwendung des Gerätes
verletzen. Halten Sie ebenfalls das Verpackungsmaterial von Kindern fern.
2.1.2 Die Betriebsanleitung während der Lebensdauer des Gerätes behalten.
Dieses Gerät ist nicht dazu bestimmt, von
2.1.3
Personen (einschließlich Kindern) mit eingeschränkten physischen, sensorischen oder geistigen Fähigkeiten oder mangelnder Erfahrung
und / oder mangelndem Wissen benutzt zu
werden, es sei denn, sie würden durch eine für
ihre Sicherheit zuständige Person beaufsichtigt
oder erhielten von ihr Anweisungen, wie das
Gerät zu benutzen ist.
2.1.4 Sollten Sie Zweifel hinsichtlich der Installation, Bedienung oder Arbeitsweise des Gerätes
haben, wenden Sie sich an qualifiziertes Fachpersonal.
5 Das Gerät und der Druckluft-
2.1.
schlauch vibrieren und erwärmen sich
beim Betrieb. Platzieren Sie das Gerät
immer an einem sicheren, gut belüfteten Standort.
Setzen Sie das Gerät keinen mechanischen
2.1.6
Belastungen, hohen Temperaturen, Ölen, Fetten,
Lösungsmitteln, Feuchtigkeit und Erschütterungen
aus!
2.1.7
Betreiben Sie das Gerät nur dann, wenn
keine Beschädigungen und Funktionsstörungen
an Gerät, Kabeln oder Zubehör vorhanden sind!
Alle Reparaturen am Gerät müssen von
2.1.8
einem qualifizierten Elektriker / qualifiziertem
Fachpersonal durchgeführt werden.
2.1.9
Das Gerät darf nicht modifiziert (verändert)
werden.
2.1.10 Betreiben Sie das Gerät nicht, wenn
dieses fallen gelassen oder anderweitig beschädigt wurde. Bringen Sie es zur Überprüfung
oder Reparatur zu einem qualifizierten Elektriker!
Page 5
DE 5
2.1.11 Verwenden Sie keine anderen Kabel oder
Zubehörteile. Verlängern Sie nicht die Kabel.
2.1.12 Während des Betriebs muss zur Sicherstellung ausreichender Luftzirkulation ein Freiraum
von mindestens 18 cm um das Gerät vorhanden
sein. Das Gerät darf nicht mit Gegenständen
abgedeckt sein!
2.1.13 Verwenden Sie das Kabel nicht, um das
Gerät zu tragen oder daran zu ziehen.
2.1.14 Zum Betrieb des Gerätes wird der interne
Akku mit einer Ausgangsspannung von 12 V / DC
oder der beiliegende 12 V Kfz-Stecker zum Betrieb an der 12 V Kfz-Steckdose eines Kraftfahrzeugs benötigt.
Das Eindringen von Flüssigkeiten in das
2.1.15
Gerät muss verhindert werden! Tauchen Sie das
Gerät nicht in Flüssigkeiten! Nehmen Sie das
Gerät ausschließlich in trockenem Zustand in
Betrieb.
2.1.16 Das Gerät ist nicht wassergeschützt.
Schützen Sie das Gerät vor regnerischem Wetter,
Nebel, Schneefall, Wasser und anderen Flüssigkeiten! Stellen Sie das Gerät nicht auf nassem Boden ab. Achtung: Gefahr von Sachschäden
und Verletzungen!
2.1.17 Vermeiden Sie jede Verwendung des
Gerätes in der Nähe von offenen Flammen und in
explosionsgefährdeten Bereichen.
Stellen Sie sicher, dass alle Stecker,
2.1.18
Stromkabel und das Gerät trocken sind. Berühren
oder bedienen Sie das Gerät niemals mit feuchten
oder nassen Händen!
2.1.19 Prüfen Sie vor jeder Anwendung das
Gerät auf Beschädigungen. Ein fehlerhaftes Gerät
darf nicht in Betrieb genommen werden!
2.1.20 Prüfen Sie vor jeder Anwendung das
Gerät und besonders die Ventiladapter auf Verschmutzungen. Reinigen Sie das Gerät vor der
Anwendung, wenn eine Verschmutzung vorhanden ist.
2.1.21 Verwenden Sie das Gerät nur in einer
sicheren Umgebung! Halten Sie Kleidung, Haare,
Gliedmaßen und das Gerät fern von beweglichen und heißen Motor- und Fahrzeugteilen!
2.1.22 Verwenden Sie für das Gerät nur die
dieser Betriebsanleitung genannten Sicherungen
mit einer Absicherung von maximal 15 A.
in
2.1.23 Sorgen Sie für Ordnung und Sicherheit
im Arbeitsbereich. Berücksichtigen Sie die Umgebungseinflüsse und sorgen Sie für ausreichende
Beleuchtung des Arbeitsbereiches.
2.2 Sicherheitshinweise zur Anwendung
des Gerätes
2.2.1 Sichern Sie das Fahrzeug vor jedem Füllen
oder jeder Luftdruckprüfung eines Autoreifens, so
dass es nicht wegrollen kann. Achtung - Ver-
letzungsgefahr und Gefahr der Sachbeschädigung! Immer die Handbremse
anziehen und einen Gang einlegen! Bei
einem Automatikgetriebe muss die “ParkPosition” eingestellt und die Handbremse
angezogen sein!
2.2.2 Während jeder Luftdruckerhöhung oder
Luftdruckprüfung darf das Fahrzeug nicht betrieben oder gestartet werden!
2.2.3 Halten Sie die Sicherheitsvorschriften ein,
wenn das Fahrzeug aufgebockt ist oder sich auf
einer Hebebühne oder ähnlichem befindet!
2.2.4 Vorsicht! Gefahr elektrischer
Spannung im Bereich von Zündspulen,
Verteilerkappe, Zündkabeln, Zündker-
zen und elektrischen Bauteilen im Kraftfahrzeug!
2.2.5 Beachten Sie die Sicherheitshinweise und
das Handbuch des Fahrzeugherstellers!
2.2.6 Verwenden Sie das Gerät nur in einer
sicheren Umgebung! Halten Sie Kleidung, Körperschmuck und Haare fern von den Lüftungsschlitzen des Gerätes.
2.2.7 Achten Sie bei der Benutzung des Gerätes
darauf, dass der Druckluftschlauch und die Kabel
nicht durch scharfkantige Gegenstände und
Wärmequellen beschädigt werden und knicken
Sie diese nicht. Verlegen Sie die Kabel und den
Druckluftschlauch so, dass man nicht darüber
stolpern kann. Ein beschädigter Druckluftschlauch
oder beschädigte Kabel müssen unverzüglich
ausgetauscht werden!
Page 6

6
Kurzschlussgefahr! Achten Sie bei der
2.2.8
Verwendung der 12 V Kfz-Steckdose des Gerätes
auf die richtige Polarität des anzuschließenden
Verbrauchers. Beachten Sie hierzu die Hinweise
in der Bedienungsanleitung und die Schaltpläne
des Verbrauchergerätes.
2.2.9 Bei der Verwendung der 12 V Kfz-Steckdose des Gerätes darauf achten, dass die Sicherheit und Funktionsfähigkeit anderer Systeme und
Geräte nicht beeinträchtigt wird! Bitte beachten
Sie hierbei die Hinweise der Bedienungsanleitung des Verbrauchergerätes.
2.2.10 Bei Betriebsstörungen und Beschädigungen muss das Gerät sofort ausgeschaltet und
von dem 230 V Ladenetzteil bzw. der 12 V KfzSteckdose des Kraftfahrzeugs getrennt werden!
2.2.11 Stellen Sie sicher, dass die Zündung und
alle Verbraucher im Fahrzeug ausgeschaltet sind,
bevor Sie das Gerät mit der 12 V Kfz-Steckdose
des Kraftfahrzeugs verbinden!
2.2.12 Bei unsachgemäßer Anwendung des
Gerätes können elektronische Bauteile des Fahrzeugs beschädigt werden. Dies könnte einen
Unfall oder Brand zur Folge haben. Achtung!
Gefahr von Sach- und Personenschäden!
2.2.13 W
ist das Gerät nicht betriebsbereit, und es ist keine
12 V Spannung an der Kfz-Steckdose des
Gerätes vorhanden.
2.2.14
und Bedienung des Gerätes unsicher sein, fragen
Sie qualifiziertes Fachpersonal um Rat.
2.2.15
bzw. fehlerhaftes Aufsetzen oder Einsetzen der
Ventiladapter auf dem / in das Ventil des aufzublasenden Artikels kann dazu führen, dass die
Verbindung zwischen Gerät und Artikel undicht
ist. Durch hier austretende Luft entsteht ein Druckabfall und in der Folge falsche Luftdruckwerte.
2.2.16 Halten Sie Kinder und andere Personen
während des Betriebs von dem Gerät fern.
2.2.17 Verwenden Sie das Gerät nicht, wenn Sie
müde sind oder unter dem Einfluss von Medikamenten, Drogen oder Alkohol stehen.
2.2.18 Schalten Sie das Gerät vor dem Wechsel
der Ventiladapter mit dem Betriebsschalter aus.
2.2.19
Personen, Tiere, Staub, Schmutz, Chemikalien,
enn die 15 A Gerätesicherung auslöst,
Sollten Sie bezüglich der Funktionsweise
Fehlerhafte Montage der Ventiladapter
Richten Sie den Druckluftstrahl nicht auf
Säuren, Gase, Gegenstände jeglicher Art oder
sich selbst. Achtung! Gefahr von Körperver-
letzung und Sachbeschädigung!
2.2.20 Reinigen Sie vor dem Aufpumpen den
Bereich des Ventils, falls dieses staubig sein sollte.
Tragen Sie zum Schutz Ihrer Atemorgane eine
Staubmaske. Achtung! Gefahr von Körper-
verletzung und Sachbeschädigung!
2.2.21 Um Fehlfunktionen oder das Zerplatzen
des Artikels beim Aufpumpen zur vermeiden,
messen Sie während der Aufblasphase mit einem
geeigneten externen Luftdruckprüfer den Luftdruck
nach. Das Manometer des Gerätes ist nicht kalibriert und die angezeigten Werte sind daher nur
als Richtwerte für den Luftdruck zu verstehen. Das
Manometer zeigt keine verbindlich genauen Luftdruckwerte an. Die Messtoleranzen des Manometers können Sie den technischen Daten (siehe
Punkt 6.0) entnehmen. Achtung! Gefahr von
Körperverletzung und Sachbeschädigung!
2.2.22 Prüfen Sie besonders den Reifendruck von
Kraftfahrzeugen, Motorrädern und Anhängerreifen nach dem Aufpumpen mit einem geeigneten externen Luftdruckprüfer nach. Bereits geringfügig falscher Luftdruck kann die Fahreigenschaften beeinträchtigen. Achtung! Gefahr von
Körperverletzung und Sachbeschädigung!
2.2.23 Beachten Sie unbedingt die Luftdruckvorgaben des aufzublasenden Artikels und die
Hinweise des Herstellers.
2.2.24 Verwenden Sie das Gerät nicht, wenn das
230 V Ladenetzteil angeschlossen ist.
2.2.25 Setzen Sie das Gerät keinen Temperaturen über 60 C aus.°
2.2.26 Überlasten Sie das Gerät nicht.
2.2.27 Tragen Sie das Gerät nur am Handgriff.
Halten Sie den Handgriff frei von Ölen, Fetten
und Feuchtigkeit.
Schalten Sie das Gerät nach maximal 10
2.2.28
Minuten Betrieb oder im Falle der Überhitzung sofort ab, indem Sie den Betriebsschalter auf ( O )
stellen. Lassen Sie das Gerät mindestens 10 Minuten abkühlen, bis die normale Betriebstemperatur
erreicht und das Gerät wieder betriebsbereit ist.
2.2.29 Die erzeugte Druckluft darf nicht für gewerbliche Nutzung sowie für Lebensmittel-,
Pharma-, Tauchsport- oder Medizinbereiche
verwendet werden.
Page 7
DE
7
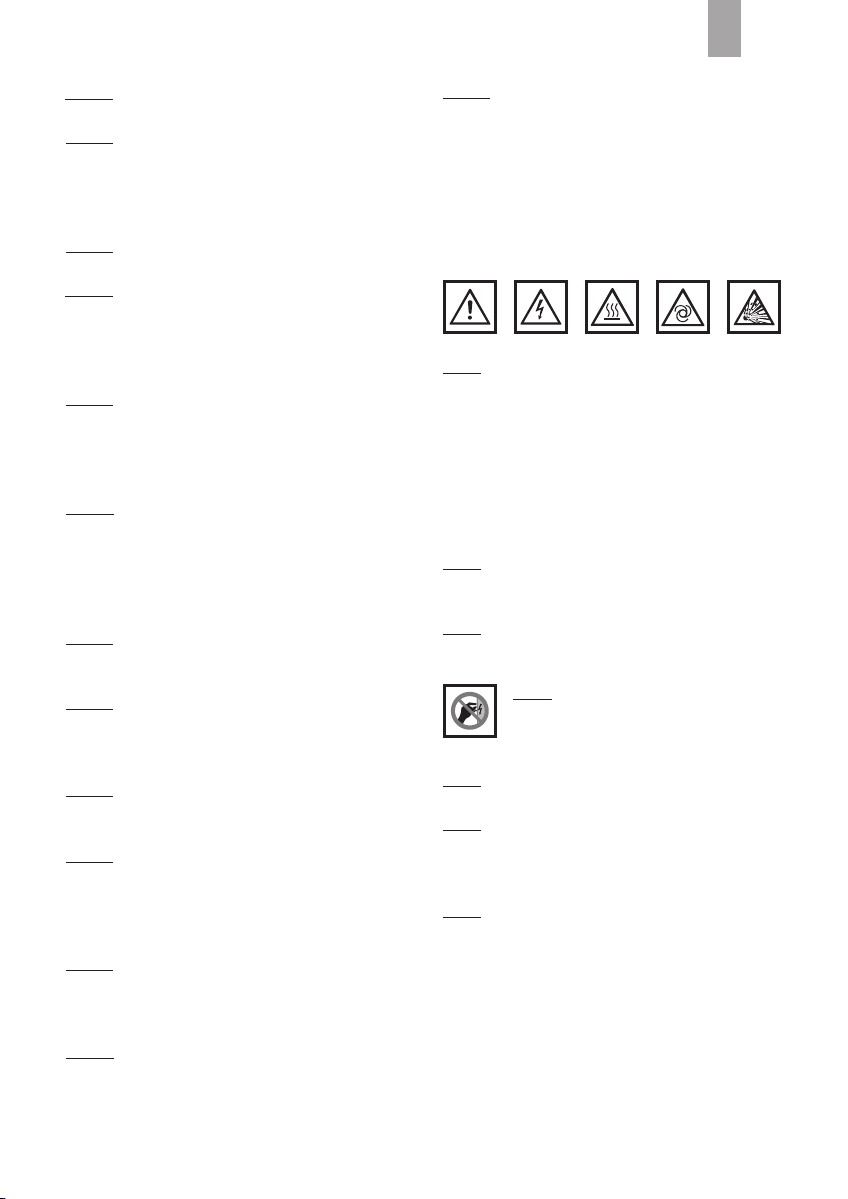
2.2.30 Warnung: LED-Strahlung!
Augenschäden vemeiden! Blicken Sie
nicht direkt für längere Zeit und nicht
ohne eine geeignete Schutzbrille in den LEDLichtstrahl des Gerätes.
2.2.31 Das Gerät verfügt über LEDs der .
Richten Sie den LED-Lichtstrahl nicht in die Augen
von anderen Personen und Tieren!
Warnung vor explosions-
2.2.32
gefährlichen Stoffen und Gegen-
ständen! Blasen Sie keine Schwimm-
hilfen, Artikel der persönlichen Schutzausstattung
und Schlauchboote auf.
2.2.33 Pumpen Sie aus Sicherheitsgründen den
Artikel nur in kurzen Aufpumpintervallen auf und
prüfen Sie zwischendurch den Luftdruck am
Manometer und dem aufzublasenden Artikel.
2.2.34 Verwenden Sie keinen beschädigten
Ventiladapter! Dieser kann durch den Luftdruck
zerbersten. Achtung: Verletzungsgefahr!
2.2.35 Durch die Einhaltung der Bestimmungen
der Betriebsanleitung und der Sicherheitshinweise
bedarf es keiner besonderen Anforderung und
Schulung des Bedieners für das Gerät.
2.3 Sicherheitshinweise zum Geräteakku
2.3.1 Werfen Sie den Geräteakku nicht ins Feuer
und schließen Sie ihn nicht kurz.
2.3.2 Ein beschädigter Geräteakku kann durch
austretende Batteriesäure Schäden am Gerät
verursachen!
2.3.3 Im Umgang mit einem beschädigten Akku
ist besondere Vorsicht geboten. Verätzungs-
gefahr! Tragen Sie geeignete Schutzhandschuhe
und Schutzkleidung. Sollte aus dem Akku Säure
ausgelaufen sein, vermeiden Sie jeden Kontakt mit
der Haut, Augen und Schleimhäuten. Die betroffenen Stellen sofort mit viel klarem Wasser spülen
und umgehend einen Arzt aufsuchen oder
medizinische Hilfe in Anspruch nehmen.
Klasse 1
2.4 Verhalten bei einem Notfall
2.4.1 Sichern Sie den Unfallort ab und bewahren
Sie die Verletzten und alle anderen Personen vor
weiteren Schädigungen.
2.4.2 Leisten Sie bei Personenverletzungen die
notwendigen Erste-Hilfe-Maßnahmen.
2.4.3 Machen Sie bei der Anforderung von Hilfe
oder bei einem Notruf (Arzt, Feuerwehr, Polizei)
folgende Angaben:
▪ Unfallort (evtl. Beschreibung der Umgebung)
▪ Unfallart
▪ Anzahl der Verletzten
▪ Art der Verletzungen
3.0 PRODUKT BESCHREIBUNG
3.1 Lieferumfang
1 Luft- und Energiestation LA 10 mit einem Hoch druckschlauch (inkl. Autoventil-Hebelstecker)
sowie einem 12 V Kfz-Anschlussstecker
1 Ladenetzteil 230 V
1 Ventiladapter mit ca. 2,0 mm Durchmesser
(Ballnadel)
1 Ventiladapter mit ca. 4,5 mm
1 Ventiladapter mit ca. 8,0 mm Durchmesser
1 Betriebsanleitung
1 Kfz-Flachstecksicherung 15 A (im Gerät
eingesteckt)
Prüfen Sie direkt nach dem Auspacken alle Teile
auf Beschädigungen und vollständigen Lieferumfang!
Verwenden Sie das Gerät nicht bei Beschädigung, Fehlfunktionen, oder wenn die Betriebsanleitung nicht vorhanden oder nicht vollständig ist!
Abbildungen können geringfügig vom Produkt
abweichen. Änderungen, die dem technischen
Fortschritt dienen, vorbehalten. Dekoration nicht
enthalten.
Durchmesser
Page 8
8
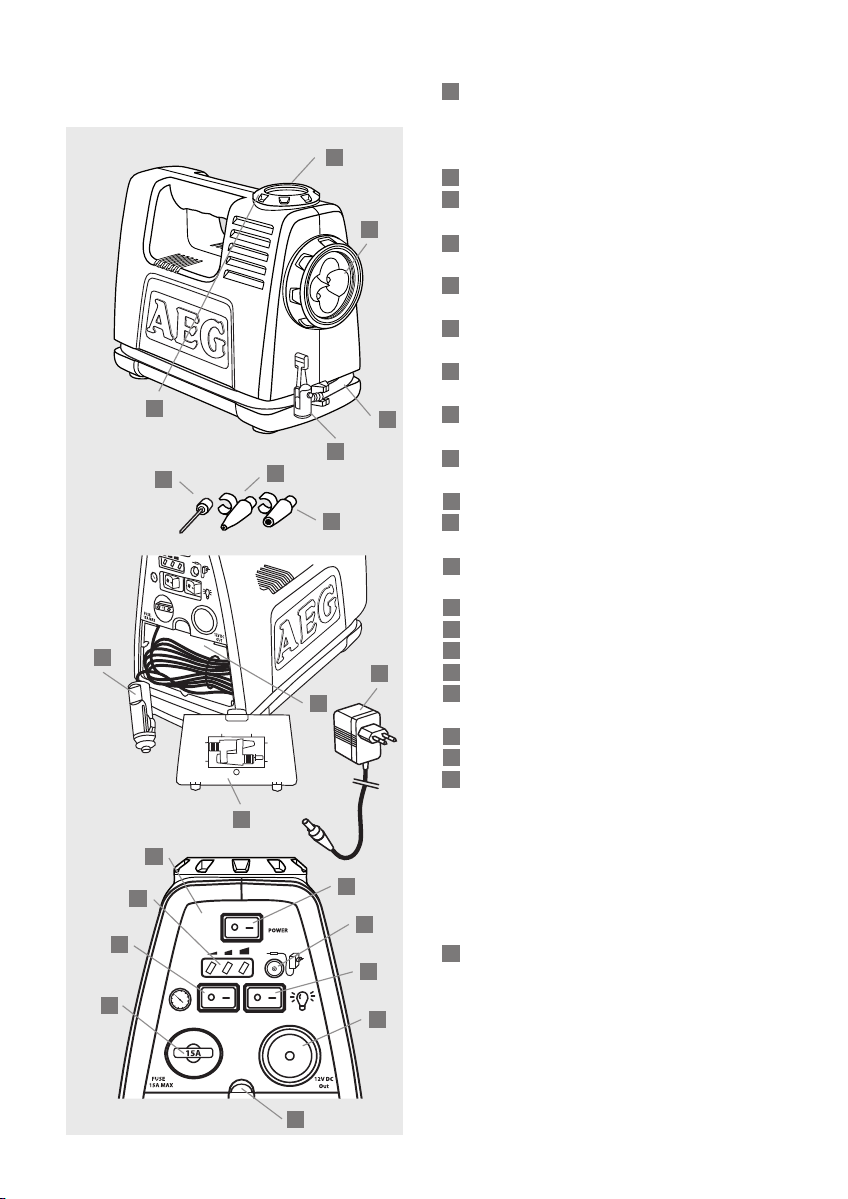
3.2 Produktübersicht
5
Bild 1
8
Bild 2
12
Bild 3
21
20
19
18
11
1
1
1
1
Manometer, Anzeige des Luftdrucks bis
max. 10 bar / 145,03 PSI (bar und PSI
sind Druckeinheiten, 1 Bar = 14,50 PSI)
1
2
und Zifferblattbeleuchtung
2
2
2
2
Leuchte mit 4 LEDs
Druckluftschlauch, an der unteren Ge-
3
3
3
3
häusevertiefung verstaubar
Autoventil-Hebelstecker mit Ventilschnell-
4
4
4
4
verschluss
5
5
5
5
Einstellring zur Markierung eines
bestimmten Luftdruckwertes
6
6
6
6
1 Ventiladapter mit ca. 8,0 mm Durchmesser
7
7
7
7
1 Ventiladapter mit ca. 4,5 mm Durchmesser
8
8
8
8
3
4
7
6
1 Ventiladapter mit ca. 2,0 mm Durchmesser (Ballnadel)
9
9
9
9
Aufbewahrungsfach für 12 V Kfz-Stecker
mit Kabel und 230 V Ladenetzteil.
230 V Ladenetzteil
10
10
10
10
11
11
11
11
Abdeckung des Aufbewahrungsfaches für
die Ventiladapter
12
12
12
12
12 V Kfz-Stecker mit Kabel und 15 A
(Ampere) Sicherung
13
13
13
13
O / I, Ein- / Aus-Betriebsschalter
14
14
14
14
Anschlussbuchse für das Ladenetzteil
15
15
15
15
O / I, Ein- / Aus-Lichtschalter für LEDs
16
16
16
10
9
16
12 V Kfz-Steckerbuchse mit Abdeckung
17
17
17
17
Clipverschluss des Ablagefaches; zum
Öffnen den Clip nach unten drücken
18
18
18
18
Gerätesicherung 15 A (Ampere)
19
19
19
19
O / I , Ein- / Aus-Kompressorschalter
20
20
20
20
LEDs zur Anzeige der Batteriekapazität
beim Betrieb sowie zur Anzeige der
Batteriekapazität während des Ladevorgangs des Akkus.
Grüne LED = Akku ist voll
13
14
15
16
Gelbe LED = Akku ist halb voll
Rote LED = Akku ist fast leer, muss ge-
laden werden.
21
21
21
21
Gehäuseeinheit für die Bedienelemente
Bild 4
17
Page 9
DE39
4.0 BEDIENUNG /
ZUBEHÖR
4.1 Gerät ein- / ausschalten
▪ Drücken Sie den Ein- / Ausschalter auf die
Position ( I ). Das Gerät ist nun betriebsbereit
und die Beleuchtung des Manometers ist
eingeschaltet. Die LED-Leuchten zeigen den
aktuellen Kapazitätsstand des Akkus an.
▪ Im betriebsbereiten Gerätemodus ist die 12 V
Kfz-Steckdose aktiviert.
▪ Um das Gerät auszuschalten, drücken Sie den
Ein- / Ausschalter auf die Position ( O ).
der Geräteeinschaltung auf Position ( I ) stehen,
läuft der Kompressor automatisch an und es wird
über den Druckluftschlauch Druckluft abgegeben.
Es besteht die Gefahr von Sach- und
Personenschäden!
16
13
Warnung vor automatischem
Anlauf! Sollte der Ein- / Ausschalter
19
für die Kompressoreinschaltung vor
13
1
20
Achtung!
brauch des Gerätes geeigneten Gehör-
schutz und eine geeignete Schutzbrille!
Prüfen Sie vor jedem Gebrauch das Gerät und
den Druckluftschlauch auf Beschädigungen!
Ein beschädigtes Gerät darf nicht in Betrieb genommen werden! Prüfen Sie vor jeder Anwendung die Anweisungen des Herstellers für den
aufzublasenden Artikel.
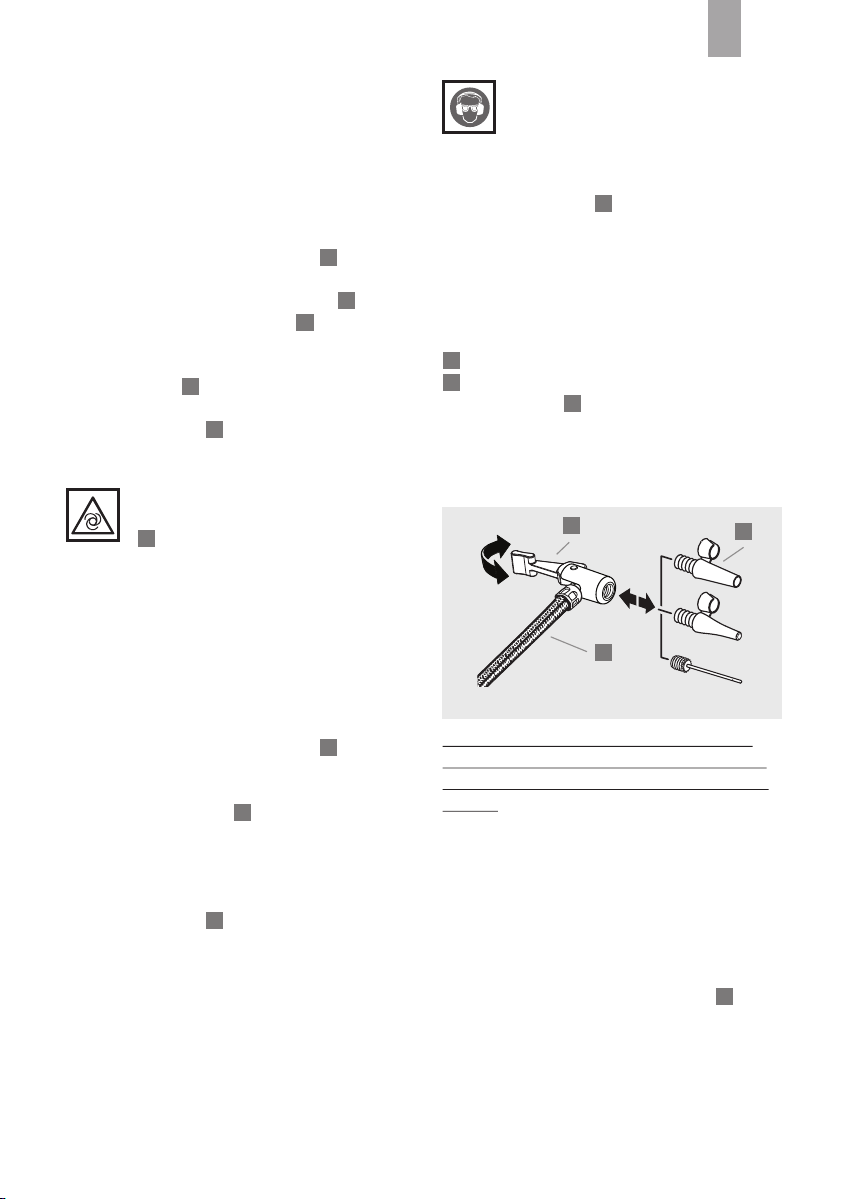
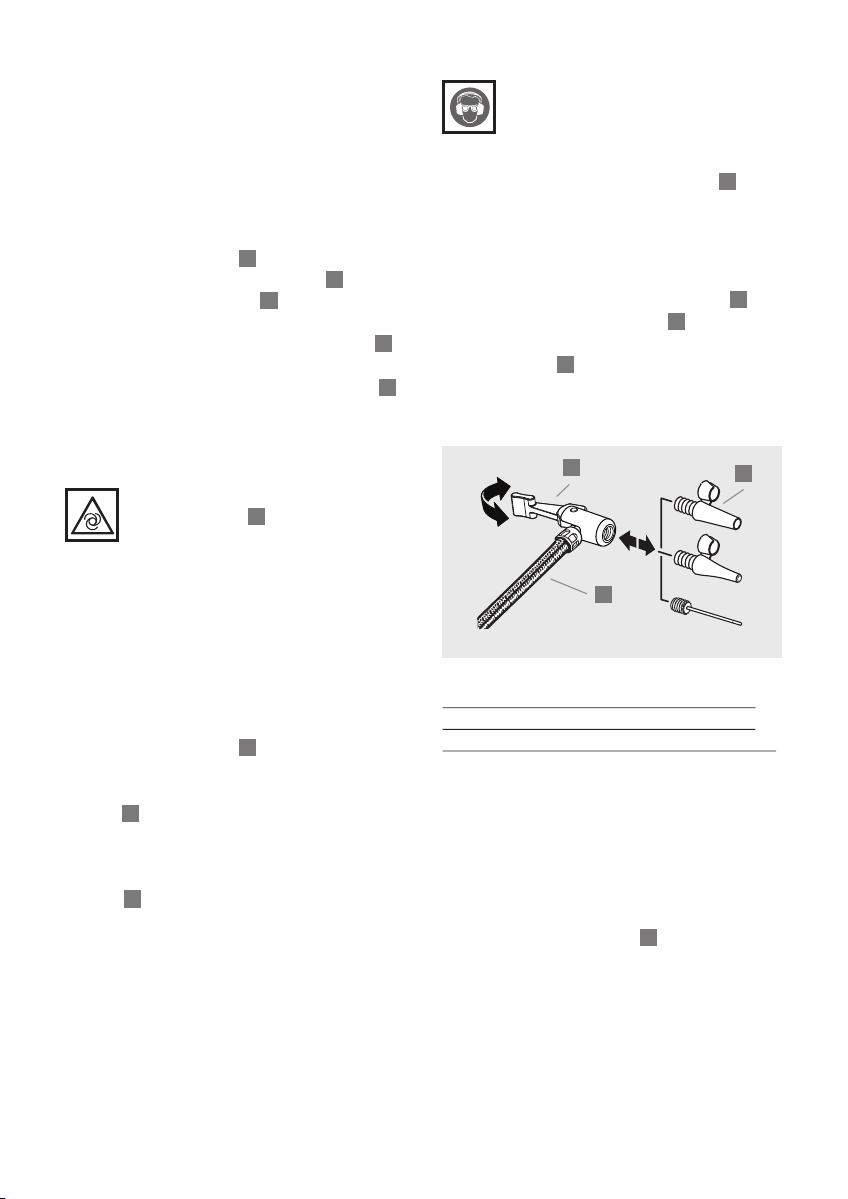
Wählen Sie den gewünschten Ventiladapter (z. B.
) aus. Öffnen Sie den Ventilschnellverschluss
7
, indem Sie den Schnellverschlusshebel vom
4
Druckluftschlauch wegdrücken. Setzen Sie nun
den Ventiladapter auf und drücken Sie den Hebel
zum Schließen wieder in Richtung des Druckluftschlauches (siehe Bild 5).
Tragen Sie vor jedem Ge-
3
4
3
7
4.2 Bedienung der Beleuchtung
▪ Drücken Sie den Ein- / Ausschalter auf die
Position ( I ). Das Gerät ist nun betriebsbereit.
▪ Um die Beleuchtung zu aktivieren, drücken Sie
den Ein- / Ausschalter der Beleuchtung auf
die Position ( I ).
▪ Zum Ausschalten der LED-Leuchten drücken Sie
den Beleuchtungsschalter auf die Position ( O ).
▪ Um das Gerät auszuschalten drücken Sie den
Ein- / Ausschalter auf die Position ( O ).
4.3 Bedienung des Kompressors
Das Gerät kann mit dem integrierten Akku oder
mit dem integrierten 12 V Kfz-Stecker betrieben
werden.
15
13
13
Bild 5
Auto-, Motorrad- und Fahrradreifen mit einem
Autoventil (Schraderventil mit 7,7 mm Gewindedurchmesser) können ohne Adapter aufgeblasen
werden!
Der Kompressor darf max. 10 Minuten
betrieben werden, anschließend muss das
Gerät 10 Minuten abkühlen!
▪ Zum Aufblasen eines Autoreifens benötigen Sie
keinen Ventiladapter. Entfernen Sie zunächst
die Abdeckkappe vom Ventil des Reifens.
▪ Öffnen Sie den Ventilschnellverschluss und
setzen Sie den Autoventil-Hebelstecker so weit
wie möglich auf das Ventil des Reifens.
Schließen Sie dabei den Ventilschnellverschluss.
▪ Prüfen Sie den festen Sitz des Autoventil Hebelsteckers auf dem Ventil des Reifens durch
vorsichtiges Ziehen.
4
Page 10
10
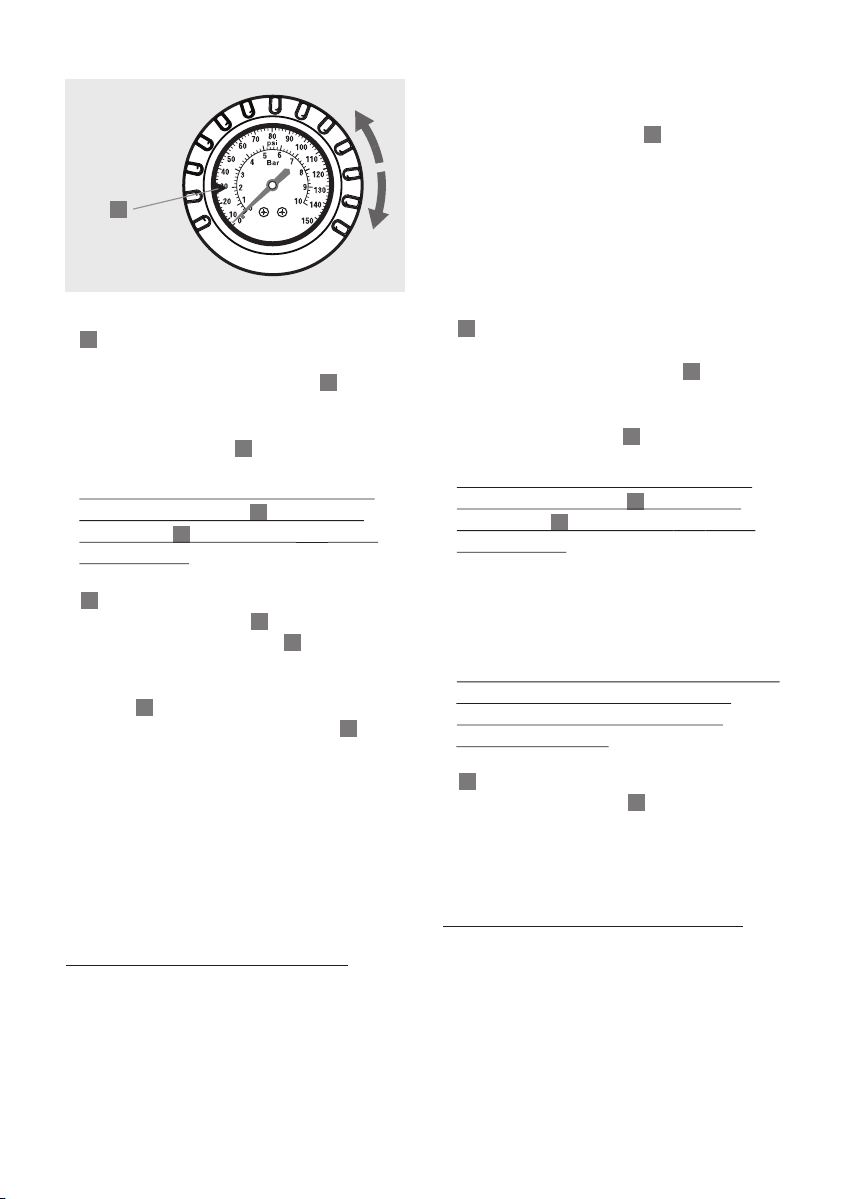
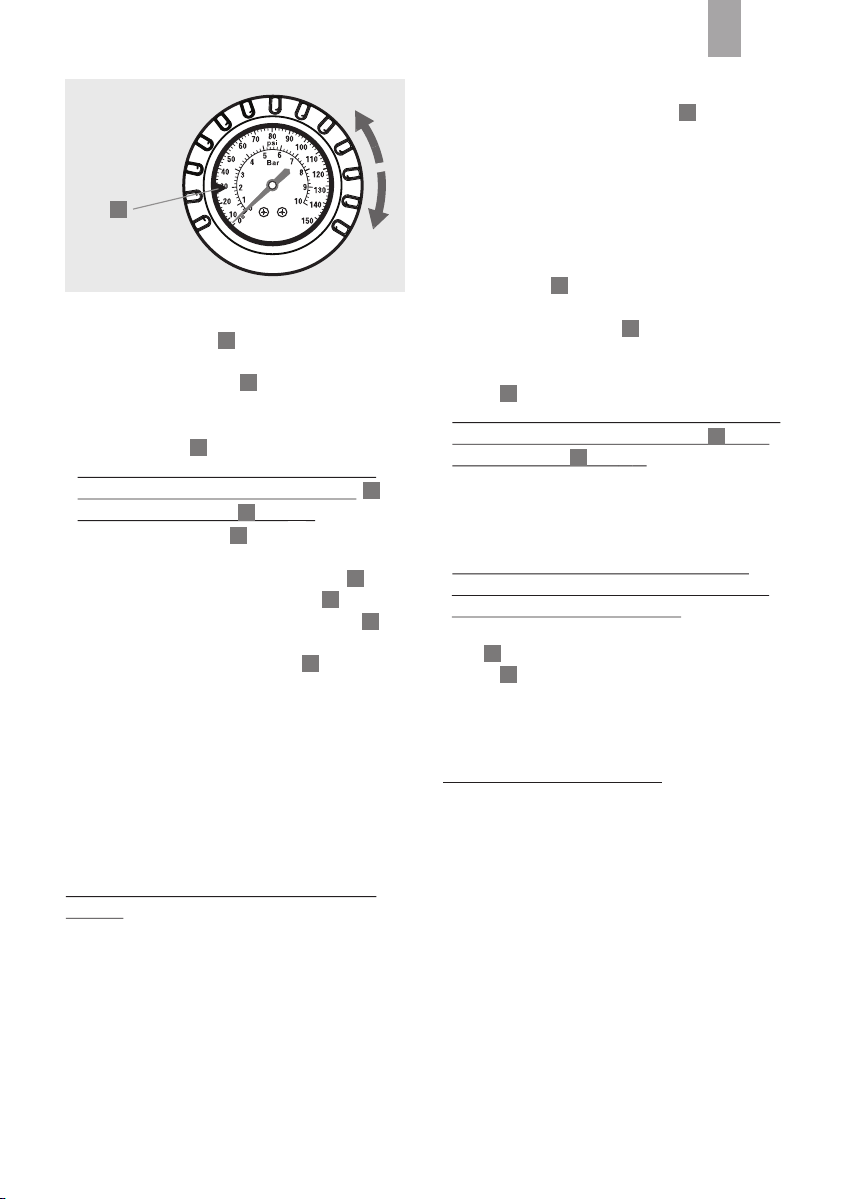
Luftdruckwert
markieren
z.B. auf 2 bar
5
Bild 6
▪ Stellen Sie die Pfeilmarkierung des Einstellrings
5
am Manometer zur Orientierung auf den
gewünschten Luftdruckwert ein (siehe Bild 6).
▪ Drücken Sie den Ein- / Ausschalter auf die
13
Position ( I ). Das Gerät ist nun betriebsbereit.
▪ Um den Kompressor zu aktivieren, drücken Sie
den Ein- / Ausschalter des Kompressors auf
19
die Position ( I ).
Hinweis: Der Kompressor kann jederzeit mit
dem Kompressorschalter oder dem Betriebsschalter in der Position ( O ) ausge-
13
19
schaltet werden.
▪ Wird der am Einstellring markierte Luftdruck
erreicht, schalten Sie den Kompressor mit
5
dem Kompressorschalter ab. Drücken Sie
dazu den Kompressorschalter auf die
19
19
Position ( O ).
▪ Zur Geräteabschaltung muss noch der Betriebs-
schalter am Gerät ausgeschaltet werden.
13
▪ Öffnen Sie den Ventilschnellverschluss und
4
entfernen Sie den Autoventil-Hebelstecker vom
Ventil des Reifens.
▪ Prüfen Sie zusätzlich den Luftdruck mit einem
anderen Luftdruckmessgerät, um den genauen
Wert zu ermitteln. Ist der gewünschte Luftdruck
nicht erreicht, wiederholen Sie den Vorgang.
▪ Schrauben Sie anschließend die Ventilschutz-
kappe wieder auf das Reifenventil auf.
Sport-, Spiel- und Freizeitartikel aufblasen
Der Kompressor darf max. 10 Minuten
betrieben werden, anschließend muss das
Gerät 10 Minuten abkühlen!
▪ Lesen Sie zuerst die Anweisungen des Artikel herstellers zum Aufblasen und zum maximal
erlaubten Luftdruck, bevor Sie mit dem Auf blasen des Artikels beginnen.
▪ Öffnen Sie die Ventilabdeckung des Artikels.
▪ Befestigen Sie den passenden Ventiladapter mit
dem Ventilschnellverschluss und drücken Sie
4
diesen in das Ventil des Artikels hinein. Sollte
sich der Ventiladapter während der Aufblas phase vom Ventil lösen, müssen Sie diesen
während der Aufblasphase mit der Hand in
das Ventil drücken.
▪ Prüfen Sie den festen Sitz des Ventiladapters
im Ventil des Artikels durch vorsichtiges Ziehen.
▪ Stellen Sie die Pfeilmarkierung des Einstellrings
5
am Manometer zur Orientierung auf den
gewünschten Luftdruckwert ein.
▪ Drücken Sie den Betriebsschalter auf die
13
Position ( I ). Das Gerät ist nun betriebsbereit.
▪ Um den Kompressor zu aktivieren, drücken Sie
den Kompressorschalter des Kompressors
19
auf die Position ( I ).
Hinweis: Der Kompressor kann jederzeit mit
dem Kompressorschalter oder dem Be-
triebsschalter in der Position ( O ) ausge-
13
19
schaltet werden.
▪ Beobachten und prüfen Sie den Härtegrad
des Artikels während der Aufblasphase. Ist
der Artikel bereits zu stark aufgeblasen, unter-
brechen Sie den Vorgang sofort und schalten
Sie den Kompressor aus!
Achtung! Bei zu hohem Luftdruck besteht
die Gefahr, dass der Artikel platzt!
Gefahr von Körperverletzung und
Sachbeschädigung!
▪ Wird der markierte Luftdruck am Einstellring
5
erreicht, schalten Sie den Kompressor mit
dem Kompressorschalter ab.
19
▪ Nehmen Sie den Ventiladapter aus dem Ventil
des Artikels und schließen Sie die Ventilkappe
des Artikels.
Unverbindliche Richtwerte für Druckangaben
Autoreifen ca. 1,9 - 3,5 bar
Anhängerreifen ca. 2,4 - 3,4 bar
Motorradreifen ca. 1,7 - 2,9 bar
Fahrradreifen ca. 2,0 - 4,0 bar
Fußball ca. 0,6 - 1,1 bar
Volleyball ca. 0,18 - 0,22 bar
Achtung! Beachten Sie die Herstellerangaben des Artikels. Blasen Sie keine
Schwimmhilfen mit dem Kompressor auf!
Page 11
DE 11
4.4 Laden des Geräteakkus
Laden mit dem 230 V Ladenetzteil
Vor der ersten Inbetriebnahme sollte der Akku
vollständig aufgeladen werden.
▪ Verbinden Sie den kleinen runden Stecker des
Ladenetzteils mit der Anschlussbuchse .
10
14
▪ Stecken Sie das Ladenetzteil in eine 230 V
Netzsteckdose.
▪ Drücken Sie den Betriebsschalter auf die
13
Position ( I ). Das Gerät schaltet nun in den
Lademodus um.
▪ Die LED-Anzeige leuchtet auf und die
20
blinkende LED zeigt die aktuelle Akkukapazität
an. Die Ladezeit beträgt ca. 10 - 12 Stunden.
Bei voll aufgeladenem Akku muss die grüne LED
dauerhaft leuchten.
▪ Nach dem Ladevorgang das Gerät mit dem
Betriebsschalter ausschalten und das 230 V
Ladenetzteil vom Gerät und der 230 V Steckdose entfernen.
Hinweis! Betreiben Sie den Kompressor
oder die Beleuchtung nicht während des
Ladevorgangs!
4.5 Verwendung der 12 V Kfz-Steckdose
▪ Entfernen Sie die Abdeckung der 12 V Kfz-
Steckerbuchse.
▪ Verbinden Sie den 12 V Kfz-Stecker des Fremd-
gerätes mit der 12 V Kfz-Steckerbuchse des
Gerätes.
▪ Drücken Sie den Betriebsschalter auf die
13
Position ( I ).
▪ Die 12 V Kfz-Steckerbuchse des Gerätes ist
nun aktiv und das angeschlossene 12 V
Fremdgerät kann jetzt betrieben werden (siehe
Bild 7).
▪ Trennen Sie nach dem Gebrauch des Fremdge-
rätes den 12 V Kfz-Stecker von der 12 V Kfz-
Steckerbuchse des Gerätes.
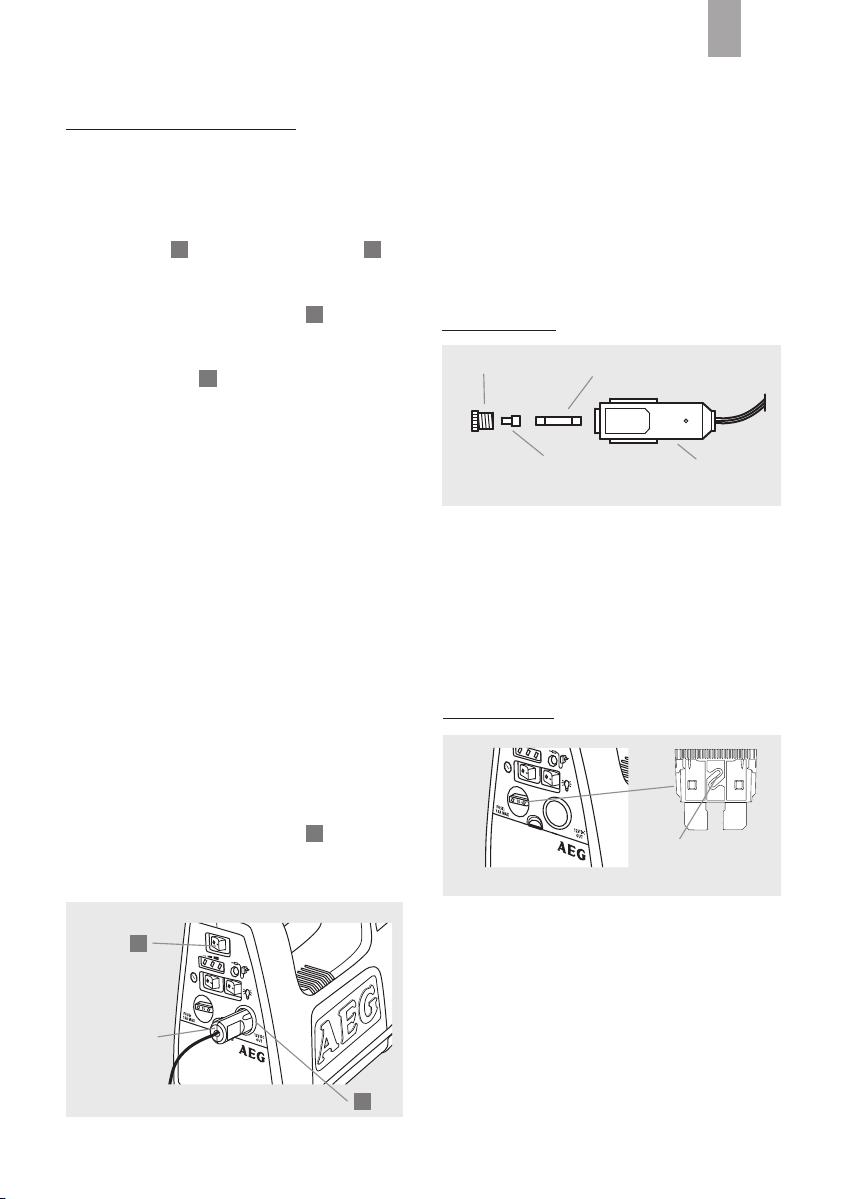
4.6 Sicherungen wechseln
12 V Kfz-Stecker
Halteschraube
Kontaktkappe
Bild 8
Rundsicherung 15 A (Ampere)
Stecker 12 V
Kfz-Anschluss
▪ Schrauben Sie die Halteschraube heraus.
▪ Entnehmen Sie die Kontaktkappe und die
15 A (Ampere) Rundsicherung.
▪ Setzen Sie alle Teile mit der neuen 15 A Siche-
rung gemäß der abgebildeten Reihenfolge zu-
sammen und schrauben Sie die Halteschraube
wieder auf (siehe Bild 8).
Gerätesicherung
Intakte Flach-
Bild 9
stecksicherung
15 A (Ampere)
13
12 V KfzStecker des
Fremdgerätes
Bild 7
16
▪ Ziehen Sie die Flachstecksicherung mit einer
Flachzange vorsichtig aus der Sicherungs-
halterung in der Gehäuseeinheit für die Bedien elemente heraus.
▪ Ersetzen Sie die defekte Sicherung durch eine
neue 15 A Flachstecksicherung, indem Sie diese
mit dem Daumen vorsichtig in die Sicherungs halterung drücken, bis sie mit dem Geräte gehäuse abschließt (siehe Bild 9).
Page 12

12
Der Kompressor ist eingeschaltet,
zeigt aber keine Funktion.
Der Betriebsschalter ist nicht
eingeschaltet.
Schalten Sie vor dem Gebrauch
des Kompressor den Betriebsschalter des Gerätes ein.
Laden Sie den Geräteakku mit
dem 230 V Ladenetzteil.
Beim Einschalten des Betriebsschalters leuchten die LEDs und
die Manometerbeleuchtung nicht
auf. Der Geräteakku ist leer.
Ersetzen Sie die defekte 15 A
Flachstecksicherung durch eine
neue.
Die 15 A Gerätesicherung ist
defekt.
Das Gerät zeigt trotz vollem
Akku und intakter Gerätesicherung keine Funktion.
Das Gerät ist defekt.
Wenden Sie sich an qualifiziertes
Fachpersonal.
Der Kompressor ist überhitzt.
Die Betriebszeit des Kompressors
war länger als 10 Minuten.
Lassen Sie das Gerät 10 Minuten
abkühlen und halten Sie den
max. Arbeitszyklus von 10
Minuten Betriebszeit und 10
Minuten Abkühlzeit ein.
Die Lüftungsschlitze des Gerätes
sind durch einen Gegenstand
abgedeckt bzw. verstopft.
Entfernen Sie den Gegenstand
von den Lüftungsschlitzen des
Gerätes bzw. reinigen Sie die
Lüftungsschlitze.
Der Kompressor verliert Druck
und baut keinen ausreichenden
Luftdruck auf.
Druckluftschlauch oder Kompressor undicht oder beschädigt.
Wenden Sie sich an qualifiziertes
Fachpersonal.
Der Ventiladapter oder der Autoventil-Hebelstecker sitzt nicht
richtig.
Prüfen Sie den richten Sitz des
Ventiladapters auf dem
und im Ventil
des Artikels. Prüfen Sie den
richtigen Sitz des
auf dem Reifen-
ventil.
Auto-
ventil-Hebelstecker
Autoventil-
Hebelsteckers
4.7 Fehlersuche
Lösungen, AbhilfeMögliche UrsachenFehler / Störung
13
13
Die oben gezeigte Tabelle zur Fehlersuche und
möglichen Ursachen und deren Abhilfen zeigt
nicht alle Fehlermöglichkeiten.
Ist eine Behebung des Gerätefehlers mit den
genannten Maßnahmen nicht möglich, wenden
Sie sich an qualifiziertes Fachpersonal.
Page 13
DE 13
5.0 WARTUNG UND
PFLEGE
5.1 Reinigung, Wartung und Aufbe-
wahrung
5.1.1 Warnung! Schalten Sie das Gerät
dem Betriebsschalter aus und trennen Sie vor der
Reinigung das Gerät vom .
5.1.2 Reinigen Sie das Gerät mit einem trockenen
Tuch. Verwenden Sie keine Flüssigkeiten oder
scharfen Reinigungsmittel, denn dies kann zu Verfärbungen und Beschädigungen der Geräteoberfläche führen, und das Gerät könnte beschädigt
werden! Das Eindringen von Flüssigkeiten in das
Geräteinnere muss verhindert werden! Tauchen
Sie das Gerät nicht in Flüssigkeiten! Nehmen Sie
das Gerät ausschließlich in trockenem Zustand in
Betrieb.
Verwahren / Lagern Sie das Gerät nur in
5.1.3
trockener Umgebung! Feuchtigkeit kann die
Elektronik des Gerätes beschädigen!
5.1.4 Lagern
Temperaturschwankungen! Hierbei entstehendes
Kondenswasser kann die Elektronik beschädigen!
Sie das Gerät nicht bei extremen
230 V Ladenetzteil
mit
6.0 TECHNISCHE
DATEN
Gerätebeschreibung:
Artikelnummer: 97180
Abmessungen: ca. 26,5 x 14 x 22,5 cm
Gewicht: ca. 3,7 kg
Geräteabsicherung: 15 A (Ampere) Flach-
Kompressor:
Kompressorleistung: max. 10 bar / 145 psi
Druckanzeige/
Manometeranzeige: Analoge Druckanzeige,
nicht kalibriert, mit
Manometertoleranzen: +/- 0,34 bar (5 psi) von
Akustische Lärmwertangabe: 90 dB (dB = Lautstärke)
Intervallbetrieb: max. 10 Minuten Betrieb,
Aggregat: ölfrei
Druckluftschlauchlänge: ca. 65 cm
Geräteakku:
Batterietyp: 12 V Bleiakku
Batteriekapazität: 7,2 Ah (Amperestunden)
Arbeitstemperatur: 0 C - 50 C (Celsius)
Batteriekapazitätsanzeige: 3 LED-Leuchten (rot,
Ladezeit: ca. 10 - 12 Stunden mit
Ladenetzteil:
Eingangsspannung: 230 V 50 Hz (V = Volt,
Eingangsstrom: max. 0,5 A (Ampere)
Luft- und Energiestation
LA 10
(L x B x H cm)
stecksicherung
(bar / psi = Druckeinheit)
Hintergrundbeleuchtung
0 - 6,9 bar (0 -100 psi)
+/- 0,48 bar (7 psi) von
6,9 - 10 bar (100 -150
psi)
min. 10 Minuten Abkühlen
°
°
orange, grün)
dem 230 V Ladenetzteil
~
Hz = Hertz, Schwingungen pro Sekunde)
Page 14
14
Ausgangsspannung: 14,5 V
Ausgangsstrom: 1000 mA DC (mA =
Milliampere, DC =
Gleichstrom)
Ladenetzteil nur im Innen-
bereich verwenden
Beleuchtung:
Beleuchtungsart: 4 LED-Leuchten
LED-Leuchten: LED-Leuchten sind nicht
austauschbar
Laserklasse: LED-Leuchten entsprechen
der Schutzklasse I
Geräte mit Schutzisolierung der Schutzklasse II
Das Gerät ist konform
gemäß der EG-Richtlinien
▪ Maschinenrichtlinie
(2006/42/EG)
▪ Richtlinie über
elektromagnetische
Verträglichkeit
(2004/108/EG)
7.1.3 Verbrauchte Batterien gehören
nicht in den Hausmüll. Entsorgen Sie
Pb
diese über Ihren Elektrofachhandel
oder Ihre öffentliche Wertstoff-Sammelstelle. Als
Verbraucher sind Sie verpflichtet, unbrauchbare
Batterien zur Entsorgung zurückzugeben.
Folgende Zeichen weisen auf eine schadstoffhaltige Batterie hin: Pb = enthält Blei, Hg =
enthält Quecksilber und Cd = enthält Cadmium.
8.0 GARANTIE UND
SERVICE
Wenden Sie sich bei Beschädigungen, Reparaturen oder anderen Problemen mit dem Produkt
an die Verkaufsstelle oder qualifiziertes Fachpersonal.
Die allgemeinen Garantiebedingungen beziehen
sich auf Produktions- und Materialdefekte.
Bringen Sie ein fehlerhaftes Produkt zur Verkaufsstelle zurück.
7.0 ENTSORGUNG
7.1.1 Eine Entsorgung und Wiederverwertung des Gerätes muss zu den
gesetzlichen Bestimmungen erfolgen.
Fragen Sie hierzu bei Ihrer Stadt / Gemeinde
oder einem Entsorgungsunternehmen nach.
Entsorgen Sie das Gerät gemäß der Elektro- und
Elektronik Altgeräte EG-Richtlinie 2002/96/EGWEEE.
7.1.2 Zur Entsorgung der Verpackungsmaterialien
sind die geltenden Gesetze zur Müllbeseitigung
zu beachten.
Für eine zügige Bearbeitung Ihrer Reklamation
benötigen Sie außerdem:
▪ Kopie des Kassenzettels mit dem Kaufdatum.
▪ Grund für die Reklamation (Fehlerbeschrei-
bung).
Page 15

TABLE OF CONTENTS
1.0 INTRODUCTION
GB 15
1.1 What are these symbols?
1.2 Unit functionality
1.3 Intended use
1.4 Unit features
2.0 SAFETY INSTRUCTIONS
2.1 General safety instructions
2.2 Safety instructions for operating the unit
2.3 Storage battery safety instructions
2.4 In emergencies
3.0 PRODUCT DESCRIPTION
3.1 Contents
3.2 Product overview
4.0 OPERATION / ACCESSORIES
4.1 Powering the unit On / Off
4.2 Operating the lighting
4.3 Operating the compressor
4.4 Charging the storage battery
4.5 Using the 12 V vehicle outlet
4.6 Replacing fuses
4.7 Troubleshooting
16
16
16
17
17
18
20
20
20
21
22
22
22
24
24
24
25
5.0 MAINTENANCE AND CARE
5.1 Cleaning, maintenance and storage
6.0 TECHNICAL DATA
7.0 DISPOSAL
8.0 WARRANTY AND SERVICE
26
26
27
27
Page 16
16
1.0 INTRODUCTION
Dear Customer,
Congratulations on your purchase of the “Air and
Power Station LA 10” and thank you for your trust.
To ensure the optimal function, performance and
safety of your unit please read the operating instructions before using it for the first time. This will
ensure you will be able to enjoy this product for a
long time.
1.1 What are these symbols?
Refer to operating instructions!
Warning - danger! Follow safety
instructions and warnings!
Warns of dangerous electrical
voltage! Risk of fatal injury!
Please refer to pages for additional
explanations about symbols, units and
abbreviations.
1.2 Unit functionality
The LA 10 Air and Power Station is a portable
unit with a powerful compressor and built-in 12 V
storage battery. The convenient inflating system
allows you to inflate vehicle and bicycle tyres,
balls and other inflatables. This unit includes 3
different valve adapters, found inside the storage
compartment. As a guide, the manometer adjusting ring on the unit can be used to set the desired
air pressure up to 10 bar. The integrated 12 V
storage battery can be used as a 12 V power
source through the vehicle outlet. Charge the
storage battery using a 230 V charging mains
adapter. Three LEDs on the control panel indicate
the battery capacity and the charge of the storage
battery. Four LED lights and the lighted dial of the
manometer also allow for twilight and night-time
use.
26 and 27
Warns of optical radiation!
Warns of explosive substances
and objects!
Warns of automatic starting!
Warns of hot surfaces!
Wear ear protection
and safety goggles!
Dispose of unit, batteries and
packaging in an environmentally
friendly manner!
1.3 Intended use
The LA 10 Air and Power Station is intended for
private use only. The unit is suitable for inflating
vehicle-, motorcycle- and bicycle tyres as well as
inflatable sporting goods, toys and recreational
products. Power from the unit's internal storage
battery may only be output via the 12 V vehicle
outlet. Any other use or modification of the air
and power station is considered improper. Only
use the built-in 12 V storage battery or the unit's
vehicle plug to operate the Air and Power Station.
The compressor is not designed for continuous
operation. The unit is not suitable for 24 V / DC
operation!
Attention: risk of personal and property
damage!
Page 17
GB 17
1.4 Unit features
▪ Powerful compressor for conveniently
inflating vehicle and bicycle tyres, balls, etc.
▪ Manometer ring with adjustable air pressure
guide adjustable on the manometer ring
▪ Built-in storage battery for portable use
▪ Portable 12 V power source (vehicle outlet)
▪ Practical LED light for use at twilight and at
night
▪ Charge indicator
▪ Accessories: 230 V / 12 V charging mains
adapter plus 3 valve adapters for inflating balls,
bicycle tyres and recreational products
▪ Practical storage for cable, plug and
accessories
2.0 SAFETY
INSTRUCTIONS
2.1 General safety instructions
Warning!
Read all instructions! Failure to comply with safety
instructions may result in damage to property, or
personal or fatal injury! Keep these instructions for
future reference. Keep these operating instructions
for future reference and include them when
passing the product on to third parties. Also keep
these instructions accessible to third parties. The
operating instructions are a part of the unit.
2.1.1 Keep the unit away from children
and adolescents under age 16!
Children and adolescents under age
16 do not understand or recognise the potential
dangers of electrical devices. Keep the unit out of
the reach of children. Small parts could be swallowed by children, possibly resulting in suffocation. Children and adolescents could become
injured when using the unit. Also keep the packaging away from children.
2.1.2 Please retain the operating instructions for
the life of the unit.
2.1.3 This unit is not intended for use by individuals (including children) with limited physical, sensory or cognitive capacity or lacking experience
and / or knowledge unless supervised or instruced on its use by an individual responsible for their
safety.
2.1.4 If you are unsure about the installation, use
or operation of the unit please consult a qualified
professional.
2.1.5 The unit and compressed air
hose will vibrate and heat up during
operation. Always place the unit in a
secure, well ventilated location.
2.1.6 Do not expose the unit to mechanical
stress, high temperatures, oils, greases, solvents,
moisture or shock!
2.1.7 Only operate the unit if no damage or
malfunctions of the unit, cables or accessories
are present!
2.1.8 All repairs to the unit must be performed by
a qualified electrician / professional.
2.1.9 Do not modify (alter) the unit.
2.1.10 Do not operate the unit if it has been
dropped or otherwise damaged. Instead, have it
inspected or repaired by a qualified electrician!
2.1.11 Never use other cables or accessories. Do
not extend the cable.
2.1.12 Allow a clearance of at least 18 cm
around the unit during operation to ensure
adequate circulation. Never cover the unit with
objects!
Page 18
18
2.1.13 Do not use the cable to carry the unit or
pull on it.
2.1.14 The unit requires the internal storage
battery with an output voltage of 12 V / DC or the
included 12 V vehicle plug for use with the 12 V
vehicle outlet for operation.
2.1.15 Do not allow liquids to enter the unit!
Never immerse the unit in liquids! Only operate
the unit when dry.
2.1.16 This unit is not waterproof. Protect the unit
from rain, fog, snow, water and other moisture!
Never place the unit on a wet surface.
Attention: risk of property damage and
injuries!
2.1.17 Avoid using the unit near open fire or
explosive areas.
2.1.18 Verify all plugs, power cables and the unit
are dry. Never touch or operate the unit with
moist or wet hands!
2.1.19 Check the unit for damage prior to every
use. Do not use a defective unit!
2.1.20 Check the unit and especially the valve
adapters for dirt. If dirty, clean the unit prior to
use.
2.1.21 Only use the unit in safe environments!
Keep clothing, hair, extremities and the unit away
from moving and hot motor and vehicle parts!
2.1.22 Only use the fuses specified in these
operating instructions with a maximum rating of
15 A.
2.1.23 Be sure the work area is clean and safe.
Consider the environmental effects and ensure the
work area is adequately lit.
2.2 Safety instructions for operating
the unit
2.2.1 Secure the vehicle from rolling away before
adding air or checking the air pressure on vehicle
tyres. Attention – risk of injury and proper-
ty damage! Always engage handbrake
and put the vehicle in gear! For automatic
transmissions set the vehicle to “Park”
and engage the handbrake!
2.2.2 Do not operate or start the vehicle whilst
adding air or checking the air pressure!
2.2.3 Follow the safety instructions if the vehicle is
jacked up or on an auto lift or similar!
2.2.4 Caution! Risk of electrical
voltage near vehicle ignition coils,
distributor cap, ignition wires, spark
plugs and electrical components!
2.2.5 Follow the safety instructions and the
manual of the automaker!
2.2.6 Only use the unit in a safe environment!
Keep clothing, body jewellery and hair away
from the unit's air vents.
2.2.7 When using the unit, be sure the compressed air hose and cables will not be damaged
by sharp objects or heat sources, and do not
bend. Place the cables and compressed air hose
so as not to create a tripping hazard. Immediately
replace a damaged compressed air hose or damaged cables!
Page 19

GB 19
2.2.8 Risk of short circuits! When using the
unit's 12 V vehicle outlet, verify the connected
load has the correct polarity. Refer to the instructions in the operating instructions and the wiring
diagram of the connected unit.
2.2.9 When using the unit's 12 V vehicle outlet
be sure this does not impair the safety and
functionality of other systems and units! Please
follow the instructions in the operating instructions
and the connected unit.
2.2.10 In the event of malfunctions or damage
immediately shut the unit off and disconnect from
the 230 V charging mains adapter or the 12 V
vehicle outlet!
2.2.11 Verify the ignition and all loads inside the
vehicle are switched off before connecting the unit
to the 12 V vehicle outlet!
2.2.12 Improper use of the unit may damage
vehicle electronics. This may then cause an
accident or fire. Attention! Risk of property
damage and personal injury!
2.2.13 If the 15 A fuse has been tripped the unit
is not operational and the 12 V vehicle outlet is
not powered.
2.2.14 If you are unsure about the unit´s function
and operation please consult a qualified
professional.
2.2.15 Incorrect installation of the valve adapter
or incorrectly attaching or inserting the valve
adapters on / in the item to be inflated may result
in an untight connection between the unit and
product. The leaking air will result in a pressure
drop, and subsequently incorrect air pressure
readings.
2.2.16 Keep children and other individuals away
from the unit during operation.
2.2.17 Do not use the unit when fatigued or
under the influence of medications, drugs or
alcohol.
2.2.18 Use the power switch to power the unit off
before switching valve adapters.
2.2.19 Do not aim the compressed air stream at
individuals, animals, dust, dirt, chemicals,
acids, gasses, objects of any type, or yourself.
Attention! Risk of personal injury and
property damage!
2.2.20 If dusty, clean the area around the valve
before inflating. Wear a dust mask to protect your
respiratory system. Attention! Risk of person-
al injury and property damage!
2.2.21 To prevent malfunctions or the product
being inflated bursting, check the air pressure
with a suitable external pressure gauge whilst
inflating. The unit's manometer is not calibrated,
thus the values shown should only be considered
air pressure guidelines. The manometer does not
indicate a binding, accurate air pressure. Please
refer to the technical data (item 6.0) for the measuring tolerances. Attention! Risk of personal
injury and property damage!
2.2.22 Especially after inflating tyres on vehicles,
motorcycles and trailers check the air pressure
with a suitable external pressure gauge. Even
minor incorrect air pressures can impact the
driving characteristics. Attention! Risk of
personal injury and property damage!
2.2.23 Always follow the pressure specifications
of the item to be inflated and the manufacturer
instructions.
2.2.24 Do not use the unit with the 230 V charging mains adapter connected.
2.2.25 Do not expose the unit to temperatures
over 60 C.
°
2.2.26 Do not overload the unit.
2.2.27 Only carry the unit by the handle. Keep
the handle free of oils, greases and moisture.
2.2.28 Immediately shut the unit off after a
maximum of 10 minutes of operation or in the
event of overheating by setting the power switch
to ( O ). Allow the unit to cool down for at least
10 minutes until the regular operating temperature
has been reached and the unit is again ready for
use.
2.2.29 Do not use the compressed air generated
for commercial purposes or for food-, pharmaceutical-, diving- or medical purposes.
Page 20

20
2.2.30 Warning: LED emission!
Avoid damage to the eye! Do not look
directly into the unit's LED light for
extended periods or without suitable safety
goggles.
2.2.31 The unit features Class 1 LEDs. Do not aim
the LED beam at the eyes of other individuals or
animals!
2.2.32 Explosive substance and
object warning! Do not inflate
swimming aids, personal protective
equipment or inflatable boats.
2.2.33 For safety reasons only inflate the item in
short intervals and occasionally check the air
pressure on the manometer and the item being
inflated.
2.2.34 Do not use damaged valve adapters! The
air pressure may cause it to burst. Attention:
risk of injury!
2.2.35 Following the instructions in the operating
instructions and the safety instructions eliminates
the need for special user requirements and
training.
2.3 Storage battery safety instructions
2.3.1 Do not throw the unit's storage battery into
fire and do not short circuit.
2.3.2 A damaged storage battery can damage
the unit due to leaking battery acid!
2.3.3 Handling a damaged storage battery
requires special caution. Risk of chemical
burns! Wear suitable safety gloves and protective clothing. If acid has leaked from the storage
battery avoid any contact with the skin, eyes and
mucous membranes. Immediately flush the affected areas with plenty of clear water and seek
medical attention.
2.4 In emergencies
2.4.1 Secure the accident area and protect the
injured and all other individuals from further
injuries.
2.4.2 Perform the necessary first aid for personal
injuries.
2.4.3 When requesting help or emergency calls
(doctor, fire department, police) provide the
following information:
▪ Accident location (if necessary description of the
environment)
▪ Type of accident
▪ Number injured
▪ Types of injuries
3.0 PRODUCT
DESCRIPTION
3.1 Contents
1 LA 10 Air and Power Station with high
pressure hose (including automotive valve
connector) and one 12 V vehicle connector
1 Charging mains adapter 230 V
1 Valve adapter, approx. 2.0 mm in diameter
(ball needle)
1 Valve adapter, approx. 4.5 mm in diameter
1 Valve adapter, approx. 8.0 mm in diameter
1 Operating instructions
1 Automotive flat fuse15 A (installed in the unit)
Check all parts for damage and verify the
package contents are complete immediately after
unpacking!
Do not use the unit if damaged, malfunctioning,
or if the operating instructions are missing or are
incomplete!
Illustrations may vary slightly from the actual
product. Subject to change in the interest of
technical progress. Decoration not included.
Page 21
GB 21
3.2 Product overview
5
Image 1
8
Image 2
12
Image 3
21
20
19
18
11
1
Manometer, indicates the air pressure to
max. 10 bar / 145.03 PSI (bar and PSI are
pressure units, 1 Bar = 14.50 PSI) and dial
1
2
light
2
Light with 4 LEDs
Compressed air hose, stores inside the
3
lower housing recess
Automotive valve connector with valve quick
4
disconnect
5
Adjusting ring for marking a specific air
pressure value
6
1 Valve adapter approx. 8.0 mm in
diameter
1 Valve adapter approx. 4.5 mm in
7
diameter
8
3
4
7
1 Valve adapter approx. 2.0 mm in
diameter (ball needle)
Storage compartment for 12 V vehicle plug
9
with cable and 230 V charging mains
adapter.
6
10
230 V charging mains adapter
11
Cover for the valve adapter storage
compartment
12 V vehicle plug with cable and 15 A
12
(Ampere) fuse
13
O / I, On / Off power switch
14
Receptacle for the charging mains adapter
10
9
15
O / I, On / Off light switch for LEDs
16
12 V automotive jack with cover
17
Storage compartment clip closure; press
clip down to open
18
Fuse15 A (Ampere)
19
O / I, compressor On / Off switch
20
LEDs indicating the battery capacity storage
battery during operation as well as whilst
charging.
Green LED = Storage battery fully charged
13
14
Yellow LED = Storage battery charged
halfway
Red LED = Storage battery almost empty,
must be recharged.
15
16
21
Housing unit for control elements
Image 4
17
Page 22
22
4.0 OPERATION /
ACCESSORIES
4.1 Powering the unit On / Off
▪ Set the On / Off switch to ( I ). The unit is
now operational and the manometer lighting
is activated. The LED lights indicate the
current capacity of the storage battery.
▪ In operational mode the 12 V vehicle outlet
is powered.
▪ To switch the unit off set the On / Off switch
to ( O ).
Automatic start warning! If the
On / Off switch for compressor
power is set to ( I ) before switching the
unit on, the compressor will automatically start
and compressed air will be supplied to the compressed air hose. Risk of property damage
and personal injury!
13
1
20
16
13
19
Attention! Always wear suitable ear
protectors and safety goggles during
operation!
Check the unit and compressed air hose for
damage before every use! Do not operate damaged units! Review the manufacturer instructions
for the item to be inflated before every use.
Select the appropriate valve adapter (e.g. ).
Open the valve quick disconnect by pressing
the quick disconnect lever away from the compressed air hose . Now attach the valve
adapter and press the lever toward the compressed air hose to close it (see Image 5).
Image 5
3
4
3
3
7
4
7
4.2 Operating the lighting
▪ Set the On / Off switch to ( I ). The unit is
now operational.
▪ To turn the lighting on set the lighting On / Off
switch to ( I ).
15
▪ To turn the LED lights off set the light
switch to ( O ).
▪ To power the unit off set the On / Off
13
switch to ( O ).
4.3 Operating the compressor
The unit can be operated with the built-in storage
battery or the built-in 12 V vehicle plug.
13
Automotive, motorcycle- and bicycle tyres with
automotive valve (Schrader valve with 7.7 mm
thread diameter) can be inflated without adapter!
Do not operate the compressor for more
than 10 minutes. After this time allow the
unit to cool down for 10 minutes!
▪ No valve adapter required to inflate car tyres.
First remove the cap from the tyre valve.
▪ Open the quick disconnect and attach the
automotive valve plug as far as possible onto the
tyre valve. Close the valve quick disconnect
when doing so.
▪ Verify the automotive valve lever plug is firmly
attached to the tyre valve by carefully pulling on
it.
4
Page 23
GB 23
Mark air pressure
value e.g. 2 bar
5
Image 6
▪ As a guide set the arrow marker on the mano-
meter adjusting ring to the desired air
5
pressure value (see Image 6).
▪ Set the On / Off switch to ( I ). The unit is
13
now operational.
▪ To activate the compressor set the compressor
On / Off switch to ( I ).
19
Note: the compressor can be switched off at
any time by setting the compressor switch
or the operating switch to ( O ).
▪ Once the air pressure marked on the ad-
13
5
19
justing ring has been reached, switch the compressor off using the compressor switch .
To do so, set the compressor switch to ( O ).
▪ To switch off the unit the operating switch on
19
19
13
the unit must be switched off.
▪ Open the valve quick disconnect and remove
4
the auto valve connector from the tyre valve.
▪ Also check the air pressure with a second
pressure gauge to determine the accurate value.
Repeat the process if the desired air pressure
has not been reached.
▪ Then replace the valve cap on the tyre valve.
Inflating sporting goods, toys and recreational
products
▪ Open the product's valve cover.
▪ Using the valve quick disconnect secure the
4
correct valve adapter and press it into the item's
valve. If the valve adapter detaches from the
valve whilst inflating, use your hand to press it
into the valve whilst inflating.
▪ Verify the valve adapter is securely connected to
the valve by carefully pulling on it.
▪ As a guide, set the arrow on the manometer
adjusting ring to the desired air pressure
5
value.
▪ Set the operating switch to ( I ). The unit is
13
now operational.
▪ To activate the compressor set the compressor
switch on the compressor to ( I ).
19
Note: the compressor can be switched off at any
time by setting the compressor switch or the
operating switch to ( O ).
13
19
▪ Observe and check the firmness of the item
whilst inflating. If the item has already been
overinflated, immediately interrupt the process
and switch the compressor off!
Attention! Excessive air pressure may
cause the item to burst! Risk of personal
injury and property damage!
▪ Once the air pressure marking on the adjusting
ring has been reached, use the compressor
5
switch to power the compressor off.
19
▪ Remove the valve adapter from the item's valve
and close the item's valve cap.
Non-binding pressure guidelines
Automotive tyre approx. 1.9 – 3.5 bar
Trailer tyre approx. 2.4 – 3.4 bar
Motorcycle tyre approx. 1.7 – 2.9 bar
Bicycle tyre approx. 2.0 – 4.0 bar
Football approx. 0.6 – 1.1 bar
Volleyball approx. 0.18 – 0.22 bar
Do not operate the compressor for more
than 10 minutes. After this time allow the
unit to cool down for 10 minutes!
▪ First read the product manufacturer's instruc tions for inflating and the approved maximum
air pressure before inflating the product.
Attention! Please note the manufacturer
specifications for the item. Do not use the
compressor to inflate swimming aids!
Page 24
24
4.4 Charging the storage battery
Charging by 230 V charging mains adapter
The storage battery should be fully charged prior
to first use.
▪ Connect the small round plug on the charging
mains adapter to the receptacle .
10
14
▪ Plug the charging mains adapter into a 230 V
power socket.
▪ Set the operating switch to ( I ). The unit will
13
now switch to charging mode.
▪ The LED display will light up and the blinking
20
LED will indicate the current storage battery
capacity. The charging time is approx. 10 - 12
hours. The green LED must stay on when the
storage battery is fully charged.
▪ After charging use the operating switch to
power the unit off and disconnect the 230 V
charging mains adapter from the unit and the
230 V outlet.
Note! Do not operate the compressor or
the light whilst charging!
▪ The unit's 12 V vehicle jack is now live and the
connected 12 V external device can be operated (see Image 7).
▪ After using the external device unplug the 12 V
vehicle plug from the 12 V vehicle jack on the
unit.
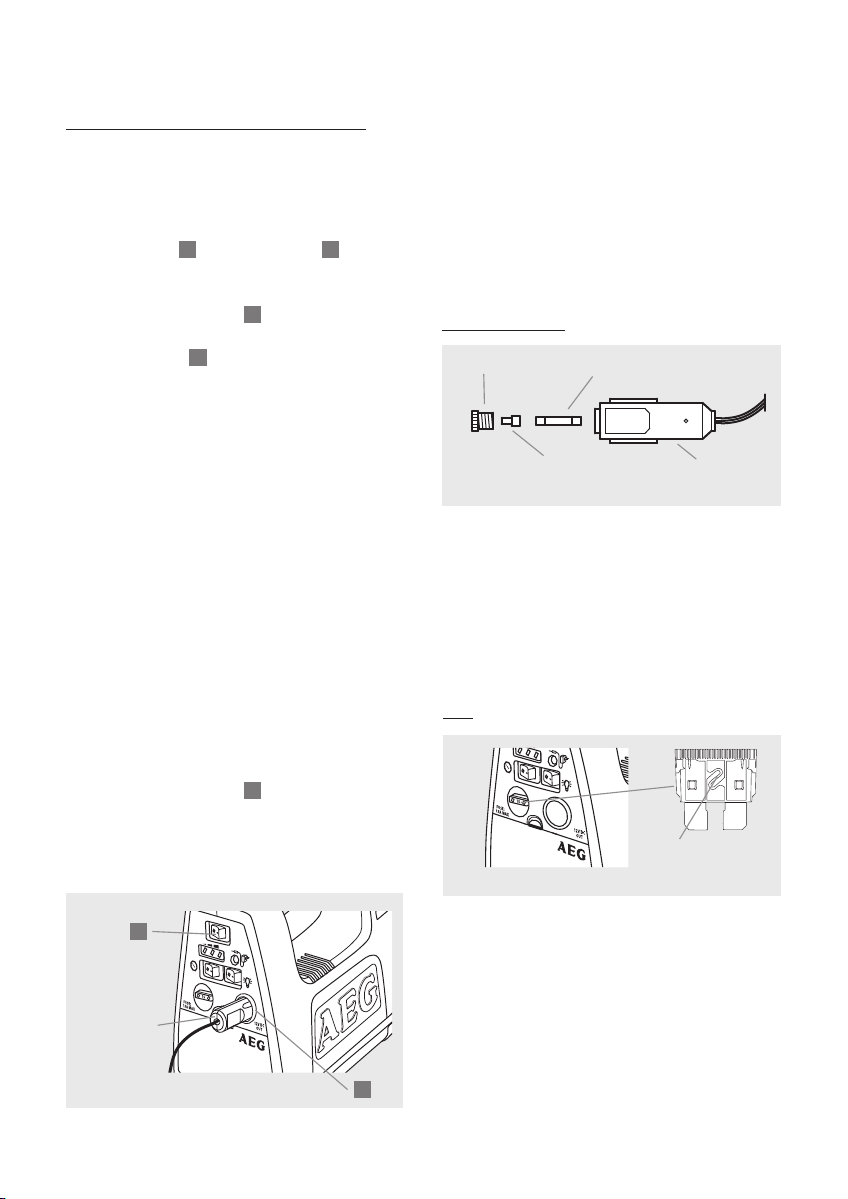
4.6 Replacing fuses
12 V Vehicle plug
Retaining screw
Terminal cap
Image 8
Round fuse 15 A (Ampere)
12 V vehicle
connector plug
▪ Unscrew the retaining screw.
▪ Remove the terminal cap and the 15 A
(Ampere) round fuse.
▪ Assemble all parts with the new 15 A fuse in the
order shown and replace the retaining screw
(see Image 8).
4.5 Using the 12 V vehicle outlet
▪ Remove the cover from the 12 V vehicle jack.
▪ Connect the 12 V vehicle plug of the external
device to the unit's 12 V vehicle jack.
▪ Set the operating switch to ( I ).
13
External device
12 V vehicle
plug
Image 7
13
16
Fuse
Intact flat fuse
Image 9
15 A (Ampere)
▪ Using a pair of flat-nose pliers carefully pull the
flat fuse inside the housing unit for the controls.
▪ Replace the defective fuse with a new 15 A flat
fuse by carefully pushing the new fuse into the
fuse holder with your thumb until it is flush with
the unit housing (see Image 9).
Page 25

The compressor is switched on
but not functioning.
The operating switch is not
activated.
Activate the unit's operating
switch before using the
compressor.
Charge the storage battery using
the 230 V charging mains
adapter.
When switching on the operating
switch the LEDs and manometer
lighting do not light up. The
storage battery is empty.
Replace the defective 15 A flat
fuse with a new fuse.
The 15 A fuse is defective.
The storage battery is fully
charged and the fuse is good,
but the unit isn't functioning.
The unit is defective.
Please consult a qualified
professional.
The compressor is overheated.
The compressor was operated for
more than 10 minutes.
Allow the unit to cool down for
10 minutes and follow the max.
operating cycle of 10 minutes of
operation and 10 minutes of cool
down.
The vents on the unit are covered
by an object or blocked.
Remove the object from the unit's
vents or clean the vents.
The compressor loses pressure
and does not build enough air
pressure.
The compressed air hose or
the compressor is leaking or
damaged.
Please consult a qualified
professional.
The valve adapter or the
automotive valve connector is
not attached.correctly
Verify the valve adapter is
correctly attached to the automotive valve connector and in the
item's valve. Verify the automotive valve connector is correctly
seated on the tyre valve.
4.7 Troubleshooting
GB 25
Solutions, repairPossible causesError / Malfunction
13
13
The above table on troubleshooting and possible
causes and their repair does not indicate all
possible errors.
If you are unable to resolve the malfunction with
the actions described, please consult a qualified
professional.
Page 26

26
5.0 MAINTENANCE
AND CARE
5.1 Cleaning, maintenance and
storage
5.1.1 Warning! Power off the unit using the
operating switch and disconnect it from the 230 V
charging mains adapter before cleaning.
5.1.2 Clean the unit with a dry cloth. Do not use
liquids or harsh cleaners as these may cause discolouration and damage the unit´s surface, and
possibly damage the unit! Do not allow liquids to
enter the unit! Do not immerse the unit in liquids!
Only operate the unit when dry.
5.1.3 Only keep / store the unit in dry environments! Moisture can damage the unit's electronics!
5.1.4 Do not store the unit in extreme temperature
fluctuations! This will result in condensation, which
can damage the electronics!
6.0 TECHNICAL
DATA
Product description: LA 10 Air and Power Station
Item number: 97180
Dimensions: approx. 26.5 x 14 x 22.5 cm
(l x w x h cm)
Weight: approx. 3.7 kg
Fuse: 15 A (Ampere) flat fuse
Compressor:
Compressor output: max. 10 bar / 145 PSI
(bar / PSI = pressure unit)
Pressure indicator/
Manometer gauge: Analogue pressure readout,
not calibrated, with back-
light
Manometer
tolerances : +/- 0.34 bar (5 PSI) at
0 – 6.9 bar (0 -100 PSI)
+/- 0.48 bar (7 PSI) at
6.9 - 10 bar (100 -150 PSI)
Noise level: 90 dB (dB = volume)
Interval operation: max. 10 minutes operation,
min. 10 minutes cool down
Generator set: oil-free
Compressed air
hose length: approx. 65 cm
Storage battery:
Battery type: 12 V lead storage battery
Battery capacity: 7.2 Ah (Ampere hours)
Operating
temperature: 0 C - 50 C (Celsius)
Battery capacity
display: 3 LED lights (red, orange,
green)
Charging time: approx. 10 - 12 hours using
the 230 V charging mains
adapter
Charging mains
adapter:
Input voltage: 230 V 50 Hz (V = Volt,
Hz = Hertz, frequency
per second)
Input current: max. 0.5 A (Ampere)
°°
~
Page 27

GB 27
Output voltage: 14.5 V
Output current: 1000 mA DC (mA =
milliampere, DC = direct
current)
Only use the charging mains
adapter indoors
Lighting:
Lighting type: 4 LED lights
LED lights: LED lights are not
replaceable
Laser class: LED lights correspond with
Protection Class I
Units with protective
insulation with protection
class II
The unit complies with
EC Directives
▪ Machinery Directive
(2006/42/EC)
▪ Directive on
electromagnetic
compatibility
(2004/108/EC)
7.1.3 Do not dispose of used batteries
through your household waste. Dispose
Pb
through your electronics retailer or
public recycling facility. As a consumer you are
obligated to return waste batteries for disposal.
The following symbols indicate batteries
containing hazardous substances: Pb = contains
lead, Hg = contains mercury and Cd = contains
cadmium.
8.0 WARRANTY AND
SERVICE
Please contact your retailer or a qualified
professional for damage, repairs or other product
issues.
The general warranty terms pertain to defects in
manufacturing and material defects. Please return
defective products to the retailer.
7.0 DISPOSAL
7.1.1 The unit must be disposed and
recycled in accordance with the law.
Please contact your municipality or
waste management company for information.
Dispose of the unit in accordance with the EC
Directive on Waste Electrical and Electronic
Equipment 2002/96/EC-WEEE.
7.1.2 Please follow the applicable laws on waste
disposal when disposing of the packaging.
To ensure speedy processing of your claim you
will also need:
▪ A copy of the receipt of purchase indicating the
date of purchase.
▪ Reason for the return (description of the error).
Page 28

28
TABLE DES MATIÈRES
1.0 INTRODUCTION
1.1 Que signifient les symboles ?
1.2 Fonctionnement de l'appareil
1.3 Utilisation conforme
1.4 Équipement de l'appareil
2.0 CONSIGNES DE SÉCURITÉ
2.1 Consignes générales de sécurité
2.2 Consignes de sécurité pour utiliser l'appareil
2.3 Consignes de sécurité sur la batterie de l appareil'
2.4 Comportement en cas d'urgence
3.0 DESCRIPTION DU PRODUIT
3.1 Contenu de la livraison
3.2 Aperçu du produit
4.0 UTILISATION / ACCESSOIRES
4.1 Allumer / éteindre l'appareil
4.2 Utiliser l'éclairage
4.3 Utiliser le compresseur
4.4 Charger la batterie de l'appareil
4.5 Utilisation de la prise automobile 12 V
4.6 Changer les fusibles
4.7 Recherche d'erreur
29
29
29
30
30
31
33
33
33
34
35
35
35
37
37
37
38
5.0 MAINTENANCE ET ENTRETIEN
5.1 Nettoyage, maintenance et conservation
6.0 CARACTÉRIST. TECHNIQUES
7.0 MISE AU REBUT
8.0 GARANTIE ET SERVICE APRÈS-VENTE
39
39
40
40
Page 29

FR
29
1.0 INTRODUCTION
Chère cliente,
cher client,
Nous vous félicitions pour votre nouvelle "station
de gonflage et d'énergie LA 10" et vous
remercions pour votre confiance.
Afin de garantir le fonctionnement optimal, la
disponibilité et la sécurité de votre appareil, nous
vous prions de lire la notice d'utilisation avant la
première utilisation. Ainsi, vous pourrez profiter
pendant longtemps de ce produit.
1.1 Que signifient les symboles ?
Lire la notice d'utilisation !
Avertissement - Danger ! Observer les
consignes de sécurité et les avertissements !
Avertissement contre la tension électrique dangereuse ! Danger de mort !
Vous trouverez d'autres explications sur les symboles, les unités et les abréviations aux pages 39
et 40.
1.2 Fonctionnement de l'appareil
La station de gonflage et d'énergie LA 10 est un
appareil mobile avec un compresseur performant
et une batterie 12 V intégré. Grâce au système
pratique de pompage, vous pouvez gonfler les
pneus de voiture et de vélo, les ballons et autres
articles. Vous avez pour cela 3 adaptateurs de
valves différents à disposition dans le compartiment de rangement de l'appareil. Sur la bague de
réglage du manomètre, il est possible de régler la
pression de l'air souhaitée jusque 10 bar. La
batterie 12 V intégrée peut être utilisée via une
fiche automobile en tant que source électrique
12 V. La charge de la batterie s'effectue par un
chargeur 230 V. La capacité de la batterie et son
niveau de charge sont affichés par 3 LED sur le
boîtier pour les éléments de commande. Grâce
aux 4 lampes à LED et au cadran éclairé du
manomètre, une utilisation le soir et la nuit est
également possible.
Avertissement contre le rayonnement
optique !
Avertissement contre les matières et
les objets explosifs !
Avertissement contre la mise en route
automatique !
Avertissement contre les surfaces
chaudes !
Porter une protection auditive et
des lunettes de protection !
Mettre votre appareil, les batteries et
l'emballage au rebut en respect de
l'environnement !
1.3. Utilisation conforme
La station de gonflage et d'énergie LA 10 a été
uniquement conçue pour un usage privé. L'appareil sert à gonfler des pneus de voiture, de moto
et de vélo ainsi que des articles de sport, de jeux
et de loisirs gonflables. L'alimentation en énergie
de la batterie interne est autorisée uniquement
pour une fiche automobile 12 V. Toute autre utilisation de la station de gonflage et d'énergie n'est
pas conforme. Pour le fonctionnement du produit,
la batterie intégrée 12 V ou la fiche automobile
12 V est prévue. Le compresseur n'a pas été conçu pour un fonctionnement durable. Un fonctionnement avec 24 V / DC n'est pas possible !
Attention : risque de dommages physiques
et matériels !
Page 30

30
1.4 Équipement de l'appareil
▪ Compresseur puissant pour un gonflage pra-
tique des pneus de voiture, de vélo, des ballons
etc.
▪ Sélection possible de la pression de l'air sur la
bague du manomètre
▪ Convient à une utilisation mobile grâce à la
batterie intégrée
▪ Source électrique 12 V portative (prise automo-
bile)
▪ Lampe à LED pratique pour une utilisa tion le
soir et la nuit
▪ Avec affichage du niveau de charge
Accessoires
adaptateurs de valve pour gonfler les ballons,
les pneus de vélo et les articles de loisirs
▪ Possibilité de rangement pratique pour les
câbles, les fiches et les accessoires
: chargeur 230 V / 12 V et 3
2.0 CONSIGNES DE
SÉCURITÉ
2.1. Consignes générales de sécurité
Avertissement !
Lisez toutes les instructions ! Ne pas respecter les
consignes de sécurité peut conduire à des
atteintes à la propriété, aux personnes ou à la
mort ! Conservez cette notice pour la consulter
ultérieurement. Conservez-la pour toute question
ultérieure et remettez-la à l'acquéreur en cas de
cession de l'appareil. Mettez la notice à disposition de tiers également. La notice d'utilisation fait
partie intégrante de l'appareil.
2.1.1 Tenez l'appareil éloigné des enfants et des jeunes de moins de 16 ans.
Ceux-ci ne peuvent en effet pas comprendre ni reconnaître les risques possibles liés à
la manipulation d'appareils électriques. Tenez
l'appareil hors de portée des enfants et conservez
de manière à ce qu'il ne leur soit pas accessible.
Les petites pièces peuvent être avalées par les
jeunes enfants et entraîner leur étouffement. Les
enfants et les jeunes peuvent se blesser lors de
l'utilisation de l'appareil. Tenez également les
emballages éloignés des enfants.
2.1.2 Conservez la notice d'utilisation pendant
toute la durée de vie de l'appareil.
2.1.3 Cet appareil ne doit pas être utilisé par des
personnes (enfants y compris) avec des capacités
physiques, sensorielles ou mentales réduites ou
avec un manque d'expérience et / ou de connaissances à moins qu'elles ne soient surveillées par
une personne chargée de leur sécurité ou qu'elles
n'aient été instruites à l'utilisation de l'appareil.
2.1.4 En cas de doute quant à l'installation,
l'utilisation ou le mode de fonctionnement de
l'appareil, adressez-vous à un technicien qualifié.
2.1.5 L'appareil et le tuyau d'air comprimé vibrent et se réchauffent pendant
le service. Placez toujours l'appareil
dans un endroit sûr et bien ventilé.
2.1.6 N'exposez pas l'appareil à des charges
mécaniques, des températures élevées, aux
huiles, aux graisses, aux solvants, à l'humidité et
aux vibrations !
2.1.7 N'utilisez l'appareil que lorsque celui-ci, les
câbles et les accessoires ne présentent aucune dégradation ni aucun dysfonctionnement !
2.1.8 Toutes les réparations sur l'appareil doivent
être effectuées par un électricien / un technicien
qualifié.
2.1.9 L'appareil ne doit pas être modifié.
2.1.10 N'utilisez pas l'appareil lorsque celui-ci
est tombé ou a été endommagé de quelque autre
manière. Apportez-le à un électricien qualifié
pour contrôle ou réparation.
2.1.11 N'utilisez aucun autre câble ni aucun
autre accessoire. Ne rallongez pas les câbles.
2.1.12 Pour garantir une circulation suffisante de
l'air, il faut qu'il y ait un espace libre disponible
d'au moins 18 cm autour de l'appareil pendant
Page 31

FR 31
son service. L'appareil ne doit pas être recouvert
par des objets !
2.1.13 N'utilisez pas le câble pour porter
l'appareil ou tirer dessus.
2.1.14 Pour le service de l'appareil, la batterie
interne avec une tension de sortie 12 V /DC ou la
fiche automobile fournie 12 V pour une prise
allume-cigare est nécessaire.
2.1.15 La pénétration de liquides à l'intérieur de
l'appareil doit être empêchée ! Ne plongez pas
l'appareil dans du liquide ! Utilisez l'appareil exclusivement lorsqu'il est sec.
2.1.16 L'appareil n'est pas protégé contre l'eau.
Protégez l'appareil de la pluie, du brouillard, de
la neige, de l'eau et autres liquides ! Ne placez
pas l'appareil sur un sol mouillé. Attention :
risque de dommages matériels et de
blessures !
2.1.17 Évitez d'utiliser l'appareil à proximité de
flammes ouvertes ou dans des zones explosives.
2.1.18 Assurez-vous que toutes les prises, tous les
câbles électriques et que l'appareil sont secs. Ne
touchez et n'utilisez jamais l'appareil avec des
mains mouillées ou humides !
2.1.19 Contrôlez l'appareil avant chaque utilisation du point de vue d'éventuels dommages. Un
appareil défectueux ne doit pas être mis en service !
2.1.20 Avant toute utilisation de l'appareil, contrôlez-le ainsi que l'adaptateur de valve du point
de vue de salissures. Nettoyez l'appareil avant
utilisation s'il est sale.
2.1.21 Utilisez uniquement l'appareil dans un
environnement sûr ! Tenez les vêtements, les
cheveux, les membres du corps et l'appareil
éloignés des pièces mobiles et chaudes du moteur et du véhicule !
2.1.22 Utilisez pour l'appareil uniquement les
fusibles mentionnés dans la présente notice avec
un puissance de maximum 15 A.
2.1.23 Veillez à l'ordre et à la sécurité sur le lieu
de travail. Tenez compte des influences ambiantes
et veillez à ce que l'espace de travail soit
suffisamment éclairé.
2.2 Consignes de sécurité pour utiliser
l'appareil
2.2.1 Sécurisez le véhicule avant tout gonflage
ou contrôle de la pression d'un pneu de voiture
afin qu'il ne puisse se dérober. Attention -
risque de blessures et de dommages
matériels ! Toujours tirer le frein à main
et passer une vitesse ! Sur les boîtes de
vitesse automatique, réglez la position
"Park" et tirez le frein à main !
2.2.2 En cas de gonflage ou de contrôle de
pression, il faut ne pas utiliser ni démarrer le
véhicule !
2.2.3 Respectez les directives de sécurité lorsque
le véhicule est surélevé, qu'il se trouve sur une
plateforme de levage ou un objet similaire !
2.2.4 Prudence ! Risque de tension
électrique dans la zone des bobines
d'allumage, des capuchons du distributeur, des câbles d'allumage, des bougies
d'allumages et des composants électriques du
véhicule !
2.2.5 Observez les consignes de sécurité et le
manuel du fabricant du véhicule !
2.2.6 Utilisez uniquement l'appareil dans un environnement sûr ! Tenez les vêtements, les bijoux et
les cheveux éloignés des fentes de ventilation de
l'appareil.
2.2.7 Lors de l'utilisation de l'appareil, veillez à
ce que le tuyau d'air comprimé et les câbles ne
soient pas endommagés par des objets aux bords
coupants ou des sources de chaleur et ne les pliez
pas. Posez le tuyau d'air comprimé et les câbles
de sorte à ce que l'on ne puisse trébucher dessus.
Un tuyau d'air comprimé endommagé ou un
câble endommagé doit être immédiatement
changé !
2.2.8 Risque de court-circuit ! Lors de l'utilisation de la prise automobile 12 V de l'appareil,
faire attention à la bonne polarité du consommateur à brancher. Pour cela, respecter les consignes de la notice d'utilisation et les plans de
commutation de l'appareil consommateur.
Page 32

32
2.2.9 Lors de l'utilisation de la prise automobile
V
12 , veillez à ne pas nuire à la sécurité et au
fonctionnement d'autres systèmes et appareils !
Pour cela, observez les consignes d'utilisation de
l'appareil consommateur.
2.2.10 En cas de dysfonctionnements et d'endom-
magements, l'appareil doit être éteint immédiatement. Il doit être également débranché du chargeur 230 V ou de la prise automobile 12 V du
véhicule !
2.2.11 Assurez-vous que l'allumage et tous les
consommateurs du véhicule sont éteints avant de
reliez l'appareil avec la fiche 12 V du véhicule !
2.2.12 En cas d'utilisation non conforme de l'ap-
pareil, les composants électroniques du véhicule
peuvent être endommagés. Cela peut provoquer
un accident ou un incendie. Attention ! Risque
de dommages matériels et physiques !
2.2.13 Lorsque le fusible 15 A se déclenche, l'ap-
pareil n'est pas fonctionnel et la prise automobile
ne présente pas une tension de 12 V.
2.2.14 Si êtes incertain quant au fonctionne-
ment et à l'utilisation de l'appareil, demandez
conseil à un technicien spécialisé.
2.2.15 Un montage erroné de l'adaptateur de
valve ou une installation incorrect de l'adaptateur
de valve sur / dans la valve de l'article à gonfler
peut entraîner la non étanchéité de la connexion
entre l'appareil et l'article. L'air qui en sort crée
une dépression et ainsi des valeurs incorrectes de
pression de l'air.
2.2.16 Tenez les enfants et les autres personnes
éloignées pendant le fonctionnement de l'appareil.
2.2.17 N'utilisez pas l'appareil lorsque vous êtes
fatigué ou sous l'influence de médicaments, de
drogues ou d'alcool.
2.2.18 Éteignez l'appareil avec l'interrupteur de
service avant de changer l'adaptateur de valve.
2.2.19 N'orientez pas le jet d'air comprimé sur
des personnes, des animaux, de la poussière, de
la saleté, des produits chimiques, des acides, des
gaz, des objets de toute sorte ni soi-même.
Attention ! Risque de blessure physique et
de dommage matériel !
2.2.20 Avant de pomper, nettoyez la zone de la
valve si celle-ci est poussiéreuse. Portez un
masque anti-poussière pour protéger les voies
vous
respiratoires. Attention ! Risque de blessure
physique et de dommages matériels !
2.2.21 Afin d'éviter tout dysfonctionnement ou
l'éclatement de l'article lors du gonflage, mesurez
la pression de l'air avec un contrôleur adapté
externe pendant la phase de gonflage. Le manomètre de l'appareil n'est pas calibré et les valeurs
affichées sont ainsi uniquement des valeurs indicatives pour la pression de l'air. Le manomètre
n'affiche aucune valeur précise et ferme de pression de l'air. Les tolérances de mesure du manomètres sont indiquées dans les caractéristiques
techniques (voir point 6.0). Attention ! Risque
de blessure physique et de dommages
matériels !
2.2.22 Contrôlez notamment la pression des
pneus des voitures, des motos et des remorques
après le gonflage avec un manomètre externe. La
pression de l'air faible et incorrecte peut nuire
aux spécificités de conduite. Attention ! Risque
de blessure physique et de dommages
matériels !
2.2.23 Observez impérativement les indications
de pression de l'air de l'article à gonfler et les
remarques du fabricant.
2.2.24 N'utilisez pas l'appareil lorsque le chargeur 230 V est branché.
2.2.25 N'exposez pas l'appareil à des températures supérieures à 60 C.
2.2.26 Ne surchargez pas l'appareil.
2.2.27 Portez l'appareil uniquement par la
poignée. Veillez que la poignée ne comporte pas
d'huiles, de graisses et ne soit pas humide.
2.2.28 Faites fonctionner l'appareil maximum
10 minutes et éteignez-le immédiatement en cas
de surchauffe en plaçant l'interrupteur de service
sur ( O ). Laissez refroidir l'appareil pendant au
moins 10 minutes jusqu'à ce qu'il atteigne la
température normale de service et qu'il soit de
nouveau fonctionnel.
2.2.29 La pression de l'air générée ne peut pas
être utilisée à des fins commerciales ni pour les
secteurs alimentaire, pharmaceutique, des sports
de plongée et médical.
2.2.30 Avertissement : Rayonne-
ment de LED ! Éviter les lésions oculaires ! Ne regardez pas directement
pendant une durée prolongée et pas sans des
°
Page 33

FR
33
lunettes de protection adaptée le rayon lumineux
des LED de l'appareil.
2.2.31 L'appareil dispose de LED de classe 1.
N'orientez pas le rayon lumineux des LED vers les
yeux d'autres personnes ou d'animaux !
2.2.32 Avertissement contre les
matériaux et les objets explosifs !
Ne gonflez aucune bouée, aucun article d'équipement personnel de protection ni
aucun bateau gonflable.
2.2.33 Pour des raisons de sécurité, gonflez les
articles uniquement par intervalles courts et contrôlez entre temps régulièrement la pression de
l'air sur la manomètre et sur l'article à gonfler.
2.2.34 N'utilisez aucun adaptateur de valve en-
dommagé ! Celui-ci peut éclater sous la pression
de l'air. Attention : Risque de blessure !
2.2.35 Si l'on respecte les dispositions de la
notice d'utilisation et les consignes de sécurité,
un ordre spécifique et une formation ne sont pas
nécessaires pour l'utilisateur de l'appareil.
2.3 Consignes de sécurité sur la batterie
de l'appareil
2.3.1 Ne jetez pas la batterie au feu et ne la
court-circuitez pas.
2.3.2 Une batterie endommagée peut causer
des dommages sur l'appareil si de l'acide s'en
écoule !
2.3.3 Une grande prudence est nécessaire lors de
la manipulation d'une batterie endommagée.
Risque de brûlure ! Porter des gants et des
vêtements de protection adaptés. Si de l'acide
s'écoule de la batterie, évitez tout contact avec la
peau, les yeux et les muqueuses. Rincer les zones
concernées immédiatement à grande eau et consultez un médecin.
2.4 Comportement en cas d'urgence
2.4.1 Sécurisez le lieu de l'accident et protégez
les blessés et toutes les autres personnes d'autres
dommages.
2.4.2 En cas de blessures physiques, fournissez
les premiers secours nécessaires.
2.4.3 En cas d'appel à l'aide ou d'appel d'urgence (médecin, pompiers, police), fournissez les
informations suivantes :
▪ lieu de l'accident (éventuellement description de
l'environnement)
▪ type d'accident
▪ nombre de blessés
▪ type de blessures
3.0 DESCRIPTION DU
PRODUIT
3.1 Contenu de la livraison
1 station de pompe et d'énergie LA 10 avec un
tuyau d'air comprimé (avec fiche à levier de
valve de voiture) et une prise automobile 12 V.
1 chargeur 230 V
1 adaptateur de valve d'environ 2,0 mm de
diamètre (embout à ballon)
1 adaptateur de valve d'environ 4,5 mm de
diamètre
1 adaptateur de valve d'environ 8,0 mm de
diamètre
1 notice d'utilisation
1 fusible automobile 15 A (intégré à l'appareil)
Après le déballage, contrôlez directement toutes
les pièces du point de vue de dommages et quant
à leur intégralité !
N'utilisez pas l'appareil en cas de dommages, de
dysfonctionnements ou lorsque la notice d'utilisation est manquante ou incomplète !
Les illustrations peuvent diverger légèrement du
produit. Sous réserve de modifications en raison
du progrès technique. Décoration non fournie..
Page 34

34
3.2 Aperçu du produit
5
Illustration 1
8
Illustration 2
12
Illustration 3
21
20
19
18
11
1
Manomètre, affichage de la pression de
l'air jusque max. 10 bar / 145,03 PSI (bar
et PSI sont des unités de pression, 1 Bar =
1
2
14,50 PSI) et éclairage du cadran
2
Lampe avec 4 LED
Tuyau d'air comprimé, peut être rangé dans
3
le renfoncement inférieur du boîtier.
Fiche à levier de la valve de la voiture avec
4
fermeture rapide
5
Bague de réglage pour marquer une
pression précise de l'air
6
1 adaptateur de valve avec un diamètre
d'environ 8,0 mm
1 adaptateur de valve avec un diamètre
7
d'environ 4,5 mm
1 adaptateur de valve avec un diamètre
3
4
7
6
8
d'environ 2,0 mm (embout à ballon)
9
Espace de rangement pour fiche automobile 12 V avec câble et chargeur 230 V
Chargeur 230 V
10
Cache de l'espace de rangement pour les
11
adaptateurs de valve
12
Prise automobile 12 V avec câble et fusible
15 A (ampère)
13
Interrupteur de marche / arrêt O / I
14
Boîtier de raccordement du chargeur
15
Interrupteur marche / arrêt pour les
10
9
LED O / I
16
Prise automobile 12 V avec cache
17
Fermeture à clip
de l'espace de rangement,
pour ouvrir le clip appuyer vers le bas
Fusible de l'appareil 15 A (ampère)
18
19
Interrupteur marche / arrêt du compresseur
O / I
20
LED pour afficher la capacité de la batterie
lors du service ainsi que pendant la charge
LED verte = batterie pleine
13
14
15
16
LED jaune = batterie à moitié pleine
LED rouge = batterie presque vide, doit
être rechargée
21
Unité de boîtier pour les éléments de
commande
Illustration 4
17
Page 35

FR
35
4.0 UTILISATION /
ACCESSOIRES
4.1 Allumer / éteindre l'appareil
▪ Appuyez sur l'interrupteur marche / arrêt
dans la osition ( I ). L'appareil est même prêt à
l'emploi et l'éclairage du manomètre est allu mé. Les LED affichent le niveau de charge
actuel de la batterie.
▪ Lorsque l'appareil est prêt à l'emploi, la prise
automobile 12 V est activée.
▪ Pour éteindre l'appareil, appuyez sur marche /
arrêt dans la Position .
route automatique ! Si l'interrupteur
marche/arrêt du compresseur est en
position( I ) avant la commutation de l'appareil, le
compresseur fonctionne automatiquement et de la
pression est générée dans le tuyau d'air comprimé. Risque de dommages matériels et phy-
siques !
P
20
16
13
Avertissement contre la mise en
( O )
19
13
1
Attention ! Lors de l´utilisation de
l'appareil, portez la protection auditive
et les lunettes de protection adaptées !
Contrôlez l'appareil et le tuyau d'air comprimé
avant toute utilisation quant à d'éventuelles dégradations ! Un appareil défectueux ne doit pas être
mis en service ! Avant toute utilisation, contrôlez
les instructions du fabricant pour l'article à gonfler.
Sélectionnez l'adaptateur de valve souhaité (par
7
ex. ). Ouvrez la fermeture rapide en
appuyant sur le levier de fermeture rapide et en
le retirant du tuyau d'air comprimé . Installez
ensuite l'adaptateur de valve et appuyez sur le
levier pour refermer en direction du tuyau d'air
comprimé (voir image 5).
4
3
4
3
3
7
4.2 Utiliser l'éclairage
▪ Appuyez sur l'interrupteur marche / arrêt
dans la Position ( I ). L'appareil est même prêt à
l'emploi.
▪ Pour activer l'éclairage, mettez l'interrupteur
marche / arrêt de l'éclairage dans la
P
osition ( I ).
▪ Pour éteindre les LED, mettez l'interrupteur de
l'éclairage sur la Position ( O ).
▪ Pour éteindre l'appareil, appuyez sur marche /
arrêt dans la Position ( O ).
13
4.3 Utiliser le compresseur
L'appareil peut fonctionner avec la batterie
intégrée ou avec la fiche automobile 12 V
intégrée.
15
13
Illustration 5
Les pneus de voiture, de moto et de vélo avec une
valve auto (valve Sc rader avec diamètre de
filetage de 7,7 mm) peuvent être gonflés sans
adaptateur !
Le compresseur peut fonctionner au maximum pendant 10 minutes, ensuite laisser
refroidir 10 minutes l'appareil !
▪ Pour gonfler un pneu de voiture, vous n'avez
pas besoin d'un adaptateur de valve. Retirez
tout d'abord le capuchon de la valve du pneu.
▪ Ouvrez la fermeture rapide et placez la
fiche à levier aussi loin que possible sur la valve
du pneu. Fermez ainsi la fermeture rapide.
▪ Contrôlez que la fiche à levier de la valve de la
voiture est bien placée sur la valve du pneu en
tirant dessus avec précaution.
h
4
Page 36

36
Marquer la valeur de
pression, par ex.
sur 2 bar
5
Illustration 6
▪ Réglez le marquage de la flèche de la bague
de réglage sur le manomètre pour indiquer
5
la valeur d'air comprimé souhaitée (voir illustra tion 6).
▪ Appuyez sur l'interrupteur de marche / arrêt
13
dans la osition ( I ). L'appareil est même
P
prêt à l'emploi.
▪ Pour activer le compresseur, mettez l'interrupteur
marche / arrêt du compresseur dans la osi-
19
P
tion ( I ).
Remarque : le compresseur peut être éteint à
tout moment avec l'interrupteur marche / arrêt
13
19
P
du compresseur ou avec l'interrupteur de
marche / arrêt dans la osition ( O ).
▪ Si la pression marquée sur la bague de réglage
5
est atteinte, le compresseur peut être éteint
avec l'interrupteur marche / arrêt du compres-
19
seur . Pour cela, mettez l'interrupteur marche
/ arrêt du compresseur en osition ( O ).
19
P
▪ Pour éteindre l'appareil, il faut encore éteindre
l'interrupteur de marche / arrêt de l'appa-
13
reil.
▪ Ouvrez la fermeture rapide et retirez la fiche
4
à levier de la valve du frein.
▪ Contrôlez en plus la pression de l'air avec un
autre manomètre afin de déterminer la valeur
précise. Si la pression souhaitée n'est pas
atteinte, répétez le processus.
▪ Revissez ensuite le capuchon sur la valve du
pneu.
Gonfler des articles de sport, des jeux, des
articles de loisirs
Le compresseur peut fonctionner au maximum pendant 10 minutes, ensuite laisser
refroidir 10 minutes l'appareil !
▪ Commencez par lire les instructions du fabricant
de l'article à gonfler et la pression de l'air maxi male autorisée avant de gonfler l'article.
▪ Ouvrez le cache de la valve de l'article.
▪ Mettez l'adaptateur de valve adapté avec la
fermeture rapide et appuyez celle-ci dans la
4
valve de l'article. Si l'adaptateur se détache de
la valve pendant le gonflage, vous devez l'appu yer dans la valve à la main.
▪ Contrôlez que l'adaptateur tient bien dans la
valve de l'article en tirant dessus avec précau tion.
▪ Réglez le marquage de la flèche de la bague
de réglage sur le manomètre pour indiquer
5
la valeur d'air comprimé souhaitée (voir
illustration 6).
▪ Placez l'interrupteur de dans
P
la osition ( I ). L'appareil est même prêt à l'em-
marche / arrêt
13
ploi.
▪ Pour activer le compresseur, mettez l'interrupteur
marche / arrêt en osition
du compresseur P
19
( I ).
Remarque : le compresseur peut être éteint à
tout moment avec l'interrupteur marche / arrêt
du compresseur ou avec l'interrupteur de
marche / arrêt dans la osition ( O ).
13
19
P
▪ Observez et contrôlez le degré de dureté de
l'article pendant le gonflage. Lorsque l'article
est déjà trop gonflé, arrêtez immédiatement le
gonflage et arrêtez le compresseur !
Attention ! Lorsque la pression de l'air est
trop élevée, il existe le risque que l'article
explose ! Risque de blessure physique et
de dommages matériels !
▪ Si la pression marquée sur la bague de réglage
est atteinte, le compresseur peut être éteint
5
avec l'interrupteur marche / arrêt du compres-
19
seur .
▪ Retirez l'adaptateur de la valve de l'article et
refermez le capuchon.
Valeurs indicatives non fermes pour la pression
de l'air
Pneu de voiture env. 1,9 - 3,5 bar
Pneu de remorque env. 2,4 - 3,4 bar
Pneu de moto env. 1,7 - 2,9 bar
Pneu de vélo env. 2,0 - 4,0 bar
Ballon de foot env. 0,6 - 1,1 bar
Ballon de volley env. 0,18 - 0,22 bar
Attention ! Respectez les informations du
fabricant de l'article. Ne gonflez aucun accessoire de natation avec le compresseur !
Page 37

FR 37
4.4 Charger la batterie de l'appareil
Charger avec le chargeur 230 V
Avant la première mise en service, la batterie doit
être chargée en intégralité.
▪ Connectez la petite prise ronde du chargeur
avec la prise .
14
10
▪ Branchez le chargeur dans une prise 230 V.
▪ Placez l'interrupteur de marche / arrêt dans
P
la osition ( I ). L'appareil se met dans le mode
13
de charge.
▪ L'affichage à LED s'allume et la LED cligno-
20
tante indique la capacité actuelle de la batterie.
Le délai de charge est de 10 - 12 heures.
Lorsque la batterie est entièrement chargée, la
LED verte reste allumée.
▪ Après le processus de charge, éteindre l'appa reil sur l'interrupteur et débranchez le chargeur
230 V de l'appareil et de la prise 230 V.
Remarque ! N'utilisez pas le compresseur
ni l'éclairage pendant le processus de
charge !
4.5 Utilisation de la prise automobile 12 V
▪ Retirez le cache de la fiche automobile 12 V..
▪ Connectez la fiche automobile 12 V de l'appa-
reil externe avec la prise 12 V de l'appareil.
▪ Placez l'interrupteur de marche / arrêt dans
13
la osition . P ( I )
13
Fiche automobile 12 V
de l'appareil
externe
4.6 Changer les fusibles
Prise automobile 12 V
Vis de maintien
Capuchon de contact
Illustration 8
Fusible rond 15 A (ampère).
Prise 12 V automobile
▪ Dévissez la vis de maintien.
▪ Retirez le capuchon de contact et le fusible rond
15 A (ampère).
▪ Assemblez toutes les pièces avec le nouveau
fusible plat 15 A en respect de l'ordre illustré et
revissez la vis de maintien (voir illustration 8).
Fusible de l'appareil
Fusible plat intact
Illustration 9
15 A (ampère)
▪ Retirez le fusible plat avec une pince plate avec
précaution de son support situé dans l'unité du
boîtier pour les éléments de commande.
▪ Remplacez le fusible plat défectueux 15 A par
un nouveau en appuyant avec précaution dans
le support de fusible avec le pouce jusqu'à ce
qu'il s'enclenche dans le boîtier (voir image 9).
Illustration 7
16
▪ La fiche 12 V de l'appareil est désormais active
et l'appareil externe 12 V peut être maintenant
mis en service (voir illustration 7).
▪ Débranchez après utilisation l'appareil externe
de la prise automobile 12 V et de la fiche 12 V
de l'appareil.
Page 38

38
Le compresseur allumé mais
ne fonctionne pas.
est
L'interrupteur n'est pas
allumé.
Avant d'utiliser le compresseur,
allumez l'interrupteur de
l'appareil.
Chargez la batterie avec le
chargeur 230 V.
Lors de la mise en route de l'interrupteur, les LED et l'éclairage
du manomètre ne s'allument pas.
La batterie de l'appareil est vide.
Remplacez le fusible plat défectueux 15 A par un nouveau.
Le fusible 15 A est défectueux.
Malgré une batterie pleine et un
fusible intacte, l'appareil ne
fonctionne pas.
L'appareil est défectueux.
Adressez-vous à un technicien
spécialisé.
Le compresseur est en surchauffe.
La durée de service du compresseur était supérieure à 10
minutes.
Laissez refroidir l'appareil 10
minutes et respectez le cycle
max. de travail de 10 minutes
de service et de 10 minutes de
refroidissement.
La fente de ventilation de
l'appareil est recouverte ou
bouchée par un objet.
Retirez l'objet des fentes de
ventilation et nettoyez celles-ci.
Le compresseur perd de la
pression et ne génère pas une
pression suffisante.
Tuyau d'air comprimé ou compresseur non étanche ou endommagé.
Adressez-vous à un technicien
spécialisé.
L'adaptateur de la valve ou la
fiche à levier de la valve de la
voiture n'est pas bien placé.
Contrôlez que l'adaptateur de
valve est bien placé sur la fiche à
levier de la valve de la voiture et
dans la valve de l'article. Contrôlez que le fichier à levier de la
valve de la voiture se trouve bien
placé sur la valve du pneu.
4.7 Recherche d'erreur
Solutions, aideCauses possiblesErreur / dysfonctionnement
13
13
Le tableau ci-dessus de recherche d'erreurs, des
causes possibles et de leurs solutions ne présente
pas tous les dysfonctionnements possibles.
Si l'erreur de l'appareil ne peut pas être éliminée
avec les mesures mentionnées, adressez-vous à
des techniciens qualifiés.
Page 39

FR 39
5.0 MAINTENANCE
ET ENTRETIEN
5.1 Nettoyage, maintenance et conser vation
5.1.1 Avertissement ! Éteignez l'appareil avec
l'interrupteur de et débranchez-le
du chargeur 230 V avant de le nettoyer.
5.1.2 Nettoyez l'appareil avec un chiffon sec.
N'utilisez aucun liquide ni aucun produit nettoyant
agressif car cela peut entraîner des décolorations
et des endommagements de la surface de l'appareil et cela peut dégrader l'appareil ! La pénétration de liquides à l'intérieur de l'appareil doit être
empêchée ! Ne plongez pas l'appareil dans du
liquide ! Utilisez exclusivement l'appareil lorsqu'il
est sec.
5.1.3 Conservez /stockez l'appareil uniquement
dans un environnement sec ! L'humidité peut endommager le système électronique de l'appareil !
5.1.4 Ne stockez pas l'appareil en cas de variations extrêmes de température ! La condensation
qui se formerait ainsi pourrait endommager le
système électronique !
marche / arrêt
6.0 CARACTÉRIST.
TECHNIQUES
Description de
l'appareil : Station de gonflage et
d'énergie LA 10
Référence : 97180
Dimensions : env. 26,5 x 14 x 22,5
cm (L x l x h cm)
Poids : env. 3,7 kg
Sécurité de l'appareil : 15 A (ampère) fusible
à fiche plate
Compresseur : Puissance du compres-
seur : max. 10 bar /
145 psi (bar / psi =
unité de pression)
Affichage du manomètre : Affichage analogue de
la pression, non calibré,
avec rétroéclairage
Manomètre, tolérances : +/- 0,34 bar (5 psi) de
0 - 6,9 bar (0 -100 psi)
+/- 0,48 bar (7 psi) de
6,9 - 10 bar (100 -150
psi)
Émission sonore: 90 dB (dB = décibels)
Fonctionnement par
intervalle : max. 10 minutes de ser-
vice, min. 10 minutes de
refroidissement
Groupe de machine : sans huile
Longueur du tuyau
d'air comprimé : env. 65 cm
Batterie de l'appareil :
Type de batterie : Batterie au plomb 12 V
Capacité de la batterie : 7,2 Ah (ampère-heure)
Température de travail : 0 C - 50 C (Celsius)
Affichage de la capacité de la batterie : 3 LED (rouge, orange,
vert)
Durée de charge : env. 10 - 12 heures
avec le chargeur 230 V
Chargeur :
Tension d'entrée: 230 V 50 Hz (V =
Volt, Hz = Hertz, oscil-
lations par seconde)
Courant d'entrée : max. 0,5 A (ampère)
°
°
~
Page 40

40
Tension de sortie : 14,5 V
Courant de sortie : 1000 mA DC (mA =
milliampère, DC =
courant continu)
Utiliser le chargeur
uniquement en intérieur
Éclairage :
Type d'éclairage : 4 lampes à LED
Lampes à LED : Les lampes à LED ne
peuvent pas être remplacées.
Classe de laser : Les lampes à LED cor-
respondent à la classe
de protection I
Appareils avec isolation
de protection de la
classe de protection II
L'appareil est conforme
aux directives CE
suivantes:
▪ Directive relative aux
machines
(2006/42/CE)
▪ Directive sur la comp tabilité électromagne tique (2004/108/CE)
7.0 MISE AU REBUT
7.1.3 Les batteries usagées ne doivent
pas être jetées avec les ordures ména-
Pb
gères. Mettez-les au rebut auprès de
votre magasin d'électronique ou d'un point de
collecte publique. En tant que consommateur,
vous êtes tenu de restituer les batteries inutilisables pour leur mise au rebut. Les symboles
suivantes indiquent des batteries contenant des
matières nocives : Pb = contient du plomb, Hg =
contient du mercure et Cd = contient du cadmium.
8.0 GARANTIE ET
SERVICE APRÈS VENTE
En cas de dégradations, de réparations ou d'autres problèmes avec le produit, adressez dans
votre point de vente aux techniciens spécialisés.
Les conditions générales de garantie s'appliquent
aux défauts de production et aux défauts matériel. Rapportez un appareil défectueux à son
point de vente.
7.1.1 La mise au rebut et le recyclage
de l'appareil doivent avoir lieu en res-
pect des dispositions légales. En cas de
question, adressez-vous à votre ville / votre commune ou à une entreprise spécialisée. Mettez
l'appareil au rebut en respect de la directive CE
sur les appareils électriques et électroniques
usagés 2002/96/CE-WEEE.
7.1.2 Pour la mise au rebut des matériaux d'emballage, il faut respecter les lois en vigueur sur le
traitement des déchets.
Pour un traitement rapide de votre réclamation,
vous avez de plus besoin :
▪ d'une copie du ticket de caisse avec la date
d'achat.
▪ de la raison de la réclamation (description des
erreurs).
Page 41

INDICE
1.0 INTRODUZIONE
IT 41
1.1 Significato dei simboli
1.2 Funzionamento dell'apparecchio
1.3 Uso conforme
1.4 Caratteristiche dell'apparecchio
2.0 INDICAZIONI DI SICUREZZA
2.1 Indicazioni generali di sicurezza
2.2 Indicazioni di sicurezza per l'uso dell'apparecchio
2.3 Indicazioni di sicurezza batteria apparecchio
2.4 Come comportarsi in caso di emergenza
3.0 DESCRIZIONE DEL PRODOTTO
3.1 Fornitura
3.2 Visione d'insieme del prodotto
4.0 USO / ACCESSORI
4.1 Accensione / spegnimento apparecchio
4.2 Uso della luce
4.3 Uso del compressore
4.4 Caricamento batteria apparecchio
4.5 Uso della presa auto 12 V
4.6 Sostituzione fusibile
4.7 Ricerca guasti
42
42
42
43
43
44
46
46
46
47
48
48
48
50
50
50
51
5.0 MANUTENZIONE E CURA
5.1 Pulizia, manutenzione e conservazione
6.0 DATI TECNICI
7.0 SMALTIMENTO
8.0 GARANZIA E ASSISTENZA
52
52
53
53
Page 42

42
1.0 INTRODUZIONE
Cara cliente,
caro cliente,
congratulazioni per l'acquisto del “kit di alimentazione e aria LA 10”, grazie della fiducia.
Per un funzionamento ottimale e per garantire la
sicurezza dell'apparecchio, leggere attentamente
le istruzioni per l'uso prima della messa in esercizio. Così sarete certi di poter utilizzare a lungo
il vostro apparecchio.
1.1 Significato dei simboli
Leggere le istruzioni per l'uso!
Avvertenza - Pericolo! Attenersi alle
avvertenze di sicurezza e alle indicazioni di pericolo!
Attenzione tensione elettrica!
Pericolo di morte!
Troverete ulteriori spiegazioni su simboli, unità e
abbreviazioni alle pagine 52 e 53.
1.2 Funzionamento dell'apparecchio
Il kit alimentazione e aria LA 10 è un apparecchio
mobile con un potente compressore e batteria integrata 12 V. Con un semplice sistema di pompaggio potrete gonfiare gli pneumatici di auto,
bici, palloni e altri articoli gonfiabili. Per farlo
avete a disposizione 3 adattatori per valvole nel
vano portaoggetti dell'apparecchio. L'anello di
registrazione del manometro può essere regolato
fino a 10 bar per aiutare ad orientarsi con la
pressione desiderata. La batteria integrata 12 V
può essere collegata tramite il connettore femmina
per auto come fonte di energia elettrica. La batteria può essere caricata mediante un caricabatterie 230 V. La capacità della batteria e lo stato di
carica vengono indicati da 3 luci LED nell'unità di
alloggiamento. Attraverso 4 luci LED e il quadrante illuminato del manometro, è possibile utilizzare
l'apparecchio anche al crepuscolo o di notte.
Attenzione radiazioni LED!
Avvertenza materiali e oggetti a
rischio di esplosione!
Avvertenza avvio automatico!
Avvertenza superfici calde!
Indossare protettori auricolari
e guanti protettivi!
Smaltire l'apparecchio, le batterie e
l'imballaggio in modo ecocompatibile!
1.3 Uso conforme
Il kit di alimentazione e aria LA 10 è stato progettato esclusivamente per uso domestico. L'apparecchio permette di pompare pneumatici per auto,
moto e bici, così come di gonfiare articoli per lo
sport, il gioco e il tempo libero. La fornitura di
energia da parte della batteria interna all'apparecchio è possibile solamente tramite l'uso di un
connettore femmina per auto 12 V. Ogni altro utilizzo o modifica del kit di alimentazione e aria
non è da considerarsi previsto. Per il funzionamento del kit di alimentazione e aria è prevista la
batteria integrata 12 V o la presa auto 12 V
dell'apparecchio. Compressore non adatto ad uso
continuo. Non è possibile l'uso con DC / 24 V!
Attenzione: pericolo di danni a cose e persone!
Page 43

43IT
1.4 Caratteristiche dell'apparecchio
▪ Compressore ad elevate prestazioni per pompa-
re gli pneumatici di auto e bici, palloni, ecc.
▪ Impostazione della pressione nell'anello del ma-
nometro per avere un riferimento
▪ Adatto all'uso mobile grazie alla batteria
▪ Fonte di energia elettrica portatile 12 V
(connettore femmina per auto)
▪ Pratica lampada a LED per l'utilizzo al crepus-
colo e di notte
▪ Con indicatore dello stato di carica
▪ Accessori: caricabatterie 230 V / 12 V,
3 adattatori per valvole, per pompare palloni,
pneumatici di bici e articoli per il tempo libero.
▪ Pratico scomparto per cavo, spina e accessori
2.0 INDICAZIONI DI
SICUREZZA
2.1 Indicazioni generali di sicurezza
Avviso!
Leggere attentamente le istruzioni! L'inosservanza
delle indicazioni di sicurezza può provocare danni a beni e persone e causare la morte! Conservare le istruzioni per future consultazioni o domande. Consegnarle assieme all'apparecchio in
caso di cessione a terzi. Permettere anche a terzi
di consultare le istruzioni. Le presenti istruzioni
sono parte dell'apparecchio.
2.1.1 Tenere l'apparecchio lontano
dalla portata di bambini e ragazzi fino
a 16 anni! Bambini e ragazzi sotto i
16 anni non riconoscono e non capiscono i possibili rischi connessi all'uso di apparecchi elettrici.
Non lasciare che i bambini si avvicinino all'apparecchio e assicurarsi che non vi possano accedere. Le piccole componenti potrebbero essere inghiottite dai bambini provocandone il soffocamento. Bambini e ragazzi potrebbero ferirsi.
Tenere lontano dai bambini anche il materiale
d'imballaggio.
2.1.2 Conservare le istruzioni per tutta la durata.
2.1.3 Questo apparecchio non è destinato a essere utilizzato da persone (compresi i bambini)
con ridotte capacità fisiche, sensoriali o mentali,
o che manchino di esperienza e conoscenza, a
meno che non siano opportunamente sorvegliate
o istruite sull'uso dell'apparecchio da parte di una
persona responsabile della loro sicurezza.
2.1.4 Per eventuali dubbi riguardanti l'installazione, l'uso o il funzionamento dell'apparecchio rivolgersi a personale specializzato.
2.1.5 L'apparecchio e il tubo per l'aria
compressa vibrano e si surriscaldano
durante l'uso. Posizionarlo sempre in
un luogo sicuro e aerato.
2.1.6 Non sottoporre l'apparecchio a carichi
meccanici, elevate temperature, oli, grassi, solventi, umidità e vibrazioni!
2.1.7 Utilizzare l'apparecchio solo quando non
sono presenti danni o difetti di funzionamento
nell'apparecchio, nei cavi o negli accessori!
2.1.8 Tutte le riparazioni devono essere eseguite
da un elettricista qualificato / personale qualificato.
2.1.9 L'apparecchio non deve essere modificato.
2.1.10 Non utilizzare l'apparecchio a seguito di
cadute o danneggiamenti di diverso tipo. Portare
l'apparecchio da un elettricista per un controllo
ed eventuale riparazione!
2.1.11 Non utilizzare altri cavi o accessori. Non
prolungare i cavi.
2.1.12 Durante l'utilizzo assicurarsi della presenza di una circolazione d'aria sufficiente e di uno
spazio libero di almeno 18 cm attorno all'apparecchio. L'apparecchio non deve essere coperto
da altri oggetti!
Page 44

44
2.1.13 Non utilizzare il cavo per sollevare o trascinare l'apparecchio.
2.1.14 Per utilizzare l'apparecchio è necessaria
una batteria con tensione in uscita 12 V / DC o la
spina auto 12 V inclusa da collegare ad una presa auto 12 V.
2.1.15 Evitare che liquidi penetrino nell'apparecchio! Non immergere l'apparecchio in sostanze
liquide! Utilizzare l'apparecchio solo se asciutto.
2.1.16 L'apparecchio non è a tenuta stagna. Proteggerlo dalla pioggia, dalla nebbia, dalla neve
e altri liquidi! Non posizionare l'apparecchio sul
pavimento umido. Attenzione: rischio di
danni e lesioni!
2.1.17 Evitare l'uso dell'apparecchio nelle vicinanze di fiamme libere e atmosfere a rischio di
esplosione.
2.1.18 Assicurarsi che la spina, il cavo di corrente e l'apparecchio siano asciutti. Non toccare e
non utilizzare l'apparecchio con mani umide o
bagnate.
2.1.19 Prima di ogni utilizzo, assicurarsi che
l'apparecchio non sia danneggiato. Un apparecchio difettoso non deve essere usato!
2.1.20 Prima di ogni utilizzo controllare che l'apparecchio e in modo particolare gli adattatori per
valvole, non siano sporchi. Pulire l'apparecchio
prima dell'uso nel caso fosse sporco.
2.1.21 Utilizzare l'apparecchio solo in un ambiente sicuro! Tenere vestiti, capelli, arti e lo stesso
apparecchio lontani da componenti in movimento
del veicolo o del motore!
2.1.22 Utilizzare per l'apparecchio esclusivamente i fusibili qui indicati, con una protezione di
massimo 15 A.
2.1.23 Assicurarsi che l'area di lavoro sia ordinata e in sicurezza. Prestare agli influssi nelle
aree di lavoro e alla presenza di una illuminazione sufficiente.
2.2 Indicazioni di sicurezza per l'uso
dell'apparecchio
2.2.1 Assicurare il veicolo prima di pompare o
controllare la pressione degli pneumatici, di modo che questo non possa muoversi. Attenzione:
Pericolo di danni a cose e persone! Azionare sempre il freno a mano e inserire una
marcia! In caso di cambio automatico inserire la posizione “parcheggio” e il freno a
mano!
2.2.2 Mentre si gonfiano gli pneumatici o si controlla la pressione il veicolo non deve essere azionato!
2.2.3 Attenersi alle indicazioni di sicurezza,
quando il veicolo si trova posizionato su cavalletti
o su un ponte solevatore!
2.2.4 Attenzione! Pericolo di tensio-
ne elettrica nell'area delle bobine d'ac-
censione, nella distribuzione, nella batteria, nelle candele e nelle componenti elettriche
del veicolo!
2.2.5 Attenersi alle indicazioni di sicurezza e alle
istruzioni per l'uso del costruttore dell'auto!
2.2.6 Utilizzare l'apparecchio esclusivamente in
un ambiente sicuro! Mantenere indumenti, gioielli,
e capelli lontani dalle aperture di aerazione
dell'apparecchio.
2.2.7 Assicurarsi durante l'uso dell'apparecchio
che il tubo per l'aria compressa e i cavi non vengano danneggiati da oggetti con spigoli vivi o
fonti di calore e non spezzarli. Posizionare i cavi
e il tubo dell'aria compressa in modo da non inciampare. Se i cavi o il tubo dell'aria compressa
sono danneggiati, non vanno utilizzati!
2.2.8 Pericolo di corto circuito! Utilizzando la
presa auto da 12 V dell'apparecchio, fate attenzione ad usare la giusta polarità. A questo scopo
attenersi alle istruzioni e allo schema elettrico.
2.2.9 Utilizzando la presa auto da 12 V dell'apparecchio, fate attenzione a non pregiudicare la
sicurezza e la funzionalità di altri apparecchi!
Attenersi alle istruzioni di altri apparecchi!
Page 45

45IT
2.2.10 In caso di malfunzionamenti o danneggiamenti, l'apparecchio deve essere immediatamente
spento e scollegato dal caricabatterie 230 V o
dalla presa per auto 12 V!
2.2.11 Accertarsi che l'accensione e le utenze del
veicolo siano spente, prima di collegare l'apparecchio all'auto con la presa 12 V!
2.2.12 In caso di uso non conforme dell'apparecchio, le componenti elettroniche potrebbero
venire danneggiate. Potrebbe conseguirne un incidente o un incendio. Attenzione! Pericolo di
danni a cose e persone!
2.2.13 Quando scatta il fusibile 15 A, l'apparecchio non è pronto per l'uso e non è presente la
tensione 12 V nella spina dell'apparecchio.
2.2.14 Per eventuali dubbi riguardanti l'uso o il
funzionamento dell'apparecchio rivolgersi a personale specializzato.
2.2.15 Un montaggio errato dell'adattatore per
valvole o un posizionamento errato dello stesso
sulla o nella valvola dell'articolo da pompare può
provocare un cattivo collegamento tra apparecchio e articolo, l'aria in uscita provoca una caduta di pressione che ha come conseguenza valori
di pressione errati.
2.2.16 Durante l'uso, tenere bambini e altre persone lontane dall'apparecchio.
2.2.17 Non utilizzate l'apparecchio se siete stanchi, o sotto l'effetto di farmaci, droghe o alcol.
2.2.18 Spegnere l'apparecchio con l'interruttore
di funzionamento prima di sostituire l'adattatore
della valvola.
2.2.19 Non rivolgere il getto di aria compressa
verso persone, animali, polvere, sporcizia,
prodotti chimici, acidi, gas, oggetti di qualsiasi
tipo o sé stessi. Attenzione! Pericolo di lesioni
e di danneggiamento oggetti!
2.2.20 Pulire prima del pompaggio l'area della
valvola, nel caso in cui questa fosse polverosa.
Indossare una maschera antipolvere come protezione. Attenzione! Pericolo di lesioni e di
danneggiamento oggetti!
2.2.21 Per evitare malfunzionamento o lo scoppio dell' articolo, mentre questo viene pompato,
controllare la pressione con un manometro esterno. Il manometro dell'apparecchio non è calibrato
e i valori sono solo indicativi per la pressione
dell'aria. Il manometro non indica dei valori vin-
colanti. Trovate la tolleranza di misurazione del
manometro nei dati tecnici (vedi 6.0). Atten-
zione! Pericolo di lesioni e di danneggiamento oggetti!
2.2.22 Testare in modo particolare e con un manometro esterno adatto la pressione degli pneumatici degli autoveicoli, delle moto e dei rimorchi
dopo averli pompati. Una pressione non sufficiente può infatti pregiudicare le prestazioni del
veicolo. Attenzione! Pericolo di lesioni e di
danneggiamento oggetti!
2.2.23 Attenersi alle indicazioni sulla pressione
dell'articolo da pompare date dal produttore.
2.2.24 Non utilizzare l'apparecchio quando il
caricabatterie 230 V è collegato.
2.2.25 Non sottoporre l'apparecchio a temperature superiori ai 60 C.
2.2.26 Non sovraccaricare l'apparecchio.
2.2.27 Spostare l'apparecchio servendosi esclusivamente l'impugnatura; che non deve essere
sporca d'olio, grasso o umidità.
2.2.28 Spegnere l'apparecchio dopo 10 minuti
d'uso o in caso di un surriscaldamento. Per farlo
basta posizionare l'interruttore di funzionamento
su ( O ). Lasciare che l'apparecchio si raffreddi
per almeno 10 minuti, fino al raggiungimento della normale temperatura di esercizio così sarà poi
di nuovo pronto per l'uso.
2.2.29 La pressione generata non può essere
usata a scopo industriale e nemmeno nei settori
alimentare, farmaceutico, del nuoto subacqueo o
medico.
2.2.30 Attenzione: radiazioni LED!
Evitare danni agli occhi! Non guardare
direttamente e per un tempo prolungato
il raggio di luce LED dell'apparecchio senza degli
occhiali protettivi adeguati.
2.2.31 L'apparecchio è fornito di LED di classe I.
Non indirizzare il raggio di luce Led verso gli
occhi di altre persone o animali!
2.2.32 Avvertenza materialie
oggetti a rischio di esplosione!
Non pompare ausili per il nuoto, dispositivi di protezione individuali e canotti gonfiabili.
2.2.33 Per motivi di sicurezza, pompare l'articolo
a brevi intervalli e controllare nel frattempo la
pressione dell'articolo da pompare con il manometro.
°
Page 46

46
2.2.34 Non utilizzare adattatori per valvole danneggiati! Questi potrebbero scoppiare a causa
della pressione. Attenzione: pericolo di lesi-
oni!
2.2.35 Se ci si attiene alle istruzioni e alle disposizioni, non sono necessari impegni o addestramenti particolari per poter utilizzare l'apparecchio.
2.3 Indicazioni di sicurezza batteria apparecchio
2.3.1 Non gettare la batteria nel fuoco e non cor-
tocircuitarla.
2.3.2 Una batteria danneggiata può causare
danni all'apparecchio a causa della fuoriuscita
di acidi!
2.3.3 Prestare particolare attenzione se si devono
manipolare batterie danneggiate. Pericolo di
cor-rosione! Indossare guanti e indumenti
adeguarti. Nel caso fossero fuoriusciti acidi dalla
batteria, evitare qualsiasi contatto con pelle,
occhi e muco-se. Sciacquare abbondantemente la
parte interes-sata con acqua pulita e contattare
immediatamen-te un medico o comunque un
centro di assistenza medica.
3.0 DESCRIZIONE
DEL PRODOTTO
3.1 Fornitura
1 kit di alimentazione e aria LA 10 con un tubo
per l'alta pressione (leva di bloccaggio-valvola
auto) e connettore auto 12 V
1 caricabatterie 230 V
1 adattatore per valvola, ca. 2,0 mm di diametro
(ago per pallone)
1 adattatore per valvola, ca. 4,5 mm di diametro
1 adattatore per valvola, ca. 8,0 mm di diametro
1 istruzioni per l'uso
1 fusibile piatto auto15 A (all'interno dell'appa recchio)
Assicurarsi, dopo aver disimballato l'apparecchio
che sia completo e che non sia danneggiato!
Non utilizzare l'apparecchio se danneggiato,
malfunzionante o se privo di istruzioni o con
istruzioni non complete!
Le figure possono in parte differire dal prodotto.
Ci riserviamo modifiche tecniche per il miglioramento del prodotto. Non contiene decorazioni.
2.4 Come comportarsi in caso di emer-
genza
2.4.1 Mettere in sicurezza il luogo dell'incidente
e preservare chi ha subito lesioni e terzi da ulteriori danni.
2.4.2 In caso di lesioni mettere in atto le misure
di primo soccorso.
2.4.3 Quando chiedete aiuto o per chiamate
d'emergenza (medico, pompieri, polizia) fornite
i seguenti dati:
▪ logo dell'incidente (se necessario descrizione
dello stesso)
▪ tipo di incidente
▪ numero dei feriti
▪ tipo di lesione
Page 47

47IT
3.2 Visione d'insieme del prodotto
5
Figura 1
8
7
Figura 2
12
9
Figura 3
11
21
20
19
18
1
Manometro, indica la pressione dell'aria
fino ad un max. di 10 bar / 145,03 PSI
(bar e PSI sono unità della pressione, 1 Bar
1
2
= 14,50 PSI) e illuminazione del quadrante
2
Luci con 4 LED
3
Tubo per l'aria compressa, ripiegabile nello
scomparto inferiore dell'alloggiamento.
4
Leva di bloccaggio-valvola auto con chiusura rapida della valvola
5
Anello di registrazione per indicare un
determinato valore di pressione
6
1 adattatore per valvola con ca. 8,0 mm di
diametro
7
1 adattatore per valvola con ca. 4,5 mm di
diametro
8
3
4
1 adattatore per valvola con ca. 2,0 mm di
diametro (ago per pallone)
9
Scomparto per la presa auto 12 V con cavo
e caricabatterie 230 V.
10
6
Caricabatterie 230 V
11
Elemento di copertura dello scomparto per
l'adattatore per valvola
12
Spina per auto 12 V con cavo e fusibile
15 A (Ampere)
13
O / I, interruttore on / off
14
Bussola di attacco del caricabatteria
15
O / I, interruttore on / off per i LED
10
16
Connettore femmina per auto 12 V con
copertura
17
Chiusura a clip dello scomparto portaoggetti; per aprire la clip premere verso il
basso
18
Fusibile dell'apparecchio 15 A (Ampere)
19
O / I , interruttore on / off del compressore
20
LED per indicare la capacità della batteria
sia durante l'utilizzo che durante il processo
di carica della batteria.
13
14
LED verde = la batteria è piena
LED giallo = la batteria è carica a metà
LED rosso = la batteria è quasi scarica,
deve essere caricata.
15
21
Unità dell'alloggiamento per gli elementi di
comando
16
Figura 4
17
Page 48

48
4.0 USO / ACCES-
SORI
4.1 Accensione / spegnimento apparecchio
▪ Posizionare l'interruttore on / off in posizi-
one ( I ). L'apparecchio è pronto all'uso e l'illuminazione del manometro è accesa. Le luci
20
LED indicano lo stato della batteria.
▪ Con l'apparecchio in modalità pronto per l'uso,
la presa per auto 12 V è attiva.
▪ Per spegnere l'apparecchio, premere l'interrutto-
re on / off in posizione ( O ).
zione ( I ) prima di accendere l'apparecchio, il
compressore partirà automaticamente e dal tubo
dell'aria compressa uscirà aria compressa.
Attenzione! Pericolo di danni a cose e
persone!
13
Avvertenza avvio automatico!
Se l'interruttore on / off per l'accensione del compressore si trova in posi-
16
13
1
19
Attenzione! Prima di ogni utilizzo indossare protettori auricolari e occhiali
protettivi adatti!
Prima di ogni utilizzo controllare il tubo per l'aria
compressa , verificando che non sia danneggiato! Se l'apparecchio è danneggiato non deve
essere messo in funzione! Prima dell'uso leggere
le istruzioni del prodotto da pompare fornite dal
produttore.
Scegliere l'adattatore per valvola (per es. ).
Aprire la valvola a chiusura rapida , inclinando la leva della chiusura rapida dal tubo dell'aria
compressa . Posizionare l'adattatore per valvole e premere la leva per richiudere nuovamente
nella direzione del tubo dell'aria compressa (vedi
fig. 5)
3
7
4
3
4
3
7
4.2 Uso della luce
▪ Premere l'interruttore on / off in posizione
( I ). L'apparecchio è pronto all'uso.
▪ Per accendere la luce, premere l'interruttore
on / off dell'illuminazione in posizione ( I ).
▪ Per spegnere le luci a LED, premere l'interruttore
dell'illuminazione in posizione ( O ).
▪ Per spegnere l'apparecchio, premere l'interrutto re on / off in posizione ( O ).
4.3 Uso del compressore
L'apparecchio può essere utilizzato con la batteria
integrata o con la spina integrata per auto 12 V.
15
13
13
Figura 5
Pneumatici di auto, moto e bici con valvola auto
(valvola Schrader con diametro filettatura 7,7
mm) possono essere pompati senza adattatore!
Il compressore può essere utilizzato al
massimo per 10 minuti, poi va lasciato
raffreddare 10 minuti!
▪ Per gonfiare gli pneumatici di un'auto non è ne cessario un adattatore per valvole. Togliere per
prima cosa il cappuccio della valvola degli
pneumatici.
▪ Aprire la valvola a chiusura rapida e posi-
zionare la leva di bloccaggio-valvola auto il più
vicino possibile alla valvola degli pneumatici.
Chiudere poi la valvola a chiusura rapida.
▪ Assicurarsi che la leva di bloccaggio-valvola
auto sia bel posizionata sugli pneumatici tiran do leggermente.
4
Page 49

49IT
Impostare il valore
della pressione
per es. a 2 bar.
5
Figura 6
▪ Impostare la freccia dell'anello di registrazione
5
del manometro sul valore di pressione desi derato (vedi fig. 6).
▪ Impostare l'interruttore on / off in posizione
13
( I ). L'apparecchio è pronto per l'uso.
▪ Per attivare il compressore, premere l'interrutto-
re on / off del compressore in posizione ( I ).
19
Nota: il compressore può essere spento in qual siasi momento con l'interruttore del compressore
19
o l'interruttore di funzionamento ( O ).
13
▪ Quando viene raggiunta la pressione impostata
nell'anello di registrazione spegnere il com pressore con l'interruttore del compressore ,
premendo in
l'interruttore del compressore
5
19
19
posizione ( O ).
▪ Per disinserire l'apparecchio si deve spegnere
anche l'interruttore di funzionamento .
▪ Aprire la chiusura rapida e togliere la leva
4
13
di bloccaggio-valvola auto dalla valvola degli
pneumatici.
▪ Controllare poi la pressione con un manometro
esterno, per conoscerne il valore esatto. Se non
fosse stato raggiunto il valore desiderato, ripe tere la procedura.
▪ Scitare il cappuccio della valvola degli pneuma tici.
Gonfiare articoli sortivi, per il tempo libero e
giochi
Il compressore può essere utilizzato al
massimo per 10 minuti, poi va lasciato
raffreddare 10 minuti!
▪ Leggere le istruzioni del produttore dell'articolo
da gonfiare per conoscere la pressione max.
consentita, prima di iniziare a pompare l'arti colo.
▪ Aprire il coperchio della valvola dell'articolo.
▪ Fissare l'adattatore per valvola adeguato con la
chiusura rapida inserendolo nella valvola
4
dell'articolo . Nel caso in cui l'adattatore si stac casse mentre pompate l'articolo, tenerlo premuto
con la mano nella valvola.
▪ Assicurarsi che l'adattatore sia ben posizionato
tirando leggermente.
▪ Impostare la freccia dell'anello di registrazione
del manometro sul valore di pressione desi-
5
derato.
▪ Premere l'interruttore di funzionamento in
13
posizione ( I ). L'apparecchio è pronto per l'uso.
▪ Per attivare il compressore premere l'interruttore
del compressore in posizione ( I ).
19
Nota: il compressore può essere spento in qual siasi momento con l'interruttore del compressore
19
o l'interruttore di funzionamento ( O ).
13
▪ Osservare e provare il livello di rigidità dell'ar-
ticolo mente lo pompate. Se l'articolo è stato
pompato eccessivamente, interrompere subito la
procedura e spegnere il compressore!
Attenzione! Se la pressione è eccessiva
l'articolo potrebbe scoppiare! Pericolo
danni a cose e persone!
▪ Quando viene raggiunta le pressione indicata
nell'anello di registrazione spegnere il com pressore con l'interruttore del compressore .
5
19
▪ Togliere l'adattatore per valvole dalla valvola
dell'articolo e chiudere il cappuccio della valvo la dell'articolo.
Valori di riferimento non vincolanti della pressione
Pneumatici auto ca. 1,9 - 3,5 bar
Pneumat. rimorchio ca. 2,4 - 3,4 bar
Pneumatici moto ca. 1,7 - 2,9 bar
Pneumatici bici ca. 2,0 - 4,0 bar
Pallone da calcio ca. 0,6 - 1,1 bar
Palla da pallavolo ca. 0,18 - 0,22 bar
Attenzione! Far riferimento ai dati del produttore dell'articolo. Non gonfiare ausili
per il nuoto con il compressore!
Page 50

50
4.4 Caricamento batteria apparecchio
Caricamento con caricabatterie 230 V
Prima primo utilizzo la batteria deve essere completamente carica.
▪ Collegare la piccola presa tonda del
caricabatterie con la bussola di attacco .
10
14
▪ Inserire il caricabatterie in una presa 230 V.
▪ Premere l'interruttore di funzionamento in
13
posizione ( I ). L'apparecchio passa in modalità
di carica.
▪ L'indicatore LED si accende e il LED lampeg-
20
giante indica lo stato di carica.
Il tempo di carica è di ca. 10 - 12 ore.
Quando la batteria sarà completamente carica
il LED verde dovrà essere acceso e fisso.
▪ Al termine del processo di carica spegnere l'ap parecchio con l'interruttore di funzionamento e
scollegare il caricabatterie dall'apparecchio e
dalla presa 230 V.
Nota! Non accendere il compressore o l'illuminazione durante il processo di carica!
▪ Il connettore femmina per auto 12 V dell'appa recchio è ora attivo e l'altro apparecchio può
ora essere messo in funzione (vedi fig. 7).
▪ Dopo l'uso dell'altro apparecchio, scollegare la
spina 12 V dal connettore femmina per auto
12 V dell'apparecchio.
4.6 Sostituzione fusibile
Spina auto 12 V
Vite d'arresto
Valvola di contatto
Figura 8
Fusibile rotondo 15 A (Ampere)
Spina di collegamento
per auto 12 V
▪ Svitare la vite d'arresto.
▪ Togliere la valvola di contatto e il fusibile roton-
do 15 A (Ampere).
▪ Montare tutti gli elementi con il nuovo fusibile
15 A da sequenza, come rappresentato e riav vitare nuovamente la vite d'arresto (vedi fig. 8).
4.5 Uso della presa auto 12 V
▪ Togliere la copertura del connettore femmina
per auto 12 V.
▪ Collegare la presa 12 V per auto dell'altro ap parecchio con il connettore femmina dell'appa recchio.
▪ Premere l'interruttore di funzionamento in
13
posizione ( I ).
13
Presa auto
12 V dell'altro
apparecchio
Figura 7
16
Fusibile dell'apparecchio
Fusibile piatto 15 A
Figura 9
(Ampere) intatto
▪ Estrarre con cautela il fusibile piatto con una
pinza piatta dal supporto del fusibile presente
nell'unità di comando dell'alloggiamento.
▪ Sostituire il fusibile difettoso con un nuovo fusibi le piatto 15 A, premendo con attenzione il sup porto del fusibile con il pollice fino a quando
non si stacca dall'alloggiamento dall'appa recchio (vedi fig. 9).
Page 51

Il compressore è acceso ma non
indica alcuna funzione.
L'interruttore di funzionamento
non è acceso.
Prima di usare il compressore
accendere l'interruttore di funzionamento dell'apparecchio.
Caricare la batteria dell'apparecchio con il caricabatterie
230 V.
Accendendo l'interruttore di funzionamento non si accendono i
LED e la luce del manometro. La
batteria dell'apparecchio è scarica.
Sostituire il fusibile piatto 15 A
difettoso con uno nuovo.
Il fusibile 15 A dell'apparecchio
è difettoso.
Nonostante indichi batteria completamente carica e fusibile intatto, l'apparecchio non funziona .
L'apparecchio è difettoso.
Rivolgersi a personale specializzato.
Il compressore si è surriscaldato.
Non si può utilizzare il compressore per più di 10 minuti.
Lasciar raffreddare il compressore per 10 minuti, ciclo massimo
di lavoro 10 minuti di utilizzo e
10 minuti per lasciar raffreddare
l'apparecchio.
Le aperture di aerazione dell'apparecchio sono coperte o ostruite
da un oggetto.
Rimuovere l'oggetto dalle aperture di aerazione dell'apparecchio
o pulire le stesse.
Il compressore perde pressione e
e non riesce a fornire la pressione sufficiente.
Tubo dell'aria compressa o compressore non stagni o anneggiati.
Rivolgersi a personale
specializzato.
L'adattatore per valvole o la leva
di bloccaggio- valvola auto non
sono posizionati correttamente.
Assicurarsi di aver posizionato
correttamente la valvola sulla valvola auto-leva di bloccaggio e
sulla valvola dell'articolo. Assicurarsi che la valvola auto-leva di
bloccaggio sia posizionata correttamente sulla valvola degli
pneumatici.
4.7 Ricerca guasti
13
51
IT
Soluzioni, rimediPossibili causeErrore / guasto
13
La tabella qui sopra per la ricerca guasti, le possibili cause e rimedi, non indica tutti i guasti possibili.
Se non è possibile riparare il guasto con le soluzioni indicate, rivolgersi a personale specializzato.
Page 52

52
5.0 MANUTENZIONE
E CURA
5.1 Pulizia, manutenzione e
conservazione
5.1.1 Attenzione! Spegnere l'apparecchio con
l'interruttore di funzionamento e scollegarlo dal
caricabatterie 230 V prima della pulizia.
5.1.2 Pulire l'apparecchio con un panno asciutto.
Non utilizzare liquidi o detergenti aggressivi, che
potrebbero causare scolorimento o danneggiare
le superfici dell'apparecchio! Evitare che i liquidi
penetrino all'interno dell'apparecchio! Non immergere l'apparecchio in liquidi! Utilizzare l'apparecchio esclusivamente in luoghi asciutti.
5.1.3 Conservare / immagazzinare l' apparecchio solo in luoghi asciutti. L'umidità potrebbe
danneggiare le componenti elettriche dell'apparecchio!
5.1.4 Non immagazzinare l'apparecchio in aree
caratterizzate da notevoli oscillazioni di
temperatura! La condensa che ne deriverebbe
potrebbe danneggiare l'apparecchio!
6.0 DATI TECNICI
Descriz. apparecchio: kit di alimentazione e
aria LA 10
Numero art.: 97180
Dimensioni: ca. 26,5 x 14 x 22,5
cm (L x L x A cm)
Peso: ca. 3,7 kg
Fusibile: 15 A (Ampere) fusibile
piatto
Compressore:
Prestazioni: max. 10 bar / 145 psi
(bar / psi = unità pres-
sione)
Indicatore pressione/
manometro: indicatore analogico,
non calibrato, con retro-
illuminazione
Tolleranze manometro: +/- 0,34 bar (5 psi) da
0 - 6,9 bar (0 -100 psi)
+/- 0,48 bar (7 psi) da
6,9 - 10 bar (100 -150
psi)
Valori acustici: 90 dB (dB = volume)
Intervalli d'uso: max. 10 min. di utilizzo,
min. 10 min. raffredda-
mento
Aggregato: privo d'olio
Lunghezza tubo aria
compressa: ca. 65 cm
Batteria apparecchio:
Tipo batteria: batteria al piombo 12 V
Capacità batteria: 7,2 Ah (Ampere/ora)
Temp. di esercizio: 0 C - 50 C (Celsius)
Indicatore capacità
batteria: 3 luci LED (rosso, aran-
cio, verde)
Tempo di carica: ca. 10 - 12 ore con il
caricabatterie 230 V
Caricabatterie:
Tensione in ingresso: 230 V 50 Hz (V =
Volt, Hz = Hertz,
oscillazioni al secondo)
Corrente in ingresso: max. 0,5 A (Ampere)
°
°
~
Page 53

53
IT
Tensione in uscita: 14,5 V
Corrente in uscita: 1000 mA DC (mA =
milliampere, DC = corrente continua)
usare il caricabatterie
solo in ambienti interni
Illuminazione:
Tipo illuminazione: 4 luci LED
Luci LED: le luci LED non sono
sostituibili
Classe laser: le luci LED sono confor-
mi alla classe di protezione I
Apparecchi con isolamento protettivo classe II
L'apparecchio è conforme alle direttive UE
▪ Direttiva macchine
(2006/42/CE)
▪ Direttiva sulla compa tibilità elettromagneti ca (2004/108/CE)
7.1.3 Le batterie esauste non sono da
considerarsi rifiuti domestici. Per lo
Pb
smaltimento rivolgersi alla propria elettrotecnica o ad un centro pubblico di raccolta.
Come consumatori siete obbligati a riportare le
batterie esauste in un centro per lo smaltimento.
I seguenti simboli indicano una batteria che contiene sostanza pericolose: Pb = contiene piombo,
Hg = contiene mercurio e Cd = contiene cadmio.
8.0 GARANZIA E
ASSISTENZA
Per guasti, riparazioni o problemi rivolgersi al
centro in cui è stato acquistato l'apparecchio o a
personale specializzato.
Le condizioni generali di garanzia si riferiscono
ai difetti di produzione e dei materiali. Riportare
il prodotto difettoso nel centro in cui è stato
acquistato.
7.0 SMALTIMENTO
7.1.1 Per lo smaltimento e il riutilizzo
dell'apparecchio attenersi alle norme
legislative vigenti. Per eventuali domande rivolgersi al comune o a alle aziende di smaltimento. Smaltire l'apparecchio secondo la direttiva
2002/96/CE sui rifiuti di apparecchiature elettriche ed elettroniche (RAEE).
7.1.2 Per lo smaltimento del materiale d'imballaggio attenersi alle norme vigenti in materia.
Per un rapido disbrigo del reclamo abbiamo
inoltre bisogno di:
▪ copia dello scontrino con data d'acquisto.
▪ motivo del reclamo (descrizione problema).
Page 54

54
OBSAH
1.0 ÚVOD
1.1 Co znamenají symboly?
1.2 Funkce přístroje
1.3 Použití ke stanovenému účelu
1.4 Vybavení přístroje
2.0 BEZPEČNOSTNÍ UPOZORNĚNÍ
2.1 Všeobecná bezpečnostní upozornění
2.2 Bezpečnostní pokyny k používání přístroje
2.3 Bezpečnostní upozornění pro akumulátor
2.4 Chování v případě nouze
3.0 POPIS VÝROBKU
3.1 Obsah dodávky
3.2 Přehled výrobku
4.0 OBSLUHA / PŘÍSLUŠENSTVÍ
4.1 Zapnutí a vypnutí přístroje
4.2 Návod pro osvětlení
4.3 Návod pro kompresor
4.4 Nabíjení akumulátoru přístroje
4.5 Použití zástrčky na 12 V pro motorová vozidla
4.6 Výměna pojistky
4.7 Hledání chyb
55
55
55
56
56
57
59
59
59
60
61
61
61
63
63
63
64
5.0 ÚDRŽBA A OŠETŘOVÁNÍ
5.1 Čištění, údržba a skladování
6.0 TECHNICKÁ DATA
7.0 ODSTRANĚNÍ DO ODPADU
8.0 ZÁRUKA A SERVIS
65
65
66
66
Page 55

CZ 55
1.0 ÚVOD
Vážená zákaznice,
vážený zákazníku,
blahopřejeme Vám k Vaší nové „Energetické stanici LA 10 s kompresorem"
Prosíme Vás, zájmu zajištění optimální
funkce, výkonnosti a bezpečnosti Vašeho
přístroje, aby jste si před uvedením do
provozu přečetli návod k jeho provozu.
Toto zajistí Vaší dlouhou radost z přístroje.
1.1 Co znamenají symboly?
Číst návod k provozu!
Varování – nebezpečí! Dbát na
bezpečnostní pokyny a
varování!
Varování před nebezpečným
elektrickým napětím!
Nebezpečí ohrožení života!
Další vysvětlivky k symbolům, jednotkám a
zkratkám najdete na stránkách 65 a 66.
1.2 Funkce přístroje
Energetická stanice LA 10 je mobilní
přístroj s výkonným kompresorem a
integrovaným akumulátorem s napětím 12
V. S tímto komfortním systémem můžete
napumpovat automobilové pneumatiky,
pneumatiky jízdních kol, míče a i jiné
nafukovací artikly. Pro tyto účely má
přístroj k dispozici v přihrádce 3 různé
ventilové adaptéry. Na prstenci
manometru je možné nastavit pro
orientaci požadovaný tlak až do 10 bar. V
přístroji integrovaný akumulátor s napětím
12 V je možné použít přes zásuvku
motorového vozidla jako zdroj proudu.
Nabíjení akumulátoru se provádí přes
nabíjecí síťový adaptér na 230 V. Kapacita
baterie a stav nabíjení akumulátoru se
znázorňuje 3 LED kontrolkami na
ovládacím panelu. Osvětlení manometru
se 4 LED umožňuje použití přístroje i za
šera nebo v noci.
Varování před optickým
zářením!
Varování před výbušnými
látkami a předměty!
Varování před automatickým
rozběhem!
Varování před horkým
povrchem!
Nosit ochranu sluchu a
ochranné brýle!
Odstraňujte do odpadu přístroj,
baterie a obalový materiál
ekologicky!
1.3 Použití ke stanovenému účelu
Energetická stanice LA 10 s kompresorem
je určená jen pro privátní použití. Přístroj
je vhodný pro napumpování pneumatik
aut, motocyklů i jízdních kol a také
sportovních artiklů i hraček. Zásobování
proudem prostřednictvím interního
akumulátoru je dovolené jen přes zásuvku
motorového vozidla pro napětí 12 V.
Každé jiné použití nebo změna stanice
není použitím ke stanovenému účelu. Pro
provoz stanice je určený integrovaný
akumulátor s napětím 12 V nebo proud
přiváděný přes zástrčku ze zásuvky
motorového vozidla na 12 V. Kompresor
není konstruovaný pro nepřetržitý provoz.
Provoz s napětím 24 V / DC není možný!
Pozor: Nebezpečí zranění osob a
věcných škod!
Page 56

56
1.4 Vybavení přístroje
▪ výkonný kompresor na komfortní
pumpování pneumatik aut, jízdních kol,
míčů, atd.
▪ pro orientaci nastavitelná předvolba
tlaku vzduchu na prstenci manometru
▪ zásluhou integrovaného akumulátoru je
přístroj vhodný k mobilnímu použití
▪ přenosný zdroj elektrického proudu s
napětím 12 V (zásuvka motorového
vozidla)
▪ praktická lampa s LED pro používání za
šera nebo v noci
▪ se zobrazením stavu nabíjení
▪ příslušenství: nabíjecí síťový adaptér pro
230 V / 12 V a 3 ventilové adaptéry na
pumpování míčů, pneumatik jízdních kol
a artiklů na volný čas
▪ praktické místo na uložení kabelu,
zástrčky a příslušenství
2.0 BEZPEČNOSTNÍ
UPOZORNĚNÍ
2.1 Všeobecná bezpečnostní
upozornění
Varování!
Předčete si všechny pokyny!
Nerespektování bezpečnostních pokynů
může vést ke škodám na majetku, zranění
osob nebo jejich usmrcení! Uschovejte si
tento návod pro pozdější potřebu.
Uchovejte si tento návod k provozu pro
případné, pozdější otázky a předávejte ho
spolu s přístrojem i třetí osobě. Dávejte ho
vždy třetí osobě k dispozici. Návod k
provozu je součástí přístroje.
2.1.1 Držte přístroj mimo dosah
dětí a nezletilých do 16 let! Děti a
nezletilé osoby nerozpoznávají
možná nebezpečí hrozící při zacházení s
přístrojem. Nedovolte, aby se dostal
přístroj do dětských rukou a uchovávejte
ho na, pro děti, nepřístupném místě. Malé
díly mohou děti spolknout a udusit se.
Děti a nezletilé osoby se mohou při
použití přístroje zranit. Držte i obalový
materiál mimo dosah dětí.
2.1.2 Uchovejte si návod k provozu
pocelou dobu používání přístroje.
2.1.3 Tento přístroj není vhodný pro
používání osobami (včetně dětí) s
omezenými fyzickými, senzorickými nebo
duševními schopnostmi nebo s
nedostatečnými zkušenostmi a / nebo
znalostmi, ledaže zůstanou pod dohledem
osoby příslušné pro jejich bezpečnost
nebo obdrží od této osoby poučení o
správném zacházení s přístrojem.
2.1.4 Jestliže máte pochybnosti při
instalaci, obsluze nebo funkci přístroje
obraťte se na kvalifikovaného odborníka.
2.1.5 Přístroj a tlaková hadice se
během provozu zahřívají a vibrují.
Proto instalujte přístroj na
bezpečném a dobře větraném místě.
2.1.6 Nevystavujte přístroj mechanickému
zatížení, vysokým teplotám, vlivu olejů,
tuků, rozpouštědel, vlhkosti a otřesů!
2.1.7 Uvádějte do provozu jen bezvadný
přístroj bez poruch funkce, s bezvadnými
kabely a příslušenstvím!
2.1. 8 Opravy přístroje smí provádět jen
kvalifikovaný elektrikář nebo kvalifikovaný
odborník!
2.1.9 Přístroj se nesmí modifikovat (měnit).
2.1.10 Neuvádějte přístroj do provozu,
jestliže spadl z výšky nebo byl jinak
poškozen. Nechte ho zkontrolovat anebo
opravit kvalifikovaným elektrikářem!
Page 57

CZ 57
2.1.11 Nepoužívejte žádné jiné kabely
nebo příslušenství. Neprodlužujte kabely.
2.1.12 Během provozu musí být zajištěné
dostatečné větrání volným prostorem
nejméně 18 cm kolem přístroje. Přístroj se
nesmí ničím přikrývat!
2.1.13 Nepoužívejte kabel na nošení
přístroje ani za něj netahejte.
2.1.14 Pro provoz přístroje je zapotřebí
interní akumulátor s výstupním napětím 12
V / DC nebo v obsahu přiložená zástrčka
na 12 V pro zásuvky v motorových
vozidlech.
2.1.15 V každém případě je nutno zabránit
vniknutí kapalin do přístroje! Neponořujte
přístroj do žádné kapaliny! Uvádějte do
provozu jen suchý přístroj.
2.1.16 Přístroj není chráněný proti vodě.
Chraňte přístroj před deštěm, mlhou,
sněhem, vodou a jinými kapalinami!
Nestavte přístroj na mokrou zem.
Pozor: hrozí nebezpečí věcných škod a
zranění!
2.1.17 Vyhýbejte se používání přístroje v
blízkosti otevřeného ohně a ve výbušném
prostředí.
2.1.18 Zajistěte, aby byly všechny zástrčky,
kabely a přístroj suché. Nedotýkejte se
přístroje a neobsluhujte ho vlhkýma nebo
mokrýma rukama!
2.1.19 Před každým použitím kontrolujte
přístroj, jestli není poškozený! Vadný
přístroj se nesmí uvádět do provozu!
2.1.20 Před každým použitím přístroje ho
kontrolujte a obzvlášť potom ventilové
adaptéry, jestli nejsou znečištěné.
Znečištěný přístroj před použitím
vyčistěte.
2.1.21 Používejte přístroj jen v bezpečném
prostředí! Držte Vaše oblečení, vlasy,
končetiny v bezpečné vzdálenosti od
pohyblivých a horkých dílů motoru a
vozidla!
2.1.22 Používejte přístroj jen s pojistkou,
uvedenou v návodu k provozu, s
hodnotou 15 A.
2.1.23 Zajistěte pořádek a bezpečnost na
pracovišti. Berte ohled na vlivy okolního
prostředí a zajistěte dostatečné osvětlení
pracoviště.
2.2
Bezpečnostní pokyny k používání
přístroje
2.2.1 Před každým pumpováním nebo
kontrolou tlaku vzduchu v pneumatikách
zajistěte vozidlo, aby nemohlo popojíždět.
Pozor – nebezpečí zranění nebo
věcných škod! Zatahujte vždy ruční
brzdu a zařaďte převodový stupeň! U
vozidla s automatickou převodovkou
musí být nastavená poloha “Parkování”
a zatažená ruční brzda!
2.2.2 Během pumpování nebo kontroly
tlaku v pneumatikách se nesmí uvádět
vozidlo do provozu ani startovat!
2.2.3 Dodržujte všechny příslušné
bezpečnostní předpisy, jestliže je vozidlo
nadzvednuté, na zvedací plošině nebo v
podobném stavu!
2.2.4 Pozor! Nebezpečné napětí
elektrického proudu v blízkosti
cívek zapalování, víka rozdělovače, kabelů zapalování, svíček a elektrických dílů motorového vozidla!
2.2.5 Dbejte na bezpečnostní pokyny
uvedené v příručce výrobce motorového
vozidla!
2.2.6 Používejte přístroj jen v bezpečném
prostředí! Držte Vaše oblečení, šperky a
vlasy v bezpečné vzdálenosti od větracích
otvorů přístroje.
2.2.7 Dbejte při použití přístroje, aby se
nepoškodila tlaková hadice a kabel
ostrými předměty a tepelnými zdroji,
neohýbejte je v ostrém úhlu. Umisťujte
kabel a tlakovou hadici tak, aby nebylo
možné o ně zakopnout. Poškozený kabel
nebo tlaková hadice se musí ihned
vyměnit!
Page 58

58
2.2.8 Nebezpečí zkratu! Při použití
zásuvky přístroje na 12 V dbejte na
správnou polaritu připojovaného
spotřebiče. Dbejte přitom na pokyny v
návodu k obsluze a plány elektrického
zapojení spotřebiče.
2.2.9 Při použití zásuvky spotřebiče na 12
V nesmí být ovlivněna bezpečnost a
funkčnost jiných systémů a přístrojů!
Dbejte přitom na pokyny uvedené v
návodu k obsluze spotřebiče.
2.2.10 Při poruše provozu nebo poškození
se musí přístroj okamžitě vypnout a
odpojit od síťového adaptéru na 230 V
resp. od zásuvky motorového vozidla na
12 V!
2.2.11 Než připojíte přístroj na zásuvku s
12 V motorového vozidla zajistěte, aby
bylo vypnuté jeho zapalování a všechny
spotřebiče!
2.2.12 Při neodborném použití přístroje
může dojít k poškození elektronických dílů
vozidla. Následkem může být nehoda
nebo požár vozidla. Pozor! Nebezpečí
věcných škod a zranění osob!
2.2.13 Po zapůsobení pojistky 15 A není
přístroj provozuschopný, zásuvka na 12 V
pro motorová vozidla je bez napětí.
2.2.14 Jestliže si nejste jistí co týká funkce
a obsluhy přístroje, konzultujte
kvalifikovaného odborníka.
2.2.15 Chybná montáž ventilového
adaptéru anebo jeho chybné nasazení na
nafukovaný artikl může vést k netěsnosti
celého spojení. Unikající vzduch pak
způsobí nesprávný tlak v artiklu.
2.2.16 Při provozu přístroje držte děti a i
jiné osoby v dostatečném odstupu.
2.2.17 Nepoužívejte přístroj, jestliže jste
unavení nebo pod vlivem léků, drog
anebo alkoholu.
2.2.18 Před výměnou ventilového
adaptéru vypněte přístroj vypínačem.
2.2.19 Nemiřte vystupujícím proudem
stlačeného vzduchu na osoby, zvířata, do
prachu, nečistot, chemických látek,kyselin,
plynů, na ostatní předměty ani na sebe.
Pozor! Nebezpečí zranění a věcných
škod!
2.2.20 V případě potřeby očistěte před
pumpováním ventil a jeho okolí. Noste
masku pro ochranu Vašich dýchacích cest.
Pozor! Nebezpečí zranění a věcných
škod!
2.2.21 Pro vyloučení chybné funkce nebo
prasknutí artiklu během pumpování měřte
přídavně tlak vhodnou, externí
zkoušečkou. Manometr přístroje není
kalibrovaný, ukazuje jen orientační
hodnoty. Neukazuje žádné přesné,
závazné hodnoty. Tolerance měření
manometru je uvedená v technických
datech (viz bod 6.0). Pozor! Nebezpečí
zranění a věcných škod!
2.2.22 Kontrolujte obzvlášť tlak v pneumatikách motorových vozidel, motocyklů
a přívěsů pomocí vhodné, externí
zkoušečky. Již nepatrně odchylný, chybný
tlak vzduchu může ovlivnit jízdní vlastnosti.
Pozor! Nebezpečí zranění a věcných
škod!
2.2.23 Dbejte bezpodmínečně na určené
hodnoty tlaku vzduchu pro pumpovaný
artikl a pokyny výrobce.
2.2.24 Nepoužívejte přístroj s připojeným
nabíjecím adaptérem na 230 V.
2.2.25 Nevystavujte přístroj teplotám
vyšším než 60 °C.
2.2.26 Přístroj nepřetěžujte.
2.2.27 Noste přístroj jen za držadlo.
Udržujte držadlo čisté, suché a zabraňte
znečištěním oleji a tuky.
2.2.28 Vypněte přístroj do maximálně 10
minut nebo ihned při jeho přehřátí
přepnutím vypínače do polohy ( O ).
Nechte přístroj nejméně 10 minut
vychladnout nebo až na normální provozní
teplotu, potom je přístroj zase
provozuschopný.
2.2.29 Stlačený vzduch z přístroje se nesmí
používat pro podnikatelské účely, v
potravinářských a lékařských oblastech ani
při potápění.
Page 59

CZ
59
2.2.30 Varování: Záření z LED!
Zabránit poškození zraku!
Nedívejte se delší dobu bez
vhodných ochranných brýlí do světelného
paprsku přístroje.
2.2.31 Přístroj je vybavený s LED třídy 1.
Nemiřte paprskem světla do očí ostatních
osob nebo zvířat!
2.2.32 Varování před výbušnými
látkami a předměty!
Nepumpujte přístrojem žádné
pomůcky na plavání, artikly osobního
ochranného vybavení a nafukovací čluny.
2.2.33 Z bezpečnostních důvodů
pumpujte artikly postupně, v krátkých
intervalech a kontrolujte tlak vzduchu na
manometru a podle stavu artiklu.
2.2.34 Nepoužívejte poškozené ventilové
adaptéry! Mohou tlakem vzduchu
prasknout. Pozor: Nebezpečí zranění!
2.2.35 Při dodržení pokynů v návodu k
provozu a bezpečnostních pokynů není
zapotřebí žádné zvláštní zaškolení obsluhy
přístroje.
2.3 Bezpečnostní upozornění pro
akumulátor
2.3.1 Akumulátory z přístroje neházejte do
ohně ani je nezkratujte.
2.3.2 Kyselina vytékající z poškozeného
akumulátoru může poškodit přístroj!
2.3.3 Při manipulaci s poškozeným
akumulátorem je třeba dávat zvláštní
pozor. Nebezpečí poleptání pokožky!
Proto noste v takových případech vhodné
ochranné rukavice a chránící oblečení.
Jestliže již vytekla kyselina z akumulátoru,
vyhýbejte se kontaktu s Vaší pokožkou,
očima a sliznicemi. Postižená místa ihned
omyjte velkým množstvím čisté vody a
okamžitě vyhledejte lékařskou pomoc.
2.4 Chování v případě nouze
2.4.1 Zajistěte místo nehody a chraňte
zraněné i všechny ostatní osoby před
dalším zraněním.
2.4.2 Při zranění osob poskytujte nutnou
první pomoc.
2.4.3 Při volání o pomoc (lékař, požárníci,
příslušníci policie) udávejte následující:
▪ místo nehody (popřípadě popis okolí)
▪ druh nehody
▪ počet zraněných
▪ druh zranění
3.0 POPIS
VÝROBKU
3.1 Obsah dodávky
1energetická stanice LA 10 s kompreso-
rem, s vysokotlakou hadicí (včetně
nástavce s páčkou pro automobilové
ventily) a zástrčkou pro napětí 12 V
motorových vozidel
1nabíjecí síťový adaptér pro 230 V
1ventilový adaptér s průměrem cca 2,0
mm (jehla na nafukování míčů)
1ventilový adaptér s průměrem cca 4,5
mm
1ventilový adaptér s průměrem cca 8,0
mm
1návod k provozu
1plochá pojistka 15 A (nastrčená v
přístroji)
Ihned po rozbalení zkontrolujte úplnost
obsahu a všechny díly, jestli nejsou
poškozené!
Nepoužívejte vadný přístroj, s chybnou
funkcí nebo když nemáte k dispozici
návod k provozu!
Zobrazení se mohou poněkud lišit od
skutečného vzhledu výrobku. Změny,
sloužící ke znázornění technického
pokroku jsou vyhrazeny. Dekorace není
součástí dodávky.
Page 60

60
3.2 Přehled výrobku
5
Obrázek 1
8
Obrázek 2
12
Obrázek 3
21
20
19
18
11
manometr, ukazatel tlaku až do
1
maximálně 10 bar / 145,03 PSI (bar a
PSI jsou jednotky tlaku, 1 bar = 14,50
1
2
PSI)
světlo se 4 LED
2
tlaková hadice, uložitelná v prohlubni
3
tělesa přístroje
4
koncovka s páčkou rychlouzávěru pro
automobilový ventil
5
nastavitelný prstenec na označení
určité hodnoty tlaku
6
1 ventilový adaptér s průměrem cca
8,0 mm
7
1 ventilový adaptér s průměrem cca
4,5 mm
8
3
4
7
1 ventilový adaptér s průměrem cca
2,0 mm (jehla na míč)
9
přihrádka na uložení zástrčky na 12 V
s kabelem a nabíjecího síťového
adaptéru pro 230 V.
10
6
nabíjecí síťový adaptér pro 230 V
11
víko přihrádky na ventilové adaptéry
12
zástrčka na 12 V s kabelem a pojistka
15 A (ampéry)
13
O / I, vypínač zapnuto / vypnuto
14
zdířka pro nabíjecí síťový adaptér
15
O / I, vypínač světla zapnuto /
10
9
vypnuto pro LED
16
zdířka s krytem pro zástrčku na 12 V
17
klip na zavírání přihrádky; pro
otevření stlačit klip dolů
18
pojistka 15 A (ampéry) pro přístroj
O / I, vypínač kompresoru zapnuto /
19
vypnuto
20
LED kontrolky pro zobrazení kapacity
baterie za provozu a zobrazení
kapacity baterie při nabíjení
13
14
zelená LED = akumulátor úplně
nabitý,
žlutá LED = akumulátor nabitý na
poloviční kapacitu,
15
16
červená LED = akumulátor je vybitý,
je zapotřebí nabít.
21
jednotka ovládacích elementů
Obrázek 4
17
Page 61

CZ361
4.0 OBSLUHA /
PŘÍSLUŠENSTVÍ
4.1 Zapnutí a vypnutí přístroje
▪ stiskněte vypínač do polohy ( I ).
Přístroj je připravený k provozu a
osvětlení manometru je zapnuté. LED
kontrolky ukazují aktuální kapacitu
akumulátoru.
▪ v provozním režimu přístroje je
aktivovaná zásuvka na 12 V.
▪ pro vypnutí přístroje stiskněte vypínač
do polohy ( O ).
Varování před automatickým
rozběhem kompresoru! Jestliže
je vypínač pro zapínání
kompresoru před zapnutím přístroje v
poloze ( I ), pak se po zapnutí přístroje
automaticky rozběhne i kompresor a vhání
do hadice stlačený vzduch. Hrozí
nebezpečí zranění a věcných škod!
13
1
20
16
13
19
Pozor! Noste při používání
přístroje vhodnou ochranu sluchu
a ochranné brýle!
Kontrolujte před každým použitím jestli
nejsou přístroj a tlaková hadice
poškozené! Poškozený přístroj se nesmí
uvádět do provozu! Před pumpováním
každého artiklu kontrolujte pokyny jeho
výrobce.
Zvolte příslušný ventilový adaptér (např.
). Otevřete rychlouzávěr ventilu
7
odtlačením páčky směrem od tlakové
hadice . Nasaďte ventilový adaptér a
stlačte páčku zase zpátky ve směru k
vysokotlaké hadici (viz obr. 5).
4
3
3
4
7
4.2 Návod pro osvětlení
▪ stiskněte vypínač do polohy ( I ).
Přístroj je připravený pro provoz.
▪ pro zapnutí osvětlení stiskněte vypínač
15
osvětlení do polohy ( I ).
▪ pro vypnutí LED světel stiskněte vypínač
osvětlení do polohy ( O ).
▪ pro vypnutí přístroje stiskněte vypínač
do polohy ( O ).
4.3 Návod pro kompresor
Přístroj je možné napájet integrovaným
akumulátorem nebo přes integrovanou
zástrčku na 12 V.
13
Obrázek 5
Pneumatiky aut, motocyklů a jízdních kol s
autoventilem (Schrader-ventil s průměrem
závitu 7,7 mm) se mohou pumpovat bez
adaptéru!
Kompresor smí být v provozu jen
maximálně 10 minut, potom se musí
13
nechat 10 minut vychladnout!
▪ na pumpování automobilových
pneumatik nepotřebujete žádný
ventilový adaptér. Odšroubujte nejdříve
čepičku z ventilu pneumatiky.
▪ otevřete rychlouzávěr a nasaďte
koncovku hadice s páčkou na ventil.
Uzavřete koncovku páčkou.
▪ zkontrolujte držení opatrným táhnutím za
koncovku.
4
Page 62

62
Označit hodnotu
Označit hodnotu
tlaku, např. 2bar
tlaku, např. 2 bar
5
Obrázek 6
Obrázek 6
▪ nastavte na manometru šipku prstence
5
pro orientaci na požadovanou
hodnotu tlaku (viz obrázek 6).
▪ zapněte vypínač do polohy ( I ).
13
Přístroj je připravený k provozu.
▪ pro zapnutí kompresoru stiskněte
vypínač kompresoru do polohy ( I ).
19
Poznámka: Kompresor je možné kdykoliv
vypnout vypínačem nebo vypínačem
13
do polohy ( O ).
19
▪ po dosažení hodnoty tlaku nastavené na
prstenci manometru vypněte kompresor
vypínačem . Vypínač stiskněte do
19
polohy ( O ).
▪ pro úplné vypnutí přístroje musíte použít
hlavní vypínač .
▪ otevřete koncovku uzávěru a sejměte
13
4
ji z ventilu pneumatiky.
▪ pro zjištění přesného tlaku zkontrolujte
přídavně tlak vzduchu ještě jiným
manometrem. Jestliže není tlak v
pneumatice dostačující, opakujte celý
postup.
▪ našroubujte čepičku zase zpátky na
ventil.
Pumpování sportovních artiklů, artiklů pro
volný čas a hraček
Kompresor smí být v provozu jen
maximálně 10 minut, potom se musí
nechat 10 minut vychladnout!
▪ nejdříve si přečtěte údaje o maximálním
povoleném tlaku výrobce artiklu, který
zamýšlíte pumpovat.
▪ otevřete ventil artiklu.
▪ připevněte vhodný ventilový adaptér
pomocí rychlouzávěru a zatlačte ho
4
do ventilu artiklu. Jestliže se uvolní
adaptér během pumpování, musíte ho
během pumpování dodatečně zatlačit.
▪ zkontrolujte držení adaptéru opatrným
tahem.
▪ nastavte šipku prstence na mano-
5
metru na požadovanou hodnotu tlaku.
▪ stiskněte provozní vypínač do polohy
13
( I ). Přístroj je připravený k provozu.
▪ pro zapnutí kompresoru stiskněte
vypínač kompresoru do polohy ( I ).
19
Poznámka: Kompresor je možné kdykoliv
vypnout vypínačem nebo vypínačem
13
do polohy ( O ).
19
▪ pozorujte a kontrolujte tvrdostpumpo-
vaného artiklu během pumpování.
Jestliže je artikl již příliš napumpovaný,
přerušte ihned pumpování vypnutím
kompresoru!
Pozor! Při vysokém tlaku vzduchu v
artiklu hrozí nebezpečí, že artikl
praskne! Nebezpečí zranění a věcných
škod!
▪ při dosažení tlaku nastaveného na
prstenci vypněte kompresor
vypínačem .
5
19
▪ sejměte ventilový adaptér z ventilu
artiklu a uzavřete jeho uzávěr.
Nezávazné orientační hodnoty pro tlaky
Automobilové pneumatikycca 1,9 - 3,5 bar
Pneumatiky přívěsů cca 2,4 - 3,4 bar
Pneumatiky motocyklů cca 1,7 - 2,9 bar
Pneumatiky jízdních kol cca 2,0 - 4,0 bar
Fotbalový míč cca 0,6 - 1,1 bar
Volejbalový míč cca 0,18 - 0,22
bar
Pozor! Dbejte na údaje výrobce artiklu
Nepumpujte kompresorem žádné
pomůcky na plavání
Page 63

CZ 63
4.4 Nabíjení akumulátoru přístroje
Nabíjení nabíjecím síťovým adaptérem na
230 V
Před prvním uvedením do provozu má být
akumulátor úplně nabitý.
▪ zapojte malou, kulatou zástrčku
nabíjecího síťového adaptéru do
14
zdířky .
10
▪ zastrčte nabíjecí síťový adaptér do
zásuvky s napětím 230 V.
▪ zapněte vypínač do polohy ( I ).
13
Přístroj se přepne do nabíjecího režimu.
▪ LED zobrazení se rozsvítí a blikající
20
LED ukazuje aktuální kapacitu
akumulátoru. Nabíjení trvá cca 10 až 12
hodin. Při plně nabitém akumulátoru svítí
trvale zelená LED.
▪ po nabití vypněte přístroj provozním
vypínačem a vytáhněte síťový adaptér ze
zásuvky.
Upozornění! Během nabíjení
nezapínejte kompresor nebo osvětlení
přístroje!
4.5 Použití zástrčky na 12 V pro
motorová vozidla
▪ nyní je zdířka přístroje na 12 V aktivní a
připojený cizí přístroj s napětím 12 V je
možné uvést do provozu (viz obrázek 7).
▪ po použití cizího přístroje vytáhněte
zástrčku na 12 V ze zdířky přístroje.
4.6 Výměna pojistky
Zástrčka na 12 V
Šroub
Kontaktní čepička
Kulatá pojistka 15 A (ampéry)
Zástrčka na 12 V
Obrázek 8
▪ vyšroubujte šroub.
▪ sejměte kontaktní čepičku a kulatou
pojistku 15 A (ampéry)
▪ sestavte zase všechny díly dohromady,
spolu s novou pojistkou 15 A, v pořadí
podle obrázku a zašroubujte šroub (viz
obrázek 8).
Pojistka přístroje
▪ sejměte kryt zdířky na 12 V.
▪ zapojte zástrčku na 12 V cizího přístroje
do zdířky na přístroji
▪ stiskněte provozní vypínač do polohy
13
( I ).
13
zástrčka
cizího
přístroje
na 12 V
Obrázek 7
16
Betvadná plochá
Obrázek 9
pojistka 15 A
(ampéry)
▪ vytáhněte opatrně plochými kleštěmi
plochou pojistku z držáku z jednotky
ovládacích elementů.
▪ nahraďte vadnou pojistku novou plochou
pojistkou 15 A, zatlačte ji palcem do
příslušného držáku tak, aby lícovala s
tělesem přístroje (viz obrázek 9).
Page 64

64
Kompresor je zapnutý, ale
neukazuje žádnou funkci.
Provozní vypínač není
zapnutý.
Před použitím kompresoru
zapněte nejdříve provozní
vypínač .
Nabijte akumulátor přístroje
pomocí nabíjecího síťového
adaptéru pro 230 V.
Při zapnutí provozního
vypínače se nerozsvítí LED
ani osvětlení manometru.
Akumulátor přístroje je
vybitý.
Vyměňte vadnou plochou
pojistku 15 A za novou.
Pojistka 15 A přístroje je
vadná.
Přístroj neukazuje žádnou
funkci, přestože je pojistka
přístroje bezvadná a
akumulátor nabitý.
Přístroj je vadný.
Obraťte se na
kvalifikovaného odborníka.
Kompresor je přehřátý.
Kompresor byl v provozu
déle než 10 minut.
Nechte přístroj 10 minut
vychladnout a potom vždy
dodržujte cyklus 10 minut
provozu a 10 minut chlazení.
Větrací otvory přístroje jsou
ucpané nebo něčím
přikryté.
Odkryjte větrací otvory
anebo je vyčistěte.
Kompresor ztrácí tlak a
nevydává dostatečný tlak.
Tlaková hadice nebo
kompresor jsou netěsné
nebo poškozené.
Obraťte se na
kvalifikovaného odborníka.
Ventilový adaptér nebo
koncovka s páčkou správně
nedrží.
Zkontrolujte držení
ventilového adaptéru na
koncovce a držení na
ventilu. Zkontrolujte držení
koncovky pro automobilové
ventily na ventilu
pneumatiky.
4.7 Hledání chyb
Řešení, pomocMožné příčinyChyby / Poruchy
13
13
Horní tabulka obsahuje popis hledání
chyb nebo poruch a pomoc k jejich
odstranění, ale neobsahuje všechny
možné případy.
Jestliže není možné odstranit poruchu
přístroje popsaným opatřením, obraťte se
na kvalifikovaného odborníka.
Page 65

CZ 65
5.0 ÚDRŽBA A
OŠETŘOVÁNÍ
5.1 Čištění, údržba a skladování
5.1.1 Varování! Před čištěním vypněte
přístroj provozním vypínačem a odpojte
nabíjecí síťový adaptér pro 230 V od
přívodu elektrického proudu.
5.1.2 Čistěte přístroj jen suchým hadrem.
Nepoužívejte žádné kapaliny nebo ostré
čistící prostředky, protože mohou
způsobit odbarvení nebo poškození
povrchu přístroje! Je třeba bránit vniknutí
kapalin do přístroje! Neponořujte přístroj
do kapalin! Uvádějte do provozu jen
suchý přístroj.
5.1.3 Skladujte přístroj jen v suchém
prostředí! Vlhkost může poškodit
elektroniku přístroje!
5.1.4 Neskladujte přístroj v prostředí s
extrémními výkyvy prostředí! Kondenzace
vody může poškodit elektroniku!
6.0 TECHNICKÁ
DATA
Popis přístroje: Energetická stanice
LA 10 s kompresorem
Číslo artiklu: 97180
Rozměry: cca 26,5 x 14 x 22,5
cm (D x Š x V cm)
Váha: cca 3,7 kg
Pojistka přístroje: 15 A (ampéry) plochá
pojistka
Kompresor:
Výkon max. 10 bar / 145 psi
kompresoru: (bar / psi = jednotky
tlaku)
Zobrazení tlaku
/ zobrazení na
manometru: analogová stupnice,
nekalibrovaná, s
osvětleným pozadím
Tolerance
manometru: +/- 0,34 bar (5 psi) při
0 - 6,9 bar (0 -100 psi)
+/- 0,48 bar (7 psi) při
6,9 - 10 bar (100 -150 psi)
Hluk: 90 dB (dB = síla hluku)
Intervalový
provoz: maximálně 10 minut
provozu, 10 minut
chlazení
Agregát: bez oleje
Délka tlakové
hadice: cca 65 cm
Akumulátor přístroje:
Typ: 12 V olovnatý
akumulátor
Kapacita: 7,2 Ah (ampérhodin)
Provozní teplota: 0 C - 50 C (Celsia)
Zobrazení
kapacity: 3 LED (červená,
oranžová, zelená)
Doba nabíjení: cca 10 - 12 hodin s
nabíjecím síťovým
adaptérem pro 230 V
Nabíjecí síťový adaptér:
Vstupní napětí: 230 V 50 Hz (V = Volt,
Hz = Hertz, kmitů za
vteřinu)
°°
~
Page 66

66
Vstupní proud: max. 0,5 A (ampéry)
Výstupní napětí: 14,5 V
Výstupní proud: 1000 mA DC (mA =
miliampéry, DC =
střídavý proud)
Nabíjecí adaptér
používat jen ve vnitřních
prostorech
Osvětlení:
Druh osvětlení: 4 LED
LED: LED nejsou vyměnitelné
Lazerová třída: LED odpovídají
ochranné třídě I
Přístroje s ochrannou
izolací ochranné třídy II
Přístroj je konformní s
EG směrnicí
▪ Směrnice pro stroje
(2006/42/EG)
▪ Směrnice pro \
elektro-magnetickou
snášenlivost
(2004/108/EG)
7.1.3 Vybité akumulátory nebo
baterie nepatří do domácího
Pb
odpadu. Odevzdejte je do
Vašeho obchodu s elektrickými spotřebiči
nebo je odstraňte do odpadu u Vaší
veřejné sběrny. Jako spotřebitel jste
povinní odevzdat akumulátor nebo
baterie do sběrny. Následující zkratky
značí baterie nebo akumulátory se
škodlivými látkami: Pb = obsahuje olovo,
Hg = obsahuje rtuť a Cd = obsahuje
kadmium.
8.0 ZÁRUKA A
SERVIS
V případě poškození výrobku, nutnosti
opravy nebo jiných problémů se obraťte
na příslušnou prodejnu nebo na
kvalifikovaného odborníka.
Všeobecné záruční podmínky se vztahují
na vady z výroby a vady materiálu.
Odevzdejte vadný výrobek do prodejny.
7.0 ODSTRANĚNÍ
DO ODPADU
7.1.1 Odstranění do odpadu se
musí provést v souladu se
zákonnými ustanoveními.
Informujte se u Vašeho města, obce nebo
u sběrny. Přístroj odstraňujte do odpadu
podle EG směrnice pro staré elektrické a
elektronické přístroje 2002/96/EG-WEEE.
7.1.2 Při odstraňování obalového
materiálu do odpadu dbejte na příslušné
zákony.
Pro rychlé zpracování Vaší reklamace
potřebujeme:
▪ kopii pokladní účtenky s datem
zakoupení.
▪ důvod reklamace (popis závady).
Page 67

OBSAH
1.0 ÚVOD
SK 67
1.1 Čo znamenajú symboly?
1.2 Spôsob činnosti prístroja
1.3 Používanie v súlade s určeným účelom
1.4 Vybavenie prístroja
2.0 BEZPEČNOSTNÉ POKYNY
2.1 Všeobecné bezpečnostné pokyny
2.2 Bezpečnostné pokyny týkajúce sa používania prístroja
2.3 Bezpečnostné pokyny týkajúce sa akumulátorovej batérie prístroja
2.4 Čo robiť v núdzovom prípade
3.0 POPIS
3.1 Obsah dodávky
3.2 Prehľad o produkte
4.0 OVLÁDANIE/ PRÍSLUŠENSTVO
4.1 Za- / vypnutie prístroja
4.2 Ovládanie osvetlenia
4.3 Ovládanie kompresora
4.4 Nabíjanie akum. batérie prístroja
4.5 Používanie 12 V automobilovej zásuvky
4.6 Výmena poistiek
4.7 Vyhľadávanie chyby
68
68
68
69
69
70
72
72
72
73
74
74
74
76
76
76
77
5.0 ÚDRŽBA A STAROSTLIVOSŤ
5.1 Čistenie, údržba a skladovanie
6.0 TECHNICKÉ ÚDAJE
7.0 LIKVIDÁCIA
8.0 GARANCIA A SERVIS
78
78
79
79
Page 68

68
1.0 ÚVOD
Vážená zákazníčka,
vážený zákazník,
blahoželáme Vám ku kúpe Vašej novej
„Pneumatickej e energetickej stanice LA
10" a ďakujeme za Vašu dôveru.
Pre zaručenie optimálnej funkčnosti,
výkonnosti a bezpečnosti Vášho prístroja
si pred prvým uvedením do prevádzky
prosím prečítajte návod na používanie.
Tak je zabezpečené, že sa budete z tohto
prístroja dlho tešiť.
1.1 Čo znamenajú symboly?
Prečítajte si návod na
používanie!
Varovanie - Nebezpečenstvo!
Dodržiavajte bezpečnostné a
výstražné pokyny!
Varovanie pred nebezpečným
elektrickým napätím!
Životunebezpečné!
Ďalšie vysvetlenia symbolov, jednotiek a
skratiek nájdete na stranách 78 a 79.
1.2 Spôsob činnosti prístroja
Pneumatická a energetická stanica LA 10
je mobilný prístroj s výkonným
kompresorom a zabudovanou 12 V
akumulátorovou batériou. Pomocou
komfortného nahusťovacieho systému
môžete napumpovať pneumatiky auta a
bicykla, lopty a iné nafukovacie predmety.
Máte na to k dispozícii 3 rôzne ventilové
adaptéry v odkladacom priestore prístroja.
Na nastavovacom krúžku manometra
prístroja je možné pre orientáciu nastaviť
želaný tlak vzduchu až do 10 bar.
Integrovanú 12 V akumulátorovú batériu
prístroja možno používať prostredníctvom
automobilovej zásuvky ako 12 V zdroj
prúdu. Nabíjanie akumulátorových batérií
prebieha prostredníctvom 230 V
nabíjacieho sieťového dielu. Kapacita
batérie a stav nabitia akumulátorových
batérií sú zobrazené 3 LED-kontrolkami na
schránkovej jednotke pre ovládacie
elementy. Vďaka 4 LED-svetlám a
osvetlenému číselníku manometra je
možné používanie aj pri stmievaní a v noci.
Varovanie pred optickým
žiarením!
Varovanie pred látkami a
predmetmi s nebezpečenstvom
explózie!
Varovanie pred automatickým
štartom!
Varovanie pred horúcim
povrchom!
Noste ochranu sluchu a
ochranné okuliare!
Prístroj, batérie a obal
ekologicky zlikvidujte!
1.3 Používanie v súlade s určeným
účelom
Pneumatická a energetická stanica LA 10
je určená výhradne pre súkromné
používanie. Prístroj je určený pre hustenie
pneumatík automobilov, motocyklov a
bicyklov ako aj nafukovacích športových
predmetov a predmetov určených na
hranie a voľnočasové aktivity. Zásobovanie
energiou je povolené výhradne skrze 12 V
automobilovú zásuvku. Každé iné
používanie alebo zmena pneumatickej a
energetickej stanice nie je v súlade s
určeným účelom. Na prevádzku pneumatickej a energetickej stanice je určená
integrovaná 12 V akumulátorová batéria
alebo 12 V automobilová zástrčka prístroja.
Kompresor nie je dimenzovaný pre trvalú
prevádzku. Prevádzka s 24 V / DC nie je
možná! Pozor: Nebezpečenstvo vzniku
vecných skôd a poranenia osôb!
Page 69

69SK
1.4 Vybavenie prístroja
▪ Výkonný kompresor pre komfortné
nahusťovanie pneumatík automobilov,
bicyklov, lôpt atď.
▪ Nastaviteľná predvoľba tlaku vzduchu na
krúžku manometra pre orientáciu
▪ Integrovaná akumulátorová batéria
umožňuje mobilné nasadenie
▪ Portabilný 12 V zdroj prúdu
(automobilová zásuvka)
▪ Praktická LED-lampa pre používanie pri
stmievaní a v noci
▪ S ukazovateľom stavu nabitosti
▪ Príslušenstvo: 230 V / 12 V nabíjací
sieťový diel ako aj 3 ventilové adaptéry
pre nafukovanie lôpt, pneumatík bicyklov
a predmetov pre voľnočasové aktivity
▪ Praktická možnosť uskladnenia pre kábel,
zástrčku a príslušenstvo
2.0 BEZPEČNOST NÉ POKYNY
2.1 Všeobecné bezpečnostné pokyny
Varovanie!
Prečítajte si všetky upozornenia!
Nedodržiavanie bezpečnostných pokynov
môže viesť k škodám na majetku,
poraneniu osôb alebo usmrteniu!
Uschovajte si tento návod pre neskoršie
nahliadnutie. Uschovajte si tento návod na
používanie pre neskoršie otázky a pri
predaní prístroja tretím osobám ho
odovzdajte spolu s prístrojom.
Sprístupnite tento návod i tretím osobám.
Návod na ovládanie je súčasťou prístroja.
2.1.1 Držte prístroj v bezpečnej
vzdialenosti od detí a mladých
do 16 rokov! Deti a mladí do 16
rokov nedokážu porozumieť a rozoznať
možné nebezpečenstvá pri styku a
elektrickými prístrojmi. Zabráňte
preniknutiu prístroja do detských rúk a
skladujte ho tak, aby bol pre deti
neprístupný. Deti môžu prehltnúť drobné
časti a zadusiť sa nimi. Deti a mladí by sa
mohli pri používaní prístroja poraniť. I
obalový materiál držte v bezpečnej
vzdialenosti od detí.
2.1.2 Návod na používanie si uschovajte
po celú dobu životnosti prístroja.
2.1.3 Tento prístroj nie je určený na
používanie osobami (vrátane detí) s
obmedzenými fyzickými, senzorickými
alebo duševnými schopnosťami alebo
nedostatočnými skúsenosťami a / alebo,
nedostatočnými vedomosťami, okrem
prípadov, keď sú pod dozorom osoby
zodpovednej za ich bezpečnosť alebo ak
boli poučené o používaní prístroja.
2.1.4 V prípade neistoty ohľadom
inštalácie, ovládania alebo spôsobu práce
prístroja sa obráťte na kvalifikovaný
personál.
2.1.5 Prístroj a pneumatická
hadica počas prevádzky vibrujú a
zahrievajú sa. Prístroj vždy
umiestnite na bezpečnom, dobre
vetranom mieste.
2.1.6 Nevystavujte prístroj žiadnej
mechanickej záťaži, vysokým teplotám,
olejom, mastnote, rozpúšťadlám, vlhkosti
a otrasom!
2.1.7 Prevádzkujte prístroj len vtedy, ak sa
na ňom nevyskytujú žiadne poškodenia,
funkčné poruchy na prístroji, kábloch
alebo príslušenstve!
2.1.8 Všetky opravy na prístroji musí
vykonať kvalifikovaný elektrikár /
kvalifikovaný odborný personál.
2.1.9 Prístroj nesmie byť modifikovaný
(zmenený).
2.1.10 Nepoužívajte prístroj, ak spadol
alebo bol iným spôsobom poškodený.Prineste ho na preskúšanie alebo
opravu kvalifikovanému elektrikárovi!
Page 70

70
2.1.11 Nepoužívajte žiadne iné káble
alebo časti príslušenstva. Nepredlžujte
káble.
2.1.12 Počas prevádzky musí byť kvôli
zabezpečeniu dostatočnej cirkulácie
vzduchu k dispozícii voľný priestor
minimálne 18 cm okolo prístroja. Prístroj
nesmie byť pokrytý predmetmi!
2.1.13 Nepoužívajte kábel na nosenie
alebo ťahanie prístroja.
2.1.14 Na prevádzku prístroja je potrebná
interná akumulátorová batéria s
výstupným napätím 12 V / DC alebo
priložená 12 V automobilová zástrčka pre
prevádzku v 12 V automobilovej zásuvke
vozidla.
2.1.15 Zabráňte preniknutiu kvapalín do
prístroja! Nikdy neponárajte prístroj do
kvapalín! Prístroj prevádzkujte výlučne v
suchom stave.
2.1.16 Prístroj nemá ochranu proti vode.
Chráňte prístroj pred daždivým počasím,
hmlou, snehovými zrážkami a inými
kvapalinami! Nepostavte prístroj na mokrý
podklad. Pozor: Nebezpečenstvo
vecných skôd a poranení!
2.1.17 Zabráňte používaniu prístroja v
blízkosti otvorených plameňov a v
prostredí s nebezpečenstvom explózie.
2.1.18 Uistite sa, že sú všetky zástrčky,
prúdový kábel a prístroj suché. Nikdy sa
nedotýkajte a neovládajte prístroj vlhkými
alebo mokrými rukami!
2.1.19 Pred každým použitím skontrolujte
prístroj ohľadom prípadných poškodení.
Defektný prístroj nesmiete uvádzať do
prevádzky!
2.1.20 Pred každým použitím skontrolujte
prístroj a najmä ventilový adaptér
ohľadom znečistenia. Ak nájdete
nečistoty, vyčistite prístroj predtým, ako
ho budete používať.
2.1.21 Používajte prístroj iba v bezpečnom
prostredí! Držte Vaše oblečenie, vlasy,
končatiny a prístroj vzdialené od horúcich
častí motora a vozidla!
2.1.22 Pre prístroj používajte iba poistky
uvedené v tomto návode na používanie s
poistkou maximálne 15 A.
2.1.23 Zabezpečte na pracovisku poriadok
a bezpečnosť. Berte ohľad na vplyvy
okolia a postarajte sa o dostatočné
osvetlenie pracovného priestoru.
2.2 Bezpečnostné pokyny týkajúce sa
používania prístroja
2.2.1 Pred každým hustením alebo
kontrolou tlaku pneumatík zaistite vozidlo,
aby sa nemohlo pohnúť. Pozor -
nebezpečenstvo poranenia a vzniku
vecných škôd! Vždy zatiahnite ručnú
brzdu a zaraďte rýchlostný chod! Pri
automatickej prevodovke musí byť
nastavená “Parkovacia pozícia” a
zatiahnutá ručná brzda!
2.2.2 Počas zvyšovania alebo kontroly
tlaku vzduchu nesmie byť vozidlo
prevádzkované alebo štartované!
2.2.3 Dodržiavajte bezpečnostné pokyny,
ak je vozidlo nadvihnuté alebo sa
nachádza na zdvižnej plošine alebo
podobnom zariadení!
2.2.4 Pozor! Nebezpečenstvo
elektrického napätia v oblasti
zapaľovacích cievok, hlavy
rozdeľovača, zapaľovacích káblov,
zapaľovacích sviečok a elektrických častí
vo vozidle!
2.2.5 Dbajte na bezpečnostné pokyny a
príručku od výrobcu vozidla!
2.2.6 Používajte prístroj iba v bezpečnom
prostredí! Držte oblečenie, ozdoby a vlasy
vzdialené od vetracích otvorov prístroja.
2.2.7 Pri používaní prístroja dbajte na to,
aby pneumatická hadica a káble neboli
poškodené ostrými predmetmi a
tepelnými zdrojmi a nezalamujte ich.
Položte pneumatickú hadicu a káble tak,
aby sa o ne nik nemohol potknúť.
Poškodená pneumatická hadica a alebo
poškodené káble musia byť okamžite
vymenené!
Page 71

71SK
2.2.8 Nebezpečenstvo skratu! Pri
používaní 12 V automobilovej zásuvky
dbajte na správnu polaritu zapájaného
spotrebiča. Dodržiavajte pritom pokyny z
návodu na používanie a schémy zapojenia
spotrebiča.
2.2.9 Pri používaní 12 V automobilovej
zásuvky prístroja dbajte na to, aby nebola
ohrozená bezpečnosť a funkčnosť iných
systémov a prístrojov! Dodržiavajte pritom
pokyny návodu na používanie spotrebiča.
2.2.10 Pri prevádzkových poruchách a
poškodeniach je potrebné prístroj
okamžite vypnúť a odpojiť od 230 V
nabíjacieho sieťového dielu príp. 12 V
automobilovej zásuvky vozidla!
2.2.11 Zabezpečte, aby bolo zapaľovanie a
všetky spotrebiče vo vozidle vypnuté
predtým, ako zapojíte prístroj do 12 V
automobilovej zásuvky vozidla!
2.2.12 Pri neodbornom používaní prístroja
môže dôjsť k poškodeniu elektronických
častí vozidla. To môže mať za následok
nehodu alebo požiar. Pozor!
Nebezpečenstvo vzniku vecných škôd a
poranenia osôb!
2.2.13 Ak sa 15 A poistka prístroja aktivuje,
nie je prístroj prevádzkyschopný a v
automobilovej zásuvke prístroja nie je
prítomné 12 V napätie.
2.2.14 V prípade neistoty ohľadom
fungovania a ovládania prístroja
požiadajte o radu kvalifikovaný personál.
2.2.15 Nesprávna montáž ventilového
adaptéra príp. nesprávne nasadenie alebo
vloženie ventilového adaptéra na / do
ventilu predmetu určeného na nafúkanie
môže viesť k netesnému spojeniu medzi
prístrojom a predmetom. Unikajúcim
vzduchom vzniká pokles tlaku a tým i
nesprávne hodnoty tlaku vzduchu.
2.2.16 Deti a iné osoby držte počas
prevádzky vzdialené od prístroja.
2.2.17 Nepoužívajte prístroj, ak ste
unavený alebo pod vplyvom liekov, drog
alebo alkoholu.
2.2.18 Pred výmenou ventilového
adaptéra vypnite prístroj prostredníctvom
prevádzkového spínača.
2.2.19 Prúd stlačeného vzduchu
nenasmerujte na osoby, zvieratá, prach,
nečistotu, chemikálie, kyseliny, plyny,
predmety akéhokoľvek typu alebo na
seba! Nebezpečenstvo poranenia osôb
a vzniku vecných škôd!
2.2.20 Pred pumpovaním vyčistite oblasť
ventilu, ak je zaprášený. Pre ochranu
Vašich dýchacích orgánov noste prachovú
masku. Pozor! Nebezpečenstvo
poranenia osôb a vzniku vecných škôd!
2.2.21 Aby ste predišli nesprávnym
funkciám alebo prasknutiu výrobku pri
hustení, zmerajte počas fázy nafukovania
tlak vzduchu vhodným externým
manometrom na meranie tlaku vzduchu.
Manometer prístroja nie je ciachovaný a
zobrazené hodnoty je teda potrebné
chápať iba ako predpísané hodnoty pre
tlak vzduchu. Manometer nezobrazuje
záväzne presné hodnoty tlaku vzduchu.
Meracie tolerancie manometra nájdete v
kapitole Technické údaje (pozri bod 6.0).
Pozor! Nebezpečenstvo poranenia osôb
a vzniku vecných škôd!
2.2.22 Po napumpovaní skontrolujte najmä
tlak pneumatík vozidiel, motocyklov a
prívesov vhodným externým manometrom
pre kontrolu tlaku vzduchu. Už minimálne
nesprávny tlak vzduchu môže ovplyvniť
správanie vozidla. Pozor!
Nebezpečenstvo poranenia osôb a
vzniku vecných škôd!
2.2.23 Bezpodmienečne zohľadnite
predpisy týkajúce sa tlaku vzduchu
predmetu, ktorý chcete nahustiť, a
upozornenia výrobcu.
2.2.24 Nepoužívajte prístroj, ak je 230 V
nabíjací sieťový diel zapojený.
2.2.25 Nevystavujte prístroj teplotám nad
60 °C.
2.2.26 Nepreťažujte prístroj.
2.2.27 Prístroj noste uchopený iba za
rukoväť. Udržiavajte rukoväť čistú od
olejov, mastnoty a vlhkosti.
2.2.28 Prístroj po maximálne 10 minútach
prevádzky alebo v prípade prehriatia
okamžite zastavte stlačením
prevádzkového spínača na ( O ). Nechajte
Page 72

72
prístroj aspoň 10 minút vychladnúť, až kým
je dosiahnutá normálna prevádzková
teplota a prístroj je opäť prevádzkyschopný.
2.2.29 Vytvorený tlak vzduchu nesmie byť
použitý na reklamné účely ako ani pre
potravinársku, farmaceutickú, potápačskú
alebo medicínsku oblasť.
2.2.30 Varovanie: LED-žiarenie!
Zabráňte poškodeniu očí!
Nepozerajte priamo dlhší čas bez
vhodných ochranných okuliarí do LED
svetelného lúča prístroja.
2.2.31 Prístroj obsahuje LED-svetlá triedy
1. Nenasmerujte LED svetelný lúč do očí
iných osôb a zvierat!
2.2.32 Varovanie pred látkami a
predmetmi s hrozbou
explózie! Nenafukujte plávacie
pomôcky, osobné ochranné predmety a
nafukovacie člny.
2.2.33 Pumpujte predmet z
bezpečnostných dôvodov iba v krátkych
pumpovacích intervaloch a medzičasom
skontrolujte tlak vzduchu na manometri a
nafukovanom predmete.
2.2.34 Nepoužívajte poškodený ventilový
adaptér! Mohol by skrze tlak vzduchu
prasknúť. Pozor: Nebezpečenstvo
poranenia!
2.2.35 Vďaka dodržiavaniu predpisov
návodu na používanie a bezpečnostných
pokynov nie sú potrebné žiadne špeciálne
požiadavky a školenia osoby obsluhujúcej
prístroj.
2.3 Bezpečnostné pokyny týkajúce sa
akumulátorovej batérie prístroja
2.3.1 Akumulátorovú batériu prístroja
nehádžte do ohňa a neskratujte ju.
2.3.2 Poškodená akumulátorová batéria
prístroja môže vytekajúcou batériovou
kyselinou poškodiť prístroj!
2.3.3 Pri zaobchádzaní s poškodenou
batériou je potrebná mimoriadna
opatrnosť. Nebezpečenstvo poranenia!
Noste vhodné ochranné okuliare a
ochranné oblečenie. Ak z batérie vytiekla
kyselina, zabráňte akémukoľvek kontaktu s
pokožkou, očami a sliznicou. Postihnuté
miesto ihneď vypláchnite veľkým
množstvom čistej vody a okamžite
vyhľadajte lekára alebo zdravotnú pomoc.
2.4 Čo robiť v núdzovom prípade
2.4.1 Zabezpečte miesto nehody a chráňte
poranené a všetky iné osoby pred ďalšími
úrazmi.
2.4.2 V prípade poranenia osôb poskytnite
nutné opatrenia prvej pomoci.
2.4.3 V prípade potrebnej pomoci alebo
pri núdzovom volaní (lekár, požiarnici,
polícia) zadajte nasledujúce údaje:
▪ Miesto nehody (príp. popis okolia)
▪ Druh nehody
▪ Počet zranených
▪ Počet zranení
3.0 POPIS
3.1 Obsah dodávky
1pneumatická a energetická stanica LA
10 s pneumatickou hadicou (vrátane
páčkovej zástrčky autoventilu) ako aj s 12
V automobilovou pripojovacou zástrčkou
1nabíjací sieťový diel 230 V
1ventilový adaptér s cca. 2,0 mm
priemerom (ihla na lopty)
1ventilový adaptér s cca. 4,5 mm
priemerom
1ventilový adaptér s cca. 8,0 mm
priemerom
1návod na používanie
1automobilová plochá nožová poistka
15 A (zasunutá v prístroji)
Ihneď po rozbalení skontrolujte všetky
časti ohľadom poškodení a úplnosť
dodávky!
V prípade poškodení, chybových fukcií
alebo chýbajúceho či neúplného návodu
na používanie prístroj nepoužívajte!
Zobrazenia sa môžu mierne odlišovať od
produktu. Zmeny slúžiace technickému
pokroku vyhradené. Dekorácia nie je
súčasťou dodávky.
Page 73

73SK
3.2 Prehľad o produkte
5
Obrázok 1
8
Obrázok 2
12
Obrázok 3
11
21
20
19
18
Obrázok 4
Manometer, ukazovateľ tlaku
1
vzduchu do max. 10 bar / 145,03 PSI
(bar a PSI sú jednotky tlaku, 1 bar =
1
2
14,50 PSI) a osvetlenie číselníka
2
Svietidlo so 4 LED-svetlami
3
Pneumatická hadica uschovateľná na
spodnom prehĺbení schránky
4
Páčková zástrčka autoventilu s
rýchlouzáverom ventilu
5
Nastavovací krúžok pre poznačenie
určitej hodnoty tlaku vzduchu
6
1 ventilový adaptér s cca. 8,0 mm
priemerom
7
1 ventilový adaptér s cca. 4,5 mm
priemerom
8
3
4
7
1 ventilový adaptér s cca. 2,0 mm
priemerom (ihla na lopty)
9
Uskladňovací priečinok pre 12 V
automobilovú zástrčku s káblom a
230 V nabíjací sieťový diel.
10
6
230 V nabíjací sieťový diel
Kryt uskladňovacieho priečinka pre
11
ventilový adaptér
12
12 V automobilová zástrčka s káblom
a 15 A (Ampere) poistkou
13
O / I, prevádzkový za- / vypínač
14
Pripojovacia zásuvka pre nabíjací
10
9
sieťový diel
15
O / I, svetelný za- / vypínač pre LED-
kontrolky
16
12 V automobilová zásuvka s krytom
17
Klipový uzáver odkladacieho
priečinku; pre otvorenie stlačte klip
nadol
18
Poistka prístroja 15 A (Ampere)
19
O / I , za- / vypínač kompresora
20
LED-kontrolky pre zobrazenie
13
14
kapacity batérie počas prevádzky
ako aj zobrazenie kapacity batérie
počas procesu nabíjania
akumulátorovej batérie.
15
16
Zelená LED-kontrolka = batéria je
plná,
žltá LED-kontrolka= batéria je
polonabitá,
červená LED-kontrolka = batéria je
takmer vybitá a je potrebné ju nabiť.
21
Schránková jednotka pre ovládacie
17
elementy
Page 74

74
4.0 OVLÁDANIE /
PRÍSLUŠENSTVO
4.1 Za- / vypnutie prístroja
▪ Stlačte za- / vypínač do polohy ( I ).
Prístroj je teraz pripravený na prevádzku
a osvetlenie manometra je zapnuté.
LED-kontrolky zobrazujú aktuálnu
kapacitu akumulátorovej batérie.
▪ V prevádzkyschopnom režime prístroja je
12 V automobilová zásuvka
aktivovaná.
▪ Pre vypnutie prístroja, stlačte za- /
vypínač do polohy ( O ).
zapnutím prístroja v polohe ( I ),
kompresor sa automaticky rozbehne a
skrze pneumatickú hadicu je odovzdávaný
stlačený vzduch. Vzniká nebezpečenstvo
vzniku vecných škôd a poranenia osôb!
13
Varovanie pred automatickým
štartom! Ak je za- / vypínač
pre zapínanie kompresora pred
13
1
20
16
19
Pozor! Pred každým používaním
prístroja noste vhodnú ochranu
sluchu a vhodné ochranné
okuliare!
Pred použitím prístroja skontrolujte
prístroj a pneumatickú hadicu ohľadom
prípadných poškodení! Poškodený prístroj
nesmie byť uvedený do prevádzky! Pred
každým použitím skontrolujte pokyny
výrobcu pre predmet, ktorý chcete
nahustiť.
Vyberte želaný ventilový adaptér (napr.
7
). Otvorte rýchlouzáver ventilu tak,
že páčku rýchlouzáveru z pneumatickej
hadice odtlačíte. Teraz nasaďte
ventilový adaptér a stlačte páčku pre
uzatvorenie opäť v smere pneumatickej
hadice (pozri obr. 5).
3
4
3
3
4
7
4.2 Ovládanie osvetlenia
▪ Stlačte za- / vypínač do polohy ( I ).
Prístroj je teraz pripravený na prevádzku.
▪ Pre aktivovanie osvetlenia stlačte za- /
vypínač osvetlenia do polohy ( I ).
▪ Pre vypnutie LED-svetiel stlačte spínač
osvetlenia do polohy ( O ).
▪ Pre vypnutie prístroja stlačte za- /
vypínač do polohy ( O ).
4.3 Ovládanie kompresora
Prístroj možno prevádzkovať pomocou
integrovanej akumulátorovej batérie alebo
integrovanej 12 V automobilovej zástrčky.
15
13
13
Obrázok 5
Automobilové, motocyklové a bicyklové
pneumatiky s autoventilom (Schrader
ventil so 7,7 mm priemerom závitu) možno
nahustiť bez adaptéra!
Kompresor môže byť v prevádzke max.
10 minút, následne sa prístroj musí 10
minút chladiť!
▪ Pre nahustenie automobilovej
pneumatiky nepotrebujete ventilový
adaptér. Najskôr odstráňte krycí uzáver
z ventilu pneumatiky.
▪ Otvorte rýchlouzáver ventilu a
nasaďte páčkovú zástrčku autoventilu čo
možno najďalej na ventil pneumatiky.
Pritom uzatvorte rýchlouzáver ventilu.
▪ Opatrným potiahnutím skontrolujte
pevné priliehanie páčkovej zástrčky
autoventilu na ventile pneumatiky.
4
Page 75

75SK
Označenie
hodnoty tlaku
vzduchu
napr. na 2 bar
5
Obrázok 6
▪ Nastavte označovaciu šípku nastavo-
vacieho krúžku na manometri pre
5
orientáciu na želanú hodnotu tlaku
vzduchu (pozri obr. 6).
▪ Stlačte za- / vypínač do polohy ( I ).
13
Prístroj je teraz prevádzkyschopný.
▪ Pre aktivovanie kompresora stlačte za- /
vypínač kompresora do polohy ( I ).
19
Poznámka: Kompresor je možné
kedykoľvek vypnúť pomocou spínača
kompresora alebo stlačením prevádzkového spínača do polohy ( O ).
▪ Keď je tlak vzduchu označený na
19
13
5
nastavovacom krúžku, vypnite kompresor
pomocou spínača kompresora .
Stlačte preto spínač kompresora
19
19
do polohy ( O ).
▪ Pre vypnutie prístroja je však potrebné
vypnúť prevádzkový spínač na
13
prístroji.
▪ Otvorte rýchlouzáver ventilu a
4
odstráňte páčkovú zástrčku autoventilu
z ventilu pneumatiky.
▪ Dodatočne skontrolujte tlak vzduchu
iným manometrom pre meranie tlaku
vzduchu, aby bolo možné sprostredkovať
presnú hodnotu. Ak nie je dosiahnutý
želaný tlak vzduchu, zopakujte proces.
▪ Následne opäť prišróbujte ochranný
uzáver ventilu na ventil pneumatiky.
Nafukovanie športových a voľnočasových
predmetov a hračiek
Kompresor môže byť v prevádzke max.
10 minút, následne sa prístroj musí 10
minút chladiť!
▪ Pred začiatkom nafukovania si prečítajte
návod výrobcu predmetu ohľadom
nafukovania a maximálneho povoleného
tlaku vzduchu.
▪ Otvorte čiapočku ventilu predmetu.
▪ Upevnite vhodný ventilový adaptér s
rýchlouzáverom ventilu a zatlačte ho
4
do ventilu predmetu. Ak sa ventilový
adaptér počas nafukovania uvoľní z
ventilu, musíte ho počas nafukovania
zatláčať do ventilu rukou.
▪ Skontrolujte pevné priliehanie ventilo-
vého adaptéra vo ventile predmetu
opatrným potiahnutím.
▪ Nastavte označovaciu šípku nastavova-
cieho krúžku na manometri pre
5
orientáciu na želanú hodnotu tlaku
vzduchu.
▪ Stlačte prevádzkový spínač do polohy
13
( I ). Prístroj je teraz pripravený na
prevádzku.
▪ Pre aktivovanie kompresora stlačte za- /
vypínač kompresora do polohy ( I ).
19
Poznámka: Kompresor je možné kedykoľvek vypnúť pomocou spínača kompresora alebo stlačením prevádzkového spínača do polohy ( O ).
19
13
▪ Pozorujte a kontrolujte stupeň tvrdosti
predmetu počas nafukovania. Ak je
predmet už príliš silno nahustený, ihneď
ukončite nafukovanie a vypnite
kompresor!
Pozor! Pri príliš vysokom tlaku
vzduchu vzniká nebezpečenstvo
prasknutia predmetu! Nebezpečenstvo telesných poranení a vecných
škôd!
▪ Keď je označený tlak vzduchu na
nastavovacom krúžku dosiahnutý,
5
vypnite kompresor pomocou spínača
kompresora .
19
▪ Vyberte ventilový adaptér z ventilu
predmetu a zatvorte čiapočku ventilu.
Nezáväzné smerové hodnoty pre tlak
vzduchu
Automobil cca. 1,9 - 3,5 bar
Príves cca. 2,4 - 3,4 bar
Motocykel cca. 1,7 - 2,9 bar
Bicykel cca. 2,0 - 4,0 bar
Futbalová cca. 0,6 - 1,1 bar
Volleybalová cca. 0,18 - 0,22 bar
Pozor! Dodržiavajte predpisy výrobcu
predmetu. Nenafukujte kompresorom
plávacie pomôcky!
Page 76

76
4.4 Nabíjanie akum. batérie prístroja
Nabíjanie prostredníctvom 230 V
nabíjacieho sieťového dielu
Pred uvedením do prevádzky by mala byť
akumulátorová batéria úplne nabitá.
▪ Nezapájajte okrúhlu zástrčku nabíjacieho
sieťového dielu do pripojovacej
zásuvky .
14
10
▪ Zapojte nabíjací sieťový diel do 230 V
sieťovej zásuvky.
▪ Stlačte prevádzkový spínač do polohy
13
( I ). Prístroj sa teraz prepne do
nabíjacieho režimu.
▪ LED-ukazovateľ sa rozsvieti a blikajúca
20
LED-kontrolka zobrazuje aktuálnu
kapacitu batérie. Doba nabíjania trvá
cca. 10 - 12 hodín. Pri úplne nabitej
akumulátorovej batérii musí trvale svietiť
zelená LED-kontrolka.
▪ Po nabíjacom procese vypnite prístroj
prevádzkovým spínačom a odstráňte
230 V nabíjací sieťový diel z prístroja a z
230 V zásuvky.
Poznámka! Neprevádzkujte kompresor
alebo osvetlenie počas procesu
nabíjania!
▪ 12 V automobilová zásuvka prístroja je
teraz aktívna a pripojený 12 V cudzí
prístroj môže byť uvedený do prevádzky
(pozri obrázok 7).
▪ Po použití cudzieho prístroja oddeľte
12 V automobilovú zástrčku prístroja od
12 V automobilovej zásuvky prístroja.
4.6 Výmena poistiek
12 V automobilová zástrčka
Fixačná skrutka
Kontaktný uzáver
Obrázok 8
Okrúhla poistka 15 A
(Ampere)
Zástrčka 12 V
automobilovej prípojky
▪ Odskrutkujte fixačnú skrutku.
▪ Vyberte kontaktný uzáver a 15 A
(Ampere) okrúhlu poistku.
▪ Zložte všetky časti s novou 15 A poistkou
podľa zobrazeného poradia a opäť
priskrutkujte fixačnú skrutku (pozri
obr. 8).
4.5 Používanie 12 V automobilovej
zásuvky
▪ Odstráňte kryt 12 V automobilovej
zásuvky.
▪ Spojte 12 V automobilovú zástrčku
cudzieho prístroja s 12 V automobilovou
zásuvkou prístroja.
▪ Stlačte prevádzkový spínač do polohy
13
( I ).
13
12 V
automobilová
zástrčka
cudzieho
prístroja
Obrázok 7
16
Poistka prístroja
Intaktná plochá
Obrázok 9
nožová poistka
15 A (Ampere)
▪ Opatrne vyberte plochú nožovú poistku
pomocou plochých klieští z upínania
poistky v schránkovej jednotke pre
ovládacie elementy.
▪ Nahraďte defektnú poistku novou 15 A
plochou nožovou poistkou tak, že
opatrne palcom zatlačíte na upínanie
poistky, až kým nezapadne do schránky
prístroja (pozri obr. 9).
Page 77

Kompresor je zapnutý,
ale nevykazuje žiadnu
funkciu.
Prevádzkový spínač nie je
zapnutý.
Pred použitím kompresora
zapnite prevádzkový spínač
prístroja.
Akumulátorovú batériu
prístroja nabíjajte 230 V
nabíjacím sieťovým dielom.
Pri zapnutí prevádzkového
spínača sa LED-kontrolky a
osvetlenie manometra
nerozsvietili. Akumulátorová batéria prístroja je
prázdna.
Nahraďte poškodenú
plochú nožovú 15 A
poistku novou.
15 A poistka prístroja
je defektná.
Prístroj napriek plnej akumulátorovej batérii a
intaktnej poistke nevykazuje
žiadnu funkciu.
Prístroj je pokazený.
Obráťte sa na kvalifikovaný
odborný personál.
Kompresor je prehriaty.
Prevádzkový čas
kompresora
bol dlhší ako 10 minút.
Nechajte prístroj 10 minút
vychladiť a dodržiavajte
max. pracovný cyklus 10
minút prevádzka a 10
minút chladenie.
Vetracie otvory prístroja sú
prikryté príp. upchaté
určitým predmetom.
Odstráňte predmet z
vetracích otvorov príp.
vyčistite vetracie otvory.
Kompresor stráca tlak
a vytvára nedostatočný tlak
vzduchu.
Pneumatická hadica alebo
kompresor netesný alebo
poškodený.
Obráťte sa na kvalifikovaný
odborný personál.
Ventilový adaptér alebo
páčková zástrčka
autoventilu nesedí správne.
Skontrolujte správne priliehanie ventilového adaptéra na páčkovej zástrčke
autoventilu a vo ventile
výrobku. Skontrolujte správne priliehanie páčkovej
zástrčky autoventilu na
ventile pneumatiky.
4.7 Vyhľadávanie chyby
77SK
Riešenia, pomocMožné príčinyChyba / Porucha
13
13
Vyššie zobrazená tabuľka pre vyhľadávanie
chýb a možných príčin a ich odstránenia
nezobrazuje všetky možnosti porúch.
Ak nie je možné odstránenie poruchy
prístroja uvedenými opatreniami, obráťte
sa na kvalifikovaný personál.
Page 78

78
5.0 ÚDRŽBA A
STAROSTLIVOSŤ
5.1 Čistenie, údržba a skladovanie
5.1.1 Varovanie! Pred čistením vypnite
prístroj prevádzkovým spínačom a
odpojte ho od 230 V nabíjacieho
sieťového dielu.
5.1.2 Prístroj čistite suchou handričkou.
Nepoužívajte žiadne tekutiny alebo drsné
čistiace prostriedky, pretože to môže viesť
k zafarbeniam a poškodeniam povrchu
prístroja a prístroj by sa mohol poškodiť!
Zabráňte preniknutiu kvapalín do vnútra
prístroja! Nikdy neponárajte prístroj do
kvapalín! Prevádzkujte prístroj výlučne v
suchom stave.
5.1.3 Uschovávajte / skladujte prístroj len v
suchom prostredí! Vlhkosť môže poškodiť
elektroniku prístroja!
5.1.4 Neskladujte prístroj pri extrémnych
teplotných výkyvoch! Vzniká pritom
kondenzovaná voda a môže poškodiť
elektroniku prístroja!
6.0 TECHNICKÉ
ÚDAJE
Popis produktu: Pneumatická a ener-
getická stanica LA 10
Číslo výrobku: 97180
Rozmery: cca. 26,5 x 14 x 22,5 cm
(D x Š x V cm)
Hmotnosť: cca. 3,7 kg
Poistky prístroja: 15 A (Ampere) plochá
nožová positka
Kompresor:
Výkon
kompresora: max. 10 bar / 145 psi
(bar / psi = jednotka
tlaku)
Ukazovateľ tlaku /
Ukazovateľ
manometera: analógový ukazovateľ
tlaku, neciachovaný
s osvetlením pozadia
Tolerancie
manometra: +/- 0,34 bar (5 psi) od
0 - 6,9 bar (0 -100 psi)
+/- 0,48 bar (7 psi) od
6,9 - 10 bar (100 -150 psi)
Akustická hodnota
hluku: 90 dB (dB = hlasitosť)
Intervalová
prevádzka: max. 10 minút
prevádzka, min. 10
minút chladenie
Agregát: bez oleja
Dĺžka pneumatickej hadice: cca. 65 cm
Akum. batéria:
Typ batérie: 12 V olovená akum.
batéria
Kapacita batérie: 7,2 Ah (Ampérhodiny)
Prevádzková
°
teplota: 0 C - 50 C (Celzius)
Zobrazenie batériovej kapacity: 3 LED-kontrolky
°
(červená, oranžová,
zelená)
Page 79

SK
79
Doba nabíjania: cca. 10 - 12 hodín s
230 V nabíjacím
sieťovým dielom
Nabíjací sieťový diel:
Vstupné napätie: 230 V 50 Hz (V = Volt,
Vstupný prúd: max. 0,5 A (Ampere)
Výstupné
napätie: 14,5 V
Výstupný prúd: 1000 mA DC (mA =
jednosmerný prúd)
Osvetlenie:
Druh osvetlenia: 4 LED-svetlá
LED-svetlá: LED-svetlá nie sú
Laserová trieda: LED-svetlá zodpovedajú
~
Hz = Hertz, kmity za
sekundu)
Milliampere, DC =
Nabíjací sieťový diel
používajte len v interiéri
vymieňateľné
ochrannej triede I
Prístroje s ochrannou
izoláciou - ochrannej
triedyII
Prístroj je konformný
podľa ES-smerníc
▪ Smernica o strojoch
(2006/42/ES)
▪ Smernica o
elektromagnetickej
znášanlivosti
(2004/108/ES)
7.1.3 Opotrebované batérie
nepatria do domového odpadu.
Pb
Odovzdajte ich vo Vašej elektropredajni alebo na verejnom zbernom
mieste. Ako spotrebiteľ máte povinnosť
odovzdať nepoužiteľné batérie naspäť pre
likvidáciu. Nasledujúce značky upozorňujú
na batérie s obsahom škodlivých látok: Pb
= obsahuje olovo, Hg = obsahuje ortuť a
Cd = obsahuje kadmium.
8.0 GARANCIA A
SERVIS
V prípade poškodení, opráv a iných
problémov s produktom sa obráťte s
produktom na predajné miesto alebo
kvalifikovaný odborný personál.
Všeobecné záručné podmienky sa
vzťahujú na produkčné chyby a chyby
materiálu. Defektný produkt prineste
naspäť na predajné miesto.
Pre rýchle spracovanie Vašej reklamácie
potrebujete okrem toho:
▪ Kópiu pokladničného lístka s dátumom
kúpy.
▪ Dôvod reklamácie (Popis chyby).
7.0 LIKVIDÁCIA
7.1.1 Likvidácia a recyklácia
prístroja musí prebiehať podľa
zákonných ustanovení. Informujte
sa preto na Vašom mestskom / obecnom
úrade alebo v likvidačnom centre. Prístroj
zlikvidujte v súlade s ES-smernicou o
opotrebovaných elektro-a elektronických
prístrojoch 2002/96/ES-WEEE.
7.1.2 Pri likvidácii obalových materiálov je
potrebné dodržiavať platné zákony o
odstraňovaní odpadu.
Page 80

SystemPartnerAutoteile GmbH & Co. KG
Benzstraße 1 ▪ D-76185 Karlsruhe
SystemPartnerAutoteile GmbH & Co.
Industriestr. 31 ▪ CH-8112 Otelfingen
SPA Systems s.r.o.
Pod Višňovkou 1661 / 37 140 00 Praha 4-Krč ▪ Česká republika
www.aeg-automotive.com
AEG is a registered trademark used under license from AB Electrolux (publ)
Stand der Information: 08/2012
EAN: 4038373971807
▪
 Loading...