

Page 1

L 71479 FL
L 71470 FL
L 71670 FL
WASHING MACHINE USER MANUAL
Page 2

2
CONTENTS
4 SAFETY INFORMATION
6 ENVIRONMENT CONCERNS
6 TECHNICAL INFORMATION
7 PRODUCT DESCRIPTION
7 ACCESSORIES
8 CONTROL PANEL
12 PROGRAMMES
15 BEFORE FIRST USE
15 USING THE APPLIANCE
15 LOADING THE LAUNDRY
16 FILLING THE DETERGENT AND ADDITIVES
17 SETTING AND STARTING A PROGRAMME
18 AT THE END OF THE PROGRAMME
20 HINTS AND TIPS
22 CARE AND CLEANING
27 TROUBLESHOOTING
30 INSTALLATION
SERVICE
When contacting Service, ensure that
you have the following data available.
The information can be found on the
rating plate.
Model
PNC
Serial Number
The following symbols are used in this
user manual:
Warning - Important Safety information.
General information and tips
Environmental information
Subject to change without notice
Page 3

FOR PERFECT RESULTS
Thank you for choosing this AEG product. We have created it to give you
impeccable performance for many years, with innovative technologies that help
make life simpler – features you might not find on ordinary appliances. Please spend
a few minutes reading to get the very best from it.
ACCESSORIES AND CONSUMABLES
In the AEG webshop, you’ll find everything you need to keep all your AEG
appliances looking spotless and working perfectly. Along with a wide range of
accessories designed and built to the high quality standards you would expect, from
specialist cookware to cutlery baskets, from bottle holders to delicate laundry bags…
Visit the webshop at:
www.aeg.com/shop
ENGLISH
3
VISIT OUR WEBSITE FOR:
- Products
- Brochures
- User manuals
- Trouble shooter
- Service information
www.aeg.com
Page 4

4
SAFETY INFORMATION
Before the installation and use, read
this manual carefully:
• For your safety and the safety of your
property
• To help the environment
• For the correct operation of the appliance.
Always keep these instructions with the
appliance also if you move or give it to
a different person.
The manufacturer is not responsible if
an incorrect installation and use causes
damage.
CHILDREN AND VULNERABLE
PERSON SAFETY
• Do not let persons, children included, with reduced physical sensory,
reduced mental functions or lack of
experience and knowledge use the
appliance. They must have supervision or instruction for the operation
of the appliance by a person who is
responsible for their safety. Do not
let children play with the appliance.
• Keep all packaging away from children. There is the risk of suffocation
or injury.
• Keep all detergents away from children.
• Keep children and pets away from
the appliance when the door is open.
• Before you close the appliance door,
make sure that children and pets are
not into the drum.
• If the appliance has a child safety device, we recommend to activate it.
GENERAL SAFETY
• Do not use the appliance for professional use. The appliance is only for
domestic use.
• Do not change the specifications of
this appliance. There is the risk of injury and damage to the appliance.
• Do not put flammable products or
items that are wet with flammable
products in, near or on the appliance.
Risk of explosion or fire.
• Obey the safety instructions on the
detergent packaging to prevent
burns to eyes, mouth and throat.
• Make sure that you remove all metal
objects from the laundry. Hard and
sharp material can cause damage to
the appliance.
• Do not touch the glass of the door
while a programme operates. The
glass can be hot (only for front-loading appliances).
CARE AND CLEANING
• Deactivate the appliance and disconnect the mains plug from the mains
socket.
• Do not use the appliance without the
filters. Make sure that the installation
of the filters is correct. An incorrect
installation causes water leakages.
INSTALLATION
• The appliance is heavy, be careful
when you move it.
• Do not transport your appliance without the transit bolts, you can damage
internal components and cause leakages or malfunctions.
• Do not install and connect a damaged appliance.
• Make sure to remove all packaging
and transport bolts.
• Make sure that the mains plug is disconnected from the mains socket
during installation.
• Only a qualified person must do the
electrical installation, the plumbing
and the installation of the appliance.
This to prevent the risks of structural
damage or injury.
• Do not install or use the appliance
where the temperature is less than 0
°C.
• When you install the appliance on a
carpet floor, make sure that there is
Page 5

air circulation between the appliance
and the carpet. Adjust the feet to
have the necessary space between
the appliance and the carpet.
Water connection
• Do not connect the appliance with
old hoses already used. Only use new
hoses.
• Make sure not to cause damage to
the water hoses.
• Do not connect the appliance to new
pipes or pipes not used for a long
time. Let the water flow for some minutes, then connect the inlet hose.
• The first time you use the appliance,
make sure that the water hoses and
the couplings do not have leakages.
Electrical connection
• Make sure that the appliance is
earthed.
• Make sure that the electrical information on the rating plate agrees with
the power supply.
• Always use a correctly installed
shockproof socket.
ENGLISH
• Do not use multiple plugs and extension cables. There is a risk of fire.
• Do not replace or change the mains
cable. Contact the service centre.
• Make sure not to cause damage to
the mains plug and cable.
• Connect the mains plug to the mains
socket only at the end of the installation. Make sure that there is access
to the mains plug after the installation.
• Do not pull the mains cable to disconnect the appliance. Always pull
the mains plug.
DISCARD THE APPLIANCE
1. Disconnect the mains plug from the
mains socket.
2. Cut off the mains cable and discard
it.
3. Discard the door catch. This pre-
vents children or pets to be closed
in the appliance. There is a risk of
suffocation (only for front-loading
appliances).
5
Page 6

6
ENVIRONMENT CONCERNS
PACKAGING MATERIALS
Recycle the materials with the symbol
.
Put the packaging in applicable containers to recycle it.
ECOLOGICAL HINTS
To help the environment, use less water
and energy, obey these instructions:
• Set a programme without the pre-
wash phase to wash laundry with normal soil.
• Always start a washing programme
with the maximum load of laundry.
• If necessary, use a stain remover
when you set a programme with a
low temperature.
• To use the correct quantity of the de-
tergent, check the water hardness of
your domestic system
TECHNICAL INFORMATION
Dimensions Width / Height / Depth 600 / 850 / 522 mm
Total depth 540 mm
Electrical connection: Voltage
Level of protection against ingress of solid particles
and moisture ensured by the protective cover, except
where the low voltage equipment has no protection
against moisture
Water supply pressure Minimum 0,5 bar (0,05 MPa)
Water supply
Maximum load Cotton 7 kg
Spin speed Maximum 1400 rpm (L 71479 FL)
1)
Connect the water inlet hose to a water tap with a 3/4'' thread.
1)
Overall power
Fuse
Frequency
Maximum 8 bar (0,8 MPa)
Cold water
The symbol
packaging indicates that this product
may not be treated as household
waste. Instead it should be taken to the
appropriate collection point for the
recycling of electrical and electronic
equipment. By ensuring this product is
disposed of correctly, you will help
prevent potential negative
consequences for the environment and
human health, which could otherwise
be caused by inappropriate waste
handling of this product. For more
detailed information about recycling of
this product, please contact your local
council, your household waste disposal
service or the shop where you
purchased the product.
on the product or on its
230 V
2200 W
10 A
50 Hz
IPX4
1400 rpm (L 71470 FL)
1600 rpm (L 71670 FL)
Page 7
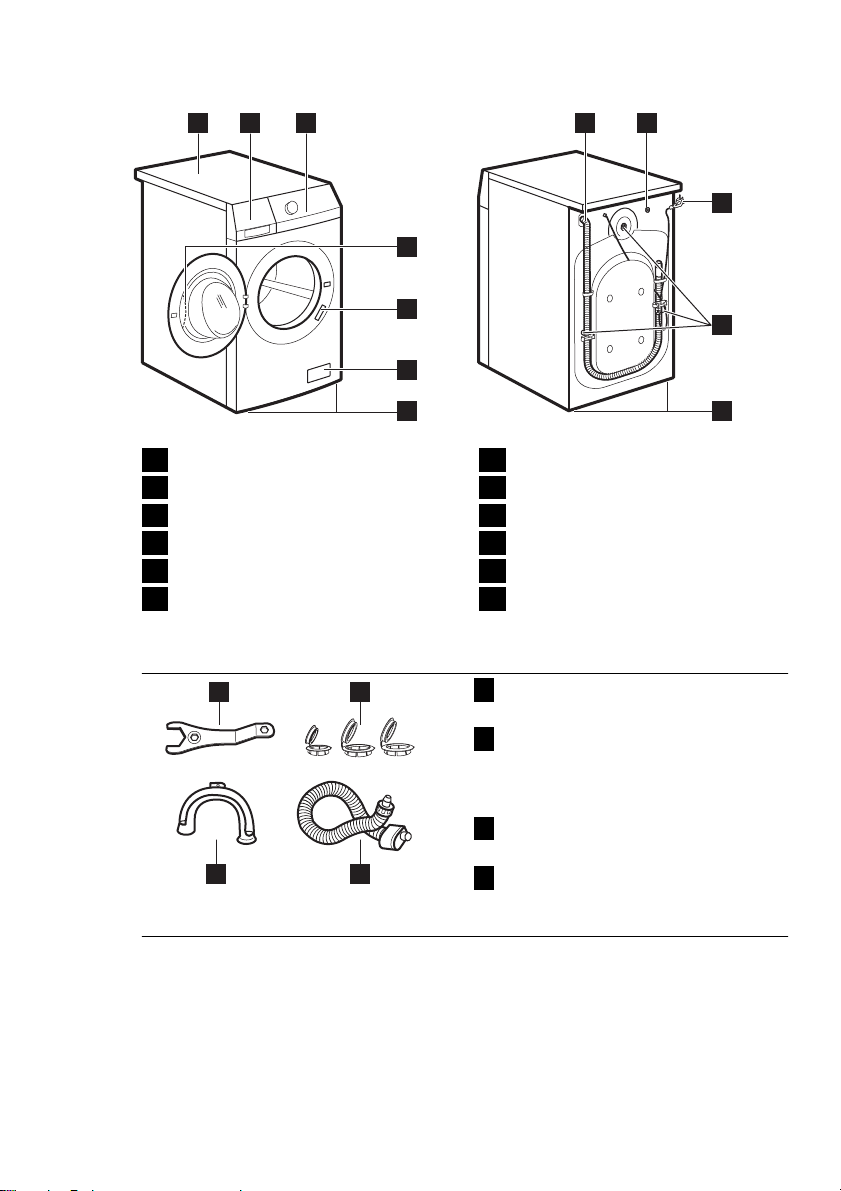
PRODUCT DESCRIPTION
ENGLISH
7
1 2 3
Worktop
1
Detergent dispenser
2
Control panel
3
Door handle
4
Rating plate
5
Drain pump
6
ACCESSORIES
1 2
8
4
5
6
7
Feet for the appliance level
7
Water drain hose
8
Water inlet valve
9
Mains cable
10
Transit bolts
11
Feet for the appliance level
12
Spanner
1
9
10
11
12
To remove the transit bolts.
Plastic caps
2
To close the holes on the rear side
of the cabinet after the removal of
the transit bolts.
Anti-flood inlet hose
3
To prevent possible leakage
34
Plastic hose guide
4
To connect the drain hose on the
edge of a sink.
Page 8
t
e
e
E
e
t
n
äsche
W
olle/Seide
ne
ra
pseigrenE
oc
E
repuS
Jeans
n
elüpS
/nred
u
elhcS
Pumpen
/
8
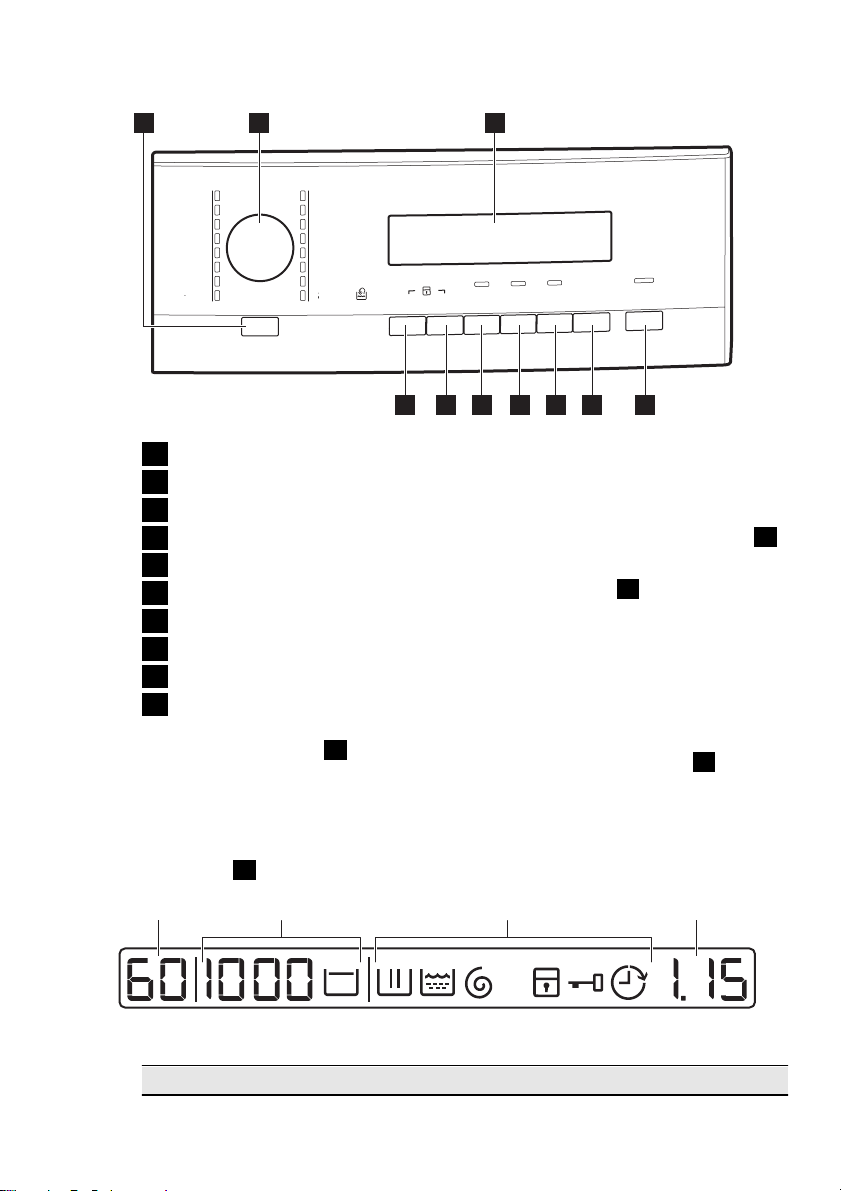
CONTROL PANEL
1 2 3
gk 3 - .niM 02
visnetnI llenhcS
nenidraG
Koch/Bun
+ Vorwäsch
xtra Leis
Pflegeleich
+ Vorwäsch
Leichtbügel
Feinw
Temp.
E
Flecken
.
ni
M/.U
vorwahl
Sparen
n
elüpS
e
s
u
a
P/trat
S
Zeit-
Zeit
artx
45678910
On/Off button (Ein/Aus)
1
Programme knob
2
Display
3
Start Pause button (Start/Pause)
4
Delay start button (Zeitvorwahl)
5
Time saving button (Zeit Sparen)
6
Extra rinse button (Extra Spülen)
7
Stain button (Flecken)
8
Spin reduction button (U./Min.)
9
Temperature button (Temp.)
10
ON OFF BUTTON
1
Press this button to activate or deactivate the appliance. A tune sounds when
the appliance is activated.
DISPLAY
3
The AUTO Stand-by function automatically deactivates the appliance to decrease the energy consumption when:
• You do not use the appliance for 5
minutes before you press button
– All settings are cancelled.
–
Press button
1
to activate the ap-
pliance again.
– Set again the washing programme
and all possible options.
• After 5 minutes from the end of the
washing programme. Refer to 'At the
end of programme'.
PROGRAMME KNOB
Turn this knob to set a programme. The
related programme indicator comes on.
A B C D
4
.
2
The display shows:
A • The maximum temperature of the programme.
Page 9
B • The default spin speed of the programme.
1)
and 'Rinse Hold' symbols.
2)
C •
•
'No Spin'
The display symbols.
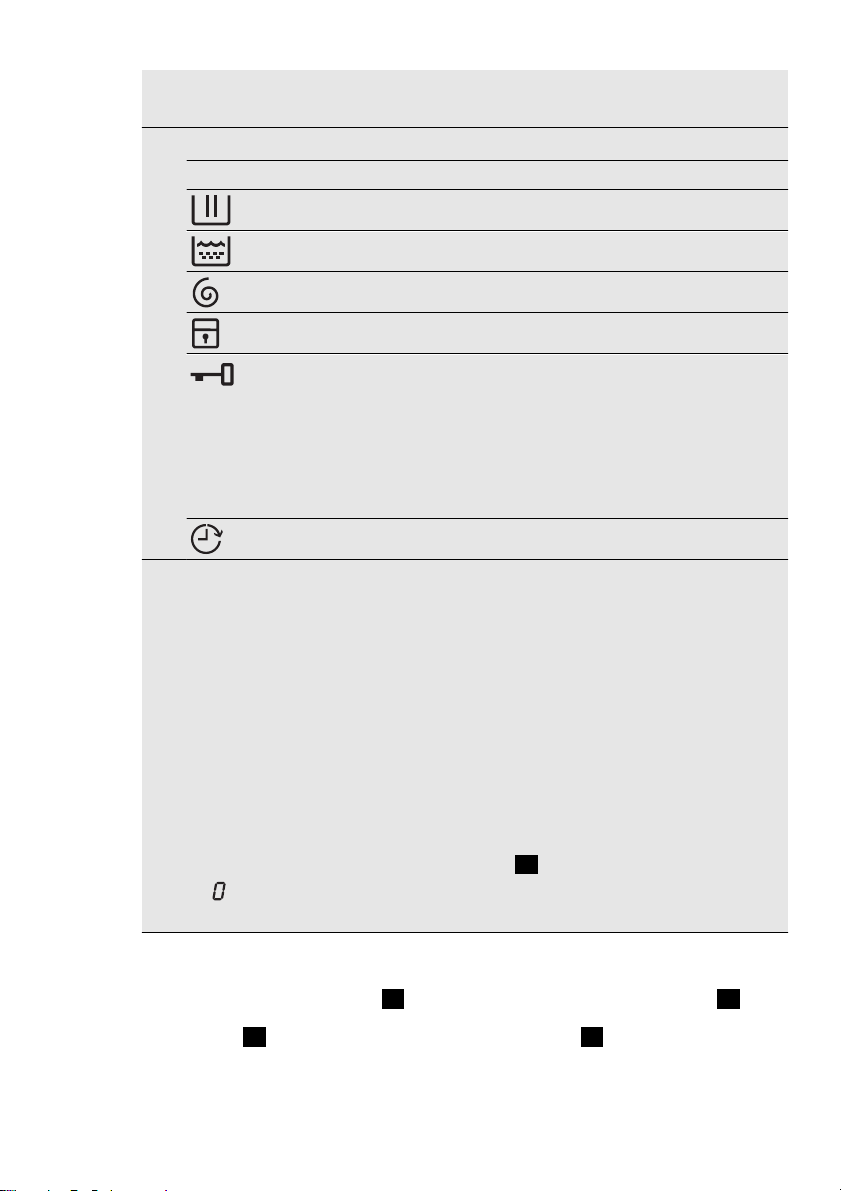
Symbols Description
Washing phase
Rinse phases
Spin phase
Child lock
You cannot open the appliance door when the symbol is on.
You cannot open the appliance door when the symbol flashes. Wait for some minutes before you open the door.
You can open the door only when the symbol goes off.
If the programme is completed but the symbol stays on:
• There is water in the drum.
• The 'Rinse Hold' function is on.
Delay start
D • The programme time
When the programme starts, the time decreases with steps of 1 minute.
• The delay start
When you press the delay start button, the display shows the delay start
time.
•Alarm codes
If the appliance has a malfunction, the display shows alarm codes. Refer
to 'Troubleshooting' chapter.
•Err
The display shows this message for some seconds if:
– You set a function that is not applicable for the programme.
– You change the programme while it operates.
4
The indicator of the Start/Pause button
flashes.
•
When the programme is completed.
1)
Only available for Spin/Drain programme.
2)
The symbols appear on the display when the related phase or function is set.
START/PAUSE BUTTON
Press button
programme.
4
to start or interrupt a
4
DELAY START BUTTON
Press button
5
to delay the start of a
programme from 30 minutes to 20
hours.
ENGLISH
5
9
Page 10
10
TIME SAVE BUTTON
6
Press the button
programme duration.
• Press one time to set 'Shortened duration' for items with daily soil.
• Press two times to set 'Extra Quick'
for items with almost no soil.
Some programmes accept only
one of the two functions.
to decrease the
EXTRA RINSE BUTTON
7
Press button
to a programme.
Use this function for persons allergic to
detergents and in areas where the water is soft.
to add rinsing phases
STAIN BUTTON
8
Press button
to a programme.
Use this function for laundry with hard
stains to remove.
When you set this function, put the
stain remover into compartment
This function increases the programme duration.
This function is not available
with a temperature lower than
40° C.
SPIN BUTTON
Press this button to:
• Decrease the maximum speed of the
spin phase when you set a programme.
The display shows only the spin
speeds available with the set
programme.
• Deactivate the spin phase.
• Activate the 'Rinse Hold' function.
Set this function to prevent fabric
creases. The appliance does not
drain the water when the programme
is completed.
to add the stain phase
9
6
7
8
Spin phase is off.
'Rinse Hold' function is
on.
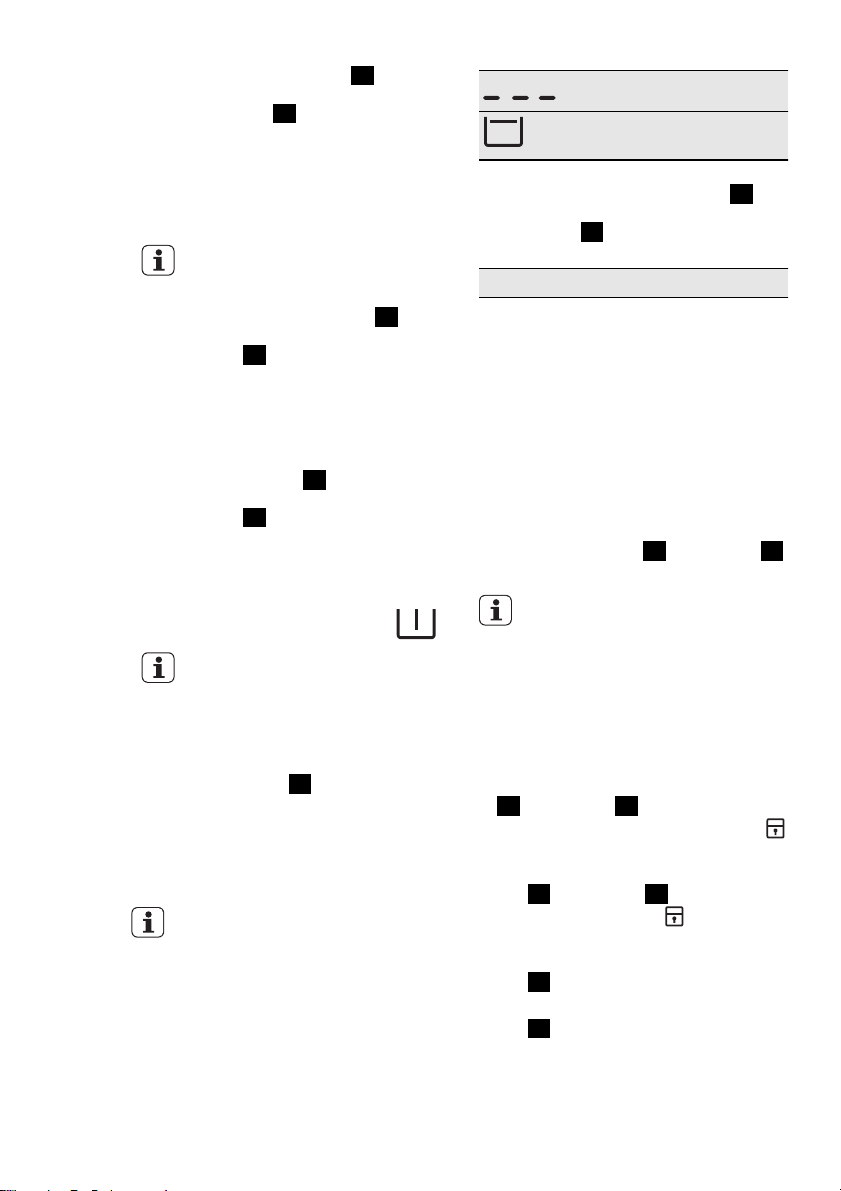
TEMPERATURE BUTTON
10
Press button
temperature.
- - = cold water
to change the default
ACOUSTIC SIGNALS
FUNCTION
You can hear the acoustic signals when:
• You activate the appliance.
• You deactivate the appliance.
• You press the buttons.
• The programme is completed.
• The appliance has a malfunction.
To deactivate/activate the acoustic
signals, press button
at the same time for 6 seconds.
If you deactivate the acoustic
.
signals, they continue operate
only when you press the buttons
and when a malfunction occurs.
8
and button
CHILD LOCK FUNCTION
This function prevents children to play
with the control panel.
• To activate the function, press button
10
and button 9 at the same time
until the display shows the symbol
.
• To deactivate the function, press but-
10
ton
and button 9 at the same
time until the symbol
You can activate the function:
• Before you press the Start/Pause but-
4
: the appliance cannot start.
ton
• After you press the Start/Pause but-
4
ton
, all the buttons and the pro-
gramme knob are deactivated.
goes off.
10
7
Page 11

PERMANENT EXTRA RINSE
FUNCTION
With this function you can keep the extra rinse function permanently on when
you set a new programme.
• To activate the function press button
6
and button 5 at the same time
7
until the indicator of button
is on.
ENGLISH
• To deactivate the function press but-
6
and button 5 at the same
ton
time until the indicator of button
7
is off.
11
Page 12

12
PROGRAMMES
Programme
Temperature
Koch/Bunt
95° - Cold
Koch/Bunt +
Vorwäsche
95° - Cold
Extra Leise
95° - Cold
Pflegeleicht
60° - Cold
Pflegeleicht +
Vorwäsche
60° - Cold
Leichtbügeln
60° - Cold
Feinwäsche
40° - Cold
Wolle/Seide
40° - Cold
Schleudern/
Pumpen
4)
Type of load
max. weight of load
White and coloured
cotton with normal
soil.
max. 7 kg
White and coloured
cotton with heavy soil.
max. 7 kg
White and coloured
cotton with normal
soil.
max. 7 kg
Synthetic or mixed
fabric items with normal level of soil.
max. 3.5 kg
Synthetic or mixed
fabric items with
heavy soil.
max. 3.5 kg
3)
Synthetic fabric items
with normal soil.
max. 3.5 kg
Delicate fabrics as
acrylics, viscose, polyester items with normal soil.
max. 3.5 kg
Machine washable
wool. Hand washable
wool and delicate
fabrics with «hand
washing» care symbol.
max. 2 kg
All fabrics
The maximum load of
the laundry is related
to the type of laundry.
Cycle
description
Wash
Rinses
Long spin
Prewash
Wash
Rinses
Long spin
Wash
Rinses
Stop with water in
the drum
Wash
Rinses
Short spin
Prewash
Wash
Rinses
Short spin
Wash
Rinses
Short spin
Wash
Rinses
Short spin
Wash
Rinses
Short spin
Drainage of the
water
Spin phase at the
maximum speed.
Functions
SPIN REDUCTION
RINSE HOLD
FLECKEN
1)
EXTRA SPÜLEN
ZEIT SPAREN
2)
SPIN REDUCTION
RINSE HOLD
EXTRA SPÜLEN
ZEIT SPAREN
FLECKEN
2)
1)
EXTRA SPÜLEN
ZEIT SPAREN
2)
SPIN REDUCTION
RINSE HOLD
FLECKEN
1)
EXTRA SPÜLEN
ZEIT SPAREN
2)
SPIN REDUCTION
RINSE HOLD
EXTRA SPÜLEN
ZEIT SPAREN
2)
SPIN REDUCTION
RINSE HOLD
EXTRA SPÜLEN
ZEIT SPAREN
2)
SPIN REDUCTION
RINSE HOLD
FLECKEN
1)
EXTRA SPÜLEN
ZEIT SPAREN
2)
SPIN REDUCTION
RINSE HOLD
SPIN REDUCTION
NO SPIN
Page 13

ENGLISH
13
Programme
Temperature
Spülen All fabrics. One rinse with ad-
Type of load
max. weight of load
Cycle
description
ditive spin phase
Functions
SPIN REDUCTION
RINSE HOLD
EXTRA SPÜLEN
Gardinen
40° - Cold
Set this programme
to wash curtains. It
adds automatically
the prewash phase to
Prewash
Wash
Rinses
Short spin
SPIN REDUCTION
RINSE HOLD
EXTRA SPÜLEN
clean the dust from
the curtains.
Do not put the detergent into the prewash
compartment.
max. 2 kg
Jeans
60° - Cold
Schnell Intensiv
60°-40°
All items in jeans. Jersey made items with
hi-tech materials.
max.7 kg
Quick washing programme, to be used
for lightly soiled
Wash
Rinses
Short spin
Wash
Rinses
Short spin
SPIN REDUCTION
RINSE HOLD
ZEIT SPAREN
EXTRA SPÜLEN
SPIN REDUCTION
RINSE HOLD
EXTRA SPÜLEN
white/fast coloured
cottons and mixed
fabrics.
max. 5 kg
20 Min. - 3 kg
40° - 30°
Super Eco
6)
Cold
Energiesparen
60° - 40°
Cotton and synthetic
items with light soil or
worn only one time.
Mixed fabrics (cotton
and synthetic items).
max. 3 kg
7)
White and fast coloured cotton with
normal soil.
max. 7 kg
Wash
Rinses
Short spin
Wash
Rinses
Short spin
Wash
Rinses
Long spin
SPIN REDUCTION
SPIN REDUCTION
RINSE HOLD
EXTRA SPÜLEN
SPIN REDUCTION
RINSE HOLD
FLECKEN
EXTRA SPÜLEN
ZEIT SPAREN
1)
The STAIN function is not available with a temperature lower than 40° C.
2)
if you press the button 6 two times (Extra Quick duration), we recommend that you
decrease the quantity of the load. It is possible to load fully the appliance, however the
washing results are reduced. For cotton economy programmes you can set only the Extra
Quick duration.
3)
The wash and spin phase is soft to prevent the creases of the laundry. The appliance adds
some rinses.
4)
The default phase of the spin speed is related to cotton items. Set the spin speed. Make
sure that it agrees with the laundry. To select the DRAIN programme only, set the function
NO SPIN.
5)
Press EXTRA RINSE button to add rinses. With a low spin speed the appliance performs
delicate rinses and a short spin.
5)
2)
2)
Page 14
14
6)
Set this programme to decrease the time and the consumption of energy and water.
7)
Set this programme to have a good washing results and decrease the energy consumption.
The time of the washing programme is extended.
CONSUMPTION VALUES
Programme
1)
Energy consumption
2)
(KWh)
Water consump-
tion (litre)
2)
White Cottons 95 °C 2.3 66
Cottons 60 °C 1.3 62
Cottons 40 °C 0.8 62
Synthetics 40 °C 0.53 45
Delicates 40 °C 0.57 53
Wool/ Handwash 30 °C 0.25 45
1)
Refer to the display for the programme time.
2)
The consumption information shown in this chart is indicative. It can vary depending on the
quantity and the type of laundry, on the temperature of the water supply and on the
ambient temperature.
Standard programmes for the
Energy Label consumption
values
The cotton 60 °C economy and cotton
40 °C economy are the standard cotton
programmes for normally soiled cotton
laundry. They are suitable to clean normally soiled cotton laundry and they
are the most efficient programmes in
terms of combined energy and water
consumption for washing that type of
cotton laundry.
They agree with EN60456.
The actual water temperature
may differ from the declared cycle temperature.
Page 15

BEFORE FIRST USE
ENGLISH
15
1. To activate the drain system, put 2
litre of water in the main wash compartment of the detergent dispenser.
2. Put a small quantity of detergent in
the main wash compartment of the
USING THE APPLIANCE
1. Open the water tap.
2. Connect the mains plug to the
mains socket.
3.
Press button
pliance.
4. Put the laundry in the appliance.
1
to activate the ap-
LOADING THE LAUNDRY
1. Open the appliance door.
2. Put the laundry in the drum, one
item at a time. Shake the items before you put them in the appliance.
detergent dispenser. Set and start
a programme for cotton at the
highest temperature without laundry. This removes all possible dirt
from the drum and the tub.
5. Use the correct quantity of detergent and additives.
6. Set and start the correct programme for the type of laundry and
soil.
Make sure not to put too much
laundry in the drum.
3. Close the door.
Make sure that no laundry stays between the seal and the door. There is a
risk of water leakage or damage to the
laundry.
Page 16

16
FILLING THE DETERGENT AND ADDITIVES
The detergent compartment for the prewash phase, the soak programme and for the stain function.
Add the detergent for prewash, soak and stain remover before
the start of the programme.
The detergent compartment for the washing phase.
If you use a liquid detergent, put it immediately before you start
the programme.
Liquid additives compartment (fabric conditioner, starch).
Put the product in the compartment before you start the programme.
This is the maximum level for the quantity of liquid additives.
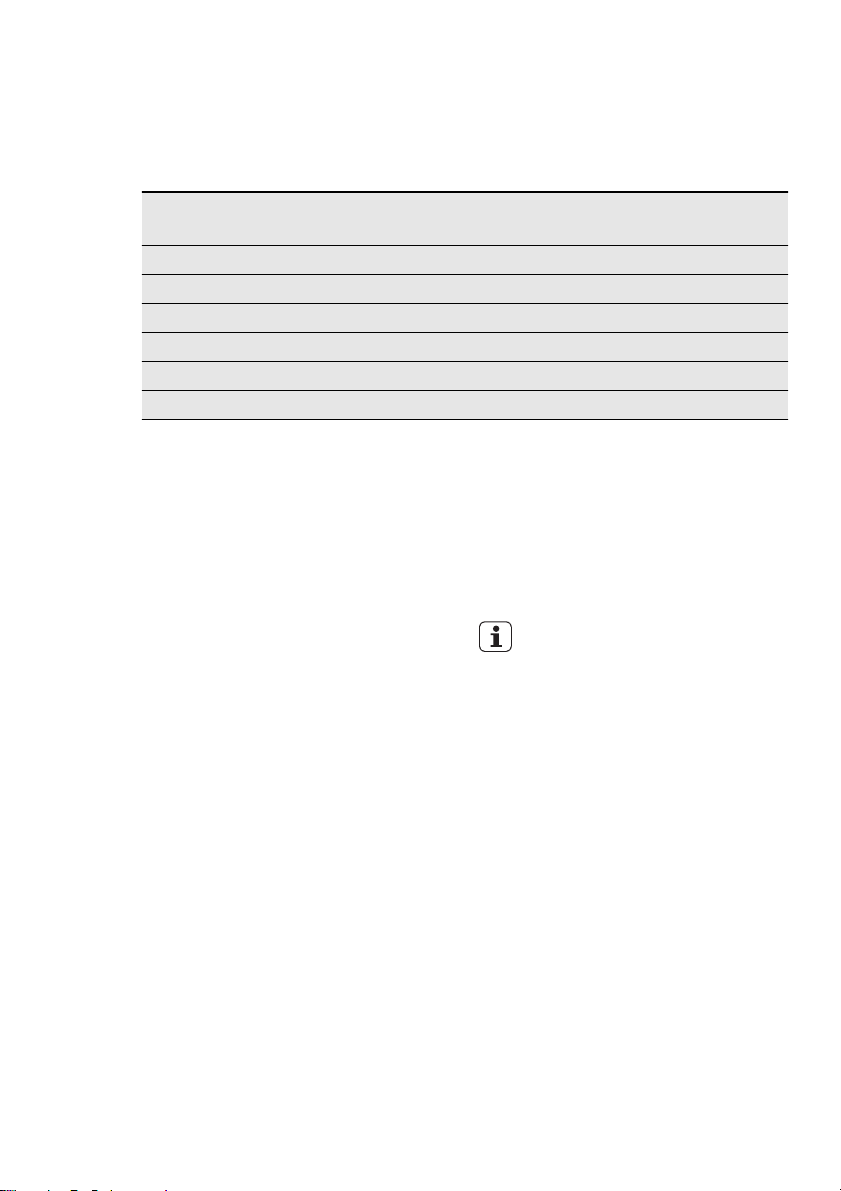
Flap for powder or liquid detergent
Turn it (up or down) in the correct position to use powder or liquid
detergent.
Always obey the instructions that you find on the packaging of the detergent products.
Check the position of the flap
1. Pull out the detergent dispenser
until it stops.
2. Press the lever down to remove the
dispenser.
Page 17
5. Measure out the detergent and the
fabric conditioner.
6. Carefully close the detergent dispenser. Make sure that the flap
does not cause a blockage when
you close the drawer.
ENGLISH
3. To use powder detergent, turn the
flap up.
4. To use liquid detergent, turn the
flap down.
With the flap in the position
DOWN:
– Do not use gelatinous or thick
liquid detergents.
– Do not put more liquid deter-
gent than the limit showed in
the flap.
– Do not set the prewash
phase.
– Do not set the delay start
function.
17
SETTING AND STARTING A PROGRAMME
1. Turn the programme knob. The related programme indicator comes
on.
2.
The indicator of button
4
flashes
with red colour.
3. The display shows the default temperature and spin speed. To
change the temperature and/or the
spin speed, press the related buttons.
4. Set the available functions. The indicator of the set function comes
on or the display shows the related
symbol.
5.
Press button
4
to start the pro-
gramme. The indicator of button
4
is on.
INTERRUPT A PROGRAMME
1.
Press button
flashes.
2.
Press button
ing programme continues.
CANCEL A PROGRAMME
1.
Press button
gramme and to deactivate the appliance.
2.
Press button
the appliance. Now, you can set a
new washing programme.
The appliance does not drain
the water.
4
. The indicator
4
again. The wash-
1
to cancel the pro-
1
again to activate
Page 18

18
CHANGE A FUNCTION
You can change only some functions
before they operate.
1.
Press button
flashes.
2. Change the function set.
4
. The indicator
SET THE DELAY START
1.
Press button
until the display shows the number
of minutes or hours. The related
symbols comes on.
2.
Press button
starts the countdown of the delay
start.
When the countdown is completed, the programme starts automatically.
Before you press button 4 to
start the appliance, you can cancel or change the set of the delay start.
5
again and again
4
, the appliance
CANCEL THE DELAY START
1.
Press button
cator flashes.
2.
Press button
until the display shows 0’.
4
. The related indi-
5
again and again
3.
Press button
starts.
4
. The programme
OPEN THE DOOR
While a programme or the delay start
operates, the appliance door is locked.
To open the appliance door:
1.
Press button
symbol in the display goes off.
2. Open the appliance door.
3. Close the appliance door and press
button
delay start continues.
If the temperature and level of
the water in the drum are too
high, the door lock symbol stays
on and you cannot open the
door. To open the door do the
steps that follow:
1. Deactivate the appliance.
2. Wait for some minutes.
3. Make sure that no water is
If you deactivate the appliance,
it is necessary to set the programme again.
4
. The door lock
4
. The programme or the
in the drum.
AT THE END OF THE PROGRAMME
• The appliance stops automatically.
• The acoustic signals operate.
•
In the display
• The indicator of the Start/Pause but-
4
ton
goes off.
• The door lock symbol goes off.
•
Press button
pliance. After five minutes from the
end of the programme, the energy
saving function automatically deactivates the appliance.
When you activate the appliance again, the display show the
end of the last set programme.
Turn the programme knob to
set a new cycle.
comes on.
1
to deactivate the ap-
• Remove the laundry from the appliance. Make sure that the drum is
empty.
• Keep the door ajar, to prevent mildew and odours.
• Close the water tap.
The washing programme is
completed, but there is water in the
drum:
– The drum turns regularly to prevent
the creases in the laundry.
–The door stays locked.
– You must drain the water to open the
door.
Page 19

To drain the water:
1. If necessary, decrease the spin
speed.
2.
Press the Start/Pause button
4
The appliance drain the water and
spin.
3. When the programme is completed and the door lock symbol goes
off, you can open the door
4. Deactivate the appliance.
The appliance drain and spin
automatically after approximate-
.
ly 18 hours.
ENGLISH
19
Page 20

20
HINTS AND TIPS
THE LAUNDRY LOAD
• Divide the laundry in: white, coloured, synthetics, delicates and wool.
• Obey the washing instructions that
are on the laundry care labels.
• Do not wash together white and coloured items.
• Some coloured items can discolour
with the first wash. We recommend
that you wash them separately for the
first times.
• Button up pillowcases, close zippers,
hooks and poppers. Tie up belts.
• Empty the pockets and unfold the
items.
• Turn inside out multilayered fabrics,
wool and items with painted illustrations.
• Remove hard stains.
• Wash with a special detergent heavy
soil stains.
• Be careful with the curtains. Remove
the hooks or put the curtains in a
washing bag or pillowcase.
• Do not wash in the appliance :
– Laundry without hems or with cuts
– Underwired bras.
– Use a washing bag to wash small
items.
• A very small load can cause balance
problems with the spin phase. If this
occurs, adjust manually the items in
the tub and start the spin phase
again.
STUBBORN STAINS
For some stains, water and detergent is
not sufficient.
We recommend that you remove these
stains before you put the items in the
appliance.
Special stain removers are available.
Use the special stain remover that is applicable to the type of stain and fabric.
DETERGENTS AND ADDITIVES
• Only use detergents and additives
specially made for washing machines.
• Do not mix different types of detergents.
• To help the environment, do not use
more than the correct quantity of detergent.
• Obey the instructions that you find
on the on packaging of these products.
• Use the correct products for the type
and colour of the fabric, the programme temperature and the level of
soil.
• If you use liquid detergents, do not
set the prewash phase.
• If your appliance has not the detergent dispenser with the flap device,
add the liquid detergents with a dosing ball.
WATER HARDNESS
If the water hardness in your area is
high or moderate, we recommend that
you use a water softener for washing
machines. In areas where the water
hardness is soft it is not necessary to
use a water softener.
To know the water hardness in your
area, contact your local water authority.
Obey the instructions that you find on
the packaging of the products.
Equivalent scales measure the water
hardness:
• German degrees (°dH).
• French degrees (°TH).
• mmol/l (millimol for each litre - international unit for the hardness of water).
• Clarke degrees.
Page 21

Water hardness table
Level Type
°dH °T.H. mmol/l Clarke
Water hardness
1 soft 0-7 0-15 0-1.5 0-9
2 medium 8-14 16-25 1.6-2.5 10-16
3 hard 15-21 26-37 2.6-3.7 17-25
4 very hard > 21 > 37 >3.7 >25
ENGLISH
21
Page 22

22
CARE AND CLEANING
WARNING!
Disconnect the appliance from the
mains supply before you clean it.
DESCALING
The water we use contains limescale. If
it becomes necessary, use a water softener to remove limescales.
Use a special product made for washing machines. Obey the instructions
that you find on the packaging of the
manufacturer.
Do this separately from the laundry
wash.
EXTERNAL CLEANING
Clean the appliance only with soap and
warm water. Fully dry all the surfaces.
DOOR SEAL
CAUTION!
Do not use alcohol, solvents or
chemical products.
MAINTENANCE WASH
With the low temperature programmes
it is possible that some detergent stays
in the drum. Make regularly a maintenance wash. To do this:
• Empty the laundry from the drum.
• Set the hottest cotton wash programme
• Use a correct quantity of powder detergent with biological properties.
After each wash, keep the door open
for a while to prevent mould and to let
unpleasant smells go out.
Regularly examine the seal and remove
all objects from the inner part.
DRUM
Regularly examine the drum to prevent
limescale and rust particles.
Only use special products to remove
rust particles from the drum.
To do this:
• Clean the drum with special product
for stainless steel.
• Start a short programme for cotton at
the maximum temperature with a
small quantity of detergent.
Page 23
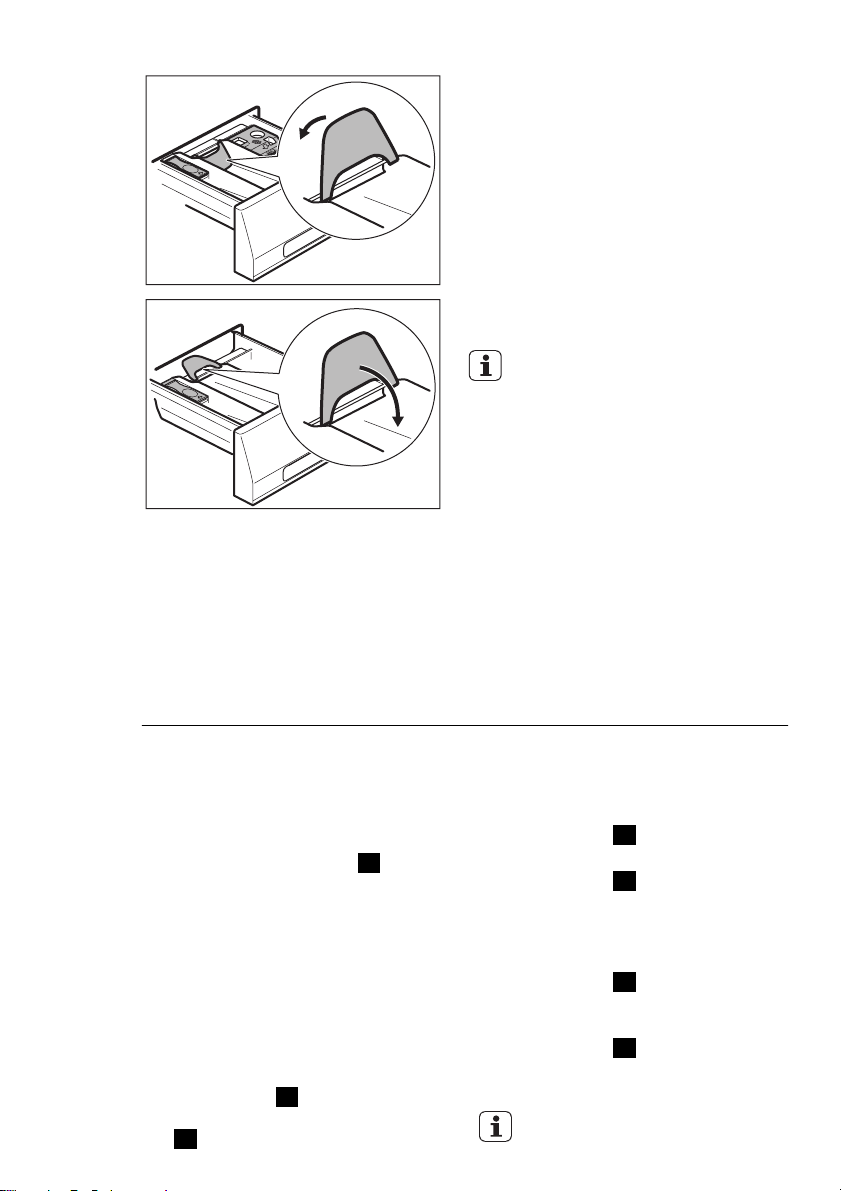
DETERGENT DISPENSER
To clean the dispenser:
1
ENGLISH
23
1. Press the lever.
2. Pull the dispenser out.
2
3. Remove the top part of the liquid
additive compartment.
4. Clean all the parts with water.
DRAIN PUMP
Regularly examine the drain
pump and make sure that it is
clean.
Clean the pump if:
• The appliance does not drain the water.
• The drum cannot turn.
• The appliance makes an unusual
noise because of the blockage of the
drain pump.
• The display shows an alarm code because of the problem with water
drain.
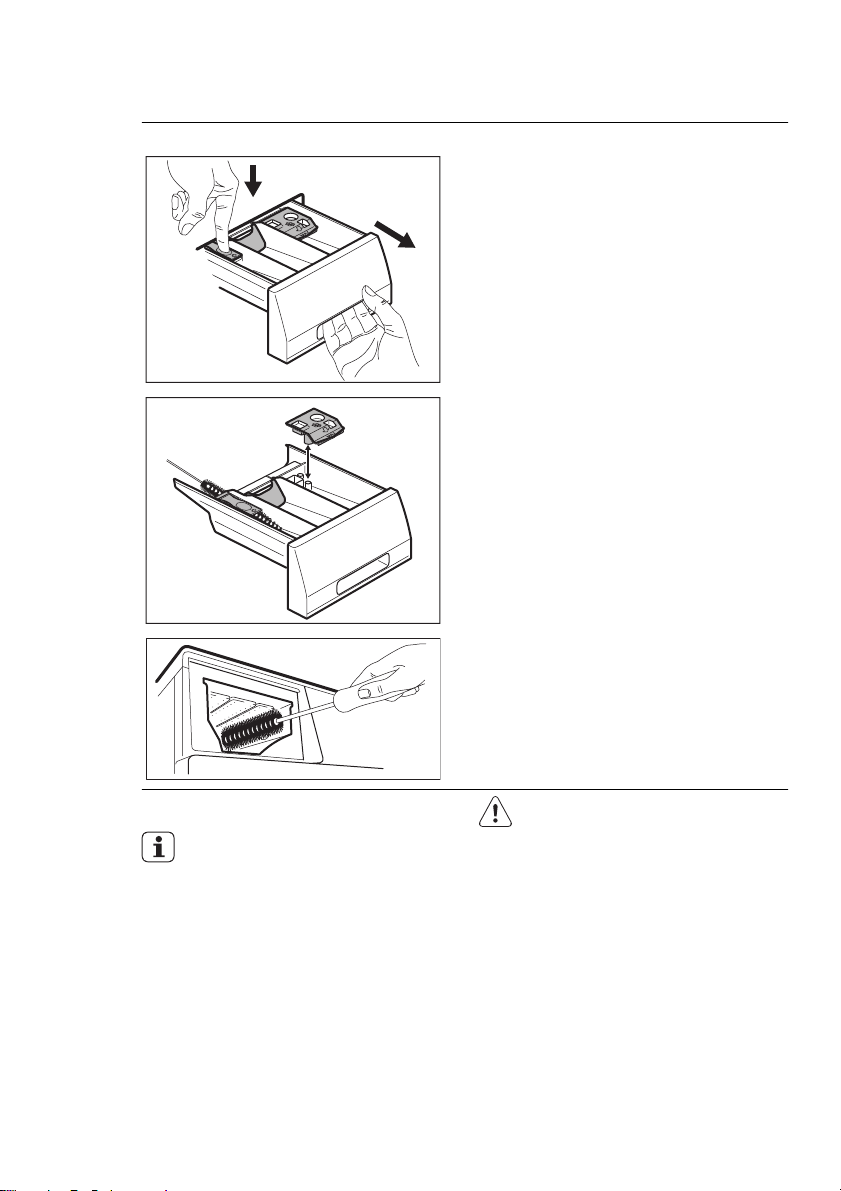
5. Clean the dispenser recess with a
brush.
6. Put back the dispenser in the recess.
WARNING!
1. Disconnect the mains plug
from the mains socket.
2. Do not remove the filter
while the appliance operates. Do not clean the drain
pump if the water in the appliance is hot. The water
must be cold before you
clean the drain pump.
Page 24

24
To clean the drain pump:
1. Open the drain pump door.
2. Put a container below the recess of
the drain pump to collect the water
that flows out.
3. Press the two levers and pull forward the drainage duct to let the
water flow out.
4. When the container is full of water,
put the drainage duct back again
and empty the container. Do steps
3 and 4 again and again until no
more water flows out from the
drain pump.
5. Pull back the drainage duct and
turn the filter to remove it.
1
2
6. Remove fluff and objects from the
pump.
7. Make sure that the impeller of the
pump can turn. If this does not occur, contact the service centre.
Page 25

ENGLISH
25
8. Clean the filter under the water tap
and put it back in the pump into
1
2
the special guides.
9. Make sure that you tighten correctly the filter to prevent leakages.
11. Close the drain pump door.
THE INLET HOSE FILTER AND
THE VALVE FILTER
It could be necessary to clean the filters
when:
• The appliance does not fill with water.
• The appliance fills with the water for
a long time.
To clean the water inlet filters:
•
The indicator of button
4
flashes
and the display shows the related
alarm. Refer to 'Troubleshooting'.
WARNING!
Disconnect the mains plug from
the mains socket.
1. Close the water tap.
2. Remove the water inlet hose from
the water tap.
3. Clean the filter in the inlet hose
with a stiff brush.
4. Remove the inlet hose behind the
appliance.
5. Clean the filter in the valve with a
stiff brush or a towel.
Page 26

26
6. Install again the inlet hose. Make
sure that the couplings are tight to
prevent leakages.
7. Open the water tap.
45°
35°
EMERGENCY DRAIN
Because of a malfunction, the appliance
cannot drain the water.
If this occurs, do steps (1) through (6) of
'To clean the drain pump'.
If necessary, clean the pump.
Put the drainage duct back and close
the drain pump flap.
When you drain the water with the
emergency drain procedure, you must
activate again the drain system:
1. Put 2 litres of water in the main
wash compartment of the detergent dispenser.
2. Start the programme to drain the
water.
FROST PRECAUTIONS
If the appliance is installed in an area
where the temperature can be less than
0 °C, remove the remaining water from
the inlet hose and the drain pump.
1. Disconnect the mains plug from the
mains socket.
2. Close the water tap.
3. Remove the water inlet hose
4. Put the two ends of the inlet hose
in a container and let the water
flow out of the hose.
5. Empty the drain pump. Refer to the
emergency drain procedure
6. When the drain pump is empty, install the inlet hose again.
WARNING!
Make sure that the temperature
is more than 0 °C before you
use the appliance again.
The manufacturer is not responsible for damages caused by
low temperatures.
Page 27

TROUBLESHOOTING
ENGLISH
27
The start of the appliance does not occur or it stops during operation.
First try to find a solution to the problem (refer to the table). If not, contact
the service centre.
With some problems, the acoustic
signals operate and the display
shows an alarm code:
•
- The appliance does not fill
•
- The appliance does not drain
the water.
•
- The appliance door is open or
not closed correctly.
•
- The anti-flood device is on.
WARNING!
Deactivate the appliance before
you do the checks.
with water.
Problem Possible cause Possible solution
The appliance
The water tap is closed. Open the water tap.
does not fill with
water.
The water inlet hose is
damaged.
The filters in the water in-
let hose is blocked .
The water tap is blocked
Make sure that the water inlet
hose has no damages.
Clean the filters. Refer to 'Care
and cleaning'.
Clean the water tap.
or is furred with limescale.
The connection of the
water inlet hose is not
Make sure that the connection is
correct.
correct.
The water pressure is too
low.
The appliance
does not drain the
The water drain hose is
damaged.
Contact your local water authori-
ty.
Make sure that the water drain
hose has no damages.
water.
The filter of the drain
pump is blocked.
Clean the filter of the drain
pump. Refer to 'Care and clean-
ing'.
The connection of the
water drain hose is not
Make sure that the connection is
correct.
correct.
A washing programme
Set the drain programme.
without the drain phase
is set.
The function Rinse &
Set the drain programme.
Hold is on.
The appliance
Close the door correctly.
door is open or
not closed correctly.
Page 28

28
Problem Possible cause Possible solution
The anti-flood de-
vice is on.
• Disconnect the appliance.
• Close the water tap.
• Contact the service centre.
The spin phase
The spin phase is off. Set the spin programme.
does not operate.
The filter of the drain
pump is blocked.
Clean the filter of the drain
pump. Refer to 'Care and clean-
ing'.
Balance problems with
the laundry load.
Adjust manually the items in the
tub and start the spin phase
again.
The programme
does not start.
The mains plug is not
connected in the mains
Put in the mains plug.
socket.
Blow out fuse in the
Replace the fuse.
household fuse box.
You did not press button
4
.
Press button 4 .
The delay start is set. To start immediately the pro-
gramme, cancel the delay start.
The Child Lock function
is activated.
There is water on
the floor.
Leakages from the couplings of the water ho-
Deactivate the Child Lock func-
tion.
Make sure that the couplings are
tight.
ses.
Leakages from the drain
pump.
The water drain hose is
damaged.
You cannot open
the appliance
The washing programme
is in operation.
Make sure that the drain pump
filter is tight.
Make sure that the water inlet
hose has no damages.
Let the washing programme end.
door.
There is water in the
drum.
The appliance
makes an unusual
Incorrect level of the appliance.
Set the drain or the spin pro-
gramme.
Adjust the level of the appliance.
Refer to 'Installation'.
noise.
You did not remove the
packaging and/or the
transit bolts.
Remove the packaging and/or
the transit bolts. Refer to 'Instal-
lation'.
The load is very small. Add more laundry in the drum.
Page 29

ENGLISH
Problem Possible cause Possible solution
The appliance fills
with water and
The end of the drain
hose is too low.
Make sure that the drain hose is
in the correct position.
drain immediately.
The washing re-
sults are not satisfactory.
You did not remove the
The detergent you used
was not sufficient or correct.
stubborn stains before
Increase the detergent quantity
or use a different one.
Use special products to remove
the stubborn stains.
you wash the laundry.
Incorrect temperature
was set.
Make sure that you set the cor-
rect temperature.
Too much laundry load. Decrease the laundry load.
After the check, activate the appliance.
The programme continues from the
If the display shows other alarm codes,
contact the service centre.
point of interruption.
If the problem occurs again, contact the
service centre.
29
Page 30

30
INSTALLATION
UNPACKING
1. Use the gloves. Remove the external film. If necessary, use a cutter.
2. Remove the cardboard top.
3. Remove the polystyrene packaging
materials.
4. Remove the internal film.
5. Open the door and remove all the
items from the drum.
Page 31

ENGLISH
31
6. Put one of the polystyrene packag-
ing elements on the floor behind
the appliance. Carefully put down
the appliance with the rear side on
it. Make sure not to damage the
hoses.
7. Remove the polystyrene protection
from the bottom.
8. Pull up the appliance in vertical po-
sition.
1
2
9. Remove the power supply cable
and the drain hose from the hose
holders.
10. Remove the three bolts. Use the
key supplied with the appliance.
11. Pull out the plastic spacers.
Page 32

32
12. Put the plastic caps in the holes.
You can find these caps in the user
manual bag.
– We recommend that you
keep the packaging and the
transit bolts for when you
move the appliance.
– If the appliance is delivered in
the winter months when there
are minus temperatures. Store
it at room temperature for 24
hours before using for the first
time.
POSITIONING AND LEVELLING
x4
• Install the appliance on a flat hard
floor.
• Make sure that carpets do not stop
the air circulation below the appliance.
• Make sure that the appliance does
not touch the wall or other units
• Loosen or tighten the feet to adjust
the level. A correct adjustment of the
appliance level prevents the vibration, noise and the movement of the
appliance when in operation.
Page 33

CAUTION!
35
O
45
O
Do not put cardboard, wood or
equivalent materials below the
appliance feet to adjust the level.
THE INLET HOSE
ENGLISH
• The appliance must be level and sta-
ble.
• Connect the hose to the appliance.
Turn the inlet hose only left or right.
Loose the ring nut to set it in the correct position.
33
O
O
35
35
Do not use an extension hose if
the inlet hose is too short. Contact the service centre for the replacement of the inlet hose.
45
45
O
O
• Connect the water inlet hose to the
cold water tap with 3/4 thread.
CAUTION!
Make sure that there are no
leaks from the couplings.
Page 34

34
Water-stop device
The inlet hose has a water stop device.
This device prevents water leaks in the
hose because of its natural ageing. The
red sector in the window «A» shows this
fault .
If this occur, close the water tap and
contact the service centre to replace
the hose.
A
WATER DRAINAGE
There are different procedures to connect the drain hose:
With the plastic hose guide.
• On the edge of a sink.
• Make sure that the plastic guide can-
not move when the appliance drains.
Attach the guide to the water tap or
the wall.
• To a stand pipe with vent-hole.
Refer to the illustration. Directly into
a drain pipe at a height of not less
than 60 cm and not more than 100
cm. The end of the drain hose must
always be ventilated , i.e. the inner
diameter of the drainpipe must be
larger than the external diameter of
the drain hose.
Page 35

Without the plastic hose guide.
You can extend the drain hose
to maximum 400 cm. Contact
the service centre for the other
drain hose and the extension.
ENGLISH
•To a sink spigot.
Refer to the illustration. Put the drain
hose in the spigot and tighten it with
a clip. Make sure that the drain hose
makes a loop to prevent that remaining particles go in the appliance from
the sink.
• Directly to a built-in drain pipe in the
room wall and tighten it with a clip.
35
Page 36

www.aeg.com/shop 132936521-A-222011
 Loading...