

Page 1
L 70271 FL EN User manual 2
ES Manual de instrucciones 33
Page 2
www.aeg.com
2
CONTENTS
1. SAFETY INFORMATION . . . . . . . . . . . . . . . . . . . . . . . . . . . . . . . . . . . . . . . . . . . . . . . . . . . . . . 3
2. SAFETY INSTRUCTIONS . . . . . . . . . . . . . . . . . . . . . . . . . . . . . . . . . . . . . . . . . . . . . . . . . . . . . . 4
3. TECHNICAL INFORMATION . . . . . . . . . . . . . . . . . . . . . . . . . . . . . . . . . . . . . . . . . . . . . . . . . . 5
4. PRODUCT DESCRIPTION . . . . . . . . . . . . . . . . . . . . . . . . . . . . . . . . . . . . . . . . . . . . . . . . . . . . . 6
5. CONTROL PANEL . . . . . . . . . . . . . . . . . . . . . . . . . . . . . . . . . . . . . . . . . . . . . . . . . . . . . . . . . . . 7
6. PROGRAMMES . . . . . . . . . . . . . . . . . . . . . . . . . . . . . . . . . . . . . . . . . . . . . . . . . . . . . . . . . . . . 10
7. CONSUMPTION VALUES . . . . . . . . . . . . . . . . . . . . . . . . . . . . . . . . . . . . . . . . . . . . . . . . . . . . 13
8. BEFORE FIRST USE . . . . . . . . . . . . . . . . . . . . . . . . . . . . . . . . . . . . . . . . . . . . . . . . . . . . . . . . . 14
9. USING THE APPLIANCE . . . . . . . . . . . . . . . . . . . . . . . . . . . . . . . . . . . . . . . . . . . . . . . . . . . . . 14
10. HINTS AND TIPS . . . . . . . . . . . . . . . . . . . . . . . . . . . . . . . . . . . . . . . . . . . . . . . . . . . . . . . . . . . 18
11. CARE AND CLEANING . . . . . . . . . . . . . . . . . . . . . . . . . . . . . . . . . . . . . . . . . . . . . . . . . . . . . . 19
12. TROUBLESHOOTING . . . . . . . . . . . . . . . . . . . . . . . . . . . . . . . . . . . . . . . . . . . . . . . . . . . . . . . 23
13. INSTALLATION . . . . . . . . . . . . . . . . . . . . . . . . . . . . . . . . . . . . . . . . . . . . . . . . . . . . . . . . . . . . 26
FOR PERFECT RESULTS
Thank you for choosing this AEG product. We have created it to give you impeccable
performance for many years, with innovative technologies that help make life simpler –
features you might not find on ordinary appliances. Please spend a few minutes reading to get
the very best from it.
Visit our website for:
Get usage advice, brochures, trouble shooter, service information:
www.aeg.com
Register your product for better service:
www.aeg.com/productregistration
Buy Accessories, Consumables and Original spare parts for your appliance:
www.aeg.com/shop
CUSTOMER CARE AND SERVICE
We recommend the use of original spare parts.
When contacting Service, ensure that you have the following data available.
The information can be found on the rating plate. Model, PNC, Serial Number.
Warning / Caution-Safety information
General information and tips
Environmental information
Subject to change without notice.
Page 3
1. SAFETY INFORMATION
Before the installation and use of the appliance, carefully read the supplied instructions. The manufacturer is
not responsible if an incorrect installation and use causes injuries and damages. Always keep the instructions
with the appliance for future reference.
1.1 Children and vulnerable people safety
WARNING!
Risk of suffocation, injury or permanent disability.
• This appliance can be used by children aged from 8
years and above and persons with reduced physical,
sensory or mental capabilities or lack of experience
and knowledge if they have been given supervision or
instruction concerning use of the appliance in a safe
way and understand the hazards involved.
• Do not let children play with the appliance.
• Keep all packaging away from children.
• Keep all detergents away from children.
• Keep children and pets away from the appliance door
when it is open.
• If the appliance has a child safety device, we recommend you activate it.
• Cleaning and user maintenance shall not be made by
children without supervision.
ENGLISH 3
1.2 General Safety
• Before maintenance, deactivate the appliance and
disconnect the mains plug from the mains socket.
• Do not change the specification of this appliance.
• Obey the maximum load volume of 7 kg (refer to the
“Programme chart” chapter).
Page 4
www.aeg.com
4
• If the supply cord is damaged, it must be replaced by
the manufacturer, its service agent or similarly qualified persons in order to avoid a hazard.
• The operating water pressure (minimum and maximum) must be between 0,5 bar (0,05 MPa) and 8 bar
(0,8 MPa)
• The ventilation openings in the base (if applicable)
must not be obstructed by a carpet.
• The appliance is to be connected to the water mains
using the new supplied hose-sets. Old hose sets must
not be reused.
2.
SAFETY INSTRUCTIONS
2.1 Installation
• Remove all the packaging and the
transit bolts.
• Keep the transit bolts. When you
move the appliance again you must
block the drum.
• Do not install or use a damaged appli-
ance.
• Do not install or use the appliance
where the temperature is less than 0
°C or where it is exposed to the
weather.
• Obey the installation instruction sup-
plied with the appliance.
• Make sure that the floor where you in-
stall the appliance is flat, stable, heat
resistant and clean.
• Do not install the appliance where the
appliance door can not be fully
opened.
• Always be careful when you move the
appliance because it is heavy. Always
wear safety gloves.
• Make sure that there is air circulation
between the appliance and the floor.
• Adjust the feet to have the necessary
space between the appliance and the
carpet.
Electrical connection
WARNING!
Risk of fire and electrical shock.
• The appliance must be earthed.
• Make sure that the electrical information on the rating plate agrees with
the power supply. If not, contact an
electrician.
• Always use a correctly installed shockproof socket.
• Do not use multi-plug adapters and
extension cables.
• Make sure not to cause damage to the
mains plug and to the mains cable.
Should the appliance power supply
cable need to be replaced, this must
be carried out by our Service Centre.
• Connect the mains plug to the mains
socket only at the end of the installation. Make sure that there is access to
the mains plug after the installation.
• Do not pull the mains cable to disconnect the appliance. Always pull the
mains plug.
• Do not touch the mains cable or the
mains plug with wet hands.
• This appliance complies with the
E.E.C. Directives.
Page 5
Water connection
• Make sure not to cause damage to the
water hoses.
• The appliance is to be connected to
the water mains using the new supplied hose-sets. Old hose sets must
not be reused.
• Before you connect the appliance to
new pipes or pipes not used for a long
time, let the water flow until it is clean.
• The first time you use the appliance,
make sure that there is no leakage.
2.2 Use
WARNING!
Risk of injury, electrical shock,
fire, burns or damage to the appliance.
• Use this appliance in a household environment.
• Do not change the specification of this
appliance.
• Obey the safety instructions on the
detergent packaging.
• Do not put flammable products or
items that are wet with flammable
products in, near or on the appliance.
• Do not touch the glass of the door
while a programme operates. The
glass can be hot.
• Make sure that you remove all metal
objects from the laundry.
ENGLISH 5
• Do not put a container to collect possible water leakage under the appliance. Contact the Service to ensure
which accessories can be used.
2.3 Care and Cleaning
WARNING!
Risk of injury or damage to the
appliance.
• Before maintenance, deactivate the
appliance and disconnect the mains
plug from the mains socket.
• Do not use water spray and steam to
clean the appliance.
• Clean the appliance with a moist soft
cloth. Only use neutral detergents. Do
not use abrasive products, abrasive
cleaning pads, solvents or metal objects.
2.4 Disposal
WARNING!
Risk of injury or suffocation.
• Disconnect the appliance from the
mains supply.
• Cut off the mains cable and discard it.
• Remove the door catch to prevent
children and pets to get closed in the
appliance.
3. TECHNICAL INFORMATION
Dimensions Width / Height / Depth 600 / 850 / 522 mm
Total depth 540 mm
Electrical connection: Voltage
Overall power
Fuse
Frequency
Level of protection against ingress of solid particles
and moisture ensured by the protective cover, except where the low voltage equipment has no protection against moisture
230 V
2200 W
10 A
50 Hz
IPX4
Page 6
www.aeg.com
6
Water supply pressure Minimum 0,5 bar (0,05 MPa)
Maximum 8 bar (0,8 MPa)
Water supply
1)
Cold water
Maximum load Cotton 7 kg
Spin speed Maximum 1200 rpm
1)
Connect the water inlet hose to a water tap with a 3/4'' thread.
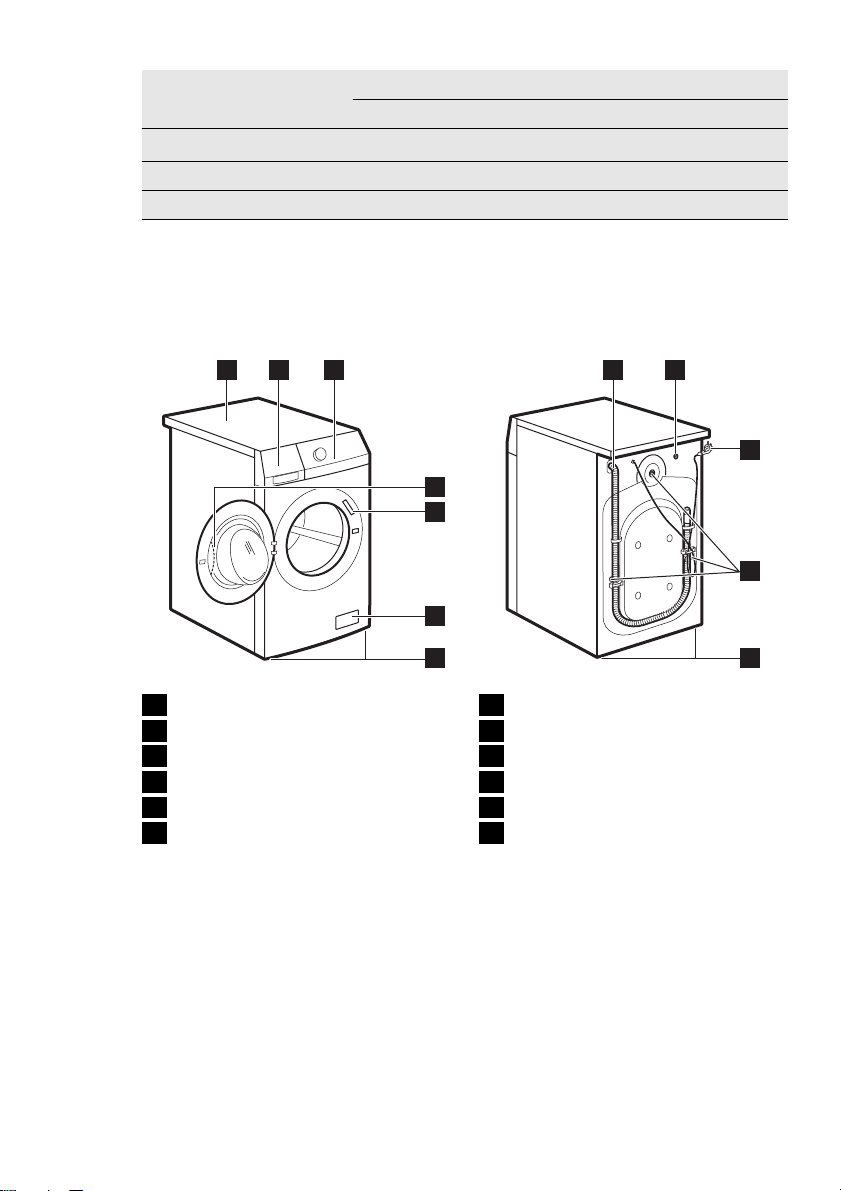
4. PRODUCT DESCRIPTION
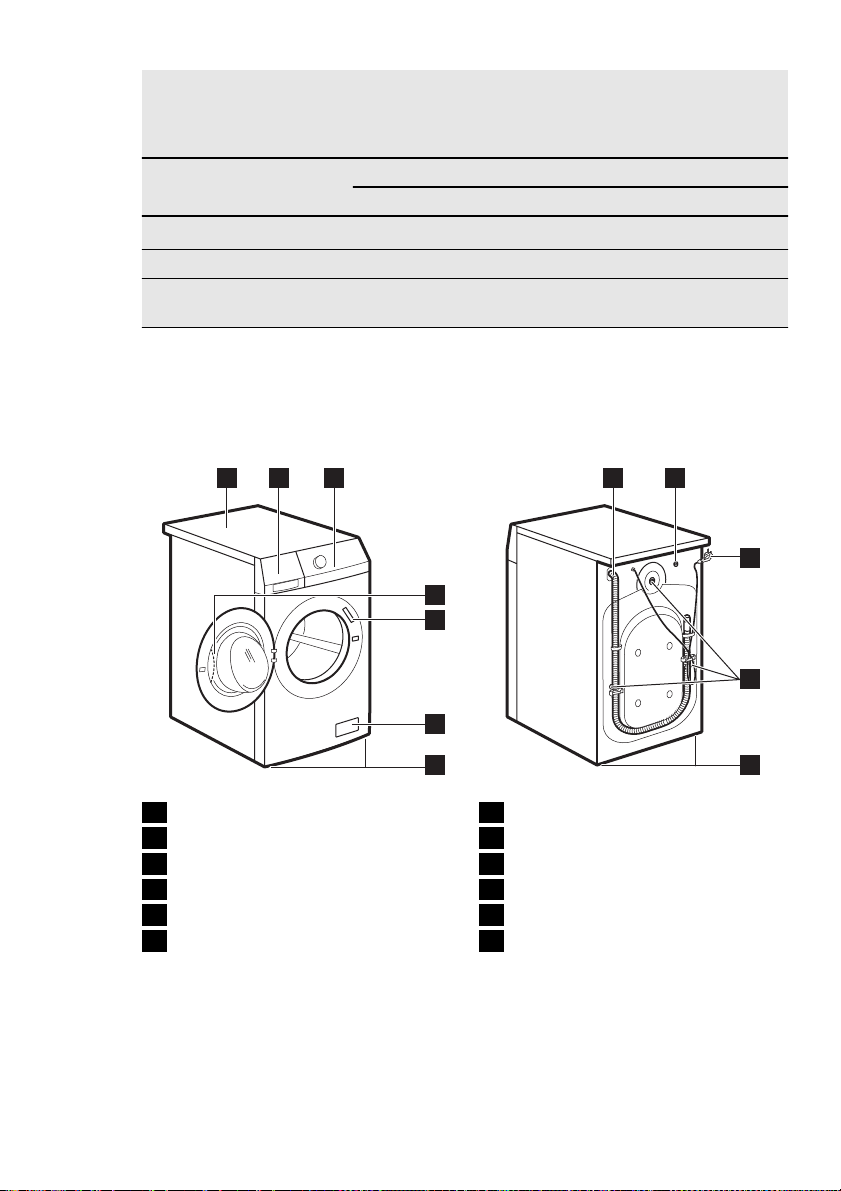
1 2 3
Worktop
1
Detergent dispenser
2
Control panel
3
Door handle
4
Rating plate
5
Drain pump
6
8
4
5
6
7
Feet for the appliance level
7
Water drain hose
8
Water inlet valve
9
Mains cable
10
Transit bolts
11
Feet for the appliance level
12
9
10
11
12
Page 7
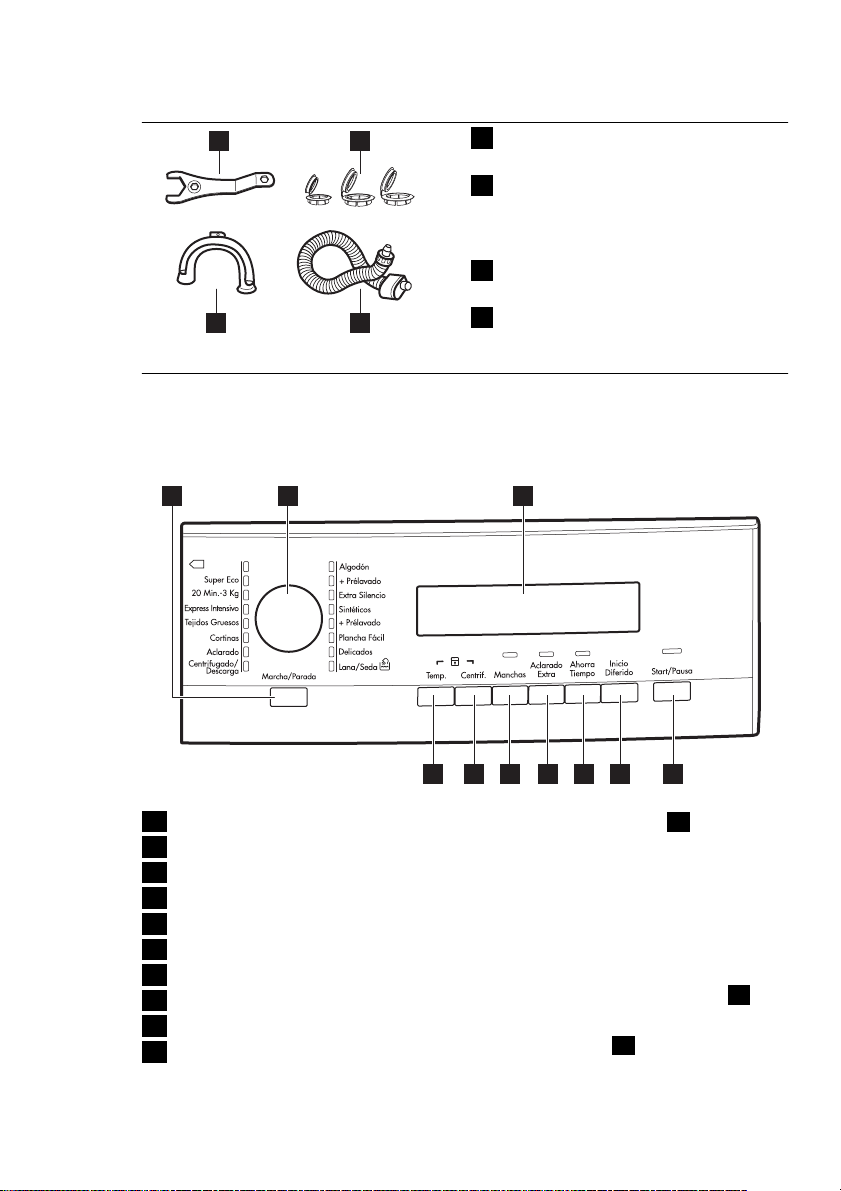
4.1 Accessories
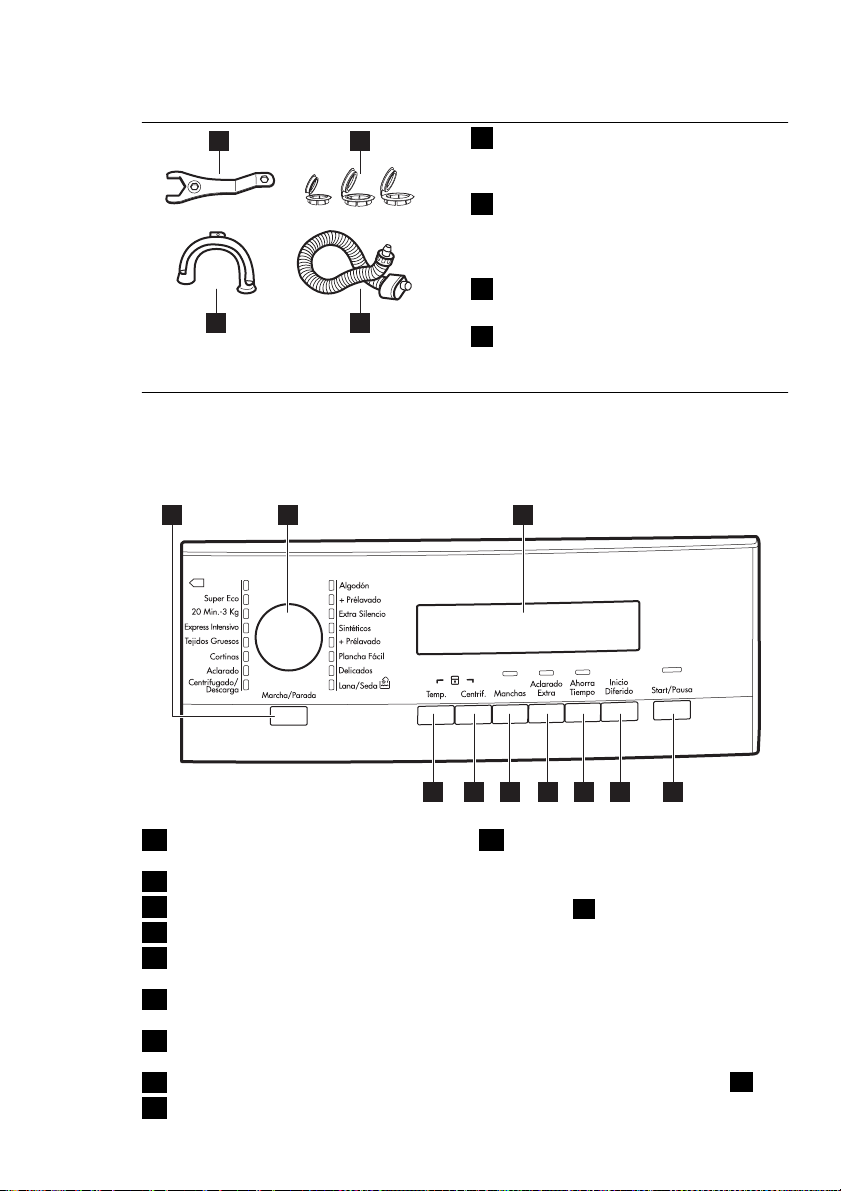
1 2
5. CONTROL PANEL
1 2 3
Algodón
Eco
ENGLISH 7
Spanner
1
To remove the transit bolts.
Plastic caps
2
To close the holes on the rear side
of the cabinet after the removal of
the transit bolts.
Anti-flood inlet hose
3
To prevent possible leakage
Plastic hose guide
34
4
To connect the drain hose on the
edge of a sink.
On/Off button (Marcha/Parada)
1
Programme knob
2
Display
3
Start Pause button (Start/Pausa)
4
Delay start button (Inicio Diferido)
5
Time saving button (Ahorra Tiempo)
6
Extra rinse button (Aclarado Extra)
7
Stain button (Manchas)
8
Spin reduction button (Centrif.)
9
Temperature button (Temp.)
10
45678910
5.1 On Off button
1
Press this button to activate or deactivate the appliance. A tune sounds when
the appliance is activated.
The AUTO Stand-by function automatically deactivates the appliance to decrease the energy consumption when:
• You do not use the appliance for 5 mi-
4
nutes before you press button
.
– All settings are cancelled.
–
Press button
1
to activate the ap-
pliance again.
– Set again the washing programme
and all possible options.
Page 8
www.aeg.com
8
• After 5 minutes from the end of the
washing programme. Refer to 'At the
end of programme'.
5.2 Programme knob
Turn this knob to set a programme. The
related programme indicator comes on.
2
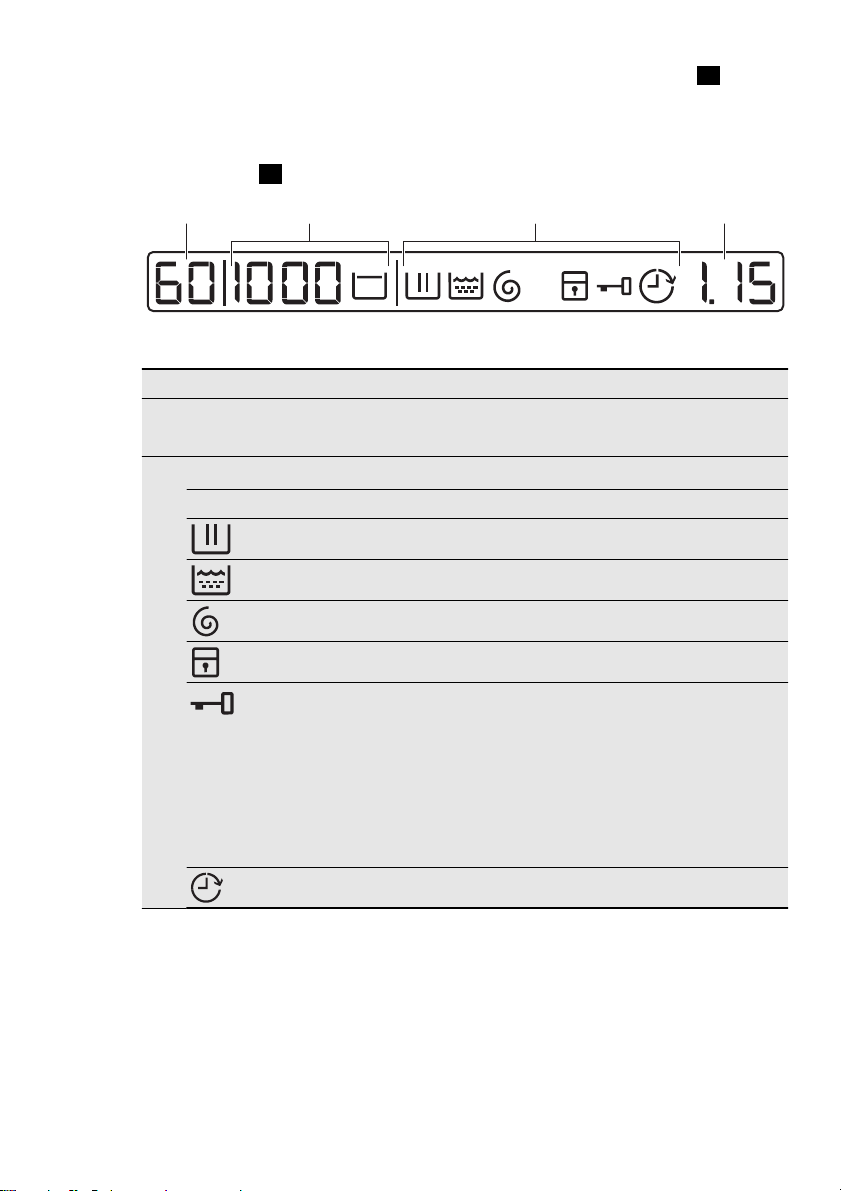
5.3 Display
3
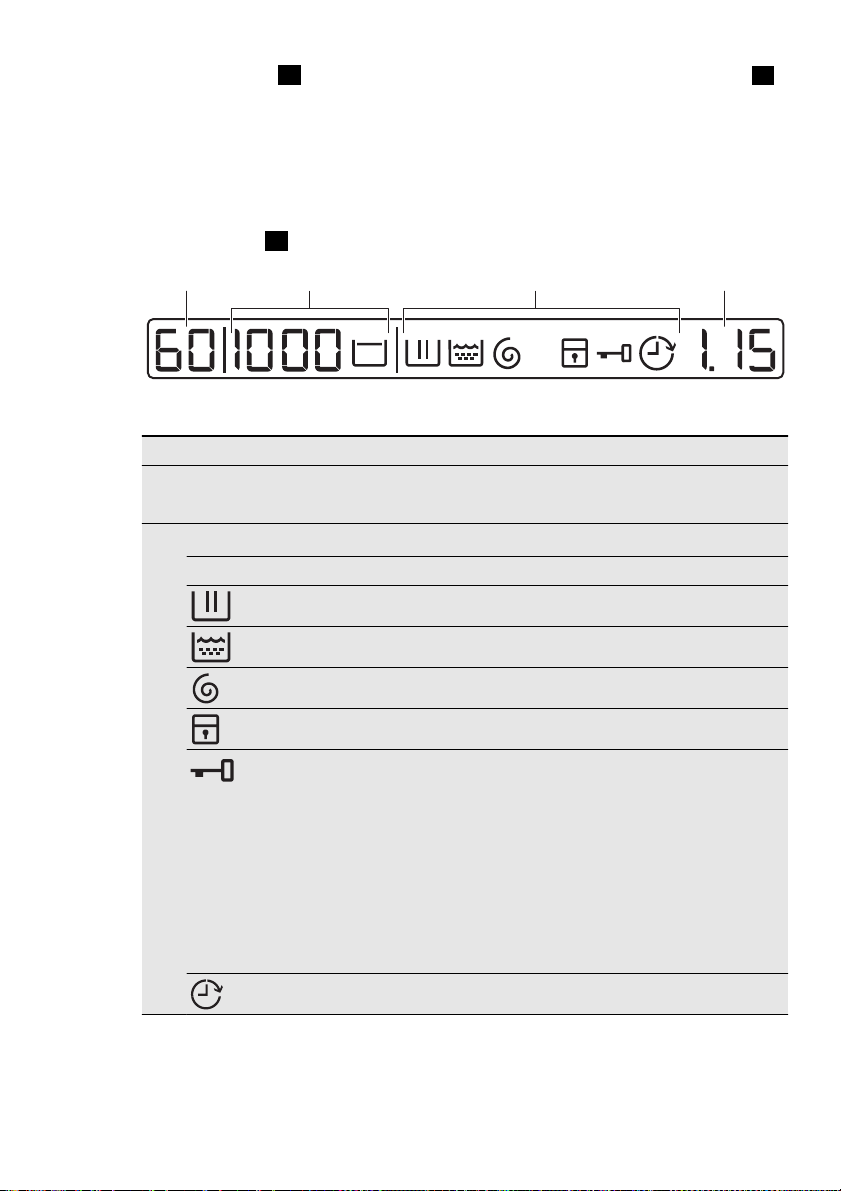
A B C D
The display shows:
A • The maximum temperature of the programme.
B • The default spin speed of the programme.
1)
and 'Rinse Hold' symbols.
2)
C •
•
'No Spin'
The display symbols.
Symbols Description
Washing phase
Rinse phases
Spin phase
Child lock
You cannot open the appliance door when the symbol is
on.
You cannot open the appliance door when the symbol
flashes. Wait for some minutes before you open the door.
You can open the door only when the symbol goes off.
If the programme is completed but the symbol stays on:
• There is water in the drum.
• The 'Rinse Hold' function is on.
Delay start
Page 9
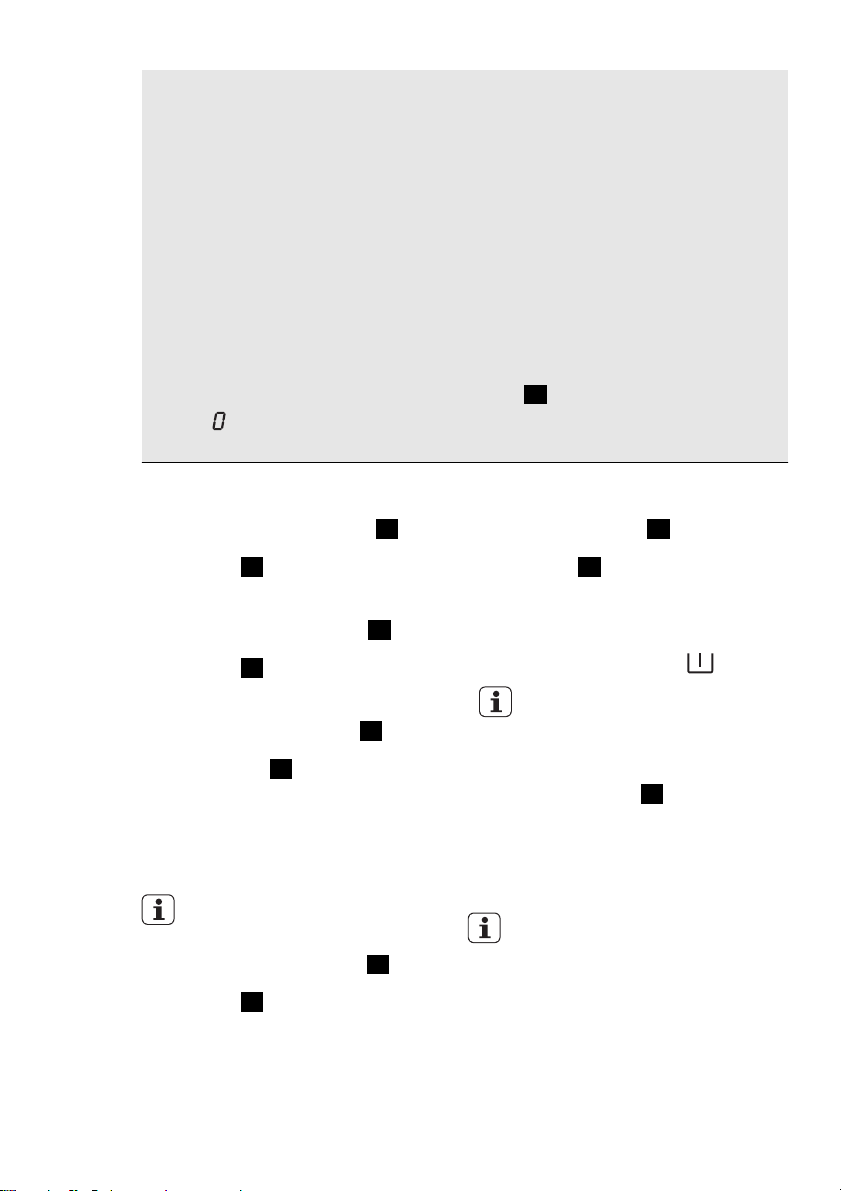
D • The programme time
When the programme starts, the time decreases with steps of 1 minute.
• The delay start
When you press the delay start button, the display shows the delay
start time.
• Alarm codes
If the appliance has a malfunction, the display shows alarm codes. Re-
fer to 'Troubleshooting' chapter.
•Err
The display shows this message for some seconds if:
– You set a function that is not applicable for the programme.
– You change the programme while it operates.
4
The indicator of the Start/Pause button
flashes.
•
When the programme is completed.
1)
Only available for Spin/Drain programme.
2)
The symbols appear on the display when the related phase or function is set.
5.4 Start/Pause button
Press button 4 to start or interrupt a
programme.
5.5 Delay start button
Press button 5 to delay the start of a
programme from 30 minutes to 20 hours.
5.6 Time save button
Press the button 6 to decrease the
programme duration.
• Press one time to set 'Shortened duration' for items with daily soil.
• Press two times to set 'Extra Quick' for
items with almost no soil.
Some programmes accept only
one of the two functions.
5.7 Extra rinse button
Press button 7 to add rinsing phases to
a programme.
Use this function for persons allergic to
detergents and in areas where the water
is soft.
4
5
6
7
5.8 Stain button
Press button 8 to add the stain phase
to a programme.
Use this function for laundry with hard
stains to remove.
When you set this function, put the stain
remover into compartment
This function increases the programme duration.
This function is not available with
a temperature lower than 40° C.
5.9 Spin button
Press this button to:
• Decrease the maximum speed of the
spin phase when you set a programme.
The display shows only the spin
speeds available with the set
programme.
• Deactivate the spin phase.
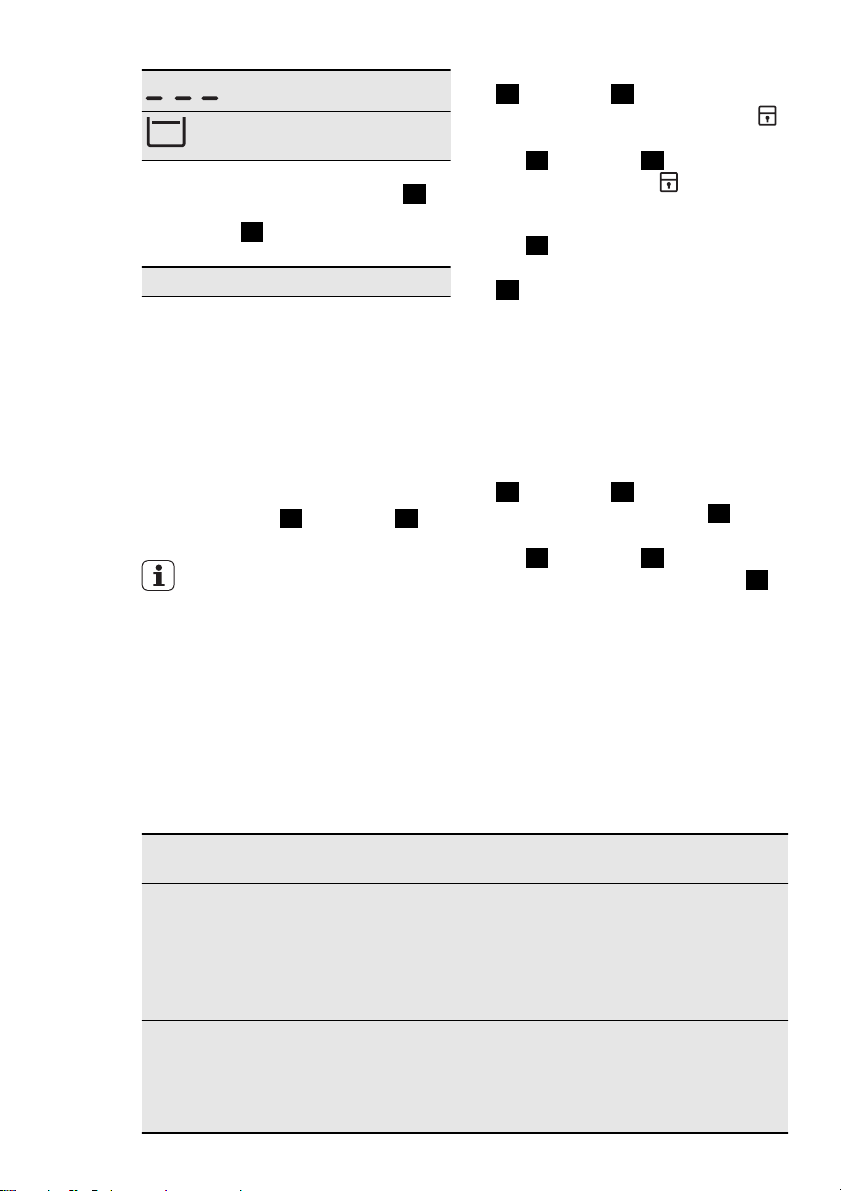
• Activate the 'Rinse Hold' function. Set
this function to prevent fabric creases.
The appliance does not drain the water when the programme is completed.
9
ENGLISH 9
8
.
Page 10
www.aeg.com
10
Spin phase is off.
'Rinse Hold' function is
on.
5.10 Temperature button
Press button 10 to change the default
temperature.
10
- - = cold water
5.11 Acoustic signals function
You can hear the acoustic signals when:
• You activate the appliance.
• You deactivate the appliance.
• You press the buttons.
• The programme is completed.
• The appliance has a malfunction.
To deactivate/activate the acoustic sig-
nals, press button
the same time for 6 seconds.
If you deactivate the acoustic signals, they continue operate only
when you press the buttons and
when a malfunction occurs.
8
and button 7 at
• To activate the function, press button
10
and button 9 at the same time
until the display shows the symbol
• To deactivate the function, press but-
10
and button 9 at the same
ton
time until the symbol
You can activate the function:
• Before you press the Start/Pause but-
4
: the appliance cannot start.
ton
• After you press the Start/Pause button
4
, all the buttons and the pro-
gramme knob are deactivated.
goes off.
5.13 Permanent extra rinse
function
With this function you can keep the extra
rinse function permanently on when you
set a new programme.
• To activate the function press button
6
and button 5 at the same time
7
until the indicator of button
• To deactivate the function press but-
6
ton
and button 5 at the same
time until the indicator of button
off.
is on.
7
is
.
5.12 Child lock function
This function prevents children to play
with the control panel.
6. PROGRAMMES
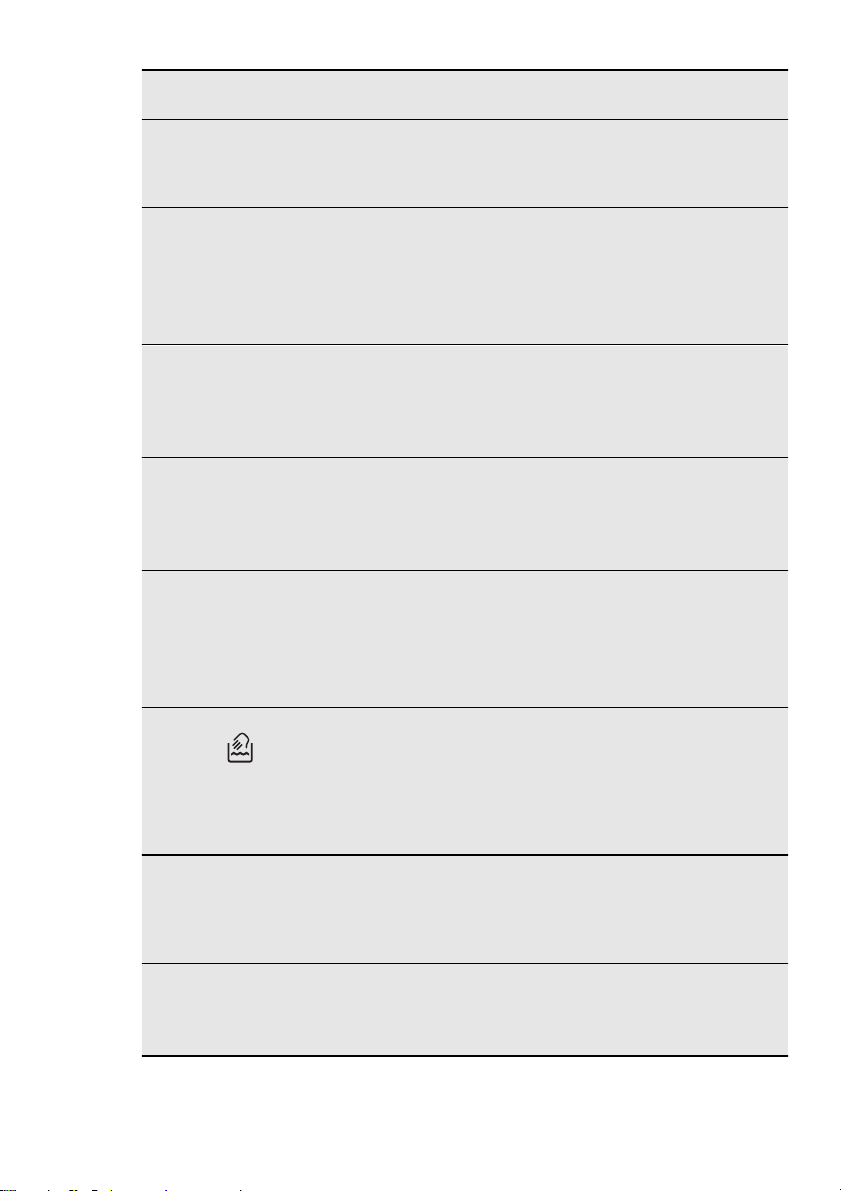
Programme
Temperature
Algodón
Cottons
95° - Cold
Algodon +
Prélavado
Cottons + Prewash
95° - Cold
Type of load
max. weight of load
White and coloured
cotton with normal
soil.
max. 7 kg
White and coloured
cotton with heavy
soil.
max. 7 kg
Cycle
description
Wash
Rinses
Long spin
Prewash
Wash
Rinses
Long spin
Functions
SPIN REDUCTION
RINSE HOLD
1)
STAIN
EXTRA RINSE
TIME SAVE
2)
SPIN REDUCTION
RINSE HOLD
EXTRA RINSE
TIME SAVE
2)
Page 11
ENGLISH 11
Programme
Temperature
Extra Silencio
Extra Silent
95° - Cold
Sintéticos
Synthetics
60° - Cold
Sintéticos +
Prélavado
Synthetics +
Prewash
60° - Cold
Plancha Fácil
3)
Easy Iron
60° - Cold
Delicados
Delicates
40° - Cold
Lana / Seda
Wool/Silk
40° - Cold
Centrifugado /
Descarga
4)
Spin/Drain
Aclarado
Rinse
Type of load
max. weight of load
White and coloured
cotton with normal
soil.
max. 7 kg
Synthetic or mixed
fabric items with normal level of soil.
max. 3.5 kg
Synthetic or mixed
fabric items with
heavy soil.
max. 3.5 kg
Synthetic fabric items
with normal soil.
max. 3.5 kg
Delicate fabrics as
acrylics, viscose, polyester items with normal soil.
max. 3.5 kg
Machine washable
wool. Hand washable
wool and delicate
fabrics with «hand
washing» care symbol.
max. 2 kg
All fabrics
The maximum load
of the laundry is related to the type of
laundry.
All fabrics.
max. 7 kg
Cycle
description
Wash
Rinses
Stop with water in
the drum
Wash
Rinses
Short spin
Prewash
Wash
Rinses
Short spin
Wash
Rinses
Short spin
Wash
Rinses
Short spin
Wash
Rinses
Short spin
Drainage of the
water
Spin phase at the
maximum speed.
One rinse with
additive spin
phase
Functions
1)
STAIN
EXTRA RINSE
TIME SAVE
2)
SPIN REDUCTION
RINSE HOLD
1)
STAIN
EXTRA RINSE
TIME SAVE
2)
SPIN REDUCTION
RINSE HOLD
EXTRA RINSE
TIME SAVE
2)
SPIN REDUCTION
RINSE HOLD
EXTRA RINSE
TIME SAVE
2)
SPIN REDUCTION
RINSE HOLD
1)
STAIN
EXTRA RINSE
TIME SAVE
2)
SPIN REDUCTION
RINSE HOLD
SPIN REDUCTION
NO SPIN
SPIN REDUCTION
RINSE HOLD
EXTRA RINSE
5)
Page 12
www.aeg.com
12
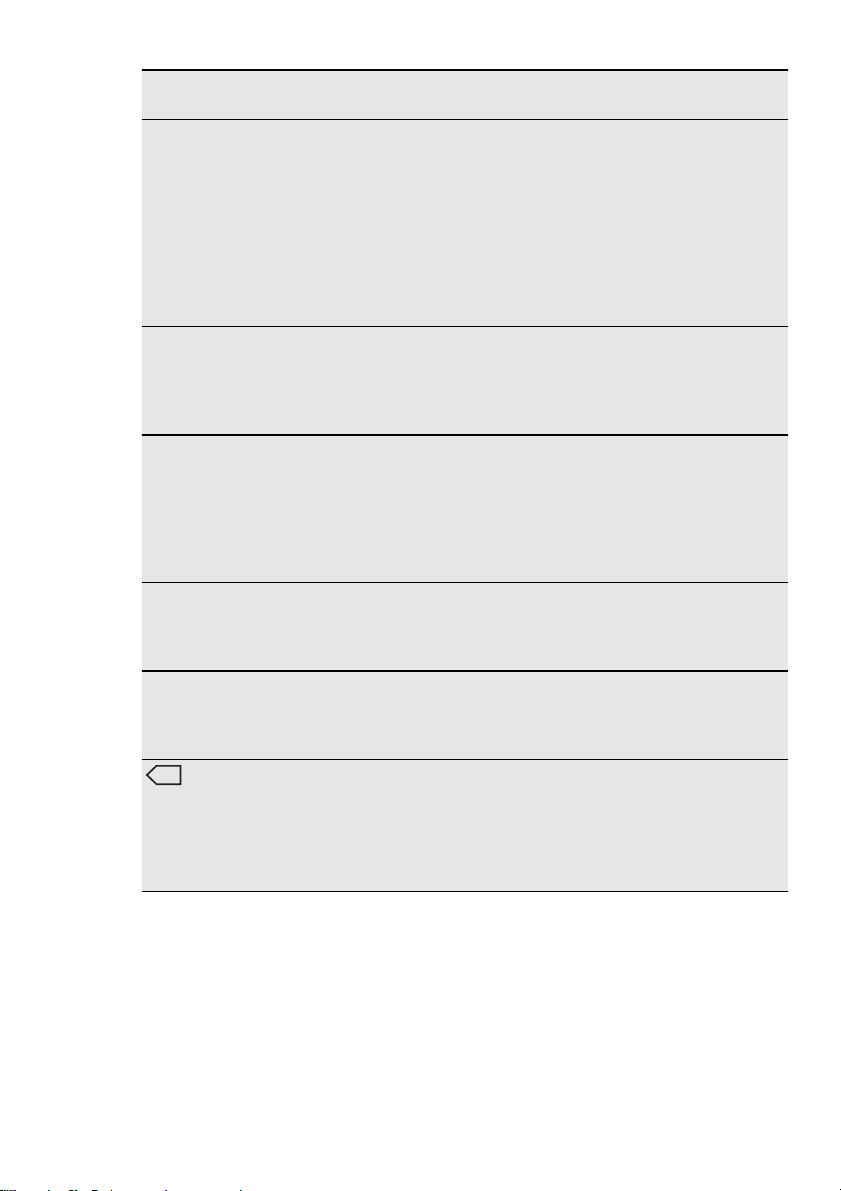
Programme
Temperature
Cortinas
Curtains
40° - Cold
Type of load
max. weight of load
Set this programme
to wash curtains. It
adds automatically
the prewash phase to
Cycle
description
Prewash
Wash
Rinses
Short spin
Functions
SPIN REDUCTION
RINSE HOLD
EXTRA RINSE
clean the dust from
the curtains.
Do not put the detergent into the prewash compartment.
max. 2 kg
Tejidos Grue-
6)
sos
Jeans
60° - Cold
Express Intensivo
Quick Intensiv
60° - 40°
All items in jeans.
Jersey made items
with hi-tech materials.
max. 7 kg
Quick washing programme, to be used
for lightly soiled
white/fast coloured
Wash
Rinses
Short spin
Wash
Rinses
Short spin
SPIN REDUC-
TION
RINSE HOLD
TIME SAVE
2)
SPIN REDUC-
TION
RINSE HOLD
EXTRA RINSE
cottons and mixed
fabrics.
max. 5 kg
20 Min. - 3 Kg
40° - 30°
Cotton and synthetic
items with light soil
or worn only one
Wash
Rinses
Short spin
SPIN REDUC-
TION
time.
Super Eco
Cold
Mixed fabrics (cotton
and synthetic items).
max. 3 kg
Wash
Rinses
Short spin
SPIN REDUC-
TION
RINSE HOLD
7)
EXTRA RINSE
Algodón
8)
Eco
60° - 40°
White and fast coloured cotton with
normal soil.
max. 7 kg
Wash
Rinses
Long spin
SPIN REDUC-
TION
RINSE HOLD
STAIN
EXTRA RINSE
TIME SAVE
1)
The STAIN function is not available with a temperature lower than 40°C.
2)
if you press the button 6 two times (Extra Quick duration), we recommend that you
decrease the quantity of the load. It is possible to load fully the appliance, however the
washing results are reduced.
3)
The wash and spin phase is soft to prevent the creases of the laundry. The appliance
adds some rinses.
4)
The default phase of the spin speed is related to cotton items. Set the spin speed. Make
sure that it agrees with the laundry. To select the DRAIN programme only, set the
function NO SPIN.
5)
Press EXTRA RINSE button to add rinses. With a low spin speed the appliance performs
delicate rinses and a short spin.
6)
The Extra Rinse option will be activated automatically.
2)
Page 13
7)
Set this programme to decrease the time and the consumption of energy and water.
8)
STANDARD PROGRAMMES for the Energy Label consumption values. According to
regulation 1061/2010, these programmes are respectively the «standard 60° C cotton
programme» and the «standard 40° C cotton programme». They are the most efficient
programmes in terms of combined energy and water consumption for washing normally
soiled cotton laundry. Set this programme to have a good washing results and decrease
the energy consumption. The time of the washing programme is extended.
The washing temperature of the washing phase may differ from the temperature de-
clared for the selected programme.
7. CONSUMPTION VALUES
At programme start the display shows the duration programme for the maximum load capacity.
During the washing phase the programme duration is automatically calculated and can greatly be reduced if the laundry load is lower than the maximum load capacity (e.g. Cotton 60°C, maximum load capacity 7 kg, the programme duration exceeds 2 hours; real load 1 kg, the programme duration
don’t reach 1 hour).
When the appliance is calculating the real programme duration a dot blinks
in the display.
The data of this table are approximate. Different causes can change the data: the quantity and type of laundry, the water and ambient temperature.
ENGLISH 13
Programmes Load
(Kg)
Energy
consump-
tion (kWh)
Water con-
sumption
(litre)
Approxi-
mate pro-
gramme
duration
Remain-
ing mois-
ture (%)
(minutes)
Cottons 60 °C 7 1.3 62 157 53
Cottons 40 °C 7 0.8 62 154 53
Synthetics 40
°C
Delicates 40
°C
Wool/Hand
wash 30 °C
3.5 0.53 45 127 35
3.5 0.57 53 100 35
2 0.25 45 56 30
Standard cotton programmes
Standard 60
°C cotton
Standard 60
°C cotton
Standard 40
°C cotton
1)
At the end of spin phase.
7 0.86 52 240 53
3.5 0.74 41 215 53
3.5 0.52 41 210 53
1)
Page 14
www.aeg.com
14
Off Mode (W) Left On Mode (W)
0.48 0.48
The information given in the charts above are in compliance with the EU Commission regulation 1015/2010 implementing directive 2009/125/EC.
8. BEFORE FIRST USE
1.
To activate the drain system, put 2 litre of water in the main wash compartment of the detergent dispenser.
2.
Put a small quantity of detergent in
the main wash compartment of the
9. USING THE APPLIANCE
1.
Open the water tap.
2.
Connect the mains plug to the mains
socket.
3.
Press button 1 to activate the appliance.
4.
Put the laundry in the appliance.
5.
Use the correct quantity of detergent and additives.
6.
Set and start the correct programme
for the type of laundry and soil.
detergent dispenser. Set and start a
programme for cotton at the highest
temperature without laundry. This
removes all possible dirt from the
drum and the tub.
9.1 Loading the laundry
1.
Open the appliance door.
2.
Put the laundry in the drum, one
item at a time. Shake the items before you put them in the appliance.
Make sure not to put too much laundry in the drum.
3.
Close the door.
Make sure that no laundry stays between
the seal and the door. There is a risk of
water leakage or damage to the laundry.
Page 15
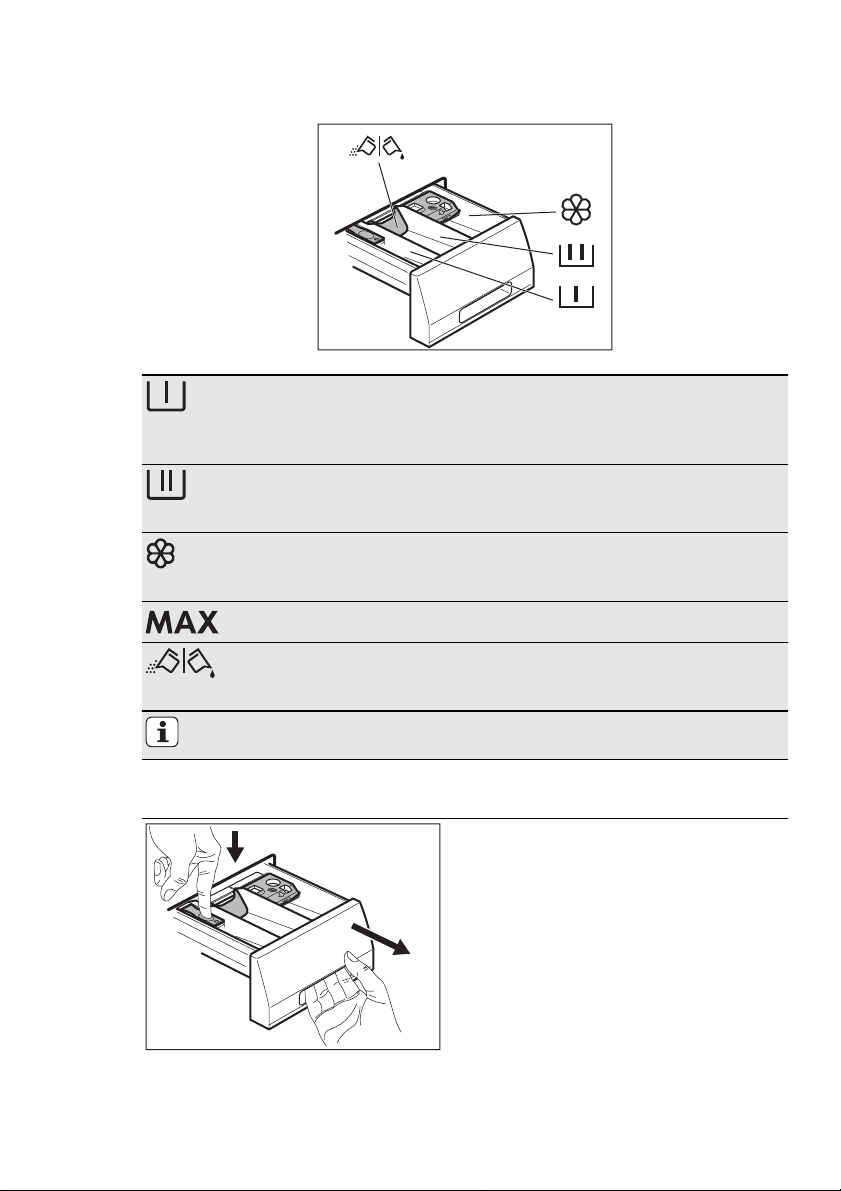
9.2 Filling the detergent and additives
The detergent compartment for the prewash phase, the soak
programme and for the stain function.
Add the detergent for prewash, soak and stain remover before
the start of the programme.
The detergent compartment for the washing phase.
If you use a liquid detergent, put it immediately before you start
the programme.
Liquid additives compartment (fabric conditioner, starch).
Put the product in the compartment before you start the programme.
This is the maximum level for the quantity of liquid additives.
ENGLISH 15
Flap for powder or liquid detergent
Turn it (up or down) in the correct position to use powder or liquid detergent.
Always obey the instructions that you find on the packaging of the detergent products.
Check the position of the flap
1.
Pull out the detergent dispenser until it stops.
2.
Press the lever down to remove the
dispenser.
Page 16
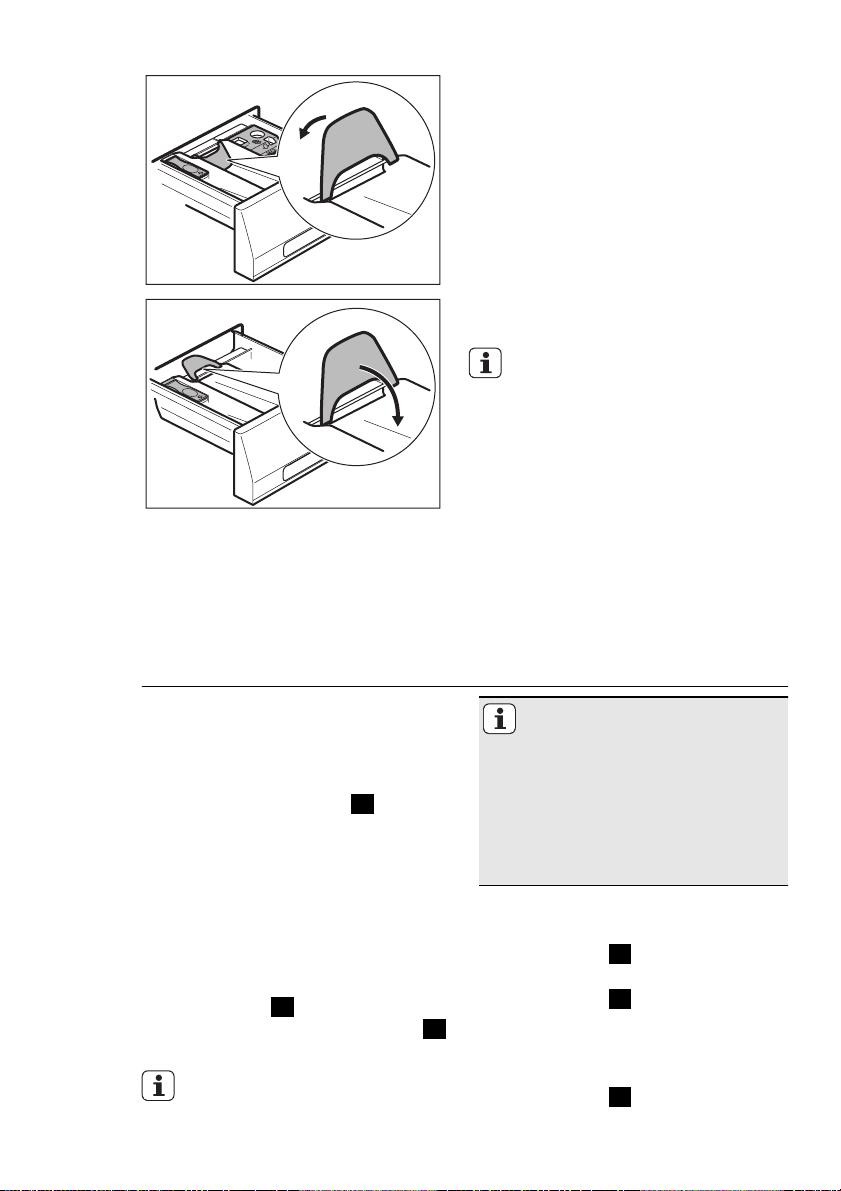
www.aeg.com
16
5.
Measure out the detergent and the
fabric conditioner.
6.
Carefully close the detergent dispenser. Make sure that the flap
does not cause a blockage when
you close the drawer.
9.3 Setting and starting a
programme
1.
Turn the programme knob. The related programme indicator comes on.
2.
The indicator of button 4 flashes
with red colour.
3.
The display shows the default temperature and spin speed. To change
the temperature and/or the spin
speed, press the related buttons.
4.
Set the available functions. The indicator of the set function comes on or
the display shows the related symbol.
5.
Press button 4 to start the programme. The indicator of button
is on.
The drain pump can operate for
a short time when the appliance
fills water.
3.
To use powder detergent, turn the
flap up.
4.
To use liquid detergent, turn the
flap down.
With the flap in the position
DOWN:
– Do not use gelatinous or thick
liquid detergents.
– Do not put more liquid deter-
gent than the limit showed in
the flap.
– Do not set the prewash phase.
– Do not set the delay start func-
tion.
The appliance adjust automatically the cycle time to the
laundry you have put in the
drum to have perfect washing
results in the minimum necessary time. After approximately 15 minutes from the start of
the programme, the display
shows the new time value.
9.4 Interrupt a programme
1.
Press button 4 . The indicator
flashes.
2.
Press button 4 again. The washing
4
programme continues.
9.5 Cancel a programme
1.
Press button 1 to cancel the programme and to deactivate the appliance.
Page 17
2.
Press button 1 again to activate
the appliance. Now, you can set a
new washing programme.
The appliance does not drain the
water.
9.6 Change a function
You can change only some functions before they operate.
1.
Press button 4 . The indicator
flashes.
2.
Change the function set.
ENGLISH 17
If the temperature and level of
the water in the drum are too
high, the door lock symbol stays
on and you cannot open the
door. To open the door do the
steps that follow:
1.
Deactivate the appliance.
2.
Wait for some minutes.
3.
Make sure that no water is in
the drum.
If you deactivate the appliance, it
is necessary to set the programme again.
9.7 Set the delay start
1.
Press button 5 again and again until the display shows the number of
minutes or hours. The related symbols comes on.
2.
Press button 4 , the appliance
starts the countdown of the delay
start.
When the countdown is completed,
the programme starts automatically.
Before you press button 4 to
start the appliance, you can cancel or change the set of the delay
start.
9.8 Cancel the delay start
1.
Press button 4 . The related indicator flashes.
2.
Press button 5 again and again until the display shows 0’.
3.
Press button 4 . The programme
starts.
9.9 Open the door
While a programme or the delay start
operates, the appliance door is locked.
To open the appliance door:
1.
Press button 4 . The door lock
symbol in the display goes off.
2.
Open the appliance door.
3.
Close the appliance door and press
button
delay start continues.
4
. The programme or the
9.10 At the end of the
programme
• The appliance stops automatically.
• The acoustic signals operate.
•
In the display
• The indicator of the Start/Pause but-
4
ton
goes off.
• The door lock symbol goes off.
•
Press button
pliance. After five minutes from the
end of the programme, the energy
saving function automatically deactivates the appliance.
When you activate the appliance
again, the display show the end
of the last set programme. Turn
the programme knob to set a
new cycle.
• Remove the laundry from the appliance. Make sure that the drum is empty.
• Keep the door ajar, to prevent mildew
and odours.
• Close the water tap.
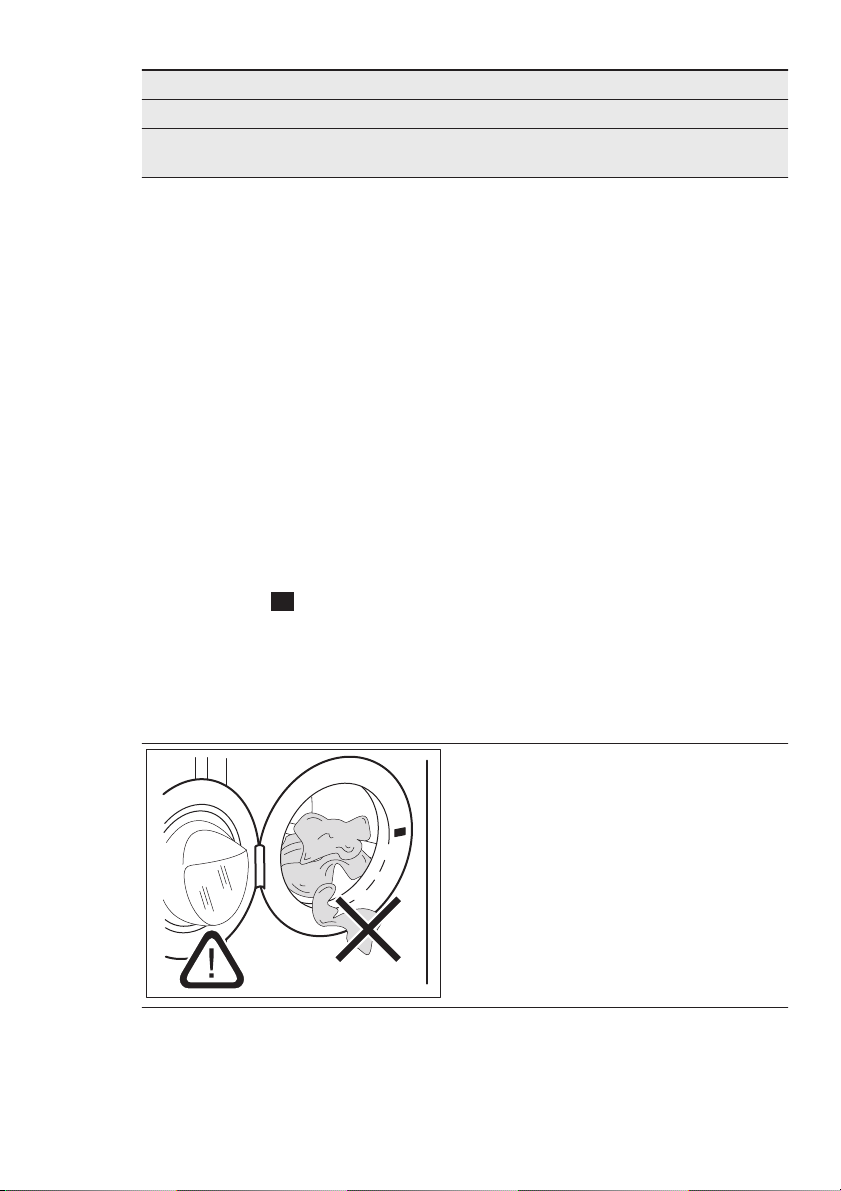
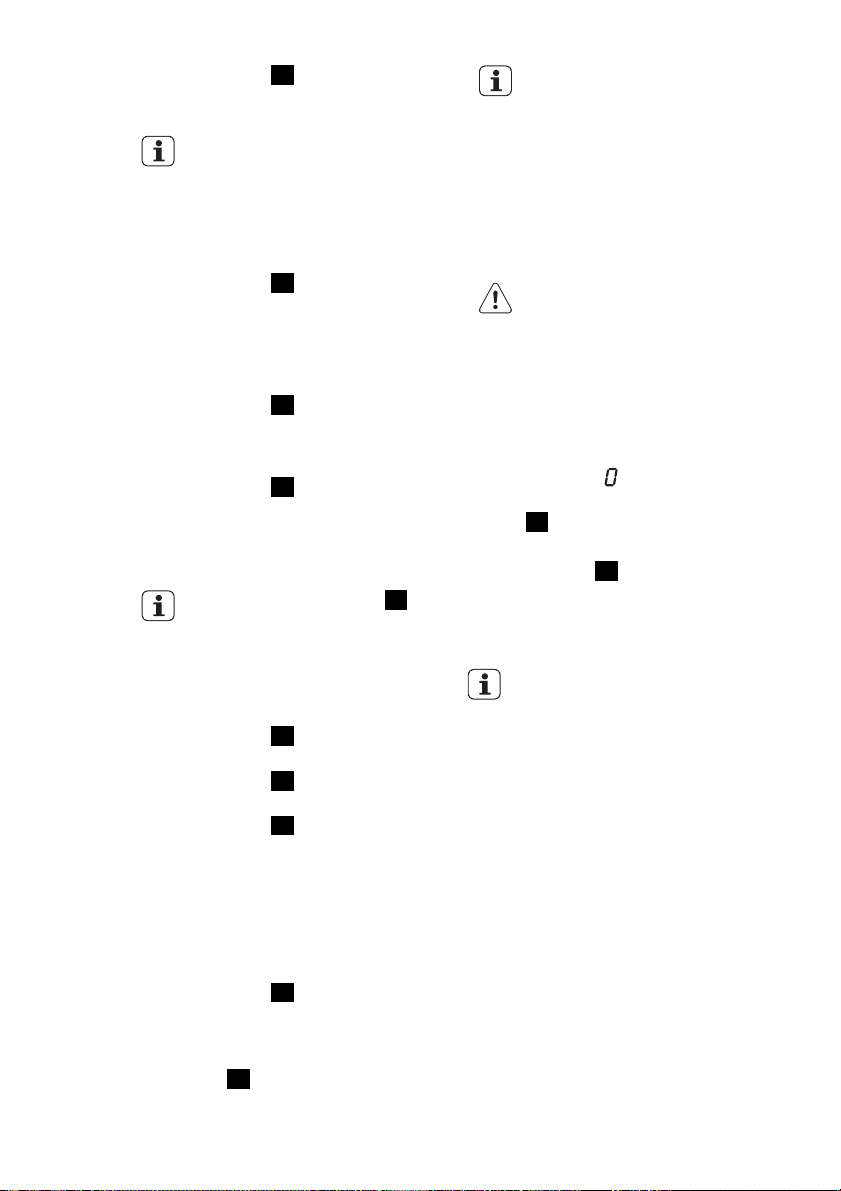
The washing programme is
completed, but there is water in the
drum:
– The drum turns regularly to prevent
the creases in the laundry.
– The door stays locked.
– You must drain the water to open the
door.
To drain the water:
1.
If necessary, decrease the spin
speed.
comes on.
1
to deactivate the ap-
Page 18

www.aeg.com
18
2.
Press the Start/Pause button 4 .
The appliance drain the water and
spin.
3.
When the programme is completed
and the door lock symbol goes off,
you can open the door
10. HINTS AND TIPS
4.
Deactivate the appliance.
The appliance drain and spin automatically after approximately
18 hours.
10.1 The laundry load
• Divide the laundry in: white, coloured,
synthetics, delicates and wool.
• Obey the washing instructions that are
on the laundry care labels.
• Do not wash together white and coloured items.
• Some coloured items can discolour
with the first wash. We recommend
that you wash them separately for the
first times.
• Button up pillowcases, close zippers,
hooks and poppers. Tie up belts.
• Empty the pockets and unfold the
items.
• Turn inside out multilayered fabrics,
wool and items with painted illustrations.
• Remove hard stains.
• Wash with a special detergent heavy
soil stains.
• Be careful with the curtains. Remove
the hooks or put the curtains in a
washing bag or pillowcase.
• Do not wash in the appliance :
– Laundry without hems or with cuts
– Underwired bras.
– Use a washing bag to wash small
items.
• A very small load can cause balance
problems with the spin phase. If this
occurs, adjust manually the items in
the tub and start the spin phase again.
10.2 Stubborn stains
For some stains, water and detergent is
not sufficient.
We recommend that you remove these
stains before you put the items in the
appliance.
Special stain removers are available. Use
the special stain remover that is applicable to the type of stain and fabric.
10.3 Detergents and additives
• Only use detergents and additives
specially made for washing machines.
• Do not mix different types of detergents.
• To help the environment, do not use
more than the correct quantity of detergent.
• Obey the instructions that you find on
the on packaging of these products.
• Use the correct products for the type
and colour of the fabric, the programme temperature and the level of
soil.
• If you use liquid detergents, do not set
the prewash phase.
• If your appliance has not the detergent dispenser with the flap device,
add the liquid detergents with a dosing ball.
10.4 Water hardness
If the water hardness in your area is high
or moderate, we recommend that you
use a water softener for washing machines. In areas where the water hardness is soft it is not necessary to use a
water softener.
To know the water hardness in your area,
contact your local water authority.
Obey the instructions that you find on
the packaging of the products.
Equivalent scales measure the water
hardness:
• German degrees (°dH).
• French degrees (°TH).
Page 19
• mmol/l (millimol for each litre - international unit for the hardness of water).
Water hardness table
Level Type
°dH °T.H. mmol/l Clarke
1 soft 0-7 0-15 0-1.5 0-9
2 medium 8-14 16-25 1.6-2.5 10-16
3 hard 15-21 26-37 2.6-3.7 17-25
4 very hard > 21 > 37 >3.7 >25
11. CARE AND CLEANING
ENGLISH 19
• Clarke degrees.
Water hardness
WARNING!
Disconnect the appliance from the mains
supply before you clean it.
11.1 Descaling
The water we use contains limescale. If it
becomes necessary, use a water softener
to remove limescales.
Use a special product made for washing
machines. Obey the instructions that you
find on the packaging of the manufacturer.
Do this separately from the laundry
wash.
11.2 External cleaning
Clean the appliance only with soap and
warm water. Fully dry all the surfaces.
11.4 Door seal
CAUTION!
Do not use alcohol, solvents or
chemical products.
11.3 Maintenance wash
With the low temperature programmes it
is possible that some detergent stays in
the drum. Make regularly a maintenance
wash. To do this:
• Empty the laundry from the drum.
• Set the hottest cotton wash programme
• Use a correct quantity of powder detergent with biological properties.
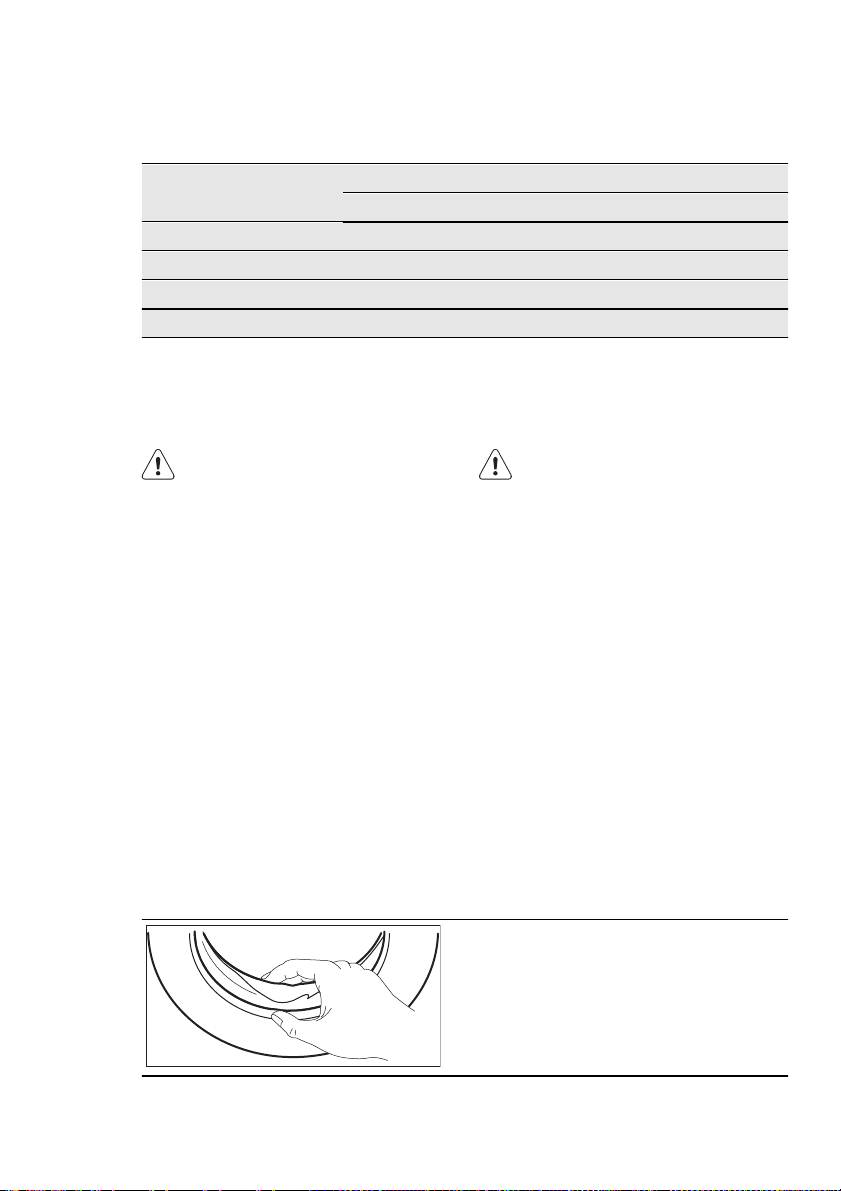
After each wash, keep the door open for
a while to prevent mould and to let unpleasant smells go out.
Regularly examine the seal and remove
all objects from the inner part.
Page 20
www.aeg.com
20
11.5 Drum
Regularly examine the drum to prevent
limescale and rust particles.
Only use special products to remove rust
particles from the drum.
To do this:
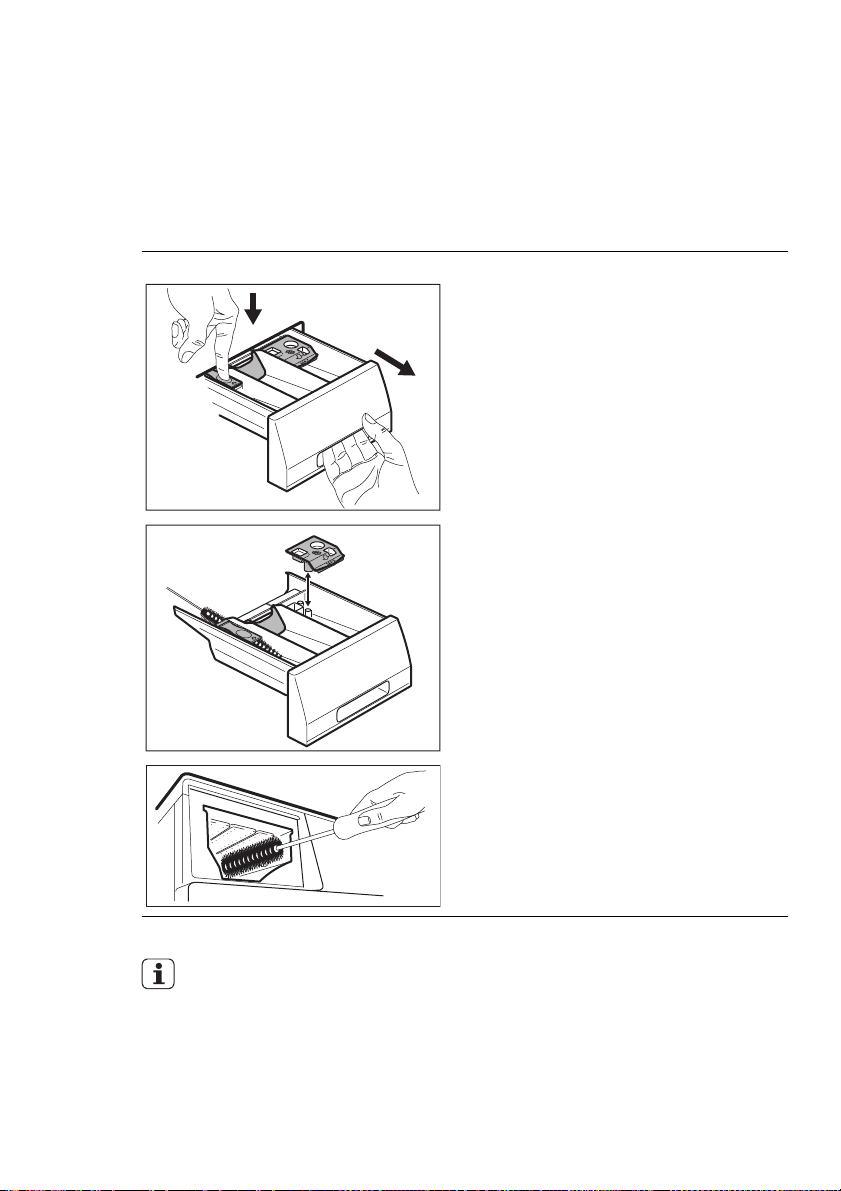
11.6 Detergent dispenser
To clean the dispenser:
1
2
• Clean the drum with special product
for stainless steel.
• Start a short programme for cotton at
the maximum temperature with a
small quantity of detergent.
1.
Press the lever.
2.
Pull the dispenser out.
3.
Remove the top part of the liquid
additive compartment.
4.
Clean all the parts with water.
11.7 Drain pump
Regularly examine the drain
pump and make sure that it is
clean.
Clean the pump if:
• The appliance does not drain the water.
• The drum cannot turn.
5.
Clean the dispenser recess with a
brush.
6.
Put back the dispenser in the recess.
• The appliance makes an unusual noise
because of the blockage of the drain
pump.
• The display shows an alarm code because of the problem with water drain.
Page 21
WARNING!
1.
Disconnect the mains plug
from the mains socket.
2.
Do not remove the filter
while the appliance operates. Do not clean the drain
pump if the water in the appliance is hot. The water
must be cold before you
clean the drain pump.
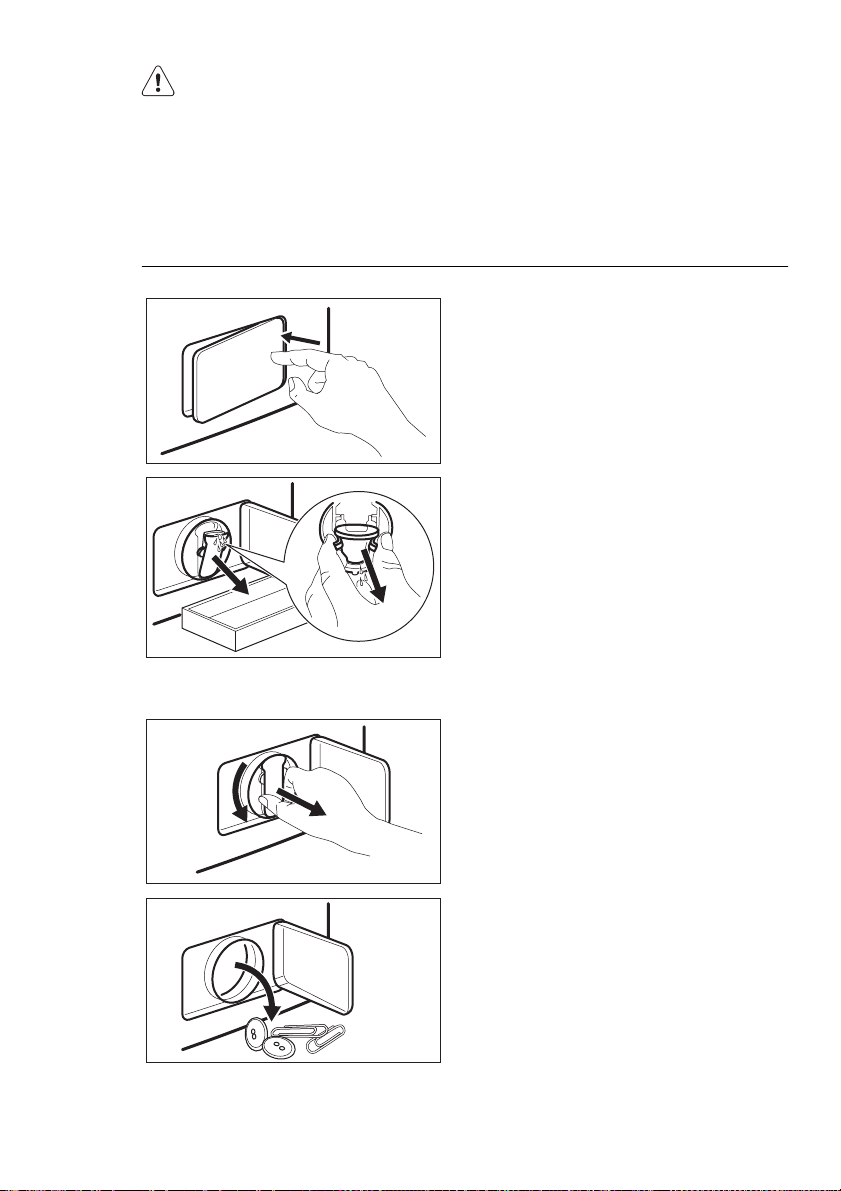
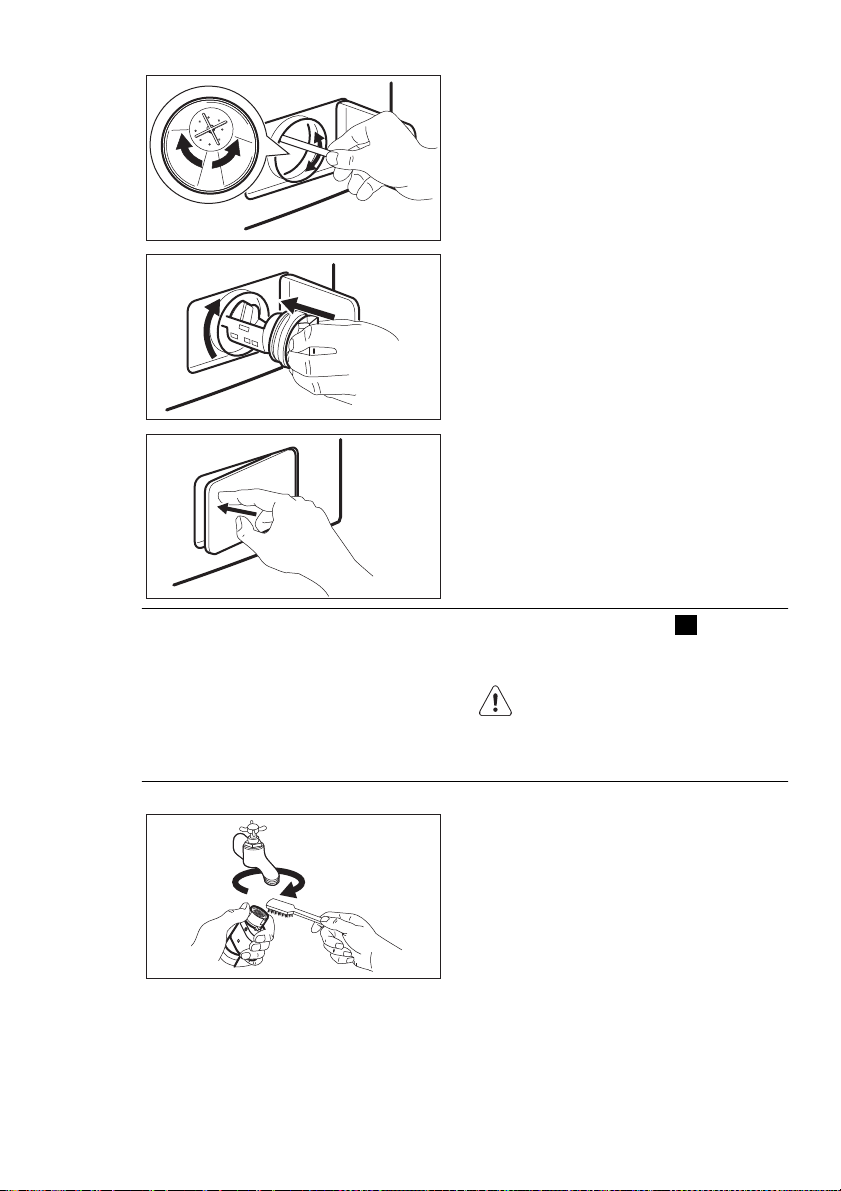
To clean the drain pump:
ENGLISH 21
1.
Open the drain pump door.
2.
Put a container below the recess of
the drain pump to collect the water
that flows out.
3.
Press the two levers and pull forward the drainage duct to let the
water flow out.
4.
When the container is full of water,
put the drainage duct back again
and empty the container. Do steps 3
and 4 again and again until no more
water flows out from the drain
pump.
5.
Pull back the drainage duct and turn
the filter to remove it.
1
2
6.
Remove fluff and objects from the
pump.
Page 22
www.aeg.com
22
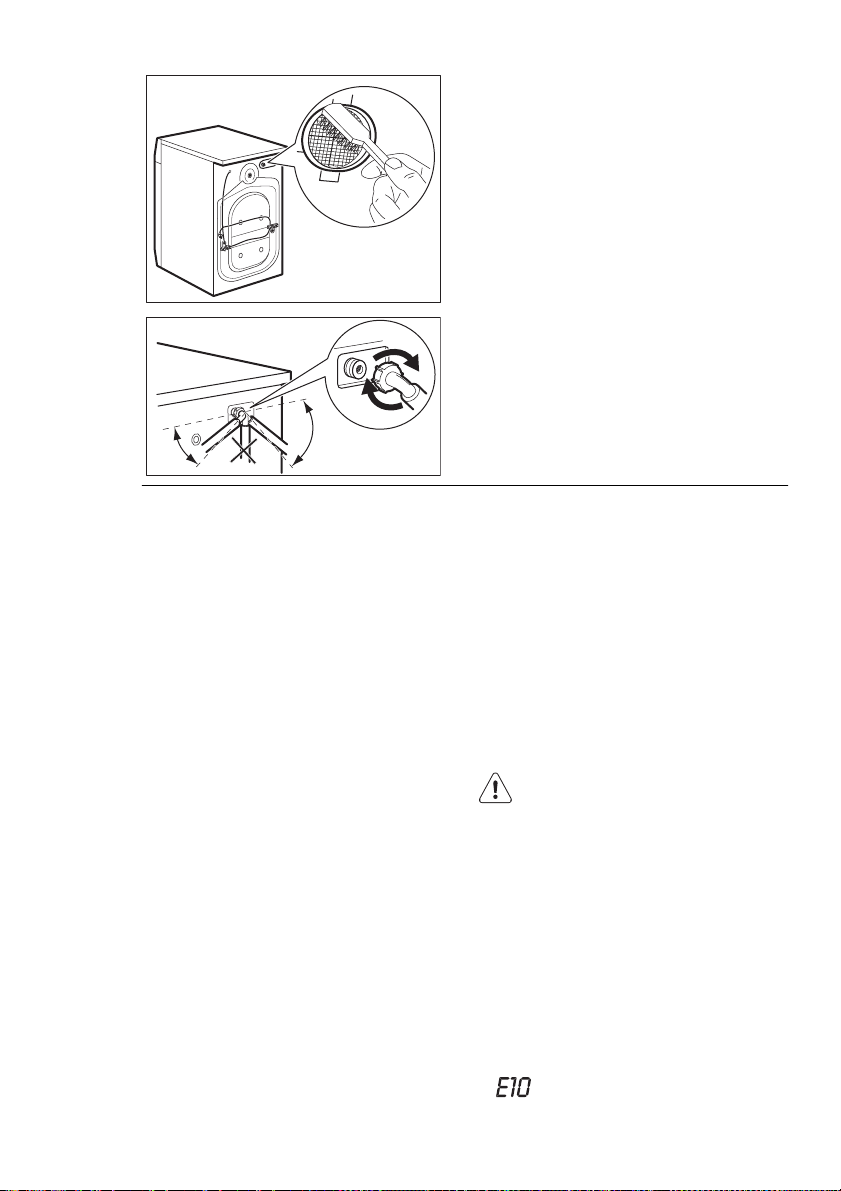
7.
Make sure that the impeller of the
pump can turn. If this does not occur, contact the service centre.
8.
Clean the filter under the water tap
and put it back in the pump into the
1
2
special guides.
9.
Make sure that you tighten correctly
the filter to prevent leakages.
10.
Close the drain pump door.
11.8 The inlet hose filter and
the valve filter
It could be necessary to clean the filters
when:
• The appliance does not fill with water.
• The appliance fills with the water for a
long time.
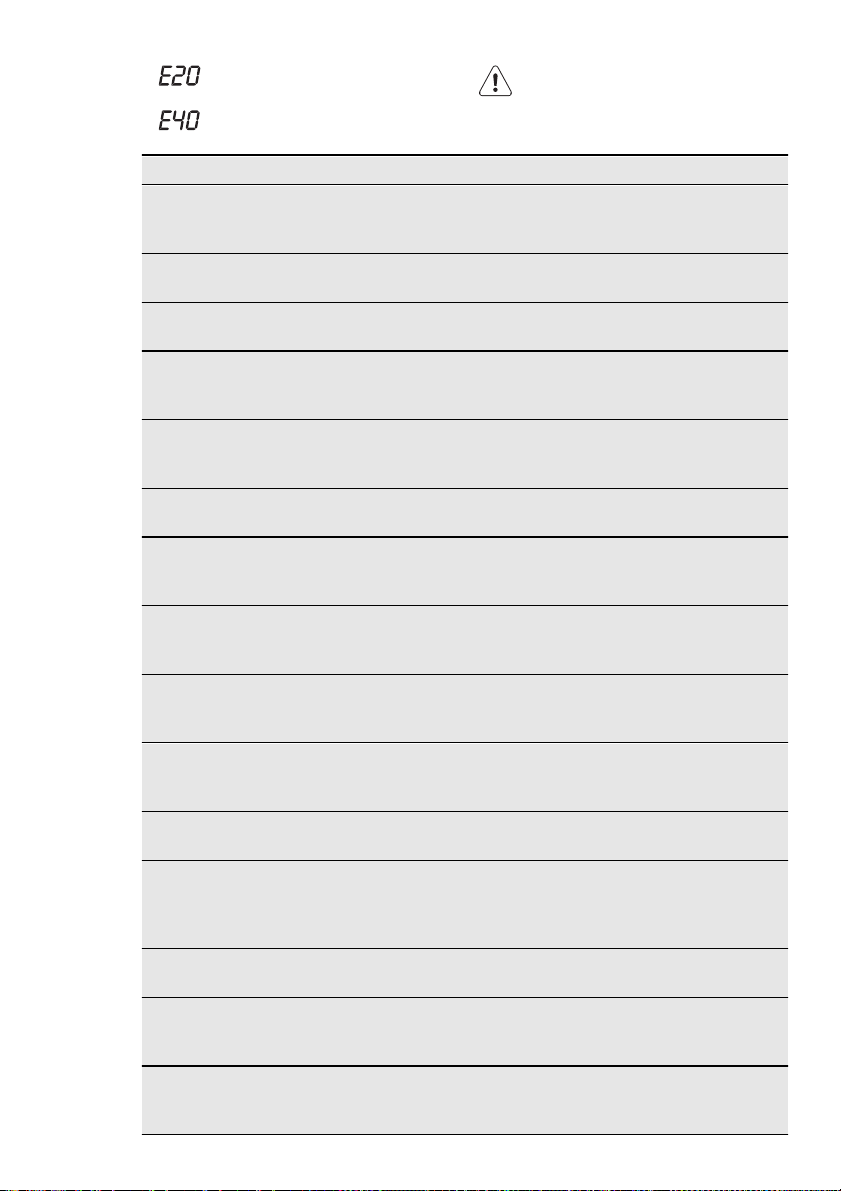
To clean the water inlet filters:
•
The indicator of button
4
the display shows the related alarm.
Refer to 'Troubleshooting'.
WARNING!
Disconnect the mains plug from
the mains socket.
1.
Close the water tap.
2.
Remove the water inlet hose from
the water tap.
3.
Clean the filter in the inlet hose with
a stiff brush.
flashes and
Page 23
20°
45°
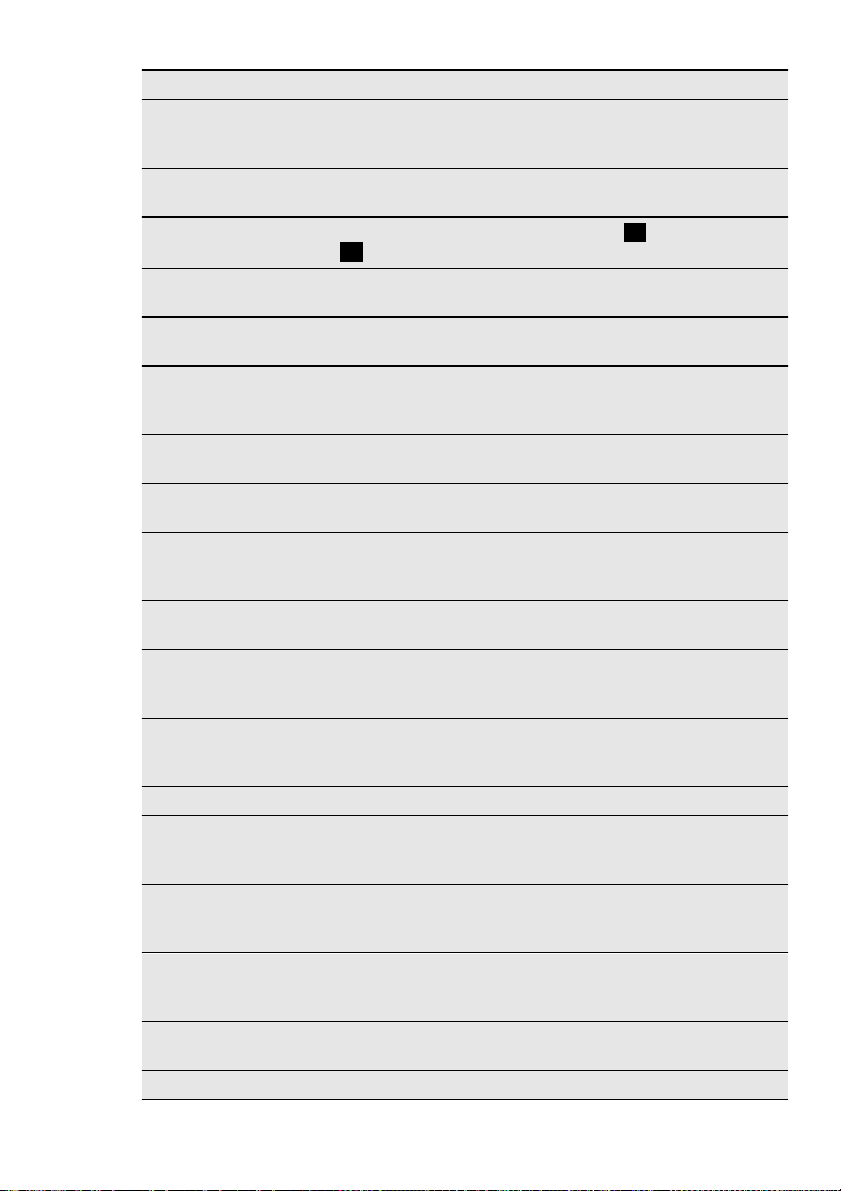
4.
Remove the inlet hose behind the
appliance.
5.
Clean the filter in the valve with a
stiff brush or a towel.
6.
Install again the inlet hose. Make
sure that the couplings are tight to
prevent leakages.
7.
Open the water tap.
ENGLISH 23
11.9 Emergency drain
Because of a malfunction, the appliance
cannot drain the water.
If this occurs, do steps (1) through (6) of
'To clean the drain pump'.
If necessary, clean the pump.
Put the drainage duct back and close the
drain pump flap.
When you drain the water with the emergency drain procedure, you must activate again the drain system:
1.
Put 2 litres of water in the main wash
compartment of the detergent dispenser.
2.
Start the programme to drain the
water.
11.10 Frost precautions
If the appliance is installed in an area
where the temperature can be less than
12. TROUBLESHOOTING
The start of the appliance does not occur or it stops during operation.
First try to find a solution to the problem
(refer to the table). If not, contact the
service centre.
0 °C, remove the remaining water from
the inlet hose and the drain pump.
1.
Disconnect the mains plug from the
mains socket.
2.
Close the water tap.
3.
Remove the water inlet hose
4.
Put the two ends of the inlet hose in
a container and let the water flow
out of the hose.
5.
Empty the drain pump. Refer to the
emergency drain procedure
6.
When the drain pump is empty, install the inlet hose again.
WARNING!
Make sure that the temperature
is more than 0 °C before you use
the appliance again.
The manufacturer is not responsible for damages caused by low
temperatures.
With some problems, the acoustic
signals operate and the display shows
an alarm code:
•
- The appliance does not fill with
water.
Page 24
www.aeg.com
24
•
- The appliance does not drain
the water.
•
- The appliance door is open or
not closed correctly.
WARNING!
Deactivate the appliance before
you do the checks.
Problem Possible cause Possible solution
The appliance
The water tap is closed. Open the water tap.
does not fill with
water.
The water inlet hose is
damaged.
The filters in the water
inlet hose is blocked .
The water tap is blocked
Make sure that the water inlet
hose has no damages.
Clean the filters. Refer to 'Care
and cleaning'.
Clean the water tap.
or is furred with limescale.
The connection of the
water inlet hose is not
Make sure that the connection
is correct.
correct.
The water pressure is
too low.
The appliance
does not drain the
The water drain hose is
damaged.
Contact your local water author-
ity.
Make sure that the water drain
hose has no damages.
water.
The filter of the drain
pump is blocked.
Clean the filter of the drain
pump. Refer to 'Care and clean-
ing'.
The connection of the
water drain hose is not
Make sure that the connection
is correct.
correct.
A washing programme
Set the drain programme.
without the drain phase
is set.
The function Rinse &
Set the drain programme.
Hold is on.
The appliance
Close the door correctly.
door is open or
not closed correctly.
The spin phase
The spin phase is off. Set the spin programme.
does not operate.
The filter of the drain
pump is blocked.
Clean the filter of the drain
pump. Refer to 'Care and clean-
ing'.
Balance problems with
the laundry load.
Adjust manually the items in the
tub and start the spin phase
again.
Page 25
ENGLISH 25
Problem Possible cause Possible solution
The programme
does not start.
The mains plug is not
connected in the mains
Put in the mains plug.
socket.
Blow out fuse in the
Replace the fuse.
household fuse box.
You did not press but-
4
.
ton
Press button 4 .
The delay start is set. To start immediately the pro-
gramme, cancel the delay start.
The Child Lock function
is activated.
There is water on
the floor.
Leakages from the couplings of the water ho-
Deactivate the Child Lock func-
tion.
Make sure that the couplings
are tight.
ses.
Leakages from the drain
pump.
The water drain hose is
damaged.
You cannot open
the appliance
The washing programme is in operation.
Make sure that the drain pump
filter is tight.
Make sure that the water inlet
hose has no damages.
Let the washing programme
end.
door.
There is water in the
drum.
The appliance
makes an unusual
Incorrect level of the appliance.
Set the drain or the spin pro-
gramme.
Adjust the level of the appli-
ance. Refer to 'Installation'.
noise.
You did not remove the
packaging and/or the
transit bolts.
Remove the packaging and/or
the transit bolts. Refer to 'Instal-
lation'.
The load is very small. Add more laundry in the drum.
The appliance fills
with water and
The end of the drain
hose is too low.
Make sure that the drain hose is
in the correct position.
drain immediately.
The washing re-
sults are not satisfactory.
You did not remove the
The detergent you used
was not sufficient or correct.
stubborn stains before
Increase the detergent quantity
or use a different one.
Use special products to remove
the stubborn stains.
you wash the laundry.
Incorrect temperature
was set.
Make sure that you set the cor-
rect temperature.
Too much laundry load. Decrease the laundry load.
Page 26
www.aeg.com
26
After the check, activate the appliance.
The programme continues from the
point of interruption.
If the problem occurs again, contact the
service centre.
13. INSTALLATION
If the display shows other alarm codes,
contact the service centre.
13.1 Fixing plate kit
(4055171146)
Available from your authorized dealer.
13.2 Unpacking
If you install the appliance on a plinth,
secure the appliance in the fixing plates.
Follow the instructions supplied with the
kit.
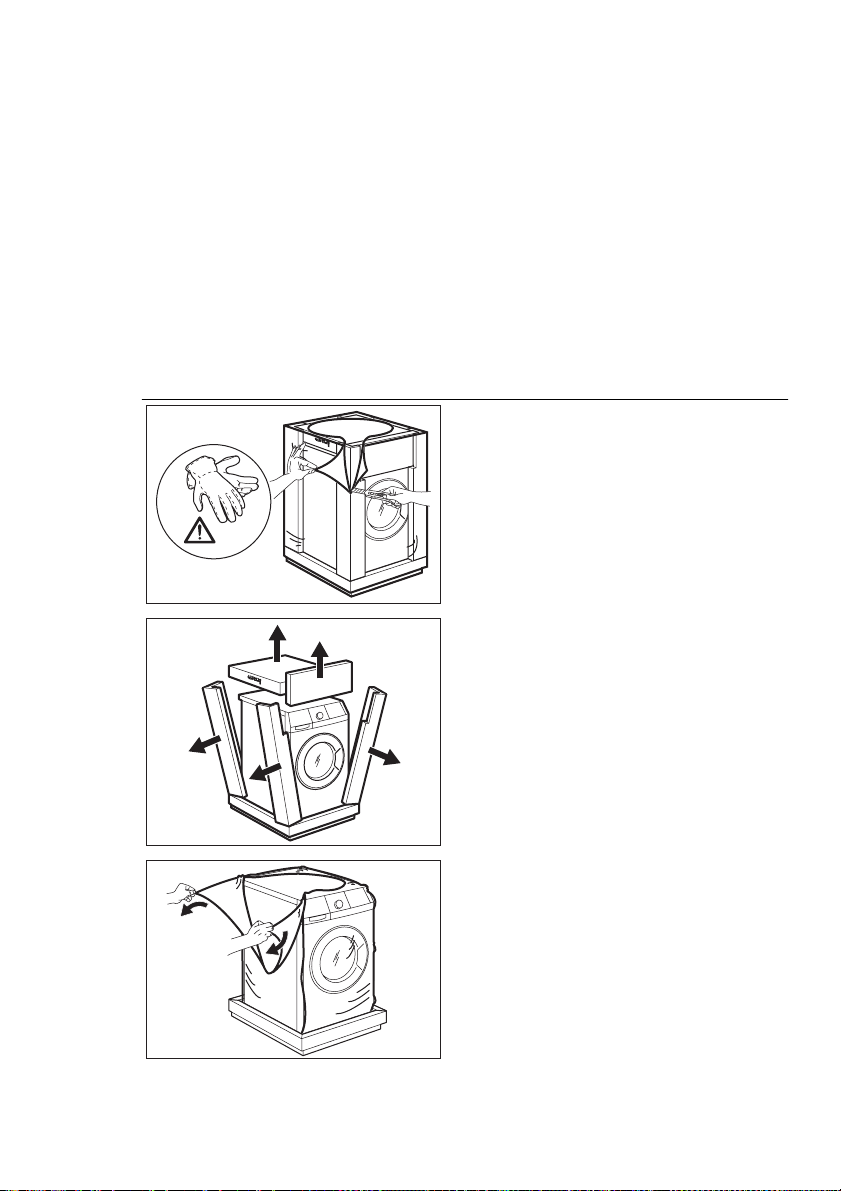
1.
Use the gloves. Remove the external
film. If necessary, use a cutter.
2.
Remove the cardboard top.
3.
Remove the polystyrene packaging
materials.
4.
Remove the internal film.
Page 27
ENGLISH 27
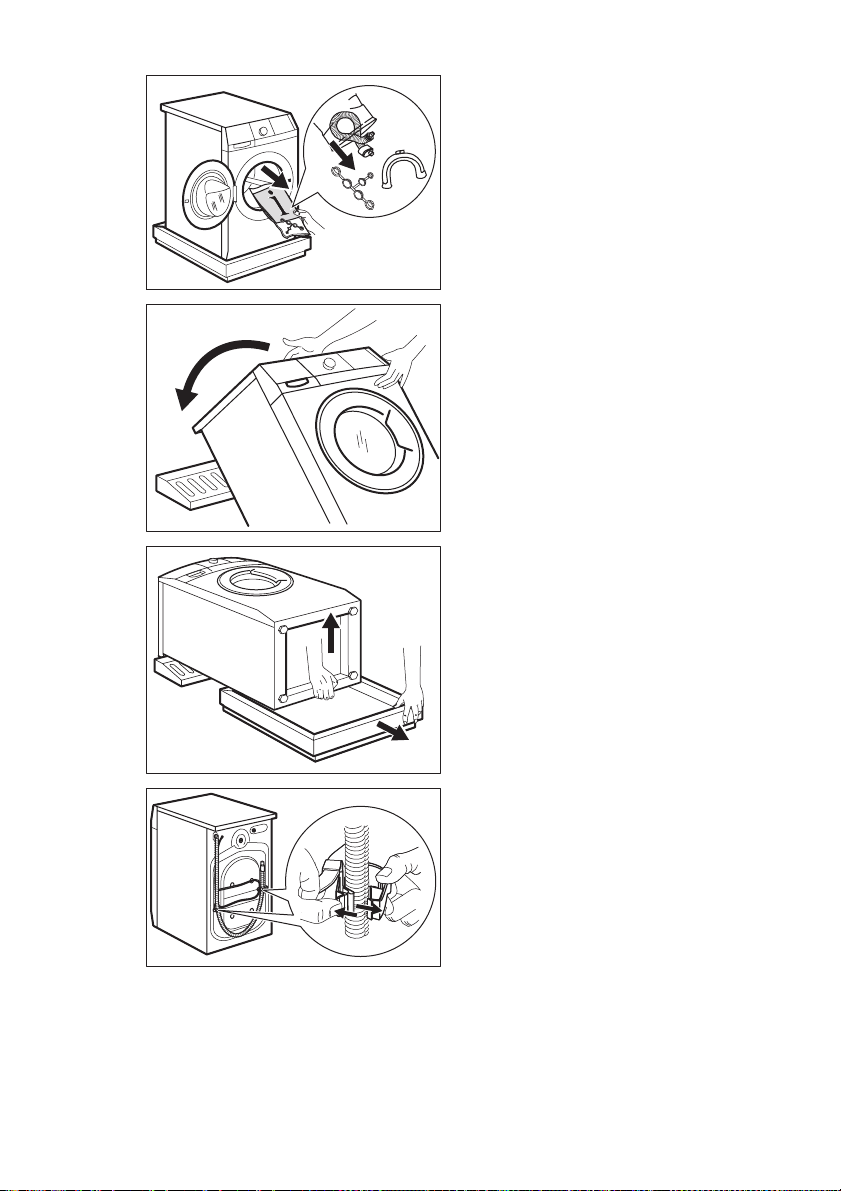
5.
Open the door and remove all the
items from the drum.
6.
Put one of the polystyrene packaging elements on the floor behind
the appliance. Carefully put down
the appliance with the rear side on
it. Make sure not to damage the hoses.
7.
Remove the polystyrene protection
from the bottom.
8.
Pull up the appliance in vertical position.
1
2
9.
Remove the power supply cable and
the drain hose from the hose holders.
Page 28
www.aeg.com
28
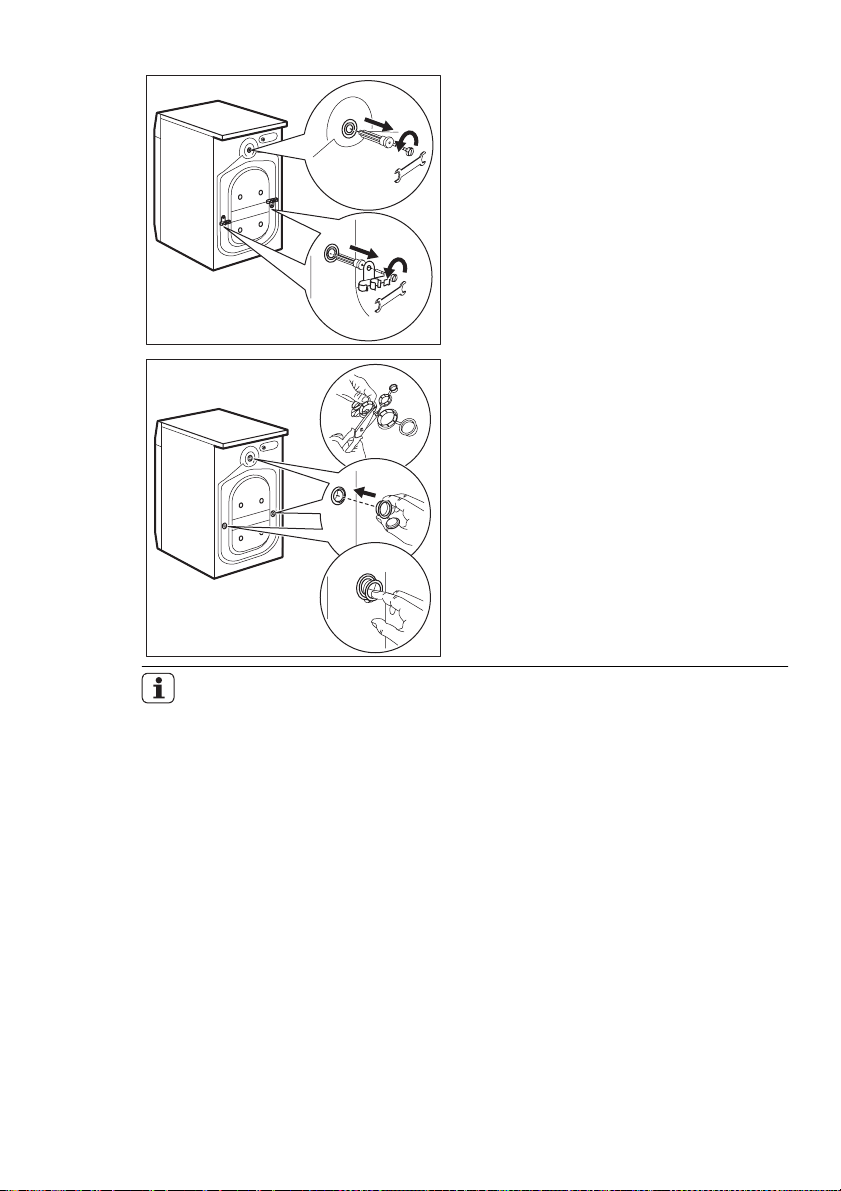
10.
Remove the three bolts. Use the key
supplied with the appliance.
11.
Pull out the plastic spacers.
12.
Put the plastic caps in the holes.
You can find these caps in the user
manual bag.
– We recommend that you keep
the packaging and the transit
bolts for when you move the
appliance.
– If the appliance is delivered in
the winter months when there
are minus temperatures. Store
it at room temperature for 24
hours before using for the first
time.
Page 29
13.3 Positioning and levelling
20
O
45
O
x4
ENGLISH 29
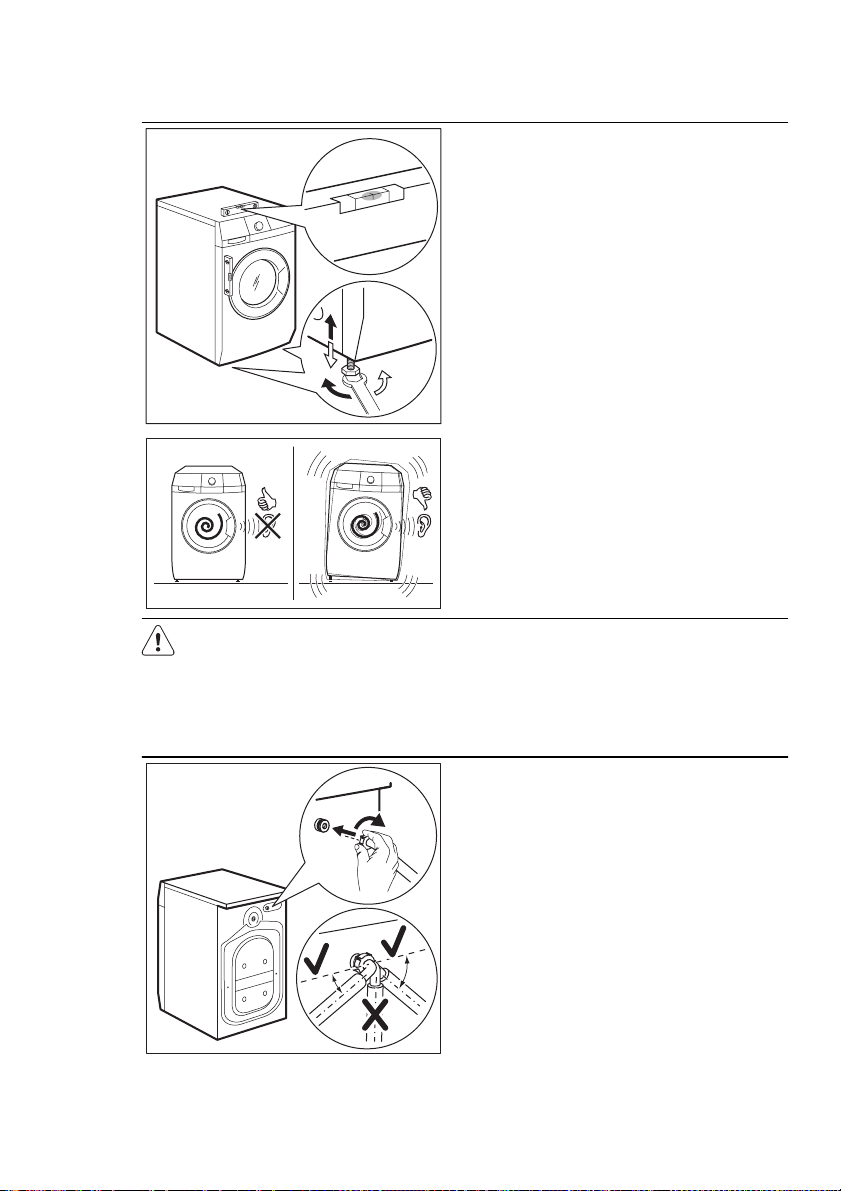
• Install the appliance on a flat hard
floor.
• Make sure that carpets do not stop
the air circulation below the appliance.
• Make sure that the appliance does not
touch the wall or other units
• Loosen or tighten the feet to adjust
the level. A correct adjustment of the
appliance level prevents the vibration,
noise and the movement of the appliance when in operation.
• The appliance must be level and stable.
CAUTION!
Do not put cardboard, wood or
equivalent materials below the
appliance feet to adjust the level.
13.4 The inlet hose
20
20
• Connect the hose to the appliance.
Turn the inlet hose only left or right.
Loose the ring nut to set it in the correct position.
O
O
45
O
O
45
Page 30
www.aeg.com
30
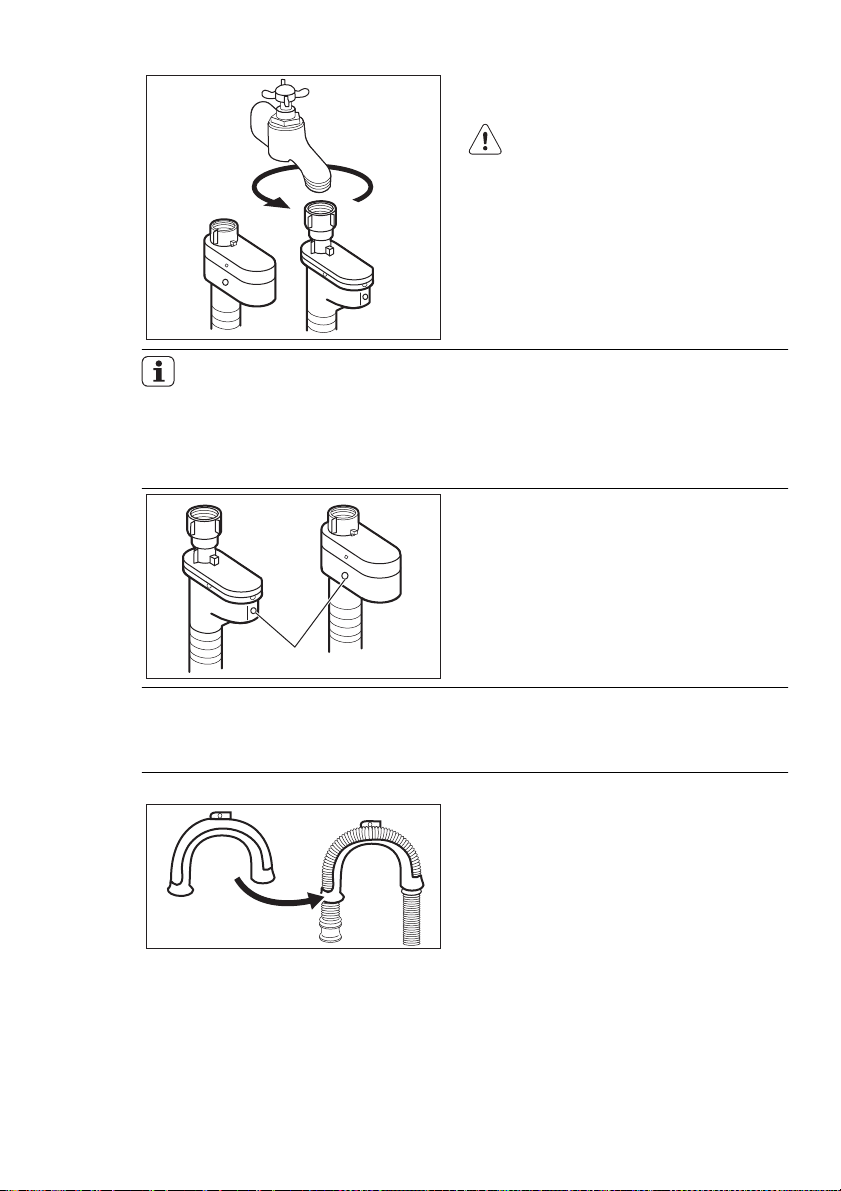
• Connect the water inlet hose to the
cold water tap with 3/4 thread.
CAUTION!
Make sure that there are no leaks
from the couplings.
Do not use an extension hose if
the inlet hose is too short. Contact the service centre for the replacement of the inlet hose.
Water-stop device
The inlet hose has a water stop device.
This device prevents water leaks in the
hose because of its natural ageing. The
red sector in the window «A» shows this
fault .
If this occur, close the water tap and
contact the service centre to replace the
hose.
A
13.5 Water drainage
There are different procedures to connect the drain hose:
With the plastic hose guide.
Page 31
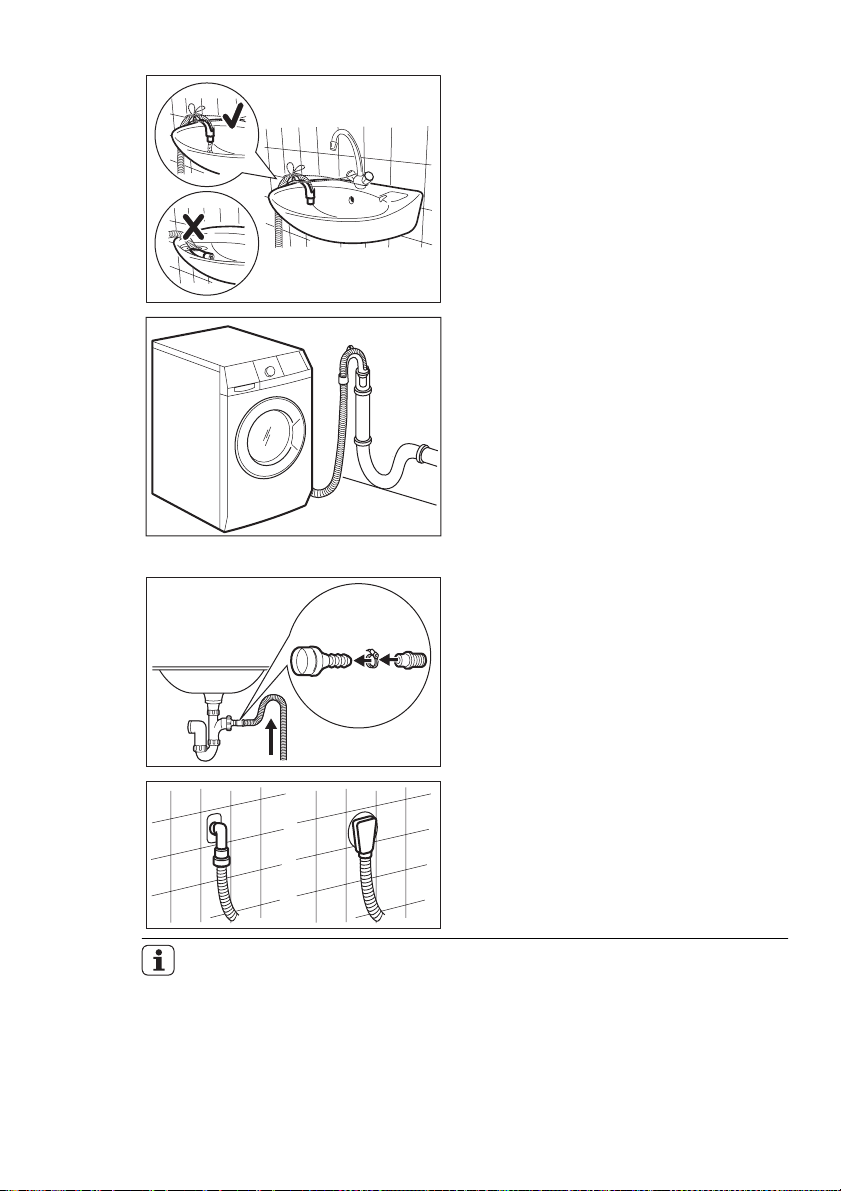
Without the plastic hose guide.
ENGLISH 31
• On the edge of a sink.
• Make sure that the plastic guide cannot move when the appliance drains.
Attach the guide to the water tap or
the wall.
• To a stand pipe with vent-hole.
Refer to the illustration. Directly into a
drain pipe at a height of not less than
60 cm and not more than 100 cm. The
end of the drain hose must always be
ventilated , i.e. the inner diameter of
the drainpipe must be larger than the
external diameter of the drain hose.
• To a sink spigot.
Refer to the illustration. Put the drain
hose in the spigot and tighten it with a
clip. Make sure that the drain hose
makes a loop to prevent that remaining particles go in the appliance from
the sink.
You can extend the drain hose to
maximum 400 cm. Contact the
service centre for the other drain
hose and the extension.
• Directly to a built-in drain pipe in the
room wall and tighten it with a clip.
Page 32

www.aeg.com
32
14. ENVIRONMENT CONCERNS
Recycle the materials with the
symbol
applicable containers to recycle it.
Help protect the environment and
human health and to recycle waste
of electrical and electronic
. Put the packaging in
appliances. Do not dispose
appliances marked with the symbol
with the household waste. Return the
product to your local recycling
facility or contact your municipal
office.
Page 33
ESPAÑOL 33
ÍNDICE DE MATERIAS
1. INFORMACIÓN SOBRE SEGURIDAD . . . . . . . . . . . . . . . . . . . . . . . . . . . . . . . . . . . . . . . . . . 34
2. INSTRUCCIONES DE SEGURIDAD . . . . . . . . . . . . . . . . . . . . . . . . . . . . . . . . . . . . . . . . . . . . 35
3. INFORMACIÓN TÉCNICA . . . . . . . . . . . . . . . . . . . . . . . . . . . . . . . . . . . . . . . . . . . . . . . . . . . 36
4. DESCRIPCIÓN DEL PRODUCTO . . . . . . . . . . . . . . . . . . . . . . . . . . . . . . . . . . . . . . . . . . . . . . 37
5. PANEL DE MANDOS . . . . . . . . . . . . . . . . . . . . . . . . . . . . . . . . . . . . . . . . . . . . . . . . . . . . . . . . 38
6. PROGRAMAS . . . . . . . . . . . . . . . . . . . . . . . . . . . . . . . . . . . . . . . . . . . . . . . . . . . . . . . . . . . . . . 42
7. VALORES DE CONSUMO . . . . . . . . . . . . . . . . . . . . . . . . . . . . . . . . . . . . . . . . . . . . . . . . . . . . 45
8. ANTES DEL PRIMER USO . . . . . . . . . . . . . . . . . . . . . . . . . . . . . . . . . . . . . . . . . . . . . . . . . . . . 46
9. UTILIZACIÓN DEL APARATO . . . . . . . . . . . . . . . . . . . . . . . . . . . . . . . . . . . . . . . . . . . . . . . . . 46
10. CONSEJOS . . . . . . . . . . . . . . . . . . . . . . . . . . . . . . . . . . . . . . . . . . . . . . . . . . . . . . . . . . . . . . . . 50
11. MANTENIMIENTO Y LIMPIEZA . . . . . . . . . . . . . . . . . . . . . . . . . . . . . . . . . . . . . . . . . . . . . . . 51
12. SOLUCIÓN DE PROBLEMAS . . . . . . . . . . . . . . . . . . . . . . . . . . . . . . . . . . . . . . . . . . . . . . . . . 56
13. INSTALACIÓN . . . . . . . . . . . . . . . . . . . . . . . . . . . . . . . . . . . . . . . . . . . . . . . . . . . . . . . . . . . . . 59
PARA OBTENER RESULTADOS PERFECTOS
Gracias por escoger este producto AEG. Este artículo ha sido creado para ofrecer un
rendimiento impecable durante muchos años, con innovadoras tecnologías que facilitarán su
vida y prestaciones que probablemente no encuentre en electrodomésticos corrientes. Por
favor, dedique algunos minutos a la lectura para disfrutar de todas sus ventajas.
Visite nuestro sitio web para:
Obtener consejos, folletos, soluciones a problemas e información de servicio:
www.aeg.com
Registrar su producto para recibir un mejor servicio:
www.aeg.com/productregistration
Adquirir accesorios, artículos de consumo y recambios originales para su aparato:
www.aeg.com/shop
ATENCIÓN Y SERVICIO AL CLIENTE
Le recomendamos que utilice recambios originales.
Al contactar con el Servicio, cerciórese de tener la siguiente información a mano.
La información se puede encontrar en la placa de características. Modelo, PNC, Número de
serie.
Advertencia - Precaución-Información sobre seguridad.
Datos y recomendaciones generales
Información medioambiental
Salvo modificaciones.
Page 34

www.aeg.com
34
1. INFORMACIÓN SOBRE SEGURIDAD
Antes de instalar y utilizar el aparato, lea atentamente
las instrucciones facilitadas. El fabricante no se hace
responsable de los daños y lesiones causados por una
instalación y uso incorrectos. Guarde siempre las instrucciones junto con el aparato para futuras consultas.
1.1 Seguridad de niños y personas vulnerables
ADVERTENCIA
Existe riesgo de sufrir asfixia, lesiones o incapacidad permanente.
• Este electrodoméstico puede ser utilizado por niños
de 8 años en adelante y personas cuyas capacidades
físicas, sensoriales o mentales estén disminuidas o
que carezcan de la experiencia y conocimientos suficientes para manejarlo, siempre que cuenten con las
instrucciones o la supervisión sobre el uso del electrodoméstico de forma segura y comprendan los riesgos.
• No deje que los niños jueguen con el aparato.
• Mantenga los materiales de embalaje alejados de los
niños.
• Mantenga todos los detergentes fuera del alcance de
los niños.
• Mantenga a los niños y mascotas alejados del aparato cuando la puerta se encuentre abierta.
• Si el aparato dispone de dispositivo de seguridad para niños, se recomienda activarlo.
• La limpieza y el mantenimiento no podrán realizarlas
niños sin supervisión.
1.2 Seguridad general
• Antes de proceder con el mantenimiento, apague el
aparato y desconecte el enchufe de la red.
• No cambie las especificaciones de este aparato.
Page 35
ESPAÑOL 35
• Respete la carga máxima de 7 kg (consulte el capítulo
“Tabla de programas”).
• Si el cable eléctrico sufre algún daño, el fabricante, su
servicio técnico o un profesional tendrán que cambiarlo para evitar riesgos.
• La presión de trabajo del agua (mínima y máxima) debe oscilar entre 0,5 bares (0,05 MPa) y 8 bares (0,8
MPa)
• Vigile que ninguna alfombra obstruya las aberturas
de ventilación de la base (si existen).
• El aparato debe conectarse a la toma de agua utilizando los nuevos juegos de tubos suministrados. No
se deben reutilizar los juegos de tubos antiguos.
2.
INSTRUCCIONES DE SEGURIDAD
Conexión eléctrica
2.1 Instalación
• Retire todo el embalaje y los pasado-
res de transporte.
• Guarde los pasadores de transporte.
Cuando vuelva a mover el aparato debe bloquear el tambor.
• No instale ni utilice un aparato daña-
do.
• No instale ni utilice el aparato si la
temperatura es inferior a 0 ºC o si está
expuesto a la intemperie.
• Siga las instrucciones de instalación
suministradas con el aparato.
• Asegúrese de que el suelo en el que
instale el aparato está plano y limpio,
y es estable y resistente al calor.
• No coloque el aparato donde la puer-
ta no se pueda abrir completamente.
• El aparato es pesado, tenga cuidado
siempre cuando lo mueva. Utilice
siempre guantes de protección.
• Compruebe que el aire circula libre-
mente entre el aparato y el suelo.
• Ajuste las patas para disponer del es-
pacio necesario entre el aparato y la
moqueta.
• El aparato debe quedar conectado a
tierra.
• Asegúrese de que las especificaciones
eléctricas de la placa coinciden con las
del suministro eléctrico de su hogar.
En caso contrario, póngase en contacto con un electricista.
• Utilice siempre una toma con aislamiento de conexión a tierra correctamente instalada.
• No utilice adaptadores de enchufes
múltiples ni cables prolongadores.
• Asegúrese de no provocar daños en el
enchufe ni en el cable de red. El centro de asistencia es el único autorizado para cambiar el cable de corriente
eléctrica del electrodoméstico en caso
necesario.
• Conecte el enchufe a la toma de corriente únicamente cuando haya terminado la instalación. Asegúrese de tener acceso al enchufe del suministro
de red una vez instalado el aparato.
ADVERTENCIA
Riesgo de incendios y descargas
eléctricas.
Page 36
www.aeg.com
36
• No desconecte el aparato tirando del
cable de conexión a la red. Tire siempre del enchufe.
• No toque el cable de red ni el enchufe
con las manos mojadas.
• Este aparato cumple las directivas
CEE.
Conexión de agua
• Asegúrese de no provocar daños en
los tubos de agua.
• El aparato debe conectarse a la toma
de agua utilizando los nuevos juegos
de tubo suministrados. No se deben
reutilizar los juegos de tubos antiguos.
• Antes de conectar el aparato a las
nuevas tuberías o a tuberías que no se
hayan usado durante mucho tiempo,
deje correr el agua hasta que esté limpia.
• La primera vez que utilice el aparato,
asegúrese de que no hay fugas.
2.2 Uso
ADVERTENCIA
Podrían producirse lesiones, descargas eléctricas, incendios, quemaduras o daños en el aparato.
• Utilice este aparato en entornos domésticos.
• No cambie las especificaciones de este aparato.
• Siga las instrucciones de seguridad
del envase de detergente.
• No coloque productos inflamables ni
objetos mojados con productos inflamables dentro, cerca o encima del
aparato.
• No toque el cristal de la puerta mientras esté en marcha un programa. El
cristal puede estar caliente.
• Asegúrese de sacar todos los objetos
metálicos de la colada.
• No coloque ningún recipiente bajo el
aparato para recoger el agua de posibles fugas. Póngase en contacto con
el servicio técnico para asegurarse de
los accesorios que puede utilizar.
2.3 Mantenimiento y limpieza
ADVERTENCIA
Podría sufrir lesiones o dañar el
aparato.
• Antes de proceder con el mantenimiento, apague el aparato y desconecte el enchufe de la red.
• No utilice pulverizadores ni vapor de
agua para limpiar el aparato.
• Limpie el aparato con un paño suave
humedecido. Utilice sólo detergentes
neutros. No utilice productos abrasivos, estropajos duros, disolventes ni
objetos de metal.
2.4 Desecho
ADVERTENCIA
Existe riesgo de lesiones o asfixia.
• Desconecte el aparato de la red.
• Corte el cable de conexión a la red y
deséchelo.
• Retire el pestillo de la puerta para evitar que los niños y las mascotas queden encerrados en el aparato.
3. INFORMACIÓN TÉCNICA
Medidas Ancho / Altura / Fondo 600 / 850 / 522 mm
Profundidad total 540 mm
Conexión eléctrica: Voltaje
Potencia total
Fusible
Frecuencia
230 V
2200 W
10 A
50 Hz
Page 37
ESPAÑOL 37
El nivel de protección contra la entrada de partículas sólidas y humedad está garantizado por la tapa
protectora, excepto si el equipo de alta tensión no
tiene protección contra la humedad.
Presión del suministro
de agua
Suministro de agua
Mínima 0.5 bares (0.05 MPa)
Máxima 8 bares (0.8 MPa)
1)
Agua fría
Carga máxima Algodón 7 kg
Velocidad de centrifuga-doMáxima 1200 rpm
1)
Conecte la manguera de entrada de agua a un grifo con rosca de 3/4 pulgadas.
4. DESCRIPCIÓN DEL PRODUCTO
1 2 3
4
5
IPX4
8
9
10
Encimera
1
Dosificador de detergente
2
Panel de mandos
3
Tirador de la puerta
4
Placa de características
5
Bomba de desagüe
6
11
6
7
Pata para nivelación del aparato
7
Tubo de desagüe
8
Válvula de entrada de agua
9
Cable de alimentación
10
Pasadores de transporte
11
Pata para nivelación del aparato
12
12
Page 38
www.aeg.com
38
4.1 Accesorios
1 2
5. PANEL DE MANDOS
1 2 3
Algodón
Eco
Llave inglesa
1
Para retirar los pasadores de transporte.
Tapones de plástico
2
Para cerrar los orificios de la parte
posterior del armario, después de
extraer los pasadores de transporte.
Tubo de entrada antiinundación
3
34
Para evitar posibles fugas.
Guía de plástico de la manguera
4
Para conectar el tubo de desagüe en
el borde de un fregadero.
Tecla de encendido/apagado (Mar-
1
cha/Parada)
Selector de programas
2
Pantalla
3
Botón de inicio/pausa (Start/Pausa)
4
Tecla de inicio diferido (Inicio Diferi-
5
do)
Botón de ahorro de tiempo (Ahorra
6
Tiempo)
Botón de aclarado extra (Aclarado
7
Extra)
Tecla Manchas (Manchas)
8
Tecla de reducción del centrifugado
9
(Centrif.)
45678910
Tecla de Temperatura (Temp.)
10
5.1 Tecla de encendido/
apagado
Pulse esta tecla para encender y apagar
el aparato. El aparato emite un tono
cuando se enciende.
La función AUTO Stand-by apaga automáticamente el aparato para reducir el
consumo de energía cuando:
• No se utiliza el aparato durante 5 minutos antes de pulsar el botón
– Se cancelan todos los ajustes.
1
4
.
Page 39
–
Pulse la tecla
aparato de nuevo.
– Ajuste de nuevo el programa de la-
vado y todas las posibles opciones.
• Transcurridos 5 minutos desde el final
del programa de lavado. Consulte "Al
finalizar el programa".
1
para encender el
ESPAÑOL 39
5.2 Selector de programas
Gire este botón para ajustar un programa. Se ilumina el indicador de programa
correspondiente.
2
5.3 Pantalla
3
A B C D
La pantalla muestra:
A • Temperatura máxima del programa.
B • Velocidad de centrifugado por defecto del programa.
1)
y "Agua en la cuba" (símbolos).
2)
C •
•
"Sin centrifugado"
Símbolos de la pantalla.
Símbolos Descripción
Fase de lavado
Fases de aclarado
Fase de centrifugado
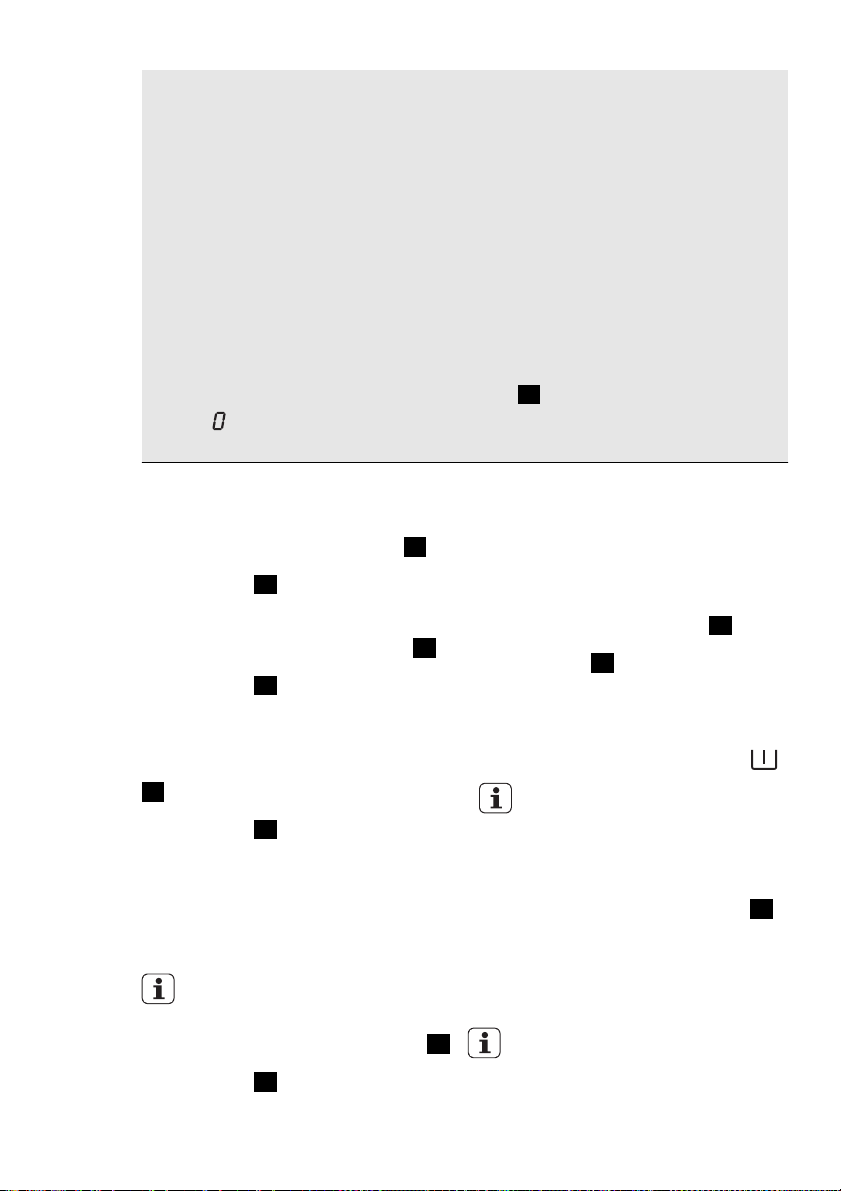
Seguro niños
No se puede abrir la puerta del aparato cuando el símbolo
está encendido.
No se puede abrir la puerta del aparato cuando el símbolo
parpadea. Espere unos minutos antes de abrir la puerta.
Puede abrir la puerta únicamente cuando el símbolo se
apague.
Si el programa termina pero el símbolo sigue encendido:
• Hay agua en el tambor.
• La función "Agua en la cuba" está encendida.
Inicio diferido
Page 40
www.aeg.com
40
D • Duración del programa
Cuando se inicia el programa, el tiempo se reduce a intervalos de 1 minuto.
•Inicio diferido
Cuando se pulsa el botón de inicio diferido, la pantalla muestra la hora
del mismo.
• Códigos de alarma
Si el aparato presenta una avería, la pantalla muestra los códigos de
alarma. Consulte el capítulo "Solución de problemas".
•Err
La pantalla muestra este mensaje durante unos segundos si:
– Se ajusta una función que no es aplicable al programa.
– Se cambia el programa mientras está en curso.
4
El indicador del botón de Inicio/Pausa
parpadea.
•
Cuando el programa ha finalizado.
1)
Solo disponible para el programa Centrifugado/Descarga.
2)
Los símbolos aparecen en la pantalla cuando se ajusta la fase o función
correspondiente.
5.4 Botón de inicio/pausa
Pulse el botón 4 para iniciar o interrumpir el programa.
4
Utilice esta función para las personas
alérgicas al detergente y en zonas en las
que el agua sea blanda.
5.8 Botón de manchas
5.5 Tecla de inicio diferido
Pulse el botón 5 para retrasar el inicio
de un programa entre 30 minutos y 20
horas.
5.6 Tecla de ahorro de tiempo
6
Pulse el botón 6 para reducir la duración del programa.
• Púlselo una vez para ajustar la "duración corta" para prendas poco sucias.
• Púlselo dos veces para ajustar "Extra
rápido" para prendas prácticamente
sin suciedad.
Algunos programas solo admiten
una de las dos funciones.
5.7 Botón de aclarado extra
Pulse el botón 7 para añadir fases de
lavado a un programa.
5
Pulse el botón 8 para añadir la fase de
manchas a un programa.
Utilice esta función para coladas con
manchas difíciles de quitar.
Cuando ajuste esta función, coloque el
quitamanchas en el compartimento
Esta función aumenta la duración
del programa.
Esta función no está disponible
con temperaturas inferiores a 40°
C.
5.9 Botón de centrifugado
Pulse esta tecla para:
• Reducir la velocidad de la fase de centrifugado máxima cuando se ajusta un
programa.
7
La pantalla muestra únicamente
las velocidades de centrifugado
disponibles para el programa seleccionado.
• Desactivar la fase de centrifugado.
8
.
9
Page 41
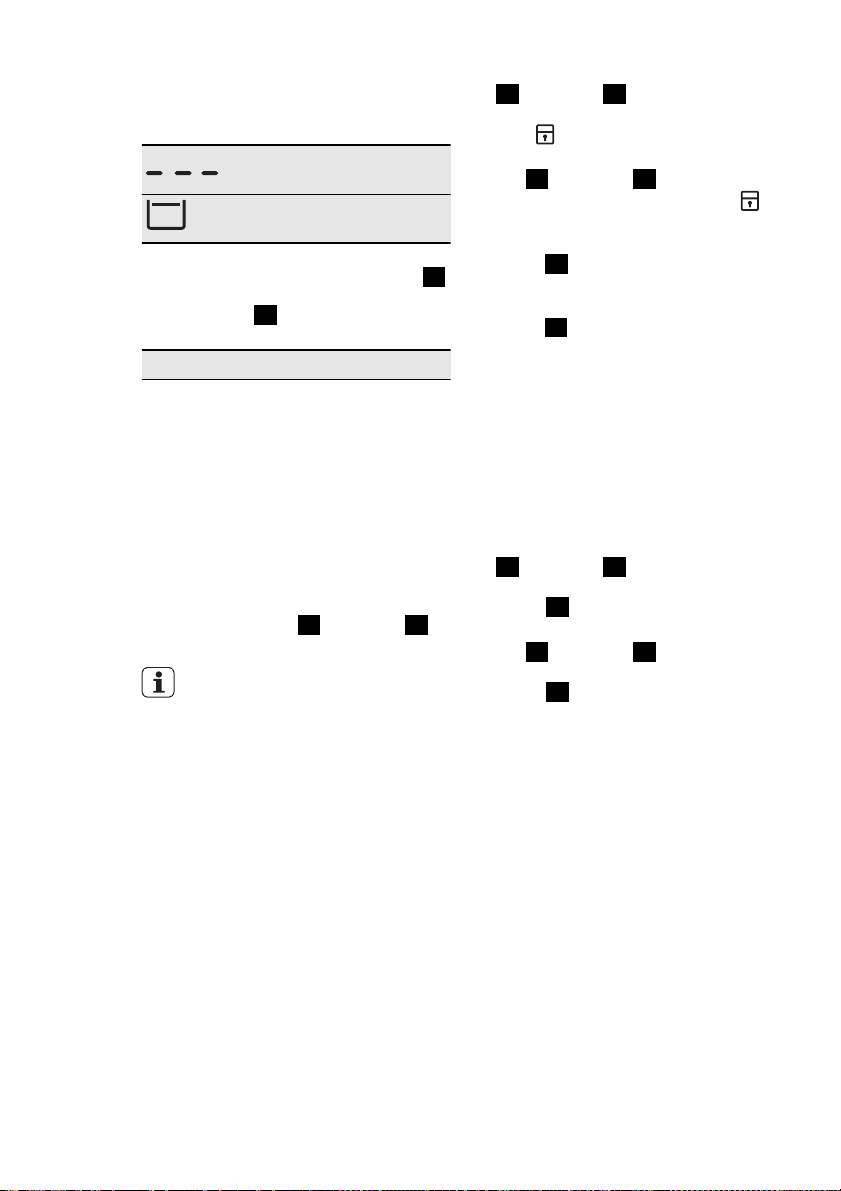
• Active la función "Agua en la cuba".
Ajuste esta función para evitar arrugas
en los tejidos. El aparato no desagua
cuando termina el programa.
La fase de centrifugado
está apagada.
La función "Agua en la
cuba" está encendida.
5.10 Botón de temperatura
Pulse el botón 10 para cambiar la temperatura predeterminada.
- - = agua fría
• Para activar la función, pulse el botón
10
y el botón 9 al mismo tiempo
hasta que la pantalla muestre el símbolo
.
• Para desactivar la función, pulse el bo-
10
y el botón 9 al mismo tiempo
tón
hasta que se apague el símbolo
Puede activar la función:
• Antes de pulsar el botón de inicio/
4
10
pausa
ciar.
• Después de pulsar el botón Inicio/
Pausa
lector de programas están desactivados.
: el aparato no se puede ini-
4
, todos los botones y el se-
ESPAÑOL 41
.
5.11 Función de señales
acústicas
Suena una señal acústica cuando:
• Se enciende el aparato.
• Se apaga el aparato.
• Se pulsan las teclas.
• El programa se termina.
• Se ha producido algún fallo.
Para desactivar/activar las señales acús-
8
ticas, pulse el botón
mismo tiempo durante 6 segundos.
Si se desactivan las señales acústicas, siguen funcionando únicamente cuando se pulsan los botones y cuando se produce un fallo.
y el botón 7 al
5.12 Función del bloqueo
contra la manipulación por
niños
Esta función impide que los niños jueguen con el panel de control.
5.13 Función de aclarado
extra permanente
Con esta función puede guardar activada la función de aclarado extra de forma
permanente cuando ajuste un nuevo
programa.
• Para activar la función, pulse el botón
6
y el botón 5 al mismo tiempo
hasta que se encienda el indicador del
7
botón
• Para desactivar la función, pulse el botón
hasta que se apague el indicador del
botón
.
6
y el botón 5 al mismo tiempo
7
.
Page 42
www.aeg.com
42
6. PROGRAMAS
Programa
Limitador de
Algodón
Algodón
95° - Frío
Algodon + Prélavado
Algodón + Prelavado
95° - Frío
Extra Silencio
Extra Silencio
95° - Frío
Sintéticos
Sintéticos
60° - Frío
Sintéticos +
Prélavado
Sintéticos +
Prelavado
60° - Frío
Tipo de carga
peso máx. de la carga
Algodón blanco y de
color con suciedad
normal.
máx. 7 kg
Algodón blanco y de
color con suciedad
intensa.
máx. 7 kg
Algodón blanco y de
color con suciedad
normal.
máx. 7 kg
Prendas de tejido
mixto o sintético con
suciedad normal.
máx. 3.5 kg
Prendas de tejido
sintético o mixto con
suciedad intensa.
máx. 3.5 kg
Ciclo
descripción
Lavado
Aclarado
Centrifugado largo
Prelavado
Lavado
Aclarado
Centrifugado largo
Lavado
Aclarado
Parada con agua
en el tambor
Lavado
Aclarado
Centrifugado corto
Prelavado
Lavado
Aclarado
Centrifugado corto
Funciones
REDUCCIÓN
DEL CENTRIFUGADO
AGUA EN LA CUBA
MANCHAS
1)
ACLARADO EXTRA
AHORRO
2)
REDUCCIÓN
DEL CENTRIFUGADO
AGUA EN LA CUBA
ACLARADO EXTRA
AHORRO
MANCHAS
2)
1)
ACLARADO EXTRA
AHORRO
2)
REDUCCIÓN
DEL CENTRIFUGADO
AGUA EN LA CUBA
MANCHAS
1)
ACLARADO EXTRA
AHORRO
2)
REDUCCIÓN
DEL CENTRIFUGADO
AGUA EN LA CUBA
ACLARADO EXTRA
AHORRO
2)
Page 43
ESPAÑOL 43
Programa
Limitador de
Plancha Fácil
3)
Fácil Plancha
60° - Frío
Delicados
Delicados
40° - Frío
Lana / Seda
Lana/Seda
40° - Frío
Centrifugado /
Descarga
4)
Centrifugado /
Descarga
Aclarado
Aclarados
Cortinas
Cortinas
40° - Frío
Tipo de carga
peso máx. de la carga
Prendas de tejido
sintético con suciedad normal.
máx. 3.5 kg
Tejidos delicados como acrílicos, viscosa
o poliéster con suciedad normal.
máx. 3.5 kg
Lana lavable a máquina. Lana lavable a
mano y tejidos delicados con el símbolo
«lavado a mano».
máx. 2 kg
Todos los tejidos
La carga máxima de
la colada es relativa
al tipo de colada.
Todos los tejidos.
máx. 7 kg
Ajuste este programa para lavar cortinas. Añade automáticamente la fase de
prelavado para limpiar el polvo de las
cortinas.
No ponga detergente en el compartimento de prelavado.
máx. 2 kg
Ciclo
descripción
Lavado
Aclarado
Centrifugado corto
Lavado
Aclarado
Centrifugado corto
Lavado
Aclarado
Centrifugado corto
Desagüe
Fase de centrifugado a máxima
velocidad.
Un aclarado con
fase de centrifugado adicional
Prelavado
Lavado
Aclarado
Centrifugado corto
Funciones
REDUCCIÓN
DEL CENTRIFUGADO
AGUA EN LA CUBA
ACLARADO EXTRA
AHORRO
2)
REDUCCIÓN
DEL CENTRIFUGADO
AGUA EN LA CUBA
MANCHAS
1)
ACLARADO EXTRA
AHORRO
2)
REDUCCIÓN
DEL CENTRIFUGADO
AGUA EN LA CUBA
REDUCCIÓN
DEL CENTRIFUGADO
SIN CENTRIFUGADO
REDUCCIÓN
DEL CENTRIFUGADO
AGUA EN LA CUBA
ACLARADO EX-
5)
TRA
REDUCCIÓN
DEL CENTRIFUGADO
AGUA EN LA CUBA
ACLARADO EXTRA
Page 44
www.aeg.com
44
Programa
Limitador de
Tipo de carga
peso máx. de la car-
Ciclo
descripción
Funciones
ga
Tejidos Grue-
6)
sos
Vaqueros
60° - Frío
Express Intensivo
Express intensivo
60° - 40°
20 Min. - 3 Kg
40° - 30°
Todas las prendas
vaqueras. Jerséis de
materiales de alta
tecnología.
máx. 7 kg
Programa de lavado
rápido, para prendas
de algodón y mixtas
blancas o de colores
resistentes ligeramente sucias.
máx. 5 kg
Prendas sintéticas y
de algodón con poca
suciedad o que se
han llevado una sola
Lavado
Aclarado
Centrifugado corto
Lavado
Aclarado
Centrifugado corto
Lavado
Aclarado
Centrifugado corto
REDUCCIÓN
DEL CENTRIFUGADO
AGUA EN LA CUBA
AHORRO
2)
REDUCCIÓN
DEL CENTRIFUGADO
AGUA EN LA CUBA
ACLARADO EXTRA
REDUCCIÓN
DEL CENTRIFUGADO
vez.
Super Eco
Frío
Tejidos mixtos (algodón y sintéticos).
máx. 3 kg
Lavado
Aclarado
Centrifugado corto
REDUCCIÓN
DEL CENTRIFUGADO
AGUA EN LA CU-
7)
BA
ACLARADO EXTRA
Algodón
8)
Eco
60° - 40°
Algodón blanco y de
colores sólidos con
suciedad normal.
máx. 7 kg
Lavado
Aclarado
Centrifugado largo
REDUCCIÓN
DEL CENTRIFUGADO
AGUA EN LA CUBA
MANCHAS
ACLARADO EXTRA
AHORRO
1)
La función MANCHAS no está disponible con temperaturas inferiores a 40°C.
2)
Si pulsa el botón 6 dos veces (duración de la función Extra rápido), se recomienda
reducir la cantidad de la carga. Es posible cargar completamente el aparato, pero los
resultados de lavado no son tan óptimos.
3)
El lavado y el centrifugado son suaves para evitar arrugas en la colada. El aparato añade
algunos aclarados.
4)
La fase predeterminada de la velocidad de centrifugado es relativa a las prendas de
algodón. Ajuste la velocidad de centrifugado. Asegúrese de que coincide con la colada.
Para seleccionar solo el programa DESCARGA, ajuste la función en SIN
CENTRIFUGADO.
5)
Pulse el botón ACLARADO EXTRA para añadir aclarados. Con una velocidad de
centrifugado baja, el aparato realiza aclarados delicados y un breve centrifugado.
6)
Se activará automáticamente la opción Aclarado extra.
2)
Page 45
7)
Seleccione este programa para reducir la duración y el consumo de energía y agua.
8)
PROGRAMAS ESTÁNDAR para los valores de consumo de etiqueta energética.
Según la norma 1061/2010, estos programas son respectivamente el «programa
estándar de algodón a 60 °C» y el «programa estándar de algodón a 40 °C». Son los
programas más eficaces en cuanto a consumo de agua y energía para el lavado de
algodón de suciedad normal. Ajuste este programa para obtener unos buenos
resultados de lavado y reducir el consumo de energía. Se amplía la duración del
programa de lavado.
La temperatura de lavado en la fase de lavado puede ser distinta de la introducida
para el programa seleccionado.
7. VALORES DE CONSUMO
Al inicio del programa, la pantalla muestra la duración para la capacidad de
carga máxima.
Durante la fase de lavado, la duración del programa se calcula automáticamente y se puede reducir mucho si la carga es inferior a la capacidad de
carga máxima (p. ej., algodón 60°C, capacidad de carga máxima 7 kg, la duración del programa supera 2 horas; carga real 1 kg, la duración del programa no alcanza 1 hora).
Cuando el aparato está calculando la duración real del programa, un punto
parpadea en la pantalla.
Los datos de esta tabla son aproximados. Los datos pueden cambiar por varios motivos: la cantidad y tipo de colada, el agua y la temperatura ambiente.
ESPAÑOL 45
Programas Carga
(kg)
Consumo
energético
(KWh)
Consumo
de agua (li-
tros)
Duración
aproxima-
da del pro-
grama (mi-
nutos)
Algodón 60
°C
Algodón 40
°C
Sintéticos 40
°C
Delicados 40
°C
Lana/Lavado
a mano 30 °C
7 1.3 62 157 53
7 0.8 62 154 53
3.5 0.53 45 127 35
3.5 0.57 53 100 35
2 0.25 45 56 30
Programa de algodón estándar
Algodón es-
tándar 60 °C
Algodón es-
tándar 60 °C
7 0.86 52 240 53
3.5 0.74 41 215 53
Humedad
restante
1)
(%)
Page 46
www.aeg.com
46
Programas Carga
(kg)
Consumo
energético
(KWh)
Algodón estándar 40 °C
1)
Al finalizar la fase de centrifugado.
3.5 0.52 41 210 53
Modo apagado (W) Modo encendido (W)
0.48 0.48
La información indicada en las tablas anteriores se ofrece en cumplimiento de
la regulación 1015/2010 de la Comisión de la UE que implementa la directiva
2009/125/EC
8. ANTES DEL PRIMER USO
1.
Para activar el sistema de desagüe,
vierta 2 litros de agua en el compartimento de lavado principal del dosificador de detergente.
2.
Coloque una pequeña cantidad en
el compartimento de lavado princi-
Consumo
de agua (li-
tros)
Duración
aproxima-
da del pro-
grama (mi-
nutos)
pal del dosificador. Ajuste e inicie un
programa para algodón a la temperatura más alta sin colada. De esta
forma se elimina toda la posible suciedad del tambor y de la cuba.
Humedad
restante
1)
(%)
9. UTILIZACIÓN DEL APARATO
1.
Abra el grifo.
2.
Conecte el enchufe a la toma de
red.
3.
Pulse el botón 1 para encender el
aparato.
4.
Introduzca la colada en el aparato.
5.
Utilice la cantidad correcta de detergente y aditivos.
6.
Ajuste e inicie el programa correcto
para el tipo de colada y suciedad.
9.1 Carga de la colada
1.
Abra la puerta del aparato.
2.
Introduzca las prendas en el tambor,
una por una. Sacuda las prendas antes de colocarlas en el aparato. Asegúrese de no colocar demasiada colada en el tambor.
3.
Cierre la puerta del aparato.
Page 47
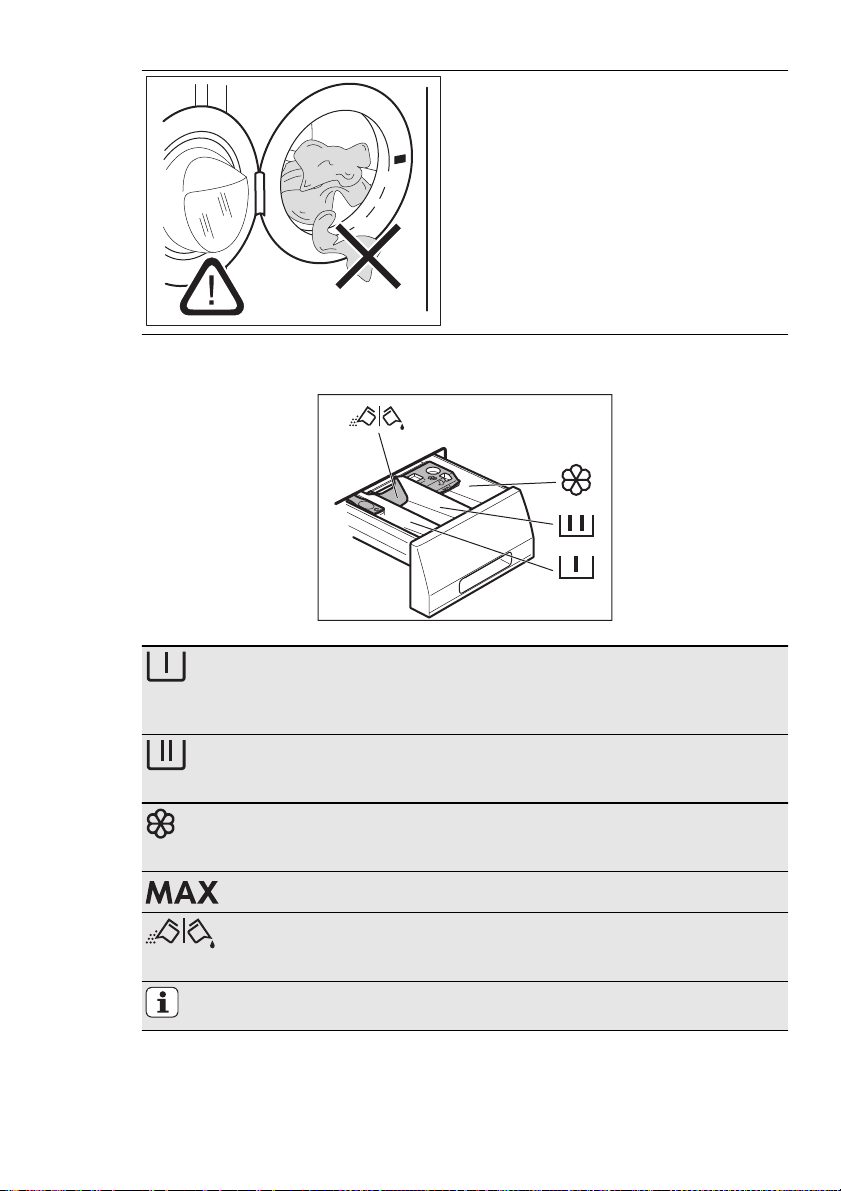
Asegúrese de que no quedan prendas
enganchadas entre la puerta y el cierre.
Podría provocar fugas de agua y dañar la
colada.
9.2 Introducción del detergente y los aditivos
ESPAÑOL 47
El compartimiento del detergente para la fase de prelavado, el
programa de remojo y la función de manchas.
Añada el detergente para el prelavado, remojo y quitamanchas
antes de iniciar el programa.
El compartimento de detergente para la fase de lavado.
Si utiliza detergente líquido, introdúzcalo inmediatamente antes
de iniciar el programa.
Compartimento para aditivos líquidos (suavizante, almidón).
Ponga el producto en el compartimento antes de iniciar el programa.
Es el nivel máximo para la cantidad de aditivos líquidos.
Tapa para detergente líquido o en polvo
Gírelo (hacia arriba o hacia abajo) en la posición correcta para
usar detergente líquido o en polvo.
Cumpla siempre las instrucciones que se encuentran en el envase de
los productos de detergente.
Page 48
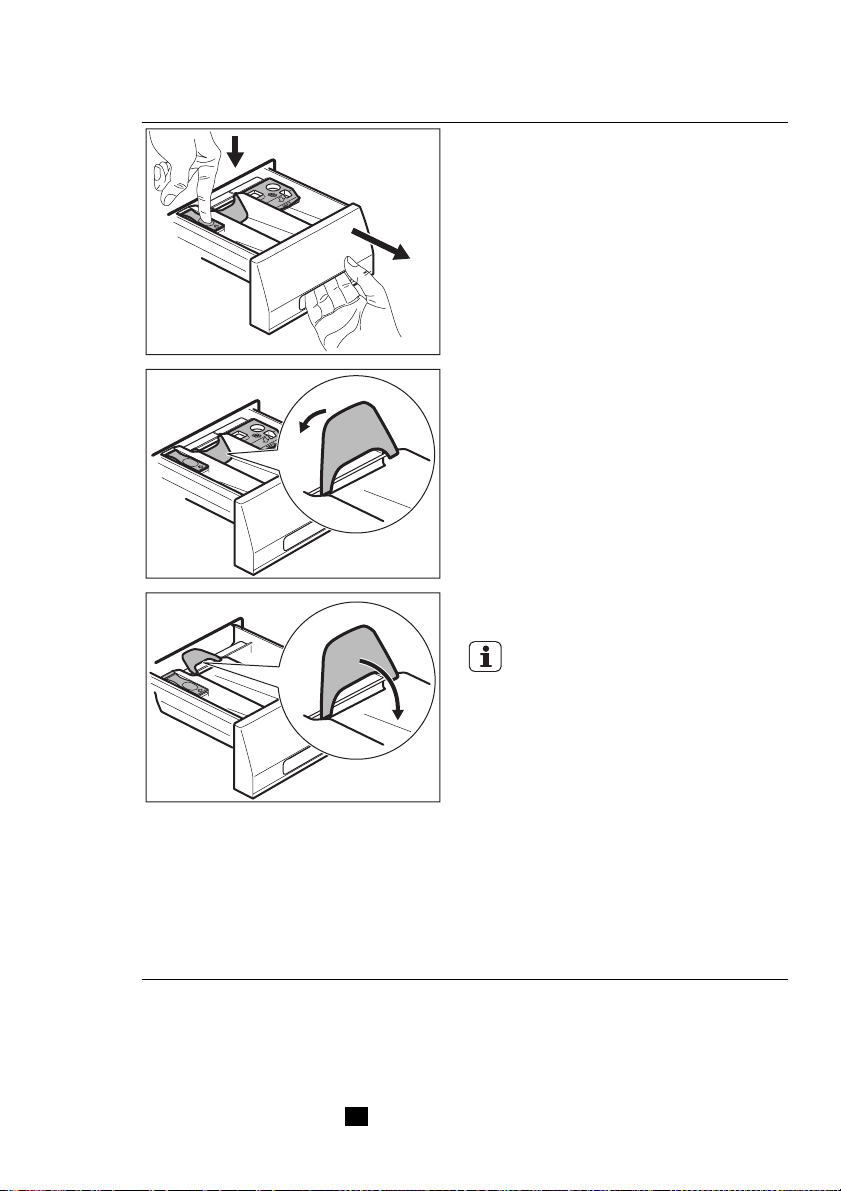
www.aeg.com
48
Compruebe la posición de la tapa
5.
Dosifique el detergente y el suavizante.
6.
Cierre con cuidado el dosificador de
detergente. Asegúrese de que la tapa no obstruye nada al cerrar el cajón.
9.3 Ajuste e inicio de un
programa
1.
Gire el selector de programas. Se
ilumina el indicador de programa
correspondiente.
2.
El indicador del botón 4 parpadea
en color rojo.
1.
Tire del depósito dosificador hasta
el tope.
2.
Presione la palanca hacia abajo para
extraer el dosificador.
3.
Para usar detergente en polvo, gire
la tapa hacia arriba.
4.
Para usar detergente líquido, gire la
tapa hacia abajo.
Con la tapa en posición BAJADA:
– No utilice detergentes líquidos
gelatinosos ni gruesos.
– No ponga más detergente lí-
quido que el límite mostrado
en la tapa.
– No ajuste la fase de prelavado.
– No ajuste la función de inicio
diferido.
3.
La pantalla muestra la velocidad de
centrifugado y la temperatura por
defecto. Para cambiar la temperatura o la velocidad de centrifugado,
pulse los botones correspondientes.
4.
Programe las funciones disponibles.
El indicador de la función ajustada
Page 49
se enciende o la pantalla muestra el
símbolo correspondiente.
5.
Pulse el botón 4 para iniciar el programa. Se ilumina el indicador del
4
botón
.
La bomba de desagüe puede
funcionar un momento cuando el
aparato llena agua.
El aparato ajusta automáticamente el tiempo del ciclo para la colada que se ha introducido en el tambor a fin de
lograr unos resultados de lavado perfectos en el mínimo
tiempo necesario. Tras aproximadamente 15 minutos
desde el inicio del programa,
la pantalla muestra el nuevo
valor de tiempo.
9.4 Interrupción de un
programa
1.
Pulse la tecla 4 . El indicador parpadea.
2.
Pulse la tecla 4 de nuevo. EL programa de lavado continúa.
9.5 Cancelación de un
programa
1.
Pulse el botón 1 para cancelar el
programa y apagar el aparato.
2.
Pulse el botón 1 de nuevo para encender el aparato. Ahora puede
ajustar un nuevo programa de lavado.
El aparato no desagua.
9.6 Cambio de una función
Puede cambiar únicamente algunas funciones antes de usarlas.
1.
Pulse la tecla 4 . El indicador parpadea.
2.
Cambio de la función ajustada.
ESPAÑOL 49
9.7 Ajuste del Inicio diferido
1.
Pulse el botón 5 repetidamente
hasta que la pantalla muestre el número de minutos u horas. Los símbolos correspondientes se encienden.
2.
Pulse la tecla 4 ; el aparato inicia la
cuenta atrás del inicio diferido.
El programa de lavado se pone en
marcha de forma automática cuando
termina la cuenta atrás.
Antes de pulsar el botón 4 para
iniciar el aparato, puede cancelar
o cambiar el ajuste del inicio diferido.
9.8 Cancelación del inicio
retardado
1.
Pulse la tecla 4 . El indicador correspondiente parpadea.
2.
Pulse el botón 5 repetidamente
hasta que la pantalla muestre 0’.
3.
Pulse la tecla 4 . Se inicia el programa.
9.9 Abra la puerta
Mientras un programa o el inicio diferido
están en marcha, la puerta del aparato
está bloqueada.
Para abrir la puerta del aparato:
1.
Pulse la tecla 4 . El símbolo del
candado de la puerta se apaga.
2.
Abra la puerta del aparato.
3.
Cierre la puerta y pulse el botón
. El programa o el inicio diferido
continúan.
Si la temperatura y el nivel de
agua del tambor son demasiado
elevados, el símbolo de bloqueo
de la puerta permanece encendido y no se puede abrir la puerta.
Para abrir la puerta, siga estos
pasos:
1.
Apague el aparato.
2.
Espere unos minutos.
3.
Asegúrese de que no hay
agua en el tambor.
4
Page 50
www.aeg.com
50
Si apaga el electrodoméstico, es
necesario volver a ajustar el programa.
9.10 Al final del programa
• El aparato se para automáticamente.
• Se activan las señales acústicas.
•
En la pantalla se enciende
• El indicador del botón de Inicio/Pausa
4
se apaga.
• El indicador de bloqueo de la puerta
se apaga.
•
Pulse el botón
rato. Cinco minutos después de finalizar el programa, la función de ahorro
de energía apaga automáticamente el
aparato.
Cuando se vuelve a encender el
aparato, la pantalla muestra el final del último programa seleccionado. Gire el selector de programas para ajustar un nuevo ciclo.
• Retire la colada del aparato. Asegúrese de que el tambor está totalmente
vacío.
1
para apagar el apa-
.
• Deje la puerta entreabierta para evitar
la formación de moho y olores desagradables.
• Cierre la toma de agua.
El programa de lavado ha finalizado,
pero hay agua en el tambor:
– El tambor gira regularmente para evi-
tar arrugas en las prendas.
– La puerta permanece bloqueada.
– Debe drenar el agua para abrir la
puerta.
Para descargar el agua:
1.
Si fuera necesario, reduzca la velocidad de centrifugado.
2.
Pulse el botón Inicio/Pausa 4 . El
aparato vacía el agua y centrifuga.
3.
Cuando el programa termina y el
símbolo de bloqueo de la puerta se
apaga, puede abrir la puerta.
4.
Apague el aparato.
El aparato vacía el agua y centrifuga automáticamente después
de unas 18 horas.
10. CONSEJOS
10.1 Cargar la colada
• Divida la colada en: ropa blanca, ropa
de color, ropa sintética, prendas delicadas y prendas de lana.
• Siga las instrucciones de lavado que
se encuentran en las etiquetas de las
prendas.
• No lave juntas las prendas blancas y
de color.
• Algunas prendas de color pueden
desteñir en el primer lavado. Se recomienda lavarlas por separado la primera vez.
• Abotone las fundas de almohadas y
cierre las cremalleras, los ganchos y
los broches. Ate las correas.
• Vacíe los bolsillos y despliegue las
prendas.
• Dé la vuelta a las prendas de varias capas, de lana y con motivos pintados.
• Retire las manchas difíciles.
• Lave con detergente especial las manchas difíciles.
• Tenga cuidado con las cortinas. Quite
los ganchos o coloque las cortinas en
una bolsa para lavadora o funda de almohada.
• No lave en el aparato:
– Prendas sin dobladillos o desgarra-
das
– Sujetadores con aros.
– Use una bolsa para lavadora para la-
var las prendas pequeñas.
• Una carga muy pequeña puede provocar problemas de desequilibrio en
la fase de centrifugado. Si esto ocurre,
ajuste manualmente las prendas en la
cuba e inicie de nuevo la fase de centrifugado.
Page 51
10.2 Manchas difíciles
Para algunas manchas, el agua y el detergente no son suficientes.
Se recomienda eliminar estas manchas
antes de colocar las prendas en el aparato.
Existen quitamanchas especiales. Utilice
el quitamanchas especial adecuado al tipo de mancha y tejido.
10.3 Detergentes y aditivos
• Utilice solo detergentes y aditivos especialmente fabricados para lavadoras.
• No mezcle diferentes tipos de detergentes.
• Para respetar el medio ambiente, no
ponga más detergente del necesario.
• Siga siempre las instrucciones que se
encuentran en el envase de estos productos.
• Use los productos adecuados para el
tipo y color del tejido, la temperatura
del programa y el grado de suciedad.
• Si utiliza detergente líquido, no ajuste
la fase de prelavado.
ESPAÑOL 51
• Si el aparato no tiene el dosificador de
detergente con dispositivo de compuerta, añada los detergentes líquidos
con una bola dosificadora.
10.4 Dureza agua
Si la dureza del agua de su zona es alta
o moderada, se recomienda usar un descalcificador de agua para lavadoras. En
las zonas en las que la dureza del agua
sea baja, no es necesario utilizar un descalcificador.
Póngase en comunicación con las autoridades correspondientes para conocer la
dureza del agua de su zona.
Siga siempre las instrucciones que se encuentran en el envase de los productos.
Medida de la dureza del agua en escalas
equivalentes:
• Grados alemanes (°dH).
• Grados franceses (°TH).
• mmol/l (milimol por litro, unidad internacional de la dureza del agua).
•Grados Clarke.
Tabla de dureza del agua
Nivel Tipo
°dH °T.H. mmol/l Clarke
1 blanda 0-7 0-15 0-1.5 0-9
2 intermedio 8-14 16-25 1.6-2.5 10-16
3 dura 15-21 26-37 2.6-3.7 17-25
4 muy dura > 21 > 37 >3.7 >25
11. MANTENIMIENTO Y LIMPIEZA
ADVERTENCIA
Desconecte el aparato de la fuente de
alimentación antes de limpiarlo.
11.1 Descalcificación
El agua corriente que utilizamos suele
contener cal. Si es necesario, use un descalcificador de agua para eliminar la cal.
Use un producto especial para lavadoras. Siga siempre las instrucciones que
se encuentran en el envase del fabricante.
Hágalo de forma separada del lavado de
la colada.
Dureza agua
Page 52
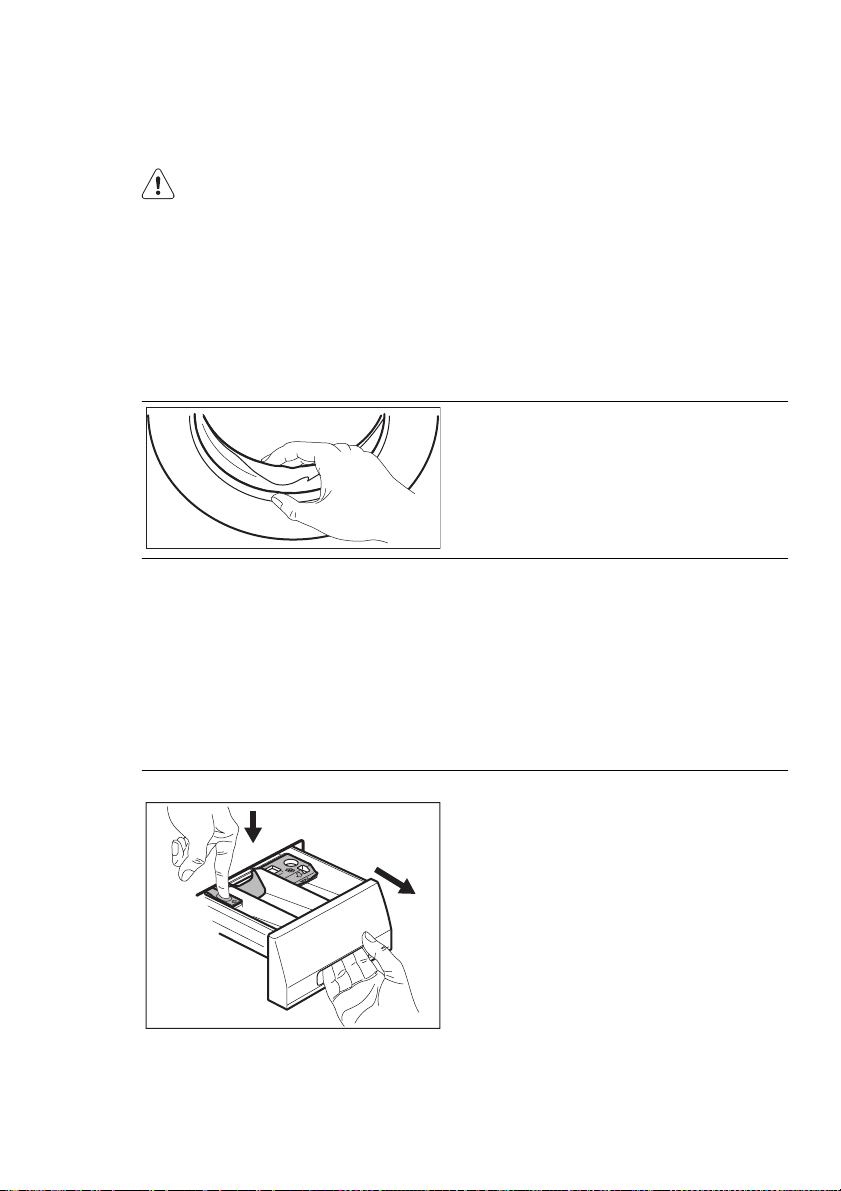
www.aeg.com
52
11.2 Limpieza del exterior
Limpie el aparato solo con agua templada y jabón. Seque completamente todas
las superficies.
PRECAUCIÓN
No utilice alcohol, disolventes ni
otros productos químicos.
11.3 Lavado de
mantenimiento
Con los programas a baja temperatura,
es posible que quede algo de detergen-
te en el tambor. Realice periódicamente
un lavado de mantenimiento. Para ello:
• Saque las prendas del tambor.
• Seleccione el programa de lavado de
algodón de mayor temperatura
• Use la cantidad correcta de detergente en polvo con propiedades biológicas.
Después de cada lavado, mantenga la
puerta abierta unos instantes para eliminar la humedad y los olores desagradables.
11.4 Junta de estanqueidad de la puerta
Examine periódicamente la junta y extraiga todos los objetos de la pieza interior.
11.5 Tambor
Examine periódicamente el tambor para
evitar la formación de cal y partículas de
óxido.
Utilice únicamente productos especiales
para eliminar la partículas de óxido del
tambor.
11.6 Dosificador de detergente
Para limpiar el dosificador:
1
2
Proceda de la siguiente manera:
• Limpie el tambor con un producto especial para acero inoxidable.
• Inicie un programa corto para algodón
a la temperatura máxima con una pequeña cantidad de detergente.
1.
Presione la palanca.
2.
Tire del dosificador hacia fuera.
Page 53
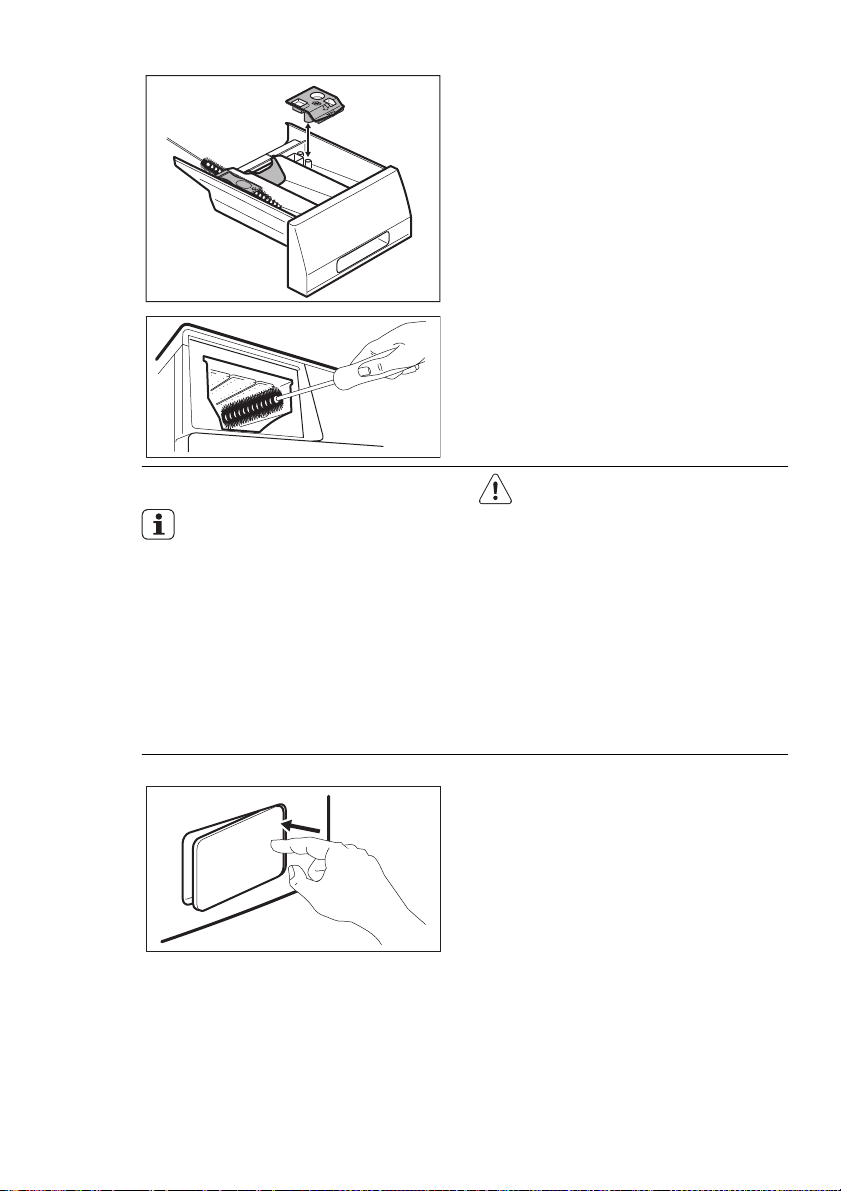
ESPAÑOL 53
3.
Retire la parte superior del compartimento de aditivo líquido.
4.
Limpie todas las piezas con agua.
5.
Limpie el hueco del dosificador con
un cepillo.
6.
Vuelva a colocar el dosificador en el
hueco.
11.7 Bomba de desagüe
Examine periódicamente la bomba de desagüe y asegúrese de
que está limpia.
Limpie la bomba si:
• El aparato no desagua.
•El tambor no gira.
• El aparato hace ruidos extraños debido al bloqueo de la bomba.
• La pantalla muestra un código de alarma debido al problema con el desagüe.
Para limpiar la bomba de desagüe:
ADVERTENCIA
1.
Desenchufe el aparato de la
toma de red.
2.
No quite el filtro mientras el
aparato esté en funcionamiento. No limpie la bomba
de desagüe si el agua del
aparato está caliente. El
agua debe enfriarse para
limpiar la bomba de desagüe.
1.
Abra la puerta de acceso a la bomba.
Page 54
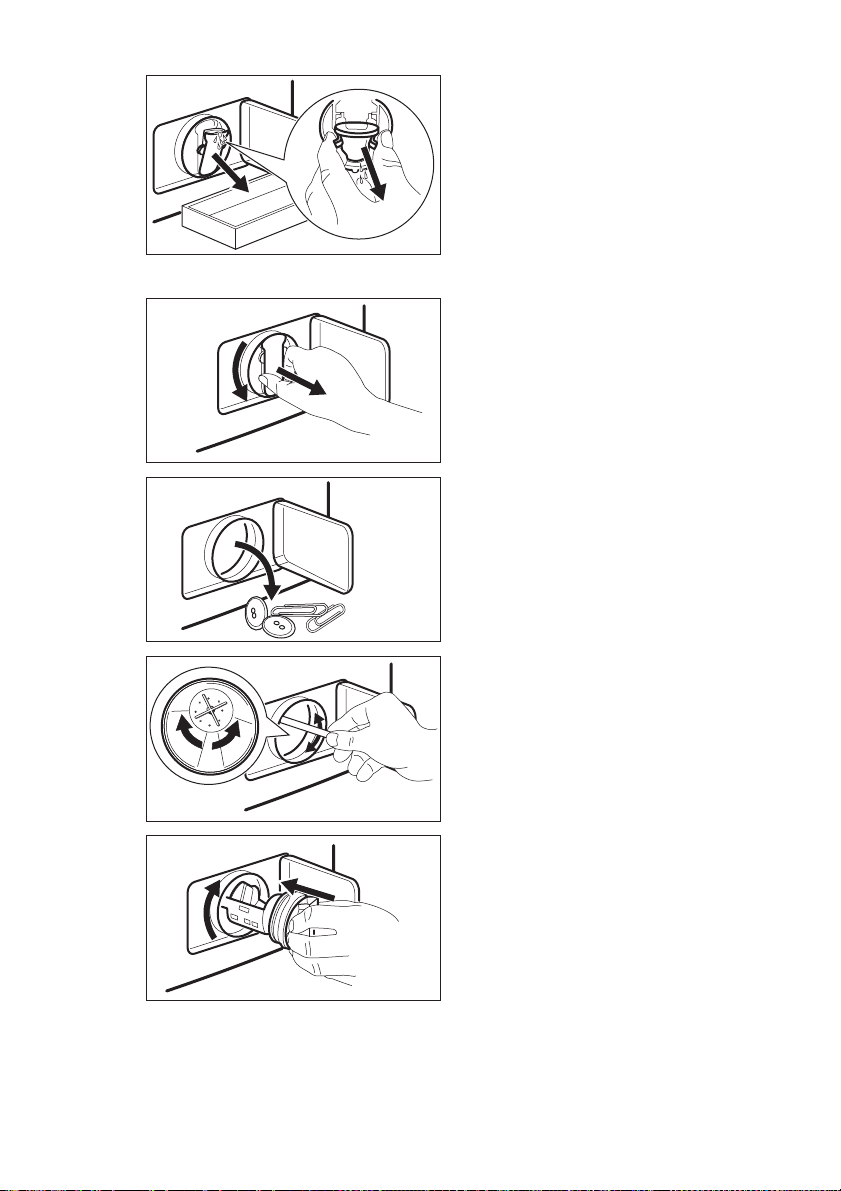
www.aeg.com
54
2.
Coloque un recipiente debajo del
hueco de la bomba para recoger el
agua que salga.
3.
Presione las dos palancas y tire del
conducto de desagüe para que salga el agua.
4.
Cuando el contenedor esté lleno de
agua, vuelva a colocar el conducto y
vacíe el contenedor. Realice los pasos 3 y 4 repetidamente hasta que
no salga más agua de la bomba.
5.
Vuelva a colocar el conducto de desagüe y gire el filtro para retirarlo.
1
2
6.
Retire las pelusas y objetos de la
bomba.
7.
Asegúrese de que el rotor de la
bomba gira. Si no es así, póngase
en contacto con el servicio técnico.
8.
Limpie el filtro con agua corriente y
vuelva a colocarlo en la bomba en
1
2
las guías especiales.
9.
Asegúrese de que lo aprieta correctamente para evitar fugas.
Page 55
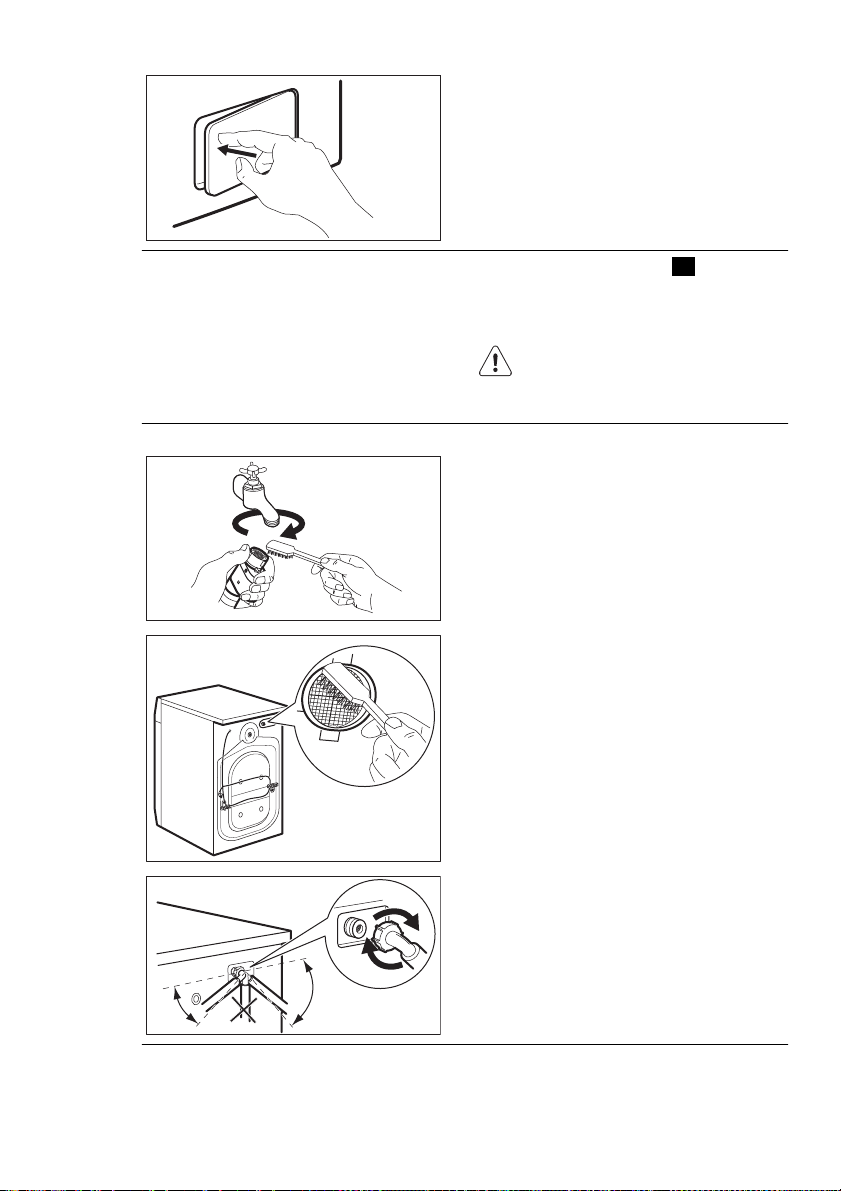
ESPAÑOL 55
10.
Cierre la puerta de acceso a la bomba de desagüe.
11.8 El filtro del tubo de
entrada y el filtro de la válvula
Podría ser necesario limpiar los filtros
cuando:
• El aparato no carga agua.
• El aparato llena con agua durante mucho tiempo.
Limpieza de los filtros de entrada de agua:
•
El indicador de la tecla
la pantalla muestra la alarma correspondiente. Consulte "Solución de
problemas".
ADVERTENCIA
Desenchufe el aparato de la toma de red.
1.
Cierre la toma de agua.
2.
Retire las tomas de entrada de agua
de los grifos.
3.
Limpie el filtro del tubo de entrada
con un cepillo rígido.
4.
Retire el tubo de entrada situado
detrás del aparato.
5.
Limpie el filtro de la válvula con un
cepillo rígido o una toalla.
4
parpadea y
45°
20°
11.9 Desagüe de emergencia
Debido a una avería, el aparato no puede desaguar.
6.
Vuelva a colocar el tubo de entrada.
Cerciórese de que las conexiones
están bien apretadas para evitar fugas.
7.
Abra el grifo.
Si esto ocurre, realice los pasos 1) a 6)
del apartado "Para limpiar la bomba de
desagüe".
Limpie la bomba si fuera necesario.
Page 56
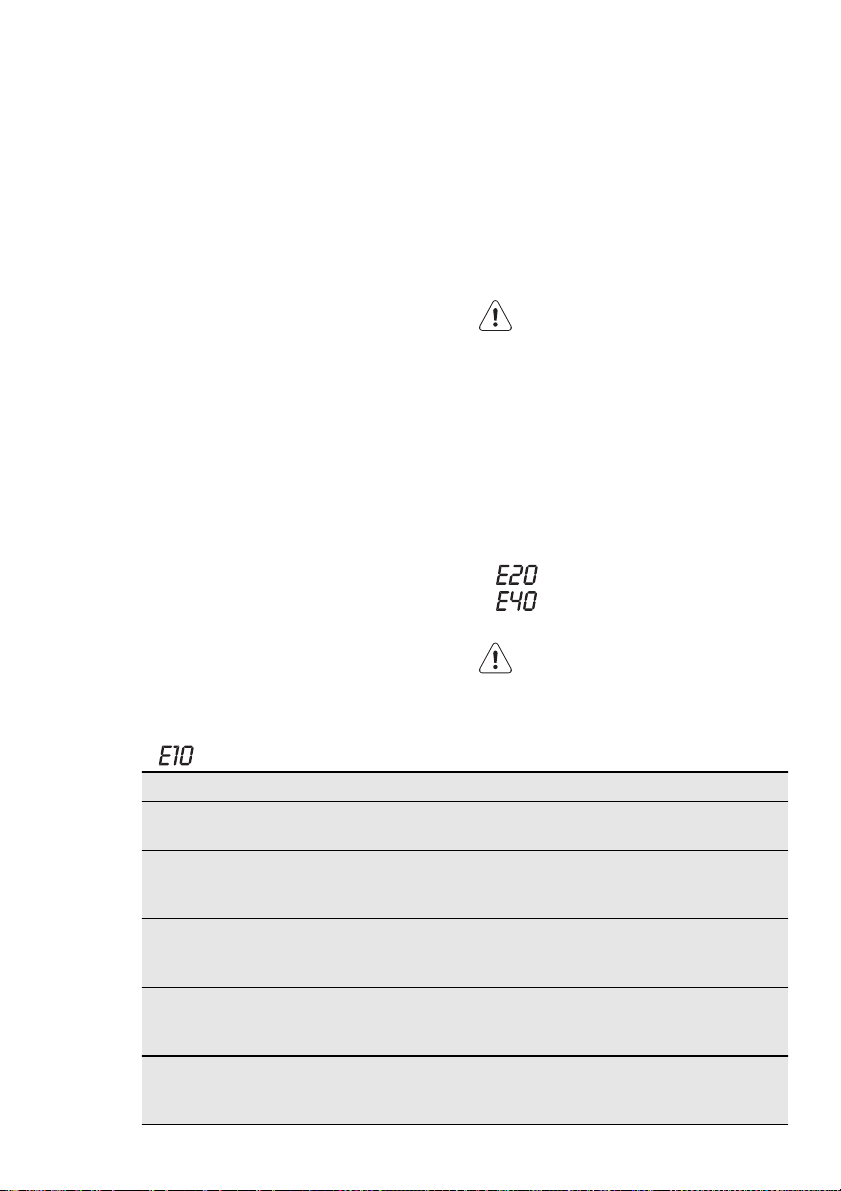
www.aeg.com
56
Vuelva a colocar el conducto de desagüe y cierre la compuerta de la bomba.
Cuando se desagua con el procedimiento de drenaje de emergencia, se debe
activar de nuevo el sistema de desagüe:
1.
Coloque 2 litros de agua en el compartimento de lavado principal del
dosificador de detergente.
2.
Inicie el programa para desaguar.
11.10 Medidas anti
congelación
Si el aparato está instalado en una zona
donde la temperatura puede llegar a ser
inferior a 0 °C, retire el agua restante del
tubo de entrada y la bomba de desagüe.
1.
Desenchufe el aparato de la toma
de red.
12. SOLUCIÓN DE PROBLEMAS
2.
Cierre la toma de agua.
3.
Retire la manguera de entrada de
agua.
4.
Coloque los dos extremos del tubo
de entrada en un recipiente y deje
que salga el agua.
5.
Vacíe la bomba de descarga. Consulte el procedimiento de desagüe
de emergencia
6.
Cuando la bomba esté vacía, coloque de nuevo la manguera.
ADVERTENCIA
Asegúrese de que la temperatura es superior a 0 °C antes de
usar de nuevo el aparato.
El fabricante no se hace responsable de los daños derivados de
las bajas temperaturas.
El aparato no se pone en marcha o se
detiene durante el funcionamiento.
Primero, intente buscar una solución al
problema (consulte la tabla). Si no la encuentra, póngase en contacto con el servicio técnico.
Con algunos problemas, las señales
acústicas funcionan y la pantalla
muestra un código de alarma:
•
- El aparato no carga agua.
•
- El aparato no desagua.
•
- La puerta del aparato está
abierta o no está bien cerrada.
ADVERTENCIA
Apague el aparato antes de realizar las comprobaciones.
Problema Causa posible Posible solución
El aparato no carga agua.
La manguera de entrada
El grifo de agua está cerrado.
de agua está dañada.
Abra la llave de agua.
Compruebe que la manguera
de entrada de agua no está dañada.
Los filtros de la man-
guera de entrada de
agua está obstruido.
El grifo está obstruido o
Limpie los filtros. Consulte el capítulo "Mantenimiento y limpieza".
Limpie el grifo.
tiene incrustaciones calcáreas.
La conexión de la man-
guera de entrada de
Compruebe que la conexión es
correcta.
agua no es correcta.
Page 57
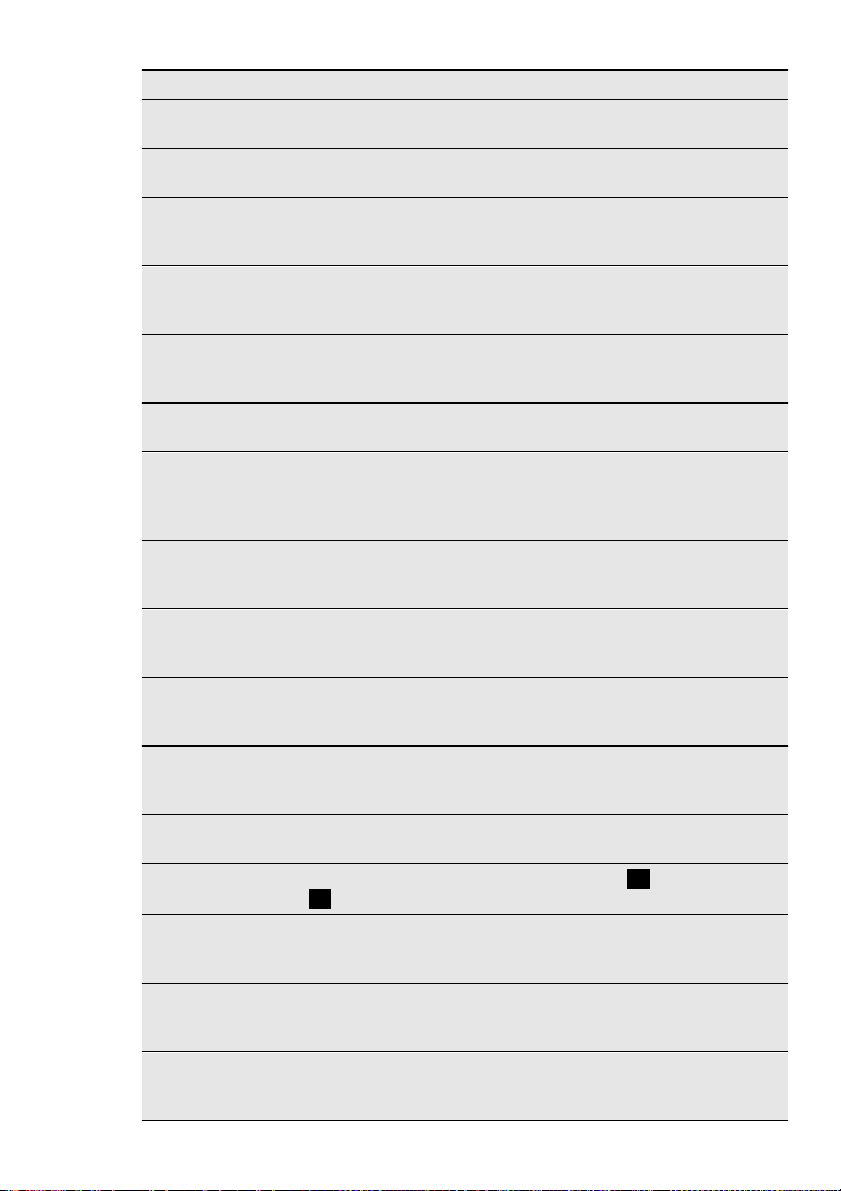
Problema Causa posible Posible solución
La presión de agua es
insuficiente.
El aparato no desagua.
La manguera de desagüe está dañada.
El filtro de la bomba de
desagüe está obstruido.
Póngase en contacto con la em-
presa de suministro de agua.
Compruebe que la manguera
de desagüe no está dañada.
Limpie el filtro de la bomba de
desagüe. Consulte el capítulo
"Mantenimiento y limpieza".
La conexión de la man-
guera de desagüe no es
Compruebe que la conexión es
correcta.
correcta.
Se ha ajustado un pro-
Ajuste el programa de desagüe.
grama de lavado sin la
fase de desagüe.
La función "Agua en la
Ajuste el programa de desagüe.
cuba" está encendida.
La puerta del apa-
Cierre la puerta correctamente.
rato está abierta o
no está bien cerrada.
La fase de centrifugado no funcio-
La fase de centrifugado
está apagada.
Seleccione el programa de cen-
trifugado.
na.
El filtro de la bomba de
desagüe está obstruido.
Limpie el filtro de la bomba de
desagüe. Consulte el capítulo
"Mantenimiento y limpieza".
Problemas de equilibrio
con la carga de la colada.
El programa no se
pone en marcha.
El aparato no está bien
enchufado a la toma de
Ajuste manualmente las pren-
das en la cuba e inicie de nuevo
la fase de centrifugado.
Conecte el cable a la toma de
corriente.
corriente.
Se ha fundido un fusi-
Cambie el fusible.
ble.
No ha pulsado la tecla
4
.
Está ajustado el inicio
diferido.
Pulse la tecla 4 .
Para iniciar el programa de lava-
do de inmediato, cancele el ini-
cio diferido.
El bloqueo de seguri-
dad para niños está acti-
Desactive el bloqueo de seguri-
dad para niños.
vado.
Hay agua en el
suelo.
Fugas de los acoplamientos de los tubos de
Asegúrese de que los acopla-
mientos están apretados.
agua.
ESPAÑOL 57
Page 58
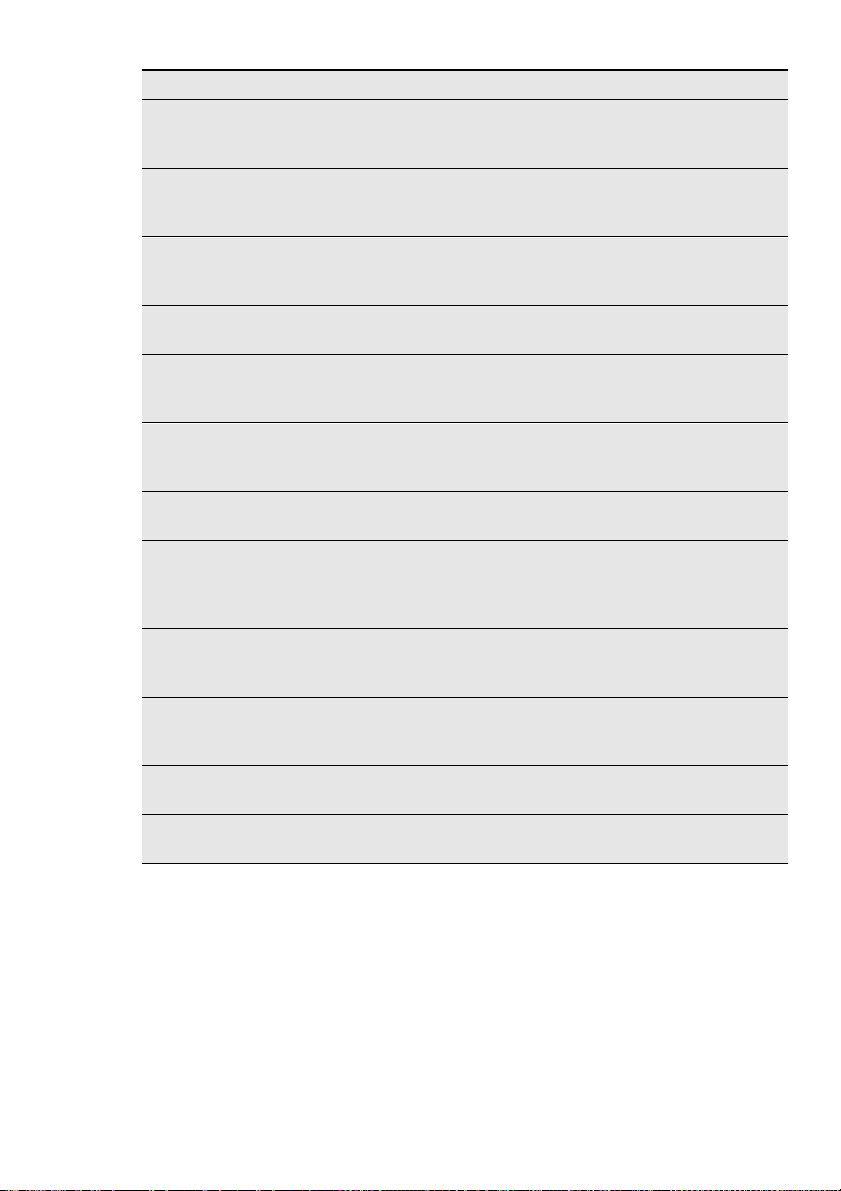
www.aeg.com
58
Problema Causa posible Posible solución
Fugas de la bomba de
desagüe.
Asegúrese de que el filtro de la
bomba de desagüe está apreta-
do.
La manguera de desa-
güe está dañada.
Compruebe que la manguera
de entrada de agua no está da-
ñada.
No se puede abrir
la puerta del apa-
El programa de lavado
está en marcha.
Deje que termine el programa
de lavado.
rato.
Hay agua en el tambor. Seleccione el programa de des-
carga o de centrifugado.
La lavadora produce un ruido ex-
Nivel incorrecto del
aparato.
Ajuste el nivel del aparato. Con-
sulte el apartado "Instalación".
traño.
No ha retirado el emba-
laje o los pasadores de
transporte.
La carga es muy peque-
Retire el embalaje o los pasado-
res de transporte. Consulte el
apartado "Instalación".
Añada más colada en el tambor.
ña.
El aparato se llena
de agua y desagua inmediata-
El extremo de la manguera de desagüe está
demasiado bajo.
Asegúrese de que el tubo de
desagüe se encuentra en la po-
sición correcta.
mente.
Los resultados del
lavado no son satisfactorios.
No ha eliminado las
El detergente empleado
era insuficiente o no era
el adecuado.
manchas difíciles antes
Aumente la cantidad de deter-
gente o utilice otro diferente.
Emplee productos especiales
para tratar las manchas difíciles.
de lavar las prendas.
Se ha ajustado la tem-
peratura incorrecta.
Demasiada carga de co-
Asegúrese de ajustar la tempe-
ratura correcta.
Reduzca la carga.
lada.
Una vez finalizada la revisión, conecte el
aparato. El programa continuará a partir
del punto en que se haya interrumpido.
Si el problema se vuelve a producir,
póngase en contacto con el servicio técnico.
Si la pantalla muestra otros códigos de
alarma, diríjase al servicio técnico.
Page 59
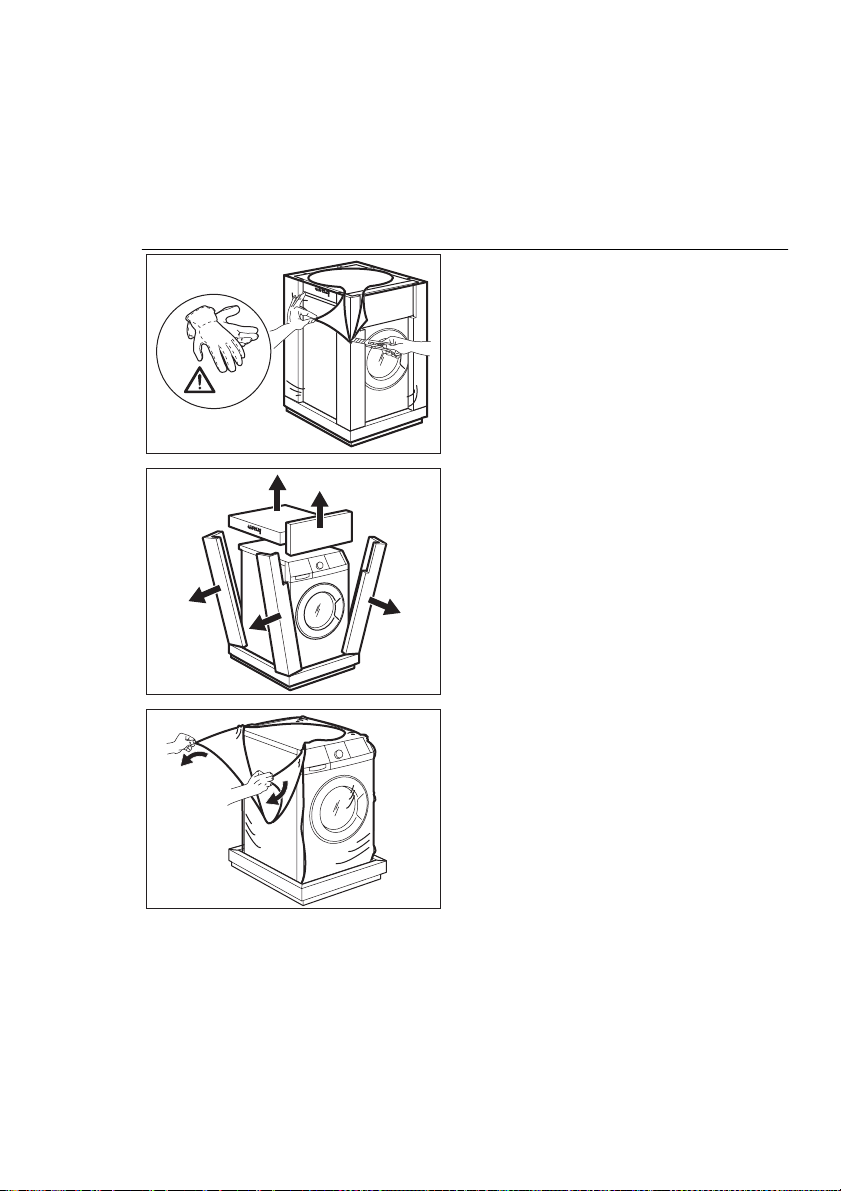
13. INSTALACIÓN
ESPAÑOL 59
13.1 Kit de la placa de fijación
(4055171146)
Disponible en su distribuidor autorizado.
13.2 Desembalaje
Si instala el aparato en un zócalo, asegúrelo con las placas de fijación.
Siga las instrucciones que se suministran
con el kit.
1.
Utilice los guantes. Retire la película
externa. Si es necesario, utilice un
cúter.
2.
Retire la cubierta de cartón.
3.
Retire los materiales del embalaje
de poliestireno.
4.
Retire la película interna.
Page 60
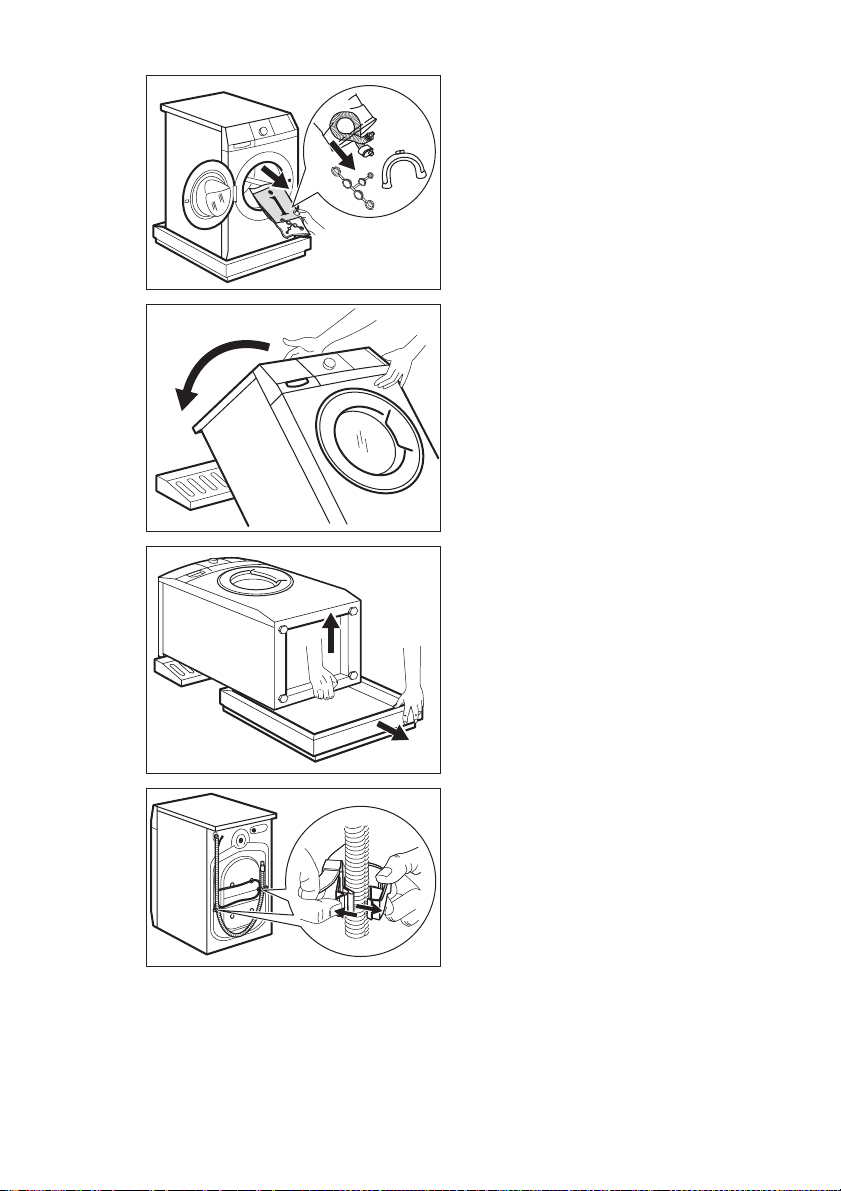
www.aeg.com
60
5.
Abra la puerta y retire todos los elementos del tambor.
6.
Extienda uno de los materiales de
embalaje de poliestireno en el suelo
detrás del aparato. Baje con cuidado el aparato sobre el lado posterior. Tenga cuidado para no dañar
los tubos.
7.
Retire la protección de poliestireno
de la base.
8.
Levante el aparato hasta la posición
vertical.
1
2
9.
Retire el cable de alimentación y el
tubo de desagüe de los soportes de
los tubos.
Page 61
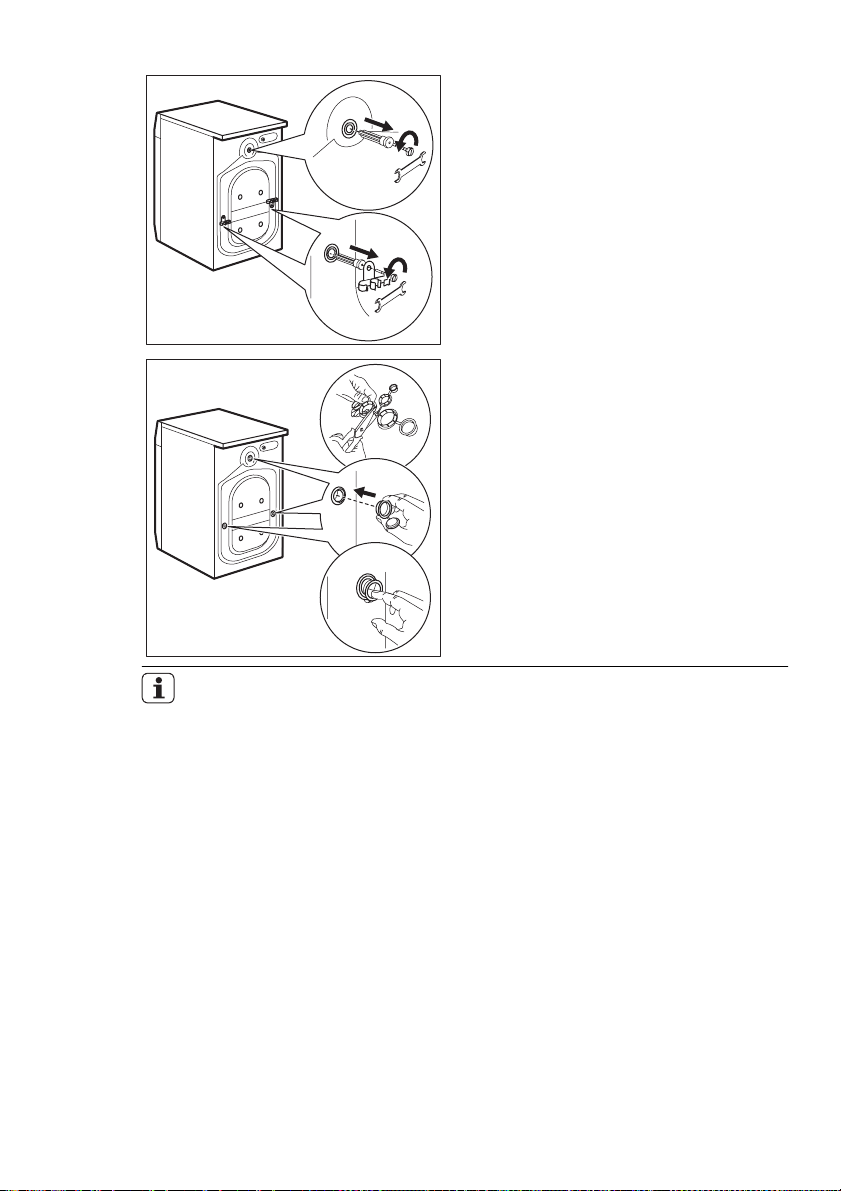
ESPAÑOL 61
10.
Suelte los tres pernos. Utilice la llave
suministrada con el aparato.
11.
Extraiga los separadores de plástico.
12.
Coloque tapones de plástico en los
orificios. Encontrará los tapones en
la bolsa del manual de instrucciones.
– Se recomienda guardar el em-
balaje y los pasadores de
transporte para cuando traslade el aparato.
– Si el aparato se suministra en
invierno, estación en la que se
dan temperaturas bajo cero.
Almacénelo a temperatura ambiente durante 24 horas antes
de utilizarlo por primera vez.
Page 62
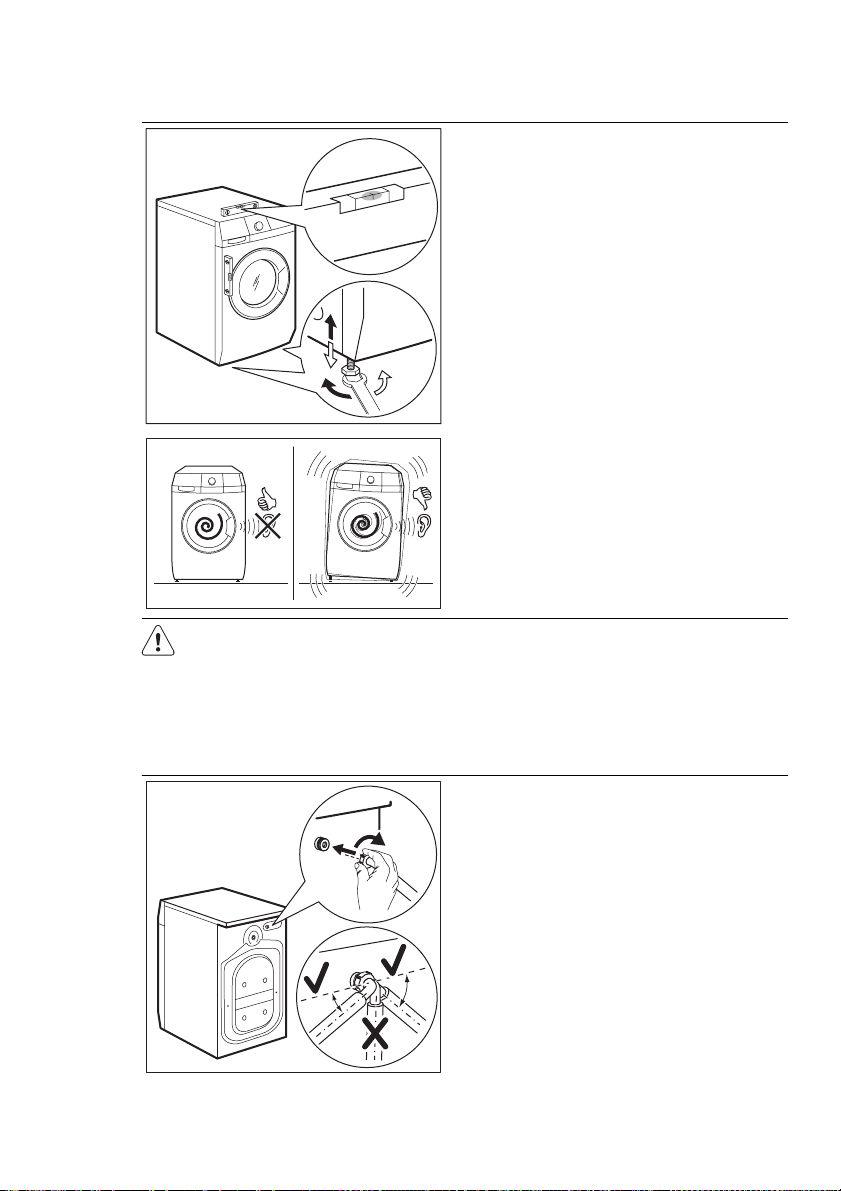
20
O
45
O
www.aeg.com
62
13.3 Colocación y nivelado
• Instale la lavadora en el suelo sobre
una superficie plana y rígida.
• Asegúrese de que las moquetas no
impidan la circulación de aire por debajo del electrodoméstico.
• Cerciórese de que el aparato no entra
en contacto con la pared u otros armarios de cocina.
• Afloje o apriete las patas para ajustar
el nivel. El ajuste correcto del nivel del
aparato evita vibraciones, ruidos y el
movimiento del aparato cuando está
funcionando.
x4
• El aparato debe estar nivelado y estable.
PRECAUCIÓN
No coloque cartón, madera ni
materiales equivalentes bajo las
patas del aparato para ajustar el
nivel.
13.4 El tubo de entrada
O
O
20
20
• Conecte el tubo al aparato. Gire el tubo de entrada solo a la derecha o a la
izquierda. Suelte la tuerca anular para
ajustarla en la posición correcta.
O
O
45
45
Page 63
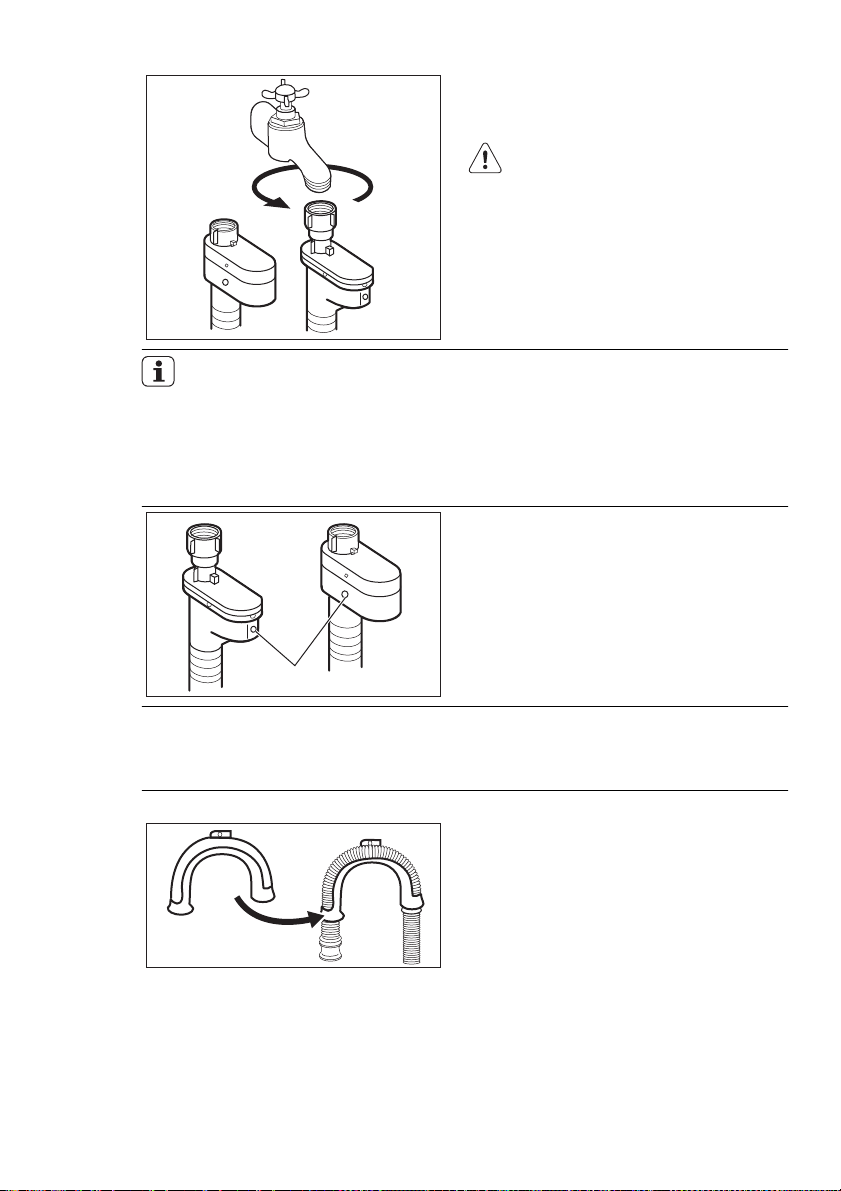
No utilice ningún tubo de extensión si el tubo de entrada es demasiado corto. Póngase en contacto con el servicio técnico para
cambiar el tubo.
Dispositivo antifuga
A
ESPAÑOL 63
• Conecte el tubo de entrada de agua
fría a una toma de agua fría con rosca
de 3/4.
PRECAUCIÓN
Asegúrese de que no haya fugas
de los acoplamientos.
El tubo de entrada tiene un dispositivo
antifuga. Este dispositivo evita las fugas
de agua del tubo por el desgaste normal. El sector rojo de la ventana «A»
muestra este fallo.
Si esto ocurre, cierre el grifo de agua y
póngase en contacto con el servicio técnico para cambiar el tubo.
13.5 Desagüe
Hay distintos procedimientos para conectar el tubo de desagüe:
Con la guía de plástico.
Page 64
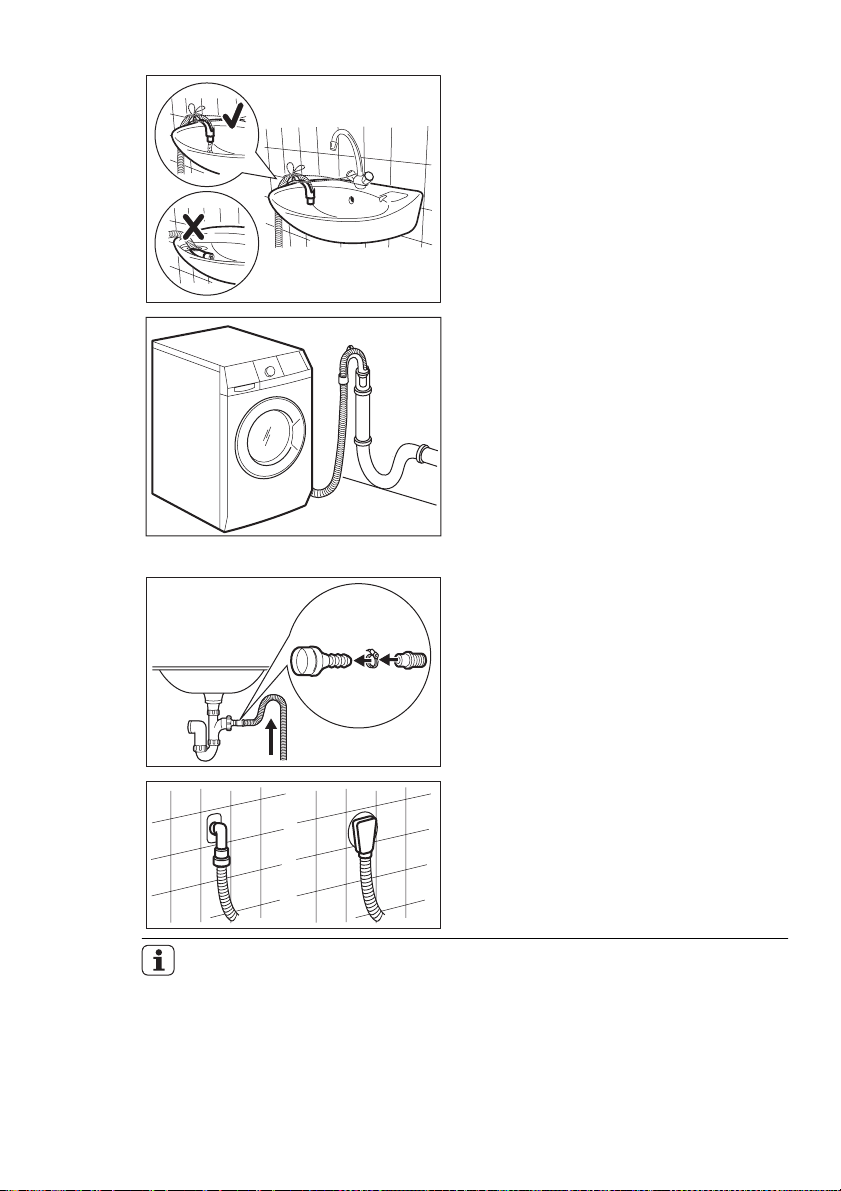
www.aeg.com
64
• En el borde de un fregadero.
• Asegúrese de que la guía de plástico
no se mueva cuando el aparato desagua. Acople la guía al grifo de agua o
a la pared.
• A un tubo vertical con orificio de ventilación.
Consulte la ilustración. Directamente
en un tubo de desagüe a una altura
mínima de 60 cm y máxima de 100 cm.
El extremo de la manguera de desagüe debe quedar siempre al aire; es
decir, el diámetro interior de la tubería
de desagüe debe ser mayor que el
diámetro exterior del tubo de desagüe.
Sin la guía de plástico.
• A un desagüe.
Consulte la ilustración. Coloque el tu-
bo de desagüe en el sumidero y asegúrela con una brida. Asegúrese de
que el tubo de desagüe realiza un bucle para evitar que las partículas restantes entren en el aparato desde el
fregadero.
Puede extender el tubo de desagüe hasta un máximo de 400 cm.
Póngase en contacto con el servicio técnico para el otro tubo de
desagüe y la extensión.
• Directamente a un tubo de desagüe
integrado en la pared de la habitación
y apretando con una brida.
Page 65

14. ASPECTOS MEDIOAMBIENTALES
ESPAÑOL 65
Recicle los materiales con el símbolo
. Coloque el material de embalaje
en los contenedores adecuados para
su reciclaje.
Ayude a proteger el medio ambiente
y la salud pública, así como a reciclar
residuos de aparatos eléctricos y
electrónicos. No deseche los
aparatos marcados con el símbolo
junto con los residuos domésticos.
Lleve el producto a su centro de
reciclaje local o póngase en contacto
con su oficina municipal.
Page 66

www.aeg.com
66
Page 67

ESPAÑOL 67
Page 68
www.aeg.com/shop
132931572-A-492012
 Loading...