

Page 1
LAVAMAT L 60800
Ekolojik Otomatik Çamaçır Makinesi
The environmentally friendly washing machine
Kullanım kılavuzu
Instruction booklet
PERFEKT IN FORM UND FUNKTION
Page 2
Sayın Müçteri,
Ekolojik zihniyet sahipleri, buna uygun davranırlar...
Bu kullanım kılavuzunu dikkat ile okumanızı, ve ilk sayfalarda belirtilen
emniyet kurallarına iliçkin olarak özel dikkat göstermenizi rica etmekteyiz. Bu kullanım kılavuzunu, gerektiginde gelecekte danıçmak üzere
saklamanızı ve makinenin satılması halinde makine ile birlikte yeni sahibine teslim etmenizi tavsiye ederiz.
Uyarı üçgeni ile ve/veya ikaz terimleri vasıtası ile (Uyarı!, Ihtiyat!,
Dikkat!) Sizin Emniyetiniz veya makinenin iyi içlemesi için özellikle
önemli talimatlar vurgulanmaktadır. Bunlara riayet edilmesi rica edilir.
Bu simge, makinenin kullanımında adım adım Size kılavuzluk edecektir.
Bu simgenin önündeki bilgiler, kullanım talimatlarını ve cihaza iliçkin
pratik kullanımı tamamlamaya yaramaktadırlar.
Yonca, makinenin çevreye saygı göstererek ekonomik çekilde
kullanılması için tavsiyeleri ve talimatları vurgulamaktadır.
Herhangi bir problem halinde, kılavuz bu sorunların tarafınızdan çözülebilmesi için talimatları içermektedir; “Arızalar ve Çözümleri” bölümüne bakınız.
Bu talimatlar yeterli olmadıgı takdirde, en yakın YETKILI SERVISIMIZE baç-
vurunuz.
Ürünün ya da ambalajının üzerindeki içareti bu ürünün ev atıgı olarak
elden çıkarılamayacagını gösterir.
Bunun yerine elektrikli ve elektronik cihazların geri dönüçümü için uygun
olan toplama noktalarına verilmelidir. Bu ürünün düzgün çekilde elden
çıkartılmasını saglayarak çevre ve insan saglıgı için olası olumsuz sonuç-
ların engellenmesine yardımcı olursunuz aksi halde bu ürünün uygun
olmayan çekilde elden çıkarılması çevre ve insan saglıgına zarar verebilir.
Bu ürünün geri dönüçümü hakkında ayrıntılı bilgi için lütfen yerel büronuza, ev atıkları servisine ya da ürünü satın aldıgınız magazaya baçvurunuz.
Geri Dönüçümlü kagıt üzerine basılmıçtır.
2
Page 3

Içindekiler
Emniyet Kuralları. . . . . . . . . . . . . . . . . . . . . . . . . . . . . . . . . . . . . . . . . . . . . . 5-6
Imha edilme . . . . . . . . . . . . . . . . . . . . . . . . . . . . . . . . . . . . . . . . . . . . . . . . . . . . 7
Çevre korunması için tavsiyeler! . . . . . . . . . . . . . . . . . . . . . . . . . . . . . . . . . . 7
Çamaçır makinenizin baçlıca özellikleri . . . . . . . . . . . . . . . . . . . . . . . . . . . . 8
Makinenin Görünüçü . . . . . . . . . . . . . . . . . . . . . . . . . . . . . . . . . . . . . . . . . . . . . 9
Kontrol Paneli . . . . . . . . . . . . . . . . . . . . . . . . . . . . . . . . . . . . . . . . . . . . . . . . . . . 10
Program seçicisi . . . . . . . . . . . . . . . . . . . . . . . . . . . . . . . . . . . . . . . . . . . . . . . 10
BAÇL. BEKL. tuçu . . . . . . . . . . . . . . . . . . . . . . . . . . . . . . . . . . . . . . . . . . . . . . 11
Gecikmeli Baçlatma tuçu . . . . . . . . . . . . . . . . . . . . . . . . . . . . . . . . . . . . . . . 11
Program Seçenek Tuçları. . . . . . . . . . . . . . . . . . . . . . . . . . . . . . . . . . . . . . . . 12
ÖN YIKAMA . . . . . . . . . . . . . . . . . . . . . . . . . . . . . . . . . . . . . . . . . . . . . . . . . . 12
NARIN LER. . . . . . . . . . . . . . . . . . . . . . . . . . . . . . . . . . . . . . . . . . . . . . . . . . . . 12
EKSTRA HIZLI . . . . . . . . . . . . . . . . . . . . . . . . . . . . . . . . . . . . . . . . . . . . . . . . . 12
SIKMA . . . . . . . . . . . . . . . . . . . . . . . . . . . . . . . . . . . . . . . . . . . . . . . . . . . . . . 12
SUDA BEKLETME . . . . . . . . . . . . . . . . . . . . . . . . . . . . . . . . . . . . . . . . . . . . . . 13
Display. . . . . . . . . . . . . . . . . . . . . . . . . . . . . . . . . . . . . . . . . . . . . . . . . . . . . . . 13
Program evreleri göstergesi . . . . . . . . . . . . . . . . . . . . . . . . . . . . . . . . . . . . . 13
Bir programın iptal edilmesi . . . . . . . . . . . . . . . . . . . . . . . . . . . . . . . . . . . . . 14
Çevrimi sırasında bir seçenegin ya da programın degiçtirilmesi. . . . . . . . 14
Program çalıçtırıldıktan sonra dolum kapagının açılması . . . . . . . . . . . . . 14
Deterjan ve katkı maddeleri gözü . . . . . . . . . . . . . . . . . . . . . . . . . . . . . . . . . . . 15
Ilk kez yıkamadan önce . . . . . . . . . . . . . . . . . . . . . . . . . . . . . . . . . . . . . . . . . . 15
Yıkama içleminin hazırlanması . . . . . . . . . . . . . . . . . . . . . . . . . . . . . . . . . . . . 16
Çamaçırların ayrılması ve hazırlanması. . . . . . . . . . . . . . . . . . . . . . . . . . . . . . . 16
Çamaçırların agırlıgı. . . . . . . . . . . . . . . . . . . . . . . . . . . . . . . . . . . . . . . . . . . . . . 17
Kumaç tipleri ve etiketler. . . . . . . . . . . . . . . . . . . . . . . . . . . . . . . . . . . . . . . 17-18
Deterjanlar ve katkı maddeleri . . . . . . . . . . . . . . . . . . . . . . . . . . . . . . . . . . . . . 19
Hangi deterjan ve katkı maddesi kullanılmalı? . . . . . . . . . . . . . . . . . . . . . 19
Ne kadar deterjan ve katkı maddesi kullanılmalı?. . . . . . . . . . . . . . . . . . . 19
Sıvı deterjan . . . . . . . . . . . . . . . . . . . . . . . . . . . . . . . . . . . . . . . . . . . . . . . . . . 19
Su yumuçatıcı ilave edilmesi . . . . . . . . . . . . . . . . . . . . . . . . . . . . . . . . . . . . . . . 19
Su sertligi üzerine bilgiler. . . . . . . . . . . . . . . . . . . . . . . . . . . . . . . . . . . . . . . . . . 19
3
Page 4

Içindekiler
Nasıl yıkanır . . . . . . . . . . . . . . . . . . . . . . . . . . . . . . . . . . . . . . . . . . . . . . . . . . . . 20
Çamaçırların makineye yüklenmesi . . . . . . . . . . . . . . . . . . . . . . . . . . . . . . . . . . 20
Deterjan ve katkı maddelerinin doldurulması . . . . . . . . . . . . . . . . . . . . . . . . . 20
Arzu edilen programın seçilmesi . . . . . . . . . . . . . . . . . . . . . . . . . . . . . . . . . . . . 20
Arzu edilen yardımcı fonksiyonların seçilmesi. . . . . . . . . . . . . . . . . . . . . . . . . 20
SIKMA devri veya SUDA BEKLETME seçeneginin seçilmesi . . . . . . . . . . . . . . . 21
Ekstra durulama. . . . . . . . . . . . . . . . . . . . . . . . . . . . . . . . . . . . . . . . . . . . . . . . . . 21
GECIKMELI BAÇLATMA seçeneginin seçilmesi . . . . . . . . . . . . . . . . . . . . . . . . . . 21
Programın çalıçtırılması . . . . . . . . . . . . . . . . . . . . . . . . . . . . . . . . . . . . . . . . . . . 22
Program evreleri göstergesi . . . . . . . . . . . . . . . . . . . . . . . . . . . . . . . . . . . . . . . . 22
Display . . . . . . . . . . . . . . . . . . . . . . . . . . . . . . . . . . . . . . . . . . . . . . . . . . . . . . . . . 22
Program sonu. . . . . . . . . . . . . . . . . . . . . . . . . . . . . . . . . . . . . . . . . . . . . . . . . . . . 23
Program tablosu: yıkama programları . . . . . . . . . . . . . . . . . . . . . . . . . . . . . 25
Program tablosu: özel programlar. . . . . . . . . . . . . . . . . . . . . . . . . . . . . . . . . 26
Temizlik ve Bakım . . . . . . . . . . . . . . . . . . . . . . . . . . . . . . . . . . . . . . . . . . . . . . . 27
Her yıkamadan sonra . . . . . . . . . . . . . . . . . . . . . . . . . . . . . . . . . . . . . . . . . . . . . 27
Periyodik temizlik . . . . . . . . . . . . . . . . . . . . . . . . . . . . . . . . . . . . . . . . . . . . . . . . 27
Gövde . . . . . . . . . . . . . . . . . . . . . . . . . . . . . . . . . . . . . . . . . . . . . . . . . . . . . . . 27
Deterjan gözü. . . . . . . . . . . . . . . . . . . . . . . . . . . . . . . . . . . . . . . . . . . . . . . . . 27
Dolum kapagı contası . . . . . . . . . . . . . . . . . . . . . . . . . . . . . . . . . . . . . . . . . . 28
Su giriç hortum filtresi . . . . . . . . . . . . . . . . . . . . . . . . . . . . . . . . . . . . . . . . . 28
Su boçaltma filtresi . . . . . . . . . . . . . . . . . . . . . . . . . . . . . . . . . . . . . . . . . . . . 28
Acil durumda su boçaltılması. . . . . . . . . . . . . . . . . . . . . . . . . . . . . . . . . . . . . . . 29
Donmaya karçı önlemler. . . . . . . . . . . . . . . . . . . . . . . . . . . . . . . . . . . . . . . . . . . 30
Arızalar ve Çözümleri . . . . . . . . . . . . . . . . . . . . . . . . . . . . . . . . . . . . . . . . . . . . 31
Arızaların giderilmesi . . . . . . . . . . . . . . . . . . . . . . . . . . . . . . . . . . . . . . . . . . 31-34
Yıkama sonuçları memnun edici degil . . . . . . . . . . . . . . . . . . . . . . . . . . . . . . . 35
Teknik veriler . . . . . . . . . . . . . . . . . . . . . . . . . . . . . . . . . . . . . . . . . . . . . . . . . . . 36
Yetkili Servis ve Yedek Parça . . . . . . . . . . . . . . . . . . . . . . . . . . . . . . . . . . . . . 37
Kurma ve elektrik baglantısı talimatları . . . . . . . . . . . . . . . . . . . . . . . . . . . 38
Emniyet kuralları . . . . . . . . . . . . . . . . . . . . . . . . . . . . . . . . . . . . . . . . . . . . . . . . . 39
Cihazın boyutları . . . . . . . . . . . . . . . . . . . . . . . . . . . . . . . . . . . . . . . . . . . . . . . . 39
Ön cepheden ve yandan bakıç. . . . . . . . . . . . . . . . . . . . . . . . . . . . . . . . . . . . . . 39
Arkadan bakıç . . . . . . . . . . . . . . . . . . . . . . . . . . . . . . . . . . . . . . . . . . . . . . . . . . . 39
Kurma . . . . . . . . . . . . . . . . . . . . . . . . . . . . . . . . . . . . . . . . . . . . . . . . . . . . . . . . . 40
Ambalajın açılması . . . . . . . . . . . . . . . . . . . . . . . . . . . . . . . . . . . . . . . . . . . . . . .40
Yerleçtirme . . . . . . . . . . . . . . . . . . . . . . . . . . . . . . . . . . . . . . . . . . . . . . . . . . . . . . 41
Seviyeleme . . . . . . . . . . . . . . . . . . . . . . . . . . . . . . . . . . . . . . . . . . . . . . . . . . . . . . 42
Su giriçi. . . . . . . . . . . . . . . . . . . . . . . . . . . . . . . . . . . . . . . . . . . . . . . . . . . . . . . . . 42
Su çıkıçı. . . . . . . . . . . . . . . . . . . . . . . . . . . . . . . . . . . . . . . . . . . . . . . . . . . . . . . . 42
Elektrik baglantısı . . . . . . . . . . . . . . . . . . . . . . . . . . . . . . . . . . . . . . . . . . . . . . . . 43
4
Page 5

Emniyet Kuralları
AEG elektrikli ev aletlerinin emniyeti, teknik yöntemlerce kabul edilen
yönetmeliklere ve cihazların emniyetleri hakkındaki kanun hükümlerine
uygundur. Ancak, üretici sıfatı ile, açagıdaki emniyet kurallarının belirtilmesinin bir görevimiz oldugu düçüncesindeyiz.
Genel Emniyet
•Makine üzerindeki tamirat içlemleri, Sadece Yetkili Servis tarafından
yapılmalıdır. Uygun olmayan tamiratlar, önemli derecede tehlike oluç-
turabilir. Tamiratlar için, bizim Yetkili servisimize ve makinenizi almıç
oldugunuz Satıcınıza baçvurunuz.
• Besleme kablosunun hasarlı oldugunu tespit ettiginizde; kontrol
paneli veya üst tabla, cihazın iç kısmına ulaçılmasına izin verecek
derecedeki hasarları içerdikleri takdirde hiç bir çekilde makineyi
çalıçtırmayınız.
• Her temizlik, gözden geçirme ve bakım içleminden evvel fiçi prizden
çıkartınız.
•Asla fiçi, kablo kısmından çekerek prizden çıkartmayınız, fiçi tutarak
çıkartınız.
• Çamaçır makinesine hiç bir zaman bir su fıçkırtmayınız. Çarpılma tehlikesi mevcuttur!
• Yüksek ısılı yıkama programında çamaçır makinesi dolum kapagının
camı ısınır. Dokunmayınız!
• Cihazın bir acil durum neticesi boçaltılması gerektiginde veya bir acil
durum nedeniyle dolum kapagı açıldıgında, boçaltma içleminden evvel
suyun sogumasını bekleyiniz.
• Ufak ev hayvanları, elektrik kablolarını ve su hortumlarını kemirebilirler.
Çarpılma tehlikesi ve suyun meydana getirdigi tehlikeler mevcuttur.
Yerleçtirme, baglantı, çalıçtırma
• Yerleçtirme ve baglantılar için talimatları izleyiniz.
•Kazan ve tamburdan üretim artıklarını gidermek için ilk kez çamaçır
koymaksızın bir yıkama gerçekleçtiriniz (PAMUKLU 60, yarım doz
deterjan ile).
•Makinenin kıç aylarında, ısı 0 derece altında iken satın alınmıç olması
halinde, makineyi çalıçtırmadan evvel 24 saat süre ile oda ısısında
tutunuz.
5
Page 6

Emniyet Kuralları
Çocukların güvenligi
• Çocuklar genelde elektrikli cihazların tehlikeli olduklarını bilmezler.
Makinenin çalıçması esnasında, çocukların uygun çekilde gözetim
altında tutulmaları ve cihaz ile oynamalarına müsaade edilmemesi
gereklidir - çocukların cihazın içine girip kapıyı kapatmaları tehlikesi
mevcuttur.
• Ambalaj ögeleri (örnegin ince tabakalar, polistirol) çocuklar için tehlikeli olabilirler. Bogulma tehlikesi mevcuttur! Bunları, çocukların
ulaçamayacakları yerlerde muhafaza ediniz.
• Tüm deterjanları çocukların eriçemeyecegi güvenli yerlerde muhafaza
ediniz.
•Çocukların ve ev hayvanlarının çamaçır makinesinin içerisine girmediklerini kontrol ediniz.
•Makine imha edilecegi zaman fiçi elektrik prizinden çıkartınız, dolum
kapagının kilit kısmını kullanılmaz hale getiriniz : bu çekilde, çocukların oyun esnasında çamaçır makinesi içerisine girip cihaz içerisinde
kapalı kalmaları tehlikesi önlenmiç olacaktır.
Öngörülen amaca uygun kullanım
• Makine, ev çamaçırlarının yıkanması ve kurutulması için kullanılmalıdır.
Makinenin, öngörülmemiç amaçlar için kullanılması veya uygun olmayan
çekilde çalıçtırılması halinde meydana gelecek zararlara iliçkin olarak, üre-
tici hiç bir sorumluluk kabul etmez.
• Güvenlik nedenleri açısından, cihaza herhangi bir degiçiklik
yapılmasına izin verilmez.
• Sadece çamaçır makineleri için öngörülmüç deterjanları kullanınız ve
üreticinin talimatlarına riayet ediniz.
• Çamaçırlarda, alev alabilecek çözücü kalıntıları bulunmamalıdır; özellikle daha evvelden kuru temizlemeden geçirilmiç çamaçırlar
yıkandıgında dikkat gösterilmesi gerekir.
• Makinenizi kuru temizleme için kullanmayınız.
• Renklendirici maddeler/renk attırıcılar sadece bu maddelerin üreticileri tarafından kullanılabilecekleri sarihen beyan edilmiç ise,
kullanılabilirler. Zarara ugranıldıgı takdirde kendimizi bundan sorumlu tutmadıgımız belirtilir.
• Cihazı daima fiçten çekiniz ve kullanımdan sonra su muslugunu
kapatınız.
6
Page 7
Imha edilme
Ambalaj malzemelerini imha ediniz
simgesini taçıyan malzemeler geri dönüçümlüdür. Bunların yeniden
degerlendirilebilmelerini saglamak için, özel alanlara (veya bidonlara)
konulmaları gerekir. Yetkili kurumdan bilgi alınız.
>PE<= polyetilen
>PS<= polistirol
>PP<= polipropilen
Eski cihazı imha ediniz
Makinenin uygun çekilde imha edilmesi için, toplama ile görevli, bölgede yetkili kuruma baç vurunuz.
Çevre korunması için tavsiyeler!
• Az kirli çamaçırlar ön yıkama yapmadan yıkanabilirler; bu çekilde,
deterjan, su ve zamandan tasarruf edilir (ve çevre korunur!).
• Normal kirli çamaçırları yıkarken enerji tasarruf programını kullanınız.
• Belirtilmiç azami çamaçır miktarları doldurulur ise, makine tasarruf
ederek çalıçır.
•Az çamaçır dolduruldugunda, tavsiye edilen deterjan miktarının sade-
ce yarısını veya üçte ikisini kullanınız.
• Uygun bir ön yıkama ile, lekeler ve sınırlı kir bölgeleri yok edilebilir-
ler; sonra, daha alçak bir ısıda yıkama yapılabilir.
•Çogu zaman yumuçatıcı kullanımından feragat edilebilir; deneyiniz!
Makinede kurutma yapılıyor ise çamaçırlar, yumuçatıcı
kullanılmaksızın da yumuçacık olacaklardır.
• Su sertligi orta veya yüksek ise, (II sertlik derecesinden baçlamak üze-
re II, bak. “Deterjanlar ve katkı maddeleri”) yumuçatıcılar ilave edilmelidir.
Deterjan miktarı, her zaman I sertlik derecesine göre ayarlanabilecektir (= tatlı).
7
Page 8

Çamaçır makinenizin baçlıca özellikleri
•Tek bir dügme sayesinde program ve ısının seçilmesi.
•Program evreleri göstergesi, program içlemesinin ilerlemesi hususunda bilgi verir.
• Normal derecede kirli pamuklu çamaçırlar için Enerji tasarrufu prog-
ramı (95E, 60E, 40E).
• Gecikmeli baçaltma: program baçlangıcı 23 saate kadar geciktirilebilir (örnegin daha ekonomik enerji bedelli saatlere göre).
• Son sıkma devir sayısı, gerek pamuklular gerekse sentetikler, hassas
çamaçırlar ve yünlüler için 600 devire düçürülebilinir.
• Tüm kumaçlar için suda bekletme programı uygulanabilir: kırıçıkların
oluçmasını önlemek amacıyla çamaçırlar son durulama suyu içerisinde kalır.
• Nazik, ahenkli yıkama ritmi sayesinde özel yünlü programı
çamaçırlarınızı keçeleçtirmeden azami hassasiyet içerisinde yıkar.
• Deterjan, yumuçatıcı ve beyazlatma maddesi için 4 bölmeli göz.
• Dengesiz Yük Kontrol Sistemi: emniyet pozisyonu ve makinenin
gürültüsüz çalıçması.
• ECO valfı deterjanın tümünün kullanımına imkan tanır ve enerjiden
tasarruf saglayarak su tüketimini azaltır.
8
Page 9
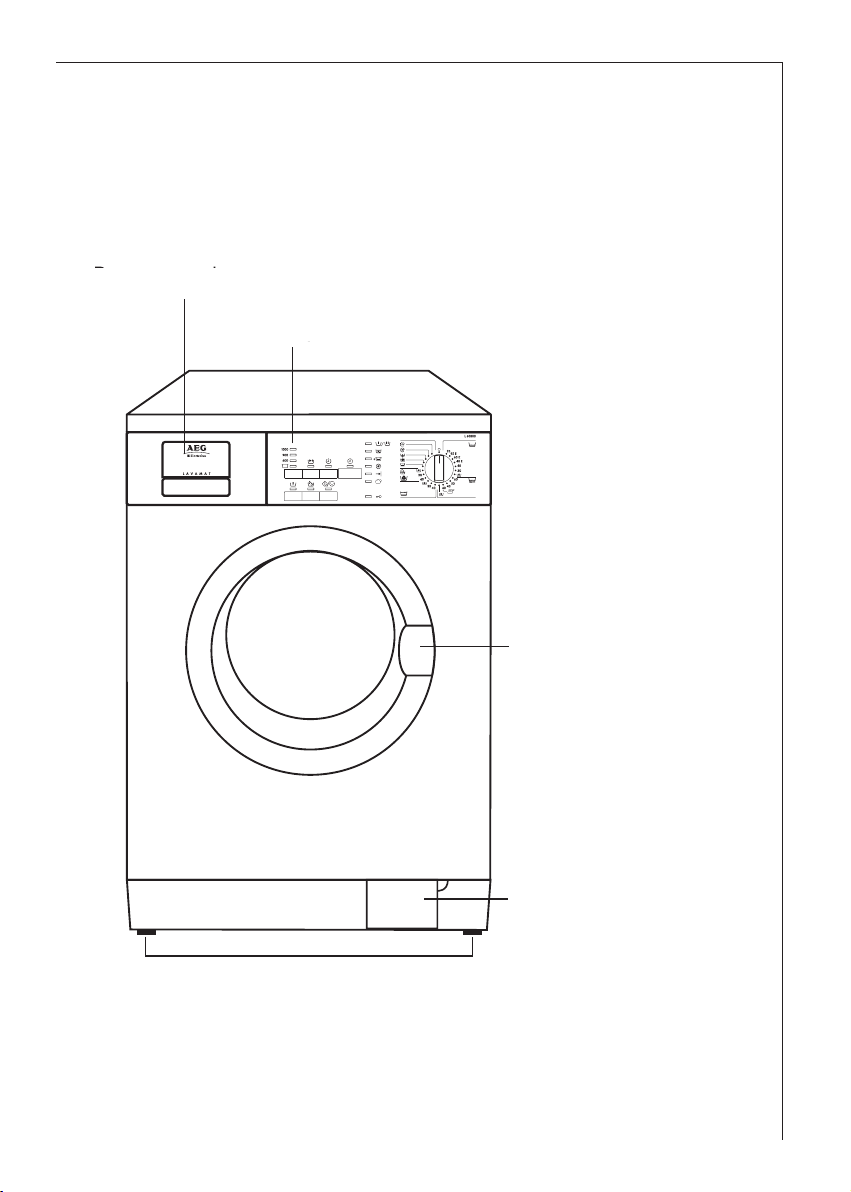
Makinenin Görünüçü
Ön yüz
Deterjan gözü
Kontrol Paneli
Dolum kapagi
Ayarlanabilir ayaklar
Boçaltma pompasi
9
Page 10
Makinenin tarifi
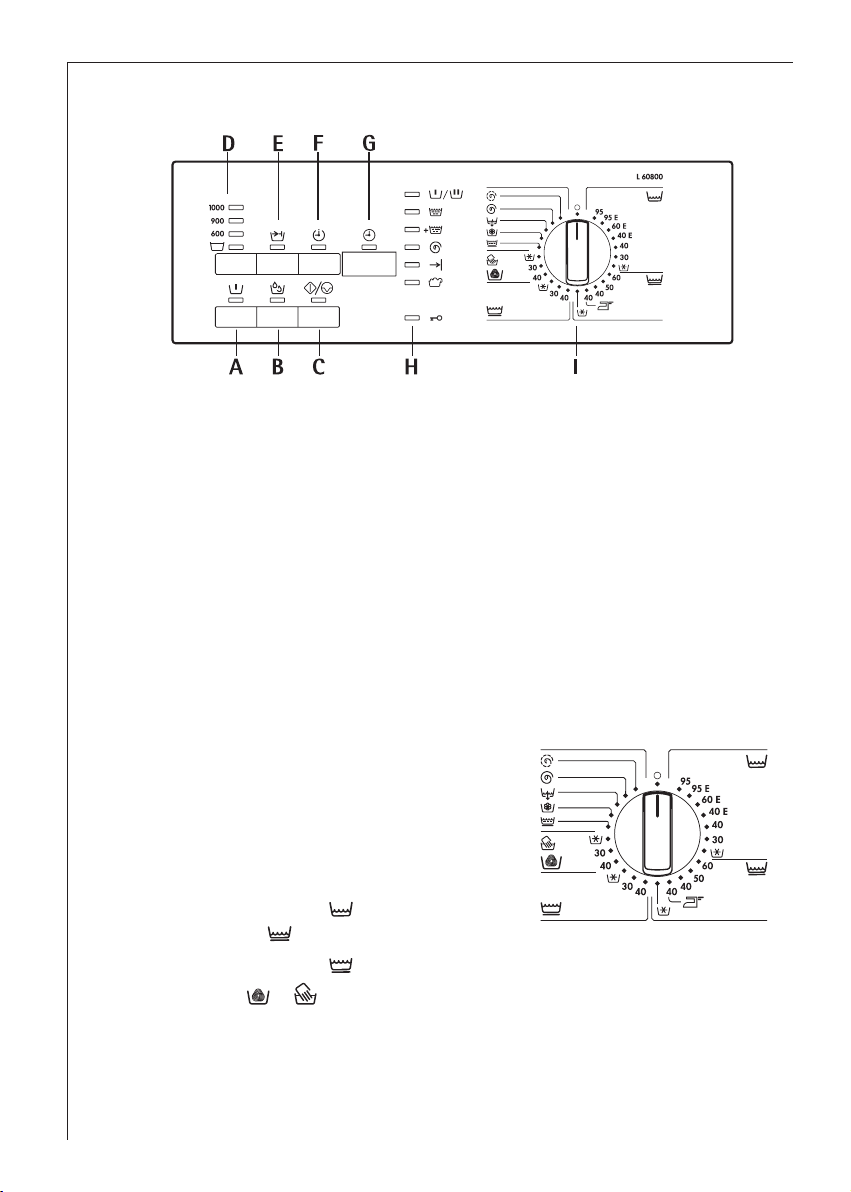
Kontrol Paneli
A=Ön yikama tuçu
B=Narinler tuçu
C=Baçl. Bekl. tuçu
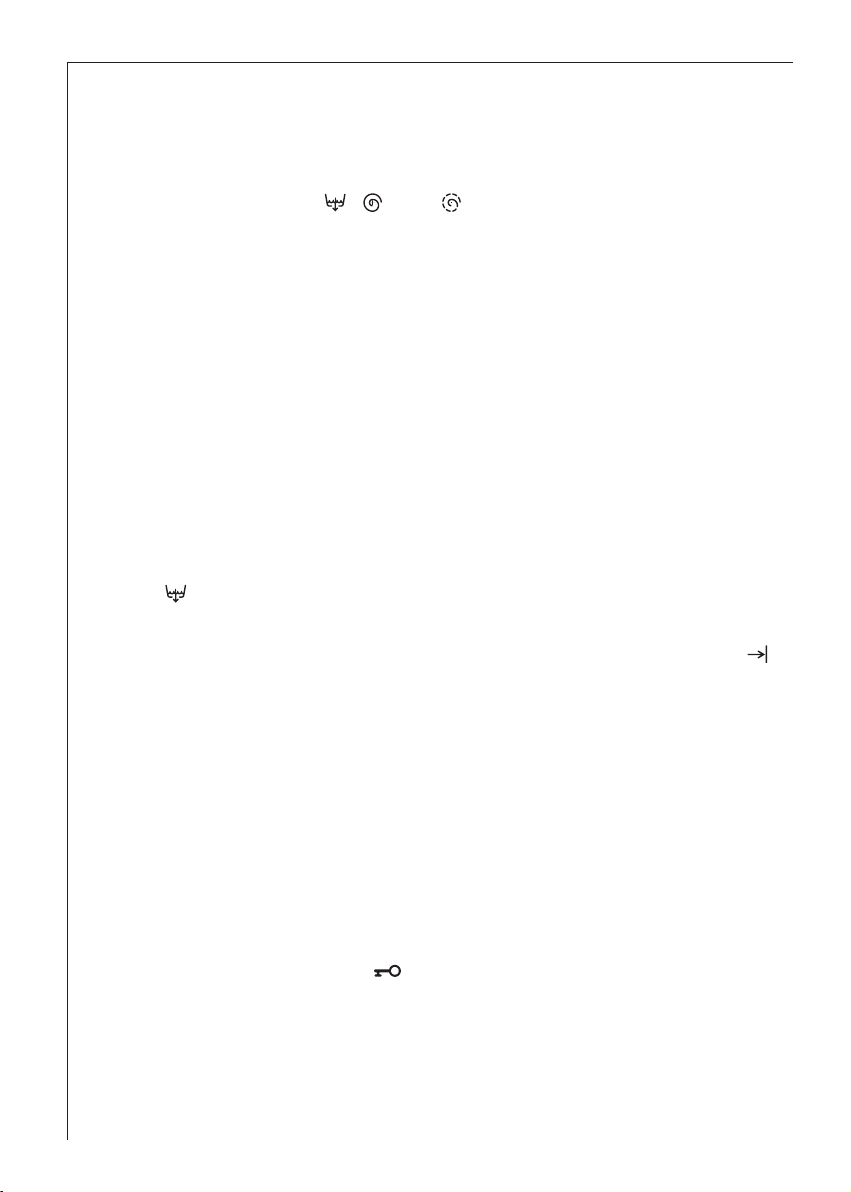
D=Devir Seçme Tuçu
E=Ekstra hizli tuçu
F=Progr. geciktirme tuçu
G=Display
H=Program evreleri göstergesi
I=Program seçicisi
10
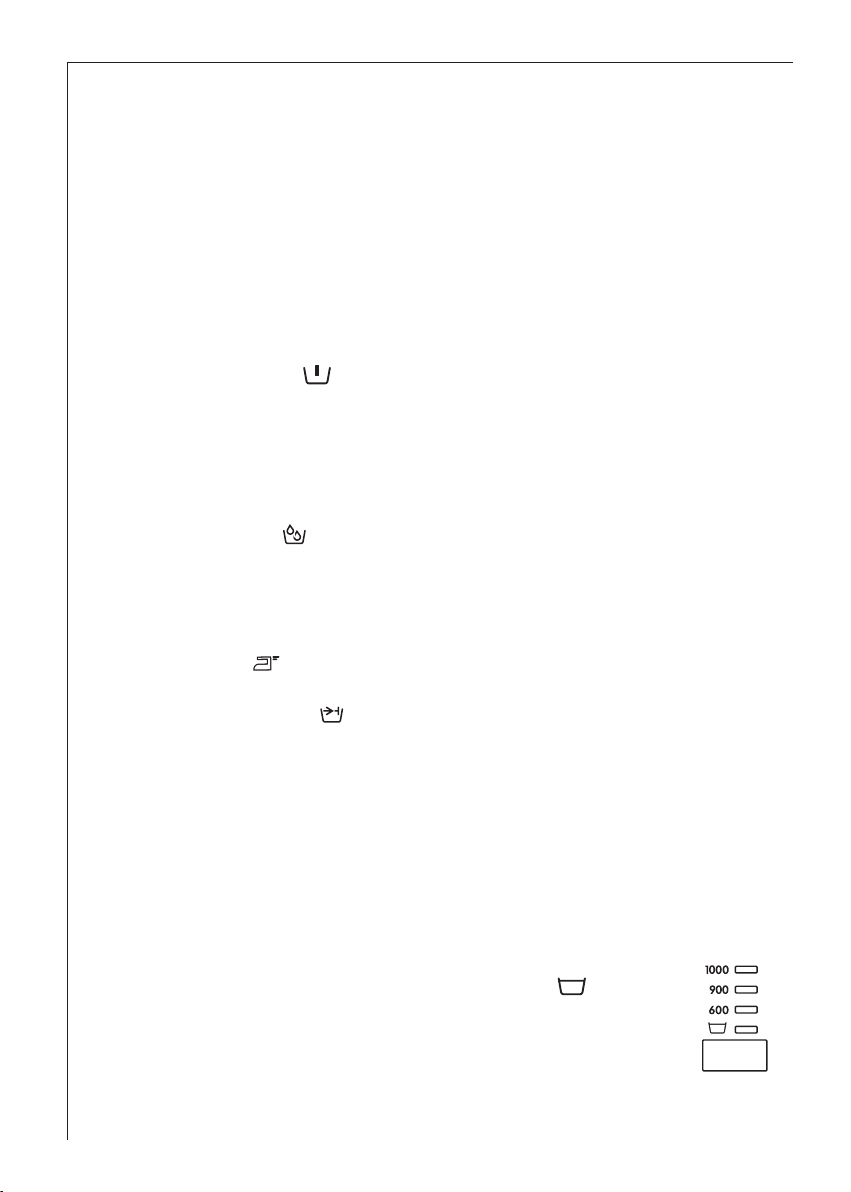
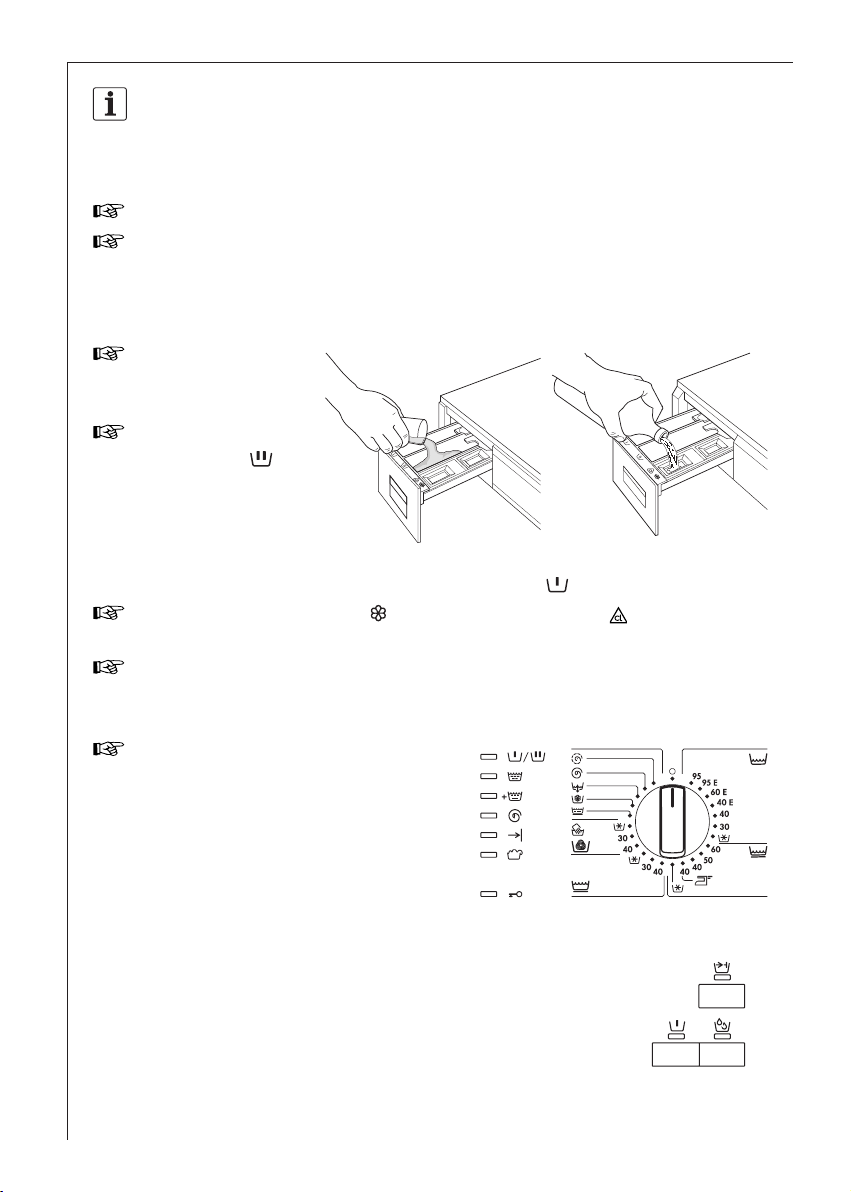
Program seçicisi
Program seçicisi, yıkama evresi tipini
(örnegin, su seviyesi, tambur hareketi,
durulama sayısı) ve yıkama ısısını belirler.
Seçici kadran 6 bölüme ayrılmıçtır:
•Pamuklular, keten
• Sentetikler
• Hassas Çamaçırlar
• Yünlüler / elde yıkananlar
• Özel programlar
• O/Kapalı
Seçici, hem saat yönünde hem de saat yönünün tersine çevrilebilir.
Page 11

Makinenin tarifi
EKONOMI pozisyonu (95E, 60E, 40E) normal derecede kirli pamuklu
çamaçırlar için, daha uzun yıkama süreli enerji tasarrufu programına
karçılık gelir (EKSTRA HIZLI opsiyonu ile uyumsuz).
KOLAY ÜTÜLEME
Bu pozisyonda çamaçırlar, kırıçıklıkların oluçmasını önlemek amacıyla,
çok hassas çekilde yıkanır ve sıkılırlar. Bu durumda ütüleme kolaylaçır.
SOGUK = soguk su ile yikama
Baçlatma/Bekletme tuçu
Bu dügmenin iki fonksıyonu bulunmaktadir:
a) Çalıçtırma
Arzu edilen yıkama programını seçtikten sonra, makineyi harekete
geçirmek için tuça basınız; iliçkin ikaz lambasının yanıp sönmesi duracaktır.
GECIKMELI BAÇLATMA seçenegini seçtiyseniz makine saat baçı geri
sayımına baçlayacaktır.
b) Bekletme
Çalıçmakta olan programa ara vermek için BAÇLAT/BEKLET tuçuna
basınız: ikaz lambası yanıp sönüyor.
Programı, ara verilmiç oldugu noktadan itibaren yeniden çalıçtırmak
için tekrardan Baçlatma/Bekletme tuçuna basınız.
GECIKMELI BAÇLATMA tuçu
Yıkama programı bu dügme sayesinde 30 dk - 60 dk - 90 dk, 2 saat veya
1 saat aralıklarla azami 23 saate kadar geciktirilebilir.
Gecikmeli baçlatmanın seçilmesi
•Programı ve istenen seçenekleri seçin.
• Gecikmeli baçlatmayı seçin.
•BAÇLAT/BEKLET dügmesine basın: Makine saatte bir geri saymaya
baçlar.
Program seçilen gecikme süresi sona erdiginde baçlatılır.
Program baçlatıldıktan sonra gecikmeli baçlatmayı iptal etme
•BAÇLAT/BEKLET dügmesine basın.
•«0’» görüntüleninceye kadar GECIKMELI BAÇLAT dügmesine basın.
•Programı yeniden baçlatmak için tekrar BAÇLAT/BEKLET dügmesine
basın.
11
Page 12
Makinenin tarifi
Çimdi yeniden BAÇLATMA/BEKLETME tuçuna basınız.
Gecikme iptal edildiginde, daha önceden seçilmiç yıkama programının
süresi display üzerinde belirecektir.
PROGRAM SEÇENEK tuçları
Programa baglı olarak farklı içlevler kombine edilebilir.
Bu tuçlara, arzu edilen program seçildikten sonra ve BAÇLAT/BEKLET
tuçuna basmadan önce basılmalıdır.
Bu tuçlara basıldıgında, iliçkin ikaz lambaları yanacaktır.
Bu tuçlara tekrar basıldıgında ikaz lambaları sönecektir.
ÖN YIKAMA
Makine, azami 30°C ısıda bir ön yıkama gerçekleçtirir. Ön yıkama,
Pamuklular keten ve Sentetikler programlarında kısa bir sıkma ile ve
Hassas Çamaçırlar programında su boçaltılması ile sona erer.
Çok kirli çamaçırlar için kullanılmalıdır.
NARINLER
Bu butona bastıgınızda, çamaçır makinesi PAMUKLULAR ve SENTETIKLER programlarına durulama ekler; tamburun dönmesini ve yıkama
yogunlugunu azaltır. Hassas renkliler veya az kirli pamuklulular için kullanılmalıdır.
Bu opsiyon programı ile seçilemez.
12
EKSTRA HIZLI
Bu tuça basıldıgında, yıkama süresinde bir kısaltma elde edilir. Az kirli
çamaçırlar için kullanılmalıdır.
Bu opsiyon yünlü programı e EKONOMI programı ile uyumlu degildir.
Önemli! SIKMA ve GECIKMELI BAÇALTMA tuçlarına aynı anda
basıldıgında, makine ek bir durulama gerçekleçtirir (sayfa 21’daki daha
detaylı bilgilere bakınız).
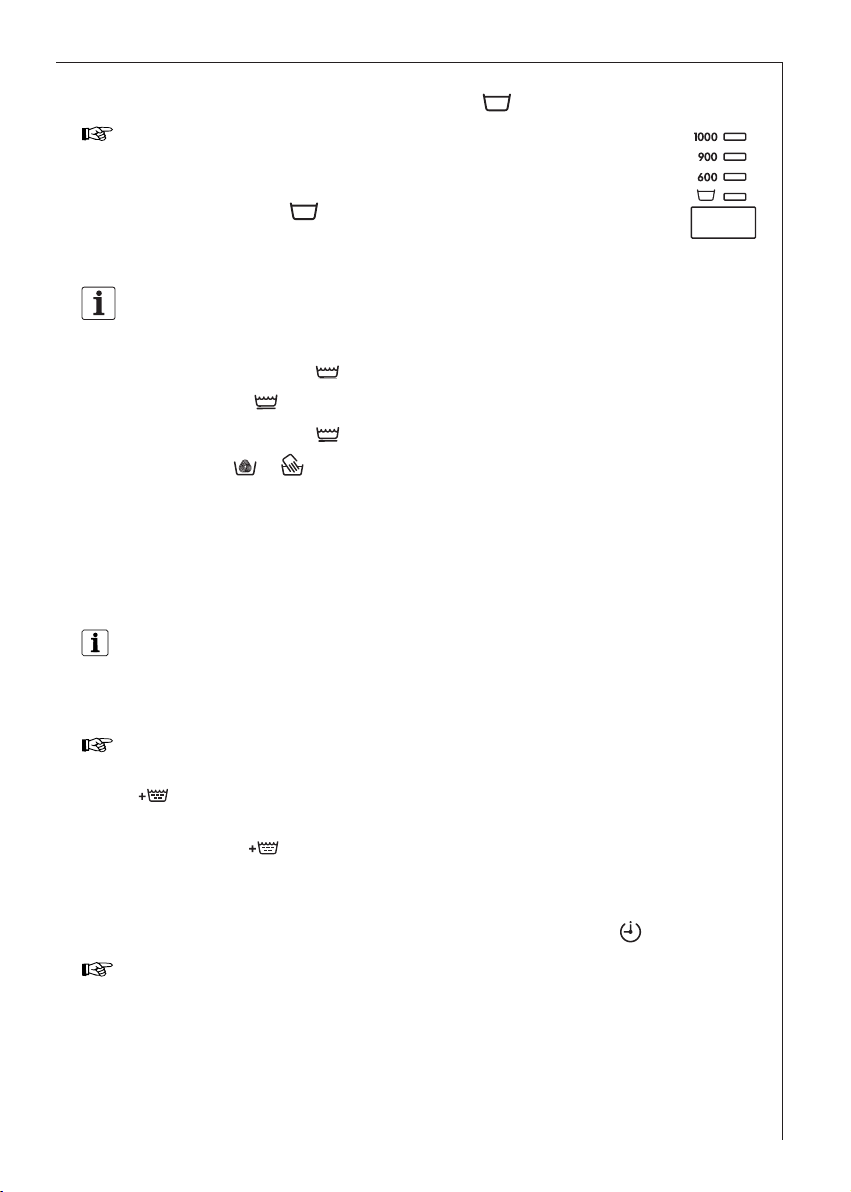
SIKMA
Seçilmiç program için makine tarafından sunulan son hızın
maksimum hızını azaltmak veya SUDA BEKLETME seçenegi için bu tuça basınız.
Pamuklular için maksimum hız 1000 devir, sentetikler ve yünlüler ve narin çamaçırlar için ise 900 devirdir.
SIKMA ve EKSTRA HIZLI tuçlarına aynı anda basıldıgında, devir sonundaki akustik sinyal devre dıçı bırakılır.
Page 13

Makinenin tarifi
kırmızı renkte.
SUDA BEKLETME
Bu fonksiyonu seçtiginizde son durulama suyu boçaltılmayarak
çamaçırların kırıçması önlenir. Program bittikten sonra BAÇLAT/BEKLET
dügmesi sonra ıçıkları yanar ve kapı kilitlenerek içerideki suyun
boçaltılması gerektigini belirtir. (Kapı) ıçıgı
Su iki çekilde boçaltılabilmektedir:
• (boçaltma) programı seçilerek:
Su kurutma yapmadan boçaltılır.
• (sıkma) veya (kisa sikma) programı seçilerek. Sıkma devrini
ilgili dügmeye basarak seçin ve daha sonra BAÇLAT/BEKLET dügmesine basın. Makine boçaltma içleminden sonra önceden seçilmiç olan
çamaçır tipine uygun sıkma devrini gerçekleçtirecektir.
Dikkat! , veya programını seçmeden önce seçim dügmesi O
(iptal etme) konumuna getirilmelidir.
Display
Display açagıdaki bilgileri temin eder:
• seçilen yıkama programının dakika olarak süresi, her tip kumaç için
öngörülmüç azami yük bazında otomatik olarak hesaplanır.
Program baçladıktan sonra kalan süre her dakika güncelleçtirilir.
• Sabit ıçıgın sıfırı göstermesi ile belirtilen Program sonu.
• Geciktirmeli baçlatma (maksimum 23 saat), iliçkin tuç kullanılarak
programlanmıçtır. Geri sayım her saatte bir
güncelleçtirilir.
•Makine içleminde bir arızayı gösteren alarm kodu (bakınız sayfa 29).
Program evreleri göstergesi
Makinenin çalıçması esnasında, seçilmiç programın
muhtelif evrelerine tekabül eden ikaz lambaları
yanarlar.
Programın harekete geçirilmesinden sonra sadece
ÖN YIKAMA/
YIKAMA
DURULAMA
EKSTRA DURULAMA
SIKMA
SON
AÇIRI DOZ
KAPI
devam etmekte olan evreye ait ikaz lambası yanık kalacaktır. Program sonu, PROGRAM SONU ikaz lambası ile haber verilir.
Program sona erdiginde, AÇIRI DOZ lambası yanarsa, bu, çok fazla
deterjan kullanılmıç oldugunu veya boçaltma filtresinin bloke oldugunu
gösterir.
13
Page 14
Makinenin tarifi
kırmızı
Bir programın iptal edilmesi
Çevrimdeki bir programı iptal etmek için, program seçicisini O/KAPALI
konumu üzerine getiriniz.
Dikkat! SUDA BEKLETME opsiyonu ile sona eren bir programdan sonra,
önce KAPALI, sonra , veya programı seçilmelidir.
Çevrimi sırasında bir seçenegin ya da programın degiçtirilmesi
Herhangi bir degiçiklik yapmadan önce
BAÇLAT/BEKLET dügmesine basarak makineyi duraklatmalısınız.
Herhangi bir adımı program çalıçtırmadan önce degiçtirmek
mümkündür.
Çalıçan bir programın degiçtirilmesi ancak onu iptal edip yeni bir pro-
gramın seçilmesiyle mümkündür.
Makine çevrime en baçtan devam eder ve tamburun içindeki yıkama
suyu boçaltılmaz.
Çalıçan programı degiçtirmek için suyu boçaltmak gerekirse, açagıdaki-
leri uygulayın:
•Program seçme dügmesini O konumuna getirin;
•programını seçin;
•Tekrar BAÇLAT/BEKLET dügmesine basın.
Su boçaltıldıktan sonra ekranda yanıp sönen sıfır görüntülenir ve
ikaz ıçıgı yanar.
Artık yeni bir program seçebilir ve BAÇLAT/BEKLET dügmesine basarak
baçlatabilirsiniz.
Program çalıçtırıldıktan sonra dolum kapagının açılması
Önce, BAÇLAT/BEKLET tuçuna basarak makineyi BEKLETME’ye getiriniz.
Kapak açagıdaki çartların saglanması durumunda açılabilir:
• makinenin su ısıtma açamasında olmaması;
•su seviyesinin çok yüksek olmaması
•tamburun hareket halinde olmaması.
Kontrol paneli üzerindeki (Kapı) ıçıgı kapagın açılıp açılamayacagını
gösterir:
•yeçil ıçık: kapak açılabilir;
• ıçık: kapak açılamaz;
14
Page 15

Deterjan ve katkı maddeleri gözü
Ön yıkama, ıslatma için deterjana ve leke sökücü tuza ayrılan göz. Ön
yıkama ve ıslatma için kullanılan deterjan, yıkama programının baçında
otomatik olarak makineye alınır.
Yıkama için toz halinde veya sıvı deterjan gözü.
Yıkama evresinin baçlangıcında boçaltılır.
Sıvı katkı maddeleri gözü (yumuçatıcı, kola).
Son durulamada boçaltılır.
Katkı maddelerinin miktarı, hiç bir zaman MAX referansını açmamalıdır.
Beyazlatma maddesi gözü.
Ilk durulamada boçaltılır.
Miktar, gözdeki "MAX" referansını açmamalıdır.
Makinenin tarifi
Ilk kez yıkamadan önce
Ilk yıkamadan önce, ECO valfını etkin kılmak amacıyla deterjan
gözünün ana yıkama bölmesine 2 litre su koymanızı öneririz. Sonra, tambur ve kazandan her olası imalat kalıntısını gidermek üzere,
makine boç olarak 95°C’de pamuklu devrini baçlatınız. Ana yıkama bölmesine yarım ölçek deterjan koyunuz ve makinayı çalıçtırınız.
15
Page 16

Makinenin tarifi
Yıkama içleminin hazırlanması
Çamaçırların ayrılması ve hazırlanması
• Çamaçırları, etiketlerine ve kumaç tipine göre ayırınız (“çamaçır tipi ve
kumaç etiketlerine bakınız”).
• Cepleri boçaltınız.
•Metal kısımları çıkartınız (ataçlar, çengelli igneler, v.s..).
• Çamaçırların zarar görmesini ve dügümlenmesini önlemek için, fermuarların çekilmesi, yastık yüzlerinin ve yorgan yüzlerinin dügmeleri-
nin kapatılması ve örnegin önlüklerin kurdeleleri gibi uçları serbest
diger kurdelelerin dügümlenmesi tavsiye olunur.
•Çift katlı kumaçları ters yüz ediniz (uyku tulumları, yagmurluklar, v.s..).
• Yün örgüsü renkli giysileri, üzeri içli yünlü kumaç ve giysileri ters yüz
ediniz.
• Çok küçük ve çok nazik giysileri (çocuk çorapları, külotlu çoraplar, v.s..)
bunları bir file, fermuarlı bir yastık yüzüne veya daha büyük bir çorap
içerisine koyarak yıkayınız.
•Perdeleri yıkarken özellikle ihtimam gösteriniz. Metal veya plastikten
kancalarını çıkartınız veya bunları ufak bir file veya torba içerisinde
baglayınız. Zarar halinde, hiç bir sorumluluk kabul edilmez.
• Beyaz ve renkli çamaçırların birlikte yıkanmamaları gerekmektedir:
beyaz çamaçırlar, beyazlıklarını kaybederler.
• Genelde yeni çamaçırlarda renklendirme maddeleri fazlaları mevcuttur; bunların ilk kez ayrı olarak yıkanmaları tavsiye olunur.
• Ufak ve büyük çamaçırları birlikte yıkayınız, bu çekilde yıkama sonuçları daha olumlu olur ve çamaçırlar, sıkma esnasında daha iyi
dagılırlar.
• Çamaçır makinesinin içerisine çamaçırları iyi yayılmıç olarak doldurunuz.
•Her çamaçırı ayrı yerleçtiriniz.
16
Page 17
Çamaçırların agırlıgı
60
40
304060
95
Yıkama isleminin hazırlanması
Çamaçır tipi
Çarçaf
Kadın gömlegi
Bulaçık bezleri
Erkek gömlegi
Iç çamaçırları
(yaklaçık degerler)
1200 gBornoz
300-600 gBeyaz önlükler
700 gYorgan yüzü
500 g
100 g
200 gEl havluları
100 g
200 g
200 gYastık yüzü
200-250 gGecelik/Pijama
200-300 gMasa örtüsü
250 g
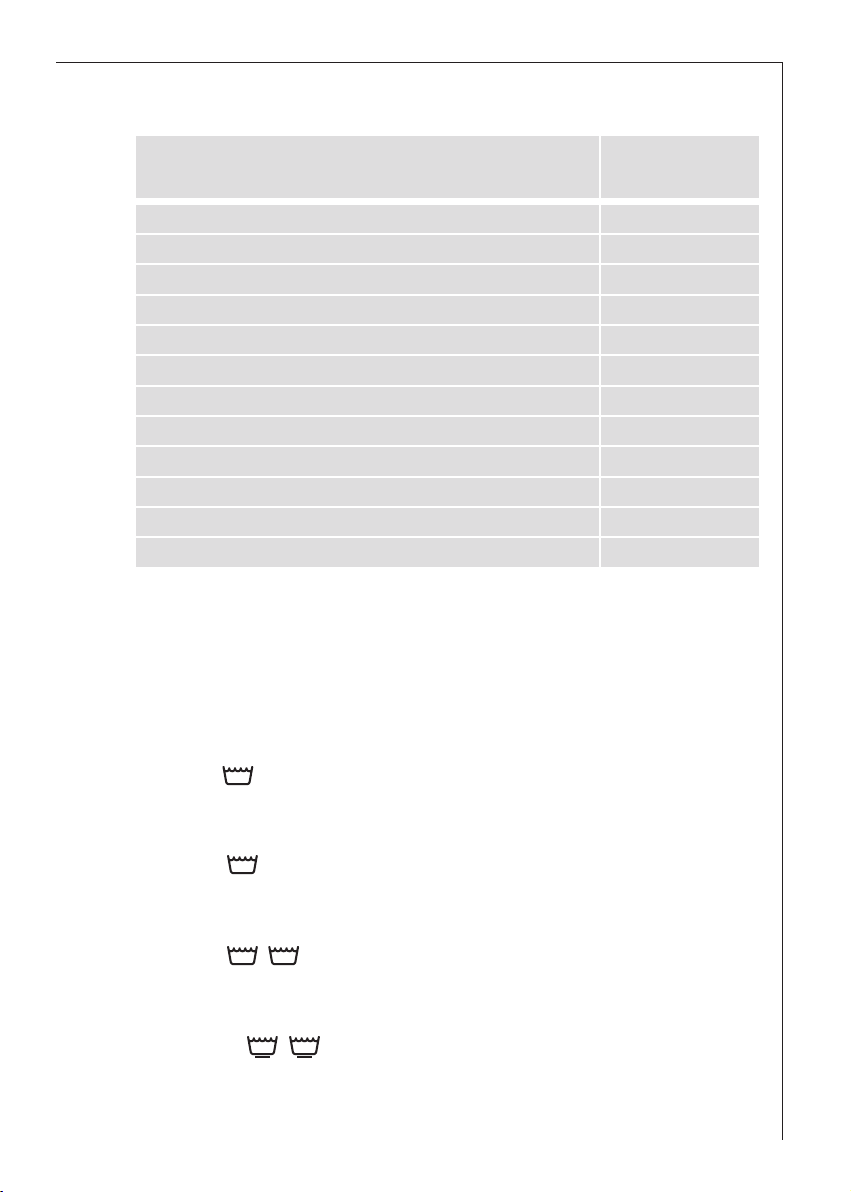
Kumaç tipleri ve etiketler
Etiketler, uygun yıkama programının seçilmesini saglarlar. Çamaçırlar,
kumaç tipine ve etiketinde belirtilen talimatlara göre seçilerek
ayrılmalıdırlar.
Etiketler üzerinde belirtilen ısı dereceleri, her zaman azami verileri belirtirler.
Kuru agırlık
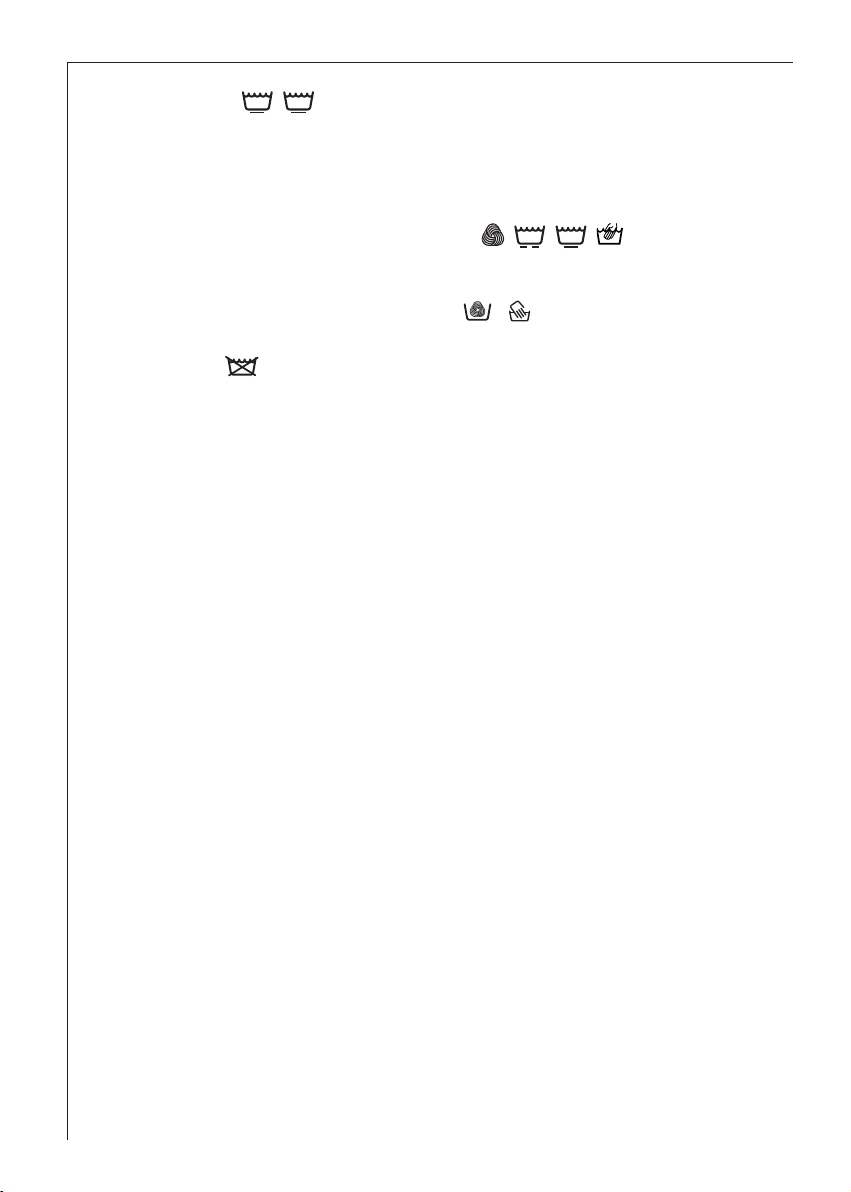
Beyazlar
Bu simge ile içaretlenilmiç keten ve pamuklu kumaçlar yüksek ısı derecelerinde yıkanabilirler.
Renkliler
Bu simge ile içaretlenilmiç keten ve pamuklu kumaçlar renk
atmadıklarından 60°C’de yıkanabilirler.
Renkliler
Bu simge ile içaretlenilmiç giysiler hassas renklilerden olduklarından,
yıkama ısısı bu degerleri açmamalıdır.
Sentetikler
Bu simgeler ile içaretlenmiç karıçık ve sentetik kumaçlar makinede hassas yıkama gerektirmekte olduklarından özel programda yıkanmalıdırlar.
17
Page 18
Yıkama isleminin hazırlanması
30
40
30
40
Hassaslar
Bu simgeyi taçıyan mikro elyaflı giysiler, sentetikler ve perdelerin özellikle hassas çekilde yıkanmaları gerekmektedir.
Bu tip çamaçırlar için, NARIN ÇAMAÇIRLAR programının kullanılması
uygundur.
Yünlüler ve özellikle hassas giysiler
Bu simgeleri taçıyan yünlü, karıçık yünlü veya ipekli kumaçlar, çamaçır
makinesinde yıkanmaya karçı özellikle hassastırlar.
Bu tip kumaçlar için YÜNLÜLER programının kullanılması
uygundur.
Etikette (yıkamayınız) sembolü varsa çamaçırlar makinede yıkanmamalıdırlar!
Bu makinenin yünlü yıkama çevrimi, çamaçırın etiketindeki talimatlara
ve bu çamaçır makinesinin üreticisi tarafından yayınlanan talimatlara
göre yıkandıgı takdirde çamaçır makinesinde yıkanabilen Woolmark
ürünler için Woolmark tarafından onaylanmıçtır. M9604.
18
Page 19

Yıkama isleminin hazırlanması
Deterjanlar ve katkı maddeleri
Hangi deterjan ve katkı maddesi kullanılmalı?
Sadece çamaçır makinesi için öngörülen deterjan ve katkı maddelerini
kullanınız. Üreticinin verdigi bilgiler dogrultusunda hareket ediniz.
Ne kadar deterjan ve katkı maddesi kullanılmalı?
Miktar açagıda belirtilen unsurlara baglıdır
• çamaçır yükü:
deterjan üreticisi, asgari yükler için kullanılacak deterjan miktarını
belirtmemiç ise, yarım yük için, komple bir yük için tavsiye olunan
miktarı üçte bir azaltarak kullanınız ve çok ufak yükler için tavsiye
edilen miktarın yarısını kullanınız;
• çamaçırların kirlilik derecesi:
hafif kirli çamaçırlar için az deterjan kullanınız. Üreticinin bilgileri
dogrultusunda ve yıkanacak çamaçır miktarına göre hareket ediniz;
•su sertligi:
su ne kadar sert ise, deterjan miktarı o kadar fazla olacaktır! Deterjan
ambalajlarında, su sertlik derecesine göre miktarlara iliçkin talimatlar
yer almaktadır.
Sıvı deterjan
Sıvı deterjan, yıkama programının baçlamasından hemen evvel yıkamaya
ayrılmıç kutunun gözüne dogrudan dogruya dökülebilir veya dogrudan
dogruya kazan içerisine yerleçtirilecek bir dozajlayıcı kullanılabilir. Üreticinin talimatları dogrultusunda deterjan miktarını ayarlayınız.
Su Yumuçatıcı ilave edilmesi
Su yumuçatıcı, su sertlik derecesi orta-yüksek (II sertlik derecesinden itibaren) oldugu takdirde ilave edilmelidir. Üreticinin talimatlarını uygulayınız.
Bundan sonra deterjan miktarı her zaman, I sertlik derecesine (= tatlı) göre
ayarlanacaktır. Su sertligi hakkındaki bilgiler, iliçkin su dairesinden elde edi-
lebilir.
Su sertligi üzerine bilgiler
Sertlik derecesi
°DH alman derecesi
ile sertlik
0-7I = tatlı
°T.H. fransız derecesi
ile sertlik
0-15
16-257-14II = orta
26-3715-21III = sert
37’den fazla21’den fazlaIV = çok sert
19
Page 20
Nasıl yıkanır
Çamaçırların makineye yüklenmesi
Dolum kapagını açınız.
Çamaçırları, birer birer olmak üzere, sepete yerleçtiriniz. Çamaçırları
imkanı oldugu kadar yayarak doldurunuz. Dolum kapagını kapatınız.
Deterjan ve katkı maddelerinin doldurulması
Deterjan gözünü
sonuna kadar dıça
dogru çekiniz.
Yıkama
deterjanını
gözüne dökünüz.
Ön yıkamalı bir
programı
uygulanması
isteniyorsa, deterjanı veya leke sökücü tuzu gözüne dökünüz.
MAX seviyesini açmadan gözüne yumuçatıcıyı ve gözüne beyazlatma maddesini dökünüz.
Deterjan gözünü iterek, kapatınız.
Arzu edilen programın seçilmesi
Program seçicisini arzu edilen
konum üzerine getiriniz. Programı
meydana getiren evrelere tekabül
eden ikaz lambaları yanarlar.
Programın süresi
displayde görüntülenir.
Arzu edilen yardımcı fonksiyonların seçilmesi
çamaçırların kirlilik derecesine baglıdır. Iliçkin ıçıklar yanacaktır.
20
Page 21
Nasıl yıkanır
Sıkma devri veya SUDA BEKLETME seçeneginin seçilmesi
Iliçkin tuça basarak daha düçük bir sıkma devri seçmek
mümkündür; seçilen devire karçılık gelen ikaz lambası
yanacaktır.
SUDA BEKLETME seçeneginin seçilmesiyle çamaçır,
son durulama suyu içinde bırakılır.
Sıkma devri düçürülmemiç ise son sıkma devri açagıda belirtilen
çekilde olacaktır:
- Pamuklular, keten 1000 devir
- Sentetikler 1900 devir
- Hassas Çamaçırlar 1900 devir
- Yünlüler / elde yıkananlar 1900 devir
Ekstra durulama
Makine az su tüketmek üzere tasarlanmıçtır. Bununla beraber, deterjanlara karçı özellikle hassas, alerjik kiçiler için çamaçırların daha fazla miktarda su ile durulanması (ekstra durulama) gerekebilir.
Ekstra durulama sadece pamuklu, sentetik ve hassas çamaçır programlarında uygulanabilir.
Ekstra durulamanın seçilmesi
SIKMA ve GECIKMELI BAÇLATMA tuçlarına yaklaçık 3 saniye süreyle aynı
anda basınız: program açamaları displayi üzerinde EKSTRA DURULAMA
ikaz lambası yanacaktır.
Bu içlev sürekli olarak devrede kalır. Iptal edilmesi isteniyorsa, EKSTRA
DURULAMA ikaz lambası sönene kadar SIKMA ve GECIKMELI BAÇ-
LATMA tuçlarına yeniden basınız.
GECIKMELI BAÇLATMA seçeneginin seçilmesi
Bir programın çalıçmasını geciktirmek için makineyi çalıçtırmadan önce
GECIKMELI BAÇLATMA tuçuna basınız. Seçilen geciktirmeye iliçkin çekil
yaklaçık 3 saniye boyunca displayde belirdikten sonra seçilen programın
süresi görüntülenecektir.
BAÇL./BEKL. tuçuna basıldıgında seçilen geciktirme displayde görüntülenecektir ve makine, saat baçı azalan geri sayımına baçlayacaktır.
21
Page 22

Nasıl yıkanır
Programın çalıçtırılması
Programı baçlatmak için BAÇL./BEKL. tuçuna basınız.
Program baçladıgında kapagın ıçıgı (Kapı) kırmızı renkte ve yanıp
sönüyorsa, bu, kapagın kapatılmamıç oldugu anlamına gelir. Kapagı
kapatınız ve BAÇLAT/BEKLET tuçuna basınız.
Geciktirmeli baçlatma seçenegi seçilmiç ise makine, her saat baçı
azalan geri sayımına baçlayacaktır ve bu, displayde belirecektir. Bu
süre içerisinde baçka çamaçır yüklemek, geciktirme süresini degiçtirmek veya silmek de mümkündür.
•Diger çamaçırların yüklenmesi: BAÇLAT/BEKLET tuçuna basınız.
Dolum kapagını açınız. Çamaçırı yükleyiniz. Dolum kapagını
kapatınız ve tekrar BAÇLAT/BEKLET tuçuna basınız.
• Geciktirme süresinin silinmesi: BAÇLAT/BEKLET tuçuna basınız.
«0’» görüntüleninceye kadar GECIKMELI BAÇLAT dügmesine basın.
Yeniden BAÇLAT/BEKLET tuçuna basınız.
Program evreleri göstergesi
Makinenin çalıçması esnasında, seçilmiç programın muhtelif evrelerine tekabül eden ikaz lambaları yanarlar.
Programın harekete geçirilmesinden sonra sadece devam
etmekte olan evreye ait ikaz lambası yanık kalacaktır.
EKSTRA DURULAMA
ÖN YIKAMA/
YIKAMA
DURULAMA
SIKMA
SON
AÇIRI DOZ
KAPI
Display
Program süresi dakika dakika azalır ve displayde görüntülenir.
22
Page 23
Program sonu
kırmızı renkte.
Makine otomatik olarak durur. Display üzerinde bir sıfır belirir ve akustik bir sinyal duyulur. Program açamaları displayi üzerindeki PROGRAM
SONU ikaz lambası yanar
Bu fonksiyonu seçtiginizde son durulama suyu boçaltılmayarak
çamaçırların kırıçması önlenir. Program bittikten sonra BAÇLAT/BEKLET
dügmesi sonra ıçıkları yanar ve kapı kilitlenerek içerideki suyun
boçaltılması gerektigini belirtir. (Kapı) ıçıgı
Su iki çekilde boçaltılabilmektedir:
• (boçaltma) programı seçilerek:
Su kurutma yapmadan boçaltılır.
• (sıkma) veya (kisa sikma) programı seçilerek. Sıkma devrini
ilgili dügmeye basarak seçin ve daha sonra BAÇLAT/BEKLET dügmesine basın. Makine boçaltma içleminden sonra önceden seçilmiç olan
çamaçır tipine uygun sıkma devrini gerçekleçtirecektir.
Dikkat! , veya programını seçmeden önce seçim dügmesi O
(iptal etme) konumuna getirilmelidir.
Seçiciyi O/KAPALI üzerine getiriniz.
Çamaçırları tamburdan çıkartınız.
Makine içerisinde unutulabilecek bir çamaçırın bir sonraki
çamaçırlarınıza zarar verebilecegi nedeniyle, tamburun tamamen
boçaltılmıç oldugunu kontrol ediniz.
Su doldurma muslugunu kapatınız.
Küf oluçmasını ve kötü kokuları önlemek için dolum kapagını açık
bırakınız.
Nasıl yıkanır
23
Page 24
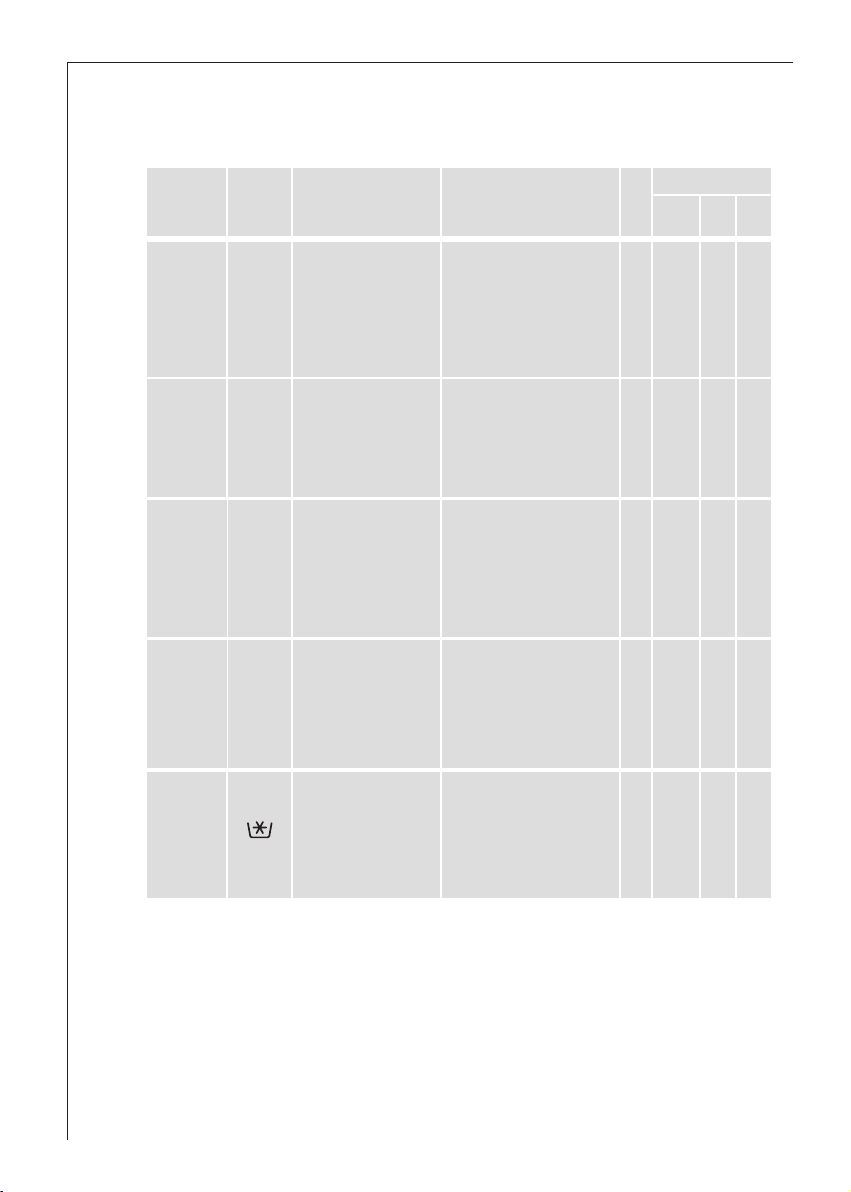
Program tablosu
Yıkama programları: keten
Program
Isı
Kumaç tipi
Yardımcı Fonksıyonlar
Azami
dol-
durma
Tüketimler *
Su
kWh
enerji
litre
Süre
dak.
Pamuk-
lular
Keten
Beyazlar
Ekonomi
Beyazlar
Ekonomi
Keten
Ekonomi
Pamuk-
lular
Pamuk-
lular
Keten
Renkliler
Beyazlar ve ketenler,
örnegin normal kirli
95°
iç elbiseleri, çarçaflar, ev çamaçırları, iç
çamaçırları, havlular.
Beyazlar ve ketenler,
örnegin, az ile normal
95°E
kirli arasındaki çarçaf-
lar ve ev çamaçırları.
Beyazlar ve solmaz
60°E
renkliler
40°E Solan renkliler
40°-30°
(SOGUK)
Pamuklu veya keten
renkli çamaçırlar,
gömlekler, iç
çamaçırları, havludan çamaçırlar..
NARINLER
EKSTRA HIZLI
ÖN YIKAMA
EKSTRA DURULAMA
SUDA BEKLETME
SIKMA
NARINLER
ÖN YIKAMA
EKSTRA DURULAMA
SUDA BEKLETME
SIKMA
NARINLER
ÖN YIKAMA
EKSTRA DURULAMA
SUDA BEKLETME
SIKMA
NARINLER
ÖN YIKAMA
EKSTRA DURULAMA
SUDA BEKLETME
SIKMA
NARINLER
EKSTRA HIZLI
ÖN YIKAMA
EKSTRA DURULAMA
SUDA BEKLETME
SIKMA
kg
kg
kg
kg
kg
6
2.3
63
145
6
1.55
49
147
6
1.14
49
141
6
1.14
49
140
6
0.6
60
11 7
24
92/95 AET yönergesine uygun olarak, enerji etiketi üzerinde belirtilen tüketimler,
6 kg bir yük ile 60°E’de Renkliler programına iliçkindir.
* Burada belirtilen veriler sadece gösterici anlam taçımakta olup, çamaçır miktarı
ve tipine, su giriç ısısı ve ortam ısısına göre degiçtirilebilirler. Bu veriler, her
yıkama programı için en yüksek sıcaklıga.
Page 25
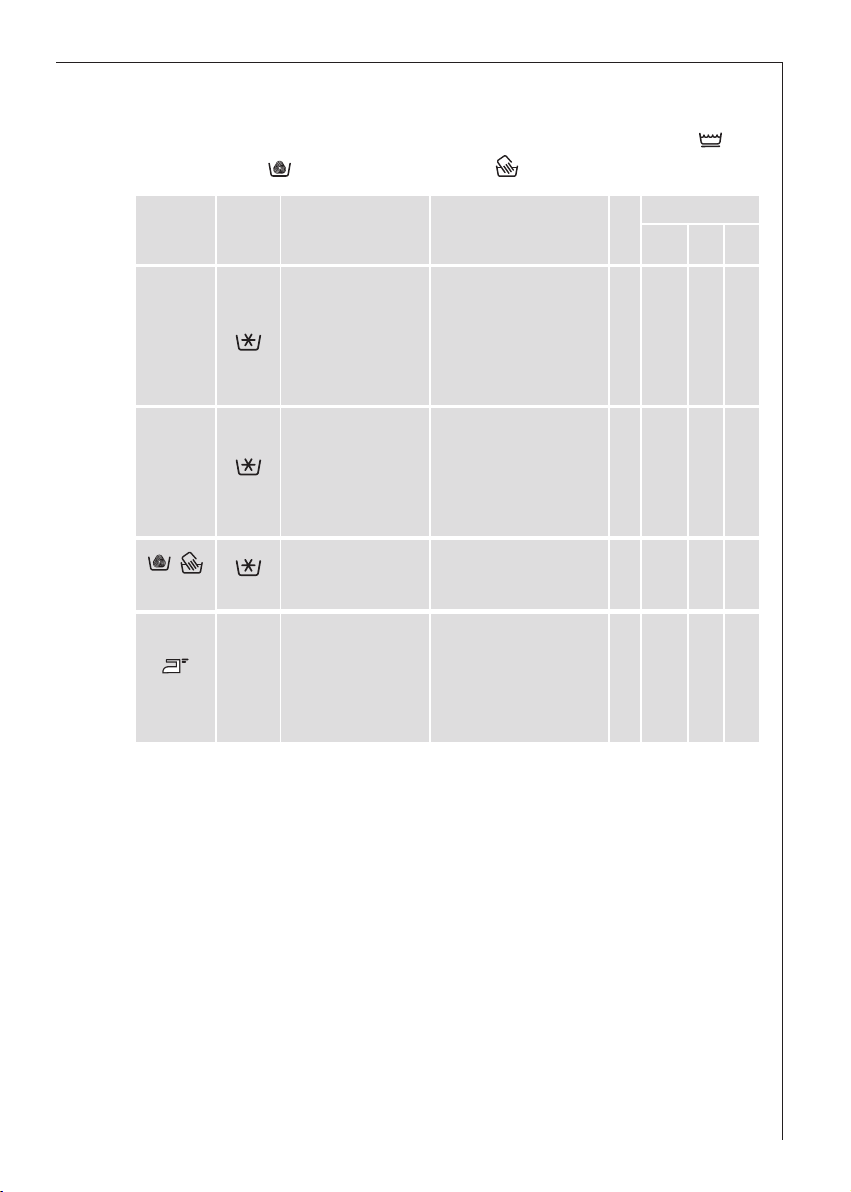
Program tablosu
Yıkama programları: sintetikler , hassas çamaçırlar
ve yünlüler / elde yikananlar
Program Isı
Kumaç tipi
Yardımcı Fonksıyonlar
Azami
dol-
durma
Tüketimler *
Su
kWh
enerji
litre
Süre
dak.
NARINLER
EKSTRA HIZLI
ÖN YIKAMA
EKSTRA DURULAMA
SUDA BEKLETME
SIKMA
EKSTRA HIZLI
ÖN YIKAMA
EKSTRA DURULAMA
SUDA BEKLETME
SIKMA
SUDA BEKLETME
SIKMA
ÖN YIKAMA
EKSTRA HIZLI
EKSTRA DURULAMA
SUDA BEKLETME
SIKMA
2.5
kg
2.5
kg
kg
1
kg
2
0.35
0.9
54
93
0.5
55
60
55
56
0.4 59 92
Sentetikler
Hassas
Çamaçırlar
Yünlüler
Sentetikler
60°-50°
SOGUK
40°-30°
SOGUK
40°-30
SOGUK
Sentetik kumaçlar,
iç çamaçırları, renkli
40°
giysiler, ütü gerektirmeyen gömlekler,
kadın gömlekleri.
Hassas kumaçlar,
örnegin perdeler.
Yünlüler, yünlü
karıçımlılar,
ipekliler.
40° Kolay ütüleme
* Burada belirtilen veriler sadece gösterici anlam taçımakta olup, çamaçır miktarı
ve tipine, su giriç ısısı ve ortam ısısına göre degiçtirilebilirler. Bu veriler, her
yıkama programı için en yüksek sıcaklıga.
25
Page 26
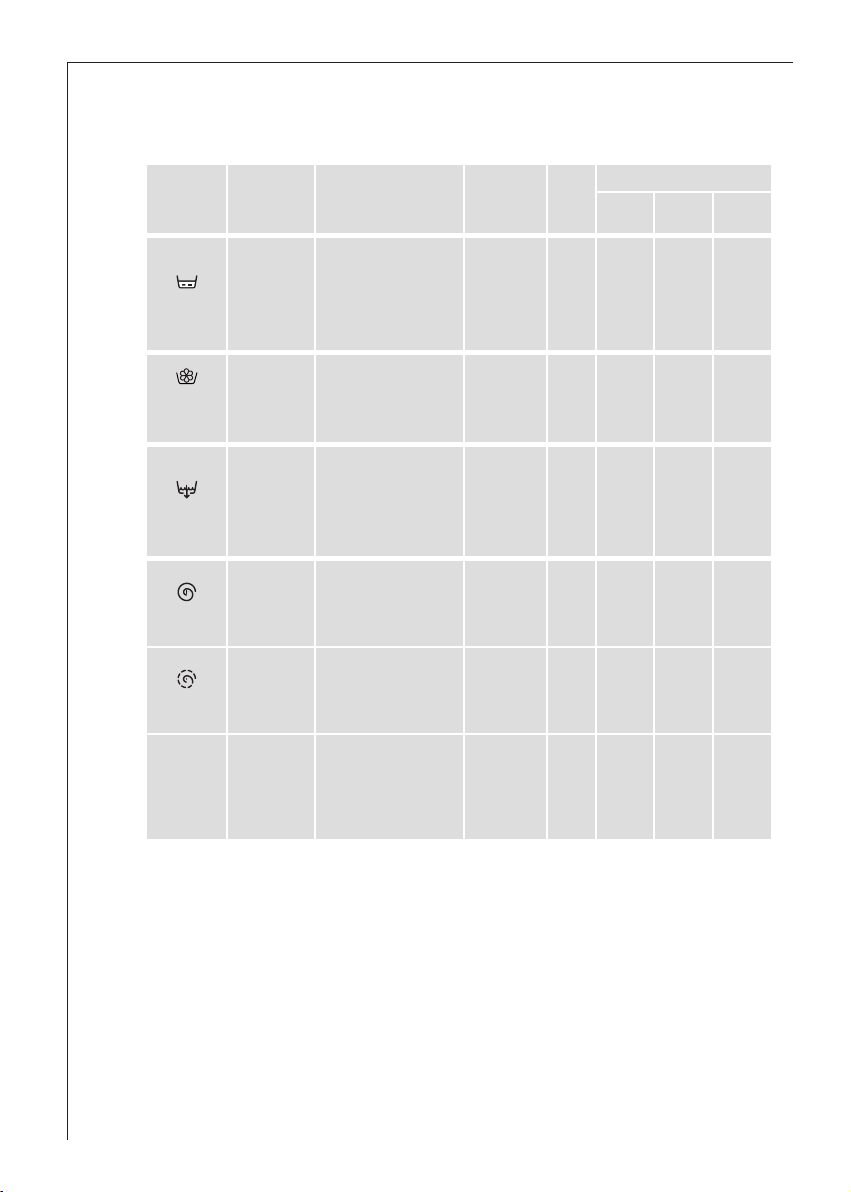
Program tablosu
Özel programlar
Program
Durulama
Kolalama/
Yumuçatıcı
Boçaltma
Uzun sıkma
Kısa sıkma
Kumaç tipi
Bu program ile,
el ile yıkanmıç
giysileri yeniden
durulamak
mümkündür.
Kolalanacak veya
yumuçatılacak
elde yıkanmıç
çamaçırlar.
Suda bekletme
opsiyonlu programlarda son
durulama suyunun boçaltılması.
Pamuklular
için ayrı
sıkma
Sentetik ve
hassas
çamaçırlar için
ayrı sıkma
Sıvı katkı maddeleri ile
3 durulama.
Kisa sıkma
Sıvı katkı maddeleri ile
1 durulama.
Uzun sıkma.
Su boçaltılması.
Uzun sıkma
Kısa sıkma
Programın
geliçmesi
Yardımcı
Fonksiyonlar
NARINLER
EKSTRA
DURULAMA
SUDA
BEKLETME
SIKMA
SUDA
BEKLETME
SIKMA
SIKMA 6 kg
SIKMA 2.5 kg
Azami
doldur-
ma
6 kg
6 kg
Tüketimler *
kWh
Su litre
enerji
0.05
/
/
-
55
19
Süre
dak.
27
21
/
2
10
-
6
26
O
(Kapali)
Uygulanmakta olan programın iptali, makinenin
kapatılması
- - -
* Burada belirtilen veriler sadece gösterici anlam taçımakta olup, çamaçır miktarı
ve tipine, su giriç ısısı ve ortam ısısına göre degiçtirilebilirler. Bu veriler, her yıkama
programı için en yüksek sıcaklıga.
Page 27
Temizlik ve Bakım
Her yıkamadan sonra
Yıkama sonunda, kurumasını saglamak amacı ile kutuyu hafifçe dıçarı
çekiniz
Makinenin hava alması için dolum kapagını açık bırakınız.
Makine uzun zaman kullanılmadıgı takdirde:
Su muslugunu kapatınız ve cihazın elektrik fiçini prizden çıkartınız.
Periyodik temizlik
Gövde
Makinenin dıç gövdesini ılık su ve açınma yapmayan natürel deterjan ile
temizleyiniz. Temiz su ile durulayınız ve yumuçak bir bez ile kurulayınız.
Önemli: makinenin dıç gövdesinin temizlenmesinde alkol, çözücü ve
benzeri maddeleri kullanmayınız.
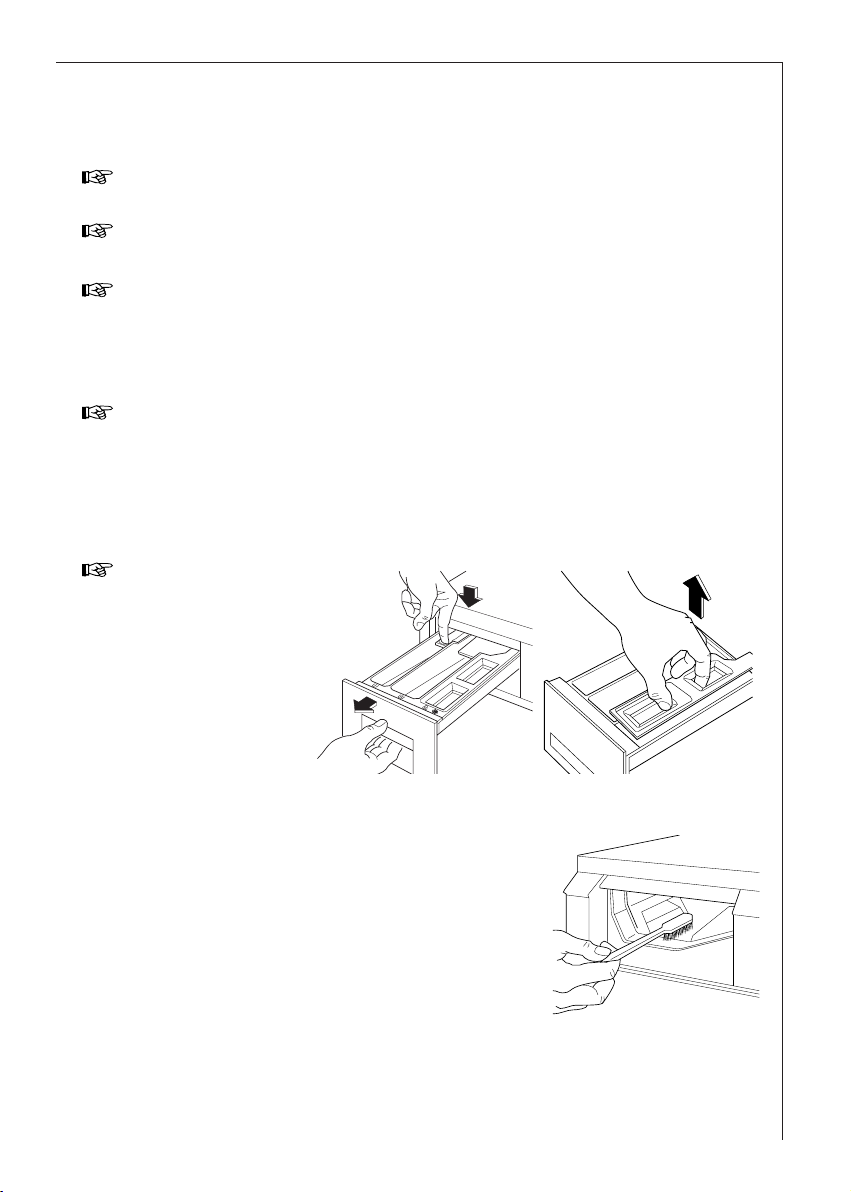
Deterjan gözü
Deterjanlar ve
katkı maddeleri
belirli bir süre sonra bölmelerde
kabuk baglamasına
sebep olurlar.
Deterjan gözünün
zaman zaman su
muslugu altında
tutularak temizlenmesi gerekir. Deterjan gözünü tamamen dıçarı çekebilmek için sol
arkada yer alan dügmeyi sonuna kadar
bastırınız.
Deterjan gözünün daha kolay temizlenebilmesi için, katkı maddeleri gözünün üst
kısmının da yerinden çıkartılması
mümkündür.
Deterjan, zamanla deterjan gözünün iç
kısmında da kabuk baglanmasına sebep olabilir: eski bir diç fırçasından faydalanarak temizleyiniz. Deterjan gözünü
tekrardan yerine yerleçtiriniz.
27
Page 28

Temizlik ve Bakım
Dolum kapagı contası
Zaman zaman dolum kapagı contasını kontrol
ediniz ve gerekirse kıvrım arasına girmiç muh-
temel nesneleri ortadan kaldırınız.
Su giriç hortum filtresi
Makineye su dolmasının çok fazla zaman
aldıgını farkedecek olursanız, su giriçi ufak filt-
resinin tıkanıp tıkanmadıgı kontrol edilmelidir.
Su muslugunu kapatınız.
Hortumu musluktan çözünüz.
Filtreyi ufak bir fırça ile temizleyiniz.
Hortumu yeniden takınız.
Su boçaltma pompası
Pompa düzenli olarak ve özellikle açagıdaki durumlar halinde kontrol
edilmelidir
• makine boçaltmıyor ve/veya sıkmıyor
• makine boçaltma esnasında, pompayı bloke eden çengelli igneler, metal
paralar vs. gibi unsurlardan kaynaklanabilecek alıçılmadık bir ses çıkarıyor.
28
Açagıdaki çekilde hareket ediniz.
Cihazın baglantısını kesiniz.
Gerekmesi halinde su soguyana kadar bekleyiniz.
Küçük kapagı açınız.
Olası sızıntıları toplamak amacıyla yere bir legen yerleçtiriniz.
Acil durum su
boçaltma hortumunu serbest
bırakınız, bu hortumu kaba
yerleçtiriniz ve
hortumun
baçlıgını çıkarınız.
Page 29

Temizlik ve Bakım
Daha fazla su çıkmıyor ise, pompa kapagının vidasını gevçetiniz ve pompayı çıkarınız. Pompayı çıkardıgınız zaman su sızıntılarını kurulamak için
yanınızda daima bir bez bulundurunuz.
Pompayı döndürerek pompa içinde takılmıç olabilecek her türlü
parçayı gideriniz.
Acil durum su
boçaltma hortumunun baçlıgını
tekrar takınız ve
hortumu tekrar
yerine yerleçtiriniz.
Pompayı tamamen yerine
sıkıçtırınız.
Küçük kapagı kapatınız.
Acil durumda su boçaltılması
Su boçaltılmamıçsa, makineyi boçaltmak için açagıdaki çekilde hareket
ediniz:
fiçi besleme prizinden çıkarınız;
su muslugunu kapatınız;
gerekmesi halinde su soguyana kadar bekleyiniz;
küçük kapagı açınız.
yere bir legen koyunuz ve acil durum hortumunun ucunu legen içine
yerleçtiriniz. Hortumun baçlıgını çıkarınız. Su, yerçekimi ile legen içine
boçaltılmalıdır. Legen doldugunda, baçlıgı tekrar hortuma takınız. Lege-
ni boçaltınız. Suyun akması durana kadar prosedürü tekrarlayınız.
gerekmesi halinde yukarıda belirtildigi gibi pompayı temizleyiniz;
acil durum su boçaltma hortumunu tıpayla kapattıktan sonra yerine
yerleçtiriniz;
pompayı yeniden sıkıçtırınız ve kapagı kapatınız.
29
Page 30

Temizlik ve Bakım
Donmaya karçı önlemler
Makine, ısının 0º C’nin altına düçebildigi yerlere kurulmuç ise, açagıdaki
çekilde hareket ediniz:
Fiçi prizden çıkarınız.
Su muslugunu kapatınız ve su giriç hortumunu musluktan çözünüz.
Acil durum su boçaltma hortumunun ve giriç hortumunun uçlarını yere
yerleçtirilmiç olan legen içine koyunuz ve suyu boçaltınız.
Su giriç hortumunu tekrar vidalayınız ve acil durum su boçaltma hortu-
munu, baçlıgı tekrar taktıktan sonra, yerine yerleçtiriniz.
Bu içlemler yapıldıgında, makine içerisinde kalmıç olan su dıçarı
atılacak, ve böylelikle buz oluçması ve buna baglı olarak ilgili kısımların
kırılmaları önlenmiç olacaktır.
Makineyi yeniden kullandıgınızda, ortam ısısının 0º C üzerinde oldugun-
dan emin olunuz.
Önemli!
Suyu acil durum boçaltma hortumu aracılıgıyla boçalttıgınız her
defasında, deterjan gözünün ana yıkama bölmesi içine 2 litre su dökmelisiniz ve sonra su boçaltma programını çalıçtırmalısınız. Bu çekilde
bir sonraki yıkamada deterjanın bir kısmının kullanılmadan kalması
önlenerek ECO valfı etkin kılınacaktır.
30
Page 31

Arızalar ve Çözümleri
Sıkma esnasında, daha evvelden sahip oldugunuz çamaçır
makinelerinden degiçik, ıslıga benzer bir gürültü duyuldugu
takdirde bu, yeni motor tipinden kaynaklanmaktadır.
Kazan içerisinde su görülmez ise bu, yeni makinelerin, yeni teknolojiler sayesinde eski makinelere nispeten daha az su ile yıkamalarından kaynaklanmaktadır.
Arızaların giderilmesi
Arıza halinde, açagıda listelenen talimatları izleyerek sorunu kendi
baçınıza gidermeye çalıçabilirsiniz. Açagıda belirtilen arızalardan bir
tanesinin meydana gelmesi halinde veya hatalı kullanım nedeni ile
ortaya çıkmıç bir arızayı tamir etmek için Yetkili servise baçvurulur ise
müdahale, garantinin geçerli oldugu müddet zarfında yapılmıç olsa bile,
karçılıgı ödetilir.
Makinenin çalıçması sırasında, akustik uyarı sinyalinin çıkması, (SON)
ıçıgının yanıp sönmesi ve açagıdaki alarm kodlarının ekranda gözükmesi
mümkündür:
- E10: su giriçinde anormallik
- E20: su boçaltmada anormallik
- E40: dolum kapagı açık
Arıza yaratan durum giderildikten sonra, yarıda kalmıç programı
harekete geçirmek için BAÇL. BEKL. tuçuna basınız. Arıza
giderilemedigi takdirde, en yakın Yetkili Servise baçvurunuz.
Arıza
Makine çalıçmıyor
Olası Sebebi
Tesis sigortası arızalı. Sigortayı degiçtiriniz.
Dolum kapagı iyi Dolum kapagını kapatınız;
kapatılmamıç. (E40) kilidin kapandıgında
Fiç prize takılmamıç.Fiçi takınız.
BAÇL. BEKL. Dügmeye basınız.
tuçuna basılmamıç.
Program seçicisi düzgün Seçiciyi, seçilen program
yerleçtirilmemiç. hizasına getiriniz.
GECIKTIRME TUÇU Display üzerinde geciktirme
Opsiyonu seçilmiç süresini kontrol ediniz.
Giderilme Yöntemleri
çıkarttıgı ses duyulmalıdır.
31
Page 32

Arizaların giderilmesi
Arıza
Makine su almıyor
Makineye su dolar dolmaz
boçalıyor
Makine suyu boçaltmıyor
ve/veya sıkma yapmıyor
Olası Sebebi
Musluk kapalı (E10). Muslugu açınız.
Su giriç hortumu Hortumun tüm uzunlugunu
bükülmüç veya sıkıçmıç kontrol ediniz ve sıkıçmayı
(E10). gideriniz.
Su giriç hortumu tıkalı (E10). Ufak filtreyi temizleyiniz.
Dolum kapagı iyi Dolum kapagını kapatınız.
kapatılmamıç (E40).
Su boçaltma hortumunun Hortumu
ucu, makineye göre öngörülmüç olan yükseklige
çok alçakta. yerleçtiriniz (kurmaya
Su boçaltma hortumu. Hortum güzergahını
sıkıçmıç veya kıvrılmıç kontrol ediniz, muhtemel
(E20). daralmaları gideriniz.
Filtre veya su boçaltma Filtreyi temizleyiniz veya
hortumu tıkalı (E20). hortumu kontrol ediniz.
SUDA BEKLETME BAÇL. BEKL. tuçuna
opsiyonu seçilmiç. basarak veya su boçaltma
Çamaçır yükü, makine Çamaçırları makine içerisin
içerisinde iyi dagıtılmamıç. de ellen yeniden dagıtınız.
Giderilme Yöntemleri
iliçkin baçlıga bakınız).
programını seçerek suyu
boçaltınız.
32
Yerde su var
Fazla deterjan konulmuç. Deterjan miktarını, üreticinin
tavsiyelerine göre ayarlayınız.
Çok fazla köpük çıkartan, Çamaçır makineleri için
uygun olmayan bir özel deterjan kullanınız.
deterjan kullanılmıç.
Su giriç hortumunun Hortumun iki ucunun da iyi
bileziklerinden bir sıkıçtırılmıç oldugunu kontrol
tanesinde kaçık var. ediniz.
Su boçaltma pompasi, Pompayi sonuna kadar
temizlikten sonra iyi sıkıçtırınız.
sıkıçtırılmamıç.
Acil durum su boçaltma Hortumun baçlıgını takınız
hortumunun baçlıgı pompa
temizlendikten sonra yerine
yerleçtirilmemiç.
Page 33

Arıza Olası Sebebi Giderilme Yöntemleri
Makine titreçim yapıyor
veya gürültülü çalıçıyor
Dolum kapagı açılmıyor
Arizaların giderilmesi
Nakliye için uygulanan Makinenin, iliçkin kurma
tüm emniyet düzenleri baçlıgında tarif edilmiç
çıkartılmamıç. oldugu gibi ambalajından
arındırılmıç oldugunu kontrol
ediniz.
Ayaklar ayarlanmamıç. Makine seviyelenmesini
ihtimam ile gerçekleçtiriniz.
Sepet içerisinde az Makinenin çalıçmasını
çamaçır var. etkilemez.
Makine duvara veya Makineyi duvarlardan veyakınındaki möblelere ya mobilyalardan biraz
dayanıyor. uzaklaçtırınız.
Program hala Dolum kapagını açmak
çalıçmakta ve tambur için programın sonunu
dönmekte. bekleyiniz.
Makine içerisindeki su Dolum kapagının açılması
seviyesi, dolum kapagı alt gerekiyor ise, önce içindeki
kısmını açıyor. suyun boçaltılması gerekir.
Makine suyu ısıtmakta. Isıtma açamasının bitmesini
bekleyiniz.
33
Page 34

Arizaların giderilmesi
Sıkma geç baçlıyor veya
sıkma yapılmıyor
Arıza Olası Sebebi Giderilme Yöntemleri
Sıkma evresinde Sıkma evresinin
titreçimi engelleyen baçlangıcında çamaçırlar
“dengesiz yük kontrol sepet içerisinde eçit çekilde
sistemi” devreye girmiç dagıtılmamıç iseler, makine
ve dengeyi saglamaya durumu fark ettiginden,
çalıçıyor. sepetin bazı rotasyonları
vasıtasıyle çamaçırları
homojen bir çekilde yeniden
dagıtmayı dener. Sadece
çamaçırlar eçit çekilde
dagıtıldıktan sonra sıkma
evresi, çamaçırlar hala iyi
dagıtılmamıç ise gerektigi
takdirde azaltılmıç hız ile
gerçekleçtirilir.
Takriben halen 10 dakika
sonra çamaçırlar halen top
halinde ise makine sıkmayı
gerçekleçtirmez. Bu çekilde,
evre sonunda çamaçırlar
ıslak kalırsa, bunların el ile
sepet içerisinde yeniden
dagıtılması ve yeniden
sıkma programının seçilmesi
tavsiye olunur.
34
Page 35

Arizaların giderilmesi
Yıkama sonuçları memnun edici degil
Çamaçırlar beyazlıklarını kaybediyor ve kazan içerisinde kireç
artıkları bulunuyor ise
• Çok az deterjan konulmuç.
• Uygun deterjan kullanılmamıç.
• Özel lekeler, yıkamadan evvel muameleden geçirilmemiç.
•Program veya ısı düzgün çekilde seçilmemiç.
Çamaçırlar üzerinde gri lekeler kalıyor ise
•Merhem, katı yag veya yag ile kirli çamaçırlar yetersiz miktarda
deterjan ile yıkanmıç.
•Yıkama, çok düçük bir ısıda gerçekleçtirilmiç.
• Genellikle yumuçatıcı - özellikle konsantre yumuçatıcılar - çamaçırlar
üzerine dökülür. Bu lekeleri hemen yıkayınız ve yumuçatıcıyı dökerken
dikkat gösteriniz.
Son durulamadan sonra da halen köpük görülür ise
• Modern deterjanlar genelde son durulamada da köpük çıkartırlar.
Ancak çamaçırlar tamamen durulanmıçtır.
Çamaçırlar üzerinde beyaz artıklar kalır ise
• Bunlar, modern deterjanları oluçturan çözünmez elemanlardır. Yani,
yetersiz bir durulamanın sebep oldugu bir durum degildir. Çamaçırları
silkeleyiniz veya fırçalayınız. Belki gelecekte çamaçırları yıkamadan
evvel ters yüz edilmeleri daha uygundur. Deterjan seçiminizi kontrol
ediniz, gerekirse sıvı deterjan kullanınız.
35
Page 36

Teknik veriler
Yükseklik x Geniçlik x Derinlik 84x60x60 cm
Kapılar açık olarak derinlik 101,5 cm
Yükseklik ayarı yaklaçık. ± 13 mm
Yük (programa göre) max. 6 kg
Kullanım ortamı ev
Yıkama esnasında tambur devir sayısı max. 55/dak.
Sıkma esnasında tambur devir sayısı max. 1000/900/600 dak.
Su basıncı 0,05-0,8 MPa
Enerji Sınıfı A
AT Bu cihaz açagıda belirtilen AET yönetmeliklerine uygundur:
- 93 / 68 / AET yönetmeligini içeren 19.2.1973 tarihli 73/23/AET sayılı
“Alçak gerilim üzerine Yönetmelik”,
-3.5.1989 tarihli 89/336/AET sayılı “Elektromanyetik uygunluk
Yönetmeligi”.
ELECTROLUX AS (GENEL MERKEZ)
Tarlabaçı Cad. No: 35 Taksim / ISTANBUL
TEL : 0 212 293 10 20
FAX : 0 212 251 91 44
ELECTROLUX AS SERVIS MD.LÜGÜ
Taçocakları Mevkii Tavçanlı Köyü Gebze / KOCAELI
TEL : 0 262 724 94 20
FAX : 0 262 724 94 21
ÜCRETSIZTÜKETICI DANIÇMA HATTI
0 800 211 61 69
Cihazınızın kullanım ömrü 10 yıldır. Kullanım ömrü, üretici ve/veya
ithalatçı firmanın cihazınızla ilgili yedek parça temini ve bakım
süresini ifade eder.
36
Page 37

Yetkili Servis ve Yedek Parça
“Arızalar ve Çözümleri” baçlıgı altında kendi baçınıza çözebileceginiz
arızalar verilmiçtir.
Arıza halinde bu bölümü okuyunuz.
Arıza tespitini kolaylaçtırmak amacıyla belirteceginiz arıza tarifini önceden hazırlayınız: Yetkili Servis personeli bu çekilde, Yetkili Servisin
müdahalesinin gerekli olup olmadıgı hususunda karar verebilecektir.
Bilgi etiketi üzerinde belirtilen seri numarasını (Ser.-Nr.) ve ürün numarasını kayıt ediniz (Ürün.No.).
Ser. No. . . . . . . . . . . . . . . . . . . . . . . .
Prod. No. . . . . . . . . . . . . . . . . . . . . . .
Mod. L60800 Type P6346646
Prod.No. 91 451525800
220-230V~50Hz 2200 W 10 A
Ser.No.
IPX4
Ayrıca açagıdaki noktaları mümkün oldugu kadar eksiksiz çekilde özetleyiniz:
- Arıza nasıl meydana geliyor?
- Hangi durumlarda ortaya çıkıyor?
Garanti kapsamında ne zaman masraflar tüketici tarafindan ödenir?
-arıza tablosuna danıçarak kendi baçınıza sorunları halledebilmenizin
mümkün oldugu durumlarda (“Arızalar ve Çözümleri” baçlıgına
bakınız),
-Yetkili servis görevlisinin, müdahalesini gerçekleçtirmeden evvel
tarafınızdan yeterli derecede bilgi verilmediginden, örnegin yedek
parçaları temin edebilmek için, muhtelif defalar gidip gelmek mecburiyetinde kaldıgı durumlarda. Teknik Servise telefon edildiginde verile-
cek bilgiler yukarıda tarif edildigi gibi hazırlanır ise, teknik servis
görevlisinin bu muhtelif defa gidip gelmeleri önlenilebilir.
37
Page 38

Kurma ve elektrik baglantısı talimatları
Emniyet kuralları
•Makine ambalajından çıkartıldıgında, makinenin hasar görmemiç
oldugunu kontrol ediniz. Çüphe halinde makineyi çalıçtırmayınız,
makineyi Size satmıç olan satıç noktasına danıçınız.
•Makineyi kullanmadan evvel iç ambalajının çıkartılması gerekir. Nakliye esnasında koruma amacı ile kullanılan düzenler tamamen
kaldırılmaz veya eksik bir çekilde kaldırılır ise, makine veya mobilyalarınız bundan zarar görebilirler. Iliçkin paragrafa bakınız.
•Makineyi kurabilmek için evinizin elektrik tesisinin tadil edilmesi
gerekir ise, bu içlem sadece uzman personel tarafından gerçekleçtirilmelidir.
•Makinenin kurulması için gerekli su ile ilgili tüm müdahaleler, sadece
uzman bir muslukçu tarafından gerçekleçtirilmelidir.
•Makineyi kurduktan sonra, makinenin besleme kablosu üzerine
yaslanmadıgını kontrol ediniz.
•Makine halı kaplı bir zemin üzerine yerleçtirilmiç ise, dayanak ayakları
ve zemin arasında hava dolaçımı oldugundan emin olunuz.
• Besleme Kablosu, sadece bizim Teknik Servisimiz tarafından degiçtirilmelidir.
•Agır olması sebebiyle, makineyi hareket ettirirken dikkat ediniz.
38
Page 39

Cihazın boyutları
Ön cepheden ve yandan bakıç
Arkadan bakıç
65
Soguk su
Elektrik besleme kablosu
Boçaltma hortumu
39
Page 40

Kurma
Kurma
Ambalajın açılması
Makineyi çalıçtırmadan evvel, taçıma için öngörülen tüm cıvata ve
ambalajın çıkarılmıç olmaları gerekir.
Arkadaki alt iki
vidayı bir
somun anahtarı
kullanarak
sökünüz ve
çıkarınız.
plastik pimi
çekerek
çıkarınız. Hortumların ezilmemesine dikkat göstererek makineyi arkaya yatırınız.
Makine ve zemin arasına ambalaj köçebentleri konularak makinenin
arkaya yatırılmasından kaçınılabilir.
Makinenin altından polistirol takozu
kaldırınız ve iki plastik torbayı çıkartınız.
Iki
40
Azami ihtimam
göstererek,
saga dogru ve
sonra açagı
dogru götürerek sol politen torbayı
çekerek çıkarınız.
Azami ihtimam göstererek, sola dogru ve sonra yukarı dogru götürerek
sag politen torbayı çekerek çıkarınız.
Page 41

Makineyi dikey
konuma getiriniz ve
kalan arka vidayı
çıkarınız.
çekerek çıkarınız.
Açık delikleri içbu
kitapçıgı içeren torbada bulacagınız
tıpalar ile kapatınız.
Taçıma için kullanılmıç tüm donanımları, ilerideki bir taçınma halinde
bunları yeniden kullanmak üzere, muhafaza ediniz.
Iliçkin pimi
Yerleçtirme
Makineyi düz ve sert bir zemin üzerine yerleçtiriniz.
Makine etrafındaki hava dolaçımının, halı, halı kaplama, vs.. tarafından
engellenmemesine dikkat gösteriniz. Makinenin duvara veya diger
mutfak mobilyalarına dokunmadıgını kontrol ediniz.
•Makinenin halı veya uzun tüylü halı kaplı zeminler veya sünger
tabakası üzerine yerleçtirilmesi, dengesini tehlikeye düçüreceginden,
tavsiye edilmez.
•Ufak boyutlu karolar üzerine yerleçtirmeden evvel, araya lastikten bir
tabaka yerleçtirilmesi tavsiye edilir.
•Makinenin, özellikle ahçap kiriçli ve oynar ahçap bölmeli titreçimli bir
zemin üzerine yerleçtirilmesi halinde, zeminin en az iki kiriçinin vidalar ile, 15 mm kalınlıkta suya dayanıklı bir ahçap tabakaya sabitleçtirilmesi gerekir. Mümkün oldugu takdirde, kiriçler en iyi çekilde köçe-
lere tutturulduklarından ve bu noktada daha az titreçime tabi olduklarından, makine, yerleçtirildigi yerin bir köçesine pozisyonlanmalıdır.
• Zemin seviyesindeki düzensizlikleri, hiç bir çekilde araya ahçap, karton
veya benzeri parçalar koyarak düzeltmeyi denemeyiniz.
•Yer yetersizligi nedeni, makinenin bir gaz fırını veya bir kömür sobası
yanına yerleçtirilmesi gerektigi takdirde, iki cihaz arasına, fırın veya
sobaya bakan tarafı aluminyumdan bir tabaka ile kaplanılmıç bir izolasyon levhasının (85x57cm) yerleçtirilmesi gerekir.
•Makine, ısının sıfır derece altına düçebilecegi mevkilere kurulmamalıdır.
• Su giriç hortumu ezilmemelidir.
•Makineyi, herhangi bir arıza anında teknisyenin ulaçabilecegi çekilde
kurunuz.
Kurma
41
Page 42

Kurma
Seviyeleme
Ayarlanabilir ayakları gevçeterek veya
vidalayarak makineyi ihtimam ile seviyeleyiniz.
Zemin seviyesindeki bozuklukları dengelemek
amacı ile karton, tahta veya benzeri
malzemeleri katiyetle makinenin altına
koymayınız.
Su giriçi
Su giriç hortumu-
nu 3/4” diçli ayrı
bir musluga
baglayınız.
Su giriç hortumu
uzatılamaz.
Hortum çok kısa
ise ve muslugun
yerini degiçtirmek
istemiyorsanız, bu tür bir kullanım için öngörülmüç daha uzun komple
bir hortum satın alınması gerekir. Su giriç hortumunun diger ucu
makinenin yan kısmından herhangi bir istikamete dogru
yönlendirilebilir. Fiksaj bilezigini hafifçe çözünüz, hortumun ucunu
döndürünüz ve su sızıntısı olmadıgını kontrol ederek bilezigi tekrardan
sıkıçtırınız.
Su çıkıçı
42
Atık su hortumu dirsegi üç degiçik çekilde
yerleçtirilebilir:
Makine ile birlikte verilen plastikten
dirsek kullanılarak lavabo kenarına
yerleçtirme. Bu durumda, makine suyu
dıçarı attıgında dirsegin lavabo kenarından
kayma tehlikesi ile karçılaçmadıgından emin
olunuz. Dirsek, bir ip ile musluga veya
duvara baglanabilir.
Page 43

Lavabonun atık
borusunun bir
yatagına
baglantı. Atık su
borusunun yatagı
sifondan yüksek
ve hortum dirsegi
zeminden en az 60 cm yükseklikte olmalıdır.
Bir atık borusuna baglantı. Bu boru, 60 cm’den alçakta ve 90 cm’den
yüksekte olmamalıdır. Atık su hortumunun ucu daima havalandırılmalıdır,
yani atık su borusunun iç çapı atık su hortumunun dıç çapından daha geniç
olmalıdır.
Atık su hortumunda daralma olmamalıdır.
Makinenin dogru bir çekilde çalıçması için su boçaltma hortumu cihazın
üst arka kısmında bulunan özel destek parçası üzerine baglanmıç olmalıdır.
Elektrik baglantısı
Makine, 220-230 V tek fazlı, 50 Hz degerlerinde çalıçmak üzere
öngörülmüçtür.
Ev elektrik tesisatının, kullanılan diger cihazlar da düçünülerek gerekli
azami yükü (2,2 kW) kaldırabilecek kapasitede oldugunu kontrol ediniz.
Makineyi, topraklanmıç bir elektrik prizine baglayınız.
Yukarıda belirtilen emniyet kaidelerine uyulmaması sebebi meyda-
na gelen hasar veya kazalar ile iliçkin mesuliyetler üretici
tarafından kabul edilmez.
Elektrik çebekesine dogrudan dogruya baglanıldıgı takdirde, kontakları
arasında en az 3 mm’lik bir aralık olacak bir omnikutuplu çalter kullanınız; bu çalterin makine için gerekli azami yükü kaldırması (2,2 kW)
ve geçerli yönetmeliklere uygun olması gerekir. Sarı-yeçil toprak kablosu çalter tarafından kesilmemelidir.
Önemli!
Besleme kablosu, makine kurulduktan sonra, kolay çekilde ulaçılabilir
olmalıdır.
Kurma
43
Page 44

Dear customer,
Please read these operating instructions carefully and pay particular
attention to the safety notes indicated in the first pages. We recommend that you keep this instruction booklet for future reference and
pass it on to any future owners.
The warning triangle and/or the key words (Warning!, Caution!) emphasize information that is particularly important for your safety or correct
functioning of the appliance.
This symbol guides you, step by step, in the operation of the appliance.
The information marked with this symbol provides additional instructions and practical tips on the use of the appliance.
Tips and information about economical and ecological use of the
machine are marked with the clover symbol.
Should any problems arise, this booklet provides instructions on how to
solve them by yourself; see section “Something not working?”.
If this information is not sufficient, please contact our nearest SERVICE
CENTRE.
44
Printed on recycled paper.
People who think ecologically, act accordingly…
Page 45

Contents
Safety instructions. . . . . . . . . . . . . . . . . . . . . . . . . . . . . . . . . . . . . . . . . . . 48-49
Disposal . . . . . . . . . . . . . . . . . . . . . . . . . . . . . . . . . . . . . . . . . . . . . . . . . . . . . . . 50
Tips for environmental protection
Main features of your washing machine . . . . . . . . . . . . . . . . . . . . . . . . . . 51
Description of the appliance. . . . . . . . . . . . . . . . . . . . . . . . . . . . . . . . . . . . . . 52
Control panel . . . . . . . . . . . . . . . . . . . . . . . . . . . . . . . . . . . . . . . . . . . . . . . . . . . . 53
Programme selector dial . . . . . . . . . . . . . . . . . . . . . . . . . . . . . . . . . . . . . . . . 53
START/PAUSE button . . . . . . . . . . . . . . . . . . . . . . . . . . . . . . . . . . . . . . . . . . 54
DELAY START button . . . . . . . . . . . . . . . . . . . . . . . . . . . . . . . . . . . . . . . . . . . 54
Programme Option buttons . . . . . . . . . . . . . . . . . . . . . . . . . . . . . . . . . . . . . 55
PREWASH . . . . . . . . . . . . . . . . . . . . . . . . . . . . . . . . . . . . . . . . . . . . . . . . . . . . 55
SENSITIVE . . . . . . . . . . . . . . . . . . . . . . . . . . . . . . . . . . . . . . . . . . . . . . . . . . . . 55
QUICK WASH . . . . . . . . . . . . . . . . . . . . . . . . . . . . . . . . . . . . . . . . . . . . . . . . . 55
SPIN SPEED. . . . . . . . . . . . . . . . . . . . . . . . . . . . . . . . . . . . . . . . . . . . . . . . . . . 55
RINSE HOLD . . . . . . . . . . . . . . . . . . . . . . . . . . . . . . . . . . . . . . . . . . . . . . . . . . 56
Display. . . . . . . . . . . . . . . . . . . . . . . . . . . . . . . . . . . . . . . . . . . . . . . . . . . . . . . 56
Programme progress display. . . . . . . . . . . . . . . . . . . . . . . . . . . . . . . . . . . . . 56
Cancelling a programme. . . . . . . . . . . . . . . . . . . . . . . . . . . . . . . . . . . . . . . . 57
Altering a programme which is running. . . . . . . . . . . . . . . . . . . . . . . . . . . 57
Altering an option . . . . . . . . . . . . . . . . . . . . . . . . . . . . . . . . . . . . . . . . . . . . . 57
Opening the door after the programme has started. . . . . . . . . . . . . . . . . 57
Detergent dispenser drawer . . . . . . . . . . . . . . . . . . . . . . . . . . . . . . . . . . . . . . . . 58
Before the first wash . . . . . . . . . . . . . . . . . . . . . . . . . . . . . . . . . . . . . . . . . . . . 58
Preparing the wash cycle. . . . . . . . . . . . . . . . . . . . . . . . . . . . . . . . . . . . . . . . . 59
Sorting out and preparing the laundry . . . . . . . . . . . . . . . . . . . . . . . . . . . . . . 59
Weight of laundry . . . . . . . . . . . . . . . . . . . . . . . . . . . . . . . . . . . . . . . . . . . . . . . . 60
Types of fabric and care labels . . . . . . . . . . . . . . . . . . . . . . . . . . . . . . . . . . 60-61
Detergents and additives . . . . . . . . . . . . . . . . . . . . . . . . . . . . . . . . . . . . . . . . . . 62
Which detergent and additive? . . . . . . . . . . . . . . . . . . . . . . . . . . . . . . . . . . 62
How much detergent?. . . . . . . . . . . . . . . . . . . . . . . . . . . . . . . . . . . . . . . . . . 62
Liquid detergent. . . . . . . . . . . . . . . . . . . . . . . . . . . . . . . . . . . . . . . . . . . . . . . 62
Adding a water softener (descaling product) . . . . . . . . . . . . . . . . . . . . . . . . . 62
Information on water hardness. . . . . . . . . . . . . . . . . . . . . . . . . . . . . . . . . . . . . 62
. . . . . . . . . . . . . . . . . . . . . . . . . . . . . . . . 50
45
Page 46

Contents
How to wash
. . . . . . . . . . . . . . . . . . . . . . . . . . . . . . . . . . . . . . . . . . . . . . . . . . . . 63
Load the laundry . . . . . . . . . . . . . . . . . . . . . . . . . . . . . . . . . . . . . . . . . . . . . . . . . 63
Add detergent and additives . . . . . . . . . . . . . . . . . . . . . . . . . . . . . . . . . . . . . . . 63
Select the desired wash programme. . . . . . . . . . . . . . . . . . . . . . . . . . . . . . . . . 64
Select the desired options . . . . . . . . . . . . . . . . . . . . . . . . . . . . . . . . . . . . . . . . . 64
Select the SPIN SPEED or RINSE HOLD option . . . . . . . . . . . . . . . . . . . . . . . . 64
Select the EXTRA RINSE . . . . . . . . . . . . . . . . . . . . . . . . . . . . . . . . . . . . . . . . . . . 65
Select the DELAY START option . . . . . . . . . . . . . . . . . . . . . . . . . . . . . . . . . . . . . 65
Starting the programme. . . . . . . . . . . . . . . . . . . . . . . . . . . . . . . . . . . . . . . . . . . 66
Programme progress display . . . . . . . . . . . . . . . . . . . . . . . . . . . . . . . . . . . . . . . 67
Display . . . . . . . . . . . . . . . . . . . . . . . . . . . . . . . . . . . . . . . . . . . . . . . . . . . . . . . . . 67
At the end of the programme . . . . . . . . . . . . . . . . . . . . . . . . . . . . . . . . . . . . . . 67
Programme charts: wash and special programmes . . . . . . . . . . . . . . . 68-70
Cleaning and maintenance . . . . . . . . . . . . . . . . . . . . . . . . . . . . . . . . . . . . . . . 71
After each wash. . . . . . . . . . . . . . . . . . . . . . . . . . . . . . . . . . . . . . . . . . . . . . . . . . 71
Periodical cleaning . . . . . . . . . . . . . . . . . . . . . . . . . . . . . . . . . . . . . . . . . . . . . . . 71
Exterior . . . . . . . . . . . . . . . . . . . . . . . . . . . . . . . . . . . . . . . . . . . . . . . . . . . . . . 71
Detergent dispenser drawer . . . . . . . . . . . . . . . . . . . . . . . . . . . . . . . . . . . . . 71
Door seal. . . . . . . . . . . . . . . . . . . . . . . . . . . . . . . . . . . . . . . . . . . . . . . . . . . . . 72
Drain pump. . . . . . . . . . . . . . . . . . . . . . . . . . . . . . . . . . . . . . . . . . . . . . . . . . . 72
Water inlet filter . . . . . . . . . . . . . . . . . . . . . . . . . . . . . . . . . . . . . . . . . . . . . . 73
Emergency emptying out . . . . . . . . . . . . . . . . . . . . . . . . . . . . . . . . . . . . . . . . . . 73
Frost precautions. . . . . . . . . . . . . . . . . . . . . . . . . . . . . . . . . . . . . . . . . . . . . . . . . 73
Something not working? . . . . . . . . . . . . . . . . . . . . . . . . . . . . . . . . . . . . . . . . . 74
Troubleshooting. . . . . . . . . . . . . . . . . . . . . . . . . . . . . . . . . . . . . . . . . . . . . . . 74-76
Unsatisfactory washing results . . . . . . . . . . . . . . . . . . . . . . . . . . . . . . . . . . . . . 77
Technical data . . . . . . . . . . . . . . . . . . . . . . . . . . . . . . . . . . . . . . . . . . . . . . . . . . 78
Service . . . . . . . . . . . . . . . . . . . . . . . . . . . . . . . . . . . . . . . . . . . . . . . . . . . . . . . . 79
Instructions for installation and electrical connection. . . . . . . . . . . . . . . 80
Safety instructions for the installer . . . . . . . . . . . . . . . . . . . . . . . . . . . . . . . . . 80
Dimensions of the appliance. . . . . . . . . . . . . . . . . . . . . . . . . . . . . . . . . . . . . . 81
Front view and side view . . . . . . . . . . . . . . . . . . . . . . . . . . . . . . . . . . . . . . . . . . 81
Rear view . . . . . . . . . . . . . . . . . . . . . . . . . . . . . . . . . . . . . . . . . . . . . . . . . . . . . . . 81
46
Page 47

Installation . . . . . . . . . . . . . . . . . . . . . . . . . . . . . . . . . . . . . . . . . . . . . . . . . . 82-83
Unpacking . . . . . . . . . . . . . . . . . . . . . . . . . . . . . . . . . . . . . . . . . . . . . . . . . . . . . . 82
Positioning . . . . . . . . . . . . . . . . . . . . . . . . . . . . . . . . . . . . . . . . . . . . . . . . . . . . . . 83
Levelling . . . . . . . . . . . . . . . . . . . . . . . . . . . . . . . . . . . . . . . . . . . . . . . . . . . . . . . . 83
Water inlet . . . . . . . . . . . . . . . . . . . . . . . . . . . . . . . . . . . . . . . . . . . . . . . . . . 83-84
Water drainage . . . . . . . . . . . . . . . . . . . . . . . . . . . . . . . . . . . . . . . . . . . . . . . . . . 84
Electrical connection . . . . . . . . . . . . . . . . . . . . . . . . . . . . . . . . . . . . . . . . . . 84-85
Permanent connection . . . . . . . . . . . . . . . . . . . . . . . . . . . . . . . . . . . . . . . . . . . . 85
47
Page 48

Safety instructions
Safety instructions
The safety of AEG/ELECTROLUX appliances complies with the industry
standards and with legal requirements on the safety of appliances.
However, as manufacturers, we feel it is our duty to provide the following safety notes.
General safety
• Repairs to the machine must be carried out only by qualified personnel. Repairs carried out by inexperienced persons could cause serious
danger. Contact your local AEG/ELECTROLUX Service Force Centre.
• Never start the machine if the electrical supply cable is damaged or
the control panel or worktop are so damaged that inner components
can be reached.
• Unplug the appliance before carrying out any cleaning or maintenance operations.
• Never pull the power supply cable to remove the plug from the socket; always take hold of the plug itself.
• Never spray the machine with a jet of water. Danger of electric shock!
• During high temperature wash programmes the door glass may get
hot. Do not touch it!
• Let the water cool down before carrying out emergency emptying or
before opening the door in an emergency.
• Small animals can gnaw electric wires and water hoses causing electrocution hazard and damage due to water leaks.
48
Positioning, connection, starting up
• Follow the instructions for positioning and connection.
• Carry out a first wash without laundry (COTTONS 95, with half the
amount of detergent) in order to remove any manufacturing residue
from the tub and the drum.
• Should the machine be purchased in winter, when temperatures can
be below 0°, leave the appliance for 24 hours at ambient temperature
before starting it.
Page 49

Child safety
• Children are often not aware of how dangerous electrical appliances
can be. When the machine is working, children should be carefully
supervised and not be allowed to play with the appliance - there is a
risk that they could become trapped inside.
• The packaging components (e.g. plastic film, polystyrene) can be dangerous to children - danger of suffocation! Keep them out of children’s reach.
• Keep all detergents in a safe place out of children’s reach.
• Make sure that children or pets do not climb into the drum.
• When the appliance is to be scrapped, cut off the electrical supply
cable and destroy the plug with the remaining cable. Disable the door
catch in order to prevent children from becoming trapped inside
while playing.
Proper use
• This appliance is designed for domestic use only. If the machine is
used for any other purposes or is not used correctly, the manufacturer accepts no responsibility for any damage that might occur.
• For safety reasons, the appliance must not be modified.
• Use only detergents suitable for washing machines and follow the
manufacturer’s instructions.
• Garments which have been in contact with flammable solvents
should not be machine washed.
• Do not use your machine for dry cleaning.
• Dyes and bleaching agents may only be used if specifically permitted
by the manufacturer of these products. We cannot be held responsible for any damage.
• Always unplug the appliance and turn off the water tap after use.
49
Page 50

Disposal
Packaging materials
The materials marked with the symbol are recyclable.
>PE<=polyethylene
>PS<=polystyrene
>PP<=polypropylene
This means that they can be recycled by disposing of them properly in
appropriate collection containers.
Machine
Use authorised disposal sites for your old appliance. Help to keep your
country tidy!
The symbol on the product or on its packaging indicates that this
product may not be treated as household waste. Instead it shall be handed
over to the applicable collection point for the recycling of electrical and
electronic equipment. By ensuring this product is disposed of correctly, you
will help prevent potential negative consequences for the environment and
human health, which could otherwise be caused by inappropriate waste
handling of this product. For more detailed information about recycling of
this product, please contact your local city office, your household waste
disposal service or the shop where you purchased the product.
50
Tips for environmental protection
To save water, energy and to help protect the environment, we recommend
that you follow these tips:
• Normally soiled laundry may be washed without prewashing or soak
in order to save detergent, water and time (the environment is protected too!).
• Use the energy saving programme when washing normally soiled garments.
• The machine works more economically if it is fully loaded.
• When small loads are washed, use only half to two thirds of the recommended amount of detergent.
• With adequate pre-treatment, stains and limited soiling can be
removed; the laundry can then be washed at a lower temperature.
Page 51

• If the water has a medium or high degree of hardness (starting from
hardness degree II, see “Detergents and additives”) water softeners
must be added.
The amount of detergent can then be adjusted to hardness degree I (= soft).
Main features of your washing machine
• Programme and temperature setting using the programme selector.
• Energy saving programmes 95E, 60E, 40E for normally soiled cotton items.
• Speed for the final spin can be reduced to 900, 600 rpm.
• RINSE HOLD: the laundry is left immersed in the final rinse water to
prevent creasing.
• Delay Start: programme start can be delayed up to 23 hours (e.g. to
times with a more economical power rate).
• Programme progress display showing the programme steps selected
and the programme phase which is running.
• Because of its gentle washing action, the special wool cycle washes
your garments with extreme care.
• 4-compartment drawer for detergent, fabric softener and bleaching
agent.
• Balance control device: to prevent vibration during spinning.
• The ECO valve allows total use of detergent and reduces water con-
sumption so saving energy.
51
Page 52

Description of the appliance
1000
900
600
95 E
60 E
40 E
40
30
95
60
50
40
40
40
30
40
30
L 60800
Drain pump
Door
Control panel
Detergent drawer
Adjustable feet
Description of the appliance
Front view
52
Page 53

Control panel
A B C HI
E
F G
D
1000
900
600
95 E
60 E
40 E
40
30
95
60
50
40
40
40
30
40
30
L 60800
A = PREWASH button
B = SENSITIVE button
C = START/PAUSE button
D = SPIN SPEED button
E = QUICK WASH button
F = DELAY START button
G = Display
H = Programme progress display
I = Programme selector dial
Description of the appliance
Programme selector dial
The programme selector determines the type of washing cycle (e.g. water
level, drum movement, number of rinses) and the washing temperature
according to the type of laundry.
The selector dial is divided into 5
sections:
• Cottons
• Synthetics
• Delicates
• Woollens /Hand washing
• Special programmes
• Reset programme O (RESET/OFF)
The selector dial can be turned either clockwise or anticlockwise.
30
40
30
95
95 E
60 E
40 E
40
30
60
50
40
40
40
53
Page 54

Description of the appliance
Position 95E, 60E and 40E (economy) corresponds to the ENERGY
SAVING programme for normally soiled laundry, extended washing
time. They cannot be combined with QUICK WASH option .
Position (Easy to iron) at 40°C
In this position the laundry is gently washed and spun to avoid any
creasing. In this way ironing is easier.
Position (Cold)= cold wash
START/PAUSE button
This button has two functions:
a) Start
After having selected the required programme, press this button to start
the machine. If you have selected the (Delay start) option , the
machine starts its hourly countdown.
b) Pause
To interrupt a programme which is running, press the START/PAUSE
button: the relevant light starts to flash.
To restart the programme from the point at which it was interrupted,
press the START/PAUSE button again.
DELAY START button
The wash programme can be delayed from 30 min – 60 min – 90 min,
2 hours and then by 1 hour up to a maximum of 23 hours by means of
this button.
Selecting the delayed start
• Select the programme and the required options.
• Select the delay start.
• Depress START/PAUSE button: the machine starts its hourly count
down.
The programme will start after the selected delay has expired.
Cancelling the delayed start
• Depress START/PAUSE button.
• Depress DELAY START button until the the symbol 0’ is displayed.
• Depress START/PAUSE button again to restart the machine
. • To modify the delay time, after the programme has already started,
set the programme again and select the new desired delay time.
54
Page 55

Description of the appliance
Programme Option buttons
Depending on the programme, different functions can be combined.
These must be selected after choosing the desired programme and
before depressing the START/PAUSE button.
When these buttons are pressed, the corresponding pilot lights come on.
When they are pressed again, the pilot lights go out.
PREWASH
The machine performs a prewash cycle before the main wash. The prewash cycle ends with a short spin in programmes for Cotton and Synthetics, and with emptying of the water without spinning for Delicates.
To be used for heavily soiled laundry.
SENSITIVE
If you depress this button, the washing machine adds one rinse in COTTONS and SYNTHETIC programmes and reduces the spinning of the
drum and the washing intensity. To be uses for delicate color or lightly
soiled cottons.
This option connot be selected with the programme.
QUICK WASH
By pressing this button the washing time is reduced. For use when
washing lightly soiled laundry.
This option is not available with programme wool, handwash and
economy programmes.
Important: By depressing at the same time buttons SPIN SPEED and
(Quick wash), the acoustic signal is suppressed when selecting the programmes, in case of incorrect option selection and at the end of the cycle.
SPIN SPEED
Press this button to reduce the maximum speed of the
final speed proposed by the machine for the selected programme or to select option RINSE HOLD .
The maximum spin speed for cotton is 1000 rpm .
For synthetics, wool and delicates is 900 rpm.
Important: By depressing at the same time buttons
SPIN SPEED and (Delay start) the machine will perform an extra rinse (see page 65).
1000
900
600
55
Page 56

Description of the appliance
RINSE HOLD
By selecting this option, the last rinse water is not emptied out, to
prevent the fabrics from creasing. When the programme has finished,
the START/PAUSE button goes off, the pilot light (End) on the programme progress display illuminates, the light (Door) is red and the
display shows a static zero to indicate that the water must be emptied
out.
To empty out water there are two possibilities:
• Select programme (draining):
The water is emptied out without spinning.
• Select programme (Spin) or (Delicate spin). Select the spin
speed by means of the relevant button and then depress the
START/PAUSE button. The water is emptied out and the laundry is spun
at the selected spin speed.
Warning! The programme selector dial must be turned first to RESET
O and then to the DRAIN programme or or .
Display
The display shows the following information:
• Duration of the selected programme (in minutes), calculated automatically on the basis of the maximum recommended load for each type
of fabric.
• When the programme has finished, a steadily lit zero is displayed.
• Delay start, (23 hours max.) programmed using the (Delay start)
button. The countdown is updated every hour during the first two hours and then every thirty minutes.
• Alarm code indicating a fault in the machine operation (see page 78).
56
Programme progress display
By selecting the wash programme, the pilot lights
corresponding to the various phases making up
the programme come on.
After the machine has started, only the running
phase pilot light stays on. When the programme
has finished, the (End) pilot light comes on.
When the programme has finished, if the
light (Overdosage) comes on, it indicates that
too much detergent has been used.
PREWASH/
WASH
RINSES
EXTRA
RINSE
SPIN
END
OVER-
DOSAGE
DOOR
Page 57

Description of the appliance
Cancelling a programme
To cancel a programme which is running, turn the programme selector
dial to the RESET O position.
Warning! After a programme which ends with water in the drum
(RINSE HOLD option), turn the selector dial first to O and then to the
programme or or .
Altering a programme which is running
To modify the selected programme turn the programme selector dial to
O and then choose a new programme.
The water is not emptied out and after pressing the START/PAUSE button again the machine restarts with the newly selected programme.
Altering an option
To alter an option, first set the machine to PAUSE by pressing the
START/PAUSE button.
Any option can be modified before the machine starts it. After selecting the new option press the START/PAUSE button again to re-start the
selected programme.
To modify the selected programme turn the programme selector dial to
O and then choose a new programme.
The water is not emptied out and after pressing the START/PAUSE button again the machine restarts with the newly selected programme.
Opening the door after the programme has started
To open the door set the machine to PAUSE by pressing the START/PAUSE
button.
The door can be opened if:
• the machine is not already heating;
• the water level is not above the bottom edge of the door;
• the drum is not turning.
The light (Door) on the control panel indicates if the door can be
opened:
• green light: the door can be opened;
• red light: the door cannot be opened;
57
Page 58

Detergent dispenser drawer
Cl
Compartment for prewash detergent and stain remover. The prewash detergent is added at the beginning of the wash programme.
Compartment for powder or liquid detergent used for main wash.
It is emptied at the beginning of the wash cycle.
Compartment for liquid additives (fabric softener, starch).
It is emptied at the last rinse.
The quantity of additives must not exceed the “MAX” mark in the
drawer.
Compartment for bleaching agent.
It is emptied at the first rinse.
The quantity must not exceed the “MAX” mark in the drawer.
Before the first wash
Before your first wash, we recommend that you pour 2 litres of water
into the main wash compartment of the detergent drawer in
order to activate the ECO valve.
Then, run a cotton cycle at 95°, without any laundry in the
machine, to remove any manufacturing residue from the drum and
tub.
Pour 1/2 a measure of detergent into the dispenser drawer and start the
machine.
58
Page 59

Preparing the wash cycle
Sorting out and preparing the laundry
• Sort out the laundry according to type of fabrics and care labels (see
“Types of fabric and care labels”).
• Empty pockets.
• Remove any metal parts (safety pins, clips, etc.).
• To prevent the laundry from getting damaged and forming bundles,
it is advisable to close zips, button up pillowcases and quilt covers and
tie up loose straps such as those of aprons.
• Turn double faced items inside out (sleeping bags, anoraks, etc.)
• Turn coloured knitted fabrics, woollens and fabrics with trim inside
out.
• Wash small and delicate items (baby socks, tights) inside a laundry net
or in a pillow case closed with a zip, or in larger socks.
• Treat curtains with special care. Remove all metal or plastic hooks or
put them in a net or a bag. We take no responsibility for any damage.
• Whites and coloureds must be washed separately: white items can
loose their whiteness.
• New coloured fabrics often have excess dyes; it is advisable to wash
them separately for the first time.
• Wash small and large items together; this improves the washing result
and the laundry is better distributed during spinning.
• Shake out garments before putting them into the machine.
• Insert each garment separately.
59
Page 60

60
40
30
40
50
60
95
Preparing the wash cycle
Weight of laundry
Sort of laundry
Approximate
1200 gBathrobes
300-600 gWork shirts
700 gQuilt covers
500 gSheets
100 gBlouses
200 gHand towels
100 gTea towels
200 gShirts
200 gPillowcases
200-250 gNight-gowns/Pyjamas
200-300 gTablecloths
250 gUnderwear
Types of fabric and care labels
The labels on garments help you to select the most suitable wash programme. The laundry should be sorted out according to the type of fabric and the instructions indicated on care labels.
Temperatures indicated on labels are always maximum temperatures.
Cotton
Linen and cottons marked with this symbol can be washed at high temperatures.
Cotton
Linen and cottons marked with this symbol are colourfast and can be
washed at 60°C.
Cotton
Garments marked with these symbols have delicate colours, therefore
the washing temperature must not exceed these values.
Synthetics
Mixed and synthetic fabrics marked with these symbols require a gentle
wash programme and they must therefore be washed using the specific
programme.
dry weights
60
Page 61

30
40
30
40
Preparing the wash cycle
Delicates
Microfibres, synthetics or curtains marked with these symbols require a
very gentle treatment.
The DELICATES programme is suitable for this type of fabric.
Woollens and particularly delicate items
Fabrics such as wool, wool mix or silk marked with this symbol are particularly sensitive to machine washing.
The WOOL programme is suitable for this type of fabric.
If the label has the symbol (do not wash), the garments must not
be machine washed!
The wool wash cycle of this machine has been approved by Woolmark
for the washing of machine washable Woolmark products provided
that the garments are washed according to the instructions on the
garment label and those issued by the manufacturer of this washing
machine. M9604.
61
Page 62

Preparing the wash cycle
Detergents and additives
Which detergent and additive?
Use only detergents and additives for washing machines. Follow the
manufacturer’s instructions.
How much detergent?
The quantity depends on:
• the load:
if the manufacturer does not provide any indications on the amount of
detergent for small loads, use about one third less than the suggested
amount for half loads and half the amount for very small loads;
• the degree of soil:
use a small amount of detergent for lightly soiled garments. Judge
the amount according to the detergent manufacturer’s instructions
and size of the load;
• the water hardness:
the harder the water, the more detergent required. Instructions
according to water hardness are given on the detergent pack.
Liquid detergent
62
Liquid detergent can be poured directly into the main wash compartment
of the dispenser drawer immediately before starting the programme, or
a special dispenser can be used that is placed directly in the drum. Measure the detergent according to the manufacturer’s instructions.
Adding a water softener (descaling product)
A water softener must be added when water has a medium-high degree
of hardness (from degree of hardness II). Follow the manufacturer’s
instructions. The quantity of detergent can then always be adjusted to
degree of hardness I (= soft). Information on water hardness can be
obtained from your local water supply authority.
Information on water hardness
Degree of hardness French degrees °TH
German degrees °dH
0-7I=Soft
0-15
16-257-14II=Medium
26-3715-21III=Hard
more than 37more than 21IV=Very hard
Page 63

How to wash
Load the laundry
Open the door.
Place the laundry in the drum, one item at a time. Distribute laundry as
evenly as possible. Close the door.
Add detergent and additives
Pull the drawer
out till it stops.
Pour the main
wash detergent
into compartment
.
If you wish to perform a PREWASH
programme, pour
detergent into compartment .
Pour the fabric softener into compartment and the bleaching
agent into compartment without exceeding the “MAX” mark.
Close the drawer gently, pushing it fully in.
Cl
Cl
63
Page 64

How to wash
Select the desired wash programme
Turn the programme selector
dial to the desired position:
the lights corresponding to
the different phases making
up the selected programme
light on.
The display shows the duration of the programme.
Select the desired options
depending on the degree of soil of the laundry.
The corresponding light comes on.
Select the spin speed or RINSE HOLD option
It is possible to select a lower spin speed by means of
the relevant button; the light corresponding to the
selected speed comes on.
Selecting the option the laundry is left immersed
in the final rinse water.
95
95 E
60 E
40 E
40
30
40
30
40
30
60
50
40
40
1000
900
600
64
If the spin speed is not reduced, the final spin speed
will be as follows:
- cottons 1000 r.p.m.
- synthetics 0900 r.p.m.
- delicates 0900 r.p.m.
- wool /hand washing 0900 r.p.m.
Page 65

EXTRA RINSE
This appliance is designed for saving water. However, for people with
a very delicate skin (allergic to detergents) it may be necessary to
rinse the laundry using an extra quantity of water (extra rinse).
The extra rinse is available only with the cotton, synthetics or delicate
programme and with programme (Delicate rinses).
Selection of the EXTRA RINSE option
Press simultaneously the buttons SPIN SPEED and (Delay start)
for about 3 seconds: the light comes on in
the programme progress display.
This function stays permanently on. To remove it press the buttons
SPIN SPEED and (Delay start) again until the pilot light
comes off.
Select the DELAY START option
To delay starting of a programme, press the (Delay start) button
before starting the machine. The figures corresponding to the
selected delay will be displayed for about 3 seconds, after which the
duration of the selected programme will appear on the display.
When the START/PAUSE button is pressed, the selected delay will
appear again on the display and the machine starts its countdown.
How to wash
65
Page 66

How to wash
Starting the programme
1. Check that the water tap is open.
2. Press START/PAUSE to start the programme.
If the Delay Start option has been selected the programme will start
at the end of the countdown.
If the light (door) is red and flashing at the start of the programme it indicates that the door is open. Close the door and press
the START/PAUSE button again.
If the delay start option has been selected, the machine starts its
countdown, in hours for the first two hours and then every 30 minutes, which will appear on the display. During this period it is possible
to load other laundry, or to cancel the delay time.
• Load other laundry: press the START/PAUSE button. Open the door.
Load the laundry. Close the door and press the START/PAUSE button
again.
• Cancel the delay time: press the START/PAUSE button. Press the
(Delay start) button until the symbol 0’ appears on the display.
Press the START/ PAUSE button again if you wish to restart the programme.
Programme progress display
By selecting the wash programme, the pilot lights corresponding to the various phases making up the programme
come on. After the machine has started, only the running
phase pilot light stays on.
PREWASH/
WASH
RINSES
EXTRA
RINSE
SPIN
END
OVER-
DOSAGE
DOOR
Display
The time to the end of the programme decreases minute by minute and
appears on the display.
66
Page 67

At the end of the programme
The machine stops automatically. A steadly zero appears on the display.
The (END) light comes on in the programme progress display.
If the RINSE HOLD option has been selected, the START/PAUSE button
goes off, the pilot light on the programme progress display illumi-
nates, the light is red and the display
shows a static zero to indicate that the water must be emptied out.
To empty out water there are two possibilities:
• Select programme (draining):
The water is emptied out without spinning.
• Select programme (spin) or (delicate spin). Select the spin
speed by means of the relevant button and then depress the
START/PAUSE button. The water is emptied out and the laundry is spun
at the selected spin speed.
Warning! The programme selector dial must be turned first to RESET
O and then to the DRAIN programme or or .
Turn the selector dial to O to switch the machine off.
Remove the laundry from the drum.
Check that the drum is empty so as to avoid any forgotten items
being damaged in a subsequent wash (e.g. shrinking) or their colour
running into a load of whites.
Close the water tap.
Leave the door open to prevent the formation of mildew and unpleas-
ant smells.
How to wash
67
Page 68

Programme chart
Wash programmes for cottons
Wash
programme
White
Cottons
and Linens
95E
Whites
ECONOMY
60E
Cottons
ECONOMY
Temp.
95°
90E
(●)60E
Fabrics
Cotton and linen,
for example normally soiled work
garments, sheets,
household linen,
underwear, towels.
White cotton and
linen, for example
normally to lightly
soiled sheets and
household linen.
Whites and fastcoloureds.
Additional
functions
PREWASH
SENSITIVE
QUICK WASH
EXTRA RINSE
RINSE HOLD
SPIN SPEED
PREWASH
SENSITIVE
EXTRA RINSE
RINSE HOLD
SPIN SPEED
PREWASH
SENSITIVE
EXTRA RINSE
RINSE HOLD
SPIN SPEED
Max.
load
6 kg
6 kg
6 kg
Consumption*
Energy
kWh
2.3
1.55
1.14
Water
lt.
63
49
49
Duration
min.
145
147
141
68
40E
Coloured
cottons
ECONOMY
Coloured
cottons
(●)
In compliance with EC directive 92/75, the consumption figures indicated on
40E Non fast-coloureds.
40°-30°
(Cold)
Coloured cotton or
linen fabric, shirts,
underwear, towels.
PREWASH
SENSITIVE
EXTRA RINSE
RINSE HOLD
SPIN SPEED
PREWASH
SENSITIVE
QUICK WASH
EXTRA RINSE
RINSE HOLD
SPIN SPEED
6 kg
6 kg
1.14
0.6
49
60
140
11 7
the energy label refer to the “60E” wash programme for cotton.
* The consumption data shown on this chart is to be considered purely indicative, as it may vary depending on the quantity and type of laundry, on the inlet
water temperature and on the ambient temperature. It refers to the highest temperature for each wash programme.
Page 69

Programme chart
Wash programmes for synthetics , delicates
and wool
Wash
programme
Synthetics
Synthetics
Delicates
Wool
Hand wash
Temp.
60°-50°
40°
(Cold)
40°
40°-30°
(Cold)
40°-30°
(Cold)
/hand washing
Fabrics
Synthetic fabrics,
underwear,
coloured garments,
non-shrink shirts,
blouses.
Synthetics, easy
iron.
Delicate fabrics, for
example curtains.
Wool, wool mixtures, silk.
Additional
functions
PREWASH
SENSITIVE
QUICK WASH
EXTRA RINSE
RINSE HOLD
SPIN SPEED
PREWASH
QUICK WASH
EXTRA RINSE
RINSE HOLD
SPIN SPEED
INTENSIVE
PREWASH
QUICK WASH
EXTRA RINSE
RINSE HOLD
SPIN SPEED
RINSE HOLD
SPIN SPEED
Max.
load
2.5 kg
1 kg
2.5 kg
2 kg
Consumption*
Energy
kWh
0.9
0.4
0.5
0.35
Water
lt.
54
59
55
55
Duration
min.
93
92
60
56
* The consumption data shown on this chart is to be considered purely indicative, as it may vary depending on the quantity and type of laundry, on the inlet
water temperature and on the ambient temperature. It refers to the highest
temperature for each wash programme.
69
Page 70

Programme chart
Special programmes
Programme
(Gentle
rinses)
(Softeners)
(Drain)
Descrip-
tion
This programme can
be used for
rinsing hand
washed garments.
Hand washed
garments to
be starched
or softened.
For emptying
out the last
rinse water in
programmes
with the RINSE
HOLD option
Programme phases
3 rinses with liquid
additive.
Short spin.
1 rinse with liquid
additive.
Long spin.
The water is emptied out.
Additional
functions
EXTRA RINSE
SENSITIVE
RINSE HOLD
SPIN SPEED
RINSE HOLD
SPIN SPEED
Max.
load
6 kg
6 kg
/
Consumption*
Energy
kWh
0.05
-
Water
lt.
55
19
-
Duration
min.
27
21
2
70
(Spin)
Short spin
O
(Reset/Off)
Separate spin
for cottons.
Separate spin
for synthetics,
delicate fabrics and wool.
Long spin.
Short spin.
For cancelling the
programme which
is running or to
switch the machine
off.
SPIN SPEED
SPIN SPEED
6 kg
2.5 kg
-
-
10
-
-
6
* The consumption data shown on this chart is to be considered purely
indicative, as it may vary depending on the quantity and type of laundry,
on the inlet water temperature and on the ambient temperature.
Page 71

Cleaning and maintenance
After each wash
At the end of the wash programme, pull the dispenser drawer out a little to let it dry.
Leave the door ajar to allow air to circulate.
If the machine is not used for a prolonged period:
Close the water tap and unplug the appliance.
Periodical cleaning
Exterior
Clean the outside of the cabinet with soap and water only. Rinse with
clean water and dry.
Important: do not use methylated spirits, solvents or similar products
to clean the cabinet.
Detergent dispenser drawer
After a while,
detergents and
fabric softeners
leave deposits in
the drawer.
Clean the drawer,
from time to time,
by rinsing it under
a running tap. To
remove the drawer
from the machine, press the button in the rear left-hand corner.
To facilitate cleaning, the top part of the additive compartments can be
removed.
Detergent can also accumulate inside the
drawer recess: clean it with an old toothbrush.
Refit the drawer after cleaning.
Cl
71
Page 72

Cleaning and maintenance
Door seal
Check from time to time the door seal and
eliminate eventual possible objects that
could be trapped in the fold.
Drain pump
The pump should be inspected regularly and particularly if
the machine does not empty and/or spin
the machine makes an unusual noise during draining due to objects
such as safety pins, coins etc. blocking the pump.
Proceed as follows:
Disconnect the appliance.
If necessary wait until the water has cooled down.
Open the pump door.
Place a container close to the
pump to collect
any spillage.
Release the
emergency
emptying hose,
place it in the
container and
remove its cap.
When no more water comes out, unscrew the pump and remove it.
Always keep a rag nearby to dry up spillage of water when removing
the pump.
72
Remove any
objects from the
pump impeller
by rotating it.
Put the cap
back on the
emergency
emptying hose
P1097
and place the
latter back in its seat.
Screw the pump fully in.
Close the pump door.
Page 73

Cleaning and maintenance
Water inlet filter
If you notice that the machine is taking longer
to fill, check that the filter in the water inlet
hose is not blocked.
Turn off the water tap.
Unscrew the hose from the tap.
Clean the filter in the hose with a stiff brush.
Screw the hose back onto the tap.
Emergency emptying out
If the water is not discharged, proceed as follows to empty out the
machine:
pull out the plug from the power socket;
close the water tap;
if necessary, wait until the water has cooled down;
open the the pump door;
place a bowl on the floor and place the end of the emergency emptying hose
into the bowl. Remove its cap. The water should drain by gravity into the
bowl. Whe the bowl is full, put the cap back on the hose. Empty the bowl.
Repeat the procedure until water stops flowing out;
clean the pump if necessary as previously described;
replace the emergency emptying hose in its seat after having plugged it;
screw the pump again and close the door.
Frost precautions
If the machine is installed in a place where the temperature could drop below
0°C, proceed as follows:
Close the water tap and unscrew the water inlet hose from the tap.
Place the end of the emergency emptying hose and that of the inlet hose in
a bowl placed on the floor and let water drain out.
Screw the water inlet hose back on and reposition the emergency emptying
hose after having put the cap on again
By doing this, any water remaining in the machine is removed, avoiding ice
forming and consequently damage to the appliance.
When you use the machine again, make sure that the ambient temperature
is above 0°C.
Important
Every time you drain the water through the emergency emptying hose
you must pour 2 litres of water into the main wash compartment of the
!
.
73
Page 74

Something not working?
detergent drawer and then run the drain programme . This will activate the ECO valve avoiding that part of the detergent remains unused
at next washing.
Something not working?
If during the spin cycle the machine makes an unusual
whistling noise, different from the noise made by traditional washing machines, this is due to a new type of
motor.
If water is not visible in the drum, this is due
to the modern technology of new washing
machines that use less water than traditional machines.
Troubleshooting
If a problem arises, you can try to solve it
yourself following the instructions below.
If you call out an engineer when one of the following problems arises, or to repair a fault due to incorrect use, the call-out will be
charged even if requested within the guarantee period.
During machine operation it is possible that an acoustic warning signal
sounds, the (END) light blinks and the following alarm codes may be
displayed:
- E10: problem with the water supply
- E20: problem with water draining
- E40: door open
Once the problem has been eliminated, press the START/PAUSE button
to restart the programme. If after all checks, the problem persists, contact your local AEG/ELECTROLUX Service Force Centre.
74
Problem
The machine does not work
Possible cause
The main electrical fuse Replace the fuse.
has blown.
The door is not properly Close the door; the click
closed (E40). of the lock should be heard.
The plug is not connected. Insert the plug.
The START button has not Press the button.
been pressed.
The DELAY START Check the selected delay on
option has been selected. the display.
Solution
Page 75

Something not working?
Problem
The machine does not fill
The machine fills then
empties immediately
The machine does not
empty and/or does not spin
There is water on the floor
Possible cause
The water tap is closed (E10). Open the water tap.
The water inlet hose is Check the whole length of the
squashed or kinked (E10). hose and remove the kink.
The small filter of the water Clean the filter.
inlet hose is clogged (E10).
The door is not properly Close the door.
closed (E40).
The end of the drain hose Place the hose at the right
is too low. height (see Installation
section).
The drain hose is Check the whole length of
squashed or kinked (E20). the hose and remove the
kink.
The drain pump or the Clean the pump or check
drain hose are clogged (E20). the hose.
The RINSE HOLD option Empty out the water by
(stop with water in drum) selecting the
has been selected. programme.
The laundry is not evenly Redistribute the laundry
distributed inside the drum. manually in the drum.
Too much detergent has Measure detergent
been used. according to the
manufacturer’s instructions.
An unsuitable detergent Use a suitable washing
has been used that machine detergent.
creates too much foam.
One of the connectors on Check that the hose is
the water inlet hose is firmly screwed on at both
leaking. ends.
The drain pump has not Fully screw the pump into
been properly screwed on place.
after cleaning.
The cap on the emergency Replace the cap on the
emptying hose has not been emergency emptying hose
replaced after cleaning the after cleaning the pump.
pump.
Solution
75
Page 76

Something not working?
Problem
The machine vibrates or is
noisy
The door will not open
Spinning starts late or the
machine does not spin
Possible cause
The transit bolts have Check that the machine
not been removed. has been unpacked as
described in the Installation
section.
The feet have not been Carefully level the machine.
adjusted.
There is little laundry in Correct operation of the
the drum. machine is not affected.
The programme is still Wait until the end of the
running and the drum programme before opening
is turning. the door.
The water level is above the Before opening the door,
bottom edge of the door. the water must be emptied
out.
The machine is heating the Wait until the end of the
water. heating phase.
The unbalance detection If the laundry is not evenly
device that prevents distributed inside the drum
excessive vibration during at the beginning of the
spinning has cut in. spin cycle, the machine
detects this and tries to
redistribute it more evenly
by means of a few drum
rotations.
Only when the laundry is
more evenly distributed
will the spin cycle be
performed, at a lower speed,
if the laundry is not evenly
distributed.
If, after about 10 minutes,
the laundry is still tangled,
the machine will not spin.
Therefore, if the laundry is
still wet at the end of the
cycle, it is advisable to
redistribute it manually
inside the drum and to
select the spin programme.
Solution
76
Page 77

Something not working?
Unsatisfactory washing results
If the laundry looks grey and lime scale is found in the drum
• Too little detergent has been used.
• An unsuitable detergent has been used.
• Stubborn stains have not been treated prior to washing.
• The programme/temperature has not been correctly selected.
If grey stains remain on the laundry
• Laundry stained with ointments, grease or oil has been washed with
an insufficient amount of detergent.
• The temperature selected for the wash programme was too low.
• Fabric softener - especially the concentrated type - has come into
direct contact with the laundry. Wash these stains immediately and
pour fabric softener carefully.
Foam is still visible even after the last rinse
• Modern detergents often produce foam, even in the last rinse. However the laundry has been completely rinsed.
White residue is left on the laundry
• This is due to insoluble components in modern detergents and is
therefore not the result of insufficient rinsing. Shake or brush the
laundry. In future, it may be better to turn garments inside out before
washing them. Check the choice of detergent; try using liquid detergents.
77
Page 78

Technical data
Height x Width x Depth 85x60x60 cm
Depth with door opened 101.5 cm
Height adjustment ± 10 mm approx.
Load (depending on programme) 6 kg max.
Use domestic
Drum speed during washing max. 55 rpm
Drum speed during spinning 1000/900/600 rpm
Water pressure 0.05 - 0.8 MPa
This appliance complies with the following EC directives:
- 73/23/EEC of 19.2.1973 “Low voltage directive”, including directive
93 / 68 / EEC
- 89/336/EEC of 3.5.1989 “Electromagnetic Compatibility Directive”.
78
Page 79

Service
In the section “Something not working?” some problems that can be
solved by yourself are listed. Read this section in the event of problems.
If you are not able to find a solution, contact the Service centre.
In all cases, explain your problem carefully, in order to facilitate troubleshooting: the engineer will be able to decide whether a service call
is necessary.
Take note of the serial number (Ser.No.) and the product number (Prod.
No.) indicated on the rating plate.
Ser. No. . . . . . . . . . . . . . . . . . . . . . . .
Prod. No. . . . . . . . . . . . . . . . . . . . . . .
Mod. L60800 Type P6346646
Prod.No. 91 451525800
220-230V~50Hz 2200 W 10 A
Ser.No.
IPX4
Furthermore, try to specify, as precisely as possible:
- The symptoms of the fault
- When the fault occurs
- The alarm code displayed
When can a service visit be charged during the guarantee period?
- when it should have been possible to solve the problem by yourself,
with the help of the troubleshooting chart (see section “Something
not working?”)
- when the engineer has to come out several times because he has
not been given all the relevant information he needs and so, for
example, has to fetch spare parts. Repeated trips can be avoided if
you prepare your call to the Service centre as described above.
79
Page 80

Instructions for installation and electrical connection
Safety instructions for the installer
• This appliance is heavy, care should be taken when moving it.
• When unpacking the appliance, check that it is not damaged. If in
doubt, do not use it and contact the retailer.
• All internal packing must be removed before using the appliance.
Serious damage may be caused to the machine or adjacent furniture
if the protective transit devices are not completely removed. Refer to
the relevant paragraph.
• Any electrical work required to install this appliance must be carried
out by a qualified electrician.
• Any plumbing work required to install this appliance must be carried
out by a qualified plumber.
• After having installed the machine, check that it is not standing on
its electrical supply cable.
• If the appliance is placed on a carpeted floor, ensure that air can circulate freely between the adjustable feet and the floor.
• The installation should comply with local water authority and building regulations requirements.
• Should the appliance power supply cable need to be replaced, this
should be carried out by our Service Force Centre.
80
Page 81

Dimensions of the appliance
90
1000
900
600
95 E
60 E
40 E
40
30
95
60
50
40
40
40
30
40
30
L 60800
565
605
1015
25
Cold water
335
170
70
40
45
85
Power cable
Drain
Front view and side view
Rear view
81
Page 82

Installation
Unpacking
All transit bolts and packing must be removed before using the appliance.
Using the supplied spanner,
unscrew and
remove the 2
rear bottom
screws. Slide out
the 2 plastic
pins. Lay the
machine on its
back, taking care not to squash the hoses.
This can be avoided by placing one of the
corner packing pieces between the
machine and the floor.
Remove the polystyrene block from the
bottom of the machine and release the
two plastic bags.
Carefully slide out
the left-hand bag
removing it
towards the right
and then downwards.
Slide out the
right-hand bag
removing it
towards the left
and then
upwards.
Set the machine
upright and
remove the
remaining rear
screw. Slide out
the relevant pin.
Plug the open holes with the plugs which you will find in the plastic bag
containing the instruction booklet.
P1129
P0001
1
2
3
P1124
82
Page 83

Installation
You are advised to keep all transit devices so that they can be refitted if the
machine ever has to be transported again.
Positioning
Install the machine on a flat hard floor.
Make sure that air circulation around the machine is not impeded by
carpets, rugs etc.
• Before placing it on small tiles, apply a rubber coating.
• Never try to correct any unevenness in the floor by putting pieces of
wood, cardboard or similar materials under the machine.
• If it is impossible to avoid positioning the machine next to a gas
cooker or coal-burning stove, an insulating panel (85x57 cm) covered
with aluminium foil on the side facing the cooker or stove, must be
inserted between the two appliances;
• The machine must not be installed in rooms where the temperature
can drop below 0.
• The water inlet hose and the drain hose must not be kinked.
• Please ensure that when the appliance is installed, it is easily accessible for the engineer in the event of a breakdown.
Levelling
Carefully level by screwing the adjustable
feet in or out. Never place cardboard, wood
or similar materials under the machine to
compensate for any unevenness in the
floor.
Water inlet
Connect the water inlet hose to a separate tap with a 3/4" thread.
The other end of
the inlet hose
which connects to
the machine can
be turned in any
direction. Simply
loosen the fitting,
rotate the hose
and retighten the
fitting, making sure there are no water leaks.
The inlet hose must not be lengthened. If it is too short and you do not
wish to move the tap, you will have to purchase a new, longer hose specially designed for this type of use.
83
Page 84

Installation
Water drainage
The end of the drain hose can be positioned in three ways:
Hooked over the edge of a sink using
the plastic hose guide supplied with the
machine. In this case, make sure the end
cannot come unhooked when the machine
is emptying.
This could be done by tying it to the tap
with a piece of string or attaching it to the
wall.
In a sink drain pipe branch. This branch must be above the trap so that
the bend is at least 60 cm above the ground.
Directly into a
drain pipe at a
height of not
less than 60 cm
and not more
than
90 cm.
The end of the drain hose must always be ventilated, i.e. the inside
diameter of the drain pipe must be larger than the outside diameter of
the drain hose.
The drain hose must not be kinked.
For a correct functioning of the machine the drain hose must
remain hooked on the proper support piece situated on the top
part of the back side of the appliance.
Electrical connection
This machine is designed to operate on a 220-230 V, single-phase,
50 Hz supply.
Check that your domestic electrical installation can take the maximum
load required (2.2 kW), also taking into account any other appliances in
use.
Connect the machine to an earthed socket.
The manufacturer does not accept any responsibility for damage or
injury through failure to comply with the above safety precaution.
84
Page 85

Permanent connection
In the case of a permanent connection it is necessary that you install a
double pole switch between the appliance and the electricity supply
(mains), with a minimum gap of 3 mm between the switch contacts and
of a type suitable for the required load in compliance with the current
electrical regulations.
The switch must not break the yellow and green earth cable at any
point.
This operation must be performed by a qualified electrician.
Important: The power supply cable must be easily accessible after
installing the machine.
Installation
85
Page 86

86
Page 87

87
Page 88

AEG Hausgeräte GmbH
Postfach 1036
D-90327 Nürnberg
http://www.aeg.hausgeraete.de
© Copyright by AEG/ELECTROLUX
132978460-00-1006 Subject to change without notice
From the Electrolux Group. The world’s No. 1 choice.
The Electrolux Group is the world's largest producer of powered appliances for kitchen, cleaning and
outdoor use. More than 55 million Electrolux Group products (such as refrigerators, cookers, washing
machines, vacuum cleaners, chain saws and lawn mowers) are sold each year to a value of
approx. USD 14 billion in more than 150 countries around the world.
 Loading...