

Page 1
LAVAMAT 60210
Washing machine
User information
Page 2

Dear customer,
Please read this User Information carefully and keep it to refer to at a
later date.
Pass this User Information on to any subsequent owner of the appliance.
The following symbols are used in the text:
1 Safety instructions
Warning: Notes that concern your personal safety.
Attention: Notes that show how to avoid damage to the appliance.
3 Useful tips and hints
2 Environmental information
2
Page 3

Contents
Operating Instructions. . . . . . . . . . . . . . . . . . . . . . . . . . . . . . . . . . . . . 5
Safety . . . . . . . . . . . . . . . . . . . . . . . . . . . . . . . . . . . . . . . . . . . . . . . . . . . . . . . . . 5
Description of the appliance . . . . . . . . . . . . . . . . . . . . . . . . . . . . . . . . . . . . 7
Control panel . . . . . . . . . . . . . . . . . . . . . . . . . . . . . . . . . . . . . . . . . . . . . . . . . . 7
Programme overview. . . . . . . . . . . . . . . . . . . . . . . . . . . . . . . . . . . . . . . . . . . . 8
Before the first wash. . . . . . . . . . . . . . . . . . . . . . . . . . . . . . . . . . . . . . . . . . . . 10
Preparing and sorting washing . . . . . . . . . . . . . . . . . . . . . . . . . . . . . . . . . . . 10
Running a washing cycle . . . . . . . . . . . . . . . . . . . . . . . . . . . . . . . . . . . . . . . . 11
Opening the door/Loading the washing . . . . . . . . . . . . . . . . . . . . . . . . . . . . . 11
Adding detergent/ additives . . . . . . . . . . . . . . . . . . . . . . . . . . . . . . . . . . . . . . . 11
Switching on the appliance/selecting a programme . . . . . . . . . . . . . . . . . . . 13
Changing the spin speed/Selecting rinse hold . . . . . . . . . . . . . . . . . . . . . . . . 13
Selecting the programme options . . . . . . . . . . . . . . . . . . . . . . . . . . . . . . . . . . 14
EXTRA RINSE . . . . . . . . . . . . . . . . . . . . . . . . . . . . . . . . . . . . . . . . . . . . . . . . 14
QUICK WASH . . . . . . . . . . . . . . . . . . . . . . . . . . . . . . . . . . . . . . . . . . . . . . . . 14
PREWASH. . . . . . . . . . . . . . . . . . . . . . . . . . . . . . . . . . . . . . . . . . . . . . . . . . . 14
STAIN . . . . . . . . . . . . . . . . . . . . . . . . . . . . . . . . . . . . . . . . . . . . . . . . . . . . . . 14
Setting the delay timer . . . . . . . . . . . . . . . . . . . . . . . . . . . . . . . . . . . . . . . . . . . 15
Starting a programme. . . . . . . . . . . . . . . . . . . . . . . . . . . . . . . . . . . . . . . . . . . . 15
Programme progress . . . . . . . . . . . . . . . . . . . . . . . . . . . . . . . . . . . . . . . . . . . . . 15
Interrupting a programme/Adding washing. . . . . . . . . . . . . . . . . . . . . . . . . . 16
End of the wash cycle/Removing the washing . . . . . . . . . . . . . . . . . . . . . . . 16
Child safety device. . . . . . . . . . . . . . . . . . . . . . . . . . . . . . . . . . . . . . . . . . . . . . 17
Cleaning and maintenance . . . . . . . . . . . . . . . . . . . . . . . . . . . . . . . . . . . . . . 17
What to do if.... . . . . . . . . . . . . . . . . . . . . . . . . . . . . . . . . . . . . . . . . . . . . . . . . 19
Remedying small malfunctions . . . . . . . . . . . . . . . . . . . . . . . . . . . . . . . . . . . . 19
If the wash results are not satisfactory. . . . . . . . . . . . . . . . . . . . . . . . . . . . . . 21
Carrying out an emergency drain . . . . . . . . . . . . . . . . . . . . . . . . . . . . . . . . . . 22
Drain pump. . . . . . . . . . . . . . . . . . . . . . . . . . . . . . . . . . . . . . . . . . . . . . . . . . . . . 23
Disposal . . . . . . . . . . . . . . . . . . . . . . . . . . . . . . . . . . . . . . . . . . . . . . . . . . . . . . . 24
Technical data. . . . . . . . . . . . . . . . . . . . . . . . . . . . . . . . . . . . . . . . . . . . . . . . . . 25
Consumption values. . . . . . . . . . . . . . . . . . . . . . . . . . . . . . . . . . . . . . . . . . . . . 25
3
Page 4

Installation and connection instructions. . . . . . . . . . . . . . . . . 26
Safety information for the installation. . . . . . . . . . . . . . . . . . . . . . . . . . . . 26
Installing the appliance . . . . . . . . . . . . . . . . . . . . . . . . . . . . . . . . . . . . . . . . . 26
Transporting the appliance. . . . . . . . . . . . . . . . . . . . . . . . . . . . . . . . . . . . . . . . 26
Unpacking. . . . . . . . . . . . . . . . . . . . . . . . . . . . . . . . . . . . . . . . . . . . . . . . . . . . . . 27
Where to install . . . . . . . . . . . . . . . . . . . . . . . . . . . . . . . . . . . . . . . . . . . . . . . . . 29
Making the appliance level. . . . . . . . . . . . . . . . . . . . . . . . . . . . . . . . . . . . . . . . 30
Electrical connection. . . . . . . . . . . . . . . . . . . . . . . . . . . . . . . . . . . . . . . . . . . . 30
Connecting to the water supply . . . . . . . . . . . . . . . . . . . . . . . . . . . . . . . . . . 30
Water inlet . . . . . . . . . . . . . . . . . . . . . . . . . . . . . . . . . . . . . . . . . . . . . . . . . . . . . 30
Water drainage. . . . . . . . . . . . . . . . . . . . . . . . . . . . . . . . . . . . . . . . . . . . . . . . . . 32
Guarantee/Customer Service. . . . . . . . . . . . . . . . . . . . . . . . . . . . . . 33
Service . . . . . . . . . . . . . . . . . . . . . . . . . . . . . . . . . . . . . . . . . . . . . . . . . . . . . . 35
4
Page 5

Operating Instructions
1 Safety
Prior to using for the first time
• Follow the ”Instructions for installation and connection”.
• If the appliance is delivered in the winter months when there are mi-
nus temperatures: Store the washing machine at room temperature
for 24 hours before using for the first time.
Correct use
• The washing machine is only designed for the washing of normal domestic laundry at home.
• Additions or modifications to the washing machine are not permitted.
• Use only detergents and additives that are suitable for use in domestic washing machines.
• The washing must not contain any inflammable solutions. Danger of
explosion!
• Do not use the washing machine for dry cleaning.
• Dyes/colour removers may only be used in the washing machine, if
the manufacturer of these products expressly permits this. We cannot
be held responsible for any damage arising.
Child safety
• Keep packaging away from children. There is a risk of suffocation.
• Children often do not recognise the hazards associated with electrical
appliances. Do not allow children to use the washing machine unsupervised.
• Make sure that children and pets don’t climb into the drum of the
washing machine. Could endanger life!
5
Page 6

General safety
• Repairs to the washing machine must only be carried out by qualified
service engineers.
• Never use the washing machine if the mains cable is damaged; or if
the control panel, work top or plinth area is damaged such that the
inside of the appliance is freely accessible.
• Switch off the washing machine before cleaning, maintenance and
servicing. In addition, pull the mains plug out of the socket or – in
the case of a permanent connection – switch off the cut-out in the
fuse box or remove the screw fuse completely.
• If operation is stopped, disconnect the appliance from the mains supply and shut off the water tap.
• Never unplug the appliance by pulling on the cable. Always pull the
plug.
• Multi-way plugs, connectors and extension cables must not be used.
This could constitute a fire hazard through overheating.
• Never wash the washing machine down with a water jet. Danger of
electric shock!
• In washing programmes with high temperatures the glass in the door
gets hot. Do not touch it.
• Before emergency emptying of the appliance, before cleaning the
drain pump or opening the door in an emergency, let the water cool
down.
• Small animals can nibble at the cables and water hoses. Danger of
electric shock and danger of water damage! Keep small animals away
from the washing machine.
6
Page 7
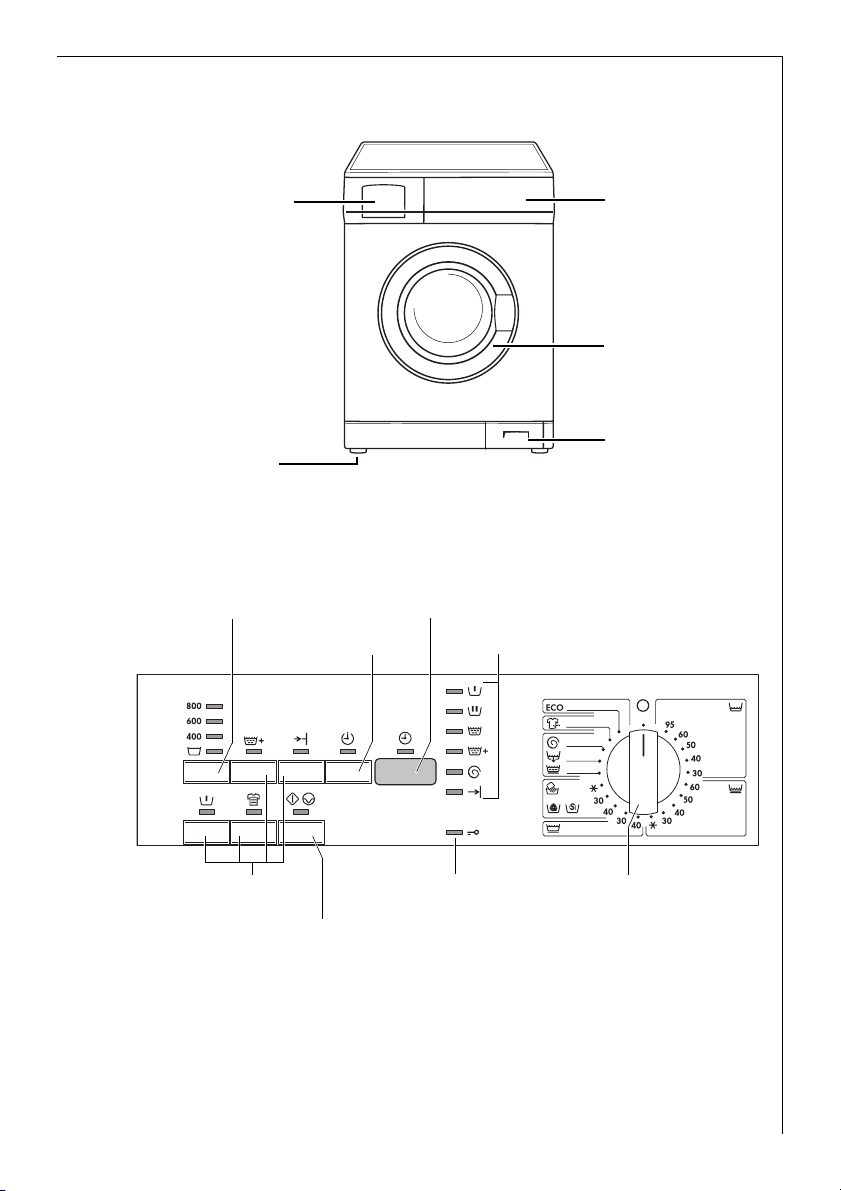
Description of the appliance
Detergent dispenser
drawer
Screw feet
(height adjustable)
Control panel
SPIN/RINSE HOLD button
DELAY TIMER button
Control panel
Rating plate
(behind door)
Plinth flap/
Drain pump
Multidisplay
Programme Progress display
Programme option
buttons
START/PAUSE button
DOOR indicator
Programme knob
7
Page 8
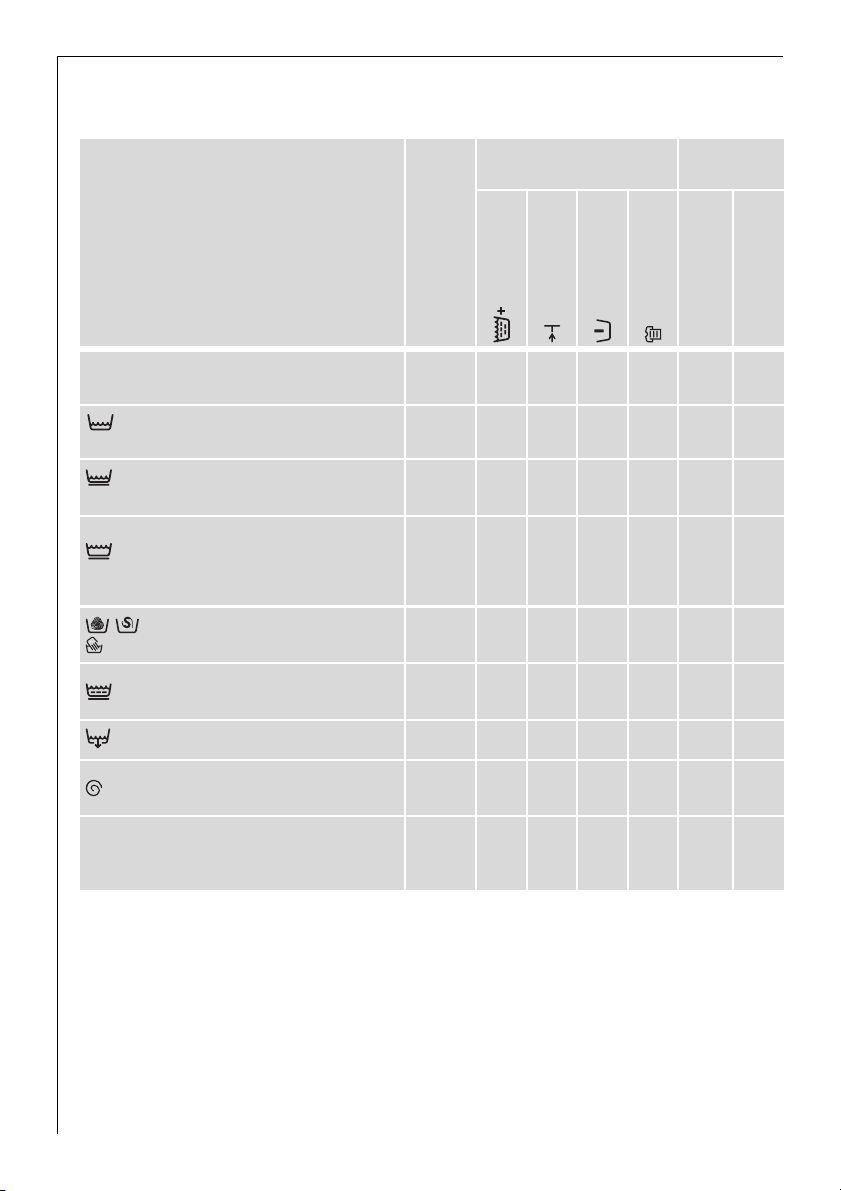
Programme overview
Programme options Spin speed
Programme
ECO (ENERGY SAVING)
2)
(COTTONS/LINEN)
95, 60, 50, 40, 30
(EASY-CARES)
60, 50, 40, 30, X (COLD)
(DELICATES)
40, 30
/ (WOOL/SILK)
(HANDWASH) 40, 30, X (COLD)
1)
max. load
(dry washing)
(EXTRA RINSE)
(QUICK WASH)
(PRE WASH)
(STAIN)
7kg • • • • •
7kg • •
3)
3,5kg • • • •
• •
4)
4)
3,5kg • • • • •
2kg • •
(GENTLE RINSE) 3,5kg • •
(DRAIN)
(SPIN) 7kg •
800/600/400
• •
• •
n (RINSE HOLD)
a (REFRESH) 3,5kg • •
1) A 10 litre bucket contains approx. 2.5 kg of dry washing (cotton)
2) Programme settings for tests in accordance with or support of EN 60 456 and IEC 60 456 are described in
the section “Consumption values”.
3) Recommended load for short progammes is 3,5 kg; full loading is possible however with somewhat reduced
cleaning results.
4) } (STAIN) can only be selected with wash temperatures of 40°C and above, as stain treatment products are
only effective at higher temperatures.
8
Page 9

Application/features: Care symbols1)
Energy-saving programme at 60 °C for lightly to normally soiled whites/
coloureds made of cotton/linen.
Programme for normally to heavily soiled whites/coloureds made of cotton/
linen.
Programme for easy-care mixed fibres and synthetics.
Gentle programme for delicate fabrics such as bonded fabrics, microfibres,
synthetics, net curtains (max. load for net curtains 20 to 25 m
(RINSE HOLD) also suitable for fabrics with climate membrane, e.g., outdoor
clothing.
Particularly delicate programme for machine washable and hand washable
wool/silk.
Separate gentle rinse cycle (3 rinses, liquid conditioner is washed in from compartment &, gentle spin).
Drains water away after a rinse hold.
Drains water out and spins, e.g. after a rinse hold, or separate spin for handwashed cottons/linens.
Special programme at 30 °C, approx. 30 minutes long, for quickly washing
through items such as e.g. slightly dirty sports clothing that have been worn
once or new clothes.
1) The figures in the care symbols indicate the maximum temperatures.
2
). With n
M O
J M O
I K N
I K
Q L H
I K N
Q L
H
J M O
J M O
I K N
9
Page 10

Before the first wash
1. Open the detergent dispenser drawer.
2. Pour about 2 litres of water through the detergent dispenser drawer
into the washing machine.
This closes the water container when the next programme is started
and the economy valve can function properly.
3. In order to remove any residues from the drum and water container
which may have been left during manufacturing, perform the first
wash cycle without any washing in the machine. Programme:
(COTTONS/LINEN) 95, press ] (QUICK WASH), add 1/4 of a measuring
cup of washing powder.
Preparing and sorting washing
Preparing washing
• Empty pockets. Remove foreign bodies (e. g. coins, paper clips, nails,
etc.).
• Do up zips, button up covers to prevent damage to washing.
• Remove the runners from net curtains or cover them with a net or a
bag.
• Wash sensitive and small items in a net or a pillow case, e.g. net cur-
tains, tights, socks, handkerchiefs, bras.
Important! Bras and other items containing wires should NOT be
washed in this washing machine.
10
Sorting washing
• By colour: Wash white and coloured washing separately. Washing can
run.
• By temperature, type of washing and care symbol.
Important! Do not wash fabrics with care symbol G (= do not wash!)
in the washing machine.
Page 11

Running a washing cycle
Opening the door/Loading the washing
1. To open the door: gently pull the handle on the door.
When the machine is switched on, the lights (DOOR) and
(START/PAUSE) indicate whether the door can be opened:
light (DOOR) light (START/PAUSE) Can the door be opened?
lit green flashes red or is off yes
lit green lit red
lit red
or is off
flashes red
or lit red
2. Unfold washing and load it loosely
into the machine. Mix large and
small items.
Important: Do not get any washing
caught between the door and the
rubber seal.
3. Press the door firmly shut. Door
catch must audibly latch.
yes, after pressing the
(START/PAUSE) button
no, water level too high or
temperature too high
Adding detergent/additives
Important: Use only detergents and additives that are suitable for use
in domestic washing machines.
1 For USA and Canada only!
Important! Only LOW-SUDSING detergent suitable for a front-loading
washing machine can be used in this machine. This machine can heat
the water up to 95 degrees celsius, or 200 degrees fahrenheit, and care
should be taken to ensure that the correct washing powder is used. If
you have any doubt, check with your dealer or the distributor.
WARRANTY AND CONSEQUENTIAL DAMAGES ARE VOIDED IF A LOW
SUDSING DETERGENT IS NOT USED.
Dose detergent and additives according to the instructions of the detergent and additive manufacturers. Follow the instructions on the
packaging.
11
Page 12

Dosing depends upon:
– the washing’s degree of soiling,
– the size of the load
– the degree of hardness of the water supply.
• If the manufacturer does not give instructions for small loads: for a
half load, use a third less, for a very small load, use only half of the
detergent that is recommended for a full load.
• From water hardness 2 (= medium) upwards, water softener should
be used. Detergent can then always be dosed for water hardness 1
(= soft). Your local water company will be able to give you information about the water hardness in your area.
1. Pull the detergent dispenser drawer out as far as the stop.
2. Add the detergent/additives.
3. Push the drawer in fully.
Washing powder/tablets
for the main wash
Softeners/
wash-care products
to preserve the shape
of garments/
starch
In-wash stain treatment/
tablets
Washing powder/tablets
for the pre-wash
or for water softener
Washing powder/tablets for the main wash
If you are using water softener and need the right-hand compartment
for the pre-wash detergent, add the water softener to the main wash
detergent in the left-hand compartment.
Softeners, wash-care products to preserve the shape of garments,
starch
Do not fill the compartment beyond the MAX mark. Dilute thick liquid
concentrates according to the manufacturer’s instructions before
putting them into the drawer. Dissolve powder starches.
If you use liquid detergents:
Add liquid detergent using the dosage container provided by the detergent manufacturer and place on top of the washing drum.
12
Page 13

Switching on the appliance/selecting a programme
Set the programme and temperature using the programme knob.
3 By selecting a programme, you
switch the appliance on at the
same time.
– The programme progress display
indicates the programme steps
that the selected programme will
perform.
– In the multi-display the
estimated length of the programme (in minutes) appears.
Changing the spin speed/Selecting rinse hold
The washing machine suggests the
maximum permitted speed that is
suitable for the selected programme. You can reduce this
speed:
Press the SPIN/ (RINSE HOLD)
button repeatedly, until the desired
indicator lights up.
3 The speed for the final spin can still be altered during the programme.
To do this:
1. Press the button (START/PAUSE).
2. Change the speed.
3. Press the button (START/PAUSE) again.
(RINSE HOLD)
With (RINSE HOLD) the washing is left to soak in the final rinse water. There is no final spin after the intermediate spin(s). Intermediate
spins are programme-dependent and cannot be altered.
13
Page 14

Selecting the programme options
If desired, press the programme option button(s). The corresponding
indicator lights up.
3 If “Err” is flashing in the multi-
display, the programme option selected cannot be combined with the
wash programme set.
EXTRA RINSE
With the programmes ECO (ENERGY SAVING), (COTTONS/LINEN),
(DELICATES) and (EASY-CARES) two additional rinses are car-
ried out (e. g. in cases of over-sensitive skin).
QUICK WASH
Shortened wash programme for less soiled items.
PREWASH
Hot pre-wash before the main wash that follows automatically; with
intermediate spin for (COTTONS/LINEN) and (EASY-CARES),
without intermediate spin for (DELICATES).
14
STAIN
For heavily soiled or stained washing. In-wash stain treatments are
washed in at the optimum time as the programme progresses. Can only
be used for washing temperatures of above 40°C as stain removers are
not effective at lower temperatures.
Page 15

Setting the delay timer
3 Using the button (DELAY TIMER) you can delay the start of a pro-
gramme by 30 minutes (30') to a maximum of 23 hours (23h).
1. Select the programme.
2. Press the button (DELAY TIMER) repeatedly until the multi-display
shows the desired time delay, e. g., 12h, if the programme is to start in
12 hours. The indicator (DELAY TIMER) will light up.
3 If the display is showing 23h and you press the button again, the time
delay will be cancelled. 0' will appear followed by the length of the
wash programme that has been set.
3. To activate the delay timer, press the
time remaining to the start of the programme is continuously displayed
(e. g., 12h, 11h, 10h,... 30
' etc.).
button (START/PAUSE). The
Starting a programme
1. Check that the tap is turned on.
2. Press the
starts after the time delay set has elapsed.
button (START/PAUSE). The programme is started or it
3 If after pressing the button (START/PAUSE) E40 flashes in the
multi-display, the (END) indicator flashes 4x and at the same time an
acoustic signal sounds 4x, the door has not been correctly shut. Push
the door firmly closed and press the
button (START/PAUSE) again.
Programme progress
• The programme progress display shows the programme step that is
currently being carried out.
– (Prewash)
– (Main wash)
– (Rinse)
– (Extra Rinse)
– (Spin)
– (End)
• The multi-display shows the estimated time remaining (in hours and
minutes) until the end of the programme.
3 The remaining programme time may increase or briefly remain constant
during the wash programme as the programme adjusts to various conditions while washing (e. g. type of washing, amount of washing, recognising out-of-balance when spinning, special rinse cycle, etc.).
15
Page 16

Interrupting a programme/Adding washing
Interrupting a programme
• A washing programme can be interrupted at any time by pressing the
button (START/PAUSE) and then re-started by pressing the
button (START/PAUSE) again.
• To stop the washing machine before the programme has ended, turn
the programme knob to (OFF). Important: Be careful if there is
water in the appliance!
Adding washing
It is possible to add washing, as long as the (DOOR) light is lit green.
1. Press the
2. Close the door and press the
button (START/PAUSE). The door can be opened.
button (START/PAUSE) again. The
programme will continue.
End of the wash cycle/Removing the washing
When the programme has finished, (END) will illuminate on the programme progress display. The door can be opened as soon as the indicator (DOOR) is lit green.
1. Open the door and remove the washing.
2. Turn the programme knob to (OFF).
3. Close the water tap.
4. When you have finished washing, pull out the detergent drawer a little
to let it to dry out. Keep the door very slightly open so that the washing
machine can air.
16
(RINSE HOLD) has been selected:
If
Following a rinse hold (END) will be lit on the programme progress
display.
The water must first be drained off:
– Either turn the programme knob to (OFF), then to (DRAIN) and
press the button (START/PAUSE) (the water will be drained
without spinning),
– turn the programme knob to (OFF) and then to (SPIN). Change
the spin speed, if necessary, and press the button (START/
PAUSE) (the water will be drained and the washing spun).
Page 17

Child safety device
When the child safety device is set, the door can no longer be closed.
Setting the child safety device:
Use a coin to turn the knob (on the
inside of the door) in a clockwise direction as far as it will go.
1 Warning! The knob must not be
sunk-in after being set, otherwise
the child safety device is not active.
The knob must stand out as shown
in the illustration.
Releasing the child safety device:
Turn the knob anti-clockwise as far
as it will go.
Cleaning and maintenance
Important! Do not use furniture care products or aggressive cleaners to
clean the appliance.
Wipe control panel and body with a damp cloth.
Cleaning procedure
If you plan to wash mainly at low temperature, you should run a hot
programme from time to time. This will reduce any deposits and clean
the appliance from the inside.
17
Page 18

Detergent dispenser drawer
The detergent dispenser drawer should be cleaned regularly.
1. Remove the detergent dispenser drawer by pulling it firmly.
2. Remove the conditioner insert from
the middle compartment.
3. Clean all parts with water.
4. Put the conditioner insert in as far as
it will go, so that it is firmly in place.
5. Clean all parts of the washing machine, especially the nozzles in the
top of the washing-in chamber, with
a brush.
6. Insert the detergent dispenser drawer in the guide rails and push it in.
Washing drum
Rust deposits in the drum may occur due to rusting foreign bodies in
the washing or tap water containing iron.
Important! Do not clean the drum with acidic descaling agents, scouring agents containing chlorine or iron or steel wool.
1. Remove any rust deposits on the drum with a cleaning agent for stainless steel.
2. Run a washing cycle without any washing to clean off any cleaning
agent residues. Programme: (COTTONS/LINEN) 95, press the button
(QUICK WASH), add approx. 1/4 measuring cup of washing powder.
18
Door and rubber collar
Regularly check whether deposits or foreign bodies are present in the
folds of the rubber collar or on the inside of the glass door.
Clean the glass in the door and the rubber collar regularly.
Page 19

What to do if...
Remedying small malfunctions
If during use of the appliance one of the following error codes is shown
in the multi-display:
– E10 (Problems with water inflow),
– E20 (Problems with water outflow),
– E40 (door open),
please have a look at the following table.
When the fault is remedied, press the button (START/PAUSE).
In the event of other errors (E and a number or letter): Switch the appliance off and then on again. Re-set the programme. Press the
button (START/PAUSE).
If the error appears again, please contact the Customer Care Department, stating the error code.
Problem Possible cause Remedy
Washing machine is not
working.
The door cannot be
closed.
When a button is
pressed, Err appears in
the multi-display.
E40 appears.
indicator (END)
flashes 4x, at the same
time an acoustic signal
sounds 4x.
E10 appears.
indicator (END)
flashes 1x, at the same
time an acoustic signal
sounds 1x.
(Problems with water
inflow)
Mains plug not plugged in
or fuse not working.
Door not closed properly.
The button (START/
PAUSE) button was not
pressed for long enough.
Child safety device engaged.
The selected function cannot be combined with the
programme set.
The door is not closed properly.
Tap turned off. Turn on the tap.
The filter in the threaded inlet hose fitting is blocked.
Water tap is furred with
lime scale or is faulty.
Connect the plug to a mains
socket. Check fuse.
Close door - there should be
an audible click.
Press the button
(START/ PAUSE).
Release the child safety device.
Select another function.
Close the door properly. Restart the programme.
Turn off the tap. Unscrew the
hose, take out the filter and
clean it.
Check the tap and have it repaired, if necessary.
19
Page 20

Problem Possible cause Remedy
The washing machine
vibrates when operating
or is not stable.
Washing has not been
spun.
Water is running out
from under the washing
machine.
Washing water is foaming excessively. At the
end of the washing cycle, the spin stops.
E20 appears.
indicator (END)
flashes 2x, at the same
time an acoustic signal
sounds 2x.
(Problems with water
outflow)
Conditioner not rinsed
in, w compartment for
additives is filled with
water.
The transport lock has not
been removed.
The screw feet not correctly
adjusted.
Only a few large items of
washing in the drum.
Screw connection on the inlet hose is leaking.
Drain hose is leaking. Replace drain hose.
Drain pump cover is not
closed properly.
Washing was caught in the
door.
Emergency drain hose is
leaking.
Probably too much detergent has been used.
Kink in drain hose. Straighten the hose.
Maximum pumping height
of 1m exceeded.
Drain pump is blocked.
For sink spigot connections:
The sink spigot is blocked.
Conditioner insert in the
compartment for additives
is not correctly attached or
is blocked.
Removing the transport lock.
Adjust the feet as described
in the installation and connection instructions.
Always load the drum as full
as possible. Mix large and
small items.
Screw the inlet hose on
tightly.
Close the cover properly.
Load washing carefully for
the next wash.
Close off emergency drain
hose properly.
Follow the manufacturer's
instructions exactly when
measuring out detergent.
Please contact the Customer
Care Department.
Switch off the appliance.
Disconnect the power plug.
Clean the drain pump. Remove foreign bodies from
the pump housing.
Clean the sink spigot.
Clean the detergent drawer,
insert the conditioner insert
firmly.
20
Page 21

Problem Possible cause Remedy
Wait until indicator
(DOOR) is lit green.
The programme will continue
when the power cut is over.
To remove washing:
If water can be seen in the
appliance, before opening
the door, first drain off the
water. (See section “Carrying
out an emergency drain”.)
Observe maximum loads.
The door cannot be
opened when the washing machine is switched
on.
Washing is heavily
creased.
Door locked.
There has been a power cut.
(All indicators are off.)
For safety reasons, the door
remains locked for approx. 4
to 10 minutes.
Possibly too much washing
was loaded.
If the wash results are not satisfactory
Washing is grey and scale is being deposited in the drum
• Too little detergent is being used.
• The right detergent was not used.
• Special soiling was not pre-treated.
• Programme or temperature was not correctly set.
There are grey stains on the washing.
• Washing soiled with ointment, grease or oil was washed with too lit-
tle detergent.
• It was washed at too low a temperature.
• A common cause is that fabric conditioner – especially a concentrate
– has got onto the washing. Such stains should be washed out as
quickly as possible and make sure that you are careful when using
fabric conditioner.
After the last rinse foam can still be seen.
• Modern detergents may create foam even in the last rinse cycle. The
washing is however sufficiently rinsed.
There are white residues on the washing.
• This is due to the insoluble ingredients in modern detergents.
They are not caused by insufficient rinsing.
Shake or brush the washing. If possible turn the washing inside out
before washing. Check your choice of detergent. Especially with dark
colours it is advisable to use liquid detergents.
21
Page 22

Carrying out an emergency drain
1 Warning! Before emergency draining, switch off the washing machine
and remove the mains plug from the socket.
Warning! The water that comes out of the emergency drain hose may
be hot. There is a risk of scalding. Let the water cool before performing
an emergency drain.
1. Open the plinth flap and remove it.
2. Take out the emergency drain hose.
3. Place a shallow container under-
neath it. Then loosen the drain plug
by turning it in an anti-clockwise
direction and pull it out.
4. The water runs out. If it is necessary
to empty the container more than
once, seal up the emergency drain
hose with the drain plug while you
are doing so.
When the water has all drained away:
5. Push the drain plug firmly into the emergency drain hose and screw it
tight in a clockwise direction.
6. Place the emergency drain hose back in the support.
7. Insert the plinth flap and close it.
22
Page 23

Drain pump
The drain pump is maintenance-free. It is only necessary to open the
pump cover if there is a malfunction and water is no longer being
pumped out, e. g. if the pump wheel is blocked.
Please make sure before loading the washing that there are no foreign
bodies in the pockets or caught between the washing. Paperclips, nails,
etc. that may have got into the washing machine with the washing remain in the pump housing (foreign body trap that protects the pump
wheel).
1 Warning! Before opening the pump cover, switch off the washing ma-
chine and remove the mains plug from the socket.
1. First carry out an emergency drain.
2. Place a cloth on the floor in front of the drain pump cover.
Residual water runs out.
3. Unscrew the pump cover in an anticlockwise direction and remove it.
4. Remove foreign bodies and fluff
from the pump housing and from
the pump wheel.
5. Check whether the pump wheel
right at the back of the pump housing can turn. (It is normal for the
pumping wheel to turn jerkily.) If
the pumping wheel cannot be
turned, please contact the Customer
Care Department.
6. Insert the pump cover. Insert the
guides at the sides of the cover into
the guide slots and tighten the cover by turning in a clockwise
direction.
7. Close off the emergency drain hose
and place it in the support.
8. Close plinth flap.
23
Page 24

Disposal
Packaging material
2
The packaging materials are environmentally friendly and can be recycled. The plastic components are identified by markings, e.g. >PE<,
>PS<, etc. Please dispose of the packaging materials in the appropriate
container at the community waste disposal facilities.
2 Old appliance
The symbol
product may not be treated as household waste. Instead it shall be
handed over to the applicable collection point for the recycling of electrical and electronic equipment. By ensuring this product is disposed of
correctly, you will help prevent potential negative consequences for the
environment and human health, which could otherwise be caused by
inappropriate waste handling of this product. For more detailed information about recycling of this product, please contact your local city
office, your household waste disposal service or the shop where you
purchased the product.
W on the product or on its packaging indicates that this
1 Warning! When an appliance is finished with, remove the plug from
the mains socket. Cut off the cable and plug and dispose of them.
Destroy the door lock. This prevents children from trapping themselves
inside and endangering their lives.
24
Page 25

Technical data
This appliance conforms with the following EU Directives:
5
– 73/23/EEC dated 19.02.1973 Low Voltage Directive
– 89/336/EEC dated 03.05.1989 EMC Directive inclusive of Amending
Directive 92/31/EEC
– 93/68/EEC dated 22.07.1993 CE Marking Directive
Height x Width x Depth 850 x 598 x 640 mm
Depth when door is open 1017 mm
Height adjustment approx. +10/-5mm
Load (depending on programme) Max. 7kg
Area of use Domestic
Drum spin speed see programme overview
Water pressure 1-10bar (=10–100N/cm2=0.1–1.0MPa)
Consumption values
The consumption values were obtained under standardised conditions.
They may vary when operating in domestic conditions.
Programme selector
Temperature
(COTTONS/LINEN) 95 7 68 2,40
ECO (ENERGY SAVING)
(COTTONS/LINEN) 40 7 62 0,80
(EASY-CARES) 40 3,5 62 0,55
(DELICATES) 30 3,5 60 0,45
/ / (WOOL/SILK/HANDWASH) 30 2 54 0,35
1) The load size is determined in accordance with the EN 60456 standard load.
2) Note: Programme setting for testing in accordance with or in support of Standard
EN 60 456 and IEC 60 456. Consumption values will vary from those quoted depending on the pressure and hardness of the water and its initial temperature, the room
temperature, type and quantity of washing, detergent used, fluctuations in mains
voltage and options selected.
2)
Load size
1)
in kg
7 52 1,19
Water
in litres
Energy
in kWh
25
Page 26

Installation and connection instructions
1 Safety information for the installation
• This washing machine cannot be built-in.
• Before using for the first time, check the appliance for damage sus-
tained while it was being transported. Do not under any circumstances connect an appliance that is damaged. In the case of damage,
please contact your supplier.
• Before using for the first time, all parts of the transport lock must be
removed. Otherwise when spinning damage may be caused to the appliance or to neighbouring units or furniture.
• Before using the appliance for the first time, splash protection must
be completed. (See “Removing the transit packaging”.)
• Always plug the mains plug into a correctly installed shockproof
socket.
• Permanent connection: a permanent connection must only be in-
stalled by a trained electrician.
• Prior to using the appliance for the first time, ensure that the rated
voltage and type of supply on the rating plate match that of the supply where the appliance is to be installed. The fuse rating is also to be
found on the rating plate.
• If work on the plumbing is required for the proper connection of the
washing machine to the water supply, this must be undertaken by a
competent person.
• If work on the electricity supply system is required for the proper
connection of the washing machine to the electricity supply, this
must be undertaken by a registered electrician.
• The washing machine’s cable must only be replaced by the Customer
Care Department or a registered electrician.
Installing the appliance
Transporting the appliance
1 Warning! The washing machine is very heavy. Risk of injury. Be careful
when lifting.
• Do not lay the appliance on its front nor on its right side (as seen
from the front). Electrical components may get wet.
26
Page 27

• Never transport the appliance without its transport lock. Only remove
the transport lock when the appliance is in its place of installation.
Transporting the appliance without its transport lock can lead to
damage to the appliance.
• Never lift the appliance by the door when it is open nor by the plinth.
When moving using a sack trolley:
• Only use the sack trolley on the side of the appliance.
Unpacking
1 The transport safeguard must be removed before putting the appliance
into operation.
Important!
You are advised to keep all the packaging for re-use in case the
machine is to be transported again.
1. After removing all the packaging,
with assistance carefully lay machine on it’s back to remove the polystyrene base from the bottom.
2. Remove the power supply cable and
the draining hose from the hose
holders on the rear of the appliance.
27
Page 28

3. With a suitable spanner unscrew and
remove the central rear bolt A. Slide
out the relevant plastic spacer.
4. Unscrew and remove the two large
rear bolts B and the six smaller bolts
C.
5. Remove the bracket D.
6. Refit the six smaller bolts C.
28
Page 29

7. Open the porthole and remove the
polystyrene block fitted with the adhesive tape on the door seal.
8. Fill the smaller upper hole and the
two large ones with the corresponding plastic plug caps supplied in the
bag containing the instruction
booklet.
Important!
All the different plug caps are supplied with the appliance in the plastic bag containing the instruction
booklet.
Connect the water inlet hose as described under the paragraph “Water
inlet”.
Where to install
Important! The appliance must not be used in a room where there is a
danger of frost. Frost damage or impaired operation! Frost damage is
not covered by the warranty.
• The surface on which the appliance is to be installed must be firm
and level. Do not install the appliance on carpets or on soft floor coverings.
• The surface on which the appliance is to be installed must be clean
and dry and free from coverings that move, so that the appliance
does not slide.
• If the location in which the appliance is to be installed is fitted with
small-format tiles, put a rubber mat (available in the shops) under
the appliance.
29
Page 30

Making the appliance level
The four feet of the appliance are
pre-adjusted.
Large degrees of unevenness can be
compensated for by individually adjusting the height adjustable screw
feet.
Use the special spanner supplied to
do this.
Important! Do not use pieces of
wood, cardboard or such like to level out unevenness in the floor, but
adjust the height adjustable screw
feet instead.
Electrical connection
Details about the voltage, type of supply and the fuses required are to
be found on the rating plate. The rating plate is next to the doorway.
Connecting to the water supply
Permitted water pressure
The water pressure must be at least 1 bar (= 10N/cm2=0.1MPa) and may
be a maximum of 10bar (=100N/cm
– If more than 10 bar: Connect a pressure reduction valve.
– If less than 1bar: Disconnect the appliance end of the inlet hose from
Water inlet
Attention!
• An inlet hose is supplied and can be found inside the machine drum.
• Do not use the hose from your previous machine to connect to
• This appliance must be connected to a cold water supply.
30
2
=1MPa).
the solenoid inlet valve and remove the flow meter. (In addition remove the filter using pointed pliers and take out the rubber gasket
behind it.) Re-insert the filter.
the water supply.
Page 31

1. Open the porthole and extract the inlet hose.
2. Connect the hose with the angled
connection to the machine.
Important!
Do not place the inlet hose downwards. Angle the hose to the left
or right depending on the position
of your water tap.
3. Set the hose correctly by loosening
the ring nut. After positioning the
inlet hose, be sure to tighten the
ring nut again to prevent leaks.
4. Connect the hose to a tap with a
3/4” thread.
Always use the hose supplied with
the appliance.
Installation should comply with local
water authority and building regulations’ requirements.
A minimum water pressure of 0.05
MPa (0.5 bar) is required for safe operation of the appliance.
If you cannot make the cold water
connection direct from the rising mains, you may be able to operate
the appliance from your cold water storage system.
There should be a minimum distance of 5.02m (16.5 ft) between the
appliance’s inlet and the bottom of the water storage tank.
Aqua Control
The inlet hose is provided with a water stop device, which protects
against damage caused by water
leaks in the hose which could develop due to natural ageing of the
hose. This fault is shown by a red
sector in the window „A”. Should this
occur, turn the water tap off and refer to your Service Centre to replace
the hose.
31
Page 32

Water drainage
The maximum permitted difference between the height of the surface
on which the appliance is installed and the water outlet is 1 metre.
Only original hoses may be used to extend hoses. (A maximum of 3 m
laid on the floor and then 80 cm vertically). The Customer Care Department stocks outlet hoses of different lengths.
Draining water into a sink outlet
Secure the outlet/sink outlet joint
with a hose band clip (available from
your dealer).
Draining water into a wash basin/bath
1 Important!
– Small basins are not suitable. Wa-
ter may overflow.
– The end of the drain hose must
not be in the water that has been
pumped out. Otherwise water
could be sucked back into the appliance.
– When draining into a wash basin
or a bath, secure the drain hose
with the supplied elbow to stop it
slipping. Otherwise the water running out can force the hose out of
the basin.
– When pumping the water out,
check that the water is running
away fast enough.
32
Pumping heights over 1 m
The washing machine’s drain pump is able to pump water to a height of
1meter, calculated from the surface on which the appliance is installed.
Warning! If pumping height is over 1 metre, malfunctions and damage
to the appliance may arise.
For pumping heights over 1metre a conversion kit can be obtained.
Please contact the Customer Care Department.
Page 33

Guarantee/Customer Service
European Guarantee
This appliance is guaranteed by Electrolux in each of the countries listed at the back of this user
manual, for the period specified in the appliance guarantee or otherwise by law. If you move
from one of these countries to another of the countries listed below the appliance guarantee
will move with you subject to the following qualifications:
•
The appliance guarantee starts from the date you first purchased the appliance which will be
evidenced by production of a valid purchase document issued by the seller of the appliance.
•
The appliance guarantee is for the same period and to the same extent for labour and parts as
exists in your new country of residence for this particular model or range of appliances.
The appliance guarantee is personal to the original purchaser of the appliance and cannot be
•
transferred to another user.
•
The appliance is installed and used in accordance with instructions issued by Electrolux and is
only used within the home, i.e. is not used for commercial purposes.
•
The appliance is installed in accordance with all relevant regulations in force within your new
country of residence.
The provisions of this European Guarantee do not affect any of the rights granted to you by law.
www.electrolux.com
p t b
Albania +35 5 4 261 450 Rr. Pjeter Bogdani Nr. 7 Tirane
Belgique/België/
Belgien
Èeská republika +420 2 61 12 61 12 Budìjovická 3, Praha 4, 140 21
Danmark +45 70 11 74 00 Sjællandsgade 2, 7000 Fredericia
Deutschland +49 180 32 26 622 Muggenhofer Str. 135, 90429 Nürnberg
Eesti +37 2 66 50 030 Mustamäe tee 24, 10621 Tallinn
España +34 902 11 63 88
France www.electrolux.fr
Great Britain +44 8705 929 929
Hellas +30 23 10 56 19 70 4 Limnou Str., 54627 Thessaloniki
Hrvatska +385 1 63 23 338 Slavonska avenija 3, 10000 Zagreb
Ireland +353 1 40 90 753 Long Mile Road Dublin 12
Italia +39 (0) 434 558500 C.so Lino Zanussi, 26 - 33080 Porcia (PN)
Latvija +37 17 84 59 34 Kr. Barona iela 130/2, LV-1012, Riga
+32 2 363 04 44 Bergensesteenweg 719, 1502 Lembeek
Carretera M-300, Km. 29,900
Alcalá de Henares Madrid
Addington Way, Luton, Bedfordshire
LU4 9QQ
33
Page 34

p t b
Lietuva +370 5 2780609 Verkių 29, LT09108 Vilnius
Luxembourg +352 42 431 301 Rue de Bitbourg, 7, L-1273 Hamm
Magyarország +36 1 252 1773
Nederland +31 17 24 68 300
Norge +47 81 5 30 222 Risløkkvn. 2 , 0508 Oslo
Österreich +43 18 66 400 Herziggasse 9, 1230 Wien
Polska +48 22 43 47 300 ul. Kolejowa 5/7, Warsaw
Portugal +35 12 14 40 39 39
Romania +40 21 451 20 30 Str. Garii Progresului 2, S4, 040671 RO
Schweiz/Suisse/
Svizzera
Slovenija +38 61 24 25 731
Slovensko +421 2 43 33 43 22
Suomi www.electrolux.fi
Sverige +46 (0)771 76 76 76
+41 62 88 99 111 Industriestrasse 10, CH-5506 Mägenwil
Türkiye +90 21 22 93 10 25
Россия +7 095 937 7837
H-1142 Budapest XIV,
Erzsébet királyné útja 87
Vennootsweg 1, 2404 CG Alphen aan den Rijn
Quinta da Fonte - Edificio Gonçalves Zarco Q 35
2774 - 518 Paço de Arcos
Electrolux Ljubljana d.o.o.
Gerbiceva 98, 1000 Ljubljana
Electrolux Slovakia s.r.o., Electrolux Domáce
spotrebièe SK, Seberíniho 1, 821 03 Bratislava
Electrolux Service, S:t Göransgatan 143,
S-105 45 Stockholm
Tarlabaþý caddesi no : 35 Taksim
Istanbul
129090 Москва, Олимпийский
проспект, 16, БЦ „Олимпик“
34
Page 35

Service
In the event of technical faults, please first check whether you can
remedy the problem yourself with the help of the operating instructions (section “What to do if…”).
If you were not able to remedy the problem yourself, please contact the
Customer Care Department or one of our service partners.
In order to be able to assist you
quickly, we require the following
information:
– Model description
– Product number (PNC)
– Serial number (S No.)
(for numbers see rating plate)
– Type of fault
– Any error messages displayed by
the appliance
So that you have the necessary reference numbers from your appliance
at hand, we recommend that you write them in here:
Model description: .....................................
PNC: .....................................
S No: .....................................
35
Page 36

www.electrolux.com
132 973 760-00-160207-01 Subject to change without notice
 Loading...