

Page 1

istruzioni per l’uso
user manual
Lavastoviglie
Dishwasher
GA60GXV402
Page 2
2 electrolux
Electrolux. Thinking of you.
Per conoscere meglio il nostro modo di pensare, visitate il sito
www.electrolux.com
Indice
Informazioni per la sicurezza 2
Descrizione del prodotto 5
Pannello dei comandi 6
Preparazione al primo utilizzo 8
Regolazione del decalcificatore dell’acqua
Uso del sale per lavastoviglie 9
Uso del detersivo e del brillantante 9
Uso di pastiglie combinate 10
Con riserva di modifiche
Sistemazione di posate e stoviglie 10
Selezione e avvio di un programma di
lavaggio 14
Programmi di lavaggio 15
Pulizia e cura 16
Cosa fare se… 17
8
Dati tecnici 19
Considerazioni ambientali 20
Informazioni per la sicurezza
Leggere attentamente il presente libretto di
istruzioni prima dell'installazione e dell'uso:
• Per la vostra sicurezza personale e delle
vostre cose.
• Per il rispetto dell’ambiente,
• Per il buon funzionamento dell’apparecchiatura.
Conservare sempre le presenti istruzioni assieme alla lavastoviglie, anche in caso di trasferimento o di vendita.
Il costruttore non risponde di danni da ascrivere a un'installazione e uso non corretti.
Sicurezza dei bambini e delle persone
con problemi
• Non permettere alle persone, compresi i
bambini, con capacità fisiche, sensoriali o
mentali ridotte, o con mancanza di esperienza e conoscenza di utilizzare l'apparecchio, a meno che tale utilizzo non avvenga sotto la supervisione o la guida di
una persona responsabile della loro sicurezza.
• Tenere i materiali di imballaggio al di fuori
della portata dei bambini. Vi è il rischio di
soffocamento o lesioni.
• Conservare i detersivi in un luogo sicuro.
Non permettere ai bambini di toccare i detersivi.
• Tenere lontani i bambini ed i piccoli animali
domestici dall'apparecchiatura quando lo
sportello è aperto.
Norme di sicurezza generali
• Non apportare modifiche alle specifiche
dell’apparecchio. Vi è il rischio di ferirsi o
danneggiare l'apparecchiatura.
• Per evitare ustioni a occhi, bocca e gola,
seguire le istruzioni di sicurezza del produttore del detersivo per lavastoviglie.
• Non bere l’acqua dell'apparecchiatura.
Residui di detersivo possono rimanere nell'apparecchio.
• Dopo aver caricato o scaricato l'apparecchiatura, chiudere sempre lo sportello per
evitare lesioni o che qualcuno cada sullo
sportello aperto.
• Non sedersi o salire sullo sportello aperto.
Uso dell’apparecchiatura
• Questa apparecchiatura è destinata solo
all'uso domestico. Non utilizzarla a fini
commerciali o industriali o per altri scopi.
• Non utilizzarla per scopi diversi da quelli
per cui è stata progettata. Si eviteranno lesioni a persone e danni alle cose.
• Utilizzare l’apparecchiatura solo per lavare
utensili idonei alla lavastoviglie.
• Non mettere prodotti infiammabili o oggetti
intrisi di prodotti infiammabili dentro o vicino all'apparecchiatura. Vi è il rischio di
esplosione o incendio.
• Mettere i coltelli e gli altri utensili appuntiti
nel cestello delle posate con la punta rivolta verso il basso, altrimenti sistemarli orizzontalmente nel cestello superiore o nel-
Page 3

electrolux 3
l'apposito cestello porta coltelli (non tutti i
modelli dispongono del cestello porta coltelli).
• Usare solo prodotti specifici per lavastoviglie (detersivo, sale, brillantante).
• Altri tipi di sale possono danneggiare il decalcificatore dell'acqua.
• Riempire di sale l'apparecchiatura prima di
iniziare un programma di lavaggio. La presenza di grani di sale o acqua salata può
causare corrosione o praticare un foro sul
fondo dell'apparecchiatura.
• Non introdurre nella vaschetta del brillantante altre sostanze (ad es. detergenti per
lavastoviglie, detersivi liquidi). Ciò potrebbe danneggiare l'apparecchiatura.
• Prima di avviare un programma di lavaggio, assicurarsi che i mulinelli possano ruotare liberamente.
• Se si apre lo sportello mentre l’apparecchio è in funzione, può fuoriuscire vapore
caldo. Vi è il rischio di scottature.
• Non togliere gli utensili dall'apparecchiatura prima della fine del ciclo completo.
Pulizia e cura
• Prima di eseguire qualunque intervento di
manutenzione, spegnere l'apparecchiatura ed estrarre la spina dalla presa.
• Non usare prodotti infiammabili o che possono causare corrosione.
• Non usare la lavastoviglie senza i filtri. Controllare che i filtri siano stati installati correttamente. Un'installazione non corretta
dei filtri influisce negativamente sui risultati
del lavaggio e può danneggiare l'apparecchiatura.
• Per la vostra sicurezza personale e delle
vostre cose, non usare acqua spray o vapore per pulire l’apparecchiatura.
Installazione
• Accertarsi che l'apparecchiatura non abbia subito dei danni durante il trasporto.
Non collegare l'apparecchiatura se è danneggiata. Se necessario, contattare il fornitore.
• Rimuovere tutti i materiali di imballaggio
prima dell’uso.
• L'installazione dell'impianto elettrico ed
idraulico, la regolazione e la manutenzione
dell'apparecchiatura devono essere eseguite solo da personale qualificato, al fine
di evitare rischi di danni strutturali o lesioni
fisiche.
• Verificare che la spina sia staccata dalla
presa elettrica durante l’installazione.
• Non forare le pareti laterali della lavastoviglie per evitare di danneggiare i componenti idraulici ed elettrici.
• Importante! Seguire le istruzioni nel modello allegato per:
– Installare l'apparecchiatura.
– Montare la porta del mobile da cucina.
– Collegare l’apparecchio all’alimentazio-
ne ed allo scarico.
• Verificare che l'apparecchiatura sia stata
installata sotto ed accanto a strutture sicure.
Precauzioni antigelo
• Non collocare l’apparecchio in un luogo in
cui la temperatura possa scendere al di
sotto di 0°C.
• Il produttore non è responsabile di eventuali danni dovuti al gelo.
Collegamento dell’acqua
• Utilizzare tubi nuovi per il collegamento
dell'apparecchiatura all'alimentazione dell'acqua. Non utilizzare tubi usati.
• Non collegare l'apparecchiatura a tubazioni nuove o rimaste inutilizzate per molto
tempo. Lasciar scorrere l’acqua per alcuni
minuti prima di collegare il tubo di carico
dell'acqua.
• Accertarsi di non schiacciare o danneggiare i tubi idraulici quando si installa l'apparecchiatura.
• Per evitare perdite, assicurarsi che gli accoppiamenti siano serrati a fondo.
• La prima volta che si usa la lavastoviglie,
accertarsi che non vi siano perdite nei tubi.
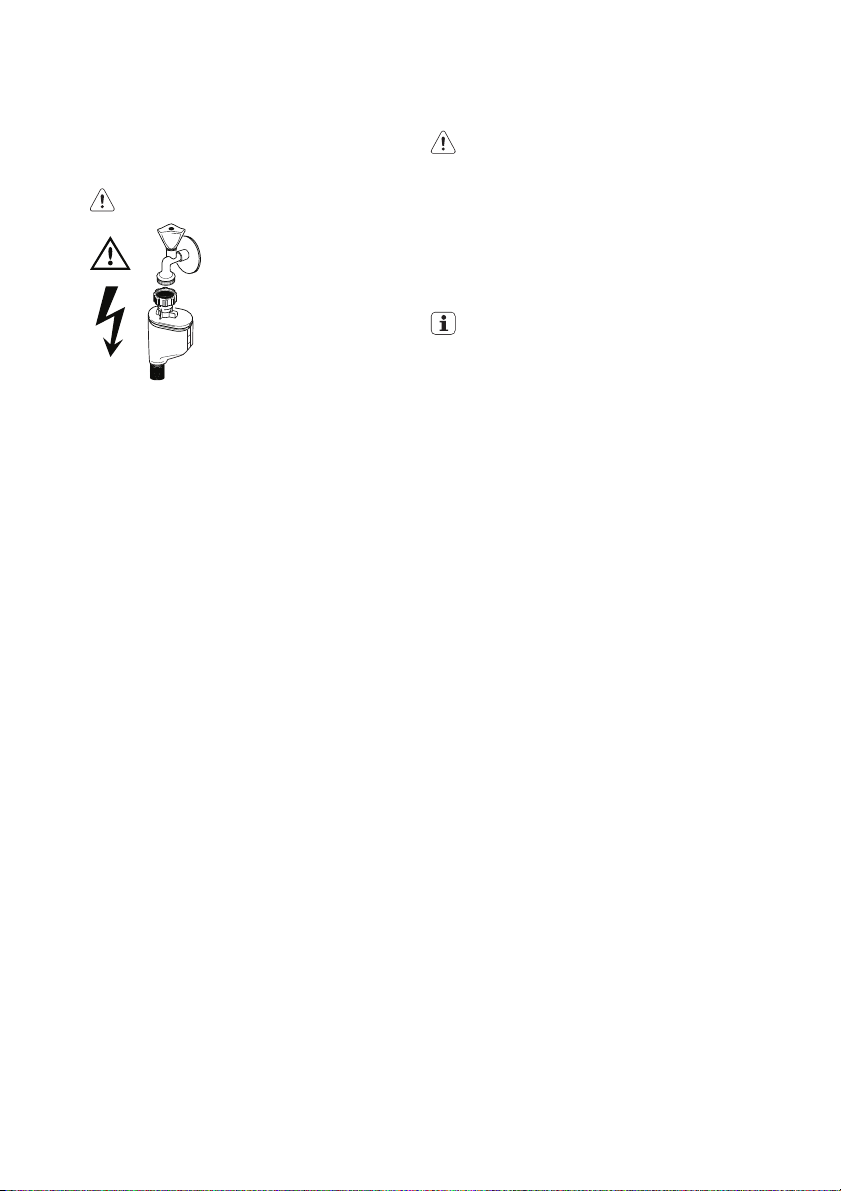
• Il tubo di carico ha una doppia parete, un
cavo interno di rete ed una valvola di sicurezza. Il tubo di carico dell'acqua è sotto
pressione solo durante il passaggio dell'acqua. In caso di una perdita nel tubo di
carico dell'acqua, la valvola di sicurezza
interrompe il passaggio dell'acqua.
– Prestare attenzione quando si collega il
tubo di carico dell'acqua:
– Non immergere nell'acqua il tubo di
carico o la valvola di sicurezza.
– Se il tubo di carico o la valvola di si-
curezza sono danneggiati, scollegare
Page 4
4 electrolux
immediatamente la spina dalla presa
elettrica.
– Rivolgersi al centro assistenza per so-
stituire il tubo di carico dell'acqua con
una valvola di sicurezza.
Avvertenza Pericolo di tensione.
Collegamento elettrico
• L'apparecchiatura deve essere messa a
terra.
• Verificare che i dati elettrici riportati sulla
targhetta del modello corrispondano a
quelli dell'impianto domestico.
• Utilizzare sempre una presa di corrente
con contatto a terra correttamente installata.
• Non utilizzare spine o connettori multivie e
cavi di prolunga. Vi è il rischio di incendio.
• Non sostituire o cambiare mai il cavo elettrico. Contattare il centro assistenza.
• Accertarsi di non schiacciare o danneggiare la spina ed il cavo di alimentazione
dietro l'apparecchiatura.
• Controllare che la presa sia accessibile dopo l’installazione.
• Non tirare il cavo di alimentazione per scollegare l'apparecchio. Sfilare sempre la spina dalla presa di corrente.
Luce interna
Questa lavastoviglie dispone di una luce interna che si accende e si spegne, rispettiva-
mente, quando si apre e si chiude lo sportello.
Avvertenza Radiazioni LED visibili: non
guardare direttamente il fascio
luminoso.
La lampada LED è di CLASSE 2 conformemente alla IEC 60825-1: 1993 + A1:1997 +
A2:2001.
Lunghezza d'onda emessa: 450 nm
Massima potenza di uscita: 548 μW
Per sostituire la luce interna, contattare
il centro assistenza.
Prima di sostituire la luce interna, scollegare la spina dalla presa elettrica.
Centro assistenza
• Le riparazioni o i lavori all'apparecchiatura
devono essere svolti da un ingegnere autorizzato. Contattare un centro di assistenza autorizzato.
• Devono essere utilizzati esclusivamente ricambi originali.
Smaltimento dell'apparecchiatura
• Per evitare rischi di danni o lesioni fisiche:
– Estrarre la spina dalla presa di corrente.
– Tagliare il cavo di alimentazione e smal-
tirlo adeguatamente.
– Rimuovere e smaltire adeguatamente il
blocco sportello per evitare che bambini
o piccoli animali domestici restino chiusi
all'interno dell'apparecchiatura. Vi è il rischio di soffocamento.
Page 5
Descrizione del prodotto
electrolux 5
10
9
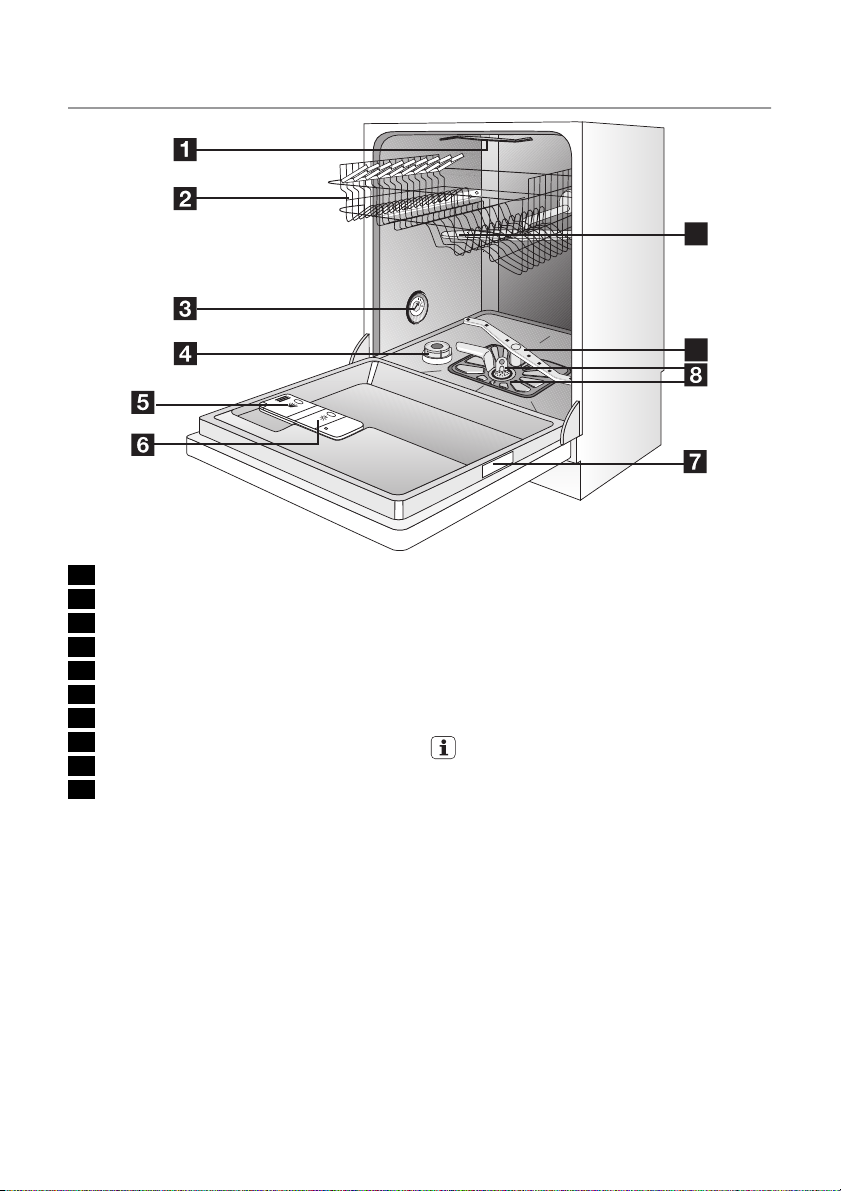
1 Mulinello superiore
2 Cestello superiore
3 Selettore durezza dell'acqua
4 Contenitore del sale
5 Contenitore del detersivo
6 Contenitore del brillantante
7 Targhetta di identificazione
8 Filtri
9 Mulinello inferiore
10 Mulinello superiore
Segnale luminoso
Dopo l’avvio di un programma di lavaggio,
sul pavimento sotto lo sportello dell’appa-
recchiatura viene proiettato un segnale ottico:
• Una spia rossa che resta accesa per tutta
la durata del programma di lavaggio.
• Una spia verde che si accende alla fine del
programma di lavaggio.
• Una luce rossa che lampeggia in caso di
guasti.
Se l’apparecchiatura è installata in posizione sopraelevata con un pannello a
copertura della porta, il segnale non è
visibile.
Page 6

6 electrolux
Pannello dei comandi
5
1
2
A
B
9
4
3
C
67
1 Tasto On/Off
2 Display
3 Tasto Avvio ritardato
4 Tasti Selezione programmi
5 Tasto Risparmio energetico
6 Tasto Funzione Multitab
7 Tasto Annulla
8 Spie
9 Tasti funzione
Spie
1)
Brillantante
1)
Sale
Fine programma Si accende quando il programma di lavaggio è terminato.
Si accende quando è necessario aggiungere il brillantante. Fare riferimento al capitolo "Uso del detersivo e del brillantante".
La spia si accende quando è necessario riempire il contenitore del sale. Fare riferimento al capitolo "Uso del sale per lavastoviglie".
Dopo avere riempito il contenitore, la spia del sale può rimanere ancora accesa per
qualche ora. Ciò non compromette il buon funzionamento dell’apparecchiatura.
8
1) Quando il contenitore del sale e/o il contenitore del brillantante sono vuoti, la spia corrispondente non
si accende durante l'esecuzione di un programma.
Display
Il display mostra:
• La regolazione elettronica del livello del de-
calcificatore dell’acqua.
• Attivazione/disattivazione del contenitore
del brillantante (solo con la funzione Multitab attiva).
• Il numero del programma di lavaggio.
• Tempo residuo al termine di un program-
ma di lavaggio.
• La fine del programma di lavaggio. Il di-
splay mostra uno zero.
• Tempo residuo al termine dell’avvio ritardato.
• Codici di errore.
• Attivazione/disattivazione dei segnali acustici.
Tasto Avvio ritardato
Usare questo tasto per ritardare l'avvio del
programma di lavaggio da 1 ora fino a un
massimo di 19 ore. Fare riferimento al capitolo "Selezione e avvio di un programma di
lavaggio".
Page 7

electrolux 7
Tasti Selezione programmi
Questi tasti consentono di selezionare un
programma di lavaggio. Premere ripetutamente il tasto fino a quando il display visualizza il numero del programma desiderato.
Fare riferimento al capitolo "Programmi di lavaggio" per ulteriori informazioni.
Tasto Risparmio energetico
Questa funzione diminuisce la temperatura
nella fase di asciugatura. Il risparmio energetico è compreso tra 10% e 25%.
Al termine del programma i piatti possono risultare bagnati. Si consiglia di aprire
lo sportello della lavastoviglie, lasciarla
socchiusa ed attendere che i piatti si
asciughino.
Questa funzione è disponibile con tutti i programmi di lavaggio. Premendo il tasto si accende la spia corrispondete.
La funzione di risparmio energetico non è efficace con tutti i programmi. Consultare la
tabella "Programmi di lavaggio".
Tasto Funzione Multitab
Premere questo tasto per attivare/disattivare
la funzione Multitab. Vedere "Uso di pastiglie
combinate".
Tasto Annulla
Questo tasto consente di annullare un programma di lavaggio o una partenza ritardata.
Fare riferimento al capitolo "Selezione e avvio
di un programma di lavaggio".
Tasti funzione
Utilizzare i tasti funzione per queste operazioni:
• Regolare elettronicamente il decalcificatore dell'acqua. Fare riferimento al capitolo
"Impostazione del decalcificatore".
• Disattivare/attivare il contenitore del brillantante quando è attiva la funzione Multitab. Fare riferimento al capitolo "Cosa fare
se...".
• Disattivare/attivare i segnali acustici. Fare
riferimento a "Segnali acustici".
Modalità impostazione
L’apparecchiatura deve essere in modalità
impostazione per le seguenti operazioni:
• Selezionare ed avviare un programma di
lavaggio e/o un avvio ritardato.
• Regolare elettronicamente il decalcificatore dell'acqua.
• Disattivare/attivare i segnali acustici.
• Disattivare/attivare il contenitore del brillantante.
Premere il tasto On/Off. L’apparecchiatura è
in modalità impostazione quando:
– Sul display compaiono due trattini orizzon-
tali.
Premere il tasto On/Off. L’apparecchiatura
non è in modalità impostazione quando:
– Il display mostra la durata di un program-
ma di lavaggio o un avvio ritardato.
– Annullare il programma o l'avvio ritarda-
to per tornare alla modalità di impostazione. Fare riferimento al capitolo "Selezione e avvio di un programma di lavaggio".
Segnali acustici
I segnali acustici indicano:
• Termine del programma di lavaggio.
• La regolazione elettronica del livello del decalcificatore dell’acqua
• L’apparecchiatura riscontra un malfunzionamento.
Per disattivare i segnali acustici procedere
nel modo seguente:
1. Accendere l'apparecchiatura.
2. Verificare che l'apparecchiatura sia in
modalità impostazione.
3. Tenere premuti i tasti funzione B e C fino
a quando le spie dei tasti funzione A, B e
C non incominciano a lampeggiare.
4. Rilasciare i tasti funzione A e B.
5. Premere il tasto funzione C.
– Le spie dei tasti funzione A e B si spen-
gono.
– La spia del tasto funzione C lampeggia.
– Il display mostra l'impostazione cor-
rente.
Segnali acustici attivati
Segnali acustici disattivati
6. Premere nuovamente il tasto funzione C.
– Il display mostra la nuova regolazione.
7. Spegnere l’apparecchiatura per mantenere l’operazione.
Seguire la procedura precedente per attivare nuovamente i segnali acustici.
Page 8
8 electrolux
Preparazione al primo utilizzo
Fare riferimento alle istruzioni per ciascun
punto della procedura:
1. Verificare se la regolazione del decalcificatore dell’acqua è conforme alla durezza dell’acqua locale. Se necessario, regolare il decalcificatore dell’acqua.
2. Riempire il contenitore del sale.
3. Riempire il contenitore del brillantante.
4. Mettere posate e piatti nella lavastoviglie.
5. Impostare il programma corretto per il tipo di carico e il grado di sporco.
6. Riempire il contenitore del detersivo con
un quantitativo corretto di detersivo.
7. Avviare il programma di lavaggio.
Se si utilizzano pastiglie combinate ("3 in
1", "4 in 1", "5 in 1"), fare riferimento al
capitolo "Uso di pastiglie combinate".
Regolazione del decalcificatore dell’acqua
Il decalcificatore dell'acqua rimuove i sali ed
i minerali presenti nell'acqua della rete idrica,
che possono compromettere il buon funzionamento dell'apparecchiatura.
La durezza dell'acqua è misurata in scale
equivalenti:
• Gradi tedeschi (dH°).
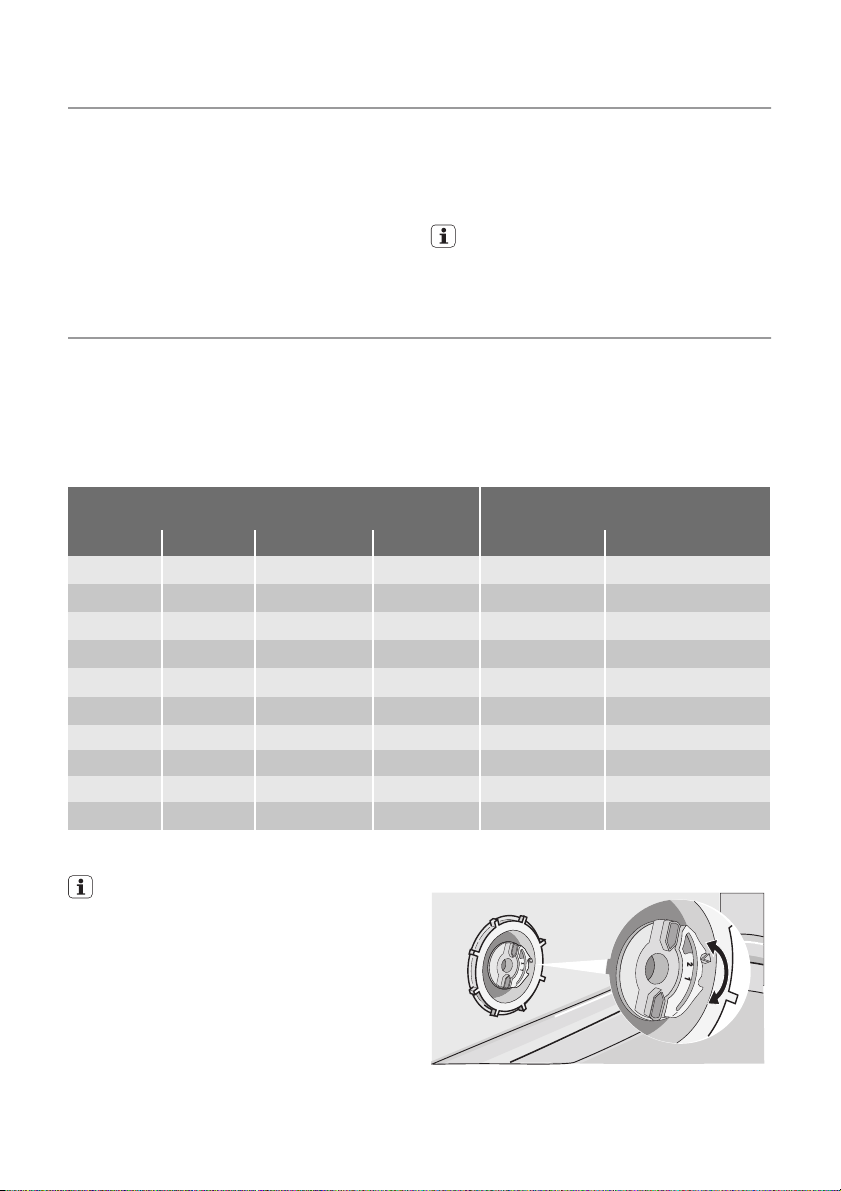
Durezza dell’acqua
°dH °TH mmol/l Clarke manuale elettronica
51 - 70 91 - 125 9,1 - 12,5 64 - 88
43 - 50 76 - 90 7,6 - 9,0 53 - 63
37 - 42 65 - 75 6,5 - 7,5 46 - 52
29 - 36 51 - 64 5,1 - 6,4 36 - 45
23 - 28 40 - 50 4,0 - 5,0 28 - 35
19 - 22 33 - 39 3,3 - 3,9 23 - 27
15 - 18 26 - 32 2,6 - 3,2 18 - 22 1 4
11 - 14 19 - 25 1,9 - 2,5 13 - 17 1 3
4 - 10 7 - 18 0,7 - 1,8 5 - 12 1 2
< 4 < 7 < 0,7 < 5
1) Impostazione di fabbrica.
2) Non è richiesto l’uso di sale.
Il decalcificatore dell’acqua deve essere
regolato manualmente ed elettronicamente.
Impostazione manuale
Ruotare la manopola per la durezza dell'acqua sulla posizione 1 o 2 (fare riferimento alla
tabella).
• Gradi francesi (°TH).
• mmol/l (millimoli per litro, unità di misura
internazionale della durezza dell'acqua).
•Gradi Clarke.
Regolare il decalcificatore dell’acqua. Se necessario, contattare l’ente erogatore locale.
Regolazione della durezza dell’ac-
1)
2
1)
2
1)
2
1)
2
1)
2
1)
2
2)
1
qua
10
9
8
7
6
1)
5
2)
1
Regolazione elettronica
1. Accendere l'apparecchiatura.
Page 9
20
30
M
A
X
1
2
3
4
+
-
electrolux 9
2. Verificare che l'apparecchiatura sia in
modalità impostazione.
3. Tenere premuti i tasti funzione B e C fino
a quando le spie dei tasti funzione A, B e
C non incominciano a lampeggiare.
4. Rilasciare i tasti funzione B e C.
5. Premere il tasto funzione A.
– Le spie dei tasti funzione B e C si spen-
gono.
– La spia del tasto funzione A lampeggia.
– Il display mostra la regolazione corren-
te.
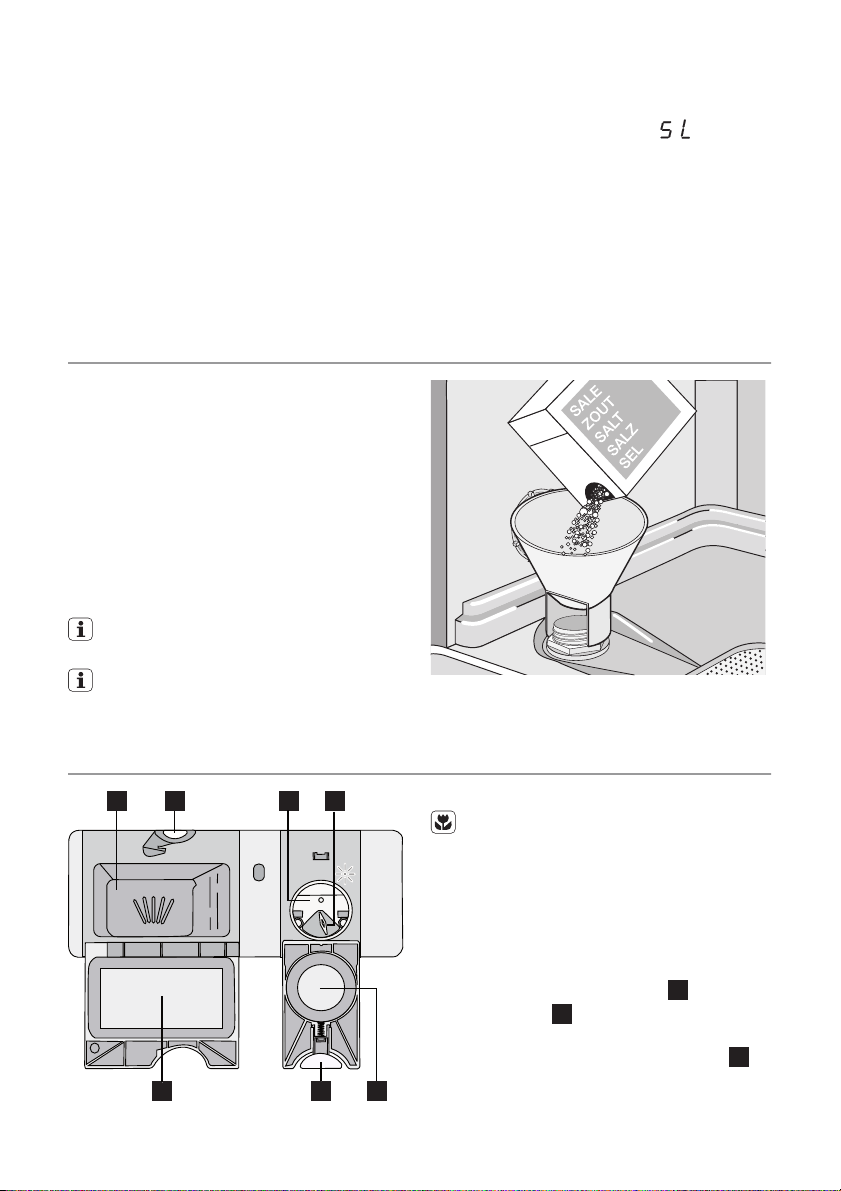
Uso del sale per lavastoviglie
Riempire il contenitore del sale procedendo nel modo seguente:
1. Ruotare il tappo in senso antiorario per
aprire il contenitore del sale.
2. Versare 1 litro di acqua all'interno del
contenitore del sale (solo la prima volta).
3. Riempire il contenitore con il sale servendosi dell'imbuto.
4. Togliere l'eventuale sale rimasto attorno
all'apertura del contenitore.
5. Ruotare il tappo in senso orario per chiudere il contenitore del sale.
È giusto che l’acqua fuoriesca dal contenitore quando si riempie con il sale.
Se il decalcificatore dell'acqua viene impostato elettronicamente sul livello 1, la
spia del sale rimane spenta.
– I segnali acustici intermittenti indicano
la regolazione corrente.
Esempio: Il display mostra
/ 5 segnali
acustici intermittenti = livello 5.
6. Premere ripetutamente il tasto funzione A
fino a quando il display visualizza la regolazione necessaria.
7. Premere il tasto On/Off per mantenere
l'operazione.
Uso del detersivo e del brillantante
1
2
7
3
4
6
5
Uso del detersivo
Per contribuire alla protezione dell’ambiente, non usare una dose di detersivo
superiore alla quantità raccomandata.
Seguire i dosaggi consigliati dal produttore del detersivo riportati sulla confezione.
Riempire il contenitore del detersivo procedendo nel modo seguente:
1.
Premere il tasto di sgancio
il coperchio
7
del contenitore del deter-
2
per aprire
sivo.
2.
Mettere il detersivo nel contenitore
1
.
3. Se il programma prevede una fase di prelavaggio, mettere una piccola quantità di
Page 10

10 electrolux
detersivo nella parte interna dello sportello della lavastoviglie.
4. Se si utilizzano tavolette combinate, inserire la tavoletta nel contenitore
5. Chiudere il contenitore. Premere il coperchio fino a che non si blocca.
Detersivi di marca diversa si sciolgono in
tempi differenti. Alcune pastiglie combinate non garantiscono ottimi risultati di
pulizia nei programmi brevi. Usare programmi di lavaggio lunghi se si utilizzano
detersivi in pastiglie, per garantire il completo scioglimento del detersivo.
Uso del brillantante
Il brillantante permette di asciugare le
stoviglie senza strisce o macchie.
Il contenitore del brillantante aggiunge
automaticamente il brillantante durante
l'ultima fase di risciacquo.
Riempire il contenitore del brillantante procedendo nel modo seguente:
1
.
Uso di pastiglie combinate
La funzione Multitab è per pastiglie di detersivo combinate.
Questi prodotti esercitano una funzione integrata e combinata di detersivo, brillantante e
sale. Alcuni tipi di pastiglie possono contenere altri agenti.
Verificare che questi detersivi siano adatti alla
durezza dell’acqua del proprio impianto. Vedere le istruzioni del produttore.
Quando si imposta la funzione Multitab, rimane attiva fino a quando non viene disattivata.
La funzione Multitab disattiva l’erogazione di
brillantante e sale.
La funzione Multitab disattiva le spie del sale
e del brillantante.
La durata del programma può aumentare se
si utilizza la funzione Multitab.
Attivare la funzione Multitab prima di avviare un programma di lavaggio.
1.
Premere il tasto di sgancio
il coperchio
tante.
2. Riempire il contenitore del brillantante
3
con il brillantante. Il simbolo "max" in-
dica il livello massimo.
3. Togliere l'eventuale brillantante fuoriuscito con un panno assorbente per evitare
la formazione di schiuma eccessiva durante il lavaggio.
4. Chiudere il contenitore del brillantante.
Premere il coperchio fino a che non si
blocca.
Regolare il dosaggio del brillantante
Impostazione di fabbrica: posizione 3.
È possibile impostare il livello del brillantante
da 1 (dosaggio minore) a 4 (dosaggio maggiore).
Ruotare il selettore del brillantante
mentare o diminuire il dosaggio.
Non è possibile attivare la funzione Multitab quando un programma è in corso.
Per attivare la funzione Multitab:
• Premere il tasto Multitab. La spia corri-
spondente si accende.
Per disattivare la funzione Multitab ed usare
separatamente detersivo, sale e brillantante:
1. Premere il tasto Multitab. La spia corrispondente si spegne.
2. Riempire di nuovo i contenitori del sale e
del brillantante.
3. Impostare il decalcificatore dell'acqua sul
livello più alto.
4. Eseguire un programma di lavaggio senza piatti.
5. Regolare il decalcificatore dell’acqua.
6. Regolare il dosaggio del brillantante.
5
del contenitore del brillan-
6
per aprire
4
per au-
Sistemazione di posate e stoviglie
Suggerimenti
Non utilizzare l’apparecchiatura per lavare
oggetti che possano assorbire acqua (come
spugne, panni).
• Prima di caricare posate e piatti, procede-
re nel modo seguente:
– Estrarre i residui di alimenti.
– Ammorbidire le tracce di bruciato nei te-
gami.
Page 11
• Mentre si caricano posate e piatti, procedere nel modo seguente:
– Caricare utensili cavi (per es. tazze, bic-
chieri e padelle) con l’apertura rivolta
verso il basso.
– Verificare che l’acqua non si fermi nel
contenitore o in una sua parte concava.
– Verificare che posate e piatti non si toc-
chino reciprocamente.
– Verificare che i bicchieri non si tocchino
l’un l’altro.
– Disporre gli oggetti piccoli nel cestello
delle posate.
– Mischiare i cucchiai ad altre posate per
impedire che si tocchino reciprocamente.
– Disporre gli oggetti in modo che l'acqua
raggiunga tutte le superfici.
• Le stoviglie in plastica ed i tegami in materiale antiaderente tendono a trattenere
maggiormente le gocce d'acqua.
• Sistemare gli oggetti leggeri nel cestello
superiore, in modo tale che non possano
muoversi.
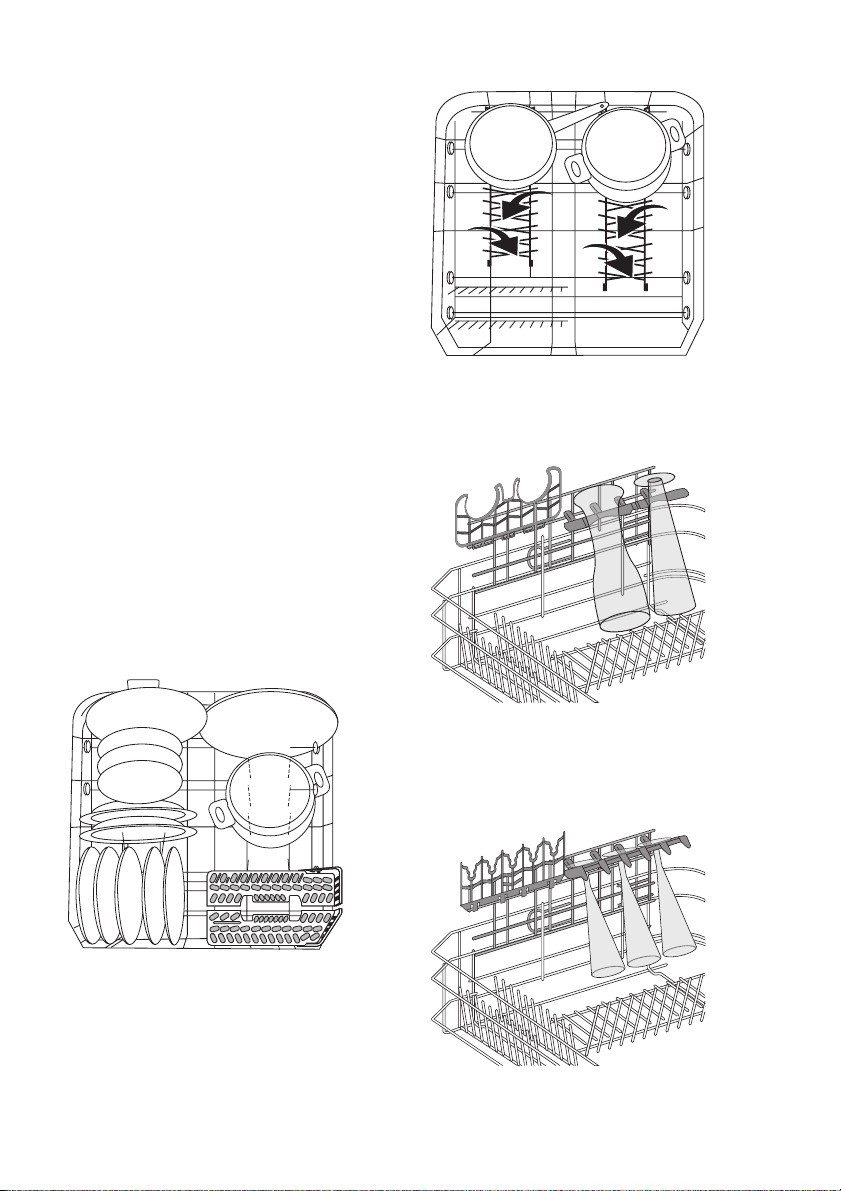
Cestello inferiore
Mettere nel cestello inferiore salsiere, coperchi, piatti, insalatiere e posate. Disporre piatti
di portata e coperchi di grandi dimensioni ai
lati del cestello.
electrolux 11
Supporti bicchieri da birra
Gli appositi supporti sul lato sinistro del cestello inferiore possono contenere al massimo quattro bicchieri da birra.
Le file di supporti nel cestello inferiore possono essere abbassate per caricare pentole,
padelle ed insalatiere.
Se non utilizzati, possono essere ripiegati.
I supporti per i bicchieri da birra possono essere sostituiti da due griglie portatazze. Utilizzare tali griglie per tazze o per bicchieri a
calice.
Per estrarre i supporti porta-bicchieri, procedere nel modo seguente:
Page 12
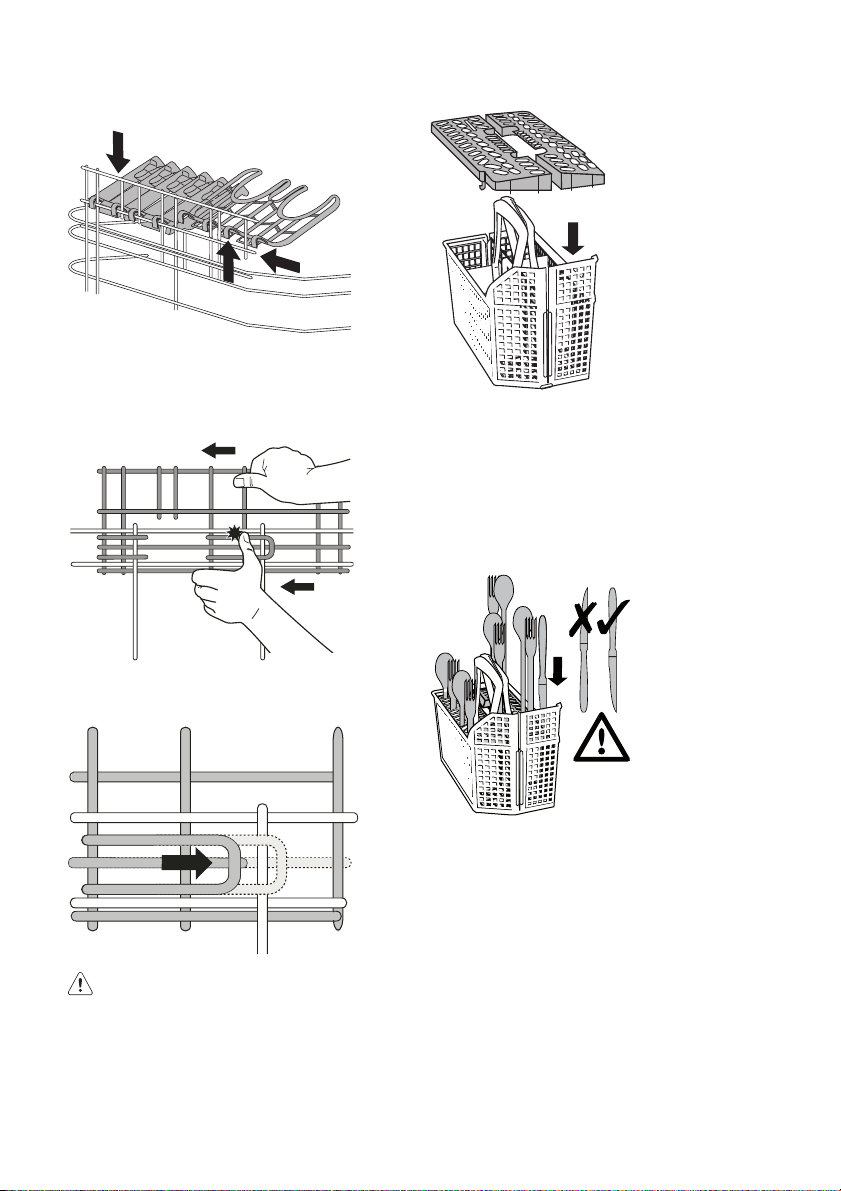
12 electrolux
1. Tirare verso l’alto i supporti spingendoli
leggermente dal basso.
2. Utilizzare i supporti portatazze sulla barra
orizzontale.
Spingere indietro il supporto porta-bicchieri
per estrarlo.
Cestello portaposate
• Posizionare le griglie divisorie sul cestello
portaposate.
• Per posate di grandi dimensioni, utilizzare
solo una delle due griglie divisorie
• Mettere forchette e cucchiai con l'impugnatura rivolta verso il basso.
• Mettere i coltelli con il manico rivolto verso
l'alto.
Spingere in avanti il supporto porta-bicchieri
per inserirlo.
Avvertenza Prestare attenzione
quando si toglie o inserisce il supporto.
• Mischiare i cucchiai ad altre posate per impedire che aderiscano gli uni alle altre.
Si può aprire il cestello per facilitare l'estrazione delle posate. Per estrarre le posate,
procedere nel modo seguente:
1. Appoggiare il cestello su un tavolo o sul
piano di lavoro.
2. Aprire il manico.
Page 13

electrolux 13
3. Estrarre le posate.
Tenere con forza le due parti del manico
quando si sposta il cestello portaposate.
Cestello superiore
Il cestello superiore è ideale per salsiere, insalatiere, tazze, bicchieri, piccoli tegami e coperchi. Disporre gli oggetti in modo che l'acqua raggiunga tutte le superfici.
• Sistemare coltelli, cucchiaini e forchettine
nell'apposito vassoio. Forchette e cucchiai
devono essere sistemati nell'apposito cestello per le posate nel cesto inferiore.
• Mettere i bicchieri a calice nelle apposite
griglie portatazze con lo stelo rivolto verso
l'alto.
• Per i bicchieri a calice, piegare il supporto
verso sinistra o destra.
• Le file di supporti sul lato sinistro del cestello possono essere ripiegate in alto o in
basso per offrire una maggiore flessibilità
di carico.
• Per oggetti più grandi, piegare la griglia
portatazze.
Page 14

14 electrolux
Regolazione dell’altezza del cestello
superiore
Il cestello superiore può essere spostato in
due diverse posizioni per offrire una maggiore flessibilità di carico.
Altezza massima delle stoviglie nel
cestello su-
Posizione più
alta
Posizione più
bassa
periore
23 cm 34 cm
25 cm 32 cm
cestello infe-
riore
2. Tenendo per la maniglia il cestello superiore, sollevarlo completamente, quindi
abbassarlo verticalmente.
Il cestello superiore si aggancia nella posizione più bassa o alta.
Per spostare il cestello superiore nella
posizione più alta o bassa, procedere
nel modo seguente:
1. Estrarre il cestello superiore fino all'arresto.
Selezione e avvio di un programma di lavaggio
Selezione ed avvio di un programma di
lavaggio senza avvio ritardato
1. Accendere l'apparecchiatura.
2. Verificare che l'apparecchiatura sia in
modalità impostazione.
3. Selezionare un programma di lavaggio.
Consultare la tabella "Programmi di lavaggio".
– Il display mostra il numero del pro-
gramma di lavaggio.
4. Se necessario, selezionare una o più funzioni.
5. Chiudere lo sportello della lavastoviglie. Il
programma di lavaggio si avvia automaticamente.
Selezione e avvio ritardato di un
programma di lavaggio
1. Accendere l'apparecchiatura e selezionare un programma di lavaggio.
2. Premere ripetutamente il tasto di avvio ritardato fino a quando il display mostra il
numero di ore del ritardo di avvio.
3. Chiudere lo sportello della lavastoviglie.
– Il conto alla rovescia incomincia auto-
maticamente.
– Appena è completato il conto alla ro-
vescia, il programma si avvia automaticamente.
L'apertura dello sportello interrompe il
conto alla rovescia. Quando si chiude
nuovamente lo sportello, il conto alla ro-
vescia viene ripreso dal punto in cui era
stato interrotto.
Interruzione del programma di lavaggio
• Aprire lo sportello della lavastoviglie.
– Il programma si interrompe.
• Chiudere lo sportello della lavastoviglie.
– Il programma riprende dal punto in cui
era stato interrotto.
Come annullare un programma di
lavaggio od un avvio ritardato
Se un programma di lavaggio o un avvio
ritardato non è ancora partito, è possibile modificare la selezione.
Durante lo svolgimento di un programma di lavaggio od un avvio ritardato non
è possibile modificare la selezione. Per
eseguire una nuova selezione, occorre
annullare il programma o l'avvio ritardato.
Quando si annulla un avvio ritardato, si
annulla automaticamente anche il programma di lavaggio selezionato. In questo caso, è necessario selezionare di
nuovo il programma di lavaggio.
1. Tenere premuto il tasto Annulla fino a
quando nel display non compaiono due
trattini orizzontali.
2. Verificare che vi sia del detersivo nell’ero-
gatore prima di impostare un nuovo programma di lavaggio.
Page 15

electrolux 15
La fine del programma di lavaggio
• La lavastoviglie si arresta automaticamente.
• Vengono emessi i segnali acustici.
1. Aprire lo sportello della lavastoviglie.
– Il display visualizza 0.
– La spia di fine programma si accende.
2. Spegnere l’apparecchiatura.
3. Per migliori risultati di asciugatura, lascia-
re lo sportello socchiuso per alcuni minuti.
• Se non si spegne la lavastoviglie, dopo tre minuti dalla fine del programma
di lavaggio:
– tutte le spie si spengono,
– sul display compare un trattino oriz-
zontale,
Programmi di lavaggio
Programmi di lavaggio
Programma Grado di
1
Automatico
2
Intenso 70°C
3
Breve 60°C
4
Eco 50°C
5
1 ora 55°C
6
Bicchieri
45°C
sporco
Qualsiasi Stoviglie miste,
2)
Sporco intenso
Sporco normale o leggero
3)
Sporco normale
4)
Sporco leggero
Sporco normale o leggero
Tipo di carico Descrizione del pro-
posate e pentole
Stoviglie miste,
posate e pentole
Stoviglie e posate
Stoviglie e posate
Stoviglie e posate
Bicchieri e stoviglie delicate
– si spegne anche il segnale ottico
proiettato sul pavimento
Ciò contribuisce a ridurre il consumo di
energia elettrica.
Premendo uno dei tasti (non quello On/
Off) il display e le spie si riaccendono.
Togliere il carico
• Lasciare raffreddare i piatti prima di estrarli
dalla lavastoviglie. Le stoviglie calde sono
più facilmente danneggiabili.
• Vuotare prima il cestello inferiore e quindi
quello superiore.
• Sulle pareti laterali e sullo sportello della lavastoviglie può formarsi della condensa
perché l'acciaio inox si raffredda più velocemente della ceramica.
gramma
Prelavaggio
Lavaggio principale 45°C
o 70°C
1 o 2 risciacqui intermedi
Ultimo risciacquo
Asciugatura
Prelavaggio
Lavaggio principale 70°C
2 risciacqui intermedi
Ultimo risciacquo
Asciugatura
Lavaggio principale 60°C
Risciacquo
Prelavaggio
Lavaggio principale fino a
50°C
1 risciacquo intermedio
Risciacquo finale
Essiccazione
Lavaggio principale 55°C
1 risciacquo intermedio
Ultimo risciacquo
Lavaggio principale 45°C
1 risciacquo intermedio
Ultimo risciacquo
Asciugatura
Risparmio energetico
Sì con effetto
Sì con effetto
Sì senza effetto
Sì con effetto
Sì senza effetto
Sì con effetto
1)
Page 16

16 electrolux
Programma Grado di
7
Prelavaggio
1) Per i programmi nei quali questa funzione ha effetto, il risparmio è compreso tra il 10% e il 25%
2) L'apparecchiatura regola automaticamente la temperatura dell'acqua durante il lavaggio principale.
Ciò dipende dal livello di carico della lavastoviglie e dal grado di sporco delle stoviglie. La durata e i
consumi dei programmi possono variare.
3) Questo è il programma giornaliero per una famiglia di 4 persone che carica solo le stoviglie e le posate
della prima colazione e della cena.
4) Programma di prova a fini normativi. Fare riferimento all'opuscolo in dotazione per i risultati del test.
sporco
Qualsiasi Carico ridotto
Tipo di carico Descrizione del pro-
(da completare
in seguito).
gramma
1 risciacquo a freddo (per
impedire che i residui di
cibo si attacchino alle
stoviglie).
Questo programma non
richiede l'uso di detersivo.
Risparmio energetico
Sì senza effetto
1)
Valori di consumo
Programma Durata (minuti) Energia elettrica
1
Automatico 45-70°
2
Intenso 70°C
3
Breve 60°C
4
90 - 130 1,1 - 1,7 12 - 23
110 - 120 1,8 - 2,0 23 - 25
30 0,9 9
150 - 160 1,0 - 1,1 12 - 13
(kWh)
Acqua (litri)
Eco 50°C
5
1 ora 55°C
6
Bicchieri 45°C
7
Prelavaggio
45 - 55 1,0 - 1,2 11 - 12
60 - 70 0,8 - 0,9 14 - 15
12 0,1 4
I valori di consumo possono variare a
seconda della pressione e della temperatura dell’acqua, delle variazioni dell’ali-
Pulizia e cura
Rimuovere e pulire i filtri
I filtri sporchi diminuiscono i risultati di lavaggio.
La lavastoviglie ha tre filtri:
mentazione elettrica e della quantità di
stoviglie.
1. filtro a maglie larghe (A)
2. microfiltro (B)
3. filtro piatto (C)
Page 17

A
B
C
1. Per sbloccare il gruppo di filtraggio, ruo-
tare la maniglia sul microfiltro (B) di circa
1/4 di giro in senso antiorario.
2. Togliere il gruppo di filtraggio.
3. Afferrare il filtro a maglie larghe (A) per la
maniglia con il foro.
4. Togliere il filtro a maglie larghe (A) dal mi-
crofiltro (B).
5. Togliere il filtro piatto (C) dal fondo
dell’apparecchiatura.
electrolux 17
6. Pulire i filtri sotto l'acqua corrente.
7. Rimettere il filtro piatto (C) nel fondo dell'apparecchiatura.
8. Rimettere il filtro a maglie larghe (A) nel
microfiltro (B) e spingere insieme i filtri.
9. Rimontare il sistema di filtraggio in posizione.
10. Per bloccare il gruppo di filtraggio, ruotare la maniglia sul microfiltro (B) in senso
orario fino a che non si blocca.
Pulire i mulinelli
Non rimuovere i mulinelli.
Se i fori dei mulinelli sono ostruiti da residui di
sporco, liberarli servendosi di uno stecchino
di legno.
Pulire le superfici esterne
Pulire le superfici esterne dell’apparecchiatura ed il pannello dei comandi con un panno
morbido inumidito. Utilizzare solo detergenti
neutri. Non usare prodotti abrasivi, spugnette abrasive o solventi (ad es. acetone).
Cosa fare se…
La lavastoviglie non si avvia o si blocca durante il funzionamento.
Malfunzionamento Codice d'errore Possibile causa Possibile soluzione
L'apparecchiatura non
carica acqua.
La pressione dell'acqua
Il rubinetto dell'acqua è
Il filtro nel tubo di carico
Il display mostra
Cercare dapprima di risolvere il problema (fare riferimento alla tabella). Se ciò non è possibile rivolgersi al centro assistenza.
Il rubinetto dell'acqua è
bloccato o intasato dal
calcare.
è troppo bassa.
chiuso.
dell'acqua è ostruito.
Pulire il rubinetto
dell’acqua.
Contattare l’ente erogatore locale.
Aprire il rubinetto dell'acqua.
Pulire il filtro.
Page 18

18 electrolux
Malfunzionamento Codice d'errore Possibile causa Possibile soluzione
Il tubo di ingresso del-
Il tubo di carico dell'ac-
L'apparecchiatura non
scarica.
Il tubo di scarico del-
Il tubo di scarico del-
Il dispositivo antiallagamento è attivato.
Il programma non si avvia.
La spina di alimentazio-
Un fusibile del quadro
È stato impostato l'Av-
Il display mostra
Il display mostra
Lo sportello dell'appa-
Una volta effettuati questi controlli, accendere l’apparecchiatura. Il programma riprende
dal punto in cui era stato interrotto.
In caso di ricomparsa del codice di allarme o
dell'anomalia, contattare il centro assistenza.
Se il display mostra altri codici di errore, con-
l'acqua non è collegato
correttamente.
qua è danneggiato.
Lo scarico è ostruito. Pulire lo scarico.
l'acqua non è collegato
correttamente.
l'acqua è danneggiato.
Chiudere il rubinetto
recchiatura è aperto.
ne non è inserita nella
presa di corrente.
elettrico di casa è bruciato.
vio ritardato (solo per le
apparecchiature dotate
dell'avvio ritardato).
Consigliamo di annotarle in questo spazio:
Model (MOD.) ....................
Numero prodotto (PNC) ....................
Numero serie (S.N.) ....................
Controllare che il raccordo sia corretto.
Accertarsi che il tubo di
carico dell'acqua non
sia danneggiato.
Controllare che il raccordo sia corretto.
Accertarsi che il tubo di
scarico dell'acqua non
sia danneggiato.
dell’acqua e contattare
il centro assistenza.
Chiudere lo sportello
correttamente.
Inserire la spina di alimentazione elettrica.
Sostituire il fusibile.
Per avviare immediatamente il programma,
annullare l'avvio ritardato.
tattare il centro assistenza.
Le informazioni necessarie per il centro assistenza sono indicate sulla targhetta dei dati.
I risultati del lavaggio e dell'asciugatura non sono soddisfacenti
Problema Possibile causa Possibile soluzione
Le stoviglie non sono pulite. Il programma di lavaggio sele-
zionato non era corretto per il tipo di carico e il grado di sporco.
I cestelli non sono stati caricati
correttamente, l'acqua non raggiungeva tutte le superfici.
I mulinelli non ruotavano libera-
mente a causa della sistemazione non corretta delle stoviglie.
Accertarsi che il programma di
lavaggio selezionato sia corretto
per il tipo di carico e il grado di
sporco.
Caricare correttamente i cestelli.
Accertarsi che una sistemazione
non corretta delle stoviglie non
blocchi i mulinelli.
Page 19

Problema Possibile causa Possibile soluzione
I filtri sono sporchi o non sono
È stata utilizzata una dose insuf-
Ci sono depositi di calcare sulle
stoviglie.
Regolazione errata del decalcifi-
Il tappo del contenitore del sale
Bicchieri e stoviglie presentano
striature, macchie biancastre o
una patina bluastra.
Tracce di gocce d'acqua che si
sono asciugate su bicchieri e
stoviglie.
La causa potrebbe essere il de-
Le stoviglie sono bagnate. Si ha impostato un programma
Le stoviglie sono bagnate ed
opache.
La funzione Multitab è attiva (il
Come attivare l'erogazione del
brillantante
1. Accendere l'apparecchiatura.
montati correttamente.
ficiente di detersivo.
Il contenitore del sale è vuoto. Riempire il contenitore del sale.
catore dell’acqua
non è chiuso correttamente.
Il dosaggio del brillantante è
troppo alto.
Il dosaggio del brillantante è
troppo basso.
tersivo.
di lavaggio senza la fase di
asciugatura o con una fase di
asciugatura ridotta.
Il contenitore del brillantante è
vuoto.
contenitore del brillantante è disattivato automaticamente).
– La spia del tasto funzione B lampeggia.
– Il display mostra l'impostazione cor-
rente.
2. Verificare che l'apparecchiatura sia in
modalità impostazione.
3. Tenere premuti i tasti funzione B e C.
– Le spie dei tasti funzione A, B e C lam-
peggiano.
4. Rilasciare i tasti funzione B e C.
5. Premere il tasto funzione B.
– Le spie dei tasti funzione A e C si spen-
gono.
6. Premere nuovamente il tasto funzione B.
– Il display mostra la nuova regolazione.
7. Spegnere l’apparecchiatura per mantenere l’operazione.
electrolux 19
Controllare che i filtri siano puliti
e montati correttamente.
Accertarsi che la quantità di detersivo sia sufficiente.
Regolare il decalcificatore dell'acqua.
Assicurarsi che il tappo del contenitore del sale sia chiuso correttamente.
Ridurre il dosaggio del brillantante.
Aumentare il dosaggio del brillantante.
Utilizzare un detersivo di marca
diversa.
Lasciare lo sportello della lavastoviglie socchiusa ed attendere
alcuni minuti prima di estrarre le
stoviglie.
Riempire il contenitore del brillantante.
Attivare il contenitore del brillantante. Fare riferimento a "Come
attivare l'erogazione del brillantante".
Contenitore del brillantante disattivato
Contenitore del brillantante attivato
Dati tecnici
Dimensioni Larghezza 596 mm
Altezza 858 - 938 mm
Profondità 550 mm
Page 20

20 electrolux
Pressione di alimentazione dell'acqua
Massima 8 bar (0,8 MPa)
Ingresso dell'acqua
Capacità Coperti 12
1) Collegare il tubo di carico dell'acqua a un rubinetto dell’acqua con filettatura 3/4".
1)
La targhetta dei dati applicata sul lato
interno dello sportello della lavastoviglie
reca le informazioni sul collegamento
Minima 0,5 bar (0,05 MPa)
Acqua fredda o calda massimo 60°C
solari o fotovoltaici ed impianti eolici), utilizzare l’acqua calda per diminuire il consumo di energia elettrica.
elettrico.
Se l’acqua calda proviene da fonti alter-
native di energia (per esempio pannelli
Considerazioni ambientali
Il simbolo sul prodotto o sulla confezione
indica che il prodotto non deve essere
considerato come un normale rifiuto
domestico, ma deve essere portato nel
punto di raccolta appropriato per il riciclaggio
di apparecchiature elettriche ed elettroniche.
Provvedendo a smaltire questo prodotto in
modo appropriato, si contribuisce a evitare
potenziali conseguenze negative, che
potrebbero derivare da uno smaltimento
inadeguato del prodotto. Per informazioni più
dettagliate sul riciclaggio di questo prodotto,
contattare l’ufficio comunale, il servizio locale
di smaltimento rifiuti o il negozio in cui è stato
acquistato il prodotto.
Dove portare gli apparecchi fuori
uso?
In qualsiasi negozio che vende
apparecchi nuovi oppure si restituiscono
ai centri di raccolta ufficiali della SENS
oppure ai riciclatori ufficiali della SENS.
La lista dei centri di raccolta ufficiali della
SENS è visibile nel sito www.sens.ch.
Riciclare i materiali con il simbolo
. Smaltire i materiali di imballaggio negli appositi
contenitori per il riciclaggio.
Page 21

Electrolux. Thinking of you.
Share more of our thinking at www.electrolux.com
Contents
Safety information 21
Product description 24
Control panel 25
Use of the appliance 27
Setting the water softener 27
Use of dishwasher salt 28
Use of detergent and rinse aid 28
Multitab function 29
Subject to change without notice
Loading cutlery and dishes 29
Select and start a washing programme
Washing programmes 34
Care and cleaning 35
What to do if… 36
Technical data 38
Environment concerns 39
Safety information
Before the installation and use, read this
manual carefully:
• For your personal safety and the safety of
your property.
• For the respect of the environment,
• For the correct operation of the appliance.
Always keep these instructions with the appliance also if you move or sell it.
The manufacturer is not responsible if an incorrect installation and use causes damage.
Children and vulnerable persons safety
• Do not let persons, children included, with
reduced physical sensory, reduced mental
functions or lack of experience and knowledge to use the appliance. They must have
supervision or instruction for the operation
of the appliance by a person who is responsible for their safety.
• Keep all packaging away from children.
There is the risk of suffocation or physical
injury.
• Keep all detergents in a safe area. Do not
let the children touch the detergents.
• Keep children and small animals away
from the appliance when the door is open.
General safety
• Do not change the specifications of this
appliance. There is the risk of injury and
damage to the appliance.
• Obey the safety instructions from the manufacturer of the dishwasher detergent to
prevent burns to eyes, mouth and throat.
• Do not drink the water from the appliance.
Detergent residue can stay in your appliance.
• Always close the door after you load or
unload the appliance to prevent injury and
to prevent someone falling on an open
door.
• Do not sit or stand on the open door.
Use
• The appliance is only for domestic use. Do
not use the appliance for commercial and
industrial use or for other uses.
• Do not use the appliance for uses than that
for which it made. You will prevent physical
injury to persons or prevent damage to
property.
• Only use the appliance to clean household
utensils that are applicable for dishwashers.
• Do not put flammable products or items
that are wet with flammable products in,
near or on the appliance. Risk of explosion
or fire.
• Put the knives and all items with sharp
points in the cutlery basket with their
points down. If not, put in a horizontal position in the upper basket or in the knife
basket. (Not all models have the knife basket).
• Use only specified products for dishwashers (detergent, salt, rinse aid).
electrolux 21
33
Page 22

22 electrolux
• Types of salt that are not specified for dishwashers can cause damage to the water
softener.
• Fill the appliance with salt before you start
a washing programme. The grains of salt
and salty water can cause corrosion or
make a hole in the bottom of the appliance.
• Do not fill the rinse aid dispenser with other
products than rinse aid, (e.g. dishwasher
cleaning agent, liquid detergent). This can
cause damage to the appliance.
• Make sure that the spray arms can move
freely before you start a washing programme.
• If you open the door while the appliance is
in operation, hot steam can escape. There
is a risk of skin burns.
• Do not remove the dishes from the appliance before the end of the washing programme.
Care and cleaning
• Before maintenance, switch off the appliance and disconnect the mains plug from
the mains socket.
• Do not use flammable products or products that can cause corrosion.
• Do not use the appliance without the filters. Make sure that the installation of the
filters is correct. An incorrect installation
causes unsatisfactory washing results and
damage to the appliance.
• For your personal safety and the safety of
your property, do not use spray water or
steam to clean the appliance.
Installation
• Make sure that the appliance has not suffered any damage while in transport. Do
not connect a damaged appliance. If necessary, contact the supplier.
• Remove all packaging before first use.
• Only a qualified person must do the electrical and the plumbing installation, the set
up and the maintenance of the appliance.
This to prevent the risks of structural damage or physical injury.
• Make sure that the mains plug is disconnected from the mains socket during installation.
• Do not drill into the sides of the appliance
to prevent damage to hydraulic components and electrical components.
•
Important! Obey the instructions in the
enclosed template:
– To install the appliance.
– To assemble the furniture door.
– To connect to the water supply and
drain.
• Make sure that the appliance is installed
under and adjacent safe structures.
Frost precautions
• Do not install the appliance where the temperature is below 0°C.
• The manufacturer is not responsible for
frost damage.
Water connection
• Use new hoses to connect the appliance
to the water supply. Do not use used hoses.
• Do not connect the appliance to new pipes
or pipes not used for a long time. Let the
water flow for some minutes, then connect
the inlet hose.
• Make sure not to squash or cause damage
to the water hoses when you install the
appliance.
• Make sure that the water couplings are
tight to prevent a water leakage.
• The first time you use the appliance, make
sure that the hoses do not have water
leaks.
• The water inlet hose is double-walled and
has an inner mains cable and a safety
valve. The water inlet hose is under pressure only when the water flows. If there is
a leak in the water inlet hose, the safety
valve interrupts the running water.
– Be careful when you connect the water
inlet hose:
– Do not put the water inlet hose or the
safety valve in water.
– If the water inlet hose or the safety
valve are damaged, immediately disconnect the mains plug from the
mains socket.
– Contact the service centre to replace
the water inlet hose with safety valve.
Warning! Dangerous voltage.
Page 23

Electrical connection
• The appliance must be earthed.
• Make sure that the electrical data on the
rating plate agree with yo ur d om es tic po wer supply.
• Always use a correctly installed shockproof socket.
• Do not use multi-way plugs, connectors
and extension cables. There is a risk of fire.
• Do not replace or change the mains cable.
Contact the service centre.
• Make sure not to squash or cause damage
to the mains plug and cable behind the
appliance.
• Make sure that the mains plug is accessible after the installation.
• Do not pull the mains cable to disconnect
the appliance. Always pull the mains plug.
Internal light
This appliance has an internal light that
comes on when you open the door and goes
off when the door is closed.
electrolux 23
Warning! Visible led radiation, do not
look directly into the beam.
The LED lamp is CLASS 2 in accordance with
IEC 60825-1: 1993 + A1:1997 + A2:2001.
Emission wave length: 450 nm
Maximum emitted power: 548 μW
To replace the internal light, contact the
service centre.
Disconnect the mains plug from the
mains socket before the replacement of
the internal light.
Service centre
• Only an approved engineer can repair or
work on the appliance. Contact an approved service centre.
• Use only original spare parts.
Disposal of the appliance
• To prevent the risk of physical injury or
damage:
– Disconnect the mains plug from the
mains socket.
– Cut off the mains cable and discard it.
– Discard the door catch. This prevents
children or small animals from being
closed inside of the appliance. There is
a risk of suffocation.
Page 24

24 electrolux
Product description
10
9
1 Top spray arm
2 Upper basket
3 Water hardness dial
4 Salt container
5 Detergent dispenser
6 Rinse aid dispenser
7 Rating plate
8 Filters
9 Lower spray arm
10 Upper spray arm
Optical signal
After the start of the washing programme, an
optical signal shows on the floor below the
appliance door:
• A red light for all the washing programme
duration.
• A green light when the washing programme ends.
• A red light that flashes when there is a malfunction.
If the appliance is installed in height, with
a flush kitchen furniture door, the optical
signal does not show.
Page 25

Control panel
electrolux 25
1
1 On/off button
2 Display
3 Delay start button
4 Programme selection buttons
5 Energy saver button
6 Multitab button
7 Cancel button
8 Indicator lights
9 Function buttons
Rinse aid
1)
Salt
End-of-programme
1)
It comes on when it is necessary to fill the rinse aid container. Refer to 'Use of
detergent and rinse aid'.
It comes on when it is necessary to fill the salt container. Refer to 'Use of dishwasher
salt'.
After you fill the container, the salt indicator light can stay on for some hours. This
does not have an unwanted effect on the operation of the appliance.
It comes on when the washing programme is completed.
2
A
B
9
Indicator lights
5
4
3
C
67
8
1) When the salt and/or rinse aid containers are empty, the related indicator lights do not come on while
a washing programme operates.
Display
The display shows:
• The electronic adjustment of the level of
the water softener.
• Activation/deactivation of the rinse aid dis-
penser (only with multitab function on).
• The number of the washing programme.
• Remaining time to the end of the washing
programme.
• The end of a washing programme. The
display shows a zero.
• Remaining time to the end of the delay
start.
• Fault codes.
• Activation/deactivation of the audible signals.
Delay start button
Use this button to delay the start of the washing programme with an interval between 1
and 19 hours. Refer to 'Select and start a
washing programme'.
Page 26

26 electrolux
Programme selection buttons
With these buttons you can select the washing programme. Press of the buttons again
and again until the display shows the number
of the necessary programme.
Refer to 'Washing programmes' for more data about the washing programmes.
Energy saver button
This function decreases the temperature in
the drying phase. The energy decrease is between 10% and 25%.
The dishes can be wet at the end of the
programme. We recommend that you
open the appliance door and keep it ajar
to let the dishes dry.
This function is available with all washing programmes. The related indicator light comes
on when you press the button.
The energy saver function does not have an
effect on some programmes. Refer to
'Washing programmes'.
Multitab button
Press this button to activate/deactivate the
multitab function. Refer to 'Multitab function'.
Cancel button
With this button you can cancel a washing
programme or a delay start. Refer to 'Select
and start a washing programme'.
Function buttons
Use the function buttons for these operations:
• To adjust electronically the level of the water softener. Refer to 'Setting the water
softener'.
• To deactivate/activate the rinse aid dispenser when the multitab function is on.
Refer to 'What to do if...'.
• To deactivate/activate the audible signals.
Refer to 'Audible signals'.
Setting mode
The appliance must be in setting mode for
these operations:
• To select and start a washing programme
and/or a delay start.
• To adjust electronically the level of the water softener.
• To deactivate/activate the audible signals.
• To deactivate/activate the rinse aid dispenser.
Press the on/off button. The appliance is in
setting mode when:
– The display shows two horizontal bars.
Press the on/off button. The appliance is not
in setting mode when:
– The display shows the duration of a wash-
ing programme or a delay start.
–It is necessary to cancel the programme
or the delay start to go back to the setting mode. Refer to 'Select and start a
washing programme'.
Audible signals
The audible signals indicate:
• The end of the washing programme.
• The electronic adjustment of the level of
the water softener
• The appliance has a malfunction.
Do these steps to deactivate the audible signals:
1. Switch on the appliance.
2. Make sure that the appliance is in setting
mode.
3. Press and hold function buttons B and C
until the indicator lights of function buttons A, B and C start to flash.
4. Release function buttons A and B.
5. Press the function button C.
– The indicator lights for function buttons
A and B go off.
– The indicator light for function button C
flashes.
– The display shows the current set.
Audible signals activated
Audible signals deactivated
6. Press the function button C again.
– The display shows the new adjust-
ment.
7. Switch off the appliance to keep the op-
eration.
Do the above procedure to activate
again the audible signals.
Page 27

Use of the appliance
Refer to the instructions for each step of procedure:
1. Make a check if the adjustment of the
water softener agrees with the water
hardness in your area. If necessary, adjust the water softener.
2. Fill the salt container with dishwasher salt.
3. Fill the rinse aid dispenser with rinse aid.
4. Load cutlery and dishes into the appliance.
5. Set the correct washing programme for
the type of load and soil.
6. Fill the detergent dispenser with the correct quantity of detergent.
7. Start the washing programme.
If you use the combi detergent tablets ('3
in 1', '4 in 1', '5 in 1'), refer to 'Multitab
function'.
Setting the water softener
The water softener removes minerals and
salts from the water supply. Minerals and
salts can have a bad effect on the operation
of the appliance.
Equivalent scales measure the water hardness:
• German degrees (dH°).
Water hardness Water hardness adjustment
°dH °TH mmol/l Clarke manually electronically
51 - 70 91 - 125 9,1 - 12,5 64 - 88
43 - 50 76 - 90 7,6 - 9,0 53 - 63
37 - 42 65 - 75 6,5 - 7,5 46 - 52
29 - 36 51 - 64 5,1 - 6,4 36 - 45
23 - 28 40 - 50 4,0 - 5,0 28 - 35
19 - 22 33 - 39 3,3 - 3,9 23 - 27
15 - 18 26 - 32 2,6 - 3,2 18 - 22 1 4
11 - 14 19 - 25 1,9 - 2,5 13 - 17 1 3
4 - 10 7 - 18 0,7 - 1,8 5 - 12 1 2
< 4 < 7 < 0,7 < 5
1) Factory position.
2) No use of salt is necessary.
You must adjust the water softener manually and electronically.
Manual adjustment
Turn the water hardness dial to the position
1 or 2 (refer to the chart).
• French degrees (°TH).
• mmol/l (millimol for each litre - international
unit for the hardness of water).
• Clarke degrees.
Adjust the water softener to the water hardness in your area. If necessary, contact your
local water authority.
1)
2
1)
2
1)
2
1)
2
1)
2
1)
2
2)
1
electrolux 27
10
9
8
7
6
1)
5
2)
1
Electronic adjustment
1. Switch on the appliance.
Page 28

20
30
M
A
X
1
2
3
4
+
-
28 electrolux
2. Make sure that the appliance is in setting
mode.
3. Press and hold function buttons B and C
until the indicator lights of function buttons A, B and C start to flash.
4. Release function buttons B and C.
5. Press function button A.
– The indicator lights for function buttons
B and C go off.
– The indicator light for function button A
continues to flash.
Use of dishwasher salt
Do these steps to fill the salt container:
1. Turn the cap counterclockwise to open
the salt container.
2. Fill the salt container with 1 litre of water
(only with the first operation).
3. Use the funnel to fill the salt container with
salt.
4. Remove the salt around the opening of
the salt container.
5. Turn the cap clockwise to close the salt
container.
It is correct that water comes out from
the salt container when you fill it with salt.
If the water softener is set electronically
to the level 1, the salt indicator light stays
off.
– The display shows the current adjust-
ment.
– The intermittent audible signals tell the
current adjustment.
Example: the display shows
/ 5 in-
termittent audible signals = level 5.
6. Press the function button A again and
again until the display shows the necessary adjustment.
7. Press the on/off button to keep the operation.
Use of detergent and rinse aid
1
2
7
3
4
6
Use of detergent
To help the environment, do not use
more than the correct quantity of detergent.
Follow the detergent manufacturer recommendations on the detergent packaging.
Do these steps to fill the detergent dispenser:
1.
Press the release button
7
lid
2.
of the detergent dispenser.
Put the detergent in the dispenser
3. If the washing programme has a prewash
phase, put a small quantity of detergent
5
on the inner part of the appliance door.
4. If you use the detergent tablets, put the
tablet in the detergent dispenser
5. Close the detergent dispenser. Press the
lid until it locks into position.
2
to open the
1
1
.
.
Page 29

electrolux 29
Different brands of detergent dissolve in
different times. Some detergent tablets
do not have the best cleaning results
during short washing programmes. Use
long washing programmes when you
use the detergent tablets to fully remove
the detergent.
Use of rinse aid
Rinse aid makes it possible to dry the
dishes without streaks and stains.
The rinse aid dispenser automatically
adds rinse aid during the last rinsing
phase.
Do these steps to fill the rinse aid dispenser:
1.
Press the release button
5
lid
of the rinse aid dispenser.
6
to open the
Multitab function
The multitab function is for combi detergent
tablets.
These tablets contain agents as detergent,
rinse aid and dishwasher salt. Some types of
tablets can contain other agents.
Do a check if these tablets are applicable for
the local water hardness. Refer to the instructions from the manufacturer.
When you set the multitab function, it stays
on until you deactivate it.
The multitab function deactivates the flow of
rinse aid and salt.
The multitab function deactivates the indicator lights of salt and rinse aid.
The programme duration can increase if you
use the multitab function.
Activate the multitab function before the
start of a washing programme.
You cannot activate the multitab function when the programme operates.
2.
Fill the rinse aid dispenser
aid. The mark 'max' shows the maximum
level.
3. Remove the spilled rinse aid with an absorbent cloth to prevent too much foam
during the washing programme.
4. Close the rinse aid dispenser. Press the
lid until it locks into position.
Adjust the rinse aid dosage
Factory set: position 3.
You can set the rinse aid dosage between
position 1 (lowest dosage) and position 4
(highest dosage).
Turn the rinse aid selector
decrease the dosage.
To activate the multitab function:
• Press the multitab button. The multitab in-
dicator light comes on.
To deactivate the multitab function and use
separately detergent, salt and rinse aid:
1. Press the multitab button. The multitab
indicator light goes off.
2. Fill the salt container and rinse aid dispenser.
3. Adjust the water hardness setting to the
highest level.
4. Do a washing programme without
dishes.
5. Adjust the water softener to the water
hardness in your area.
6. Adjust the rinse aid dosage.
3
with rinse
4
to increase or
Loading cutlery and dishes
Hints and tips
Do not use the appliance to clean objects
that can absorb water (e.g. sponges, household cloths).
• Before you load cutlery and dishes, follow
these steps:
– Remove remaining food.
– Make remaining burnt food in the pans
soft.
• While you load cutlery and dishes, follow
these steps:
– Load hollow items (e.g. cups, glasses
and pans) with the opening down.
– Make sure that water does not collect in
the container or in a deep base.
– Make sure that cutlery and dishes do not
bond together.
Page 30

30 electrolux
– Make sure that the glasses do not touch
other glasses.
– Put small objects in the cutlery basket.
– Mix the spoons with other cutlery to pre-
vent them from bonding together.
– Arrange the items to let water touch all
surfaces.
• Plastic items and pans with non-stick
coatings can retain the water droplets.
• Put light items in the upper basket. Make
sure that the items do not move.
Lower basket
Put the saucepans, lids, plates, salad bowls
and cutlery in the lower basket. Arrange the
service dishes and large lids around the edge
of the basket.
If you do not use the beer glass holders, fold
them up.
You can replace the beer glass holders with
the two cup racks. You can use the cup
racks for cups or for glasses with long stems.
The rows of prongs in the lower basket can
be flat to load pots, pans and bowls.
Beer glass holders
The beer glass holders on the left side in the
lower basket can hold a maximum of four
beer glasses.
Do these steps to remove the beer glass
holders:
1. Pull up the hooks and push them lightly
from below.
2. Use the hooks to put the cup racks on the
horizontal bar.
Push the support to the rear to remove the
support of the beer glass holders.
Page 31

electrolux 31
Push the support to the front to attach the
support of the beer glass holders.
Warning! Be careful when you remove
or attach the support.
Cutlery basket
• Mix the spoons with other cutlery to pre-
vent them to bond together.
You can open the cutlery basket to remove
the cutlery more easily. Do these steps to remove the cutlery:
1. Put the cutlery basket on a table or work
surface.
2. Open the handle.
3. Remove the cutlery.
Hold the two parts of the handle tightly
when you move the cutlery basket.
The upper basket
The upper basket is for saucers, salad bowls,
cups, glasses, pots and lids. Arrange the
items to let water touch all surfaces.
•Put the grids on the cutlery basket.
• For larger items use only one of the cutlery
grids
• Put the forks and spoons with the handles
down.
• Put the knives with the handles up.
Page 32

32 electrolux
• Put the knives and small cutlery in the cutlery tray. Put cutlery that is too large for the
cutlery tray in the cutlery basket.
• For longer items fold the cup racks up.
• Y ou ca n fold u p or do wn th e row o f pro ngs
on the left side of the upper basket to increase the load flexibility.
• Put the glasses with long stems in the cup
racks with the stems up.
• For glasses with long stems, turn the glass
holder to the left side or to the right side.
Adjustment of the height of the upper
basket
You can put the upper basket in two positions to increase the load flexibility.
Maximum height of the dishes in:
the upper
Higher position
Lower position
basket
23 cm 34 cm
25 cm 32 cm
the lower
basket
Do these steps to move to the upper
basket to the higher position or to the
lower position:
1. Pull out the upper basket until it stops.
2. Hold the upper basket by the handle, lift
it up fully and then let it down vertically.
The upper basket latches into the lower
position or the higher position.
Page 33

Select and start a washing programme
Select and start a washing programme
without delay start
1. Switch on the appliance.
2. Make sure that the appliance is in setting
mode.
3. Select a washing programme. Refer to
'Washing programmes'.
– The display shows the number of the
washing programme.
4. If necessary, select one or more functions.
5. Close the appliance door. The washing
programme starts automatically.
Select and start a washing programme
with delay start
1. Switch on the appliance and select a
washing programme.
2. Press the delay start button again and
again until the display shows the necessary number of hours for the delay start.
3. Close the appliance door.
– The countdown starts automatically.
– When the countdown is completed,
the washing programme starts automatically.
The opening of the appliance door interrupts the countdown. When you close
the door, the countdown continues from
the point of interruption.
Interruption of a washing programme
• Open the appliance door.
– The washing programme stops.
• Close the appliance door.
– The washing programme continues
from the point of interruption.
How to cancel a washing programme or
a delay start
1. Press and hold the cancel button until the
2. Make sure that there is detergent in the
At the end of the washing programme
• The appliance stops automatically.
• The audible signals operate.
1. Open the appliance door.
2. Switch off the appliance.
3. For better drying results, keep the door
electrolux 33
If a washing programme or a delay start
has not started, you can change the selection.
When a washing programme or a delay
start are in progress, it is not possible to
change the selection. It is necessary to
cancel the washing programme or the
delay start to make a new selection.
When you cancel the delay start, this automatically cancels the selected washing programme. You have to select the
washing programme again.
display shows two horizontal bars.
detergent dispenser before you start a
new washing programme.
– The display shows 0.
– The end-of-programme indicator light
is on.
ajar for some minutes.
Page 34

34 electrolux
• If you do not switch off the appliance,
after three minutes from the end of the
washing programme:
– all indicator lights go off,
– the display shows one horizontal
bar,
– the optical signal goes off.
This helps to decrease energy consumption.
Press one of the buttons (not the on/off
button), the display and the indicator
lights come on again.
Washing programmes
Washing programmes
Programme Degree of
1
Automatic
2
Intensive
70°C
3
Quick 60°C
4
Economy
50°C
5
One hour
55°C
6
Glass 45°C
2)
4)
soil
Any Crockery, cut-
Heavy soil Crockery, cut-
Normal or
light soil
3)
Normal soil Crockery and
Light soil Crockery and
Normal or
light soil
Type of load Programme descrip-
lery, pots and
pans
lery, pots and
pans
Crockery and
cutlery
cutlery
cutlery
Delicate crockery and glassware
Remove the load
• Let the dishes become cold before you remove them from the appliance. Hot dishes
are easily damaged.
• First remove the items from the lower basket, then from the upper basket.
• There can be water on the sides and door
of the appliance. Stainless steel becomes
cool more quickly than the dishes.
tion
Prewash
Main wash 45°C or 70°C
1 or 2 middle rinses
Last rinse
Dry
Prewash
Main wash 70°C
2 middle rinses
Last rinse
Dry
Main wash 60°C
Rinse
Prewash
Main wash up to 50°C
1 intermediate rinse
Final rinse
Drying
Main wash 55°C
1 middle rinse
Last rinse
Main wash 45°C
1 middle rinse
Last rinse
Dry
Energy saver
yes with effect
yes with effect
yes without effect
yes with effect
yes without effect
yes with effect
1)
Page 35

electrolux 35
Programme Degree of
7
Prewash
1) For programmes where the function has an effect, the energy saving is between 10% and 25%
2) The appliance adjusts automatically the temperature of the water during the main wash. This depends
if the appliance has a full load or not and on the level of soil on the dishes. The programme duration
and the programme consumptions can change.
3) This is the daily programme for a family of 4 persons who load only the breakfast and the dinner
crockery and cutlery.
4) Test programme for test institutes. Refer to supplied leaflet for test data.
soil
Any Not fully load.
Type of load Programme descrip-
(To be completed later on).
1 cold rinse (to prevent
the remaining food to
bond).
Detergent is not necessary with this programme.
tion
Energy saver
yes without effect
1)
Consumption values
Programme Duration (minutes) Energy (kWh) Water (litres)
1
Automatic 45-70°
2
Intensive 70°C
3
Quick 60°C
4
Economy 50°C
5
90 - 130 1,1 - 1,7 12 - 23
110 - 120 1,8 - 2,0 23 - 25
30 0,9 9
150 - 160 1,0 - 1,1 12 - 13
45 - 55 1,0 - 1,2 11 - 12
One hour 55°C
6
Glass 45°C
7
Prewash
60 - 70 0,8 - 0,9 14 - 15
12 0,1 4
The pressure and temperature of the
water, the variations of power supply
Care and cleaning
To remove and clean the filters
Dirty filters decrease the washing results.
The appliance has three filters:
1. coarse filter (A)
2. microfilter (B)
3. flat filter (C)
and the quantity of dishes can change
these values.
Page 36

A
36 electrolux
B
C
1. To unlock the filter system, turn the han-
dle on the microfilter (B) approximately
1/4 counterclockwise.
2. Remove the filter system.
3. Hold the coarse filter (A) by the handle
with the hole.
4. Remove the coarse filter (A) from the mi-
crofilter (B).
5. Remove the flat filter (C) from the bottom
of the appliance.
6. Clean the filters below running water.
7. Put the flat filter (C) in the bottom of the
appliance.
8. Put the coarse filter (A) in the microfilter
(B) and push the filters together.
9. Put the filter system in position.
10. To lock the filter system, turn the handle
on the microfilter (B) clockwise until it
locks in position.
To clean the spray arms
Do not remove the spray arms.
If the holes in the spray arms become clogged, remove remaining parts of soil with a
cocktail stick.
To clean the external surfaces
Clean the external surfaces of the appliance
and control panel with a damp soft cloth.
Only use neutral detergents. Do not use
abrasive products, scouring pads or solvents
(e.g. acetone).
What to do if…
The appliance does not start or stops during
operation.
Malfunction Fault code Possible cause Possible solution
The appliance does not
fill with water.
The water pressure is
The water tap is closed. Open the water tap.
The filter in the water in-
The display shows The water tap is
First try to find a solution to the problem (refer
to the chart). If not, contact the service centre.
blocked or is furred with
limescale.
too low.
let hose is blocked.
Clean the water tap.
Contact your local water authority.
Clean the filter.
Page 37

Malfunction Fault code Possible cause Possible solution
The connection of the
The water inlet hose is
The appliance does not
drain the water.
The connection of the
The water drain hose is
The anti-flood device
operates.
The programme does
not start.
The mains plug is not
Blow out fuse in the
Delay start is set. (Only
The display shows There is a blockage in
The display shows Close the water tap and
The appliance door is
After the check, switch on the appliance. The
programme continues from the point of interruption.
If the malfunction shows again, contact the
service centre.
If the display shows other fault codes, con-
water inlet hose is not
correct.
damaged.
the sink spigot.
water drain hose is not
correct.
damaged.
open.
connected in.
household fuse box.
for appliances with delay start).
We recommend that you write the data here:
Model (MOD.) ....................
Product number (PNC) ....................
Serial number (S.N.) ....................
Make sure that the connection is correct.
Make sure that the water inlet hose has no
damages.
Clean the sink spigot.
Make sure that the connection is correct.
Make sure that the water drain hose has no
damages.
contact the service
centre.
Close the door correctly.
Put in the mains plug.
Replace the fuse.
To start immediately
the programme, cancel
the delay start.
tact the service centre.
The necessary data for the service centre is
on the rating plate.
The washing results and drying results are not satisfactory
Problem Possible cause Possible solution
The dishes are not clean. The selected washing pro-
gramme was not applicable for
the type of load and soil.
The baskets were not loaded
correctly, water did not touch all
surfaces.
The spray arms could not turn
freely because of incorrect arrangement of the load.
Make sure that the washing programme is applicable for the
type of load and soil.
Load the baskets correctly.
Make sure that an incorrect arrangement of the load does not
cause a blockage of the spray
arms.
electrolux 37
Page 38

38 electrolux
Problem Possible cause Possible solution
The filters are dirty or not as-
The quantity of detergent was
Limescale particles on the
dishes.
Incorrect water softener adjust-
The salt container cap is not
There are streaks, milky stains,
or a bluish layer on glasses and
dishes.
Dry water drop stains on glasses
and dishes.
The detergent can be the cause. Use a different brand of deter-
The dishes are wet. You have set a washing pro-
The dishes are wet and dull. The rinse aid dispenser is emp-
The multitab function is on. (The
How to activate the rinse aid dispenser
sembled and installed correctly.
not sufficient or missing.
The salt container is empty. Fill the salt container with dish-
ment
closed correctly.
Rinse aid dosage is too high. Decrease the rinse aid dosage.
Rinse aid dosage is too low. Increase the rinse aid dosage.
gramme without drying phase or
with a decreased drying phase.
ty.
rinse aid dispenser is automatically off).
– The display shows the current set.
1. Switch on the appliance.
2. Make sure that the appliance is in setting
mode.
3. Press and hold function buttons B and C.
– The indicator lights for function buttons
A, B, and C start to flash.
4. Release function buttons B and C.
5. Press function button B.
– The indicator lights for function buttons
A and C go off.
6. Press function button B again.
– The display shows the new adjust-
ment.
7. Switch off the appliance to keep the operation.
Make sure that the filters are
clean and correctly assembled
and installed.
Make sure that the quantity of
detergent is sufficient.
washer salt.
Adjust the water softener.
Make sure that the salt container
cap is closed correctly.
gent.
Let the door stay ajar for some
minutes before you remove the
dishes.
Fill the rinse aid dispenser with
rinse aid.
Activate the rinse aid dispenser.
Refer to 'How to activate the
rinse aid dispenser'.
Rinse aid dispenser deactivated
Rinse aid dispenser activated
– The indicator light for function button B
continues to flash.
Technical data
Dimensions Width 596 mm
Height 858 - 938 mm
Depth 550 mm
Water supply pressure Minimum 0,5 bar (0,05 MPa)
Maximum 8 bar (0,8 MPa)
Water supply
1)
Cold water or hot water maximum 60°C
Page 39

electrolux 39
Capacity Place settings 12
1) Connect the water inlet hose to a water tap with a 3/4'' thread.
The rating plate on the inner edge of the
appliance door shows the electrical connection data.
If the hot water comes from alternative
sources of energy, (e.g. solar panels,
photovoltaic panels and aeolian), use a
hot water supply to decrease energy
consumption.
Environment concerns
The symbol on the product or on its
packaging indicates that this product may
not be treated as household waste. Instead
it should be taken to the appropriate
collection point for the recycling of electrical
and electronic equipment. By ensuring this
product is disposed of correctly, you will help
prevent potential negative consequences for
the environment and human health, which
could otherwise be caused by inappropriate
waste handling of this product. For more
detailed information about recycling of this
product, please contact your local council,
your household waste disposal service or the
shop where you purchased the product.
Recycle the materials with the symbol
Put the packaging in applicable containers to
recycle it.
.
Page 40

www.electrolux.com
Per gli accessori e i pezzi di ricambio vogliate visitare il nostro Web Shop:
www.electrolux.ch
117949340-00-102009
 Loading...