

Page 1
USER
MANUAL
FSE83807P
EN User Manual 2
Dishwasher
FR Notice d'utilisation 30
Lave-vaisselle
Page 2

www.aeg.com2
CONTENTS
1. SAFETY INFORMATION......................................................................................2
2. SAFETY INSTRUCTIONS.................................................................................... 4
3. PRODUCT DESCRIPTION...................................................................................6
4. CONTROL PANEL................................................................................................7
5. PROGRAMME SELECTION.................................................................................8
6. BASIC SETTINGS ............................................................................................. 10
7. BEFORE FIRST USE..........................................................................................14
8. DAILY USE......................................................................................................... 16
9. HINTS AND TIPS................................................................................................19
10. CARE AND CLEANING.................................................................................... 20
11. TROUBLESHOOTING......................................................................................24
12. TECHNICAL INFORMATION............................................................................28
FOR PERFECT RESULTS
Thank you for choosing this AEG product. We have created it to give you
impeccable performance for many years, with innovative technologies that help
make life simpler – features you might not find on ordinary appliances. Please
spend a few minutes reading to get the very best from it.
Visit our website to:
Get usage advice, brochures, trouble shooter, service and repair information:
www.aeg.com/support
Register your product for better service:
www.registeraeg.com
Buy Accessories, Consumables and Original spare parts for your appliance:
www.aeg.com/shop
CUSTOMER CARE AND SERVICE
Always use original spare parts.
When contacting our Authorised Service Centre, ensure that you have the
following data available: Model, PNC, Serial Number.
The information can be found on the rating plate.
Warning / Caution-Safety information
General information and tips
Environmental information
Subject to change without notice.
1. SAFETY INFORMATION
Before the installation and use of the appliance, carefully
read the supplied instructions. The manufacturer is not
responsible for any injuries or damage that are the result
Page 3

ENGLISH 3
of incorrect installation or usage. Always keep the
instructions in a safe and accessible location for future
reference.
1.1 Children and vulnerable people safety
• This appliance can be used by children aged from 8
years and above and persons with reduced physical,
sensory or mental capabilities or lack of experience
and knowledge if they have been given supervision or
instruction concerning the use of the appliance in a
safe way and understand the hazards involved.
• Children between 3 and 8 years of age and persons
with very extensive and complex disabilities shall be
kept away from the appliance unless continuously
supervised.
• Children of less than 3 years of age should be kept
away from the appliance unless continuously
supervised.
• Do not let children play with the appliance.
• Keep detergents away from children.
• Keep children and pets away from the appliance when
the door is open.
• Children shall not carry out cleaning and user
maintenance of the appliance without supervision.
1.2 General Safety
• This appliance is intended to be used in household
and similar applications such as:
– farm houses; staff kitchen areas in shops, offices
and other working environments;
– by clients in hotels, motels, bed & breakfast and
other residential type environments.
• Do not change the specification of this appliance.
• The operating water pressure (minimum and
maximum) must be between 0.5 (0.05) / 8 (0.8) bar
(MPa)
• Follow the maximum number of 13 place settings.
Page 4
www.aeg.com4
• If the supply cord is damaged, it must be replaced by
the manufacturer, its Authorised Service Centre or
similarly qualified persons in order to avoid a hazard.
• Put the cutlery in the cutlery basket with the sharp
ends pointing down or put them in the cutlery drawer
in a horizontal position with the sharp edges down.
• Do not leave the appliance with the open door
unattended to avoid stepping accidentally onto it.
• Before any maintenance operation, deactivate the
appliance and disconnect the mains plug from the
socket.
• Do not use high pressure water sprays and/or steam
to clean the appliance.
• If the appliance has ventilation openings in the base,
they must not be covered e.g. by a carpet.
• The appliance is to be connected to the water mains
using the new supplied hose-sets. Old hose sets must
not be reused.
2. SAFETY INSTRUCTIONS
2.1 Installation
WARNING!
Only a qualified person must
install this appliance.
• Remove all the packaging.
• Do not install or use a damaged
appliance.
• Do not use the appliance before
installing it in the built-in structure due
to safety manner.
• Follow the installation instructions
supplied with the appliance.
• Always take care when moving the
appliance as it is heavy. Always use
safety gloves and enclosed footwear.
• Do not install or use the appliance
where the temperature is less than
0 °C.
• Install the appliance in a safe and
suitable place that meets installation
requirements.
2.2 Electrical connection
WARNING!
Risk of fire and electric
shock.
• The appliance must be earthed.
• Make sure that the parameters on the
rating plate are compatible with the
electrical ratings of the mains power
supply.
• Always use a correctly installed
shockproof socket.
• Do not use multi-plug adapters and
extension cables.
• Make sure not to cause damage to
the mains plug and to the mains
cable. Should the mains cable need to
be replaced, this must be carried out
by our Authorised Service Centre.
• Connect the mains plug to the mains
socket only at the end of the
installation. Make sure that there is
access to the mains plug after the
installation.
Page 5
ENGLISH 5
• Do not pull the mains cable to
disconnect the appliance. Always pull
the mains plug.
• This appliance is fitted with a 13 A
mains plug. If it is necessary to
change the mains plug fuse, use only
a 13 A ASTA (BS 1362) fuse (UK and
Ireland only).
2.3 Water connection
• Do not cause damage to the water
hoses.
• Before connection to new pipes, pipes
not used for a long time, where repair
work has been carried out or new
devices fitted (water meters, etc.), let
the water flow until it is clean and
clear.
• Ensure that there are no visible water
leaks during and after the first use of
the appliance.
• The water inlet hose has a safety
valve and a sheath with an inner
mains cable.
• Do not remove the dishes from the
appliance until the programme is
complete. Some detergent may
remain on the dishes.
• Do not store items or apply pressure
on the open door of the appliance.
• The appliance can release hot steam
if you open the door while a
programme operates.
2.5 Internal lighting
WARNING!
Risk of injury.
• Concerning the lamp(s) inside this
product and spare part lamps sold
separately: These lamps are intended
to withstand extreme physical
conditions in household appliances,
such as temperature, vibration,
humidity, or are intended to signal
information about the operational
status of the appliance. They are not
intended to be used in other
applications and are not suitable for
household room illumination.
• This appliance has an internal lamp
that comes on when you open the
door and goes off when the door is
closed.
• To replace the internal lighting,
contact the Authorised Service
Centre.
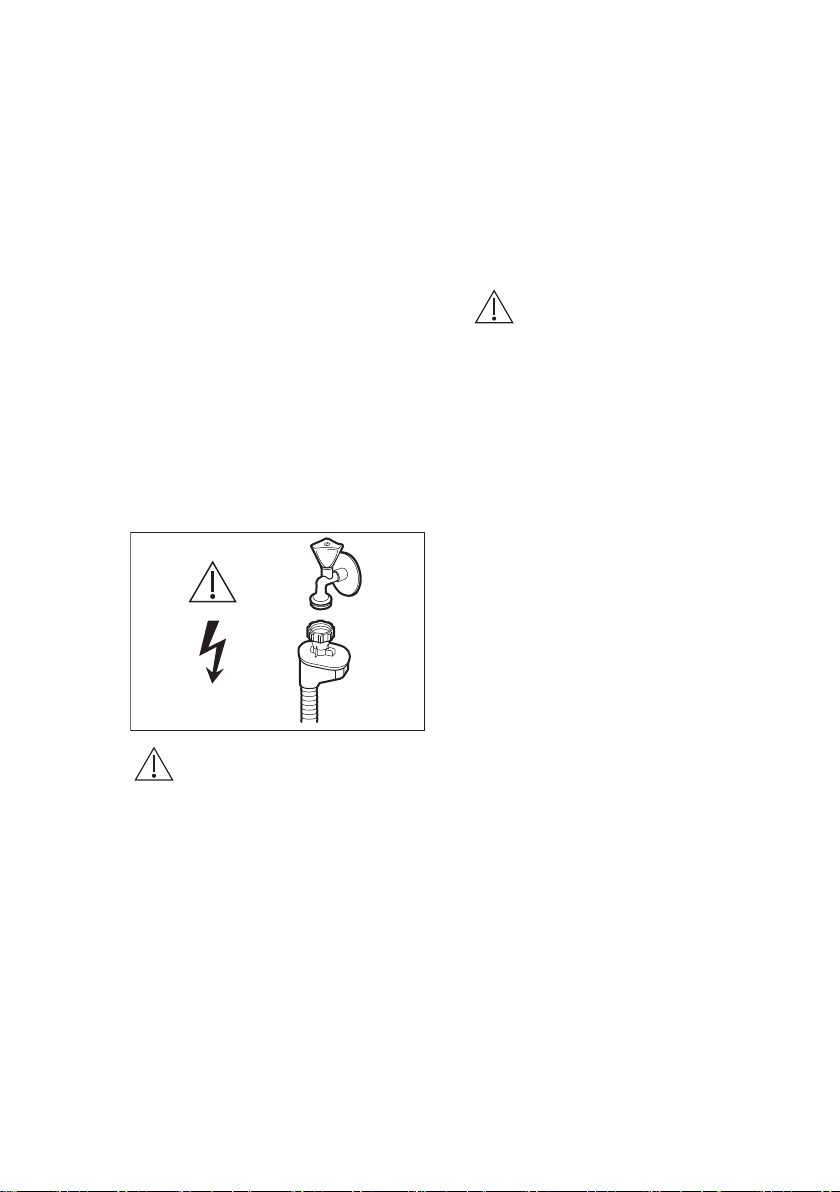
WARNING!
Dangerous voltage.
• If the water inlet hose is damaged,
immediately close the water tap and
disconnect the mains plug from the
mains socket. Contact the Authorised
Service Centre to replace the water
inlet hose.
2.4 Use
• Do not put flammable products or
items that are wet with flammable
products in, near or on the appliance.
• Dishwasher detergents are
dangerous. Follow the safety
instructions on the detergent
packaging.
• Do not drink and play with the water in
the appliance.
2.6 Service
• To repair the appliance contact the
Authorised Service Centre. Use
original spare parts only.
• Please note that self-repair or nonprofessional repair can have safety
consequences and might void the
guarantee.
• The following spare parts will be
available for 7 years after the model
has been discontinued: motor,
circulation and drain pump, heaters
and heating elements, including heat
pumps, piping and related equipment
including hoses, valves, filters and
aquastops, structural and interior
parts related to door assemblies,
printed circuit boards, electronic
displays, pressure switches,
thermostats and sensors, software
Page 6
5
4
9
67
13
12
11
10
14
2
3
1
8
www.aeg.com6
and firmware including reset software.
Please note that some of these spare
parts are only available to
professional repairers, and that not all
spare parts are relevant for all
models.
• The following spare parts will be
available for 10 years after the model
has been discontinued: door hinge
and seals, other seals, spray arms,
drain filters, interior racks and plastic
peripherals such as baskets and lids.
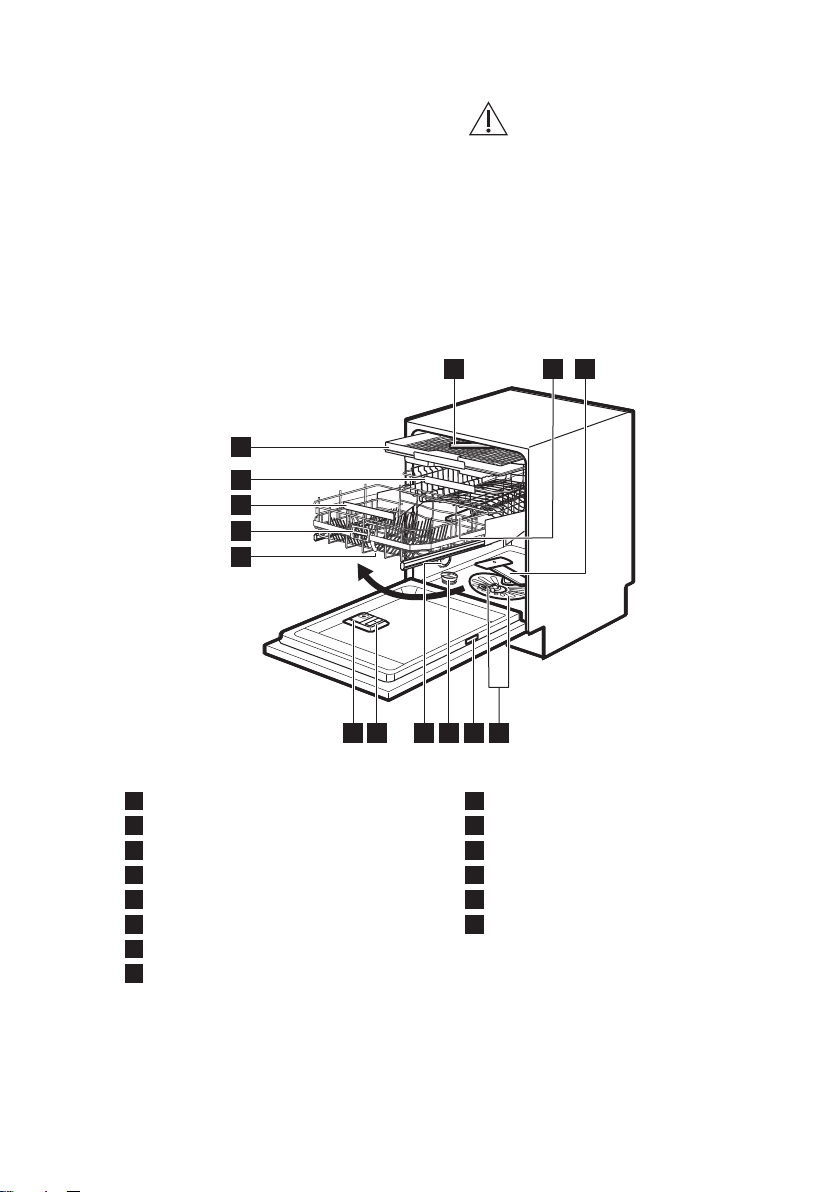
3. PRODUCT DESCRIPTION
2.7 Disposal
WARNING!
Risk of injury or suffocation.
• Disconnect the appliance from the
mains supply.
• Cut off the mains cable and discard it.
• Remove the door catch to prevent
children and pets to get closed in the
appliance.
Ceiling spray arm
1
Upper spray arm
2
Lower spray arm
3
Filters
4
Rating plate
5
Salt container
6
Air vent
7
Rinse aid dispenser
8
3.1 Internal light
The appliance has an internal lamp. It
comes on when you open the door or
switch the appliance on while the door is
open.
ComfortLift basket
10
Trigger handle
11
Lower basket handle
12
Upper basket
13
Cutlery drawer
14
The lamp goes off when you close the
door or switch the appliance off.
Otherwise, it goes off automatically after
some time to save energy.
Detergent dispenser
9
Page 7
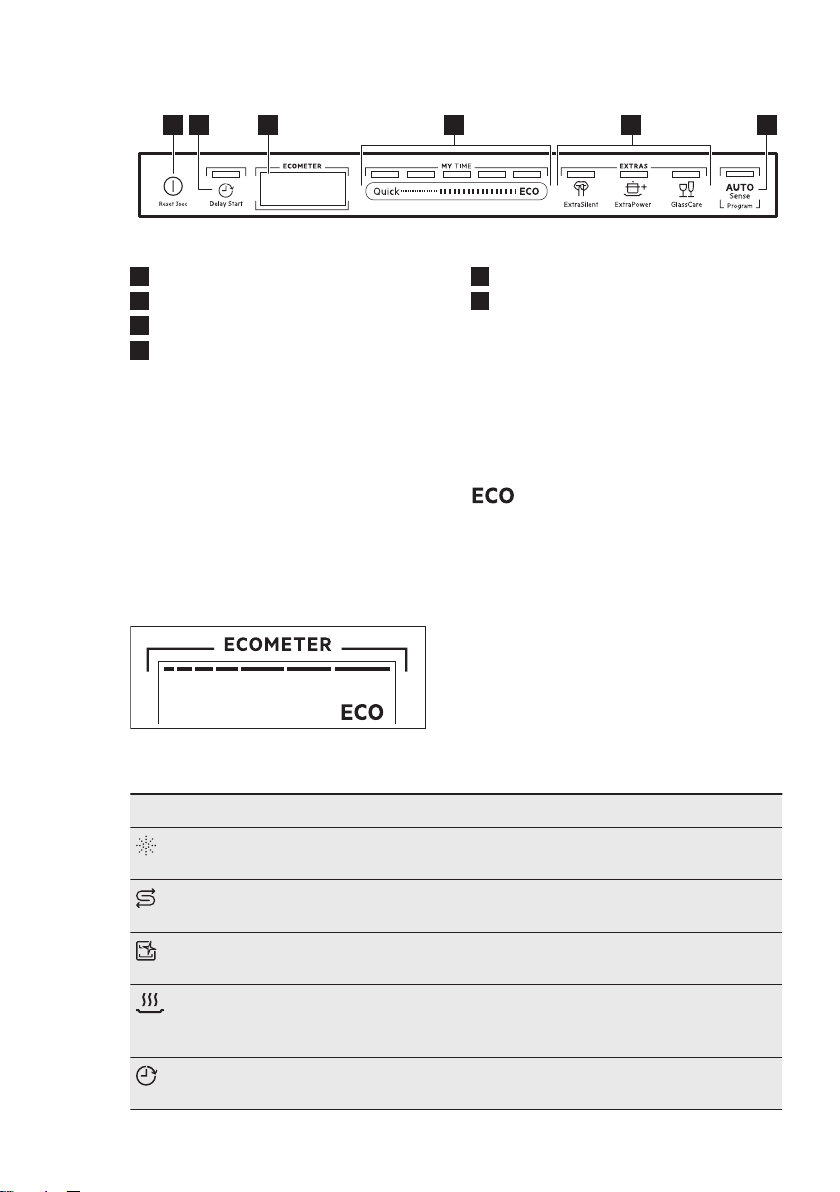
4. CONTROL PANEL
1 2 3
4 5 6
ENGLISH 7
On/Off button / Reset button
1
Delay Start button
2
Display
3
MY TIME selection bar
4
4.1 Display
The display shows the following
information:
• ECOMETER
• Indicators
• Programme names and durations
• Delay start time
• Information texts
4.2 ECOMETER
4.3 Indicators
Indicator Description
Rinse aid indicator. It is on when the rinse aid dispenser needs refilling.
Refer to "Before first use".
Salt indicator. It is on when the salt container needs refilling. Refer to "Be‐
fore first use".
Machine Care indicator. It is on when the appliance needs internal clean‐
ing with the Machine Care programme. Refer to "Care and cleaning".
Drying phase indicator. It is on when a programme with the drying phase
is selected. It flashes when the drying phase operates. Refer to "Pro‐
gramme selection".
Delay Start indicator. It is on when you set the delay start. Refer to "Daily
use".
EXTRAS buttons
5
AUTO Sense program button
6
The ECOMETER indicates how the
programme selection impacts energy
and water consumption. The more bars
are on, the lower the consumption is.
indicates the most environmentally
friendly programme selection for a
normally soiled load.
Page 8
CA B D E
www.aeg.com8
Indicator Description
Pause indicator. It flashes when you pause a wash cycle or the delay
countdown by opening the appliance door. Refer to "Daily use".
Alert indicators. They are on when a malfunction of the appliance occurs.
Refer to "Troubleshooting".
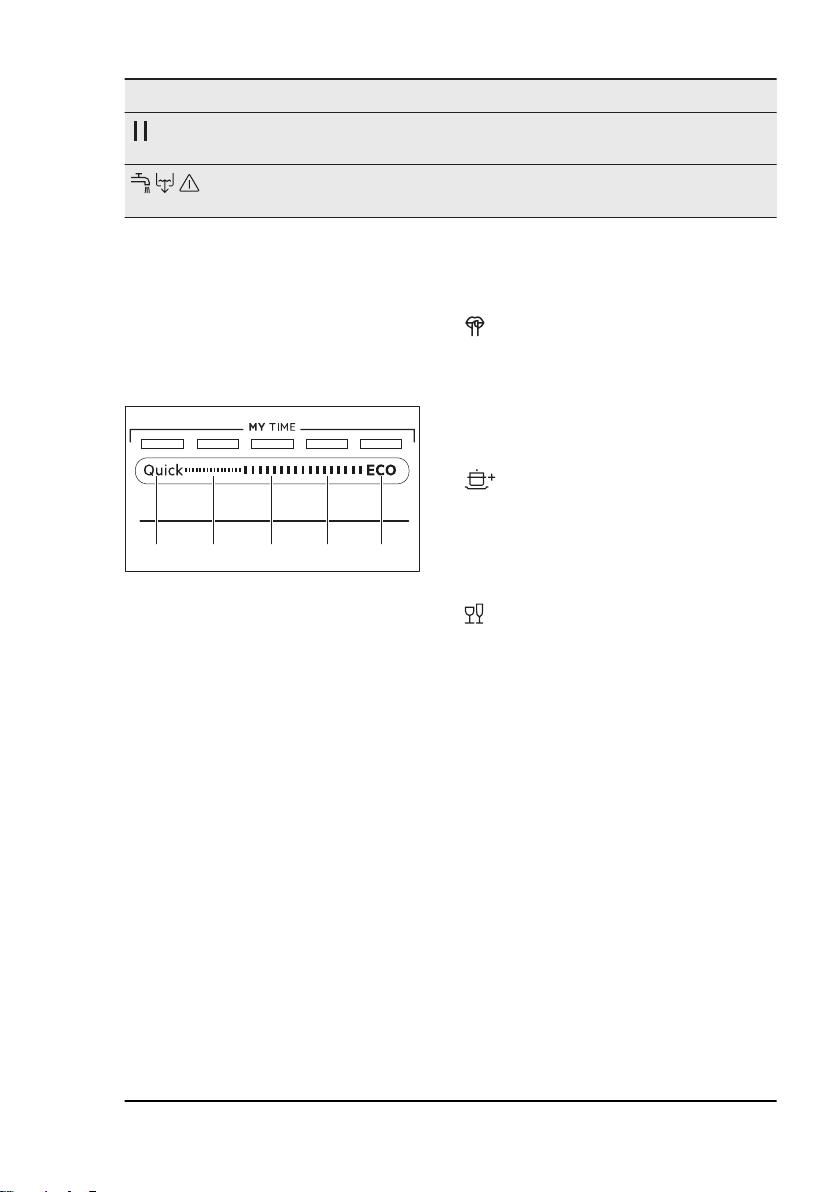
5. PROGRAMME SELECTION
5.1 MY TIME
Using MY TIME selection bar, you can
select a suitable wash cycle based on
programme duration, ranging from 30
minutes to four hours.
A. Quick is the shortest programme
(30min) suitable for washing a load
with fresh and light soil.
B. 1h is a programme suitable for
washing a load with fresh and lightly
dried-on soil.
C. 1h 30min is a programme suitable
for washing and drying normally
soiled items.
D. 2h 40min is a programme suitable
for washing and drying heavily soiled
items.
E. ECO is the longest programme (4h)
offering the most efficient use of
energy and water consumption for
crockery and cutlery with normal soil.
This is the standard programme for
test institutes.
1)
ExtraSilent
ExtraSilent allows to reduce the noise
generated by the appliance. When the
option is activated, the wash pump works
quietly at a lower speed. Due to the low
speed, the programme duration is longer.
ExtraPower
ExtraPower improves the washing
results of the selected programme. The
option increases the wash temperature
and duration.
GlassCare
GlassCare provides special care for a
delicate load. The option prevents rapid
changes in the wash temperature of the
selected programme and reduces it to
45 °C. This protects glassware in
particular from damaging.
5.3 AUTO Sense
The AUTO Sense program automatically
adjusts the wash cycle to the type of
load.
The appliance senses the degree of soil
and the amount of dishes in the baskets.
It adjusts the temperature and quantity of
water as well as the wash duration.
5.2 EXTRAS
You can adjust the programme selection
to your needs by activating EXTRAS.
1)
This programme is used to assess compliance with the Ecodesign Comission Regulation (EU)
2019/2022.
Page 9

5.4 Programmes overview
ENGLISH 9
Pro‐
gramme
Quick • Crockery
1h • Crockery
1h 30min • Crockery
2h 40min • Crockery
ECO • Crockery
AUTO
Sense
Machine
Care
Type of load Degree of
• Cutlery
• Cutlery
• Cutlery
• Pots
• Pans
• Cutlery
• Pots
• Pans
• Cutlery
• Pots
• Pans
• Crockery
• Cutlery
• Pots
• Pans
• No load The pro‐
Programme phases EXTRAS
soil
• Fresh • Wash 50 °C
• Intermediate rinse
• Final rinse 45 °C
• AirDry
• Fresh
• Lightly
dried-on
• Normal
• Lightly
dried-on
• Normal to
heavy
• Dried-on
• Normal
• Lightly
dried-on
The pro‐
gramme ad‐
justs to all de‐
grees of soil.
gramme
cleans the ap‐
pliance interi‐
or.
• Wash 60 °C
• Intermediate rinse
• Final rinse 50 °C
• AirDry
• Wash 60 °C
• Intermediate rinse
• Final rinse 55 °C
• Drying
• AirDry
• Prewash
• Wash 60 °C
• Intermediate rinse
• Final rinse 60 °C
• Drying
• AirDry
• Prewash
• Wash 50 °C
• Intermediate rinse
• Final rinse 55 °C
• Drying
• AirDry
• Prewash
• Wash 50 - 60 °C
• Intermediate rinse
• Final rinse 60 °C
• Drying
• AirDry
• Wash 70 °C
• Intermediate rinse
• Final rinse
• AirDry
• ExtraPower
• GlassCare
• ExtraPower
• GlassCare
• ExtraPower
• GlassCare
• ExtraPower
• GlassCare
• ExtraPower
• GlassCare
• ExtraSilent
EXTRAS are not
applicable to this
programme.
EXTRAS are not
applicable to this
programme.
Consumption values
Programme 1)
Quick 9.3 - 11.4 0.54 - 0.66 30
2)
Water (l) Energy (kWh) Duration (min)
Page 10

www.aeg.com10
Programme 1)
2)
1h 10.6 - 12.9 0.80 - 0.93 60
1h 30min 10.4 - 12.7 0.97 - 1.10 90
2h 40min 10.8 - 13.2 0.97 - 1.11 160
ECO
AUTO Sense 9.6 - 13.1 0.74 - 1.06 120 - 170
Machine Care 8.9 - 10.9 0.58 - 0.70 60
1)
The pressure and the temperature of the water, the variations of the mains supply, the options, the
quantity of dishes and the degree of soil can change the values.
2)
The values for programmes other than ECO are indicative only.
3)
In accordance with the 1016/2010 regulation.
4)
In accordance with the 2019/2022 regulation.
Information for test institutes
To receive the necessary information for
conducting performance tests (e.g.
according to EN60436), send an email
to:
info.test@dishwasher-production.com
6. BASIC SETTINGS
You can configure the appliance by
changing basic settings according to
your needs.
Water (l) Energy (kWh) Duration (min)
11 3) / 11
4)
0.8213) / 0.835
4)
2403) / 240
In your request, include the product
number code (PNC) from the rating plate.
For any other questions regarding your
dishwasher, refer to the service book
provided with your appliance.
4)
Settings Values Description
Water hardness From level 1 to level
10 (default: 5)
Rinse aid level From level 0 to level
6 (default: 4)
End sound ON
OFF (default)
Auto door open ON (default)
OFF
Key tones ON (default)
OFF
Adjust the level of the water softener accord‐
ing to the water hardness in your area.
Adjust the level of the rinse aid according to
the necessary dosage.
Activate or deactivate the acoustic signal for
the end of a programme.
Activate or deactivate AirDry.
Activate or deactivate the sound of the but‐
tons when pressed.
1)
1)
1)
1)
Page 11
BA C
ENGLISH 11
Settings Values Description
Latest prog. selec‐
tion
Display on floor ON (default)
Brightness From level 0 to level9Adjust the brightness of the display.
ON
OFF (default)
OFF
Enable or disable the automatic selection of
the most recently used programme and op‐
1)
tions.
Activate or deactivate TimeBeam.
1)
Language List of languages
(default: English)
Reset settings YES
NO
PNC number Number
1)
For more details, refer to the information provided in this chapter.
6.1 Setting mode
Set the preferred language.
Reset the appliance to the factory settings.
Check the PNC number of your appliance.
To enter setting mode, press and hold
simultaneously and for
How to navigate in setting
about 3 seconds.
mode
You can navigate in setting mode using
MY TIME selection bar.
How to change a setting
Make sure the appliance is in setting
mode.
1. Use Previous or Next to select the
The display shows the setting name and
A. Previous button
B. OK button
C. Next button
Use Previous and Next to switch
between the basic settings and to
change their value.
its current value.
2. Press OK to enter the setting.
The display shows available values.
3. Press Previous or Next to change
4. Press OK to confirm the setting.
Use OK to enter the selected setting and
to confirm changing its value.
5. Press and hold simultaneously
How to enter setting mode
You can enter setting mode before
starting a programme. You cannot enter
setting mode while the programme is
running.
The appliance returns to the programme
selection.
The saved settings remain valid until you
change them again.
1)
• The lights related to the
Previous, OK and Next are on.
• The display shows the first
available setting and its current
value.
desired setting.
the value.
• The new setting is saved.
• The appliance returns to the basic
settings list.
and for about 3
seconds to exit setting mode.
Page 12
www.aeg.com12
6.2 The water softener
The water softener removes minerals
from the water supply, which would have
a negative effect on the washing results
and on the appliance.
The higher the content of these minerals,
The water softener should be adjusted
according to the hardness of the water in
your area. Your local water authority can
advise you on the hardness of the water
in your area. It is important to set the
right level of the water softener to assure
good washing results.
the harder your water is. Water hardness
is measured in equivalent scales.
Water hardness
German de‐
grees (°dH)
47 - 50 84 - 90 8.4 - 9.0 58 - 63 10
43 - 46 76 - 83 7.6 - 8.3 53 - 57 9
37 - 42 65 - 75 6.5 - 7.5 46 - 52 8
29 - 36 51 - 64 5.1 - 6.4 36 - 45 7
23 - 28 40 - 50 4.0 - 5.0 28 - 35 6
19 - 22 33 - 39 3.3 - 3.9 23 - 27
15 - 18 26 - 32 2.6 - 3.2 18 - 22 4
11 - 14 19 - 25 1.9 - 2.5 13 - 17 3
4 - 10 7 - 18 0.7 - 1.8 5 - 12 2
<4 <7 <0.7 < 5
1)
Factory setting.
2)
Do not use salt at this level.
French de‐
grees (°fH)
mmol/l Clarke de‐
grees
Water softener lev‐
el
1)
5
2)
1
Regardless of the type of detergent
used, set the proper water hardness
level to keep the salt refill indicator
active.
Multi-tabs containing salt are
not effective enough to
soften hard water.
Regeneration process
For the correct water softener operation,
the resin of the softener device needs to
be regenerated regularly. This process is
automatic and is the part of the normal
dishwasher operation.
When the prescribed quantity of water
(see values in the table) has been used
since the previous regeneration process,
a new regeneration process will be
initiated between the final rinse and the
programme end.
Water softener lev‐elAmount of water
(l)
1 250
2 100
3 62
4 47
5 25
6 17
7 10
8 5
Page 13
Water softener lev‐elAmount of water
(l)
9 3
10 3
In case of the high water softener setting,
it may occur also in the middle of the
programme, before the rinse (twice
during a programme). Regeneration
initiation has no impact on the cycle
duration, unless it occurs in the middle of
a programme or at the end of a
programme with a short drying phase. In
that cases, the regeneration prolongs the
total duration of a programme by
additional 5 minutes.
Subsequently, the rinsing of the water
softener that lasts 5 minutes may begin
in the same cycle or at the beginning of
the next programme. This activity
increases the total water consumption of
a programme by additional 4 litres and
the total energy consumption of a
programme by additional 2 Wh. The
rinsing of the softener ends with a
complete drain.
Each performed softener rinse (possible
more than one in the same cycle) may
prolong the programme duration by
another 5 minutes when it occurs at any
point at the beginning or in the middle of
a programme.
All the consumption values
mentioned in this section are
determined in accordance
with the currently applicable
standard in laboratory
conditions with water
hardness 2.5mmol/L
according to the 2019/2022
regulation (water softener:
level 3).
The pressure and the
temperature of water as well
as the variations of the
mains supply can change
the values.
ENGLISH 13
6.3 Rinse aid level
The rinse aid helps to dry the dishes
without streaks and stains. It is
automatically released during the hot
rinse phase. It is possible to set the
released quantity of rinse aid.
When the rinse aid dispenser is empty,
the display shows the indicator
Rinse aid low. If the drying results are
satisfactory while using multi-tablets only,
it is possible to deactivate the dispenser
and the refill notification. However, for
best drying performance, always use
rinse aid and keep the notification active.
To deactivate the rinse aid dispenser and
the notification, set the rinse aid level to
0.
and
6.4 End sound
You can activate an acoustic signal that
sounds when the programme is
completed.
Acoustic signals sound also
when a malfunction of the
appliance occurs. It is not
possible to deactivate these
signals.
6.5 AirDry
AirDry improves the drying results. The
appliance door opens automatically
during the drying phase and remains
ajar.
AirDry is automatically activated with all
programmes.
Page 14
www.aeg.com14
The duration of the drying phase and the
door opening time vary depending on the
selected programme and options.
When AirDry opens the door, the display
shows the remaining time of the running
programme.
CAUTION!
Do not try to close the
appliance door within 2
minutes after automatic
opening. This can cause
damage to the appliance.
CAUTION!
If children have access to
the appliance, we advise to
deactivate AirDry. The
automatic opening of the
door may pose a danger.
6.6 Latest programme selection
You can set the automatic selection of
the most recently used programme and
options.
The latest programme that was
completed before the appliance
deactivation is saved. It is then selected
automatically after you activate the
appliance.
When the latest programme selection is
disabled, the default programme is ECO.
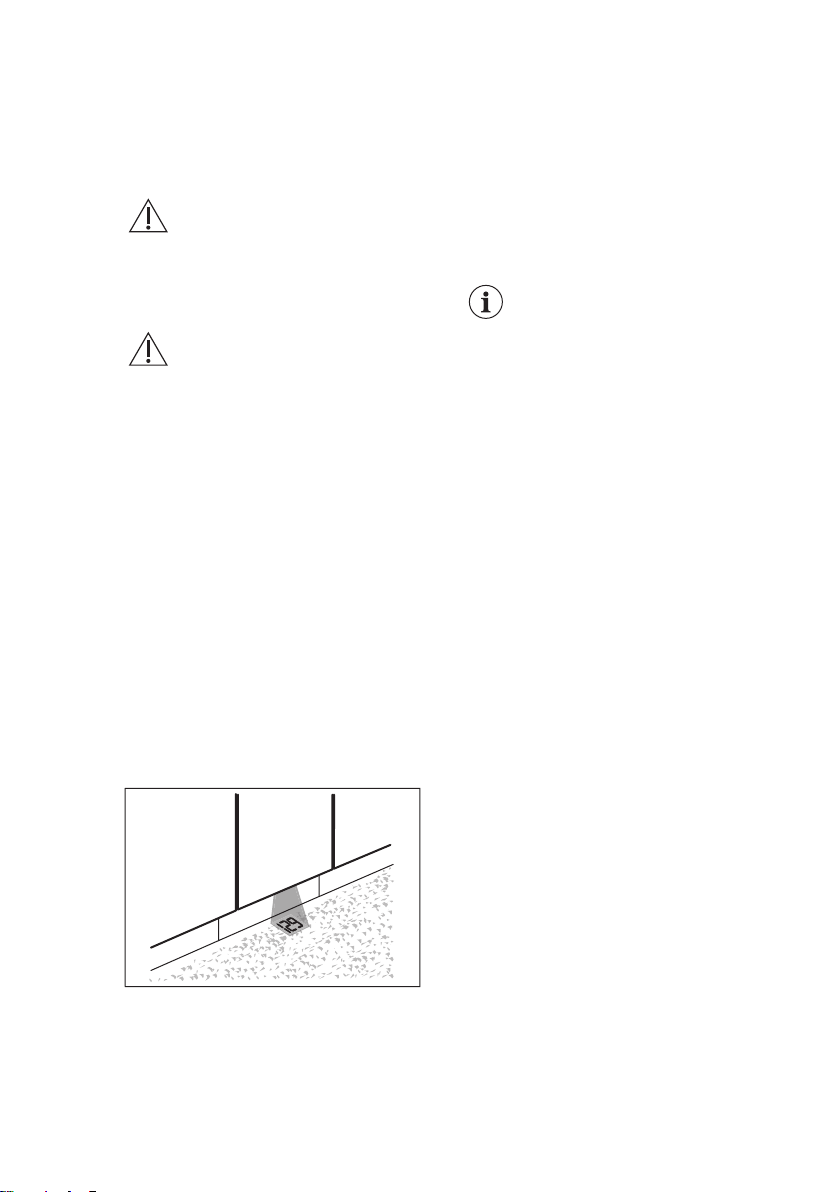
TimeBeam displays the following
information on the floor below the
appliance door:
• The programme duration when the
programme begins.
• 0:00 and CLEAN when the
programme is completed.
• DELAY and the countdown duration
when the delay start begins.
• An alarm code when the appliance
has a malfunction.
When AirDry opens the
door, TimeBeam is off. To
check the remaining time of
the running programme, look
at the control panel display.
6.8 PNC number
If you contact an Authorised Service
Centre, you need to provide the product
number code (PNC number) of your
appliance.
The number can be found on the rating
plate on the appliance door. You can
also check the number on the display.
Select PNC number from the setting list
to check the number.
6.7 TimeBeam
7. BEFORE FIRST USE
1. Make sure that the current level of
the water softener agrees with the
hardness of the water supply. If
not, adjust the level of the water
softener.
2. Fill the salt container.
Page 15

3. Fill the rinse aid dispenser.
A
B
C
4. Open the water tap.
5. Start the programme Quick to
remove any residuals from the
manufacturing process. Do not use
detergent and do not put dishes in
the baskets.
After starting the programme, the
appliance recharges the resin in the
water softener for up to 5 minutes. The
washing phase starts only after this
procedure is complete. The procedure is
repeated periodically.
7.1 The salt container
CAUTION!
Use rough salt designed for
dishwashers only. Fine salt
increases the risk of
corrosion.
The salt is used to recharge the resin in
the water softener and to assure good
washing results in daily use.
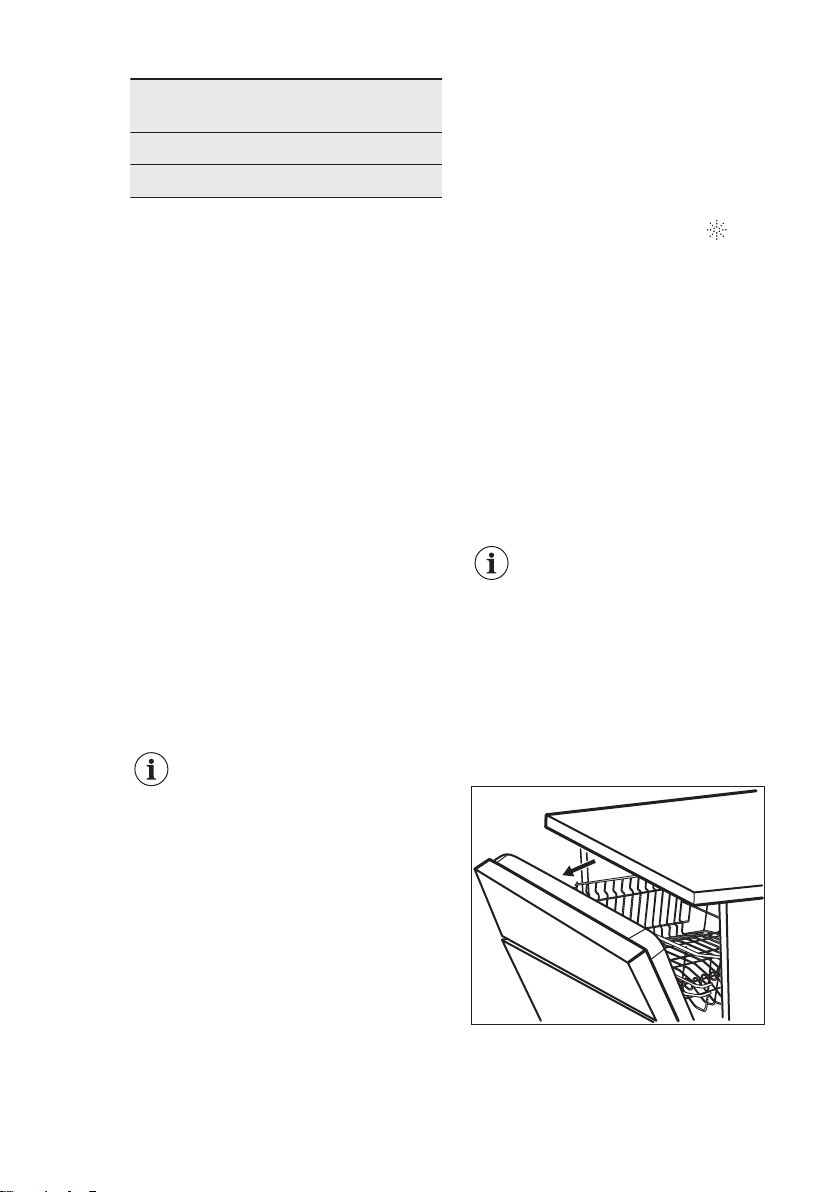
How to fill the salt container
Make sure that the
ComfortLift basket is empty
and locked in the raised
position.
ENGLISH 15
6. Turn the cap of the salt container
clockwise to close the salt container.
CAUTION!
Water and salt can come out
of the salt container when
you fill it. After you fill the
salt container, immediately
start the shortest programme
to prevent corrosion. Do not
put dishes in the baskets.
7.2 How to fill the rinse aid
dispenser
1. Turn the cap of the salt container
counterclockwise and remove it.
2. Put 1 litre of water in the salt
container (only for the first time).
3. Fill the salt container with dishwasher
salt (until it is full).
4. Carefully shake the funnel by its
handle to get the last granules inside.
5. Remove the salt around the opening
of the salt container.
CAUTION!
The compartment (B) is for
rinse aid only. Do not fill it
with detergent.
CAUTION!
Only use rinse aid designed
specifically for dishwashers.
1. Open the lid (C).
2. Fill the dispenser (B) until the rinse
aid reaches the marking ''MAX''.
3. Remove the spilled rinse aid with an
absorbent cloth to prevent excessive
foam formation.
Page 16
www.aeg.com16
4. Close the lid. Make sure that the lid
locks into position.
8. DAILY USE
1. Open the water tap.
2. Press and hold until the appliance
is activated.
3. Fill the salt container if it is empty.
4. Fill the rinse aid dispenser if it is
empty.
5. Load the baskets.
6. Add the detergent.
7. Select and start a programme.
8. Close the water tap when the
programme is complete.
8.1 ComfortLift
CAUTION!
Do not sit on the rack or put
excessive pressure on the
locked basket.
CAUTION!
Do not exceed the max load
capacity of 18 kg.
CAUTION!
Make sure that items do not
stick out of the basket frame
as it can cause damage to
the items and the ComfortLift
mechanism.
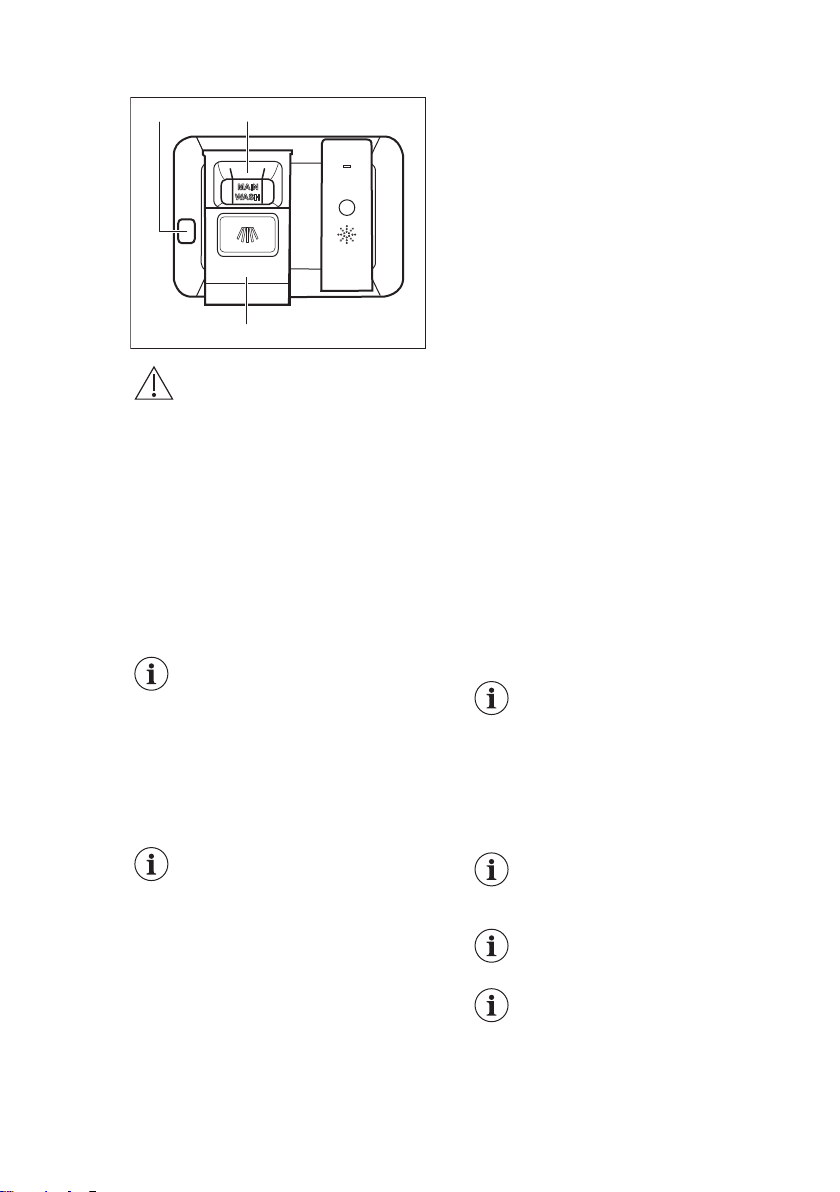
Fill the rinse aid dispenser
when the indicator (A) is
clear.
The basket is automatically locked on the
upper level.
2. Carefully place items in the basket or
remove them (refer to Basket
loading leaflet).
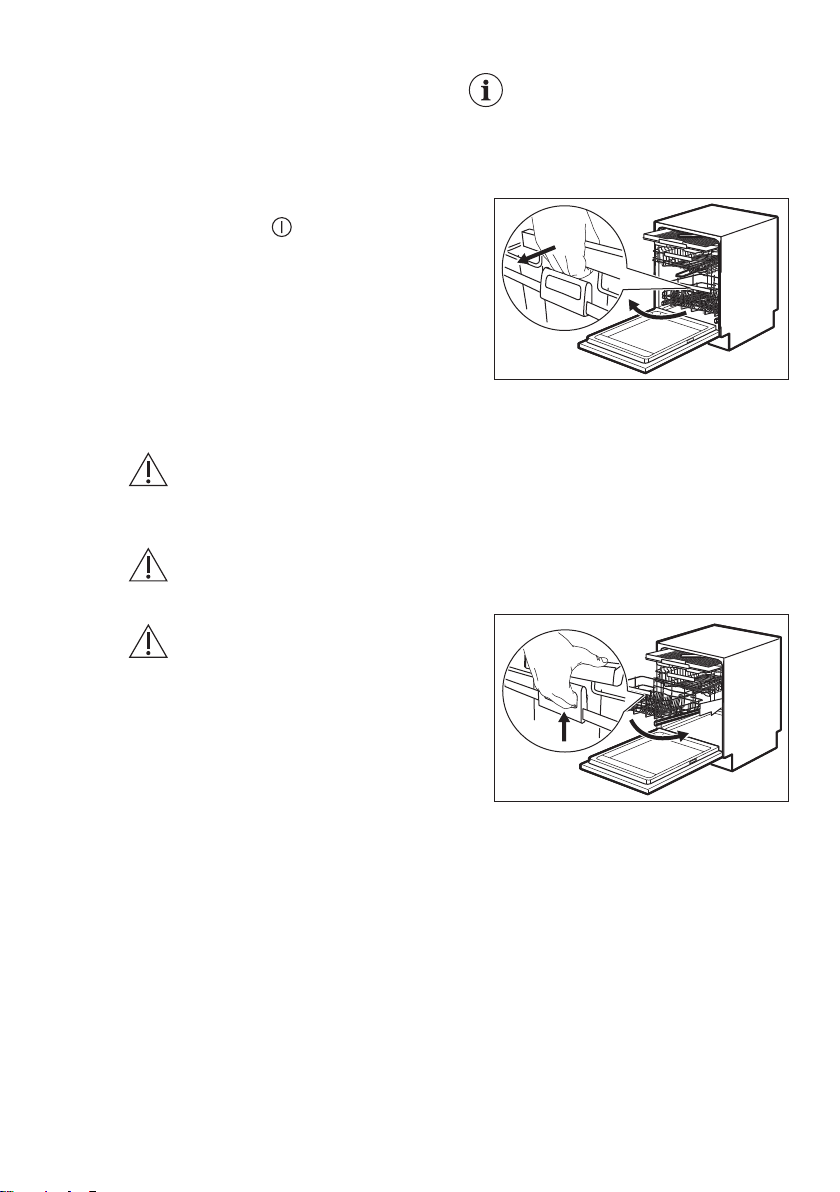
3. Lower the basket by connecting the
trigger handle with the basket frame
as shown below. Lift the trigger
handle completely and the basket
handle slightly until the basket is
disengaged on both sides.
The ComfortLift mechanism allows to lift
the lower rack up (to the second rack
level) and put it down to load and unload
dishes easily.
To load or unload the lower basket:
1. Lift the basket by pulling the rack out
of the dishwasher by the basket
handle. The trigger handle should not
be used.
Once the basket is unlocked, push
the rack down. The mechanism
returns to its default position on the
lower level.
There are two ways of lowering the
basket depending on the loading:
• If there is a full load of plates,
slightly push the basket down.
• If the basket is empty or halfloaded, press the basket down.
Page 17
A
B
C
ENGLISH 17
8.2 Using the detergent
8.3 How to select and start a programme using MY TIME selection bar
1. Slide your finger across MY TIME
selection bar to choose a suitable
programme.
• The light related to the selected
programme is on.
• The ECOMETER indicates the
level of energy and water
consumption.
• The display shows the
programme duration.
2. Activate applicable EXTRAS if
CAUTION!
Only use detergent
specifically designed for
dishwashers.
1. Press the release button (A) to open
the lid (C).
2. Put the detergent (gel, powder or
tablets) in the compartment (B).
3. If the programme has a prewash
phase, put a small quantity of
detergent on the inner part of the
appliance door.
4. Close the lid. Make sure that the lid
locks into position.
For information about the
detergent dosage, refer to
the manufacturer's
instructions on the
packaging of the product.
Usually, 20 - 25 ml of gel
detergent is adequate for
washing a load with normal
soil.
The upper ends of the two
vertical ribs inside the
compartment (B) indicate
the maximum level for filling
the dispenser with gel (max.
30ml).
desired.
3. Close the appliance door to start the
programme.
8.4 How to activate EXTRAS
1. Select a programme using MY TIME
selection bar.
2. Press the button dedicated to the
option you want to activate.
• The light related to the button is
on.
• The display shows the updated
programme duration.
• The ECOMETER indicates the
updated level of energy and water
consumption.
By default, options must be
activated every time before
you start a programme.
If the latest programme
selection is enabled, the
saved options are activated
automatically along with the
programme.
It is not possible to activate
or deactivate options while a
programme is running.
Not all options are
compatible with each other.
Activating options often
increases the water and
energy consumption as well
as the programme duration.
Page 18

www.aeg.com18
8.5 How to start the AUTO Sense program
1. Press .
• The light related to the button is
on.
• The display shows the longest
possible program duration.
MY TIME and EXTRAS are
not applicable to this
program.
2. Close the appliance door to start the
program.
The appliance senses the type of load
and adjusts a suitable wash cycle.
During the cycle, the sensors operate
several times and the initial program
duration can decrease.
8.6 How to delay the start of a
programme
1. Select a programme.
2. Press repeatedly until the display
shows the desired delay time (from 1
to 24 hours).
The light related to the button is on.
3. Close the appliance door to start the
countdown.
During the countdown, it is not possible
to change the delay time and the
programme selection.
When the countdown is complete, the
programme starts.
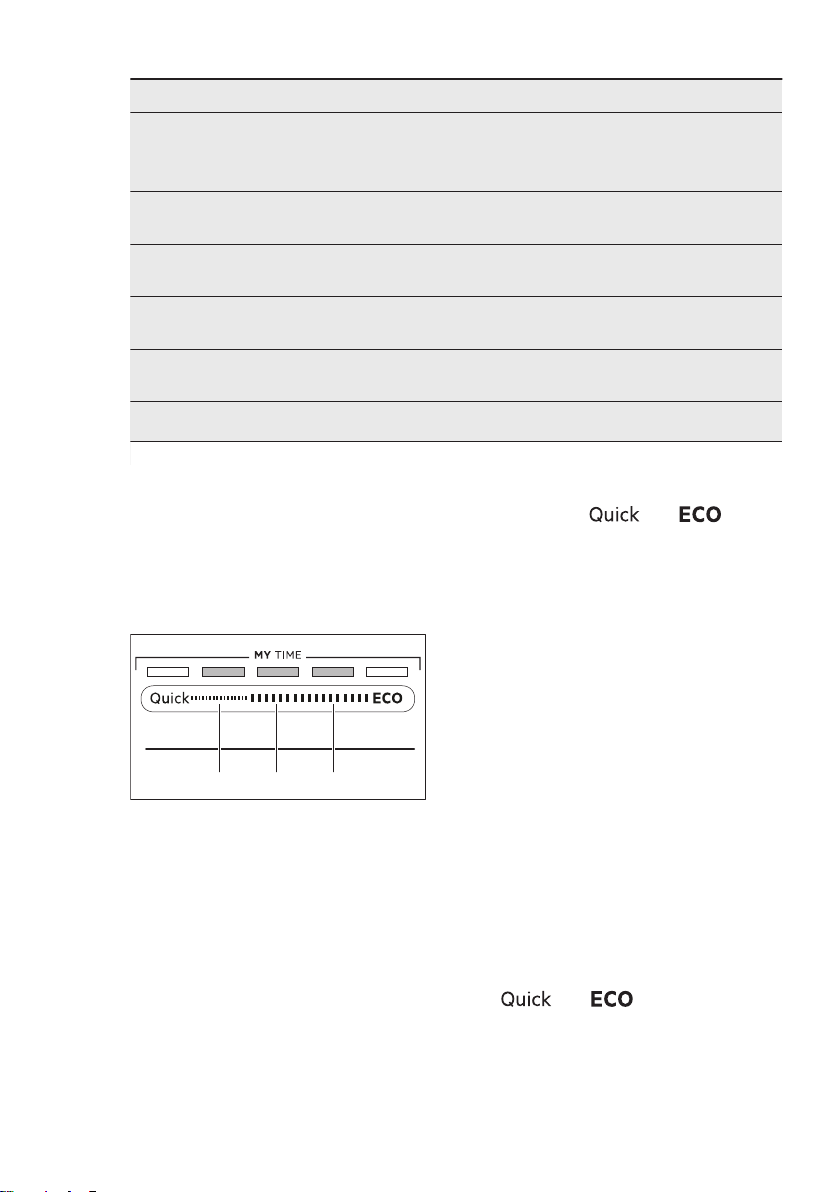
8.7 Opening the door while
the appliance operates
Opening the door while a programme is
running pauses the wash cycle. The
display shows the remaining duration of
the programme. The programme bar at
the bottom of the display indicates the
current progress of the wash cycle. The
length of the bar decreases along with
the programme duration. After closing
the door, the wash cycle resumes from
the point of interruption.
If you open the door during the delay
start countdown, the countdown is
paused. The display shows the current
countdown status. After closing the door,
the countdown resumes.
Opening the door while the
appliance operates may
affect the energy
consumption and the
programme duration.
If the door is opened for
more than 30 seconds
during the drying phase, the
running programme ends. It
does not happen if the door
is opened by the AirDry
function.
8.8 How to cancel the delay start while the countdown operates
Press and hold for about 3 seconds.
The appliance returns to the programme
selection.
If you cancel the delay start,
you have to select the
programme again.
8.9 How to cancel a running programme
Press and hold for about 3 seconds.
The appliance returns to the programme
selection.
Make sure that there is
detergent in the detergent
dispenser before you start a
new programme.
8.10 The Auto Off function
This function saves energy by switching
the appliance off when it is not operating.
The function comes into operation
automatically:
• When the programme is completed.
• After 5 minutes if a programme was
not started.
Page 19

ENGLISH 19
8.11 End of the programme
When the programme is complete, the
display shows Dishes clean.
9. HINTS AND TIPS
9.1 General
Follow the hints below to ensure optimal
cleaning and drying results in daily use
and to protect the environment.
• Washing dishes in the dishwasher as
instructed in the user manual usually
consumes less water and energy than
washing dishes by hand.
• Load the dishwasher to its full
capacity to save water and energy.
For best cleaning results, arrange
items in the baskets as instructed in
the user manual and do not overload
the baskets.
• Do not pre-rinse dishes by hand. It
increases the water and energy
consumption. When needed, select a
programme with a prewash phase.
• Remove larger residues of food from
the dishes and empty cups and
glasses before putting them inside the
appliance.
• Soak or slightly scour cookware with
firmly cooked-on or baked-on food
before washing it in the appliance.
• Make sure that items in the baskets
do not touch or cover each other.
Only then can the water completely
reach and wash the dishes.
• You can use dishwasher detergent,
rinse aid and salt separately or you
can use the multi-tablets (e.g. ''All in
1''). Follow the instructions on the
packaging.
• Select a programme according to the
type of load and the degree of soil.
ECO offers the most efficient use of
water and energy consumption.
• To prevent limescale buildup inside
the appliance:
– Refill the salt container whenever
necessary.
– Use the recommended dosage of
the detergent and rinse aid.
– Make sure that the current level of
the water softener agrees with the
hardness of the water supply.
The Auto Off function switches the
appliance off automatically.
All buttons are inactive except for the
on/off button.
– Follow the instructions in the
chapter "Care and cleaning".
9.2 Using salt, rinse aid and detergent
• Only use salt, rinse aid and detergent
designed for dishwasher. Other
products can cause damage to the
appliance.
• In areas with hard and very hard
water, we recommend to use basic
dishwasher detergent (powder, gel,
tablets containing no additional
agents), rinse aid and salt separately
for optimal cleaning and drying
results.
• Detergent tablets do not fully dissolve
with short programmes. To prevent
detergent residues on the tableware,
we recommend that you use tablets
with long programmes.
• Always use the correct quantity of
detergent. Insufficient dosage of
detergent can result in poor cleaning
results and hard-water filming or
spotting on the items. Using too much
detergent with soft or softened water
results in detergent residues on the
dishes. Adjust the amount of
detergent based on the water
hardness. Refer to the instructions on
the detergent packaging.
• Always use the correct quantity of
rinse aid. Insufficient dosage of rinse
aid decreases the drying results.
Using too much rinse aid results in
bluish layers on the items.
• Make sure that the water softener
level is correct. If the level is too high,
the increased quantity of salt in the
water might result in rust on cutlery.
Page 20

www.aeg.com20
9.3 What to do if you want to stop using multi-tablets
Before you start using separately
detergent, salt and rinse aid, complete
the following steps:
1. Set the highest level of the water
softener.
2. Make sure that the salt and rinse aid
containers are full.
3. Start the Quick programme. Do not
add detergent and do not put dishes
in the baskets.
4. When the programme is completed,
adjust the water softener according
to the water hardness in your area.
5. Adjust the released quantity of rinse
aid.
9.4 Before starting a
programme
Before you start the selected
programme, make sure that:
• The filters are clean and correctly
installed.
• The cap of the salt container is tight.
• The spray arms are not clogged.
• There is enough salt and rinse aid
(unless you use multi-tablets).
• The arrangement of the items in the
baskets is correct.
• The programme is suitable to the type
of load and the degree of soil.
• The correct quantity of detergent is
used.
• Use the appliance to wash
dishwasher-safe items only.
• Do not wash in the appliance items
made of wood, horn, aluminium,
pewter and copper as they could
crack, warp, get discoloured or pitted.
• Do not wash in the appliance items
that can absorb water (sponges,
household cloths).
• Put hollow items (cups, glasses and
pans) with the opening facing
downwards.
• Make sure that glass items do not
touch each other.
• Put light items in the upper basket.
Make sure that the items do not move
freely.
• Put cutlery and small items in the
cutlery drawer.
• Move the upper basket upwards to
accommodate large items in the lower
basket.
• Make sure that the spray arms can
move freely before you start a
programme.
9.6 Unloading the baskets
1. Let the tableware cool down before
you remove it from the appliance. Hot
items can be easily damaged.
2. First remove items from the lower
basket, then from the upper basket.
After the programme is
completed, water can still
remain on the inside
surfaces of the appliance.
9.5 Loading the baskets
• Always use the whole space of the
baskets.
10. CARE AND CLEANING
WARNING!
Before any maintenance
other than running the
programme Machine Care,
deactivate the appliance and
disconnect the mains plug
from the main socket.
Make sure that the
ComfortLift basket is empty
and locked in the raised
position.
Page 21

C
B
A
ENGLISH 21
Dirty filters and clogged
spray arms negatively affect
the washing results. Check
these elements regularly
and, if necessary, clean
them.
10.1 Machine Care
Machine Care is a programme designed
to clean the appliance interior with
optimal results. It removes limescale and
grease buildup.
When the appliance senses the need for
cleaning, the display shows the reminder
message Please run MachineCare and
the indicator . Start the Machine Care
programme to clean the appliance
interior.
How to start the Machine Care programme
Before starting the Machine
Care programme, clean the
filters and spray arms.
1. Use a descaler or a cleaning product
designed specifically for
dishwashers. Follow the instructions
on the packaging. Do not put dishes
in the baskets.
2. Press and hold simultaneously
and for about 3 seconds.
The indicator
shows the programme duration.
3. Close the appliance door to start the
programme.
When the programme is complete, the
reminder message is disabled.
flashes. The display
Carefully follow the instructions on the
packaging of the product.
• For optimal cleaning results, start the
Machine Care programme.
10.3 Removal of foreign
objects
Check the filters and the sump after each
use of the dishwasher. Foreign objects
(e.g. pieces of glass, plastic, bones or
toothpicks, etc) decrease the cleaning
performance and can cause damage to
the drain pump.
CAUTION!
If unable to remove the
foreign objects, contact an
Authorised Service Centre.
1. Disassemble the filters system as
instructed in this chapter.
2. Remove any foreign objects
manually.
3. Reassemble the filters as instructed
in this chapter.
10.4 External cleaning
• Clean the appliance with a moist soft
cloth.
• Only use neutral detergents.
• Do not use abrasive products,
abrasive cleaning pads or solvents.
10.5 Cleaning the filters
The filter system is made of 3 parts.
10.2 Internal cleaning
• Carefully clean the appliance,
including the rubber gasket of the
door, with a soft damp cloth.
• Do not use abrasive products,
abrasive cleaning pads, sharp tools,
strong chemicals, scourer or solvents.
• To maintain the performance of your
appliance, use a cleaning product
designed specifically for dishwashers
at least once every two months.
1. Turn the filter (B) counterclockwise
and remove it.
Page 22

www.aeg.com22
2. Remove the filter (C) out of filter (B).
3. Remove the flat filter (A).
4. Wash the filters.
7. Reassemble the filters (B) and (C).
8. Put back the filter (B) in the flat filter
(A). Turn it clockwise until it locks.
CAUTION!
An incorrect position of the
filters can cause bad
washing results and damage
to the appliance.
5. Make sure that there are no residues
of food or soil in or around the edge
of the sump.
6. Put back in place the flat filter (A).
Make sure that it is correctly
positioned under the 2 guides.
10.6 Cleaning the lower spray arm
We recommend to clean the lower spray
arm regularly to prevent soil from
clogging the holes.
Clogged holes can cause unsatisfactory
washing results.
1. To remove the lower spray arm, pull
it upwards.
Page 23

2. Wash the spray arm under running
water. Use a thin pointed tool, e.g. a
toothpick, to remove particles of soil
from the holes.
ENGLISH 23
2. To detach the spray arm from the
basket, press the spray arm upwards
and simultaneously turn it clockwise.
3. Wash the spray arm under running
water. Use a thin pointed tool, e.g. a
toothpick, to remove particles of soil
from the holes.
3. To install the spray arm back, press it
downwards.
10.7 Cleaning the upper
spray arm
We recommend to clean the upper spray
arm regularly to prevent soil from
clogging the holes.
Clogged holes can cause unsatisfactory
washing results.
1. Pull out the upper basket.
4. To install the spray arm back, press
the spray arm upwards and
simultaneously turn it
counterclockwise until it locks into
place.
Page 24

C
B
A
2
1
www.aeg.com24
10.8 Cleaning the ceiling spray arm
We recommend to clean the ceiling spray
arm regularly to prevent soil from
clogging the holes. Clogged holes can
cause unsatisfactory washing results.
The ceiling spray arm is placed on the
ceiling of the appliance. The spray arm
(C) is installed in the delivery tube (A)
with the mounting element (B).
1. Remove the stoppers from the sliding
rails of the cutlery drawer and pull the
drawer out.
2. Move the upper basket to the lowest
level to reach the spray arm more
easily.
3. To detach the spray arm (C) from the
delivery tube (A), turn the mounting
element (B) counterclockwise and
pull the spray arm downwards.
4. Wash the spray arm under running
water. Use a thin pointed tool, e.g. a
toothpick, to remove particles of soil
from the holes. Run the water
through the holes to wash soil
particles away from the inside.
5. To install the spray arm (C) back,
insert the mounting element (B) in
the spray arm and fix it in the delivery
tube (A) by turning it clockwise. Make
sure that the mounting element locks
into place.
6. Install the cutlery drawer on the
sliding rails and insert the stoppers.
11. TROUBLESHOOTING
WARNING!
Improper repair of the
appliance may pose a
danger to the safety of the
user. Any repairs must be
The majority of problems that may
occur can be solved without the need
performed by qualified
personnel.
to contact an Authorised Service
Centre.
Refer to the below table for information
on possible problems.
With some problems, the display shows
an alarm code.
Page 25

Problem and alarm code Possible cause and solution
You cannot activate the ap‐
pliance.
• Make sure that the mains plug is connected to the mains
socket.
• Make sure that there is no damaged fuse in the fuse
box.
The programme does not
start.
• Make sure that the appliance door is closed.
• If the delay start is set, cancel the setting or wait for the
end of the countdown.
• The appliance recharges the resin inside the water soft‐
ener. The duration of the procedure is approximately 5
minutes.
The appliance does not fill
with water.
The display shows , Error
i10 or Error i11 and No in‐
take of water .
• Make sure that the water tap is open.
• Make sure that the pressure of the water supply is not
too low. For this information, contact your local water
authority.
• Make sure that the water tap is not clogged.
• Make sure that the filter in the inlet hose is not clogged.
• Make sure that the inlet hose has no kinks or bends.
The appliance does not
drain the water.
The display shows , Error
• Make sure that the sink spigot is not clogged.
• Make sure that the interior filter system is not clogged.
• Make sure that the drain hose has no kinks or bends.
i20 and Water is not drain‐
ing .
The anti-flood device is on.
The display shows , Error
• Close the water tap and contact an Authorised Service
Centre.
i30 and Risk of flood de‐
tected .
Malfunction of the water lev‐
el detection sensor.
• Make sure that the filters are clean.
• Switch the appliance off and on.
The display shows i41 - i44.
Malfunction of the wash
• Switch the appliance off and on.
pump or the drain pump.
The display shows i51 - i59
or i5A - i5F.
The temperature of the wa‐
ter inside the appliance is
too high or malfunction of
• Make sure that the temperature of the inlet water does
not exceed 60°C.
• Switch the appliance off and on.
the temperature sensor oc‐
curred.
The display shows i61 or
i69.
ENGLISH 25
Page 26

www.aeg.com26
Problem and alarm code Possible cause and solution
Technical malfunction of the
appliance.
The display shows iC0 or
iC3.
The level of water inside the
appliance is too high.
The display shows iF1.
The appliance stops and
starts more times during op‐
eration.
The programme lasts too
long.
The remaining time in the
display increases and skips
nearly to the end of the pro‐
gramme duration.
Small leak from the appli‐
ance door.
The appliance door is diffi‐
cult to close.
The appliance door opens
during the wash cycle.
Rattling or knocking sounds
from the inside of the appli‐
ance.
The appliance trips the cir‐
cuit-beaker.
• Switch the appliance off and on.
• Switch the appliance off and on.
• Make sure that the filters are clean.
• Make sure that the outlet hose is installed at the right
height above the floor. Refer to the installation instruc‐
tions.
• It is normal. It provides optimal cleaning results and en‐
ergy savings.
• If the delay start option is set, cancel the delay setting or
wait for the end of the countdown.
• Activating options often increases the programme dura‐
tion.
• This is not a defect. The appliance is working correctly.
• The appliance is not levelled. Loosen or tighten the ad‐
justable feet (if applicable).
• The appliance door is not centred on the tub. Adjust the
rear foot (if applicable).
• The appliance is not levelled. Loosen or tighten the ad‐
justable feet (if applicable).
• Parts of the tableware are protruding from the baskets.
• The AirDry function is activated. You can deactivate the
function. Refer to "Basic settings".
• The tableware is not properly arranged in the baskets.
Refer to basket loading leaflet.
• Make sure that the spray arms can rotate freely.
• The amperage is insufficient to supply simultaneously all
the appliances in use. Check the socket amperage and
the capacity of the meter or turn off one of the applian‐
ces in use.
• Internal electrical fault of the appliance. Contact an Au‐
thorised Service Centre.
Once you have checked the appliance,
deactivate and activate the appliance. If
the problem occurs again, contact an
Authorised Service Centre.
For alarm codes not described in the
table, contact an Authorised Service
Centre.
Page 27

ENGLISH 27
Before contacting an
Authorised Service Centre,
write down the PNC number.
Refer to "Basic settings".
WARNING!
We do not recommend using
the appliance until the
problem has been
completely fixed. Unplug the
appliance and do not plug it
in again until you are certain
that it operates correctly.
11.1 The washing and drying results are not satisfactory
Problem Possible cause and solution
Poor washing results. • Refer to "Daily use", "Hints and tips" and the basket
loading leaflet.
• Use more intensive washing programme.
• Activate the ExtraPower option to improve the washing
results of a selected programme.
• Clean spray arm jets and filter. Refer to "Care and
Cleaning".
Poor drying results. • Tableware was left for too long inside the closed appli‐
ance. Activate AirDry to set the automatic opening of
the door and to improve the drying performance.
• There is no rinse aid or the dosage of rinse aid is not
sufficient. Fill the rinse aid dispenser or set the level of
rinse aid to a higher level.
• The quality of the rinse aid can be the cause.
• We recommend to use rinse aid always, even in com‐
bination with multi-tablets.
• Plastic items may need to be towel dried.
• The programme does not have the drying phase. Re‐
fer to "Programmes overview".
There are whitish streaks or
bluish layers on glasses and
dishes.
There are stains and dry water
drops on glasses and dishes.
The interior of the appliance is
wet.
Unusual foam during washing. • Use the detergent designed specifically for dishwash‐
• The released quantity of rinse aid is too high. Adjust
the rinse aid level to a lower level.
• The quantity of detergent is too high.
• The released quantity of rinse aid is not sufficient. Ad‐
just the rinse aid level to a higher level.
• The quality of the rinse aid can be the cause.
• This is not a defect of the appliance. Humid air con‐
densates on the appliance walls.
ers.
• Use a detergent from a different manufacturer.
• Do not pre-rinse dishes under running water before
putting them in the appliance.
Page 28

www.aeg.com28
Problem Possible cause and solution
Traces of rust on cutlery. • There is too much salt in the water used for washing.
Refer to "The water softener".
• Silver and stainless steel cutlery were placed together.
Do not put silver and stainless steel items close to‐
gether.
There are residues of deter‐
gent in the dispenser at the
end of the programme.
Odours inside the appliance. • Refer to "Internal cleaning".
Limescale deposits on the ta‐
bleware, on the tub and on the
inside of the door.
Dull, discoloured or chipped
tableware.
• The detergent tablet was stuck in the dispenser and
therefore was not completely washed away by water.
• Water cannot wash away the detergent from the dis‐
penser. Make sure that the spray arms are not blocked
or clogged.
• Make sure that items in the baskets do not impede the
lid of the detergent dispenser from opening.
• Start the Machine Care programme with a descaler or
a cleaning product designed for dishwashers.
• The level of salt is low, check the refill indicator.
• The cap of the salt container is loose.
• Your tap water is hard. Refer to "The water soften‐
er".
• Use salt and set regeneration of the water softener
even when multi-functional tablets are used. Refer to
"The water softener".
• Start the Machine Care programme with a descaler
designed for dishwashers.
• If limescale deposits still remain, clean the appliance
with appliance cleaners which are particularly suitable
for this purpose.
• Try a different detergent.
• Contact the detergent manufacturer.
• Make sure that only dishwasher-safe items are wash‐
ed in the appliance.
• Load and unload the basket carefully. Refer to the
basket loading leaflet.
• Place delicate items in the upper basket.
• Activate the GlassCare option to ensure special care
for glassware and delicate items.
Refer to "Before first use",
"Daily use", or "Hints and
tips" for other possible
causes.
12. TECHNICAL INFORMATION
Dimensions Width / height / depth (mm) 596 / 818 - 898 / 550
Page 29

ENGLISH 29
Electrical connection
Water supply pressure bar (minimum and maximum) 0.5 - 8
Water supply
Capacity Place settings 13
Power consumption
1)
Refer to the rating plate for other values.
2)
If the hot water comes from alternative source of energy (e.g. solar panels), use the hot water supply
to decrease energy consumption.
3)
In accordance with the 1059/2010 regulation.
1)
3)
12.1 Link to the EU EPREL database
The QR code on the energy label
supplied with the appliance provides a
web link to the registration of this
appliance in the EU EPREL database.
Keep the energy label for reference
together with the user manual and all
Voltage (V) 200 - 240
Frequency (Hz) 50 - 60
MPa (minimum and maximum) 0.05 - 0.8
Cold water or hot water
Left-on mode (W) 5.0
Off-mode (W) 0.50
2)
max 60 °C
EPREL database using the link https://
eprel.ec.europa.eu and the model name
and product number that you can find on
the rating plate of the appliance. Refer to
the chapter "Product description".
For more detailed information about the
energy label, visit
www.theenergylabel.eu.
other documents provided with this
appliance.
It is possible to find information related to
the performance of the product in the EU
13. ENVIRONMENTAL CONCERNS
Recycle materials with the symbol .
Put the packaging in relevant containers
to recycle it. Help protect the
environment and human health by
recycling waste of electrical and
electronic appliances. Do not dispose of
appliances marked with the symbol
with the household waste. Return the
product to your local recycling facility or
contact your municipal office.
Page 30

www.aeg.com30
TABLE DES MATIÈRES
1. INFORMATIONS DE SÉCURITÉ....................................................................... 30
2. CONSIGNES DE SÉCURITÉ............................................................................. 32
3. DESCRIPTION DE L’APPAREIL........................................................................ 35
4. BANDEAU DE COMMANDE.............................................................................. 36
5. SÉLECTION DES PROGRAMMES....................................................................37
6. RÉGLAGES DE BASE .......................................................................................40
7. AVANT LA PREMIÈRE UTILISATION................................................................44
8. UTILISATION QUOTIDIENNE............................................................................46
9. CONSEILS..........................................................................................................49
10. ENTRETIEN ET NETTOYAGE.........................................................................51
11. DÉPANNAGE....................................................................................................55
12. CARACTÉRISTIQUES TECHNIQUES.............................................................60
POUR DES RÉSULTATS PARFAITS
Merci d'avoir choisi ce produit AEG. Nous l'avons conçu pour vous offrir des
performances irréprochables pendant longtemps, avec des technologies
innovantes qui simplifient la vie : autant de caractéristiques que vous ne
trouverez peut-être pas sur des appareils ordinaires. Veuillez prendre quelques
instants pour lire cette notice afin d'utiliser au mieux votre appareil.
Visitez notre site Web pour :
Obtenir des conseils d'utilisation, des brochures, un dépanneur, des
informations sur le service et les réparations :
www.aeg.com/support
Enregistrer votre produit pour un meilleur service :
www.registeraeg.com
Acheter des accessoires, des consommables et des pièces de rechange
d'origine pour votre appareil :
www.aeg.com/shop
SERVICE ET ASSISTANCE À LA CLIENTÈLE
Utilisez toujours des pièces de rechange d'origine.
Avant de contacter notre centre de service agréé, assurez-vous de disposer des
informations suivantes : Modèle, PNC, Numéro de série.
Les informations se trouvent sur la plaque signalétique.
Avertissement/Mise en garde-Information de sécurité
Informations générales et conseils
Informations environnementales
Sous réserve de modifications.
1. INFORMATIONS DE SÉCURITÉ
Avant d'installer et d'utiliser cet appareil, lisez
soigneusement les instructions fournies. Le fabricant ne
Page 31

FRANÇAIS 31
pourra être tenu pour responsable des blessures et
dégâts résultant d'une mauvaise installation ou
utilisation. Conservez toujours les instructions dans un
lieu sûr et accessible pour vous y référer ultérieurement.
1.1 Sécurité des enfants et des personnes vulnérables.
• Cet appareil peut être utilisé par des enfants âgés
d'au moins 8 ans et par des personnes ayant des
capacités physiques, sensorielles ou mentales
réduites ou dénuées d’expérience ou de
connaissance, s'ils sont correctement surveillés ou si
des instructions relatives à l'utilisation de l'appareil en
toute sécurité leur ont été données et s’ils
comprennent les risques encourus.
• Les enfants entre 3 et 8 ans et les personnes ayant un
handicap très important et complexe doivent être
tenus à l'écart de l'appareil, à moins d'être surveillés
en permanence.
• Les enfants de moins de 3 ans doivent être tenus à
l'écart de l'appareil, à moins d'être surveillés en
permanence.
• Ne laissez pas les enfants jouer avec l'appareil.
• Ne laissez pas les détergents à la portée des enfants.
• Tenez les enfants et les animaux éloignés de
l'appareil lorsque la porte est ouverte.
• Le nettoyage et l'entretien ne doivent pas être
effectués par des enfants sans surveillance.
1.2 Sécurité générale
• Cet appareil est conçu pour un usage domestique et
des applications équivalentes, comme :
– dans des fermes, des coins cuisines réservés au
personnel dans des magasins, bureaux et autres ;
– pour une utilisation privée, par les clients, dans des
hôtels, motels, chambres d’hôte, et autres types de
lieux de séjour ;
• Ne modifiez pas les caractéristiques de cet appareil.
Page 32

www.aeg.com32
• La pression de l’eau en fonctionnement (minimale et
maximale) doit se situer entre 0.5 (0.05) / 8 (0.8) bar
(MPa)
• Respectez le nombre maximal de 13 couverts.
• Si le câble d’alimentation est endommagé, il doit être
remplacé par le fabricant, son service après-vente ou
par un professionnel qualifié afin d’éviter un danger.
• Placez les couverts dans le panier à couverts, avec
les extrémités pointues vers le bas, ou placez-les
dans le tiroir à couverts en position horizontale, bords
tranchants vers le bas.
• Ne laissez pas la porte de l’appareil ouverte sans
surveillance pour éviter de vous prendre
accidentellement les pieds dedans.
• Avant toute opération d'entretien, éteignez l'appareil et
débranchez la fiche de la prise secteur.
• Ne pulvérisez pas d'eau ni de vapeur à haute pression
pour nettoyer l'appareil.
• Si l’appareil dispose d’orifices d’aération à la base,
veillez à ne pas les couvrir, p. ex. avec de la
moquette.
• L’appareil doit être raccordé au réseau d’eau à l’aide
des tuyaux neufs fournis. Les anciens ensembles de
tuyaux ne doivent pas être réutilisés.
2. CONSIGNES DE SÉCURITÉ
2.1 Installation
AVERTISSEMENT!
L'appareil doit être installé
uniquement par un
professionnel qualifié.
• Retirez l'intégralité de l'emballage.
• N'installez pas et ne branchez pas un
appareil endommagé.
• Pour des raisons de sécurité,
n'utilisez pas l'appareil avant de l'avoir
installé dans la structure encastrée.
• Suivez scrupuleusement les
instructions d'installation fournies
avec l'appareil.
• Soyez toujours vigilants lorsque vous
déplacez l'appareil car il est lourd.
Utilisez toujours des gants de sécurité
et des chaussures fermées.
• N'installez pas l'appareil ou ne
l'utilisez pas dans un endroit où la
température ambiante est inférieure à
0 °C.
• Installez l'appareil dans un lieu sûr et
adapté répondant aux exigences
d'installation.
Page 33

FRANÇAIS 33
2.2 Branchement électrique
AVERTISSEMENT!
Risque d'incendie ou
d'électrocution.
• L’appareil doit être relié à la terre.
• Assurez-vous que les paramètres
figurant sur la plaque signalétique
correspondent aux données
électriques nominale de l’alimentation
secteur.
• Utilisez toujours une prise de courant
de sécurité correctement installée.
• N'utilisez pas d'adaptateurs multiprise
et de rallonges.
• Veillez à ne pas endommager la fiche
secteur ni le câble d'alimentation. Le
remplacement du câble d’alimentation
de l’appareil doit être effectué par
notre service après-vente agréé.
• Ne branchez la fiche secteur dans la
prise secteur qu'à la fin de
l'installation. Assurez-vous que la
prise secteur est accessible après
l'installation.
• Ne tirez pas sur le câble secteur pour
débrancher l'appareil. Tirez toujours
sur la fiche de la prise secteur.
• Cet appareil est fourni avec un câble
d'alimentation de 13 A. Si vous devez
changer le fusible de la fiche secteur,
utilisez uniquement un fusible 13 A
approuvé ASTA (BS 1362)
(Royaume-Uni et Irlande
uniquement).
2.3 Raccordement à l'arrivée
d'eau
• Veillez à ne pas endommager les
tuyaux de circulation d'eau.
• Avant d'installer des tuyaux neufs,
des tuyaux n'ayant pas servi depuis
longtemps, lorsqu'une réparation a
été effectuée ou qu'un nouveau
dispositif a été installé (compteurs
d'eau, etc.), laissez l'eau s'écouler
jusqu'à ce qu'elle soit parfaitement
propre et claire.
• Pendant et après la première
utilisation de l'appareil, vérifiez
qu'aucune fuite n'est visible.
• Le tuyau d'arrivée d'eau possède une
vanne de sécurité et une gaine avec
un câble d'alimentation électrique
interne.
AVERTISSEMENT!
Tension dangereuse.
• Si le tuyau d'arrivée d'eau est
endommagé, fermez immédiatement
le robinet d'eau et débranchez la fiche
de la prise secteur. Contactez le
service après-vente pour remplacer le
tuyau d'arrivée d'eau.
2.4 Utilisation
• Ne placez pas de produits
inflammables ou d'éléments imbibés
de produits inflammables à l'intérieur
ou à proximité de l'appareil, ni sur
celui-ci.
• Les produits de lavage pour lavevaisselle sont dangereux. Suivez les
consignes de sécurité figurant sur
l'emballage du produit de lavage.
• Ne buvez pas et ne jouez pas avec
l’eau de l’appareil.
• N'enlevez pas la vaisselle de
l'appareil avant la fin du programme. Il
se peut que la vaisselle contienne
encore du produit de lavage.
• Ne posez pas d’objets et n’appliquez
pas de pression sur la porte ouverte
de l'appareil.
• L’appareil peut dégager de la vapeur
chaude si vous ouvrez la porte
pendant le déroulement d’un
programme.
2.5 Éclairage intérieur
AVERTISSEMENT!
Risque de blessure.
• Concernant la/les lampe(s) à
l’intérieur de ce produit et les lampes
de rechange vendues séparément :
Ces lampes sont conçues pour
Page 34

www.aeg.com34
résister à des conditions physiques
extrêmes dans les appareils
électroménagers, telles que la
température, les vibrations, l’humidité,
ou sont conçues pour signaler des
informations sur le statut opérationnel
de l’appareil. Elles ne sont pas
destinées à être utilisées dans
d'autres applications et ne
conviennent pas à l’éclairage des
pièces d’un logement.
• Cet appareil dispose d'un éclairage
intérieur qui s'allume lors de
l'ouverture de la porte et s'éteint lors
de sa fermeture.
• Pour remplacer l'éclairage intérieur,
contactez le service après-vente
agréé.
2.6 Service
• Pour réparer l'appareil, contactez un
service après-vente agréé. Utilisez
exclusivement des pièces d'origine.
• Veuillez noter qu’une autoréparation
ou une réparation non professionnelle
peuvent avoir des conséquences sur
la sécurité et annuler la garantie.
• Les pièces de rechange suivantes
seront disponibles pendant 7 ans
après l’arrêt du modèle : moteur,
pompe de circulation et de vidange,
éléments chauffants, dont
thermopompes, canalisations et
équipements correspondants dont
tuyaux, valves, filtres et électrovannes
(aquastops), pièces structurelles et
intérieures liées aux assemblages de
portes, cartes de circuits imprimés,
affichages électroniques, pressostats,
thermostats et capteurs, logiciel et
firmware dont logiciel de
réinitialisation. Veuillez noter que
certaines de ces pièces de rechange
ne sont disponibles qu’auprès de
réparateurs professionnels et que
toutes les pièces de rechange ne sont
pas adaptées à tous les modèles.
• Les pièces de rechange suivantes
seront disponibles pendant 10 ans
après l’arrêt du modèle : charnière et
joints de porte, autres joints, bras
d'aspersion, filtres de vidange,
supports intérieurs et périphériques
en plastique tels que paniers et
couvercles.
2.7 Mise au rebut
AVERTISSEMENT!
Risque de blessure ou
d'asphyxie.
• Débranchez l'appareil de
l'alimentation électrique.
• Coupez le câble d'alimentation et
mettez-le au rebut.
• Retirez le dispositif de verrouillage de
la porte pour empêcher les enfants et
les animaux de s'enfermer dans
l'appareil.
Page 35

3. DESCRIPTION DE L’APPAREIL
5
4
9
67
13
12
11
10
14
2
3
1
8
FRANÇAIS 35
Bras d’aspersion de plafond
1
Bras d’aspersion supérieur
2
Bras d’aspersion inférieur
3
Filtres
4
Plaque signalétique
5
Réservoir de sel régénérant
6
Fente d’aération
7
Distributeur de liquide de rinçage
8
3.1 Éclairage interne
L’appareil dispose d’une ampoule
interne. Il s’allume lorsque vous ouvrez
la porte ou mettez en fonctionnement
l’appareil lorsque la porte est ouverte.
Distributeur de détergent
9
Panier ComfortLift
10
Poignée
11
Poignée du panier inférieur
12
Panier supérieur
13
Tiroir à couverts
14
L’éclairage s’éteint lorsque vous fermez
la porte ou mettez à l’arrêt l’appareil.
Sinon, il s’éteint automatiquement au
bout d’un certain temps pour une
économie d’énergie.
Page 36

1 2 3
4 5 6
www.aeg.com36
4. BANDEAU DE COMMANDE
4.1 Affichage
L'affichage indique les informations
suivantes :
• ECOMETER
• Voyants
• Noms et durées des programmes
• Durée du départ différé
• Textes d'information
4.2 ECOMETER
4.3 Voyants
Touche Marche/Arrêt / Touche
1
Réinitialiser
Delay Start touche
2
Afficheur
3
Indicateur Description
Voyant du réservoir de liquide de rinçage. Il s'allume lorsque le distributeur
de liquide de rinçage doit être rempli. Reportez-vous au chapitre « Avant
la première utilisation ».
Voyant du réservoir de sel régénérant. Il s'allume lorsque le réservoir de
sel régénérant doit être rempli. Reportez-vous au chapitre « Avant la pre‐
mière utilisation ».
Voyant Machine Care. Il s'allume lorsque l'appareil a besoin d'être nettoyé
de l'intérieur avec le programme Machine Care. Reportez-vous au chapi‐
tre « Entretien et nettoyage ».
Voyant de phase de séchage. Il s'allume lorsqu'un programme compre‐
nant une phase de séchage est sélectionné. Il clignote au cours de la pha‐
se de séchage. Reportez-vous au chapitre « Sélection du programme ».
MY TIME Touche de sélection
4
EXTRAS touches
5
AUTO Sense touche de programme
6
L'ECOMETER indique l'impact que le
programme sélectionné aura sur la
consommation d'eau et d'énergie. Plus le
nombre de barres allumées est élevé,
plus la consommation est basse.
indique le programme le plus
écologique pour une vaisselle
normalement sale.
Page 37

Indicateur Description
CA B D E
Voyant Delay Start. Il s'allume lorsque vous activez le départ différé. Re‐
portez-vous au chapitre « Utilisation quotidienne ».
Indicateur de pause Il clignote lorsque vous mettez le cycle de lavage ou
le décompte du départ différé en pause en ouvrant la porte de l'appareil.
Reportez-vous au chapitre « Utilisation quotidienne ».
Voyants d'alarme Ils s'allument lorsqu'une anomalie de fonctionnement
s'est produite. Reportez-vous au chapitre « En cas d'anomalie de fonc‐
tionnement ».
5. SÉLECTION DES PROGRAMMES
FRANÇAIS 37
5.1 MY TIME
Avec la barre de sélection MY TIME,
vous pouvez choisir un cycle de lavage
adapté en fonction de la durée du
programme, de 30 minutes à 4 heures.
A. Quick est le programme le plus court
(30min) pour laver une charge de
vaisselle fraîchement salie.
B. 1h est un programme permettant de
laver la vaisselle récemment salie ou
ayant des résidus légèrement secs.
C. 1h 30min est un programme adapté
pour laver et sécher une vaisselle
normalement sale.
D. 2h 40min est un programme adapté
pour laver et sécher une vaisselle
très sale.
E. ECO est le programme le plus long
(4h) dont la consommation d’eau et
d’énergie est la plus économique
pour la vaisselle et les couverts
normalement sales. Il s’agit du
programme standard pour les
instituts de tests.
1)
5.2 EXTRAS
Vous pouvez adapter le programme
sélectionné à vos besoins en activant la
fonction EXTRAS.
ExtraSilent
ExtraSilent vous permet de réduire le
bruit généré par l'appareil. Lorsque cette
option est activée, la pompe de lavage
fonctionne en silence, à une vitesse
réduite. En raison de la vitesse réduite,
la durée du programme est plus longue.
ExtraPower
ExtraPower améliore les résultats
de lavage du programme sélectionné.
Cette option augmente la durée et la
température de lavage.
GlassCare
GlassCare offre un soin spécial à la
vaisselle délicate. L'option empêche les
changements rapides de température de
lavage du programme sélectionné et la
réduit à 45 °C. Ainsi, les verres sont
protégés contre les domamges.
5.3 AUTO Sense
Le programme AUTO Sense ajuste
automatiquement le cycle de lavage au
type de vaisselle.
1)
Ce programme permet d’évaluer la conformité avec la réglementation de la Commission (UE)
2019/2022 Ecodesign.
Page 38

www.aeg.com38
L'appareil détecte le degré de salissure
et la quantité de vaisselle dans les
paniers. Il règle automatiquement la
5.4 Présentation des programmes
Program‐meType de char‐geDegré de sa‐
lissure
Quick • Vaisselle
• Couverts
1h • Vaisselle
• Couverts
1h 30min • Vaisselle
• Couverts
• Casseroles
• Poêles
2h 40min • Vaisselle
• Couverts
• Casseroles
• Poêles
ECO • Vaisselle
• Couverts
• Casseroles
• Poêles
• Fraîche • Lavage à 50 °C
• Fraîche
• Légère‐
ment sè‐
che
• Normale
• Légère‐
ment sè‐
che
• Normale à
très sale
• Séchée
• Normale
• Légère‐
ment sè‐
che
Phases du program‐meEXTRAS
• Rinçage intermé‐
• Rinçage final à
• AirDry
• Lavage à 60 °C
• Rinçage intermé‐
• Rinçage final à
• AirDry
• Lavage à 60 °C
• Rinçage intermé‐
• Rinçage final à
• Séchage
• AirDry
• Prélavage
• Lavage à 60 °C
• Rinçage intermé‐
• Rinçage final à
• Séchage
• AirDry
• Prélavage
• Lavage à 50 °C
• Rinçage intermé‐
• Rinçage final à
• Séchage
• AirDry
température et le volume d'eau, ainsi que
la durée du lavage.
• ExtraPower
• GlassCare
diaire
45 °C
• ExtraPower
• GlassCare
diaire
50 °C
• ExtraPower
• GlassCare
diaire
55 °C
• ExtraPower
• GlassCare
diaire
60 °C
• ExtraPower
• GlassCare
• ExtraSilent
diaire
55 °C
Page 39

FRANÇAIS 39
Program‐meType de char‐geDegré de sa‐
lissure
AUTO
Sense
Machine
Care
• Vaisselle
• Couverts
• Casseroles
• Poêles
• Pas de
vaisselle
Le programme
s'adapte à
tous les de‐
grés de salis‐
sure.
Le programme
nettoie l'inté‐
rieur de l'ap‐
pareil.
Phases du program‐meEXTRAS
• Prélavage
• Lavage à 50 60 °C
• Rinçage intermé‐
diaire
• Rinçage final à
60 °C
• Séchage
• AirDry
• Lavage à 70 °C
• Rinçage intermé‐
diaire
• Rinçage final
• AirDry
EXTRAS ne sont
pas compatibles
avec ce program‐
me.
EXTRAS ne sont
pas compatibles
avec ce program‐
me.
Valeurs de consommation
Programme 1)
Quick 9.3 - 11.4 0.54 - 0.66 30
1h 10.6 - 12.9 0.80 - 0.93 60
1h 30min 10.4 - 12.7 0.97 - 1.10 90
2h 40min 10.8 - 13.2 0.97 - 1.11 160
ECO
AUTO Sense 9.6 - 13.1 0.74 - 1.06 120 - 170
Machine Care 8.9 - 10.9 0.58 - 0.70 60
1)
Les valeurs de consommation peuvent changer en fonction de la pression et de la température de
l'eau, des variations de l'alimentation électrique, de la quantité de vaisselle chargée, du degré de salissu‐
re, ainsi que des options sélectionnées.
2)
Les valeurs pour les programmes autres que ECO sont fournies uniquement à titre indicatif.
3)
Conformément à la réglementation 1016/2010.
4)
Conformément à la réglementation 2019/2022.
2)
Eau (l) Énergie (kWh) Durée (min)
11 3) / 11
4)
0.8213) / 0.835
4)
2403) / 240
4)
Informations pour les laboratoires d’essais
Pour recevoir les informations
nécessaires à la mise en œuvre des
tests de performances (par ex.
conformément à la norme EN60436),
envoyez un e-mail à l'adresse :
info.test@dishwasher-production.com
Dans votre demande, indiquez le code
produit (PNC) de la plaque signalétique.
Pour toute autre question concernant
votre lave-vaisselle, veuillez vous
reporter au manuel d'utilisation fourni
avec votre appareil.
Page 40

www.aeg.com40
6. RÉGLAGES DE BASE
Vous pouvez configurer l'appareil en
modifiant les réglages de base en
fonction de vos besoins.
Réglages Valeurs Description
Dureté de l'eau Du niveau 1 au ni‐
veau 10 (par défaut :
5)
Niv. liquide rinçage Du niveau 0 au ni‐
veau 6 (par défaut :
4)
Signal sonore de fin MARCHE
ARRET (par défaut)
Ouverture automati‐
que de la porte
Tonalités des tou‐
ches
Sélect. dernier prog. MARCHE
Affichage sur le sol MARCHE (par dé‐
Affichage Luminosi‐téDu niveau 0 au ni‐
Langue Liste des langues
Réinitialiser les ré‐
glages
Numéro PNC Numéro
1)
Pour plus de détails, reportez-vous aux informations de ce chapitre.
MARCHE (par dé‐
faut)
ARRET
MARCHE (par dé‐
faut)
ARRET
ARRET (par défaut)
faut)
ARRET
veau 9 (par défaut :
(par défaut : anglais)
OUI
NON
Pour régler le niveau de l'adoucisseur d'eau
en fonction de la dureté de l'eau de votre ré‐
1)
gion.
Ajustez le niveau de liquide de rinçage en
fonction du dosage nécessaire.
1)
Pour activer ou désactiver le signal sonore
indiquant la fin d'un programme.
Activer ou désactiver AirDry
1)
1)
Pour activer ou désactiver la tonalité des tou‐
ches lorsque vous appuyez dessus.
Activer ou désactiver la sélection automati‐
que du dernier programme et des dernières
options utilisés.
Activer ou désactiver TimeBeam.
1)
1)
Pour modifier la luminosité de l'affichage.
Pour sélectionner votre langue préférée.
Pour réinitialiser l'appareil aux réglages d'usi‐
ne.
Vérifiez le PNC de votre appareil.
1)
Page 41

BA C
FRANÇAIS 41
6.1 Mode réglage
Comment naviguer dans le Mode réglage
Vous pouvez naviguer dans le Mode
réglage en utilisant la barre de sélection
MY TIME.
A. Touche Précédent
B. Touche OK
C. Touche Suivant
Utilisez Précédent et Suivant pour
naviguer entre les réglages de base et
changer leur valeur.
Utilisez OK pour entrer dans le réglage
sélectionné et confirmer le changement
de valeur.
Comment entrer en Mode réglage
Vous pouvez entrer en Mode réglage
avant de lancer un programme. Vous ne
pouvez pas entrer en Mode réglage
lorsque le programme est en cours.
Pour entrer en Mode réglage, maintenez
simultanément les touches et
enfoncées pendant environ
3 secondes.
• Les voyants correspondant aux
touches Précédent, OK et
Suivant sont allumés.
• L'affichage indique le premier
réglage disponible et sa valeur
actuelle.
1. Utilisez les touches Précédent ou
Suivant pour sélectionner le réglage
souhaité.
L'affichage indique le nom du réglage et
sa valeur actuelle.
2. Appuyez sur OK pour modifier le
réglage.
Les valeurs disponibles s'affichent.
3. Appuyez sur Précédent ou Suivant
pour changer la valeur.
4. Appuyez sur la touche OK pour
confirmer le réglage.
• Le nouveau réglage est
mémorisé.
• L'appareil revient à la liste des
réglages de base.
5. Maintenez simultanément les
touches et enfoncées
pendant environ 3 secondes pour
quitter le mode Programmation.
L'appareil revient au mode de sélection
de programme.
Ces réglages seront sauvegardés
jusqu'à ce que vous les changiez à
nouveau.
6.2 Adoucisseur d'eau
L'adoucisseur d'eau élimine les minéraux
de l'arrivée d'eau qui pourraient avoir un
impact négatif sur les résultats de lavage
et sur l'appareil.
Plus la teneur en minéraux est élevée,
plus l'eau est dure. La dureté de l'eau est
mesurée en échelles d'équivalence.
L'adoucisseur doit être réglé en fonction
du degré de dureté de l'eau de votre
région. Votre compagnie des eaux peut
vous indiquer la dureté de l'eau dans
votre région. Il est important de régler
l'adoucisseur d'eau sur un niveau
adéquat pour vous garantir de bons
résultats de lavage.
Comment modifier le réglage
Assurez-vous que l'appareil est en mode
Programmation.
Page 42

www.aeg.com42
Dureté de l'eau
Degrés alle‐
mands (°dH)
47 - 50 84 - 90 8,4 - 9,0 58 - 63 10
43 - 46 76 - 83 7,6 - 8,3 53 - 57 9
37 - 42 65 - 75 6,5 - 7,5 46 - 52 8
29 - 36 51 - 64 5,1 - 6,4 36 - 45 7
23 - 28 40 - 50 4,0 - 5,0 28 - 35 6
19 - 22 33 - 39 3,3 - 3,9 23 - 27
15 - 18 26 - 32 2,6 - 3,2 18 - 22 4
11 - 14 19 - 25 1,9 - 2,5 13 - 17 3
4 - 10 7 - 18 0,7 - 1,8 5 - 12 2
< 4 < 7 < 0,7 < 5
1)
Réglages d'usine.
2)
N'utilisez pas de sel à ce niveau.
Degrés fran‐
çais (°fH)
Quel que soit le type de détergent
utilisé, réglez le niveau de dureté de
l'eau approprié afin d'activer le voyant
de remplissage du sel régénérant.
Les pastilles tout-en-1
contenant du sel régénérant
ne sont pas assez efficaces
pour adoucir l'eau dure.
Processus de régénération
Pour le fonctionnement correct de
l’adoucisseur d’eau, la résine du
dispositif adoucisseur doit être
régulièrement régénérée. Ce processus
est automatique et fait partie du
fonctionnement normal du lave-vaisselle.
Si la quantité d’eau prescrite (voir les
valeurs dans le tableau) a été utilisée
depuis le dernier processus de
régénération, un nouveau processus de
régénération sera lancé entre le rinçage
final et la fin du programme.
mmol/l Degrés
Clarke
Réglage du niveau
de l'adoucisseur
d'eau
1 250
2 100
3 62
4 47
5 25
6 17
7 10
8 5
9 3
10 3
Réglage du niveau
de l'adoucisseur
Quantité d'eau (l)
En cas de réglage élevé de l’adoucisseur
d’eau, cela peut également se produire
au milieu du programme, avant le
rinçage (deux fois pendant un
programme). Le lancement de la
régénération n’a aucun impact sur la
durée du cycle, sauf s’il se produit au
d'eau
1)
5
2)
1
Page 43

FRANÇAIS 43
milieu d'un programme ou à la fin d’un
programme avec une courte phase de
séchage. Dans ces cas, la régénération
prolonge la durée totale d’un programme
de 5 minutes supplémentaires.
Ensuite, le rinçage de l’adoucisseur
d’eau qui dure 5 minutes peut
commencer au cours du même cycle ou
au début du programme suivant. Cette
activité augmente la consommation
d’eau totale d’un programme de 4 litres
supplémentaires et la consommation
énergétique totale d’un programme de
2 Wh supplémentaires. Le rinçage de
l’adoucisseur se termine avec une
vidange complète.
Chaque rinçage d’adoucisseur effectué
(plusieurs possibles au cours du même
cycle) peut prolonger la durée du
programme de 5 minutes
supplémentaires s’il se produit à
n’importe quel point au début ou au
milieu d’un programme.
Toutes les valeurs de
consommation indiquées
dans cette section sont
déterminées conformément
à la norme actuellement en
vigueur dans des conditions
de laboratoire avec une
dureté de l’eau de
2,5 mmol/L conformément
au règlement 2019/2022
(adoucisseur d’eau : niveau
3).
La pression et la
température de l’eau ainsi
que les variations de
l’alimentation secteur
peuvent modifier les valeurs.
satisfaisants avec des pastilles tout en
1 uniquement, il est possible de
désactiver le distributeur et la notification
de remplissage. Cependant, pour de
meilleures performances de séchage,
utilisez toujours du liquide de rinçage et
veillez à maintenir la notification activée.
Pour désactiver le distributeur de liquide
de rinçage et sa notification, réglez le
Niv. liquide rinçage sur 0.
6.4 Tonalité de fin
Vous pouvez activer le signal sonore
déclenché lorsque le programme est
terminé.
Des signaux sonores
retentissent lorsqu'une
anomalie de fonctionnement
s'est produite. Il est
impossible de désactiver ces
signaux sonores.
6.5 AirDry
AirDry améliore les résultats de séchage.
Durant la phase de séchage, la porte
s'ouvre automatiquement et reste
entrouverte.
6.3 Niveau liquide de rinçage
Le liquide de rinçage permet à la
vaisselle de sécher sans traces ni
taches. Il est automatiquement émis
pendant la phase de rinçage chaud. Il est
possible de définir la quantité de liquide
de rinçage libérée.
Lorsque le distributeur de liquide de
rinçage est vide, l’affichage montre le
voyant et Liquide de rinçage bas. Si
les résultats de séchage sont
AirDry est automatiquement activée avec
tous les programmes.
La durée de la phase de séchage et le
moment auquel la porte est ouverte
varient selon le programme et les options
sélectionnés.
Lorsque la fonction AirDry ouvre la porte,
la durée restante du programme en
cours s’affiche.
Page 44

www.aeg.com44
ATTENTION!
Ne tentez pas de refermer la
porte de l'appareil dans les
2 minutes suivant son
ouverture automatique. Cela
pourrait endommager
l’appareil.
ATTENTION!
Si un enfant a accès à
l'appareil, nous vous
conseillons de désactiver
l'option AirDry. L'ouverture
automatique de la porte peut
entraîner un risque.
6.6 Sélection du dernier programme
Vous pouvez activer ou désactiver la
sélection automatique du dernier
programme et des dernières options
utilisés.
Le dernier programme effectué avant
d'éteindre l'appareil est enregistré. Il est
alors automatiquement sélectionné
lorsque vous rallumez l'appareil.
Lorsque la sélection du dernier
programme est désactivée, le
programme par défaut est ECO.
6.7 TimeBeam
Le faisceau TimeBeam affiche les
informations suivantes sous la porte de
l'appareil :
• La durée du programme, lorsque le
programme démarre.
• 0:00 et CLEAN lorsque le programme
est terminé.
• DELAY et le décompte lorsque le
départ différé démarre.
• Un code d'alarme en cas d'anomalie
de fonctionnement.
Lorsque AirDry ouvre la
porte, TimeBeam est
désactivé. Pour vérifier le
temps restant au programme
en cours, vous pouvez
regarder l'affichage du
bandeau de commande.
6.8 Numéro PNC
Si vous contactez un service après-vente
agréé, vous devrez fournir la référence
de produit (Numéro PNC), de votre
appareil.
Vous trouverez ce nombre sur la plaque
signalétique située sur la porte de
l'appareil. Vous pouvez également
trouver ce nombre sur l'affichage.
Choisissez Numéro PNC dans la liste
des réglages pour vérifier le numéro.
7. AVANT LA PREMIÈRE UTILISATION
1. Assurez-vous que le réglage
actuel de l'adoucisseur d'eau est
compatible avec la dureté de
l'arrivée d'eau. Si ce n'est pas le
cas, réglez le niveau de
l'adoucisseur d'eau.
2. Remplissez le réservoir de sel
régénérant.
3. Remplissez le distributeur de liquide
de rinçage.
4. Ouvrez le robinet d'eau.
5. Démarrez le programme Quick pour
éliminer tout résidu de fabrication.
Page 45

A
B
C
FRANÇAIS 45
N'utilisez pas de produit de lavage et
laissez les paniers vides.
Lorsque vous démarrez un programme,
l'appareil peut prendre 5 minutes pour
recharger la résine dans l'adoucisseur
d'eau. La phase de lavage ne démarre
qu'une fois cette procédure achevée. La
procédure sera répétée régulièrement.
7.1 Réservoir de sel régénérant
ATTENTION!
Utilisez uniquement du gros
sel spécialement conçu pour
les lave-vaisselle. Le sel fin
augmente le risque de
corrosion.
Le sel permet de recharger la résine
dans l'adoucisseur d'eau et de garantir
de bons résultats de lavage au quotidien.
Comment remplir le réservoir de sel régénérant
Assurez-vous que le
ComfortLift est vide et
correctement verrouillé en
position surélevée.
1. Tournez le couvercle du réservoir de
sel régénérant vers la gauche et
retirez-le.
2. Mettez 1 litre d'eau dans le réservoir
de sel régénérant (uniquement la
première fois).
3. Remplissez le réservoir avec du sel
régénérant (jusqu'à ce qu'il soit
rempli).
5. Enlevez le sel qui se trouve autour
de l'ouverture du réservoir de sel
régénérant.
6. Tournez le couvercle du réservoir de
sel régénérant vers la droite pour le
refermer.
ATTENTION!
De l'eau et du sel peuvent
sortir du réservoir de sel
régénérant lorsque vous le
remplissez. Afin d'éviter la
corrosion, lancez
immédiatement le
programme le plus court
après avoir rempli le
réservoir de sel régénérant.
Ne placez pas de vaisselle
dans les paniers.
7.2 Comment remplir le
distributeur de liquide de
rinçage
4. Secouez doucement l'entonnoir par
la poignée pour faire tomber les
derniers grains qu'il contient.
Page 46

www.aeg.com46
ATTENTION!
Le compartiment (B) est
uniquement destiné au
liquide de rinçage. Ne le
remplissez pas de produit de
lavage.
ATTENTION!
Utilisez uniquement des
liquides de rinçage
spécialement conçus pour
les lave-vaisselles.
1. Ouvrez le couvercle (C).
8. UTILISATION QUOTIDIENNE
1. Ouvrez le robinet d'eau.
2. Maintenez la touche enfoncée
jusqu'à ce que l'appareil s'allume.
3. Remplissez le réservoir de sel
régénérant s'il est vide.
4. Remplissez le distributeur de liquide
de rinçage s'il est vide.
5. Chargez les paniers.
6. Ajoutez du produit de lavage.
7. Sélectionnez et démarrez un
programme.
8. Une fois le programme ferminé,
fermez le robinet d'eau.
8.1 ComfortLift
2. Remplissez le distributeur (B) jusqu’à
ce que le liquide de rinçage atteigne
le repère « MAX ».
3. Retirez le liquide de rinçage à l’aide
d’un chiffon absorbant pour éviter
tout excès de mousse.
4. Fermez le couvercle. Assurez-vous
que le couvercle se verrouille
correctement.
Remplissez le distributeur de
liquide de rinçage lorsque le
voyant (A) s’allume.
charger et décharger plus facilement la
vaisselle.
Pour charger et décharger le panier
inférieur :
1. Pour soulever le panier, sortez-le du
lave-vaisselle en utilisant la poignée
du panier. N'utilisez pas la poignée
pour détacher le panier.
ATTENTION!
Ne vous asseyez pas et
n'exercez pas de forte
pression sur le panier
verrouillé.
ATTENTION!
Ne dépassez pas la charge
maximale de 18 kg.
ATTENTION!
Assurez-vous que les
articles ne sont pas collés au
cadre du panier car vous
pourriez endommager ces
articles, ainsi que le
mécanisme ComfortLift.
Le mécanisme ComfortLift vous permet
de soulever le panier (au niveau du
deuxième panier) et de le rabaisser pour
Le panier est automatiquement verrouillé
au niveau supérieur.
2. Placez soigneusement la vaisselle
dans le panier, ou sortez-la
(reportez-vous à la brochure de
déchargement du panier).
3. Pour abaisser le panier, reliez la
poignée au cadre du panier comme
indiqué ci-dessous. Soulevez
complètement la poignée et soulevez
légèrement la poignée du panier
jusqu'à ce que le panier se détache
des deux côtés.
Page 47

A
B
C
FRANÇAIS 47
petite quantité de produit de lavage
sur la face intérieure de la porte de
l’appareil.
4. Fermez le couvercle. Assurez-vous
que le couvercle se verrouille
correctement.
Pour plus d’informations sur
le dosage du produit de
lavage, reportez-vous aux
Une fois le panier déverrouillé,
poussez-le vers le bas. Le
mécanisme revient à sa position par
défaut au niveau inférieur.
Vous pouvez abaisser le panier de
deux façons, en fonction de la
charge :
• s'il s'agit d'une charge pleine
d'assiettes, poussez légèrement
le panier vers le bas.
• si le panier est vide ou chargé à
moitié, enfoncez le panier vers le
bas.
8.2 Utilisation du produit de lavage
8.3 Comment sélectionner et
instructions du fabricant sur
l’emballage du produit.
Généralement, 20 à 25 ml
de produit de lavage en gel
suffit pour laver de la
vaisselle présentant une
salissure normale.
Les extrémités supérieures
des deux travers verticaux à
l’intérieur du compartiment
(B) indiquent le niveau
maximal pour remplir le
distributeur de gel (max.
30 ml).
démarrer un programme en
utilisant la barre de sélection
MY TIME.
1. Faites glisser votre doigt le long de la
barre de sélection MY TIME pour
choisir un programme adapté.
• Le voyant correspondant au
programme sélectionné est
allumé.
• L'ECOMETER indique la
consommation d'énergie et d'eau.
• L'affichage indique la durée du
programme.
ATTENTION!
Utilisez uniquement des
produits de lavage
spécialement conçus pour
les lave-vaisselles.
1. Appuyez sur la touche de
déverrouillage (A) pour ouvrir le
couvercle (C).
2. Versez le produit de lavage (gel,
poudre ou pastille) dans le
compartiment (B).
3. Si le programme comporte une
phase de prélavage, versez une
2. Activez les EXTRAS compatibles si
vous le souhaitez.
3. Fermez la porte de l'appareil pour
démarrer le programme.
8.4 Comment activer l'option
EXTRAS
1. Sélectionnez un programme en
utilisant la barre de sélection
MY TIME.
2. Appuyez sur la touche correspondant
à l'option que vous souhaitez activer.
Page 48

www.aeg.com48
• Le voyant correspondant à la
touche est allumé.
• L'affichage indique la durée du
programme réactualisée.
• L'ECOMETER indique la
consommation d'énergie et d'eau
mis à jour.
Par défaut, les options
souhaitées doivent être
activées à chaque fois,
avant de lancer un
programme.
Si le dernier programme
sélectionné est activé, les
options sauvegardées sont
automatiquement activées
avec le programme.
Vous ne pouvez pas activer
ni désactiver ces options
pendant le déroulement d'un
programme.
Toutes les options ne sont
pas compatibles les unes
avec les autres.
Activer des options
augmente souvent la
consommation d'eau et
d'énergie, ainsi que sur la
durée du programme.
8.5 Comment lancer le programme AUTO Sense
1. Appuyez sur .
• Le voyant correspondant à la
touche est allumé.
• L'affichage indique la durée
maximale du programme.
MY TIME et EXTRAS ne
sont pas compatibles avec
ce programme.
2. Fermez la porte de l'appareil pour
démarrer le programme.
L'appareil détecte le type de charge et
choisit un cycle de lavage adapté. En
cours de cycle, les capteurs
s'enclenchent à plusieurs reprises, et la
durée initiale du programme peut être
diminuée.
8.6 Comment différer le départ d'un programme
1. Sélectionnez un programme.
2. Appuyez sur la touche
reprises jusqu'à ce que l'affichage
indique le délai choisi pour le départ
différé (de 1 à 24 heures).
Le voyant correspondant à la touche est
allumé.
3. Fermez la porte de l'appareil pour
démarrer le décompte.
Pendant un décompte, il n'est pas
possible de changer le délai du départ
différé et le choix du programme.
Lorsque le décompte est terminé, le
programme démarre.
à plusieurs
8.7 Ouverture de la porte
pendant le fonctionnement
de l’appareil
Si vous ouvrez la porte lorsqu’un
programme est en cours, le cycle de
lavage se met en pause. La durée
restante du programme s’affiche. La
barre du programme en bas de
l’affichage indique la progression actuelle
du cycle de lavage. La longueur de la
barre diminue en même temps que la
durée du programme. Après avoir
refermé la porte, le cycle de lavage
reprend là où il a été interrompu.
Si vous ouvrez la porte pendant le
décompte du départ différé, le décompte
est mis en pause. Le statut actuel du
décompte s’affiche. Après avoir refermé
la porte, le décompte reprend.
Ouvrir la porte lorsque
l’appareil est en
fonctionnement peut avoir
un impact sur la
consommation d’énergie et
la durée du programme.
Durant la phase de séchage,
si la porte est ouverte
pendant plus de
30 secondes, le programme
en cours s’arrête. Ceci ne se
produit pas si la porte est
ouverte par la fonction
AirDry.
Page 49

FRANÇAIS 49
8.8 Comment annuler le départ différé au cours du décompte
Maintenez la touche enfoncée
pendant environ 3 secondes.
L'appareil revient au mode de sélection
de programme.
Si vous annulez le départ
différé, vous devez régler de
nouveau le programme.
8.9 Pour annuler un programme en cours
Maintenez la touche enfoncée
pendant environ 3 secondes.
L'appareil revient au mode de sélection
de programme.
Assurez-vous que le
distributeur de produit de
lavage n'est pas vide avant
de démarrer un nouveau
programme de lavage.
9. CONSEILS
9.1 Informations générales
Suivez les conseils ci-dessous pour
garantir des résultats de lavage et de
séchage optimaux au quotidien et pour
protéger l'environnement.
• Laver les plats au lave-vaisselle
comme indiqué dans la notice
d’utilisation permet généralement de
consommer moins d’eau et d’énergie
par rapport au lavage des plats à la
main.
• Chargez le lave-vaisselle à sa
capacité maximale pour économiser
l’eau et l’énergie. Pour obtenir les
meilleurs résultats de nettoyage,
disposez les articles dans les paniers
comme indiqué dans la notice
d'utilisation et ne surchargez pas les
paniers.
• Ne rincez pas vos plats à la main au
préalable. Cela augmente la
consommation d’eau et d’énergie. Si
nécessaire, sélectionnez un
8.10 Fonction Auto Off
Cette fonction permet d'économiser de
l'énergie en éteignant l'appareil lorsqu'il
n'est pas en cours de fonctionnement.
La fonction est activée
automatiquement :
• Lorsque le programme est terminé.
• Au bout de 5 minutes si le programme
n'a pas démarré.
8.11 Fin du programme
Lorsque le programme est terminé, Plats
propres s'affiche.
La fonction Auto Off éteint
automatiquement l'appareil.
Toutes les touches sont inactives, à
l'exception de la touche Marche/Arrêt.
programme avec une phase de
prélavage.
• Enlevez les plus gros résidus
d’aliments des plats et videz les
tasses et les verres avant de les
mettre dans l’appareil.
• Faites tremper ou récurez légèrement
la vaisselle contenant des aliments
très cuits avant de la placer dans
l'appareil.
• Vérifiez que les plats ne se touchent
pas dans les paniers ou ne se
recouvrent pas les uns les autres.
L'eau peut ainsi atteindre toute la
vaisselle et la laver parfaitement.
• Vous pouvez utiliser du détergent, du
liquide de rinçage et du sel
régénérant séparément, ou des
pastilles tout en 1. Suivez les
instructions inscrites sur l'emballage.
• Sélectionnez un programme en
fonction du type de charge et du
degré de saleté. ECO assure
l’utilisation la plus efficace de
consommation d’eau et d’énergie.
Page 50

www.aeg.com50
• Pour empêcher la formation de
dépôts calcaires à l’intérieur de
l’appareil :
– Remplissez le réservoir de sel
régénérant dès que nécessaire.
– Utilisez le dosage recommandé
de détergent et de liquide de
rinçage.
– Assurez-vous que le niveau réglé
pour l'adoucisseur d'eau
correspond à la dureté de l'eau de
votre région.
– Suivez les instructions du chapitre
« Entretien et nettoyage ».
9.2 Utilisation de sel
régénérant, de liquide de
rinçage et de produit de
lavage
• Utilisez uniquement du sel
régénérant, du liquide de rinçage et
du produit de lavage conçus pour les
lave-vaisselle. D'autres produits
peuvent endommager l'appareil.
• Dans les régions où l'eau est dure ou
très dure, nous recommandons
l'utilisation séparée d'un détergent
simple (poudre, gel, pastille, sans
fonction supplémentaire), de liquide
de rinçage et de sel régénérant pour
des résultats de lavage et de séchage
optimaux.
• Les tablettes de détergent ne se
dissolvent pas complètement durant
les programmes courts. Pour éviter
que des résidus de produit de lavage
ne se déposent sur la vaisselle, nous
recommandons d'utiliser des pastilles
de détergent avec des programmes
longs.
• Utilisez toujours la quantité adéquate
de détergent. Un dosage insuffisant
de détergent peut entraîner de
mauvais résultats de nettoyage et la
formation d’une pellicule ou de taches
d’eau dure sur les articles. Utiliser
trop de détergent avec une eau douce
ou adoucie entraîne la présence de
résidus de détergent sur les plats.
Ajustez la quantité de détergent en
fonction de la dureté de l’eau.
Reportez-vous aux instructions
figurant sur l'emballage du produit de
lavage.
• Utilisez toujours la quantité adéquate
de liquide de rinçage. Un dosage
insuffisant du liquide de rinçage
diminue les résultats de séchage.
Utiliser trop de liquide de rinçage
entraîne la formation de couches
bleutées sur les articles.
• Assurez-vous que le niveau
d’adoucisseur d’eau est correct. Si le
niveau est trop élevé, la quantité
accrue de sel régénérant dans l’eau
peut entraîner la formation de rouille
sur les couverts.
9.3 Que faire si vous ne
voulez plus utiliser de
pastilles tout en 1
Avant de commencer à utiliser le produit
de lavage, le sel régénérant et le liquide
de rinçage séparément, suivez les
étapes suivantes :
1. Réglez l'adoucisseur d'eau sur le
niveau maximal.
2. Assurez-vous que le réservoir de sel
régénérant et le distributeur de
liquide de rinçage sont pleins.
3. Lancez le programme Quick.
N'ajoutez pas de produit de lavage et
laissez les paniers vides.
4. Lorsque le programme de lavage est
terminé, réglez l'adoucisseur d'eau
en fonction de la dureté de l'eau
dans votre région.
5. Ajustez la quantité de liquide de
rinçage libérée.
9.4 Avant de lancer un
programme
Avant de lancer le programme
sélectionné, assurez-vous que :
• Les filtres sont propres et
correctement installés.
• Le bouchon du réservoir de sel
régénérant est serré.
• Les bras d’aspersion ne sont pas
obstrués.
• Il y a assez de sel régénérant et de
liquide de rinçage (sauf si vous
utilisez des pastilles tout-en-un).
• La vaisselle est bien positionnée dans
les paniers.
• Le programme est adapté au type de
vaisselle et au degré de salissure.
Page 51

FRANÇAIS 51
• La bonne quantité de détergent est
utilisée.
• Placez les couverts et les petits
• Déplacez le panier supérieur vers le
9.5 Chargement des paniers
• Utilisez toujours l’espace complet des
paniers.
• N’utilisez l’appareil que pour laver des
articles adaptés au lave-vaisselle.
• Ne lavez pas dans l’appareil des
articles fabriqués en bois, corne,
aluminium, étain et cuivre car ils
pourraient se fissurer, se déformer,
être décolorés ou piqués.
• Ne placez pas dans l’appareil des
objets pouvant absorber l’eau
(éponges, chiffons de nettoyage).
• Chargez les articles creux (tasses,
verres et casseroles) en les
retournant.
• Assurez-vous que les objets en verre
ne se touchent pas.
• Placez les articles légers dans le
panier supérieur. Veillez à ce que les
articles ne puissent pas bouger.
• Assurez-vous que le bras d’aspersion
9.6 Déchargement des paniers
1. Attendez que la vaisselle refroidisse
2. Commencez par décharger le panier
10. ENTRETIEN ET NETTOYAGE
AVERTISSEMENT!
Avant toute opération
d'entretien autre que le
programme Machine Care,
éteignez l'appareil et
débranchez la fiche de la
prise secteur.
Assurez-vous que le
ComfortLift est vide et
correctement verrouillé en
position surélevée.
Les filtres sales et les bras
d'aspersion obstrués ont un
impact négatif sur les
résultats de lavage.
Contrôlez-les régulièrement
et nettoyez-les si
nécessaire.
10.1 Machine Care
Machine Care est un programme conçu
pour laver l'intérieur de l'appareil, pour
des résultats optimaux. Il élimine le tartre
et l'accumulation de graisses.
Lorsque l'appareil détecte qu'il doit être
nettoyé, l’écran affiche le message de
rappel Veuillez démarrer MachineCare
et l’indicateur . Lancez le programme
Machine Care pour nettoyer l'intérieur de
l'appareil.
Comment lancer le programme Machine Care
1. Utilisez un produit de détartrage ou
2. Maintenez simultanément les
L’indicateur clignote.L’écran affiche
la durée du programme.
articles dans le tiroir à couverts.
haut à l’aide des poignées pour
pouvoir placer les grands récipients
dans le panier inférieur.
tourne librement avant de lancer un
programme.
avant de la retirer de l'appareil. La
vaisselle encore chaude est sensible
aux chocs.
inférieur, puis le panier supérieur.
Une fois le programme
terminé, il peut rester de
l'eau sur les surfaces
intérieures de l'appareil.
Avant de lancer le
programme Machine Care,
nettoyez les filtres et les
bras d'aspersion.
de nettoyage spécialement conçu
pour les lave-vaisselle. Suivez les
instructions inscrites sur l'emballage.
Ne placez pas de vaisselle dans les
paniers.
touches et enfoncées
pendant environ 3 secondes.
Page 52

C
B
A
www.aeg.com52
3. Fermez la porte de l'appareil pour
démarrer le programme.
Lorsque le programme est terminé, le
message de rappel est désactivé.
10.2 Nettoyage intérieur
• Nettoyez soigneusement l'appareil, y
compris le joint en caoutchouc de la
porte, avec un chiffon doux humide.
• N'utilisez pas de produits abrasifs, de
tampons à récurer, d'outils
tranchants, de produits chimiques
agressifs, d'éponges métalliques, ni
de solvants.
• Pour maintenir des performances
optimales, utilisez un produit de
nettoyage spécifiquement conçu pour
les lave-vaisselle (au moins une fois
tous les deux mois). Reportez-vous
aux instructions figurant sur
l'emballage de ces produits.
• Pour des résultats de lavage
optimaux, lancez le programme
Machine Care.
• N'utilisez pas de produits abrasifs, de
tampons à récurer ni de solvants.
10.5 Nettoyage des filtres
Le système de filtres est composé de
3 parties.
1. Tournez le filtre (B) vers la gauche et
sortez-le.
10.3 Élimination de corps étrangers
Vérifiez les filtres et le collecteur d’eau
après chaque utilisation du lavevaisselle. Les corps étrangers (par
exemple les morceaux de verre, de
plastique, les os ou les cure-dents, etc.)
réduisent les performances de nettoyage
et peuvent endommager la pompe de
vidange.
ATTENTION!
Si vous ne pouvez pas
retirer les corps étrangers,
contactez un service aprèsvente agréé.
1. Démontez le système de filtres
comme indiqué dans ce chapitre.
2. Retirez manuellement tout corps
étranger.
3. Remontez les filtres comme indiqué
dans ce chapitre.
2. Retirez le filtre (C) du filtre (B).
3. Retirez le filtre plat (A).
10.4 Nettoyage extérieur
• Nettoyez l'appareil avec un chiffon
doux humide.
• Utilisez uniquement des produits de
lavage neutres.
4. Lavez les filtres.
Page 53

5. Assurez-vous qu'il ne reste aucun
résidu alimentaire ni salissure à
l'intérieur ou autour du bord du
collecteur d'eau.
6. Réinstallez le filtre plat (A). Assurezvous qu'il soit correctement
positionné entre les 2 guides.
FRANÇAIS 53
ATTENTION!
Une position incorrecte des
filtres peut donner de
mauvais résultats de lavage
et endommager l'appareil.
10.6 Nettoyage du bras d’aspersion inférieur
Nous vous conseillons de nettoyer
régulièrement le bras d’aspersion
inférieur afin d’éviter que ses orifices ne
se bouchent.
Quand les orifices sont bouchés, les
résultats de lavage peuvent être
insatisfaisants.
1. Pour retirer le bras d’aspersion
inférieur, tirez-le vers le haut.
7. Remontez les filtres (B) et (C).
8. Remettez le filtre (B) dans le filtre
plat (A). Tournez-le vers la droite
jusqu'à la butée.
2. Lavez le bras d’aspersion sous l’eau
courante. Utilisez un outil pointu
comme un cure-dent pour extraire
toutes les particules de saleté
incrustées dans les orifices.
3. Pour réinstaller le bras d’aspersion,
enfoncez-le vers le bas.
Page 54

www.aeg.com54
10.7 Nettoyage du bras d’aspersion supérieur
Nous vous conseillons de nettoyer
régulièrement le bras d’aspersion
supérieur afin d’éviter que ses orifices ne
se bouchent.
Quand les orifices sont bouchés, les
résultats de lavage peuvent être
insatisfaisants.
1. Sortez le panier supérieur.
2. Pour détacher le bras d’aspersion du
panier, poussez le bras vers le haut
tout en le tournant vers la droite.
4. Pour réinstaller le bras d’aspersion,
pousser le bras vers le haut tout en
le tournant vers la gauche, jusqu’à ce
qu’il se verrouille en place.
3. Lavez le bras d’aspersion sous l’eau
courante. Utilisez un outil pointu
comme un cure-dent pour extraire
toutes les particules de saleté
incrustées dans les orifices.
10.8 Nettoyage du bras d'aspersion de plafond
Nous vous conseillons de nettoyer
régulièrement le bras d'aspersion de
plafond afin d'éviter que ses orifices se
bouchent. Si les orifices sont bouchés,
les résultats de lavage peuvent ne pas
être satisfaisants.
Le bras d'aspersion de plafond se trouve
sur le plafond de l'appareil. Le bras
d'aspersion (C) se trouve dans le tuyau
d'alimentation (A) avec la fixation (B).
Page 55

C
B
A
1. Retirez les butées des rails
2
1
coulissants du bac à couverts et
retirez le bac à couverts.
2. Déplacez le panier supérieur vers le
niveau inférieur pour atteindre le bras
d'aspersion plus facilement.
3. Pour détacher le bras d'aspersion (C)
du tuyau d'alimentation (A), tournez
la fixation (B) vers la gauche et tirez
le bras d'aspersion vers le bas.
FRANÇAIS 55
4. Nettoyez le bras d'aspersion à l'eau
courante. Utilisez un outil pointu
comme un cure-dent pour extraire
toutes les particules de saleté
incrustées dans les orifices. Faites
couler de l'eau dans les orifices pour
éliminer les particules de saleté se
trouvant à l'intérieur.
5. Pour réinstaller le bras d'aspersion
(C), insérez la fixation (B) dans le
bras d'aspersion et insérez-le dans le
tuyau d'alimentation (A) en le
tournant vers la droite. Assurez-vous
que la fixation se verrouille
correctement dans la bonne position.
6. Réinstallez le bac à couverts sur les
rails coulissants et réinsérez les
butées.
11. DÉPANNAGE
AVERTISSEMENT!
Une mauvaise réparation de
l’appareil peut entraîner un
danger pour la sécurité de
l’utilisateur. Toute réparation
doit être effectuée par du
personnel qualifié.
La plupart des problèmes peuvent
être résolus sans avoir recours au
service après-vente agréé.
Reportez-vous au tableau ci-dessous
pour obtenir plus d’informations sur les
problèmes possibles.
Pour certaines anomalies, l’écran affiche
un code d’alarme.
Page 56

www.aeg.com56
Problème et code d’alarme Cause et solution possibles
Vous ne pouvez pas mettre
en fonctionnement l’appareil.
• Assurez-vous que la fiche du câble d’alimentation est
bien connectée dans la prise de courant.
• Assurez-vous qu’aucun fusible n’a disjoncté dans la boî‐
te à fusibles.
Le programme ne démarre
pas.
• Assurez-vous que la porte de l'appareil est fermée.
• Si vous avez sélectionné Départ différé, annulez-le ou
attendez la fin du décompte.
• L’appareil recharge la résine à l’intérieur de l’adoucis‐
seur d’eau. La durée de la procédure est d’environ 5 mi‐
nutes.
L’appareil ne se remplit pas
d’eau.
L’affichage indique , Er‐
reur i10 ou Erreur i11 et
Pas d'arrivée d'eau .
• Assurez-vous que l'arrivée d'eau est ouverte.
• Assurez-vous que la pression de l’alimentation d’eau est
suffisante. Pour cela, contactez les autorités locales en
charge de l’eau.
• Assurez-vous que l’arrivée d’eau n’est pas bouchée.
• Assurez-vous que le filtre du tuyau d’arrivée d’eau n’est
pas bouché.
• Assurez-vous que le tuyau de raccordement ne présen‐
te pas de plis ni de coudes.
L’appareil ne vidange pas
l'eau.
L'affichage indique , Er‐
reur i20 et L'eau n'est pas
évacuée .
Le dispositif anti-inondation
est activé.
• Assurez-vous que le siphon n’est pas bouché.
• Assurez-vous que le système de filtre intérieur n’est pas
bouché.
• Assurez-vous que le tuyau de vidange n’est pas tordu ni
plié.
• Fermez l’arrivée d’eau et contactez un service aprèsvente agréé.
L'affichage indique , Er‐
reur i30 et Risque d'inon‐
dation détecté .
Dysfonctionnement du cap‐
teur de détection du niveau
d’eau.
• Assurez-vous que les filtres sont propres.
• Mettez à l’arrêt l’appareil et mettez-le de nouveau en
fonctionnement.
L’affichage indique i41 - i44.
Dysfonctionnement de la
pompe de lavage ou de la
• Mettez à l’arrêt et mettez-le de nouveau en fonctionne‐
ment.
pompe de vidange.
L'affichage indique i51 - i59
ou i5A - i5F.
Page 57

Problème et code d’alarme Cause et solution possibles
La température de l’eau à
l’intérieur de l’appareil est
trop élevée ou un dysfonc‐
tionnement du capteur de
• Assurez-vous que la température de l’eau de l’arrivée
ne dépasse pas 60 °C.
• Mettez à l’arrêt l’appareil et mettez-le de nouveau en
fonctionnement.
température s’est produit.
L’affichage indique i61 ou
i69.
Dysfonctionnement techni‐
que de l’appareil.
• Mettez à l’arrêt l’appareil et mettez-le de nouveau en
fonctionnement.
L’affichage indique iC0 ou
iC3.
Le niveau d’eau à l’intérieur
de l’appareil est trop élevé.
L’affichage indique iF1.
• Mettez à l’arrêt l’appareil et mettez-le de nouveau en
fonctionnement.
• Assurez-vous que les filtres sont propres.
• Assurez-vous que le tuyau de sortie est installé à la
bonne hauteur au-dessus du sol. Reportez-vous aux
instructions d'installation.
L'appareil s'arrête et démar‐
re plusieurs fois pendant son
• Cela est normal. Cela vous garantit des résultats de la‐
vage optimaux et des économies d’énergie.
fonctionnement.
Le programme dure trop
longtemps.
• Si vous avez sélectionné l'option de départ différé, an‐
nulez-le ou attendez la fin du décompte.
• L'activation des options augmente généralement la du‐
rée du programme.
Le temps restant sur l'affi‐
chage augmente et passe
• Ce n'est pas un défaut. L'appareil fonctionne correcte‐
ment.
presque instantanément à la
fin du programme.
Petite fuite de la porte de
l'appareil.
• L’appareil n’est pas d’aplomb. Desserrez ou serrez les
pieds réglables (si disponibles).
• La porte de l’appareil n’est pas centrée sur la cuve. Ré‐
glez le pied arrière (si disponible).
La porte de l’appareil est dif‐
ficile à fermer.
• L’appareil n’est pas d’aplomb. Desserrez ou serrez les
pieds réglables (si disponibles).
• De la vaisselle dépasse des paniers.
La porte de l’appareil s’ou‐
vre pendant le cycle de lava‐
ge.
Cliquetis ou bruits de batte‐
ment à l'intérieur de l'appa‐
reil.
• La fonction AirDry est activée. Vous pouvez désactiver
la fonction. Reportez-vous au chapitre « Réglages de
base ».
• La vaisselle n'est pas correctement rangée dans les pa‐
niers. Reportez-vous à la notice de chargement du pa‐
nier.
• Assurez-vous que les bras d’aspersion peuvent tourner
librement.
FRANÇAIS 57
Page 58

www.aeg.com58
Problème et code d’alarme Cause et solution possibles
L’appareil déclenche le dis‐
joncteur.
• L’intensité est insuffisante pour alimenter simultanément
tous les appareils en cours d’utilisation. Vérifiez l’intensi‐
té de la prise et la capacité du mètre ou mettez à l’arrêt
l’un des appareils en cours d’utilisation.
• Défaut électrique interne de l’appareil. Contactez un ser‐
vice après-vente agréé.
Après avoir vérifié l'appareil, mettez à
l’arrêt l’appareil et mettez-le de nouveau
en fonctionnement. Si le problème
persiste, contactez un service aprèsvente agréé.
Pour les codes d’alarme non décrits
dans le tableau, contactez un service
après-vente agréé.
Avant de contacter un
AVERTISSEMENT!
Nous vous conseillons de ne
pas utiliser l’appareil tant
que le problème n’a pas été
entièrement résolu.
Débranchez l’appareil et ne
le rebranchez pas tant que
vous n’êtes pas certain qu’il
fonctionne correctement.
service après-vente agréé,
notez le Numéro PNC.
Reportez-vous au chapitre
« Réglages de base ».
11.1 Les résultats obtenus en matière de lavage et de séchage sont insuffisants
Problème Cause et solution possibles
Résultats de lavage insatisfai‐
sants.
• Reportez-vous aux sections « Utilisation quotidien‐
ne », « Utilisation quotidienne », et au manuel de
chargement du panier.
• Utilisez un programme de lavage plus intense.
• Activez ExtraPower l’option pour améliorer les résul‐
tats de lavage du programme sélectionné.
• Nettoyez les jets des bras d'aspersion et le filtre. Re‐
portez-vous à la section « Entretien et nettoyage ».
Page 59

Problème Cause et solution possibles
Résultats de séchage insatis‐
faisants.
• La vaisselle est restée trop longtemps à l'intérieur de
l'appareil, porte fermée. Activez l’option AirDry pour
définir l'ouverture automatique de la porte et améliorer
les performances de séchage.
• Il n'y a pas de liquide de rinçage ou le dosage du liqui‐
de de rinçage n'est pas suffisant. Remplissez le distri‐
buteur de liquide de rinçage ou réglez le niveau de li‐
quide de rinçage sur un niveau plus élevé.
• La qualité du liquide de rinçage peut être la cause.
• Nous vous recommandons de toujours utiliser du liqui‐
de de rinçage, même si vous utilisez déjà des pastilles
tout-en-un.
• Les articles en plastique peuvent avoir besoin d’être
séchés à l’aide d’une serviette.
• Le programme ne possède pas de phase de séchage.
Reportez-vous à la section « Présentation des pro‐
grammes ».
Les verres et la vaisselle pré‐
sentent des rayures blanchâ‐
tres ou des couches bleuâtres.
Il y a des taches et des traces
d’eau sèche sur les verres et
la vaisselle.
• Le niveau de liquide de rinçage libérée est trop haut.
Baisser le niveau du liquide de rinçage.
• La quantité de produit de lavage est excessive.
• La quantité de liquide de rinçage libérée n’est pas suf‐
fisante. Placez le sélecteur de dosage du liquide de
rinçage sur un niveau plus élevé.
• La qualité du liquide de rinçage peut être la cause.
L'intérieur de l'appareil est hu‐
mide.
Mousse inhabituelle en cours
de lavage.
• Ce n’est pas un défaut de l’appareil. De l'air humide se
condense sur les parois de l'appareil.
• Utilisez uniquement des produits de lavage spéciale‐
ment conçus pour les lave-vaisselles.
• Utilisez un produit de lavage d’un autre fabricant.
• Ne pré-rincez pas les plats à l’eau courante avant de
les mettre dans l’appareil.
Traces de rouille sur les cou‐
verts.
• Il y a trop de sel dans l’eau utilisée pour le lavage. Re‐
portez-vous aux sections « L’adoucisseur d’eau ».
• Des couverts en argent et en acier inoxydable ont été
placés ensemble. Évitez de placer des couverts en ar‐
gent et en acier inoxydable les uns à côté des autres.
Il y a des résidus de détergent
dans le distributeur de produit
de lavage à la fin du program‐
me.
• La pastille de détergent est restée coincée dans le dis‐
tributeur de produit de lavage, qui n'a donc pas été en‐
tièrement éliminée par l'eau.
• L’eau ne peut pas laver le produit de lavage du distri‐
buteur. Assurez-vous que les bras d'aspersion ne sont
pas bloqués ou obstrués.
• Assurez-vous que les articles dans les paniers n’entra‐
vent pas l’ouverture du couvercle du distributeur de
produit de lavage.
FRANÇAIS 59
Page 60

www.aeg.com60
Problème Cause et solution possibles
Odeurs à l'intérieur de l'appa‐
reil.
Dépôts calcaires sur la vais‐
selle, dans la cuve et à l'inté‐
rieur de la porte.
Vaisselle ternie, décolorée ou
ébréchée.
• Reportez-vous aux sections « Nettoyage interne ».
• Lancez le programme Machine Care avec un agent
détartrant ou un produit de nettoyage conçu pour les
lave-vaisselles.
• Le niveau de sel régénérant est bas, vérifiez le voyant
de remplissage.
• Le bouchon du réservoir de sel régénérant est desser‐
ré.
• L'eau de votre arrivée est dure. Reportez-vous aux
sections « L’adoucisseur d’eau ».
• Utilisez du sel régénérant et sélectionner la régénéra‐
tion de l'eau même si vous utilisez des pastilles touten-un. Reportez-vous aux sections « L’adoucisseur
d’eau ».
• Lancez le Machine Care programme avec un détar‐
trant conçu pour les lave-vaisselles.
• Si des dépôts de calcaire persistent, nettoyez l'appa‐
reil avec un nettoyant spécial pour le détartrage de
l'appareil.
• Testez différents produits de lavage.
• Contactez le fabricant du produit de lavage.
• Assurez-vous que seuls des articles lavables au lavevaisselle sont lavés dans l’appareil.
• Chargez et déchargez le panier avec précautions. Re‐
portez-vous au manuel de chargement du panier.
• Placez les articles délicats dans le panier supérieur.
• Activez l’option GlassCare pour garantir un soin spé‐
cial aux verres et à la vaisselle délicate.
Reportez-vous aux sections
« Avant la première
utilisation », « Utilisation
quotidienne », ou
« Conseils » pour d’autres
causes possibles.
12. CARACTÉRISTIQUES TECHNIQUES
Dimensions Largeur / hauteur / profondeur
(mm)
Tension (V) 200 - 240
Branchement électrique
Pression de l’arrivée d’eau bar (minimum et maximum) 0.5 - 8
1)
Fréquence (Hz) 50 - 60
MPa (minimum et maximum) 0.05 - 0.8
596 / 818 - 898 / 550
Page 61

FRANÇAIS 61
Arrivée d’eau
Capacité Configurations du nombre de cou‐
Consommation d’énergie
1)
Reportez-vous à la plaque signalétique pour d'autres valeurs.
2)
Si l'eau chaude est produite à partir de sources d'énergie respectueuses de l'environnement (par
exemple des panneaux solaires), utilisez une arrivée d'eau chaude afin de réduire la consommation
d'énergie.
3)
Conforme à la réglementation 1059/2010.
12.1 Lien vers la base de données EPREL de l’UE
Le code QR présent sur l’étiquette
énergétique fournie avec l’appareil
contient un lien Web permettant
d’enregistrer cet appareil dans la base
de données EPREL de l’UE. Conservez
l’étiquette énergétique à titre de
référence avec le manuel d’utilisation et
tous les autres documents fournis avec
Eau froide ou eau chaude
verts
Mode « Laissé sur marche » (W) 5.0
3)
Mode « Arrêt » (W) 0.50
du produit dans la base de données
EPREL de l’EU grâce au lien https://
eprel.ec.europa.eu avec le nom du
modèle et le numéro de produit se
trouvant sur la plaque signalétique de
l’appareil. Reportez-vous au chapitre
« Description du produit ».
Pour des informations plus détaillées sur
l’étiquette énergétique, consultez le site
www.theenergylabel.eu.
2)
cet appareil.
Il est possible de trouver des
informations relatives aux performances
13. EN MATIÈRE DE PROTECTION DE
L'ENVIRONNEMENT
max. 60°C
13
Recyclez les matériaux portant le
symbole . Déposez les emballages
dans les conteneurs prévus à cet effet.
Contribuez à la protection de
l'environnement et à votre sécurité,
recyclez vos produits électriques et
électroniques. Ne jetez pas les appareils
portant le symbole avec les ordures
ménagères. Emmenez un tel produit
dans votre centre local de recyclage ou
contactez vos services municipaux.
*
Page 62

Page 63

Page 64

www.aeg.com/shop
117864011-A-422020
 Loading...