

Page 1

KM 21 FINESSE PLUS electronic
KM 31 FINESSE SUPER electronic
KM 41 FINESSE PROFI electronic
Kompakt-Küchenmaschinen
Compact Food Processors
Robots de cuisine compacts
Macchine compatte da cucina
Gebrauchsanweisung
Operations instructions
Mode d’emploi
Istrucciones per l’uso
Page 2
Herzlichen Glückwunsch zum Kauf Ihrer neuen AEG Küchenmaschine Sie haben ein technisch
zuverlässiges Gerät gekauft, welches Ihnen auf vielfache Weise die Zubereitung von Speisen
erleichtert
Wie bei jedem technischen Gerät gilt es auch bei dieser Küchenmaschine einige grundlegende
Dinge zu beachten und einzuhalten
Bitte lesen Sie aus diesem Grund diese Gebrauchsanweisung vor der Inbetriebnahme
aufmerksam durch und bewahren Sie sie sorgfätüg auf
H
1
KM 21 RNESSE PLUS electronic
KM 31 FINESSE SUPER electronic
KM 41 FINESSE PROR electronic
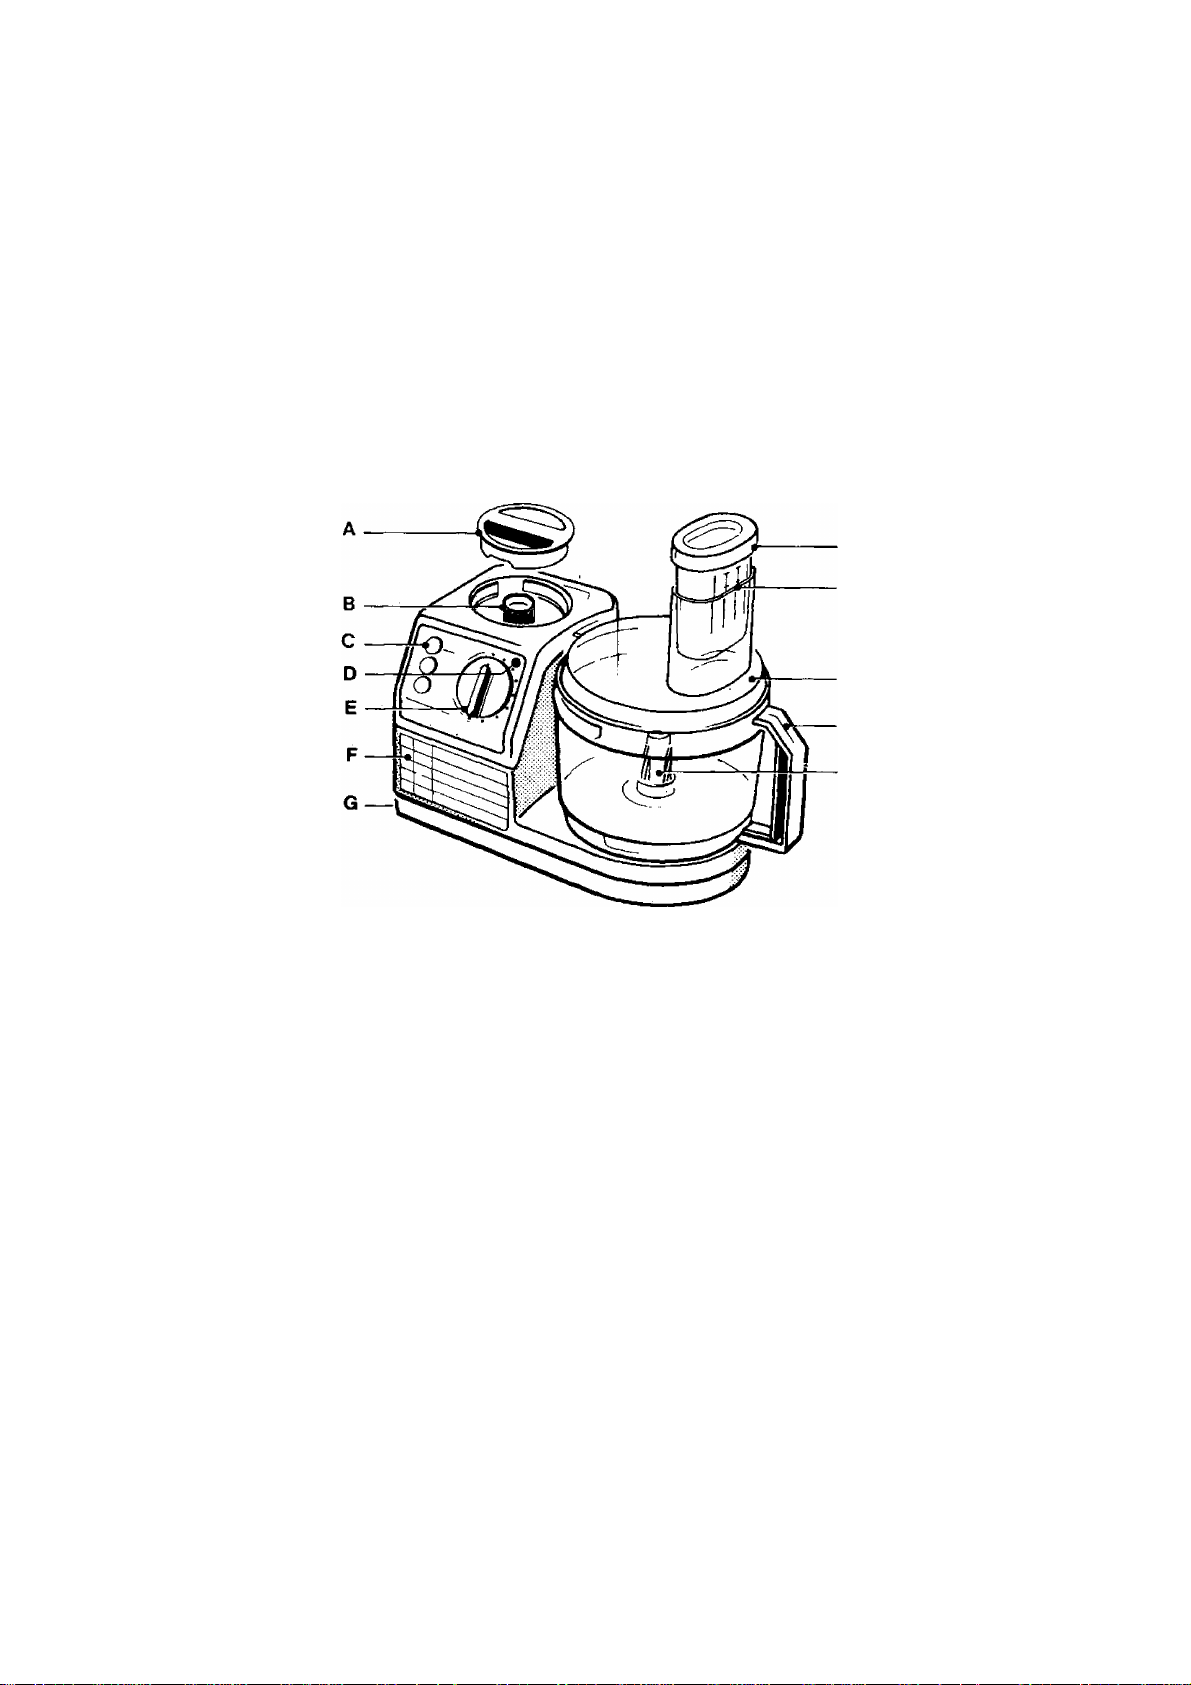
Ausstattung
A Abdeckung des Mixerantriebs
B Antrieb für Mixer bzw Mini-Hacker
C Funktions-Tasten
D Kontroll-Leuchte {nur bei KM 41)
E Stufenloser Drehzahlwähler
F Kurz-GebrauchsanWeisung
G Kabelkammer
H Stopfer
J Einfüllöffnung
K Deckel
L Arbeitsschüssel
M Antrieb für die Arbeitswerkzeuge
Page 3

Features
A Cover of mixer driver
B Drive for mixer or mini-chopper
C Function buttons
D Pilot light (only on KM 41)
E Infinitely variable speed selector
F Brief instructions for use
Equipement
A Couvercle de la commande du mixer
B Commande pour le mixer ou le mini-hachoir
Ç Touches de commande
D Voyant de contrôle (uniquement pour le
modèle KM 41)
E Sélecteur progressif pour varier la vitesse
F Modé d’emploi résumé
Corredo
A Copertura dell’azionamento del
miscelatore
B Azionamento per miscelatore,
minisminuzzatore rispettivamente
C Pulsanti di funzionamento
D Lampadina di controllo (soltanto nel
KM 41)
E Selettore progressivo del numero di giri
Cable storage
Pestle
Filling aperture
K Lid
L Working bowl
M Drive for working tools
G Logement cordon
H Poussoir
J Orifice de remplissage
K Couvercle
L Bol
M Commande pour les outils de travail
F Istruzioni brevi per l’uso
G Ricettaccolo del cavo
H Pigiatore
J Apertura di carica
K Coperchio
L Contenitore di lavoro
M Azionamento per attrezzi da lavoro
Page 4
m
Uï
Ò3
I
Page 5
Page 6

Hearty congratulations
on purchasing your new AEG food
processor
You have bought a technically reliable appli
ance with which you will find many kinds of
cooking work much easier
As with any technical appliance, there are a
number of fundamental points concerning this
food processor which require your attention
Please therefore read these instructions for
use attentively before using the appliance for
tile first time, keep them in a safe place for
later reference, and pay particular attention to
the safety instructions
Please note:
For your safety, this appliance is fitted with an
OFF function, which means the electric power
supply is cut off if;
• the working bowl
• thetid
• the mixing cover
or, if in use
• the professional puree-ing system
• the mixer, or
• the mini-chopper
is not fitted correctly into place on the appli
ance
Make sure yoii hear these pieces click into
place when you fit them!
Because of this safety function, it is only
possible to work with one of the following at a
time
the working bowl
or the mixer
or the mini-chopper
or the professional puree-ing system
Safety instructions
it is essential for you to read these instructions
for use attentively before using the appliance
for the first time
• The appliance must only ever be connected
to a mains supply with the same voltage as
that shown on the rating place (see under
side of appliance)
• The appliance must only ever be connected
to a properly installed socket
Caution! - the appliance must only be used
under supervision Pull the plug out even if
you are only leaving tiie room for a
moment
Keep children at a safe distance
The appliance absolutely must be switched
off and the plug pulled out before any clean
ing work is done on it or when it is not in
use
Do not pull the plug out of the socket by
tugging on the lead
Only take hold of the metal knife by its grip
- it is extremely sharp! Be very careful
when washing as there is a risk of injury
Always fit the protective cover whcm storing
the appliance away
When the appliance is in use
DO NOT reach into the filling opening with
your fingers
DO NOT insert any long objects such as
kitchen knives, cooking spoons, spatulas, or
similar into the filling opening
ONLY use the pestle to press food down into
the opening
The motor section, the whisk attachment, the
mixer, and the mini-chopper must never be
immersed in wader
Do not bend a kink in the lead Check it from
time to time for signs of damage, and
arrange for it to be replaced at once if you
find any This can only be done in an au
thorised dealer’s workshop or at ybur AEG
Service Centre
IMPORTAffT: Repairs to electrical
appliances must only ever be carried out by
a qualified electrician Improper attempts at
repair can result in serious danger for the
user
If there is a defect, please therefore contact
your dealer or AEG service centre
This appliance complies with EC Directive
&7/308 EEC on suppressing interference
with radio and television signals,
EN 55014/DlN VDE 0875 Parti, and the
standard EN 60555 Parts 1 to 3/DlN
VDE 0838 Parts 1 to 3 on the reciprocal
effects on mains supply
18
Page 7

__________
______________
_
These are the features of your appliance;
KM 21 FINESSE PLUS
• Mixer
• Plastic and metal knives
• Whisk attachment
• 1 grating disc tor fine and coarse grating
• 1 slicing disc for thin or thick slicing
• 1 potato disc for finely grated potato
• 1 spatula
• 1 cookery book
• simple filling opening
• disc holder
KM 31 FINESSE SUPER
• Same features as KM 21, plus:
• Double filling opening
• Orange/iemon squeezer \ (optional extra
• Mini-chopper / on KM 21)
KM 41 FINESSE PROFI
• Same features as KM 31, plus
• Pilot light
• Potato-chipper disc (optional extra on KM 21
and KM 31)
• Professional puree system (not suitable for
KM 21 or KM 31)
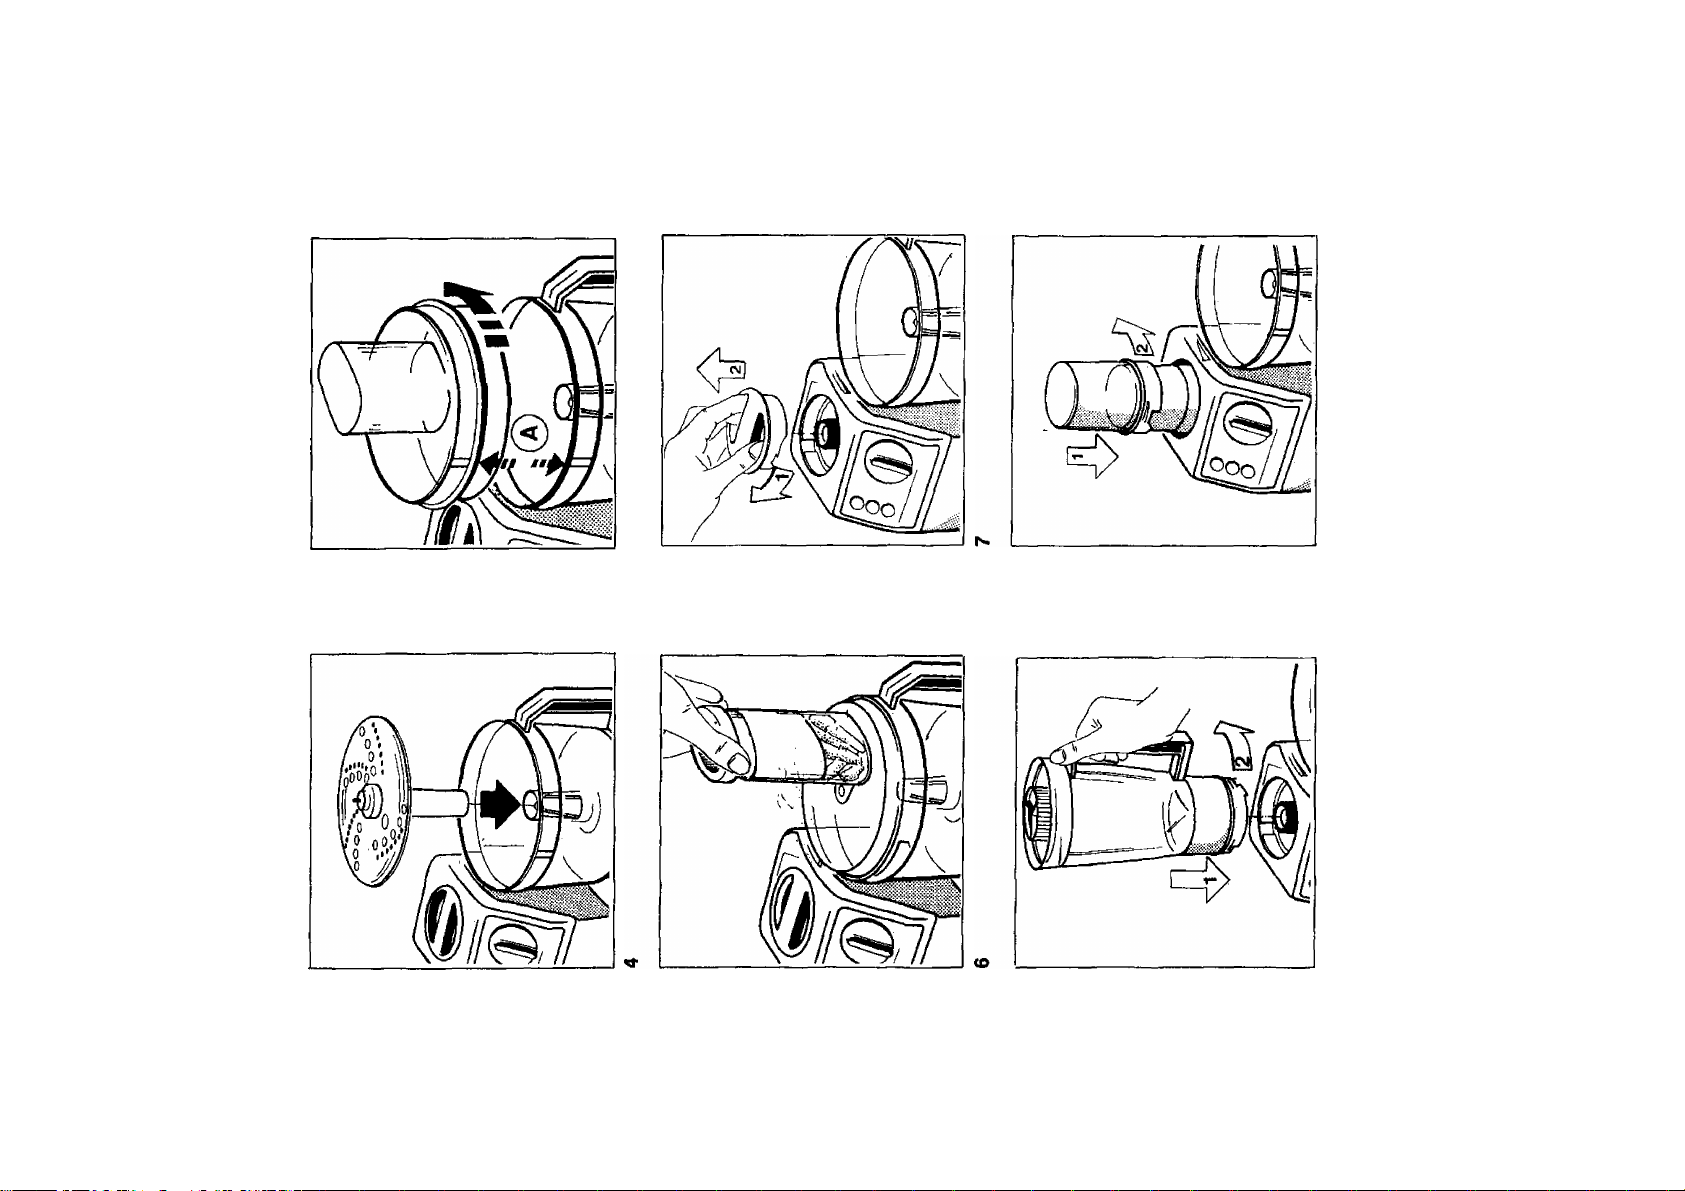
must be exactly In line with those on the work
ing bowl Now turn the lid anti-clockwise until
you hear it click into place in the housing slit
Rg 1/A:
Make sure that the cover of the mixer drive is
locked in position (you can hear it click into
place)
Rg 6:
Only ever use the pestle to close the filler open
ing and to press the food down into the slicer
Before taking the tools to pieces, always press
the “0" button (fig 2/C) and pull the plug out
Fitting the mixer (accessory on KM 21 KM 31,
and KM 41) and the mini-chopper (accessory
on KM 31 and KM 41, optional extra on KM 21)
Before fitting the mixer or the mini-chopper,
release the cover of the working bowl and
remove it
Rg 7:
Remove the cover from the mixer drive
Fig. 8/A япй 8/B:
Set the mixer or the mini-chopper on the drive
and lock it into position (you can hear it cli^
into place)
Location
The appliance should be set up on a level, dry
worktop with plenty of “elbow room”
Assembly
The working bowl and all accessories should
be clean and perfectly dry before work starts
Rg 3:
Set the working bowl up in such a way that the
drive shaft is inside ttie tube Lock it in by turn
ing it anti-clockwise (until you hear it click into
place)
Rg 4:
Fit the accessories onto the drive shaft needed
for each kind of work
Rg 5;
Set the lid onto the working bowl with the lock
ing lugs at the rear The markings on the lid
19
Page 8

Cable storage chamber and grips
Fig 1/G:
Your food processor has a cable chamber in its
base If the lead is longer than is needed to
reach the socket, the surplus can be stored
here Then press the cable into the openings
(in the rear of the base) that grip it
How to start using your appliance
Fig 2:
There are two buttons and one selector knob
on the control panel
Rg 2/A:
When you press the impulse button the appli
ance will start, and it will stop again as soon as
you let go
Fig 2/B:
The “1" button will start the appliance and keep
it running
Fig 2/C:
The “0” button switches the appliance off again
Fig 2Л5:
You can use the speed knob to set the right
working speed for the food you are working on
Slowest speed 1 (= O)
Highest speed Max
You can reach the maximum speed either by
turning the knob to the left or by turning it as far
as it will go to the right
Working with the double filler opening on the KM 31 or KM 41;
• Large opening (A)
Slicing potatoes, gherkins, etc, grating pota
toes, cabbage, carrots, etc {cut them up first
into pieces about 6 or 7 cm - 2V2 inches across)
• Small opening: (6)
Slicing carrots, radishes, small gherkins, etc
into tine slices
When pressing the food down, only ever use
the pestle (fig 1/H)
20
Page 9

TTie correct accessories for the job concerned
Important: All food processed in your machine
must be carefully prepared Remove pips and
stones from fruit Meat and bacon must be
bone-free In this way, the working tools will be
spared
Mixing/kneading with the plastic blade
• Use the plastic blade for all doughs requiring
mixing and kneading (fig 9)
For sponge mixes, see under “Beating with
the whisk”
• Piace all ingredients in the large work-bowl
The addition sequence is very important first
add all dry ingredients, such as sugar, flour,
then the soft ones, such as butter, marga
rine, eggs, foilowed by any possible liquid
Pastr^aking examples
Sultanas, currants, or candied fruits can be
placed in the work-howl together with the
other ingredients Best mix them with the
flour
Close lid
Max approx
Setting
quantity
Scones and
teabreads
Yeast dough 1000 g MAX
Short pastry
Strudel pastry
1250 g MAX 60 sec Basic recipe (max quantity):
1000 g MAX
1000 g
MAX
Approx
Remarks
duration
250 g sugar, 500 g flour,
1 sachet baking powder, 250 g margarine.
3 eggs, 1 pinch salt, 150 ml milk
60 sec Baste recipe (max quantity):
30 sec
30 sec Basic recipe
500 g flour, 30 g yeast. 50 g sugar,
60 g margarine, 200 ml milk, 1 egg
Basic recipe:
60 g sugar, 250 g flour,
1 teasp baking powder, 125 g margarine,
1 egg yolk
Allow prepared dough to rest
for at least 1 hour
250 g flour, 1 pinch ?alt, 2 tablesp oil,
1 egg, 100 g warm milk
Allow pastry to rest for at least 1 hour
before further processing
21
Page 10

Whipping with the whisk
The whisk attachment with the whisking head is
especially well suited for whipped cream, icing
sugar, sponge pastry, butter creams, and
mayonnaise
For other pastries, the whisk should not be
used Neither should it be used for kneaded
doughs
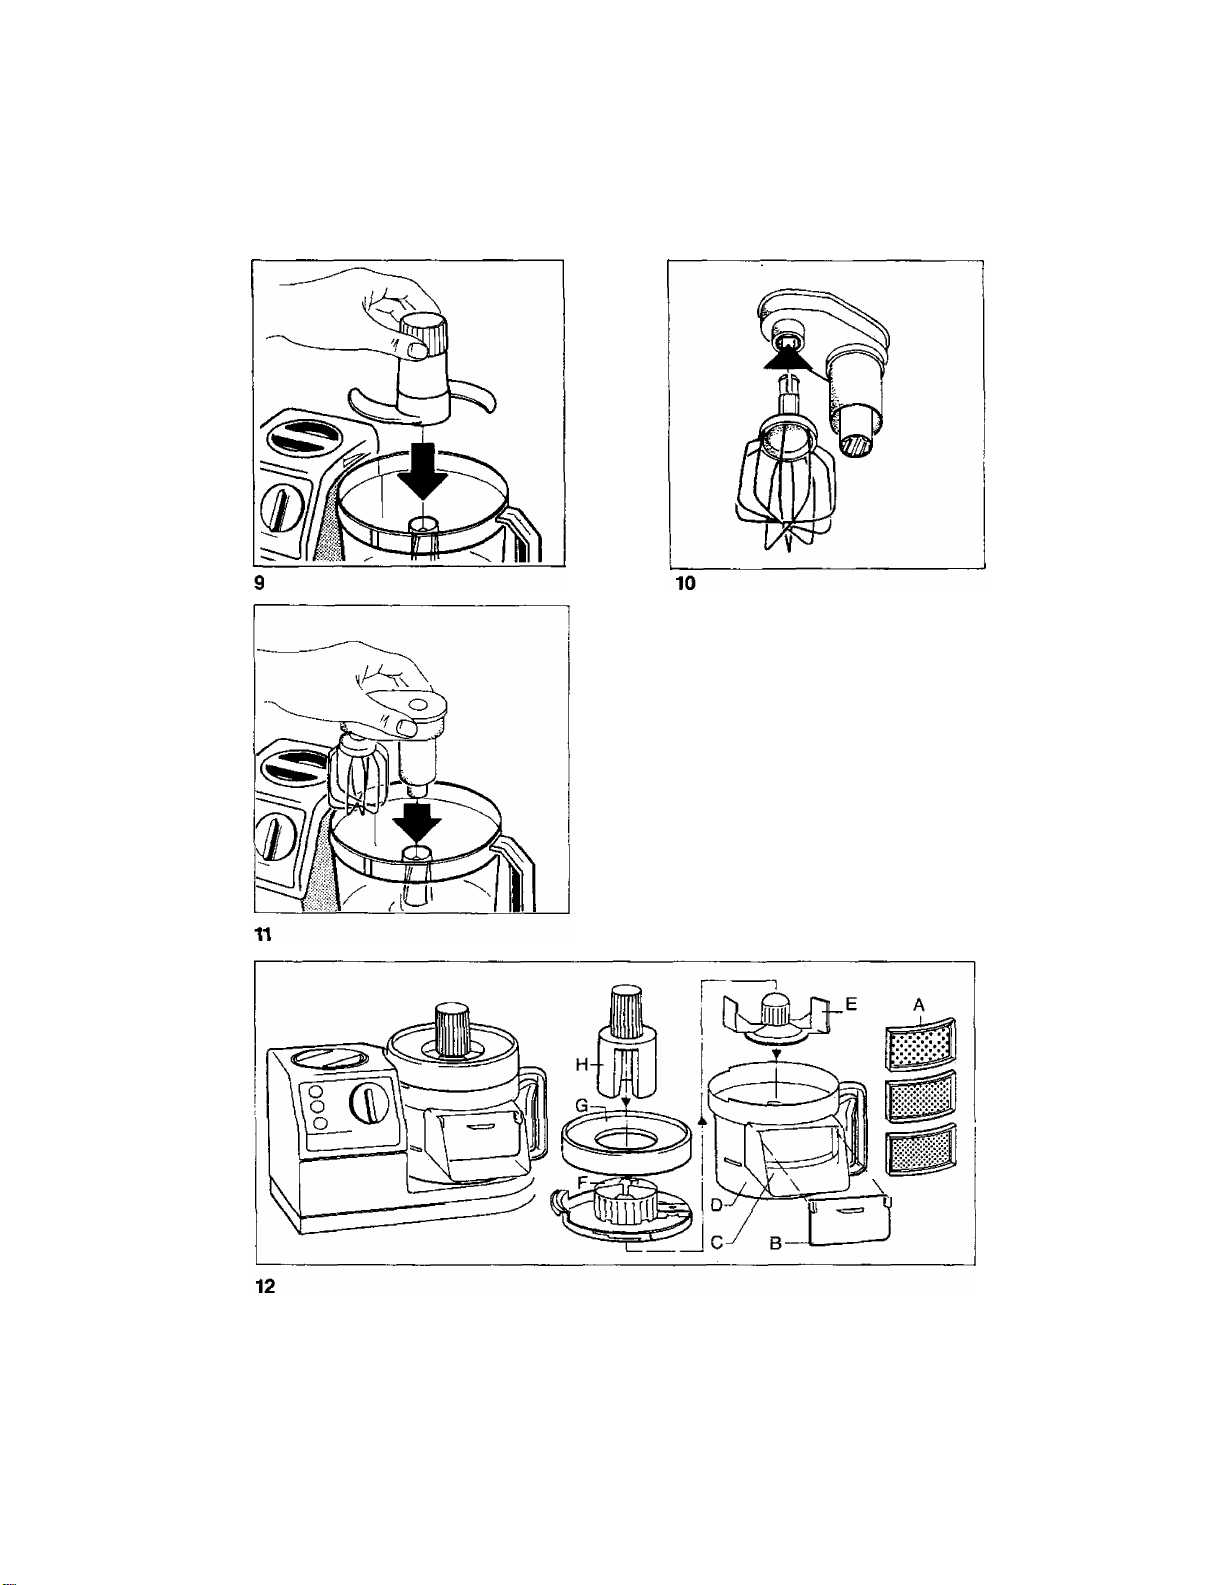
Fitting the whisk attachment
• Insert the stirring head in the openings
provided on the underside of the whisk
attachment and lightly turn until it engages
(fig 10)
• Insert the whisk attachment together with the
stirring head (bg 11)
• Place the ingredients little by little in the
work-bowl
• Lock together with the lid
When work is finished, only place the
stirring head in washing-up water
Do not wash the whisk or the mixing-bowl in
the dish-washing machine
Whisk attachment with stirring head
Whisking examples
Quantity Setting
Mixed drinks
Sponge mix
Icing 2-5
Whipped cream
Cottage cheese
dishes
Dips and
spreads
22
1 25 litres 1/7
max ca
500 g
200-500 ml MAX 1-4 min
max 800g
max 800 g 6-MAX 1-2 min
Approx
Remarks
duration
10-20 sec 2 purged oranges, juice of 2 lemons,
MAX 4-5 min Basic recipe 4eggs, Stablesp hot water,
MAX
MAX
2 min
2 min
4 dessertspoonfuls glucose sugar,
1 litre milk
125g sugar, 60 g flour, 60 g farina,
1 level teasp baking powder, 1 pinch salt
Whipping duration depends on quantity
Page 11

SHcing/grating/chipping with the work-discs
Disc Side A
for fine grating
Disc side D
make fine slices
Disc side C
for coarse grating
Disc side H
makes thick slices
Fitting the woric-discs (fig 4)
• Insert the disc-holder into the work-disc
opening (with the working side facing
upwards) and turn until it locks
Disc side G
for fine grating (potatoes)
Disc side E chips potatoes
(special accessory
KM 21. KM 31)
• The required disc side marking must be
legible from above when inserting The discs
are to some extent to be used on both
sides
• Close lid
• Possibly cut the prepared food to slightly
smaller size so that it will fit the feed tube
• Place the inserted food as upright as
possible in the feed tube
• Always use the plunger to press the food
downwards
• The thickness of the food to be processed
can be affected by pressure
Potato-chipping disc (special accessory
KM 21> KM 31)
• Fill potatoes with appliance switched off
Uniformly press down with plunger
• Switch on appliance (setting 1)
• Repeat procedure for next fill
23
Page 12

Slicing/grating/chipping examples
Disc Max. approx
Carrots, celery A, C, D. H, G
Kohlrabi
Apples, pears
Onions D, H
Cabbage C, D, H
Cucumbers D
Mushrooms H
Green and red
peppers
Raw potatoes D, H
Boiled potatoes H
Chipped potatoes E
A, C, D, H. E
A, C. D, H
D, H
Setting
quantity
900 g 2-4
1000 g
900 g 1-4 Cut finely for salads and
900 g 2-4 Cut coarsely for boiling
800 g 1
500 g
800 g 1-3
1000 g
1000 g 1 Preboit salad potatoes
1000 g 1 Fill with appliance
1-3
1
2-4
Remarks
Cut or grate more finely as raw food
or more coarsely as cooked food
Cut or grate coarsely
for baking
coarsely for frying
Cut finely for chips and
coarsely for preparing “au gratin”
switched off
Potatoes for potato
cakes and dumpling
Salami D, H, E
G
Chopping and mincing with die
mini-chopper
(special accessory for Food Processor KM 21)
Fitting;
• Unlock lid of work-bowl
• Place mini-chopper on drive (fig 8/B)
and fill
24
1000 g
600 g 1-3
e Lock wi№ lid (fig 8/B)
• Setting: MAX/pulse
This accessory is especially suitable for small
quantities, e g
• Onions, cabbage, nuts
• Boiled vegetables, parsley, dill
2-4
Page 13

Chopping/mincing/puree-ing with the metal knife
• Insert metal blade (fig 9)
• Place food in work-bowl Precut large pieces
to smaller size
• Lock lid
• The degree of fineness of the processed
food is determined by the time for which the
appliance is switched on
Mincing/purée-ing examples
Max approx,
Setting
quantity
Raw meat 500 g
Boiled meat 500 g
Ham
Fish
Onions
Tomatoes
Potatoes
Parsley, dill
Nuts
Dry white bread 200 g MAX 60 sec Break white bread Into pieces
Chocolate
Potato and
vegetable soup 1 litre 7-MAX 10-20 sec After boiling, dice potatoes and fill
Mayonnaise
300 g
500 g
400 g MAX
600 g MAX
500 g
2 bd MAX 10-20 sec
400 g
200 g MAX
max 500 g MAX
MAX
MAX
MAX
MAX
MAX
MAX
Approx
Remarks
duration
20 sec
10 sec Dice meat
20 sec
20 sec
10 sec
30 sec
30 sec
60 sec
20 sec Break chpcolate into pieces
60 sec
Dice meat Without sinews
Dice ham
Dice fish
Quarter onions
Quarter tomatoes
Suitable for potato fritters
After cleaning, dry well
the mass with water up to the
1-litre mark
Basic recipe 1-2 egg yolks,
1 tablesp vinegar, 1 teasp salt
sugar, pepper to taste,
150-200 mi oil
25
Page 14

Pilot tight on the KM 41
The equipment is litted with a fuse which pro
tects the motor in the event of a power surge
If this safety device is tripped, the indicator light
will go out
The fuse should then be replaced by an appro
ved engineer or the AEG aftersales service (If
any other case the lamp will burn constantly as
soon as the appliance is plugged in)
Puree-ing/pressing (only on the
KM 41) with the professional puree
system
Accessories required;
• Puree attachment (fig 12)
Preparation:
• Check whether the safety cover (1/A) is firmly
latched into place on the upper drive (1/B)
Mounting the accessories:
• Slip the puree sieve, with the right perfora
tions for processing food (12/A), into the
slots provided in the bowl (12/D)
• Fit the bowl onto the lovrer drive (1/M) and
turn the handle as far as it will go
• Fit the puree insert (12/E) onto the drive
shaft
• Fit the (id (12/F) and rotate it as described in
the section on “Assembly”
• Fit the flap (12/B) In front of the outlet {12/C)
• Fit thé protective lid (12/G) onto the lid (12/F)
• Only ever use the pestle to press the food
down Into the filling aperture (12 H)
Switch position (fig 2):
• Set the speed selector (2/D) at “3"
• Set the button (2/B) to “1 ” for continuous
operation
• Now fill the food into the filling aperture - not
before
Preparation:
• You can puree up to 4 kilos of fruit and
vegetables, eg for potato, carrot, spinach, or
pea puree, compote, soups, tomato puree,
juices, etc
• Please consult the table below to help you
select the right puree-ing sieve
• Please see the section on “switch position"
for the right speed for each puree-ing
process
InshiiCtions:
• Switch the appliance on before you fill it with
food
• If you wish to process large quantities of fruit
and vegetables with stones, peel, or other
waste, you should clean the puree-ing sieve
out after every 500 grams
• Fill the food slowly into the opening, as this
will produce a better result
• Once you have processed a total of about
4 kilos the motor must be left for about one
hour to cool.
• Never let the appliance run empty for more
than 10 seconds
• Do not attempt to puree deep-frozen food
• Berries (eg blackcurrants or redcurrants)
are easier to puree if they have first been
boiled to soften them
26
Page 15

Exemple: puree-ing/pressing:
Type of food Preparation
Potato puree
Carrot puree Boil, cut into pieces Medium holes Pour in a little boiled water
Celery puree
Spinach puree
Pea puree Boil, dry in coiander
Apple or pear
compote
Vegetable soup Boil, dry in coiander
Tomato puree Cut into slices raw
Strawberry
mousse
Raspberry
mousse
Blackcurrant or
redcurrant juice
Grapes
Boil, cut into pieces Large holes
Boii, cut into pieces Medium holes
Boii, dry in coiander Medium holes
Peel, de-core,
cut into pieces
or boiied
Remove stalks Small holes
Raw or boiled Medium holes
Boiled Large holes Increase speed towards
Remove stalks Small holes
Puree-ing sieve
Medium holes
Medium holes
Large holes
Large holes
Instructions
Pour in a little boiled water
or milk towards the end
towards the end
Pour in a little boiled water
towards the end
Pour in a little boiled water
towards the end.
Puree with a little clear
vegetable soup
Increase speed towards
end
Increase speed towards
end
end
Increase speed towards
end
27
Page 16

Blending/pureeing with the blender
Fitting the blender;
• Unlock lid of work-bowl
• Place blender on upper drive and turn until it
iocks (fig 8/A)
• Place all ingredients in the blending beaker
• Pit lid
• Por exclusively liquid ingredients, press
pulse buttons
• Never fill any boiHng liquids
• For mayonnaise, add the oil through the lid
opening
• For batter, fill the liquid ingredients first, then
the flour
• The following cannot be blended with the
blender mashed potato, icing, raw meat,
hard foods, such as coffeebeans, nuts, etc
Blending examples
Safety instructions
• Never place your hand in the inserted
blending beaker
• Remove the lid only when the blade has
come to a complete standstill
Milkshakes
Soups 1 I
Mayonnaise 0,4 I
Batter
Omelette mix
28
Max approx
quantity
1 i
0.8 I
0,8 I
Setting
Approx
Remarks
duration
4-MAX
4-MAX 10-20 sec Puree boiled vegetables (cooled) with
8-MAX 30 sec Basic recipe: 1 egg, 1 teasp lemon juice,
4-MAX
4-MAX
10-20 sec
10 sec
10 sec
Eg banana milkshake
1 banana, 500 ml milk, 3 teasp cream,
2 teasp sugar, few drops vanilla essence,
1 egg yolk
around V4 1 boiled water and place back
in pan
small qty mustard, salt, sugar, around
200 ml oil
Basic recipe; 250 ml milk, 2-3 eggs,
125 g flour, small qty salt
Basic recipe: 8 eggs, 8 teasp cold water,
salt and pepper to taste
Page 17

Juice extraction with the juice
extractor
(Special accessory for Food Processors
KM 21)
Unlock lid of workbowt and detach
Insert juice extractor and lock by turning to
the left The locking cam available on the
attachment must thereby audibly engage on
the housing slot
Important note
The juice extractor should only be operated
with setting 1 and the pulse button (fig 2/A)
Cleaning and care
Before cleaning, always unplug your appliance!
Wipe motor compartment and wisk attachment
wftti damp cloth only! Make sure that the slot for
the safety interlock Is always clean! Clean vrith
wet brush where necessary
Clean ail other parts under running tap or in
normal washing-up water
The sooner you do this after using your food
processor, the simpler this virill be!
Never immerse blender and mini-chopper in
washing-up water, but brush out using hot
water with washing-up liquid
Take special care with the sharp blade and
discs!
Dry all parts well
All accessories other than blender, mini
chopper and wisk can also be cleaned in a
dishwasher Arrange the parts in the upper
basket
Recipe booklet
Practical hints and instructions are given in the
AEG Compact Food Processor Recipe Booklet
(only available in German)
For the sake of the environment
Do not simply throw the packaging away
• Cardboard packaging material can be
handed in as salvage at your local wastepaper collection point or to the proper
waste-disposal system
If the following packaging materials have been
used
• Plastic bags made of polythene (PE) can be
handed in to your local PE collection point
• Padding made of expanded polystyrol (PS)
are free of CFC’s
Please ask your local authority for the address
of your nearest recycling depot Used espresso
coffee "grouts" are marvellous for composting
After-sales sennce
We demand the highest quality of ourselves and
our products
Should nevertheless have any problem in using
this appliance, please write to us
It is only with your help that we will be able to
develop appliances which exacUy match your
requirements
29
 Loading...