

Page 1

FAVORIT 34032
EN
DISHWASHER USER MANUAL
PT
MÁQUINA DE LAVAR LOIÇA MANUAL DE INSTRUÇÕES
24
2
Page 2

2
FOR PERFECT RESULTS
Thank you for choosing this AEG product. We have created it to give you
impeccable performance for many years, with innovative technologies that help
make life simpler – features you might not find on ordinary appliances. Please
spend a few minutes reading to get the very best from it.
ACCESSORIES AND CONSUMABLES
In the AEG webshop, you’ll find everything you need to keep all your AEG
appliances looking spotless and working perfectly. Along with a wide range of
accessories designed and built to the high quality standards you would expect,
from specialist cookware to cutlery baskets, from bottle holders to delicate
laundry bags…
Visit the webshop at:
www.aeg.com/shop
Page 3

CONTENTS
Contents
4 Safety information
7 Product description
8 Control panel
10 Use of the appliance
10 Setting the water softener
12 Use of dishwasher salt
12 Use of detergent and rinse aid
14 Loading cutlery and dishes
16 Washing programmes
17 Setting and starting a washing
programme
18 Care and cleaning
20 What to do if…
22 Technical data
22 Environment concerns
3
The following symbols are used in this user
manual:
Important information concerning your
personal safety and information on how to
avoid damaging the appliance.
General information and tips
Environmental information
Subject to change without notice.
Page 4

4 Safety information
SAFETY INFORMATION
Before the installation and use, read this manual carefully:
• For your safety and the safety of your property.
• To help the environment.
• For the correct operation of the appliance.
Always keep these instructions with the appliance also if you move or give it to a different
person.
The manufacturer is not responsible if an incorrect installation and use causes damage.
Children and vulnerable persons safety
• Do not let persons, children included, with reduced physical sensory, reduced mental
functions or lack of experience and knowledge to use the appliance. They must have supervision or instruction for the operation of the appliance by a person who is responsible
for their safety.
• Children must get supervision to make sure that they do not play with the appliance.
• Keep all packaging away from children. There is the risk of suffocation or injury.
• Keep all detergents in a safe area. Do not let the children touch the detergents.
• Keep children and pets away from the appliance when the door is open.
General safety
• Do not change the specifications of this appliance. There is the risk of injury and damage
to the appliance.
• Obey the safety instructions from the detergent manufacturer to prevent burns to eyes,
mouth and throat.
• Do not drink the water from the appliance. Particles of detergent can stay in your appliance.
• Do not keep the appliance door open without supervision. This to prevent injury and to
fall on an open door.
• Do not sit or stand on the open door.
Use
• The appliance is only for domestic use. Do not use the appliance for other uses to prevent injury to persons and damage to property.
• Only use the appliance to clean accessories that are applicable for dishwashers.
• Do not put flammable products or items that are wet with flammable products in, near
or on the appliance. Risk of explosion or fire.
• Put the knives and all items with sharp points in the cutlery basket with their points
down. If not, put in a horizontal position in the upper basket or in the knife basket. (Not
all models have the knife basket).
• Use only specified products for dishwashers (detergent, salt, rinse aid).
• Types of salt that are not specified for dishwashers can cause damage to the water softener.
Page 5

Safety information
• Fill the appliance with salt before you start a washing programme. Remaining salt in the
appliance can cause corrosion or make a hole in the bottom of the appliance.
• Do not fill the rinse aid dispenser with other products than the rinse aid, (dishwasher
cleaning agent, liquid detergent). This can cause damage to the appliance.
• Make sure that the spray arms can move freely before you start a washing programme.
• The appliance can release hot steam if you open the door while a washing programme
operates. There is a risk of skin burns.
• Do not remove the dishes from the appliance until the washing programme is completed.
Care and cleaning
• Before you clean the appliance, deactivate it and disconnect the mains plug from the
mains socket.
• Do not use flammable products or products that can cause corrosion.
• Do not use the appliance without the filters. Make sure that the installation of the filters
is correct. An incorrect installation causes unsatisfactory washing results and damage to
the appliance.
• Do not use spray water or steam to clean the appliance. Risk of electrical shock and
damage to the appliance.
Installation
• Make sure that the appliance is not damaged. Do not install or connect a damaged appliance, contact the supplier.
• Remove all packaging before you install and use the appliance.
• Only a qualified person must do the electrical connection, the plumbing and the installation of the appliance. This to prevent the risks of structural damage or injury.
• Make sure that the mains plug is disconnected from the mains socket during installation.
• Do not drill into the sides of the appliance to prevent damage to hydraulic components
and electrical components.
• Important!Obey the instructions in the template supplied with the appliance:
– To install the appliance.
– To assemble the door panel.
– To connect to the water supply and drain.
• Make sure that the appliance is installed below and adjacent to safe structures.
5
Frost precautions
• Do not install the appliance where the temperature is less than 0 °C.
• The manufacturer is not responsible for frost damage.
Water connection
• Use new hoses to connect the appliance to the water supply. Do not use used hoses.
• Do not connect the appliance to new pipes or pipes not used for a long time. Let the
water flow for some minutes, then connect the inlet hose.
Page 6
6 Safety information
• Make sure not to squash or cause damage to the water hoses when you install the appliance.
• Make sure that the water couplings are tight to prevent a water leakage.
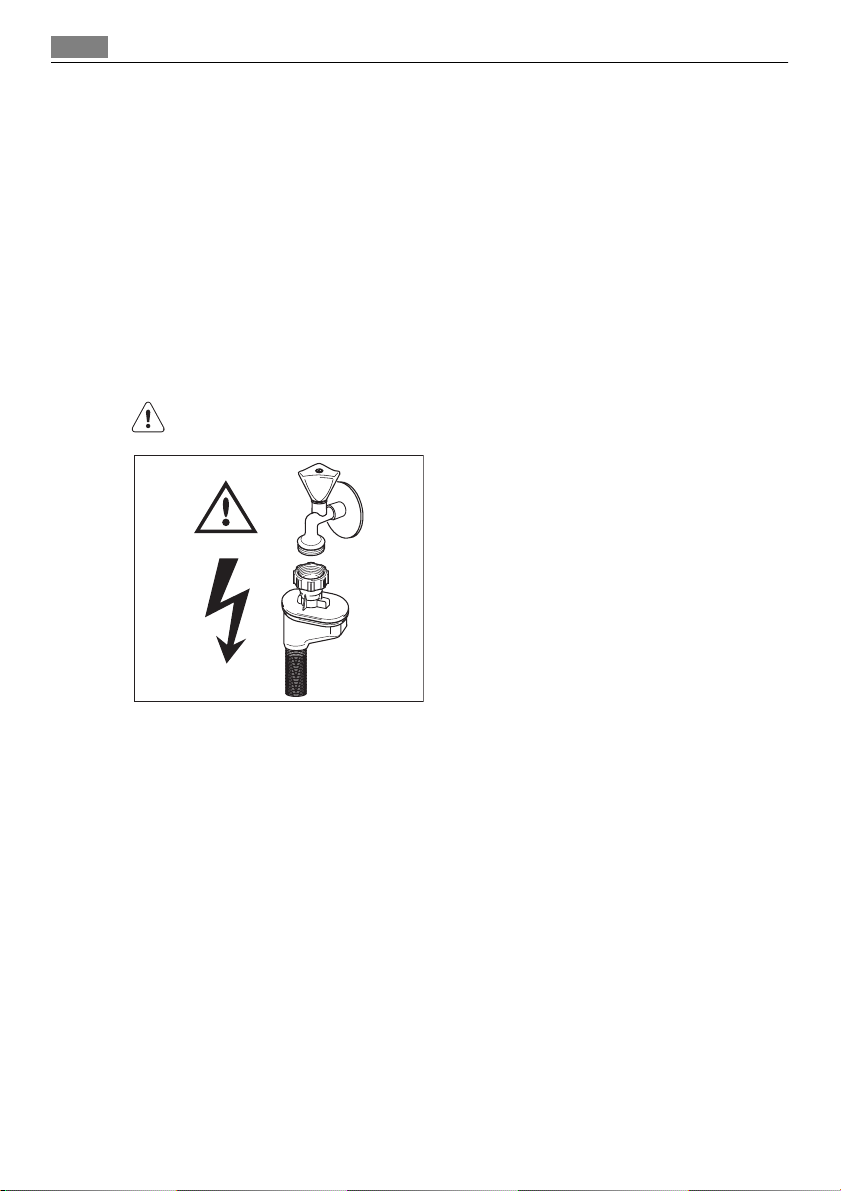
• The first time you use the appliance, make sure that the hoses do not have water leaks.
• The water inlet hose has a safety valve and a double sheath with an inner mains cable.
There is pressure in the water inlet hose only when the water flows. If there is a leak in
the water inlet hose, the safety valve interrupts the flow of water.
– Be careful when you connect the water inlet hose:
– Do not put the water inlet hose or the safety valve in water.
– If the water inlet hose or the safety valve are damaged, immediately disconnect the
mains plug from the mains socket.
– Contact the service centre to replace the water inlet hose with safety valve.
WARNING!
Dangerous voltage.
Electrical connection
• The appliance must be earthed.
• Make sure that the electrical information on the rating plate agrees with the power supply.
• Always use a correctly installed shockproof socket.
• Do not use multiple plugs and extension cables. There is a risk of fire.
• Do not replace or change the mains cable. Contact the service centre.
• Make sure not to squash or cause damage to the mains plug and cable behind the appliance.
• Make sure that there is access to the mains plug after the installation.
• Do not pull the mains cable to disconnect the appliance. Always pull the mains plug.
Service centre
• Only a qualified person can repair or work on the appliance. Contact the service centre.
• Use only original spare parts.
Page 7
Product description
To discard the appliance
• To prevent the risk of injury or damage:
– Disconnect the mains plug from the mains socket.
– Cut off the mains cable and discard it.
– Remove the door catch. This prevents children or pets to be closed in the appliance.
There is a risk of suffocation.
– Discard the appliance at the local waste disposal centre.
WARNING!
The dishwasher detergents are dangerous and can cause corrosion !
• If an accident occurs with these detergents, contact immediately a physician.
• If the detergent gets into the mouth, contact immediately a physician.
• If the detergent gets into the eyes, contact immediately a physician and clean the eyes
with water.
• Keep dishwasher detergents in a safe area and out of children touch.
• Do not keep the appliance door open when there is detergent in the detergent dispenser.
• Fill the detergent dispenser only before you start a washing programme.
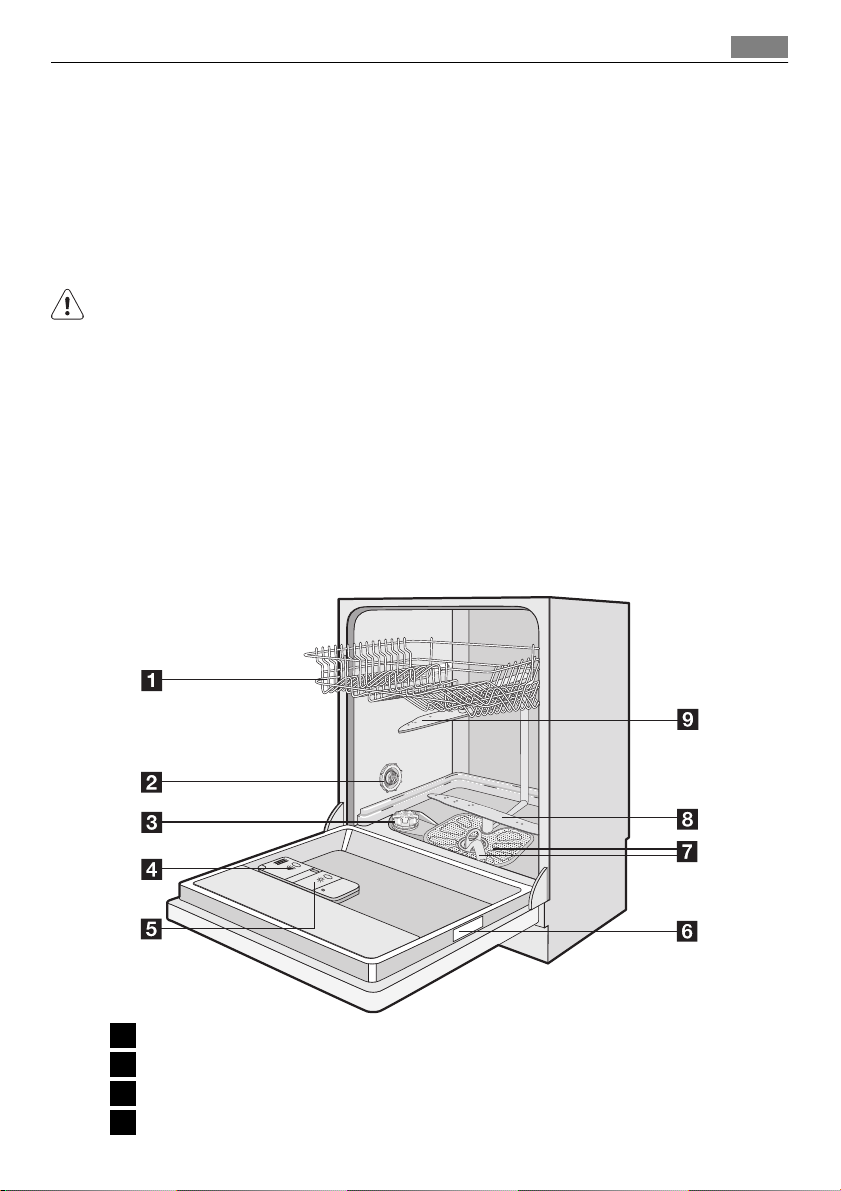
PRODUCT DESCRIPTION
7
Upper basket
1
Water hardness dial
2
Salt container
3
Detergent dispenser
4
Page 8
8 Control panel
Rinse aid dispenser
5
Rating plate
6
Filters
7
Lower spray arm
8
Upper spray arm
9
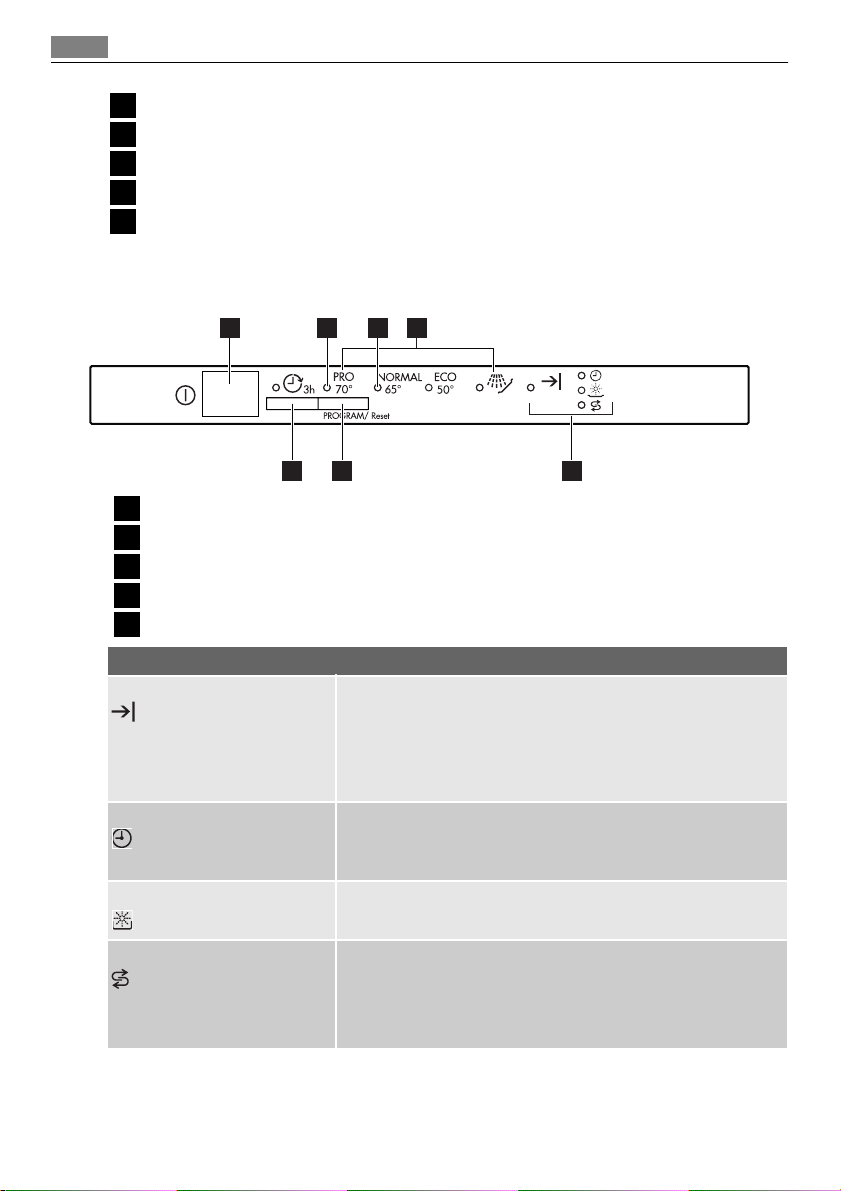
CONTROL PANEL
1
On/off button
1
Programme indicator lights
2
Indicator lights
3
PROGRAM/Reset button
4
Delay start button
5
End-of-programme The indicator comes on when:
Programme-in-progress • It comes on when you select a washing programme.
Rinse aid
1)
A
4
5
• The washing programme is completed.
• You adjust the level of the water softener.
• You activate/deactivate the audible signals.
• There is a malfunction of the appliance.
• It stays on for all the duration of the washing programme.
• It goes off at the end of the washing programme.
The indicator comes on when it is necessary to fill the rinse aid
dispenser.
2
B
Indicator lights
3
1)
Salt
1) When the salt and/or rinse aid containers are empty, the related indicator lights do not come on while a
washing programme operates.
It comes on when it is necessary to fill the salt container. Refer
to 'Use of dishwasher salt'.
After you fill the container, the salt indicator light can stay on
for some hours. This does not have an unwanted effect on the
operation of the appliance.
Programme selection/cancel button
Use the programme selection/cancel button for these operations:
Page 9

Control panel
• To set the washing programme. Refer to the chapter 'Setting and starting a washing programme'.
• To set the water softener. Refer to the chapter 'Setting the water softener'.
• To deactivate/activate the audible signals. Refer to the section 'Audible signals'.
• To cancel a washing programme in progress. Refer to the chapter 'Setting and starting a
washing programme'.
Delay start button
Use this button to delay the start of the washing programme with an interval of 3 hours.
Refer to 'Select and start a washing programme'.
Programme lights A and B
These lights have also an auxiliary function when you:
• Adjust the level of the water softener.
• Deactivate/activate the audible signals.
Setting mode
The appliance must be in setting mode for these operations:
• To select and start a washing programme.
• To adjust electronically the level of the water softener.
• To deactivate/activate the audible signals.
Press the on/off button. The appliance is in setting mode when:
• All the programme lights are off and the end-of-programme indicator light flashes.
Press the on/off button. The appliance is not in setting mode when:
• Only one programme light comes on.
– It is necessary to cancel the programme to go back to the setting mode. Refer to 'Set-
ting and starting a washing programme'.
9
Audible signals
You can hear the audible signals when:
• The washing programme ends.
• The appliance has a malfunction.
Do these steps to deactivate the audible signals:
1. Switch on the appliance.
2. Make sure that the appliance is in setting mode.
3. Press and hold the programme button until the programme light A flashes and the
programme light B comes on.
4. When the programme light A flashes and the programme light B comes on, press im-
mediately the programme button again.
The programme light A comes on and the programme light B starts to flash.
After some seconds the programme light A goes off and the end-of-programme indi-
cator light comes on. (The programme light B continues to flash).
Page 10

10 Use of the appliance
– The audible signals are active.
5. Press the programme button again. The end-of-programme indicator light goes off.
– The audible signals are deactivated.
6. Switch of the appliance to confirm the operation.
Do these steps to activate again the audible signals:
1. Follow the procedure how to deactivate the audible signals from point 1 to point 4.
2. The programme light A goes off. The end-of-programme indicator light is off. (The
programme light B continues to flash).
– The audible signals are deactivated.
3. Press the programme button again. The end-of-programme indicator light comes on.
– The audible signals are active.
4. Switch of the appliance to confirm the operation.
USE OF THE APPLIANCE
1. Be sure that the set level of the water softener agrees with the water hardness in your
area. If not, adjust the water softener.
2. Fill the salt container with dishwasher salt.
3. Fill the rinse aid dispenser with rinse aid.
4. Load cutlery and dishes into the appliance.
5. Set the correct washing programme for the type of load and soil.
6. Fill the detergent dispenser with the correct quantity of detergent.
7. Start the washing programme.
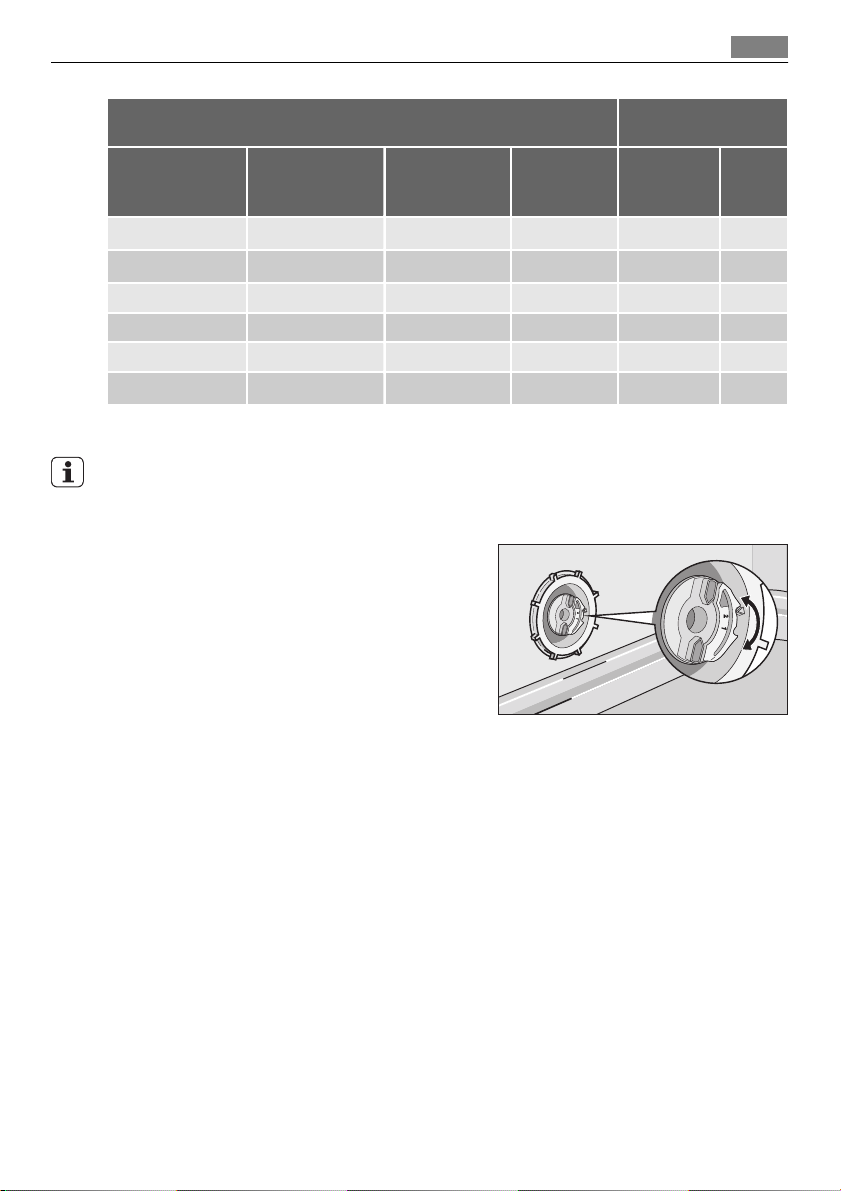
SETTING THE WATER SOFTENER
The water softener removes minerals and salts from the water supply. These minerals and
salts can cause damage to the appliance.
Adjust the level of the water softener if this does not agree with the water hardness in your
area.
Contact your local water authority to know the water hardness in your area.
Water hardness
German degrees
(°dH)
51 - 70 91 - 125 9,1 - 12,5 64 - 88
43 - 50 76 - 90 7,6 - 9,0 53 - 63
37 - 42 65 - 75 6,5 - 7,5 46 - 52
29 - 36 51 - 64 5,1 - 6,4 36 - 45
French degrees
(TH°)
mmol/l Clarke de-
grees
Water hardness ad-
manually elec-
2
2
2
2
justment
1)
1)
1)
1)
troni-
cally
10
9
8
7
Page 11
Setting the water softener 11
Water hardness
German degrees
(°dH)
23 - 28 40 - 50 4,0 - 5,0 28 - 35
19 - 22 33 - 39 3,3 - 3,9 23 - 27
15 - 18 26 - 32 2,6 - 3,2 18 - 22 1 4
11 - 14 19 - 25 1,9 - 2,5 13 - 17 1 3
4 - 10 7 - 18 0,7 - 1,8 5 - 12 1 2
< 4 < 7 < 0,7 < 5
1) Factory position.
2) Do not use salt at this level.
French degrees
(TH°)
mmol/l Clarke de-
You must adjust the water softener manually and electronically.
Manual adjustment
Turn the water hardness dial to the position 1 or 2
(refer to the table).
grees
Water hardness ad-
justment
manually elec-
1)
2
1)
2
2)
1
troni-
cally
6
1)
5
2)
1
Electronic adjustment
1. Switch on the appliance.
2. Make sure that the appliance is in setting mode.
3. Press and hold the programme button until the programme light A starts to flash and
the programme light B comes on.
4. When the programme light B goes off and the end-of-programme indicator light
starts to flash, press the programme button again. (The programme light A continues
to flash).
At this point the electronic adjustment of the water softener is active.
–The end-of-programme indicator light shows sequences of flashes with a pause of
some seconds between each sequence. The number of flashes shows the set level.
– Example: 5 flashes / pause / 5 flashes = level 5.
5. Press the programme button to change the adjustment. Each time you press the pro-
gramme button the adjustment goes to the subsequent level.
6. Switch off the appliance to keep the operation.
Page 12

12 Use of dishwasher salt
If the water softener is set electronically to the level 1, the salt indicator light stays off.
USE OF DISHWASHER SALT
How to fill the salt container
1. Turn the cap counterclockwise and open
the salt container.
2. Fill the salt container with 1 litre of water
(only for the first time you fill with salt).
3. Use the funnel to fill the salt container
with salt.
4. Remove the salt around the opening of
the salt container.
5. Turn the cap clockwise to close the salt
container.
It is correct that water comes out from the
salt container when you fill it with salt.
USE OF DETERGENT AND RINSE AID
5
1
3
2
8
4
6
7
Use of detergent
To help the environment, do not use more than the correct quantity of detergent.
Follow the detergent manufacturer recommendations on the detergent packaging.
Do these steps to fill the detergent dispenser:
1.
Press the release button
2.
Put the detergent in the dispenser
to open the lid 8 of the detergent dispenser.
2
.
3
Page 13
Use of detergent and rinse aid
3. If the washing programme has a prewash phase, put a small quantity of detergent in
the prewash detergent compartment
4.
If you use the detergent tablets, put the tablet in the detergent dispenser
5. Close the detergent dispenser. Press the lid until it locks into position.
Different brands of detergent dissolve in different times. Some detergent tablets do not
have the best cleaning results during short washing programmes. Use long washing programmes when you use the detergent tablets to fully remove the detergent.
.
1
Use of rinse aid
Rinse aid makes it possible to dry the dishes without streaks and stains.
The rinse aid dispenser automatically adds rinse aid during the last rinsing phase.
Do these steps to fill the rinse aid dispenser:
1.
Press the release button
2.
Fill the rinse aid dispenser
3. Remove the spilled rinse aid with an absorbent cloth to prevent too much foam during
the washing programme.
4. Close the rinse aid dispenser. Press the lid until it locks into position.
to open the lid 7 of the rinse aid dispenser.
5
with rinse aid. The mark 'max' shows the maximum level.
4
Adjust the rinse aid dosage
Factory set: position 4.
You can set the rinse aid dosage between position 1 (lowest dosage) and position 6 (highest
dosage).
Turn the rinse aid selector
to increase or decrease the dosage.
6
13
.
3
Using combi detergent tablets
These tablets contain agents as detergent, rinse aid and dishwasher salt. Some types of tablets can contain other agents.
When you use tablets, that contain salt and rinse aid, do not fill the salt container and rinse
aid dispenser. The rinse aid indicator stays on when the appliance is activated.
Be sure that these tablets are applicable for the water hardness in your area (refer to the
instructions on the packaging of the products).
1. Adjust the water hardness to the lowest level. Refer to 'Setting the water softener'.
2. Set the rinse aid dosage to the lowest position.
Using again separately detergent, salt and rinse aid
1. Fill the salt container and the rinse aid dispenser.
2. Adjust the water hardness to the highest level.
3. Start a washing programme without dishes.
4. When the washing programme is completed, adjust the water softener to the water
hardness in your area.
5. Adjust the quantity of rinse aid.
Page 14

14 Loading cutlery and dishes
LOADING CUTLERY AND DISHES
Hints and tips
• Do not put in the appliance items that can absorb water (sponges, household cloths).
• Remove the remaining food from the items.
• Make soft the remaining burned food on the items.
• Put hollow items (cups, glasses and pans) with the opening down.
• Make sure that water does not collect in containers or in bowls.
• Make sure that cutlery and dishes do not bond together.
• Make sure that the glasses do not touch other glasses.
• Put small items in the cutlery basket.
• Mix the spoons with other cutlery to prevent them to bond together.
• When you put the items in the baskets, make sure that the water can touch all surfaces.
• Put light items in the upper basket. Make sure that the items do not move.
• Water droplets can collect on plastic items and non-stick pans.
Lower basket
Put the saucepans, lids, plates, salad bowls and
cutlery in the lower basket. Arrange the service
dishes and large lids around the edge of the basket.
The cutlery basket
Put the forks and spoons with the handles down.
Page 15
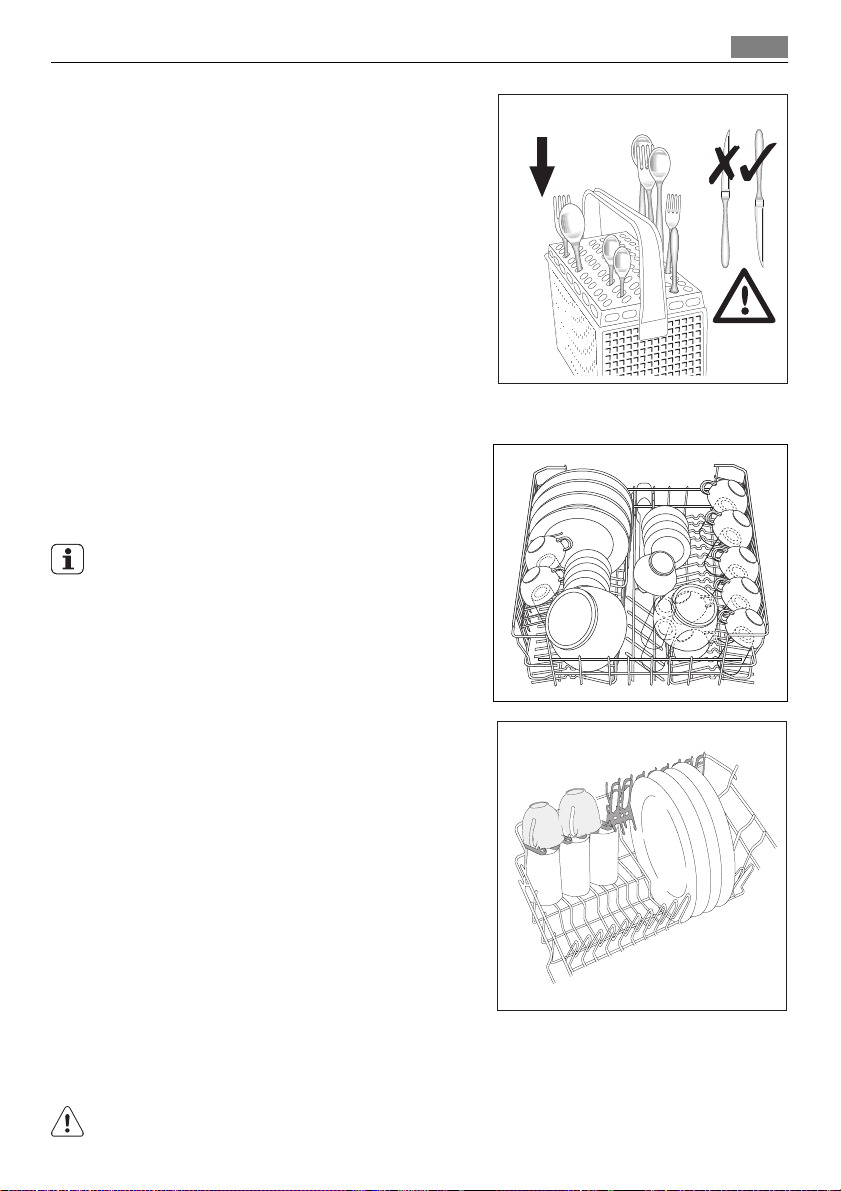
Put the knives with the handles up.
Mix the spoons with other cutlery to prevent them
to bond together.
Use the cutlery grid. If the dimensions of the cutlery prevent use of the cutlery grid, you can easily
remove it.
Upper basket
The upper basket is for plates (maximum 24 cm in
diameter), saucers, salad bowls, cups, glasses, pots
and lids. Arrange the items to let water touch all
surfaces.
Prevent to put plates in the first three sectors in
the front part of the basket. Make sure the plates
tilt forward.
Loading cutlery and dishes 15
Put the glasses with long stems in the cup racks
with the stems up. For longer items, fold the cup
racks up.
Adjustment of the height of the upper basket
You can put the upper basket in two positions to increase the load flexibility.
CAUTION!
Adjust the height before you load the upper basket.
Page 16

16 Washing programmes
Maximum height of the dishes in:
the upper basket the lower basket
Higher position 20 cm 31 cm
Lower position 24 cm 27 cm
Do these steps to move the upper basket to the higher position:
1. Move the front runner stops (A) out.
2. Pull the basket out.
3. Put the basket in the upper position.
4. Put back the front runner stops (A) in
their initial position.
CAUTION!
If the basket is in the upper position, do not
put cups on the cup racks.
WASHING PROGRAMMES
Programme Type of soil Type of load Programme description
Heavy soil Crockery, cutlery, pots
and pans
Normal soil Crockery and cutlery Prewash
Normal soil Crockery and cutlery Prewash
1)
Use this programme to quickly rinse the
dishes. This prevents the remaining food
to bond on the dishes and bad odours to
come out from the appliance.
Do not use detergent with this programme.
1) This is the standard programme for test institutes (refer to the supplied leaflet for test information). With this
programme you have the most efficient use of water and energy consumption for crockery and cutlery with
normal soil.
Prewash
Wash 70 °C
2 middle rinses
Last rinse
Dry
Wash 65 °C
1 middle rinse
Last rinse
Dry
Wash 50 °C
1 middle rinse
Last rinse
Dry
1 cold rinse
Page 17

Setting and starting a washing programme
Consumption values
Programme Programme time (mi-
nute)
120-130 1,8-2,0 22-24
100-110 1,4-1,6 19-21
130-140 1,0-1,2 14-16
12 0,1 5
The water pressure and temperature, the variations of the mains supply and the quantity of
dishes can change the consumption values.
Energy (kWh) Water (litre)
SETTING AND STARTING A WASHING PROGRAMME
Select and start a washing programme without delay
1. Switch on the appliance.
2. Make sure that the appliance is in setting mode.
3. Select a washing programme. Press the programme button again and again until the
programme light related to the washing programme comes on. Refer to the 'Washing
programmes' table.
4. Close the appliance door. The washing programme starts automatically.
17
Select and start a washing programme with delay start
1. Switch on the appliance and select a washing programme
2. Press the delay start button.
– The delay start indicator light comes on.
3. Close the appliance door.
– The countdown starts automatically.
– When the countdown is completed, the washing programme starts automatically.
The opening of the appliance door interrupts the countdown. When you close the door, the
countdown continues from the point of interruption.
Interruption of a washing programme
• Open the appliance door.
– The washing programme stops.
• Close the appliance door.
– The washing programme continues from the point of interruption.
Page 18

18 Care and cleaning
How to cancel a washing programme or a delay start
If a washing programme or a delay start has not started, you can change the selection.
When a washing programme or a delay start are in progress, it is not possible to change the
selection. It is necessary to cancel the washing programme or a delay start to make a new
selection.
How to cancel a washing programme
1. Press and hold the programme button until the programme and programme-in-pro-
gress lights go off.
2. Make sure that there is detergent in the detergent dispenser before you start a new
washing programme.
How to cancel a delay start
1. Press and hold the programme button until the programme and the delay start lights
go off.
2. Press the programme button to select a new washing programme.
At the end of the washing programme
• The appliance stops automatically.
• The audible signals operate.
1. Open the appliance door.
–The end-of-programme indicator light is on.
– The programme light is on.
2. Switch off the appliance.
3. For better drying results, keep the door ajar for some minutes.
Remove the items from the baskets
• Let the dishes become cold before you remove them from the appliance. Hot dishes can
be easily damaged.
• First remove the items from the lower basket, then from the upper basket.
• There can be water on the sides and on the door of the appliance. Stainless steel becomes cool more quickly than the dishes.
CARE AND CLEANING
To remove and clean the filters
Dirty filters decrease the washing results. Make a check at intervals and if necessary, clean
them.
The appliance has three filters:
• Coarse filter (A)
• Microfilter (B)
Page 19

• Flat filter (C).
1. To unlock the filters (A) and (B), turn the
handle on the microfilter (B) approximately 1/4 counterclockwise and remove.
2. Hold the coarse filter (A) by the handle
and remove it from the microfilter (B).
3. Remove the flat filter (C) from the bottom
of the appliance.
4. Fully clean the filters with water.
5. Put the flat filter (C) to its initial position.
Make sure that it assembles correctly in
the two guides (D).
6. Put the coarse filter (A) in the microfilter
(B) and push the filters together.
7. Put the filters (A) and (B) in position. Turn
the handle on the microfilter (B) clockwise
until it locks in position.
Care and cleaning 19
A
A
B
B
C
C
D
To clean the spray arms
Do not remove the spray arms.
If the holes in the spray arms become clogged, remove remaining parts of soil with a thin
pointed object.
To clean the external surfaces
Clean the external surfaces of the appliance and control panel with a moist soft cloth.
Only use neutral detergents.
Do not use abrasive products, abrasive cleaning pads or solvents (acetone).
Page 20

20 What to do if…
WHAT TO DO IF…
The appliance does not start or stops during operation.
First try to find a solution to the problem (refer to the chart). If not, contact the service
centre.
Malfunction Fault code Possible cause Possible solution
The appliance
does not fill
with water.
The water pressure is
The water tap is closed. Open the water tap.
The filter in the water
The connection of the
The water inlet hose is
The appliance
does not drain
the water.
The connection of the
The water drain hose is
The anti-flood
device operates.
The programme
does not start.
• The light of the programme in progress
flashes.
• The end-of-programme
indicator light flashes 1
time.
• The light of the programme in progress
flashes.
• The end-of-programme
indicator light flashes 2
times.
• The light of the programme in progress
flashes.
• The end-of-programme
indicator light flashes 3
times.
The appliance door is
The water tap is blocked
or is furred with limescale.
too low.
inlet hose is blocked.
water inlet hose is not
correct.
damaged.
There is a blockage in
the sink spigot.
water drain hose is not
correct.
damaged.
Close the water tap and
open.
Clean the water tap.
Contact your local water authority.
Clean the filter.
Make sure that the
connection is correct.
Make sure that the water inlet hose has no
damages.
Clean the sink spigot.
Make sure that the
connection is correct.
Make sure that the water drain hose has no
damages.
contact the service centre.
Close the door correctly.
Page 21

What to do if… 21
Malfunction Fault code Possible cause Possible solution
The mains plug is not
connected in.
Blow out fuse in the
household fuse box.
The delay start is set. If you want to cancel
Put in the mains plug.
Replace the fuse.
the delay start, refer to
'Select and start a
washing programme'.
After the check, switch on the appliance. The programme continues from the point of interruption.
If the malfunction shows again, contact the service centre.
For other fault codes, not showed in the chart, contact the service centre.
The necessary data for the service centre is on the rating plate.
We recommend that you write the data here:
Model (MOD.) ....................
Product number (PNC) ....................
Serial number (S.N.) ....................
The washing results and drying results are not satisfactory
Problem Possible cause Possible solution
The dishes are not clean. The selected washing pro-
The baskets were not loaded
The spray arms could not turn
The filters are dirty or not as-
The quantity of detergent was
Limescale particles on the
dishes.
Incorrect water softener ad-
The salt container cap is not
gramme was not applicable for
the type of load and soil.
correctly, water did not touch
all surfaces.
freely because of incorrect arrangement of the load.
sembled and installed correctly.
not sufficient or missing.
The salt container is empty. Fill the salt container with dish-
justment
closed correctly.
Make sure that the washing
programme is applicable for
the type of load and soil.
Load the baskets correctly.
Make sure that an incorrect arrangement of the load does not
cause a blockage of the spray
arms.
Make sure that the filters are
clean and correctly assembled
and installed.
Make sure that the quantity of
detergent is sufficient.
washer salt.
Adjust the water softener.
Make sure that the salt container cap is closed correctly.
Page 22

22 Technical data
Problem Possible cause Possible solution
There are streaks, milky stains,
or a bluish layer on glasses and
dishes.
Dry water drop stains on
glasses and dishes.
The detergent can be the
The dishes are wet. You have set a washing pro-
The dishes are wet and dull. The rinse aid dispenser is emp-
Rinse aid dosage is too high. Decrease the rinse aid dosage.
Rinse aid dosage is too low. Increase the rinse aid dosage.
cause.
gramme without drying phase
or with a decreased drying
phase.
ty.
Use a different brand of detergent.
Let the door stay ajar for some
minutes before you remove the
dishes.
Fill the rinse aid dispenser with
rinse aid.
TECHNICAL DATA
Dimensions Width 596 mm
Height 818-898 mm
Depth 555 mm
Water supply pressure Minimum 0.5 bar (0.05 MPa)
Maximum 8 bar (0.8 MPa)
Water supply
Capacity Place settings 12
1) Connect the water inlet hose to a water tap with a 3/4'' thread.
1)
The rating plate on the inner edge of the appliance door shows the electrical connection
data.
Cold water or hot water maximum 60 °C
If the hot water comes from alternative sources of energy, (e.g. solar panels, photovoltaic
panels and aeolian), use a hot water supply to decrease energy consumption.
ENVIRONMENT CONCERNS
The symbol on the product or on its packaging indicates that this product may not be
treated as household waste. Instead it should be taken to the appropriate collection point
for the recycling of electrical and electronic equipment. By ensuring this product is
disposed of correctly, you will help prevent potential negative consequences for the
environment and human health, which could otherwise be caused by inappropriate waste
handling of this product. For more detailed information about recycling of this product,
please contact your local council, your household waste disposal service or the shop where
you purchased the product.
Page 23

Environment concerns
The packaging materials are environmentally friendly and can be recycled. The plastic components are identified by markings, e.g. >PE<, >PS<, etc. Discard the packaging materials in
the applicable container at the community waste disposal facilities.
WARNING!
To discard the appliance, follow the procedure:
• Pull the mains plug out of the socket.
• Cut off the mains cable and mains plug and discard them.
• Discard the door catch. This prevents the children to close themselves inside the appliance and endanger their lives.
23
Page 24

24
PARA RESULTADOS PERFEITOS
Obrigado por escolher este produto AEG. Criámo-lo para lhe oferecer um
desempenho impecável durante vários anos, com tecnologias inovadoras que
tornam a sua vida mais fácil – funcionalidades que poderá não encontrar em
aparelhos convencionais. Continue a ler durante alguns minutos para tirar o
máximo partido do produto.
ACESSÓRIOS E CONSUMÍVEIS
Na loja web AEG, encontrará tudo aquilo de que necessita para manter os seus
aparelhos AEG imaculados e a funcionarem na perfeição. A par de uma vasta
gama de acessórios projectados e concebidos de acordo com os padrões de
elevada qualidade que esperaria, de utensílios de cozinha especializados a cestos
de talheres, de suportes para garrafas a delicados sacos para roupa...
Visite a loja online em
www.aeg.com/shop
Page 25

ÍNDICE
Índice
26 Informações de segurança
30 Descrição do produto
30 Painel de controlo
33 Utilização do aparelho
33 Regular o amaciador da água
35 Utilização do sal para máquinas
de lavar loiça
35 Utilização de detergente e
abrilhantador
37 Carregar pratos e talheres
40 Programas de lavagem
41 Seleccionar e iniciar um programa
de lavagem
42 Manutenção e limpeza
43 O que fazer se…
46 Dados técnicos
46 Preocupações ambientais
25
Os símbolos que se seguem são utilizados no
presente manual:
Informações importantes relativas à
segurança de pessoas e à prevenção de
danos a aparelhos.
Informações gerais e conselhos úteis
Informações ambientais
Sujeito a alterações sem aviso prévio.
Page 26

26 Informações de segurança
INFORMAÇÕES DE SEGURANÇA
Antes da instalação e utilização, leia atentamente este manual:
• Para a sua segurança e para a segurança da sua máquina.
• Para proteger o ambiente.
• Para o funcionamento correcto da máquina.
Guarde sempre estas instruções com a máquina, mesmo que seja transferida ou entregue a
outra pessoa.
O fabricante não é responsável por danos resultantes de uma instalação e utilização incorrectas.
Segurança para crianças e pessoas vulneráveis
• Não permita que o aparelho seja utilizado por pessoas, incluindo crianças, com capacidades físicas e sensoriais reduzidas, funções mentais reduzidas ou sem experiência e conhecimento quanto à utilização do mesmo. Estas pessoas devem ser vigiadas ou ensinadas a
utilizar o aparelho por uma pessoa que seja responsável pela sua segurança.
• É necessário supervisionar as crianças para não permitir que brinquem com o aparelho.
• Mantenha todos os materiais de embalagem fora do alcance das crianças. Existe o risco
de asfixia ou ferimentos.
• Mantenha todos os detergentes num local seguro. Não permita que as crianças toquem
nos detergentes.
• Mantenha as crianças e os animais domésticos afastados do aparelho quando a porta está aberta.
Segurança geral
• Não altere as especificações desta máquina. Existe o risco de ferimentos e danos na máquina.
• Cumpra as instruções de segurança do fabricante do detergente para evitar queimaduras
nos olhos, boca e garganta.
• Não beba água da máquina. Os resíduos de detergente podem ficar na máquina.
• Não mantenha a porta da máquina aberta sem supervisão. Tal permite evitar ferimentos
e que alguém tropece na porta aberta.
• Não se sente nem se apoie na porta aberta.
Utilização da máquina
• Esta máquina destina-se apenas a uso doméstico. Não utilize a máquina com outros fins
para evitar ferimentos pessoais e danos materiais.
• Utilize a máquina apenas para lavar acessórios que são aplicáveis para máquinas de lavar
loiça.
• Não coloque produtos inflamáveis ou peças molhadas com produtos inflamáveis no interior, ao lado ou em cima da máquina. Existe o risco de explosão ou incêndio.
• Coloque as facas e todas as peças com pontas afiadas no cesto de talheres com a ponta
virada para baixo. Caso contrário, coloque-as numa posição horizontal no cesto superior
ou no cesto para facas. (Nem todos os modelos possuem o cesto para facas.)
Page 27

Informações de segurança
• Utilize apenas produtos específicos para máquinas de lavar loiça (detergente, sal, abrilhantador).
• Tipos de sal que não são específicos para máquinas de lavar loiça podem causar danos no
descalcificador de água.
• Encha a máquina com sal antes de iniciar um programa de lavagem. O sal restante na
máquina pode causar corrosão ou fazer um furo na parte inferior da máquina.
• Não encha o distribuidor de abrilhantador com qualquer outra substância que não abrilhantador (agente de limpeza para máquinas de lavar loiça, detergente líquido). Isto pode
provocar danos na máquina.
•Certifique-se de que os braços aspersores se podem mover livremente antes de iniciar um
programa de lavagem.
• A máquina pode libertar vapor quente se abrir a porta com um programa de lavagem em
funcionamento. Existe o risco de queimaduras na pele.
• Não retire a loiça da máquina até o programa de lavagem estar concluído.
Manutenção e limpeza
• Antes de limpar a máquina, desligue-a e retire a ficha de alimentação eléctrica da tomada.
• Não utilize produtos inflamáveis ou produtos que possam causar corrosão.
• Não utilize a máquina sem os filtros. Certifique-se de que a instalação dos filtros está
correcta. Uma instalação incorrecta provoca resultados de lavagem insatisfatórios e danos na máquina.
• Não utilize jactos de água ou vapor para limpar a máquina. Existe o risco de choque eléctrico e danos na máquina.
27
Instalação
•Certifique-se de que a máquina não está danificada. Não instale ou ligue uma máquina
danificada, contacte o fornecedor.
• Retire todo o material de embalagem antes de instalar e utilizar a máquina.
• A ligação eléctrica, a canalização e a instalação da máquina apenas devem ser realizadas
por uma pessoa qualificada. Tal permite evitar riscos de danos estruturais ou ferimentos.
•Certifique-se de que a ficha de alimentação eléctrica está desligada da tomada durante a
instalação.
• Não perfure os lados da máquina para evitar danos nos componentes hidráulicos e eléctricos.
• Importante!Cumpra as instruções incluídas no modelo fornecido com a máquina:
– Para instalar a máquina.
– Para montar o painel da porta.
– Para ligar ao fornecimento de água e escoamento.
•Certifique-se de que a máquina é instalada sob e ao lado de estruturas seguras.
Precauções contra a formação de gelo
• Não instale a máquina em locais com temperatura inferior a 0 °C.
• O fabricante não é responsável por danos resultantes da formação de gelo.
Page 28

28 Informações de segurança
Ligação à rede de abastecimento de água
• Utilize mangueiras novas para ligar a máquina ao fornecimento de água. Não utilize
mangueiras usadas.
• Não ligue a máquina a canos novos ou canos que não sejam usados há muito tempo.
Deixe a água correr durante alguns minutos e, depois, ligue a mangueira de entrada.
•Certifique-se de que não esmaga nem provoca danos nas mangueiras de água ao instalar
a máquina.
•Certifique-se de que as uniões de água estão bem apertadas para evitar fugas de água.
• Quando utilizar a máquina pela primeira vez, certifique-se de que as mangueiras não têm
fugas de água.
• A mangueira de entrada de água possui uma válvula de segurança e revestimento duplo
com um cabo de alimentação interior. Apenas existe pressão na mangueira de entrada de
água quando há fluxo de água. Se houver uma fuga na mangueira de entrada de água, a
válvula de segurança interrompe o fluxo de água.
– Tenha cuidado quando ligar a mangueira de entrada de água:
– Não coloque a mangueira de entrada de água ou a válvula de segurança em água.
– Se a mangueira de entrada de água ou a válvula de segurança estiver danificada,
desligue imediatamente a ficha de alimentação eléctrica da tomada.
– Contacte o centro de assistência para substituir a mangueira de entrada de água
com a válvula de segurança.
ADVERTÊNCIA
Tensão perigosa.
Ligação eléctrica
• A máquina deve ter uma ligação à terra.
•Certifique-se de que a informação sobre a ligação eléctrica existente na placa de carac-
terísticas está em conformidade com a fonte de alimentação.
• Utilize sempre uma tomada correctamente instalada e à prova de choques eléctricos.
• Não utilize fichas de contactos múltiplos e cabos de extensão. Existe o risco de incêndio.
• Não substitua ou altere o cabo de alimentação eléctrica. Contacte o centro de assistência.
Page 29

Informações de segurança
•Certifique-se de que não esmaga nem provoca danos na ficha de alimentação eléctrica e
no cabo de alimentação atrás da máquina.
•Certifique-se de que a ficha de alimentação eléctrica está acessível após a instalação.
• Não puxe o cabo de alimentação eléctrica para desligar a máquina. Puxe sempre a ficha
de alimentação.
Centro de assistência
• Apenas uma pessoa qualificada pode efectuar trabalhos ou reparações na máquina. Contacte o centro de assistência.
• Utilize apenas peças sobresselentes originais.
Para eliminar a máquina
• Para evitar o risco de ferimentos ou danos:
– Desligue a ficha de alimentação eléctrica da tomada.
– Corte o cabo de alimentação eléctrica e elimine-o.
– Retire o fecho da porta. Isto evita que crianças ou animais domésticos fiquem fecha-
dos no interior da máquina. Existe o risco de asfixia.
– Elimine a máquina no centro de eliminação de resíduos local.
ADVERTÊNCIA
Os detergentes para a máquina de lavar loiça são perigosos e podem causar corrosão!
• Se ocorrer um acidente com estes detergentes, contacte imediatamente um médico.
• Se entrar detergente na boca, contacte imediatamente um médico.
• Se entrar detergente nos olhos, contacte imediatamente um médico e lave os olhos com
água.
• Mantenha os detergentes para a máquina de lavar loiça num local seguro e fora do alcance das crianças.
• Não mantenha a porta da máquina aberta quando existe detergente no distribuidor de
detergente.
• Encha o distribuidor de detergente apenas antes de iniciar um programa de lavagem.
29
Page 30

30 Descrição do produto
DESCRIÇÃO DO PRODUTO
Cesto superior
1
Indicador da dureza da água
2
Depósito de sal
3
Distribuidor de detergente
4
Distribuidor de abrilhantador
5
Placa de características
6
Filtros
7
Braço aspersor inferior
8
Braço aspersor superior
9
PAINEL DE CONTROLO
1
A
4
5
2
B
3
Page 31

Painel de controlo
Botão de Ligar/Desligar
1
Indicadores luminosos de programa
2
Indicadores luminosos
3
Botão PROGRAM/Reset
4
Botão de Início Diferido
5
Indicadores luminosos
Fim do programa O indicador acende-se quando:
• O programa de lavagem está concluído.
• Regula o nível da dureza da água.
• Os sinais sonoros são activados/desactivados.
• Há uma anomalia no aparelho.
Programa em curso • Acende-se quando é seleccionado um programa de lavagem.
• Permanece aceso durante todo o programa de lavagem.
• Apaga-se no fim do programa de lavagem.
Abrilhantador
1)
O indicador acende-se quando é necessário encher o distribuidor
de abrilhantador.
31
1)
Sal
1) Quando os depósitos de sal e/ou abrilhantador estão vazios, os respectivos indicadores luminosos não se
acendem enquanto um programa de lavagem estiver em funcionamento.
Acende-se quando é necessário encher o depósito de sal. Consulte "Utilização do sal para máquinas de lavar loiça".
Depois de encher o depósito, o indicador luminoso de sal pode
permanecer aceso durante algumas horas. Isso não tem um efeito indesejado no funcionamento do aparelho.
Botão de selecção/cancelamento de programa
Utilize a tecla de selecção/cancelamento de programa para estas operações:
• Para seleccionar o programa de lavagem. Consulte o capítulo "Seleccionar e iniciar um
programa de lavagem".
• Para regular a dureza da água. Consulte o capítulo "Regular a dureza da água".
• Para desactivar/activar os sinais sonoros. Consulte a secção "Sinais sonoros".
• Para cancelar um programa de lavagem em curso. Consulte o capítulo "Seleccionar e iniciar um programa de lavagem".
Botão de início diferido
Utilize este botão para atrasar o início do programa de lavagem com um intervalo de 3 horas. Consulte "Seleccionar e iniciar um programa de lavagem".
Indicadores luminosos do programa A e B
Estes indicadores têm também uma função auxiliar quando:
• Regula o nível da dureza da água.
• Desactiva/activa os sinais sonoros.
Page 32

32 Painel de controlo
Modo de selecção
O aparelho tem de estar no modo de selecção para estas operações:
• Para seleccionar e iniciar um programa de lavagem.
• Para regular electronicamente o nível da dureza da água.
• Para desactivar/activar os sinais sonoros.
Prima o botão de ligar/desligar. O aparelho está no modo de selecção quando:
• Todos os indicadores luminosos de programa estão desligados e o indicador de fim do
programa está intermitente.
Prima o botão de ligar/desligar. O aparelho não está no modo de selecção quando:
• Apenas um indicador luminoso de programa está aceso.
– É necessário cancelar o programa para voltar ao modo de selecção. Consulte "Selec-
cionar e iniciar um programa de lavagem".
Sinais sonoros
Os sinais sonoros são emitidos quando:
• O programa de lavagem termina.
• O aparelho tem uma anomalia.
Execute estes passos para desactivar os sinais sonoros:
1. Ligue o aparelho.
2. Certifique-se de que o aparelho está no modo de selecção.
3. Mantenha premido o botão de programa até que o indicador luminoso do programa A
fique intermitente e o indicador luminoso do programa B se acenda.
4. Quando o indicador luminoso do programa A estiver intermitente e o indicador lumi-
noso do programa B estiver aceso, prima imediatamente o botão de programa novamente.
O indicador luminoso do programa A acende-se e o indicador luminoso do programa B
fica intermitente.
Após alguns segundos, o indicador luminoso do programa A apaga-se e o indicador de
fim do programa acende-se. (O indicador luminoso do programa B continua intermitente.)
– Os sinais sonoros estão activos.
5. Prima novamente o botão de programa. O indicador de fim do programa apaga-se.
– Os sinais sonoros estão desactivados.
6. Desligue o aparelho para confirmar a operação.
Execute estes passos para activar novamente os sinais sonoros:
1. Execute os passos 1 a 4 do procedimento de desactivação dos sinais sonoros.
2. O indicador luminoso do programa A apaga-se. O indicador de fim do programa está
desligado. (O indicador luminoso do programa B continua intermitente.)
– Os sinais sonoros estão desactivados.
3. Prima novamente o botão de programa. O indicador de fim do programa acende-se.
– Os sinais sonoros estão activos.
Page 33

Utilização do aparelho
4. Desligue o aparelho para confirmar a operação.
UTILIZAÇÃO DO APARELHO
1. Certifique-se de que o nível definido de amaciador da água corresponde à dureza da
água na sua área. Caso contrário, ajuste o amaciador da água.
2. Encha o depósito de sal com sal para máquinas de lavar loiça.
3. Encha o distribuidor de abrilhantador com abrilhantador.
4. Coloque os pratos e talheres no aparelho.
5. Defina o programa de lavagem correcto para o tipo de carga e sujidade.
6. Encha o distribuidor de detergente com a quantidade correcta de detergente.
7. Inicie o programa de lavagem.
REGULAR O AMACIADOR DA ÁGUA
O descalcificador de água retira minerais e sais do fornecimento de água. Estes minerais e
sais podem causar danos na máquina.
Ajuste o nível de descalcificador de água se este não corresponder à dureza da água na sua
área.
Contacte os serviços de abastecimento de água locais para saber qual a dureza da água na
sua área.
Dureza da água
Graus alemães
(°dH)
51 - 70 91 - 125 9,1 - 12,5 64 - 88
43 - 50 76 - 90 7,6 - 9,0 53 - 63
37 - 42 65 - 75 6,5 - 7,5 46 - 52
29 - 36 51 - 64 5,1 - 6,4 36 - 45
23 - 28 40 - 50 4,0 - 5,0 28 - 35
19 - 22 33 - 39 3,3 - 3,9 23 - 27
15 - 18 26 - 32 2,6 - 3,2 18 - 22 1 4
11 - 14 19 - 25 1,9 - 2,5 13 - 17 1 3
4 - 10 7 - 18 0,7 - 1,8 5 - 12 1 2
< 4 < 7 < 0,7 < 5
1) Posição de fábrica.
2) Não utilize sal neste nível.
Graus franceses
(TH°)
mmol/l Graus Clarke manual-
Tem de ajustar o descalcificador de água manual e electronicamente.
Ajuste da dureza da
mente
2
2
2
2
2
2
1
1)
1)
1)
1)
1)
1)
2)
água
33
elec-
tronica-
mente
10
9
8
7
6
1)
5
2)
1
Page 34

34 Regular o amaciador da água
Ajuste manual
Rode o indicador da dureza da água para a posição 1 ou 2 (consulte a tabela).
Regulação electrónica
1. Ligue o aparelho.
2. Certifique-se de que o aparelho está no modo de selecção.
3. Mantenha premido o botão de programa até que o indicador luminoso do programa A
fique intermitente e o indicador luminoso do programa B se acenda.
4. Quando o indicador luminoso do programa B se apagar e o indicador de fim do pro-
grama ficar intermitente, prima o botão de programa novamente. (O indicador luminoso do programa A continua intermitente.)
Neste momento, a regulação elecrónica da dureza da água está activada.
– O indicador de fim do programa mostra sequências de intermitência com uma pau-
sa de alguns segundos entre cada sequência. O número de intermitências indica o
nível definido.
– Exemplo: 5 intermitências / pausa / 5 intermitências = nível 5.
5. Prima o botão de programa para alterara regulação. De cada vez que premir o botão de
programa, a regulação passa para o nível seguinte.
6. Desligue o aparelho para guardar a operação.
Se o descalcificador de água estiver electronicamente regulado para o nível 1, o indicador
luminoso de sal permanece apagado.
Page 35

Utilização do sal para máquinas de lavar loiça 35
UTILIZAÇÃO DO SAL PARA MÁQUINAS DE LAVAR LOIÇA
Como encher o depósito de sal
1. Rode a tampa para a esquerda e abra o
depósito de sal.
2. Encha o depósito de sal com 1 litro de
água (apenas da primeira vez que enche
com sal).
3. Utilize o funil para encher o depósito com
sal.
4. Retire o sal em torno da abertura do de-
pósito de sal.
5. Rode a tampa para a direita para fechar o
depósito de sal.
É normal que a água transborde do depósito de sal quando o enche com sal.
UTILIZAÇÃO DE DETERGENTE E ABRILHANTADOR
5
1
3
2
4
6
8
7
Utilização do detergente
Para proteger o meio ambiente, não utilize mais do que a quantidade correcta de detergente.
Respeite as recomendações do fabricante do detergente indicadas na embalagem do detergente.
Execute estes passos para encher o distribuidor de detergente:
1.
Prima o botão de desbloqueio
2.
Coloque o detergente no distribuidor
para abrir a tampa 8 do distribuidor de detergente.
2
.
3
Page 36

36 Utilização de detergente e abrilhantador
3. Se o programa de lavagem tiver uma fase de pré-lavagem, coloque uma pequena
quantidade de detergente no compartimento de detergente de pré-lavagem
4.
Se utilizar pastilhas de detergente, coloque a pastilha no distribuidor de detergente
.
5. Feche o distribuidor de detergente. Pressione a tampa até ficar bloqueada.
As diferentes marcas de detergente dissolvem em tempos diferentes. Algumas pastilhas de
detergente não têm os melhores resultados de limpeza durante programas de lavagem curtos. Utilize programas de lavagem longos quando utilizar pastilhas de detergente, de forma
a retirar por completo o detergente.
Utilização do abrilhantador
O abrilhantador torna possível secar a loiça sem riscos e manchas.
O distribuidor de abrilhantador adiciona automaticamente abrilhantador durante a última
fase de enxaguamento.
Execute estes passos para encher o distribuidor de abrilhantador:
1.
Prima o botão de desbloqueio
dor.
2.
Encha o distribuidor de abrilhantador
o nível máximo.
3. Retire o abrilhantador entornado com um pano absorvente para evitar demasiada es-
puma durante o programa de lavagem.
4. Feche o distribuidor de abrilhantador. Pressione a tampa até ficar bloqueada.
para abrir a tampa 7 do distribuidor de abrilhanta-
5
com abrilhantador. A marca "max" apresenta
4
.
1
3
Ajuste da dosagem de abrilhantador
Definição de fábrica: posição 4.
Pode regular a dosagem de abrilhantador entre a posição 1 (dosagem mais baixa) e a posição 6 (dosagem mais alta).
Rode o selector do abrilhantador
para aumentar ou diminuir a dosagem.
6
Utilizar Multitab - Pastilha multifunções
Estas pastilhas contêm agentes como detergente, abrilhantador e sal para máquinas de lavar loiça. Alguns tipos de pastilhas podem conter outros agentes.
Quando utilizar pastilhas que contenham sal e abrilhantador, não encha o depósito de sal e
o distribuidor de abrilhantador. O indicador de abrilhantador permanece aceso enquanto o
aparelho está activado.
Certifique-se de que estas pastilhas são adequadas à dureza da água na sua área (consulte
as instruções na embalagem dos produtos).
1. Regule a dureza da água para o nível mais baixo. Consulte "Regular o amaciador da
água".
2. Regule a dosagem de abrilhantador para a posição mais baixa.
Voltar a utilizar detergente, sal e abrilhantador separadamente
1. Encha o depósito de sal e o distribuidor de abrilhantador.
2. Regule a dureza da água para o nível mais elevado.
Page 37

Carregar pratos e talheres 37
3. Inicie um programa de lavagem sem loiça.
4. Quando o programa de lavagem estiver concluído, regule o amaciador da água para a
dureza da água na sua área.
5. Regule a quantidade de abrilhantador.
CARREGAR PRATOS E TALHERES
Sugestões e conselhos
• Não coloque itens que possam absorver água na máquina (esponjas, panos domésticos).
• Retire os resíduos de comida da loiça.
• Amoleça os resíduos de comida queimada na loiça.
• Coloque as peças ocas (chávenas, copos e panelas) com a abertura para baixo.
•Certifique-se de que não fica água acumulada nos recipientes ou taças.
•Certifique-se de que os talheres e os pratos não ficam colados.
•Certifique-se de que os copos não tocam noutros copos.
• Coloque as peças pequenas no cesto de talheres.
• Misture as colheres com outros talheres para evitar que fiquem coladas.
• Quando colocar estas peças nos cestos, certifique-se de que a água entra em contacto
com todas as superfícies.
• Coloque as peças leves no cesto superior. Certifique-se de que a loiça não se mexe.
• Podem acumular-se gotas de água nas peças de plástico e tachos antiaderentes.
Cesto inferior
Coloque tachos, tampas, pratos, saladeiras e talheres no cesto inferior. Coloque as travessas e as
tampas grandes nas extremidades do cesto.
Page 38

38 Carregar pratos e talheres
O cesto de talheres
Coloque os garfos e as colheres com os cabos para baixo.
Coloque as facas com os cabos para cima.
Misture as colheres com outros talheres para evitar
que fiquem coladas.
Utilize a grelha para talheres. Se o tamanho dos
talheres não permitir a utilização da grelha para
talheres, pode retirá-la facilmente.
Cesto superior
O cesto superior destina-se aos pratos (no máximo
24 cm de diâmetro), pires, saladeiras, chávenas,
copos, tachos e tampas. Disponha a loiça de forma
a permitir que a água entre em contacto com todas as superfícies.
Evite colocar pratos nos três primeiros sectores na
parte da frente do cesto. Certifique-se de que os
pratos ficam inclinados para a frente.
Page 39

Carregar pratos e talheres 39
Coloque os copos de pé alto nas prateleiras para
chávenas com o pé para cima. Para peças maiores,
levante as prateleiras para chávenas.
Regular a altura do cesto superior
Pode colocar o cesto superior em duas posições para aumentar a flexibilidade de carga.
CUIDADO
Ajuste a altura antes de carregar o cesto superior.
Altura máxima da loiça no:
no cesto superior no cesto inferior
Posição superior 20 cm 31 cm
Posição inferior 24 cm 27 cm
Execute estes passos para mover o cesto superior para a posição superior:
1. Retire os travões frontais das calhas (A).
2. Retire o cesto.
3. Coloque o cesto na posição superior.
4. Volte a colocar os travões frontais das
calhas (A) nas suas posições iniciais.
CUIDADO
Se o cesto estiver na posição superior, não
coloque chávenas nas prateleiras para chávenas.
Page 40

40 Programas de lavagem
PROGRAMAS DE LAVAGEM
Programa Tipo de sujidade Tipo de carga Descrição do programa
Sujidade intensa Faianças, talheres, ta-
chos e panelas
Sujidade normal Faianças e talheres Pré-lavagem
Sujidade normal Faianças e talheres Pré-lavagem
1)
Utilize este programa para enxaguar rapidamente a loiça. Isto evita que os resíduos de comida se colem à loiça e que
saiam odores desagradáveis do aparelho.
Não utilize detergente com este programa.
1) Este é o programa standard para teste (para informações relativas aos testes, consulte o folheto fornecido). Este
programa proporciona a utilização de água e energia mais eficiente para faianças e talheres com sujidade
normal.
Valores de consumo
Programa Tempo do programa
(minutos)
120-130 1,8-2,0 22-24
Pré-lavagem
Lavagem a 70 °C
2 enxaguamentos intermédios
Enxaguamento final
Secagem
Lavagem a 65 °C
1 enxaguamento intermédio
Enxaguamento final
Secagem
Lavagem a 50 °C
1 enxaguamento intermédio
Enxaguamento final
Secagem
1 enxaguamento a frio
Energia (kWh) Água (litros)
100-110 1,4-1,6 19-21
130-140 1,0-1,2 14-16
12 0,1 5
A pressão e a temperatura da água, as variações da corrente eléctrica e a quantidade de
loiça podem alterar os valores de consumo.
Page 41

Seleccionar e iniciar um programa de lavagem
SELECCIONAR E INICIAR UM PROGRAMA DE LAVAGEM
Seleccionar e iniciar um programa de lavagem sem início diferido
1. Ligue o aparelho.
2. Certifique-se de que o aparelho está no modo de selecção.
3. Seleccione um programa de lavagem. Prima o botão de programa várias vezes até que
o indicador luminoso do programa de lavagem pretendido se acenda. Consulte a tabela
"Programas de lavagem".
4. Feche a porta do aparelho. O programa de lavagem inicia automaticamente.
Seleccionar e iniciar um programa de lavagem com início diferido
1. Ligue o aparelho e seleccione um programa de lavagem
2. Prima o botão de início diferido.
– O indicador luminoso de início diferido acende-se.
3. Feche a porta do aparelho.
– A contagem decrescente inicia automaticamente.
– Quando a contagem decrescente terminar, o programa de lavagem inicia automati-
camente.
A abertura da porta do aparelho interrompe a contagem decrescente. Quando fechar a porta, a contagem decrescente continuará a partir do ponto de interrupção.
41
Interrupção de um programa de lavagem
• Abra a porta da máquina.
– O programa de lavagem pára.
• Feche a porta da máquina.
– O programa de lavagem continua a partir do ponto de interrupção.
Como cancelar um programa de lavagem ou um início diferido
Se um programa de lavagem ou um início diferido ainda não tiver iniciado, pode alterar a
selecção.
Quando um programa de lavagem ou um início diferido está em curso, não é possível alterar a selecção. É necessário cancelar o programa de lavagem ou o início diferido para efectuar uma nova selecção.
Como cancelar um programa de lavagem
1. Mantenha premido o botão de programa até que os indicadores luminosos de progra-
ma e de programa em curso se apaguem.
2. Certifique-se de que existe detergente no distribuidor de detergente antes de iniciar
um novo programa de lavagem.
Como cancelar um início diferido
1. Mantenha premido o botão de programa até que os indicadores luminosos de progra-
ma e de início diferido se apaguem.
Page 42

42 Manutenção e limpeza
2. Prima o botão de programa para seleccionar um novo programa de lavagem.
No fim do programa de lavagem
• O aparelho pára automaticamente.
•Ouvem-se sinais sonoros.
1. Abra a porta do aparelho.
– O indicador de fim do programa está aceso.
– O indicador luminoso de programa está aceso.
2. Desligue o aparelho.
3. Para obter os melhores resultados de secagem, mantenha a porta entreaberta durante
alguns minutos.
Retire a loiça dos cestos
• Deixe a loiça arrefecer antes de a retirar da máquina. A loiça quente danifica-se facilmente.
• Esvazie primeiro o cesto inferior e, de seguida, o superior.
• Pode haver água nos lados e na porta da máquina. O aço inoxidável arrefece mais rapidamente do que os pratos.
MANUTENÇÃO E LIMPEZA
Para retirar e limpar os filtros
Os filtros sujos reduzem os resultados de lavagem. Efectue verificações periódicas e, se necessário, limpe-os.
A máquina tem três filtros:
• Filtro grosso (A)
• Microfiltro (B)
• Filtro plano (C).
A
A
B
B
C
C
Page 43

O que fazer se… 43
1. Para desbloquear os filtros (A) e (B), rode
o manípulo do microfiltro (B) aproximadamente 1/4 para a esquerda e retire.
2. Segure o filtro grosso (A) pelo manípulo e
retire-o do microfiltro (B).
3. Retire o filtro plano (C) da parte inferior
da máquina.
4. Limpe totalmente os filtros com água.
5. Coloque o filtro plano (C) na posição inici-
al. Certifique-se de que encaixa correctamente nas duas guias (D).
6. Coloque o filtro grosso (A) no microfiltro
(B) e empurre os dois filtros em conjunto.
7. Coloque os filtros (A) e (B) na posição cor-
recta. Rode o manípulo do microfiltro (B)
para a direita até bloquear.
Para limpar os braços aspersores
Não retire os braços aspersores.
Se os orifícios dos braços aspersores ficarem obstruídos, retire a sujidade com um objecto
fino e afiado.
D
Para limpar as superfícies externas
Limpe as superfícies externas da máquina e o painel de comandos com um pano macio e
húmido.
Utilize apenas detergentes neutros.
Não utilize produtos abrasivos, esfregões ou solventes (acetona).
O QUE FAZER SE…
A máquina não arranca nem pára durante o funcionamento.
Tente primeiro encontrar uma solução para o problema (consulte a tabela). Se não conseguir, contacte o centro de assistência.
Avaria Código de avaria Causa possível Solução possível
O aparelho não
se enche com
água.
• O indicador luminoso do
programa em curso está
intermitente.
• O indicador de fim do
programa pisca 1 vez.
A torneira da água está
obstruída ou tem incrustações de calcário.
Limpe a torneira da
água.
Page 44

44 O que fazer se…
Avaria Código de avaria Causa possível Solução possível
A pressão da água é de-
A torneira da água está
O filtro da mangueira
A ligação da mangueira
A mangueira de entrada
O aparelho não
escoa a água.
A ligação da mangueira
A mangueira de escoa-
O dispositivo anti-inundação está activado.
O programa não
inicia.
A ficha de alimentação
Disjuntor desligado no
O início diferido está se-
• O indicador luminoso do
programa em curso está
intermitente.
• O indicador de fim do
programa pisca 2 vezes.
• O indicador luminoso do
programa em curso está
intermitente.
• O indicador de fim do
programa pisca 3 vezes.
A porta do aparelho es-
masiado baixa.
fechada.
de entrada de água está
obstruído.
de entrada de água não
está correcta.
de água está danificada.
O sifão do lava-loiça está bloqueado.
de escoamento de água
não está correcta.
mento de água está danificada.
Feche a torneira da
tá aberta.
eléctrica não está ligada.
quadro eléctrico.
leccionado.
Contacte os serviços de
abastecimento de água
da sua área.
Abra a torneira da água.
Limpe o filtro.
Certifique-se de que a
ligação está correcta.
Certifique-se de que a
mangueira de entrada
de água não está danificada.
Limpe o sifão do lava-
-loiça.
Certifique-se de que a
ligação está correcta.
Certifique-se de que a
mangueira de escoamento de água não está
danificada.
água e contacte o centro de assistência técnica.
Feche a porta correctamente.
Ligue a ficha de alimentação eléctrica.
Ligue o disjuntor no
quadro eléctrico.
Se pretender cancelar o
início diferido, consulte
"Seleccionar e iniciar
um programa de lavagem".
Page 45

O que fazer se… 45
Após a verificação, ligue o aparelho. O programa continua a partir do ponto de interrupção.
Se a avaria persistir, contacte o centro de assistência.
Para outros códigos de avaria, não indicados na tabela, contacte o centro de assistência.
Os dados de contacto do Centro de Assistência Técnica encontram-se na placa de caracte-
rísticas.
Recomendamos que anote os dados aqui:
Modelo (MOD.) ....................
Número do produto (PNC) ....................
Número de série (S.N.) ....................
Os resultados de lavagem e de secagem não são satisfatórios
Problema Causa possível Solução possível
A loiça não está lavada. O programa de lavagem selec-
Os cestos não foram carrega-
Os braços aspersores não pude-
Os filtros estão sujos ou não
Utilizou uma quantidade insu-
Partículas de calcário na loiça. O depósito de sal está vazio. Encha o depósito de sal com sal
Ajuste incorrecto do amaciador
A tampa do depósito de sal não
Há riscos, manchas esbranquiçadas ou uma camada azulada
nos copos e pratos.
Manchas de gotas de água secas em copos e pratos.
A causa pode ser o detergente. Utilize uma marca de detergen-
cionado não era aplicável ao tipo de carga e sujidade.
dos correctamente. A água não
chegou a todas as superfícies.
ram rodar livremente devido à
disposição incorrecta da loiça.
estão montados e instalados
correctamente.
ficiente de ou nenhum detergente.
da água.
está bem fechada.
A dosagem de abrilhantador é
demasiado elevada.
A dosagem de abrilhantador é
demasiado baixa.
Certifique-se de que o programa de lavagem é adequado ao
tipo de carga e sujidade.
Carregue os cestos correctamente.
Certifique-se de que os braços
aspersores não ficam bloqueados devido a uma disposição
incorrecta da loiça.
Certifique-se de que os filtros
estão limpos e montados e instalados correctamente.
Certifique-se de que a quantidade de detergente é suficiente.
para máquinas de lavar loiça.
Ajuste o amaciador da água.
Certifique-se de que a tampa
do depósito de sal está bem fechada.
Diminua a dosagem de abrilhantador.
Aumente a dosagem de abrilhantador.
te diferente.
Page 46

46 Dados técnicos
Problema Causa possível Solução possível
A loiça está molhada. Definiu um programa de lava-
gem sem fase de secagem ou
com uma fase de secagem reduzida.
A loiça está molhada e baça. O distribuidor de abrilhantador
está vazio.
Deixe a porta aberta durante
alguns minutos antes de retirar
a loiça.
Encha o distribuidor de abrilhantador com abrilhantador.
DADOS TÉCNICOS
Dimensões Largura 596 mm
Altura 818-898 mm
Profundidade 555 mm
Pressão do fornecimento de
água
Máxima 8 bar (0,8 MPa)
Fornecimento de água
Capacidade Talheres completos 12
1) Ligue a mangueira de entrada de água a uma torneira de água com uma rosca de 3/4".
1)
A placa de características situada na parte interior da porta do aparelho apresenta os dados
sobre a ligação eléctrica.
Mínima 0,5 bar (0,05 MPa)
Água fria ou água quente máximo 60 °C
Se a água quente for proveniente de fontes alternativas de energia (ex.: painéis solares ou
fotovoltaicos e eólicas), utilize um fornecimento de água quente para diminuir o consumo
de energia.
PREOCUPAÇÕES AMBIENTAIS
O símbolo no produto ou na embalagem indica que este produto não pode ser tratado
como lixo doméstico. Em vez disso, deve ser entregue ao centro de recolha selectiva para a
reciclagem de equipamento eléctrico e electrónico. Ao garantir uma eliminação adequada
deste produto, irá ajudar a evitar eventuais consequências negativas para o meio ambiente
e para a saúde pública, que, de outra forma, poderiam ser provocadas por um tratamento
incorrecto do produto. Para obter informações mais pormenorizadas sobre a reciclagem
deste produto, contacte os serviços municipalizados locais, o centro de recolha selectiva da
sua área de residência ou o estabelecimento onde adquiriu o produto.
Os materiais da embalagem são ecológicos e podem ser reciclados. Os componentes de
plástico estão identificados por marcas, por exemplo, >PE<, >PS<, etc. Elimine os materiais
de embalagem no receptáculo adequado nas instalações de eliminação de resíduos da sua
zona.
Page 47

47
ADVERTÊNCIA
Para eliminar a máquina, siga o procedimento:
• Retire a ficha da tomada.
• Corte o cabo de alimentação eléctrica e a ficha de alimentação eléctrica e elimine-os.
• Elimine o fecho da porta. Isto evita que as crianças se fechem dentro da máquina e coloquem a vida em perigo.
Page 48

www.aeg.com/shop 156954351-A-422011
 Loading...