

Page 1

AEG Dishwasher
FAVORIT 146
Operating instructions
Page 2

Your
FAVORIT146
Dishwasher
oKers you the best possible dishwashing
results and economy. The special charac
teristics of this madiine are an economy
programme for lightly soiled crockery with
low operating costs and a gentle washing
process for particularly delicate articles.
Please read the following instructions very
carefully before using your dishwasher in
order that you may achieve the greatest
benefits from the many possible functions
featured only in this appliance.
Contents
Page
Installation
Electrical connections
Water supply
Water outlet 6
Opening the door
Preparing the dishes 7
Arranging the dishes
Detergent and rinse aid 8-10
Controls
Programmes 11-12
Operating procedure
Water softener 13
Maintenance
What to do If...
5
5
5
7
7
11
13
15
16
Page 3
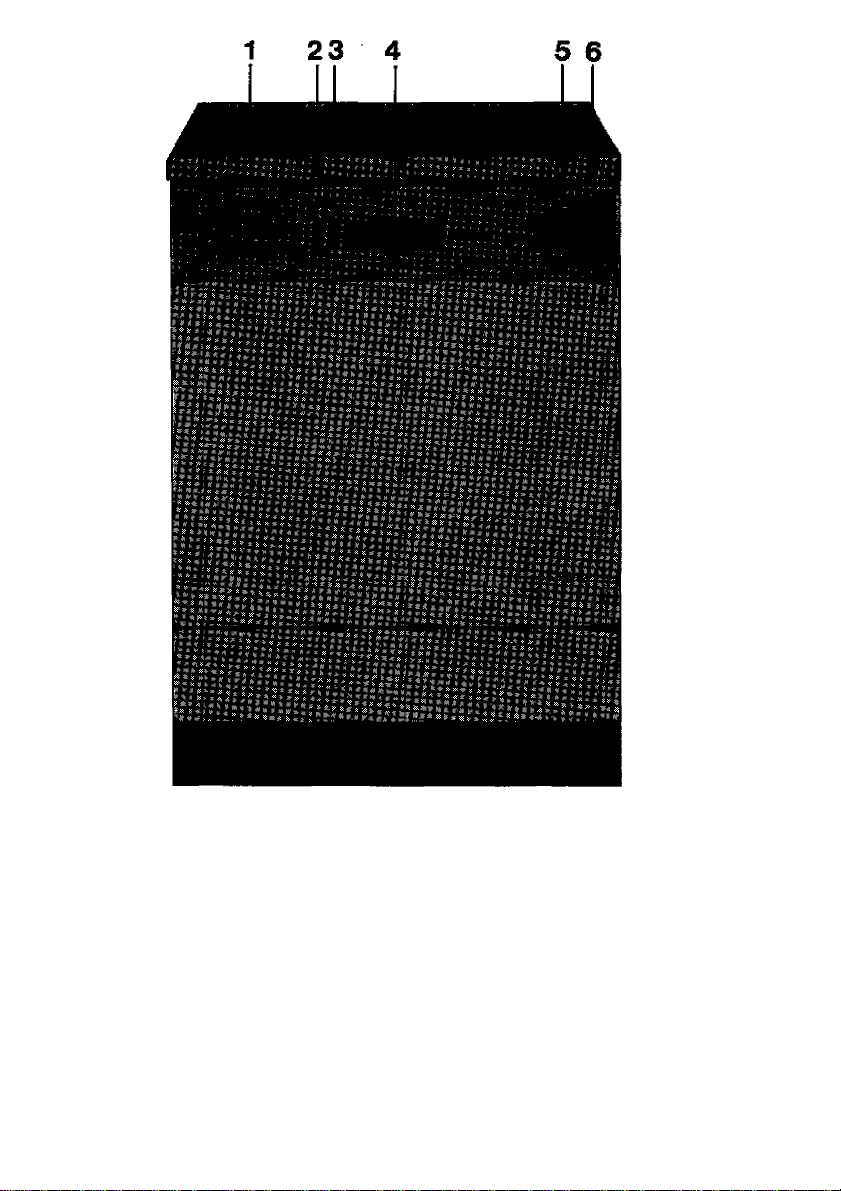
1 = Switch on button/Programme
selection buttons
2 = Sliding switdi tor correct degree of
water hardness
3 — Rinse aid level indicator and on/
off indicator light
4 = Handle for opening the door
5 = Programme sequence indicator
6 = Salt level Indicator
Page 4
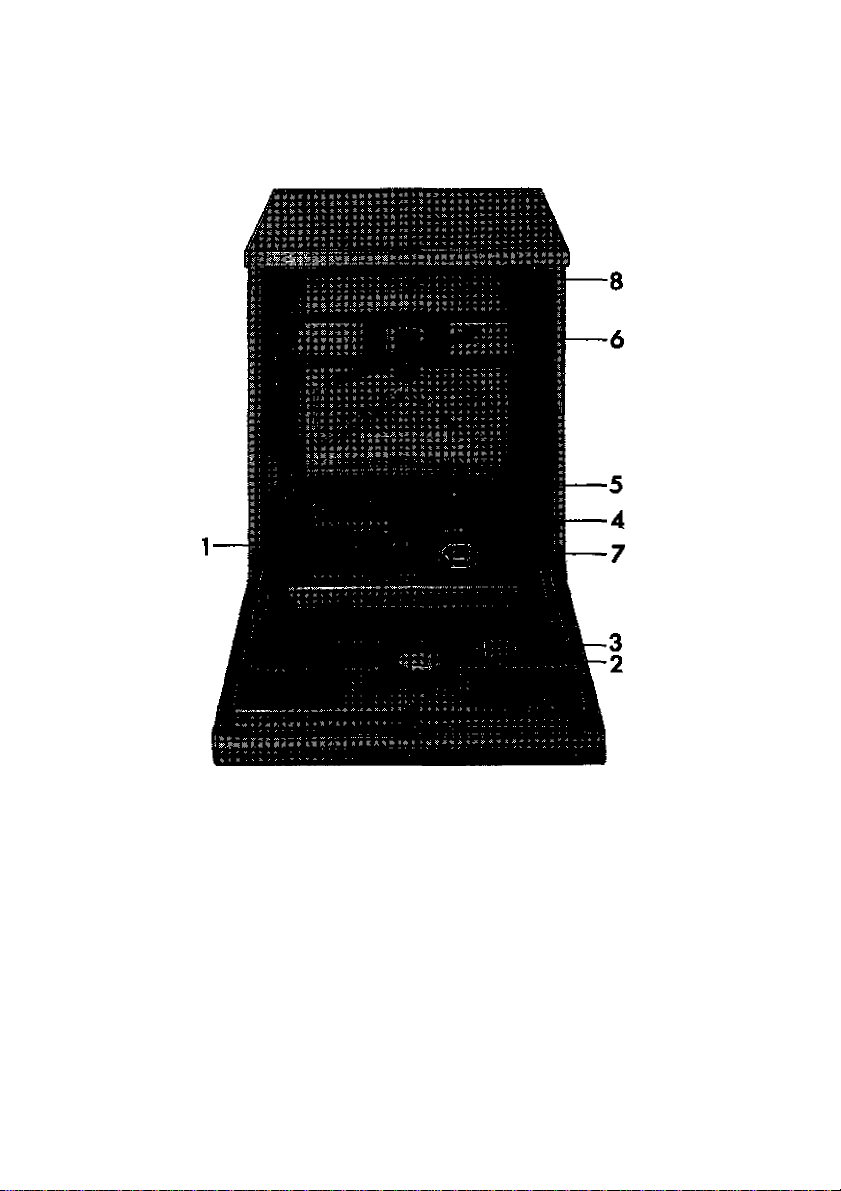
1 = Coarseand fine filter in tub
2 = Storage unit for rinse aid
3 = Detergent dispenser
4 = Lower spray arm
5 = Heating eiement
6 = Upper spray arm
7 = Sait storage container
8 = E-number and sellai number
Page 5

Installation
Before you use your new FAVORIT dish
washer, you should make the following
checks:
Permanent fitting In kitchens:
Seek advice from your Specialist
Retailer from whom you purchased the
appliance.
Removal of packing
During transit the outlet hose is attadned to the machine at the underside,
with plastic tape. Tilt the machine badtwards and remove the plastic tape.
When returning the machine to its ori
ginal position, make sure that the outlet
hose lies freely against the left hand
side of the appliance and is not crushed
on the floor. The two baskets are secu
red by wooden blocks, inside the washer
tub.
Open the door and remove supporting
wooden blodcs and corrugated card
board packaging.
The lower left hand basket assembly is
secured by transparent adhesive tape
inside the lower basket.
Pull off adhesive tape.
Dimensions;
With worktop
Without worktop
The appliance must stand level — If In
doubt use a spirit — level (maximum
permissjble deviation 2°). If necessary
adjust front feet.
Height 85 cm
Width 60 cm
Depth 60 cm
Height 82 cm
Width 59.5 cm
Depth 57.5 cm
Dimensions of Decor panels
(for built-under model)
Door
Lower panel
457.5 X 589.5-radius 11
120.5 X 589.5-radius 11
Electrical connections
A. C. Current 220 V
(U. K.-version240V)
Connected load 3.4 kW
(U. K.-version 3.1 kWJ
Plus 13 amp —fused
Green and yellow Earth
Blue Neutral
Brown Live
As the colours of this mains lead of this
appliance might not correspond with the
coloured markings Identifying the ter
minals in your plug, connect as follows:
The green and yellow wire must be
connected to the terminal In the plug
which is marked with the letter "E" or by
the earth symbol or coloured green or
green and yellow. The wire which is
coloured brown must be connected
to the terminal marked with the letter
"L" or coloured red. The wire which is
coloured blue must be connected to the
terminal with the letter "N" or coloured
black.
Wafer supply
Welg^i
Free standing model approx. 72 Kg net
Built-iiVunder model approx. 68 Kg net
The Appliance has adjustable feet at the
front and fixed rollers at the rear.
The high pressure hose (Va" = 10 NW,
1.55 m long] with V«" hose coupling com
plete with sealing washers Is supplied. We
recommend not to use other washers
which may be of inferior quality. It is suffi
cient to tighten the nuts by hand but if a
spanner is used proceed very carefully.
5
Page 6
The machine may be connected
a) directly to a tap with yt," B.S.P. Thread
termination
b) to a T-junction on your existing tap
or preferably
c) to a completely separate water supply
in order to avoid the interference with
the kitchen water supply during opera
tion of the machine.
A connection to a hot water supply up to
a maximum of 60 Is possible, although
the machine must not be connected to
single outlet instantaneous electric or
gas heaters.
Minimum water pressure: approx 1 bar
pressure above atmospheric pressure
(1 ato = approx. 1 kp/cm* = approx.
10N/cm»).
For less than one bar of pressure above
atmospheric pressure, consult the Serv
icing Engineer.. Maximum permissible
water pressure: approx. 10 bars. For over
10 bars excess pressure, connect a pres
sure relief valve in series (Type AD 723,
E.-NO. 612.896.723).
If a longer water supply hose is needed it
should be a simple run of high pressure
bursting strength of 60 bars. Do not add
extenslone to hoses. Under no circum
stances should cheap garden hoses or
similar types be used. Please also ensure
that hoses are connected by means of
screw connections with suitable hose
clips.
Turn off the water tap If the machine Is
not In use.
It Is not unusual to find a small amount of
water in your new dishwasher which re
mains from our thorough factory checks.
than 85 cm above the floor level the
maximum hose extension is 3 m. The out
let hose should never be more than 1 m
above floor level and at least 30 cm above
floor level.
The outlet hose (internal diameter 19 mm]
has a bend for hanging over the edge of
the sink. If the sink edge is too wide, fit the
hose support provided as illustrated below
or fasten the support to the water tap.
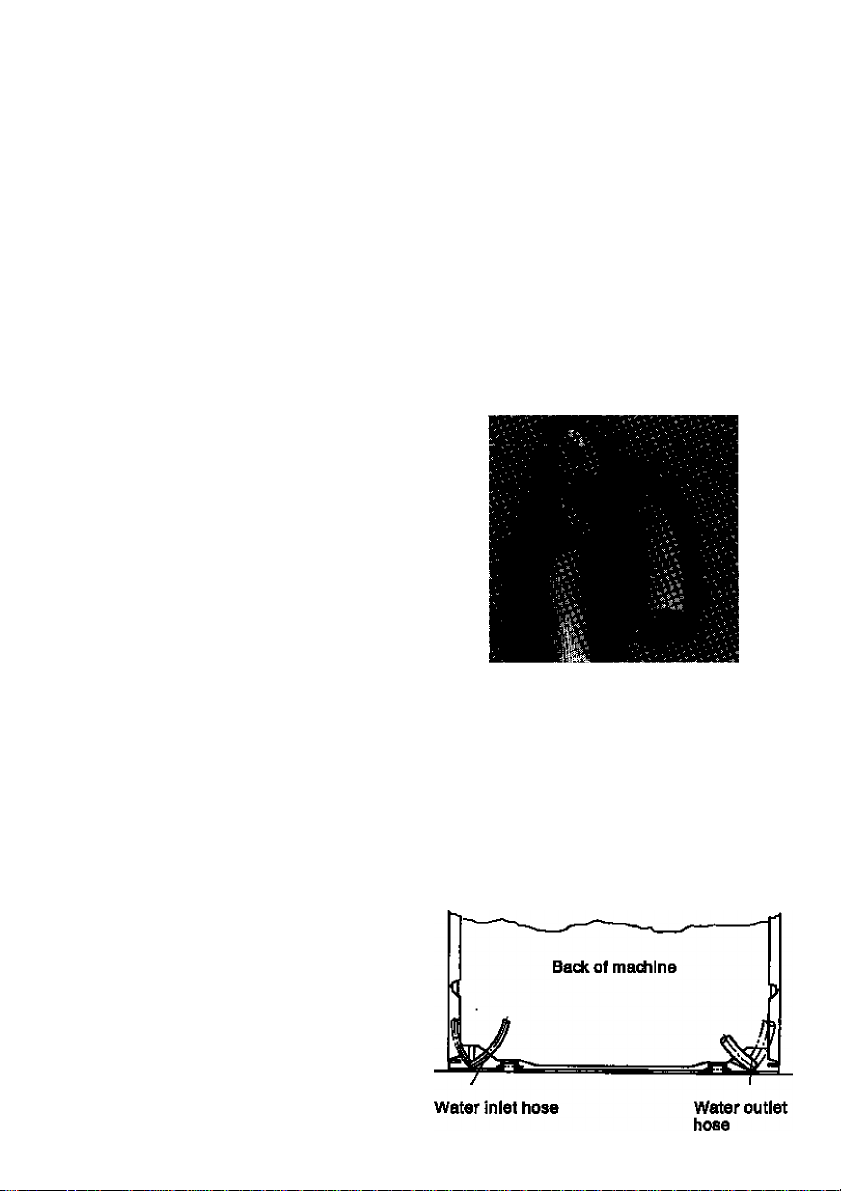
Make sure that the outlet hose is installed
along the left hand side in the base of the
machine.
The recess at the back of the machine
offers sufficient space to accomodate the
outlet hose for installation to the left or
right of the machine (see illustration).
Water outlet
Your dishwasher is fitted with a water
pump, controlled by the programme to
pump off the water. With a sink not more
6
Page 7

Opening the door
The door is easy to open, grip the handle
on the control panel and pull the door in a
downward direction. The door also serves
as a surface on which the lower basket
can be rested.
When closing the door, press firmly shut
until the lock engages.
If possible, avoid opening the door during
operation as this may affect the wash re^
suit adversely.
If you wish to add Items after the pro
gramme has started, press the “off” push
button, wait approximately 3 seconds until
the spray arms have stopped, open the
door. Add the items. Close the door and
press appropriate programme button.
If the machine has already heated the
water for the wash, wait 30 seconds before
you re-start the machine.
stubborn remains of food with water, if
necessary use a little detergent.
Arranging the dishes
Puil the iower basket out of the machine
as far as the stops. This can then be
stacked with dishes while resting on the
door, it is designed for iarge articies:
plates, serving dishes and serving plates
and saucepans.
Place large plates and soup dishes to the
left and the right at the rear of the rack
with the soiled side facing towards the
centre. Place side plates to the right and
left of the cutlery basket. Items of up to
30 cm in diameter may be placed In the
lower basket.
The cutlery basket Is divided into two
parts. One part Is fixed at the rear between
the plate supports. The other section is
iocated in the front and Is fixed by means
of ciips on the underside to the cross
piece for the lower basket. This allows It
to be shifted further to the left or to the
right according to the size of the piates.
Distribute cutlery so that It is not cramped.
Knives and spoons are placed with their
handles pointing downwards. Do not place
spoons too closely together. If necessary,
place long handled utensils In the upper
basket.
Adding salt
See Section “Water Softener”
Preparing the dishes
Remove ali hard and Insoluble items, e. g.
meat bones, fish bones etc., large pieces
of left over food - potato, spinatii,
porridge, coffee, and tea leaves, lettuce
leaves and fruit peelings, before arranging
the dishes.
Treat saucepans and other dishes just as
you would for washing by hand, soften
Page 8

Pull out the upper basket as far as pos
sible (up to the stops) to stack saucers,
dessert dishes, glasses, coffee and tea
pots and other small items. Stack cups,
bowles, glasses etc. in such a way that the
water will run off freely. (Use sloping sur
faces provided In the upper basket). Items
of up to 19 cm in diameter may be placed
In the upper basket.
When using the hinged section for cups,
stack any articles underneath in such a
way that water can get through.
Ensure that all items, particularly light
weight ones, are firmly placed within their
supports to ensure that they remain In
position during the wash cycle.
The phctographs show various methods
for loading the racks.
After stacking and Inserting the baskets,
check that the spray arms can revolve
freely.
After a few washes, you will no doubt have
found the best possible arrangement for
your dishes.
Detergent and rinse agent
Use reputable brand name detergents for
a satisfactory wash result.
We recommend Sun and Sun Rinse Aid.
Washing up liquids, even with similar
names, should not be used.
Detergent
Before filling the dispenser check that It Is
bcth clean and dry. The detergent should
be placed in the dispenser immediately
before use. It must not be stored In the
dispenser. Should it be necessary to
open the dispenser lid manually, push
the catch to the left. Do not forget to close
the lid once the detergent has been added.
The detergent will be added to the water
automatically during the wash cycle. If you
require to use the intensive programme
fill the dispenser and add two tablespoons
of detergent In the door recess for the first
wash.
Page 9

Detergent Dispenser
Rinse aid
The rinse aid (liquid) is released during
the last hot rinse. It aids the drying of the
load by breaking down the water tension
allowing it to flow from the items in a sheet
rather than droplets, leaving the plates
sparkling.
An automatic rinse aid storage unit Is
fitted in the door. If you wish to try out
various rinse aids, do not fill the unit
completely the first time. The capacity of
the storage unit Is about 150 cm^.
To fill up, unscrew the filler cap (page 4,
no. 2). Fill the rinse aid container (red
centre) to the grey marking. Repiace the
filler cap. Try not to spill any rinse aid as
this may affect the next wash adversely
due to excessive foaming.
If, by any chance, rinse aid is spilled Into
the funnel between Inner and outer pipe,
the ventilation of the storage container
may get blocked and no further rinse aid
can be added. In such a case, re-tighten
filler cap and close door briefly. Then
continue with the filling.
You will find the rinse aid level indicator
on the control panel (page 3, no. 3). Refill
the rinse aid corrtalner when the ievei has
reached the lower edge of the indicator.
Rinse aid ad|uster
Depending on local water diaracteristics,
you may need to adjust the rinse aid out
put.
Page 10

The adjuster Is located In the centre of the
filler nozzle (see Illustration). It is factory
set at 3 cu. cm. If the adjuster is turned to
the left, more rinse aid Is dispensed and
if turned to the right, the rinse aid output
Is reduced. Various markings around
the edge of the adjuster indicate the
increase or decrease of the rinse eJd out
put.
Detergents
Finish Finish rinse aid Sollax (UK) Ltd.,
Sun
Rinse aids Manufacturer/Dlstrlbutor
Slough
Sun rinse aid Lever Bros. Ltd.,
Port Sunlight,
Cheshire
to
Page 11

Controls
Off button
Automatic reset button
Programme push buttons
Rinse aid ievei indicator and on/off
indicator
Programme stage Indicator
The indicator wiii progress with the pro
gramme. it wiii remain temporariiy station
ary while the water is being heated for
the pre-wash, wash and finai rinse, untii
the required temperature has been rea
ched.
Automatic reset
Pushbuttons
Selection of the wash programme is by
means of push buttons. As soon as you
press the push button for the programme
required, the dnse aid ievei indicator ilghts
up. The push button for the programme
of your choice has to be pressed until the
hand of the programme indicator moves
off the 0-positlon. Now the programme
starts.
You wiii find an expianation of the symbols
above the push buttons In the following
table and In the summary of instructions
printed on the inside of the door of the
appliance.
Programme stage Indlealor
The symbols on the indicator are as
follows:
= Pre-wash or wash with detergent
= Pre-rinse or intermediate rinse
O'
= Final rinse with rinse aid
.MV
= Hot air drying
Should you wish to correct a programme
which has already started, press the
“automatic reset” push button. The pro
gramme indicator hand will quickly
travel through all stages dispensing the
detergent and rinse aid before it stops
at “0”.
Refill the detergent dispenser and wipe
off any spilled rinse aid. You can now reselect.
Switching off
When the programme is finished, the
machine switches off automatically. When
you press the “ofr’ switch, the light of the
rinse aid indicatorwill go out.
Programmes
Below you will find the six programmes of
your dishwasher, together with their
operating sequence and operating In
structions. Try out the programmes to
establish which one is most suitable for
your household.
11
Page 12

Symbol Programme Programme
sequence
Off
For
Machine switched off
Washing
period
in minutes
(approx.)
0
a
Automatic
reset
intensive Pre-wash 50°
Hot 65° Pre-rinse
**
Economy
65°
Programme
indicator
goes back to 0
Rinse
Wash 65°
Rinse
Rinse
Rinse
Finai Rinse 65°
Drying
Pre-rinse
Wash 65°
Rinse
Rinse
Rinse
Final rinse 65°
Drying
Pre-rinse
Wash 65°
Rinse
Finai rinse 65°
Drying
Corrections to programme
Heavily soiied crockery with stub
born or dried on food soii partlcuiarly protein, starch, therefore
pre-wash at 50 °C
Heavily to normaliy soiled crockery
with dried on food soli particuiariy
vegetabie soil-like spinach, there
fore 2 rinses before the wash
Normally soiled dishes
90
80
65
12
Normai 50°
Light 50°
RIns&Hold
___
Pre-rinse
Pre-rinse
Wash 50°
Rinse
Rinse
Final rinse 50°
Drying
Wash 50°
Rinse
Rinse 50°
Drying
Pre-rinse
Pre-rinse
Normally soiled crockery including
Items which can be washed at 50 °C
but not at 65 °C such as plastic
items.
Slightly dirty dessert dishes and
coffee/tea cups and saucers etc.,
as well as delicate glassware.
When full load is washed at a later
time.
70
SO
12
Page 13

Operating procedure Water softener
If noi permanently connected, hang the
outlet pipe over the sink and atta^ the
inlet hose to the vrater tapL
Plug the maclilne Into the wall socket or,
In the case of a permanent connection,
switch on.
Turn on the water tap. Open the door.
Arrange cutlery and crockery In baskets.
Push baskets Into machine.
Put 2 level tablespoom of cleaning agent
In the dispenser, and when using the In
tensive programme, pour the same quan
tity into the door recess.
Close door.
Check rinse-ald level Indicator.
Check salt level Indicator for water softe
ner (see page 14).
Press programme button until the rinse
aid ievel Indicator ilghts up and the pro
gramme indicator moves from O-positlon
and the programme starts.
Your dishwasher has been provided with
a water softener, which gives you soft,
lime free water tor the rinses. This greatly
aids the cleaning process and prevents
chalky patches.
All you need to do is to top up the salt
container from lime 1o time.
The programme indicator progresses with
the programme.
it remains stationary during the wash and
final rinse until the required temperature
has been reached.
When the programme Is finished, the
machine will stop automatically. Press the
off button. The rinse aid level indicator
light will go out.
Turn off the water tap.
Remove the plug from the wall socket, or
switch off. Do not remove the crockery
Immediately from the machine — leave It
in for a few minutes, with the door left
slightly ajar.
We recommend that you empty the lower
basket first and then the upper basket.
Before using the machine for the first time,
lift out the lower basket, unscrew the cap
from the salt container and fill it with wa
ter. Place the funnel over the opening and
pour the salt into the container until it is
full to the top. Some water will overflow
which will be pumped off at the start of the
next programme.
Clean any surplus salt from the thread of
the container and replace the cap.
Replace the basket.
The machine is ready for use.
13
Page 14

Salt level Indicator
Three different colours indicate the vary
ing degrees of water hardness.
Orange for water hardness up to 12° d
— colour Indicator appears after
64progrwnmes.
Yellow
Qreen
for water hardness between 13
and 20° d
— colour Indicator appears after
32 programmes.
for vrater hardness between 21
and 40° d
— colour Indicator appears after
Slide for selection of degree of watei
hardness.
You can re-set the machine by yourself
(Please ensure lhat the machine Is swit
ched off.) Preferably using a baiipoint per
or some other pointed object.
Watch out for the matching coiour on the
salt ievel indicator window. Whenever the
colour In the window matches the one you
have selected salt has to be added. The
colour remains for a further programme
before disappearing again; please take
this into account when using your machine
for the first time. Ignore all other coloure
which appear in the window.
Suitable forms of salt are common salt anc
rock salts whidi do not contain substan
ces Insoluble In water, and special reclai
med salts with a maximum grain size ol
5 mm.
UnsuHeble forms of salt are diet salti
containing Insoluble elements, I. e. cattle
sal^ road sal^ processed sea salt anc
many household salts containing special
additives for free flowing.
Select the right colour according to the
water hardness In your area. The local
Water Authority will supply you with this
information.
14
Useful hints
1. If you use the dishwasher at the end of
the day use the rinse and hold pro
gramme after you have stacked the
Page 15

breakfast and lunch dishes to prevent
food soli from drying on.
2. Place items of different metals such as
silver and stainless steel in different
compartments.
3. As with washing by hand, certain types
of ‘on glaze' decorated china and some
aluminium items have a tendency to
discolourorfade.
4. ‘Soft’ glassware tends to become o-
paque after being washed many times, it
is advisable to ask the manufacturers
of any crystal glassware whether It Is
dishwasher suitable. Use the ‘light’ at
50° for glassware.
Particular valuable items with long
stands, or coloured glassware such as
MURANO Glass, and handicraft glass
ware should be washed by hand. The
decorative markings on glasses tend to
come off! Do not put ashtrays and vases
into your dishwasher.
5. Wooden and bone handled cutlery is
unsuitable for machine washing unless
they have been specially treated.
6. Check whether plastic items can with
stand a temperature of 65° C. Do not
stack plastic items above the heater, if
possible use the upper basket, or if you
are in doubt, wash by hand.
7. When buying tableware and dishes en
sure that they can be washed in a dish
washer.
Care and maintenance
On completion of the washing process,
turn off the tap and remove the plug from
the socket, or switch off. Leave the door
open for a short time, in order for the
moisture to escape from the tub.
The tub cleans Itself automatically.
The circular coarse filter In the base of the
tub should be cleaned after each wash.
Remove the lower basket and take out the
filter by turning it anti-clockwise and
lift it out. When replacing, ensure that
it sits straight and Is secured properly, by
tightening it in a clockwise direction.
Never carry out a washing programme without a fllterl
The large fine filter underneath generally
cleans itself. However, It must be checked
from time to time. If necessary, under
neath and Inside the cylindrical section as
well. If necessary, use a brush for this
purpose.
When replacing, make sure that the filter
sits straight. Now and again clean the filter
in the water inlet hose too.
The heating elements are made of high
grade stainless steel. The dark colour has'
no adverse effect on quality or service
life. The tub and Inner door are also made
of high grade stainless steel. If rust occurs
on these sections, this may be attributed
to water containing iron. Remove with Jif,
do not use any abrasives.
15
Page 16

What to do H...
If your dishwasher does not work, this is
often due to small things, which you can
put right yourself.
1. The programme does not atari Have you plugged the machine in, have
you switched on the main switch?
Are the fuses alright?
Is the door closed properly?
Have you selected the correct pro
gramme?
2. NowaterortooIHUaweter. Have you turned the tap on? Is the water filter In the filler hose clean? It needs cleaning from time to time. Is the water pressure sufficient?
This fault may also occur If incoming wa
ter is drained due to the drain hose being
lower than the required 30 cm. from the
base of the machine.
Secure the outlet hose at the correct
height and to start the machine, supply
enough water to cover the heating ele
ment. Then start the programme.
3. The water Immediately runs out again from the outlet hose.
Is the outlet hose at least 30 cm above the
base of the appliance? Ensure that the
bend at the end of the hose Is not Im
mersed In the pumped off water.
4. Dishes not dean Did you select the correct programme? Did you use sufficient detergent? Did you
usia the recommended detergent?
Did you add the detergent correctly?
Did you stack the dishes correctly?
Where the spray arms able to rotate
without obstruction?
16
5. Dishes not sparking clean. Did you use a rinse aid recommends«
by us?
IS the correct quantity of rinse aid beini
dispensed?
If too little is used, marks are left, if to«
much is used, the dishes are smeared.
Was the screw cap of the salt contains
fastened securely?
Did you add salt for the water softener li
time?
If you forget this once the water softene
will work efficiently again by adding salt
After filling with salt, set the programme ii
motion by pressing the "automatic reset
button until the hand of the programm«
indicator reaches the final rinse symbol.
Press the intensive button to set the re
maining programme in motion. Fo
degrees of water hardness up to 20° d
temporarily set the slider at green, thei
re-set to orange or yellow.
Please use these hints for the smooth an<
satisfactory operation of the machine.
If you wish to avail yourself of our custo
mer service to rectify one of the abov«
faults, the necessary services cannot b«
supplied free of charge, even during th«
guarantee period. In other respects, plea
se see the guarantee terms as set out ii
the Customer Service Booklet. If yoi
cannot establish the cause of a fault, ge
in touch with our Customer Service DivI
Sion. You will make their job easier if yoi
are able to give them the E-No. and thi
serial number of the machine, which yoi
will find on the rating plate under thi
worktop.
The AEG ComprehensIveServiceContrac
offers you a wider guarantee. For a smal
annual payment you can sign a senriclnj
contract with our Customer Service Divi
sion up to the 10th year of using your
appliances. This guarantees you free
rectification of all faults which may occur
In your appliance.
Page 17

Capacity:
14 place settings Including serving setting.
One place setting contains:
1 soup dish, diameter about 24 cm
1 fiat piate, diameter approx. 24 cm
1 dessert piate, diameter approx. 16.5 cm
1 teacup, diameter approx. 8.7 cm
1 saucer, diameter approx. 14cm
1 tumbler about 7 cm V« litre size
1 knife
1 fork
1 spoon
1 teaspoon
1 dessertspoon
One serving setflng contains:
1 ovaipiatter approx. 29.5X20 cm
1 round dish approx. 20 cm height approx.
9 cm
1 round dish, approx. 17.5 cm height
approx. 7.5 cm
1 fruit dish approx. 13 cm
1 serving fork
2 serving spoons
1 gravy spoon
'f. ■ •<'**.. \ r
y : g .•
'.v - ;
~1---■ ■
•• ' X i i S$
i ■ -
*¥:: >„ ' ' ■ : ^1SS5« r.fi:
' • •• Xf
""■■■■■ -trij
17
Page 18

Page 19

Page 20

AEG
H 24в 214 640 - 07773./01 -
Subjaot to diange without natica
 Loading...