

Page 1

FAVORIT 65040 VI
EN DISHWASHER USER MANUAL 2
DE GESCHIRRSPÜLER BENUTZERINFORMATION 19
ES LAVAVAJILLAS MANUAL DE INSTRUCCIONES 38
Page 2

www.aeg.com
2
CONTENTS
4 SAFETY INSTRUCTIONS
6 PRODUCT DESCRIPTION
7 CONTROL PANEL
8PROGRAMMES
10 OPTIONS
11 BEFORE FIRST USE
13 DAILY USE
15 HINTS AND TIPS
16 CARE AND CLEANING
17 TROUBLESHOOTING
18 TECHNICAL INFORMATION
ENVIRONMENT CONCERNS
Recycle the materials with the symbol . Put the packaging in applicable containers to
recycle it.
Help protect the environment and human health and to recycle waste of electrical and
electronic appliances. Do not dispose appliances marked with the symbol
household waste. Return the product to your local recycling facility or contact your
municipal office.
with the
VISIT OUR WEBSITE FOR:
- Products
- Brochures
- User manuals
- Trouble shooter
- Service information
www.aeg.com
LEGEND
Warning - Important Safety information.
General information and tips
Environmental information
Subject to change without notice.
Page 3

FOR PERFECT RESULTS
Thank you for choosing this AEG product. We have created it to give you
impeccable performance for many years, with innovative technologies that help
make life simpler – features you might not find on ordinary appliances. Please spend
a few minutes reading to get the very best from it.
ACCESSORIES AND CONSUMABLES
In the AEG webshop, you’ll find everything you need to keep all your AEG
appliances looking spotless and working perfectly. Along with a wide range of
accessories designed and built to the high quality standards you would expect, from
specialist cookware to cutlery baskets, from bottle holders to delicate laundry bags…
ENGLISH
3
Visit the webshop at:
www.aeg.com/shop
CUSTOMER CARE AND SERVICE
We recommend the use of original spare parts.
When contacting Service, ensure that you have the following data available. The
information can be found on the rating plate.
Model
PNC
Serial Number
Page 4
www.aeg.com
4
SAFETY INSTRUCTIONS
Before the installation and use of the appliance, carefully read the supplied instructions. The manufacturer is not responsible if an incorrect installation and
use causes injuries and damages. Always
keep the instructions with the appliance
for future reference.
CHILDREN AND VULNERABLE
PEOPLE SAFETY
WARNING!
Risk of suffocation, injury or permanent disability.
• Do not let persons, children included,
with reduced physical sensory, reduced
mental functions or lack of experience
and knowledge use the appliance. They
must have supervision or instruction for
the operation of the appliance by a person who is responsible for their safety.
Do not let children play with the appliance.
• Keep all packaging away from children.
• Keep all detergents away from children.
• Keep children and pets away from the
appliance door when it is open.
INSTALLATION
• Remove all the packaging.
• Do not install or use a damaged appliance.
• Do not install or use the appliance
where the temperature is less than 0 °C.
• Obey the installation instruction supplied with the appliance.
• Make sure that the appliance is installed below and adjacent to safe structures.
Water connection
• Make sure not to cause damage to the
water hoses.
• Before you connect the appliance to
new pipes or pipes not used for a long
time, let the water flow until it is clean.
• The first time you use the appliance,
make sure that there is no leakage.
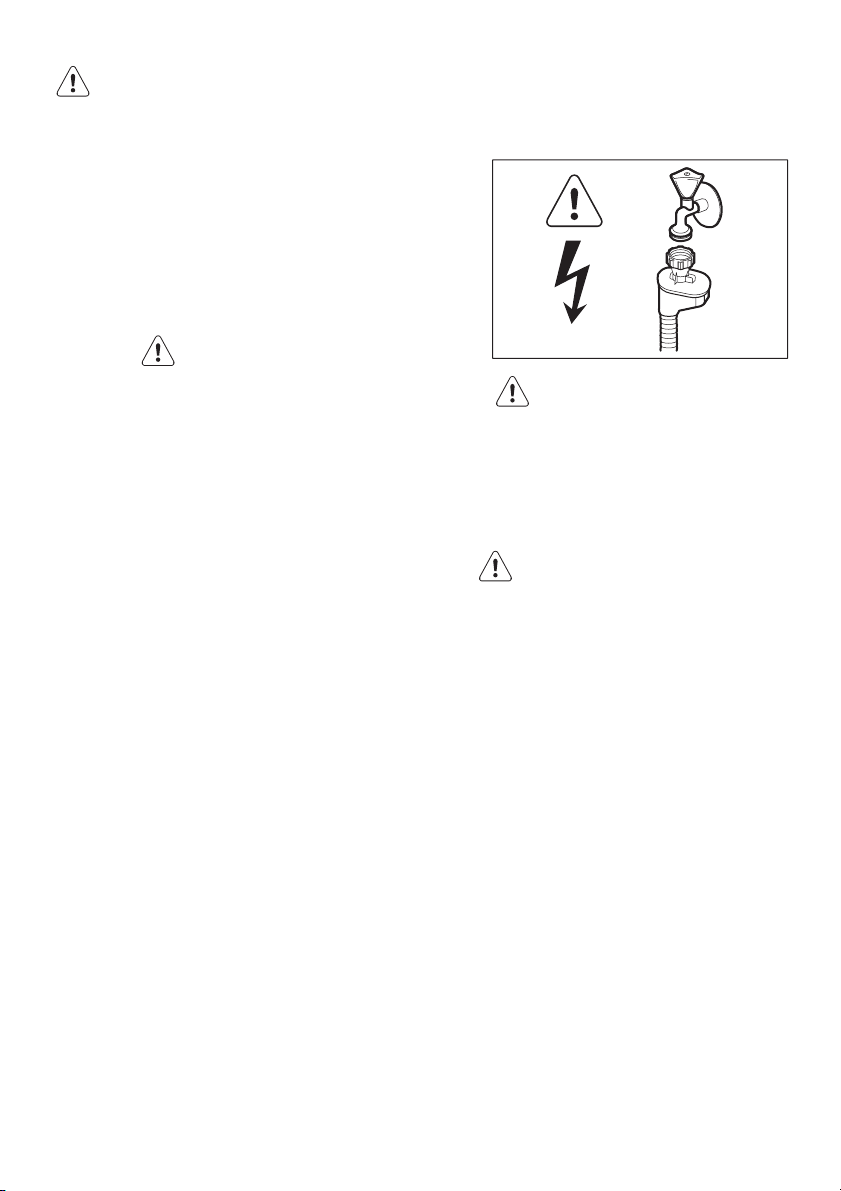
• The water inlet hose has a safety valve
and a sheath with an inner mains cable.
WARNING!
Dangerous voltage.
• If the water inlet hose is damaged, immediately disconnect the mains plug
from the mains socket. Contact the
service to replace the water inlet hose.
Electrical connection
WARNING!
Risk of fire and electrical shock.
• The appliance must be earthed.
• Make sure that the electrical information on the rating plate agrees with the
power supply. If not, contact an electrician.
• Always use a correctly installed shockproof socket.
• Do not use multi-plug adapters and extension cables.
• Make sure not to cause damage to the
mains plug and to the mains cable.
Contact the Service or an electrician to
change a damaged mains cable.
• Connect the mains plug to the mains
socket only at the end of the installation. Make sure that there is access to
the mains plug after the installation.
• Do not pull the mains cable to disconnect the appliance. Always pull the
mains plug.
USE
• This appliance is intended to be used in
household and similar applications such
as:
Page 5

– Staff kitchen areas in shops, offices
and other working environments
– Farm houses
– By clients in hotels, motels and other
residential type environments
– Bed and breakfast type environ-
ments.
WARNING!
Risk of injury.
• Do not change the specification of this
appliance.
• Put knives and cutlery with sharp points
in the cutlery basket with the points
down or in a horizontal position.
• Do not keep the appliance door open
without supervision to prevent to fall on
it.
• Do not sit or stand on the open door.
• Dishwasher detergents are dangerous.
Obey the safety instructions on the detergent packaging.
• Do not drink and play with the water in
the appliance.
• Do not remove the dishes from the appliance until the programme is completed. There can be detergent on the
dishes.
WARNING!
Risk of electrical shock, fire or
burns.
ENGLISH
5
• Do not put flammable products or
items that are wet with flammable
products in, near or on the appliance.
• Do not use water spray and steam to
clean the appliance.
• The appliance can release hot steam if
you open the door while a programme
operates.
DISPOSAL
WARNING!
Risk of injury or suffocation.
• Disconnect the appliance from the
mains supply.
• Cut off the mains cable and dispose of
it.
• Remove the door catch to prevent children and pets to get closed in the appliance.
Page 6
www.aeg.com
6
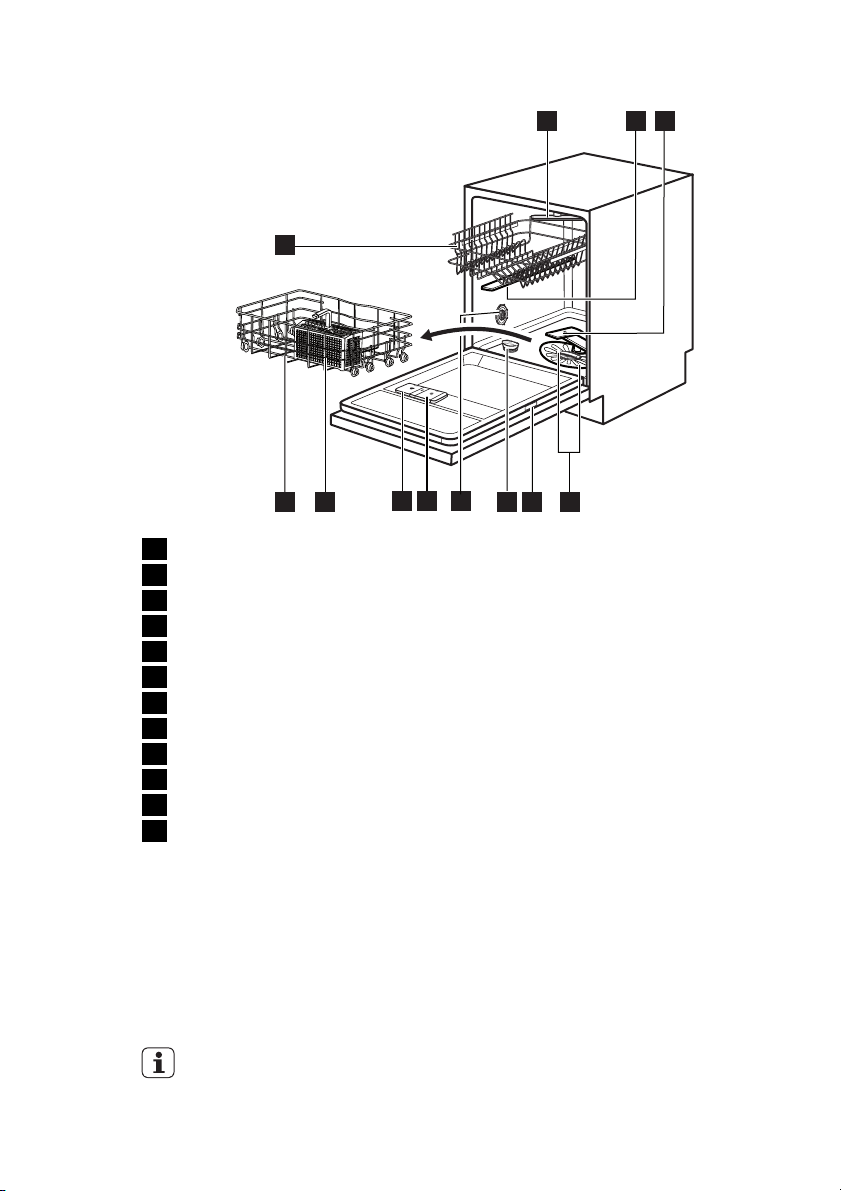
PRODUCT DESCRIPTION
Top spray arm
1
Upper spray arm
2
Lower spray arm
3
Filters
4
Rating plate
5
Salt container
6
Water hardness dial
7
Rinse aid dispenser
8
Detergent dispenser
9
Cutlery basket
10
Lower basket
11
Upper basket
12
12
11
10
1
7
8
9
6
4
5
3
2
LIGHT BEAM
• When a programme operates, a red
light beam shows on the floor below
the appliance door. When the programme is completed, the red light
changes to a green light.
• When the appliance has a malfunction,
the red light beam flashes.
The light beam goes off when the
appliance is deactivated.
Page 7
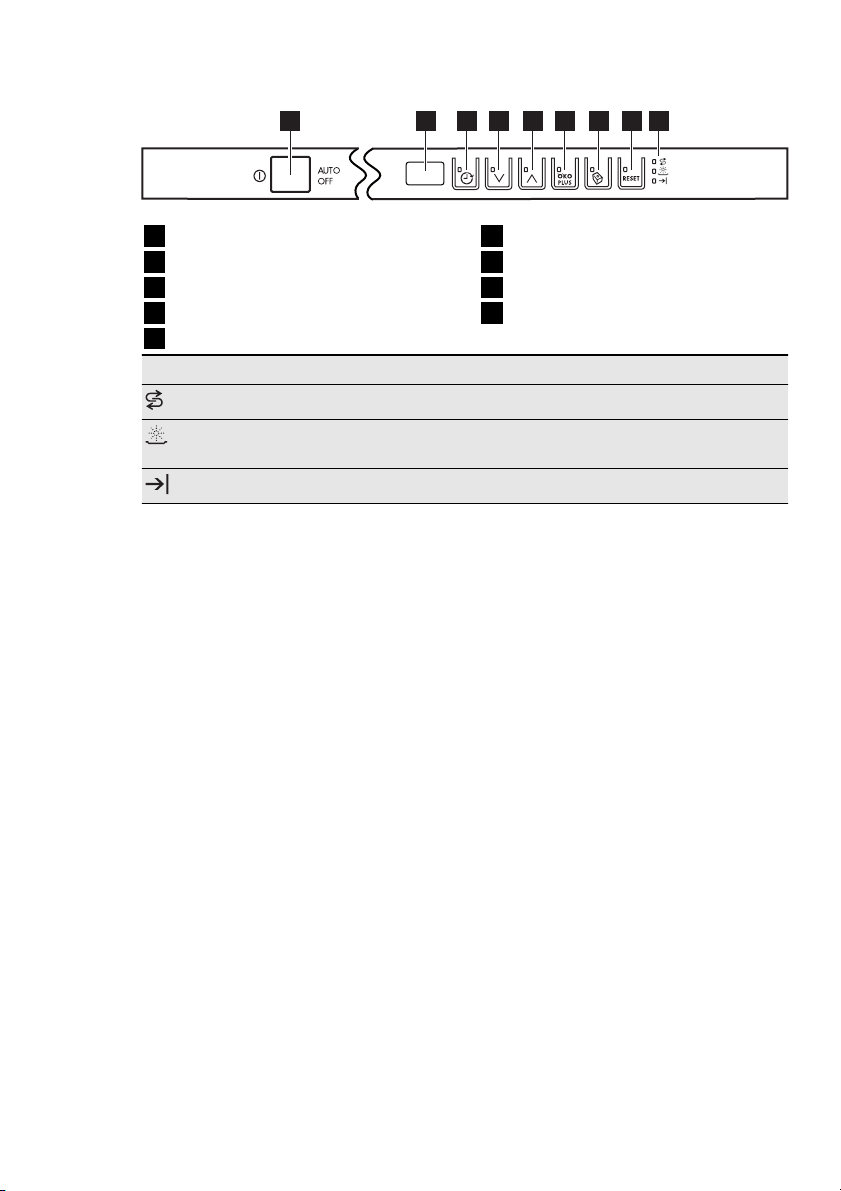
CONTROL PANEL
ENGLISH
7
1
On/off button
1
Display
2
Delay button
3
Programme button (down)
4
Programme button (up)
5
Indicators Description
Salt indicator. This indicator is off while the programme operates.
Rinse aid indicator. This indicator is off while the programme operates.
End indicator.
4
2
3
5
ÖKO PLUS button
6
Multitab button
7
RESET button
8
Indicators
9
7
6
9
8
Page 8

www.aeg.com
8
PROGRAMMES
Programme Degree of soil
Type of load
1
All
Crockery, cutlery,
1)
pots and pans
Programme
phases
Prewash
Wash from 45 °C to 70
°C
Rinses
Options
ÖKO PLUS
Dry
2
2)
Heavy soil
Crockery, cutlery,
pots and pans
Prewash
Wash 70 °C
Rinses
ÖKO PLUS
Dry
3
3)
4
4)
5
5)
Normal soil
Crockery and cutlery
Fresh soil
Crockery and cutlery
Normal soil
Crockery and cutlery
Prewash
Wash 50 °C
Rinses
Dry
Wash 60 °C
Rinse
Prewash
Wash 50 °C
Rinses
ÖKO PLUS
Dry
1)
The appliance senses the degree of soil and the quantity of items in the baskets. It
automatically adjusts the temperature and quantity of the water, the energy consumption
and the programme duration.
2)
This programme has a high temperature rinsing phase for better hygiene results. During
the rinsing phase, the temperature stays at 70 °C for 10 to 14 minutes.
3)
This is the most silent washing programme. The pump works at a very low speed to
decrease the level of noise. Because of the low speed, the programme duration is long.
4)
With this programme you can wash a load with fresh soil. It gives good washing results in a
short time.
5)
This is the standard programme for test institutes. With this programme you have the most
efficient use of water and energy consumption for crockery and cutlery with normal soil.
Consumption values
Programme
1)
Duration
(min)
Energy
(kWh)
Water
(l)
1 40 - 150 0.6 - 1.4 7 - 14
2 140 - 160 1.4 - 1.6 13 - 14
Page 9

ENGLISH
9
Programme
1)
Duration
(min)
Energy
(kWh)
Water
(l)
3 200 - 220 1.1 - 1.2 9 - 11
4 30 0.8 9
5 160 - 180 0.8 - 0.9 9 - 10
1)
The pressure and the temperature of the water, the variations of the mains supply, the
options and the quantity of dishes can change the programme duration and the
consumption values.
Information for test institutes
For all the necessary information for test performance. send an email to:
info.test@dishwasher-production.com
Write down the product number (PNC) that is on the rating plate.
Page 10
www.aeg.com
10
OPTIONS
Activate or deactivate the options
before the start of a programme.
You cannot activate or deactivate
the options while a programme
operates.
If one or more options are set,
make sure that the related indicators are on before the programme
starts.
ÖKO PLUS
This option decreases the temperature in
the drying phase. The energy consumption decreases by 25%.
The dishes can be wet at the end of the
programme.
Press the ÖKO PLUS button:
• If the option is applicable to the programme, the related indicator comes
on.
• If the option is not applicable to the
programme, the related indicator flashes for some seconds and then stays off.
MULTITAB
Activate this option only when you use the
combi detergent tablets.
This option deactivates the flow of rinse
aid and salt. The related indicators are off.
The programme duration can increase.
• Press the multitab button, the related
indicator comes on.
• The option stays on until you deactivate
it. Press the multitab button, the related
indicator goes off.
If you stop to use the combi detergent
tablets, before you start to use
separately detergent, rinse aid and
dishwasher salt, do these steps:
1. Deactivate the multitab option.
2. Set the water softener to the highest
level.
3. Make sure that the salt container and
the rinse aid dispenser are full.
4. Start the shortest programme with a
rinsing phase, without detergent and
without dishes.
5. Adjust the water softener to the water
hardness in your area.
6. Adjust the released quantity of rinse
aid.
ACOUSTIC SIGNALS
The acoustic signals operate in these conditions:
• The programme is completed.
• The level of the water softener is adjusted electronically.
• The appliance has a malfunction.
Factory setting: on. You can deactivate the acoustic signals.
Deactivating the acoustic signals
1. Press the on/off button to activate the
appliance. Make sure that the appliance is in setting mode. Refer to ‘SETTING AND STARTING A PROGRAMME’.
2. Press and hold buttons (4) and (5) at
the same time until the indicators of
buttons (3), (4) and (5) flash.
3. Press button (5),
• The indicators of buttons (3) and (4)
go off.
• The indicator of button (5) contin-
ues to flash.
• The display shows the setting of the
acoustic signals.
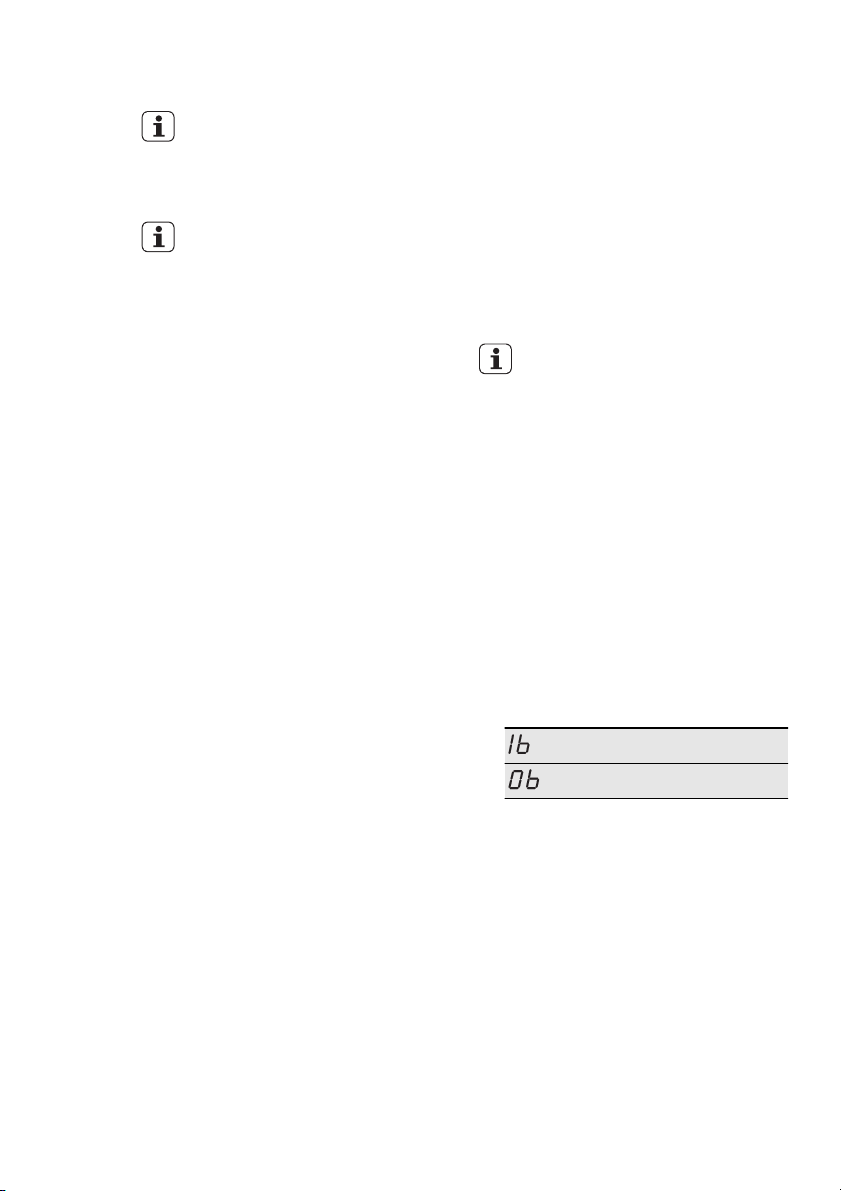
On
Off
4. Press button (5) to change the setting.
5. Deactivate the appliance to confirm.
Page 11
BEFORE FIRST USE
ENGLISH
11
1. Make sure that the set level of the wa-
ter softener agrees with the water
hardness in your area. If not, adjust the
water softener. Contact your local water authority to know the water hardness in your area.
2. Fill the salt container.
3. Fill the rinse aid dispenser.
4. Open the water tap.
5. Processing residues can stay in the ap-
pliance. Start a programme to remove
them. Do not use detergent and do
not load the baskets.
If you use the combi detergent
tablets, activate the multitab option.
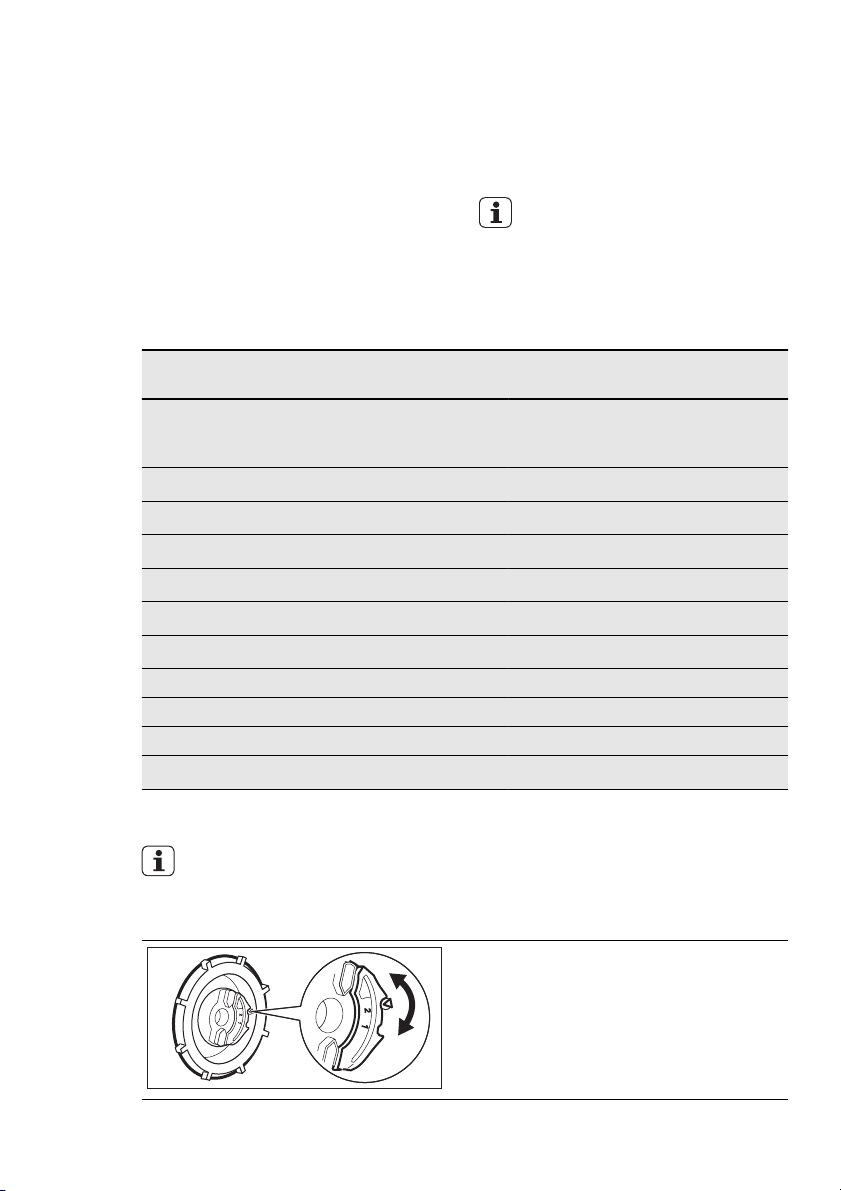
ADJUSTING THE WATER SOFTENER
Water hardness
German
degrees
(°dH)
French
degrees
(°fH)
mmol/l Clarke
degrees
51 - 70 91 - 125 9.1 - 12.5 64 - 88
43 - 50 76 - 90 7.6 - 9.0 53 - 63
37 - 42 65 - 75 6.5 - 7.5 46 - 52
29 - 36 51 - 64 5.1 - 6.4 36 - 45
23 - 28 40 - 50 4.0 - 5.0 28 - 35
19 - 22 33 - 39 3.3 - 3.9 23 - 27
15 - 18 26 - 32 2.6 - 3.2 18 - 22 1 4
11 - 14 19 - 25 1.9 - 2.5 13 - 17 1 3
4 - 10 7 - 18 0.7 - 1.8 5 - 12 1 2
< 4 < 7 < 0.7 < 5
1)
Factory position.
2)
Do not use salt at this level.
You must adjust the water softener manually and electronically.
Water softener
adjustment
Manual Elec-
1)
2
1)
2
1)
2
1)
2
1)
2
1)
2
2)
1
tronic
10
9
8
7
6
1)
5
2)
1
Manual adjustment
Turn the water hardness dial to the position 1 or 2.
Page 12
www.aeg.com
12
Electronic adjustment
1. Press the on/off button to activate the
appliance. Make sure that the appliance is in setting mode, refer to ‘SETTING AND STARTING A PROGRAMME’.
2. Press and hold buttons (4) and (5) at
the same time until the indicators of
buttons (3), (4) and (5) flash.
3. Press button (3).
• The indicators of buttons (4) and (5)
go off.
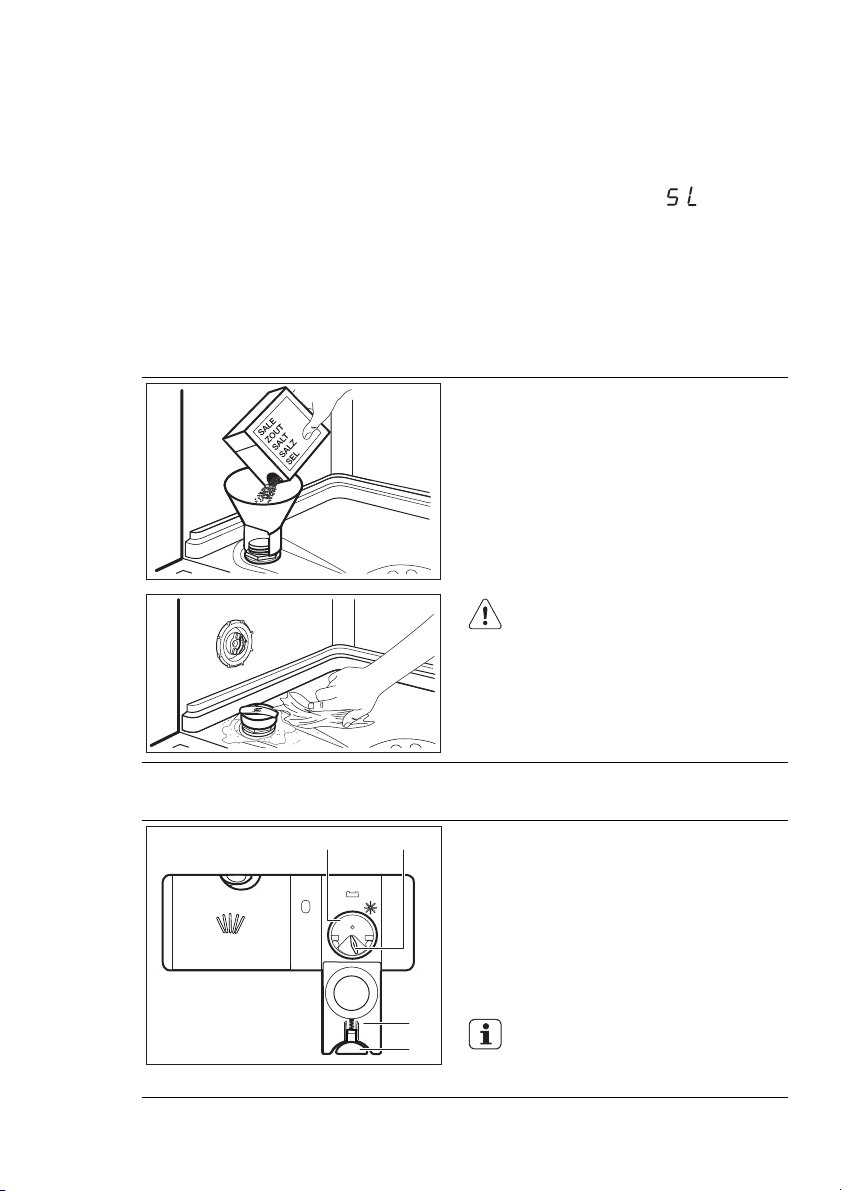
FILLING THE SALT CONTAINER
• The indicator of button (3) continues to flash.
• The acoustic signals operate, e.g.
five intermittent acoustic signals =
level 5.
• The display shows the setting of the
water softener, e.g.
= level 5.
4. Press button (3) again and again to
change the setting.
5. Deactivate the appliance to confirm
the setting.
1.
Turn the cap counterclockwise and
open the salt container.
2.
Put 1 litre of water in the salt container (only for the first time).
3.
Fill the salt container with dishwasher
salt.
4.
Remove the salt around the opening
of the salt container.
5.
Turn the cap clockwise to close the
salt container.
CAUTION!
Water and salt can come out from
the salt container when you fill it.
Risk of corrosion. To prevent it, after you fill the salt container, start
a programme.
FILLING THE RINSE AID DISPENSER
A
B
A
X
M
2
1
3
4
+
-
1.
2.
3.
4.
C
D
Press the release button (D) to open
the lid (C).
Fill the rinse aid dispenser (A), no
more than the mark 'max'.
Remove the spilled rinse aid with an
absorbent cloth to prevent too much
foam.
Close the lid. Make sure that the release button locks into position.
You can turn the selector of the
released quantity (B) between position 1 (lowest quantity) and position 4 (highest quantity).
Page 13
DAILY USE
M
A
X
1
2
3
4
+
-
ENGLISH
13
1. Open the water tap.
2. Press the on/off button to activate the
appliance. Make sure that the appliance is in setting mode, refer to ’SETTING AND STARTING A PROGRAMME’.
• If the salt indicator is on, fill the salt
container.
USING THE DETERGENT
B
A
30
20
C
SETTING AND STARTING A
PROGRAMME
Setting mode
The appliance must be in setting mode to
accept some operations.
The appliance is in setting mode when,
after the activation the display shows 2
horizontal status bars.
If the control panel shows other conditions, press RESET until the appliance is
in setting mode.
Starting a programme without
delay start
1. Open the water tap.
2. Press the on/off button to activate the
appliance. Make sure that the appliance is in setting mode.
3. Set the programme.
• The related programme number
flashes in the display.
4. If you want, you can set the options.
5. Close the appliance door. The pro-
gramme starts.
• If the rinse aid indicator is on, fill the
rinse aid dispenser.
3. Load the baskets.
4. Add the detergent.
5. Set and start the correct programme
for the type of load and the degree of
soil.
1.
Press the release button (B) to open
the lid (C).
2.
Put the detergent in the compartment (A) .
3.
If the programme has a prewash
phase, put a small quantity of detergent on the inner part of the appliance door.
4.
If you use detergent tablets, put the
tablet in the compartment (A).
5.
Close the lid. Make sure that the release button locks into position.
• If you open the door, the display
shows the programme duration that
decreases with steps of 1 minute.
Starting a programme with
delay start
1. Set the programme.
2. Press the delay button again and
again until the display shows the delay
time you want to set (from 1 to 24
hours).
• The delay time flashes in the display.
• The delay indicator is on.
3. Close the appliance door. The count-
down starts.
• If you open the door, the display
shows the countdown of the delay
start that decreases with steps of 1
hour.
When the countdown is completed, the
programme starts.
Page 14
www.aeg.com
14
Opening the door while the
appliance operates
If you open the door, the appliance stops.
When you close the door, the appliance
continues from the point of interruption.
Cancelling the delay start while
the countdown operates
Press RESET until the display shows 2 horizontal status bars.
When you cancel a delay start, the
appliance goes back to setting
mode. You have to set the programme again.
Cancelling the programme
Press RESET until the display shows 2 horizontal status bars.
Make sure that there is detergent
in the detergent dispenser before
you start a new programme.
At the end of the programme
When the programme is completed, an
intermittent acoustic signal operates. The
display shows 0 and the end indicator
comes on.
1. Press the on/off button to deactivate
the appliance.
2. Close the water tap.
If you do not press the on/off button, the AUTO OFF device automatically deactivates the appliance after some minutes. This
helps to decrease the energy consumption.
Important
• Let the dishes become cold before you
remove them from the appliance. Hot
dishes can be easily damaged.
• First remove the items from the lower
basket, then from the upper basket.
• There can be water on the sides and on
the door of the appliance. Stainless
steel becomes cool more quickly than
the dishes.
Page 15
HINTS AND TIPS
ENGLISH
15
THE WATER SOFTENER
Hard water contains a high quantity of
minerals that can cause damage to the
appliance and bad washing results. The
water softener neutralises these minerals.
The dishwasher salt keeps the water softener clean and in good conditions. It is
important to set the right level of the water softener. This makes sure that the water softener uses the correct quantity of
dishwasher salt and water.
LOADING THE BASKETS
Refer to the supplied leaflet with
examples of the load of the baskets.
• Only use the appliance to wash items
that are dishwasher-safe.
• Do not put in the appliance items made
of wood, horn, aluminium, pewter and
copper.
• Do not put in the appliance items that
can absorb water (sponges, household
cloths).
• Remove remaining food from the items.
• To remove easily remaining burned
food, soak pots and pans in water before you put them in the appliance.
• Put hollow items (cups, glasses and
pans) with the opening down.
• Make sure that cutlery and dishes do
not bond together. Mix spoons with
other cutlery.
• Make sure that glasses do not touch
other glasses.
• Put the small items in the cutlery basket.
• Put the light items in the upper basket.
Make sure that they do not move.
• Make sure that the spray arms can
move freely before you start a programme.
• The rinse aid helps, during the last rinsing phase, to dry the dishes without
streaks and stains.
• Combi detergent tablets contain detergent, rinse aid and other added agents.
Be sure that these tablets are applicable to the water hardness in your area.
Refer to the instructions on the packaging of the products.
• Detergent tablets do not fully dissolve
with short programmes. To prevent detergent residues on the tableware, we
recommend that you use the tablets
with long programmes.
Do not use more than the correct
quantity of detergent. Refer to the
instructions on the detergent
packaging.
BEFORE STARTING A
PROGRAMME
Make sure that:
• The filters are clean and correctly installed.
• The spray arms are not clogged.
• The position of the items in the baskets
is correct.
• The programme is applicable for the
type of load and for the degree of soil.
• The correct quantity of detergent is
used.
• There is dishwasher salt and rinse aid
(unless you use combi detergent tablets).
• The cap of the salt container is tight.
USING SALT, RINSE AID AND
DETERGENT
• Only use salt, rinse aid and detergent
for dishwasher. Other products can
cause damage to the appliance.
Page 16

www.aeg.com
16
CARE AND CLEANING
WARNING!
Before maintenance, deactivate
the appliance and disconnect the
mains plug from the mains socket.
CLEANING THE FILTERS
C
B
A1
A2
Dirty filters and clogged spray
arms decrease the washing results.
Make a check regularly and, if
necessary, clean them.
1.
Turn the filter (A) counterclockwise
and remove it.
C
A
2.
To disassemble the filter (A), pull
apart (A1) and (A2).
3.
Remove the filter (B).
4.
Wash the filters with water.
5.
Put the filter (B) to its initial position.
Make sure that it assembles correctly
under the two guides (C).
6.
Assemble the filter (A) and put it into
position in filter (B). Turn it clockwise
until it locks.
An incorrect position of the filters
can cause bad washing results and
damage to the appliance.
CLEANING THE SPRAY ARMS
Do not remove the spray arms.
If the holes in the spray arms are clogged,
remove remaining parts of soil with a thin
pointed object.
EXTERNAL CLEANING
Clean the appliance with a moist soft
cloth.
Only use neutral detergents. Do not use
abrasive products, abrasive cleaning pads
or solvents.
Page 17
TROUBLESHOOTING
ENGLISH
17
The appliance does not start or it stops
during operation.
Before you contact the Service, refer to
the information that follows for a solution
to the problem.
With some problems, the display shows
an alarm code:
•
- The appliance does not fill with
water.
•
- The appliance does not drain the
water.
•
- The anti-flood device is on.
WARNING!
Deactivate the appliance before
you do the checks.
Problem Possible cause Possible solution
The programme
does not start.
The mains plug is not connected in the mains socket.
Connect the mains plug.
The appliance door is open. Close the appliance door.
The fuse in the fuse box is
Replace the fuse.
damaged.
The delay start is set. Cancel the delay start or
wait for the end of the
countdown.
The appliance does
The water tap is closed. Open the water tap.
not fill with water.
The water pressure is too
low.
The water tap is clogged or
Contact your local water authority.
Clean the water tap.
there is limescale on it.
The filter in the water inlet
Clean the filter.
hose is clogged.
The water inlet hose has a
kink or a bend.
The anti-flood device is on.
There are water leakages in
Make sure that the position
of the hose is correct.
Close the water tap and
contact the Service.
the appliance.
The appliance does
The sink spigot is clogged. Clean the sink spigot.
not drain the water.
The water drain hose has a
kink or a bend.
After the checks are completed, activate
the appliance. The programme continues
from the point of interruption.
If the problem occurs again, contact the
Service.
If the display shows other alarm codes,
contact the Service.
IF THE WASHING AND
DRYING RESULTS ARE NOT
SATISFACTORY
Whitish streaks or bluish layers on
glasses and dishes
• The released quantity of rinse aid is too
• The quantity of detergent is too much.
Make sure that the position
of the hose is correct.
much. Adjust the rinse aid selector to a
lower position.
Page 18
www.aeg.com
18
Stains and dry water drops on glasses
and dishes
• The released quantity of rinse aid is not
sufficient. Adjust the rinse aid selector
to a higher position.
• The quality of the detergent can be the
cause.
Dishes are wet
• The programme is without a drying
phase or with a low temperature drying
phase.
• The rinse aid dispenser is empty.
• The quality of the rinse aid can be the
cause.
• The quality of the combi detergent tablets can be the cause. Try a different
brand or activate the rinse aid dispenser and use rinse aid together with the
combi detergent tablets.
Refer to ‘HINTS AND TIPS’ for
other possible causes.
HOW TO ACTIVATE THE
RINSE AID DISPENSER
The activation of the rinse aid dispenser
can occur only with the multitab option
activated.
1. Press the on/off button to activate the
appliance. Make sure that the appliance is in setting mode, refer to ‘Setting and starting a programme’.
2. Press and hold buttons (4) and (5) at
the same time until the indicators of
buttons (3), (4) and (5) start to flash.
3. Press button (4).
• The indicators of buttons (3) and (5)
go off.
• The indicator of button (4) contin-
ues to flash.
• The display shows the current setting of the rinse aid dispenser.
Off
On
4. Press button (4) to change the setting.
5. Deactivate the appliance to confirm
the setting.
6. Adjust the released quantity of rinse
aid.
7. Fill the rinse aid dispenser.
TECHNICAL INFORMATION
Dimensions Width / Height / Depth (mm) 596 / 818 - 898 / 550
Electrical connection Refer to the rating plate.
Voltage 220-240 V
Frequency 50 Hz
Water supply pressure Min. / max. (bar / MPa) (0.5 / 0.05 ) / (8 / 0.8 )
Water supply
Capacity Place settings 12
Power consumption Left-on mode 0.10 W
1)
Connect the water inlet hose to a water tap with a 3/4'' thread.
2)
If the hot water comes from alternative sources of energy, (e.g. solar panels, aeolian
energy), use the hot water supply to decrease energy consumption.
1)
Cold water or hot water
Off-mode 0.10 W
2)
max. 60 °C
Page 19

INHALT
21 SICHERHEITSHINWEISE
23 GERÄTEBESCHREIBUNG
24 BEDIENFELD
25 PROGRAMME
27 OPTIONEN
28 VOR DER ERSTEN INBETRIEBNAHME
31 TÄGLICHER GEBRAUCH
33 TIPPS UND HINWEISE
34 REINIGUNG UND PFLEGE
35 FEHLERSUCHE
36 TECHNISCHE DATEN
UMWELTTIPPS
Recyceln Sie Materialien mit dem Symbol . Entsorgen Sie die Verpackung in den
entsprechenden Recyclingbehältern.
Recyceln Sie zum Umwelt- und Gesundheitsschutz elektrische und elektronische Geräte.
Entsorgen Sie Geräte mit diesem Symbol
Gerät zu Ihrer örtlichen Sammelstelle oder wenden Sie sich an Ihr Gemeindeamt.
DEUTSCH
nicht mit dem Hausmüll. Bringen Sie das
19
AUF UNSERER WEBSITE FINDEN SIE:
- Produkte
- Prospekte
- Gebrauchsanweisungen
- Problemlöser
- Service-Informationen
www.aeg.com
LEGENDE
Warnung - Wichtige Sicherheitshinweise.
Allgemeine Hinweise und Ratschläge
Hinweise zum Umweltschutz
Änderungen vorbehalten.
Page 20

www.aeg.com
20
FÜR PERFEKTE ERGEBNISSE
Danke, dass Sie sich für dieses AEG Produkt entschieden haben. Wir haben es
geschaffen, damit Sie viele Jahre von seiner ausgezeichneten Leistung und den
innovativen Technologien, die Ihnen das Leben erleichtern, profitieren können. Es ist
mit Funktionen ausgestattet, die in gewöhnlichen Geräten nicht vorhanden sind.
Nehmen Sie sich ein paar Minuten Zeit zum Lesen, um seine Vorzüge kennen zu
lernen.
ZUBEHÖR UND VERBRAUCHSMATERIALIEN
Im AEG Webshop finden Sie alles, was Sie für ein makelloses Aussehen und
perfektes Funktionieren Ihrer AEG Geräte benötigen. Wir bieten auch ein
umfangreiches Zubehörsortiment, das Ihre höchsten Qualitätsansprüche erfüllt, vom
Profi-Kochgeschirr bis zu Besteckkörben, von Flaschenhaltern bis hin zu
Wäschebeuteln für empfindliche Wäsche...
Besuchen Sie den Webshop unter
www.aeg.com/shop
KUNDENDIENST UND -BETREUUNG
Wir empfehlen die Verwendung von Originalersatzteilen.
Halten Sie folgende Angaben bereit, wenn Sie sich an den Kundendienst
wenden. Die Informationen finden Sie auf dem Typenschild.
Modell
Produkt-Nummer (PNC)
Seriennummer
Page 21

SICHERHEITSHINWEISE
DEUTSCH
21
Lesen Sie die mitgelieferte Anleitung
sorgfältig vor der Montage und dem ersten Gebrauch des Geräts durch. Der Hersteller ist nicht dafür verantwortlich, wenn
eine fehlerhafte Montage oder Verwendung Verletzungen und Schäden verursacht. Bewahren Sie die Anleitung zusammen mit dem Gerät für den zukünftigen
Gebrauch auf.
SICHERHEIT VON KINDERN
UND SCHUTZBEDÜRFTIGEN
PERSONEN
WARNUNG!
Erstickungs- und Verletzungsgefahr oder Gefahr einer dauerhaften Behinderung.
• Lassen Sie keine Personen (einschließlich Kinder) mit eingeschränkten physischen, sensorischen oder geistigen Fähigkeiten, mangelnder Erfahrung oder
mangelndem Wissen dieses Gerät benutzen. Solche Personen müssen von
einer Person beaufsichtigt oder bei der
Bedienung des Geräts angeleitet werden, die für ihre Sicherheit verantwortlich ist. Lassen Sie Kinder nicht mit dem
Gerät spielen.
• Halten Sie das Verpackungsmaterial
von Kindern fern.
• Halten Sie alle Reinigungsmittel von
Kindern fern.
• Halten Sie Kinder und Haustiere vom
geöffneten Gerät fern.
MONTAGE
• Entfernen Sie das Verpackungsmaterial.
• Stellen Sie ein beschädigtes Gerät nicht
auf und benutzen Sie es nicht.
• Stellen Sie das Gerät nicht an einem
Ort auf, an dem die Temperatur unter 0
°C absinken kann, und benutzen Sie
das Gerät nicht, wenn die Temperatur
unter 0 °C absinken könnte.
• Halten Sie sich an die mitgelieferte
Montageanleitung.
• Stellen Sie sicher, dass das Gerät unter
und an angrenzenden sicheren Konstruktionen montiert ist.
Wasseranschluss
• Achten Sie darauf, die Wasserschläuche
nicht zu beschädigen.
• Bevor Sie neue oder lange Zeit nicht
benutzte Schläuche an das Gerät anschließen, lassen Sie Wasser durch die
Schläuche fließen, bis es sauber austritt.
• Achten Sie darauf, dass beim ersten
Gebrauch des Geräts keine Undichtheiten vorhanden sind.
• Der Wasserzulaufschlauch verfügt über
ein Sicherheitsventil und eine Ummantelung mit einem innenliegenden Netzkabel.
WARNUNG!
Gefährliche Spannung.
• Ziehen Sie den Netzstecker sofort aus
der Steckdose, wenn der Wasserzulaufschlauch beschädigt ist. Wenden Sie
sich für den Austausch des Wasserzulaufschlauchs an den Kundendienst.
Elektrischer Anschluss
WARNUNG!
Brand- und Stromschlaggefahr.
•Das Gerät muss geerdet sein.
• Stellen Sie sicher, dass die elektrischen
Daten auf dem Typenschild den Daten
Ihrer Stromversorgung entsprechen.
Wenden Sie sich andernfalls an einen
Elektriker.
• Schließen Sie das Gerät nur an eine
sachgemäß installierte Schutzkontaktsteckdose an.
• Verwenden Sie keine Mehrfachsteckdosen oder Verlängerungskabel.
• Achten Sie darauf, Netzstecker und
Netzkabel nicht zu beschädigen. Wen-
Page 22

www.aeg.com
22
den Sie sich zum Austausch des beschädigten Netzkabels an den Kundendienst oder einen Elektriker.
• Stecken Sie den Netzstecker erst nach
Abschluss der Montage in die Steckdose. Stellen Sie sicher, dass der Netzstecker nach der Montage noch zugänglich ist.
• Ziehen Sie nicht am Netzkabel, wenn
Sie das Gerät vom Stromnetz trennen
möchten. Ziehen Sie dazu immer direkt
am Netzstecker.
GEBRAUCH
• Dieses Gerät ist für die Verwendung im
Haushalt und ähnliche Zwecke vorgesehen, wie z. B.:
– Personalküchenbereiche in Geschäf-
ten, Büros und anderen Arbeitsum-
feldern
– Bauernhöfe
– Für Gäste in Hotels, Motels und an-
deren wohnungsähnlichen Räumlich-
keiten
– In Pensionen und vergleichbaren Un-
terbringungsmöglichkeiten.
WARNUNG!
Verletzungsgefahr.
WARNUNG!
Stromschlag-, Brand- und Verbrennungsgefahr.
• Platzieren Sie keine entflammbaren
Produkte oder Gegenstände, die mit
entflammbaren Produkten benetzt sind,
im Gerät, auf dem Gerät oder in der
Nähe des Geräts.
• Reinigen Sie das Gerät nicht mit einem
Wasser- oder Dampfstrahl.
• Es kann heißer Dampf aus dem Gerät
austreten, wenn Sie die Tür während
des Ablaufs eines Programms öffnen.
ENTSORGUNG
WARNUNG!
Verletzungs- oder Erstickungsgefahr.
• Trennen Sie das Gerät von der Stromversorgung.
• Schneiden Sie das Netzkabel ab und
entsorgen Sie es.
• Entfernen Sie das Türschloss, um zu
verhindern, dass sich Kinder oder Haustiere in dem Gerät einschließen.
• Nehmen Sie keine technischen Änderungen am Gerät vor.
• Stellen Sie Messer und Besteck mit
scharfen Spitzen mit der Spitze nach
unten in den Besteckkorb oder legen
Sie sie in eine waagerechte Position.
• Lassen Sie die Gerätetür nicht ohne Beaufsichtigung offen stehen, damit von
der Tür keine Stolpergefahr ausgeht.
• Setzen oder stellen Sie sich nie auf die
offene Tür.
• Geschirrspüler-Reinigungsmittel sind
gefährlich. Beachten Sie die Sicherheitsanweisungen auf der Reinigungsmittelverpackung.
• Trinken Sie nicht das Wasser aus dem
Gerät und verwenden Sie es nicht zum
Spielen.
• Nehmen Sie kein Geschirr aus dem Gerät, bevor das Programm beendet ist.
Es könnte sich noch Reinigungsmittel
auf dem Geschirr befinden.
Page 23

GERÄTEBESCHREIBUNG
DEUTSCH
23
12
11
Oberer Sprüharm
1
Mittlerer Sprüharm
2
Unterer Sprüharm
3
Filter
4
Typenschild
5
Salzbehälter
6
Wasserhärtestufen-Wähler
7
Klarspülmittel-Dosierer
8
Waschmittelschublade
9
Besteckkorb
10
Unterkorb
11
Oberkorb
12
10
1
7
8
9
6
4
5
3
2
LICHTSTRAHL
• Während eines laufenden Programms
scheint ein roter Lichtstrahl auf den Boden vor der Gerätetür. Nach Abschluss
des Programms erscheint anstelle des
roten Lichtstrahls ein grüner Lichtstrahl.
• Bei einer Störung des Geräts blinkt der
rote Lichtstrahl.
Nach dem Abschalten des Gerätes erlischt der Lichtstrahl.
Page 24

www.aeg.com
24
BEDIENFELD
1
Taste Ein/Aus
1
Display
2
Taste Zeitvorwahl
3
Programmtaste (nach unten)
4
Programmtaste (nach oben)
5
Kontrolllam-
Beschreibung
pen
Kontrolllampe „Salz“. Diese Kontrolllampe erlischt während des
Programmbetriebs.
Kontrolllampe „Klarspülmittel“. Diese Kontrolllampe erlischt während des Programmbetriebs.
Kontrolllampe „Programmende“.
4
2
3
5
Taste ÖKO PLUS
6
Taste Multitab
7
Taste RESET
8
Kontrolllampen
9
7
6
9
8
Page 25

PROGRAMME
DEUTSCH
25
Programm Verschmutzungs-
grad
Programmphasen
Optionen
Beladung
1
1)
Alle
Geschirr, Besteck,
Töpfe und Pfannen
Vorspülen
Hauptspülgang von 45
°C bis 70 °C
Spülgänge
ÖKO PLUS
Trocknen
2
2)
Stark verschmutzt
Geschirr, Besteck,
Töpfe und Pfannen
Vorspülen
Hauptspülgang 70 °C
Spülgänge
ÖKO PLUS
Trocknen
3
3)
4
4)
5
5)
1)
Das Gerät erkennt den Verschmutzungsgrad und die Anzahl der Geschirrteile in den
Körben. Es stellt dann automatisch die Wassertemperatur und -menge, den
Energieverbrauch und die Programmdauer ein.
2)
Dieses Programm enthält eine Spülphase mit hoher Temperatur, um hygienischere
Spülergebnisse zu liefern. Während der Spülphase wird die Temperatur für 10 bis 14
Minuten auf 70 °C gehalten.
3)
Dies ist das leiseste Spülprogramm. Die Pumpe arbeitet mit einer sehr niedrigen Drehzahl,
um die Geräuschentwicklung zu verringern. Aufgrund der niedrigen Drehzahl verlängert
sich die Programmdauer.
4)
Mit diesem Programm können Sie vor kurzem benutztes Geschirr spülen. Sie erhalten gute
Spülergebnisse in kurzer Zeit.
5)
Dies ist das Standardprogramm für Prüfinstitute. Dieses Programm gewährleistet den
wirtschaftlichsten Wasser- und Energieverbrauch für normal verschmutztes Geschirr und
Besteck.
Normal verschmutzt
Geschirr und Besteck
Vor kurzem benutztes Geschirr
Geschirr und Besteck
Normal verschmutzt
Geschirr und Besteck
Vorspülen
Hauptspülgang 50 °C
Spülgänge
Trocknen
Hauptspülgang 60 °C
Spülgang
Vorspülen
Hauptspülgang 50 °C
Spülgänge
Trocknen
ÖKO PLUS
Verbrauchswerte
Programm
1)
Dauer
(Min.)
Energieverbrauch
Wasser
(l)
(kWh)
1 40 - 150 0.6 - 1.4 7 - 14
Page 26

www.aeg.com
26
Programm
1)
Dauer
(Min.)
Energieverbrauch
Wasser
(l)
(kWh)
2 140 - 160 1.4 - 1.6 13 - 14
3 200 - 220 1.1 - 1.2 9 - 11
4 30 0.8 9
5 160 - 180 0.8 - 0.9 9 - 10
1)
Druck und Temperatur des Wassers, Schwankungen in der Stromversorgung, die
ausgewählten Optionen und die Geschirrmenge können die Programmdauer und die
Verbrauchswerte verändern.
Informationen für Prüfinstitute
Möchten Sie Informationen zum Leistungstest erhalten, schicken Sie eine E-Mail an:
info.test@dishwasher-production.com
Notieren Sie die Produktnummer (PNC), die Sie auf dem Typenschild finden.
Page 27

OPTIONEN
DEUTSCH
27
Schalten Sie die Optionen vor
dem Programmstart ein oder aus.
Sie können die Optionen nicht
ein- oder ausschalten, wenn ein
Programm angelaufen ist.
Haben Sie eine oder mehrere Optionen eingeschaltet, prüfen Sie,
ob die entsprechenden Kontrolllampen leuchten, bevor Sie das
Programm starten.
ÖKO PLUS
Diese Option senkt die Temperatur in der
Trocknungsphase. Der Energieverbrauch
wird um 25 % reduziert.
Das Geschirr kann am Ende des Programms noch feucht sein.
Drücken Sie die ÖKO PLUS-Taste:
• Ist die Option mit dem Programm kombinierbar, leuchtet die zugehörige Kontrolllampe auf.
• Ist die Option nicht mit dem Programm
kombinierbar, blinkt die zugehörige
Kontrolllampe einige Sekunden lang
und leuchtet dann nicht mehr.
MULTITAB
Schalten Sie diese Option nur ein, wenn
Sie Kombi-Reinigungstabletten verwenden.
Mit der Option „Multitab“ wird die Zufuhr
von Klarspülmittel und Salz ausgeschaltet.
Die entsprechenden Kontrolllampen sind
ausgeschaltet.
Die Programmdauer kann sich verlängern.
• Drücken Sie die Taste „Multitab“, die
zugehörige Kontrolllampe leuchtet auf.
• Die Option bleibt so lange eingeschaltet, bis Sie von Ihnen ausgeschaltet
wird. Drücken Sie die Taste „Multitab“,
die zugehörige Kontrolllampe erlischt.
Wenn Sie nicht länger KombiReinigungstabletten verwenden, führen
Sie die folgenden Schritten aus, bevor
Sie ein anderes Reinigungsmittel, ein
anderes Klarspülmittel oder ein
anderes Geschirrspülsalz verwenden:
1. Schalten Sie die Option „Multitab“
aus.
2. Stellen Sie den Wasserenthärter auf
die höchste Stufe ein.
3. Stellen Sie sicher, dass der Salzbehäl-
ter und der Klarspülmittel-Dosierer gefüllt sind.
4. Starten Sie das kürzeste Programm mit
einem Spülgang ohne Reinigungsmittel und ohne Geschirr.
5. Stellen Sie den Wasserenthärter ent-
sprechend der Wasserhärte in Ihrem
Gebiet ein.
6. Stellen Sie die Menge des Klarspülmit-
tels ein.
SIGNALTÖNE
Es ertönen akustische Signale, wenn:
• Das Programm beendet ist.
• Die Wasserenthärterstufe elektronisch
eingestellt wird.
• Eine Störung des Geräts vorliegt.
Werkseitige Einstellung: Ein. Sie
können die akustischen Signale
ausschalten.
Ausschalten der akustischen Signale
1. Drücken Sie die Taste „Ein/Aus“, um
das Gerät einzuschalten. Stellen Sie sicher, dass sich das Gerät im Einstellmodus befindet. Siehe „Einstellen und
Starten eines Programms“.
2. Halten Sie die Tasten (4) und (5)
gleichzeitig gedrückt, bis die Kontrolllampen der Tasten (3), (4) und (5) blinken.
3. Drücken Sie die Taste (5).
• Die Kontrolllampen der Tasten (3)
und (4) erlöschen.
• Die Kontrolllampe der Taste (5)
blinkt weiterhin.
• Das Display zeigt die Einstellung für
die akustischen Signale an.
Ein
Aus
4. Ändern Sie die Einstellung durch Drücken der Taste (5).
5. Schalten Sie das Gerät zur Bestätigung aus.
Page 28

www.aeg.com
28
VOR DER ERSTEN INBETRIEBNAHME
1. Prüfen Sie, ob der Wasserenthärter
entsprechend der Wasserhärte in Ihrem Gebiet eingestellt ist. Passen Sie
die Einstellung bei Bedarf entsprechend an. Wenden Sie sich an das örtliche Wasserversorgungsunternehmen, um die Wasserhärte in Ihrem Gebiet zu erfahren.
2. Füllen Sie den Salzbehälter.
3. Füllen Sie den Klarspülmittel-Dosierer.
4. Drehen Sie den Wasserhahn auf.
5. Möglicherweise haben sich im Gerät
Rückstände angesammelt. Starten Sie
ein Programm, um diese zu entfernen.
Verwenden Sie kein Reinigungsmittel
und beladen Sie die Körbe nicht.
Schalten Sie die Option „Multitab“ ein, wenn Sie Kombi-Reinigungstabletten verwenden.
EINSTELLEN DES WASSERENTHÄRTERS
Wasserhärte
Deutsche
Wasserhärte-
grade
(°dH)
Französische
Wasserhärte-
grade
(°fH)
mmol/l Clarke
Wasserhär-
tegrade
51 - 70 91 - 125 9.1 - 12.5 64 - 88
43 - 50 76 - 90 7.6 - 9.0 53 - 63
37 - 42 65 - 75 6.5 - 7.5 46 - 52
29 - 36 51 - 64 5.1 - 6.4 36 - 45
23 - 28 40 - 50 4.0 - 5.0 28 - 35
19 - 22 33 - 39 3.3 - 3.9 23 - 27
15 - 18 26 - 32 2.6 - 3.2 18 - 22 1 4
11 - 14 19 - 25 1.9 - 2.5 13 - 17 1 3
4 - 10 7 - 18 0.7 - 1.8 5 - 12 1 2
< 4 < 7 < 0.7 < 5
1)
Werkseinstellung.
2)
Verwenden Sie kein Salz bei diesen Werten.
Sie müssen den Wasserenthärter
manuell und elektronisch einstellen.
Wasserenthärter-
Einstellung
Manuell Elekt-
1)
2
1)
2
1)
2
1)
2
1)
2
1)
2
2)
1
ro-
nisch
10
9
8
7
6
1)
5
2)
1
Page 29

Manuelle Einstellung
DEUTSCH
Stellen Sie den Wasserhärtestufen-Wähler
auf Stufe 1 oder 2.
29
Elektronische Einstellung
1. Drücken Sie die Taste „Ein/Aus“, um
das Gerät einzuschalten. Stellen Sie sicher, dass sich das Gerät im Einstellmodus befindet, siehe Abschnitt „Einstellen und Starten eines Programms“.
2. Halten Sie die Tasten (4) und (5)
gleichzeitig gedrückt, bis die Kontrolllampen der Tasten (3), (4) und (5) blinken.
3. Drücken Sie Taste (3).
• Die Kontrolllampen der Tasten (4)
und (5) erlöschen.
FÜLLEN DES SALZBEHÄLTERS
• Die Kontrolllampe der Taste (3)
blinkt weiterhin.
• Der Signalton ist in Betrieb, z. B.
fünf aufeinander folgende Signaltöne = Wasserhärte 5.
• Das Display zeigt die Einstellung
des Wasserenthärters an, z. B.
= Wasserhärte 5.
4. Drücken Sie zur Einstellungsänderung
wiederholt die Taste (3).
5. Schalten Sie zur Speicherung der Einstellung das Gerät aus.
1.
Drehen Sie den Deckel gegen den
Uhrzeigersinn und öffnen Sie den
Salzbehälter.
2.
Füllen Sie 1 Liter Wasser in den Salzbehälter (nur beim ersten Mal).
3.
Füllen Sie den Salzbehälter mit Geschirrspülsalz.
4.
Entfernen Sie das Salz, das sich um
die Öffnung des Salzbehälters herum
angesammelt hat.
5.
Drehen Sie den Deckel im Uhrzeigersinn, um den Salzbehälter zu schließen.
VORSICHT!
Beim Befüllen des Salzbehälters
können Wasser und Salz austreten. Korrosionsgefahr. Starten Sie
ein Programm, nachdem Sie den
Salzbehälter befüllt haben, um die
Korrosion zu vermeiden.
Page 30

www.aeg.com
30
FÜLLEN DES KLARSPÜLMITTEL-DOSIERERS
1.
A
B
A
X
M
2
1
3
4
+
-
C
D
Drücken Sie die Entriegelungstaste
(D), um den Deckel (C) zu öffnen.
2.
Füllen Sie den Klarspülmittel-Dosierer
(A) nicht über die Marke „max“ hinaus.
3.
Wischen Sie verschüttetes Klarspülmittel mit einem saugfähigen Tuch
auf, um zu große Schaumbildung zu
vermeiden.
4.
Schließen Sie den Deckel. Achten Sie
darauf, dass die Entriegelungstaste
einrastet.
Sie können den Regler der Zugabemenge (B) zwischen Position 1
(geringste Menge) und Position 4
(größte Menge) einstellen.
Page 31

TÄGLICHER GEBRAUCH
M
A
X
1
2
3
4
+
-
DEUTSCH
31
1. Drehen Sie den Wasserhahn auf.
2. Drücken Sie die Taste „Ein/Aus“, um
das Gerät einzuschalten. Stellen Sie sicher, dass sich das Gerät im Einstellmodus befindet, siehe Abschnitt „Einstellen und Starten eines Programms“.
• Füllen Sie den Salzbehälter auf,
wenn die Kontrolllampe „Salz“
leuchtet.
• Leuchtet die Kontrolllampe „Klarspülmittel“, füllen Sie den Klarspülmittel-Dosierer.
3. Beladen Sie die Körbe.
4. Füllen Sie Reinigungsmittel ein.
5. Stellen Sie je nach Beladung und Ver-
schmutzungsgrad das passende Programm ein.
VERWENDUNG DES REINIGUNGSMITTELS
1.
B
A
30
20
C
EINSTELLEN UND STARTEN
EINES PROGRAMMS
Einstellmodus
Das Gerät muss sich für einige Einstellungen im Einstellmodus befinden.
Das Gerät befindet sich im Einstellmodus,
wenn im Display nach dem Einschalten
des Geräts zwei horizontale Linien angezeigt werden.
Wenn das Bedienfeld andere Einstellungen anzeigt, drücken Sie RESET, bis sich
das Gerät im Einstellmodus befindet.
Starten eines Programms ohne
Zeitvorwahl
1. Drehen Sie den Wasserhahn auf.
2. Drücken Sie die Ein/Aus-Taste, um das
3. Wählen Sie das Programm.
Gerät einzuschalten. Stellen Sie sicher,
dass sich das Gerät im Einstellmodus
befindet.
Drücken Sie die Entriegelungstaste
(B), um den Deckel (C) zu öffnen.
2.
Füllen Sie das Reinigungsmittel in
den Behälter (A).
3.
Wenn das Programm einen Vorspülgang hat, schütten Sie eine kleine
Menge Reinigungsmittel auf die Innenseite der Gerätetür.
4.
Wenn Sie Geschirrspüler-Tabs verwenden, legen Sie diese in den Reinigungsmittelbehälter (A).
5.
Schließen Sie den Deckel. Achten Sie
darauf, dass die Entriegelungstaste
einrastet.
• Die Nummer des eingestellten Programms blinkt im Display.
4. Stellen Sie nach Bedarf die Optionen
ein.
5. Schließen Sie die Gerätetür. Das Pro-
gramm startet.
• Wenn Sie die Tür öffnen, zeigt das
Display die Programmdauer an, die
in 1-Minuten-Schritten zurückgezählt wird.
Starten eines Programms mit
Zeitvorwahl
1. Wählen Sie das Programm.
2. Drücken Sie wiederholt die Zeitvor-
wahl-Taste, bis das Display die gewünschte Zeitvorwahl anzeigt (1 bis 24
Stunden).
• Die Zeitvorwahl blinkt im Display.
• Die Kontrolllampe für die Zeitvorwahl leuchtet auf.
3. Schließen Sie die Gerätetür. Der Ab-
lauf der Zeitvorwahl beginnt.
Page 32

www.aeg.com
32
• Wenn Sie die Tür öffnen, zeigt das
Display die Zeitvorwahl an, die in
Schritten von jeweils 1 Stunde abnimmt.
Nach Ablauf der Zeitvorwahl wird das Programm gestartet.
Öffnen der Tür während eines
laufenden Programms
Wenn Sie die Tür öffnen, unterbricht das
Gerät das Programm. Wenn Sie die Tür
wieder schließen, arbeitet das Gerät ab
dem Zeitpunkt der Unterbrechung weiter.
Abbrechen einer eingestellten
Zeitvorwahl während des
Countdowns
Drücken Sie RESET wiederholt, bis im Display zwei horizontale Balken angezeigt
werden.
Wenn Sie die Zeitvorwahl abbrechen, kehrt das Gerät in den Einstellmodus zurück. In diesem Fall
müssen Sie das Programm erneut
einstellen.
Wichtig
• Lassen Sie das Geschirr abkühlen, bevor Sie es aus dem Gerät nehmen. Heißes Geschirr ist stoßempfindlich.
• Nehmen Sie das Geschirr zuerst aus
dem Unterkorb und dann aus dem
Oberkorb.
• An den Innenseiten und an der Tür des
Gerätes kann sich Wasser niederschlagen. Edelstahl kühlt schneller ab als
Geschirr.
Beenden des Programms
Drücken Sie RESET wiederholt, bis im Display zwei horizontale Balken angezeigt
werden.
Bevor Sie ein neues Programm
starten, stellen Sie sicher, dass der
Reinigungsmittelbehälter gefüllt
ist.
Am Programmende
Nach Ablauf des Programms ertönt eine
Signaltonfolge. Im Display wird 0 angezeigt, und die Kontrolllampe „Programmende“ leuchtet auf.
1. Drücken Sie die Taste „Ein/Aus“, um
das Gerät auszuschalten.
2. Schließen Sie den Wasserhahn.
Wenn Sie die Ein/Aus-Taste nicht
drücken, schaltet die AUTO OFFFunktion das Gerät nach einigen
Minuten automatisch aus. Diese
Funktion hilft bei der Senkung des
Energieverbrauchs.
Page 33

TIPPS UND HINWEISE
DEUTSCH
33
DER WASSERENTHÄRTER
Hartes Wasser enthält viele Mineralien,
die das Gerät beschädigen können und
zu schlechten Spülergebnissen führen.
Der Wasserenthärter neutralisiert diese
Mineralien.
Das Geschirrspülsalz hält den Wasserenthärter sauber und in gutem Zustand. Der
Wasserenthärter muss unbedingt auf die
richtige Stufe eingestellt werden. So stellen Sie sicher, dass der Wasserenthärter
die richtige Menge Geschirrspülsalz und
Wasser verwendet.
BELADEN DER KÖRBE
Beispiele für die Beladung der
Körbe finden Sie in der mitgelieferten Broschüre.
• Spülen Sie im Gerät nur spülmaschinenfestes Geschirr.
• Spülen Sie im Gerät keine Geschirrteile
aus Holz, Horn, Aluminium, Zinn oder
Kupfer.
• Spülen Sie in diesem Gerät keine Gegenstände, die Wasser aufnehmen können (Schwämme, Geschirrtücher, usw.).
• Entfernen Sie Speisereste vom Geschirr.
• Um eingebrannte Essensreste leicht zu
beseitigen, weichen Sie diese ein, bevor Sie das Kochgeschirr in das Gerät
stellen.
• Ordnen Sie hohle Gefäße (z. B. Tassen,
Gläser, Pfannen) mit der Öffnung nach
unten ein.
• Stellen Sie sicher, dass Geschirr und
Besteck nicht aneinander haften. Mischen Sie Löffel mit anderem Besteck.
• Achten Sie darauf, dass Gläser einander
nicht berühren.
• Ordnen Sie kleine Gegenstände in den
Besteckkorb ein.
• Ordnen Sie leichte Gegenstände im
Oberkorb an. Achten Sie darauf, dass
diese nicht verrutschen können.
• Vergewissern Sie sich, dass sich die
Sprüharme ungehindert bewegen können, bevor Sie ein Programm starten.
VERWENDUNG VON SALZ,
KLARSPÜLMITTEL UND
REINIGUNGSMITTEL
• Verwenden Sie nur Salz, Klarspülmittel
und Reinigungsmittel für Geschirrspüler. Andere Produkte können das Gerät
beschädigen.
• Das Klarspülmittel lässt das Geschirr
während der letzten Spülphase ohne
Streifen und Flecken trocknen.
• Kombi-Reinigungstabletten enthalten
Reinigungsmittel, Klarspülmittel und
andere Zusätze. Achten Sie darauf, dass
die Tabletten der Wasserhärte in Ihrer
Region entsprechen. Beachten Sie die
Anweisungen auf der Reinigungsmittelverpackung.
• Geschirrspüler-Tabs lösen sich bei kurzen Programmen nicht vollständig auf.
Wir empfehlen, die Tabletten nur mit
langen Programmen zu verwenden, damit keine Reinigungsmittel-Rückstände
auf dem Geschirr zurückbleiben.
Verwenden Sie nicht mehr als die
angegebene Reinigungsmittelmenge. Siehe hierzu die Angaben
auf der Reinigungsmittelverpackung.
VOR DEM STARTEN EINES
PROGRAMMS
Kontrollieren Sie folgende Punkte:
• Die Filter sind sauber und ordnungsgemäß eingesetzt.
• Die Sprüharme sind nicht verstopft.
• Die Geschirrteile sind richtig in den
Körben angeordnet.
• Das Programm eignet sich für die Beladung und den Verschmutzungsgrad.
• Die Reinigungsmittelmenge stimmt.
• Geschirrspülsalz und Klarspülmittel sind
vorhanden (außer Sie verwenden Kombi-Reinigungstabeletten).
• Der Deckel des Salzbehälters ist fest
geschlossen.
Page 34

www.aeg.com
34
REINIGUNG UND PFLEGE
WARNUNG!
Schalten Sie vor Reinigungsarbeiten immer das Gerät aus und ziehen Sie den Netzstecker aus der
Steckdose.
REINIGEN DER FILTER
C
B
A1
A2
Verschmutzte Filter und verstopfte
Sprüharme beeinträchtigen das
Spülergebnis.
Prüfen Sie die Filter regelmäßig
und reinigen Sie diese, falls nötig.
1.
Drehen Sie den Filter (A) nach links
und nehmen Sie ihn heraus.
C
A
2.
Um den Filter (A) auseinanderzubauen, ziehen Sie (A1) und (A2) auseinander.
3.
Nehmen Sie den Filter (B) heraus.
4.
Reinigen Sie die Filter mit Wasser.
5.
Setzen Sie den Filter (B) wieder in der
ursprünglichen Position ein. Vergewissern Sie sich, dass er korrekt unter
den beiden Führungen (C) sitzt.
6.
Bauen Sie den Filter (A) zusammen
und setzen Sie ihn in Filter (B) ein.
Drehen Sie ihn nach rechts, bis er
einrastet.
Eine falsche Anordnung der Filter
führt zu schlechten Spülergebnissen und kann das Gerät beschädigen.
REINIGEN DER SPRÜHARME
Bauen Sie die Sprüharme nicht aus.
Falls die Löcher in den Sprüharmen verstopft sind, reinigen Sie sie mit einem
dünnen spitzen Gegenstand.
REINIGEN DER
AUSSENSEITEN
Reinigen Sie das Geräts mit einem weichen, feuchten Tuch.
Verwenden Sie ausschließlich Neutralreiniger. Benutzen Sie keine Scheuermittel,
scheuernde Reinigungsschwämmchen
oder Lösungsmittel.
Page 35

FEHLERSUCHE
DEUTSCH
35
Das Gerät startet nicht oder bleibt während des Betriebs stehen.
Prüfen Sie, ob Sie die Störung mit den folgenden Hinweisen selbst beheben können, bevor Sie den Kundendienst rufen.
Bei manchen Störungen zeigt das Display einen Alarmcode an:
•
- Es läuft kein Wasser in das Gerät.
•
- Das Gerät pumpt das Wasser
nicht ab.
•
- Die Aquasafe-Einrichtung ist aus-
gelöst.
WARNUNG!
Schalten Sie das Gerät aus, bevor
Sie die Überprüfungen vornehmen.
Problem Mögliche Ursache Mögliche Abhilfe
Das Programm startet nicht.
Der Netzstecker steckt nicht
richtig in der Steckdose.
Stecken Sie den Netzstecker
richtig in die Steckdose.
Die Gerätetür ist offen. Schließen Sie die Gerätetür.
Die Sicherung im Siche-
rungskasten ist durchge-
Setzen Sie eine neue Siche-
rung ein.
brannt.
Die Zeitvorwahl ist einge-
stellt.
Brechen Sie die Zeitvorwahl
ab oder warten Sie auf das
Ende des Countdowns.
Es läuft kein Wasser
in das Gerät.
Der Wasserdruck ist zu
Der Wasserhahn ist geschlossen.
niedrig.
Drehen Sie den Wasserhahn
auf.
Wenden Sie sich an Ihr örtli-
ches Wasserversorgungsun-
ternehmen.
Der Wasserhahn ist blo-
ckiert oder durch Kalkabla-
Reinigen Sie den Wasser-
hahn.
gerungen verstopft.
Der Filter im Wasserzulauf-
Reinigen Sie den Filter.
schlauch ist verstopft.
Der Wasserzulaufschlauch
ist geknickt oder gebogen.
Vergewissern Sie sich, dass
der Schlauch ordnungsge-
mäß angebracht ist.
Das Aqua-Control-System
ist eingeschaltet. Im Gerät
sind Wasserlecks aufgetre-
Drehen Sie den Wasserhahn
zu und wenden Sie sich an
den Kundendienst.
ten.
Das Gerät pumpt
Der Siphon ist verstopft. Reinigen Sie den Siphon.
das Wasser nicht ab.
Der Wasserablaufschlauch
ist geknickt oder gebogen.
Vergewissern Sie sich, dass
der Schlauch ordnungsge-
mäß angebracht ist.
Schalten Sie das Gerät nach der Überprüfung wieder ein. Das Programm wird an
der Stelle fortgesetzt, an der es unterbrochen wurde.
Page 36

www.aeg.com
36
Tritt das Problem erneut auf, wenden Sie
sich an den Kundendienst.
Zeigt das Display andere Alarmcodes an,
wenden Sie sich an den Kundendienst.
DIE SPÜL- UND
TROCKNUNGSERGEBNISSE
SIND NICHT
ZUFRIEDENSTELLEND.
Weiße Streifen oder blau schimmernder
Belag auf Gläsern und Geschirr
• Die zugegebene Klarspülmittelmenge
ist zu hoch. Stellen Sie den Dosierwähler für Klarspülmittel niedriger ein.
• Die Reinigungsmittelmenge ist zu hoch.
Wasserflecken und andere Flecken auf
Gläsern und Geschirr
• Die zugegebene Klarspülmittelmenge
ist zu niedrig. Stellen Sie den Dosierwähler für Klarspülmittel höher ein.
• Die Ursache kann in der Qualität des
Reinigungsmittels liegen.
Das Geschirr ist noch nass.
• Das Programm enthält keine Trocknungsphase oder eine Trocknungsphase mit niedriger Temperatur.
• Der Klarspülmittel-Dosierer ist leer.
• Die Ursache kann in der Qualität des
Klarspülmittels liegen.
• Die Ursache kann in der Qualität der
Kombi-Reinigungstablette liegen. Probieren Sie eine andere Marke aus oder
schalten Sie den Klarspülmittel-Dosierer ein und verwenden Sie ihn zusammen mit den Kombi-Reinigungstabletten.
Mögliche andere Ursachen finden
Sie unter „Tipps und Hinweise“.
Einschalten des KlarspülmittelDosierers bei eingeschalteter
Funktion „Multitab“
1. Drücken Sie die Taste „Ein/Aus“, um
das Gerät einzuschalten. Stellen Sie sicher, dass sich das Gerät im Einstellmodus befindet, siehe Abschnitt „Einstellen und Starten eines Programms“.
2. Halten Sie die Tasten (4) und (5)
gleichzeitig gedrückt, bis die Kontrolllampen der Tasten (3), (4) und (5) blinken.
3. Drücken Sie Taste (4).
• Die Kontrolllampen der Tasten (3)
und (5) erlöschen.
• Die Kontrolllampe der Taste (4)
blinkt weiterhin.
• Im Display wird die Einstellung des
Klarspülmittel-Dosierers angezeigt.
Aus
Ein
4. Ändern Sie die Einstellung durch Drücken der Taste (4).
5. Schalten Sie das Gerät aus, um die
Einstellung zu speichern.
6. Stellen Sie die Menge des Klarspülmittels ein.
7. Füllen Sie den Klarspülmittel-Dosierer.
TECHNISCHE DATEN
Abmessungen Breite / Höhe / Tiefe (mm) 596 / 818 - 898 / 550
Elektrischer Anschluss Siehe Typenschild.
Spannung 220-240 V
Frequenz 50 Hz
Wasserdruck Min. / max. (bar / MPa) (0.5 / 0.05 ) / (8 / 0.8 )
Wasserversorgung
Fassungsvermögen Gedecke 12
1)
Kalt- oder Warmwasser
2)
max. 60 °C
Page 37

DEUTSCH
Leistungsaufnahme Unausgeschaltet 0.10 W
Ausgeschaltet 0.10 W
1)
Schließen Sie den Zulaufschlauch an einen Wasserhahn mit einem 3/4"-Außengewinde an.
2)
Wenn Sie Heißwasser mit umweltfreundlichen, alternativen Energiequellen (z. B.
Solaranlagen oder Windkraft) aufbereiten, können Sie durch den Anschluss des Geräts an
die Heißwasserversorgung Energie sparen.
37
Page 38

www.aeg.com
38
ÍNDICE DE MATERIAS
40 INSTRUCCIONES DE SEGURIDAD
42 DESCRIPCIÓN DEL PRODUCTO
43 PANEL DE MANDOS
44 PROGRAMAS
46 OPCIONES
47 ANTES DEL PRIMER USO
50 USO DIARIO
52 CONSEJOS
53 MANTENIMIENTO Y LIMPIEZA
54 SOLUCIÓN DE PROBLEMAS
55 INFORMACIÓN TÉCNICA
ASPECTOS MEDIOAMBIENTALES
Recicle los materiales con el símbolo . Coloque el material de embalaje en los
contenedores adecuados para su reciclaje.
Ayude a proteger el medio ambiente y la salud pública, así como a reciclar residuos de
aparatos eléctricos y electrónicos. No deseche los aparatos marcados con el símbolo
junto con los residuos domésticos. Lleve el producto a su centro de reciclaje local o
póngase en contacto con su oficina municipal.
CONSULTE EN NUESTRO SITIO WEB:
- Productos
- Folletos
- Manuales del usuario
- Solución de problemas
- Información sobre servicios
www.aeg.com
NOTAS
Advertencia - Información importante sobre seguridad.
Datos y recomendaciones generales
Información medioambiental
Salvo modificaciones.
Page 39

PARA OBTENER RESULTADOS PERFECTOS
Gracias por escoger este producto AEG. Este artículo ha sido creado para ofrecer un
rendimiento impecable durante muchos años, con innovadoras tecnologías que
facilitarán su vida y prestaciones que probablemente no encuentre en
electrodomésticos corrientes. Por favor, dedique algunos minutos a la lectura para
disfrutar de todas sus ventajas.
ACCESORIOS Y CONSUMIBLES
En la página web de AEG, encontrará todo lo necesario para la perfecta limpieza y
funcionamiento de todos sus electrodomésticos AEG. Junto con una amplia gama
de accesorios diseñados y fabricados conforme a los elevados estándares de calidad
característicos de la marca, desde utensilios de cocina especializados a cestos de
cubiertos, desde portabotellas a bolsas para el lavado de prendas delicadas...
ESPAÑOL
39
Visite la tienda web en
www.aeg.com/shop
ATENCIÓN Y SERVICIO AL CLIENTE
Le recomendamos que utilice recambios originales.
Cuando se ponga en contacto con el servicio técnico, asegúrese de tener a
mano los siguientes datos. Puede encontrar la información en la placa de
características.
Modelo
PNC
Número de serie
Page 40

www.aeg.com
40
INSTRUCCIONES DE SEGURIDAD
Antes de instalar y utilizar el aparato, lea
atentamente las instrucciones facilitadas.
El fabricante no se hace responsable de
los daños y lesiones causados por una instalación y uso incorrectos. Guarde siempre las instrucciones junto con el aparato
para futuras consultas.
SEGURIDAD DE NIÑOS Y
PERSONAS VULNERABLES
ADVERTENCIA
Existe riesgo de sufrir asfixia, lesiones o incapacidad permanente.
• Este electrodoméstico no debe ser usado por niños, ni por personas con capacidades físicas o mentales reducidas, ni
por personas sin experiencia en el manejo del aparato, a menos que lo hagan
bajo las instrucciones o la supervisión
de la persona responsable de su seguridad. No deje que los niños jueguen
con el aparato.
• Mantenga los materiales de embalaje
alejados de los niños.
• Mantenga todos los detergentes fuera
del alcance de los niños.
• Mantenga a los niños y mascotas alejados del aparato cuando la puerta se encuentre abierta.
• La primera vez que utilice el aparato,
asegúrese de que no hay fugas.
• La manguera de entrada de agua tiene
una válvula de seguridad y un revestimiento con un cable interno de conexión a la red.
ADVERTENCIA
Voltaje peligroso.
• Si la manguera de entrada de agua está
dañada, desconecte el aparato inmediatamente de la toma de corriente.
Póngase en contacto con el servicio
técnico para cambiar la manguera de
entrada de agua.
Conexión eléctrica
ADVERTENCIA
Riesgo de incendios y descargas
eléctricas.
INSTALACIÓN
• Retire todo el embalaje.
• No instale ni utilice un aparato dañado.
• No instale ni utilice el aparato en lugares con temperaturas inferiores a 0 ºC.
• Siga las instrucciones de instalación suministradas con el aparato.
• Asegúrese de que el aparato se instala
debajo y junto a estructuras seguras.
Conexión de agua
• Asegúrese de no provocar daños en los
tubos de agua.
• Antes de conectar el aparato a las nuevas tuberías o a tuberías que no se hayan usado durante mucho tiempo, deje
correr el agua hasta que esté limpia.
• El aparato debe quedar conectado a
tierra.
• Asegúrese de que las especificaciones
eléctricas de la placa coinciden con las
del suministro eléctrico de su hogar. En
caso contrario, póngase en contacto
con un electricista.
• Utilice siempre una toma con aislamiento de conexión a tierra correctamente
instalada.
• No utilice adaptadores de enchufes
múltiples ni cables prolongadores.
• Asegúrese de no provocar daños en el
enchufe ni en el cable de red. Póngase
en contacto con un electricista o con el
servicio técnico para cambiar un cable
de red dañado.
• Conecte el enchufe a la toma de corriente únicamente cuando haya terminado la instalación. Asegúrese de tener
Page 41

acceso al enchufe del suministro de red
una vez instalado el aparato.
• No desconecte el aparato tirando del
cable de conexión a la red. Tire siempre del enchufe.
USO
• Este aparato está concebido para utilizarse en aplicaciones domésticas y similares como:
– Cocinas del personal en tiendas, ofi-
cinas y otros entornos de trabajo
–Granjas
– Por clientes en hoteles, moteles y
otros entornos de tipo residencial
– Entornos tipo hostales o pensiones.
ADVERTENCIA
Existe riesgo de lesiones.
• No cambie las especificaciones de este
aparato.
• Los cuchillos y otros objetos con puntas
afiladas deben colocarse en el cesto
para cubiertos con las puntas hacia
abajo o en posición horizontal.
• No deje la puerta del aparato abierta
sin supervisión para evitar caídas sobre
él.
• No se siente ni se ponga de pie sobre
la puerta abierta.
• Los detergentes para lavavajillas son
peligrosos. Siga las instrucciones de seguridad del envase de detergente.
• No beba agua procedente del aparato
ni juegue con ella.
• No retire la vajilla del aparato hasta que
finalice el programa. Puede quedar detergente en los platos.
ADVERTENCIA
Riesgo de incendios, descargas
eléctricas o quemaduras.
ESPAÑOL
ELIMINACIÓN
ADVERTENCIA
Existe riesgo de lesiones o asfixia.
• Desconecte el aparato de la toma de
red.
• Corte el cable y el enchufe, y deséchelos.
• Retire el pestillo de la puerta para evitar que los niños y las mascotas queden
encerrados en el aparato.
41
• No coloque productos inflamables ni
objetos mojados con productos inflamables, dentro, cerca o encima del
aparato.
• No utilice pulverizadores ni vapor de
agua para limpiar el aparato.
• El aparato puede liberar vapor caliente
si abre la puerta durante un programa.
Page 42

www.aeg.com
42
DESCRIPCIÓN DEL PRODUCTO
12
11
Brazo aspersor del techo
1
Brazo aspersor intermedio
2
Brazo aspersor inferior
3
Filtros
4
Placa de características
5
Depósito de sal
6
Selector de dureza del agua
7
Dosificador de abrillantador
8
Dosificador de detergente
9
Cesto para cubiertos
10
Cesto inferior
11
Cesto superior
12
10
1
7
8
9
6
4
5
3
2
HAZ LUMINOSO
• Al iniciarse un programa, aparece un
haz luminoso rojo en el suelo debajo
de la puerta del aparato. Cuando termina el programa, la luz roja cambia a una
luz verde.
• Cuando el aparato presenta una avería,
el haz luminoso rojo parpadea.
El haz luminoso desaparece cuando se desactiva el aparato.
Page 43

PANEL DE MANDOS
ESPAÑOL
43
1
Tecla de encendido/apagado
1
Visor digital
2
Tecla Inicio diferido
3
Tecla de programa (descendente)
4
Tecla de programa (ascendente)
5
Indicadores Descripción
Indicador de sal. Este indicador está apagado mientras el programa está en curso.
Indicador de abrillantador. Este indicador está apagado mientras
el programa está en curso.
Indicador de fin.
4
2
3
5
Tecla ÖKO PLUS
6
Tecla Multitab
7
Tecla RESET
8
Indicadores
9
7
6
9
8
Page 44

www.aeg.com
44
PROGRAMAS
Programa Grado de sucie-
dad
Fases del
programa
Opciones
Tipo de carga
1
1)
Todo
Vajilla, cubiertos,
cacerolas y sartenes
Prelavado
Lavado de 45 °C a 70
°C
Aclarados
ÖKO PLUS
Secado
2
2)
3
3)
4
4)
5
5)
Suciedad intensa
Vajilla, cubiertos,
cacerolas y sartenes
Suciedad normal
Vajilla y cubiertos
Suciedad reciente
Vajilla y cubiertos
Suciedad normal
Vajilla y cubiertos
Prelavado
Lavado 70 °C
Aclarados
Secado
Prelavado
Lavado 50 °C
Aclarados
Secado
Lavado 60 °C
Aclarado
Prelavado
Lavado 50 °C
Aclarados
ÖKO PLUS
ÖKO PLUS
Secado
1)
El aparato detecta el tipo de suciedad y la cantidad de objetos en los cestos. Ajusta
automáticamente la temperatura y la cantidad del agua, el consumo de energía y la
duración del programa.
2)
Este programa tiene una fase de aclarado a alta temperatura para obtener resultados más
higiénicos. Durante la fase de aclarado, la temperatura se mantiene a 70 °C durante 10-14
minutos.
3)
Es el programa de lavado más silencioso. La bomba funciona a muy baja velocidad para
reducir el nivel de ruido. Debido a la baja velocidad, el programa es largo.
4)
Con este programa puede lavar una carga con suciedad reciente. Ofrece buenos
resultados de lavado en poco tiempo.
5)
Este es el programa estándar para institutos de pruebas. Con este programa se consigue
el uso más eficaz del agua y consumo de energía para vajillas y cubiertos con suciedad
normal.
Valores de consumo
Programa
1)
Duración
(min)
Energía
(kWh)
Agua
(l)
1 40 - 150 0.6 - 1.4 7 - 14
2 140 - 160 1.4 - 1.6 13 - 14
Page 45

ESPAÑOL
45
Programa
1)
Duración
(min)
Energía
(kWh)
Agua
(l)
3 200 - 220 1.1 - 1.2 9 - 11
4 30 0.8 9
5 160 - 180 0.8 - 0.9 9 - 10
1)
La presión y temperatura del agua, las variaciones del suministro de energía, las opciones y
la cantidad de platos pueden alterar la duración del programa y los valores de consumo.
Información para los institutos de pruebas
Para obtener toda la información necesaria para la prueba de rendimiento, envíe un
correo electrónico a:
info.test@dishwasher-production.com
Anote el número de producto (PNC) que aparece en la placa de características.
Page 46

www.aeg.com
46
OPCIONES
Active o desactive las opciones
antes de poner en marcha un programa. No es posible activar ni
desactivar las opciones con el
programa en marcha.
Si se ajustan una o varias opciones, asegúrese de que los indicadores correspondientes están encendidos antes de que empiece
el programa.
ÖKO PLUS
Esta opción reduce la temperatura en la
fase de secado. El consumo energético se
reduce un 25%.
Los platos pueden quedar mojados al final del programa.
Pulse el botón ÖKO PLUS:
• Si la opción es aplicable al programa, el
indicador correspondiente se enciende.
• Si la opción no es aplicable al programa, el indicador correspondiente parpadea durante unos segundos y después permanece apagado.
MULTITAB
Seleccione esta opción únicamente si utiliza pastillas de detergente combinadas.
Esta opción desactiva la entrada de abrillantador y sal. Los indicadores correspondientes están desactivados.
La duración del programa puede aumentar.
• Pulse la tecla multitab, tras lo que se
encenderá el indicador de esta función.
• La opción permanece encendida hasta
que se desactiva. Pulse la tecla multitab, tras lo que se apaga el indicador
de esta función.
Si deja de usar pastillas de detergente
combinado, antes de empezar a utilizar
por separado detergente, abrillantador
y sal para lavavajillas, siga estos pasos:
1. Desactive la opción Multitab.
2. Ajuste el descalcificador en el nivel
más alto.
3. Asegúrese de llenar los recipientes de
sal y de abrillantador.
4. Inicie el programa más corto con una
fase de aclarado, sin detergente y sin
platos.
5. Ajuste el descalcificador de agua en
función de la dureza del agua de su
zona.
6. Ajuste la cantidad de abrillantador.
SEÑALES ACÚSTICAS
Las señales acústicas se producen en estas situaciones:
• El programa se termina.
• El nivel del descalcificador se ajusta
electrónicamente.
• Se ha producido algún fallo en el aparato.
Ajuste de fábrica: activado. Puede
desactivar las señales acústicas.
Desactivación de las señales acústicas
1. Pulse la tecla de encendido/apagado
para encender el aparato. Asegúrese
de que el aparato se encuentra en
modo de ajuste. Consulte “AJUSTE E
INICIO DE UN PROGRAMA”.
2. Mantenga pulsadas las teclas (4) y (5)
simultáneamente hasta que parpadeen los indicadores de las teclas (3),
(4) y (5).
3. Pulse la tecla (5):
• Los indicadores de las teclas (3) y (4)
se apagan.
• El indicador de la tecla (5) continúa
parpadeando.
• En la pantalla aparece el ajuste de
las señales acústicas.
On
Off
4. Pulse la tecla (5) para cambiar el ajus-
te.
5. Apague el aparato para confirmar.
Page 47

ANTES DEL PRIMER USO
ESPAÑOL
47
1. Asegúrese de que el ajuste del descal-
cificador coincide con la dureza del
agua de su zona. De no ser así, ajuste
el descalcificador de agua. Póngase
en comunicación con las autoridades
correspondientes para conocer la dureza del agua de su zona.
2. Llene el depósito de sal.
3. Llene el dosificador de abrillantador.
4. Abra el grifo.
5. El interior del aparato puede tener
restos. Inicie un programa para eliminarlos. No utilice detergente ni cargue
los cestos.
Si utiliza pastillas de detergente
combinadas, active la opción multitab.
AJUSTE EL DESCALCIFICADOR DE AGUA
Dureza agua
Grados
alemanes
(°dH)
Grados
franceses
(°fH)
mmol/l Grados
Clarke
51 - 70 91 - 125 9.1 - 12.5 64 - 88
43 - 50 76 - 90 7.6 - 9.0 53 - 63
37 - 42 65 - 75 6.5 - 7.5 46 - 52
29 - 36 51 - 64 5.1 - 6.4 36 - 45
23 - 28 40 - 50 4.0 - 5.0 28 - 35
19 - 22 33 - 39 3.3 - 3.9 23 - 27
15 - 18 26 - 32 2.6 - 3.2 18 - 22 1 4
11 - 14 19 - 25 1.9 - 2.5 13 - 17 1 3
4 - 10 7 - 18 0.7 - 1.8 5 - 12 1 2
< 4 < 7 < 0.7 < 5
1)
Posición de fábrica.
2)
No utilice sal en este nivel.
El descalcificador de agua se debe ajustar manual o electrónicamente.
Ajuste del descalci-
Manual Elec-
1)
2
1)
2
1)
2
1)
2
1)
2
1)
2
2)
1
ficador
de agua
tróni-
co
10
9
8
7
6
1)
5
2)
1
Ajuste manual
Coloque el selector de dureza del agua
en la posición 1 o 2.
Page 48

www.aeg.com
48
Ajuste electrónico
1. Pulse la tecla de encendido/apagado
para encender el aparato. Asegúrese
de que el aparato se encuentra en
modo de ajuste; consulte "AJUSTE E
INICIO DE UN PROGRAMA".
2. Mantenga pulsadas las teclas (4) y (5)
simultáneamente hasta que parpadeen los indicadores de las teclas (3),
(4) y (5).
3. Pulse la tecla (3).
• Los indicadores de las teclas (4) y (5)
se apagan.
LLENAR EL DEPÓSITO DE SAL
• El indicador de la tecla (3) continúa
parpadeando.
• Las señales acústicas funcionan, p.
ej., cinco señales intermitentes = nivel 5.
• En la pantalla aparece el ajuste del
descalcificador, p. ej.,
= nivel 5.
4. Pulse la tecla (3) repetidamente para
cambiar el ajuste.
5. Desactive el aparato para confirmar el
ajuste.
1.
Abra el depósito de sal girando la tapa hacia la izquierda.
2.
Vierta un litro de agua en el depósito
de sal (sólo la primera vez).
3.
Llene el depósito con sal para lavavajillas.
4.
Elimine los restos de sal que puedan
haber quedado en la entrada del depósito.
5.
Cierre el depósito girando la tapa hacia la derecha.
PRECAUCIÓN
El agua y la sal pueden salirse del
depósito de sal cuando lo llena.
Riesgo de corrosión. Para evitarlo,
después de llenar el depósito, inicie un programa.
Page 49

LLENADO DEL DISTRIBUIDOR DE ABRILLANTADOR
1.
A
B
A
X
M
2
1
3
4
+
-
C
D
Pulse el botón de apertura (D) para
abrir la tapa (C).
2.
Llene el dosificador de abrillantador
(A) hasta la marca "max" como máximo.
3.
Limpie las salpicaduras de abrillantador con un paño absorbente para evitar que se forme demasiada espuma.
4.
Cierre la tapa. Asegúrese de que el
botón de apertura se encaja en su sitio.
Puede girar el selector de la cantidad (B) entre la posición 1 (menor
cantidad) y la posición 4 (mayor
cantidad).
ESPAÑOL
49
Page 50

M
A
X
1
2
3
4
+
-
www.aeg.com
50
USO DIARIO
1. Abra el grifo.
2. Pulse la tecla de encendido/apagado
para encender el aparato. Asegúrese
de que el aparato se encuentra en
modo de ajuste; consulte "AJUSTE E
INICIO DE UN PROGRAMA".
• Si el indicador de sal está encendido, llene el depósito.
• Si el indicador de abrillantador está
encendido, llene el dosificador de
abrillantador.
USO DEL DETERGENTE
B
A
30
20
C
AJUSTE E INICIO DE UN
PROGRAMA
Modo de ajuste
El aparato debe estar en modo de ajuste
para realizar algunas operaciones.
El aparato se encuentra en modo de ajuste cuando, tras la activación, la pantalla
muestra dos barras de estado horizontales.
Si el panel de control muestra otras condiciones, pulse RESET hasta que el aparato se encuentre en el modo de ajuste.
Inicio de un programa sin inicio
diferido
1. Abra el grifo.
2. Pulse la tecla de encendido/apagado
para encender el aparato. Asegúrese
de que el aparato se encuentra en
modo de ajuste.
3. Cargue los cestos.
4. Añada el detergente.
5. Ajuste e inicie el programa correcto
para el tipo de carga y el grado de suciedad.
1.
Pulse el botón de apertura (B) para
abrir la tapa (C).
2.
Coloque el detergente en el compartimento (A).
3.
Si el programa tiene una fase de prelavado, inserte una pequeña cantidad
de detergente en la parte interior de
la puerta del aparato.
4.
Si utiliza pastillas de detergente, coloque la pastilla en el compartimento
(A).
5.
Cierre la tapa. Asegúrese de que el
botón de apertura se encaja en su sitio.
3. Ajuste el programa.
• El número del programa correspondiente parpadea en la pantalla.
4. Si lo desea, puede ajustar las opcio-
nes.
5. Cierre la puerta del aparato. Se inicia
el programa.
• Si abre la puerta, la pantalla muestra la duración del programa que
disminuye a intervalos de 1 minuto.
Inicio de un programa con
inicio diferido
1. Ajuste el programa.
2. Pulse la tecla de inicio diferido varias
veces hasta que la pantalla muestre el
tiempo de inicio diferido que desee
ajustar (entre 1 y 24 horas).
• El tiempo de inicio diferido parpadea en la pantalla.
• Se ilumina el indicador de inicio diferido.
Page 51

3. Cierre la puerta del aparato. La cuenta
atrás se inicia.
• Si abre la puerta, la pantalla muestra la cuenta atrás del inicio diferido
que disminuye a intervalos de 1 hora.
El programa de lavado se pone en marcha cuando termina la cuenta atrás.
Apertura de la puerta mientras
está funcionando el aparato
Si abre la puerta, se detiene el aparato.
Cuando cierra la puerta, el aparato continúa a partir del punto en que se interrumpió.
Cancelación del inicio diferido
mientras está en curso la
cuenta atrás
Pulse RESET hasta que aparezcan 2 barras de estado horizontales en la pantalla.
Al cancelar el inicio diferido, el
aparato vuelve al modo de ajuste.
En tal caso tendrá que ajustar el
programa de nuevo.
ESPAÑOL
Importante
• Deje enfriar la vajilla antes de retirarla
del aparato. Los platos calientes son
sensibles a los golpes.
• Vacíe primero el cesto inferior y, a continuación, el superior.
• Puede haber restos de agua en los laterales y en la puerta del aparato. El acero inoxidable se enfría con mayor rapidez que los platos.
51
Cancelación de un programa
Pulse RESET hasta que aparezcan 2 barras de estado horizontales en la pantalla.
Compruebe que hay detergente
en el dosificador antes de iniciar
un nuevo programa.
Al final del programa
Al terminar el programa, se oye una señal
acústica intermitente. La pantalla muestra
0 y el indicador de fin de programa se enciende.
1. Pulse la tecla de encendido/apagado
para apagar el aparato.
2. Cierre el grifo.
Si no se pulsa la tecla de encendido/apagado, el dispositivo AUTO
OFF desactiva el aparato automáticamente transcurridos unos minutos. Esto ayuda a reducir el consumo de energía.
Page 52

www.aeg.com
52
CONSEJOS
DESCALCIFICADOR DE AGUA
El agua dura contiene gran cantidad de
minerales que pueden dañar el aparato y
provocar resultados de lavado no satisfactorios. El descalcificador de agua neutraliza estos minerales.
La sal para lavavajillas mantiene el descalcificador limpio y en buen estado. Es muy
importante ajustar el nivel de descalcificador. De esta forma se asegura de que el
descalcificador utilice la cantidad correcta
de sal y agua.
CARGA DE LOS CESTOS
Consulte el folleto suministrado
con ejemplos de carga de los cestos.
• Utilice el aparato exclusivamente para
lavar utensilios aptos para lavavajillas.
• No coloque en el aparato utensilios de
madera, cuerno, aluminio, peltre o cobre.
• No coloque en el aparato objetos que
puedan absorber agua (esponjas, paños de limpieza, etc.).
• Elimine los restos de comida de los platos.
• Para eliminar fácilmente los restos de
comida, remoje las cacerolas y sartenes
en agua antes de colocarlas en el aparato.
• Coloque los objetos huecos (por ejemplo, tazas, vasos, cazuelas) boca abajo.
• Asegúrese de que los cubiertos y los
platos no se adhieran entre sí. Mezcle
las cucharas con otros cubiertos.
• Asegúrese de que los vasos no chocan
entre sí
• Coloque los objetos pequeños en el
cesto de cubiertos.
• Coloque los objetos ligeros en el cesto
superior. Asegúrese de que no se mueven.
• Antes de iniciar un programa, compruebe que los brazos aspersores giran sin
obstrucción.
UTILIZACIÓN DE SAL,
ABRILLANTADOR Y
DETERGENTE
• Utilice únicamente sal, abrillantador y
detergente para el lavavajillas. El aparato podría dañarse con otros productos.
• El abrillantador ayuda a secar la vajilla
sin dejar rayas ni manchas durante la última fase de aclarado.
• Las pastillas de detergente combinado
contienen detergente, abrillantador y
otros productos añadidos. Compruebe
que las pastillas son adecuadas para la
dureza del agua de su zona. Consulte
las instrucciones del paquete de los
productos.
• Las pastillas de detergente no se disuelven completamente con programas
cortos. Para evitar restos de detergente
en la vajilla, se recomienda usar pastillas de detergente con los programas
largos.
No utilice más cantidad de detergente que la recomendada. Consulte las instrucciones del envase
del detergente.
ANTES DEL INICIO DE UN
PROGRAMA
Compruebe que:
• Los filtros están limpios y bien instalados.
• Los brazos aspersores no están obstruidos.
• La posición de los objetos en los cestos
es correcta.
• El programa es adecuado para el tipo
de carga y el grado de suciedad.
• Se utiliza la cantidad correcta de detergente.
• Hay abrillantador y sal para lavavajillas
(a menos que utilice pastillas de detergente combinado).
• La tapa del depósito de sal está apretada.
Page 53

MANTENIMIENTO Y LIMPIEZA
ESPAÑOL
53
ADVERTENCIA
Antes de proceder con el mantenimiento, apague el aparato y
desconecte el enchufe de la red.
LIMPIEZA DE LOS FILTROS
C
B
A1
A2
Los filtros sucios y los brazos aspersores obstruidos reducen la
calidad del lavado.
Revíselos periódicamente y, si es
necesario, límpielos.
1.
Gire el filtro (A) a la izquierda y extráigalo.
C
A
2.
Para desmontar el filtro (A), separe
(A1) y (A2).
3.
Extraiga el filtro (B).
4.
Lave los filtros con agua.
5.
Coloque el filtro (B) en su posición
inicial. Asegúrese de montarlo correctamente bajo las dos guías (C).
6.
Coloque el filtro (A) en su posición
en el filtro (B). Gírelo hacia la derecha
hasta que encaje.
Una posición incorrecta de los filtros puede dañar el aparato y provocar resultados de lavado no satisfactorios.
LIMPIEZA DE LOS BRAZOS
ASPERSORES
No retire los brazos aspersores.
Si los orificios de los brazos aspersores se
taponan, retire la suciedad restante con
un objeto afilado.
LIMPIEZA DEL EXTERIOR
Limpie el aparato con un paño suave humedecido.
Utilice sólo detergentes neutros. No utilice productos abrasivos, estropajos duros
ni disolventes.
Page 54

www.aeg.com
54
SOLUCIÓN DE PROBLEMAS
El aparato no se pone en marcha ni se detiene durante el funcionamiento.
Antes de ponerse en contacto con el servicio técnico, consulte la información siguiente para solucionar el problema.
Algunos fallos de funcionamiento se indican en la pantalla con un código de
alarma:
•
- El aparato no carga agua.
•
- El aparato no desagua.
•
- El dispositivo anti inundación se
ha puesto en marcha.
ADVERTENCIA
Apague el aparato antes de realizar las comprobaciones.
Problema Posible causa Posible solución
El programa no se
pone en marcha.
El aparato no está bien enchufado a la toma de co-
Enchufe el aparato correctamente.
rriente.
La puerta del aparato está
Cierre la puerta del aparato.
abierta.
Se ha fundido un fusible de
Cambie el fusible.
la instalación doméstica.
Está ajustado el inicio diferi-
do.
Cancelación del inicio diferido o espera hasta el final de
la cuenta atrás.
El aparato no carga
agua.
La presión de agua es insu-
El grifo de agua está cerrado.
ficiente.
Abra el grifo.
Póngase en contacto con la
empresa de suministro de
agua.
El grifo está obstruido o tie-
Limpie el grifo.
ne incrustaciones calcáreas.
El filtro de la manguera de
Limpie el filtro.
entrada de agua está obstruido.
La manguera de entrada de
agua está doblada o retorcida.
El dispositivo anti inunda-
ción se ha puesto en marcha. Hay fugas de agua en
Compruebe que la mangue-
ra está instalada correcta-
mente.
Cierre el grifo y póngase en
contacto con el servicio téc-
nico.
el aparato.
El aparato no desa-
El desagüe está obstruido. Desatásquelo.
gua.
La manguera de desagüe
está doblada o retorcida.
Compruebe que la mangue-
ra está instalada correcta-
mente.
Una vez finalizada la revisión, encienda el
aparato. El programa continuará a partir
del punto en que se haya interrumpido.
Si el problema se vuelve a producir, póngase en contacto con el servicio técnico.
Si la pantalla muestra otros códigos de
alarma, diríjase al servicio técnico.
Page 55

ESPAÑOL
55
LOS RESULTADOS DEL
LAVADO Y EL SECADO NO
SON SATISFACTORIOS
Se ven rayas o películas azuladas en
vasos y platos
• La dosificación del abrillantador es demasiado alta. Ajuste el selector de abrillantador en la posición más baja.
• La cantidad de detergente es demasiada.
Manchas y gotas de agua en vajilla y
cristalería
• La dosificación del abrillantador es insuficiente. Ajuste el selector de abrillantador en una posición más alta.
• La calidad del detergente podría ser la
causa.
La vajilla está mojada
• El programa no tiene una fase de secado o la tiene con una temperatura baja.
• El dosificador de abrillantador está vacío.
• La calidad del abrillantador podría ser
la causa.
• La calidad de las pastillas de detergente combinado podría ser la causa. Pruebe con una marca diferente o active el
dosificador del abrillantador y utilice
éste junto con las pastillas de detergente combinado.
Consulte otras posibles causas en
"CONSEJOS".
Activación del dosificador del
abrillantador con la función
multitab activada
1. Pulse la tecla de encendido/apagado
para encender el aparato. Asegúrese
de que el aparato se encuentra en
modo de ajuste; consulte “AJUSTE E
INICIO DE UN PROGRAMA”.
2. Mantenga pulsadas las teclas (4) y (5)
simultáneamente hasta que parpadeen los indicadores de las teclas (3),
(4) y (5).
3. Pulse la tecla (4).
• Los indicadores de las teclas (3) y (5)
se apagan.
• El indicador de la tecla (4) continúa
parpadeando.
• La pantalla muestra el ajuste del dosificador de abrillantador.
Off
On
4. Pulse la tecla (4) para cambiar el ajus-
te.
5. Apague el aparato para confirmar el
ajuste.
6. Ajuste la cantidad de abrillantador.
7. Llene el dosificador de abrillantador.
INFORMACIÓN TÉCNICA
Medidas Ancho / Alto / Fondo (mm) 596 / 818 - 898 / 550
Conexión eléctrica Consulte la placa de características.
Voltaje 220-240 V
Frecuencia 50 Hz
Presión del suministro
de agua
Suministro de agua
Capacidad Cubiertos 12
Consumo de potencia Modo encendido 0.10 W
1)
Conecte la manguera de entrada de agua a un grifo con rosca de 3/4 pulgadas.
Mín. / máx. (bares / MPa) (0.5 / 0.05 ) / (8 / 0.8 )
1)
Agua fría o caliente
Modo apagado 0.10 W
2)
máx. 60 °C
Page 56

www.aeg.com
56
2)
Si el agua caliente procede de fuentes de energía alternativas (por ejemplo, paneles
solares, energía eólica), utilice la toma de agua caliente para reducir el consumo de
energía.
Page 57

ESPAÑOL
57
Page 58

www.aeg.com
58
Page 59

ESPAÑOL
59
Page 60

www.aeg.com/shop 117911590-A-432012
 Loading...