

Page 1

FAVORIT 50870
User manual Dishwasher
Οδηγίες Χρήσης Πλυντήριο πιάτων
Page 2
Contents
2
Thank you for choosing one of our high-quality products.
To ensure optimal and regular performance of your appliance please read this
instruction manual carefully. It will enable you to navigate all processes perfectly
and most efficiently. To refer to this manual any time you need to, we recommend
you to keep it in a safe plac e. An d p le as e pass it to any future owner of the appliance.
We wish you much joy with your new appliance.
Contents
Operating instructions 3
Safety information 3
Correct use 3
General safety 3
Child safety 3
Installation 4
Product description 4
Control panel 5
Delay start button 6
Digital display 6
Function buttons 6
Setting mode 6
Use of the appliance 7
Setting the water softener 7
Manual adjustment 8
Electronic adjustment 8
Use of dishwasher salt 8
Use of rinse aid 9
Adjusting the rinse aid dosage 10
Loading cutlery and dishes 10
Helpful hints and tips 10
Lower basket 11
Cutlery basket 12
The upper basket 13
Adjustment of the height of the upper
basket 14
Use of detergent 14
Multitab function 16
Washing programmes 17
Setting and starting a washing programme
Cancelling a washing programme 18
Interrupting a washing programme 18
Setting and starting a washing programme
with delay start 19
End of the washing programme 19
Removing the load 19
Care and cleaning 20
Cleaning the filters 20
External cleaning 21
Frost precautions 21
What to do if… 21
Technical data 23
Installation instructions 23
Installation 23
Fitting under a counter 23
Do these steps to remove the appliance
worktop: 24
Adjusting the level of the appliance 24
Water connection 25
Water inlet hose 25
Water drain hose 25
Electrical connection 26
Environment concerns 26
Subject to change without notice
18
Page 3

Safety information
Operating instructions
Safety information
For your safety and correct operation of the appliance, read this manual carefully before
installation and use. Always keep these instructions with the appliance even if you move
or sell it. Users must fully know the operation and safety features of the appliance.
Correct use
• The appliance is designed exclusively for domestic use.
• Only use the appliance to clean household utensils that are applicable for dishwashers.
• Do not put solvents in the appliance. Risk of explosion.
• Put the knives and all items with sharp points in the cutlery basket with their points
down. If not, put in a horizontal position in the upper basket.
• Use only branded products for dishwashers (detergent, salt, rinse aid).
• If you open the door while the appliance is in operation, hot steam can escape. Risk of
skin burns.
• Do not remove dishes from the dishwasher before the end of the washing programme.
• When the washing programme is completed, disconnect the mains plug from the mains
socket and close the water tap.
• Only an authorised service engineer can repair this appliance. Use only original spare
parts.
• Do not do repairs yourself to prevent injury and damage to the appliance. Always contact
your local Service Force Centre.
3
General safety
• Persons (including children) with reduced physical sensory, mental capabilities or lack
of experience and knowledge must not use the appliance. They must have supervision
or instruction for the operation of the appliance by a person responsible for their safety.
• Obey the safety instructions from the manufacturer of the dishwasher detergent to
prevent burns to eyes, mouth and throat.
• Do not drink the water from the dishwasher. Detergent residues can stay in your appliance.
• Always close the door when you do not use the appliance to prevent injury and not to
stumble over the open door.
• Do not sit or stand on the open door.
Child safety
• Only adults can use this appliance. Children must get supervision to make sure that they
do not play with the appliance.
• Keep all the packaging away from children. There is a risk of suffocation.
• Keep all detergents in a safe area. Do not let children touch the detergents.
• Keep children away from the appliance when the door is open.
Page 4
Product description
4
Installation
• Make sure that the appliance is not damaged because of transport. Do not connect a
damaged appliance. If necessary, contact the supplier.
• Remove all packaging before first use.
• A qualified and competent person must do the electrical installation.
• A qualified and competent person must do the plumbing installation.
• Do not change the specifications or modify this product. Risk of injury and damage to
the appliance.
• Do not use the appliance:
– if the mains cable or water hoses are damaged,
– if the control panel, worktop or plinth area are damaged, that you can get access to
the inner side of the appliance.
Contact your local Service Force Centre.
• Do not drill into the sides of the appliance to prevent damage to hydraulic and electrical
components.
WARNING!
Carefully obey the instructions for electrical and water connections.
Product description
Page 5
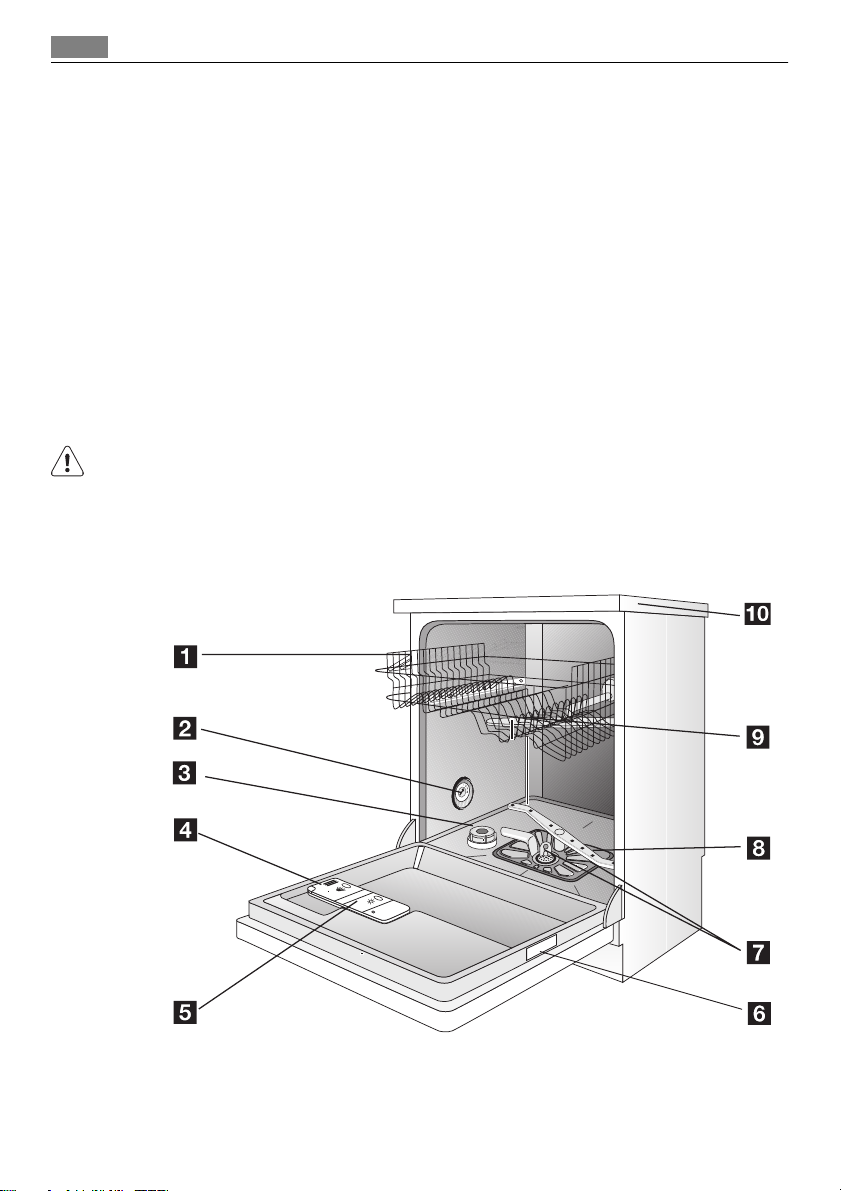
1 Upper basket
2 Water hardness dial
3 Salt container
4 Detergent dispenser
5 Rinse aid dispenser
6 Rating plate
7 Filters
8 Lower spray arm
9 Upper spray arm
10 Worktop
Control panel
Control panel
5
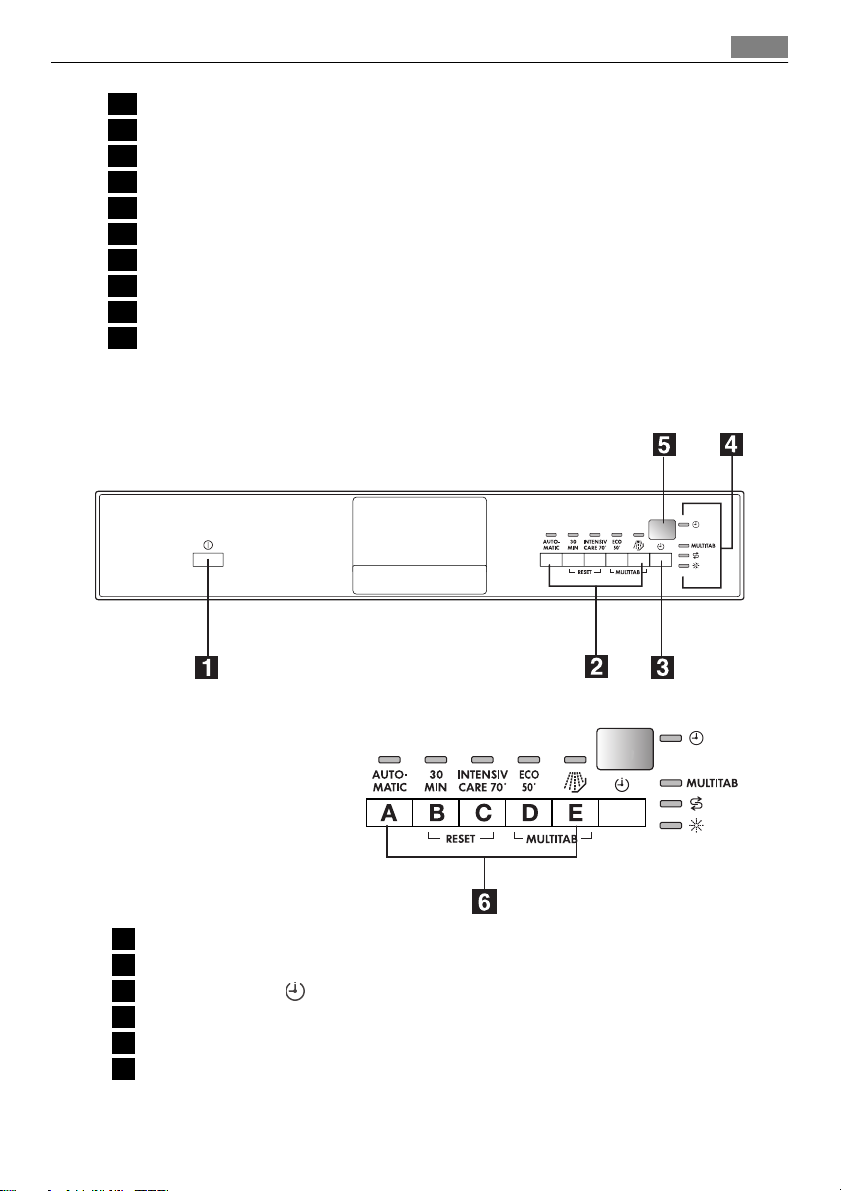
1 On/off button
2 Programme selection buttons
3
Delay start button
4 Indicator lights
5 Digital display
6 Function buttons
Page 6

Control panel
6
Indicator lights
Programme in progress The indicator light comes on when you select a
washing programme.
MULTITAB The indicator light shows the activation/deacti-
1)
Salt
Rinse aid
1) When the salt and/or rinse aid containers are empty, the related indicator lights do not come on while a washing
1)
programme operates.
vation of the multitab function. Refer to 'Multitab function'.
The indicator light comes on when it is necessary
to fill the salt container. Refer to 'Use of dishwasher salt'.
After you fill the container, the salt indicator
light can continue to stay on for some hours.
This does not have an unwanted effect on the
operation of the appliance.
The indicator light comes on when it is necessary
to fill the rinse aid. Refer to 'Use of rinse aid'.
Delay start button
Use the delay start button to delay the start of the washing programme with an interval
between 1 and 19 hours. Refer to the chapter 'Setting and starting a washing programme'.
Digital display
The display shows:
• the set level of the water softener.
• Remaining time to the end of the programme.
• Activation/deactivation of the rinse aid dispenser (only with multitab function on).
• End of the washing programme. The display shows a zero.
• Number of hours in delay start.
•Fault codes.
Function buttons
Use the function buttons for these operations:
• To set the water softener. Refer to the chapter 'Setting the water softener'.
• To cancel the washing programme in progress or a delay start in progress. Refer to the
chapter 'Setting and starting a washing programme'.
• To activate/deactivate the multitab function. Refer to the chapter 'Multitab function'.
• To deactivate/activate the rinse aid dispenser, when multitab function is active. Refer to
the chapter 'Multitab function'.
Setting mode
The appliance must be in setting mode for these operations:
• To set a washing programme.
• To set the water softener level.
• To deactivate/activate the rinse aid dispenser.
Page 7
Use of the appliance
Press the on/off button. The appliance is in setting mode when:
– All the programme indicator lights come on.
Press the on/off button. The appliance is not in setting mode when:
– Only one programme indicator light comes on
– A washing programme is set. It is necessary to cancel the programme to go back to the
setting mode. Refer to the chapter 'Setting and starting a washing programme'.
Use of the appliance
Refer to the following instructions for each step of procedure:
1. Make a check if the water softener level is correct for the water hardness in your area.
If necessary set the water softener.
2. Fill the salt container with dishwasher salt.
3. Fill the rinse aid dispenser with rinse aid.
4. Load cutlery and dishes into the dishwasher.
5. Set the correct washing programme for the type of load and soil.
6. Fill the detergent dispenser with the correct quantity of detergent.
7. Start the washing programme.
If you use combi detergent tablets ('3 in 1', '4 in 1', '5 in 1', etc.), refer to the chapter 'Multitab
function'.
Setting the water softener
7
The water softener removes minerals and salts from the water supply. Minerals and salts
can have bad effect on the operation of the appliance.
Water hardness is measured in equivalent scales:
• German degrees (dH°).
• French degrees (°TH).
• mmol/l (millimol per litre - international unit for the hardness of water).
•Clarke.
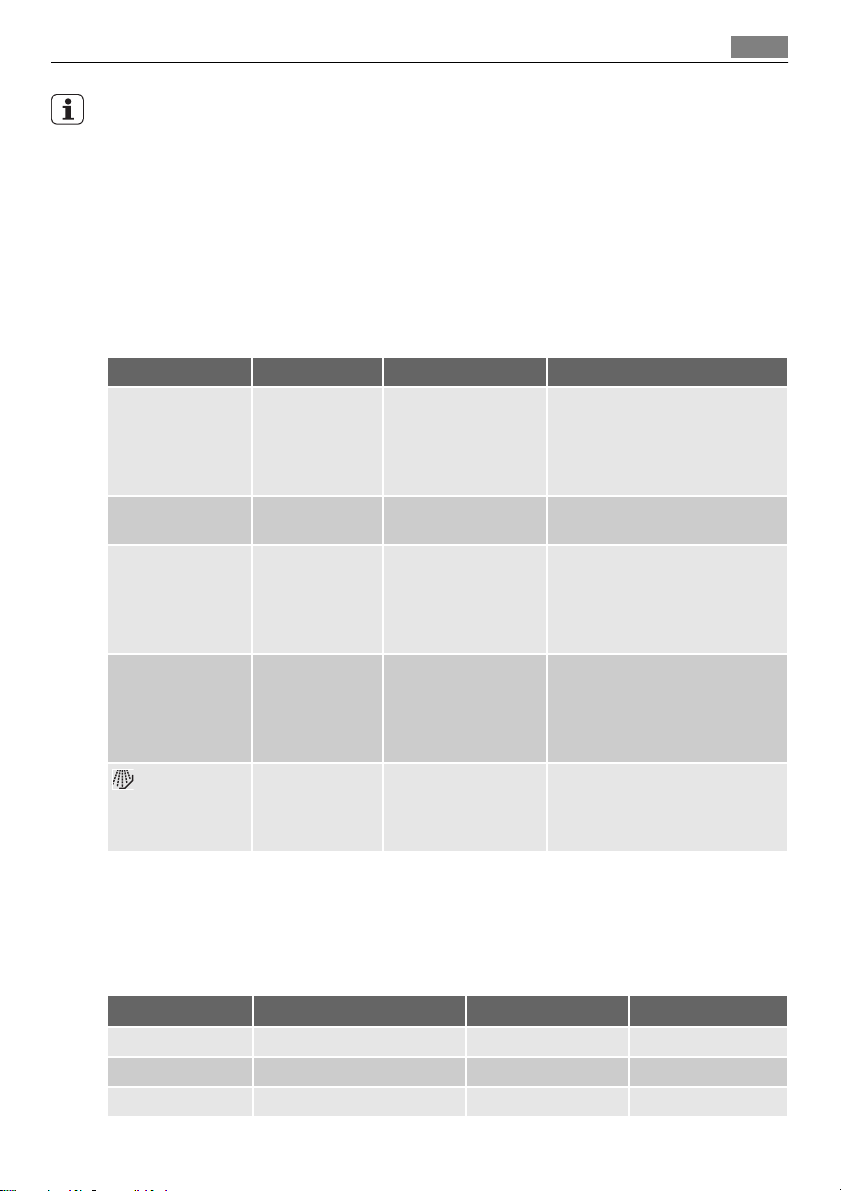
Adjust the water softener to the water hardness in your area. If necessary, contact your
local water authority.
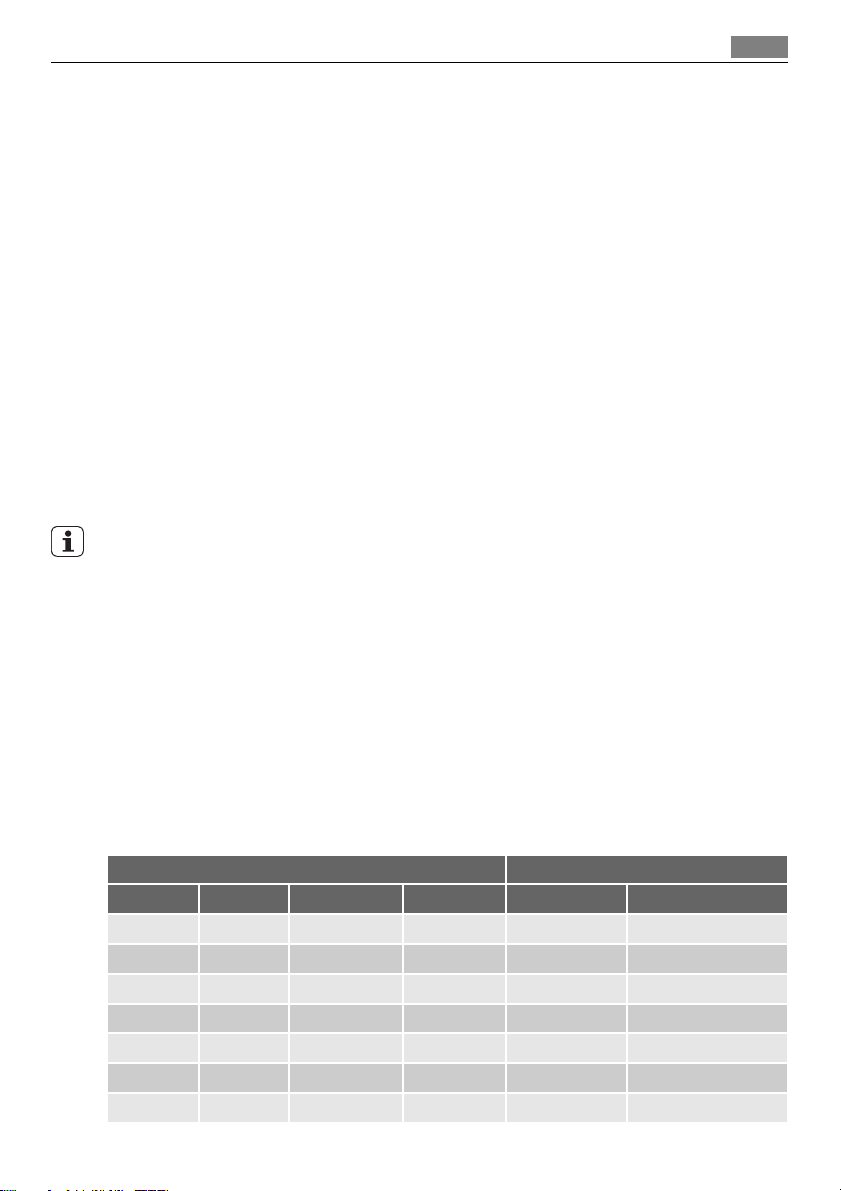
Water hardness Water hardness setting
°dH °TH mmol/l Clarke manually electronically
51 - 70 91 - 125 9,1 - 12,5 64 - 88 2 10
43 - 50 76 - 90 7,6 - 9,0 53 - 63 2 9
37 - 42 65 - 75 6,5 - 7,5 46 - 52 2 8
29 - 36 51 - 64 5,1 - 6,4 36 - 45 2 7
23 - 28 40 - 50 4,0 - 5,0 28 - 35 2 6
19 - 22 33 - 39 3,3 - 3,9 23 - 27 2 5
15 - 18 26 - 32 2,6 - 3,2 18 - 22 1 4
Page 8
Use of dishwasher salt
8
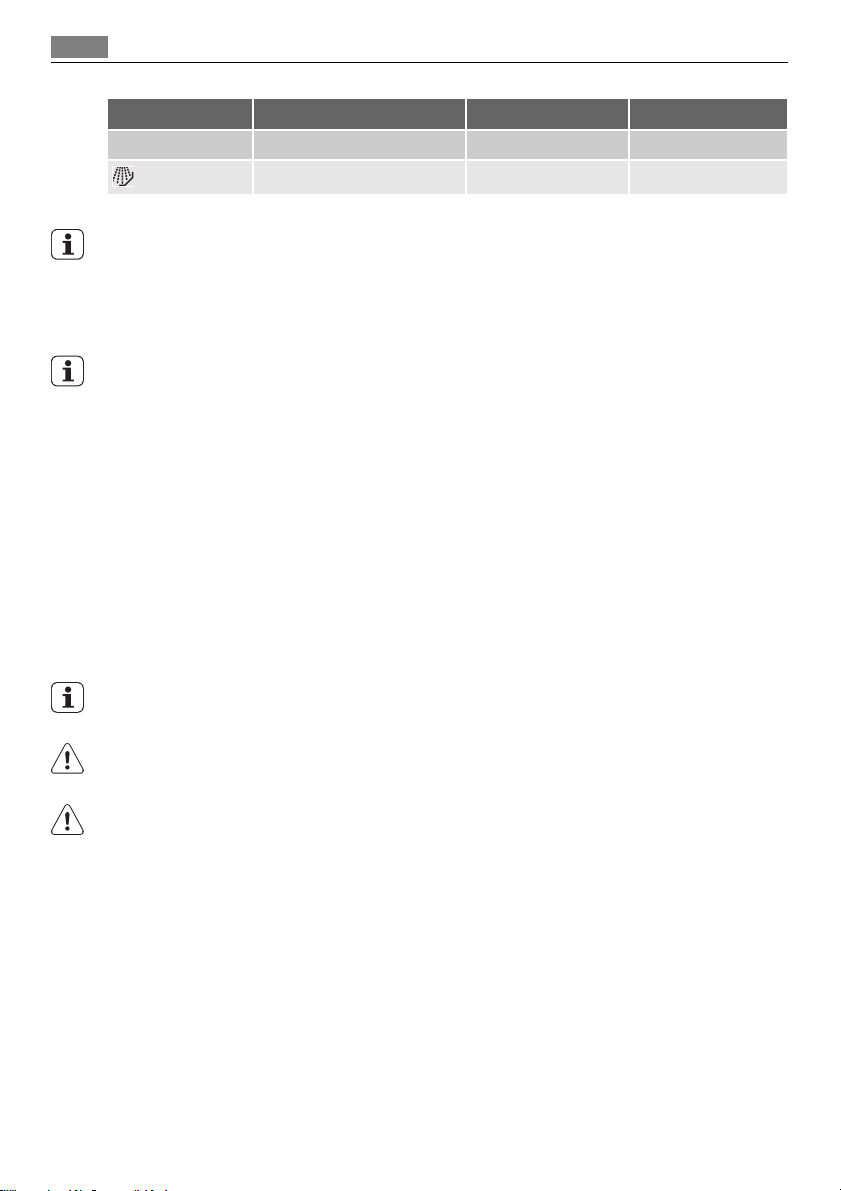
Water hardness Water hardness setting
°dH °TH mmol/l Clarke manually electronically
11 - 14 19 - 25 1,9 - 2,5 13 - 17 1 3
4 - 10 7 - 18 0,7 - 1,8 5 - 12 1 2
< 4 < 7 < 0,7 < 5
1) No use of salt required.
You must set the water softener manually and electronically.
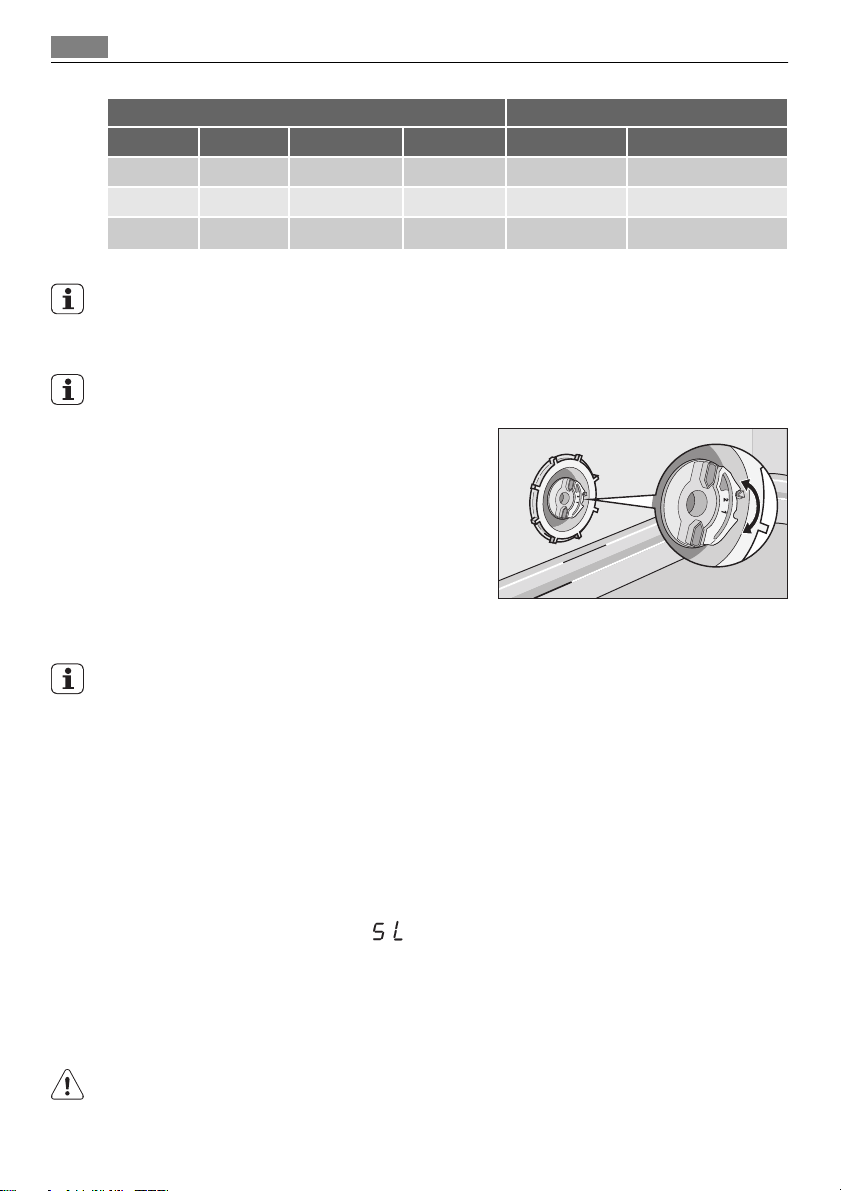
Manual adjustment
The appliance is set at the factory at position 2.
1. Open the door.
2. Remove the lower basket.
3. Turn the water hardness dial to position 1
or 2 (refer to the chart).
4. Install the lower basket.
5. Close the door.
1)
1
1)
1
Electronic adjustment
The water softener is set at the factory at level 5.
1. Switch on the appliance.
2. Make sure that the appliance is in setting mode.
3. Press and hold function buttons B and C until the indicator lights of function buttons
A, B and C start to flash.
4. Release function buttons B and C.
5. Press function button A.
– The indicator lights for function buttons B and C go off.
– The indicator light for function button A continues to flash.
– The digital display shows the current level.
Example: digital display shows
= level 5.
6. Press the function button A one time to increase the water softener level by one step.
7. Press the on/off button to save the operation.
Use of dishwasher salt
CAUTION!
Only use dishwashers salt. Types of salt that are not applicable for dishwashers cause damage to the water softener.
Page 9
Use of rinse aid
CAUTION!
Grains of salt and salty water on the bottom of the appliance can cause corrosion. Fill the
appliance with salt before you start a washing programme to prevent corrosion.
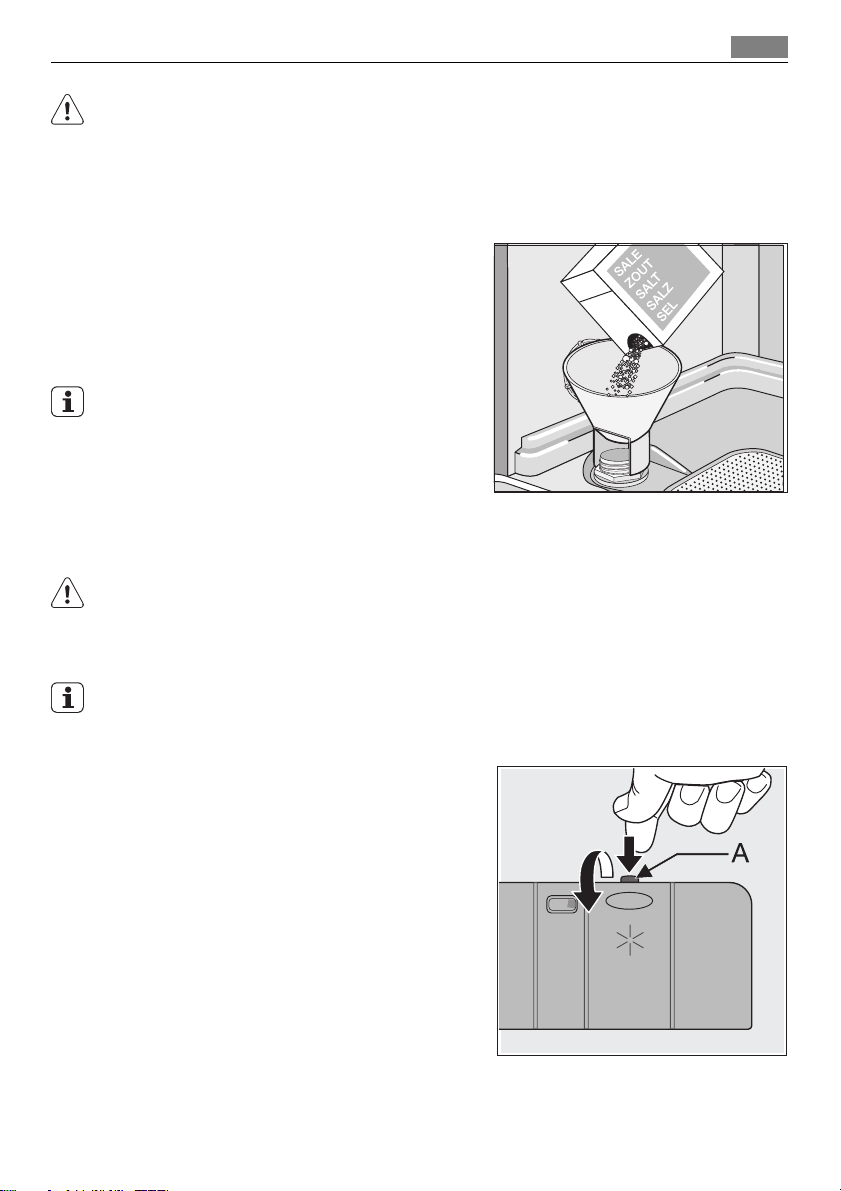
Do these steps to fill the salt container:
1. Turn the cap anticlockwise to open the salt container.
2. Fill the salt container with 1 litre of water (only the first operation).
3. Use the funnel to fill the salt container
with salt.
4. Remove the salt around the opening of
the salt container.
5. Turn the cap clockwise to close the salt
container.
It is normal that water overflows from the salt
container when you fill it with salt.
Use of rinse aid
CAUTION!
Only use branded rinse aid for dishwashers.
Do not fill the rinse aid dispenser with other products (e.g. dishwasher cleaning agent, liquid
detergent). This can cause damage to the appliance.
9
Rinse aid makes it possible to dry the dishes without streaks and stains.
Rinse aid is automatically added during the last rinsing phase.
Do these steps to fill the rinse aid dispenser:
1. Press the release button (A) to open the
rinse aid dispenser.
Page 10
Loading cutlery and dishes
10
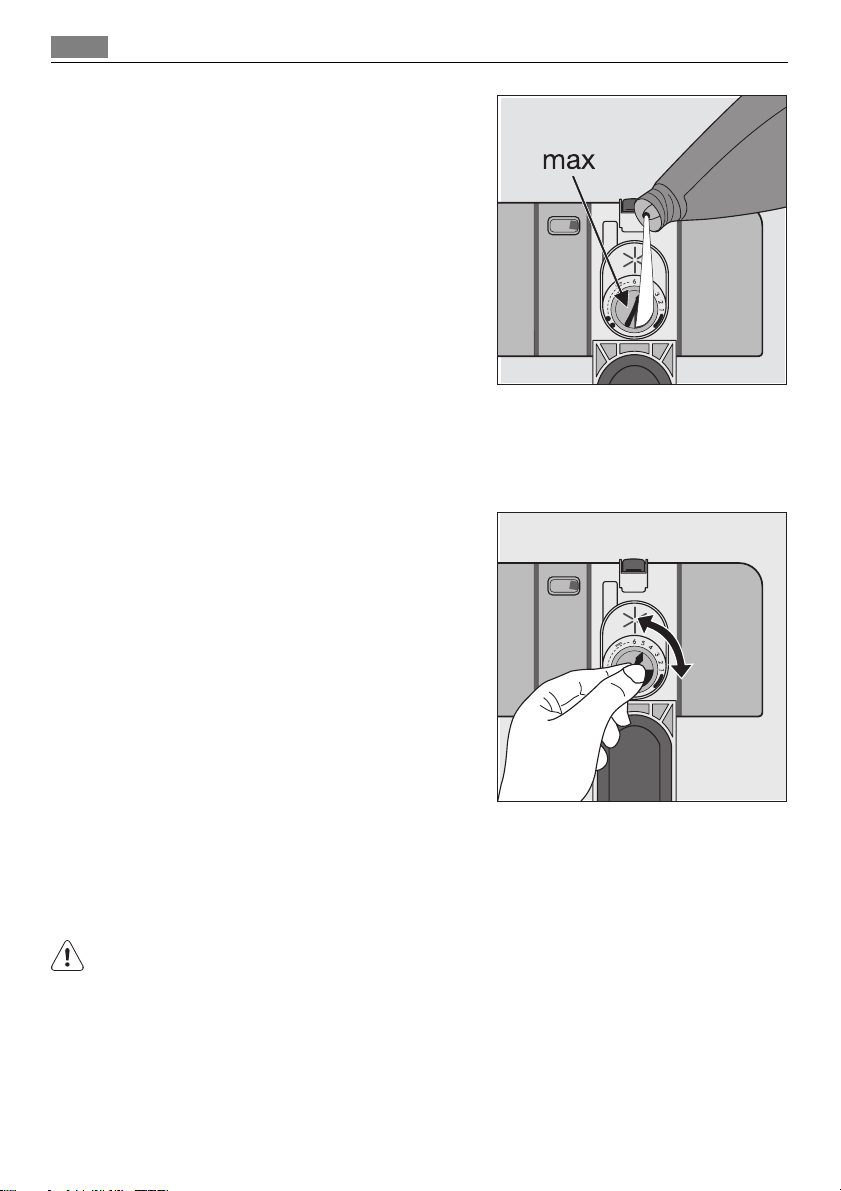
2. Fill the rinse aid dispenser with rinse aid.
The mark 'max.' shows the maximum level.
3. Remove the spilled rinse aid with an ab-
sorbent cloth to prevent too much foam
during the subsequent washing programme.
4. Close the rinse aid dispenser.
Adjusting the rinse aid dosage
The rinse aid is set at the factory at position 4.
You can set the rinse aid dosage between position 1 (lowest dosage) and position 6 (highest
dosage).
Turn the rinse aid dial to increase or decrease the
dosage.
– Increase the dosage if there are water droplets
or limescale on the dishes.
– Decrease the dosage if there are streaks, whitish
stains or bluish layers on the dishes.
Loading cutlery and dishes
Helpful hints and tips
CAUTION!
Only use the appliance for household utensils that are applicable for dishwashers.
Do not use the appliance to clean objects that can absorb water (sponges, household cloths,
etc.).
• Before you load cutlery and dishes, do these steps:
– Remove all food remainings and debris.
– Make burnt, remaining food in pans soft.
Page 11
Loading cutlery and dishes
• While you load cutlery and dishes, do these steps:
– Load hollow items (e.g. cups, glasses and pans) with the opening down.
– Make sure that water does not collect in the container or in a deep base.
– Make sure that cutlery and dishes do not lie inside one another.
– Make sure that cutlery and dishes do not cover other cutlery and dishes.
– Make sure that glasses do not touch other glasses.
– Put small objects in the cutlery basket.
• Plastic items and pans with non-stick coatings can keep water droplets. Plastic items do
not dry as well as porcelain and steel items.
• Put light items in the upper basket. Make sure that the items do not move.
CAUTION!
Make sure that the spray arms can move freely before you start a washing programme.
WARNING!
Always close the door after you load or unload the appliance. An open door can be dangerous.
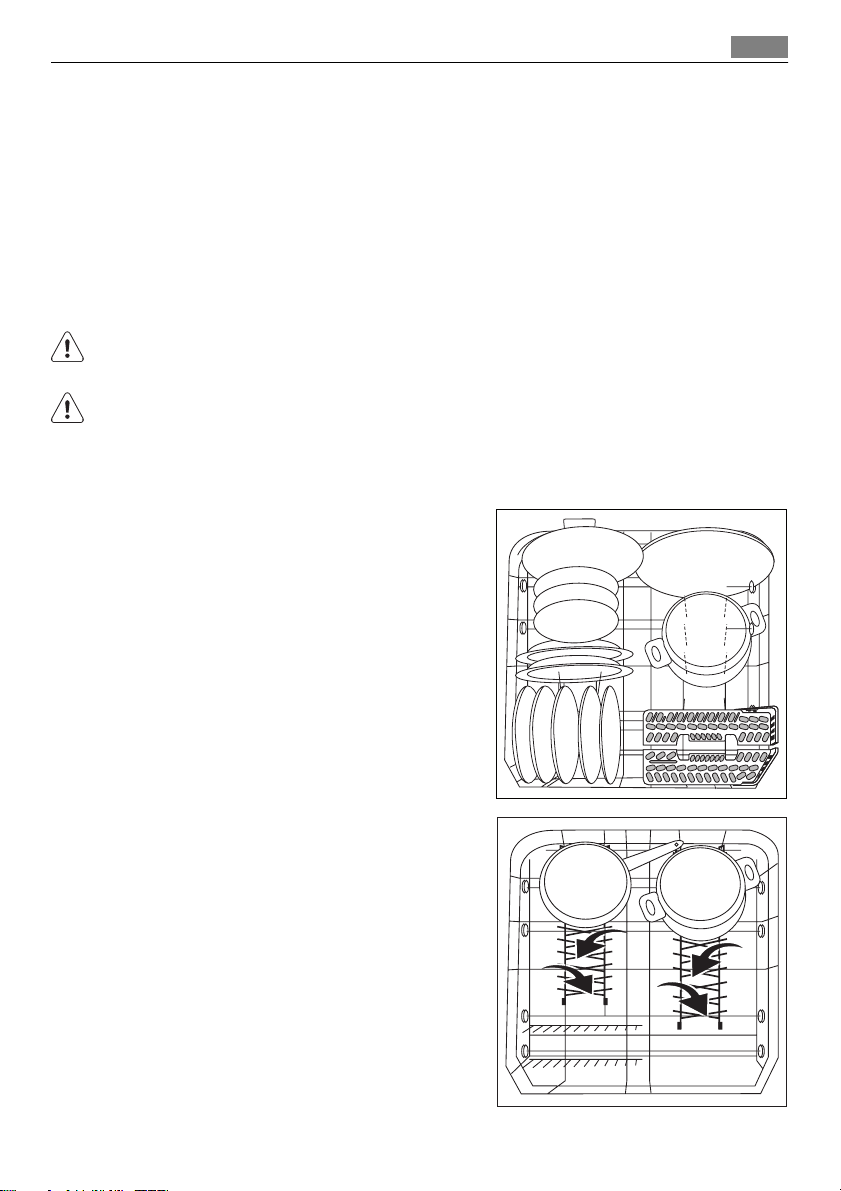
Lower basket
Put large and heavily soiled dishes and pans in the
lower basket.
11
The rows of prongs in the lower basket can be flat
to load large dishes, pots, pans and bowls.
Page 12
Loading cutlery and dishes
12
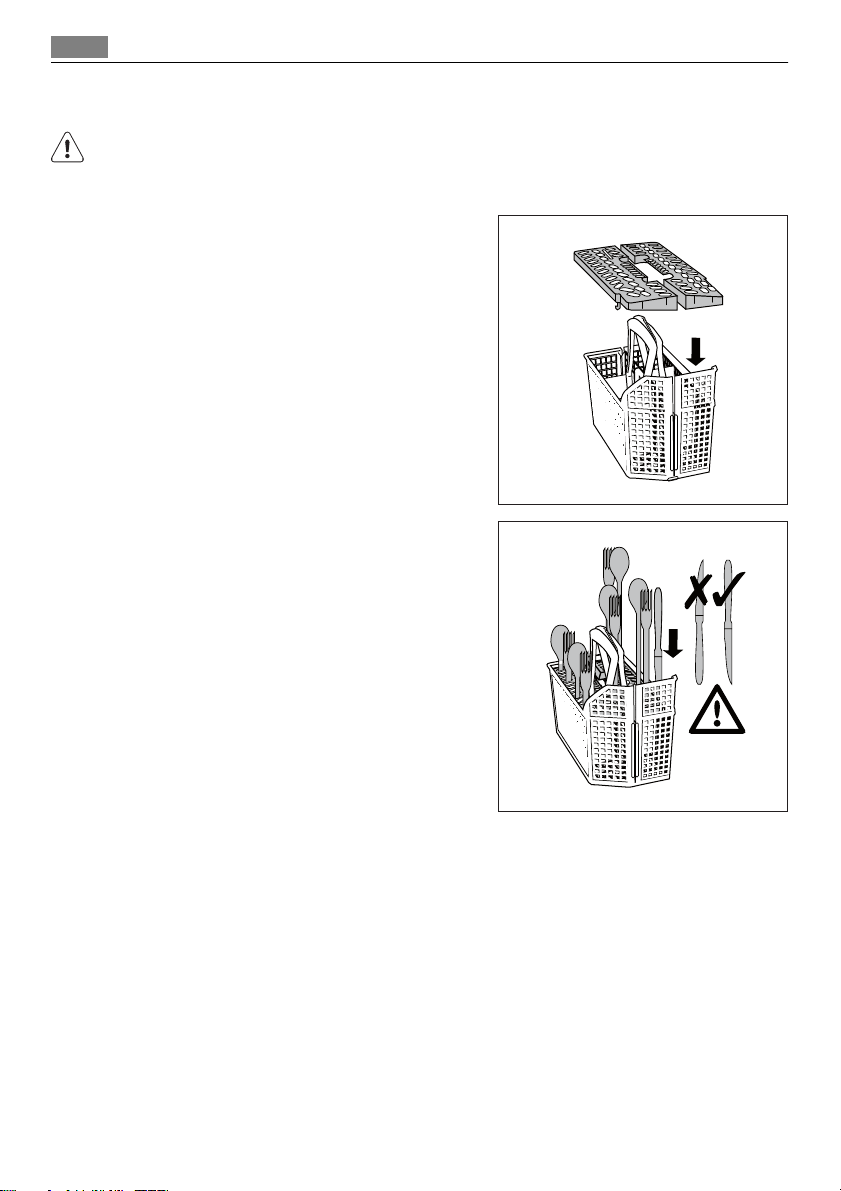
Cutlery basket
WARNING!
Do not put long-bladed knives in a vertical position. Arrange long and sharp cutlery horizontally in the upper basket. Be careful with sharp items.
Use the cutlery grids.
• Put the grids on the cutlery basket.
• For larger items use only one of the cutlery grids.
• Put forks and spoons with the handles down.
• Put knives with the handles up.
• Mix spoons with other cutlery to prevent
them to bond together.
Page 13
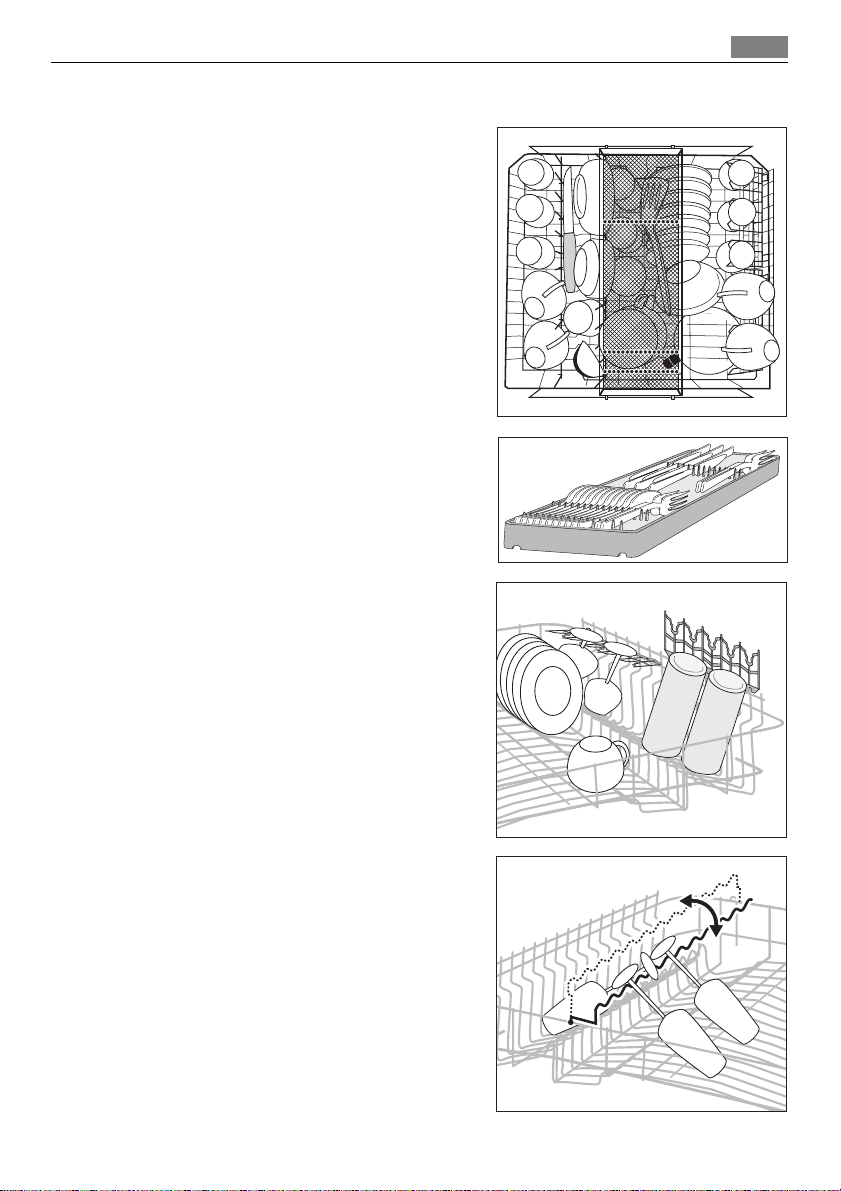
The upper basket
The upper basket is for saucers, salad bowls, cups,
glasses, pots and lids. Arrange the items to let water touch all surfaces.
• Put knives and small cutlery in the cutlery
tray. Put cutlery that is too large for the cutlery tray in the cutlery basket.
• For longer items fold the cup racks up.
• Put glasses with long stems in the cup racks
with the stems up.
Loading cutlery and dishes
13
• For glasses with long stems, turn the glass
holder to the left or to the right.
Page 14
Use of detergent
14
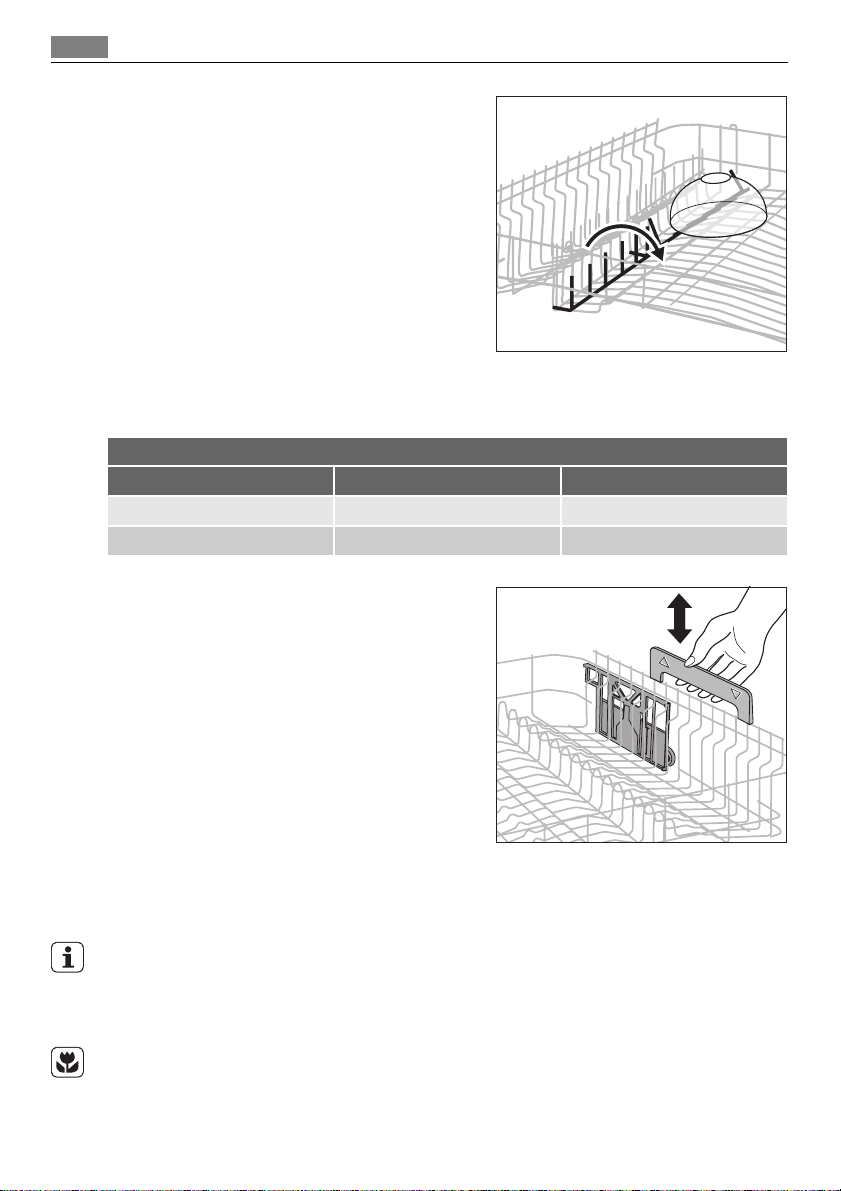
• You can fold up or down the row of prongs
on the left side of the upper basket to increase load flexibility.
Adjustment of the height of the upper basket
You can put the upper basket in two positions to increase load flexibility.
Maximum height of the dishes in:
the upper basket the lower basket
Upper position 22 cm 30 cm
Lower position 24 cm 29 cm
Do these steps to move to the upper basket to the lower/upper position:
1. Pull out the upper basket until it stops.
2. Hold the upper basket by the handle, lift it
as far as possible and lower it vertically.
The upper basket latches into the lower or
the upper position.
Use of detergent
Only use detergents (powder, liquid or tablet) that are applicable for dishwashers.
Follow the data on the packaging:
• Dosage recommended by the manufacturer.
• Storage recommendations.
Do not use more than the correct quantity of detergent to save an environment.
Do these steps to fill the detergent dispenser:
Page 15

1. Open the lid of the detergent dispenser.
2. Fill the detergent dispenser (A) with de-
tergent. The marking shows the dosage:
20 = approximately 20 g of detergent
30 = approximately 30 g of detergent.
3. If you use a washing programme with pre-
wash phase, put more detergent in the
prewash detergent compartment (B).
Use of detergent
A
B
15
4. If you use detergent tablets, put the de-
tergent tablet in the detergent dispenser
(A).
5. Close the lid of the detergent dispenser.
Press the lid until it locks into position.
Different brands of detergent dissolve in different times. Some detergent tablets do not
have the best cleaning results during short washing programmes. Use long washing programmes when you use detergent tablets to fully remove the detergent.
Page 16
Multitab function
16
Multitab function
The multitab function is for combi detergent tablets.
These tablets contain agents such as detergent, rinse aid and dishwasher salt. Some types
of tablets can contain other agents.
Do a check if these tablets are applicable for the local water hardness. Refer to the instructions from the manufacturer.
When you set the multitab function, it stays on until you deactivate it.
The multitab function stops automatically the flow of rinse aid and salt. The rinse aid
indicator light and salt indicator light are deactivated.
The programme duration can increase if you use the multitab function.
Activate or deactivate the multitab function before the start of a washing programme.
You cannot activate or deactivate the multitab function when the programme operates.
Cancel the washing programme, then set the programme again.
To activate the multitab function:
• Press and hold the two multitab buttons (function buttons D and E). The multitab indicator light comes on.
To deactivate the multitab function:
• Press and hold the two multitab buttons (function buttons D and E). The multitab indicator light goes off.
Do these steps if the drying results are not satisfactory:
1. Fill the rinse aid dispenser with rinse aid.
2. Activate the rinse aid dispenser.
3. Set the rinse aid dosage to position 2.
• You can only activate or deactivate the rinse aid dispenser when the multitab function
is activated.
To activate/deactivate the rinse aid dispenser:
1. Switch on the appliance.
2. Make sure that the appliance is in setting mode.
3. Press and hold function buttons B and C.
– The indicator lights for function buttons A, B, and C start to flash.
4. Release function buttons B and C.
5. Press function button B.
– The indicator lights for function buttons A and C go off.
– The indicator light for function button B continues to flash.
– The digital display shows the setting.
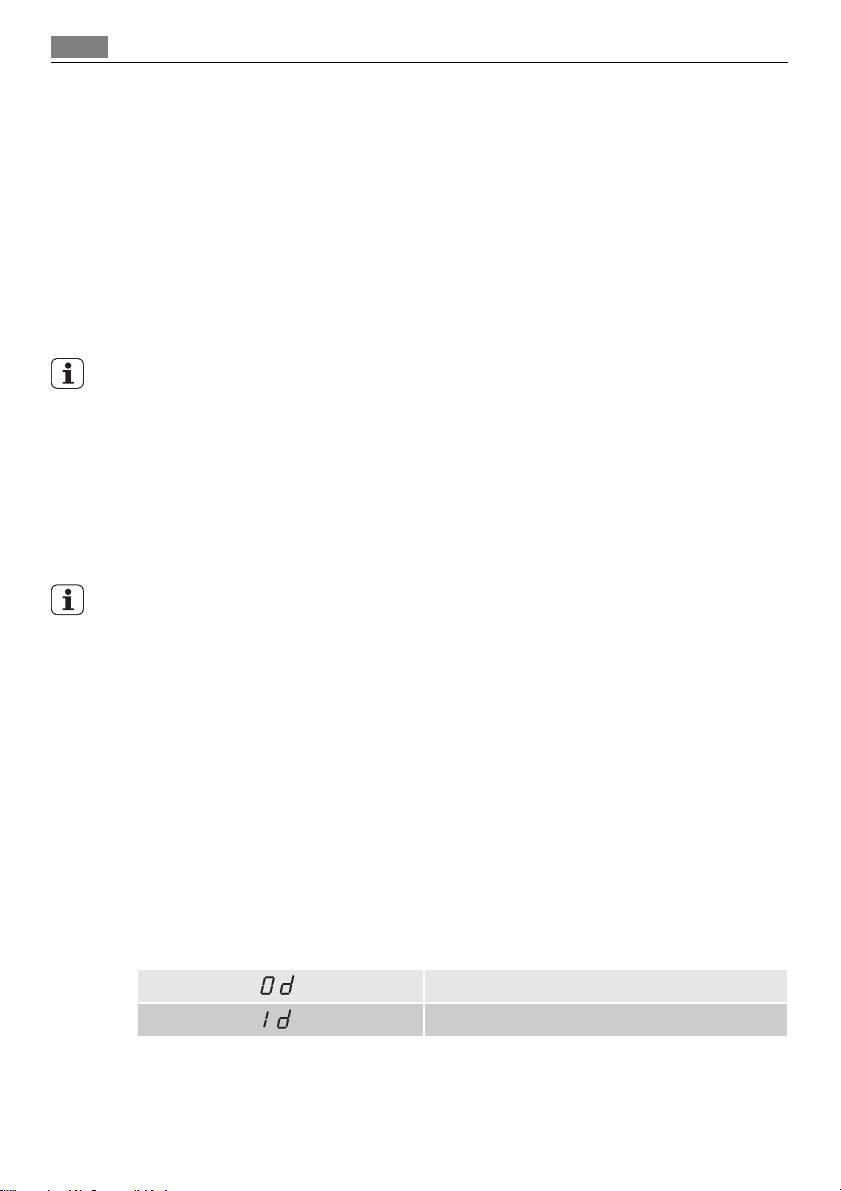
Rinse aid dispenser deactivated
Rinse aid dispenser activated
6. Press function button B again.
– The digital display shows the new setting.
7. Switch off the appliance to save the operation.
Page 17
Washing programmes
To use normal detergent again:
1. Deactivate the multitab function.
2. Fill the salt container and rinse aid dispenser.
3. Adjust the water hardness setting to the highest level.
4. Do a washing programme without dishes.
5. Adjust the water softener to the water hardness in your area.
6. Adjust the rinse aid dosage.
Washing programmes
Washing programmes
Programme Degree of soil Type of load Programme description
1)
AUTOMATIC
2)
30 MIN
INTENSIV CARE 70° Heavy soil Crockery, cutlery,
3)
ECO 50°
1) During the Automatic programme, the soil level of the dishes is given by how cloudy the water is. The programme
duration and consumptions can change. This depends if the appliance is fully or not and on the level of soil on
the dishes. The appliance adjusts automatically the temperature of the water during the main wash.
2) This is the perfect daily programme to clean a not fully load. Ideal for a family of 4 persons who only want to
load breakfast and dinner crockery and cutlery.
3) Test programme for test institutes. Please refer to separate leaflet supplied, for test data.
Any Crockery, cutlery,
Normal or light
soil
Normal soil Crockery and cutlery Prewash
Any Partial load (to be
pots and pans
Crockery and cutlery Main wash up to 60°C
pots and pans
completed later in the
day).
Consumption values
Programme
AUTOMATIC - 1,1 - 1,7 12 - 23
30 MIN - 0,9 9
INTENSIV CARE 70° - 1,5 - 1,7 16 - 18
Duration (in minutes)
1)
Energy (in kWh) Water (in litres)
Prewash
Main wash up to 45°C or 70°C
1 or 2 intermediate rinses
Final rinse
Drying
Final rinse
Prewash
Main wash up to 70°C
1 intermediate rinse
Final rinse
Drying
Main wash up to 50°C
1 intermediate rinse
Final rinse
Drying
1 cold rinse (to prevent food
scraps to bond).
Detergent is not necessary with
this programme.
17
Page 18
Setting and starting a washing programme
18
Programme
ECO 50° - 1,0 - 1,1 12 - 13
1) The digital display shows the programme duration.
Duration (in minutes)
- 0,1 4
1)
Energy (in kWh) Water (in litres)
The pressure and temperature of the water, the variations of power supply and the quantity
of dishes can change these values.
Setting and starting a washing programme
Set the washing programme with the door ajar. The washing programme only starts after
you close the door. Until then it is possible to modify the settings.
Do these steps to set and start a washing programme:
1. Switch on the appliance.
2. Make sure that the appliance is in setting mode.
3. Press one of the programme buttons. Refer to the chapter 'Washing programmes'.
– The programme indicator light comes on.
– All other programme indicator lights go off.
– The digital display shows in flashing the programme duration.
– The programme-in-progress indicator light comes on.
4. Close the door.
– The washing programme starts automatically.
– The programme-in-progress indicator light remains on.
When the washing programme operates, you cannot change the programme. Cancel the
washing programme.
WARNING!
Only interrupt or cancel a washing programme if necessary.
CAUTION!
Open the door carefully. Hot steam can come free.
Cancelling a washing programme
1. Press and hold function buttons B and C until:
– All the programme lights come on,
– The programme-in-progress indicator light goes off.
2. Release function buttons B and C to cancel the washing programme.
At this time you can do these steps:
1. Switch off the appliance.
2. Set a new washing programme .
Fill the detergent dispenser with detergent before you set a new washing programme.
Interrupting a washing programme
Open the door.
Page 19

Setting and starting a washing programme
• The programme stops.
Close the door.
• The programme continues from the point of interruption.
Setting and starting a washing programme with delay start
1. Press the on/off button.
2. Set a washing programme.
3. Press the delay start button until the display shows on flashing the necessary delay
start of the washing programme.
4. Close the door.
– The number on the display comes on with fixed light.
– The programme-in-progress indicator light goes off.
– The countdown of the delay start starts.
– The countdown of the delay start decreases with steps of 1 hour.
– When the countdown is completed, the washing programme starts automatically.
– The programme-in-progress indicator light comes on.
Do not open the door during the countdown to prevent interruption of the countdown.
When you close the door again, the countdown continues from the point of interruption.
Cancelling a delay start:
1. Press and hold function buttons B and C until:
– All the programme lights come on
When you cancel a delay start, you also cancel the washing programme.
2. Set a new washing programme.
You can select the washing programme and delay start also with the door closed. When
you press a programme button you have only 3 seconds to select a different washing
programme or a delay start. After these 3 seconds, the selected programme starts automatically.
19
End of the washing programme
Switch off the appliance in these conditions:
• The appliance stops automatically.
• The display shows 0.
• The programme in progress indicator light remains on.
1. Press the on/off button.
2. Open the door.
3. For better drying results, keep the door ajar for some minutes before you remove the
dishes.
Let the dishes cool down before you remove them from the appliance. Hot dishes are easily
damaged.
Removing the load
• First remove items from the lower basket, then from the upper basket.
• There can be water on the sides and door of the appliance. Stainless steel becomes cool
more quickly than the dishes.
Page 20

Care and cleaning
20
Care and cleaning
WARNING!
Switch the appliance off before you clean the filters.
Cleaning the filters
CAUTION!
Do not use the appliance without the filters. Make sure that the installation of the filters
is correct. Incorrect installation will cause unsatisfactory washing results and damage to
the appliance.
If necessary, clean the filters. Dirty filters decrease the washing results.
The dishwasher has three filters:
1. coarse filter (A)
2. microfilter (B)
3. flat filter (C)
Do these steps to clean the filters:
1. Open the door.
2. Remove the lower basket.
A
B
3. To unlock the filter system, turn the han-
dle on the microfilter (B) approximately
1/4 anticlockwise.
4. Remove the filter system.
5. Hold the coarse filter (A) by the handle
with the hole.
6. Remove the coarse filter (A) from the
microfilter (B).
C
Page 21

What to do if…
7. Remove the flat filter (C) from the bot-
tom of the appliance.
8. Clean the filters below running water.
9. Put the flat filter (C) in the bottom of the
appliance.
10. Put the coarse filter (A) in the microfilter
(B) and push the filters together.
11. Put the filter system in position.
12. To lock the filter system, turn the handle
on the microfilter (B) clockwise until it
lock in position.
13. Install the lower basket.
14. Close the door.
Do not remove the spray arms.
If the holes in the spray arms become clogged, remove remaining parts of soil with a cocktail
stick.
External cleaning
Clean the external surfaces of the appliance and control panel with a damp soft cloth. Only
use neutral detergents. Do not use abrasive products, scouring pads or solvents (acetone,
trichloroethylene etc...).
Frost precautions
21
CAUTION!
Do not install the appliance where the temperature is below 0 °C. The manufacturer is not
responsible for damage because of frost.
If not possible, empty the appliance and close the door. Disconnect the water inlet hose
and remove water from the water inlet hose.
What to do if…
The appliance does not start or stops during operation.
If there is a fault, first try to find a solution to the problem yourself. If you cannot find a
solution to the problem yourself, contact the Service Force Centre.
CAUTION!
Switch off the appliance before you do the below suggested corrective actions.
Page 22

What to do if…
22
Fault code and malfunction Possible cause and solution
•
digital display shows
The dishwasher does not fill with
water
•
digital display shows
The dishwasher will not drain
•
digital display shows
The anti-flood device operates
The programme does not start • The appliance door is not closed.
• The water tap is blocked or furred with limescale.
Clean the water tap.
• The water tap is closed.
Open the water tap.
• The filter in the water inlet hose is blocked.
Clean the filter.
• The connection of the water inlet hose is not correct. The
hose can be kinked or squashed.
Make sure that the connection is correct.
• There is a blockage in the sink spigot.
Clean the sink spigot.
• The connection of the water drain hose is not correct. The
hose can be kinked or squashed.
Make sure that the connection is correct.
• Close the water tap and contact your local Service Force
Centre.
Close the door.
• Mains plug is not connected in.
Put in the mains.
• The fuse has blown out in the household fuse box.
Replace the fuse.
• Delay start is set.
Cancel the delay start to start the programme immedi-
ately.
After the check, switch on the appliance. The programme continues from the point of
interruption. If the malfunction shows again, contact your Service Force Centre.
If the display shows a fault code, not described in the chart, contact your Service Force
Centre.
These data are necessary to help you quickly and correctly:
• Model (Mod.)
• Product number (PNC)
• Serial number (S.N.)
For these data, refer to the rating plate.
Write the necessary data here:
Model description : ..........
Product number : ..........
Serial number : ..........
Page 23

The dishes are not clean • The selected washing programme is not applicable for the type
Limescales particles on the
dishes
The dishes are wet and dull • No rinse aid has been used.
There are streaks, milky spots
or a bluish coating on glasses
and dishes
Dry water drop signs on
glasses and dishes
Technical data
Technical data
The cleaning results are not satisfactory
of load and soil.
• The baskets are loaded incorrectly so that water cannot reach all
surfaces.
• Spray arms do not turn freely because of incorrect arrangement
of the load.
• The filters are dirty or not correctly installed.
• The quantity of detergent is too little or missing.
• The salt container is empty.
• The water softener is adjusted on a wrong level.
• The salt container cap is not closed correctly.
• The rinse aid dispenser is empty.
• Decrease the rinse aid dosage.
• Increase rinse aid dosage.
• The detergent can be the cause.
23
Dimensions Width cm 59,6
Height cm 85
Depth cm 62,5
Electrical connection - Voltage
- Overall power - Fuse
Water supply pressure Minimum 0,5 bar (0,05 MPa)
Maximum 8 bar (0,8 MPa)
Capacity Place settings 12
Information on the electrical connection is given on the rating
plate on the inner edge of the dishwasher door.
Installation instructions
Installation
Fitting under a counter
WARNING!
Make sure that the mains plug is disconnected from the mains socket during installation.
Page 24

Installation
24
Put the appliance adjacent to a water tap and a
water drain. Remove the appliance worktop to
install it under a sink unit or a kitchen worktop.
Make sure that the dimensions of the recess
agree with the given dimensions.
Do these steps to remove the appliance worktop:
1. Remove the rear screws (1).
2. Pull the worktop from the behind the appliance.
3. Lift the worktop and move it from the
front slots.
4. Use the adjustable feet to adjust the level
of the appliance.
Install the appliance under the kitchen worktop. Make sure that there are no kinks in the
water hoses and that the water hoses are not
squashed.
If a repair is necessary, the appliance must be easily accessible for the engineer. Install the
appliance worktop to the appliance if you want to use the dishwasher as a freestanding
appliance.
The plinth on freestanding appliance is not adjustable.
Adjusting the level of the appliance
Make sure that the appliance is level to close and seal the door correctly. If the level of the
appliance is correct, the door does not catch on the sides of the cabinet. If the door does
not close correctly, loosen or tighten the adjustable feet until the appliance is level.
Page 25

Water connection
Water connection
Water inlet hose
Connected the appliance to a hot (max. 60°) or cold water supply.
If the hot water comes from alternative sources of energy that are more environmentally
friendly (e.g. solar or photovoltaic panels and aeolian), use a hot water supply to decrease
energy consumption.
Connect the inlet hose to a water tap with an external thread of 3/4”.
CAUTION!
Do not use connection hoses from an old appliance.
The water pressure must be in the limits (refer to 'Technical data'). Make sure that the local
water authority gives you the average mains pressure in your area.
Make sure that there are no kinks in the water inlet hose and that the water inlet hose is
not squashed or entangled.
Fit the locknut correctly to prevent water leaks.
CAUTION!
Do not connect the appliance to new pipes or pipes that are not used for a long time. Let
the water run for some minutes, then connect the inlet hose.
The water inlet hose is double-walled and has an inner mains cable and a safety valve. The
water inlet hose is under pressure only while the water is running. If there is a leak in the
water inlet hose, , the safety valve interrupts the running water.
Be careful when you connect the water inlet hose:
• Do not put the water inlet hose or the safety valve in water.
• If the water inlet hose or the safety valve is damaged, immediately disconnect the mains
plug from the mains socket.
• Only let the Service Force Centre replace the water inlet hose with safety valve.
WARNING!
Dangerous voltage
25
Water drain hose
1. Connect the water drain hose to the sink spigot and attach it under the work surface.
This prevents that the waste water from the sink goes back into the appliance.
Page 26

Electrical connection
26
2. Connect the water drain hose to a stand pipe with vent-hole (minimum internal diameter 4 cm).
Make sure that the drain hose is not bent or
squashed to prevent that the water drains does
max 85 cm
not drain correctly.
Remove the sink plug when the appliance drains
the water to prevent that the water goes back into
min 40 cm
the appliance.
A drain hose extension must not be longer than 2
max 400 cm
m. The internal diameter must not be smaller than
the diameter of the hose.
If you connect the water drain hose to a trap spigot under the sink, remove the plastic membrane
(A). If you do not remove the membrane, remaining food can cause a blockage in the drain hose
spigot
The appliance has a security feature to prevent
that dirty water goes back into the appliance. If,
the spigot of the sink has a 'non-return valve', this
valve can cause the appliance to drain incorrectly.
Remove the non-return valve.
CAUTION!
Make sure that the water couplings are tight to prevent water leakage.
Electrical connection
WARNING!
The manufacturer is not responsible if you do not follow these safety precautions.
Ground the appliance according to safety precautions.
Make sure that the rated voltage and type of power on the rating plate agree with the
voltage and the power of the local power supply.
Always use a correctly installed shockproof socket.
Do not use multi-way plugs, connectors and extension cables. There is a risk of fire.
Do not replace the mains cable yourself. Contact the Service Force Centre.
Make sure that the mains plug is accessible after installation.
Do not pull the mains cable to disconnect the appliance. Always pull the mains plug.
Environment concerns
The symbol on the product or on its packaging indicates that this product may not be
treated as household waste. Instead it should be taken to the appropriate collection point
for the recycling of electrical and electronic equipment. By ensuring this product is disposed
of correctly, you will help prevent potential negative consequences for the environment
Page 27

Environment concerns
and human health, which could otherwise be caused by inappropriate waste handling of
this product. For more detailed information about recycling of this product, please contact
your local council, your household waste disposal service or the shop where you purchased
the product.
The packaging materials are environmentally friendly and can be recycled. The plastic components are identified by markings, e.g. >PE<, >PS<, etc. Discard the packaging materials
in the applicable container at the community waste disposal facilities.
WARNING!
To discard the appliance, follow the procedure:
• Pull the mains plug out of the socket.
• Cut off the mains cable and mains plug and discard them.
• Discard the door catch. This prevents the children to close themselves inside the appliance
and endanger their lives.
27
Page 28

28
Περιεχόμενα
Ευχαριστούμε που επιλέξατε ένα από τα υψηλής ποιότητας προϊόντα
μας.
Για να εξασφαλίσετε την άψογη και συνεχή απόδοση της συσκευής σας,
παρακαλούμε διαβάστε προσεκτικά αυτό το εγχειρίδιο οδηγιών. Θα σας
επιτρέψει να κινηθείτε σε όλες τις διαδικασίες άψογα και πολύ
αποτελεσματικά. Για να μπορείτε να ανατρέχετε σε αυτό το εγχειρίδιο
όποτε είναι ανάγκη, συνιστούμε να το φυλάτε σε ασφαλές σημείο. Και
παρακαλούμε παραδώστε το στον όποιον επόμενο κάτοχο της
συσκευής.
Σας ευχόμαστε κάθε ευχαρίστηση με τη νέα σας συσκευή.
Περιεχόμενα
Οδηγίες λειτουργίας 29
Πληροφορίες ασφαλείας 29
Σωστή χρήση 29
Γενική ασφάλεια 29
Ασφάλεια για τα παιδιά 30
Εγκατάσταση 30
Περιγραφή προϊόντος 31
Πίνακας χειριστηρίων 32
Κουμπί καθυστέρησης έναρξης 33
Ψηφιακή οθόνη 33
Κουμπιά λειτουργιών 33
Τρόπος λειτουργίας ρύθμισης 33
Πριν από την πρώτη χρήση 34
Ρύθμιση του αποσκλυρηντή νερού 34
Χειροκίνητη ρύθμιση 35
Ηλεκτρονική ρύθμιση 35
Χρήση αλατιού για πλυντήριο πιάτων
Χρήση λαμπρυντικού 36
Ρύθμιση της δόσης λαμπρυντικού
Φόρτωμα των μαχαιροπίρουνων και των
πιάτων 38
Χρήσιμες συμβουλές 38
Κάτω καλάθι 39
Καλάθι για τα μαχαιροπίρουνα 39
Πάνω καλάθι 40
Ρύθμιση ύψους του πάνω καλαθιού
Χρήση απορρυπαντικού 42
Λειτουργία Multitab 43
Προγράμματα πλύσης 45
Επιλογή και έναρξη ενός προγράμματος
πλύσης 46
Ακύρωση ενός προγράμματος
πλύσης 46
Διακοπή προγράμματος πλύσης
Ρύθμιση και έναρξη προγράμματος
πλύσης με καθυστέρηση εκκίνησης
Τέλος του προγράμματος πλύσης
Αφαίρεση του φορτίου 48
Φροντίδα και καθάρισμα 48
Καθαρισμός των φίλτρων 48
Εξωτερικός καθαρισμός 50
Προστασία από τον πάγο 50
Τι να κάνετε αν... 50
36
Τεχνικά χαρακτηριστικά 52
Οδηγίες εγκατάστασης 52
Εγκατάσταση 52
37
41
Τοποθέτηση κάτω από πάγκο 52
Εκτελέστε τα ακόλουθα βήματα για να
αφαιρέσετε το καπάκι της συσκευής:
Ρύθμιση οριζόντιας θέσης της
συσκευής 53
Σύνδεση νερού 54
Σωλήνας παροχής 54
Σωλήνας αποστράγγισης νερού
47
47
48
53
55
Page 29

Πληροφορίες ασφαλείας
Ηλεκτρική σύνδεση 56 Περιβαλλοντικά θέματα 56
Υπόκειται αε αλλαγές χωρίς προειδποίηση
Οδηγίες λειτουργίας
Πληροφορίες ασφαλείας
Για την προσωπική σας ασφάλεια και τη σωστή λειτουργία της συσκευής, δια‐
βάστε το παρόν εγχειρίδιο προσεκτικά πριν από την εγκατάσταση και τη χρήση.
Φυλάσσετε πάντα τις οδηγίες αυτές μαζί με τη συσκευή, ακόμη και εάν μετα‐
κομίσετε ή πουλήσετε τη συσκευή. Οι χρήστες πρέπει να είναι πλήρως εξοι‐
κειωμένοι με τη λειτουργία και τα χαρακτηριστικά ασφαλείας της συσκευής.
Σωστή χρήση
• Η συσκευή έχει σχεδιαστεί αποκλειστικά για οικιακή χρήση.
• Χρησιμοποιείτε τη συσκευή μόνο για οικιακά σκεύη που είναι κατάλληλα για
πλυντήρια πιάτων.
• Μη χρησιμοποιείτε διαλύτες στη συσκευή. Κίνδυνος έκρηξης.
• Τοποθετείτε τα μαχαίρια και άλλα αντικείμενα με αιχμηρά άκρα στο καλάθι
για τα μαχαιροπίρουνα με το αιχμηρό άκρο προς τα κάτω. Σε αντίθετη περί‐
πτωση, τοποθετείτε τα σε οριζόντια θέση στο πάνω καλάθι.
• Χρησιμοποιείτε μόνο προϊόντα για πλυντήρια πιάτων (απορρυπαντικό, αλά‐
τι, λαμπρυντικό).
• Αν ανοίξε τε την πόρτ α όταν λειτ ουργ εί η συ σκευή, μπορεί να διαφύγει ζεστός
ατμός. Κίνδυνος εγκαυμάτων στο δέρμα.
• Μην αφαιρείτε τα πιάτα από το πλυντήριο πιάτων πριν από το τέλος του
προγράμματος πλύσης.
• Όταν ολοκληρωθεί το πρόγραμμα πλύσης, αποσυνδέετε το φις τροφοδοσίας
από την πρίζα και κλείνετε τη βρύση νερού.
• Η συσκευή αυτή πρέπει να επισκευάζεται μόνο από εξουσιοδοτημένο τεχνικό
σέρβις. Χρησιμοποιείτε μόνο γνήσια ανταλλακτικά.
• Για να αποφεύγονται οι τραυματισμοί και η ζημιά στη συσκευή, μην κάνετε
εσείς τις επισκευές. Επικοινωνείτε πάντα με το Κέντρο Σέρβις της περιοχής
σας.
29
Γενική ασφάλεια
• Η συσκευή δεν πρέπει να χρησιμοποιείται από άτομα (συμπεριλαμβανομέ‐
νων παιδιών) με μειωμένες σωματικές, αισθητηριακές ή διανοητικές ικανό‐
τητες ή με έλλειψη εμπειρίας και γνώσεων. Τα άτομα αυτά πρέπει να βρί‐
σκονται υπό επιτήρηση ή να έχουν λάβει οδηγίες σχετικά με τη χρήση της
συσκευής από κάποιο άτομο που είναι υπεύθυνο για την ασφάλειά τους.
• Ακολουθείτε πάντα τις οδηγίες ασφαλείας που παρέχονται από τον κατα‐
σκευαστή του απορρυπαντικού πιάτων, ώστε να αποφευχθούν εγκαύματα
στα μάτια, το στόμα και το φάρυγγα.
117988121-00-062009
Page 30

30
Πληροφορίες ασφαλείας
• Μην πίνετε το νερό που υπάρχει στο πλυντήριο πιάτων. Στη συσκευή πα‐
ραμένουν υπολείμματα απορρυπαντικού.
• Κλείνετε πάντα την πόρτα όταν δεν χρησιμοποιείτε τη συσκευή, ώστε να
αποφευχθεί ο κίνδυνος τραυματισμού και ανατροπής λόγω της ανοικτής
πόρτας.
• Μην κάθεστε και μη στέκεστε πάνω στην ανοικτή πόρτα.
Ασφάλεια για τα παιδιά
• Η συσκευή αυτή πρέπει να χρησιμοποιείται μόνο από ενήλικες. Τα παιδιά
πρέπει να βρίσκονται υπό επιτήρηση, ώστε διασφαλιστεί ότι δεν παίζουν με
τη συσκευή.
• Φυλάσσετε όλα τα υλικά της συσκευασίας μακριά από τα παιδιά. Υπάρχει
κίνδυνος ασφυξίας.
• Φυλάσσετε όλα τα απορρυπαντικά σε ασφαλή περιοχή. Τα παιδιά δεν πρέ‐
πει να έρχονται σε επαφή με απορρυπαντικά.
• Κρατήστε τα παιδιά μακριά από τη συσκευή όταν η πόρτα είναι ανοικτή.
Εγκατάσταση
• Βεβαιωθείτε ότι η συσκευή δεν έχει υποστεί ζημιά κατά τη μεταφορά. Μη
συνδέετε τη συσκευή εάν έχει υποστεί ζημιά. Εάν απαιτείται, επικοινωνήστε
με τον προμηθευτή.
• Αφαιρέστε όλα τα υλικά συσκευασίας πριν από την πρώτη χρήση.
• Η ηλεκτρική εγκατάσταση πρέπει να εκτελείται από κατάλληλα καταρτισμένο
άτομο.
• Η υδραυλική εγκατάσταση πρέπει να εκτελείται από κατάλληλα καταρτισμένο
άτομο.
• Μην αλλάζετε τις προδιαγραφές και μην τροποποιείτε αυτό το προϊόν. Υπάρ‐
χει κίνδυνος τραυματισμού και βλάβης της συσκευής.
• Μη χρησιμοποιείτε τη συσκευή:
– εάν το καλώδιο τροφοδοσίας ή οι σωλήνες νερού έχουν υποστεί ζημιά,
– εάν ο πίνακας ελέγχου, ο πάγκος ή η βάση έχουν υποστεί ζημιά, με απο‐
τέλεσμα να μην είναι δυνατή η πρόσβαση στο εσωτερικό της συσκευής.
Επικοινωνήστε με το κέντρο σέρβις της περιοχής σας.
• Μην ανοίγετε οπές στα πλαϊνά τμήματα της συσκευής, ώστε να αποφευχθεί
η βλάβη των υδραυλικών και ηλεκτρικών στοιχείων.
ΠΡΟΕΙΔΟΠΟΙΗΣΗ
Τηρείτε προσεκτικά τις οδηγίες για τις ηλεκτρικές συνδέσεις και τις συνδέσεις
νερού.
Page 31

Περιγραφή προϊόντος
Περιγραφή προϊόντος
31
1 Πάνω καλάθι
2 Ρύθμιση της σκληρότητας του νερού
3 Θήκη αποσκληρυντικού αλατιού
4 Θήκη απορρυπαντικού
5 Θήκη λαμπρυντικού
6 Πλακέτα τεχνικών στοιχείων
7 Φίλτρα
8 Κάτω εκτοξευτήρας νερού
9 Επάνω εκτοξευτήρας νερού
10 Πάγκος εργασίας
Page 32

32
Πίνακας χειριστηρίων
Πίνακας χειριστηρίων
1 Κουμπί ενεργοποίησης/απενεργοποίησης
2 Κουμπιά επιλογής προγράμματος
3
Κουμπί καθυστέρησης έναρξης
4 Ενδεικτικές λυχνίες
5 Ψηφιακή οθόνη
6 Κουμπιά λειτουργιών
Ενδεικτικές λυχνίες
Πρόγραμμα σε εξέλιξη Η ενδεικτική λυχνία ανάβει όταν επιλέξετε
MULTITAB Η ενδεικτική λυχνία υποδεικνύει την ενερ‐
ένα πρόγραμμα πλύσης.
γοποίηση/απενεργοποίηση της λειτουρ‐
γίας multitab. Ανατρέξτε στο κεφάλαιο
"Λειτουργία Multitab".
Page 33

Πίνακας χειριστηρίων
Ενδεικτικές λυχνίες
1)
Αλάτι
Λαμπρυντικό
1) Όταν οι θήκες αλατιού ή/και λαμπρυντικού είναι κενές, οι σχετικές ενδεικτικές λυχνίες δεν
ανάβουν κατά την εκτέλεση ενός προγράμματος πλύσης.
1)
Η ενδεικτική λυχνία ανάβει όταν είναι απα‐
ραίτητο να γεμίσετε τη θήκη αλατιού. Ανα‐
τρέξτε στο κεφάλαιο "Χρήση αλατιού για
πλυντήρια πιάτων".
Ότα ν γ εμ ίσ ετε τη θή κη, η εν δε ικ τική λυ χν ία
αλατιού μπορεί να παραμείνει αναμμένη
για μερικές ώρες. Κάτι τέτοιο δεν έχει αρ‐
νητικές επιπτώσεις στη λειτουργία της συ‐
σκευής.
Η ενδεικτική λυχνία ανάβει όταν πρέπει να
γεμίσετε τη θήκη λαμπρυντικού. Ανατρέξ‐
τε στο κεφάλαιο "Χρήση λαμπρυντικού.
Κουμπί καθυστέρησης έναρξης
Χρησιμοποιήστε το κουμπί καθυστέρησης έναρξης για να καθυστερήσετε την
έναρξη του προγράμματος πλύσης κατά 1 ώρα ή 19 ώρες. Ανατρέξτε στο κε‐
φάλαιο "Ορισμός και έναρξη προγράμματος πλύσης".
Ψηφιακή οθόνη
Η οθόνη εμφανίζει τα εξής:
• Το επίπεδο ρύθμισης του αποσκληρυντή νερού.
• Υπόλοιπος χρόνος για το τέλος του προγράμματος.
• Eνεργοποίηση/απενεργοποίηση της θήκης του λαμπρυντικού (μόνο με ενερ‐
γοποιημένη τη λειτουργία Multitab).
• Τέλος του προγράμματος πλύσης. H οθόνη δείχνει μηδέν.
• Αριθμός ωρών για την καθυστέρηση έναρξης.
• Κωδικοί βλαβών.
33
Κουμπιά λειτουργιών
Χρησιμοποιήστε τα κουμπιά λειτουργιών για τις παρακάτω ενέργειες:
• Ρύθμιση του αποσκληρυντή νερού. Ανατρέξτε στο κεφάλαιο "Ρύθμιση του
αποσκληρυντή νερού".
• Ακύρωση του προγράμματος πλύσης σε εξέλιξη ή καθυστέρησης έναρξης
σε εξέλιξη. Ανατρέξτε στο κεφάλαιο "Ρύθμιση και έναρξη προγράμματος
πλύσης".
• Ενεργοποίηση/απενεργοποίηση της λειτουργίας multitab. Ανατρέξτε στο κε‐
φάλαιο "Λειτουργία Multitab".
• Aπενεργοποίηση/ενεργοποίηση της θήκης λαμπρυντικού, όταν είναι ενερ‐
γοποιημένη η λειτουργία multitab. Ανατρέξτε στο κεφάλαιο "Λειτουργία
Multitab".
Τρόπος λειτουργίας ρύθμισης
Η συσκευή πρέπει να βρίσκεται σε τρόπο λειτουργίας ρύθμισης για τις
παρακάτω ενέργειες:
• Ρύθμιση ενός προγράμματος πλύσης.
Page 34

34
Πριν από την πρώτη χρήση
• Ρύθμιση του επιπέδου αποσκληρυντή νερού.
• Απενεργοποίηση/ενεργοποίηση της θήκης λαμπρυντικού.
Πατήστε το κουμπί ενεργοποίησης/απενεργοποίησης. Η συσκευή βρίσκεται σε
τρόπο λειτουργίας ρύθμισης όταν:
– Ανάβουν όλες οι ενδεικτικές λυχνίες προγράμματος.
Πατήστε το κουμπί ενεργοποίησης/απενεργοποίησης. Η συσκευή δεν
βρίσκεται σε τρόπο λειτουργίας ρύθμισης όταν:
– Ανάβει μόνο μία ενδεικτική λυχνία προγράμματος
– Έχει ρυθμιστεί ένα πρόγραμμα πλύσης. Πρέπει να ακυρώσετε το πρόγραμ‐
μα, για να επιστρέψετε στον τρόπο λειτουργίας ρύθμισης. Ανατρέξτε στο κε‐
φάλαιο "Ρύθμιση και έναρξη προγράμματος πλύσης".
Πριν από την πρώτη χρήση
Ανατρέξτε στις ακόλουθες οδηγίες για κάθε βήμα της διαδικασίας:
1. Ελέγξτε αν το επίπεδο αποσκληρυντή νερού είναι σωστό για το βαθμό
σκληρότητας του νερού στην περιοχή σας. Αν απαιτείται, ρυθμίστε τον
αποσκληρυντή νερού.
2. Γεμίστε τη θήκη αλατιού με αλάτι για πλυντήριο πιάτων.
3. Γεμίστε τη θήκη λαμπρυντικού με λαμπρυντικό.
4. Φορτώστε τα μαχαιροπίρουνα και τα πιάτα στο πλυντήριο πιάτων.
5. Ρυθμίστε το σωστό πρόγραμμα πλύσης για τον τύπο φορτίου και το βαθμό
λερώματος.
6. Γεμίστε τη θήκη απορρυπαντικού με τη σωστή ποσότητα απορρυπαντικού.
7. Ξεκινήστε το πρόγραμμα πλύσης.
Αν χρησιμοποιείτε συνδυαστικές ταμπλέτες απορρυπαντικού (3 σε 1, 4 σε 1, 5
σε 1, κτλ.), ανατρέξτε στο κεφάλαιο "Λειτουργία Multitab".
Ρύθμιση του αποσκλυρηντή νερού
Ο αποσκληρυντής νερού απομακρύνει τα μεταλλικά στοιχεία και τα άλατα από
την παροχή νερού. Τα μεταλλικά στοιχεία και τα άλατα επιδρούν αρνητικά στη
λειτουργία της συσκευής.
Η σκληρότητα του νερού μετράται σε ισοδύναμες κλίμακες:
• Γερμανικοί βαθμοί (dH°),
• Γαλλικοί βαθμοί (°TH),
• mmol/l (millimol ανά λίτρο - διεθνής μονάδα για τη σκληρότητα του νερού),
•Clarke.
Ρυθμίζετε τον αποσκληρυντή νερού ανάλογα με το βαθμό σκληρότητας του
νερού στην περιοχή σας. Εάν απαιτείται, επικοινωνήστε με τις τοπικές αρχές
υδροδότησης.
Page 35

Ρύθμιση του αποσκλυρηντή νερού
Σκληρότητα νερού Ρύθμιση σκληρότητας νερού
°dH °TH mmol/λίτρο Κλαρκ χειροκίνητα ηλεκτρονικά
51 - 70 91 - 125 9,1 - 12,5 64 - 88 2 10
43 - 50 76 - 90 7,6 - 9,0 53 - 63 2 9
37 - 42 65 - 75 6,5 - 7,5 46 - 52 2 8
29 - 36 51 - 64 5,1 - 6,4 36 - 45 2 7
23 - 28 40 - 50 4,0 - 5,0 28 - 35 2 6
19 - 22 33 - 39 3,3 - 3,9 23 - 27 2 5
15 - 18 26 - 32 2,6 - 3,2 18 - 22 1 4
11 - 14 19 - 25 1,9 - 2,5 13 - 17 1 3
4 - 10 7 - 18 0,7 - 1,8 5 - 12 1 2
< 4 < 7 < 0,7 < 5
1) Δεν απαιτείται χρήση αλατιού.
1)
1
Πρέπει να ρυθμίσετε τον αποσκληρυντή νερού χειροκίνητα ή ηλεκτρονικά.
Χειροκίνητη ρύθμιση
Η συσκευή έχει ρυθμιστεί από το εργοστάσιο στο επίπεδο 2.
35
1)
1
1. Ανοίξτε την πόρτα.
2. Αφαιρέστε το κάτω καλάθι.
3. Περιστρέψτε το ρυθμιστή σκληρότη‐
τας νερού στη θέση 1 ή 2 (ανατρέξτε
στον πίνακα).
4. Τοποθετήστε το κάτω καλάθι.
5. Κλείστε την πόρτα.
Ηλεκτρονική ρύθμιση
Ο αποσκληρυντής νερού έχει ρυθμιστεί από το εργοστάσιο στο επίπεδο 5.
1. Ενεργοποιήστε τη συσκευή.
2. Βεβαιωθείτε ότι η συσκευή είναι σε τρόπο λειτουργίας ρύθμισης.
3. Πατήστε συνεχόμενα τα κουμπιά λειτουργιών B και C μέχρι να αρχίσουν να
αναβοσβήνουν οι ενδεικτικές λυχνίες των κουμπιών λειτουργιών A, B και C .
4. Αφήστε τα κουμπιά λειτουργιών B και C.
5. Πατήστε το κουμπί λειτουργιών A.
– Οι ενδεικτικές λυχνίες για τα κουμπιά λειτουργιών B και C σβήνουν.
– Συνεχίζει να αναβοσβήνει η ενδεικτική λυχνία για το κουμπί λειτουργιών
A.
– Η ψηφιακή οθόνη εμφανίζει το τρέχον επίπεδο.
Page 36

36
Χρήση αλατιού για πλυντήριο πιάτων
Παράδειγμα: η ψηφιακή οθόνη εμφανίζει = επίπεδο 5.
6. Πατήστε μία φορά το κουμπί λειτουργιών A για να αυξήσετε το επίπεδο
αποσκληρυντικού νερού κατά ένα βήμα.
7. Πατήστε το κουμπί ενεργοποίησης/απενεργοποίησης για να αποθηκεύσετε
τη λειτουργία.
Χρήση αλατιού για πλυντήριο πιάτων
ΠΡΟΣΟΧΗ
Χρησιμοποιείτε μόνο αλάτι για πλυντήρια πιάτων. Η χρήση τύπων αλατιού που
δεν είναι κατάλληλοι για πλυντήρια πιάτων μπορεί να οδηγήσει στην πρόκληση
βλάβης στον αποσκληρυντή νερού.
ΠΡΟΣΟΧΗ
Οι κόκκοι αλατιού και το νερό με αλάτι στο κάτω μέρος της συσκευής μπορεί
να προκαλέσουν διάβρωση. Γεμίστε τη συσκευή με αλάτι πριν από την ενερ‐
γοποίηση του προγράμματος πλύσης για την αποφυγή τυχόν διάβρωσης.
Ακολουθήστε τα παρακάτω βήματα, για να γεμίσετε τη θήκη αλατιού:
1. Περιστρέψτε αριστερόστροφα το καπάκι, για να ανοίξετε τη θήκη αλατιού.
2. Γεμίστε τη θήκη αλατιού με 1 λίτρο νερού (μόνο για την πρώτη λειτουργία).
3. Χρησιμοποιήστε το χωνί, για να γε‐
μίσετε τη θήκη αλατιού με αλάτι.
4. Απομακρύνετε το αλάτι γύρω από το
άνοιγμα της θήκης αλατιού.
5. Περιστρέψτε δεξιόστροφα το καπά‐
κι, για να κλείσετε τη θήκη αλατιού.
Η υπερχείλιση νερού στη θήκη αλατιού
κατά την πλήρωση με αλάτι είναι φυσιο‐
λογική.
Χρήση λαμπρυντικού
ΠΡΟΣΟΧΗ
Χρησιμοποιήστε μόνο λαμπρυντικό μάρκας ειδικής για πλυντήριο πιάτων.
Μη γεμίσετε τη θήκη λαμπρυντικού με άλλα προϊόντα (π.χ. καθαριστικό πλυ‐
ντηρίου πιάτων, υγρό απορρυπαντικό). Μπορεί να προκληθούν ζημιές στη
συσκευή.
Το λαμπρυντικό καθιστά δυνατό το στέγνωμα των πιάτων χωρίς στίγματα και
σημάδια.
Το λαμπρυντικό προστίθεται αυτόματα κατά τη φάση τελευταίου ξεβγάλματος.
Κάντε αυτά τα βήματα για να γεμίσετε τη θήκη λαμπρυντικού:
Page 37

1. Πατήστε το κουμπί απασφάλισης (A)
για να ανοίξετε τη θήκη λαμπρυντι‐
κού.
2. Γεμίστε τη θήκη λαμπρυντικού με
λαμπρυντικό. Η ένδειξη "max." εμ‐
φανίζει το μέγιστο επίπεδο.
3. Απομακρύνετε το χυμένο λαμπρυ‐
ντικό με απορροφητικό πανί για να
αποφύγετε το σχηματισμό υπερβο‐
λικού αφρού κατά το επακόλουθο
πρόγραμμα πλύσης.
4. Κλείστε τη θήκη λαμπρυντικού.
Χρήση λαμπρυντικού
37
Ρύθμιση της δόσης λαμπρυντικού
Η λειτουργία λαμπρυντικού έχει ρυθμιστεί από το εργοστάσιο στο επίπεδο 4.
Μπορείτε να ρυθμίσετε τη δόση λαμπρυντικού μεταξύ του επιπέδου 1 (χαμη‐
λότερη δόση) και του επιπέδου 6 (υψηλότερη δόση).
Περιστρέψτε το διακόπτη λαμπρυντικού για
να αυξήσετε ή να μειώσετε τη δόση.
– Αυξήστε τη δόση αν υπάρχουν σταγονί‐
δια νερού ή άλατα στα πιάτα.
– Μειώστε τη δόση αν υπάρχουν σημάδια,
λευκοί λεκέδες ή γαλάζιες στρώσεις στα
πιάτα.
Page 38

38
Φόρτωμα των μαχαιροπίρουνων και των πιάτων
Φόρτωμα των μαχαιροπίρουνων και των πιάτων
Χρήσιμες συμβουλές
ΠΡΟΣΟΧΗ
Χρησιμοποιείτε τη συσκευή μόνο για οικιακά σκεύη που είναι κατάλληλα για
πλυντήρια πιάτων.
Μη χρησιμοποιείτε τη συσκευή για τον καθαρισμό αντικειμένων που μπορεί να
απορροφήσουν νερό (σφουγγάρια, πανιά οικιακής χρήσης, κλπ.).
• Πριν τοποθετήσετε μαχαιροπίρουνα και πιάτα, ακολουθήστε τα παρακάτω
βήματα:
– Απομακρύνετε όλα τα υπολείμματα τροφών.
– Μαλακώνετε τα υπολείμματα καμένων τροφών στα ταψιά.
• Πριν τοποθετήσετε μαχαιροπίρουνα και πιάτα, ακολουθήστε τα παρακάτω
βήματα:
– Τοποθετείτε τα κοίλα αντικείμενα (π.χ. φλιτζάνια, ποτήρια, κατσαρόλες) με
το άνοιγμα προς τα κάτω.
– Βεβαιωθείτε ότι δεν συγκεντρώνεται νερό στο δοχείο ή σε μια βαθιά βάση.
– Βεβαιωθείτε ότι τα μαχαιροπίρουνα και τα πιάτα δεν εισχωρούν το ένα στο
άλλο.
– Βεβαιωθείτε ότι τα μαχαιροπίρουνα και τα πιάτα δεν καλύπτουν άλλα μα‐
χαιροπίρουνα και πιάτα.
– Βεβαιωθείτε ότι τα ποτήρια δεν έρχονται σε επαφή με άλλα ποτήρια.
– Τοποθετήστε τα μικροαντικείμενα στο καλάθι για τα μαχαιροπίρουνα.
• Τα πλαστικά αντικείμενα και οι κατσαρόλες με αντικολλητικές επιστρώσεις
συγκρατούν σταγόνες νερού. Τα πλαστικά αντικείμενα δεν θα στεγνώσουν
τόσο καλά όσο τα αντικείμενα από πορσελάνη ή χάλυβα.
• Τοποθετείτε τα ελαφριά αντικείμενα στο πάνω καλάθι. Βεβαιωθείτε ότι τα
αντικείμενα δεν μετακινούνται.
ΠΡΟΣΟΧΗ
Βεβαιωθείτε ότι ο εκτοξευτήρας νερού μπορεί να μετακινηθεί ελεύθερα πριν
από την εκκίνηση ενός προγράμματος πλύσης.
ΠΡΟΕΙΔΟΠΟΙΗΣΗ
Να κλείνετε πάντα την πόρτα μετά το φόρτωμα ή ξεφόρτωμα της συσκευής. Η
πόρτα είναι επικίνδυνη όταν είναι ανοιχτή.
Page 39

Φόρτωμα των μαχαιροπίρουνων και των πιάτων
Κάτω καλάθι
Τοποθετήστε τα μεγαλύτερα και πιο λερω‐
μένα πιάτα και σκεύη στο κάτω καλάθι.
Οι σειρές από στηρίγματα στο κάτω καλάθι
μπορούν εύκολα να χαμηλώσουν επίπεδα
για να μπορέσετε να τοποθετήσετε κατσα‐
ρόλες, ταψιά και μπολ.
39
Καλάθι για τα μαχαιροπίρουνα
ΠΡΟΕΙΔΟΠΟΙΗΣΗ
Μην τοποθετείτε μαχαίρια με μεγάλου μήκους λεπίδες σε κατακόρυφη θέση.
Διευθετήστε τα μακριά και αιχμηρά μαχαιροπίρουνα στο πάνω καλάθι. Απαι‐
τείται ιδιαίτερη προσοχή με τα αιχμηρά αντικείμενα.
Page 40

40
Φόρτωμα των μαχαιροπίρουνων και των πιάτων
Χρησιμοποιήστε τις σχάρες για τα μαχαιρο‐
πίρουνα.
• Τοποθετήστε τις σχάρες στο καλάθι για τα
μαχαιροπίρουνα.
• Για μεγάλα αντικείμενα, χρησιμοποιήστε
μόνο τις σχάρες για τα μαχαιροπίρουνα.
• Τοποθετήστε τα πιρούνια και τα κουτά‐
λια με τις λαβές προς τα κάτω.
• Τοποθετήστε τα μαχαίρια με τις λαβές
προς τα πάνω.
• Αναμείξτε τα κουτάλια μαζί με άλλα μα‐
χαιροπίρουνα, ώστε να μην κολλήσουν
μεταξύ τους.
Πάνω καλάθι
Το άνω καλάθι είναι για πιατάκια, μπολ σα‐
λάτας, φλιτζανάκια, ποτήρια, κατσαρόλες
και καπάκια. Διευθετήστε τα αντικείμενα για
να έρχεται το νερό σε επαφή με όλες τις επι‐
φάνειες.
Page 41

Φόρτωμα των μαχαιροπίρουνων και των πιάτων
• Τοποθετήστε τα μαχαίρια και τα μι‐
κροαντικείμενα στο δίσκο για τα μαχαι‐
ροπίρουνα. Τοποθετήστε τα μαχαιρο‐
πίρουνα που είναι πολύ μεγάλα για το
δίσκο για τα μαχαιροπίρουνα μέσα στο
καλάθι για τα μαχαιροπίρουνα.
• Για μεγαλύτερα αντικείμενα, αναδιπλώ‐
στε τις σχάρες για τα ποτήρια προς τα
επάνω.
• Τοποθετήστε τα ποτήρια με μακρύ κο‐
λονάκι στις σχάρες για ποτήρια με τα
κολονάκια προς τα επάνω.
• Για ποτήρια με μακρύ κολονάκι, γυρί‐
στε τη θήκη για τα ποτήρια προς τα
αριστερά ή προς τα δεξιά.
41
• Μπορείτε να διπλώσετε τη σειρά από
στηρίγματα στην αριστερή πλευρά του
άνω καλαθιού για να αυξήσετε την ευε‐
λιξία της φόρτωσης.
Ρύθμιση ύψους του πάνω καλαθιού
Μπορείτε να τοποθετήσετε το άνω καλάθι σε δύο θέσεις για να αυξήσετε την
ευελιξία της φόρτωσης.
Page 42

42
Χρήση απορρυπαντικού
Μέγιστο ύψος πιάτων στο:
πάνω καλάθι κάτω καλάθι
Επάνω θέση 22 εκατοστά 30 εκατοστά
Κάτω θέση 24 εκατοστά 29 εκατοστά
Εκτελέστε αυτά τα βήματα για να μετακινήσετε το άνω καλάθι στην κάτω/άνω
θέση:
1. Τραβήξτε προς τ α έξω τ ο άνω κ αλάθι
μέχρι να σταματήσει.
2. Κρατήστε το άνω καλάθι από τη λα‐
βή, ανυψώστε όσο είναι δυνατό πε‐
ρισσότερο και χαμηλώστε το κατα‐
κόρυφα.
Το άνω καλάθι θα ασφαλίσει στην
κατώτερη ή στην ανώτερη θέση.
Χρήση απορρυπαντικού
Χρησιμοποιείτε μόνο απορρυπαντικά (σκόνη, υγρό ή ταμπλέτες) που είναι κα‐
τάλληλα για πλυντήρια πιάτων.
Τηρείτε τα στοιχεία που αναγράφονται στη συσκευασία:
• συνιστώμενη δοσολογία από τον κατασκευαστή,
• συστάσεις αποθήκευσης.
Μη χρησιμοποιείτε μεγαλύτερη ποσότητα απορρυπαντικού από την απαιτού‐
μενη για μείωση της ρύπανσης.
Ακολουθήστε τα παρακάτω βήματα, για να γεμίσετε τη θήκη απορρυπαντικού:
1. Ανοίξτε το καπάκι της θήκης απορ‐
ρυπαντικού.
2. Γεμίστε τη θήκη απορρυπαντικού
( A) με α πορρυπ αντικ ό . Η έν δειξη ε μ‐
φανίζει τη δόση:
20 = περίπου 20 γρ. απορρυπαντι‐
κού
30 = περίπου 30 γρ. απορρυπαντι‐
κού.
Page 43

3. Αν χρησιμοποιείτε πρόγραμμα πλύ‐
σης με φάση πρόπλυσης, βάλτε πε‐
ρισσότερο απορρυπαντικό στη θήκη
απορρυπαντικού πρόπλυσης ( B).
4. Αν χρησιμοποιείτε ταμπλέτες απορ‐
ρυπαντικού, βάλτε την ταμπλέτα
απορρυπαντικού στη θήκη απορρυ‐
παντικού ( A).
5. Κλείστε το καπάκι της θήκης απορ‐
ρυπαντικού. Πατήστε το καπάκι μέ‐
χρι να ασφαλίσει στη θέση του.
Λειτουργία Multitab
A
B
43
Όλες οι μάρκες απορρυπαντικών δεν διαλύονται στον ίδιο χρόνο. Ορισμένες
ταμπλέτες απορρυπαντικού δεν παρέχουν βέλτιστα αποτελέσματα καθαρι‐
σμού στα σύντομα προγράμματα πλύσης. Χρησιμοποιείτε μεγάλης διάρκειας
προγράμματα πλύσης, όταν χρησιμοποιείτε ταμπλέτες απορρυπαντικού, για
πλήρη απομάκρυνση του απορρυπαντικού.
Λειτουργία Multitab
Η λειτουργία Multitab δεν προορίζεται για συνδυασμένες ταμπλέτες απορρυ‐
παντικού.
Οι ταμπλέτες αυτές περιέχουν παράγοντες όπως απορρυπαντικό, λαμπρυντι‐
κό και άλατα για πλυντήρια πιάτων. Μερικοί τύποι ταμπλετών μπορεί να πε‐
ριέχουν άλλους παράγοντες.
Ελέγξτε αν αυτές οι ταμπλέτες είναι κατάλληλες για τη σκληρότητα του τοπικού
νερού. Ανατρέξτε στις οδηγίες του κατασκευαστή.
Όταν ρυθμίσετε τη λειτουργία Multitab, παραμένει ενεργοποιημένη μέχρι να την
απενεργοποιήσετε.
Page 44

44
Λειτουργία Multitab
Η λειτουργία Multitab σταματάει αυτόματα τη ροή του λαμπρυντικού και αλα‐
τιού. Η ενδεικτική λυχνία λαμπρυντικού και η ενδεικτική λυχνία αλατιού είναι
απενεργοποιημένες.
Η διάρκεια του προγράμματος μπορεί να αυξηθεί αν χρησιμοποιείτε τη λει‐
τουργία Multitab.
Ενεργοποιήστε ή απενεργοποιήστε τη λειτουργία Multitab πριν την έναρξη ενός
προγράμματος πλύσης.
Δεν μπορείτε να ενεργοποιήσετε ή να απενεργοποιήσετε τη λειτουργία Multitab
όταν το πρόγραμμα βρίσκεται σε λειτουργία. Ακυρώστε το πρόγραμμα πλύσης,
και κατόπιν ρυθμίστε ξανά το πρόγραμμα.
Για ενεργοποίηση της λειτουργίας multitab:
• Πατήστε παρατεταμένα τα δύο κουμπιά multitab (κουμπιά λειτουργιών D
και E). Η ενδεικτική λυχνία multitab ανάβει.
Για απενεργοποίηση της λειτουργίας multitab:
• Πατήστε παρατεταμένα τα δύο κουμπιά multitab (κουμπιά λειτουργιών D
και E). Η ενδεικτική λυχνία multitab σβήνει.
Ακολουθήστε τα παρακάτω βήματα, όταν τα αποτελέσματα στεγνώματος δεν
είναι ικανοποιητικά:
1. Γεμίστε τη θήκη λαμπρυντικού με λαμπρυντικό.
2. Ενεργοποιήστε τη θήκη λαμπρυντικού.
3. Ρυθμίστε τη δόση του λαμπρυντικού στη θέση 2.
• Μπορείτε να ενεργοποιήσετε ή να απενεργοποιήσετε τη θήκη λαμπρυντικού
μόνο όταν είναι ενεργοποιημένη η λειτουργία Multitab.
Για την απενεργοποίηση/ενεργοποίηση της θήκης λαμπρυντικού:
1. Ενεργοποιήστε τη συσκευή.
2. Βεβαιωθείτε ότι η συσκευή είναι σε τρόπο λειτουργίας ρύθμισης.
3. Πατήστε συνεχόμενα τα κουμπιά λειτουργιών B και C.
– Αρχίζουν να αναβοσβήνουν οι ενδεικτικές λυχνίες για τα κουμπιά λει‐
τουργιών A, B και C.
4. Αφήστε τα κουμπιά λειτουργιών B και C.
5. Πατήστε το κουμπί λειτουργιών B.
– Οι ενδεικτικές λυχνίες για τα κουμπιά λειτουργιών A και C σβήνουν.
– Συνεχίζει να αναβοσβήνει η ενδεικτική λυχνία για το κουμπί λειτουργιών
B.
– Η ψηφιακή οθόνη θα εμφανίσει τη ρύθμιση.
Η θήκη του λαμπρυντικού είναι απενεργο‐
ποιημένη
Η θήκη του λαμπρυντικού είναι ενεργοποιη‐
μένη
6. Πατήστε ξανά το κουμπί λειτουργιών B.
– Η ψηφιακή οθόνη θα εμφανίσει τη νέα ρύθμιση.
7. Σβήστε τη συσκευή για να αποθηκεύσετε τη λειτουργία.
Page 45

Προγράμματα πλύσης
Για να χρησιμοποιήσετε ξανά κανονικό απορρυπαντικό:
1. Απενεργοποιήστε τη λειτουργία Multitab.
2. Γεμίστε τις θήκες αλατιού και λαμπρυντικού.
3. Ρυθμίστε τη σκληρότητα του νερού στο υψηλότερο επίπεδο.
4. Εκτελέστε ένα πρόγραμμα πλύσης χωρίς πιάτα.
5. Ρυθμίστε τον αποσκληρυντή νερού σύμφωνα με τη σκληρότητα νερού της
περιοχής σας.
6. Ρυθμίστε τη δόση λαμπρυντικού.
Προγράμματα πλύσης
Προγράμματα πλύσης
Πρόγραμμα Βαθμός λερώ‐
AUTOMATIC
30 MIN
INTENSIV
CARE 70°
ECO 50°
1) Κ ατ ά τ ο π ρό γρ αμ μα Au to matic , τ ο π όσ ο λ ερ ωμ έν α είναι τ α π ιά τα καθορίζεται από τη θολερότητα
του νερού. Η διάρκεια προγράμματος και η κατανάλωση μπορούν να τροποποιηθούν. Αυτό
εξαρτάται από το εάν η συσκευή είναι γεμάτη ή όχι και από το πόσο λερωμένα είναι τα πιάτα. Η
συσκευή ρυθμίζει αυτόματα τη θερμοκρασία του νερού κατά τη διάρκεια της κύριας πλύσης.
2) Το ιδανικό καθημερινό πρόγραμμα για μη γεμάτο πλυντήριο πιάτων. Κατάλληλο για οικογένεια
4 ατόμων που χρησιμοποιούν το πλυντήριο μόνο για πιάτα και μαχαιροπίρουνα πρωινού και
γεύματος.
3) Δοκιμαστικό πρόγραμμα για ινστιτούτα δοκιμών. Ανατρέξτε στο ξεχωριστό φυλλάδιο που
παρέχεται για τα δεδομένα δοκιμών.
1)
2)
3)
ματος
Όλοι Πιάτα, μαχαιροπί‐
Κανονικά ή λί‐
γο λερωμένα
Πολύ λερωμέ‐ναΠιάτα, μαχαιροπί‐
Κανονικά λε‐
ρωμένα
Όλοι Μερικό φορτίο (θα
Τύπος φορτίου Περιγραφή προγράμματος
ρουνα, κατσαρό‐
λες και τηγάνια
Πιάτα και μαχαιρο‐
πίρουνα
ρουνα, κατσαρό‐
λες και τηγάνια
Πιάτα και μαχαιρο‐
πίρουνα
συμπληρωθεί αρ‐
γότερα μέσα στην
ημέρα).
Πρόπλυση
Κύρια πλύση μέχρι 45°C ή
70°C
1 ή 2 ενδιάμεσα ξεβγάλματα
Τελικό ξέβγαλμα
Στέγνωμα
Κύρια πλύση μέχρι 60°C
Τελικό ξέβγαλμα
Πρόπλυση
Κύρια πλύση μέχρι 70°C
1 ενδιάμεσο ξέβγαλμα
Τελικό ξέβγαλμα
Στέγνωμα
Πρόπλυση
Κύρια πλύση μέχρι 50°C
1 ενδιάμεσο ξέβγαλμα
Τελικό ξέβγαλμα
Στέγνωμα
1 κρύο ξέβγαλμα (για να μην
κολλήσουν τα υπολείμματα
τροφών).
Δεν απαιτείται απορρυπαντι‐
κό για αυτό το πρόγραμμα.
45
Page 46

46
Επιλογή και έναρξη ενός προγράμματος πλύσης
Τιμές κατανάλωσης
Πρόγραμμα
AUTOMATIC - 1,1 - 1,7 12 - 23
30 MIN - 0,9 9
INTENSIV
CARE 70°
ECO 50° - 1,0 - 1,1 12 - 13
1) Στην ψηφιακή οθόνη εμφανίζεται η διάρκεια του προγράμματος.
Διάρκεια (σε λεπτά)
- 1,5 - 1,7 16 - 18
- 0,1 4
1)
Ενέργεια (σε kWh) Νερό (σε λίτρα)
Οι τιμές αυτές μπορούν να τροποποιηθούν λόγω της πίεσης και της θερμο‐
κρασίας νερού, των διακυμάνσεων στην ηλεκτρική τροφοδοσία και της ποσό‐
τητας των πιάτων.
Επιλογή και έναρξη ενός προγράμματος πλύσης
Ρυθμίσ τε το π ρόγρ αμμα πλύσης με τ ην πόρτα ανοιχτ ή. Το πρόγραμμα πλύσης
αρχίζει μόνο αφού κλείσετε την πόρτα. Μόνο στο διάστημα αυτό μπορείτε να
τροποποιήσετε τις ρυθμίσεις.
Ακολουθήστε τα παρακάτω βήματα, για να ρυθμίσετε και να ενεργοποιήσετε
ένα πρόγραμμα πλύσης:
1. Ενεργοποιήστε τη συσκευή.
2. Βεβαιωθείτε ότι η συσκευή βρίσκεται σε τρόπο λειτουργίας ρύθμισης.
3. Πατήστε ένα από τα κουμπιά προγράμματος. Ανατρέξτε στο κεφάλαιο
"Προγράμματα πλύσης".
– Η ενδεικτική λυχνία προγράμματος ανάβει.
– Όλες οι άλλες ενδεικτικές λυχνίες προγραμμάτων σβήνουν.
– Στην ψηφιακή οθόνη αναβοσβήνει η διάρκεια του προγράμματος.
– Η ενδεικτική λυχνία προγράμματος σε εξέλιξη ανάβει.
4. Κλείστε την πόρτα.
– Το πρόγραμμα πλύσης ξεκινά αυτόματα.
– Η ενδεικτική λυχνία προγράμματος σε εξέλιξη παραμένει αναμμένη.
Όταν το πρόγραμμα πλύσης βρίσκεται σε εξέλιξη, δεν μπορείτε να το αλλάξετε.
Ακυρώστε το πρόγραμμα πλύσης.
ΠΡΟΕΙΔΟΠΟΙΗΣΗ
Διακόψτε ή ακυρώστε το πρόγραμμα πλύσης μόνο αν είναι απαραίτητο.
ΠΡΟΣΟΧΗ
Ανοίξτε την πόρτα προσεχτικά. Μπορεί να εκλυθεί καυτός ατμός.
Ακύρωση ενός προγράμματος πλύσης
1. Πατήστε παρατεταμένα τα κουμπιά λειτουργιών B και C μέχρι να:
Page 47

Επιλογή και έναρξη ενός προγράμματος πλύσης
– ανάψουν όλες οι ενδεικτικές λυχνίες προγράμματος,
– σβήσει η ενδεικτική λυχνία προγράμματος σε εξέλιξη.
2. Αφήστε τα κουμπιά λειτουργιών B και C, για να ακυρώσετε το πρόγραμμα
πλύσης.
Στο σημείο αυτό, μπορείτε να εκτελέσετε τα παρακάτω βήματα:
1. Απενεργοποιήστε τη συσκευή.
2. Ρυθμίστε ένα νέο πρόγραμμα πλύσης.
Γεμίστε τη θήκη απορρυπαντικού με απορρυπαντικό πριν ρυθμίσετε νέο πρό‐
γραμμα πλύσης.
47
Διακοπή προγράμματος πλύσης
Ανοίξτε την πόρτα.
• Το πρόγραμμα διακόπτεται.
Κλείστε την πόρτα.
• Το πρόγραμμα συνεχίζει από το σημείο στο οποίο διακόπηκε.
Ρύθμιση και έναρξη προγράμματος πλύσης με καθυστέρηση εκκίνησης
1. Πατήστε το κουμπί ενεργοποίησης/απενεργοποίησης.
2. Ρυθμίστε ένα πρόγραμμα πλύσης.
3. Πατήστε το κουμπί καθυστέρησης έναρξης μέχρι στην οθόνη να αναβο‐
σβήνει η απαιτούμενη καθυστέρηση έναρξης του προγράμματος πλύσης.
4. Κλείστε την πόρτα.
– Ο αριθμός στην οθόνη ανάβει σταθερά.
– Η ενδεικτική λυχνία προγράμματος σε εξέλιξη σβήνει.
– Ξεκινά η αντίστροφη μέτρηση της καθυστέρησης εκκίνησης.
– Η αντίστροφη μέτρηση της καθυστέρησης έναρξης μειώνεται σε βήματα
1 ώρας.
– Όταν ολοκληρωθεί η αντίστροφη μέτρηση, το πρόγραμμα πλύσης αρχίζει
αυτόματα.
– Η ενδεικτική λυχνία προγράμματος σε εξέλιξη ανάβει.
Μην ανοίγετε την πόρτα κατά τη διάρκεια της αντίστροφης μέτρησης, ώστε να
μη διακοπεί. Όταν κλείσετε την πόρτα ξανά, η αντίστροφη μέτρηση συνεχίζει
από το σημείο της διακοπής.
Ακύρωση καθυστερημένης εκκίνησης:
1. Πατήστε παρατεταμένα τα κουμπιά λειτουργιών B και C μέχρι να:
– ανάψουν όλες οι ενδεικτικές λυχνίες προγράμματος
Όταν ακυρώνεται η καθυστέρηση έναρξης, ακυρώνεται και το πρόγραμμα
πλύσης.
2. Ρυθμίστε ένα νέο πρόγραμμα πλύσης.
Μπορείτε να επιλέξετε το πρόγραμμα πλύσης και την καθυστέρηση έναρξης
και με κλειστή την πόρτα. Όταν πατάτε κάποιο κουμπί προγράμματος, έχετε
μόνο 3 δευτερόλεπτα για να επιλέξετε διαφορετικό πρόγραμμα πλύσης ή κα‐
θυστέρηση έναρξης. Μετά από αυτά τα 3 δευτερόλεπτα, το επιλεγμένο πρό‐
γραμμα αρχίζει αυτόματα.
Page 48

48
Φροντίδα και καθάρισμα
Τέλος του προγράμματος πλύσης
Απενεργοποιείτε τη συσκευή στις παρακάτω περιπτώσεις:
• Η λειτουργία της συσκευής σταματά αυτόματα.
• Στην οθόνη εμφανίζεται η ένδειξη 0.
• Η ενδεικτική λυχνία προγράμματος σε εξέλιξη παραμένει αναμμένη.
1. Πατήστε το κουμπί ενεργοποίησης/απενεργοποίησης.
2. Ανοίξτε την πόρτα.
3. Για καλύτερα αποτελέσματα στεγνώματος, αφήστε την πόρτα μισάνοιχτη
για μερικά λεπτά πριν αφαιρέσετε τα πιάτα.
Περιμένετε μέχρι να κρυώσουν τα πιάτα πριν τα αφαιρέσετε από τη συσκευή.
Τα ζεστά πιάτα μπορεί να υποστούν εύκολα ζημιά.
Αφαίρεση του φορτίου
• Πρώτα, βγάλτε τα αντικείμενα από το κάτω καλάθι και μετά από το άνω κα‐
λάθι.
• Μπορεί να υπάρχει νερό στα πλαϊνά και την πόρτα της συσκευής. Το ανο‐
ξείδωτο ατσάλι ψύχεται πιο γρήγορα από τα πιάτα.
Φροντίδα και καθάρισμα
ΠΡΟΕΙΔΟΠΟΙΗΣΗ
Απενεργοποιείτε τη συσκευή πριν την καθαρίσετε.
Καθαρισμός των φίλτρων
ΠΡΟΣΟΧΗ
Μη χρησιμοποιείτε τη συσκευή χωρίς τα φίλτρα. Βεβαιωθείτε ότι τα φίλτρα
έχουν τοποθετηθεί σωστά. Σε περίπτωση εσφαλμένης τοποθέτησης, τα απο‐
τελέσματα της πλύσης μπορεί μην είναι ικανοποιητικά και να προκληθεί βλάβη
στη συσκευή.
Αν απαιτείται, καθαρίστε τα φίλτρα. Τα βρόμικα φίλτρα μειώνουν τα αποτελέ‐
σματα της πλύσης.
Το πλυντήριο πιάτων έχει τρία φίλτρα:
1. χοντρό φίλτρο (A)
2. μικροφίλτρο (B)
Page 49

3. επίπεδο φίλτρο (C)
Ακολουθήστε τα παρακάτω βήματα, για
να καθαρίσετε τα φίλτρα:
1. Ανοίξτε την πόρτα.
2. Αφαιρέστε το κάτω καλάθι.
3. Για να απασφαλίσετε το σύστημα
φίλτρων, περιστρέψτε τη λαβή του
μικροφίλτρου (B) κατά περίπου ¼
αριστερόστροφα.
4. Αφαιρέστε το σύστημα φίλτρου.
5. Πιάστε το χοντρό φίλτρο (A) από τη
λαβή με την οπή.
6. Αφαιρέστε το χοντρό φίλτρο (A)
από το μικροφίλτρο (B).
Φροντίδα και καθάρισμα
A
B
C
49
7. Αφαιρέστε το επίπεδο φίλτρο (C)
από το κάτω μέρος της συσκευής.
8. Καθαρίστε τα φίλτρα με τρεχούμε‐
νο νερό.
9. Τοποθετήστε το επίπεδο φίλτρο
(C) στο κάτω μέρος της συσκευής.
10. Τοποθετήστε το χοντρό φίλτρο (A)
στο μικροφίλτρο (B) και πιέστε τα
δύο φίλτρο μαζί.
11. Τοποθετήστε το σύστημα φίλτρων
στη θέση του.
12. Για να ασφαλίσετε το σύστημα φίλ‐
τρων, περιστρέψτε τη λαβή του μι‐
κροφίλτρου (B) δεξιόστροφα μέχρι να ασφαλίσει στη θέση του.
13. Τοποθετήστε το κάτω καλάθι.
14. Κλείστε την πόρτα.
Μην αφαιρείτε τους εκτοξευτήρες νερού.
Αν έχουν βουλώσει οι τρύπες στους εκτοξευτήρες νερού, αφαιρέστε τα υπο‐
λείμματα της βρομιάς με μια οδοντογλυφίδα.
Page 50

50
Τι να κάνετε αν...
Εξωτερικός καθαρισμός
Καθαρίστε τις εξωτερικές επιφάνειες της συσκευής και τον πίνακα ελέγχου με
ένα μαλακό υγρό πανί. Χρησιμοποιείτε μόνο ουδέτερα απορρυπαντικά. Μη
χρησιμοποιείτε αποξεστικά προϊόντα, σύρματα ή διαλύτες (ασετόν, τριχλω‐
ροαιθυλένιο κλπ...).
Προστασία από τον πάγο
ΠΡΟΣΟΧΗ
Μην εγκαθιστάτε τη συσκευή σε χώρο με θερμοκρασία κάτω των 0°C. Ο κα‐
τασκευαστής δεν είναι υπεύθυνος για βλάβες λόγω παγετού.
Εάν δεν δυνατόν, αδειάστε τη συσκευή και κλείστε την πόρτα. Αποσυνδέστε το
σωλήνα παροχής νερού και αφαιρέστε το νερό από το σωλήνα παροχής νερού.
Τι να κάνετε αν...
Η συσκευή δεν ξεκινά ή σταματά κατά τη λειτουργία.
Αν υπάρχει βλάβη, προσπαθήστε πρώτα να αποκαταστήσετε το πρόβλημα
μόνοι σας. Αν δεν μπορείτε να αποκαταστήσετε το πρόβλημα μόνοι σας, επι‐
κοινωνήστε με το Κέντρο Σέρβις.
ΠΡΟΣΟΧΗ
Απενεργοποιήστε τη συσκευή πριν από την εκτέλεση των παρακάτω συνιστώ‐
μενων διορθωτικών ενεργειών.
Κωδικός βλάβης και δυσλει‐
τουργία
• Στ ην οθ όν η ε μφ αν ίζ ετ αι η έ ν‐
δειξη
Το πλυντήριο πιάτων δεν γεμί‐
ζει με νερό
• Στ ην οθ όν η ε μφ αν ίζ ετ αι η έ ν‐
δειξη
Το πλυντήριο πιάτων δεν
αδειάζει το νερό
Πιθανή αιτία και λύση
• Υπάρχει έμφραξη στη βρύση νερού λόγω επικα‐
θίσεων αλάτων.
Καθαρίστε τη βρύση νερού.
• Η βρύση νερού είναι κλειστή.
Ανοίξτε τη βρύση νερού.
• Το φίλτρο στο σωλήνα παροχής νερού είναι φραγ‐
μένο.
Καθαρίστε το φίλτρο.
• Η σύνδεση του σωλήνα παροχής νερού δεν είναι
σωστή. Ο σωλήνας μπορεί να έχει συστραφεί ή
συμπιεστεί.
Βεβαιωθείτε ότι η σύνδεση είναι σωστή.
• Υπάρχει έμφραξη στη στρόφιγγα του νεροχύτη.
Καθαρίστε τη στρόφιγγα του νεροχύτη.
• Η σύνδεση του σωλήνα αποστράγγισης νερού δεν
εί ναι σ ωστή . Ο σ ωλήν ας μπ ορε ί να έ χει συστ ραφε ί
ή συμπιεστεί.
Βεβαιωθείτε ότι η σύνδεση είναι σωστή.
Page 51

Τι να κάνετε αν...
51
Κωδικός βλάβης και δυσλει‐
• Στ ην οθ όν η ε μφ αν ίζ ετ αι η έ ν‐
δειξη
Λειτουργεί η διάταξη προστα‐
σίας από υπερχείλιση
Το πρόγραμμα δεν ξεκινά • Η πόρτα της συσκευής δεν έχει κλείσει.
τουργία
• Κλείστε τη βρύση νερού και επικοινωνήστε με το
τοπικό κέντρο σέρβις.
Κλείστε την πόρτα.
• Το φις της κεντρικής ηλεκτρικής παροχής δεν είναι
συνδεδεμένο.
Συνδέστε το φις της κεντρικής ηλεκτρικής παρο‐
χής.
• Έχει καεί η ασφάλεια στον οικιακό ηλεκτρικό πίνα‐
κα.
Αντικαταστήστε την ασφάλεια.
• Έχει ρυθμιστεί καθυστέρηση εκκίνησης.
Ακυρώστε την καθυστέρηση εκκίνησης και ενερ‐
γοποιήστε αμέσως το πρόγραμμα.
Πιθανή αιτία και λύση
Μετά τον έλεγχο, ενεργοποιήστε τη συσκευή. Το πρόγραμμα συνεχίζει από το
σημείο στο οποίο είχε διακοπεί. Εάν η δυσλειτουργία εμφανιστεί ξανά, επικοι‐
νωνήστε με το τοπικό κέντρο σέρβις.
Τα παρακάτω στοιχεία είναι απαραίτητα για άμεση και κατάλληλη υποστήριξη
από το κέντρο σέρβις:
• Μοντέλο (Mod.)
• Αριθμός προϊόντος (PNC)
• Αριθμός σειράς (S.N.)
Για να εντοπίσετε τα στοιχεία αυτά, ανατρέξτε στην πινακίδα τεχνικών στοι‐
χείων.
Σημειώστε τα απαιτούμενα στοιχεία στον παρακάτω χώρο:
Περιγραφή μοντέλου: ..........
Αριθμός προϊόντος: ..........
Αριθμός σειράς: ..........
Τα αποτελέσματα καθαρισμού δεν είναι ικανοποιητικά.
Τα πιάτα δεν είναι καθα‐ρά• Το επιλεγμένο πρόγραμμα πλύσης δεν είναι κατάλληλο
για τον τύπο φορτίου και το βαθμό λερώματος.
• Τα καλάθια δεν έχουν φορτωθεί σωστά, με αποτέλεσμα
το νερό να μη φτάνει σε όλες τις επιφάνειες.
• Οι εκτοξευτήρες νερού δεν περιστρέφονται ελεύθερα λό‐
γω λανθασμένης διευθέτησης του φορτίου.
• Τα φίλτρα έχουν ακαθαρσίες ή δεν έχουν τοποθετηθεί
σωστά.
• Υπάρχει πολύ μικρή ποσότητα απορρυπαντικού ή δεν
υπάρχει καθόλου απορρυπαντικό.
Page 52

52
Τεχνικά χαρακτηριστικά
Τα αποτελέσματα καθαρισμού δεν είναι ικανοποιητικά.
Σωματίδια ασβεστίου
στα πιάτα.
Τα πιάτα είναι υγρά και
θαμπά
Υπάρχουν σημάδια, γα‐
λακτώδεις κηλίδες ή μια
κάπως γαλάζια επικάλυ‐
ψη στα ποτήρια και στα
πιάτα
Έχουν στεγνώσει οι στα‐
γόνες νερού στα ποτήρια
και στα πιάτα.
• Η θήκη αλατιού είναι άδεια.
• Ο αποσκληρυντής νερού έχει ρυθμιστεί σε εσφαλμένο
• Δεν έχει κλείσει σωστά το καπάκι της θήκης αλατιού.
• Δεν χρησιμοποιήθηκε λαμπρυντικό.
• Η θήκη λαμπρυντικού είναι άδεια.
• Μειώστε τη δοσολογία του λαμπρυντικού.
• Αυξήστε τη δοσολογία του λαμπρυντικού.
• Μπορεί να φταίει το απορρυπαντικό.
Τεχνικά χαρακτηριστικά
Διαστάσεις Πλάτος σε εκατοστά 59,6
Ύψος σε εκατοστά 85
Βάθος σε εκατοστά 62,5
Τάση ηλεκτρικής σύνδεσης
- Συνολική ισχύς - Ασφά‐
λεια
Πίεση παροχής νερού Ελάχιστη 0,5 bar (0,05 MPa)
Μέγιστη 8 bar (0,8 MPa)
Χωρητικότητα Σερβίτσια 12
επίπεδο.
Πληροφορίες σχετικά με την ηλεκτρική σύνδεση δίνονται
στην πλακέτα τύπου που βρίσκεται στο εσωτερικό άκρο
της πόρτας του πλυντηρίου πιάτων.
Οδηγίες εγκατάστασης
Εγκατάσταση
Τοποθέτηση κάτω από πάγκο
ΠΡΟΕΙΔΟΠΟΙΗΣΗ
Βεβαιωθείτε ότι τ ο φις τρο φοδοσίας δεν είναι συνδεδεμένο στη ν πρίζα κατά την
εγκατάσταση.
Page 53

Εγκατάσταση
Τοποθετήστε τη συσκευή κοντά στη βρύ‐
ση νερού και την αποχέτευση. Αφαιρέστε
το καπάκι της συσκευής για να την τοπο‐
θετήσετε κάτω από το νεροχύτη ή έναν
πάγκο κουζίνας. Βεβαιωθείτε ότι οι δια‐
στάσεις της εσοχής αντιστοιχούν με τις
διαστάσεις που καθορίζονται.
Εκτελέστε τα ακόλουθα βήματα για να αφαιρέσετε το καπάκι της
συσκευής:
1. Αφαιρέστε τις πίσω βίδες (1).
53
2. Τραβήξτε το καπάκι από το πίσω μέ‐
ρος της συσκευής.
3. Ανυψώστε το καπάκι και αφαιρέστε
το από τις μπροστινές εγκοπές.
4. Χρησιμοποιήστε τα ρυθμιζόμενα πό‐
δια για να ρυθμίσετε το επίπεδο της
συσκευής.
Τοποθετήστε τη συσκευή κάτω από τον
πάγκο της κουζίνας. Βεβαιωθείτε ότι δεν
έχουν στραβώσει ή τσακίσει οι σωλήνες νερού.
Αν απαιτείται επισκευή, ο τεχνικός πρέπει να έχει εύκολη πρόσβαση στη συ‐
σκευή. Τοποθετήστε το καπάκι της συσκευής στη συσκευή αν επιθυμείτε να
χρησιμοποιείτε το πλυντήριο πιάτων ως ανεξάρτητη συσκευή.
Η βάση στις συσκευές για ανεξάρτητη τοποθέτηση δεν είναι ρυθμιζόμενη.
Ρύθμιση οριζόντιας θέσης της συσκευής
Βεβαιωθείτε ότι η συσκευή έχει τοποθετηθεί σε οριζόντια θέση, ώστε η πόρτα
να κλείνει και να σφραγίζει σωστά. Εάν η οριζόντια θέση της συσκευής δεν είναι
σωστή, η πόρτα δεν ασφαλίζει στα πλαϊνά τμήματα του θαλάμου. Εάν η πόρτα
Page 54

54
Σύνδεση νερού
δεν κλείνει σωστά, χαλαρώστε ή σφίξτε τα ρυθμιζόμενα πόδια μέχρι η συσκευή
να βρίσκεται σε οριζόντια θέση.
Σύνδεση νερού
Σωλήνας παροχής
Συνδέστε τη συσκευή σε παροχή ζεστού (μέγιστο 60°C) ή κρύου νερού.
Αν το ζεστό νερό προέρχεται από εναλλακτικές πηγές ενέργειας που είναι πιο
φιλικές στο περιβάλλον (π.χ. ηλιακούς ή φωτοβολταϊκούς συλλέκτες και αιολικά
συστήματα), χρησιμοποιήστε την παροχή ζεστού νερού για να μειώσετε την
κατανάλωση ενέργειας.
Συνδέστε το σωλήνα παροχής σε βρύση νερού με εξωτερικό σπείρωμα 3/4".
ΠΡΟΣΟΧΗ
Μη χρησιμοποιείτε σωλήνες σύνδεσης από παλιά συσκευή.
Η πίεση του νερού πρέπει να είναι εντός των ορίων (ανατρέξτε στα "Τεχνικά
στοιχεία"). Βεβαιωθείτε ότι ο τοπικός οργανισμός ύδρευσης σάς παρέχει τη μέ‐
ση πίεση του δικτύου στην περιοχή σας.
Βεβαιωθείτε ότι δεν έχουν στραβώσει ή τσακίσει ή μπλεχτεί οι σωλήνες παρο‐
χής νερού.
Τοποθετήστε σωστά το ασφαλιστικό παξιμάδι για την αποφυγή διαρροών.
ΠΡΟΣΟΧΗ
Μη συνδέετε τη συσκευή σε καινούργιους σωλήνες ή σωλήνες που δεν έχουν
χρησιμοποιηθεί για πολύ καιρό. Αφήστε το νερό να τρέξει για μερικά λεπτά πριν
συνδέσετε το σωλήνα παροχής.
Ο σωλήνας παροχής νερού έχει διπλό τοίχωμα και διαθέτει εσωτερικό καλώδιο
παροχής και βαλβίδα ασφαλείας. Ο σωλήνας παροχής νερού είναι υπό πίεση
μόνο όταν τρέχει το νερό. Αν υπάρχει διαρροή στο σωλήνα παροχής νερού, η
βαλβίδα ασφαλείας διακόπτει το τρεχούμενο νερό.
Προσέχετε κατά τη σύνδεση του σωλήνα παροχής νερού:
• Μη βυθίσετε το σωλήνα παροχής νερού ή τη βαλβίδα ασφαλείας στο νερό.
• Αν ο σωλήνας παροχής νερού ή η βαλβίδα ασφαλείας καταστραφούν, απο‐
συνδέστε αμέσως το φις από την πρίζα.
• Η αντικατάσταση του σωλήνα παροχής νερού με τη βαλβίδα ασφαλείας πρέ‐
πει να εκτελείται μόνο από το Κέντρο Σέρβις.
Page 55

Σύνδεση νερού
ΠΡΟΕΙΔΟΠΟΙΗΣΗ
Επικίνδυνη τάση
Σωλήνας αποστράγγισης νερού
1. Συνδέστε το σωλήνα αποστράγγισης νερού στη στρόφιγγα του νεροχύτη
και συνδέστε τον στην επιφάνεια εργασίας. Αυτό θα εμποδίσει τα απόβλητα
νερά από το νεροχύτη να επιστρέψουν στη συσκευή.
2. Συνδέστε το σωλήνα αποστράγγισης νερού σε όρθιο σωλήνα με οπή εξαε‐
ρισμού (ελάχιστη εσωτερική διάμετρο 4 εκατοστά).
Βεβαιωθείτε ότι ο σωλήνας αποστράγγισης
δεν έχει στραβώσει ή τσακίσει για την απο‐
φυγή της λανθασμένης αποστράγγισης του
νερού.
Αφαιρέστε την τάπα του νεροχύτη όταν η
συσκευή αποστραγγίζει το νερό για την
αποφυγή της επιστροφής του νερού στη
συσκευή.
Η προέκταση του σωλήνα αποστράγγισης
δεν πρέπει να είναι μεγαλύτερη από 2 μέ‐
τρα. Η εσωτερική διάμετρος δεν πρέπει να
είναι μικρότερη από τη διάμετρο του σωλήνα.
Αν συνδέσετε το σωλήνα αποστράγγισης
νερού σε πώμα παγίδας κάτω από το νε‐
ροχύτη, απομακρύνετε την πλαστική μεμ‐
βράνη (A). Αν δεν απομακρύνετε τη μεμ‐
βράνη, το υπόλοιπο φαγητό μπορεί να
προκαλέσει φράξιμο στο πώμα του εύκαμ‐
πτου σωλήνα αποστράγγισης
Η συσκευή διαθέτει ένα χαρακτηριστικό
ασφάλειας για την αποφυγή της επιστρο‐
φής του βρόμικου νερού στη συσκευή. Αν
η στρόφιγγα του νεροχύτη διαθέτει "βαλβίδα αντεπιστροφής", η βαλβίδα αυτή
μπορεί να προκαλέσει τη λανθασμένη αποστράγγιση της συσκευής. Αφαιρέστε
τη βαλβίδα αντεπιστροφής.
max 85 cm
min 40 cm
max 400 cm
55
Page 56

56
Ηλεκτρική σύνδεση
ΠΡΟΣΟΧΗ
Βεβαιωθείτε ότι οι συνδέσεις νερού είναι σφιγμένες για την αποφυγή της διαρ‐
ροής νερού.
Ηλεκτρική σύνδεση
ΠΡΟΕΙΔΟΠΟΙΗΣΗ
Ο κατασκευαστής δεν είναι υπεύθυνος για τυχόν βλάβες σε περίπτωση μη τή‐
ρησης αυτών των προφυλάξεων ασφαλείας.
Γειώστε τη συσκευή σύμφωνα με τις προφυλάξεις ασφαλείας.
Βεβαιωθείτε ότι η ονομαστική τάση και ο τύπος ισχύος στην πινακίδα τεχνικών
στοιχείων συμφωνούν με την τάση και την ισχύ της παροχής ρεύματος στην
περιοχή σας.
Χρησιμοποιείτε πάντα μια σωστά εγκατεστημένη πρίζα με προστασία από την
ηλεκτροπληξία.
Μη χρησιμοποιείτε ταφ, συνδετήρες και προεκτάσεις. Υπάρχει κίνδυνος πυρ‐
καγιάς.
Μην αντικαθιστάτε το καλώδιο τροφοδοσίας μόνοι σας. Επικοινωνήστε με το
κέντρο σέρβις.
Βεβαιωθείτε ότι υπάρχει εύκολη πρόσβαση στο φις τροφοδοσίας μετά την
εγκατάσταση.
Μην τραβάτε το καλώδιο τροφοδοσίας για αποσύνδεση της συσκευής. Τρα βά τε
πάντα το φις τροφοδοσίας.
Περιβαλλοντικά θέματα
Το σύµβολο στο προϊόν ή επάνω στη συσκευασία του υποδεικνύει ότι δεν
πρέπει να µ εταχειρίζεστε το προϊόν αυτό ως οικιακό απόρριµµα . Αντιθέτως
θα πρέπει να παραδίδεται στο κατάλληλο σηµείο συλλογής για την
ανακύκλωση ηλεκτρικού και ηλεκτρονικού εξοπλισµού. Εξασφαλίζοντας ότι το
προϊόν αυτό διατίθεται σωστά, συµβάλλετε στην αποτροπή ενδεχόµενων
αρνητικών συνεπειών για το περιβάλλον και την ανθρώπινη υγεία, οι οποίες θα
µπορούσαν διαφορετικά να προκληθούν από ακατάλληλο χειρισµό απόρριψης
του προϊόντος αυτού. Για λεπτοµερέστερες πληροφορίες σχετικά µε την
ανακύκλωση του προϊόντος αυτού, επικοινωνήστε µε το δηµαρχείο της
περιοχής σας, την τοπική σας υπηρεσία αποκοµιδής οικιακών απορριµµάτων
ή µε το κατάστηµα όπου αγοράσατε το προϊόν.
Τα υλικά συσκευασίας είναι φιλικά προς το περιβάλλον και ανακυκλώσιμα. Τα
πλαστικά εξαρτήματα αναγνωρίζονται από την ένδειξη, π.χ.>PE<, >PS<, κλπ.
Απορρίψτε τα υλικά συσκευασίας στο κατάλληλο δοχείο στην τοπική εγκατά‐
σταση διάθεσης απορριμμάτων.
Page 57

575859
ΠΡΟΕΙΔΟΠΟΙΗΣΗ
Για την απόρριψη της συσκευής, ακολουθήστε την παρακάτω διαδικασία:
• Τραβήξτε το φις τροφοδοσίας από την πρίζα.
• Κόψτε το καλώδιο και το φις τροφοδοσίας και απορρίψτε τα.
• Απορρίψτε το μάνδαλο της πόρτας. Με τον τρόπο αυτό, αποτρέπεται ο κίν‐
δυνος παγίδευσης των παιδιών στο εσωτερικό της συσκευής.
Page 58

Page 59

Page 60

www.electrolux.com
www.aeg-electrolux.gr
117988121-00-062009
 Loading...