

Page 1
MANUALE DI INSTALLAZIONE, USO E MANUTENZIONE I
INSTALLATION, USE AND MAINTENANCE HANDBOOK GB
MANUEL D’INSTRUCTIONS POUR L’INSTALLATION, L’EMPLOI ET L’ENTRETIEN
HANDBUCH FÜR INSTALLATION, BEDIENUNG UND WARTUNG
INSTRUCTIES VOOR MONTAGE, GEBRUIK EN ONDERHOUD
MANUAL DE INSTRUCCIONES, USO Y MANTENIMIENTO E
MANUAL DE INSTRUÇÕES, UTILIZAÇÃO E MANUTENÇÃO P
F
D
NL
Page 2

Contenuti - Contenents
GENERALITÀ ................................................................................................... 6
1 - AVVERTENZE PER LA SICUREZZA.................................................................. 6
2 - INSTALLAZIONE ........................................................................................... 6
2.1 - Apertura e rimozione della griglia di aspirazione ............................................................... 6
2.2 - Installazione sottopensile .............................................................................................. 7
2.3 - Installazione a muro ..................................................................................................... 7
2.4 - Scelta della versione .................................................................................................... 8
2.5 - Connessione elettrica e controllo funzionale ..................................................................... 8
3 - FUNZIONAMENTO ........................................................................................ 9
4 - MANUTENZIONE E PULIZIA .......................................................................... 9
4.1 - Filtro antigrasso .......................................................................................................... 9
4.2 - Filtro al carbone attivo ............................................................................................... 10
4.3 - Illuminazione .............................................................................................................10
4.4 - Pulizia...................................................................................................................... 10
GENERAL INFORMATION ................................................................................. 11
1 - SAFETY WARNINGS ................................................................................... 11
2 - INSTALLATION INSTRUCTIONS .................................................................... 12
2.1 - Instructions for opening and removing the metal grille panel ............................................ 12
2.2 - Wall cabinet fixing ..................................................................................................... 12
2.3 - Wall mounting .......................................................................................................... 12
2.4 - Choice of operating mode ........................................................................................... 13
2.5 - Electrical connection and working test .......................................................................... 13
3 - OPERATION ............................................................................................... 14
4 - MAINTENANCE AND CLEANING .................................................................. 14
4.1 - Grease filter .............................................................................................................14
4.2 - Charcoal filter ...........................................................................................................15
4.3 - Worktop illumination .................................................................................................. 15
4.4 - Cleaning ..................................................................................................................15
2
Page 3

Sommaire - Inhalt
GENERALITES ................................................................................................. 16
1 - CONSEILS CONCERNANT LA SECURITE ....................................................... 16
2 - MONTAGE ................................................................................................. 17
2.1 - Ouverture et enlèvement de la grille d’aspiration ............................................................ 17
2.2 - Installation au dessous d’un meuble ............................................................................. 17
2.3 - Installation au mur..................................................................................................... 17
2.4 - Choix de la version .................................................................................................... 18
2.5 - Raccordement électrique et contrôle fonctionnel ............................................................ 18
3 - FONCTIONNEMENT .................................................................................... 19
4 - ENTRETIEN ET NETTOYAGE ......................................................................... 19
4.1 - Filtre à graisse ......................................................................................................... 19
4.2 - Filtre à charbon actif ................................................................................................. 20
4.3 - Eclairage .................................................................................................................. 20
4.4 - Nettoyage ................................................................................................................ 20
ALLGEMEINES ................................................................................................ 21
SICHERHEITSHINWEISE .................................................................................. 21
MONTAGE ................................................................................................. 22
Elektrischer Anschluß und Funktionskontrolle ......................................................................... 23
Bedienung ................................................................................................. 24
Umluft ................................................................................................. 24
Wartung ................................................................................................. 24
1 - Fettfilter ................................................................................................................ 24
2 - Aktiv-Kohlefilter (beim Kundendienst oder im Zubehörhandel erhältlich) ................................. 25
3
Page 4

Inhoud - Contenidos
ALGEMEEN ................................................................................................. 27
1 - VEILIGHEIDSMAATREGELEN ....................................................................... 27
2 - AANWIJZINGEN VOOR DE INSTALLATIE ....................................................... 28
2.1 - Openen en verwijderen van het rooster ......................................................................... 28
2.2 - Montage onder een keukenkastje ................................................................................. 28
2.3 - Montage aan de wand ............................................................................................... 28
2.4 - Keuze afzuigen of cirkuleren ........................................................................................ 29
2.5 - Elektrische aansluiting en controle van de werking .......................................................... 29
3 - HET GEBRUIK ............................................................................................ 30
4 - ONDERHOUD ............................................................................................. 30
4.1 - Het filter .................................................................................................................. 30
4.2 - Het koolstoffilter ....................................................................................................... 31
4.3 - De verlichting ........................................................................................................... 31
4.4 - Schoonmaken ........................................................................................................... 31
GENERALIDADES ............................................................................................ 32
1 - NORMAS DE SEGURIDAD ........................................................................... 32
2 - INSTALACION ............................................................................................ 32
2.1 - Apertura y extracción de la rejilla de aspiración ............................................................. 32
2.2 - Instalación de la campana debajo de un armario de cocina .............................................. 33
2.3 - Fijación a la pared ..................................................................................................... 33
2.4 - Elección de la versión ................................................................................................. 34
2.5 - La conexión elétrica se puede realizar .......................................................................... 34
3 - FUCIONAMIENTO ....................................................................................... 35
4 - MANTENIMIENTO Y LIMPIEZA .................................................................... 35
4.1 - Filtro antigrasa ......................................................................................................... 35
4.2 - Filtro de carbón activo ............................................................................................... 36
4.3 - Iluminación ...............................................................................................................36
4.4 - Limpieza ..................................................................................................................36
4
Page 5

Conteúdos
INFORMAÇÕES GERAIS ................................................................................... 37
1 - PRECAUÇÕES DE SEGURANÇA.................................................................... 37
2 - INSTALAÇÃO.............................................................................................. 38
2.1 - Abertura e remoção da grelha de aspiração ................................................................. 38
2.2 - Instalação por baixo do móvel suspenso ....................................................................... 38
2.3 - Instalação na parede ................................................................................................. 38
2.4 - Escolha da versão ..................................................................................................... 39
2.5 - Ligação eléctrica e controlo do funcionamento............................................................... 39
3 - FUNCIONAMENTO ...................................................................................... 40
4 - MANUTENÇÃO E LIMPEZA .......................................................................... 40
4.1 - Filtro antigordura ...................................................................................................... 40
4.2 - Filtro a carvão activo ................................................................................................. 41
4.3 - Iluminação ............................................................................................................... 41
4.4 - Limpeza ...................................................................................................................41
5
Page 6

Parte 1ª - ISTRUZIONI PER L’INSTALLAZIONE
GENERALITÀ
Questa cappa è predisposta per essere installata a muro, sopra un piano di cottura
posizionato a ridosso di una parete. Può essere utilizzata in versione aspirante (evacuazione esterna), oppure in versione filtrante (riciclo interno). Le migliori prestazioni si ottengono nella versione aspirante: tuttavia nel periodo invernale può essere
conveniente utilizzare la cappa in versione filtrante per evitare dispersioni di calore.
Si raccomanda che l’installazione venga effettuata da personale specializzato,
rispettando tutte le prescrizioni delle autorità competenti relative allo scarico
dell’aria da evacuare. Il produttore declina qualsiasi responsabilità per danni
dovuti ad installazione non corretta o non conforme alle regole dell’arte.
1 - AVVERTENZE PER LA SICUREZZA
1.1 - Non collegare la cappa a condotti di scarico dei fumi prodotti da combustione (caldaie,
caminetti, ecc...).
1.2 - Verificare che la tensione di rete corrisponda a quella riportata nella targhetta posta
all’interno della cappa.
1.3 - Collegare la cappa alla rete interponendo un interruttore bipolare con apertura dei
contatti di almeno 3 mm.
1.4 - Per cappe provviste di terra, accertarsi che l’impianto elettrico domestico garantisca un
corretto funzionamento.
1.5 - Le cappe in classe II hanno il doppio isolamento; non devono essere collegate con una
spina con messa a terra, ma vanno collegate con una semplice spina bipolare.
1.6 - La distanza minima di sicurezza tra il piano di cottura e la cappa è di 65 cm.
1.7 - Non fare cucine alla fiamma sotto la cappa.
1.8 - Controllare le friggitrici durante l’uso: l’olio surriscaldato potrebbe infiammarsi.
1.9 - Prima di procedere a qualsiasi operazione di pulizia o di manutenzione, disinserire
l’apparecchio togliendo la spina o agendo sull’interruttore generale.
1.10- Nel caso in cui nella stanza vengano utilizzati sia la cappa che apparecchi non azionati
da energia elettrica (ad esempio apparecchi utilizzatori a gas), si deve provvedere ad
una aerazione sufficiente dell’ambiente. Un uso proprio e senza rischi si ottiene quando
la depressione massima del locale non supera 0,04 mBar; si evita in questo modo un
ritorno dei gas di scarico.
2 - INSTALLAZIONE
Alcuni sistemi di installazione prevedono l’apertura e la rimozione della griglia di
aspirazione.
2.1 - Apertura e rimozione della griglia di aspirazione
Per aprire la griglia, far scorrere verso il centro i tastini posti nella parte inferiore
della cappa. Aprire la visiera. La griglia scenderà ruotando intorno ai due perni po-
6
Page 7
Parte1a - ISTRUZIONI PER L’INSTALLAZIONE
steriori. Con griglia aperta e verticale, far scorrere il perno posteriore di destra in
avanti lungo l’asola laterale fino a provocarne la fuoriuscita.
2.2 - Installazione sottopensile
a) Pensile preforato: collegare la cappa al pensile attraverso i fori predisposti sulla
base del pensile, utilizzando le 4 viti 4,2 x 44,4 in dotazione. Non è necessario aprire
la griglia.
b) Pensile non forato:
b.1 - Se alla cappa è allegata una maschera di foratura, seguire le istruzioni riportate
su di essa.
b.2 -Se non c’è maschera, aprire la griglia, appoggiare la cappa contro la base del
pensile e avvitare dall’interno direttamente al legno con viti 3,5 x 16, non in dotazione.
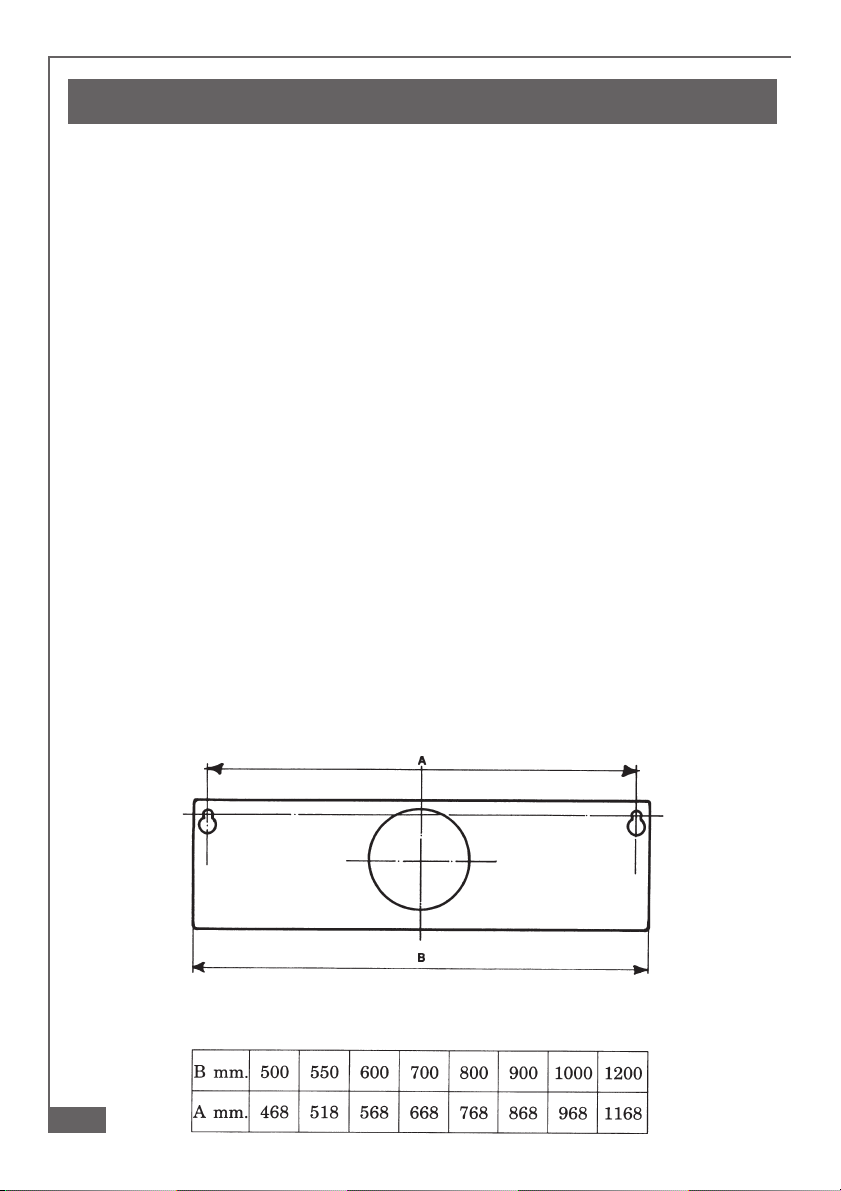
2.3 - Installazione a muro
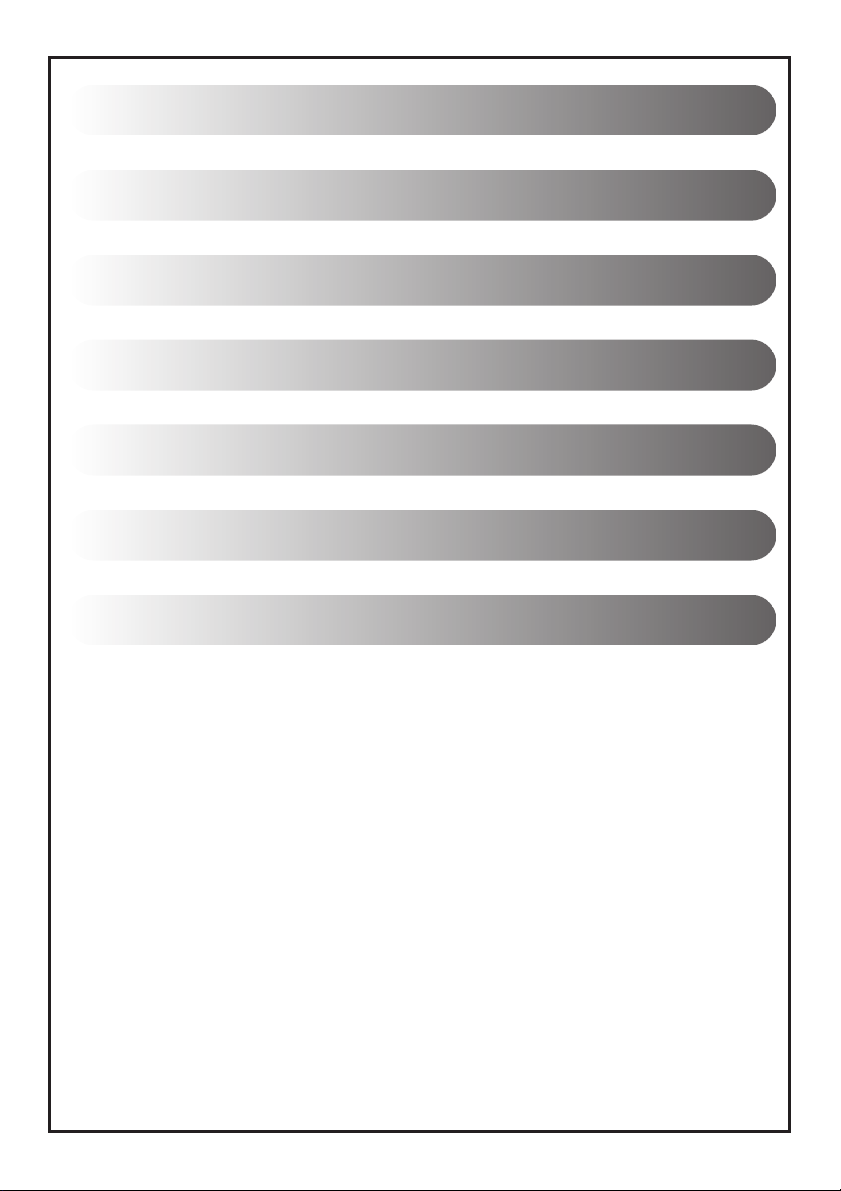
a) Con l’ausilio della eventuale maschera di foratura fare 2 fori Ø 8 nel muro, applicare
i due tasselli, inserire due viti 4,2 x 44,4 lasciando 5 mm non avvitati, rimuovere la
griglia di aspirazione, agganciare la cappa alle due viti negli appositi fori asolati
posteriori e procedere dall’interno al serraggio completo delle viti.
b) Se non è disponibile la maschera, praticare 2 fori Ø 8 (vedi dis.) ed inserire tasselli e
viti, procedendo come paragrafo a.
c) Per una installazione a muro tramite staffe (opzionali), attenersi alle istruzioni ripor-
tate nella apposita maschera abbinata.
d) Rispettare l’avvertenza 1. 6 .
7
Page 8
Parte 1ª - ISTRUZIONI PER L’INSTALLAZIONE
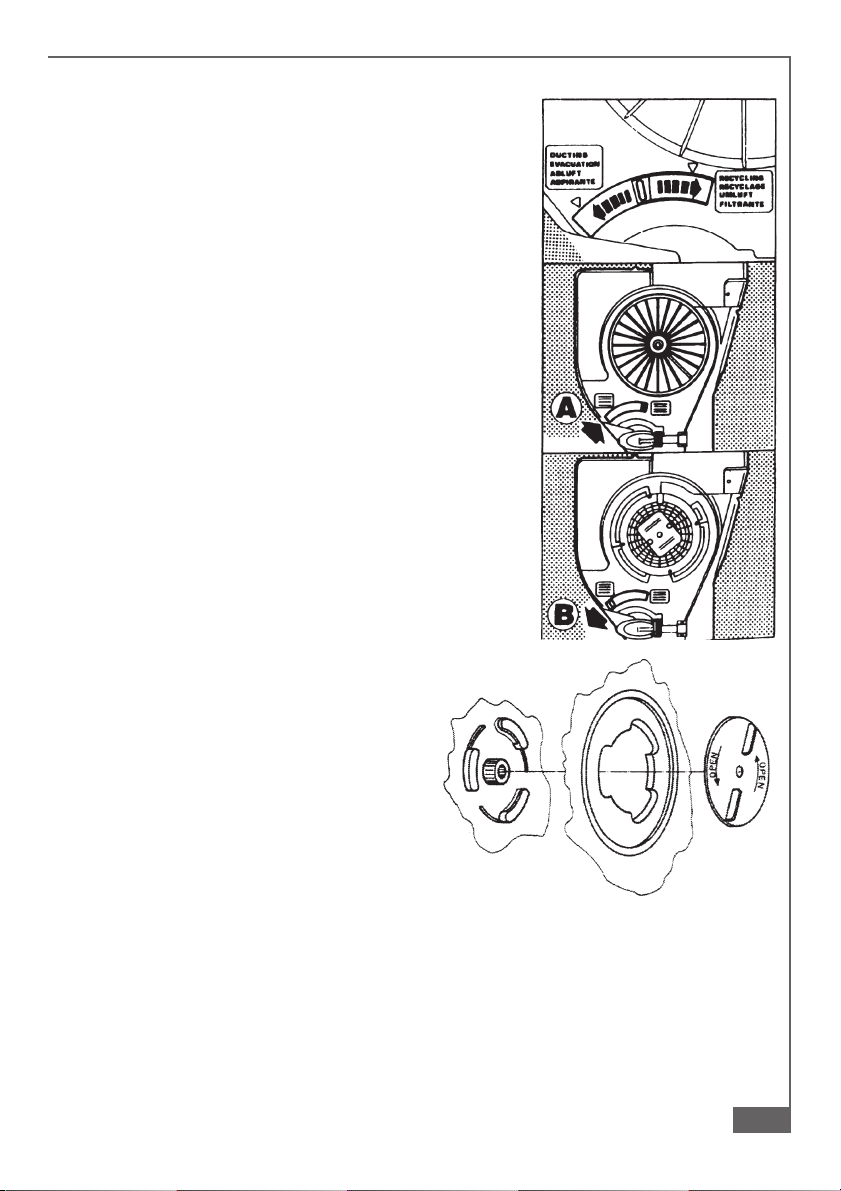
2.4 - Scelta della versione
a) Aspirante
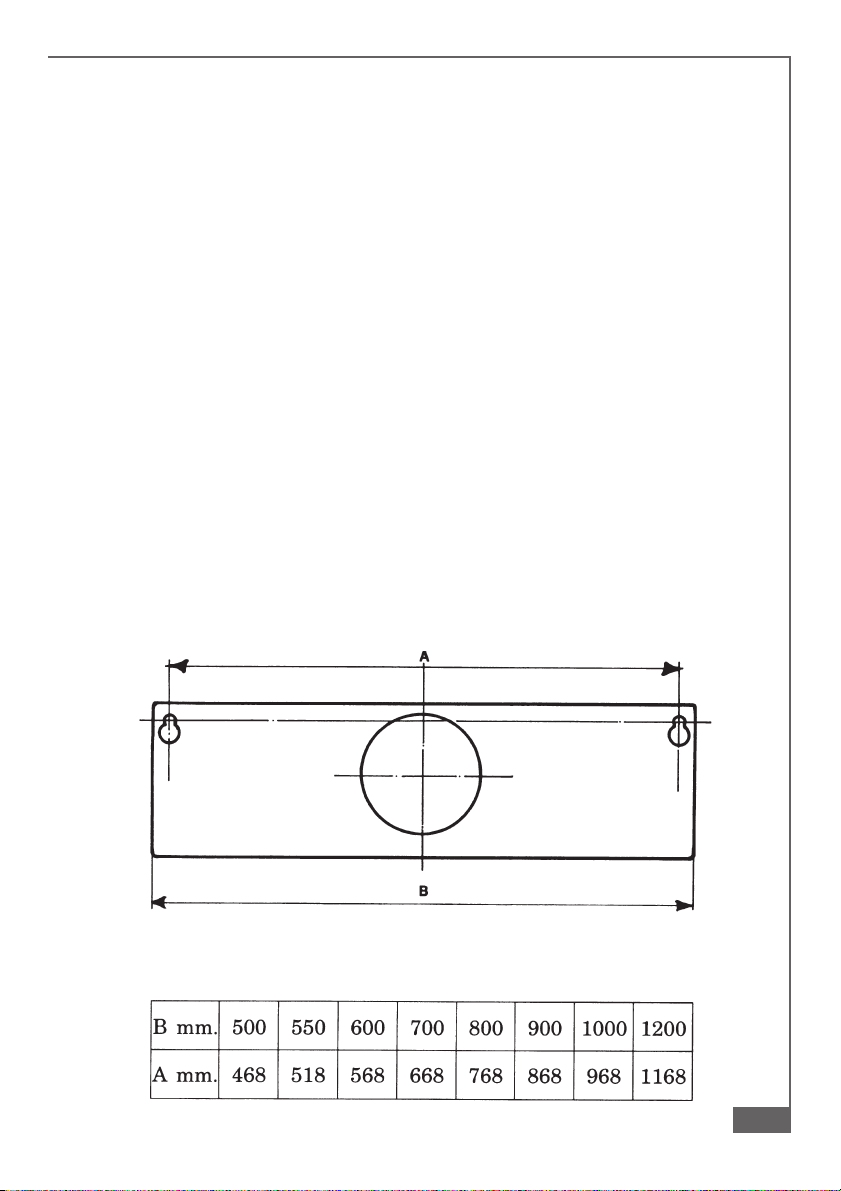
Aprire la griglia di aspirazione e posizionare la leva o
l’indice della manopola sulla posizione «aspirante» al
fondo della sua corsa (B). Eliminare, se applicata, la
cartuccia di carbone attivo, svitando il pomello centrale o ruotando lentamente in senso antiorario per
sganciare l’attacco centrale a baionetta. Collegare la
tubazione esterna alla flangia Ø 100 mm (o Ø 120
mm su alcuni modelli) posizionata sulla uscita superiore o posteriore secondo necessità. Applicare il tappo nel foro rimasto libero. Rispettare tassativamente
l’avvertenza 1.1.
b) Filtrante
Aprire la griglia di aspirazione e posizionare la leva o
l’indice della manopola nella sua posizione filtrante al
fondo della sua corsa (A). Applicare la cartuccia di
carbone attivo al supporto motore con il pomello metallico centrale o ruotando lentamente in senso orario
per agganciare l’attacco centrale a baionetta. La tubazione esterna, se c’è, può rimanere collegata.
2.5 - Connessione elettrica e controllo funzionale
1 - È necessario rispettare scrupolosamente
le avvertenze 1.2, 1.3, 1.4 e 1.5 del paragrafo 1 relative alla sicurezza.
2 - Effettuato il collegamento elettrico, verifi-
care il corretto funzionamento di illuminazione, accensione del motore, cambio
delle velocità.
8
Page 9

Parte 2ª - ISTRUZIONI PER L’USO E LA MANUTENZIONE
3 - FUNZIONAMENTO
3.1 - L’interruttore comanda l’accensione, la regolazione della velocità del motore e l’illuminazione del piano di cottura. Per il miglior rendimento dell’apparecchio si consiglia di aprire la visiera e di usare la velocità più elevata in caso di forte concentrazione di odori e fumi, e la velocità intermedia o inferiore per un ricambio d’aria silenzioso ed economico. È inoltre necessario mettere in funzione la cappa quando si inizia
a cucinare, lasciandola accesa ancora per qualche minuto dopo aver terminato la
cottura.
3.2 - Rispettare tassativamente le avvertenze 1. 7 e 1. 8 .
4 - MANUTENZIONE E PULIZIA
Una buona manutenzione garantisce un elevato rendimento, e una lunga durata
della cappa. ATTENZIONE: L’accumulo di grassi all’interno del filtro, oltre a pregiudicare il rendimento dell’apparecchio, può comportare anche rischi di incendio. Si
raccomanda pertanto di attenersi scrupolosamente alle istruzioni sotto indicate.
4.1 - Filtro antigrasso
È il filtro meccanico, fornito in diversi tipi alternativi, che trattiene le particelle di
grasso. È posto all’interno della griglia di aspirazione. Per la manutenzione operare
come segue:
a) Generalità: Indipendentemente dal tipo del filtro, per toglierlo aprire la griglia e ri-
muovere gli appositi fermi in filo metallico.
b) Filtro sottile a perdere (spessore circa 1 mm):
Non lavare, ma sostituire mediamente ogni 2 mesi. Se il filtro è dotato di indicatori
chimici di saturazione sostituire quando:
b.1 - Il colore viola dei puntini visibili dall’esterno si è diffuso su tutta la superficie del
filtro.
b.2 - Il colore rosso delle strisce interne, normalmente non visibile, è diventato visibile dall’esterno.
c) Filtro sintetico a materassino (spessore circa 10 mm): è rigenerabile e deve essere
mediamente lavato ogni 2 mesi in acqua tiepida e detersivo neutro, lasciando asciugare dopo leggera strizzatura su fonte di calore a max 40°C. Sostituire dopo 5 o 6
lavaggi.
d) Filtro metallico multistrato: va lavato mediamente 1 volta al mese in acqua con nor-
male detersivo o in lavastoviglie. Asciugare bene prima di rimontarlo.
9
Page 10
Parte 2ª - ISTRUZIONI PER L’USO E LA MANUTENZIONE
4.2 - Filtro al carbone attivo
È il filtro chimico che trattiene gli odori
nella cappa filtrante. Per rimuoverlo, aprire
la griglia e svitare il pomello centrale metallico o ruotare leggermente in senso
antiorario il filtro fino a sganciare la baionetta centrale. Rimontare procedendo inversamente. Per un buon rendimento sostituire mediamente ogni 3 mesi.
4.3 - Illuminazione
Se una lampada non funziona o smette di funzionare, aprire la griglia di aspirazione
e controllare che sia ben avvitata. Se fosse necessario, cambiarla con un’altra di
pari tipo o potenza.
4.4 - Pulizia
Pulire la cappa con acqua tiepida e detersivo liquido neutro; evitare l’uso di solventi,
alcool e abrasivi. Per tutte le operazioni dal punto 4.1 al punto 4.4 rispettare l’avvertenza 1. 9 , in particolare per l’operazione 4.3.
10
Page 11

Part 1 - INSTALLATION INSTRUCTIONS
GENERAL INFORMATION
This canopy hood is designed to be fixed to any rigid vertical surface, over a gas or
electric hotplate and can be used either in the extraction mode (ducted to the outside)
or in the recirculation mode (internal recycling). All cookers hood perform better when
used in evacuation mode. During winter time it may be convenient to use the hood in
the recycling mode to avoid heat loss from the kitchen. Before starting the
installation, consideration should be given to the difficulties to be found during
installation. The installation work must be undertaken by a qualified and
competent person in conformity to the rules concerning the evacuation of
contaminated air. The manufacturer disclaims all liability for any damage or
injury caused as a result of not following the instructions for installation
contained in the following text.
1 - SAFETY WARNINGS
1.1 - When used in the extraction mode, the cooker hood ducting must not be connected to
a flue which is used for exhausting fumes from appliances supplied with energy other
than electric, such as a central heating flue or water heating flue.
1.2 - Before connecting to the mains supply ensure that the mains voltage corresponds with
the voltage on the rating plate inside the hood.
1.3 - Connect the cooker hood to the mains via a bipolar switch which has 3mm clearance
between the contacts.
1.4 - For cooker hoods featuring an earth cable, make sure the electric plant of your house
is correctly earthed.
1.5 - Appliance in class II are provided with a double insulation; therefore do not connect
then through earthed plugs but through simple bipolar plugs.
1.6 - When installed, the hood must be positioned at least 65cm above the hotplate.
1.7 - Never do flambé cooking under this cooker hood.
1.8 - Never leave frying pans unattended during use as overheated fat and oil may catch fire.
1.9 - Before carrying out any kind of maintenance or cleaning, disconnect the hood from the
mains supply.
1.10- If the room where the cooker hood is to be used contains a fuel burning appliance such
as a central heating boiler then this must be of the room sealed or balanced flue type.
If other types of flue or appliance are fitted, ensure that there is an adequate supply of
air into the room. When the cooker hood is used in conjunction with appliances supplied
with energy other than electric, the negative pressure in the room must not exceed 0,04
mbar to prevent fumes being drawn back into the room by the cooker hood.
11
Page 12
Part 1 - INSTALLATION INSTRUCTIONS
2 - INSTALLATION INSTRUCTIONS
Some installation systems require the opening and removal of the metal grille panel.
2.1 - Instructions for opening and removing the metal grille panel
To open the grille panel, press inwardly on the two slider catches at each side of the
grille panel and the grille will pivot down. To remove the metal grille, pull forward on
the right hand side so that the hinge pin on the back of the grille will be released from
the slot in the side of the casing.
2.2 - Wall cabinet fixing
a) Predrilled wall cabinet: fix the hood onto the wall cabinet base panel using the four
screws 4.2 x 45 mm (supplied with the fixing kit). It is not necessary to open the
metal grille.
b) No predrilled wall cabinet:
b.1 - If the hood is provided with a paper fixing template, follow the instructions.
b.2 - If the hood is not provided with a paper fixing template, position the hood on the
wall cabinet base panel and pilot drill the 3.5 x 16 mm screws (not supplied with the
fixing kit) from the inside onto the wood.
2.3 - Wall mounting
a) Drill two Ø 8 mm holes on the wall using the paper template, insert two rawl plugs
and two 4.2 x 44,4 mm screws leaving 5 mm untightened. Open the metal grille
panel, hook the hood on and fully tighten the screws.
b) If the hood is not provided with a paper fixing template, drill two Ø 8 mm holes (see
draw.), insert the plugs and screws, proceeding as directed under paragraph a.
c) For wall mounting using wallbrackets (optional), follow the instructions of the fixing
template.
d) Pay attention to the safety regulation of point 1. 6 .
12
Page 13
Part 1 - INSTALLATION INSTRUCTIONS
2.4 - Choice of operating mode
a) Evacuation mode
To check that the hood is set up for evacuation, open
the grille panel and make sure that the conversion lever
or the change-over knob on the centrifugal unit is in
the DUCTING position (B). The charcoal filter is not
required. For ducting to the outside, the hood is
supplied with a rear and top outlet. A flange spigot of
100 mm diameter (120 mm in certain models) is usually
fitted on the top outlet and a blanking plug on the rear
outlet. If you choose to duct the hood from the rear of
the casing, you should invert the position of the flange
and of the blanking plug. Pay attention to the safety
regulation 1.1.
b) Internal recirculation mode
To check that the hood is set up for recycling, open
the grille panel and make sure that the conversion lever
or the change-over knob on the centrifugal unit is in
the RECYCLING position (A). The charcoal filter is to
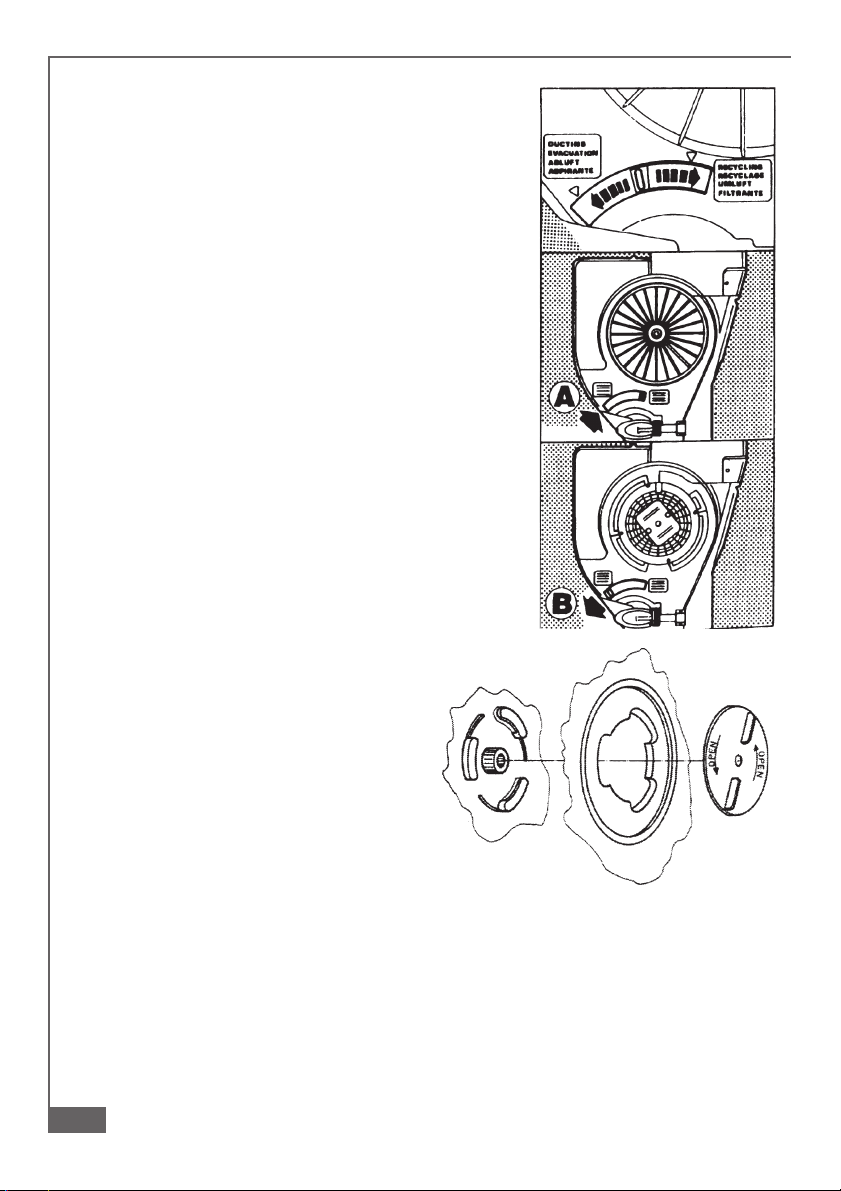
be fitted. To fit the charcoal filter, support the filter with
one hand and turn the thumb screw through the centre
of the charcoal filter. If the filter is of the interlocking
type, turn the filter clockwise. The hood can remain
connected to the outside.
2.5 - Electrical connection and working test
1 - The safety measures 1.2, 1.3, 1.4 and 1.5
of paragraph 1 are to be strictly observed.
2 - Once the electrical connection has been
completed, check that the worktop
illumination, motor and speeds work
properly.
13
Page 14

Part 2 - USE AND MAINTENANCE INSTRUCTIONS
3 - OPERATION
3.1 - Control is located on the right hand side of the front to operate worktop illumination
and select the most suitable working speed for your cooking. To increase the area of
extraction, the glass visor should be pulled open. The top speed should be used
when frying or cooking foods with strong odours, while a lower speed can be used
for normal cooking. To obtain the best performance from your hood, turn it on before
you start cooking and leave it running for a few minutes after your cooking is over to
clear the air.
3.2 - Pay attention to safety regulations 1. 7 and 1. 8 .
4 - MAINTENANCE AND CLEANING
Regular maintenance and cleaning will ensure good performance and reliability, while
extending the working-life of the hood. Special attention should be reserved to the
grease filter and to the charcoal filter (recycling mode).
4.1 - Grease filter
This retains the solid grease particles and can be supplied in different types. lt is
fitted onto the reverse side of the metal grille panel. Maintenance of the grease filter
varies according to the used type.
a) Whatever type of filters used, the filter is easily removed from the grille by pushing
the metal wire clips to one side and removing.
b) Thin synthetic filter (1 mm thick). It should not be washed and should be replaced
every two months. If the filter is provided with a saturation indicator, replace when:
b.1 - The violet colour of the dots, which are visible through the metal grille, is spread
over the whole surface of the filter.
b.2 - The red colour of the stripes, which is not visible through the metal grille when
the filter is clean, becomes visible from the outside of the metal grille.
c) Foam synthetic filter (approx. 10 mm thick).
It should be washed every two months in hot water using mild detergent and should
be squeezed dry, not wrung out. Replace after 5 or 6 washings.
d) Multi-layer metal filter. It should be washed once a month in hot water using mild
detergent or liquid soap. It can be washed in a dish-washer. It should not be bent
and should be left to drain dry. WARNING: An excess of grease in the filter not only
would affect the performance of the hood, but it is also a possible fire risk. We strongly
recommend therefore to clean and replace filters in accordance with the manufacturer
instructions.
14
Page 15

Part 2 - USE AND MAINTENANCE INSTRUCTIONS
4.2 - Charcoal filter
The charcoal filter is a chemical filter to
be used only when the hood is in the
recycling position. To replace the charcoal
filter, open the grille and remove the thumb
screw through the centre of the charcoal
filter. If the filter is of the interlocking type,
turn the filter anticlockwise. Replace by
reversing the operation. For a good performance replace the charcoal filter on
average every three months.
4.3 - Worktop illumination
If a lamp fails to function at any time, open the metal grille panel and check that the
lamp is fully screwed into the holder. When changing the lamp, an identical
replacement must be fitted to ensure a safe working of the hood.
4.4 - Cleaning
The metal work should be cleaned regularly, at least once a month, using mild
household cleaner and polish. Never use abrasives. For all operations from point
4.1 to point 4.4 and in particular for point 4.3, pay special attention to the safety
regulation 1. 9 .
15
Page 16

1ère Partie - INSTRUCTIONS POUR L’INSTALLATION
GENERALITES
Cette hotte est destinée à être installée au mur, au dessus d’un plan de cuisson. Elle
peut être utilisée en version évacuation (raccordement extérieur) ou recyclage
(recyclage interne). Les meilleures performances s’obtiennent dans la version en
évacuation extérieure. De toute façon il est conseillable d’utiliser la hotte dans la
version recyclage pendant l’hiver pour éviter des dispertions de chaleur. A cause de
la complexité de l’appareil il est préférable que l’installation soit effectuée par
un spécialiste tout en respectant les prescriptions des autorités concernant
l’évacuation de l’air. La responsabilité du producteur ne saurait être engagée
pour tout incident ou accident provoqué par une installation défectueuse.
1 - CONSEILS CONCERNANT LA SECURITE
1.1 - N’utilisez jamais pour le raccordement une cheminée servant de conduit de fumée
(chaudières, cheminées, etc...)
1.2 - Vérifiez que la tension du secteur soit identique aux valeurs indiquées sur la plaquette
signalétique figurant à l’intérieur de la hotte.
1.3 - Reliez la hotte au réseau en interposant un interrupteur bipolaire avec ouverture des
contacts de 3 mm au moins.
1.4 - Pour les hottes avec cable de mise à la terre assurez-vous que l’installation électrique
de votre logement ait une mise à la terre correcte.
1.5 - Les hottes en classe II ont un double isolement; elles ne doivent donc pas être branchées
avec une fiche équiée de mise à la terre mais avec une simple fiche bipolaire.
1.6 - La distance de sûreté minimum entre le plan de cuisson et la hotte est de 65 cm.
1.7 - Il est interdit de faire flamber des préparations sous la hotte.
1.8 - Lorsque des fritures sont effectuées sous la hotte en fonctionnement, elles doivent
faire l’objet d’une surveillance permanente: l’huile surchauffée pourrait s’enflammer.
1.9 - Avant d’effectuer le nettoyage ou l’entretien de la hotte, débranchez l’appareil ou agissez
sur l’interrupteur omnipolaire de votre installation.
1.10- Une ventilation convenable de la pièce doit être prévue si une hotte de cuisine et des
appareils alimentés par une énergie autre que l’énergie électrique évacuent les fumées
simultanément. Une utilisation sans dangers est possible si la dépression maximum
qui se crée dans la pièce est inférieure à 0,04 mbar, ce que évite un retour des gaz de
décharge dans la pièce.
16
Page 17

1ère Partie - INSTRUCTIONS POUR L’INSTALLATION
2 - MONTAGE
Quelques systèmes d’installation prévoient l’ouverture et l’enlèvement de la grille
d’aspiration.
2.1 - Ouverture et enlèvement de la grille d’aspiration
Pour ouvrir la grille déplacer vers le centre les boutons situés dans la partie inférieure
de la hotte. Ouvrir la visière. La grille glissera autour des pivots postérieurs. La grille
ouverte et en position verticale, déplacer en avant le pivot postérieur droit le long de
l’ouverture latérale jusqu’à sa sortie.
2.2 - Installation au dessous d’un meuble
a) Meuble préperçé: fixer la hotte au meuble à travers les trous prédisposés sur la
base du meuble en utilisant les 4 vis 4,2 x 45 mm. Il n’est pas nécessaire d’ouvrir la
grille.
b) Meuble non perçé:
b.1 - Si avec la hotte il y a un gabarit de per-çage, il faut suivre ses instructions.
b.2 - Si le gabarit n’est pas fourni, ouvrir la grille, appuyer la hotte contre la base du
meuble et visser de l’intérieur directement au bois en utilisant des vis 3,5 x 16 mm
non fournies.
2.3 - Installation au mur
a) A l’aide de l’éventuel gabarit de perçage faire deux trous de Ø 8 mm dans le mur,
appliquer les deux chevilles, insérer deux vis 4,2 x 44,5 mm en laissant 5 mm non
vissés. Déplacer la grille d’aspiration, accrocher la hotte aux deux vis et procéder de
l’intérieur au serrage définitif des vis.
b) Si le gabarit n’est pas disponible, faire deux trous Ø 8 mm, insérer chevilles et vis et
procéder comme au paragraphe a.
c) Pour une installation au mur avec des équerres (en option) s’en tenir aux instructions
reportées sur le gabarit annexé.
d) Respecter le conseil 1. 6 .
17
Page 18

1ère Partie - INSTRUCTIONS POUR L’INSTALLATION
2.4 - Choix de la version
a) Evacuation
Ouvrir la grille d’aspiration et positionner le levier de
conversion ou l’aiguille du bouton sur la position “aspirante” à la fin de son parcours (B). Enlever, si fourni,
le filtre à charbon, en dévissant le pommeau central
ou en tournant lentement dans le sens contraire à
celui des aiguilles d’une montre pour décrocher
l’attaque centrale à baïonette. Relier le tuyau extérieur
à un anneau de raccord Ø 100 mm (ou Ø 120 mm
pour quelques modèles) situé au dessous ou à
l’arrière selon les nécessités. Obstruer la sortie non
utilisée avec le cache prévu à cet effet. Respecter le
conseil 1.1.
b) Recyclage
Ouvrir la grille d’aspiration et positionner le levier de
conversion ou l’aiguille du bouton sur la position “filtrante” à la fin de son parcours (A). Appliquer le filtre
à charbon actif au support du moteur à l’aide du
pommeau central en tournant lentement dans le sens
des aiguilles d’une montre pour accrocher l’attaque
centrale à baïonette. La hotte peut eventuellement
rester branchée à un conduit.
2.5 - Raccordement électrique et contrôle fonctionnel
1 - Il est nécessaire de respecter
scrupuleusement les conseils 1.2, 1.3,
1.4 et 1.5 du paragraphe 1 concernant la
sécurité.
2 - Le raccordement électrique effectué,
vérifiez le bon fonctionnement de
l’éclairage, du moteur et du changement
des vitesses d’aspiration.
18
Page 19

2ème Partie - INSTRUCTIONS POUR L’UTILISATION ET L’ENTRETIEN
3 - FONCTIONNEMENT
3.1 - Le interrupteur actionnent la mise en marche, le réglage des vitesses du moteur et
l’illumination du plan de cuisson. Pour obtenir des performances optimales il est
conseillé d’utiliser la vitesse la plus élevée en cas de forte concentration d’odeurs et
de vapeurs, la vitesse intermédiaire ou la petite vitesse pour maintenir l’air propre
avec une faible consommation d’énergie. Mettre la hotte en fonctionnement avant le
début d’une cuisson et laisser-la fonctionner encore quelques minutes après la fin
de cuisson.
3.2 - Respecter scrupuleusement les conseils 1. 7 et 1. 8 .
4 - ENTRETIEN ET NETTOYAGE
Un bon entretien est la garantie d’un bon fonctionnement et d’un bon rendement de
la hotte. ATTENTION: L’accumulation de graisse à l’intérieur du filtre peut nuire au
rendement de l’appareil et provoquer des risques de feu. On conseille pourtant de
respecter les instructions ci-dessous.
4.1 - Filtre à graisse
Il s’agit d’un filtre mécanique, fourni en différents types alternatifs, qui retient les
particules de graisse. Il est situé à l’intérieur de la grille d’aspiration. Pour l’entretien
agir comme suit:
a) Généralités
Pour enlever n’importe quel type de filtre, ouvrir la grille et déplacer les arrêts
métalliques.
b) Filtre mince à perdre (épaisseur 1 mm environ). Ce filtre ne peut être lavé; il doit être
remplacé tous les deux mois. Si le filtre est fourni d’indicateurs chimiques de
saturation, il faut le substituer si:
b.1 - La couleur violet des pois visibles à l’extérieur aura couvert toute la surface du
filtre.
b.2 - La couleur rouge des bandes à l’intérieur, normalement pas visibles, sera visible
à l’extérieur.
c) Filtre synthétique
Il doit être lavé tous les 2 mois à l’eau tiède savonneuse; laisser-le sécher sur une
source de chaleur à 40°C maximum après l’avoir tordu légèrement. Substituer-le
après 5 ou 6 lavages.
d) Filtre métallique multi-couche
Il doit être lavé tous les mois à l’eau tiède avec un détergent normal. Vous pouvez
également le laver dans votre lave-vaisselle. Laisser-le sécher avant de le replacer.
19
Page 20

2ème Partie - INSTRUCTIONS POUR L’UTILISATION ET L’ENTRETIEN
4.2 - Filtre à charbon actif
Il s’agit d’un filtre chimique qui retient les
odeurs dans la hotte à recyclage. Pour
l’enlever, ouvrir la grille et dévisser le
pommeau central en métal. Tourner
légèrement le filtre dans le sens contraire
à celui des aiguilles d’une montre jusqu’à
décrocher la baïonette centrale. Pour le
replacer procéder en séquence inverse.
Afin d’obtenir le meilleur rendement, ce
filtre doit être remplacé tous les trois mois.
4.3 - Eclairage
Si une lampe ne fonctionne pas, ouvrir la grille d’aspiration et contrôler qu’elle soit
bien vissée. S’il est nécessaire, substituer-la par une autre du même type et de la
même puissance.
4.4 - Nettoyage
Nettoyer la hotte à l’eau tiède et avec du détergent liquide neutre. N’employez jamais
de produits abrasifs ou caustiques. Pour toutes les opérations du point 4.1 au point
4.4 respecter scrupuleusement le conseil 1. 9 , particulièrement pour l’opération 4.3.
20
Page 21

Teil 1 - MONTAGEHINWEISE
ALLGEMEINES
Diese Dunstabzugshaube ist zur Wandmontage über einem Kochfeld vorgesehen.
Die Haube kann als Umluft- oder Abluft-Haube verwendet werden. Die besten
Leistungen erhält man in Abluftversion; jeden Falls kann die Haube im Winter in
Umluftversion betrieben werden: man spart auf diese Weise Hitzerverlust. Wegen
des beträchtlichen Eigengewichtes der Haube empfiehlt es sich, die Anbringung
von geschultem Personal durchführen zu lassen, wobei alle behördlichen
Bestimmungen über Luftableitung zu beachten sind. Für Schäden, die durch
nicht vorschriftsmäßige oder unsachgemäße Anbringung verursacht werden,
lehnt der Hersteller jegliche Haftung ab.
SICHERHEITSHINWEISE
1 - Die Dunstesse nicht an Rauch- oder Abgaskamine anschließen, die noch für offene
Feuerstellen benutzt werden. Bei der Ableitung von Abluft sind die behördlichen
Bestimmungen zu beachten. Gegebenenfalls ist der zuständige Schornsteinfeger-Meister
zu befragen.
2 - Es ist sicherzustellen, daß die Netzspannung den Anschlußwerten auf dem Typenschild
im Inneren der Dunstesse entspricht.
3 - Es muß gewährleistet sein, daß nach erfolgter Montage des Gerätes der
Schutzkontaktstecker erreichbar ist; andernfalls ist bei direktem Anschluß der Dunstesse
ein zweipoliger Schalter, mit einem Öffnungsweg von mindestens 3 mm für jeden Pol,
zwischenzuschalten.
4 - Bei Hauben mit Schutzleiter ist es sicherzustellen, daß die Wohnung über eine
vorschriftsmäßige Erdung verfügt.
5 - Dunstabzugshauben in Schutzklasse II haben eine Doppelt-Isolierung; deswegen sind
sie nicht mit einem Erdstecker sondern mit einem normalen zweipoligen Stecker
anzuschließen.
6 - Der Sicherheitsabstand zwischen Kochstelle und Dunstesse soll mindestens 65 cm
betragen.
7 - Das Flambieren unter der Dunstesse ist zu unterlassen. Achtung Brandgefahr!
8 - Frittiergeräte, die unter der Dunstesse betrieben werden, sind während der gesamten
Betriebsdauer zu beaufsichtigen. Achtung Brandgefahr!
9 - Die Filter dieser Dunstabzugshaube müssen in regelmäßigen Zeitabständen gereinigt
oder erneuert werden. Fettgetränkte Filter sind leicht brennbar: daher ist der in dieser
Anleitung unter der Rubrik “Wartung” angegebene Reinigungsrhythmus unbedingt
einzuhalten. Vor jedem Reinigungsvorgang, vor dem Filterwechsel und vor
Instandsetzungsarbeiten ist entweder der Gerätestecker aus der Steckdose zu ziehen,
der Hauptschalter (allpolig) abzuschalten oder die Sicherung herauszudrehen.
10 - Wenn in dem Raum außer der Haube andere, nicht elektrisch betriebene Geräte (z.B.
Gas, Ölöfen) betrieben werden, muß für ausreichende Lüftung (Zuluft) gesorgt werden.
Bitte in diesem Zusammenhang den folgenden Absatz besonders beachten. Wichtiger
21
Page 22

Teil 1 - MONTAGEHINWEISE
Hinweis für den Abluftbetrieb Bei gleichzeitigem Betrieb einer Dunstabzugshaube und
einer raumluftabhängigen Feuerstätte (wie z.B. gas-, öl oder kohlebetriebene Heizgeräte,
Durchlaufer-hitzer, Warmwasserbereiter) ist Vorsicht geboten, da beim Absaugen der
Luft durch die Dunstabzugshaube dem Aufstellraum die Luft entnommen wird, die die
Feuerstätte zur Verbrennung benötigt. Ein gefahrloser Betrieb ist möglich, wenn bei
gleich-zeitigem Betrieb von Haube und raumluftabhängiger Feuerstätte im Aufstellraum
der Feuerstätte ein Unterdruck von höchstens 0,04 mbar erreicht wird und damit ein
Rücksaugen der Feuerstättenabgase vermieden wird. Dies kann erreicht werden, wenn
durch nicht ver-schließbare Öffnungen, z.B. Türen, Fenster, Zuluft/Abluftmauerkästen
oder andere technische Maßnah-men, wie gegenseitige Verriegelung o.ä., die Verbrennungsluft nachströmen kann. Anmerkung: Bei der Beurteilung muß immer der gesamte
Lüftungsverbund der Wohnung beachtet werden. Bei Betrieb von Kochgeräten, z.B.
Koch-mulde und Gasherd, wird diese Regel nicht angewendet. Im Zweifelsfalle muß der
zuständige Schornsteinfe-germeister zu Rate gezogen werden. Wenn die
Dunstabzugshaube im Umluftbetrieb - unter Verwendung eines separat zu beschaffenden
Aktiv-kohlefilters - verwendet wird, ist der Betrieb ohne Einschränkung möglich.
Abluft:
Der Abluftkanal darf nur an einen Luftschacht an-geschlossen werden (nicht an einen
noch benutzten Kamin!) oder sollte direkt ins Freie führen. Der Weg des Abluftkanals
von der Dunstabzugshaube bis zum Luftschacht sollte nicht mehr als 4-5 Meter betragen
und möglichst gerade verlegt werden. Ist der Weg länger oder mit mehreren Bogen
versehen, kann eine erhebliche Verschlechterung der Luftleistung die Folge sein. Bei
Reduzierung des Abluft Querschnitts, z.B. durch Kleinere Flachkanalsysteme, tritt
gleichfalls eine erhebliche Verschlechterung der Luftleistung sowie ein Anstieg der
Geräuschbildung ein. Es wird daher in solchen Fällen die Installation von Umluftgeräten
empfohlen.
MONTAGE
a) Wandmontage
Unter Verwendung der jeder Haube beiliegenden Bohrschablone werden zwei 8 mm
Dübel eingesetzt und die Schrauben 4,2 x 44,4 mm eingedreht (Abstand von
Schraubenkopf zur Wand ca. 5 mm). Das Fettfiltergitter der Dunstabzugshaube (nach
Betätigen der seitlichen Kunststoffschieber zur Gerätemitte hin) abklappen und
herausnehmen. Die Dunstabzugshaube unter Benutzung der an der Rückwand
angeordneten “Schlüssellöcher” an den Wandschrauben einhängen und diese sodann
festdrehen (B). Einige Geräteversionen sind mit zusätzlichen
Wandbefestigungslaschen ausgestattet (Mehrpreis). Diese Laschen können unter
Verwendung von Dübeln und Schrauben an der Wand befestigt werden, und die
Dunstabzugshaube kann eingehangen werden. Der beiliegende Arretierungswinkel
wird nach dem Einhängen der Haube hinten oben, im Winkel am Gerät und an der
Wand anliegend angeschraubt. Dadurch wird unbeabsichtigtes “Ausheben” der
Dunstabzugshaube vermieden (A).
22
Page 23

b) Schrankmontage
In der Haubenoberseite sind mehrere Bohrungen
eingearbeitet, die eine Befestigung unter
Hängeschränken ermöglichen. Nach dem Anbringen
der entsprechenden Bohrungen an der
Schrankunterseite (Bohrschablone verwenden), kann
die Haube unter Verwendung der beiliegenden
Schrauben mit dem Schrank verschraubt werden.
Während der Montage muß die Dunstabzugs-haube
nach unten abgestützt werden.
c) Montage Abluftführung
Bei Ablufthauben muß zusätzlich ein Abluftrohr vom
Luftaustritt am Gerät nach außen verlegt werden
(Material im Handel erhältlich). Die Dunstabzugshaube
ist mit einem Luftabgang nach hinten und nach oben
versehen. Durch Austauschen der Verschlußscheibe
und des Luftstutzens kann beliebig die gewünschte
Geräteöffnung für den Luftabgang gewählt werden.
Scheibe und Stutzen können durch eine
Drehbewegung aus den Gehäuseausschnitten
genommen und umgekehrt wieder eingesetzt werden.
Sofern das obere Gehäuseloch als Luftabgang benutzt
wird, muß im Boden des Hängeschrankes analog ein
runder Ausschnitt in den Schrankboden gesägt
werden, wiederum unter Benutzung der
Bohrschablone.
d) Montage bei Umluft
Bei Hängeschränken von mehr als 35 cm
Tiefe muß darauf geachtet werden, daß die
Haube so weit nach vorn angeschraubt
wird, daß die vorderen Luftschlitze in der
Haubenoberseite frei vor der Schranktüre
liegen, damit die Umluft ungehindert in den
Raum zurückströmen kann. Bei
Umlufthauben müssen die beim
Kundendienst oder im Zubehörhandel
erhältlichen Aktivkohlefilter innerhalb des
Gerätes einge-setzt werden.
Teil 1 - MONTAGEHINWEISE
Elektrischer Anschluß und Funktionskontrolle
a) Für den Anschluß an das 220-Volt-Wechselstromnetz ist die Dunstabzugshaube mit
einem festmontierten Kabel und einem Schutzkontaktstecker versehen. Der
Gesamtanschlußwert (Motor und Beleuchtung) ist dem Typenschild zu entnehmen.
Die in der Montageanleitung besonders hervorgehobenen Sicherheitshinweise,
insbesondere die Punkte 2, 3, 4 und 5 von Abschnitt sind strengstens zu beachten.
b) Nach Durchführung des elektrischen Anschlusses wird die Funktionskontrolle
bezüglich Beleuchtung, Einschalten des Motors und Wechseln der Schaltstufen
durchgeführt.
23
Page 24

Teil 2 - GEBRAUCHS- UND WARTUNGSHINWEISE
Bedienung
Das Bedienungselement (Schalter) besitzt folgende Funktionen:
Position 0 - LICHT AN-AUS
Position 1 - kleine Gebläsestufe
Position 2 - mittlere Gebläsestufe (nur bei 3 stufigen Hauben)
Position 3 - große Gebläsestufe
Die Beleuchtung kann unabhängig vom Gebläsebetrieb ein- und ausgeschaltet
werden. Der Gebläsebetries kann nur mit eingeschaltetem Licht erfolgen.
Einstellung Abluft - Umluft
Fettfiltergitter nach Betätigen der Kunststoffschieber zur Gerätemitte hin
herunterklappen. Am Gebläsekasten befindet sich hinten ein Umlenkhebel, der jeweils
zum Links- oder Rechtsanschlag geschwenkt werden kann. Beide Positionen sind
mehrsprachig, unter anderem auch mit UMLUFT und ABLUFT beschriftet.
Umluft
Achtung: Umluftgeräte benötigen einen, oder mehrere (2 motorige Geräte benötigen
zwei Filter) Aktivkohle-Rundfilter. Diese Aktivkohlefilter müssen, wenn sie nicht bei
bestimmten Geräten werkseitig beigefügt sind, beim Kundendienst oder im
Zubehörhandel erworben werden. Einsetzen des Aktivkohlefilter: Fettfilter
herunterklap-pen. Aktivkohlefilter unter Benutzung der Rändel-schraube oder durch
Einrasten der Bajonettscheibe vor dem Motor-Luftgitter einsetzen.
Wartung
Die Dunstabzugshaube bedarf keiner besonderen Wartung. Die Filter jedoch müssen
zur Aufrechterhaltung der Funktion des Gerätes und aus Sicherheitsgründen in
regelmäßigen Abständen erneuert werden.
1 - Fettfilter
Die Filtermatte wird gesamtflächig am Filtergitter durch Klammern befestigt. Im
Urzustand ist diese Matte hoch wärmebeständig durch Verwendung schwer
entflammbarer, selbstverlöschender Materialien. Die Filtermatte hält beim
Luftdurchfluß der in Betrieb befindlichen Haube Schwebestoffe, wie Staub und
Fettpartikel zurück. Dabei wird die Matte mehr und mehr gesättigt, so daß sie zur
Wiederherstellung der ursprünglichen Leistung von Zeit zu Zeit gereinigt bzw. erneuert
werden muß. Es sind verschiedene Arten von Filtermatten erhältlich:
a) Flachfilter mit aufgedrucktem Sättigungs-indikator
Dieser Mattentyp ist mit einem Raster aus roten Punkten bedruckt. Bei fortschreitender
Sättigung mit Fettstoffen färbt sich die gesamte Filterfläche von den Punkten ausgehend ein. Sobald eine geschlossene Ein-färbung der Matte vorliegt, muß diese
24
Page 25

Teil 2 - GEBRAUCHS- UND WARTUNGSHINWEISE
gegen eine neue Filtermatte beim Kundendienst oder (im Zubehörhandel erhältlich)
ausge-tauscht werden. Die gesättigte Matte kann nicht durch Auswaschen regeneriert
und erneut benutzt werden.
b) Kunststoffaser-Filtermatte (Dicke ca. 10 mm)
Eine solche Matte kann regeneriert werden und soll mindestens alle 2 Monate unter
Zusatz von warmem Wasser und mildem Spülmittel ausgewaschen werden. Danach
leicht auspressen und bei maximal 40° C trocknen lassen. Lebensdauer: ca. 4-5
Waschvorgänge. Danach ist die Matte durch eine neue, im Zuberhörhandel erhältliche
auszutauschen.
c) Mehrlagiger Metallfilter
Auf Anfrage lieferbar. Wird in gleicher Weise angebracht, wie Textil- oder Kunstfasermatten. Metallfilter können praktisch unbegrenzt regeneriert werden. Auswaschen
ist sowohl in der Spülmaschine als auch von Hand (unter Zusatz von heißem Wasser
und herkömmlichen Haushalts-Spülmitteln einweichen und auswaschen) möglich.
Austausch (Reinigung) der Filtermatte (des Metallfilters)
Abnehmen des gesamten Fettfiltergitters vom Gerät. Feder-Haltebügel abnehmen,
gesättigte Fettfiltermatte herausnehmen (evtl. wie oben beschrieben reinigen) und
neue (bzw. gereinigte) Matte (eventuelle Bedruckung in Richtung Metallgitter)
einlegen. Feder-Haltebügel hinter den Abkantungen festklemmen. Gitter wieder
einsetzen.
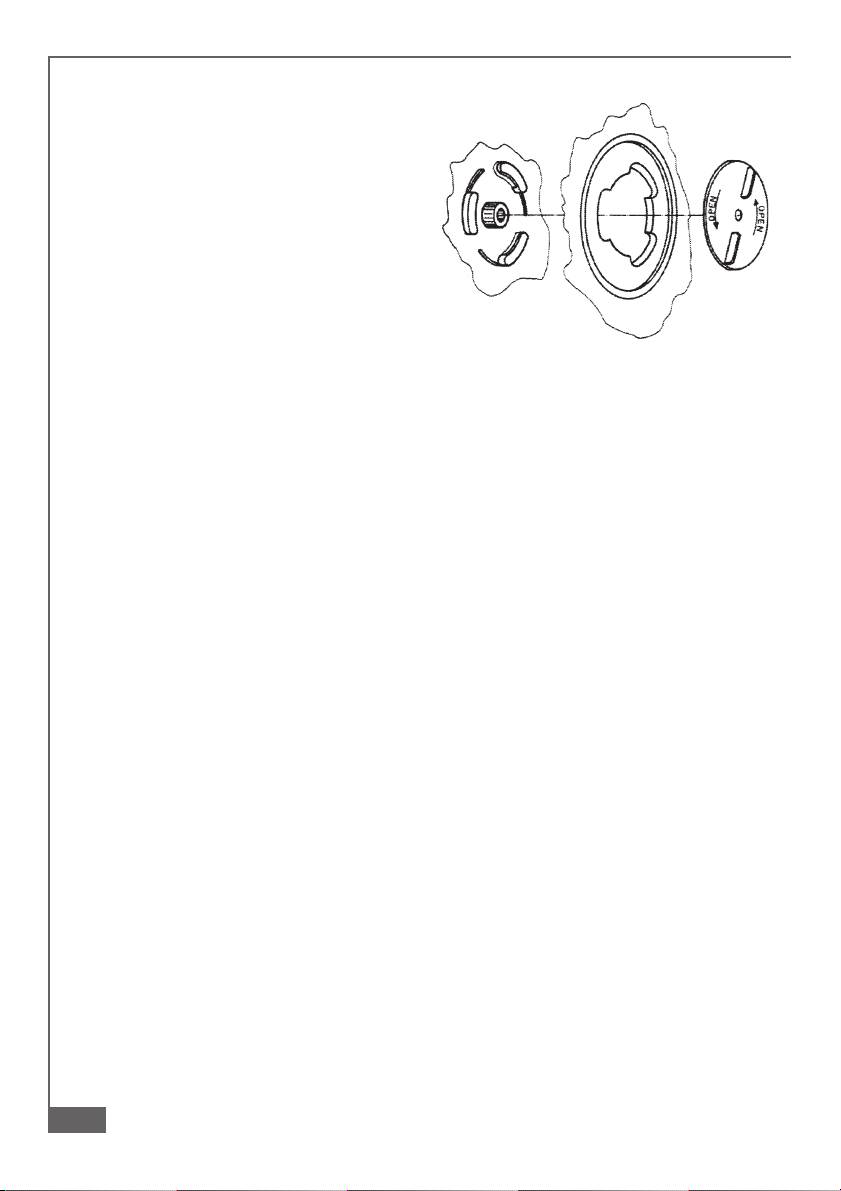
2 - Aktiv-Kohlefilter (beim Kundendienst oder im Zubehörhandel erhältlich)
Der Aktivkohlefilter wird bei Umlufthauben
vor dem Lufteinlaßgitter des Motors (oder
beider Motore, bei zweimotorigen
Geräten) montiert. Aktivkohle hat die
Aufgabe Geruchsstoffe zu absorbieren,
also zurückzuhalten. Die durch den
Fettfilter vorgereinigte und von Fett und
Staub gereinigte Luft wird beim
Durchströmen der Aktivkohle von
Geruchsstoffen gereinigt. Die gute
Abscheide-Wirkung ist unter anderem von
nicht zu großer Luftgeschwindigkeit
abhängig, weshalb Umlufthauben vorzugsweise mit kleiner oder mittlerer
Gebläsestufe betrieben werden sollten. Auch die Aktivkohle ist nach gewisser Zeit
gesättigt und muß gegen eine neue Aktivkohle-Kassette ausgewechselt werden.
Regenerierung und Wiederverwendung ge-brauchter Aktiv-Kohle ist nicht möglich.
Austausch der Aktiv-Kohle
Nach dem Öffnen des Fettfiltergitters ist der Aktivkohlefilter zugänglich. Mittelschraube
lösen (oder Bajonettverschluss unter Linksdrehung öffnen) und gebrauchter Kohlefilter
entfernen. Neuen Kohlefilter in umgekehrter Reihenfolge einsetzen.
25
Page 26

Teil 2 - GEBRAUCHS- UND WARTUNGSHINWEISE
Achtung: eventuelle Schutzfolie an neuer Aktivkohle-Kassette unbedingt vor dem
Einsetzen entfernen, da sonst kein Luftdurchlaß möglich ist.
Allgemeines: Ein Nachlassen der Filterwirkung (Einfärbung der Fettfiltermatte, oder
Nachlassen der Geruchsbeseitigung durch die Aktivkohle) beeinträchtigt die Leistung
der Dunsthaube. Volle Funktion kann immer nur bei einwandfreien, aufnahmefähigen
Filtern erreicht werden.
Daher:
Filterwechsel regelmäßig durchführen, um gleichbleibend gute Funktion zu erhalten.
Durch fettgetränkte Filter besteht Brandgefahr. Wechsel- bzw. Reinigungsrhythmus
für Filter:
a) Fettfilter: Nach kompletter violetter Einfärbung der Matte, oder, wenn Filtermatten
ohne Sättigungsindikator verwendet werden sollten, mindestens alle 2 Monate.
b) Aktivkohle: Bei Nachlassen der Filterwirkung, mindestens jedoch alle 6 Monate.
26
Page 27

Eerste deel - INSTRUCTIES VOOR DE INSTALLATIE
ALGEMEEN
Deze kap is geschikt om aan de muur te worden geïnstalleerd, boven een kookplaat
die tegen een wand is geplaatst. Hij kan worden gebruikt in de afzuigversie (afvoer
naar buiten) of in de filterversie (recycling binnen). In de winter kan het wenselijk zijn
de kap als cirkulatiekap te gebruiken; de prestatie is dan wel aanzienlijk minder dan
bij gebruik als afzuigkap. Het is bovendien van uiterlijk belang dat de installatie
van de wasemkap door een vakman uitgevoerd wordt. De fabrikant wijst iedere
verantwoordelijkheid voor schade, die te wijten is aan een niet juiste of niet
volgens de regels uitgevoerde installatie, af.
1 - VEILIGHEIDSMAATREGELEN
1.1 - Sluit de inbouwgroep niet aan, aan voor verbrandings bestemde afvoerkanalen aan
(CVC, schouwen, enz.).
1.2 - Verzeker er U van dat de netsapnning met de in de inbouwgroep aangegeven
spanning overeenstemt.
1.3 -De inbouwgroep met een tweepolige schakelaar voorzien van min. 3mm
contactopeningen, aan het elektriciteitsnet verbinden.
1.4 - Vergewis er U van voor geaarde wasemkappen, is het noodzakelijk na te gaan.
1.5 - De wasemkappen van Klasse II hebben een dubbele isolering: zij mogen niet worden
verbonden met een geaarde stekker, maar moeten worden aangesloten met een
eenvoudige tweepolige stekker.
1.6 - De minimum veiligheidsafstand tussen kookplaat en inbouwgroep is 65 cm.
1.7 - Flambeer niet onder de inbouwgroep.
1.8 - Gedurende hun gebruik, frituurpannen in het oog houden: oververhitte olie is
ontvlambaar.
1.9 - Haal de stekker uit het stopkontakt of schakel de hoofdschakelaar uitalvorens eender
welke reinings- of onderhoudswerkzaamheid uit te voeren.
1.10- Indien in hetzelfde vertrek hetzij een inbouwwasemkap alsook een niet elektrisch
aangedreven apparaat (zoals b.v. gasapparaten) geinstalleerd zijn, is het noodzakelijk
een aangepaste verluchting van het vertrek te voorzien. Om geen gevaar te lopen,
mag de ruimtelijke depressie 0,04 mbaar niet overschrijden. Op deze wijze voorkomt
U een terugkeer van uitlaatgassen.
27
Page 28

Eerste deel - INSTRUCTIES VOOR DE INSTALLATIE
2 - AANWIJZINGEN VOOR DE INSTALLATIE
2.1 - Openen en verwijderen van het rooster
Om het rooster te openen schruift u de twee schruifjes, links en rechts, naar de
richting van het midden van de kap. Het rooster kan nu omlaag geklapt worden en
blijft op de achterstiften hangen. Om het rooster geheel te verwijderen schuift u de
rechterkant iets naar u toe waardoor de stift uit de sleuf vrijkomt.
2.2 - Montage onder een keukenkastje
Er zij twee mogelijkheden:
a) Door middel van de bijgeleverde schroeven 3,5 x 16 mm vanuit het keukenkastje;
dan moet u eerst door middel van de boormal gaatjes in de bodem van het kastje
boren.
b) Door middel van niet bijgeleverde korte houtschroeven vanuit de kap; kan moet u
eerst het rooster verwijderen, de kap op z’n plaats houden en de slobgaten onder op
de bodem van het kastje aftekenen. Vervolgens draait u de schroeven in de bodem
en schuift u de kap, door middel van de slob-gaten, over de schroeven. Schroeven
nu aantrekken.
2.3 - Montage aan de wand
Er zijn twee mogelijkheden:
a) Direkte montage tegen de wand, door middel van de slobgaten in de achterkant van
de kap. Door middel van de boormal of aftekenen vanuit de kap, boort u twee gaten
van tenminste 8 mm in de wand. Dan plaatst u de bij de gebruikte boormaat behorende
pluggen en draait u schroeven tot op 5 mm in de pluggen. Vervolgens hangt u de
kap, door middel van de slobgaten over de schroefkoppen en trekt de schroeven
aan.
b) Montage door middel van ophangbeugels. Dit setje is als accessoire apart leverbaar.
Zie de daarbij geleverde instrukties.
28
Page 29

Eerste deel - INSTRUCTIES VOOR DE INSTALLATIE
2.4 - Keuze afzuigen of cirkuleren
a) Afzuigen:
Afhankelijk van het model is de kap uitgerust met een
100 mm Ø of 120 mm Ø flens voor de aansluiting van
een slang of buis. De opening welke niet benut wordt
moet met het meegeleverde deksel afgesloten worden.
Voor de plaatsbepaling van het doorvoergat in de wand
(achter-afvoer) of in het keukenkastje (boven-afvoer)
gebruikt u de boormal. De schuifhendel in het
ventilatorhuis schuift u naar links, dat is de positie
«afzuigen» (B). U gebruikt geen koolstoffilter.
b) Cirkuleren:
Een eventueel aangesloten afvoerslang- of buis
behoeft niet verwijderd of afgesloten te worden. De
afsluiting naar buiten gebeurt inwendig zodra u de
schruifhendel in het ventilatorhuis naar rechts schuift,
dat is de positie «cirkuleren» (A). Ten behoeve van de
geurverwijdering plaatst u een, als accessoire
leverbaar, koolstoffilter op het ventilatorhuis.
Afhankelijk van het model wordt het koolstoffilter
levestigd door middel van een bajonetbevestiging
(draaiende beweging) of door middel van een centrale schroef.
2.5 - Elektrische aansluiting en controle van de werking
1 - De waarschuwingen onder 2.2, 2.3, 2.4
en 2.5 en paragraaf 2 betreffende de
veiligheid moeten nauwgezet in acht
worden genomen.
2 - Wanneer de elektrische aansluiting
eenmaal is uitgevoerd, moet worden
nagegaan of de verlichting, de
aanschakeling van de motor en het
veranderen van de snelheid correct functioneren.
29
Page 30

Deel 2 - INSTRUCTIES VOOR HET GEBRUIK EN HET ONDERHOUD
3 - HET GEBRUIK
3.1 -De bedieningsschakelaars op het bedieningspa-neel wijzen de weg vanzelf.
Afhankelijk van het model is uw wasemkap uitgevoerd met twee of meer snelheden.
Wij adviseren u om tijdens het koken de hoogste snelheid te kiezen. Indien u de kap
«cirkulerend» gebruikt, advi-seren wij u om na het koken de kap nog circa een half
uur op een lagere of laagste snelheid in werking te laten. De verlichting kunt u
onafhankelijk van het in werding zijn van de kap in- of uitschakelen.
3.2 - Leest u nog even de punten 1.2, 1.5, 1.6 en 1.7.
4 - ONDERHOUD
Korrekt onderhoud bevordert de goede werking van de kap en is voor de veiligheid
op langere termijn belangrijk.
4.1 - Het filter
Het vetfilter bevindt zich, door veerstrippen vastgehouden, aan de binnenkant van
het rooster. Omwille van brandveiligheid en goed werkings-rendement is het beslist
noodzakelijk dat het vetfilter gewassen of vervangen wordt. Wij wijzen er op dat zich
ophopend vet in brand kan vliegen. In principe zijn er drie soorten vetfilters. Afhankelijk
van het model is uw wasemkap met één daarvan uitgerust. De andere soort is als
accessoire leverbaar.
a) Een dun, cirka 1 mm, vetfilter van kunststofvezel mag niet gewassen worden, maar
moet u minstens iedere twee maanden vervangen. Soms zijn deze filters voorzien
“verzadigings-indikatoren”; dat kunnen strepen of stippen zijn die verkleuren zodra
het filter vol raakt.
b) Een dik, cirka 10 mm, vetfilter van kunststof-vezel mag, in lauwwarm water en wat
wasmiddel, 5 tot 6 keer gewassen worden. Doet u dat in ieder geval minstens elke
twee maanden. Op natuurlijke wijze laten drogen vóór u het in het rooster terugplaatst.
Niet in de droogstrommel of over een radiator drogen. Een metaalvetfilter kunt u
iedere maand rei-nigen met warm water en een huishoudschoon-maakmiddel of
afwasmiddel. Reinigen in de afwasmachine is geen bezwaar. Goed laten drogen
vóór u het in het rooster terugplaatst.
30
Page 31

Deel 2 - INSTRUCTIES VOOR HET GEBRUIK EN HET ONDERHOUD
4.2 - Het koolstoffilter
Het koolstoffilter, wat u gebruikt indien u
de kap “cirkulerend” laat werken, dient om
geurente absorberen. Ook dit filter raakt
op een gegeven moment verzadigd met
stoffen die zowel uit het voedsel als uit
verbrandingsresten (gas) afkomstig zijn.
Door chemische reakties met het koolstof
kunnen, bij verzadiging, gevaarlijke stoffen
in het filter onstaan die zich in het vertrek
kunnen verspreiden. Wij adviseren u dan
ook dit filter, afhankelijk van hoe vaak u
de kap gebruikt, 2 tot 4 keer per jaar te vervangen. Bovendien werkt een vers filter
uiteraard veel beter dan een verzadigd filter.
4.3 - De verlichting
Afhankelijk van het model is uw wasemkap met één of twee verlichtingslampjes
uitgerust. Neem, vóór een lampje vervangt, even de steker uit het stopkontakt. Het
vervangende lampje mag niet groter in vermogen (watt) zijn dan op het typeplaatje
(achterin de kap) staat aangegeven.
4.4 - Schoonmaken
De buitenkant van de kap kunt u, naar behoefte, schoonmaken met lauwwarm water
en een huishoudschoonmaakmiddel wat niet krast. Neem, zeker als u ook de
binnenkant gaat schoonmaken, eerst de steker uit het stopkontakt. Gebruik geen
drijfnatte, maar een vochtige doek.
31
Page 32

Parte 1ª - INSTRUCCIONES DE INSTALACION
GENERALIDADES
La campana ha sido proyectada para ser instalada adosada a la pared, colocada
sobre un plano de cocción. Se puede usar en dos ver-siones: filtrante (reciclaje
interno del aire) o aspirante (evacuación externa del aire). De todas maneras, se
obtiene un mejor resultado con la versión aspirante. Se recomienda que la
instalación sea llevada a cabo por personal especializado, respetando las reglas
establecidas por la autoridad competente en cuanto a evacuación de gases.
El fabricante declina toda responsabilidad por daños debidos a una instalación
incorrecta o no conforme a las reglas del arte.
1 - NORMAS DE SEGURIDAD
1.1 - No conectar el aparato a tuberías de evacuación de humos causados por combustión
(calderas, chimeneas, etc.)
1.2 - Controlar que el voltaje de la red corresponda al indicado en la matrícula de la campana.
1.3 - Enchufar la campana con un enchufe bipolar con una apertura en los contactos de al
menos 3mm.
1.4 - Si la campana posee descarga a tierra, asegurarse de que la instalación eléctrica
garantice una perfecta descarga.
1.5 - Las campanas clase II tienen doble aislamiento; por lo tanto no necesitan un enchufe
con toma de tierra, sino un enchufe bipolar normal.
1.6 - La distancia mínima de seguridad entre el plano de cocción y la campana es de 65 cm.
1.7 - No cocinar con llamas altas debajo de la campana.
1.8 - Controlar las sartenes durante su uso: el aceite podría inflamarse.
1.9 - Antes de realizar cualquier tipo de limpieza, reparación o mantenimiento desenchufar
el aparato.
1.10- Si en la cocina se usan tanto la campana como otros aparatos no eléctricos (por
ejemplo aparatos a gas), se deberà proceder a una correcta ventilación del ambiente.
Para usar el aparato adecuadamente y sin ningún riesgo la depresión del ambiente no
debe superar los 0,04 milibares, evitando de esta manera que vuelvan a penetrar en el
interior los gases que se desea eliminar.
2 - INSTALACION
En ciertas ocasiones para proceder a la insta-lación de la campana es necesario
quitar la rejilla de aspiración.
2.1 - Apertura y extracción de la rejilla de aspiración
Para abrir la rejilla deslizar hacia el centro los botones situados en la parte inferior
de la campana. La rejilla descenderà girando alrededor de los dos pernos posteriores.
Con la rejilla abierta, en posición vertical, deslizar el perno posterior derecho hacia
32
adelante hasta sacarlo completamente.
Page 33

Parte 1ª - INSTRUCCIONES DE INSTALACION
2.2 - Instalación de la campana debajo de un armario de cocina
a) Armario preagujereado: Unir la campana al armario mediante los agujeros
existentes en la base del armario usando los cuatro tornillos 4,2x44,4 incluidos en la
bolsa de accesorios. No es necesario abrir la rejilla.
b) Armario sin agujerear:
b.1 - Si la campana incluye una plantilla, seguir las indicaciones dadas en esta.
b.2 - Si la campana no incluye la plantilla abrir la rejilla, apoyar la campana contra la
base del armario y atornillarla desde el interior directamente a la madera del armario
con tornillos 3,5x16 (Sin incluir en la bolsa de los accesorios).
2.3 - Fijación a la pared
a) Ayudándonos con la plantilla, hacer dos agujeros de diametro 8 en el muro, colocar
los dos tacos de plástico y los dos tornillos 4,2 x 44,4 dejando 5 mm sin atornillar,
quitar la rejilla de aspiración, enganchar la campana a los dos tornillos mediante los
dos agujeros posteriores con forma de ojal y atornillar completamente los tornillos.
b) Si no disponemos de la plantilla, hacer dos agujeros de diametro 8 (Ver figura) y
colocar los tacos y los tornillos procediendo como se indica en el párrafo a.
c) Si la campana se fija a la pared mediante placas de sujeción (Opcional) seguir las
instrucciones dadas en la correspondiente plantilla.
d) Respetar la norma de seguridad 1. 6 .
33
Page 34

Parte 1ª - INSTRUCCIONES DE INSTALACION
2.4 - Elección de la versión
a) Aspirante
Abrir la rejilla de aspiración y colocar la leva o el manubrio en la posición “aspirante” (B). Quitar, si se
encuentra colocado, el cartucho de carbón activo
desenroscando el pomo central a bayoneta. Unir la
tubería externa con el empalme de diametro 100 mm
(Ø 12 mm en algunos modelos) situado en la salida
superior o posterior según sea necesario. Colocar el
tapón en el agujero que no se vaya a usar. Respetar
escrupulosamente la norma de seguridad 1.1.
b) Filtrante
Abrir la rejilla de aspiración y colocar la leva o el manubrio en posición “filtrante” (A). Colocar el cartucho
de carbón activo en el soporte del motor sujetándolo
con el pomo metálico central o girandolo lentamente
en el sentido de las agujas del reloj para colocarlo en
el enganche a bayoneta. La tuberíaexterna puede
seguir conectada.
2.5 - La conexión elétrica se puede realizar
a) Directamente a un enchufe con descarga a tierra, si
el aparato está dotado de un enchufe
adecuado.
b)Con la correspondiente instalación
eléctrica de conexión si el aparato no
posee enchufe.
c) Respetar las normas de seguridad 1.2 ,1.3
y 1.4.
34
Page 35

Parte 2ª - INSTRUCCIONES DE USO Y MANUTENCION
3 - FUCIONAMIENTO
3.1 - Mediante el interruptor se optiene el encendido, regulación de la velocidad del motor
e iluminación del plano de cocción. Para obtener un rendimiento óptimo se aconseja
abrir la visera y usar la velocidad mas fuerte en caso de una gran concentración de
olores y humos, y la velocidad intermedia o inferior para proceder a un cambio de
aire silencioso y económico. Además, es necesario encender la campana cuando
se empieza a cocinar, dejándola encendidad durante algún minuto cuando se haya
terminado.
3.2 - Respetar sin falta las normas de seguridad 1. 7 y 1. 8 .
4 - MANTENIMIENTO Y LIMPIEZA
Un correcto mantenimiento garantiza un mayor rendimiento y una larga vida a la
campana. ATENCION: Si se acumula grasa en el interior del filtro, además de
perjudicar al rendimiento del aparato, puede ser causa de incendio. Recomendamos
por lo tanto, respetar las intrucciones dadas a continuación.
4.1 - Filtro antigrasa
Es un filtro mecánico, que se fabrica en diferentes versiones alternativas, que detiene las partículas de grasa. Está colocado en el interior de la rejilla de aspiración.
Para cambiarlo proceder de la siguiente manera:
a) Generalidades
Independientemente del tipo de filtro, para quitarlo, abrir la rejilla y quitar las sujeciones
metálicas.
b) Filtro sutil
(Espesor alrededor de 1 mm): No se puede lavar, debe sustituirse cada dos meses.
Si el filtro está dotado de indicadores químicos de saturación sustituirlo cuando:
b.1 - El color viola de los puntos visibles desde el exterior se haya extendido a toda
la superficie del filtro.
b.2 - El color rojo de las rayas internas, que en cicunstancias normales no se ven,
sean visibles desde el exterior.
c) Filtro sintético a colchoncillo (espesor alrededor de 10 mm), es regenerable y debe
lavarse cada dos meses por lo menos con agua templada y detergente neutro,
dejándolo secar, despues de haberlo escurrido ligeramente, sobre una fuente de
calor que no supere los 40°. Sustituir al cabo de cinco o seis lavados.
d) Filtro metálico multicapas: Se debe lavar una vez al mes en agua y detergente normal
o en el lavavajillas. Dejarlo secar completamente antes de volver a montarlo.
35
Page 36

Parte 2ª - INSTRUCCIONES DE USO Y MANUTENCION
4.2 - Filtro de carbón activo
Es un filtro químico que retiene los olores
en la campana en versión filtrante. Para
quitarlo, abrir la rejilla y desenroscar el
pomo metálico central o girarlo en el
sentido contrario al de las agujas del reloj,
hasta desenganchar la bayoneta central.
Volver a montarlo procediendo de manera
inversa. Para obtener un buen rendimiento
debe ser sustituido cada tres meses.
4.3 - Iluminación
Si una bombilla se funde o deja de funcionar, abrir la rejilla de aspiración y controlar
que la bombilla esté bien colocada. Si es necesario, cambiarla por otra de tipo y
potencia igual.
4.4 - Limpieza
Limpiar la campana con agua templada y detergente líquido neutro, evitar el uso de
disolventes, alcohol o sustancias abrasivas. En todas las operaciones a partir del
punto 4.1 al punto 4.4 respetar la norma de seguridad 1. 9 , en particular al realizar
la operación 4.3.
36
Page 37

Parte 1ª - INSTRUÇÕES PARA A INSTALAÇÃO
INFORMAÇÕES GERAIS
Esta coifa foi preparada para ser instalada na parede à qual está encostada uma
mesa de cozedura. Pode ser utilizada na versão aspirante (com evacuação ao
exterior) ou na versão filtrante (com reciclagem interna). A versão exaustãp é
geralmente a mais eficaz. Devido à complexidade e ao peso do aparelho,
aconselha-se que a instalação seja feita por técnicos especializados e que
todas as prescrições das autoridades competentes em matéria de descarga
de ar de evacuação sejam respeitadas. O fabricante declina qualquer
responsabilidade por danos provocados por uma instalação incorrecta ou não
em conformidade com a legislação em matéria.
1 - PRECAUÇÕES DE SEGURANÇA
1.1 - Não ligue o aparelho a canalizações de descarga dos fumos produzidos por combustão
(caldeiras, lareiras, etc ...).
1.2 - Verifique se a tensão da rede corresponde à tensão indicada na plaqueta de
características colocada dentro da coifa.
1.3 - Faça a ligação entre a coifa e a rede eléctrica intercalando um interruptor bipolar cuja
abertura dos contactos seja de pelo menos 3 mm.
1.4 - Para as coifas dotadas de ligação à terra, verifique se a instalação eléctrica da casa
garante o funcionamento correcto da ligação.
1.5 - As coifas pertencentes à Classe II possuem isolamento duplo: não devem ser ligadas
mediante uma ficha com ligação à terra, mas sim mediante uma ficha bipolar simples.
1.6 - A distância mínima de segurança entre a mesa de cozedura e a coifa é de 65 cm.
1.7 - Não faça a flambagem de alimentos sob a coifa.
1.8 - Tome cuidado com as frigideiras durante a sua utilização: o óleo excessivamente
aquecido pode inflamarse.
1.9 - Antes de efectuar qualquer operação de limpeza ou de manutenção, desligue o aparelho
tirando a ficha da tomada de corrente ou carregando no interruptor geral.
1.10- Se usar coifas ou aparelhos que não funcionem com energia eléctrica (por exemplo
aparelhos a gás), o aposento deverá possuir uma ventilação adequada. A utilização
destes aparelhos será correcta e sem riscos quando a depressão máxima do local não
superar 0,04 mbar; desta maneira, evitar-se-á um retorno do gás de descarga.
37
Page 38

Parte 1ª - INSTRUÇÕES PARA A INSTALAÇÃO
2 - INSTALAÇÃO
Alguns sistemas de instalação preveem a abertura e a remoção da grelha de
aspiração.
2.1 - Abertura e remoção da grelha de aspiração
Para abrir a grelha, fazer deslizar para o centro os botoes colocados na parte inferior
do exaustor. Abrir a viseira. A grelha deslizará girando em volta dos dois pivots
posteriores. Com a grelha aberta e na posição vertical, fazer deslizar o pivot posterior
da direita, para frente ao longo da abertura lateral, até provocar a sua saída.
2.2 - Instalação por baixo do móvel suspenso
a) móvel préfurado: fixar o exaustor ao móvel, através dos furos já feitos na base do
móvel, utilizando os 4 parafusos de 4,2 x 44,4 fornecidos. Não é necessário abrir a
grelha.
b) Móvel não furado:
b.1 - Se ao exaustor está anexado um molde para furação, seguir as instruções
contidas no mesmo.
b.2 -Se não há molde, abrir a grelha apoiar o exaustor contra a base do móvel e
parafusar directamente do interior na madeira com parafusos de 3,5 x 16, nao fornecidos.
2.3 - Instalação na parede
a) Com o auxílio eventualmente do molde de fu-ração, fazer dois furos de Ø 8 na
parede, aplicar as duas buchas, inserir dois parafusos de 4,2 x 44,4 deixando 5 mm
não aparafusados, remover a grelha de aspiração, enganchar o exaustor aos dois
parafusos nos furos posteriores e proceder do interior, até a fixação completa dos
parafusos.
b) Se o molde não for disponível, fazer dois furos de Ø 8 (ver des.) e inserir buchas e
parafusos procedendo como no parágrafo a.
c) Para uma instalação na parede através de esquadrias (opcionais), seguir as
instruçães descritas no molde anexado.
d) Seguir a advertência 1. 6 .
38
Page 39

Parte 1ª - INSTRUÇÕES PARA A INSTALAÇÃO
2.4 - Escolha da versão
a) Aspirante
Abrir a grelha de aspiração e posicionar a alavanca
ou o indicador do botão naposição -aspirante- até o
fim do seu curso (B). Eliminar, se aplicado, o filtro de
carvão activo, desaparafusando o botão central ou
girando lentamente no sentido anti-horário,para
desenganchar o grampo central à baioneta. Ligar o
tubo externo ao anel de raccord de Ø 100 mm (ou Ø
120 mm em alguns modelos), posicionado na abertura
superior ou posterior conforme a necessidade. Aplicar
a bucha no furo que ficou livre. Seguir com atenção a
advertência 1.1.
b) Filtrante
Abrir a grelha de aspiração e posicionar a alavanca
ou o indicador do botão, na posição filtrante, ao fim do
seu curso (A). Aplicar o filtro de carvão activo, no
suporte do motor com o botão metalico central, ou girando lentamente no sentido horário, para enganchar
o grampo central a baioneta. Se existe canalização
externa, poderá permanecer ligada.
2.5 - Ligação eléctrica e controlo do funcionamento
1-
É preciso respeitar à risca as precauções de
segurança 1.2, 1.3, 1.4 e 1.5 do parágrafo 1.
2 - Depois de ter feito a ligação eléctrica,
verifique o funcionamento correcto da
iluminação, do accionamento do motor e
da mudança das velocidades.
39
Page 40

Parte 2ª - INSTRUÇÕES PARA A UTILIZAÇÃO E A MANUTENÇÃO
3 - FUNCIONAMENTO
3.1 - O interruptor acciona-se o motor, a regulagem da velocidade e a iluminação da
plataforma de cozedura. Para um melhor rendimento do aparelho, aconselha-se
abrir a viseira e usar a velocidade maior, no caso em que haja uma forte concentração
de odores e fumo; a velocidade intermediaria ou inferior para uma troca de ar, limpo
de modo silencioso e economico. É aconselhável ligar o exaustor quando inicia-se
a cozinhar, deixando ligado quando terminado, ainda por alguns minutos.
3.2- Seguir com atençúo as advertências 1. 7 e 1. 8 .
4 - MANUTENÇÃO E LIMPEZA
Uma boa manutenção garante um elevado rendimento e, uma longa duração do
exaustor. ATENÇÃO: O acumular de gordura no interior do filtro, pode acarretar
também riscos de incendio. Aconselha-se portanto de seguir escrupulosamente as
instruções indicadas.
4.1 - Filtro antigordura
É um filtro mecânico, fornecido em varios tipos, que retém as partículas de gordura.
Está colocado no interior da grelha de aspiração. Para fazer a sua manutenção,
seguir o seguinte:
a) Generalidades: independente do tipo de filtro, para retirá-lo, abrir a grelha e remover
os grampos metálicos.
b) Filtro descartável (espessura de 1 mm aproximadamente): não lavar, substituir a
cada 2 meses:
Se o filtro for dotado de indicadores quimicos de saturação, substituir quando:
b.1 - A cor violeta dos pontos visíveis exteriormente, espalha-se por toda a superfície
do filtro.
b.2 - A cor vermelha das faixas internas, normalmente não visíveis exteriormente,
tornareh-se visíveis.
c) Filtro sintético (espessura de 10 mm aproximadamente): É reutilizável e deve ser
lavado a cada 2 meses em água morna com detergente neutro, deixando enxugar
depois de ser levemente torcido, numa fonte de calor de no máximo 40°C. Substituir
depois de 5 ou 6 lavagens.
d) Filtro metálico multicamadas: deve ser lavado 1 vez por mes, com água e detergen-
te ou na máquina de lavar louça. Enxugar bem antes de recolocá-lo.
40
Page 41

Parte 2ª - INSTRUÇÕES PARA A UTILIZAÇÃO E A MANUTENÇÃO
4.2 - Filtro a carvão activo
É o filtro quimico que retém os odores no
exaustor. Para removêlo, abrir a grelha e
desaparafusar o botão metálico central, ou
então girar no sentido anti-horário o filtro
até desenganchar a baioneta central. Montar procedendo inversamente. Para um
bom rendimento, substituir a cada 3
meses.
4.3 - Iluminação
Se uma lâmpada não funciona, abrir a grelha de aspiração e controlar se está bem
aparafusada. Se for necessário, trocála por outra de igual potencial e tipo.
4.4 - Limpeza
Limpar o exaustor com água morna e detergente neutro; evitar o uso de alcool,
solventes e abrasivos. Para todas as operações do ponto 4.1 ao ponto 4.4, seguir a
advertência 1. 9 e principalmente a operação 4.3.
41
Page 42

Page 43

Page 44

4329475 01 - 300600
 Loading...