

Page 1
147 103 101
EWF 1495
Page 2
Dear customer,
Please read these operating instructions carefully
and pay particular attention to the safety notes
indicated in the first pages. We recommend that you
keep this instruction booklet for future reference and
pass it on to any future owners.
The symbols you will see on some paragraphs of this booklet have the following meaning:
The warning triangle and/or the key words (Warning!, Caution!) emphasize information that is particularly
important for your safety or correct functioning of the appliance.
The information marked with this symbol provides additional instructions and practical tips on the use of
the appliance.
Tips and information about economical and ecological use of the machine are marked with this symbol.
Our contribution to the protection of the
environment: we use environmentally
friendly paper.
Transport damages
When unpacking the appliance, check that it is not
damaged. If in doubt, do not use it and contact the
Service Centre.
Contents
Warnings 3
Disposal 4
Tips for environmental protection 4
Technical specifications 4
Installation 5
Unpacking 5
Positioning 5
Water inlet 5
Water drainage 6
Electrical connection 6
Your new washing machine 7
Description of the appliance 7
Detergent dispenser drawer 7
Use 8
Control panel 8
Controls 8-13
Washing hints 14
Sorting the laundry 14
Temperatures 14
Before loading the laundry 14
Maximum loads 14
Laundry weights 14
Removing stains 14
Detergents and additives 15
Internationnal wash code symbols 16
Operating sequence 17-19
Washing programmes 20-21
Maintenance 22
Body Work 22
Door seal 22
Detergent dispenser drawer 22
Drain pump 22
Water inlet filter 23
Emergency emptying out 23
Frost precautions 23
Something not working? 24-25
Programme information 13
2
Page 3

UserManual 1495 UK2272005.qxd 30/08/05 15.20 Page 3
Warnings
The following warnings are provided in the interests of overall safety. You must read them carefully
before installing or using the appliance.
Installation
• All internal packing must be removed before using
the appliance. Serious damage may be caused to
the machine or adjacent furniture if the protective
transit devices are not removed or are not
completely removed. Refer to the relevant
paragraph in the instruction book.
• Any electrical work required to install this
appliance must be carried out by a qualified
electrician.
• Any plumbing work required to install this
appliance must be carried out by a qualified
plumber.
• After having installed the machine, check that it is
not standing on its electrical supply cable.
• If the appliance is placed on a carpeted floor,
ensure that air can circulate freely between the
feet and the floor.
Use
• This appliance is designed for domestic use. It
must not be used for purposes other than those
for which it was designed.
• Only wash fabrics which are designed to be
machine washed. Follow the instructions on each
garment label.
• Do not overload the appliance. Follow the
instructions in the instruction book.
• Make sure that all pockets are empty. Objects
such as coins, safety pins, pins and screws can
cause extensive damage.
• Do not machine wash garments saturated with
petroleum, methylated spirits, trichlorethylene, etc.
If such fluids have been used to remove stains
prior to washing, wait until they have completely
evaporated from the fabric before placing
garments in the appliance.
• Place small items such as socks, belts, etc. in a
cloth bag or pillowcase to prevent them getting
trapped between the drum and the tub.
ENGLISH
• Use only the recommended quantities of fabric
softener. An excessive amount could damage the
laundry.
• Leave the porthole door slightly ajar when the
appliance is not in use. This preserves the door
seal and prevents the formation of musty smells.
• Always check that water has emptied out before
opening the door. If not, drain the water following
the instructions in the instruction book.
• Always unplug the appliance and shut the water
tap after use.
General safety
• Repairs to the machine must be carried out only by
qualified personnel. Repairs carried out by
inexperienced persons could cause serious
danger. Contact your local Service Centre.
• Never pull the power supply cable to remove the
plug from the socket; always take hold of the plug
itself.
• During high temperature wash programmes the
door glass may get hot. Do not touch it!
Child safety
• Children are often not aware of how dangerous
electrical appliances can be. When the machine is
working, children should be carefully supervised
and not be allowed to play with the appliance.
• The packaging components (e.g. plastic film,
polystyrene) can be dangerous to children - danger
of suffocation! Keep them out of children’s reach.
• Keep all detergents in a safe place out of children’s
reach.
• When the appliance is to be scrapped, cut off the
electrical supply cable and destroy the plug with
the remaining cable. Disable the door catch in
order to prevent children from becoming trapped
inside while playing.
3
Page 4

Disposal
Packaging materials
The materials marked with the symbol are
recyclable.
>PE<=polyethylene
>PS<=polystyrene
>PP<=polypropylene
This means that they can be recycled by disposing of
them properly in appropriate collection containers.
Tips for environmental protection
To save water, energy and to help protect the
environment, we recommend that you follow these
tips:
• Normally soiled laundry may be washed without
prewashing in order to save detergent, water and
time (the environment is protected too!).
• The machine works more economically if it is fully
loaded.
Machine
Use authorised disposal sites for your old appliance.
Help to keep your country tidy!
• With adequate pre-treatment, stains and limited
soiling can be removed; the laundry can then be
washed at a lower temperature.
• Measure out detergent according to the water
hardness, the degree of soiling and the quantity of
laundry being washed.
Technical specifications
DIMENSIONS Height 85 cm
Width 60 cm
Depth 60 cm
MAXIMUM LOAD Cotton 8.0 kg
Synthetics 4.0 kg
Delicates 3.0 kg
Woollens 2.0 kg
Hand wash 2.0 kg
Silk 1.0 kg
SPIN SPEED 1400 rpm max.
POWER SUPPLY VOLTAGE/FREQUENCY 220-240 V/50 Hz
TOTAL POWER ABSORBED 2200 W
MINIMUM FUSE PROTECTION 10 A
WATER PRESSURE Minimum 500 kPa
Maximum 800 kPa
This appliance complies with the following EEC Directives:
73/23/EEC of 19/02/73 relating to low voltage
89/336/EEC of 03/05/89 relating to electromagnetic compatibility.
4
Page 5
UserManual 1495 UK2272005.qxd 30/08/05 15.20 Page 5
Installation
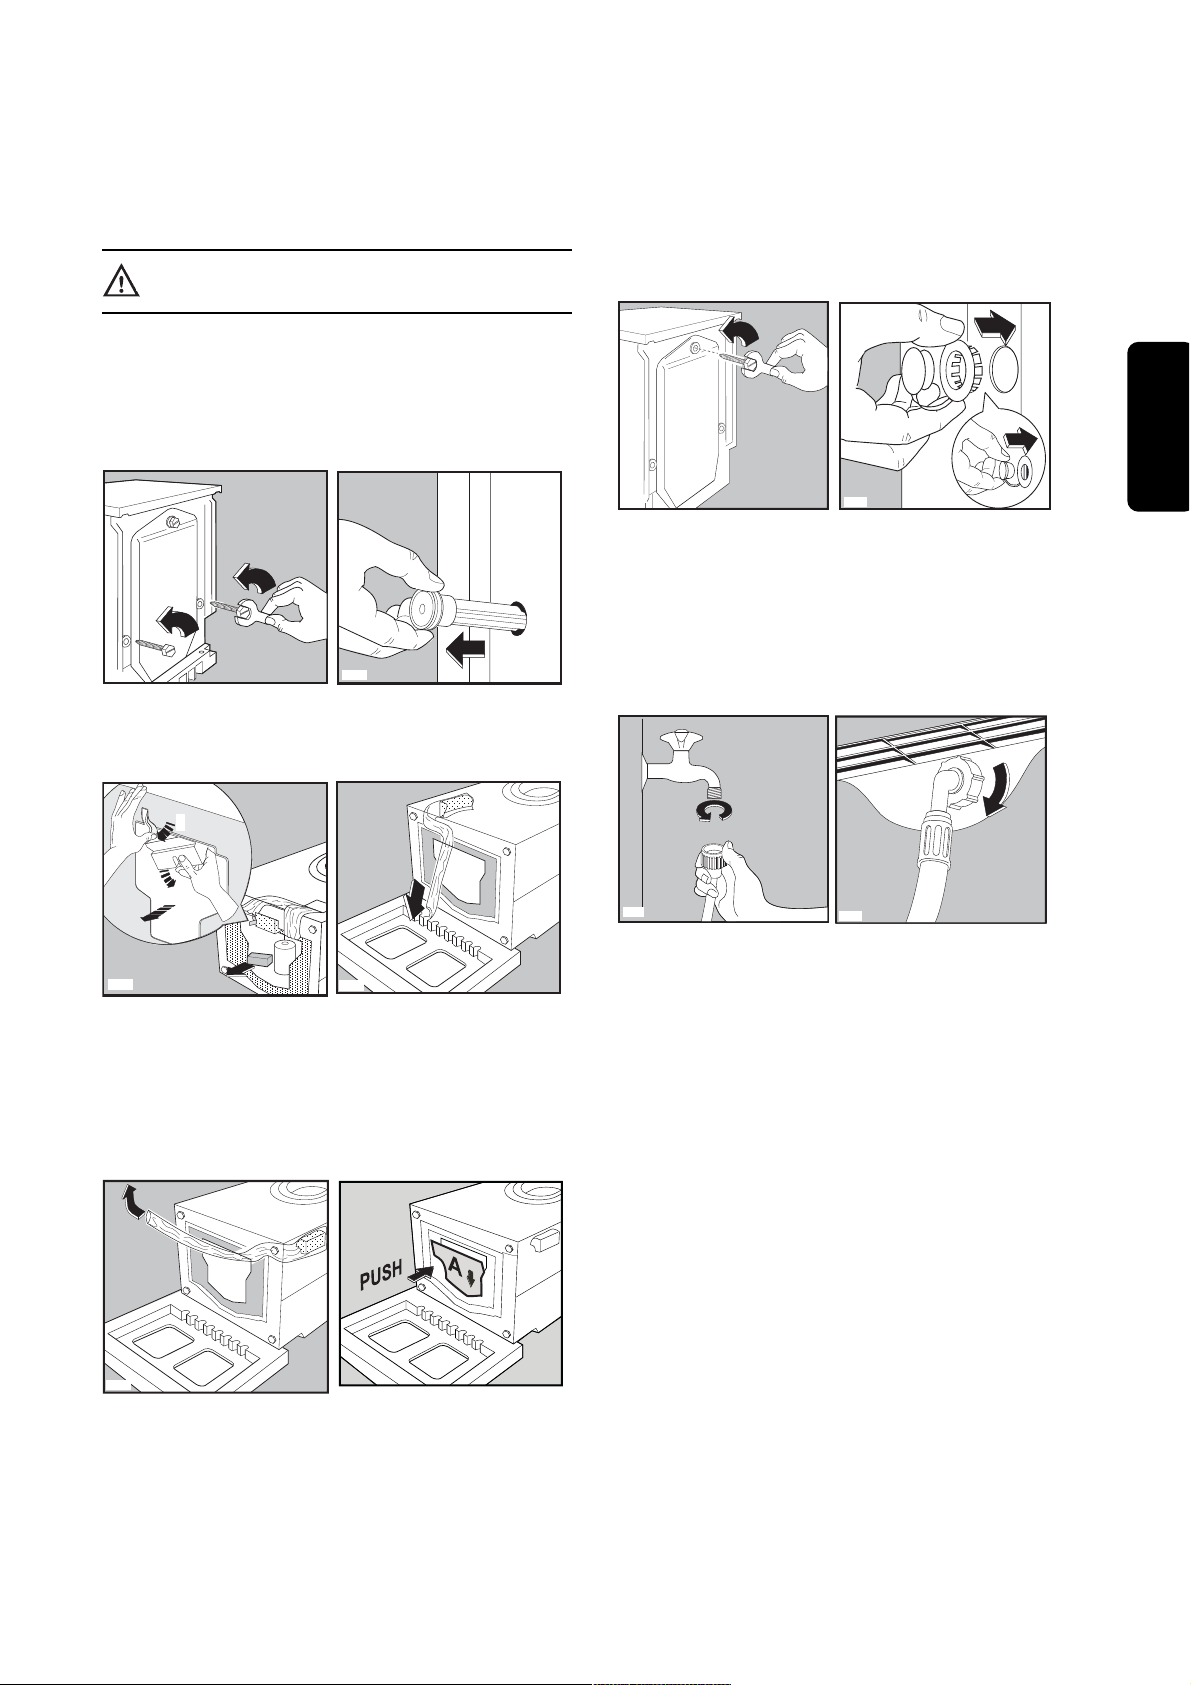
Unpacking
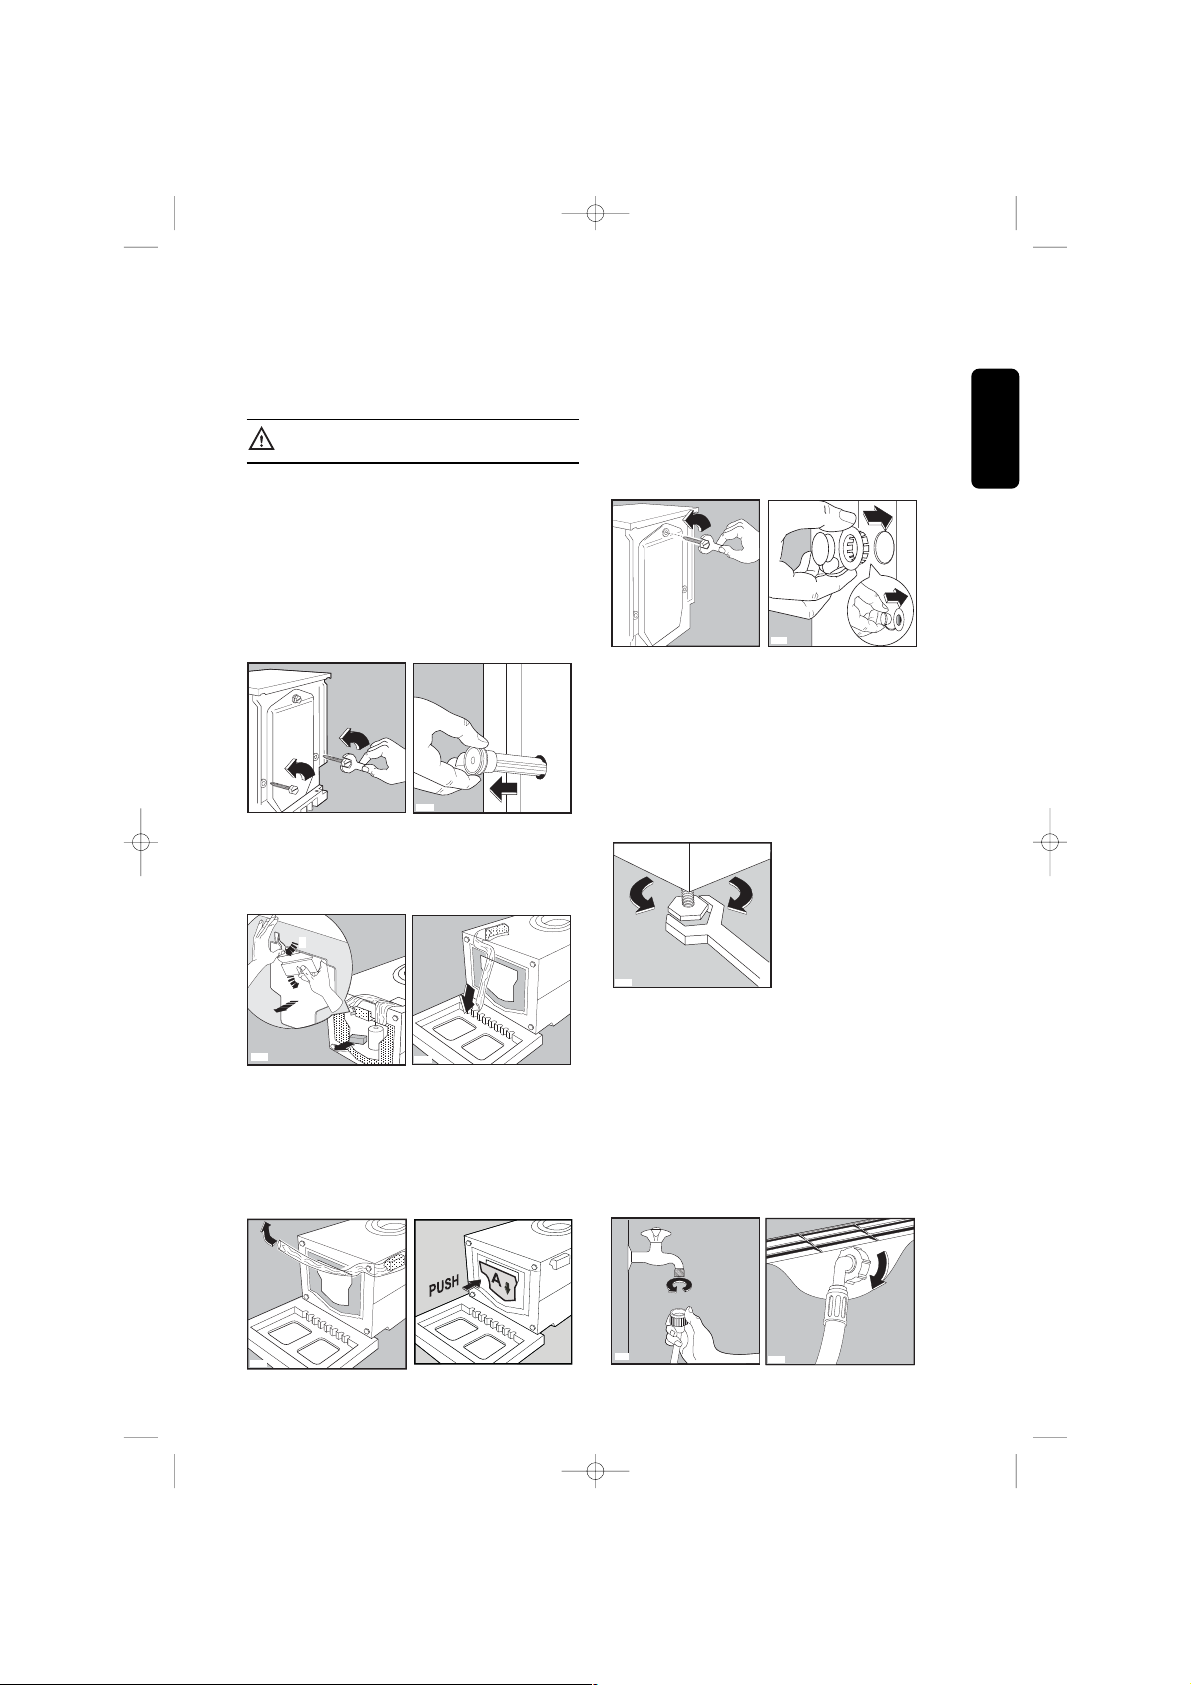
All transit bolts and packing must be
removed before using the appliance.
You are advised to keep all transit devices so that they
can be refitted if the machine ever has to be transported
again.
1. Using a spanner, unscrew and remove the two
rear bottom screws. Slide out the two plastic pins.
Lay the machine on its back, taking care not to
squash the hoses. This can be avoided by placing
one of the corner packing pieces between the
machine and the floor
2. Remove the polystyrene block(s) from the bottom
P1129
of the machine and release the two plastic bags.
3. Very carefully slide out the left polythene bag,
removing it towards the right and then
downwards.
4. Very carefully slide out the right polythene bag,
1
2
3
P1123
removing it towards
the left and then upwards.
Remove the bottom cover placed into the drum of
your appliance, lay it’s hook as the arrow ’A’
indicates and push the top of the cover to seal it
closed
Important: You can find more detailed instructions
regarding the bottom cover assembling in it’s relative
bag.
P0001
P1126
5. Set the machine upright and remove the
remaining rear screw. Slide out the relevant pin.
6. Plug all the holes with the plugs which you will
find in the envelope containing the instruction
manual.
P1128
P0002
Positioning
Install the machine on a flat hard floor.
Make sure that air circulation around the machine
is not impeded by carpets, rugs etc. Check that
the machine does not touch the wall or cupboard
units. Carefully level by screwing the adjustable
feet in or out. Never place cardboard, wood or
similar materials under the machine to
compensate for any unevenness in the floor.
P1051
Water inlet
Connect the water inlet hose to a tap with 3/4” BSP
thread.
Use the hose supplied with the washing machine.
DO NOT USE OLD HOSES.
The other end of the inlet hose which connects to the
machine can be turned in any direction. Simply
loosen the fitting, rotate the hose and retighten the
fitting, making sure there are no water leaks.
ENGLISH
P1127
P1088
P0021
5
Page 6
The inlet hose must not be lengthened. If it is too
short and you do not wish to move the tap, you will
have to purchase a new, longer hose specially
designed for this type of use.
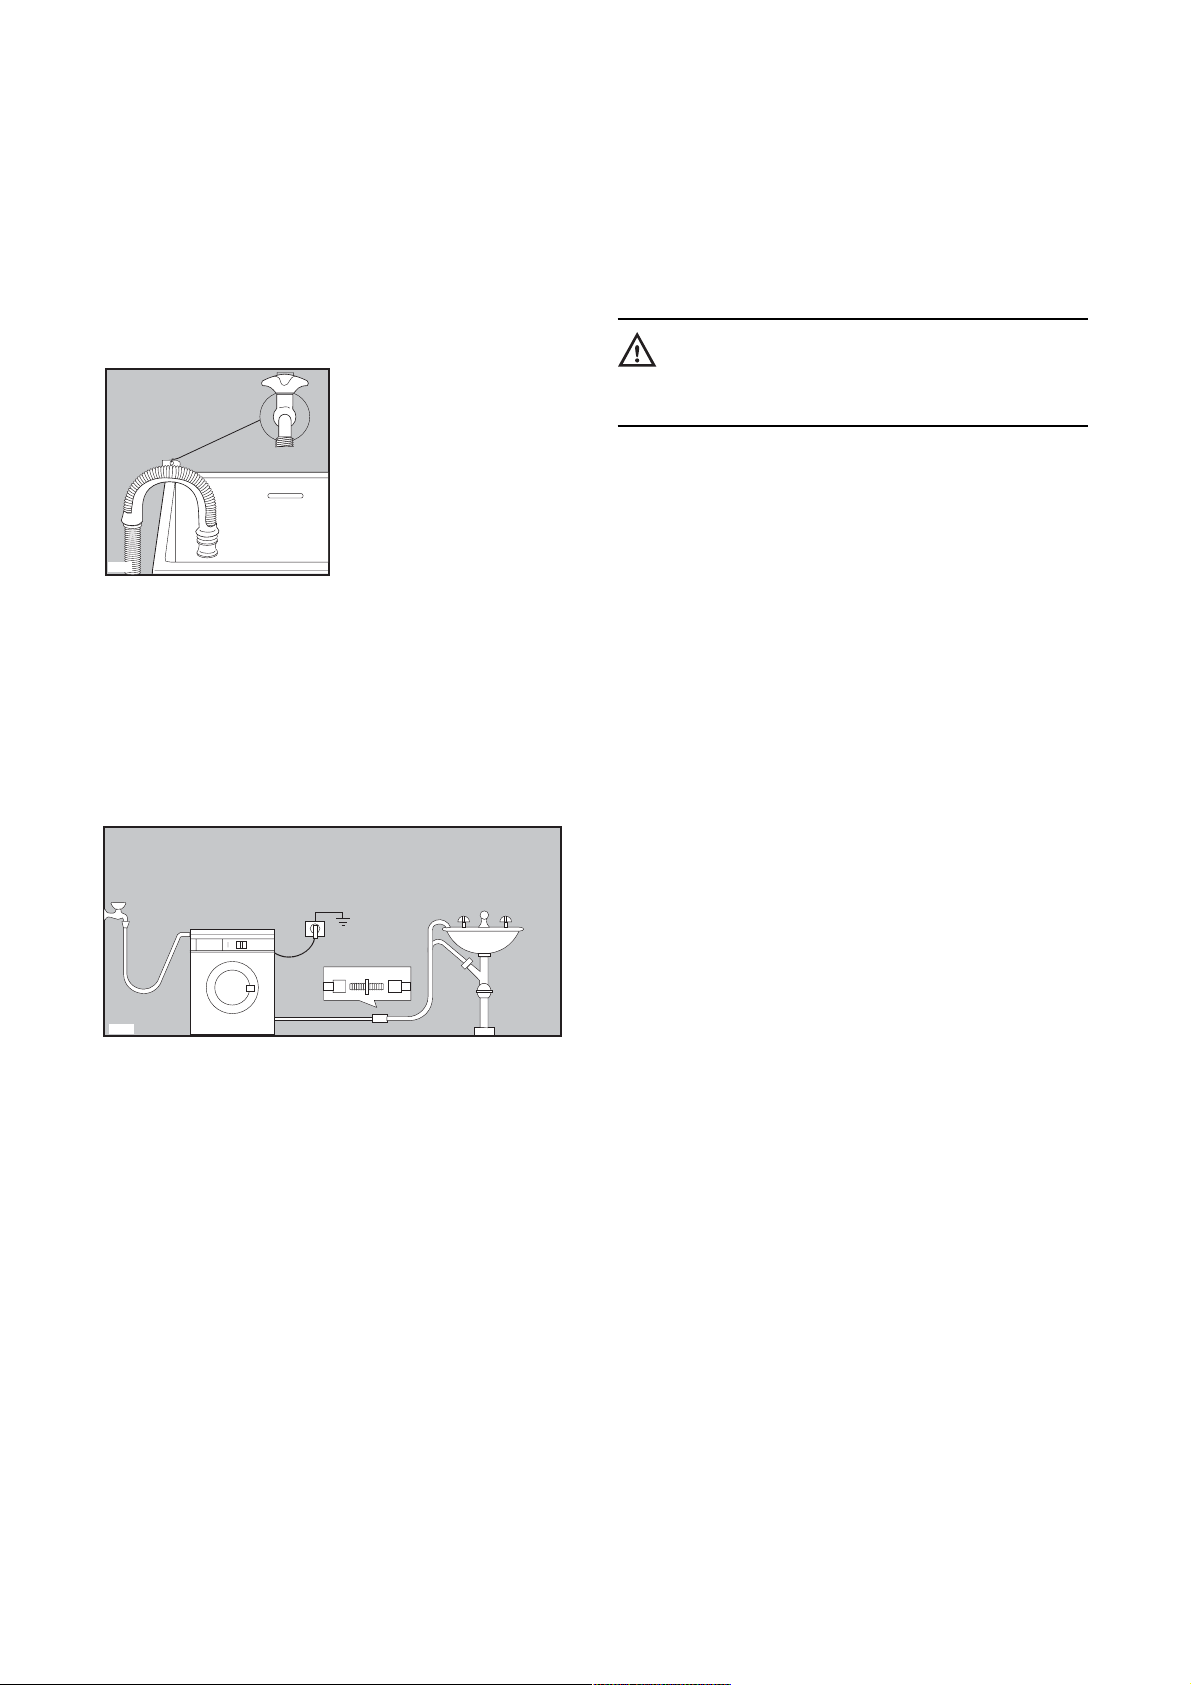
Water drainage
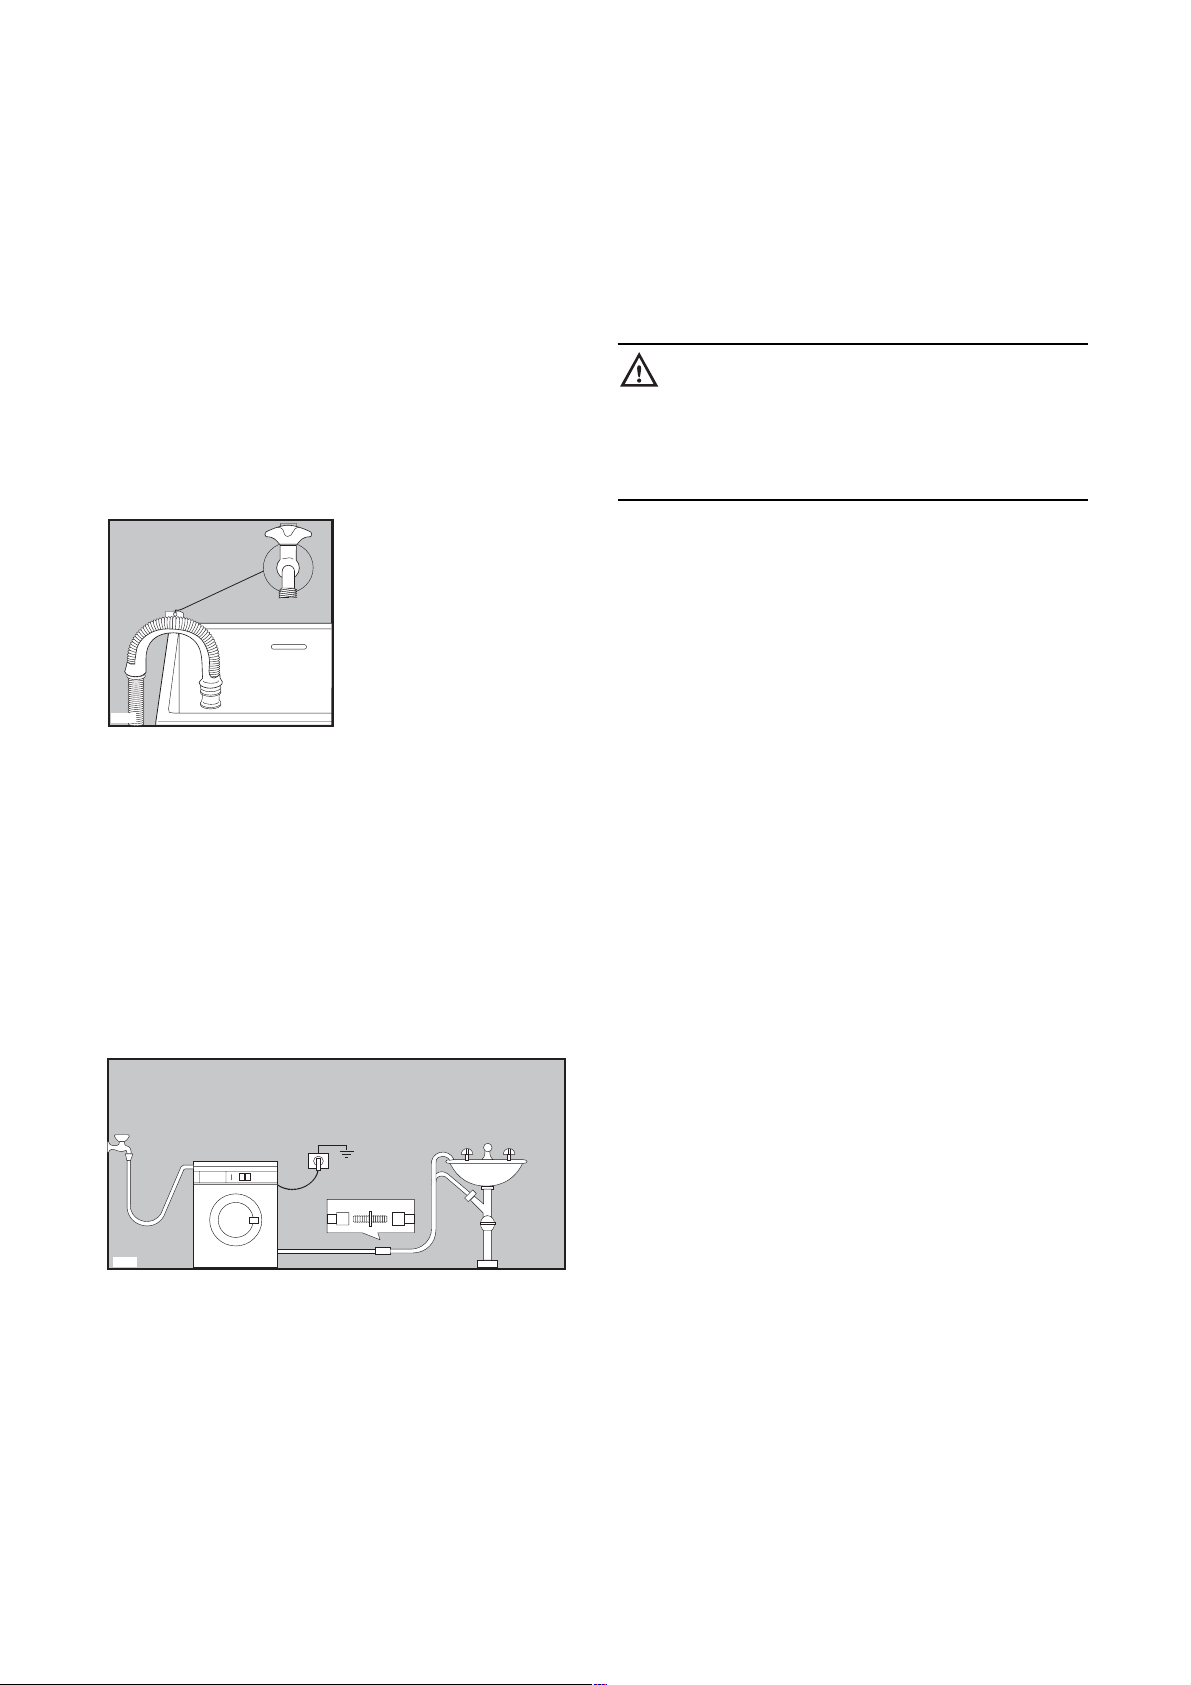
The end of the drain hose can be positioned in three
ways:
Hooked over the edge of a sink using the plastic
hose guide supplied with the machine. In this
case, make sure the end cannot come unhooked
when the machine is emptying.
This could be done by tying it to the tap with a piece
of string or attaching it to the wall.
Electrical connection
This machine is designed to operate on a 220-240 V,
single-phase, 50 Hz supply.
Check that your domestic electrical installation can
take the maximum load required (2.2 kW), also
taking into account any other appliances in use.
Connect the machine to an earthed socket.
The manufacturer declines any responsibility
for damage or injury through failure to comply
with the above safety precaution.
Should the appliance power supply cable
need to be replaced, this must be carried out
by our Service Centre.
Important!
When the appliance is installed the power supply
cable must be easily accessible.
P0022
In a sink drain pipe branch. This branch must be
above the trap so that the bend is at least 60 cm
above the ground.
Directly into a drain pipe at a height of not less
than 60 cm and not more than 90 cm.
The end of the drain hose must always be
ventilated, i.e. the inside diameter of the drain pipe
must be larger than the outside diameter of the drain
hose.
The drain hose must not be kinked. Run it along the
floor; only the part near the drainage point must be
raised.
P0023
For the correct functioning of the machine the
drain hose must remain hooked on the proper
support piece situated on the top part of back
side of the appliance
6
Page 7
UserManual 1495 UK2272005.qxd 30/08/05 15.20 Page 7
Your new washing machine
This new machine, which is fitted with the New Jet System, meets all modern requirements for effective
treatment of laundry with low water, energy and detergent consumption.
• The special handwash programme with its new delicate wash system treats your delicate items with
extreme care.
• The special wool programme with its new delicate wash system treats your woollens with extreme care.
• The automatic cooling of the washing water from 95° to 60°C before draining will prevent old drain pipes
from being deformed.
• The balance control device ensures the machine is stable during the spin.
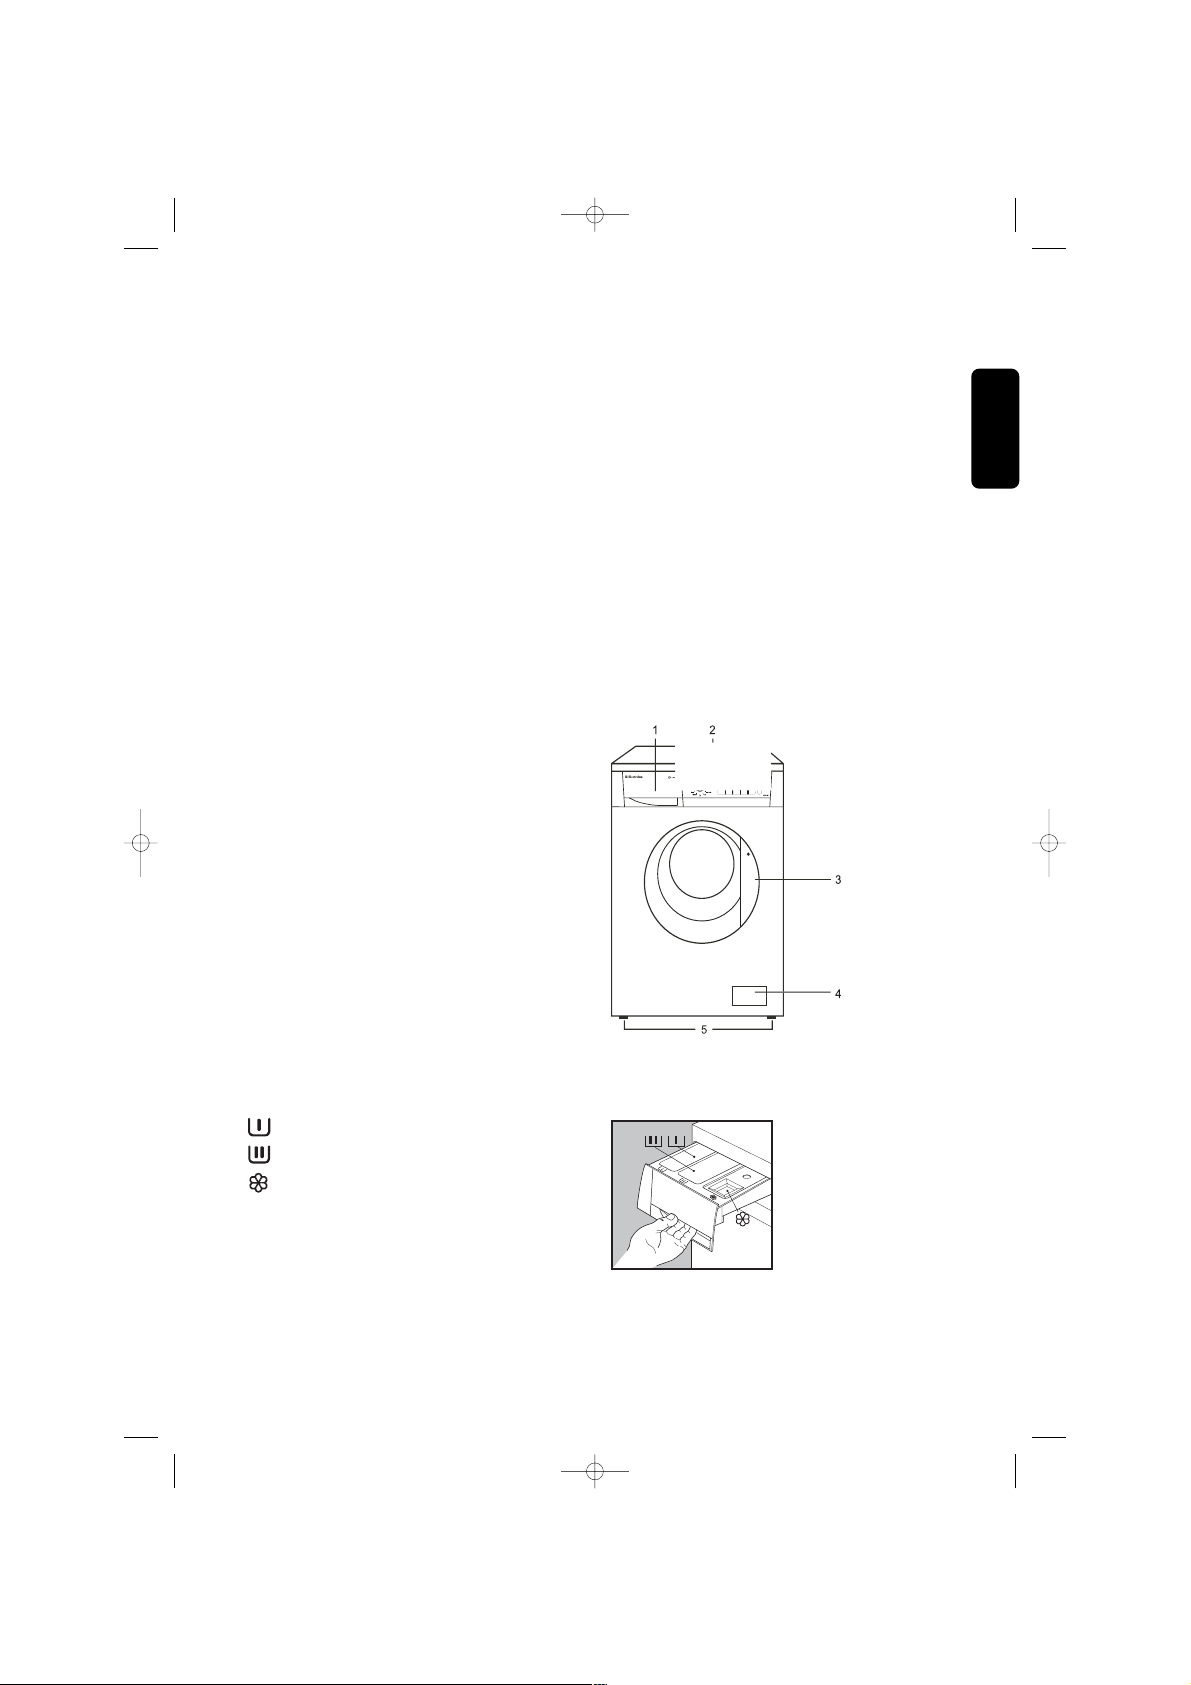
Description of the appliance
1. Detergent dispenser drawer
2. Control panel
3. Door handle
4. Drain pump
5. Adjustable feet
ENGLISH
Detergent dispenser drawer
Pre-wash
Main wash
Fabric softener, starch
P1206
7
Page 8
Use
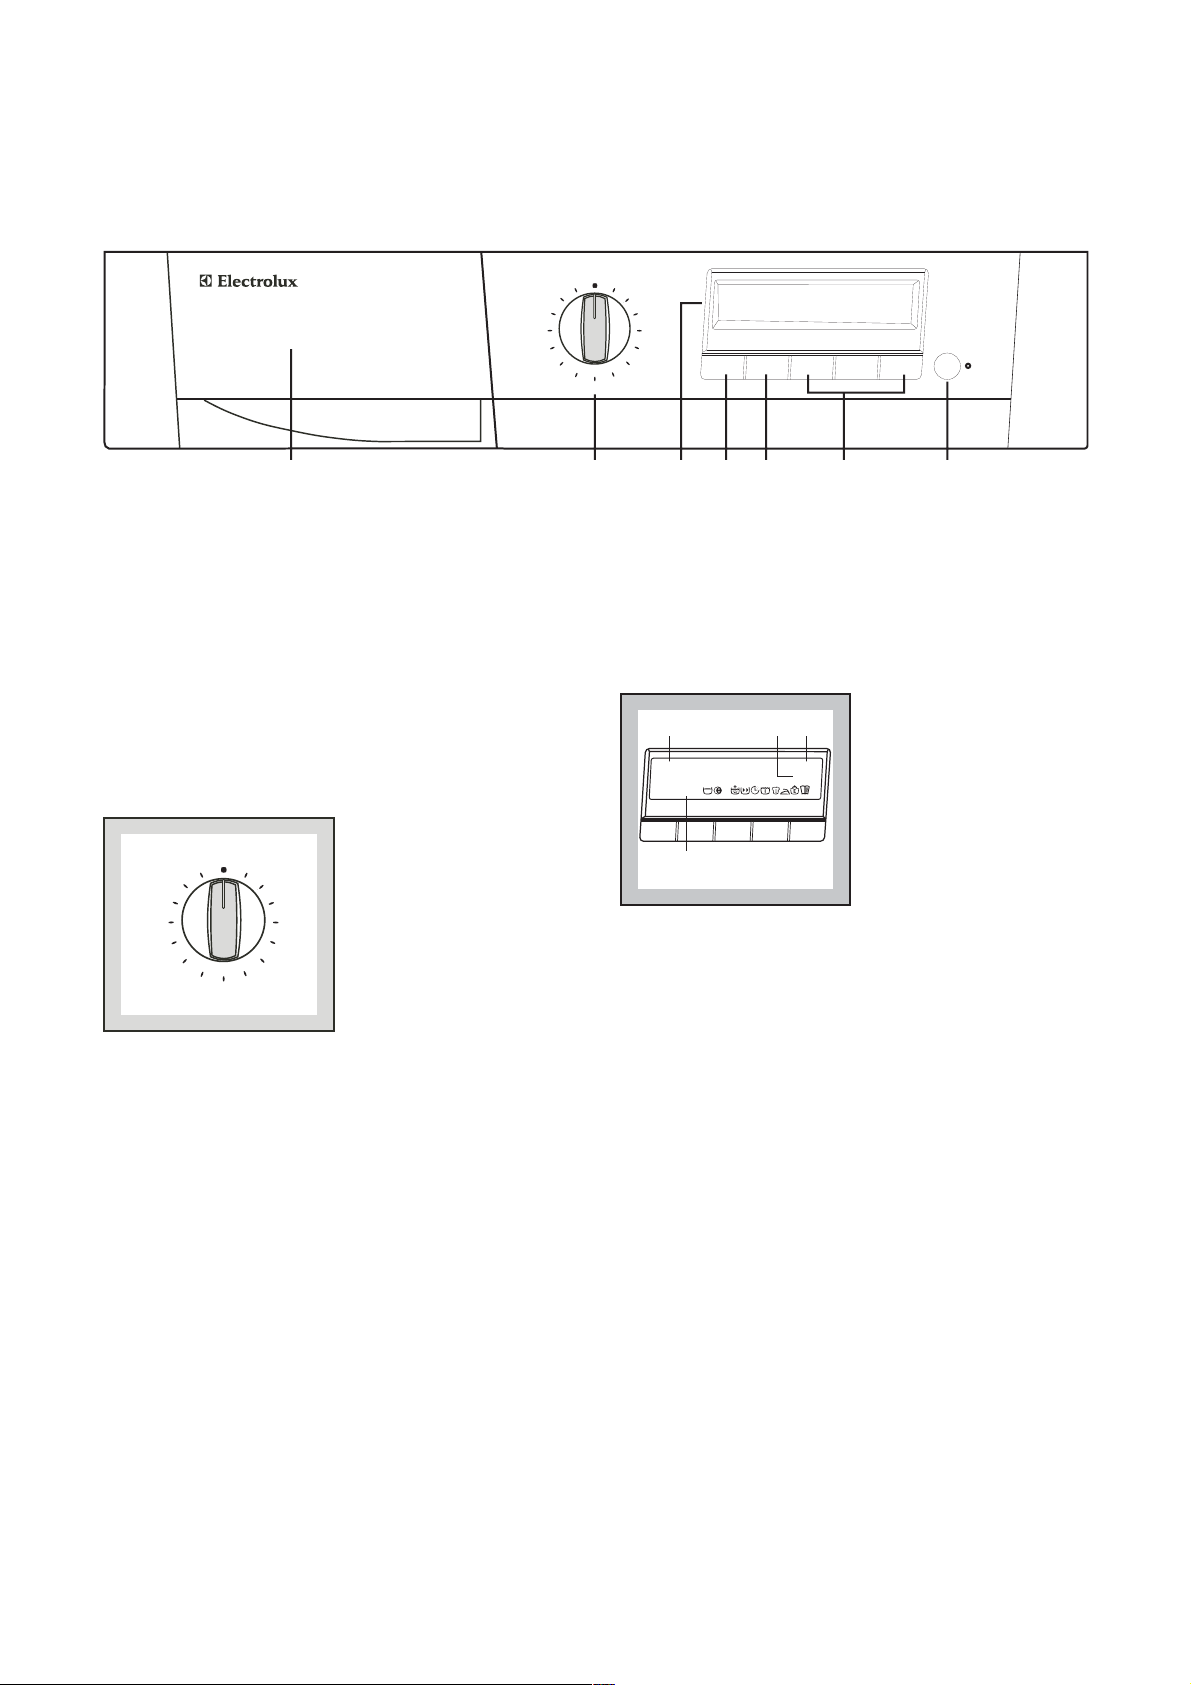
Control panel
Memory 2
Delicate Spin
Off
Memory 1
Spin
Drain
Rinse
Blankets
Cotton
Quick 60
Cotton Eco
Synthetic
Delicate
Hand Wash
Wool
Silk
SpinTemp.
Options
Change
Start/
Add Clothes
Exit
EWF 1495
2134567
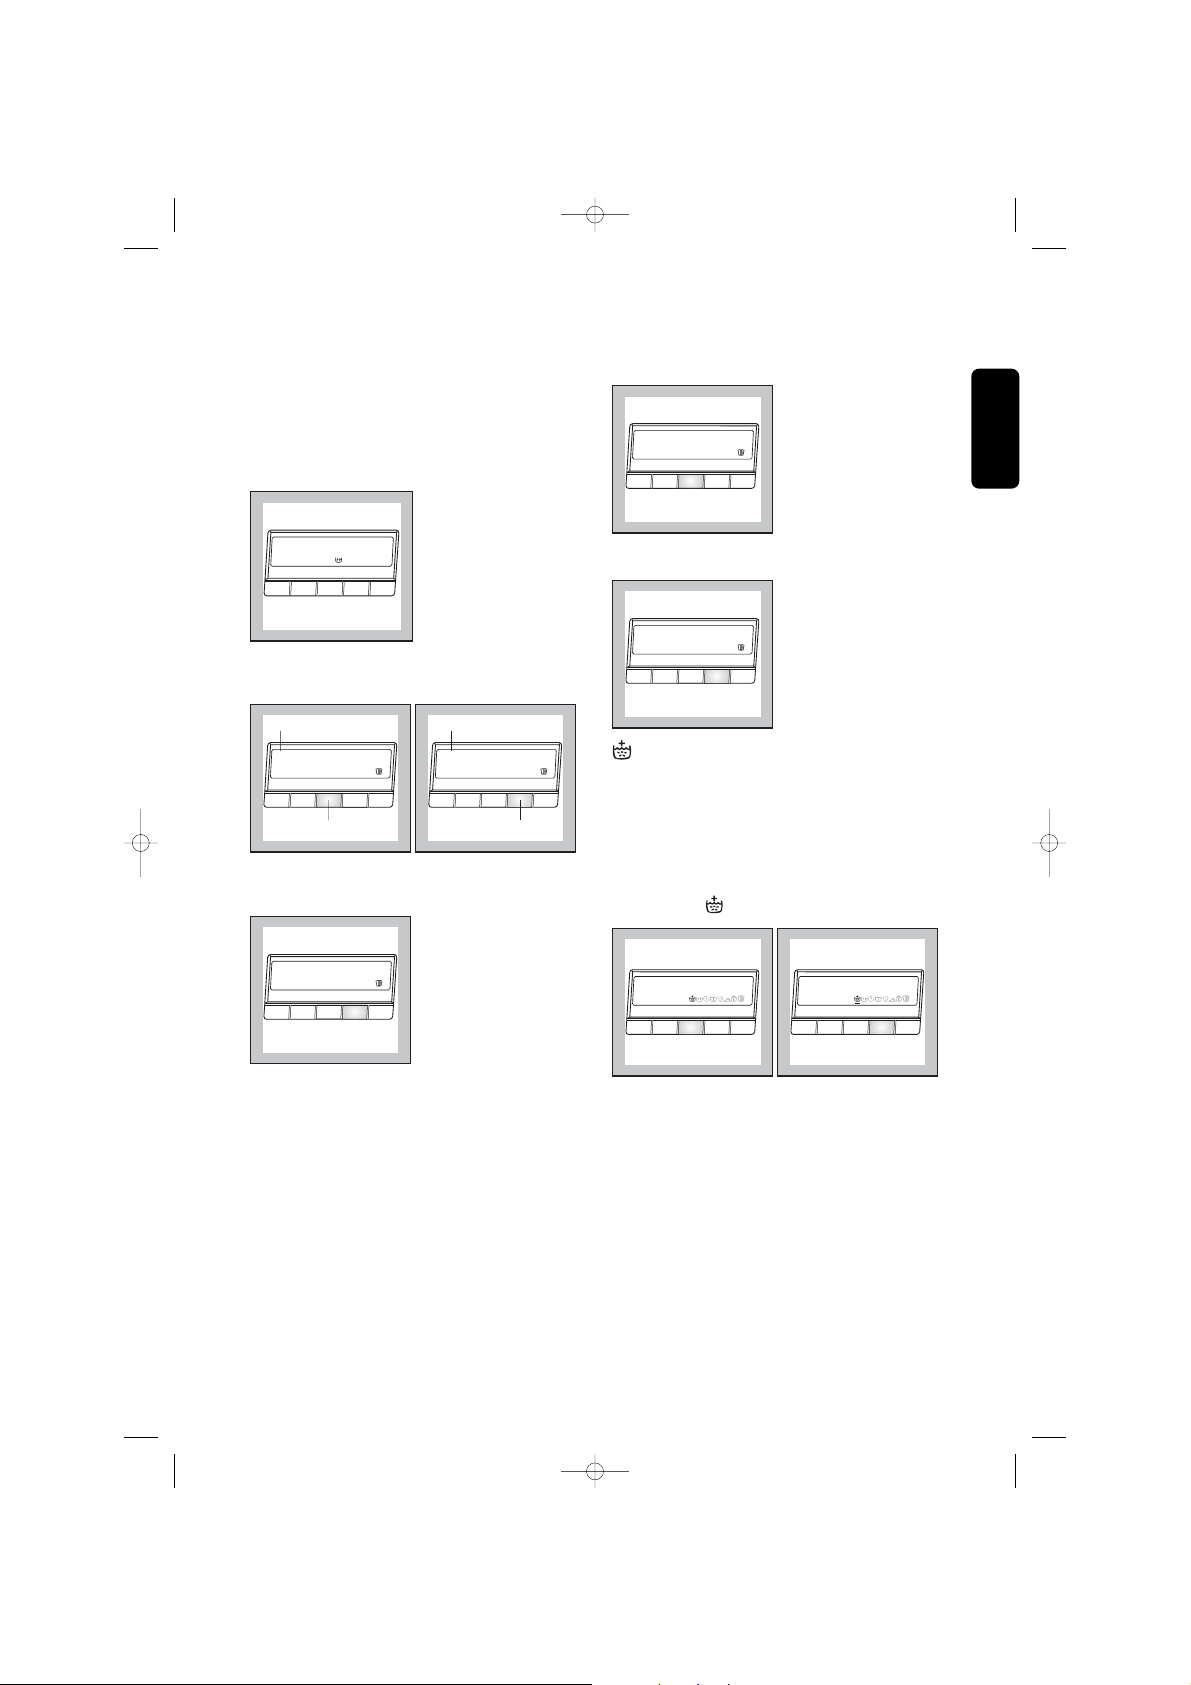
1. Detergent Dispenser Drawer
2. Programme selector dial
The programme selector dial is divided into 4
sections:
1. Cotton (Green section)
2. Synthetic, delicate, handwash, wool, silk and
blankets (Blue section)
3. Rinse, drain, spin and delicate spin (grey section)
4. Memory 1, Memory 2 (Grey section)
Off
Memory 1
Memory 2
Delicate Spin
Spin
Drain
Rinse
Blankets
The selector dial can be turned either clockwise or
anti-clockwise. Position “cotton Eco” corresponds to
an energy saving programme for cotton and to “OFF”
to reset programme or switching OFF the machine.
At the end of programme, the selector dial must be
turned to position “OFF” to switch the machine OFF.
Attention !
If you turn the programme selector dial to another
programme when the machine is working, a warning
message appears for 4 secconds on the display
while the buzzer sounds 3 times.
Cotton
Quick 60
Cotton Eco
Synthetic
Delicate
Hand Wash
Wool
Silk
This simple control method is made easy, thanks to
the interactive display. Interactive means that the
washing machine display changes to reflect each
step you have entered. This ensures that only those
settings that make sense are made. You are able to
see the current settings at any time in the information
panel and in the option row.
1 23
Cotton
Cycle and at
95°C 1400
Temp. Spin
4
Options
Change
08.30
10.55
Exit
1. Information panel shows the current settings
2. Real time clock
3. End cycle time
4. Selection shows temperature, spin speed,
options and extras.
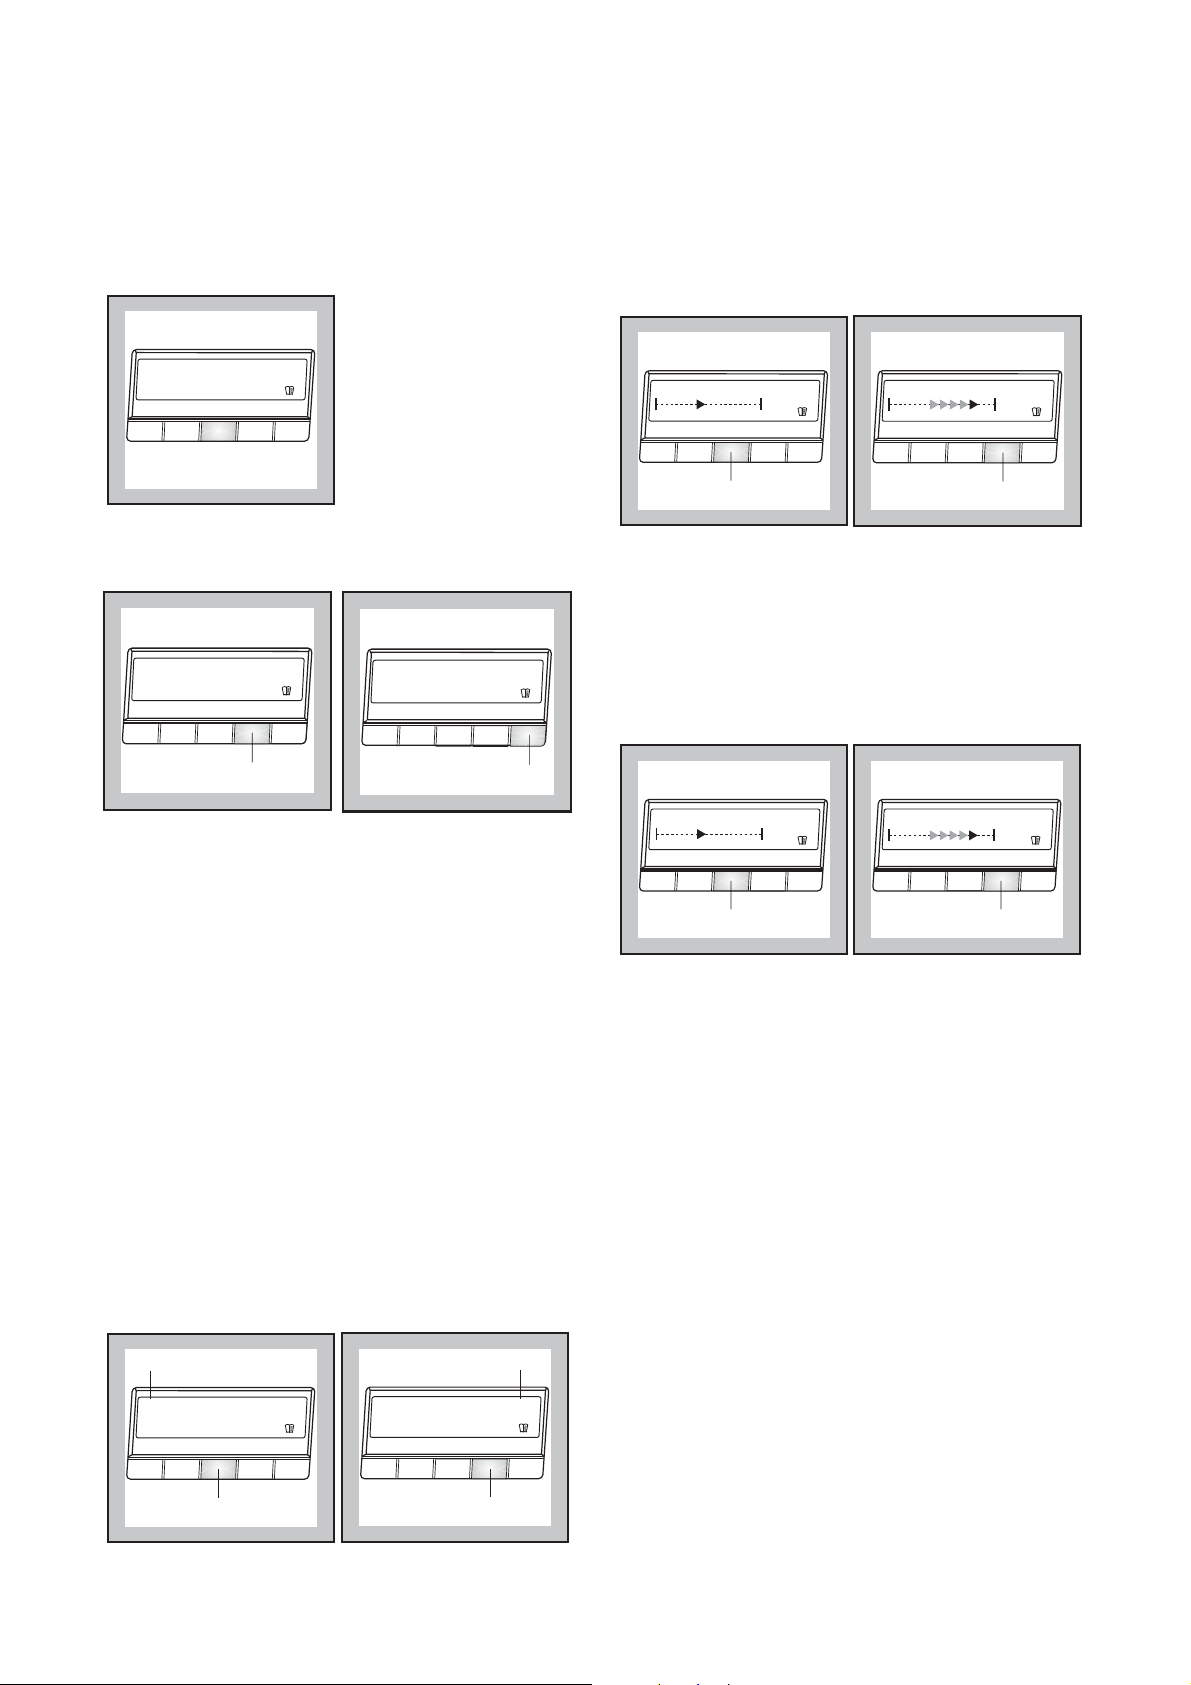
4 Temperature button "Temp".
Press this button repeatedly to increase or decrease
the temperature, if you want your laundry to be
washed at a temperature different from the one
proposed by the washing machine.
Maximum temperatures are 95°C for cotton, 60°C for
synthetic fabrics, 40°C for delicates, wool, blankets
and fabrics to be hand-washed, and 30°C for silk ,
while «O» corresponds to cold wash.
By pressing Temperature “Temp.” button, the
relevant message will appear on the second row of
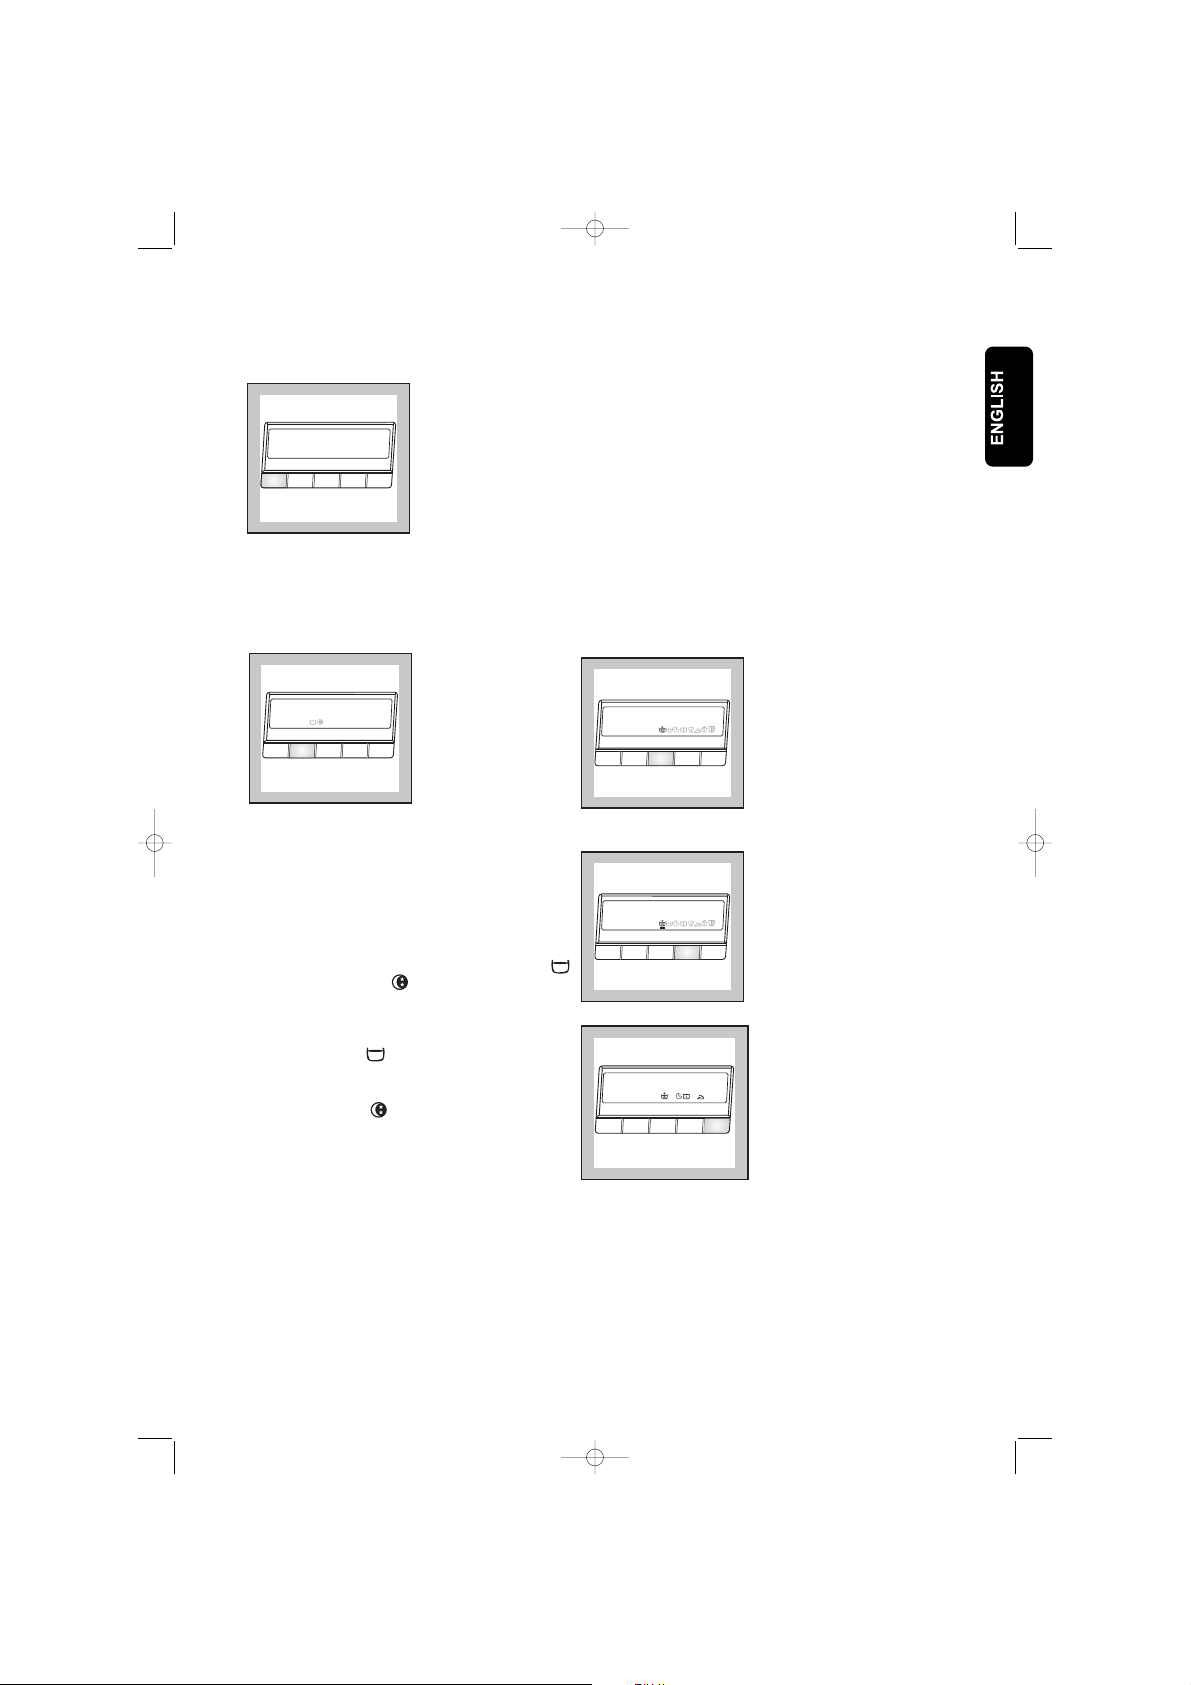
3. Display
The display is used for setting a large number of
functions and to combine them with each other using
only a few control elements (1 programme selector
dial and 6 buttons)
8
Page 9
the display (instead of «cycle end at»). In the corner
of the third row appears the indication of the selected
temperature.
5 Spin Speed button "Spin".
Press this button repeatedly to change the spin
speed, if you want your laundry to be spun at a
speed different from the one proposed by the
washing machine.
Drain
To drain the water select Drain programme by means of
the selector dial, then press the Start/Add clothes button.
Spin
To spin the laundry choose spin or delicate spin
programme by means of the selector dial; select spin
speed by means of button "Spin" and then press the
Start/Add clothes button.
Important!
Before choosing the programme Drain, Spin or Delicate
Spin the selector dial has to be positioned to “Off ”.
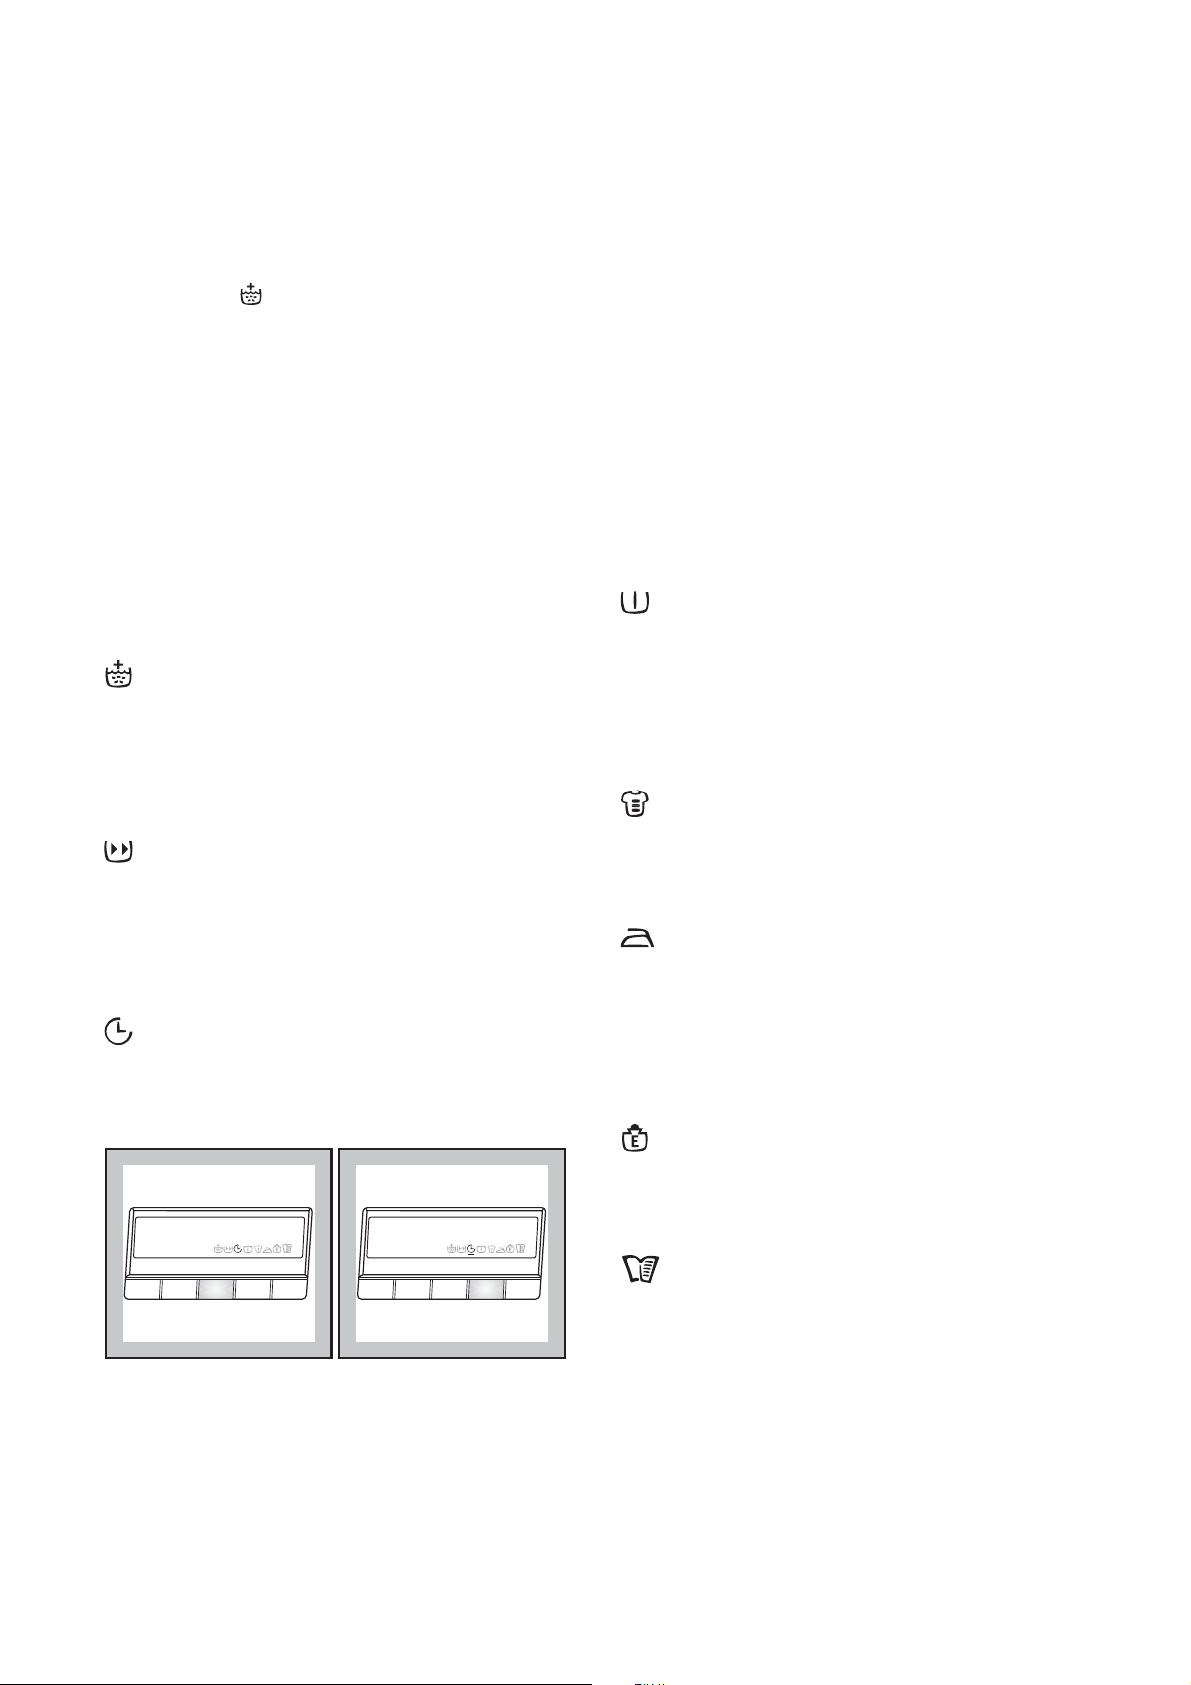
6 «Options», «Change» and «Exit»
buttons
Options button allows you to move through the option
icons.
!"#$
Maximum speeds are:
• for cotton: 1400 rpm
• for wool, and fabrics to be handwashed:
900 rpm;
• for delicate, silk fabrics, blankets:
0700 rpm;
By depressing the Spin speed button you can also
choose No Spin option «0», Rinse Hold option
and Night cycle option .
No spin «0» option eliminates all the spin phases
and increases the rinses number for cottons and
synthetics.
Rinse hold option : when you choose this option,
the machine will not drain the water of the last rinse,
so as not to wrinkle the laundry.
Night cycle option : when you choose this
option, the machine will not drain the water of the
last rinse, so as not to wrinkle the laundry.
As all spinning phases are suppressed, this washing
cycle is very quiet and it can be selected at night or
in times with a more economical power rate.
On cotton and synthetic programmes the rinses will
be performed with more water.
To complete the cycle, choose one of the following
programmes:
Change button allows you to select/change the status of
the different icons.
$
!"#$
Exit button allows you to return to the previous selection.
-
9
Page 10
Depending on the program, different functions can be
combined. These must be selected after choosing the
desired program and before pressing the Start/Add
clothes button.
By pressing the "Options" button, all the symbol icons,
allowed for the selected programme will appear in the
display .
The first option will start flashing. Its name and
status will appear in the display.
If you want to change the option status, press
"Change" button. There will appear a line below the
selected icon, indicating that the option is set.
To select the other options press again the «Options»
button and proceed as before.
Once you have completed the selection of the options,
pressing the «Exit» button, the selected icons will
remain fixed in the display.
Note: To modify the already chosen option selections,
repeat the previous procedure.
Important! While selecting the option, if you press the
temperature “Temp.”, “Spin” , or Start/Add clothes
button, the relative function will be executed.
EXTRA RINSE: this option can be selected with
all programmes, except the wool, handwash programs
and blankets.The machine will add 2 rinses for cottons
and 1 rinse for synthetics, delicates and silk.
This option is recommended for people who are
allergic to detergents, and in areas where the water is
very soft.
TIME SAVING: this option can be used for lightly
soiled cotton, synthetic or delicates items in order to
obtain a good washing program in a short time. The
washing time will be reduced according to the type of
fabric and the selected temperature. Selecting this
option «Short» or «Very Short» will be shown in the
display.
DELAY START: this option makes it possible to
delay the starting of the washing program by 30 min 60 min - 90 min, 2 hours and then by 1 hour till 20
hours. The delay you have selected is indicated in the
display.
Delay Start
No 10.55
Change
Temp. Spin
Options
Exit
Delay Start
Start in 30 min 11.25
Temp. Spin
Options
Change
Exit
You must select this option after you have set the
program and before you press the Start/Add clothes
button.
You can cancel the delay time at any moment, before
you press the Start/Add Clothes button. If you have
you press the Start/Add clothes button. If you have
already pressed the Start/Add clothes button and you
wish to cancel the Delay time proceed as follows:
1. set the washing machine to PAUSE by pressing
the Start/Add clothes button;
2. deselect the Delay start option, changing the
status;
3. press the Start/Add clothes button to start the
program.
Important!
The selected delay can be changed only after
selecting the washing program again.
The door will be locked throughout the delay time.
If you need to open the door, you must first set the
washing machine to PAUSE by pressing the
Start/Add clothes button. After you have closed the
door, press the Start/Add clothes button again.
The Delay Start cannot be selected with
SPIN/DELICATE SPIN and DRAIN programmes.
PREWASH: select this option if you wish your
laundry to be prewashed before the main wash (not
available for wool and handwash cycle, quick 60 and
silk programmes).
The Prewash ends with a short spin at 650 rpm in
programmes for cotton and synthetic fabrics, whereas
in the program for delicate fabrics the water is only
drained.
INTENSIVE: for heavily soiled laundry.
This option can be selected only for cottons and
synthetics.
The washing time will be prolonged according to the
cycle temperature and the fabric type.
EASY IRON: selecting this button the laundry is
gently washed and spun to avoid any creasing. In
this way ironing is easier. Furthermore the machine
will perform 6 rinses instead of 3 for cotton and 4
rinses instead of 3 for synthetics. This function can
be used for cotton and synthetic fabrics. If this option
is selected for cotton programmes, the spin speed
automatically will reduce to 1000 rpm.
ENERGY SAVING: this option can be selected
only for synthetics lightly or normally soiled with a
temperature of 40°C or higher. The washing time will
be prolonged. If you select 60°C-50°C-40°C, the
washing temperature will be reduced to 42°C.
MENU:
Menu option is used for selecting various basic
settings without affecting the particular wash
programme. These basic settings will remain active
until they are deselected/modified.
To move through the different Menu settings use the
«Options» button.
To change/confirm the selected setting use the
«Change» button.
10
Page 11
UserManual 1495 UK2272005.qxd 30/08/05 15.20 Page 11
MEMORY
Programme settings that are frequently used can be
saved (e.g. cotton, 95°C, 1200 rpm, with time saving).
There are 2 memory spaces available for this
purpose. The saved programme can be selected in
the same way as any other wash programme by
means of the selector dial.
Example: Cotton , 95°C, 1200 rpm, with Time saving.
1. Select the cycle and programme settings.
Cotton
Cycle end at
60°C 1400
Temp. Spin
Options
Change
08.30
10.55
Exit
2. Enter the Menu option and select one of the
memory positions. A «Store programme?»
message will appear in the display.
A
Setup
Temp. Spin
Options
Change
Exit
A
B
Memory 1
Store programme?
Temp. Spin
Options
Change
Exit
B
3. To memorise the selected programme press the
«Change» button. «Stored» message will appear
in the display.
Example:
1. Enter the Menu option and select the sound
setting.
Sound
Normal
Temp. Spin
Options
Change
Exit
2. Use the «Change» button to select the desired
level.
Sound
Low or No Sound
Change
Options
Temp. Spin
Exit
RINSE +
The washing machine is set such that its water
consumption is extremely economical. For people with
allergies and in areas where the water is very soft, it
can however be helpful to use more water when
rinsing. When you select RINSE +, 2 additional rinses
will be carried out for cottons and 1 additional rinse for
synthetics, delicates and silk items. If RINSE + has
been selected, will appear in the option row.
ENGLISH
Programme Stored
Change
Options
Temp. Spin
Exit
To change the memorized programme setting repeat
the procedure from the beginning.
SOUND
The sound setting permits you to modify the volume of
the sound emitter. You can choose between different
levels: low, no sound and normal.
Extra Rinse
No 10.55
Temp. Spin
11
Options
Change
Extra Rinse
Yes 10.55
Exit
Temp. Spin
Options
Change
Exit
Page 12
LANGUAGE
You can change the language setting if you would like
the indicators in the display to appear in a different
language.
Example:
1. Enter the Menu option and select the Language
setting.
Language
ENGLISH
Change
Temp. Spin
Options
Exit
CONTRAST
The Contrast setting allows you to modify the optical
characteristic of the display.
Example:
1. Enter the Menu option and select the Contrast
setting.
2. Use the «Change» button to set up the desired
contrast level.
Contrast
Temp. Spin
Options
Change
Exit
Contrast
Temp. Spin
Options
Change
Exit
2. Press the «Change» button to select the desired
Language.
Sprache
DEUTCH
Temp. Spin
Options
Change
A
Exit
Einstellungen
Temp. Spin
Options
Change
Exit
B
CLOCK
The clock setting option permits you to set the
current time in the memory. It is important to set it
correctly as the display indicates the cycle end time
when you select a programme (refer item 3).
To set the current time of day:
1.Turn the power ON and select any Programme.
(E.g. Cotton)
2.Press the <<OPTIONS>> button repeatedly until
“Setup” appears in the display.
3.Press the <<CHANGE>> button to select the
“Setup” function.
4.Press the <<OPTIONS>> button repeatedly until
“Clock: Set Time” appears in the display.
5.Set the time by pressing the <<CHANGE>> button.
A short press will advance the time by 1 minute.Hold
the << CHANGE>> button down and the time will
advance in 10 minute increments.
6.Press the << EXIT>> button.
A
B
BRIGHTNESS
The Brightness setting allows you to modify the
backlight intensity of the display.
Example:
1. Enter the Menu option and select the Brightness
setting.
2. Use the "Change"button to set up the desired
brightness level.
Brightness
Temp. Spin
Options
A
Change
Exit
Brightness
Temp. Spin
Options
Change
B
Exit
Note:
At the end of the programme if no button is pressed
for approximately 10 minutes the backlight intensity
goes off.
A
Clock
Set Time
Temp. Spin
Options
A
Change
14.45
B
Clock
Set Time
Exit
Temp. Spin
Options
Change
14.46
Exit
B
12
Page 13
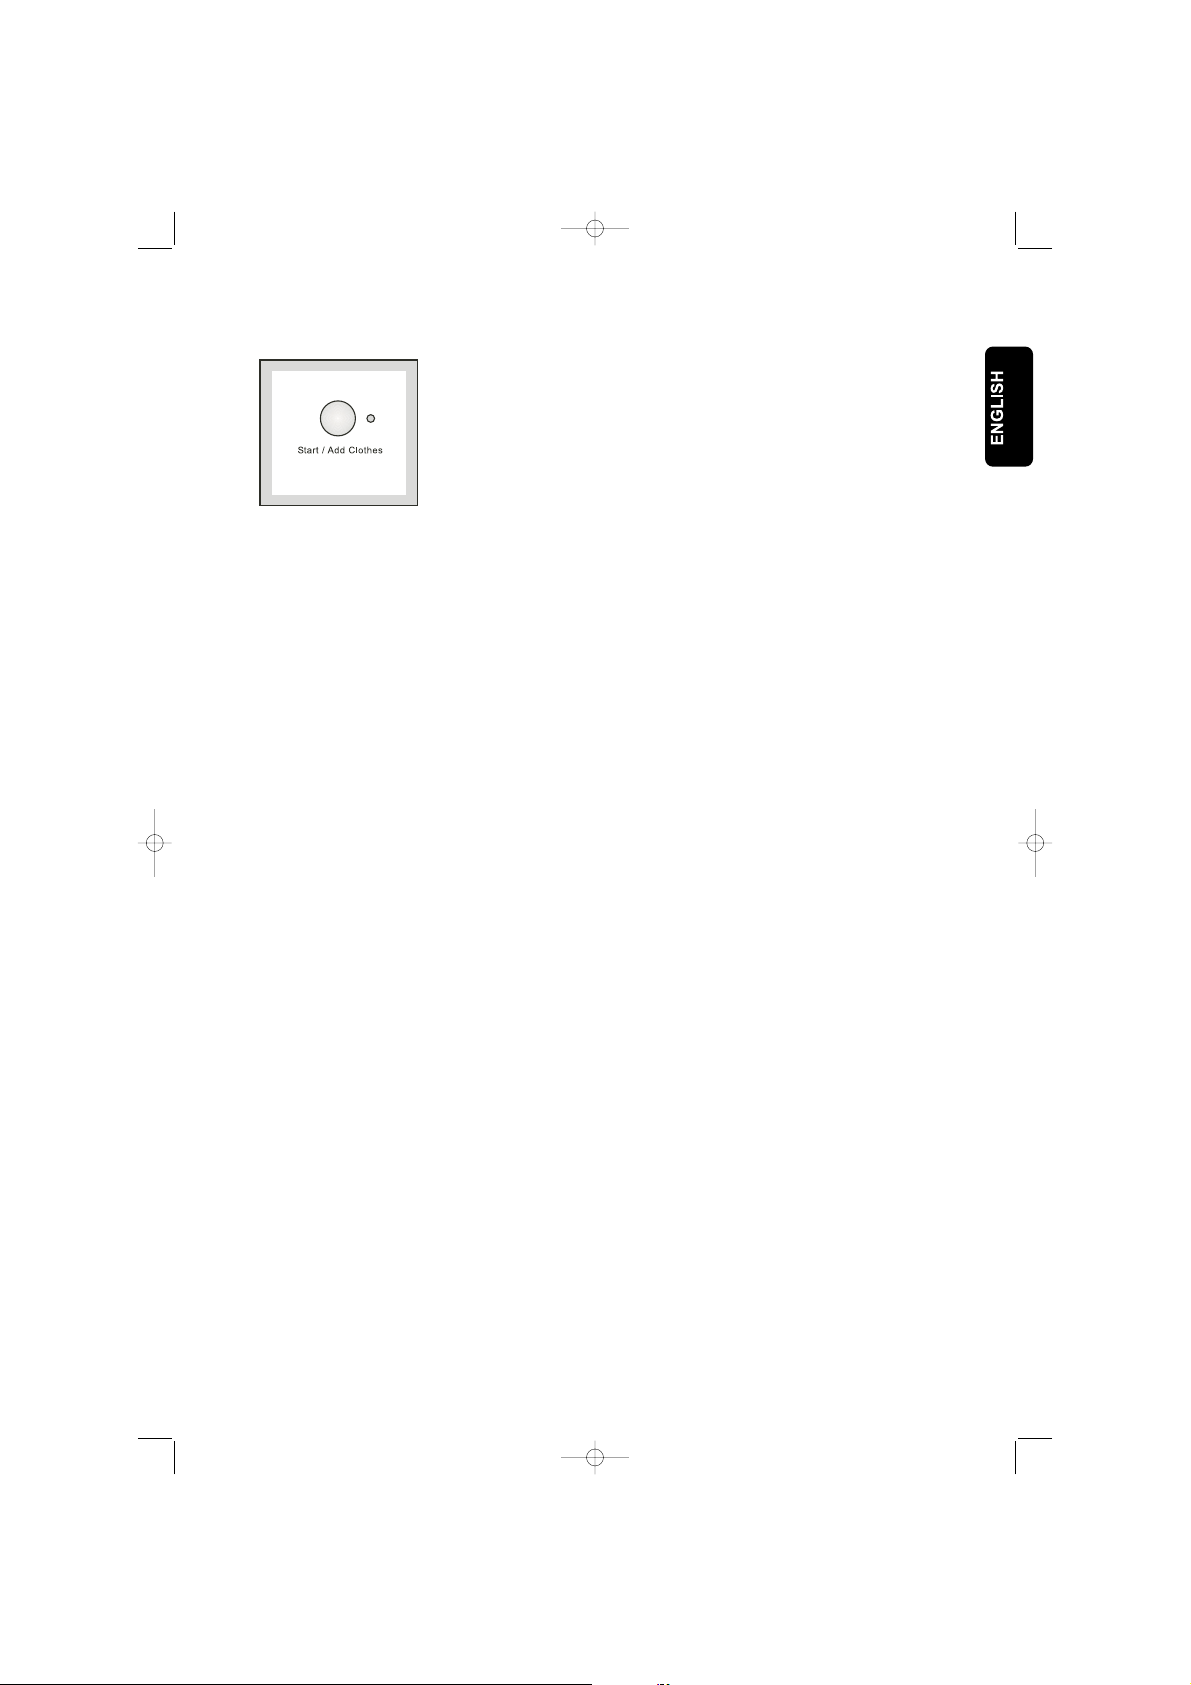
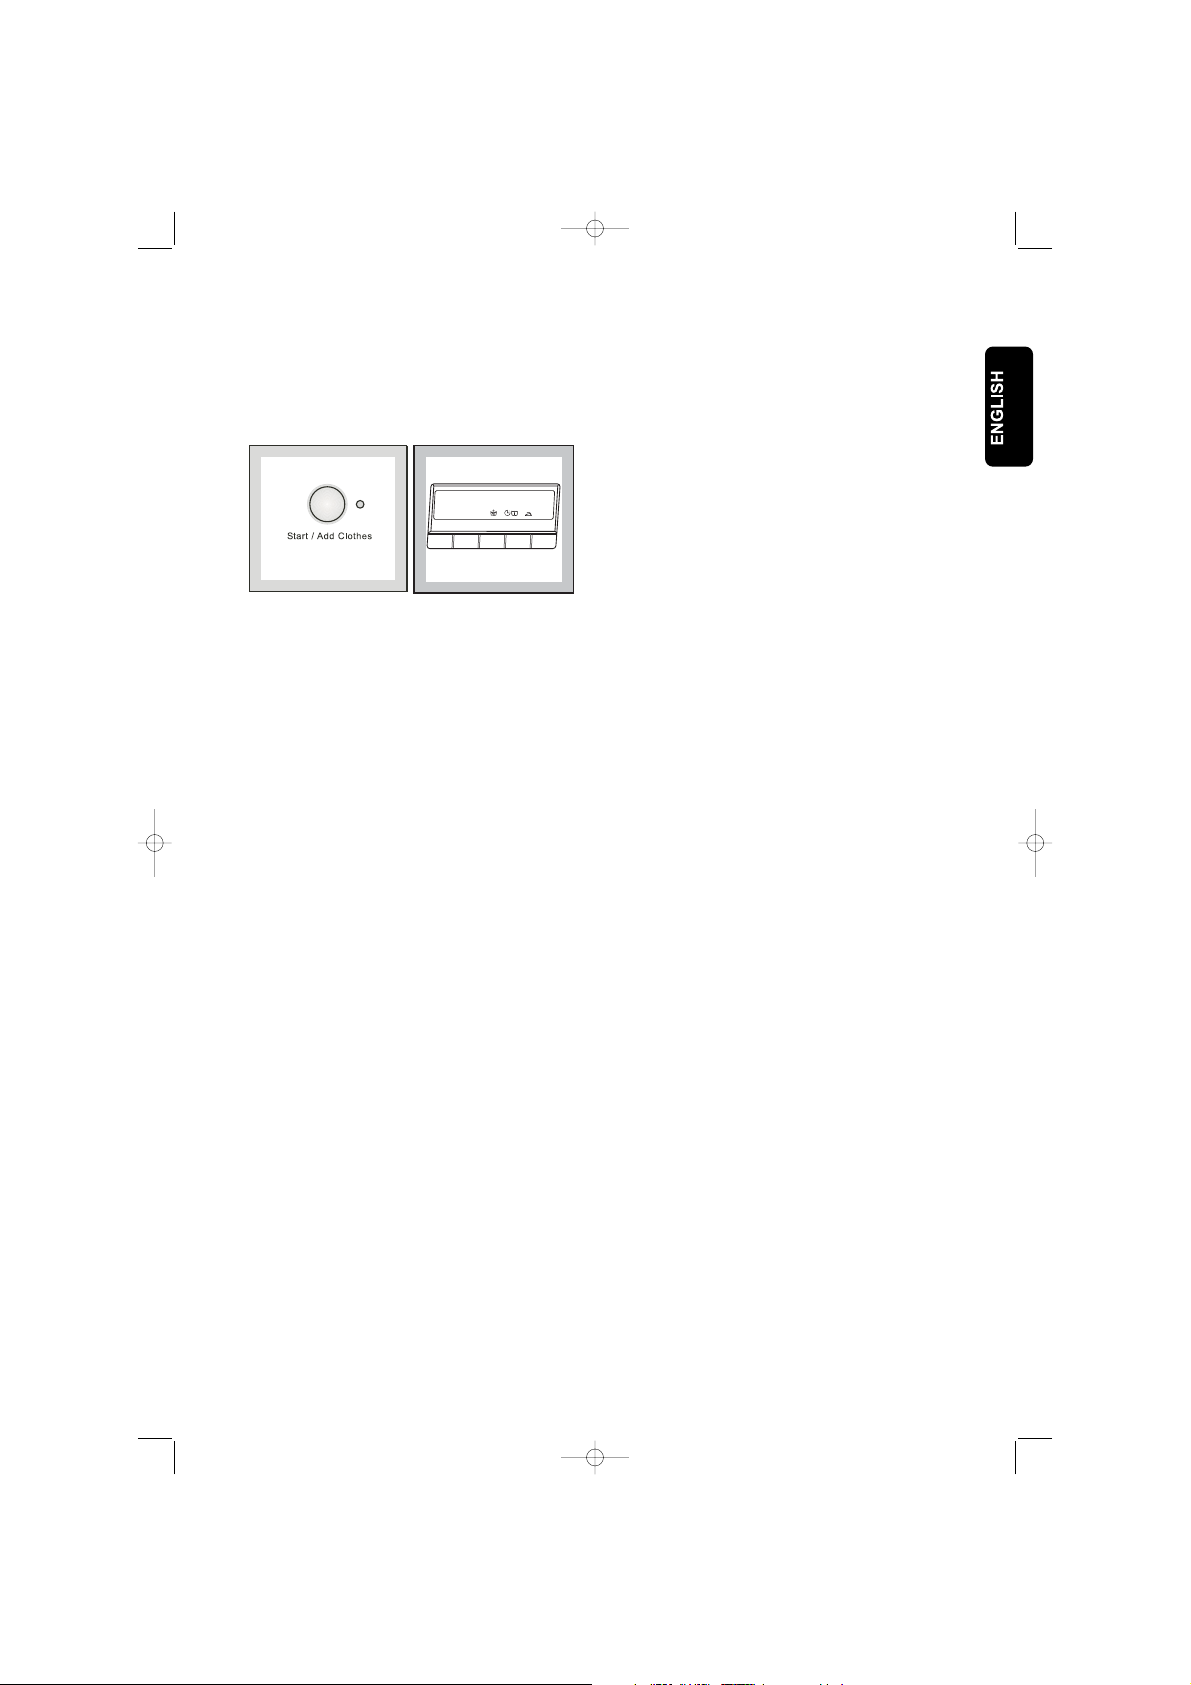
7. Start/Add Clothes button
This button has 2 functions:
Start: after you have selected the desired
programme and options, press this button to start
the washing machine. The light close to the button
will stop flashing and remain lit.
If you have selected a delay time option, the
countdown will begin and will be shown on the
display.
Add Clothes: When you press this button again, the
programme in progress is interupted . The light close
to the button will start flashing. To restart the
programme, press the button again.When you press
“Start/Add clothes”button, it becomes possible to
open the door only if:
The washing machine is not in the heating phase;
The level of the water is not high;
The drum is not turning.
Important! You must pause the washing machine
before you make any change in the programme in
progress, by pressing “Start/Add clothes” button.
13
Page 14

Washing hints
Sorting the laundry
Follow the wash code symbols on each garment
label and the manufacturer’s washing instructions.
Sort the laundry as follows:
whites, coloureds, synthetics, delicates, woollens.
Temperatures
90°- 95° for normally soiled white cottons and linen
(e.g. tea cloths, towels, tablecloths,
sheets...)
50°- 60° for normally soiled, colour fast garments
(e.g. shirts, night dresses, pyjamas....) in
linen, cotton or synthetic fibres and for
lightly soiled white cotton (e.g. underwear).
O
(cold) for delicate items (e.g. net curtains), mixed
30°- 40° laundry including synthetic fibres and
woollens bearing the label «pure new
wool, machine washable, non-shrink».
Before loading the laundry
Never wash whites and coloureds together. Whites
may lose their “whiteness” in the wash.
New coloured items may run in the first wash; they
should therefore be washed separately the first time.
Make sure that no metal objects are left in the
laundry (e.g. hair clips, safety pins, pins).
Button up pillowcases, close zip fasteners, hooks
and poppers. Tie any belts or long tapes.
Remove persistent stains before washing. Rub
particularly soiled areas with a special detergent or
detergent paste.
Treat curtains with special care. Remove hooks or tie
them up in a bag or net.
Maximum loads
Recommended loads are indicated in the
programme charts.
General rules:
Cotton, linen: drum full but not too tightly packed;
Synthetics: drum no more than half full;
Delicate fabrics and woollens: drum no more than
one third full.
Washing a maximum load makes the most efficient
use of water and energy.
For heavily soiled laundry, reduce the load size.
Laundry weights
The following weights are indicative:
bathrobe 1200 g
napkin 100 g
quilt cover 700 g
sheet 500 g
pillow case 200 g
tablecloth 250 g
towels 200 g
tea cloth 100 g
night dress 200 g
ladies’ briefs 100 g
man’s work shirt 600 g
man’s shirt 200 g
man’s pyjamas 500 g
blouse 100 g
men’s underpants 100 g
Removing stains
Stubborn stains may not be removed by just water
and detergent. It is therefore advisable to treat them
prior to washing.
Blood: treat fresh stains with cold water. For dried
stains, soak overnight in water with a special
detergent then rub in the soap and water.
Oil based paint: moisten with benzine stain
remover, lay the garment on a soft cloth and dab the
stain; treat several times.
Dried grease stains: moisten with turpentine, lay
the garment on a soft surface and dab the stain with
the fingertips and a cotton cloth.
Rust: oxalic acid dissolved in hot water or a rust
removing product used cold. Be careful with rust
stains which are not recent since the cellulose
structure will already have been damaged and the
fabric tends to hole.
Mould stains: treat with bleach, rinse well (whites
and fast coloureds only).
Grass: soap lightly and treat with bleach (whites and
fast coloureds only).
Ball point pen and glue: moisten with acetone (*),
lay the garment on a soft cloth and dab the stain.
Lipstick: moisten with acetone as above, then treat
stains with methylated spirits. Remove any residual
marks from white fabrics with bleach.
Red wine: soak in water and detergent, rinse and
treat with acetic or citric acid, then rinse. Treat any
residual marks with bleach.
14
Page 15
Ink: depending on the type of ink, moisten the fabric
first with acetone (*), then with acetic acid; treat any
residual marks on white fabrics with bleach and then
rinse thoroughly.
Tar stains: first treat with stain remover, methylated
spirits or benzene, then rub with detergent paste.
(*) do not use acetone on artificial silk.
Detergents and additives
Good washing results also depend on the choice of
detergent and use of the correct quantities to avoid
waste and protect the environment. Although
biodegradable, detergents contain substances
which, in large quantities, can upset the delicate
balance of nature.
The choice of detergent will depend on the type of
fabric (delicates, woollens, cottons, etc.), the colour,
washing temperature and degree of soiling.
Only low suds frontload washing detergent should
be used in this appliance:
– powder detergents for all types of fabric,
– powder detergents for delicate fabrics (60°C max)
and woollens,
– liquid detergents, preferably for low temperature
wash programmes (60°C max) for all types of
fabric, or special for woollens only.
The detergent and any additives must be placed in
the appropriate compartments of the dispenser
drawer before starting the wash programme.
If using concentrated powder or liquid detergents, a
programme without prewash must be selected.
The washing machine incorporates a recirculation
system which allows an optimal use of the
concentrated detergent.
Pour liquid detergent into the dispenser drawer
compartment marked just before starting the
programme.
Any fabric softener or starching additives must be
poured into the compartment marked before
starting the wash programme.
Follow the product manufacturer’s recommendations
on quantities to use and do not exceed the «MAX»
mark in the detergent dispenser drawer.
Quantity of detergent to be used
The type and quantity of detergent will depend on
the type of fabric, load size, degree of soiling and
hardness of the water used.
Water hardness is classified in so-called “degrees” of
hardness. Information on hardness of the water in
your area can be obtained from the relevant water
supply company, or from your local authority.
Follow the product manufacturers’ instructions on
quantities to use.
Use less detergent if:
– you are washing a small load,
– the laundry is lightly soiled,
– large amounts of foam form during washing.
15
Page 16
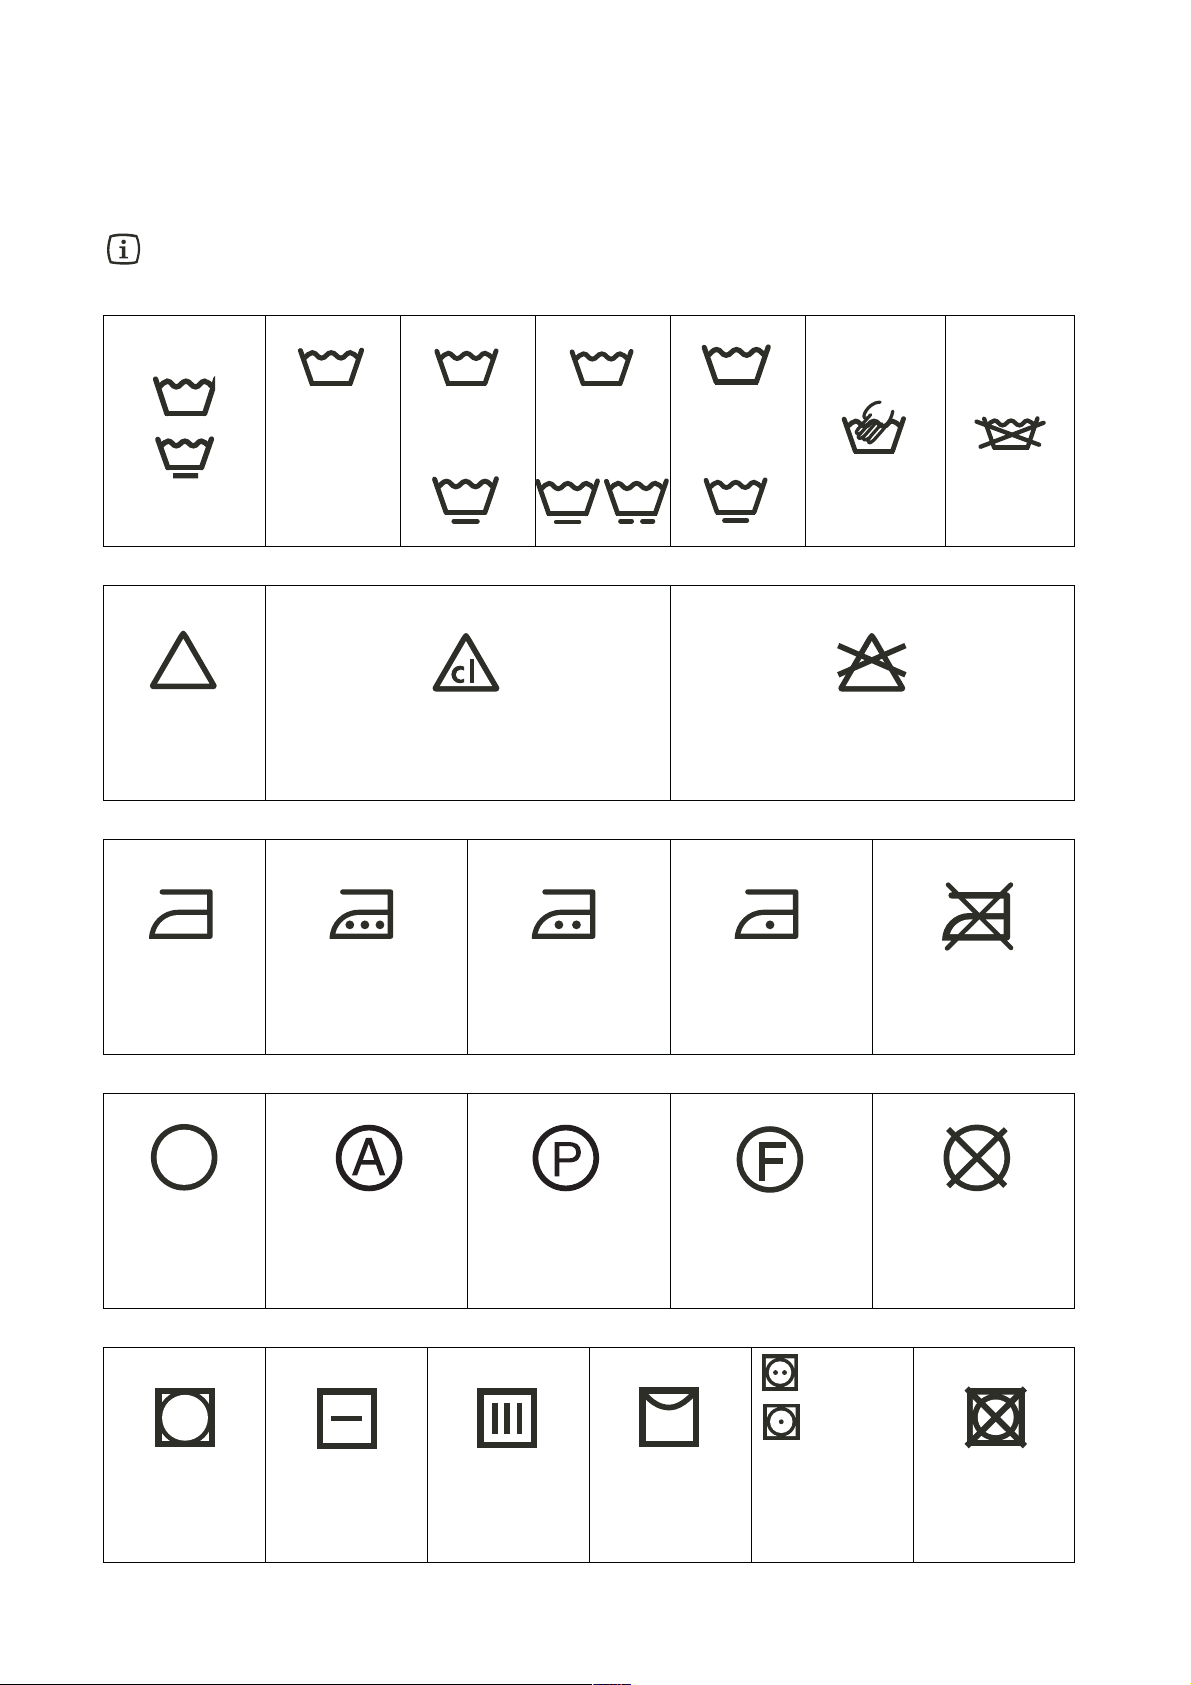
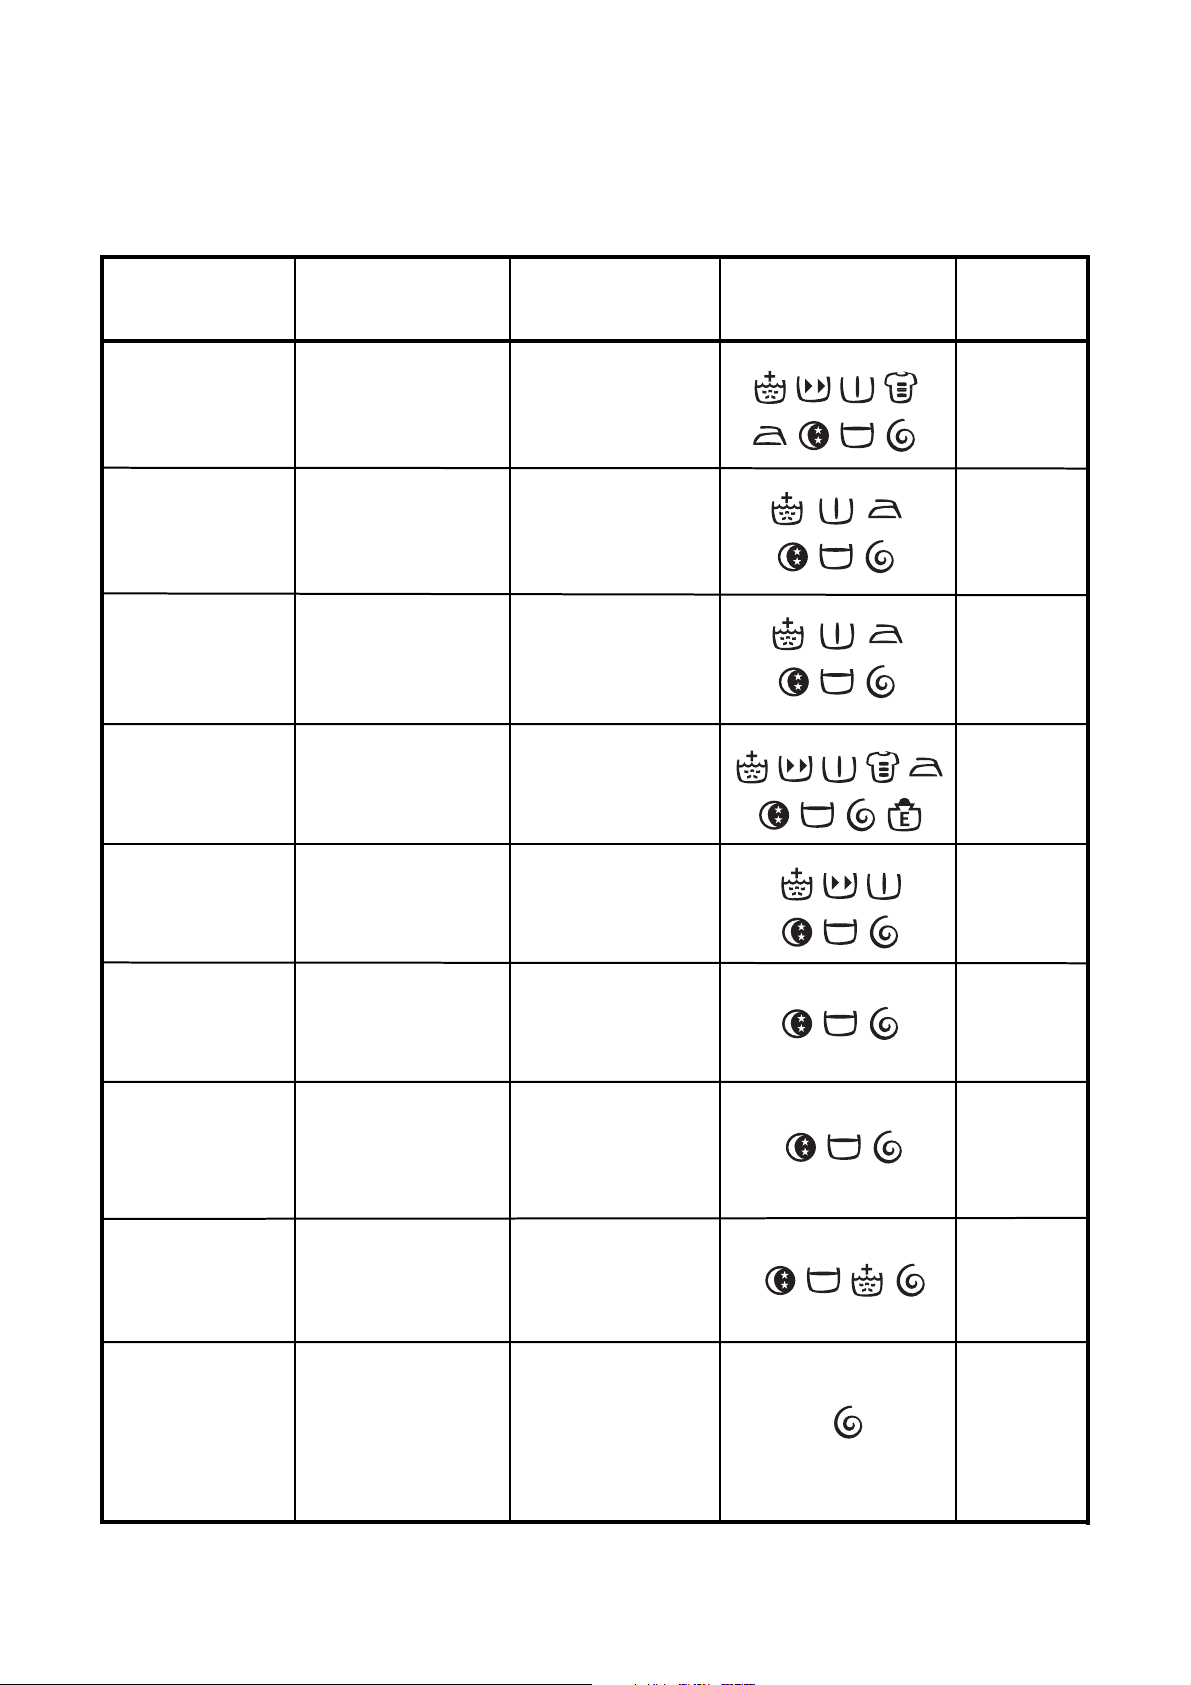
International wash code symbols
These symbols appear on fabric labels, in order to help you choose the best way to treat your laundry.
Energetic wash
95 60 40
30
Max. wash
temperature
95°C
Delicate wash
Bleaching Bleach in cold water Do not bleach
Ironing Hot iron
max 200°C
Max. wash
temperature
60°C
60
Max. wash
temperature
40°C
40 40
Warm iron
max 150°C
Max. wash
temperature
30°C
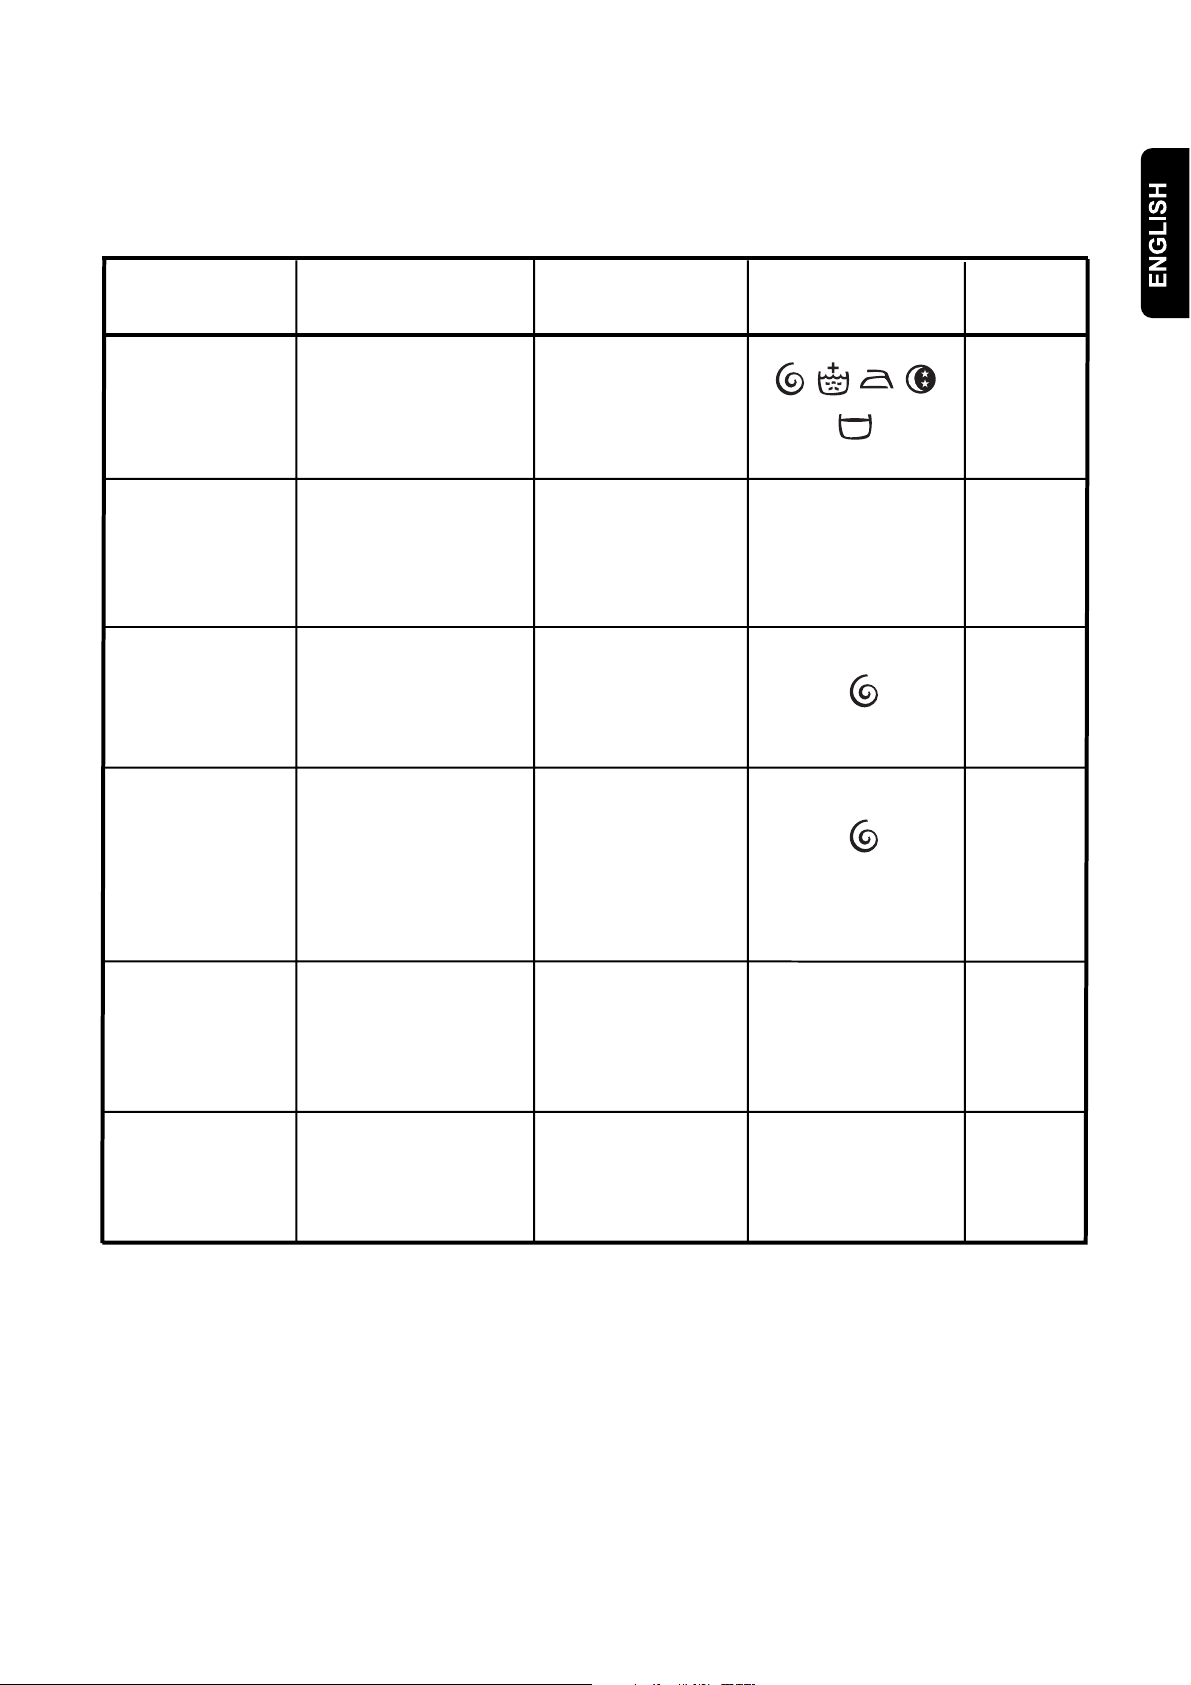
Hand wash Do not
30
Lukewarm iron
max 110°C
wash
at all
Do not iron
Dry cleaning Dry cleaning
in all solvents
Drying Flat On the line On clothes
Dry cleaning in
perchlorethylene,
petrol, pure alcohol,
R 111 & R 113
hanger
16
Dry cleaning
in petrol,
pure alcohol
and R 113
Tumble dry
Do not
dry clean
high
temperature
low
temperature
Do not
tumble dry
Page 17
UserManual 1495 UK2272005.qxd 30/08/05 15.20 Page 17
Operating sequence
Before the first wash we recommend that you pour 2
litres of water into the main wash compartment
of the detergent drawer. Then run a cotton cycle at
60°C, with the machine empty, in order to remove
any manufacturing residue from the drum and tub.
Pour half a measure of detergent into the main wash
compartment and start up the machine.
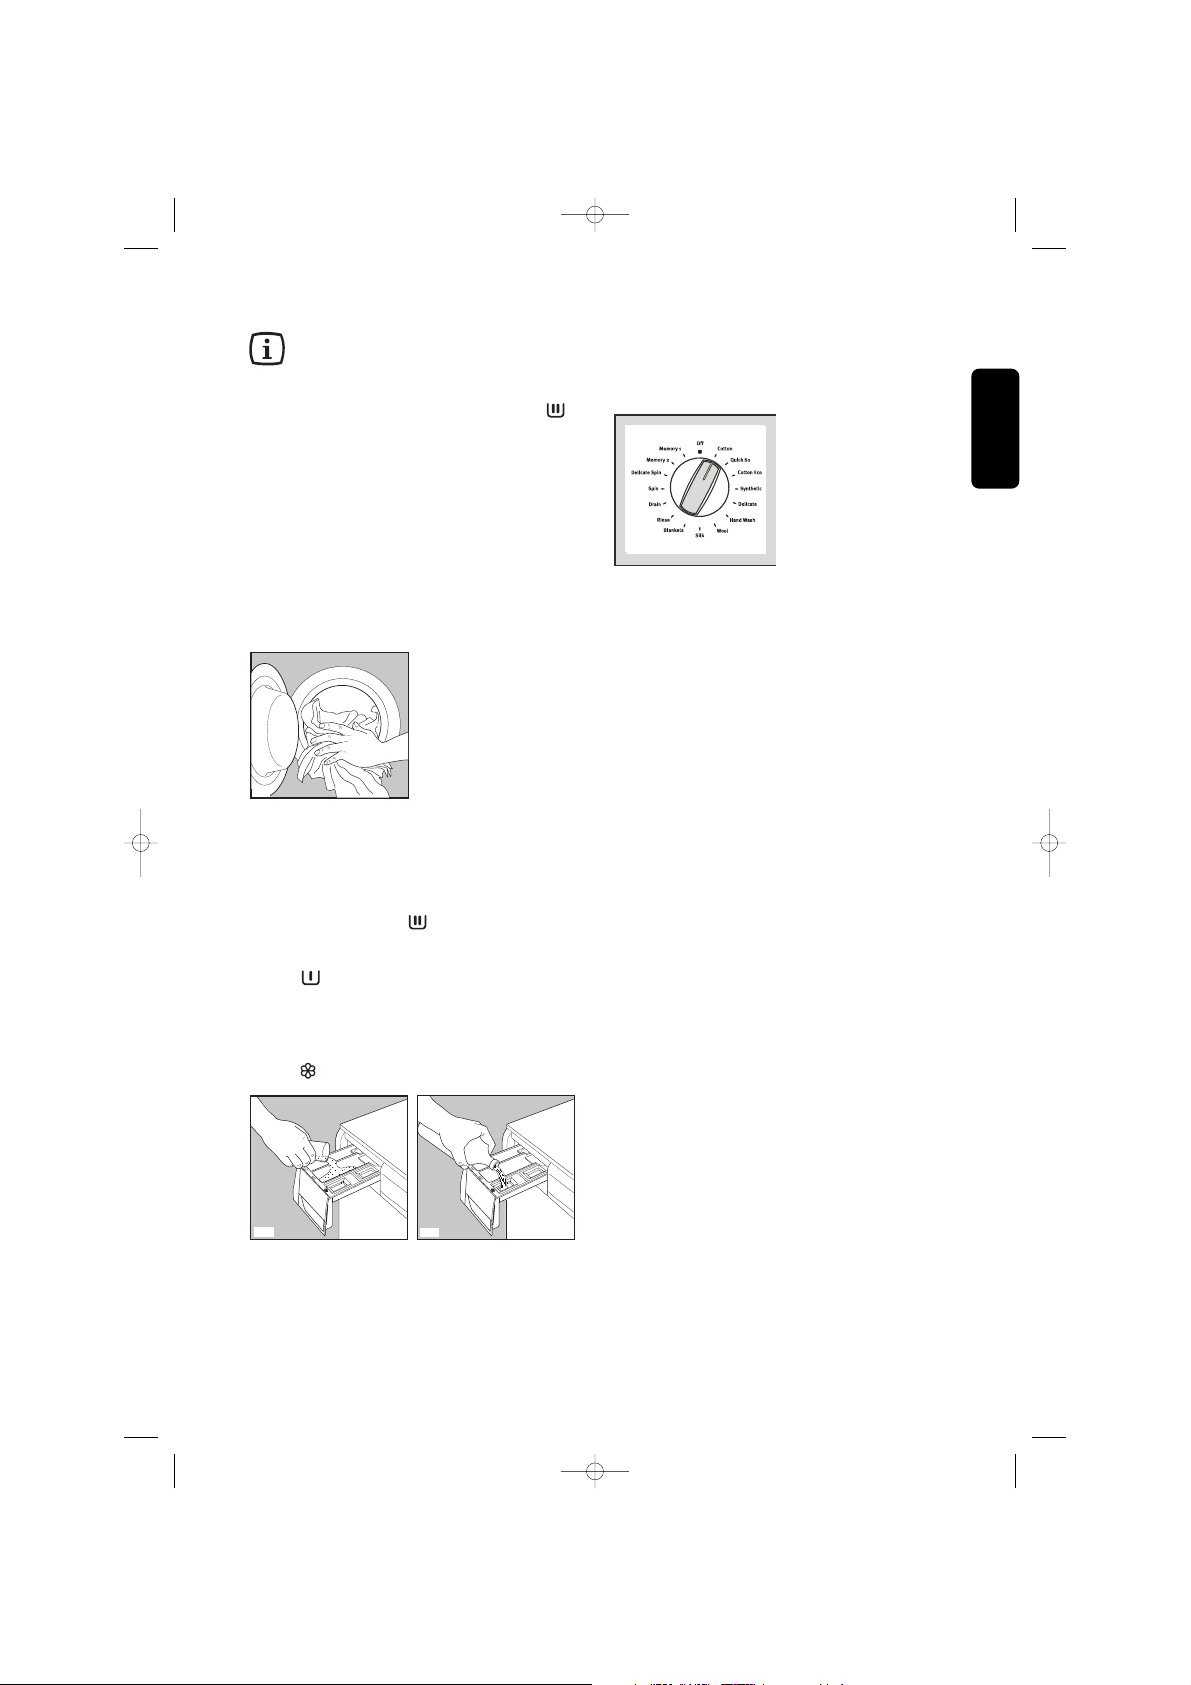
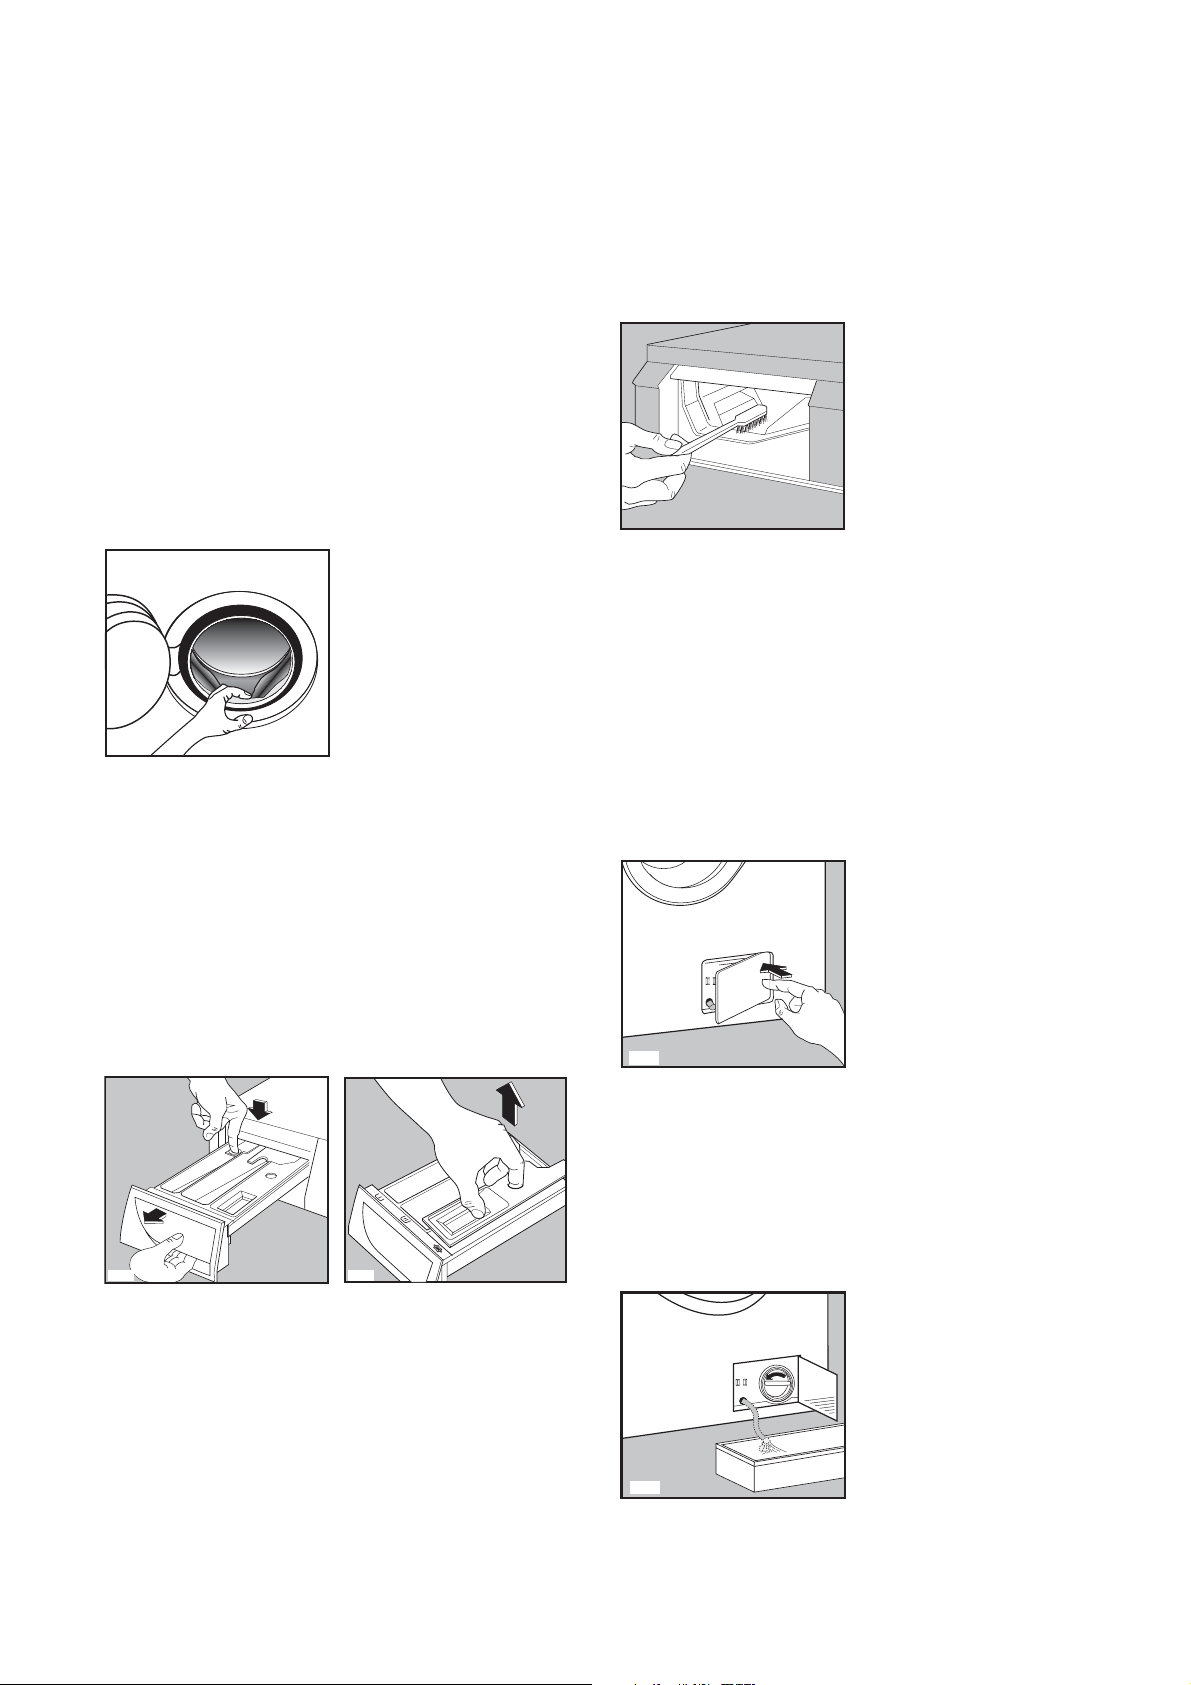
1. Place the laundry in the drum
Open the door.
Place the laundry in the drum, one item at a time,
shaking them out as much as possible.
Close the door.
P0004
2. Measure out the detergent
Pull out the dispenser drawer until it stops. Measure
out the amount of detergent recommended by the
manufacturer in a graduated cup and pour it into the
main wash compartment .
If you wish to carry out the prewash or soak phase,
pour detergent into the appropriate compartment
marked .
4. Switch the machine ON
Turn the selector dial to the desired programme to
switch the appliance on.
To switch the appliance off turn it to «Off».
ENGLISH
Switching the appliance for the first time.
LANGUAGE
When switching on the appliance for the first time
you must set the language in which you want the
indicators in the display to appear.
Important!
If the display is not showing any language, the
appliance has already been switched on once. In
such case, go to the chapter «Change language» if
you would like to change the language setting.
Please refer page 12.
3. Measure out the additive
If required, pour fabric softener into the compartment
marked , without exceeding the «MAX» mark.
C0116
C0117
17
Page 18
SETTING THE TIME
You should set the time prior to the first wash and
when changing to and from daylight savings time.
See «Clock setting», Menu on page 12.
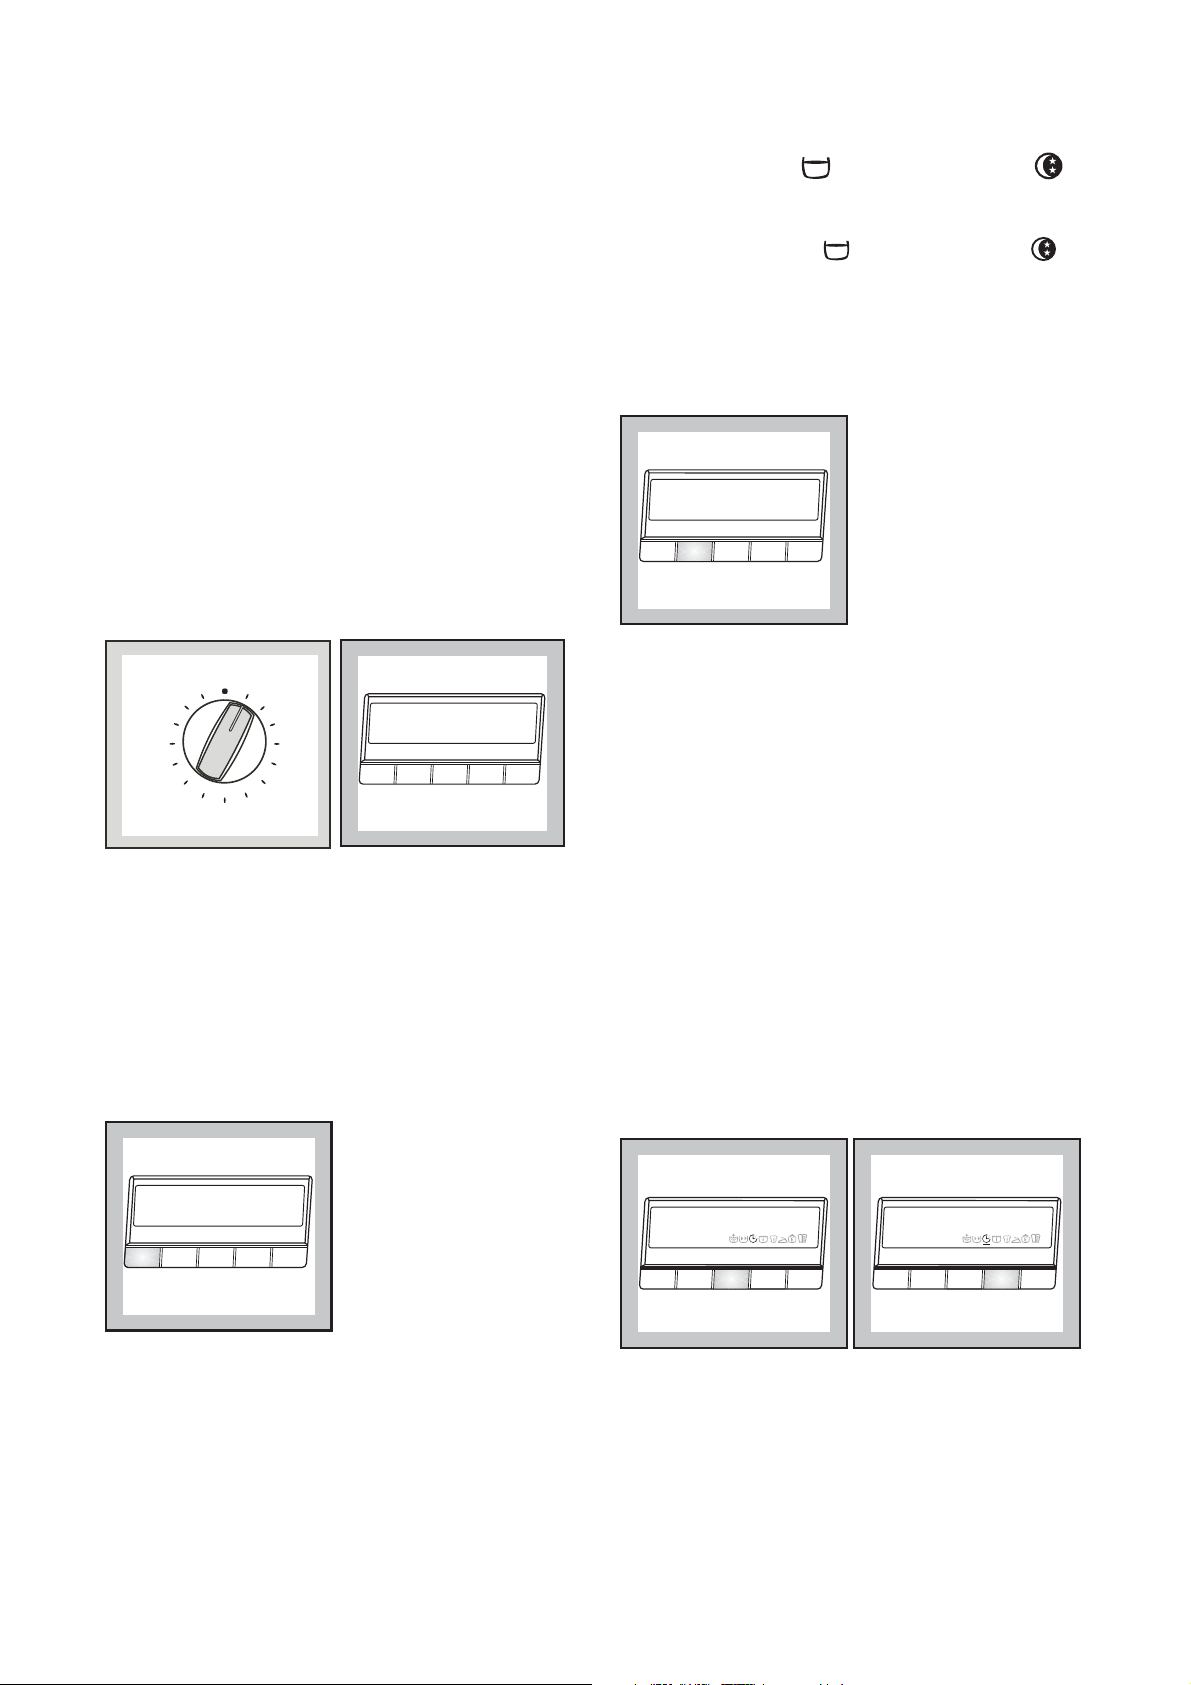
5. Select the desired
programme/fabric
Turn the selector dial, in order to select the desired
programme/fabric. The relevant message will appear
in the display.
The display will show the END CYCLE TIME of the
selected programme, calculated on the basis of the
maximum load for each type of fabric. The Start/Add
clothes button light will start flashing.
If the load of laundry to be washed is small, at the
beginning of the cycle the display will still indicate the
END CYCLE relevant to the maximum load. The
duration value will be gradually adjusted during the
execution of the cycle.
Off
Memory 2
Delicate Spin
Spin
Drain
Memory 1
Rinse
Blankets
Cotton
Quick 60
Cotton Eco
Synthetic
Delicate
Hand Wash
Wool
Silk
Cotton
Cycle and at
60°C 1400
Temp. Spin
Options
Change
08.30
10.55
Exit
6. Select the temperature
7. Select the Spin Speed "Spin",the
Rinse Hold or Night cycle .
Press the SPIN SPEED button repeatedly, in
order to select the desired spin speed or No Spin
«O» or the Rinse Hold or the Night Cycle
options. The relevant message will appear on the
second row of the display. The selected spin level
will be shown on the third row next to the spin button.
If you select the Rinse Hold or Night Cycle options,
the machine will stop at the end of the programme
with the water still in the tub.
COTTON
MAX 1400
40°C
Temp. Spin
1200
Options
Change
08.30
10.55
Exit
8. Select the desired options
Depress the relevant buttons to select the required
options.
Depending on the selected programme only
certain options are available and shown during
the selection phase.
Note: Not all the options are compatible between
themselves. The uncompatible option icons will
disappear.
Press the TEMPERATURE button if you wish to
select a temperature value different from the one
proposed by the washing machine.
The message of the maximum available temperature
appears on the second row of the display (instead of
«cycle end at»). In the corner of the third row
appears the indication of the selected temperature.
COTTON
MAX 95°C
40°C 1400
Temp. Spin
Options
Change
08.30
10.55
Exit
9. Select the DELAY TIME
Before you start the programme, if you wish the
starting to be delayed, choose the DELAY option.
The selected delay time value (up to 20 hours) will
appear on the display while selecting.
The end cycle will be updated and shown on the
relative position of the display.
Delay Start
No 10.55
Change
Temp. Spin
Options
Exit
Delay Start
Start in 30 min 11.25
Temp. Spin
Options
Change
Exit
18
Page 19
10. Start the programme
Press the Start/Add clothes button. The light will stop
flashing. The message relevant to the phase that is
in progress will be shown in the display.
If you have chosen a delayed start, the washing
machine will begin the countdown.
5$2#) '
11. How to change a programme
during its cycle
Before you make any change, you must pause the
washing machine by pressing the Start/Add clothes
button.
It is possible to change any phase before the
programme carries it out.
When the programme has started, you can only
reset it by turning the programme selector dial to
«Off» and then you can select the new programme.
The washing water remains in the tub.Start the new
programme by depressing the Start/Add clothes
button.
Note: To drain the water before starting the new
cycle you have to cancel the programme and select
the DRAIN cycle.
12. Cancelling a programme
Turn the selector dial to «Off» to cancel a
programme which is running. Now you can select a
new programme.
13.How to open the door during
the cycle of a programme
You can open the door, after having set the washing
machine to PAUSE, by pressing Start/Add clothes
button provided the following conditions exist:
1) the washing machine is not in the heating phase
beyond 55°C
2) the level of the water is not high;
3) the drum is not turning.
If these requirements are met, when you pause the
washing machine, the relevant message appears in
the display, the door locked light goes out and the
door can be opened.
Should it not be possible to open the door and the
door locked light is on, should it be absolutely
necessary to do so, switch the machine off by turning
the selector dial on "Off" position.
After approximately 3 minutes, you can open the
door.
Pay attention to the level and temperature of the
water in the washing machine!
'
14. End of programme
At the end of the programme, the washing machine
stops automatically, gives an audible signal (if option
no sound has not been selected), and displays the
relevant message.
If you had selected the RINSE HOLD or NIGHT
CYCLE option, the Start/Add clothes button light is
off and the door locked light is on.
To drain or spin first turn the programme selector dial
to «Off» and then to drain programme or
spin/delicate spin programme.
Release of the lock is also indicated by the coming
on of the message "Door openable" (cycle ended)
and the going out of the door locked light.
Turn the programme selector dial to «Off» to switch
the machine off.
Remove the laundry from the washing machine.
Check whether the drum is completely empty, by
rotating it with your hand. The purpose of this is to
prevent any items of laundry from remaining
accidentally in the drum, where they might get
damaged in a subsequent wash (e.g. by shrinking) or
bleed colour into another load of laundry.
We advise you to close the water supply tap and
disconnect the plug from the socket.
Leave the door ajar in order to air the washing
machine.
19
Page 20
Programme table
Washing Programmes
Wash programmes
Fabrics
Cotton
Quick 60
Cotton Eco*
Synthetics
Type of Laundry
White and coloured
cotton e.g Sheets,
tablecloths,
household linen
White and coloured
cotton
A mixed load of
normally soiled
cottons.
Synthetic fabrics:
e.g.shirts,blouses,
Description of
Programme
Main wash at
O(cold)-95°C
3 rinses
Long spin
Main wash at
O(cold)-95°C
3 rinses
Long spin
Main wash at
40°C-60°C
3 rinses
Long spin
Main wash at
O(cold)-60°C
3 rinses
Short spin
Availble options
Max. Load
8kg
4.5kg
8kg
3.5kg
Delicate
Handwash
Wool
Silk
Blankets
Delicates like pillow
covers and curtains
Special programmes
for hand washing
fabrics
Clothes labelled
machine washable
wool or pure new
wool.
Silk
Blankets
Main wash at
O(cold)-40°C
3 rinses
Short spin
Main wash at
O(cold)-40°C
3 rinses
Short spin
Main wash at
O(cold)-40°C
3 rinses
Short spin
Main wash at
30°C
3 rinses
Short spin
Main wash at
30°C-40°C
3 rinses
Short spin
3.5kg
2kg
1kg
1kg
4.5kg
*This programme at 60°c is the reference program for the energy label according to EEC directive 92/75
20
Page 21
Programme table
Special Programmes
Wash programmes
Fabrics
Rinse
Drain
Spin
Delicate Spin
Type of Laundry
For rinsing cloths
For draining out the
water from last rinse
of wash programmes
with options Rinse
Hold or Night cycle
Special short
programme for lightly
soild synthetics or
mixed fabircs (wool,
delicate and silk)
Special short
Programme for
lightly soiled
synthetic or mixed
fabrics(wool,delicates
and silk)
Description of
Programme
3 rinses with liquid
additive,if required.
Long spin at max.
spin
Draining of
water
Drain and long spin
Drain and delicate
spin at maximum
700 rpm speed
Availble options
Max. Load
8kg
8kg
8kg
3.5kg
Memory 1
Memory 2
Programme stored in
the machine for
reuse
Programme stored in
the machine for
reuse
21
Page 22
Maintenance
1. Bodywork
Clean the outside of the machine with soap and
water only. Rinse with clean water and dry with a soft
cloth.
Important: do not use methylated spirits, solvents or
similar products to clean the bodywork.
2. Door seal
Check the door seal from time to time and remove
any objects that may be trapped in the fold.
P1050
3. Detergent dispenser drawer
After a while, detergents and fabric softeners leave
deposits in the drawer.
Clean the drawer from time to time by rinsing it under
a running tap. To remove the drawer from the
machine, press the button in the rear left-hand
corner.
To facilitate cleaning, the top part of the additive
compartments can be removed.
Detergent can also accumulate inside the drawer
recess: clean it with an old toothbrush. Refit the
drawer after cleaning.
P0038
4. Drain pump
The pump should be inspected if
• the machine does not empty and/or spin
• the machine makes an unusual noise during
draining due to objects such as safety pins, coins
etc. blocking the pump.
Proceed as follows:
• Disconnect the appliance electricity supply
• If necessary wait until the water has cooled down.
• Open the pump door.
P1114
C0066
• Place a container close to the pump to collect any
spillage.
• Release the emergency emptying hose, place it in
the container and remove its cap.
• When no more water comes out, unscrew the drain
filter and remove. Always keep a rag nearby to dry
up spillage of water when removing the filter.
C0067
P1115
22
Page 23
UserManual 1495 UK2272005.qxd 30/08/05 15.20 Page 23
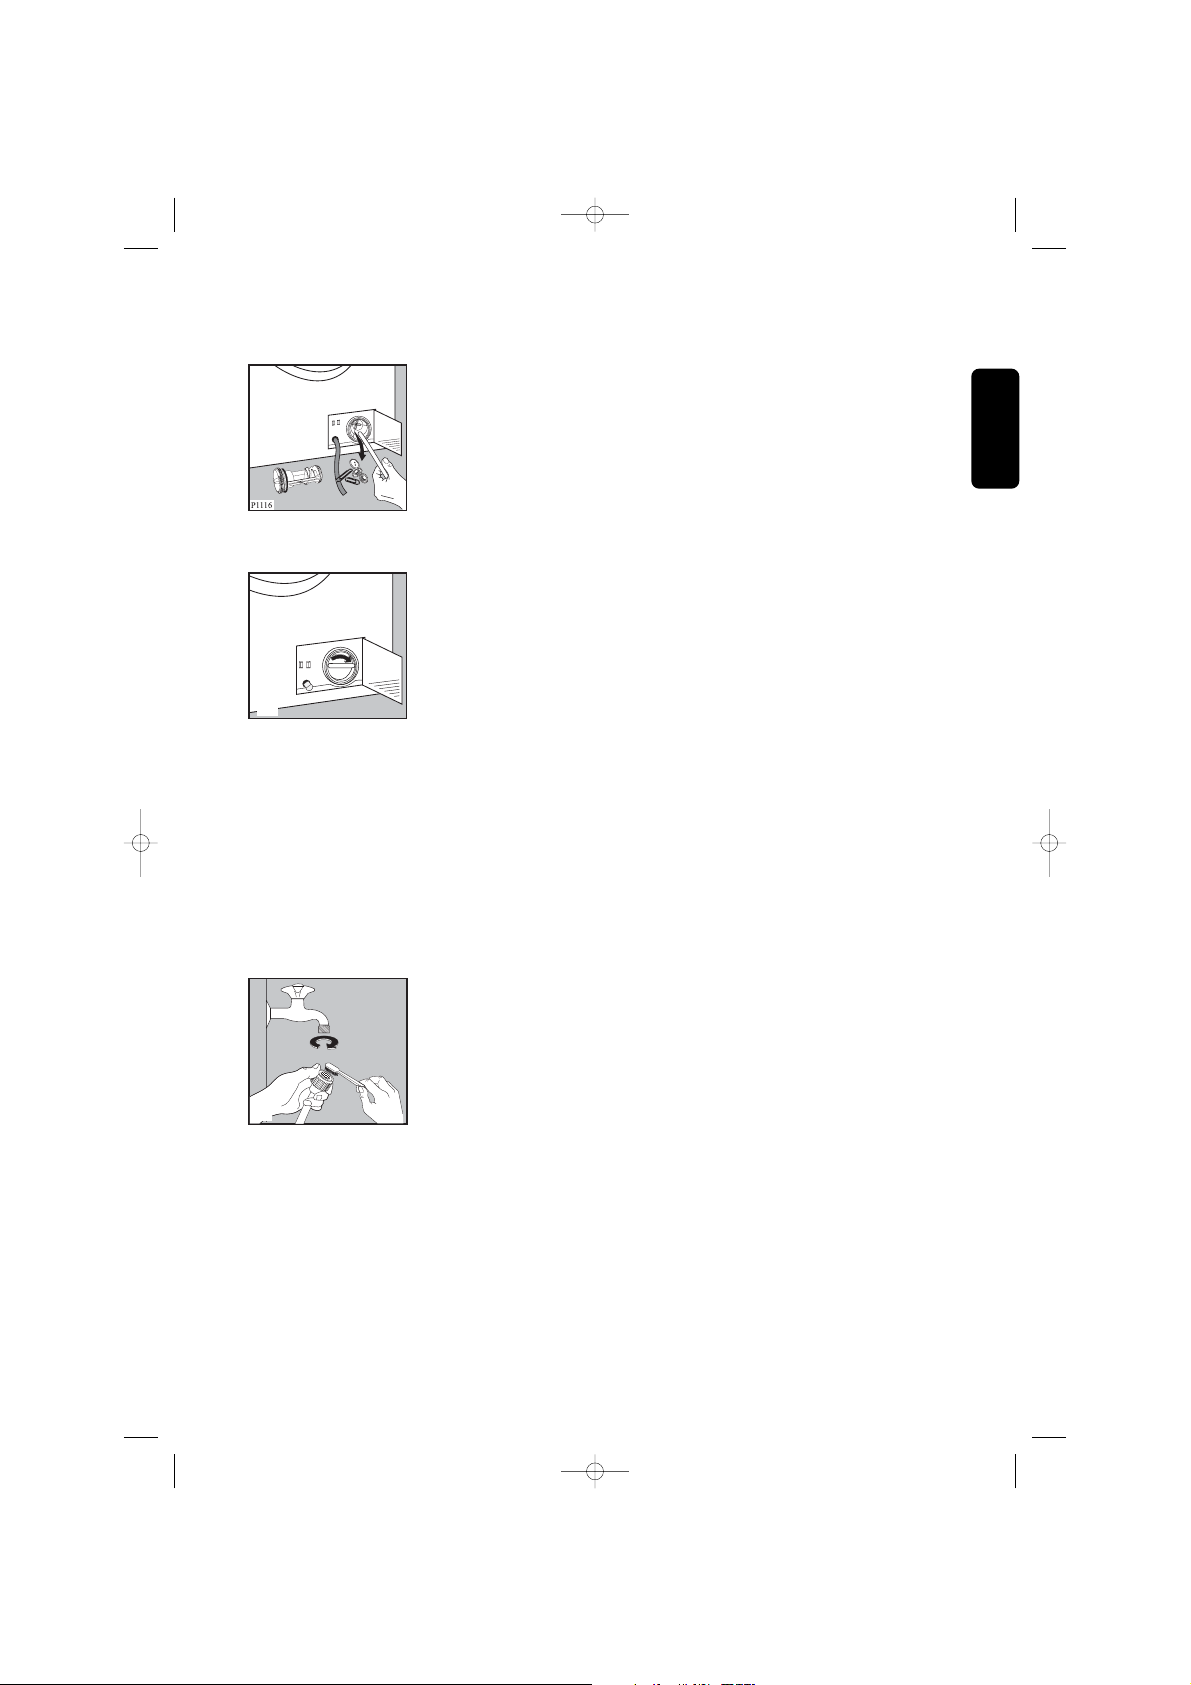
• Remove any objects from the pump impeller by
rotating it.
• Put the cap back on the emergency emptying hose
and place the latter back in its seat.
P1117
• Screw the pump cover fully in.
• Close the pump door.
5. Water inlet filter
If you notice that the machine is taking longer to fill,
check that the filter in the water inlet hose is not
blocked.
Turn off the water tap.
Unscrew the hose from the tap.
Clean the filter with a stiff brush.
Screw the hose back onto the tap.
6. Emergency emptying out
If the water is not discharged, proceed as follows to
empty out the machine:
• pull out the plug from the power socket;
• close the water tap;
• if necessary, wait until the water has cooled down;
• open the pump door;
• place a bowl on the floor and place the end of the
emergency emptying hose into the bowl. Remove
its cap. The water should drain by gravity into the
bowl. Whe the bowl is full, put the cap back on the
hose. Empty the bowl. Repeat the procedure until
water stops flowing out;
• clean the pump if necessary as previously
described;
• replace the emergency emptying hose in its seat
after having plugged it;
• screw the pump cover again and close the door.
7. Frost precautions
If the machine is installed in a place where the
temperature could drop below 0°C, proceed as
follows:
• Remove the plug from the socket.
• Close the water tap and unscrew the water inlet
hose from the tap.
• Place the end of the emergency emptying hose
and that of the inlet hose in a bowl placed on the
floor and let water drain out.
• Screw the water inlet hose back on and reposition
the emergency emptying hose after having put the
cap on again.
By doing this, any water remaining in the machine is
removed, avoiding the formation of ice and,
consequently, breakage of the affected parts.
When you use the machine again, make sure that
the ambient temperature is above 0°C.
ENGLISH
P1090
23
Page 24
Something not working?
Problems which you can resolve yourself.
During machine operation it is possible that one of the following messages appear on the display:
- Problem with the water supply: “No incoming water. Check tap & hose”
- Problem with water draining: “No drain. Check drain hose /filter”
- Door open: “Door not closed. Please check”
Once the problem has been eliminated, press the Start/Add clothes button to restart the programme. If after
all checks, the problem persists, contact your local Service Centre.
Problem Possible cause•
The machine does not start up:
The machine does not fill:
The machine fills then empties
immediately:
The machine does not empty
and/or does not spin:
• The door is not firmly closed. ( “Door not closed.
Please check”)
• The machine is not plugged in or there is no power
at the socket.
• The main fuse has blown.
• The START/ADD CLOTHES button has not been
depressed.
• The DELAY START option has been selected.
• The programme selector dial is not positioned.
• The water tap is closed. (“No incoming water.
Check tap & hose”)
• The inlet hose is squashed or kinked. (“No
incoming water. Check tap & hose”)
• The filter in the inlet hose is blocked. (“No
incoming water. Check tap & hose”)
• The door is not properly closed. ( “Door not
closed. Please check”)
• The end of the drain hose is too low. Refer to
relevant paragraph in “water drainage” section.
• The drain hose is squashed or kinked. (“No drain.
Check drain hose /filter”)
• The RINSE HOLD option , NIGHT CYCLE or
NO SPIN «O» has been
selected.
• The laundry is not evenly distributed in the drum.
• The drain pump is clogged. (“No drain. Check
drain hose /filter”)
There is water on the floor:
• Too much detergent or unsuitable detergent
(creates too much foam) has been used.
• Check whether there are any leaks from one of the
inlet hose fittings. It is not always easy to see this
as the water runs down the hose; check to see if it
is damp.
• The drain hose is damaged.
• The cap on the emergency emptying hose has not
been replaced after cleaning the pump.
24
Page 25
UserManual 1495 UK2272005.qxd 30/08/05 15.20 Page 25
Problem Possible cause
• Unsatisfactory washing results:
• The machine vibrates or is
noisy:
• Too little detergent or unsuitable detergent has
been used.
• Stubborn stains have not been treated prior to
washing.
• The correct temperature was not selected.
• Excessive laundry load.
• The transit bolts and packing have not been
removed.
• The support feet have not been adjusted.
• The laundry is not evenly distributed in the drum.
• Maybe there is very little laundry in the drum.
ENGLISH
• The door will not open:
• Spinning starts late or the
machine does not spin:
• The programme is still running.
• The door lock has not been released.
• There is water in the drum.
The door could be opened only when «Door
openable» message appears in the display and
the door locked light goes off.
• The electronic unbalance detection device has cut
in because the laundry is not evenly distributed in
the drum. The laundry is redistributed by reverse
rotation of the drum. This may happen several
times before the unbalance disappears and normal
spinning can resume. If, after 10 minutes, the
laundry is still not evenly distributed in the drum,
the machine will not spin. In this case, redistribute
the load manually and select the spin programme.
If you are unable to identify or solve the problem,
contact our service centre. Before telephoning, make
a note of the model, serial number and purchase
date of your machine: the Service Centre will require
this information.
.
..
..
..
..
.
.
d
o
M
.
..
.
.
..
.
..
.
.
o
. N
d
ro
P
..
.
....
.
.
.
o
N
.
r
e
S
Mod. ..........
Prod. No. ...........
P0042
Ser. No. .........
25
Page 26
аГХВ¹ ЕЩ¡¤йТ¼ЩйБХНШ»¡ТГ¤Ш³
в»Г´НиТ¹¤Уб¹Р¹Уг¹¡ТГгªй§Т¹¹ХйНВиТ§ЕРаНХВ´
бЕРв»Г´»¯ФºСµФµТБ¤Уб¹Р¹У´йТ¹¤ЗТБ»ЕН´АСВ·ХиЛ¹йТбГ¡
аГТ¢Нб¹Р¹УгЛй¤Ш³а¡зº¤ЩиБЧН¤Уб¹Р¹У¹ХйдЗй а¾ЧиНгªй§Т¹г¹Н¹Т¤µ
бЕРа¡зºГС¡ЙТдЗйКУЛГСºа¨йТ¢Н§ГТВµиНд»
КСЕС¡Й³м·Хи¤Ш³аЛз¹г¹¤ЩиБЧН¹ХйБХ¤ЗТБЛБТВ´С§¹Хй:
а¤ГЧиН§ЛБТВ¤УаµЧН¹ГЩ»КТБаЛЕХиВБбЕР/ЛГЧН¤УаµЧН¹НЧи¹ (¤УаµЧН¹! ¢йН¤ЗГГРЗС§!) а¹й¹¶Ц§¢йНБЩЕ·ХиБХ¤ЗТБКУ¤Са»з¹¾ФаИЙµиН¤ЗТБ»ЕН´АСВ¢Н§¤Ш³
бЕР¡ТГ·У§Т¹·Хи¶Щ¡µйН§¢Н§а¤ГЧиН§
¤ЗТБаКХВЛТВа¹ЧиН§¨Т¡¡ТГ¢¹Ки§
ЛЕС§¨Т¡·Хи¹Уа¤ГЧиН§НН¡¨Т¡ºГГ¨ШАС³±м
в»Г´µГЗ¨КНºЗиТНШ»¡Г³м·Ш¡НВиТ§НВЩиг¹КАТ¾´Х ЛТ¡БХ¢йНК§КСВ
в»Г´НВиТа»Ф´а¤ГЧиН§бЕРµФ´µиНИЩ¹ВмºГФ¡ТГ·ХиНВЩиг¡ЕйºйТ¹¤Ш³·С¹·Х
¢йНБЩЕ·ХиБХа¤ГЧи
¤Уб¹Р¹УбЕР¢йНБЩЕа¡ХиВЗ¡Сº¡ТГгªй§Т¹а¤ГЧиН§НВиТ§»ГРЛВС´ бЕРКН´¤ЕйН§¡СºГРºº¹ФаЗИЗФ·ВТ¨РбК´§´йЗВа¤ГЧиН§ЛБТВ¹Хй
ͧËÁÒ¹ÕéáÊ´§¶Ö§¤Óá¹Ð¹Óà¾ÔèÁàµÔÁ áÅÐà¤Åç´ÅѺ㹡ÒÃãªé§Ò¹ÍØ»¡Ã³ì
¤ЗТБ¾ВТВТБ¢Н§аГТг¹¡ТГ»¡»йН§КФи§бЗ´ЕйНБ
аГТгªй¡ГР´ТЙ·Хи¹У¡ЕСºБТгªйгЛБи
ÊÒúÑ
¤Óàµ×͹ 27
¡Ò÷Ô駻¯Ô¡ÙÅ28
¤Уб¹Р¹УКУЛГСº¡ТГ»¡»йН§КФи§бЗ´ЕйНБ 28
ГТВЕРаНХВ´´йТ¹а·¤¹Ф¤28
¡ÒõԴµÑé§29
¡ÒùÓÍÍ¡¨Ò¡ºÃèØÀѳ±ì 29
¡ÒèѴÇÒ§ 29
ªèͧ¹éÓà¢éÒ29
ÊèǹÃкÒ¹éÓ30
¡ТГµиНКТВд¿ 30
à¤Ã×èͧ«Ñ¡¼éÒà¤Ã×èͧãËÁè¢Í§¤Ø³31
¤УН¸ФºТВКУЛГСºНШ»¡Г³м 31
ªиН§гКиКТГ«С¡¿Н¡ 31
¡ÒÃãªé§Ò¹ 32
ἧ¤Çº¤ØÁ 32
¡ÒäǺ¤ØÁ 32-37
¤Óá¹Ð¹Ó㹡Òëѡ 38
¡ÒÃᡪ¹Ô´¢Í§¼éÒ 38
НШ³ЛАЩБФ 38
¡è͹ãÊè¼éÒŧã¹à¤Ã×èͧ«Ñ¡ 38
¤ÇÒÁ¨ØÊÙ§ÊØ´ 38
¹éÓ˹Ñ
¡¢Í§¼éÒ 38
¡Òâ¨Ñ´ÃÍÂà»×é͹ 38
КТГ«С¡¿Н¡бЕРКТГа¾ФиБаµФБ 39
ÊÑÅѡɳìÊÒ¡ÅÊÓ˹ÃѺ¡Òëѡ¼éÒ40
ÅӴѺ¡Ò÷ӧҹ 41-43
â»Ãá¡ÃÁ¡Òëѡ 44-45
¡ТГ´ЩбЕГС¡ЙТ 46
ÂÒ§¡Ñ¹ÃÑèǢͧ½Ò»Ô´ 46
ÀÒ¹͡¢Í§à¤Ã×èͧ«Ñ¡¼éÒ 46
ªиН§гКиКТГ«С¡¿Н¡ 46
»СкБГРºТВ¹йУ 46
µÑÇ¡Ãͧªèͧ¹éÓà¢éÒ 47
¡ÒöèÒ¹éÓ·Ô駩ءà©Ô¹ 47
¢йН¤ЗГГРЗС§г¹¡Г³Х·Хи¹йУ¨СºµСЗа»з¹¹йУб¢з§ 47
à¤Ã×èͧäÁè·Ó§Ò¹? 48-49
¢йНБЩЕа¡ХиВЗ¡Сºв»Гб¡ГБ¡ТГ«С¡37
26
Page 27

¤Óàµ×͹
¤УаµЧН¹µиНд»¹ХйБХгЛйа¾ЧиН¤ЗТБ»ЕН´АСВ¢Н§¼Щй
гªй в»Г´НиТ¹¤УаµЧН¹НВиТ§¶Хи¶йЗ¹¡иН¹·Хи¨РµФ´µСй§ЛГЧНгªйНШ»¡Г³м
¡ÒõԴµÑé§
в»Г´¹УЗСК´Ш·Хиа»з¹ºГГ¨ШАС³±мАТВг¹НН¡¨Т¡НШ»¡Г³м¡иН¹·Хи¨Ргªй§Т¹
БФ©Р¹Сй¹НТ¨¡иНгЛйа¡Ф´¤ЗТБаКХВЛТВµиНа¤ГЧиН§
ЛГЧНа¤ГЧиН§гªйг¹¤ГСЗаГЧН¹·ХиНВЩи¢йТ§а¤ХВ§
в»Г´НиТ¹¢йНБЩЕ·Хиа¡ХиВЗ¢йН§г¹¤ЩиБЧН¤Уб¹Р¹У¡ТГгªй§Т¹
в»Г´гЛйªиТ§д¿¿йТ¼ЩйБХ
в»Г´гЛйªиТ§»ГР»Т¼ЩйБХ¤ЗТБªУ¹Та»з¹¼ЩйµФ´µСй§§Т¹ЗТ§·иН¢Н§НШ»¡Г³м¹Хй
ЛЕС§¨Т¡·ХиµФ´µСй§а¤ГЧиН§бЕйЗ в»Г´µГЗ¨КНºЗиТа¤ГЧиН§дБид´йЗТ§НВЩиº¹КТВд¿г´ж
ЛТ¡¤Ш³ЗТ§а¤ГЧиН§«С¡¼йТдЗйº¹¾Чй¹·Хи»Щ¾ГБ в»Г´µГЗ¨КНºЗиТБХªиН§З
КУЛГСº¡ТГГРºТВНТ¡ТИГРЛЗиТ§¢ТµСй§бЕР¾Чй¹
¤ÇÒÁªÓ¹Òà»ç¹¼ÙéµÔ´µÑ駧ҹ俿éҢͧÍØ»¡Ã³ì¹Õé
èÒ§à¾Õ§¾Í
¡ÒÃãªé§Ò¹
НШ»¡Г³м¹Хйд´йГСº¡ТГНН¡бººКУЛГСº¡ТГгªй§Т¹АТВг¹ºйТ¹а·иТ¹Сй¹
в»Г´НВиТгªйНШ»¡Г³м¹Хй¼Ф´д»¨Т¡ЗСµ¶Ш»ГРК§¤м¢Н§¡ТГНН¡бºº
в»Г´«С¡а©¾ТР¼йТ·Хид´йГСº¡ТГНН¡бººКУЛГСº¡ТГ«С¡´йЗВа¤ГЧиН§
бЕРв»Г´»¯ФºСµФµТБ¤Уб¹Р¹Уг¹¤ЩиБЧНб¹Р¹У¡ТГгªй§Т¹
в»Г´НВиТгКи¼йТ¨¹а¡Ф¹¤ЗТБ¨Ш¢Н§а¤ГЧиН§
бЕРв»Г´»¯ФºСµФµТБ¤Уб¹Р¹Уг¹¤Щи
в»Г´µГЗ¨КНºЗиТдБиБХЗСµ¶Шг´ЛЕ§аЛЕЧННВЩиг¹¡ГРа»лТ¢Н§аКЧйН¼йТ аЛГХВ а¢зБ¡ЕС´
а¢зБЛБШ´ бЕел٤ǧНТ¨·УгЛйа¡Ф´¤ЗТБаКХВЛТВНВиТ§ГШ¹бГ§
в»Г´НВиТ§«С¡¼йТ·Хиа»ХВ¡¹йУБС¹аªЧйНа¾ЕФ§ аБ¸ФЕбНЕ¡НОНЕм дµГ¤ЕНГХд¸ЕХ¹ ПЕП
ЛТ¡БХ¡ТГгªйКТГаЛЕиТ¹Хйа¾ЧиН¢¨С´ГНВа»ЧйН¹¡иН¹·Х
в»Г´ГНгЛйКТГГРаЛВ¨¹ЛБ´ ¡иН¹·Хи¨Р¹У¼йТЕ§г¹а¤ГЧиН§«С¡
в»Г´гКи¼йТªФй¹аЕз¡ аªи¹ ¶Ш§а·йТ а¢зБ¢С´¼йТ ПЕП г¹¶Ш§¼йТЛГЧН»ЕН¡ЛБН¹
а¾ЧиН»йН§¡С¹дБигЛй¼йТµФ´АТВг¹¶С§«С¡
Á×Íá¹Ð¹Ó¡ÒÃãªé§Ò¹
è¨Ð«Ñ¡
â»Ã´ãªé¹éÓÂÒ»ÃѺ¼éÒ¹ØèÁã¹»ÃÔÁÒ³·Õèá¹Ð¹Óà·èÒ¹Ñé¹
БФ©Р¹Сй¹НТ¨·УгЛйа¡Ф´¤ЗТБаКХВЛТВб¡и¼йТ
б§йБ½Т»Ф´гЛйа»Ф´дЗйаЕз¡¹йНВаБЧиНдБигªй§Т¹а¤ГЧиН§«С¡¼йТ
а¾ЧиНГС¡ЙТКАТ¾ВТ§¡С¹ГСиЗ¢Н§½Т бЕР»йН§¡С¹¡ТГа¡Ф´¡ЕФи¹НСº
â»Ã´µÃǨÊͺÇèÒä´é¶èÒ¹éÓ·Ô駡
БФ©Р¹Сй¹гЛй¶иТВ¹йУ·Ф駵ТБ¤Уб¹Р¹Уг¹¤ЩиБЧНб¹Р¹У¡ТГгªй§Т¹
â»Ã´¶Í´»ÅÑê¡à¤Ã×èͧáÅлԴ¡êÍ¡¹éÓ·Ø¡¤ÃÑé§ËÅѧãªé§Ò¹
è͹¨Ðà»Ô´½Òà¤Ã×èͧ
¤ÇÒÁ»ÅÍ´ÀÑ·ÑèÇä»
¡ÒëèÍÁá«ÁÍØ»¡Ã³ì¨Ðµéͧ¡ÃзÓâ´Â¼Ùé·ÕèÁÕ¤ÇÒÁªÓ¹Ò
БФ©Р¹Сй¹НТ¨¡иНгЛйа¡Ф´НС¹µГТВ
ГйТВбГ§ в»Г´µФ´µиНИЩ¹ВмºГФ¡ТГг¡ЕйºйТ¹¤Ш³
НВиТ´Ц§КТВд¿¿йТв´В¨Сº·ХиКТВд¿ в»Г´¨Сº·ХиµСЗ»ЕСк¡·Ш¡¤ГСй§·Хи´Ц§
½Т»Ф´КиЗ¹·Хиа»з¹¡ГР¨¡НТ¨БХ¤ЗТБГйН¹КЩ§ГРЛЗиТ§в»Гб¡ГБ«С
в»Г´НВиТКСБ¼СККиЗ¹´С§¡ЕиТЗ¢³Р«С¡!
¡·ХигªйНШ³ЛАЩБФКЩ§
¤ЗТБ»ЕН´АСВКУЛГСºа´з¡
а´з¡ж НТ¨дБи·ГТºЗиТа¤ГЧиН§гªйд¿¿йТБХНС¹µГТВНВиТ§дГ г¹¢³Р·Хиа¤ГЧиН§·У§Т¹
в»Г´´ЩбЕа´з¡НВиТ§ГРБС´ГРЗС§ бЕРЛйТБдБигЛйа´з¡аЕи¹¡Сºа¤ГЧиН§гªйд¿¿йТ¹Хй
ЗСК´Ш·Хиа»з¹ºГГ¨ШАС³±м (аªи¹ б¼и¹¾ЕТКµФ¡ в¿Бв¾ЕХКдµГХ¹)
ÍÒ¨à»ç¹ÍѹµÃÒµèÍà´ç¡ä´é â´Â੾ÒÐÍѹµÃÒ¨ҡ¡ÒÃÍØ´µÑ¹Ãкº·Ò§à´
в»Г´а¡зºгЛй¾й¹БЧНа´з¡
в»Г´а¡зºКТГ«С¡¿Н¡·Сй§ЛБ´г¹·Хи»ЕН´АСВ бЕР¾й¹¨Т¡БЧНа´з¡
аБЧиНбВ¡КиЗ¹»ГР¡Нº¢Н§а¤Г ЧиН§ в»Г´µС´КТВд¿
бЕР·УЕТВ»ЕСк¡бЕРКиЗ¹¢Н§КТВд¿·ХиµиННВЩи µС´¡ТГ·У§Т¹¢Н§ЕзН¡½Т»Ф´
а¾ЧиНдБигЛйа´з¡µФ´НВЩиАТВг¹ЛТ¡а¢йТд»аЕи¹
Ô¹ËÒÂã¨!
АТЙТд·В
27
Page 28

¡Ò÷Ô駻¯Ô¡ÙÅ
ЗСК´ШКУЛГСºЛХºЛиН
ЗСК´Ш·ХиБХа¤ГЧиН§ЛБТВ а»з¹ЗСК´Ш·ХиКТБТГ¶¹У¡ЕСºд»гªйгЛБид´й
>PE<=в¾ЕХаН¸ХЕХ¹
>PS<=в¾ЕХКдµГХ¹
>PP<=в¾ЕХв¾Г¾ФЕХ¹
«Ци§ЛБТВ¶Ц§КТБТГ¶¹У¡ЕСºд»гªйгЛБи ЛТ¡¤Ш³·Фй§
г¹¶С§·ХиаЛБТРКБ
¤Уб¹Р¹УКУЛГСº¡ТГ»¡»йН§КФи§бЗ´ЕйНБ
г¹¡ТГ»ГРЛВС´¹йУ ¾ЕС§§Т¹д¿¿йТ бЕРа¾ЧиН¤ШйБ¤ГН§КФи§НЗ´ЕйНБ
аГТ¢Нб¹Р¹Уа¤Ез´ЕСºµиНд»¹Хй:
¤Ш³КТБТГ¶«С¡¼йТ·Хиа»ЧйН¹µТБ»¡µФв´ВдБиµйН§БХ¡ТГ«С¡¤ГСй§бГ¡
а¾ЧиН»ГРЛВС´¼§«С¡¿Н¡ ¹йУ бЕРаЗЕТ (бЕРа¾
à¤Ã×èͧ«Ñ¡¼éҨзӧҹ¤ØéÁ¤èÒÁÒ¡¢Öé¹ ËÒ¡¤Ø³ãÊè¼éÒ¨¹àµçÁ¤ÇÒÁ¨Ø
ЧиНГС¡ЙТКФи§бЗ´ЕйНБ´йЗВ!)
à¤Ã×èͧ
гªйºГФ¡ТГ¢Н§К¶Т¹¡У¨С´¢ВР·Хид´йГСºН¹ШТµа¾ЧиН·Фй§НШ»¡Г³ма¡иТ
в»Г´ГС¡ЙТ¤ЗТБКРНТ´¢Н§ºйТ¹аБЧН§!
¤Ш³КТБТГ¶¢¨С´ГНВа»ЧйН¹µиТ§ж ¡иН¹¡ТГ«С¡г¹а¤ГЧиН§
а¾ЧиНгЛйКТБТГ¶«С¡¼йТд´йв´ВгªйНШ³ЛАЩБФµиУЕ§д´й
ЗС´»ГФБТ³¢Н§¼§«С¡¿Н¡µТБ¤ЗТБ¡ГР´йТ§¢Н§¹йУ ¤ЗТБК¡»Г¡
áÅШӹǹ¼éÒ·Õè¨Ð«Ñ¡
ГТВЕРаНХВ´´йТ¹а·¤¹Ф¤
¢¹Ò´ ¤ТЗТБКЩ§ 85 «Á
¤ÇÒÁ¡ÇéÒ§ 60 cm
Depth 60 cm
¤ÇÒÁ¨ØÊÙ§ÊØ´¼éÒ½éÒ 8,0 ¡¡
¼йТгВКС§а¤ГТРЛм 4,0 ¡¡
¼éÒºÒ§ 3,0 ¡¡
¼éÒ¢¹ÊѵÇì 2,0 ¡¡
¼éÒ«Ñ¡Á×Í2,0 ¡¡
¼йТдЛБ 1,0 ¡¡
¤ЗТБаГзЗг¹¡ТГ»Си¹ЛБТ´ ÊÙ§ÊØ´ 1400 Ãͺµè͹ҷÕ
áç´Ñ¹/¤ÇÒÁ¶Õè¢Í§ä¿¿éÒ 230-240 V/50 Hz
¾Åѧ§Ò¹ä¿¿éÒ·Õèãªé 2200 W
¡Òûéͧ¡Ñ¹¿ÔÇÊìµèÓÊØ´ 10 A
áç´Ñ¹¹éÓµèÓÊØ´500 kPa
ÊÙ§ÊØ´ 800 kPa
НШ»¡Г³м¹Хйа»з¹д»µТБ¢йН¡УЛ¹´¢Н§ EEC ´С§µиНд»¹Хй:
73/23/EEC ³ ЗС¹·Хи 19/02/73 г¹аГЧиН§а¡ХиВЗ¡СºбГ§´С¹д¿¿йТµиУ
89/336/EEC ³ ЗС¹·Хи 03/05/89 г¹аГЧиН§а¡ХиВЗ¡Сº¤ЗТБКТБТГ¶гªй§Т¹ГиЗБ¡СºК¹ТБбБиаЛЕз¡д¿¿йТ
28
Page 29
¡ÒõԴµÑé§
¡ÒùÓÍÍ¡¨Ò¡ºÃèØÀѳ±ì
¹Уб·и§»йН§¡С¹¢³Р¢¹Ки§ бЕРºГГ¨ШАС³±м·Сй§ЛБ´
НН¡¨Т¡а¤ГЧиН§¡иН¹·Хи¨РаГФиБµй¹гªй§Т¹а¤ГЧиН§«С¡¼йТ
¤ÇÃà¡çºá·è§»éͧ¡Ñ¹¢³Ð¢¹Êè§áÅкÃèØÀѳ±ì·Ñé§ËÁ´äÇé
à¾×èÍãªé㹡óշÕèµéͧ¡Òâ¹Êè§à¤Ã×èͧ«Ñ¡¼éÒÍÕ¡
1. гªй»ГРб¨д¢К¡ГЩ·Хи´йТ¹ЛЕС§·Т§´йТ¹ЕиТ§¢Н§а¤ГЧиН§НН¡КН§µСЗ
´Ц§ЛБШ´¾ЕТКµФ¡КН§µСЗНН¡ аН¹а¤ГЧиН§д»´йТ¹ЛЕС§ ГРЗС§НВиТгЛй·СºКТВ·иН¹йУ
гªйб·и§в¿БГН§ГРЛЗиТ§а¤Г
P1129
2. ¹Уб·и§в¾ЕХНХКаµНГмНН¡¨Т¡гµйµСЗа¤ГЧиН§
бЕР»Е´¶Ш§¾ЕТКµФ¡КН§гºНН¡¨Т¡´йТ¹г¹
3. ¤иНВж ´Ц§¶Ш§¾ЕТКµФ¡·Хи´йТ¹«йТВ НН¡·Т§¢ЗТбЕйЗ´Ц§Е§
ЧиН§«С¡¼йТбЕР¾Чй¹
P0001
5. ЗТ§а¤ГЧиН§«С¡¼йТгЛйµС駵ç бЕР¶Н´¹зНµ·ХиаЛЕЧННН¡¨Т¡´йТ¹ЛЕС§а¤ГЧиН§
´Ц§ЛБШ´ВЦ´НН¡
6. ãªéËÁ
Ш´·ХиНВЩиг¹«Н§ºГГ¨Ш¤ЩиБЧНб¹Р¹У¡ТГгªй§Т¹НШ´ГЩ·Сй§ЛБ´
P1128
P0002
¡ÒèѴÇÒ§
µФ´µСй§а¤ГЧиН§Е§º¹¾Чй¹·Хиб¢з§бЕРаГХВº
ГРЗС§гЛйБХ¾Чй¹·ХиГРºТВНТ¡ТИГНºж а¤ГЧиН§г¹¡Г³Х·ХиµФ´µСй§º¹¾ГБ ПЕП
µГЗ¨КНºЗиТдБид´йµСй§а¤ГЧиН§µФ´¡Сº¼¹С§ ЛГЧНа¤ГЧиН§¤ГСЗНЧи¹ж ¤иНВж
»ГСºГР´Сºв´В¡ТГ¢С¹К¡ГЩ¢ТµСй§бºº»ГСºд´йа¢йТЛГЧННН¡ ЛйТБ¹Уб¼и¹¡ГР´Т¹ дБй
ЛГЧНЗСК´Ш·Хи¤ЕйТВ¡С¹¹Хй БТЗТ§гµйа¤ГЧиН§а¾ЧиН»ГСº¾Чй¹·ХиЗТ§гЛйаГХВº
АТЙТд·В
1
2
3
P1123
P1126
4. ¤иНВж ´Ц§¶Ш§¾ЕТКµФ¡·Хи´йТ¹¢ЗТ НН¡·Т§«йТВбЕйЗ´Ц§¢Цй¹
¶Н´½Т¤ГНº´йТ¹ЕиТ§«Ци§НВЩи·Хи¶С§«С¡º¹µСЗа¤ГЧиН§
в´ВЗТ§¢На¡Х
иВЗгЛйНВЩиг¹µУбЛ¹и§µТБ·ХиЕЩ¡ИГ A ГРºШ
áÅéǴѹÊèǹº¹¢Í§½Ò¤Ãͺà¾×èͻԴãËéʹԷ
¢йНКУ¤С:
¤Ш³КТБТГ¶´ЩГТВЕРаНХВ´а¾ФиБаµФБа¡ХиВЗ¡Сº¢йНб¹Р¹Уг¹¡ТГ»ГР¡Нº½Т¤ГНº´йТ¹ЕиТ§д
´йг¹¶Ш§
P1127
P1088
P0021
29
Page 30
ЛйТБµиНКТВВТ§гЛйВТЗНН¡д» ЛТ¡¾ºЗиТКТВВТ§КСй¹д» бЕР¤Ш³дБиНВТ¡ВйТВ¡кН¡¹йУ
¡ГШ³Т«ЧйНКТВгЛБи·ХиВТЗ¡ЗиТа´ФБ КУЛГСºгªй¡Сºа¤ГЧиН§«С¡¼йТв´Ва©¾ТР
ÊèǹÃкÒ¹éÓ
¡ТГ¨С´ЗТ§»ЕТВ·иНГРºТВ¹йУ·Уд´йКТБЗФ¸Х:
а¡ХиВЗдЗй¡Сº¢НºНиТ§ЕйТ§¨Т¹в´Вгªй»ЕН¡¾ЕТКµФ¡·ХигЛйБТ¾ГйНБа¤ГЧиН§
ЛТ¡¨С´ЗТ§´йЗВЗФ¸Х¹Хй ¨РµйН§´ЩгЛйб¹иг¨ЗиТ»ЕТВ·иНдБиЛЕШ´НН¡¢³Ра¤ГЧиН§¶иТВ¹йУ·Фй§
«Ци§·Уд´йв´ВгªйаªЧН¡¼Щ¡дЗй¡Сº¡кН¡¹йУ ЛГЧНВЦ´µ
P0022
µèÍà¢éҡѺÊèǹ·Õèá¡ÍÍ¡¨Ò¡·èÍÃкÒ¹éӢͧÍèÒ§ÅéÒ§¨Ò¹
·иНКиЗ¹·Хи¨РµиНµйН§НВЩиаЛ¹ЧНªиН§ГРºТВ·Хи¾Чй¹
а¾ЧиНгЛйБХГРВРв¤й§§НаЛ¹ЧН¾Чй¹´Ф¹НВиТ§¹йНВ 60 «Б.
µиНа¢йТ¡Сº·иНГРºТВ¹йУв´ВµГ§гЛйНВЩиг¹КиЗ¹·ХиКЩ§ »ГРБТ³ 60 - 90 «Б.
»ЕТВКТВВТ§¹йУ·Фй§¨Рµ
йН§БХ·ХиКУЛГСºгЛйНТ¡ТИ¶иТВа·
в´ВаКй¹¼иТИЩ¹Вм¡ЕТ§АТВг¹¢Н§·иН¨РµйН§гЛи¡ЗиТаКй¹¼иТИЩ¹Вм¡ЕТ§АТВ¹Н¡¢Н§КТВВ
Т§
КТВВТ§¹йУ·Фй§¨РµйН§дБиЛС¡§Н а´Ф¹КТВд»µТБ¾Чй¹
бЕйЗВ¡¢Цй¹а©¾ТРКиЗ¹·ХиНВЩиг¡Ей¨Ш´ГРºТВ¹йУа·иТ¹Сй¹
Ô´¡Ñº¼¹Ñ§
¡ТГµиНКТВд¿
НШ»¡Г³м¹Хйд´йГСº¡ТГНН¡бººгЛй·У§Т¹¡Сº¡ГРбКд¿¿йТ 220-230 вЗЕм· бººа¿Ка´ХВЗ
50 аОФГ쵫
µГЗ¨КНºЗиТГРººд¿¿йТАТВг¹ºйТ¹¢Н§¤Ш³КТБТГ¶ГН§ГСºвЛЕ´КЩ§КШ´¢Н§а¤ГЧиН§ (2.2
kW) бЕРв»Г´¾Ф¨ТГ³Т¡ТГгªйа¤ГЧиН§д¿¿йТª¹Ф´НЧи¹ж ГиЗБ´йЗВ
ãËéµèÍà¤Ã×èͧà¢éҡѺªèͧàÊÕº»ÅÑê¡ä¿·Õèà´Ô¹ÊÒ´ԹäÇé
¼Щй¼ЕФµдБиГСº¼Ф´ªНºµиН¤ЗТБаКХВЛТВбЕР¡ТГºТ´а¨зº
г¹¡Г³Х·ХидБи»¯ФºСµФµТБ ¤УаµЧН¹а¾ЧиН¤ЗТБ»ЕН´АСВ¢йТ§µй¹
ЛТ¡µйН§¡ТГа»ЕХиВ¹КТВд¿
¤ЗГб¨й§гЛйИЩ¹ВмºГФ¡ТГа»з¹¼Щй´Уа¹Ф¹¡ТГгЛйа·иТ¹Сй¹
¢йНКУ¤С!
аБЧиНµФ´µСй§а¤ГЧиН§бЕйЗ¤ЗГгЛйКТВд¿НВЩиг¹µУбЛ¹и§·ХиЛВФºгªй§Т¹д´й§иТВ
P0023
а¾ЧиНгЛйа¤ГЧиН§«С¡¼йТКТБТГ¶·У§Т¹д´йНВиТ§¶Щ¡µйН§
¨РµйН§а¡ХиВЗКТВВТ§¹йУ·Фй§а¢йТ¡Сº¢Н·ХиНВЩи·Т§´йТ¹º¹·Хи´йТ¹ЛЕС§¢Н§µСЗа¤ГЧиН§НВи
Т§¶Щ¡µйН§
30
Page 31

à¤Ã×èͧ«Ñ¡¼éÒà¤Ã×èͧãËÁè¢Í§¤Ø³
а¤ГЧиН§«С¡¼йТа¤ГЧиН§гЛБи¹ХйµФ´µСй§ГРººЛСЗ©Х´гЛБи ªиЗВµНºК¹Н§¤ЗТБµйН§¡ТГ¢Н§ªХЗФµКБСВгЛБид´йНВиТ§КБºЩГ³мбºº ´йЗВ»ГРКФ·¸ФАТ¾г¹¡ТГ«С¡¼йТв´Вгªй¹йУ ¾ЕС§§Т¹
бЕРКТГ«С¡¿Н¡¹йНВ
в»Гб¡ГБ¾ФаИЙКУЛГСº¼йТ«С¡БЧН гªйГРºº«С¡¼йТ·ХиºНººТ§а»з¹¾ФаИЙ а¾ЧиН·У¤ЗТБКРНТ´¼йТа¹ЧйНºТ§¢Н§¤Ш
в»Гб¡ГБ¾ФаИЙКУЛГСº¼йТ¢¹КСµЗм гªйГРºº«С¡¼йТ·ХиºНººТ§а»з¹¾ФаИЙ а¾ЧиН·У¤ЗТБКРНТ´¼йТ¢¹КСµЗм¢Н§¤Ш³´йЗВ¤ЗТБгКиг¨НВиТ§·ХиКШ´
ГРºº·У¤ЗТБаВз¹¹йУНСµв¹БСµФ ¨РЕ´НШ³ЛАЩБФ¢Н§¹йУ·Хигªйг¹¡ТГ«С¡¨Т¡ 95
·Сй§¹Хйа¾ЧиН»йН§¡С¹дБигЛйКТВВТ§¹йУ·Фй§·Хи¼иТ¹¡ТГгªй§Т¹БТ¹Т¹аКХВГЩ»·Г§
°
à»ç¹ 60°C ¡è͹·Õè¨ÐÃкÒ¹éÓÍÍ¡¨Ò¡à¤Ã×èͧ
³´йЗВ¤ЗТБгКиг¨НВиТ§·ХиКШ´
¤УН¸ФºТВКУЛГСºНШ»¡Г³м
1. ªиН§гКиКТГ«С¡¿Н¡
2. ἧ¤Çº¤ØÁ
3. ´éÒÁ¨Ñº¢Í§½Ò»Ô´¶Ñ§«Ñ¡
4. »СкБГРºТВ¹йУ
5. ¢ÒµÑ駷Õè»ÃѺä´é
АТЙТд·В
ªиН§гКиКТГ«С¡¿Н¡
«Ñ¡¤ÃÑé§áá
«Ñ¡»¡µÔ
¹éÓÂÒ»ÃѺ¼éÒ¹ØèÁ ŧá»é§
PIC 001
P1206
31
Page 32

¡ÒÃãªé§Ò¹
ἧ¤Çº¤ØÁ
1. ªиН§гКиКТГ«С¡¿Н¡
2. ÅÙ¡ºÔ´àÅ×Í¡â»Ãá¡ÃÁ
ÅÙ¡ºÔ´àÅ×Í¡â»Ãá¡ÃÁ¨Ðáºè§ÍÍ¡à»ç¹ 4 Êèǹ:
1. ¼éÒ½éÒ (ÊèǹÊÕà¢ÕÂÇ)
2. ¼йТгВКС§а¤ГТРЛм ¼йТºТ§ ¼йТ«С¡БЧН ¼йТ¢¹КСµЗм ¼йТдЛБ бЕР
¼йТЛиБ (КиЗ¹КХ¹йУа§Ф¹)
3. ÅéÒ§¹éÓ ¶èÒ¹éÓ·Ôé§ »Ñè¹ËÁÒ´ áÅлÑè¹áºº¹ØèÁ¹ÇÅ (ÊèǹÊÕà·Ò)
4. ˹èǤÇÒÁ¨Ó·Õè 1 ˹èǤÇÒÁ¨Ó·Õè 2 (ÊèǹÊÕà·Ò)
Щ¡ºФ´КТБТГ¶ЛБШ¹д´й·Сй§г¹·ФИ·Т§µТБа¢зБ¹ТМФ¡Т бЕР
Å
·З¹а¢зБ¹ТМФ¡Т µУбЛ¹и§ cotton Eco
¨Ра»з¹в»Гб¡ГБ»ГРЛВС´¾ЕС§§Т¹КУЛГСº«С¡¼йТ½йТВ бЕРд»·Хи OFF
а¾ЧиНµСй§в»Гб¡ГБгЛБи ЛГЧН»Ф´КЗФµªма¤ГЧиН§ аБЧиНКФй¹КШ´в»Гб¡ГБ¡ТГ·У§Т¹
ЕЩ¡ºФ´аЕЧН¡в»Гб¡ГБ¨РµйН§ЛБШ¹¡ЕСºБТ·ХиµУбЛ¹и§ OFF (»Ф´) а¾ЧиН»Ф´а¤ГЧиН§
¢йН¤ЗГГРЗ
С§ !
ЛТ¡ЛБШ¹ЕЩ¡ºФ´аЕЧН¡в»Гб¡ГБд»ВС§в»Гб¡ГБНЧи¹ГРЛЗиТ§а¤ГЧиН§¡УЕС§·У§Т¹
¨РБХ¢йН¤ЗТБаµЧН¹»ГТ¡¯¢Цй¹¹Т¹ 4 ЗФ¹Т·Хº¹Л¹йТ¨Н ¾ГйНБКи§аКХВ§аµЧН¹ 3 ¤ГСй§
ЗФ¸Х¤Зº¤ШБ¡ТГ·У§Т¹бºº§иТВж
¹ХйªиЗВгЛйа¤ГЧиН§гªй§Т¹§иТВа¹ЧиН§¨Т¡БХЛ¹йТ¨Н·ХиµНºК¹Н§µиН¡ТГ·У§Т¹
¤УЗиТµНºК¹Н§µиН¡ТГ·У§Т¹ЛБТВ¶Ц§Л¹йТ¨Н¢Н§а¤ГЧиН§«С¡¼йТ¨Ра»ЕХиВ¹д»а¾ЧиНКР·йН¹
гЛйаЛз¹бµиЕР¢Сй¹µН¹г¹¡ТГ·У§Т¹·Хи¤Ш³»йН¹а¢йТа¤ГЧиН§
·Сй§¹Хйа¾ЧиНгЛйб¹иг¨ЗиТЗиТд´й
µС駤иТ¡ТГ·У§Т¹·ХиаЛБТРКБ
¤Ш³КТБТГ¶´Щ¤иТ·ХиµСй§НВЩиаБЧиНг´¡зд´йº¹б¼§бК´§¢йНБЩЕ бЕРг¹б¶ЗбК´§µСЗаЕЧН¡
Change
08.30
10.55
Exit
23
1
Cotton
Cycle and at
95°C 1400
Temp. Spin
4
Options
1. б¼§¢йНБЩЕ¨РбК´§¤иТ·Хи¡УЕС§µСй§НВЩи
2. ¹ÒÌÔ¡ÒáÊ´§àÇÅһѨ¨ØºÑ¹
3. аЗЕТКФй¹КШ´ГНº¡ТГ«С¡
4. ¡ТГаЕЧН¡бК´§НШ³ЛАЩБФ ¤ЗТБаГзЗг¹¡ТГ»Си¹ЛБТ´
µСЗаЕЧН¡ бЕР¿С§¡мªСи¹¾Ф
àÈÉ
4 »ШиБНШ³ЛАЩБФ Temp
¡´»ШиБ¹Хй«йУж а¾ЧиНа¾ФиБЛГЧНЕ´НШ³ЛАЩБФ
ЛТ¡¤Ш³µйН§¡ТГ«С¡¼йТ·ХиНШ³ЛАЩБФНЧи¹¹Н¡аЛ¹ЧНд»¨Т¡·Хиа¤ГЧиН§¡УЛ¹´дЗй
НШ³ЛАЩБФКЩ§КШ´КУЛГСº¼йТ½йТВ¤ЧН 95
КУЛГСº¼йТа¹ЧйНºТ§ ¼йТ¢¹КСµЗм бЕР¼йТ«С¡БЧН¤ЧН 40
Miniprogramme ¤ЧН 30
аБЧиН¡´»ШиБНШ³ЛАЩБФ Temp. ¨РБХ¢йН¤ЗТБ»ГТ¡¯¢Цй¹г¹б¶З·ХиКН§¢Н§
°
C КУЛГСº¼йТгВКС§а¤ГТРЛм¤ЧН 60°C
°
C КУЛГСº¼йТдЛБбЕР
°
C КиЗ¹ 0 а»з¹¡ТГ«С¡г¹¹йУаВз¹
3. ˹éÒ¨ÍáÊ´§¼Å
Л¹йТ¨НгªйКУЛГСºµСй§¿С§¡мªСи¹¨У¹З¹БТ¡ бЕРГЗБ¿С§¡мªСи¹а¢йТ´йЗВ¡С¹ в´Вгªй
Н§¤м»ГР¡Нºг¹¡ТГ¤Зº¤ШБдБиБТ¡ (1 ЕЩ¡ºФ´аЕЧН¡в»Гб¡ГБбЕР 6 »ШиБ)
32
Page 33

˹éÒ¨Í (á·¹·Õè ÊÔé¹ÊØ´Ãͺ¡Òëѡ·Õè)
·ХиБШБ¢Н§б¶З·ХиКТБ¨Р»ГТ¡¯¢йН¤ЗТБГРºШНШ³ЛАЩБФ·ХиаЕЧН¡
COTTON
MAX 95°C
60°C
Temp. Spin
Options
Change
08.30
10.55
Exit
¶èÒ¹éÓ·Ôé§
аБЧиН¨Р¶иТВ¹йУ·Фй§гЛйаЕЧН¡в»Гб¡ГБ Drain (¶иТВ¹йУ·Фй§) ´йЗВЕЩ¡ºФ´аЕЧН¡в»Гб¡ГБ
¨Т¡¹Сй¹¡´»ШиБ Start/Add clothes (аГФиБ¡ТГ·У§Т¹/а¾ФиБ¼йТ)
»Ñè¹ËÁÒ´
аБЧиН¨Р»Си¹ЛБТ´гЛйаЕЧН¡в»Гб¡ГБ»Си¹ЛБТ´ЛГЧН»Си¹ЛБТ´НВиТ§¹ШиБ¹ЗЕ
´йЗВЕЩ¡ºФ´аЕЧН¡в»Гб¡ГБ аЕЧН¡¤ЗТБаГзЗг¹¡ТГ»Си¹ЛБТ´´йЗВ»Ши
Á Spin (»Ñè¹ËÁÒ´)
¨Т¡¹Сй¹¡´»ШиБ Start/Add clothes (аГФиБ¡ТГ·У§Т¹/а¾ФиБ¼йТ)
¢éÍÊÓ¤Ñ!
¡è͹àÅ×Í¡â»Ãá¡ÃÁ Drain (¶èÒ¹éÓ·Ôé§) Spin (»Ñè¹ËÁÒ´) ËÃ×Í Delicate Spin
(»Ñè¹ËÁÒ´ÍÂèÒ§¹ØèÁ¹ÇÅ) ¨ÐµéͧËÁعÅÙ¡ºÔ´àÅ×Í¡â»Ãá¡ÃÁä»ÂѧµÓáË¹è§ O (»Ô´)
5 »ШиБ¤ЗТБаГзЗг¹¡ТГ»Си¹ЛБТ´ Spin
¡´»ШиБ¹Хй«йУж а¾ЧиНа»ЕХиВ¹¤ЗТБаГзЗг¹¡ТГ»Си¹ЛБТ´
ЛТ¡¤Ш³µйН§¡ТГ»Си¹ЛБТ´¼йТ·Хи¤ЗТБаГзЗНЧи¹¹Н¡аЛ¹ЧНд»¨Т¡·Хиа¤ГЧиН§¡УЛ¹´дЗй
COTTON
MAX 1400
1400
Temp. Spin
Options
¤ЗТБаГзЗКЩ§КШ´¤ЧН:
КУЛГСº¼йТ½йТВ: 1400 ГНºµиН¹Т·Х
КУЛГСº¼йТ¢¹КСµЗм бЕР¼йТ«С¡БЧН: 700 ГНºµиН¹Т·Х
КУЛГСº¼йТºТ§ ¼йТдЛБ ¼йТЛиБ: 700 Ãͺµè͹ҷÕ
àÁ×è
Н¡´»ШиБ¤ЗТБаГзЗг¹¡ТГ»Си¹ЛБТ´ ¤Ш³¨РаЕЧН¡µСЗаЕЧН¡ No Spin (дБи»Си¹ЛБТ´) 0
Rinse Hold (бªи¼йТ) бЕР Night cycle (ГНº«С¡¡ЕТ§¤Ч¹д´й)
µСЗаЕЧН¡ No spin (дБи»Си¹ЛБТ´) 0 ¨РВ¡аЕФ¡¢Сй¹µН¹¡ТГ»Си¹ЛБТ´·Сй§ЛБ´
бЕРа¾ФиБГНº¡ТГЕйТ§¹йУ¢Цй¹КУЛГСº¼йТ½йТВбЕР¼йТгВКС§а¤ГТРЛм
µСЗаЕЧН¡ Rinse hold (бªи¼йТ) : аБЧиНаЕЧН¡µСЗаЕЧН¡¹Хй а¤ГЧиН§¨РдБи
а¾ЧиНдБигЛй¼йТБХГНВВСºВи¹
µСЗаЕЧН¡ Night cycle (ГНº¡ТГ«С¡¡ЕТ§¤Ч¹) : аБЧиНаЕЧН¡µСЗаЕЧН¡¹Хй
а¤ГЧиН§¨РдБи¶иТВ¹йУКШ´·йТВ·Фй§ а¾ЧиНдБигЛй¼йТБХГНВВСºВи¹
аБЧиНВ¡аЕФ¡¢Сй¹µН¹¡ТГ»Си¹ЛБТ´·Сй§ЛБ´ ГНº¡ТГ«С¡¨РБХаКХВ§а§
бЕРКТБТГ¶аЕЧН¡«С¡µН¹¡ЕТ§¤Ч¹ ЛГЧНг¹ªиЗ§·Хи¤иТд¿¶Щ¡д´й
г¹в»Гб¡ГБ«С¡¼йТ½йТВбЕР¼йТгВКС§а¤ГТРЛм а¤ГЧиН§¨Ргªй¹йУБТ¡¢Цй¹г¹¡ТГЕйТ§¹йУа»ЕиТ
ЛТ¡µйН§¡ТГ«С¡гЛй¤ГºГНºв»Г´аЕЧН¡в»Гб¡ГБг´в»Гб¡ГБЛ¹Ци§´С§µиНд»¹Хй:
Change
08.30
10.55
Exit
¶èÒ¹éÓÊØ´·éÒ·Ôé§
ÕºÁÒ¡
6»ШиБµСЗаЕЧН¡, А»ЕХиВ¹ бЕР ННН¡¨Т¡¡ТГ·У§Т¹
»ШиБµСЗаЕЧН¡ªиЗВгЛй¤Ш³аЕЧиН¹д»ВС§дН¤Н¹µСЗаЕЧН¡д´й
Extra Rinse
No 10.55
Temp. Spin
»ШиБа»ЕХиВ¹ªиЗВгЛй¤Ш³аЕЧН¡/а»ЕХиВ¹К¶Т¹Р¢Н§дН¤Н¹µиТ§ж д´й
Extra Rinse
Yes 10.55
Temp. Spin
»ШиБНН¡¨Т¡¡ТГ·У§Т¹ªиЗВгЛй¤Ш³¡ЕСºд»ВС§в»Гб¡ГБ·ХиаЕЧН¡дЗй¡иН¹Л¹йТд´й
COTTON
CYCLE END AT
60°C 1400
Temp. Spin
Options
Options
Options
Change
Change
Change
Exit
Exit
08.30
10.55
Exit
АТЙТд·В
33
Page 34

¤Ш³КТБТГ¶ГЗБ¿С§¡мªСи¹µиТ§ж а¢йТ´йЗВ¡С¹д´й¢Цй¹НВЩи¡Сºв»Гб¡ГБ ¿С§¡мªСи¹µиТ§ж
КТБТГ¶аЕЧН¡д´й ЛЕС§¨Т¡аЕЧН¡в»Гб¡ГБ·ХиµйН§¡ТГбЕйЗ бЕР¡иН¹¡´»ШиБ Start/Add
clothes (аГФиБ¡ТГ·У§Т¹/а¾ФиБ¼йТ)
´йЗВ¡ТГ¡´»ШиБ Options (µСЗаЕЧН¡)
дН¤Н¹КСЕС¡Й³м·Сй§ЛБ´·ХиН¹ШТµгЛйгªйГиЗБ¡Сºв»Гб¡ГБ·
ХиаЕЧН¡д´й
¨Р»ГТ¡¯¢Цй¹º¹Л¹йТ¨Н (Н¹ШТµгЛйгªйГиЗБ¡Сºв»Гб¡ГБ·ХиаЕЧН¡д´й)
µСЗаЕЧН¡бГ¡ ¨РаГФиБ¡ГР¾ГФº ªЧиНбЕРК¶Т¹Р¢Н§µСЗаЕЧН¡¹Сй¹¨Р»ГТ¡¯¢Цй¹º¹Л¹йТ¨Н
ЛТ¡¤Ш³µйН§¡ТГа»ЕХиВ¹К¶Т¹Р¢Н§µСЗаЕЧН¡ гЛй¡´»ШиБ Change (а»ЕХиВ¹)
¨РБХаКй¹»ГТ¡¯¢Цй¹гµйдН¤Н¹·ХиаЕЧН¡ ºН¡гЛй·ГТºЗиТµСй§д´й¤иТµС
ЗаЕЧН¡¹Сй¹
г¹¡ТГаЕЧН¡µСЗаЕЧН¡НЧи¹ гЛй¡´»ШиБ Options (µСЗаЕЧН¡)
НХ¡¤ГСй§бЕйЗ´Уа¹Ф¹¡ТГµТБ¢Сй¹µН¹¢йТ§µй¹
аБЧиНаЕЧН¡µСЗаЕЧН¡д´й¤ГºбЕйЗ гЛй¡´»ШиБ Exit (НН¡¨Т¡¡ТГ·У§Т¹)
дН¤Н¹·ХиаЕЧН¡¨РВС§¤§»ГТ¡¯НВЩиº¹Л¹йТ¨Н
ЛБТВаЛµШ: г¹¡ТГа»ЕХиВ¹µСЗаЕЧН¡·Хид´йаЕЧН¡д»бЕйЗ
гЛй·УµТБ¢Сй¹µН¹¡иН¹Л¹
éÒ¹Ñ鹫éÓÍÕ¡¤ÃÑé§
¢йНКУ¤С! ГРЛЗиТ§аЕЧН¡µСЗаЕЧН¡НВЩи ЛТ¡¤Ш³¡´»ШиБ НШ³ЛАЩБФ Temp., Spin (»Си¹ЛБТ´)
ЛГЧН Start/Add clothes (аГФиБ¡ТГ·У§Т¹/а¾ФиБ¼йТ) а¤ГЧиН§¨Ра»Ф´гªй¿С§¡мªСи¹¹Сй¹
ЕйТ§¹йУа¾ФиБ: µСЗаЕЧН¡¹ХйКТБТГ¶аЕЧН¡д´й¡Сº·Ш¡в»Гб¡ГБ
¡àÇé¹â»Ãá¡ÃÁ¼éÒ¢¹ÊѵÇì
/¼йТ«С¡БЧН бЕР miniprogramme а¤ГЧиН§¨РЕйТ§¹йУа¾ФиБНХ¡ 2
ГНºКУЛГСº¼йТ½йТВ бЕР 1 ГНºКУЛГСº¼йТгВКС§а¤ГТРЛм ¼йТºТ§ бЕР¼йТдЛБ
¢Нб¹Р¹УгЛйаЕЧН¡µСЗаЕЧН¡¹ХйКУЛГСº¼Щй·Хиб¾й¼§«С¡¿Н¡ бЕРНВЩиг¹¾Чй¹·Хи·Хи¹йУ¡ГР´йТ§
¡ТГ»ГРЛВС´аЗЕТ«С¡: µСЗаЕЧН¡¹ХйКТБТГ¶аЕЧН¡д´й¡Сº¼йТ½йТВ ¼й
ТгВКС§а¤ГТРЛ м
ЛГЧН¼йТа¹ЧйНºТ§К¡»Г¡¹йНВ а¾ЧиНгЛйв»Гб¡ГБ«С¡¼йТд´йКРНТ´г¹аЗЕТ·ХиКСй¹Е§
аЗЕТ«С¡¨РЕ´Е§µТБª¹Ф´¢Н§а¹ЧйН¼йТ бЕРНШ³ЛАЩБФ·ХиаЕЧН¡ аБЧиНаЕЧН¡µСЗаЕЧН¡¹Хй
¨РБХ¢йН¤ЗТБ Short ЛГЧН Very Short »ГТ¡¯¢Цй¹º¹Л¹йТ¨Н
Л¹иЗ§аЗЕТаГФиБ¡ТГ·У§Т¹:
µСЗаЕЧН¡¹ХйªиЗВгЛйЛ¹иЗ§аЗЕТаГФиБв»Гб¡ГБ¡ТГ«С¡д´й
µÑé§áµè 30 ¹Ò·Õ - 60 ¹Ò·Õ - 90 ¹Ò·Õ 2
ªСиЗвБ§ бЕР 1 ªСиЗвБ§ ¨¹¶Ц§ 20 ªСиЗвБ§ аЗЕТЛ¹иЗ§·ХиаЕЧН¡¨Р»ГТ¡¯º¹Л¹йТ¨Н
¤Ш³КТБТГ¶В¡аЕФ¡Л¹иЗ§аЗЕТаГФиБ·У§Т¹аБЧиНг´¡зд´й ¡иН¹¨Р¡´»ШиБ START/PAUSE
(аГФиБ¡ТГ·У§Т¹/ЛВШ´ªСиЗ¤ГТЗ) ЛТ¡¤Ш³¡´»ШиБ START/PAUSE
(аГФиБ¡ТГ·У§Т¹/ЛВШ´ªСиЗ¤ГТЗ) д»бЕйЗ бµиµйН§¡ТГВ¡аЕФ¡¡ТГЛ¹иЗ§аЗЕТ
гЛй·УµТБ¢Сй¹µН¹´С§¹Хй:
1. µÑé§à¤Ã×èͧ«Ñ¡¼éÒä»·Õè PAUSE ´éÇ¡Òá´»ØèÁ START/PAUSE
2. В¡аЕФ¡¡ТГаЕЧН¡µСЗаЕЧН¡Delay start (Л¹иЗ§аЗЕТаГФиБ·У§Т¹)
в´В¡ТГа»ЕХиВ¹К¶Т¹Р
3. ¡´»ШиБ START/PAUSE а¾ЧиНаГФиБв»Гб¡ГБ
¢йНКУ¤С!
¡ТГЛ¹иЗ§аЗЕТ·ХиаЕЧН¡КТБТГ¶а»ЕХиВ¹б»Е§д´йЛЕС§¨Т¡аЕЧН¡в»Гб¡ГБ¡ТГ«С¡гЛБиа·иТ¹Сй¹
½Т»Ф´¶С§«С¡¨РЕзН¤µЕН´ªиЗ§·ХиЛ¹иЗ§аЗЕТдЗй
ЛТ¡µйН§¡ТГа»Ф´½Т¶С§«С¡ ¤Ш³µйН§µСй§а¤ГЧиН§«С¡¼йТд»·Хи PAUSE ¡иН¹´йЗВ¡ТГ¡´»ШиБ
START/PAUSE ЛЕС§¨Т¡»Ф´½Т¶С§«С
¡бЕйЗ гЛй¡´»ШиБ START/PAUSE гЛБиНХ¡¤ГСй§
µСЗаЕЧН¡ Delay Start дБиКТБТГ¶аЕЧН¡д´й¡Сºв»Гб¡ГБ SPIN/GENTLE SPIN бЕР
DRAIN
¡ТГ«С¡¤ГСй§бГ¡: аЕЧН¡µСЗаЕЧН¡¹ХйЛТ¡¤Ш³µйН§¡ТГгЛй¼йТ«С¡¤ГСй§бГ¡¡иН¹¨Р«С¡»¡µФ
(дБиКТБТГ¶гªйд´й¡Сºв»Гб¡ГБ«С¡¼йТ¢¹КСµЗм ¼йТ«С¡БЧН miniprogram бЕР¼йТдЛБ)
¡ТГ«С¡¤ГСй§бГ¡¨РКФй¹КШ´Е§´йЗВ¡ТГ»С
и¹ЛБТ´КСй¹ж ·Хи¤ЗТБаГзЗ 650
ГНºµиН¹Т·Хг¹в»Гб¡ГБКУЛГСº¼йТ½йТВ бЕР¼йТгВКС§а¤ГТРЛм
КиЗ¹г¹в»Гб¡ГБКУЛГСº¼йТºТ§а¤ГЧиН§¨Р¶иТВ¹йУ·Фй§а·иТ¹Сй¹
INTENSIVE: КУЛГСº¼йТК¡»Г¡БТ¡
µСЗаЕЧН¡¹ХйКТБТГ¶аЕЧН¡д´йа©¾ТР¡Сº¼йТ½йТВбЕР¼йТгВКС§а¤ГТРЛма ·иТ¹Сй¹
аЗЕТ«С¡¨Ра¾ФиБ¢Цй¹НШ³ЛАЩБФбЕРª¹Ф´¢Н§а¹Чй
ͼéÒ
EASY IRON: аБЧиНаЕЧН¡»ШиБ¹Хйа¤ГЧиН§¨Р«С¡бЕР»Си¹ЛБТ´НВиТ§¹ШиБ¹ЗЕ
а¾ЧиНдБигЛйа¡Ф´ГНВВСº ·УгЛй¼йТГХ´д´й§иТВ¢Цй¹ ¹Н¡¨Т¡¹Сй¹а¤ГЧиН§¨РЕйТ§¹йУ 6
ГНºб·¹·Хи¨Ра»з¹ 3 ГНºКУЛГСº¼йТ½йТВ бЕР 4 ГНºб·¹·Хи¨Ра»з¹ 3
ГНºКУЛГСº¼йТгВКС§а¤ГТРЛм ¿С§¡мªСи¹¹ХйКТБТГ¶гªй¡Сº¼йТ½йТВбЕР¼йТгВКС§а¤ГТРЛмд´й
¶йТаЕЧН¡µСЗаЕЧН¡¹Хй¡Сºв»Гб¡ГБ«С¡¼йТ½йТВ
¤ЗТБаГзЗг¹¡ТГ»Си¹ЛБТ´¨РЕ´Е§аН§в´ВНСµв¹БСµФа»з¹ 1000 ГНºµиН¹Т·Х
Delay Start
No 10.55
Change
Temp. Spin
Options
Exit
Delay Start
Start in 30 min 11.25
Temp. Spin
Options
Change
Exit
¤Ш³µйН§аЕЧН¡µСЗаЕЧН¡¹ХйЛЕС§¨Т¡µСй§в»Гб¡ГБбЕйЗ бЕР¡иН¹·Хи¨Р¡´»ШиБ Start/Add clothes
(аГФиБ¡ТГ·У§Т¹/а¾ФиБ¼йТ)
ECONOMY: аЕЧН¡µСЗаЕЧН¡¹Хй¡Сº¼йТгВКС§а¤ГТРЛм·ХиК¡»Г¡¹йНВЛГЧНК¡»Г¡¸ГГБ´Т
´йЗВНШ³ЛАЩБФ 40
°C НШ³ЛАЩБФг¹¡ТГ«С¡¨РЕ´Е§а»з¹ 42°C
40
°C ЛГЧНКЩ§¡ЗиТ¹Хй аЗЕТ¡ТГ«С¡¨Р¹Т¹¢Цй¹ ЛТ¡¤Ш³аЕЧН¡ 60°C-50°C-
аБ¹Щ:
µСЗаЕЧН¡аБ¹Щ¨Ргªйа¾ЧиНаЕЧН¡µС駤иТ¾Чй¹°Т¹µиТ§ж
в´ВдБи¡ГР·ºµиНв»Гб¡ГБ«С¡г´в´Ва©¾ТР
¤иТ¾Чй¹°Т¹аЛЕиТ¹Хй¨РВС§¤§гªй§Т¹µиНд»¨¹¡ЗиТ¨РБХ¡ТГВ¡аЕФ¡/а»ЕХиВ¹б»Е§
г¹¡ТГаЕЧиН¹¤иТ·ХиµСй§дЗйг¹аБ¹ЩµиТ§ж гЛйгªй»ШиБ Options
г¹¡ТГа»ЕХиВ¹б»Е§/ВЧ¹ВС¹¤иТ·ХиаЕЧН¡ гЛ
éãªé»ØèÁ Change
34
Page 35

˹èǤÇÒÁ¨Ó
¡ТГ¡УЛ¹´¤иТг¹в»Гб¡ГБ·ХигªйºиНВКТБТГ¶а¡зººС¹·Ц¡д´й (аªи¹ ¼йТ½йТВ, 95
°C, 1200
ГНºµиН¹Т·Х, ¾ГйНБ¿С§¡мªСи¹»ГРЛВС´аЗЕТ) в´ВКТБТГ¶¨С´а¡зºЕ§Л¹иЗВ¤ЗТБ¨Уд´й 3
ГТВ¡ТГ в»Гб¡ГБ·Хиа¡зººС¹·Ц¡дЗйКТБТГ¶аЕЧН¡гªйд´йаЛБЧН¹¡Сºв»Гб¡ГБ«С¡НЧи¹ж
´йЗВЕЩ¡ºФ´аЕЧН¡в»Гб¡ГБ
µСЗНВиТ§: ¼йТ½йТВ, 95
°C, 1200 ГНºµиН¹Т·Х, ¾ГйНБ¿С§¡мªСи¹»ГРЛВС´аЗЕТ
1. àÅ×Í¡Ãͺ¡ÒëѡáÅÐâ»Ãá¡ÃÁ
µСЗНВиТ§:
1. »йН¹µСЗаЕЧН¡аБ¹ЩбЕйЗаЕЧН¡µС駤иТаКХВ§
Sound
Normal
Temp. Spin
Options
Change
Exit
Cotton
Cycle end at
60°C 1400
Temp. Spin
Options
Change
08.30
10.55
Exit
2. »йН¹µСЗаЕЧН¡аБ¹ЩбЕйЗаЕЧН¡Л¹Ци§г¹µУбЛ¹и§¢Н§Л¹иЗВ¤ЗТБ¨У ¨РБХ¢йН¤ЗТБ
Store programme »ГТ¡¯¢Цй¹º¹Л¹йТ¨Н
A
Setup
Temp. Spin
Options
A
Change
Exit
B
Memory 1
Store programme?
Temp. Spin
Options
Change
Exit
B
3. ËÒ¡µéͧ¡ÒÃà¡çºÅ§Ë¹èǤÇÒÁ¨Ó ãËé¡´»ØèÁ Change ¨ÐÁÕ¢éͤÇÒÁ Stored
»ÃÒ¡¯¢Ö鹺¹Ë¹éÒ¨Í
Programme Stored
Change
Temp. Spin
Options
Exit
2. гªй»ШиБ Change а¾ЧиНаЕЧН¡ГР´СºаКХВ§·Хи
Sound
Low or No Sound
Change
Temp. Spin
Options
Exit
µéͧ¡ÒÃ
ÅéÒ§¹éÓ +
а¤ГЧиН§«С¡¼йТ¨РµСй§БТгЛйгªй¹йУ»ГРЛВС´·ХиКШ´ КУЛГСº¼Щй·ХиБХвГ¤АЩБФб¾й
бЕРНВЩиг¹¾Чй¹·Хи·Хи¹йУ¡ГР´йТ§БТ¡ж НТ¨µйН§гªй¹йУа¾ФиБг¹¡ТГЕйТ§¹йУа»ЕиТ аБЧиН¤Ш³аЕЧН¡
RINSE + а¤ГЧиН§¨РЕйТ§¹йУа¾ФиБНХ¡ 2 ГНºКУЛГСº¼
йТ½йТВбЕРНХ¡ 1
ГНºКУЛГСº¼йТгВКС§а¤ГТРЛм ¼йТºТ§ бЕР¼йТдЛБ ЛТ¡аЕЧН¡ RINSE + ¨РБХ
»ГТ¡¯г¹б¶З¢Н§µСЗаЕЧН¡
Extra Rinse
No 10.55
Temp. Spin
Options
Change
Exit
Extra Rinse
Yes 10.55
Temp. Spin
Options
Change
Exit
АТЙТд·В
㹡ÒÃà»ÅÕè¹á»Å§â»Ãá¡ÃÁ·Õèà¡çºÅ§Ë¹èǤÇÒÁ¨Ó
ãËé·ÓµÒÁ¢Ñ鹵͹à´ÔÁ«éÓÍÕ¡¤ÃÑ駵Ñé
§áµèµé¹
аКХВ§
¡ТГµСй§аКХВ§ªиЗВгЛй¤Ш³а»ЕХиВ¹б»Е§ГР´СºаКХВ§¢Н§а¤ГЧиН§д´й ¤Ш³КТБТГ¶аЕЧН¡ГР´СºµиТ§ж
д´й´С§¹Хй: µиУ дБиБХаКХВ§бЕРаКХВ§»¡µФ
35
Page 36

АТЙТ
¤Ш³КТБТГ¶а»ЕХиВ¹АТЙТд´йЛТ¡µйН§¡ТГбК´§АТЙТНЧи¹º¹Л¹йТ¨Н
µСЗНВиТ§:
1. »йН¹µСЗаЕЧН¡аБ¹ЩбЕйЗаЕЧН¡µС駤иТАТЙТ
Language
ENGLISH
Change
Temp. Spin
Options
Exit
¤ЗТБ¤БªС´
¡ТГµС駤иТ¤ЗТБ¤БªС´ªиЗВгЛй¤Ш³а»ЕХиВ¹б»Е§ЕС¡Й³РбК§º¹Л¹йТ¨Нд´й
µСЗНВиТ§:
1. »йН¹µСЗаЕЧН¡аБ¹ЩбЕйЗаЕЧН¡µС駤иТ¤ЗТБ¤БªС´
2. гªй»ШиБ Change а¾ЧиНаЕЧН¡ГР´Сº¤ЗТБ¤БªС´·ХиµйН§¡ТГ
Contrast
Temp. Spin
Options
Change
Exit
Contrast
Temp. Spin
Options
Change
Exit
2. гªй»ШиБ Change а¾ЧиНаЕЧН¡АТЙТ·ХиµйН§¡ТГ
Sprache
DEUTCH
Temp. Spin
Options
Change
Exit
A
Einstellungen
Temp. Spin
Options
Change
¹ТМФ¡Т
¡ТГµСй§¹ТМФ¡ТªиЗВгЛй¤Ш³а»ЕХиВ¹б»Е§/µСй§аЗЕТ»С¨¨ШºС¹д´й
¤ЗГµСй§аЗЕТгЛйµГ§НВЩиаКБНа¹ЧиН§¨Т¡аЗЕТКФй¹КШ´ГНº¡ТГ«
С¡¨Р¤У¹З³¨Т¡аЗЕТ¢Н§¹Т
МФ¡Т·ХиµСй§дЗй
µСЗНВиТ§:
1. »йН¹µСЗаЕЧН¡аБ¹ЩбЕйЗаЕЧН¡µС駤иТ¹ТМФ¡Т
2. ´éÇ¡Òá´»ØèÁ Change ÊÑé¹æ/à¾Õ§¤ÃÑé§à´ÕÂÇ àÇÅÒ¨Ðà»ÅÕè¹令ÃÑé§ÅйҷÕ
´éÇ¡Òá´»ØèÁ Change ¤éÒ§äÇé àÇÅÒ¨Ðà»ÅÕè¹令ÃÑé§ÅÐ 10 ¹Ò·Õ
A
B
¤ЗТБКЗиТ§
¡ТГµС駤иТ¤ЗТБКЗиТ§ªиЗВгЛй¤Ш³а»ЕХиВ¹б»Е§¤ЗТБа¢йБ¢Н§бК§·Хи¾Чй¹ЛЕС§¢Н§Л¹й
Ò¨Íä´é
µСЗНВиТ§:
1. »йН¹µСЗаЕЧН¡аБ¹ЩбЕйЗаЕЧН¡µС駤иТ¤ЗТБКЗиТ§
2. гªй»ШиБ Change а¾ЧиНµСй§ГР´Сº¤ЗТБКЗиТ§
Brightness
Temp. Spin
Options
Change
Exit
A
Exit
ЛБТВаЛµШ:
Brightness
Temp. Spin
Options
Change
B
Exit
аБЧиНКФй¹КШ´в»Гб¡ГБ ЛТ¡дБиБХ¡ТГ¡´»ШиБг´ бК§º¹¾Чй¹ЛЕС§¨Р´Сºд»ЛЕС§¨Т¡»ГРБТ³
B
10 ¹Ò·Õ
A
Clock
Set Time
Temp. Spin
Options
A
Change
14.45
B
Clock
Set Time
Exit
Temp. Spin
Options
Change
14.46
Exit
B
36
Page 37

7 »ШиБ Start/Add Clothes (аГФиБ¡ТГ·У§Т¹/а¾ФиБ¼йТ)
»ШиБ¹ХйБХЛ¹йТ·Хи 2 »ГР¡ТГ:
аГФиБ¡ТГ·У§Т¹: ЛЕС§¨Т¡аЕЧН¡в»Гб¡ГБ бЕРµСЗаЕЧН¡·ХиµйН§¡ТГбЕйЗ
гЛй¡´»ШиБ¹Хйа¾ЧиН аГФиБ¡ТГ·У§Т¹¢Н§а¤ГЧиН§«С¡¼йТ д¿·ХиНВЩиµФ´¡Сº
»ШиБ¹Хй¨РЛВШ´¡ГР¾ГФºбЕРµФ´¤йТ§НВЩи
ЛТ¡¤Ш³аЕЧН¡µСЗаЕЧН¡Л¹иЗ§аЗЕТ а¤ГЧиН§¨РаГФиБ¹СºаЗЕТ¶НВЛЕ
а¾ФиБ¼йТ: аБЧиН¤Ш³¡´»ШиБ¹Хй«йУНХ¡¤ГСй§ в»Гб¡ГБ¨РЛВШ´¡ТГ·У§Т¹ д¿
·ХиНВЩиµФ´¡Сº»ШиБ¹Хй¨РаГФиБ¡ГР¾ГФº г¹¡ТГ аГФиБв»Гб¡ГБгЛБи гЛй¡´»ШиБ¹Хй«йУНХ¡¤ГСй§
аБЧиН¤Ш³¡´»ШиБ Start/Add clothes (аГФиБ¡ТГ·У§Т¹/а¾ФиБ¼йТ)
¤Ш³КТБТГ¶а»Ф´½Т¶С§«С¡д´йаБЧ
а¤ГЧиН§«С¡¼йТдБид´йНВЩиГРЛЗиТ§¢Сй¹µН¹¡ТГ·У¤ЗТБГйН¹
ГР´Сº¢Н§¹йУдБиКЩ§¨¹а¡Ф¹д» ¶С§«С¡дБид´йЛБШ¹НВЩи
¢йНКУ¤С! ¤Ш³µйН§ЛВШ´а¤ГЧиН§«С¡¼йТªСиЗ¤ГТЗ
¡иН¹¨Ра»ЕХиВ¹в»Гб¡ГБ·Хи¡УЕС§·У§Т¹НВЩи´йЗВ¡ТГ¡´»ШиБ Start/Add clothes
(аГФиБ¡ТГ·У§Т¹/а¾ФиБ¼йТ)
èÍ:
С§бЕРбК´§º¹Л¹йТ¨Н
АТЙТд·В
37
Page 38

¤Óá¹Ð¹Ó㹡Òëѡ
¡ÒÃᡪ¹Ô´¢Í§¼éÒ
в»Г´»¯ФºСµФµТБ¤Уб¹Р¹Уº¹КСЕС¡Й³мКУЛГСº¡ТГ«С¡¼йТ¢Н§¼йТбµиЕРªФй¹
ГЗБ·С駤Уб¹Р¹Уг¹¡ТГ«С¡¨Т¡¼Щй¼ЕФµ´йЗВ
¤Ш³¤ЗГбВ¡¼йТ´С§µиНд»¹Хй:
¼йТ¢ТЗ, ¼йТКХ, ¼йТгВКС§а¤ГТРЛм, ¼йТºТ§, ¼йТ¢¹КСµЗм
НШ³ЛАЩБФ
90°-95° КУЛГСº¼йТ½йТВбЕР¼йТЕФ¹Ф¹КХ¢ТЗ·ХиК¡»Г¡·СиЗд» (аªи¹ ¼йТГН§º¹вµкР
¼éÒàªç´µÑÇ ¼éÒ»ÙâµêÐ ¼éÒ»Ù·Õè¹Í¹...)
50°-60° КУЛГСºаКЧйН¼йТКХдБиµ¡·ХиК¡»Г¡·СиЗд» (аªи¹ аКЧйНаªФйµ ªШ´¡ЕТ§¤Ч¹
ªШ´¹Н¹....) ·ХиµС´´йЗВ¼йТЕФ¹Ф¹ ¼йТ½йТВ ЛГЧН¼йТгВКС§а¤ГТРЛм
бЕРКУЛГСº¼йТ½йТВКХ¢ТЗК¡»Г¡¹йНВ (аªи¹ ªШ´ªСй¹г¹)
O
(cold) КУЛГСº¼йТа¹ЧйНºТ§ (аªи¹ ¼йТБиТ¹µТ¢иТВ) ¼йТа¹ЧйН¼КБ
30°-40° ГЗБ¶Ц§¼йТгВКС§а¤ГТРЛм бЕР¼йТ¢¹КСµЗм·ХиБХ»йТВГРºШЗиТ ¼йТ¢¹КСµЗмб·й
«Ñ¡à¤Ã×èͧä´é äÁèË´
¡è͹ãÊè¼éÒŧã¹à¤Ã×èͧ«Ñ¡
¹éÓ˹ѡ¢Í§¼éÒ
µиНд»¹Хйа»з¹¹йУЛ¹С¡в´В»ГРБТ³¢Н§¼йТª¹Ф´µиТ§ж:
аКЧйН¤ЕШБНТº¹йУ 1200 ¡
¼éÒàªç´»Ò¡ 100 ¡
»ÅÍ¡·Õè¹Í¹ 700 ¡
¼éÒ»Ù·Õè¹Í¹ 500 ¡
»ÅÍ¡ËÁ͹ 200 ¡
¼éÒ»ÙâµêÐ 250 ¡
¼éÒàªç´µÑÇ 200 ¡
¼éÒÃͧº¹âµêÐ 100 ¡
ªØ´¡ÅÒ§¤×¹ 200 ¡
ªØ´´éҹ㹢ͧʵÃÕ 100 ¡
àªÔêµ·Ó§Ò¹ºØÃØÉ 600 ¡
àªÔ굺ØÃØÉ 200 ¡
ªØ´¹Í¹ºØÃØÉ 500 ¡
Õ 100 ¡
аКЧйНКµГ
¡Т§а¡§ªСй¹г¹ºШГШЙ 100 ¡
НВиТ«С¡¼йТ¢ТЗГЗБ¡Сº¼йТКХ а¹ЧиН§¨Т¡¼йТ¢ТЗНТ¨КЩаКХВ ¤ЗТБ¢ТЗ ¨Т¡¡ТГ«С¡
¼йТКХ·Хи«С¡¤ГСй§бГ¡НТ¨БХКХµ¡ºйТ§аЕз¡¹йНВ ¨Ц§¤ЗГ«С¡¼йТаЛЕиТ¹ХйбВ¡µиТ§ЛТ¡г¹¤ГСй§бГ¡
µГЗ¨КНºЗиТдБиБХЗСµ¶ШвЕЛРЛЕ§НВЩиг¹¼йТ (аªи¹ ¡ФкºµФ´¼Б а¢зБ¡ЕС´ а¢зБЛБШ´)
µФ´¡ГР´ШБ»ЕН¡ЛБН¹ ГЩ´«
¢¨С´ГНВа»ЧйН¹·Хи«С¡НН¡ВТ¡¡иН¹¨Р«С¡
гªйКТГ¿Н¡¾ФаИЙЛГЧН¹йУВТ«С¡¼йТ·ТºГФаЗ³·Хиа»ЧйН¹БТ¡
«С¡¼йТБиТ¹´йЗВ¤ЗТБГРБС´ГРЗС§а»з¹¾ФаИЙ ¶Н´¢На¡ХиВЗЛГЧН¼Щ¡дЗйг¹¶Ш§ЛГЧН¶Ш§µТ¢иТВ
Ф» µФ´µР¢Н ЛГЧН¡ГР´ШБб»к¡ ГС´а¢зБ¢С´¼йТЛГЧНКТВГС´
¤ÇÒÁ¨ØÊÙ§ÊØ´
¤ЗТБ¨ШКЩ§КШ´·Хиб¹Р¹У¨РбК´§НВЩиг¹¼С§в»Гб¡ГБ
ЛЕС¡а¡³±м·СиЗд»:
¼йТ½йТВбЕРЕФ¹Ф¹: аµзБ¶С§бµиНВиТгЛйб¹и¹¨¹а¡Ф¹д»
¼йТгВКС§а¤ГТРЛм: гКи¼йТдБиа¡Ф¹¤ГЦи§Л¹Ци§¢Н§¶С§«С¡
¡Òâ¨Ñ´ÃÍÂà»×é͹
¤Ш³НТ¨дБиКТБТГ¶¢¨С´ГНВа»ЧйН¹·Хи«С¡НН¡ВТ¡´йЗВ¹йУбЕРКТГ«С¡¿Н¡а·иТ¹Сй¹
¢НгЛй»¯ФºСµФ´С§¹Хй¡иН¹·Хи¨Р«С¡
ГНВаЕЧН´: «С¡¼йТ·Хиа»ЧйН¹аЕЧН´гЛБиж ´йЗВ¹йУаВз¹ КУЛГСºаЕЧН´·ХибЛй§бЕйЗ
гЛйбªиг¹¹йУВТ«С¡¼йТ·Фй§дЗйЛ¹Ц觤Ч
КХ¹йУБС¹: »йТВ´йЗВ¹йУВТ¢¨С´¤ГТº·Хи·У¨Т¡аº¹«Ф¹ ЗТ§¼йТа»ЧйН¹º¹¼йТ¹ШиБ
бЕРаªз´ГНВа»ЧйН¹ ЛЕТВж ¤ГСй§
ГНВа»ЧйН¹¨ТГºХ: »йТВ´йЗВа·НГма¾¹·Х¹ ЗТ§¼йТа»ЧйН¹дЗйº¹¾Чй¹¼ФЗ·Хи¹ШиБ
аªз´ГНВа»ЧйН¹´йЗВ»ЕТВ¹ФйЗбЕР¼йТ½йТВ
К¹ФБ: гªй¡Г´НзН¡«ТЕ
в»Г´гªй¤ЗТБГРБС´ГРЗС§¡СºГНВа»ЧйНВК¹ФБ·Хиа¡иТбЕйЗ
а¹ЧиН§¨Т¡в¤Г§КГйТ§¢Н§а«ЕЕЩвЕК¨РБХ¤ЗТБаКХВЛТВНВЩибЕйЗ бЕРа¹ЧйН¼йТНТ¨а»з¹ГЩ
ГНВаªЧйНГТ: ·У¤ЗТБКРНТ´´йЗВКТГ¿Н¡КХ бЕРЕйТ§гЛйКРНТ´
(КУЛГСº¼йТ¢ТЗбЕР¼йТ·ХиКХдБиµ¡а·иТ¹Сй¹)
ГНВа»ЧйН¹Л
»Т¡¡ТЕЩ¡ЕЧи¹бЕР¡ТЗ: аªз´´йЗВНР«Хв·¹ (*) в´ВЗТ§¼йТа»ЧйН¹º¹¼йТ¹ШиБ
бЕРаªз´ГНВа»ЧйН¹НН¡
ЕФ»КµФ¡: аªз´´йЗВНР«Хв·¹аЛБЧН¹ЗФ¸Х¢йТ§µй¹¹Хй
¨Т¡¹Сй¹·У¤ЗТБКРНТ´ГНВа»ЧйН¹´йЗВбНЕ¡НОНЕм
бЕР¢¨С´¤ГТº·ХиЛЕ§аЛЕЧН´йЗВКТГ¿Н¡КХ
йТ: гªйКºЩиНиН¹ж бЕРКТГ¿Н¡КХ (КУЛГСº¼йТ¢ТЗбЕР¼йТКХдБиµ¡а·иТ¹Сй¹)
¹áÅТÂÕéã¹¹éÓʺÙè
Ф¤ЕРЕТВг¹¹йУГйН¹ ЛГЧНгªй¼ЕФµАС³±м¢¨С´¤ГТºК¹ФБ
38
Page 39

ЛБЦ¡: ¢Цй¹НВЩи¡Сº»ГРаА·¢Н§ЛБЦ¡ ¤Ш³КТБТГ¶аªз´´йЗВНР«Хв·Г (*)
¨Т¡¹Сй¹гªй¡Г´НР«ХµФ¡ бЕР¢¨С´¤ГТº·ХиЛЕ§аЛЕЧНг¹¼йТ¢ТЗ´йЗВКТГ¿Н¡КХ
бЕРЕйТ§¹йУгЛйКРНТ´
ГНВа»ЧйН¹¹йУБС¹: гªйКТГ¢¨С´¤ГТº ¨Т¡¹Сй¹гªйбНЕ¡НОНЕмЛГЧНаº¹«Ф¹
бЕйЗ¢ВХй´йЗВКТГ«С¡¿Н¡
(*) ЛйТБгªйНР«Хв·¹¡Сº¼йТдЛБа·ХВБ
КТГ«С¡¿Н¡бЕРКТГа¾ФиБаµФБ
¡ТГ«С¡·Хид´й¼Е´ХБТ¨Т¡¡ТГаЕЧН¡КТГ«С¡¿Н¡·Хи¶Щ¡µйН§
бЕРаЕЧН¡гªйг¹»ГФБТ³·ХиаЛБТРКБ а¾ЧиНЛЕХ¡аЕХиВ§¡ТГаКХВа»ЕиТ бЕР»¡»йН§КФи§бЗ´ЕйНБ
бБйЗиТКТГ«С¡¿Н¡¨РВиНВКЕТВд´й¡зµТБ
бµи¡зВС§БХКТГ»ГР¡Нº·Хи·УгЛйаКХВКБ´ШЕ¸ГГБªТµФд´й
¡ТГаЕЧН¡гªйКТГ«С¡¿Н¡¢Цй¹НВЩи¡Сº»ГРаА·¢Н§¼йТ·
КХ НШ³ЛАЩБФ¡ТГ«С¡ бЕР¤ЗТБК¡»Г¡¢Н§¼йТ
¤Ш³КТБТГ¶гªйКТГ«С¡¿Н¡КУЛГСºа¤ГЧиН§·ХиБХ¨УЛ¹иТВ·СиЗд»КУЛГСºа¤ГЧиН§«С¡¼йТ¹Хй:
- ¼§«С¡¿Н¡КУЛГСº¼йТ·Ш¡ª¹Ф´
- ¼§«С¡¿Н¡КУЛГСº¼йТºТ§ (НШ³ЛАЩБФКЩ§КШ´ 60
-¹йУВТ«С¡¼йТ аЛБТРКУЛГСºв»Гб¡ГБ«С¡НШ³ЛАЩБФµиУ (НШ³ЛАЩБФКЩ§КШ´ 60
КУЛГСº¼йТ·Ш¡ª¹Ф´ ЛГЧНа©¾ТР¼йТ¢¹КСµЗм
в»Г´гКиКТГ«С¡¿Н¡бЕРКТГа¾ФиБаµФБНЧи¹ж Е§г¹ªиН§гКиКТГ«С¡¿Н¡
¡иН¹·Хи¨РаГФиБµй¹в»Гб¡ГБ«С¡
ЛТ¡¤Ш³гªйКТГ«С¡¿Н¡ª¹Ф´а¢йБ¢й¹ ЛГЧН¹йУВТ«С¡¼йТ
¤Ш³¨РµйН§аЕЧН¡в»Гб¡ГБ«С¡·ХидБиБХ¡ТГ«С¡¤ГСй§бГ¡
а¤ГЧиН§«С¡¼йТ¨РБХГРºº¡ГР¨ТВКТГ«
а¾ЧиНгЛйКТБТГ¶гªй§Т¹д´йНВиТ§БХ»ГРКФ·¸ФАТ¾КЩ§КШ´
в»Г´а·¹йУВТ«С¡¼йТЕ§г¹ªиН§·ХиБХа¤ГЧиН§ЛБТВ ¡иН¹·Хи¨РаГФиБµй¹в»Гб¡ГБ«С¡·С¹·Х
бЕРв»Г´а·¹йУВТ»ГСº¼йТ¹ШиБЛГЧНКТГКУЛГСºЕ§б»й§НЧи¹ж Е§г¹ªиН§·ХиБХа¤ГЧиН§ЛБТВ
¡иН¹аГФиБв»Гб¡ГБ«С¡
в»Г´»¯ФºСµФµТБ¤Уб¹Р¹УВ¢Н§¼Щ
MAX ¢Н§ªиН§гКиКТГ«С¡¿Н¡¢Н§а¤ГЧиН§
Ñ¡¿Í¡
й¼ЕФµКТГ«С¡¿Н¡ бЕРв»Г´НВиТгªйКТГ«С¡¿Н¡а¡Ф¹¢Х´
Õè«Ñ¡ (¼éÒºÒ§ ¼éÒ¢¹ÊѵÇì ¼éÒ½éÒ ÏÅÏ)
°C) áÅмéÒ¢¹ÊѵÇì
°C)
»ÃÔÁÒ³¢Í§ÊÒëѡ¿Í¡·Õèãªé
»ÃÐàÀ·áÅлÃÔÁÒ³¢Í§ÊÒëѡ¿Í¡¨Ð¢Öé¹ÍÂÙè¡Ñºà¹×éͼéÒ »ÃÔÁÒ³¢Í§¼éÒ·Õè«Ñ¡
ÃдѺ¤ÇÒÁÊ¡»Ã¡ áÅФÇÒÁ¡ÃдéÒ§¢Í§¹éÓ
¤ЗТБ¡ГР´йТ§¢Н§¹йУ¨Р¶Щ¡бºи§НН¡а»з¹ ГР´Сº µиТ§ж
«Ци§¤Ш³КТБТГ¶ЛТ¢йНБЩЕ´С§¡ЕиТЗд´й¨Т¡ºГФЙС·¼ЩйгЛйºГФ¡ТГ¹йУ»ГР»Т
ЛГЧНЛ¹иЗВ§Т¹·йН§¶Фи¹г¹¾Чй¹·Хи¢Н§¤Ш³
â»Ã´»¯ÔºÑµ
ãªéÊÒëѡ¿Í¡ãËé¹éÍÂŧ㹡óյèÍ仹Õé:
-¤Ш³¡УЕС§«С¡¼йТг¹»ГФБТ³дБиБТ¡
-¼éÒ·Õè«Ñ¡äÁèÊ¡»Ã¡ÁÒ¡
-а¡Ф´¿Н§¨У¹З¹БТ¡ГРЛЗиТ§¡ТГ«С¡
ФµТБ¤Уб¹Р¹У¢Н§¼Щй¼ЕФµКТГ«С¡¿Н¡г¹аГЧиН§»ГФБТ³¡ТГгªй
АТЙТд·В
39
Page 40

16
Page 41

ÅӴѺ¡Ò÷ӧҹ
¡иН¹аГФиБ¡ТГ«С¡¼йТа»з¹¤ГСй§бГ¡ ¢Нб¹Р¹УгЛй¤Ш³а·¹йУ 2 ЕФµГ Е§г¹ªиН§«С¡ЛЕС¡
¢Н§ªиН§гКи¼§«С¡¿Н¡ ¨Т¡¹Сй¹а»Ф´а¤ГЧиН§гЛй·У§Т¹´йЗВв»Гб¡ГБ«С¡¼йТ½йТВ·ХиНШ³ЛАЩБФ
60
°C â´ÂäÁèµéͧºÃèؼéÒ
а¾ЧиН·У¤ЗТБКРНТ´КФи§К¡»Г¡·ХиµФ´НВЩиАТВг¹¶С§«С¡г¹¢Сй¹µН¹¡ТГ¼ЕФµ
а·¼§«С¡¿Н¡¤ГЦи§Л¹Ци§Е§г¹ªиН§гКи¼§«С¡¿Н¡ бЕРаГФиБ¡ТГ·У§Т¹¢Н§а¤ГЧиН§
1. ãÊè¼éÒŧ㹶ѧ«Ñ¡
а»Ф´½Т¢Н§¶С§«С¡
гКи¼йТЕ§г¹¶С§«С¡·ХЕРªФй¹ КРºС´¼йТЛЕТВж ¤ГСй§¡иН¹гКи
а»Ф´½Та¤ГЧиН§
P0004
4. à»Ô´ÊÇÔµªìà¤Ã×èͧ«Ñ¡¼éÒ
ЛБШ¹ЕЩ¡ºФ´аЕЧН¡в»Гб¡ГБд»ВС§в»Гб¡ГБ«С¡·ХиµйН§¡ТГа¾ЧиНа»Ф´а¤ГЧиН§
г¹¡ТГ»Ф´КЗФµªма¤ГЧиН§«С¡¼йТ гЛйЛБШ¹БТ·Хи O
¡ÒÃà»Ô´ÊÇÔµªìà¤Ã×èͧ«Ñ¡¼éÒà»ç¹¤ÃÑé§áá
ÀÒÉÒ
аБЧиНа»Ф´КЗФµªма¤ГЧиН§«С¡¼йТа»з¹¤ГСй§бГ¡
¤Ш³µйН§¡УЛ¹´АТЙТ·ХиµйН§¡ТГгЛй»ГТ¡¯º¹Л¹йТ¨Н
¢éÍÊÓ¤Ñ!
ЛТ¡Л¹йТ¨НдБибК´§АТЙТг´ж бК´§ЗиТа¤Ва»Ф´КЗФµªма¤ГЧиН§БТ¤ГСй§Л¹Ци§бЕйЗ
г¹¡Г³Хаªи¹¹ХйгЛйд»·ХиЛСЗ¢йН а»ЕХиВ¹АТЙТ ЛТ¡µйН§¡ТГа»ЕХиВ¹б»Е§¡ТГµСй§АТЙТгЛБи
АТЙТд·В
2. ¤Ó¹Ç³»ÃÔÁÒ³ÊÒëѡ¿Í¡·Õè¤ÇÃãªé
´Ц§ªиН§гКиКТГ«С¡¿Н¡НН¡БТ¨¹КШ´
µЗ§КТГ«С¡¿Н¡µТБ»ГФБТ³·Хи¼Щй¼ЕФµб¹Р¹У´йЗВ¶йЗВµЗ§ бЕРа·Е§г¹ªиН§«С¡ЛЕС¡
ЛТ¡¤Ш³µйН§¡ТГ«С¡КН§¤ГСй§ ЛГЧНбªи¼йТ¡иН¹«С¡
гЛйа·КТГ«С¡¿Н¡Е§г¹ªиН§·ХиБХа¤ГЧиН§ЛБТВ
3. ¤Ó¹Ç³»ÃÔÁÒ³ÊÒÃà¾ÔèÁàµÔÁ·Õè¤ÇÃãªé
ЛТ¡µйН§¡ТГгªй¹йУВТ»ГСº¼йТ¹ШиБ гЛйа·Е§г¹ªиН§·ХиБХа¤ГЧиН§ЛБТВ в´ВдБигЛйа¡Ф¹¢Х´
MAX
41
Page 42

¡ÒõÑɧÀÇÅÒ
¤Ш³¤ЗГµСй§аЗЕТ¡иН¹аГФиБ¡ТГ«С¡а»з¹¤ГСй§бГ¡
бЕРаБЧиНБХ¡ТГа»ЕХиВ¹б»Е§ªиЗ§аЗЕТ¡ЕТ§ЗС¹
´ЩаБ¹Щ ¡ТГµСй§¹ТМФ¡Т г¹Л¹йТ 12
5. àÅ×Í¡â»Ãá¡ÃÁ/¼éÒ·Õèµéͧ¡ÒÃ
ЛБШ¹ЕЩ¡ºФ´аЕЧН¡в»Гб¡ГБа¾ЧиНаЕЧН¡в»Гб¡ГБ/¼йТ·ХиµйН§¡ТГ
¨РБХ¢йН¤ЗТБ»ГТ¡¯¢Цй¹º¹Л¹йТ¨Н
Л¹йТ¨Н¨РбК´§ END CYCLE TIME (аЗЕТКФй¹КШ´¡ТГ·У§Т¹) ¢Н§в»Гб¡ГБ·ХиаЕЧН¡
в´В¤У¹З³µТБ»ГФБТ³КЩ§КШ´¢Н§ª¹Ф´¼йТ·ХигКиЕ§г¹а¤ГЧиН§ д¿КСТ³·Хи»ШиБ Start/Add
clothes (аГФиБ¡ТГ·У§Т¹/а¾ФиБ¼йТ) ¨РаГФиБ¡ГР¾ГФº
ЛТ¡¼йТ·Хи¨Р«С¡БХ»ГФБТ³¹йНВ аБЧи
аГФиБГН§¡ТГ«С¡Л¹йТ¨Н¨РГРºШ END CYCLE (аЗЕТКФй¹КШ´ГНº¡ТГ·У§Т¹)
µТБ»ГФБТ³¼йТ·ХигКиКЩ§КШ´ а¤ГЧиН§¨Р»ГСºГРВРаЗЕТГРЛЗиТ§ГНº¡ТГ«С¡
Íà
7. аЕЧН¡¤ЗТБаГзЗг¹¡ТГ»Си¹ЛБТ´ Spin
(¡ТГ»Си¹ЛБТ´) Rinse Hold (¡ТГбªи¼йТ) ËÃ×Í
Night cycle (Ãͺ¡Òëѡ¡ÅÒ§¤×¹)
¡´»ШиБ SPIN SPEED (¤ЗТБаГзЗг¹¡ТГ»Си¹ЛБТ´) а¾ЧиН
аЕЧН¡¤ЗТБаГзЗг¹¡ТГ»Си¹ЛБТ´·ХиµйН§¡ТГ ЛГЧНаЕЧН¡µСЗаЕЧН¡ No Spin (дБи»Си¹ЛБТ´)
O ЛГЧН Rinse Hold (бªи¼йТ) ЛГЧН Night Cycle (ГНº¡ТГ«С¡¡ЕТ§¤Ч¹)
¨РБХ¢йН¤ЗТБ»ГТ¡¯¢Цй¹г¹б¶З·ХиКН§¢Н§Л¹йТ¨Н
ГР´Сº¡ТГ»Си¹ЛБТ´·ХиаЕЧН¡¨Р»ГТ¡¯г¹б¶З·ХиКТБµФ´¡Сº»ШиБ»Си¹ЛБТ´
ЛТ¡аЕЧН¡µСЗаЕЧН¡ Rinse Hold (бªи¼йТ) ЛГЧН Night Cycle (ГНº¡ТГ«
а¤ГЧиН§¨РЛВШ´аБЧиНКФй¹КШ´в»Гб¡ГБв´ВВС§а¡зº¹йУдЗйг¹¶С§
COTTON
MAX 1400
40°C
1200
Temp. Spin
Options
Change
08.30
10.55
Exit
Ñ¡¡ÅÒ§¤×¹)
Cotton
Cycle and at
60°C 1400
Temp. Spin
Options
Change
08.30
10.55
Exit
6. аЕЧН¡НШ³ЛАЩБФ
¡´»ШиБ TEMPERATURE (НШ³ЛАЩБФ)
ЛТ¡¤Ш³µйН§¡ТГаЕЧН¡НШ³ЛАЩБФ·Хибµ¡µиТ§¨Т¡НШ³ЛАЩБФ·Хиа¤ГЧиН§«С¡¼йТ¡УЛ¹´
¨РБХ¢йН¤ЗТБГРºШНШ³ЛАЩБФКЩ§КШ´·ХиКТБТГ¶аЕЧН¡д´й»ГТ¡¯¢Цй¹З¹б¶З·ХиКН§¢Н§Л¹йТ¨Н
(б·¹·Хи cycle end at (КФй¹КШ´ГНº¡ТГ·У§Т¹·Хи))
·ХиБШБ¢Н§б¶З·ХиКТБ¨Р»ГТ¡¯¢йНЗТБГРºШН
COTTON
MAX 95°C
40°C 1400
Temp. Spin
Options
Change
08.30
10.55
Ш³ЛАЩБФ·ХиаЕЧН¡
Exit
8. аЕЧН¡µСЗаЕЧН¡·ХиµйН§¡ТГ
¡´»ШиБа¾ЧиНаЕЧН¡µСЗаЕЧН¡·ХиµйН§¡ТГ
¨Т¡в»Гб¡ГБ·ХиаЕЧН¡¨РБХа¾ХВ§ºТ§µСЗаЕЧН¡а·иТ¹Сй¹·ХиКТБТГ¶аЕЧН¡д´й
бЕР»ГТ¡¯¢Цй¹г¹¢Сй¹µН¹¡ТГаЕЧН¡в»Гб¡ГБ
ЛБТВаЛµШ: µСЗаЕЧН¡µиТ§ж НТ¨гªй§Т¹ГиЗБ¡С¹дБид´й·Сй§ЛБ´
дН¤Н¹¢Н§µСЗаЕЧН¡·ХидБиКТБТГ¶гªй§Т¹ГиЗБ¡С¹д´й¨РдБи»ГТ¡¯¢Цй¹
9. àÅ×Í¡ DELAY TIME (˹èǧàÇÅÒ)
¡иН¹аГФиБв»Гб¡ГБ ЛТ¡¤Ш³µйН§¡ТГЛ¹иЗ§аЗЕТаГФиБ¡ТГ·У§Т¹ гЛйаЕЧН¡µСЗаЕЧН¡ DELAY
(Л¹иЗ§аЗЕТ)
ªиЗ§Л¹иЗ§аЗЕТ·ХиаЕЧН¡ (КЩ§КШ´¶Ц§ 20 ªСиЗвБ§) ¨Р»ГТ¡¯º¹Л¹йТ¨Н¢³РаЕЧН¡
аЗЕТКФй¹КШ´ГНº¡ТГ·У§Т¹¨Р¶Щ¡б¡йд¢бЕРбК´§º¹Л¹йТ¨Н
Delay Start
No 10.55
Change
Temp. Spin
Options
Exit
Delay Start
Start in 30 min 11.25
Temp. Spin
Options
Change
Exit
42
Page 43

10. аГФиБв»Гб¡ГБ
¡´»ШиБ Start/Add clothes (аГФиБ¡ТГ·У§Т¹/а¾ФиБ¼йТ) д¿КСТ³¨РЛВШ´¡ГР¾ГФº
¢йН¤ЗТБбК´§¢Сй¹µН¹¡ТГ·У§Т¹¢³Р¹Сй¹¨Р»ГТ¡¯¢Цй¹º¹Л¹йТ¨Н
ЛТ¡¤Ш³аЕЧН¡гЛйа¤ГЧиН§Л¹иЗ§аЗЕТаГФиБ¡ТГ·У§Т¹ а¤ГЧиН§«С¡¼йТ¨РаГФиБµй¹¹Сº¶НВЛЕС§
COTTON
Washing
40°C 1200
Temp. Spin
Options
Change
08.30
12.00
Exit
11. ЗФ¸Ха»ЕХиВ¹в»Гб¡ГБГРЛЗиТ§ГНº¡ТГ«С¡
¡иН¹·Хи¨Ра»ЕХиВ¹в»Гб¡ГБ ¤Ш³µйН§ЛВШ´¡ТГ·У§Т¹¢Н§а¤ГЧиН§«С¡¼йТ в´В¡´»ШиБ
Start/Add clothes (аГФиБ¡ТГ·У§Т¹/а¾ФиБ¼йТ)
¤Ш³КТБТГ¶а»ЕХиВ¹в»Гб¡ГБ·Хи¢Сй¹µН¹г´¡зд´й¡иН¹в»Гб¡ГБ¨РКФй¹КШ´¡ТГ·У§Т¹
аБЧиНаГФиБв»Гб¡ГБбЕйЗ
¤Ш³КТБТГ¶µСй§а¤ГЧиН§д´йгЛБи´йЗВ¡ТГЛБШ¹ЕЩ¡ºФ´аЕЧН¡в»Гб¡ГБд»·Хи O
бЕйЗ¨Ц§аЕЧН¡в»Гб¡ГБгЛБид´
й ¹йУ·Хигªй«С¡¨РВС§¤§¤йТ§НВЩиг¹¶С§
гЛйаГФиБв»Гб¡ГБгЛБив´¹¡ТГ¡´»ШиБ Start/Add clothes (аГФиБ¡ТГ·У§Т¹/а¾ФиБ¼йТ)
ЛБТВаЛµШ: г¹¡ТГ¶иТВ¹йУ·Фй§¡иН¹аГФиБГНº¡ТГ«С¡гЛБи
¤Ш³µйН§В¡аЕФ¡в»Гб¡ГБбЕРаЕЧН¡ГНº¡ТГ¶иТВ¹йУ·Фй§
12. ¡ÒáàÅÔ¡â»Ãá¡ÃÁ
ЛБШ¹ЕЩ¡ºФ´аЕЧН¡в»Гб¡ГБд»·Хи O а¾ЧиНВ¡аЕФ¡в»Гб¡ГБ·Хи¡УЕС§·У§Т¹НВЩи
¨Т¡¹Сй¹¤Ш³¡зКТБТГ¶аЕЧН¡в»Гб¡ГБгЛБид´й
ЛТ¡а»з¹д»µТБ¢йН¡УЛ¹´аЛЕиТ¹Хй аБЧиН¤Ш³ЛВШ´¡ТГ·У§Т¹¢Н§а¤ГЧиН§«С¡¼йТЕ§ªСиЗ¤ГТЗ
¨РБХ¢йН¤ЗТБ»ГТ¡¯¢Цй¹º¹Л¹йТ¨Н д¿КСТ³бК´§¡ТГЕзН¤½Та¤ГЧиН§´СºЕ§
бЕР»ГРµЩКТБТГ¶а»Ф´НН¡д´й
ЛТ¡дБиКТБТГ¶а»Ф´½Та¤ГЧиН§д´й д¿КСТ³бК´§¡ТГЕзН¤½Та¤ГЧиН§¨РµФ´
ЛТ¡¨Уа»з¹µйН§а»
Ф´гЛйд´й
¤Ш³µйН§»Ф´КЗФµªма¤ГЧиН§´йЗВ¡ТГЛБШ¹ЕЩ¡ºФ´аЕЧН¡в»Гб¡ГБд»·ХиµУбЛ¹и§ O
ЛЕС§¨Т¡¹Сй¹»ГРБТ³ 3 ¹Т·Х ¤Ш³¨Ра»Ф´½Та¤ГЧиН§д´й
¢НгЛйГРЗС§ГР´СºбЕРНШ³ЛАЩБФ¢Н§¹йУг¹а¤ГЧиН§«С¡¼йТ!
14. аБЧиНКФй¹КШ´в»Гб¡ГБ¡ТГ«С¡
аБЧиНКФй¹КШ´в»Гб¡ГБ¡ТГ«С¡ а¤ГЧиН§¨РЛВШ´аН§в´ВНСµв¹БСµФ БХКСТ³аКХВ§аµЧН¹
(ЛТ¡дБид´йаЕЧН¡µСЗаЕЧН¡»Ф´КСТ³аКХВ§аµЧН¹дЗй)
бЕРЛ¹йТ¨НбК´§¢йН¤ЗТБб¨й§гЛй·ГТº
ЛТ¡аЕЧН¡µСЗаЕЧН¡ RINSE HOLD (бªи¼йТ) ЛГЧН NIGHT CYCLE (ГНº¡ТГ«С¡¡ЕТ§¤Ч¹)
д¿КСТ³·Хи»ШиБ Start/Add clothes (аГФиБ¡ТГ·У§Т¹/а¾ФиБ¼йТ)
¨Р´СºбЕРд¿КСТ³бК´§¡ТГЕзН¤½Та¤Г
г¹¡ТГ¶иТВ¹йУ·Фй§ЛГЧН»Си¹ЛБТ´¡иН¹ гЛйЛБШ¹ЕЩ¡ºФ´аЕЧН¡в»Гб¡ГБд»·Хи O
бЕйЗµТБ´йЗВв»Гб¡ГБ¶иТВ¹йУ·Фй§ЛГЧНв»Гб¡ГБ»Си¹ЛБТ´/»Си¹¼йТа¹ЧйНºТ§
¢йН¤ЗТБ Door openable (»ГРµЩКТБТГ¶а»Ф´д´й) (КФй¹КШ´ГНº¡ТГ«С¡)
¨Р»ГТ¡¯¢Цй¹а¾ЧиНб¨й§¡ТГ»Е´ЕзН¤ бЕРд¿КСТ³б¨й§¡ТГЕзН¤½Та¤ГЧиН§¨Р´СºЕ§
ЛБШ¹ЕЩ¡º
Ô´àÅ×Í¡â»Ãá¡ÃÁä»·Õè O à¾×èͻԴÊÇÔµªìà¤Ã×èͧ
¹У¼йТНН¡¨Т¡а¤ГЧиН§«С¡¼йТ
ЛБШ¹¶С§«С¡´йЗВБЧН а¾ЧиНµГЗ¨КНºЗиТдБиБХ¼йТЛЕ§аЛЕЧННВЩиг¹¶С§
а»з¹¡ТГ»йН§¡С¹¡ТГЕЧБ¼йТдЗй бЕР·УгЛй¼йТаКХВЛТВг¹¡ТГ«С¡¤ГСй§¶С´д» (аªи¹ ¼йТЛ´µСЗ)
ЛГЧНБХКХµ¡гКи¼йТ·
Хи¨Р«С¡¤ГС駵иНд»
¢Нб¹Р¹УгЛй»Ф´¡кН¡¹йУ бЕР»Е´»ЕСк¡д¿НН¡
б§йБ½Т¢Н§¶С§«С¡дЗйаЕз¡¹йНВа¾ЧиН·Фй§гЛйбЛй§
×èͧ¨ÐµÔ´
АТЙТд·В
13. ЗФ¸Ха»Ф´½ТГРЛЗиТ§ГНº¡ТГ«С¡г¹в»Гб¡ГБ
¤Ш³КТБТГ¶а»Ф´½Та¤ГЧиН§д´йЛЕС§¨Т¡µСй§а¤ГЧиН§«С¡¼йТд»·Хи¢Сй¹µН¹ PAUSE
(ЛВШ´ªСиЗ¤ГТЗ) в´В¡´»ШиБ Start/Add clothes (аГФиБ¡ТГ·У§Т¹/а¾ФиБ¼йТ)
·Ñ駹Õé¨Ðµéͧà»ç¹ä»µÒÁà§×è͹䢴ѧ¹Õé:
1) а¤ГЧиН§«С¡¼йТдБид´йНВЩиГРЛЗиТ§¢Сй¹µН¹¡ТГ·У¤ЗТБГйН¹а¡Ф¹¡ЗиТ 55
2) ГР´Сº¢Н§¹йУдБиКЩ§¨¹а¡Ф¹д»
3) ¶Ñ§«Ñ¡äÁèä´éËÁعÍÂÙè
°C
43
Page 44

Page 45

Page 46

¡ТГ´ЩбЕГС¡ЙТ
P0038
1. ÀÒ¹͡¢Í§à¤Ã×èͧ«Ñ¡¼éÒ
·У¤ЗТБКРНТ´а¤ГЧиН§АТВ¹Н¡´йЗВ¹йУбЕРКºЩиа·иТ¹Сй¹ ЕйТ§´йЗВ¹йУКРНТ´
бЕРаªз´гЛйбЛй§´йЗВ¼йТ¹ШиБ
¢йНКУ¤С: ЛйТБгªйбНЕ¡НОНЕм КТГ·УЕРЕТВ ЛГЧНКТГНЧи¹·ХиБХ¤Ш³КБºСµФ¤ЕйТВ¡С¹¹Хй
г¹¡ТГ·У¤ЗТБКРНТ´АТВ¹Н¡µСЗа¤ГЧиН§
2. ÂÒ§¡Ñ¹ÃÑèǢͧ½Ò»Ô´
ЛБСи¹µГЗ¨КНºВТ§¡С¹ГСиЗ¢Н§½Т»Ф´¶С§«С¡ бЕР¹УЗСµ¶ШµиТ§ж ·ХиНТ¨¤йТ§НВЩиАТВг¹НН¡
P1050
3. ªиН§гКиКТГ«С¡¿Н¡
ЛЕС§¨Т¡гªй§Т¹д»д´йГРВРЛ¹Ци§ КТГ«С¡¿Н¡бЕР¹йУВТ»ГСº¼йТ¹ШиБ¨Рµ¡¤йТ§НВЩиг¹ªиН§
ЛБСи¹·У¤ЗТБКРНТ´ªиН§´С§¡ЕиТЗв´Ва»Ф´¹йУ¡кН¡гЛйдЛЕ¼иТ¹
г¹¡ТГ¹УªиН§´С§¡ЕиТЗНН¡¨Т¡µСЗа¤ГЧиН§ гЛй¡´»ШиБ·ХиБШБ«йТВ´йТ¹ЛЕС§
¤Ш³НТ¨¶Н´КиЗ¹º¹¢Н§ªиН§гКи¹йУВТ»ГСº¼йТ¹ШиБНН¡ а¾ЧиНгЛй·У¤ЗТБКРНТ´д´й§
èÒ¢Öé¹
КТГ«С¡¿Н¡НТ¨КРКБНВЩи´йТ¹г¹¢Н§ªиН§: гЛй·У¤ЗТБКРНТ´´йЗВб»Г§КХ¿С¹а¡иТ
бЕРгКиªиН§¹Хй¡ЕСºа¢йТ·Хиа´ФБЛЕС§¨Т¡·У¤ЗТБКРНТ´бЕйЗ
4. »СкБГРºТВ¹йУ
¤ЗГµГЗ¨КНº»СкБГРºТВ¹йУаБЧиН
а¤ГЧиН§дБи¶иТВ¹йУ·Фй§бЕР/ЛГЧНдБи»Си¹ЛБТ´
БХаКХВ§´С§¼Ф´»¡µФ¨Т¡µСЗа¤ГЧиН§ г¹ГРЛЗиТ§·Хиа¤ГЧиН§¡УЕС§¶иТВ¹йУ·Фй§
а¹ЧиН§¨Т¡БХКФи§б»Е¡»ЕНБ аªи¹ а¢зБ¡ЕС´ аЛГХВ ПЕП НШ´µС¹·Хи»СкБГРºТВ¹йУ
г¹¡ТГµГЗ¨КНºгЛй»¯ФºСµФ´С
¶Н´»ЕСк¡д¿а¤ГЧиН§«С¡¼йТНН¡¨Т¡аµйТаКХВº
ЛТ¡¨Уа»з¹ гЛйГН¨¹¡ГР·Си§¹йУ·Хи¢С§НВЩиг¹а¤ГЧиН§аВз¹Е§¡иН¹
а»Ф´½Т»Ф´»СкБГРºТВ¹йУ
§¹Õé:
C0118
P1114
ЗТ§АТª¹РГН§ГСºдЗйг¡Ей¡Сº»СкБГРºТВ¹йУ а¾ЧиНГН§¹йУ·ХиНТ¨Л¡аЕНР
»Е´·иНГРºТВ¹йУг¹¡Г³Х©Ш¡а©Ф¹НН¡ ЗТ§·иНдЗйг¹АТª¹РГН§ГСº
119
C0
áÅÐà»Ô´½Ò»Ô´·èÍÍÍ¡
àÁ
ЧиНГРºТВ¹йУНН¡¨¹ЛБ´бЕйЗ гЛй¤ЕТВа¡ЕХВЗ»СкБГРºТВ¹йУ
бЕР¶Н´»СкБГРºТВ¹йУНН¡ г¹ГРЛЗиТ§·Хи¶Н´»СкБГРºТВ¹йУ гЛйаµГХВБ¼йТ¢ХйГФйЗдЗйг¡ЕйБЧН
а¾ЧиНаªз´¹йУ·ХиНТ¨Л¡аЕНР
P1115
22
Page 47

·У¤ЗТБКРНТ´гº¾С´¢Н§»СкБГРºТВ¹йУ в´В¡ТГЛБШ¹гº¾С´
а¾ЧиНгЛйЗСК´Ш·ХиНШ´µС¹ЛЕШ´НН¡БТ
гКи½Т»Ф´·иНГРºТВ¹йУг¹¡Г³Х©Ш¡а©Ф¹¡ЕСºа¢йТ·Хи бЕРгКиКиЗ¹»ЕТВ¢Н§·иН¡ЕСºа¢йТ·Хи
6. ¡ÒÃÃкÒ¹éÓÍÍ¡¨Ò¡à¤Ã×èͧ㹡óթءà©Ô¹
ЛТ¡а¤ГЧиН§«С¡¼йТдБиГРºТВ¹йУ·Фй§НН¡ гЛй»¯ФºСµФµТБ¢Сй¹µН¹µиНд»¹Хй
а¾ЧиНГРºТВ¹йУНН¡¨Т¡а¤ГЧиН§:
¶Н´»ЕСк¡д¿а¤ГЧиН§«С¡¼йТНН¡¨Т¡аµйТаКХВº
»Ф´¡кН¡¹йУ
ЛТ¡¨Уа»з¹ гЛйГН¨¹¡ГР·Си§¹йУ·Хи¢С§НВЩиг¹а¤ГЧиН§аВз¹Е§¡иН¹
а»Ф´½Т»Ф´»СкБГРºТВ¹йУ
ЗТ§НиТ§¹йУЕ§º¹¾
бЕР¶Н´½Т»Ф´·иННН¡ ¹йУ¤ЗГГРºТВНН¡¨Т¡а¤ГЧиН§ бЕРдЛЕЕ§КЩиªТБНиТ§
аБЧиНªТБНиТ§аµзБ гЛй»Ф´½Т»Ф´·иН¡ЕСºа¢йТ·Хи а·¹йУг¹ªТБНиТ§·Фй§
бЕйЗ·У«йУ¢Сй¹µН¹¹Хй¨¹¡ЗиТ¹йУ¨РГРºТВНН¡¨Т¡а¤ГЧиН§¨¹ЛБ´
ЛТ¡¨Уа»з¹гЛй·У¤ЗТБКРНТ´»СкБГРºТВ¹йУµТБ¢Сй¹µН¹·ХиГРºШ¢йТ§µй
ЛЕС§¨Т¡»Ф´½Т»Ф´·иНГРºТВ¹йУг¹¡Г³Х©Ш¡а©Ф¹¡ЕСºа¢йТ·ХибЕйЗ
гЛйгКиКиЗ¹»ЕТВ¢Н§·иН¡ЕСºа¢йТ·Хи
¢С¹а¡ЕХВЗ»СкБГРºТВ¹йУа¢йТ¨¹КШ´ бЕР»Ф´½Т»Ф´»СкБГРºТВ¹йУ
×é¹ ÇÒ§»ÅÒ·èÍÃкÒ¹éÓ㹡óթءà©Ô¹Å§ã¹ÍèÒ§¹éÓ
7. ¢йН¤ЗГГРЗС§г¹¡Г³Х·Хи¹йУ¨СºµСЗа»з¹¹йУб¢з§
¹
АТЙТд·В
P1117
¢С¹а¡ЕХВЗ½Т»Ф´»СкБГРºТВ¹йУа¢йТ¨¹КШ´
»Ф´½Т»Ф´»СкБГРºТВ¹йУ
5. µÑÇ¡Ãͧ¹éÓà¢éÒ
ЛТ¡·иТ¹КС§а¡µаЛз¹ЗиТа¤ГЧиН§гªйаЗЕТг¹¡ТГаµФБ¹йУ¹Т¹¡ЗиТ»¡µФ
гЛйµГЗ¨КНºµСЗ¡ГН§г¹·иН¹йУа¢йТЗиТНШ´µС¹ЛГЧНдБи
»Ô´¡êÍ¡¹éÓ
ä¢Ê¡ÃÙ·Õè·èÍÍÍ¡¨Ò¡¡êÍ¡¹éÓ
·У¤ЗТБКРНТ´µСЗ¡ГН§´йЗВб»Г§б¢з§
¢С¹К¡ГЩ·Хи·иНа¢йТ¡Сº¡кН¡¹йУµТБа´ФБ
P1090
¶йТа¤ГЧиН§µСй§НВЩиг¹ºГФаЗ³·ХиБХНШ³ЛАЩБФµиУ¡ЗиТ 0 Н§ИТа«Еа«ХВК
гЛй»¯ФºСµФµТБ¢Сй¹µН¹µиНд»¹Хй:
¶Н´»ЕСк¡д¿а¤ГЧиН§«С¡¼йТНН¡¨Т¡аµйТаКХВº
»Ф´¡кН¡¹йУбЕР¤ЕТВа¡ЕХВЗ·иН¹йУа¢йТНН¡¨Т¡¡кН¡
ЗТ§»ЕТВ·иНГРºТВ¹йУг¹¡Г³Х©Ш¡а©Ф¹бЕР»ЕТВ·иН¹йУа¢йТ дЗйг¹ªТБНиТ§·
бЕйЗ»ЕиНВгЛй¹йУГРºТВНН¡¨Т¡а¤ГЧиН§
¢Ñ¹à¡ÅÕÂÇ·è͹éÓà¢éÒ¡ÅѺà¢éÒ·Õè
бЕРЛЕС§¨Т¡»Ф´½Т»Ф´·иНГРºТВ¹йУг¹¡Г³Х©Ш¡а©Ф¹¡ЕСºа¢йТ·ХибЕйЗ гЛйгКи·иН¡ЕСºа¢йТ·Хи
¡ТГ·Уаªи¹¹Хй¨РªиЗВгЛй¹йУ·ХиВС§¤йТ§НВЩига¤ГЧиН§ГРºТВНН¡
§¨РЕ´¡ТГб¢з§µСЗ¢Н§¹йУа»з¹¹йУб¢з§ ·ХиНТ¨¡иНгЛйа¡Ф´¡ТГбµ¡ЛС¡
«Öè
¢Í§ªÔé¹Êèǹ㹵ÑÇà¤Ã×èͧ
аБЧиНµйН§¡ТГ¨Ргªй§Т¹а¤ГЧиН§НХ¤ГСй§ ¤ЗГµГЗ¨КНºгЛйб¹иг¨ЗиТ НШ³ЛАЩБФЛйН§КЩ§¡ЗиТ 0
Н§ИКа«Еа«ХВК
ÕèÇÒ§º¹¾×é¹
23
Page 48

à¤Ã×èͧäÁè·Ó§Ò¹?
»СЛТ·Хи¤Ш³КТБТГ¶б¡йд¢д´й´йЗВµ¹аН§
ГРЛЗиТ§а¤ГЧиН§·У§Т¹НТ¨БХ¢йН¤ЗТБµиНд»¹Хй»ГТ¡¯¢Цй¹º¹¨НбК´§¼Е:
-»ÑËÒà¡ÕèÂǡѺ¹éÓà¢éÒà¤Ã×èͧ: дБиБХ¹йУа¢йТа¤ГЧиН§ µГЗ¨КНº¡кН¡бЕР·иН¹йУ
-»ÑËÒ¡ÒÃÃкÒ¹éÓ·Ôé§: а¤ГЧиН§дБиГРºТВ¹йУНН¡ µГЗ¨КНº·иН/·Хи¡ГН§ГРºТВ¹йУ·Фй§
-¡ÒÃà»Ô´½Ò: à¤Ã×èͧäÁèä´é
аБЧиН¢¨С´»СЛТд´йбЕйЗ гЛй¡´»ШиБаГФиБ¡ТГ·У§Т¹/´¾ФиБ¼йТ а¾ЧиНаГФиБв»Гб¡ГБгЛБи ЛТ¡µГЗ¨КНº¤Гº¶йЗ¹·Ш¡НВиТ§бЕйЗ ВС§дБиКТБТГ¶б¡йд¢»СЛТд´й
â»Ã´µÔ´µèÍÈÙ¹ÂìºÃÔ¡ÒÃã¡ÅéºéÒ¹¤Ø³
»ÑËÒ ÊÒà˵طÕèà»ç¹ä»ä´é
»×´½Ò â»Ã´µÃǨÊͺ
à¤ÃЧиН§«С¡¼йТдБиаГФиБ·У§Т¹:
à¤ÃЧиН§«С¡¼йТдБиБХ¹йУа¢йТ:
à¤ÃЧиН§»ЕиНВ¹йУ¨¹аµзБбЕйЗГРºТВ·Фй§·С¹·Х:
à¤ÃЧиН§дБиГРºТВ¹йУНН¡бЕР/ЛГЧНдБи»Си¹ЛБТ´:
»Ф´½ТдБиК¹Ф· (à¤Ã×èͧäÁèä´é»Ô´½Ò â»Ã´µÃǨÊͺ)
ВС§дБид´йаКХВº»ЕСк¡а¤ГЧиН§«С¡¼йТ ЛГЧНдБиБХ¡ГРбКд¿¿йТг¹аµйТаКХВº
¿ФЗКмЛЕС¡¢Т´
ВС§дБид´й¡´»ШиБ аГФиБ¡ТГ·У§Т¹/а¾ФиБ¼йТ
аЕЧН¡ Л¹иЗ§¡ТГаГФиБ·У§Т¹ дЗй
ЛБШ¹ЕЩ¡ºФ´аЕЧН¡в»Гб¡ГБдБиµГ§µУбЛ¹и§
¡êÍ¡¹éÓ»Ô´ÍÂÙè (дБиБХ¹йУа¢йТа¤ГЧиН§ µГЗ¨КНº¡кН¡¹йУбЕРКТВВТ§)
КТВВТ§·иН¹йУа¢йТбº¹ЛГЧНЛС¡§Н (дБиБХ¹йУа¢йТа¤ГЧиН§
µГЗ¨КНº¡кН¡¹йУбЕРКТВВТ§)
µСЗ¡ГН§·ХиКТВВТ§·иН¹йУа¢йТНШ´µС¹ (дБиБХ¹йУа¢йТа¤ГЧиН§
µГЗ¨КНº¡кН¡¹йУбЕРКТВВТ§)
»Ф´»ГРµЩдБиК¹Ф· (à¤Ã×
»ЕТВ·иНГРºТВ¹йУНВЩиµиУа¡Ф¹д» в»Г´НиТ¹¢йНБЩЕ·Хиа¡ХиВЗ¢йН§г¹ЛСЗ¢йН
¡ÒöèÒ¹éÓ·Ôé§
·иНГРºТВ¹йУбº¹ЛГЧНЛС¡§Н (а¤ГЧиН§дБиГРºТВ¹йУНН¡
µÃǨÊͺ·èÍ/µÑÇ¡ÃͧÃкÒ¹éÓ·Ôé§)
аЕЧН¡µСЗаЕЧН¡ RINSEHOLD (бªи¼йТ) NIGHT CYCLE («Ñ¡Ãͺ¡ÅÒ§¤×¹)
ËÃ×Í NO SPIN (äÁè»Ñè¹ËÁÒ´) O äÇé
¼йТг¹¶С§«С¡дБи¡ГР¨ТВµСЗНВиТ§КБиУаКБН
»СкБГРºТВ¹йУНШ´µС¹ (а¤ГЧиН§дБиГРºТВ¹йУНН¡
µÃǨÊͺ·èÍ/µÑÇ¡ÃͧÃкÒ¹éÓ·Ôé§)
èͧäÁèä´é»Ô´½Ò â»Ã´µÃǨÊͺ)
ÁÕ¹éӹͧº¹¾×é¹:
гКи¼§«С¡¿Н¡БТ¡а¡Ф¹д» ЛГЧНгªй¼§«С¡¿Н¡дБиаЛБТРКБ (а¡Ф´¿Н§БТ¡а¡Ф¹д»)
µГЗ¨КНºЗиТБХГНВГСиЗ·Хи¨Ш´г´г¹¡ТГµиН·иН¹йУа¢йТ
НТ¨КС§а¡µаЛз¹¹йУЛВ´¨Т¡·иНдБид´й§иТВж
гЛйµГЗ¨КНºЗиТБХГНВа»ХВ¡ªЧй¹·ХидЛ¹ЛГЧНдБи
·иНГРºТВ¹йУªУГШ´аКХВЛТВ
ЛЕС§¨Т¡·У¤ЗТБКРНТ´»СкБ ·иТ¹дБид´йгКи½Т¤ГНº»ЕТВ·иН¶иТВ¹й
24
Ó·Ô駩ءà©Ô¹
Page 49

Mod. ..........
Prod. No. ...........
Ser. No. .........
M
o
d
. .
....
..
..
.
P
r
o
d
.
N
o
.
...
.
...
.
...
S
e
r.
N
o
.
..
.
..
....
P0042
»ÑËÒ ÊÒà˵طÕèà»ç¹ä»ä´é
¼Å¡ÒÃ«С¡дБиКРНТ´а·иТ·Хи¤ЗГ:
à¤ÃЧиН§КСи¹ЛГЧНКи§аКХВ§´С§:
à»Ô´½Ò¶Ñ§«Ñ¡äÁèä´é:
¡ÒûСи¹ЛБТ´аГФиБ·У§Т¹ªйТ ЛГЧНа¤ГЧиН§«С¡¼йТдБи»Си¹ЛБТ´:
гКи¼§«С¡¿Н¡¹йНВа¡Ф¹д» ЛГЧНгªй¼§«С¡¿Н¡дБиаЛБТРКБ
дБид´й¢¨С´ГНВа»ЧйН¹·Хи«С¡НН¡ВТ¡¡иН¹¡ТГ«С¡а¤ГЧиН§
аЕЧН¡НШ³ЛАЩБФКУЛГСº¡ТГ«С¡дБи¶Щ¡µйН§
»ГФБТ³¼йТБТ¡а¡Ф¹д»
дБид´й¹Уб·и§»йН§¡С¹¢³Р¢¹Ки§бЕРºГГ¨ШАС³±мНН¡
дБид´й»ГСº¢ТµСй§
¼йТг¹¶С§«С¡дБи¡ГР¨ТВНВиТ§КБиУаКБН
¼йТг¹¶С§НТ¨¹йНВа¡Ф¹д»
в»Гб¡ГБВС§·У§Т¹НВЩи
ЕзН¤¢Н§½Т»Ф´¶С§«С¡дБи»Е´НН¡
БХ¹йУ¤йТ§НВЩиг¹¶С§«С¡
а»Ф´½Т¶С§«С¡д´йаБЧиНБХ¢йН¤ЗТБ Door openable »ГТ¡¯º¹Л¹йТ¨Н
бЕРд¿ЕзН¤½Т¶С§´СºбЕйЗа·иТ¹Сй¹
НШ»¡Г³мНФаЕз¡·ГН¹Ф¡КмµГЗ¨КНº¤ЗТБКБ´ШЕаГФиБ·У§Т¹
а¹ЧиН§¨Т¡¼йТдБид´й¡ГР¨ТВµСЗНВЩиг¹¶С§«С¡НВиТ§·СиЗ¶Ц§
¼йТ¨Р¡ГР¨ТВµСЗг¹¶С§«С¡НХ¡¤ГСй§аБЧиН¶С§«С¡ЛБШ¹¡ЕСºд»НХ¡·Т§
¢Сй¹µН¹аªи¹¹ХйНТ¨·У§Т¹ЛЕТВ¤ГСй§ ¨¹¡ЗиТ¼йТ¨Р¡ГР¨ТВµСЗНВЩиг¹¶С§«С¡НВиТ§·СиЗ¶
¨Т¡¹Сй¹¨Ц§¨Ра¢йТКЩи¢Сй¹µН¹¡ТГ»Си¹ЛБТ´µТБ»¡µФ
ЛЕС§¨Т¡·ХиНШ»¡Г³мµГЗ¨КНº¡ТГ·У§Т¹бЕйЗа»з¹аЗЕТ 10 ¹Т·Х¼иТ¹д»
ЛТ¡¼йТВС§¡ГР¨ТВµСЗНВЩиг¹¶С§«С¡дБи·СиЗ¶Ц§ а¤ГЧиН§¨РдБи»Си¹ЛБТ´
г¹¡Г³Хаªи¹¹ХйгЛйгªйБЧН¡ГР¨ТВ¼йТбЕйЗаЕЧН¡в»Гб¡ГБ»Си¹ЛБТ´
АТЙТд·В
Ö§
ЛТ¡¤Ш³дБиКТБТГ¶ГРºШЛГЧНб¡йд¢»СЛТд´й ¡ГШ³ТµФ´µиНИЩ¹ВмºГФ¡ТГ¢Н§аГТ
¡иН¹¨Рв·Гб¨й§ИЩ¹Вм ¡ГШ³Т¨´ªЧиНГШи¹ «ХаГХВЕ¹СБаºНГм бЕРЗС¹·Хи¤Ш³«ЧйНа¤ГЧиН§БТ:
ИЩ¹ВмºГФ¡ТГ¨РКНº¶ТБ¢йНБЩЕаЛЕиТ¹Хй
49
Page 50

Pelanggan yang terhormat,
Bacalah petunjuk penggunaan ini dengan saksama
dan terutama perhatikan keterangan mengenai
keselamatan yang tercantum di beberapa halaman
pertama. Kami sarankan Anda menyimpan buklet
petunjuk ini untuk digunakan dan disampaikan ke
pemilik berikutnya kelak.
Simbol-simbol yang terdapat pada beberapa paragraf buklet ini memiliki arti berikut:
Segitiga peringatan dan/atau kata kunci (Peringatan!, Awas!) menekankan informasi yang penting
khususnya bagi keselamatan Anda atau agar mesin berfungsi dengan benar.
Informasi yang ditandai simbol ini berisi petunjuk tambahan dan saran praktis mengenai penggunaan
mesin.
Saran dan informasi mengenai penggunaan mesin secara ekonomis dan dengan memperhatikan
ekologi yang ditandai dengan simbol ini.
Kontribusi kami bagi perlindungan
lingkungan: kami menggunakan kertas yang
ramah lingkungan.
Kerusakan akibat pengangkutan
Setelah membuka kemasan, periksalah apakah
mesin tidak rusak. Jika ragu-ragu, jangan
menggunakan mesin, namun hubungi Pusat Servis
setempat.
Daftar Isi
Peringatan 51
Pembuangan 52
Saran bagi perlindungan lingkungan 52
Spesifikasi teknis 52
Pemasangan 53
Membuka kemasan 53
Menempatkan mesin 53
Saluran air masuk 53
Pembuangan air 54
Sambungan listrik 54
Mesin cuci Anda yang baru 55
Deskripsi mesin 55
Laci deterjen 55
Penggunaan 56
Panel kontrol 56
Tombol kontrol 56-61
Petunjuk mencuci 62
Memilah cucian 62
Suhu 62
Sebelum memasukkan cucian 62
Beban maksimum 62
Berat cucian 62
Menghilangkan noda 62
Deterjen dan aditif 63
Simbol kode cuci internasional 64
Urutan operasi 65-67
Program cuci 68-69
Perawatan 70
Penyekat pintu 70
Badan mesin 70
Laci deterjen 70
Pompa pembuangan 70
Filter air masuk 71
Pengurasan darurat 71
Pencegahan bunga es 71
Ada yang tidak berfungsi? 72-73
Informasi program 61
50
Page 51

Peringatan
Peringatan berikut diberikan demi keselamatan secara keseluruhan. Anda harus membacanya dengan
saksama sebelum memasang atau menggunakan mesin ini.
Pemasangan
• Semua kemasan internal harus dikeluarkan
sebelum mesin ini digunakan. Kerusakan serius
dapat terjadi pada mesin atau perabotan sekitar
jika perangkat pelindung pengangkutan tidak
dilepaskan atau jika dilepaskan sebagian saja.
Lihat bagian yang sesuai dalam buku petunjuk.
• Setiap pekerjaan kelistrikan yang diperlukan untuk
memasang mesin ini harus dilakukan oleh tukang
listrik yang kompeten.
• Setiap pekerjaan saluran air yang diperlukan
untuk memasang mesin ini harus dilakukan oleh
tukang ledeng yang kompeten.
• Setelah dipasang, periksa dan pastikan mesin
tidak menginjak kabel listriknya.
• Jika mesin diletakkan pada lantai berkarpet,
pastikan udara dapat mengalir bebas di antara
kaki mesin dan lantai.
Penggunaan
• Mesin ini dirancang hanya untuk penggunaan
rumah tangga. Mesin ini tidak boleh digunakan
untuk tujuan lain.
• Hanya mencuci bahan kain yang memang
dirancang untuk dicuci dengan mesin cuci. Patuhi
selalu petunjuk pada label pakaian.
• Jangan membebani mesin secara berlebihan. Ikuti
petunjuk pada buku petunjuk.
• Pastikan semua saku pakaian sudah kosong.
Benda seperti koin, peniti, bros dan sekrup dapat
mengakibatkan kerusakan berat.
• Jangan menggunakan mesin untuk mencuci
pakaian yang penuh dengan minyak tanah,
spiritus alkohol, trikloretilen, dll. Jika cairan
semacam itu digunakan untuk menghilangkan
noda pada pakaian, tunggulah sampai seluruh
cairan tersebut menguap sebelum memasukkan
pakaian ke dalam mesin.
• Masukkan benda berukuran kecil seperti kaos
kaki, ikat pinggang, dsb. ke dalam kantung kain
atau sarung bantal untuk mencegah agar bendabenda ini tidak tersangkut di antara tabung dan
bak.
• Gunakan pelembut cucian sebanyak yang
disarankan saja. Jumlah yang berlebih dapat
merusak cucian.
• Biarkan pintu sedikit terbuka jika mesin sedang
tidak digunakan. Ini untuk memperpanjang usia
penyekat pintu dan mencegah bau tak sedap.
• Selalu periksa apakah air sudah keluar semua
sebelum membuka pintu. Jika belum, keluarkan air
sesuai dengan petunjuk pada buku petunjuk.
• Setelah menggunakan mesin, selalu cabut steker
dan tutup keran air.
Keselamatan umum
• Perbaikan mesin hanya boleh dilakukan oleh
petugas yang kompeten. Perbaikan oleh orang tak
berpengalaman dapat mengakibatkan bahaya
yang
serius. Hubungi Pusat Servis setempat.
• Jangan sekali-kali menarik kabel listrik untuk
melepaskan steker dari stopkontak; melainkan,
peganglah selalu stekernya.
• Selama program cuci dengan suhu tinggi dan
selama siklus pengeringan, pintu kaca dapat
menjadi panas. Jangan menyentuh pintu!
Keselamatan anak-anak
• Anak-anak sering kali tidak menyadari bahwa
perangkat listrik dapat sangat berbahaya. Ketika
mesin sedang bekerja, awasi anak-anak dengan
saksama dan jangan biarkan mereka bermain
dengan mesin.
• Komponen pengemas (misalnya lapisan plastik,
polistiren) dapat berbahaya bagi anak-anak bahaya tercekik karena kurang oksigen! Jauhkan
benda-benda tersebut dari jangkauan anak-anak.
• Simpanlah semua deterjen di tempat aman dan
jauh dari jangkauan anak-anak.
• Jika mesin akan dibuang, potong kabel listrik dan
hancurkan steker beserta sisa kabelnya. Rusakkan
kunci pintu agar anak-anak tidak terperangkap di
dalam mesin ketika bermain.
BAHASA
INDONESIA
51
Page 52

Pembuangan
Bahan pengemas
Bahan yang ditandai dengan simbol dapat
didaur-ulang.
>PE<=polietilen
>PS<=polistiren
>PP<=polipropilena
Ini berarti, bahan tersebut dapat didaur-ulang
dengan cara dibuang ke tempat pengumpulan
limbah daur-ulang yang sesuai.
Saran bagi perlindungan lingkungan
Untuk menghemat air, energi dan melindungi
lingkungan, ikutilah saran-saran berikut:
• Cucian yang kotornya normal dapat dicuci tanpa
pra-cuci untuk menghemat deterjen, air dan waktu
(juga untuk melindungi lingkungan!).
• Mesin akan bekerja dengan lebih ekonomis jika
diberi beban penuh.
Mesin
Gunakan lokasi pembuangan yang diizinkan untuk
mesin lama Anda. Bantulah menjaga kebersihan
negara Anda!
• Dengan pra-perawatan yang memadai, noda dan
sebagian kotoran dapat dihilangkan; cucian dapat
dicuci pada suhu yang lebih rendah.
• Takar jumlah deterjen sesuai dengan tingkat
kesadahan air, tingkat kekotoran cucian serta
jumlah cucian.
Spesifikasi teknis
DIMENSI Tinggi 85 cm
Lebar 60 cm
Kedalaman 60 cm
BEBAN MAKSIMUM Katun 8,0 kg
Sintetis 4,0 kg
Bahan halus 3,0 kg
Wol 2,0 kg
Hand wash 2,0 kg
Sutera 1,0 kg
KECEPATAN PEMERASAN 1400 rpm maks.
TEGANGAN/FREKUENSI DAYA LISTRIK 230-240 V/50 Hz
PEMAKAIAN DAYA LISTRIK TOTAL 2200 W
UKURAN SEKRING MINIMUM 10 A
TEKANAN AIR Minimum 500 kPa
Maksimum 800 kPa
Mesin ini memenuhi Ketentuan EEC berikut:
73/23/EEC tanggal 19/02/73 mengenai tegangan rendah
89/336/EEC tanggal 03/05/89 mengenai kompatibilitas elektromagnetik.
52
Page 53

Pemasangan
Membuka kemasan
Semua kemasan dan baut pengiriman harus
dikeluarkan sebelum mesin digunakan.
Simpanlah semua perangkat pengiriman agar dapat
digunakan lagi jika mesin akan dipindahkan.
1. Dengan kunci pas, buka dan lepaskan kedua
sekrup di bagian bawah. Tarik keluar kedua pasak
plastik. Baringkan mesin pada bagian
belakangnya, perhatikan agar selang jangan
sampai tertekan. Ini dapat dihindarkan dengan
menyisipkan salah satu perangkat pengemas
sudut di antara mesin dan lantai
2. Lepaskan blok polistiren dari bagian bawah mesin
dan keluarkan kedua kantung plastik.
P1129
3. Dengan sangat hati-hati, keluarkan kantung
polietilen sebelah kiri, dengan menggesernya ke
arah kanan dan kemudian ke bawah.
P0001
5. Tegakkan mesin dan lepaskan sekrup belakang
yang masih tersisa. Keluarkan pasak yang
bersangkutan.
6. Sumbat semua lubang dengan sumbat yang
terdapat dalam amplop yang berisi buku
petunjuk.
P1128
P0002
Menempatkan mesin
Pasang mesin pada lantai yang datar dan keras.
Pastikan sirkulasi udara di sekitar mesin tidak
terhalang oleh karpet, permadani, dll. Periksa dan
pastikan mesin tidak menyentuh dinding atau
perangkat dapur lainnya. Dengan hati-hati,
datarkan posisi mesin dengan memutar kaki
mesin ke dalam atau ke luar. Jangan sekali-kali
menempatkan kardus, kayu atau semacamnya di
bawah mesin untuk mengkompensasi
ketidakrataan di lantai.
BAHASA
INDONESIA
1
2
3
P1123
P1126
4. Dengan sangat hati-hati, keluarkan kantung
polietilen sebelah kanan, dengan menggesernya
ke arah kiri dan kemudian ke bawah.
Ambil penutup alas yang dipasang ke dalam drum
mesin cuci Anda, sangkutkan pengaitnya seperti
yang ditunjukkan panah «A», lalu dorong bagian
atas penutup untuk menutupnya rapat-rapat.
Penting: Anda bisa mendapatkan rincian petunjuk
selengkapnya mengenai perakitan penutup bagian
bawah di dalam kantung yang berisi panduan yang
sesuai.
P1088
P0021
P1127
53
Page 54

Selang air masuk tidak boleh diperpanjang. Jika
selang terlalu pendek dan Anda tidak ingin
memindahkan keran air, Anda harus membeli selang
baru yang lebih panjang dan yang khusus dirancang
untuk penggunaan ini.
Pembuangan air
Ujung selang pembuangan dapat diletakkan dengan
tiga cara:
Dipasang pada sisi bak cuci dengan menggunakan
pemandu selang plastik yang disertakan bersama
mesin. Dalam hal ini, pastikan ujungnya tidak dapat
terlepas ketika mesin sedang mengeluarkan air.
Ini dapat dilakukan dengan mengikat selang ke
keran air dengan tali atau menempelkannya ke
dinding.
Sambungan listrik
Mesin ini dirancang untuk digunakan pada daya
listrik 220-230 V, fasa-tunggal, 50 Hz.
Periksa apakah daya listrik di rumah Anda cukup
untuk menjalankan mesin dengan beban maksimum
(2,2 kW), jangan lupa perhitungkan pula peralatan
listrik lain.
Hubungkan mesin ke stopkontak yang dibumikan.
Produsen mesin ini tidak bertanggung jawab
atas kerusakan atau cedera yang diakibatkan
kelalaian untuk mematuhi
aturan keselamatan di atas.
Jika kabel listrik mesin harus diganti,
penggantian ini harus dilakukan oleh Pusat
Servis kami.
Penting!
Apabila mesin dipasang, kabel listrik harus mudah
dijangkau.
P0022
Pada cabang pipa pembuangan bak cuci. Cabang ini
harus berada di atas perangkap/saringan kotoran
sedemikian sehingga lekukan berada sedikitnya
60 cm di atas lantai.
Langsung pada pipa pembuangan dengan
ketinggian tidak kurang dari 60 cm dan tidak lebih
dari 90 cm.
Ujung selang pembuangan harus selalu berventilasi,
yaitu, diameter dalam pipa pembuangan harus lebih
besar daripada diameter luar selang pembuangan.
Selang pembuangan tidak boleh ditekuk. Letakkan
selang di lantai; hanya bagian di dekat titik
pembuangan saja yang harus dinaikkan.
P0023
Agar mesin berfungsi dengan benar, selang
pembuangan harus tetap terkait pada penyangga
yang sesuai, yang diletakkan di bagian atas pada
samping belakang mesin.
54
Page 55

Mesin cuci Anda yang baru
Mesin ini, yang dilengkapi New Jet System, memenuhi semua kebutuhan modern atas penanganan cucian
yang efektif dengan pemakaian air, energi dan deterjen yang rendah.
• Program HANDWASH khusus dengan sistem baru pencucian halus akan menangani pakaian dari bahan
halus dengan hati-hati.
• Program wol khusus dengan sistem baru pencucian halus akan menangani pakaian wol Anda dengan hatihati.
• Pendinginan otomatis air pencucian dari 95° ke 60°C sebelum pembuangan, akan mencegah agar pipa
saluran pembuangan yang lama tidak menjadi bengkok.
Deskripsi mesin
1. Laci deterjen
2. Panel kontrol
3. Pegangan pintu
4. Pompa pembuangan
5. Kaki yang dapat disetel
BAHASA
INDONESIA
Laci deterjen
Pra-cuci
Pencucian utama
Pelembut cucian, kanji
PIC 001
P1206
55
Page 56

Penggunaan
Panel kontrol
1. Laci Penyaluran Deterjen
2. Tombol pemilih program
Tombol pemilih program dibagi ke dalam 4 bagian:
1. Katun (Bagian Hijau)
2. Sintetis, halus, handwash, wol, sutera dan
selimut (Bagian Biru)
3. Bilas, kuras, peras dan peras halus (Bagian Abuabu)
4. Memori 1, Memori 2 (Bagian Abu-abu)
Tombol pemilih dapat diputar searah jarum jam atau
berlawanan arah jarum jam. Posisi “cotton Eco” sesuai
dengan program penghematan energi untuk bahan
katun dan bisa diatur ke posisi “OFF” untuk menyetel
ulang program atau ke OFF untuk mematikan mesin.
Pada akhir program, tombol pemilih program harus
disetel ke posisi “OFF” untuk mematikan mesin.
Perhatian!
Jika Anda memutar tombol pemilih program ke
program lain sewaktu mesin sedang bekerja, akan
muncul pesan peringatan selama 4 detik pada layar
tampilan diiringi bunyi buzzer sebanyak 3 kali.
3. Layar tampilan
Layar tampilan digunakan untuk menyetel sejumlah
besar fungsi dan mengkombinasikan satu fungsi
dengan fungsi lainnya dengan hanya menggunakan
beberapa elemen kontrol (1 tombol pemilih program
dan 6 tombol)
Metodo kontrol ini memang dibuat agar mudah,
berkat layar tampilan interaktif. Interaktif artinya,
bahwa layar tampilan mesin cuci berubah-ubah
untuk menunjukkan setiap langkah yang sudah Anda
masuki. Ini menjamin, bahwa hanya pengaturan itu
saja yang memang sesuai untuk dilakukan. Anda
dapat melihat pengaturan yang berlaku sekarang,
setiap saat, dalam panel informasi dan di baris opsi.
1 23
Cotton
Cycle and at
95°C 1400
Temp. Spin
4
Options
Change
08.30
10.55
Exit
1. Panel informasi menunjukkan pengaturan yang
sekarang berlaku
2. Jam waktu nyata
3. End cycle time [Akhir waktu siklus]
4. Pemilihan menunjukan opsi suhu, kecepatan
pemerasan, dan ekstra.
4. Tombol suhu “Temp.”
Tekan tombol ini berulang kali untuk menaikkan atau
menurunkan suhu, jika Anda ingin mencuci pada
suhu yang lain dari yang diusulkan oleh mesin.
Suhu maksimum yaitu 95°C untuk katun, 60°C untuk
bahan sintetis, 40°C untuk bahan halus, wol dan
bahan kain yang akan dicuci dengan lembut (handwash), 30°C untuk sutera dan «Miniprogramme»,
sementara «0» berkaitan untuk cold wash, atau
mencuci dengan air dingin.
Dengan menekan tombol Suhu “Temp.”, pesan
terkait akan muncul di baris kedua layar
56
Page 57

tampilan (alih-alih «cycle end at»). Pada sudut baris
ketiga, muncul indikasi suhu yang dipilih.
COTTON
MAX 95°C
60°C
Temp. Spin
Options
Change
08.30
10.55
Exit
Kuras
Untuk menguras air, pilih program Drain dengan
cara memutar tombol pemilih, kemudian tekan
tombol Start/Add clothes [Mulai/Masukkan pakaian].
Peras
Untuk memeras cucian, pilih program spin atau
delicate spin dengan cara memutar tombol pemilih;
pilih spin speed dengan tombol “Spin” kemudian
tekan tombol Start/Add clothes [Mulai/Masukkan
pakaian].
5. Tombol Kecepatan Pemerasan
“Spin”
Tekan tombol ini berulang kali untuk mengubah
kecepatan pemerasan, jika Anda ingin cucian
diperas pada kecepatan yang berbeda dari yang
diusulkan oleh mesin.
COTTON
MAX 1400
1400
Temp. Spin
Options
Kecepatan maksimum adalah:
• untuk katun: 1400 rpm
• untuk wol dan bahan kain yang akan di-handwash
[cuci lembut]: 900 rpm;
• untuk bahan kain halus, sutera, selimut:
Dengan menekan tombol Spin speed [kecepatan
pemerasan], Anda juga dapat memilih opsi No Spin
«0», Rinse Hold dan opsi Night cycle .
Opsi No spin «0» akan meniadakan semua fase
pemerasan dan menambah jumlah bilasan untuk
katun dan sintetis.
Opsi rinse hold [pembilasan ditahan] : jika opsi ini
dipilih, air bilasan terakhir tidak akan dikeluarkan,
untuk menjaga agar bahan tidak kusut.
Opsi Night cycle [Siklus malam] : jika opsi ini
dipilih, air bilasan terakhir tidak akan dikeluarkan,
untuk menjaga agar bahan tidak kusut.
Sewaktu semua fase pemerasan ditekan, siklus cuci
ini tidak akan menjadi sangat berisik dan hal ini
dapat dipilih pada malam hari atau untuk
penghematan listrik yang lebih tinggi.
Pada program katun dan sintetis, bilasan akan
dilakukan dengan air yang lebih banyak.
Untuk menyelesaikan siklus, pilih salah satu dari
program berikut:
08.30
10.55
Change
Exit
700 rpm;
Penting!
Sebelum memilih program Drain, tombol pemilih spin
atau Delicate Spin harus diposisikan pada «O»
(OFF).
6 «Tombol options», «Change» dan
«exit»
Dengan tombol Options [Opsi], Anda dapat bergerak
melintasi semua ikon opsi.
Extra Rinse
No 10.55
Temp. Spin
Dengan tombol Change [Ubah], Anda dapat
memilih/mengubah status ikon yang berbeda-beda.
Extra Rinse
Yes 10.55
Temp. Spin
Dengan tombol Exit [Keluar], Anda dapat kembali ke
pilihan sebelumnya.
COTTON
CYCLE END AT
60°C 1400
Temp. Spin
Options
Options
Options
Change
Change
Change
Exit
Exit
08.30
10.55
Exit
BAHASA
INDONESIA
57
Page 58

Tergantung pada program yang dipilih, Anda dapat
mengkombinasikan sejumlah fungsi yang berbeda.
Fungsi-fungsi ini harus dipilih setelah menentukan
program yang dikehendaki dan sebelum menekan
tombol Start/Add clothes [Mulai/Masukkan pakaian].
Dengan menekan tombol “Options” [Opsi], semua
ikon simbol, yang bisa dilakukan untuk program yang
dipilih, akan muncul di layar tampilan (bisa dilakukan
untuk program yang dipilih).
Opsi pertama akan mulai berkedip. Nama dan
statusnya akan muncul di layar.
Jika Anda ingin mengubah status opsi, tekan tombol
“Change” [Ubah]. Akan muncul garis di bawah ikon
yang dipilih, menandakan, bahwa opsi sudah disetel.
Untuk memilih opsi yang lain, tekan lagi tombol
«Options» dan lanjutkan seperti sebelumnya.
Setelah Anda menyelesaikan pemilihan opsi, tekan
tombol «Exit», ikon yang dipilih akan tetap tampak di
layar tampilan.
Catatan: Untuk memodifikasi pemilihan opsi yang sudah
ditentukan, ulangi prosedur yang dilakukan sebelumnya.
Penting! Sewaktu memilih opsi, jika Anda menekan
tombol suhu, “Temp.”, “Spin”, atau Start/Add clothes,
fungsi yang terkait akan dilaksanakan.
EXTRA RINSE (BILASAN EKSTRA): opsi ini
dapat dipilih dengan semua program, kecuali program
wool/handwash dan miniprogram. Mesin akan
menambah 2 kali bilasan untuk katun dan 1 kali
bilasan untuk sintetis, kain halus dan sutera.
Opsi ini disarankan bagi orang-orang yang alergi
terhadap deterjen dan untuk daerah-daerah yang
airnya sangat lunak.
HEMAT WAKTU: opsi ini dapat digunakan untuk
bahan katun, sintentis, atau kain halus yang agak kotor
agar dapat dicuci bersih dalam waktu yang singkat.
Waktu pencucian akan dikurangi menurut jenis bahan
dan suhu yang dipilih. Dengan memilih opsi ini, «Short»
atau «Very Short» akan diperlihatkan di layar tampilan.
DELAY START [PENUNDAAN PELAKSANAAN]:
dengan opsi ini, Anda dapat menunda pelaksanaan
program pencucian selama 30 men - 60 men - 90 men,
2 jam kemudian 1 jam sampai 20 jam. Penundaan
yang sudah Anda pilih ditunjukkan di layar tampilan.
Delay Start
No 10.55
Change
Temp. Spin
Options
Exit
Delay Start
Start in 30 min 11.25
Temp. Spin
Options
Change
Exit
Anda harus memilih duu opsi ini setelah Anda
menyetel program dan sebelum menekan tombol
Start/Add clothes.
Anda dapat membatalkan waktu penundaan kapan
saja, sebelum menekan tombol START/PAUSE
(MULAI/JEDA). Jika tombol START/PAUSE
(MULAI/JEDA) sudah terlanjur ditekan dan Anda ingin
membatalkan waktu Tunda, lakukan hal berikut:
1. setel mesin ke PAUSE (JEDA) dengan menekan
tombol START/PAUSE (MULAI/JEDA);
2. batal-pilih opsi Delay start, akan mengubah
status;
3. tekan tombol START/PAUSE (MULAI/JEDA)
untuk menjalankan program.
Penting!
Penundaan yang dipilih bisa diubah, hanya setelah
Anda memilih lagi program pencucian.
Pintu mesin akan dikunci selama waktu penundaan.
Jika Anda perlu membuka pintu, terlebih dahulu mesin
harus disetel ke PAUSE (JEDA) dengan menekan tombol
START/PAUSE (MULAI/JEDA). Setelah pintu ditutup,
tekan lagi tombol START/PAUSE (MULAI/JEDA).
Delay Start [Penundaan Pelaksanaan] tidak dapat
dipilih dengan program SPIN/GENTLE SPIN
[PEMERASAN] dan DRAIN [KURAS].
PREWASH (PRA-CUCI): pilih opsi ini jika Anda
ingin cucian menjalani tahap pra-cuci sebelum
pencucian utama (tidak tersedia untuk miniprogram
siklus wol dan handwash).
Pra-cuci berakhir dengan pemerasan singkat dengan
kecepatan 650 rpm pada program untuk bahan katun
dan sintetis, sedangkan pada program untuk bahan
halus, air hanya dikuras.
INTENSIVE: untuk cucian yang sangat kotor.
Opsi ini hanya dapat dipilih untuk bahan katun dan
sintentis. Waktu pencucian akan diperpanjang
menurut suhu siklus dan jenis bahan.
EASY IRON [MUDAH DISETRIKA]: dengan
memilih tombol ini, cucian dicuci dengan lembut dan
diperas untuk menghindari kekusutan. Dengan cara
ini, penyetrikaan akan lebih mudah. Selanjutnya,
mesin akan melakukan 6 kali pembilasan, alih-alih 3
kali untuk katun dan 4 kali pembilasan alih-alih 3 kali
untuk sintetis. Fungsi ini dapat digunakan untuk
bahan katun dan sintetis. Jika opsi ini dipilih untuk
program cotton [katun], kecepatan pemerasan akan
secara otomatis dikurangi hingga 1000 rpm.
ECONOMY [EKONOMIS]: opsi ini hanya dapat
dipilih untuk bahan sintetis kotor ringan atau normal
dengan suhu 40c atau lebih tinggi. Waktu pencucian
akan diperpanjang. Jika Anda memilih 60°C-50°C40°C, suhu pencucian akan dikurangi hingga 42°C.
MENU:
Opsi menu digunakan untuk memilih berbagai
pengaturan dasar tanpa mempengaruhi program cuci
tertentu. Pengaturan dasar ini akan tetap aktif sampai
pengaturan ini dibatalkan/diubah.
Untuk bergerak melintasi beberapa pengaturan Menu
yang berbeda-beda, gunakan tombol «Options».
Untuk mengubah/mengkonfirmasi pengaturan yang
dipilih, gunakan tombol «Change».
58
Page 59

MEMORY [MEMORI]
Pengaturan program yang sering digunakan, dapat
disimpan (mis. cotton [katun],95°C, 1200rpm dengan
fungsi hemat waktu). Tersedia 3 ruang memori untuk
maksud ini. Program yang disimpan dapat dipilih
dengan cara yang sama seperti program cuci lainnya
dengan menggunakan tombol pemilih.
Contoh: Katun, 95°C, 1200 rpm, dengan Time saving
[Hemat waktu].
1. Pilih pengaturan siklus dan program.
Contoh:
1. Masuk ke opsi Menu dan pilih pengaturan Sound
[Suara].
Sound
Normal
Temp. Spin
Options
Change
Exit
Cotton
Cycle end at
60°C 1400
Temp. Spin
Options
Change
08.30
10.55
Exit
2. Masuk ke opsi Menu dan pilih salah satu posisi
memori. Pesan «Store programme?» akan
muncul di layar tampilan.
A
Setup
Temp. Spin
Options
A
Change
Exit
B
Memory 1
Store programme?
Temp. Spin
Options
Change
Exit
B
3. Untuk mengingat program yang sudah dipilih
tekan tombol «Change». Pesan «Stored» akan
muncul di layar tampilan.
2. Gunakan tombol «Change» untuk memilih tingkat
yang dikehendaki.
Sound
Low or No Sound
Change
Temp. Spin
Options
Exit
RINSE [BILAS] +
Mesin cuci disetelh sedemikian rupa sehingga
pemakaian airnya sangat hemat. Namun, bagi orangorang yang alergi terhadap deterjen dan untuk
daerah-daerah yang airnya sangat lunak, disarankan
untuk menggunakan air yang lebih banyak ketika
membilas. Apabila Anda memilih RINSE +, maka
akan dilakukan 2 kali pembilasan tambahan untuk
bahan katun dan 1 kali bilasan tambahan untuk bahan
sintetis, halus dan sutera. Jika RINSE + sudah dipilih,
akan muncul pada baris opsi.
BAHASA
INDONESIA
Programme Stored
Change
Temp. Spin
Options
Exit
Untuk mengubah pengaturan program yang
dimemori, ulangi prosedur dari awal.
SUARA
Dengan pengaturan suara, Anda dapat memodifikasi
volume emitter suara. Anda dapat memilih di anatara
sejumlah tingkat yang berbeda-beda: low [rendah], no
sound [tanpa suara] dan normal.
59
Extra Rinse
No 10.55
Temp. Spin
Options
Change
Extra Rinse
Yes 10.55
Exit
Temp. Spin
Options
Change
Exit
Page 60

LANGUAGE [BAHASA]
Anda dapat mengubah pengaturan bahasa jika Anda
ingin agar indikator pada layar agar tampil dalam
bahasa yang berbeda.
Contoh:
1. Masuk ke opsi Menu dan pilih pengaturan
Language [Bahasa].
Language
ENGLISH
Change
Temp. Spin
Options
Exit
CONTRAST [KONTRAS]
Dengan pengaturan Contrast [Kontras], Anda dapat
memodifikasi karakteristik optik layar tampilan.
Contoh:
1. Masuk ke opsi Menu dan pilih pengaturan
Contrast [Kontras].
2. Gunakan tombol «Change» untuk memilih
tingkat kontras yang dikehendaki.
Contrast
Temp. Spin
Options
Change
Exit
Contrast
Temp. Spin
Options
Change
Exit
2. Tekan tombol «Change» untuk memilih Bahasa
yang dikehendaki.
Sprache
DEUTCH
Temp. Spin
Options
Change
Exit
A
Einstellungen
Temp. Spin
Options
Change
Exit
B
CLOCK [JAM WAKTU]
Dengan pengaturan jam waktu, Anda dapat
memodifikasi/menyetel waktu yang sesuai. Memang
penting untuk tetap memperbarui waktu karena END
Cycle Time [AKHIR Waktu Siklus] yang berlaku
sekarang, tergantung pada setelan waktu tersebut.
Contoh:
1. Masuk ke opsi Menu dan pilih pengaturan Clock
[Jam waktu].
2. Dengan menekan sekilas/sekali tombol
«Change», waktu akan berubah menit per menit.
Dengan terus menekan tombol «Change», waktu
akan berubah 10 menit per 10 menit.
A
B
BRIGHTNESS [KECERAHAN]
Dengan pengaturan Brightness [Kecerahan], Anda
dapat memodifikasi intensitas cahaya latara layar
tampilan.
Contoh:
1. Masuk ke opsi Menu dan pilih pengaturan
Brightness [Kecerahan].
2. Gunakan tombol “Change” untuk menyetel
tingkat kecerahan yang dikehendaki.
Brightness
Temp. Spin
Options
A
Change
Exit
Brightness
Temp. Spin
Options
Change
B
Exit
Catatan:
Pada akhir program, jika tidak ada tombol yang
ditekan selama kira-kira 10 menit, intensitas cahaya
latar akan padam.
A
Clock
Set Time
Temp. Spin
Options
A
Change
14.45
B
Clock
Set Time
Exit
Temp. Spin
Options
Change
14.46
Exit
B
60
Page 61

7. Tombol “Start /Add Clothes”
[Mulai/Masukkan Pakaian]
Tombol ini memiliki 2 fungsi:
Start [Memulai]: setelah Anda memilih program
dan opsi yang dikehendaki, tekan tombol ini
untuk menjalankan mesin cuci. Lampu dekat
tombol akan berhenti berkedip dan tetap
menyala.
Jika Anda sudah memilih opsi waktu tunda,
penghitungan waktu mundur akan dimulai dan
diperlihatkan pada layar.
Add Clothes [Masukkan Pakaian]: Apabila Anda
menekan lagi tombol ini, program yang sedang
berjalan akan dihentikan. Lampu di dekat tombol
akan mulai berkedip. Untuk kembali menjalankan
program, tekan lagi tombol ini.
Apabila Anda menekan tombol “Start/Add clothes”,
Anda dapat membuka pintu jika:
Mesin cuci tidak berada dalam tahap pemanasan;
Tingkat permukaan air tidak tinggi;
Tabung tidak sedang berputar.
Penting! Anda harus menghentikan sementara (jeda)
mesin cuci sebelum Anda melakukan perubahan apa
pun dalam program yang sedang berjalan, dengan
menekan tombol “Start/Add clothes”.
BAHASA
INDONESIA
61
Page 62

Petunjuk mencuci
Memilah cucian
Ikuti simbol kode cuci pada setiap label pakaian dan
petunjuk cuci dari produsen.
Pilah cucian seperti berikut:
cucian putih, berwarna, sintetis, bahan halus, wol.
Suhu
90°-95° untuk cucian katun dan linen putih yang
kotor normal (misalnya taplak meja kecil,
handuk, taplak meja, seprai…)
50°-60° untuk pakaian berwarna yang tak luntur
dan kotor normal (misalnya kemeja, baju
tidur wanita, piyama…) berbahan linen,
katun atau serat sintetis dan untuk katun
putih yang kotor sedikit (misalnya baju
dalam).
O
(cold) untuk cucian halus (misalnya vitrase),
30°-40° antara lain cucian bahan sintetis dan wol
yang ada label «pure new wool, machine
washable, non-shrink» [wol baru asli,
dapat dicuci mesin, tidak menyusut].
Sebelum memasukkan cucian
Jangan sekali-kali menyatukan cucian putih dan
berwarna. Cucian putih dapat menjadi “kusam”.
Cucian berwarna baru bisa luntur saat dicuci
pertama kali; oleh sebab itu, cucian berwarna harus
dicuci secara terpisah saat pertama kali dicuci.
Pastikan tak ada benda logam yang tertinggal dalam
cucian (misalnya jepit rambut, peniti, bros).
Kancingkan sarung bantal, tutup ritsleting, kancing
kait dan kancing tekan. Ikatlah ikat pinggang atau
pita panjang.
Hilangkan noda membandel sebelum dicuci. Gosok
bagian yang sangat kotor dengan deterjen khusus
atau pasta deterjen.
Perlakukan tirai dengan hati-hati. Lepaskan kaitan
atau masukkan ke dalam kantung atau jaring.
Beban maksimum
Beban yang disarankan tercantum dalam diagram
program.
Aturan umum:
Katun, linen: penuhi tabung tapi jangan terlalu padat;
Sintetis: jangan penuhi tabung lebih dari
setengahnya;
Berat cucian
Berat berikut hanyalah patokan saja:
kimono mandi 1.200 g
serbet 100 g
selimut quilt 700 g
seprai 500 g
sarung bantal 200 g
taplak meja 250 g
handuk 200 g
taplak kecil 100 g
baju tidur wanita 200 g
celana dalam wanita 100 g
kemeja kerja pria 600 g
kemeja pria 200 g
piyama pria 500 g
blus 100 g
celana dalam pria 100 g
Menghilangkan noda
Noda membandel mungkin tidak dapat dihilangkan
hanya dengan air dan deterjen. Karena itu,
disarankan untuk memberikan perlakuan awal
sebelum mencuci.
Darah: hilangkan noda yang masih baru dengan air
dingin. Untuk noda yang sudah mengering, rendam
semalam dalam air dengan deterjen khusus,
kemudian gosok dengan air dan sabun.
Cat minyak: lembabkan dengan penghilang noda
benzin, letakkan pakaian di atas kain lembut,
kemudian tekan-tekan noda; lakukan beberapa kali.
Noda gemuk yang mengering: lembabkan dengan
terpentin, letakkan pakaian pada permukaan yang
lembut dan tekan-tekan noda dengan ujung jari yang
dibungkus lap katun.
Karat: asam oksalat yang dilarutkan dalam air panas
atau produk penghilang karat digunakan dalam
keadaan dingin. Berhati-hatilah dengan noda karat
yang sudah lama karena struktur selulosa bahan
sudah rusak dan bahan cenderung sobek.
Noda jamur: bersihkan dengan pemutih, bilas
dengan baik (hanya cucian putih dan cucian
berwarna yang tak luntur saja)
Rumput: beri sedikit sabun dan hilangkan dengan
pemutih (hanya cucian putih dan cucian berwarna
yang tak luntur saja).
Tinta bolpoin dan lem: lembabkan dengan aseton (*),
letakkan cucian pada kain halus kemudian tekantekan noda.
Lipstik: lembabkan dengan aseton seperti di atas,
kemudian hilangkan noda dengan spiritus alkohol.
Hilangkan sisa noda dari bahan putih dengan
pemutih.
62
Page 63

Tinta: tergantung pada jenis tintanya, basahi dulu
kain dengan aseton (*), kemudian dengan asam
asetat; hilangkan sisa noda dari bahan putih dengan
pemutih, lalu bilas dengan saksama.
Noda aspal: terlebih dahulu gunakan penghilang
noda, spiritus alkohol atau benzin, kemudian gosok
dengan pasta deterjen.
(*) jangan gunakan aseton pada sutra buatan.
Deterjen dan aditif
Hasil cuci yang baik juga bergantung pada pemilihan
deterjen dan penggunaannya dalam jumlah yang
tepat agar tidak banyak yang terbuang percuma dan
untuk melindungi lingkungan. Walaupun dapat
terurai secara alami, deterjen mengandung zat yang,
dalam jumlah besar, dapat merusak keseimbangan
alam.
Pemilihan deterjen bergantung pada jenis bahan
(halus, wol, katun, dll.), warna, suhu pencucian dan
tingkat kekotoran.
Semua deterjen mesin cuci yang umum tersedia
dapat digunakan untuk mesin ini:
- deterjen bubuk untuk semua jenis bahan,
- deterjen bubuk untuk bahan halus (60°C maks)
dan wol,
- deterjen cair, lebih baik untuk program cuci suhu
rendah (60°C maks) untuk semua jenis bahan,
atau yang khusus untuk wol saja.
Deterjen dan bahan aditif harus ditempatkan dalam
kompartemen yang sesuai dalam laci deterjen
sebelum program cuci dimulai.
Jika menggunakan konsentrat deterjen bubuk atau
cair, harus dipilih program tanpa pra-cuci.
Mesin cuci ini dilengkapi sistem resirkulasi yang
memungkinkan penggunaan deterjen konsentrat
secara optimal.
Tuangkan deterjen cair ke dalam kompartemen laci
deterjen bertanda tepat sebelum memulai
program.
Aditif pelembut cucian atau kanji harus dituangkan
ke kompartemen bertanda sebelum program cuci
dimulai.
Ikuti saran produsen dalam hal jumlah yang harus
digunakan dan jangan melampaui tanda «MAX»
pada laci penyaluran deterjen.
Jumlah deterjen yang digunakan
Jenis dan jumlah deterjen akan bergantung pada
jenis bahan, jumlah beban, tingkat kekotoran dan
kesadahan air yang digunakan.
Kesadahan air digolongkan berdasarkan ukuran
yang disebut “derajat” kesadahan. Informasi
mengenai kesadahan air di wilayah Anda dapat
diperoleh dari perusahaan air minum (PAM)
setempat, atau dari pihak yang berwenang.
Ikuti petunjuk produsen mengenai jumlah yang harus
digunakan..
Kurangi jumlah deterjen jika:
- beban yang dicuci hanya sedikit,
- cucian hanya kotor sedikit,
- terbentuk banyak busa ketika pencucian
berlangsung.
BAHASA
INDONESIA
63
Page 64

Simbol kode cucian internasional
Simbol ini dicantumkan pada setiap label pakaian, agar Anda dapat memilih cara paling cocok untuk mencuci pakaian.
Suhu cuci
maks
95°C
Cuci
dengan
tangan
Jangan
pernah
dicuci
Pemutihan
Pemutihan dalam air dingin
Jangan menggunakan bahan pemutih
Setrika
Setrika panas
maks 200°C
Setrika hangat
maks 150°C
Setrika suam
maks 110°C
Jangan setrika
Cuci kering
Cuci kering dalam
semua bahan pelarut
Pengeringan
Dibentangkan Digantung
pada tali jemuran
Digantung pada
gantungan baju
Dikeringkan
pada mesin
suhu
tinggi
suhu
rendah
Cuci
kuat
95
60
40
30
Suhu cuci
maks
60°C
Suhu cuci
maks
40°C
Suhu cuci
maks
30°C
Cuci halus
60
40
40
30
Cuci kering dalam
perkloretilen, bensin,
alkohol murni,
R 111 & R 113
64
Cuci kering
dalam bensin,
alkohol murni
dan R 113
Jangan
dicuci kering
Jangan
dikeringkan
pada mesin
Page 65

Urutan operasi
Sebelum melakukan pencucian yang pertama kali,
kami sarankan agar Anda menuangkan 2 liter air ke
dalam wadah cucian utama laci deterjen.
Kemudian jalankan siklus katun pada 60°C, dengan
mesin dalam keadaan kosong untuk membuang sisa
kotoran apa pun yang berasal dari pabrik dari tabung
dan bak.
Tuangkan setengah takar deterjen ke dalam wadah
cucian utama, kemudian jalankan mesin.
4. Nyalakan mesin
Putar tombol pemilih ke program yang dikehendaki
untuk menghidupkan mesin.
Untuk mematikan mesin, putar ke «O».
1. Masukkan cucian ke dalam
tabung
Buka pintu.
Masukkan cucian, satu per satu, sambil dikebutkebut agak lama.
Tutup pintu.
P0004
2. Takar deterjen
Tarik keluar laci deterjen sampai berhenti. Takar
jumlah deterjen sesuai dengan saran produsen
dengan menggunakan gelas penakar, kemudian
tuangkan ke dalam wadah cucian utama .
Jika Anda ingin menjalankan program pra-cuci atau
fase rendaman, tuang deterjen ke dalam wadah
yang sesuai dan bertanda .
Menghidupkan mesin untuk pertama kali.
LANGUAGE [BAHASA]
Apabila menghidupkan mesin untuk pertama kali,
Anda harus menyetel bahasa yang Anda ingin
munculkan di indikator layar.
Penting!
Jika layar tampilan tidak menunjukkan bahasa apa
pun, berarti mesin sudah pernah dihidupkan satu
kali. Jika begitu, lihalah bab «Change language»
[Ubah bahasa], jika Anda ingin mengubah
pengaturan bahasa.
BAHASA
INDONESIA
3. Takar jumlah bahan aditif
Jika perlu, tuang pelembut pakaian ke dalam wadah
bertanda , tanpa melampaui tanda «MAX».
65
Page 66

MENGATUR WAKTU
Anda harus menyetel waktu sebelum pencucian
yang pertama dan apabila mengubah ke dan dari
waktu daylight saving.
Lihat «Clock setting» [Pengaturan jawam waktu],
Menu di halaman 12.
5. Pilih program/bahan yang
diinginkan
Putar tombol pemilih untuk memilih program/bahan
yang dikehendaki. Pesan terkait akan muncul di
layar.
Layar akan menampilkan END CYCLE TIME [AKHIR
WAKTU SIKLUS] dari program yang dipilih, dihitung
berdasarkan beban maksimum untuk setiap jenis
bahan. Lampu tombol Start/Add clothes
[Mulai/Masukkan pakaian] akan mulai berkedip.
Jika beban cucian yang akan dicuci tidak banyak,
pada awal siklus, layar tampilan akan tetap
menunjukkan END CYCLE yang terkait ke beban
maksimum. Angka durasi ini secara bertahap akan
berubah selama siklus berlangsung.
7. Pilih Spin Speed “Spin”, Rinse Hold
atau Night cycle .
Tekan tombol SPIN SPEED berulang-ulang,
untuk memilih kecepatan pemerasan yang
dikehendaki atau opsi No Spin «O» atau Rinse Hold
atau Night Cycle . Pesan terkait akan muncul
di baris kedua layar tampilan. Tingkat pemerasan
yang dipilih akan ditunjukkan paad baris ketiga di
samping tombol spin [pemerasan].
Jika Anda memilih opsi Rinse Hold (Pembilasan
Ditahan) atau Night Cycle [Siklus Malam], mesin
akan berhenti di akhir program dengan air masih
tetap berada di dalam bak.
COTTON
MAX 1400
40°C
1200
Temp. Spin
Options
Change
08.30
10.55
Exit
Cotton
Cycle and at
60°C 1400
Temp. Spin
Options
Change
08.30
10.55
Exit
6. Pilih suhu
Tekan tombol TEMPERATURE [SUHU] jika Anda
ingin memilih angka suhu yang berbeda dari yang
diusulkan mesin cuci.
Pesan suhu maksimum yang tersedia akan muncul
di baris kedua layar tampilan (alih-alih «cycle end
at»). Pada sudut baris ketiga, muncul indikasi suhu
yang dipilih.
COTTON
MAX 95°C
40°C 1400
Temp. Spin
Options
Change
08.30
10.55
Exit
8. Pilih opsi yang diinginkan
Tekan ke bawah tombol yang terkait untuk memilih
opsi yang dikehendaki.
Tergantung pada program yang dipilih, hanya
sejumlah opsi tertentu yang tersedia dan
diperlihatkan sewaktu fase pemilihan.
Catatan: Tidak semua opsi saling kompatibel antara
satu dan yang lainnya. Ikon opsi yang tidak
kompatibel akan menghilang.
9. Pilih DELAY TIME (WAKTU
TUNDA)
Sebelum Anda menjalankan program, jika Anda
ingin agar pelaksanaannya ditunda, pilih opsi DELAY
[TUNDA].
Lama waktu penundaan yang dipilih (hingga 20 jam)
akan muncul pada layar sewaktu Anda memilih.
Akhir siklus akan diperbarui dan diperlihatkan pada
posisi relatif di layar tampilan.
66
Delay Start
No 10.55
Change
Temp. Spin
Options
Delay Start
Start in 30 min 11.25
Exit
Temp. Spin
Options
Change
Exit
Page 67

10. Jalankan program
Tekan tombol Start/Add clothes [Mulai/Masukkan
pakaian]. Lampu yang terkait, akan berhenti
berkedip. Pesan yang terkait ke fase yang sedang
berlangsung akan diperlihatkan pada layar.
Jika Anda memilih untuk menunda pelaksanaan,
mesin akan mulai menghitung mundur.
COTTON
Washing
40°C 1200
Temp. Spin
Options
Change
08.30
12.00
Exit
11. Cara mengubah program saat
siklus sedang berjalan
Sebelum mengubah, mesin harus disetel ke pause
(jeda) dengan menekan tombol Start/Add clothes
[Mulai/Masukkan pakaian].
Fase apa pun dapat diubah jika belum dijalankan.
Apabila program sudah dimulai, Anda hanya dapat
menyetel ulang dengan memutar tombol pemilih
program ke «O» kemudian Anda dapat memilih
program baru. Air cucian tetap berada dalam bak.
Jalankan program baru dengan menekan ke bawah
tombol Start/Add clothes.
Catatan: Untuk menguras air sebelum memulai
siklus baru, Anda harus membatalkan program dan
memilih DRAIN cycle [Siklus KURAS].
12. Membatalkan program
Putar tombol pemilih ke «O» untuk membatalkan
program yang sedang berjalan. Sekarang, Anda
dapat memilih program baru.
13. Cara membuka pintu sewaktu
siklus program sedang
berlangsung
Jika persyaratan ini tidak terpenuhi, apabila Anda
menjedakan mesin cuci, pesan terkait akan muncul
di layar, lampu yang menandakan pintu terkunci
akan padam dan pintu dapat dibuka.
Seandainya pintu tidak dapat dibuka, lampu pintu
terkunci menyala, dan pintu harus dibuka, matikan
mesin dengan memutar tombol pemilih ke posisi “O”.
Setelah sekitar 3 menit, Anda dapat membuka pintu.
Perhatikan tingkat permukaan dan suhu air dalam
mesin cuci!
14. Akhir program
Di akhir program, mesin cuci berhenti secara
otomatis dan terdengar bunyi (jika Anda tidak
memilih opsi tanpa suara), dan layar menampilkan
pesan yang terkait.
Jika Anda sudah memilih opsi RINSE HOLD atau
NIGHT CYCLE, lampu tombol Start/Add clothes
akan padam dan lampu pintu terkunci akan menyala.
ntuk menguras atau memeras, putar dulu tombol
pemilih program ke «O» kemudian ke program drain
[kuras] atau program spin/delicate spin
[pemerasan/pemerasan halus].
Pelepasan kunci, juga diindikasikan dengan
munculnya pesan “Door openable” (cycle ended)
dan lampu pintu terkunci, padam.
Putar tombol pemilihan program ke «O» untuk
mematikan mesin.
Keluarkan cucian dari mesin cuci.
Periksa apakah tabung sudah benar-benar kosong
dengan memutarnya dengan tangan. Ini untuk
mencegah agar tidak ada cucian yang tertinggal
dalam tabung, karena jika ada, cucian ini dapat
rusak akibat turut serta dalam pencucian berikutnya
(misalnya jadi mengerut) atau melunturkan warna ke
cucian lain.
Sebaiknya tutup keran air dan lepaskan steker dari
stopkontak.
Biarkan pintu terbuka agar mesin cuci mendapat
aliran udara.
BAHASA
INDONESIA
Anda dapat membuka pintu, setelah menyetel mesin
cuci ke fase PAUSE (JEDA), dengan menekan
tombol Start/Add clothes, asalkan kondisi berikut
terpenuhi:
1) mesin cuci tidak berada dalam tahap pemanasan,
di atas 55°C;
2) tingkat permukaan air tidak tinggi;
3) tabung tidak sedang berputar.
67
Page 68

Page 69

Page 70

Perawatan
1. Badan mesin
Bersihkan bagian luar mesin dengan sabun dan air
saja. Bilas dengan air bersih dan keringkan dengan
lap halus.
Penting: jangan menggunakan spiritus termetilat,
pelarut atau produk sejenis untuk membersihkan
badan mesin.
2. Penyekat pintu
Secara berkala periksalah penyekat pintu dan
singkirkan benda-benda yang mungkin terperangkap
dalam lipatan pada penyekat.
P1050
3. Laci deterjen
Deterjen juga dapat mengumpul di dalam cerukan
laci: bersihkan dengan sikat gigi bekas. Pasang
kembali laci setelah dibersihkan.
P0038
4. Pompa pembuangan
Pompa harus diperiksa jika
• mesin tidak dapat dikosongkan dan/atau tidak
melakukan pemerasan
• mesin mengeluarkan suara asing ketika menguras
air karena ada benda seperti peniti, koin dll. yang
menyumbat pompa.
Lakukan sebagai berikut:
• Putuskan hubungan listrik.
• Jika perlu, tunggu sampai air menjadi dingin.
• Buka pintu pompa.
Lama-kelamaan, deterjen dan pelembut cucian akan
meninggalkan endapan dalam laci.
Bersihkan laci dari waktu ke waktu dengan
membilasnya dalam air yang mengalir. Untuk
melepaskan laci dari mesin, tekan tombol di sudut
kiri belakang.
Agar lebih mudah dicuci, bagian atas kompartemen
aditif dapat dilepaskan.
C0118
C0119
P1114
• Tempatkan sebuah wadah di dekat pompa untuk
menampung tumpahan.
• Lepaskan selang penguras darurat, tempatkan
dalam wadah dan buka tutupnya.
• Jika sudah tidak ada lagi air yang keluar, putar
pompa dan lepaskan
mengeringkan tumpahan air ketika melepaskan
pompa.
. Selalu siapkan lap untuk
70
P1115
Page 71

• Lepaskan benda dari penggerak pompa dengan
memutarnya.
• Pasang kembali tutup selang penguras darurat dan
kembalikan selang ke tempatnya.
6. Pengurasan darurat
Jika air tidak bisa keluar, lakukan sebagai berikut
untuk menguras mesin:
• cabut steker dari stopkontak;
• tutup keran air;
•jika perlu, tunggu sampai air menjadi dingin;
• buka pintu pompa;
• siapkan sebuah wadah di lantai dan tempatkan
ujung selang pengurasan darurat pada wadah.
Lepaskan tutupnya. Akibat gaya tarik bumi, air
akan turun ke wadah. Jika wadah sudah penuh,
pasang kembali tutup selang. Kosongkan wadah.
Ulang prosedur ini sampai air tidak mengalir lagi;
• bersihkan pompa
dijelaskan sebelumnya;
• kembalikan selang pengurasan darurat ke
tempatnya setelah disambungkan;
• pasang lagi tutuppompa, kemudian tutup pintu.
jika perlu sebagaimana
P1117
• Putar pompa sampai sepenuhnya masuk.
• Tutup pintu pompa.
5. Filter air masuk
Jika Anda merasa bahwa mesin perlu waktu lebih
lama untuk mengisi air, periksa apakah selang air
masuk tidak terhalang.
Tutup keran air.
Lepaskan selang dari keran.
Bersihkan filter dengan sikat yang kaku.
Pasang kembali selang pada keran.
7. Pencegahan bunga es
Jika mesin dipasang di tempat yang suhunya dapat
turun sampai di bawah 0°C, lakukan sebagai berikut:
• Lepaskan steker dari stopkontak.
• Tutup keran air dan putar selang air masuk sampai
terlepas dari keran.
• Tempatkan ujung selang pengurasan darurat dan
ujung selang air masuk pada sebuah wadah di
lantai, lalu biarkan air keluar.
• Pasang kembali selang air masuk dan kembalikan
selang pembuangan ke tempatnya setelah
tutupnya dipasang kembali.
Dengan melakukan hal ini, air yang tersisa dalam
mesin akan keluar sehingga pembentukan es dapat
dicegah dan bagian-bagian mesin terhindar dari
kerusakan.
Ketika mesin kembali di
sekitar mesin di atas 0°C.
gunakan, pastikan suhu
BAHASA
INDONESIA
P1090
71
Page 72

Ada yang tidak berfungsi?
Masalah yang dapat Anda selesaikan sendiri.
Selama mesin bekerja, mungkin muncul salah satu kode alarm berikut pada layar:
- Masalah pasokan air: “No incoming water. Check tap & hose” [Tidak ada masukan air. Periksa
keran & selang]
- Masalah pengurasan air: “No drain. Check drain hose /filter” [Tidak ada pengurasan. Periksa selang
/saringan kuras]
-Pintu terbuka: “Door not closed. Please check” [Pintu tidak tertutup. Coba periksa]
Jika masalah sudah dipecahkan, tekan tombol Start/Add clothes [Mulai/Masukkan pakaian] untuk kembali
menjalankan program. Jika, setelah pemeriksaan di atas, masih ada masalah, hubungi Pusat Servis setempat.
Masalah Kemungkinan penyebabnya
• Mesin tidak jalan:
• Mesin tidak mau mengisi air:
• Mesin mengisi air kemudian
langsung membuangnya:
• Pintu tidak ditutup rapat. (“Door not closed. Please
check” [Pintu tidak tertutup. Coba periksa])
• Mesin tidak tersambung ke sumber listrik atau tak
ada daya listrik pada stopkontak.
• Sekering utama putus
• Tombol START/ADD CLOTHES belum ditekan.
• Opsi DELAY START (PENUNDAAN
PELAKSANAAN) sudah dipilih.
• Tombol pemilih program tidak pada posisi yang benar.
• Keran air tertutup. (“No incoming water. Check
tap & hose” [Tidak ada masukan air. Periksa
keran & selang])
• Selang air masuk terjepit atau tertekuk. (“No
incoming water. Check tap & hose” [Tidak ada
masukan air. Periksa keran & selang])
• Filter dalam selang air masuk tersumbat. (“No
incoming water. Check tap & hose” [Tidak ada
masukan air. Periksa keran & selang])
• Pintu tidak tertutup dengan baik. (“Door not
closed. Please check” [Pintu tidak tertutup.
Coba periksa])
• Ujung selang pembuangan terlalu rendah. Lihat
paragraf yang sesuai di bagian “pembuangan air”.
• Mesin tidak dapat dikosongkan
dan/atau tidak melakukan
pemerasan:
• Ada air di lantai:
• Selang pembuangan terjepit atau tertekuk. (“No
drain. Check drain hose /filter” [Tidak ada
pengurasan. Periksa selang /saringan kuras])
• Opsi RINSE HOLD , NIGHT CYCLE atau
NO SPIN «O» sudah dipilih.
• Cucian tidak terbagi rata dalam tabung.
• Pompa pembuangan tersumbat. (“No drain.
Check drain hose /filter” [Tidak ada
pengurasan. Periksa selang /saringan kuras])
• Deterjen terlalu banyak atau jenisnya tidak tepat
(menimbulkan terlalu banyak busa).
• Periksa apakah ada kebocoran pada sambungan
selang air masuk. Tidak selalu mudah untuk
melihat ini karena air mengalir dalam selang;
periksa, apakah ada daerah yang basah.
• Selang pembuangan rusak.
• Tutup selang pengurasan darurat belum dipasang
kembali setelah pompa dibersihkan.
72
Page 73

BAHASA
INDONESIA
73
Jika Anda tidak dapat mengenali atau memecahkan
masalah, hubungi pusat servis kami. Sebelum
menelepon, catatlah model, nomor seri dan tanggal
pembelian mesin Anda: informasi ini diperlukan oleh
Pusat Servis.
Mod. ..........
Prod. No. ...........
Ser. No. .........
M
o
d
. .
....
.
...
.
P
r
o
d
.
N
o
.
...
.
...
.
...
S
e
r.
N
o
. ..
...
..
..
P0042
Masalah Kemungkinan penyebabnya
• Pemerasan lambat memulai atau
mesin tidak memeras:
• Perangkat elektronik pendeteksi
ketidakseimbangan diaktifkan karena cucian tidak
terbagi rata dalam tabung. Cucian akan didistribusiulang dengan memutar tabung ke arah
berlawanan. Ini dapat terjadi beberapa kali sebelum
ketidakseimbangan dapat dihilangkan dan
pemerasan normal dapat dilanjutkan. Jika, setelah
10 menit, cucian tetap tidak terdistribusi secara rata
di dalam tabung, mesin tidak akan memeras. Jika
begitu, distribusikan ulang beban cucian secara
manual dan pili
h program pemerasan.
• Pintu tak dapat dibuka:
• Program masih berlangsung.
• Kunci pintu belum dilepaskan.
• Ada air di dalam tabung.
Pintu hanya bisa dibuka apabila pesan «Door
openable» [Pintu dapat dibuka], muncul di layar
dan lampu pintu terkunci, padam.
• Mesin bergetar atau bising:
• Baut-baut dan pengemas pengiriman belum
dilepaskan.
• Kaki penyangga belum disetel.
• Cucian tidak terbagi rata dalam tabung.
• Mungkin cucian dalam tabung terlalu sedikit.
• Hasil cuci tidak memuaskan:
• Deterjen yang digunakan terlalu sedikit atau
jenisnya tidak tepat.
• Noda membandel belum mendapat perlakuan apa-
apa sebelum dicuci.
• Suhu yang dipilih tidak tepat.
• Beban terlalu berat.
Page 74

Nh÷ng ký hiÖu quÝ vÞ thÊy t¹i nhiÒu n¬i trong cuèn s¸ch nµy cã ý nghÜa nh sau:
H×nh tam gi¸c c¶nh gi¸c vµ/hoÆc nh÷ng ch÷ quan träng (c¶nh gi¸c, cÈn thËn!) nhÊn m¹nh ®Õn c¸c chØ dÉn cã tÇm
quan träng ®Æc biÖt liªn quan ®Õn sù an toµn cña quÝ vÞ hoÆc sù thùc hiÖn ®óng c¸c chøc n¨ng cña m¸y.
Nh÷ng th«ng tin mang ký hiÖu nµy cung cÊp nh÷ng chØ dÉn bæ sung vµ c¸c lêi khuyªn thùc tÕ vÒ c¸ch sö dông m¸y.
C¸c lêi khuyªn vµ th«ng tin vÒ viÖc sö dông m¸y tiÕt kiÖm vµ b¶o vÖ sinh th¸i ®îc ®¸nh dÊu b»ng ký hiÖu nµy.
74
KÝnh tha quÝ vÞ kh¸ch hµng,
Xin vui lßng ®äc kü tËp híng dÉn sö dông nµy vµ chó ý
®Æc biÖt ®Õn môc an toµn nªu râ trong c¸c trang ®Çu.
Chóng t«i ®Ò nghÞ quÝ vÞ gi÷ l¹i tËp híng dÉn nµy ®Ó tham
kh¶o trong t¬ng lai vµ trao l¹i cho ngêi së h÷u kÕ tiÕp
sau nµy.
C¸ch giÆt 86
S¾p xÕp ®å cÇn giÆt 86
NhiÖt ®é 86
Tríc khi bá ®å giÆt vµo m¸y 86
T¶i träng tèi ®a 86
Träng lîng ®å giÆt 86
TÈy c¸c vÕt bÈn 86
Bét giÆt vµ c¸c chÊt liÖu phô 87
C¸c ký hiÖu giÆt quèc tÕ 88
Tr×nh tù ®iÒu khiÓn 89-91
C¸c ch¬ng tr×nh giÆt 92-93
B¶o tr× 94
Gio¨ng cöa 94
Th©n m¸y 94
Ng¨n chøa bét giÆt 94
B¬m th¸o níc 94
Bé phËn läc níc vµo 95
C¸ch th¸o níc khÈn cÊp 95
Phßng ngõa khi thêi tiÕt ®«ng gi¸ 95
C¸ch söa ch÷a khi m¸y trôc trÆc 96-97
C¶nh gi¸c 75
PhÕ th¶i 76
Lêi khuyªn b¶o vÖ m«i sinh 76
C¸c ®Æc ®iÓm kü thuËt 76
ThiÕt ®Æt m¸y 77
Më bao b× 77
§Æt m¸y vµo vÞ trÝ 77
C¸ch cho níc vµo 77
C¸ch th¶i níc 78
C¸ch nèi ®iÖn vµo m¸y 78
M¸y giÆt míi cña quÝ vÞ 79
M« t¶ m¸y 79
Ng¨n chøa bét giÆt 79
Sö dông 80
B¶ng ®iÒu khiÓn 80
C¸c nót ®iÒu khiÓn 80-85
Th«ng tin vÒ ch¬ng tr×nh 85
Môc lôc
H h¹i do vËn chuyÓn
Khi th¸o bao b×, h·y kiÓm tra ®Ó biÕt ch¾c m¸y kh«ng bÞ
h h¹i. NÕu cã nghi ngê m¸y bÞ h, ®õng sö dông vµ h·y
liªn l¹c víi Trung T©m Phôc Vô.
Chóng t«i ®ãng gãp vµo viÖc b¶o vÖ m«i sinh:
chóng t«i sö dông giÊy t¸i chÕ.
Page 75

TiÕng ViÖt
75
ThiÕt ®Æt m¸y
• TÊt c¶ nh÷ng ®å ®ãng gãi bªn trong ph¶i ®îc th¸o gì
hÕt tríc khi sö dông m¸y. NÕu kh«ng th¸o gì hay th¸o
gì kh«ng hÕt nh÷ng bé phËn chÌn lãt b¶o vÖ m¸y trong
khi di chuyÓn cã thÓ g©y h h¹i nÆng nÒ cho m¸y hoÆc
nh÷ng ®å gç xung quoanh. Xem thªm phÇn liªn quan
trong tËp híng dÉn.
• TÊt c¶ nh÷ng c«ng t¸c l¾p r¸p vÒ ®iÖn ph¶i do thî ®iÖn
cã ®ñ kh¶ n¨ng chuyªn m«n ®¶m nhËn.
• TÊt c¶ nh÷ng c«ng t¸c l¾p r¸p vÒ èng níc ph¶i do thî
èng níc cã ®ñ kh¶ n¨ng chuyªn m«n ®¶m nhËn.
• Sau khi thiÕt ®Æt m¸y xong, kiÓm tra xem m¸y cã ®Ì lªn
d©y c¸p dÉn ®iÖn kh«ng.
• NÕu m¸y ®îc ®Æt trªn sµn cã lãt th¶m, ph¶i ch¾c ch¾n
r»ng kh«ng khÝ cã thÓ lu th«ng dÔ dµng gi÷a ch©n m¸y
vµ sµn nhµ.
Sö dông
• M¸y nµy ®îc thiÕt kÕ ®Ó sö dông trong gia ®×nh.
Kh«ng nªn sö dông m¸y vµo nh÷ng môc ®Ých kh¸c víi
thiÕt kÕ.
• ChØ giÆt nh÷ng lo¹i hµng ®îc chÕ t¹o ®Ó giÆt ®îc
b»ng m¸y. H·y xem nh÷ng híng dÉn ghi trªn nh·n
tõng lo¹i hµng.
• §õng sö dông m¸y qu¸ t¶i. H·y theo ®óng nh÷ng
híng dÉn trong s¸ch híng dÉn.
• Ph¶i ch¾c ch¾n r»ng tói cña c¸c quÇn ¸o giÆt trèng rçng.
Nh÷ng vËt nh ®ång xu, kim b¨ng, kim gµi vµ èc vÝt cã
thÓ g©y h h¹i trÇm träng cho m¸y.
• Kh«ng giÆt nh÷ng ®å dÝnh ®Ém dÇu má, cån methylate,
tricholorethylene,v.v... NÕu ®· dïng nh÷ng dung m«i ®Ó
tÈy vÕt bÈn tríc khi giÆt, ph¶i chê cho nh÷ng chÊt ®ã
hoµn toµn bay h¬i hÕt míi bá vµo thïng giÆt.
• Bá nh÷ng ®å giÆt nhá nh ví, d©y ®eo v.v... vµo mét tói
v¶i hay ¸o gèi ®Ó tr¸nh chóng bÞ kÑt vµo kÏ hë gi÷a trôc
m¸y vµ thïng giÆt.
C¶nh gi¸c
• ChØ sö dông ®óng sè lîng ®Ò nghÞ chÊt lµm mÒm v¶i.
Dïng qu¸ nhiÒu cã thÓ lµm h h¹i ®å giÆt.
• Gi÷ cöa m¸y khÐp hê khi m¸y kh«ng sö dông. Nh vËy
khiÕn cho m¸y kh«ng bÞ mïi h«i do sù bÝt kÝn g©y nªn.
• Tríc khi më cöa thïng m¸y, lu«n kiÓm tra xem níc
®· ®îc th¸o hÕt cha. NÕu cha, h·y th¸o níc theo
híng dÉn trong s¸ch híng dÉn.
• Lu«n lu«n rót d©y ®iÖn cña m¸y ra khái æ c¾m vµ t¾t vßi
níc sau khi sö dông xong.
An toµn chung
• ViÖc s¶ ch÷a cho m¸y ph¶i do chuyªn viªn lµnh nghÒ
®¶m tr¸ch. ViÖc söa ch÷a do ngêi thiÕu kinh nghiÖm
thùc hiÖn cã thÓ g©y cho m¸y h h¹i.
trÇm träng. H·y liªn hÖ víi Trung T©m Phôc Vô.
• §õng bao giê kÐo d©y ®iÖn ®Ó rót phÝt c¾m khái æ ®iÖn;
lu«n lu«n n¾m phÝt ®iÖn ®Ó rót ra.
• Trong chu tr×nh giÆt ë nhiÖt ®é cao cöa kÝnh cña m¸y cã
thÓ bÞ nãng. §õng sê tay vµo ®ã!
An toµn cho trÎ em
• TrÎ em thêng kh«ng ý thøc ®îc sù nguy hiÓm cña
nh÷ng m¸y mãc ch¹y b»ng ®iÖn. Khi m¸y ®ang ch¹y,
ph¶i tr«ng chõng trÎ em cÈn thËn vµ ®õng cho c¸c em
®ïa nghÞch víi m¸y mãc.
• C¸c vËt liÖu bao b× (bao ni l«ng, polystyrene) cã thÓ rÊt
nguy hiÓm víi trÎ em- cã thÓ g©y chÕt ng¹t! H·y ®Ó xa
tÇm tay víi cña trÎ.
• CÊt gi÷ c¸c lo¹i xµ phßng ë n¬i an toµn c¸ch xa tÇm tay
víi cña trÎ.
• Khi phÕ th¶i m¸y, c¾t bá d©y ®iÖn, ®Ëp bÓ phÝt c¾m vµ
d©y dÉn ®iÖn. Ph¸ bá chèt gµi cöa thïng m¸y phßng
ngõa trÎ em ®ïa nghÞch bß vµo thïng m¸y vµ kÑt bªn
trong.
Sau ®©y lµ nh÷ng c¶nh gi¸c ph¶i tu©n theo v× lîi Ých trªn hÕt cña sù an toµn. QuÝ vÞ ph¶i ®äc cÈn thËn nh÷ng ®iÒu
sau ®©y tríc khi thiÕt ®Æt hay sö dông m¸y.
Page 76

76
PhÕ th¶i
Lêi khuyªn b¶o vÖ m«i sinh
VËt liÖu bao b×
C¸c vËt liÖu cã ký hiÖu cã thÓ t¸i sinh ®îc.
>PE<=polyethylene
>PS<=polystyrene
>PP<=polypropylene
NghÜa lµ chóng cã thÓ ®îc t¸i chÕ nÕu vøt bá
chóng vµo nh÷ng thïng chøa phÕ th¶i ®Ó t¸i chÕ phï hîp.
M¸y
H·y vøt bá m¸y cò t¹i ®óng ®Þa ®iÓm chÝnh quyÒn cho
phÐp. H·y gióp gi÷ g×n n¬i sinh sèng s¹ch sÏ!
§Ó tiÕt kiÖm níc, n¨ng lîng vµ gióp b¶o vÖ m«i sinh,
chóng t«i ®Ò nghÞ quÝ vÞ tu©n thªo nh÷ng lêi khuyªn sau
®©y:
• Aã quÇn víi ®é bÈn b×nh thêng cã thÓ giÆt kh«ng qua
kh©u xö lý tríc ®Ó tiÕt kiÖm xµ phßng, níc vµ thêi
gian (còng ®Ó b¶o vÖ m«i sinh n÷a!).
• M¸y sÏ ho¹t ®éng tiÕt kiÖm h¬n nÕu ®îc t¶i ®Çy mÎ.
• Víi sù xö lý tríc phï hîp, c¸c vÕt bÈn vµ ®é d¬ giíi
h¹n cã thÓ ®îc lµm s¹ch; sau ®ã m¸y cã thÓ giÆt ë nhiÖt
®é thÊp h¬n.
• Lîng xµ phßng bá vµo m¸y tïy theo ®é cøng cña nuíc,
®é bÈn cña quÇn ¸o vµ sè lîng quÇn ¸o cÇn giÆt.
kÝch cì ChiÒu cao 85 cm
ChiÒu ngang 60 cm
ChiÒu s©u 60 cm
T¶i träng tèi ®a Hµng cotton 8,0 kg
Hµng tæng hîp 4,0 kg
Hµng máng 3,0 kg
Hµng len 2,0 kg
Hµng giÆt tay 2,0 kg
T¬ lôa 1,0 kg
Tèc §é V¾t 1400 vßng/phót tèi ®a
§iÖn sö dông v«n/tÇn sè 230-240 V/50 Hz
tæng sè ®iÖn n¨ng tiªu thô 2200 W
CÇu ch× b¶o vÖ tèi thiÓu 10 A
¸p suÊt níc Tèi thiÓu 500 kPa
Tèi ®a 800 kPa
M¸y nµy ®îc thiÕt kÕ theo nh÷ng chØ thÞ cña EEC sau ®©y:
73/23/EEC ngµy 19/02/73 liªn quan ®Õn ®iÖn thÕ thÊp
89/336/EEC ngµy 03/05/89 liªn quan ®Õn t×nh tr¹ng t¬ng hîp ®iÖn tõ.
C¸c ®Æc ®iÓm kü thuËt
Page 77

TiÕng ViÖt
77
Më bao b×
TÊt c¶ nh÷ng bao gãi vµ chèt b¶o vÖ khi vËn
chuyÓn ph¶i ®îc th¸o bá tríc khi sö dông m¸y.
Chóng t«i khuyªn quÝ vÞ gi÷ l¹i tÊt c¶ c¸c vËt liÖu bao b× ®Ó
sau nµy cã thÓ sö dông khi cÇn chë m¸y ®i n¬i kh¸c.
1. Dïng ch×a vÆn ®ai èc, th¸o më hai èc ®¸y ®»ng sau.
KÐo ra hai ghim nhùa §Æt m¸y n»m ngöa, cÈn thËn
kh«ng ®Ì bÑp c¸c èng dÉn. §Ó tr¸nh cho èng khái bÞ ®Ì,
®Æt miÕng chÌn gi÷a lng m¸y vµ sµn nhµ.
2. Th¸o c¸c khèi xèp polystyrene khái ®¸y m¸y vµ lÊy ra
hai tói nhùa.
3. CÈn thËn gì tói nhùa bªn tr¸i, b»ng c¸ch kÐo nã vÒ phÝa
ph¶i sau ®ã xuèng phÝa díi.
4. CÈn thËn gì tói bªn ph¶i, b»ng c¸ch kÐo nã vÒ phÝa tr¸i
sau ®ã lªn phÝa trªn.
LÊy n¾p ®¸y cña m¸y tõ trong thïng m¸y ra, ®Æt b¶n lÒ
cña nã theo mòi tªn <A> chØ trªn h×nh vµ ®Èy phÇn trªn
cña n¾p ®Ó g¾n chÆt nã l¹i.
§iÒu quan träng! Quý vÞ cã thÓ t×m thÊy híng dÉn chi tiÕt
h¬n cho viÖc l¾p r¸p n¾p ®¸y cña m¸y trong tói ®ùng cña
nã.
5. Dùng m¸y ®øng lªn vµ th¸o nèt èc phÝa sau. LÊy ta c¸c
ghim t¬ng øng.
6. §Ëy c¸c lç b»ng c¸c nót ®Ëy quÝ vÞ t×m thÊy trong tói
®ùng s¸ch híng dÉn.
§Æt m¸y vµo vÞ trÝ
ThiÕt ®Æt m¸y trªn sµn ph¼ng vµ cøng.
Ph¶i ch¾c ch¾n r»ng kh«ng khÝ lu th«ng quoanh m¸y
kh«ng bÞ c¶n trë bëi th¶m ®Öm, v.v.. KiÓm so¸t ®Ó m¸y
kh«ng ch¹m têng hay nh÷ng ®å dïng nhµ bÕp kh¸c.
CÈn thËn chØnh th¨ng b»ng b»ng c¸ch vÆn c¸c ch©n m¸y
lªn hay xuèng. Kh«ng ®îc dïng b×a cøng, gæ hay c¸c
vËt liÖu t¬ng tù ®Ó chªm díi m¸y ®Ó gi÷ cho m¸y
th¨ng b»ng trªn sµn.
ThiÕt ®Æt m¸y
P1129
1
P0001
P1128
P0002
2
3
P1123
P1126
P1127
P1088
P0021
Page 78

78
Kh«ng ®îc kÐo dµi èng dÉn níc nµy. NÕu thÊy èng ng¾n
qu¸ vµ quÝ vÞ kh«ng muèn di chuyÓn vßi níc, quÝ vÞ nªn
mua mét èng kh¸c dµi h¬n ®îc s¶n xuÊt ®Æc biÖt cho viÖc
nµy.
C¸ch th¶i níc
§Çu èng dÉn níc th¶i cã thÓ l¾p r¸p theo ba c¸ch:
Mãc trªn r×a cña bån tho¸t níc dïng èng nhùa cã cung
cÊp theo m¸y. Trong trêng hîp nµy ph¶i gi÷ cho ®Çu èng
kh«ng bÞ tôt ra khi m¸y ®ang th¸o níc.
Cã thÓ dïng d©y cét ®Çu èng s¸t vµo vßi níc hay ®Ýnh
èng vµo têng.
Nèi ®Çu èng vµo nh¸nh èng tho¸t níc. Nh¸nh nµy ph¶i
n»m cao h¬n ®o¹n èng ch÷ U sao cho chç bÎ cong ph¶i
cao h¬n mÆt ®Êt Ýt nhÊt 60cm.
B¾t trùc tiÕp vµo èng tho¸t níc víi ®é cao kh«ng díi
60 cm vµ kh«ng qu¸ 90 cm.
§Çu mót cuèi cña èng dÉn níc th¶i ph¶i lu«n ®îc th«ng
h¬inghÜa lµ ®êng kÝnh bªn trong cña èng tho¸t níc ph¶i
lín h¬n ®êng kÝnh bªn ngoµi cña èng dÉn níc th¶i cña
m¸y.
Ph¶i gi÷ cho èng th¶i níc kh«ng bÞ xo¾n gËp. §Æt èng
däc theo sµn nhµ; chØ phÇn gÇn ®iÓm tho¸t níc ®îc n©ng
cao lªn.
§Ó ®¶m b¶o chøc n¨ng ®óng cho m¸y èng dÉn níc th¶i
ph¶i lu«n ®îc mãc gi÷ trªn miÕng ®Öm thÝch hîp ®îc
®Æt ë trªn cña phÝa sau th©n m¸y.
C¸ch nèi ®iÖn vµo m¸y
M¸y nµy ®îc thiÕt kÕ sö dông nguån ®iÖn 220-230 V,
®¬n pha, 50 Hz.
KiÓm tra xem nguån ®iÖn thiÕt kÕ trong nhµ cã ®ñ t¶i
träng tèi ®a theo yªu cÇu cña m¸y (2,2 kW), vµ ph¶i kÓ
lu«n c¸c m¸y mãc ch¹y ®iÖn kh¸c ch¹y ®ång thêi.
Nèi m¸y vµo æ tiÕp ®Êt.
Nhµ s¶n xuÊt tõ chèi tÊt c¶ nh÷ng tr¸ch nhiÖm vÒ
thiÖt h¹i hay th¬ng tÝch g©y ra do kh«ng tu©n theo
nh÷ng biÖn ph¸p an toµn trªn.
Trêng hîp cÇn thay d©y c¸p dÉn ®iÖn, xin vui
lßng liªn hÖ Trung T©m Phôc Vô cña chóng t«i.
§iÒu quan träng!
§êng d©y c¸p cung cÊp ®iÖn ph¶i ®îc tiÕp cËn dÔ dµng
sau khi l¾p ®Æt m¸y.
P0022
P0023
Page 79

TiÕng ViÖt
79
1. Ng¨n chøa bét giÆt
2. B¶ng ®iÒu khiÓn
3. Tay n¾m cöa
4. B¬m th¸o níc
5. Ch©n linh ®éng
Ng¨n chøa bét giÆt
Xö lý tríc
GiÆt
ChÊt lµm mÒm v¶i, bét hå
M¸y giÆt míi cña quÝ vÞ
M« t¶ m¸y
M¸y míi nµy, ®îc trang bÞ víi hÖ thèng Phun Tia míi, ®¸p øng tÊt c¶ c¸c nhu cÇu cho viÖc xö lý hiÖu qu¶ ®å giÆt víi sù
tiªu thô Ýt níc, n¨ng lîng vµ xµ phßng.
• Ch¬ng tr×nh giÆt tay ®Æc biÖt víi hÖ thèng míi chuyªn giÆt hµng máng sÏ xö lý hµng mÒm máng cña quÝ vÞ thËt cÈn
thËn.
• Ch¬ng tr×nh giÆt len ®Æc biÖt víi hÖ thèng míi chuyªn giÆt hµng máng sÏ xö lý hµng len cña quÝ vÞ thËt cÈn thËn.
• C¬ chÕ tù ®éng lµm nguéi níc tõ 95°C xuèng 60°C tríc khi th¸o níc sÏ b¶o vÖ nh÷ng ®êng èng cò kh«ng bÞ biÕn
d¹ng.
PIC 001
P1206
Page 80

80
Sö dông
B¶ng ®iÒu khiÓn
1. Ng¨n chøa bét giÆt
2. §ång hå lùa chän ch¬ng tr×nh
§ång hå chän ch¬ng tr×nh nµy ®îc chia thµnh 4 phÇn:
1. Hµng cotton (phÇn mµu Xanh lôc)
2. Hµng tæng hîp, mÒm máng, giÆt tay, len, lôa vµ ch¨n
(phÇn mµu Xanh d¬ng)
3. X¶, th¸o níc, v¾t vµ v¾t nhÑ (phÇn mµu X¸m)
4. Bé nhí 1, Bé nhí 2 (phÇn mµu X¸m)
§ång hå lùa chän cã thÓ quay t¸m nÊc theo chiÒu kim
®ång hå hoÆc
ngîc chiÒu kim ®ång hå. VÞ trÝ “cotton Eco” t¬ng øng
víi ch¬ng tr×nh giÆt tiÕt kiÖm n¨ng lîng cho hµng cotton
vµ ®Ó t¾t “OFF” khi chØnh l¹i ch¬ng tr×nh hoÆc ®Ó t¾t m¸y
“OFF”. T¹i ®iÓm kÕt thóc ch¬ng tr×nh, ®ång hå lùa chän
ph¶i ®îc quay trë vÒ vÞ trÝ “OFF” ®Ó t¾t m¸y.
Chó ý!
NÕu quÝ vÞ quay ®ång hå lùa chän ®Õn mét ch¬ng tr×nh
kh¸c khi m¸y ®ang ch¹y, th«ng tin c¶nh b¸o sÏ xuÊt hiÖn
trong 4 gi©y trªn mµn h×nh vµ tiÕng ®éng c¶nh b¸o kªu 3
lÇn.
3. Mµn h×nh
Mµn h×nh ®îc dïng ®Ó hiÖn thÞ mét sè lín c¸c chøc n¨ng
vµ kÕt hîp chóng víi nhau chØ dïng
mét vµi yÕu tè ®iÒu khiÓn (1 ®ång hå chän ch¬ng tr×nh vµ
6 nót ®iÒu khiÓn)
Nhê vµo mµn h×nh ho¹t ®éng t¬ng t¸c nµy, mµ ph¬ng
ph¸p ®¬n gi¶n ®iÒu khiÓn m¸y ®îc dÔ dµng. Ho¹t ®éng
t¬ng t¸c nghÜa lµ mµn h×nh thay ®æi ®Ó ph¶n ¸nh tõng
bíc mµ quÝ vÞ lùa chän. §iÒu nµy ®¶m b¶o r»ng nh÷ng
®iÒu khiÓn hîp lý ®· ®îc thùc hiÖn. QuÝ vÞ cã thÓ nh×n
thÊy nh÷ng ®iÒu khiÓn hiÖn thêi bÊt cø lóc nµo trªn b¶ng
th«ng tin vµ trªn hµng ®Æc ®iÓm.
1. B¶ng th«ng tin cho thÊy nh÷ng ®iÒu khiÓn hiÖn hµnh.
2. §ång hå chØ thêi gian
3. Thêi gian tíi ®iÓm kÕt thóc
4. Bé lùa chän cho thÊy nhiÖt ®é, tèc ®é v¾t, c¸c ®Æc ®iÓm
vµ nhiÒu ®iÓm phô kh¸c.
4 Nót NhiÖt ®é NhiÖt ®é Temp.
NhÊn nót nµy nhiÒu lÇn ®Ó t¨ng hay gi¶m nhiÖt ®é, nÕu qói
vÞ muèn giÆt ë nhiÖt ®é kh¸c víi nhiÖt ®é mµ m¸y ®a ra.
NhiÖt ®é tèi ®a lµ 95°C cho cotton, 60°C cho v¶i tæng hîp,
40°C cho hµng máng vµ giÆt tay, 30°C cho t¬ lôa vµ
Ch¬ng tr×nh giÆt nhá, vµ 0 t¬ng øng víi giÆt l¹nh.
Khi nhÊn nót NhiÖt ®é Temp,, th«ng b¸o t¬ng øng sÏ
xuÊt hiÖn trªn hµng thø hai cña mµn h×nh (thay cho chu
tr×nh kÕt thóc t¹i). T¹i gãc cña hµng thø ba hiÓn thÞ nhiÖt
®é ®· ®îc chän.
1 23
Cotton
Cycle and at
95°C 1400
Temp. Spin
4
Options
Change
08.30
10.55
Exit
COTTON
MAX 95°C
60°C
Temp. Spin
Options
Change
08.30
10.55
Exit
Page 81

TiÕng ViÖt
81
5 Nót Tèc §é V¾t Spin
NhÊn nót nµy nhiÒu lÇn ®Ó thay ®æi tèc ®é v¾t, nÕu qói vÞ
muèn giÆt víi tèc ®é v¾t kh¸c víi tèc ®é mµ m¸y ®a ra.
Tèc ®é v¾t tèi ®a lµ:
• cho hµng cotton: 1400 vßng/phót;
• cho len, vµ hµng giÆt tay: 900 vßng/phót;
• cho hµng máng, t¬ lôa, ch¨n: 700 vßng/phót;
B»ng c¸ch nhÊn nót Tèc ®é v¾t quÝ vÞ còng cã thÓ chän
®Æc ®iÓm Kh«ng V¾t 0, H·m X¶ vµ ®Æc ®iÓm chu
tr×nh §ªm .
§Æc ®iÓm Kh«ng V¾t 0 sÏ lo¹i bá tÊt c¶ c¸c c«ng ®o¹n
v¾t vµ t¨ng c¸c lît x¶ cho hµng cotton vµ hµng tæng hîp.
§Æc ®iÓm H·m X¶ : khi quÝ vÞ chän ®Æc ®iÓm nµy, m¸y
sÏ kh«ng th¸o níc cña lît x¶ cuèi ®Ó tr¸nh nhµu cho ®å
giÆt.
§Æc ®iÓm chu tr×nh §ªm : khi quÝ vÞ chän ®Æc ®iÓm
nµy, m¸y sÏ kh«ng th¸o níc cña lît x¶ cuèi ®Ó tr¸nh
nhµu cho ®å giÆt.
Khi tÊt c¶ c¸c c«ng ®o¹n v¾t bÞ chÆn l¹i, chu tr×nh giÆt sÏ
rÊt tÜnh lÆng vµ nh vËy nã cã thÓ ®îc chän vµo ban ®ªm
hoÆc nh÷ng thêi ®iÓm ®îc hëng gi¸ tiÒn ®iÖn tiÕt kiÖm.
Trong c¸c ch¬ng tr×nh giÆt hµng cotton vµ hµng tæng hîp
c¸c lît x¶ sÏ ®îc thùc hiÖn víi nhiÒu níc h¬n.
§Ó hoµn tÊt chu kú, chän mét trong c¸c ®Æc ®iÓm sau ®©y:
Th¸o níc
§Ó th¸o níc chän ch¬ng tr×nh Th¸o níc b»ng ®ång hå
lùa chän, sau ®ã nhÊn nót Khëi ®éng/Thªm ®å
(Start/Add).
V¾t
§Ó v¾t ®å giÆt chän ch¬ng tr×nh v¾t hoÆc v¾t nhÑ b»ng
®ång hå lùa chän ch¬ng tr×nh; chän tèc ®é v¾t b»ng nót
Spin vµ sau ®ã nhÊn nót Khëi ®éng/Thªm ®å (Start/Add)
§iÒu quan träng!
Tríc khi chän ch¬ng tr×nh Th¸o níc, V¾t hoÆc V¾t
NhÑ ®ång hå chän ch¬ng tr×nh ph¶i quay vÒ vÞ trÝ O
(OFF).
6 C¸c nót §Æc §iÓm, Thay ®æi vµ
Tho¸t khái
Nót §Æc ®iÓm cho phÐp quÝ vÞ di chuyÓn qua c¸c biÓu tîng
®Æc ®iÓm
Nót Thay ®æi cho phÐp quÝ vÞ chän/thay ®æi tr¹ng th¸i cña
c¸c biÓu tîng kh¸c nhau.
Nót Tho¸t khái cho phÐp quÝ vÞ trë l¹i lùa chän tríc ®ã.
COTTON
MAX 1400
1400
Temp. Spin
Options
Change
08.30
10.55
Exit
Extra Rinse
No 10.55
Temp . Spi n
Extra Rinse
Yes 10.55
Options
Change
Exit
Temp. Spin
Options
Change
Exit
COTTON
CYCLE END AT
60°C 1400
Temp. Spin
Options
Change
08.30
10.55
Exit
Page 82

82
Tïy theo ch¬ng tr×nh, c¸c chøc n¨ng kh¸c nhau cã thÓ
®îc kÕt hîp l¹i. Nh÷ng chøc n¨ng nµy ph¶i ®¬c chän sau
khi chän ch¬ng tr×nh mong muèn vµ tríc khi nhÊn nót
Khëi ®éng/Thªm ®å.
Khi nhÊn nót §Æc ®iÓm, tÊt c¶ c¸c ký hiÖu biÓu tîng cña
ch¬ng tr×nh ®· chän sÏ xuÊt hiÖn trªn mµn h×nh (cho phÐp
cho ch¬ng tr×nh ®· chän).
§Æc ®iÓm thø nhÊt sÏ b¾t ®Çu chíp. Tªn vµ tr¹ng th¸i
cña nã sÏ xuÊt hiÖn trªn mµn h×nh.
NÕu quÝ vÞ muèn thay ®æi tr¹ng th¸i cña ®Æc ®iÓm nµy, nhÊn
nót Thay ®æi. SÏ cã mét ®êng phÝa sau biÓu tîng ®µ
chän, chØ ra r»ng ®Æc ®iÓm ®ã ®· ®îc cµi ®Æt.
§Ó chän nh÷ng ®Æc ®iÓm kh¸c nhÊn nót §Æc ®iÓm vµ thao
t¸c nh ®· nãi trªn.
Mét khi quÝ vÞ ®· hoµn tÊt viÖc lùa chän c¸c ®Æc ®iÓm, nhÊn
nót Tho¸t khái, c¸c biÓu tîng ®· chän sÏ duy tr× cè ®Þnh
trªn mµn h×nh.
Ghi chó: §Ó thay ®æi nh÷ng ®Æc ®iÓm ®· chän, lÆp l¹i
nh÷ng qu¸ tr×nh nh tríc.
§iÒu quan träng! Trong khi chän ®Æc ®iÓm, nÕu quÝ vÞ nhÊn
nót Temp., Spin, hoÆc Khëi ®éng/Thªm ®å, c¸c chøc
n¨ng t¬ng øng sÏ ®îc thùc hiÖn.
X¶ thªm: ®Æc ®iÓm nµy cã thÓ ®îc chän cho tÊt c¶
c¸c ch¬ng tr×nh, ngo¹i trõ c¸c ch¬ng tr×nh len/giÆt tay vµ
ch¬ng tr×nh nhá. M¸y sÏ thªm vµo 2 lît x¶ cho hµng
cotton vµ 1 lît x¶ cho hµng tæng hîp, máng vµ t¬ lôa.
§Æc ®iÓm nµy nªn ¸p dông cho nh÷ng ngêi bÞ dÞ øng víi
bét giÆt, vµ cho nh÷ng khu vùc níc rÊt mÒm.
TiÕt kiÖm thêi gian: ®Æc ®iÓm nµy cã thÓ ®îc
dïng cho hµng cotton Ýt bÈn, hµng tæng hîp hoÆc máng ®Ó
®¹t ®îc ch¬ng tr×nh giÆt tèt trong thêi gian ng¾n. Thêi
gian giÆt sÏ gi¶m xuèng tïy theo lo¹i hµng vµ nhiÖt ®é ®·
chän. Khi chän ®Æc ®iÓm nµy Short hoÆc Very Short sÏ
hiÓn thÞ trªn mµn h×nh.
Tr× ho·n khëi ®éng: ®Æc ®iÓm nµy cho phÐp tr×
ho·n sù khëi ®éng cña ch¬ng tr×nh giÆt tõng kho¶ng 30
phót - 60 phót- 90 phót, 2 tiÕng vµ sau ®ã tõng tiÕng mét
cho ®Õn 20 tiÕng. Kho¶ng thêi gian tr× ho·n quÝ vÞ ®· chän
®îc hiÓn thÞ trªn mµn h×nh.
QuÝ vÞ ph¶i chän ®Æc ®iÓm nµy sau khi ®· chän ch¬ng tr×nh
mong muèn vµ tríc khi nhÊn nót Khëi ®éng/Thªm ®å.
QuÝ vÞ cã thÓ hñy bá thêi gian tr× ho·n t¹i bÊt cø thêi ®iÓm
nµo, tríc khi nhÊn nót Khëi ®éng/ t¹m ngng. NÕu
quÝ vÞ ®· nhÊn nót Khëi §éng/ T¹m Ngng råi, vµ quÝ
vÞ muèn hñy bá thêi gian tr× ho·n thi` thao t¸c nh sau:
1. chØnh m¸y l¹i vÞ trÝ T¹m Ngng b»ng c¸ch nhÊn nót
Khëi §éng/T¹m Ngng;
2. bá lùa chän Tr× ho·n Khëi ®éng, thay ®æi tr¹ng th¸i;
3. NhÊn nót Khëi §éng/ T¹m Ngng ®Ó khëi ®éng
ch¬ng tr×nh.
§iÒu quan träng!
Thêi gian tr× ho·n ®· chän chØ cã thÓ thay ®æi ®îc sau khi
chän ch¬ng tr×nh giÆt m«tl lÇn n÷a.
Cöa m¸y sÏ ®ãng suèt thêi gian tr× ho·n.
NÕu quÝ vÞ cÇn më cöa, quÝ vÞ ph¶i chØnh m¸y ë vÞ trÝ T¹m
Ngng b»ng c¸ch nhÊn nót Khëi ®éng/T¹m Ngng.
Sau khi quÝ vÞ ®· ®ãng cöa, nhÊn nót Khëi §éng/ T¹m
Ngng lÇn n÷a.
Tr× Ho·n Khëi ®éng kh«ng thÓ chän cïng víi c¸c ch¬ng
tr×nh V¾t/V¾t nhÑ vµ Th¸o níc
Xö lý tríc: chän ®Æc ®iÓm nµy nÕu quÝ vÞ muèn
®å giÆt ®îc xö lý tríc khi giÆt chÝnh (kh«ng ¸p dông cho
len vµ ch¬ng tr×nh giÆt tay, ch¬ng tr×nh nhá vµ t¬ lôa).
ViÖc xö lý tríc kÕt thóc b»ng v¾t ng¾n ë 650 vßng/phót
trong c¸c ch¬ng tr×nh giÆt hµng cotton vµ tæng hîp, trong
khi ®ã trong ch¬ng tr×nh cho hµng máng m¸y chØ th¸o
níc th«i.
cêng ®é cao: cho ®å giÆt bÈn nhiÒu.
§Æc ®iÓm nµy cã thÓ ®îc chän cho hµng cotton vµ tæng
hîp.
Thêi gian giÆt sÏ ®îc kÐo dµi thªm tïy theo nhiÖt ®é cña
chu tr×nh vµ lo¹i v¶i.
dÔ lµ: chän nót nµy ®å giÆt sÏ ®îc giÆt vµ v¾t nhÑ
nhµng ®Ó tr¸nh nhµu. Nh vËy viÖc lµ ñi sÏ dÔ dµng h¬n.
H¬n n÷a m¸y sÏ thùc hiÖn 6 lît x¶ thay v× 3 lît cho
hµng cotton vµ 4 lît x¶ thay v× 3 lît cho hµng tæng hîp.
Chøc n¨ng nµy cã thÓ ®îc dïng cho hµng cotton vµ tæng
hîp. NÕu ®Æc ®iÓm nµy ®îc chän cho nh÷ng ch¬ng tr×nh
cho hµng cotton, tèc ®é v¾t tù ®éng sÏ gi¶m xuèng 1000
vßng/phót.
tiÕt kiÖm: ®Æc ®iÓm nµy cã thÓ ®îc chän chØ cho
hµng tæng hîp Ýt bÈn hoÆc bÈn b×nh thêng ë nhiÖt ®é 40°C
hoÆc cao h¬n. Thêi gian giÆt sÏ bÞ kÐo dµi h¬n. NÕu quÝ vÞ
chän 60°C-50°C-40°C, nhiÖt ®é giÆt sÏ gi¶m xuèng 42°C.
B¶ng liÖt kª:
§Æc ®iÓm liÖt kª ®îc dïng ®Ó chän c¸c lo¹i s¾p ®Æt c¬ b¶n
mµ kh«ng ¶nh hëng ®ªnd ch¬ng tr×nh giÆt cô thÓ. C¸c s¾p
®Æt c¬ b¶n nµy sÏ duy tr× ho¹t ®éng cho tíi khi chóng bÞ lo¹i
bá/thay ®æi.
§Ó di chuyÓn qua l¹i gi÷a c¸c môc ®îc LiÖt kª dïng nót
§Æc ®iÓm.
§Ó thay ®æi/ kh¼ng ®Þnh môc ®· lùa chän dïng nót Thay
®æi.
Delay Start
No 10.55
Change
Temp. Spin
Options
Exit
Delay Start
Start in 30 min 11.25
Temp. Spin
Options
Change
Exit
Page 83

TiÕng ViÖt
83
Bé nhí:
C¸c tr×nh tù cña ch¬ng tr×nh mµ ®îc dïng thêng xuyªn
cã thÓ ®îc nhí (vÝ dô cotton, 95°C, 1200 vßng/phót, tiÕt
kiÖm thêi gian). Cã 3 kho¶ng bé nhí dïng cho môc ®Ých
nµy. Ch¬ng tr×nh ®îc lu gi÷ cã thÓ ®îc chän theo c¸ch
gièng nh bÊt cø ch¬ng tr×nh giÆt nµo b»ng ®ång hå lùa
chän.
VÝ dô: cotton, 95°C, 1200 vßng/phót, tiÕt kiÖm thêi gian.
1. Chän chu tr×nh vµ c¸c tr×nh tù cña ch¬ng tr×nh.
2. Vµo ®Æc ®iÓm LiÖt kª vµ chän mét trong c¸c vÞ trÝ bé
nhí. Mét th«ng b¸o SÏ lu tr÷ ch¬ng tr×nh? sÏ xuÊt
hiÖn trªn mµn h×nh.
3. §Ó ghi nhí ch¬ng tr×nh ®· lùa chän nhÊn nót Thay
®æi. Th«ng b¸o §· lu tr÷ sÏ xuÊt hiÖn trªn mµn
h×nh.
§Ó thay ®æi ch¬ng tr×nh ®· ®îc ghi nhí lÆp l¹i c¸c bíc
tõ ®Çu.
©m thanh
ChØnh ©m thanh cho phÐp quÝ vÞ thay ®æi ©m lîng cña ©m
thanh ph¸t ra. QuÝ vÞ cã thÓ chän gi÷a c¸c møc ®é kh¸c
nhau: nhá, kh«ng tiÕng vµ b×nh thêng.
VÝ dô:
1. Vµo ®Æc ®iÓm LiÖt kª vµ chän chØnh ©m thanh.
2. Dïng nót Thay ®æi ®Ó chän møc ®é phï hîp.
X¶ +
M¸y giÆt ®îc chØnh sao cho lîng níc tiªu thô lµ tiÕt
kiªmj nhÊt. Tuy nhiªn ®èi víi nh÷ng ngêi bÞ di øng vµ
nh÷ng khu vùc níc rÊt mÒm, cã thÓ cÇn dïng lîng n¬c
nhiÒu h¬n khi x¶. Khi quÝ vÞ chän X¶ +, 2 lît x¶ thªm sÏ
®îc thùc hiÖn cho hµng cotton vµ 1 lît cho hµng tæng
hîp, máng vµ t¬ lôa. NÕu X¶ + ®îc chän, sÏ hiÖn ra
trªn hµng ®Æc ®iÓm.
Sound
Normal
Temp. Spin
Options
Change
Exit
Cotton
Cycle end at
60°C 1400
Temp. Spin
Options
Change
08.30
10.55
Exit
A
Setup
Temp. Spin
Options
A
Change
Exit
B
Memory 1
Store programme?
Temp. Spin
Options
Change
Exit
B
Programme Stored
Sound
Low or No Sound
Change
Temp. Spin
Options
Exit
Extra Rinse
No 10.55
Temp. Spin
Options
Change
Exit
Extra Rinse
Yes 10.55
Temp. Spin
Options
Change
Exit
Change
Temp. Spin
Options
Exit
Page 84

84
ng«n ng÷
QuÝ vÞ cã thÓ chän chØnh ng«n ng÷ nÕu quÝ vÞ muèn mµn
h×nh sÏ hiÓn thÞ b»ng ng«n ng÷ kh¸c.
VÝ dô:
1. Vµo ®Æc ®iÓm LiÖt kª vµ chän chØnh Ng«n ng÷.
2. Dïng nót Thay ®æi ®Ó chän Ng«n ng÷ mong muèn.
§ång hå
ChØnh ®ång hå cho phÐp quÝ vÞ thay ®æi/cµi ®Æt thêi gian
hiÖn hµnh. CËp nhËt thêi gian chÝnh x¸c lµ cÇn thiÕt v×
Thêi gian KÕt Thóc Chu tr×nh phô thuéc vµo ®ã.
VÝ dô:
1. Vµo ®Æc ®iÓm LiÖt kª vµ chän chØnh §ång hå.
2. B»ng c¸ch bÊm tõng c¸i mét vµo nót Thay ®æi, thêi
gian sÏ nh¶y tõng phót mét. TiÕp tôc gi÷ tay bÊm vµo
nót Thay ®æi, thêi gian sÏ nh¶y tõng 10 phót mét.
§é ph¶n quang
§iÒu chØnh ®é Ph¶n quang cho phÐp quÝ vÞ thay ®æi ®Æc
®iÓm quang häc cña mµn h×nh.
VÝ dô:
1. Vµo ®Æc ®iÓm LiÖt kª vµ chän chØnh Ph¶n quang.
2. Dïng nót Thay ®æi ®Ó chØnh møc ®é ph¶n quang
mong muèn.
§é s¸ng
ChØnh §é s¸ng cho phÐp quÝ vÞ thay ®æi cêng ®é ¸nh
s¸ng cña mµn h×nh.
VÝ dô:
1. Vµo ®Æc ®iÓm LiÖt kª vµ chän chØnh §é s¸ng.
2. Dïng nót Thay ®æi ®Ó chØnh møc ®é s¸ng mong
muèn.
Ghi chó:
Vµo ®iÓm kÕt thóc ch¬ng tr×nh nÕu kh«ng mét nót nµo
®îc nhÊn trong kho¶ng 10 phót ®Ìn cña mµn h×nh sÏ t¾t
®i.
Language
ENGLISH
Change
Temp. Spin
Options
Exit
Contrast
Contrast
Sprache
DEUTCH
Temp. Spin
Options
Change
Exit
A
Einstellungen
Temp. Spin
Options
Change
Exit
B
Temp. Spin
Options
A
Change
Exit
Temp . S pi n
Options
Change
Exit
B
Brightness
Temp. Spin
Options
A
Change
Exit
Brightness
Temp. Spin
Options
Change
B
Exit
A
Clock
Set Time
Temp. Spin
Options
A
Change
14.45
B
Clock
Set Time
Exit
Temp. Spin
Options
Change
14.46
Exit
B
Page 85

TiÕng ViÖt
85
7 Nót Khëi ®éng/Thªm ®å (Start/Add
Clothes)
Nót nµy cã 2 chøc n¨ng:
Khëi ®éng sau khi quÝ vÞ chän ch¬ng tr×nh mong
muèn, nhÊn nót nµy ®Ó khëi ®éng m¸y. §Ìn s¸t víi nót
nµy sÏ ngng chíp vµ gi÷ s¸ng.
NÕu quÝ vÞ chän tr× ho·n khëi ®éng, m¸y sÏ b¾t ®Çu ®Õm
ngîc cho ®Õn giê khëi ®éng vµ sÏ hiÖn ra trªn mµn h×nh.
Thªm ®å: Khi quÝ vÞ nhÊn nót nµy lÇn n÷a, ch¬ng
tr×nh ®ang ch¹y sÏ bÞ gi¸n ®o¹n. §Ìn b¸o cña nót nµy
sÏ b¾t ®Çu chíp. §Ó khëi ®éng l¹i ch¬ng tr×nh, nhÊn
nót lÇn n÷a.
Khi quÝ vÞ nhÊn nót Khëi ®éng/Thªm ®å, cöa m¸y cã thÓ
më ®îc nÕu nh:
M¸y giÆt kh«ng ë trong giai ®o¹n lµm nãng;
Mùc níc trong thïng m¸y kh«ng cao;
Thïng m¸y ®ang kh«ng quay.
§iÒu quan träng! QuÝ vÞ ph¶i ngng m¸y l¹i tríc khi lµm
bÊt cø thay ®æi nµo trong ch¬ng tr×nh ®ang ch¹y, b»ng
c¸ch nhÊn nót Khëi ®éng/Thªm ®å
Page 86

86
C¸ch giÆt
S¾p xÕp ®å cÇn giÆt
Theo ®óng nh÷ng ký hiÖu giÆt trªn nh·n cña tõng mãn
®åvµ nh÷ng chØ dÉn cña nhµ s¶n xuÊt;
S¾p xÕp ®å cÇn giÆt nh sau:
hµng tr¾ng, hµng mµu, hµng tæng hîp, hµng máng, len.
NhiÖt ®é
90°-95° cho nh÷ng ®å bÈn b×nh thêng v¶i cotton vµ
lanh tr¾ng (nh kh¨n uèng trµ, kh¨n t¾m, kh¨n
tr¶i bµn, ra giêng..)
50°-60° cho nh÷ng ®å mµu bÒn, cã ®é bÈn b×nh thêng
(nh ¸o s¬ mi, ®å mÆc ban ®ªm, quÇn ¸o ngñ..)
b»ng v¶i lanh, cotton hay v¶i tæng hîp vµ cho
®å Ýt bÈn b»ng v¶i cotton tr¾ng (nh ®å lãt).
O
(l¹nh) c¸c ®å máng nhÑ (nh mµn líi),
30°-40° ®å giÆt hçn hîp bao gåm v¶i tæng hîp vµ len cã
nh·n hiÖu len nguyªn chÊt, cã thÓ giÆt m¸y,
kh«ng co.
Tríc khi bá ®å giÆt vµo m¸y
§õng bao giê bá ®å tr¾ng vµ ®å mµu chung víi nhau. §å
tr¾ng cã thÓ kh«ng cßn mµu tr¾ng sau khi giÆt.
Nh÷ng ®å mµu míi cã thÓ ra mµu trong lÇn giÆt ®Çu tiªn;
nªn ph¶i giÆt riªng trong lÇn giÆt ®Çu tiªn.
Ph¶i ch¾c ch¾n kh«ng ®Ó cho c¸c ®å vËt kim lo¹i bÞ bá
quªn trong ®å giÆt (nh kÑp tãc, kim gµi, kim ghim).
Nªn cµi ¸o gèi, kÐo d©y kÐo, gµi mãc, ®ãng nót bãp. Cét
d©y nÞt hay sîi d©y dµi l¹i.
T¶y nh÷ng vÕt bÈn khã phai tríc khi giÆt. Vß s¹ch nh÷ng
chç bÈn víi thuèc giÆt hay kem giÆt ®Æc biÖt.
Xö lý mµn cöa víi sù ch¨m sãc ®Æc biÖt. Th¸o gì mãc
hoÆc cét chóng vµo trong mét tói líi.
T¶i träng tèi ®a
T¶i trong ®Ò nghÞ ®îc nªu râ trong biÓu ®å chi tiÕt
ch¬ng tr×nh.
C¸c qui luËt tæng qu¸t:
Cotton, lanh: bá ®Çy thïng giÆt nhng kh«ng qu¸ Ðp chÆt;
Hµng tæng hîp: kh«ng qu¸ nöa thïng giÆt;
Träng lîng ®å giÆt
Träng lîng ®å giÆt nh sau:
¸o choµng t¾m 1200 g
kh¨n tay 100 g
vá ch¨n 700 g
tÊm ra 500 g
vá gèi 200 g
kh¨n bµn 250 g
kh¨n t¾m 200 g
kh¨n uèng trµ 100 g
¸o ngñ 200 g
®å lãt n÷ 100 g
¸o lao ®éng nam 600 g
¸o s¬ mi nam 200 g
®å bé nam 500 g
¸o choµng 100 g
quÇn lãt nam 100 g
TÈy c¸c vÕt bÈn
Nh÷ng vÕt bÈn khã tÈy cã thÓ sÏ kh«ng tÈy ®îc víi níc
vµ bét giÆt V× thÕ chóng t«i khuyªn quÝ vÞ nªn tÈy chóng
tríc khi giÆt.
M¸u xö lý vÕt m¸u t¬i víi níc l¹nh. §èi víi vÕt m¸u
kh«, ng©m qua ®ªm trong níc víi lo¹i bét giÆt ®Æc biÖt
sau ®ã vß víi bét giÆt vµ níc.
S¬n dÇu thÊm ít víi chÊt tÈy s¬n benzine, ®Æt mãn ®å lªn
mét bÒ mÆt mÒm vµ chïi vÕt bÈn; vµi lÇn
VÕt dÇu kh«: thÊm ít víi chÊt turpentine, ®Æt mãn ®å lªn
mét bÒn mÆt mÒm vµ chïi vÕt bÈn b»ng mãng tay bäc v¶i
bªn ngoµi.
VÕt rØ s¾t: dïng dung m«i oxalic acid trong níc nãng hay
chÊt tÈy vÕt rØ s¾t víi níc l¹nh. H·y cÈn thËn víi nh÷ng
vÕt rØ s¾t ®· l©u ngµyv× cÊu tróc cña sí v¶i ®· bÞ hñy ho¹i
vµ mãn ®å dÔ bÞ lñng.
VÕt mèc: xö lý víi thuèc tÈy, x¶ thËt s¹ch (chØ thùc hiÖn
trªn ®å tr¾ng vµ ®å cã mµu bÒn).
VÕt cá: x¸t xµ phßng nhÑ vµ xö lý víi thuèc tÈy (chØ thùc
hiÖn trªn ®å tr¾ng vµ ®å cã mµu bÒn).
Mùc bót bi vµ keo d¸n: thÊm ít víi acetone(*), ®Æt mãn
®å lªn mét líp v¶i mÒm vµ chïi vÕt bÈn.
VÕt son m«i: thÊm ít b»ng acatone nh trªn, sau ®ã xö lý
bÇng cån methylated. Vß s¹ch vÕt bÈn cßn sãt l¹i trªn v¶i
tr¾ng víi thuèc tÈy.
Page 87

TiÕng ViÖt
87
Xö lý mäi dÊu vÕt cßn l¹i b»ng chÊt tÈy.
VÕt mùc: tïy theo lo¹i mùc, thÊm ít v¶i víi acetone (*),
sau ®ã víi acid acetic; xö lý vÕt bÈn cßn sãt l¹i trªn v¶i
tr¾ng víi thuèc tÈy sau ®ã x¶ s¹ch.
VÕt nhùa ®êng: ®Çu tiªn xö lý víi chÊt tÈy vÕt bÈn, cån
methylayed hay benzine, sau ®ã vß s¹ch víi kem giÆt.
(*) kh«ng dïng acetone trªn t¬ nh©n t¹o.
Bét giÆt vµ c¸c chÊt liÖu phô
KÕt qu¶ giÆt tèt cßn phô thuéc vµo sù lùa chän bét giÆt vµ
sù sö dông ®óng sè lîng cÇn thiÕt ®Ó tr¸nh bÞ l·ng phÝ vµ
b¶o vÖ m«i sinh. MÆc dï cã thÓ tho¸i hãa sinh häc, bét
giÆt chøa nh÷ng hãa chÊt mµ víi sè lîng lín cã thÓ lµm
®¶o lén sù qu©n b×nh mong manh cña thiªn nhiªn.
ViÖc chän bét giÆt tïy thuéc vµo lo¹i hµng (máng, len,
cotton, v.v.), mµu, nhiÖt ®é giÆt vµ ®é bÈn.
TÊt c¶ c¸c lo¹i bét giÆt th«ng thêng dïng cho m¸y giÆt
®Òu cã thÓ dïng ®îc cho m¸y nµy:
- bét giÆt cho tÊt c¶ c¸c lo¹i v¶i,
- bét giÆt cho hµng máng nhÑ (tèi ®a ë 60°C) vµ len,
- chÊt giÆt láng, thÝch hîp cho nh÷ng ch¬ng tr×nh giÆt ë
nhiÖt ®é thÊp (tèi ®a ë 60°C) cho tÊt c¶ c¸c lo¹i v¶i, hoÆc
®Æc biÖt chØ cho len.
Bét giÆt vµ bÊt cø lo¹i chÊt liÖu phô nµo ®Òu ph¶i ®îc ®æ
vµo ®óng ng¨n chøa tríc khi khëi sù ch¬ng tr×nh giÆt.
NÕu dïng bét giÆt c« ®Æc hay chÊt giÆt láng, ph¶i chän
ch¬ng tr×nh giÆt kh«ng cã xö lý tríc.
M¸y giÆt nµy cã hÖ thèng håi lu l¹i cho phÐp sù sö dông
tèi u cña bét giÆt c« ®Æc.
§æ chÊt giÆt láng vµo ng¨n cã h×nh ngay tríc khi b¾t
®Çu ch¬ng tr×nh.
C¸c lo¹i phô gia lµm mÒm v¶i hay bét hå ph¶i ®îc ®æ
vµo ng¨n chøa cã h×nh tríc khi b¾t ®Çu ch¬ng tr×nh giÆt.
Theo ®óng chØ dÉn cña nhµ s¶n xuÊt vÒ sè lîng sö dông
vµ kh«ng ®æ qu¸ møc tèi ®a ®¸nh dÊu MAX trªn ng¨n
chøa bét giÆt.
Sè lîng bét giÆt cÇn sö dông
ViÖc chän bét giÆt tïy thuéc vµo lo¹i hµng, møc t¶i träng,
®é bÈn vµ tÝnh cøng cña níc sö dông.
TÝnh cøng cña níc ®îc xÕp h¹ng theo ®é cøng. QuÝ vÞ
h·y liªn hÖ víi c«ng ty cÊp níc hay chÝnh quyÒn ®Ó biÕt
nh÷ng th«ng tin vÒ tÝnh cøng cña níc trong khu vùc cña
quÝ vÞ.
Theo ®óng chØ dÉn cña nhµ s¶n xuÊt vÕ sè lîng sö dông.
Sö dông bét giÆt Ýt h¬n nÕu nh:
- quÝ vÞ giÆt lîng ®å Ýt,
- ®å giÆt Ýt bÈn,
- bät næi lªn kh¸ nhiÒu trong khi giÆt.
Page 88

16
Page 89

TiÕng ViÖt
89
Tr×nh tù ®iÒu khiÓn
Tríc khi giÆt lÇn ®Çu tiªn chóng t«i ®Ò nghÞ quÝ vÞ ®æ 2 lit
níc vµo ng¨n giÆt chÝnh cña « chøa bét giÆt. Sau ®ã
ch¹y ch¬ng tr×nh giÆt hµng cotton ë 60°C víi m¸y kh«ng
t¶i ®Ó lo¹i bá c¸c cÆn b¸m c«ng nghiÖp khái thïng m¸y vµ
bån.
§æ mét nöa lîng bét giÆt cÇn thiÕt vµo ng¨n giÆt chÝnh vµ
khëi ®éng m¸y.
1. Bá ®å vµo thïng giÆt
Më cöa thïng m¸y.
Bá ®å vµo thïng giÆt, tõng c¸i mét, giò cµng t¬i cµng tèt.
§ãng cöa thïng m¸y l¹i.
2. §o lêng bét giÆt ®æ vµo
KÐo hÕt ng¨n chøa bét giÆt ra. §o lêng bét giÆt theo ®óng
sè lîng chØ dÉn cña nhµ s¶n xuÊt vµ ®æ tõng cup mét vµo
ng¨n giÆt chÝnh .
NÕu quÝ vÞ muèn thùc hiÖn kh©u sö lý tríc, ®æ bét giÆt
vµo ®óng ng¨n thÝch hîp cã ký hiÖu .
3. §o lêng chÊt liÖu phô ®æ vµo
NÕu cÇn, ®æ chÊt lµm mÒm v¶i vµo ng¨n cã ký hiÖu ,
kh«ng ®îc vît qu¸ v¹ch MAX.
4. BËt m¸y lªn
Quay ®ång hå lùa chän ®Õn ch¬ng tr×nh mong muèn vµ
bËt m¸y lªn.
§Ó t¾t m¸y quay nã vÒ vÞ trÝ O.
BËt m¸y lÇn ®Çu tiªn.
ng«n ng÷
Khi bËt m¸y lªn lÇn®Çu tiªn quÝ vÞ ph¶i ®Æt ng«n ng÷ nµo
quÝ vÞ muèn sÏ hiÓn thÞ trªn mµn h×nh.
§iÒu quan träng!
NÕu mµn h×nh kh«ng cho thÊy mét ng«n ng÷ nµo c¶, thi`
m¸y ®· tõng ®îc bËt lªn tríc ®ã råi. Trong trêng hîp
nµy, t×m hiÓu ë ch¬ng Thay ®æi ng«n ng÷ nÕu quÝ vÞ
muèn thay ®æi ng«n ng÷ cµi ®Æt cho m¸y.
P0004
Page 90

90
§ÆT THEI GIAN
QuÝ vÞ nªn cµi ®Æt thêi gian tríc khi giÆt lÇn ®Çu tiªn vµ
khi giê giÊc chuyÓn ®æi theo mïa.
Xem môc §Æt ®ång hå, Menu ë trang 12.
5. Chän ch¬ng tr×nh/lo¹i hµng muèn giÆt
Quay ®ång hå lùa chän ®Ó chän ch¬ng tr×nh/lo¹i hµng
muèn giÆt. Th«ng b¸o t¬ng øng sÏ xuÊt hiÖn trªn mµn
h×nh.
Mµn h×nh sÏ hiÖn ra thêi ®iÓm kÕt thóc cña ch¬ng tr×nh
®· chän, ®îc tÝnh to¸n dùa trªn lîng t¶i tèi ®a cña tõng
lo¹i hµng. §Ìn b¸o cña nót Khëi ®éng/Thªm ®å sÏ b¾t ®Çu
chíp.
NÕu t¶i träng cña mÎ giÆt nhá, vµo lóc b¾t ®Çu chu tr×nh
giÆt mµn h×nh vÉn sÏ hiÓn thÞ ®iÓm kÕt thóc chu tr×nh
t¬ng øng víi mÎ giÆt tèi ®a. Thêi gian thùc sù sÏ tõ tõ
®îc ®iÒu chØnh trong khi chu kú ®îc thùc hiÖn.
6. Chän nhiÖt ®é
NhÊn nót NhiÖt §é nÕu quÝ vÞ muèn chän mét nhiÖt ®é
kh¸c víi nhiÖt ®é ®· ®Þnh trong m¸y.
Th«ng tin vÒ nhiÖt ®é tèi ®a cã thÓ xuÊt hiÖn trªn hµng thø
hai cña mµn h×nh (thay cho chu tr×nh kÕt thó t¹i). T¹i
gãc cña hµng thø ba hiÓn thÞ nhiÖt ®é ®· ®îc chän.
7. Chän Tèc ®é V¾t Spin H·m X¶
hoÆc chu tr×nh §ªm
NhÊn nót Tèc ®é V¾t nhiÒu lÇn, ®Ó chän tèc ®é v¾t mong
muèn hoÆc c¸c ®Æc ®iÓm Kh«ng V¾t O hoÆc H·m X¶
hoÆc chu tr×nh §ªm . Th«ng b¸o t¬ng øng sÏ xuÊt
hiÖn trªn hµng thø hai cña mµn h×nh. Tèc ®é v¾t ®îc chän
sÏ ®îc chØ trªn hµng thø ba bªn canh nót v¾t.
NÕu quÝ vÞ chän ®Æc ®iÓm H·m X¶ hoÆc Chu tr×nh §ªm,
m¸y sÏ ngng vµo lóc cuèi ch¬ng tr×nh vµ níc vÉn cßn
l¹i trong thïng m¸y.
8. Chän c¸c ®Æc ®iÓm mong muèn
NhÊn c¸c nót t¬ng øng ®Ó chän c¸c ®Æc ®iÓm cÇn thiÕt.
Tïy thuéc vµo ch¬ng tr×nh ®· chän chØ cho phÐp cã
nh÷ng ®Æc ®iÓm nhÊt ®Þnh ®îc chØ ra trong qu¸ tr×nh chän
lùa.
Ghi chó: Kh«ng ph¶i tÊt c¶ c¸c ®Æc ®iÓm ®Òu cã thÓ t¬ng
hîp lÉn nhau. Nh÷ng ®Æc ®iÓm kh«ng t¬ng hîp sÏ mÊt ®i.
9. Chän Thêi Gian Tr× Ho·n
Tríc khi quÝ vÞ chän ch¬ng tr×nh, nÕu quÝ vÞ muèn lïi
thêi gian khëi ®éng l¹i thi` h·y chän ®Æc ®iÓm Tr× Ho·n.
Thêi gian tr× ho·n ®îc chän (cho tíi 20 tiÕng) sÏ xuÊt
hiÖn trªn mµn h×nh trong khi lùa chän.
Thêi gian kÕt thóc chu tr×nh sÏ ®îc cËp nhËt vµ chØ ra trªn
mµn h×nh.
COTTON
MAX 1400
1200
40°C
Temp. Spin
Options
Change
08.30
10.55
Exit
Cotton
Cycle and at
60°C 1400
Temp. Spin
Options
Change
08.30
10.55
Exit
COTTON
MAX 95°C
40°C 1400
Temp. Spin
Options
Change
08.30
10.55
Exit
Delay Start
No 10.55
Change
Temp. Spin
Options
Exit
Delay Start
Start in 30 min 11.25
Temp. Spin
Options
Change
Exit
Page 91

TiÕng ViÖt
91
10. B¾t ®Çu ch¬ng tr×nh
NhÊn nót Khëi ®éng/Thªm ®å. §Ìn b¸o t¬ng øng sÏ
ngng chíp. Th«ng b¸o t¬ng øng cho giai ®o¹n m¸y
®ang thùc hiÖn sÏ chØ ra trªn mµn h×nh.
NÕu quÝ vÞ chän tr× ho·n khëi ®éng, m¸y sÏ b¾t ®Çu ®Õm
ngîc.
11. Lµm thÕ nµo ®Ó ®æi ch¬ng tr×nh
®ang thùc hiÖn
Tríc khi quÝ vÞ thùc hiÖn bÊt cø thay ®æi nµo, ph¶i t¹m
dõng m¸y b»ng c¸ch nhÊn nót Khëi §éng/Thªm ®å.
Cã thÓ thay ®æi bÊt cø giai ®o¹n nµo tríc khi ch¬ng
tr×nh thùc hiÖn giai ®o¹n ®ã.
Khi ch¬ng tr×nh ®· b¾t ®Çu råi thi` quÝ vÞ chØ cã thÓ ®Æt
l¹i ch¬ng tr×nh b»ng c¸ch quay ®ång hå chän ch¬ng
tr×nh vÒ O vµ sau ®ã quÝ vÞ cã thÓ chän ch¬ng tr×nh
míi. Níc cña mÎ giÆt vÉn ë trong thïng m¸y. B¾t ®Çu
ch¬ng tr×nh m íi b»ng c¸ch nhÊn nót Khëi ®éng/Thªm
®å.
Ghi chó: §Ó th¸o níc tríc khi b¾t ®Çu chu tr×nh míi quÝ
vÞ cã thÓ ph¶i hñy bá ch¬ng tr×nh vµ chän chu tr×nh Th¸o
Níc.
12. Hñy bá mét ch¬ng tr×nh
Quay ®ång hå lùa chän ®Õn O ®Ó hñy bá ch¬ng tr×nh
®ang ch¹y. B©y giê quÝ vÞ cã thÓ chän ch¬ng tr×nh míi.
13. Lµm thÕ nµo ®Ó më cöa m¸y trong
khi ch¬ng tr×nh ®ang thùc hiÖn
QuÝ vÞ cã thÓ më cöa m¸y, sau khi chØnh m¸y T¹m
Ngng b»ng c¸ch nhÊn nót Khëi ®éng/ Thªm ®å miÔn lµ
c¸c ®iÒu kiÖn sau hiÖn h÷u:
1) m¸y giÆt kh«ng ë trong giai ®o¹n lµm nãng trªn 55°C;
2) mùc níc trong thïng m¸y kh«ng cao;
3) thïng m¸y ®ang kh«ng quay.
NÕu cã ®ñ c¸c ®iÒu kiÖn trªn, khi quÝ vÞ t¹m ngng m¸y,
th«ng b¸o t¬ng øng xuÊt hiÖn trªn mµn h×nh, ®Ìn b¸o cöa
®ang khãa sÏ t¾t ®i vµ cöa cã thÓ më ®îc.
NÕu quÝ vÞ kh«ng thÓ më ®îc cöa, ®Ìn b¸o cöa ®ang khãa
s¸ng mµ quÝ vÞ cÇn ph¶i më cöa, h·y t¾t m¸y ®i b»ng c¸ch
quay ®ång hå lùa chän vÒ vÞ trÝ O.
Sau kho¶ng 3 phót, quÝ vÞ cã thÓ më cöa ®îc.
H·y chó ý ®Õn mùc níc vµ nhiÖt ®é cña níc trong m¸y
giÆt!
14. Vµo lóc hÕt ch¬ng tr×nh
Vµo lóc hÕt ch¬ng tr×nh, m¸y tù ®éng ngõng, ph¸t ra
tiÕng kªu b¸o hiÖu (nÕu nh quÝ vÞ kh«ng chän ®Æc ®iÓm
kh«ng cã tiÕng) vµ mµn h×nh hiÖn ra th«ng tin t¬ng øng.
NÕu quÝ vÞ ®· chän H·m X¶ hoÆc Chu tr×nh §ªm, ®Ìn
cña nót Khëi ®éng/ Thªm ®å t¾t ®i vµ ®Ìn b¸o cöa khãa
s¸ng lªn.
§Ó th¸o níc hoÆc v¾t tríc tiªn quay ®ång hå lùa chän vÒ
vÞ trÝ O vµ sau ®ã quay tíi ch¬ng tr×nh th¸o níc hoÆc
v¾t/v¾t nhÑ.
Cöa m¸y më ®îc còng ®ång thêi ®îc b¸o hiÖu b»ng
th«ng b¸o Cöa më ®îc (kÕt thóc chu tr×nh) vµ ®Ìn b¸o
cöa khãa t¾t ®i.
Quay ®ång hå lùa chän ®Õn O ®Ó t¾t m¸y.
LÊy ®å ra khái thïng giÆt.
Xem xÐt xem thïng giÆt cßn mãn ®å nµo kh«ng b»ng c¸ch
dïng tay quay thïng giÆt. Môc ®Ých cña viÖc nµy lµ phßng
ngõa bÊt cø mãn ®å nµo nÕu sãt l¹i trong thïng giÆt cã thÓ
bÞ h trong lÇn giÆt kÕ tiÕp (ch¼ng h¹n bÞ co rót) hoÆc phai
mµu sang nh÷ng mÎ giÆt kh¸c.
Chóng t«i ®Ò nghÞ quÝ vÞ nªn khãa vßi níc vµ rót d©y ®iÖn
khái æ c¾m.
§Ó cöa thïng m¸y khÐp hê cho m¸y ®îc th«ng h¬i.
COTTON
Washing
40°C 1200
Temp. Spin
Options
Change
08.30
12.00
Exit
Page 92

Page 93

93
Page 94

22
B¶o tr×
1. Th©n m¸y
Lµm s¹ch bªn ngoµi m¸y b»ng xµ phßng vµ níc mµ th«i.
Röa s¹ch víi níc l¹nh vµ dïng kh¨n mÒm lau kh«.
§iÒu quan träng! kh«ng dïng cån methylated, dung m«i
hay nh÷ng chÊt t¬ng tù ®Ó chïi th©n m¸y.
2. Gio¨ng cöa
ThØnh tho¶ng kiÓm tra gio¨ng cöa cña thïng m¸y vµ gì bá
nh÷ng vËt ®ãng ë ®ã l©u ngµy m¾c trong ®êng gÊp cña
miÕng nep.
3. Ng¨n chøa bét giÆt
Sau mét thêi gian, bét giÆt vµ chÊt lµm mÒm v¶i sÏ ®ãng
l¹i trong ng¨n chøa.
ThØnh tho¶ng nªn röa ng¨n díi vßi níc ®ang ch¶y.
Muèn lÊy ng¨n chøa ra khái m¸y, bÊm nót bªn tr¸i ë mÆt
sau cña m¸y.
M¸y ®îc thiÕt kÓ ®Ó phÇn trªn cña ng¨n chøa cã thÓ ®îc
th¸o ra dÔ dµng.
Bét giÆt còng dÇn dÇn tÝch lòy bªn trong ng¨n chøa: dïng
bµn chØ r¨ng cò ®Ó chïi s¹ch. L¾p l¹i ng¨n chøa vµo sau
khi ®· lµm s¹ch.
4. B¬m th¸o níc
B¬m cÇn ®îc kiÓm tra nÕu
• m¸y kh«ng th¶i níc vµ/hoÆc kh«ng v¾t
• m¸y g©y tiÕng ®éng bÊt thêng trong qu¸ tr×nh th¸o
níc do nh÷ng ®å vËt nh kim b¨ng, ®ång xu v.v lµm
nghÑt b¬m.
Thao t¸c nh sau:
• Rót ®iÖn cña m¸y.
• NÕu cÇn chê cho níc nguéi bít.
• Më cöa b¬m.
• §Æt mét thau høng gÇn víi b¬m ®Ó høng níc bÞ trµn.
• Th¸o èng th¶i níc khÈn cÊp ra, ®Æt vµo thau, më n¾p ra.
• Khi níc hÕt ch¶y, vÆn th¸o n¾p b¬m ra. Lu«n lu«n ®Ó
s½n giÎ lau ®Ó lau níc trµn khi th¸o b¬m.
P1050
C0118
C0119
P0038
P1114
P1115
Page 95

TiÕng ViÖt
23
• Gì bá tÊt c¶ nh÷ng vËt b¸m trong b¬m b»ng c¸ch quay
nã.
• VÆn l¹i n¾p cho èng th¶i níc khÈn cÊp vµ ®Æt nã l¹i vµo
chç cña nã.
• VÆn l¹i b¬m vµo võa chÆt.
• §ãng cöa b¬m l¹i.
5. Bé phËn läc níc vµo
NÕu quÝ vÞ nhËn thÊy m¸y lÊy níc bÞ chËm, h·y kiÓm tra
bé phËn läc níc vµo n»m trong èng dÉn níc xem nã cã
bÞ nghÑt kh«ng.
Khãa vßi níc l¹i.
Th¸o èng dÉn ra khái vßi.
Chïi s¹ch bé phËn läc b»ng bµn ch¶i cøng.
L¾p èng dÉn trë l¹i vßi níc.
6. C¸ch th¸o níc khÈn cÊp
NÕu m¸y kh«ng th¶i níc, thao t¸c nh sau ®Ó th¸o níc
ra khái m¸y:
• rót d©y ®iÖn khái æ c¾m;
• khãa vßi níc l¹i;
• nÕu cÇn chê cho níc nguéi bít;
• Më cöa b¬m.
• ®Æt mét thau høng trªn sµn vµ ®Æt mét ®Çu èng tho¸t
níc khÈn cÊp vµo thau. Th¸o n¾p cña nã ra. Níc sÏ
ch¶y xuèng thau theo träng lùc. Khi thau ®Çy, vÆn l¹i
n¾p vµo. §æ níc trong thau ®i. LÆp l¹i c¸c bíc trªn
®Õn khi níc ngõng ch¶y ra.
• Chïi s¹ch bé phËn läc nÕu cÇn.
• ®Æt l¹i èng th¶i níc khÈn cÊp vµo vÞ trÝ cña nã sau khi
®· ®Ëy n¾p èng;
• vÆn b¬m trë l¹i vµ ®ãng cöa b¬m.
7. Phßng ngõa khi thêi tiÕt ®«ng gi¸
NÕu m¸y giÆt ®îc l¾p ®Æt t¹i n¬i nhiÖt ®é cã thÓ gi¶m
xuèng díi 0°C, thao t¸c nh sau:
• Rót phit c¾m ra khái æ.
• §ãng vßi níc l¹i vµ vÆn th¸o èng dÉn níc vµo ra khái
vßi níc.
• §Æt ®Çu èng dÉn níc vµo vµ ®Çu èng th¶i níc khÈn
cÊp vµo thau høng ®Æt trªn sµn vµ cho níc tho¸t ra.
• L¾p èng dÉn níc vµo l¹i vßi níc vµ ®Æt èng th¶i níc
khÈn cÊp l¹i vÞ trÝ cò sau khi ®· vÆn chÆt n¾p cña nã trë
l¹i.
Khi lµm nh vËy, níc cßn l¹i trong m¸y ®îc th¸o hÕt
tr¸nh ®«ng thµnh ®¸ vµ hËu qu¶ lµ lµm vì c¸c bé phËn liªn
quan.
Khi quÝ vÞ dïng m¸y l¹i, ph¶i ®¶m b¶o nhiÖt ®é chung
quoanh ph¶i cao h¬n 0°C.
P1117
P1090
Page 96

24
C¸ch söa ch÷a khi m¸y trôc trÆc
Nh÷ng trôc trÆc quÝ vÞ cã thÓ tù söa ch÷a lÊy.
Khi m¸y ®ang ch¹y mét trong nh÷ng th«ng b¸o sau cã thÓ hiÖn ra mµn h×nh:
- Trôc trÆc vÒ nguån cung cÊp níc “Kh«ng cã níc vµo. KiÓm tra vßi níc vµ èng”
- Trôc trÆc vÒ viÖc th¶i níc: “Kh«ng th¸o níc. KiÓm tra èng th¶i níc/c¸i läc”
- Cöa më: “Cöa kh«ng ®ãng. H·y kiÓm tra”
Khi quÝ vÞ ®· söa ch÷a xong nh÷ng trôc trÆc trªn, nhÊn nót Khëi §éng/Thªm ®å ®Ó khëi ®éng l¹i ch¬ng tr×nh. NÕu sau
khi kiÓm tra tÊt c¶ mäi thø mµ m¸y cßn trôc trÆc, h·y liªn l¹c víi Trung T©m Phôc Vô ®Þa ph¬ng.
Trôc trÆc Nguyªn nh©n cã thÓ
• M¸y kh«ng thÓ khëi ®éng ®¬c:
• Cöa ®ãng kh«ng s¸t. (Cöa kh«ng ®ãng. H·y kiÓm
tra”)
• M¸y cha ®îc c¾m ®iÖn hoÆc æ c¾m kh«ng cã ®iÖn.
• CÇu ch× chÝnh bÞ næ.
• Cha nhÊn nót Khëi §éng/ Thªm ®å.
• §· chän ®Æc ®iÓm Tr× Ho·n Khëi §éng.
• §ång hå chän ch¬ng tr×nh kh«ng ®îc ®Æt ®óng vÞ trÝ.
• M¸y kh«ng ®Çy níc ®îc:
• Vßi níc ®· bÞ khãa. (“Kh«ng cã níc vµo. KiÓm tra
vßi níc vµ èng”)
• ¤ng dÉn níc vµo bÞ gÊp hay bÞ ®Ì bÑp. (“Kh«ng cã
níc vµo. KiÓm tra vßi níc vµ èng”)
• Läc trong èng dÉn níc vµo bÞ nghÑt. (“Kh«ng cã níc
vµo. KiÓm tra vßi níc vµ èng”)
• Cöa ®ãng kh«ng ®óng c¸ch. (Cöa kh«ng ®ãng. H·y
kiÓm tra”)
• M¸y ®Çy níc sau ®ã th¸o hÕt níc
ngay:
• §Çu èng tho¸t níc qu¸ thÊp. Xem l¹i phÇn c¸ch th¶i
níc ra.
• M¸y kh«ng th¶i níc vµ/hoÆc kh«ng
v¾t:
• ¤ng th¶i níc bÞ gÊp hay bÞ ®Ì bÑp. (“Kh«ng th¸o
níc. KiÓm tra èng th¶i níc/c¸i läc”)
• §Æc ®iÓm H·m X¶ , Chu tr×nh §ªm hoÆc Kh«ng
V¾t ®· ®îc chän.
• §å giÆt kh«ng ph©n bè ®Òu trong thïng.
• B¬m th¸o níc bÞ nghÑt. (“Kh«ng th¸o níc. KiÓm tra
èng th¶i níc/c¸i läc”)
• Níc ch¶y ra sµn nhµ:
• Qu¸ nhiÒu bét giÆt hay dïng bét giÆt kh«ng thÝch hîp
(g©y qu¸ nhiÓu bät).
• KiÓm tra xem c¸c chç nèi trªn èng dÉn níc vµo cã bÞ x×
kh«ng. Thêng rÊt khã ph¸t hiÖn v× níc ch¶y trong
èng; kiÓm tra xem nã cã bÞ ®Ém níc kh«ng.
• ¤ng dÉn níc th¶i bÞ h h¹i.
• N¾p cña èng th¶i níc khÈn cÊp kh«ng ®îc ®Ëy l¹i sau
khi lau chïi c¸i läc.
Page 97

TiÕng ViÖt
97
NÕu quÝ vÞ kh«ng thÓ nhËn biÕt hay söa ch÷a ®îc trôc
trÆc, h·y liªn l¹c trung t©m phôc vô cña chóng t«i. Tríc
khi gäi ®iÖn tho¹i, nªn ghi chó kiÓu m¸y, m· sè l« hµng vµ
ngµy mua m¸y. Trung T©m Phôc Vô cÇn biÕt nh÷ng th«ng
tin nµy.
Mod. ..........
Prod. No. ...........
Ser. No. .........
M
o
d
. .
.
...
.
...
.
P
r
o
d
.
N
o
.
...
.
...
....
S
e
r.
N
o
.
..
.
..
..
..
P0042
Trôc trÆc Nguyªn nh©n cã thÓ
• M¸y b¾t ®Çu v¾t muén h¬n hoÆc kh«ng
v¾t:
• Bé phËn ph¸t hiÖn sù mÊt c©n b»ng ®· can thiÖp vµo v×
quÝ vÞ ®· bá ®å vµo thïng giÆt kh«ng c©n b»ng. M¸y sÏ
tù s¾p xÕp l¹i b»ng c¸ch quay ngîc thïng l¹i. M¸y cã
thÓ lµm ®iÒu nµy vµi lÇn cho ®Õn khi sù mÊt c©n b»ng
mÊt ®i vµ m¸y cã thÓ v¾t b×nh thêng. NÕu sau 10 phót,
®å giÆt vÉn kh«ng ®îc ph©n bè ®Òu trong thïng, m¸y sÏ
kh«ng v¾t. Trong trêng hîp ®ã, ph©n bè l¹i ®å giÆt
b»ng tay vµ chän ch¬ng tr×nh v¾t.
• Cöa m¸y sÏ kh«ng më ®îc:
• Ch¬ng tr×nh giÆt cßn ®ang ch¹y.
• Khãa cöa cha ®îc th¸o ra.
• Cã níc trong thïng m¸y.
Cöa m¸y cã thÓ më ®îc chØ khi th«ng b¸o “Cöa më
®îc” xuÊt hiÖn trªn mµn h×nh vµ ®Ìn b¸o cöa khãa
t¾t ®i.
• M¸y bÞ rung hoÆc g©y ån:
• Nh÷ng èc vÝt bao b× khi vËn chuyÓn cßn xãt l¹i trong
m¸y.
• §Õ ch©n m¸y cha ®îc chØnh cho c©n b»ng.
• §å giÆt kh«ng ph©n bè ®Òu trong thïng.
• Cã thÓ cã qu¸ Ýt ®å trong thïng giÆt.
• KÕt qu¶ giÆt kh«ng võa ý:
• Sö dông qu¸ Ýt bét giÆt hay bét giÆt kh«ng thÝch hîp.
• Tríc khi giÆt kh«ng xö lý nh÷ng vÕt bÈn khã s¹ch.
• Kh«ng chän ®óng nhiÖt ®é giÆt thÝch hîp.
• GiÆt qu¸ nhiÒu ®å.
Nhìn vaøo maùy
khoâng thaáy nöôùc nhôø kyõ thuaät taân tieán,
maùy hoaït ñoäng moät caùch raát tieát kieäm
tieâu thuï ít nöôùc. Tuy vaäy, hieäu suaát
cuûa maùy raát tuyeät haûo.
P103 UK
Maùy gaây tieáng ñoäng baát
thöôøng. Maùy ñöôïc trang bò vôùi ñoäng cô
ñaûo maïch giuùp caûi thieän hieäu
suaát cuûa maùy
P1034UK
Page 98

The Electrolux Group. The world’s No. 1 choice.
The Electrolux Group is the world’s largest producer of powered appliances for kitchen, cleaning and outdoor
use. More than 55 million Electrolux Group products (such as refrigerators, cookers, washing machines,
vacuum cleaners, chain saws and lawn mowers) are sold each year to a value of approx. USD 14 billion in
more than 150 countries around the world.
 Loading...