

Page 1
Electric built-in oven
INSTRUCTION BOOKLET
Please read this instruction booklet before using the appliance
35687-5301
Model ESOPMSS
GB
Page 2

Important Safety Information
You MUST read these warnings carefully before installing or using the oven. If you need
assistance, contact our Customer Care Department on 08705 950950
Installation
• It is mandatory that all operations required for the
installation are carried out by a qualified or competent
person, in accordance with existing rules and
regulations.
• It is dangerous to alter the specification in any way.
• Once you have removed all packaging from the
appliance, ensure that it is not damaged and the
electric cable is in perfect condition. Otherwise, contact
your dealer before proceeding with the installation.
During use
• During use the appliance becomes hot. Care should be
taken to avoid touching heating elements inside the
oven.
• This appliance has been designed for cooking edible
foodstuff only and must not be used for any other
purposes.
• Ensure that all control knobs are in the OFF position
when not in use.
• Should you connect any electrical tool to a plug near
this cooking appliance, ensure that electric cables are
not in contact with it and keep them far enough from the
heated parts of this appliance.
• If the appliance is out of order, disconnect it from the
electric supply.
• Do not leave untensils containing foodstuffs, e. g. fat, oil
or any inflammable product in or on the appliance. This
could cause damage in case the appliance is
inadvertently switched on.
• Always place the dripping pan in position to collect fat
when using the grill or when cooking meat. Pour a little
water into the dripping pan to avoid smoke and
unpleasant smells.
• Always use oven gloves to remove pans from the oven.
• For hygiene and safety reasons, this appliance should
be kept clean at all times. A build-up of fats or other
foodstuff could result in a fire.
• Disconnect the appliance from the electrical supply,
before carrying out any cleaning or manteinance work.
• Some parts of the appliance are covered by a shockproof plastic film. Remove this film before using the
oven.
• Always stand back from the oven when opening
the oven door during cooking or at the end of it to
allow any build up of steam or heat to release.
• Never use steam or steam machines to clean the
appliance.
• We recommend that you supervise each step of the
pyrolytic cleaning cycle. A power failure could cause a
temperature increase of the surround or cabinet which
could result in a fire.
It is important that the oven door, the door gasket, the
oven light and the cavity are in good condition to avoid
a fire.
A build-up of fat or other foodstuff could generate white
smoke, irritating for your eyes and the respiratory
system. We recommend that you stop the cleaning
cycle using the ON/OFF button to cool down the oven
cavity. Do not disconnect the appliance from the
electric supply. When the oven has cooled down
remove the food residue with a wet sponge.
• The manufacturer disclaims any responsability
should all the safety measures not be carried out.
Child Safety
• This appliance has been designed to be operated by
adults and children under supervision. Young children
must not be allowed to tamper with the controls or
play near or with the oven.
• Accessible parts of this appliance may become hot
when it is in use. Children should be kept away until
it has cooled.
Service
• Under no circumstances should you attempt to repair
the appliance yourself. Repairs carried out by
inexperienced persons may cause injury or serious
malfunctioning. Refer to your local Service Centre.
Always insist on genuine spare parts.
Environmental Information
• After installation, please dispose of the packaging
with due regard to safety and the environment.
• When disposing of an old appliance, make it unusable,
by cutting off the cable. Remove any door catches,
to prevent small children being trapped inside.
The symbol on the product or on its packaging
indicates that this product may not be treated as
household waste. Instead it shall be handed over to the
applicable collection point for the recycling of electrical
and electronic equipment. By ensuring this product is
disposed of correctly, you will help prevent potential negative consequences for the environment and human
health, which could otherwise be caused by inappropriate
waste handling of this product.
For more detailed information about recycling of this
product, please contact your local city office, your
household waste disposal service or the shop where you
purchased the product.
2
Page 3
Contents
For the User
Important Safety Information 2
Description of the Oven 4
Control Panel 5
Oven Features 6
When the Oven is First Installed 6
The On/Off Button 7
Before the First Use of the Oven 7
Using the Oven 8
Cooking Functions 9
Programming the Oven 9
Safety and Energy Saving Functions 11
Hints and Tips 13
Cooking Tables 15
Cleaning the Oven 17
Pyrolitic Cleaning 17
Replacing the Oven Light 19
Cleaning the Oven Door 20
Something not Working 22
Service and Spare Parts 23
Customer Care Department 23
Guarantee Conditions 24
For the Installer
Installation 25
Technical Data 25
Electrical Connection 25
Building In 26
It is most important that this instruction book
should be retained with the appliance for
future reference. Should the appliance be
sold or transferred, always ensure that the
book is left with the appliance in order that the
new owner can get to know the functions of
the appliance and the relevant warnings.
Guide to use the instructions
The following symbols will be found in the text to guide
you throughout the Instructions:
Safety Instructions
Step by step instructions for an operation
Hints and Tips
Environmental Information
This appliance complies with the following
E.E.C. Directives:
* 73/23 - 90/683
(Low VoltageDirective);
* 93/68 (General Directives);
* 89/336 (Electromagnetical
Compatibility Directive) .
and subsequent modifications
MANUFACTURER:
ELECTROLUX HOME PRODUCTS ITALY S.p.A.
Viale Bologna, 298
47100 FORLÌ (Italy)
3
Page 4
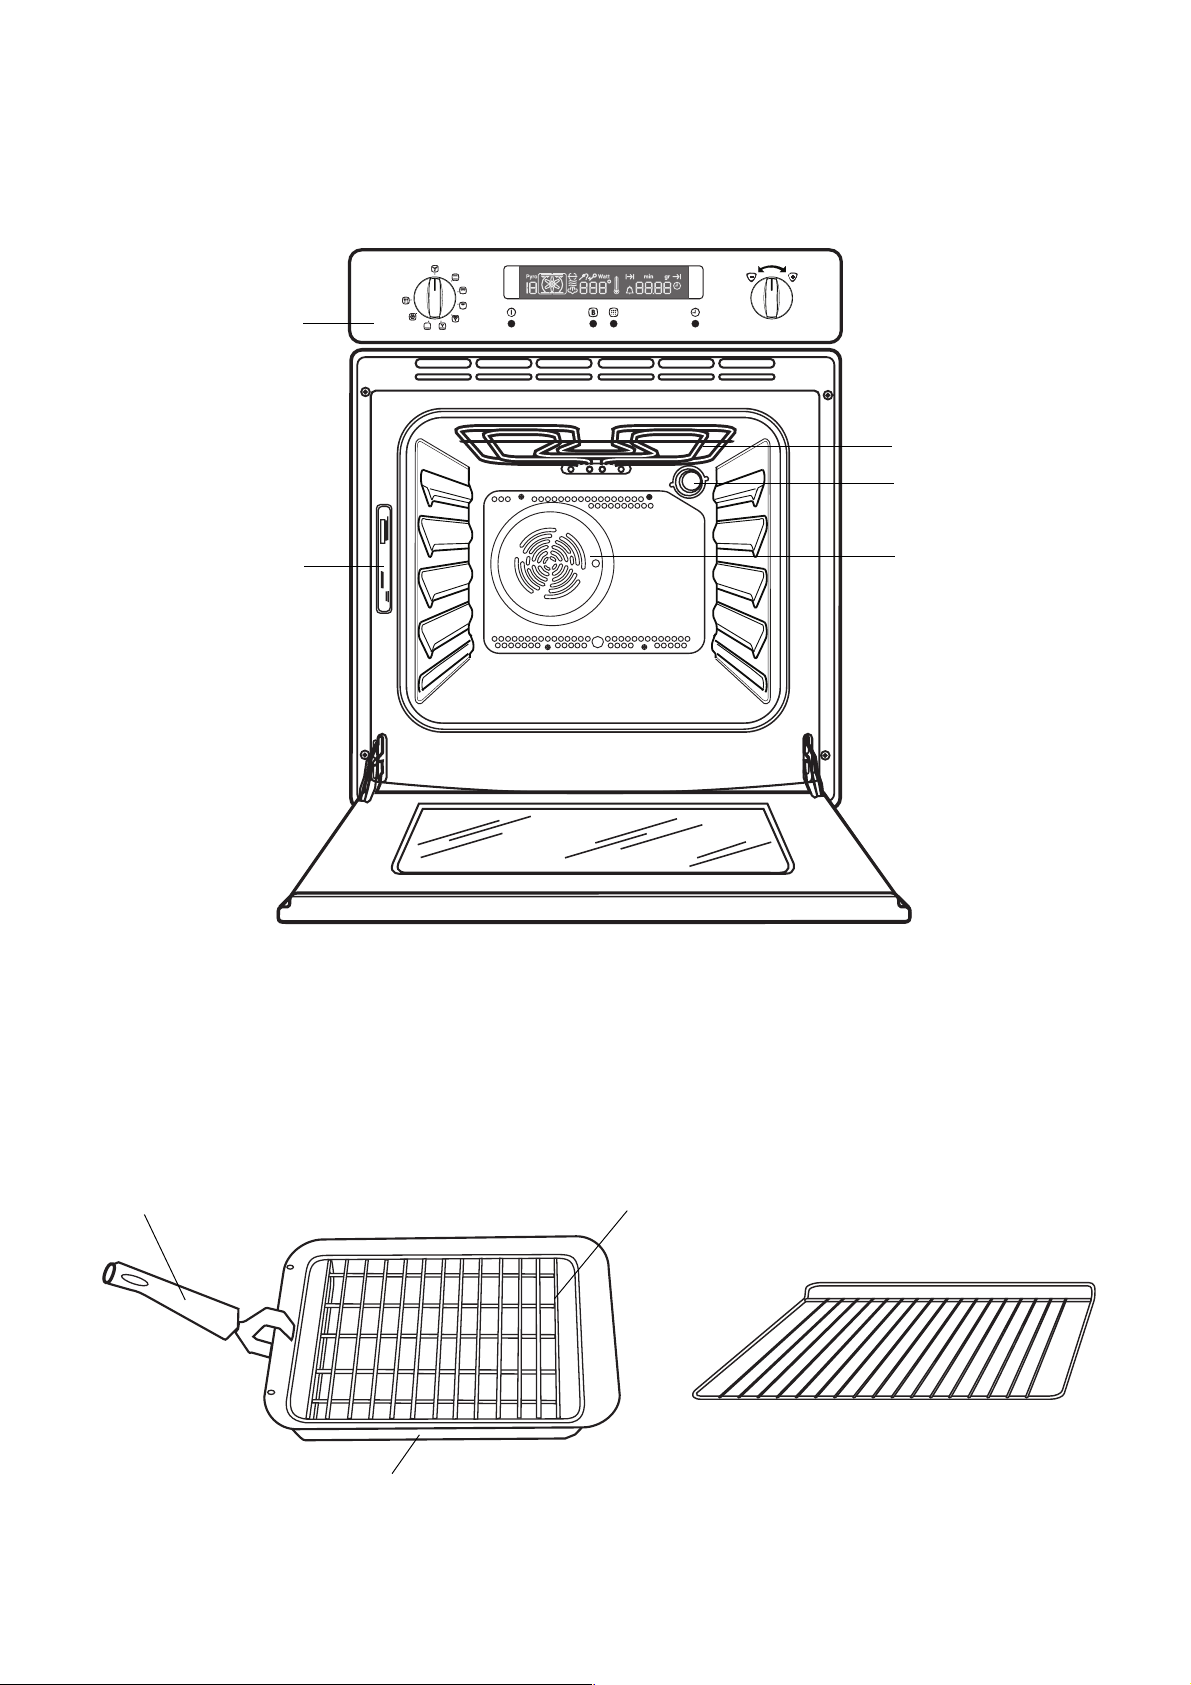
Description of the Oven
Control
Panel
Grill Element
Oven Light
Rating
Plate
Oven accessories
Fan
Removable
handle
4
Grill Pan Grid
Oven shelf (x 2)
Grill / Roasting pan
Page 5
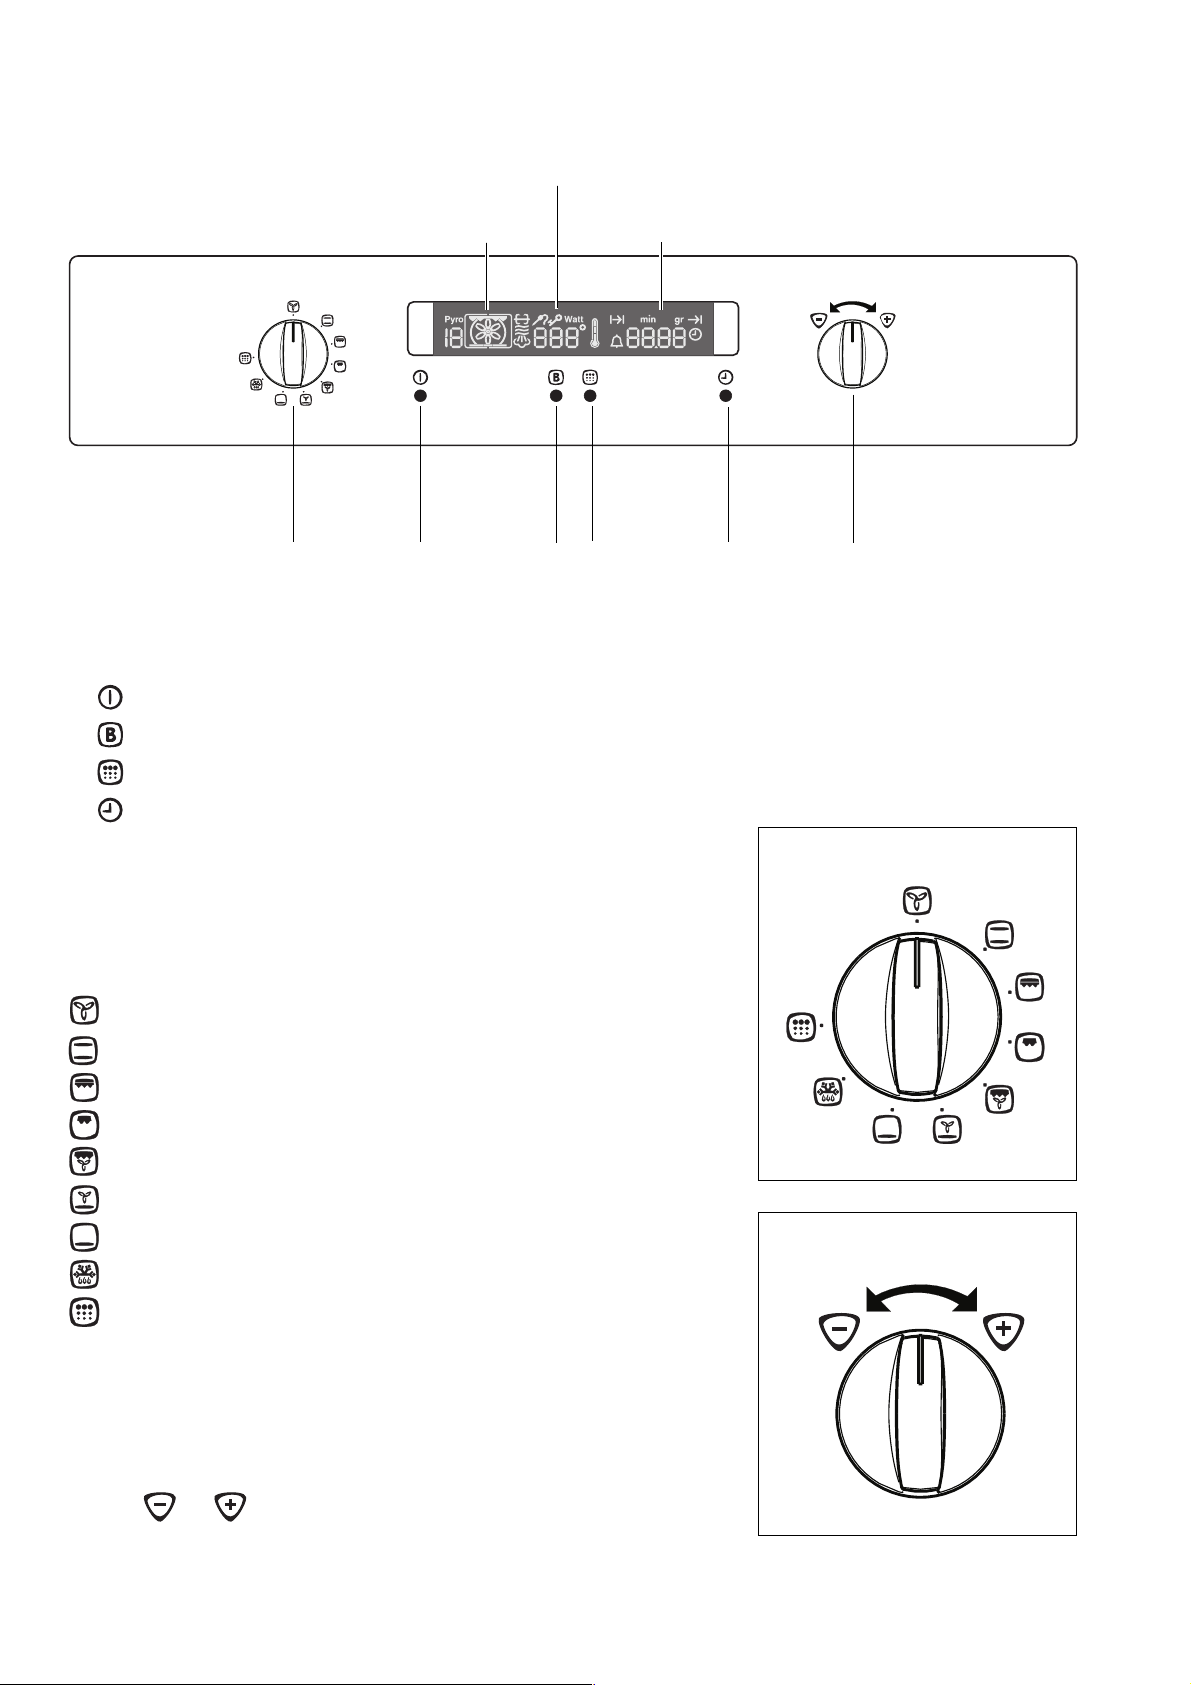
Control Panel
TEMPERATURE
DISPLAY
1 2 3 4 5 6
Controls
1. Oven Function Control knob
2. ON / OFF button
3. Fast Heat Up Function button
4. Pyrolitic Function button
COOKING
FUNCTION
TIME DISPLAY
5. Time Function button
6. Time/Temperature Control knob
Oven Function Control Knob
You can choose nine different functions by turning the
Oven Function Control Knob to the following symbols:
Fan cooking
Conventional cooking
Full Grill
Small Grill
Thermal Grilling
Pizza Function
Bottom heating element
Defrosting
Pyrolytic Cleaning Function
Oven Function Control Knob
Time/Temperature Control Knob
Time/Temperature Control knob
The time/temperature control knob allows you to
select the time (minute minder, cooking duration and
end of cooking time) and temperature by turning the
knob to or .
5
Page 6
Oven features
All the oven functions are controlled by an electronic
programmer.
You can select any combination of cooking function,
cooking temperature and automatic timing.
In the event of a power failure, the programmer will
keep all the settings (time of day, programme
setting or programme in operation) for about 3
minutes. If power is not restored within 3 minutes,
all the settings will be cancelled. When the power
is restored, the numbers in the display will flash,
and the clock/timer has to be reset.
Cooling fan
The cooling fan operates during cooking. Air is expelled
through vents between the oven door and the control panel,
as shown in the diagram.
The cooling fan may run on after the oven is switched off
to keep the controls cool. This is quite normal.
The Safety Thermostat
This oven is provided with a safety thermostat. In case of
malfunctioning of the main thermostat, and consequent
over-heating, the safety device will stop the power supply
to the appliance. If this happens, call your local Service
Force Centre. Under no circumstances should you
attempt to repair the appliance yourself.
Air Circulation
The oven is supplied with an exclusive system which
produces a natural circulation of air and the constant
recycling of steam. This system makes it possible to
cook in a steamy environment and keep the dishes soft
inside and crusty outside. Moreover, the cooking time
and energy consumption are reduced to a minimum.
During cooking steam may be produced which can be
released when opening the oven door. This is absolutely
normal.
However, always stand back from the oven
when opening the oven door during cooking
or at the end of it to allow any build up of
steam or heat to release.
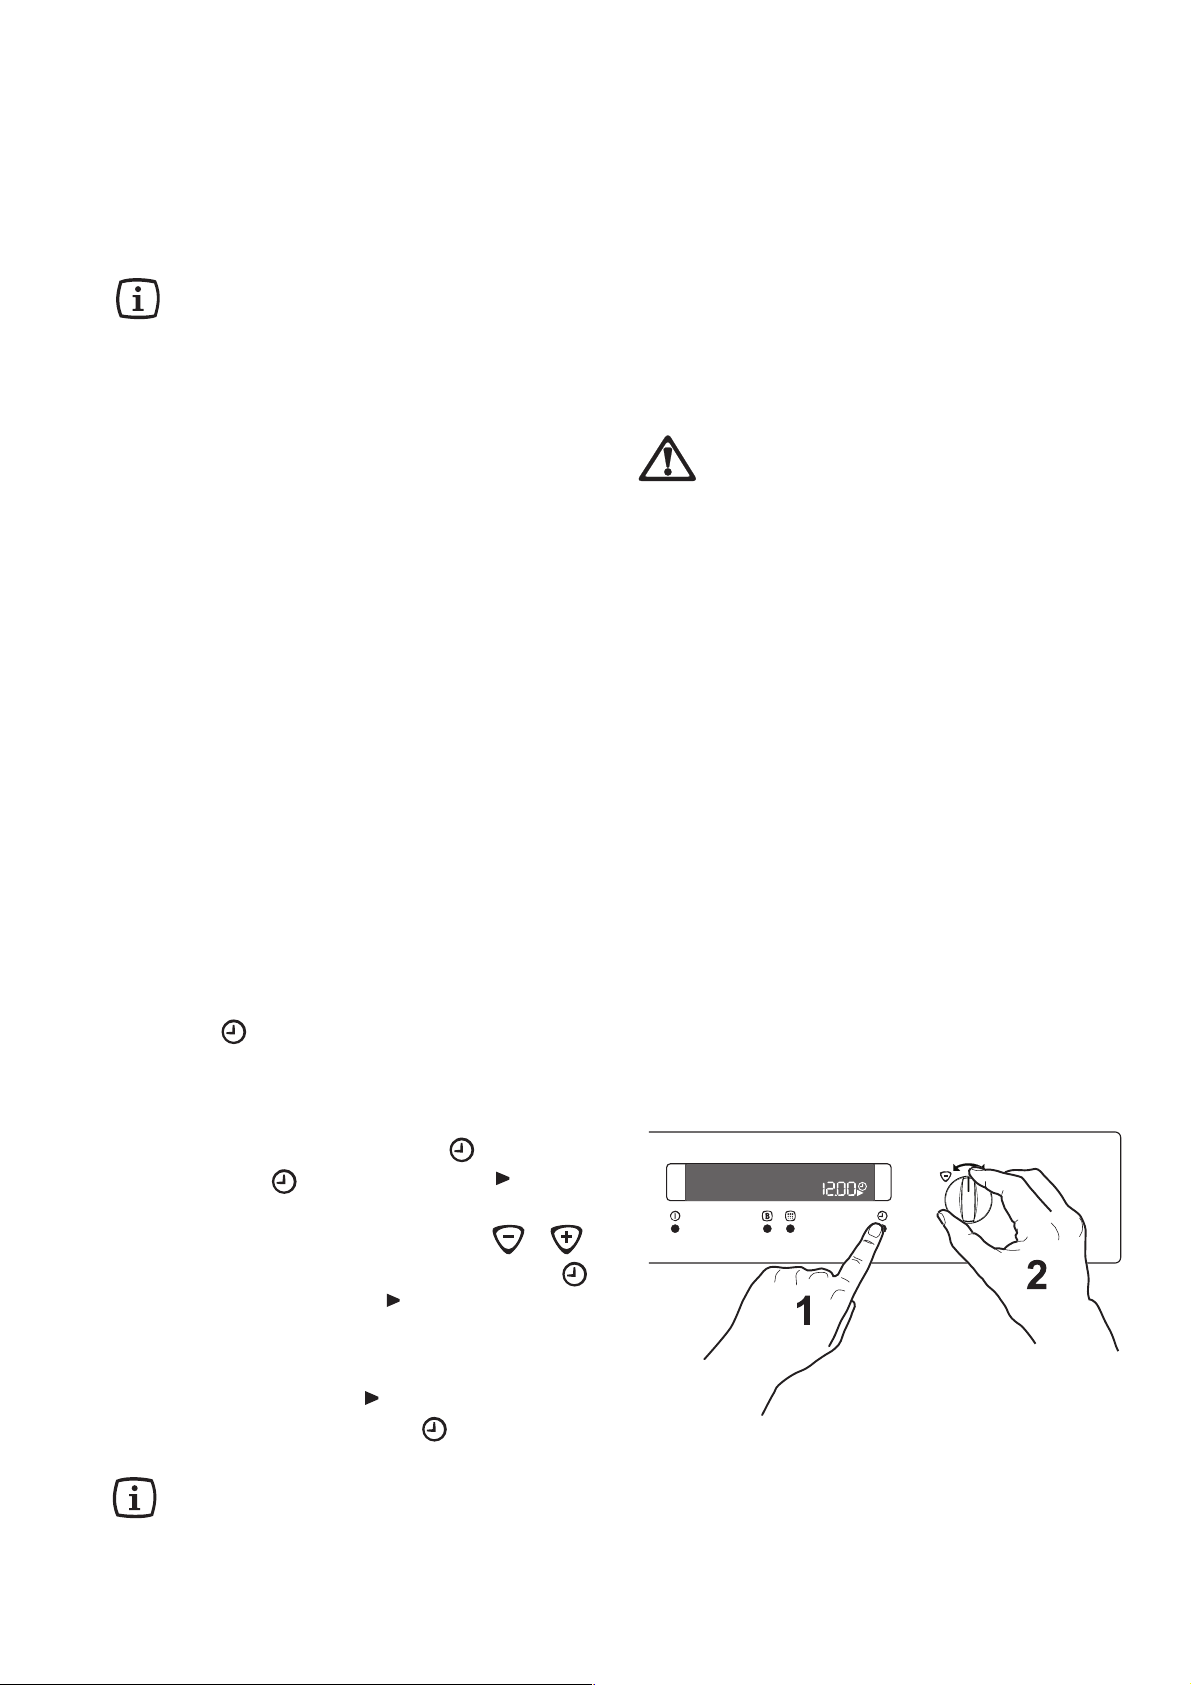
When the oven is first installed
When the oven is first connected to the electrical
supply, the display will automatically show 12:00 and
the
symbol
set the correct time of day.
To set the correct time of day :
1. Press time function button : the clock
2. If the arrow symbol does not flash anymore,
It is possible to set the time of day only when the
oven is off.
will flash. This means that you have to
symbol and the arrow symbol will flash
(Fig. 5). Set the correct time by turning the
Time/Temperature control knob to or .
Once you set the time, the clock symbol
and the arrow symbol will keep flashing for 5
seconds and then go off. This means that the
time setting has been stored in the programmer
memory.
press time function button two times.
Then, proceed as explained in point 1.
6
Page 7
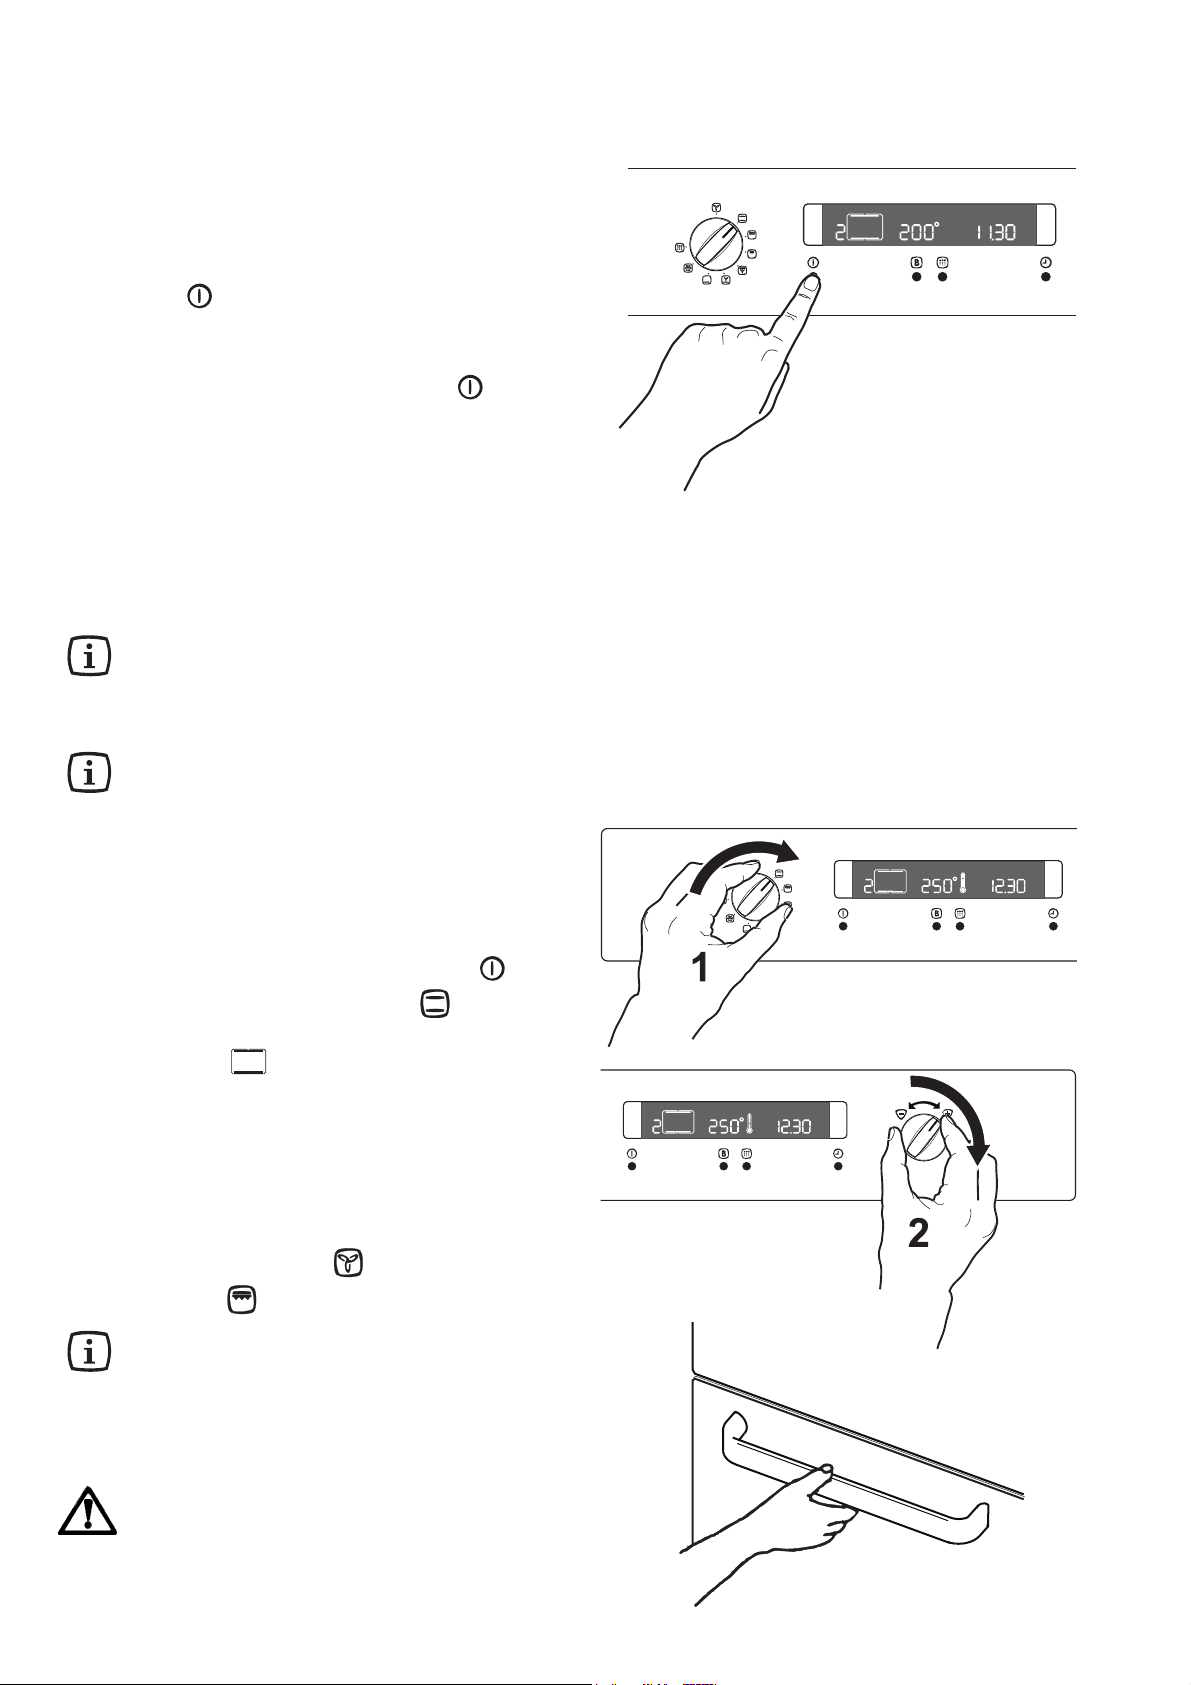
The On/Off Button
The oven must be off to carry out some special operation
(setting the time of day, setting the child lock).
In all other cases, the oven must be switched on before
setting any cooking function or programme.
When button is pressed, the symbol of the cooking
function selected with the oven control knob will come
on the display, and the oven light will switch on.
To switch off the oven, you can press button at any
time. Any cooking function or programme will stop, the
oven light will switch off and the time display will show
the time of day only.
Before the First Use of the Oven
Remove all packaging, both inside and outside
the oven, before using the oven.
The oven will work only if the time of day has
been set.
Before first use, the oven should be heated without
food.
During this time, an unpleasant odour may be
emitted. This is absolutely normal, and is
caused by residues of manufacturing.
1. Set the time of day with the electronic
programmer (see paragraph "To set the correct
time of day").
2. Switch on the oven by pressing button .
3. Turn the oven control knob to and select
the "Conventional Cooking" function. This
symbol
4. Set the temperature to 250°C by turning the
Time/Temperature control knob.
5. Allow the oven to run empty for approximately 45
minutes.
6. Open a window for ventilation.
7. This procedure should be repeated with the "Fan
Cooking" function and the "Full Grill"
function for approximately 5-10 minutes.
appears on the display.
Once this operation is carried out, let the oven
cool down, then clean the oven cavity with a
soft cloth soaked in warm water to which a little
mild washing-up liquid has been added.
Before cooking for the first time, carefully wash
the oven accessories.
To open the oven door, always hold the
handle in the centre.
7
Page 8
Using the Oven
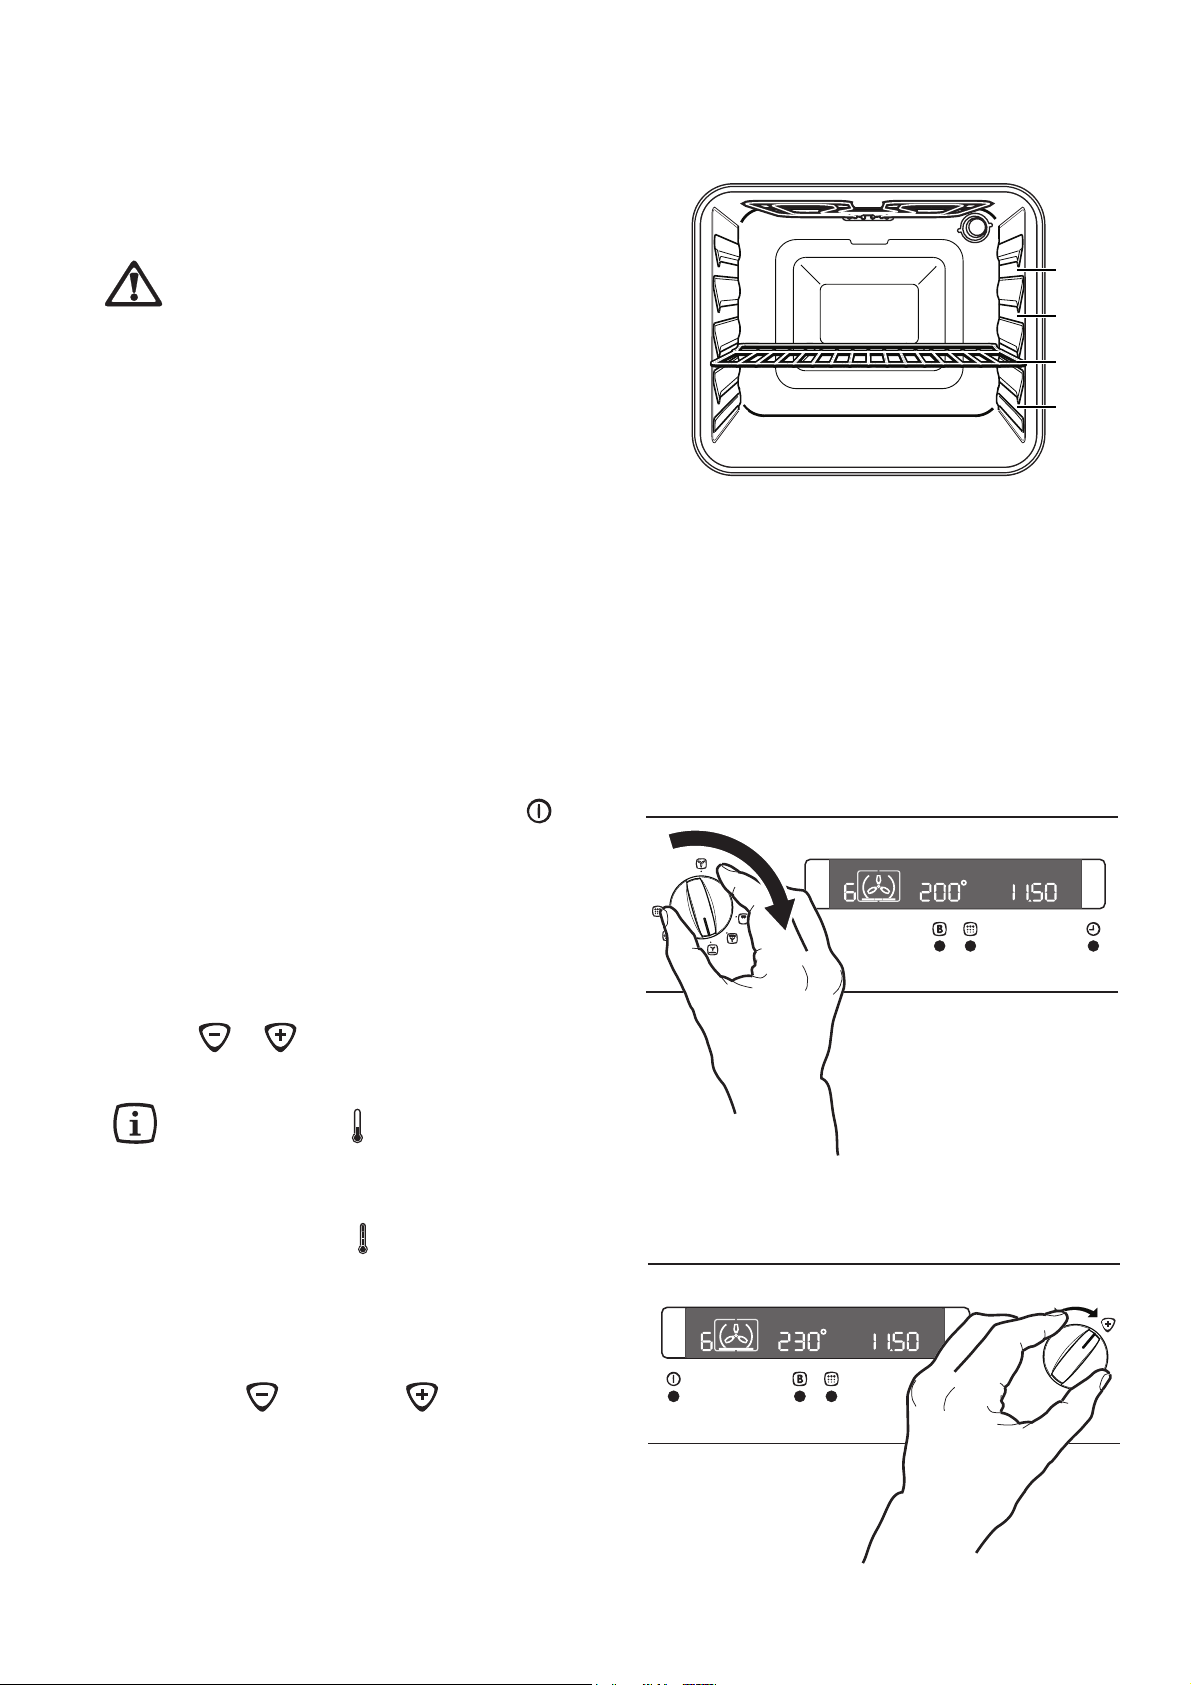
Shelf Positions
The oven shelves can be placed at different heights to
obtain better cooking results.
The levels are shown in Fig. 5.
Always cook with the oven door
closed.
• Always use oven gloves to remove and replace food
in the oven.
• Always ensure that you are using oven proof baking
trays, oven dishes, etc.
• Do not place baking trays, cake tins or aluminium foil
directly on the base of the oven. This could cause a
heat build-up which could affect the performance of the
oven and damage the oven enamel.
• Carefully supervise cooking with fat or oil, since
these types of foodstuff can result in a fire, if overheated. For the same reason, be careful when placing
or removing food in the oven, not to let any fat or oil fall
on the oven base. If this happens, carefully clean the
oven to avoid unpleasant smells or smoke.
How to select a Cooking
Function
1. Switch on the oven by pressing button .
2. Turn the oven control knob to select the required
cooking function. Each time a cooking function
is selected, the corresponding symbol comes
on the display and the cooking function number
appears to the left of the currently selected
cooking function.
3. If the pre-set temperature is not suitable,
turn the Time/Temperature control knob to
or to adjust the temperature in 5
degree steps.
As soon as the oven heats up, the thermometer
symbol rises slowly , indicating the degree to
which the oven is currently heated.
4
3
2
1
When the required temperature is reached, an
acoustic alarm will sound for a short time and the
thermometer symbol will light permanently.
How to change the temperature
At any time after a cooking is started, you can adjust
the temperature setting by turning the Time/Temperature
control knob to (decrease) or (increase).
The maximum temperature setting is 250°C (285°C only
with the "Conventional cooking" function).
8
Page 9
Cooking Functions
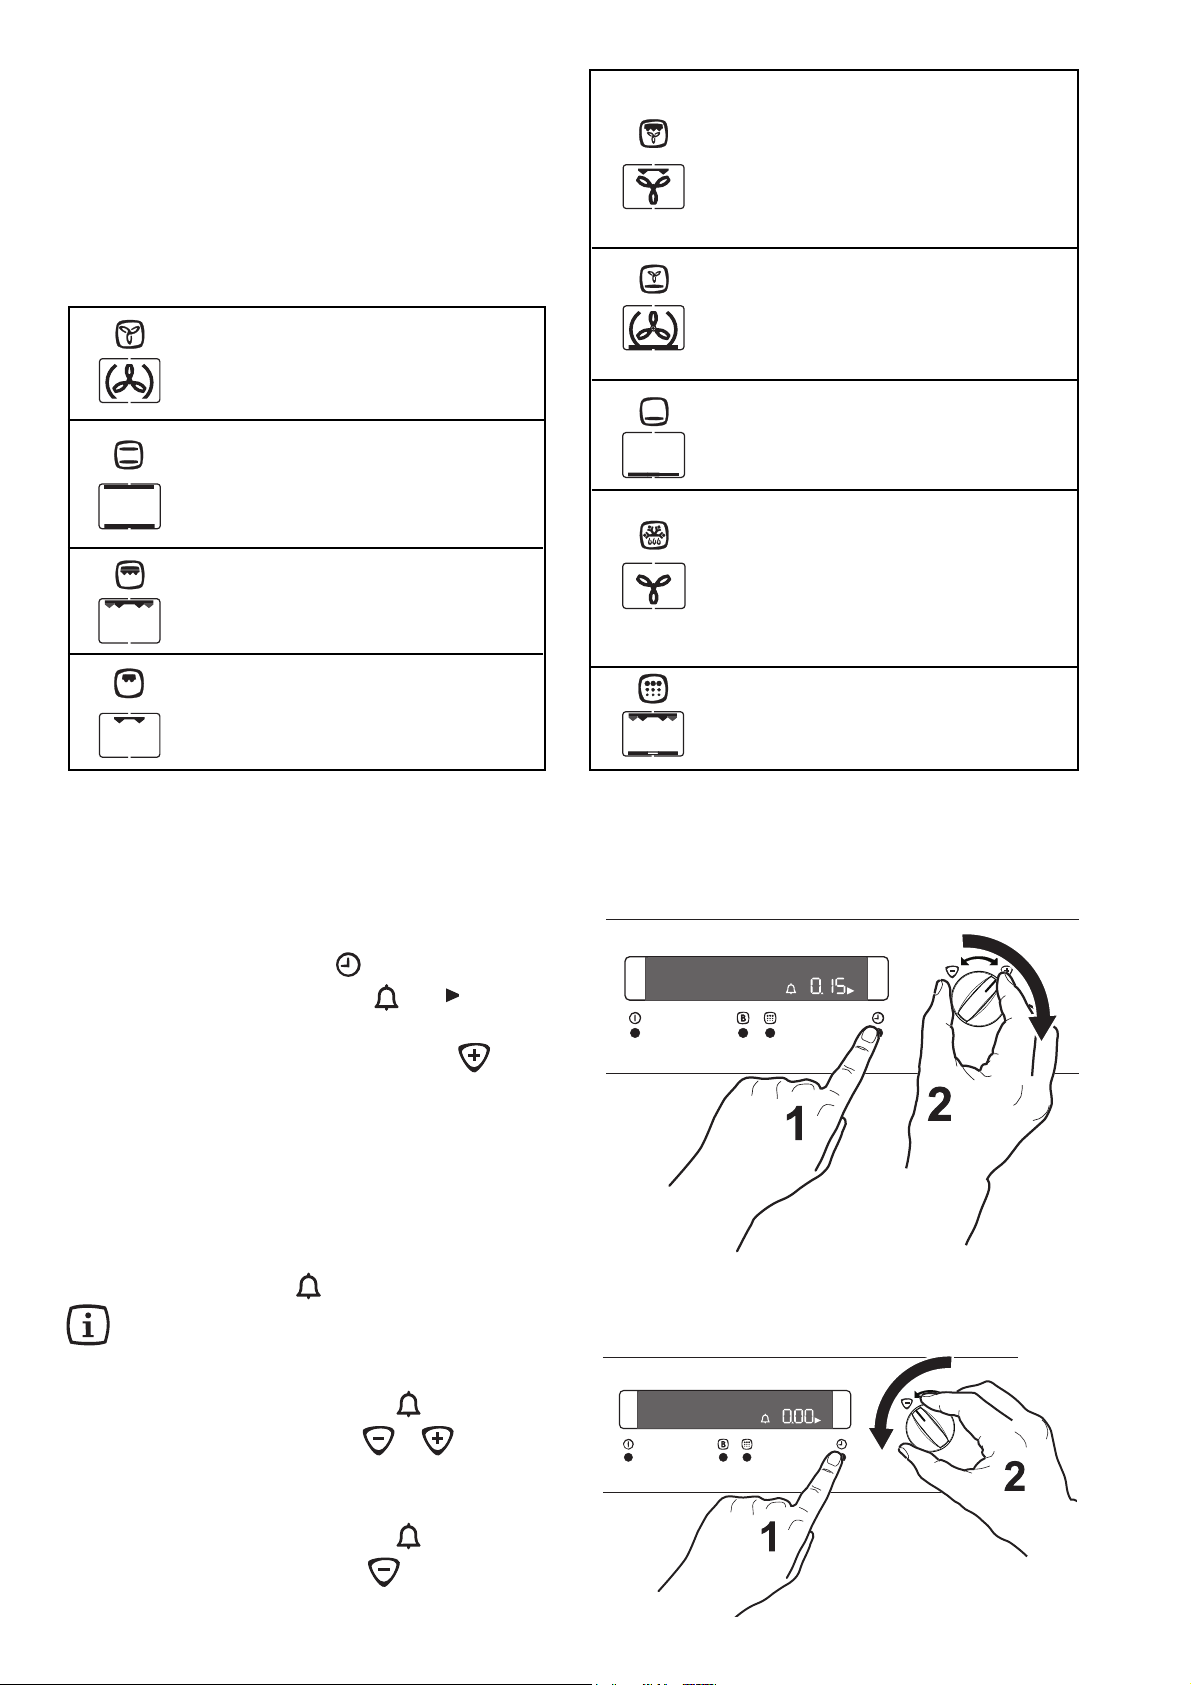
Here follows the list of the available cooking functions.
The small symbol appears on the Oven Function Control
Knob, the large one appears on the programmer display
when the relevant function is set with the knob.
Fan cooking - This setting allows you to
1
2
3
roast or roast and bake simultaneously
using any shelf, without flavour transference.
Pre-set temperature: 175 °C.
Conventional cooking - The heat comes
from both the top and bottom element,
ensuring even heating inside the oven. Preset temperature: 200 °C. The maximum
setting temperature is 285 °C.
Full Grill - The full grill element will be on.
Recommended for large quantities. Pre-set
temperature: 250 °C.
Thermal Grilling - This function offers an
alternative method of cooking food items,
5
6
7
8
normally associated with conventional
grilling. The grill element and the oven fan
operate together, circulating hot air around
the food. Pre-set temperature: 180 °C.
Select a maximum temperature of 200 °C.
Pizza Oven - The bottom element provides
direct heat to the base of pizzas, quiches or
pies, while the fan ensures air is circulated
to cook the pizza toppings or pie fillings.
Pre-set temperature: 175 °C.
Bottom heating element - The heat comes
from the bottom of the oven only, to allow
you to finish your dishes. Pre-set
temperature: 250 °C.
Defrosting – The oven fan operates without
heat and circulates the air, at room
temperature, inside the oven. This function
is particularly suitable for defrosting delicate
food which could be damaged by heat, e.g.
cream filled gateaux, iced cakes, pastries,
bread and other yeast products.
4
Small Grill - can be used for grilling small
quantities. Pre-set temperature: 250 °C.
9
Pyrolytic cleaning - This function allows
you to clean thoroughly the oven cavity.
Programming the Oven
How to set the minute minder
1. Press time function button to select the Minute
Minder Function. The symbols and will flash
and the control panel will display 0.00.
2. Turn the Time/Temperature control knob to within
3 seconds to select the required time (up to 23 hours
59 minutes). The Minute Minder will wait 3 seconds
and then start running.
3. When the programmed time has elapsed, an acoustic
alarm will be heard.
The oven will NOT switch off if in use.
4. To switch off the acoustic alarm, press any button.
The control panel will display the time of day and the
Minute Minder symbol will go out.
The Minute Minder function can be used as well
when the oven is off.
To use or to change the Minute Minder setting
Select the Minute Minder function and turn the
Time/Temperature control knob to or to change
the Minute Minder setting.
To cancel the Minute Minder:
Select the Minute Minder function and turn the
Time/temperature control knob to to decrease the
time until the display will show 0.00.
9
Page 10
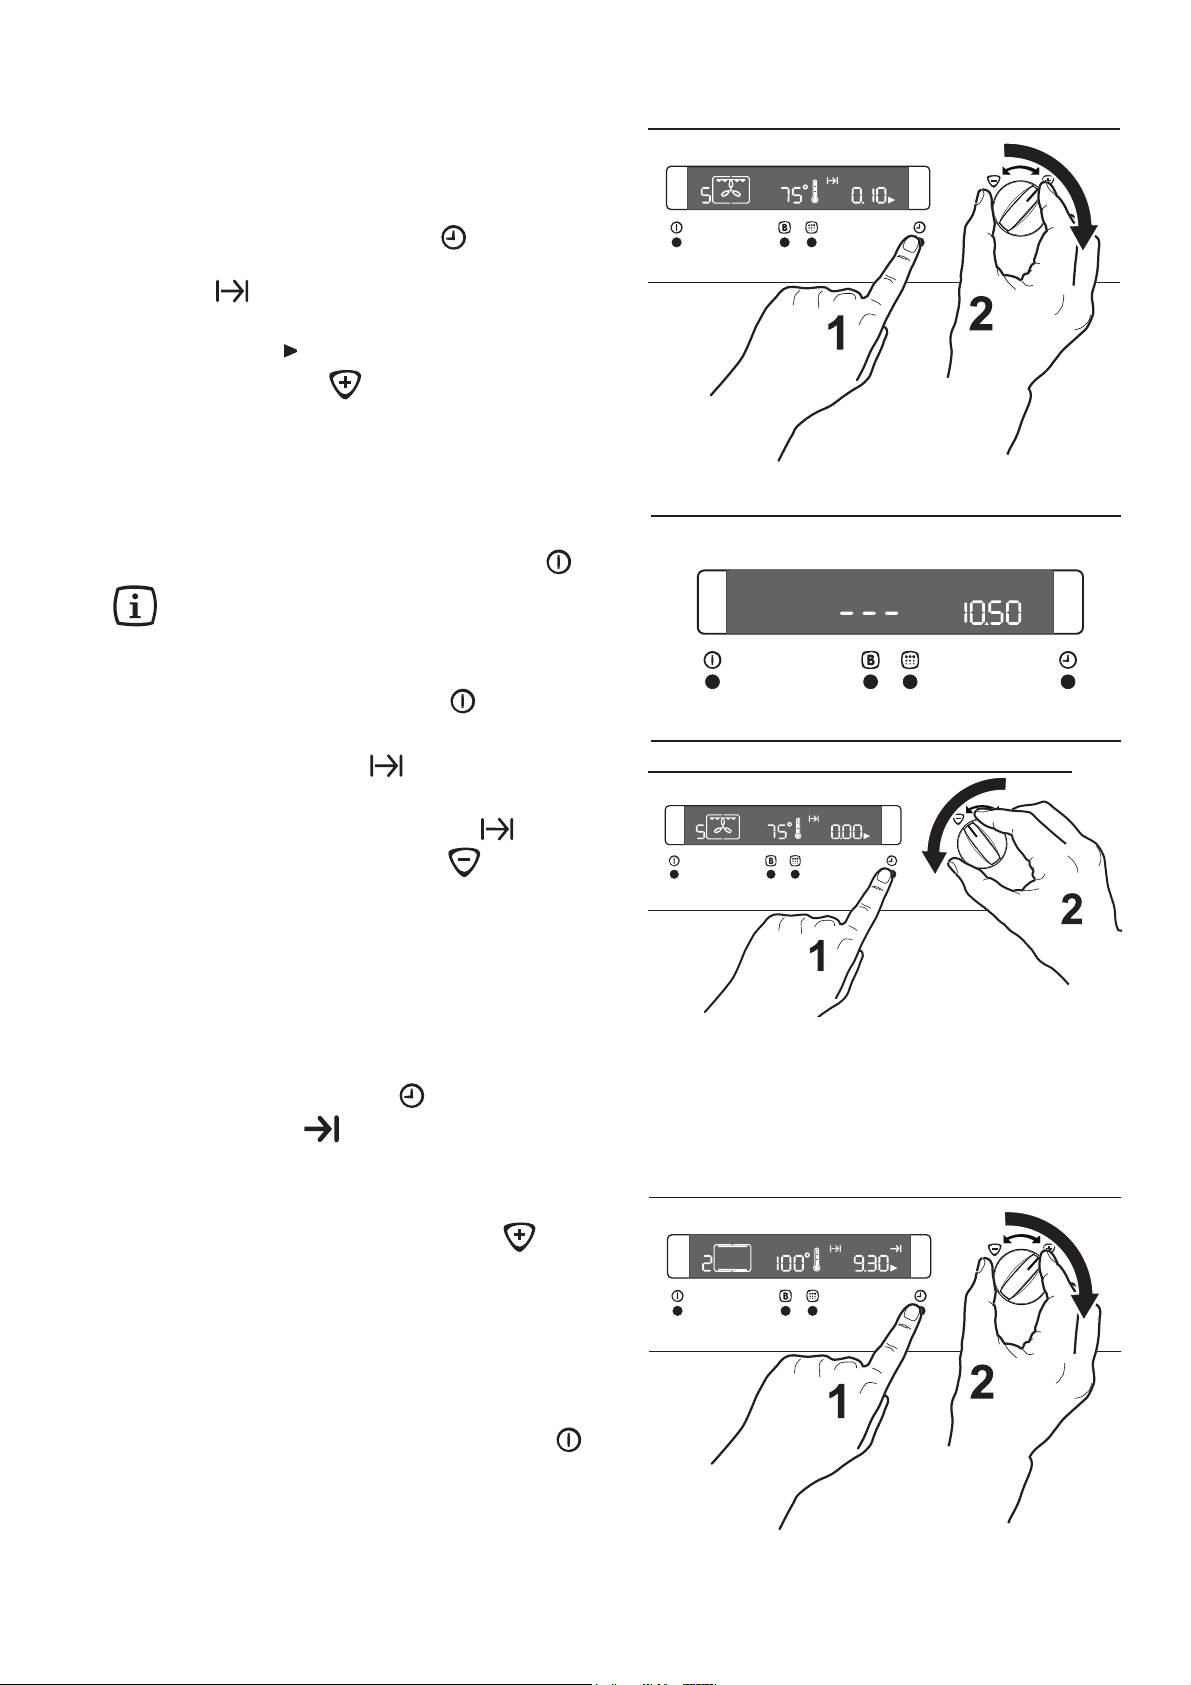
To programme the Oven to
switch off
1. Switch the oven on, place food in the oven, select a
cooking function and adjust the cooking temperature, if required.
2. Press the Time Function button
Cooking Duration function. The Cooking Duration
symbol will flash and the control panel will
display 0.00.
3. While the arrow is flashing, turn the Time/Temperature control knob to to select the required time
(up to 23 hours 59 minutes). The programmer will
wait 3 seconds and then start the countdown.
4. When cooking time is over, the oven will be
automatically switched off and an acoustic alarm will
be heard while the control panel displays 0.00.
5. To switch off the acoustic alarm, press button .
If you press any other button or turn the knobs
the alarm will stop, the display will show three
dashes “
blocked. Then, you will need to reset the
programmer by pressing button .
The control panel will display the time of day and the
Cooking Duration symbol will go out.
To cancel the Duration Time
Select the Cooking Duration Time function and turn
the Time/Temperature control knob to to decrease
the time until the display will show 0.00.
” and the programmer will be
- - -
to select the
To programme the Oven to
switch on and off
1. Carry out the cooking duration setting as described
in the previous chapter, points 1 to 3.
2. Press time function button until the "End of
Cooking" function is selected and the relevant
symbol will flash. The control panel will display the
end of cooking time (that is, the actual time + cooking
duration).
3. Turn the Time/Temperature control knob to within
3 seconds to select the required end of cooking time.
4. The programmer will wait 3 seconds, then the cooking
duration time will appear on the control panel. When
the oven switches on, the display will count down
the programmed time in minutes.
5. The oven will switch on and off automatically. The
end of cooking will be marked by an acoustic alarm.
6. To switch off the acoustic alarm, press button .
The control panel will display the time of day and the
cooking functions symbols will go off.
To cancel the programme, simply cancel the
Cooking Duration Time.
10
Page 11
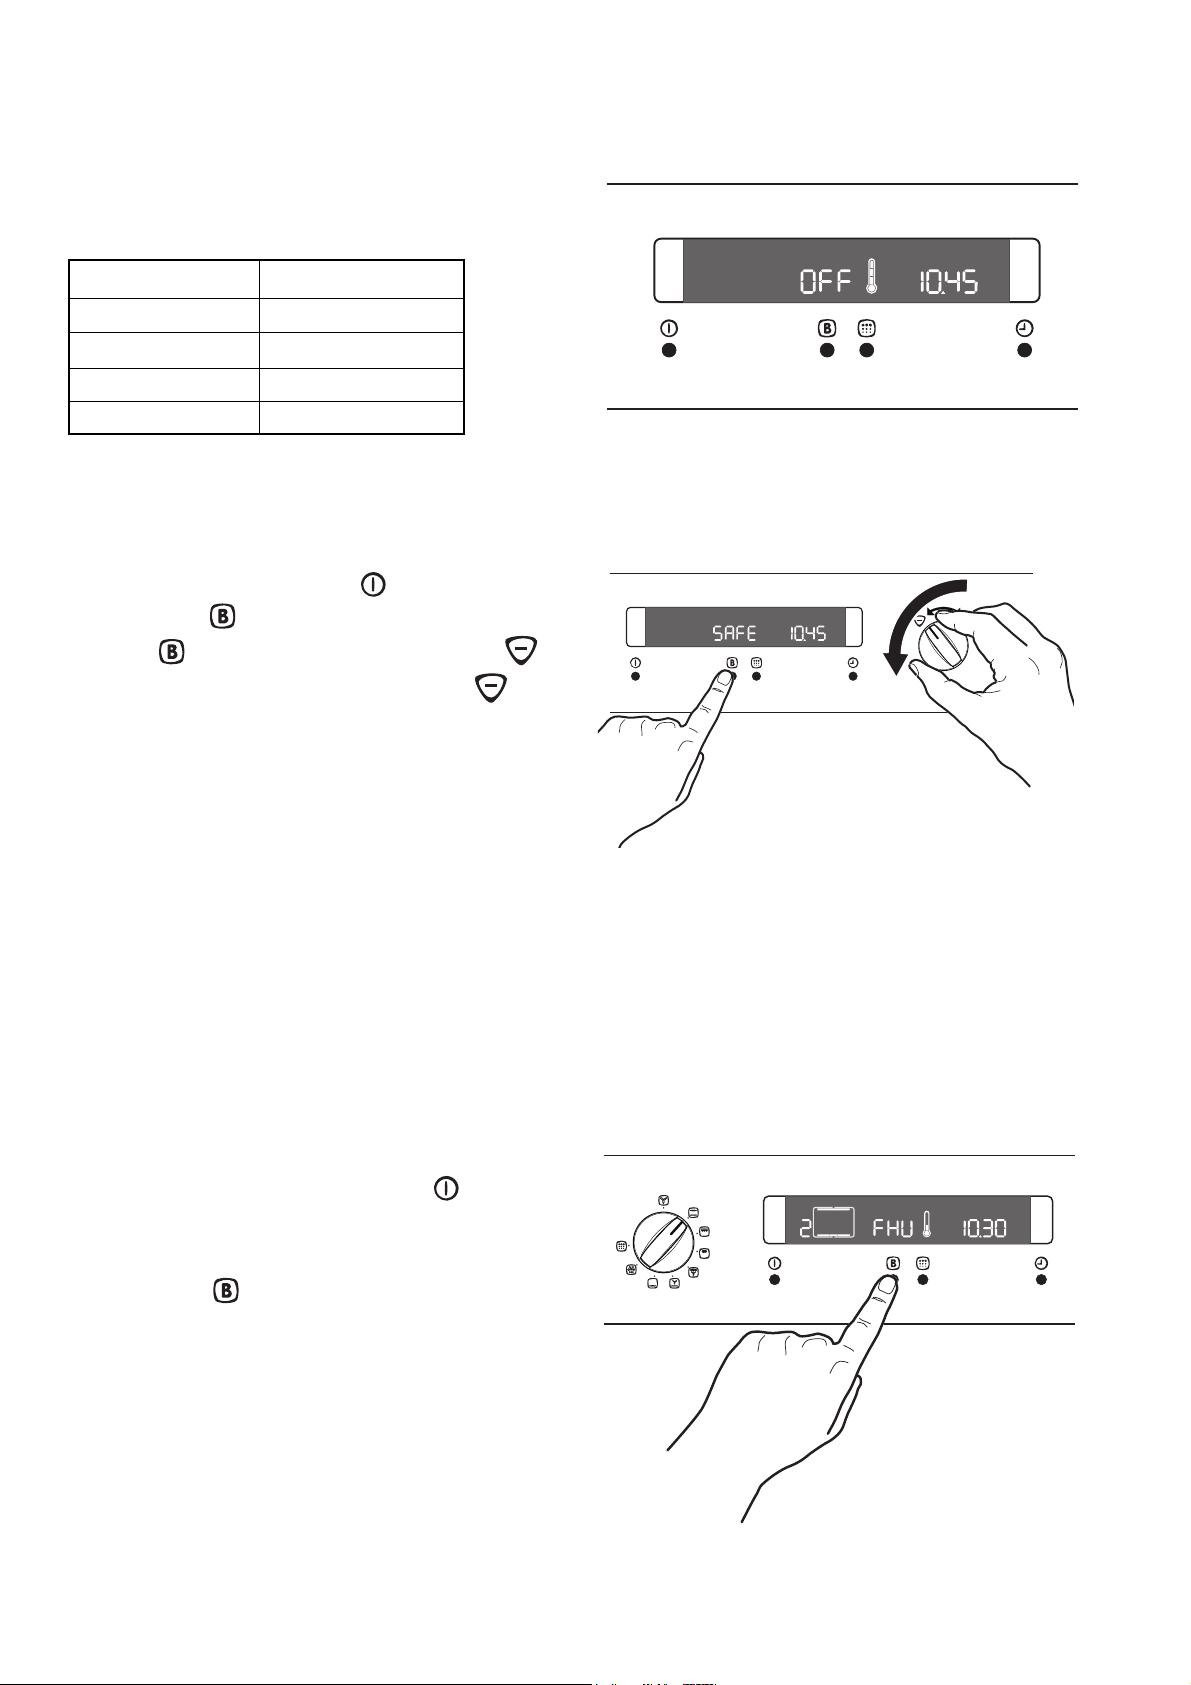
Safety and Energy Saving Functions
Safety Cut-Off Function
The oven will switch off automatically if any change of
setting is made, according to the table below.
If temperature setting is: the oven will switch off:
250°C after 1 1/2 hours
from 200 up to 245°C after 5,5 hours
from 120 up to 195°C after 8,5 hours
less than 120°C after 12
Child Safety Function
To avoid children switching on the oven, it is possible to
lock the oven controls.
1. If the oven is on, press button to switch it off.
2. Press button and keep it pressed. While pressing
button turn the Time/Temperature knob to .
Keep the button pressed and the knob on for
about 3 seconds. An acoustic signal will be emitted
and the indication ‘SAFE’ will be appear on the display.
3. The oven is now locked. Neither oven functions nor
temperatures can be selected.
To unlock the oven
Repeat the same actions as described in point 2. An
acoustic signal will be emitted and the indication ‘SAFE’
will go off. The oven can now be operated.
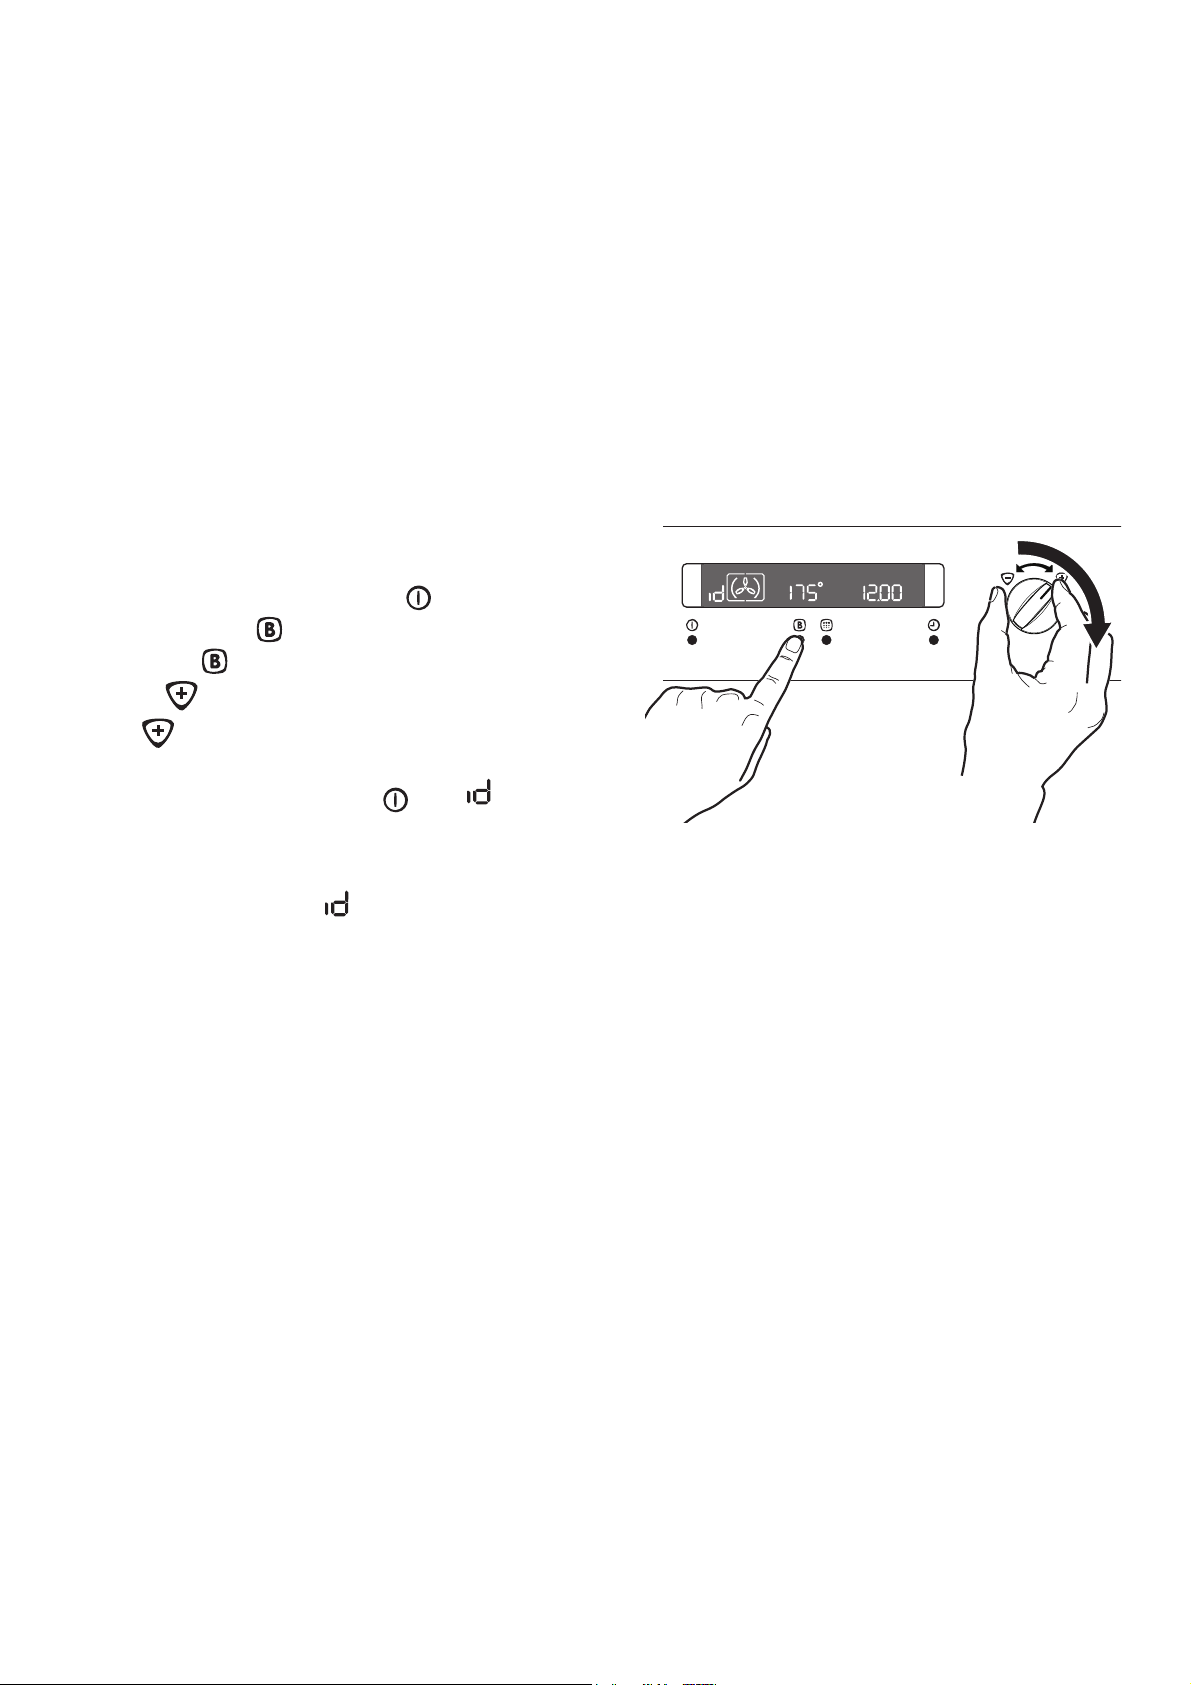
"Fast Heat Up" function
After a cooking function has been selected and the
temperature has been adjusted, the cavity will gradually
heat up until the selected temperature is reached. This
will take from 10 to 15 minutes, depending on selected
function and temperature.
If it is necessary to reach the required temperature in a
shorter time, the "Fast Heat Up" Function can be used.
1. Switch the oven on by pressing button .
hours
2. Set the required cooking function and temperature as
explained in the previous pages.
3. Press button once. The temperature display will
show "FHU".
4. When the required temperature is reached, an acoustic
alarm will sound for a short time, and the temperature
display will revert to the set temperature.
This function can be used with any cooking function or
temperature.
11
Page 12
Residual Heat Function
When a Cooking Duration time is set, the oven will
automatically switch off a few minutes before the end of
the programmed time, and use the residual heat to finish
your dishes without energy consumption. All current
settings will be displayed until the Cooking Duration time
is over.
This function will not operate when the Cooking Duration
time is less than 15 minutes.
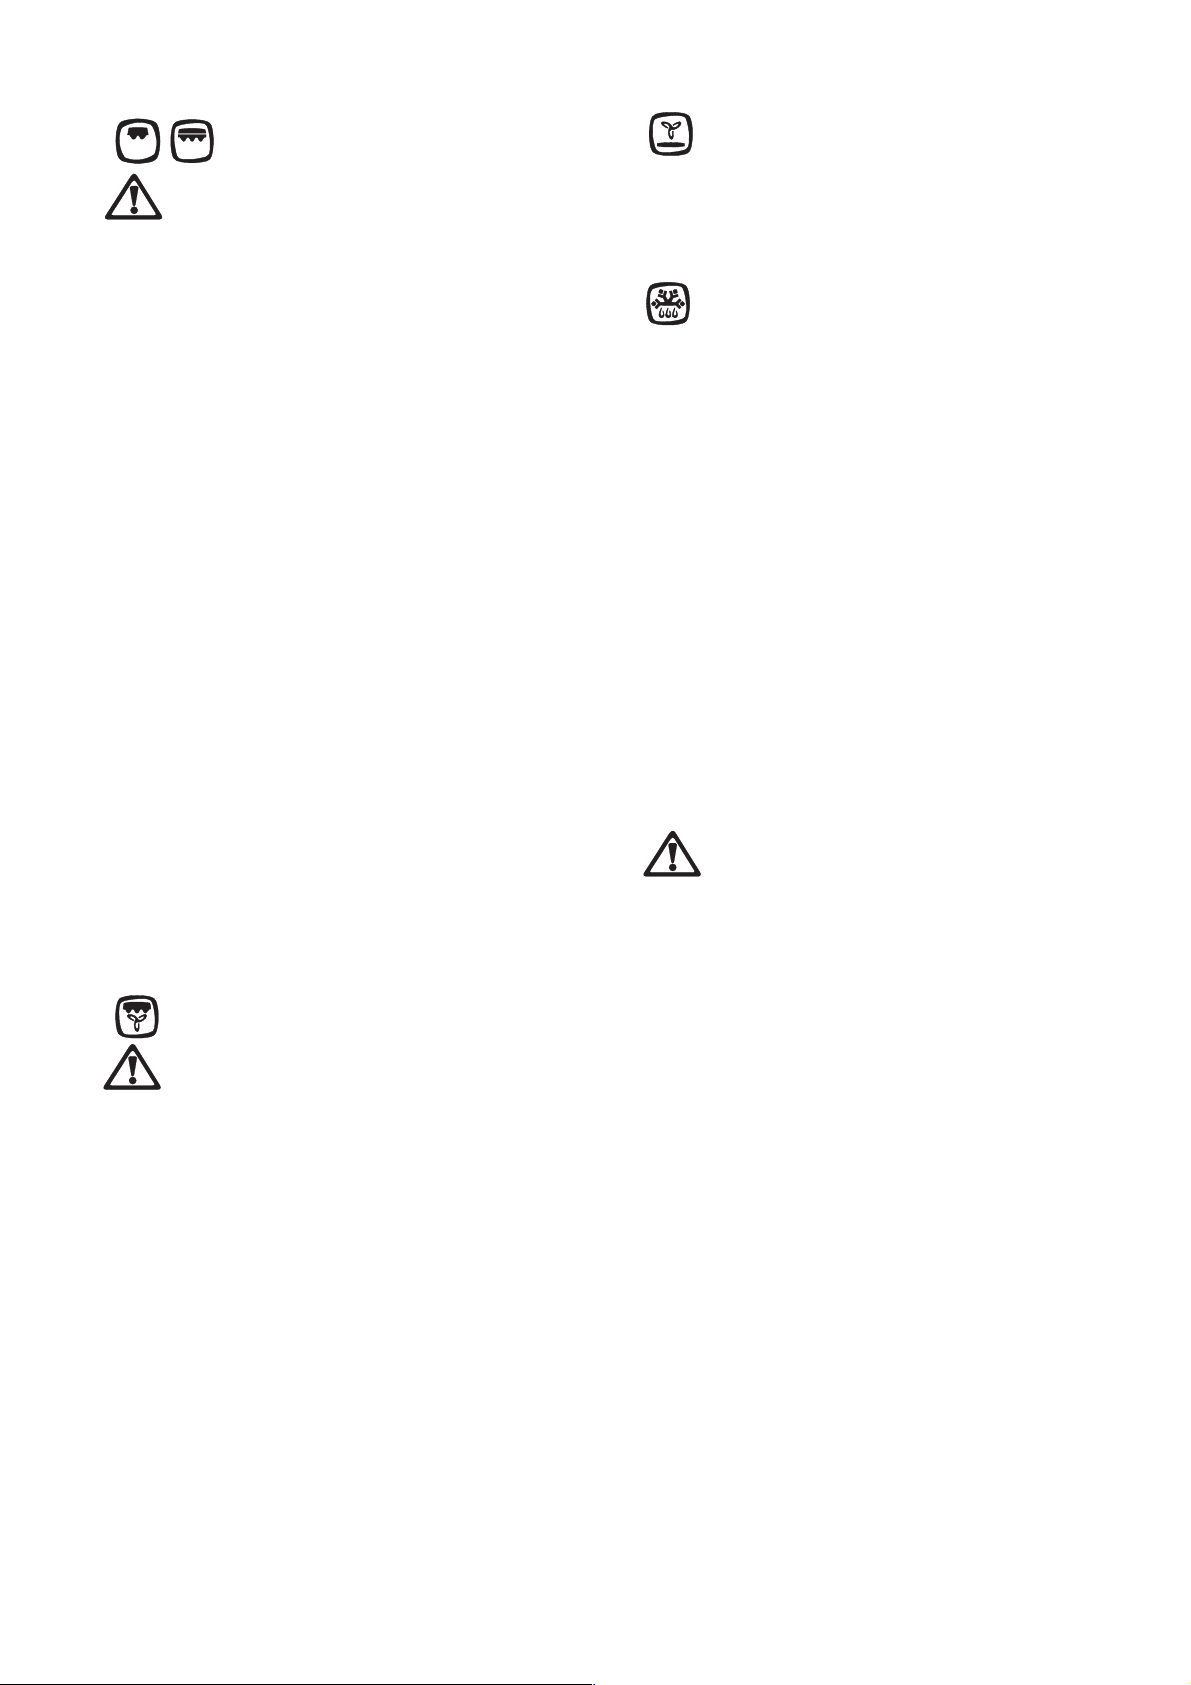
Demo mode
This mode is intended to be used at the shops to
demonstrate the oven functionality without any power
consumption except the oven lamp.
To activate this function:
1. If the oven is on, press button to switch it off.
2. Press button and keep it pressed. While keeping
button pressed, turn the Time/Temperature knob
to . Keep the button pressed and the knob on
for 3 seconds. The system beeps once.
The oven is now set on “Demo” mode. When you switch
on the oven by pressing button , the “ ” indication
appears on the display.
All oven functions can be selected, but the thermometer
symbol will not flash and the cooking function number
will be replaced by the “ ” indication.
Follow the same procedure to deactivate the demo
mode.
Error code
The electronic programmer performs a continuous
diagnostic check of the system. If some parameters
are not correct, the control unit will stop the activated
functions and the corresponding error code (letter “E”
followed by number digits) will be displayed.
For further details, refer to chapter “Something not
working”.
12
Page 13

Hints and Tips
Always cook with the oven door closed.
The heating elements do not work when the
oven door is not completely closed.
When food is heated, it produces steam in the
same way as a boiling kettle does. When
steam comes in contact of the oven door
glass, it will condense and produce water
droplets.
To reduce condensation, ensure the oven is
well heated before placing food in the oven
cavity. A short oven pre-heating (about 10
minutes) will then be necessary before any
cooking.
We recommend you to wipe away
condensation after each use of the appliance.
Conventional Cooking
Function
When using this setting, heat comes from both the top
and bottom elements. This allows you to cook on a single
level and is particularly suitable for dishes which require
extra base browning such as quiches and flans.
Gratins, lasagnes and hotpots which require extra top
browning also cook well in the conventional oven. This
form of cooking gives you the opportunity to cook without
the fan in operation.
The middle shelf position allows for the best heat
distribution. To increase base browning simply lower the
shelf position. To increase top browning, raise the shelf
position.
The material and finish of the baking trays and dishes
used will affect base browning. Enamelware, dark, heavy
or non-stick utensils increase base browning, while oven
glassware, shiny aluminium or polished steel trays reflect
the heat away and give less base browning.
Always place dishes centrally on the shelf to ensure
even browning.
Stand dishes on suitably sized baking trays to prevent
spillage onto the base of the oven and make cleaning
easier.
Do not place dishes, tins or baking trays directly on
the oven base as it becomes very hot and damage will
occur.
For faster preheating use the Fast Heat-Up Function.
Single level cooking gives best results. If you require
more than one level cooking use the fan oven function.
Bottom oven element only
This function is particularly useful when blind-baking
pastry. It may also be used to finish off quiches or flans
to ensure the base pastry is cooked through.
Fan Oven Cooking Function
The air inside the oven is heated by the element around
the fan situated behind the back panel. The fan circulates
hot air to maintain an even temperature inside the oven.
The advantages of cooking with this function are:
Faster Preheating
As the fan oven quickly reaches temperature, it is not
usually necessary to preheat the oven although you
may find that you need to allow an extra 5-7 minutes
on cooking times. For recipes which require higher
temperatures, best results are achieved if the oven is
preheated first, e.g. bread, pastries, scones, souffles,
etc.
Lower Temperatures
Fan oven cooking generally requires lower
temperatures than conventional cooking.
Follow the temperatures recommended in the
cooking chart. Remember to reduce temperatures by
about 20-25 °C for your own recipes which use
conventional cooking.
Even Heating for Baking
The fan oven has uniform heating on all shelf
positions. This means that batches of the same food
can be cooked in the oven at the same time.
However, the top shelf may brown slightly quicker
than the lower one. This is quite usual. There is no
mixing of flavours between dishes.
Shelf positions are not critical, but make sure the
shelves are evenly spaced.
When cooking more than one dish in the fan oven,
place dishes centrally on the shelves rather than several
dishes on one shelf.
When the oven is full, you may need to allow a slightly
longer cooking time.
A shelf may be placed on the floor of the oven. Place
dishes on a shelf in this position rather than on the oven
base, to allow air circulation around the food.
When the oven is full of the same food, e.g. equal
trays of small cakes or equal size victoria sandwich cakes,
then they will be cooked in the same time and removed
from the oven together. When different sizes of trays or
types of food, e.g. biscuits and cakes are cooked, they
will not necessarily be ready together.
The fan oven can be used to heat foods through without
thawing first, e.g. fruit tarts, mince pies, sausage rolls,
and other small pastry items. Use a temperature of 190200°C and allow 20-40 minutes (depending on the quantity
of food in the oven).
The use of too high temperatures can cause uneven
browning. Check with the recommendations for oven
temperatures given in the cooking charts, but be prepared
to adjust the temperature by 10 °C if necessary.
Remember to reduce temperatures by about 20-25 °C
for your own conventional recipes.
The meat tin should not be placed on a heated hotplate
or burner as this may cause the enamel to crack.
13
Page 14
Grilling
Grilling must be carried out with the oven door
closed.
The grill pan handles must be removed from
the pan during grilling. Always use oven gloves
to remove and replace the grill pan handles.
Ensure that you support the grill pan when
removing it from the oven.
Adjust the grid and grill pan runner position to allow for
different thicknesses of food. Position the food close to
the element for faster cooking and further away for more
gentle cooking.
Preheat the grill on a full setting for a few minutes before
sealing steaks or toasting. Adjust the heat setting and
the shelf as necessary, during cooking.
Most foods should be placed on the grid in the grill
pan to allow maximum circulation of air to lift the food
out of the fats and juices. Food such as fish, liver and
kidneys may be placed directly on the grill pan, if
preferred.
Food should be thoroughly dried before grilling to
minimise splashing. Brush lean meats and fish lightly
with a little oil or melted butter to keep them moist during
cooking.
Accompaniments such as tomatoes and mushrooms
may be placed underneath the grid when grilling meats.
When toasting bread, we suggest that the top runner
position is used. The food should be turned over during
cooking, as required.
The grill element is controlled by the thermostat.
During cooking, the grill cycles on and off to
prevent overheating.
Pizza Oven Function
The bottom element provides direct heat to the base of
pizzas, quiches or pies, while the fan ensures air is
circulated to cook the pizza toppings or pie fillings.
To obtain the best results use the lower shelf levels.
Defrosting Function
The oven fan operates without heat and circulates the
air, at room temperature, inside the oven. This increases
the speed of defrosting. However, please note that the
temperature of the kitchen will influence the speed of
defrosting. This function is particularly suitable for
defrosting delicate food which could be damaged by heat,
e.g. cream filled gateaux, iced cakes, pastries, bread
and other yeast products.
Cover food with a lid, aluminium foil or plastic film to
prevent drying out during defrosting.
ALWAYS COOK THOROUGHLY IMMEDIATELY
AFTER THAWING.
Frozen food should be placed in a single layer when
ever possible and turned over half way through the
defrosting process.
Only joints of meat and poultry up to 2 kg. (4 lb.) are
suitable for defrosting in this way.
Warning! - Do not place objects on the bottom of
the oven and do not cover it with aluminium foil
while cooking, as you can damage the enamelled
surfaces and the food you are cooking.
Always place pans, heat-resisting pans and
aluminium foils on the oven shelves.
Thermal Grilling
Select a maximum temperature of 200°C
when using the Thernal Grill Function.
Thermal grilling offers an alternative method of cooking
food items normally associated with conventional grilling.
The grill element and the oven fan operate alternately,
circulating hot air around the food. The need to check
and turn the food is reduced. Thermal grilling helps to
minimise cooking smells in the kitchen.
With the exception of toast and rare steaks, you can
thermally grill all the foods you would normally cook
under a conventional grill.
Cooking is more gentle, therefore food generally takes a
little longer to cook with thermal grilling compared with
conventional grilling. One of the advantages is that larger
quantities can be cooked at the same time.
Prepare foods in the same way as for conventional
grilling.
Brush lean meats and fish lightly with a little oil or
butter to keep them moist during cooking.
Warning! - Be careful when you insert and extract
the grid and the drip tray from the oven in order
not to damage the enamelled surfaces of the oven
cavity.
Cooking times
Cooking times vary according to the type of food to be
cooked, its consistency, and volume.We suggest that
you take particular note of your first cooking experiments
with the oven, since operating in the same conditions for
the same dishes you will of course obtain similar results.
Only experience will enable you to make the appropriate
changes to values given on charts.
14
Page 15
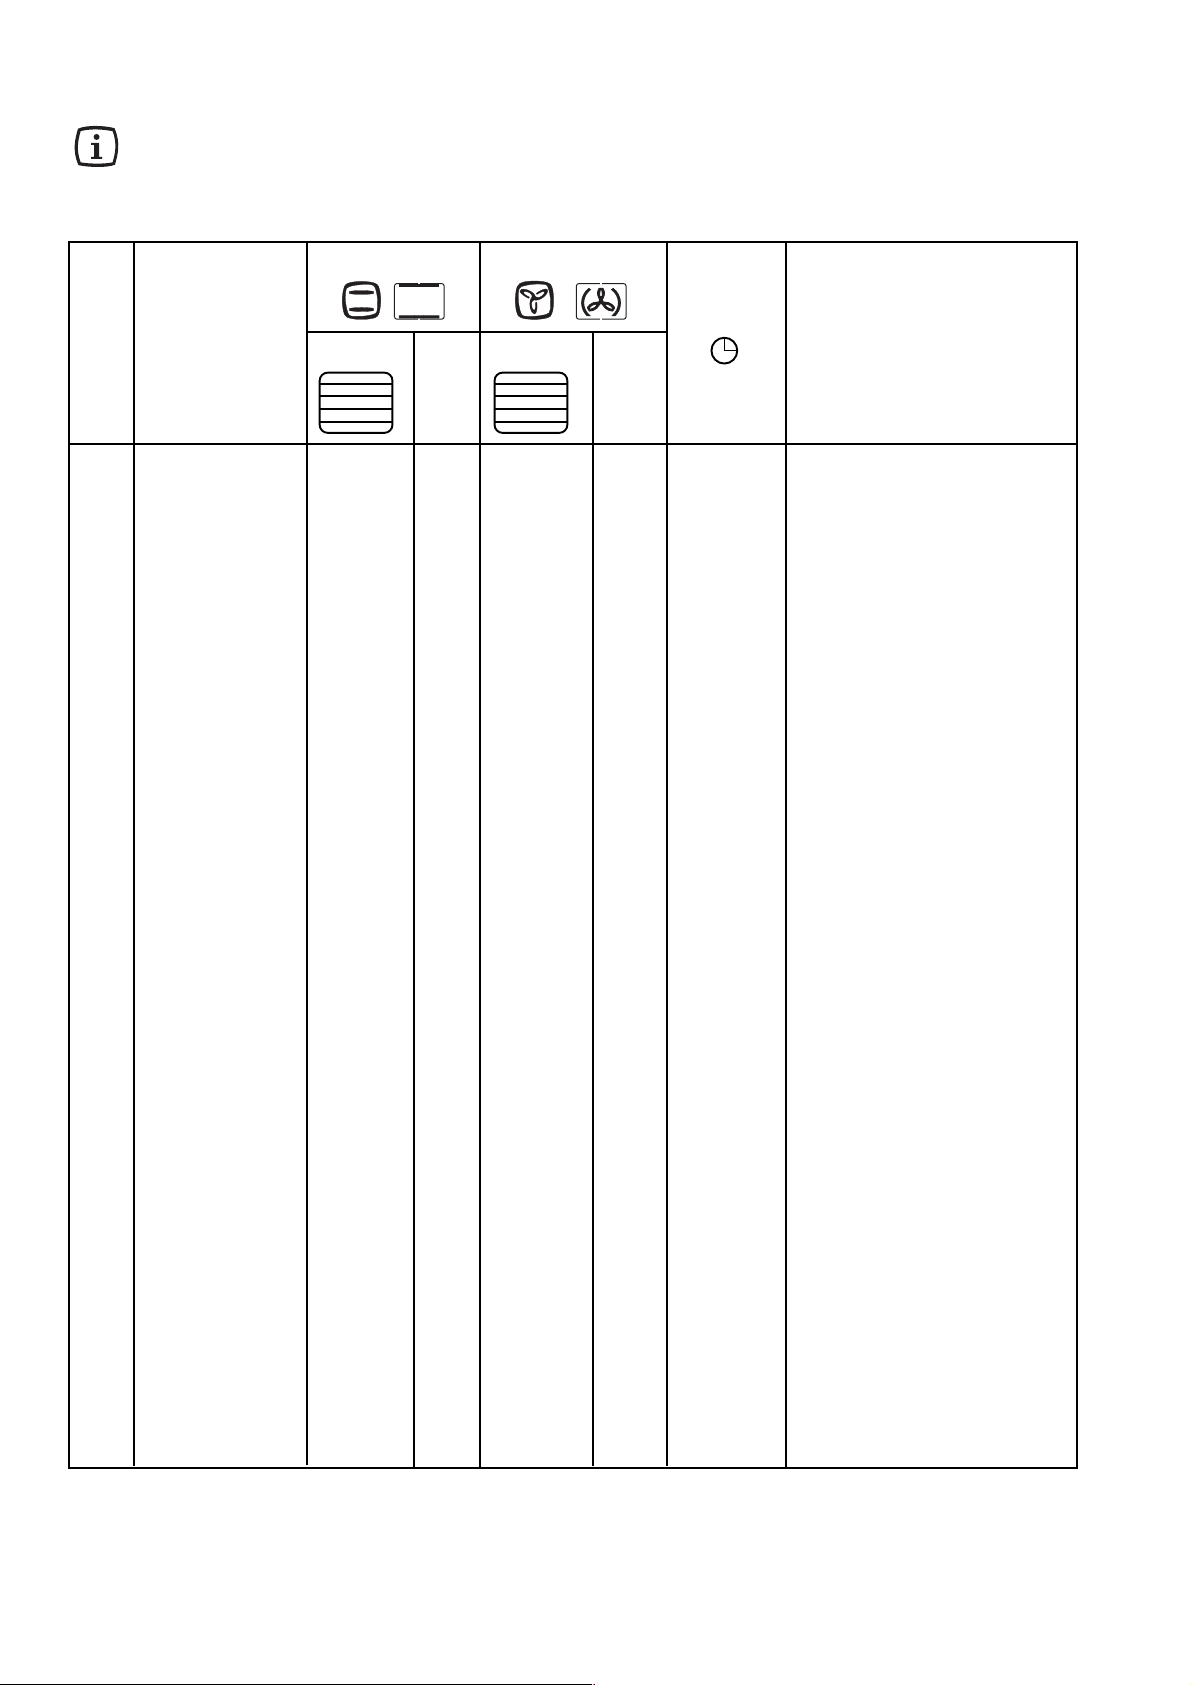
Cooking Tables
Cooking times do not include pre-heating time.
A short oven pre-heating (about 10 minutes) is necessary before any cooking.
Traditional cooking and fan ducted cooking
Traditional Cooking
Fan Oven
Cooking
time
TYPE OF DISH
Level
Weight (gr.)
CAKES
Whisked recipes
Shortbread dough
Butter-milk cheese cake
Apple cake 1 180 2 (1 and 3)* 170 40 ~ 60 In cake mould on the shelf
Strudel 2 175 2 150 60 ~ 80 In cake tin on the shelf
Jam-tart 2 175 2 (1 and 3)* 160 30 ~ 40 In cake mould on the shelf
Fruit cake 1 175 1 160 45 ~ 60 In cake mould
Sponge cake 1 175 2 160 30 ~ 40 In cake mould on the shelf
Christmas cake 1 170 1 160 40 ~ 60 In cake mould on the shelf
Plum cake 1 170 1 160 50 ~ 60 In cake mould on the shelf
PASTRIES
Small cakes 2 170 2 (1 and 3)* 160 25 ~ 35 In baking tray
Biscuits 3 190 3 170 15 ~ 25 In baking tray
Meringues 2 100 2 100 90 ~ 120 In baking tray
Buns 2 190 2 180 12 ~ 20 In baking tray
Pastry: Choux 2 200 2 (1 and 3)* 190 15 ~ 25 In baking tray
BREAD AND PIZZA
1000 White bread 1 190 2 180 40 ~ 60 2 pieces in baking tray
500 Rye bread 1 190 1 180 30 ~ 45 In bread pan on the grid
500 Bread rolls 2 200 2 175 20 ~ 35 6-8 rolls in baking tray
250 Pizza 1 200 2 (1 and 3)* 190 15 ~ 30 On baking tray on the grid
FLANS
Pasta flan 2 200 2 (1 and 3)* 175 40 ~ 50 In mould on the shelf
Vegetable flan 2 200 2 (1 and 3)* 175 45 ~ 60 In mould on the shelf
Quiches 1 200 2 (1 and 3)* 180 35 ~ 45 In mould on the shelf
Lasagne 2 180 2 160 45 ~ 65 In mould on the shelf
Cannelloni 2 200 2 175 40 ~ 55 In mould on the shelf
MEAT
1000 Beef 2 190 2 175 50 ~ 70 On shelf and dripping pan
1200 Pork 2 180 2 175 100 ~ 130 On shelf and dripping pan
1000 Veal 2 190 2 175 90 ~ 120 On shelf and dripping pan
1500
1500 rare 2 210 2 200 50 ~ 60 On grid and dripping pan
1500 medium 2 210 2 200 6 0 ~ 70 On grid and dripping pan
1500 well done 2 210 2 200 70 ~ 80 On grid and dripping pan
2000 Shoulder of pork 2 180 2 170 120 ~ 150 With rind-in dripping pan
1200 Shin of pork 2 180 2 160 100 ~ 120 2 pieces-in dripping pan
1200 Lamb 2 190 2 175 110 ~ 130 Leg-in dripping pan
1000 Chicken 2 190 2 175 60 ~ 80 Whole-in dripping pan
4000 Turkey 2 180 2 160 210 ~ 240 Whole-in dripping pan
1500 Duck 2 175 2 160 120 ~ 150 Whole-in dripping pan
3000 Goose 2 175 2 160 150 ~ 200 Whole-in dripping pan
1200 Rabbit 2 190 2 175 60 ~ 80 Cut in pieces
1500 Hare 2 190 2 175 150 ~ 200 Cut in pieces
1200 Trout/Sea bream 2 190 2 (1 and 3)* 175 30 ~ 40 3-4 fishes
1500 Tuna fish/Salmon 2 190 2 (1 and 3)* 175 25 ~ 35 4-6 fillets
English roast beef
800 Pheasant 2 190 2 175 90 ~ 120 Whole
FISH
2 170 2 160 45 ~ 60 In cake mould on the shelf
2 170 2 (1 and 3)* 160 20 ~ 30 In cake mould on the shelf
1 160 2 150 60 ~ 80 In cake mould on the shelf
4
3
2
1
temp.
°C
Level
temp.
4
3
°C
2
1
minutes
NOTES
(*) If you need to cook more than one dish at the same time, we recommend you to place them on the levels quoted between
brackets.
If you wish to cook more than one dish at the same time, we suggest that you change the cooking levels of your dishes during the
last 5-10 minutes in order to obtain a more uniform colour of your dishes.
15
Page 16
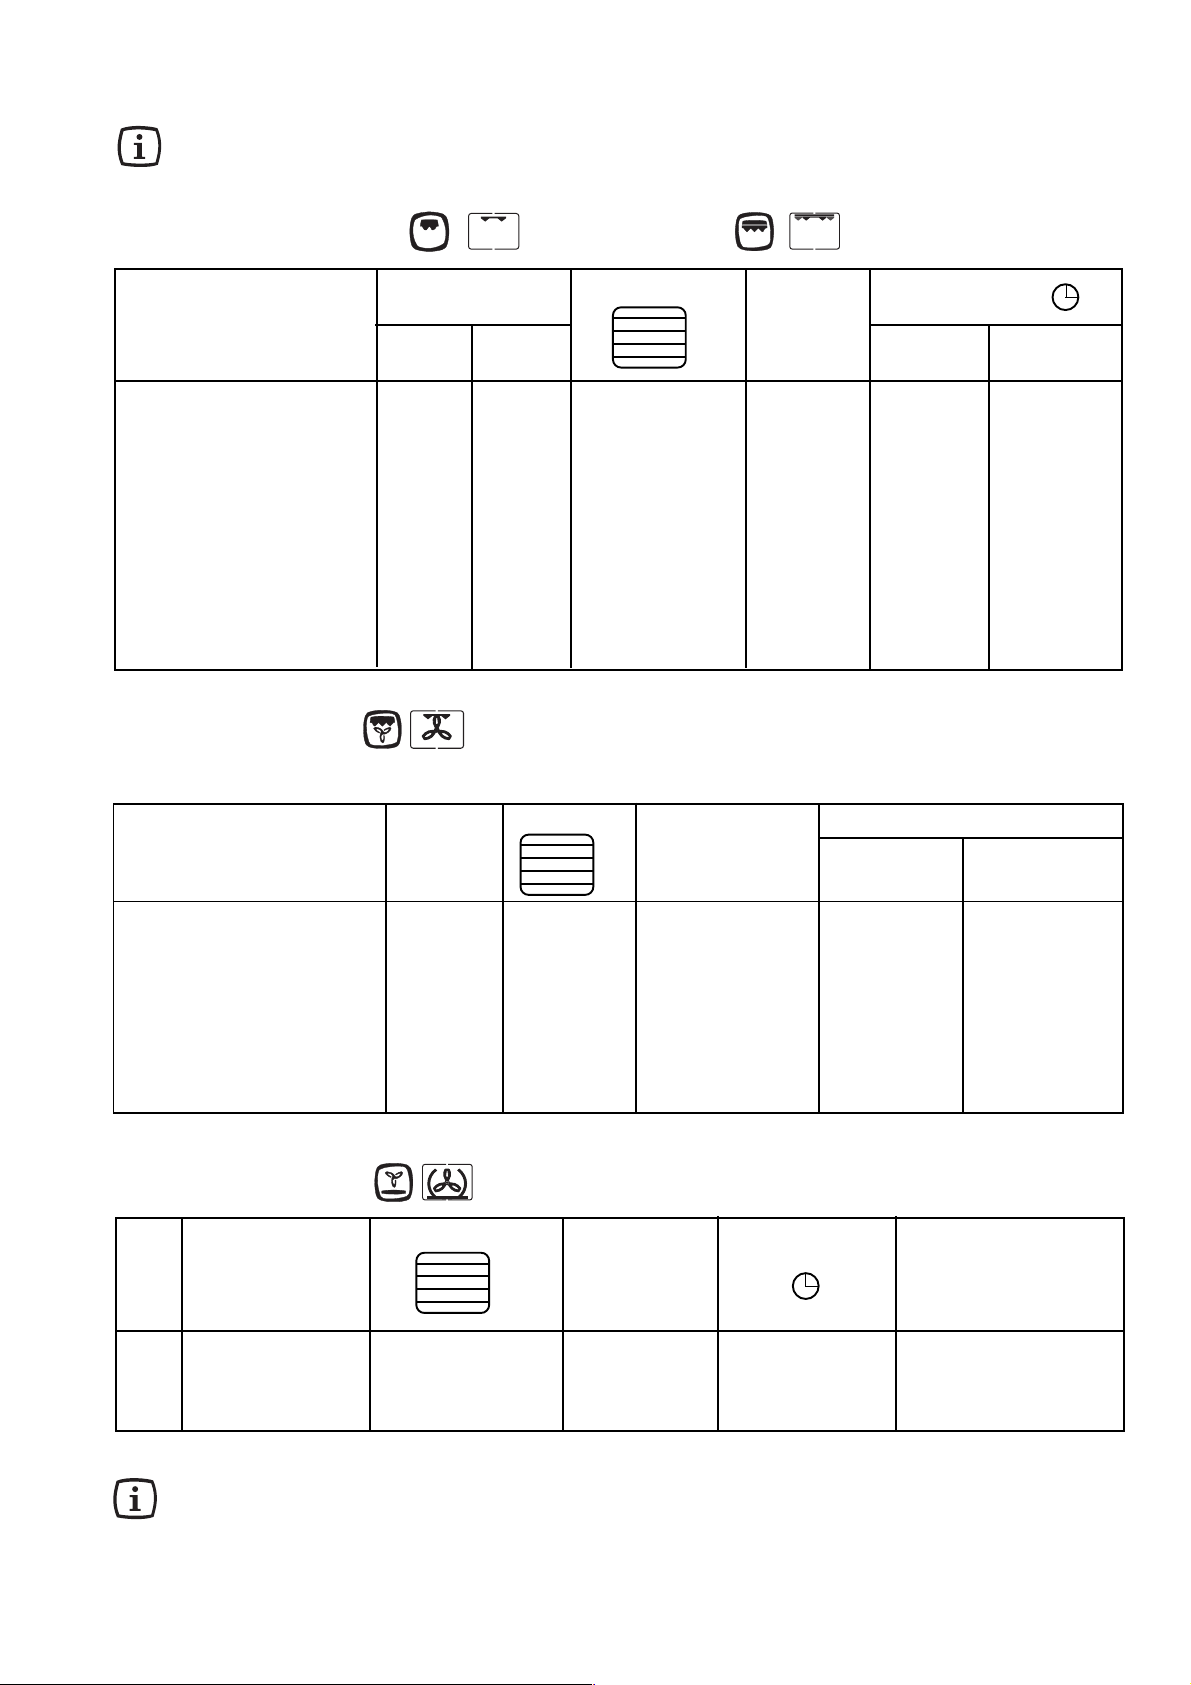
Cooking times do not include pre-heating time.
A short oven pre-heating (about 10 minutes) is necessary before any cooking.
Grilling (Small Grill ) - (Full Grill )
Cooking time
(minutes)
Upper
side
Lower
side
TYPE OF DISH
Fillet steaks
Quantity
Pieces Weight
Level
4
3
2
1
Temperature
°C
4 800 3 250 12 ~ 15 12 ~ 14
Beef-steaks 4 600 3 250 10 ~ 12 6 ~ 8
Sausages 8 — 3 250 12 ~ 15 10 ~ 12
Pork chops 4 600 3 250 12 ~ 16 12 ~ 14
Chicken (cut in two) 2 1000 3 250 30 ~ 35 25 ~ 30
Kebabs 4 — 3 250 10 ~ 15 10 ~ 12
Chicken (breast) 4 400 3 250 12 ~ 15 12 ~ 14
Hamburger 6 600 3 250 10 ~ 15 8 ~ 10
Fish (fillets) 4 400 3 250 12 ~ 14 10 ~ 12
Sandwiches 4-6 — 3 250 3 ~ 7 —
Toast 4-6 — 3 250 2 ~ 4 2 ~ 3
Thermal grilling
When using the thermal grill cooking function, select a maximum temperature of 200°C.
TYPE OF DISH Quantity Temperature Time in minutes
(gr.) °C lower upper
Level
4
3
2
1
side side
Rolled joints
(turkey) 1000 3 200 30 ~ 40 20 ~ 30
Chicken (cut in two) 1000 3 200 25 ~ 30 20 ~ 30
Chicken legs — 3 200 15 ~ 20 15 ~ 18
Quail
500 2 200 25 ~ 30 20 ~ 25
Vegetable gratin — 3 200 20 ~ 25 —
St. Jacques shells — 3 200 15 ~ 20 —
Mackerel — 3 200 15 ~ 20 10 ~ 15
Fish slices 800 3 200 12 ~ 15 8 ~ 10
"Pizza" function
Cooking
time
minutes
NOTES
TYPE OF DISH
Weight (gr.)
Level
4
3
2
1
Temperature
°C
700 Pizza, large 1 200 15 ~ 25 in baking tray
500 Pizza, small 1 200 10 ~ 20 in mould on the shelf
500 Flat cake 1 200 15 ~ 25 in baking tray
The oven temperatures are intended as a guide only. It may be necessary to increase or decrease the
temperatures to suit individual preferences and requirements.
16
Page 17
Cleaning the Oven
Before cleaning always allow the cooling fan to
cool the oven down before switching off at the
electricity supply.
This appliance cannot be cleaned with steam or
with a steam cleaning machine.
The oven should be kept clean at all times. A
build-up of fats or other foodstuffs could result in
a fire, especially in the grill pan.
Cleaning materials
Before using any cleaning materials on your oven, check
that they are suitable and that their use is recommended
by the manufacturer.
Cleaners that contain bleach should NOT be used as
they may dull the surface finishes. Harsh abrasives should
also be avoided.
External cleaning
Regularly wipe over the control panel, oven door and door
seal using a soft cloth well wrung out in warm water to
which a little washing-up liquid has been added.
To prevent damaging or weakening the door glass
panels avoid the use of the following:
• Household detergent and bleaches
• Impregnated pads unsuitable for non-stick
saucepans
• Brillo/Ajax pads or steel wool pads
• Chemical oven pads or aerosols
• Rust removers
• Bath/Sink stain removers
Clean the outer and inner door glass using warm soapy
water. Should the inner door glass become heavily soiled
it is recommended that a cleaning product such as Hob
Brite is used. Do not use paint scrapers to remove soilage.
DO NOT clean the oven door while the glass
panels are warm. If this precaution is not
observed the glass panel may shatter.
If the door glass panel becomes chipped or
has deep scratches, the glass will be weakened
and must be replaced to prevent the possibility
of the panel shattering. Contact your local
Service Force Centre who will be pleased to
advise further.
Oven Shelves
To clean the oven shelves, soak in warm soapy water and
remove stubborn marks with a well wetted soap
impregnated pad. Rinse well and dry with a soft cloth.
Pyrolytic cleaning
The oven cavity is coated with a special enamel resistant
to high temperatures.
During the pyrolytic cleaning operation, the temperature
inside the oven can reach about 500 °C thus burning food
residuals.
For your security, during the pyrolityc cleaning operation,
the oven door automatically locks when the temperature
inside the oven approaches about 300 °C.
Upon completion of the cleaning operation, the
oven door will be locked until the oven cavity has
cooled down.
The cooling fan operates during cooking until the oven
has cooled down. After cooking, it is advisable to remove
all the food residues with a wet sponge.
However, from time to time, it will be necessary to do a
more complete and thorough cleaning, using the pyrolytic
cleaning function. You can select two different levels of
pyrolytic cleaning depending on how dirty the oven is.
Two Levels of Pyrolytic Cleaning
Two different levels of Pyrolytic Cleaning are available.
Pyrolytic Cleaning Level No. 1 (P I)
Duration : 2 h. = 30 min. heat-up +
1 h. at 480°C +
30 min. cooling down.
Pyrolytic Cleaning Level No. 2 (P 2)
Duration :2 h. 30 min. = 30 min. heat-up +
1 h. 30 min. at 480°C +
30 min. cooling down.
The Pyrolytic Cleaning duration time cannot
be changed.
If the oven cavity is not very dirty, we recommend that you
select the Pyrolytic Cleaning Level No.1 (P I) on the
programmer display.
It is advisable to wipe the oven over with a soft sponge
soaked in warm water after each pyrolytic cleaning cycle
is carried out.
If the oven cavity is very dirty, we advise you to select the
Pyrolytic Cleaning Level No.2 (P 2) on the programmer
display.
During the pyrolytic cleaning function, it is not possible to
use the oven for 2 hours when selecting the P1 function
and up to 2 1/2 hours when the P2 function is active.
17
Page 18
How to use the pyrolytic cleaning
function
Before activating the pyrolytic cleaning function,
remove any excessive spillage and make sure
that the oven is empty. Do not leave anything
inside it (e.g. pans, grids, baking tray, dripping
pan, etc.) as this could heavily damage them.
Ensure that the oven door is closed before
activating the pyrolytic cleaning function.
When the pyrolytic cleaning function is on, it is
advisable not to use the hob as this could cause
overheating and damage the appliance.
During the pyrolytic cleaning cycle the oven door
becomes hot. Children should be kept away until
it has cooled.
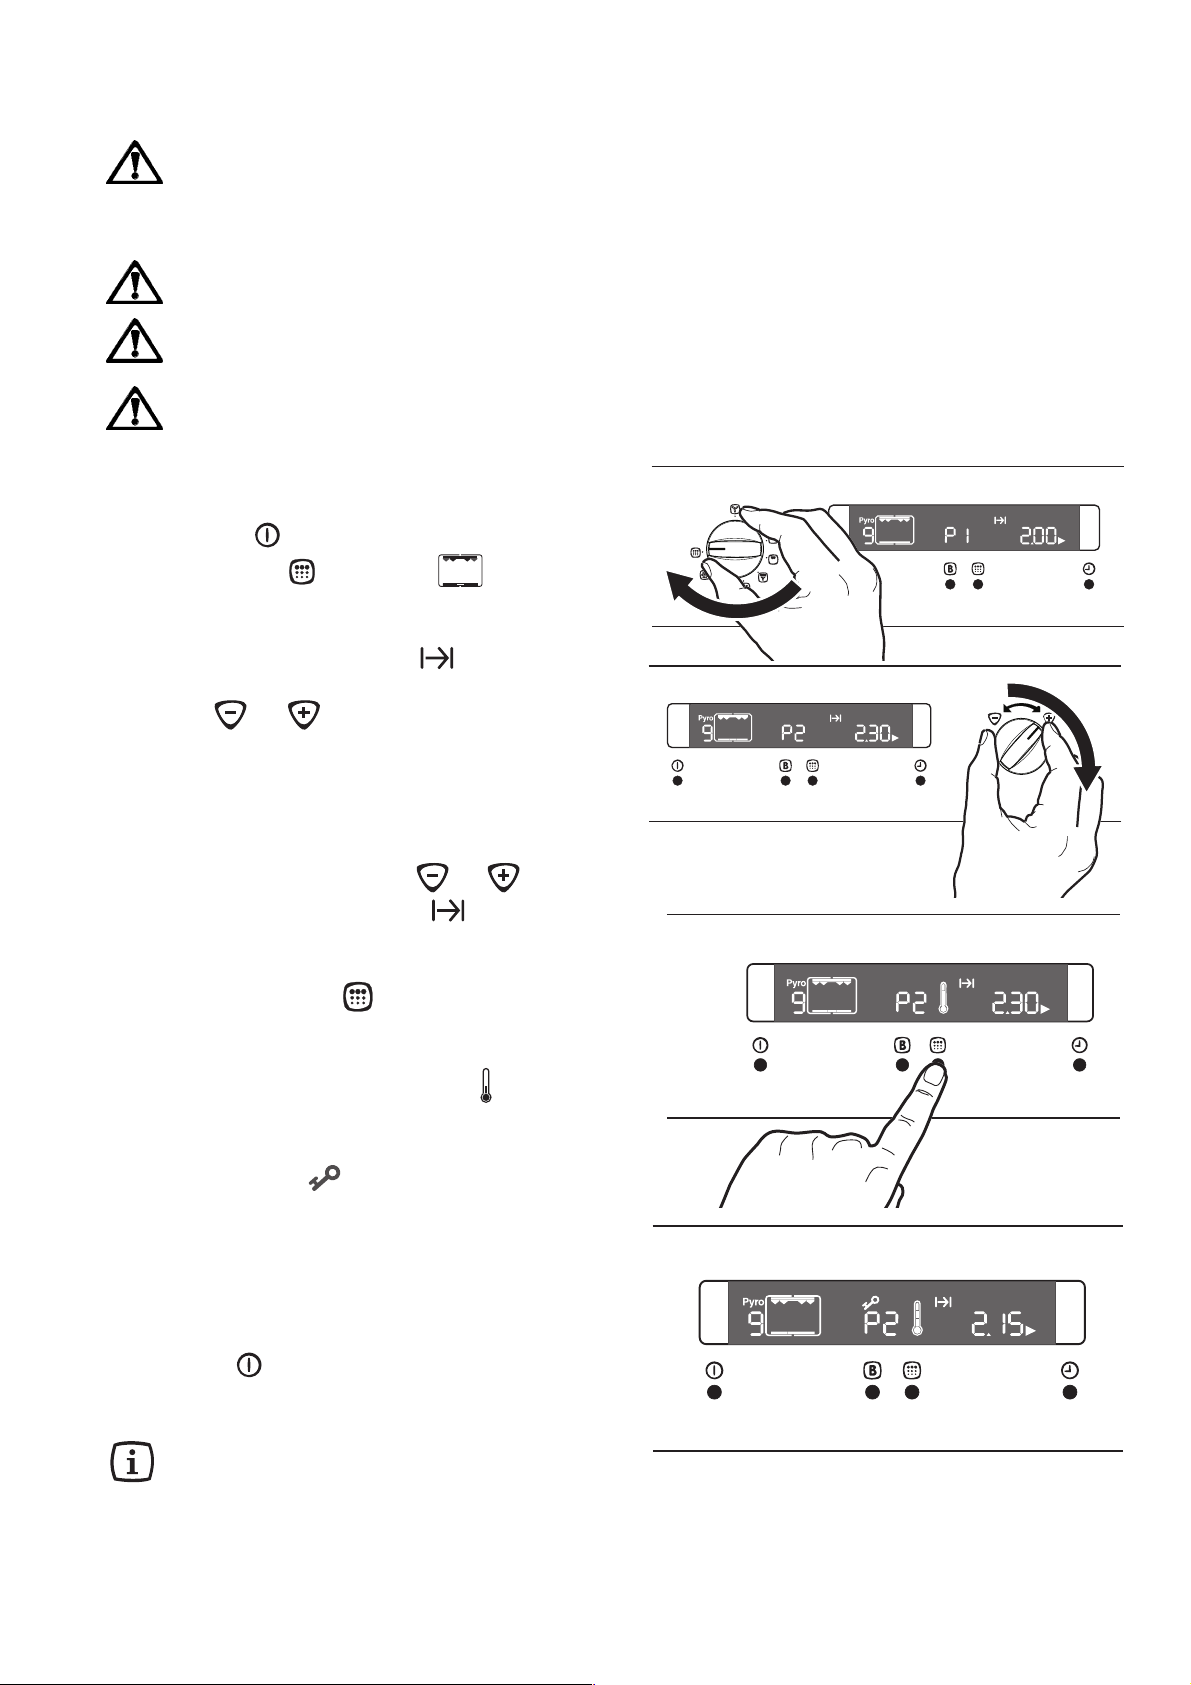
To activate the pyrolytic cleaning function proceed
as follows.
1. Press button to switch on the oven. Turn the oven
knob to position . The symbol appears on
the display and the “PI” indication means that the
Pyrolytic Cleaning Level 1 is currently pre-selected.
2. The Cooking Duration symbol will flash for 5
seconds. During this time turn the Time/Temperature
knob to or to change to Pyrolytic Cleaning
Level 2 (P2) or go back to Pyrolytic Cleaning Level 1 (PI).
3. Once you have chosen the desired Pyrolytic Cleaning
Level, the “Pyro” writing will flash on the display
waiting for confirmation to start the Pyrolytic Cleaning
cycle. You can still change your mind and turn the
the Time/Temperature knob to or . In that
case the Cooking Duration symbol will flash again
to allow you to change the selection.
4. To confirm the selected Pyrolytic Cleaning Level, press
the Pyrolysis button : the “Pyro” text stops
flashing, the oven light goes out and the pyrolytic
cleaning cycle starts. As soon as the oven heats up,
the thermometer symbol rises slowly , indicating
that the temperature inside the oven is increasing.
5. After some time, the door lock will be activated and
the related symbol will be displayed (Fig. 25).
6. At the end of the pyrolitic cleaning process, the
display will show the time of day till the door lock will
be on.
7. Once the oven has cooled down, an acoustic signal
will be emitted and the door will unlock.
To stop the pyrolytic cleaning cycle at any time,
press button .
NOTE: The time indication is comprehensive of the
cooling down time.
If you turn the oven knob to a cooking function
while the pyrolytic function is active, the cleaning
cycle will be interrupted.
Please note that, if the oven door lock is activated,
it is impossible to select any cooking function until
the door lock is off.
18
Page 19
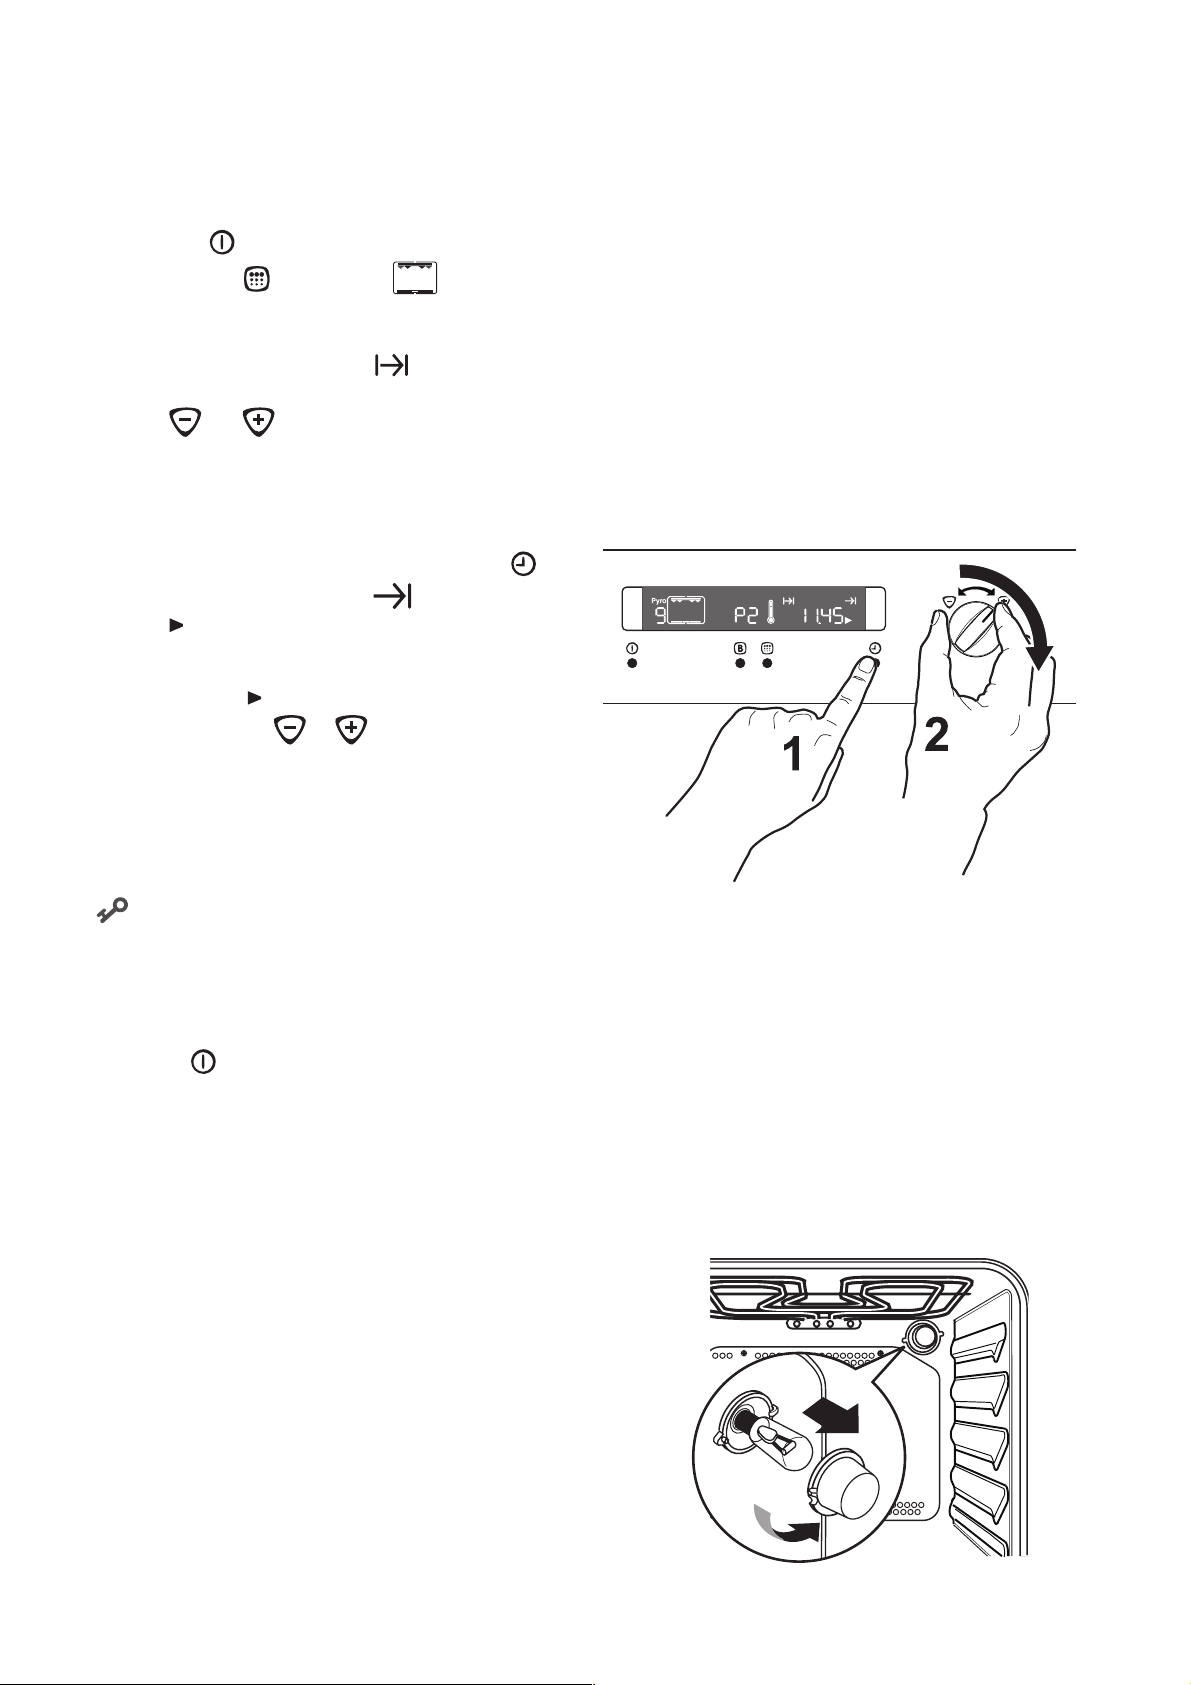
To programme the pyrolytic
cleaning cycle (delayed start,
automatic stop)
If you desire, you can programme the starting and ending
time of the pyrolytic cleaning cycle.
1. Press button to switch on the oven. Turn the oven
knob to position . The symbol appears on
the display and the “PI” indication means that the
Pyrolytic Cleaning Level 1 is currently pre-selected.
2. The Cooking Duration symbol
seconds. During this time turn the Time/Temperature
knob to
Level 2 (P2) or go back to Pyrolytic Cleaning Level 1 (PI).
3. Once you have chosen the desired pyrolytic function,
“Pyro” will flash in the display waiting for confirmation
to start the pyro cleaning function.
At this time, push the time function button .
The "End of Cooking" symbol and the arrow
symbol will flash. The control panel will display
the end of the cleaning cycle (that is, the actual
time + pyrolytic cycle duration).
4. While symbol is flashing, turn the Time/
Temperature knob to or to select the required
end of cycle time. Then, the “Pyro” writing stops
flashing and the oven lamp switches off. The pyrolytic
cleaning cycle will start and stop according your
settings.
5. Some time after the cleaning cycle is started, the
door lock will be activated and the related symbol
will be displayed.
At the end of the pyrolitic cleaning process, the display
shows the time of day. The oven door is locked.
Once the oven has cooled down, an acoustic signal will
be emitted and the door will unlock.
To stop the pyrolytic cleaning cycle at any time,
press button .
or to change to Pyrolytic Cleaning
will flash for 5
Replacing the Oven Light
If the oven bulb needs replacing, it must comply with the
following specifications:
- Power: 40 W,
- Voltage: 230 V (50 Hz),
- Temperature Rating of 300 °C,
- Thread type: E14.
These bulbs are available from your local Service Force
Centre.
To replace the faulty bulb:
1. Ensure the oven is disconnected from the electrical
supply.
2. Turn the glass cover anticlockwise.
3. Remove the faulty bulb and replace with the new one.
4. Refit the glass cover.
5. Reconnect to the electrical supply.
19
Page 20
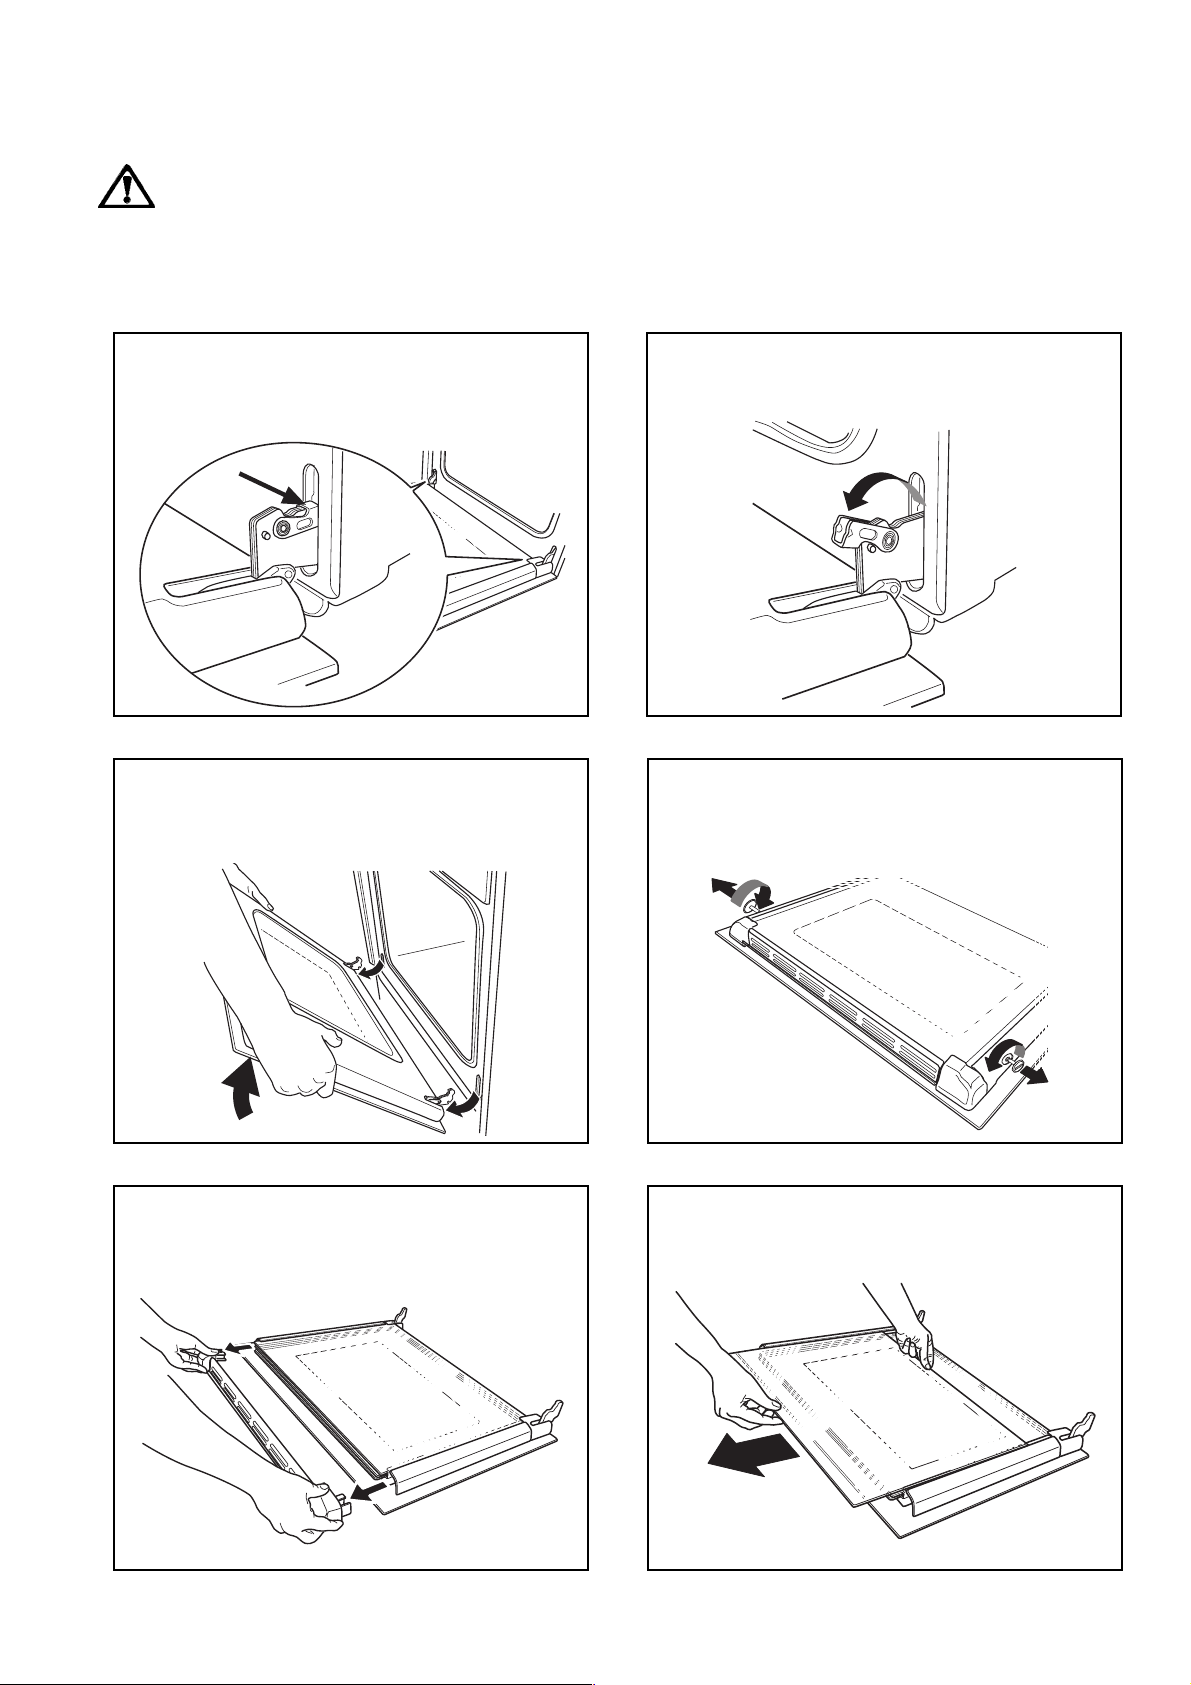
Cleaning The Oven Door
The oven door is made up of four glasses.
It is possible to remove them for easier cleaning.
Warning - The oven door may bang shut if you try
to extract the inner glasses when the oven door
is still fitted to the oven.
Before cleaning the oven door, we recommend you to
remove it from the oven.
Proceed as follows:
1. open the oven door completely and locate the two
hinges which link the door to the oven;
3. handle the door by its left- and right-hand sides,
then slowly turn it towards the oven until it is halfclosed; at this point, gently pull the oven door away
from the oven frame;
2. unlock and turn the small levers located on the two
hinges;
4. place the oven door on a solid surface, being careful
to avoid the glass becoming scratched. Then
remove the two screws located on the sides of the
oven door;
5. extract the inner glass support; 6. gently extract the three inner glasses, starting with
the uppermost one first.
20
Page 21
Clean the oven door glass with warm water and a softh
cloth only. Never use harsh abrasives as they could
damage the special heat-resistant surface of the inner
glasses.
Once the cleaning is carried out, refit the oven door,
following the procedure in reverse.
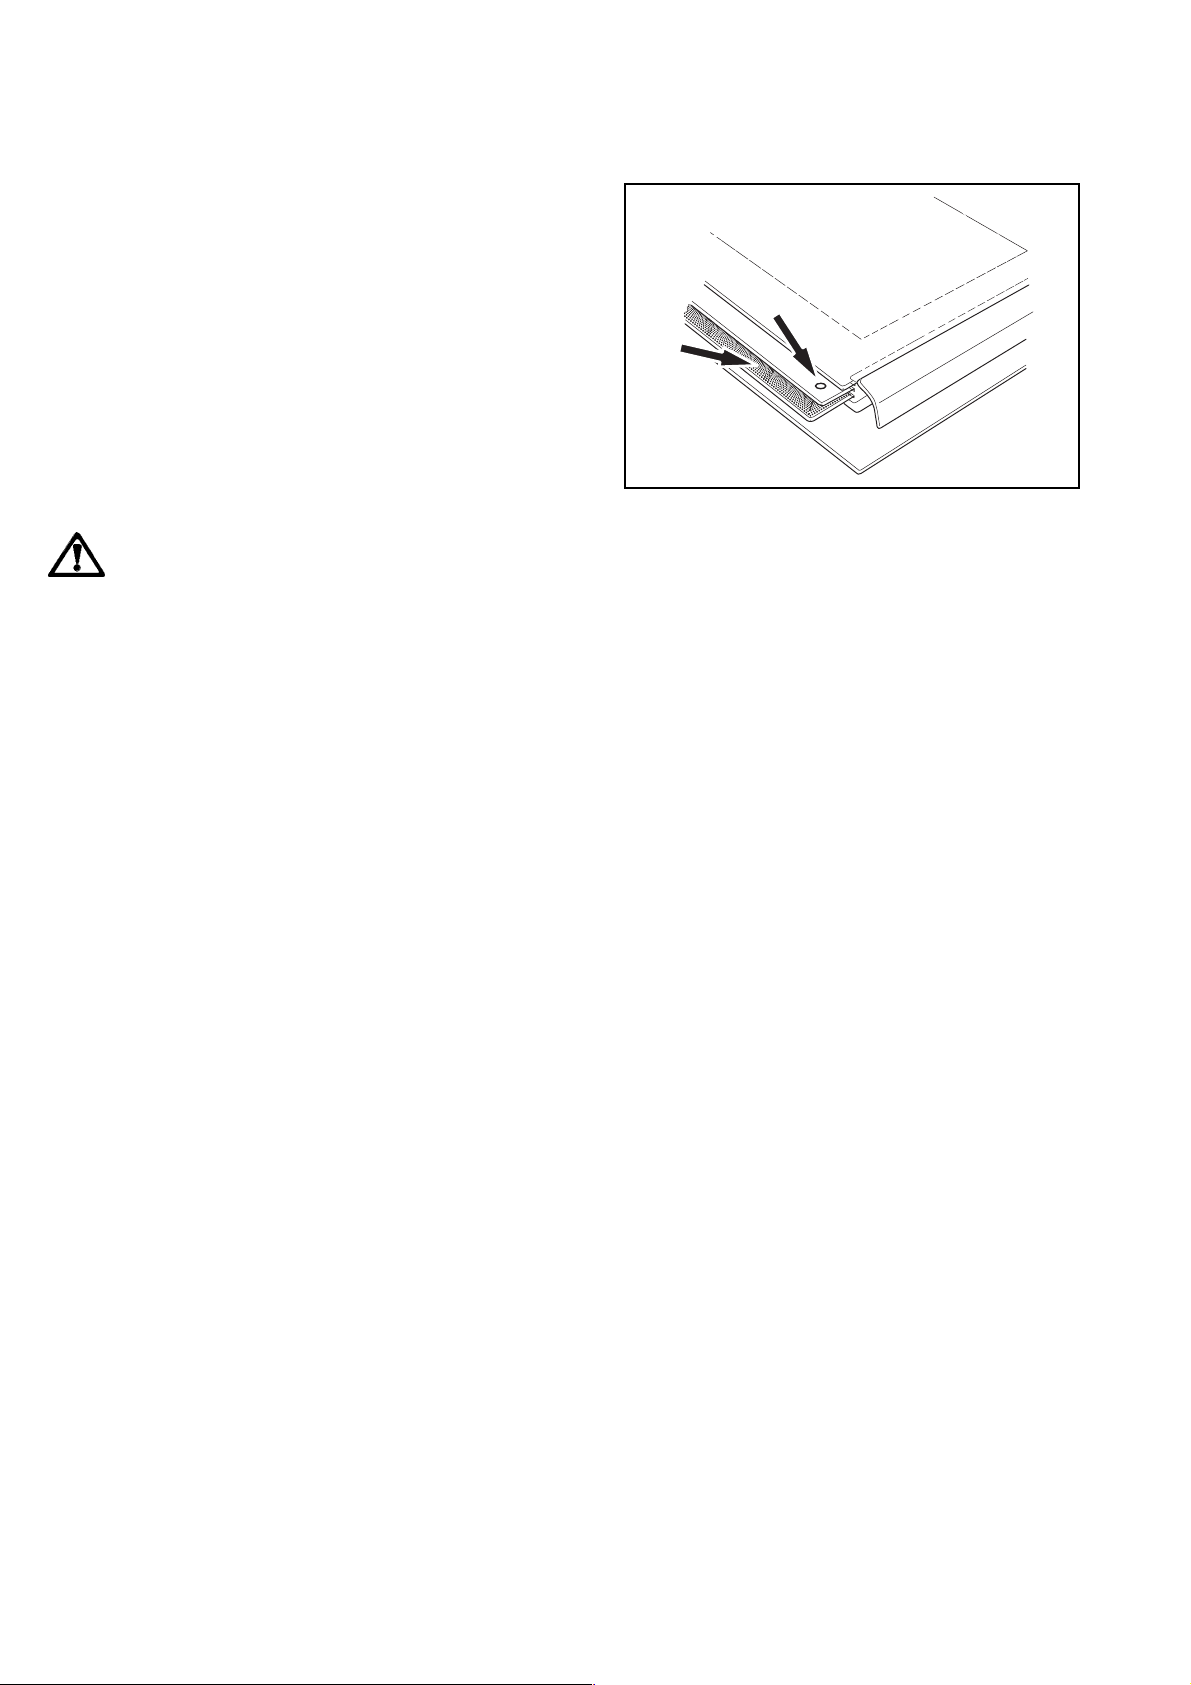
The two glasses in the middle are special glasses
that have been treated to resist heat. They are
marked with a small dot located on a corner and a
black frame respectively.
It is important that, when refitting the oven door,
the inner glasses are fixed in the right position.
To check if this operation has been carried out
correctly, when inserting the glass, make sure that
the surface of the glass marked with a black frame
looks downwards and that the dot is located on the
upper left corner of the glass.
DO NOT clean the oven door while the glass
panels are warm. If this precaution is not observed
the glass panels may shatter.
If the door glass panels become chipped or have
deep scratches, the glasses will be weakened and
must be replaced to prevent the possibility of the
panel shattering. Contact your local Service Force
Centre who will be pleased to advise further.
21
Page 22
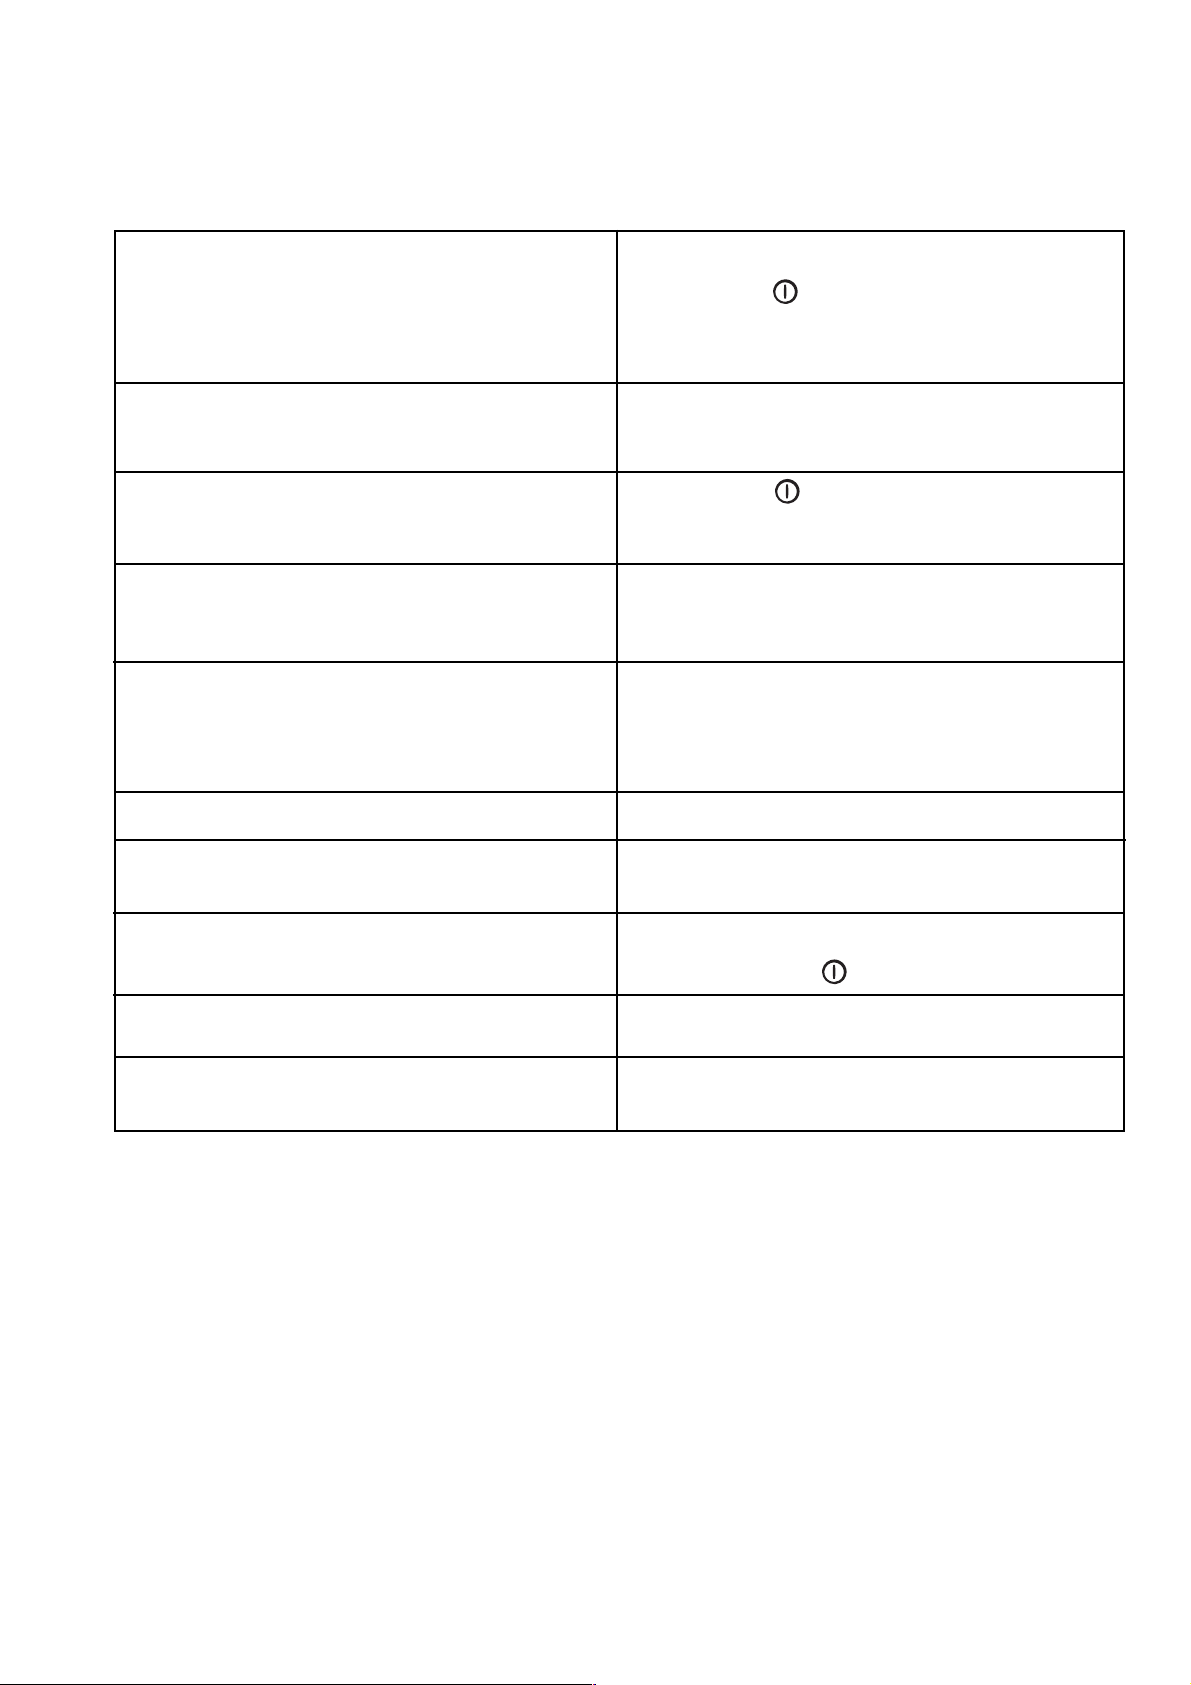
Something not working
If the appliance is not working correctly, please carry out the following checks, before contacting your local
Service Centre.
SYMPTOM
The oven does not come on.
Nothing happens when operating the oven controls
.
The oven light does not come on.
It takes too long to finish the dishes, or they are
cooked too fast.
Steam and condensation settle on the food and the
oven cavity.
The timer does not work.
SOLUTION
Press button to switch on the oven, then select a
cooking function.
Check the fuse and ensure the socket switch or the
switch from the mains supply to the oven are ON.
Check that the time of day has been set on the
programmer. Follow instructions given at chapter “To
set the correct the time of day”.
Press button to switch on the oven.
Check the light bulb, and replace it if necessary (see
"Replacing the Oven Light")
The temperature may need adjusting
Refer to the cooking function sections and to any
cooking chart provided
Remember that a 10 minutes pre-heating is necessary
before any cooking. Anyway, leave dishes inside the
oven no longer than 15-20 minutes after the cooking
is completed.
Check the instructions for the timer.
The oven fan is noisy.
Error code "E40" appears on the control panel.
An error code other than "E40" appears on the
control panel.
The display shows "12.00".
Check that shelves and bakeware are not vibrating in
contact with the oven back panel.
Switch the appliance off and leave it to cool down.
Then press button to switch on the oven.
Take note of the error code and contact an authorised
Service Centre.
Set the time of day (see chapter "How the set the time
of day").
22
Page 23

Service and Spare Parts
In the event of your appliance requiring service, or if you
wish to purchase spare parts, please contact your local
Electrolux
Your telephone call will be automatically routed to the
Service Force Centre covering your post code area.
For the address of your local Service Force Centre and
further information about Service Force, please visit the
website at www.serviceforce.co.uk
Before calling out an engineer, please ensure you have
read the details under the heading “Something Not Working.”
When you contact the Service Force Centre you will need
to give the following details:
1. Your name, address and post code
2. Your telephone number
3. Clear and concise details of the fault
4. The model and serial number of the appliance (found
on the rating plate)
5. The purchase date
Service Force Centre by telephoning:
0870 5 929929
For general enquiries concerning your
appliance or for further information on
products, please contact our Customer Care Department
by letter or telephone at the address below or visit our
website at www.electrolux.co.uk
Electrolux
Electrolux
Customer Care Department
Electrolux
55-77 High Street
Slough
Berkshire
SL1 1DZ
08705 950950 (*)
* calls to this number may be recorded for training
purposes.
For Customer Service in the Republic of Ireland please
contact us at the address below:
Electrolux Group (Irl) Ltd
Long Mile Road
Dublin 12
Republic of Ireland
Tel: +353 (0) 1 4090 751
Email: [email protected]
23
Page 24

Guarantee Conditions
Electrolux Guarantee conditions
We, Electrolux, undertake that if, within 12 months of
the date of the purchase, this
any part thereof is proved to be defective by any reason
only of faulty workmanship or materials, we will, at our
option, repair or replace the same FREE OF ANY
CHARGE for labour, materials or carriage on condition
that:
* The appliance has been correctly installed and used
only on the gas and electricity supply stated on the
rating plate.
* The appliance has been used for normal domestic
purpose only, and in accordance with the
manufacturer's instructions.
* The appliance has not been serviced, maintained,
repaired, taken apart or tampered with by any person
not authorised by us.
* All service work under this guarantee must be
undertaken by a Electrolux Service Centre.
* Any appliance or defective part replaced shall become
the Company's property.
* This guarantee is in addition to your statutory and
other legal rights.
Home visits are made between 8.30am and 5.30pm
Monday to Friday. Visits may be available outside these
hours, in which case a premium will be charged.
Electrolux
appliance or
European Guarantee
If you should move to another country within Europe then
your guarantee moves with you to your new home
subject to the following qualifications:
* The guarantee starts from the date you first
purchased your product.
* The guarantee is for the same period and to the same
extent for labour and parts as exist in the new country
of use for this brand or range of products.
* This guarantee relates to you and cannot be
transferred to another user.
* Your new home is within the European Community
(EC) or European Free Trade Area.
* The product is installed and used in accordance with
our instructions and is only used domestically, i.e. a
normal household
* The product is installed taking into account
regulations in your new country.
Before you move, please contact your nearest Customer
Care centre, listed below, to give them details of your
new home. They will then ensure that the local Service
Organisation is aware of your move and able to look after
you and your appliances.
France Senlis +33 (0) 344622013
Germany Nürnberg +49 (0) 800 234 7378
Exclusions
This guarantee does not cover:
* Damage or calls resulting from transportation,
improper use or neglect, the replacement of any light
bulbs or removable parts of glass or plastic.
* Costs incurred for calls to put right an appliance
which is improperly installed or calls to appliance
outside the United Kingdom.
* Appliances found to be in use within a commercial or
similar environment, plus those which are the subject
to rental agreements.
* Products of
marketed by
Electrolux
Electrolux
manufacture which are not
.
Italy Pordenone +39 (0) 800 117511
Sweden Stockholm +46 (0) 20 78 77 50
U K Slough +44 (0) 1753 219898
24
Page 25
Installation
The oven must be installed according to the
instructions supplied.
Technical Data
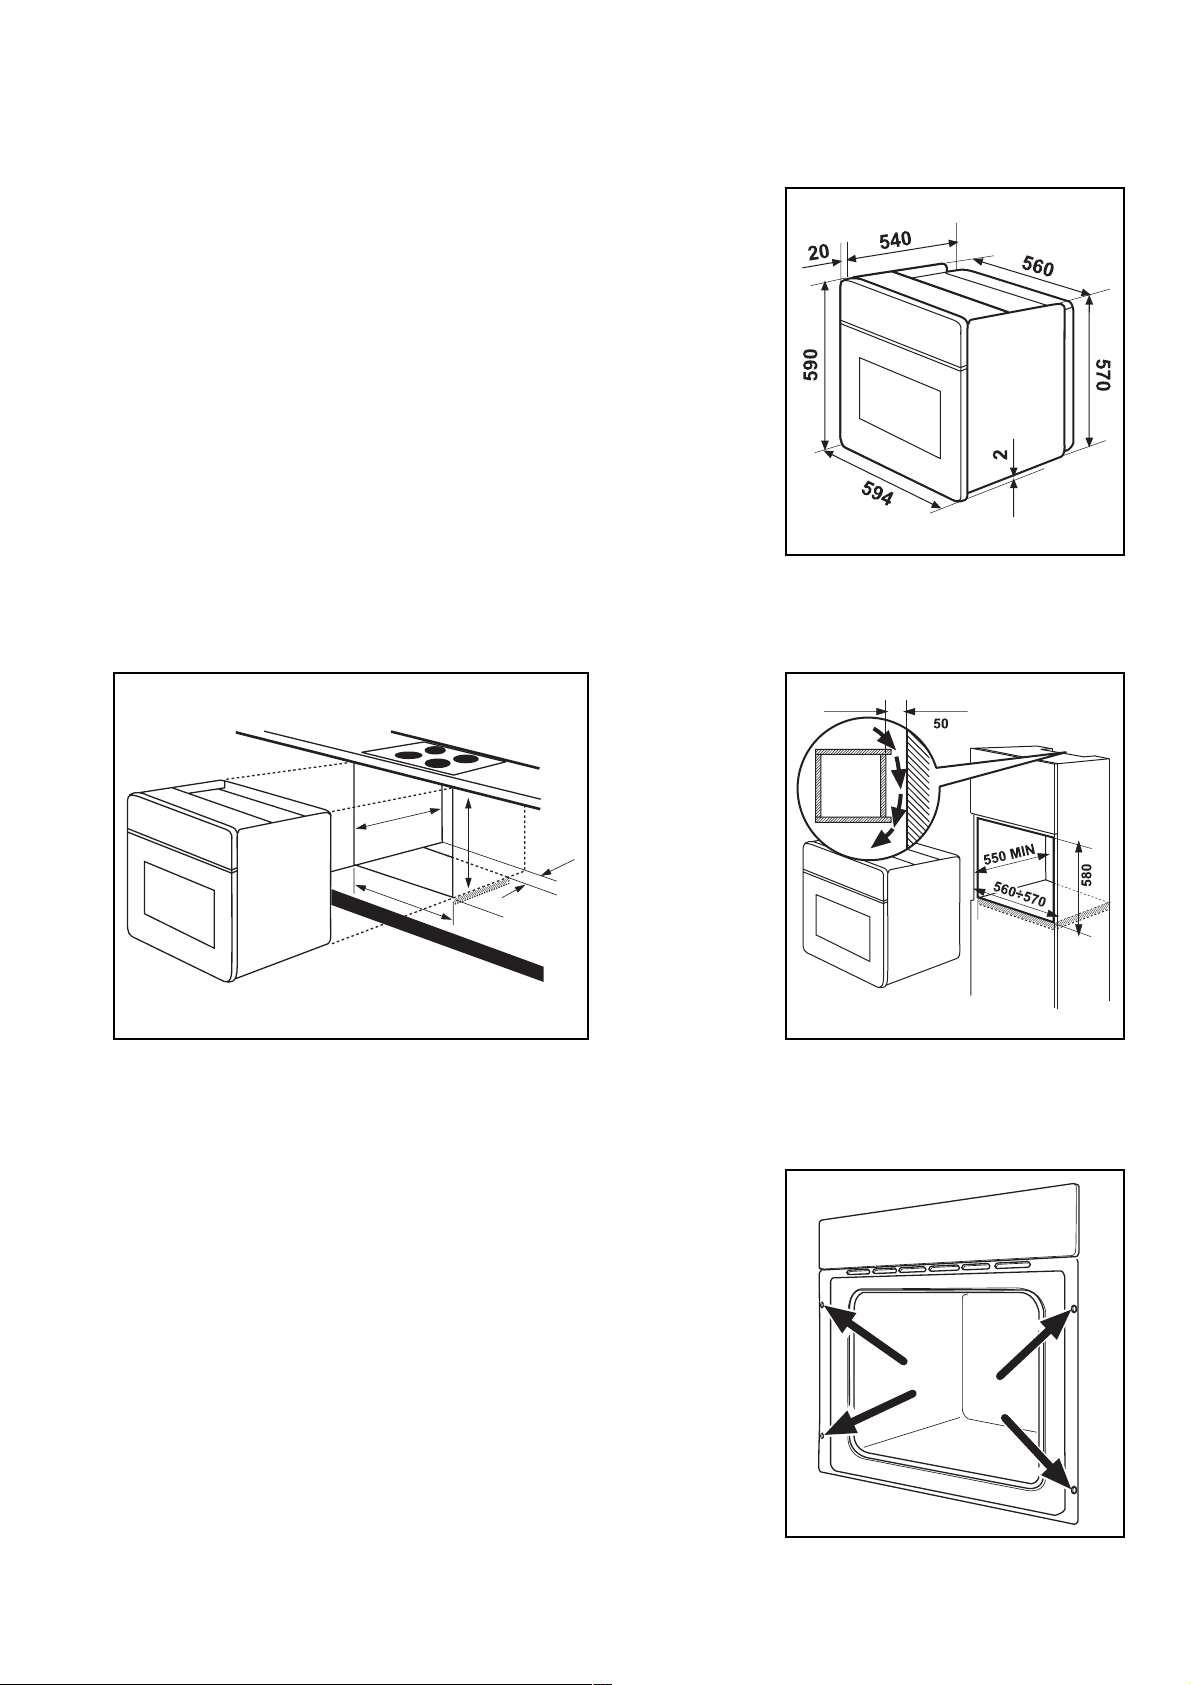
Dimensions of recess
Height undertop: 593 mm; in coloumn 580 mm
Width 560 ÷ 570 mm
Depth 550 mm
Dimensions of the oven cavity
Height 335 mm
Width 405 mm
Depth 400 mm
Oven capacity 56 litres
This oven must be installed by qualified
personnel.
Heating elements rating
Conventional cooking elements (top+bottom) 1,800 W
Bottom element 1,000 W
Convection element 2,000 W
Grill element 1,650 W
Double Grill element 2,450 W
Thermal Grill 2,480 W
Pizza Oven Function 3,000 W
Pyrolytic cleaning function 2,450 W
Convection Fan 30 W
Oven Light 40 W
Cooling Fan 25 W
Total Rating 3,080 W
Supply voltage (50 Hz) 230 V
Electrical connection
The oven is designed to be connected to 230 V (50 Hz)
electricity supply.
The oven has an easily accessible terminal block which
is marked as follows:
Letter L - Live terminal
Letter N - Neutral terminal
or E - Earth terminal
THIS OVEN MUST BE EARTHED
The cable used to connect the oven to the electrical
supply must comply to the specifications given below.
For Uk use only
Connection Min. size Cable / flex Fuse
via Cable/flex type
• Cooker 2.5 mm
Control twin and
Circuit earth
2
PVC/PVC 20 A
It is necessary that you install a double pole switch
between the oven and the electricity supply (mains), with
a minimum gap of 3 mm between the switch contacts
and of a type suitable for the required load in compliance
with the current rules.
The switch must not break the yellow and green earth
cable at any point.
Important
After installation and connecting, the cable must be
placed so that it cannot at any point reach a temperature of more than 60 °C above the ambient temperature.
Before the oven is connected, check that the main fuse
and the domestic installation can support the load; and
that the power supply is properly earthed.
The manufacturer disclaims any responsibility should
these safety measures not be carried out.
For Europe use only
Min. size Cable/flex Cable / flex type Fuse
2.5 mm
2
H07 RN-F, H05 RN-F, 15 A
H05 RR-F, H05 VV-F,
H05 V2V2-F (T90),
H05 BB-F
25
Page 26
Building In
Please ensure that when the oven is installed it is
easily accessible for the engineer in the event of a
breakdown.
Building In
The surround or cabinet into which the oven will be built
must comply with these specifications:
the dimensions must be as shown in the relevant
diagrams;
the materials must withstand a temperature increase
of at least 60 °C above ambient;
proper arrangements must be made of a continuous
supply of air to the oven to prevent the oven overheating.
Dimensions of the oven and recess required are given in
the relevant diagrams.
Fig. 25
IN
550 M
593
560 - 570
80÷100
Securing The Oven To The
Cabinet
1. Fit the oven into the cabinet recess,
2. Open the oven door,
3. Secure the oven to the kitchen cabinet with four wood
screws, which fit the holes provided in the oven frame.
26
Fig. 28
Page 27
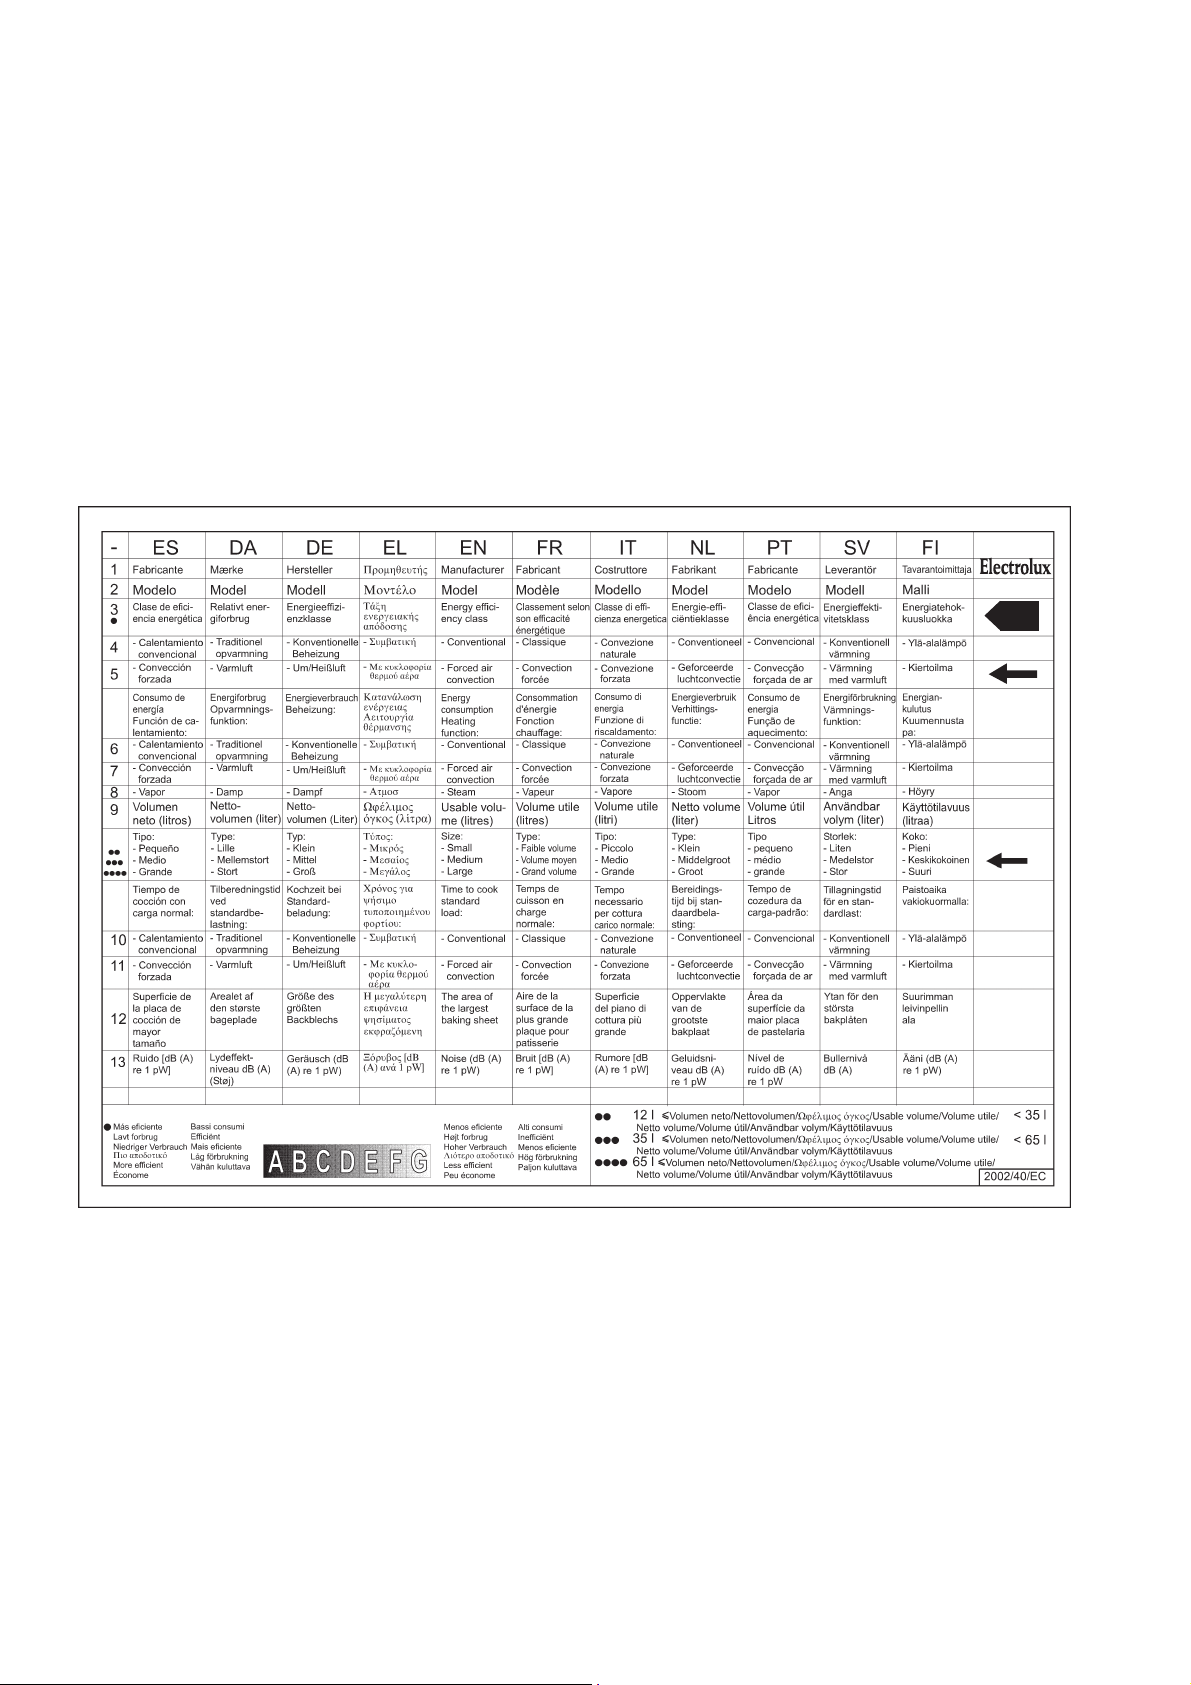
ESOPMSS
A
0,79 kWh
0,78 kWh
56,0
43 min.
41 min.
1130 cm²
Page 28

CUSTOMER CARE
Zanussi
55-77 High Street
Slough
Berkshire, SL1 1DZ
Tel:
08705 950950
© Electrolux plc 2004
From the Electrolux Group. The world’s No.1 choice.
The Electrolux Group is the world’s largest producer of powered appliances for kitchen, cleaning and outdoor use. More than
55 million Electrolux Group products (such as refrigerators, cookers, washing machines, vacuum cleaners, chain saws and
lawn mowers) are sold each year to a value of approx. USD 14 billion in more than 150 countries around the world.
09/04
Grafiche MDM - Forlì
 Loading...