

Page 1

user manual
instrukcja obsługi
kullanma kılavuzu
Dishwasher
Zmywarka
Bulaşık Makinesi
ESL 64010
Page 2
2 electrolux
Electrolux. Thinking of you.
Share more of our thinking at www.electrolux.com
Contents
Safety information 2
Product description 3
Control panel 4
Use of the appliance 5
Setting the water softener 5
Use of dishwasher salt 6
Use of rinse aid 7
Loading cutlery and dishes 8
Use of detergent 10
Setting and starting a washing programme
Subject to change without notice
Washing programmes 13
Care and cleaning 13
What to do if… 14
Technical data 16
Installation 16
Water connection 16
Electrical connection 18
Environment concerns 18
12
Safety information
For your safety and correct operation of
the appliance, read this manual carefully
before installation and use. Always keep
these instructions with the appliance
even if you move or sell it. Users must
fully know the operation and safety features of the appliance.
Correct use
• The appliance is designed exclusively for
domestic use.
• Only use the appliance to clean household
utensils that are applicable for dishwashers.
• Do not put solvents in the appliance. Risk
of explosion.
• Put the knives and all items with sharp
points in the cutlery basket with their
points down. If not, put in a horizontal position in the upper basket.
• Use only branded products for dishwashers (detergent, salt, rinse aid).
• If you open the door while the appliance is
in operation, hot steam can escape. Risk
of skin burns.
•Do not remove dishes from the dishwasher
before the end of the washing programme.
• When the washing programme is completed, disconnect the mains plug from the
mains socket and close the water tap.
• Only an authorised service engineer can
repair this appliance. Use only original
spare parts.
• Do not do repairs yourself to prevent injury
and damage to the appliance. Always contact your local Service Force Centre.
General safety
• Persons (including children) with reduced
physical sensory, mental capabilities or
lack of experience and knowledge must
not use the appliance. They must have supervision or instruction for the operation of
the appliance by a person responsible for
their safety.
• Obey the safety instructions from the manufacturer of the dishwasher detergent to
prevent burns to eyes, mouth and throat.
• Do not drink the water from the dishwasher. Detergent residues can stay in your appliance.
• Always close the door when you do not
use the appliance to prevent injury and not
to stumble over the open door.
• Do not sit or stand on the open door.
Child safety
• Only adults can use this appliance. Children must get supervision to make sure
that they do not play with the appliance.
• Keep all the packaging away from children.
There is a risk of suffocation.
Page 3
electrolux 3
• Keep all detergents in a safe area. Do not
let children touch the detergents.
• Keep children away from the appliance
when the door is open.
Installation
• Make sure that the appliance is not damaged because of transport. Do not connect a damaged appliance. If necessary,
contact the supplier.
• Remove all packaging before first use.
• A qualified and competent person must do
the electrical installation.
• A qualified and competent person must do
the plumbing installation.
• Do not change the specifications or modify
this product. Risk of injury and damage to
the appliance.
Product description
• Do not use the appliance:
– if the mains cable or water hoses are
damaged,
– if the control panel, worktop or plinth
area are damaged, that you can get access to the inner side of the appliance.
Contact your local Service Force Centre.
• Do not drill into the sides of the appliance
to prevent damage to hydraulic and electrical components.
Warning! Carefully obey the
instructions for electrical and water
connections.
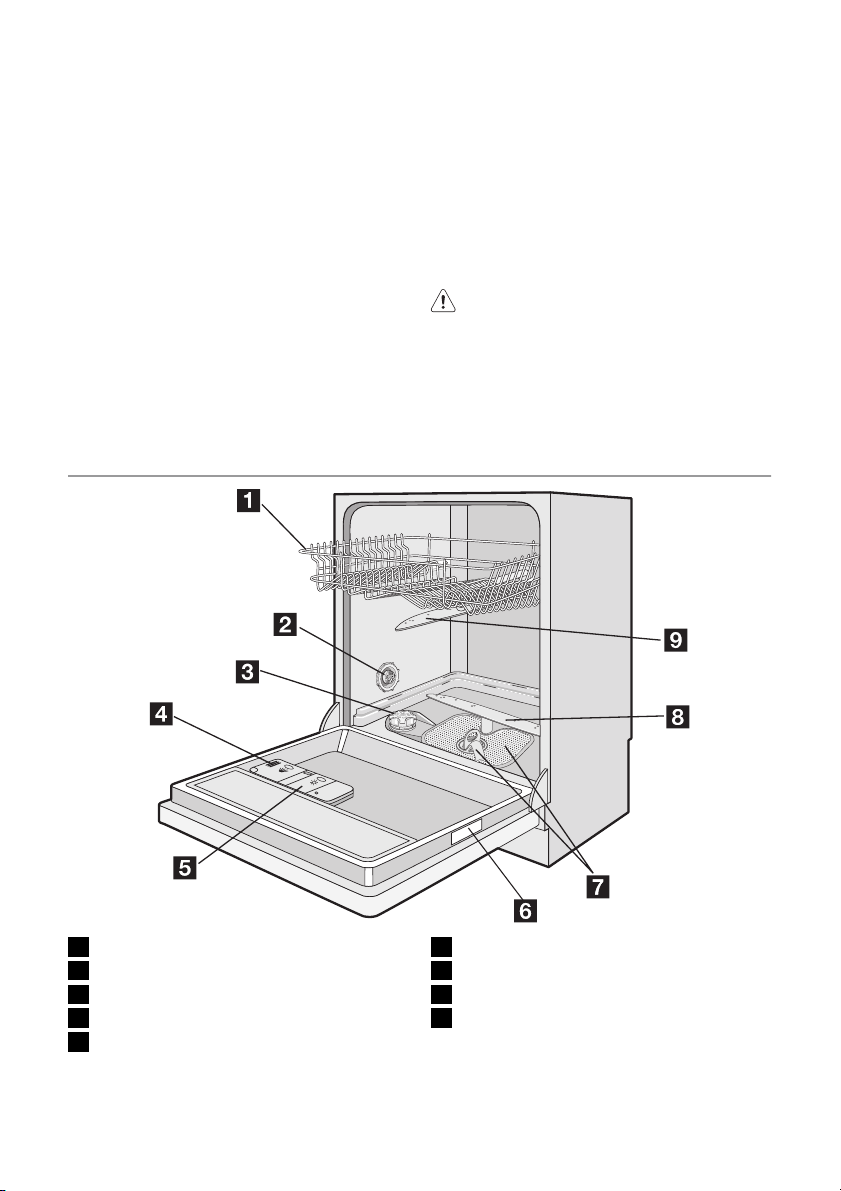
1 Upper basket
2 Water hardness dial
3 Salt container
4 Detergent dispenser
5 Rinse aid dispenser
6 Rating plate
7 Filters
8 Lower spray arm
9 Upper spray arm
Page 4
4 electrolux
Control panel
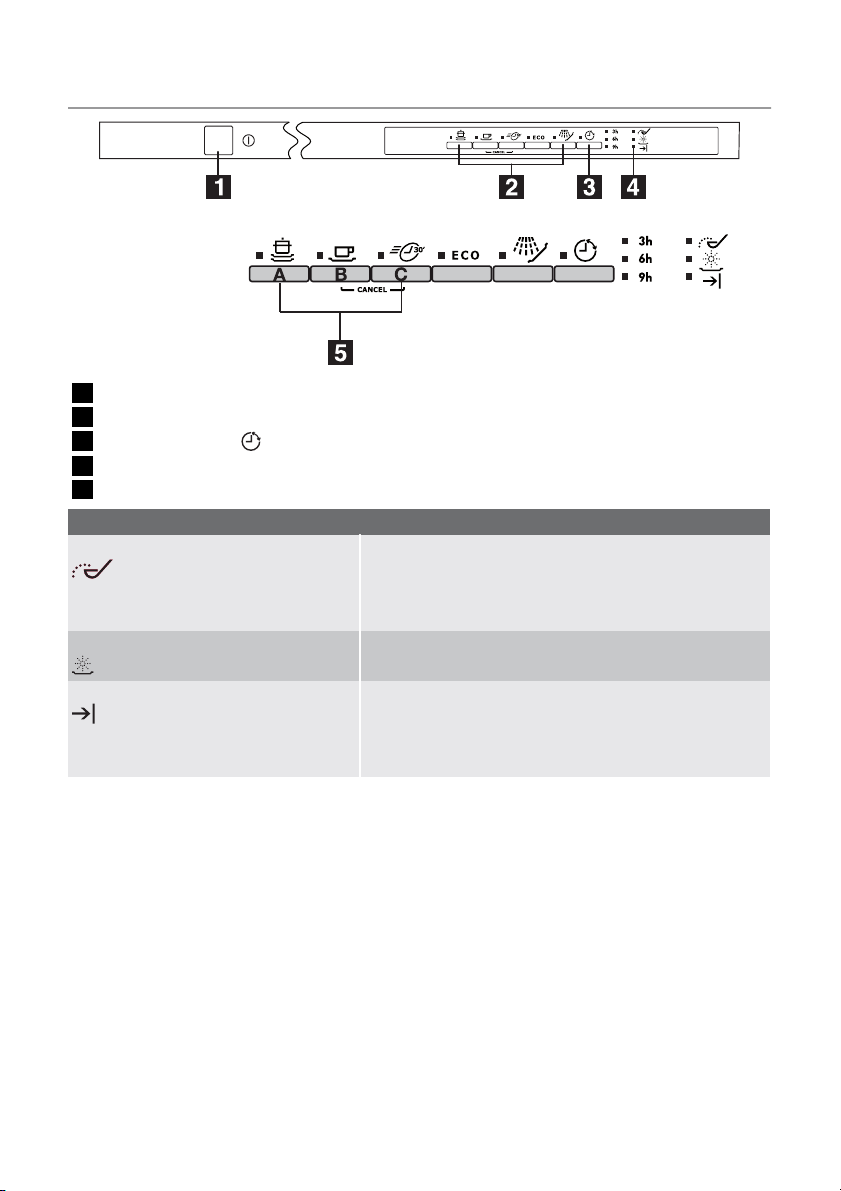
1 On/off button
2 Programme selection buttons
3
Delay start button
4 Indicator lights
5 Function buttons
Indicator lights
1)
Salt
Rinse aid
End-of-programme Comes on when the washing programme is completed.
1) When the salt and/or rinse aid containers are empty, the related indicator lights do not come on while
1)
a washing programme operates.
Programme selection buttons
With these buttons you can select the washing programme. Press a programme button,
the related indicator light comes on. Refer to
'Washing programmes' chapter for more data about the washing programmes.
Delay start button
Use the delay start button to delay the start
of the washing programme with an interval of
3, 6 or 9 hours. Refer to the chapter 'Setting
and starting a washing programme'.
Function buttons
Use the function buttons for these operations:
Comes on when it is necessary to fill the salt container.
Refer to the chapter 'Use of dishwasher salt'.
After you fill the container, the salt indicator light can continue to stay on for some hours. This does not have an
unwanted effect on the operation of the appliance.
Comes on when it is necessary to fill the rinse aid dispenser. Refer to the chapter 'Use of rinse aid'.
Auxiliary functions:
• Level of the water softener.
• Activation/deactivation of the audible signals.
• An alarm if the appliance has a malfunction.
• To set the water softener. Refer to the
chapter 'Setting the water softener'.
• To deactivate/activate the audible signals.
Refer to the section 'Audible signals'.
• To cancel the washing programme in progress or a delay start in progress. Refer to
the chapter 'Setting and starting a washing
programme'.
Setting mode
The appliance must be in setting mode for
these operations:
• To set a washing programme.
• To set the water softener level.
• To deactivate/activate the audible signals.
Page 5
electrolux 5
Press the on/off button. The appliance is in
setting mode when:
• All the programme indicator lights come
on.
Press the on/off button. The appliance is not
in setting mode when:
• Only one programme indicator light comes
on.
• A washing programme is set. It is necessary to cancel the programme to go back
to the setting mode. Refer to the chapter
'Setting and starting a washing programme'.
Audible signals
You can hear an audible signal:
• At the end of the washing programme.
• During the setting of the level of the water
softener.
• When the appliance has a malfunction.
The activation of the audible signals is set at
the factory.
Do these steps to deactivate the audible signals:
Use of the appliance
Refer to the following instructions for each
step of procedure:
1. Make a check if the water softener level
is correct for the water hardness in your
area. If necessary set the water softener.
2. Fill the salt container with dishwasher salt.
3. Fill the rinse aid dispenser with rinse aid.
4. Load cutlery and dishes into the dish-
washer.
1. Switch on the appliance.
2. Make sure that the appliance is in setting
mode.
3. Press and hold function buttons B and C
until the indicator lights of function buttons A, B and C start to flash.
4. Press the function button C.
– Indicator lights for function buttons A
and B go off.
– Indicator light for function button C
starts to flash.
– The end-of-programme indicator light
comes on.
The audible signals are activated.
5. Press the function button C again.
– The end-of-programme indicator light
goes off.
The audible signals are deactivated.
6. Switch off the appliance to save the operation.
Do these steps to activate the audible signals:
1. Do the above procedure until the end-ofprogramme indicator light comes on.
5. Set the correct washing programme for
the type of load and soil.
6. Fill the detergent dispenser with the correct quantity of detergent.
7. Start the washing programme.
If you use detergent tablets, refer to the
chapter 'Use of detergent'.
Setting the water softener
The water softener removes minerals and
salts from the water supply. Minerals and
salts can have bad effect on the operation of
the appliance.
Water hardness is measured in equivalent
scales:
• German degrees (dH°).
Water hardness Water hardness setting
°dH °TH mmol/l Clarke manually electronically
51 - 70 91 - 125 9,1 - 12,5 64 - 88 2 10
43 - 50 76 - 90 7,6 - 9,0 53 - 63 2 9
37 - 42 65 - 75 6,5 - 7,5 46 - 52 2 8
• French degrees (°TH).
• mmol/l (millimol per litre - international unit
for the hardness of water).
•Clarke.
Adjust the water softener to the water hardness in your area. If necessary, contact your
local water authority.
Page 6
6 electrolux
Water hardness Water hardness setting
°dH °TH mmol/l Clarke manually electronically
29 - 36 51 - 64 5,1 - 6,4 36 - 45 2 7
23 - 28 40 - 50 4,0 - 5,0 28 - 35 2 6
19 - 22 33 - 39 3,3 - 3,9 23 - 27 2 5
15 - 18 26 - 32 2,6 - 3,2 18 - 22 1 4
11 - 14 19 - 25 1,9 - 2,5 13 - 17 1 3
4 - 10 7 - 18 0,7 - 1,8 5 - 12 1 2
< 4 < 7 < 0,7 < 5
1) No use of salt required.
You must set the water softener manually and electronically.
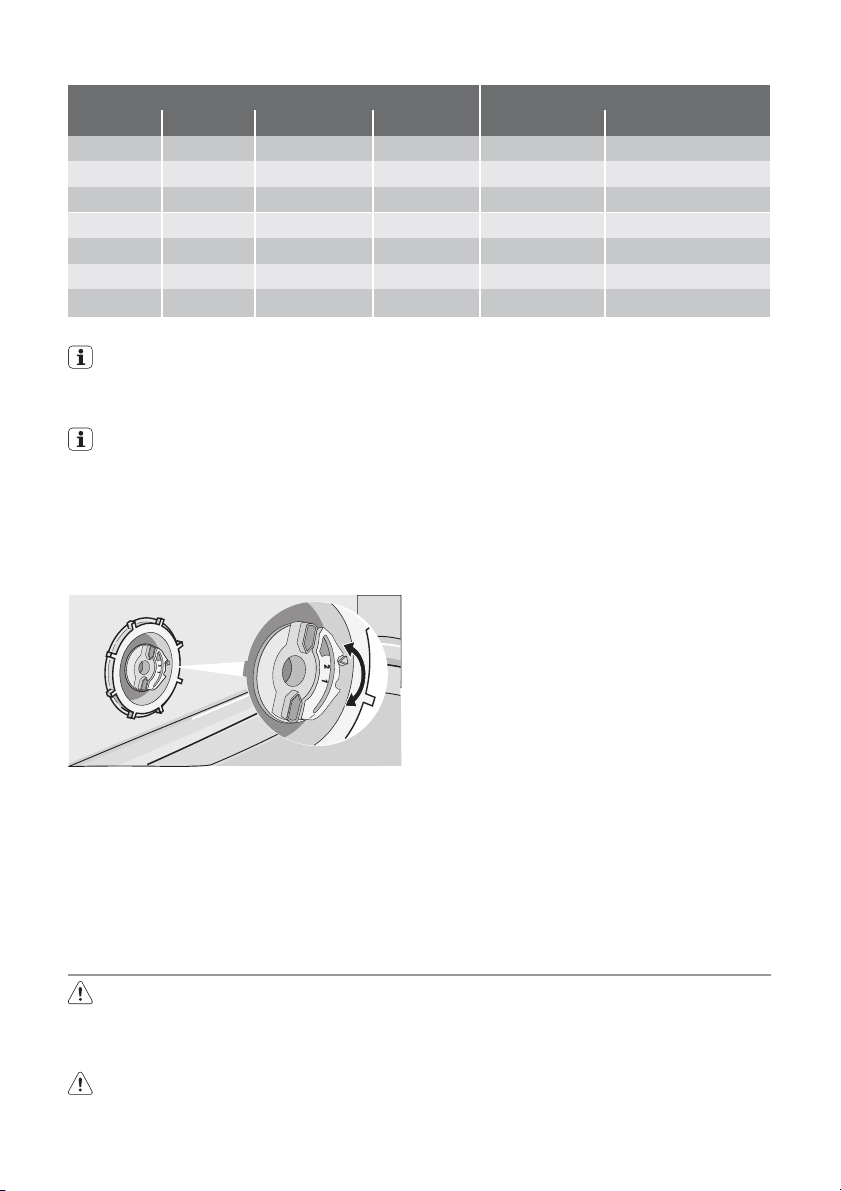
Manual adjustment
The appliance is set at the factory at position 2.
1. Open the door.
2. Remove the lower basket.
3. Turn the water hardness dial to position
1 or 2 (refer to the chart).
4. Install the lower basket.
3. Press and hold function buttons B and C
until the indicator lights for function buttons A, B and C start to flash.
4. Release function buttons B and C.
5. Press function button A.
– The indicator light for function button A
continues to flash.
– The indicator lights for function buttons
B and C go off.
– The end-of-programme indicator light
starts to flash.
– You can hear an audible signal.
1)
1
The setting function of the water softener
is activated.
The end-of-programme indicator light
flashes and an audible signal operates to
show the level of the water softener. The
pause is approximately 3 seconds.
Example: 5 flashes / 5 intermittent audible
signals - pause - 5 flashes / 5 intermittent
audible signals - pause - etc. = level 5
5. Close the door.
Electronic adjustment
The water softener is set at the factory
at level 5.
6. Press the function button A one time to
increase the water softener level by one
step.
7. Press the on/off button to save the operation.
1. Switch on the appliance.
2. Make sure that the appliance is in setting
mode.
1)
1
Use of dishwasher salt
Caution! Only use dishwashers salt.
Types of salt that are not applicable for
dishwashers cause damage to the water
softener.
Caution! Grains of salt and salty water
on the bottom of the appliance can
cause corrosion. Fill the appliance with
salt before you start a washing
programme to prevent corrosion.
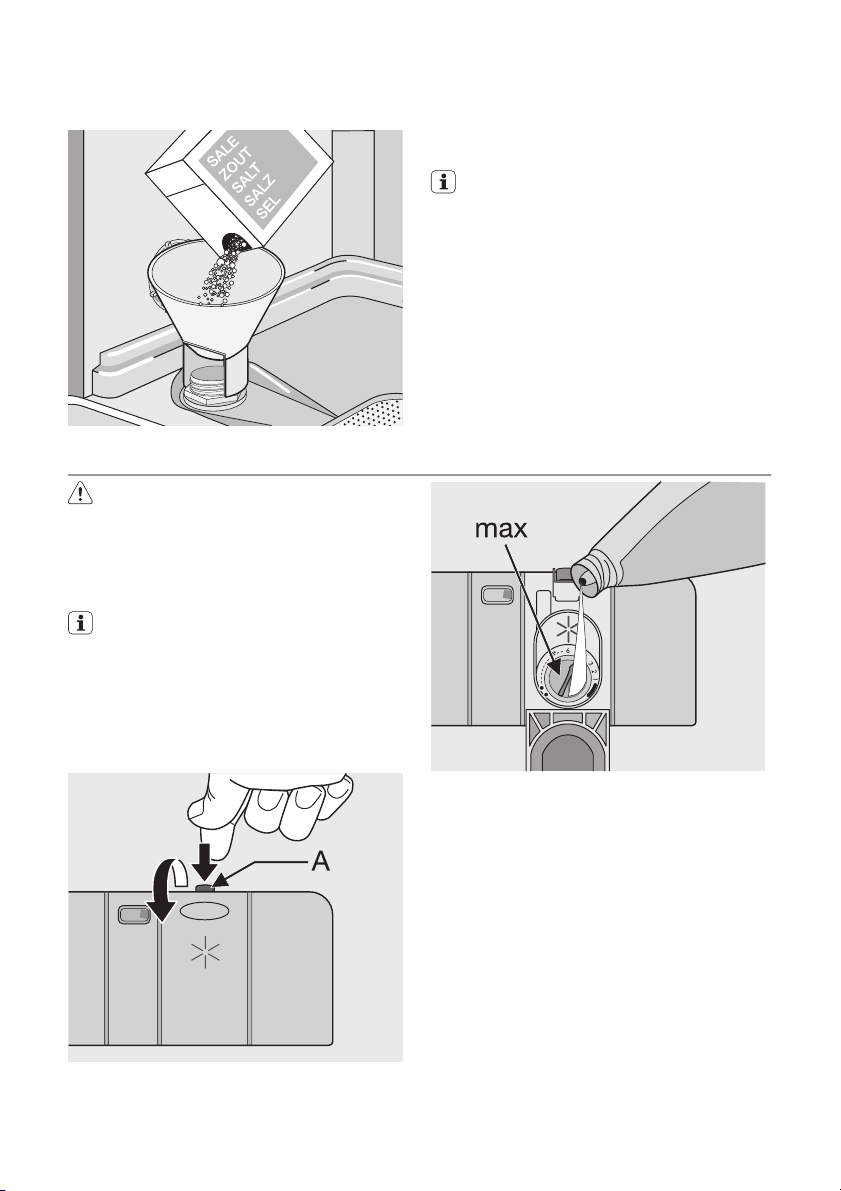
Do these steps to fill the salt container:
1. Turn the cap anticlockwise to open the
salt container.
2. Fill the salt container with 1 litre of water
(only the first operation).
Page 7
electrolux 7
3. Use the funnel to fill the salt container with
salt.
Use of rinse aid
Caution! Only use branded rinse aid for
dishwashers.
Do not fill the rinse aid dispenser with
other products (e.g. dishwasher cleaning agent, liquid detergent). This can
cause damage to the appliance.
Rinse aid makes it possible to dry the
dishes without streaks and stains.
Rinse aid is automatically added during
the last rinsing phase.
Do these steps to fill the rinse aid dispenser:
1. Press the release button (A) to open the
rinse aid dispenser.
4. Remove the salt around the opening of
the salt container.
5. Turn the cap clockwise to close the salt
container.
It is normal that water overflows from the
salt container when you fill it with salt.
When you set electronically the water softener to level 1, the salt indicator light does
not stay on.
3. Remove the spilled rinse aid with an absorbent cloth to prevent too much foam
during the subsequent washing programme.
4. Close the rinse aid dispenser.
Adjusting the rinse aid dosage
The rinse aid is set at the factory at position
4.
You can set the rinse aid dosage between
position 1 (lowest dosage) and position 6
(highest dosage).
2. Fill the rinse aid dispenser with rinse aid.
The mark 'max.' shows the maximum
level.
Page 8
8 electrolux
Loading cutlery and dishes
Helpful hints and tips
Caution! Only use the appliance for
household utensils that are applicable
for dishwashers.
Do not use the appliance to clean objects
that can absorb water (sponges, household
cloths, etc.).
• Before you load cutlery and dishes, do
these steps:
– Remove all food remainings and debris.
– Make burnt, remaining food in pans soft.
• While you load cutlery and dishes, do
these steps:
– Load hollow items (e.g. cups, glasses
and pans) with the opening down.
– Make sure that water does not collect in
the container or in a deep base.
– Make sure that cutlery and dishes do not
lie inside one another.
– Make sure that cutlery and dishes do not
cover other cutlery and dishes.
– Make sure that glasses do not touch
other glasses.
– Put small objects in the cutlery basket.
• Plastic items and pans with non-stick
coatings can keep water droplets. Plastic
items do not dry as well as porcelain and
steel items.
• Put light items in the upper basket. Make
sure that the items do not move.
Caution! Make sure that the spray arms
can move freely before you start a
washing programme.
1. Turn the rinse aid dial to increase or decrease the dosage.
– Increase the dosage if there are water
droplets or limescale on the dishes.
– Decrease the dosage if there are
streaks, whitish stains or bluish layers
on the dishes.
Warning! Always close the door after
you load or unload the appliance. An
open door can be dangerous.
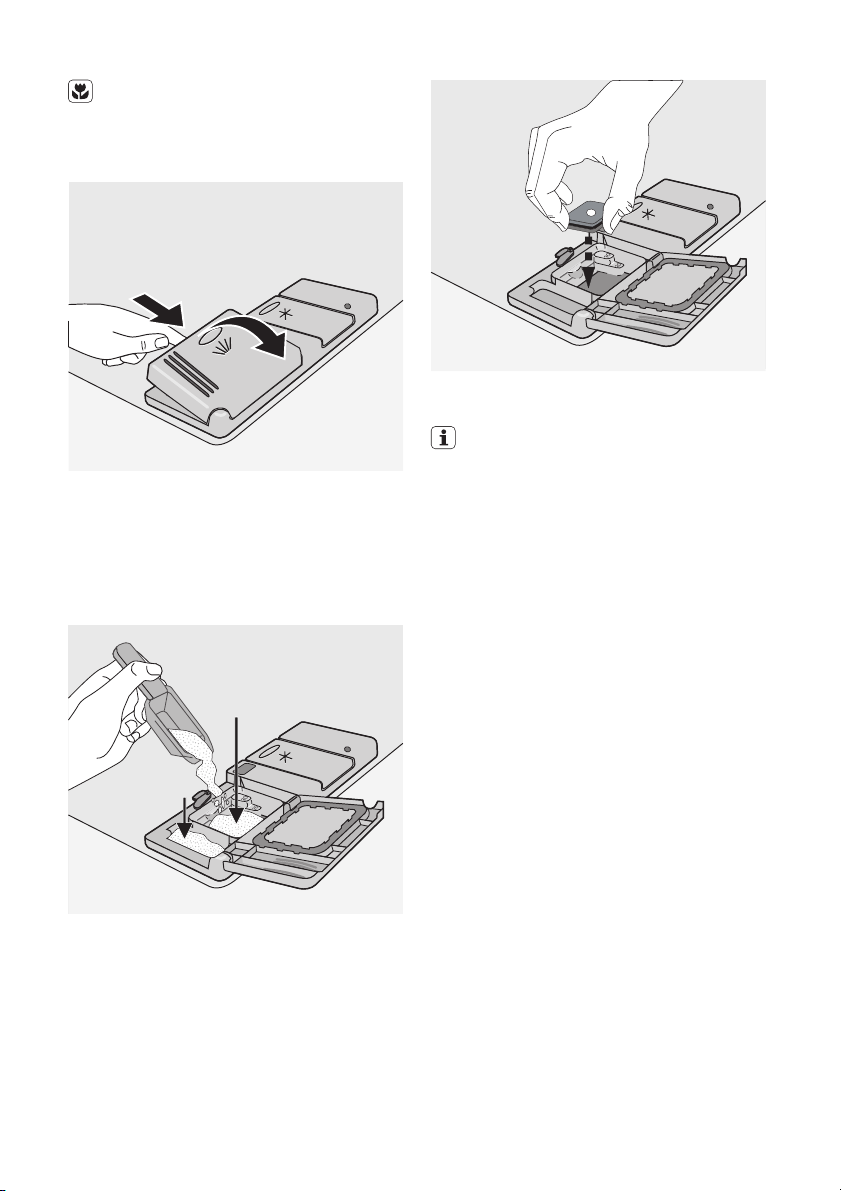
Lower basket
Put saucepans, lids, plates, salad bowls and
cutlery in the lower basket. Arrange service
dishes and large lids around the edge of the
basket.
The rows of prongs in the lower basket can
be flat to load pots, pans and bowls.
Page 9
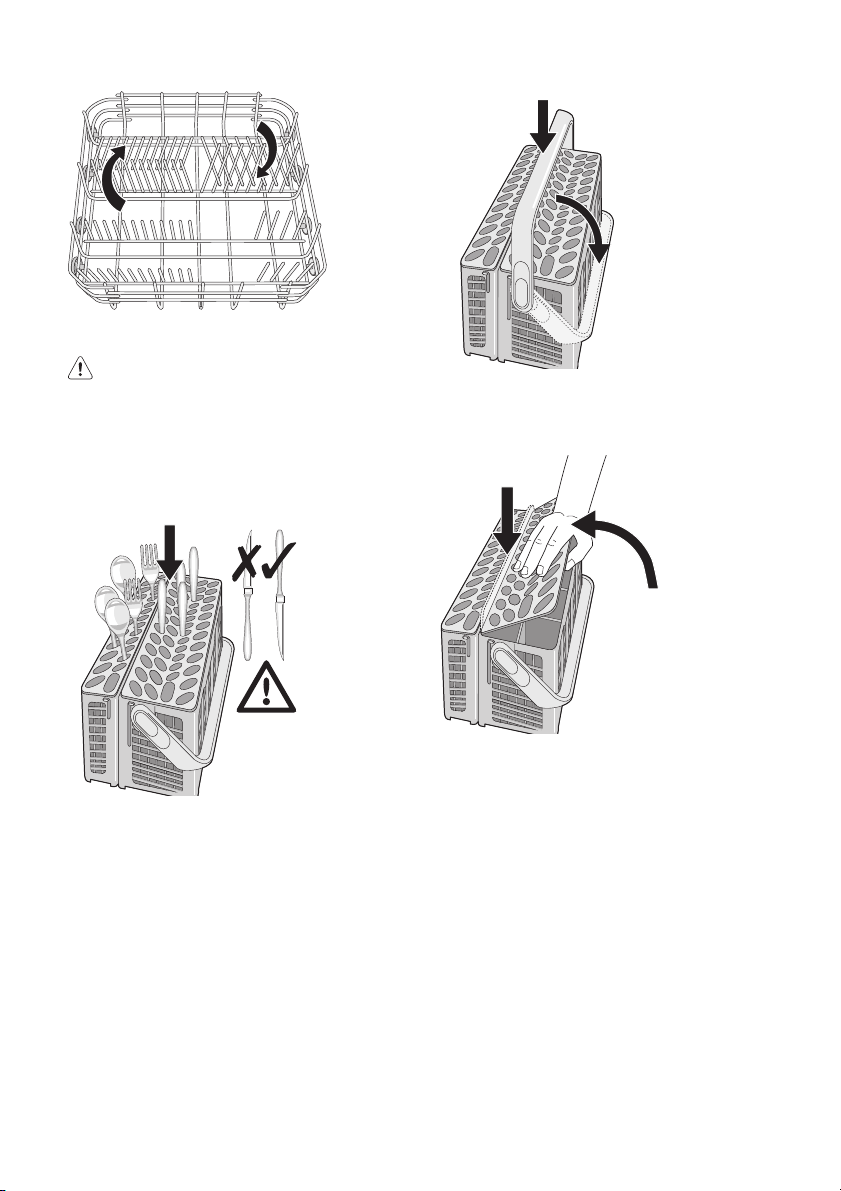
Cutlery basket
Warning! Do not put long-bladed knives
in a vertical position in the cutlery basket.
Arrange long and sharp cutlery
horizontally in the upper basket. Be
careful with sharp items.
Put forks and spoons with the handles down.
Put knives with the handles up.
electrolux 9
Use the cutlery grids. If the dimensions of the
cutlery prevent use of the cutlery grids, you
can easily hide them.
Mix spoons with other cutlery to prevent
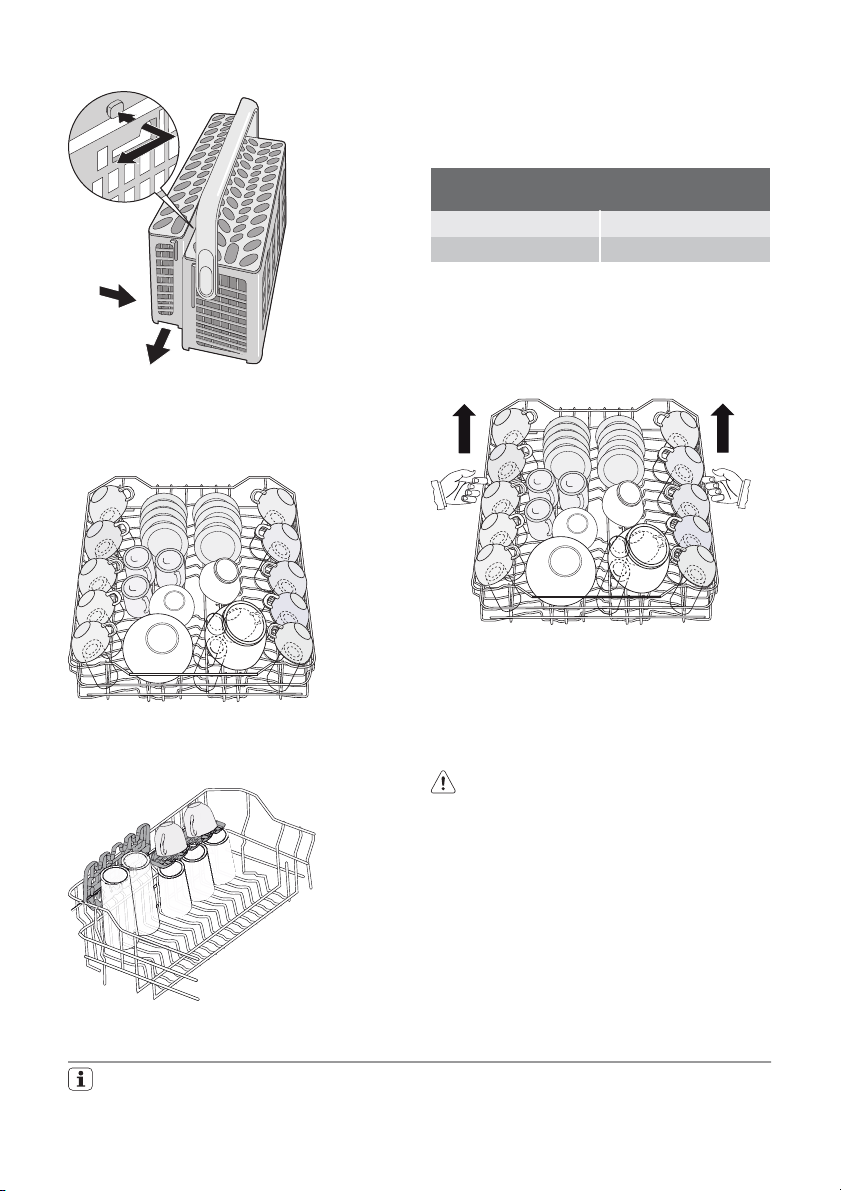
them to bond together.
Lower the handle of the cutlery basket to put
the cutlery in the basket.
The cutlery basket has two parts. You can
use these parts separately for more loading
flexibility. To disassemble the parts, move
them horizontally in opposite directions and
pull them apart. To assemble the parts, put
them together and move horizontally to each
other.
Page 10
10 electrolux
Upper basket
The upper basket is for saucers, salad bowls,
cups, glasses, pots and lids. Arrange the
items to let water touch all surfaces.
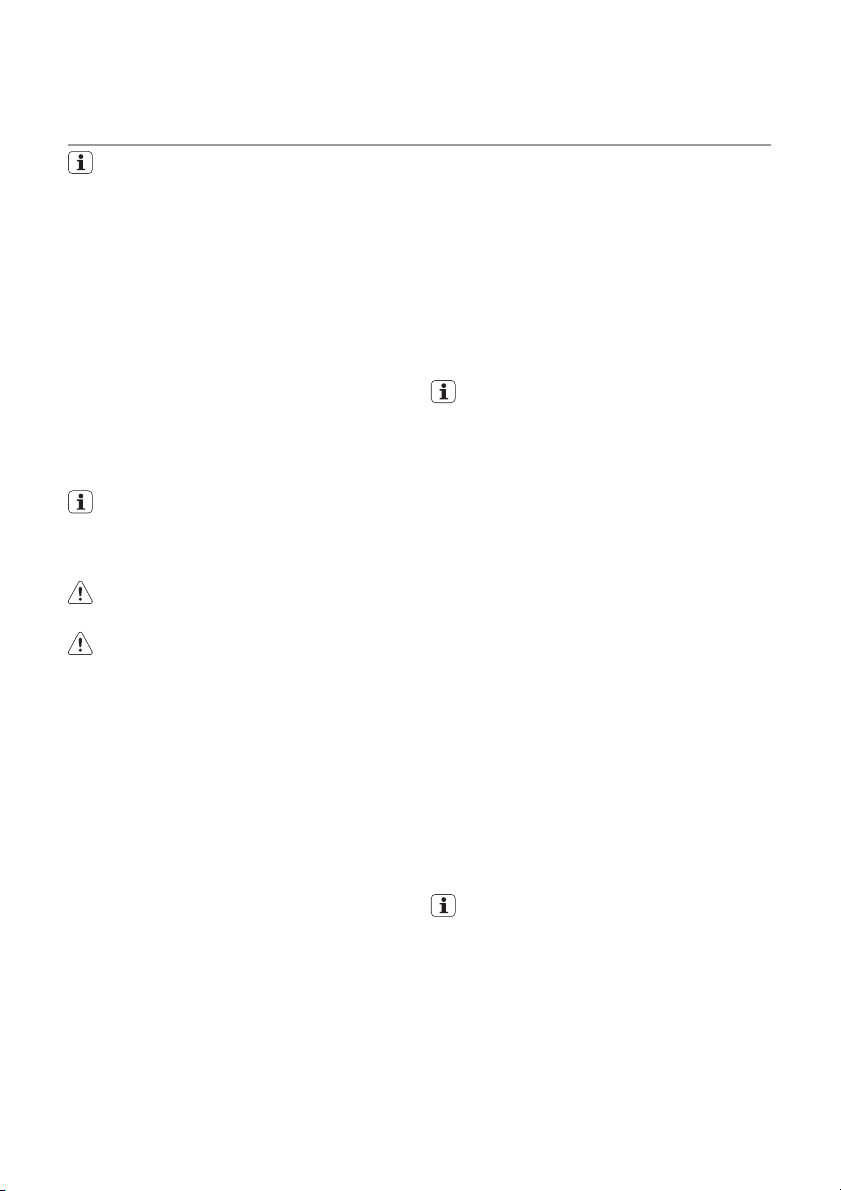
Adjustment of the height of the upper
basket
If you put large plates in the lower basket, first
move the upper basket to the upper position.
Maximum height of the dishes in the lower
basket
Upper position 31 cm
Lower position 27 cm
Do these steps to move the upper basket to
the upper position:
1. Pull the basket out until it stops.
2. Carefully lift the two sides until the mechanism is engaged and the basket is stable.
Put glasses with long stems in the cup racks
with the stems up. For longer items, fold the
cup racks up.
Use of detergent
Only use detergents (powder, liquid or
tablet) that are applicable for dishwashers.
Follow the data on the packaging:
Do these steps to move the upper basket to
the lower position:
1. Pull the basket out until it stops.
2. Carefully lift the two sides upwards.
3. Hold the mechanism and let it fall back
down slowly.
Caution!
• Do not lift or lower the basket on one
side only.
• If the basket is in the upper position,
do not put cups on the cup racks.
• Dosage recommended by the manufacturer.
• Storage recommendations.
Page 11
Do not use more than the correct quantity of detergent to save an environment.
Do these steps to fill the detergent dispenser:
1. Open the lid of the detergent dispenser.
2. Fill the detergent dispenser (A) with detergent. The marking shows the dosage:
20 = approximately 20 g of detergent
30 = approximately 30 g of detergent.
3. If you use a washing programme with
prewash phase, put more detergent in
the prewash detergent compartment (B).
A
B
4. If you use detergent tablets, put the detergent tablet in the detergent dispenser
(A).
electrolux 11
5. Close the lid of the detergent dispenser.
Press the lid until it locks into position.
Different brands of detergent dissolve in
different times. Some detergent tablets
do not have the best cleaning results
during short washing programmes. Use
long washing programmes when you
use detergent tablets to fully remove the
detergent.
Use of combi detergent tablets
These tablets contain agents such as detergent, rinse aid and dishwasher salt. Some
types of tablets can contain other agents
When you use tablets, that contain special
salt and rinse aid, it is not necessary to fill the
salt and rinse aid containers. In this condition
the rinse aid indicator light stays on when the
appliance is switched on.
1. Do a check if these tablets are applicable
for the local water hardness. Refer to the
instructions from the manufacturer.
2. Select the lowest setting for the water
hardness and rinse aid dosage.
Do these steps if the drying results are not
satisfactory
1. Fill the rinse aid dispenser with rinse aid.
2. Set the rinse aid dosage to position 2.
To use normal detergent again
1. Fill the salt container and rinse aid dispenser.
2. Adjust the water hardness setting to the
highest level.
3. Do a washing programme without
dishes.
4. Adjust the water softener to the water
hardness in your area.
Page 12
12 electrolux
5. Adjust the rinse aid dosage.
Setting and starting a washing programme
Set the washing programme with the
door ajar. The washing programme only
starts after you close the door. Until then
it is possible to modify the settings.
Do these steps to set and start a washing
programme:
1. Switch on the appliance.
2. Make sure that the appliance is in setting
mode.
3. Press one of the programme buttons.
Refer to the chapter 'Washing programmes'.
– The programme indicator light comes
on.
4. Close the door.
– The washing programme starts.
When the washing programme operates, you cannot change the programme. Cancel the washing programme.
Warning! Only interrupt or cancel a
washing programme if necessary.
Caution! Open the door carefully. Hot
steam can come free.
Interrupting a washing programme
Open the door.
• The programme stops.
Close the door.
• The programme continues from the point
of interruption.
Cancelling a washing programme
1. Press and hold function buttons B and C
until all the programme lights come on.
2. Release function buttons B and C to cancel the washing programme.
At this time you can do these steps:
1. Switch off the appliance.
2. Set a new washing programme .
Fill the detergent dispenser with detergent
before you set a new washing programme.
Setting and starting a washing
programme with delay start
1. Press the on/off button.
2. Set a washing programme.
– The programme indicator light comes
on.
3. Press the delay start button until the indicator light with the correct number of
hours starts to flash (3, 6, or 9 hours).
4. Close the door.
– The countdown of the delay start
starts.
– The countdown of the delay start de-
creases with steps of 3 hours.
When the countdown is completed,
the washing programme starts automatically.
Do not open the door during the countdown to prevent interruption of the
countdown. When you close the door
again, the countdown continues from
the point of interruption.
Cancelling a delay start:
1. Press and hold function buttons B and C
until all the programme lights come on.
– When you cancel a delay start, you also
cancel the washing programme.
2. Set a new washing programme.
End of the washing programme
• The appliance stops automatically.
• The audible signal for the end of the pro-
gramme operates.
1. Open the door.
– The end-of-programme indicator light
comes on.
– The indicator light for the completed
programme stays on.
2. Press the on/off button.
3. For better drying results, keep the door
ajar for some minutes before you remove
the dishes.
Let the dishes cool down before you remove them from the appliance. Hot
dishes are easily damaged.
Removing the load
• First remove items from the lower basket,
then from the upper basket.
• There can be water on the sides and door
of the appliance. Stainless steel becomes
cool more quickly than the dishes.
Page 13
electrolux 13
Washing programmes
Washing programmes
Programme Degree of soil Type of load Programme description
Heavy soil Crockery, cutlery, pots
Intensive
Normal soil Crockery and cutlery Prewash
Normal
Normal or light
1)
Quick
Economy
Glass
1) This is the perfect daily programme to clean a not fully load. Ideal for a family of 4 persons who only
2) Test programme for test institutes. Please refer to separate leaflet supplied, for test data.
2)
want to load breakfast and dinner crockery and cutlery.
soil
Normal soil Crockery and cutlery Prewash
Normal or light
soil
and pans
Crockery and cutlery Main wash up to 60°C
Delicate crockery and
glassware
Consumption values
Programme Duration (in minutes) Energy (in kWh) Water (in litres)
110 - 120 1,8 - 2,0 23 - 25
Intensive
90 - 100 1,4 - 1,6 18 - 20
Normal
30 0,9 9
Quick
150 - 160 0,1 - 1,1 12 - 13
Economy
60 - 70 0,8 - 0,9 14 - 15
Glass
The pressure and temperature of the
water, the variations of power supply
and the quantity of dishes can change
these values.
Prewash
Main wash up to 70°C
2 intermediate rinses
Final rinse
Drying
Main wash up to 65°C
1 intermediate rinse
Final rinse
Drying
Final rinse
Main wash up to 50°C
1 intermediate rinse
Final rinse
Drying
Main wash up to 45°C
1 intermediate rinse
Final rinse
Drying
Care and cleaning
Warning! Switch the appliance off
before you clean the filters.
Cleaning the filters
Caution! Do not use the appliance
without the filters. Make sure that the
installation of the filters is correct.
Page 14
14 electrolux
Incorrect installation will cause
unsatisfactory washing results and
damage to the appliance.
If necessary, clean the filters. Dirty filters decrease the washing results.
The dishwasher has three filters:
1. coarse filter (A)
2. microfilter (B)
3. flat filter (C)
A
B
C
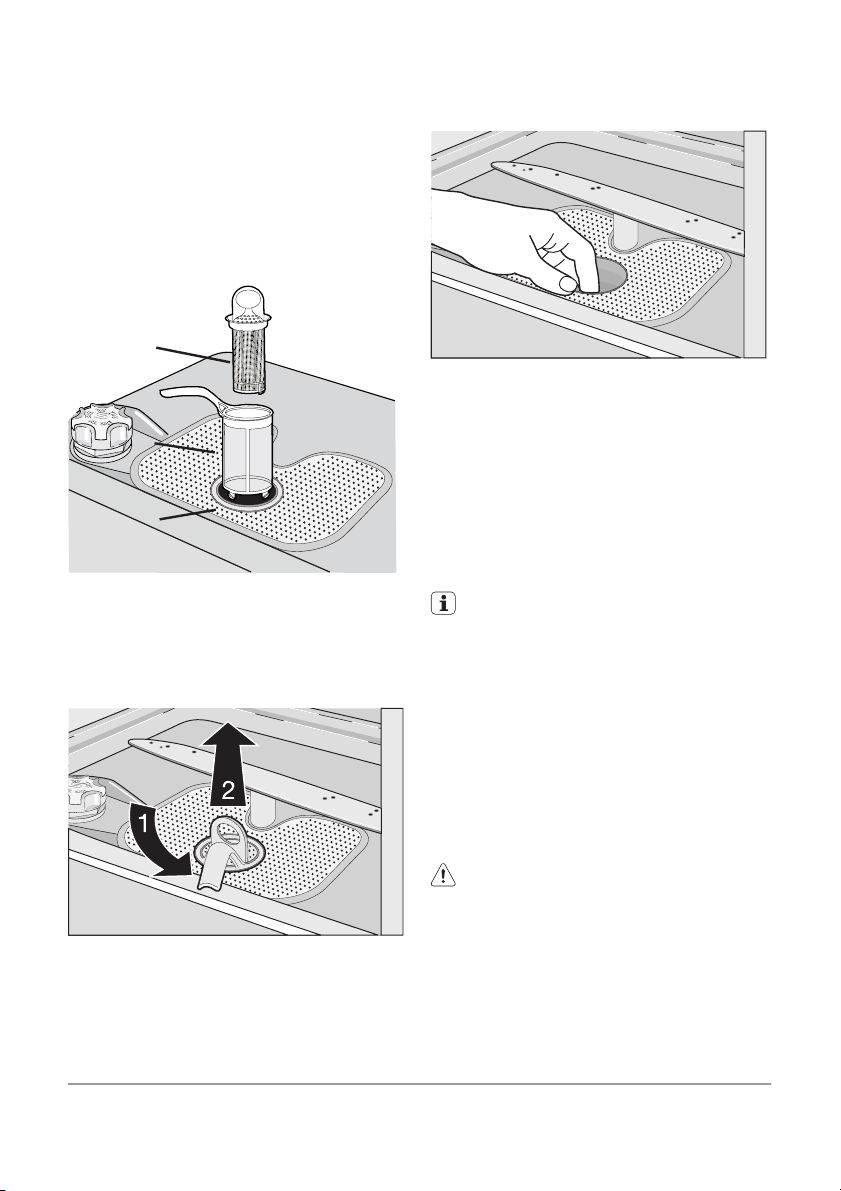
Do these steps to clean the filters:
1. Open the door.
2. Remove the lower basket.
3. To unlock the filter system, turn the handle on the microfilter (B) approximately
1/4 anticlockwise.
4. Remove the filter system.
5. Hold the coarse filter (A) by the handle
with the hole.
6. Remove the coarse filter (A) from the microfilter (B).
7. Remove the flat filter (C) from the bottom
of the appliance.
8. Clean the filters below running water.
9. Put the flat filter (C) in the bottom of the
appliance.
10. Put the coarse filter (A) in the microfilter
(B) and push the filters together.
11. Put the filter system in position.
12. To lock the filter system, turn the handle
on the microfilter (B) clockwise until it
lock in position.
13. Install the lower basket.
14. Close the door.
Do not remove the spray arms.
If the holes in the spray arms become clogged, remove remaining parts of soil with a
cocktail stick.
External cleaning
Clean the external surfaces of the appliance
and control panel with a damp soft cloth.
Only use neutral detergents. Do not use
abrasive products, scouring pads or solvents
(acetone, trichloroethylene etc...).
Frost precautions
Caution! Do not install the appliance
where the temperature is below 0 °C.
The manufacturer is not responsible for
damage because of frost.
If not possible, empty the appliance and
close the door. Disconnect the water inlet
hose and remove water from the water inlet
hose.
What to do if…
The appliance does not start or stops during
operation.
If there is a fault, first try to find a solution to
the problem yourself. If you cannot find a sol-
Page 15
electrolux 15
ution to the problem yourself, contact the
Service Force Centre.
Caution! Switch off the appliance
before you do the below suggested
corrective actions.
Fault code and malfunction Possible cause and solution
• continuous flash of the light of the
running programme
• intermittent audible signal
• 1 flash of the end-of-programme
indicator light
The dishwasher does not fill with water
• continuous flash of the light of the
running programme
• intermittent audible signal
• 2 flashes of the end-of-programme indicator light
The dishwasher will not drain
• continuous flash of the light of the
running programme
• intermittent audible signal
• 3 flashes of the end-of-programme indicator light
The anti-flood device operates
The programme does not start • The appliance door is not closed.
After the check, switch on the appliance. The
programme continues from the point of interruption. If the malfunction shows again,
contact your Service Force Centre.
For other fault codes, not described in the
chart, contact your Service Force Centre.
These data are necessary to help you quickly
and correctly:
The cleaning results are not satisfactory
The dishes are not clean • The selected washing programme is not applicable for the type of
Limescales particles on the
dishes
• The water tap is blocked or furred with limescale.
Clean the water tap.
• The water tap is closed.
Open the water tap.
• The filter in the water inlet hose is blocked.
Clean the filter.
• The connection of the water inlet hose is not correct. The
hose can be kinked or squashed.
Make sure that the connection is correct.
• There is a blockage in the sink spigot.
Clean the sink spigot.
• The connection of the water drain hose is not correct. The
hose can be kinked or squashed.
Make sure that the connection is correct.
• Close the water tap and contact your local Service Force
Centre.
Close the door.
• Mains plug is not connected in.
Put in the mains.
• The fuse has blown out in the household fuse box.
Replace the fuse.
• Delay start is set.
Cancel the delay start to start the programme immediately.
• Model (Mod.)
• Product number (PNC)
• Serial number (S.N.)
For these data, refer to the rating plate.
Write the necessary data here:
Model description : ..........
Product number : ..........
Serial number : ..........
load and soil.
• The baskets are loaded incorrectly so that water cannot reach all
surfaces.
• Spray arms do not turn freely because of incorrect arrangement of
the load.
• The filters are dirty or not correctly installed.
• The quantity of detergent is too little or missing.
• The salt container is empty.
• The water softener is adjusted on a wrong level.
• The salt container cap is not closed correctly.
Page 16
16 electrolux
The cleaning results are not satisfactory
The dishes are wet and dull • No rinse aid has been used.
There are streaks, milky spots
or a bluish coating on glasses
and dishes
Dry water drop signs on
glasses and dishes
• The rinse aid dispenser is empty.
• Decrease the rinse aid dosage.
• Increase rinse aid dosage.
• The detergent can be the cause.
Technical data
Dimensions Width cm 59,6
Height cm 81,8 - 87,8
Depth cm 55
Electrical connection - Voltage -
Overall power - Fuse
Water supply pressure Minimum 0,5 bar (0,05 MPa)
Maximum 8 bar (0,8 MPa)
Capacity Place settings 12
Information on the electrical connection is given on the rating plate
on the inner edge of the dishwasher door.
Installation
Warning! Make sure that mains plug is
disconnected from the mains socket
during installation.
Important! Obey the instructions in the
enclosed template to:
• Build-in the appliance.
• Install the furniture panel.
• Connect to the water supply and drain.
Install the appliance under a counter (kitchen
worktop or sink).
If a repair is necessary, the appliance must
be easily accessible for the engineer.
Put the appliance adjacent to a water tap and
a drain.
For the venting of the dishwasher only water
fill, water drain and power supply cable openings are necessary.
The dishwasher has adjustable feet to allow
the adjustment of the height.
Make sure that the water inlet hose, the drain
hose and the supply cable are not kinked or
squashed, when you insert the machine.
Attaching the appliance to the adjacent
units
Make sure that the counter below which you
attach the appliance is a safe structure (adjacent kitchen units, cabinets, wall).
Adjusting the level of the appliance
Make sure that the appliance is level to close
and seal the door correctly. If the level of the
appliance is correct, the door does not catch
on the sides of the cabinet. If the door does
not close correctly, loosen or tighten the adjustable feet until the appliance is level.
Water connection
Water inlet hose
Connected the appliance to a hot (max. 60°)
or cold water supply.
If the hot water comes from alternative sources of energy that are more environmentally
friendly (e.g. solar or photovoltaic panels and
aeolian), use a hot water supply to decrease
energy consumption.
Connect the inlet hose to a water tap with an
external thread of 3/4”.
Caution! Do not use connection hoses
from an old appliance.
Page 17
The water pressure must be in the limits (refer
to 'Technical data'). Make sure that the local
water authority gives you the average mains
pressure in your area.
Make sure that there are no kinks in the water
inlet hose and that the water inlet hose is not
squashed or entangled.
Fit the locknut correctly to prevent water
leaks.
Caution! Do not connect the appliance
to new pipes or pipes that are not used
for a long time. Let the water run for
some minutes, then connect the inlet
hose.
The water inlet hose is double-walled and
has an inner mains cable and a safety valve.
The water inlet hose is under pressure only
while the water is running. If there is a leak in
the water inlet hose, the safety valve interrupts the running water.
Be careful when you connect the water inlet
hose:
• Do not put the water inlet hose or the safety valve in water.
• If the water inlet hose or the safety valve is
damaged, immediately disconnect the
mains plug from the mains socket.
• Only let the Service Force Centre replace
the water inlet hose with safety valve.
Warning! Dangerous voltage
electrolux 17
The waste connection must be at a maximum height of 60cm from the bottom of the
appliance.
Make sure that the drain hose is not bent or
squashed to prevent that the water drains
does not drain correctly.
Remove the sink plug when the appliance
drains the water to prevent that the water
goes back into the appliance.
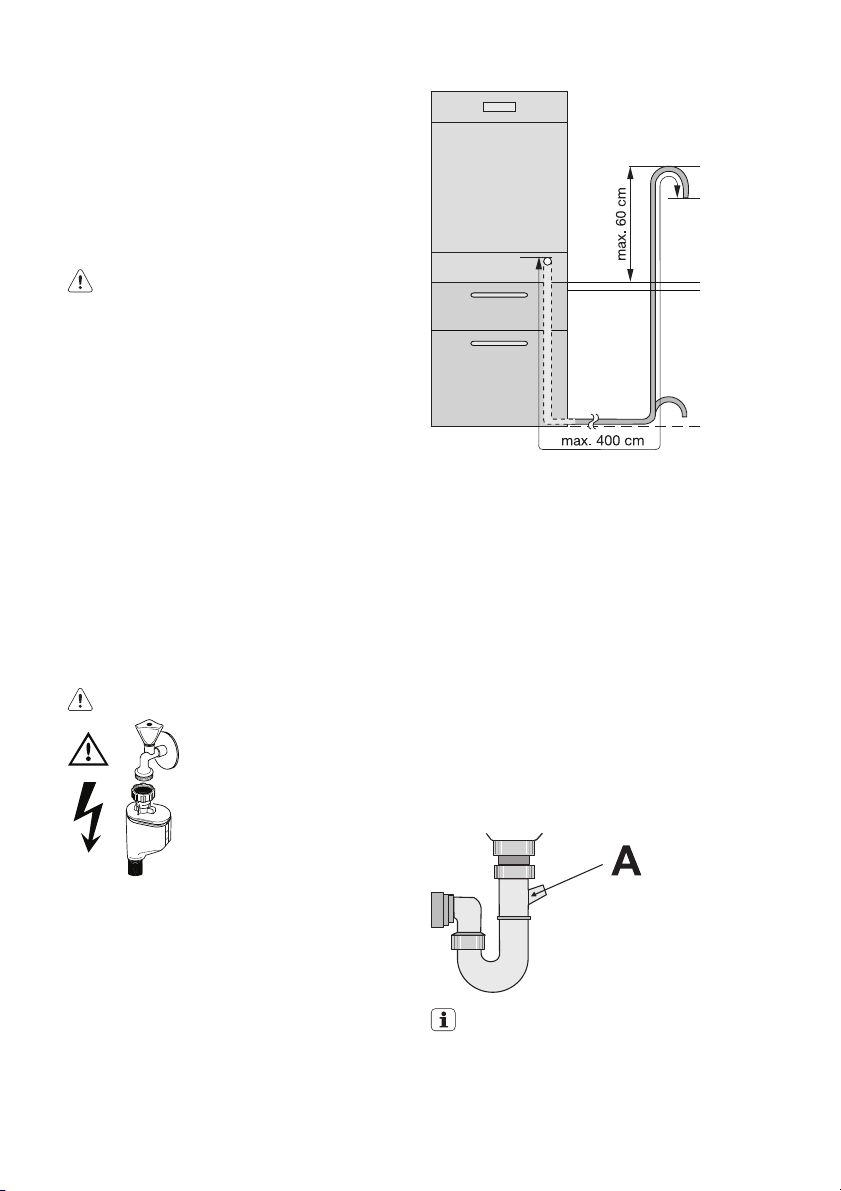
The total length of the drain hose, extension
included, must not be longer than 4m. The
internal diameter must not be smaller than
the diameter of the hose.
If you connect the water drain hose to a trap
spigot under the sink, remove the plastic
membrane (A). If you do not remove the
membrane, remaining food can cause a
blockage in the drain hose spigot
Water drain hose
1. Connect the water drain hose to the sink
spigot and attach it under the work surface. This prevents that the waste water
from the sink goes back into the appliance.
2. Connect the water drain hose to a stand
pipe with vent-hole (minimum internal diameter 4 cm).
The appliance has a security feature to
prevent that dirty water goes back into
the appliance. If, the spigot of the sink
has a 'non-return valve', this valve can
cause the appliance to drain incorrectly.
Remove the non-return valve.
Page 18

18 electrolux
Caution! Make sure that the water
couplings are tight to prevent water
leakage.
Electrical connection
Warning! The manufacturer is not
responsible if you do not follow these
safety precautions.
Ground the appliance according to safety precautions.
Make sure that the rated voltage and
type of power on the rating plate agree
with the voltage and the power of the local power supply.
Always use a correctly installed shockproof socket.
Environment concerns
The symbol on the product or on its
packaging indicates that this product may
not be treated as household waste. Instead
it should be taken to the appropriate
collection point for the recycling of electrical
and electronic equipment. By ensuring this
product is disposed of correctly, you will help
prevent potential negative consequences for
the environment and human health, which
could otherwise be caused by inappropriate
waste handling of this product. For more
detailed information about recycling of this
product, please contact your local council,
your household waste disposal service or the
shop where you purchased the product.
The packaging materials are environmentally
friendly and can be recycled. The plastic
Do not use multi-way plugs, connectors
and extension cables. There is a risk of
fire.
Do not replace the mains cable yourself.
Contact the Service Force Centre.
Make sure that the mains plug is accessible after installation.
Do not pull the mains cable to disconnect the appliance. Always pull the
mains plug.
components are identified by markings, e.g.
>PE<, >PS<, etc. Discard the packaging
materials in the applicable container at the
community waste disposal facilities.
Warning! To discard the appliance,
follow the procedure:
• Pull the mains plug out of the socket.
• Cut off the mains cable and mains
plug and discard them.
• Discard the door catch. This prevents
the children to close themselves inside the appliance and endanger their
lives.
Page 19

Electrolux. Thinking of you.
Aby dowiedzieć się więcej o naszej filozofii, odwiedź naszą
stronę internetową www.electrolux.com
Spis treści
Informacje dotyczące bezpieczeństwa
Opis urządzenia 20
Panel sterowania 21
Eksploatacja urządzenia 22
Ustawianie zmiękczacza wody 22
Wsypywanie soli do zmywarki 24
Wlewanie płynu nabłyszczającego 24
Wkładanie sztućców i naczyń 25
Stosowanie detergentu 28
Może ulec zmianie bez powiadomienia
Wybór i uruchamianie programu zmywania
19
Programy zmywania 30
Konserwacja i czyszczenie 31
Co zrobić, gdy… 32
Dane techniczne 34
Instalacja 34
Podłączenie do sieci wodociągowej 35
Podłączenie do sieci elektrycznej 36
Ochrona środowiska 36
Informacje dotyczące bezpieczeństwa
Aby zapewnić bezpieczeństwo użytko-
wania i prawidłowe działanie urządzenia,
przed przystąpieniem do instalacji i obsługi należy dokładnie przeczytać niniejszą instrukcję. Instrukcję przechowywać
zawsze razem z urządzeniem, również w
razie jego przeniesienia lub odsprzedaży. Użytkownicy muszą w pełni poznać
działanie i funkcje ochronne urządzenia.
Prawidłowe użytkowanie
•Urządzenie jest przeznaczone wyłącznie
do użytku domowego.
•Urządzenie służy wyłącznie do czyszcze-
nia naczyń i sprzętów domowych nadają-
cych się do mycia w zmywarce.
•Nie używać rozpuszczalników w urządze-
niu. Zagrożenie wybuchem.
•Noże i wszystkie przedmioty z ostrymi
końcówkami umieszcza
sztućce, ostrym końcem skierowanym w
dół. Można też układać je w pozycji poziomej w koszu górnym.
•Używać wyłącznie markowych produktów
do zmywarek do naczyń (detergent, sól,
płyn nabłyszczający).
• Po otwarciu drzwi podczas pracy urzą-
dzenia może dojść do uwolnienia gorącej
pary. Ryzyko poparzenia skóry.
•Nie wyjmować naczyń ze zmywarki przed
zakończeniem programu mycia.
ć w koszyku na
•Po zakończeniu zmywania wyjąć wtyczkę
z gniazdka i zamknąć zawór dopływu wody.
•Urządzenie może być naprawiane wyłącz-
nie przez montera z autoryzowanego serwisu. Używać wyłącznie oryginalnych
części zamiennych.
• Nie wymieniać ich samodzielnie, aby uniknąć obrażeń i uszkodzenia urządzenia. Zawsze kontaktować si
zowanym serwisem.
Ogólne zasady bezpieczeństwa
•Urządzenie nie jest przeznaczone do użyt-
ku przez osoby (w tym dzieci) o ograniczonych zdolnościach fizycznych, sensorycznych czy umysłowych, a także nieposiadające doświadczenia ani odpowiedniej
wiedzy. Osoby te mogą obsługiwać urzą-
dzenie wyłącznie pod nadzorem i po uzyskaniu instrukcji od osoby odpowiedzialnej
za ich bezpieczeństwo.
•Przestrzegać instrukcji dotyczących bez-
pieczeństwa, dostarczonych przez producentów detergentów, aby uniknąć poparzeń oczu, ust i gardła.
•Nie pić wody ze zmywarki. W zmywarce
mogą być obecne pozostałości detergentów.
ę z lokalnym autory-
electrolux 19
29
Page 20

20 electrolux
• Zawsze zamykać drzwi urządzenia, gdy
nie jest ono używane, aby uniknąć obrażeń
i nie potknąć się o otwarte drzwi.
•Nie siadać ani nie stawać na otwartych
drzwiach.
Bezpieczeństwo dzieci
•Urządzenie może być użytkowane wyłącz-
nie przez osoby dorosłe. Dzieci należy pilnować, aby mieć pewność, że nie bawią
się urządzeniem.
• Opakowanie przechowywać w miejscu
niedostępnym dla dzieci. Istnieje ryzyko
uduszenia.
• Wszystkie detergenty należy przechowywać w bezpiecznym miejscu. Nie dopuś-
cić do kontaktu dzieci z detergentami.
• Dzieci nie powinny znajdować się w pobliżu urządzenia, gdy jego drzwi są otwarte.
Instalacja
•Upewnić się, że urządzenie nie uległo usz-
kodzeniu w czasie transportu. Nie pod
czać uszkodzonego urządzenia. W razie
potrzeby skontaktować się z dostawcą.
• Przed pierwszym użyciem usunąć wszystkie materiały opakowaniowe.
łą-
Opis urządzenia
• Instalację elektryczną powierzyć wykwalifikowanemu i kompetentnemu specjaliś-
cie.
•Podłączenie wodociągowe i kanalizacyjne
powierzyć wykwalifikowanemu i kompetentnemu specjaliście.
• Nie zmieniać specyfikacji ani nie modyfikować produktu. Ryzyko odniesienia obrażeń i uszkodzenia urządzenia.
•Nie używać urządzenia:
–jeżeli przewód zasilający lub węże wod-
ne są uszkodzone,
–jeżeli panel sterowania, blat roboczy lub
cokół są uszkodzone w sposób dający
dostęp do wnętrza urządzenia.
Skontaktować się z lokalnym autoryzowanym serwisem.
• Nie wolno nawiercać ś
dzenia, aby uniknąć uszkodzenia części
hydraulicznych lub elektrycznych.
Ostrzeżenie! Dokładnie przestrzegać
instrukcji dotyczących połączeń
elektryczności oraz wody.
cian bocznych urzą-
1 Kosz górny
2 Pokrętło regulacji zmiękczania wody
3 Zbiornik soli
4 Dozownik detergentu
Page 21

electrolux 21
5 Dozownik płynu nabłyszczającego
6 Tabliczka znamionowa
8 Dolne ramię spryskujące
9 Górne ramię spryskujące
7 Filtry
Panel sterowania
1 Przycisk Wł./Wył.
2 Przyciski wyboru programów
3
Przycisk opóźnienia rozpoczęcia programu
4 Kontrolki
5 Przyciski funkcyjne
Kontrolki
1)
Sól
Płyn nabłyszczający
Koniec programu Zapala się po zakończeniu programu zmywania. Funkcje
1) Gdy zbiornik soli oraz/lub dozownik płynu nabłyszczającego są puste, ich kontrolki nie świecą się
podczas programu zmywania.
1)
Przyciski wyboru programów
Przyciski te służą do wyboru programu mycia. Po naciśnięciu przycisku programu zapala się odpowiednia kontrolka. Więcej informacji o programach znajduje się w rozdziale
"Programy zmywania".
Przycisk opóźnienia rozpoczęcia
programu
Przycisk ten służy do opóźnienia rozpoczęcia
programu zmywania o 3, 6 lub 9 godzin. Za-
Zapala się, gdy należy uzupełnić sól. Zapoznać się z rozdziałem "Używanie soli do zmywarek".
Po napełnieniu zbiornika kontrolka soli może nadal świecić
przez kilka godzin. Nie ma to żadnego negatywnego wpły-
wu na działanie urządzenia.
Zapala się, gdy należy uzupełnić płyn nabłyszczający. Zapoznać się z rozdziałem "Używanie płynu nabłyszczającego".
dodatkowe:
•Poziom zmiękczania wody.
•Włączenie/wyłączenie sygnałów dźwiękowych.
• Alarm w razie nieprawidłowego działania urządzenia.
poznać się z rozdziałem "Ustawianie i uruchamianie programu".
Przyciski funkcyjne
Przyciski funkcyjne służą do wykonywania
następujących czynności:
•Do ustawiania zmiękczania wody. Zapo-
znać się z rozdziałem "Ustawianie zmiękczania wody".
Page 22

22 electrolux
•Do włączania/wyłączania sygnałów dźwię-
kowych. Zapoznać się z rozdziałem "Sygnały dźwiękowe".
• Do anulowania trwającego programu zmywania lub opóźnienia rozpoczęcia programu w trakcie odliczania. Zapoznać się z
rozdziałem "Ustawianie i uruchamianie
programu".
Tryb ustawiania
Tryb ustawiania jest wymagany do
wykonania następujących czynności:
• Do ustawiania programu zmywania.
• Do ustawiania poziomu zmiękczania wody.
•Do włączania/wyłączania sygnałów dźwię-
kowych.
Nacisnąć przycisk Wł./Wył. Urządzenie jest
w trybie ustawiania, gdy:
• Świecą się kontrolki wszystkich programów.
Nacisnąć przycisk Wł./Wył. Urządzenie nie
jest w trybie ustawiania, gdy:
• Świeci się kontrolka tylko jednego programu.
• Ustawiony jest program zmywania. Należy
anulować program, aby powrócić do trybu
ustawiania. Zapoznać się z rozdziałem
"Ustawianie i uruchamianie programu".
Sygnały dźwiękowe
Sygnały dźwiękowe są generowane w następujących sytuacjach:
•Po zakończeniu programu zmywania.
• Podczas ustawiania poziomu zmiękczania
wody.
•W razie wystąpienia usterki urządzenia.
Fabrycznie sygnały dźwiękowe są włączone.
Aby wyłączyć sygnały dźwiękowe, należy
wykonać poniższe czynności:
1. Włączyć urządzenie.
2. Upewnić się, że urządzenie jest w trybie
ustawiania.
3. Nacisnąć i przytrzyma
kontrolki przycisków funkcyjnych A, B i C
zaczną migać.
4. Nacisnąć przycisk funkcyjny C.
– Kontrolki przycisków funkcyjnych A i B
zgasną.
– Zacznie migać kontrolka przycisku
funkcyjnego C.
– Zapali się kontrolka sygnalizująca za-
kończenie programu.
Sygnały dźwiękowe są włączone.
5. Ponownie nacisnąć przycisk funkcyjny C.
– Kontrolka sygnalizująca zakończenie
programu zgaśnie.
Sygnały dźwiękowe są wyłączone.
6. Wyłączyć urządzenie, aby zapisać ustawienie.
Aby włączyć sygnały dźwiękowe, należy wykonać poniższe czynności:
1. Powyższą procedurę należy wykonywać
do momentu, gdy zaświeci się kontrolka
sygnalizująca zakończenie programu.
ć przyciski B i C, aż
Eksploatacja urządzenia
Należy postępować zgodnie z poniższymi instrukcjami wykonując kolejne czynności:
1. Sprawdzić zgodność poziomu zmiękczania wody z twardością wody doprowadzonej do zmywarki. W razie potrzeby –
zmienić ustawienia zmiękczacza wody.
2. Napełnić zbiornik soli solą do zmywarek.
3. Napełnić dozownik płynu nabłyszczają-
cego.
4. Włożyć naczynia i sztućce do zmywarki.
Ustawianie zmiękczacza wody
Zmiękczacz wody usuwa minerały i sole z
doprowadzanej wody. Substancje mineralne
i sole mogą mieć negatywny wpływ na działanie urządzenia.
5. Ustawić program mycia odpowiedni do
rodzaju naczyń i stopnia zabrudzenia.
6. Napełnić dozownik odpowiednią ilością
detergentu.
7. Uruchomić program mycia.
W przypadku używania tabletek do zmywarek należy zapoznać się z rozdziałem
"Używanie detergentów".
Twardość wody jest mierzona w równoważ-
nych skalach:
• Stopnie niemieckie (dH°).
• Stopnie francuskie (°TH).
Page 23

electrolux 23
• mmol/l (milimol na litr – międzynarodowa
jednostka twardości wody).
trzeby skontaktować się z lokalnym zakła-
dem wodociągowym.
•Stopnie Clarka.
Ustawić zmiękczacz wody zgodnie z twardością wody z lokalnego ujęcia. W razie po-
Twardość wody Ustawienie zmiękczania wody
°dH °TH mmol/l Stopnie
51 - 70 91 - 125 9,1 - 12,5 64 - 88 2 10
43 - 50 76 - 90 7,6 - 9,0 53 - 63 2 9
37 - 42 65 - 75 6,5 - 7,5 46 - 52 2 8
29 - 36 51 - 64 5,1 - 6,4 36 - 45 2 7
23 - 28 40 - 50 4,0 - 5,0 28 - 35 2 6
19 - 22 33 - 39 3,3 - 3,9 23 - 27 2 5
15 - 18 26 - 32 2,6 - 3,2 18 - 22 1 4
11 - 14 19 - 25 1,9 - 2,5 13 - 17 1 3
4 - 10 7 - 18 0,7 - 1,8 5 - 12 1 2
< 4 < 7 < 0,7 < 5
1) Nie jest wymagane użycie soli.
Zmiękczacz wody należy regulować
Clarka
3. Nacisnąć i przytrzymać przyciski B i C, aż
ręcznie i elektronicznie.
Regulacja ręczna
Urządzenie zostało fabrycznie ustawio-
4. Zwolnić przyciski funkcyjne B i C.
5. Nacisnąć przycisk funkcyjny A.
ne w położeniu 2.
1. Otworzyć drzwi.
2. Wyjąć dolny kosz.
3. Obrócić pokrętło regulacji twardości wo-
dy w położenie 1 lub 2 (patrz tabela).
4. Włożyć dolny kosz.
ręczne elektroniczne
1)
1
kontrolki przycisków funkcyjnych A, B i C
zaczną migać.
–Kontrolka przycisku funkcyjnego A
wciąż miga.
– Kontrolki przycisków funkcyjnych B i C
zgasną.
– Kontrolka sygnalizująca zakończenie
programu zacznie migać.
–Sygnały dźwiękowe są słyszalne.
Funkcja ustawiania zmiękczania wody
jest włączona.
Kontrolka sygnalizująca zakończenie
programu zacznie migać oraz słyszalny
będzie sygnał dźwiękowy, wskazując poziom zmiękczania wody. Pauza trwa około 3 sekund.
Przykład: 5 mignięć / 5 przerywanych
sygnałów dźwiękowych - pauza - 5 mig-
5. Zamknąć drzwi.
Regulacja elektroniczna
Zmiękczanie wody zostało fabrycznie
ustawione na poziom 5.
1. Włączyć urządzenie.
2. Upewnić się, że urządzenie jest w trybie
nięć / 5 przerywanych sygnałów dźwię-
kowych - pauza, itd. = poziom 5
6. Nacisnąć jeden raz przycisk funkcyjny A,
aby zwiększyć poziom zmiękczania wody
o jeden.
7. Nacisnąć przycisk Wł./Wył., aby zapisać
ustawienie.
ustawiania.
1)
1
Page 24

24 electrolux
Wsypywanie soli do zmywarki
Uwaga! Używać wyłącznie soli do
zmywarek. Sól nieprzeznaczona do
zmywarek do naczyń powoduje
uszkodzenie zmiękczacza wody.
Uwaga! Grudki soli lub słona woda na
dnie urządzenia mogą spowodować
korozję. Aby zapobiec korozji, należy
uzupełniać sól w urządzeniu
bezpośrednio przed włączeniem
programu mycia.
Aby napełnić zbiornik soli, należy wykonać poniższe czynności:
1. Obrócić pokrywkę w kierunku przeciw-
nym do ruchu wskazówek zegara, aby
otworzyć zbiornik soli.
2. Wlać do zbiornika soli 1 litr wody (tylko za
pierwszym razem).
3. Do napełnienia zbiornika solą należy użyć
lejka.
4. Usunąć sól rozsypaną wokół otworu
zbiornika soli.
5. Obrócić pokrywkę w kierunku zgodnym
z ruchem wskazówek zegara, aby zamknąć zbiornik soli.
Podczas napełniania zbiornika solą wypływa z niego woda – jest to normalne.
Po elektronicznym ustawieniu zmiękczania
wody na poziom 1 kontrolka soli będzie na
stałe wyłączona.
Wlewanie płynu nabłyszczającego
Uwaga! Należy używać wyłącznie
markowych płynów nabłyszczających
przeznaczonych do zmywarek do
naczyń.
Nie napełniać dozownika płynu nabły-
szczającego innymi produktami (np.
środkiem do czyszczenia zmywarek,
detergentem w płynie). Może to prowadzić do uszkodzenia urządzenia.
Płyn nabłyszczający umożliwia suszenie
naczyń bez smug lub plam.
Podczas ostatniej fazy płukania płyn nabłyszczający jest dodawany automatycznie.
Aby napełnić dozownik płynu nabłyszczają-
cego, wykonać poniższe czynności:
1. Nacisnąć klamkę (A), aby otworzyć dozownik płynu nabłyszczającego.
2. Napełnić dozownik płynu nabłyszczają-
cego. Oznaczenie "max."wskazuje maksymalny poziom.
Page 25

3. Rozlany płyn nabłyszczający należy usunąć przy pomocy szmatki dobrze pochłaniającej wodę, aby zapobiec zbyt intensywnemu pienieniu podczas późniejsze-
go programu mycia.
4. Zamknąć dozownik płynu nabłyszczają-
cego.
Regulacja dozowania płynu
nabłyszczającego
Dozowanie płynu nabłyszczającego zostało
fabrycznie ustawione w pozycji 4.
Dozowanie płynu nabłyszczającego można
ustawić w zakresie od 1 (najmniejsze dozowanie) do 6 (największe dozowanie).
electrolux 25
1. Obracając pokrętło regulacji twardości
wody zmniejszyć lub zwiększyć dozowanie.
–Jeśli na naczyniach widoczne są krople
wody lub osad kamienia, należy zwięk-
szyć dozowanie.
–Jeśli na naczyniach po myciu pozosta-
ją białe smugi, biały lub niebieskawy
nalot, należy zmniejszyć dozowanie.
Wkładanie sztućców i naczyń
Przydatne wskazówki i porady
Uwaga! Urządzenie służy wyłącznie do
czyszczenia naczyń i sprzętów
domowych przeznaczonych do mycia w
zmywarce.
Nie używać urządzenia do czyszczenia
przedmiotów pochłaniających wodę (gąbki,
odzież domowa itd.).
•Przed włożeniem naczyń i sztućców do
zmywarki, wykonać poniższe czynności:
–Usunąć wszelkie pozostałości jedzenia i
resztki.
–Namoczyć przypalone i wyschnięte
resztki jedzenia.
• Podczas wkładania naczyń i sztućców do
zmywarki należy przestrzegać poniższych
wskazówek:
–Wydrążone elementy (np. kubki, szklan-
ki i miski) układać otworami w dół.
–Upewnić się, że woda nie zbiera się w
pojemniku ani w zag
naczynia.
–Upewnić się, że żadne naczynia ani
sztućce nie znajdują się wewnątrz innych.
–Upewnić się, że naczynia i sztućce nie
zakrywają innych.
–Upewnić się, że szklanki nie stykają się
ze sobą.
–Małe elementy umieścić w koszyku na
sztućce.
• Elementy plastikowe i miski z powłoką zapobiegającą przywieraniu mogą zatrzymywać krople wody. Elementy plastikowe nie
wysychają tak szybko, jak elementy porcelanowe i stalowe.
• Lekkie elementy umieścić w koszu górnym. Upewnić się, że naczynia się nie
przemieszczają.
łębieniu podstawy
Page 26

26 electrolux
Uwaga! Przed uruchomieniem
programu mycia upewnić się, że
ramiona natryskowe mogą się
swobodnie obracać.
Ostrzeżenie! Po załadowaniu lub
rozładowaniu urządzenia zawsze
zamykać drzwi. Otwarte drzwi mogą być
niebezpieczne.
Kosz dolny
Do dolnego kosza należy wkładać rondle,
pokrywki, talerze, salaterki i sztućce. Naczynia z serwisu i duże pokrywki układać przy
krawędziach kosza.
Kosz na sztućce
Ostrzeżenie! Noży z długimi ostrzami
nie należy umieszczać pionowo w koszu
na sztućce. Długie i ostre sztućce należy
układać poziomo w koszu górnym.
Zachować ostrożność podczas
wkładania i wyjmowania ostrych
przedmiotów.
Widelce i łyżki należy wkładać trzonkami w
dół.
Noże wkładać należy trzonkami w górę.
Wymieszać łyżki z innymi sztućcami, aby nie
przylegały do siebie.
Aby ułatwić wkładanie sztućców do kosza na
sztućce, można złożyć jego uchwyt.
Rzędy metalowych kratek podtrzymujących
w koszu dolnym można złożyć, aby umożli-
wić wkładanie garnków, patelni i misek.
Używać kratek na sztućce. Jeżeli wymiary
sztućców uniemożliwiają korzystanie z kratek, można je łatwo schować.
Page 27

Kosz na sztućce posiada dwie części. Moż-
na z nich korzystać osobno tak, aby zapewnić większą elastyczność wypełnienia urzą-
dzenia. Aby rozłączyć części, należy je przesunąć poziomo w przeciwnych kierunkach i
odciągnąć od siebie. Aby złączyć części, należy je przyłożyć do siebie i przesunąć je poziomo wzdłuż siebie.
electrolux 27
Kieliszki na wysokich nóżkach układać nóż-
kami do góry na półkach na filiżanki. W przypadku dłuższych przedmiotów można złożyć
półki na filiżanki.
Kosz górny
Górny kosz jest przeznaczony dla talerzyków, salaterek, filiżanek, szklanek, garnków i
pokrywek. Naczynia rozmieszczać tak, aby
woda miała dostęp do wszystkich powierzchni.
Regulacja wysokości górnego kosza
Aby włożyć większe talerze do dolnego kosza, należy najpierw przełożyć górny kosz do
górnego położenia.
Maksymalna wysokość naczyń w koszu
dolnym
Położenie górne 31 cm
Położenie dolne 27 cm
Aby przełożyć górny kosz do położenia górnego, należy wykonać poniższe czynności:
1. Wyciągnąć kosz do oporu.
2. Ostrożnie unieść dwa boki, aż mecha-
nizm zostanie zablokowany i kosz będzie
stabilny.
Page 28

28 electrolux
Stosowanie detergentu
Używać wyłącznie detergentów (proszków, płynów lub tabletek) przeznaczonych do zmywarek do naczyń.
Przestrzegać informacji podanych na
opakowaniu:
• Dozowanie zalecane przez producenta.
• Zalecenia dotyczące przechowywania.
Aby chronić środowisko, nie używać
większej ilości detergentów niż to zalecane.
Aby napełnić dozownik detergentu, należy
wykonać poniższe czynności:
1. Otworzyć pokrywkę dozownika deter-
gentu.
Aby przełożyć górny kosz do położenia dolnego, należy wykonać poniższe czynności:
1. Wyciągnąć kosz do oporu.
2. Ostrożnie unieść dwa boki do góry.
3. Przytrzymując kosz pozwolić, aby powoli
opadł w dół.
Uwaga!
• Nie podnosić ani nie opuszczać kosza, trzymając tylko jedną stronę.
•Jeżeli kosz znajduje się w górnym po-
łożeniu, nie umieszczać filiżanek na
ich półkach.
detergentu do przegródki mycia wstęp-
nego ( B).
A
B
4. W przypadku korzystania z tabletek do
zmywarek, włożyć tabletkę do dozownika detergentu ( A).
2. Napełnić dozownik ( A) detergentem. Oz-
naczenie pokazuje dawki:
20 = około 20 g detergentu
30 = około 30 g detergentu.
3. Jeżeli wybrano program obejmujący mycie wstępne, wsypać dodatkową ilość
5. Zamknąć pokrywkę dozownika detergentu. Docisnąć pokrywkę, aż zaskoczy.
Page 29

electrolux 29
Detergenty różnych producentów rozpuszczają się w różnym czasie. Niektóre
tabletki do zmywarek nie zapewniają odpowiednich wyników podczas krótkich
programów mycia. Przy używaniu tabletek do zmywarek zaleca się korzystanie
z długich programów mycia w celu cał-
kowitego usunięcia detergentu.
Korzystanie z tabletek do zmywarek
Tabletki takie zawierają w sobie detergent,
środek nabłyszczający i sól do zmywarek.
Niektóre typy tabletek mogą zawierać również inne środki
W przypadku stosowania tabletek zawierających specjalną sól oraz środek nabłyszczający nie ma potrzeby napełniania pojemnika
soli i płynu nabłyszczającego. W takim przypadku, lampka kontrolna płynu nabłyszcza-
jącego będzie świeciła się po włączeniu urzą-
dzenia.
1. Przed użyciem sprawdzić, czy dane tabletki są odpowiednie do stopnia twardoś-
ci wody doprowadzanej do zmywarki.
Zapozna
2. Wybrać najniższy poziom zmiękczania
wody i najmniejszą dawkę płynu nabły-
szczającego.
Jeżeli efekty suszenia nie są zadowalające,
wykonać poniższe czynności:
1. Napełnić odpowiedni dozownik płynem
nabłyszczającym.
2. Ustawić dozowanie płynu nabłyszczają-
cego w pozycji 2.
Aby ponownie użyć detergentu w proszku:
1. Uzupełnić zbiornik soli i dozownik płynu
nabłyszczającego.
2. Ustawić najwyższy poziom twardości
wody.
3. Uruchomić program mycia bez naczyń.
4. Ustawić zmiękczanie wody odpowiednio
do twardości wody doprowadzanej do
urządzenia.
5. Wyregulowa
szczającego.
Wybór i uruchamianie programu zmywania
Ustawić program zmywania przy uchylonych drzwiach. Program zmywania
rozpoczyna się zaraz po zamknięciu
drzwi. Do tego momentu można zmodyfikować ustawienia.
Aby ustawić i uruchomić program mycia, należy wykonać poniższe czynności:
1. Włączyć urządzenie.
2. Upewnić się, że urządzenie jest w trybie
ustawiania.
3. Nacisnąć przycisk jednego z programów.
Zapoznać się z rozdziałem "Programy
zmywania".
–Zaświeci się kontrolka programu.
4. Zamknąć drzwi.
–Nastąpi rozpoczęcie programu zmy-
wania.
Gdy program jest włączony nie można
go zmienić. Należy anulować program
mycia.
Ostrzeżenie! Program mycia
przerywać lub anulować tylko w razie
konieczności.
Uwaga! Ostrożnie otwierać drzwi. Może
dojść do uwolnienia gorącej pary.
Przerywanie programu mycia
Otworzyć drzwi.
• Program zostanie zatrzymany.
Zamknąć drzwi.
• Program zostanie wznowiony od momen-
tu, w którym został przerwany.
Anulowanie programu zmywania
1. Nacisnąć i przytrzymać przyciski funkcyjne B i C, aż zaświecą się kontrolki wszystkich programów.
2. Zwolnić przyciski funkcyjne B i C, aby
anulować program zmywania.
W tym momencie można wykonać następu-
jące czynności:
1. Wyłączyć urządzenie.
2. Ustawić nowy program zmywania.
Przed ustawieniem nowego programu mycia
należy napełnić dozownik detergentem.
Ustawianie i uruchamianie programu z
opóźnionym rozpoczęciem
1. Nacisnąć przycisk Wł./Wył.
2. Ustawić program zmywania.
–Zaświeci się kontrolka programu.
3. Naciskać przycisk opóźnienia rozpocz
cia programu, aż zacznie migać kontrolka
ć się z instrukcjami producenta.
ć dozowanie płynu nabły-
ę-
Page 30

30 electrolux
odpowiedniej liczby godzin (3, 6 lub 9 godzin).
4. Zamknąć drzwi.
–Rozpocznie się odliczanie czasu opó-
źnienia rozpoczęcia programu.
–Czas opóźnienia jest odliczany w kro-
kach co 3 godziny.
Po zakończeniu odliczania następuje
automatyczne rozpoczęcie programu
zmywania.
Nie otwierać drzwi podczas odliczania,
ponieważ spowoduje to jego przerwanie. Po ponownym zamknięciu drzwi odliczanie jest kontynuowane od momentu
przerwania.
Anulowanie opóźnienia rozpoczęcia
programu:
1. Nacisnąć i przytrzymać przyciski funkcyjne B i C, aż zaświecą się kontrolki wszystkich programów.
– Anulowanie opóźnienia rozpoczęcia
programu powoduje również anulowanie samego programu.
2. Ustawić nowy program zmywania.
Programy zmywania
Programy zmywania
Program Stopień za-
Intensywny
Normalny
1)
Szybki
Ekonomiczny
2)
brudzenia
Bardzo zabrudzone
Średnio zabrudzone
Średnio lub lekko zabrudzone
Średnio zabrudzone
Zakończenie programu zmywania
•Urządzenie zatrzyma się automatycznie.
• Wygenerowany zostanie sygnał dźwięko-
wy zakończenia programu.
1. Otworzyć drzwi.
– Zapali się kontrolka sygnalizująca za-
kończenie programu.
– Kontrolka zakończonego programu
dalej się świeci.
2. Nacisnąć przycisk Wł./Wył.
3. W celu osiągnięcia lepszych wyników su-
szenia, przed wyjęciem naczyń pozostawić drzwi uchylone na kilka minut.
Przed wyjęciem naczyń ze zmywarki,
poczekać aż wystygną. Gorące naczynia łatwo ulegają uszkodzeniu.
Wyjmowanie naczyń
• W pierwszej kolejności wyjmować naczynia z dolnego kosza, a następnie z górnego.
• Na bokach i na drzwiach urządzenia może
występować woda. Stal nierdzewna stygnie szybciej niż naczynia.
Rodzaj załadunku Opis programu
Naczynia stołowe,
sztućce, garnki i patelnie
Naczynia stołowe i
sztućce
Naczynia stołowe i
sztućce
Naczynia stołowe i
sztućce
Mycie wstępne
Zmywanie zasadnicze w temperaturze do 70°C
2 płukania pośrednie
Płukanie końcowe
Suszenie
Mycie wstępne
Zmywanie zasadnicze w temperaturze do 65°C
1 płukanie pośrednie
Płukanie końcowe
Suszenie
Zmywanie zasadnicze w temperaturze do 60°C
Płukanie końcowe
Mycie wstępne
Zmywanie zasadnicze w temperaturze do 50°C
1 płukanie pośrednie
Płukanie końcowe
Suszenie
Page 31

electrolux 31
Program Stopień za-
Szkło
1) Jest to doskonały program do codziennego użytku przy niepełnym załadunku. Idealnie nadaje się dla
czteroosobowej rodziny, która zmywa tylko naczynia i sztućce po śniadaniu i obiedzie.
2) Program testowy dla ośrodków przeprowadzających testy. Dane z testów są przedstawione na
osobnej, dołączonej do urządzenia naklejce.
brudzenia
Średnio lub lekko zabrudzone
Rodzaj załadunku Opis programu
Delikatne naczynia i
szkło
Zmywanie zasadnicze w temperaturze do 45°C
1 płukanie pośrednie
Płukanie końcowe
Suszenie
Dane eksploatacyjne
Program Czas trwania (w minu-
tach)
110 - 120 1,8 - 2,0 23 - 25
Intensywny
90 - 100 1,4 - 1,6 18 - 20
Normalny
30 0,9 9
Szybki
150 - 160 0,1 - 1,1 12 - 13
Ekonomiczny
60 - 70 0,8 - 0,9 14 - 15
Szkło
Podane wartości mogą ulec zmianie w
zależności od ciśnienia i temperatury
Zużycie energii (w
kWh)
Zużycie wody (w li-
trach)
wody, zmian w napięciu zasilania oraz
ilości naczyń.
Konserwacja i czyszczenie
Ostrzeżenie! Przed przystąpieniem do
czyszczenia należy wyłączyć
urządzenie.
Czyszczenie filtrów
Uwaga! Nie używać urządzenia bez
filtrów. Upewnić się, że filtry są
prawidłowo zainstalowane.
Nieprawidłowa instalacja filtrów
spowoduje niezadowalające wyniki
mycia oraz uszkodzenie urządzenia.
W razie konieczności wyczyść filtry. Brudne
filtry sprawiają, że wyniki mycia są gorsze.
Zmywarka ma trzy filtry:
1. filtr zgrubny (A)
2. mikrofiltr (B)
3. filtr płaski (C)
A
B
C
Aby wyczyścić filtry, należy wykonać poniż-
sze czynności:
1. Otworzyć drzwi.
2. Wyjąć dolny kosz.
3. Odblokować system filtrów, obracając w
tym celu rączkę umieszczoną na mikro-
Page 32

32 electrolux
filtrze (B) o około 1/4 obrotu w kierunku
przeciwnym do ruchu wskazówek zegara.
4. Wyjąć system filtrów.
5. Chwycić filtr zgrubny (A) za uchwyt z ot-
worem.
6. Wyjąć filtr zgrubny (A) z mikrofiltra (B).
7. Wyjąć filtr płaski (C) z dna urządzenia.
8. Dokładnie wyczyścić filtry pod bieżącą
wodą.
9. Włożyć filtr płaski (C) w dno urządzenia.
10. Włożyć filtr zgrubny (A) do mikrofiltra (B)
i docisnąć je razem.
11. Umieścić system filtrów na swoim miejscu.
12. Aby zablokować system filtrów, obrócić
rączkę na mikrofiltrze (B) w kierunku
zgodnym z ruchem wskazówek zegara,
aż do zablokowania.
13. Włożyć dolny kosz.
14. Zamknąć drzwi.
Nie wolno wyjmować ramion spryskują-
cych.
Jeżeli otwory w ramionach spryskujących
ulegną zatkaniu, zabrudzenia należy usunąć
przy pomocy patyczka do koktajlu.
Czyszczenie zewnętrzne
Zewnętrzne powierzchnie urządzenia i panel
sterowania czyścić zwilżoną, miękką szmatką. Używać wyłącznie neutralnych środków
do czyszczenia. Nie używać materiałów
ściernych, myjek do szorowania ani rozpuszczalników (aceton, trichloroetylen itp.).
Środki ostrożności w przypadku mrozu
Uwaga! Nie instalować urządzenia w
miejscach, w których temperatura jest
niższa niż 0°C. Producent nie ponosi
odpowiedzialności za uszkodzenia
wywołane przez mróz.
Jeśli nie ma innej możliwości, opróżnić urzą-
dzenie i zamknąć drzwi. Odłączyć wąż doprowadzający wodę i usunąć z niego wodę.
Co zrobić, gdy…
Urządzenie nie uruchamia się lub zatrzymuje
się podczas pracy.
W razie wystąpienia problemów, należy najpierw spróbować samodzielnie znaleźć rozwiązanie. Jeżeli nie można znaleźć rozwią-
zania, należy skontaktować się ze sprzedawcą lub lokalnym autoryzowanym serwisem.
Uwaga! Wyłączyć urządzenie przed
przeprowadzeniem następujących
zalecanych działań korygujących.
Page 33

electrolux 33
Kod błędu i nieprawidłowe dzia-
•Ciągłe miganie kontrolki trwające-
go programu
•Słyszalny przerywany sygnał
dźwiękowy
•1 mignięcie kontrolki sygnalizują-
cej zakończenie programu
Zmywarka nie napełnia się wodą
•Ciągłe miganie kontrolki trwające-
go programu
•Słyszalny przerywany sygnał
dźwiękowy
•2 mignięcia kontrolki sygnalizują-
cej zakończenie programu
Zmywarka nie wypompowuje wody
•Ciągłe miganie kontrolki trwające-
go programu
•Słyszalny przerywany sygnał
dźwiękowy
•3 mignięcia kontrolki sygnalizują-
cej zakończenie programu
Włączyło się zabezpieczenie przed
zalaniem
Program nie uruchamia się •Drzwi urządzenia nie są zamknięte.
łanie
• Zawór wody jest zablokowany lub zatkany osadem kamienia.
Wyczyścić zawór wody.
•Zamknięty zawór wody.
Odkręcić zawór wody.
• Zablokowany filtr w wężu doprowadzającym wodę.
Wyczyścić filtr.
•Nieprawidłowe połączenie węża doprowadzającego wodę.
Wąż może być zagięty lub przygnieciony.
Upewnić się, że połączenie jest prawidłowe.
•Zatkane rozgałęzienie syfonu zlewozmywaka.
Wyczyścić rozgałęzienie syfonu zlewozmywaka.
•Nieprawidłowe połączenie węża spustowego. Wąż może
być zagięty lub przygnieciony.
Upewnić się, że połączenie jest prawidłowe.
•Zamknąć dopływ wody i skontaktować się z lokalnym auto-
ryzowanym serwisem.
Zamknąć drzwi.
• Wtyczka przewodu zasilającego nie jest włożona do gniazdka.
Włożyć wtyczkę do gniazdka.
• Przepalony bezpiecznik w domowej instalacji elektrycznej.
Wymienić bezpiecznik.
•Ustawiono opóźnienie rozpoczęcia programu.
Anulować opóźnienie rozpoczęcia programu, aby uruchomić program.
Po sprawdzeniu włączyć urządzenie. Program zostanie wznowiony od momentu, w
którym został przerwany. Jeżeli problem wystąpi ponownie, skontaktować się z lokalnym
autoryzowanym serwisem.
Poniższe dane są niezbędne dla serwisu, aby
pomoc była szybka i odpowiednia:
•Model (Mod.)
Możliwa przyczyna i rozwiązanie
• Numer seryjny (S.N.)
Informacje te znajdują się na tabliczce znamionowej.
W tym miejscu można zapisać wymagane
dane:
Nazwa modelu: ..........
Numer produktu: ..........
Numer seryjny: ..........
• Numer produktu (PNC)
Page 34

34 electrolux
Efekty mycia nie są zadowalające
Naczynia nie są czyste • Wybrano program mycia nieodpowiedni do rodzaju naczyń lub za-
Osad kamienia na naczyniach • Pusty zbiornik na sól.
Naczynia są mokre i matowe •Nie użyto płynu nabłyszczającego.
Smugi, mętne plamy lub niebieskawa powłoka na szklankach i naczyniach
Wyschnięte ślady kropel wody na szklankach i naczyniach
brudzenia.
•Kosze są załadowane nieprawidłowo, przez co woda nie dochodzi
do wszystkich powierzchni.
• Ramiona natryskowe nie obracają się swobodnie w wyniku nieprawidłowego rozmieszczenia naczyń.
• Zabrudzone lub nieprawidłowo zainstalowane filtry.
•Zbyt mała ilość lub brak detergentu.
• Nieprawidłowo Ustawiony poziom zmiękczania wody.
• Pokrywka zbiornika na sól nie jest prawidłowo dokręcona.
• Dozownik płynu nabłyszczającego jest pusty.
•Zmniejszyć dozowanie płynu nabłyszczającego.
•Zwiększyć dozowanie płynu nabłyszczającego.
• Przyczyną może być rodzaj użytego detergentu.
Dane techniczne
Wymiary Szerokość cm 59,6
Wysokość cm 81,8 - 87,8
Głębokość cm 55
Przyłącze elektryczne - Napięcie
- Moc całkowita - Bezpiecznik
Ciśnienie doprowadzanej wody Wartość minimalna 0,5 bara (0,05 MPa)
Wartość maksymalna 8 barów (0,8 MPa)
Pojemność Ilość standardowych nakryć 12
Informacje dotyczące podłączenia elektrycznego są podane na
tabliczce znamionowej umieszczonej na wewnętrznej krawędzi
drzwi zmywarki.
Instalacja
Ostrzeżenie! Upewnić się, że podczas
instalacji wtyczka przewodu
zasilającego jest wyjęta z gniazdka.
Ważne! Przestrzegać instrukcji zawartych
na dołączonym szablonie w celu:
• zmontowania urządzenia,
• instalacji panelu meblowego,
•podłączenia doprowadzenia i spustu wo-
dy.
Urządzenie zainstalować pod blatem (blatem
kuchennym lub zlewozmywakiem).
W razie konieczności dokonania naprawy,
urządzenie musi być łatwo dostępne dla serwisanta.
Ustawić urządzenie w pobliżu źródła i odpływu wody.
Dla wentylacji zmywarki wystarczą otwory na
wąż doprowadzający wodę, wąż spustowy i
przewód zasilający.
Zmywarka ma w regulowane nóżki, umożli-
wiające regulację wysokości.
Podczas ustawiania urządzenia upewnić się,
że wąż doprowadzaj
ący wodę, wąż spusto-
wy i przewód zasilający nie są zagięte lub
przygniecione.
Mocowanie urządzenia do sąsiednich
szafek
Upewnić się, że blat, pod którym ma być zainstalowane urządzenie, jest stabilnie umocowany (sąsiadujące urządzenia kuchenne,
szafki, ściana).
Page 35

electrolux 35
Poziomowanie urządzenia
Należy zadbać o wypoziomowanie urządzenia, aby drzwi były szczelne i zamykały się
prawidłowo. Jeżeli urządzenie jest prawidłowo wypoziomowane, drzwi nie zahaczają o
Podłączenie do sieci wodociągowej
Wąż doprowadzający wodę
Podłączyć urządzenie do wody ciepłej
(maks. 60°) lub zimnej.
Jeżeli ciepła woda jest wytwarzana przy pomocy alternatywnych źródeł energii, które są
bardziej przyjazne środowisku (np. kolektory
słoneczne, ogniwa słoneczne lub elektrownie
wiatrowe), można użyć jej do zasilania urzą-
dzenia, aby zmniejszyć zużycie energii.
Podłączyć wąż doprowadzający wodę do
zaworu z zewnętrznym gwintem 3/4".
Uwaga! Nie używać węży
połączeniowych ze starych urządzeń.
Ciśnienie wody musi mieścić się w przedziale
określonym w "Danych technicznych".
Upewnić się, że lokalny zakład wodociągowy
zapewnia odpowiednie ciśnienie wody.
Upewnić się, że wąż doprowadzający wodę
nie jest zagięty, przygnieciony ani zaplątany.
Szczelnie dokręcić nakrętkę, aby zapobiec
wyciekom wody.
Uwaga! Nie podłączać urządzenia do
rur nowych lub nieużywanych przez
długi okres czasu. Otworzyć wodę na
kilka minut, a następnie podłączyć wąż
doprowadzający wodę.
Wąż doprowadzający wodę ma podwójne
ściany, wewnętrzny przewód zasilający oraz
zawór bezpieczeństwa. Wąż doprowadzają-
cy wodę jest pod ciśnieniem tylko podczas
przepływu wody. W razie wycieku z węża
doprowadzającego wodę zawór bezpieczeństwa zatrzymuje przepływ wody.
Zachować ostrożność podczas podłączania
węża doprowadzającego wodę:
• Nie umieszczać węża doprowadzającego
wodę ani zaworu bezpieczeństwa w wodzie.
• W razie uszkodzenia w
cego wodę lub zaworu bezpieczeństwa,
należy natychmiast wyjąć wtyczkę z
gniazdka.
ęża doprowadzają-
boki obudowy. Jeżeli nie można prawidłowo
zamknąć drzwi, należy wkręcać lub wykrę-
cać regulowane nóżki, aż urządzenie zostanie wypoziomowane.
•Wąż doprowadzający wodę z zaworem
bezpieczeństwa może być wymieniany
wyłącznie przez lokalny autoryzowany serwis.
Ostrzeżenie! Niebezpieczne napięcie
Wąż spustowy
1. Podłączyć wąż spustowy do rozgałęzie-
nia syfonu zlewozmywaka i zamocować
go pod blatem. Zapobiegnie to cofaniu
się brudnej wody ze zlewozmywaka do
urządzenia.
2. Podłączyć wąż spustowy do rury kanali-
zacyjnej z otworem odpowietrzającym (o
średnicy wewnętrznej min. 4 cm).
Page 36

36 electrolux
Podłączenie do instalacji kanalizacyjnej musi
znajdować się na wysokości maksymalnie
60 cm od podstawy urządzenia.
Upewnić się, że wąż spustowy nie jest zagięty ani przygnieciony, ponieważ może to
utrudnić prawidłowe odprowadzanie wody.
W czasie odprowadzania wody, w otworze
odpływowym zlewu nie może być zatyczki,
ponieważ mogłoby to spowodować zassanie wody z powrotem do urządzenia.
Całkowita długość węża spustowego łącznie
z dołączonym przez użytkownika wężem
przedłużającym nie może wynosić więcej niż
4 metry. Średnica wewnętrzna nie może być
mniejsza niż średnica węża.
Usun
ąć plastikową membranę (A) przed
podłączeniem węża spustowego do syfonu
pod zlewem. Jeżeli membrana nie zostanie
całkowicie usunięta, gromadzące się resztki
jedzenia mogą spowodować powstanie blo-
kady w rozgałęzieniu syfonu.
Podłączenie do sieci elektrycznej
Ostrzeżenie! Producent nie ponosi
odpowiedzialności za szkody
wynikające z nieprzestrzegania
wskazówek bezpieczeństwa.
Uziemić urządzenie zgodnie z przepisami bezpieczeństwa.
Upewnić się, że napięcie znamionowe i
moc podane na tabliczce znamionowej
są zgodne z napięciem i obciążalnością
lokalnej instalacji zasilającej.
Używać wyłącznie prawidłowo zainstalowanego gniazdka z uziemionym stykiem ochronnym.
Urządzenie ma zabezpieczenie uniemożliwiające powrót brudnej wody do
urządzenia. Jeżeli w odpływie zlewu zamontowano zawór zwrotny, może on
uniemożliwiać prawidłowe odprowadzanie wody z urządzenia. Zawór zwrotny
trzeba usunąć.
Uwaga! Aby zapobiec wyciekom wody,
po zainstalowaniu należy sprawdzić
szczelność połączeń hydraulicznych.
Nie używać rozgałęziaczy, łączników ani
przedłużaczy. Istnieje ryzyko pożaru.
Nie wymieniać samodzielnie przewodu
zasilającego. Skontaktować się z lokalnym autoryzowanym serwisem.
Należy zadbać o to, aby po zakończeniu
instalacji urządzenia wtyczka przewodu
zasilającego była łatwo dostępna.
Nie ciągn
lu odłączenia urządzenia. Zawsze ciąg-
nąć za wtyczkę.
ąć za przewód zasilający w ce-
Ochrona środowiska
Symbol na produkcie lub na opakowaniu
oznacza, że tego produktu nie wolno
traktować tak, jak innych odpadów
domowych. Należy oddać go do właściwego
punktu skupu surowców wtórnych
zajmującego się złomowanym sprzętem
elektrycznym i elektronicznym. Właściwa
utylizacja i złomowanie pomaga w eliminacji
niekorzystnego wpływu złomowanych
produktów na środowisko naturalne oraz
zdrowie. Aby uzyskać szczegółowe dane
dotyczące możliwości recyklingu niniejszego
urządzenia, należy skontaktować się z
lokalnym urzędem miasta, służbami
oczyszczania miasta lub sklepem, w którym
produkt został zakupiony.
Użyte materiały opakowaniowe są przyjazne
dla środowiska i nadają się do przetworzenia.
Elementy plastikowe można zidentyfikować
na podstawie oznaczeń, np. >PE<, >PS< itd.
Opakowanie należy wyrzucić do wł
pojemnika w instytucjach zajmujących się
utylizacją odpadów.
aściwego
Page 37

electrolux 37
Ostrzeżenie! Aby poddać urządzenie
utylizacji, wykonać poniższe czynności:
•Wyjąć wtyczkę przewodu zasilające-
go z gniazdka.
•Odciąć i usunąć przewód zasilający z
wtyczką.
•Usunąć zatrzask drzwi. Zapobiega to
zatrzaśnięciu się dzieci wewnątrz
urządzenia i zagrożeniu ich życia.
Page 38

38 electrolux
Electrolux. Thinking of you.
Düşüncelerinizi www.electrolux.com.tr adresinden bizimle
daha fazla paylaşın
İçindekiler
Güvenlik bilgileri 38
Ürün tanımı 39
Kontrol Paneli 40
Cihazın kullanımı 41
Su yumuşatıcının ayarlanması 41
Bulaşık makinesi tuzunun kullanımı 42
Parlatıcı bölmenin doldurulması 43
Çatal-bıçaklar ve tabakların yerleştirilmesi
Deterjan kullanımı 47
Önceden haber verilmeksizin değişiklik yapma hakkı saklıdır.
Bir yıkama programının seçilmesi ve
başlatılması 48
Yıkama programları 49
Bakım ve temizlik 50
Servisi aramadan önce 51
Teknik veriler 52
Montaj 53
Su bağlantısı 53
Elektrik ağlantısı 54
44
Çevreyle ilgili bilgiler 55
Güvenlik bilgileri
Kendi güvenliğiniz ve cihazın doğru çalışması için cihazı monte etmeden ve kullanmadan önce, bu kılavuzu dikkatle
okuyunuz. Bu kılavuzu saklayınız, cihazı
başka bir yere taşıdığınızda veya sattığınızda dahi beraberinde veriniz. Kullanıcılar, cihazın çalışma ve emniyet özelliklerini tam olarak bilmelidir.
Doğru kullanım
• Cihaz, sadece evde kullanım için tasarlan-
mıştır.
• Bu cihazı sadece bulaşık makinesinde yı-
kanabilir ev eşyalarını temizlemek için kullanınız.
• Cihaza çözücü maddeler koymayınız. Patlama riski.
•Bıçaklar ve keskin uçlu nesnelerin tümü,
sivri uçları
çak sepetine konulmalıdır. Bu şekilde koyamıyorsanız, yatay bir şekilde üst sepete
koyunuz.
• Sadece bulaşık makineleri için uygun ürünleri (deterjan, tuz ve parlatıcı) kullanınız.
• Cihaz çalışmaktayken kapağını açarsanız,
sıcak buhar çıkabilir. Yanma tehlikesi.
•Bulaşıkları, yıkama işlemi bitmeden önce
bulaşık makinesinden çıkartmayınız.
•Yıkama programı sona erdiğinde, bulaşık
makinesinin fişini prizden çekiniz ve su
musluğunu kapatınız.
aşağı gelecek şekilde çatal-bı-
•Bu cihazı sadece yetkili bir servis mühen-
disi tamir edebilir. Sadece orijinal yedek
parçalar kullanını
• Yaralanmaları ve cihazın zarar görmesini
önlemek için, tamir işlemlerini kendiniz
yapmayınız. Daima yerel yetkili servisinizi
arayınız.
Genel güvenlik
• Fiziksel, duyusal ve mental kapasiteleri düşük veya cihazın kullanımı hakkında dene-
yimi ve bilgisi olmayan kişiler (çocuklar da
dahil) bu cihazı kullanmamalıdır. Bu kişiler
cihazı, güvenliklerinden sorumlu olan bir kişinin denetimi altında veya cihazın kullanımı
hakkında bu kişi tarafından bilgilendirilmek
kaydıyla kullanabilir.
•Gözde, ağızda ve boğazda yanıkları önle-
mek için bulaşık makinesi deterjanı üreticisinin güvenlik talimatlarına riayet ediniz.
•Bulaşık makinesindeki sudan içmeyiniz.
Cihazınızda deterjan artıkları kalabilir.
• Yaralanmalardan ve açık kapağ
tan kaçınmak için kullanmadığınızda cihazın kapağını daima kapatınız.
•Açık kapak üzerine oturmayınız veya bas-
mayınız.
z.
a takılmak-
Page 39

electrolux 39
Çocuk emniyeti
• Bu cihazı sadece yetişkinler kullanabilir.
Çocukların cihazla oynamadıklarından
emin olmak için denetim altında tutulmaları
gerekir.
• Tüm ambalaj malzemelerini çocuklardan
uzak tutunuz. Boğulma riski teşkil eder.
•Tüm deterjanları güvenli bir yere koyunuz.
Çocukların deterjanlara dokunmasına izin
vermeyiniz.
•Kapağı açıkken, çocukları cihazdan uzak
tutunuz.
Montaj
•Cihazın nakliye nedeniyle zarar görme-
diğinden emin olunuz. Hasarlı bir cihazın fişini prize takmayınız. Gerektiği takdirde tedarikçiyi arayınız.
• İlk kez kullanmadan önce tüm ambalaj
malzemelerini çıkartınız.
Ürün tanımı
• Elektriksel kurulumu kalifiye ve uzman bir
kişi yapmalıdır.
• Su tesisatının kurulumunu kalifiye ve uz-
man bir kişi yapmalıdır.
• Bu ürünün özelliklerini değiştirmeyiniz veya
ürünü modife etmeyiniz. Yaralanma ve cihazın zarar görme riski.
• Şu durumlarda cihazı kullanmayınız:
– Kablosu veya su hortumları hasarlı ise,
– kontrol paneli, cihazın üst kısmı veya ta-
ban bölgesi cihazın içine direk erişimin
mümkün olabileceği bir şekilde hasar
görmüşse.
Yerel yetkili servis merkezine başvurunuz.
• Hidrolik ve elektrikli bileşenlerine zarar ver-
memek için, cihazın yanlarında delik açmayınız.
Uyarı Elektrik ve su bağlantısı ile ilgili
talimatlara dikkatlice riayet ediniz.
1 Üst sepet
2 Su sertliği ayar düğmesi
3 Tuz haznesi
4 Deterjan çekmecesi
5 Parlatıcı çekmecesi
6 Bilgi etiketi
7 Filtreler
8 Alt püskürtme kolu
9 Üst püskürtme kolu
Page 40

40 electrolux
Kontrol Paneli
1 Açma / Kapama tuşu
2 Program seçme tuşları
3
Gecikmeli başlatma tuşu
4 Gösterge ışıkları
5 Fonksiyon tuşları
Gösterge ışıkları
1)
Tuz
1)
Parlatıcı
Program sonu Yıkama aşaması sona erdiğinde yanar. Ek fonksiyonlar:
1) Tuz ve / veya parlatıcı çekmecelerinin boş olması durumunda, herhangi bir yıkama programı
çalışıyorken ilgili gösterge lambaları yanmayacaktır.
Program seçme tuşları
Bu tuşları kullanarak yıkama programı seçebilirsiniz. Bir program tuşuna bastığınızda,
karşılık gelen gösterge ışığı yanar. Yıkama
programları hakkında daha fazla bilgi için 'Yı-
kama programları' bölümüne bakınız.
Gecikmeli başlatma tuşu
Yıkama programının başlatılmasını 3, 6 veya
9 saatlik bir süre ertelemek için, gecikmeli
başlatma tuşunu kullanınız. 'Bir yıkama programının ayarlanması ve başlatılması' bölümüne bakınız.
Gösterge ışığı, tuz haznesinin doldurulması gerektiği zaman
yanar. 'Bulaşık makinesi tuzunun kullanımı' bölümüne bakınız.
Tuz gösterge ışığı, tuz eklendikten birkaç saat sonrasına
kadar yanık kalmaya devam edebilir. Ancak bu durumun,
cihazın çalışması üzerinde herhangi bir olumsuz etkisi yoktur.
Parlatıcı haznesinin doldurulması gerektiğinde yanar. 'Parlatıcının kullanımı' bölümüne bakınız.
•Su yumuşatıcı seviyesi.
• Sesli sinyallerin aktive edilmesi / devre dışı bırakılması.
• Makinede bir arıza durumunda bir alarm verilmesi.
Fonksiyon tuş
ları
Aşağıdaki işlemler için fonksiyon tuşlarını kullanınız:
•Su yumuşatıcıyı ayarlamak için. 'Su yumu-
şatıcının ayarlanması' bölümüne bakınız.
• Sesli sinyalleri devre dışı bırakmak / aktive
etmek için. 'Sesli sinyaller' bölümüne bakınız.
•Çalışmakta olan bir yıkama programını ve-
ya aktive edilmiş bir gecikmeli başlatmayı
iptal etmek için. 'Bir yıkama programının
ayarlanması ve başlatılması' bölümüne bakınız.
Page 41

electrolux 41
Ayarlama modu
Aşağıdaki işlemler için cihazın ayarlama
modunda olması gereklidir:
•Bir yıkama programını ayarlamak için.
•Su yumuşatıcı seviyesini ayarlamak için.
• Sesli sinyalleri devre dışı bırakmak / aktive
etmek için.
Açma / Kapama tuşuna basınız. Aşağıdaki
durumlarda cihaz ayarlama modundadır:
• Tüm program gösterge ışıkları yanıyorsa.
Açma / Kapama tuşuna basınız. Aşağıdaki
durumlarda cihaz ayarlama modunda
değildir:
• Sadece bir program gösterge ışığı yanıyor-
sa.
•Bir yıkama programı ayarlanmışsa. Ayarla-
ma moduna dönmek için programı iptal
ediniz. 'Bir yıkama programı
sı ve başlatılması' bölümüne bakınız.
Sesli sinyaller
Aşağıdaki durumlarda sesli bir sinyal işitilir:
•Yıkama programının sonunda.
•Su yumuşatıcı seviyesinin ayarlanması es-
nasında.
• Cihazda bir sorun olduğunda.
nın ayarlanma-
Cihazın kullanımı
Prosedürün her adımı için belirtilen talimatlara
bakınız.
1. Su yumuşatıcı seviyesinin bölgenizdeki su
sertliği için uygun olup olmadığını kontrol
ediniz. Gerektiği takdirde su yumuşatıcıyı
ayarlayınız.
2. Tuz haznesini bulaşık makinesi tuzu ile
doldurunuz.
3. Parlatıcı çekmecesine parlatıcı doldurunuz.
Sesli sinyaller fabrikada aktive edilmiştir.
Sesli sinyalleri devre dışı bırakmak için
aşağıdaki işlemleri yapınız:
1. Cihazı açınız.
2. Cihazın ayarlama modunda olduğundan
emin olunuz.
3. B ve C fonksiyon tuşlarına basınız ve A, B
ve C fonksiyon tuşlarının gösterge ışı
yanıp sönmeye başlayıncaya kadar basılı
tutunuz.
4. Fonksiyon tuşu C'ye basınız.
–Fonksiyon tuşları A ve B'nin gösterge
ışıkları söner.
–Fonksiyon tuşu C'nin gösterge ışığı ya-
nıp sönmeye başlar.
– Program sonu gösterge ışığı yanar.
Sesli sinyaller aktive edilir.
5. Fonksiyon tuşu C'ye tekrar basınız.
– Program sonu gösterge ışığı söner.
Sesli sinyaller devre dışıdır.
6. İşlemi kaydetmek için, cihazı kapatınız.
Sesli sinyalleri aktive etmek için aşağıdaki iş-
lemleri yapınız:
1. Program sonu gösterge ışığ
dar yukarıda anlatılan prosedürü uygulayınız.
4. Çatal-bıçakları ve tabakları bulaşık makinesine koyunuz.
5. Bulaşığın tipine ve kirliliğine göre uygun
yıkama programını ayarlayınız.
6. Deterjan çekmecesine uygun miktarda
deterjan koyunuz.
7. Yıkama programını başlatınız.
Eğer deterjan tabletleri kullanıyorsanız,
'Deterjan kullanımı' bölümüne bakınız.
ı yanana ka-
kları
Su yumuşatıcının ayarlanması
Su yumuşatıcı su sistemindeki mineralleri ve
tuzları giderir. Mineraller ve tuzlar cihazın çalışmasını kötü yönde etkileyebilir.
Su sertliği eşdeğer ıskalalarda ölçülür:
• Alman derecesi (dH°),
•Fransız derecesi (°TH),
Su sertliği Su sertliği ayarı
°dH °TH mmol / l Klark Manuel Elektronik
51 - 70 91 - 125 9,1 - 12,5 64 - 88 2 10
• mmol/l (litre başına milimol - su sertliğinin
uluslararası birimi),
•Clarke.
Su yumuşatıcıyı bölgenizdeki suyun sertliğine
göre ayarlayınız. Gerektiği takdirde, yerel su
idarenizi arayınız.
Page 42

42 electrolux
Su sertliği Su sertliği ayarı
°dH °TH mmol / l Klark Manuel Elektronik
43 - 50 76 - 90 7,6 - 9,0 53 - 63 2 9
37 - 42 65 - 75 6,5 - 7,5 46 - 52 2 8
29 - 36 51 - 64 5,1 - 6,4 36 - 45 2 7
23 - 28 40 - 50 4,0 - 5,0 28 - 35 2 6
19 - 22 33 - 39 3,3 - 3,9 23 - 27 2 5
15 - 18 26 - 32 2,6 - 3,2 18 - 22 1 4
11 - 14 19 - 25 1,9 - 2,5 13 - 17 1 3
4 - 10 7 - 18 0,7 - 1,8 5 - 12 1 2
< 4 < 7 < 0,7 < 5
1) Tuz kullanmanız gerekmez.
Su yumuşatıcıyı manuel ve elektronik
olarak ayarlamalısınız.
Manuel ayarlama
Cihaz, fabrikada 2 pozisyonuna ayarlanmıştır.
1. Kapağı açınız.
2. Alt sepeti çıkartınız.
3. Su sertliği ayar düğmesini pozisyon 1 ve-
ya 2'ye getiriniz (tabloya bakınız).
4. Alt sepeti takınız.
3. B ve C tuşlarına basınız ve fonksiyon tuş-
ları A, B ve C'nin gösterge ışıkları yanıp
sönmeye başlayıncaya kadar basılı tutunuz.
4. B ve C tuşlarını serbest bırakınız.
5. Fonksiyon tuşu A'ya basınız.
–Fonksiyon tuşu A'nın gösterge ışığı ya-
nıp sönmeye devam eder.
–Fonksiyon tuşları B ve C'nin gösterge
ışıkları söner.
– Program sonu gösterge ışığı yanıp sön-
meye başlar.
1)
1
–Aşağıdaki durumlarda sesli bir sinyal
işitilir.
Su yumuşatıcıyı ayarlama fonksiyonu aktive edilmiştir.
Su yumuşatıcının seviyesini göstermek
üzere, program sonu gösterge ışığı yanıp
söner ve bir sesli uyarı verilir. Duraklama
yaklaşık 3 saniye sürer.
Örnek: 5 yanıp sönme / 5 aralıklı sesli sin-
5. Kapağı kapatınız.
Elektronik ayarlama
Su yumuşatıcı fabrikada seviye 5'e ayar-
lanmıştır.
1. Cihazı açınız.
2. Cihazın ayarlama modunda olduğundan
yal - duraklama - 5 yanıp sönme / 5 aralıklı
sesli sinyal - duraklama vs. = seviye 5
6. Su yumuşatıcı seviyesini bir kademe artırmak için fonksiyon tuşu A'ya bir kez basınız.
7.
İşlemi kaydetmek için açma / kapama tu-
şuna basınız.
emin olunuz.
1)
1
Bulaşık makinesi tuzunun kullanımı
Dikkat Sadece bulaşık makinesi tuzu
kullanınız. Bulaşık makinelerine uygun
olmayan tuz tipleri, su yumuşatıcının
zarar görmesine neden olur.
Dikkat Cihazın tabanındaki tuz
tanecikleri ve tuzlu su paslanmaya
neden olabilir. Paslanmayı önlemek için,
bir yıkama programını başlatmadan
önce cihaza tuz koyunuz.
Page 43

electrolux 43
Tuz haznesini doldurmak için aşağıdaki
işlemleri yapınız:
1. Tuz haznesini açmak için, tuz haznesi ka-
pağını saatin tersi yönde çeviriniz.
2. Tuz haznesine 1 litre su koyunuz (sadece
ilk kez çalıştırırken).
3. Tuz haznesine tuz koymak için huniyi kullanınız.
Parlatıcı bölmenin doldurulması
Dikkat Sadece bulaşık makineleri için
özel üretilmiş parlatıcıları kullanınız.
Parlatıcı çekmecesine asla başka maddeler koymayınız (örneğin bulaşık makinesi temizleme maddesi, sıvı deterjan).
Aksi halde cihazınız zarar görebilir.
Parlatıcı, kapların üzerlerinde çizgiler ve
lekeler olmaksızın kurutulabilmesini
sağlar.
Parlatıcı, son durulama aşamasında otomatik olarak eklenir.
Parlatıcı çekmecesini doldurmak için
aşağıdaki işlemleri yapınız:
1. Parlatıcı çekmecesini açmak için kilit açma tuşuna (A) basınız.
4. Tuz haznesi deliğinin etrafındaki tuzları te-
mizleyiniz.
5. Tuz haznesini kapatmak için, tuz hazne-
sinin kapağını saat yönünde çeviriniz.
Tuz doldururken, tuz haznesinden su
taşması normaldir.
Su yumuşatıcıyı elektronik olarak 1 seviyesine
ayarladığınızda, tuz göstergesi ışığı yanık kalmaz.
2. Parlatıcı çekmecesine parlatıcı dolduru-
nuz. 'Max.' işareti,maksimum seviyeyi
gösterir.
Page 44

44 electrolux
3. Dökülen parlatıcıyı, bir sonraki yıkamada
aşırı köpük oluşmasını önlemek için emici
bir bezle siliniz.
4. Parlatıcı çekmecesini kapatınız.
Parlatıcı dozunun ayarlanması
Parlatıcı dozu, fabrikada 4 konumuna ayarlanmıştır.
Parlatıcı dozunu konum 1 (en düşük doz) ile
konum 6 (en yüksek doz) arasında ayarlayabilirsiniz.
1. Dozu artırmak veya azaltmak için parlatıcı
ayar düğmesini döndürünüz.
– Tabaklarda su damlaları veya kireç le-
–Eğer tabakların üzerinde çizgiler, beya-
Çatal-bıçaklar ve tabakların yerleştirilmesi
Faydalı tavsiyeler ve ipuçları
Dikkat Bu cihazı sadece, bulaşık
makinesinde yıkanabilir ev kaplarını
yıkamak için kullanınız.
Cihazı, suyu emebilen eşyaları (süngerler, ev
temizlik bezleri, vs.) temizlemek için kullanmayınız.
•Çatal-bıçakları ve tabakları yerleştirilmeden
önce aşağıdaki işlemleri yapınız:
– Yemek kalıntılarının ve artıkların tümünü
çıkartınız.
– Tavalardaki yanıkları, yemek kalıntılarını
yumuşatınız.
•Çatal-bıçakları ve tabakları yerleştirirken
aşağıdaki işlemleri yapınız:
– İçi boş eşyaları (örneğin kupalar, bar-
daklar ve tavalar) ağızları aşağı gelecek
şekilde yerleştiriniz.
–Kapların veya içi derin eşyaların içerisin-
de su toplanmadığından emin olunuz.
– Çatal-bıçakları ve tabakları birbirinin üze-
rine koymayınız.
– Çatal-bıçakların ve tabakların, diğer ça-
tal-bıçakların ve tabakların üzerini kapatmadığından emin olunuz.
– Bardakların, diğer bardaklara temas et-
mediğinden emin olunuz.
– Küçük eşyaları çatal-bıçak sepetine ko-
yunuz.
• Plastik eş
lon) tavalar su damlalarını tutabilirler. Plastik eşyalar, porselen ve çelik eşyalar gibi
kurumazlar.
•Hafif eşyaları üst sepete koyunuz. Eşyaların
hareket etmediğinden emin olunuz.
Dikkat Yıkama programını başlatmadan
önce, püskürtme kollarının serbestçe
hareket edebildiğinden emin olunuz.
Uyarı Cihaza bulaşık koyduktan ve
bulaşıkları çıkarttıktan sonra, cihazın
kapağını daima kapatınız. Kapağın açık
kalması tehlike arz edebilir.
Alt sepet
Kulplu tencereleri, tencere kapaklarını, tepsileri, salata kaplarını ve çatal-bıçakları alt sepete koyunuz. Servis tabaklarını ve büyük kapakları sepetin etrafına yerleştiriniz.
kesi varsa, dozu artırınız.
zımsı lekeler veya mavimsi izler varsa,
dozu azaltınız.
yalar ve yapışmaz kaplamalı (tef-
Page 45

Alt sepetteki gözler, tencereleri, tavaları ve
kapları koyabilmeniz için düz olarak yatırılabilirler.
electrolux 45
Kaşıkların birbirlerine yapışmalarını önlemek
için, diğer çatal-bıçaklarla karışık halde koyunuz.
Çatal-bıçakları sepete yerleştirebilmek için,
çatal-bıçak sepetinin kulpunu indiriniz.
Çatal-bıçak sepeti
Uyarı Uzun bıçakları, çatal-bıçak
sepetine dikey olarak yerleştirmeyiniz.
Uzun ve keskin çatal-bıçakları, üst
sepete yatay bir şekilde yerleştiriniz.
Keskin bulaşıklara karşı dikkatli olunuz.
Çatalları ve kaşıkları, sapları aşağıya gelecek
şekilde yerleştiriniz.
Bıçakları, sapları yukarıya gelecek şekilde
yerleştiriniz.
Çatal-bıçak ızgaralarını kullanınız. Eğer çatalbıçakların boyutları çatal-bıçak ızgarasının
kullanımına imkan tanımazsa, bunları kolayca
gizleyebilirsiniz.
Page 46

46 electrolux
Çatal-bıçak sepeti iki kısımdan oluşmaktadır.
Daha esnek bulaşık yerleştirme imkanı için bu
kısımları ayrı ayrı kullanabilirsiniz. İki kısmı
ayırmak için, ters yönlerde yatay olarak kaydırınız ve çekerek ayırınız. Birleştirmek için, bir
araya getiriniz ve birbirlerine yatay olarak kaydırmak suretiyle geçiriniz.
Uzun kulplu bardakları, kulpları yukarı gelecek şekilde bardak raflarına yerleştiriniz. Daha uzun bulaşıkları için, bardak raflarını yukarı
katlayınız.
Üst sepet
Üst sepet, çay tabakları, salata kaseleri, kupalar, bardaklar, kaplar ve kapaklar içindir.
Su bulaşıkların tüm yüzeylerine temas edecek şekilde, bulaşıkları düzenleyiniz.
Üst sepetin yükseklik ayarlaması
Eğer geniş tabakları alt sepete koyarsanız,
öncelikle üst sepeti üst konuma kaldırınız.
Alt sepet için maksimum tabak yüksekliği
Üst pozisyon 31 cm.
Alt pozisyon 27 cm.
Üst sepeti üst pozisyona kaldırmak için
aşağıdaki işlemleri yapınız:
1. Sepeti duruncaya kadar dışarı doğru çe-
kiniz.
2. Mekanizma yerine oturuncaya ve sepet
sabitlenene kadar, mekanizmayı her iki
yanından dikkatlice kaldırınız.
Page 47

Üst sepeti alt pozisyona kaldırmak için
aşağıdaki işlemleri yapınız:
Deterjan kullanımı
Sadece bulaşık makinesi için uygun deterjanları (toz, sıvı veya tablet) kullanınız.
Ambalajın üzerindeki bilgilere uyunuz:
• Üretici tarafından önerilen miktar,
• Muhafaza ile ilgili tavsiyeler.
Çevre kirliliğini azaltmak için, gereğinden
fazla deterjan kullanmayınız.
Deterjan çekmecesini doldurmak için
aşağıdaki işlemleri yapınız:
1. Deterjan çekmecesinin kapağını açınız.
electrolux 47
1. Sepeti duruncaya kadar dışarı doğru çe-
kiniz.
2. Her iki yanını yukarıya doğru dikkatlice
kaldırınız.
3. Mekanizmayı tutunuz ve yavaşça arkaya
doğru indiriniz.
Dikkat
• Sepeti sadece tek bir tarafından kaldırmayınız veya alçaltmayınız.
•Eğer sepet üst pozisyonda ise, bardak
raflarına kupaları / bardakları koymayınız.
A
B
2. Deterjan çekmecesine ( A) deterjanı ko-
yunuz. İşaretli kısım dozu gösterir:
20 = yaklaşık 20 gram deterjan.
30 = yaklaşık 30 gram deterjan.
3. Eğer ön yıkama aşamalı bir yıkama prog-
ramı kullanacaksanız, ön yıkama bölmesine de ( B) deterjan koyunuz.
4. Eğer deterjan tabletleri kullanacaksanız,
deterjan tabletini deterjan çekmecesine
( A) koyunuz.
Page 48

48 electrolux
5. Deterjan çekmecesinin kapağını kapatı-
nız. Kapağı, yerine oturuncaya kadar bastırınız.
Farklı markalardaki deterjanlar farklı sürelerde çözünürler. Bazı deterjan tabletleri kısa yıkama programlarında iyi temizleme sonuçları vermezler. Deterjan tabletleri kullanırken deterjan kalıntılarının tamamen gidermek için uzun yıkama
programlarını seçiniz.
Kombi deterjan tabletlerinin kullanımı
Bu tabletler; deterjan, parlatıcı ve bulaşık makinesi tuzu gibi maddeleri içerir. Bazı tablet
tipleri başka maddeler de içerebilir.
Özel tuz ve parlatıcı içeren tabletleri kullanır-
ken, tuz ve parlatıcı haznelerini doldurmak
gerekmez. Bu durumda, bulaşık makinesi
açık kaldığı sürece parlatıcı gösterge ışığı da
yanık kalır.
1. Bu tabletlerin bölgenizdeki su sertliğine
uygun olup olmadığın
tici firmanın talimatlarına bakınız.
ı kontrol ediniz. Üre-
2. En düşük su sertlik ayarını ve parlatıcı do-
zunu seçiniz.
Eğer kurutma sonuçları tatmin edici değilse,
aşağıdaki işlemleri yapınız:
1. Parlatıcı çekmecesine parlatıcı doldurunuz.
2. Parlatıcı dozu ayarını pozisyon 2'ye getiriniz.
Normal deterjan kullanımına dönmek için:
1. Tuz haznesini ve parlatıcı çekmecesini
doldurunuz.
2. Su sertliği ayarını en yüksek seviyeye getiriniz.
3. Makineye bulaşık koymadan bir yıkama
programı çalıştırınız.
4. Su yumuş
liğine göre ayarlayınız.
5. Parlatıcı dozunu ayarlayınız.
atıcısını, bölgenizdeki su sert-
Bir yıkama programının seçilmesi ve başlatılması
Yıkama programını, kapak hafif açık haldeyken ayarlayınız. Yıkama programı ancak kapağı kapattığınız zaman başlar.
Bu ana kadar, ayarların değiştirilmesi
mümkündür.
Bir yıkama programını ayarlamak ve başlat-
mak için aşağıdaki işlemleri yapınız:
1. Cihazı açınız.
2. Cihazın ayarlama modunda olduğundan
emin olunuz.
3. Program tuşlarından birine basınız. 'Yıka-
ma programları' bölümüne bakınız.
– Program gösterge ışığı yanar.
4. Kapağı kapat
–Yıkama programı çalışmaya başlar.
Yıkama programı çalışırken, programı
değiştirmeniz mümkün değildir. Yıkama
programını iptal ediniz.
Uyarı Çalışmakta olan bir yıkama
programını, sadece gerekiyorsa
duraklatınız veya iptal ediniz.
Dikkat Kapağı dikkatlice açınız. Sıcak
buhar çıkabilir.
Bir yıkama programını duraklatma
Kapağı açınız.
ınız.
• Program durdurulur.
Kapağı kapatınız.
• Program duraklatıldığı noktadan itibaren
çalışmaya devam eder.
Bir yıkama programının iptal edilmesi
1. Fonksiyon tuşları B ve C' ye b as ınız ve tüm
program tuşlarının ışıkları yanıncaya kadar, basılı tutunuz.
2. Yıkama programını iptal etmek için fonk-
siyon tuşları B ve C'yi bırakın
Bu durumda aşağıdaki işlemleri yapabilirsiniz:
1. Cihazı kapatınız.
2. Yeni bir yıkama programını ayarlayınız.
Yeni bir yıkama programını ayarlamadan önce deterjan çekmecesine deterjan koyunuz.
Yıkama programının gecikmeli
başlatmaya ayarlanması ve başlatılması
1. Açma / Kapama tuşuna basınız.
2. Bir yıkama programı ayarlayınız.
– Program gösterge ışığı yanar.
3. Gecikmeli başlatma tuşuna basınız ve
gösterge ışığı doğru saat değerini gösterecek şekilde (3, 6 veya 9 saat) yanıp sön-
meye başlayıncaya kadar basılı tutunuz.
4. Kapağı kapatınız.
ız.
Page 49

electrolux 49
– Gecikmeli başlatma için geri sayım
başlar.
– Gecikmeli başlatma işleminin geri sa-
yım süreci, 3'er saatlik kademelerle
azalır.
Geri sayım işlemi sona erdiğinde, yıkama programı otomatik olarak çalışma-
ya başlar.
Geri sayımın kesintiye uğramaması için,
geri sayım esnasında kapağı açmayınız.
Kapağı tekrar kapattığınızda, geri sayım
işlemi kaldığı yerden devam eder.
Gecikmeli başlatmanın iptal edilmesi:
1. Fonksiyon tuşları B ve C'ye basınız ve tüm
program tuşlarının ışıkları yanıncaya kadar, basılı tutunuz.
– Gecikmeli başlatmayı iptal ettiğiniz za-
man, yıkama programı da iptal edilir.
2. Yeni bir yıkama programını ayarlayınız.
Yıkama programı
nın sonu
•Programın sona erdiğini belirten sesli bir
uyarı verilir.
1. Kapağı açınız.
– Program sonu gösterge ışığı yanar.
– Sona eren programın gösterge ışığı ya-
nık halde kalır.
2. Açma / Kapama tuşuna basınız.
3. Daha iyi kurutma sonuçları almak için, tabakları çıkartmadan önce kapağı birkaç
dakika aralık bırakınız.
Tabakları cihazdan çıkartmadan önce
soğumalarını bekleyiniz. Sıcak tabaklar
kolayca hasar görebilirler.
Bulaşıkların makineden çıkartılması
• Öncelikle alt sepeti sonra da üst sepeti bo-
şaltınız.
•Yan kısımlarda ve cihazın kapağında su
olabilir. Paslanmaz çelik, tabaklara göre
daha çabuk soğur.
• Cihaz otomatik olarak durur.
Yıkama programları
Yıkama programları
Program Kirlilik derecesi Bulaşık türü Program tanımı
Ağır kirli Çanak-çömlekler, ça-
Yoğun
Normal kirli Çanak-çömlekler ve
Normal
Normal veya hafif
Hızlı yıkama
Ekonomi
Bardaklar
1) Bu program, tam yük yıkama haricindeki yıkama işlemleri için mükemmel bir günlük kullanım
programıdır. Sadece kahvaltı ve akşam yemeği bulaşıklarını y ıkamak isteyen, 4 kişilik bir aile için idealdir.
2) Test enstitüleri için test programı. Test bilgileri için lütfen ayrıca verilen bilgi belgesine bakınız.
1)
2)
kirli
Normal kirli Çanak-çömlekler ve
Normal veya hafif
kirli
tal-bıçaklar, tencereler
ve tavalar
çatal-bıçaklar
Çanak-çömlekler ve
çatal-bıçaklar
çatal-bıçaklar
Hassas çanak-çömlekler ve cam eşyalar
Ön yıkama
70°C'ye kadar ana yıkama
2 ara durulama
Son durulama
Kurutma
Ön yıkama
65°C'ye kadar ana yıkama
1 ara durulama
Son durulama
Kurutma
60°C'ye kadar ana yıkama
Son durulama
Ön yıkama
50°C'ye kadar ana yıkama
1 ara durulama
Son durulama
Kurutma
45°C'ye kadar ana yıkama
1 ara durulama
Son durulama
Kurutma
Page 50

50 electrolux
Tüketim değerleri
Program Program süresi (daki-
ka olarak)
110 - 120 1,8 - 2,0 23 - 25
Yoğun
90 - 100 1,4 - 1,6 18 - 20
Normal
30 0,9 9
Hızlı yıkama
150 - 160 0,1 - 1,1 12 - 13
Ekonomi
60 - 70 0,8 - 0,9 14 - 15
Bardaklar
Su basıncı ve sıcaklığı, elektrik beslemesindeki değişimler ve konulan bulaşık
Bakım ve temizlik
Uyarı Temizlemeden önce cihazı
kapatınız.
Filtrelerin temizliği
Dikkat Cihazı filtresiz kullanmayınız.
Filtrelerin düzgün takıldığından emin
olunuz. Filtrelerin yanlış takılması, yıkama
performansının düşmesine ve cihazın
zarar görmesine neden olur.
Gerekirse filtreleri temizleyiniz. Kirli filtreler, yı-
kama sonuçlarının kötüleşmesine neden olur.
Bulaşık makinesinde üç filtre bulunmaktadır:
1. Kaba filtre (A)
2. Mikro-filtre (B)
3. Yassı filtre (C)
Enerji tüketimi
(kWs)
miktarı bu değerlerin değişmesine neden
olabilir.
1. Kapağı açınız.
2. Alt sepeti çıkartınız.
3. Filtre sisteminin kilidini açınız, mikro-filtrenin kulpunu (B) saatin tersi yönde yaklaşık 1/4 tur döndürünüz.
Su (litre)
A
B
C
Filtreleri temizlemek için aşağıdaki işlemleri
yapınız:
4. Filtre sistemini çıkartınız.
5. Kaba filtreyi (A) elinizle delik kısmından
tutunuz.
6. Kaba filtreyi (A) mikro-filtreden (B) çıkar-
tınız.
7. Yassı filtreyi (C) cihazın tabanından çıkartınız.
Page 51

Püskürtme kollarını çıkartmayınız.
Eğer püskürtme kollarındaki delikler tıkanırsa,
kalan pislik parçalarını bir kokteyl çubuğu ile
çıkartınız.
Dış temizlik
Cihazın dış yüzeylerini ve kontrol panelini
nemli yumuşak bir bezle temizleyiniz. Sadece
nötr deterjanlar kullanınız. Aşındırıcı temizlik
ürünleri, ovalama telleri veya çözücüler (aseton, trikloroetilen vs.) kullanmayınız.
8. Filtreleri akan suyun altında temizleyiniz.
9. Yassı filtreyi (C) cihazın tabanına koyunuz.
10. Kaba filtreyi (A) mikro-filtrenin (B) içine
yerleştiriniz ve filtreleri birlikte yerine bastırarak oturtunuz.
11. Filtre sistemini yerine koyunuz.
12. Filtre sistemini kilitlemek için, mikro-filtre
(B) yerine oturuncaya kadar mikro-filtrenin kulpunu saat yönünde döndürünüz.
13. Alt sepeti takınız.
Donmaya karşı önlemler
Dikkat Cihazı, sıcaklığın 0°C'nin altına
düştüğü yerlere kurmayınız. Üretici firma
donmadan kaynaklanan zararlardan
sorumlu değildir.
Bunun mümkün olmaması halinde, cihazı boşaltınız ve kapağını kapatınız. Su giriş hortumunun bağlantısını kesiniz ve hortumdaki suyu boşaltınız.
14. Kapağı kapatınız.
Servisi aramadan önce
Cihaz çalışmıyor veya çalışırken bir anda duruyor.
Eğer bir arıza varsa, sorunun çözümünü öncelikle kendiniz bulmaya çalışınız. Sorunu gideremediğiniz takdirde, Yetkili Servise baş-
vurunuz.
Hata kodu ve arıza Olası sebep ve çözümü
•Çalışan programın ışığı devamlı ya-
nıp sönüyor.
•Aralıklı (duraklamalı) sesli sinyal
• Program sonu gösterge ışığı 1 kez
yanıp sönüyor.
Bulaşık makinesi su almıyordur.
•Çalışan programın ışığı devamlı ya-
nıp sönüyor.
•Aralıklı (duraklamalı) sesli sinyal
• Program sonu gösterge ışığının 2
kez yanıp sönmesi.
Bulaşık makinesi suyu tahliye etmiyor.
•Su musluğu tıkalıdır veya kireç kaplamıştır.
Su musluğunu temizleyiniz.
•Su musluğu kapalıdır.
Su musluğunu açınız.
•Su giriş hortumundaki filtre tıkalıdır.
Filtreyi temizleyiniz.
•Su giriş hortumunun bağlantısı yanlış yapılmıştır. Hortum bü-
külmüş veya ezilmiş olabilir.
Bağlantının düzgün yapıldığından emin olunuz.
• Lavabo borusunun ağzı tıkanmıştır.
Lavabo borusunun ağzını temizleyiniz.
• Su tahliye hortumunun bağlantısı düzgün yapılmamıştır. Hortum bükülmüş veya ezilmiş olabilir.
Bağlantının düzgün yapıldığından emin olunuz.
Dikkat Aşağıda önerilen düzeltici
işlemleri yapmadan önce, cihazı
kapatınız.
electrolux 51
Page 52

52 electrolux
Hata kodu ve arıza Olası sebep ve çözümü
•Çalışan programın ışığı devamlı ya-
nıp sönüyor.
•Aralıklı (duraklamalı) sesli sinyal
• Program sonu gösterge ışığının 3
kez yanıp sönmesi
Taşma tespit aygıtı çalışıyor.
Program çalışmaya başlamıyor. •Cihazın kapağı tam olarak kapatılmamıştır.
Kontrol ettikten sonra cihazı çalıştırınız. Program, duraklatıldığı noktadan tekrar başlaya-
rak çalışmaya devam eder. Arıza tekrarlarsa,
yetkili servisinizi arayınız.
Aşağıdaki bilgiler, size daha hızlı ve daha
doğru destek sağlamak için gereklidir:
•Model (Mod.)
Tabaklar temiz değil. • Seçilen yıkama programı, bulaşık tipi veya kirlilik derecesi için uygun
Tabaklar üzerinde kireç kalın-
tıları var.
Tabaklar ıslak ve mat. •Parlatıcı kullanılmamıştır.
Bardakların ve tabakların üzerinde çizgiler, beyazımsı lekeler veya mavimsi bir tabaka
var.
Bardakların ve tabakların üzerinde kurumuş su damlaları
var.
•Su musluğunu kapatınız ve yetkili servisinizi arayınız.
Kapağı kapatınız.
•Cihazın fişi prize takılı değildir.
Fişi prize takınız.
• Evin sigorta kutusundaki sigorta yanmıştır / atmıştır.
Sigortayı değiştiriniz.
• Gecikmeli başlatma ayarlanmıştır.
Programı hemen başlatmak için gecikmeli başlatmayı iptal
ediniz.
• Ürün numarası (PNC)
•Seri numarası (S.N.)
Bu bilgiler için bilgi etiketine bakınız.
Gerekli bilgileri buraya yazınız:
Model tanımı: ..........
Ürün numarası: ..........
Seri numarası: ..........
Kurutma sonuçları tatmin edici değil
değildir.
• Sepetler yanlış şekilde doldurulmuştur, bu yüzden su tüm yüzeylere
ulaşamıyordur.
•Bulaşıkların yanlış yerleştirilmesinden ötürü, püskürtme kolları rahat-
ça dönemiyordur.
• Filtreler kirlidir veya düzgün takılmamıştır.
• Çok az deterjan kullanılmıştır veya hiç deterjan kullanılmamıştır.
• Tuz haznesi boştur.
•Su yumuşatıcı seviyesi yanlış ayarlanmıştır.
• Tuz haznesinin kapağı doğru bir şekilde kapatılmamıştır.
•Parlatıcı çekmecesi boştur.
•Parlatıcı dozunu azaltınız.
•Parlatıcı dozunu artırınız.
• Sebebi kullandığınız deterjan olabilir.
Teknik veriler
Boyutlar Genişlik cm. 59,6
Yükseklik cm. 81,8 - 87,8
Derinlik cm. 55
Elektrik bağlantısı - Voltaj - Top-
lam güç - Sigorta
Elektrik bağlantısıyla ilgili bilgiler, bulaşık makinesi kapağının iç kenarındaki bilgi etiketinde yazılıdır.
Page 53

electrolux 53
Su besleme basıncı Minimum 0,5 bar (0,05 MPa)
Maksimum 8 bar (0,8 MPa)
Kapasite ... kişilik yemek takımı 12
Montaj
Uyarı Kurulum esnasında, elektrik fişinin
prizden çekilmiş olduğundan emin
olunuz.
Önemli Aşağıdaki işlemler için, ilişikte verilen
şablondaki talimatları takip ediniz:
•Cihazın ankastre montajı.
• Mobilya panelinin montajı.
• Su besleme (giriş) ve tahliyesinin (çıkışının)
bağlanması.
Cihazı, bir tezgahın altına (mutfak veya lavabo
tezgahı) yerleştiriniz.
Eğer bir tamir işlemi gerekirse, cihaz, teknisyenin kolayca erişebileceği bir yerde olmalı-
dır.
Cihazı bir su musluğunun ve tahliye noktası-
nın yakınına yerleştiriniz.
Bulaşık makinesinin havalandırmas
dece su alma, su boşaltma ve elektrik kabloları için gerekli menfezler yeterlidir.
Bulaşık makinesinin yükseklik ayarı için, boyu
ayarlanabilir ayakları vardır.
ı için, sa-
Makineyi yerine yerleştirirken, su giriş hortumunun, tahliye hortumunun ve elektrik kablosunun kırılmadığından veya ezilmediğinden
emin olunuz.
Cihazın bitişik mobilyalara montajı
Cihazı altına monte ettiğiniz tezgahın (bitişik
mutfak mobilyaları, kabinler, duvar gibi), güvenli bir yapıya sahip olduğundan emin olunuz.
Cihazın düzlemselliğinin ayarlanması
Cihazın, kapağı düzgün şekilde kapatılabilecek ve sızdırmazlığı sağlanabilecek şekilde
düzlemsel olduğundan emin olunuz. Cihazın
düzlemselliği uygun ise, kapak kabinin yan
tarafları
na takılmayacaktır. Eğer kapak doğru
kapanmıyorsa, makine tam düz seviyeye gelinceye kadar ayarlanabilir ayakları gevşetiniz
veya sıkınız.
Su bağlantısı
Su giriş hortumu
Bu cihaz, bir sıcak (maks. 60°) veya soğuk su
beslemesine bağlanabilir.
Eğer sıcak su çevreyle dost, alternatif enerji
kaynaklarından geliyorsa (örneğin güneş veya fotovoltaj panelleri ve rüzgar), enerji tüketimini azaltmak için sıcak su kaynağını kullanınız.
Su giriş hortumunu, 3/4" ebadında, harici dişli
bir su musluğuna takınız.
Dikkat Eski bir cihazın bağlantı
hortumlarını kullanmayınız.
Su basıncı, sınır değerleri dahilinde olmalıdır
('Teknik özellikler' bölümüne bakınız). Bölgenizdeki ortalama şebeke basıncı değerini, yerel su idarenizden öğreniniz.
Su giriş hortumunun bükülmediğinden ve
ezilmediğinden veya dolaşmadığından emin
olunuz.
Su kaçağı olmaması için, kilit somununu
doğru bir şekilde takınız.
Dikkat Cihazı yeni borulara veya uzun
bir süre kullanılmamış olan borulara
bağlamayınız. Suyun birkaç dakika
akmasını bekleyiniz, daha sonra giriş
hortumunu bağlayınız.
Su giriş hortumu çift-blokludur ve bir dahili
elektrik kablosu ile bir güvenlik valfına sahiptir. Su giriş hortumu sadece su gelirken basınç altında kalır. Eğer su giriş hortumunda
kaçak olursa, güvenlik valfı su akışını keser.
Su giriş hortumunu bağlarken dikkatli olunuz:
•Su giriş hortumunu veya güvenlik valfını su-
ya batırmayınız.
•Eğer su giriş hortumu veya güvenlik valfı
hasar görürse, cihazın fişini derhal prizden
çekiniz.
• Güvenlik valfı su giriş hortumunu sadece
yetkili servisin değiştirmesine izin veriniz.
Page 54

54 electrolux
Uyarı Tehlikeli voltaj
Su tahliye hortumu
1. Su tahliye hortumunu lavabo tahliyesine
bağlayınız ve mutfak tezgahının altından
takınız. Bu durum, atık suyun lavabodan
cihaza akışını engeller.
2. Su tahliye hortumunu, havalandırma
menfezli (minimum dahili çapı 4 cm. olan)
bir tezgah borusuna bağlayınız.
Atık su bağlantısı, cihazın tabanından maksimum 60 cm. yükseklikte olmalıdır.
Su tahliyesinin doğru bir şekilde yapılabilmesi
için, tahliye hortumunun bükülmediğinden
veya ezilmediğinden emin olunuz.
Atık suyun cihaza geri akışını önlemek için,
cihaz tahliye yaparken lavabo tapasını çıkar-
tınız.
Herhangi bir uzatma borusu da dahil olmak
üzere, tahliye hortumu toplam uzunluğu 4
metreyi geçmemelidir. Uzatma hortumun dahili çapı, tahliye hortumun çapından küçük
olmamalıdır.
Eğer su tahliye hortumunu süzgeçli bir lavabo-altı tahliye borusuna bağlıyorsanız, plastik
membranı (A) çıkartınız. Eğer membranı çı-
kartmazsanız, yiyecek kalıntılar
munun süzgecini tıkayabilir.
Cihaz, atık suyun cihaza geri akışını önleyen bir güvenlik fonksiyonuna sahiptir.
Eğer lavabo tahliyesinde bir 'tek yönlü
valf' varsa, bu valf, cihazın doğru tahliye
yapmasına engel olabilir. Tek yönlü valfı
çıkartınız.
Dikkat Su kaçağı olmaması için, su
bağlantılarının sıkı olduğundan emin
olunuz.
ı tahliye hortu-
Elektrik ağlantısı
Uyarı Bu güvenlik önlemlerine
uyulmamanız halinde üretici firma
sorumluluk kabul etmez.
Cihazı güvenlik önlemlerine uygun şekilde topraklayınız.
Bilgi etiketinde yazılı olan nominal voltaj
ve güç tipinin cihazın monte edildiği yerdeki voltaj ve güç değerlerine uyduğun-
dan emin olunuz.
Daima düzgün takılmış, elektrik çarpmasına karşı korumalı bir priz kullanınız.
Priz çoğaltıcılar, konnektörler ve uzatma
kabloları kullanmayınız. Yangın riski söz
konusudur.
Elektrik kablosunu kendiniz değiştirme-
yiniz. Yetkili servis merkezine başvuru-
nuz.
Kurulumdan sonra elektrik prizinin erişi-
lebilir olduğundan emin olunuz.
Cihazın fişini prizden çekmek için kabloyu çekmeyiniz. Daima fişin kendisinden
tutarak çekiniz.
Page 55

Çevreyle ilgili bilgiler
Ürünün ya da ambalajının üzerindeki
simgesi, bu ürünün normal ev çöpü gibi
atılmayıp, elektrik ve elektronik cihazların geri
dönüşüm için verildiği özel toplama
noktalarından birine verilmesi gerektiğini
belirtir. Bu ürünün doğru şekilde imha
edilmesine katkıda bulunmakla hem çevreyi,
hem de çevrenizdekilerin sağlığını korumuş
olursunuz. Yanlış şekilde imha ise hem
çevreye hem sağlığa zararlıdır. Bu ürünün
geri dönüşümüne ilişkin daha ayrıntılı bilgileri
belediyenizden, çöp dairenizden veya ürünü
satın almış olduğunuz bayiden edinebilirsiniz.
EEE Yönetmeliğine Uygundur.
Ambalaj malzemeleri çevreyle dosttur ve geri-
dönüşümlüdür. Plastik bileşenler işaretlerle
electrolux 55
tanımlıdır, örn. >PE<, >PS<, vs. Lütfen ambalaj malzemelerini uygun çöp atma noktalarına ve atık imha tesislerine teslim ediniz.
Uyarı Cihazı imha etmek için aşağıdaki
prosedürleri uygulayınız:
•Fişini elektrik prizinden çekiniz.
• Kabloyu ve fişini kesiniz ve atınız.
• Kapak kilit dilini atınız. Bu, çocukların
kendilerini cihazın içerisine kapatmalarını ve hayatlarını tehlikeye atmalarını
önler.
Page 56

www.electrolux.com
www.electrolux.pl
www.electrolux.com.tr
117951040-00-062009
 Loading...