

AEG ESL4161 User Manual

Geschirrspüler
Dishwasher
Bedienungsanleitung Seite 2
Instruction book page 23
Model ESL 4161
GB
D

Safety instructions 24
Disposal 24
Economical and ecological dishwashing 24
Installation instructions 25
Building-in 25
Levelling 25
Fixing to adjacent units 25
Water supply connections 25
Water inlet hose with safety valve 25
Water outlet hose connection 26
Electrical connection 26
Description of the appliance 27
The control panel 27
Audible signals 28
Prior to using for the first time 29
Setting the water softener 29
Filling with salt 30
Rinse aid 31
In daily use 32
Loading cutlery and dishes 32
The lower basket 32
The cutlery basket 33
The upper basket 33
Adjusting the height of the upper basket 33
Use of detergent 34
Different kinds of detergent 35
Washing programmes 36
Starting a washing programme 37
Maintenance and cleaning 39
Cleaning the filters 39
Prolonged periods of non-operation 39
Frost precautions 39
Moving the machine 39
What to do, when... 40
Hints for test centres 42
Contents
23
Dimensions Width 44.6 cm
Height 81.8 - 87.8 cm
Max depth 55.5 cm
Max depth with open door 114 cm
Electrical connection: Information on the electrical connection is given on the rating plate on the
Voltage inner edge of the dishwasher’s door.
Overall power
Fuse
Water supply pressure Minimum 50 kPa (0.5 bar)
Maximum 800 kPa (8 bar)
Capacity 9 place settings
Technical specifications
This appliance complies with the following E.E.C. Directives:
- 73/23 or 19.2.73 (Low Voltage Directive) and subsequent modifications;
- 89/336 or 3.5.89 (Electromagnetic Compatibility Directive) and subsequent modifications.

It is most important that this instruction book should be retained with the appliance for future reference. Should the
appliance be sold or transferred to another owner, or should you move house and leave the appliance, always ensure that
the book is left with the appliance in order that the new owner can get to know the functioning of the appliance and the
relevant safety information.
This information has been provided in the interest of your safety. You MUST read it carefully before installing or using the
appliance.
Installation
● Check your dishwasher for any transport damage. Never
connect a damaged machine. If your dishwasher is
damaged, you should contact your supplier.
● For safety reasons it is dangerous to alter the specifications
or attempt to modify this product in any way.
● Any electrical and plumbing work required to install this
appliance should be carried out by a qualified and
competent person.
● Care must be taken to ensure that the appliance does not
stand on the electrical supply cable.
● The sides of the dishwasher must never be drilled to
prevent damage to hydraulic components.
Child safety
● This appliance is designed to be operated by adults.
● Children should not be allowed to tamper with the controls
or play with the product.
● Packaging parts may be dangerous for children, who could
even be suffocated! You should therefore keep all
packaging well away from children.
● The water in your dishwasher is not for drinking. Detergent
residues may still be present in your machine. Keep
children well away from your dishwasher when the door is
open.
● Keep all detergents in a safe place out of children's reach.
Your dishwasher in day-to-day use
● Items that are contaminated by petrol, paint, steel or iron
debris, corrosive, acidic or alkaline chemicals must not be
washed in this dishwasher.
● Under no circumstances should you open the door whilst
the appliance is in operation, especially during the washing
phase, hot water may escape. However, if the door is
opened, a safety device ensures that the machine stops.
● Only use products (detergent, salt and rinse aid) specifically
designed for use in dishwashers.
● Long bladed knives stored in an upright position are a
potential hazard.
● Long and/or sharp items of cutlery such as carving knives
must be positioned horizontally in the upper basket.
● When finishing loading or unloading close the door, as an
open door can be a hazard.
● Do not sit or stand on the open door.
● Isolate the appliance from the power supply and turn off the
water supply after use.
● This product should be serviced by an authorised service
engineer, and only genuine spare parts should be used.
● Under no circumstances should you attempt to repair the
machine yourself. Repairs carried out by inexperienced
persons may cause injury or serious malfunctioning.
Contact your local Service Force Centre. Always insist on
genuine spare parts.
Disposal
Dispose of the dishwasher packaging material correctly.
All packaging materials can be recycled.
Plastic parts are marked with standard international
abbreviations:
>PE< for polyethylene, e.g. sheet wrapping material.
>PS< for polystyrene, e.g. padding material (always CFC-
free).
>POM< for polyoxymethylene, e.g. plastic clips.
Cardboard packaging is manufactured from recycled paper
and should be deposited in the waste paper collection for
recycling.
As and when you cease to use your dishwasher and withdraw
it from service, your should render it unserviceable before
having it disposed of.
Warning! Children at play could lock themselves in your
dishwasher or otherwise endanger their lives. Therefore cut off
the power supply cable and make the door closing device
unusable to prevent children from being trapped inside.
For the disposing of the appliance please take it to a recycling
centre or to your dealer who may, for a small contribution to
the costs, dispose it for you.
Economical and
ecological dishwashing
● Ensure that the water softener is correctly adjusted.
● Do not pre-wash under running water.
● Select the wash programme to suit the nature and degree of
the soiling on the dishes.
● Do not use more detergent, dishwasher salt and rinse aid
than is recommended in these operating instructions and by
the manufacturer of the respective product.
Safety instructions
24

Any electrical and/or plumbing work required to install
this appliance should be carried out by a qualified
electrician and/or plumber or competent person.
Remove all packaging before positioning the machine.
If possible, position the machine next to a water tap and a
drain.
Building-in
This dishwasher is designed to be fitted under a kitchen
counter or worksurface.
Attention!
Carefully follow the instructions on the enclosed template for
building in the dishwasher and fitting the furniture panel.
No further openings for the venting of the dishwasher are
required, but only to let the water fill and drain hose and power
supply cable pass through.
The dishwasher incorporates adjustable feet to allow the
adjustment of the height.
During all operations that involve accessibility to internal
components the dishwasher has to be unplugged.
When inserting the machine, ensure that the water inlet hose,
the drain hose and the supply cable are not kinked or
squashed.
Levelling
Good levelling is essential for correct closure and sealing of
the door.
When the appliance is correctly levelled, the door will not catch
on either side of the cabinet.
If the door does not close correctly, loosen or tighten the
adjustable feet until the machine is perfectly level.
Fixing to the adjacent units
The dishwasher must be secured against tilting.
Therefore make sure that the counter it is fixed under, is
suitably secured to a fixed structure (adjacent kitchen units
cabinets, wall).
Water supply connections
This dishwasher may be fed with either hot (max. 60°) or cold
water. Nevertheless we advise you a cold water supply.
A hot water supply is not always efficient with very soiled
crockery as it shortens the washing programmes a lot.
For making the connection itself, the coupling nut fitted to the
machine’s supply hose is designed to screw onto either a 3/4"
inch gas thread spout or to a purpose made quick-coupling tap
such as the Press-block.
The water pressure must be within the limits given in the
"Technical specifications". Your local Water Authority will
advise you on the average mains pressure in your area.
The water inlet hose must not be kinked, crushed, or entangled
when it is being connected up.
The dishwasher features fill and drain hoses which can be
turned either to the left or the right to suit the installation by
means of the locknut. The locknut must be correctly fitted
to avoid water leaks. (Attention! NOT all models of
dishwashers have fill and drain hoses provided with locknut. In
this case, this kind of facility is not possible).
If the machine is connected to new pipes or pipes which have
not been used for a long time, you should run the water for a
few minutes before connecting the inlet hose.
Do not use, for connection, old hoses which have been
used in another appliance.
The dishwasher is fitted with safety devices that prevent the
wash water returning into the drinking water system and
comply with the applicable plumbing regulations.
Water inlet hose with safety valve
After connecting the double-walled water inlet hose, the safety
valve is next to the tap. Therefore the water inlet hose is only
under pressure while the water is running. If the water inlet
hose starts to leak during this operation, the safety valve cuts
off the running water.
Please take care when installing the water inlet hose:
- The electrical cable for the safety valve is in the doublewalled water inlet hose. Do not immerse the water inlet hose
or the safety valve in water.
- If water inlet hose or the safety valve is damaged, remove
the mains plug immediately.
- Awater inlet hose with safety valve must only be replaced by
a specialist or by the Service Force Centre.
- Place the water inlet hose in such a way that it is never
higher than the bottom edge of the safety valve.
Installation instructions
25
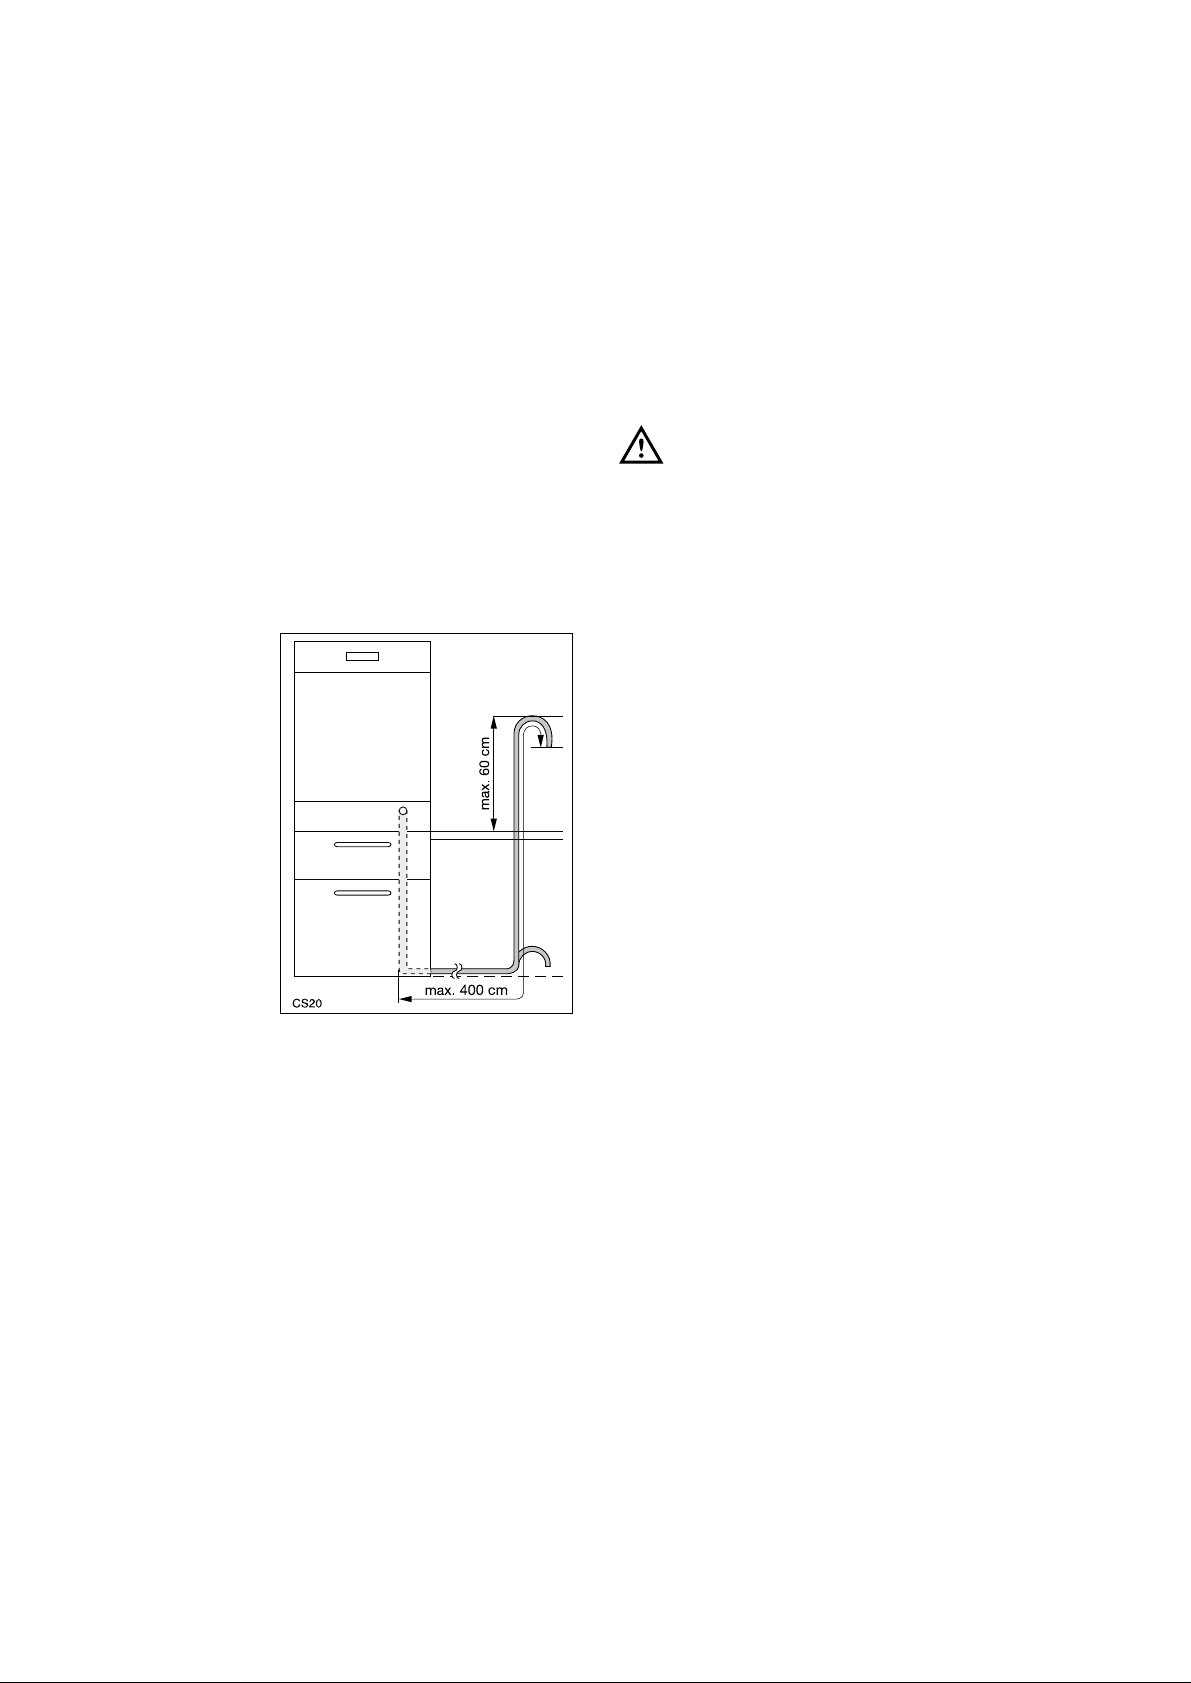
Water outlet hose connection
The end of the drain hose can be connected in the following
ways:
1. To the sink outlet spigot, securing it to the underside of the
work surface. This will prevent waste water from the sink
running into the machine.
2. Hooked over the edge of the sink using the special curved
plastic guide (if provided with the machine).
3. To a stand pipe provided with vent-hole, minimum internal
diameter 4 cm.
The waste connection must be at a maximum height of 60 cm
from the bottom of the dishwasher.
The drain hose can face either to the right or left of the
dishwasher
Ensure the hose is not bent or squashed as this could prevent
or slow down the discharge of water.
The sink plug must not be in place when the machine is
draining as this could cause the water to siphon back into the
machine.
The total length of the drain hose, included an eventual
extension, must be no longer than 4 metres. The internal
diameter of the extension hose must be no smaller than the
diameter of the hose provided.
Likewise the internal diameter of the couplings used for
connections to the waste outlet must be no smaller than the
diameter of the hose provided.
Attention!
Our appliances are supplied with a security device to protect
against the return of dirty water back into the machine.
If the spigot of your sink has a "no return valve" incorporated
this can prevent the correct draining of your dishwasher.
We advise you therefore to remove it.
Electrical connection
Information concerning the electrical connection is given on the
rating plate on the edge of the dishwasher’s door.
Before plugging the appliance into the wall socket, make sure
that:
1. The mains voltage and current rating at the site of
installation match the nominal voltage and current rating
given on the rating plate.
2. The meter, fuses, mains power supply and wall socket can
all take the maximum load required. Make sure that the
socket and plug are compatible without having to use any
type of adaptor. If necessary, have the domestic wiring
system socket replaced.
To isolate the dishwasher from mains, remove the mains plug.
Important!
The plug must still be accessible after the appliance
has been installed.
In case that the electrical cable has to be replaced,
please contact your local Service Force Centre.
The appliance should not be connected to the
electrical supply by means of an extension cable.
Safety standards require the appliance to be
earthed.
The manufacture accepts no liability for failure to
observe the above safety precautions.
26
Function push buttons: in addition to the dishwashing
programme selected and the "delay start", the following
functions can also be set with the help of these push buttons:
- water softener setting,
- deactivation/activation of the inflow of rinse aid,
- deactivation/activation of the audible signals.
- cancel a washing programme in progress.
"Programme selection" push buttons: allows the
selection of the desired washing programme (see "Washing
programmes" chart).
"Delay start" option push button: this option allows
the start of the programme to be delayed from 1 to 19 hours.
The corresponding indicator light illuminates.
The digital display indicates:
- the level of hardness to which the water softener is set,
- if the audible signals are activated/deactivated,
- if the rinse aid inflow is activated/deactivated,
- the decreasing countdown of the delay start,
- the approximative remaining time of the running programme,
- fault codes concerning malfunction of the dishwasher.
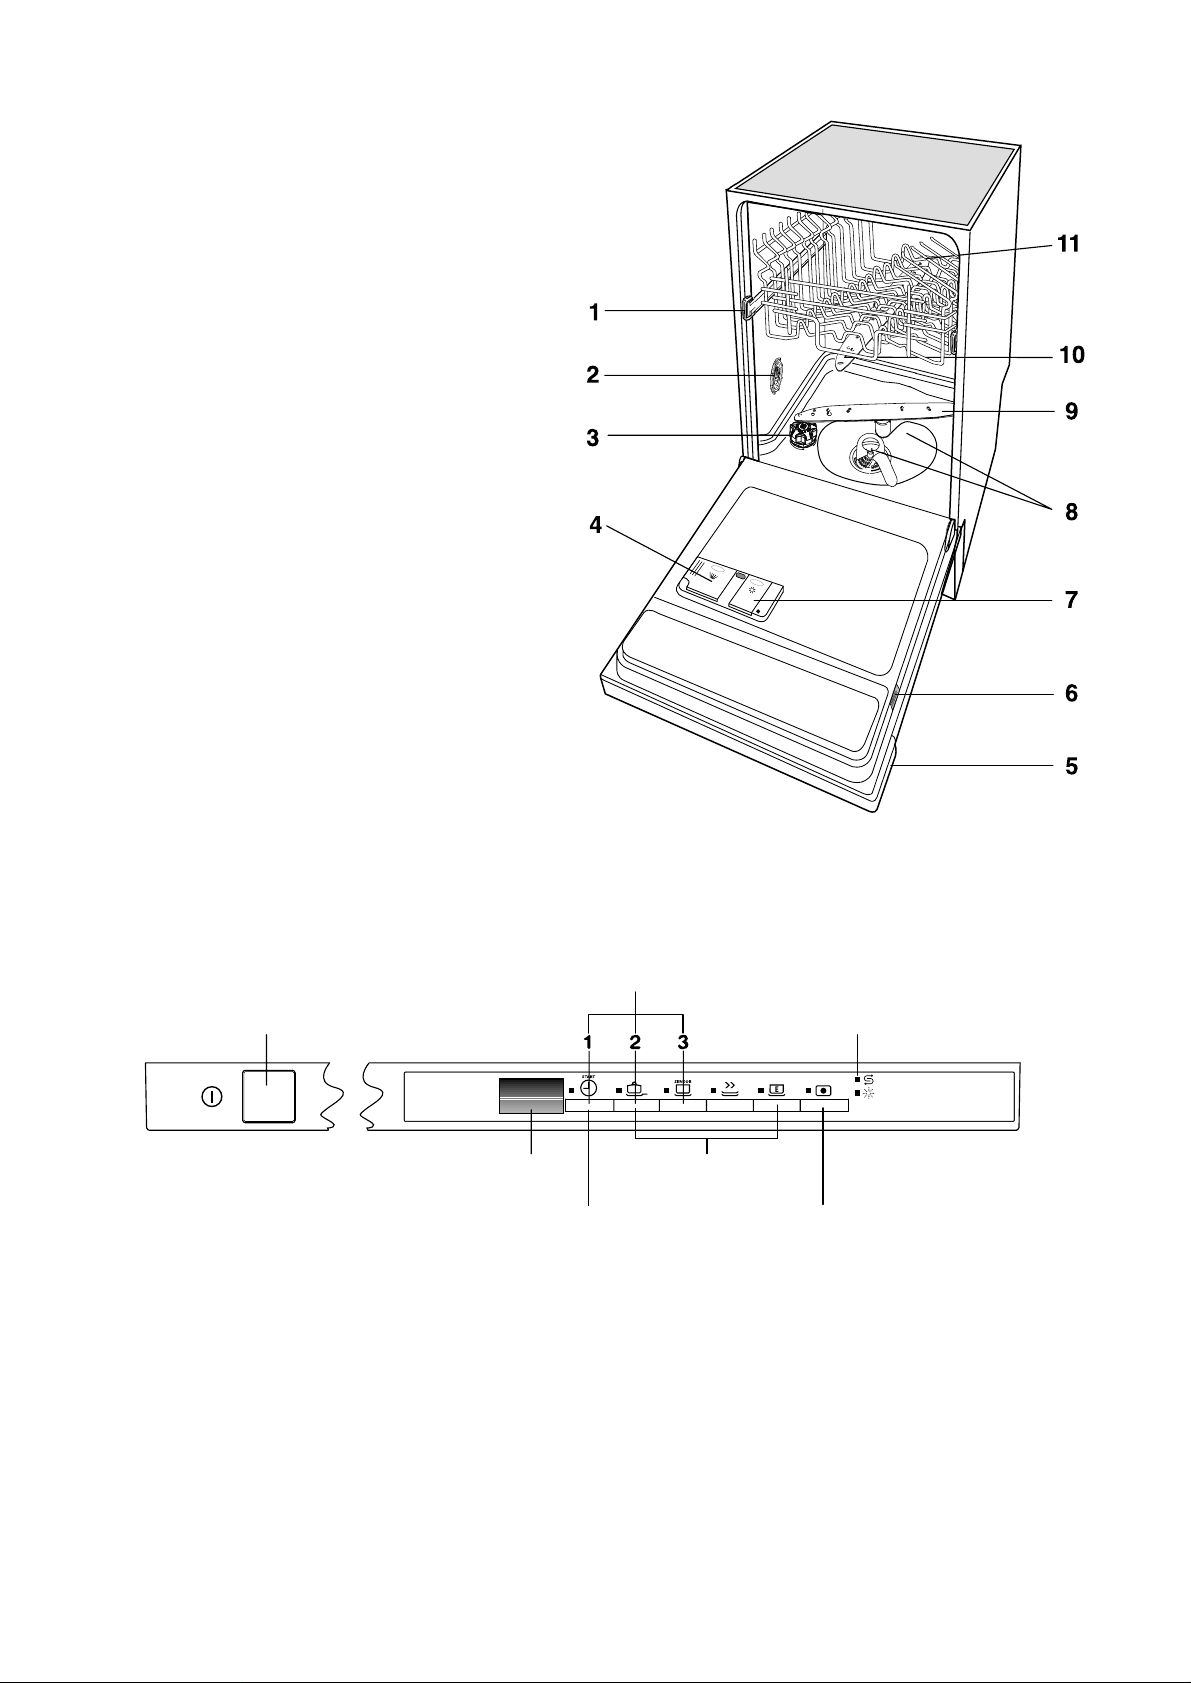
The control panel
27
1. Upper basket stop
2. Water hardness switch
3. Salt container
4. Detergent dispenser
5. Control panel
6. Rating plate
7. Rinse aid dispenser
8. Filters
9. Lower spray arm
10. Upper spray arm
11. Upper basket
Description of the appliance
On/Off
push button
Function push buttons
Delay start
option push button
3 in 1
function push button
Digital display
Indicator lights
Programme selection
push buttons
IN155
Function push button 3 in 1: This appliance is
equipped with the option 3 in 1, that allows the use of the "3 in
1" combi detergent tablets.
This function can be selected with all washing programmes.
With the selection of this function the inflow of rinse aid and
salt from each respective supply container is automatically
deactivated and also the indicator lights for salt and rinse aid
are deactivated.
Once selected this option (push button indicator light
illuminated ) it will remain active also for the following washing
programmes, to deactivate the function, press the push button
(push button indicator light off).
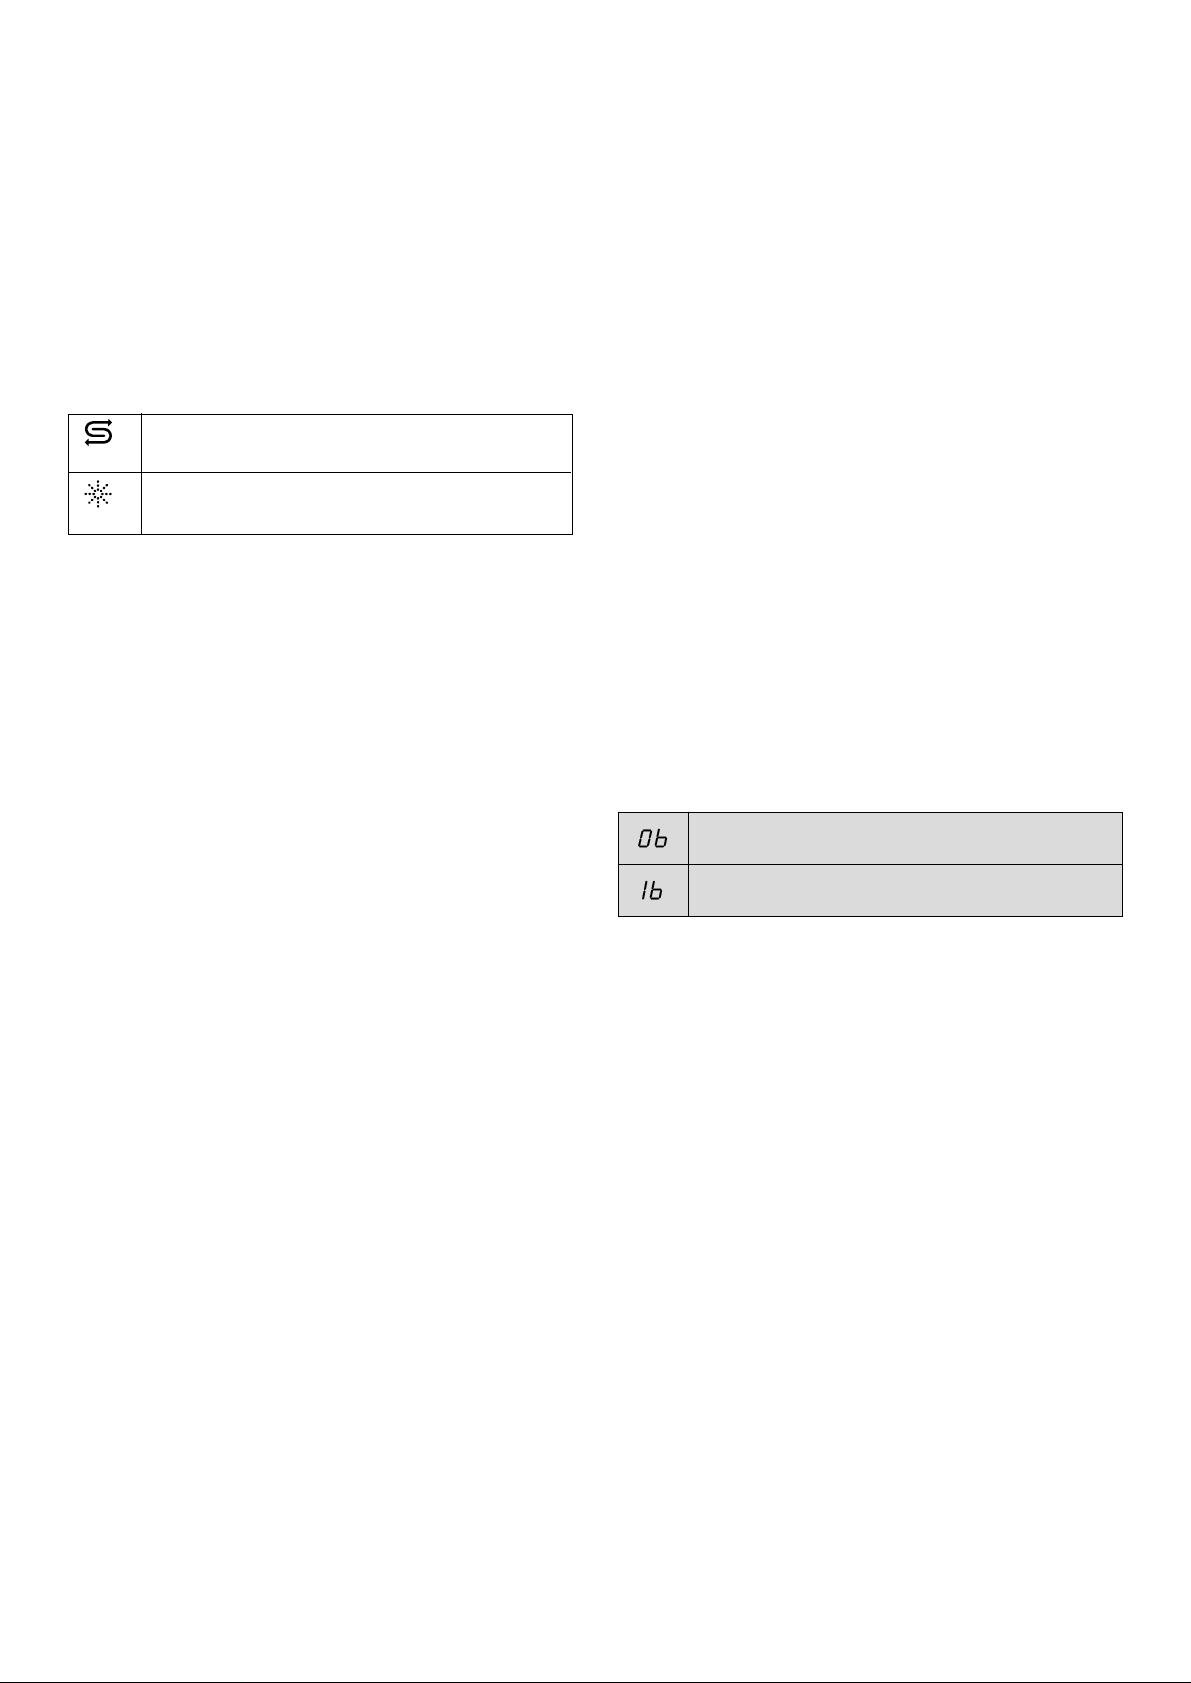
Indicator lights: have the following meanings:
Audible signals
Audible signals have been introduced to help indicate which
operations the dishwasher is performing:
- Setting of the water softener
- End of programme
- Something not working with the machine
Deactivation/activation of the audible signals
(The dishwasher must be switched off)
Factory setting: audible signals activated
1. Press the On/Off push button. All programme selection push
buttons indicator lights will illuminate (setting mode).
If only one programme selection push button indicator light
is illuminated, this means that a washing programme has
been set. The programme must be cancelled: press
simultaneously the function push buttons 2 and 3 for about
2 seconds, the indicator light of the set programme push
button starts flashing for about 2 seconds. After about 2
seconds the indicator lights of all the programme selection
push buttons will illuminate indicating that the set
programme has been cancelled and that the machine is
now in setting mode.
2. Press simultaneously function push buttons 2 and 3, the
indicator lights of the function push buttons 1, 2 and 3 start
flashing.
3. Press the function push button 3, the indicator lights of
function push buttons 1 and 2 turn off while the indicator
light of the push button 3 goes on flashing, the digital
display indicates the current setting.
4. To change the current setting, press again the function
push button 3, the digital display will indicate the new
setting.
5. To memorise the operation, switch off the dishwasher by
pressing the On/Off push button or wait about 60 seconds
after which the dishwasher will automatically return to
setting mode.
28
salt refilling indicator light, illuminates when the salt
has run out and needs replenishing.
rinse aid refilling indicator light, illuminates when
the rinse aid has run out and needs replenishing.
Audible signals deactivated
Audible signals activated (factory set)
 Loading...