

Page 1
Geschirrspüler
Lave-vaisselle
Afwasautomaat
Dishwasher
BEDIENUNGSANLEITUNG - Teil 2 2
MODE D’EMPLOI - Partie 2 9
GEBRUIKSAANWIJZING - Deel 2 16
INSTRUCTION BOOK - Part 2 23
Model ESI 669
152980 77/0
NL
F
D
GB
Page 2
23
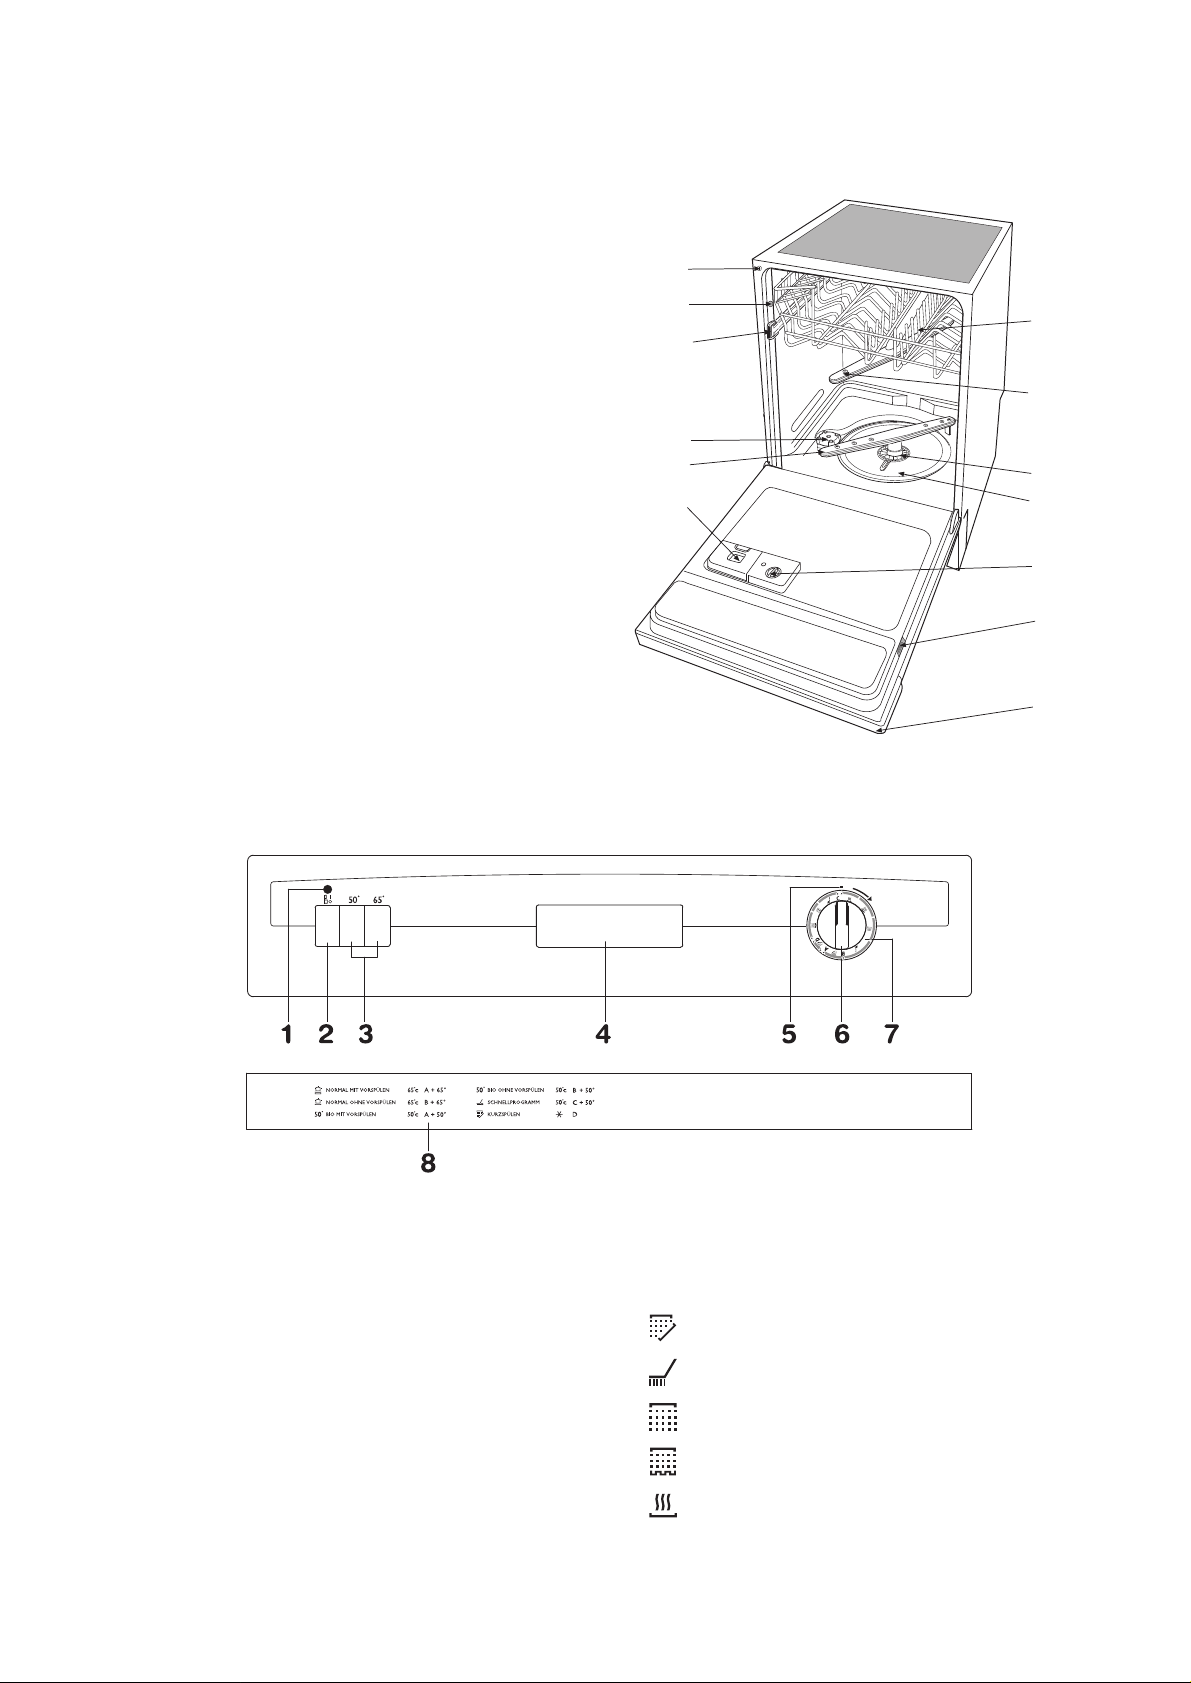
The control panel
Description of the appliance
1. Water hardness adjustment
2. Levelling spacers
3. Upper basket stop
4. Salt container
5. Lower spray arm
6. Detergent dispenser
7. Control panel
8. Rating plate
9. Rinse aid dispenser
10. Large filter
11. Central filter
12. Upper spray arm
13. Upper basket
2
3
4
5
6
8
9
10
11
12
IN85
13
1
7
1. On/Off indicator light
2. On/Off push button
3. Main wash temperature push buttons
4. Door handle
5. Programme marker
6. Programme selector dial
7. Programme sequence indicator
As the programme progresses, the programme
selector dial turns, to show the phase in the wash
programme the appliance has reached.
Prewash / Rinse and Hold
Wash
Cold rinse
Hot rinse
Drying
8. Programme guide
Page 3
24
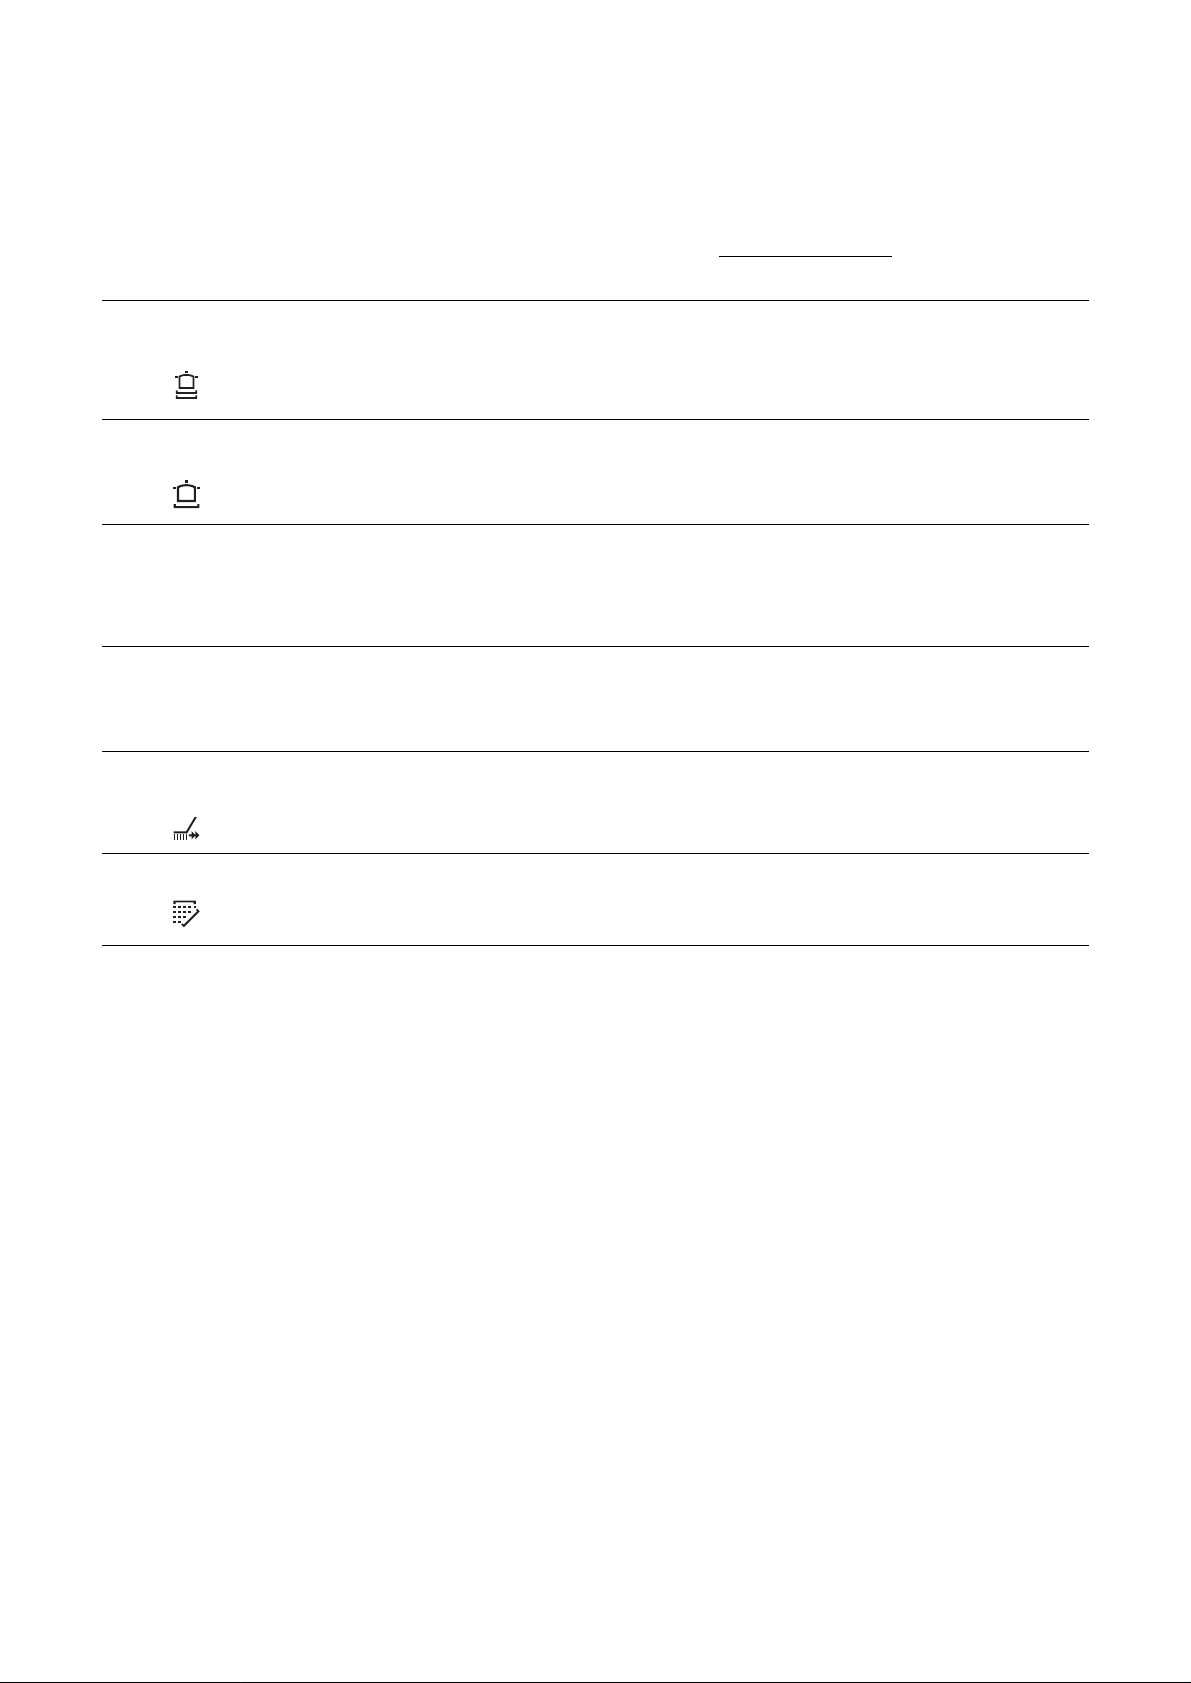
Washing programmes
Programme Degree of soil
and
type of load
Require
push button
Starting
position of the
programme
selector
Recommended quantity
of detergent
Wash
Prewash
Normal soil
Crockery and cutlery
Normal soil
Crockery and cutlery
Light soil
Crockery and cutlery
Light soil
Crockery and cutlery
Light soil
Crockery and party
crockery
Any.
Partial load (to be
completed later in
the day).
Cycle description
Normal 65°c
with prewash
Normal 65°c
no prewash
*
Bio 50°c
with
prewash
Bio 50°c
no
prewash
**
Quick wash
50°c
Rinse & Hold
Cold prewash
Main wash up to 65°C
1 cold rinse
1 hot rinse
Drying
Cold prewash
Main wash up to 50°C
1 cold rinse
1 hot rinse
Drying
Main wash up to 65°C
1 cold rinse
1 hot rinse
Drying
Main wash up to 50°C
1 cold rinse
1 hot rinse
Drying
Main wash up to 50°C
1 cold rinse
1 hot rinse
1 cold rinse (to avoid
food scraps from
sticking together).
*
Testing programme for EN 50242 (see "Hints for Test Centres").
**
This is a special programme for quick washing a full load of lightly soiled dishes, glasses and crockery (except pots) so
that you may re-use them promptly.
25 g 5 g
25 g 5 g
30 g /
30 g /
30 g /
/ /
A
A
50°
+
On/Off
50°
+
On/Off
65°
+
On/Off
65°
+
On/Off
50°
+
On/Off
On/Off
B
B
C
D
Page 4
25
1. Check the filters
Ensure they are clean and properly positioned
(see "Maintenance and cleaning").
2. Check that there is rinse aid and
salt
3. Load the dishes
Remove any scraps of food.
Pull the lower basket out and arrange the
saucepans, plates and cutlery in it.
Pull the upper basket out and arrange the plates,
saucers, glasses and cups etc.in it.
Slide the baskets back into the machine.
4. Ensure that the spray arms can
rotate freely.
5. Measure out detergent
Add the required amount of detergent into the
dispenser according to the "Washing programmes"
chart.
Close the detergent dispenser lid.
6. Ensure that the spray arms can
rotate freely.
7. Set the programme
Turn the programme selector dial clockwise until the
letter of the programme you wish to select
corresponds with the programme marker on the
control panel.
If necessary select the temperature of the main
wash according to the instructions in the "Washing
programmes" chart (see "Required push buttons").
8. Start the programme
Depress the On/Off push button.
The On/Off indicator light will come on and the
machine will start.
9. At the end of the washing
programme
At the end of the programme the dishwasher will
automatically stop.
10. Switch off the dishwasher
Switch off the dishwasher by pressing the On/Off
push button and open the door.
Wait a few minutes before removing the dishes;in
this way they will be cooler and the drying will be
improved.
Empty the lower basket first and then the upper one;
this will avoid water dripping from the upper basket
onto the dishes in the lower one.
When the washing programme has finished, it
is recommended that the dishwasher is
unplugged and the water tap turned off.
In general it is not advisable to open the door
while the machine is working; if the door is
opened however, a safety device ensures that
the machine stops.
Important!
Care must be taken if the door is opened during
the hot phase or immediately after a
programme has finished, as steam may escape.
Operating sequence
Page 5
26
Loading your appliance
Before placing dishes in the machine, remove any scraps of
food, to avoid clogging the filters and consequently reducing
the performance.
Do not load very small items which can fall
through the baskets.
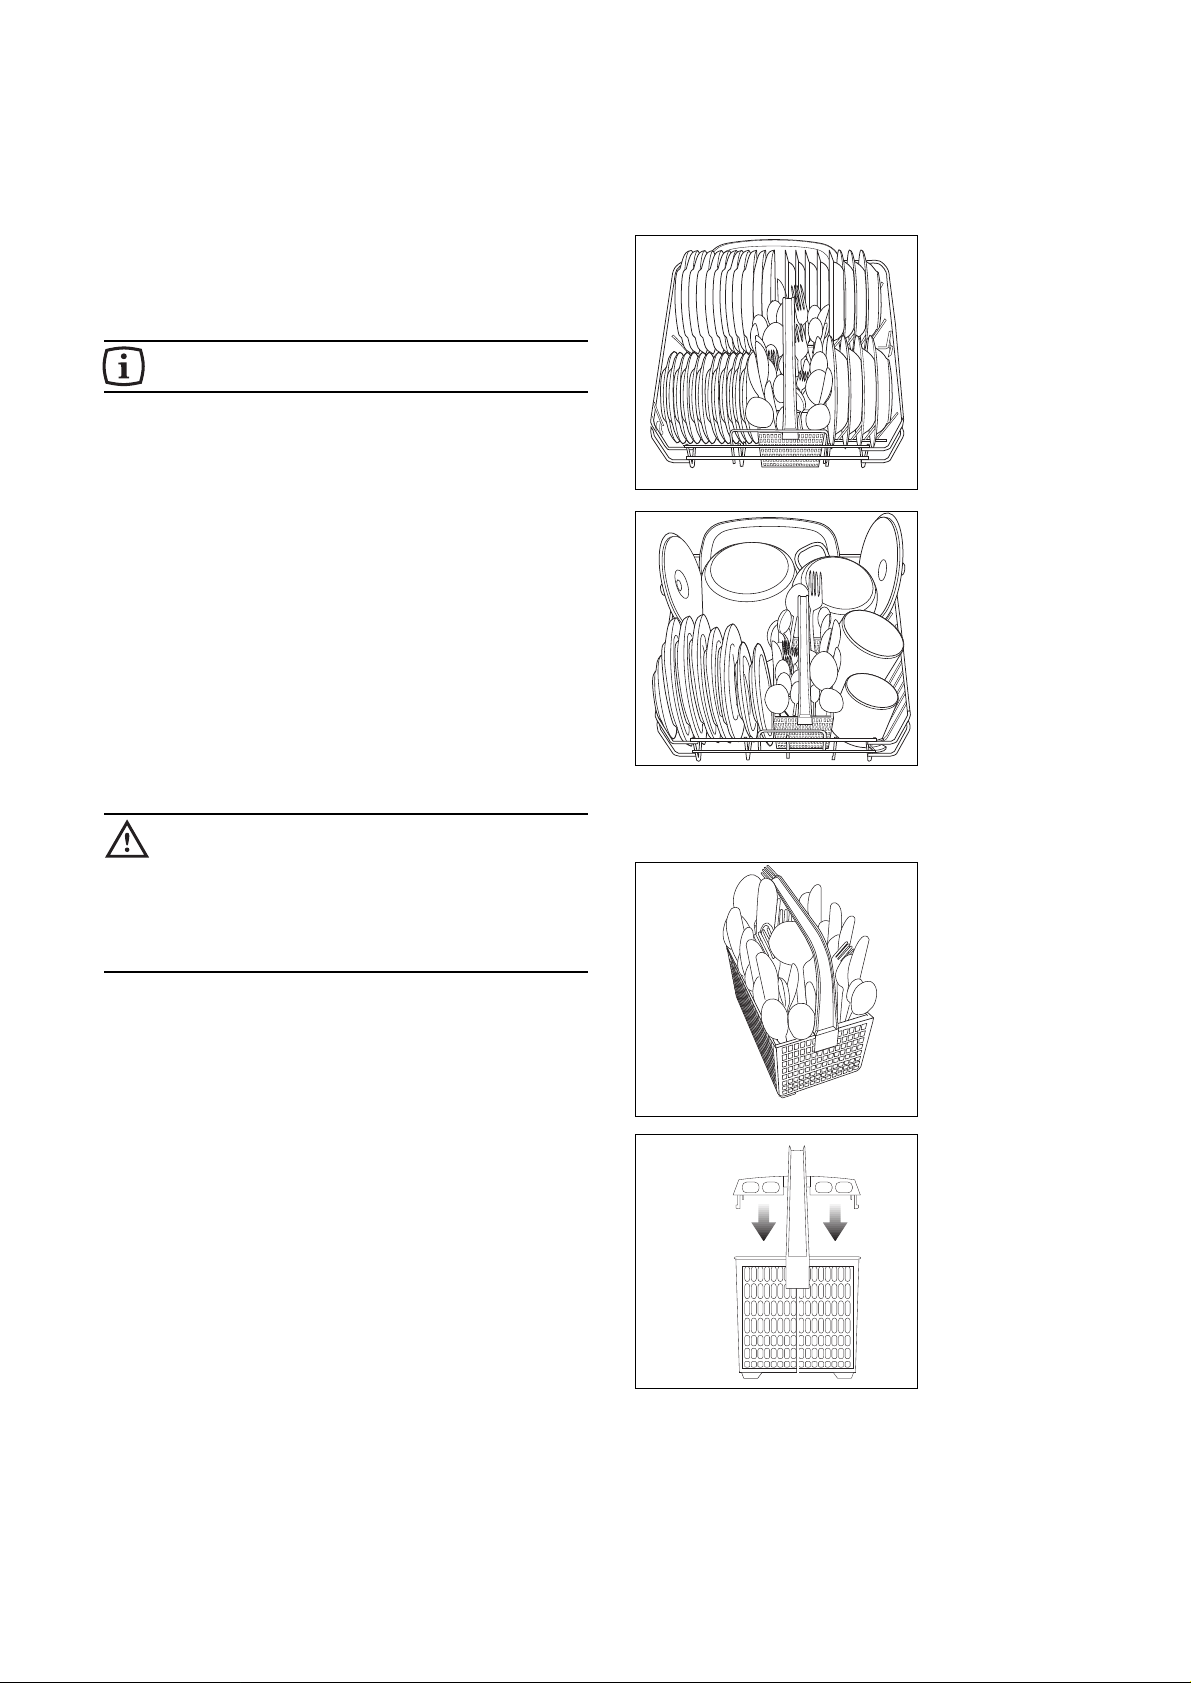
The lower basket
The lower basket is designed to take saucepans, lids, plates,
salad bowls, cutlery etc.
Serving dishes and large lids should be arranged around the
edge of the basket, ensuring that the upper spray arm can
turn freely.
The cutlery basket
Long bladed knives stored in an upright position
are a potential hazard.
Long and/or sharp items of cutlery such as
carving knives must be positioned horizontally in
the upper basket.
Take care when loading or unloading sharp items
such as knives.
Cutlery should be placed in the removable cutlery basket
with the handles facing downwards.
If the handles protrude from the bottom of the basket,
obstructing the lower spray arm, load the cutlery with the
handles facing upwards.
Mix spoons with other cutlery to prevent them from sticking
together.
For best results we recommend to use the cutlery grid
provided (if the size and dimensions of the cutlery allow it).
Using your appliance
UI49
UI19
UI04
UI71
Page 6
27
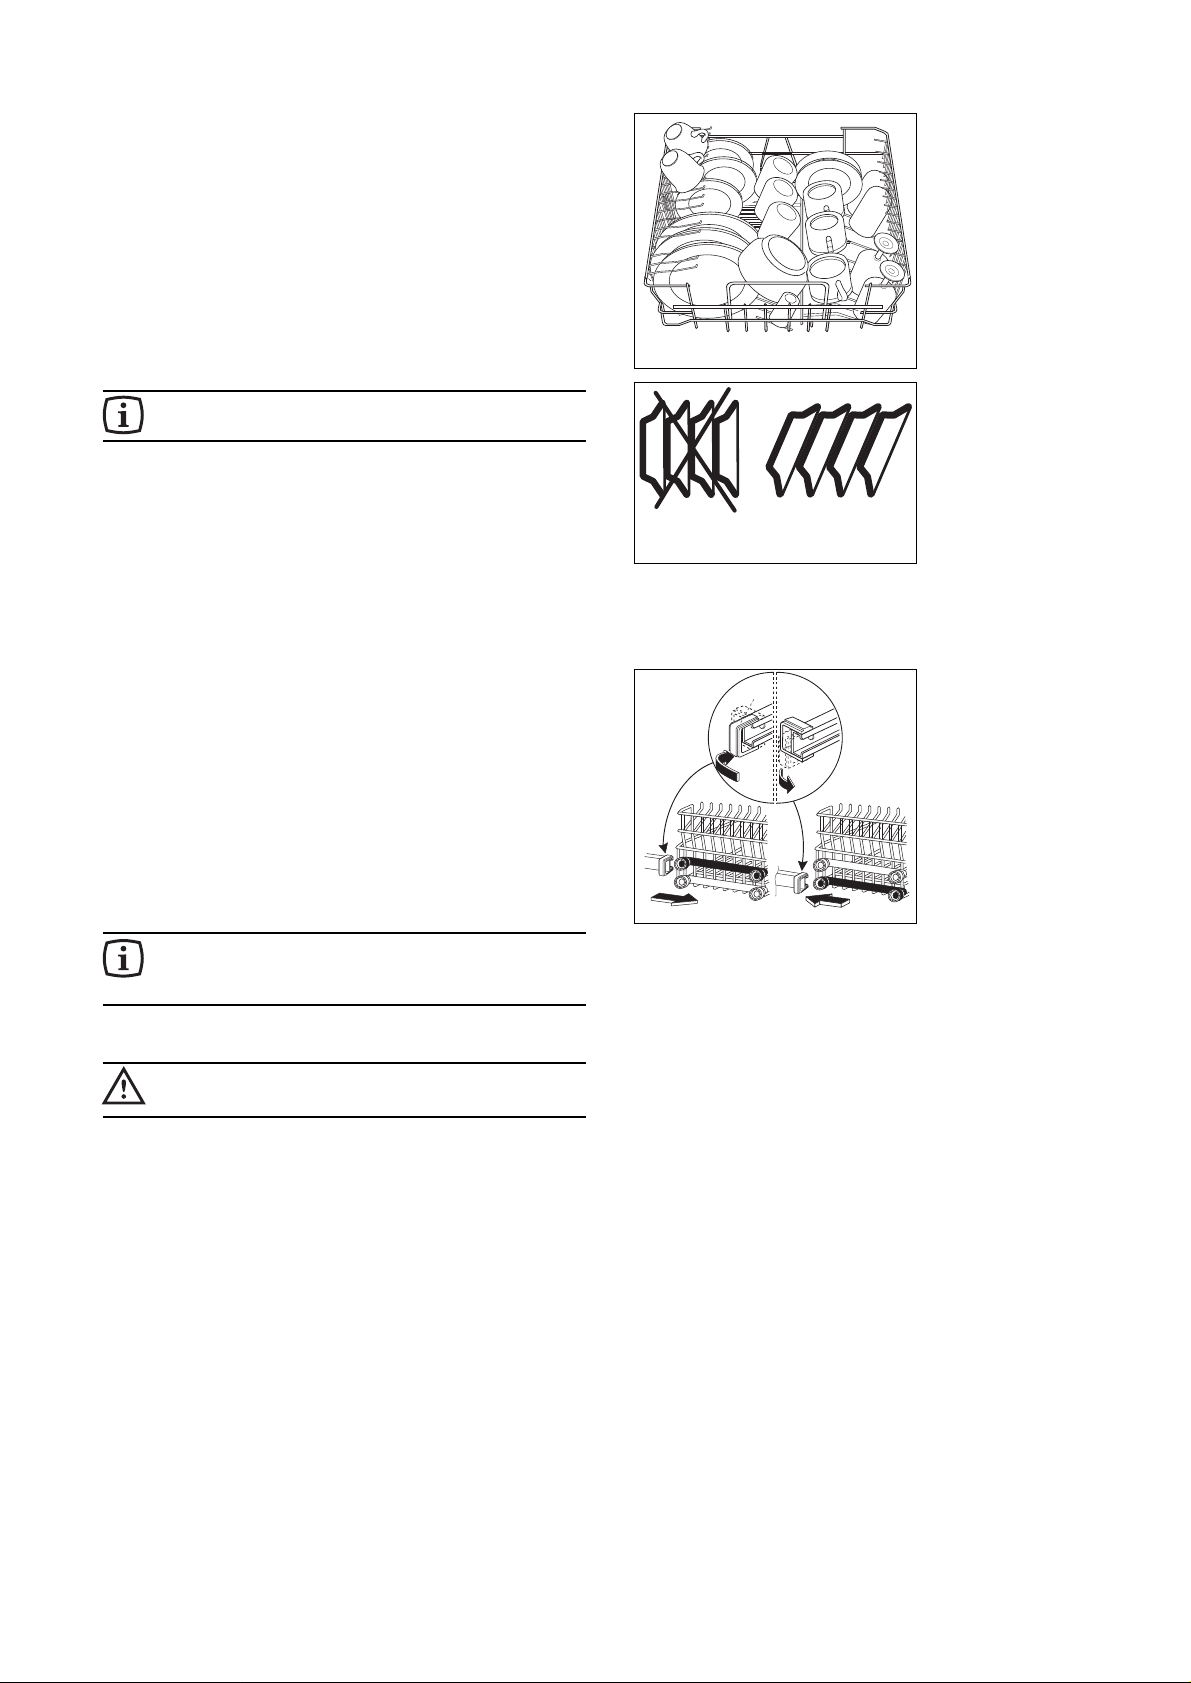
The upper basket
The upper basket is designed for plates (dessert plates,
saucers, dinner plates of up to 24 cm in diameter), salad
bowls, cups and glasses.
If dishes are loaded in the upper basket, tilt them forwards.
Arrange items on and underneath the fold-down cup racks
so that water can reach all surfaces.
Light items (plastic bowls etc.) should be loaded in the upper
basket and arranged so they do not move.
Before closing the door, ensure that the spray
arms can rotate freely.
Adjusting the height of the upper
basket
If washing very large plates (over 27 cm and up to 31 cm in
diameter) you can load them in the lower basket after
moving the upper basket to the higher position.
To move to the higher position proceed as follows:
1. Move the front runner stops (A) of the upper basket
outwards and slide the basket out.
2. Refit the basket in the higher position and replace the
stops (A) in their original position.
When the top basket is in the higher position it
will only take plates up to 20 cm in diameter and
you will not be able to use the raised cup racks.
After loading your machine always close the
door,as an open door can be a hazard.
US64
US70
A
RC01
Page 7
Dimensions Width 59.6 cm
Height 81.8 - 87.8 cm
Max depth 57.5 cm
Max depth with open door 111.4 cm
Electrical connection Voltage 230 V - 50 Hz
Motor rating during wash 200 W
Power of heating element 2100 W
Overall power 2300 W
Water supply pressure Minimum 50 kPa (0.5 bar)
Maximum 800 kPa (8 bar)
Capacity 12 place settings
Technical specifications
28
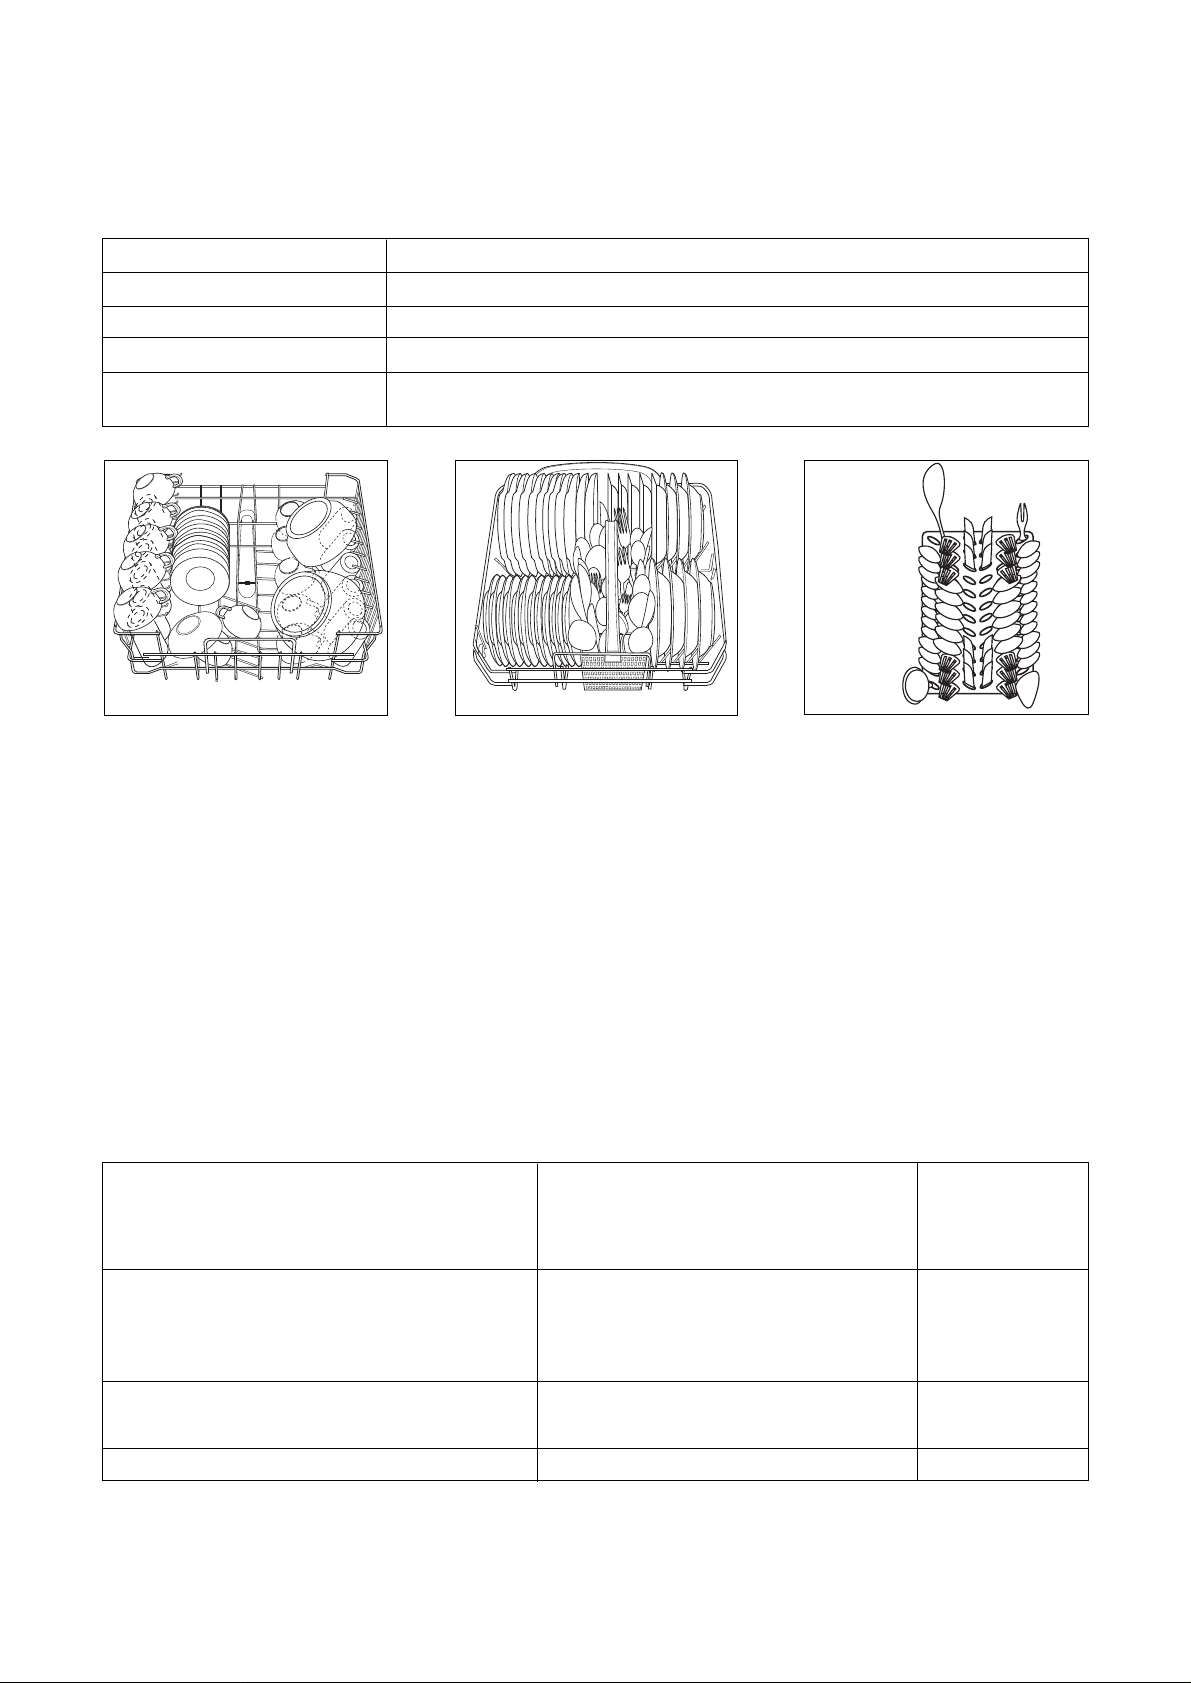
Hints for test centres
Before starting any test it is necessary to fill completely with salt the salt container and with rinse aid the rinse aid dispenser
Test standard: EN 50242
Reference programme: Bio 50°c with prewash
Load: 12 standard place settings
Rinse aid selector: position 5
Detergent dosage: 25 g in the dispenser
5 g on the dispenser lid
Arrangement
upper basket
Arrangement
cutlery basket
UI49
Arrangement
lower basket
US57
UI72
Page 8
29
Protection against flooding
In order to prevent water floods, the machine has been
provided with two devices, having the following
characteristics:
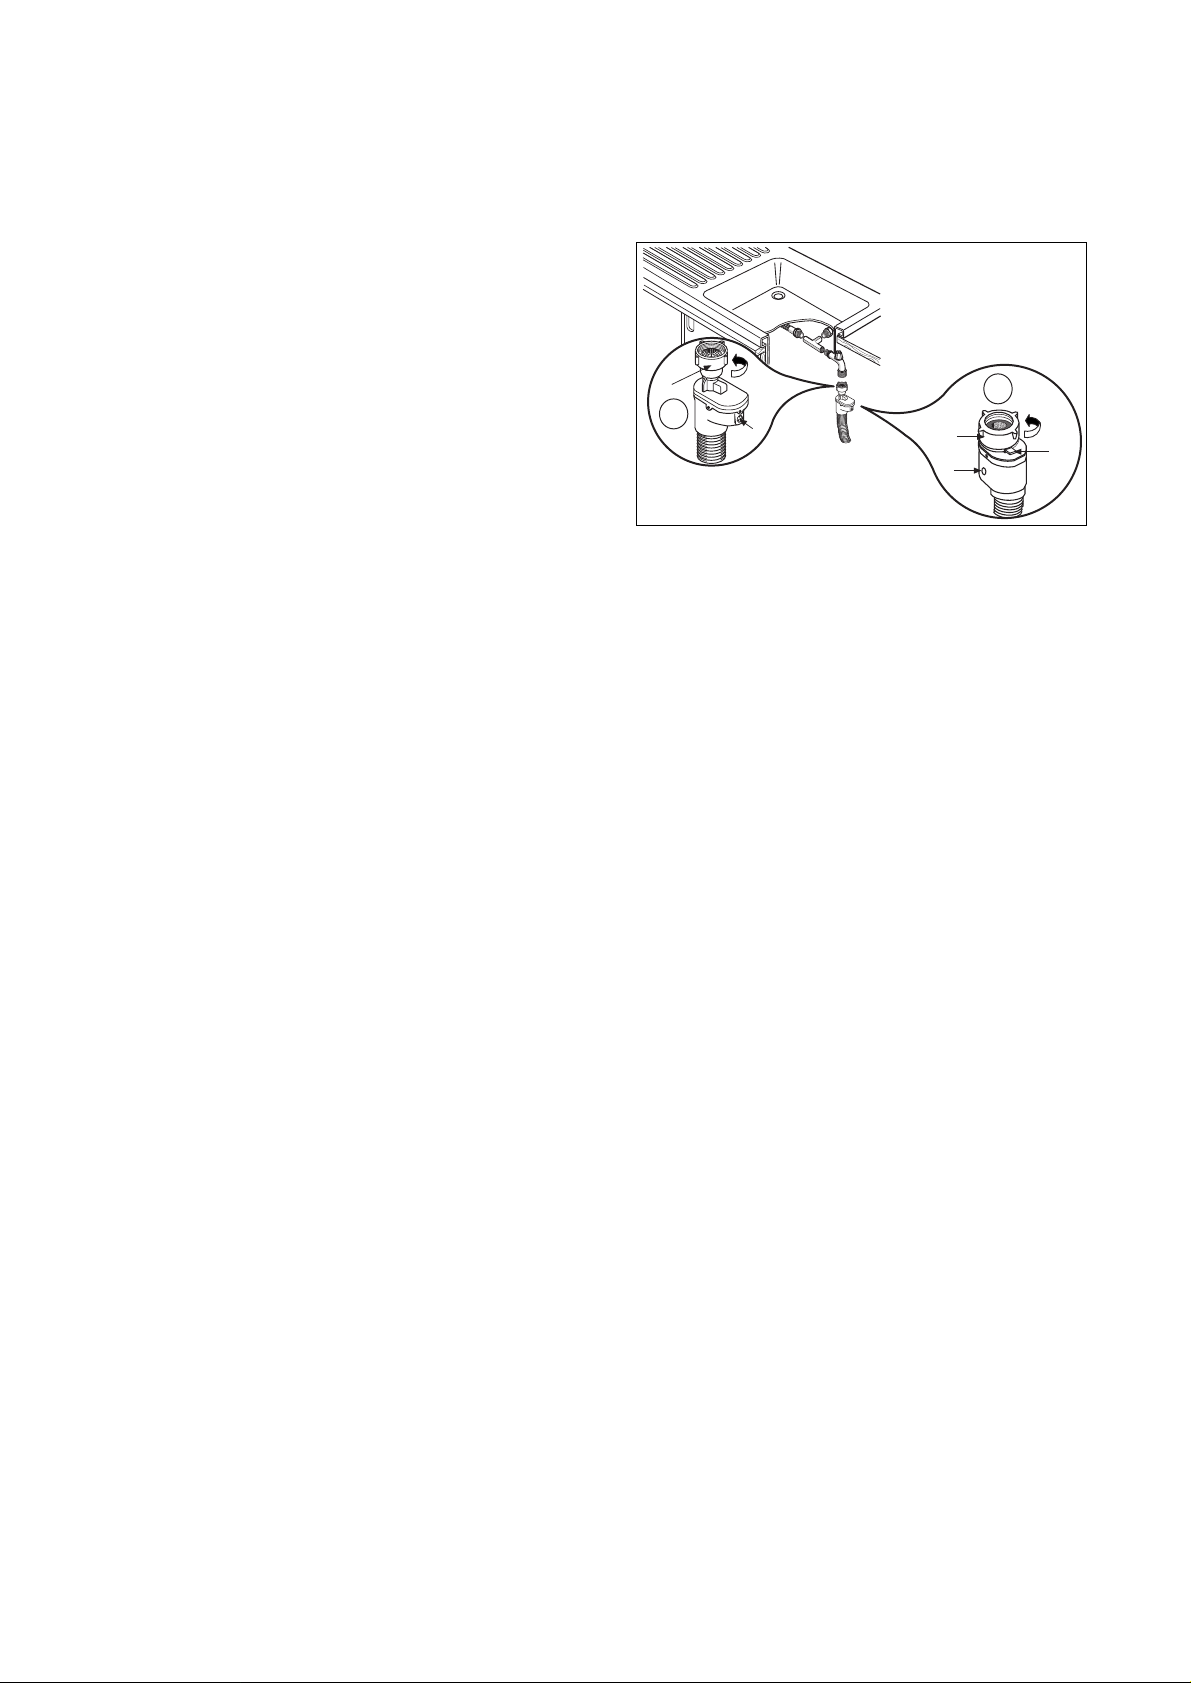
1. In the water inlet hose:
The water supply hose is fitted with a safety device,
which prevents water from entering the machine should
the inner hose split, due to wear.It operates even with
the machine off
The problem is signalled by a red indicator which
appears in the window (B - ➀ ➁).
If this happens, close the water tap and have the hose
replaced.
The retaining ring (A - ➀ ➁) must be properly fitted so as
to avoid water leaks.
Note!
Only for water supply hoses with Lock-fast safety
device to prevent inadvertent loosening.
To detach the hose press yellow lever (C - ➁) and turn
the retaining ring anticlockwise ➁.
2. In the bottom of the machine:
This device will operate if there are any water leaks in
the machine, however it will only operate if the machine
is on.
In case of intervention, turn off the water tap and call the
Service Force Centre.
To repair the machine call the Service Centre.
B
A
B
A
C
CA13
1
2
Page 9

The Electrolux Group. The world’s No.1 choice.
The Electrolux Group is the world’s largest producer of powered appliances for kitchen,
cleaning and outdoor use. More than 55 million Electrolux Group products (such as
refrigerators, cookers, vacuum cleaners, chain saws and lawn mowers) are sold each year
to a value of approx. 14 billion USD in more than 150 countries around the world.
 Loading...