

Page 1

user manual
bruksanvisning
bruksanvisning
Dishwasher
Oppvaskmaskin
Diskmaskin
ESI 45010
Page 2
2 electrolux
Electrolux. Thinking of you.
Share more of our thinking at www.electrolux.com
Contents
Safety information 2
Product description 3
Control panel 4
Use of the appliance 5
Setting the water softener 6
Use of dishwasher salt 7
Use of rinse aid 8
Loading cutlery and dishes 9
Use of detergent 11
Multitab function 12
Subject to change without notice
Setting and starting a washing programme
Washing programmes 14
Care and cleaning 14
What to do if… 16
Technical data 17
Installation 17
Water connection 18
Electrical connection 19
Environment concerns 19
Safety information
For your safety and correct operation of
the appliance, read this manual carefully
before installation and use. Always keep
these instructions with the appliance
even if you move or sell it. Users must
fully know the operation and safety features of the appliance.
Correct use
• The appliance is designed exclusively for
domestic use.
• Only use the appliance to clean household
utensils that are applicable for dishwashers.
• Do not put solvents in the appliance. Risk
of explosion.
• Put the knives and all items with sharp
points in the cutlery basket with their
points down. If not, put in a horizontal position in the upper basket.
• Use only branded products for dishwashers (detergent, salt, rinse aid).
• If you open the door while the appliance is
in operation, hot steam can escape. Risk
of skin burns.
•Do not remove dishes from the dishwasher
before the end of the washing programme.
• When the washing programme is completed, disconnect the mains plug from the
mains socket and close the water tap.
• Only an authorised service engineer can
repair this appliance. Use only original
spare parts.
• Do not do repairs yourself to prevent injury
and damage to the appliance. Always contact your local Service Force Centre.
General safety
• Persons (including children) with reduced
physical sensory, mental capabilities or
lack of experience and knowledge must
not use the appliance. They must have supervision or instruction for the operation of
the appliance by a person responsible for
their safety.
• Obey the safety instructions from the manufacturer of the dishwasher detergent to
prevent burns to eyes, mouth and throat.
• Do not drink the water from the dishwasher. Detergent residues can stay in your appliance.
• Always close the door when you do not
use the appliance to prevent injury and not
to stumble over the open door.
• Do not sit or stand on the open door.
Child safety
• Only adults can use this appliance. Children must get supervision to make sure
that they do not play with the appliance.
• Keep all the packaging away from children.
There is a risk of suffocation.
• Keep all detergents in a safe area. Do not
let children touch the detergents.
• Keep children away from the appliance
when the door is open.
12
Page 3
electrolux 3
Installation
• Make sure that the appliance is not damaged because of transport. Do not connect a damaged appliance. If necessary,
contact the supplier.
• Remove all packaging before first use.
• A qualified and competent person must do
the electrical installation.
• A qualified and competent person must do
the plumbing installation.
• Do not change the specifications or modify
this product. Risk of injury and damage to
the appliance.
• Do not use the appliance:
Product description
– if the mains cable or water hoses are
damaged,
– if the control panel, worktop or plinth
area are damaged, that you can get access to the inner side of the appliance.
Contact your local Service Force Centre.
• Do not drill into the sides of the appliance
to prevent damage to hydraulic and electrical components.
Warning! Carefully obey the
instructions for electrical and water
connections.
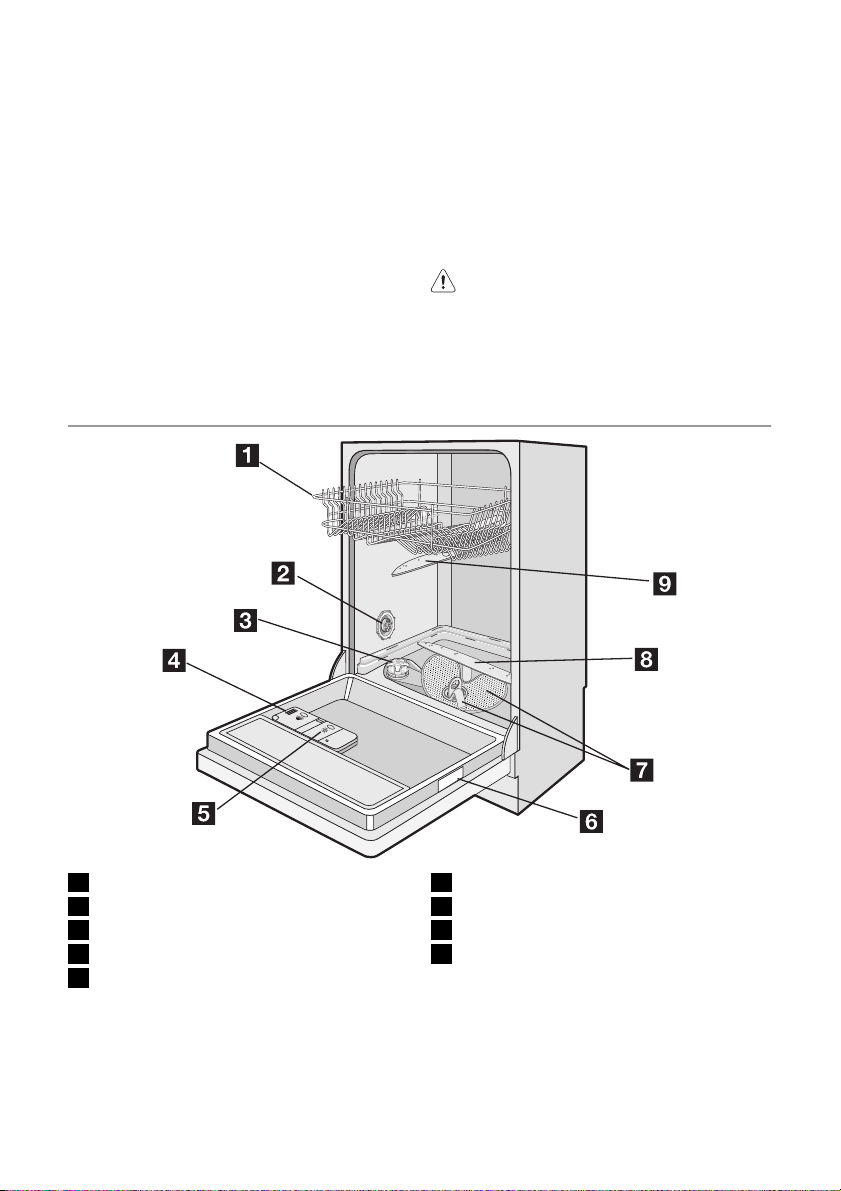
1 Upper basket
2 Water hardness dial
3 Salt container
4 Detergent dispenser
5 Rinse aid dispenser
6 Rating plate
7 Filters
8 Lower spray arm
9 Upper spray arm
Page 4

4 electrolux
Control panel
1 On/off button
2 Programme selection buttons
3
Delay start button
4 Digital display
5 Indicator lights
6 Function buttons
Indicator lights
Programme-in-progress – Comes on when you select a washing pro-
End-of-programme Comes on when the washing programme is com-
gramme.
– Stays on for all the duration of the washing pro-
gramme.
– Goes off at the end of the washing programme.
pleted. Auxiliary functions:
• Level of the water softener.
• Activation/deactivation of the rinse aid dispenser.
• An alarm if the appliance has a malfunction.
Page 5

electrolux 5
Indicator lights
Multitab Comes on when you activate the multitab func-
1)
Salt
Rinse aid
1) When the salt and/or rinse aid containers are empty, the related indicator lights do not come on while
1)
a washing programme operates.
Programme selection buttons
With these buttons you can select the washing programme. Press a programme button,
the related indicator light comes on. Refer to
'Washing programmes' chapter for more data about the washing programmes.
Delay start button
Use the delay start button to delay the start
of the washing programme with an interval
between 1 and 9 hours. Refer to the chapter
'Setting and starting a washing programme'.
Digital display
The display shows:
• Number of hours for the delay start.
• If the appliance is in setting mode.
• If a washing programme is set.
Function buttons
Use the function buttons for these operations:
• To set the water softener. Refer to the
chapter 'Setting the water softener'.
• To cancel the washing programme in progress or a delay start in progress. Refer to
the chapter 'Setting and starting a washing
programme'.
tion. Refer to the chapter 'Multitab function'.
Comes on when it is necessary to fill the salt container. Refer to the chapter 'Use of dishwasher
salt'.
After you fill the container, the salt indicator light
can continue to stay on for some hours. This does
not have an unwanted effect on the operation of
the appliance.
Comes on when it is necessary to fill the rinse aid
dispenser. Refer to the chapter 'Use of rinse aid'.
• To deactivate/activate the rinse aid dispenser, when multitab function is active.
Refer to the chapter 'Multitab function'.
Setting mode
The appliance must be in setting mode for
these operations:
• To set a washing programme.
• To set the water softener level.
• To deactivate/activate the rinse aid dispenser.
Press the on/off button. The appliance is in
setting mode when:
– All the programme indicator lights come on
and the digital display shows three horizontal bars.
Press the on/off button. The appliance is not
in setting mode when:
– Only one programme indicator light comes
on and the digital display shows one horizontal bar.
– A washing programme is set. It is neces-
sary to cancel the programme to go back
to the setting mode. Refer to the chapter
'Setting and starting a washing programme'.
• To activate/deactivate the multitab function. Refer to the chapter 'Multitab function'.
Use of the appliance
Refer to the following instructions for each
step of procedure:
1. Make a check if the water softener level
is correct for the water hardness in your
area. If necessary set the water softener.
Page 6
6 electrolux
2. Fill the salt container with dishwasher salt.
3. Fill the rinse aid dispenser with rinse aid.
4. Load cutlery and dishes into the dishwasher.
5. Set the correct washing programme for
7. Start the washing programme.
If you use combi detergent tablets ('3 in
1', '4 in 1', '5 in 1', etc.), refer to the
chapter 'Multitab function'.
the type of load and soil.
6. Fill the detergent dispenser with the correct quantity of detergent.
Setting the water softener
The water softener removes minerals and
salts from the water supply. Minerals and
salts can have bad effect on the operation of
the appliance.
Water hardness is measured in equivalent
scales:
• German degrees (dH°).
Water hardness Water hardness setting
°dH °TH mmol/l Clarke manually electronically
51 - 70 91 - 125 9,1 - 12,5 64 - 88 2 10
43 - 50 76 - 90 7,6 - 9,0 53 - 63 2 9
37 - 42 65 - 75 6,5 - 7,5 46 - 52 2 8
29 - 36 51 - 64 5,1 - 6,4 36 - 45 2 7
23 - 28 40 - 50 4,0 - 5,0 28 - 35 2 6
19 - 22 33 - 39 3,3 - 3,9 23 - 27 2 5
15 - 18 26 - 32 2,6 - 3,2 18 - 22 1 4
11 - 14 19 - 25 1,9 - 2,5 13 - 17 1 3
4 - 10 7 - 18 0,7 - 1,8 5 - 12 1 2
< 4 < 7 < 0,7 < 5
1) No use of salt required.
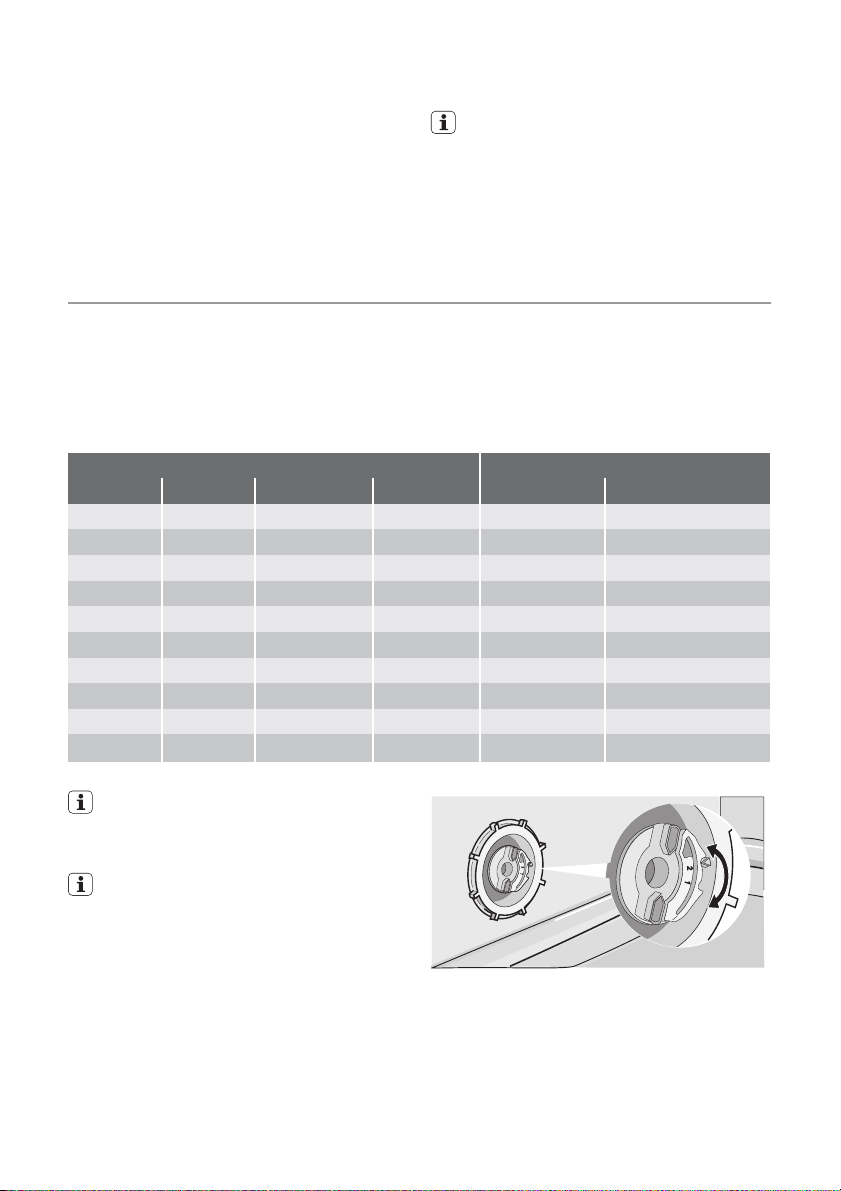
You must set the water softener manually and electronically.
Manual adjustment
The appliance is set at the factory at position 2.
1. Open the door.
2. Remove the lower basket.
3. Turn the water hardness dial to position
1 or 2 (refer to the chart).
4. Install the lower basket.
• French degrees (°TH).
• mmol/l (millimol per litre - international unit
for the hardness of water).
•Clarke.
Adjust the water softener to the water hardness in your area. If necessary, contact your
local water authority.
1)
1
5. Close the door.
Electronic adjustment
The water softener is set at the factory
at level 5.
1. Switch on the appliance.
2. Make sure that the appliance is in setting
mode.
1)
1
Page 7

electrolux 7
3. Press and hold function buttons B and C
until the indicator lights for function buttons A, B and C start to flash.
4. Release function buttons B and C.
5. Press function button A.
– The indicator light for function button A
continues to flash.
– The indicator lights for function buttons
B and C go off.
– The end-of-programme indicator light
starts to flash.
The setting function of the water softener
is activated.
Use of dishwasher salt
Caution! Only use dishwashers salt.
Types of salt that are not applicable for
dishwashers cause damage to the water
softener.
Caution! Grains of salt and salty water
on the bottom of the appliance can
cause corrosion. Fill the appliance with
salt before you start a washing
programme to prevent corrosion.
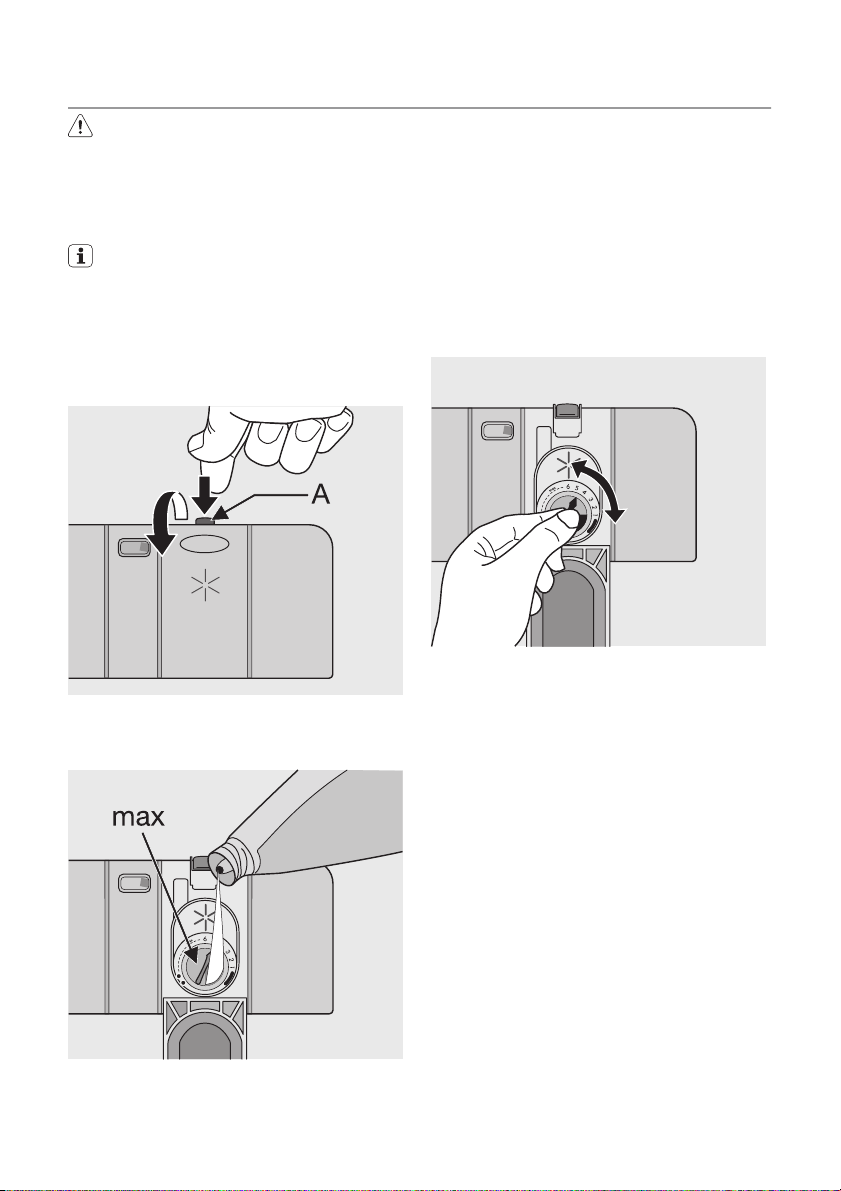
Do these steps to fill the salt container:
1. Turn the cap anticlockwise to open the
salt container.
2. Fill the salt container with 1 litre of water
(only the first operation).
3. Use the funnel to fill the salt container with
salt.
The end-of-programme indicator light
flashes to show the level of the water
softener. The pause is approximately 5
seconds.
Example: 5 flashes, pause, 5 flashes,
pause, etc. = level 5
6. Press the function button A one time to
increase the water softener level by one
step.
7. Press the on/off button to save the operation.
4. Remove the salt around the opening of
the salt container.
5. Turn the cap clockwise to close the salt
container.
It is normal that water overflows from the
salt container when you fill it with salt.
When you set electronically the water softener to level 1, the salt indicator light does
not stay on.
Page 8
8 electrolux
Use of rinse aid
Caution! Only use branded rinse aid for
dishwashers.
Do not fill the rinse aid dispenser with
other products (e.g. dishwasher cleaning agent, liquid detergent). This can
cause damage to the appliance.
Rinse aid makes it possible to dry the
dishes without streaks and stains.
Rinse aid is automatically added during
the last rinsing phase.
Do these steps to fill the rinse aid dispenser:
1. Press the release button (A) to open the
rinse aid dispenser.
3. Remove the spilled rinse aid with an absorbent cloth to prevent too much foam
during the subsequent washing programme.
4. Close the rinse aid dispenser.
Adjusting the rinse aid dosage
The rinse aid is set at the factory at position
4.
You can set the rinse aid dosage between
position 1 (lowest dosage) and position 6
(highest dosage).
2. Fill the rinse aid dispenser with rinse aid.
The mark 'max.' shows the maximum
level.
1. Turn the rinse aid dial to increase or decrease the dosage.
– Increase the dosage if there are water
droplets or limescale on the dishes.
– Decrease the dosage if there are
streaks, whitish stains or bluish layers
on the dishes.
Page 9

Loading cutlery and dishes
Helpful hints and tips
Caution! Only use the appliance for
household utensils that are applicable
for dishwashers.
Do not use the appliance to clean objects
that can absorb water (sponges, household
cloths, etc.).
• Before you load cutlery and dishes, do
these steps:
– Remove all food remainings and debris.
– Make burnt, remaining food in pans soft.
• While you load cutlery and dishes, do
these steps:
– Load hollow items (e.g. cups, glasses
and pans) with the opening down.
– Make sure that water does not collect in
the container or in a deep base.
– Make sure that cutlery and dishes do not
lie inside one another.
– Make sure that cutlery and dishes do not
cover other cutlery and dishes.
– Make sure that glasses do not touch
other glasses.
– Put small objects in the cutlery basket.
• Plastic items and pans with non-stick
coatings can keep water droplets. Plastic
items do not dry as well as porcelain and
steel items.
• Put light items in the upper basket. Make
sure that the items do not move.
Caution! Make sure that the spray arms
can move freely before you start a
washing programme.
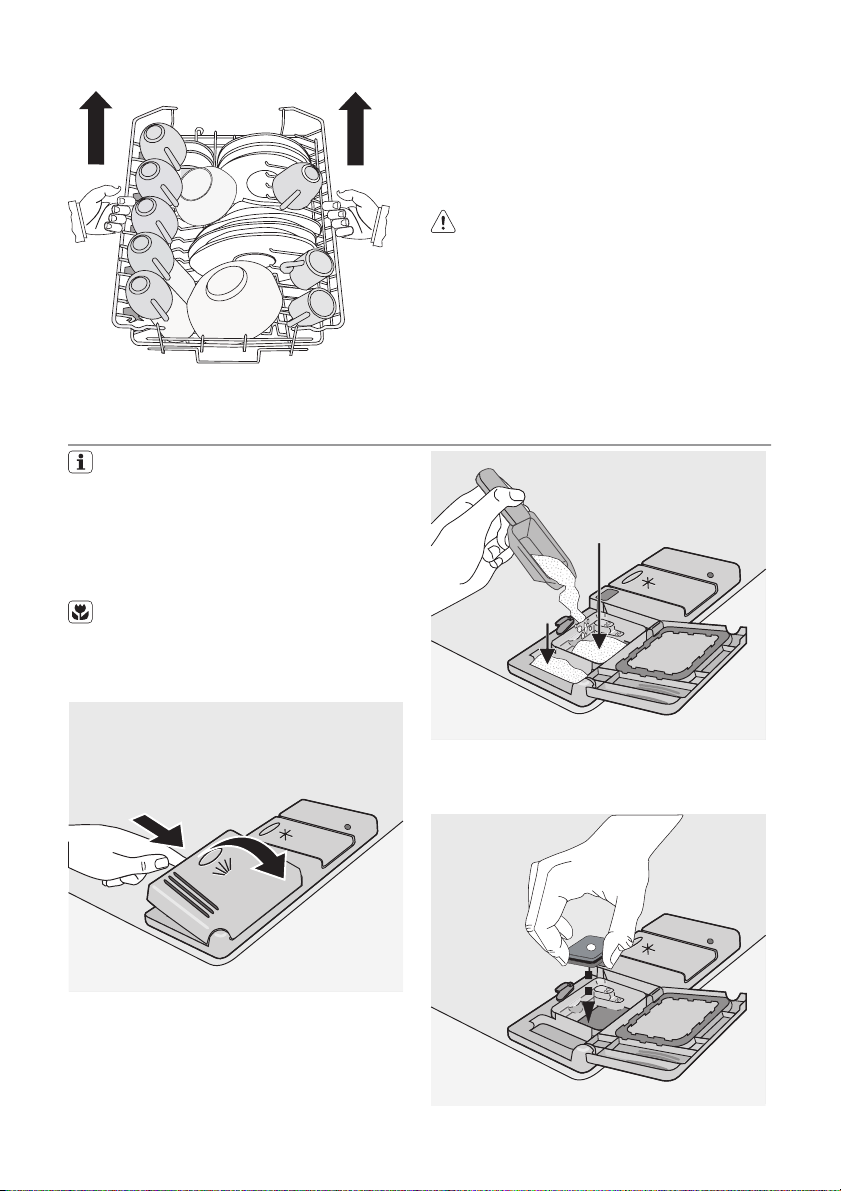
Warning! Always close the door after
you load or unload the appliance. An
open door can be dangerous.
Lower basket
Put saucepans, lids, plates, salad bowls and
cutlery in the lower basket. Arrange service
dishes and large lids around the edge of the
basket.
electrolux 9
Cutlery basket
Warning! Do not put long-bladed knives
in a vertical position. Arrange long and
sharp cutlery horizontally in the upper
basket. Be careful with sharp items.
Put forks and spoons with the handles down.
Put knives with the handles up.
Page 10

10 electrolux
Mix spoons with other cutlery to prevent
them to bond together.
Lower the handle of the cutlery to put cutlery
in the basket.
Upper basket
The upper basket is for plates (maximum 24
cm in diameter), saucers, salad bowls, cups,
glasses, pots and lids. Arrange the items to
let water touch all surfaces.
Put glasses with long stems in the cup racks
with the stems up. For longer items, fold the
cup racks up.
Use the cutlery grid. If the dimensions of the
cutlery prevent use of the cutlery grid, you
can easily hide it.
Adjustment of the height of the upper
basket
If you put large plates in the lower basket, first
move the upper basket to the upper position.
Maximum height of the dishes
Upper position 20 cm 31 cm
Lower position 24 cm 27 cm
upper basket
lower bas-
ket
Do these steps to move the upper basket to
the upper position:
1. Pull the basket out until it stops.
2. Carefully lift the two sides until the mechanism is engaged and the basket is stable.
Page 11
Use of detergent
Only use detergents (powder, liquid or
tablet) that are applicable for dishwashers.
Follow the data on the packaging:
• Dosage recommended by the manufacturer.
• Storage recommendations.
Do not use more than the correct quantity of detergent to save an environment.
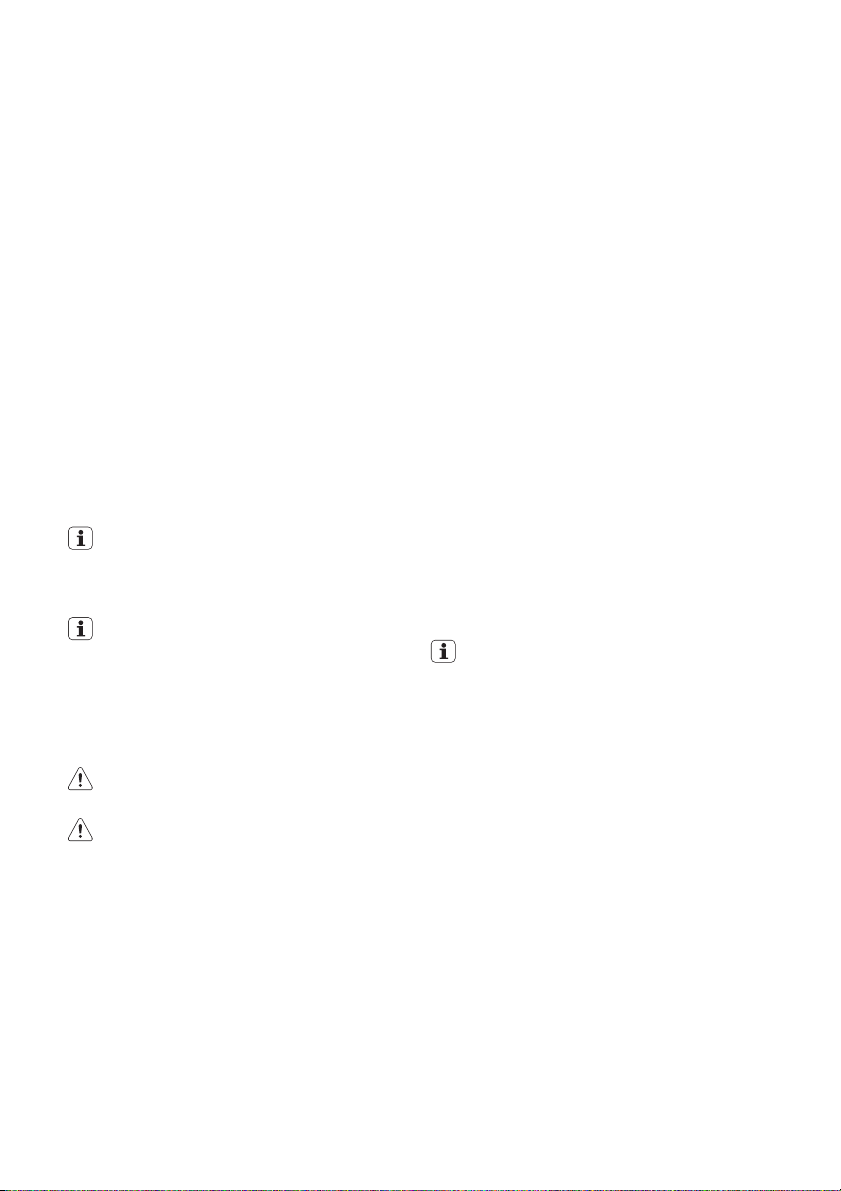
Do these steps to fill the detergent dispenser:
1. Open the lid of the detergent dispenser.
electrolux 11
Do these steps to move the upper basket to
the lower position:
1. Pull the basket out until it stops.
2. Carefully lift the two sides upwards.
3. Hold the mechanism and let it fall back
down slowly.
Caution!
• Do not lift or lower the basket on one
side only.
• If the basket is in the upper position,
do not put cups on the cup racks.
A
B
2. Fill the detergent dispenser (A) with detergent. The marking shows the dosage:
20 = approximately 20 g of detergent
30 = approximately 30 g of detergent.
3. If you use a washing programme with
prewash phase, put more detergent in
the prewash detergent compartment (B).
4. If you use detergent tablets, put the detergent tablet in the detergent dispenser
(A).
Page 12

12 electrolux
5. Close the lid of the detergent dispenser.
Press the lid until it locks into position.
Different brands of detergent dissolve in
different times. Some detergent tablets
do not have the best cleaning results
Multitab function
The multitab function is for combi detergent
tablets.
These tablets contain agents such as detergent, rinse aid and dishwasher salt. Some
types of tablets can contain other agents.
Do a check if these tablets are applicable for
the local water hardness. Refer to the instructions from the manufacturer.
When you set the multitab function, it stays
on until you deactivate it.
The multitab function stops automatically the
flow of rinse aid and salt. The salt indicator
light is deactivated.
The programme duration can increase if you
use the multitab function.
Activate or deactivate the multitab function before the start of a washing programme.
You cannot activate or deactivate the
multitab function when the programme
operates. Cancel the washing programme, then set the programme again.
To activate the multitab function:
•Press and hold the two multitab buttons
(function buttons D and E). The multitab
indicator light comes on.
To deactivate the multitab function:
•Press and hold the two multitab buttons
(function buttons D and E). The multitab
indicator light goes off.
Do these steps if the drying results
are not satisfactory:
1. Fill the rinse aid dispenser with rinse
aid.
2. Activate the rinse aid dispenser.
3. Set the rinse aid dosage to position
2.
during short washing programmes. Use
long washing programmes when you
use detergent tablets to fully remove the
detergent.
• You can only activate or deactivate
the rinse aid dispenser when the multitab function is activated.
To activate the rinse aid dispenser
1. Switch on the appliance.
2. Make sure that the appliance is in setting
mode.
3. Press and hold function buttons B and C.
– The indicator lights for function buttons
A, B, and C start to flash.
4. Press function button B.
– The indicator lights for function buttons
A and C go off.
– The indicator light for function button B
continues to flash.
5. Press function button B again.
– The end-of-programme indicator light
comes on.
6. Switch off the appliance to save the operation.
To deactivate the rinse aid dispenser do the
above steps until the end-of-programme indicator light goes off.
To use normal detergent again:
1. Deactivate the multitab function.
2. Fill the salt container and rinse aid
dispenser.
3. Adjust the water hardness setting to
the highest level.
4. Do a washing programme without
dishes.
5. Adjust the water softener to the water hardness in your area.
6. Adjust the rinse aid dosage.
Setting and starting a washing programme
Set the washing programme with the
door ajar. The washing programme
starts only after you close the door. Until
then it is possible to modify the settings.
Page 13
electrolux 13
Do these steps to set and start a washing
programme:
1. Switch on the appliance.
2. Make sure that the appliance is in setting
mode.
3. Press one of the programme buttons.
Refer to the chapter 'Washing programmes'.
– The programme indicator light comes
on.
– The digital display shows three hori-
zontal bars.
– The programme-in-progress indicator
light comes on.
4. Close the door.
– The washing programme starts auto-
matically.
– The programme-in-progress indicator
light remains on.
– The digital display shows only one hor-
izontal bar. It remains for all the duration of the washing programme.
When the washing programme operates, you cannot change the programme. Cancel the washing programme.
You can select the washing programme
and delay start also with the door closed.
When you press a programme button
you have only 3 seconds to select a different washing programme or a delay
start. After these 3 seconds, the selected programme starts automatically.
Warning! Only interrupt or cancel a
washing programme if necessary.
Caution! Open the door carefully. Hot
steam can come free.
Interrupting a washing programme
Open the door.
• The programme stops.
Close the door.
• The programme continues from the point
of interruption.
Cancelling a washing programme
1. Press and hold function buttons B and C
until:
– All the programme lights come on.
– The digital display shows three hori-
zontal bars.
2. Release function buttons B and C. The
washing programme is cancelled.
At this time you can do these steps:
1. Switch off the appliance.
2. Set a new washing programme .
Fill the detergent dispenser with detergent
before you set a new washing programme.
Setting and starting a washing
programme with delay start
1. Switch on the appliance.
2. Set a washing programme.
3. Press the delay start button until the display shows on flashing the necessary delay start of the washing programme.
4. Close the door.
– The countdown of the delay start
starts.
– The number on the display comes on
with fixed light.
– The programme-in-progress indicator
light goes off.
– The countdown of the delay start de-
creases with steps of 1 hour.
5. When the countdown is completed, the
washing programme starts automatically.
– The programme-in-progress indicator
light comes on.
Do not open the door during the countdown to prevent interruption of the
countdown. When you close the door
again, the countdown continues from
the point of interruption.
Cancelling a delay start
1. Press and hold function buttons B and C
until:
– All the programme lights come on.
– The digital display shows three hori-
zontal bars.
When you cancel a delay start, you also
cancel the washing programme.
2. Set a new washing programme.
End of the washing programme
• The appliance stops automatically.
• The programme-in-progress indicator light
goes off.
• The end-of-programme indicator light
comes on.
• The digital display goes off.
1. Switch off the appliance.
2. Open the door.
Page 14

14 electrolux
3. For better drying results, keep the door
ajar for some minutes before you remove
the dishes.
Let the dishes cool down before you remove
them from the appliance. Hot dishes are
easily damaged.
Removing the load
• First remove items from the lower basket,
then from the upper basket.
• There can be water on the sides and door
of the appliance. Stainless steel becomes
cool more quickly than the dishes.
Washing programmes
Washing programmes
Programme Degree of soil Type of load Programme description
Heavy soil Crockery, cutlery, pots
Intensive
Normal soil Crockery and cutlery Prewash
Normal
Normal or light
1)
Quick
Economy
Glass
1) This is the perfect daily programme to clean a not fully load. Ideal for a family of 4 persons who only
2) Test programme for test institutes. Please refer to separate leaflet supplied, for test data.
2)
want to load breakfast and dinner crockery and cutlery.
soil
Normal soil Crockery and cutlery Prewash
Normal or light
soil
and pans
Crockery and cutlery Main wash up to 60°C
Delicate crockery and
glassware
Consumption values
Programme Duration (in minutes) Energy (in kWh) Water (in litres)
Intensive 105 - 115 1,6 - 1,8 19 - 21
Normal 90 - 100 1,1 - 1,2 15 - 16
Quick 30 0,8 8
Economy 160 - 170 0,8 - 0,9 12 - 13
Glass 65 - 75 0,6 - 0,7 11 - 12
The pressure and temperature of the
water, the variations of power supply
and the quantity of dishes can change
these values.
Prewash
Main wash up to 70°C
2 intermediate rinses
Final rinse
Drying
Main wash up to 65°C
1 intermediate rinse
Final rinse
Drying
Final rinse
Main wash up to 50°C
1 intermediate rinse
Final rinse
Drying
Main wash up to 45°C
1 intermediate rinse
Final rinse
Drying
Care and cleaning
Warning! Switch the appliance off
before you clean the filters.
Page 15
electrolux 15
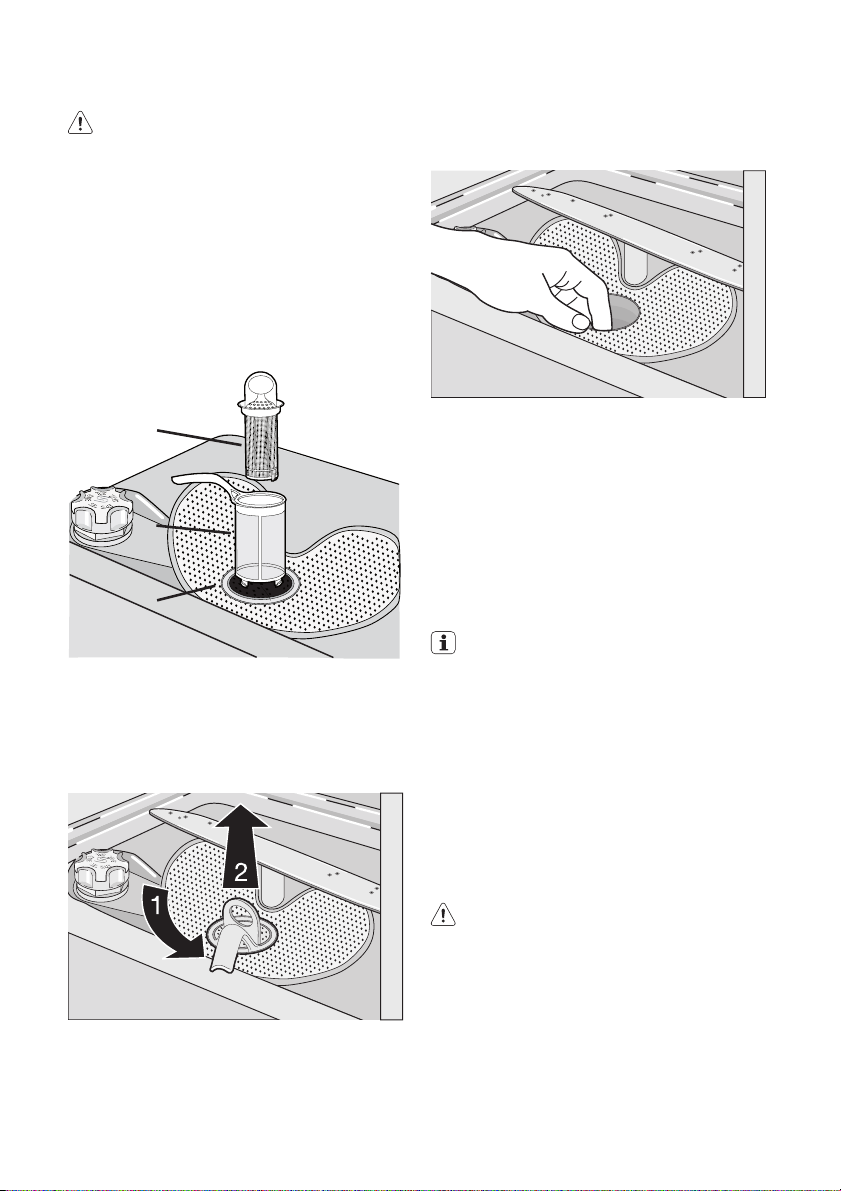
Cleaning the filters
Caution! Do not use the appliance
without the filters. Make sure that the
installation of the filters is correct.
Incorrect installation will cause
unsatisfactory washing results and
damage to the appliance.
If necessary, clean the filters. Dirty filters decrease the washing results.
The dishwasher has three filters:
1. coarse filter (A)
2. microfilter (B)
3. flat filter (C)
A
B
C
Do these steps to clean the filters:
1. Open the door.
2. Remove the lower basket.
3. To unlock the filter system, turn the handle on the microfilter (B) approximately
1/4 anticlockwise.
4. Remove the filter system.
5. Hold the coarse filter (A) by the handle
with the hole.
6. Remove the coarse filter (A) from the microfilter (B).
7. Remove the flat filter (C) from the bottom
of the appliance.
8. Clean the filters below running water.
9. Put the flat filter (C) in the bottom of the
appliance.
10. Put the coarse filter (A) in the microfilter
(B) and push the filters together.
11. Put the filter system in position.
12. To lock the filter system, turn the handle
on the microfilter (B) clockwise until it
lock in position.
13. Install the lower basket.
14. Close the door.
Do not remove the spray arms.
If the holes in the spray arms become clogged, remove remaining parts of soil with a
cocktail stick.
External cleaning
Clean the external surfaces of the appliance
and control panel with a damp soft cloth.
Only use neutral detergents. Do not use
abrasive products, scouring pads or solvents
(acetone, trichloroethylene etc...).
Frost precautions
Caution! Do not install the appliance
where the temperature is below 0 °C.
The manufacturer is not responsible for
damage because of frost.
If not possible, empty the appliance and
close the door. Disconnect the water inlet
hose and remove water from the water inlet
hose.
Page 16

16 electrolux
What to do if…
The appliance does not start or stops during
operation.
If there is a fault, first try to find a solution to
the problem yourself. If you cannot find a solution to the problem yourself, contact the
Service Force Centre.
Fault code and malfunction Possible cause and solution
• continuous flash of the light of the
running programme
• 1 flash of the end-of-programme
indicator light
The dishwasher does not fill with water
• continuous flash of the light of the
running programme
• 2 flashes of the end-of-programme indicator light
The dishwasher will not drain
• continuous flash of the light of the
running programme
• 3 flashes of the end-of-programme indicator light
The anti-flood device operates
The programme does not start • The appliance door is not closed.
• The water tap is blocked or furred with limescale.
Clean the water tap.
• The water tap is closed.
Open the water tap.
• The filter in the water inlet hose is blocked.
Clean the filter.
• The connection of the water inlet hose is not correct. The
hose can be kinked or squashed.
Make sure that the connection is correct.
• There is a blockage in the sink spigot.
Clean the sink spigot.
• The connection of the water drain hose is not correct. The
hose can be kinked or squashed.
Make sure that the connection is correct.
• Close the water tap and contact your local Service Force
Centre.
Close the door.
• Mains plug is not connected in.
Put in the mains.
• The fuse has blown out in the household fuse box.
Replace the fuse.
• Delay start is set.
Cancel the delay start to start the programme immediately.
After the check, switch on the appliance. The
programme continues from the point of interruption. If the malfunction shows again,
contact your Service Force Centre.
These data are necessary to help you quickly
and correctly:
•Model (Mod.)
The cleaning results are not satisfactory
The dishes are not clean • The selected washing programme is not applicable for the type of
load and soil.
• The baskets are loaded incorrectly so that water cannot reach all
surfaces.
• Spray arms do not turn freely because of incorrect arrangement of
the load.
• The filters are dirty or not correctly installed.
• The quantity of detergent is too little or missing.
Caution! Switch off the appliance
before you do the below suggested
corrective actions.
• Product number (PNC)
• Serial number (S.N.)
For these data, refer to the rating plate.
Write the necessary data here:
Model description : ..........
Product number : ..........
Serial number : ..........
Page 17

electrolux 17
The cleaning results are not satisfactory
Limescales particles on the
dishes
The dishes are wet and dull • No rinse aid has been used.
There are streaks, milky spots
or a bluish coating on glasses
and dishes
Dry water drop signs on
glasses and dishes
• The salt container is empty.
• The water softener is adjusted on a wrong level.
• The salt container cap is not closed correctly.
• The rinse aid dispenser is empty.
• Decrease the rinse aid dosage.
• Increase rinse aid dosage.
• The detergent can be the cause.
Technical data
Dimensions Width cm 44,6
Height cm 81,8 - 89,8
Depth cm 57,5
Electrical connection - Voltage -
Overall power - Fuse
Water supply pressure Minimum 0,5 bar (0,05 MPa)
Maximum 8 bar (0,8 MPa)
Capacity Place settings 9
Information on the electrical connection is given on the rating plate
on the inner edge of the dishwasher door.
Installation
Warning! Make sure that mains plug is
disconnected from the mains socket
during installation.
Important! Obey the instructions in the
enclosed template to:
• Build-in the appliance.
• Install the furniture panel.
• Connect to the water supply and drain.
Install the appliance under a counter (kitchen
worktop or sink).
If a repair is necessary, the appliance must
be easily accessible for the engineer.
Put the appliance adjacent to a water tap and
a drain.
For the venting of the dishwasher only water
fill, water drain and power supply cable openings are necessary.
The dishwasher has adjustable feet to allow
the adjustment of the height.
Make sure that the water inlet hose, the drain
hose and the supply cable are not kinked or
squashed, when you insert the machine.
Attaching the appliance to the adjacent
units
Make sure that the counter below which you
attach the appliance is a safe structure (adjacent kitchen units, cabinets, wall).
Adjusting the level of the appliance
Make sure that the appliance is level to close
and seal the door correctly. If the level of the
appliance is correct, the door does not catch
on the sides of the cabinet. If the door does
not close correctly, loosen or tighten the adjustable feet until the appliance is level.
Page 18

18 electrolux
Water connection
Water inlet hose
Connected the appliance to a hot (max. 60°)
or cold water supply.
If the hot water comes from alternative sources of energy that are more environmentally
friendly (e.g. solar or photovoltaic panels and
aeolian), use a hot water supply to decrease
energy consumption.
Connect the inlet hose to a water tap with an
external thread of 3/4”.
Caution! Do not use connection hoses
from an old appliance.
The water pressure must be in the limits (refer
to 'Technical data'). Make sure that the local
water authority gives you the average mains
pressure in your area.
Make sure that there are no kinks in the water
inlet hose and that the water inlet hose is not
squashed or entangled.
Fit the locknut correctly to prevent water
leaks.
Caution! Do not connect the appliance
to new pipes or pipes that are not used
for a long time. Let the water run for
some minutes, then connect the inlet
hose.
The water inlet hose is double-walled and
has an inner mains cable and a safety valve.
The water inlet hose is under pressure only
while the water is running. If there is a leak in
the water inlet hose, the safety valve interrupts the running water.
Be careful when you connect the water inlet
hose:
• Do not put the water inlet hose or the safety valve in water.
• If the water inlet hose or the safety valve is
damaged, immediately disconnect the
mains plug from the mains socket.
• Only let the Service Force Centre replace
the water inlet hose with safety valve.
Warning! Dangerous voltage
Water drain hose
1. Connect the water drain hose to the sink
spigot and attach it under the work surface. This prevents that the waste water
from the sink goes back into the appliance.
2. Connect the water drain hose to a stand
pipe with vent-hole (minimum internal diameter 4 cm).
max 85 cm
min 40 cm
max 400 cm
Make sure that the drain hose is not bent or
squashed to prevent that the water drains
does not drain correctly.
Remove the sink plug when the appliance
drains the water to prevent that the water
goes back into the appliance.
A drain hose extension must not be longer
than 2 m. The internal diameter must not be
smaller than the diameter of the hose.
If you connect the water drain hose to a trap
spigot under the sink, remove the plastic
membrane (A). If you do not remove the
membrane, remaining food can cause a
blockage in the drain hose spigot
Page 19

electrolux 19
The appliance has a security feature to
prevent that dirty water goes back into
the appliance. If, the spigot of the sink
has a 'non-return valve', this valve can
cause the appliance to drain incorrectly.
Remove the non-return valve.
Electrical connection
Warning! The manufacturer is not
responsible if you do not follow these
safety precautions.
Ground the appliance according to safety precautions.
Make sure that the rated voltage and
type of power on the rating plate agree
with the voltage and the power of the local power supply.
Always use a correctly installed shockproof socket.
Environment concerns
The symbol on the product or on its
packaging indicates that this product may
not be treated as household waste. Instead
it should be taken to the appropriate
collection point for the recycling of electrical
and electronic equipment. By ensuring this
product is disposed of correctly, you will help
prevent potential negative consequences for
the environment and human health, which
could otherwise be caused by inappropriate
waste handling of this product. For more
detailed information about recycling of this
product, please contact your local council,
your household waste disposal service or the
shop where you purchased the product.
The packaging materials are environmentally
friendly and can be recycled. The plastic
components are identified by markings, e.g.
>PE<, >PS<, etc. Discard the packaging
materials in the applicable container at the
community waste disposal facilities.
Warning! To discard the appliance,
follow the procedure:
• Pull the mains plug out of the socket.
• Cut off the mains cable and mains
plug and discard them.
Caution! Make sure that the water
couplings are tight to prevent water
leakage.
Do not use multi-way plugs, connectors
and extension cables. There is a risk of
fire.
Do not replace the mains cable yourself.
Contact the Service Force Centre.
Make sure that the mains plug is accessible after installation.
Do not pull the mains cable to disconnect the appliance. Always pull the
mains plug.
• Discard the door catch. This prevents
the children to close themselves inside the appliance and endanger their
lives.
Page 20

20 electrolux
Electrolux. Thinking of you.
Les mer om hvordan vi tenker på www.electrolux.com
Innhold
Sikkerhetsinformasjon 20
Produktbeskrivelse 21
Betjeningspanel 22
Før første gangs bruk 23
Stille inn vannhardhet 24
Bruke oppvaskmaskinsalt 25
Bruke skyllemiddel 25
Sette inn servise og bestikk 26
Bruke vaskemiddel 29
Multitab-funksjon 29
Med forbehold om endringer
Velge og starte et vaskeprogram 30
Vaskeprogrammer 32
Stell og rengjøring 32
Hva må gjøres, hvis... 34
Tekniske data 35
Montering 35
Vanntilkopling 36
Elektrisk tilkopling 37
Miljøvern 37
Sikkerhetsinformasjon
For at du skal bruke apparatet korrekt og
sikkert, må du lese denne bruksanvisningen nøye før apparatet installeres.
Oppbevar denne bruksanvisningen
sammen med apparatet, også hvis du
selger det eller flytter. Den som bruker
apparatet må være godt kjent med sikkerhetsfunksjonene og hvordan apparatet betjenes.
Riktig bruk
• Denne maskinen er utelukkende beregnet
for bruk i vanlig husholdning.
• Bruk maskinen kun til å vaske husholdningsredskaper som kan vaskes i oppvaskmaskin.
• Ikke ha løsemidler i maskinen. Eksplosjonsfare.
• Sett kniver og alle skarpe redskaper med
spissen ned i bestikkurven. Eller legg dem
horisontalt i den øvre kurven.
• Bruk kun produkter som er merket for
oppvaskmaskiner (oppvaskmiddel, salt,
skyllemiddel).
• Hvis du åpner døren mens maskinen er i
gang, kan det sive ut varm damp. Skåldingsfare.
• Ikke ta serviset ut av oppvaskmaskinen før
vaskeprogrammet er ferdig.
• Trekk støpselet ut av stikkontakten og
steng vannkranen når vaskeprogrammet
er ferdig.
• Kun en autorisert servicetekniker kan reparere denne maskinen. Bruk kun originale
reservedeler.
• Ikke foreta reparasjoner selv. Slik unngår
du personskade og skader på maskinen.
Ta alltid kontakt med kundeservice.
Generelt om sikkerhet
• Personer (innbefattet barn) med redusert
fysisk eller psykisk helse eller som ikke har
erfaring og kunnskaper om bruken, må ikke bruke apparatet. De må kun bruke apparatet under tilsyn og få instruksjon av en
person som er ansvarlig for deres sikkerhet.
• Følg sikkerhetsanvisningene fra vaskemiddelprodusenten for å unngå etseskader på
øyne, munn og svelg.
• Ikke drikk vannet fra oppvaskmaskinen.
Det kan være rester etter oppvaskmiddel.
• Lukk alltid døren når du ikke bruker apparatet, slik at du unngår personskader eller
at noen snubler over den åpne døren.
• Ikke sitt eller stå på den åpne døren.
Barns sikkerhet
• Dette apparatet skal kun brukes av voksne. Hold tilsyn med barn, slik at de ikke leker med apparatet.
• Hold all emballasje unna barns rekkevidde.
Kvelningsfare.
• Oppbevar alle vaskemidler på et trygt sted.
Ikke la barn få kontakt med vaskemidlene.
Page 21

electrolux 21
• Hold barn borte fra apparatet når døren er
åpen.
Installasjon
• Påse at apparatet ikke oppviser transportskader. Ikke kople til et skadet apparat. Om nødvendig, kontakt leverandøren.
• Fjern all emballasje før første gangs bruk.
• En kvalifisert og faglært person skal utføre
den elektriske installasjonen.
• En kvalifisert og faglært person skal utføre
vvs-tilkoplingen.
• Ikke modifiser eller endre spesifikasjonene
på dette produktet. Fare for personskade
eller skade på apparatet.
Produktbeskrivelse
• Ikke bruk apparatet:
– dersom strømkabelen eller vannslange-
ne er skadet,
– dersom betjeningspanelet, topplaten el-
ler sokkelen er så skadet at du har tilgang til apparatets indre.
Ta kontakt med nærmeste kunderservice.
• Ikke bor inn i sidene på apparatet, da dette
kan skade hydrauliske eller elektriske komponenter.
Advarsel Følg nøye anvisningene for
tilkopling av vann og strøm.
1 Øvre kurv
2 Innstillingshjul for vannhardhet
3 Saltbeholder
4 Oppvaskmiddelbeholder
5 Skyllemiddelbeholder
6 Typeskilt
7 Filtre
8 Nedre spylearm
9 Øvre spylearm
Page 22

22 electrolux
Betjeningspanel
1 På/Av-knapp
2 Knapper for programvalg
3
Knapp for starttidsforvalg
4 Digitalt display
5 Indikatorlamper
6 Funksjonsknapper
Indikatorlamper
Aktivt program – Tennes når du velger et vaskeprogram.
Programslutt Tennes når vaskeprogrammet er ferdig. Tilleggs-
– Blir værende på så lenge vaskeprogrammet va-
rer.
– Slukkes når vaskeprogrammet er ferdig.
funksjoner:
• Nivå på vannavherder.
• Aktivering/deaktivering av skyllemiddelbeholderen.
• En alarm hvis det oppstår en feil med apparatet.
Page 23

electrolux 23
Indikatorlamper
Multitab-funksjon Tennes når multitab-funksjonen aktiveres. Se ka-
1)
Salt
Skyllemiddel
1) Når salt- og/eller skyllemiddelbeholderen er tomme, tennes ikke indikatorlampene når et
vaskeprogram er i gang.
1)
Knapper for programvalg
Med disse knappene kan du velge vaskeprogram. Trykk på en programknapp, og tilsvarende indikatorlampe tennes. Se etter i
'Vaskeprogrammer' for mer informasjon om
vaskeprogrammene.
Knapp for starttidsforvalg
Bruk knappen for starttidsforvalg for å utsette
programstart med et intervall på mellom 1 og
9 timer. Se kapitlet "Stille inn og starte et vaskeprogram".
Digitalt display
Displayet viser:
• Antall timer til starttidsforvalg.
• Dersom apparatet er i innstillingsmodus.
• Dersom et vaskeprogram er innstilt.
Funksjonsknapper
Bruk funksjonsknappene når du vil gjøre følgende:
• Stille inn vannavherderen. Se kapitlet 'Stille
inn vannavherder'.
• Avbryte et aktivt vaskeprogram eller et ak-
tivt starttidsforvalg. Se kapitlet "Stille inn og
starte et vaskeprogram".
pitlet 'Multitab-funksjon'.
Indikatorlampen lyser når du må fylle opp saltbeholderen. Se kapitlet "Bruke oppvaskmaskinsalt".
Når du har fylt opp beholderen, kan indikatorlampen for salt fortsette å lyse i noen timer. Dette har
ingen ting å si for apparatet.
Tennes når du må fylle på mer skyllemiddel. Se
kapitlet "Bruk av skyllemiddel".
• Aktivere/deaktivere skyllemiddelbeholderen når multitab-funksjonen er aktivert. Se
kapitlet 'Multitab-funksjon'.
Innstillingsmodus
Apparatet må være i innstillingsmodus når du
vil stille inn følgende:
• Innstille et vaskeprogram.
• Innstille nivået på vannavherderen.
• Deaktivere/aktivere skyllemiddelbeholderen.
Trykk på På/Av-knappen. Apparatet er i innstillingsmodus når:
– Alle programindikatorlampene tennes og
det digitale displayet viser tre horisontale
streker.
Trykk på På/Av-knappen. Apparatet er ikke i
innstillingsmodus når:
– Kun én programindikatorlampe tennes og
det digitale displayet viser én horisontal
strek.
– Et vaskeprogram er innstilt. Avbryt pro-
grammet for å gå tilbake til innstillingsmodus. Se kapitlet "Stille inn og starte et vaskeprogram".
• Aktivere/deaktivere multitab-funksjonen.
Se kapitlet 'Multitab-funksjon'.
Før første gangs bruk
Se følgende instrukser for hvert trinn i prosedyren:
1. Kontroller at vannhardhetsnivået er kor-
rekt innstilt i henhold til vannhardheten
der du bor. Still inn avherderen om nødvendig.
2. Fyll saltbeholderen med spesialsalt for
oppvaskmaskiner.
3. Fyll skyllemiddel i skyllemiddelbeholderen.
4. Sett inn bestikk og servise i oppvaskmaskinen.
Page 24

24 electrolux
5. Velg korrekt vaskeprogram på bakgrunn
av mengden servise og grad av smuss.
6. Fyll oppvaskmiddelbeholderen med den
Hvis du bruker kombi-oppvaskmiddeltabletter ('3 i 1', '4 i 1', '5 i 1', osv.), se
'Multitab-funksjon'.
korrekte mengde oppvaskmiddel.
7. Start vaskeprogrammet.
Stille inn vannhardhet
Vannavherderen fjerner mineraler og salter
fra vannet som tilføres. Mineraler og salter
kan ha dårlig innvirkning på apparatets drift.
Vannhardheten måles i ekvivalente skalaer:
• Tyske grader (dH°).
• Franske grader (°TH).
Vannhardhet Innstilling av vannhardhet
°dH °TH mmol/l Clarke manuelt elektronisk
51 - 70 91 - 125 9,1 - 12,5 64 - 88 2 10
43 - 50 76 - 90 7,6 - 9,0 53 - 63 2 9
37 - 42 65 - 75 6,5 - 7,5 46 - 52 2 8
29 - 36 51 - 64 5,1 - 6,4 36 - 45 2 7
23 - 28 40 - 50 4,0 - 5,0 28 - 35 2 6
19 - 22 33 - 39 3,3 - 3,9 23 - 27 2 5
15 - 18 26 - 32 2,6 - 3,2 18 - 22 1 4
11 - 14 19 - 25 1,9 - 2,5 13 - 17 1 3
4 - 10 7 - 18 0,7 - 1,8 5 - 12 1 2
< 4 < 7 < 0,7 < 5
1) Ikke nødvendig med salt.
Du må stille inn vannavherderen manuelt
og elektronisk.
Manuell innstilling
Maskinen er fabrikkinnstilt på 2.
1. Åpne døren.
2. Fjern den nedre kurven.
3. Drei på innstillingshjulet for vannhardhet
til posisjon 1 eller 2 (se tabell).
4. Sett i den nedre kurven.
• mmol/l (millimol per liter - internasjonal enhet for vannhardhet).
•Clarke.
Still inn vannavherderen etter vannhardheten
der du bor. Kontakt om nødvendig kommunen eller vannverket.
1)
1
Elektronisk innstilling
Vannavherderen er fabrikkinnstilt på ni-
vå 5.
1. Slå apparatet på.
2. Forsikre deg om at apparatet befinner
seg i innstillingsmodus.
3. Trykk inn og hold inne funksjonsknappe-
ne B og C, til indikatorlampene på funksjonsknappene A, B og C begynner å
blinke.
4. Slipp funksjonsknappene B og C.
5. Trykk på funksjonsknapp A.
– Indikatorlampen for funksjonsknappen
A fortsetter å blinke.
– Indikatorlampene for funksjonsknap-
pene B og C slukker.
– Indikatorlampen for programslutt be-
gynner å blinke.
Innstillingsfunksjonen for vannavherderen
er aktivert.
1)
1
5. Lukk døren.
Page 25

electrolux 25
Indikatorlampen for programslutt blinker
for å vise det innstilte vannhardhetsnivået. Pausen varer i ca. 5 sekunder.
Eksempel: 5 blink, pause, 5 blink, pause,
osv. = nivå 5
Bruke oppvaskmaskinsalt
Obs Bruk kun oppvaskmaskinsalt.
Salttyper som ikke er beregnet for
oppvaskmaskin, ødelegger
vannavherderen.
Obs Saltkorn og saltvann i bunnen av
maskinen kan føre til korrosjon. Fyll
maskinen med salt før du starter et
vaskeprogram for å hindre korrosjon.
Gå frem som følger for å fylle saltbeholderen:
1. Drei hetten mot urviserne for å åpne saltbeholderen.
2. Fyll saltbeholderen med 1 liter vann (kun
ved første gangs drift).
3. Bruk trakten for å fylle salt i saltbeholderen.
6. Trykk på funksjonsknapp A én gang for å
øke avherderen med ett trinn.
7. Trykk på På/Av-knappen for å lagre
handlingen.
4. Fjern saltsøl rundt beholderens åpning.
5. Drei hetten med viserne for å lukke saltbeholderen.
Det er normalt at det renner vann fra
saltbeholderen når du fyller den med
salt.
Når du stiller vannavherderen på nivå 1, fortsetter ikke indikatorlampen å lyse.
Bruke skyllemiddel
Obs Bruk kun skyllemiddel som er
merket for oppvaskmaskin.
Fyll aldri andre produkter i skyllemiddelbeholderen (f.eks. vanlig oppvaskmiddel
eller flytende oppvaskmiddel). Dette kan
skade maskinen.
Skyllemiddelet gjør at serviset tørkes
uten striper og flekker.
Skyllemiddelet tilsettes automatisk i klarskyllingsfasen.
Gå frem som følger for å fylle skyllemiddelbeholderen:
Page 26

26 electrolux
1. Trykk på utløserknappen (A) for å åpne
skyllemiddelbeholderen.
2. Fyll skyllemiddel i skyllemiddelbeholderen. Merket 'max' viser maksimumsnivået.
3. Tørk bort skyllemiddelsøl med en absorberende klut for å unngå for mye skumdannelse under neste vaskeprogram.
4. Lukk skyllemiddelbeholderen.
Stille inn dosering av skyllemiddel
Skyllemiddelet er innstilt på posisjon 4 fra fabrikken.
Du kan stille inn skyllemiddeldoseringen på
mellom posisjon 1 (lavest dosering) og posisjon 6 (høyest dosering).
1. Drei skyllemiddelhjulet for å øke eller redusere doseringen.
– Øk doseringen hvis det er vanndråper
eller kalkflekker på serviset.
– Reduser doseringen hvis det er striper,
hvitaktige flekker eller blålig belegg på
serviset.
Sette inn servise og bestikk
Nyttige informasjoner og tips
Obs Bruk maskinen kun for
husholdningsredskaper som kan vaskes
i oppvaskmaskin.
Ikke bruk maskinen til å vaske gjenstander
som kan absorbere vann (svamper, husholdningstekstiler osv.).
• Før du setter servise og bestikk inn i maskinen, må du gjøre følgende:
– Fjern alle matrester.
– Bløtgjør rester av fastbrent mat i koke-
kar.
• Når du setter servise og bestikk inn i maskinen, må du gjøre følgende:
– Plasser hule redskaper (f.eks. kopper,
glass og kokekar) med åpningen ned.
– Påse at vannet ikke kan samle seg i be-
holdere eller hulrom.
– Påse at deler av servise eller bestikk ikke
ligger inni hverandre.
– Påse at serviset og bestikket ikke dek-
ker til hverandre.
– Påse at glass ikke berører hverandre.
– Plasser små gjenstander i bestikkurven.
Page 27

electrolux 27
• Plastredskaper og panner med teflonbelegg kan holde på vanndråper. Plastredskaper tørker ikke like godt som redskaper
av porselen eller stål.
• Plasser lette redskaper i den øvre kurven.
Påse at ingen redskaper kan bevege seg.
Obs Påse at spylearmene kan bevege
seg fritt før du starter et vaskeprogram.
Advarsel Lukk alltid døren etter at du
har fylt eller tømt maskinen. En åpen dør
kan medføre fare.
Nedre kurv
Sett kokekar, lokk, tallerkner, salatboller og
bestikk i den nedre kurven. Plasser serveringsfat og store grytelokk langs ytterkanten
av kurven.
Sett gafler og skjeer med skaftet ned.
Sett kniver med skaftet opp.
Bland skjeer med andre bestikkdeler for å
hindre at de legger seg i hverandre.
Senk håndtaket på bestikkurven, for å plassere bestikk i den.
Bestikkurv
Advarsel Ikke plasser lange, skarpe
kniver loddrett. Legg lange og skarpe
kniver vannrett i den øvre kurven. Vær
forsiktig med skarpe gjenstander.
Bruk bestikkristen. Hvis bestikket ikke passer
i bestikkristen, kan du lett fjerne den.
Page 28

28 electrolux
Øvre kurv
Den øvre kurven er for tallerkener (maksimum
24 cm i diameter), tefat salatskåler, kopper,
glass, gryter og lokk. Plasser alle gjenstandene slik at vannet kan nå frem til alle overflatene.
Justere høyden på den øvre kurven
Hvis du vil sette særlig store fat i den nedre
kurven, må du flytte den øvre kurven til en
høyere posisjon.
Maksimal høyde på serviset
øvre kurv nedre kurv
Øvre posisjon 20 cm 31 cm
Nedre posisjon 24 cm 27 cm
Gjør som følger for å flytte den øvre kurven til
øvre posisjon:
1. Trekk ut kurven til den stopper.
2. Løft begge sider forsiktig oppover til mekanismen griper i og kurven er stabil.
Plasser glass med lang stett i kopphyllene
med stetten opp. Du kan folde opp kopphyllene for høyere gjenstander.
Gjør som følger for å flytte den øvre kurven til
nedre posisjon:
1. Trekk ut kurven til den stopper.
2. Løft de to sidene forsiktig opp.
3. Hold mekanismen og la den falle langsomt på plass.
Obs
• Du må aldri løfte eller senke kurven
bare på den ene siden.
• Når kurven er i øverste posisjon, kan
du ikke bruke kopphyllene.
Page 29

Bruke vaskemiddel
Bruk kun oppvaskmiddel (pulver, flytende eller tablett) som er beregnet for oppvaskmaskin.
Følg opplysningene på pakken:
• Anbefalinger om dosering.
• Anbefalinger om oppbevaring.
Ikke bruk mer enn anbefalt mengde
oppvaskmiddel av hensyn til miljøet.
Gå frem som følger for å fylle i oppvaskmiddelbeholderen:
1. Åpne lokket på oppvaskmiddelbeholderen.
electrolux 29
A
B
4. Hvis du bruker oppvaskmiddeltabletter,
legger du tabletten i oppvaskmiddelbeholderen ( A).
2. Fyll oppvaskmiddelbeholderen ( A) med
oppvaskmiddel. Merket viser doseringen:
20 = ca. 20 g oppvaskmiddel
30 = omlag 30 g oppvaskmiddel.
3. Hvis du bruker et vaskeprogram med forvask, tilsetter du oppvaskmiddel i forvaskbeholderen også ( B).
Multitab-funksjon
Multitab-funksjonen er for kombi-oppvaskmiddeltabletter.
5. Lukk lokket på oppvaskmiddelbeholderen. Trykk på lokket til det klikker på
plass.
De forskjellige vaskemiddelmerkene løser seg opp i forskjellig hastighet. Noen
vaskemiddeltabletter oppnår ikke alltid
gode vaskeresultater under kortprogrammer. Bruk lange vaskeprogrammer
når du bruker vaskemiddeltabletter for å
fjerne vaskemiddelet fullstendig.
Page 30

30 electrolux
Disse tablettene inneholder midler for rengjøring, skyllemiddel og salt. Noen typer tabletter kan inneholde andre midler.
Kontroller om tablettene er egnet for vannhardheten der du bor. Les anvisningene fra
produsenten.
Hvis du stiller inn multitab-funksjonen, blir
den værende aktivert, til du deaktiverer den.
Multitab-funksjonen stopper tilførselen av
skyllemiddel og salt automatisk. Indikatorlampen for salt er deaktivert.
Hvis du bruker multitab-funksjonen, kan programvarigheten bli lengre.
Aktiver eller deaktiver multitab-funksjonen før du starter et vaskeprogram.
Du kan ikke aktivere eller deaktivere multitab-funksjonen etter at programmet
har startet. Avbryt vaskeprogrammet,
og still inn programmet på nytt.
Aktivere multitab-funksjonen:
• Trykk inn og hold inne de to multitab-knappene (funksjonsknappene D og E). Indikatorlampen for multitab tennes.
Deaktivere multitab-funksjonen:
• Trykk inn og hold inne de to multitab-knappene (funksjonsknappene D og E). Indikatorlampen for multitab slukkes.
Gå frem på følgende måte hvis tørkeresultatene ikke er tilfredsstillende:
1. Fyll skyllemiddel i skyllemiddelbeholderen.
2. Aktiver skyllemiddelbeholderen.
3. Still inn skyllemiddeldoseringen på 2.
• Du kan kun aktivere/deaktivere skyllemiddelbeholderen når multitabfunksjonen er aktivert.
Aktivere skyllemiddelbeholderen
1. Slå maskinen på.
2. Påse at maskinen er i innstillingsmodus.
3. Trykk inn og hold inne funksjonsknappene B og C.
– Indikatorlampene for funksjonsknap-
pene A, B, og C begynner å blinke.
4. Trykk på funksjonsknapp B.
– Indikatorlampene for funksjonsknap-
pene A og C slukkes.
– Indikatorlampen for funksjonsknapp B
fortsetter å blinke.
5. Trykk en gang til på funksjonsknapp B.
– Indikatorlampen for programslutt ten-
nes.
6. Slå maskinen av for å lagre innstillingene.
For å deaktivere skyllemiddelbeholderen, går
du gjennom trinnene ovenfor til indikatorlampen for programslutt slukkes.
Gå frem på følgende måte for å bruke
vanlig oppvaskmiddel igjen:
1. Deaktiver multitab-funksjonen.
2. Fyll saltbeholderen og skyllemiddelbeholderen.
3. Still vannhardheten på høyeste nivå.
4. Kjør et vaskeprogram uten servise.
5. Still inn vannavherderen etter vannhardheten der du bor.
6. Still inn doseringen av skyllemiddel.
Velge og starte et vaskeprogram
Velg vaskeprogram med døren litt på
gløtt. Vaskeprogrammet starter først når
du lukker døren. Inntil da kan du endre
valget ditt.
Gå frem på følgende måte for å innstille og
starte et oppvaskprogram:
1. Slå apparatet på.
2. Forsikre deg om at apparatet befinner
seg i innstillingsmodus.
3. Trykk på en av programknappene. Se kapittelet "Vaskeprogrammer".
– Programindikatorlampen tennes.
– Det digitale displayet viser tre horison-
tale streker.
– Indikatorlampen for det aktive pro-
grammet tennes.
4. Lukk døren.
– Vaskeprogrammet starter automatisk.
– Indikatorlampen for det aktive pro-
grammet fortsetter å lyse.
– Det digitale displayet viser kun én hori-
sontal strek. Den blir værende der så
lenge vaskeprogrammet varer.
Du kan ikke endre et vaskeprogram som
er i gang. Avbryt vaskeprogrammet.
Page 31

electrolux 31
Du kan velge vaskeprogram og starttidsforvalg med døren lukket. Når du
trykker på en programknapp, har du kun
3 sekunder til å velge et annet program
eller starttidsforvalg. Etter disse 3 sekundene starter det valgte programmet automatisk.
Advarsel Du må kun stoppe eller
avbryte et vaskeprogram hvis dette er
nødvendig.
Obs Åpne døren forsiktig. Det kan sive
ut varm damp.
Stoppe et vaskeprogram
Åpne døren.
• Programmet stopper.
Lukk døren.
• Programmet fortsetter fra der det ble stoppet.
Avbryte et vaskeprogram
1. Trykk inn og hold inne funksjonsknappe-
ne B og C til:
– Alle programlampene tennes.
– Det digitale displayet viser tre horison-
tale streker.
2. Slipp funksjonsknappene B og C. Vaske-
programmet er avbrutt.
Nå kan nå gjøre følgende:
1. Slå av apparatet.
2. Still inn et nytt vaskeprogram .
Fyll oppvaskmiddelbeholderen med oppvaskmiddel før du velger et nytt vaskeprogram.
Velge og starte vaskeprogram med
starttidsforvalg
1. Slå apparatet på.
2. Velg et vaskeprogram.
3. Trykk på knappen for starttidsforvalg til
tidspunktet du vil at vaskeprogrammet
skal starte, blinker i displayet.
4. Lukk døren.
– Nedtellingen for starttidsforvalget vil
begynne.
– Nummeret lyser kontinuerlig på di-
splayet.
– Indikatorlampen for det aktive pro-
grammet slukker.
– Nedtellingen for startidsforvalget skjer i
trinn på 1 time.
5. Når nedtellingen er ferdig, starter vaskeprogrammet automatisk.
– Indikatorlampen for det aktive pro-
grammet tennes.
Ikke åpne døren under nedtellingen, ellers vil innstillingen avbrytes. Når du lukker døren igjen, vil nedtellingen begynne
fra det punktet den ble avbrutt.
Avbryte et starttidsforvalg
1. Trykk inn og hold inne funksjonsknappene B og C til:
– Alle programlampene tennes.
– Det digitale displayet viser tre horison-
tale streker.
Når du avbryter et starttidsforvalg, avbryter du også vaskeprogrammet.
2. Velg et nytt vaskeprogram.
Når vaskeprogrammet er ferdig
• Apparatet stopper automatisk.
• Indikatorlampen for det aktive programmet slukker.
• Indikatorlampen for programslutt tennes.
• Det digitale displayet slukker.
1. Slå av apparatet.
2. Åpne døren.
3. La døren stå på gløtt i noen minutter før
du tar ut serviset. Da blir tørkeresultatet
bedre.
La serviset avkjøle seg før du tar det ut av
apparatet. Varmt servise er ømfintlig mot
støt.
Ta ut serviset
• Tøm den nedre kurven først, og deretter
den øvre.
• Det kan være vann på sidene og på døren
til oppvaskmaskinen, fordi det rustfrie stålet gradvis blir kaldere enn serviset.
Page 32

32 electrolux
Vaskeprogrammer
Vaskeprogrammer
Program Grad av smuss Type oppvask Beskrivelse av programmet
Meget skittent Servise, bestikk, gryter
Intensiv
Normalt skittent Servise og bestikk Forvask
Normalt
Normalt eller lett
1)
Kort
Energisparing
Glass
1) Dette er et perfekt program når apparatet ikke er helt fullt. Ideelt for en familie på 4 personer som bare
vil vaske bestikk og servise fra frokost og middag.
2) Testprogram for testinstitutter. Se eget vedlagt hefte for testdata.
skittent
Normalt skittent Servise og bestikk Forvask
2)
Normalt eller lett
skittent
og panner
Servise og bestikk Hovedvask opptil 60°C
Ømfintlig servise og
glasstøy
Forbruksverdier
Program Varighet (i minutter) Energiforbruk (i
Intensiv 105 - 115 1,6 - 1,8 19 - 21
Normalt 90 - 100 1,1 - 1,2 15 - 16
Kort 30 0,8 8
Energisparing 160 - 170 0,8 - 0,9 12 - 13
Glass 65 - 75 0,6 - 0,7 11 - 12
Vannets trykk og temperatur, variasjoner
i strømforsyning og mengden servise
kan endre disse verdiene.
Forvask
Hovedvask opptil 70°C
2 mellomskyllinger
Klarskylling
Tørking
Hovedvask opptil 65°C
1 mellomskylling
Klarskylling
Tørking
Klarskylling
Hovedvask opptil 50°C
1 mellomskylling
Klarskylling
Tørking
Hovedvask opptil 45°C
1 mellomskylling
Klarskylling
Tørking
Vann (i liter)
kWh)
Stell og rengjøring
Advarsel Slå av maskinen før du rengjør
filtrene.
Rengjøre filtrene
Obs Ikke bruk maskinen uten filtrene.
Påse at filtrene er satt korrekt på plass.
Feil installasjon fører til at
vaskeresultatene blir utilfredsstillende og
maskinen blir skadet.
Rengjør filtrene om nødvendig. Skitne filtre
fører til dårligere vaskeresultater.
Oppvaskmaskinen har tre filtre:
1. grovfilter (A)
2. mikrofilter (B)
3. flatfilter (C)
Page 33

A
B
C
Gå frem som følger for å rengjøre filtrene:
1. Åpne døren.
2. Fjern den nedre kurven.
3. Løsne filtersystemet ved å dreie håndta-
ket på mikrofilter (B) omlag 1/4 omgang
mot urviserne.
4. Fjern filtersystemet.
5. Hold i ringen på håndtaket til grovfilteret
(A).
6. Ta grovfilteret (A) av mikrofilteret (B).
7. Løft flatfilteret (C) ut av bunnen i opp-
vaskmaskinen.
electrolux 33
8. Rengjør filtrene under rennende vann.
9. Sett flatfilteret (C) inn i bunnen av maskinen.
10. Plasser grovfilteret (A) inn i mikrofilteret
(B) og trykk filtrene sammen.
11. Sett filtersystemet på plass.
12. For å låse filtersystemet, dreier du håndtaket på mikrofilteret med urviserne til
det klikker på plass.
13. Sett i den nedre kurven.
14. Lukk døren.
Ikke demonter spylearmene.
Hvis matrester blokkerer hullene i spylearmene, kan du fjerne dem med en tynn trepinne.
Utvendig rengjøring
Rengjør de utvendige overflatene på apparatet og betjeningspanelet med en myk, fuktig klut. Bruk kun nøytrale rengjøringsmidler.
Ikke bruk slipende rengjøringsmidler, skuresvamper eller løsemiddel (aceton, trikloroetylen osv...).
Forholdsregler ved frost
Obs Ikke installer apparatet på et sted
der temperaturen er under 0 °C.
Produsenten er ikke ansvarlig for skader
på grunn av frost.
Hvis dette ikke er mulig, tøm apparatet og
lukk døren. Kople fra vanntilførselsslangen
og fjern vannet fra tilførselsslangen.
Page 34

34 electrolux
Hva må gjøres, hvis...
Oppvaskmaskinen vil ikke starte eller stopper
under drift.
Hvis det er en feil, forsøk først å løse problemet selv. Hvis du ikke greier å løse problemet
selv, kontakter du serviceavdelingen.
Feilkode og feilfunksjon Mulig årsak og løsning
• indikatorlampen for det programmet som er i gang, blinker hele tiden
• Indikatorlampen for ferdig blinker
én gang
Oppvaskmaskinen tar ikke inn vann
• indikatorlampen for det programmet som er i gang, blinker hele tiden
• Indikatorlampen for programslutt
blinker 2 ganger
Oppvaskmaskinen tømmer ikke
• indikatorlampen for det programmet som er i gang, blinker hele tiden
• Indikatorlampen for programslutt
blinker 3 ganger
Lekkasjesystemet er aktivert
Programmet starter ikke • Apparatets dør er ikke lukket.
• Vannkranen er blokkert eller full av kalk.
Rengjør vannkranen.
• Vannkranen er stengt.
Åpne vannkranen.
• Filteret i vanninntaksslangen er tett.
Rengjør filteret.
• Vanninntaksslangen er ikke koplet til på riktig måte. Slangen
kan ligge i klem eller være vridd.
Påse at tilkoplingen er korrekt.
• Avløpsrøret til vasken er blokkert.
Rengjør avløpsrøret til vasken.
• Vannavløpsslangen er ikke koplet til på riktig måte. Slangen
kan ligge i klem eller være vridd.
Påse at tilkoplingen er korrekt.
• Steng vannkranen og ta kontakt med kundeservice.
Lukk døren.
• Støpselet er ikke satt inn i stikkontakten.
Sett støpslet i stikkontakten.
• Sikringen er gått i husets sikringskap.
Skift sikring.
• Starttidsforvalg er innstilt.
Avbryt starttidsforvalget for å starte programmet med en
gang.
Slå apparatet på etter kontrollen. Programmet fortsetter fra der det ble stoppet. Hvis
feilfunksjonen opptrer igjen, kontakt kundeservice.
Disse dataene trenger du for å få rask og riktig hjelp:
• Modell (Mod.)
Vaskeresultatet er ikke tilfredsstillende
Serviset er ikke rent • Det programmet du valgte, var ikke egnet for mengden servise og
graden av smuss.
• Serviset er plassert feil i kurven, slik at vannet ikke kan nå frem til
alle delene.
• Spylearmen kan ikke rotere fritt, fordi serviset er plassert feil.
• Filtrene er skitne eller sitter ikke som de skal.
• Det ble brukt for lite eller ikke noe oppvaskmiddel.
Obs Slå maskinen av, og følg forslagene
under for å rette feilen.
• Produktnummer (PNC)
• Serienummer (S.N.)
Se typeskiltet for disse dataene.
Skriv de nødvendige dataene ned her:
Modellbeskrivelse : ..........
Produktnummer : ..........
Serienummer : ..........
Page 35

electrolux 35
Vaskeresultatet er ikke tilfredsstillende
Det er kalkflekker på serviset • Saltbeholderen er tom.
Serviset er vått og matt • Det ble ikke brukt skyllemiddel.
Det er striper, melkeaktige
flekker eller blålig belegg på
glass og servise
Tørre flekker etter dråper på
glass og servise
• Vannavherderen er innstilt på feil nivå.
• Lokket på saltbeholderen er ikke skikkelig lukket.
• Skyllemiddelbeholderen er tom.
• Reduser dosering av skyllemiddel.
• Øk dosering av skyllemiddel.
• Det kan være oppvaskmiddelet som er årsaken.
Tekniske data
Mål Bredde cm 44,6
Høyde cm 81,8 - 89,8
Dybde cm 57,5
Elektrisk tilkopling - Spenning -
Totaleffekt - Sikring
Vanntilførselstrykk Minimum 0,5 bar (0,05 MPa)
Maksimum 8 bar (0,8 MPa)
Kapasitet Kuverter 9
På typeskiltet på kanten av døren på oppvaskmaskinen finner du
informasjon om den elektriske tilkoplingen.
Montering
Advarsel Forsikre deg om at apparatet
ikke er tilkoplet strømnettet under
installasjonen.
Viktig Følg nøye alle instruksjonene på
vedlagte sjablon for:
• Innbygging av apparatet.
• Montering av møbelpanel.
• Foreta tilkoplingene til vannforsyning og
vannavløp.
Monter apparatet under en benk (kjøkkenbenk eller utslagsvask).
Sørg for at det er enkelt å trekke fram maskinen ved service.
Plasser oppvaskmaskinen ved siden av en
vannkran og et avløp.
Det er ikke nødvendig med ytterligere åpninger for ventilasjon av oppvaskmaskinen, men
kun for å la vanninntaks- og avløpsslangene
samt den elektriske nettkabelen passere
gjennom.
Oppvaskmaskinen har justerbare føtter for å
tilpasse høyden.
Når maskinen settes på plass, pass på at
vanninntaksslangen, vannavløpsslangen og
strømforsyningskabelen ikke kommer i klem
eller bøyes.
Fest maskinen til seksjonene den står
inntil
Pass på at arbeidsbenken den er plassert
under er godt festet til tilstøtende seksjoner,
vegg e.l.
Sette apparatet i vater
Forsikre deg om at apparatet står i vater, slik
at døren lukker seg skikkelig. Dersom apparatet står riktig i vater, vil ikke døren berøre
sidene på kabinettet. Hvis døren ikke lukker
skikkelig, skrus de justerbare føttene enten
strammere eller løsere til maskinen er helt i
vater.
Page 36

36 electrolux
Vanntilkopling
Vanninntaksslange
Denne maskinen kan koples til en varm
(maks. 60°) eller kald vanntilførsel.
Hvis varmtvannet kommer fra alternative
energikilder som er mer miljøvennlige (f. eks.
solpaneler eller vindkraft), benyttes varmtvannstilførselen for å redusere maskinens
energiforbruk.
Kople inntaksslangen til en vannkran med utvendige gjenger på 3/4".
Obs Ikke bruk en tilkoplingsslange fra en
gammel maskin.
Vanntrykket må ligge innenfor grensene (se
'Tekniske spesifikasjoner'). Hos det lokale
vannverket får du opplysninger om gjennomsnittlig vanntrykk der du bor.
Påse at det ikke er knekk på vanninntaksslangen, og at den ikke ligger i klem eller er
vridd.
Plasser låsemutteren korrekt, slik unngår du
vannlekkasjer.
Obs Ikke kople maskinen til nye rør eller
rør som ikke har vært brukt på en stund.
La vannet renne i noen minutter før du
kopler til inntaksslangen.
Vanninntaksslangen er dobbeltmantlet og
har en innvendig strømkabel og en sikkerhetsventil. Vanninntaksslangen er kun under
trykk, når det strømmer vann gjennom den.
Hvis det er en lekkasje i vanninntaksslangen,
vil sikkerhetsventilen avbryte vanngjennomstrømningen.
Vær forsiktig når du kopler til vanninntaksslangen:
• Ikke legg vanninntaksslangen eller sikkerhetsventilen i vann.
• Hvis vanninntaksslangen eller sikkerhetsventilen er defekt, må du trekke støpselet
ut øyeblikkelig.
• En vanninntaksslange med sikkerhetsventil må kun skiftes ut av kundeservice.
Advarsel Farlig spenning
Vannavløpsslange
1. Kople vannavløpsslangen til vannlåsen
under vasken, og fest den under arbeidsbenken. Dette forhindrer at avløpsvann
fra vasken renner tilbake i maskinen.
2. Kople avløpsslangen til et fastmontert avløpsrør med ventil (minimum indre diameter 4 cm).
max 85 cm
min 40 cm
max 400 cm
Påse at det ikke er knekk på avløpsslangen
og at den ikke ligger i klem eller er vridd. Ellers
tømmes ikke vannet skikkelig.
Fjern proppen i vasken når maskinen tømmer
ut vannet, ellers kan vannet renne tilbake i
maskinen igjen.
En skjøteslange må ikke være lenger enn 2
m. Den innvendige diameteren må ikke være
mindre enn diameteren på slangen.
Hvis vannavløpsslangen koples til en vannlås
under en vask, må du fjerne plastmembranen
(A). Hvis du ikke fjerner membranen, kan matrester føre til blokkering i vannlåsen
Page 37

electrolux 37
Maskinen har en sikkerhetsinnretning
som forhindrer at avløpsvann renner tilbake i maskinen. Hvis røret på vasken
har en innebygget tilbakeslagsventil kan
dette føre til at oppvaskmaskinen ikke
Elektrisk tilkopling
Advarsel Produsenten er ikke ansvarlig
dersom du ikke følger disse
sikkerhetsforholdsreglene.
Jorde apparatet i samsvar med forholdsreglene om sikkerhet.
Påse at den nominelle spenningen og
strømtypen på typeskiltet samsvarer
med spenningen og strømtypen fra din
strømforsyning.
Bruk alltid en korrekt installert og støtsikker stikkontakt.
Miljøvern
Symbolet på produktet eller på
emballasjen viser at dette produktet ikke må
behandles som husholdningsavfall. Det skal
derimot bringes til et mottak for resirkulering
av elektrisk og elektronisk utstyr. Ved å sørge
for korrekt avhending av apparatet, vil du
bidra til å forebygge de negative
konsekvenser for miljø og helse som gal
håndtering kan medføre. For nærmere
informasjon om resirkulering av dette
produktet, vennligst kontakt kommunen,
renovasjonsselskapet eller forretningen der
du anskaffet det.
Emballasjen er miljøvennlig og kan gjenvinnes. Deler av plast er merket med f.eks.
>PE<, >PS< osv. Kast emballasjematerialene i riktig avfallsbeholder hos kommunens
avfallsinnsamlingsstasjon.
Advarsel Gå frem som følger for å
avfallsbehandle apparatet:
• Trekk støpselet ut av stikkontakten.
• Kutt strømkabelen med støpselet, og
kast det separat.
• Ødelegg dørlåsen. Dette forhindrer at
barn kan lukke seg selv inne i apparatet og utsette seg for livsfare.
tømmer som den skal. Fjern antireturventilen.
Obs Påse at vannforbindelsene er tette
for å unngå lekkasjer.
Ikke bruk doble stikkontakter eller skjøteledninger. Brannfare.
Ikke skift strømkabelen selv. Kontakt
kundeservice.
Påse at støpselet er tilgjengelig etter installasjonen.
Ikke trekk støpselet ut av stikkontakten
etter kabelen for å kople fra apparatet.
Trekk alltid i selve støpselet.
Page 38

38 electrolux
Electrolux. Thinking of you.
Ta del av våra tankegångar på www.electrolux.com
Innehåll
Säkerhetsinformation 38
Produktbeskrivning 39
Kontrollpanel 40
Innan maskinen används första gången
Att ställa in vattenavhärdaren 42
Användning av avhärdningssalt 43
Användning av sköljmedel 43
Att ladda bestick och porslin 44
Användning av diskmedel 47
Med reservation för ändringar
Multitab funktion 47
Att välja och starta ett diskprogram 48
Diskprogram 50
Underhåll och rengöring 50
Om maskinen inte fungerar 52
41
Tekniska data 53
Installation 53
Anslutning av vatten 54
Elektrisk anslutning 55
Miljöskydd 55
Säkerhetsinformation
För din egen säkerhet och för att du skall
kunna använda diskmaskinen på korrekt
sätt är det viktigt att du noggrant läser
igenom denna bruksanvisning innan du
installerar och använder diskmaskinen.
Förvara bruksanvisningen nära till hands
och se till att den också medföljer diskmaskinen om du flyttar eller säljer den.
Alla användare måste ha fullgod kännedom om användningen av diskmaskinen
och dess säkerhetsfunktioner.
Korrekt användning
• Denna diskmaskin är endast avsedd för
användning i hemmet.
• Använd diskmaskinen endast till att rengöra husgeråd som är lämpliga för diskmaskiner.
• Häll inte lösningsmedel i diskmaskinen.
Explosionsrisk föreligger.
• Placera knivar och andra vassa föremål i
bestickskorgen med spetsarna vända
nedåt. Lägg dem annars ned i den övre
korgen..
• Använd endast produkter (diskmedel, salt
och sköljmedel) som är avsedda för diskmaskiner.
• Het ånga kan strömma ut om du öppnar
luckan när maskinen är i drift. Risk för
brännskador föreligger.
• Plocka inte ut disk ur diskmaskinen förrän
diskprogrammet är klart.
• När diskprogrammet är klart, stäng av
diskmaskinen och stäng vattenkranen.
• Service på denna diskmaskin får endast
utföras av en auktoriserad servicetekniker.
Använd endast originaldelar vid reparationer och utbyten.
• Försök inte att utföra reparationer på egen
hand, detta för att undvika personskador
ch skador på diskmaskinen. Kontakta alltid vår lokala serviceavdelning.
Allmän säkerhet
• Personer (inklusive barn) med nedsatt fysisk, sensorisk eller mental förmåga, eller
om de har bristande erfarenhet och kunskap, får inte använda maskinen. De måste ges vägledning och instruktioner om
maskinens användning av en person som
ansvarar för deras säkerhet.
• Följ säkerhetsanvisningarna från tillverkaren av diskmedlet för att undvika brännskador i ögon, mun och hals.
• Drick inte vattnet som diskmaskinen använder. Rester från diskmedlet kan finnas
kvar i maskinen.
• Stäng alltid luckan när diskmaskinen inte
skall användas, detta för att undvika personskador och för att ingen skall snubbla
på den öppna luckan.
• Sitt eller stå inte på luckan när den är öppen.
Barnsäkerhet
• Endast vuxna personer får använda denna
diskmaskin. Barn måste övervakas så att
de inte leker med maskinen.
Page 39

electrolux 39
• Håll allt förpackningsmaterial utom räckhåll för barn. Risk för kvävning föreligger.
• Förvara alla diskmedel på en säker plats.
Låt inte barn ta i diskmedlen.
• Håll barn borta från diskmaskinen när luckan är öppen.
Installation
• Kontrollera att diskmaskinen inte har skadats under transporten. Nätanslut inte maskinen om den är skadad. Kontakta din
återförsäljare vid behov.
• Avlägsna allt förpackningsmaterial innan
diskmaskinen används första gången.
• Den elektriska installationen måste utföras
av en kvalificerad och kompetent person.
• Alla rörläggningsarbeten måste utföras av
en kvalificerad och kompetent person.
Produktbeskrivning
• Modifiera inte denna produkt och ändra
inte dess specifikationer. Risk för personskador och skador på maskinen föreligger.
• Använd inte diskmaskinen om:
– nätkabeln eller vattenslangarna är ska-
dade,
– maskinens kontrollpanel, övre panel el-
ler sockel är skadad så att det går att
komma åt maskinens insida.
Kontakta vår lokala serviceavdelning.
• Borra inte i diskmaskinens sidor. Maskinens hydrauliska och elektriska komponenter kan skadas av detta.
Varning Följ noga instruktionerna för
anslutning av elektricitet och vatten.
1 Överkorg
2 Reglage för inställning av vattenhårdhet
3 Saltbehållare
4 Diskmedelsfack
5 Sköljmedelsfack
6 Typskylt
7 Filter
8 Nedre spolarm
9 Övre spolarm
Page 40

40 electrolux
Kontrollpanel
1 Strömbrytare På/Av
2 Programvalsknappar
3
Knapp för Fördröjd start
4 Digital display
5 Kontrollampor
6 Funktionsknappar
Kontrollampor
Program pågår – Tänds när du väljer ett diskprogram.
Program klart Tänds när diskprogrammet är klart. Ytterligare
– Lyser under hela diskprogrammet.
– Slocknar när diskprogrammet är klart.
funktioner:
• Vattenavhärdarens nivå.
• Aktivering / inaktivering av sköljmedelsdoseringen.
• Larm om produkten har en felfunktion.
Page 41

electrolux 41
Kontrollampor
Multitab Tänds när du aktiverar Multitabfunktionen. Se av-
1)
Salt
Sköljmedel
1) När saltbehållaren och/eller sköljmedelsfacket blir tomma tänds inte motsvarande kontrollampa medan
ett diskprogram pågår.
1)
Programvalsknappar
Med dessa knappar väljer du diskprogram.
Tryck på en programknapp varpå motsvarande kontrollampa tänds. Se avsnittet "Programöversikt" för mer information om diskprogrammen.
Knapp för Fördröjd start
Använd denna knapp för att fördröja starten
av ett diskprogram med mellan 1 och 9 timmar. Se avsnittet "Ställa in och starta ett diskprogram".
Digital display
Displayen visar:
• Antalet timmar vid Fördröjd start.
• Om produkten är i inställningsläge.
• Om ett diskprogram är inställt.
Funktionsknappar
Använd funktionsknapparna för att göra följande:
• Ställa in vattenavhärdaren. Se avsnittet
"Inställning av vattenavhärdaren".
• Avbryta ett pågående diskprogram eller
fördröjd start. Se avsnittet "Ställa in och
snittet "Multitabfunktion".
Kontrollampan tänds när saltbehållaren behöver
fyllas på. Se avsnittet "Användning av disksalt".
När du har fyllt på saltbehållaren kan kontrollampan fortsätta att lysa i några timmar. Detta har
dock inte någon negativ effekt på produktens
funktion.
Tänds när sköljmedelsfacket behöver fyllas på. Se
avsnittet "Användning av sköljmedel".
• Aktivera / inaktivera sköljmedelsdoseringen när Multitabfunktionen är aktiverad. Se
avsnittet "Multitabfunktion".
Inställningsläge
Produkten måste vara i inställningsläge för att
du skall kunna göra följande:
• Ställa in ett diskprogram.
• Ställa in vattenavhärdarens nivå.
• Aktivera / inaktivera sköljmedelsdoseringen.
Tryck på strömbrytaren. Produkten är i inställningsläge när:
– Alla programlampor tänds och den digitala
displayen visar tre horisontella streck.
Tryck på strömbrytaren. Produkten är inte i
inställningsläge när:
– Endast en programlampa tänds och den
digitala displayen visar ett horisontellt
streck.
– Ett diskprogram är inställt. Avbryt pro-
grammet för att återgå till inställningsläge.
Se avsnittet "Ställa in och starta ett diskprogram".
starta ett diskprogram".
• Aktivera / inaktivera Multitabfunktionen. Se
avsnittet "Multitabfunktion".
Innan maskinen används första gången
Se följande instruktioner för varje steg av proceduren:
1. Kontrollera att vattenavhärdarens nivå är
korrekt inställd för den hårdhet vattnet har
där du bor. Justera vattenavhärdaren vid
behov.
2. Fyll på disksalt i saltbehållaren.
3. Fyll på sköljmedel i sköljmedelsfacket.
4. Ladda diskmaskinen med bestick, porslin
5. Ställ in lämpligt diskprogram för typen av
och övrig disk.
disk och smutsgraden.
Page 42

42 electrolux
6. Fyll på diskmedelsfacket med korrekt
mängd diskmedel.
7. Starta diskprogrammet.
Om du tänker använda kombinerade
disktabletter ("3 i 1", "4 i 1", "5 i 1", etc.),
se avsnittet "Multitabfunktion".
Att ställa in vattenavhärdaren
Vattenavhärdaren avlägsnar mineraler och
salter från det inkommande vattnet. Mineraler och salter kan ha en negativ effekt på maskinens funktion.
Vattnets hårdhet mäts enligt ekvivalenta skalor:
• Tyska grader (dH°).
Vattenhårdhet Inställning av vattnets hårdhet
°dH °TH mmol/l Clarke manuellt elektroniskt
51 - 70 91 - 125 9,1 - 12,5 64 - 88 2 10
43 - 50 76 - 90 7,6 - 9,0 53 - 63 2 9
37 - 42 65 - 75 6,5 - 7,5 46 - 52 2 8
29 - 36 51 - 64 5,1 - 6,4 36 - 45 2 7
23 - 28 40 - 50 4,0 - 5,0 28 - 35 2 6
19 - 22 33 - 39 3,3 - 3,9 23 - 27 2 5
15 - 18 26 - 32 2,6 - 3,2 18 - 22 1 4
11 - 14 19 - 25 1,9 - 2,5 13 - 17 1 3
4 - 10 7 - 18 0,7 - 1,8 5 - 12 1 2
< 4 < 7 < 0,7 < 5
1) Salt behöver inte användas.
Du måste ställa in vattenavhärdaren manuellt eller elektroniskt.
Manuell inställning
Diskmaskinen är fabriksinställd på läge
2.
1. Öppna luckan.
2. Plocka ut underkorgen.
3. Ställ vattenavhärdarens reglage i läge 1
eller 2 (se tabell).
4. Sätt tillbaka underkorgen på plats.
5. Stäng luckan.
• Franska grader (°TH).
• mmol/l (millimol per liter - en internationell
enhet för vattnets hårdhetsgrad).
•Clarke.
Ställ in vattenavhärdaren på den hårdhet
vattnet har där du bor. Hör efter hos Vattenverket om du är osäker.
1)
1
Elektronisk inställning
Vattenavhärdaren är fabriksinställd på
nivå 5.
1. Sätt på produkten.
2. Kontrollera att produkten är i inställnings-
läge.
3. Håll funktionsknapparna B och C intryck-
ta tills kontrollamporna för funktionsknapparna A, B och C börjar att blinka.
4. Släpp funktionsknapparna B och C.
5. Tryck på funktionsknapp A.
– Kontrollampan för funktionsknapp A
fortsätter att blinka.
– Kontrollamporna för funktionsknap-
parna B och C slocknar.
– Kontrollampan för "Program klart" bör-
jar att blinka.
Inställningsfunktionen för vattenavhärdaren är aktiverad.
Kontrollampan för "Program klart" blinkar
för att indikera vattenavhärdarens inställda nivå Pausen varar cirka 5 sekunder.
1)
1
Page 43

electrolux 43
Exempel: 5 blinkningar, paus, 5 blinkningar, paus, etc. = nivå 5.
6. Tryck en gång på funktionsknapp A för att
öka vattenavhärdarens nivå ett steg.
Användning av avhärdningssalt
Försiktighet Använd endast salter som
är avsedda för diskmaskiner. Typer av
salt som inte är avsedda för
diskmaskiner skadar vattenavhärdaren.
Försiktighet Saltkorn eller saltvatten
som blir kvar på botten i maskinen kan
orsaka korrosion. Fyll på diskmaskinen
med salt innan du startar ett
diskprogram för att undvika korrosion.
Gör så här för att fylla på saltbehållaren:
1. Öppna saltbehållaren genom att vrida
locket moturs.
2. Fyll på saltbehållaren med en liter vatten
(endast första gången).
3. Använd tratten för att fylla saltbehållaren
med salt.
7. Tryck på strömbrytaren för att spara inställningen.
4. Ta bort eventuellt salt från saltbehållarens
öppning.
5. Stäng saltbehållaren genom att vrida
locket medurs.
Det är normalt att vatten rinner över när
du fyller på salt.
När du ställer in vattenavhärdaren på nivå 1
med den elektroniska metoden förblir inte
saltbehållarens kontrollampa tänd.
Användning av sköljmedel
Försiktighet Använd endast sköljmedel
som är avsedda för diskmaskiner.
Fyll inte på sköljmedelsfacket med andra
produkter (t.ex. rengöringsmedel eller
flytande diskmedel). Det kan skada diskmaskinen.
Genom att använda sköljmedel kan disken torkas utan att det blir ränder eller
fläckar.
Sköljmedlet tillsätts automatiskt under
den sista sköljfasen.
Gör så här för att fylla på sköljmedelsfacket:
1. Tryck på spärren (A) för att öppna sköljmedelsfacket.
Page 44

44 electrolux
2. Fyll på sköljmedel i sköljmedelsfacket.
Markeringen "max." indikerar den maximala nivån.
3. Torka upp eventuellt utspillt sköljmedel
med en absorberande trasa så att det inte
bildas för mycket skum under nästa diskprogram.
4. Stäng sköljmedelsfacket.
Justera doseringen av sköljmedel
Doseringen av sköljmedel är fabriksinställd
på läge 4.
Du kan ställa in doseringen av sköljmedel
mellan läge 1 (lägsta dosering) och läge 6
(högsta dosering).
1. Vrid på doseringsreglaget för att öka eller
minska doseringen.
– Öka doseringen om det är vatten- eller
kalkfläckar på disken.
– Minska doseringen om det är ränder,
vita fläckar eller en blåaktig beläggning
på disken.
Att ladda bestick och porslin
Råd och tips
Försiktighet Använd diskmaskinen
endast för husgeråd som är lämpliga för
diskmaskiner.
Använd inte diskmaskinen för att rengöra föremål som kan absorbera vatten (t.ex. svampar eller trasor).
• Gör på följande sätt innan du laddar bestick och porslin:
– Avlägsna alla matrester och andra
smutspartiklar.
– Mjuka upp rester av inbränd mat i pan-
nor.
• Gör på följande sätt när du laddar bestick
och porslin:
– Ladda ihåliga föremål (t.ex. koppar, glas
och pannor) med öppningarna vända
nedåt.
– Se till att vatten inte kan samlas i glas
eller andra föremål med djup bas.
– Se till att bestick och porslin inte ligger
inuti andra föremål.
– Se till att bestick och porslin inte täcker
andra föremål.
– Se till att glas inte vidrör andra glas.
– Placera små föremål i bestickskorgen.
Page 45

electrolux 45
• Plastföremål och teflonbehandlade pannor
kan hålla kvar vattendroppar. Plastföremål
torkar inte lika bra som porslin och stålföremål.
• Placera lätta föremål i överkorgen. Se till att
föremålen inte kan röra sig.
Försiktighet Kontrollera att
spolarmarna kan rotera fritt innan du
startar ett diskprogram.
Varning Stäng alltid luckan när du är klar
med att ladda eller plocka ur disk. En
öppen lucka kan vara farlig.
Underkorg
Placera kastruller, lock, tallrikar, salladsskålar
och bestick i underkorgen. Placera serveringsfat och stora lock längs korgens kanter.
Placera gafflar och skedar med handtagen
vända nedåt.
Placera knivar med handtagen vända uppåt.
Blanda skedar med andra bestick så att de
inte fastnar i varandra.
Sänk ned bestickskorgens handtag för att
placera besticken i korgen.
Bestickskorg
Varning Ställ inte långa knivar i en
vertikal position. Arrangera långa och
vassa föremål liggande i överkorgen. Var
försiktig med vassa föremål.
Använd besticksgallret. Om storleken på besticken gör att gallret inte går att använda kan
du lätt dölja det.
Page 46

46 electrolux
Överkorg
Den övre korgen är avsedd för tallrikar (max.
24 cm i diameter), tefat, salladsskålar, koppar, glas, kastruller och lock. Arrangera föremålen så att vattnet når alla ytor.
Justering av överkorgens höjd
För att placera stora tallrikar i underkorgen,
flytta först överkorgen till den övre positionen.
Föremålens maximala höjd i
Övre position 20 cm 31 cm
Undre position 24 cm 27 cm
överkorgen
underkor-
gen
Gör så här för att flytta överkorgen till den
övre positionen:
1. Dra ut korgen så långt det går.
2. Lyft försiktigt båda sidorna uppåt tills mekanismen hakar i och korgen sitter stadigt.
Placera glas med hög fot i koppställen med
fötterna vända nedåt. Fäll upp koppställen för
att placera höga föremål.
Gör så här för att flytta överkorgen till den
undre positionen:
1. Dra ut korgen så långt det går.
2. Lyft försiktigt båda sidorna uppåt.
3. Håll i mekanismen och låt den sakta falla
tillbaka nedåt.
Försiktighet
• Lyft eller sänk inte korgen på endast
ena sidan.
• Placera inte koppar i koppställen när
korgen är i den övre positionen.
Page 47

Användning av diskmedel
Använd endast diskmedel (pulver, flytande eller tabletter) som är lämpliga för
diskmaskiner.
Läs och följ anvisningarna på förpackningen:
• Dosera enligt tillverkarens anvisningar.
• Rekommendationer för förvaring.
Skydda miljön genom att inte använda
mer än den rekommenderade mängden
diskmedel.
Gör så här för att fylla på diskmedelsfacket:
1. Öppna locket till diskmedelsfacket.
electrolux 47
A
B
4. Om du använder disktabletter, lägg tabletten i huvuddiskfacket ( A).
2. Fyll på diskmedel i diskmedelsfacket ( A).
Markeringen anger doseringen:
20 = cirka 20 gram diskmedel,
30 = cirka 30 gram diskmedel.
3. Om du tänker köra ett diskprogram med
fördiskfas, häll i mer diskmedel i fördiskfacket ( B).
Multitab funktion
Multitabfunktionen är avsedd för kombinerade disktabletter.
Dessa tabletter innehåller ämnen såsom
diskmedel, sköljmedel och disksalt. Vissa typer av tabletter kan innehålla andra ämnen.
5. Stäng locket till diskmedelsfacket. Tryck
på locket tills det låser fast i läge.
Olika märken av diskmedel löses upp
olika snabbt. Vissa disktabletter uppnår
inte bästa rengöringsresultat under korta diskprogram. Avänd långa diskprogram med disktabletter för att avlägsna
allt diskmedel.
Kontrollera om dessa tabletter är lämpliga för
vattnets hårdhet där du bor. Se tillverkarens
anvisningar.
När du aktiverar Multitabfunktionen förblir
den aktiverad tills du inaktiverar den.
Page 48

48 electrolux
Multitabfunktionen stoppar automatiskt doseringen av sköljmedel och salt. Kontrollampan för saltbehållaren inaktiveras.
Programtiden kan öka när du använder Multitabfunktionen.
Aktivera eller inaktivera Multitabfunktionen innan du startar ett diskprogram.
Du kan inte aktivera eller inaktivera Multitabfunktionen medan ett program pågår. Avbryt diskprogrammet och ställ sedan in det igen.
För att aktivera Multitabfunktionen:
• Håll de två Multitab-knapparna (funktionsknapparna D och E) intryckta. Kontrollampan för Multitabfunktionen tänds.
För att inaktivera Multitabfunktionen:
• Håll de två Multitab-knapparna (funktionsknapparna D och E) intryckta. Kontrollampan för Multitabfunktionen slocknar.
Gör så här om torkresultaten inte är
tillfredsställande:
1. Fyll på sköljmedel i sköljmedelsfacket.
2. Aktivera sköljmedelsdoseringen.
3. Ställ in sköljmedelsdoseringen på
läge 2.
• Du kan endast aktivera eller inaktivera
sköljmedelsdoseringen när Multitabfunktionen är aktiverad,
För att aktivera sköljmedelsdoseringen:
1. Sätt på diskmaskinen.
2. Kontrollera att maskinen är i inställningsläge.
3. Håll funktionsknapparna B och C intryckta.
– Kontrollamporna för funktionsknap-
parna A, B och C börjar att blinka.
4. Tryck på funktionsknapp B.
– Kontrollamporna för funktionsknap-
parna A och C slocknar.
– Kontrollampan för funktionsknapp B
fortsätter att blinka.
5. Tryck på funktionsknapp B en gång till.
– Kontrollampan för "Program klart"
tänds.
6. Stäng av diskmaskinen för att spara inställningen.
För att inaktivera sköljmedelsdoseringen, utför ovanstående steg tills kontrollampan för
"Program klart" slocknar.
För att åter använda vanligt diskmedel:
1. Inaktivera Multitabfunktionen.
2. Fyll på saltbehållaren och sköljmedelsfacket.
3. Ställ in vattenavhärdaren på den
högsta nivån.
4. Kör ett diskprogram utan disk.
5. Ställ in vattenavhärdaren på den
hårdhet vattnet har där du bor.
6. Justera doseringen av sköljmedel.
Att välja och starta ett diskprogram
Ställ in diskprogrammet med luckan på
glänt. Diskprogrammet startar först när
luckan stängs. Tills dess går det att ändra inställningarna.
Gör så här för att ställa in och starta ett diskprogram:
1. Sätt på produkten.
2. Kontrollera att produkten är i inställningsläge.
3. Tryck på en av programknapparna. Se
avsnittet "Programöversikt".
– Kontrollampan för det valda program-
met tänds.
– Den digitala displayen visar tre horison-
tella streck.
– Kontrollampan för "Program pågår"
tänds.
4. Stäng luckan.
– Diskprogrammet startar automatiskt.
– Kontrollampan för "Program pågår"
förblir tänd.
– Den digitala displayen visar endast ett
horisontellt streck. Detta streck visas
under hela diskprogrammet
Medan diskprogrammet pågår kan du
inte ändra programmet. Avbryt diskprogrammet.
Page 49

electrolux 49
Du kan välja diskprogram och fördröjd
start även när luckan är stängd. När du
trycker på en programknapp har du endast 3 sekunder på dig för att välja ett
annat diskprogram eller fördröjd start.
Efter dessa 3 sekunder startar det valda
programmet automatiskt.
Varning Pausa eller avbryt ett pågående
diskprogram endast om det är absolut
nödvändigt.
Försiktighet Öppna luckan försiktigt.
Het ånga kan strömma ut.
Göra en paus i ett diskprogram
Öppna luckan.
• Programmet stannar.
Stäng luckan.
• Programmet fortsätter från den punkt där
det avbröts.
Avbryta ett diskprogram
1. Håll funktionsknapparna B och C intryck-
ta tills:
– Alla programlampor lyser.
– Den digitala displayen visar tre horison-
tella streck.
2. Släpp funktionsknapparna B och C. Dis-
kprogrammet har nu avbrutits.
Du kan i detta läge göra följande:
1. Stänga av produkten.
2. Ställa in ett nytt diskprogram.
Fylla på diskmedelsfacket innan du ställer in
ett nytt diskprogram.
Ställa in och starta ett diskprogram med
fördröjd start
1. Sätt på produkten.
2. Ställ in önskat diskprogram.
3. Tryck på knappen "Fördröjd start" tills
displayen blinkande visar önskad tidsfördröjning för diskprogrammet.
4. Stäng luckan.
– Nedräkningen av den fördröjda starten
börjar.
– Siffran på displayen börjar lysa med
fast sken.
– Kontrollampan för "Program pågår"
slocknar.
– Nedräkningen minskar i steg om 1 tim-
me.
5. När nedräkningen löper ut startar diskprogrammet automatiskt.
– Kontrollampan för "Program pågår"
tänds.
Öppna inte luckan under nedräkningen
för att inte avbryta nedräkningen. Om du
gör det och stänger luckan igen fortsätter nedräkningen från den punkt där den
avbröts.
Avbryta en fördröjd start
1. Håll funktionsknapparna B och C intryckta tills:
– Alla programlampor lyser.
– Den digitala displayen visar tre horison-
tella streck.
När du avbryter en fördröjd start så avbryts också diskprogrammet.
2. Ställ in ett nytt diskprogram.
När diskprogrammet är klart
• Produkten stannar automatiskt.
• Kontrollampan för "Program pågår" slocknar.
• Kontrollampan för "Program klart" tänds.
• Den digitala displayen slocknar.
1. Stäng av produkten.
2. Öppna luckan.
3. För bättre torkresultat, låt luckan stå på
glänt några minuter innan du plockar ut
disken.
Låt disken kallna innan du plockar ut den ur
produkten. Hett porslin skadas lätt.
Plocka ut diskgodset
• Plocka först ut diskgods från den nedre
korgen, sedan från den övre.
• Det kan finnas vatten på diskmaskinens
sidor och lucka. Rostfritt stål kallnar fortare
än diskgodset.
Page 50

50 electrolux
Diskprogram
Programöversikt
Program Smutsgrad Typ av disk Programbeskrivning
Hårt smutsad
Intensiv
Normal
Snabbdisk
Eko
Glas
1) Detta är det perfekta, dagliga programmet när produkten endast är delvis laddad. Det är idealiskt för
en familj på 4 personer som endast vill ladda porslin och bestick efter frukost och middag.
2) Testprogram för provningsanstalter. Se medföljande separata folder för information om testdata.
1)
2)
disk
Normalt smutsad
disk
Normalt eller lätt
smutsad disk
Normalt smutsad
disk
Normalt eller lätt
smutsad disk
Förbrukningsvärden
Program Programtid (minuter) Energiförbrukning
Intensiv 105 - 115 1,6 - 1,8 19 - 21
Normal 90 - 100 1,1 - 1,2 15 - 16
Snabbdisk 30 0,8 8
Eko 160 - 170 0,8 - 0,9 12 - 13
Glas 65 - 75 0,6 - 0,7 11 - 12
Förbrukningsvärdena kan variera beroende på vattnets tryck och tempera-
Porslin, bestick, kastruller och pannor
Porslin och bestick Fördisk
Porslin och bestick Huvuddisk upp till 60 °C
Porslin och bestick Fördisk
Ömtåligt porslin och
glas
Fördisk
Huvuddisk upp till 70 °C
2 mellanliggande sköljningar
Avslutande sköljning
Torkning
Huvuddisk upp till 65 °C
1 mellanliggande sköljning
Avslutande sköljning
Torkning
Avslutande sköljning
Huvuddisk upp till 50 °C
1 mellanliggande sköljning
Avslutande sköljning
Torkning
Huvuddisk upp till 45 °C
1 mellanliggande sköljning
Avslutande sköljning
Torkning
Vatten (liter)
(kWh)
tur, variationer i nätspänningen och diskmängden.
Underhåll och rengöring
Varning Stäng av diskmaskinen innan
du rengör filtren.
Rengöring av filtren
Försiktighet Använd inte diskmaskinen
utan att filtren sitter på plats. Kontrollera
att filtren har monterats korrekt. Felaktig
montering resulterar i dåliga diskresultat
och skadar maskinen.
Rengör filtren vid behov. Smutsiga filter försämrar diskresultaten.
Diskmaskinen har tre filter:
1. grovfilter (A)
2. mikrofilter (B)
3. platt filter (C)
Page 51

A
B
C
Rengör filtren på följande sätt:
1. Öppna luckan.
2. Plocka ut underkorgen.
3. För att låsa upp filtersystemet, vrid hand-
taget på mikrofiltret (B) cirka ett 1/4 varv
moturs.
4. Avlägsna filtersystemet.
5. Håll grovfiltret (A) i handtaget som har ett
hål.
6. Lossa grovfiltret (A) från mikrofiltret (B).
7. Lossa det platta filtret (C) från diskmas-
kinens botten.
electrolux 51
8. Rengör filtren under rinnande vatten.
9. Sätt tillbaka det platta filtret (C) på plats i
diskmaskinens botten.
10. Placera grovfiltret (A) i mikrofiltret (B) och
tryck ihop filtren.
11. Sätt tillbaka filtersystemet på plats.
12. För att låsa filtersystemet, vrid handtaget
på mikrofiltret (B) medurs tills det låser
fast.
13. Sätt tillbaka underkorgen på plats.
14. Stäng luckan.
Avlägsna inte spolarmarna.
Om hålen i spolarmarna täpps igen av matrester kan hålen rensas med en cocktailpinne.
Utvändig rengöring
Rengör maskinens utvändiga ytor och kontrollpanelen med en mjuk, fuktig trasa. Använd endast neutrala, milda rengöringsmedel. Använd inte produkter med slipeffekt,
skursvampar eller lösningsmedel (aceton, trikloretylen eller liknande).
Åtgärder vid frysrisk
Försiktighet Installera inte
diskmaskinen på en plats där
temperaturen kan sjunka under 0 °C.
Tillverkaren ansvarar inte för skador
orsakade av frost.
Om detta inte går att undvika, töm maskinen
och stäng luckan. Koppla loss tillvattenslangen och töm slangen på vatten.
Page 52

52 electrolux
Om maskinen inte fungerar
Diskmaskinen startar inte eller stoppar under
drift.
Om ett fel uppstår, försök först att lösa problemet på egen hand. Kontakta vår serviceavdelning om du inte kan lösa problemet.
Felkod och problem Möjliga orsaker och åtgärder
• Kontrollampan för det pågående
programmet blinkar kontinuerligt.
• Kontrollampan för "Program klart"
blinkar 1 gång.
Diskmaskinen fylls inte med vatten.
• Kontrollampan för det pågående
programmet blinkar kontinuerligt.
• Kontrollampan för "Program klart"
blinkar 2 gånger.
Diskmaskinen tömmer inte vattnet.
• Kontrollampan för det pågående
programmet blinkar kontinuerligt.
• Kontrollampan för "Program klart"
blinkar 3 gånger.
Översvämningsskyddet har aktiverats.
Programmet startar inte. • Luckan till produkten är inte stängd.
• Vattenkranen är blockerad eller belagd med kalk.
Rengör vattenkranen.
• Vattenkranen är stängd.
Öppna vattenkranen.
• Filtret i tilloppsslangen är igentäppt.
Rengör filtret.
• Anslutningen av tilloppsslangen är felaktig. Slangen kan vara
snodd eller klämd.
Kontrollera att slangen är korrekt ansluten.
• Avloppsmuffen är blockerad.
Rengör avloppsmuffen.
• Anslutningen av tömningsslangen är felaktig. Slangen kan
vara snodd eller klämd.
Kontrollera att slangen är korrekt ansluten.
• Stäng vattenkranen och kontakta vår lokala serviceavdelning.
Stäng luckan.
• Stickkontakten sitter inte i eluttaget.
Sätt i stickkontakten.
• Säkringen har bränt i hushållets säkringsskåp.
Byt ut säkringen.
• Fördröjd start är inställd.
Avbryt startfördröjningen för att starta programmet omedelbart.
Sätt på produkten efter kontrollen. Programmet fortsätter från den punkt där det avbröts.
Kontakta vår serviceavdelning om problemet
återkommer.
För att kunna hjälpa dig snabbt och korrekt
behöver du ha följande uppgifter till hands:
• Modellbeteckning (Mod.)
Diskresultaten är inte tillfredsställande
Disken är inte ren. • Det valda diskprogrammet är inte lämpligt för typen av disk och
smutsgraden.
• Korgarna har laddats på fel sätt så att vattnet inte når alla ytor.
• Spolarmarna kan inte rotera fritt på grund av att disken har laddats
på fel sätt.
• Filtren är smutsiga eller felaktigt monterade.
• För lite eller inget diskmedel har använts.
Försiktighet Stäng av diskmaskinen
innan du går igenom följande förslag på
korrigerande åtgärder.
• Produktnummer (PNC)
• Serienummer (S.N.)
Dessa uppgifter finner du på typskylten.
Anteckna uppgifterna här:
Modellbeteckning: ....................
Produktnummer: ....................
Serienummer: ....................
Page 53

electrolux 53
Diskresultaten är inte tillfredsställande
Det är kalkbeläggningar på
disken.
Disken är våt och glanslös. • Sköljmedel har inte använts.
Det är ränder, mjölkaktiga
fläckar eller en blåaktig beläggning på glas och porslin.
Vattendroppar har torkat in på
glas och porslin.
• Saltbehållaren är tom.
• Vattenavhärdaren är inställd på fel nivå.
• Locket till saltbehållaren är inte stängt ordentligt.
• Sköljmedelsfacket är tomt.
• Minska doseringen av sköljmedel.
• Öka doseringen av sköljmedel.
• Diskmedlet kan också vara orsaken.
Tekniska data
Mått Bredd cm 44,6
Höjd cm 81,8 - 89,8
Djup cm 57,5
Elektrisk anslutning - Nätspän-
ning - Total effekt - Säkring
Vattentryck Min 0,5 bar (0,05 MPa)
Max 8 bar (0,8 MPa)
Kapacitet Kuvert 9
Information om den elektriska anslutningen finns på typskylten som
sitter på innerkanten av diskmaskinens lucka.
Installation
Varning Kontrollera att stickkontakten
inte sitter i eluttaget under installationen.
Viktigt Följ anvisningarna i bifogad
beskrivning för att:
• Bygga in diskmaskinen.
• Montera dekorskiva.
• Ansluta vatten- och tömningsslang.
Installera diskmaskinen under bänk.
Vid behov av reparation skall diskmaskinen
vara lätt åtkomlig för servicetekniker.
Placera diskmaskinen intill en vattenkran och
ett avlopp.
För tömningsslang och elkabel behövs öppningar.
Diskmaskinen har justerbara fötter för justering av höjden.
Se till att tilloppsslangen, tömningsslangen
och elkabeln inte är klämda eller vikta när
maskinen sätts på plats.
Placera diskmaskinen intill andra
enheter
Se till att bänken under vilken maskinen placeras är av säker konstruktion (andra köksenheter, skåp, vägg).
Justera diskmaskinens nivå
Se till att maskinen är i våg och tätar luckan
korrekt. Om maskinens nivå är korrekt, når
inte luckan sidorna på skåpet. Om luckan
inte stänger korrekt, lossa eller drag åt justeringsfötterna tills maskinen är i våg.
Page 54

54 electrolux
Anslutning av vatten
Tilloppsslang
Anslut diskmaskinen till en varm- (max 60°)
eller kallvattensledning.
Om varmvattnet kommer från en alternativ
energikälla som är mer miljövänlig (till exempel bergvärme, fjärrvärme eller vindkraft), använd en varmvattensanslutning för att minska energiförbrukningen.
Anslut tilloppsslangen till en vattenkran med
3/4" utvändig gänga.
Försiktighet Använd inte
anslutningsslangar från en gammal
maskin.
Vattentrycket skall vara inom gränsvärdena
( se "Tekniska data"). Se till att du får det rätta
medeltrycket i ditt område från din vattenleverantör.
Kontrollera att det inte finns några veck på
tilloppsslangen och att slangen inte är klämd
eller vinklad.
Montera låsmuttern korrekt för att förhindra
vattenläckage.
Försiktighet Anslut inte diskmaskinen
till nya ledningar eller ledningar som inte
har använts på lång tid. Låt vattnet rinna
några minuter, anslut därefter
tilloppsslangen.
Tilloppsslangen har dubbla väggar och har
en kabel inuti samt en säkerhetsventil. Det är
endast tryck i tilloppsslangen när vattenkranen är öppen. Om det är en läcka i tilloppsslangen stänger säkerhetsventilen av vattentillförseln.
Var försiktig när tilloppsslangen ansluts:
• Lägg inte tilloppsslangen eller säkerhetsventilen i vatten.
• Om tilloppsslangen eller säkerhetsventilen
är skadad, tag genast ur stickkontakten
från eluttaget.
• Låt bara kundtjänst byta tilloppsslang eller
säkerhetsventil.
Varning Farlig spänning
Tömningsslang
1. Anslut tömningsslangen till diskhons avloppsmuff och fäst slangen på undersidan av bänkskivan. Detta förhindrar att
avloppsvatten från diskhon rinner tillbaka
in i maskinen.
2. Anslut tömningsslangen till ett stigrör
med ett ventilationshål som har minst 4
cm invändig diameter.
max 85 cm
min 40 cm
max 400 cm
Se till att tömningsslangen inte är snodd eller
klämd så att vattnet inte kan tömmas korrekt.
Lossa diskhons propp när diskmaskinen
tömmer vatten för att förhindra att vattnet rinner tillbaka in i maskinen.
En förlängd tömningsslang får inte vara längre än 2 meter. Den invändiga diametern får
inte vara mindre än slangens diameter.
Om du ansluter tömningsslangen till en tapp
på ett vattenlås under en diskho är det viktigt
att du avlägsnar plastmembranet (A). Om
membranet inte avlägsnas kan matpartiklar
ansamlas och täppa igen tömningsslangens
förbindning.
Page 55

electrolux 55
Diskmaskinen har en säkerhetsfunktion
som förhindrar att smutsigt vatten rinner
tillbaka in i maskinen. Om avloppsmuffen har en backventil kan denna hindra
diskmaskinen från att tömma korrekt. Ta
bort backventilen.
Elektrisk anslutning
Varning Tillverkaren ansvarar inte för
skador orsakade av att ovanstående
säkerhetsåtgärder inte har följts.
Jorda diskmaskinen enligt gällande säkerhetsbestämmelser.
Kontrollera att spänningen och strömstyrkan i ditt hem överensstämmer med
de märkdata som anges på diskmaskinens typskylt.
Anslut alltid maskinen till ett korrekt installerat, stötsäkert och jordat eluttag.
Miljöskydd
Symbolen på produkten eller emballaget
anger att produkten inte får hanteras som
hushållsavfall. Den skall i stället lämnas in på
uppsamlingsplats för återvinning av el- och
elektronikkomponenter. Genom att
säkerställa att produkten hanteras på rätt
sätt bidrar du till att förebygga eventuellt
negativa miljö- och hälsoeffekter som kan
uppstå om produkten kasseras som vanligt
avfall. För ytterligare upplysningar om
återvinning bör du kontakta lokala
myndigheter eller sophämtningstjänst eller
affären där du köpte varan.
Förpackningsmaterialen är miljövänliga och
kan återvinnas. Plastkomponenterna är
märkta med t.ex. >PE<, >PS<, etc. Kassera
förpackningsmaterialen i härför avsedda behållare på kommunens sopstationer.
Varning Gör på följande sätt för att
kassera diskmaskinen:
• Koppla loss maskinen från eluttaget.
• Klipp av nätkabeln och stickkontakten
och kassera dem.
• Kassera lucklåset. Detta gör att barn
inte kan bli innestängda i maskinen
med risk för deras liv.
Försiktighet Kontrollera att
vattenanslutningarna är helt täta för att
undvika vattenläckage.
Använd inte grenuttag, adaptrar eller förlängningskablar. Risk för brand föreligger.
Byt inte ut nätkabeln på egen hand. Kontakta vår lokala serviceavdelning.
Se till att stickkontakten är åtkomlig när
diskmaskinen har installerats.
Dra inte i nätkabeln för att koppla loss
diskmaskinen från eluttaget - ta tag i
stickkontakten.
Page 56

www.electrolux.com
Besøk vår hjemmeside www.electrolux.no for bestilling av tilbehør og reservedeler:
www.electrolux.no
För att köpa tillbehör, förbrukningsartiklar och reservdelar i vår internetbutik besök oss på:
www.electrolux.se
117962741-00-042009
 Loading...