

Page 1
user manual
Dishwasher
ESF63021
Page 2
2 electrolux
Electrolux. Thinking of you.
Share more of our thinking at www.electrolux.com
CONTENTS
Safety information 2
Product description 3
Control panel 4
Use of the appliance 5
Setting the water softener 5
Use of dishwasher salt 6
Use of rinse aid 7
Loading cutlery and dishes 8
Use of detergent 9
Setting and starting a washing programme
11
SAFETY INFORMATION
For your safety and correct operation
of the appliance, read this manual
carefully before installation and use. Always keep these instructions with the
appliance even if you move or sell it.
Users must fully know the operation
and safety features of the appliance.
Correct use
• The appliance is designed exclusively for
domestic use.
• Only use the appliance to clean household utensils that are applicable for dishwashers.
• Do not put solvents in the appliance. Risk
of explosion.
• Put the knives and all items with sharp
points in the cutlery basket with their
points down. If not, put in a horizontal
position in the upper basket.
• Use only branded products for dishwashers (detergent, salt, rinse aid).
• If you open the door while the appliance
is in operation, hot steam can escape.
Risk of skin burns.
• Do not remove dishes from the dishwasher before the end of the washing
programme.
• When the washing programme is completed, disconnect the mains plug from
the mains socket and close the water
tap.
Washing programmes 12
Care and cleaning 12
What to do if… 14
Technical data 15
Installation 15
Water connection 16
Electrical connection 17
Environment concerns 17
Subject to change without notice
• Only an authorised service engineer can
repair this appliance. Use only original
spare parts.
• Do not do repairs yourself to prevent injury and damage to the appliance. Always contact your local Service Force
Centre.
General safety
• Persons (including children) with reduced
physical sensory, mental capabilities or
lack of experience and knowledge must
not use the appliance. They must have
supervision or instruction for the operation of the appliance by a person responsible for their safety.
• Obey the safety instructions from the
manufacturer of the dishwasher detergent to prevent burns to eyes, mouth and
throat.
• Do not drink the water from the dishwasher. Detergent residues can stay in
your appliance.
• Always close the door when you do not
use the appliance to prevent injury and
not to stumble over the open door.
• Do not sit or stand on the open door.
Child safety
• Only adults can use this appliance. Children must get supervision to make sure
that they do not play with the appliance.
• Keep all the packaging away from children. There is a risk of suffocation.
Page 3
electrolux 3
• Keep all detergents in a safe area. Do not
let children touch the detergents.
• Keep children away from the appliance
when the door is open.
Installation
• Make sure that the appliance is not damaged because of transport. Do not connect a damaged appliance. If necessary,
contact the supplier.
• Remove all packaging before first use.
• A qualified and competent person must
do the electrical installation.
• A qualified and competent person must
do the plumbing installation.
• Do not change the specifications or modify this product. Risk of injury and damage to the appliance.
PRODUCT DESCRIPTION
• Do not use the appliance:
– if the mains cable or water hoses are
damaged,
– if the control panel, worktop or plinth
area are damaged, that you can get
access to the inner side of the appliance.
Contact your local Service Force Centre.
• Do not drill into the sides of the appliance
to prevent damage to hydraulic and electrical components.
Warning! Carefully obey the
instructions for electrical and water
connections.
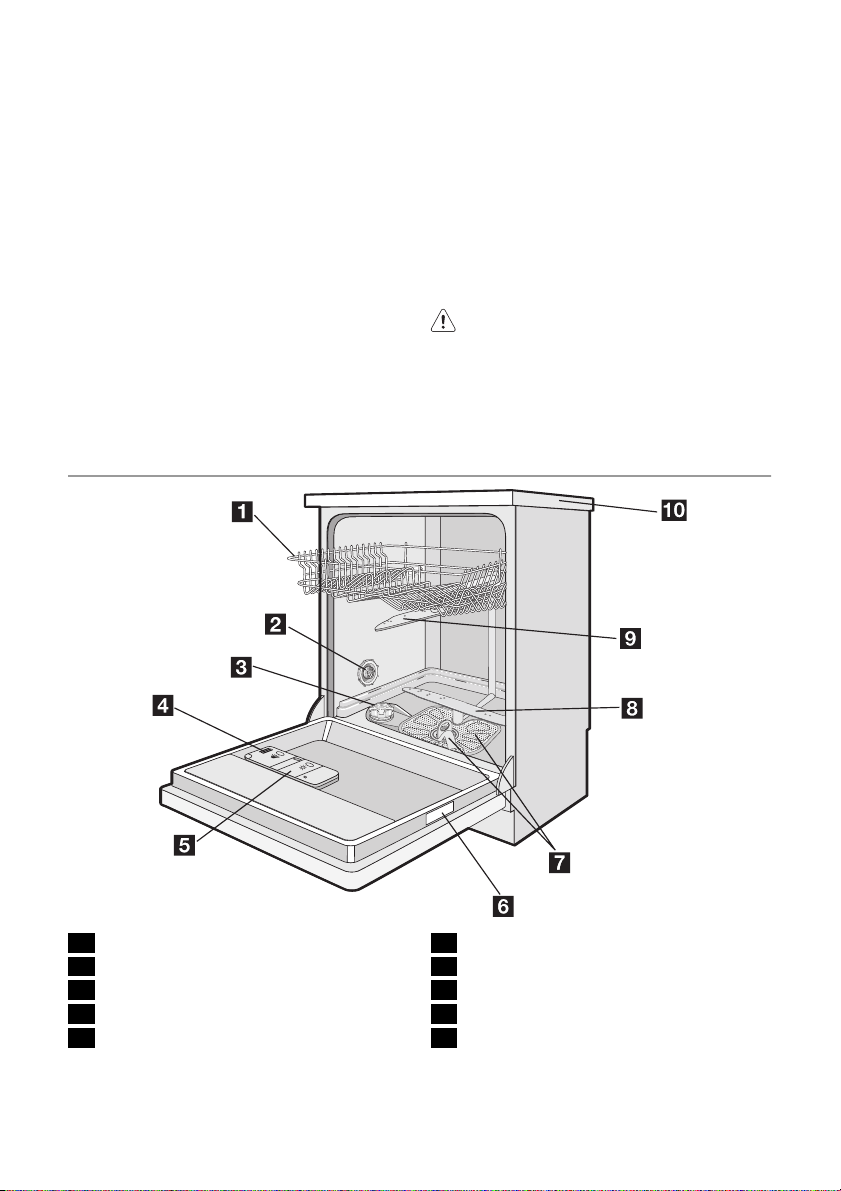
1 Upper basket
2 Water hardness dial
3 Salt container
4 Detergent dispenser
5 Rinse aid dispenser
6 Rating plate
7 Filters
8 Lower spray arm
9 Upper spray arm
10 Worktop
Page 4
4 electrolux
CONTROL PANEL
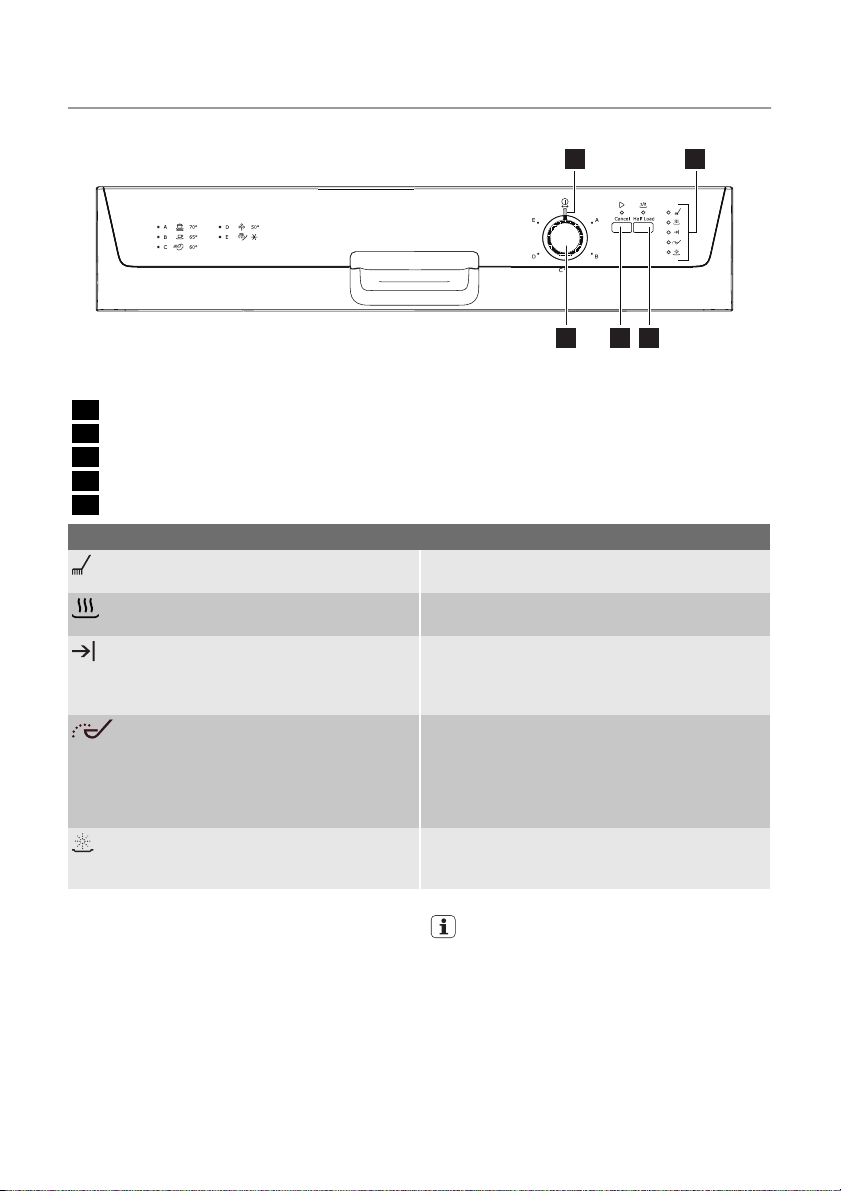
1 Programme knob
2 Start/cancel button
3 Half-load button
4 Indicator lights
5 On/off indicator light
Indicator lights
The indicator light comes on when the washing
phase or the rinsing phase operates.
The indicator light comes on when the drying
phase operates.
The indicator light comes on when the washing
programme is completed. Auxiliary functions:
• Level of the water softener.
• An alarm if the appliance has a malfunction.
The indicator light comes on when it is necessa-
1)
1)
1) The indicator light is off while a washing programme operates.
Half-load button
The half-load option is not available for all
washing programmes. Refer to the chapter
'Washing programmes'.
• Load dishes in the upper and lower basket.
• Decrease the detergent dosage when
you use the half-load option.
• Press the half-load button to set the option.
– The half-load indicator light comes on,
when the half-load option is selectable.
ry to fill the salt container. Refer to the chapter
'Use of dishwasher salt'.
The salt indicator light can stay on for some
hours, but it does not have an unwanted effect
on the operation of the appliance.
The indicator light comes on when it is necessary to fill the rinse aid. Refer to the chapter 'Use
of rinse aid'.
Programme knob and on/off indicator
light
• To set a washing programme, turn the
45
1 2 3
With the half-load button pressed the
time duration and the consumption of
water and energy are reduced.
programme knob clockwise or anticlockwise. The programme marker on the programme knob must agree with one of the
washing programmes on the control panel.
Page 5
electrolux 5
– The on/off indicator light comes on
(position ON).
• To set the appliance to the off position,
turn the programme knob until the pro-
gramme marker agrees with the on/off indicator light.
– The on/off indicator light goes off (posi-
tion OFF).
USE OF THE APPLIANCE
Refer to the following instructions for each
step of procedure:
1. Make a check if the water softener level
is correct for the water hardness in your
area. If necessary set the water softener.
2. Fill the salt container with dishwasher
salt.
3. Fill the rinse aid dispenser with rinse
aid.
4. Load cutlery and dishes into the dishwasher.
5. Set the correct washing programme for
the type of load and soil.
6. Fill the detergent dispenser with the
correct quantity of detergent.
7. Start the washing programme.
If you use detergent tablets, refer to the
chapter 'Use of detergent'.
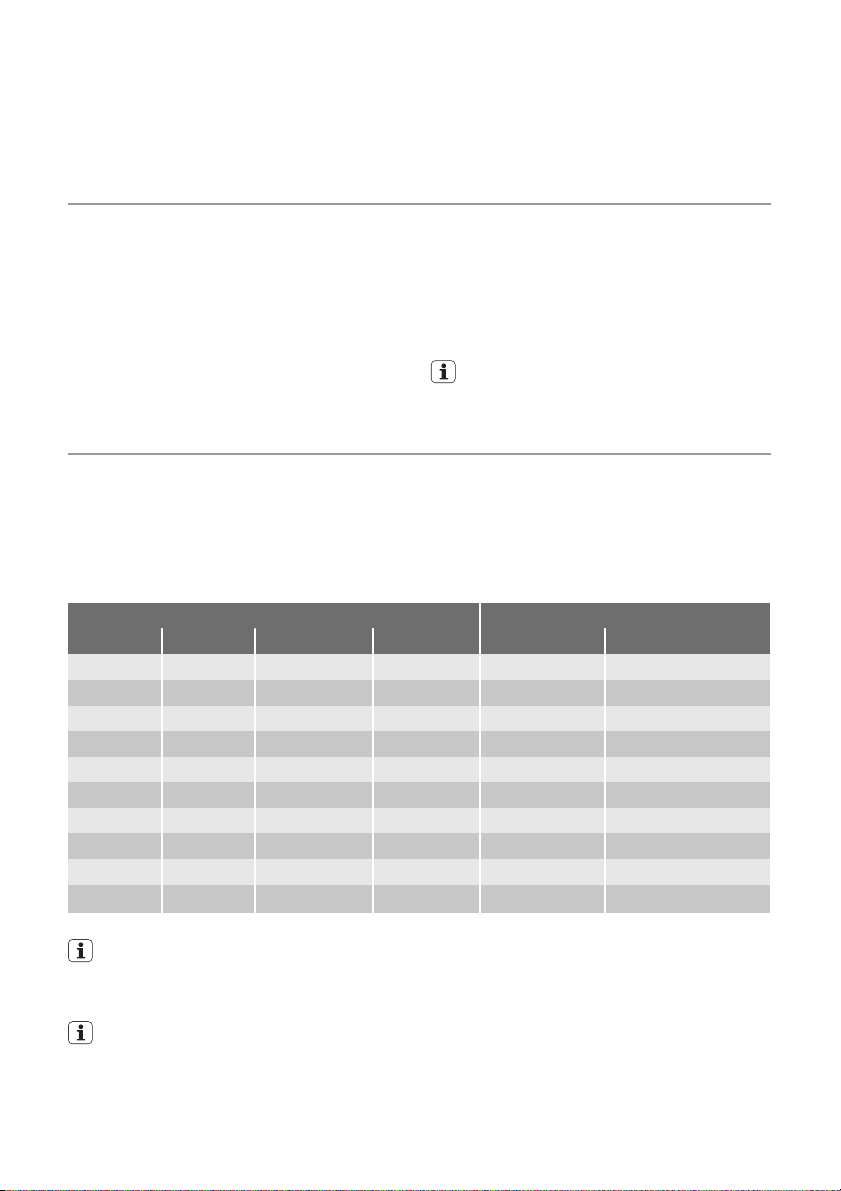
SETTING THE WATER SOFTENER
The water softener removes minerals and
salts from the water supply. Minerals and
salts can have bad effect on the operation
of the appliance.
Water hardness is measured in equivalent
scales:
• German degrees (dH°).
Water hardness Water hardness setting
°dH °TH mmol/l Clarke manually electronically
51 - 70 91 - 125 9,1 - 12,5 64 - 88 2 10
43 - 50 76 - 90 7,6 - 9,0 53 - 63 2 9
37 - 42 65 - 75 6,5 - 7,5 46 - 52 2 8
29 - 36 51 - 64 5,1 - 6,4 36 - 45 2 7
23 - 28 40 - 50 4,0 - 5,0 28 - 35 2 6
19 - 22 33 - 39 3,3 - 3,9 23 - 27 2 5
15 - 18 26 - 32 2,6 - 3,2 18 - 22 1 4
11 - 14 19 - 25 1,9 - 2,5 13 - 17 1 3
4 - 10 7 - 18 0,7 - 1,8 5 - 12 1 2
< 4 < 7 < 0,7 < 5
1) No use of salt required.
You must set the water softener manually and electronically.
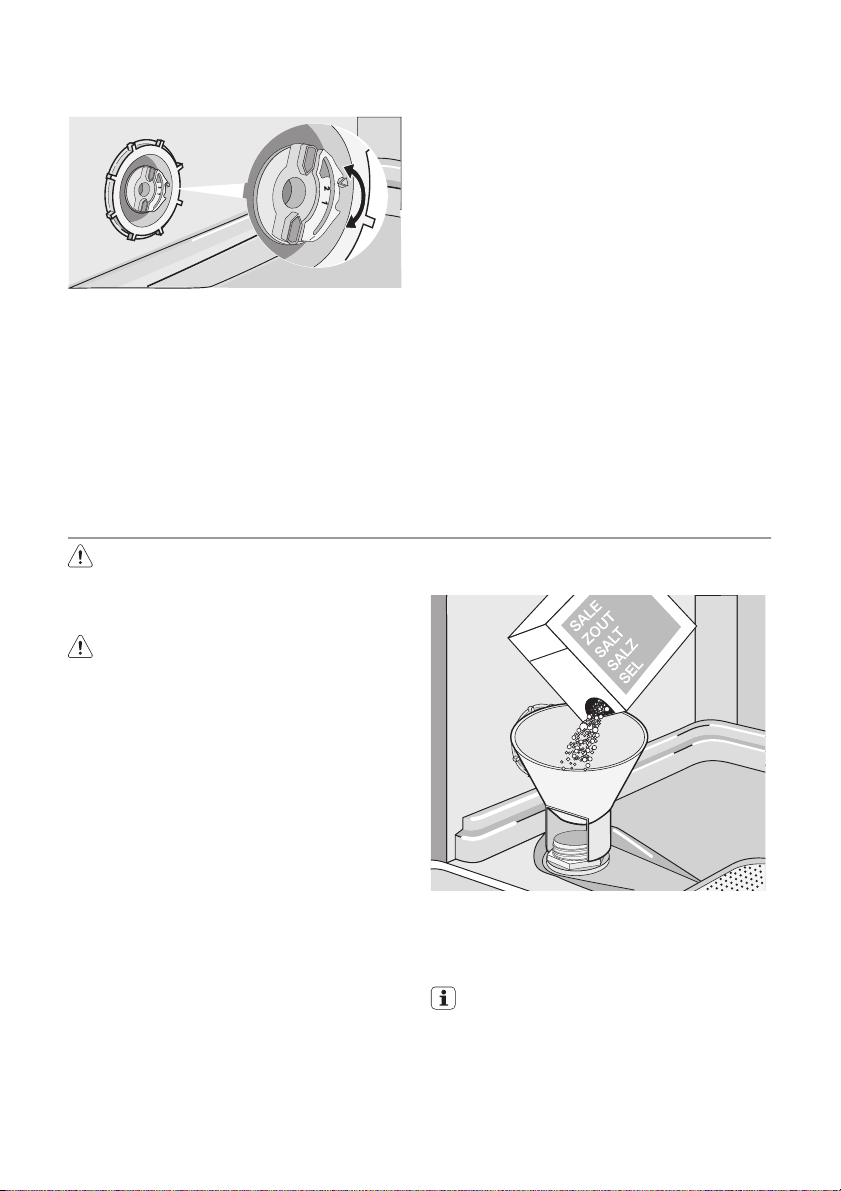
Manual adjustment
The appliance is set at the factory at
position 2.
1. Open the door.
2. Remove the lower basket.
• French degrees (°TH).
• mmol/l (millimol per litre - international
unit for the hardness of water).
•Clarke.
Adjust the water softener to the water hardness in your area. If necessary, contact
your local water authority.
1)
1
3. Turn the water hardness dial to position
1 or 2 (refer to the chart).
1)
1
Page 6
6 electrolux
4. Install the lower basket.
5. Close the door.
Electronic adjustment
The water softener is set at the factory
at level 5.
1. Press and hold the start/cancel button.
Turn the programme knob clockwise
until the programme marker agrees
with the first washing programme on
the control panel.
USE OF DISHWASHER SALT
Caution! Only use dishwashers salt.
Types of salt that are not applicable for
dishwashers cause damage to the
water softener.
Caution! Grains of salt and salty water
on the bottom of the appliance can
cause corrosion. Fill the appliance with
salt before you start a washing
programme to prevent corrosion.
Do these steps to fill the salt container:
1. Turn the cap anticlockwise to open the
salt container.
2. Fill the salt container with 1 litre of water (only the first operation).
2. Release the start/cancel button when
the on/off indicator light and the start/
cancel indicator light start to flash.
– At the same time, the end indicator
light flashes to show the level of the
water softener.
Example:
5 flashes, pause, 5 flashes, pause,
etc... = level 5
3. Press the start/cancel button one time
to increase the water softener level by
one step.
The end indicator light shows the new
level.
4. Turn the programme knob to the off
position to save the operation.
3. Use the funnel to fill the salt container
with salt.
4. Remove the salt around the opening of
the salt container.
5. Turn the cap clockwise to close the salt
container.
It is normal that water overflows from
the salt container when you fill it with
salt.
When you set electronically the water softener to level 1, the salt indicator light does
not stay on.
Page 7
USE OF RINSE AID
Caution! Only use branded rinse aid
for dishwashers.
Do not fill the rinse aid dispenser with
other products (e.g. dishwasher cleaning agent, liquid detergent). This can
cause damage to the appliance.
Rinse aid makes it possible to dry the
dishes without streaks and stains.
Rinse aid is automatically added during
the last rinsing phase.
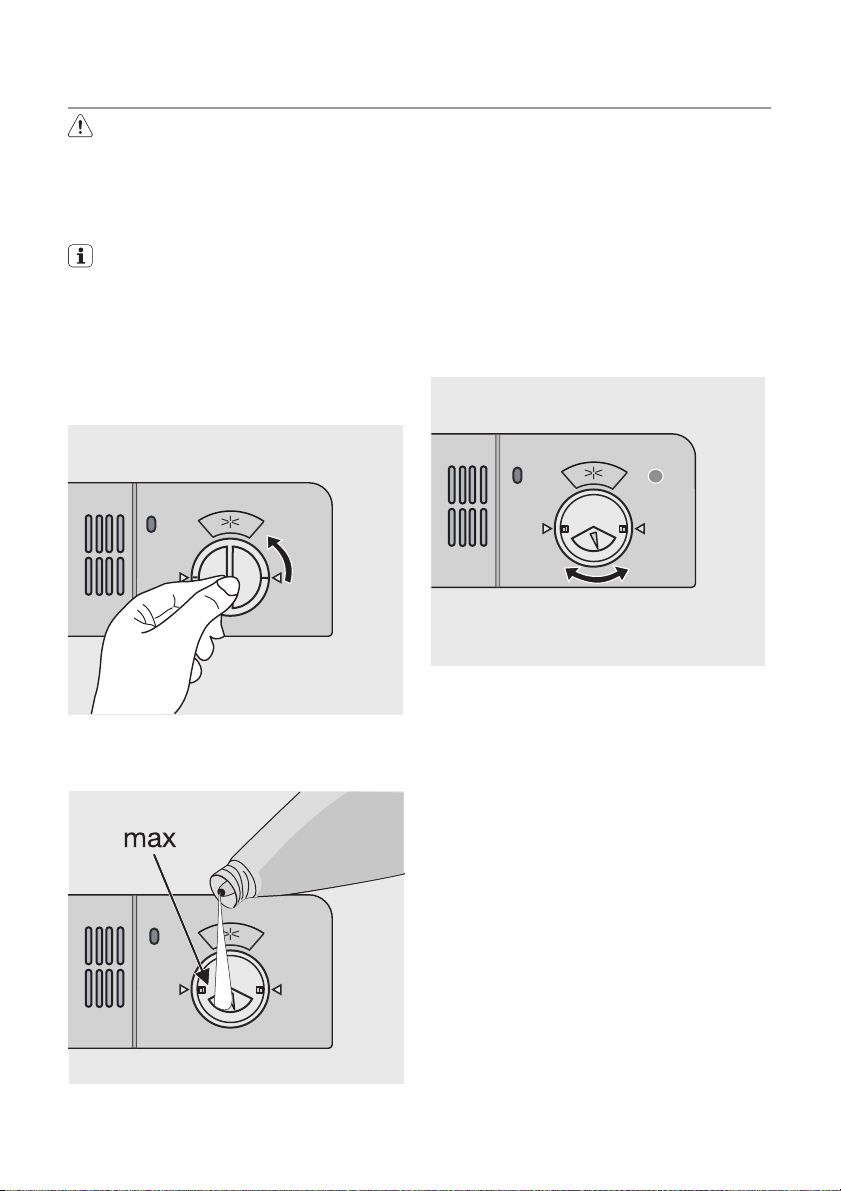
Do these steps to fill the rinse aid dispenser:
1. Turn the cap anticlockwise to open the
rinse aid dispenser.
electrolux 7
3. Remove the spilled rinse aid with an
absorbent cloth to prevent too much
foam during the subsequent washing
programme.
4. Replace and turn the cap clockwise to
close the rinse aid dispenser.
Adjusting the rinse aid dosage
The rinse aid is set at the factory at position
3.
You can set the rinse aid dosage between
position 1 (lowest dosage) and position 4
(highest dosage).
A
X
M
+
1
4
2
3
2. Fill the rinse aid dispenser with rinse
aid. The mark 'max.' shows the maximum level.
A
X
M
+
1
4
2
3
1. Turn the rinse aid dial to increase or decrease the dosage.
– Increase the dosage if there are wa-
ter droplets or limescale on the
dishes.
– Decrease the dosage if there are
streaks, whitish stains or bluish layers
on the dishes.
Page 8
8 electrolux
LOADING CUTLERY AND DISHES
Helpful hints and tips
Caution! Only use the appliance for
household utensils that are applicable
for dishwashers.
Do not use the appliance to clean objects
that can absorb water (sponges, household
cloths, etc.).
• Before you load cutlery and dishes, do
these steps:
– Remove all food remainings and deb-
ris.
– Make burnt, remaining food in pans
soft.
• While you load cutlery and dishes, do
these steps:
– Load hollow items (e.g. cups, glasses
and pans) with the opening down.
– Make sure that water does not collect
in the container or in a deep base.
– Make sure that cutlery and dishes do
not lie inside one another.
– Make sure that cutlery and dishes do
not cover other cutlery and dishes.
– Make sure that glasses do not touch
other glasses.
– Put small objects in the cutlery basket.
• Plastic items and pans with non-stick
coatings can keep water droplets. Plastic
items do not dry as well as porcelain and
steel items.
• Put light items in the upper basket. Make
sure that the items do not move.
Caution! Make sure that the spray
arms can move freely before you start
a washing programme.
Warning! Always close the door after
you load or unload the appliance. An
open door can be dangerous.
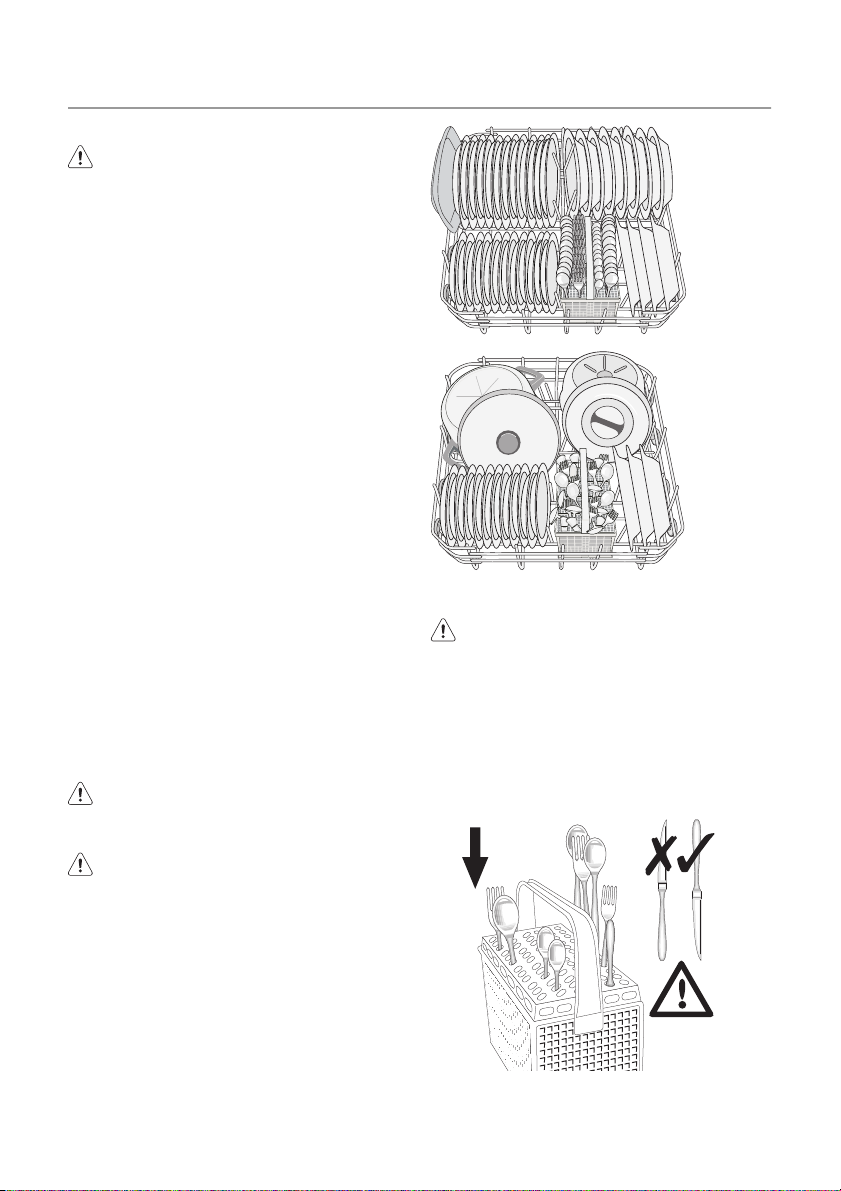
Lower basket
Put saucepans, lids, plates, salad bowls
and cutlery in the lower basket. Arrange
service dishes and large lids around the
edge of the basket.
Cutlery basket
Warning! Do not put long-bladed
knives in a vertical position. Arrange
long and sharp cutlery horizontally in
the upper basket. Be careful with sharp
items.
Put forks and spoons with the handles
down.
Put knives with the handles up.
Page 9
electrolux 9
Mix spoons with other cutlery to prevent
them to bond together.
Use the cutlery grid. If the dimensions of the
cutlery prevent the use of the cutlery grid,
you can remove it.
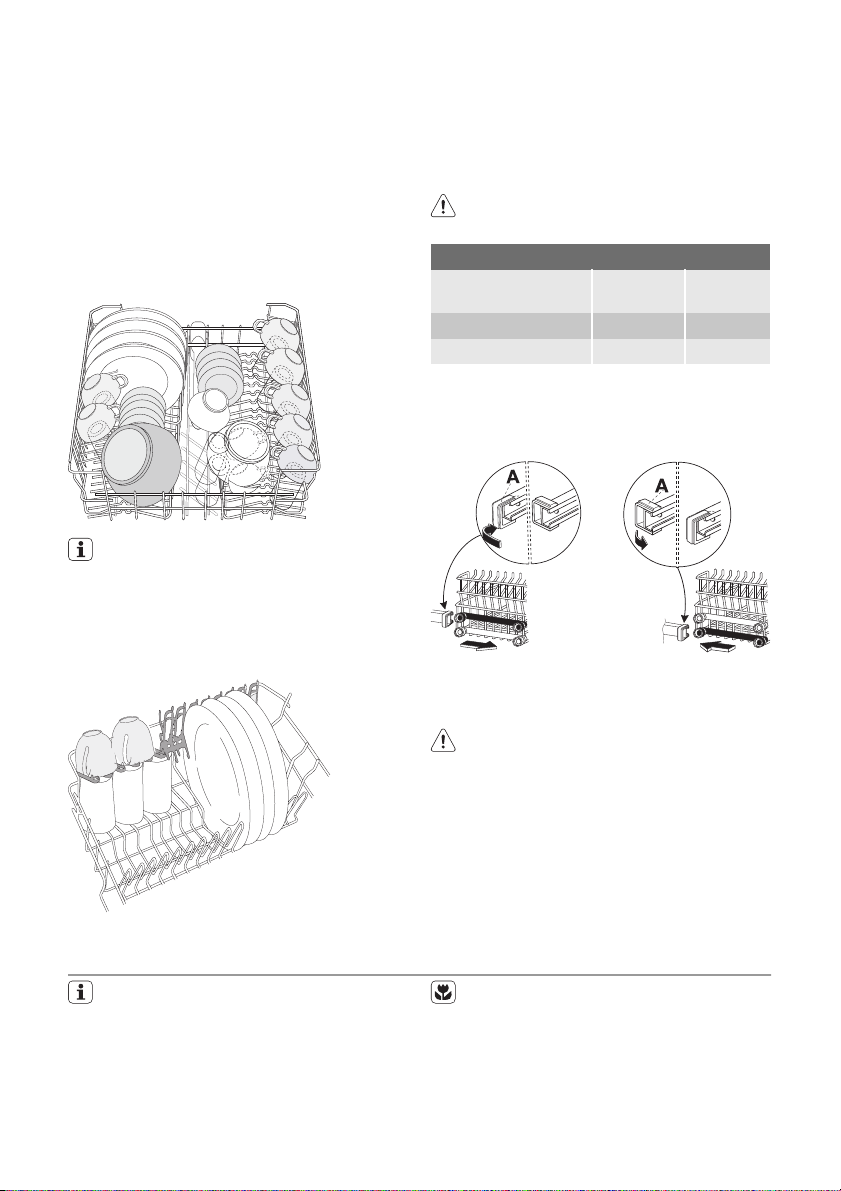
Upper basket
The upper basket is for plates (maximum
24 cm in diameter), saucers, salad bowls,
cups, glasses, pots and lids. Arrange the
items to let water touch all surfaces.
Prevent to put plates in the first three
sectors in the front part of the basket.
Make sure the plates tilt forward.
Put glasses with long stems in the cup
racks with the stems up. For longer items,
fold the cup racks up.
Adjustment of the height of the upper
basket
If you put large plates in the lower basket,
first move the upper basket to the upper
position.
Caution! Adjust the height before you
load the upper basket.
Maximum height of the dishes
upper bas-
ket
Upper position 20 cm 31 cm
Lower position 24 cm 27 cm
lower
basket
Do these steps to move the upper basket
to the upper position:
1. Move the front runner stops (A) out.
2. Pull the basket out.
3. Put the basket in the upper position.
4. Put back the front runner stops (A) in
their initial position.
Caution! If the basket is in the upper
position, do not put cups on the cup
racks.
USE OF DETERGENT
Only use detergents (powder, liquid or
tablet) that are applicable for dishwashers.
Follow the data on the packaging:
• Dosage recommended by the manufacturer.
• Storage recommendations.
Do not use more than the correct
quantity of detergent to save an environment.
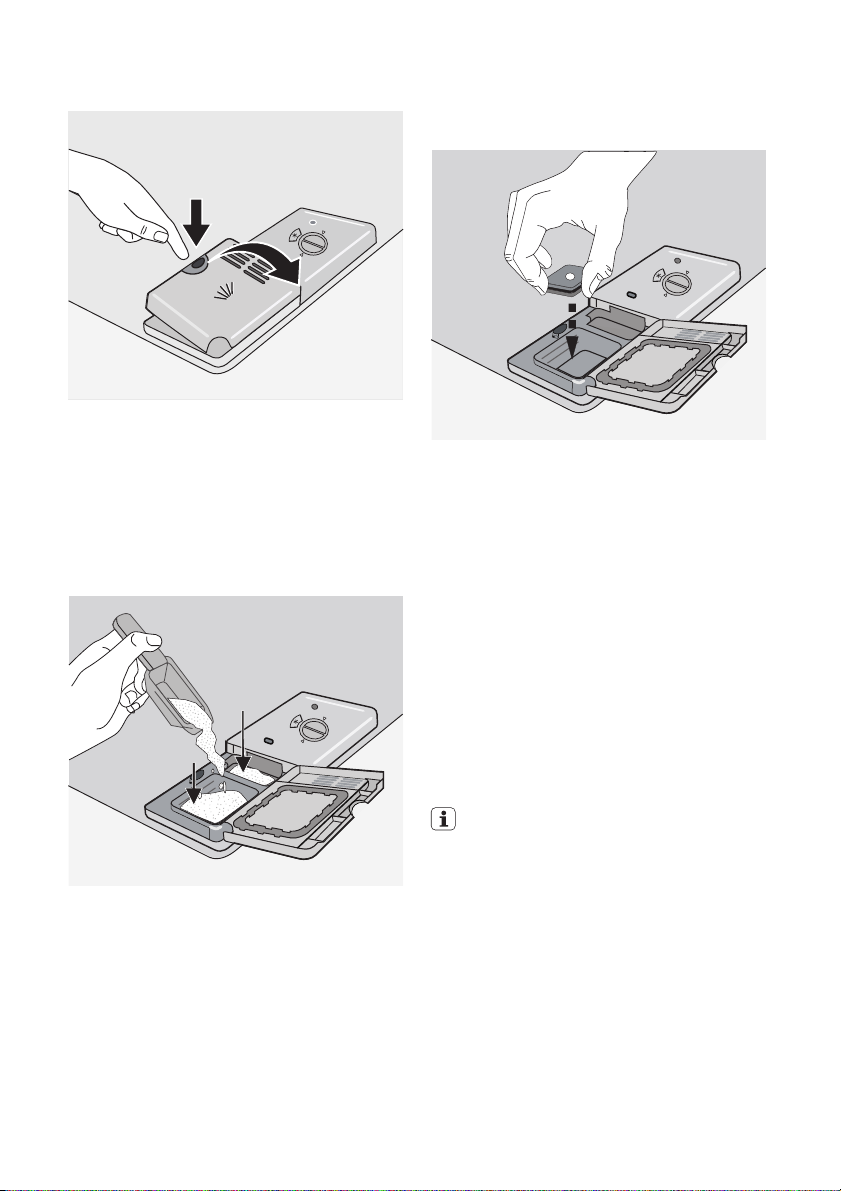
Do these steps to fill the detergent dispenser:
Page 10
10 electrolux
1. Open the lid of the detergent dispenser.
2. Fill the detergent dispenser (A) with detergent. The marking shows the dosage:
20 = approximately 20 g of detergent
30 = approximately 30 g of detergent.
3. If you use a washing programme with
prewash phase, put more detergent in
the prewash detergent compartment
(B).
B
A
4. If you use detergent tablets, put the detergent tablet in the detergent dispenser (A).
5. Close the lid of the detergent dispenser. Press the lid until it locks into position.
Use of detergent tablets
Put the detergent tablet in the detergent
dispenser (A).
Detergent tablets contain:
• detergent
•rinse aid
• other cleaning agents.
Do these steps to use detergent tablets:
1. Make sure that the detergent tablets
are applicable for your water hardness.
Refer to the instructions from the manufacturer.
2. Set the lowest levels of water hardness
and rinse aid dosage.
It is not necessary to fill the salt container and the rinse aid dispenser.
Do these steps when the drying results
are not satisfactory:
1. Fill the rinse aid dispenser with rinse
aid.
2. Set the rinse aid dosage to position 2.
Do these steps to use the detergent
powder again:
1. Fill the salt container and the rinse aid
dispenser.
2. Set the water softener to the highest
level.
3. Do a washing programme without
dishes.
Page 11
electrolux 11
4. Adjust the water softener. Refer to the
chapter 'Setting the water softener'.
5. Adjust the rinse aid dosage.
Different brands of detergent dissolve
in different times. Some detergent tablets do not have the best cleaning results during short washing programmes. Use long washing programmes when you use detergent tablets to fully remove the detergent.
SETTING AND STARTING A WASHING PROGRAMME
Do these steps to set and start a washing
programme:
1. Close the door.
2. Turn the programme knob to set the
washing programme. Refer to the
chapter 'Washing programmes'.
– The on/off indicator light comes on.
– The phase indicator light for the
washing programme starts to flash.
3. Press the start/cancel button.
– The washing programme starts auto-
matically.
– The start/cancel indicator light
comes on.
– When the programme starts, only the
phase in progress indicator light
stays on.
When the washing programme operates, you cannot change the programme. Cancel the washing programme.
Warning! Only interrupt or cancel a
washing programme if necessary.
Caution! Open the door carefully. Hot
steam can come free.
Cancelling a washing programme
• Press and hold the start/cancel button for
approximately 5 seconds.
– The start/cancel indicator light goes
off.
– The phase indicator lights starts to
flash.
The washing programme is cancelled.
At this time you can do these steps:
1. Switch off the appliance.
2. Set a new washing programme.
Fill the detergent dispenser with detergent before you set a new washing programme.
Interrupting a washing programme
Open the door.
• The programme stops.
Close the door.
• The programme continues from the point
of interruption.
End of the washing programme
Switch off the appliance in these conditions:
• The appliance stops automatically.
• The end indicator light comes on.
For better drying results, keep the door ajar
for some minutes before you remove the
dishes.
Let the dishes cool down before you remove them from the appliance. Hot dishes
are easily damaged.
Removing the load
• First remove items from the lower basket,
then from the upper basket.
• There can be water on the sides and
door of the appliance. Stainless steel becomes cool more quickly than the dishes.
Page 12
12 electrolux
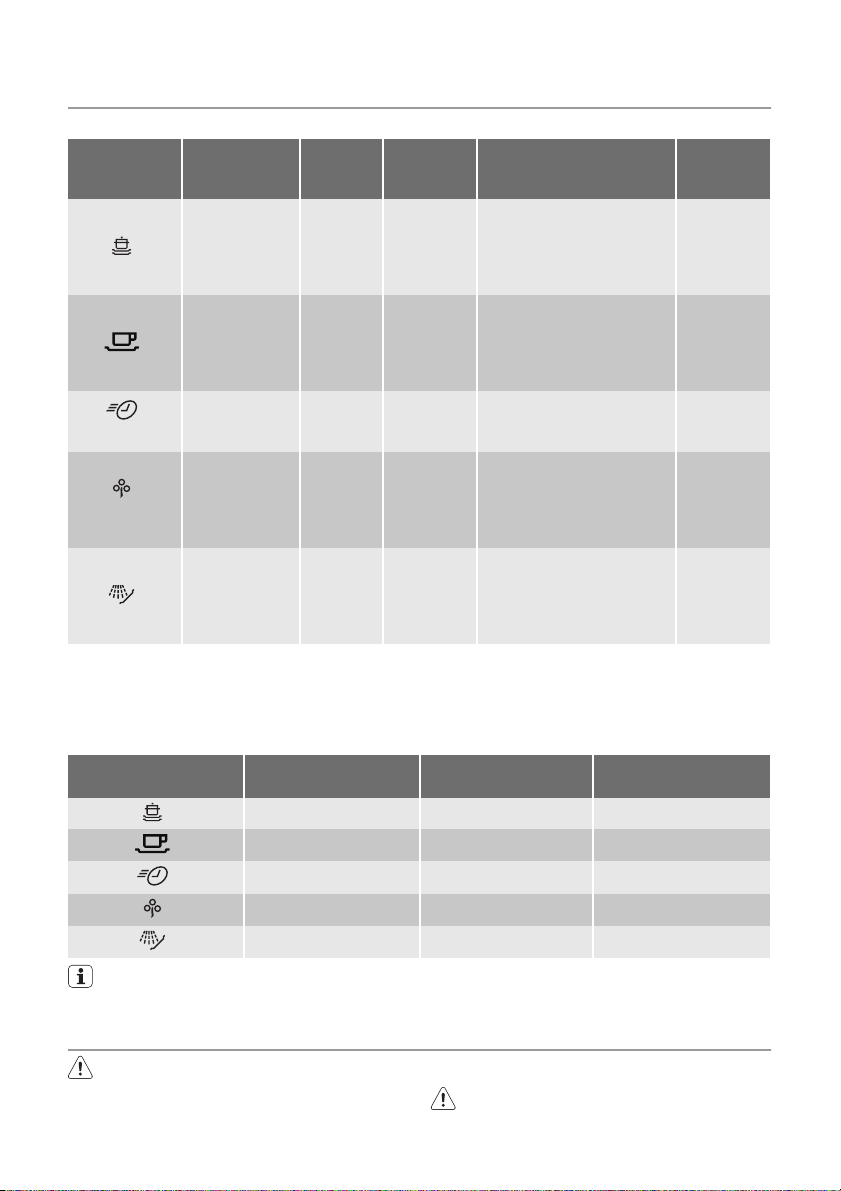
WASHING PROGRAMMES
Washing programmes
Programme
2)
3)
1) With half load option selected, prewash phase is not included. Do not use detergent for prewash phase.
2) This is the perfect daily programme to clean a not fully load. Ideal for a family of 4 persons who only want to load
breakfast and dinner crockery and cutlery.
3) Test programme for test institutes. Please refer to separate leaflet supplied, for test data.
4) With half load option selected, the washing phase duration is decreased.
Programme
knob posi-
tion
A
B
C
D
E Any
Consumption values
Programme Programme duration
The pressure and temperature of the
water, the variations of power supply
Degree
of soil
Heavy
soil
Normal
soil
Normal
or light
soil
Normal
soil
(in minutes)
85-95 1,8-2,0 22-25
105-115 1,5-1,7 23-25
30 0,9 9
130-140 1,0-1,2 14-16
12 0,1 5
Type of
load
Crockery,
cutlery,
pots and
pans
Crockery,
cutlery,
pots and
pans
Crockery
and cutlery
Crockery
and cutlery
Partial load
(to be
completed
later in the
day)
Programme description
Prewash
Main wash up to 70°C
2 intermediate rinses
Final rinse
Drying
Prewash
Main wash up to 65°C
2 intermediate rinses
Final rinse
Drying
Main wash up to 60°C
Final rinse
Prewash
Main wash up to 50°C
1 intermediate rinse
Final rinse
Drying
1 cold rinse (to avoid food
scraps from sticking).
This programme does not
require the use of detergent).
Energy consumption
(in kWh)
Water consumption
(in litres)
and the quantity of dishes can change
these values.
Half load
option
Selectable
1)
Selectable
1)
Not selectable
Selectable
4)
Not selectable
CARE AND CLEANING
Warning! Switch the appliance off
before you clean the filters.
Cleaning the filters
Caution! Do not use the appliance
without the filters. Make sure that the
installation of the filters is correct.
Page 13
electrolux 13
Incorrect installation will cause
unsatisfactory washing results and
damage to the appliance.
If necessary, clean the filters. Dirty filters decrease the washing results.
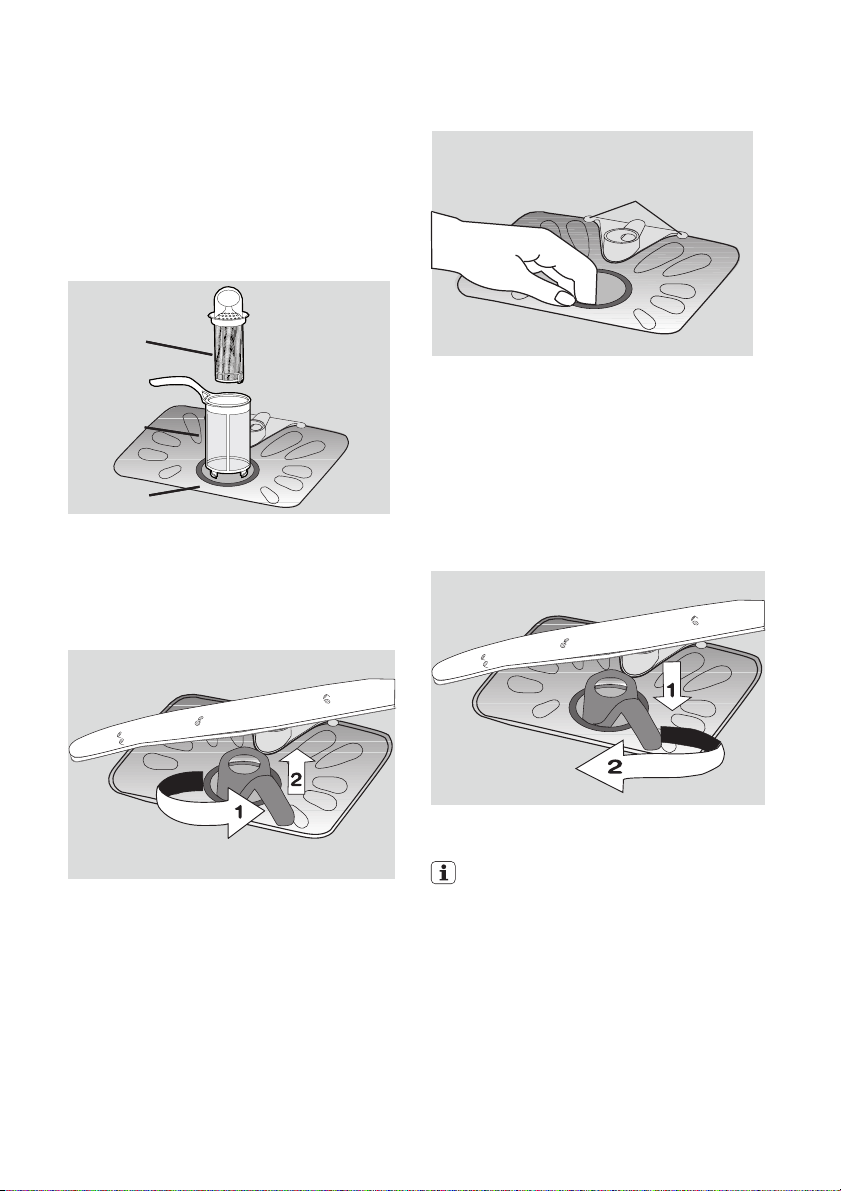
The dishwasher has three filters:
1. coarse filter (A)
2. microfilter (B)
3. flat filter (C)
A
A
B
B
C
C
Do these steps to clean the filters:
1. Open the door.
2. Remove the lower basket.
3. To unlock the filter system, turn the
handle on the microfilter (B) approximately 1/4 anticlockwise.
7. Remove the flat filter (C) from the bottom of the appliance.
D
8. Clean the filters below running water.
9. Put the flat filter (C) in the bottom of the
appliance. Install the flat filter correctly
under the two guide (D).
10. Put the coarse filter (A) in the microfilter
(B) and push the filters together.
11. Put the filter system in position.
12. To lock the filter system, turn the handle on the microfilter (B) clockwise until
it lock in position.
4. Remove the filter system.
5. Hold the coarse filter (A) by the handle
with the hole.
6. Remove the coarse filter (A) from the
microfilter (B).
13. Install the lower basket.
14. Close the door.
Do not remove the spray arms.
If the holes in the spray arms become clogged, remove remaining parts of soil with a
cocktail stick.
External cleaning
Clean the external surfaces of the appliance
and control panel with a damp soft cloth.
Only use neutral detergents. Do not use
abrasive products, scouring pads or solvents (acetone, trichloroethylene etc...).
Page 14
14 electrolux
Frost precautions
Caution! Do not install the appliance
where the temperature is below 0 °C.
The manufacturer is not responsible for
If not possible, empty the appliance and
close the door. Disconnect the water inlet
hose and remove water from the water inlet
hose.
damage because of frost.
WHAT TO DO IF…
The appliance does not start or stops during operation.
If there is a fault, first try to find a solution to
the problem yourself. If you cannot find a
solution to the problem yourself, contact
the Service Force Centre.
Fault code and malfunction Possible cause and solution
• continuous flash of the start/cancel indicator light
• 1 flash of the end indicator light
The dishwasher does not fill with
water
• continuous flash of the start/cancel indicator light
• 2 flashes of the end indicator light
The dishwasher will not drain
• continuous flash of the start/cancel indicator light
• 3 flashes of the end indicator light
The anti-flood device operates
The programme does not start • The appliance door is not closed.
• The water tap is blocked or furred with limescale.
Clean the water tap.
• The water tap is closed.
Open the water tap.
• The filter in the water inlet hose is blocked.
Clean the filter.
• The connection of the water inlet hose is not correct. The
hose can be kinked or squashed.
Make sure that the connection is correct.
• There is a blockage in the sink spigot.
Clean the sink spigot.
• The connection of the water drain hose is not correct. The
hose can be kinked or squashed.
Make sure that the connection is correct.
• Close the water tap and contact your local Service Force
Centre.
Close the door.
• Mains plug is not connected in.
Put in the mains.
• The fuse has blown out in the household fuse box.
Replace the fuse.
After the check, switch on the appliance.
The programme continues from the point of
interruption. If the malfunction shows again,
contact your Service Force Centre.
These data are necessary to help you
quickly and correctly:
•Model (Mod.)
Caution! Switch off the appliance
before you do the below suggested
corrective actions.
• Product number (PNC)
• Serial number (S.N.)
For these data, refer to the rating plate.
Write the necessary data here:
Model description : ..........
Product number : ..........
Serial number : ..........
Page 15
electrolux 15
The cleaning results are not satisfactory
The dishes are not clean • The selected washing programme is not applicable for the type of
Limescales particles on the
dishes
The dishes are wet and dull • No rinse aid has been used.
There are streaks, milky
spots or a bluish coating on
glasses and dishes
Dry water drop signs on
glasses and dishes
load and soil.
• The baskets are loaded incorrectly so that water cannot reach all
surfaces.
• Spray arms do not turn freely because of incorrect arrangement of
the load.
• The filters are dirty or not correctly installed.
• The quantity of detergent is too little or missing.
• The salt container is empty.
• The water softener is adjusted on a wrong level.
• The salt container cap is not closed correctly.
• The rinse aid dispenser is empty.
• Decrease the rinse aid dosage.
• Increase rinse aid dosage.
• The detergent can be the cause.
TECHNICAL DATA
Dimensions Width cm 60
Height cm 85
Depth cm 61
Electrical connection - Voltage Overall power - Fuse
Water supply pressure Minimum 0,5 bar (0,05 MPa)
Maximum 8 bar (0,8 MPa)
Capacity Place settings 12
Information on the electrical connection is given on the rating
plate on the inner edge of the dishwasher door.
INSTALLATION
Fitting under a counter
Warning! Make sure that mains plug is
disconnected from the mains socket
during installation.
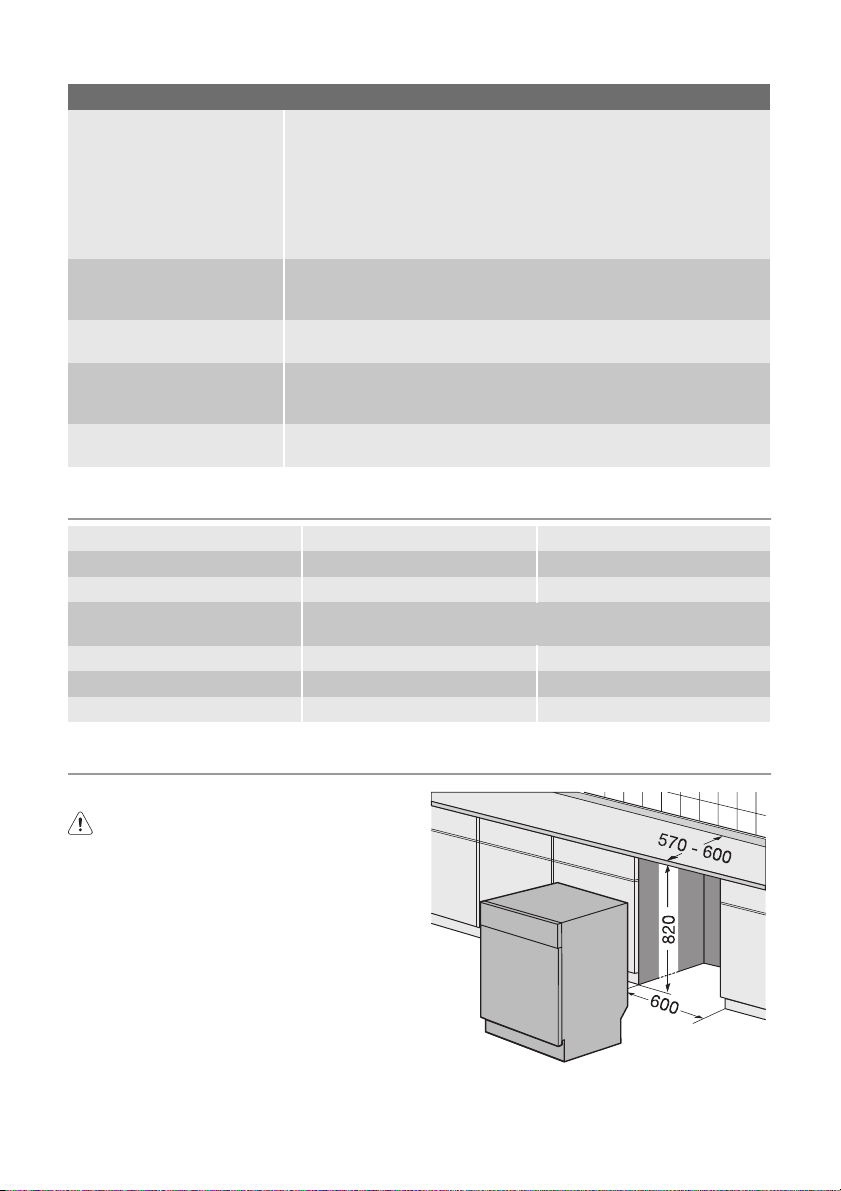
Put the appliance adjacent to a water tap
and a water drain. Remove the appliance
worktop to install it under a sink unit or a
kitchen worktop. Make sure that the dimensions of the recess agree with the given dimensions.
Page 16
16 electrolux
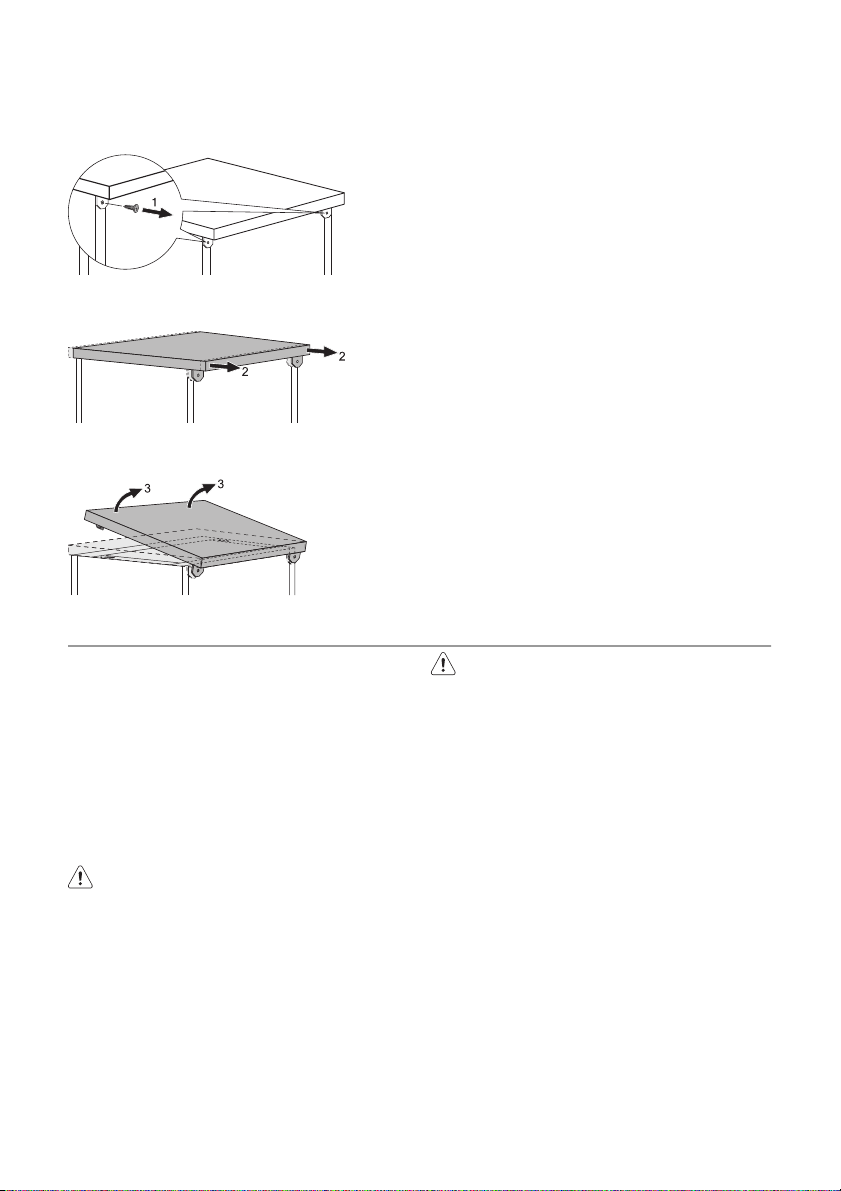
Do these steps to remove the
appliance worktop:
1. Remove the rear screws (1).
2. Pull the worktop from the behind the
appliance (2).
3. Lift the worktop and move it from the
front slots (3).
WATER CONNECTION
Water inlet hose
Connected the appliance to a hot (max.
60°) or cold water supply.
If the hot water comes from alternative
sources of energy that are more environmentally friendly (e.g. solar or photovoltaic
panels and aeolian), use a hot water supply
to decrease energy consumption.
Connect the inlet hose to a water tap with
an external thread of 3/4”.
Caution! Do not use connection hoses
from an old appliance.
The water pressure must be in the limits (refer to the chapter 'Technical data'). Make
sure that the local water authority gives you
the average mains pressure in your area.
Make sure that there are no kinks in the
water inlet hose and that the water inlet
hose is not squashed or entangled.
Turn the inlet hose to the left or the right to
suit the installation. Fit the locknut correctly
to prevent water leaks.
4. Use the adjustable feet to adjust the
level of the appliance.
5. Install the appliance under the kitchen
worktop. Make sure that there are no
kinks in the water hoses and that the
water hoses are not squashed.
If a repair is necessary, the appliance must
be easily accessible for the engineer. Install
the appliance worktop to the appliance if
you want to use the dishwasher as a freestanding appliance.
The plinth on freestanding appliance is not
adjustable.
Adjusting the level of the appliance
Make sure that the appliance is level to
close and seal the door correctly. If the level
of the appliance is correct, the door does
not catch on the sides of the cabinet. If the
door does not close correctly, loosen or
tighten the adjustable feet until the appliance is level.
Caution! Do not connect the appliance
to new pipes or pipes that are not used
for a long time. Let the water run for
some minutes, then connect the inlet
hose.
Water drain hose
1. Connect the water drain hose to the
sink spigot and attach it under the work
surface. This prevents that the waste
water from the sink goes back into the
appliance.
2. Connect the water drain hose to a
stand pipe with vent-hole (minimum internal diameter 4 cm).
Page 17
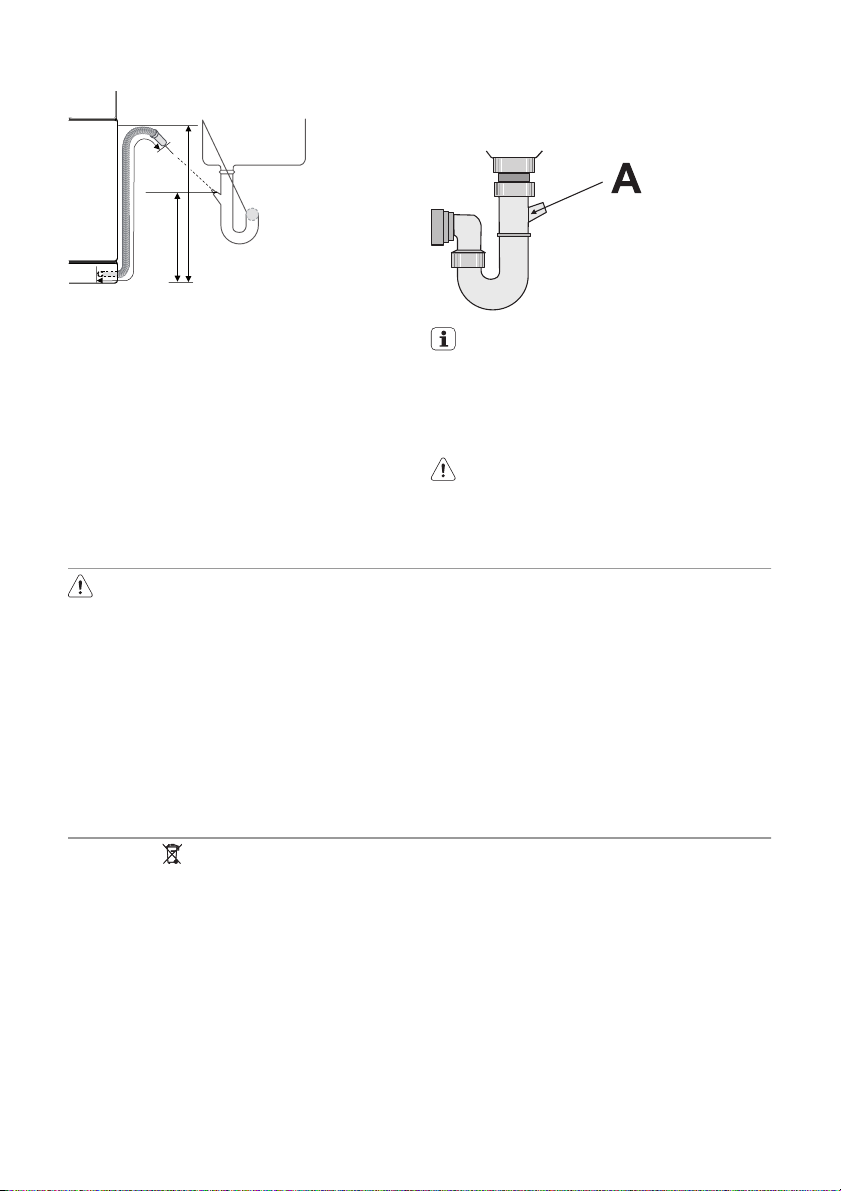
max 85 cm
min 40 cm
max 400 cm
Make sure that the drain hose is not bent or
squashed to prevent that the water drains
does not drain correctly.
Remove the sink plug when the appliance
drains the water to prevent that the water
goes back into the appliance.
A drain hose extension must not be longer
than 2 m. The internal diameter must not be
smaller than the diameter of the hose.
If you connect the water drain hose to a
trap spigot under the sink, remove the plas-
ELECTRICAL CONNECTION
Warning! The manufacturer is not
responsible if you do not follow these
safety precautions.
This appliance needs to be earthed according to safety precautions.
Make sure that the rated voltage and
type of power on the rating plate agree
with the voltage and the power of the
local power supply.
Always use a correctly installed shockproof socket.
electrolux 17
tic membrane (A). If you do not remove the
membrane, remaining food can cause a
blockage in the drain hose spigot
The appliance has a security feature to
prevent that dirty water goes back into
the appliance. If, the spigot of the sink
has a 'non-return valve', this valve can
cause the appliance to drain incorrectly. Remove the non-return valve.
Caution! Make sure that the water
couplings are tight to prevent water
leakage.
Do not use multi-way plugs, connectors and extension cables. There is a
risk of fire.
Do not replace the mains cable yourself. Contact the Service Force Centre.
Make sure that the mains plug is accessible after installation.
Do not pull the mains cable to disconnect the appliance. Always pull the
mains plug.
ENVIRONMENT CONCERNS
The symbol on the product or on its
packaging indicates that this product may
not be treated as household waste. Instead
it should be taken to the appropriate
collection point for the recycling of electrical
and electronic equipment. By ensuring this
product is disposed of correctly, you will
help prevent potential negative
consequences for the environment and
human health, which could otherwise be
caused by inappropriate waste handling of
this product. For more detailed information
about recycling of this product, please
contact your local council, your household
waste disposal service or the shop where
you purchased the product.
The packaging materials are environmentally friendly and can be recycled. The plastic
components are identified by markings, e.g.
>PE<, >PS<, etc. Discard the packaging
materials in the applicable container at the
community waste disposal facilities.
Page 18

18 electrolux
Warning! To discard the appliance,
follow the procedure:
• Pull the mains plug out of the socket.
• Cut off the mains cable and mains
plug and discard them.
• Discard the door catch. This prevents the children to close themselves inside the appliance and endanger their lives.
Page 19

electrolux 19
Page 20
www.electrolux.com/shop
156955120-A-162011
 Loading...