

Page 1
Fridge-Freezer / Derin donduruculu buzdolabi
INSTALLATION AND INSTRUCTION MANUAL
MONTAJ VE KULLANIM KILAVUZU
ERN 3121
2222 171-83
TR
GB
ELECTROLUX HOME PRODUCTS OPERATIONS EUROPE
Page 2

2
WARNINGS
It is most important that this instruction book should be retained with the appliance for future
reference. Should the appliance be sold or transferred to another owner, or should you move house
and leave the appliance, always ensure that the book is supplied with the appliance in order that the
new owner can be acquainted with the functioning of the appliance and the relevant warnings.
If this appliance featuring magnetic door seals is to replace an older appliance having a spring lock
(latch) on the door or lid, be sure to make that spring lock unusable before you discard the old
appliance. This will prevent it from becoming a death-trap for a child.
These warnings are provided in the interest of safety. You must read them carefully before installing or
using the appliance.
General Safety
• This appliance is designed to be operated by
adults. Children should not be allowed to tamper
with the controls or play with the product.
• It is dangerous to alter the specifications or
modify this product in any way.
• Before any cleaning or maintenance work is carried
out, be sure to switch off and unplug the appliance.
• This appliance is heavy. Care should be taken
when moving it
• Ice lollies can cause frost burns if consumed
straight from the appliance.
• Take utmost care when handling your
appliance so as not to cause any damages to
the cooling unit with consequent possible
fluid leakages.
• The appliance must not be located close to
radiators or gas cookers.
• Avoid prolonged exposure of the appliance to
direct sunlight.
• There must be adequate ventilation round the
back of the appliance and any damage to the
refrigerant circuit must be avoided.
• For freezers only (except built-in models): an
ideal location is the cellar or basement.
• Do not use other electrical appliances (such
as ice cream makers) inside of refrigerating
appliances.
Service/Repair
• Any electrical work required to install this
appliance should be carried out by a qualified
electrician or competent person
• This product should be serviced by an authorized
Service Centre, and only genuine spare parts
should be used.
• Under no circumstances should you attempt to
repair the appliance yourself. Repairs carried out
by inexperienced persons may cause injury or
more serious malfunctioning. Refer to your local
Service Centre, and always insist on genuine
spare parts.
• This appliance contains hydrocarbons in its
cooling unit; maintenance and recharging must
therefore only be carried out by authorized
technicians.
Use
• The domestic refrigerators and freezers are
designed to be used specifically for the storage
of edible foodstuffs only.
• Best performance is obtained with ambient
temperature between +18°C and +43°C (class
T); +18°C and +38°C (class ST); +16°C and
+32°C (class N); +10°C and +32°C (class SN).
The class of your appliance is shown on its rating
plate.
Warning: when the ambient temperature is not
included within the range indicated for the class
of this appliance, the following instructions must
be observed: when the ambient temperature
drops below the minimum level, the storage
temperature in the freezer compartment cannot
be guaranteed; therefore it is advisable to use
the food stored as soon as possible.
• Frozen food must not be re-frozen once it has
been thawed out.
• Manufacturers’ storage recommendations should
be strictly adhered to. Refer to relevant
instructions.
• The inner lining of the appliance consists of
channels through which the refrigerant passes. If
these should be punctured this would damage the
appliance beyond repair and cause food loss. DO
NOT USE SHARP INSTRUMENTS to scrape off
frost or ice. Frost may be removed by using a
plastic scraper. Under no circumstances should
solid ice be forced off the liner. Solid ice should be
allowed to thaw when defrosting the appliance.
Page 3
3
2222 171-83
• Do not place carbonated or fizzy drinks in the
freezer as it creates pressure on the container,
which may cause it to explode, resulting in
damage to the appliance. Do not use a
mechanical device or any artificial means to
speed up the thawing process other than those
recommended by the manufacturer. Never use
metal objects for cleaning your appliance as it
may get damaged.
Installation
• During normal operation, the condenser and
compressor at the back of the appliance heat up
considerably. For safety reasons, minimum
ventilation must be as shown in the instructions.
Attention: keep ventilation openings clear of
obstruction.
• Care must be taken to ensure that the appliance
does not stand on the electrical supply cable.
Important: if the supply cord is damaged, it must
be replaced by a special cord or assembly available from the manufacturer or its service agent.
• If the appliance is transported horizontally, it is
possible that the oil contained in the compressor
flows in the refrigerant circuit. It is advisable to
wait at least two hours before connecting the
appliance to allow the oil to flow back in the
compressor.
• There are working parts in this product which
heat up. Always ensure that there is adequate
ventilation as a failure to do this will result in
component failure and possible food loss. See
installation instructions.
• Parts which heat up should not be exposed.
Wherever possible the back of the product
should be against a wall.
Environment Protection
This appliance does not contain gasses which
could damage the ozone layer, in either its
refrigerant circuit or insulation materials. The
appliance shall not be discarded together with
the urban refuse and rubbish. Avoid damaging
the cooling unit, especially at the rear near the
heat exchanger. Information on your local
disposal sites may be obtained from municipal
authorities. The materials used on this appliance
marked by the symbol are recyclable.
Page 4
4
CONTENTS
Warnings . . . . . . . . . . . . . . . . . . . . . . . . . . . . . . . . . . . . . . . . . . . . . . . . . . . . . . . . . . . . . . . . . . . . . . . .2
Use / Cleaning the interior - Operation - Temperature regulation - Fresh food refrigeration . . . . . . . . . .4
Use / Freezing fresh food - Storage of frozen food - Thawing - Ice-cube production . . . . . . . . . . . . . . . .5
Use / Movable shelves -Positioning the door shelves - Removable drawer - Air recycling . . . . . . . . . . .6
Hints/ Hints for refrigeration- Hints for freezing - Hints for storage of frozen food . . . . . . . . . . . . . . . . . .7
Maintenance - Periodic cleaning - Periods of no operation - Interior light . . . . . . . . . . . . . . . . . . . . . . . .8
Maintenance / Defrosting - Customer service and spare parts . . . . . . . . . . . . . . . . . . . . . . . . . . . . . .9
Technical information / Installation - Location - Electrical connection . . . . . . . . . . . . . . . . . . . . . . . . .10
Installation - Instruction for totally built-in appliances . . . . . . . . . . . . . . . . . . . . . . . . . . . . . . . . . . . . . . .11
Installation - Reversibility of the freezer door . . . . . . . . . . . . . . . . . . . . . . . . . . . . . . . . . . . . . . . . . . . . .12
Cleaning the interior
Before using the appliance for the first time, wash
the interior and all internal accessories with lukewarm water and some neutral soap so as to remove
the typical smell of a brand-new product, then dry
thoroughly.
Do not use detergents or abrasive
powders, as these will damage the finish.
Temperature regulation
The temperature is automatically regulated and can
be increased to achieve a higher temperature
(warmer) by rotating the thermostat knob toward
lower settings or reduced (colder) rotating the knob
towards higher settings.
However, the exact setting should be chosen
keeping in mind that the temperature inside the
refrigerator depends on:
• room temperature;
• how often the door is opened;
• the quantity of food stored;
• location of appliance.
A medium setting is generally the most suitable.
USE
Operation
Insert the plug into the wall socket.
Turn the thermostat knob ,clockwise, beyond the “O”
(STOP) position.
To stop operation, simply turn the thermostat knob to
position “O”.
Important
If the ambient temperature is high or the
appliance is fully loaded, and the appliance is
set to the lowest temperatures, it may run
continuously causing frost to form on the rear
wall. In this case the dial must be set to a higher
temperature to allow automatic defrosting and
therefore reduced energy consumption.
Fresh food refrigeration
To obtain the best performance:
• do not store warm food or evaporating liquids in
the refrigerator;
• do cover or wrap the food, particularly if it has a
strong flavour.
• Position food so that air can circulate freely round
it.
Page 5
5
Freezing fresh food
The 4-star compartment is suitable for
long term storage of commercially frozen food, and
for freezing fresh food.
To freeze fresh foods It is not necessary to change
the setting of the thermostatknob. However, for a
quicker freezing operation, turn the thermostat knob
to the coldest setting; but remeber that, in this
condition, the refrigerator compartment temperature
might drop below 0°C. If this occurs reset thermostat
knob to a warmer setting.
Place the food to be frozen on the upper
compartment.
Storage of frozen food
When first starting-up or after a period out of use,
before putting the products in the compartment let
the appliance run at least two hours on the coldest
setting, then turn the thermostat knob to the normal
operating position.
Important
In the event of accidental defrosting, for example
due to a power failure, if the power has been off
for longer that the value shown in the technical
characteristics chart under “rising time”, the
defrosted food must be consumed quickly or
cooked immediately and then refrozen (after
cooling).
Ice-cube production
This appliance is equipped with one or more trays
for the production of ice-cubes. Fill these trays with
water, then put them in the freezer compartment.
Do not use metallic instruments to remove the
trays from the freezer.
Thawing
Deep-frozen or frozen food, prior to being used, can
be thawed in the refrigerator compartment or at
room temperature, depending on the time available
for this operation.
Small pieces may even be cooked still frozen,
directly from the freezer: in this case, cooking will
take longer.
28
Yerine oturana kadar kapa¤ı (D) kılavuz üzerine (B)
sabitleyiniz.
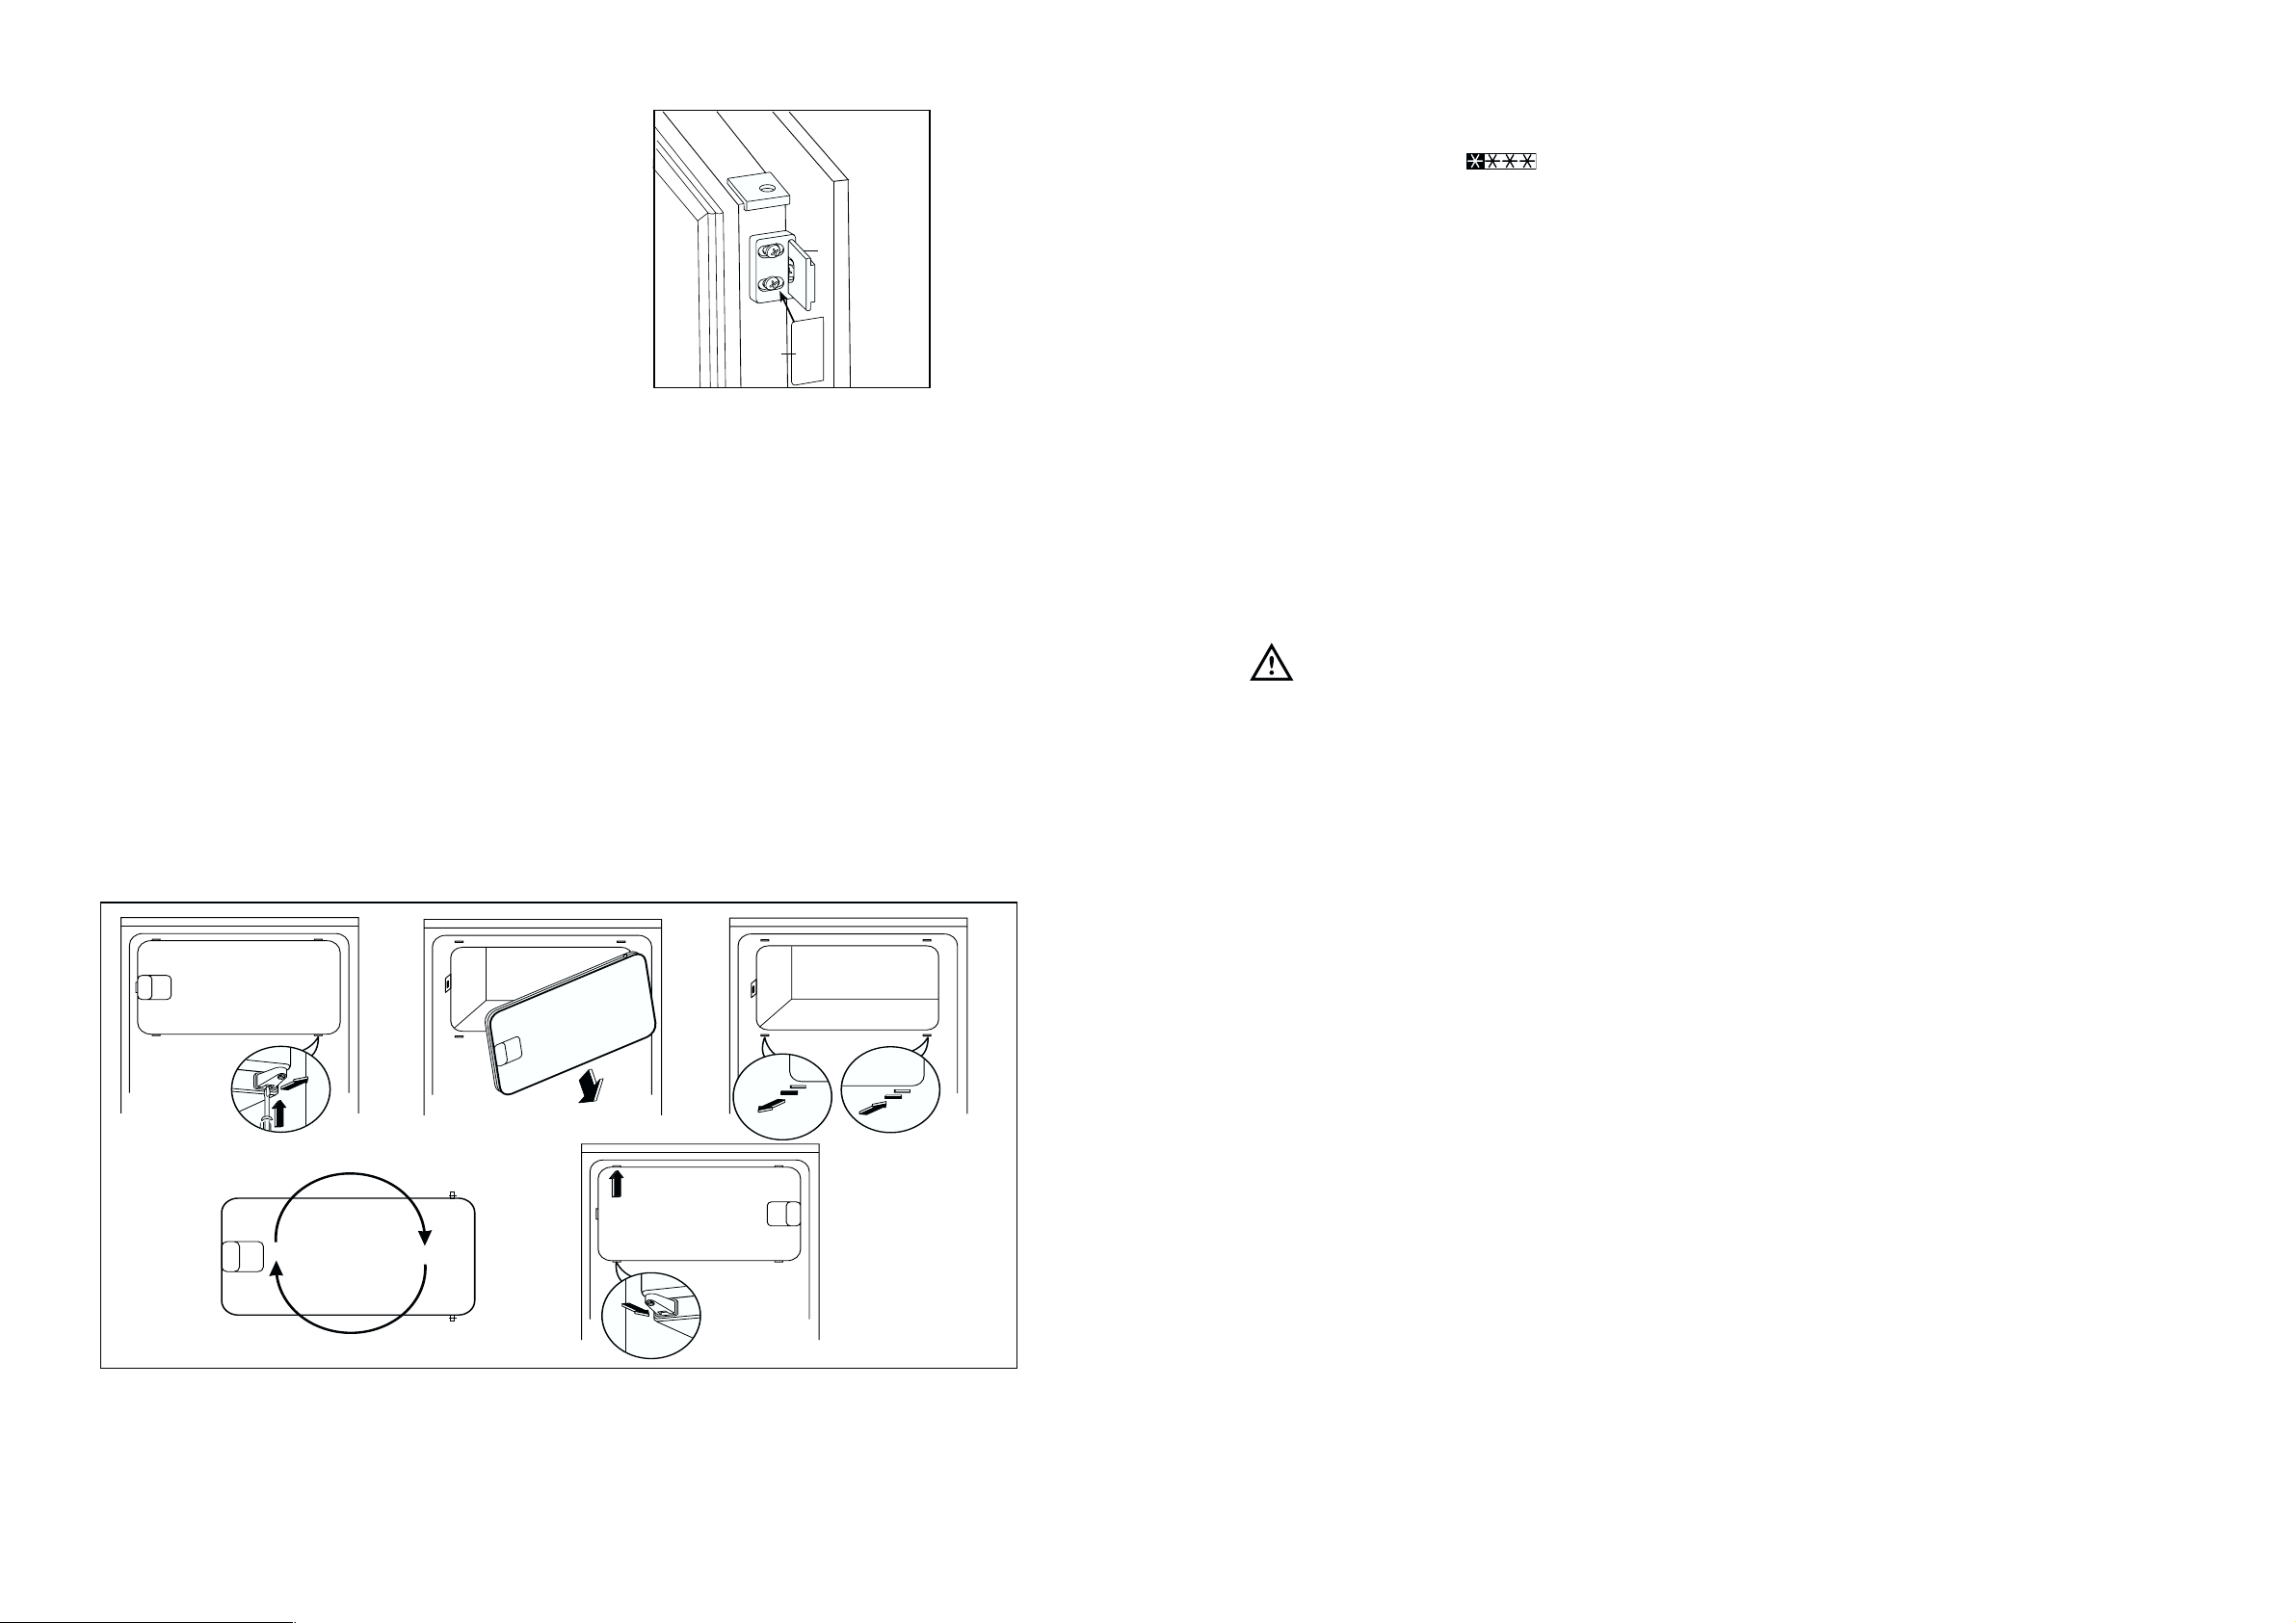
Derin dondurucunun kapı yönünün de¤ifltirilmesi
Kapıların açılma yönünü ters çevirdikten sonra
tüm vidaların uygun flekilde sıkıfltırılmıfl
olduklarını ve manyetik contanın dolaba
yapıflmıfl oldu¤unu kontrol ediniz. Ortam ısısının
so¤uk olması halinde (Kıfl mevsiminde oldu¤u
gibi), sızdırmaz conta dolaba mükemmel flekilde
sabitlenmeyebilir. Bu durumda, sızdırmaz
contanın do¤al biçimde sabitlenmesini
bekleyiniz veya iliflkin kısmı normal bir saç
kurutma makinesi ile ısıtarak bu süreci
hızlandırınız.
B
D
PR167/1
180°
Page 6
6
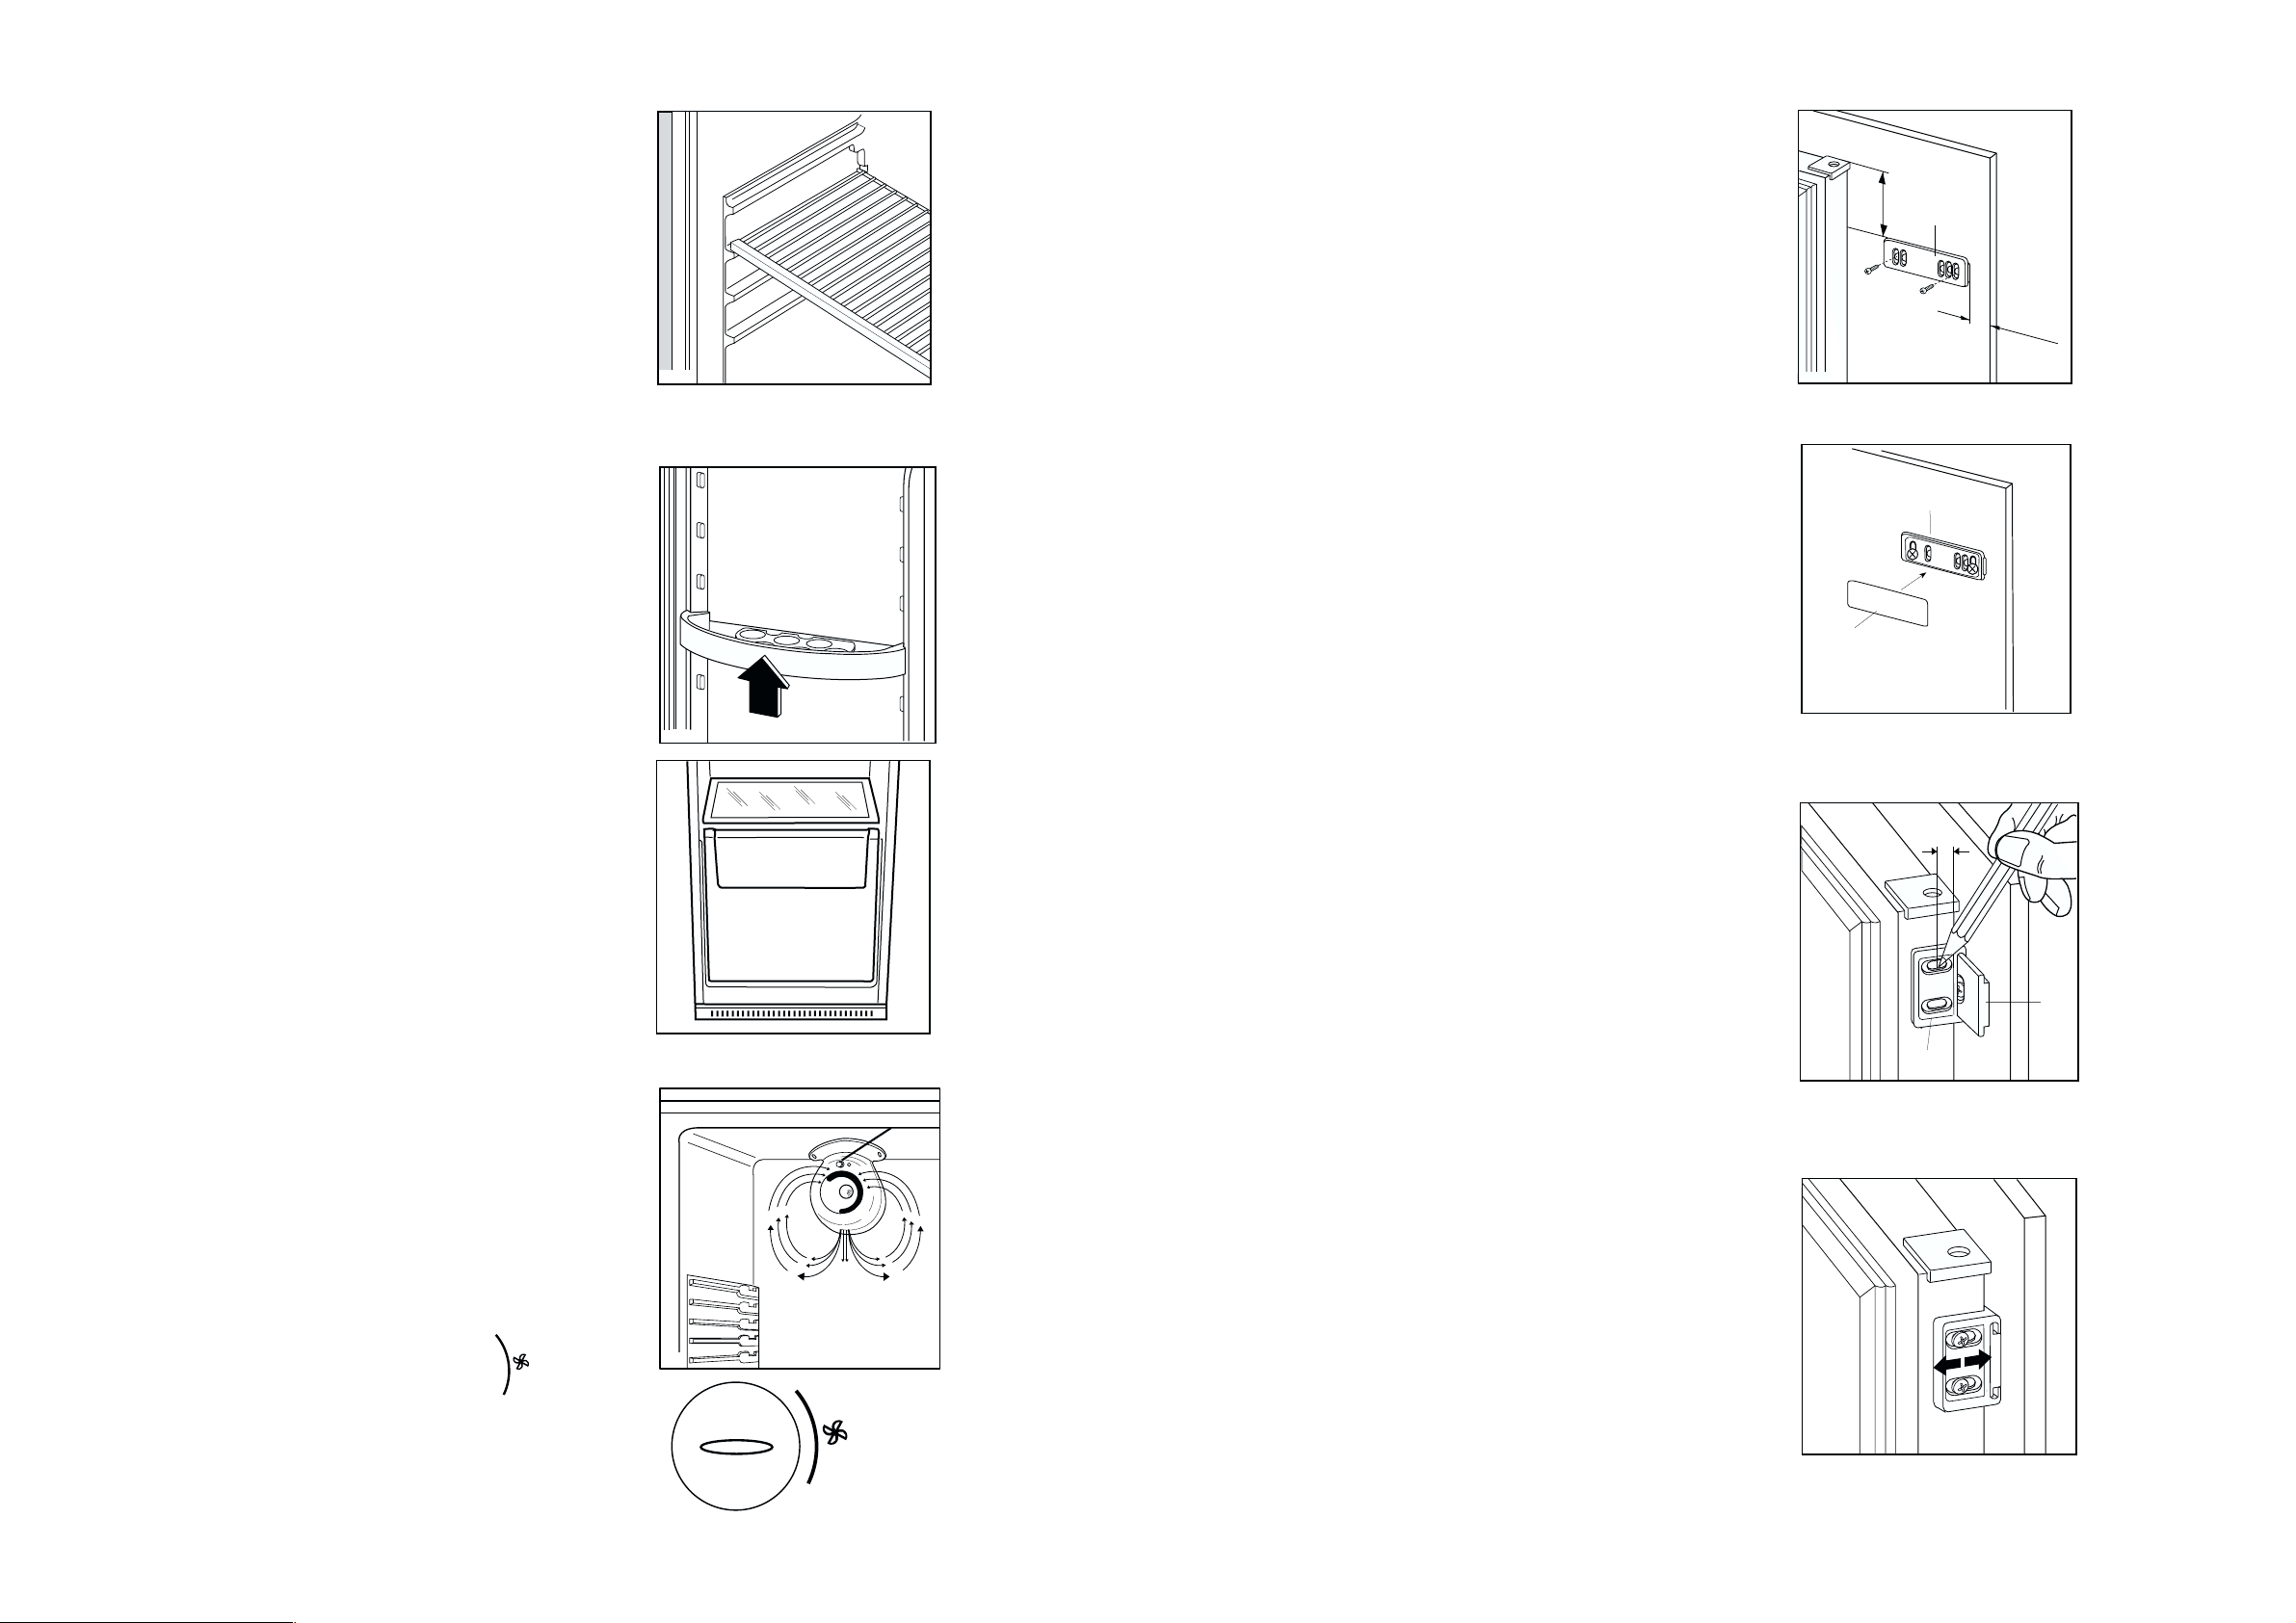
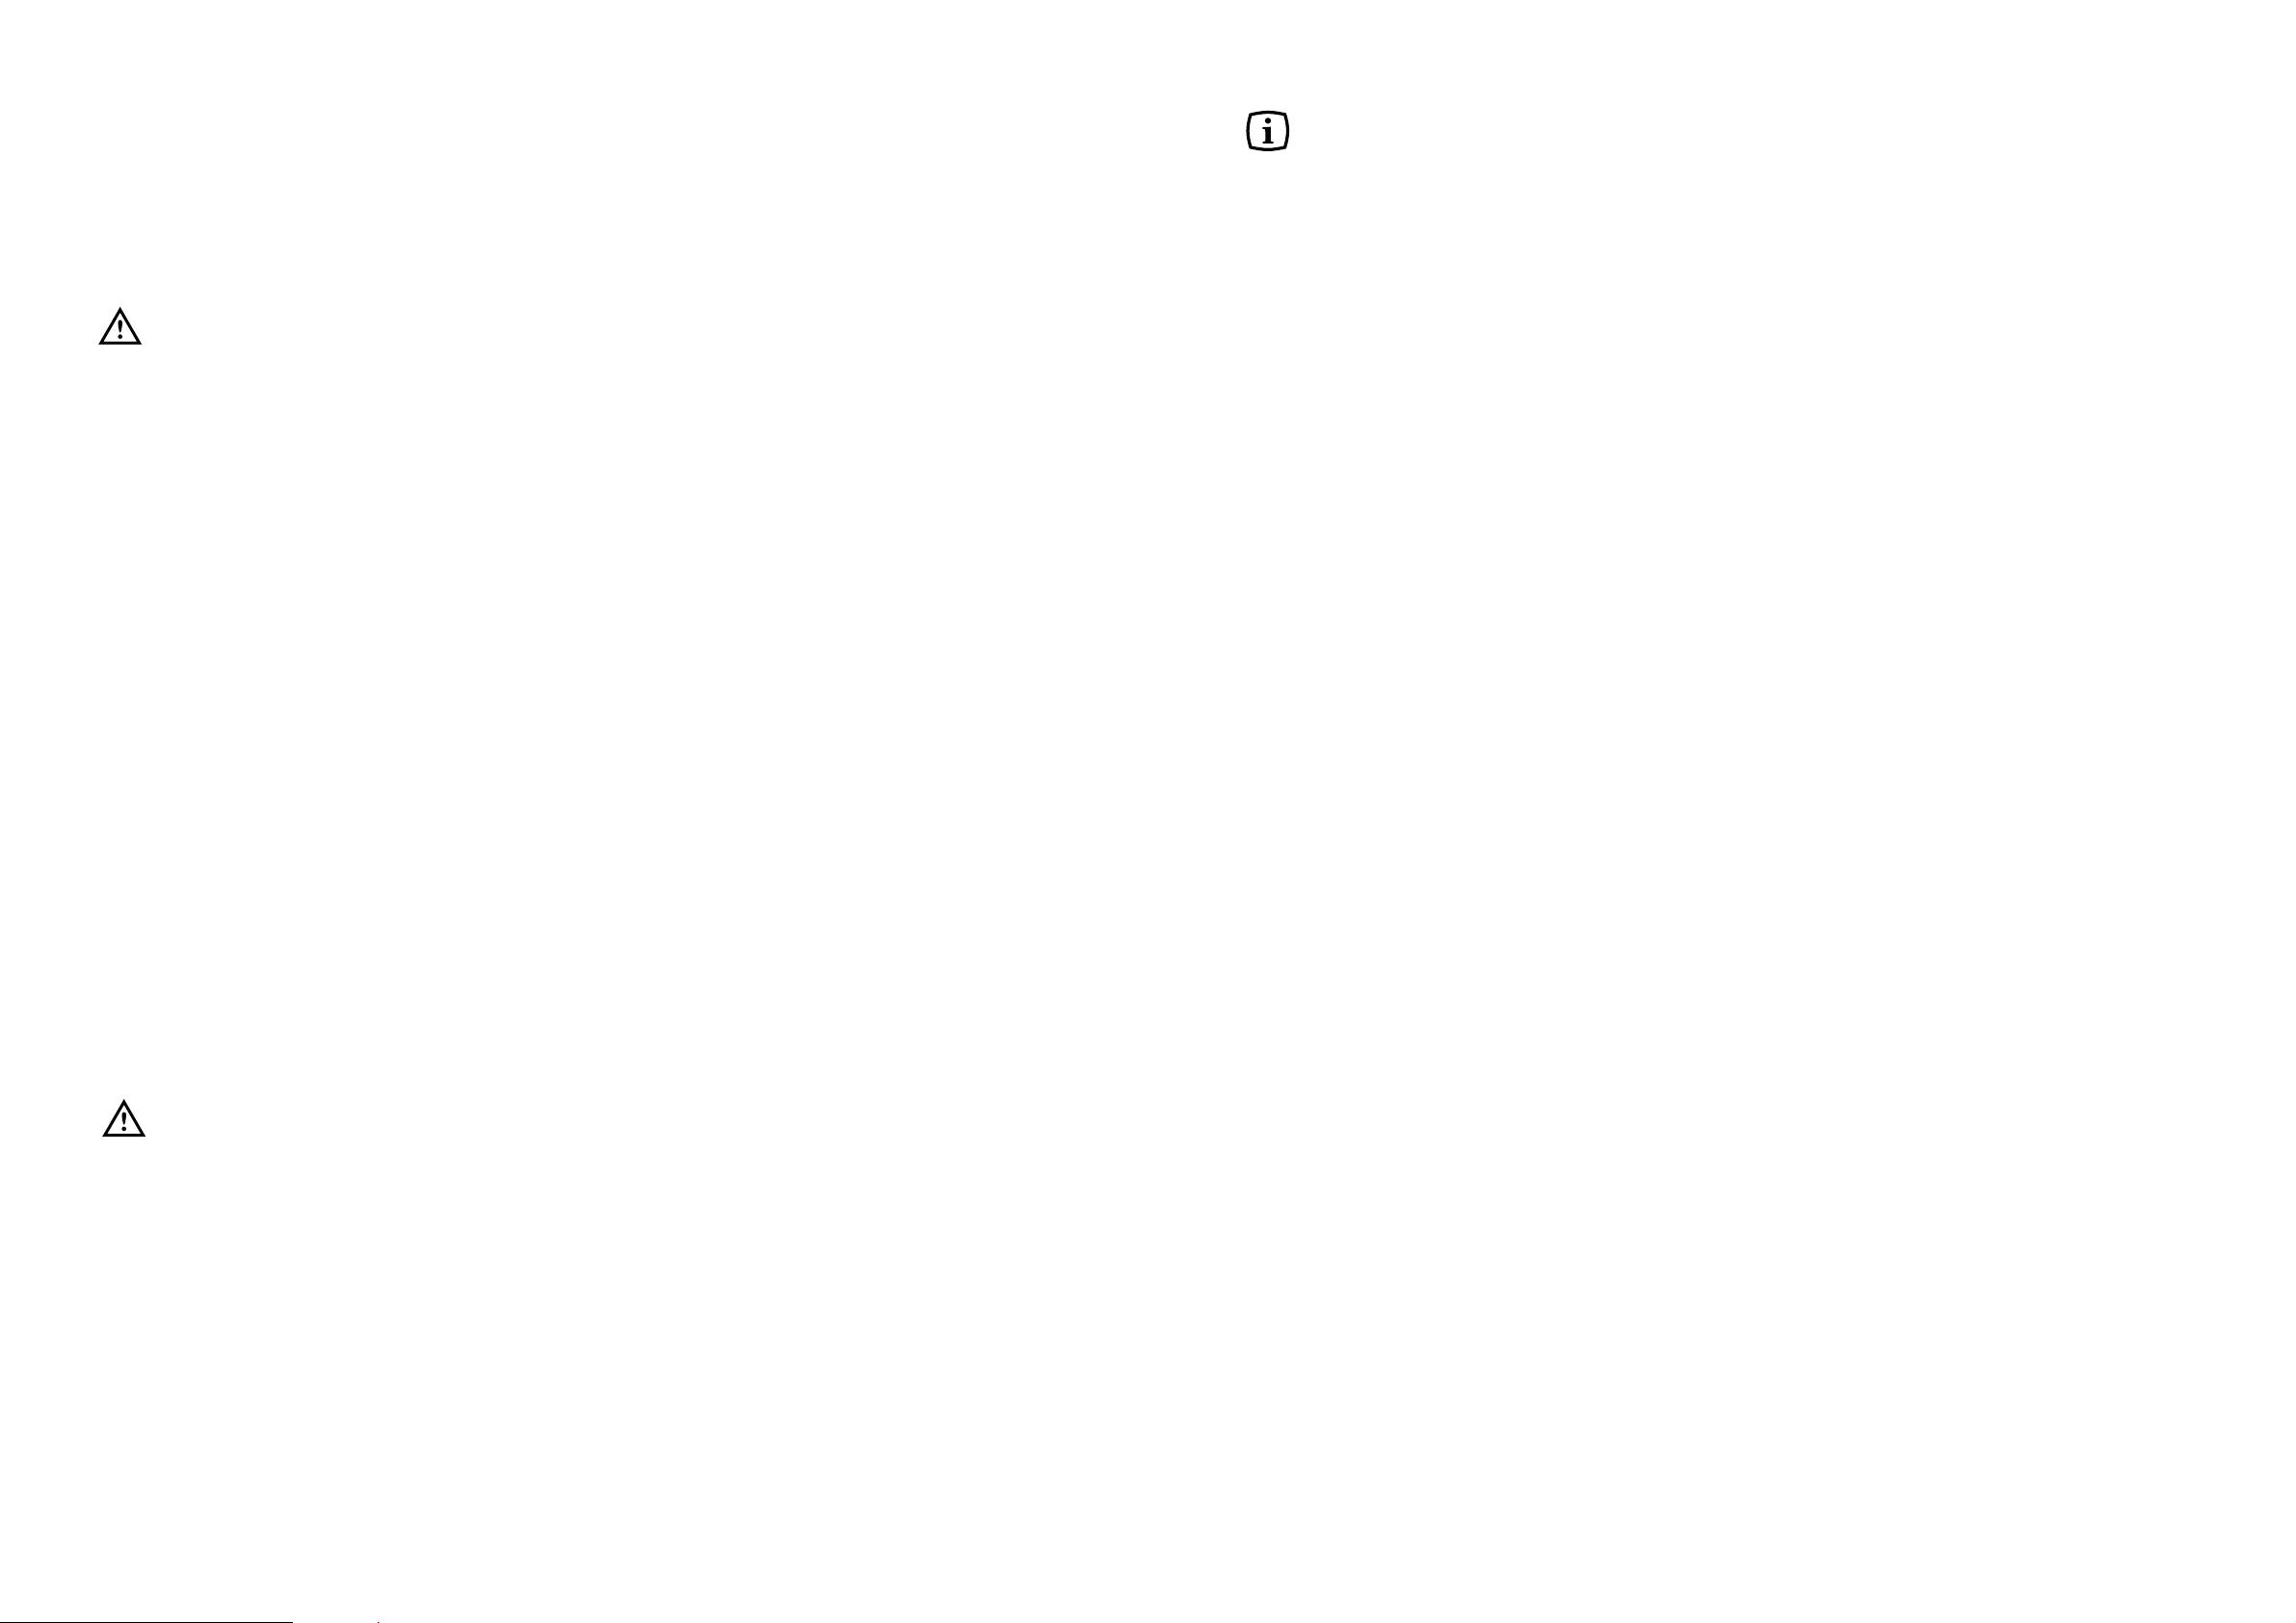
Movable shelves
The walls of the refrigerator are equipped with a
series of runners so that the shelves can be
positioned as desired.
Positioning the door shelves
To permit storage of food packages of various sizes,
the door shelves can be placed at different heights.
To make these adjustments proceed as follows:
Gradually pull the shelf in the direction of the arrows
until it comes free, then reposition as required.
Removable drawer
Fruit, vegetables and bottles should be placed in the
special bottom drawer provided (see the diagram).
Air recycling
The refrigerator compartment is equipped with a
special D.A.C. (Dynamic Air Cooling) fan which can
be turned on with the switch (see fig. 1). The green
light, when on, means that the fan is working.
It is suggested that the fan (D.A.C.) be used when
the ambient temperature exceeds 25° C.
It should be remembered that the thermostat knob
must be placed (see fig. 2) within the sector .
This device allows for rapid cooling of foods and a
more uniform temperature in the compartment.
Fig. 1
Fig. 2
27
20 mm
A
50mm
PR166
PR33
C
A
8mm
PR167
A
B
PR168
Kılavuzu (A) resimde gösterildi¤i gibi mobilyanın
kapısının iç kısmının üstüne ve altına yerlefltiriniz ve
dıfl deliklerin pozisyonunu iflaretleyiniz. Delikleri
açtıktan sonra, ikmal edilen vidalarla kılavuzu
sabitleyiniz.
Yerine oturana kadar kapa¤ı (C) kılavuz üzerine (A)
sabitleyiniz.
Cihazın ve mobilyanın kapısını 90° açınız. Küçük
dört köfle ba¤lantı parçasını (B) kılavuz (A) içine
geçiriniz. Cihazın ve mobilyanın kapılarını
birlefltiriniz ve resimde gösterildi¤i gibi delikleri
iflaretleyiniz. Dört köfle ba¤lantı parçalarını çıkarınız
ve kapının dıfl kenarından 8 mm mesafeye 2 mm
çapında delik açınız. Küçük ba¤lantı parçasını tekrar
kılavuz üzerine yerlefltiriniz ve ikmal edilen vidalarla
sabitleyiniz.
Mobilya kapısının hizalanması gerekirse, aralıkların
toleransını kullanınız.
‹fllemlerin sonunda mobilya kapısının uygun flekilde
kapanıp kapanmadı¤ının kontrol edilmesi gerekir.
D040
PR187
SWITCH
D671NEW
O
6
5
1
2
3
4
Page 7
7
Hints for storage of frozen food
To obtain the best performance from this appliance,
you should:
• make sure that the commercially frozen
foodstuffs were adequately stored by the retailer;
• be sure that frozen foodstuffs are transferred
from the foodstore to the freezer in the shortest
possible time;
• not open the door frequently or leave it open
longer than absolutely necessary.
• Once defrosted, food deteriorates rapidly and
cannot be refrozen.
• Do not exceed the storage period indicated by
the food manufacturer.
• do not put carbonated liquids (fizzy drinks,
etc.) in the freezer compartment as they may
burst.
HINTS
Hints for refrigeration
Useful hints:
Meat (all types): wrap in polythene bags and place
on the glass shelf above the vegetable drawer.
For safety, store in this way only one or two days
at the most.
Cooked foods, cold dishes, etc..: these should be
covered and may be placed on any shelf.
Fruit and vegetables: these should be thoroughly
cleaned and placed in the special drawer(s)
provided.
Butter and cheese: these should be placed in
special airtight containers or wrapped in aluminium
foil or polythene bags to exclude as much air as
possible.
Milk bottles: these should have a cap and should
be stored in the bottle rack on the door.
Bananas, potatoes, onions and garlic, if not
packed, must not be kept in the refrigerator.
Hints for freezing
To help you make the most of the freezing process,
here are some important hints:
• the maximum quantity of food which can be
frozen in 24 hrs. is shown on the rating plate;
• the freezing process takes 24 hours. No further
food to be frozen should be added during this
period;
• only freeze top quality, fresh and thoroughly
cleaned, foodstuffs;
• prepare food in small portions to enable it to be
rapidly and completely frozen and to make it
possible subsequently to thaw only the quantity
required;
• wrap up the food in aluminium foil or polythene
and make sure that the packages are airtight;
• do not allow fresh, unfrozen food to touch food
which is already frozen, thus avoiding a rise in
temperature of the latter;
• lean foods store better and longer than fatty
ones; salt reduces the storage life of food;
• water ices, if consumed immediately after
removal from the freezer compartment, can
possibly cause the skin to be freeze burnt;
• it is advisable to show the freezing-in date on
each individual pack to enable you to keep tab of
the storage time;
26
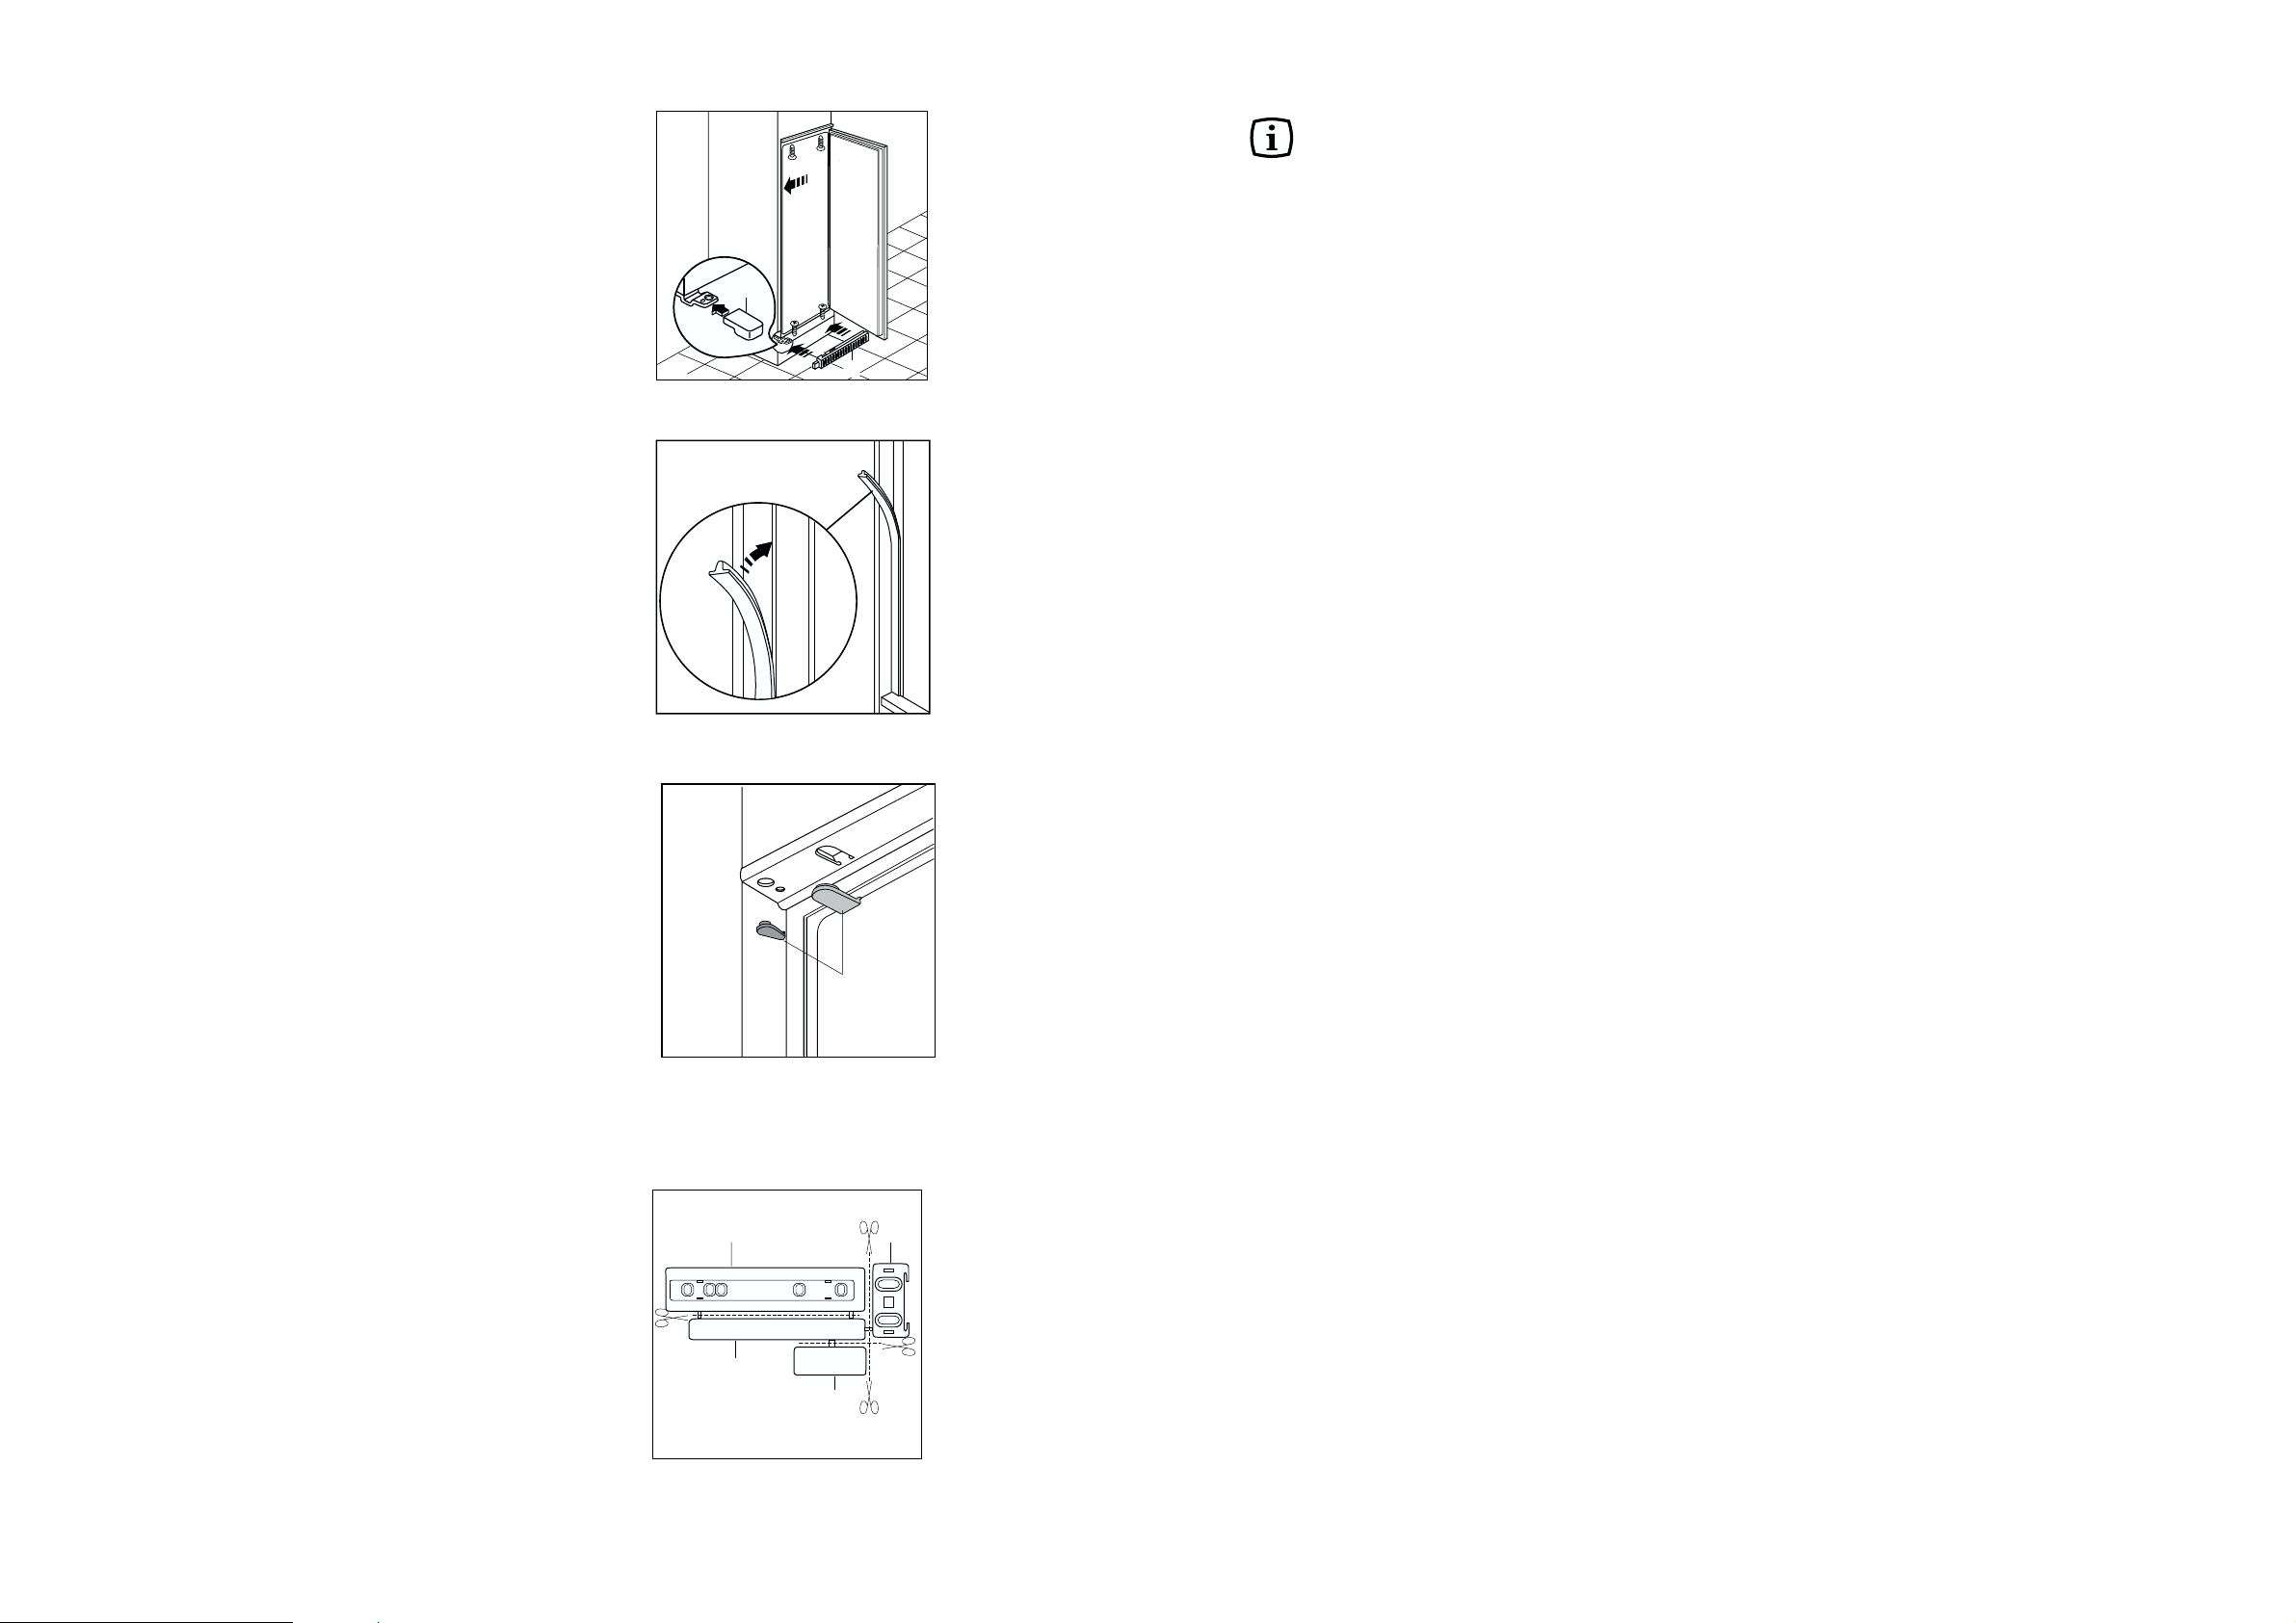
Cihaz ve mutfak ünitesi arasındaki ba¤lantı
kapaklarına bastırınız.
Ba¤lantı kapak mandalları üzerine ve mentefle
deliklerine kapakları (B) takınız.
Kapıyı açınız ve cihazın menteflelerinin
bulundu¤u kenara karflı gelecek flekilde cihazı
mutfak ünitesinin kenarına do¤ru itiniz.
Cihaz ile birlikte ikmal edilen set içinde bulunan
4 vida ile cihazı sıkıfltırınız. Havalandırma
ızgarasını (C) ve mentefle kapa¤ını (D)
yerlerine oturtunuz.
A, B, C, D kısımlarını resimde gösterildi¤i gibi
ayırınız.
D
D723/2
C
D724
D726
PR266
B
A
C
B
D
Page 8
8
MAINTENANCE
Unplug the appliance before carrying out
any maintenance operation.
Warning
This appliance contains hydrocarbons in its cooling
unit; maintenance and recharging must therefore
only be carried out by authorized technicians.
Periodic cleaning
Clean the inside with warm water and bicarbonate of
soda.
Rinse and dry thoroughly.
Clean the condenser (black grill) and the
compressor at the back of the appliance with a
brush or a vacuum cleaner. This operation will
improve the performance of the appliance and save
electricity consumption.
Periods of non-operation
When the appliance is not in use for long periods,
take the following precautions:
remove the plug from the wall socket;
remove all food;
defrost and clean the interior and all accessories;
leave the door ajar to allow air to circulate to prevent
unpleasant smells.
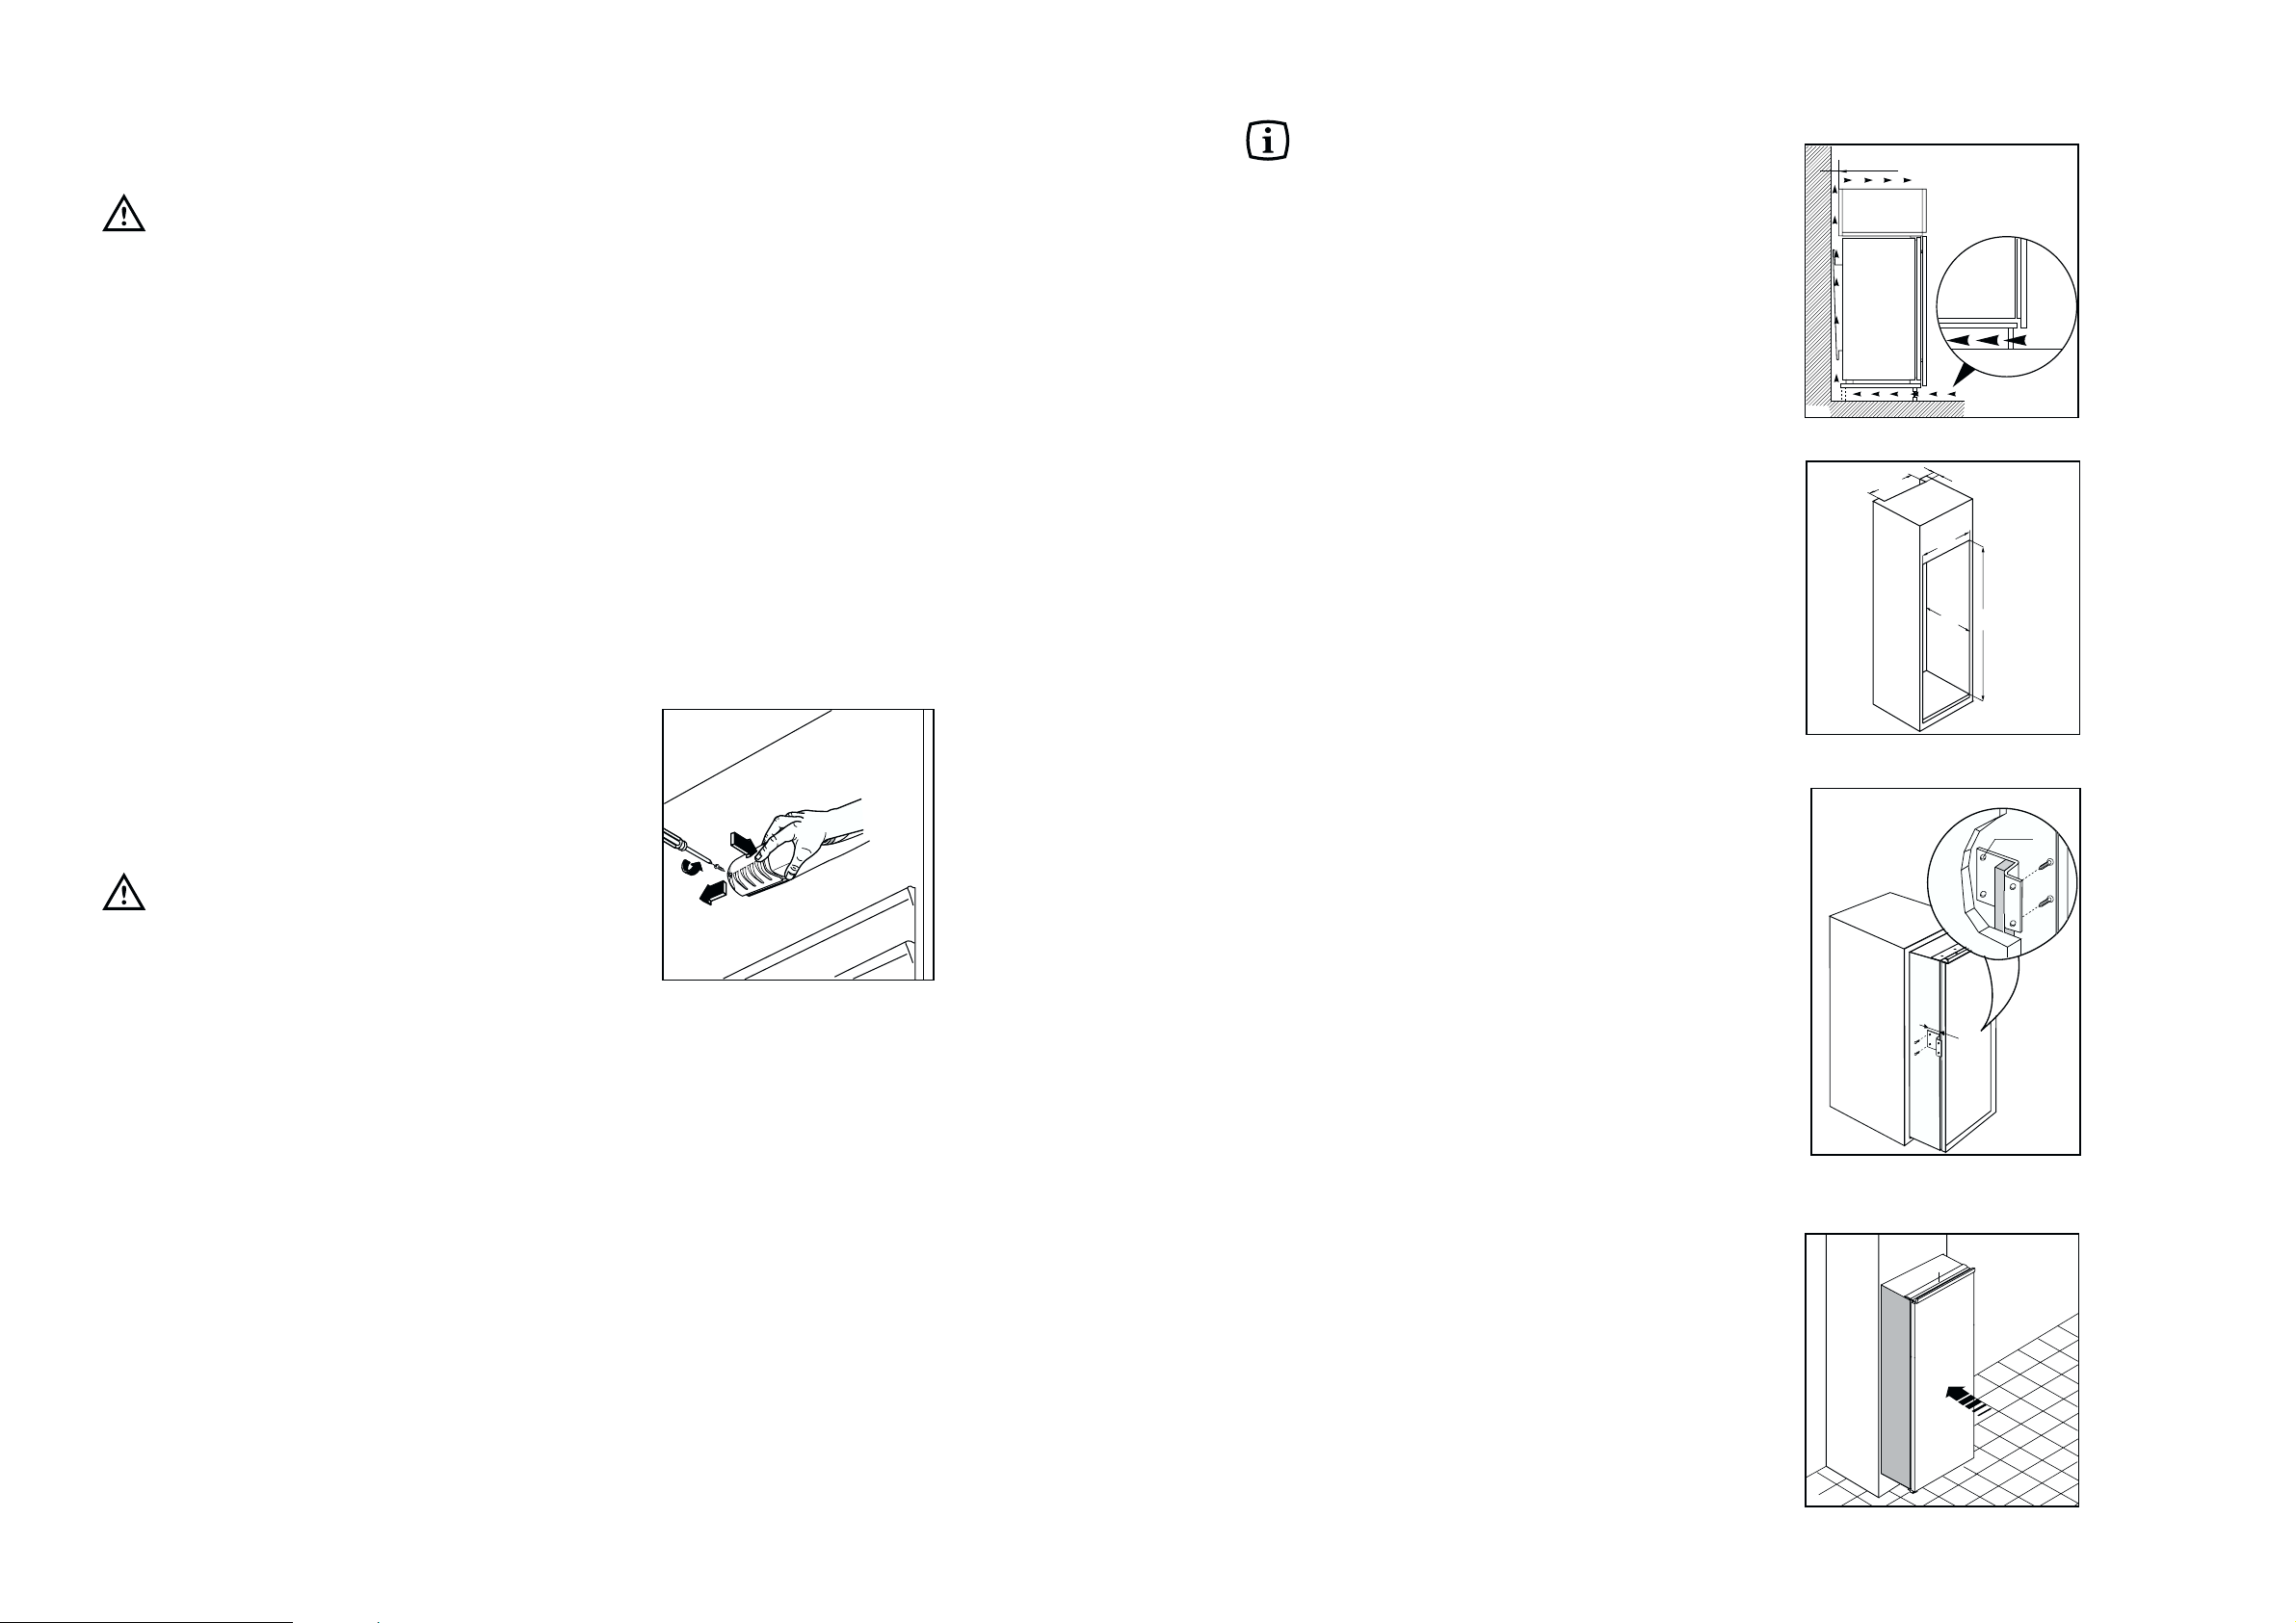
Interior light
The light bulb inside the refrigerator compartment
can be reached as follows:
- unscrew the light cover securing screw.
- unhook the moving part as shown in the figure.
If the light does not come on when the door
is open, check that it is screwed into place
properly. If it still does not light up, change the
bulb. The rating is shown on the light bulb cover.
25
50 mm
min.
200 cm
2
200 cm
2
min.
D567
A
D015/1
13mm
D740
Ø 2,5
PR01
540
50
3
2
1
Tamamen ankastre modeller
için bilgiler
Girinti ebatları
Yükseklik (1) 1780 mm
Derinlik (2) 550 mm
Genifllik (3) 560 mm
Cihazın kapısı, nakliyat esnasında her iki tarafta
da bulunan pimler vasıtasıyla kilitli olmalıdır.
Kapının açıldı¤ı yöne göre üstteki ve alttaki
iliflkin pimleri çıkarınız.
Güvenlik nedenleriyle, minimum havalandırma Res.
…'de gösterildi¤i gibi olmalıdır.
Dikkat: havalandırma deliklerini tıkanmalara
karflı temiz tutunuz.
Ayrıca, deli¤in afla¤ıdaki ölçülere sahip bir
havalandırma kanalı ile donatılmıfl olması
gerekmektedir:
derinlik 50 mm
genifllik 540 mm
• Üniteyi 2.5 mm çaplı bir matkap kullanarak
deliniz (maksimum penetrasyon 10 mm).
• Dört köfle ba¤lantı parçasını cihaza sabitleyiniz.
Durdurma çubu¤u (A) mutfak ünitesine dokunana
kadar cihazı yuva içine itiniz.
D411
Page 9
9
Defrosting
Frost is automatically eliminated from the evaporator
of the refrigerator compartment every time the motor
compressor stops, during normal use. The defrost
water drains out through a trough into a special
container at the back of the appliance, over the
motor compressor, where it evaporates.
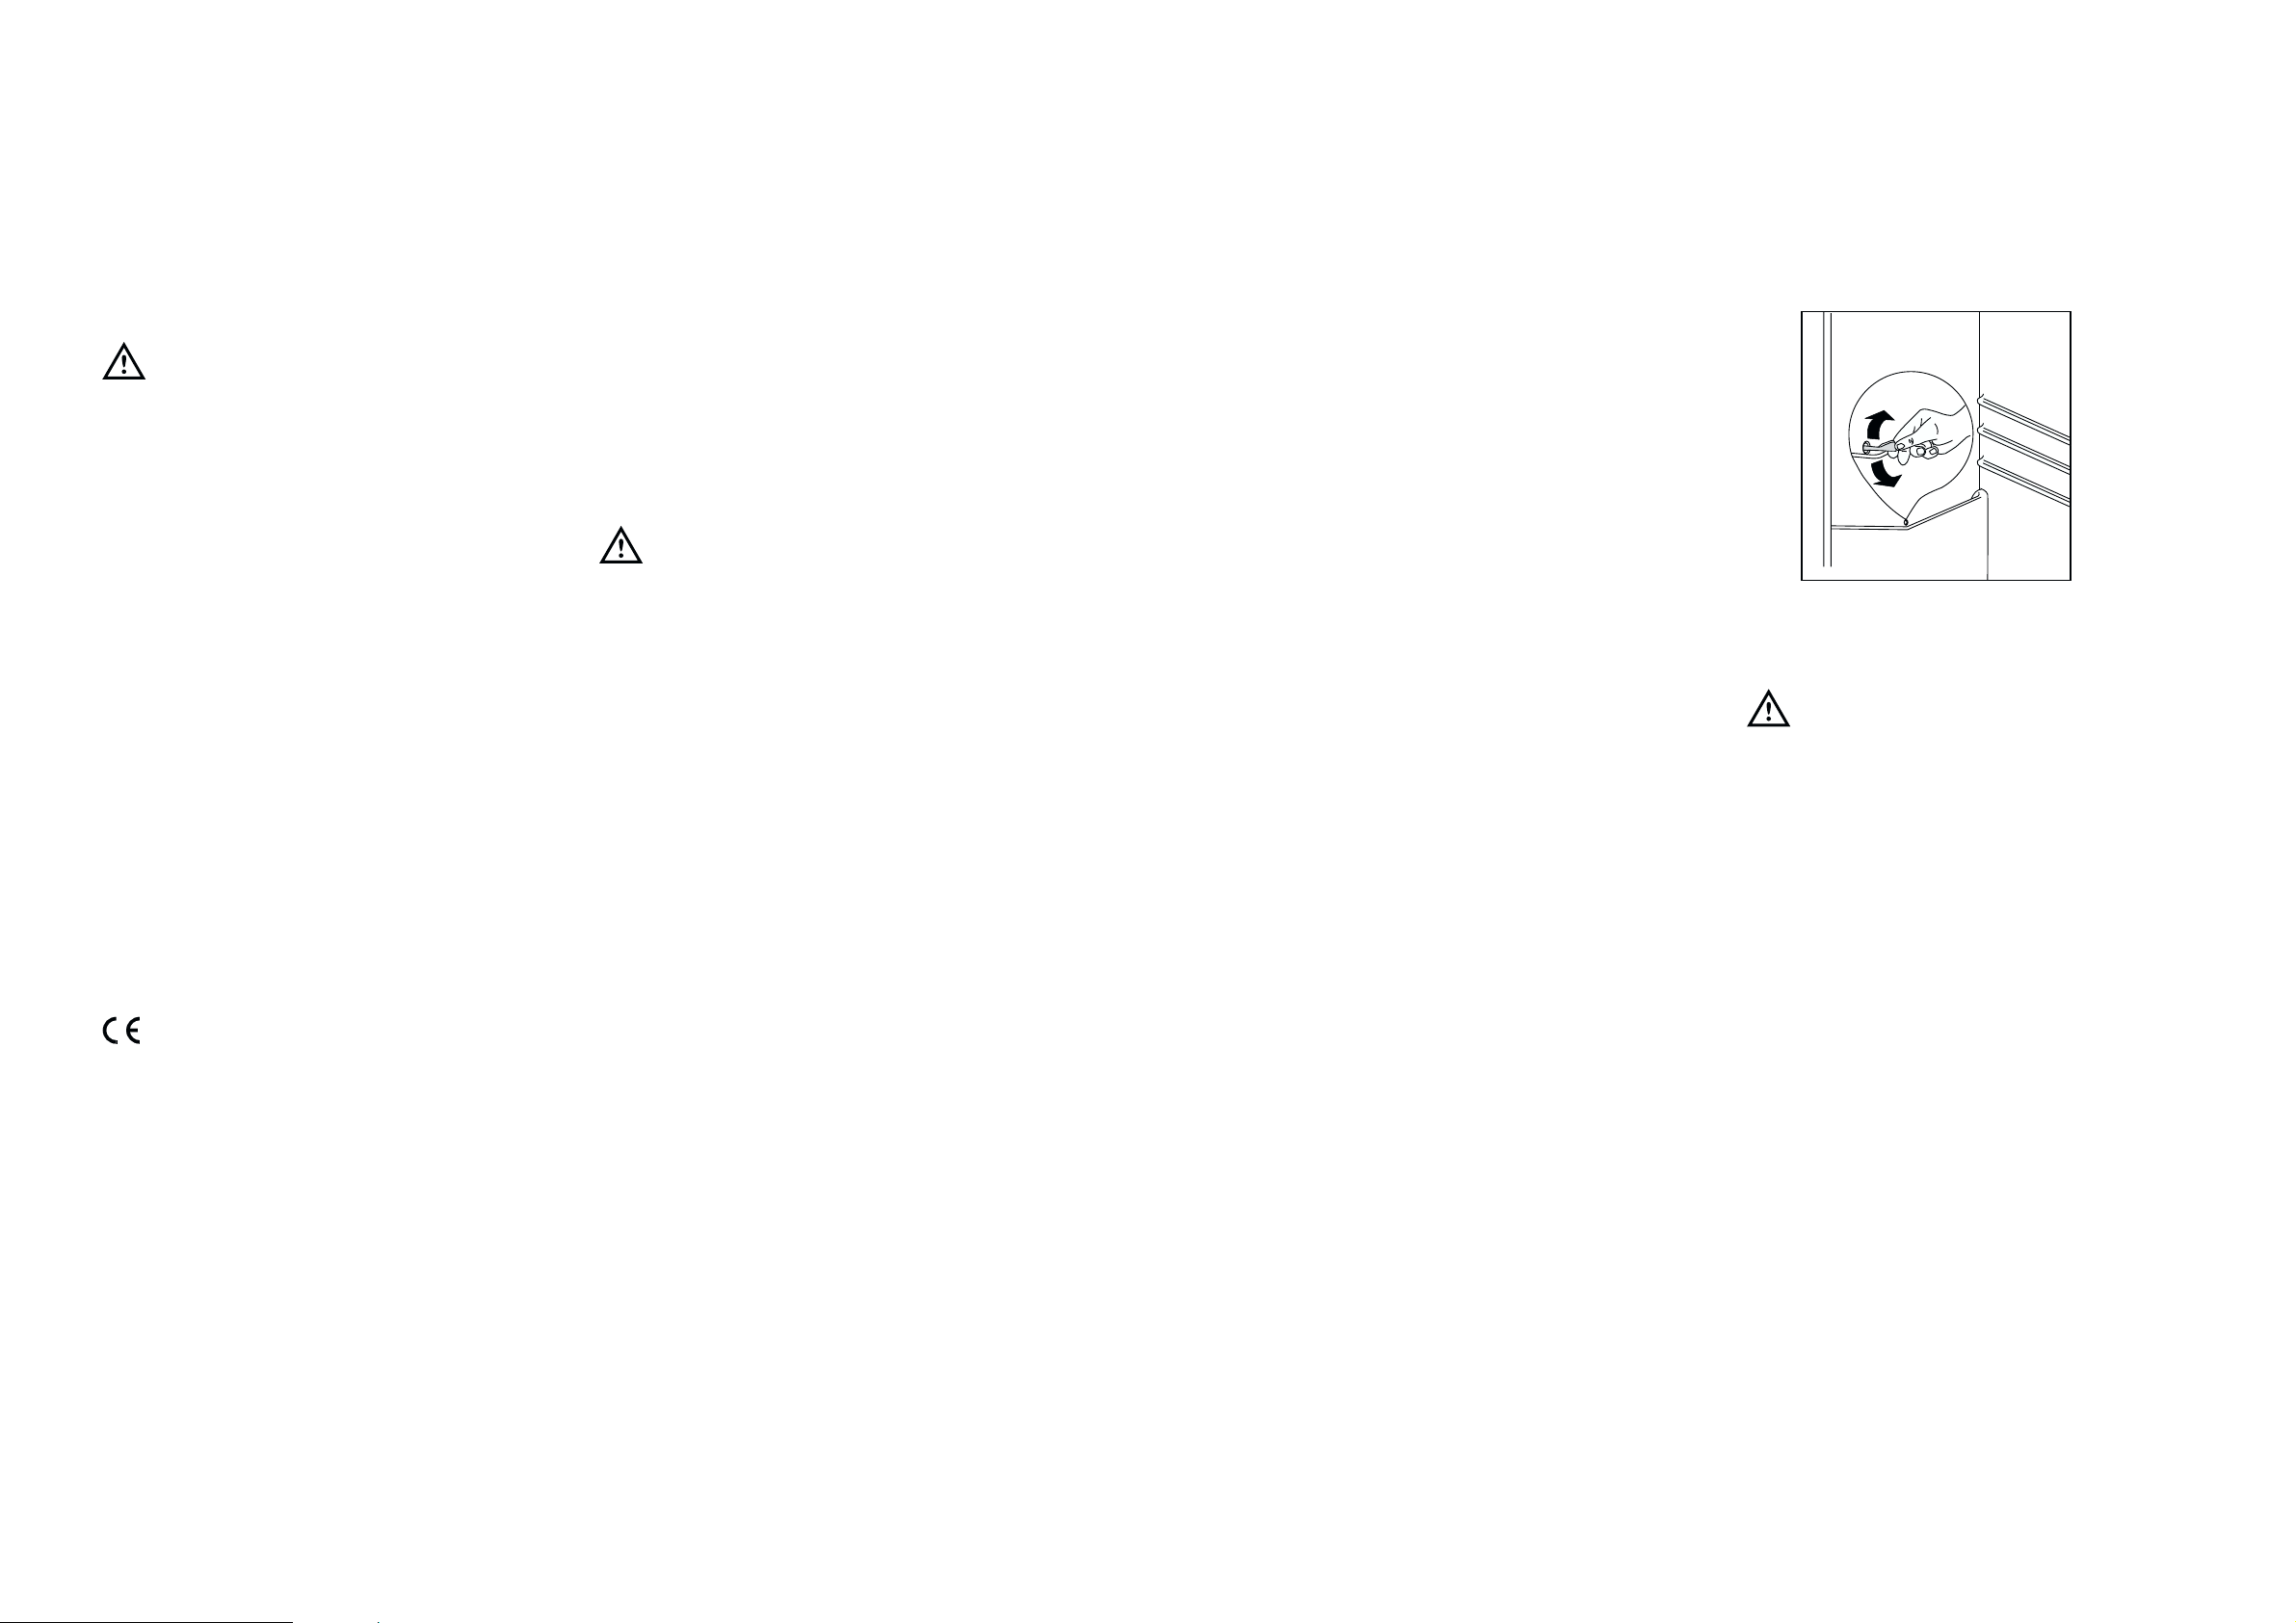
It is important to periodically clean the defrost
water drain hole in the middle of the refrigerator
compartment channel to prevent the water
overflowing and dripping onto the food inside.
Use the special cleaner provided, which you will
find already inserted into the drain hole.
The freezer compartment, however, will become
progressively covered with frost. This should be
removed with a plastic scraper, whenever the
thickness of the frost exceeds 4 mm. During this
operation it is not necessary to switch off the power
supply or to remove the foodstuffs.
However, when the ice becomes very thick on the
inner liner, complete defrosting should be carried out
as follows:
1. pull out the plug from the wall socket or turn the
thermostat knob to the «O» setting;
2. remove any stored food, wrap it in several layers
of newspaper and put it in a cool place;
3. leave the door open;
4. when defrosting is completed, dry the interior
thoroughly;
5. turn the thermostat knob back to the required
setting or replace the plug in the power socket.
6. After two or three hours, reload the previously
removed food into the compartment.
D037
Important:
Never use sharp metal tools to scrape off frost
from the evaporator as you could damage it.
Do not use a maechanical device or any artificial
means to speed up the thawing process other
than those recommended by the manufacturer.
A temperature rise of the frozen food packs,
during defrosting, may shorten their safe
storage life.
CUSTOMER SERVICE AND SPARE PARTS
If the appliance is not functioning properly, check
that:
• the plug is firmly in the wall socket and the mains
power switch is on;
• there is an electricity supply (find out by plugging
in another appliance);
• the thermostat knob is in the correct position.
• If there are water drops on the bottom of the
cabinet, check that the defrost water drain
opening is not obstructed (see “Defrosting”
section).
• If your appliance is still not working properly after
making the above checks, contact the nearest
service centre.
To obtain fast service, it is essential that when you
apply for it you specify the model and serial number
of your appliance which can be found on the
guarantee certificate or on the rating plate located
inside the appliance, on the bottom left-hand side.
24
Elektrik Ba¤lant›s›
Fifli takmadan önce seri numara plakas›nda
belirtilen voltaj ve frekans›n sizinkine uydu¤undan
emin olun. Voltaj verilmifl olan voltaj›n %± 6's›
olabilir.
Farkl› voltajlarda çal›flt›rabilmek için uygun ebatta bir
regulator kullan›n›z.
Cihaz topraklanm›fl olmal›d›r.
Elektrik kablosunun fifli bu amaçla bir kontak ile
donat›lm›flt›r.
Kullanaca¤›n›z priz toprakl› de¤il ise ehliyetli bir
teknisyene dan›flarak ve mevcut yönetmeliklere
uygun olarak buzdolab›n› ayr› bir toprak hatt›na
irtibatlay›n›z.
Yukar›da belirtilen güvenlik uygulamalar›na
uyulmamas› halinde üreticiye hiçbir sorumluluk
yüklenemez.
Bu ürün afla¤›da belirtilen A.E.T.
yönetmeliklerine uygundur.
- Radyo giriflimi parazit gidericileri ile ilgili 2/6/87
tarihli 87/308 AET
- 19.2.73 tarihli 73/23 AET (Düflük Voltaj
Yönetmeli¤i) ve de¤ifliklikleri
- 3.5.89 tarihli 89/336 AET Elektromanyetik
Uygunluk Yönetmeli¤i ve de¤ifliklikleri
MONTAJ
Yerlefltirme
Bu cihaz kalorifer, kazan, direkt günefl ıflı¤ı, vs. gibi
ısı kaynaklarından uza¤a kurulmalıdır.
Mutfak üniteleri içine ankastre edilmesi için özel
'Ankastre' bölümünde verilen bilgileri izleyiniz.
Dikkat
Cihazın güç besleme flebekesiyle ba¤lantısının
kesilmesi mümkün olmalıdır; bu açıdan cihazın
kurulmasından sonra priz, kolay eriflilebilir olmalıdır.
Uyar›:
Kap›lar›n aç›lma yönünü de¤ifltirdikten sonra
tüm vidalar›n düzgün bir flekilde s›k›ld›¤›ndan ve
kap› contas›n›n buzdolab›n›n gövdesine
yap›flt›¤›ndan emin olunuz. Ortam s›cakl›¤›
düflükse (örne¤in k›fl aylar›nda) conta
buzdolab›n›n gövdesine tam olarak
oturmayabilir. Bu durumda contan›n
kendili¤inden oturmas›n› bekleyiniz ya da ilgili
parçayı bir saç kurutma makinesi ile ısıtarak bu
ifllemi hızlandırınız.
Page 10
10
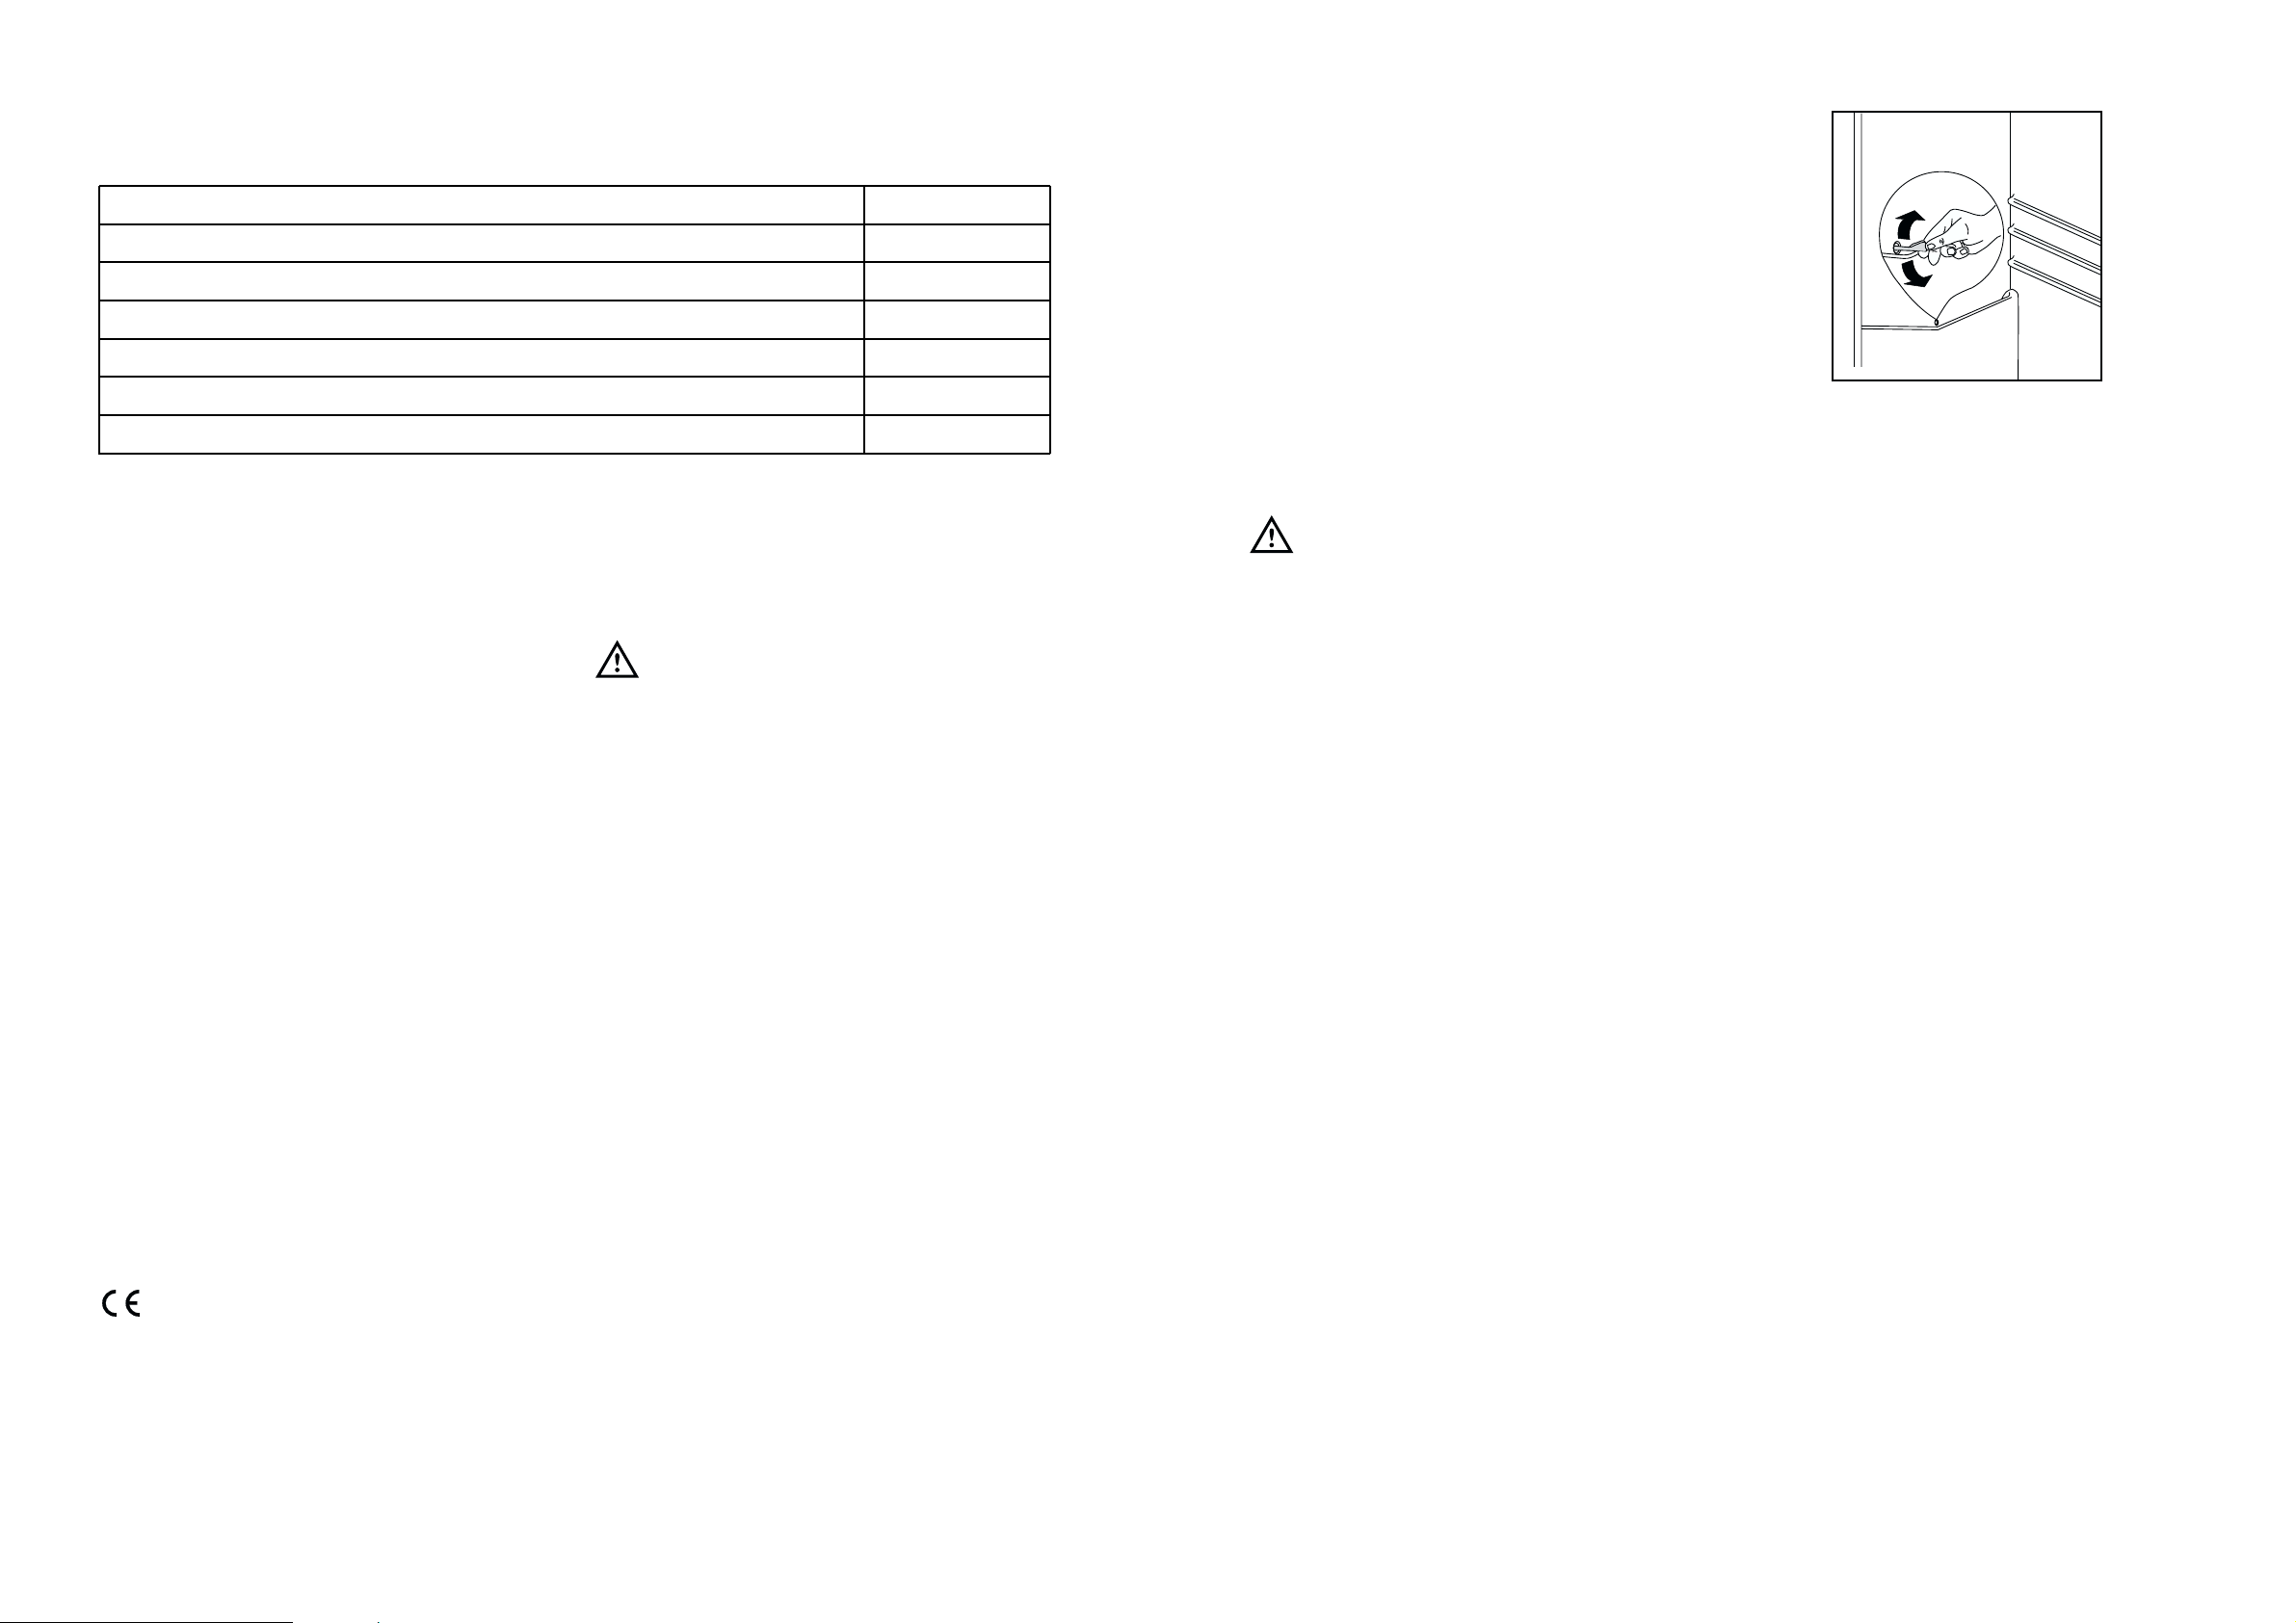
TECHNICAL INFORMATION
Energy Efficiency class
B
267
35
1.00
365
3
20
Net Fridge Capacity lt.
Energy Consumption kWh/24h
Energy Consumption kWh/year
Freezing Capacity kg
Rising time h
Net Frezer Capacity lt.
The technical infomation are situated in the rating plate on the internal left side of the appliance .
Electrical connection
Before plugging in, ensure that the voltage and
frequency shown on the serial number plate
correspond to your domestic power supply. Voltage
can vary by ±6% of the rated voltage.
For operation with different voltages, a suitably sized
auto-transformer must be used.
The appliance must be earthed.
The power supply cable plug is provided with a
contact for this purpose.
If the domestic power supply socket is not earthed,
connect the appliance to a separate earth in
compliance with current regulations, consulting a
specialist technician.
The Manufacturer declines all responsibility if
the above safety precautions are not observed.
This appliance complies with the following
E.E.C. Directives:
- 87/308 EEC of 2/6/87 relative to radio interference
suppression.
- 73/23 EEC of 19.2.73 (Low Voltage Directive) and
subsequent modifications;
- 89/336 EEC of 3.5.89 (Electromagnetic
Compatibility Directive) and subsequent
modifications.
INSTALLATION
Location
The appliance should be installed well away from
sources of heat such as radiators, boilers, direct
sunlight etc.
For building into kitchen units follow the special “
Building-in” instructions given.
Attention
It must be possible to disconnect the appliance from
the mains power supply; the plug must therefore be
easily accessible after installation.
23
Ancak iç kaplaman›n üstünde çok kal›n bir buzlanma
olufltu¤unda eritme ifllemi afla¤›daki flekilde
gerçeklefltirilmelidir:
1. Fifli çekin veya termostat dü¤mesini << O >>
ayar›na getirin.
2. Yiyecekleri ç›kart›n. Birkaç kat gazeteyle sararak
serin bir yerde muhafaza ediniz.
3. Kapıyı açık bırakınız;
4. Eritme ifllemi tamamlandı¤ında, iç kısmı iyice
kurulayınız;
5. Termostat dü¤mesini istenilen ayara geri çevirin
veya fifli tak›n.
6. ‹ki veya üç saat sonra ç›kard›¤›n›z yiyecekleri
tekrar bölmelere koyun.
Önemlidir:
Buharlaflt›r›c›daki (evaparatördeki) karlanmay›
temizlemek için hiçbir zaman keskin madeni
aletler kullanmay›n›z, aksi taktirde
buharlaflt›r›c›ya hasar verebilirsiniz.
Çözdürme ifllemini h›zland›rmak amac› ile üretici
taraf›ndan önerilenler d›fl›nda bir mekanik ayg›t
ya da suni yöntemler kullanmay›n›z.
Eritme ifllemi s›ras›nda donmufl g›dalar›n ›s›s›
artaca¤›ndan güvenli saklama süreleri
k›salabilecektir.
D037
MÜfiTER‹ H‹ZMETLER‹ VE YEDEK PARÇA
E¤er cihaz düzgün çal›flm›yorsa flunlar› kontrol edin:
• Fifl tam olarak prize tak›l› ve ana açma/kapama
dü¤mesi aç›k m›?
• Elektrik geliyor mu? (baflka bir cihaz takarak
deneyin.)
• Termostat dü¤mesi do¤ru pozisyonda m›?
• E¤er kabinin alt›nda su tanecikleri varsa, su
süzdürme bölümünün t›kan›p t›kanmad›¤›n›
kontrol edin. (Çözdürme bölümüne bak›n›z)
• E¤er cihaz›n›z hala problemli çal›fl›yorsa
yukar›daki kontrolleri yapt›ktan sonra en yak›n
yetkili servisi aray›n›z.
H›zl› servis alabilmeniz için, baflvurdu¤unuzda
garanti belgesi veya cihaz›n içinde sol kenarda bilgi
etiketi üzerinde bulabilece¤iniz cihaz model ve seri
numaras›n› belirtiniz.
Electrolux A.fi. (Genel Müdürlük)
Tarlabafl› cad. no: 35 Taksim/Istanbul
Tel: 0 212 293 10 20
Fax: 0 212 251 91 44
Electrolux A.fi. (Servis)
Tavflanl› köyü Taflocaklar› mevkii
Gebze - Kocaeli
Tel: 0 262 724 94 20
Fax: 0 262 724 94 21
Ücretsiz Tüketici Dan›flma Hatt›: 0 800 211 60 32
Page 11
11
50 mm
min.
200 cm
2
200 cm
2
min.
D567
A
D015/1
13mm
D740
Ø 2,5
PR01
540
50
3
2
1
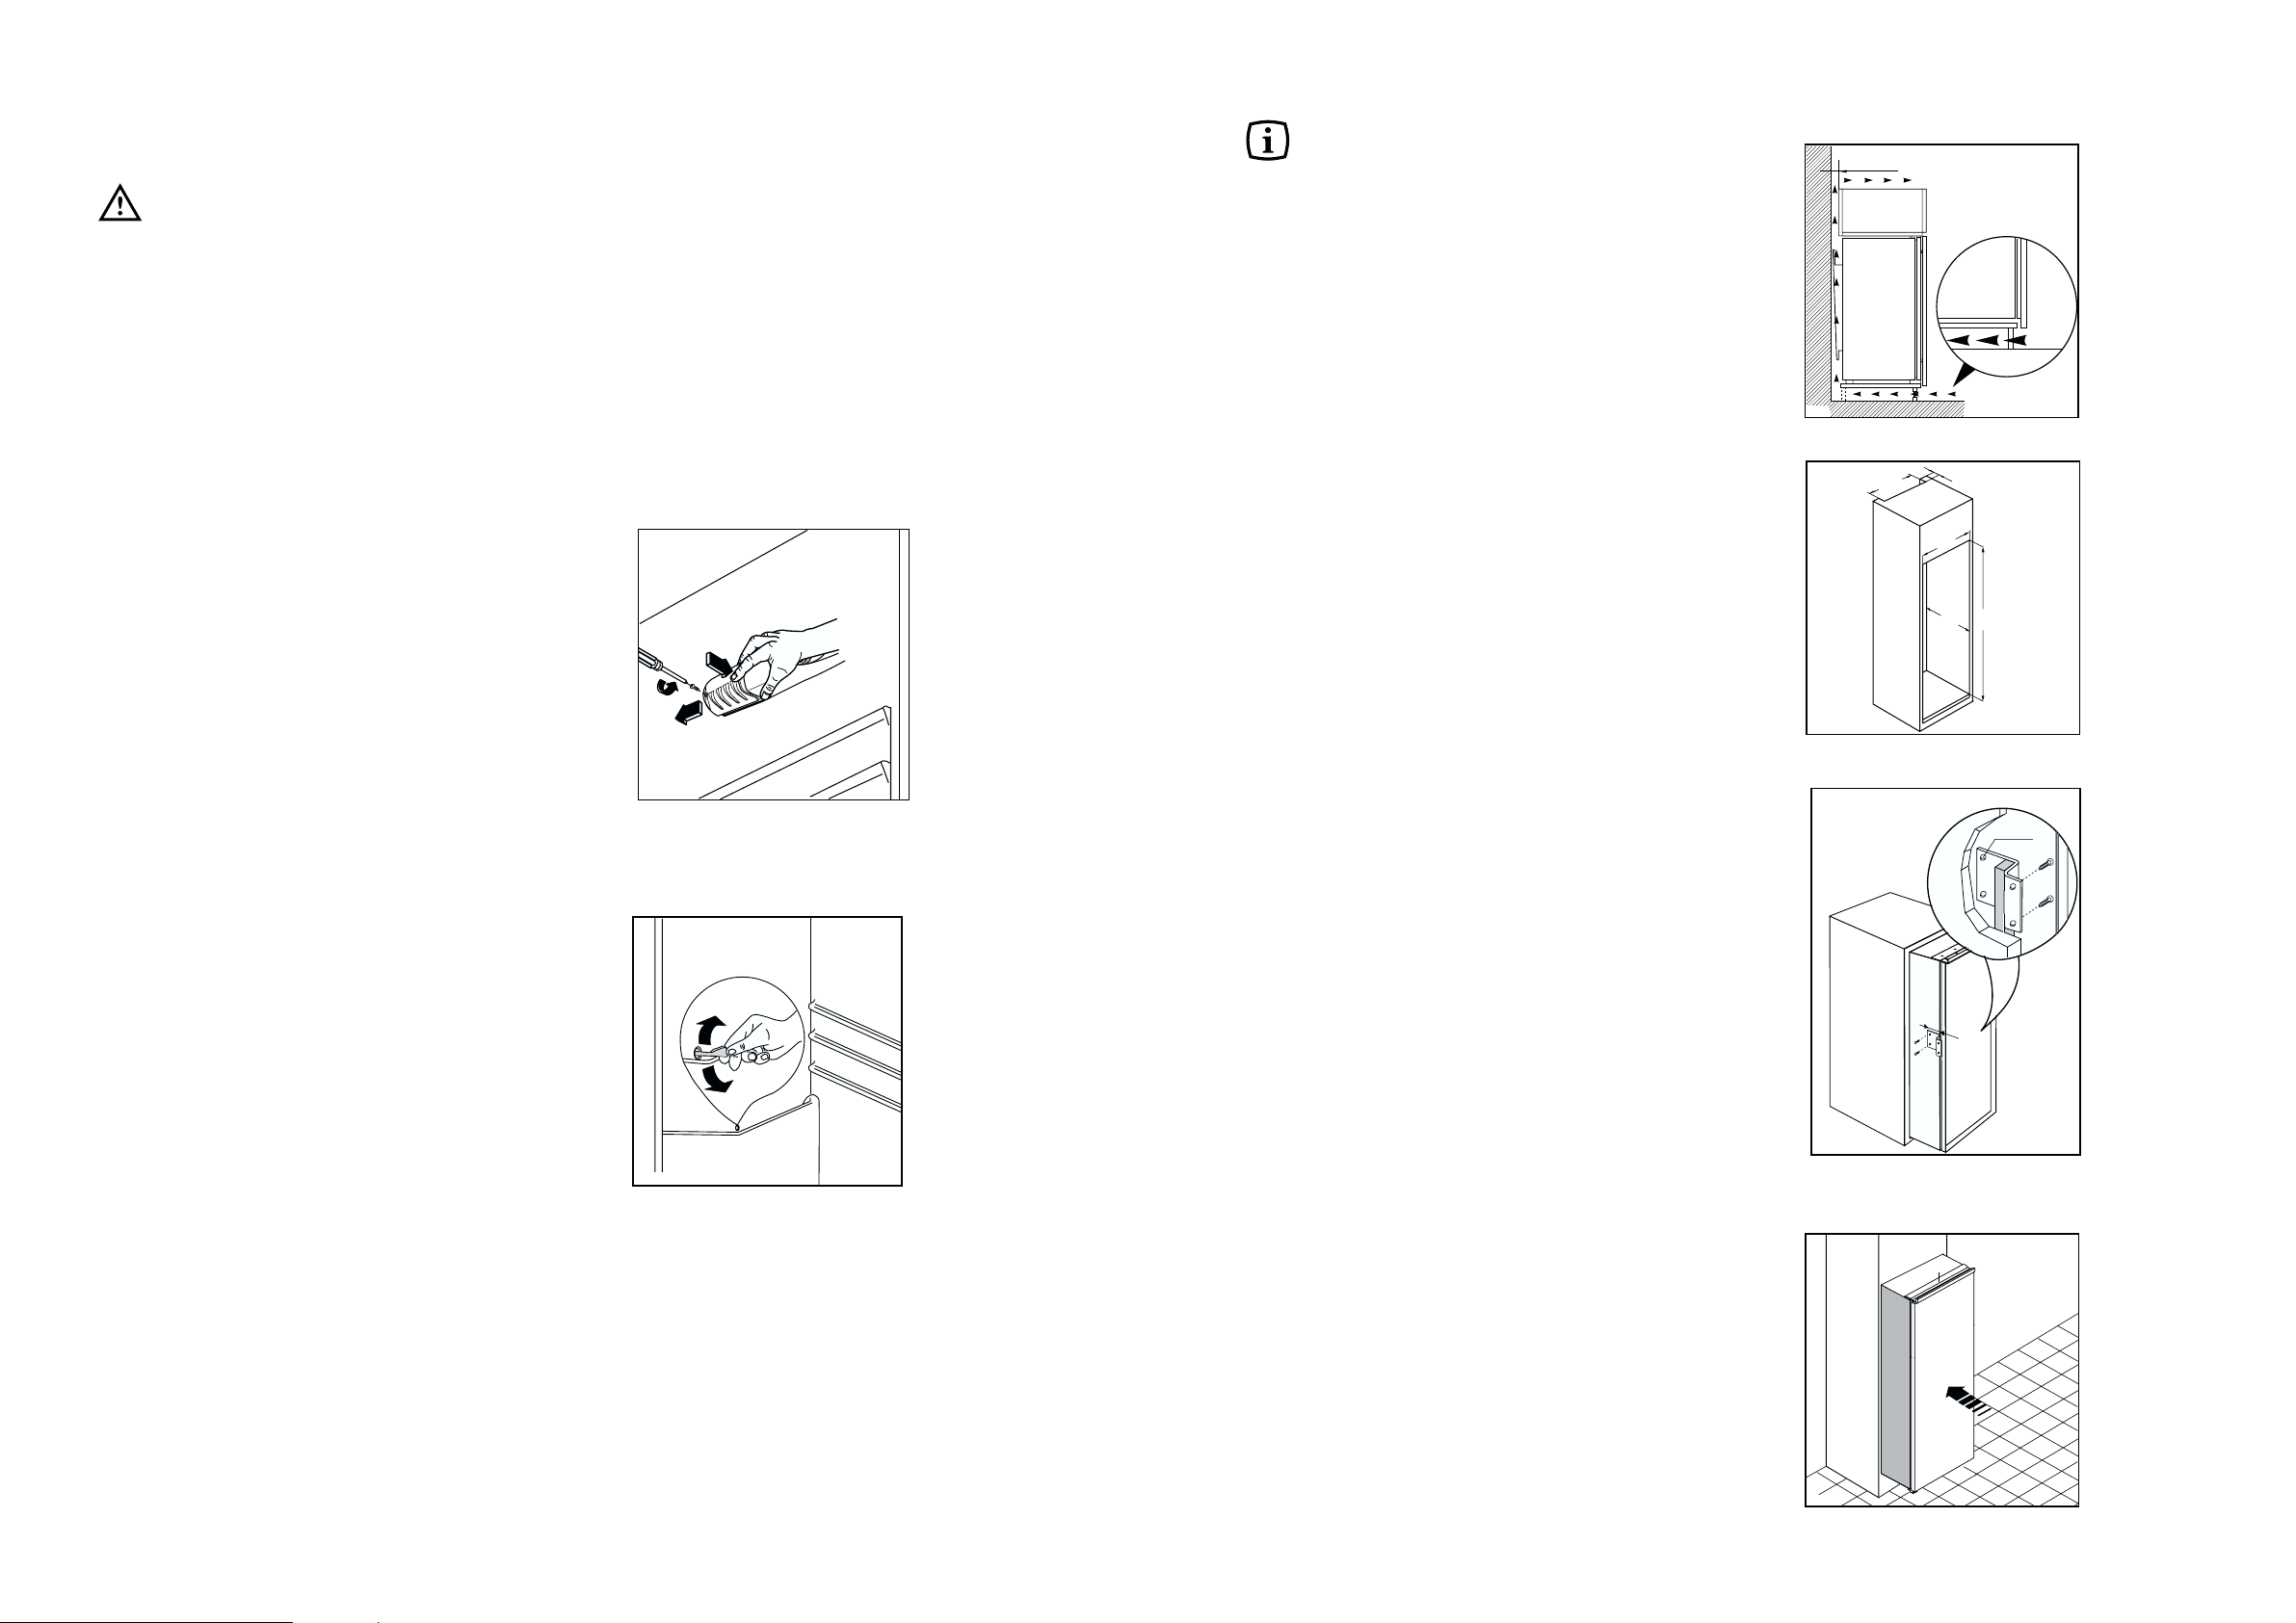
Instructions for totally built-in
appliances
Dimensions of the recess
Height (1) 1780 mm
Depth (2) 550 mm
Width (3) 560 mm
The appliance’s door has been locked in
position for transport by means of pins on both
sides. According to the door opening direction,
remove relevant pins at the top and at the
bottom.
For safety reasons, minimum ventilation must be as
shown in Fig.
Attention: keep ventilation openings clear of obstruction.
Furthermore, it is necessary that the niche is provid
with a conduct of ventilation having the following
dimensions:
depth 50 mm
width 540 mm
• Drill the unit using a Ø 2.5 mm drill (10 mm max.
penetration).
• Fix the square fitting to the appliance.
Push appliance into the housing until stop strip (A)
touches the kitchen unit.
22
BAKIM
Herhangi bir temizlik ve bak›m iflleminden
önce fifli çekiniz.
Uyarı
Bu cihazın so¤utma ünitesinde hidrokarbon
bulunmaktadır; bakım ve yeniden doldurma ifllemleri
sadece yetkili teknisyenler tarafından yapılmalıdır.
Periyodik temizlik
Cihaz›n içini ›l›k su ve sodyum bikarbonatla siliniz.
‹yice durulay›p temizleyiniz.
Kondanser (siyah ›zgara) ve cihaz›n arkas›ndaki
kompresörü bir f›rça veya elektrik süpürgesiyle
temizleyin. Bu ifllem cihaz›n performans›n› art›racak
ve enerji tasarrufu sa¤layacakt›r.
‹ç ayd›nlatma lambas›
So¤utucu bölümündeki lamba ampülüne
ulaflabilmek için:
- lambanın kapa¤ını tespit eden vidayı sökünüz
- hareketli parçayı flekilde gösterildi¤i gibi çıkartınız
E¤er kap› aç›ld›¤›nda ›fl›k yanmazsa yerine tam
olarak vidalanm›fl olup olmadı¤ını kontrol edin. E¤er
hala yanm›yorsa ampülü de¤ifltirin.
Ampülün de¤eri kapa¤›nda gösterilmifltir.
Uzun Süre Kullan›lmayaca¤›nda
Cihaz uzun süre devre d›fl› kald›¤›nda flu önlemleri
al›n›z :
Fifli ç›kart›n.
Yiyecekleri ç›kart›n.
‹çini ve aksesuarlar› çözülmeye b›rak›n.
Hava ak›m› sa¤lamak ve kötü kokular› önlemek için
kap›y› aral›k b›rak›n.
Eritme
Normal kullan›m s›ras›nda motor kompresörü her
devre d›fl› kald›¤›nda so¤utucu bölümündeki
buharlaflt›r›c›da biriken karlanma otomatik olarak
eritilir. Eritme sonucunda ortaya ç›kan su bir oluk
vas›tas› ile buzdolab›n›n arka taraf›nda, motor
kompresörünün üst k›sm›nda bulunan özel bir kapta
birikir ve orada buharlafl›r.
Suyun tafl›p g›dalar›n üstüne damlamas›n›
önlemek için so¤utucu bölmesi kanal›n›n
ortas›ndaki su tahliye deli¤i periyodik olarak
temizlenmelidir. Tahliye deli¤inin içinde bulunan
özel temizlik aletini kullan›n›z.
Ancak dondurucu bölümü zamanla karlanacakt›r. Bu
karlanma 4 mm .kal›nl›¤›na ulaflt›¤›nda buzdolab› ile
birlikte verilen özel plastik raspa ile temizlenmelidir.
Bu ifllem s›ras›nda buzdolab›n› kapatmak ya da
içindeki g›dalar› ç›kartmak gerekmemektedir.
Buharlaflt›r›c›daki karlanmay› temizlemek için
hiçbir zaman keskin madeni aletler
kullanmay›n›z, aksi taktirde buharlaflt›r›c›ya
hasar verebilirsiniz.
D411
D037
Page 12
12
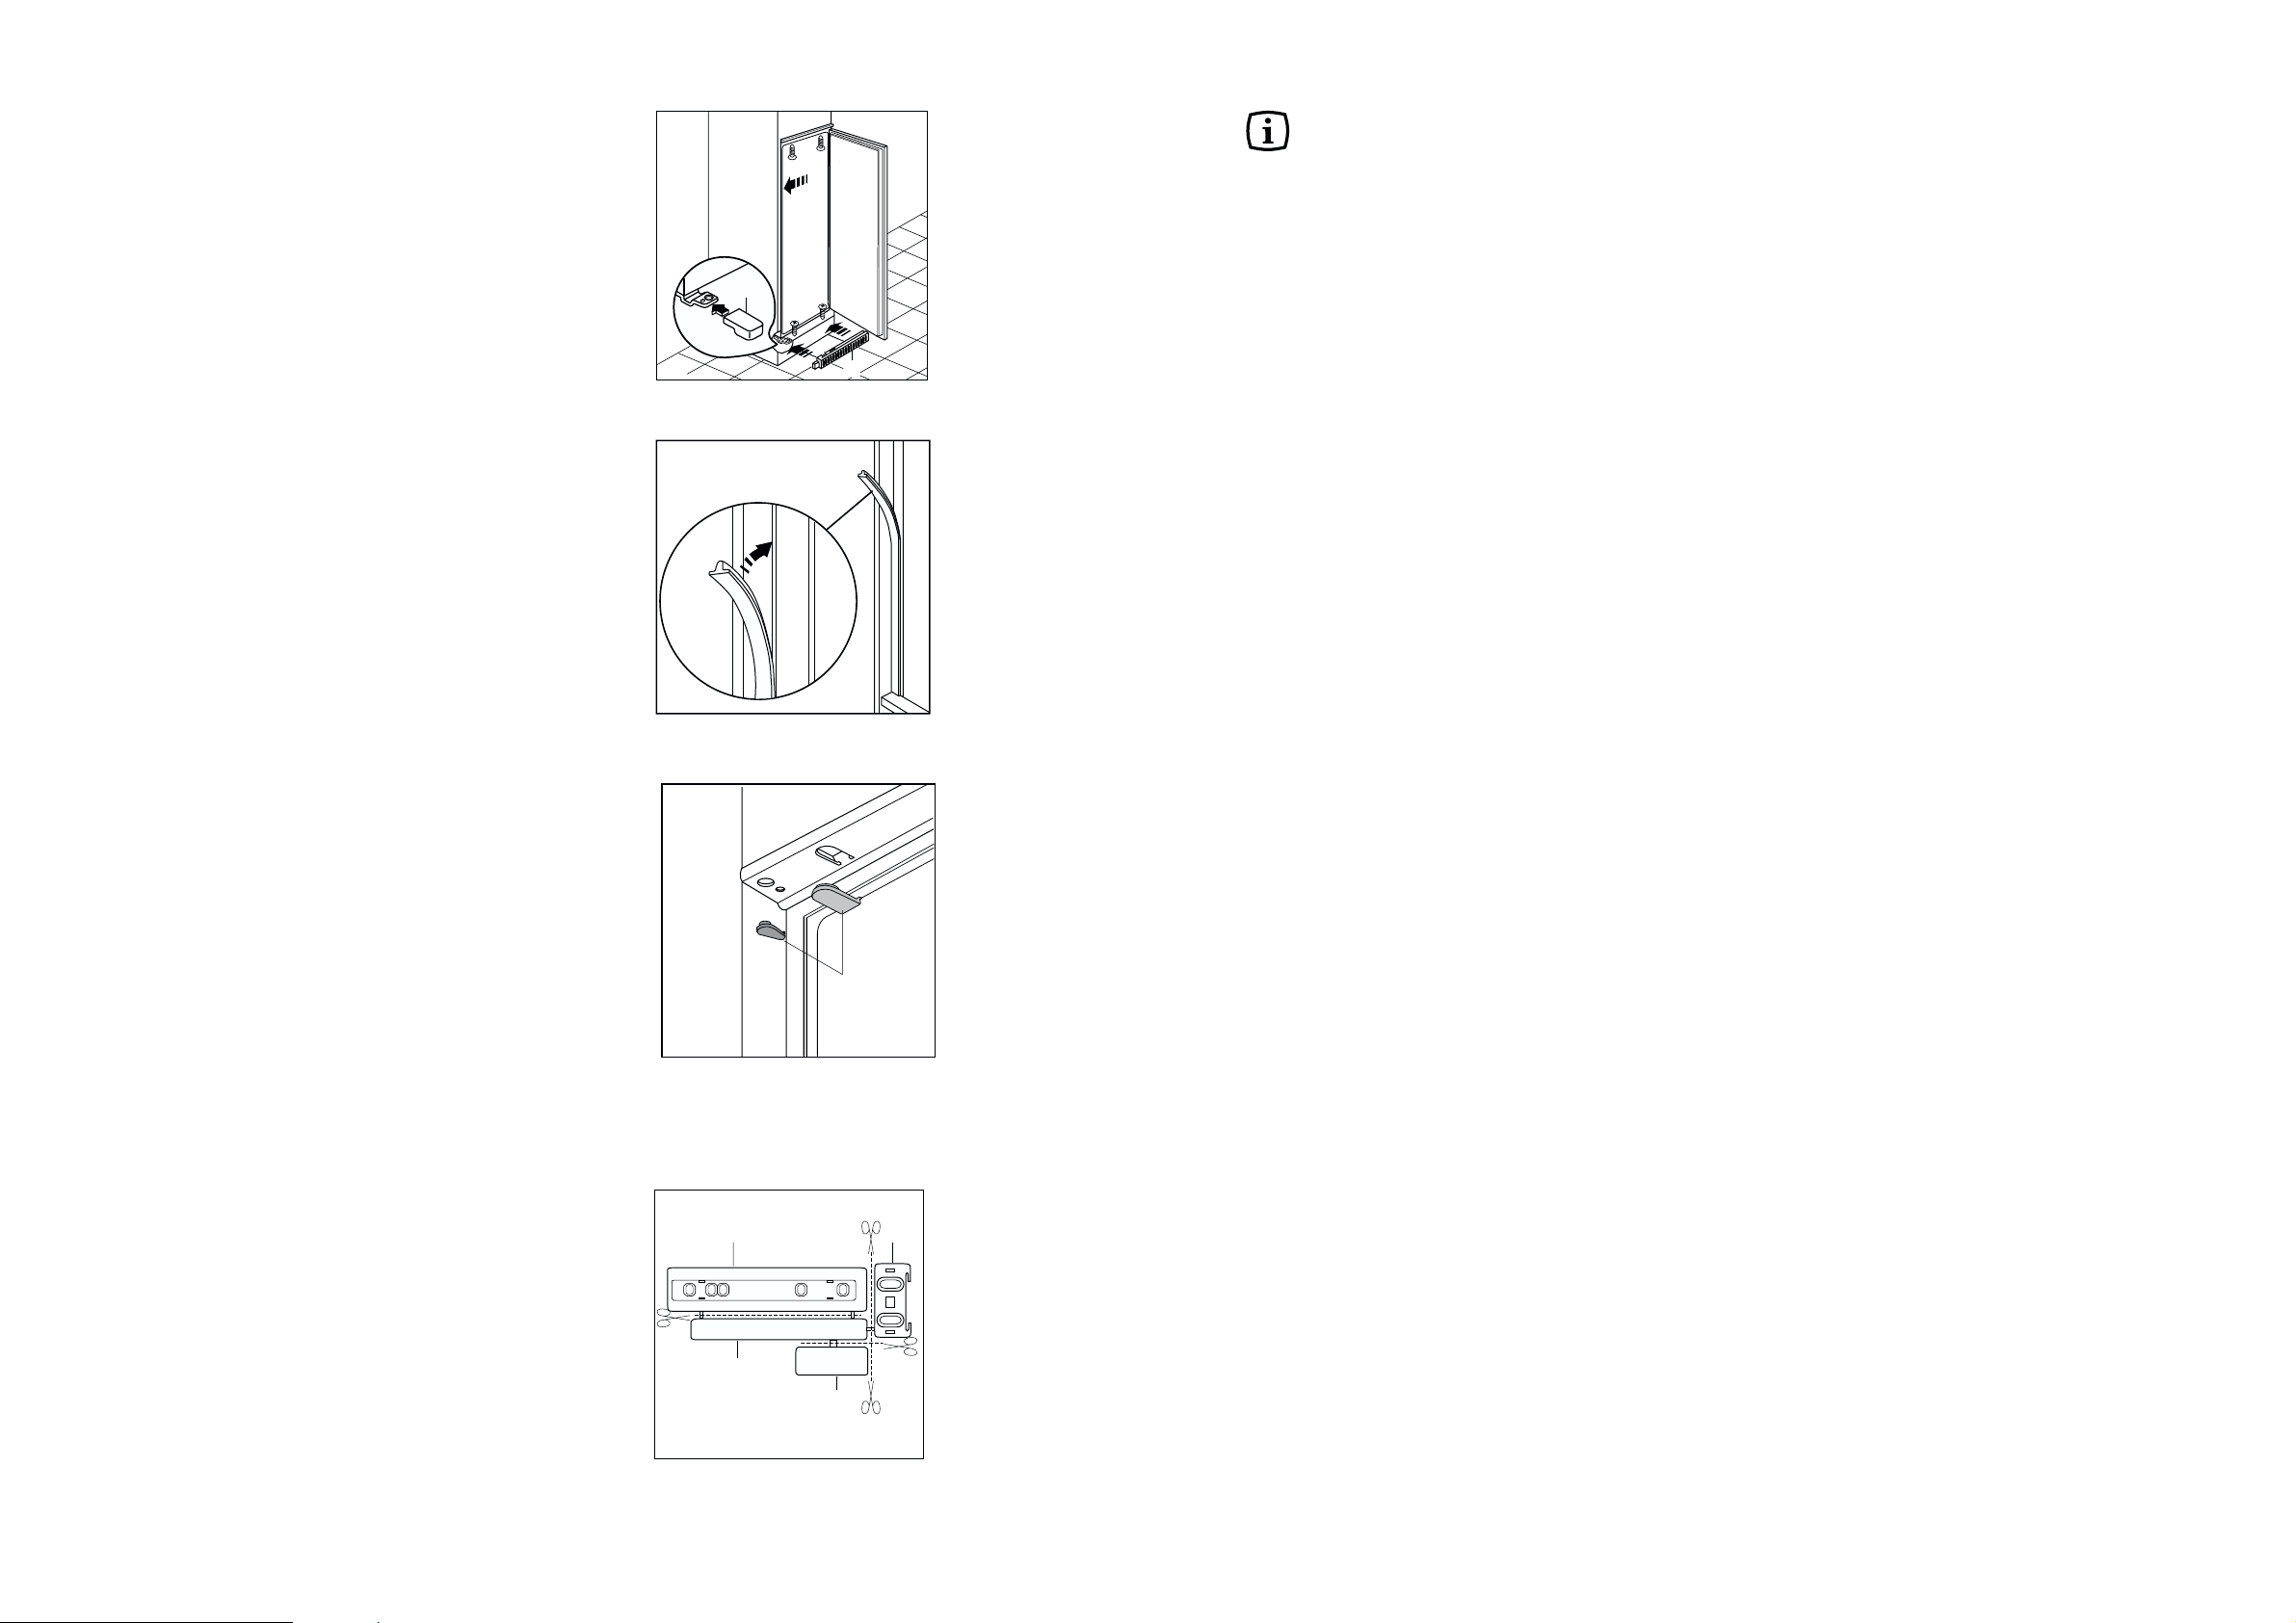
Press in the joint covers between the appliance and
the kitchen unit.
Apply covers (B) on joint cover lugs and into hinge
holes.
Open the door and push the appliance against
the side of the kitchen unit opposite to that of
appliance hinges.
Fasten the appliance with 4 screws provided in
the kit included with the appliance. Snap vent
grille (C) and hinge cover (D) into position.
Separate parts A, B, C, D as shown in the figure
21
PRAT‹K VE YARARLI B‹LG‹LER
So¤utucu hakk›nda pratik bilgiler
Faydal› Bilgiler:
Et (tüm çeflitleri) : plastik torbaya sar›n ve
sebzeli¤in üstündeki cam rafa yerlefltirin.
Güvenlik aç›s›ndan bu flekilde sadece bir veya
iki gün muhafaza ediniz.
Piflmifl yiyecekler, so¤uk yemekler, vb.: Sar›larak
herhangi bir rafa koyulur.
Meyva ve Sebzeler : Temizlenerek özel
çekmecelerine koyulmal›d›r.
Tereya¤› ve peynir: özel hava geçirmez kaplarda
saklanmal› ya da alüminyum folyo veya plastik
torbalara sar›larak hava almalar› mümkün
oldu¤unca engellenmelidir.
Süt fiifleleri: Kapaklar›n› kapal› tutarak kap›daki
flifle bölümünde saklanmal›d›r.
Muz, patates, so¤an ve sarm›sak e¤er ambalajl›
de¤ilse buzdolab›nda muhafaza edilmemelidir.
Dondurucu hakk›nda pratik bilgiler
Dondurma iflleminde en iyi sonucu alabilmeniz için
baz› önemli bilgiler:
• Dondurulacak gıdayı en so¤uk bölüm oldu¤u için
dondurucu bölüme koyunuz.
• 24 saat içinde donabilecek maksimum gıda
maddesi miktar› oran plakas›nda gösterilmifltir.
• Donma ifllemi 24 saat al›r. Bu süre içinde yeni
gıda maddesi eklenmemelidir.
• Sadece kaliteli, taze ve temiz gıdaları dondurun.
• Çabuk ve tamamen donmas› ve arzu edildi¤i
miktarda çözdürelebilmesi için gıdaları küçük
porsiyonlara ay›r›n.
• Gıdaları strech film veya alüminyum folyo ile
hava almayacak flekilde sar›n.;
• Taze ve donmam›fl gıdaları donmufl gıdalarla
temas ettirmeyin. Böylece di¤erinin ›s›s›ndaki
yükselmeyi önlersiniz.
• Ya¤s›z besinler ya¤l› besinlerden daha iyi ve
uzun muhafaza edilebilir. Tuz gıdanın saklama
ömrünü azalt›r.
• Buzlar e¤er dondurcudan ç›kar›r ç›karmaz deriye
temas ettirilirse deride buz yan›¤›na sebep
olabilir.
• Herbir paketin üzerine donduruldu¤u günü
yazman›z tavsiye edilebilir. Bu sayede muhafaza
edece¤iniz zaman›n takibini yapabilirsiniz.
• Patlama olasılı¤ı bulundu¤undan dondurucu
bölmeye gazlı içecek koymayınız.
Dondurulmufl g›dalar›n saklanmas›
hakk›nda pratik bilgiler
Bu uygulamada en iyi sonucu alabilmek için:
• Dondurulmufl olarak sat›lan besinlerin sat›c›
taraf›ndan derecede uygun flekilde muhafaza
edildi¤inden emin olun.
• Dondurulmufl yiyecekler dükkandan dondurucuya
en k›sa zamanda tafl›nmal›d›r.
• Kapa¤› çok s›k açmay›n›z ve gerekti¤inde fazla
aç›k tutmay›n›z.
• Bir kez çözdürüldükten sonra gıdalar çabuk
bozulur ve tekrar dondurulmamal›d›r.
• Gıda maddesi üreticisi taraf›ndan belirtilen
saklama süresini aflmay›n›z.
D
D723/2
C
D724
B
D726
A
C
PR266
B
D
Page 13
13
20 mm
A
50mm
PR166
PR33
C
A
8mm
PR167
A
B
PR168
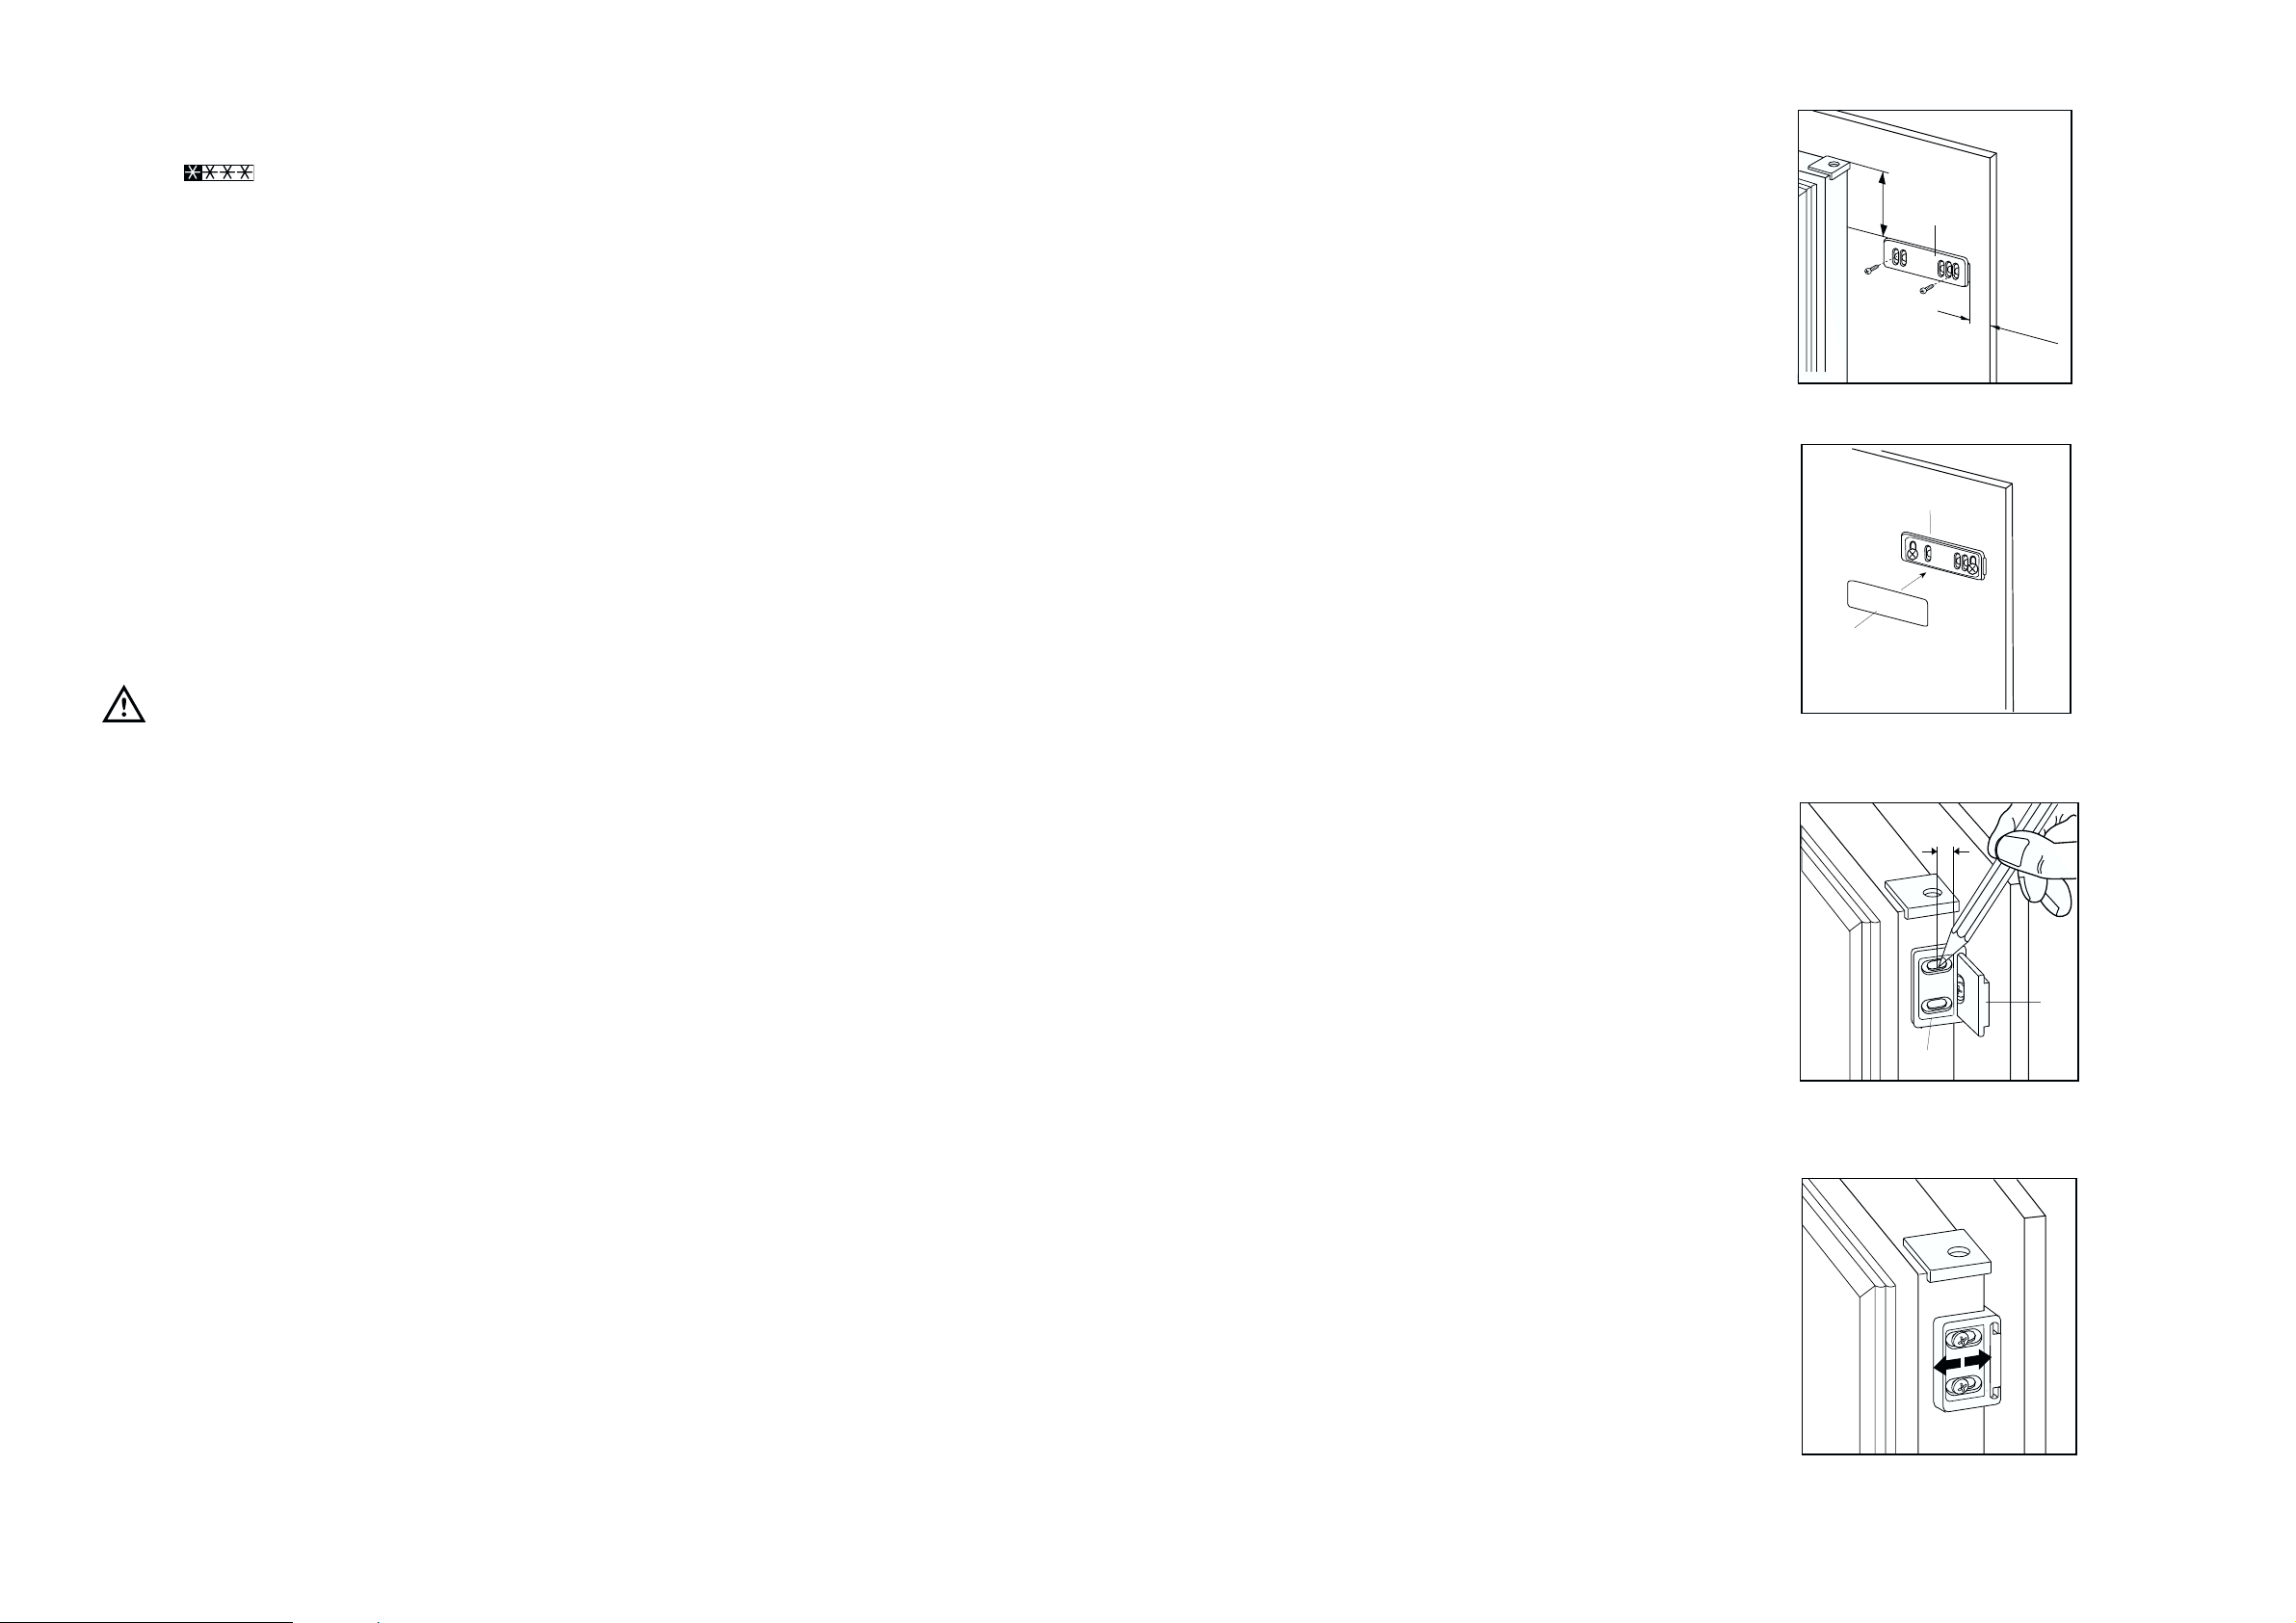
Place guide (A) on the inside part of the furniture
door, up and down as shown in the figure and mark
the position of external holes. After having drilled
holes, fix the guide with the screws supplied.
Fix cover (C) on guide (A) until it clips into place.
Open the appliance door and the furniture door at
90°. Insert the small square (B) into guide (A). Put
together the appliance door and the furniture door
and mark the holes as indicated in the figure.
Remove the squares and drill holes with ø 2 mm at
8 mm from the outer edge of the door. Place the
small square on the guide again and fix it with the
screws supplied.
Should the lining up of the furniture door be
necessary, use the clearance of slots.
At the end of operations, it is necessary to check if
the door of the furniture closes properly.
20
Taze gıdaların dondurulması
4 yıldızlı dondurucu bölme dondurulmufl
olarak satın alınan gıdaların uzun süreli saklanması
ve taze gıdaların dondurulması ifllemleri için
uygundur.
Taze yiyecekleri dondurmak için termostat ayar›n›
normal pozisyondan baflka bir pozisyona
de¤ifltirmeye gerek yoktur.
Ancak daha çabuk dondurmak için termostat
dü¤mesini en so¤uk ayara çevirin; fakat unutmay›n›z
ki bu durumda so¤utucu bölmenin ›s›s› 0°C'nin alt›na
düflebilir.
E¤er böyle bir durum ortaya ç›karsa termostat
dü¤mesini daha s›cak bir ayara çevirin.
Dondurulmufl gıdaların saklanması
Cihaz› ilk kez çal›flt›r›rken yada cihaz›n uzun bir süre
kullan›lmamas›ndan, ürünleri bölmelere koymadan
en so¤uk ayarda cihaz› en az iki saat çal›flt›r›n ve
daha sonra termostat dü¤mesini normal çal›flma
pozisyonuna getirin.
Önemli
Derin dondurucu gıda maddeleri ile dolu
oldu¤unda elektrik kesilmesi halinde, derin
dondurucu kapa¤ını açmayınız. Elektrik
kesintisinin kısa sürmesi (6-8 saate kadar) ve
derin dondurucunun dolu olması halinde,
donmufl gıdalar bu durumdan etkilenmezler; aksi
takdirde, gıda maddelerinin mümkün oldu¤unca
çabuk tüketilmeleri tavsiye edilir (dondurulmufl
gıda maddelerinin ısılarının yükselmesi, bunların
güvenli saklama süresini azaltır).
Buz cözdürme (Defrost)
Derin dondurulmufl ya da dondurulmufl g›dalar
kullan›lmadan önce, bu ifllem için gerekli süreye
ba¤l› olarak so¤utucu bölmede ya da oda
s›cakl›¤›nda çözdürülebilir.
Küçük parçalar›n dondurucu bölmeden ç›kart›ld›ktan
sonra do¤rudan, donmufl halde piflirilmeleri de
mümkündür: bu durumda piflirme ifllemi daha uzun
sürecektir.
Buz yapmak
Bu cihazda buz yap›m› için bir veya daha fazla buz
kab› bulunmaktad›r. Bu kaplar› suyla doldurarak
dondurucu bölmesine koyun.
Kaplar› dondurucudan ç›kartmak için metal aletler
kullanmay›n›z.
Page 14
14
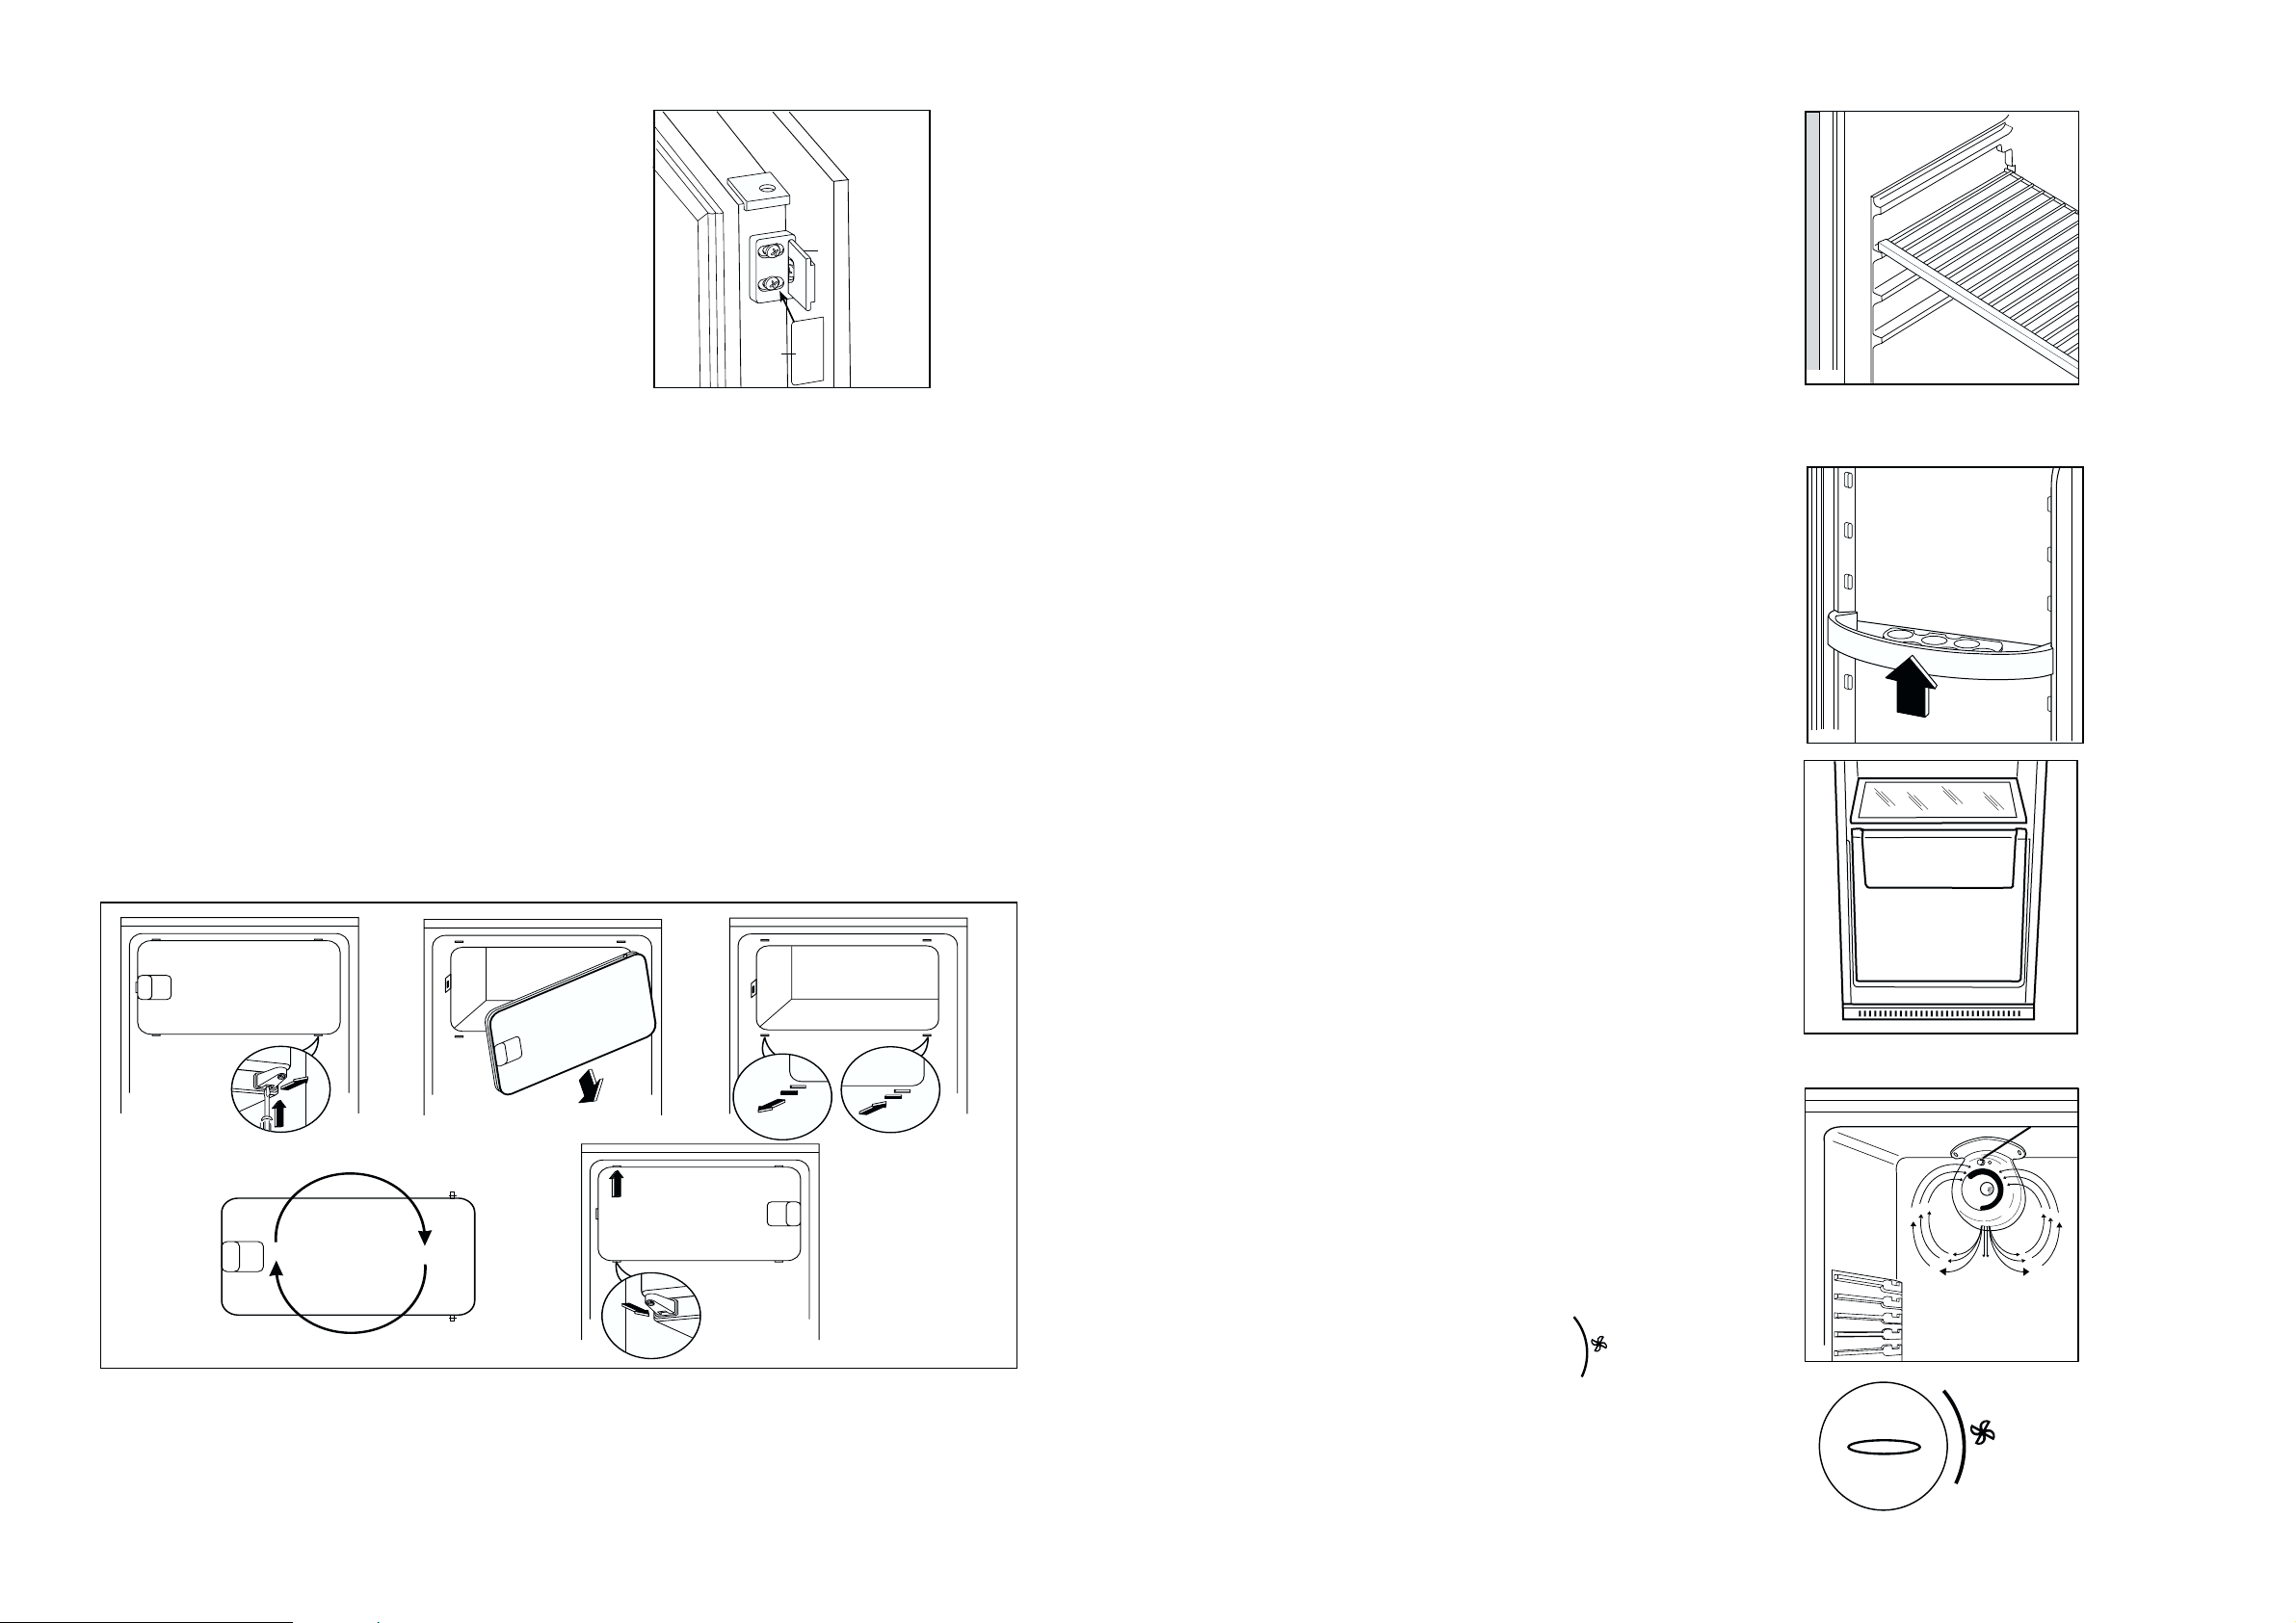
Fix cover (D) on guide (B) until it clips into place.
Reversibility of the freezer door
After having reversed the opening direction of
the doors check that all the screws are properly
tightened and that the magnetic seal adheres to
the cabinet. If the ambient temperature is cold
(i.e. in Winter), the gasket may not fit perfectly to
the cabinet. In that case, wait for the natural
fitting of the gasket or accelerate this process by
heating up the part involved with a normal
hairdrier.
19
PR187
Çıkartılabilir raflar
Buzdolab›n›n iç yan duvarlar› birden fazla rayla
donatılmıfltır. Böylece raflar iste¤e göre
yerlefltirilebilir.
D040
Kapak raflar›n›n yerlefltirilmesi
Farkl› ebatlarda yiyecek paketlerini saklayabilmek
için kapak raflar›n›n yüksekli¤ini ayarlaman›z
mümkündür.
Bu ayarlar› yapmak için: Raf› dikkatlice oklar›n
istikametinde serbest kalana dek çekin ve istedi¤iniz
gibi tekrar yerlefltirin.
Portatif çekmece
Meyve, sebze ve flifleler öngörülen özel alt
çekmeceye yerlefltirilebilirler (flemaya bakınız).
Hava devridaimi
Buzdolabının içi, flaltere basılarak harekete geçirilen
(resim 1’e bakınız) özel bir D.A.C. (Dynamic Air
Cooling) fan ile donatılmıfltır, yeflil ikaz lambasının
yanması, fanın çalıflmakta oldu¤u anlamına gelir.
Ortam ısısı 25º C’yi afltı¤ında fanın kullanılması
tavsiye edilir.
Buzdolabının termostat dü¤mesinin sektörü
içinden pozisyonlaması gerekti¤ini (resim 2’ye
bakınız) unutmayınız.
Bu aygıt, yiyeceklerin çabuk so¤utulmasını ve
buzdolabı içindeki ısının daha iyi eflit flekilde
yayılmasını sa¤lar.
6
5
4
3
2
1
O
fiALTER
D671NEW
Res. 1
Res. 2
PR167/1
B
D
180°
Page 15
15
UYARILAR
Bu k›lavuz bir baflvuru kayna¤› olarak ürünle birlikte muhafaza edilmelidir. Ürünün sat›lmas› veya
baflka bir kifliye devredilmesi ya da evinizden tafl›n›rken ürünü b›rakman›z halinde yeni sahibinin de
ürünün kullan›lmas› ve gerekli uyar›lar konusunda bilgi sahibi olabilmesi amac› ile k›lavuzun ürünle
birlikte kalmas›n› temin ediniz.
Manyetik kap› lastikleri ile donat›lm›fl bu ürünü, kapak kilidi yayl› tip olan eski bir ürünün yerine
kullanacaksan›z, eski ürünü atmadan önce yayl› kilidi çal›flmaz hale getirmeyi ihmal etmeyiniz. Aksi
taktirde bu tür ürünler çocuklar için bir ölüm tuza¤› haline gelebilmektedir.
Bu uyar›lar güvenlik amac› ile yap›lmaktad›r. Ürünü monte etmeden veya kullanmadan önce bu uyar›lar›
dikkatli bir flekilde okuman›z› önemle rica ederiz.
Genel Güvenlik
• Bu ürün yetiflkinler taraf›ndan kullan›lmak üzere
tasarlanm›flt›r. Çocuklar›n ürünün çevresinde
oynamas›na ya da ürünün kontrol dü¤melerini
kar›flt›rmalar›na izin vermeyiniz.
• Güvenli¤iniz için ürünün teknik özelliklerini
de¤ifltirmeyiniz ya da üründe herhangi bir
de¤ifliklik yapmay›n›z.
• Üründe temizlik ya da bak›m ifllemi yaparken
mutlaka ürünü kapat›n›z ve fiflini çekiniz.
• Ürün a¤›rd›r. Tafl›rken dikkatli tafl›y›n›z.
• Buzluktan ç›kart›ld›ktan sonra hemen tüketilen
buz parçalar› so¤uk yan›¤›na neden
olabilmektedir.
• Olası sıvı sızıntılarına sebep olabilece¤inden
so¤utma ünitesine herhangi bir zarar
vermemek amacıyla cihazı tutarken son
derece dikkat gösteriniz.
• Cihaz kalorifer veya gaz ocakları yakınlarına
yerlefltirilmemelidir.
• Cihazın uzun süreyle direkt günefl ıflı¤ına
maruz kalmasından sakınınız.
• Cihazın arka kısmının etrafında uygun bir
havalandırma olmalı ve so¤utma devresine
herhangi bir zarar gelmesinden sakınılmalıdır.
• Sadece derin dondurucular için (ankastre
modeller hariç): ideal yerleflim mahzen veya
bodrum katıdır.
• So¤utma cihazlarının içinde baflka elektrikli
cihazlar (dondurma hazırlama makineleri gibi)
kullanmayınız.
• Cihaz ev tipi kullanımlar icin tasarlanarak
üretilmistir. Endüstriyel ve ticari amaclar icin
kullanmay›n›z.
Servis/Onar›m
• Ürünün montaj› s›ras›nda flebeke ba¤lant›s›n› ve
gerekli di¤er elektrik ifllerini mutlaka ehliyetli bir
elektrikçiye ya da bu konuda yeterli bilgi sahibi
olan bir kifliye yapt›r›n›z.
• Bu ürünün montaj›, bak›m› yetkili Servis
Merkezleri taraf›ndan yap›lmal› ve sadece orijinal
yedek parça kullan›lmal›d›r.
• Bu cihazın so¤utma ünitesinde hidrokarbon
bulunmaktadır; bakım ve yeniden doldurma
ifllemleri sadece yetkili teknisyenler tarafından
yapılmalıdır.
Kullan›m
• Ev buzdolaplar› ve dondurucular› sadece
tüketime haz›r g›da maddelerinin saklanmas›
amac›na yönelik olarak tasarlanm›flt›r.
• Ürünün en verimli flekilde çal›flt›¤› ortam
s›cakl›klar›; +18°C ila +43°C aras› (T s›n›f›);
+18°C ila +38°C aras› (ST s›n›f›); +16°C ila
+32°C aras› (N s›n›f›); ve +10°C ila +32°C
aras›d›r (SN s›n›f›);. Ürününüzün s›n›f› teknik
de¤erler plakas›nda yer almaktad›r
Uyar›: bulundu¤unuz bölgedeki ortam
s›cakl›¤›n›n ürünün s›n›f›na uygun olmamas›
halinde, afla¤›daki talimatlara uyulmas›
gerekmektedir: ortam s›cakl›¤›n›n asgari
seviyenin alt›na düflmesi durumunda dondurucu
bölmenin g›da saklama s›cakl›¤› garanti
edilememektedir; bu nedenle bu tür durumlarda
saklanan g›da maddelerinin bir an önce
tüketilmesi önerilmektedir.
• Ayr›ca ortam ›s›s› 10°C-nin alt›na düfltü¤ünde
so¤utucu bölüm performans› düfler veya uzun
süre otomatikte kalabilir. Bu bir ar›za de¤ildir.
• Dondurulmufl g›dalar çözüldükten sonra tekrar
dondurulmamal›d›r.
• Üreticinin saklama konusundaki önerilerine
tamamen uyulmal›d›r. Lütfen ilgili talimatlara
bak›n›z.
Geri dönüflümlü ka¤›da bas›lm›flt›r.
18
‹ç Temizlik
Cihaz›n ilk kullan›m›ndan önce içini ve iç
aksesuarlar›n› ›l›k sabunlu su ile y›kayarak yeni ürün
kokusunu ç›kar›n›z. Daha sonra kurulay›n›z.
Deterjan veya afl›nd›r›c› toz zarar
verece¤inden kullan›lmamal›d›r.
Çal›flt›rma
Fifli duvardaki prize tak›n›z.
Buzdolabı kapısını açın ve termostat dü¤mesini saat
yönünde «O» (STOP) pozisyonundan daha ileri
çeviriniz. Cihaz çal›flmaya bafllayacakt›r.
Durdurmak için, termostat dü¤mesini «O»
pozisyonuna çevirmek yeterlidir.
Sıcaklık ayarı
Sıcaklık ayarı otomatik olarak yap›l›r ve termostat
dü¤mesini daha düflük ayara do¤ru çevirerek daha
yüksek (daha s›cak) yada daha yüksek ayara do¤ru
çevirerek daha alçak (daha so¤uk) dereceye
ayarlanabilir.
Ancak kesin ayarı belirlerken buzdolabının içindeki
sıcaklı¤ın afla¤ıdaki etkenlere ba¤lı oldu¤u akıldan
çıkartılmamalıdır:
• Oda ›s›s›
• Kap› aç›l›fl s›kl›¤›
• saklanan yiyecek miktar›
• Cihaz›n yerlefltirildi¤i yer.
Orta derece genelde en uygun ayard›r.
Önemli
E¤er hava ›s›s› yüksekse veya cihaz tamamen
doluysa ve en düflük derecedeyse, arka duvar
buzlanma yapabilir. Bu durumda dü¤me daha
yüksek dereceye ayarlanmal› ve böylece
otomatik çözülme ve daha az enerji tüketimi
sa¤lanmal›d›r.
Taze gıdaların so¤utulması
En iyi performans› elde etmek için:
• Il›k yiyecek yada buharlaflan s›v›lar› dolaba
koymay›n›z.
• E¤er belirgin güçlü bir tad› varsa yiyece¤i sar›n›z.
• Yiyece¤i buzdolab›n›n içindeki hava dolafl›m›n›
engellemeyecek flekilde yerlefltiriniz.
Kullan›m
Page 16
16
• Cihaz›n›z›n kullan›m ömrü 10 y›ld›r. Kullan›m
ömrü, üretici ve/veya ithalatc› firman›n cihaz›n›zla
ilgili yedek parça temini ve bak›m süresini ifade
eder.
• Ürünün iç kaplamas› so¤utucu gaz›n dolaflt›¤›
kanallardan oluflmaktad›r. Bu kanallar›n
delinmesi halinde ürün onar›lamayacak derecede
hasar görecek ve içindeki g›dalar da bozulacakt›r.
Kar ve buzlar› kaz›mak için KESK‹N UÇLU
ALETLER KULLANMAYINIZ. Karlar› kaz›mak için
ürün ile birlikte verilen raspay› kullan›n›z. Kat›
buzlar› hiçbir flekilde zorlayarak ç›kartmay›n›z.
Kat› buzlar› eritmek için buzdolab›n› çözdürünüz.
Çözdürme konusundaki talimatlara bak›n›z.
• Dondurucu bölmesine gazl› içecek koymay›n›z,
patlayarak buzdolab›na hasar verebilirler.
Montaj
• Üründe çal›flma s›ras›nda ›s›nan parçalar
bulunmaktad›r. Daima yeterli havaland›rma
sa¤lay›n›z, aksi taktirde bu parçalar ar›zalanabilir
ve saklanan g›dalar›n bozulmas›na neden olabilir.
Montaj talimatlar›na bak›n›z.
• Ürünün elektrik kablosunun üstüne
oturmad›¤›ndan emin olunuz.
Önemlidir: Elektrik kablosunun hasar görmesi
durumunda, üreticiden ya da yetkili servisten
temin edilebilecek orijinal kablo ile
de¤ifltirilmelidir.
• Is›nan parçalar a盤a bakmamal›d›r. Ürünün
arkas›n› duvara vermeye özen gösteriniz.
• Ürünün yatay olarak tafl›nmas› halinde
kompresör ya¤›n›n so¤utucu devresine akmas›
mümkündür. Ya¤›n tekrar kompresöre dönmesini
sa¤lamak amac› ile ürünü çal›flt›rmadan önce en
az iki saat beklemenizi öneririz.
Çevre Korumas›
Bu cihaz ne so¤utucu devresinde nede izolasyon
materyallerinde ozon tabakas›na zarar verebilecek
gazlar içermemektedir. Cihaz evdeki çöpler veya
kent çöplü¤ündeki çöplerle beraber at›lmamal›d›r.
So¤utma birimine zarar vermeyiniz; Yerel imha
alan›n›zla ilgili bilgi belediye yetkililerince
sa¤lanabilir. Bu cihazda kullan›lan iflaretli
maddeler geri dönüflümlüdür.
17
‹Ç‹NDEK‹LER
Uyar›lar 15
Kullan›m 15
‹ç temizlik 18
Çal›flt›rma 18
Sıcaklık ayarı 18
Taze gıdaların so¤utulması 18
Çıkartılabilen raflar 18
Kapak raflar›n›n yerlefltirilmesi 19
Portatif çekmece 19
Hava devridaimi 19
Taze gıdaların dondurulması 20
Dondurulmufl gıdaların saklanması 20
Buz cözdürme (Defrost) 20
Buz yapmak 20
Pratik ve yararlı bilgiler 21
So¤utucu hakkında pratik bilgiler 21
Dondurucu hakkında pratik bilgiler 21
Dondurulmufl gıdaların saklanması
hakkında pratik bilgiler 21
Bak›m 22
Periyodik temizlik 22
Uzun Süre Kullan›lmayaca¤›nda 22
‹ç aydınlatma lambası 22
Eritme 22
Müflteri hizmetleri ve yedek parça 23
Montaj 24
Yerlefltirme 24
Elektrik ba¤lant›s› 24
Arka takozlar 20
Tamamen ankastre modeller için bilgiler 25
Derin dondurucunun kapısının tersyüz
edilebilirli¤i 28
TEKN‹K ÖZELL‹KLER
ÇALIfiMA GER‹L‹M‹ 220-240 V/50 Hz
YÜKSEKL‹K (mm) 1780
GEN‹fiL‹K (mm) 560
DER‹NL‹K (mm) 550
‹KL‹M SINIFI T
YILDIZ SINIFI ****
TOPLAM KAPAS‹TE (NET) 302
DOND.BÖL.KAPAS‹TES‹ (NET) 267
SO⁄T.BÖL.KAPAS‹TES‹ (NET) 35 lt.
SO⁄UTUCU AKIfiKAN R 600 a
M‹KTARI (gr) 45
TOPLAM GÜÇ (W) 120
ENERJ‹ SARF‹YATI kWh/24h 1,00 kWh
DONDURMA KAPAS‹TES‹ 3 kg/24 saat
ENERJI SINIFI B
 Loading...